Embed Size (px)
Citation preview

PROJECT AND PHASE SETUP PARTICIPANT GUIDE
PROGRAM AND PROJECT MANAGEMENT SYSTEM (PPMS)
PREPARED BY: AURIGO TRAINING & DOCUMENTATION TEAM
REVISED: MAY 21. 2021
Project and Phase Setup
IOWA DOT PPMS Implementation – Document Version Log
Deliverable Name: Project and Phase Setup - Participant Guide
Version # Description of Changes Author Date
1.0 Initial Publication Aurigo Documentation 5/3/21
1.1
• Fields and definitions updated• Workflow status updated• Added RCE Organization to Letting Plans
and Work Details • New fields added in Asset Details grid
Aurigo Documentation 5/21/21

Project and Phase Setup
©Aurigo® Software Technologies Inc. 2021. All Rights Reserved.
No part of this publication may be reproduced or used in any form, without permission in writing from Aurigo® Software Technologies Inc. This includes electronic or mechanical means, such as photocopying, recording, or information storage and retrieval systems. The material in this manual is subject to change without notice.
While every reasonable precaution has been taken in the preparation of this document, Aurigo® Software Technologies Inc. does not assume responsibility for errors or omissions, or for damages resulting from the use of the information contained herein.
The software is provided strictly on an “as is” basis. All software furnished to the user is on a licensed basis. Aurigo® Software Technologies Inc. grants to the user a non-transferable and non-exclusive license to use the software program delivered hereunder (licensed program). Such license may not be assigned, sublicensed, or otherwise transferred by the user without prior written consent of Aurigo® Software Technologies Inc. No right to copy a licensed program in whole or in part is granted, except as permitted under copyright law. The user shall not modify, merge, or incorporate any form or portion of a licensed program with other program material, without written permission from Aurigo® Software Technologies Inc. The user agrees to maintain Aurigo® Software Technologies’ copyright notice on the licensed programs delivered hereunder, and to include the same on any authorized copies it makes, in whole or in part. The user agrees not to decompile, disassemble, decode, or reverse engineer any licensed program delivered to the user or any portion thereof.
Aurigo® Software Technologies Inc. reserves the right to make changes to any software or product to improve reliability, function, or design.
Aurigo® Software Technologies Inc. does not assume any product liability arising out of, or in connection with, the application or use of any product, or application described herein.
No license is granted, either expressly or by implication, estoppel, or otherwise under any Aurigo® Software Technologies Inc., intellectual property rights.
Aurigo® Masterworks and all other Aurigo® Software Technologies, Inc., product or service names are registered trademarks or trademarks of Aurigo® Software Technologies, Inc. in the USA, Canada and other countries.
Other brand and product names are trademarks of their respective companies.
Aurigo® Software Technologies Inc.
www.aurigo.com
Project and Phase Setup
TABLE OF CONTENTS 1 Introduction to Using the Participant Guide ......................................................................................... 1
2 Process Flow.......................................................................................................................................... 2
3 Project Management ............................................................................................................................ 3
3.1 Creating a Project .......................................................................................................................... 4
3.1.1 Creating a Project .................................................................................................................. 4
3.1.2 Copying a Project ................................................................................................................ 14
3.2 Editing Project Details ................................................................................................................. 16
4 User Management in Projects ............................................................................................................ 18
4.1 Inviting Users to a Project ........................................................................................................... 18
4.2 Mapping Projects to a User ......................................................................................................... 19
4.3 Inviting Users to Contracts of a Project ...................................................................................... 21
4.4 Inviting a User to Contracts of Multiple Projects ........................................................................ 22
5 Project Location .................................................................................................................................. 24
5.1 Managing Project Location Details ............................................................................................. 24
5.2 Viewing Project Locations at Enterprise Level ............................................................................ 29
6 Project Fund Sources .......................................................................................................................... 31
6.1 Defining Project Fund Sources .................................................................................................... 31
6.2 Project Fund Source Workflow Stages ........................................................................................ 34
6.3 Project Fund Rules ...................................................................................................................... 35
6.3.1 Creating a Funding Rule ...................................................................................................... 35
6.3.2 Funding Rules Workflow Stages .......................................................................................... 37
6.3.3 Marking a Funding Rule as Default ..................................................................................... 38
7 Project Phases ..................................................................................................................................... 39
7.1 Creating a Project Phase ............................................................................................................. 39
7.2 Managing Phase Location Details ............................................................................................... 53
7.3 Project Phase Workflow Stages .................................................................................................. 58
7.3.1 Project Phase Workflow Stages - Bid Letting Required ...................................................... 58
7.3.2 Project Phase Workflow Stages - Bid Letting Not Required ............................................... 63
7.4 Project Phase Close Out .............................................................................................................. 64
8 Project Task Schedule ......................................................................................................................... 66
8.1 Adding Tasks to the Schedule ..................................................................................................... 66
Project and Phase Setup
8.1.1 Import Items as Tasks to a Schedule ................................................................................... 66
8.1.2 Add Tasks to a Schedule ...................................................................................................... 67
8.2 Uploading Task Details in Bulk using Microsoft Project .............................................................. 68
8.3 Other Scheduling Activities ......................................................................................................... 69
8.4 Editing Task Details ..................................................................................................................... 70
8.4.1 Updating Task Details from the Schedule Table ................................................................. 70
8.4.2 Updating Task Details from the Gantt Chart ....................................................................... 72
8.4.3 Updating Task Details in the Schedule Form ...................................................................... 74
8.5 Removing Tasks from Schedule .................................................................................................. 79
8.6 Taking a Snapshot of the Schedule ............................................................................................. 79
8.7 Viewing the Critical Path ............................................................................................................. 80
8.8 Hiding the Critical Path ............................................................................................................... 81
8.9 Schedule Reports ........................................................................................................................ 81
9 Project Workflow Stages ..................................................................................................................... 83
9.1 Project Workflow Stages - Programming Not Required ............................................................. 83
9.2 Project Workflow Stages - Programming Required .................................................................... 84
10 Appendix ............................................................................................................................................. 88
10.1 Attachments ................................................................................................................................ 88
10.1.1 Attaching a File to a Form ................................................................................................... 88
10.1.2 Accessing Attached Files ..................................................................................................... 89
10.1.3 Deleting Attached Files ....................................................................................................... 89
Project and Phase Setup
1 | P a g e
1 Introduction to Using the Participant Guide
PPMS provides an integrated set of project management modules designed to support the full range of projects performed by IOWA DOT. Using these modules, you can create custom projects, add and store project-related information, and track funding sources and fund allocations to manage projects.
The Participant Guide helps you get started with the process of setting up a new project and quickly navigate through the various key processes of project execution.
The options selected for use in this guide are for instructional purposes to showcase the entire lifecycle of a project and its associated phases. Field selections, other than the ones used in this guide, could possibly lead to a varied project workflow and may not be covered in this guide. For additional information on the application, refer to the User Guide/PPMS Online Help available with the application.
Project and Phase Setup
2 | P a g e
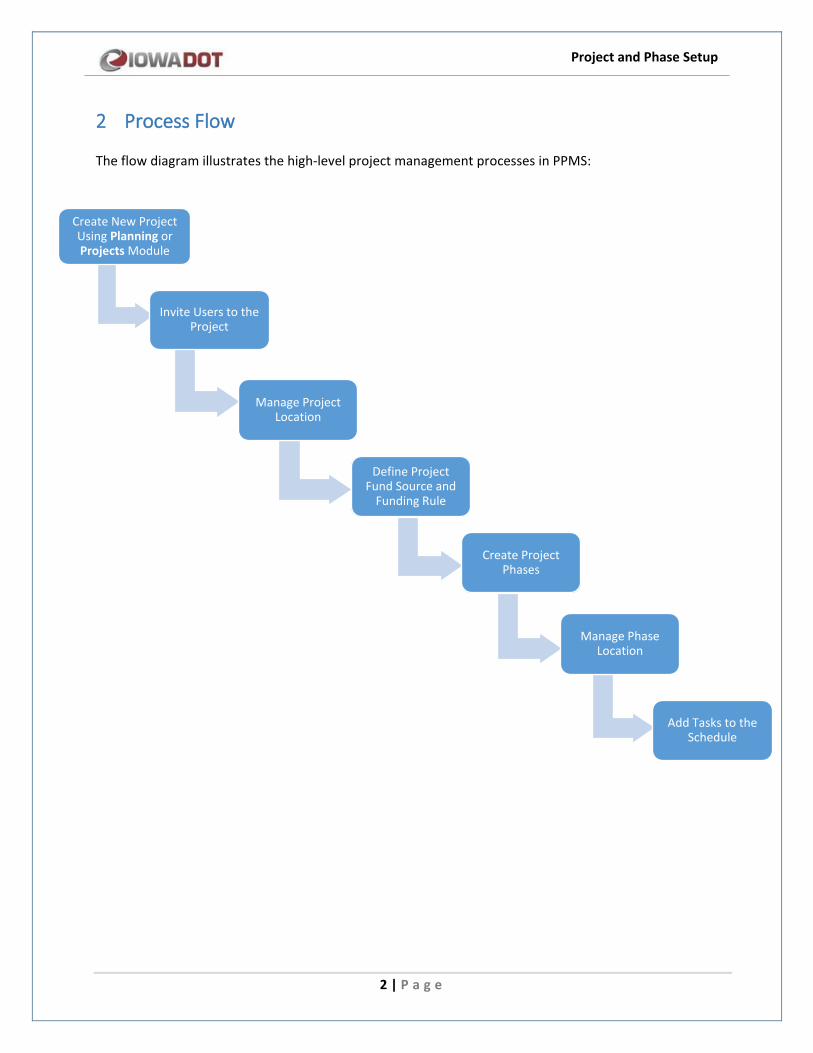
2 Process Flow
The flow diagram illustrates the high-level project management processes in PPMS:
Create New Project Using Planning or Projects Module
Invite Users to the Project
Manage Project Location
Define Project Fund Source and
Funding Rule
Create Project Phases
Manage Phase Location
Add Tasks to the Schedule
Project and Phase Setup
3 | P a g e
3 Project Management The Projects and Planning modules comprise features to manage a project through its lifecycle. You can create custom projects, add and store project-related information, and integrate functional modules to manage projects.
If the project does not require five-year programming, then you can create a project using the Projects module. If a project requires five-year programming, then you can create a planned project using the Planning module. Planned projects that are published are added into a five-year program based on various criteria such as program type, program year, required year, budget estimates, project score, and so on.
You can access projects and perform project-related tasks based on the following factors:
• Business unit of the project is a business unit that is assigned to you
• Roles assigned to you
• Permissions defined for the roles assigned to you
• Workflow stage of the project
You can perform the following tasks in the Projects or Planning module:
• Create a project, and add project related information
• Manage users in a project
• Manage project location details
• Plan project phases
• Schedule project tasks
• Collaborate with stakeholders
Project and Phase Setup
4 | P a g e
3.1 Creating a Project
You can create a project in two modes:
• Create a project and select required modules.
• Copy a project with selected information.
Prerequisites
• User accounts are created.
• Roles are assigned to users.
3.1.1 Creating a Project
You can enter project details that include basic project information, select modules for the project, and attach project related images and files.
Steps
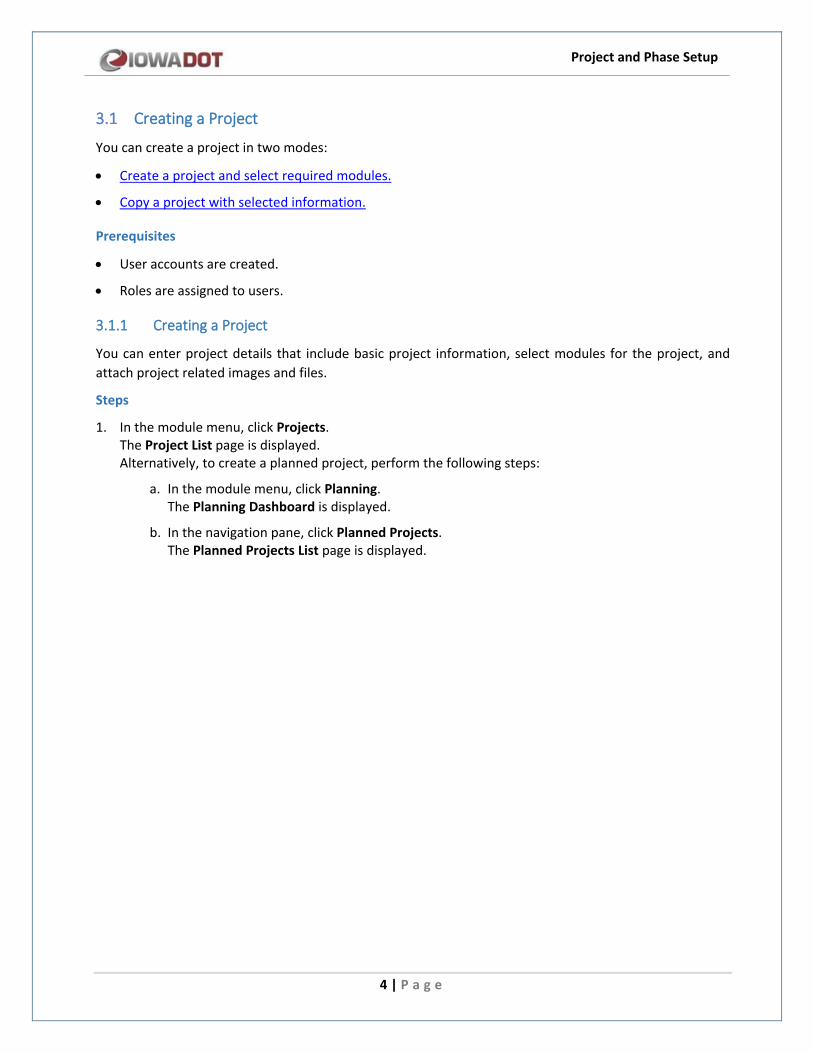
1. In the module menu, click Projects. The Project List page is displayed. Alternatively, to create a planned project, perform the following steps:
a. In the module menu, click Planning. The Planning Dashboard is displayed.
b. In the navigation pane, click Planned Projects. The Planned Projects List page is displayed.
Project and Phase Setup
5 | P a g e
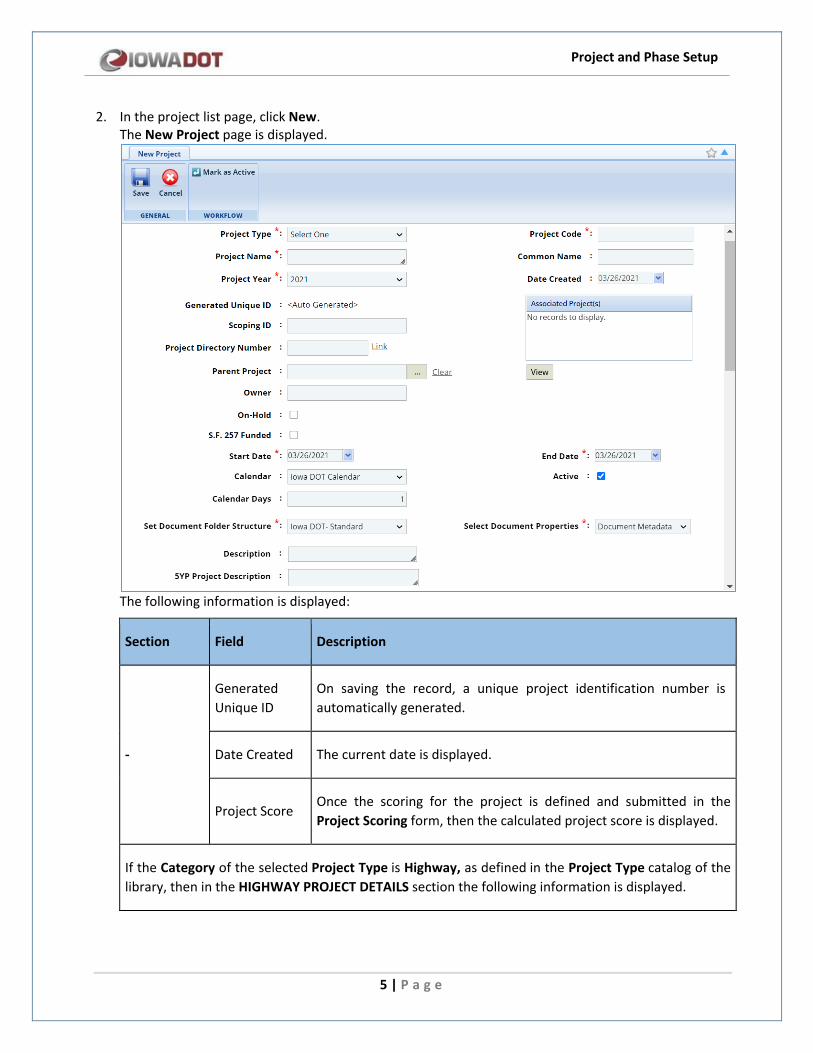
2. In the project list page, click New. The New Project page is displayed.
The following information is displayed:
Section Field Description
-
Generated Unique ID
On saving the record, a unique project identification number is automatically generated.
Date Created The current date is displayed.
Project Score Once the scoring for the project is defined and submitted in the Project Scoring form, then the calculated project score is displayed.
If the Category of the selected Project Type is Highway, as defined in the Project Type catalog of the library, then in the HIGHWAY PROJECT DETAILS section the following information is displayed.
Project and Phase Setup
6 | P a g e
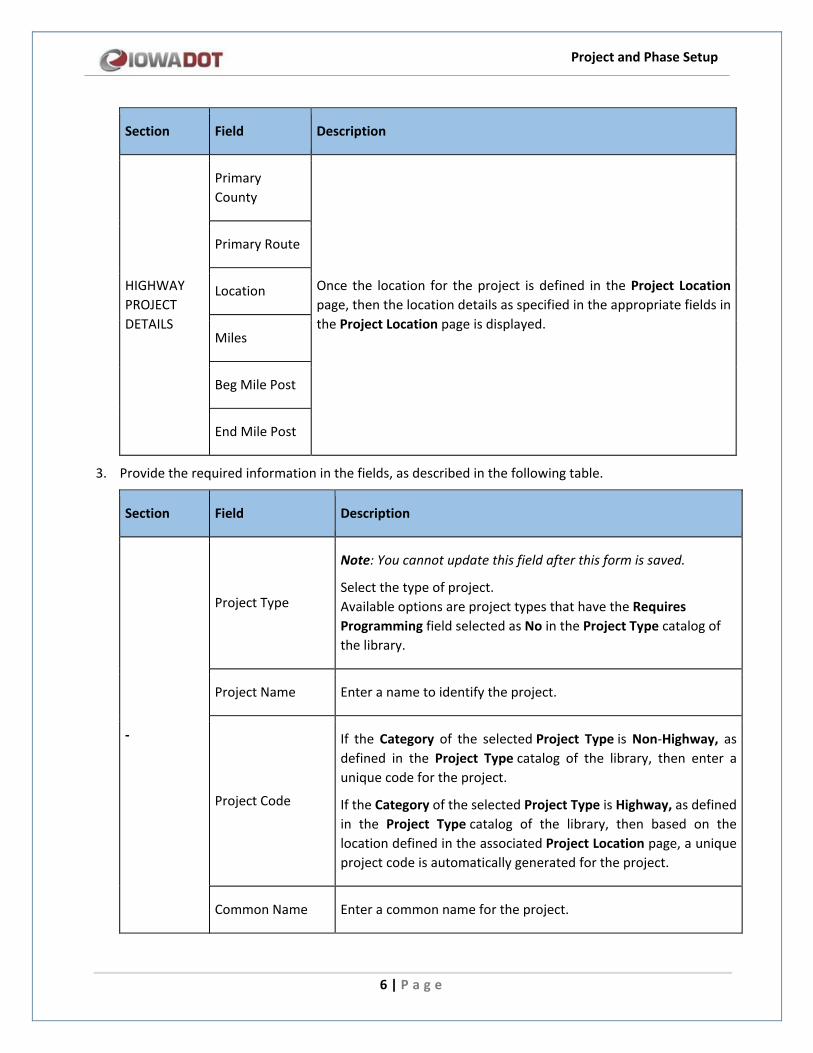
Section Field Description
HIGHWAY PROJECT DETAILS
Primary County
Once the location for the project is defined in the Project Location page, then the location details as specified in the appropriate fields in the Project Location page is displayed.
Primary Route
Location
Miles
Beg Mile Post
End Mile Post
3. Provide the required information in the fields, as described in the following table.
Section Field Description
-
Project Type
Note: You cannot update this field after this form is saved.
Select the type of project. Available options are project types that have the Requires Programming field selected as No in the Project Type catalog of the library.
Project Name Enter a name to identify the project.
Project Code
If the Category of the selected Project Type is Non-Highway, as defined in the Project Type catalog of the library, then enter a unique code for the project.
If the Category of the selected Project Type is Highway, as defined in the Project Type catalog of the library, then based on the location defined in the associated Project Location page, a unique project code is automatically generated for the project.
Common Name Enter a common name for the project.
Project and Phase Setup
7 | P a g e
Section Field Description
Disaster Event # This field is displayed if the Project Type selected for the project is ER-EMER Number. Enter the presidential declaration of the major disaster event number.
County
This field is displayed if the Project Type selected for the project is ER-EMER Number. To select the county affected by the disaster, perform the following steps:
1. Click . The County dialog box is displayed. Available options counties defined in the Project County catalog of the library.
2. Click the required county, and then click Select.
Location This field is displayed if the Project Type selected for the project is ER-EMER Number. Enter the location of the disaster.
FHWA Disaster Event Approval Date
This field is displayed if the Project Type selected for the project is ER-EMER Number. Select the approval date for the major disaster event.
Scoping ID
Enter the scoping identification number for the project.
When the Get Scoping Geometry button in the associated Project Location page is triggered, based on the number entered in the Scoping ID field, the location data for the project is received from the RAMS external system and updated in the appropriate fields in the Project Location page.
Project Directory Number
If the Category of the selected Project Type is Non-Highway, as defined in the Project Type catalog of the library, then click Link and select the project directory number for the project.
If the Category of the selected Project Type is Highway, as defined in the Project Type catalog of the library, then based on the Project Code, the project directory number for the project is automatically generated.
Parent Project To select a parent project for the project being created, perform the following steps:
Project and Phase Setup
8 | P a g e
Section Field Description
3. Click . The Parent Project dialog box is displayed. Available options are planned projects with the Project Type selected as Major and not in Archived workflow status.
4. Click the required project, and then click Select. The project name and project code of the selected project are displayed in the Associated Project(s) box.
5. Optionally, to view the parent project details, click the project, and then click View.
Owner Enter the project owner's name.
On-Hold
To defer the project, select the check box. You can manually defer a project at any time. Note: All associated project phases and contracts will not be placed on hold. You can also manually reinstate the project at any time. To reinstate the project, clear the check box.
S.F. 257 Funded Select the check box if the project is S.F 257 funded.
Start Date Select the date the project begins.
End Date Select the date the project is planned for completion.
Calendar
Select the calendar for the project. Available options are calendars defined in the Calendar catalog of the library.
If no option is selected in the Calendar drop-down list, then the Calendar Days box displays the number of days calculated from the selected Start Date to the selected End Date of the project.
If a calendar is selected in the Calendar drop-down list, then based on the calendar selected, the Calendar Days box displays the number of days calculated from the selected Start Date to the selected End Date of the project.
Project and Phase Setup
9 | P a g e
Section Field Description
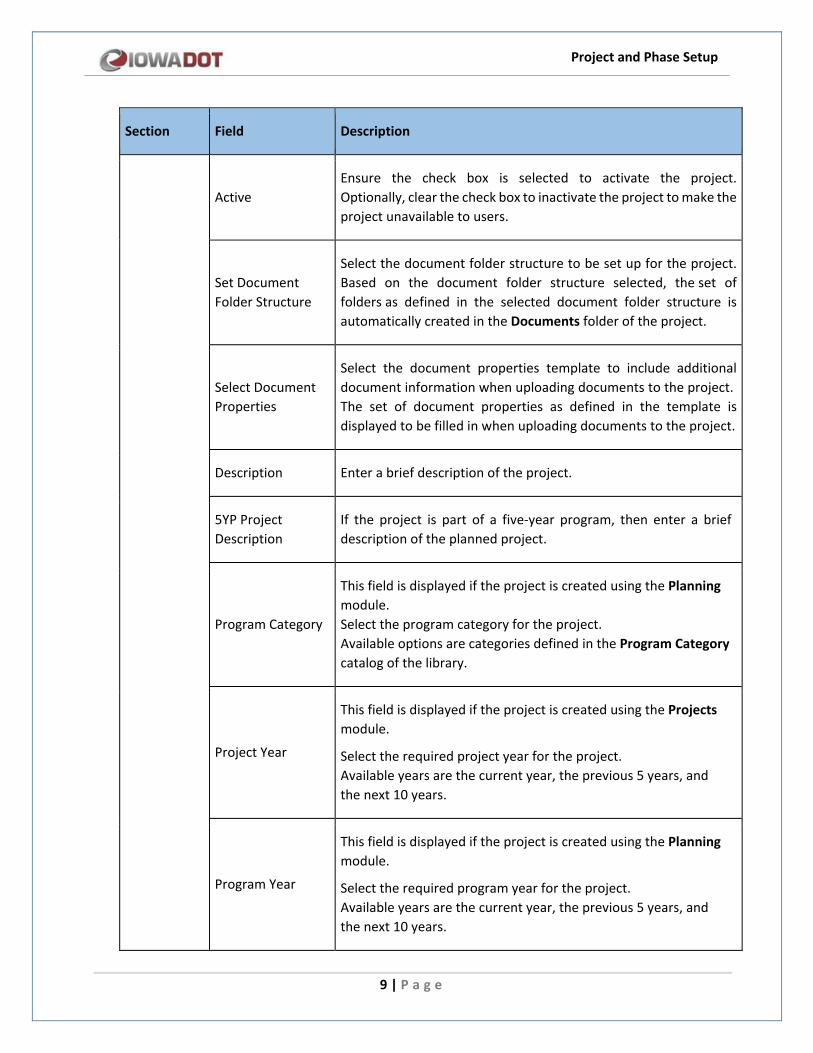
Active Ensure the check box is selected to activate the project. Optionally, clear the check box to inactivate the project to make the project unavailable to users.
Set Document Folder Structure
Select the document folder structure to be set up for the project. Based on the document folder structure selected, the set of folders as defined in the selected document folder structure is automatically created in the Documents folder of the project.
Select Document Properties
Select the document properties template to include additional document information when uploading documents to the project. The set of document properties as defined in the template is displayed to be filled in when uploading documents to the project.
Description Enter a brief description of the project.
5YP Project Description
If the project is part of a five-year program, then enter a brief description of the planned project.
Program Category
This field is displayed if the project is created using the Planning module. Select the program category for the project. Available options are categories defined in the Program Category catalog of the library.
Project Year
This field is displayed if the project is created using the Projects module.
Select the required project year for the project. Available years are the current year, the previous 5 years, and the next 10 years.
Program Year
This field is displayed if the project is created using the Planning module.
Select the required program year for the project. Available years are the current year, the previous 5 years, and the next 10 years.
Project and Phase Setup
10 | P a g e
Section Field Description
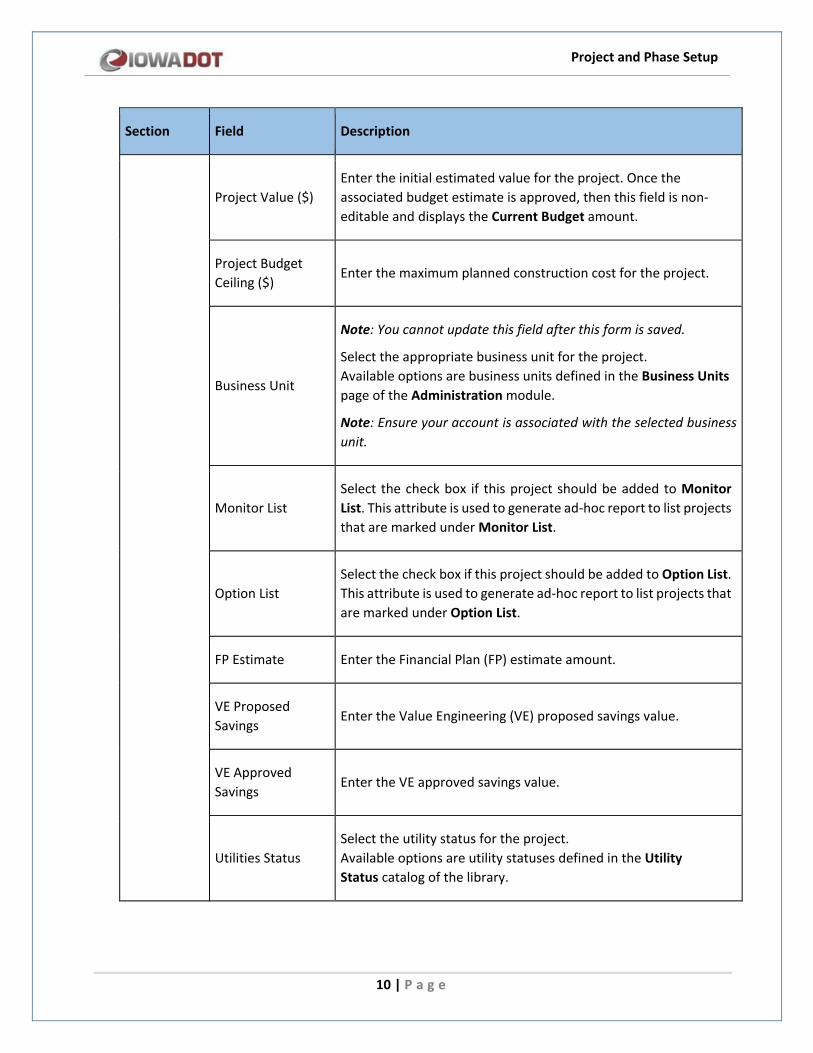
Project Value ($) Enter the initial estimated value for the project. Once the associated budget estimate is approved, then this field is non-editable and displays the Current Budget amount.
Project Budget Ceiling ($)
Enter the maximum planned construction cost for the project.
Business Unit
Note: You cannot update this field after this form is saved.
Select the appropriate business unit for the project. Available options are business units defined in the Business Units page of the Administration module.
Note: Ensure your account is associated with the selected business unit.
Monitor List Select the check box if this project should be added to Monitor List. This attribute is used to generate ad-hoc report to list projects that are marked under Monitor List.
Option List Select the check box if this project should be added to Option List. This attribute is used to generate ad-hoc report to list projects that are marked under Option List.
FP Estimate Enter the Financial Plan (FP) estimate amount.
VE Proposed Savings
Enter the Value Engineering (VE) proposed savings value.
VE Approved Savings
Enter the VE approved savings value.
Utilities Status Select the utility status for the project. Available options are utility statuses defined in the Utility Status catalog of the library.
Project and Phase Setup
11 | P a g e
Section Field Description
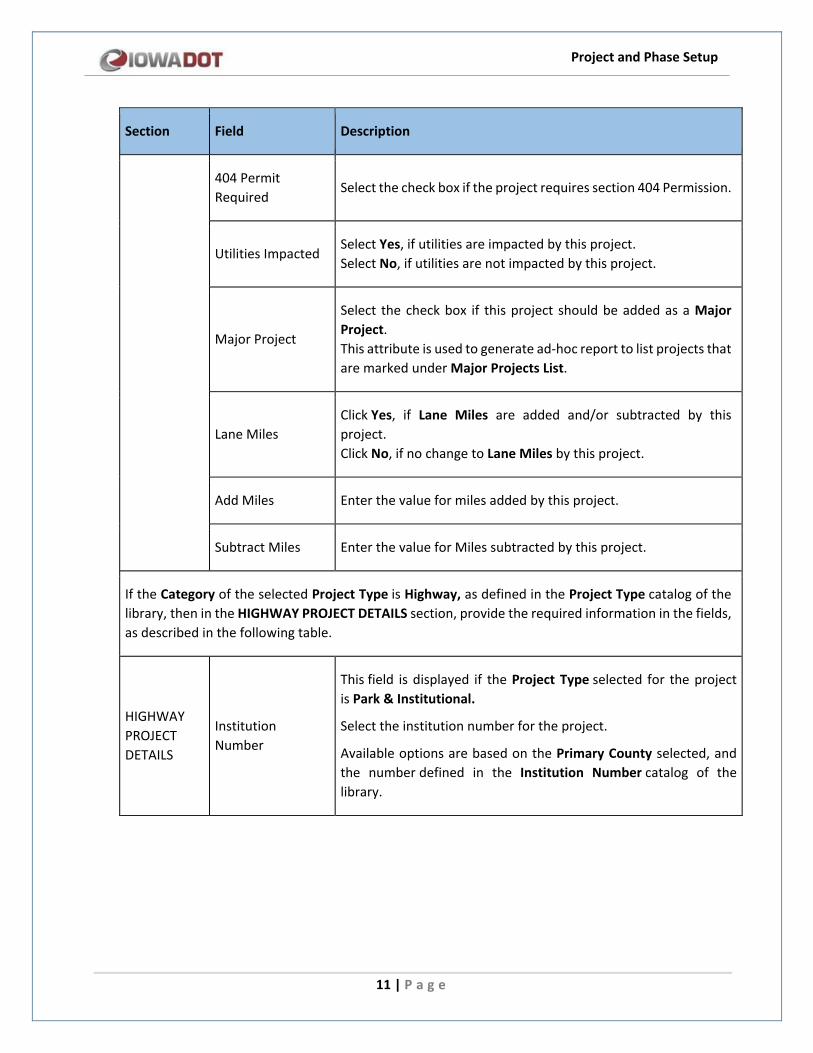
404 Permit Required
Select the check box if the project requires section 404 Permission.
Utilities Impacted Select Yes, if utilities are impacted by this project. Select No, if utilities are not impacted by this project.
Major Project
Select the check box if this project should be added as a Major Project. This attribute is used to generate ad-hoc report to list projects that are marked under Major Projects List.
Lane Miles Click Yes, if Lane Miles are added and/or subtracted by this project. Click No, if no change to Lane Miles by this project.
Add Miles Enter the value for miles added by this project.
Subtract Miles Enter the value for Miles subtracted by this project.
If the Category of the selected Project Type is Highway, as defined in the Project Type catalog of the library, then in the HIGHWAY PROJECT DETAILS section, provide the required information in the fields, as described in the following table.
HIGHWAY PROJECT DETAILS
Institution Number
This field is displayed if the Project Type selected for the project is Park & Institutional.
Select the institution number for the project.
Available options are based on the Primary County selected, and the number defined in the Institution Number catalog of the library.
Project and Phase Setup
12 | P a g e
Section Field Description
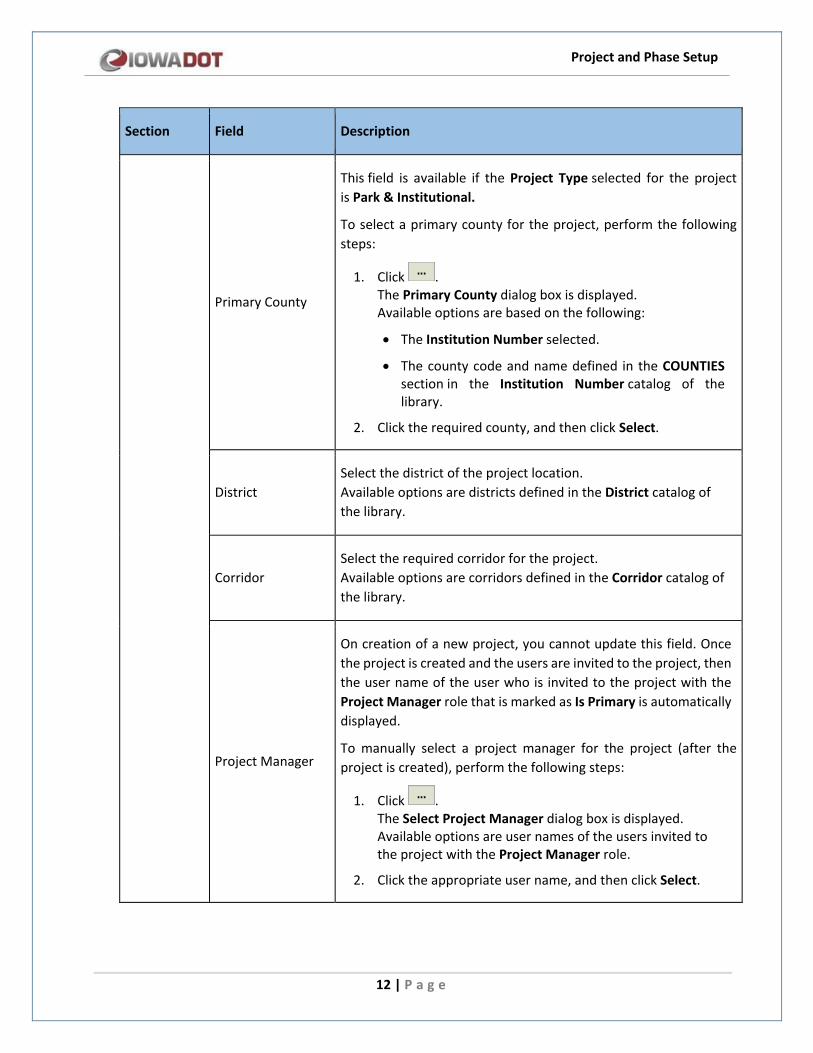
Primary County
This field is available if the Project Type selected for the project is Park & Institutional.
To select a primary county for the project, perform the following steps:
1. Click . The Primary County dialog box is displayed. Available options are based on the following:
• The Institution Number selected.
• The county code and name defined in the COUNTIES section in the Institution Number catalog of the library.
2. Click the required county, and then click Select.
District Select the district of the project location. Available options are districts defined in the District catalog of the library.
Corridor Select the required corridor for the project. Available options are corridors defined in the Corridor catalog of the library.
Project Manager
On creation of a new project, you cannot update this field. Once the project is created and the users are invited to the project, then the user name of the user who is invited to the project with the Project Manager role that is marked as Is Primary is automatically displayed.
To manually select a project manager for the project (after the project is created), perform the following steps:
1. Click . The Select Project Manager dialog box is displayed. Available options are user names of the users invited to the project with the Project Manager role.
2. Click the appropriate user name, and then click Select.
Project and Phase Setup
13 | P a g e
Section Field Description
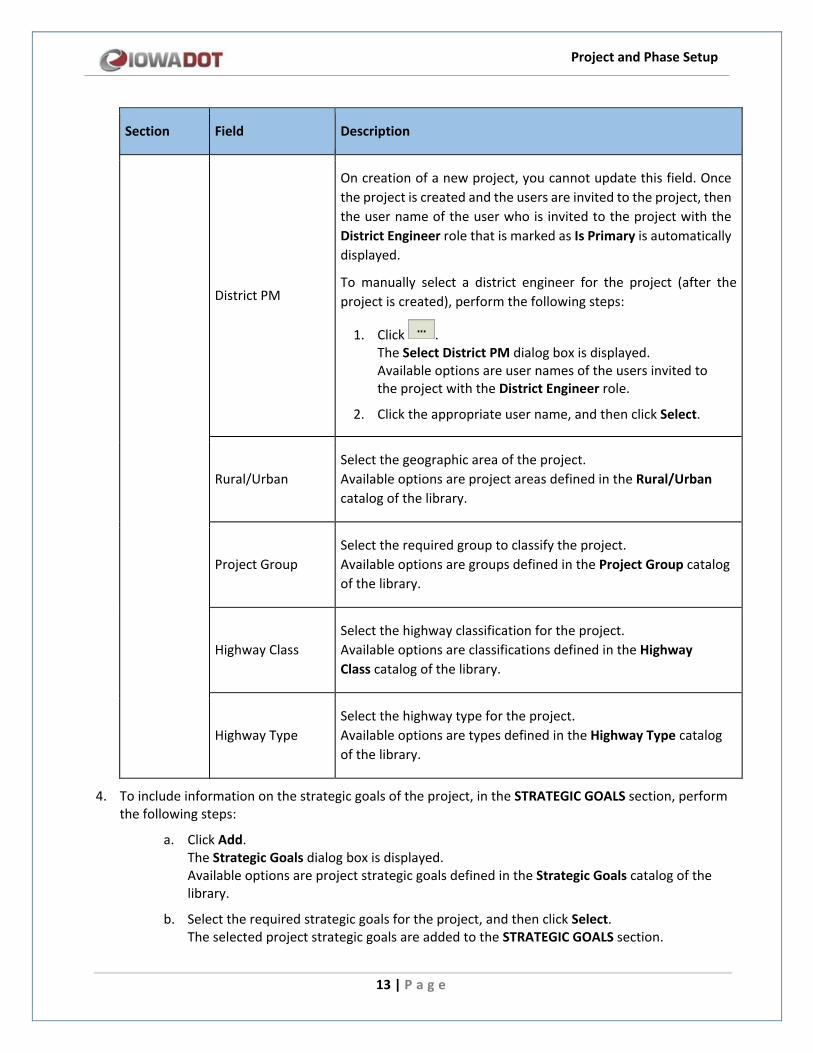
District PM
On creation of a new project, you cannot update this field. Once the project is created and the users are invited to the project, then the user name of the user who is invited to the project with the District Engineer role that is marked as Is Primary is automatically displayed.
To manually select a district engineer for the project (after the project is created), perform the following steps:
1. Click . The Select District PM dialog box is displayed. Available options are user names of the users invited to the project with the District Engineer role.
2. Click the appropriate user name, and then click Select.
Rural/Urban Select the geographic area of the project. Available options are project areas defined in the Rural/Urban catalog of the library.
Project Group Select the required group to classify the project. Available options are groups defined in the Project Group catalog of the library.
Highway Class Select the highway classification for the project. Available options are classifications defined in the Highway Class catalog of the library.
Highway Type Select the highway type for the project. Available options are types defined in the Highway Type catalog of the library.
4. To include information on the strategic goals of the project, in the STRATEGIC GOALS section, perform the following steps:
a. Click Add. The Strategic Goals dialog box is displayed. Available options are project strategic goals defined in the Strategic Goals catalog of the library.
b. Select the required strategic goals for the project, and then click Select. The selected project strategic goals are added to the STRATEGIC GOALS section.
Project and Phase Setup
14 | P a g e
c. For each goal, in the Percentage column, click and enter the prominence value in percentage for the goal. Note: The sum of all the percentage values must be 100%.
5. To include information on the strategic objectives of the project, in the STRATEGIC OBJECTIVES section, perform the following steps:
a. Click Add. The Strategic Objectives dialog box is displayed. Available options are project strategic objectives defined in the Strategic Objectives catalog of the library.
b. Select the required strategic objectives for the project, and then click Select. The selected project strategic objectives are added to the STRATEGIC OBJECTIVES section.
c. For each objective, in the Percentage column, click and enter the prominence value in percentage for the objective. Note: The sum of all the percentage values must be 100%.
d. In the Strategic Objective Notes box, enter any notes for the strategic objectives added.
e. In the Notes box, enter any notes for the project.
6. You can define the module visibility for your project. You can select specific modules that you require to manage the project, and make the other modules that are not required for the project unavailable in the project in the web application and the mobile app. To select modules for the web application, and the mobile app, perform the following steps in the Modules section:
a. Expand the Modules section.
b. By default, all modules in the application are enabled for a project in the web application. To remove modules that are not required for the project from the web application, clear the check box in the first column of the modules that are not required for the project. Alternatively, select the check box of the modules that are required for the project in the web application On saving the form, the Web column displays a selected check box for modules selected for the project, and a cleared check box for modules that are not selected for the project.
c. To select modules to be made available in the mobile app, in the Offline Client column, select the check box for the modules required for the project in the mobile app. Note: Only check boxes of modules that are available for the mobile app are enabled.
7. Optionally, in the ATTACHMENTS section, attach or link related documents. For information on attachments, refer to Attachments.
8. Click Save. The project is created. You can now invite users to the project.
3.1.2 Copying a Project
You can copy selected details of a project to create a new project with a new name and project number. The workflow status of the new project is set to the first workflow stage as defined for projects.
Project and Phase Setup
15 | P a g e
Steps
1. In the module menu, click Projects. The Project List page is displayed. Alternatively, to create a planned project, perform the following steps:
a. In the module menu, click Planning. The Planning Dashboard is displayed.
b. In the navigation pane, click Planned Projects. The Planned Projects List page is displayed.
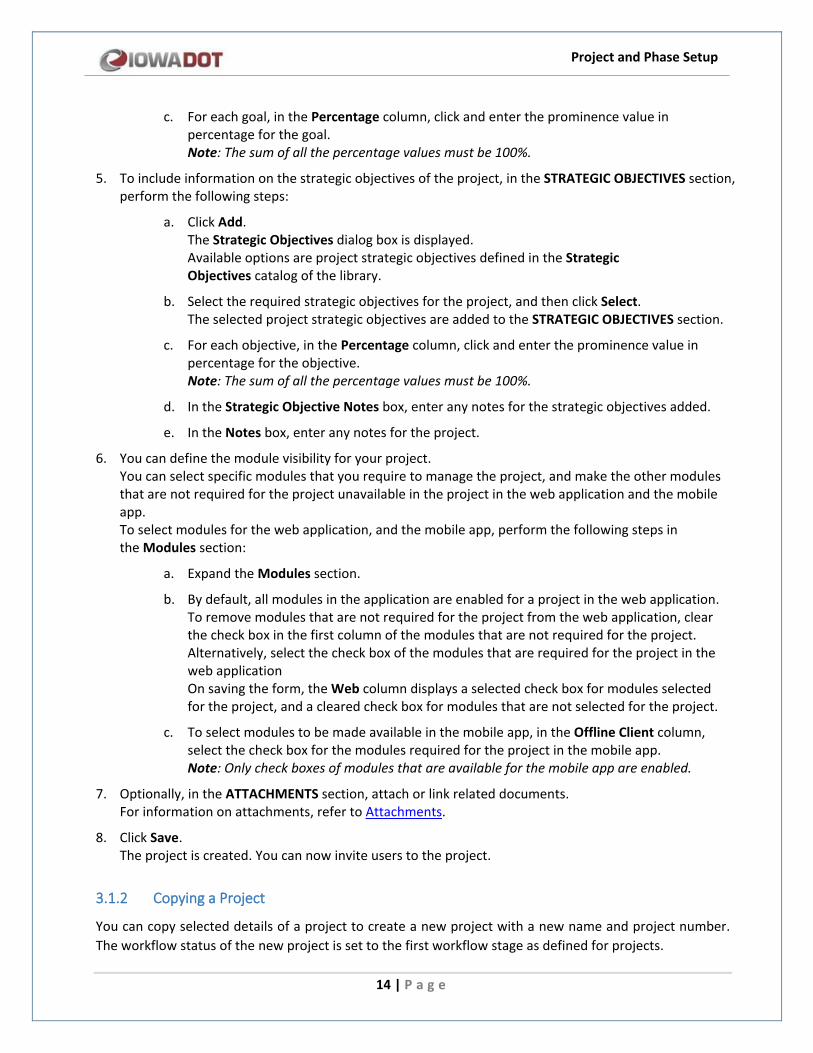
2. In the project list page, perform either of the following steps: - Select the project to be copied, click Copy, and then click OK. - Double-click the project to be copied, click the Project Details tab, and then click Copy. The Copy Project page is displayed.
The following information is displayed:
Field Name Description
Source Project Name The name of the project being copied is displayed.
Source Project Code The project code of the project being copied is displayed.
3. In the New Project Name box, enter a name to identify the project.
4. In the New Project Code box, enter a unique alphanumeric code to identify the project.
5. In the Description box, enter the description of the project.
Project and Phase Setup
16 | P a g e
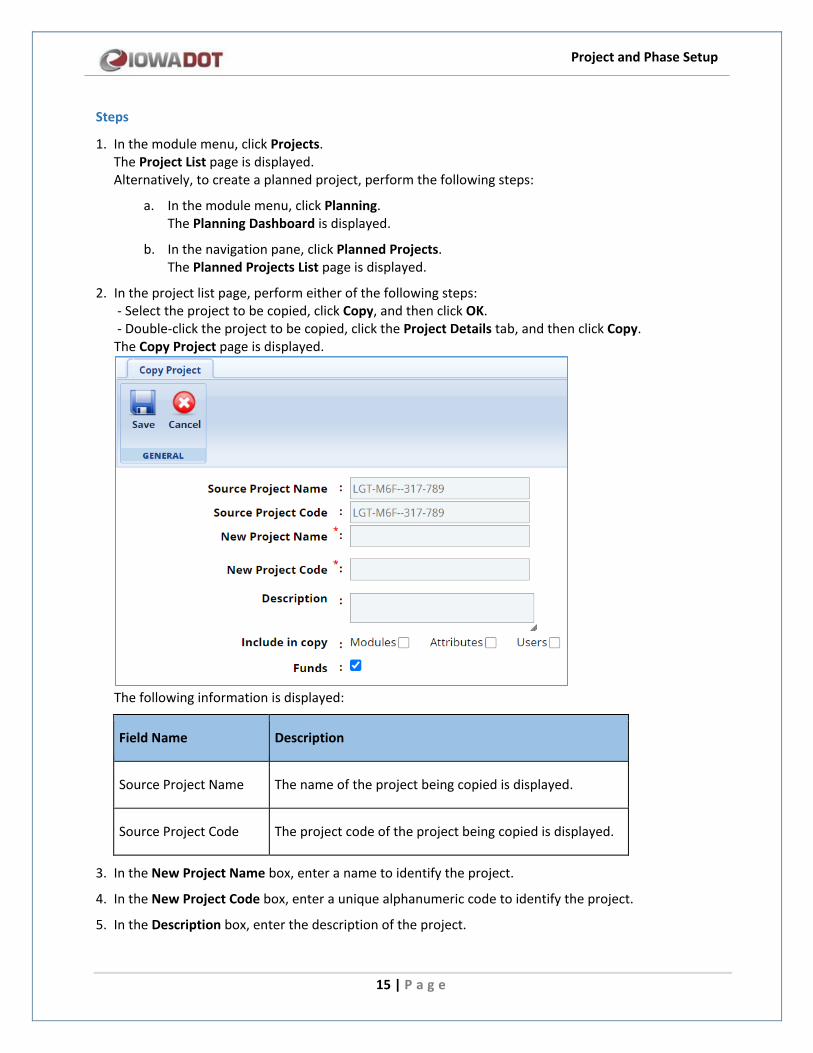
6. In the Include in copy section, select the required information to be copied into the new project, as described in the following table:
Section Description
Modules Makes available in the copied project, the modules selected in the project being copied.
Attributes Copies all attributes defined in the project.
Users Copies all users invited to the project.
Funds Copies all project fund sources and active project fund rules.
7. Click Save. The project is created. You can now invite users to the project.
3.2 Editing Project Details
Based on the workflow settings of a project workflow and the current workflow stage of the project, you can edit details of a project.
Steps
1. In the module menu, click Projects. The Project List page is displayed. Alternatively, to edit details of a planned project, perform the following steps:
a. In the module menu, click Planning. The Planning Dashboard is displayed.
b. In the navigation pane, click Planned Projects. The Planned Projects List page is displayed.
2. In the project list page, click the required project, and then click Edit. Alternatively, double-click the required project. The Project Dashboard is displayed.
3. Click the Project Details tab.
Project and Phase Setup
17 | P a g e
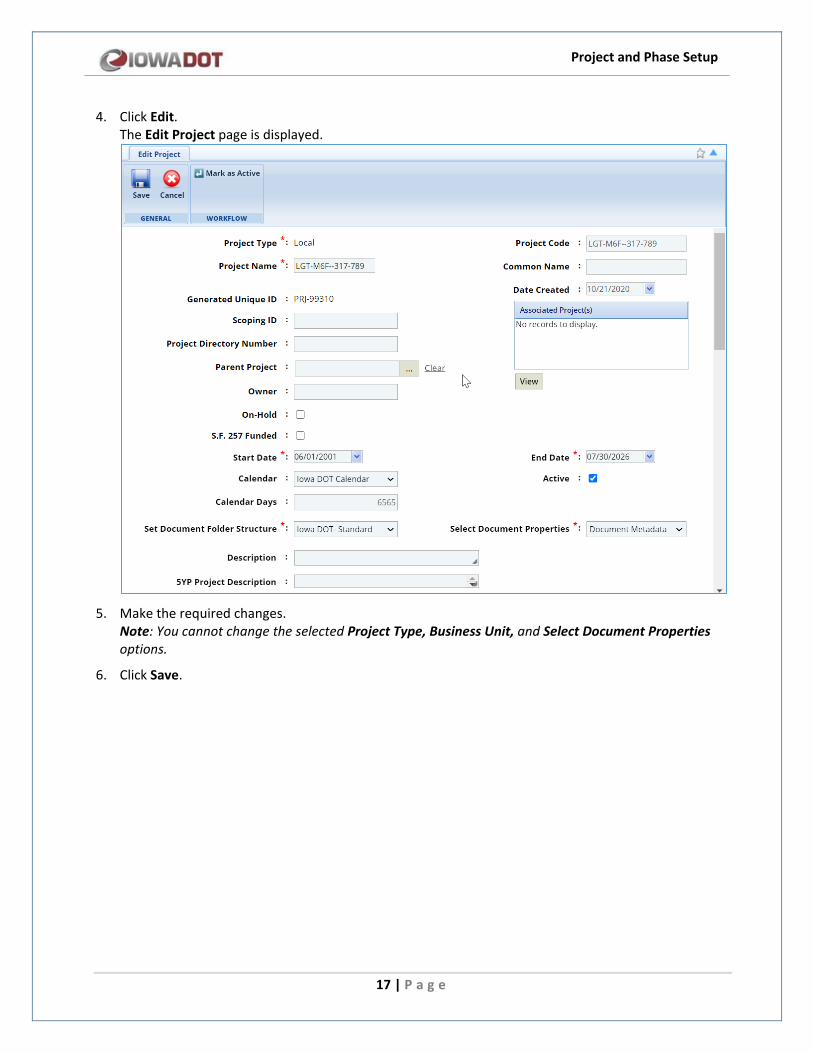
4. Click Edit. The Edit Project page is displayed.
5. Make the required changes.
Note: You cannot change the selected Project Type, Business Unit, and Select Document Properties options.
6. Click Save.
Project and Phase Setup
18 | P a g e
4 User Management in Projects To manage the functioning of a project, you must invite users to the project. Only invited users can access the project and the contracts of the project. Each user can participate in the working of the project based on the roles assigned to the user in the project. You can assign roles to a user in a project based on the roles assigned to the user at the enterprise level.
The users with the specific roles are automatically invited to the projects, based on the following:
• The Project Type selected for the project.
• The user roles defined in the AUTO INVITE ROLES section in the Project Type catalog of the library.
You can manually invite users to a project in the following modes:
• Inviting users to a project
• Inviting a user to multiple projects
Note: The following section is to explain adding users to a contract. This feature is used to invite users to a design contract that is managed by Project Management Bureau. It is not used for managing users in construction contracts.
You can invite users to a contract to enforce information security by allowing contract information visibility only to authorized users. To invite a user to a contract, the user is first invited to the project, and then to the required contracts in the project. The user creating the contract is automatically invited to the contract. In addition, you can invite other users to the contract. You can assign roles to a user in a contract based on the roles assigned to the user in the project.
You can invite users to a contract in two modes:
• Inviting users to contracts of a project
• Inviting a user to contracts of multiple projects
You can remove users from a project. Users removed from a project cannot access the project and perform any project-related tasks.
4.1 Inviting Users to a Project
You can invite users to a project and assign project-specific roles to the users.
Prerequisites
• User accounts are created. • Roles are assigned to users.
Steps
1. In the module menu, click Projects. The Project List page is displayed. Alternatively, to invite users to a planned project, perform the following steps:
Project and Phase Setup
19 | P a g e
a. In the module menu, click Planning. The Planning Dashboard is displayed.
b. In the navigation pane, click Planned Projects. The Planned Projects List page is displayed.
2. In the project list page, click the required project, and then click View. The Project Dashboard is displayed.
3. Click the Project Details tab.
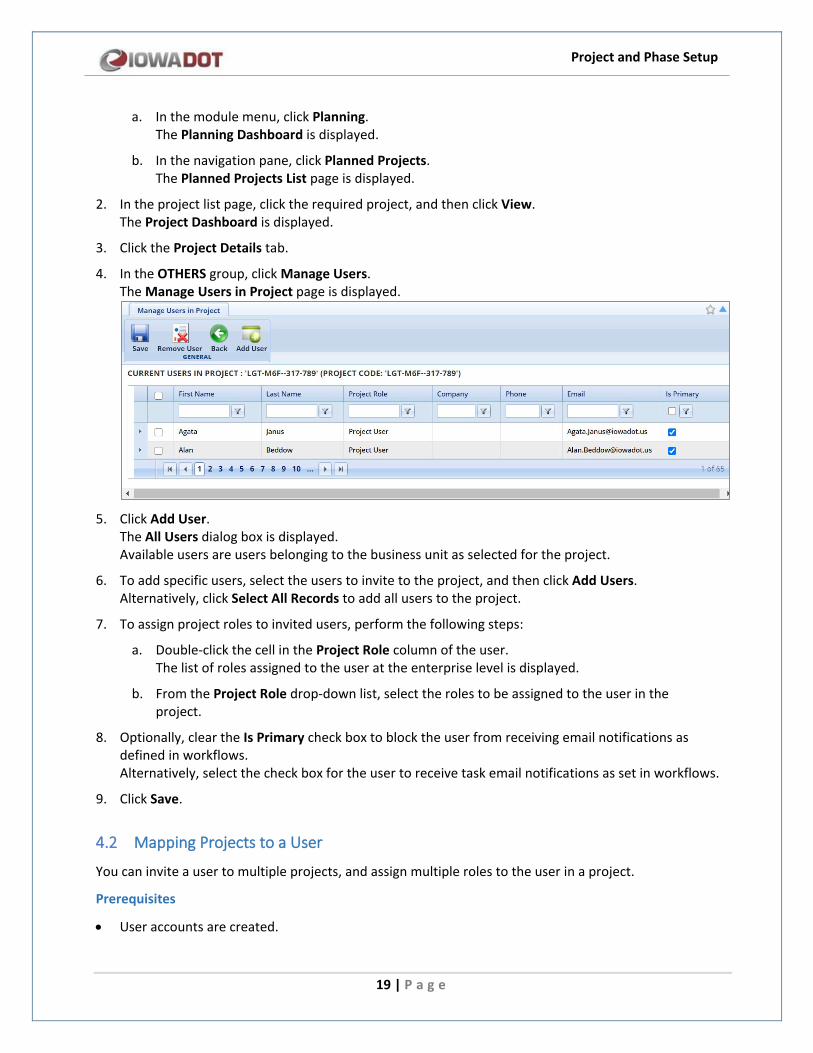
4. In the OTHERS group, click Manage Users. The Manage Users in Project page is displayed.
5. Click Add User.
The All Users dialog box is displayed. Available users are users belonging to the business unit as selected for the project.
6. To add specific users, select the users to invite to the project, and then click Add Users. Alternatively, click Select All Records to add all users to the project.
7. To assign project roles to invited users, perform the following steps:
a. Double-click the cell in the Project Role column of the user. The list of roles assigned to the user at the enterprise level is displayed.
b. From the Project Role drop-down list, select the roles to be assigned to the user in the project.
8. Optionally, clear the Is Primary check box to block the user from receiving email notifications as defined in workflows. Alternatively, select the check box for the user to receive task email notifications as set in workflows.
9. Click Save.
4.2 Mapping Projects to a User
You can invite a user to multiple projects, and assign multiple roles to the user in a project.
Prerequisites
• User accounts are created.
Project and Phase Setup
20 | P a g e
• Roles are assigned to users at the enterprise level.
Steps
1. In the module menu, click Projects. The Project List page is displayed. Alternatively, to invite a user to multiple planned projects, perform the following steps:
a. In the module menu, click Planning. The Planning Dashboard is displayed.
b. In the navigation pane, click Planned Projects. The Planned Projects List page is displayed.
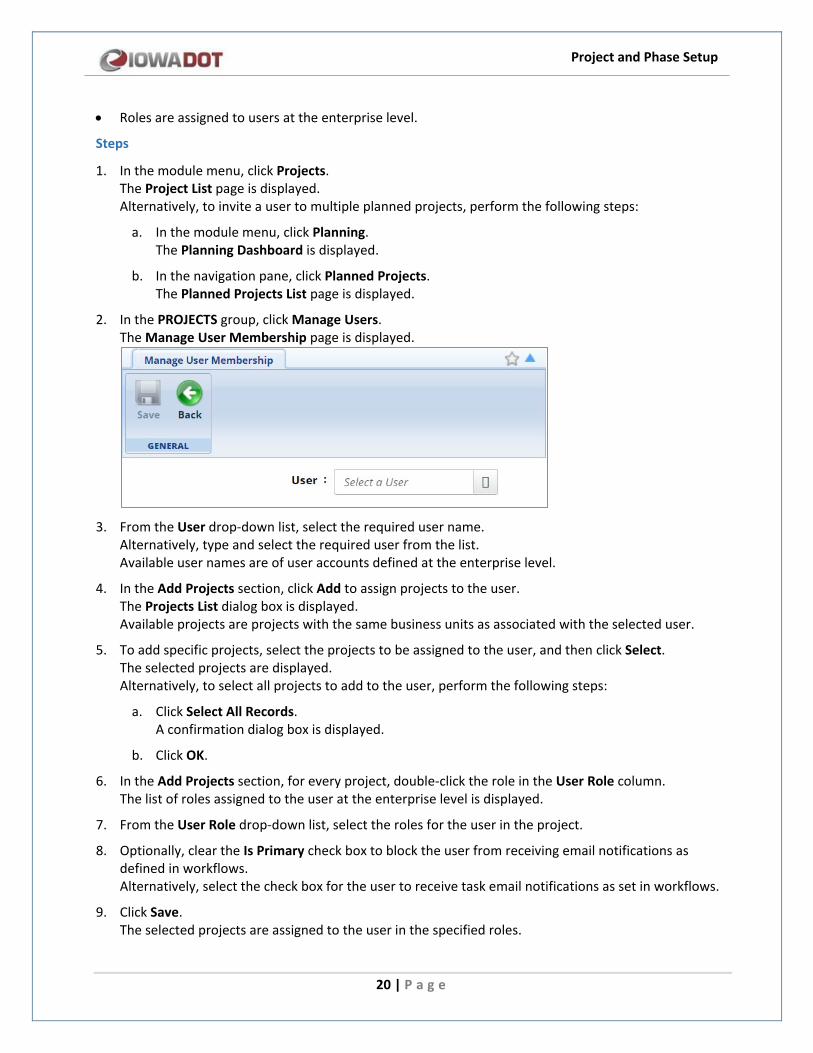
2. In the PROJECTS group, click Manage Users. The Manage User Membership page is displayed.
3. From the User drop-down list, select the required user name.
Alternatively, type and select the required user from the list. Available user names are of user accounts defined at the enterprise level.
4. In the Add Projects section, click Add to assign projects to the user. The Projects List dialog box is displayed. Available projects are projects with the same business units as associated with the selected user.
5. To add specific projects, select the projects to be assigned to the user, and then click Select. The selected projects are displayed. Alternatively, to select all projects to add to the user, perform the following steps:
a. Click Select All Records. A confirmation dialog box is displayed.
b. Click OK.
6. In the Add Projects section, for every project, double-click the role in the User Role column. The list of roles assigned to the user at the enterprise level is displayed.
7. From the User Role drop-down list, select the roles for the user in the project.
8. Optionally, clear the Is Primary check box to block the user from receiving email notifications as defined in workflows. Alternatively, select the check box for the user to receive task email notifications as set in workflows.
9. Click Save. The selected projects are assigned to the user in the specified roles.
Project and Phase Setup
21 | P a g e
4.3 Inviting Users to Contracts of a Project
Note: This feature is used to invite users to a design contract that is managed by Project Management Bureau. It is not used for managing users in construction contracts.
Prerequisites
• User is invited to the project.
Steps
1. In the module menu, click Projects. The Project List page is displayed. Alternatively, to invite users to a contract of a planned project, perform the following steps:
a. In the module menu, click Planning. The Planning Dashboard is displayed.
b. In the navigation pane, click Planned Projects. The Planned Projects List page is displayed.
2. In the project list page, click the required project, and then click View. The Project Dashboard is displayed.
3. Click the Project Details tab.
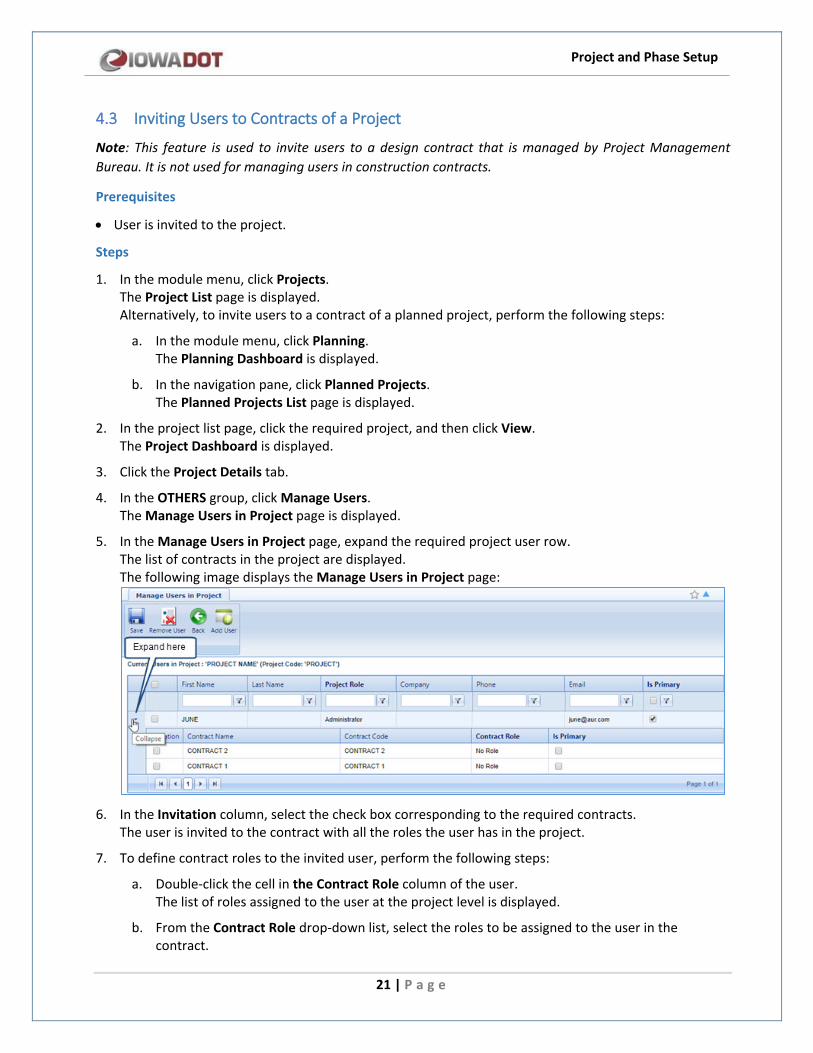
4. In the OTHERS group, click Manage Users. The Manage Users in Project page is displayed.
5. In the Manage Users in Project page, expand the required project user row. The list of contracts in the project are displayed. The following image displays the Manage Users in Project page:
6. In the Invitation column, select the check box corresponding to the required contracts.
The user is invited to the contract with all the roles the user has in the project.
7. To define contract roles to the invited user, perform the following steps:
a. Double-click the cell in the Contract Role column of the user. The list of roles assigned to the user at the project level is displayed.
b. From the Contract Role drop-down list, select the roles to be assigned to the user in the contract.
Project and Phase Setup
22 | P a g e
Available roles are roles the user is assigned to in the project. The selected roles are also added as the roles for the user in the project.
8. Optionally, clear the Is Primary check box to block the user from receiving task email notifications as defined in the associated workflow.
9. Alternatively, select the check box for the user to receive task email notifications as defined in the associated workflow.
10. Click Save.
4.4 Inviting a User to Contracts of Multiple Projects
Steps
1. In the module menu, click Projects. The Project List page is displayed. Alternatively, to invite a user to contracts of multiple planned projects, perform the following steps:
a. In the module menu, click Planning. The Planning Dashboard is displayed.
b. In the navigation pane, click Planned Projects. The Planned Projects List page is displayed.
2. In the PROJECTS group, click Manage Users. The Manage User Membership page is displayed.
3. From the User drop-down list, select the required user name. Available user names are of user accounts defined at the enterprise level.
Project and Phase Setup
23 | P a g e
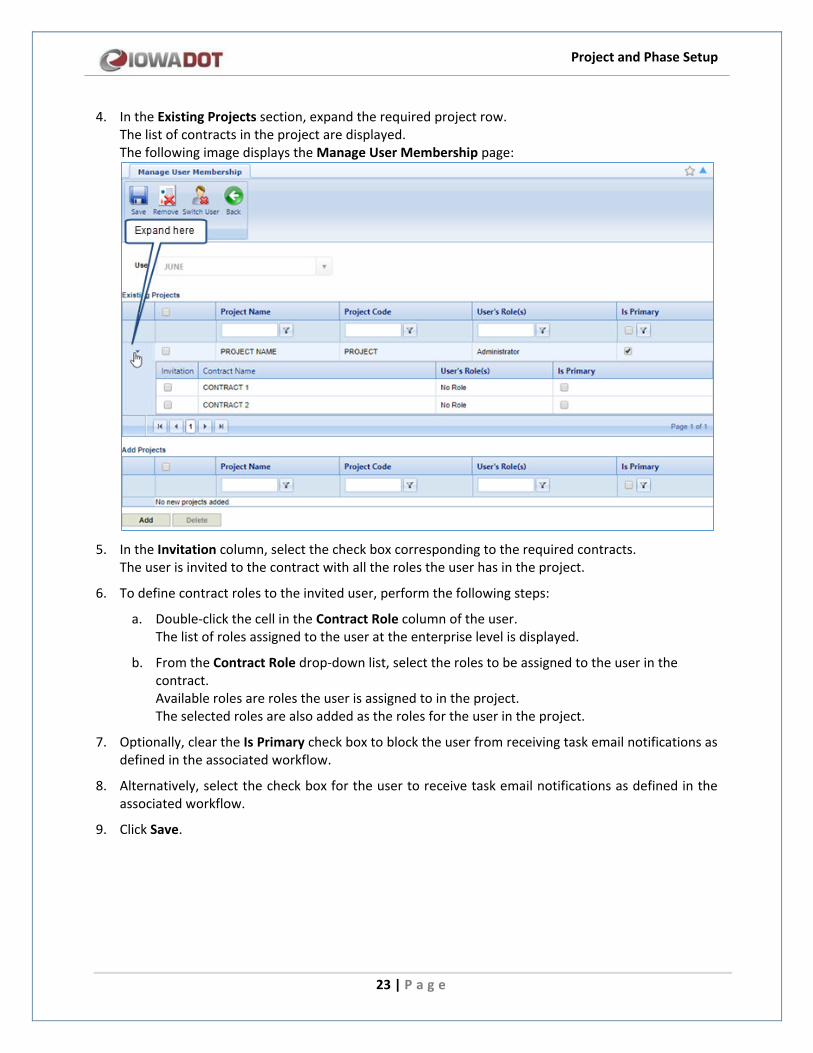
4. In the Existing Projects section, expand the required project row. The list of contracts in the project are displayed. The following image displays the Manage User Membership page:
5. In the Invitation column, select the check box corresponding to the required contracts.
The user is invited to the contract with all the roles the user has in the project.
6. To define contract roles to the invited user, perform the following steps:
a. Double-click the cell in the Contract Role column of the user. The list of roles assigned to the user at the enterprise level is displayed.
b. From the Contract Role drop-down list, select the roles to be assigned to the user in the contract. Available roles are roles the user is assigned to in the project. The selected roles are also added as the roles for the user in the project.
7. Optionally, clear the Is Primary check box to block the user from receiving task email notifications as defined in the associated workflow.
8. Alternatively, select the check box for the user to receive task email notifications as defined in the associated workflow.
9. Click Save.
Project and Phase Setup
24 | P a g e
5 Project Location The Project Location form is used to mark location data pertinent to a project like Project Area, Work Site, and so on. Project locations marked on maps that are viewed at the project level and the enterprise level. You can mark multiple project locations and project boundaries by placing points or drawing boundaries on a map. While using map markers, you can view layers as a reference on the map.
The Project Location form in PPMS enables you to record and display location and asset information alongside other pertinent project information. You can perform the following actions:
• Add project locations on a map using map markers
• Add asset details of the project
• View location-specific data attributes of projects
• View all project locations in a consolidated map view
5.1 Managing Project Location Details
Steps
1. In the module menu, click Projects. The Project List page is displayed. Alternatively, to manage the location details of a planned project, perform the following steps:
a. In the module menu, click Planning. The Planning Dashboard is displayed.
b. In the navigation pane, click Planned Projects. The Planned Projects List page is displayed.
2. In the project list page, click the required project, and then click View.
Project and Phase Setup
25 | P a g e
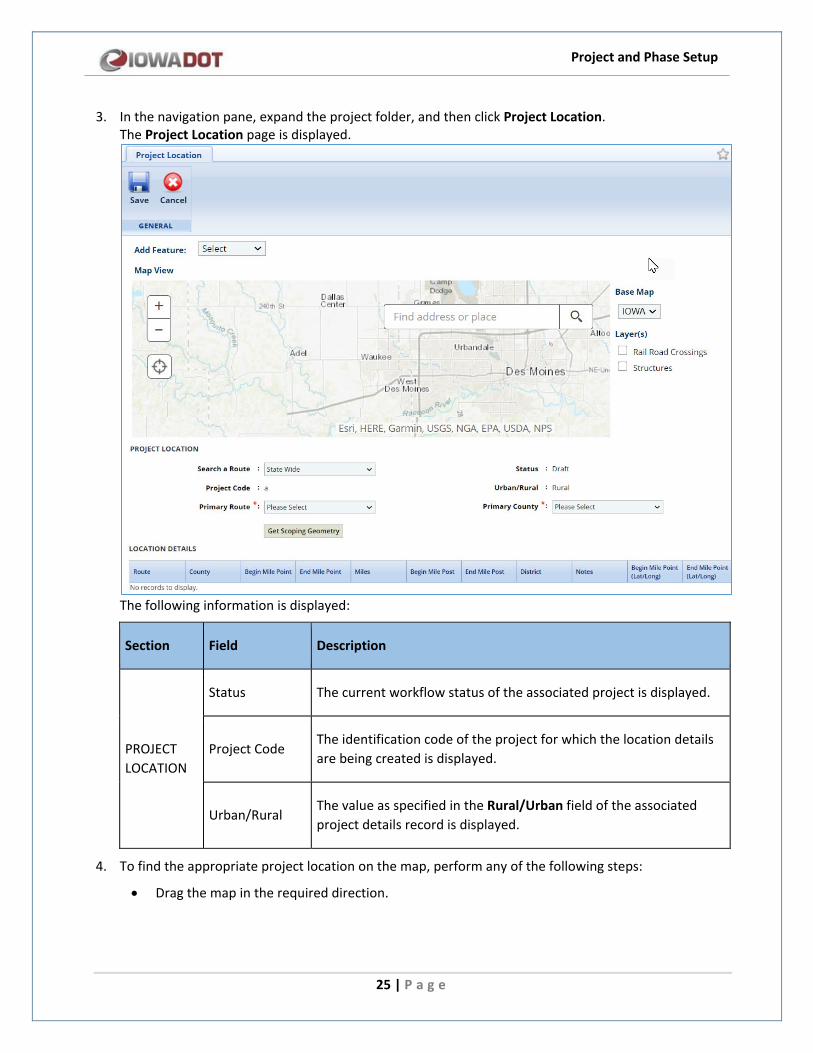
3. In the navigation pane, expand the project folder, and then click Project Location. The Project Location page is displayed.
The following information is displayed:
Section Field Description
PROJECT LOCATION
Status The current workflow status of the associated project is displayed.
Project Code The identification code of the project for which the location details are being created is displayed.
Urban/Rural The value as specified in the Rural/Urban field of the associated project details record is displayed.
4. To find the appropriate project location on the map, perform any of the following steps:
• Drag the map in the required direction.

Project and Phase Setup
26 | P a g e
• In the Find address or place box, enter the name of the location, click , and then click the required location. The map of the area is displayed.
• Use or to zoom in or out on the map.
• Select the required base map from the Base Map drop-down list. Available options are base maps defined in the GIS Settings page of the Administration module.
• To view layers such as structures or rail road crossings, select the required layers in the Layer(s) section. Available options are layers defined in the GIS Settings page of the Administration module.
5. Click the required project location on the map.
6. In the PROJECT LOCATION section, from the Search a Route drop-down list, select the required route. Available options are routes associated with the location selected on the map. The selected route is displayed on the map.
7. From the Add Feature drop-down list, select the required feature to mark on the map. The drawing tool-set will display options based on the configured geometry corresponding to the selected feature.
8. To draw the project location geometries on the map, perform the following steps:
• To mark a point on the map, click , and then click on the map at the required location.
• To draw a polyline, click , and then click on the map. To complete the boundary, follow the instructions as displayed on the map.
• To draw a freehand polyline, click , and then click on the map. To complete the boundary, follow the instructions as displayed on the map.
• To draw a triangle, rectangle, or circle, click , , or , click on the map and drag to size the map marker.
• To mark a boundary, click or , and then click on the map. To complete the boundary, follow the instructions as displayed on the map.
• To draw an arrow mark, click , and then click on the map and drag to size the map marker.
9. Optionally, to delete a map marker, perform the following steps:
a. Right-click on a boundary or on a line to be deleted.
b. Click Delete. A confirmation message is displayed.
c. Click OK.
Project and Phase Setup
27 | P a g e
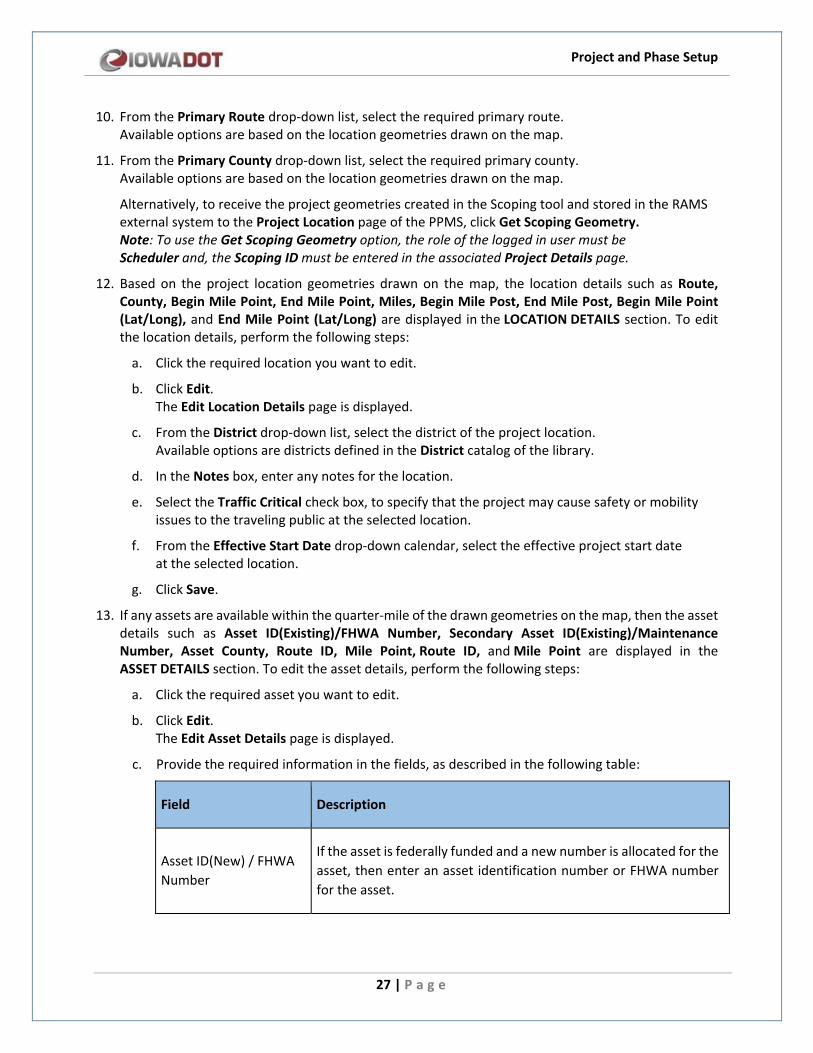
10. From the Primary Route drop-down list, select the required primary route. Available options are based on the location geometries drawn on the map.
11. From the Primary County drop-down list, select the required primary county. Available options are based on the location geometries drawn on the map.
Alternatively, to receive the project geometries created in the Scoping tool and stored in the RAMS external system to the Project Location page of the PPMS, click Get Scoping Geometry. Note: To use the Get Scoping Geometry option, the role of the logged in user must be Scheduler and, the Scoping ID must be entered in the associated Project Details page.
12. Based on the project location geometries drawn on the map, the location details such as Route, County, Begin Mile Point, End Mile Point, Miles, Begin Mile Post, End Mile Post, Begin Mile Point (Lat/Long), and End Mile Point (Lat/Long) are displayed in the LOCATION DETAILS section. To edit the location details, perform the following steps:
a. Click the required location you want to edit.
b. Click Edit. The Edit Location Details page is displayed.
c. From the District drop-down list, select the district of the project location. Available options are districts defined in the District catalog of the library.
d. In the Notes box, enter any notes for the location.
e. Select the Traffic Critical check box, to specify that the project may cause safety or mobility issues to the traveling public at the selected location.
f. From the Effective Start Date drop-down calendar, select the effective project start date at the selected location.
g. Click Save.
13. If any assets are available within the quarter-mile of the drawn geometries on the map, then the asset details such as Asset ID(Existing)/FHWA Number, Secondary Asset ID(Existing)/Maintenance Number, Asset County, Route ID, Mile Point, Route ID, and Mile Point are displayed in the ASSET DETAILS section. To edit the asset details, perform the following steps:
a. Click the required asset you want to edit.
b. Click Edit. The Edit Asset Details page is displayed.
c. Provide the required information in the fields, as described in the following table:
Field Description
Asset ID(New) / FHWA Number
If the asset is federally funded and a new number is allocated for the asset, then enter an asset identification number or FHWA number for the asset.
Project and Phase Setup
28 | P a g e
Field Description
Secondary Asset ID(New) / Maintenance Number
If a new number is allocated for the asset, then enter a secondary asset identification number or maintenance number for the asset.
Asset Type Select the type of asset. Available options are types defined in the Asset Type catalog of the library.
Asset Description Enter a description of the asset.
Design Numbers Enter the design numbers for the asset.
Station Enter the station name for the asset.
Open To Traffic? Select Yes, if the work zone of the asset is open to traffic. Select No, if the work zone of the asset is not open to traffic.
Phase Critical? Select Yes, if the asset is part of the project work area. Select No, if the asset is not part of the project work area.
d. Click Save.
14. Optionally, to remove an asset from the ASSET DETAILS section, perform the following steps:
a. On the map, right-click on the required asset to be deleted.
b. Click Delete. A confirmation message is displayed.
c. Click OK.
15. Click Save. The location and asset details of the project are saved.
Project and Phase Setup
29 | P a g e
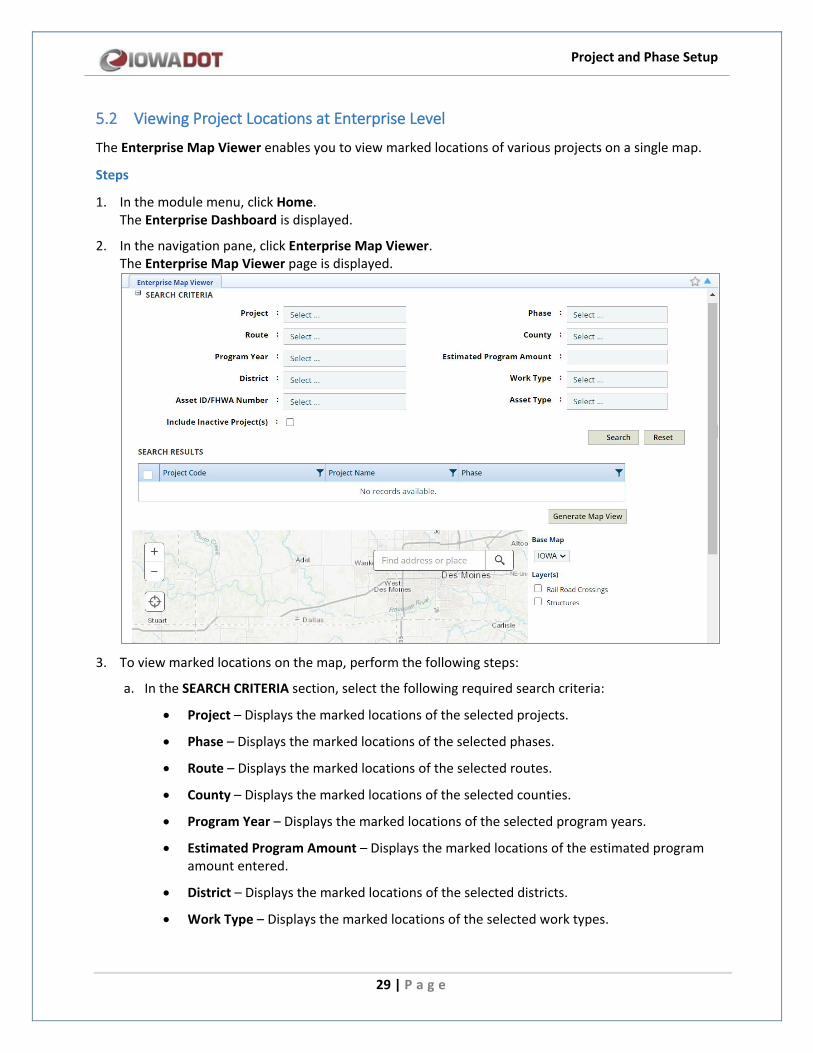
5.2 Viewing Project Locations at Enterprise Level
The Enterprise Map Viewer enables you to view marked locations of various projects on a single map.
Steps
1. In the module menu, click Home. The Enterprise Dashboard is displayed.
2. In the navigation pane, click Enterprise Map Viewer. The Enterprise Map Viewer page is displayed.
3. To view marked locations on the map, perform the following steps:
a. In the SEARCH CRITERIA section, select the following required search criteria:
• Project – Displays the marked locations of the selected projects.
• Phase – Displays the marked locations of the selected phases.
• Route – Displays the marked locations of the selected routes.
• County – Displays the marked locations of the selected counties.
• Program Year – Displays the marked locations of the selected program years.
• Estimated Program Amount – Displays the marked locations of the estimated program amount entered.
• District – Displays the marked locations of the selected districts.
• Work Type – Displays the marked locations of the selected work types.
Project and Phase Setup
30 | P a g e
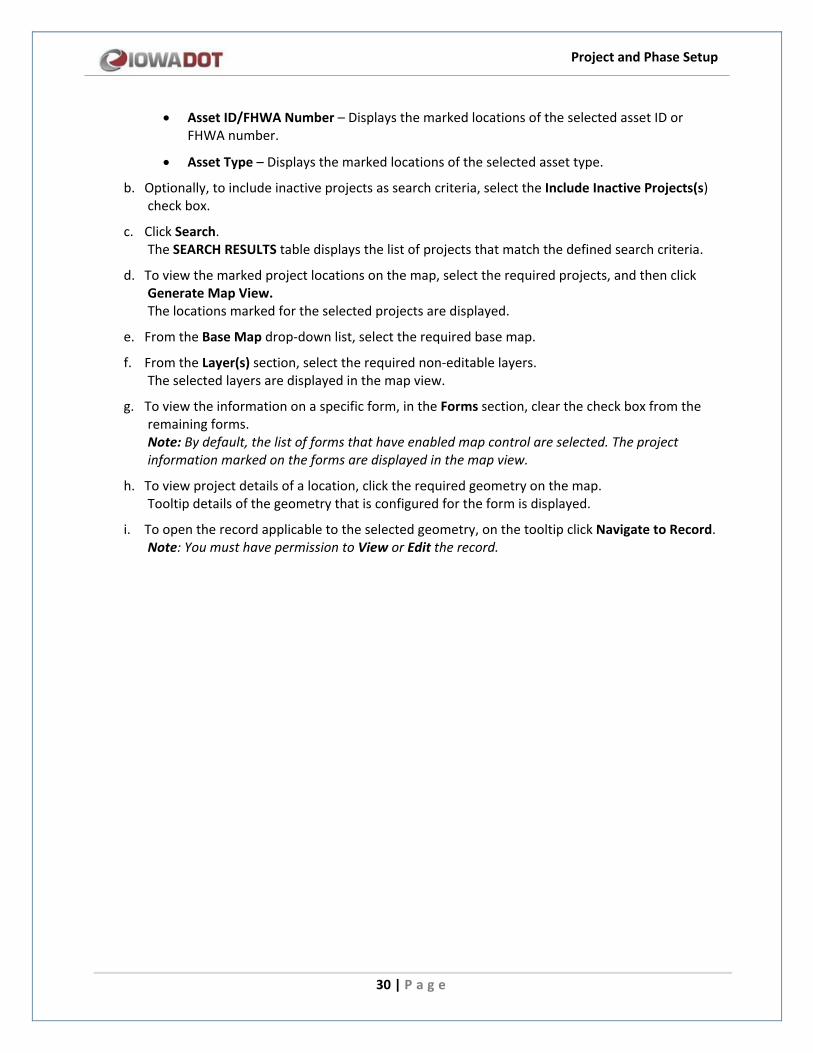
• Asset ID/FHWA Number – Displays the marked locations of the selected asset ID or FHWA number.
• Asset Type – Displays the marked locations of the selected asset type.
b. Optionally, to include inactive projects as search criteria, select the Include Inactive Projects(s) check box.
c. Click Search. The SEARCH RESULTS table displays the list of projects that match the defined search criteria.
d. To view the marked project locations on the map, select the required projects, and then click Generate Map View. The locations marked for the selected projects are displayed.
e. From the Base Map drop-down list, select the required base map.
f. From the Layer(s) section, select the required non-editable layers. The selected layers are displayed in the map view.
g. To view the information on a specific form, in the Forms section, clear the check box from the remaining forms. Note: By default, the list of forms that have enabled map control are selected. The project information marked on the forms are displayed in the map view.
h. To view project details of a location, click the required geometry on the map. Tooltip details of the geometry that is configured for the form is displayed.
i. To open the record applicable to the selected geometry, on the tooltip click Navigate to Record. Note: You must have permission to View or Edit the record.
Project and Phase Setup
31 | P a g e
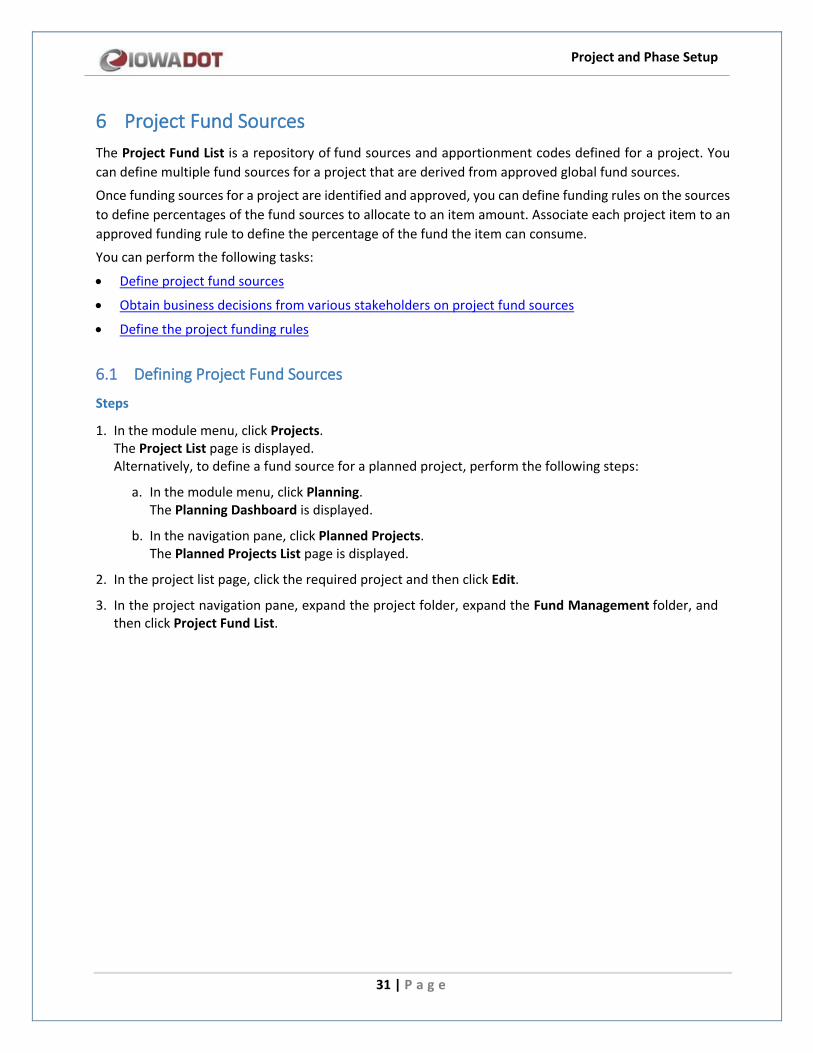
6 Project Fund Sources The Project Fund List is a repository of fund sources and apportionment codes defined for a project. You can define multiple fund sources for a project that are derived from approved global fund sources.
Once funding sources for a project are identified and approved, you can define funding rules on the sources to define percentages of the fund sources to allocate to an item amount. Associate each project item to an approved funding rule to define the percentage of the fund the item can consume.
You can perform the following tasks:
• Define project fund sources
• Obtain business decisions from various stakeholders on project fund sources • Define the project funding rules
6.1 Defining Project Fund Sources
Steps
1. In the module menu, click Projects. The Project List page is displayed. Alternatively, to define a fund source for a planned project, perform the following steps:
a. In the module menu, click Planning. The Planning Dashboard is displayed.
b. In the navigation pane, click Planned Projects. The Planned Projects List page is displayed.
2. In the project list page, click the required project and then click Edit.
3. In the project navigation pane, expand the project folder, expand the Fund Management folder, and then click Project Fund List.

Project and Phase Setup
32 | P a g e
4. Click New. The Project Fund List page is displayed.
The following information is displayed:
Field Name Description
Project Fund ID On saving the record, an identification code for the project fund source is automatically generated.
5. From the Fund Source Name drop-down list, select the required global fund source to associate with the project. Available options are approved global fund sources. The Fund Source Code, Fund Source Type, Funding Agency, Available Amount in Fund Source ($), and Prorata in % of the selected fund source are displayed.
Project and Phase Setup
33 | P a g e
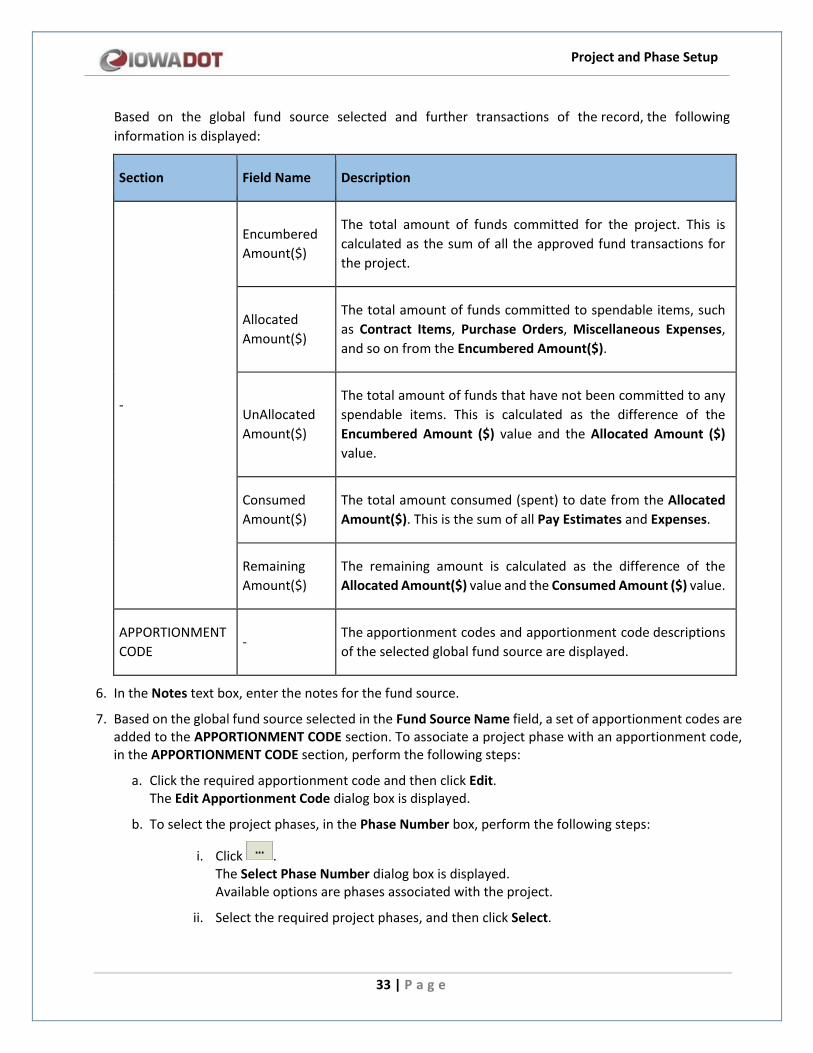
Based on the global fund source selected and further transactions of the record, the following information is displayed:
Section Field Name Description
-
Encumbered Amount($)
The total amount of funds committed for the project. This is calculated as the sum of all the approved fund transactions for the project.
Allocated Amount($)
The total amount of funds committed to spendable items, such as Contract Items, Purchase Orders, Miscellaneous Expenses, and so on from the Encumbered Amount($).
UnAllocated Amount($)
The total amount of funds that have not been committed to any spendable items. This is calculated as the difference of the Encumbered Amount ($) value and the Allocated Amount ($) value.
Consumed Amount($)
The total amount consumed (spent) to date from the Allocated Amount($). This is the sum of all Pay Estimates and Expenses.
Remaining Amount($)
The remaining amount is calculated as the difference of the Allocated Amount($) value and the Consumed Amount ($) value.
APPORTIONMENT CODE
- The apportionment codes and apportionment code descriptions of the selected global fund source are displayed.
6. In the Notes text box, enter the notes for the fund source.
7. Based on the global fund source selected in the Fund Source Name field, a set of apportionment codes are added to the APPORTIONMENT CODE section. To associate a project phase with an apportionment code, in the APPORTIONMENT CODE section, perform the following steps:
a. Click the required apportionment code and then click Edit. The Edit Apportionment Code dialog box is displayed.
b. To select the project phases, in the Phase Number box, perform the following steps:
i. Click . The Select Phase Number dialog box is displayed. Available options are phases associated with the project.
ii. Select the required project phases, and then click Select.
Project and Phase Setup
34 | P a g e
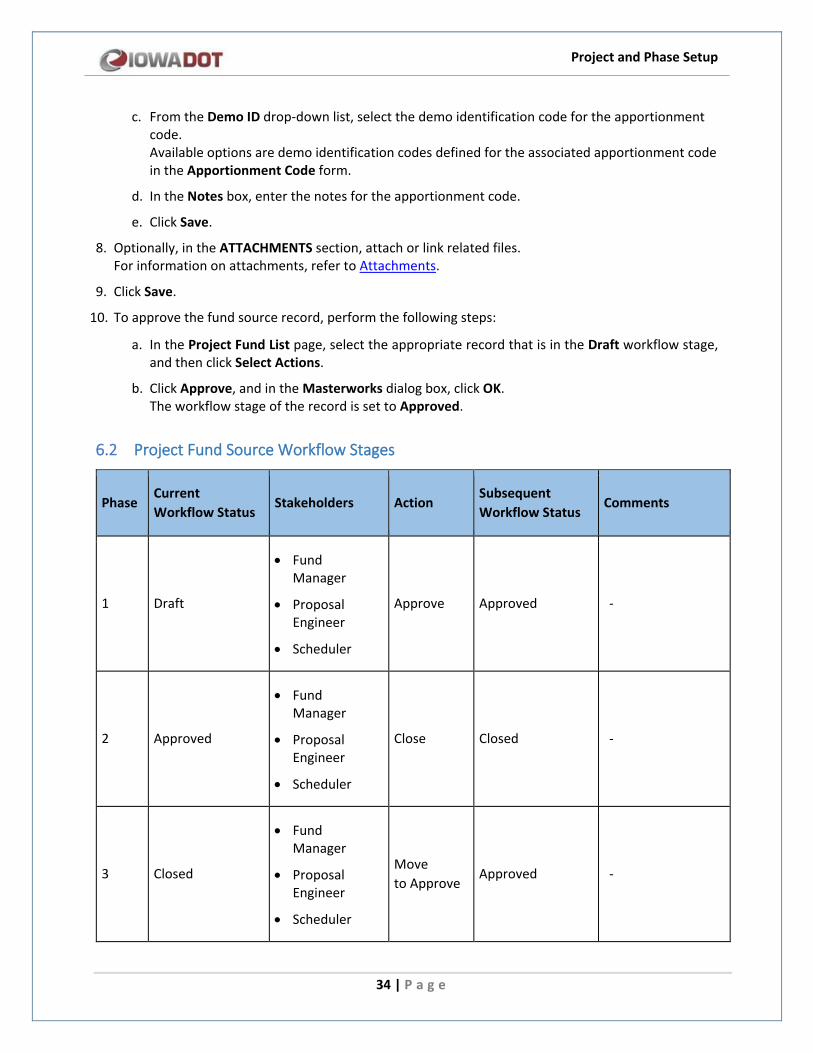
c. From the Demo ID drop-down list, select the demo identification code for the apportionment code. Available options are demo identification codes defined for the associated apportionment code in the Apportionment Code form.
d. In the Notes box, enter the notes for the apportionment code.
e. Click Save.
8. Optionally, in the ATTACHMENTS section, attach or link related files. For information on attachments, refer to Attachments.
9. Click Save.
10. To approve the fund source record, perform the following steps:
a. In the Project Fund List page, select the appropriate record that is in the Draft workflow stage, and then click Select Actions.
b. Click Approve, and in the Masterworks dialog box, click OK. The workflow stage of the record is set to Approved.
6.2 Project Fund Source Workflow Stages
Phase Current Workflow Status
Stakeholders Action Subsequent Workflow Status
Comments
1 Draft
• Fund Manager
• Proposal Engineer
• Scheduler
Approve Approved -
2 Approved
• Fund Manager
• Proposal Engineer
• Scheduler
Close Closed -
3 Closed
• Fund Manager
• Proposal Engineer
• Scheduler
Move to Approve
Approved -

Project and Phase Setup
35 | P a g e
6.3 Project Fund Rules
Once funding sources for a project are identified and approved, you can define funding rules on the sources to define percentages of the fund sources to allocate to an item amount. Each project item can be associated with an approved funding rule to define the percentage of the fund the item can consume.
You can perform the following tasks:
• Create a funding rule
• Mark a fund rule as default
• Obtain business decisions from various stakeholders on funding rules
6.3.1 Creating a Funding Rule
Prerequisites
• Project fund sources in the Approved workflow stage are available.
Steps
1. In the module menu, click Projects. The Project List page is displayed. Alternatively, to create a fund rule for a planned project, perform the following steps:
a. In the module menu, click Planning. The Planning Dashboard is displayed.
b. In the navigation pane, click Planned Projects. The Planned Projects List page is displayed.
2. In the project list page, click the required project, and then click Edit.
3. In the navigation pane, expand the project folder, expand the Fund Management folder, and then click Funding Rules. The Funding Rules list page is displayed.
Project and Phase Setup
36 | P a g e
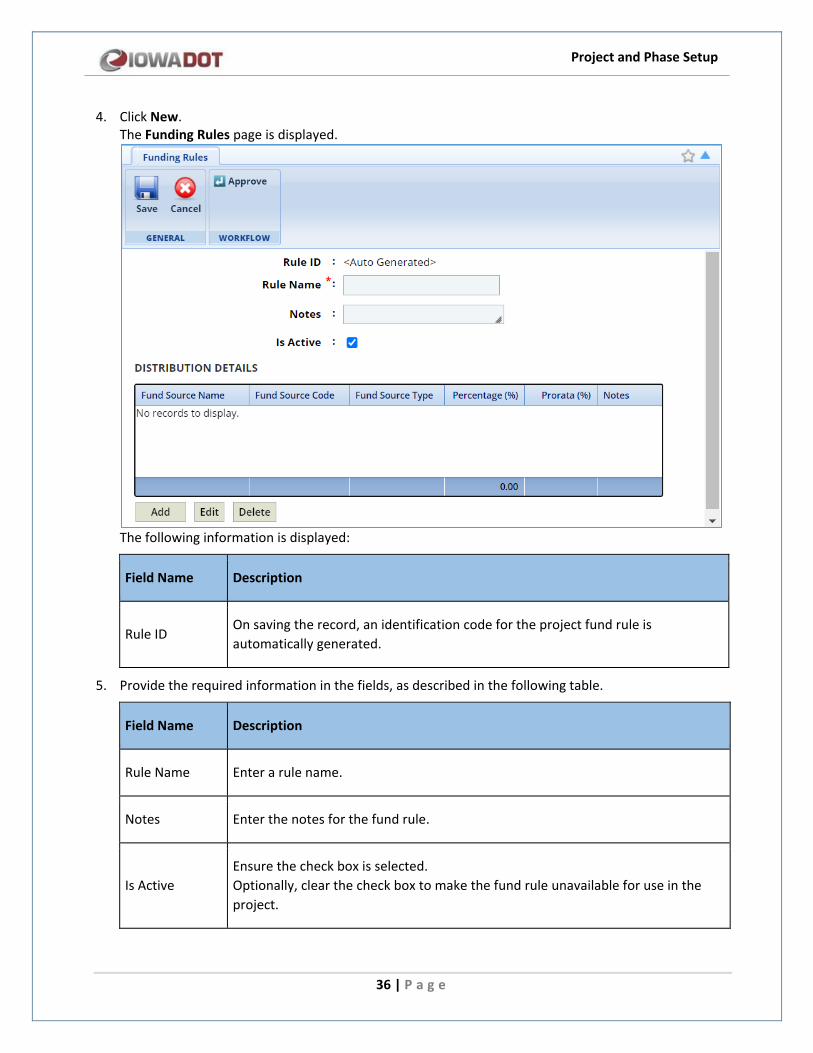
4. Click New. The Funding Rules page is displayed.
The following information is displayed:
Field Name Description
Rule ID On saving the record, an identification code for the project fund rule is automatically generated.
5. Provide the required information in the fields, as described in the following table.
Field Name Description
Rule Name Enter a rule name.
Notes Enter the notes for the fund rule.
Is Active Ensure the check box is selected. Optionally, clear the check box to make the fund rule unavailable for use in the project.
Project and Phase Setup
37 | P a g e
6. To add distribution details of funding sources to the project, in the DISTRIBUTION DETAILS section, perform the following steps:
a. Click Add. The Project Fund List dialog box is displayed. Available fund sources are approved project fund sources.
b. Select the required fund sources, and then click Select.
c. To enter the percentage of the source to be utilized for an item amount, click the required fund source, and then click Edit. The Edit Distribution Details dialog is displayed.
d. In the Percentage (%) box, enter the percentage of the fund source amount to be utilized for an item amount.
e. In the Prorata (%) box, enter the percentage of the prorata value to limit the funding share from the selected the fund source. By default, the percentage defined in the associated global fund list or project fund list is displayed.
f. In the Notes box, enter any notes for the fund distribution.
g. Click Save. Note: Ensure the total of the percentages defined in the Percentage (%) column for the funding sources is 100.
7. Click Save.
8. To approve the funding rule record, perform the following steps:
a. In the Funding Rules list page, select the appropriate record that is in the Draft workflow stage, and then click Select Actions.
b. Click Approve, and in the Masterworks dialog box, click OK. The workflow stage of the record is set to Approved.
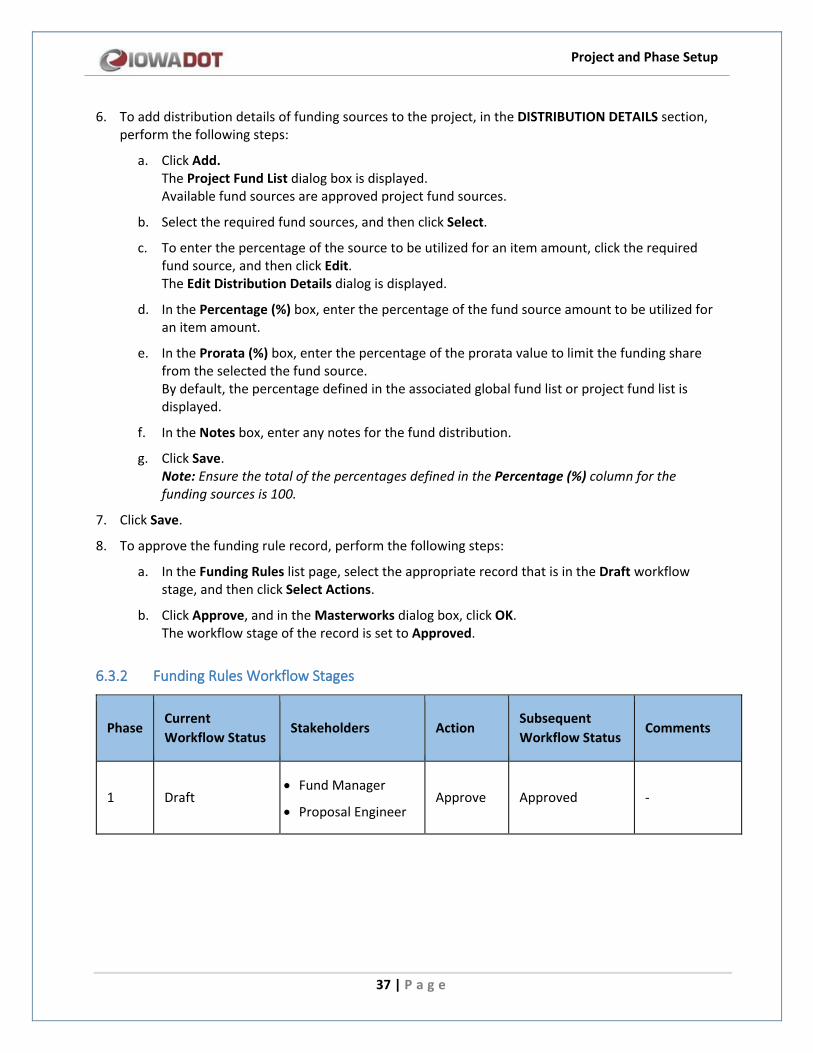
6.3.2 Funding Rules Workflow Stages
Phase Current Workflow Status
Stakeholders Action Subsequent Workflow Status
Comments
1 Draft • Fund Manager
• Proposal Engineer Approve Approved -
Project and Phase Setup
38 | P a g e
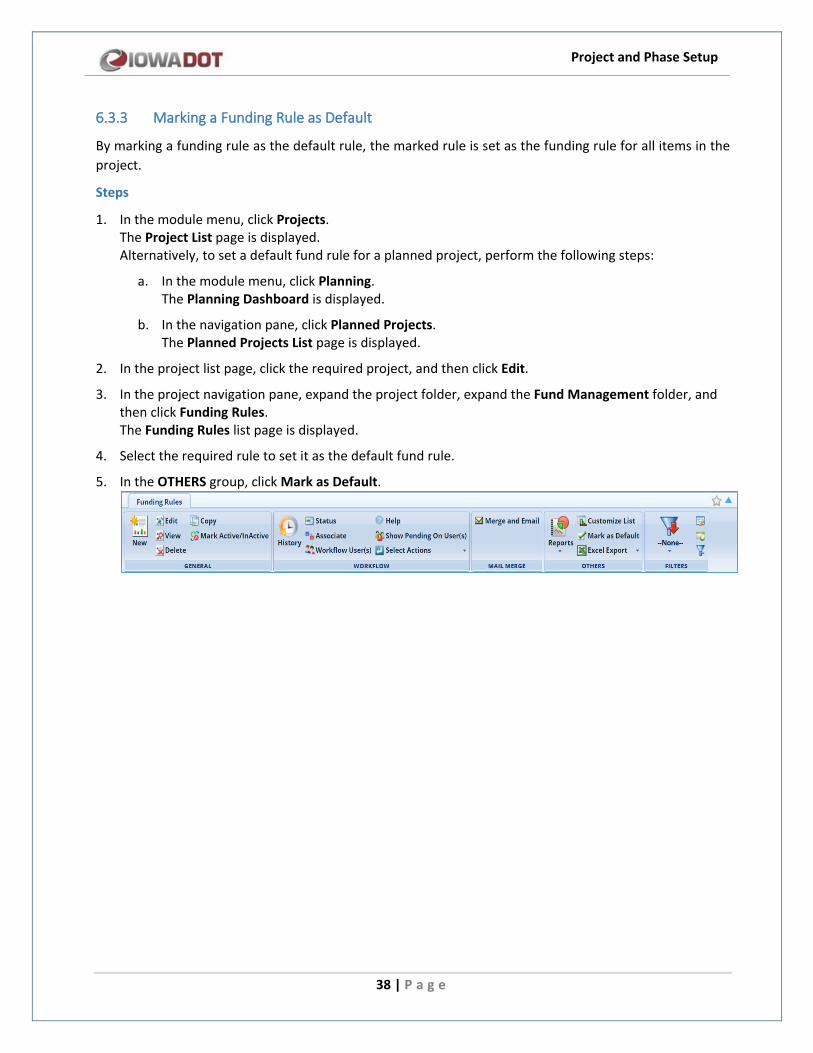
6.3.3 Marking a Funding Rule as Default
By marking a funding rule as the default rule, the marked rule is set as the funding rule for all items in the project.
Steps
1. In the module menu, click Projects. The Project List page is displayed. Alternatively, to set a default fund rule for a planned project, perform the following steps:
a. In the module menu, click Planning. The Planning Dashboard is displayed.
b. In the navigation pane, click Planned Projects. The Planned Projects List page is displayed.
2. In the project list page, click the required project, and then click Edit.
3. In the project navigation pane, expand the project folder, expand the Fund Management folder, and then click Funding Rules. The Funding Rules list page is displayed.
4. Select the required rule to set it as the default fund rule.
5. In the OTHERS group, click Mark as Default.
Project and Phase Setup
39 | P a g e
7 Project Phases You can structure and organize a large project into logical phases to implement and manage the project effectively.
In PPMS, you can create multiple project phases, define plans, assets, location, and work details. Additionally, multiple offices can collaborate and update specific phase attributes.
For each project phase that is created and saved, the following activities occur:
• A corresponding container is created in every budget estimate of the project
• A set of tasks are automatically created in the Schedule page of the project
• The following forms to manage a project phase are available in the navigation pane:
o Phase Location
o Construction
o RailRoad
o Road Design
o Bridges and Structures
The project phases feature enables you to perform the following tasks:
• Create a project phase
• Manage phase location details
• Obtain business decisions from various stakeholders
7.1 Creating a Project Phase
You can create a new phase and enter phase details that include basic phase information, funding type, phase program category, letting plans, and attach phase-related images and files.
Note: To finalize the project phase’s process, you need to perform actions specified in the Project Management Participant guide.
Prerequisite
• An approved fund source is available for the project.
Steps
1. In the module menu, click Projects. The Project List page is displayed. Alternatively, to create a phase for a planned project, perform the following steps:
a. In the module menu, click Planning. The Planning Dashboard is displayed.
b. In the navigation pane, click Planned Projects. The Planned Projects List page is displayed.
Project and Phase Setup
40 | P a g e
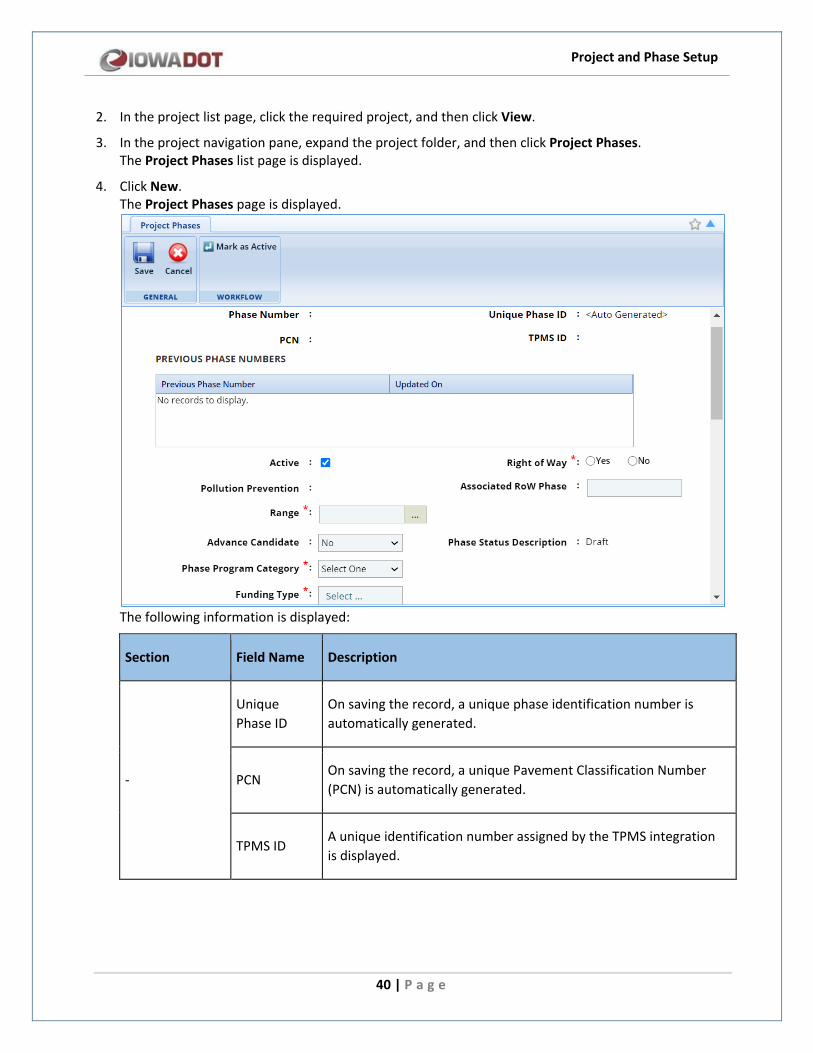
2. In the project list page, click the required project, and then click View.
3. In the project navigation pane, expand the project folder, and then click Project Phases. The Project Phases list page is displayed.
4. Click New. The Project Phases page is displayed.
The following information is displayed:
Section Field Name Description
-
Unique Phase ID
On saving the record, a unique phase identification number is automatically generated.
PCN On saving the record, a unique Pavement Classification Number (PCN) is automatically generated.
TPMS ID A unique identification number assigned by the TPMS integration is displayed.
Project and Phase Setup
41 | P a g e
Section Field Name Description
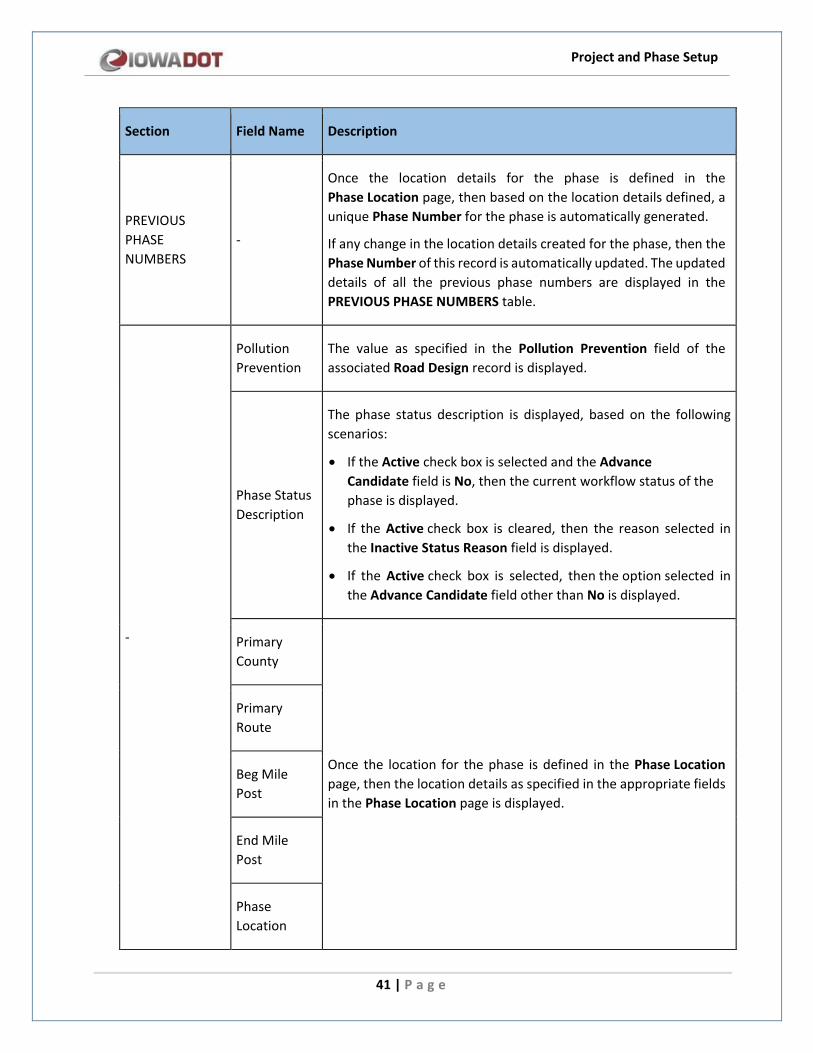
PREVIOUS PHASE NUMBERS
-
Once the location details for the phase is defined in the Phase Location page, then based on the location details defined, a unique Phase Number for the phase is automatically generated.
If any change in the location details created for the phase, then the Phase Number of this record is automatically updated. The updated details of all the previous phase numbers are displayed in the PREVIOUS PHASE NUMBERS table.
-
Pollution Prevention
The value as specified in the Pollution Prevention field of the associated Road Design record is displayed.
Phase Status Description
The phase status description is displayed, based on the following scenarios:
• If the Active check box is selected and the Advance Candidate field is No, then the current workflow status of the phase is displayed.
• If the Active check box is cleared, then the reason selected in the Inactive Status Reason field is displayed.
• If the Active check box is selected, then the option selected in the Advance Candidate field other than No is displayed.
Primary County
Once the location for the phase is defined in the Phase Location page, then the location details as specified in the appropriate fields in the Phase Location page is displayed.
Primary Route
Beg Mile Post
End Mile Post
Phase Location
Project and Phase Setup
42 | P a g e
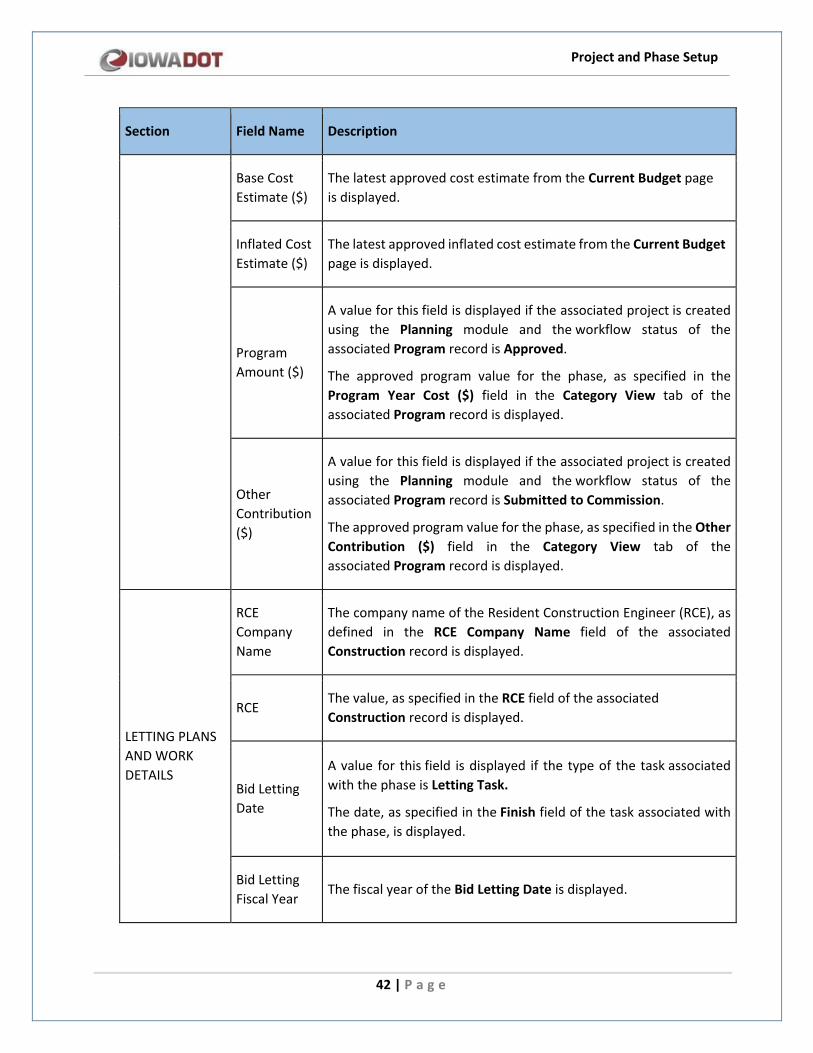
Section Field Name Description
Base Cost Estimate ($)
The latest approved cost estimate from the Current Budget page is displayed.
Inflated Cost Estimate ($)
The latest approved inflated cost estimate from the Current Budget page is displayed.
Program Amount ($)
A value for this field is displayed if the associated project is created using the Planning module and the workflow status of the associated Program record is Approved.
The approved program value for the phase, as specified in the Program Year Cost ($) field in the Category View tab of the associated Program record is displayed.
Other Contribution ($)
A value for this field is displayed if the associated project is created using the Planning module and the workflow status of the associated Program record is Submitted to Commission.
The approved program value for the phase, as specified in the Other Contribution ($) field in the Category View tab of the associated Program record is displayed.
LETTING PLANS AND WORK DETAILS
RCE Company Name
The company name of the Resident Construction Engineer (RCE), as defined in the RCE Company Name field of the associated Construction record is displayed.
RCE The value, as specified in the RCE field of the associated Construction record is displayed.
Bid Letting Date
A value for this field is displayed if the type of the task associated with the phase is Letting Task.
The date, as specified in the Finish field of the task associated with the phase, is displayed.
Bid Letting Fiscal Year
The fiscal year of the Bid Letting Date is displayed.
Project and Phase Setup
43 | P a g e
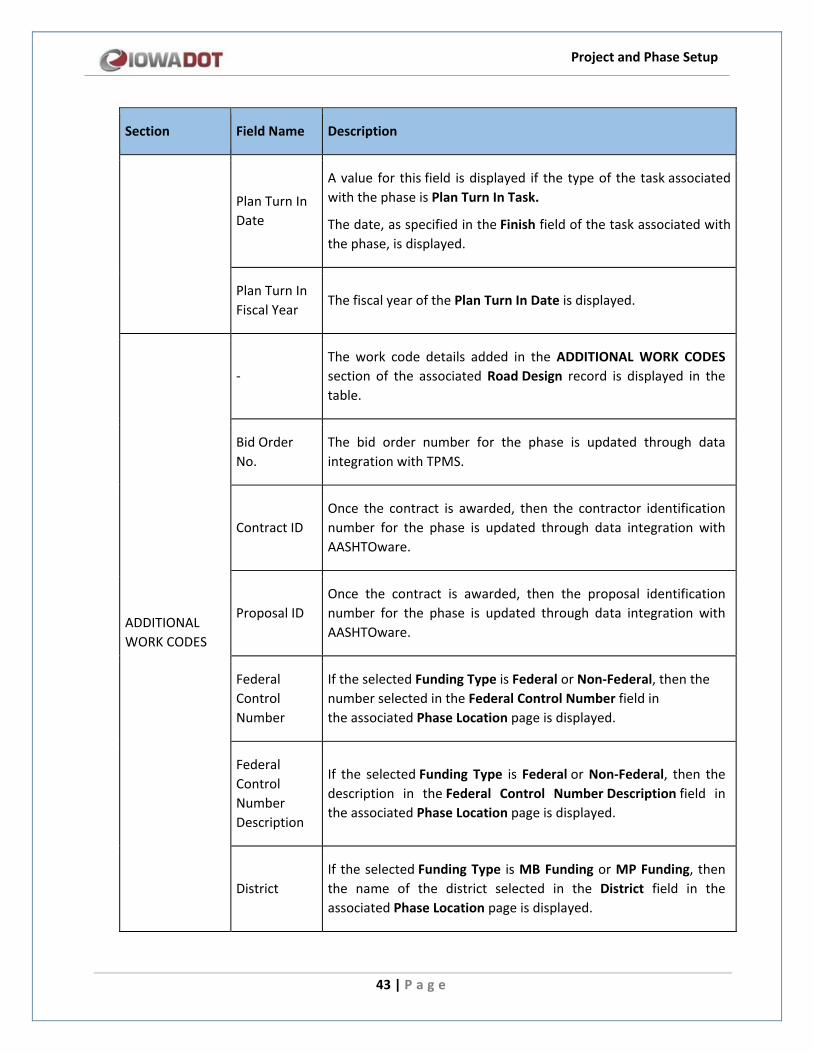
Section Field Name Description
Plan Turn In Date
A value for this field is displayed if the type of the task associated with the phase is Plan Turn In Task.
The date, as specified in the Finish field of the task associated with the phase, is displayed.
Plan Turn In Fiscal Year
The fiscal year of the Plan Turn In Date is displayed.
ADDITIONAL WORK CODES
- The work code details added in the ADDITIONAL WORK CODES section of the associated Road Design record is displayed in the table.
Bid Order No.
The bid order number for the phase is updated through data integration with TPMS.
Contract ID Once the contract is awarded, then the contractor identification number for the phase is updated through data integration with AASHTOware.
Proposal ID Once the contract is awarded, then the proposal identification number for the phase is updated through data integration with AASHTOware.
Federal Control Number
If the selected Funding Type is Federal or Non-Federal, then the number selected in the Federal Control Number field in the associated Phase Location page is displayed.
Federal Control Number Description
If the selected Funding Type is Federal or Non-Federal, then the description in the Federal Control Number Description field in the associated Phase Location page is displayed.
District If the selected Funding Type is MB Funding or MP Funding, then the name of the district selected in the District field in the associated Phase Location page is displayed.
Project and Phase Setup
44 | P a g e
Section Field Name Description
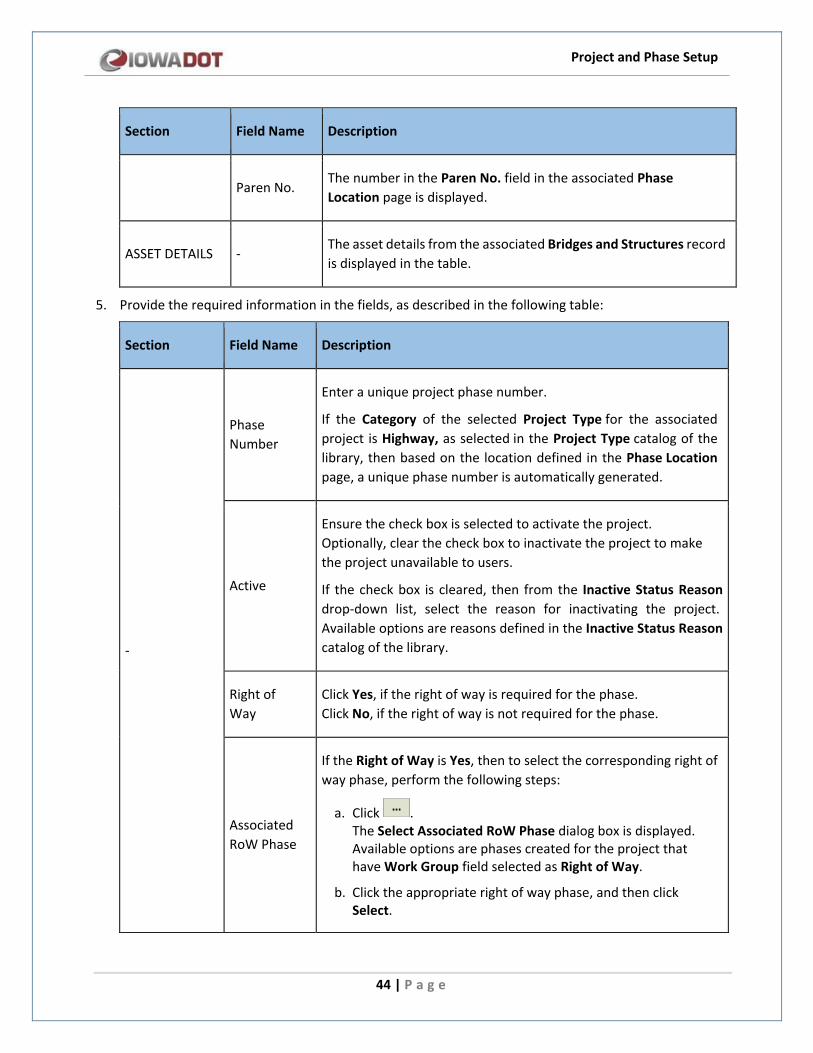
Paren No. The number in the Paren No. field in the associated Phase Location page is displayed.
ASSET DETAILS - The asset details from the associated Bridges and Structures record is displayed in the table.
5. Provide the required information in the fields, as described in the following table:
Section Field Name Description
-
Phase Number
Enter a unique project phase number.
If the Category of the selected Project Type for the associated project is Highway, as selected in the Project Type catalog of the library, then based on the location defined in the Phase Location page, a unique phase number is automatically generated.
Active
Ensure the check box is selected to activate the project. Optionally, clear the check box to inactivate the project to make the project unavailable to users.
If the check box is cleared, then from the Inactive Status Reason drop-down list, select the reason for inactivating the project. Available options are reasons defined in the Inactive Status Reason catalog of the library.
Right of Way
Click Yes, if the right of way is required for the phase. Click No, if the right of way is not required for the phase.
Associated RoW Phase
If the Right of Way is Yes, then to select the corresponding right of way phase, perform the following steps:
a. Click . The Select Associated RoW Phase dialog box is displayed. Available options are phases created for the project that have Work Group field selected as Right of Way.
b. Click the appropriate right of way phase, and then click Select.
Project and Phase Setup
45 | P a g e
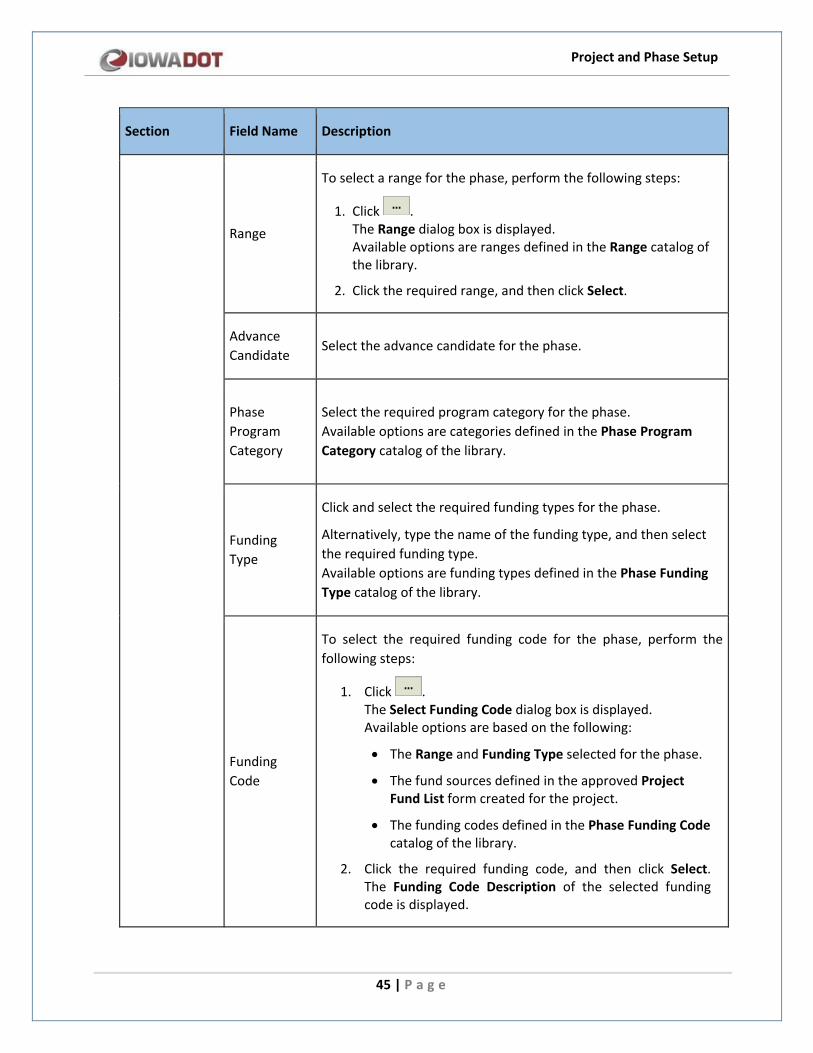
Section Field Name Description
Range
To select a range for the phase, perform the following steps:
1. Click . The Range dialog box is displayed. Available options are ranges defined in the Range catalog of the library.
2. Click the required range, and then click Select.
Advance Candidate
Select the advance candidate for the phase.
Phase Program Category
Select the required program category for the phase. Available options are categories defined in the Phase Program Category catalog of the library.
Funding Type
Click and select the required funding types for the phase.
Alternatively, type the name of the funding type, and then select the required funding type. Available options are funding types defined in the Phase Funding Type catalog of the library.
Funding Code
To select the required funding code for the phase, perform the following steps:
1. Click . The Select Funding Code dialog box is displayed. Available options are based on the following:
• The Range and Funding Type selected for the phase.
• The fund sources defined in the approved Project Fund List form created for the project.
• The funding codes defined in the Phase Funding Code catalog of the library.
2. Click the required funding code, and then click Select. The Funding Code Description of the selected funding code is displayed.
Project and Phase Setup
46 | P a g e
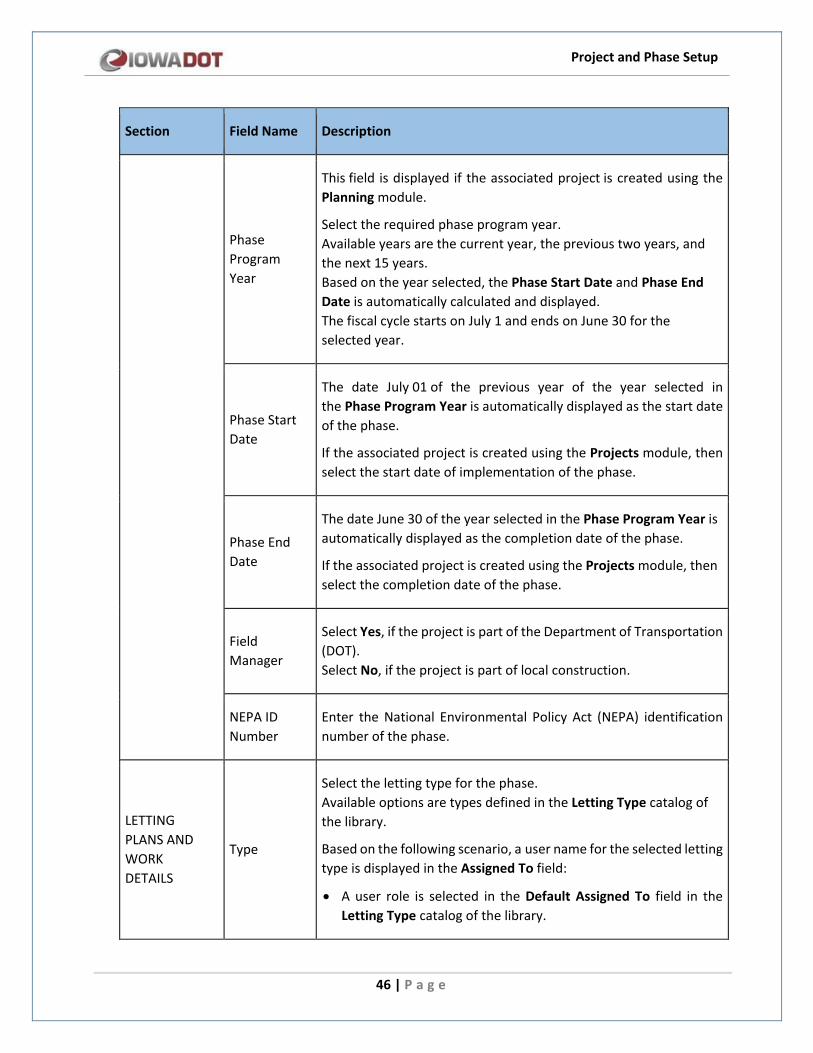
Section Field Name Description
Phase Program Year
This field is displayed if the associated project is created using the Planning module.
Select the required phase program year. Available years are the current year, the previous two years, and the next 15 years. Based on the year selected, the Phase Start Date and Phase End Date is automatically calculated and displayed. The fiscal cycle starts on July 1 and ends on June 30 for the selected year.
Phase Start Date
The date July 01 of the previous year of the year selected in the Phase Program Year is automatically displayed as the start date of the phase.
If the associated project is created using the Projects module, then select the start date of implementation of the phase.
Phase End Date
The date June 30 of the year selected in the Phase Program Year is automatically displayed as the completion date of the phase.
If the associated project is created using the Projects module, then select the completion date of the phase.
Field Manager
Select Yes, if the project is part of the Department of Transportation (DOT). Select No, if the project is part of local construction.
NEPA ID Number
Enter the National Environmental Policy Act (NEPA) identification number of the phase.
LETTING PLANS AND WORK DETAILS
Type
Select the letting type for the phase. Available options are types defined in the Letting Type catalog of the library.
Based on the following scenario, a user name for the selected letting type is displayed in the Assigned To field:
• A user role is selected in the Default Assigned To field in the Letting Type catalog of the library.
Project and Phase Setup
47 | P a g e
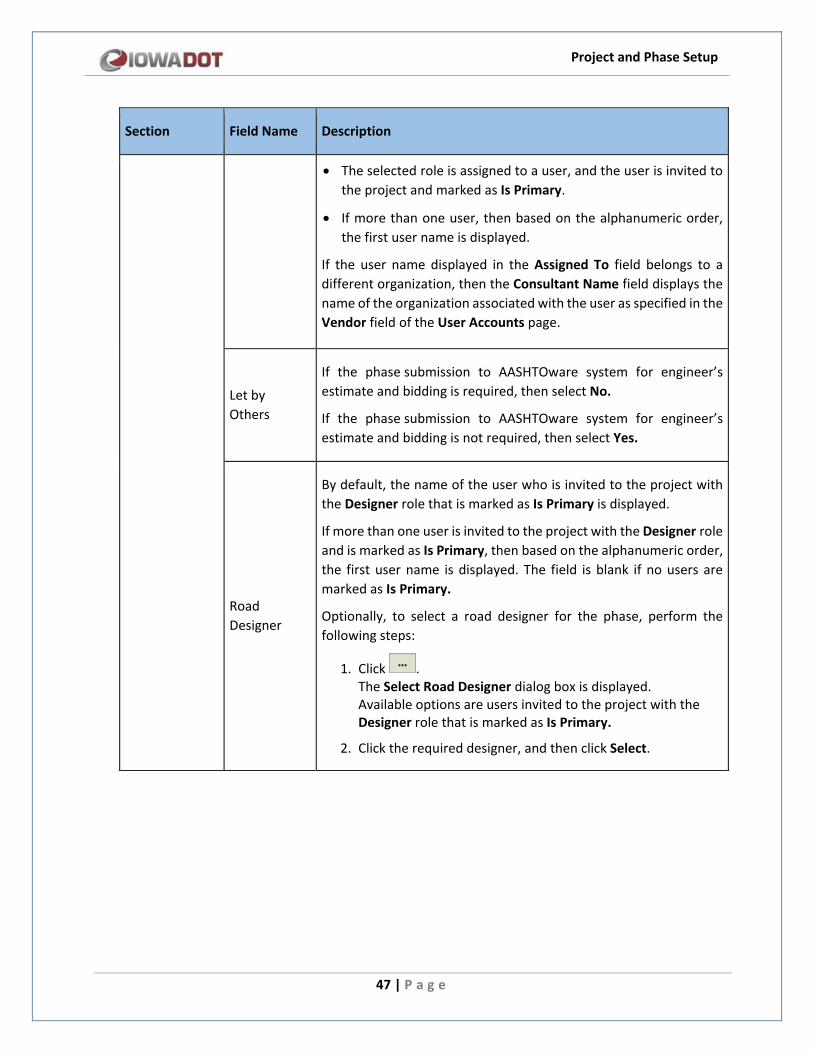
Section Field Name Description
• The selected role is assigned to a user, and the user is invited to the project and marked as Is Primary.
• If more than one user, then based on the alphanumeric order, the first user name is displayed.
If the user name displayed in the Assigned To field belongs to a different organization, then the Consultant Name field displays the name of the organization associated with the user as specified in the Vendor field of the User Accounts page.
Let by Others
If the phase submission to AASHTOware system for engineer’s estimate and bidding is required, then select No.
If the phase submission to AASHTOware system for engineer’s estimate and bidding is not required, then select Yes.
Road Designer
By default, the name of the user who is invited to the project with the Designer role that is marked as Is Primary is displayed.
If more than one user is invited to the project with the Designer role and is marked as Is Primary, then based on the alphanumeric order, the first user name is displayed. The field is blank if no users are marked as Is Primary.
Optionally, to select a road designer for the phase, perform the following steps:
1. Click . The Select Road Designer dialog box is displayed. Available options are users invited to the project with the Designer role that is marked as Is Primary.
2. Click the required designer, and then click Select.
Project and Phase Setup
48 | P a g e
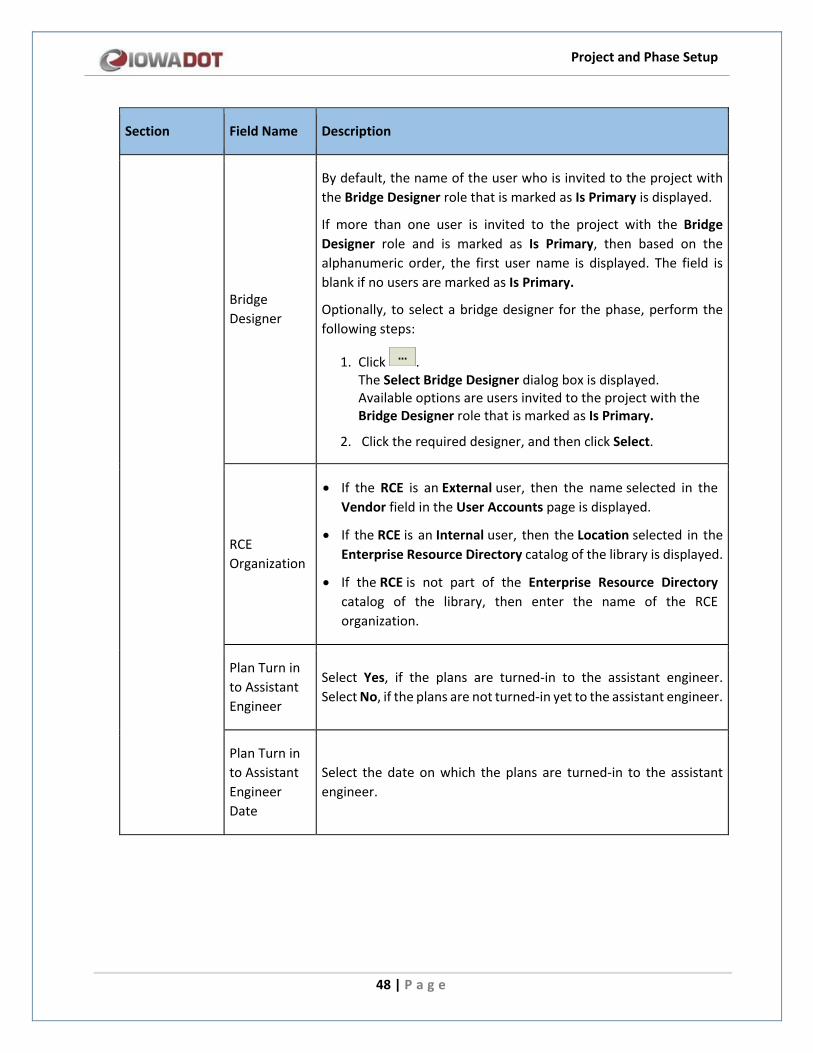
Section Field Name Description
Bridge Designer
By default, the name of the user who is invited to the project with the Bridge Designer role that is marked as Is Primary is displayed.
If more than one user is invited to the project with the Bridge Designer role and is marked as Is Primary, then based on the alphanumeric order, the first user name is displayed. The field is blank if no users are marked as Is Primary.
Optionally, to select a bridge designer for the phase, perform the following steps:
1. Click . The Select Bridge Designer dialog box is displayed. Available options are users invited to the project with the Bridge Designer role that is marked as Is Primary.
2. Click the required designer, and then click Select.
RCE Organization
• If the RCE is an External user, then the name selected in the Vendor field in the User Accounts page is displayed.
• If the RCE is an Internal user, then the Location selected in the Enterprise Resource Directory catalog of the library is displayed.
• If the RCE is not part of the Enterprise Resource Directory catalog of the library, then enter the name of the RCE organization.
Plan Turn in to Assistant Engineer
Select Yes, if the plans are turned-in to the assistant engineer. Select No, if the plans are not turned-in yet to the assistant engineer.
Plan Turn in to Assistant Engineer Date
Select the date on which the plans are turned-in to the assistant engineer.
Project and Phase Setup
49 | P a g e
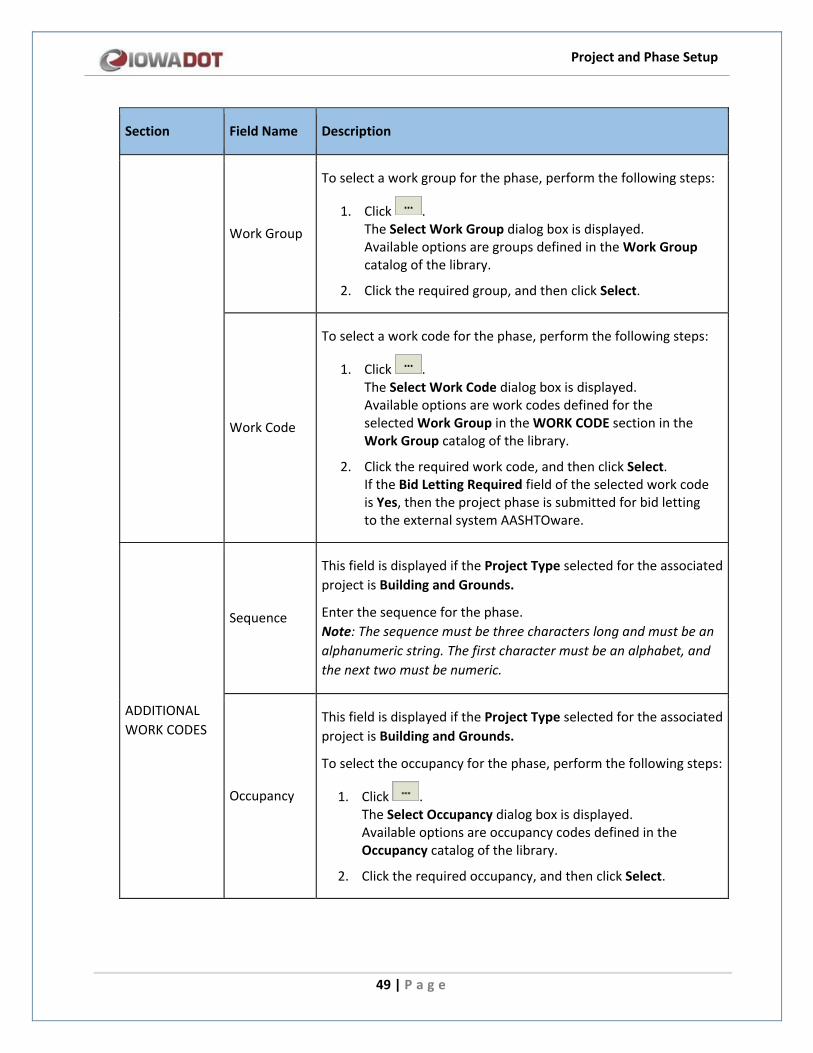
Section Field Name Description
Work Group
To select a work group for the phase, perform the following steps:
1. Click . The Select Work Group dialog box is displayed. Available options are groups defined in the Work Group catalog of the library.
2. Click the required group, and then click Select.
Work Code
To select a work code for the phase, perform the following steps:
1. Click . The Select Work Code dialog box is displayed. Available options are work codes defined for the selected Work Group in the WORK CODE section in the Work Group catalog of the library.
2. Click the required work code, and then click Select. If the Bid Letting Required field of the selected work code is Yes, then the project phase is submitted for bid letting to the external system AASHTOware.
ADDITIONAL WORK CODES
Sequence
This field is displayed if the Project Type selected for the associated project is Building and Grounds.
Enter the sequence for the phase. Note: The sequence must be three characters long and must be an alphanumeric string. The first character must be an alphabet, and the next two must be numeric.
Occupancy
This field is displayed if the Project Type selected for the associated project is Building and Grounds.
To select the occupancy for the phase, perform the following steps:
1. Click . The Select Occupancy dialog box is displayed. Available options are occupancy codes defined in the Occupancy catalog of the library.
2. Click the required occupancy, and then click Select.
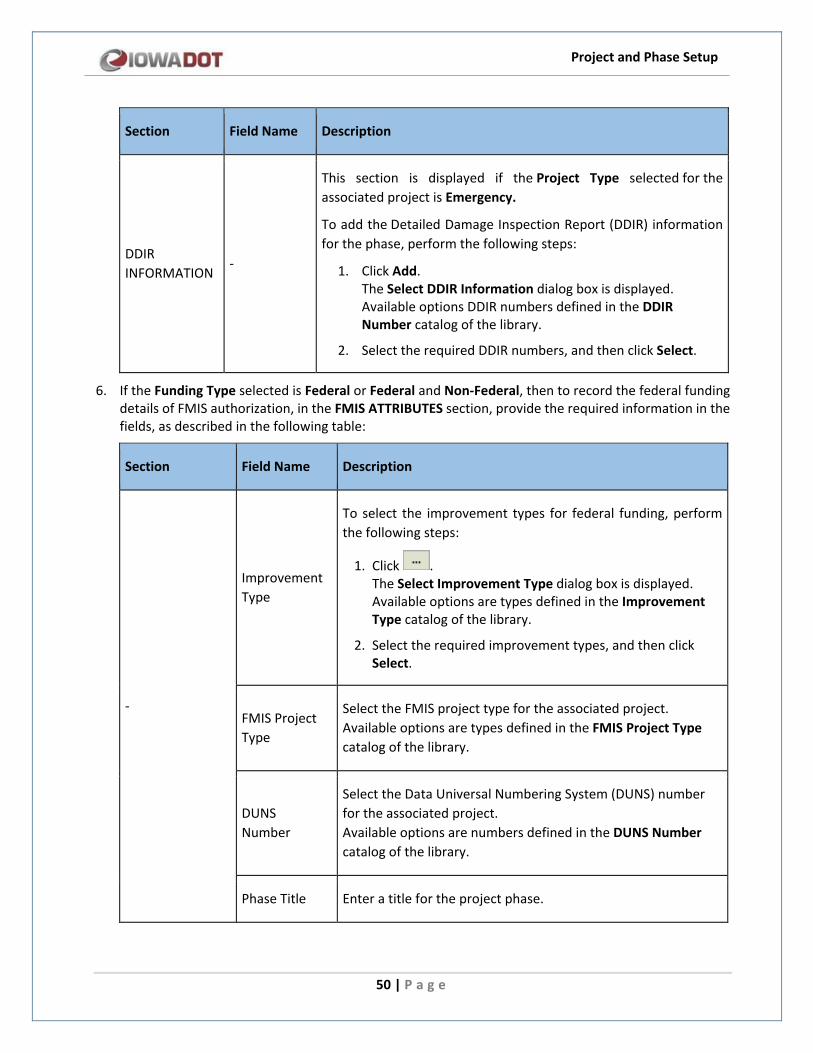
Project and Phase Setup
50 | P a g e
Section Field Name Description
DDIR INFORMATION
-
This section is displayed if the Project Type selected for the associated project is Emergency.
To add the Detailed Damage Inspection Report (DDIR) information for the phase, perform the following steps:
1. Click Add. The Select DDIR Information dialog box is displayed. Available options DDIR numbers defined in the DDIR Number catalog of the library.
2. Select the required DDIR numbers, and then click Select.
6. If the Funding Type selected is Federal or Federal and Non-Federal, then to record the federal funding details of FMIS authorization, in the FMIS ATTRIBUTES section, provide the required information in the fields, as described in the following table:
Section Field Name Description
-
Improvement Type
To select the improvement types for federal funding, perform the following steps:
1. Click . The Select Improvement Type dialog box is displayed. Available options are types defined in the Improvement Type catalog of the library.
2. Select the required improvement types, and then click Select.
FMIS Project Type
Select the FMIS project type for the associated project. Available options are types defined in the FMIS Project Type catalog of the library.
DUNS Number
Select the Data Universal Numbering System (DUNS) number for the associated project. Available options are numbers defined in the DUNS Number catalog of the library.
Phase Title Enter a title for the project phase.
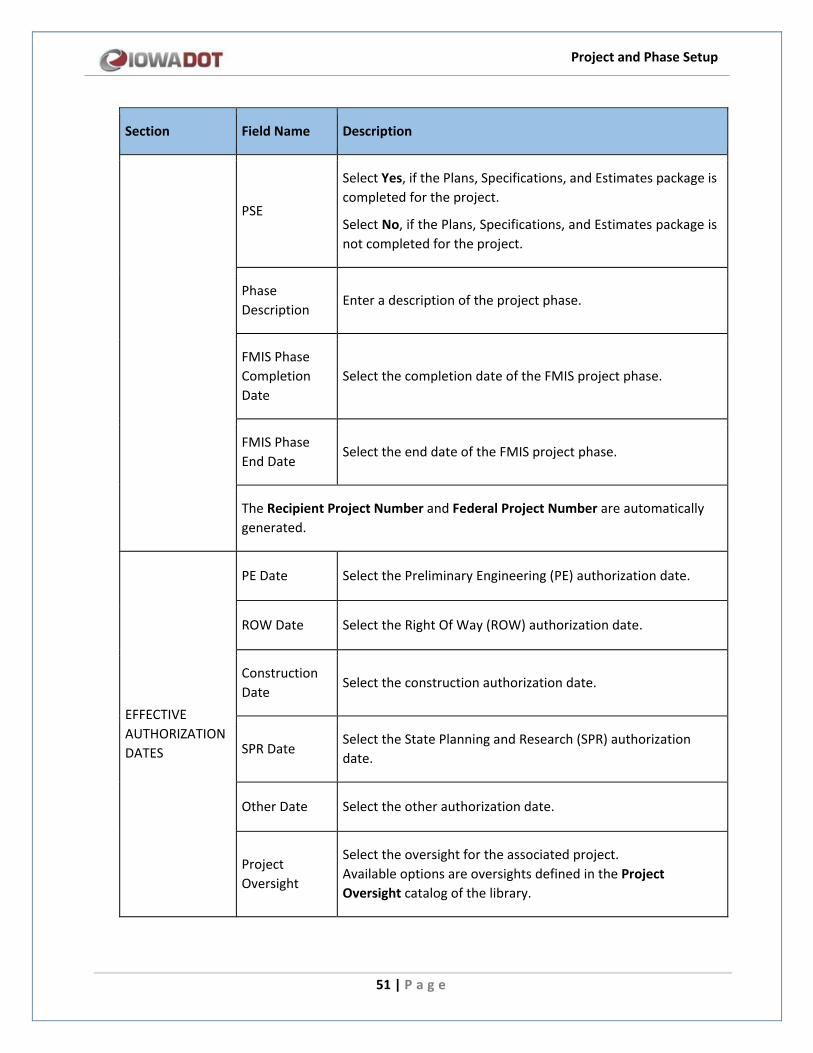
Project and Phase Setup
51 | P a g e
Section Field Name Description
PSE
Select Yes, if the Plans, Specifications, and Estimates package is completed for the project.
Select No, if the Plans, Specifications, and Estimates package is not completed for the project.
Phase Description
Enter a description of the project phase.
FMIS Phase Completion Date
Select the completion date of the FMIS project phase.
FMIS Phase End Date
Select the end date of the FMIS project phase.
The Recipient Project Number and Federal Project Number are automatically generated.
EFFECTIVE AUTHORIZATION DATES
PE Date Select the Preliminary Engineering (PE) authorization date.
ROW Date Select the Right Of Way (ROW) authorization date.
Construction Date
Select the construction authorization date.
SPR Date Select the State Planning and Research (SPR) authorization date.
Other Date Select the other authorization date.
Project Oversight
Select the oversight for the associated project. Available options are oversights defined in the Project Oversight catalog of the library.
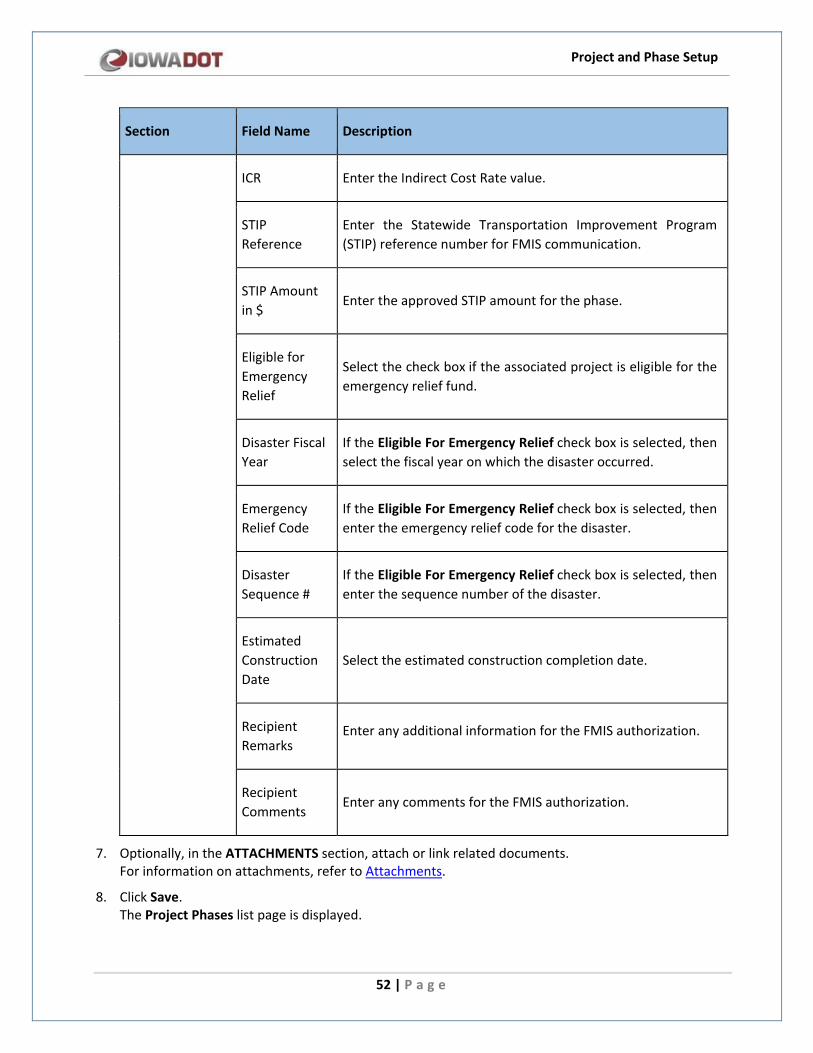
Project and Phase Setup
52 | P a g e
Section Field Name Description
ICR Enter the Indirect Cost Rate value.
STIP Reference
Enter the Statewide Transportation Improvement Program (STIP) reference number for FMIS communication.
STIP Amount in $
Enter the approved STIP amount for the phase.
Eligible for Emergency Relief
Select the check box if the associated project is eligible for the emergency relief fund.
Disaster Fiscal Year
If the Eligible For Emergency Relief check box is selected, then select the fiscal year on which the disaster occurred.
Emergency Relief Code
If the Eligible For Emergency Relief check box is selected, then enter the emergency relief code for the disaster.
Disaster Sequence #
If the Eligible For Emergency Relief check box is selected, then enter the sequence number of the disaster.
Estimated Construction Date
Select the estimated construction completion date.
Recipient Remarks
Enter any additional information for the FMIS authorization.
Recipient Comments
Enter any comments for the FMIS authorization.
7. Optionally, in the ATTACHMENTS section, attach or link related documents. For information on attachments, refer to Attachments.
8. Click Save. The Project Phases list page is displayed.
Project and Phase Setup
53 | P a g e
7.2 Managing Phase Location Details
Steps
1. In the module menu, click Projects. The Project List page is displayed. Alternatively, to manage phase location details of a planned project, perform the following steps:
a. In the module menu, click Planning. The Planning Dashboard is displayed.
b. In the navigation pane, click Planned Projects. The Planned Projects List page is displayed.
2. Click the required project, and then click View.
3. In the navigation pane, expand the project folder, and then click Project Phases. The Project Phases list page is displayed.
4. Click the required phase, and then click Edit.
5. In the navigation pane, expand the Project Phases folder, and then expand the phase folder.
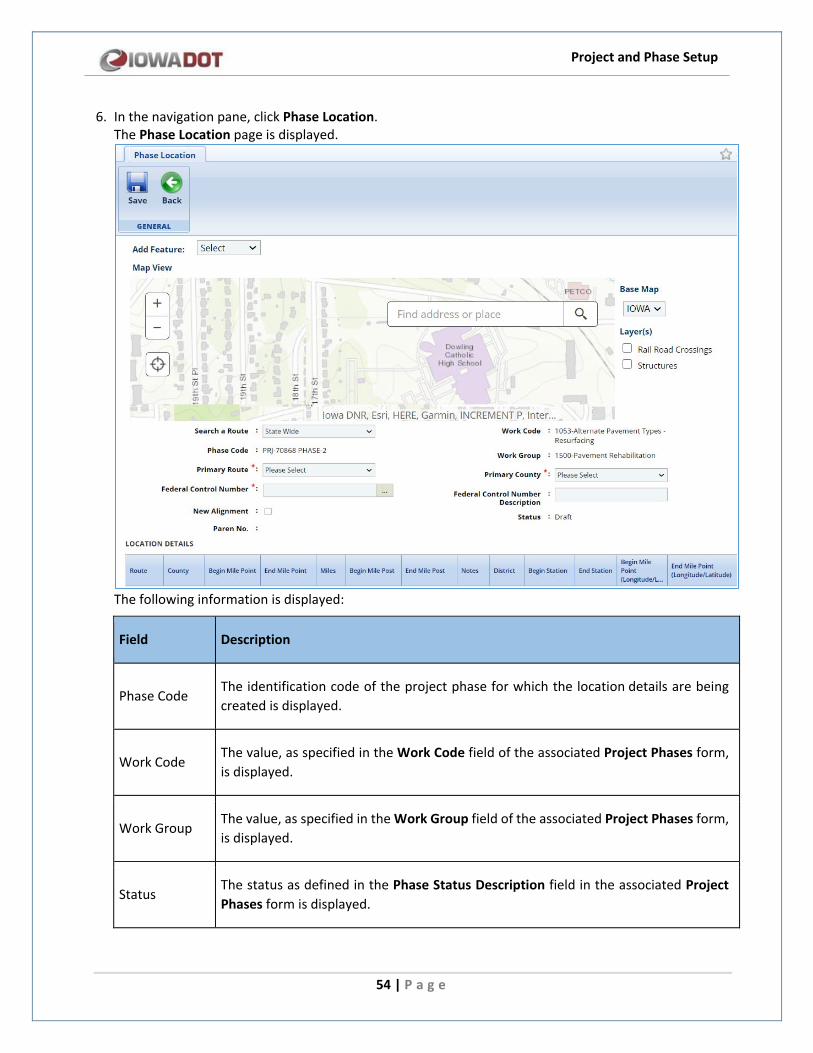
Project and Phase Setup
54 | P a g e
6. In the navigation pane, click Phase Location. The Phase Location page is displayed.
The following information is displayed:
Field Description
Phase Code The identification code of the project phase for which the location details are being created is displayed.
Work Code The value, as specified in the Work Code field of the associated Project Phases form, is displayed.
Work Group The value, as specified in the Work Group field of the associated Project Phases form, is displayed.
Status The status as defined in the Phase Status Description field in the associated Project Phases form is displayed.
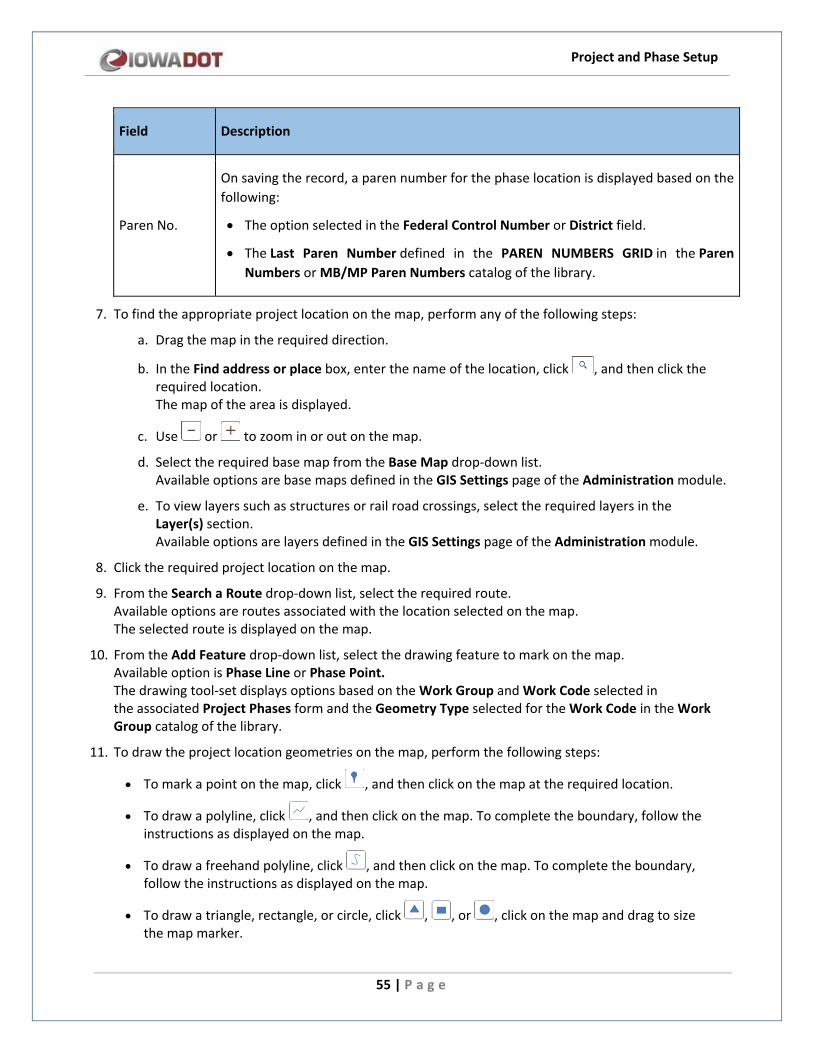
Project and Phase Setup
55 | P a g e
Field Description
Paren No.
On saving the record, a paren number for the phase location is displayed based on the following:
• The option selected in the Federal Control Number or District field.
• The Last Paren Number defined in the PAREN NUMBERS GRID in the Paren Numbers or MB/MP Paren Numbers catalog of the library.
7. To find the appropriate project location on the map, perform any of the following steps:
a. Drag the map in the required direction.
b. In the Find address or place box, enter the name of the location, click , and then click the required location. The map of the area is displayed.
c. Use or to zoom in or out on the map.
d. Select the required base map from the Base Map drop-down list. Available options are base maps defined in the GIS Settings page of the Administration module.
e. To view layers such as structures or rail road crossings, select the required layers in the Layer(s) section. Available options are layers defined in the GIS Settings page of the Administration module.
8. Click the required project location on the map.
9. From the Search a Route drop-down list, select the required route. Available options are routes associated with the location selected on the map. The selected route is displayed on the map.
10. From the Add Feature drop-down list, select the drawing feature to mark on the map. Available option is Phase Line or Phase Point. The drawing tool-set displays options based on the Work Group and Work Code selected in the associated Project Phases form and the Geometry Type selected for the Work Code in the Work Group catalog of the library.
11. To draw the project location geometries on the map, perform the following steps:
• To mark a point on the map, click , and then click on the map at the required location.
• To draw a polyline, click , and then click on the map. To complete the boundary, follow the instructions as displayed on the map.
• To draw a freehand polyline, click , and then click on the map. To complete the boundary, follow the instructions as displayed on the map.
• To draw a triangle, rectangle, or circle, click , , or , click on the map and drag to size the map marker.
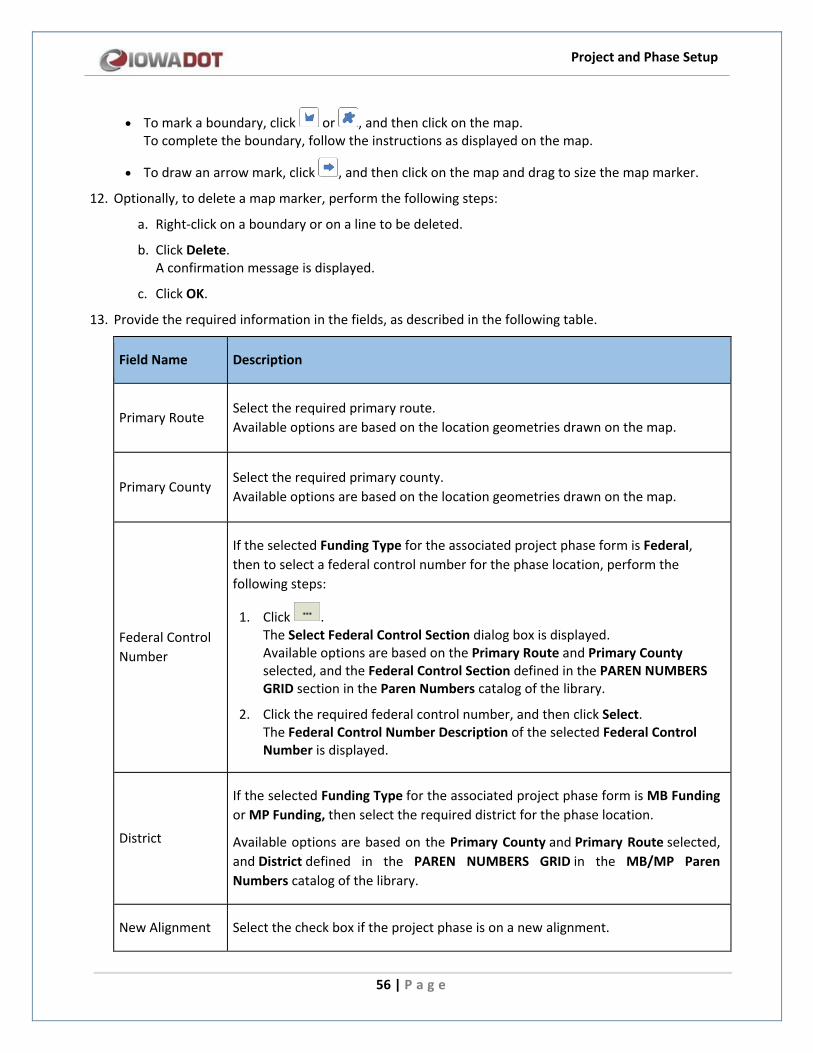
Project and Phase Setup
56 | P a g e
• To mark a boundary, click or , and then click on the map. To complete the boundary, follow the instructions as displayed on the map.
• To draw an arrow mark, click , and then click on the map and drag to size the map marker.
12. Optionally, to delete a map marker, perform the following steps:
a. Right-click on a boundary or on a line to be deleted.
b. Click Delete. A confirmation message is displayed.
c. Click OK.
13. Provide the required information in the fields, as described in the following table.
Field Name Description
Primary Route Select the required primary route. Available options are based on the location geometries drawn on the map.
Primary County Select the required primary county. Available options are based on the location geometries drawn on the map.
Federal Control Number
If the selected Funding Type for the associated project phase form is Federal, then to select a federal control number for the phase location, perform the following steps:
1. Click . The Select Federal Control Section dialog box is displayed. Available options are based on the Primary Route and Primary County selected, and the Federal Control Section defined in the PAREN NUMBERS GRID section in the Paren Numbers catalog of the library.
2. Click the required federal control number, and then click Select. The Federal Control Number Description of the selected Federal Control Number is displayed.
District
If the selected Funding Type for the associated project phase form is MB Funding or MP Funding, then select the required district for the phase location.
Available options are based on the Primary County and Primary Route selected, and District defined in the PAREN NUMBERS GRID in the MB/MP Paren Numbers catalog of the library.
New Alignment Select the check box if the project phase is on a new alignment.
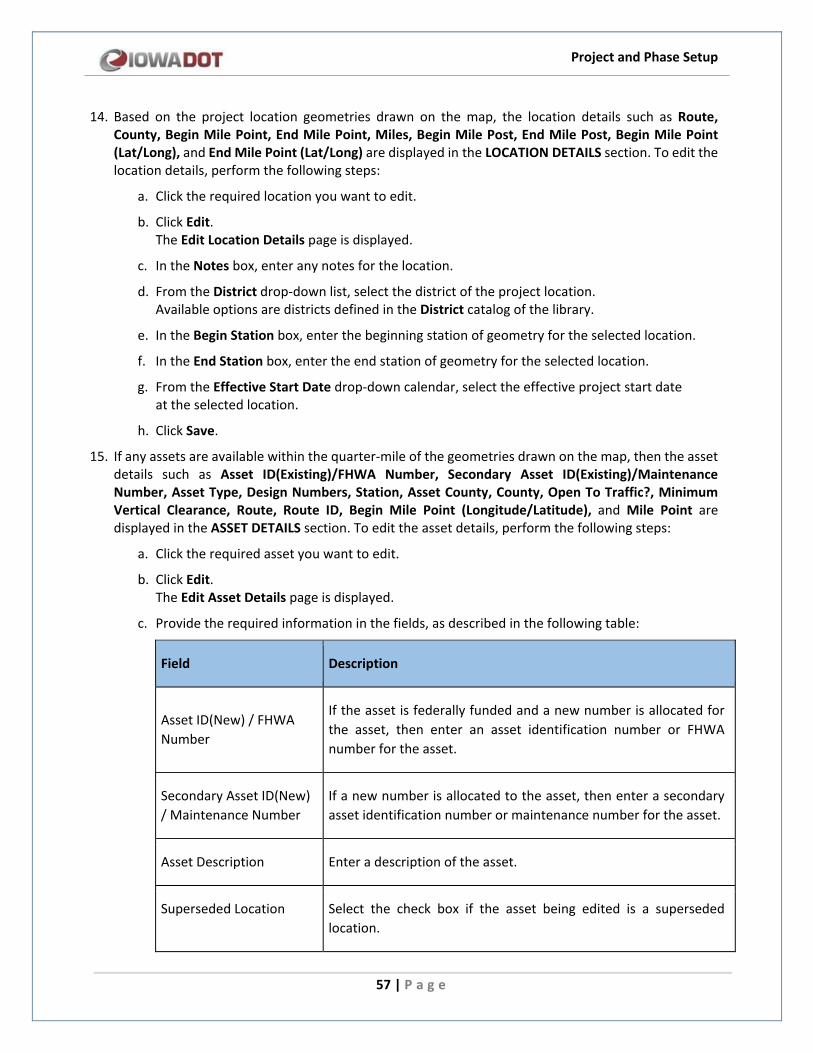
Project and Phase Setup
57 | P a g e
14. Based on the project location geometries drawn on the map, the location details such as Route, County, Begin Mile Point, End Mile Point, Miles, Begin Mile Post, End Mile Post, Begin Mile Point (Lat/Long), and End Mile Point (Lat/Long) are displayed in the LOCATION DETAILS section. To edit the location details, perform the following steps:
a. Click the required location you want to edit.
b. Click Edit. The Edit Location Details page is displayed.
c. In the Notes box, enter any notes for the location.
d. From the District drop-down list, select the district of the project location. Available options are districts defined in the District catalog of the library.
e. In the Begin Station box, enter the beginning station of geometry for the selected location.
f. In the End Station box, enter the end station of geometry for the selected location.
g. From the Effective Start Date drop-down calendar, select the effective project start date at the selected location.
h. Click Save.
15. If any assets are available within the quarter-mile of the geometries drawn on the map, then the asset details such as Asset ID(Existing)/FHWA Number, Secondary Asset ID(Existing)/Maintenance Number, Asset Type, Design Numbers, Station, Asset County, County, Open To Traffic?, Minimum Vertical Clearance, Route, Route ID, Begin Mile Point (Longitude/Latitude), and Mile Point are displayed in the ASSET DETAILS section. To edit the asset details, perform the following steps:
a. Click the required asset you want to edit.
b. Click Edit. The Edit Asset Details page is displayed.
c. Provide the required information in the fields, as described in the following table:
Field Description
Asset ID(New) / FHWA Number
If the asset is federally funded and a new number is allocated for the asset, then enter an asset identification number or FHWA number for the asset.
Secondary Asset ID(New) / Maintenance Number
If a new number is allocated to the asset, then enter a secondary asset identification number or maintenance number for the asset.
Asset Description Enter a description of the asset.
Superseded Location Select the check box if the asset being edited is a superseded location.
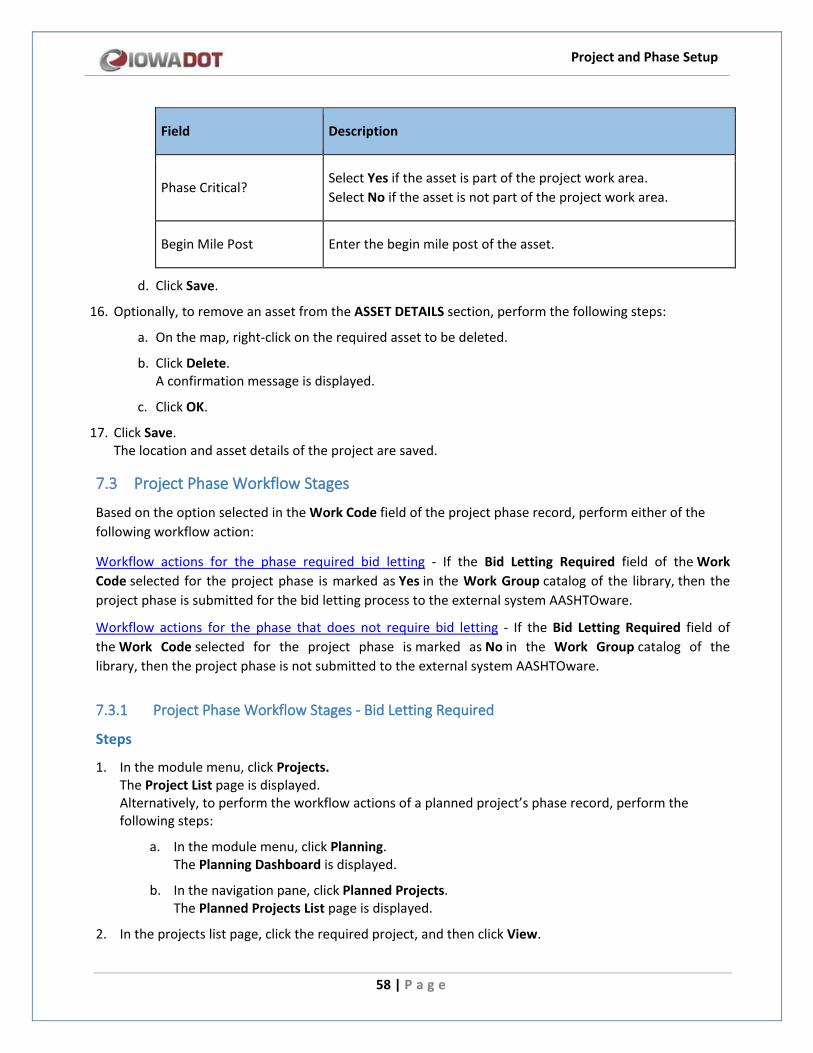
Project and Phase Setup
58 | P a g e
Field Description
Phase Critical? Select Yes if the asset is part of the project work area. Select No if the asset is not part of the project work area.
Begin Mile Post Enter the begin mile post of the asset.
d. Click Save.
16. Optionally, to remove an asset from the ASSET DETAILS section, perform the following steps:
a. On the map, right-click on the required asset to be deleted.
b. Click Delete. A confirmation message is displayed.
c. Click OK.
17. Click Save. The location and asset details of the project are saved.
7.3 Project Phase Workflow Stages
Based on the option selected in the Work Code field of the project phase record, perform either of the following workflow action:
Workflow actions for the phase required bid letting - If the Bid Letting Required field of the Work Code selected for the project phase is marked as Yes in the Work Group catalog of the library, then the project phase is submitted for the bid letting process to the external system AASHTOware.
Workflow actions for the phase that does not require bid letting - If the Bid Letting Required field of the Work Code selected for the project phase is marked as No in the Work Group catalog of the library, then the project phase is not submitted to the external system AASHTOware.
7.3.1 Project Phase Workflow Stages - Bid Letting Required
Steps
1. In the module menu, click Projects. The Project List page is displayed. Alternatively, to perform the workflow actions of a planned project’s phase record, perform the following steps:
a. In the module menu, click Planning. The Planning Dashboard is displayed.
b. In the navigation pane, click Planned Projects. The Planned Projects List page is displayed.
2. In the projects list page, click the required project, and then click View.
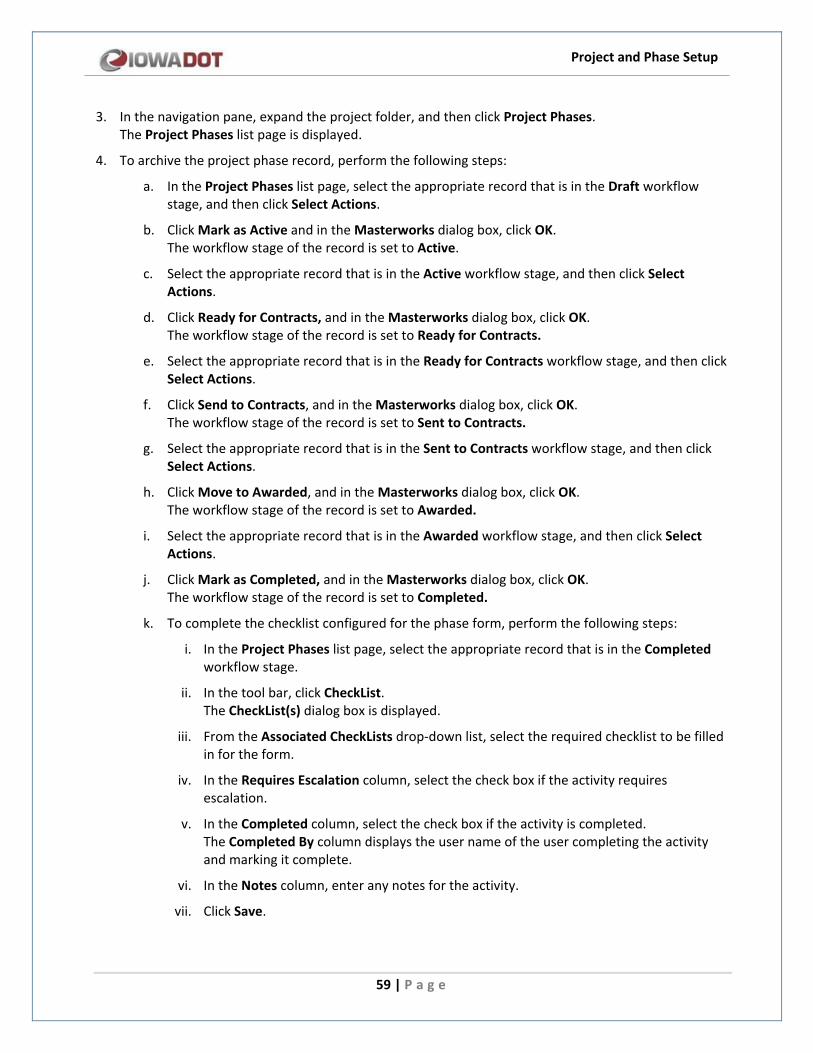
Project and Phase Setup
59 | P a g e
3. In the navigation pane, expand the project folder, and then click Project Phases. The Project Phases list page is displayed.
4. To archive the project phase record, perform the following steps:
a. In the Project Phases list page, select the appropriate record that is in the Draft workflow stage, and then click Select Actions.
b. Click Mark as Active and in the Masterworks dialog box, click OK. The workflow stage of the record is set to Active.
c. Select the appropriate record that is in the Active workflow stage, and then click Select Actions.
d. Click Ready for Contracts, and in the Masterworks dialog box, click OK. The workflow stage of the record is set to Ready for Contracts.
e. Select the appropriate record that is in the Ready for Contracts workflow stage, and then click Select Actions.
f. Click Send to Contracts, and in the Masterworks dialog box, click OK. The workflow stage of the record is set to Sent to Contracts.
g. Select the appropriate record that is in the Sent to Contracts workflow stage, and then click Select Actions.
h. Click Move to Awarded, and in the Masterworks dialog box, click OK. The workflow stage of the record is set to Awarded.
i. Select the appropriate record that is in the Awarded workflow stage, and then click Select Actions.
j. Click Mark as Completed, and in the Masterworks dialog box, click OK. The workflow stage of the record is set to Completed.
k. To complete the checklist configured for the phase form, perform the following steps:
i. In the Project Phases list page, select the appropriate record that is in the Completed workflow stage.
ii. In the tool bar, click CheckList. The CheckList(s) dialog box is displayed.
iii. From the Associated CheckLists drop-down list, select the required checklist to be filled in for the form.
iv. In the Requires Escalation column, select the check box if the activity requires escalation.
v. In the Completed column, select the check box if the activity is completed. The Completed By column displays the user name of the user completing the activity and marking it complete.
vi. In the Notes column, enter any notes for the activity.
vii. Click Save.
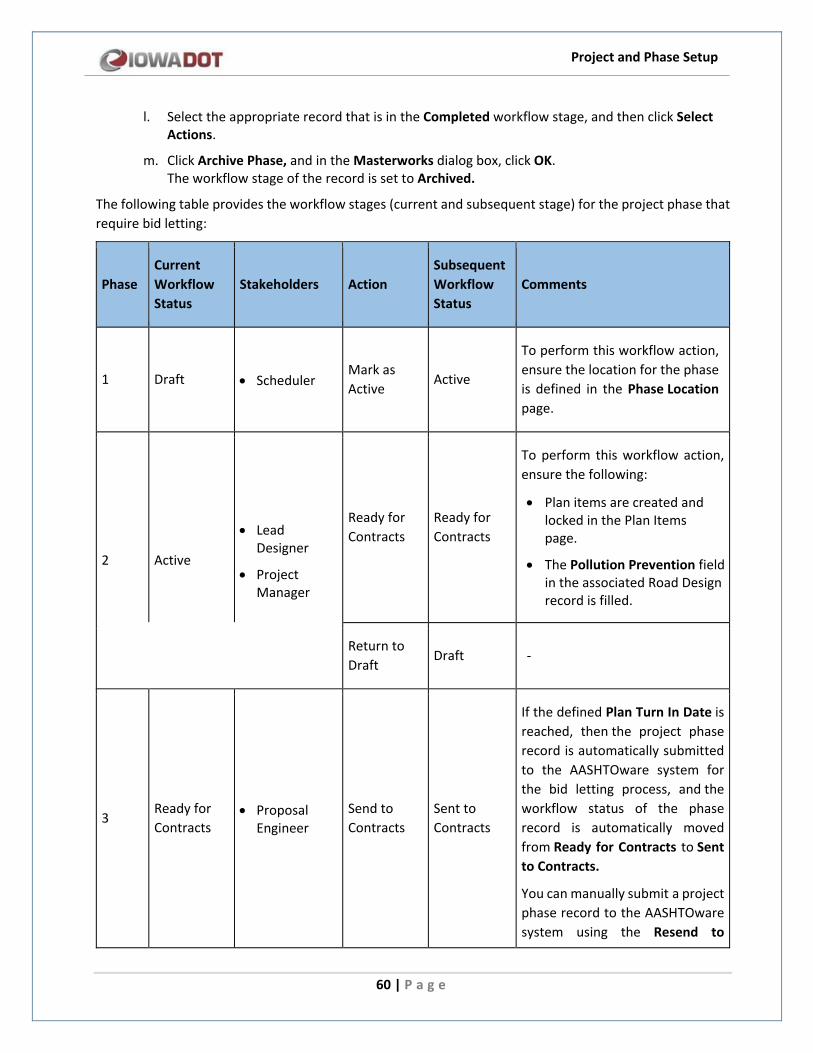
Project and Phase Setup
60 | P a g e
l. Select the appropriate record that is in the Completed workflow stage, and then click Select Actions.
m. Click Archive Phase, and in the Masterworks dialog box, click OK. The workflow stage of the record is set to Archived.
The following table provides the workflow stages (current and subsequent stage) for the project phase that require bid letting:
Phase Current Workflow Status
Stakeholders Action Subsequent Workflow Status
Comments
1 Draft • Scheduler Mark as Active
Active
To perform this workflow action, ensure the location for the phase is defined in the Phase Location page.
2 Active
• Lead Designer
• Project Manager
Ready for Contracts
Ready for Contracts
To perform this workflow action, ensure the following:
• Plan items are created and locked in the Plan Items page.
• The Pollution Prevention field in the associated Road Design record is filled.
Return to Draft
Draft -
3 Ready for Contracts
• Proposal Engineer
Send to Contracts
Sent to Contracts
If the defined Plan Turn In Date is reached, then the project phase record is automatically submitted to the AASHTOware system for the bid letting process, and the workflow status of the phase record is automatically moved from Ready for Contracts to Sent to Contracts.
You can manually submit a project phase record to the AASHTOware system using the Resend to
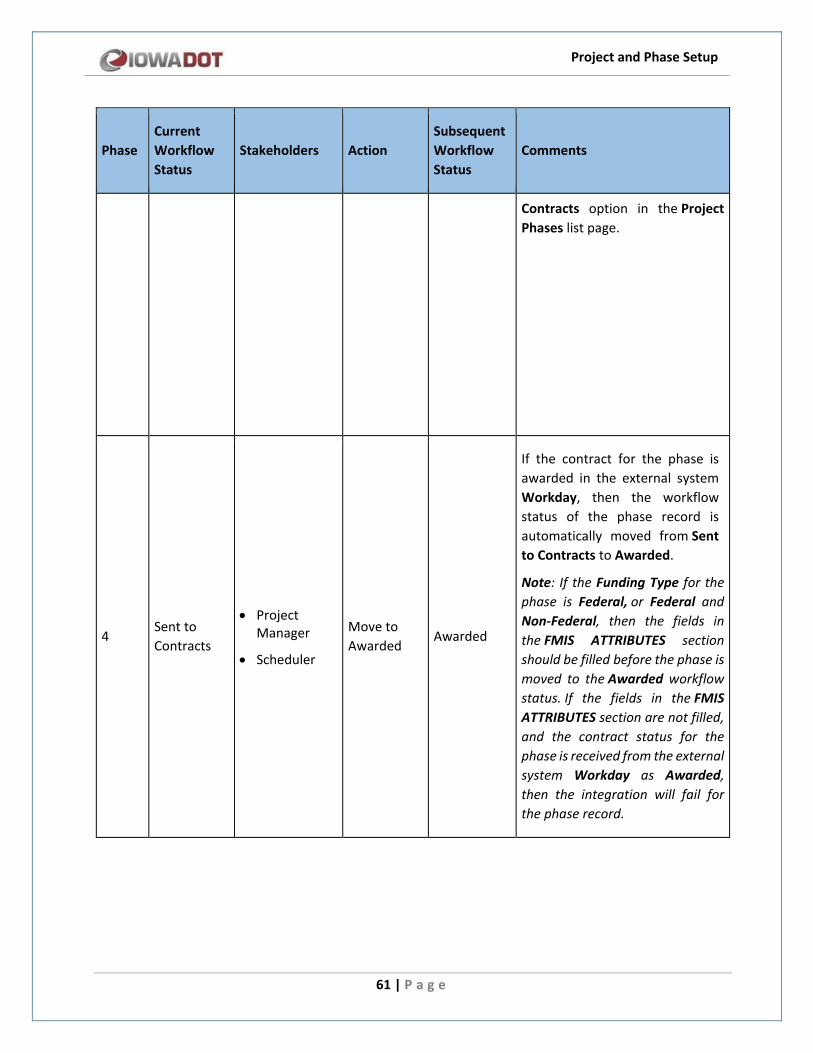
Project and Phase Setup
61 | P a g e
Phase Current Workflow Status
Stakeholders Action Subsequent Workflow Status
Comments
Contracts option in the Project Phases list page.
4 Sent to Contracts
• Project Manager
• Scheduler
Move to Awarded
Awarded
If the contract for the phase is awarded in the external system Workday, then the workflow status of the phase record is automatically moved from Sent to Contracts to Awarded.
Note: If the Funding Type for the phase is Federal, or Federal and Non-Federal, then the fields in the FMIS ATTRIBUTES section should be filled before the phase is moved to the Awarded workflow status. If the fields in the FMIS ATTRIBUTES section are not filled, and the contract status for the phase is received from the external system Workday as Awarded, then the integration will fail for the phase record.
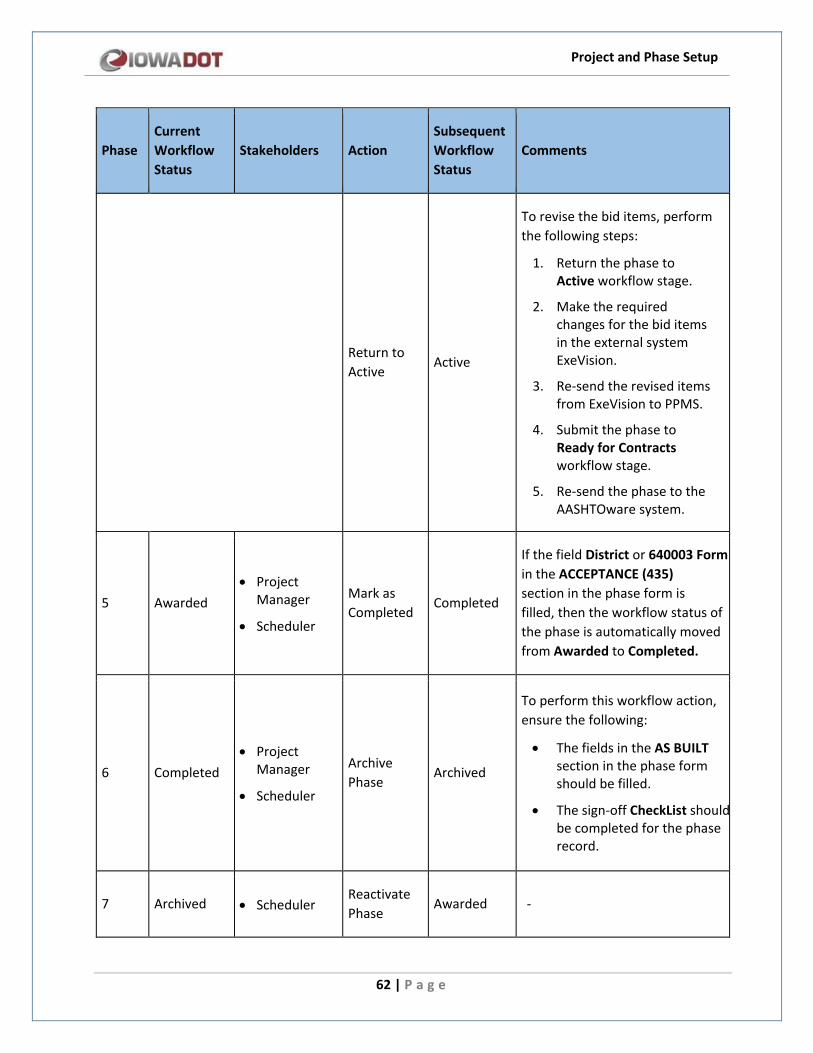
Project and Phase Setup
62 | P a g e
Phase Current Workflow Status
Stakeholders Action Subsequent Workflow Status
Comments
Return to Active
Active
To revise the bid items, perform the following steps:
1. Return the phase to Active workflow stage.
2. Make the required changes for the bid items in the external system ExeVision.
3. Re-send the revised items from ExeVision to PPMS.
4. Submit the phase to Ready for Contracts workflow stage.
5. Re-send the phase to the AASHTOware system.
5 Awarded • Project
Manager
• Scheduler
Mark as Completed
Completed
If the field District or 640003 Form in the ACCEPTANCE (435) section in the phase form is filled, then the workflow status of the phase is automatically moved from Awarded to Completed.
6 Completed • Project
Manager
• Scheduler
Archive Phase
Archived
To perform this workflow action, ensure the following:
• The fields in the AS BUILT section in the phase form should be filled.
• The sign-off CheckList should be completed for the phase record.
7 Archived • Scheduler Reactivate Phase
Awarded -
Project and Phase Setup
63 | P a g e
7.3.2 Project Phase Workflow Stages - Bid Letting Not Required
Steps
1. In the module menu, click Projects. The Project List page is displayed. Alternatively, to perform the workflow actions of a planned project’s phase record, perform the following steps:
a. In the module menu, click Planning. The Planning Dashboard is displayed.
b. In the navigation pane, click Planned Projects. The Planned Projects List page is displayed.
2. In the projects list page, click the required project, and then click View.
3. In the navigation pane, expand the project folder, and then click Project Phases. The Project Phases list page is displayed.
4. To archive the project phase record, perform the following steps:
a. In the Project Phases list page, select the appropriate record that is in the Draft workflow stage, and then click Select Actions.
b. Click Mark as Active and in the Masterworks dialog box, click OK. The workflow stage of the record is set to Active.
c. Select the appropriate record that is in the Active workflow stage, and then click Select Actions.
d. Click Mark as Completed, and in the Masterworks dialog box, click OK. The workflow stage of the record is set to Completed.
n. To complete the checklist configured for the phase form, perform the following steps:
i. In the Project Phases list page, select the appropriate record that is in the Completed workflow stage.
ii. In the tool bar, click CheckList. The CheckList(s) dialog box is displayed.
iii. From the Associated CheckLists drop-down list, select the required checklist to be filled in for the form.
iv. In the Requires Escalation column, select the check box if the activity requires escalation.
v. In the Completed column, select the check box if the activity is completed. The Completed By column displays the user name of the user completing the activity and marking it complete.
vi. In the Notes column, enter any notes for the activity.
vii. Click Save.
e. Select the appropriate record that is in the Completed workflow stage, and then click Select Actions.
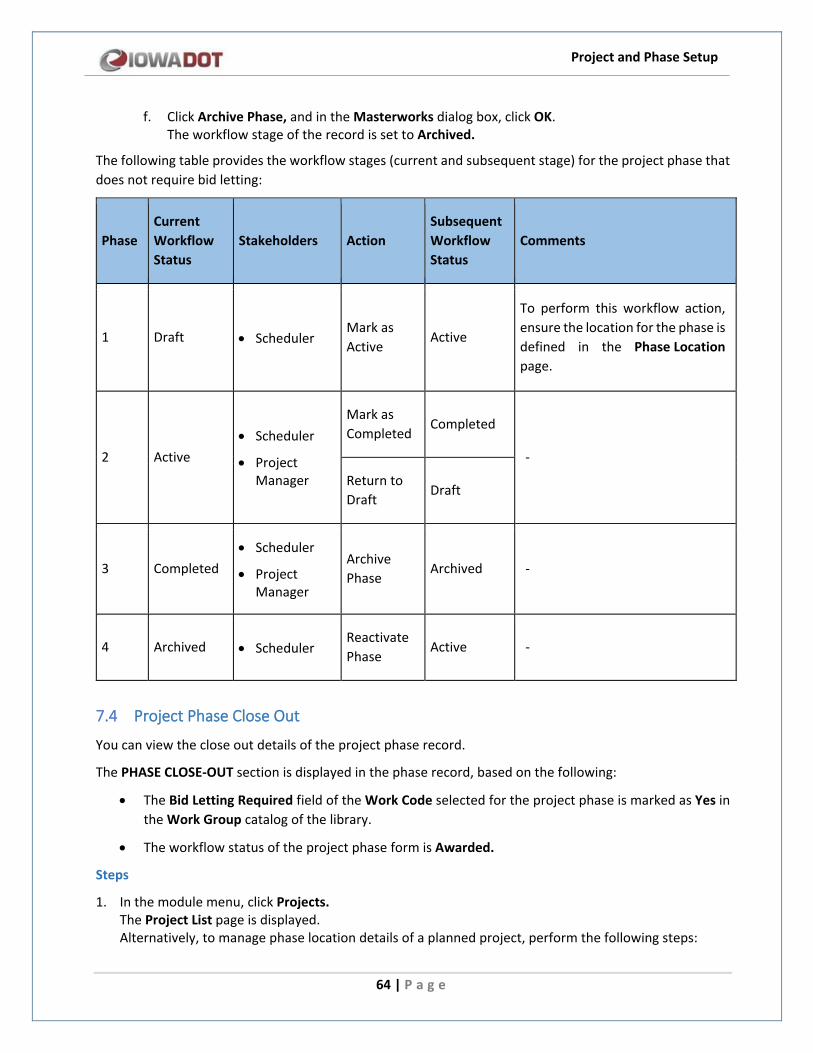
Project and Phase Setup
64 | P a g e
f. Click Archive Phase, and in the Masterworks dialog box, click OK. The workflow stage of the record is set to Archived.
The following table provides the workflow stages (current and subsequent stage) for the project phase that does not require bid letting:
Phase Current Workflow Status
Stakeholders Action Subsequent Workflow Status
Comments
1 Draft • Scheduler Mark as Active
Active
To perform this workflow action, ensure the location for the phase is defined in the Phase Location page.
2 Active • Scheduler
• Project Manager
Mark as Completed
Completed
-
Return to Draft
Draft
3 Completed • Scheduler
• Project Manager
Archive Phase
Archived -
4 Archived • Scheduler Reactivate Phase
Active -
7.4 Project Phase Close Out
You can view the close out details of the project phase record.
The PHASE CLOSE-OUT section is displayed in the phase record, based on the following:
• The Bid Letting Required field of the Work Code selected for the project phase is marked as Yes in the Work Group catalog of the library.
• The workflow status of the project phase form is Awarded.
Steps
1. In the module menu, click Projects. The Project List page is displayed. Alternatively, to manage phase location details of a planned project, perform the following steps:
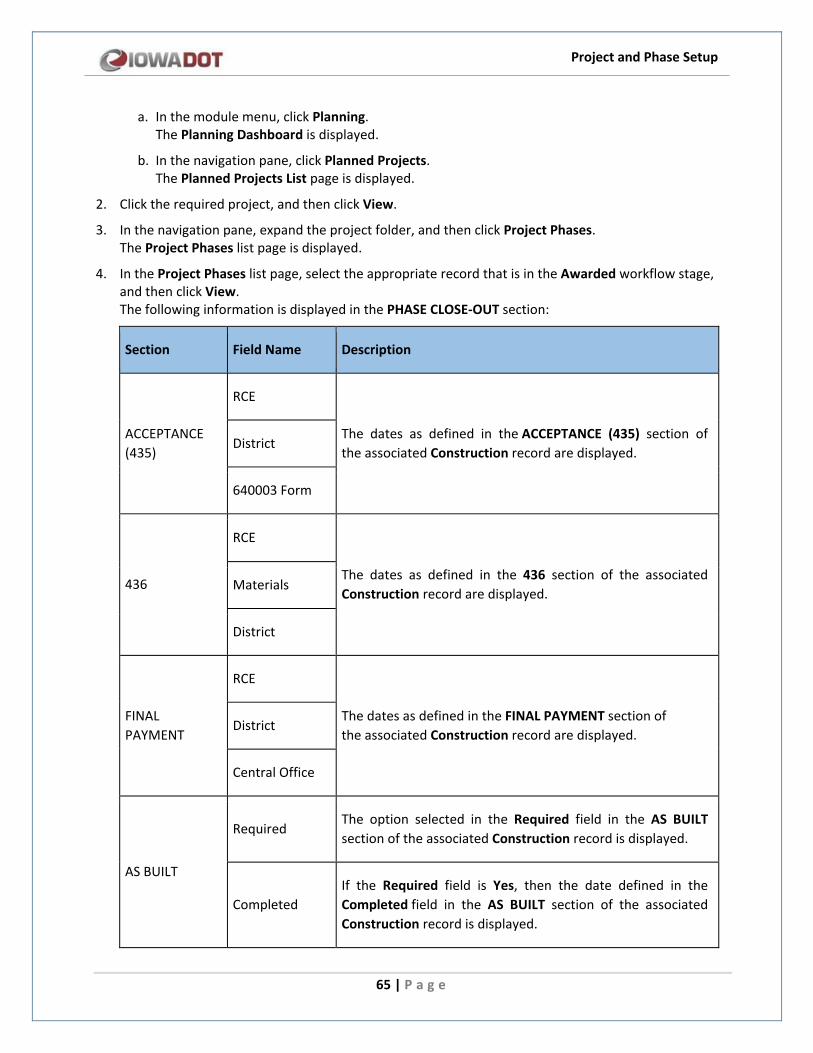
Project and Phase Setup
65 | P a g e
a. In the module menu, click Planning. The Planning Dashboard is displayed.
b. In the navigation pane, click Planned Projects. The Planned Projects List page is displayed.
2. Click the required project, and then click View.
3. In the navigation pane, expand the project folder, and then click Project Phases. The Project Phases list page is displayed.
4. In the Project Phases list page, select the appropriate record that is in the Awarded workflow stage, and then click View. The following information is displayed in the PHASE CLOSE-OUT section:
Section Field Name Description
ACCEPTANCE (435)
RCE
The dates as defined in the ACCEPTANCE (435) section of the associated Construction record are displayed.
District
640003 Form
436
RCE
The dates as defined in the 436 section of the associated Construction record are displayed. Materials
District
FINAL PAYMENT
RCE
The dates as defined in the FINAL PAYMENT section of the associated Construction record are displayed.
District
Central Office
AS BUILT
Required The option selected in the Required field in the AS BUILT section of the associated Construction record is displayed.
Completed If the Required field is Yes, then the date defined in the Completed field in the AS BUILT section of the associated Construction record is displayed.
Project and Phase Setup
66 | P a g e
8 Project Task Schedule The Schedule feature enables you to organize project tasks into deliverable-oriented manageable sub-components and tasks. The Schedule feature is integrated with capabilities to schedule project tasks and track project progress. Additionally, you can plan, associate a phase, identify resources, and add persons to a title while editing a scheduled task.
The PPMS Schedule provides you with the following functionalities:
• Create a hierarchical structure of tasks without any level limitations.
• Define tasks with information such as scheduled begin and end dates, actual begin and end dates, task duration, prioritization, and weightage.
• Schedule tasks.
• Illustrate task progress.
• Illustrate critical path.
• Take a snapshot of the schedule.
8.1 Adding Tasks to the Schedule
By default, a set of tasks are automatically displayed on the Schedule page, based on the following:
• The Project Type selected in the associated Project Details form
• The Funding Type selected in the associated Project Phases form
• The option selected in the Right of Way field in the associated Project Phases form
• Tasks defined in the TASK LIST section in the Template Information catalog of the library.
Additionally, you can define project tasks in the following two modes:
• Import items as tasks to the Schedule from the standard items table
• Add tasks and define additional information
You can define information such as scheduled begin and end dates, actual begin and end dates, task duration, prioritization, and weightage for every task.
8.1.1 Import Items as Tasks to a Schedule
Steps
1. In the module menu, click Projects. The Project List page is displayed. Alternatively, to import items as task to the Schedule page of a planned project, perform the following steps:
a. In the module menu, click Planning. The Planning Dashboard is displayed.
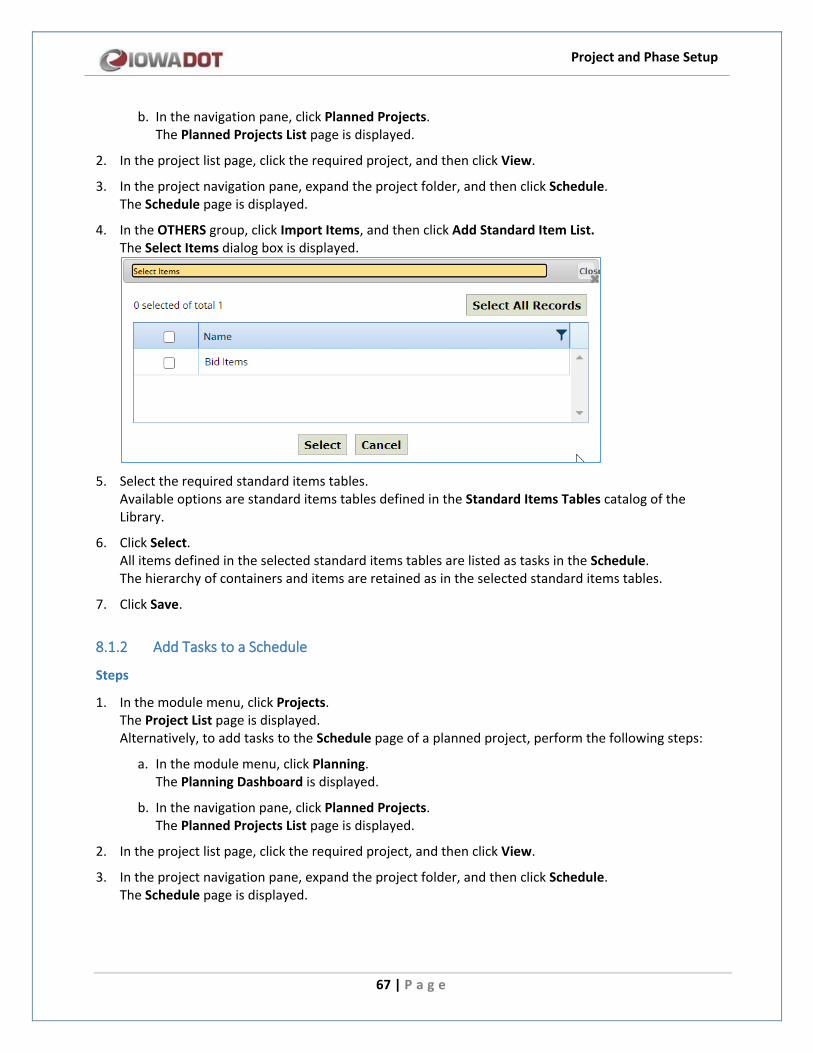
Project and Phase Setup
67 | P a g e
b. In the navigation pane, click Planned Projects. The Planned Projects List page is displayed.
2. In the project list page, click the required project, and then click View.
3. In the project navigation pane, expand the project folder, and then click Schedule. The Schedule page is displayed.
4. In the OTHERS group, click Import Items, and then click Add Standard Item List. The Select Items dialog box is displayed.
5. Select the required standard items tables.
Available options are standard items tables defined in the Standard Items Tables catalog of the Library.
6. Click Select. All items defined in the selected standard items tables are listed as tasks in the Schedule. The hierarchy of containers and items are retained as in the selected standard items tables.
7. Click Save.
8.1.2 Add Tasks to a Schedule
Steps
1. In the module menu, click Projects. The Project List page is displayed. Alternatively, to add tasks to the Schedule page of a planned project, perform the following steps:
a. In the module menu, click Planning. The Planning Dashboard is displayed.
b. In the navigation pane, click Planned Projects. The Planned Projects List page is displayed.
2. In the project list page, click the required project, and then click View.
3. In the project navigation pane, expand the project folder, and then click Schedule. The Schedule page is displayed.
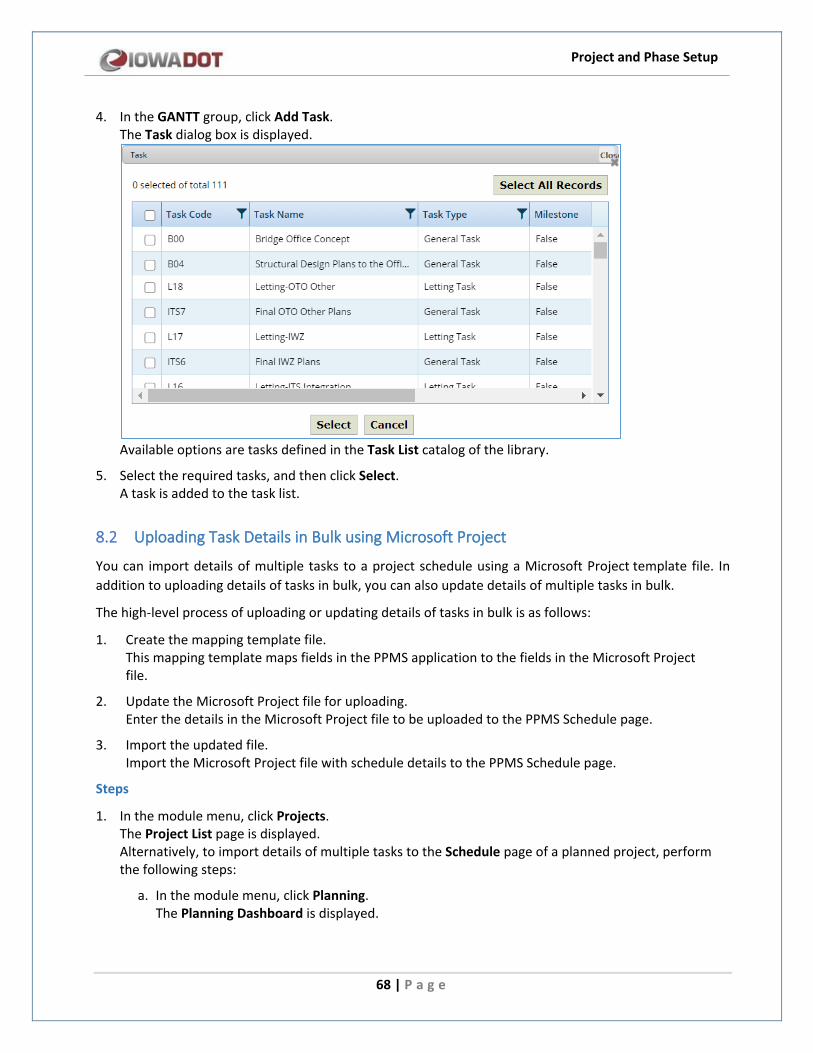
Project and Phase Setup
68 | P a g e
4. In the GANTT group, click Add Task. The Task dialog box is displayed.
Available options are tasks defined in the Task List catalog of the library.
5. Select the required tasks, and then click Select. A task is added to the task list.
8.2 Uploading Task Details in Bulk using Microsoft Project
You can import details of multiple tasks to a project schedule using a Microsoft Project template file. In addition to uploading details of tasks in bulk, you can also update details of multiple tasks in bulk.
The high-level process of uploading or updating details of tasks in bulk is as follows:
1. Create the mapping template file. This mapping template maps fields in the PPMS application to the fields in the Microsoft Project file.
2. Update the Microsoft Project file for uploading. Enter the details in the Microsoft Project file to be uploaded to the PPMS Schedule page.
3. Import the updated file. Import the Microsoft Project file with schedule details to the PPMS Schedule page.
Steps
1. In the module menu, click Projects. The Project List page is displayed. Alternatively, to import details of multiple tasks to the Schedule page of a planned project, perform the following steps:
a. In the module menu, click Planning. The Planning Dashboard is displayed.
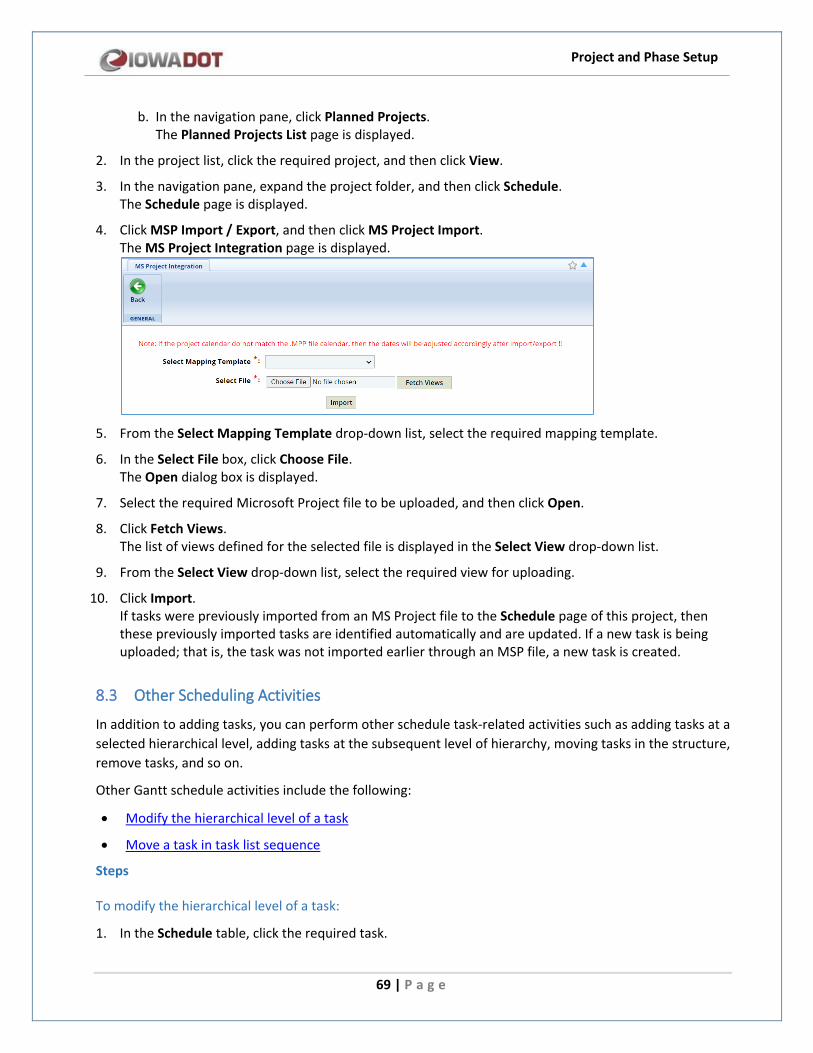
Project and Phase Setup
69 | P a g e
b. In the navigation pane, click Planned Projects. The Planned Projects List page is displayed.
2. In the project list, click the required project, and then click View.
3. In the navigation pane, expand the project folder, and then click Schedule. The Schedule page is displayed.
4. Click MSP Import / Export, and then click MS Project Import. The MS Project Integration page is displayed.
5. From the Select Mapping Template drop-down list, select the required mapping template.
6. In the Select File box, click Choose File. The Open dialog box is displayed.
7. Select the required Microsoft Project file to be uploaded, and then click Open.
8. Click Fetch Views. The list of views defined for the selected file is displayed in the Select View drop-down list.
9. From the Select View drop-down list, select the required view for uploading.
10. Click Import. If tasks were previously imported from an MS Project file to the Schedule page of this project, then these previously imported tasks are identified automatically and are updated. If a new task is being uploaded; that is, the task was not imported earlier through an MSP file, a new task is created.
8.3 Other Scheduling Activities
In addition to adding tasks, you can perform other schedule task-related activities such as adding tasks at a selected hierarchical level, adding tasks at the subsequent level of hierarchy, moving tasks in the structure, remove tasks, and so on.
Other Gantt schedule activities include the following:
• Modify the hierarchical level of a task
• Move a task in task list sequence
Steps
To modify the hierarchical level of a task:
1. In the Schedule table, click the required task.
Project and Phase Setup
70 | P a g e
2. In the GANTT group, perform either of the following steps: - To lower the hierarchical level of the task, click Indent Task. The selected task is set as the subsequent sub-level task. - To increase the hierarchical level of the task, click Outdent Task. The selected task is set to the previous task level.
To move a task in task list sequence:
1. In the Schedule table, click the required task.
2. In the GANTT group, perform either of the following steps: - To move a task up the list, click Move Task Up. The selected task is moved one level up in the task sequence. - To move the task down the list, click Move Task Down. The selected task is moved one level down in the task sequence.
8.4 Editing Task Details
You can define information such as project phase, scheduled begin and end dates, actual begin and end dates, task duration, prioritization, weightage, and clearance details for every task.
You can update task details in the following modes:
• Schedule table
• Gantt chart
• Schedule form
8.4.1 Updating Task Details from the Schedule Table
Prerequisite
• Tasks are added to the schedule.
Steps
1. In the module menu, click Projects. The Project List page is displayed. Alternatively, to update the task details of a planned project, perform the following steps:
a. In the module menu, click Planning. The Planning Dashboard is displayed.
b. In the navigation pane, click Planned Projects. The Planned Projects List page is displayed.
2. In the project list page, click the required project, and then click View.
3. In the project navigation pane, expand the project folder, and then click Schedule. The Schedule page is displayed.
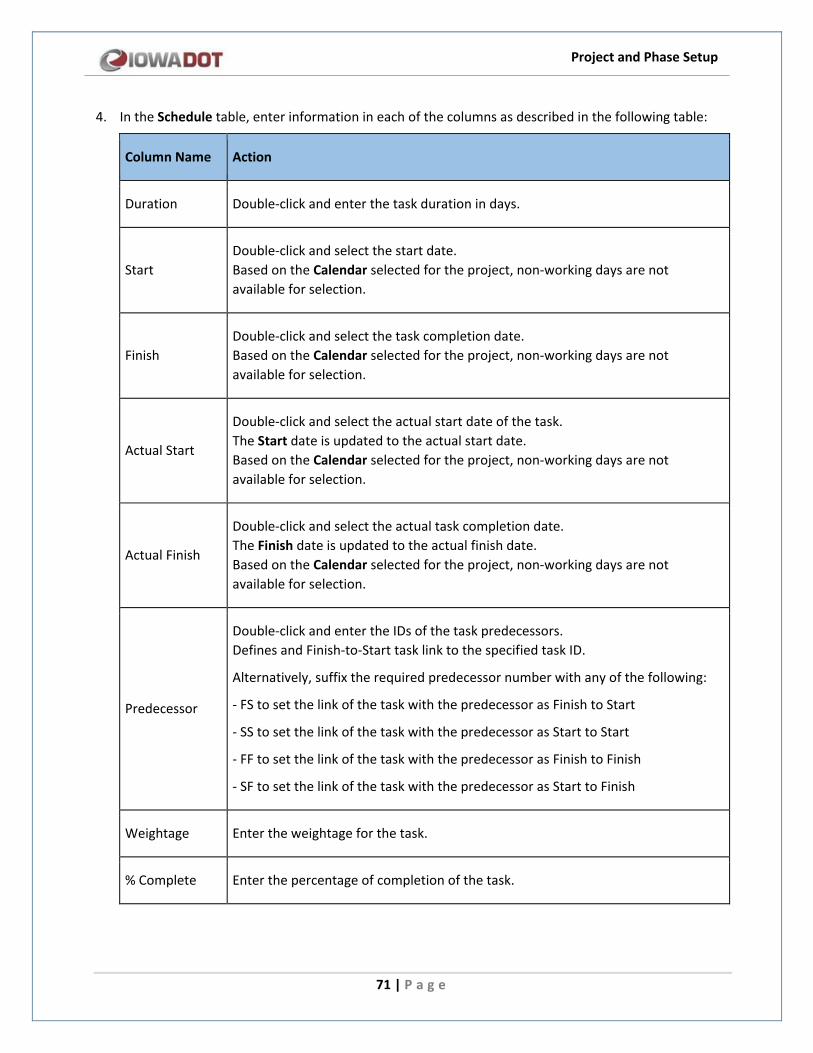
Project and Phase Setup
71 | P a g e
4. In the Schedule table, enter information in each of the columns as described in the following table:
Column Name Action
Duration Double-click and enter the task duration in days.
Start Double-click and select the start date. Based on the Calendar selected for the project, non-working days are not available for selection.
Finish Double-click and select the task completion date. Based on the Calendar selected for the project, non-working days are not available for selection.
Actual Start
Double-click and select the actual start date of the task. The Start date is updated to the actual start date. Based on the Calendar selected for the project, non-working days are not available for selection.
Actual Finish
Double-click and select the actual task completion date. The Finish date is updated to the actual finish date. Based on the Calendar selected for the project, non-working days are not available for selection.
Predecessor
Double-click and enter the IDs of the task predecessors. Defines and Finish-to-Start task link to the specified task ID.
Alternatively, suffix the required predecessor number with any of the following:
- FS to set the link of the task with the predecessor as Finish to Start
- SS to set the link of the task with the predecessor as Start to Start
- FF to set the link of the task with the predecessor as Finish to Finish
- SF to set the link of the task with the predecessor as Start to Finish
Weightage Enter the weightage for the task.
% Complete Enter the percentage of completion of the task.
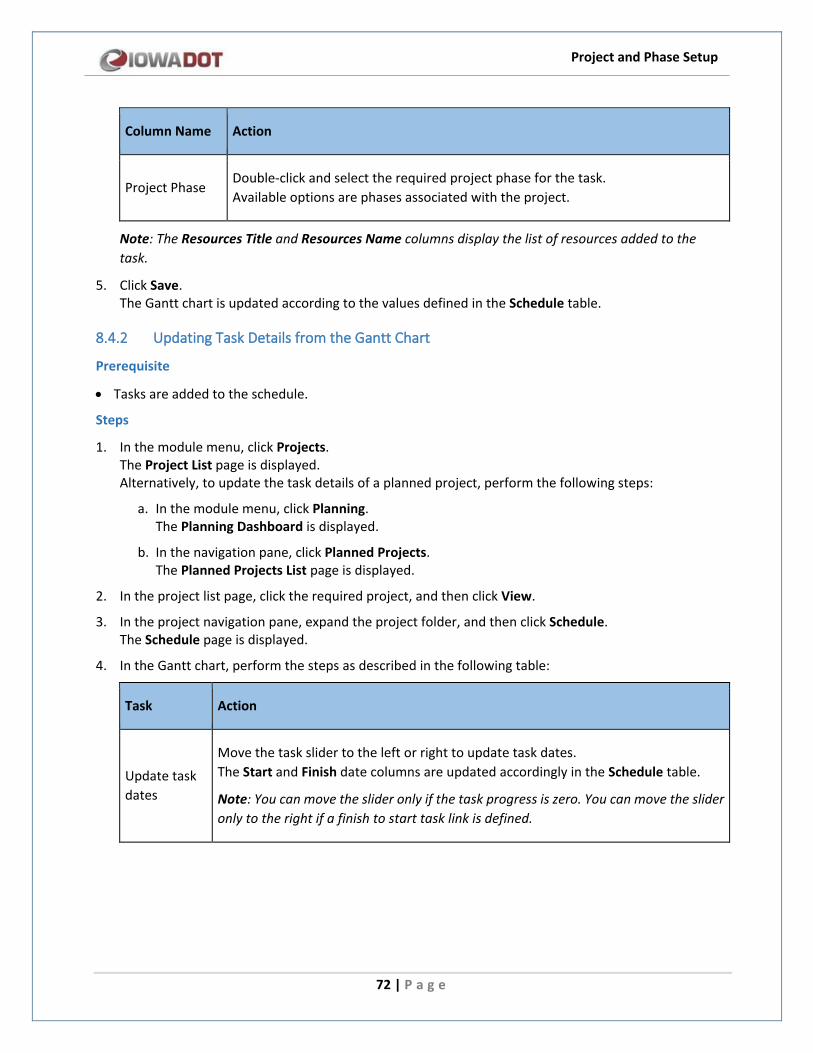
Project and Phase Setup
72 | P a g e
Column Name Action
Project Phase Double-click and select the required project phase for the task. Available options are phases associated with the project.
Note: The Resources Title and Resources Name columns display the list of resources added to the task.
5. Click Save. The Gantt chart is updated according to the values defined in the Schedule table.
8.4.2 Updating Task Details from the Gantt Chart
Prerequisite
• Tasks are added to the schedule.
Steps
1. In the module menu, click Projects. The Project List page is displayed. Alternatively, to update the task details of a planned project, perform the following steps:
a. In the module menu, click Planning. The Planning Dashboard is displayed.
b. In the navigation pane, click Planned Projects. The Planned Projects List page is displayed.
2. In the project list page, click the required project, and then click View.
3. In the project navigation pane, expand the project folder, and then click Schedule. The Schedule page is displayed.
4. In the Gantt chart, perform the steps as described in the following table:
Task Action
Update task dates
Move the task slider to the left or right to update task dates. The Start and Finish date columns are updated accordingly in the Schedule table.
Note: You can move the slider only if the task progress is zero. You can move the slider only to the right if a finish to start task link is defined.
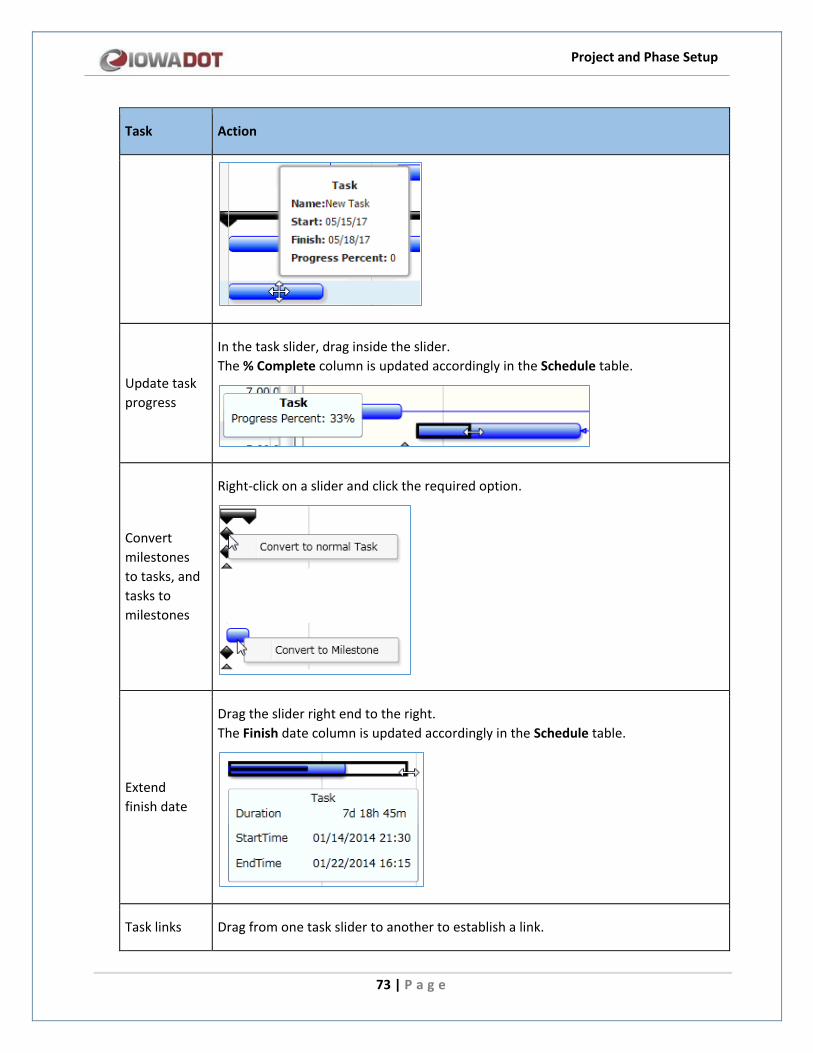
Project and Phase Setup
73 | P a g e
Task Action
Update task progress
In the task slider, drag inside the slider. The % Complete column is updated accordingly in the Schedule table.
Convert milestones to tasks, and tasks to milestones
Right-click on a slider and click the required option.
Extend finish date
Drag the slider right end to the right. The Finish date column is updated accordingly in the Schedule table.
Task links Drag from one task slider to another to establish a link.
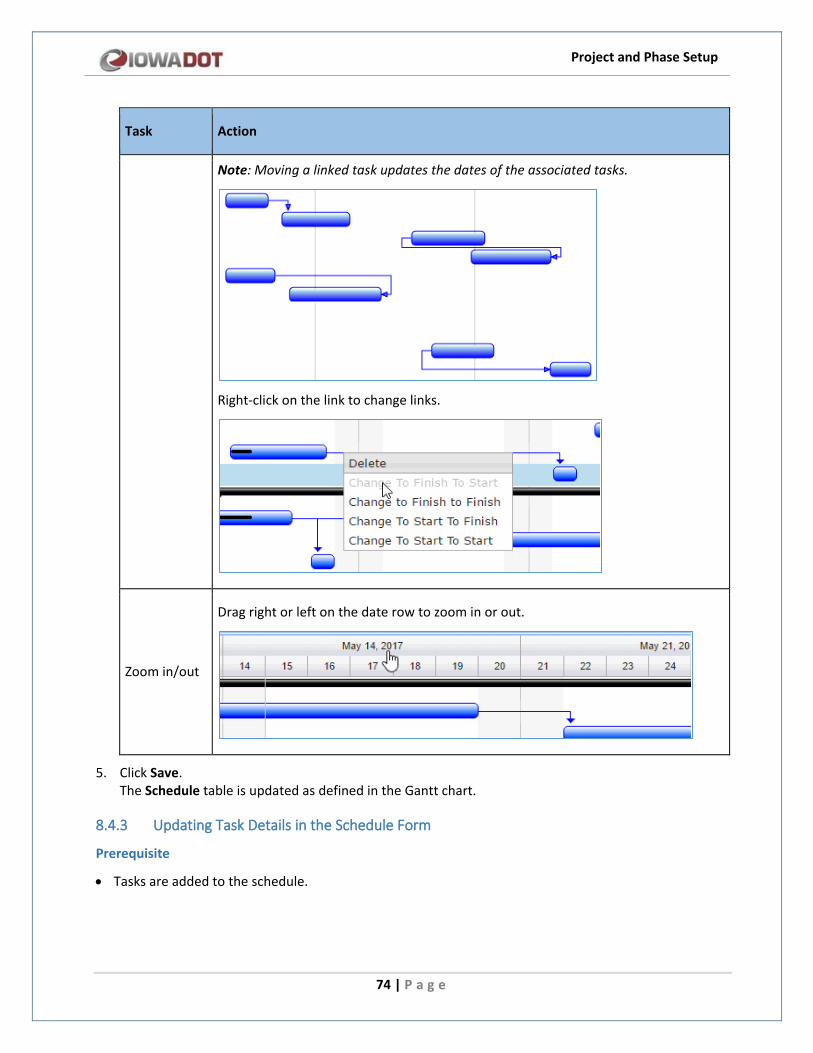
Project and Phase Setup
74 | P a g e
Task Action
Note: Moving a linked task updates the dates of the associated tasks.
Right-click on the link to change links.
Zoom in/out
Drag right or left on the date row to zoom in or out.
5. Click Save. The Schedule table is updated as defined in the Gantt chart.
8.4.3 Updating Task Details in the Schedule Form
Prerequisite
• Tasks are added to the schedule.
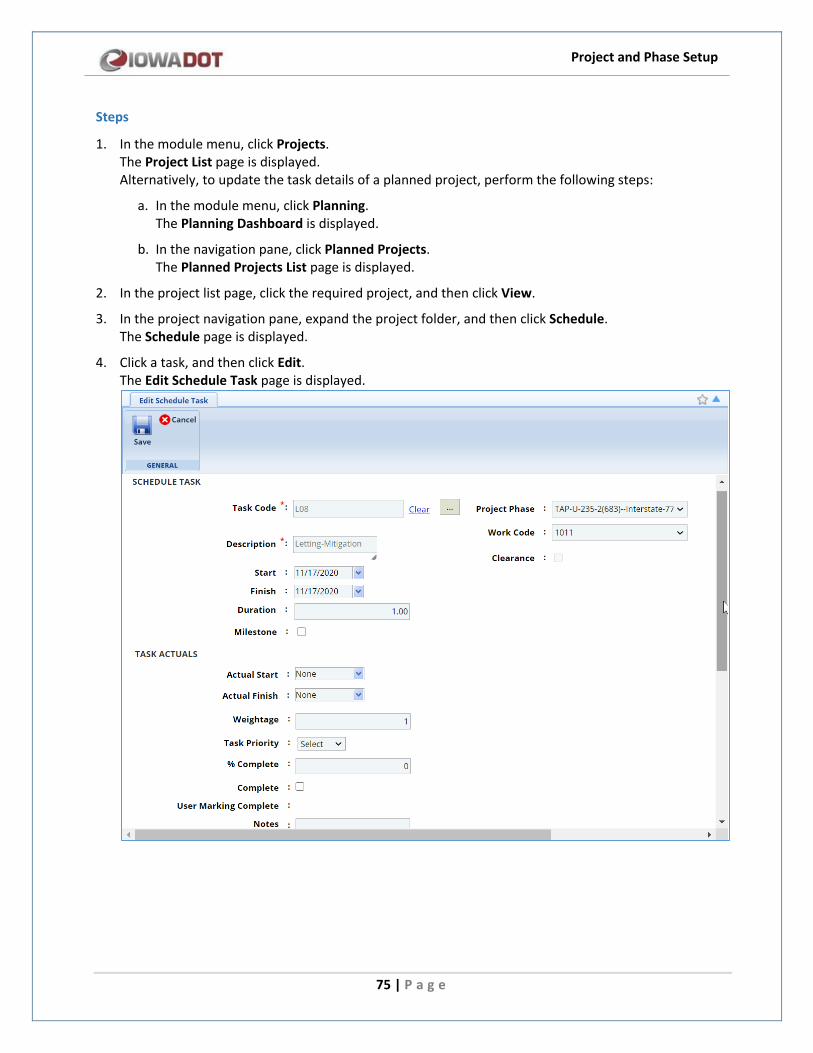
Project and Phase Setup
75 | P a g e
Steps
1. In the module menu, click Projects. The Project List page is displayed. Alternatively, to update the task details of a planned project, perform the following steps:
a. In the module menu, click Planning. The Planning Dashboard is displayed.
b. In the navigation pane, click Planned Projects. The Planned Projects List page is displayed.
2. In the project list page, click the required project, and then click View.
3. In the project navigation pane, expand the project folder, and then click Schedule. The Schedule page is displayed.
4. Click a task, and then click Edit. The Edit Schedule Task page is displayed.
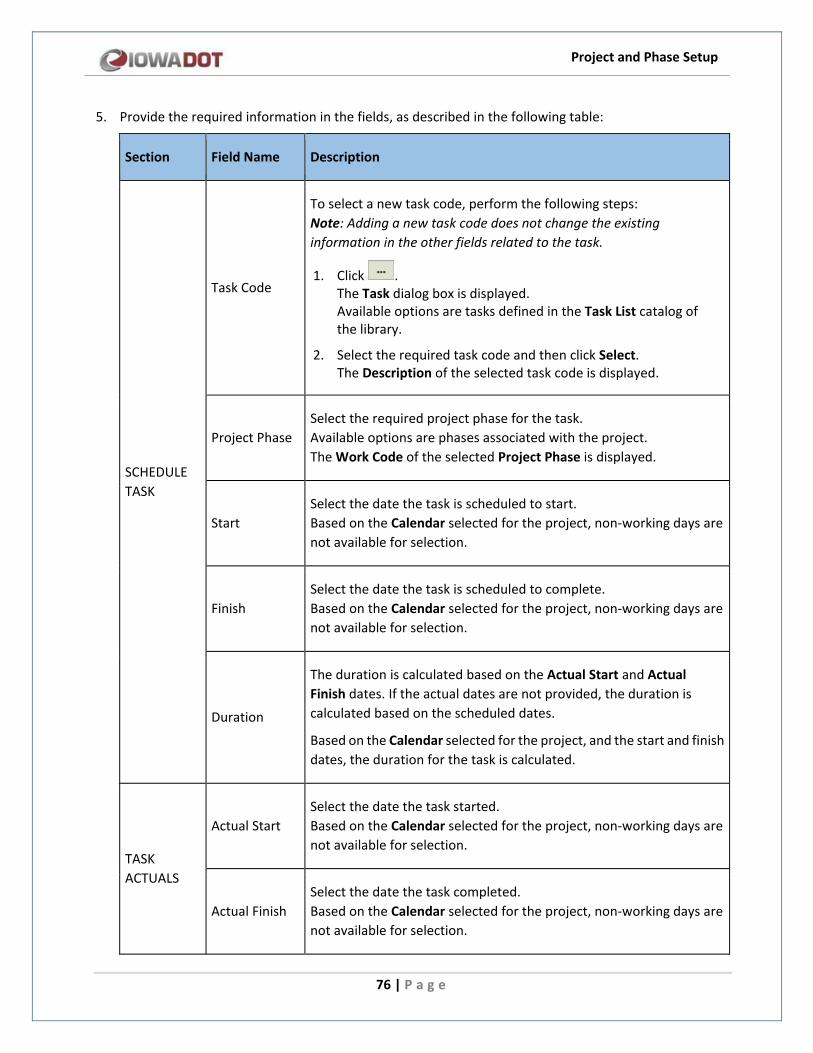
Project and Phase Setup
76 | P a g e
5. Provide the required information in the fields, as described in the following table:
Section Field Name Description
SCHEDULE TASK
Task Code
To select a new task code, perform the following steps: Note: Adding a new task code does not change the existing information in the other fields related to the task.
1. Click . The Task dialog box is displayed. Available options are tasks defined in the Task List catalog of the library.
2. Select the required task code and then click Select. The Description of the selected task code is displayed.
Project Phase Select the required project phase for the task. Available options are phases associated with the project. The Work Code of the selected Project Phase is displayed.
Start Select the date the task is scheduled to start. Based on the Calendar selected for the project, non-working days are not available for selection.
Finish Select the date the task is scheduled to complete. Based on the Calendar selected for the project, non-working days are not available for selection.
Duration
The duration is calculated based on the Actual Start and Actual Finish dates. If the actual dates are not provided, the duration is calculated based on the scheduled dates.
Based on the Calendar selected for the project, and the start and finish dates, the duration for the task is calculated.
TASK ACTUALS
Actual Start Select the date the task started. Based on the Calendar selected for the project, non-working days are not available for selection.
Actual Finish Select the date the task completed. Based on the Calendar selected for the project, non-working days are not available for selection.

Project and Phase Setup
77 | P a g e
Section Field Name Description
Weightage Enter the weightage for the task.
Task Priority Select the task priority. Available options are High, Medium, and Low.
% Complete
If the Actual Finish date is selected, then the % Complete will be automatically marked as 100%.
Optionally, enter the percentage of completion of the task. Note: Editing the % Complete will automatically remove the Actual Finish date selected and clear the Complete check box. The percentage of completion of a task with sub-tasks is calculated based on the weightage and the percentage of completion of the sub-tasks. The % Complete value of a task with sub-tasks is calculated as:
% Complete = Sum (Weightage of sub-task 1 * % Complete of sub-task 1, Weightage of sub-task 2 * % Complete of sub-task 2, Weightage of sub-task n * % Complete of sub-task n)
Complete
If the Actual Finish date is selected, then the Complete check box is automatically selected.
Optionally, select the check box if the task is complete. On selecting the check box, the % Complete will be marked as 100%. On saving the page, the name of the user who marked the item as complete is displayed in the User Marking Complete field.
Notes Enter any notes for the task.
If the Clearance check box is selected for the task in the Task List catalog of the library, then the task required clearance or approval from the respective regulatory agencies. To add the clearance details for the task, in the CLEARANCE section, provide the required information in the fields, as described in the following table:
CLEARANCE Applicable To All Phases
Select the check box to make the clearance details defined for this task apply to all the project phases associated with the task.
The name of the clearance is displayed in the Clearance Name field.
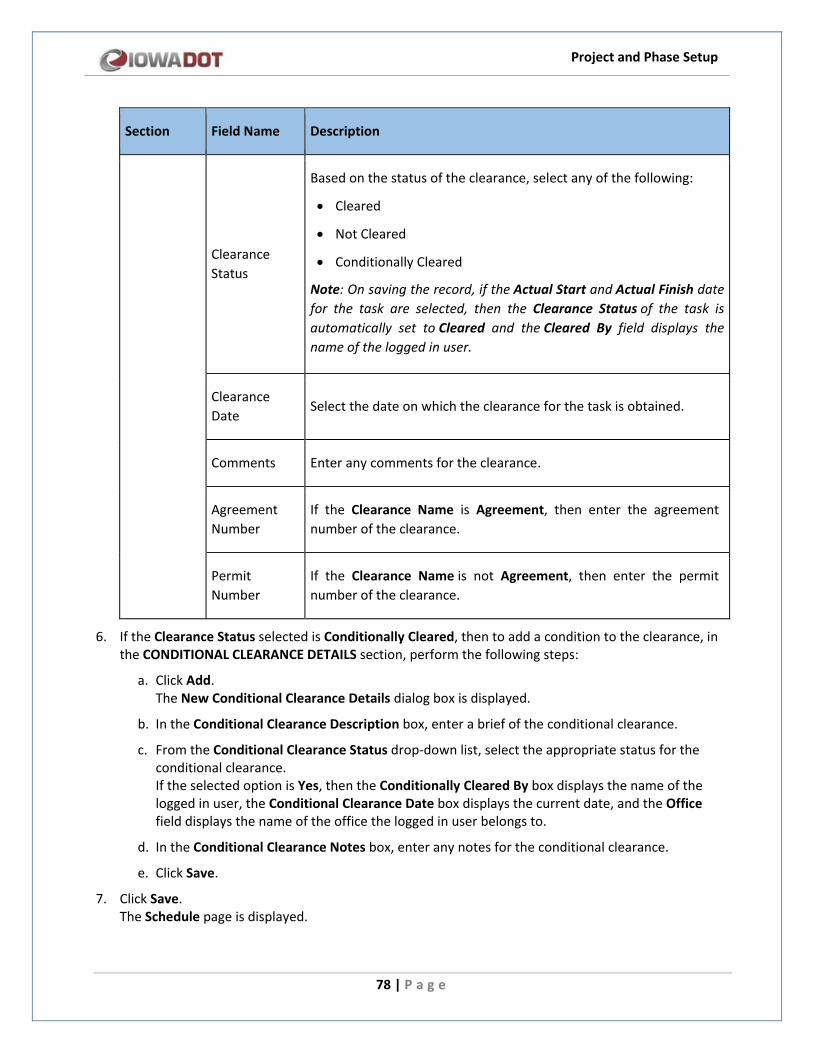
Project and Phase Setup
78 | P a g e
Section Field Name Description
Clearance Status
Based on the status of the clearance, select any of the following:
• Cleared
• Not Cleared
• Conditionally Cleared
Note: On saving the record, if the Actual Start and Actual Finish date for the task are selected, then the Clearance Status of the task is automatically set to Cleared and the Cleared By field displays the name of the logged in user.
Clearance Date
Select the date on which the clearance for the task is obtained.
Comments Enter any comments for the clearance.
Agreement Number
If the Clearance Name is Agreement, then enter the agreement number of the clearance.
Permit Number
If the Clearance Name is not Agreement, then enter the permit number of the clearance.
6. If the Clearance Status selected is Conditionally Cleared, then to add a condition to the clearance, in the CONDITIONAL CLEARANCE DETAILS section, perform the following steps:
a. Click Add. The New Conditional Clearance Details dialog box is displayed.
b. In the Conditional Clearance Description box, enter a brief of the conditional clearance.
c. From the Conditional Clearance Status drop-down list, select the appropriate status for the conditional clearance. If the selected option is Yes, then the Conditionally Cleared By box displays the name of the logged in user, the Conditional Clearance Date box displays the current date, and the Office field displays the name of the office the logged in user belongs to.
d. In the Conditional Clearance Notes box, enter any notes for the conditional clearance.
e. Click Save.
7. Click Save. The Schedule page is displayed.

Project and Phase Setup
79 | P a g e
8.5 Removing Tasks from Schedule
You can remove tasks from the project schedule.
Steps
1. In the module menu, click Projects. The Project List page is displayed. Alternatively, to remove tasks from the project schedule page of a planned project, perform the following steps:
a. In the module menu, click Planning. The Planning Dashboard is displayed.
b. In the navigation pane, click Planned Projects. The Planned Projects List page is displayed.
2. In the project list page, click the required project, and then click View.
3. In the project navigation pane, click Schedule. The Schedule page is displayed.
4. In the Schedule table, select the required task.
5. To select multiple tasks, perform either of the following steps: - Press CTRL, and then click the required tasks. - Press SHIFT, and then click the first task and the last task. All tasks between the first and last tasks are selected.
6. In the GANTT group, click Remove Tasks.
7. Click Save.
8.6 Taking a Snapshot of the Schedule
You can take a snapshot of the current project schedule and save the snapshot for future reference.
Steps
1. In the module menu, click Projects. The Project List page is displayed. Alternatively, to take a snapshot of the current schedule of a planned project, perform the following steps:
a. In the module menu, click Planning. The Planning Dashboard is displayed.
b. In the navigation pane, click Planned Projects. The Planned Projects List page is displayed.
2. In the project list page, click the required project, and then click View.
3. In the project navigation pane, click Schedule. The Schedule page is displayed.
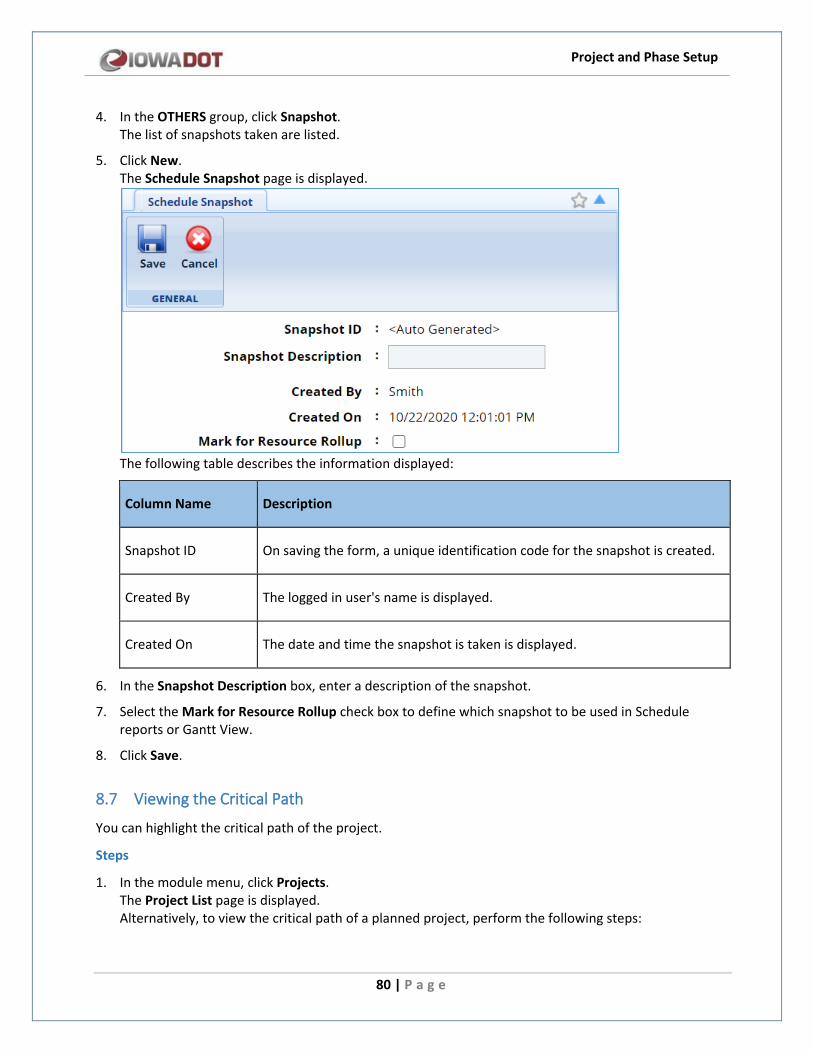
Project and Phase Setup
80 | P a g e
4. In the OTHERS group, click Snapshot. The list of snapshots taken are listed.
5. Click New. The Schedule Snapshot page is displayed.
The following table describes the information displayed:
Column Name Description
Snapshot ID On saving the form, a unique identification code for the snapshot is created.
Created By The logged in user's name is displayed.
Created On The date and time the snapshot is taken is displayed.
6. In the Snapshot Description box, enter a description of the snapshot.
7. Select the Mark for Resource Rollup check box to define which snapshot to be used in Schedule reports or Gantt View.
8. Click Save.
8.7 Viewing the Critical Path
You can highlight the critical path of the project.
Steps
1. In the module menu, click Projects. The Project List page is displayed. Alternatively, to view the critical path of a planned project, perform the following steps:
Project and Phase Setup
81 | P a g e
a. In the module menu, click Planning. The Planning Dashboard is displayed.
b. In the navigation pane, click Planned Projects. The Planned Projects List page is displayed.
2. In the project list page, click the required project, and then click View.
3. In the project navigation pane, click Schedule. The Schedule page is displayed.
4. In the OTHERS group, click Show Critical Path. The critical path of the project is highlighted.
8.8 Hiding the Critical Path
If the critical path of the project is highlighted, you can remove the critical path highlights.
Steps
1. In the module menu, click Projects. The Project List page is displayed. Alternatively, to hide the critical path of a planned project, perform the following steps:
a. In the module menu, click Planning. The Planning Dashboard is displayed.
b. In the navigation pane, click Planned Projects. The Planned Projects List page is displayed.
2. In the project list page, click the required project, and then click View.
3. In the project navigation pane, click Schedule. The Schedule page is displayed.
4. In the OTHERS group, click Hide Critical Path. The highlights of the critical path are removed.
8.9 Schedule Reports
Steps
1. In the module menu, click Projects. The Project List page is displayed. Alternatively, to view the schedule report of a planned project, perform the following steps:
a. In the module menu, click Planning. The Planning Dashboard is displayed.
b. In the navigation pane, click Planned Projects. The Planned Projects List page is displayed.
2. In the project list page, double-click the required project.
3. In the navigation pane, expand the project folder, and then click Schedule.

Project and Phase Setup
82 | P a g e
4. Click Reports, and then click the required report.
You can generate the following reports:
• Clearance Summary Report
• Schedule Comparison Report
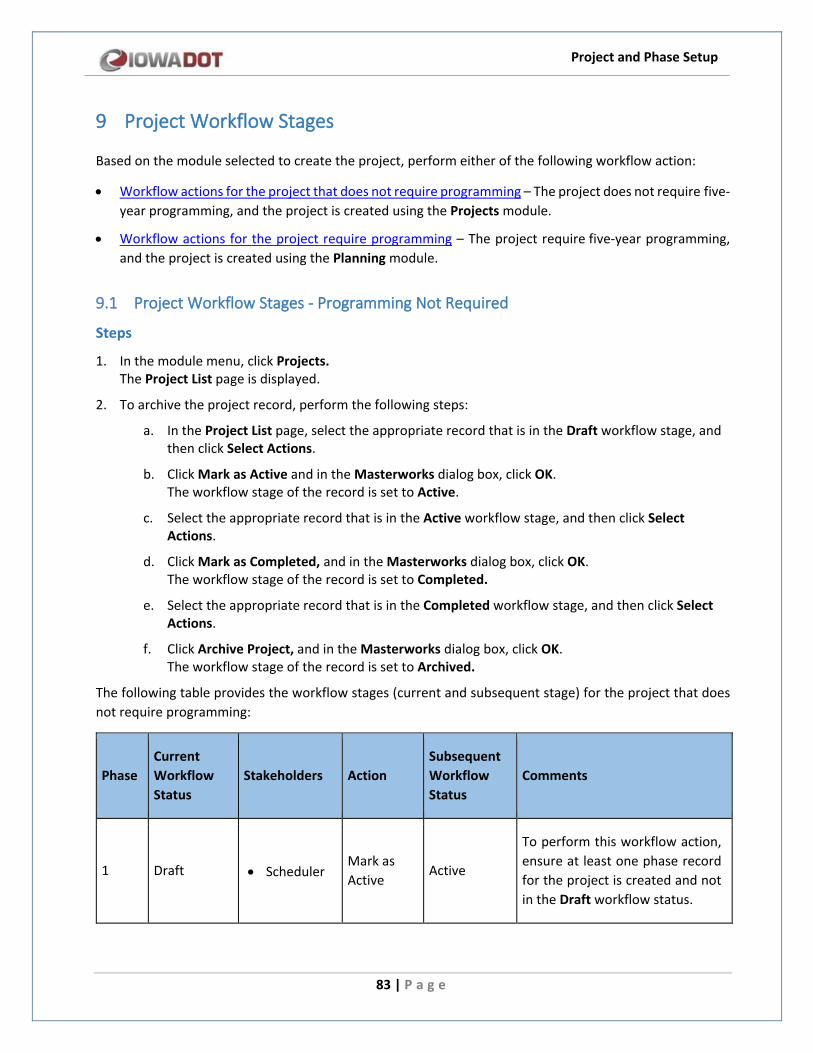
Project and Phase Setup
83 | P a g e
9 Project Workflow Stages
Based on the module selected to create the project, perform either of the following workflow action:
• Workflow actions for the project that does not require programming – The project does not require five-year programming, and the project is created using the Projects module.
• Workflow actions for the project require programming – The project require five-year programming, and the project is created using the Planning module.
9.1 Project Workflow Stages - Programming Not Required
Steps
1. In the module menu, click Projects. The Project List page is displayed.
2. To archive the project record, perform the following steps:
a. In the Project List page, select the appropriate record that is in the Draft workflow stage, and then click Select Actions.
b. Click Mark as Active and in the Masterworks dialog box, click OK. The workflow stage of the record is set to Active.
c. Select the appropriate record that is in the Active workflow stage, and then click Select Actions.
d. Click Mark as Completed, and in the Masterworks dialog box, click OK. The workflow stage of the record is set to Completed.
e. Select the appropriate record that is in the Completed workflow stage, and then click Select Actions.
f. Click Archive Project, and in the Masterworks dialog box, click OK. The workflow stage of the record is set to Archived.
The following table provides the workflow stages (current and subsequent stage) for the project that does not require programming:
Phase Current Workflow Status
Stakeholders Action Subsequent Workflow Status
Comments
1 Draft • Scheduler Mark as Active
Active
To perform this workflow action, ensure at least one phase record for the project is created and not in the Draft workflow status.
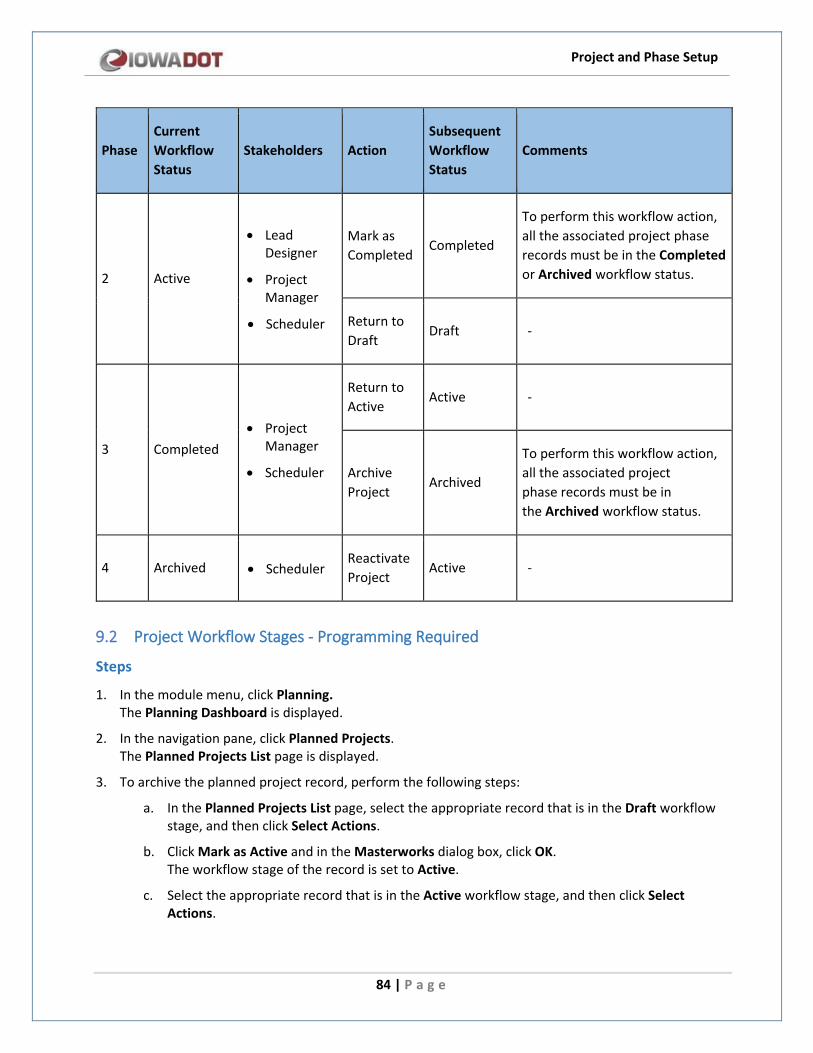
Project and Phase Setup
84 | P a g e
Phase Current Workflow Status
Stakeholders Action Subsequent Workflow Status
Comments
2 Active
• Lead Designer
• Project Manager
• Scheduler
Mark as Completed
Completed
To perform this workflow action, all the associated project phase records must be in the Completed or Archived workflow status.
Return to Draft
Draft -
3 Completed • Project
Manager
• Scheduler
Return to Active
Active -
Archive Project
Archived
To perform this workflow action, all the associated project phase records must be in the Archived workflow status.
4 Archived • Scheduler Reactivate Project
Active -
9.2 Project Workflow Stages - Programming Required
Steps
1. In the module menu, click Planning. The Planning Dashboard is displayed.
2. In the navigation pane, click Planned Projects. The Planned Projects List page is displayed.
3. To archive the planned project record, perform the following steps:
a. In the Planned Projects List page, select the appropriate record that is in the Draft workflow stage, and then click Select Actions.
b. Click Mark as Active and in the Masterworks dialog box, click OK. The workflow stage of the record is set to Active.
c. Select the appropriate record that is in the Active workflow stage, and then click Select Actions.
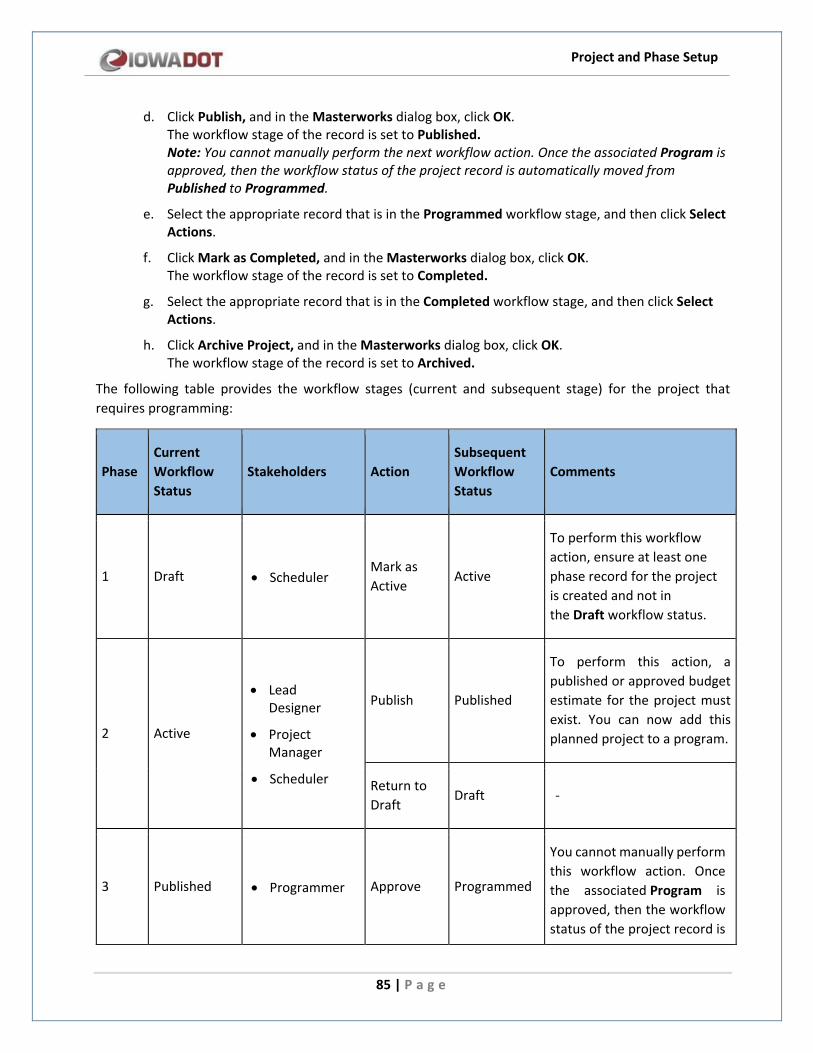
Project and Phase Setup
85 | P a g e
d. Click Publish, and in the Masterworks dialog box, click OK. The workflow stage of the record is set to Published. Note: You cannot manually perform the next workflow action. Once the associated Program is approved, then the workflow status of the project record is automatically moved from Published to Programmed.
e. Select the appropriate record that is in the Programmed workflow stage, and then click Select Actions.
f. Click Mark as Completed, and in the Masterworks dialog box, click OK. The workflow stage of the record is set to Completed.
g. Select the appropriate record that is in the Completed workflow stage, and then click Select Actions.
h. Click Archive Project, and in the Masterworks dialog box, click OK. The workflow stage of the record is set to Archived.
The following table provides the workflow stages (current and subsequent stage) for the project that requires programming:
Phase Current Workflow Status
Stakeholders Action Subsequent Workflow Status
Comments
1 Draft • Scheduler Mark as Active
Active
To perform this workflow action, ensure at least one phase record for the project is created and not in the Draft workflow status.
2 Active
• Lead Designer
• Project Manager
• Scheduler
Publish Published
To perform this action, a published or approved budget estimate for the project must exist. You can now add this planned project to a program.
Return to Draft
Draft -
3 Published • Programmer Approve Programmed
You cannot manually perform this workflow action. Once the associated Program is approved, then the workflow status of the project record is
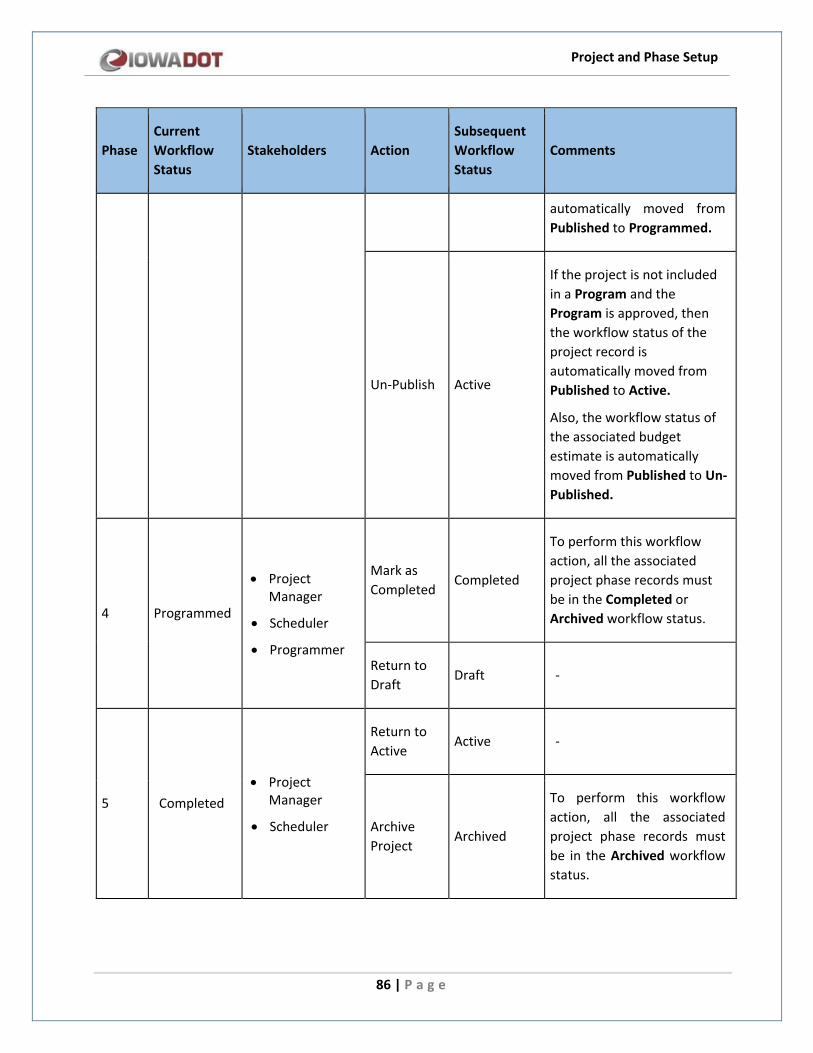
Project and Phase Setup
86 | P a g e
Phase Current Workflow Status
Stakeholders Action Subsequent Workflow Status
Comments
automatically moved from Published to Programmed.
Un-Publish Active
If the project is not included in a Program and the Program is approved, then the workflow status of the project record is automatically moved from Published to Active.
Also, the workflow status of the associated budget estimate is automatically moved from Published to Un-Published.
4 Programmed
• Project Manager
• Scheduler
• Programmer
Mark as Completed
Completed
To perform this workflow action, all the associated project phase records must be in the Completed or Archived workflow status.
Return to Draft
Draft -
5 Completed • Project
Manager
• Scheduler
Return to Active
Active -
Archive Project
Archived
To perform this workflow action, all the associated project phase records must be in the Archived workflow status.
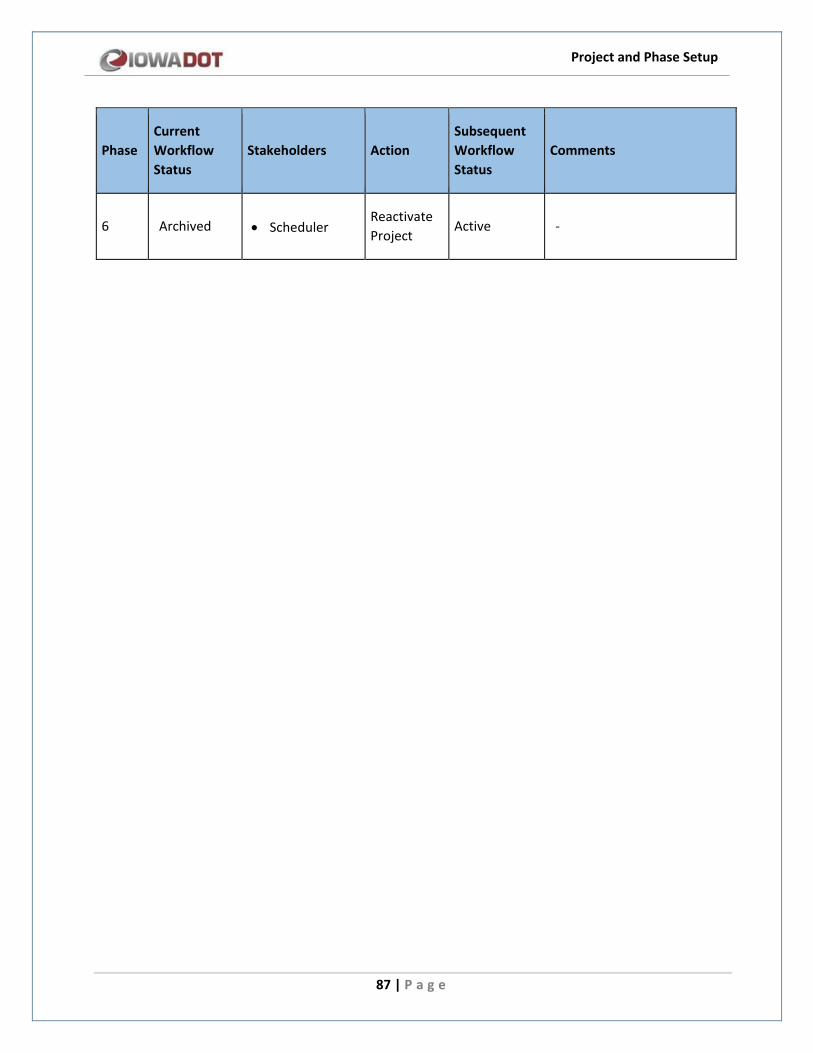
Project and Phase Setup
87 | P a g e
Phase Current Workflow Status
Stakeholders Action Subsequent Workflow Status
Comments
6 Archived • Scheduler Reactivate Project
Active -
Project and Phase Setup
88 | P a g e
10 Appendix
10.1 Attachments
You can upload attachments, or link files in the Documents folders to every form and workflow transition. There is no limitation on the number of attachments or the size of attachments that you can upload in a form or during workflow transition.
Refer to the following topics to upload or link, and access attachments:
• Attaching Files to a Form
• Accessing Attachments
You can download, annotate, and update attachments.
10.1.1 Attaching a File to a Form
You can upload files to a form or during a workflow transition. You can also link a file in the Documents folders to a form or during a workflow transition.
Steps
• To upload files, perform the following steps in the ATTACHMENTS section:
a. Click Upload Document. The Choose File to Upload dialog box is displayed.
b. To upload a single file, click the required file. Alternatively, to upload multiple files, press CTRL key, and then click the required files.
c. Click Open. The files are uploaded to the form and are displayed in the ATTACHMENTS section.
d. In the Title column, enter the titles for the files attached.
• To link to files in the Documents folders, perform the following steps:
a. In the ATTACHMENTS section, click Link Document.
b. Click Masterworks Document.
c. From the Folder drop-down list, select the required folder where the files exist. The list of files in that folder are displayed.
d. From the list of files, select the required files.
e. Click OK. The files are linked to the form and are displayed in the attachment grid.
f. In the Title column, enter the titles for the linked files.
• To link a file in an external storage system, perform the following steps:
a. In the ATTACHMENTS section, click Link Document.
Project and Phase Setup
89 | P a g e
b. Click External Document.
c. In the URL/Link box, enter the URL to the file in external storage system.
d. In the Title box, enter the title for the linked file.
e. Click OK. The file is linked to the form and is displayed in the attachment grid.
10.1.2 Accessing Attached Files
You can access files that are attached to forms and workflows.
Steps
• To access files attached to a form:
1. In the navigation pane, click the required form. The form list page is displayed.
2. In the tool bar, in the OTHERS group, click Attachments. The attachments of all the forms are listed.
• To access files attached to a workflow:
o You can access files attached to a workflow from the Workflow History dialog box.
• To download an attachment, click the required document, and then click .
10.1.3 Deleting Attached Files
You can delete files that are attached to forms and workflows.
Steps
1. To access the required file, perform either of the following steps:
• Files attached to a form:
a. In the navigation pane, click the required form. The form list page is displayed.
b. In the tool bar, in the OTHERS group, click Attachments. The attachments of all the forms are listed.
• Files attached to a workflow:
o You can access files attached to a workflow from the Workflow History dialog box.
2. To delete an attachment, click the required document, and then click .