Embed Size (px)
Citation preview

*071-8015-04*
Profile System Software 3.2.7 Release Notes
Table of ContentsTable of Contents . . . . . . . . . . . . . . . . . . . . . . . . . . . . . . . . . . . . . . . . . . . . . . . . . . . 1Grass Valley Group Product Support . . . . . . . . . . . . . . . . . . . . . . . . . . . . . . . . . . . 2Version Requirements . . . . . . . . . . . . . . . . . . . . . . . . . . . . . . . . . . . . . . . . . . . . . . . 3About Profile DVCPRO Codecs . . . . . . . . . . . . . . . . . . . . . . . . . . . . . . . . . . . . . . . 4
Profile DVCPRO Specifications . . . . . . . . . . . . . . . . . . . . . . . . . . . . . . . . . . . . . 4Using DVCPRO 50 Codecs . . . . . . . . . . . . . . . . . . . . . . . . . . . . . . . . . . . . . . . . . 5Profile DVCPRO System Timing Considerations . . . . . . . . . . . . . . . . . . . . . . . . 6Using DVCPRO with Avid Newscutter . . . . . . . . . . . . . . . . . . . . . . . . . . . . . . . . 6
Software Installation . . . . . . . . . . . . . . . . . . . . . . . . . . . . . . . . . . . . . . . . . . . . . . . . 7Installing Profile System Software 3.2.7 . . . . . . . . . . . . . . . . . . . . . . . . . . . . . . . 7
New Startup Procedures . . . . . . . . . . . . . . . . . . . . . . . . . . . . . . . . . . . . . . . . 8Updating EDR Firmware . . . . . . . . . . . . . . . . . . . . . . . . . . . . . . . . . . . . . . . 9Updating Fibre Channel Microcode . . . . . . . . . . . . . . . . . . . . . . . . . . . . . . 10Upgrading Media Drive Microcode . . . . . . . . . . . . . . . . . . . . . . . . . . . . . . 11Media Manager Notes . . . . . . . . . . . . . . . . . . . . . . . . . . . . . . . . . . . . . . . . . 11
Updating the RS-422 interface board device driver . . . . . . . . . . . . . . . . . . . . . 12Viewing version numbers . . . . . . . . . . . . . . . . . . . . . . . . . . . . . . . . . . . . . . 12Removing the existing RS-422 device driver . . . . . . . . . . . . . . . . . . . . . . . . 12Installing the RS-422 Board Device Driver . . . . . . . . . . . . . . . . . . . . . . . . 13
Version Compatibility . . . . . . . . . . . . . . . . . . . . . . . . . . . . . . . . . . . . . . . . . . . . 20Ethernet Interface Configuration . . . . . . . . . . . . . . . . . . . . . . . . . . . . . . . . . . . . . . 21EDR Memory Requirements . . . . . . . . . . . . . . . . . . . . . . . . . . . . . . . . . . . . . . . . . 22Using Fibre Channel . . . . . . . . . . . . . . . . . . . . . . . . . . . . . . . . . . . . . . . . . . . . . . . 23
Installing Fibre Channel . . . . . . . . . . . . . . . . . . . . . . . . . . . . . . . . . . . . . . . . . . 23Fibre Channel Compatibility . . . . . . . . . . . . . . . . . . . . . . . . . . . . . . . . . . . . . . 23Concurrent Fibre Channel Copies . . . . . . . . . . . . . . . . . . . . . . . . . . . . . . . . . . 23
Microsoft Windows NT Support . . . . . . . . . . . . . . . . . . . . . . . . . . . . . . . . . . . . . . . 25Known Problems . . . . . . . . . . . . . . . . . . . . . . . . . . . . . . . . . . . . . . . . . . . . . . . . . . 26
Startup . . . . . . . . . . . . . . . . . . . . . . . . . . . . . . . . . . . . . . . . . . . . . . . . . . . . . . . . 26Recording . . . . . . . . . . . . . . . . . . . . . . . . . . . . . . . . . . . . . . . . . . . . . . . . . . . . . 27Video . . . . . . . . . . . . . . . . . . . . . . . . . . . . . . . . . . . . . . . . . . . . . . . . . . . . . . . . . 27Audio . . . . . . . . . . . . . . . . . . . . . . . . . . . . . . . . . . . . . . . . . . . . . . . . . . . . . . . . . 28Profile Applications . . . . . . . . . . . . . . . . . . . . . . . . . . . . . . . . . . . . . . . . . . . . . 29Fibre Channel . . . . . . . . . . . . . . . . . . . . . . . . . . . . . . . . . . . . . . . . . . . . . . . . . . 31Disk Management . . . . . . . . . . . . . . . . . . . . . . . . . . . . . . . . . . . . . . . . . . . . . . . 32Profile Library Systems . . . . . . . . . . . . . . . . . . . . . . . . . . . . . . . . . . . . . . . . . . . 32PRC100 . . . . . . . . . . . . . . . . . . . . . . . . . . . . . . . . . . . . . . . . . . . . . . . . . . . . . . . 32Louth Protocol . . . . . . . . . . . . . . . . . . . . . . . . . . . . . . . . . . . . . . . . . . . . . . . . . 32APIs . . . . . . . . . . . . . . . . . . . . . . . . . . . . . . . . . . . . . . . . . . . . . . . . . . . . . . . . . . 33Diagnostics . . . . . . . . . . . . . . . . . . . . . . . . . . . . . . . . . . . . . . . . . . . . . . . . . . . . 33
Copyright © 2002 Grass Valley Group Inc. All rights reserved. Printed in the United States of America.
This document may not be copied in whole or in part, or otherwise reproduced except as specifically permitted under U.S. copyright law, without the prior written consent of Grass Valley Group Inc., P.O. Box 59900, Nevada City, California 95959-7900
Grass Valley, GRASS VALLEY GROUP, Profile and Profile XP are either registered trademarks or trademarks of Grass Valley Group in the United States and/or other countries. Other trademarks used in this document are either registered trademarks or trademarks of the manufacturers or vendors of the associated products. Grass Valley Group products are covered by U.S. and foreign patents, issued and pending. Additional information regarding Grass Valley Group’s trademarks and other proprietary rights may be found at www.grassvalleygroup.com.
Product options and specifications subject to change without notice. The information in this manual is furnished for informational use only, is subject to change without notice, and should not be construed as a commitment by Grass Valley Group. Grass Valley Group assumes no responsibility or liability for any errors or inaccuracies that may appear in this publication.

2
Grass Valley Group Product SupportTo get technical assistance, check on the status of problems, or report new problems, contact Grass Valley Product Support via e-mail, the Web, or by phone or fax.
Web Technical Support To access support information on the Web, visit the product support Web page on the Grass Valley Group Web site. You can download software or find solutions to problems by searching our Frequently Asked Questions (FAQ) database.
World Wide Web: http://www.grassvalleygroup.com/support/Technical Support E-mail Address: [email protected].
Phone SupportUse the following information to contact product support by phone during business hours. Afterhours phone support is available for warranty and contract customers.
USA and Americas (includes Latin America and Canada)
Europe and UK
Asia Pacific
Authorized Support RepresentativeA local authorized support representative may be available in your country. To locate the support representative for your country, visit the product support Web page on the Grass Valley Group Web site.
Profile Users GroupYou can connect with other Profile XP Media Platform users to ask questions or share advice, tips, and hints. Send e-mail to [email protected] to join the community and benefit from the experience of others.
Telephone (800) 547-8949 (Toll Free)(530) 478-4148 (Direct Dial Toll Call)
Fax (530) 478-3181
UK Regional Service Location
Tel +44 1753 218 777Fax +44 1753 218 757
Italy Tel +39 72 901 428Fax +39 72 905 371
France Tel +33 145 297 300Fax +33 145 297 302
Germany Tel +49 221 1791 234Fax +49 221 1791 235
Australia Tel (612) 8877 6800Fax (612) 8877 6825
India Tel (91) 11 373 0544Fax (91) 11 373 0543
China Tel (86) 10 6235 1185Fax (86)10 6235 1190
Japan Tel (813) 5484 6869Fax (813) 5484 3775
Hong Kong Tel (852)-2531-3000Fax (852)-2802-2996
South East Asia
Tel (65) 7328 729Fax (65)7327 649
Profile Release Notes Version 3.2.7 — 21 June, 2002

Ve
Version Requirements>>> Profile System Software 3.2.7 of Profile System Software requires:
• A PDR400 system, or a PDR200 system upgraded with a DVCPRO Codec board. All DVCPRO Codec boards must be Revision 2, mod level 3 or higher.
• Windows NT 4.0 with Service Pack 3 and the Year 2000 Hotfix. You’ll find more information about the Windows NT requirement in the section called “Microsoft Windows NT Support” on page 25. Please note that this release is not approved for operation with Windows NT 3.51.
>>> Do not install Profile System Software 3.2.7 on PDR100 or PDR300 systems, or on PDR200 systems which are not equipped with DVCPRO Codec boards.
>>> You must have increased enhanced disk recorder memory (RAM) to use the Profile System Software 3.2.7. Refer to “EDR Memory Requirements” on page 22 for more information.
>>> You must load the most recent EDR firmware, included with this release, to improve internal data transfers and Fibre Channel performance. Refer to “Updating EDR Firmware” on page 9 for more information.
>>> You must load the most recent Fibre Channel Switch mode firmware, included with this release, to improve your Fibre Channel transfer performance with a Fibre Channel switch. Refer to “Updating Fibre Channel Microcode” on page 10 for more information.
>>> This version of Profile System Software was built using Visual C++ version 6.0. Applications built with earlier versions of Visual C++ may not operate correctly, and should be rebuilt using the current Profile SDK and Visual C++ version 6.0.
rsion 3.2.7 — 21 June, 2002 Profile Release Notes 3

4
About Profile DVCPRO CodecsProfile System Software 3.2.7 introduces support for DVCPRO 50 operation on the DVCPRO codec boards. Each DVCPRO 50 codec uses a pair of DVCPRO 25 codecs.
Your Profile system may be equipped with up to six DVCPRO 25 codecs: one 4-codec board and one 2-codec board. The 2-codec board must be located in slot J12 (the higher-numbered slot). All DVCPRO Codec boards must be Revision 2, mod level 3 or higher. Look for the following line in your Profile.log file.
I: P1 DvcproInitBoardInfo: DVCPRO codec board recognized, rev:2 mod:3
Contact your Grass Valley representative for information on obtaining the required version of DVCPRO codec boards.
When using the DVCPRO codecs in your Profile system, you should be aware of a number of differences in operation compared to JPEG codecs, and to the MPEG encoders and decoders on other Profile systems. The following sections detail these differences, and will help you ensure optimal performance of your system.
Profile DVCPRO SpecificationsThe following specifications apply to this release of DVCPRO 25 and DVCPRO 50 support in PDR400 systems, and PDR200 systems with the optional DVCPRO codec board installed. These specifications may change in future releases.
• The Profile DVCPRO codecs do not allow the display of fields from adjacent frames. Therefore, off-speed play, both forward and reverse, is not smooth at some slow speeds. Stepping through material with both fields enabled (Jog Frame Mode) does not step from field to field, but does step from frame to frame.
• You can store the following VBI information from your video inputs when recording with DVCPRO codecs.
- Line 21 data, including Closed Captioning and Content Advisory Information (EIA-608, EIA-708, EIA-744).
- VITC from any specified line between 6 and 20.
On playout, you can select the desired line for VITC insertion. The closed captioning and content advisory information is played on the required lines.
You can not store any other VBI information when recording using DVCPRO codecs.
Profile Release Notes Version 3.2.7 — 21 June, 2002

Ve
Using DVCPRO 50 CodecsThe Profile DVCPRO 50 codecs are actually pairs of DVCPRO codecs operating together. If you wish to use a DVCPRO 50 codec, you must use Configuration Manager to assign a pair of DVCPRO 25 codecs for use as a DVCPRO 50 codec. The DVCPRO 50 codec can then be used in all of your applications, such as VdrPanel. Once the DVCPRO 50 codec is assigned, the corresponding DVCPRO 25 codecs are not available for DVCPRO 25 operations until you change the configuration again.
To configure DVCPRO codecs for use as DVCPRO 25 or DVCPRO 50 codecs:
1. Close all your Profile applications.
2. Start Configuration Manager and choose Option | DVCPRO Codec Configuration.
3. Select the desired combination of DVCPRO 25 and DVCPRO 50 codecs for your application.
Figure 1. DVCPRO codec configuration selection
4. Select the desired number of DVCPRO 25 and DVCPRO 50 codecs. DVCPRO 50 codecs are created using pairs of DVCPRO 25 codecs in ascending order. The first DVCPRO 50 codec uses DVCPRO 25 codecs 1 and 2, the second 3 and 4, and so on.
5. Click OK for your selection to take effect. You do not need to restart your system to change DVCPRO codec configurations. However, the configuration change will not take effect until you close all of your Profile applications and restart them.
NOTE: You must shut down all Profile applications, both local and remote, before switching the configuration of DVCPRO codecs. Restarting your system is the best way to ensure that all Profile applications are shut down.
rsion 3.2.7 — 21 June, 2002 Profile Release Notes 5

6
Profile DVCPRO System Timing ConsiderationsThe Profile DVCPRO 25 codecs are grouped as pairs of codecs which can be used together as a single DVCPRO 50 codec. When you select a DVCPRO 50 codec, you are using both DVCPRO 25 codecs in the pair.
Because of this paired codec architecture, some restrictions apply to DVCPRO codecs which require the following system timing limitations:
1. You must supply a Reference In signal to the Profile system.
2. All video signals that you want to record with a DVCPRO codec must be synchronous with the Reference In signal.
3. If you want to use DVCPRO 25 codecs as four or six independent codecs, all of your video inputs must be auto-timed to the Reference input. Make sure that all inputs are within the correction range of the auto-timing setting (+/- 1 line). In Configuration Manager, select Enable Auto-Timing for each input. You must ensure that each input actually auto-times by checking that the Auto-Timed indicator in the Video Input dialog box is lit. Refer to “Using the Profile Configuration Manager” in the Profile Family User Manual.
4. If you are unable to auto-time an input, or if you wish to use DVCPRO 25 codecs for BVW Insert/Edit operations, you may only use one of the codecs from each pair, Codec 1, Codec 3, and Codec 5. Note that the second DVCPRO 25 codec from each pair must not be used for recording or playback in this situation.
Using DVCPRO with Avid NewscutterIf you are exchanging material between your PDR400 and an Avid Newscutter, you must install appropriate software (DHM and Tserver) on both systems. You can obtain this software from your Grass Valley Group representative. Be sure to use the installation and configuration instructions included in the Avid Newscutter-Profile Installation and Configuration manual to install this software.
Table 1 lists the compatible versions.of Newcutter, DHM, and Tserver software.
Table 1: Newscutter, DHM, and Tserver version compatibility
Newscutter version
DHM version
Tserver version
2.0 2.0 2.0
1.5 1.0 1.0
Profile Release Notes Version 3.2.7 — 21 June, 2002

Ve
Software InstallationYou can install this release of Profile System Software 3.2.7 on any PDR400 Profile Video File Server, or on any PDR200 equipped with a DVCPRO codec board. Your Profile system must also have the correct version of Windows NT installed (see “Microsoft Windows NT Support” on page 25).
You can also use the CD-ROM to install Media Manager on a PC running the supported version of Windows NT. You must also install Profile System Software 3.2.7 on a PC prior to installing Profile Tool Box or TimeDelay on the PC. Be sure to specify that you’re not installing on a Profile system when the prompt appears on the screen.
NOTE: Time Delay and the two Tool Box applications (Tool Box Editor and List Manager) are optional, extra-cost applications available separately from Profile System Software 3.2.7. You may purchase these applications by contacting your Grass Valley Group Sales representative.
Installing Profile System Software 3.2.7Profile System Software 3.2.7 is installed at the factory on all current Profile PDR400 systems. If you’re installing a new PDR400 Profile Video File Server, you do not need to install this software. Refer to the Profile Family User Manual to learn how to start using your Profile Video File Server right away.
Follow these steps to upgrade from Profile System Software 2.X or 3.X to Profile System Software 3.2.7.
>>> Do not delete the contents of the c:\profile directory before installing Profile System Software 3.2.7.
1. Log out of the system to ensure that no applications are running.
2. Hold the Shift key down during start-up to prevent auto-logon as user profile.
3. Log in as administrator. The default administrator password on a Profile system is triton.
4. Run \releases\3.2\disk1\setup.exe from the Profile System CD-ROM. Use My Computer or Network Neighborhood to locate the appropriate CD-ROM drive, either the optional drive directly connected to your Profile system, or a drive on a remote machine accessible through a network connection.
NOTE: You can also install Profile System Software 3.2.7 from diskettes that you make yourself. Refer to \releases\3.2\readme.txt on the Profile System CD-ROM for instructions on how to create Profile System Software diskettes.
5. Follow the instructions displayed by setup.
6. When prompted, confirm whether you are installing the software on a PC or a Profile system.
rsion 3.2.7 — 21 June, 2002 Profile Release Notes 7
8
7. After a successful installation, setup will shut down and prompt you to restart the system.
8. After restarting, you must ensure that your Enhanced Disk Recorder (EDR) board contains the latest version of firmware. Update the EDR firmware by following the instructions in “Updating EDR Firmware” on page 9.
9. If your Profile system is connected to a Fibre Channel switch, you must also install the latest version of Fibre Channel switch-compatible microcode. Refer to “Updating Fibre Channel Microcode” on page 10 for instructions on how to do this.
10. Initialize the Event Scheduler Engine for remote operations by performing the following steps:
a. Start the Event Scheduler by double-clicking its icon.
b. Type config in the Event Scheduler window to open the Event Scheduler Engine Settings window.
c. Close the Event Scheduler Engine Settings window without making any configuration changes.
d. Close the Event Scheduler window by typing exit.
11. Update your RS-422 interface board driver. Refer to “Updating the RS-422 interface board device driver” on page 12.
12. Update your emergency repair disk by inserting the floppy disk in the A drive and running rdisk.exe.
NOTE: If you wish to manage Profile operation over a network from a remote system, or transfer media to or from a Profile system through Fibre Channel, you must start PortServer on the Profile system before performing these operations.
New Startup Procedures
Profile System Software 3.2.7 now includes a Host Transfer Service that replaces htssvc.exe, an executable included in previous releases. This new service manages all streaming requests used in Fibre Channel transfers and in moving material to and from Profile Library System data tapes.
Since the Host Transfer Service is started automatically whenever you start Windows NT, you no longer need to run pdrstart.bat to start htssvc.exe and other applications. The Version 3.2.7 installation application removes pdrstart.bat shortcut from the Startup folder so that it won’t run when starting Windows NT.
If you have any applications that you wish to start automatically when you start Windows NT, you can now add them directly to the Startup folder. If you had previously added these applications to the pdrstart.bat file, you can refer to c:\profile\pdrstart.bat to identify those applications, and add them to the Startup folder.
Profile Release Notes Version 3.2.7 — 21 June, 2002

Ve
Updating EDR Firmware
Profile System Software 3.2.7 includes a new version of Enhanced Disk Recorder (EDR) firmware, which improves data transfers inside your Profile System. Grass Valley Group recommends that you update your EDR firmware after you install Version 3.2.7. This version of firmware is compatible with all EDR boards.
When you install a DVCPRO codec board in a PDR200, you must upgrade the firmware in some components on the master enhanced disk recorder (EDR) board immediately after installing Profile System Software 3.2.7.
NOTE: The reprogramming uses the file c:\profile\edr_isp.all. Do not alter this file in any way as it may lead to incorrect programming of parts.
To update EDR firmware:
1. Close any applications that are running on the system.
2. At a command line, type vdrsvc -stop and then press Enter. This stops the PDR Access Service. The service will not stop if all applications have not been shut down. Make sure there are no remote connections to the local machine.
3. Choose Start | Programs | PDR Debug Tools | Update EDR Firmware.
4. The program warns you to shut down any applications that may be running and to stop the PDR Access Service. If you have already done so, as instructed in steps 1 and 2, type y. Otherwise, type n, and return to step 1.
5. The update procedure steps through the reprogramming of the components, giving progress information as it proceeds. It retries up to three times to reprogram parts in the event of verification errors. After reprogramming all parts, a summary is provided that describes what has been done.
NOTE: Be sure to shut down Windows NT and power off the system before continuing.
6. If parts have failed to program, power down the Profile unit completely, power it up again, and then run the program again. If the programming fails again, the EDR board may be defective, contact Grass Valley Group support. If the parts are correctly programmed, restart the Profile system.
rsion 3.2.7 — 21 June, 2002 Profile Release Notes 9

10
Updating Fibre Channel Microcode
This release provides two versions of Fibre Channel board microcode. You must choose which one to use depending on your environment. The two versions are:
• Loop compatible. This version is loaded on your Fibre Channel board at the factory. Use this microcode with Fibre Channel hubs, when your Video Network includes only Profile Systems and SGI Fibre Channel Servers. You can reload this microcode with the FC Loop-mode Microcode icon in the Profile Debug Tools folder.
• Switch compatible. Use the FC Switch-mode Microcode to load this version of microcode onto your Fibre Channel board if you are connecting your Profile system to a Fibre Channel Switch. In addition, you must set switch mode on with the fcconfig -s on command, or with the appropriate check box in Configuration Manager’s Configure Fibre Channel dialog box.
You should also use the switch compatible version of microcode if you are connecting your Profile system to Fibre Channel devices from other manufacturers. Please note that this inter-operable microcode has not yet been optimized for loop operations.
NOTE: If you used switch-compatible microcode from earlier versions of Profile System Software, you must load the most recent version of the microcode as described here.
Follow these instructions to use either of these icons to load Fibre Channel microcode.
1. Close any applications that may be running on the system.
2. At a command line, type vdrsvc -start and then press Enter. This starts the PDR Access Service if it is not already started.
3. Choose Start | Programs | PDR Debug Tools | FC Switch-mode Microcode.or Start | Programs | PDR Debug Tools | FC Loop-mode Microcode. A window appears.
4. The program asks if you want to continue. Type Y.
5. The program now reads the new image of the microcode from c:\profile\etc\gfcucode.img. The program automatically copies the old microcode to the file c:\profile\etc\gfcucode.old.
6. Restart the disk recorder in order for the microcode update to take effect.
7. Use the Fibre Channel Configuration dialog box or the fcconfig command to verify that switch mode is on or off according to your needs. Each icon establishes settings that should be appropriate for most uses.
Profile Release Notes Version 3.2.7 — 21 June, 2002

Ve
Upgrading Media Drive Microcode
Grass Valley Group strongly recommends that you upgrade the microcode on all your media drives to the latest version. The following table lists the microcode files included in this release. Refer to “Using the Profile Disk Utility” in the Profile Family User Manual for instructions on how to load microcode onto your media drives.
Model numbers may appear with suffixes such as W or WD. The listed microcode file can be used for all drives with the same model number, regardless of the suffix.
NOTE: Grass Valley Group does not support media drives purchased from other vendors.
Media Manager Notes
• The version of Media Manager included in this release can display and manage material on your networked Profile XP Media Platform systems as well as PDR200s and PDR300s.
• Streamed Fibre Channel copies transfer only the material between clip marks, not the entire media file.
• Do not set the physical read-only switch or tab on a library data tape or cartridge.
• Clips created with Profile System Software 3.2.7 show the clip’s correct video format and length based on the clip’s properties. Clips created with Profile System Software versions prior to version 3.2.2 may show the Profile system’s current video format, and the clip’s timecode (length) is based on the current video format.
• If your Media Manager is connected to a remote Profile system and you lose an Ethernet connection to that system (disconnected cable, for example), you must shut down and restart Media Manager to reestablish proper communications.
Table 2: Profile Microcode Files
Drive type Model Microcode File Name
Seagate 4 GB ST15150 cu4w6001.lod
Seagate 9GB ST19171 cu9w6004.lod
IBM 18GB 10K DMVS18D ibm18g10k_b.lod
IBM 18GB DGHSI18D ibm18g_b.lod
rsion 3.2.7 — 21 June, 2002 Profile Release Notes 11

12
Updating the RS-422 interface board device driverThe Profile system software installation program copies an updated version of the RS-422 device driver to C:\profile\drivers but does not automatically install it. Check the version currently running on your Profile XP Media Platform and if it is older than the version in C:\profile\drivers\rocket, update it using the following procedure.
If your Profile system is not equipped with a Comtrol RocketPort RS-422 board, you must not update the RS-422 interface board driver. Follow steps 1 to 5 of Removing the existing RS-422 device driver to determine your RS-422 interface board type.
Viewing version numbers
To find out what version of the RS-422 device driver is running on your system and what version is included with this release, do the following:
1. Use My Computer to open the c:\winnt\system32\drivers folder.
2. Highlight rocket.sys and choose Properties from the right-click menu.
3. Choose the Version tab to view the version number for the RS-422 device driver that is currently running on your system.
4. Repeat steps 2. and 3. to view the version information for c:\profile\drivers\rocket\rocket.sys.
Removing the existing RS-422 device driver
Before you can install the updated RS-422 device driver, you must first remove the current driver.
1. Power On the Profile system and logon as Administrator using these steps.
a. Power On the Profile system and hold the Shift key down during start-up to prevent auto-logon as user profile. Be sure to hold down the shift key until the logon dialog box appears.
b. Logon as administrator. The factory default administrator password on a Profile system is triton.
2. Open Control Panel by choosing Start | Settings | Control Panel.
3. Double-click the Network icon.
4. The Network dialog box appears. Click the Adapters tab.
NOTE: If Comtrol RocketPort RocketModem does not appear on the list of Network Adapters, click Cancel and do not proceed with this driver update. The updated driver is not compatible with other RS-422 interface boards.
5. Highlight the Comtrol RocketPort RocketModem and then click the Remove button.
6. When prompted “Do you wish to continue?”, click Yes.
7. Close the Network dialog box.
Profile Release Notes Version 3.2.7 — 21 June, 2002
Ve
8. Restart the system and logon again as Administrator.
You are now ready to install the updated RS-422 device driver.
Installing the RS-422 Board Device Driver
After removing the old RS-422 board device driver and re-starting the system, you are ready to install the driver for the RS-422 board. Use the following instructions to install the driver.
To install the RS-422 device driver:
1. Make sure you are logged on as Administrator. The factory default password on the Profile system for Administrator is triton.
2. Open the Control Panel by choosing Start | Settings | Control Panel.
3. Double-click the Network icon.
4. The Network dialog box appears. Click the Adapters tab.
5. Click the Add button, and then the Have Disk button.
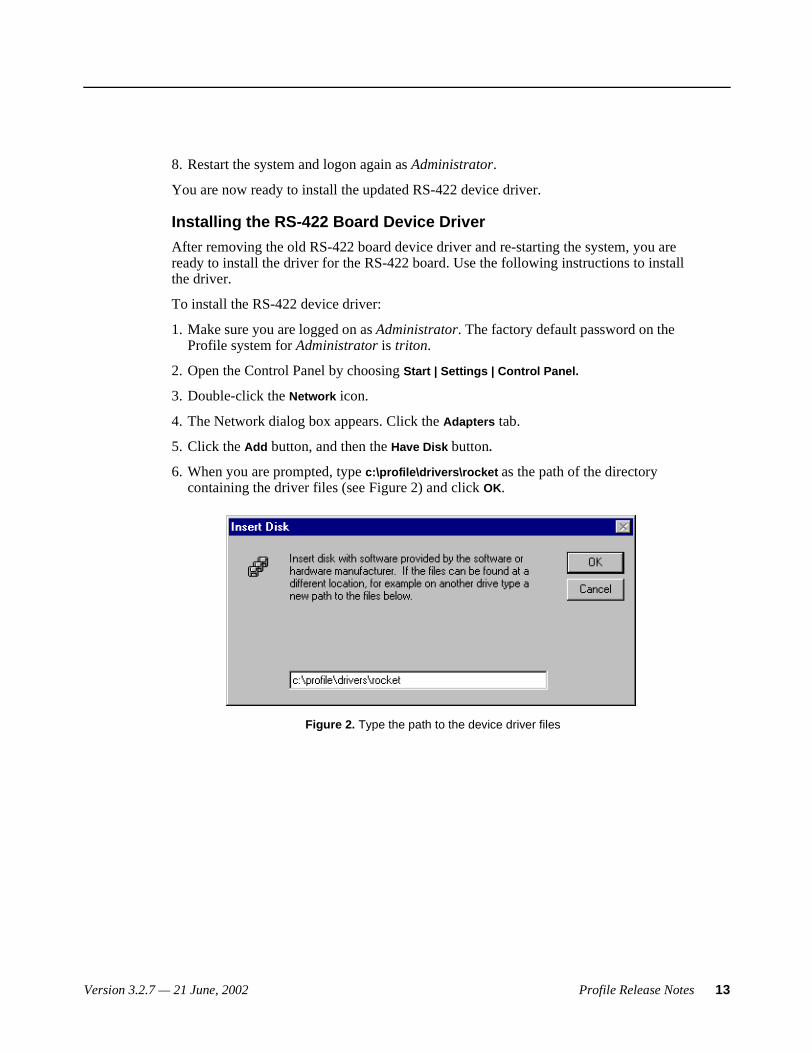
6. When you are prompted, type c:\profile\drivers\rocket as the path of the directory containing the driver files (see Figure 2) and click OK.
Figure 2. Type the path to the device driver files
rsion 3.2.7 — 21 June, 2002 Profile Release Notes 13

14
7. The Select OEM Option dialog box appears (see Figure 3). Ensure that the Comtrol RocketPort RocketModem is selected, then click OK.
Figure 3. Select the RocketPort driver.
8. The Add Device Wizard starts. Click Next to continue, then select ISA bus as the bus type (see Figure 4) and click Next again.
Figure 4. Select the ISA bus type.
Profile Release Notes Version 3.2.7 — 21 June, 2002

Ve
9. Select RocketPort as the board type (see Figure 5), then click Next.
Figure 5. Select RocketPort board model.
10. Select eight ports on the hardware (see Figure 6), then click Next.
Figure 6. Select eight ports.
rsion 3.2.7 — 21 June, 2002 Profile Release Notes 15

16
11. Set the I/O Base Address to 180 Hex (see Figure 7), then click Next.
Figure 7. Set the I/O Base Address to 180.
12. Click Finish to close the Add Devices Wizard (see Figure 8) and open the Device Properties dialog box.
Figure 8. Finish the driver installation.
Profile Release Notes Version 3.2.7 — 21 June, 2002

Ve
13. Ensure that the Starting COM Port is set to COM3 and that the I/O Base Address is set to 180 Hex, then click OK to close the Device Properties dialog box (see Figure 9).
Figure 9. Select COM3 as the starting port.
rsion 3.2.7 — 21 June, 2002 Profile Release Notes 17

18
14. Choose the Options tab in the Comtrol RocketPort/RocketModem Setup dialog box (see Figure 10).
Figure 10. Choose the Options tab.
Profile Release Notes Version 3.2.7 — 21 June, 2002

Ve
15.In the Options tab (see Figure 11), set the Scan Rate(ms) to 1ms.
Figure 11. Set the scan rate to 1ms.
16. Choose OK to accept your changes in the RocketPort/RocketModem Setup dialog box.
17. Chose OK to save new configuration settings and exit the setup.18. Click Close in the Network dialog box.19. Restart the system. Logon as Profile. The factory default password for the Profile
user account is profile.
rsion 3.2.7 — 21 June, 2002 Profile Release Notes 19

20
Version CompatibilityYou must install Profile System Software 3.2.7 on all systems equipped with DVCPRO boards. If you are operating a Profile system in a Video Network environment, you must ensure that all other systems connected to the Fibre Channel network are running compatible versions of Profile System Software.
Please observe the following restrictions when operating a DVCPRO-equipped Profile system in a Video Network environment
1. You should only store DVCPRO clips on Profile systems running Version 3.2.7. If you temporarily store DVCPRO clips on Profile systems running Profile System Software earlier than Version 3.0 (such as version 2.5), do not attempt to play the clips on those systems.
2. If you wish to perform streaming transfers of simple clips or masters (Complex Movies), or if you wish to operate in a Fibre Channel fabric environment (with a Fibre Channel switch), all connected systems must be runningVersion 2.5 or Version 3.2.7.
3. If you wish to perform streaming transfers of simple JPEG clips only, and transfer masters (Complex Movies) through PDRCopy operations, you may connect to systems running Version 2.4.
4. Profile systems running Version 3.2.7 can not transfer JPEG clips to or from Profile systems running Profile System Software versions earlier than 2.2.2.
If you use third-party applications, you must check with your vendor before installing or using Profile System Software 3.2.7, or any other version of Profile System Software. If your automation system or third party application does not yet support Profile System Software 3.2.7, Grass Valley Group recommends that you install Profile System Software 2.5.X on systems which are not equipped with DVCPRO boards. This release has been qualified by most vendors.
Profile Release Notes Version 3.2.7 — 21 June, 2002

Ve
Ethernet Interface ConfigurationIf you connect your Profile Video File Server to an Ethernet network, be sure to set the Ethernet Interface driver to match the speed of your network, either 10BaseT or 100BaseT. To set the Ethernet Interface speed:
1. Choose Settings | Control Panel from the Start menu.
2. Double-click Network, then select the Adapters tab in the Network dialog box.
3. Select the Intel EtherExpress PRO Adapter, then click the Properties button.
4. In the Properties dialog box, click the Settings button for the Intel EtherExpress PRO Adapter.
5. In the Basic Settings panel, select the appropriate speed, either 10Mbps or 100Mbps, from the Network Speed drop-down list box.
NOTE: The Auto speed setting may not work correctly with some Ethernet hubs and switches. Grass Valley Group does not recommend the use of the Auto setting.
6. Click OK to close all of the open dialog boxes, and reboot your system.
rsion 3.2.7 — 21 June, 2002 Profile Release Notes 21

22
EDR Memory RequirementsThe following new features and planned future enhancements require increased memory on the EDR (enhanced disk recorder) master and slave boards. This memory, called JPEG memory in the Profile log, is used as buffer memory between the media disks and the rest of the system.
- DVCPRO support
- 32-track audio
- Fibre Channel streaming
Current production of the EDR master and slave boards includes this increased memory, 64 MBytes per board. If you wish to use any of these new features on an older PDR200 that does not have the required memory, you must purchase and install the available EDR memory upgrade kit.
To see the amount of memory you have on the Master and Slave EDR boards, choose Start | Programs | PDR Debug Tools | PDR Diagnostics | Master EDR from the Windows NT 4.0 desktop. (PDR Diagnostics are in the PDR Debug Tools group in the Windows NT3.51 Program Manager.) If your system does not have 64 MBytes of memory on both the master and the slave EDR, you will need two service kits— one kit for the Master and one for the Slave—each with two 32 MByte SIMMs.
If you have a large file system, Grass Valley Group recommends that you also upgrade the local i960 memory on the EDR master board to 32 MBytes. This memory is called RTS memory in the Profile log. You will need one kit for this upgrade, containing one 32 MByte SIMM, replacing the existing 16 Mbyte SIMM.
Contact your Grass Valley Group representative or Grass Valley Group Support to obtain these memory upgrades.
Profile Release Notes Version 3.2.7 — 21 June, 2002

Ve
Using Fibre ChannelProfile System Software 3.2.7 supports Fibre Channel Video Networking on Profile systems. You can use the Media Manager application, or the listnames and copymovie commands to manage your material on the Video Network. Refer to the Profile Family User Manual for more details. The following sections provide additional information about Video Networking.
Installing Fibre ChannelTo avoid address conflicts on your video network, you should configure your Fibre Channel settings, such as the Fibre Channel address, before you make your Fibre Channel cable connections.
If you’re adding a VideoGateway to your video network, you should complete the installation and configuration of all your Profile systems before adding the VideoGateway. You must connect VideoGateway to an existing, working video network.
Fibre Channel CompatibilityDue to recently introduced enhancements in Fibre Channel support, you should install Version 2.5 or higher on all compatible systems in your Fibre Channel network, including remote PCs. (See “Version Compatibility” on page 20.) This will ensure complete compatibility between systems, and make new features available to all units on the network.
Applications written to take advantage of the new TekXfr API commands can benefit from the ability to perform concurrent operations on clips. For example, an application could allow a clip to be transferred to another machine as it is being recorded, or to play out as it is being transferred. Tool Box Editor and Media Manager will allow you to use these new capabilities. Both clips and masters (complex movies) can be transferred with the TekXfr commands in Version 3.2.7.
If you have installed Profile System Software 3.2.7 and change Fibre Channel configuration settings, then revert to a previous release, the Fibre Channel settings will revert to what they were before the Version 3.2.7 software was installed. Reinstalling the Version 3.2.7 software will restore the configuration settings to the values set from the previous Version 3.2.7 installation, regardless of any configuration changes made while running under the older version.
Concurrent Fibre Channel CopiesProfile Fibre Channel transfers are dependent on system and network bandwidth. You must manage the use of your systems, especially a system used as a server, to ensure acceptable performance.
The Profile video disk recorder assigns the highest priority to audio and video record and playback operations. Any other operations, such as Fibre Channel transfers, will be performed with remaining system bandwidth.
rsion 3.2.7 — 21 June, 2002 Profile Release Notes 23

24
By using the following techniques, you can manage your server’s bandwidth to meet your needs.
1. Reduce video input and output channel usage on the server system. Try recording at a lower bit rate (Most recording time), or record and play on fewer channels.
2. Limit to three the number of simultaneous transfers from a single system.
NOTE: In some circumstances, performing four or more simultaneous copy operations from a single system may result in a failed transfer. The clip will not be present on the destination system, and an error message will appear on both the client and the server systems. If this occurs, re-initiate the transfer, making sure that there are no more than three transfers to or from that system at the time of the request.
Only one copy operation (PdrCopyMovie) to a system is permitted at any one time. Applications will usually queue transfers to a system, and the transfers will occur sequentially. If an application displays an error message instead of queuing, wait until the first transfer is complete, then request the next transfer. Media Manager copies one item at a time, queuing additional copy requests until the transfer is complete.
If you use the new TekXfr commands to perform streaming transfers of clips, you can usually perform concurrent transfers of up to three clips to or from a system at faster than real time transfer speeds, depending on the clip bitrate settings. As with any other Fibre Channel operation, you must be aware that video playout and record operations will be allocated bandwidth first.
Profile Release Notes Version 3.2.7 — 21 June, 2002

Ve
Microsoft Windows NT SupportYour new Profile video disk recorder is preloaded with all of the required software, including Windows NT 4.0 with Service Pack 3 and the Year 2000 hotfix. The c:\i386 directory contains all the Windows NT 4.0 installation files that normally would be found on the installation diskettes or on the CD-ROM. Profile administrators can use files in this directory if they need to add drivers or other software to the default installation. Service Pack 3 is located in c:\i386\nt40sp3. The year 2000 hotfix is located in c:\i386\nt40sp3y2k.
To upgrade to Profile System Software 3.2.7, your Profile system must be running Windows NT 4.0 with Service Pack 3 and the Year 2000 hotfix. The version of Windows NT appears on the screen during system startup. You may have to install a Windows NT 4.0 upgrade to meet this requirement.
You can download Service Pack 3 from the Microsoft FTP site at:
ftp://ftp.microsoft.com/bussys/winnt/winnt-public/fixes
For example, U.S. customers can find instructions on how to download Service Pack 3 in:
ftp://ftp.microsoft.com/bussys/winnt/winnt-public/fixes/usa/nt40/ussp3/
You should also install the Windows NT 4.0 Year 2000 hotfix. You’ll find the hotfix on the same Microsoft FTP site. For example, U.S. customers will find the Year 2000 hotfix for Windows NT 4.0 at this location:
ftp://ftp.microsoft.com/bussys/winnt/winnt-public/fixes/usa/nt40/hotfixes-postSP3/y2k-fix/
Windows NT 4.0 may be available on CD-ROM only. If your Profile Disk Recorder is connected to a LAN, you can upgrade your operating system over the network from a remote PC.
If you can’t upgrade to Windows NT 4.0 over a network connection, contact Profile Customer Support for information on how to obtain a CD-ROM reader (PDRFCD) for your Profile system.
rsion 3.2.7 — 21 June, 2002 Profile Release Notes 25

26
Known ProblemsPlease note the following limitations in Profile System Software 3.2.7.
The reference numbers included in some problem descriptions (15413, for example) refer to the Grass Valley Group bug-tracking database. Please use these numbers if you contact Grass Valley Group Customer Support about these problems.
Startup
Problem After upgrading to Profile System Software 3.2.7, the Profile system does not start, and a Real Time Subsystem error message appears.
Workaround Profile System Software 3.2.7 requires revision 2, mod level 3 or higher DVCPRO boards. Look for a line similar to the following for each of your DVCPRO boards in the Profile log after restarting your system.
I: P1 DvcproInitBoardInfo: DVCPRO codec board recognized, rev:2 mod:3
If one or more of your DVCPRO boards is not revision 2, mod level 3, contact your Grass Valley representative for information on obtaining the required version of DVCPRO codec boards.
Problem Third party applications placed in the Startup group don’t start correctly.
Workaround All Profile internal software must be initialized and running before starting applications. Use a batch file in the Startup group to delay starting the desired applications, or start the applications manually.
Problem Profile applications may not start, or may perform more slowly than normal.
Workaround You should limit the total number of local and remote (network or serial control) Profile applications to eight or fewer. Having too many Profile applications running concurrently depletes system resources, and may produce unpredictable results. Try to close unneeded applications whenever possible. Note that due to its design, the Tool Box Editor must be counted as two Profile applications.
Problem Using Windows NT 4.0, occasionally PDR Access Control won’t start when you boot your system. Applications such as VdrPanel will display an error message and will not start.
Workaround There are three known causes of this problem.
1.VdrPanel starts before PDR Access Control during boot. Restart VdrPanel after PDR Access Control has started.
2.You must install the required Service Pack when using Windows NT 4.0. Refer to “Microsoft Windows NT Support” on page 25 for instruction on how to obtain Service Packs and hotfixes.
3.In a networked environment, you must ensure that no two devices have the same name.
Profile Release Notes Version 3.2.7 — 21 June, 2002

Ve
Recording
Problem The selected video input is not recorded when recording with both the #4 DVCPRO codec and the #2 JPEG codec.
Workaround These two codecs share a common input on the Profile systems internal video router. You should not use these two codecs for concurrent record operations. Playout operations on these codecs are not affected.
Problem Recording an asynchronous source results in black video, or no recording.
Workaround You must connect a reference signal to a DVCPRO-equipped Profile system, and you must auto-time any inputs as described in “Profile DVCPRO System Timing Considerations” on page 6.
Problem Some third party applications may not operate correctly if you attempt to start a DVCPRO 25 or DVCPRO 50 recording at Field 2, or end a recording after Field 1.
Workaround DVCPRO 25 and DVCPRO 50 are frame-based recording formats. You must start and stop all of your recordings at frame boundaries.
Problem You can’t create a new clip, even though there’s disk space available. For example, VdrPanel won’t provide a new clip name.
Workaround Check the number of files in the c:\pdrmovie_db directory structure. If that number is large (close to 2500), you may have reached the set limit of clips for your system.
The number of clips on a system is limited by a registry entry. If you need to record more clips, you can use regedt32.exe to increase that limit. The limit is set by Max Movies under the \Software\Tektronix\Profile\PdrMovie key located in the HKEY_LOCAL_MACHINE section of the registry. If you create complex movies (masters) from applications such as the Tool Box Editor, you may also have to modify Max Media References. Note that increasing these limits allocates more Windows NT disk space for the clip database.
Please contact your third-party software vendor or Grass Valley Group Customer Support before changing these registry entries.
Video
Problem On some systems, analog composite inputs shift slightly compared to other inputs when using the optional Mix/Effects card.
Workaround Contact Grass Valley Group Customer Support for the latest information on this problem.
rsion 3.2.7 — 21 June, 2002 Profile Release Notes 27

28
Problem Video shifts up and black appears at the bottom of the screen when using the optional Mix/Effects card.
Workaround Set timing to E to E when using the optional Mix/Effects board.
Audio
Problem There is no analog audio output on a PDR400.
Workaround Analog audio outputs are muted by default on the PDR400. Use Configuration Manager (Line Level tab in Analog Audio Output) to unmute the outputs.
Problem PDR400 analog audio inputs aren’t available to applications.
Workaround When connecting the PAC208 or 216 to the PDR400, be sure to use Configuration Manager to set the desired audio inputs to Analog.
Problem On some systems, the analog audio output occasionally becomes muted. (POL1099)
Workaround In Configuration Manager, choose Audio Output, then Line Level. Check and then clear the Mute box. The audio will be unmuted.
Problem The Audio Configuration command is not available in the Option menu to set recording quality, playback quality, or audio scrubbing. (16121)
Workaround You can open the System Audio Configuration dialog box to make these settings by clicking the System Audio Configuration button on the Configuration Manager tool bar.
Problem When using embedded audio, pops and clicks start occurring in the audio, and the profile.log includes a message mentioning “LOCKED flag false”
Workaround These symptoms usually indicate a hardware problem, often as the result of a hardware upgrade. Internal SharcNet audio cables or their matching connectors on the Serial Digital video board or the Audio Signal Processing Board may be damages, or one of the boards may have an internal problem.
Problem Audio pops are audible on the recorded material when some channels in the same audio group are playing and some are recording.
Workaround Groups of four Profile audio channels (1, 2, 3, and 4, for example) use a common clock to time signals. If you split a group of audio channels and use some for input and some for output (for example, two for input and two for output), either the input or the output will be using a clock which is not synchronized to the corresponding video signal. You should avoid splitting groups of four audio channels wherever possible.
Profile Release Notes Version 3.2.7 — 21 June, 2002

Ve
If you must split a group of four audio channels, use Profile Configuration Manager to change the audio configuration for those channels. They must all be set to use the System clock.
Problem Audible pops may be present during insert edits when switching from Playback to E to E on a source deck. The following messages appear in Profile Log:
Au board 2: Bad average sample count = 822.550000
Au board 2: corrected average sample count = 818.744444
3 missing Jpeg DMA 1800 912353 3512 3526 35133535 6829 3514
Workaround Avoid changing the mode of source machines during record operations. The change in signal timing may adversely affect audio quality.
Problem Audible pops may be present during insert edits while in BVW emulation, with the following error messages in Profile Log:
Au board 2: Bad rate src = PLAY_CLK, expected RECORD_CLK
Au board 1: Bad rate src = RECORD_CLK, expected PLAY_CLK
Workaround Using Configuration Manager, change the audio input configuration to use Play Clock in the Select Audio Record Clock Source panel.
Profile Applications
Problem List Manager or other applications which use the Event Scheduler Engine generate error messages when you attempt to run them remotely.
Workaround After installing Profile System Software 3.2.7, you must initialize the Event Scheduler Engine for remote operation. Refer to “Software Installation” on page 7 for instructions on how to do this.
Problem Media Manager does not correctly display the duration of drop-frame clips. (14125)
Workaround View the clip duration in VdrPanel.
Problem Media Manager locks up and can’t be restarted.
Workaround Use Process Viewer from the PDR Debug group to kill both the mediamgr.exe and vmhwcom.exe processes.
Problem Media Manager won’t start, and a message mentioning vmhwcom appears on the screen.
Workaround The Profile System Software 3.2.7 installation program was unable to register vmhwcom. To do this manually, enter the following commands at the MS-DOS prompt:
rsion 3.2.7 — 21 June, 2002 Profile Release Notes 29

30
regsvr32 vmhwcomproxy.dllvmhwcom /regserver
Problem The Transcode utility in Media Manager will not transcode locked clips (POL1102).
Workaround Use VdrPanel to unlock clips before transcoding them.
Problem Tool Box Editor, List Manager, and Media Manager display clip durations than other applications such as PRC100 for the same clips.
Workaround Tool Box Editor, List Manager, and Media Manager display all 525/60 durations in drop-frame, corresponding to clock time. Other Profile applications display the total number of fields divided by 30, which does not always accurately reflect clock time.
Problem Remote operations fail between Profile systems or PCs running Profile System Software versions 2.2.X and 3.1.X.
Workaround Version 3.2.7 does not support operation with systems running versions earlier than 2.2.2. While Grass Valley Group recommends that all systems running together be upgraded to Version 2.5.X or Version 3.2.7, you may contact Grass Valley Group Support to obtain Version 2.2.4 if you require a version of 2.2.X that is compatible with the current version.
Problem Free disk space is reduced to an unacceptable level on the Profile system drive, or on a remote PC.
Workaround You can free up some disk space by carefully deleting unused files. The following files can be safely deleted in the specified situation.
Table 3: Profile files that can be deleted
If you: You can delete:
Never use Tool Box Editor c:\profile\tbxedit.exec:\profile\tbxedit.tsfc:\profile\tbxedit.hlpc:\profile\tbxedit.cnt
Never use List Manager c:\profile\listmgr.exec:\profile\listmgr.tsfc:\profile\listmgr.hlpc:\profile\listmgr.cntc:\profile\evntsch.dllc:\profile\teksch.dllc:\profile\schdrv.dllc:\profile\*.mmf
Never use Time Delay c:\profile\tdelay.exec:\profile\tdelay.tsfc:\profile\tdelay.hlpc:\profile\tdelay.cnt
Installed on a PC c:\profile\diag\*.*c:\profile\*.96don the PC only
Profile Release Notes Version 3.2.7 — 21 June, 2002

Ve
Problem Media Manager shows a new date for a file after it was used as the source of a copy operation.
Workaround The clip creation date displayed in the clip properties is unchanged. The displayed date is the Modified date, which changes to show that the clip was locked during the copy operation.
Fibre Channel
Problem Cancelling a transfer of the last (or only) clip in a list to or from an Avid Newcutter causes the Avid Transfer Manager to hang. (12171)
Workaround Restart the Avid Transfer Manager, then choose Transfer | Reconnect to Server on the Newscutter to proceed.
Problem Clips being recorded in loop mode are not updated if a video network transfer is initiated more than once. Applications such as InSync will not correctly update clips being recorded in loop mode. (9966, 10619)
Workaround There is no workaround for this problem since the content of the clip is endlessly changing. Avoid transferring clips being recorded in loop mode.
Problem A request for a PdrCopyMovie operation times out without response. Operations such as Fibre Channel copies using Media Manager are slow.
Workaround Increasing the number of systems connected together with Fibre Channel tends to slow copy operations between systems or to Profile Library Systems. In extreme cases, PdrCopyMovie operations may take several minutes. Try to limit the number of active connections between Profile systems to those you really need at any time.
Problem A transfer of a clip from a Newscutter system to a Profile system will fail if the clip already exists on the Profile system.
Workaround Delete or rename the clip on the Profile system before transferring the clip from the Newscutter system.
Problem The Clear button in the Fibre Channel Configuration dialog box in System Configuration clears the Fibre Channel address immediately, even if you choose Cancel to close the dialog box (POL1094).
Workaround Avoid pressing the Clear button unless you want to change the address. If you inadvertently press Clear, you can retrieve the Fibre Channel information from Profile.log.
Problem Clips transferred to a Profile system running Profile System Software version 2.2.X lose their attributes, incorrectly displaying drop-frame when they are non-drop frame, etc. (15959)
rsion 3.2.7 — 21 June, 2002 Profile Release Notes 31

32
Workaround Profile System Software version 2.4 introduced extended clip information in Fibre Channel transfers. Earlier versions of Profile System Software are unable to interpret this additional information. Grass Valley Group recommends that you upgrade all Profile systems on your video network to version 2.5.X and 3.1.X or higher.
Disk Management
Problem When starting Disk Utility, an Unable to Connect to Service message appears, and the application does not start.
Workaround You must be logged on as Administrator to run Disk Utility. In addition, all other applications and services must be shut down before running Disk Utility. Some applications and services take a long time to shut down. Wait a minute, then try starting Disk Utility again.
Profile Library Systems
Problem It is difficult to manage space in PLS partitions because the actual clip size may be unknown and the free space in partitions is not visible.
Workaround New PLS commands have been added that provide the clip size (PlsGetClipSize) and return the free space in a set of partitions (PlsGetPartitionMap).
PRC100
Problem Using the Preliminary version of the PRC100 configuration utility, a “Resources not available” message appears on the PRC100 display.
Workaround The new Profile Protocol Resources utility, described in the Profile Family User Manual and included with this release, provides JPEG, MPEG and DVCPRO configuration capabilities. This new utility replaces the PRC100 configuration utility.
Problem When using the PRC100 in Gang Mode, you cannot add a clip to the slave channel.
Workaround You must add all clips to the slave channel before you start Gang Mode.
Problem On some older Profile systems equipped with DVCPRO Codec boards, the PRC100 may occasionally display a “Profile Has Reset” message. (16211)
Workaround Contact Grass Valley Group support for a new RS-422 driver which may help with this problem.
Louth Protocol
Problem Using Louth automation, you see Lost Connection error messages.
Profile Release Notes Version 3.2.7 — 21 June, 2002

Ve
Workaround A new RS-422 board and driver are available which allow for up to eight channels under Louth control. Contact Grass Valley Group support for information on obtaining this board.
APIs
Problem Slave Mode, set by the VdrSetPlayMode() command, does not work as expected (DEV170).
Workaround Contact Grass Valley Group Support for the latest information on this problem.
Problem VfsCopySegment() calls do not work as expected for network transfers.
Workaround VfsCopySegment() is no longer supported for network transfers. This call continues to be supported for LOCAL copies. Consult the latest Profile SDK documentation for more information on workarounds.
Diagnostics
Problem Some tests fail on known good boards.
Workaround Run all failed tests at least twice before concluding that a board is defective. If the test passes at least once, the board is not defective.
Problem When selecting SerialUA (rev 0) | Video I/O Tests | VITC Tests in PAL mode, the selected test will fail for either channel.
Workaround Prior to running PAL mode tests, the system must be configured for PAL mode using Configuration Manager. Note that when this is done, the NTSC tests will fail.
rsion 3.2.7 — 21 June, 2002 Profile Release Notes 33

34
Profile Release Notes Version 3.2.7 — 21 June, 2002