Embed Size (px)
Citation preview

Professional VariTilt ® Electric Food Slicer
Model 645
2
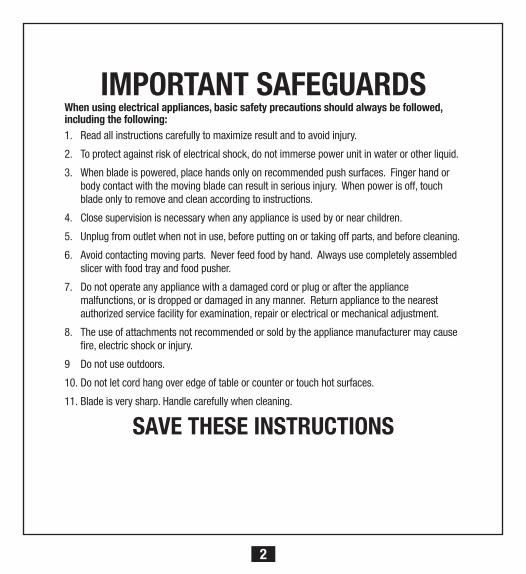
IMPORTANT SAFEGUARDSWhen using electrical appliances, basic safety precautions should always be followed, including the following: 1. Read all instructions carefully to maximize result and to avoid injury.
2. To protect against risk of electrical shock, do not immerse power unit in water or other liquid.
3. When blade is powered, place hands only on recommended push surfaces. Finger hand or body contact with the moving blade can result in serious injury. When power is off, touch blade only to remove and clean according to instructions.
4. Close supervision is necessary when any appliance is used by or near children.
5. Unplug from outlet when not in use, before putting on or taking off parts, and before cleaning.
6. Avoid contacting moving parts. Never feed food by hand. Always use completely assembled slicer with food tray and food pusher.
7. Do not operate any appliance with a damaged cord or plug or after the appliance malfunctions, or is dropped or damaged in any manner. Return appliance to the nearest authorized service facility for examination, repair or electrical or mechanical adjustment.
8. The use of attachments not recommended or sold by the appliance manufacturer may cause fire, electric shock or injury.
9 Do not use outdoors.
10. Do not let cord hang over edge of table or counter or touch hot surfaces.
11. Blade is very sharp. Handle carefully when cleaning.
SAVE THESE INSTRUCTIONS
3
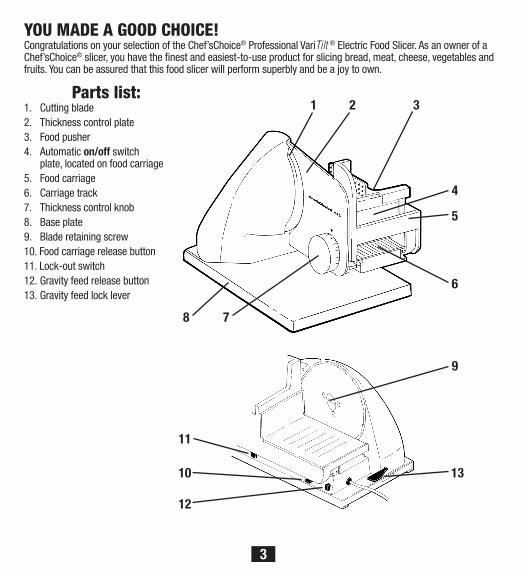
YOU MADE A GOOD CHOICE!Congratulations on your selection of the Chef’sChoice® Professional VariTilt ® Electric Food Slicer. As an owner of a Chef’sChoice® slicer, you have the finest and easiest-to-use product for slicing bread, meat, cheese, vegetables and fruits. You can be assured that this food slicer will perform superbly and be a joy to own.
Parts list:1. Cutting blade2. Thickness control plate3. Food pusher4. Automatic on/off switch
plate, located on food carriage5. Food carriage6. Carriage track7. Thickness control knob8. Base plate9. Blade retaining screw10. Food carriage release button11. Lock-out switch12. Gravity feed release button13. Gravity feed lock lever
10
9
11
12
13
1 2 3
5
4
6
78

4
IntroductionThe Chef’sChoice® professional electric food slicer comes equipped with a specially designed multi-purpose blade for slicing a large variety of foods including bread, meat, cheese, vegetables and fruits.
VariTilt ® FeatureThe Model 645 operates in either the upright position which is ideal for slicing meats and cheese or tilts the carriage a full 30° into true “gravity feed” position for effortless slicing of breads, vegetables and fruits. Changing position of the slicer is fast and simple:• Tochangefrom“upright”positionto“gravityfeed”(Figure1and2): 1. Press the release button located on the back side of the motor housing beneath the food carriage track. 2. When the slicer releases from the base, lightly lift it until it comes to a stop, then rotate the lock lever on the
side of the motor housing, upwards into a vertical position until it clicks into place. The slicer can now operate in the “gravity feed” mode.
• Toreturntheslicerintothe“upright”position: 1. Support the slicer with the left hand under the food carriage. With the right hand, rotate the lock lever
downward into the horizontal position. 2. Lower the slicer until it seats on the base plate.3. Press down firmly on the front of the carriage track so the slicer clicks into position. The slicer will now operate in
the “upright” position.
Safety SwitchThe Chef’sChoice®professionalelectricfoodslicerisprovidedwithachildsafetyswitch(11)showninFigure3,toreduce the risk of accidentally turning on the slicer.• WhenthissafetyswitchisinPositionAtheslicerwillnotoperate.• WhenthissafetyswitchisinPositionBtheslicercanbeoperatednormally.Thesafetyswitchisdesignedtodisabletheoperationoftheautomaticon/offswitch(4).
Figure 1. Figure 2.
Release Button
Base Plate
Lock Lever
Figure 3.
A B➙
➙

5
Instructions — “Chute” Attachment and UseTheModel645FoodSlicercomesequippedwithaconvenient“chute”(seeFigure4)tohelpslicefooditemswhenthe slicer is operated in the “gravity feed” mode.To mount the chute:1. Remove the food carriage from the slicer.2. Note the “engagement clip” on the “L” shaped chute. Position the “engagement clip” on the underside of the food
carriage behind the gray plastic lip.3. Rotate the long portion of the “L” shaped chute onto the stainless steel top surface of the food carriage until it
snapsintoposition(Figure5and6).Please note that when using the chute the food should self-feed while slicing in the “gravity feed” mode. The food pusher cannot be used when the chute is in place. Caution: Do not use hands or fingers to push the food. If the food does not easily self-feed during slicing, remove the chute and use the food pusher to continue slicing.
Before You SliceCaution: Avoid personal contact with the blade edge. Serious injury can result.1. Beforeusingtheslicerforthefirsttime,disassembleandcleanit(seepage6).2. Place assembled slicer on a clean, dry smooth surface. Position slicer so
foodcarriage(5)istoyourrightandthicknesscontrolknob(7)toyourleft.Besurebladeisproperlysecured.(Retentionscrewtightenscounter clockwise).Foodcarriageshouldglidesmoothlyinitstrack.Pullittowardyou and away from the blade.
3. Movesafetyswitch(Figure3)toPositionB.4. Place the food on the carriage and attach the food pusher on the back
edge of the carriage. For extra large foods, such as briskets or slab bacon, their length may have to be reduced to fit on the carriage.
5. Setthethicknesscontrolknobs(Figure7)fordesiredthickness.6. Placefoodtrayonthebaseplate(8),tocatchtheslicedfood.
Figure 7.Figure 6.
Snaps into position
Figure 5.
Engagement Clip
Figure 4.
Engagement Clip

6
To Slice1. Plug cord into 120V three prong grounded, AC outlet.2. Hold the food pusher with the right hand with the thumb behind the guard, in contact with the automatic on/off
switchplate(seeFigures8and9).Withlightthumbpressureontheswitchplate,theunitwillturnonandtheblade will start to turn. As soon as the thumb pressure is released from the switch, the motor will turn off.
3. To slice, maintain thumb pressure on the automatic switch and slide the carriage forward to cut and backward to prepare for the next cut, moving back and forth steadily. Using the food pusher, keep the food pressed against the thicknesscontrolplate(2)forevenslices.
4. Adjust the thickness control knob to select the desired thickness of the slices. The dial is calibrated in millimeters of thickness.
5. When finished slicing, turn the motor off by releasing thumb pressure on the automatic switch, unplug the slicer andlockthesafetyswitchinPositionA(Figure3).
For safety in strorage and handling, always return the thickness control plate to “zero” thickness, where it is aligned with the blade.
Cleaning and MaintenanceNote: Before cleaning, removing the blade or maintenance always unplug the cord from the outlet. Never immerse the slicer in water or other liquid.Cleaning: Slicer parts can be removed as described in the following sections for thorough cleaning. Wash with a soft cloth or sponge and a mild soap or spray cleaner. Rinse and dry.- Never use steel wool or scouring powder on any parts.- Do not wash any part of slicer in dishwasher.Removing the Food Carriage: Turn the thickness control knob to the O-position until it stops. Under the right side of thefoodcarriage,pressupwardonthecarriagereleasebutton(10).Whilemaintainingpressureonthisbutton,pullthecarriageawayfromthebladeuntilitcomesoffthetrack(Figure10).
Figure 10.Figure 9.Figure 8.
Switch Plate
7
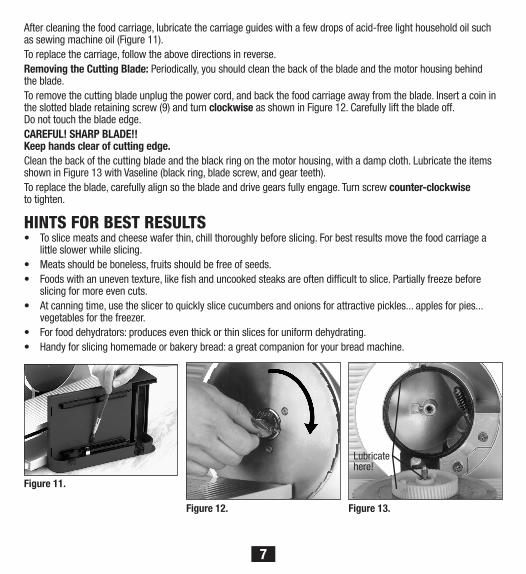
After cleaning the food carriage, lubricate the carriage guides with a few drops of acid-free light household oil such assewingmachineoil(Figure11).To replace the carriage, follow the above directions in reverse.Removing the Cutting Blade: Periodically, you should clean the back of the blade and the motor housing behind the blade.To remove the cutting blade unplug the power cord, and back the food carriage away from the blade. Insert a coin in theslottedbladeretainingscrew(9)andturnclockwise as shown in Figure 12. Carefully lift the blade off. Do not touch the blade edge.CAREFUL! SHARP BLADE!! Keep hands clear of cutting edge.Clean the back of the cutting blade and the black ring on the motor housing, with a damp cloth. Lubricate the items showninFigure13withVaseline(blackring,bladescrew,andgearteeth).To replace the blade, carefully align so the blade and drive gears fully engage. Turn screw counter-clockwise to tighten.
HINTS FOR BEST RESULTS• Toslicemeatsandcheesewaferthin,chillthoroughlybeforeslicing.Forbestresultsmovethefoodcarriagea
little slower while slicing.• Meatsshouldbeboneless,fruitsshouldbefreeofseeds.• Foodswithanuneventexture,likefishanduncookedsteaksareoftendifficulttoslice.Partiallyfreezebefore
slicing for more even cuts.• Atcanningtime,usetheslicertoquicklyslicecucumbersandonionsforattractivepickles...applesforpies...
vegetables for the freezer.• Forfooddehydrators:produceseventhickorthinslicesforuniformdehydrating.• Handyforslicinghomemadeorbakerybread:agreatcompanionforyourbreadmachine.
Figure 11.
Figure 12. Figure 13.
Lubricate here!
8
NOTICE!!This Chef’sChoice® electric food slicer has been equipped with a special safety switch to prevent motor overheating. This self resettable switch will shut off the motor if its temperature gets too high. If this happens, please take the following steps:1. Make sure slicer is turned off. 2. Disconnect the power cord from the outlet.3. Allowtheslicertocooloff(approx.15-30min.).4. After the slicer has cooled off, plug the power cord into the outlet.The slicer should now operate normally.
OPTIONAL ACCESSORIES:• Ultra-thinSlicingBlade:Excellentforprosciutto,smokedsalmonandotherdelicatemeats,thatneedtobecut
extra thin. Stainless steel blade with non-serrated edge, will not shred or tear.• BladeSharpener(Model498):Excellentforresharpeningofserratedandnon-serratedfood
slicer blades.
SERVICEThis appliance is for household use only. No user-serviceable parts are inside. Refer servicing to qualified personnel.In the event post-warranty service is needed, return your food slicer to EdgeCraft Corp., where the cost of repair or electrical or mechanical adjustment can be estimated before the repair is undertaken.Please include your return address and a brief description of the problem or damage to the slicer on a separate sheet inside the box.Send your slicer, insured and postage prepaid to:
EdgeCraft Corporation 825 Southwood Road, Avondale, PA 19311
Tel: 800-342-3255 www.edgecraft.com
Retain evidence of shipping for your protection.
Limited Warranty:Usedwithnormalcare,thisEdgeCraftproductisguaranteedagainstdefectivematerialandworkmanshipforaperiodoffive(5)yearsandthemotorforten(10)yearsfromthedateoforiginalpurchase(“WarrantyPeriod”).Wewillrepairorreplace,atouroption,anyproductorpartthatisdefectiveinmaterialor workmanship without charge if the product is returned to us postage prepaid with dated proof of purchase within the Warranty Period. This warranty does not apply to commercial use or any product abuse. ALL IMPLIED WARRANTIES, INCLUDING IMPLIED WARRANTIES OF MERCHANTABILITY AND FITNESS FOR A PARTICULAR PUR-POSE, ARE LIMITED TO THE WARRANTY PERIOD. EDGECRAFT CORPORATION SHALL NOT BE LIABLE FOR ANY INCIDENTAL OR CONSEQUENTIAL DAMAGES. Some states do not allow limitations on how long an implied warranty lasts and some states do not allow exclusions or limitation of incidental or consequential damages, so the above limitations or exclusions may not apply to you. This Limited Warranty gives you specific legal rights, and you may also have other rights which vary from state to state.
Conforms to: UL 982 Certified to CAN/CSA: C22.2#1335 120 volts/60 Hertz, 1.2 Amps, 124 watts© EdgeCraft Corporation 2011 K11 S645200A