Embed Size (px)
Citation preview

PROCESS TRADING
S&P Emini Futures Trading Guide
The Process Trading S&P Emini futures trading system is like using a driving GPS app for trading. It
has two components, which are trendlines and indicators. The Process Trading trendline system,
detailed below provides a general road map for intraday trading, while the Process Trading Indicators
with trade setups, also detailed below correspond to turn by turn directions. Together they provide
a highly accurate road map with specific directions to end up in high probability trades.
1500 Tick Bar Chart
INDICATOR
ProAm / Probar1 blue, yellow bars / blue bars
ProAm2, / Probar2 blue, yellow bars / blue bars
ProMomentum showme Magenta bar - up momentum
red bar - down momentum
Improved Price Action Showme EOT White / Red
Improved Traders Cycle Showme U / D
Improved ATRs (Avg. True Range Bands) +1,2,3 / -1,-2,-3
Improved Traders Probe Uptrend / Downtrend
SineCombo Pink / Green dots tight couple
TRIGGER
Improved Price Momentum Color and Slope
Improved Price Force Red peak, red dominant
Green peak, green dominant
Improved Price Conviction Green crossing up thru Red
Green crossing up thru Lower Limit
Green over Red
Green crossing down thru Red
Green crossing down thru Upper Limit
Green under Red

EVIDENCE (Adds support, not required)
Improved Price Momentum Yellow top Sinewave
Pink bottom Sinewave
Improved Volume Green, Darkgreen Move up, or absorption
Magenta Move up, or end of up
White Move down, or end of down
Red, Darkgred Follow Trend, or end of trend
Improved Price Volume Divergence Red / Cyan
ProMomentum showme Magenta - up momentum
Red - down momentum
SHORT SETUPS 1, 2, 3, 4, 5, 6, 7
LONG SETUPS 8, 9, 10, 11,12, 13
GUIDELINES Trade with the trend
Initial trend will be established early (by around 10:30 am)
Reversals usually happen before twelve O'Clock
Reversals should be accompanied by EOT or STC signals
` Scalps (against the trend) valid only with EOT or STC signals
or valid price action setups
Normally no more than two trends a day
Contrarian trades should be scalp trades
As price breaks the trendline, do not trade
until a valid primary or secondary trendline
is established.
Anticipate a consolidation day after a trend day
Anticipate a continuation day after a reversal day

1500 Tick Bar Chart
SHORT SETUPS
#1 SETUP Condition
ProAm, Probar1 Two blue bars down from the top of a trend
TRIGGER
Improved Price Momentum slope changing to down (white line best)
Improved Price Force Green crossing down under Red
Improved Price Conviction Green sloping down thru Upper Limit
Green crossing down thru Red conviction line
Evidence
Improved Price Momentum turned red, to white
Improved Traders Cycle Showme D
Improved ATRs (Avg. True Range Bands) above +1
Improved Price Momentum yellow or pink sinewave dot
Improved Volume white bar
Improved Volume Price Divergence red dot in proximity
ProMometum showme magenta or red bar to direct left

#2 SETUP Condition
ProAm2, Probar2 Blue bar decsending from the top of a trend
TRIGGER
Improved Price Momentum slope changing to down (white line best)
Improved Price Force Green crossing down under Red
Improved Price Conviction Green sloping down thru Upper Limit
Green crossing down thru Red conviction line
Evidence
Improved Price Momentum turned red, to white
Improved Traders Cycle Showme D
Improved ATRs (Avg. True Range Bands) above +1
Improved Price Momentum yellow or pink sinewave dot
Improved Volume white bar
Improved Volume Price Divergence red dot in proximity
ProMometum showme magenta or red bar to direct left

#3 SETUP Condition
ProMomentum Magenta or Red bar at top of trend
TRIGGER
Improved Price Momentum slope changing to down (white line best)
Improved Price Force Green crossing down under Red
Improved Price Conviction Green sloping down thru Upper Limit
Green crossing down thru Red conviction line
Evidence
Improved Price Momentum turned red, to white
Improved Traders Cycle Showme D
Improved ATRs (Avg. True Range Bands) above +1
Improved Price Momentum yellow or pink sinewave dot
Improved Volume red , white bar
Improved Volume Price Divergence red dot in proximity
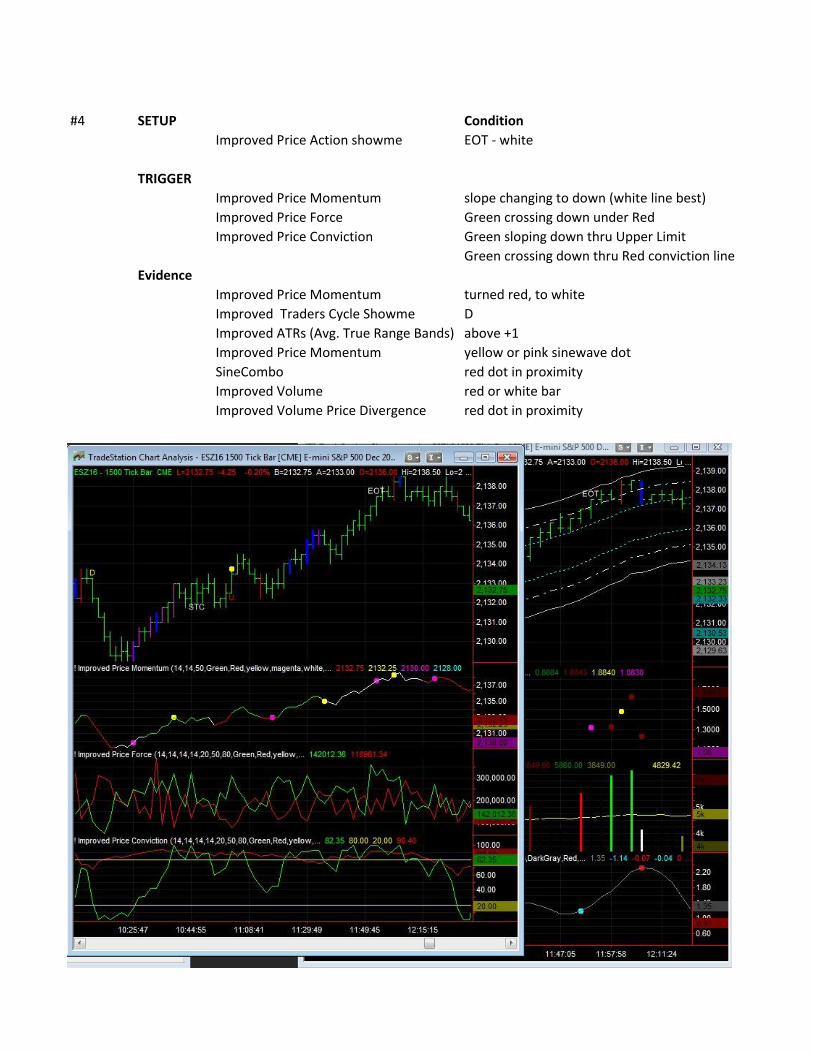
#4 SETUP Condition
Improved Price Action showme EOT - white
TRIGGER
Improved Price Momentum slope changing to down (white line best)
Improved Price Force Green crossing down under Red
Improved Price Conviction Green sloping down thru Upper Limit
Green crossing down thru Red conviction line
Evidence
Improved Price Momentum turned red, to white
Improved Traders Cycle Showme D
Improved ATRs (Avg. True Range Bands) above +1
Improved Price Momentum yellow or pink sinewave dot
SineCombo red dot in proximity
Improved Volume red or white bar
Improved Volume Price Divergence red dot in proximity

#5 SETUP Condition
Improved Traders Cycle Showme D
TRIGGER
Improved Price Momentum slope changing to down (white line best)
Improved Price Force Green crossing down under Red
Improved Price Conviction Green sloping down thru Upper Limit
Green crossing down thru Red conviction line
Evidence
Improved Price Momentum turned red, to white
Improved ATRs (Avg. True Range Bands) above +1
Improved Price Momentum yellow or pink sinewave dot
SineCombo red dot in proximity
Improved Volume red or white bar
Improved Volume Price Divergence red dot in proximity

#6 SETUP Condition
Improved ATRs (Avg. True Range Bands) at or above +2
TRIGGER
Improved Price Momentum slope changing to down (white line best)
Improved Price Force Green crossing down under Red
Improved Price Conviction Green sloping down thru Upper Limit
Green crossing down thru Red conviction line
Evidence
Improved Price Momentum turned red
SineCombo red dot in proximity
SineCombo yellow or pink sinewave dot
Improved Volume red or white bar
Improved Volume Price Divergence red dot in proximity

#7 SETUP Condition
Improved Traders Probe - (Pullback) Pullback line down from high to low
PB targets
yellow line - 1st target
red line - 2nd target
TRIGGER
Improved Price Momentum slope changing to down (white line best)
Improved Price Force Green crossing down under Red
Improved Price Conviction Green sloping down thru Upper Limit
Green crossing down thru Red conviction line
Evidence
Improved Price Momentum turned red
SineCombo red dot in proximity
SineCombo yellow or pink sinewave dot
Improved Volume red or white bar
Improved Volume Price Divergence red dot in proximity

LONG SETUPS
#8 SETUP Condition
Improved Price Action showme EOT - Red
TRIGGER
Improved Price Momentum slope changing to up (white line best)
Improved Price Force Green crossing up over Red
Improved Price Conviction Green sloping up through Lower Limit
Green crossing up through Red conviction line
Evidence
Improved Price Momentum turned green
Improved Traders Cycle Showme U
Improved ATRs (Avg. True Range Bands) at or below -2
Improved Price Momentum yellow or pink sinewave dot
SineCombo green dot in proximity
Improved Volume red, green, or magenta bar
Improved Volume Price Divergence cyan dot in proximity

#9 SETUP Condition
ProMomentum showme Magenta or Red bar at bottom of trend
TRIGGER
Improved Price Momentum slope changing to up (white line best)
Improved Price Force Green crossing up over Red
Improved Price Conviction Green sloping up through Lower Limit
Green crossing up through Red conviction line
Evidence
Improved Price Momentum turned rgreen
Improved Traders Cycle Showme U
Improved ATRs (Avg. True Range Bands) at -2 or below
Improved Volume red, green, or magenta bar
Improved Volume Price Divergence cyan dot in proximity

#10 SETUP Condition
Improved Traders Cycle Showme U
TRIGGER
Improved Price Momentum slope changing to up (white line best)
Improved Price Force Green crossing up over Red
Improved Price Conviction Green sloping up through Lower Limit
Green crossing up through Red conviction line
Evidence
Improved Price Momentum turned rgreen
Improved ATRs (Avg. True Range Bands) at -2 or below
Improved Price Momentum yellow or pink sinewave dot
Improved Volume red, green, or magenta bar
Improved Volume Price Divergence cyan dot in proximity

#11 SETUP Condition
Improved ATRs (Avg. True Range Bands) at or below -2
TRIGGER
Improved Price Momentum slope changing to up (white line best)
Improved Price Force Green crossing up over Red
Improved Price Conviction Green sloping up through Lower Limit
Green crossing up through Red conviction line
Evidence
Improved Price Momentum turned green
Improved Price Momentum yellow or pink sinewave dot
Improved Volume red , white, or magenta bar
Improved Volume Price Divergence cyan dot in proximity

#12 SETUP Condition
Improved Traders Probe - (Pullback) trendline up from low to high
PB targets
cyan line - 1st target
red line - 2nd target
TRIGGER
Improved Price Momentum slope changing to up (white line best)
Improved Price Force Green crossing up over Red
Improved Price Conviction Green sloping up through Lower Limit
Green crossing up through Red conviction line
Evidence
Improved Price Momentum turned green
SineCombo green dot in proximity
SineCombo yellow or pink sinewave dot
Improved Volume red , white, or magenta bar
Improved Volume Price Divergence cyan dot in proximity
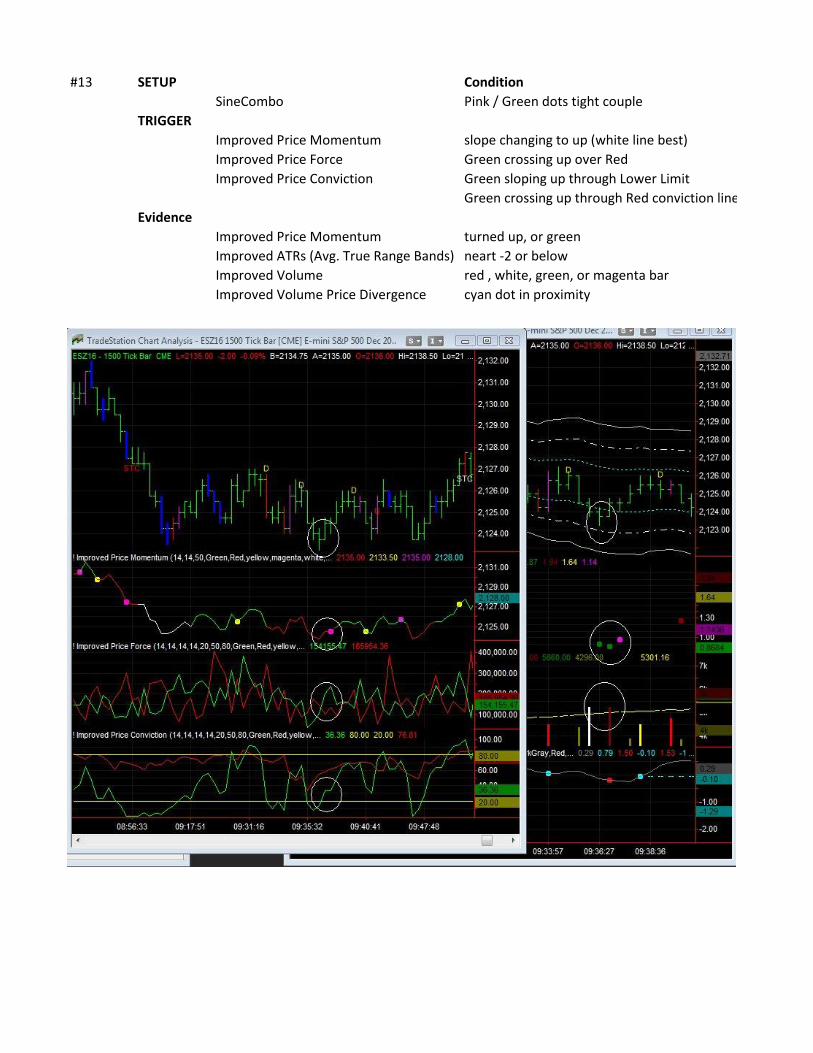
#13 SETUP Condition
SineCombo Pink / Green dots tight couple
TRIGGER
Improved Price Momentum slope changing to up (white line best)
Improved Price Force Green crossing up over Red
Improved Price Conviction Green sloping up through Lower Limit
Green crossing up through Red conviction line
Evidence
Improved Price Momentum turned up, or green
Improved ATRs (Avg. True Range Bands) neart -2 or below
Improved Volume red , white, green, or magenta bar
Improved Volume Price Divergence cyan dot in proximity

#14 SETUP "Convergence" Condition
Improved Price Momentum Slopes to bottom of indicator (white line best)
Improved Price Force Red (or Green) peaks up to top of indicator
The two inidcators converge
TRIGGER
Improved Price Momentum sloping down to bottom (white line best)
Improved Price Force Red (or Green) peaks up to top of indicator
Improved Price Conviction Green sloping up through Lower Limit
Green crossing up through Red conviction line
Evidence
Improved Price Momentum turned up, or green
Improved ATRs (Avg. True Range Bands) neart -2 or below
Improved Volume red , white, green, or magenta bar
Improved Volume Price Divergence cyan dot in proximity


`
`

`


`


`


Green crossing up through Red conviction line
`

Green crossing up through Red conviction line

Green crossing up through Red conviction line

Green crossing up through Red conviction line

Green crossing up through Red conviction line

Green crossing up through Red conviction line

Slopes to bottom of indicator (white line best)
Green crossing up through Red conviction line