Embed Size (px)
Citation preview
1
Process- och Komponentteknologi FFF110
Summary by: Kajsa Dahlin, N10
After this course you should be able to:
Describe fabrication processes of deposition/etching, surface patterning and diffusion.
Explain these processes realized on nm-scale
Explain relations between possibilities and limitations in processing and device performance
Basic processing in a clean room
Analyze a device structure and identify important process steps required to fabricate it
Contents
Chapter 1 - Introduction .......................................................................................................................... 2
Chapter 2 – Crystal growth ...................................................................................................................... 3
Chapter 3 - Silicon Oxidation ................................................................................................................... 5
Chapter 4 – Photolithography ................................................................................................................. 9
Chapter 5 – Etching ............................................................................................................................... 12
Chapter 6 – Diffusion ............................................................................................................................. 14
Chapter 7 – Ion implantation ................................................................................................................ 18
Chapter 8 – Film deposition .................................................................................................................. 20
Chapter 9 – Process integration ............................................................................................................ 25
Processing in research ........................................................................................................................... 28

2
Chapter 1 - Introduction
The history of transistors 1940 – Electromechanical An electromagnet controls a switch on and off. The electromechanical relay does not scale down well; it has a low currency and is dependent of the current. 1950 – Vacuum tube These have a heated cathode (electrons from thermionic emission). The flow is controlled by potential of a grid. High power, large, expensive and fragile. ENIAC was completed in 1946 and consisted of 17468 tubes. Many burnt out every day. It was 1000 times faster than electromechanical machines. 1970 – Discrete transistor Smaller than tubes, more reliable and use less power. They can be miniaturized. 1960- MOSFET (metal-oxide-semiconductor field-effect transistor) Source-drain control by voltage. Can be scaled, is cheap and reliable and uses low power. 1961 – Integrated circuit Transistors connected directly on the wafer.
Silicon - Silicon is semiconducting, and has a stable high-quality oxide with good insulating properties. It is a good barrier for diffusion. It has a wider bandgap than Ge, and transistors can therefore be operated at higher temperatures. Silicon is very cheap and can be highly purified. It is not used in semiconductor applications as light emitters and some high frequency transistors.
Moore’s law – A doubling of the number of transistors every two years (exponential growth).
In traditional scaling you use scaling of gate length and width, gate oxide thickness, and the junction depth. To a degree, it works fine. The chip operates faster, uses less power and is more complex. A downside is the heat generation, and a limiting of the CPU frequency. On a very small level, quantization effects starts to play an important role. Also, tunneling can appear when the gate oxide is made thinner. For now, other insulations works, but innovation is crucial to take the scaling to a new level. SiO2 (k = 3.7) is replaced by HfO2 (k=20) - smaller voltage, same change.
Examples of semiconductor devices and applications (beside transistors) are standard silicon technology (CPU, memories etc.), solar cells, LEDs, lasers, photodetectors…

3
Major steps of a planar process
Figur 1: Planar process. b) by wet/dry oxidation depending on using dry oxygen or water vapor c) often done by spin-coating, and then baked to harden the resist for better adhesion d/e) the exposed photoresist region undergoes a chemical reaction and remains/dissolves depending on resist under development f) etching removes the unprotected SiO2 surface g) resist is stripped away by chemical solution or an oxygen plasma system h) the not protected substrate surface is exposed to doping i) metal film formed by physical/chemical vapor deposition.
Chapter 2 – Crystal growth The most important semiconductors for discrete devices and integrated circuits are silicon and gallium arsenide.
Important steps: 1. Purification of starting materials 2. Distillation and reduction (synthesis) to polycrystalline semiconductor material 3. Crystal growth of single crystal semiconductor ingots. 4. Wafer preparation. These ingots are shaped to define the diameter of the material and are
sawed into wafers. Czochralski crystal growth – The basic technique for silicon crystal growth from the melt, which is material in liquid form. A single-crystal seed is used to slowly pull a rod of single crystal Si from a melt. The pull-rate is a few mm/minute and is done by an oxypuller. The starting material is a relatively pure form of sand (SiO2) called quartzite. The apparatus, called a crystal puller, has three main components: a furnace (crucible, rotation mechanism, heating element, and power supply), a crystal pulling mechanism (seed holder and rotation mechanism) and an ambient control (gas source, flow control, exhaust system).
Polycrystalline silicon is placed in the crucible, and the furnace is heated above silicon’s melting temperature. The suitable
Figur 2: Czochralski crystal growth

4
oriented seed crystal is inserted into the melt and slowly withdrawn. This yields a large, single crystal with the same crystal orientation as the seed crystal. A known amount of dopant is added to the melt to obtain desired doping concentration. The doping concentration incorporated into the crystal is usually different from the doping concentration of the melt. For an equilibrium segregation coefficient k0 < 1, the dopants are rejected into the melt during the growth.
Doping Doping – adding impurity atoms to a crystal to reduce resistivity. It is used in basically all devices. Doping levels is usually 1x10¹⁵ - 1x10²⁰ atoms/cm3. The doping options is doping during growth, ion implantation, diffusion and neutron bombardment.
Elements with impurity energy levels close to the conduction or valence band edge can be used for n- and p-doping. Elements that diffuse too easily or are highly toxic are not suitable as dopants.
III-V semiconductor crystal growth Examples: GaAs, InP, InAs, GaN, InSb. They are used because of their optical properties (direct bandgap: LEDs, Laser etc.) and their electrical properties (high mobility transistors). These semiconductors are much more difficult to grow than Si and Ge crystals. The starting materials are the elemental chemically pure gallium and arsenic. Because gallium arsenide is a combination, its behavior is different from that of a single material such as silicon. Two techniques are used: Czochralski and the Bridgman technique.
The Bridgman technique is used to grow most gallium arsenide, but Czochralski is more used for the growth of large diameter crystals. The Czochralski basic puller is the same as for growth of silicon, but here a liquid encapsulation is employed to prevent decomposition of the melt. This is a 1 cm layer of molten boron trioxide. It can dissolve silicon dioxide, so the fused-silica crucible is replaced with a graphite crucible.
Bridgman technique: A two-zone furnace is used for growing single-crystal GaAs. The left-hand has a temperature that maintains an overpressure of arsenic, and the right-hand zone is held just above the GaAs melting point. The boat (grey) is loaded with a charge of polycrystalline gallium arsenide, with the arsenic kept at the other end of the tube. As the furnace is moved toward the right, the melt cools at one end. Usually, there is a seed placed at the left end of the boat to establish a specific crystal orientation. The gradual solidification of the melt allows a single crystal to propagate.
Wafer shaping 1. Trimming and diameter grind. The seed is removed and the other, half-melted end of the
ingot. 2. Flat grinding. The flats identify doping type and crystal orientation. Grinding the surface
defines the diameter of the material. One or more flat regions are ground along the ingot to especially mark the specific crystal orientation. The primary flat is the basis for orientating the devices. Secondary flats (smaller) identifies the orientation and the conductivity type.
3. Wafer sawing. The wafer is sawed into thin, flat discs. The slicing determines the surface orientation, thickness, taper (thickness variations) and bow (surface curvature)
4. Edge rounding.
Figur 3: Bridgman technique

5
5. Lapping. Smoothing the surface by rough polishing to form typical flatness uniformity. This usually leaves the surface and edges damaged and contaminated.
6. Wafer etching. Removes the damaged and contaminated regions. 7. Polishing.
Every step makes the surface smoother and more even. GaAs is more fragile than Si and the wafer shaping must be done more carefully. To measure the wafer properties you can use a 4-point probe measurement (checking resistivity by currents) and a secondary ions mass spectroscopy, SIMS, (quantify impurity types and concentrations) that sputters the sample with a beam (destructive), and the sputtered ions are then analyzed. This technique has an excellent depth resolution and high sensitivity.
Crystal planes and defects Distance is measured in the number of lattice parameter we must move in a direction to go from the origin to the current point and specify the point coordinates. Some directions in the unit cell are particularly important. To determine the Miller indices for a plane:
1. Identify the points at which the plane intersects the x-, y-and z-axes. If it goes through the origin, move the origin! 2. Take the reciprocals of these points of intersection. 3. Arrange the fractions but do not reduce down to the smallest integer. 4. Place the result in (), negative signs of the numbers.
Comment: Plan and its negative matched solutions are identical,
(020) = (0-20). Plan and their multiples are not identical. In each unit cell the plane represents a certain group of equivalent planes that has specific index because of its coordinate directions. These similar planes are represented by {}. In the cubic system a direction has the same index as a plane that is perpendicular to these planes.
Figur 5: Point defects
The ideal crystal does not have defects as our crystal has. This strongly influences the electrical, mechanical and optical properties. Point defects are shown above. Other defects are line defects (edge and screw dislocation formation), stacking defects (intrinsic/extrinsic stacking faults, grain boundaries) and volume defects (local collections of impurities) which occur if more impurities are introduced than the solid solubility of the impurity in the host crystal lattice.
Chapter 3 - Silicon Oxidation
Thin films Almost all parts of a chip are made from thin films. First, a film of a material is formed on the wafer, followed by patterning of the film. There are several methods to form thin films in IC fabrication:
Figur 4: Unit cell

6
Chemical reaction – of reactive gases and Si substrate to form thin films (in other words thermally grown SiO2 and SiN).
CVD (chemical vapor deposition) of reactive gases with each other to form thin solid films on substrate + gaseous products
PVD (physical vapor deposition)
Electroplate think-film onto substrate (metal ions grow metal film)
Spin-on a liquid chemical and bake to drive off solvents and form thin films
Thermal oxides are for gate oxides, insulation and masking. SiO2 is a good barrier for oxidation.
SiO2
SiO2 films are used for gate oxides, field oxides (isolation of devices), masking, capping (prevent loss of dopants) and passivation (protection from moisture and impurities). It is an important reason for the success of MOSFETs/CMOS (Complementary Metal Oxide Semiconductor). SiO2 is a good insulator and a hard, stable oxide with a good interface to Si. It has replaced Ge as it is cheaper and has a more stable oxide (Ge oxide is water soluble). In 2007, SiO2 was replaced as gate oxide by HfO2!
Methods to form SiO2 films:
Thermal oxidation - Converting existing Si to SiO2 by adding oxygen at an elevated temperature. This gives the best oxide and interface quality and is used for gate and field oxides.
CVD - Depositing Si- and O- containing compounds, and forming SiO2 by a chemical reaction on the surface. This is a more flexible process, but with reduced quality. Used for masking, insulation and temporary layers (far from transistors). We’ll be back to CVD later on.
Thermal oxidation Thermal oxidation is by far the most important for silicon devices. For GaAs, thermal oxidation results in generally nonstoichiometric films. These oxides provide poor electrical insulation and semiconductor surface protection - they are seldom used in GaAs technology. Therefore, this chapter considers only oxidation of silicon.
Thermal oxidation can be dry or wet depending on oxidizing substance. Dry oxidation with oxygen is slower, and gives thin, high-quality oxides. Wet oxidation with water is faster, but the oxides get thick. Oxides used for masking are usually grown by wet oxidation, and gate oxides that have a higher breakdown voltage by dry oxidation.
The basic thermal oxidation apparatus is shown below, which provides the heat needed to elevate the oxidizing ambient temperature. A furnace typically consists of: 1) a cabinet; 2) a heating system; 3) a temperature measurement and control system; 4) fused quartz process tubes where the wafers undergo oxidation; 5) a system for moving process gases into and out of the process tubes; and 6) a loading station used for loading (or unloading) wafers into (or from) the process tubes.
Figur 6: Oxidation furnace with Si wafers at typical 900-1200 degrees
Oxidation takes place at the Si surface, and the new O2 or H2O diffuses through the SiO2 to the Si and reacts. The SiO2 is amorphous, because crystalline SiO2 has a big misfit with Si. Wet oxidation is about

7
ten times faster than dry because H2O diffuses faster than O2 through SiO2. The SiO2 moves into the silicon during the process which creates a fresh interface region. See figure.
Figur 7: Growth of silicon dioxide by thermal oxidation
The amorphous structure of SiO2 is relatively open accounting for the lower density and allows a variety of impurities to enter and diffuse readily through the layer. During the early stages of growth when surface reaction is the rate-limiting factor, the oxide thickness varies linearly with time. As it becomes thicker, the oxidant must diffuse through the oxide layer to react at the interface, and the reaction becomes diffusion limited with a parabolic growth rate. The general equation is:
x2+Ax =B(t+τ)
where A and B are constants found in a table for wet/dry oxidation, t is the time, x the thickness of the oxide and τ is the time it would take to grow the oxide. B/A is called the linear rate constant and depends on crystal orientation, which the parabolic rate constant does not. The latter is a diffusion process through a random network layer of amorphous silica.
Example: A Si sample is oxidized in dry O2 at 1200 degrees for 1 hour. a) What is the thickness of the oxide grown? x2+Ax =B(t+τ). Dry oxidation, T = 1200 degrees. A and B from table for dry oxidation. τ = 0.027, t = 1 h. x = 0.196 µm. b) How much additional time is required to grow 0.1 µm more oxide in wet oxidation at 1200 degrees? x2+Ax =B(t+τ). Find new constants in table for wet oxidation. Calculate τ for the 0.196 µm SiO2 = 0.067 h. Calculate t+ τ (total time to grow x = 0.196+0.1 = 0.296 µm.) = 0.142 h. t = 0.142-0.067 = 0.076 h.
The thickness of oxide grown on a (111) substrate is larger than that grown on a (100) because of the larger linear rate constant of the (111) orientation. Dopants near the silicon surface will be redistributed during thermal oxidation. Influencing this are the segregation constant and that the impurity may diffuse rapidly through the SiO2 and escape to the gaseous ambient. A third factor is that the oxide is growing and the boundary interface is advancing into the silicon.
There are several ways to determine the thickness of the SiO2. The simplest are by color inspection (but you have to know roughly the thickness). Ellipsometry uses an optical machine, and can scan large areas. Profilometry, done with a probe, can only determine the topography and require patterning. Another is inspection of wafer cross-section by high-resolution electron microscopy (very local technique but accurate).
Ellipsometry – Non-destructive optical characterization technique where light undergoes a change in polarization when reflected off the surface. The change is captured by the machine, and gives information on layer thickness and a variety of sample properties. It is important to have a general idea about the sample before using the ellipsometer though because a good model structure has to be selected. Surfaces with multiple layers can be analyzed.

8
Scanning probe techniques – are useful to measure film thicknesses for samples that have been patterned, a sharp tip interacts with the sample. The profilometer only does single line-scans, where an AFM does area scans.
MOSFET (metal oxide semiconductor field-effect transistor) MOS structures are the fundamental building blocks for capacitors, transistors, CCDs and memories. MOSFET idea: A voltage applied to the gate should change the number of mobile carriers in the Si.
In the ideal MOS no charges exit during bias other than those in the semiconductor. In a real, unwanted traps/charges in the oxide/interface lead to leaky behavior, reduced and unpredictable device performance:
Interface trapped charges Due to SiO2 interface properties and dependent on the chemical composition of this interface. Trap density is orient dependent. <100> Si has much fewer interface traps and fixed oxide charges than <111> Si. Most of the trapped charges can be removed by low-temperature annealing.
Fixed-oxide charges Located by the interface. This charge is fixed and very hard to remove. Generally the charges are positive and depend on oxidation and annealing conditions and on silicon orientation.
Oxide-trapped charges Charges are associated with defects in the SiO2. Can be created by ex. X-ray radiation or high-electron bombardment and are distributed inside the bulk SiO2. Most of the process-related oxide trapped charges can be removed by low-temperature annealing.
Mobile ionic charges These charges, such as sodium or other alkali ion are mobile within the oxide under raised temperature and high-electric field operations. It may cause stability problem in the device and threshold voltage shifts. It can be treated with different methods depending on the ions; sodium can be neutralized by adding chlorine during oxidation.
N-MOS is an n-type semiconductor which is negatively doped, like Figur 7. Inversion is not reached at high-frequencies as it takes time to generate minority carriers in the capacitor (not the case in an MOSFET transistor).
Figur 8: Ideal case of a p-type semiconductor

9
Saturation effect – the limit of flowing current through a device depending on voltage. The applied gate voltage affects how early saturation is reached. A probe station is used for electrical characterization of wafers and individual devices without the need of wire-bonding. CMOS (complimentary metal-oxide-semiconductor) – combination of p-type and n-type MOSFETs. Two important characteristics of CMOS devices are high noise immunity and low static power consumption. Since one transistor of the pair is always off, the series combination draws significant power only momentarily during switching between on and off states (see more in chapter 9).
Chapter 4 – Photolithography Photolithography is used for transferring a pattern from a mask onto the surface of a wafer. This means it’s used for all local processes on the wafer:
Locally removing (etching) material form the wafer
Locally adding (depositing) material onto the wafer
Locally changing the properties of the wafer
All patterned structures are processed by photolithography. Lithography is the first fundamentally new printing technology since the intervention of relief printing in the fifteenth century. In contrast to this, lithography is a mechanical planographic process. As an example of early methods for photolithography, gelatin is not soluble in water when exposed to UV, and is some sort of negative resist. There are different lithographic techniques – and different ways to pattern transfer:
UV lithography most importantly
X-ray lithography (XRL)
Electron beam lithography (EBL)
Nanoimprint lithography (NIL)
Focused ion beam (FIB) lithography
Main parameters are resolution (minimum feature size), throughput (wafers per hour) and registration (alignment accuracy). If there’s a positive resist, the parts exposed to the UV change and become soluble to the development as in the figure above. For negative resist it’s the opposite and remains in the development step.
UV lithography In the modern photolithographic process, it goes as follows: Clean and prime the wafer, spin-coat with resist (final thickness depends on viscosity and spin speed), pre-bake to enhance the adhesive ability, expose with UV, post-exposure bake (some resists), develop, post-bake, etch and strip!
The resist is a hydrophobic polymer – SiO2 is hydrophilic. The surface needs to be modified, and a primer is used to make it hydrophobic. The positive resist is made of three components; photosensitive compound, base resin and organic solvent. Upon exposure, the photosensitive
Figur 9: Part of Figur 1 that shows photolithography

10
compound changes its chemical structure and becomes soluble. The negative resist is polymers combined with photosensitive compound, and absorbs optical energy and starts crosslinking. Film defects can be streaks, a result of contaminating particles that affect the resist flow during the spin process. Also uncoated areas when too little resist has been applied or when there is a severe resist adhesion problem. There are two families of optical exposure methods:
1. Shadow printing (contact or proximity printing) 2. Projection printing (scanning and/or stepping)
Shadow printing. Contact printing has no gap between the mask with photoresist and the substrate, while the proximity has one. The advantages are that it is a simple and cheap method to achieve high resolution. Closer to the substrate gives a well-defined shadow. The downside is the risk of damaging the mask and the substrate. This makes it okay for using when masks are inexpensive and not used frequently. Projection printing. Projection of the mask on a wafer many centimeters away. This is expensive, but very safe for the mask and the sample as they do not touch. This is important to the industry. Wafer and mask move together. Here, only a small part of the wafer is typically exposed at a time, called step-and-scan. Step-and-repeat allows higher resolution than scanning projection printing.
Masks are defined with CAD-software, and the mask pattern is only one level of an IC design. The total layout requires several masks. Materials used are fused-silica plates and chromium. In the corners of the masks, they have holes formed as crosses, through which alignments can be made to get the substrate in place.
Examples of a pattern transfer: Etching. You want to form a metal pattern on the wafer. The starting point is a wafer with a metal film. The resist is exposed and developed. Etch away the metal not covered by the resist. Strip the resist by solvents and/or plasma. Lift-off. Spin-coat first with a Lift-off layer (LOL) and then with the resist on the wafer. Expose and develop, time sets the undercut that is made into the LOL. Metal deposition, the undercut prevents a continuous metal layer. Dissolve only the resist to lift off metal residues, and then dissolve the LOL to get your metal pattern.
Maybe we won’t reach the limiting small level for photolithography soon, maybe we will. Today, the wavelength is not limiting the resolution. Maybe the cost of a tool will limit further scaling? The resolution enhances with shorter wavelengths, better resists, phase shift masks (reverses the sign of the electric field), optical proximity correction and with immersion lithography (replaces the ar gap with a liquid medium with a refractive index greater than 1.0).
EBL – Electron beam lithography Electrons instead of light are used to expose a resist – no limiting wavelength problem.
Advantages are allowing nm-scale patterning of resist at reasonable cost, high resolution, highly automated and controlled operation, greater focus depth (not sensible to height) and that the electron beam writes directly in the resist (without a mask).
Disadvantages are serial exposure problems – extremely low throughput and potential damage from electron beam irradiation.
The most common exposure method is sequential writing pixel-by-pixel. For EBL, you need an e-beam source, a pattern generator and a mechanical substrate stage (for “stitching” fields). The writing schemes can be raster scan (round beam, low throughput), vector scan (variable beam and rather high throughput) and cell projection (system of beams, highest throughput). All of these are

11
still much slower than optical exposure because it has to visit all the points. Resist material is long polymer chains. A common positive resist is PMMA.
The proximity effect in EBL is the phenomenon that the exposure dose distribution, and hence the developed pattern, is wider than the scanned pattern, due to the interactions of the primary beam electrons with the resist and substrate. These cause the resist outside the scanned pattern to receive a non-zero dose. Software can correct for proximity effects. This can for example have effects when growing nanowires; the middle ones is getting a bigger dose and are wider and short, the ones longer out is thinner and hence longer.
NIL – Nanoimprint lithography A polymer is deposited onto a surface and a stamp is applying a pressure at higher temperature to melt the polymer layer. Cooling the polymer below the glass transition temperature and releasing it from the stamp, the polymer forms from the pattern on the stamp. Oxygen plasma ashing removes resist residues from the substrate and also widens the pattern a bit. The stamp fabrication is tedious and typically requires EBL.
Advantages are high resolution, cheap tolls, parallel process and much higher throughput than EBL. Issues are stamp wear and contamination, stamp alignment, proximity effect (flowing problem) and it’s expensive.
UV-NIL – the use of transparent stamps. The stamp is pressed into a curable polymer film, there’s no need for heating. UV exposure cures the polymer, remove stamp. This also solves some problems related to stamp, wafer alignment.
Figur 10: Micro-contact printing
FIB – Focused ion beam lithography Uses charged ions (protons) instead of electrons to pattern a resist layer (they are heavier). Advantages are the high mass of ions that results in less back scattering and considerably reduced proximity effects. Cons are, similar to EBL, a serial (slow) process.
FIB is often used to prepare cross-sectional samples for TEM analysis. Thin lamellas are milled with the ion beam and a nano-manipulator (a sharp needle) picks up the lamella and moves it to a TEM inspection grid. Materials can be deposited via beam induced deposition through a local CVD process.
Figur 11: FIB principles

12
Clean room Dust can land on wafers and masks and cause defects and device failure. The clean rooms were introduced in the 1960s to increase yield in processing. In these, the dust-level is very accurately controlled by filtered air and a laminar flow with direction from ceiling to floor. Temperature, humidity are also controlled to stabilize process tools and chemical processes, Paper, pencils and regular clothes are not allowed. Materials/surfaces are designed not to produce dust and be easy to clean. Often, there is an over-pressure to prevent outside air from coming in. The clean rooms are shielded from electro-magnetic radiation – no cell phones allowed.
Types of contamination are organic material from employers, silicon/quartz dust, solvent residues, resist residues, oil films etc. The problem of dust/contamination is solved with mini-environments. Each machine has its own atmosphere. Wafers are transported in special sealed boxes. Tabell 1: Clean room standards
Level 2 class ISO 7 1 class ISO 5
Garment Hair cover, lab coat, lab shoes Hood, coverall, booties, gloves
Maximum particles/m3
3 520 > 0.5 micrometer (for example)
352000 > 0.5 micrometer
Chapter 5 – Etching
Etching is the reverse of film growth and deposition. As in oxidation, there is wet and dry etching.
Wet etching uses liquid-phase etchants and dry etching bombardment of ions onto the surface.
Wet etching: chemical Used for wafer preparation (lapping and polishing), cleaning of wafer surface and local etching in windows defined by lithography. The essential steps are:
1. Transport of reactants to the surface 2. Chemical reaction at the surface 3. Removal of products from the surface
The etch rate for wet etch is surface/reaction limited (depends on temperature) or diffusion limited (depends on agitation – reaction limited is better because it’s well controlled). Today, spray etching (with rotated wafers) is more used than immersion etching, because it has a more stable etch rate and uniformity by constant supply of fresh chemical. Wet etching tends to be isotropic (etches in all directions) which causes undercut. This is unsuitable for small pattern transfer, where dry etching is used instead.
To etch silicon use a mixture of nitric acid (HNO3) and hydrofluoric acid (HF), dilute it with water or acetic acid (ättiksyra). Wet etching in silicon is orientation dependent. The more bonds to break, the slower etch rate in some etch solutions – (111) is densest and slowest. This can be used to fabricate submicron device structures. To etch SiO2, only the first step with HNO3 is needed. To wet etch III-V materials such as GaAs you need oxidation of semiconductor surface and dissolution of the oxides: H3PO4, HNO3, H2SO4, HCl, sometimes with an oxidizer (H2O2).
Dry etching: plasma-assisted Examples of dry-etch methods are plasma-, sputter-, reactive ion (RIE)- and high-density plasma etching (ICP). These are either chemical or physical or both. The plasma in generated by ionization of

13
a gas using RF excitations. All by-products volatile (forms a gas) at low pressure (temperature may need to be elevated). The essential steps in dry etching are:
1. Generation of etchant species in plasma 2. Diffusion to the surface 3. Adsorption 4. Reaction 5. Desorption and diffusion, pumped out
Plasma is a chemical soup (“4th state of matter”) where a certain amount of particles is ionized, but most of them are not. The electrons are shared over the whole soup, and move fast. Plasma is made through adding enough energy to a gas to cause ionization (electrical, thermal, electro-magnetic energy…). Examples are neon signs (low pressure) and lightning (high pressure). To start a plasma, apply energy. An electric filed accelerates both ions and electrons. To work in a low pressure ensures long path between collisions. To determine the relative concentrations of species and by-products, plasma diagnostics are used, which investigates the color of the plasma.
There are three families of dry etching techniques:
Physical etching (sputtering) High energy ions impact substrate and eject material – “a billiard ball effect”. The etch rate decreases with increased process pressure. The technique is related to that of Ga-ion milling using a focused ion beam (FIB). Methods are using an inert gas (“ädelgas”) as Ar and low pressure, a large area for the chamber and wafer on powered electrode as the bombardment on wafer is heavy. The selectivity is low, most materials sputter equally, and the etch rate is low.
Chemical etching (plasma) This method is dominated by neutral species (atoms, radicals, molecules) and radicals react with the surface. Is it purely isotropic and causes low damage. Reaction by-products need to be volatile. The RIE (reactive ion etcher) is similar to the sputter etcher, but not optimal for chemical etching. Instead, use the plasma etcher (where wafer and chamber are grounder, upper electrode powered) or an ICP (inductively coupled plasma etcher). The latter has independent control of plasma and substrate bias.
Ion enhanced etching Both physical (ions) and chemical (radicals) are etching components. Ions striking the surface enhance reactions and product desorption. With an inhibitor accumulating on the sidewalls, the sidewalls have minimal ion bombardment and are protected from chemical etching (improves anisotropy). For ion enhanced etching, the RIE (wafer
electrode powered and runs at low pressure) or the ICP can be used.
For processes that require very tall/deep features DRIE (deep reactive ion etching) is used. This has a cycled process with conformal polymer deposition and anisotropic polymer etching.
Figur 12: Dry etching methods

14
Wet or dry etch?
Figur 13: Comparison of wet and dry etching
Wet etch is often used for blanket etch as in etching the whole wafer surface (such as when cleaning and preparing a wafer before processing). Dry etching is typically used in pattern transfer process (partially masked wafers). Tabell 2: Comparison
Wet etching Dry etching
Typically isotropic – limited control in pattern transfer.
Can be highly anisotropic which is good.
Chemical etch – no physical damage and good material selectivity
Physical damage due to plasma and ion bombardment.
Requires rinse and dry steps
Liquids: potential source of contamination Clean process
Wide choice of chemicals For chemical etching: by-products must be a gas
Cheap, but typically uses large amounts of hazardous chemicals
More expensive equipment
Chapter 6 – Diffusion Doping adds impurity atoms to a crystal to reduce resistivity. Doping can be done during growth, through ion implantation, diffusion, neutron bombardment. Elements with impurity energy levels close to the conduction or valence band edge can be used for n- and p-doping. Elements that diffuse too easily or are highly toxic are not suitable as dopants. Doping is very common and is used in for example LEDs, where electron-hole recombination in a p-n junction is responsible for the light output. Methods for local impurity incorporation:
Diffusion
Ion implantation (see Chapter 7)
Doping during epitaxial film growth

15
Figur 14: Diffusion concentration vs. Ion-implantation
Diffusion Material is redistributed due to a concentration gradient through Fick’s first law:
F is the flux (nbr of dopants passing through unit area in unit time), C the number of dopants per unit volume and D the diffusion coefficient.
Diffusion mechanisms are vacancy- and interstitial mechanism. If dopant atoms are smaller than the host atoms, interstitial diffusion of dopant atoms usually dominates. But only active dopants need to occupy substitutional sites. D can be described as:
is the activation energy linked to the diffusion mechanism. It is typically higher for vacancy diffusion than for interstitial diffusion because energy is required for both impurity motion and vacancy motion. Lateral diffusion is slower than vertical because of the presence of a mask. The driving force for diffusion is concentration gradients. This next equation is called Fick’s diffusion equation.
You can solve diffusion problems from these equations for two special cases; constant surface concentration of dopants, and constant amount of dopant.
1. Constant surface concentration C(x,0) = 0
C(0,t) = , surface concentration
=0 The solution of Fick’s equations are:
Note as time progresses, the dopant penetrates deeper into the semiconductor.
is the "error function" encountered in integrating the normal distribution. It is an entire function, from which solutions can be found in a table. The total number of dopants, Q(t) per unit surface area is:
Figur 15: Concentration over time

16
The gradient of the diffusion profile is:
2. Constant total dopants C(x,0) = 0
, total impurities in system constant
=0
Solution to the diffusion equation:
The surface concentration x=0 will decrease over time. The gradient of the diffusion profile:
The gradient is zero at x=0 and x= , and maximum for x= .
In IC-fabrication, both techniques are done in one step each.
Extrinsic diffusion These are not described as constant diffusivities, and the profiles occur when the doping concentration is lower than the intrinsic carrier concentration at diffusion temperature, for example:
T=1000 degrees -> (Si) = 5 x 1018 cm-3.
For low doping concentration (n < ni) – intrinsic diffusivity
More intrinsic vacancies than doping-related vacancies.
The diffusions can be treated independently; we assume that D is independent of C. For high doping levels (n > ni) – extrinsic regime
The contribution from D from C cannot be ignored, the diffusivity becomes concentration dependent.
D is generally much higher.
Figur 17: Donor impurity diffusivity vs. electron concentration
The impurity distribution during oxidation depends on the segregation constant k.
Figur 16: Concentration over time

17
If k < 1 it is more likely that the SiO2 takes up the impurity.
Figur 18: Impurity distribution
Evaluation of doped material The results of a diffusion process can be evaluated by three measurements: the junction depth (the position where the dopant concentration equals the substrate concentration), the sheet resistance and the dopant profile of the diffused layer.
1. Staining – to measure junction depth It’s a destructive method where a groove first is cut into the semiconductor. Sample is dipped into HF and HNO3. p-type etch differently than n-type and becomes less reflective -> dark. If the junction depth is known, the surface concentration and the impurity distribution can be calculated.
2. Spreading-resistance profiling Also destructive, sample is cut at an angle, and two probes are stepped in. The resistance between them is measured and gives a high depth resolution profile. Measures only active dopants, and is a bit tricky to perform.
3. Sheet resistance from conductor strips Measures the resistance through strips, counting on length parameters and such. Non-destructive!
4. 4-point measurement measures the resistance of a diffused layer Four probes, with a fixed current between the two outer probes, where voltage is measured between the inner. Non-destructive. Assumptions are large surface and equal probe spacings.
5. Secondary Ion Mass Spectrometry (SIMS) measures the total impurity profile Sample is sputtered by a beam – destructive. These ions are analyzed according to mass-to-charge ratio. Gives excellent depth resolution. Problem is that it cannot distinguish between activated and un-activated dopants.
18
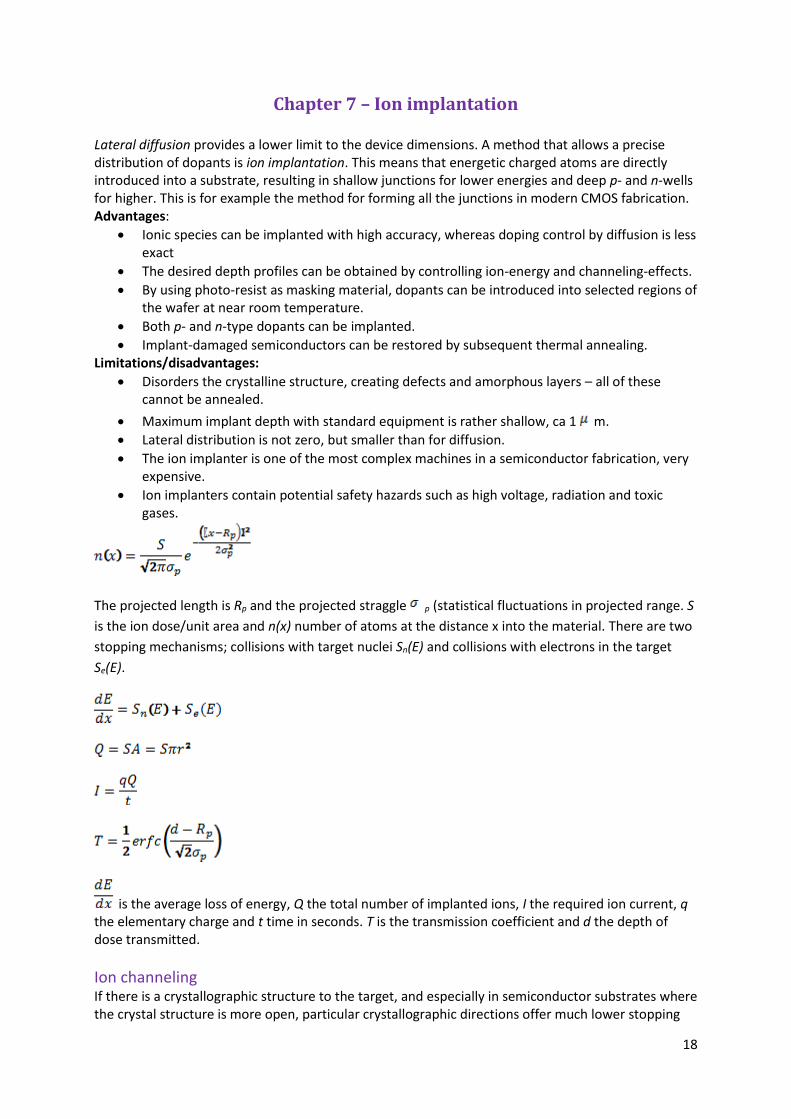
Chapter 7 – Ion implantation Lateral diffusion provides a lower limit to the device dimensions. A method that allows a precise distribution of dopants is ion implantation. This means that energetic charged atoms are directly introduced into a substrate, resulting in shallow junctions for lower energies and deep p- and n-wells for higher. This is for example the method for forming all the junctions in modern CMOS fabrication. Advantages:
Ionic species can be implanted with high accuracy, whereas doping control by diffusion is less exact
The desired depth profiles can be obtained by controlling ion-energy and channeling-effects.
By using photo-resist as masking material, dopants can be introduced into selected regions of the wafer at near room temperature.
Both p- and n-type dopants can be implanted.
Implant-damaged semiconductors can be restored by subsequent thermal annealing. Limitations/disadvantages:
Disorders the crystalline structure, creating defects and amorphous layers – all of these cannot be annealed.
Maximum implant depth with standard equipment is rather shallow, ca 1 m.
Lateral distribution is not zero, but smaller than for diffusion.
The ion implanter is one of the most complex machines in a semiconductor fabrication, very expensive.
Ion implanters contain potential safety hazards such as high voltage, radiation and toxic gases.
The projected length is Rp and the projected straggle p (statistical fluctuations in projected range. S
is the ion dose/unit area and n(x) number of atoms at the distance x into the material. There are two
stopping mechanisms; collisions with target nuclei Sn(E) and collisions with electrons in the target
Se(E).
is the average loss of energy, Q the total number of implanted ions, I the required ion current, q the elementary charge and t time in seconds. T is the transmission coefficient and d the depth of dose transmitted.
Ion channeling If there is a crystallographic structure to the target, and especially in semiconductor substrates where the crystal structure is more open, particular crystallographic directions offer much lower stopping

19
than other directions. The result is that the range of an ion can be much longer if the ion travels exactly along a particular direction, for example the <110> direction in silicon The doping goes far deeper than intended.
<110> channel in Silicon – channeling occurs when incident ions align with a major crystallographic direction – the ions are guided between atomic rows in the target crystal. No loss of energy due to nuclear collisions.
To minimize ion channeling:
Blocking amorphous surface layers randomizes the directions of the incident ions
Misorientation of the wafer relative to the ions beam prevents channel entering
Creating a damaged surface layer randomizes the incident directions.
Figur 19: Minimizing ion channeling. a) ions will have randomized directions c) scattered ions will misalign
Implant damage Electron collisions give exited states, e-h pairs, ionization – but no real damage to the crystal. Nuclear collisions results in host atoms getting displaced and implantation damage through lattice disorder! Gives cascades of secondary displacements – a tree of disorder is created along the ion path. Light ions loses energy primarily from electron stopping while heavy loses energy primarily from nuclear stopping (only these can lead to implant damage), i.e. use of heavy ions lead to more implant damage and created a disorder cluster in the material with a larger, shorter area.
Damage degrades mobility and minority carrier lifetime severely. It is possible to treat this with annealing. Annealing is a high temperature treatment at a certain time. This activates the implanted ions by for example moving the impurities to their right sites in the lattice, and to restore mobility.
Conventional annealing
Open tube furnace – long time at relatively high temperature. With too long time and too
high a temperature dopants activated and spread out more. Higher dose gives higher
damage and requires higher temperature to get rid of defects.
Rapid thermal annealing (RTA)
Short annealing process based on very rapid heating to a high temperature. Control the
temperature. An advantage is that it doesn’t change the ion profile, but it’s hard to control.
To implant in certain areas, as in n- and p-doped areas we use masking. Masking materials can be SiO2, silicon nitride (most effective) or photoresist. Use a mask thick enough! Photoresist needs to be thicker because they are flexible but are letting through ions easier. To dope during epitaxy: introduce dopant precursor during CVD growth.

20
Chapter 8 – Film deposition
Dielectrics A dielectric is an electrical insulator that can be polarized by an applied electric field. When a dielectric is placed in an electric field, electric charges do not flow through the material as they do in a conductor, but only slightly shift from their average equilibrium positions causing dielectric polarization. Deposition of dielectric film is done by one of these common methods:
Atmospheric pressure CVD, low-pressure CVD and plasma-enhanced CVD. ALD (atomic layer deposition) is a special adaption of CVD.
Plasma-enhanced CVD – PECVD.
Radio-frequency electromagnetic field applied. Gas turns into partial plasma. Lower deposition temperature possible (energy is provided). Amorphous films and often significant impurity incorporation. Deposition can be combined with plasma pre-etching for wafer cleaning.
CVD CVD is a collection of gas-phase methods to form a thin film from reactants. First there is a reaction of vapor-phase chemicals that contain the film material. Ideally, reactions should only take place at the wafer surface. A solid film is formed as by-product. Energy input is needed for chemical reactions (heat, plasma). CVD can be used to deposit dielectrics (SiO2, SiNx), polycrystalline silicon and metals (W, Al, TiN...) which are amorphous or poly-crystalline. CVD can also be used to deposit (grow) crystalline semiconductor films oriented with the substrate. This is called VPE and will be treated later on.
CVD of SiO2 - have different reactions for different temperatures. There’s a direct correlation between Tdep and SiO2 quality. For high Tdep, SiO2 is structurally similar to a thermal oxide. A low Tdep is required when a high temperature process may damage already processed structures (causing diffusion etc.).
CVD of P-glass - Phosphorus-doped silicon dioxide. It becomes soft when heated and flows. The heat-treatment improves step-coverage (evaporated materials deposit nonuniformly if the substrate has a rough surface and gets attacked from a single direction). For a low weight percent of P, the flow is low. For a high percent, say 7 %, the flow is high when annealed.
CVD of silicon nitride (SiNx) - Insulator that oxidizes very slowly - mask for local oxidation of Si. It provides a moisture barrier (and barrier for Na diffusion) into the wafer. It also works as a scratch barrier (hard). For high temperatures thick films over > 200 nm are stressed and may crack. For lower temperatures its good for final passivation ass there is less stress. This is often used in the very end of the processing.
-dielectrics These is typically based on the relative permittivity or the dielectric constant of the material.
is frequency dependent, and not a constant unless the frequency is given. = 3.9 for SiO2
Low (<3.9) = smaller capacitance (small coupling). Low -films is used for insulation and passivation of devices and IC, and to insulate multilevel metallization, reduced RC constant.
High (>3.9) = higher capacitance (strong coupling, more charge per applied volt). These are used in gate oxides and DRAMS - for high capacitance and low leakage.
RC constant - The RC constant of a device determines its maximum switching speed and energy
dissipation. . R is addressed by using copper lines with low resistivity. C is addressed by

21
optimized circuit design and low k-dielectrics. The gain in device speed form a reduced feature length is offset by a higher RC constant at the metal interconnects.
Low –films: Examples are Parylene N (polymer) (2.6), c-doped SiO2 called black diamond (2.7- 3) and polyimide (2.7 - 2.9). The dielectric constant for vacuum is 1. These can be deposited by following methods: CVD:
Fluorine-doped silicon dioxide (SiO2 doped with fluorine lowers from 3.9 to 3.5)
Carbon-doped silicon dioxide (SiO2 doped with carbon lowers down to around 2.7)
Porous silicon dioxide (increasing the porosity of the film decreases . (reduces mechanical stability and makes etching and polishing processes more difficult)
Spin-on: Organic and silicone-based polymeric dielectrics (lower mechanical strength and thermal stability) Spin on of polyimide: for low k-films require curing (ca 400 degrees) -> problem is stress from thermal expansion. Photosensitive versions are available, and allow direct patterning/development by UV lithography. Film can be dry-etched to desired thickness and is typically used as insulator in research devices (too high stress for consumer products)
High -films:
High -dielectrics have improved electrostatic coupling and less leakage - crucial when
working on scaling down transistors. Cells can be made smaller if is increased, while
maintaining Q. Examples of dielectrics with a high is HfO2, (20-30) TiO2 (40) and SrTiO3
(140). These films are typically deposited by CVD or ALD. Requirements for high in
transistors are: sufficiently high , no reaction with Si, stable up to 1050 degrees, wide band gap for low leakage, good interface, low impurities and no traps.
ALD (atomic layer deposition) Is in chemistry similar to CVD, but the ALD reaction breaks the CVD reaction into two half-reactions. The precursor materials are kept separate during the reaction. Typically one monolayer of material is deposited for each full cycle, and it’s suitable for deposition of thin films. This makes very low temperature deposition possible. Example: Al2O3 at 300 degrees. First TMA (tri-methyl-aluminum) then H2O. See figure below.

22
Figur 20: Al203 example
Polycrystalline silicon
Replaced aluminum as gate electrode in 1970 and is deposited by low-pressure CVD: SiH4 -> Si + 2 H2 at 600 degrees
The polysilicon requires doping to be conductive:
Doping during CD growth - too complicated. The presence of the dopants affects film growth. (It isn’t very usable.)
Doping by diffusion after CVD growth - Not so accurate, used for the highest doping concentrations.
Doping by ion-implantation after CVD - Gives the best doping control - resistivity can be accurately controlled over a wide range.
A polysilicon electrode has a much higher maximum time to breakdown than aluminum, and it does not depend on oxide thickness as for the latter. It’s on approximately 6 days. IC resistors - Diffused resistor is implemented in resistor and is not very good (implemented as doped regions in the Si wafer, can be doped by diffusion or ion implantation) or a thin film resistor (made
from deposited polysilicon doped by ion implantation. The most common resistor in ICs.)
Metal films Main purpose for metal films are wiring, contacts and interconnects. Methods used for deposition are:
PVD (Ti, Al, Cu, TiN, TaN - evaporation, sputtering - does not rely on surface reactions)
CVD (W, TiN), electroplating – see lower down (for thick films, damascene process - an additive process technique)
ALD (mostly in research)

23
PVD (physical vapor deposition) Evaporation - Source material is heated above melting temperature in an evacuated chamber.
Source is melted by resistance heating, by radio frequency heating or by a focused electron beam). The sample is not heated which results in limited diffusion. Deposited thickness is monitored by detecting the change in resonance frequency of a quartz crystal. Good for lift-off processing.
Sputtering – Accelerate ions toward a target, target material is kicked out and deposits on the wafer. Ion current and energy can be separately adjusted. In modern CMOS fabrication processes, sputtering has replaced evaporation. This method is less directional, and therefor gives a more uniform film.
CVD of metals Attractive for metallization because it offers good step coverage and conformal coatings. Suitable materials are Tungsten (W) and TiN.
CVD Tungsten – W has low resistivity and is used as contact plug and conductor. This can be done through H2-, Si- or SiH4 reduction. The Si reduction process offers selectivity – no deposition on SiO2. CVD TiN – Diffusion barrier to avoid junction spiking in Al-Si interface. TiN is a very stable material and extremely hard. Today it is also used as gate electrode in combination with HfSiOx. Often in CVD process with NH3, N2 or H2.
Al metallization Al is deposited by PVD or CVD. It’s a very common material for conductors. Advantages are that Al has low resistivity, and adheres well to SiO2. Cons are junction spiking and electromigration.
Junction spiking - In non-barrier metal processes aluminum can sit in physical contact with silicon. The silicon will diffuse into the aluminum and leave holes which will be filled by Al. Large currents flowing through a contact can heat the contact up to the point where the aluminum diffuses deep into the silicon shorting out the p-n junction. To avoid this, add Si when depositing Al to saturate Al, or introduce a barrier (TiN) between Al and Si.
Electromigration – smaller devices lead to higher current densities. Electromigration is transport of atoms under influence of current. The electromigration resistance of Al conductors can be increased by alloying with Cu, encapsulating the conductor or incorporating oxygen during film deposition.
Cu metallization Cu has high conductivity and high electromigration resistance. Also, it can be scaled better than Al. Drawbacks is corrosion, no passivating native oxide (as Al2O3), have no good etching method and has poor adhesion to dielectrics such as SiO2. Deposition is made in a damascene process. Electroplating Often used for thicker metal films, such as in contact pads. Now also used in the damascene process for interconnects. Metal ions in a solution are moved by an electric field to coat an electrode. The process uses electrical current to reduce cations of a desired material from a solution and coat a conductive object with a thin layer of the material, such as a metal. CMP (chemical mechanical polishing) - The wafer is rotated and pushed against a rotating polishing pad coated with slurry with nm-sized silica.
Figur 21: Junction spiking

24
Epitaxy The basic idea is to grow a single-crystalline (semiconductor) film on top of a (semiconductor) substrate, with the same crystal orientation. Methods in epitaxy are following:
MBE (Molecular Beam Epitaxy). Growth of epitaxial films using atomic or molecular beams. MBE is widely used in the manufacture of semiconductor devices, including transistors for cellular phones and Wi-Fi. Recently, the world's most efficient solar cells have been demonstrated with MBE and are being commercialized.
LPE (Liquid Phase Epitaxy) - A method to grow semiconductor crystal layers from the melt on solid substrates. This happens at temperatures well below the melting point of the deposited semiconductor. The semiconductor is dissolved in the melt of another material. At conditions that are close to the equilibrium between dissolution and deposition, the deposition of the semiconductor crystal on the substrate is relatively fast and uniform.
VPE (Vapor Phase Epitaxy) A subset of the family of VPE is MOVPE (Metal-organic-VPE). It is a highly complex process for growing crystalline layers to create complex semiconductor multilayer structures as GaAs and InP. It uses metal-organic precursors that are very versatile, and allows lower growth temperature than non-organic CVD sources. Important processes are mass transport to the surface and chemical reactions in the gas and on the surface.
In epitaxy film grows layer-by-layer. This can be by step flow growth or by 2d island nucleation, which
depends on the surface diffusion length . The first happens when > step-step distance, and the
other when < the same. 2d island misorientation causes grain boundaries. Homoepitaxy – epitaxial layer and substrate same Heteroepixaty - epitaxial layer and substrate different Strained-layer epitaxy – deforming to common spacing. Can occur when dislocations forms at the critical thickness. The lattice mismatch leads to island formation called Stranski-Krastanow islands.
Crystal defects:
Defects from the substrate and interface Use high quality wafers. Clean and etch surface before growth.
Precipitates or dislocations loops Too high doping concentration
Grain boundaries and twin-plane formation Avoid 2D island nucleation and grow on a clean surface
Edge dislocations Too high lattice mismatch or bad substrate
Figur 22: Electroplating
Figur 23: MBE

25
Chapter 9 – Process integration
CMOS Design is top-down – large functionality first, then the details. Fabrication is bottom-up.
Figur 24: CMOS inverter
Inverter logic gate fabricated using a twin-well CMOS technology. The following fabrication example
is for a 15 mask, twin-well, 2-level metal CMOS of SiN:
Figur 25: Starting material and isolation. Si with p-epitaxy on p+ wafer. Forming active and field regions using thermal oxidation (stress relief film layer pad oxide), CVD of SiN, optical lithography and dry etching. Isolation is important.

26
Figur 26: Well formation. Ion implantation to form active field regions of Boron. Thermal oxidation to grow filed oxide and wet etching of SiN in hot H3PO4. Photolithography and ion implantation x 2 to open up parts becoming p- and n-wells and implant doping Boron. Resist stripped.
Figur 27: Threshold voltage and gate oxide. Drive-in diffusion of impurities by long high-temp process and adding photoresist. Masks defines N-and PMOS transistors and Boron implant adjusts the channels. Wet etch removes the pad oxide and bares the Si, and thermal oxidation (dry) forms the SiO2 gate oxide.
Figur 28: Polysilicon deposition, patterning and formation of source/drain regions. Undoped polysilicon film layer, photoresist applied and mask used to define the gates. Dry etching defines their length and resist is stripped. New resist added, and a new mask covers the regions where P- or NMOSFETs exist. Shallow implantation dopes the lightly-doped drain regions for N- and PMOSFETs.
Figur 29: Formation of source/drain regions continues. Layer of SiO2 is deposited by CVD and then dry etched, leaving side-wall-spacers along the edges of the polysilicon gate-structures. Photoresist and a mask cover P- and NMOSFETS regions. Phosphorus-implant forms the n+ and p+ source/drain regions.

27
Figur 30: Formation of TiSi2 salicide. Etch step removes the thin-oxide layer that covers the source/drain and gate-poly regions in preparation for salicide formation. Thin layer of Ti is sputtered over the wafer. Annealing converts Ti to TiSi2 where Ti is in contact with Si and Ti residues can be selectively removed by wet etch. Second higher temp annealing converts TiSi2 to a final, lower-resistance form.
The CMOS can be connected by different ways; wire-bonding, flip-chip bonding (interconnecting to external circuitry with solder bumps that have been deposited onto the chip pads) and tape-automated bonding (places bare integrated circuits onto a printed circuit board (PCB) by attaching them to a polyamide or polyimide film).
Figur 31: Oxide deposition, CMP, contact holes and metal - 1 deposition. Dielectric layer (ex SiO2) is deposited by CVD then it is planarized by CMP (chemical-mechanical polishing). Resist applied and mask pattern the contact-opening regions. Dry etching of the thick layer to allow connections to reach the silicon substrate and poly-silicon layers (the source/drain). TiN-liner is sputtered, and CVD is used to deposit a film of W that fills the contact holes. Residues on the top surface is removed.
Figur 32: Metal deposition, intermetal dielectric and metal-2. Al:Cu alloy is sputtered onto the wafer, photoresist added and mask defines the Metal-1 lines which are created by using a anisotropic Al dry-etch process. Resist is then stripped. Annealing improves the contact between metal and doped regions and reduces the interface-trap-density in the gate oxide. Metal-2 is formed with the same steps as in the illustrations before. A final passivation-layer covers the chip (typically oxide or nitride).

28
Processing in research MEMS (micro-electromechanical systems) - is the technology of very small devices; it merges at the nano-scale into nanoelectromechanical systems (NEMS) and nanotechnology. MEMS are also referred to as micromachines (in Japan), or micro systems technology – MST (Europe). In Lund nanolab they study:
Top-down vs. bottom up fabrication of semiconductor structures
Methods to grow semiconductor nanowires
Characterization of nanowires
Nanowire device fabrication
Nanowire device measurements
Top-down method uses an etch mask, and requires lattice matching. It is a well-controlled process. Bottom-up method uses growth seeds to grow nanowires. It’s more flexible, but much less controlled and often limited to (111).
Hard growing InAs on Si because there’s a large difference in Si and InAs lattice constant. The strain can be accommodated at the base of a sufficiently thin nanowire. InAs is expensive, but Si is so cheap that the can be built. Substrate preparation - To suppress film growth and/or enhance local nanowire growth. Epitaxial growth from metal nanoparticles deposited onto a semiconductor surface is done by VLS-(vapor liquid solid) or VSS (vapor solid solid) growth. Epitaxial growth from holes in a mask on top of a semiconductor by self-seeded III-V growth (group III as seed) or selective area epitaxy (some facets have higher growth rate).
VLS – mechanism for the growth of 1D structures from CVD. The growth of a crystal through direct adsorption of a gas phase on to a solid surface is generally very slow. The VLS mechanism circumvents this by introducing a catalytic liquid alloy phase which can rapidly adsorb a vapor to supersaturation levels, and from which crystal growth can subsequently occur from nucleated seeds at the liquid–solid interface. The physical characteristics of nanowires grown in this manner depend, in a controllable way, upon the size and physical properties of the liquid alloy. Growth typically occurs at low temperature where competing (bulk) growth is very slow.
An excellent transistor material is Ge-Si because Ge has good mobility and Si good surface. Thin nanowires have no requirements for lattice matching. Au particle (interactions) gives limitations like kinking, bending etc. Nanowire processing can be done in two ways:
Planar processing – liquid flow deposition from different directions allows nanowire crossings
Vertical processing – processing of nanowires directly on the growth-chip. Requires good position- and growth-direction control.
Challenges with nanowires are many. Growth uniformity (epitaxial growth is very sensitive), doping (already grown surfaces are exposed to dopants), most nanowires are still grown from gold (SI and CMOS incompatible), processing of tall vertical structures is a challenge, nanowire arrays require nanoscale patterning and is expensive (nanoimprint lithography can be a solution!) and reduced crystal quality and purity.