Embed Size (px)
Citation preview

PrinterOn Network PrintValet Admin Guide
Version 1.0

PrinterOn Network PrintValet Admin Guide 2 ©2013 PrinterOn Inc.
1. Introduction .......................................................................................................................................................3
2. Requirements ....................................................................................................................................................4
2.1. Network Requirements .................................................................................................................................4
2.2. Physical Requirements ................................................................................................................................4
3. Deployment Options .........................................................................................................................................5
3.1. Two Network Ports available at installation location ....................................................................................5
3.2. One Network Port available at installation location ......................................................................................6
4. Configuration .....................................................................................................................................................7
4.1. Config Mode Configuration ..........................................................................................................................7
4.1.1. Steps to enter Config Mode ..................................................................................................................7
4.1.2. Steps to change IP Address through Config Mode ..............................................................................8
4.1.3. Steps to enable/disable DHCP through Config Mode ..........................................................................8
4.1.4. Steps to change Netmask through Config Mode ..................................................................................8
4.1.5. Steps to change Gateway through Config Mode ..................................................................................8
4.1.6. Steps to change Communication Port through Config Mode ...............................................................9
4.1.7. Steps to enable/disable Telnet through Config Mode ...........................................................................9
4.1.8. Steps to change the contrast or the brightness of the screen ..............................................................9
4.1.9. Steps to restore the Network PrintValet settings through Config Mode ...............................................9
4.1.10. Steps to Save Changes/Exit Config Mode............................................................................................9
4.2. Telnet Configuration .................................................................................................................................. 10
4.3. PDS Configuration .................................................................................................................................... 12
5. Using the Network PrintValet to Release Jobs ........................................................................................... 15
6. Best Practices ................................................................................................................................................ 16
Trademarks and Servicemarks ............................................................................................................................ 17
Copyright Notice .................................................................................................................................................... 17

PrinterOn Network PrintValet Admin Guide 3 ©2013 PrinterOn Inc.
1. Introduction
The Network PrintValet is a keypad for use with the PrinterOn Mobile Printing Solution. This enables users to
release print jobs that have been securely queued on Print Delivery Station software to a specific printer in your
organization.
1. When you submit your document, you will receive a 4-10 digit Release Code to identify your print
job.
2. On the Network PrintValet keypad near the printer, press OK and enter your Release Code, then
press OK again. This ensures that the document is sent privately and securely to the printer and
prevents unwanted documents from being printed.
3. Your document is released to the printer.
PrinterOn Network PrintValet Admin Guide 4 ©2013 PrinterOn Inc.
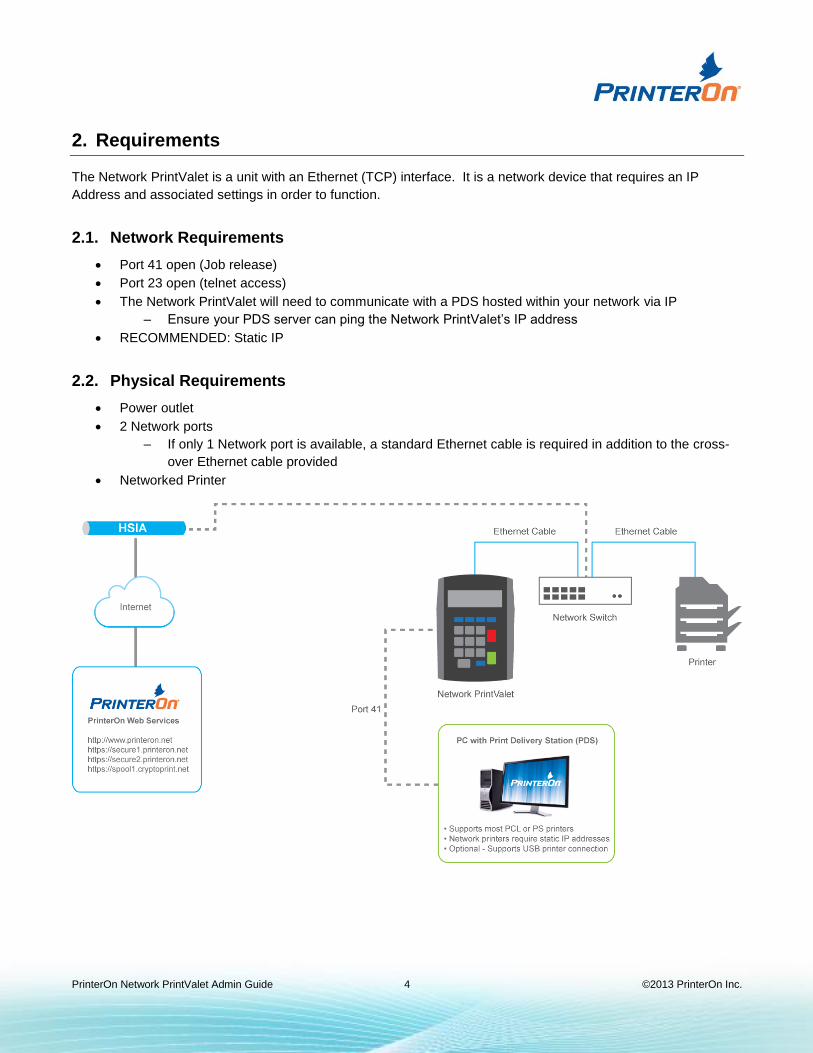
2. Requirements
The Network PrintValet is a unit with an Ethernet (TCP) interface. It is a network device that requires an IP
Address and associated settings in order to function.
2.1. Network Requirements
Port 41 open (Job release)
Port 23 open (telnet access)
The Network PrintValet will need to communicate with a PDS hosted within your network via IP
‒ Ensure your PDS server can ping the Network PrintValet’s IP address
RECOMMENDED: Static IP
2.2. Physical Requirements
Power outlet
2 Network ports
‒ If only 1 Network port is available, a standard Ethernet cable is required in addition to the cross-
over Ethernet cable provided
Networked Printer

PrinterOn Network PrintValet Admin Guide 5 ©2013 PrinterOn Inc.
3. Deployment Options
3.1. Two Network Ports available at installation location
When 2 or more network ports are available where the Network PrintValet will be installed, the connectivity is as
follows:
Network PrintValet plugged into power outlet with power supply
Network PrintValet plugged into network port/switch with Ethernet cable
Network printer plugged into network port/switch with Ethernet cable

PrinterOn Network PrintValet Admin Guide 6 ©2013 PrinterOn Inc.
3.2. One Network Port available at installation location
When only 1 network port is available where the Network PrintValet will be installed, the connectivity is as follows:
Network PrintValet plugged into power outlet with power supply
Network PrintValet plugged into network port/switch with Ethernet cable
Network printer plugged into Network PrintValet with Crossover Ethernet cable

PrinterOn Network PrintValet Admin Guide 7 ©2013 PrinterOn Inc.
4. Configuration
This section will cover the configuration steps using both the keypad’s config mode and telnet, as well as the
steps required in PDS.
4.1. Config Mode Configuration
Config Mode is used to configure the unit via the keys on the keypad. The LCD Panel displays the current setting
the unit has and provides a menu-driven interface for configuration.
When in Config Mode, you use the Menu button to scroll through the options available. These are:
1. Change IP Addr a. Changes the IP address of the PrintValet
2. Change DHCP a. Enables or disables DHCP. Yes indicates it is enabled, No indicates it is disabled. Yes/Enabled
by default. 3. Change Mask
a. Changes the Netmask settings 4. Change GW
a. Changes the Gateway settings 5. Change Port
a. Changes the port used by the PrintValet to communicate with PDS 6. Change Dest.IP
a. Does not apply. 7. Change Mode
a. Does not apply. Do not change this setting from its default of Server. 8. Change Telnet
a. Enables or disables telnet connectivity. Yes indicates it is enabled, No indicates it is disabled. Yes/Enabled by default.
9. Change Contrast a. Changes the contrast or brightness of the screen
R. Restore a. Restore to default settings. NOTE: this will reset any static IP details and the telnet password.
Q. Save and Exit
When in Config Mode, use the Menu button to cycle through the available options, then press OK to select the
option shown. The unit will display the current setting for that option. Press Menu to go back to the menu without
making changes or press OK again to go into Edit Mode (cursor block is shown) in order to change the setting.
When all the configuration values have been set as desired, be sure to go to Option Q and press OK. The unit
will save the settings and go through a reboot cycle in order to start using the new settings. Once complete, the
PrintValet will be in Operator mode.
Specific steps on how to modify these settings are outlined in the next sections.
4.1.1. Steps to enter Config Mode
1. With the power plug disconnected, press and hold Flag and OK, then connect the power plug.
2. Continue to press and hold the Flag and OK keys until the unit displays:

PrinterOn Network PrintValet Admin Guide 8 ©2013 PrinterOn Inc.
CONFIG MODE
172.16.100.5
3. On the LCD display, the first line shows that Config Mode is active and the second line shows the IP
Address being used by the unit.
4.1.2. Steps to change IP Address through Config Mode
1. Enter Config Mode 2. Press the Menu button once 3. Press OK to enter this option 4. Press OK to edit this option 5. Enter the IP address you’d like to set for this device
a. NOTE: To enter a period character, press the Clear button. 6. Press OK
a. You will be returned to the Config Mode Main Menu, press Menu to cycle through the options.
4.1.3. Steps to enable/disable DHCP through Config Mode
1. Enter Config Mode 2. Press the Menu button twice 3. Press OK to enter this option 4. Press ? to toggle this option
a. Options available are Yes or No. DHCP is enabled by default. 5. Press OK
a. You will be returned to the Config Mode Main Menu, press Menu to cycle through the options.
4.1.4. Steps to change Netmask through Config Mode
1. Enter Config Mode 2. Press the Menu button three times 3. Press OK to enter this option 4. Press OK to edit this option 5. Enter your Netmask address
a. NOTE: To enter a period character, press the Clear button 6. Press OK
a. You will be returned to the Config Mode Main Menu, press Menu to cycle through the options.
4.1.5. Steps to change Gateway through Config Mode
1. Enter Config Mode 2. Press the Menu button four times 3. Press OK to enter this option 4. Press OK to edit this option 5. Enter your Gateway address
a. NOTE: To enter a period character, press the Clear button 6. Press OK
a. You will be returned to the Config Mode Main Menu, press Menu to cycle through the options.
NOTE: If an IP address is not obtained, the display will show an IP of 192.168.1.99.

PrinterOn Network PrintValet Admin Guide 9 ©2013 PrinterOn Inc.
4.1.6. Steps to change Communication Port through Config Mode
1. Enter Config Mode 2. Press the Menu button five times 3. Press OK to enter this option 4. Press OK to edit this option 5. Enter the port you’d like to use in place of the default 6. Press OK
a. You will be returned to the Config Mode Main Menu, press Menu to cycle through the options.
4.1.7. Steps to enable/disable Telnet through Config Mode
1. Enter Config Mode 2. Press the Menu button eight times 3. Press OK to enter this option 4. Press ? to toggle this option
a. Options available are Yes or No. Telnet is enabled by default. 5. Press OK
a. You will be returned to the Config Mode Main Menu, press Menu to cycle through the options.
4.1.8. Steps to change the contrast or the brightness of the screen
1. Enter Config Mode 2. Press the Menu button nine times or until you see “9: Change Contrast” 3. Press OK to enter this option 4. Press OK again to edit this option 5. using number keys “4” and “6” on the keypad, you can adjust the contrast 6. Press Ok after the desired contrast has been set
a. You will be returned to the Config Mode Main Menu, press Menu to cycle through the options.
4.1.9. Steps to restore the Network PrintValet settings through Config Mode
1. Enter Config Mode 2. Press the Menu button ten times 3. Press OK to restore
a. This will restore all settings to default and resets the telnet password to “admin”. 4. The device will reboot itself and you will be returned to the Operator Mode Main Menu.
a. If PDS has been configured already, the display will read Print Release Press OK b. If PDS has not been configured, the display will read Server is disconnected
4.1.10. Steps to Save Changes/Exit Config Mode
1. Enter Config Mode 2. Press the Menu button eleven times 3. Press OK to exit 4. The device will reboot itself and you will be returned to the Operator Mode Main Menu.
a. If PDS has been configured already, the display will read Print Release Press OK
NOTE: If you change the Communication Port after the PDS configuration is complete, remember to modify
the port within the PDS configuration as well. Job release will not be available until this is modified.
See section 3.3 for details on configuring PDS.

PrinterOn Network PrintValet Admin Guide 10 ©2013 PrinterOn Inc.
b. If PDS has not been configured, the display will read Server is disconnected
4.2. Telnet Configuration
When the Telnet interface is enabled, you can use any telnet client to access the device. On Windows 7, for
example, you’d open a Command prompt and enter the command:
telnet 172.16.100.5
You will be prompted for a Login ID and password. The username is admin and the default password is admin.

PrinterOn Network PrintValet Admin Guide 11 ©2013 PrinterOn Inc.
The following screen shot shows the default settings for the network PrintValet, as connected in our
network. Note that the IP Address, gateway, subnet mask and DNS server IP Addresses are obtained via DHCP
and are subject to being different depending on the DHCP server that the keypad connects to.
To modify a setting, enter the number or letter associated with that option.
1. Change host name a. Not necessary to configure, but reccomended. Changes the host name of the Network PrintValet
2. Change static IP address a. Changes the IP address of the Network PrintValet
3. Change static gateway address a. Changes the Gateway settings
4. Change static subnet mask a. Changes the Netmask settings
5. Change static primary DNS server a. Changes the primary DNS server address
6. Change static Secondary DNS server a. Changes the secondary DNS server address
7. DHCP Client a. Enables or disables DHCP. Enabled by default.
8. Change destination IP address a. Does not apply.
9. Change destination TCP Port a. Changes the port used by the Network PrintValet to communicate with PDS. Port 41 by default.
A. Change Unit Mode
a. Does not apply. Server by default and should not be changed.
K. Keys Buffered
a. Disabled by default and should not be changed. Enabling this option will cause the keypad to be
unresponsive.
M. Send MAC
a. Disabled by default and does not need to be modified. This option will send the MAC address to
our software based on the interval set in option N.
N. MAC Sent (every key or enter only)
a. Enter Only by default and does not need to be modified.
O. Echo Output

PrinterOn Network PrintValet Admin Guide 12 ©2013 PrinterOn Inc.
a. Enabled by default and does not need to be modified.
S. Sleep Mode
a. Does not apply.
P. Change Telnet Password
a. Changes the telnet password
E. Telnet Access
a. Enables or disables Telnet access on the network PrintValet. Enabled by default.
Q. Quit
4.3. PDS Configuration
You must now finalize the configuration of Print Delivery Station (PDS) to work with the newly installed Network
PrintValet keypad. Printers assigned to a particular PDS Serial Number can be associated with a Network
PrintValet on a per printer basis.
This guide assumes that PDS’ initial configuration and printer mapping have already been done. For complete
details on installing and configuring PDS, go to http://www.printeron.com/images/docs/PDSUserGuide.pdf
1. Login to the Windows computer running PDS with Local Administrator rights (not as a “Guest”).
IMPORTANT: Before proceeding, reboot your computer and when prompted, login as
“Administrator” (not as “Guest”). A windows password may be required to login as
“Administrator”. PrinterOn does not have access to this Windows password.

PrinterOn Network PrintValet Admin Guide 13 ©2013 PrinterOn Inc.
2. From the system tray double-click on the PDS icon.
Note: Please verify that your Print Delivery Station software version is 2.6DR or higher before proceeding.
3. In the PDS Advanced Settings > PrintValet tab, follow these steps.
a. Press the Add button.
b. Select Ethernet Connection
c. Enter the IP address (and port if not using the default port 41) of the Network PrintValet that
will be used to release jobs for the printers associated with this PDS

PrinterOn Network PrintValet Admin Guide 14 ©2013 PrinterOn Inc.
o Optional: It is possible to configure different printers to different Network PrintValets
when more than one printer is assigned to the PDS.
Click the Edit button to the right of the Printer Association box
Select the Select Printers radio button
Enable the PrinterOn IDs that you would like this Network PrintValet to have
access to
Click OK to exit the Edit Printer Associate dialog box
d. Click OK to exit the Add PrintValet dialog box
e. Click OK to exit the Print Delivery Station Settings dialog box
4. Reboot your computer. 5. Your installation and configuration should now be complete. Once your computer has rebooted and the
PDS service starts up, the PrintValet Keypad LCD screen display should change from “Server is disconnected” to “Print Release Press OK”.
NOTE: PrinterOn recommends utilizing one Network PrintValet when multiple printers are located in close proximity to each other.

PrinterOn Network PrintValet Admin Guide 15 ©2013 PrinterOn Inc.
5. Using the Network PrintValet to Release Jobs
To release print jobs:
1. At the first screen, press OK. To return to first screen, press Cancel.
2. At the ID code prompt, enter the 4-10 digit release code that corresponds with the print job(s) you
sent and press OK.
3. The Network PrintValet will then search for your print job and display the number of jobs that
match that release code as well as the total number of pages. To print your jobs, press OK.
MENU
1. Print job
2. Delete job
3. Reprint job, if permitted
Languages
1. English
2. French
3. Spanish
4. Dutch
5. Italian
6. German
Back: Deletes one entered character.
? Help: Displays the version number of the PrintValet software.
CANCEL: Returns the user to “Print Release Press OK” home
screen.
CLEAR: Clears all entered characters.

PrinterOn Network PrintValet Admin Guide 16 ©2013 PrinterOn Inc.
6. Best Practices
PrinterOn recommends the following steps be taken to secure the Networked PrintValet after its initial
configuration and testing:
Change the telnet password from its default value of “admin”
‒ To change the telnet password, see section 4.2
Disable telnet access after the password has been changed
‒ To disable/re-enable telnet, see section 4.1.7
Give the Network PrintValet a host name
‒ To modify the host name, see section 4.2

PrinterOn Network PrintValet Admin Guide 17 ©2013 PrinterOn Inc.
Trademarks and Servicemarks
The following are trademarks or registered trademarks of PrinterOn Corporation in Canada and other countries:
PrinterOn, PrintWhere, PrintAnywhere, the PrinterOn “bird”, the PrinterOn Logotype and the PrinterOn Signature.
The following are trademarks or registered trademarks of other companies:
Windows, Internet Explorer, Microsoft® Word, Microsoft® Excel, Microsoft® PowerPoint, and Microsoft® Visio®
are trademarks or registered trademarks of Microsoft ® Corporation.
Other brands and their products are trademarks or registered trademarks of their respective holders.
Copyright Notice
© Copyright 2013 by PrinterOn Inc.
All rights reserved. No part of this publication may be reproduced, stored in a retrieval system, or transmitted, in
any form or by any means, electronic, mechanical, photocopy, recording, or otherwise, without the prior written
permission of PrinterOn Inc.
Disclaimer:
PrinterOn Inc. makes no warranty with respect to the adequacy of this documentation, programs, or hardware,
which it describes for any particular purpose, or with respect to the adequacy to produce any particular result. In
no event shall PrinterOn Inc. be held liable for special, direct, indirect, or consequential damages, losses, costs,
charges, claims, demands, or claim for lost profits, fees, or expenses of any nature or kind.