Embed Size (px)
Citation preview
!!!!!!What is Prezi? !On a mission to end boring presentations and make you a great presenter, Prezi is presentation software, which, unlike slides that literally box you in, lets you show your ideas in context. You can zoom in on details and pull back to reveal the big picture. This makes your message more understandable and also makes your overall presentation much more fun and engaging. !
�1
PREZI QUICK START GUIDE
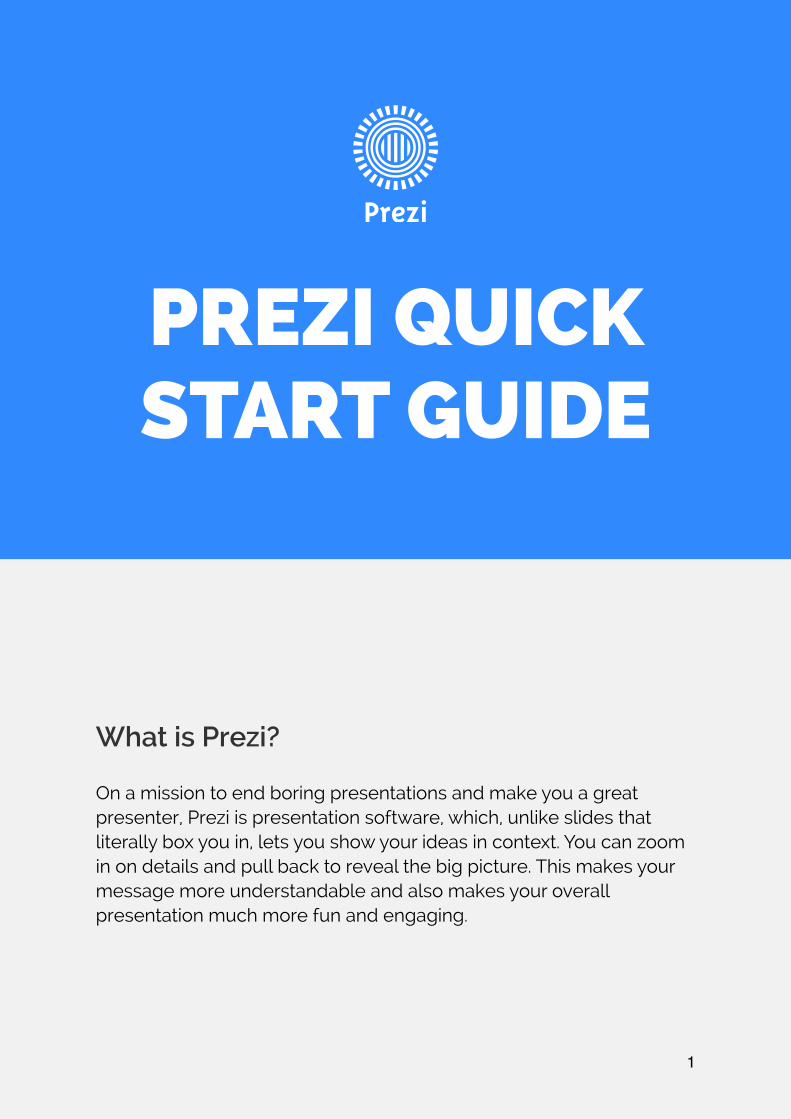
!!!!!Signing up !To begin using Prezi, you'll need to create an account on Prezi.com. You will choose between obtaining a free public account, or paying extra to get more privacy, storage, and the ability to work offline. There is also a free student/teacher license, which requires an email address from an educational institution. This account type also grants more flexibility to users. Visit: https://prezi.com/support/article/account/guide-to-prezi-accounts for more information on plans and pricing! !
�2
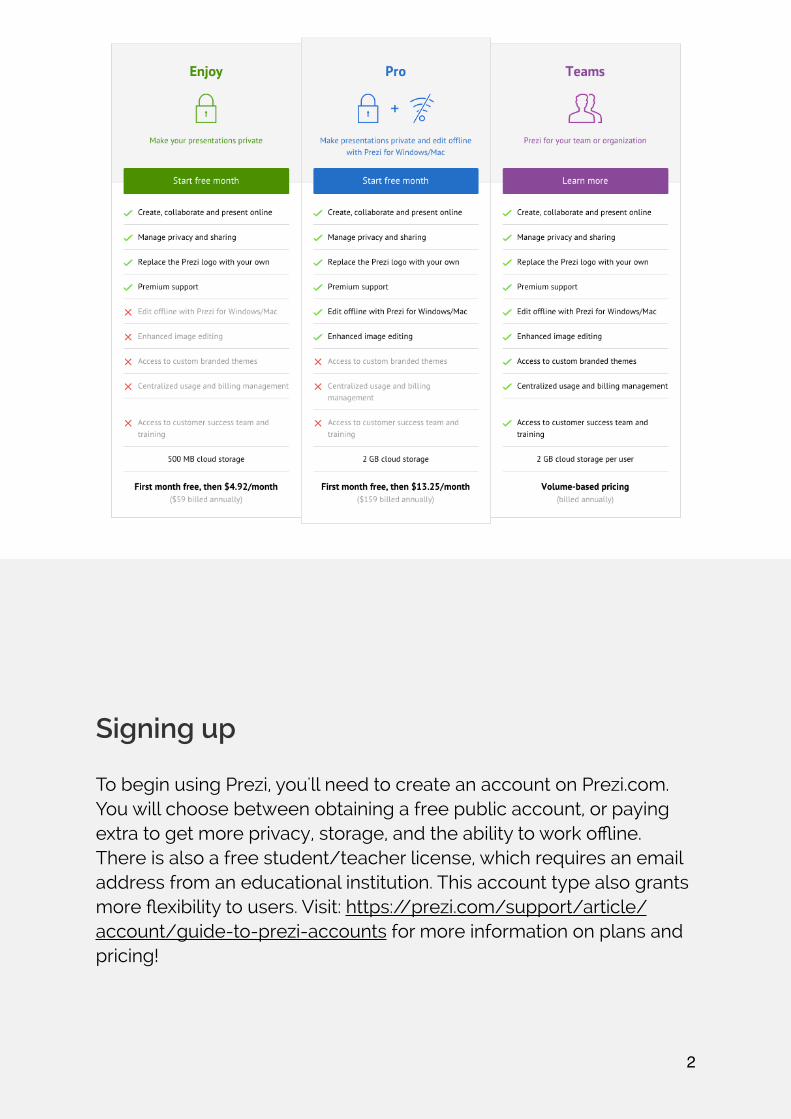
!!!!!!Start with a template !When you create a prezi, you can choose from a number of reusable templates or a blank canvas. When you decide to use a template, you can edit everything you see on the canvas just as if you were creating your own prezi, including copying and pasting pre-made content from other prezis or applications. !
�3
Click ‘More’ for the complete list Search here for templates
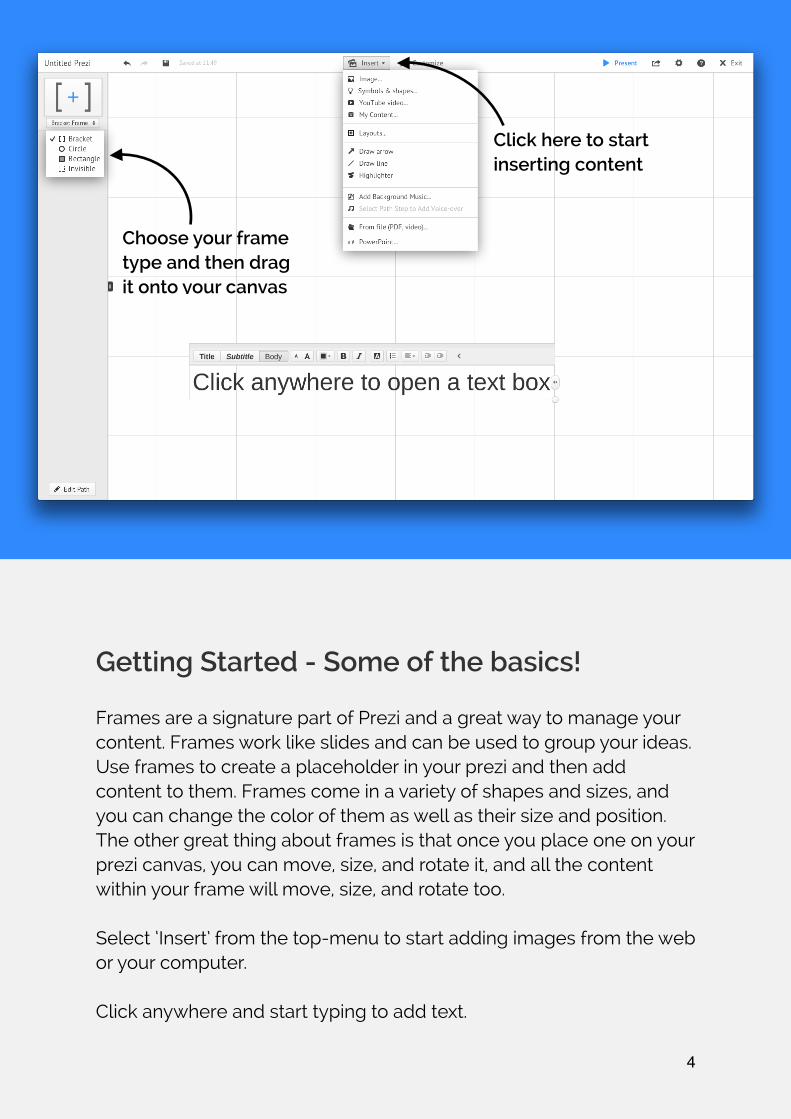
!!!Getting Started - Some of the basics! !Frames are a signature part of Prezi and a great way to manage your content. Frames work like slides and can be used to group your ideas. Use frames to create a placeholder in your prezi and then add content to them. Frames come in a variety of shapes and sizes, and you can change the color of them as well as their size and position. The other great thing about frames is that once you place one on your prezi canvas, you can move, size, and rotate it, and all the content within your frame will move, size, and rotate too. !Select ‘Insert’ from the top-menu to start adding images from the web or your computer. !Click anywhere and start typing to add text.
�4
Choose your frame type and then drag it onto your canvas
Click here to start inserting content
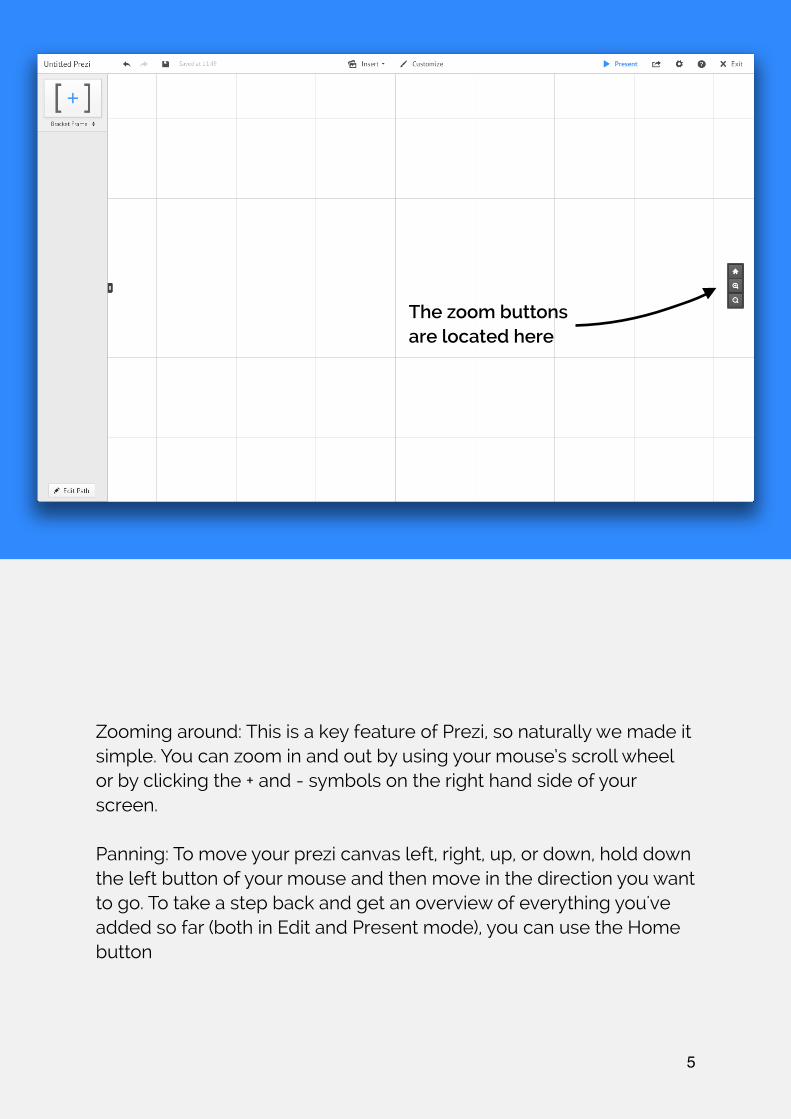
! !!!!!Zooming around: This is a key feature of Prezi, so naturally we made it simple. You can zoom in and out by using your mouse’s scroll wheel or by clicking the + and - symbols on the right hand side of your screen. !Panning: To move your prezi canvas left, right, up, or down, hold down the left button of your mouse and then move in the direction you want to go. To take a step back and get an overview of everything you've added so far (both in Edit and Present mode), you can use the Home button
�5
The zoom buttons are located here
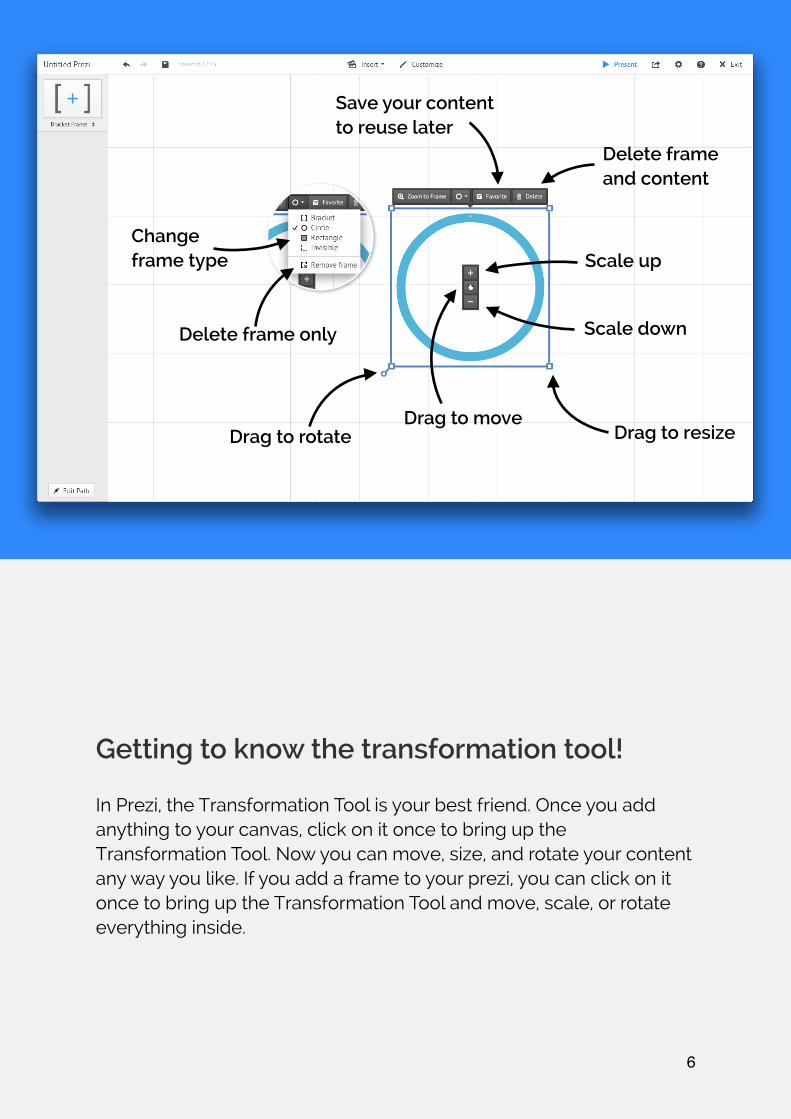
!!!!!!Getting to know the transformation tool! !In Prezi, the Transformation Tool is your best friend. Once you add anything to your canvas, click on it once to bring up the Transformation Tool. Now you can move, size, and rotate your content any way you like. If you add a frame to your prezi, you can click on it once to bring up the Transformation Tool and move, scale, or rotate everything inside.
�6
Save your content to reuse later
Delete frame and content
Scale up
Scale down
Drag to resizeDrag to rotate
Delete frame only
Change frame type
Drag to move
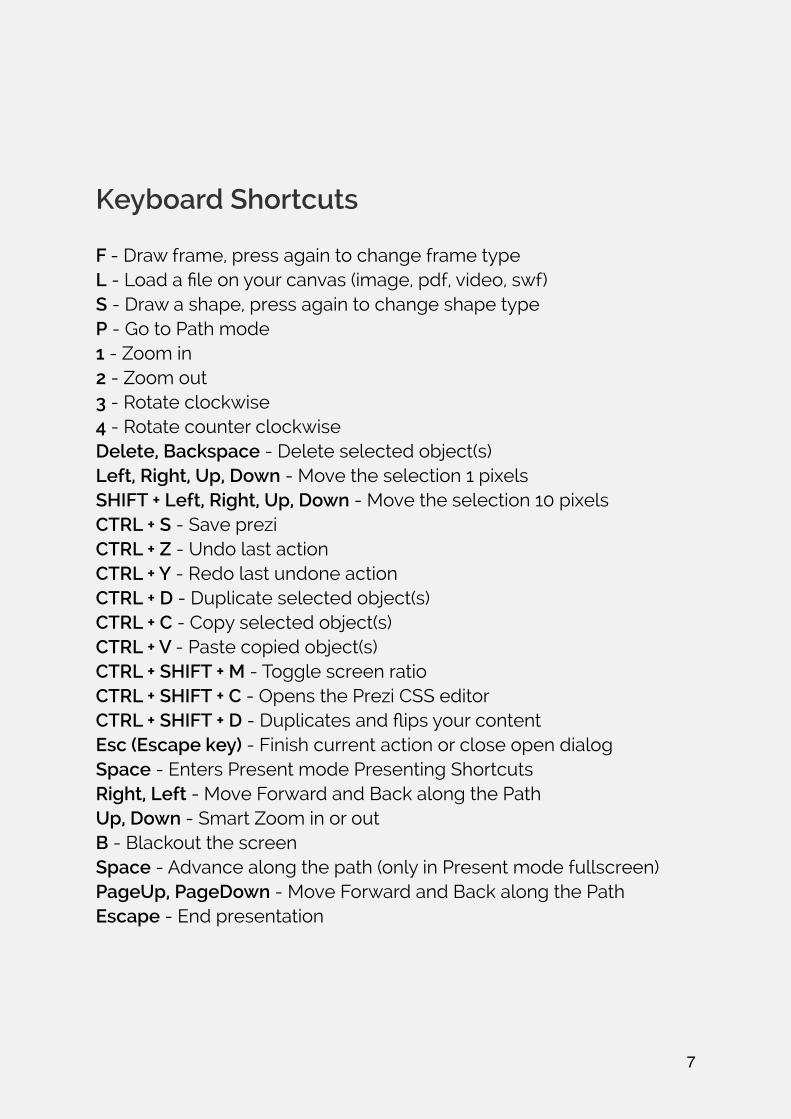
!!!!Keyboard Shortcuts !F - Draw frame, press again to change frame type L - Load a file on your canvas (image, pdf, video, swf) S - Draw a shape, press again to change shape type P - Go to Path mode 1 - Zoom in 2 - Zoom out 3 - Rotate clockwise 4 - Rotate counter clockwise Delete, Backspace - Delete selected object(s) Left, Right, Up, Down - Move the selection 1 pixels SHIFT + Left, Right, Up, Down - Move the selection 10 pixels CTRL + S - Save prezi CTRL + Z - Undo last action CTRL + Y - Redo last undone action CTRL + D - Duplicate selected object(s) CTRL + C - Copy selected object(s) CTRL + V - Paste copied object(s) CTRL + SHIFT + M - Toggle screen ratio CTRL + SHIFT + C - Opens the Prezi CSS editor CTRL + SHIFT + D - Duplicates and flips your content Esc (Escape key) - Finish current action or close open dialog Space - Enters Present mode Presenting Shortcuts Right, Left - Move Forward and Back along the Path Up, Down - Smart Zoom in or out B - Blackout the screen Space - Advance along the path (only in Present mode fullscreen) PageUp, PageDown - Move Forward and Back along the Path Escape - End presentation !
�7
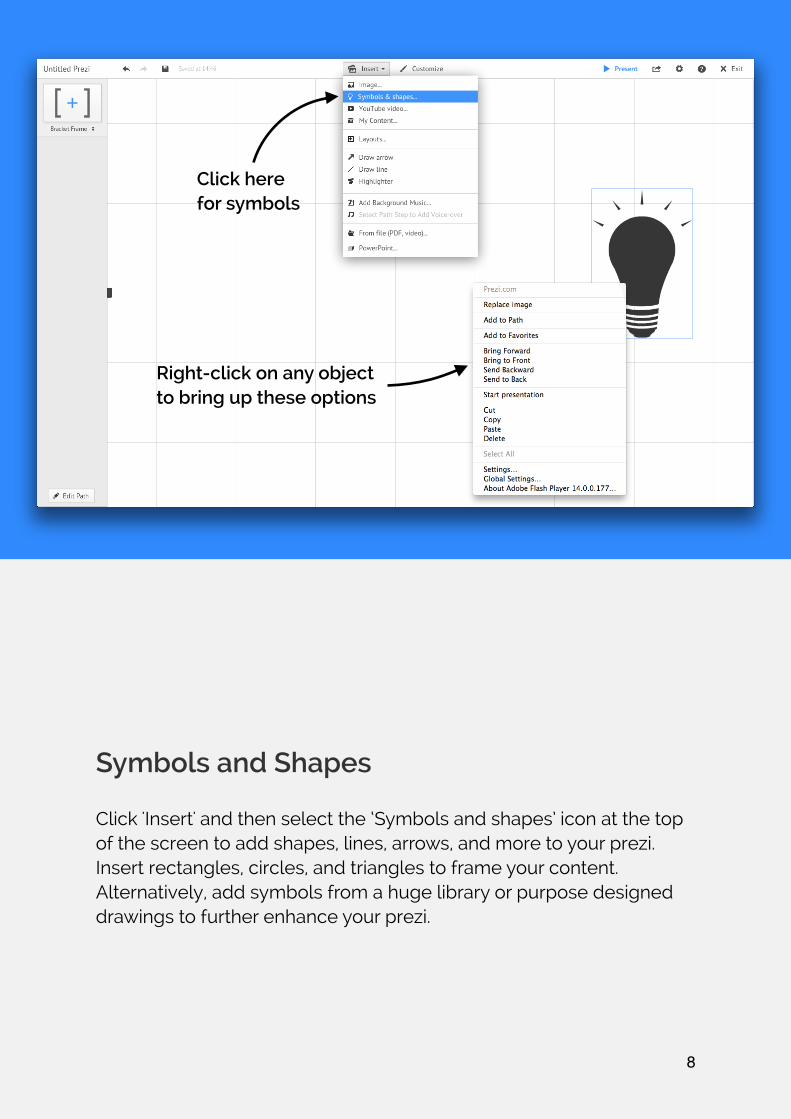
!!!!!!!!Symbols and Shapes Click 'Insert' and then select the ‘Symbols and shapes’ icon at the top of the screen to add shapes, lines, arrows, and more to your prezi. Insert rectangles, circles, and triangles to frame your content. Alternatively, add symbols from a huge library or purpose designed drawings to further enhance your prezi.
�8
Right-click on any object to bring up these options
Click here for symbols
!!!!!!
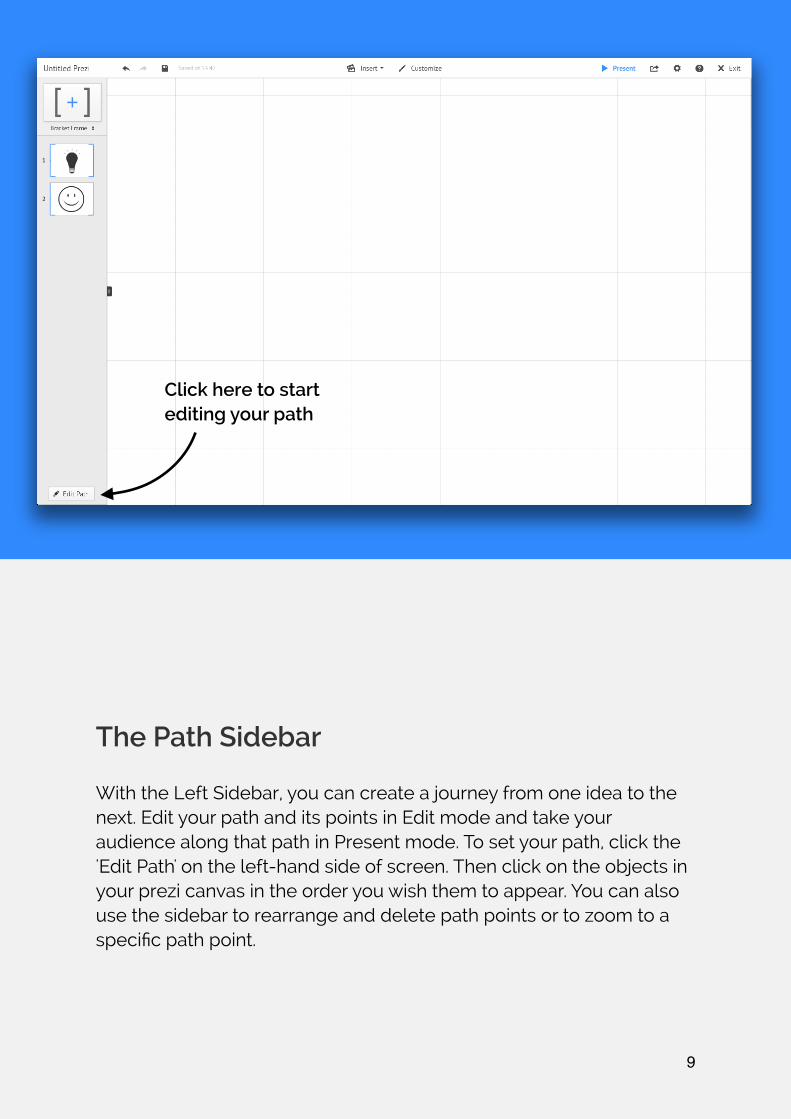
The Path Sidebar !With the Left Sidebar, you can create a journey from one idea to the next. Edit your path and its points in Edit mode and take your audience along that path in Present mode. To set your path, click the 'Edit Path' on the left-hand side of screen. Then click on the objects in your prezi canvas in the order you wish them to appear. You can also use the sidebar to rearrange and delete path points or to zoom to a specific path point.
�9
Click here to start editing your path