Embed Size (px)
Citation preview
1 MAY 1978
Preventive Maintenance
of
The 'Lectric Factory
•How Battery Works •Slaving Trucks •Operator/ Crew Maintenance •Jump-Starting •Organizational Maintenance •Support Maintenance •Slaying Tracks •Care In Storage •NATO Slave Cable •Charging
;,~,~-----'°--"-'O.llll/--..:C>-:>-~=--<:;;>.~~~ :. ~-= ___,,,___

But it goes to work only when it gets the signal that electricity's needed, like when you use the starter motor to crank your engine. Or when you operate your radio while the engine's not running.
Then those chemicals go to work on each other. They change into different chemicals to "discharge" electricity.
This can keep going on until the chemical action fades out. Then the battery's "dead'~-completely discharged. It can't supply any more electricity.
But your battery's got more lives than a cat. When the engine starts, the battery charging system kicks in . This is the voltage regulator and the alternator or generator. Charging turns the chemicals back like they were. The chemicals can start all over again. And the battery can keep on producing electricity.
This back-and-forth chemical action goes on until the battery is worn out. It can't be recharged any more.
How long will the battery last? It should be good for 3 or 4 years. Its life depends some on how much it's used.
But battery life depends more on the kind of Preventive Maintenance it gets-good PM or poor PM.
New batteries come to your Direct Support Unit "charged-and-dry." Your DSU puts in the electrolyte-a mix of water and sulfuric acid.
But the charge already in the battery is not enough. It's only about 70 percent of a full charge. So support gives the battery an "initial charge" to make it 100 percent ready-to-go.
When the battery's installed in a truck, tank, tractor or whatever, it's ready to serve a long, useful life.
, A battery doesn't ask for much. A drink of water once in awhile. A bath to keep it clean. A close watch on the charging system.
1
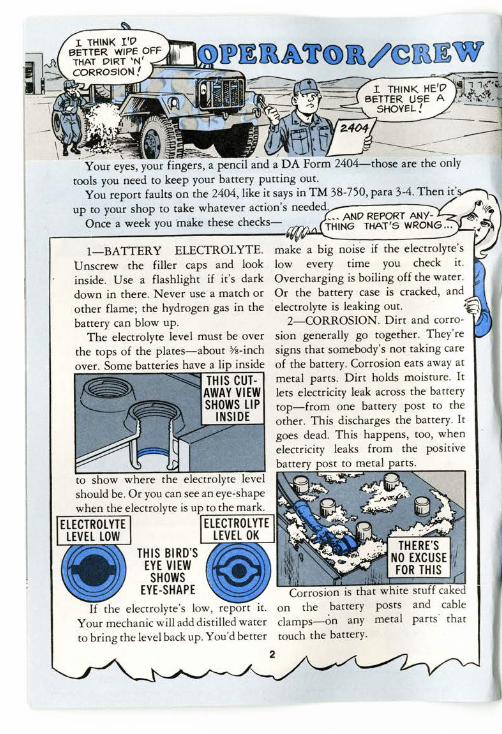
I-BATTERY ELECTROLYTE. Unscrew the filler caps and look inside. Use a flashlight if it"s dark down in there. Never use a match or other flame; the hydrogen gas in the battery can blow up.
The electrolyte level must be over the tops of the plates-about Ys-inch over. Some batteries have a lip inside
THIS BIRD'S EYE VIEW
SHOWS EYE-SHAPE
THIS CUTAWAY VIEW SHOWS LIP
INSIDE
If the electrolyte's low, report it. Your mechanic will add distilled water to bring the level back up. You'd better
make a big noise if the electrolyte's low every time you check it. Overcharging is boiling off the water. Or the battery case is cracked, and electrolyte is leaking out. '~
2-CORROSION. Dirt and corrosion generally go together. They're signs that somebody's not taking care of the battery. Corrosion eats away at metal parts. Dirt holds moisture. It lets electricity leak across the battery top-from one battery post to the other. This discharges the battery. It goes dead. This happens, too, when electricity leaks from the positive battery post to metal parts.
2
Corrosion is that white stuff caked on the battery posts and cable clamps-on any metal parts· that touch the battery.
If dirt and corrosion are not too bad, you can wipe it off with a clean cloth. But your mechanic will have to handle tough jobs.
3-CONNECTIONS. Make sure the clamps are tight on the battery posts. _A loose clamp won't let the battery deliver full power. A common cause of engine starting failure is a loose clamp. Electricity can't get across from the battery post to the clamp. · Grab the clamp with your thumb
and 2 fingers. Try to twist the clamp on the post. Look to see that the clamp is all the way down on the post.
Loose? Installed only Report it.
And check the cable-to-clamp connections. With just' your thumb and finger, lift and press the cable where it's bolted onto the clamp. Any movement? Get it tightened.
Check the other ends of the cables, too. Make sure you've got a tight
3
connection where the ground cable hooks onto the engine or frame. And where the positive cable is connected to the starter relay.
Get loose connections tightened. 4-HOLDDOWNS. Batteries must
be held snug-or they'll shift, rattle 'n' bounce and get broken. And connections will come loose.
Grab each battery and try to move it.
And if your batteries are carried in a pullout-type box, make sure the box can be fastened tight.
Holddowns loose? Get your
5-PERFORMANCE. Your equipment has either a battery-generator indicator or an ammeter on the instrumeri.t panel.
Operator/Crew Maintenance
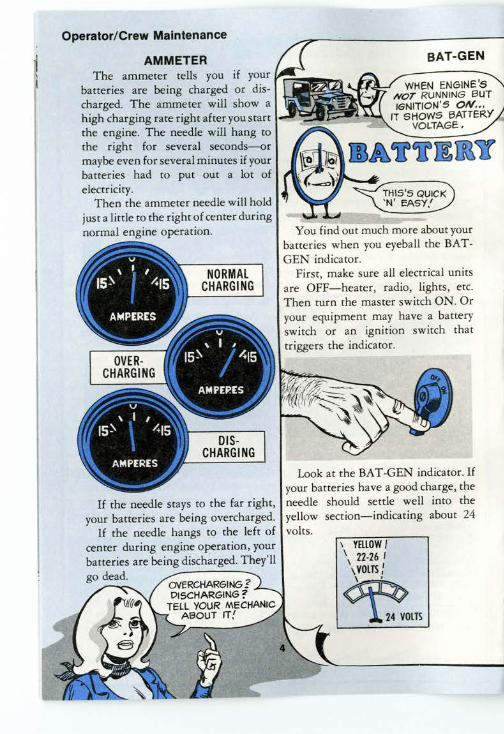
AMMETER The ammeter tells you if your
batteries are being charged or discharged. The ammeter will show a high charging rate right after you start the engine. The needle will hang to the right for several seconds-or maybe even for several minutes if your batteries had to put out a lot of electricity.
Then the ammeter needle will hold just a little to the right of center during normal engine operation.
NORMAL CHARGING
If the needle stays to the far right, your batteries are being overcharged.
If the needle hangs to the left of center during eng'ine operation, your batteries are being discharged. They'll go dead.
OVERCHARGING'! DISCHARGING?
TELL YOUR MECHANIC ABOUT IT!
BAT-GEN
WHEN ENGINE'S NOT RUNNING BUT IGNITION'S OIV...
IT SHOWS BATTERY VOLTAGE.
You find out much more about your batteries when you eyeball the BATGEN indicator.
First, make sure all electrical units are OFF-heater, radio, lights, etc. Then turn the master switch ON. Or your equipment may have a battery switch or an ignition switch that triggers the indicator.
Look at the BAT-GEN indicator. If your batteries have a good charge, the needle should settle well into the yellow section-indicating about 24 volts.
' YELLOW I \ 22-26 I
\VOLTS: \ ' .
~m
INDICATOR
WHEN ENGINE'S RUNNING IT
SHOWS GENERATOR SYSTEM OUTPUT
VO LTAGE .
But if the needle hangs over in the left red section, you've got only 22 volts or less in your batteries. This means your batteries are weak, defect ive or need charging. Or there's a short in the system. Report it.
RED\ 18-22\
~~~l,Ts~\DQo UNDER
22 VOLTS
N ow crank the engine and watch the needle. Get a good lookbefore the engine starts. If the needle swings over into the left red section; you've got battery trouble. They could be worn out or have a bad cell. Report it.
After the engine starts, run it at fas t idle-about 1,500 RPM. Your battery
Undercharging shows when the needle settles well below that 28.5volt nub. Report it. ;
I GREEN I I
5 ,..~-~~":"..::...!!!!'
Operator/Crew Maintenance
charging system's working OK if the needle settles at about the 28.5-volt mark-that little white nub in the right of the green section.
I GREEN / I 26-30 I 1 I
VOLTS I I 28.5
'___,~-r/- VOLToa 6 MARK

Operator/Crew Maintenance
AMMETER The ammeter tells you if your
batteries are being charged or discharged. The ammeter will show a high charging rate right after you start the engine. The needle will hang to the right for several seconds-or maybe even for several minutes if your batteries had to put out a lot of electricity.
Then the ammeter needle will hold just a little to the right of center during normal engine operation.
NORMAL CHARGING
If the needle stays to the far right, your batteries are being overcharged.
If the needle hangs to the left of center during eng'ine operation, your batteries are being discharged. They'll go dead.
OVERCHARGING'! DISCHARGING?
TELL YOUR MECHANIC ABOUT IT!
BAT-GEN
WHEN ENGINE'S NOT RUNNING BUT IGNITION'S OIV...
IT SHOWS BATTERY VOLTAGE.
You find out much more about your batteries when you eyeball the BATGEN indicator.
First, make sure all electrical units are OFF-heater, radio, lights, etc. Then turn the master switch ON. Or your equipment may have a battery switch or an ignition switch that triggers the indicator.
Look at the BAT-GEN indicator. If your batteries have a good charge, the needle should settle well into the yellow section-indicating about 24 volts.
' YELLOW I \ 22-26 I
\VOLTS: \ ' .
~m
INDICATOR
WHEN ENGINE'S RUNNING IT
SHOWS GENERATOR SYSTEM OUTPUT
VO LTAGE .
But if the needle hangs over in the left red section, you've got only 22 volts or less in your batteries. This means your batteries are weak, defect ive or need charging. Or there's a short in the system. Report it.
RED\ 18-22\
~~~l,Ts~\DQo UNDER
22 VOLTS
N ow crank the engine and watch the needle. Get a good lookbefore the engine starts. If the needle swings over into the left red section; you've got battery trouble. They could be worn out or have a bad cell. Report it.
After the engine starts, run it at fas t idle-about 1,500 RPM. Your battery
Undercharging shows when the needle settles well below that 28.5volt nub. Report it. ;
I GREEN I I
5 ,..~-~~":"..::...!!!!'
Operator/Crew Maintenance
charging system's working OK if the needle settles at about the 28.5-volt mark-that little white nub in the right of the green section.
I GREEN / I 26-30 I 1 I
VOLTS I I 28.5
'___,~-r/- VOLToa 6 MARK
I
connection.
YOU CAN'T DO A GOOD JOB OF
BAITERY MAINTENANCE WITHOU1 THE.RIGHT
TOOLS, EQUIPMENT SUPPLIES AND PUBS .
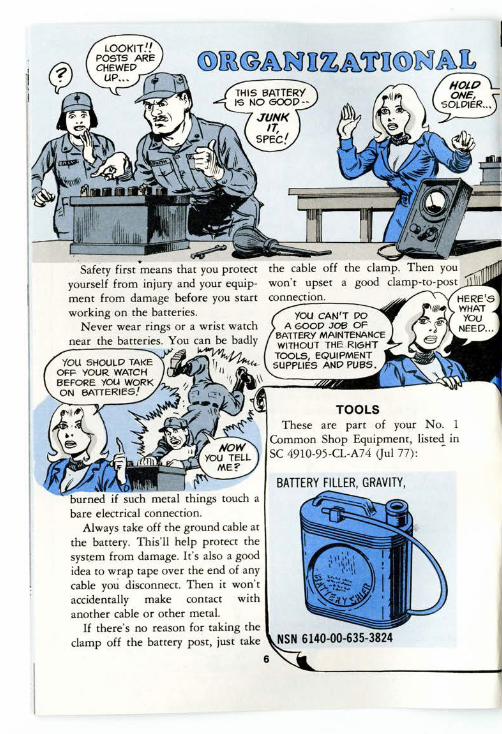
TOOLS These are part of your No. 1
Common Shop Equipment, listed in SC 4910-95-CL-A74 Oul 77):
BATTERY FILLER, GRAVITY, burned if such metal things touch a bare electrical connection.
Always take off the ground cable at the battery. This'll help protect the syst.em from damage. It's also a good idea to wrap tape over the end of any cable you disconnect. Then it won't accidentally make contact with another cable or other metal.
If there's no reason for taking the clamp off the battery post, just take
6
RIGHT ON, CONNIE.1 MANY GOOD BATTERIES
ONi-Y SUPPORT DECIDES HAVE BEEN WINDING UP If.IWHETHER A BATTERY JS PROPERTY PISPOSAL.'UNSERVICEABLE!
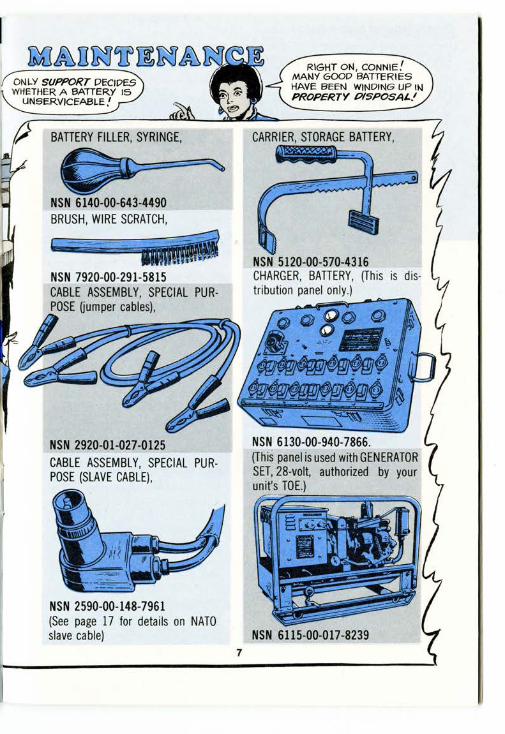
BATTERY FILLER, SYRINGE,
~ ~ NSN 6140-00-643-4490 BRUSH, WIRE SCRATCH,
' ~~ ·w1111ii NSN 7920-00-291-5815 CABLE ASSEMBLY, SPECIAL PURPOSE Oumper cables),
NSN 2920-01-027-0125
NSN 2590-00-148-7961 (See page 17 for details on NATO slave cable)
7
I
connection.
YOU CAN'T DO A GOOD JOB OF
BAITERY MAINTENANCE WITHOU1 THE.RIGHT
TOOLS, EQUIPMENT SUPPLIES AND PUBS .
TOOLS These are part of your No. 1
Common Shop Equipment, listed in SC 4910-95-CL-A74 Oul 77):
BATTERY FILLER, GRAVITY, burned if such metal things touch a bare electrical connection.
Always take off the ground cable at the battery. This'll help protect the syst.em from damage. It's also a good idea to wrap tape over the end of any cable you disconnect. Then it won't accidentally make contact with another cable or other metal.
If there's no reason for taking the clamp off the battery post, just take
6
RIGHT ON, CONNIE.1 MANY GOOD BATTERIES
ONi-Y SUPPORT DECIDES HAVE BEEN WINDING UP If.IWHETHER A BATTERY JS PROPERTY PISPOSAL.'UNSERVICEABLE!
BATTERY FILLER, SYRINGE,
~ ~ NSN 6140-00-643-4490 BRUSH, WIRE SCRATCH,
' ~~ ·w1111ii NSN 7920-00-291-5815 CABLE ASSEMBLY, SPECIAL PURPOSE Oumper cables),
NSN 2920-01-027-0125
NSN 2590-00-148-7961 (See page 17 for details on NATO slave cable)
7
••
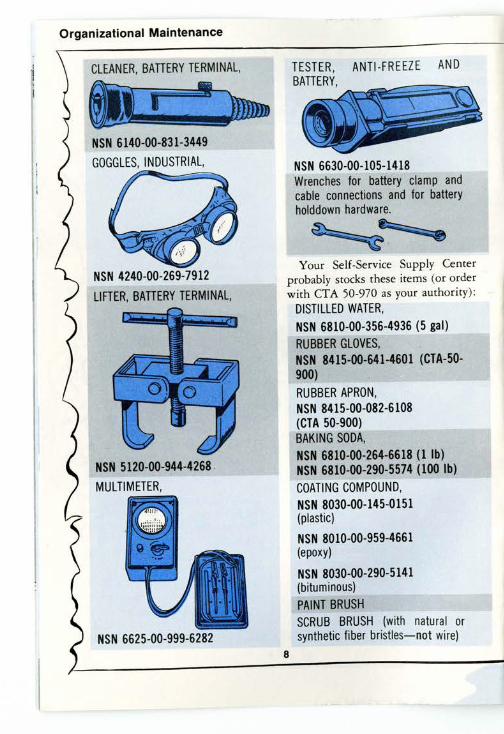
Organizational Maintenance
CLEANER, BATTERY TERMINAL,
iJ I NSN 6140-00-831-3449
GOGGLES, INDUSTRIAL,
NSN 4240-00-269-7912
LIFTER, BATTERY TERMINAL,
NSN 5120-00-944-4268 .
MULTIMETER,
NSN 6625-00-999-6282
TESTER , ANTI -FREEZE AND
BATTERY, ~·~F;;;;;::\0
NSN 6630-00-105-1418 Wrenches for battery clamp and cable connections and for battery holddown hardware.
~~ Your Self-Service Supply Center
probably stocks these items (or order with CTA 50-970 as your authority):
DISTILLED WATER, NSN 6810-00-356-4936 (5 gal) RUBBER GLOVES, NSN 8415-00-641-4601 (CTA-50900) RUBBER APRON, NSN 8415-00-082-6108 (CTA 50-900) BAKING SODA, NSN 6810-00-264-6618 (1 lb) NSN 6810-00-290-5574 (100 lb) COATING COMPOUND, NSN 8030-00-145-0151 (plastic)
NSN 8010-00-959-4661 (epoxy)
NSN 8030-00-290-5141 (bituminous) PAINT BRUSH SCRUB BRUSH (with natural or synthetic fiber bristles-not wire)
8
,, '
You also need a dab of Grease, Automotive and Artillery (always on hand in your shop), a soaking tub (made from steel drum) and plenty of clean water.
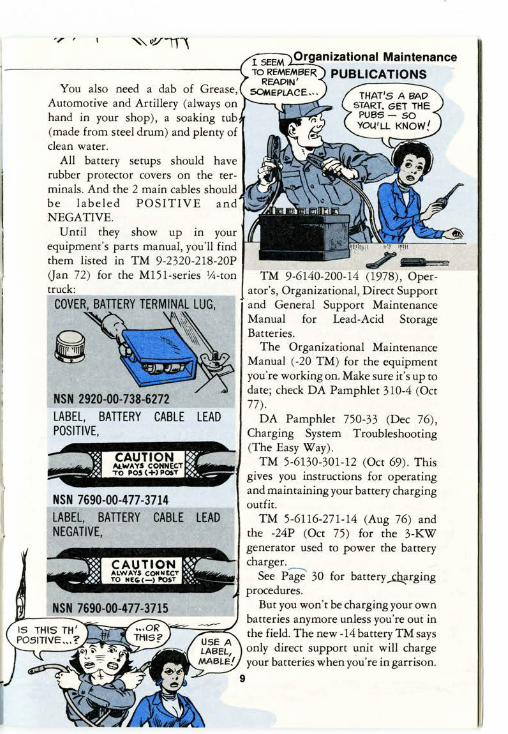
All battery setups should have rubber protector covers on the terminals. And the 2 main cables should be labeled POSITIVE NEGATIVE.
Until they show up in your equipment's parts manual, you'll find them listed in TM 9-2320-218-20P (Jan 72) for the Ml51-series 11! -ton TM 9-6140-200-14 (1978), Opertruck: ator's, Organizational, Direct Support
and -..;;..;n.r..,
J~~
COVER, BATTERY TERMINAL LUG, and General Support Maintenance Manual for Lead-Acid Storage Batteries.
The Organizational Maintenance Manual (-20 TM) for the equipment you're working on. Make sure it's up to date; check DA Pamphlet 310-4 (Oct
NSN 2920-00-738-6272
. . \~~
77) . LABEL, BATTERY CABLE LEAD DA Pamphlet 750-33 (Dec 76), POSITIVE, Charging System Troubleshooting
(The Easy Way). CAUTION TM 5-6130-301-12 (Oct 69). This ALWAYS CONNEC.T
TO POS(+)PO$T gives you instructions for operating and maintaining your battery charging
NSN 7690-00-477-3714 outfit. LABEL, BATTERY CABLE LEAD TM 5-6116-271-14 (Aug 76) and NEGATIVE, the -24P (Oct 75) for the 3-KW
-...il•llfllll!~l!l!IJ!~~~IJ'•~J generator used to power the battery charger.
See P;ge 30 for battery ~rging procedures.
But you won't be charging your own batteries anymore unless you're out in the field. The new -14 battery TM says only direct support unit will charge your batteries when you're in garrison.
••
Organizational Maintenance
CLEANER, BATTERY TERMINAL,
iJ I NSN 6140-00-831-3449
GOGGLES, INDUSTRIAL,
NSN 4240-00-269-7912
LIFTER, BATTERY TERMINAL,
NSN 5120-00-944-4268 .
MULTIMETER,
NSN 6625-00-999-6282
TESTER , ANTI -FREEZE AND
BATTERY, ~·~F;;;;;::\0
NSN 6630-00-105-1418 Wrenches for battery clamp and cable connections and for battery holddown hardware.
~~ Your Self-Service Supply Center
probably stocks these items (or order with CTA 50-970 as your authority):
DISTILLED WATER, NSN 6810-00-356-4936 (5 gal) RUBBER GLOVES, NSN 8415-00-641-4601 (CTA-50900) RUBBER APRON, NSN 8415-00-082-6108 (CTA 50-900) BAKING SODA, NSN 6810-00-264-6618 (1 lb) NSN 6810-00-290-5574 (100 lb) COATING COMPOUND, NSN 8030-00-145-0151 (plastic)
NSN 8010-00-959-4661 (epoxy)
NSN 8030-00-290-5141 (bituminous) PAINT BRUSH SCRUB BRUSH (with natural or synthetic fiber bristles-not wire)
8
,, '
You also need a dab of Grease, Automotive and Artillery (always on hand in your shop), a soaking tub (made from steel drum) and plenty of clean water.
All battery setups should have rubber protector covers on the terminals. And the 2 main cables should be labeled POSITIVE NEGATIVE.
Until they show up in your equipment's parts manual, you'll find them listed in TM 9-2320-218-20P (Jan 72) for the Ml51-series 11! -ton TM 9-6140-200-14 (1978), Opertruck: ator's, Organizational, Direct Support
and -..;;..;n.r..,
J~~
COVER, BATTERY TERMINAL LUG, and General Support Maintenance Manual for Lead-Acid Storage Batteries.
The Organizational Maintenance Manual (-20 TM) for the equipment you're working on. Make sure it's up to date; check DA Pamphlet 310-4 (Oct
NSN 2920-00-738-6272
. . \~~
77) . LABEL, BATTERY CABLE LEAD DA Pamphlet 750-33 (Dec 76), POSITIVE, Charging System Troubleshooting
(The Easy Way). CAUTION TM 5-6130-301-12 (Oct 69). This ALWAYS CONNEC.T
TO POS(+)PO$T gives you instructions for operating and maintaining your battery charging
NSN 7690-00-477-3714 outfit. LABEL, BATTERY CABLE LEAD TM 5-6116-271-14 (Aug 76) and NEGATIVE, the -24P (Oct 75) for the 3-KW
-...il•llfllll!~l!l!IJ!~~~IJ'•~J generator used to power the battery charger.
See P;ge 30 for battery ~rging procedures.
But you won't be charging your own batteries anymore unless you're out in the field. The new -14 battery TM says only direct support unit will charge your batteries when you're in garrison.
Organizational Maintenance Organizational Maintenance
OR ALL THE WAY .. . EASY ON THE WATER
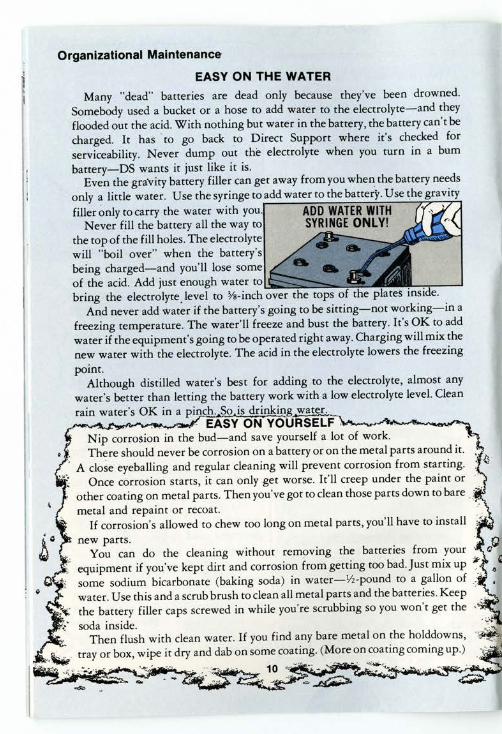
Many "dead" batteries are dead only because they've been drowned. Somebody used a bucket or a hose to add water to the electrolyte-and they flooded out the acid. With nothing but water in the battery, the battery can't be charged. It has ·to go back to Direct Support where it's checked for serviceability. Never dump out the electrolyte when you turn in a bum battery-DS wants it just like it is.
Even the gravity battery filler can get away from you when the battery needs only a little water. Use the syringe to add water to the battery.Use the gravity filler only to carry the water with you. ADD WATER WITH '
Never fill the battery all the way to SYRINGE ONLY! the top of the fill holes . The electrolyte will "boil over" when the battery's being charged-and you'll lose some of the acid. Add just enough water to . _ _...,.___ ___. bring the electrolyte.Jevel to %-inch over the tops of the plates m~1de . .
And never add water if the battery's going to be sitting-not workmg-m a freezing temperature. The water'll freeze and bust the battery. It's OK to add water if the equipment's going to be operated right away. Charging will mix ~he new water with the electrolyte. The acid in the electrolyte lowers the freezing
point. Although distilled water's best for adding to the electrolyte, almost any
water's better than letting the battery work with a low electrolyte level. Clean rain water's OK in a pinch . ..._So,is drinkin.g~
. . . · EASY ON YOURSELF ..~.......,...,,..-..--._""""""'
Nip corrosion in the bud-and save yourself a lot of work. . · · There should never be corrosion on a battery or on the metal parts around 1t.
A close eyeballing and regular cleaning will prevent corrosion from starting. Once corrosion starts, it can only get worse. It'll creep under the paint or
other coating on metal parts. Then you've got to clean those parts down to bare metal and repaint or recoat.
If corrosion's allowed to chew too long on metal parts , you'll have to install
new parts. . You can do the cleaning without removing the battenes from your _
equipment if you've kept dirt and corrosion from getting too bad.Just mix up ~some sodium bicarbonate (baking soda) in water-V2-pound to a gallon of ., water. Use this and a scrub brush to clean all metal parts and the batteries. Keep the battery filler caps screwed in while you're scrubbing so you won't get the
soda inside. Then flush with clean water. If you find any bare metal on the holddowns,
tray or box, wipe it dry and dab on some coating. (More on coating coming up.)
10
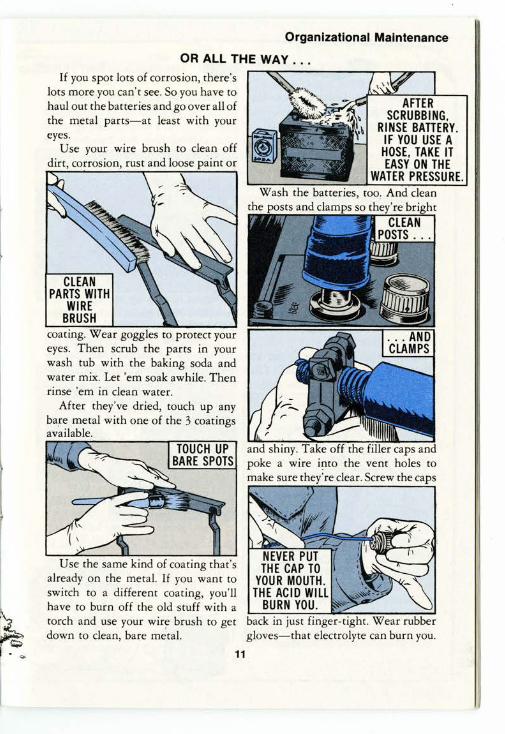
If you spot lots of corrosion, there's lots more you can't see. So you have to haul out the batteries and go over all of the metal parts-at least with your eyes.
Use your wire brush to clean off dirt, corrosion, rust and loose paint or
CLEAN PARTS WITH
WIRE BRUSH
coating. Wear goggles to protect your eyes. Then scrub the parts in your wash tub with the baking soda and water mix. Let "em soak awhile. Then rinse 'em in clean water.
After they've dried, touch up any ba_re metal with one of the 3 coatings available.
Use the same kind of coating that's already on the metal. If you want to switch to a different coating, you'll have to burn off the old stuff with a
AFTER SCRUBBING,
RINSE BATTERY. IF YOU USE A HOSE, TAKE IT EASY ON THE
WATER PRESSURE.
and shiny. Take off the filler caps and poke a wire into the vent holes to make sure they're clear. Screw the caps
NEVER PUT THE CAP TO
YOUR MOUTH . THE ACID WILL
BURN YOU. torch and use your wire brush to get back in just finger-tight. Wear rubber down to clean, bare m~tal. gloves-that electrolyte can burn you.
11
Organizational Maintenance Organizational Maintenance
OR ALL THE WAY .. . EASY ON THE WATER
Many "dead" batteries are dead only because they've been drowned. Somebody used a bucket or a hose to add water to the electrolyte-and they flooded out the acid. With nothing but water in the battery, the battery can't be charged. It has ·to go back to Direct Support where it's checked for serviceability. Never dump out the electrolyte when you turn in a bum battery-DS wants it just like it is.
Even the gravity battery filler can get away from you when the battery needs only a little water. Use the syringe to add water to the battery.Use the gravity filler only to carry the water with you. ADD WATER WITH '
Never fill the battery all the way to SYRINGE ONLY! the top of the fill holes . The electrolyte will "boil over" when the battery's being charged-and you'll lose some of the acid. Add just enough water to . _ _...,.___ ___. bring the electrolyte.Jevel to %-inch over the tops of the plates m~1de . .
And never add water if the battery's going to be sitting-not workmg-m a freezing temperature. The water'll freeze and bust the battery. It's OK to add water if the equipment's going to be operated right away. Charging will mix ~he new water with the electrolyte. The acid in the electrolyte lowers the freezing
point. Although distilled water's best for adding to the electrolyte, almost any
water's better than letting the battery work with a low electrolyte level. Clean rain water's OK in a pinch . ..._So,is drinkin.g~
. . . · EASY ON YOURSELF ..~.......,...,,..-..--._""""""'
Nip corrosion in the bud-and save yourself a lot of work. . · · There should never be corrosion on a battery or on the metal parts around 1t.
A close eyeballing and regular cleaning will prevent corrosion from starting. Once corrosion starts, it can only get worse. It'll creep under the paint or
other coating on metal parts. Then you've got to clean those parts down to bare metal and repaint or recoat.
If corrosion's allowed to chew too long on metal parts , you'll have to install
new parts. . You can do the cleaning without removing the battenes from your _
equipment if you've kept dirt and corrosion from getting too bad.Just mix up ~some sodium bicarbonate (baking soda) in water-V2-pound to a gallon of ., water. Use this and a scrub brush to clean all metal parts and the batteries. Keep the battery filler caps screwed in while you're scrubbing so you won't get the
soda inside. Then flush with clean water. If you find any bare metal on the holddowns,
tray or box, wipe it dry and dab on some coating. (More on coating coming up.)
10
If you spot lots of corrosion, there's lots more you can't see. So you have to haul out the batteries and go over all of the metal parts-at least with your eyes.
Use your wire brush to clean off dirt, corrosion, rust and loose paint or
CLEAN PARTS WITH
WIRE BRUSH
coating. Wear goggles to protect your eyes. Then scrub the parts in your wash tub with the baking soda and water mix. Let "em soak awhile. Then rinse 'em in clean water.
After they've dried, touch up any ba_re metal with one of the 3 coatings available.
Use the same kind of coating that's already on the metal. If you want to switch to a different coating, you'll have to burn off the old stuff with a
AFTER SCRUBBING,
RINSE BATTERY. IF YOU USE A HOSE, TAKE IT EASY ON THE
WATER PRESSURE.
and shiny. Take off the filler caps and poke a wire into the vent holes to make sure they're clear. Screw the caps
NEVER PUT THE CAP TO
YOUR MOUTH . THE ACID WILL
BURN YOU. torch and use your wire brush to get back in just finger-tight. Wear rubber down to clean, bare m~tal. gloves-that electrolyte can burn you.
11

ll-1111••-·Q
.....,._,,,,,...., and
lJl,_..liiiliii,;.'..dl fault.
13
and lifting with your thumb and finger.
give the clamp and post a good coating of GAA- on top , all around and underneath. A thin coating-Vs of an inch-is enough.
wrenches of the right size-never an This'll head. off corrosion. adjustable wrench. When the nut's ~
snug, give it just a Vi-turn more. That's ~ FAILURE TO MATCH
enough. Check the clamps by twisting ~ BATTERIES IN YOUR h b d f EQUIPMENT IS A BIG with your t um an 2 ingers. ..;,; ~ CAUSE OF BAITERY
12 ,I FAILURE!
~
~-Before you put your batteries back
in the equipment, check to make sure they're matched. TM 9-6140-200-14, para 3-6, tells how.
A strong battery will be damaged if it's teamed up with a weaker battery.
Always check for matching when you install a new or recharged battery.
Matching is important whenever you've got a set of 2 or more batteries in your equipment.
When you put the batteries in the equipment, tighten the holddowns only enough so you can't move the batteries around with your hands. Many batteries die young because holddowns are overtightened and crack the battery.
Make sure clamps are all the way down on the battery posts. Then tighten the bolt and nut with 2
INSTALLING BATTERIES
Mount the cable to the clamp with the cable terminal under the head of the bolt. Then it won'tloosen up when the cable bounces·. But if you've got 2 cables going to the same clamp, mount the second cable under the nut. You
can cut down on cable bounce by fastening the cable to the battery holddown with plastic hanger straps, NSN 5975-00-074-2072.
Tighten the cable-to-clamp bolt and nut enough but not too much. Use the right-size wrenches. Tighten snug and then a Vi- turn more. Test by pressing
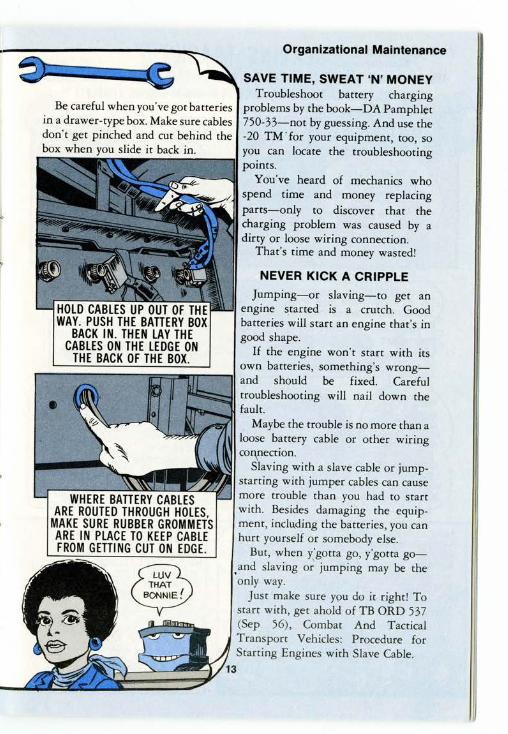
Be careful when you've got batteries in a drawer-type box. Make sure cables don't get pinched and cut behind the box when you slide it back in.
Organizational Maintenance
SAVE TIME, SWEAT 'N' MONEY Troubleshoot battery charging
problems by the book- DA Pamphlet 750-33-not by guessing. And use the -20 TM.for your equipment, too, so you can locate the troubleshooting points.
You've heard of mechanics who spend time and money replacing parts-only to discover that the charging problem was caused by a dirty or loose wiring connection.
That's time and money wasted!
NEVER KICK A CRIPPLE
Jumping-or slaving-to get an engine started is a crutch. Good batteries will start an engine that's in good shape.
If the engine won't start with its own batteries, something's wrong-
should be fixed. Careful troubleshooting will nail down the
Maybe the trouble is no more than a loose battery cable or other wiring co!\nection.
Slaving with a slave cable or jumpstarting with jumper cables can cause more trouble than you had to start with. Besides damaging the equipment, inclu_ding the batteries, you can hurt yourself or somebody else.
But, when y:gotta go, y'gotta go•and slaving or jumping may be the only way.
Just make sure you do it r ight! To start with, get ahold of T B ORD 537 (Sep 56), Combat And Tactical Transport Vehicles: Procedure for Starting Engines with Slave Cable.
ll-1111••-·Q
.....,._,,,,,...., and
lJl,_..liiiliii,;.'..dl fault.
13
and lifting with your thumb and finger.
give the clamp and post a good coating of GAA- on top , all around and underneath. A thin coating-Vs of an inch-is enough.
wrenches of the right size-never an This'll head. off corrosion. adjustable wrench. When the nut's ~
snug, give it just a Vi-turn more. That's ~ FAILURE TO MATCH
enough. Check the clamps by twisting ~ BATTERIES IN YOUR h b d f EQUIPMENT IS A BIG with your t um an 2 ingers. ..;,; ~ CAUSE OF BAITERY
12 ,I FAILURE!
~
~-Before you put your batteries back
in the equipment, check to make sure they're matched. TM 9-6140-200-14, para 3-6, tells how.
A strong battery will be damaged if it's teamed up with a weaker battery.
Always check for matching when you install a new or recharged battery.
Matching is important whenever you've got a set of 2 or more batteries in your equipment.
When you put the batteries in the equipment, tighten the holddowns only enough so you can't move the batteries around with your hands. Many batteries die young because holddowns are overtightened and crack the battery.
Make sure clamps are all the way down on the battery posts. Then tighten the bolt and nut with 2
INSTALLING BATTERIES
Mount the cable to the clamp with the cable terminal under the head of the bolt. Then it won'tloosen up when the cable bounces·. But if you've got 2 cables going to the same clamp, mount the second cable under the nut. You
can cut down on cable bounce by fastening the cable to the battery holddown with plastic hanger straps, NSN 5975-00-074-2072.
Tighten the cable-to-clamp bolt and nut enough but not too much. Use the right-size wrenches. Tighten snug and then a Vi- turn more. Test by pressing
Be careful when you've got batteries in a drawer-type box. Make sure cables don't get pinched and cut behind the box when you slide it back in.
Organizational Maintenance
SAVE TIME, SWEAT 'N' MONEY Troubleshoot battery charging
problems by the book- DA Pamphlet 750-33-not by guessing. And use the -20 TM.for your equipment, too, so you can locate the troubleshooting points.
You've heard of mechanics who spend time and money replacing parts-only to discover that the charging problem was caused by a dirty or loose wiring connection.
That's time and money wasted!
NEVER KICK A CRIPPLE
Jumping-or slaving-to get an engine started is a crutch. Good batteries will start an engine that's in good shape.
If the engine won't start with its own batteries, something's wrong-
should be fixed. Careful troubleshooting will nail down the
Maybe the trouble is no more than a loose battery cable or other wiring co!\nection.
Slaving with a slave cable or jumpstarting with jumper cables can cause more trouble than you had to start with. Besides damaging the equipment, inclu_ding the batteries, you can hurt yourself or somebody else.
But, when y:gotta go, y'gotta go•and slaving or jumping may be the only way.
Just make sure you do it r ight! To start with, get ahold of T B ORD 537 (Sep 56), Combat And Tactical Transport Vehicles: Procedure for Starting Engines with Slave Cable.

Orga~=~~~~~=~ce SLAVING TRACKS TRACKED VEHICLE SLAYING CALLS FOR EVEN MORE CARE THAN SLAYING OTHER EQUIPMENT.
EVERY YEAR, SOLDIERS ARE INJURED OR KILLED IN SLAYING ACCIDENTS .
Jnsitinns FOR ARTILLERY VEHICLES, THE
BEST FOSfTION 15 SIDE BY SIDE
FACING IN OF'POSITE DIRECTfONSf .
WITH TANKS, THE EASIEST WAY IS TO HAVE:. THEM SIDf BY SIDE, FACING IN THE gAME PIRECTIOfL .
Gf?EAT, BONNIE -- BUT WHAT ro YOU DO WHEN THE TANI( YOU WANT 15 SANDWICHED BFTWEEN OTHER DEAD T,A;jt<5?
PUT THE
LIVE TANK IN FRONT
OF AND AT RIGHT
ANGLES TO THE DEAD VEHICLE!
SAFE SLAYING MEANS THINKIN<7 THINGS OUT F/fi>ST! STUDY THE SLAVING INFO IN YOUR TM BtFO'T?E YOU
... AND ALWAYS HAVE A GROUND GUIDE HONCHO·ING THE OPERATION!
START...
BE ~AREFlll !
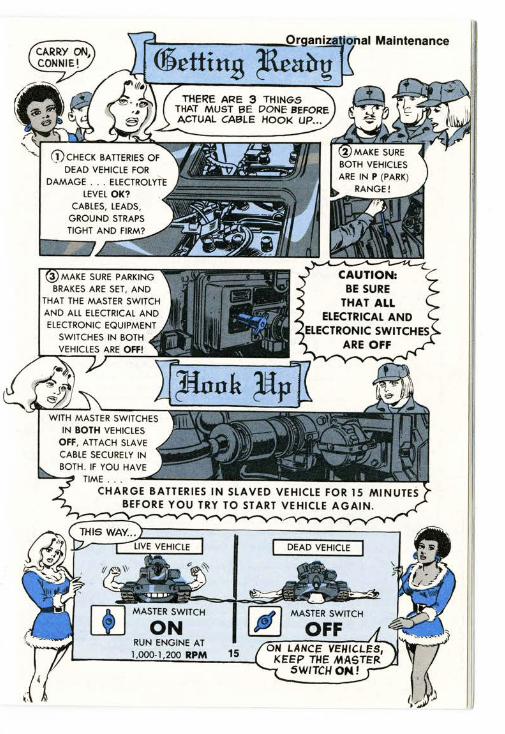
(l)CHECK BATTERIES OF
DEAD VEHICLE FOR
DAMAGE . .. ELECTROLYTE
LEVEL OK?
CABLES, LEADS ,
GROUND STRAPS
RUN ENGINE AT
1,000-1,200 RPM 15
CAUTION: BE SURE
THAT ALL ELECTRICAL AND
ELECTRONIC SWITCHES ARE OFF
Orga~=~~~~~=~ce SLAVING TRACKS TRACKED VEHICLE SLAYING CALLS FOR EVEN MORE CARE THAN SLAYING OTHER EQUIPMENT.
EVERY YEAR, SOLDIERS ARE INJURED OR KILLED IN SLAYING ACCIDENTS .
Jnsitinns FOR ARTILLERY VEHICLES, THE
BEST FOSfTION 15 SIDE BY SIDE
FACING IN OF'POSITE DIRECTfONSf .
WITH TANKS, THE EASIEST WAY IS TO HAVE:. THEM SIDf BY SIDE, FACING IN THE gAME PIRECTIOfL .
Gf?EAT, BONNIE -- BUT WHAT ro YOU DO WHEN THE TANI( YOU WANT 15 SANDWICHED BFTWEEN OTHER DEAD T,A;jt<5?
PUT THE
LIVE TANK IN FRONT
OF AND AT RIGHT
ANGLES TO THE DEAD VEHICLE!
SAFE SLAYING MEANS THINKIN<7 THINGS OUT F/fi>ST! STUDY THE SLAVING INFO IN YOUR TM BtFO'T?E YOU
... AND ALWAYS HAVE A GROUND GUIDE HONCHO·ING THE OPERATION!
START...
BE ~AREFlll !
(l)CHECK BATTERIES OF
DEAD VEHICLE FOR
DAMAGE . .. ELECTROLYTE
LEVEL OK?
CABLES, LEADS ,
GROUND STRAPS
RUN ENGINE AT
1,000-1,200 RPM 15
CAUTION: BE SURE
THAT ALL ELECTRICAL AND
ELECTRONIC SWITCHES ARE OFF
I
Organizational Maintenance
, I ~~~LI:~==::::::..:....--t~~:_:__:__J-..:__~~~-4...!~
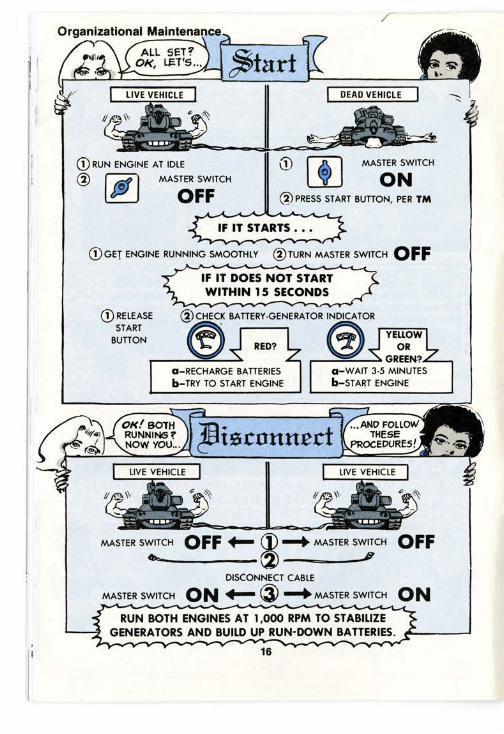
G) RUN ENGINE AT IDLE
@ ItS1 I MASTER SWITCH
MASTER SWITCH
ON I? OFF @PRESS START BUTTON, PER TM
<!)GET ENGINE RUNNING SMOOTHLY @TURN MASTER SWITCH OFF If IT DOES NOT STA~T f.. WITHIN 15 SECOND~
(!)RELEASE ~)CHECK BATTERY-GENERATOR INDICATOR START
tool kits. In time the 2-prong receptacles will
be phased out and all new vehicles, both wheeled and track, will have NATO receptacles.
If the NATO adapters get lost, the AMDF lists them as NSN 5935-00322-8959 per set.
OLD 2-PRONG SLAVE CABLE <
17
a
BUTTON ~ RED? Ii' .-Y-E-~-~-W-\!:J --~-=:;;...-~GREEN-?
a-RECHARGE BATTERIES b-TRY TO START ENGINE
a-WAIT 3-5 MINUTES b-START ENGINE
MASTER SWITCH OFF +- (j) ~ MASTER SWITCH OFF ..... (2) --==----_§ DISCONNECT CABLE
MASTER SWITCH ON +- @ ~MASTER SWITCH ON RUN BOTH ENGINES AT 1,000 RPM TO STABILIZE
GENERATORS AND BUILD UP RUN·DOWN BATTERIES.
16

I
Organizational Maintenance
, I ~~~LI:~==::::::..:....--t~~:_:__:__J-..:__~~~-4...!~
G) RUN ENGINE AT IDLE
@ ItS1 I MASTER SWITCH
MASTER SWITCH
ON I? OFF @PRESS START BUTTON, PER TM
<!)GET ENGINE RUNNING SMOOTHLY @TURN MASTER SWITCH OFF If IT DOES NOT STA~T f.. WITHIN 15 SECOND~
(!)RELEASE ~)CHECK BATTERY-GENERATOR INDICATOR START
tool kits. In time the 2-prong receptacles will
be phased out and all new vehicles, both wheeled and track, will have NATO receptacles.
If the NATO adapters get lost, the AMDF lists them as NSN 5935-00322-8959 per set.
OLD 2-PRONG SLAVE CABLE <
17
a
BUTTON ~ RED? Ii' .-Y-E-~-~-W-\!:J --~-=:;;...-~GREEN-?
a-RECHARGE BATTERIES b-TRY TO START ENGINE
a-WAIT 3-5 MINUTES b-START ENGINE
MASTER SWITCH OFF +- (j) ~ MASTER SWITCH OFF ..... (2) --==----_§ DISCONNECT CABLE
MASTER SWITCH ON +- @ ~MASTER SWITCH ON RUN BOTH ENGINES AT 1,000 RPM TO STABILIZE
GENERATORS AND BUILD UP RUN·DOWN BATTERIES.
16
, I
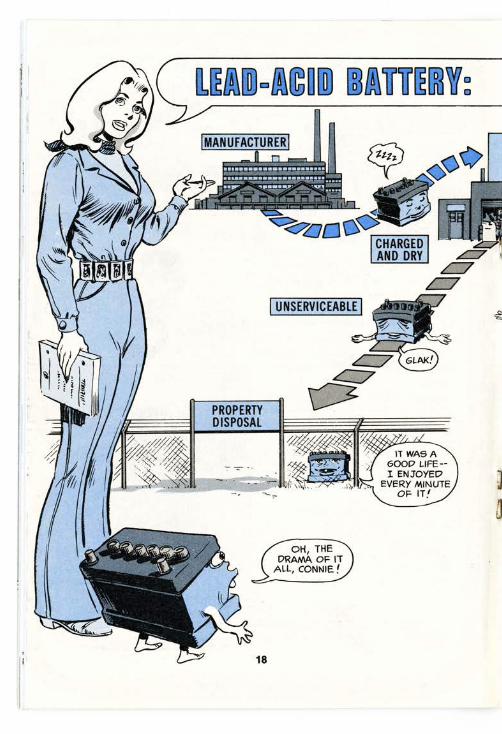
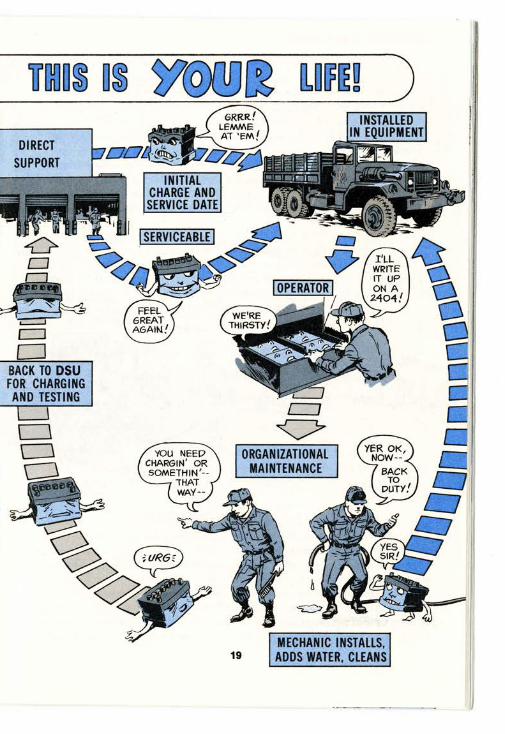
PROPERTY DISPOSAL
18
IUNSERVICEABLE I
OH, THE DRAMA OF IT
ALL, CONNIE!
ISERVICEABLE I ~~- ~;.._
~~~ ~ -·
.::::=;._J
c:J CJ
BACK TO DSU FOR CHARGING
AND TESTING
19 MECHANIC INSTALLS, ADDS WATER, CLEANS ' Ii
I
, I
PROPERTY DISPOSAL
18
IUNSERVICEABLE I
OH, THE DRAMA OF IT
ALL, CONNIE!
ISERVICEABLE I ~~- ~;.._
~~~ ~ -·
.::::=;._J
c:J CJ
BACK TO DSU FOR CHARGING
AND TESTING
19 MECHANIC INSTALLS, ADDS WATER, CLEANS ' Ii
I
- -
Organizational Maintenance
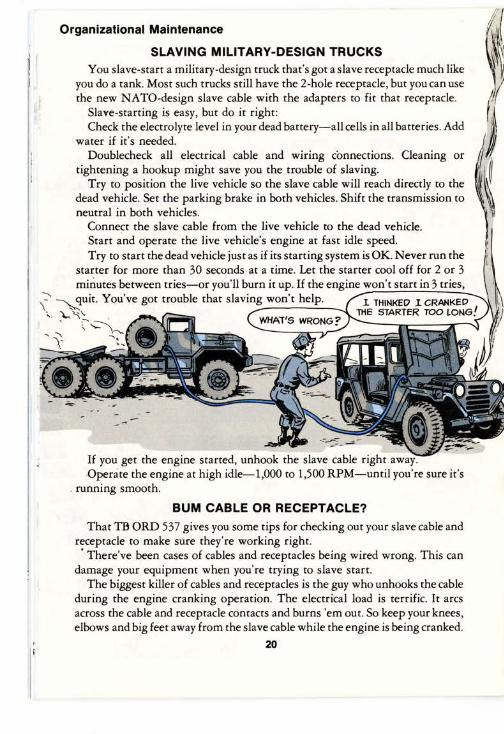
SLAVING MILITARY-DESIGN TRUCKS i I
You slave-start a military-design truck that's got a slave receptacle much like you do a tank. Most such trucks still have the 2-hole receptacle, but you can use the new NATO-design slave cable with the adapters to fit that receptacle.
Slave-starting is easy, but do it right: Check the electrolyte level in your dead battery-all cells in all batteries. Add
water if it's needed. Doublecheck all electrical cable and wiring connections. Cleaning or
tightening a hookup might save you the trouble of slaving. Try to position the live vehicle so the slave cable will reach directly to the
dead vehicle. Set the parking brake in both vehicles. Shift the transmission to neutral in both vehicles.
Connect the sl~ve cable from the live vehicle to the dead vehicle. Start and operate the live vehicle's engine at fast idle speed. Try to start the dead vehicle just as if its starting system is OK. Never run the
starter for more than 30 seconds at a time. Let the starter cool off for 2 or 3 minutes between tries-or you'll burn it up. If the engine won't start in 3 tries,
\-:::- ~uit. You've got trouble that slaving won't help. l. THINKED I.CRANKED
'- "\,...'"'' THE STARTER TOO LONG! - :...::----.
' - ''""'~ .
If you get the engine started, unhook the slave cable right away. .Operate the engine at high idle-1,000 to 1,500 RPM-until you're sure it's
. running smooth.
BUM CABLE OR RECEPTACLE?
That TB ORD 537 gives you some tips for checking out your slave cable and receptacle to make sure they're working right.
' There've been cases of cables and receptacles being wired wrong. This can damage your equipment when you're trying to slave start.
The biggest killer of cables and receptacles is the guy who unhooks the cable during the engine cranking operation. The electrical load is terrific. It arcs across the cable and receptacle contacts and burns 'em out. So keep your knees, elbows and big feet away from the slave cable while the engine is being cranked.
20
Organizational Maintenance
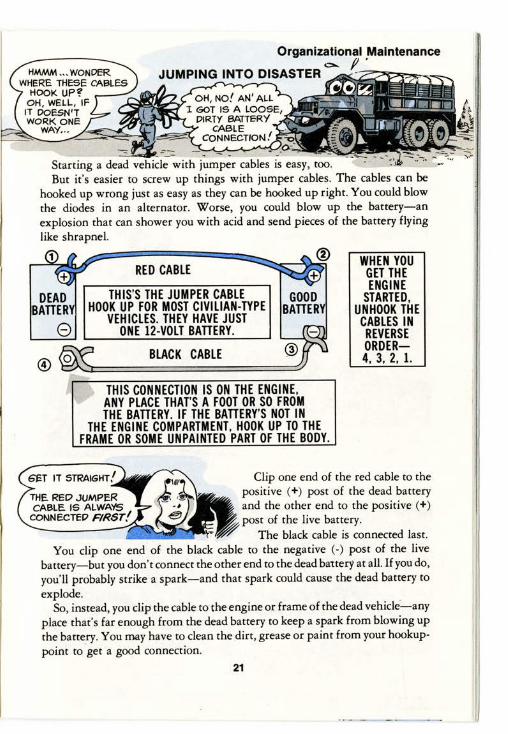
JUMPING INTO DISASTER°""' /I_;::'?~~......"""'-...
Starting a dead vehicle with jumper cables is easy, too. But it's easier to screw up things with jumper cables. The cables can be
hooked up wrong just as easy as they can be hooked up right. You could blow the diodes in an alternator. Worse, you could blow up the battery-an explosion that can shower you with acid and send pieces of the battery flying like shrapnel.
RED CABLE
THIS'S THE JUMPER CABLE HOOK UP FOR MOST CIVILIAN-TYPE
VEHICLES. THEY HAVE JUST ONE 12-VOLT BATIERY.
BLACK CABLE
THIS CONNECTION IS ON THE ENGINE, ANY PLACE THAT'S A FOOT OR SO FROM THE BATIERY. IF THE BATIERY'S NOT IN
THE ENGINE COMPARTMENT, HOOK UP TO THE FRAME OR SOME UNPAINTED PART OF THE BODY.
WHEN YOU GET THE ENGINE
STARTED, UNHOOK THE
CABLES IN REVERSE ORDER4, 3, 2, 1.
Clip one end of the red cable to the positive (+) post of the dead battery and the other end to the positive (+)
~ post of the live battery. ~ ~ The black cable is connected last.
You clip one end of the black cable to the negative (-) post of the live battery-but you don't connect the other end to the dead battery at all. Ifyou do, you'll probably strike a spark-and that spark could cause the dead battery to explode. .
So, instead, you clip the cable to the engine or frame of the dead vehicle-any place that's far enough from the dead battery to keep a spark from blowing up the battery. You may have to clean the dirt, grease or paint from your hookuppoint to ·get a good connection.
21
- -
Organizational Maintenance
SLAVING MILITARY-DESIGN TRUCKS i I
You slave-start a military-design truck that's got a slave receptacle much like you do a tank. Most such trucks still have the 2-hole receptacle, but you can use the new NATO-design slave cable with the adapters to fit that receptacle.
Slave-starting is easy, but do it right: Check the electrolyte level in your dead battery-all cells in all batteries. Add
water if it's needed. Doublecheck all electrical cable and wiring connections. Cleaning or
tightening a hookup might save you the trouble of slaving. Try to position the live vehicle so the slave cable will reach directly to the
dead vehicle. Set the parking brake in both vehicles. Shift the transmission to neutral in both vehicles.
Connect the sl~ve cable from the live vehicle to the dead vehicle. Start and operate the live vehicle's engine at fast idle speed. Try to start the dead vehicle just as if its starting system is OK. Never run the
starter for more than 30 seconds at a time. Let the starter cool off for 2 or 3 minutes between tries-or you'll burn it up. If the engine won't start in 3 tries,
\-:::- ~uit. You've got trouble that slaving won't help. l. THINKED I.CRANKED
'- "\,...'"'' THE STARTER TOO LONG! - :...::----.
' - ''""'~ .
If you get the engine started, unhook the slave cable right away. .Operate the engine at high idle-1,000 to 1,500 RPM-until you're sure it's
. running smooth.
BUM CABLE OR RECEPTACLE?
That TB ORD 537 gives you some tips for checking out your slave cable and receptacle to make sure they're working right.
' There've been cases of cables and receptacles being wired wrong. This can damage your equipment when you're trying to slave start.
The biggest killer of cables and receptacles is the guy who unhooks the cable during the engine cranking operation. The electrical load is terrific. It arcs across the cable and receptacle contacts and burns 'em out. So keep your knees, elbows and big feet away from the slave cable while the engine is being cranked.
20
Organizational Maintenance
JUMPING INTO DISASTER°""' /I_;::'?~~......"""'-...
Starting a dead vehicle with jumper cables is easy, too. But it's easier to screw up things with jumper cables. The cables can be
hooked up wrong just as easy as they can be hooked up right. You could blow the diodes in an alternator. Worse, you could blow up the battery-an explosion that can shower you with acid and send pieces of the battery flying like shrapnel.
RED CABLE
THIS'S THE JUMPER CABLE HOOK UP FOR MOST CIVILIAN-TYPE
VEHICLES. THEY HAVE JUST ONE 12-VOLT BATIERY.
BLACK CABLE
THIS CONNECTION IS ON THE ENGINE, ANY PLACE THAT'S A FOOT OR SO FROM THE BATIERY. IF THE BATIERY'S NOT IN
THE ENGINE COMPARTMENT, HOOK UP TO THE FRAME OR SOME UNPAINTED PART OF THE BODY.
WHEN YOU GET THE ENGINE
STARTED, UNHOOK THE
CABLES IN REVERSE ORDER4, 3, 2, 1.
Clip one end of the red cable to the positive (+) post of the dead battery and the other end to the positive (+)
~ post of the live battery. ~ ~ The black cable is connected last.
You clip one end of the black cable to the negative (-) post of the live battery-but you don't connect the other end to the dead battery at all. Ifyou do, you'll probably strike a spark-and that spark could cause the dead battery to explode. .
So, instead, you clip the cable to the engine or frame of the dead vehicle-any place that's far enough from the dead battery to keep a spark from blowing up the battery. You may have to clean the dirt, grease or paint from your hookuppoint to ·get a good connection.
21
Organizational Maintenance
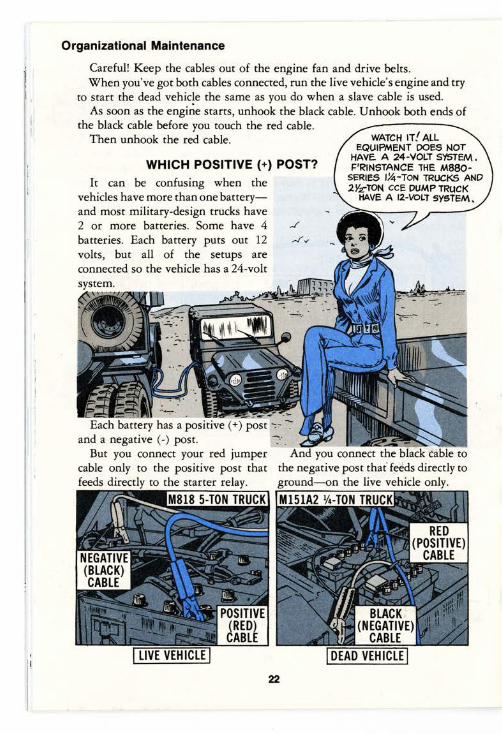
Careful! Keep the cables out of the engine fan and drive belts . When you've got both cables connected, run the live vehicle's engine and try
to start the dead vehicle the same as you do when a slave cable is used. As soon as the engi~e starts, unhook the black cable. Unhook both ends of
the black cable before you touch the red cable. Then unhook the red cable.
. I
WATCH IT! ALL EQUIPMENT DOES NOT
HAVE. A 24-VOLT SYSTEM. WHICH POSITIVE(+) POST? F'RINSTANCE THE M880
SERIES J!1i-TON TRUCKS ANDIt can be confusing when the 2.Y.z-TON CCE DUMP TRUCK vehicles have more than one battery HAVE A 12-VOLT SYSTEM.
and most military-design trucks have 2 or more batteries. Some have 4 batteries. Each battery puts out 12 volts, but all of the setups are connected so the vehicle has a 24-volt
• •·c' • ,,,,, ~..._--· ~~-
Each battery has a positive ( +) post •-:; ~
and a negative (-) post. But you connect your red jumper And you connect the-black cable to
cable only to the positive post that the negative post that' feeds directly to feeds directly to the starter relay. ground-on the live vehicle only.
18 5-TON TRUCK M151A2 1/4-TQN TRUCK
22
REAR FRONT
Organizational Maintenance
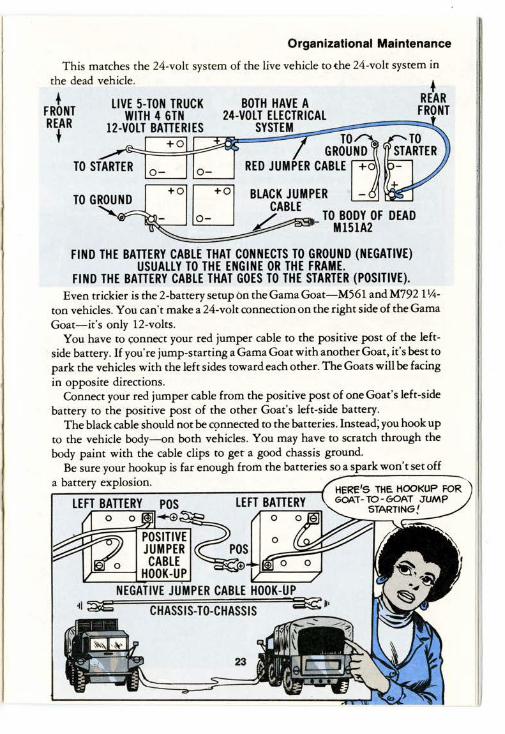
This matches the 24-volt system of the live vehicle tothe 24-volt system in the dead vehicle. •
FRONT REAR • t
FIND THE BATTERY CABLE THAT CONNECTS TO GROUND (NEGATIVE) USUALLY TO THE ENGINE OR THE FRAME.
FIND THE BATTERY CABLE THAT GOES TO THE STARTER (POSITIVE). Even trickier is the 2-battery setup on the Gama Goat-M561 and M792 11,4
ton vehicles. You can't make a 24-volt connection on the right side of the Gama Goat-it's only 12-volts.
You have to ~onnect your red jumper cable to the positive post of the leftside battery. If you' re jump-starting a Gama Goat with another Goat, it's best to park the vehicles with the left sides toward each other. The Goats will be facing in opposite directions.
Connect your red jumper cable from the positive post of one Goat's left-side battery to the positive post of the other Goat's left-side battery.
The black cable should not be connected to the batteries. Instead; you hook up to the vehicle body-on both v~hicles. You may have to scratch through the body paint with the cable clips to get a good chassis ground.
Be sure your hookup is far enough from the batteries so a spark won't set off a battery explosion.
CHASSIS-TO-CHASSIS
23
HERE'S THE. HOOKUP FOR GOAi - TO- GOAT JUMP
STARTING!
Organizational Maintenance
Careful! Keep the cables out of the engine fan and drive belts . When you've got both cables connected, run the live vehicle's engine and try
to start the dead vehicle the same as you do when a slave cable is used. As soon as the engi~e starts, unhook the black cable. Unhook both ends of
the black cable before you touch the red cable. Then unhook the red cable.
. I
WATCH IT! ALL EQUIPMENT DOES NOT
HAVE. A 24-VOLT SYSTEM. WHICH POSITIVE(+) POST? F'RINSTANCE THE M880
SERIES J!1i-TON TRUCKS ANDIt can be confusing when the 2.Y.z-TON CCE DUMP TRUCK vehicles have more than one battery HAVE A 12-VOLT SYSTEM.
and most military-design trucks have 2 or more batteries. Some have 4 batteries. Each battery puts out 12 volts, but all of the setups are connected so the vehicle has a 24-volt
• •·c' • ,,,,, ~..._--· ~~-
Each battery has a positive ( +) post •-:; ~
and a negative (-) post. But you connect your red jumper And you connect the-black cable to
cable only to the positive post that the negative post that' feeds directly to feeds directly to the starter relay. ground-on the live vehicle only.
18 5-TON TRUCK M151A2 1/4-TQN TRUCK
22
REAR FRONT
Organizational Maintenance
This matches the 24-volt system of the live vehicle tothe 24-volt system in the dead vehicle. •
FRONT REAR • t
FIND THE BATTERY CABLE THAT CONNECTS TO GROUND (NEGATIVE) USUALLY TO THE ENGINE OR THE FRAME.
FIND THE BATTERY CABLE THAT GOES TO THE STARTER (POSITIVE). Even trickier is the 2-battery setup on the Gama Goat-M561 and M792 11,4
ton vehicles. You can't make a 24-volt connection on the right side of the Gama Goat-it's only 12-volts.
You have to ~onnect your red jumper cable to the positive post of the leftside battery. If you' re jump-starting a Gama Goat with another Goat, it's best to park the vehicles with the left sides toward each other. The Goats will be facing in opposite directions.
Connect your red jumper cable from the positive post of one Goat's left-side battery to the positive post of the other Goat's left-side battery.
The black cable should not be connected to the batteries. Instead; you hook up to the vehicle body-on both v~hicles. You may have to scratch through the body paint with the cable clips to get a good chassis ground.
Be sure your hookup is far enough from the batteries so a spark won't set off a battery explosion.
CHASSIS-TO-CHASSIS
23
HERE'S THE. HOOKUP FOR GOAi - TO- GOAT JUMP
STARTING!

.i!-. ·· - . '· w., ". ' .,,, =·~·'"'''·'''~""'"'"" You can jump-start a 12-volt system-like in the M880-series l1A-ton
vehicles-from a vehicle with a 24-volt system. But you jump from only one of the batteries in the 24-volt vehicle. Repeat-only one of the batteries. This'll give you the 12 volts you need to jump-start the dead 12-volt system.
M818 5-TON TRUCK
If you've got an M880-series truck with the add-on 60-amp or 100-amp system, you can jump start from one of those 2 batteries.
You don't even need to use the black jumper cable. That pair of batteries has the same ground as the single battery that powers the starter.
Careful, though! Hook up only to the battery at far right.This 'll give you 12 volts. If you hook up to that battery's mate, you'll get 24 voltsand. damage the 12 volt electrical system.
Just connect the red cable from the positive post on the far right battery to the positive post on the far left battery. Then try to start the engine.
24
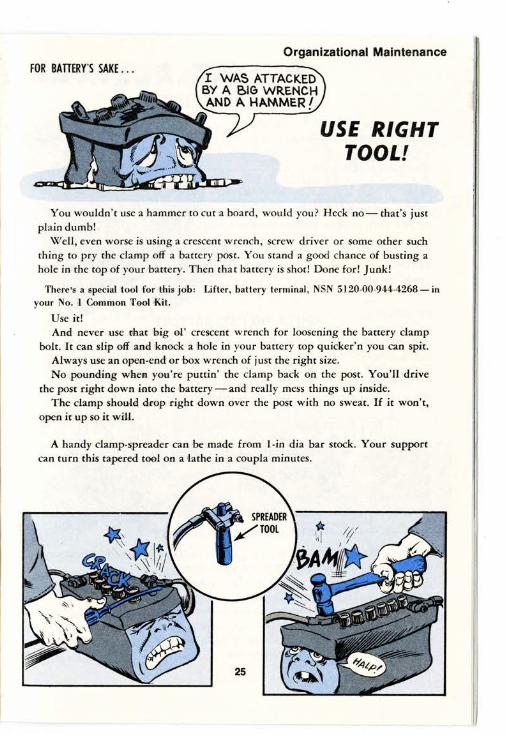
FOR BATTERY'S SAKE ... I WAS ATTACKED BY A BIG WRENCH AND A HAMMER!
Organizational Maintenance
USE RIGHT TOOL!
You wouldn't use a hammer to cut a board, would you? Heck no-that's just plain dumb!
Well, even worse is using a crescent wrench, screw driver or some other such thing to pry the clamp off a battery post. You stand a good chance of busting a hole in the top of your battery. Then that battery is shot! Done for! Junk!
There's a special tool for this job: Lifter, battery terminal , NSN 5120-00-944-4268- in your No. 1 Common Tool Kit.
Use it! And never use that big el' crescent wrench for loosening the battery clamp
bolt. It can slip off and knock a hole in your battery top quicker'n you can spit. Always use an open-end or box wrench of just the right size. No pounding when you're puttin' the clamp back on the post. You'll drive
the post right down into the battery-and really mess things up inside. The clamp shollld drop right down over the post with no sweat. If ic won't,
open ic up so it will.
A handy clamp-s_preader can be made from 1-in dia bar stock. Your support can turn this capered cool on a fathe in a coupla minutes.
.i!-. ·· - . '· w., ". ' .,,, =·~·'"'''·'''~""'"'"" You can jump-start a 12-volt system-like in the M880-series l1A-ton
vehicles-from a vehicle with a 24-volt system. But you jump from only one of the batteries in the 24-volt vehicle. Repeat-only one of the batteries. This'll give you the 12 volts you need to jump-start the dead 12-volt system.
M818 5-TON TRUCK
If you've got an M880-series truck with the add-on 60-amp or 100-amp system, you can jump start from one of those 2 batteries.
You don't even need to use the black jumper cable. That pair of batteries has the same ground as the single battery that powers the starter.
Careful, though! Hook up only to the battery at far right.This 'll give you 12 volts. If you hook up to that battery's mate, you'll get 24 voltsand. damage the 12 volt electrical system.
Just connect the red cable from the positive post on the far right battery to the positive post on the far left battery. Then try to start the engine.
24
FOR BATTERY'S SAKE ... I WAS ATTACKED BY A BIG WRENCH AND A HAMMER!
Organizational Maintenance
USE RIGHT TOOL!
You wouldn't use a hammer to cut a board, would you? Heck no-that's just plain dumb!
Well, even worse is using a crescent wrench, screw driver or some other such thing to pry the clamp off a battery post. You stand a good chance of busting a hole in the top of your battery. Then that battery is shot! Done for! Junk!
There's a special tool for this job: Lifter, battery terminal , NSN 5120-00-944-4268- in your No. 1 Common Tool Kit.
Use it! And never use that big el' crescent wrench for loosening the battery clamp
bolt. It can slip off and knock a hole in your battery top quicker'n you can spit. Always use an open-end or box wrench of just the right size. No pounding when you're puttin' the clamp back on the post. You'll drive
the post right down into the battery-and really mess things up inside. The clamp shollld drop right down over the post with no sweat. If ic won't,
open ic up so it will.
A handy clamp-s_preader can be made from 1-in dia bar stock. Your support can turn this capered cool on a fathe in a coupla minutes.

CHARGING NEW BATTERIES
A new charged-and dry battery is made ready for issue by your putting in the electrolyte and giving the battery its initial charge.
DATE-NO STAMPING!! And you issue the battery with the
service date already painted on the top. This's done free-hand with a brush or can be stencilled on the battery. Using a stamp and hammer to
apply the service date is out-taboo.
CHECKING DX'D BATTERY
PAINT OR STENCIL ISSUE
You've got to check out a battery that's turned in as no-good to see if it's really "unserviceable." If the battery can't be repaired or can't be fully recharged or can't stand up to a load test, it's unserviceable and goes to Property Disposal.
The only repair you're authorized is fixing cracks in the case and rebuilding the posts. These repairs are covered by para 4-10 and 4-11 in TM 9-6140-20014.
TESTING SPECIFIC GRAVITY
After you've repaired the battery-or if it needs no repair-your first step is checking the specific gravity of the electrolyte.
Testing the specific gravity of the electrolyte shows how strong the electrolyte is . This's covered in para 3-10, TM 9-6140-200-14.
Electrolyte in a fully-charged battery is about 75 percent water and 25 per cent sulfuric acid. As the battery discharges, chemical action makes the electrolyte weaker-less acid. Charging turns the chemical action around, so the electrolyte gets stronger-more acid.
26
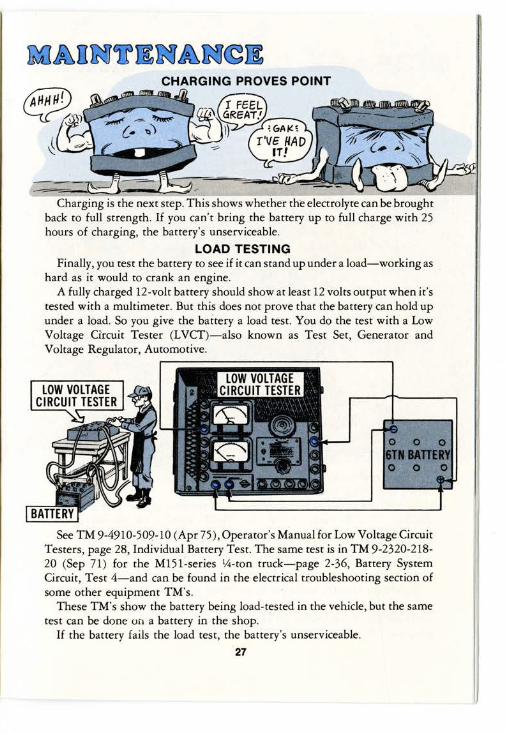
CHARGING PROVES POINT
~=·· ·=· ~· ~;;..~;;!!~~:b,::;::,,,;fi!;d,~.,,~~~~~~=:-~~--:~'~~~~:-.--:~-::::;,4--~-'""'ll l"·~·~i~g is next step. shows whether the electrolyte can be brought
back to full strength. If you can't bring the battery up to full charge with 25 hours of charging, the battery's unserviceable.
LOAD TESTING Finally, you test the battery to see if it can stand up under a load-working as
hard as it would to crank an engine. A fully charged 12-volt battery should show at least 12 volts output when it's
tested with a multimeter. But this does not prove that the battery can hold up under a load. So you give the battery a load test. You do the test with a Low Voltage Circuit Tester (LVCT)-also known as Test Set, Generator and Voltage Regulator, Automotive.
~~;;;;;;;;~~---i
See TM 9-4910-509-10 (Apr75 ), Operator's Manual for Low Voltage Circuit Testers, page 28, Individual Battery Test. The same test is in TM 9-2320-21820 (Sep 71) for the M151-series 14 -ton truck-page 2-36, Battery System Circuit, Test 4-and can be found in the electrical troubleshooting section of some other equipment TM's.
These TM's show the battery being load-tested in the vehicle, but the same test can be done on a battery in the shop.
If the battery fails the load test, the battery's unserviceable.
27
CHARGING NEW BATTERIES
A new charged-and dry battery is made ready for issue by your putting in the electrolyte and giving the battery its initial charge.
DATE-NO STAMPING!! And you issue the battery with the
service date already painted on the top. This's done free-hand with a brush or can be stencilled on the battery. Using a stamp and hammer to
apply the service date is out-taboo.
CHECKING DX'D BATTERY
PAINT OR STENCIL ISSUE
You've got to check out a battery that's turned in as no-good to see if it's really "unserviceable." If the battery can't be repaired or can't be fully recharged or can't stand up to a load test, it's unserviceable and goes to Property Disposal.
The only repair you're authorized is fixing cracks in the case and rebuilding the posts. These repairs are covered by para 4-10 and 4-11 in TM 9-6140-20014.
TESTING SPECIFIC GRAVITY
After you've repaired the battery-or if it needs no repair-your first step is checking the specific gravity of the electrolyte.
Testing the specific gravity of the electrolyte shows how strong the electrolyte is . This's covered in para 3-10, TM 9-6140-200-14.
Electrolyte in a fully-charged battery is about 75 percent water and 25 per cent sulfuric acid. As the battery discharges, chemical action makes the electrolyte weaker-less acid. Charging turns the chemical action around, so the electrolyte gets stronger-more acid.
26
CHARGING PROVES POINT
~=·· ·=· ~· ~;;..~;;!!~~:b,::;::,,,;fi!;d,~.,,~~~~~~=:-~~--:~'~~~~:-.--:~-::::;,4--~-'""'ll l"·~·~i~g is next step. shows whether the electrolyte can be brought
back to full strength. If you can't bring the battery up to full charge with 25 hours of charging, the battery's unserviceable.
LOAD TESTING Finally, you test the battery to see if it can stand up under a load-working as
hard as it would to crank an engine. A fully charged 12-volt battery should show at least 12 volts output when it's
tested with a multimeter. But this does not prove that the battery can hold up under a load. So you give the battery a load test. You do the test with a Low Voltage Circuit Tester (LVCT)-also known as Test Set, Generator and Voltage Regulator, Automotive.
~~;;;;;;;;~~---i
See TM 9-4910-509-10 (Apr75 ), Operator's Manual for Low Voltage Circuit Testers, page 28, Individual Battery Test. The same test is in TM 9-2320-21820 (Sep 71) for the M151-series 14 -ton truck-page 2-36, Battery System Circuit, Test 4-and can be found in the electrical troubleshooting section of some other equipment TM's.
These TM's show the battery being load-tested in the vehicle, but the same test can be done on a battery in the shop.
If the battery fails the load test, the battery's unserviceable.
27

Store those batteries properly and they'll last a long time.
Never stack batteries on top of one If you have to store a lot of batteries, another. That'll push in on the build a wood rack to put 'em on. TM 9terminal post and damage the plates 6140-200-14, para 3.2, tells how to inside. You could even get enough build one. weight to crack the caps or break the Separate the batteries by type- 6 top out of the case. TN, 2 HN, etc. Mark the date the
Store batteries on a wood platform battery was received, or charged, on or on boards raised h igh enough to the battery with chalk. That way it's keep 'em out of the mud or off of the easy to put the oldest battery in service concrete. first.
28
'TIPS TO THE BATTERY KEEPER:
* KEEP 'EM DRY-UP OFF THE FLOOROR GROUND.
* KEEP 'EM COOL- BUT NOT WH ERE IT'S FREEZING.
* KEEP 'EM PROTECTED FROM BEI NG CRUSHED OR DAMAGED IN ANY OTHER WAY.
* KEEP 'EM CHARGED UP!
Keep an eye on those chalk-marked dates. Every 30 days check the specific gravity. If the specific gravity drops to
All wet-charged batter ies will 1.240, give the battery a booster slowly discharge during storage. They charge. It doesn't matter whether they discharge fas ter when warm than are going to be returned to storage, when cold. To cut down on self- used or issued, charge 'em. Re-mark discharge, store the batteries in as cool the new charging date on the battery a place as possible. Keep 'em away with chalk. Then you can tell which from heat ducts and radiators in the are ready to use and which are ready winter and shielded from direct forthe 30 day check for specific gravity sunlight in the summer. and possible recharging.
29
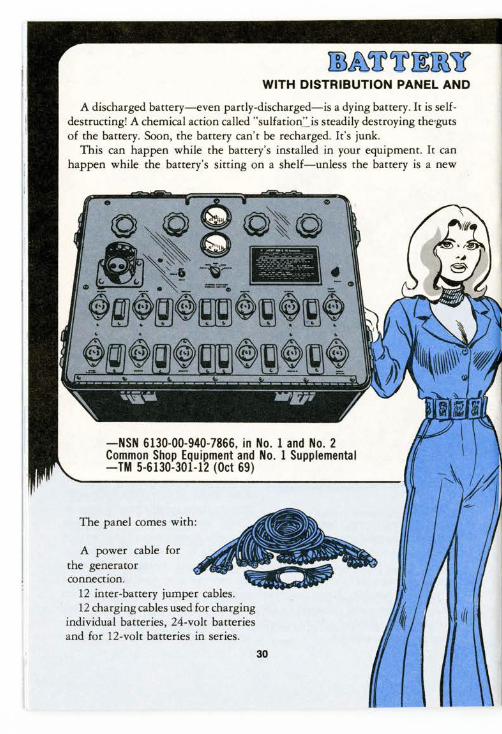
WITH DISTRIBUTION PANEL AND
A discharged battery-even partly-discharged-is a dying battery. It is selfdestructing! A chemical action called "sulfation.'..'... is steadily destroying the•guts of the battery. Soon, the battery can't be recharged. It's junk.
This can happen while the battery's installed in your equipment. It can happen while the battery's sitting on a shelf-unless the battery is a new
-NSN 6130-00-940-7866, in No. 1 and No. 2 Common Shop Equipment and No. 1 Supplemental-TM 5-6130-301-12 (Oct 69)
The panel comes with:
A power cable for the generator connection.
12 inter-battery jumper cables. 12 charging cables used for charging
individual batteries, 24-volt batteries and for 12-volt batteries in series.
30
@IB1£IB®il~® ooo 3-KW, 28-VOLT DC GENERATOR
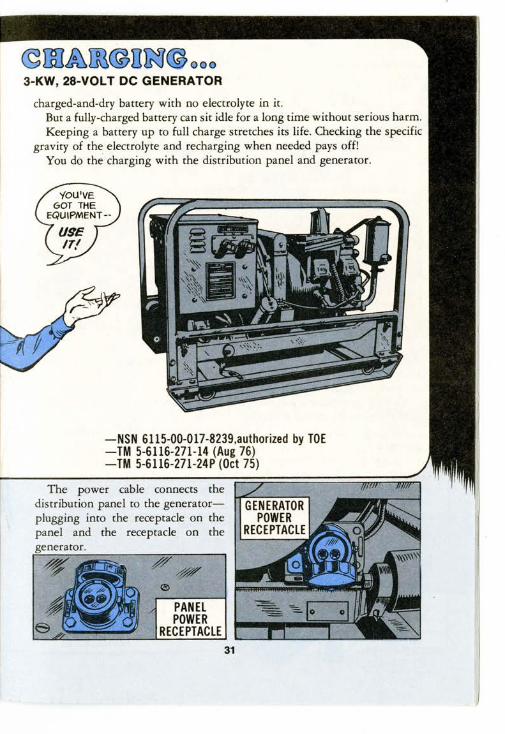
charged-and-dry battery with no electrolyte in it. But a fully-charged battery can sit idle for a long time without serious harm. Keeping a battery up to full charge stretches its life. Checking the specific
gravity of the electrolyte and recharging when needed pays off! You do the charging with the distribution panel and generator.
-NSN 6115-00-017-8239,authorized by TOE -TM 5-6116-271-14 (Aug 76) -TM 5-6116-271-24P (Oct 75)
The power cable connects the distribution panel to the generatorplugging into the receptacle on the panel and the receptacle on the
PANEL POWER
RECEPTACLE 31
WITH DISTRIBUTION PANEL AND
A discharged battery-even partly-discharged-is a dying battery. It is selfdestructing! A chemical action called "sulfation.'..'... is steadily destroying the•guts of the battery. Soon, the battery can't be recharged. It's junk.
This can happen while the battery's installed in your equipment. It can happen while the battery's sitting on a shelf-unless the battery is a new
-NSN 6130-00-940-7866, in No. 1 and No. 2 Common Shop Equipment and No. 1 Supplemental-TM 5-6130-301-12 (Oct 69)
The panel comes with:
A power cable for the generator connection.
12 inter-battery jumper cables. 12 charging cables used for charging
individual batteries, 24-volt batteries and for 12-volt batteries in series.
30
@IB1£IB®il~® ooo 3-KW, 28-VOLT DC GENERATOR
charged-and-dry battery with no electrolyte in it. But a fully-charged battery can sit idle for a long time without serious harm. Keeping a battery up to full charge stretches its life. Checking the specific
gravity of the electrolyte and recharging when needed pays off! You do the charging with the distribution panel and generator.
-NSN 6115-00-017-8239,authorized by TOE -TM 5-6116-271-14 (Aug 76) -TM 5-6116-271-24P (Oct 75)
The power cable connects the distribution panel to the generatorplugging into the receptacle on the panel and the receptacle on the
PANEL POWER
RECEPTACLE 31

' ~
You have to rig up your own ground wire-any eavy wire will do. The wire goes from the ground stud on the panel to a metal stake and to the frame of the generator.
Good ventilation is important ... both at the generator location and where you set up your batteries. 'fhe batteries give off hydrogen gas during charging, and a spark or flame could set it off. So, it's a good idea to locate the batteries as far from the generator as possible.
It should go without saying that you neither smoke nor permit an open flame near the batteries during charging.
Also, use safety goggles, a rubber apron and gloves ... for your own protection.
To charge 24-volt batteries or single 12-volt batteries from the 2 12-volt station outlets, all you need is the charging cable. You plug the connector end of the cable into the station outlet and clip the ends to the positive and negative terminals of the battery.
- ...:• ;;::::a::::::;&;;;z::::::Jii" CAREFUL! BE SURE TO CONNECT THE RED CABLE
CLIP TO THE BATTERY POSITIVE POST. CONNECT THE BLACK
CABLE TO THE NEGATIVE POST. IF YOU HOOK 'EM WRONG, YOU'LL WIND UP WITH A
REVERSE CHARGED BATTERYAND THIS CAN DAMAGE THE EQUIPMENT THE BATTERY'S
INSTALLED IN .
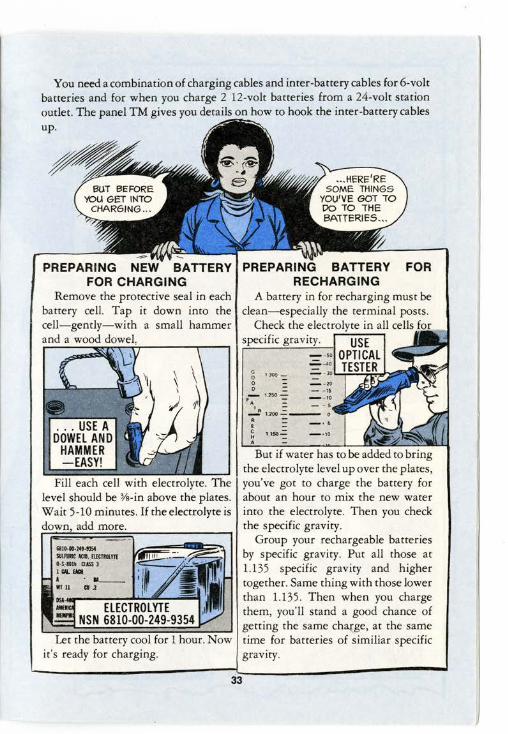
You need a combination of charging cables and inter-battery cables for 6-volt batteries and for when you charge 2 12-volt batteries from a 24-volt station outlet. The panel TM gives you details on how to hook the inter-battery cables up.
PREPARING NEW BATTERY FOR CHARGING
Remove the protective seal in each battery cell. Tap it down into the cell-gently-with a small hammer and a wood dowel.
Fill each cell with electrolyte. The level should be Vs-in above the plates. Wait 5-10 minutes. If the electrolyte is down, add more.
Let the battery cool for 1 hour. Now it's ready for charging.
33
PREPARING BATTERY FOR RECHARGING
A battery in for recharging must be clean-especially the terminal posts.
USE _ _,, OPTICAL .;;;;, _., TESTER ~-JO...,~"""'~ - - 21J - -15
- 5
-·· -·1.0
Check the electrolyte in all cells for . specific gravity.
g 1 300 -=
0
0 = - 1.2SO
F
~ 1.200 ~----R. ~ 1,150-= A
But if water has to be added to bring the electrolyte level up over the plates, you've got to charge the battery for about an hour to mix the new water into the electrolyte. Then you check the specific gravity.
Group your rechargeable batteries by specific gravity. Put all those at 1.135 specific gravity and higher together. Same thing with those lower than 1.135. Then when you charge them, you'll stand a good chance of getting the same ch~ge, at the same time for batteries of similiar specific gravity.
' ~
You have to rig up your own ground wire-any eavy wire will do. The wire goes from the ground stud on the panel to a metal stake and to the frame of the generator.
Good ventilation is important ... both at the generator location and where you set up your batteries. 'fhe batteries give off hydrogen gas during charging, and a spark or flame could set it off. So, it's a good idea to locate the batteries as far from the generator as possible.
It should go without saying that you neither smoke nor permit an open flame near the batteries during charging.
Also, use safety goggles, a rubber apron and gloves ... for your own protection.
To charge 24-volt batteries or single 12-volt batteries from the 2 12-volt station outlets, all you need is the charging cable. You plug the connector end of the cable into the station outlet and clip the ends to the positive and negative terminals of the battery.
- ...:• ;;::::a::::::;&;;;z::::::Jii" CAREFUL! BE SURE TO CONNECT THE RED CABLE
CLIP TO THE BATTERY POSITIVE POST. CONNECT THE BLACK
CABLE TO THE NEGATIVE POST. IF YOU HOOK 'EM WRONG, YOU'LL WIND UP WITH A
REVERSE CHARGED BATTERYAND THIS CAN DAMAGE THE EQUIPMENT THE BATTERY'S
INSTALLED IN .
You need a combination of charging cables and inter-battery cables for 6-volt batteries and for when you charge 2 12-volt batteries from a 24-volt station outlet. The panel TM gives you details on how to hook the inter-battery cables up.
PREPARING NEW BATTERY FOR CHARGING
Remove the protective seal in each battery cell. Tap it down into the cell-gently-with a small hammer and a wood dowel.
Fill each cell with electrolyte. The level should be Vs-in above the plates. Wait 5-10 minutes. If the electrolyte is down, add more.
Let the battery cool for 1 hour. Now it's ready for charging.
33
PREPARING BATTERY FOR RECHARGING
A battery in for recharging must be clean-especially the terminal posts.
USE _ _,, OPTICAL .;;;;, _., TESTER ~-JO...,~"""'~ - - 21J - -15
- 5
-·· -·1.0
Check the electrolyte in all cells for . specific gravity.
g 1 300 -=
0
0 = - 1.2SO
F
~ 1.200 ~----R. ~ 1,150-= A
But if water has to be added to bring the electrolyte level up over the plates, you've got to charge the battery for about an hour to mix the new water into the electrolyte. Then you check the specific gravity.
Group your rechargeable batteries by specific gravity. Put all those at 1.135 specific gravity and higher together. Same thing with those lower than 1.135. Then when you charge them, you'll stand a good chance of getting the same ch~ge, at the same time for batteries of similiar specific gravity.
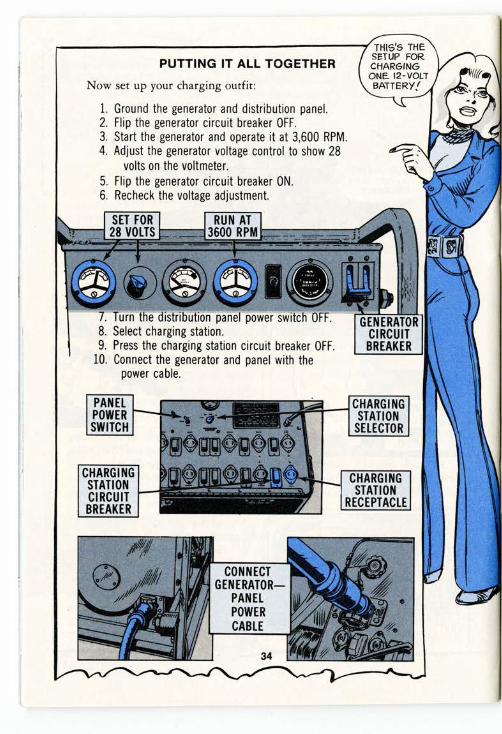
PUTTING IT ALL TOGETHER
Now set up your charging outfit:
1. Ground the generator and distribution panel. 2. Flip the generator circuit breaker OFF. 3. Start the generator and operate it at 3,600 RPM. 4. Adjust the generator voltage control to show 28
volts on the voltmeter. 5. Flip the generator circuit breaker ON. 6. Recheck the voltage adjustment.
PANEL POWER SWITCH
CHARGING STATION CIRCUIT BREAKER
CHARGING STATION
SELECTOR
CHARGING STATION
RECEPTACLE
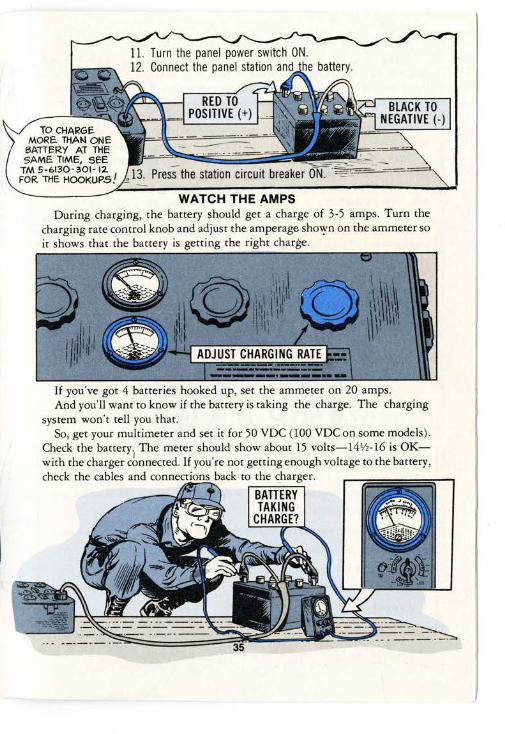
11. Turn the panel power switch ON. 12. Connect the panel station and the battery.
RED TO POSITIVE (+)
TO CHARGE MORE. THAN ONE
6A1TERY AT THE SAME. TIME, SEE
TM 5-6130-301-12. = 13. Pressthe station circuit breaker Oft -~c:-~~: ~
FOR THE HOOKUPS!
WATCH THE AMPS During charging, the battery should get a charge of 3-5 amps. Turn the
charging rate control knob and adjust the amperage shmyn on the ammeter so it shows that the battery is getting the righ~ _charge . ...,....,....,....,,,...,...,,,.,
If you've got 4 batteries hooked up, set the ammeter on 20 amps. And you'll want to know if the battery is taking the charge. The charging
system won't tell you i:hat. So, get your multimeter and set it for 50 VDC (100 VDC on some models).
Check the battery. The meter should show about 15 volts-14112-16 is OKwith the charger cbnnected. If you're not getting enough voltage to the battery, check the cables and connections back to the c.harger.
PUTTING IT ALL TOGETHER
Now set up your charging outfit:
1. Ground the generator and distribution panel. 2. Flip the generator circuit breaker OFF. 3. Start the generator and operate it at 3,600 RPM. 4. Adjust the generator voltage control to show 28
volts on the voltmeter. 5. Flip the generator circuit breaker ON. 6. Recheck the voltage adjustment.
PANEL POWER SWITCH
CHARGING STATION CIRCUIT BREAKER
CHARGING STATION
SELECTOR
CHARGING STATION
RECEPTACLE
11. Turn the panel power switch ON. 12. Connect the panel station and the battery.
RED TO POSITIVE (+)
TO CHARGE MORE. THAN ONE
6A1TERY AT THE SAME. TIME, SEE
TM 5-6130-301-12. = 13. Pressthe station circuit breaker Oft -~c:-~~: ~
FOR THE HOOKUPS!
WATCH THE AMPS During charging, the battery should get a charge of 3-5 amps. Turn the
charging rate control knob and adjust the amperage shmyn on the ammeter so it shows that the battery is getting the righ~ _charge . ...,....,....,....,,,...,...,,,.,
If you've got 4 batteries hooked up, set the ammeter on 20 amps. And you'll want to know if the battery is taking the charge. The charging
system won't tell you i:hat. So, get your multimeter and set it for 50 VDC (100 VDC on some models).
Check the battery. The meter should show about 15 volts-14112-16 is OKwith the charger cbnnected. If you're not getting enough voltage to the battery, check the cables and connections back to the c.harger.
I' I
During charging, make sure the battery is not boiling hard-big and frequent bubbles stirring the liquid surface. Soft boiling-small bubbles and liquid surface mostly smooth-is a normal condition. If you get hard boiling, turn the charging rate control knob to adjust the amperage down to 2.5-3 amps per battery.
If you can't get the charging current low enough when you' re charging a lone battery, you charge 2 together.
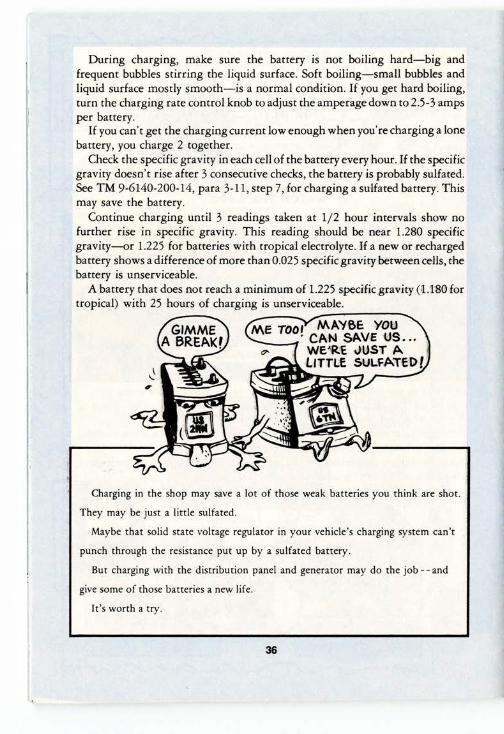
Check the specific gravity in each cell of the battery every hour. If the specific gravity doesn't rise after 3 consecutive checks, the battery is probably sulfated. See TM 9-6140-200-14, para 3-11, step 7, for charging a sulfated battery. This may save the battery.
Continue charging until 3 readings taken at 1/2 hour intervals show no further rise in specific gravity. This reading should be near 1.280 specific gravity-or 1.225 for batteries with tropical electrolyte. If a new or recharged battery shows a difference of more than 0.025 specific gravity between cells, the battery is unserviceable.
A battery that does not reach a minimum of 1.225 specific gravity (il.1'80 for tropical) with 25 hours of charging is unserviceable.
Charging in the shop may save a lot of those weak batteries you think are shot.
They may be just a little sulfated.
Maybe that solid state voltage regulator in your vehicle's charging system can't
punch through the resistance put up by a sulfated battery.
But charging with the distribution panel and generator may do the job - - and
give some of those batteries a new life.
It's worth a try.
36
REPORTING OF ERRORS
You can help improve this publication by calling attention to errors and by recommending improvements and stating your reasons for the recommendations. Your letter or DA Form 2028, Recommended Changes to Publications, should be mailed directly to Commander, US Army TankAutomotive Materiel Readiness Command, ATTN: DRSTA-M, Warren, Michigan 48090. A reply will be furnished directly to you.
By Order of the Secretary of the Army:
BERNARD W. ROGERS General, United States Army
Chief of Staff
Official: ]. C. PENNINGTON
Brigadier General, United Army
The Adjutant General
States
Distribution: To be distributed in accordance with DA Form 12-5 qty rqr Block 38
requirements for PS Magazine.
,:, U.S. GOVERNMENT PRINTING OFFICE: 1978-261-044/8

I' I
During charging, make sure the battery is not boiling hard-big and frequent bubbles stirring the liquid surface. Soft boiling-small bubbles and liquid surface mostly smooth-is a normal condition. If you get hard boiling, turn the charging rate control knob to adjust the amperage down to 2.5-3 amps per battery.
If you can't get the charging current low enough when you' re charging a lone battery, you charge 2 together.
Check the specific gravity in each cell of the battery every hour. If the specific gravity doesn't rise after 3 consecutive checks, the battery is probably sulfated. See TM 9-6140-200-14, para 3-11, step 7, for charging a sulfated battery. This may save the battery.
Continue charging until 3 readings taken at 1/2 hour intervals show no further rise in specific gravity. This reading should be near 1.280 specific gravity-or 1.225 for batteries with tropical electrolyte. If a new or recharged battery shows a difference of more than 0.025 specific gravity between cells, the battery is unserviceable.
A battery that does not reach a minimum of 1.225 specific gravity (il.1'80 for tropical) with 25 hours of charging is unserviceable.
Charging in the shop may save a lot of those weak batteries you think are shot.
They may be just a little sulfated.
Maybe that solid state voltage regulator in your vehicle's charging system can't
punch through the resistance put up by a sulfated battery.
But charging with the distribution panel and generator may do the job - - and
give some of those batteries a new life.
It's worth a try.
36
REPORTING OF ERRORS
You can help improve this publication by calling attention to errors and by recommending improvements and stating your reasons for the recommendations. Your letter or DA Form 2028, Recommended Changes to Publications, should be mailed directly to Commander, US Army TankAutomotive Materiel Readiness Command, ATTN: DRSTA-M, Warren, Michigan 48090. A reply will be furnished directly to you.
By Order of the Secretary of the Army:
BERNARD W. ROGERS General, United States Army
Chief of Staff
Official: ]. C. PENNINGTON
Brigadier General, United Army
The Adjutant General
States
Distribution: To be distributed in accordance with DA Form 12-5 qty rqr Block 38
requirements for PS Magazine.
,:, U.S. GOVERNMENT PRINTING OFFICE: 1978-261-044/8

Overcharging Cooks Batteries to Death!
\ ~ \ ~,, ;#~
GOOD
All ELECTR ICAL UNITS ON.
BAD NEED LE IN RIGH T RED SECTIO N SHO WS OV ER CH AR GI NG.
BATTE RIES CAN'T TAKE IT!
GET YOUR MECHANIC TO CHECK OUT THE BATTERIES AND CHARGING SYSTEM:
NEEDLE SHO ULD RES T HERE .
~
OVERCHA RGIN G
~
DA PAM 750·33[0EC 76). CHARGING SYSTEM~ fROUBLESHOOTING [THE EASY WAY ] . •