Embed Size (px)
Citation preview
2002 eMedia Unit RVC 1 of 10
Preventative Veterinary Dentistry
Introduction
This chapter guides you through the logical process required to examine the oral cavity, plan, and then institute the basics of dental surgery.
By the end of this chapter you should be able to:
ü Perform a complete oral examination and relate the findings to the whole body examination
ü Know the basic dental procedures for operative cases
ü Carry out a charting procedure
ü Understand the need to initiate and sustain dental homecare
Oral Examination
A complete and thorough oral examination is essential as part of the overall physical examination.
Oropharyngeal disorders are the most common health abnormalities in the dog and cat. However, signs in the mouth can also be a local manifestation of a systemic problem, which disturbs the epithelium of the oral cavity.
Examples include:
• Autoimmune conditions (e.g. Systemic Lupus Erythematosis, Discoid Lupus Erythematosis, Autoimmune Haemolytic Anaemia)
• Metabolic diseases (e.g. diabetes mellitus, chronic renal failure and secondary renal hyperparathyroidism)
• Immuno-suppressive viruses (e.g. FIV and FeLV)
Domestic pets are substantially less demonstrative of oral pain than humans. Therefore the owner may be unaware of major lesions until the disease is well advanced or until more obvious signs, such as a discharge, swelling, or severe halitosis, are present.
Taking the History
Taking the history is the first part of any clinical examination. The owner is your eyes and ears and the patient’s voice. You need to determine the following:
Signalment
Age Oral problems are more common as the animal ages. You should also watch out for difficulties as the dentition changes from deciduous to permanent.
Breed Brachycepahlic type skulls and small breeds tend to have the most problems, often due to tooth crowding. Determine if the animal is pedigree or cross breed. Certain breeds have a predilection for dental disease, for example Maltese terriers and Greyhounds.
2002 eMedia Unit RVC 2 of 10
Sex Prepubertal neutering may have a role in Feline Odontoclastic Resorptive Lesions (FORLs) and in susceptibility to certain metabolic diseases.
Environmental
• Vaccinal status
• Diet
• Possible behaviour changes
• Home environment – house or yard?
• Pet or working animal?
Presenting signs
• Possible weight loss
• Anorexia
• Halitosis
• Dysphagia
• Salivation abnormality (too little, too much, too viscous, stained with discharge)
• Retching or vomiting
• Regurgitation
• Chattering jaws
• Inability or difficulty to close or open mouth
• Facial swelling or disfigurement
Oral/historical
• Previous dental procedures? When and what done? Chart available?
• Present and previous level of homecare
Oral Examination Procedure
Much of the initial examination is performed automatically whilst taking the history, putting the patient on the table and making a fuss to calm it. The information is frequently obtained subliminally with only abnormalities registering as worth following up.
History taking with this step will allow the examination to be history driven.
1. Visually inspect the head and neck from afar. Palpate the outer surfaces of the head for pain, heat, sensitivity or swelling. Palpate the mandibular lymph nodes.
2. Externally, inspect the lips and palpate them. Retract the lips and examine the vestibule (i.e. - inner surfaces of the lips, the buccal mucosa, the rostral surfaces of the incisors and the buccal surfaces of the canines, premolars and molars).

2002 eMedia Unit RVC 3 of 10
3. Open the mouth – if this is not possible, consider sedation at this point as there may be an underlying (painful) reason for this.
4. Examine the mucous membranes of the floor of the mouth, the tongue (dorsum and ventrum), gingiva and palatal tissues. Check for colour, inflammation, ulceration, hyperplasia, bleeding, unusual swellings, tumours, and foreign bodies.
5. Examine teeth for calculus, gingivitis, malocclusion of bite and, in cats, feline odontoclastic resorptive lesions. Look for retained deciduous teeth, attrition facets, enamel abnormalities, root or furcation exposure, caries and absence of teeth.
6. Examine the oropharynx and the tonsillar area for pathology or foreign bodies.
Note that a more detailed oral examination can only be performed under sedation or general anaesthetic. This will incorporate detailed periodontal and dental examination including sulcus depth, periodontal pocketing (if present) and any areas where caries or pulp exposure may be suspected – often seen initially as black spots on incisal edges or occlusal pits.
Diagnostic Techniques
Introduction
Following the initial oral examination it may be necessary to resort to certain diagnostic techniques to obtai n more information to make or support a diagnosis.
Functional Studies
Offer the patient food and/or water and observe it eating. Do not rely on the owner’s observations if in any doubt.
Imaging
Radiography is the number one tool for diagnosis, prognosis a nd treatment of many dental problems. It is essential to master the specialist techniques required for good oral radiographs. More information can be found in the radiography chapter.
Computed Tomography Scanning (CT Scans) and Magnetic Resonance Imaging (MRI) are becoming more available for inaccessible areas such as TMJ’s , sinuses and nasal cavity.
Biopsy
Biopsy is an essential tool for diagnosis as so many diverse lesions present a similar appearance in the mouth (i.e. a red, inflamed mass).
This technique is often simply performed in the oral cavity as excisional or incisional biopsies. Use a 4mm or 6mm biopsy punch and send to a laboratory experienced in oral pathology. If neoplasia is suspected do not take a marginal sample of normal and abnormal tissue to prevent opening a previously closed tissue plane.
Culture
Culture can be of help but is often over-rated – it can be very difficult to interpret culture results. A large and diverse oral flora is to be expected in healthy and unhealthy animals. Often it is not important what is present but why it is present.
If you think a culture is indicated, call ahead to the lab and ask for advice regarding the swab and transport medium needed. This is vital if anaerobic culture is needed (common for the oral cavity).

2002 eMedia Unit RVC 4 of 10
Laboratories should be aware of why you are sending material and what type of examination you wish from them.
Complete Blood Count and Serum Chemistry
Complete blood count and serum chemistry tests will often indicate the degree of severity of the systemic disease process. Many dental patients fall into high risk categories. These include geriatrics, toy breeds, animals with chronic periodontal disease and subsequent organ involvement and those generally debilitated. Serum biochemistry will allow you to assess and address the risk factors inherent in anaesthesia. Serum proteins are of particular help in feline lymphocytic plasmacytic stomatitis.
Haematology will be of use in those cases, mainly medical, where abnormalities of red or white cell numbers will assist or confirm the diagnosis.
Pre-treatment Antibiotics
Before the dental procedure it is wise to consider the role of antibiotics. Their role is two fold. Primarily they will prevent the haematogenous seeding of dangerous pathogens during a dental procedure. Secondly, they will reduce the pathogenicity of the aerosol the operators are exposed to during the procedure. The use of antibiotics is a clinical decision. They will not be required in every case.
Do you need to use antibiotics?
• Fit and healthy animals undergoing routine scaling and polishing will usually not require any antibiotics as their reticulo-endothelial system can easily handle pulses of bacteraemia from scaling
• With moderate to severe cases of periodontal disease, start antibiotic therapy at the time of the premedication injection. Give ampicillin or amoxycillin i/m or clindamycin per os at least 20 minutes pre -op.
• Severe cases may require up to one week pre-treatment to prevent bacteraemia during surgery
Remember that whate ver antibiotic is dispensed post-operatively the owner will have to be able to comply with your instructions. If the mouth is painful and the patient is uncooperative it may be wise to select an agent on the basis of its palatability and ease of administration.
Dental Charting
Why Chart?
The first step in basic dental procedures is to chart your patient.
Why do you need to chart your dental cases?
• Charting is essential to record the presence of health and/or disease in a form that can be used now and later
• At its very simplest form, it is necessary for medico -legal protection reasons to know what teeth and pathology was present before treatment was started
• The success, or otherwise, of treatments is impossible to gauge over time without gathering the proper information at initial treatment
• It is a good clinical habit to develop. The client is often impressed by the time taken to gather information that they can easily understand and use themselves to play their part in the maintenance of the oral cavity

2002 eMedia Unit RVC 5 of 10
• Many different charts exist in the vet dental literature. Use one that suits your purposes
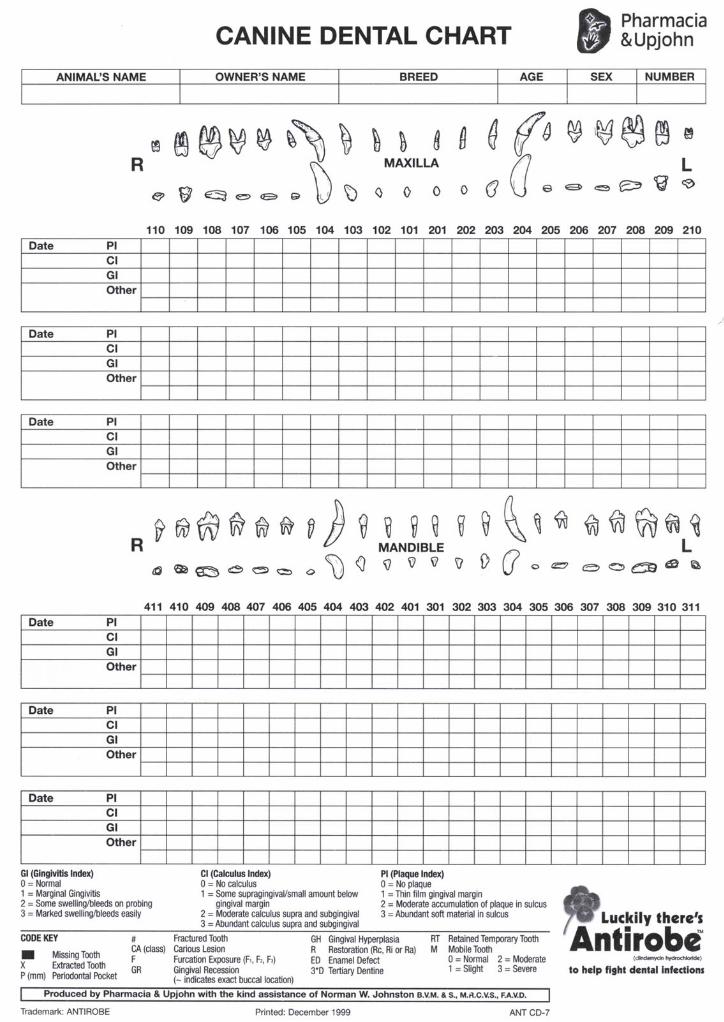
Dog Chart
Note the graphics of the teeth. The top line indicates the buccal (lateral) view. The lower line indicates the occlusal view – seen as if you were inside the mouth looking out.
The three boxes for the upper and lower jaws can be used for three separate dental procedures. This allows progression or deterioration of any single index to be monitored over time. Fill in today’s date in the first available box.
The teeth are numbered using the modified Triadan system. The midline is between the 101 and 201 on the maxilla and 401 and 301 on the mandibles.
PI is “plaque index”: A standard system is used based on Silness and Loe (1964). Plaque is measured from 0 to 3 as per the code key.
CI is “calculus index”: A standard system is used based on Ramfjord (1967). Calculus is measured from 0 to 3 as per the code key.
GI is “gingival index”: A standard system is used based on Loe and Silness (1963). Gingivitis is measured from 0 to 3 as per the code key.
Other findings boxes allow the operator to record numerous other abnormalities, the most important of which are listed on the code key, for example the mobility of teeth can be recorded using the index listed on the code key.
Some findings may be best drawn onto the teeth. Periodontal pockets, caries, fracture sites etc are all more easily noted on the graphics bar rather than in the boxes. Use the chart as an aid - the more information you routinely log the more benefit it will be to you.

2002 eMedia Unit RVC 6 of 10
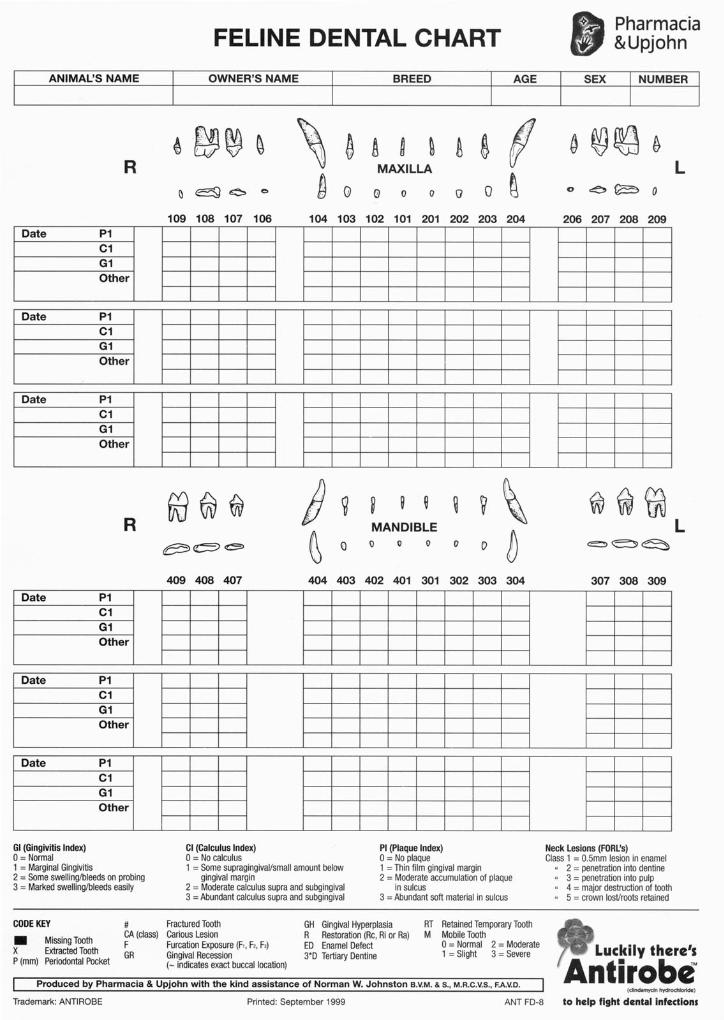
Cat Chart
The cat chart is basically the same as the dog chart with less teeth (30 rather than 42) which have different shapes. Note the importance of the carnassial teeth in the modified Triadan numbering system.
One major difference is the addition of the classification for Feline Odontoclastic Resorptive Lesions (FORLs). These lesions are more common in felines than other species. With this exception, all other indices (e.g. CI, GI, PI) are the same.
2002 eMedia Unit RVC 7 of 10
Sequence of Charting
Chart the mouth starting at the uppermost side – it may be easier to use a microcassette recorder and transcribe later to improve speed and cleanliness.
1. Count the teeth and note missing or extra teeth
2. Determine the level of calculus, as per the legend ( 0 = none to 3 = 100% cover)
3. Determine the level of gingival inflammation, as per the legend. Using the blunt perio probe, gently run the probe around the buccal sulcus to determine the degree of gingival inflammation. Take care not to use too much apical pressure or pass the same way twice - you do not wish to create damage where none exists
4. Note any major visible abnormalities – fractured teeth, enamel defects, neoplasms, attrition with tertiary dentine exposure
5. Optional – use disclosing solution to determine location and level of plaque. This step is of most use postoperatively in consulting room examinations. Apply to buccal surfaces with a soaked cotton bud. Duo -128™ (Virbac) contains two dyes - pink deposit indicates immature plaque and purple is mature, mineralised plaque
After initial scaling
6. Examine the sulcus of each tooth in a minimum of six locations - three buccal and three palatal/lingual. Use the graduated probe, in the long axis of the tooth, in an apical direction. Apply no more than one ounce of pressure. Use the probe as your eyes under the gumline and feel for missed subgingival calculus, abnormal pits and depressions in the root surfaces and periodontal pockets – describe depth and location
7. Note the location of any teeth extracted by crossing out the corresponding boxes and tooth graphics
8. Note other important features such as:
• Gingival recession and root furcation exposure - draw new line on buccal graphic
• Caries - draw location
• Enamel defects - draw location and insert classification in parenthesis.
• Mobile teeth - use index as per code key
• Other significant lesions (e.g. fractured crowns or cusps, abrasion sites, FORL’s in cats etc)
9. Note treatments performed - fillings, root planing, extractions, pocket management and gingival flaps and root canals
Charting Terminology
Apical - towards to the root
Buccal - surface of tooth towards cheeks
Coronal - towards the crown
Distal - surface away from midline
Facial - can be labial or buccal surface
Interproximal - surface between two teeth
Labial - surface of tooth towards lips

2002 eMedia Unit RVC 8 of 10
Lingual - surface of tooth towards tongue
Mesial - surface towards front midline
Occlusal - surface facing tooth in opposite jaw
Palatal - surface of tooth towards palate
Scaling and Polishing
Introduction All dental procedures start with a routine scale and polish. Once the mouth has been charted and the status is recorded the operative procedure can begin.
Removing Calculus
Remove gross calculus by cracking with forceps very carefully (Cat teeth can be fractured by over -zealous cracking).
Remove the obvious remaining calculus mechanically, with an ultrasonic/sonic scaler or with a hand scaler. Ensure scaling is carried out both supra and subgingivally.
Explore and Probe
Locate any remaining subgingival calculus by the use of an explorer or probe. Feel the irregularities on the cemental surfaces of the roots. Note their position for the next step.
Evaluate pocket depths and amount of mobility with a graduated probe. For pockets greater than 3-4 mm assess whether the bulk of the pocket is apical or coronal to the CEJ.
Tactile senses are important here, as no more than one ounce of pressure should be used in the sulcus.
Subgingival Scaling
Subgingival scaling involves the removal of subgingival calculus from the tooth surface. This can be from the enamel (crown) or from the root cementum surface, in which case it is termed root planing. Subgingival curettage or root planing can be closed or open. If open, some form of flap will have been made to aid vision and improve efficiency.
Inadequate removal leaves an inflammatory focus present and the disease process will continue. Continued attachment loss will cause further deepening of the pocket.
Use appropriate ultrasonic scaler tips.
For subgingival scaling with hand instruments, use a subgingival curette (e.g. Gracey curette SG 11/12 or 13/14). Place the blade at 45o-90o to the root surface and pull firmly against the tissue to remove as much debris and chronically inflamed tissue as possible. Root cement is capable of being shaped by these instruments as well as with the ultrasonic tips. Aim to smooth the root as much as possible - multiple overlapping strokes may be required. Evaluate again for smoothness with the probe.
The use of fine tips in an ultrasonic scaler has proven to be a great deal more efficient for supragingival and subgingival scaling when followed by hand instrumentation. FSI™ tips Slimline™ tips and TFI™ tips (Dentsply) and Odontoson™ are all ultrasonic instruments that can be used under the gingival margin, albeit with care, as the water supply is carried with the tip.

2002 eMedia Unit RVC 9 of 10
For FSI and Slimline tips the maximum distance safe for subgingival use is 6-7mm. It is claimed that the Odontoson can be used as much as 12mm subgingival.
Polishing
Polishing is required to remove the tiny irregularities caused by mechanical or hand instrumentation which will continue to attract plaque and calculus, if it is left.
Use a fine or flour grade of paste containing fluoride to polish all supra and subgingival surfaces.
Use with a light touch and for a short time and make sure that there is an adequate slurry of paste and water on the tooth.
For cat teeth a Cavi -Jet type system may be preferable, as all prophy cups tend to be too large for cat teeth.
Irrigation
After polishing, irrigate the gingival sulcus to remove the debrided bacterial components and prevent immediate reorganisation in the sulcus. Use saline via a blunted needle or plastic pipette.
Remember that if chlorhexidine is used at this time it is not possible to give fluoride treatment, as fluoride and chlorhexidine compete for the same receptor sites on the tooth surface.
Fluoride or Barrier Treatment
The final treatment is to apply fluoride or a barrier substance to protect the teeth.
An application of fluoride hardens the enamel and desensitises the dentine. Alternatively, a barrier product such as ProVSeal™ can be applied to limit plaque attachment. This treatment can be continued by the owner.
Homecare
Homecare - the most important aspect of a basic dental procedure.
• Bring the patient back after five to seven days to allow you to demonstrate the techniques once the soft tissues have healed
• Stress that home care is a daily maintenance task to mechanically remove plaque. Note that humans do this twice daily
• Brushing every second day is 60% less effective than once daily. Brushing less frequently will have dubious effectiveness
• Advise owners that professional scaling and polishing without home care is unlikely to be effective
• Review the mouth using an interval consistent with the disease present. In severely affected cases 1-3 months is advised. An interval of 4 -6 months is more usual. At the time of review, use a disclosing solution to demonstrate any areas of plaque that the client may be missing. This can be added to the ongoing dental chart
How to brush
1. Home care involves training the animal to accept something new. Realistically it may take a month to introduce it fully
2. Show the owner how to apply the dentifrice with their fingers, initially to the buccal surfaces of the teeth

2002 eMedia Unit RVC 10 of 10
3. Once the principle is accepted by the animal, introduce the brush and gradually move it rostral to caudal to distribute the dentifrice. Finally attempt to rotate the brush head in a circular motion at a 600 angle to the gingival margin to debride the crowns, gingiva and gingival sulcus. Both sides of the teeth need to be brushed – buccal and lingual or palatal
Aids to home care
Other useful aids to home care help the process but should be used in addition to brushing - not instead of it.
• ProVseal™ is a product making use of barrier technology. The tooth surface carries a negative charge which allows positively charged transfer agents to bind strongly with it. These agents are easily applied by the owners and prevent plaque attachment for 4-7 days. The y should be considered complementary to brushing
• Canine and Feline t/d™ diet (Hills Pet Products) can be a useful adjunct to brushing but never a substitute for it. It only removes supragingival plaque in the teeth used to chew the food. Painful areas that the animal does not use will not benefit
• Chews for cats and dogs have also improved in recent years. These can be either the traditional cow hide type or, more effectively, the newer circular manufactured chews. (CET Cat Chews™: CET Dog Chews™ ( Virbac) and Rask™ (Waltham))
Key Points
4 A thorough oral examination with history is essential to enable you to relate the findings to the body as a whole.
4 Charting the mouth to record the findings before and after surgery is essential to keep track of the case.
4 The homecare programme is the most important part of prevention. It should be constructed , initiated and monitored with relevance to the needs of the patient and the abilities of the owner.
Further Reading
• Crossley DA and Penman S (eds), BSAVA Manual of Small Animal Dentistry, 1995
• Holmstrom SE, Frost P and Eisner ER, Veterinary Dental Techniques, 2nd edition, Saunders 1998
• Lobprise HB and Wiggs RB, The Veterinarian's Companion for Common Dental Procedures, AAHA Press 2000
• Verstraete FJM, Self-assessment Colour Review of Veterinary Dentistry, Manson 1999
• Wiggs RB & Lobprise HB, Veterinary Dentistry - principles and practice, Lippincott-Raven 1997