Embed Size (px)
Citation preview

Prairie Band Casino & Resort
1 Revised 8/7/07 dm
Introduction..................................................................................................................................... 3 General............................................................................................................................................ 3 Overview......................................................................................................................................... 3 Logging On ..................................................................................................................................... 4 Manager (main menu)..................................................................................................................... 5
Document Tracking .................................................................................................................... 5 Employee Changes...................................................................................................................... 7
RE – Performance Review...................................................................................................... 9 ST – Status Change............................................................................................................... 10 SC – Salary Change .............................................................................................................. 11 LO – Layoff .......................................................................................................................... 11 TE – Termination.................................................................................................................. 12 EA – Employment Action..................................................................................................... 13 TR – Transfer........................................................................................................................ 14 LV – Leave of Absence ........................................................................................................ 15 PC – Personal Change........................................................................................................... 16 PR – Promotion or DM - Demotion...................................................................................... 17
Employee Information .............................................................................................................. 18 New Employee.......................................................................................................................... 19 Performance Reviews ............................................................................................................... 19 Rehire Employee....................................................................................................................... 21
In Box (main menu) ...................................................................................................................... 22 Alternate Approvers.................................................................................................................. 22 For My Approval ...................................................................................................................... 24 My Messages ............................................................................................................................ 26 My Requests.............................................................................................................................. 28
Personal (main menu) ................................................................................................................... 29 Address ..................................................................................................................................... 29 Certifications............................................................................................................................. 29 Education .................................................................................................................................. 30 Emergency Contact................................................................................................................... 30 Password ................................................................................................................................... 31 Personal..................................................................................................................................... 31
Payroll (main menu) ..................................................................................................................... 32 Direct Deposit Info ................................................................................................................... 32 Direct Deposit Change.............................................................................................................. 32 Pay History................................................................................................................................ 33 Prior Year Pay........................................................................................................................... 33 W-2 Information ....................................................................................................................... 33 W-4 Form.................................................................................................................................. 33 W-4 Information ....................................................................................................................... 33
Benefits (main menu).................................................................................................................... 33 Benefit Providers (main menu)..................................................................................................... 33 Training (main menu) ................................................................................................................... 33 Company (main menu) ................................................................................................................. 34 Requests (main menu)................................................................................................................... 34
2 Revised 8/7/07 dm
MANAGER SELF SERVICE
Introduction This manual is produced as a reference to assist you with the Manager Self Service (MSS) System. By working closely with our consultant for the Infinium System, we feel that every effort has been made to ensure that we account for all anticipated situations that may arise in our working environment pertaining to the workflow. If you have any questions after your training and need clarification, please do not hesitate to contact Human Resources. We welcome any comments/suggestions to help us improve the MSS system.
General 1. USER ID = First Initial + Last Initial + last 4 digits of employee number 2. PASSWORD = First Initial + Last Initial + last 4 digits of social security number
Overview Manager Self Service allows for the following functions to ensure paperless workflow throughout Prairie Band Casino:
1. Document Tracking 2. Employee Changes 3. Employee Information 4. Employee Training (pending) 5. Performance Reviews
PLEASE NOTE THAT DISPLAYED DATA IN ANY OF THE EXAMPLES IN THIS DOCUMENT HAS BEEN ALTERED FROM ITS ORIGINAL FORM TO PROTECT ITS INTEGRITY.
DO NOT USE THE BACK ARROW KEY WHILE IN THIS APPLICATION.
3 Revised 8/7/07 dm
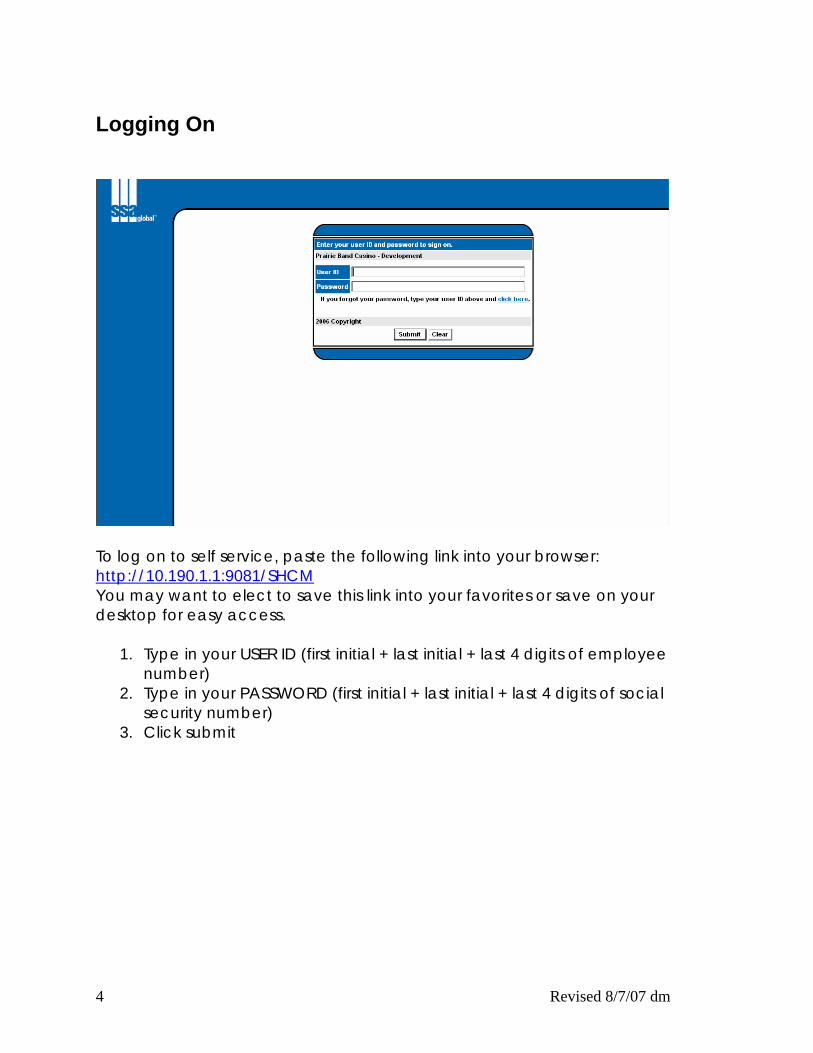
Logging On
To log on to self service, paste the following link into your browser: http://10.190.1.1:9081/SHCM You may want to elect to save this link into your favorites or save on your desktop for easy access.
1. Type in your USER ID (first initial + last initial + last 4 digits of employee number)
2. Type in your PASSWORD (first initial + last initial + last 4 digits of social security number)
3. Click submit
4 Revised 8/7/07 dm

Manager (main menu) Document Tracking: Tracks documents that you have initiated or for which you are responsible in the Self-Service workflow process. Add Dependent/Beneficiary Benefit Changes Change Address Change Dependent/Beneficiary Direct Deposit Change Employee Changes Demotion Employee Changes Employment Action Employee Changes Leave of Absence Employee Changes Personal Change Employee Changes Promotion Employee Changes Review Employee Changes Salary Change Employee Changes Status Change Employee Changes Termination/End Employment Employee Changes Transfer Lifestyle Change Request Open Enrollments (pending) Training Enrollment (pending) Training Request (pending)
MGR Name
To track the status of documents routed through the Self Service workflow process, complete these steps:
5 Revised 8/7/07 dm
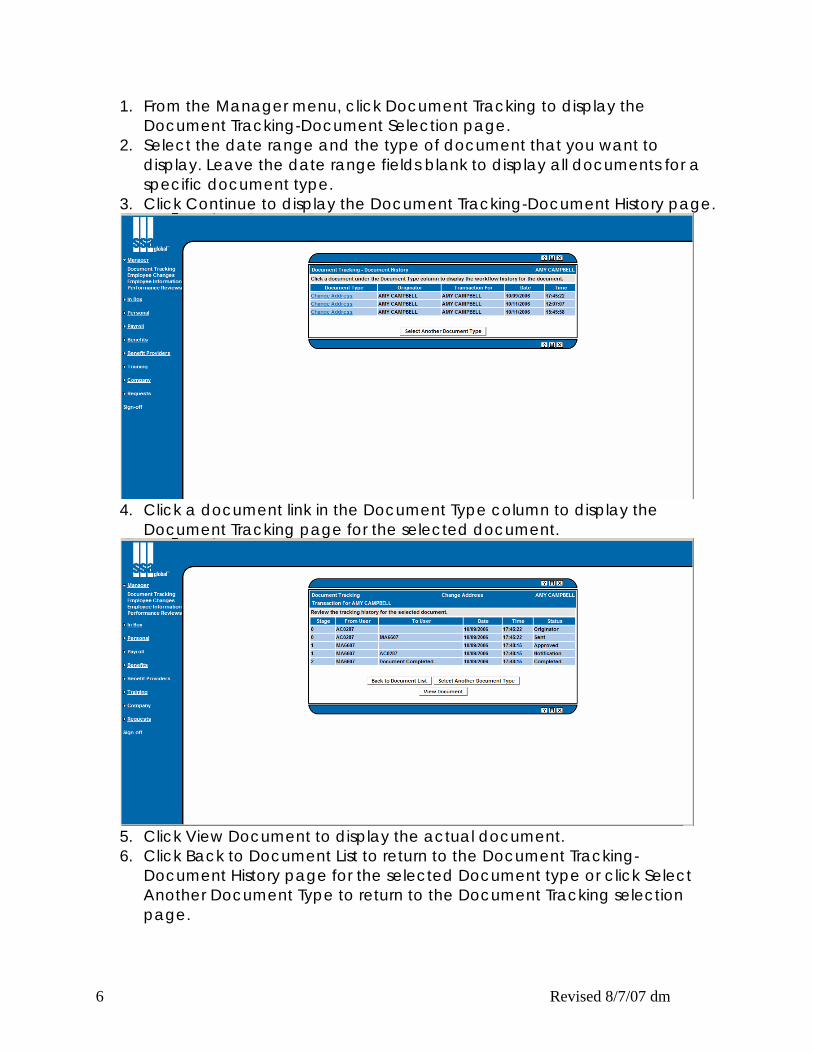
1. From the Manager menu, click Document Tracking to display the Document Tracking-Document Selection page.
2. Select the date range and the type of document that you want to display. Leave the date range fields blank to display all documents for a specific document type.
3. Click Continue to display the Document Tracking-Document History page.
4. Click a document link in the Document Type column to display the
Document Tracking page for the selected document.
5. Click View Document to display the actual document. 6. Click Back to Document List to return to the Document Tracking-
Document History page for the selected Document type or click Select Another Document Type to return to the Document Tracking selection page.
6 Revised 8/7/07 dm
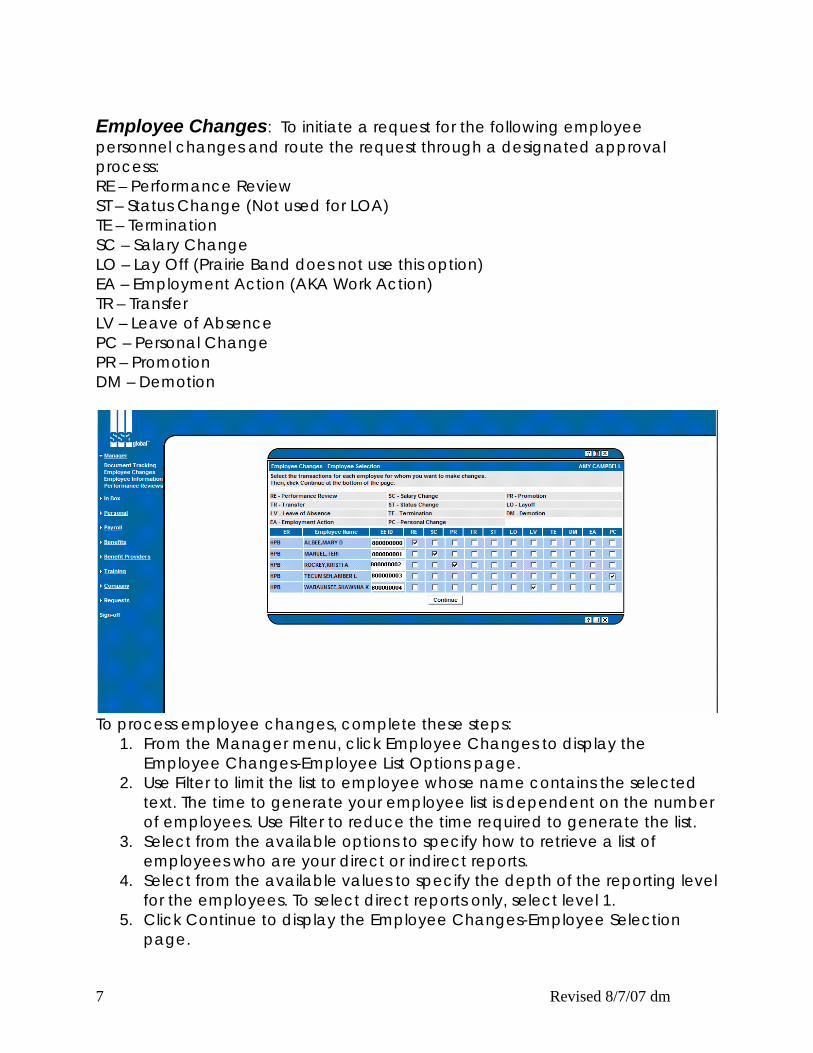
Employee Changes: To initiate a request for the following employee personnel changes and route the request through a designated approval process: RE – Performance Review ST – Status Change (Not used for LOA) TE – Termination SC – Salary Change LO – Lay Off (Prairie Band does not use this option) EA – Employment Action (AKA Work Action) TR – Transfer LV – Leave of Absence PC – Personal Change PR – Promotion DM – Demotion
To process employee changes, complete these steps:
1. From the Manager menu, click Employee Changes to display the Employee Changes-Employee List Options page.
2. Use Filter to limit the list to employee whose name contains the selected text. The time to generate your employee list is dependent on the number of employees. Use Filter to reduce the time required to generate the list.
3. Select from the available options to specify how to retrieve a list of employees who are your direct or indirect reports.
4. Select from the available values to specify the depth of the reporting level for the employees. To select direct reports only, select level 1.
5. Click Continue to display the Employee Changes-Employee Selection page.
7 Revised 8/7/07 dm
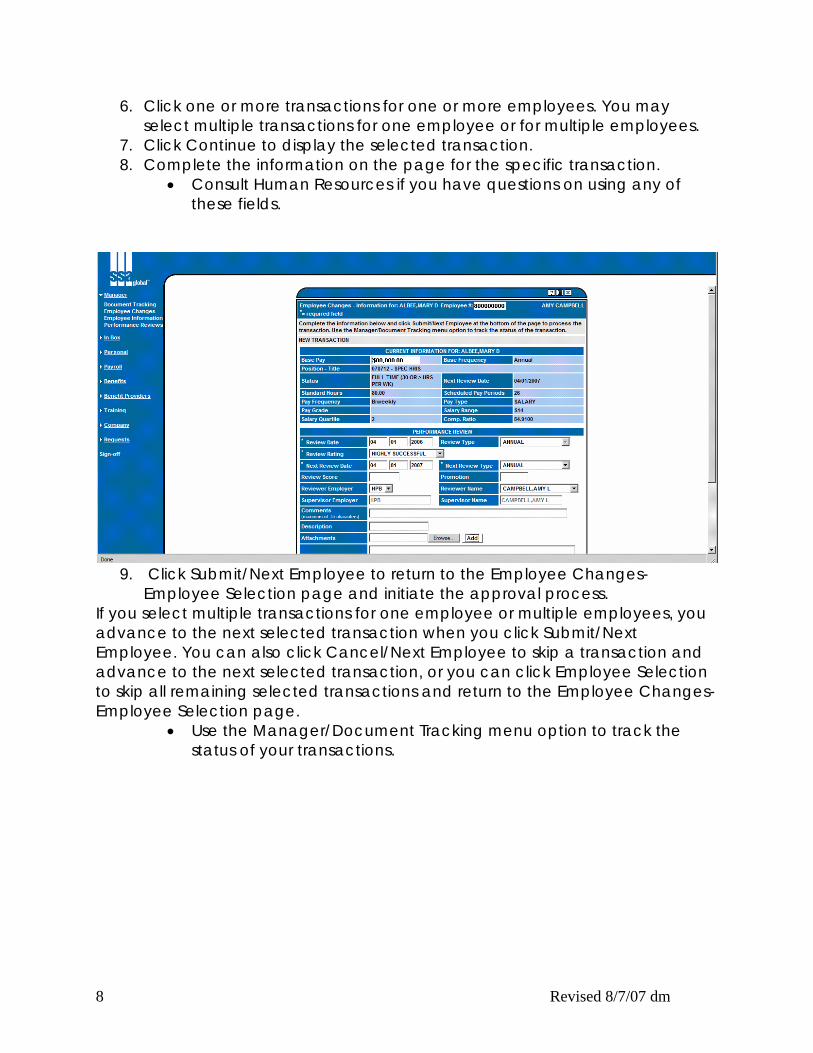
6. Click one or more transactions for one or more employees. You may select multiple transactions for one employee or for multiple employees.
7. Click Continue to display the selected transaction. 8. Complete the information on the page for the specific transaction.
• Consult Human Resources if you have questions on using any of these fields.
9. Click Submit/Next Employee to return to the Employee Changes-
Employee Selection page and initiate the approval process. If you select multiple transactions for one employee or multiple employees, you advance to the next selected transaction when you click Submit/Next Employee. You can also click Cancel/Next Employee to skip a transaction and advance to the next selected transaction, or you can click Employee Selection to skip all remaining selected transactions and return to the Employee Changes-Employee Selection page.
• Use the Manager/Document Tracking menu option to track the status of your transactions.
8 Revised 8/7/07 dm
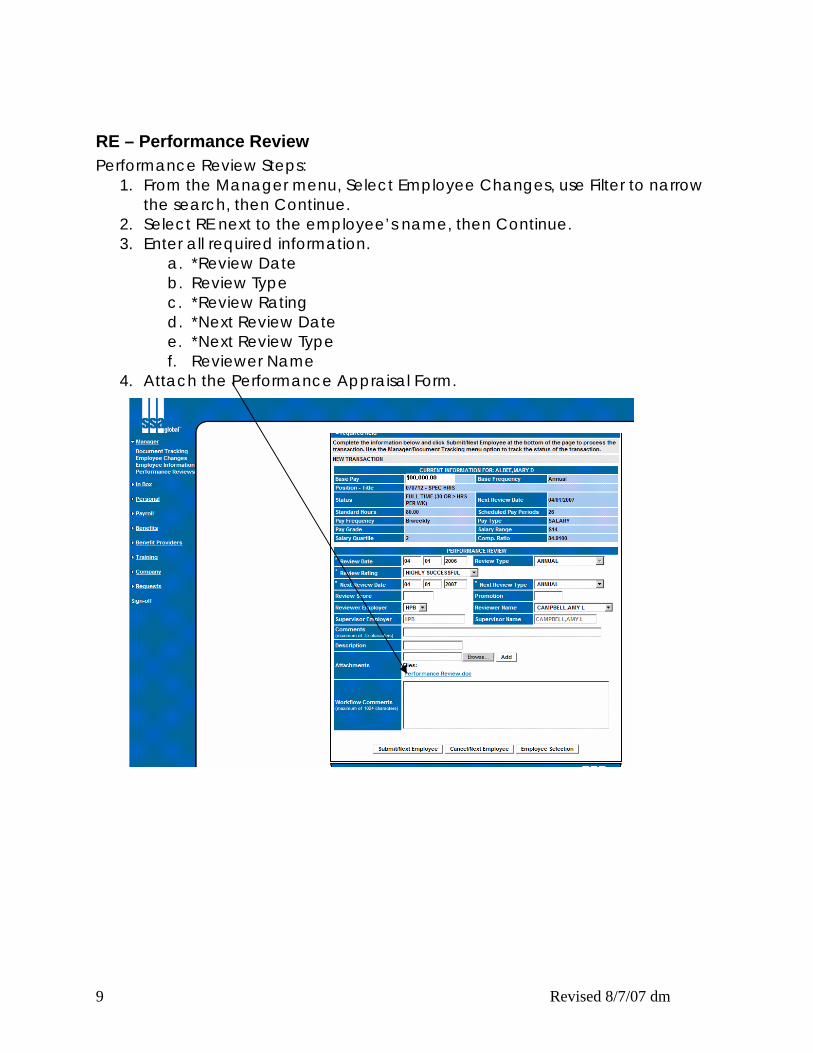
RE – Performance Review Performance Review Steps:
1. From the Manager menu, Select Employee Changes, use Filter to narrow the search, then Continue.
2. Select RE next to the employee’s name, then Continue. 3. Enter all required information.
a. *Review Date b. Review Type c. *Review Rating d. *Next Review Date e. *Next Review Type f. Reviewer Name
4. Attach the Performance Appraisal Form.
9 Revised 8/7/07 dm
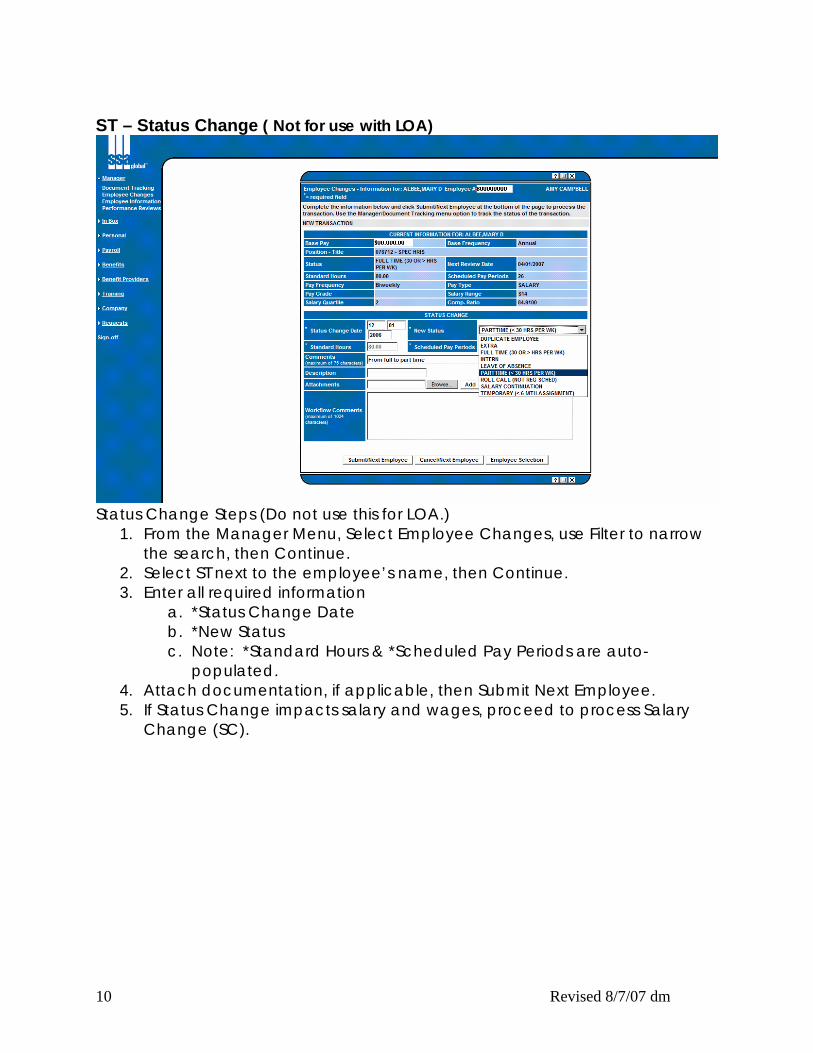
ST – Status Change ( Not for use with LOA)
Status Change Steps (Do not use this for LOA.)
1. From the Manager Menu, Select Employee Changes, use Filter to narrow the search, then Continue.
2. Select ST next to the employee’s name, then Continue. 3. Enter all required information
a. *Status Change Date b. *New Status c. Note: *Standard Hours & *Scheduled Pay Periods are auto-
populated. 4. Attach documentation, if applicable, then Submit Next Employee. 5. If Status Change impacts salary and wages, proceed to process Salary
Change (SC).
10 Revised 8/7/07 dm
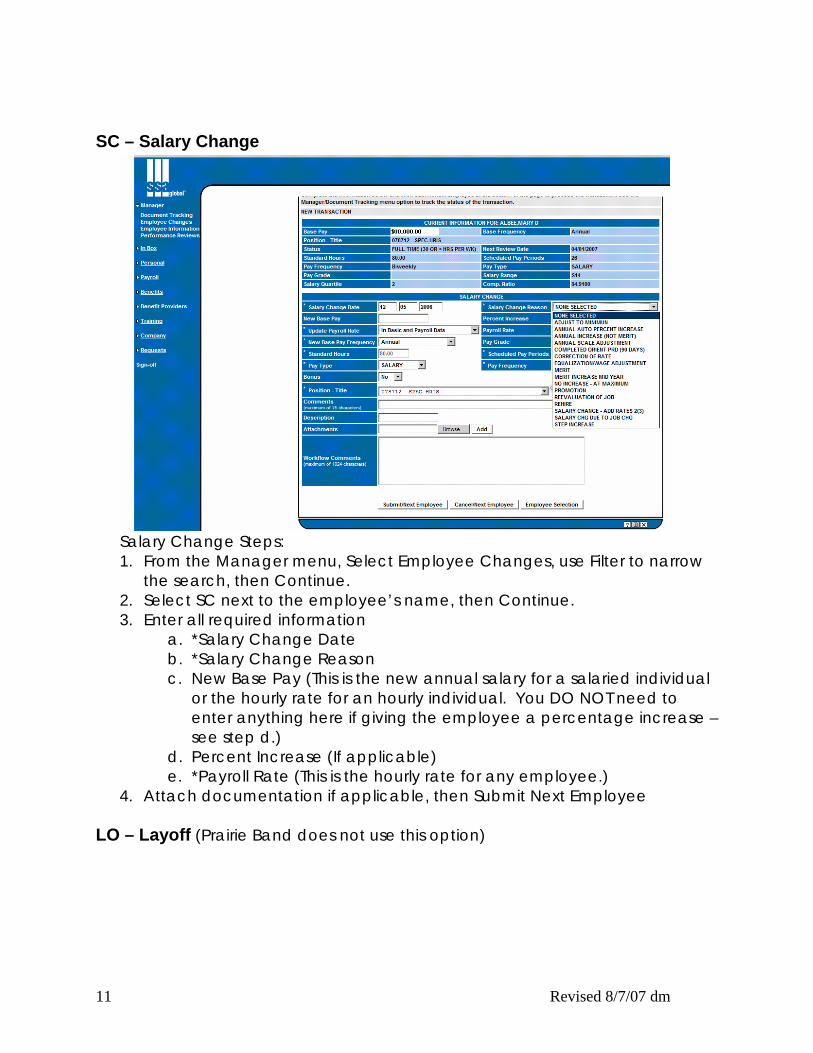
SC – Salary Change
Salary Change Steps: 1. From the Manager menu, Select Employee Changes, use Filter to narrow
the search, then Continue. 2. Select SC next to the employee’s name, then Continue. 3. Enter all required information
a. *Salary Change Date b. *Salary Change Reason c. New Base Pay (This is the new annual salary for a salaried individual
or the hourly rate for an hourly individual. You DO NOT need to enter anything here if giving the employee a percentage increase – see step d.)
d. Percent Increase (If applicable) e. *Payroll Rate (This is the hourly rate for any employee.)
4. Attach documentation if applicable, then Submit Next Employee LO – Layoff (Prairie Band does not use this option)
11 Revised 8/7/07 dm
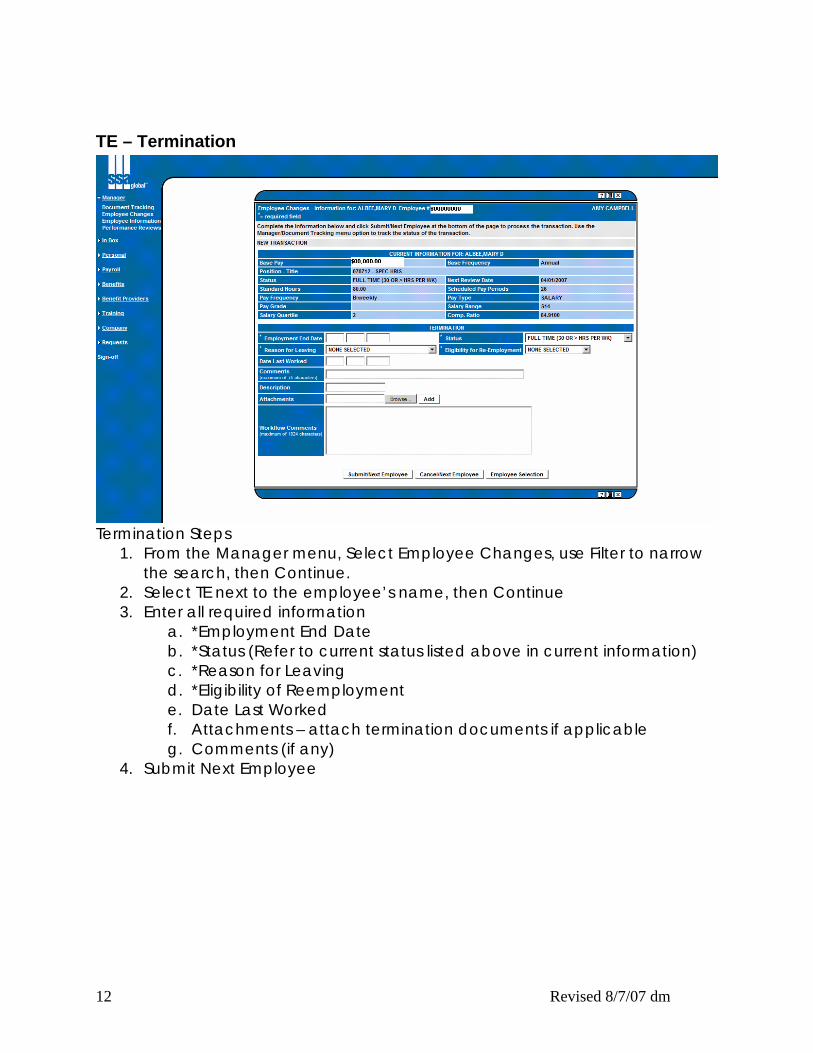
TE – Termination
Termination Steps
1. From the Manager menu, Select Employee Changes, use Filter to narrow the search, then Continue.
2. Select TE next to the employee’s name, then Continue 3. Enter all required information
a. *Employment End Date b. *Status (Refer to current status listed above in current information) c. *Reason for Leaving d. *Eligibility of Reemployment e. Date Last Worked f. Attachments – attach termination documents if applicable g. Comments (if any)
4. Submit Next Employee
12 Revised 8/7/07 dm
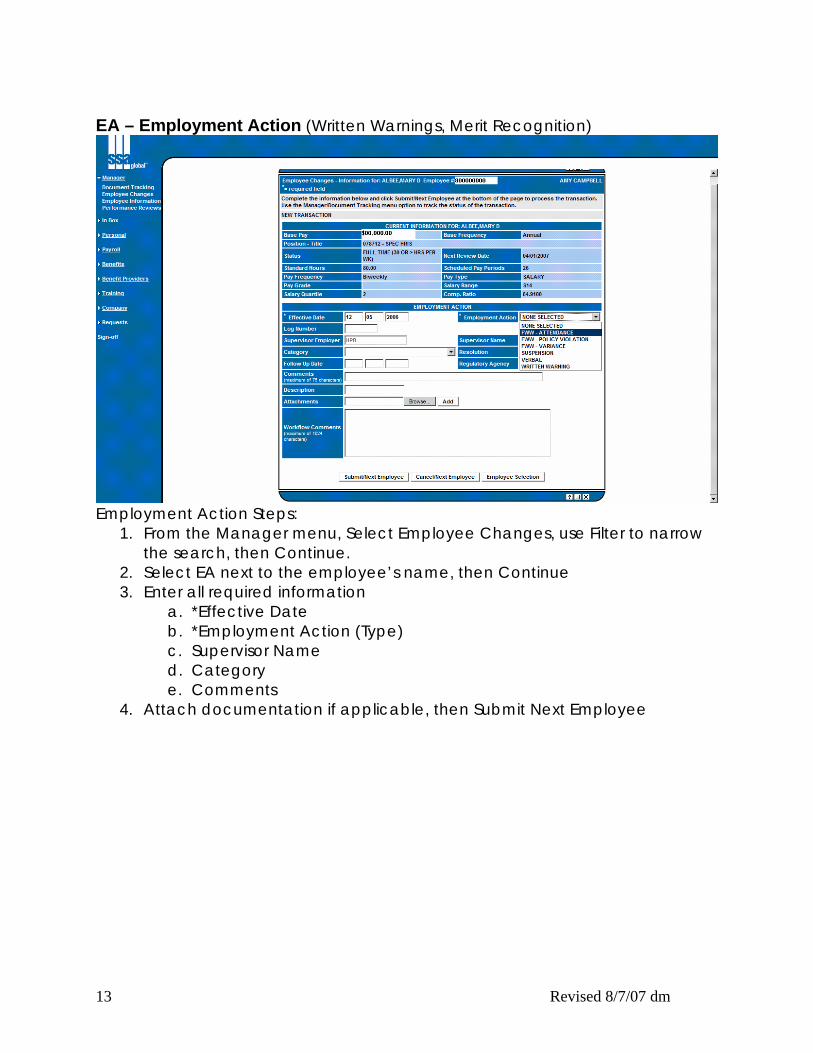
EA – Employment Action (Written Warnings, Merit Recognition)
Employment Action Steps:
1. From the Manager menu, Select Employee Changes, use Filter to narrow the search, then Continue.
2. Select EA next to the employee’s name, then Continue 3. Enter all required information
a. *Effective Date b. *Employment Action (Type) c. Supervisor Name d. Category e. Comments
4. Attach documentation if applicable, then Submit Next Employee
13 Revised 8/7/07 dm
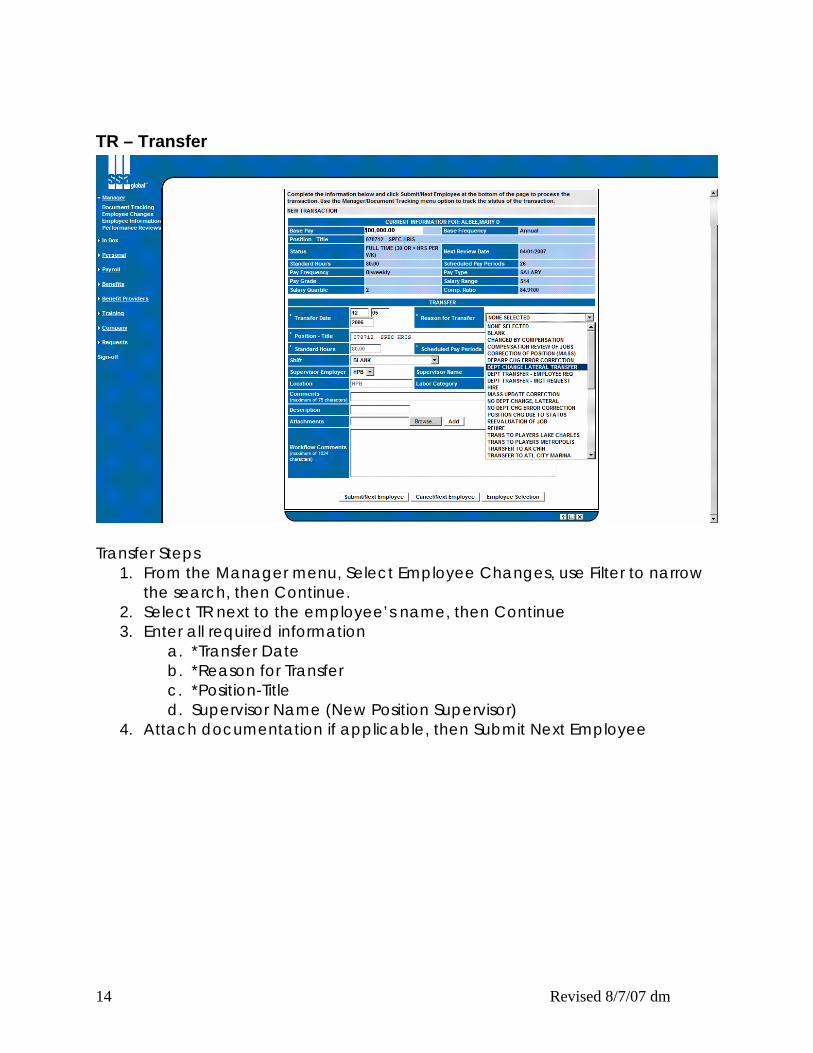
TR – Transfer
Transfer Steps
1. From the Manager menu, Select Employee Changes, use Filter to narrow the search, then Continue.
2. Select TR next to the employee’s name, then Continue 3. Enter all required information
a. *Transfer Date b. *Reason for Transfer c. *Position-Title d. Supervisor Name (New Position Supervisor)
4. Attach documentation if applicable, then Submit Next Employee
14 Revised 8/7/07 dm
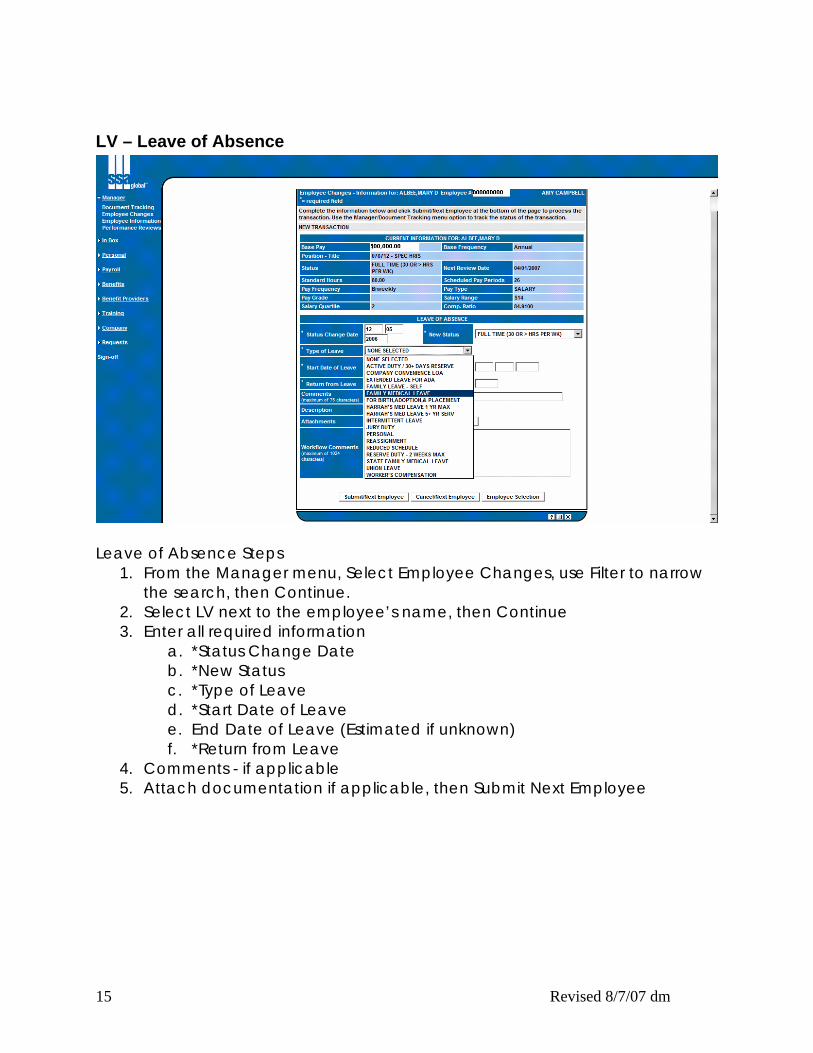
LV – Leave of Absence
Leave of Absence Steps
1. From the Manager menu, Select Employee Changes, use Filter to narrow the search, then Continue.
2. Select LV next to the employee’s name, then Continue 3. Enter all required information
a. *Status Change Date b. *New Status c. *Type of Leave d. *Start Date of Leave e. End Date of Leave (Estimated if unknown) f. *Return from Leave
4. Comments - if applicable 5. Attach documentation if applicable, then Submit Next Employee
15 Revised 8/7/07 dm
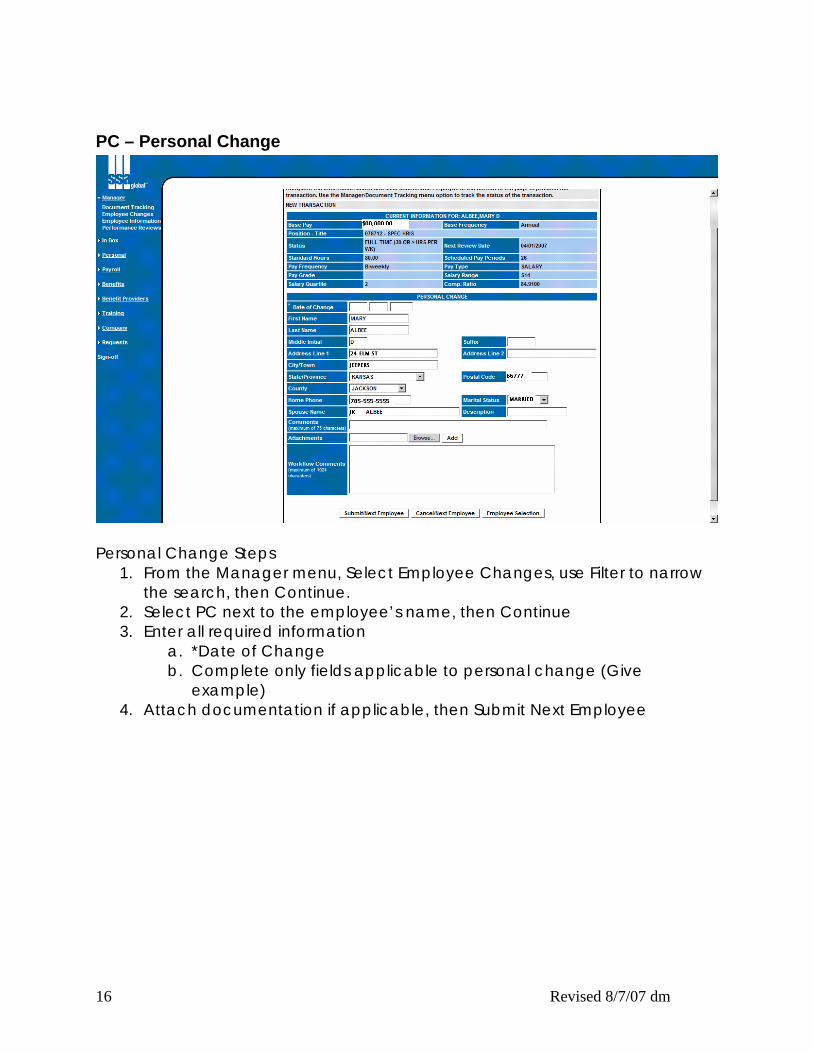
PC – Personal Change
Personal Change Steps
1. From the Manager menu, Select Employee Changes, use Filter to narrow the search, then Continue.
2. Select PC next to the employee’s name, then Continue 3. Enter all required information
a. *Date of Change b. Complete only fields applicable to personal change (Give
example) 4. Attach documentation if applicable, then Submit Next Employee
16 Revised 8/7/07 dm
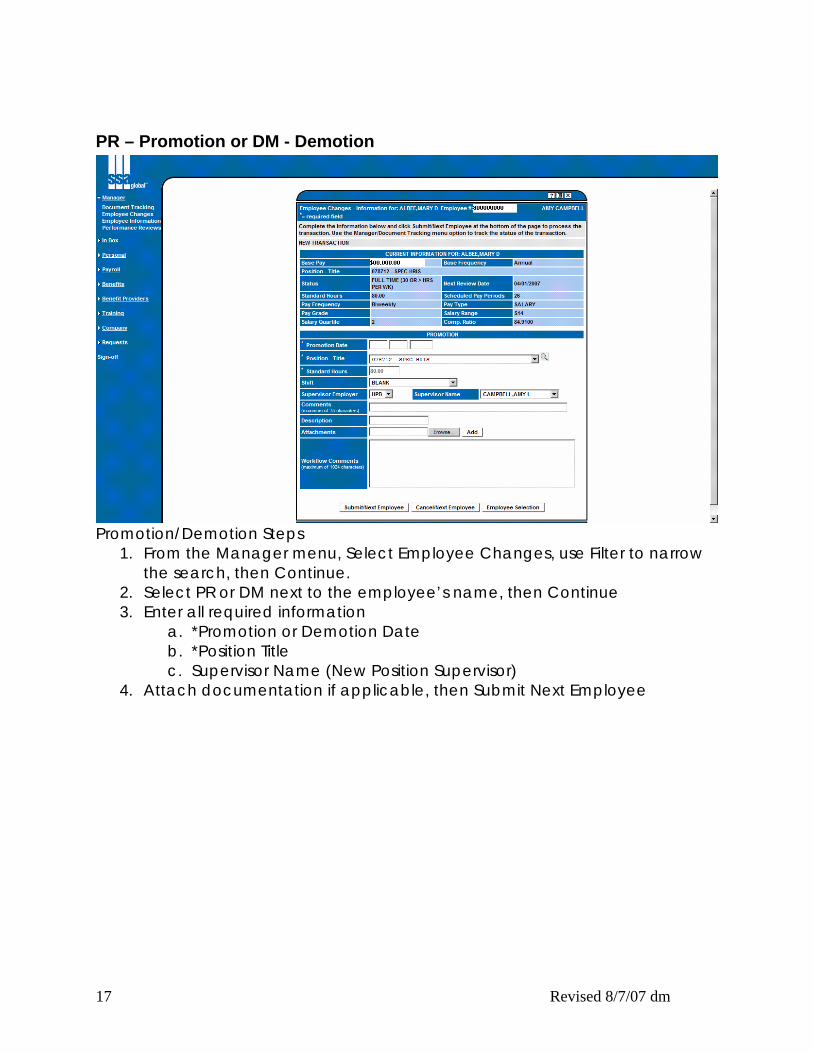
PR – Promotion or DM - Demotion
Promotion/Demotion Steps
1. From the Manager menu, Select Employee Changes, use Filter to narrow the search, then Continue.
2. Select PR or DM next to the employee’s name, then Continue 3. Enter all required information
a. *Promotion or Demotion Date b. *Position Title c. Supervisor Name (New Position Supervisor)
4. Attach documentation if applicable, then Submit Next Employee
17 Revised 8/7/07 dm
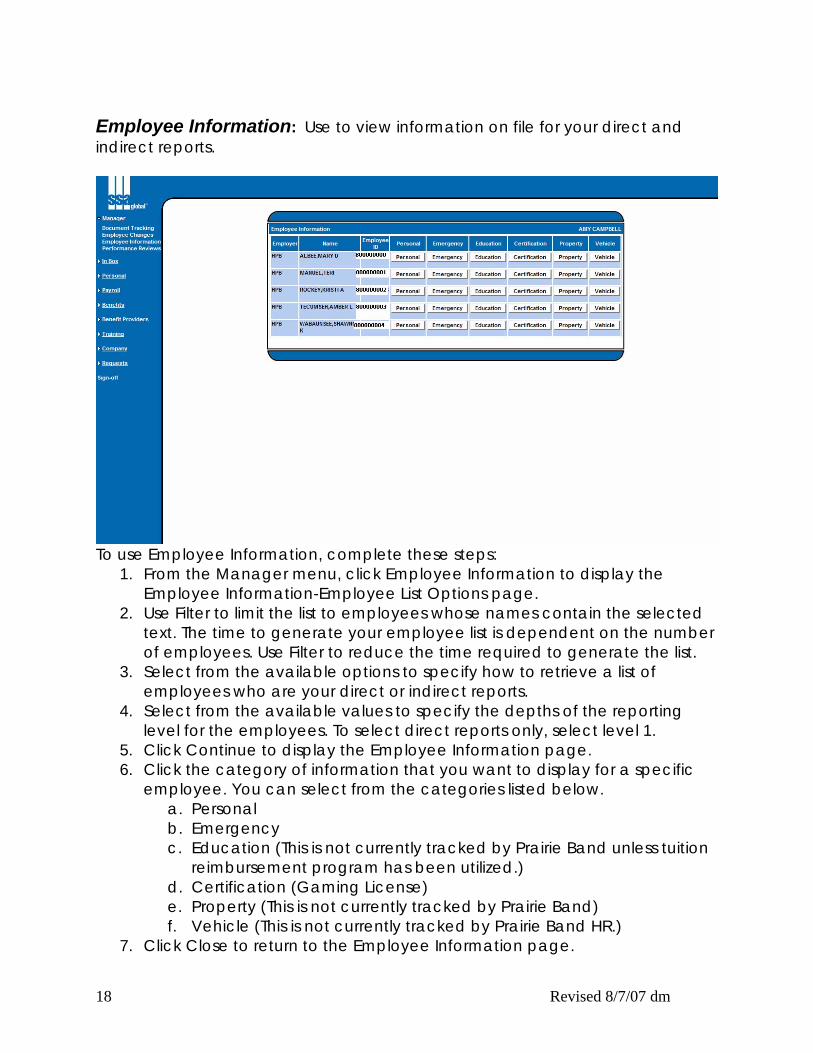
Employee Information: Use to view information on file for your direct and indirect reports.
To use Employee Information, complete these steps:
1. From the Manager menu, click Employee Information to display the Employee Information-Employee List Options page.
2. Use Filter to limit the list to employees whose names contain the selected text. The time to generate your employee list is dependent on the number of employees. Use Filter to reduce the time required to generate the list.
3. Select from the available options to specify how to retrieve a list of employees who are your direct or indirect reports.
4. Select from the available values to specify the depths of the reporting level for the employees. To select direct reports only, select level 1.
5. Click Continue to display the Employee Information page. 6. Click the category of information that you want to display for a specific
employee. You can select from the categories listed below. a. Personal b. Emergency c. Education (This is not currently tracked by Prairie Band unless tuition
reimbursement program has been utilized.) d. Certification (Gaming License) e. Property (This is not currently tracked by Prairie Band) f. Vehicle (This is not currently tracked by Prairie Band HR.)
7. Click Close to return to the Employee Information page.
18 Revised 8/7/07 dm
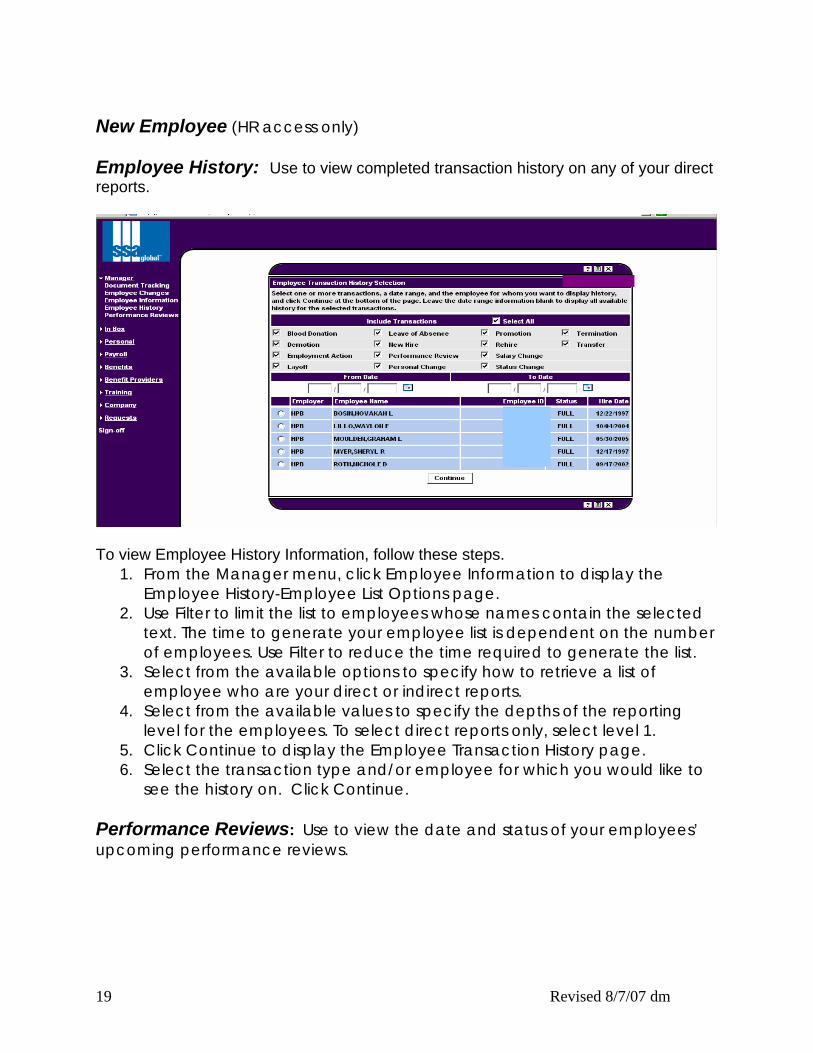
New Employee (HR access only) Employee History: Use to view completed transaction history on any of your direct reports.
To view Employee History Information, follow these steps.
1. From the Manager menu, click Employee Information to display the Employee History-Employee List Options page.
2. Use Filter to limit the list to employees whose names contain the selected text. The time to generate your employee list is dependent on the number of employees. Use Filter to reduce the time required to generate the list.
3. Select from the available options to specify how to retrieve a list of employee who are your direct or indirect reports.
4. Select from the available values to specify the depths of the reporting level for the employees. To select direct reports only, select level 1.
5. Click Continue to display the Employee Transaction History page. 6. Select the transaction type and/or employee for which you would like to
see the history on. Click Continue. Performance Reviews: Use to view the date and status of your employees’ upcoming performance reviews.
19 Revised 8/7/07 dm
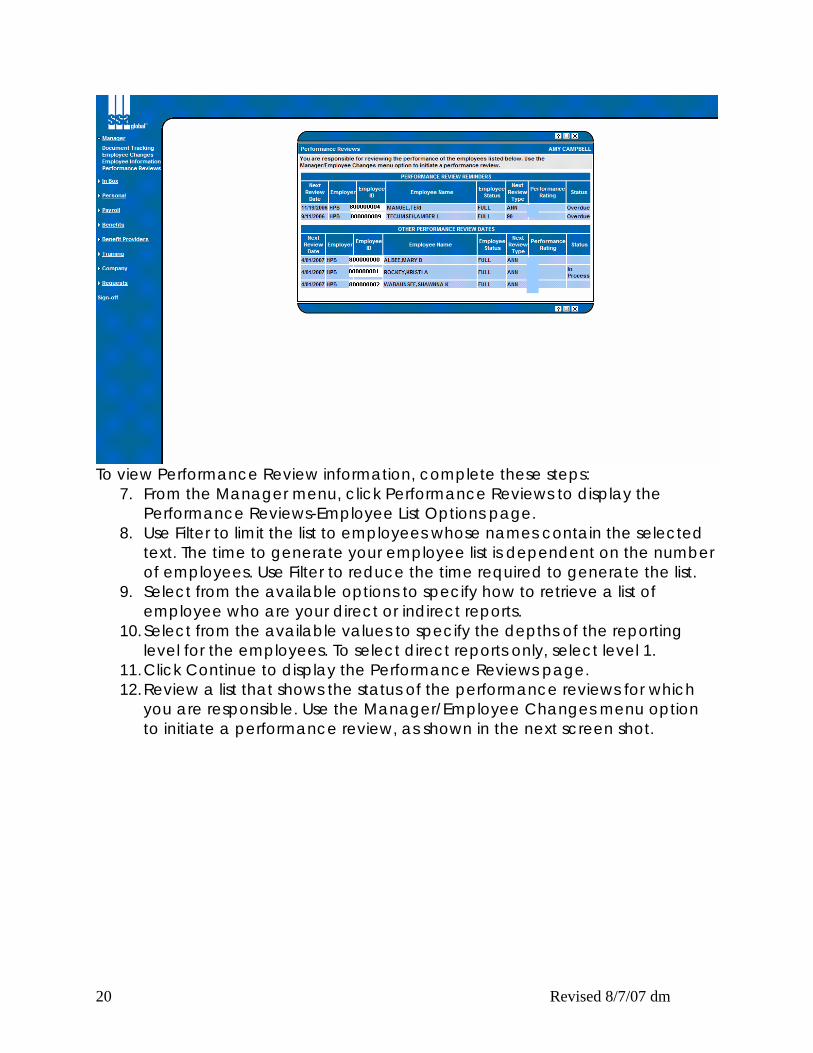
To view Performance Review information, complete these steps:
7. From the Manager menu, click Performance Reviews to display the Performance Reviews-Employee List Options page.
8. Use Filter to limit the list to employees whose names contain the selected text. The time to generate your employee list is dependent on the number of employees. Use Filter to reduce the time required to generate the list.
9. Select from the available options to specify how to retrieve a list of employee who are your direct or indirect reports.
10. Select from the available values to specify the depths of the reporting level for the employees. To select direct reports only, select level 1.
11. Click Continue to display the Performance Reviews page. 12. Review a list that shows the status of the performance reviews for which
you are responsible. Use the Manager/Employee Changes menu option to initiate a performance review, as shown in the next screen shot.
20 Revised 8/7/07 dm

Rehire Employee (HR access only)
21 Revised 8/7/07 dm
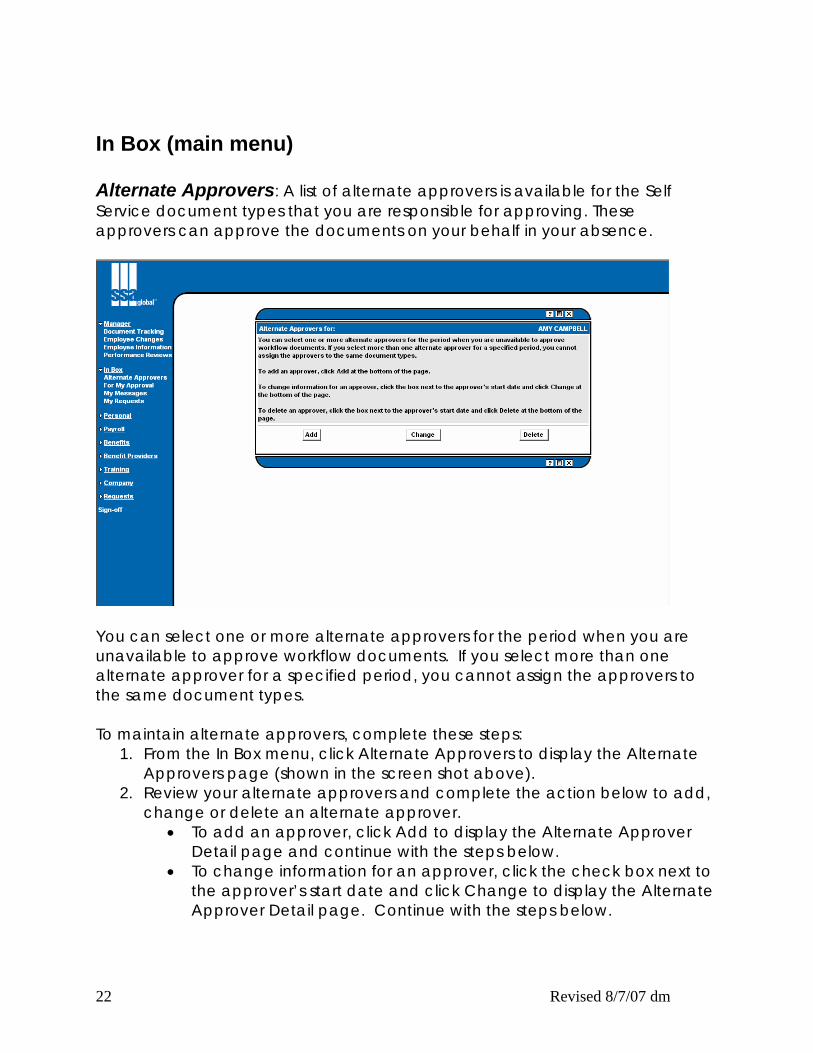
In Box (main menu) Alternate Approvers: A list of alternate approvers is available for the Self Service document types that you are responsible for approving. These approvers can approve the documents on your behalf in your absence.
You can select one or more alternate approvers for the period when you are unavailable to approve workflow documents. If you select more than one alternate approver for a specified period, you cannot assign the approvers to the same document types. To maintain alternate approvers, complete these steps:
1. From the In Box menu, click Alternate Approvers to display the Alternate Approvers page (shown in the screen shot above).
2. Review your alternate approvers and complete the action below to add, change or delete an alternate approver.
• To add an approver, click Add to display the Alternate Approver Detail page and continue with the steps below.
• To change information for an approver, click the check box next to the approver’s start date and click Change to display the Alternate Approver Detail page. Continue with the steps below.
22 Revised 8/7/07 dm
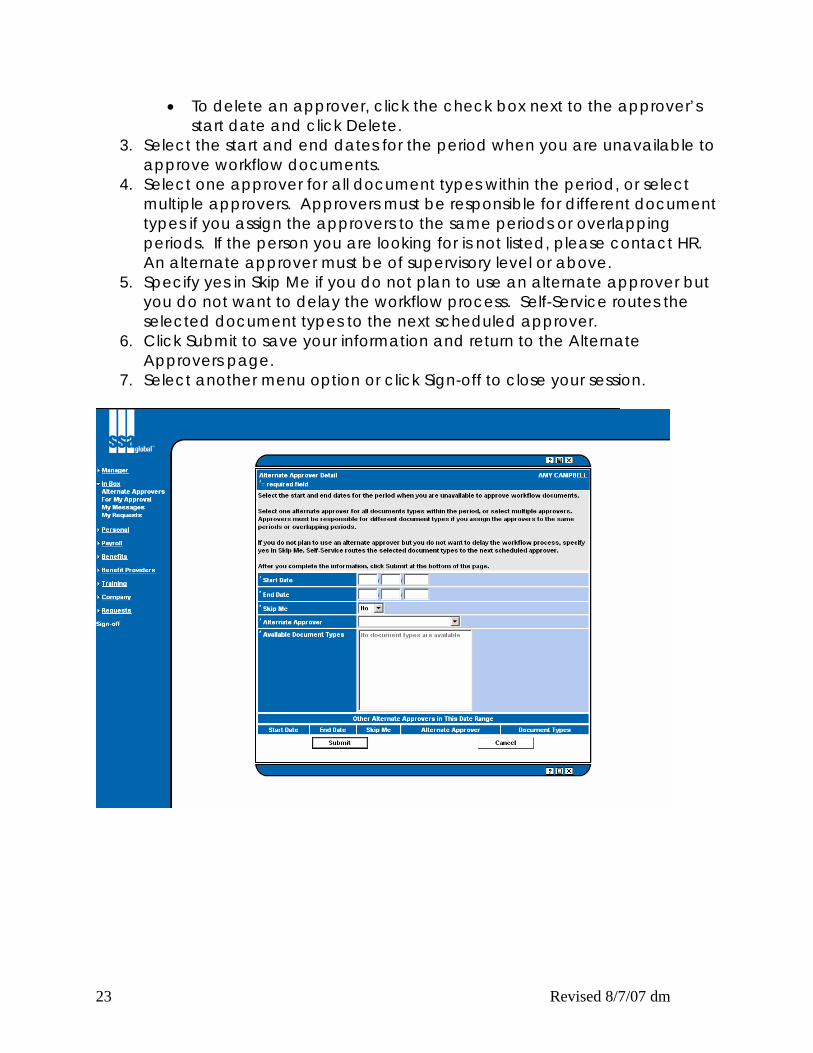
• To delete an approver, click the check box next to the approver’s start date and click Delete.
3. Select the start and end dates for the period when you are unavailable to approve workflow documents.
4. Select one approver for all document types within the period, or select multiple approvers. Approvers must be responsible for different document types if you assign the approvers to the same periods or overlapping periods. If the person you are looking for is not listed, please contact HR. An alternate approver must be of supervisory level or above.
5. Specify yes in Skip Me if you do not plan to use an alternate approver but you do not want to delay the workflow process. Self-Service routes the selected document types to the next scheduled approver.
6. Click Submit to save your information and return to the Alternate Approvers page.
7. Select another menu option or click Sign-off to close your session.
23 Revised 8/7/07 dm
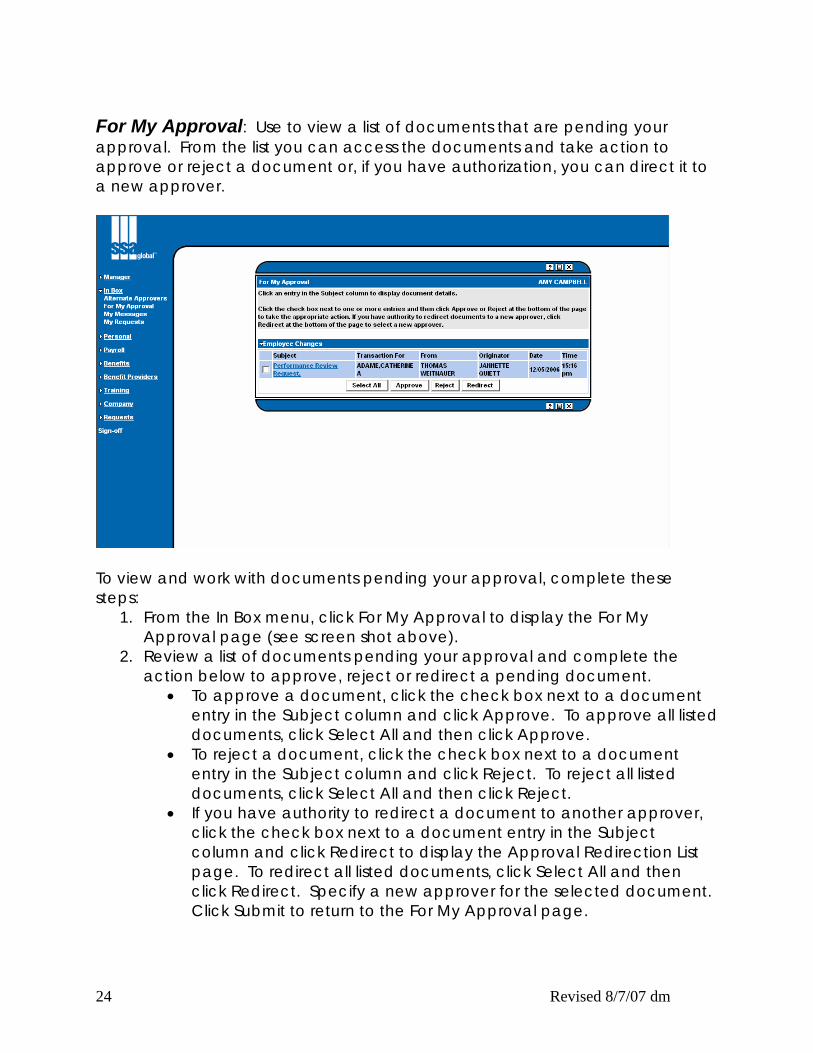
For My Approval: Use to view a list of documents that are pending your approval. From the list you can access the documents and take action to approve or reject a document or, if you have authorization, you can direct it to a new approver.
To view and work with documents pending your approval, complete these steps:
1. From the In Box menu, click For My Approval to display the For My Approval page (see screen shot above).
2. Review a list of documents pending your approval and complete the action below to approve, reject or redirect a pending document.
• To approve a document, click the check box next to a document entry in the Subject column and click Approve. To approve all listed documents, click Select All and then click Approve.
• To reject a document, click the check box next to a document entry in the Subject column and click Reject. To reject all listed documents, click Select All and then click Reject.
• If you have authority to redirect a document to another approver, click the check box next to a document entry in the Subject column and click Redirect to display the Approval Redirection List page. To redirect all listed documents, click Select All and then click Redirect. Specify a new approver for the selected document. Click Submit to return to the For My Approval page.
24 Revised 8/7/07 dm
You can also click an entry in the Subject column on the For My Approvals page to view the document details. From the detailed view, you can approve or reject the document or, if you have authorization, redirect the document to a new approver.
3. Select another menu option or click Sign-off to close your session.
25 Revised 8/7/07 dm
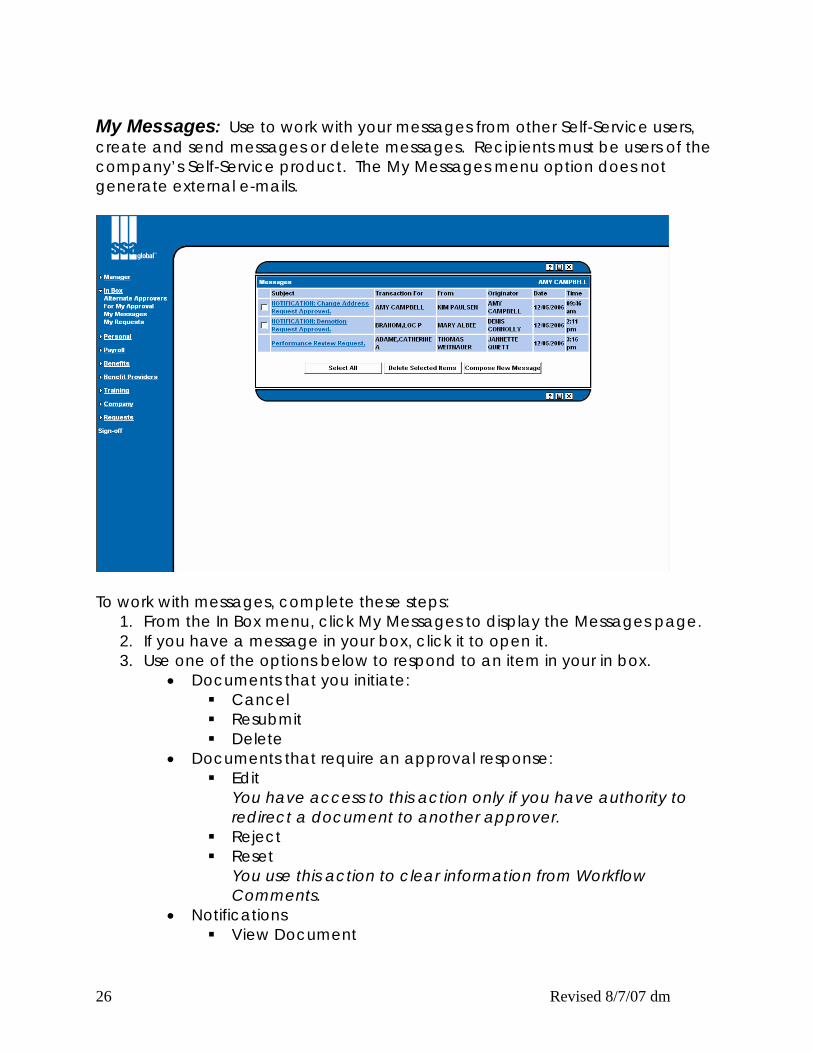
My Messages: Use to work with your messages from other Self-Service users, create and send messages or delete messages. Recipients must be users of the company’s Self-Service product. The My Messages menu option does not generate external e-mails.
To work with messages, complete these steps: 1. From the In Box menu, click My Messages to display the Messages page. 2. If you have a message in your box, click it to open it. 3. Use one of the options below to respond to an item in your in box.
• Documents that you initiate: Cancel Resubmit Delete
• Documents that require an approval response: Edit
You have access to this action only if you have authority to redirect a document to another approver.
Reject Reset
You use this action to clear information from Workflow Comments.
• Notifications View Document
26 Revised 8/7/07 dm
4. To create a message, click Compose New Message on the Messages page, complete the information on the Message Composer page and click Send.
5. To delete a message, click the check box next to the message you want to delete from the Messages page. Click Delete Selected Items. You can delete only those notifications and messages created with Compose New Message. You cannot delete messages that require your approval or rejection.
6. Select another menu option or click Sign-off to close your session.
27 Revised 8/7/07 dm
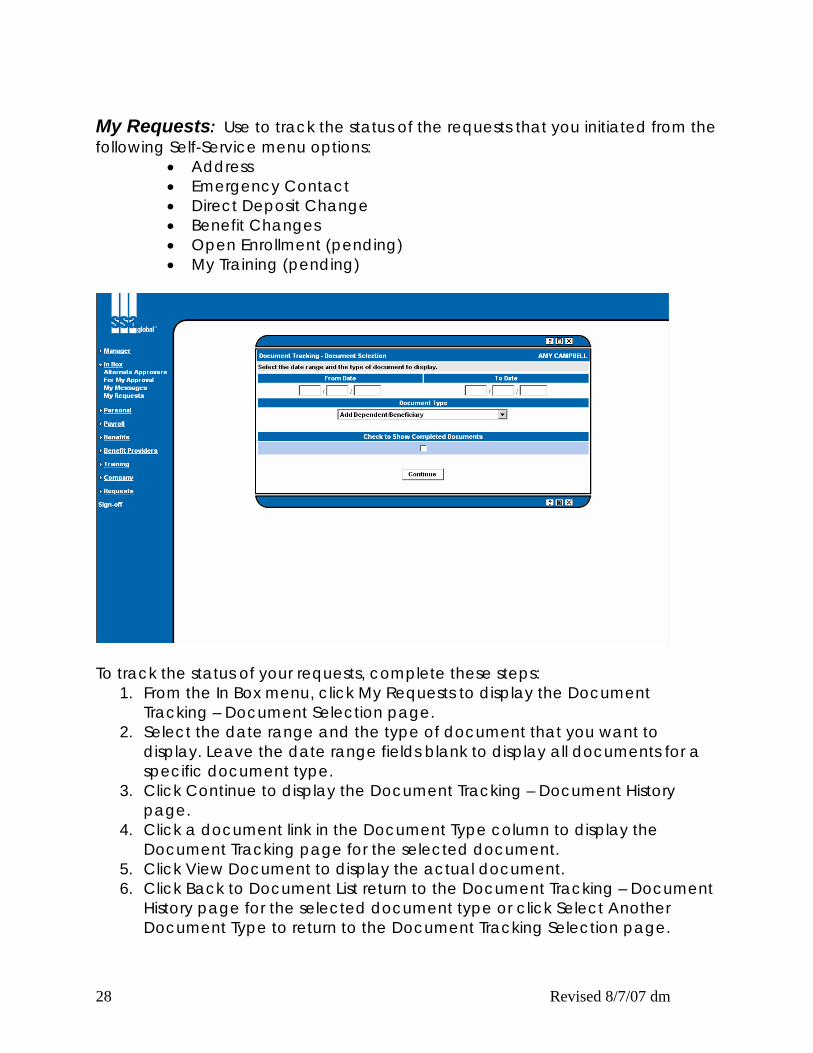
My Requests: Use to track the status of the requests that you initiated from the following Self-Service menu options:
• Address • Emergency Contact • Direct Deposit Change • Benefit Changes • Open Enrollment (pending) • My Training (pending)
To track the status of your requests, complete these steps:
1. From the In Box menu, click My Requests to display the Document Tracking – Document Selection page.
2. Select the date range and the type of document that you want to display. Leave the date range fields blank to display all documents for a specific document type.
3. Click Continue to display the Document Tracking – Document History page.
4. Click a document link in the Document Type column to display the Document Tracking page for the selected document.
5. Click View Document to display the actual document. 6. Click Back to Document List return to the Document Tracking – Document
History page for the selected document type or click Select Another Document Type to return to the Document Tracking Selection page.
28 Revised 8/7/07 dm
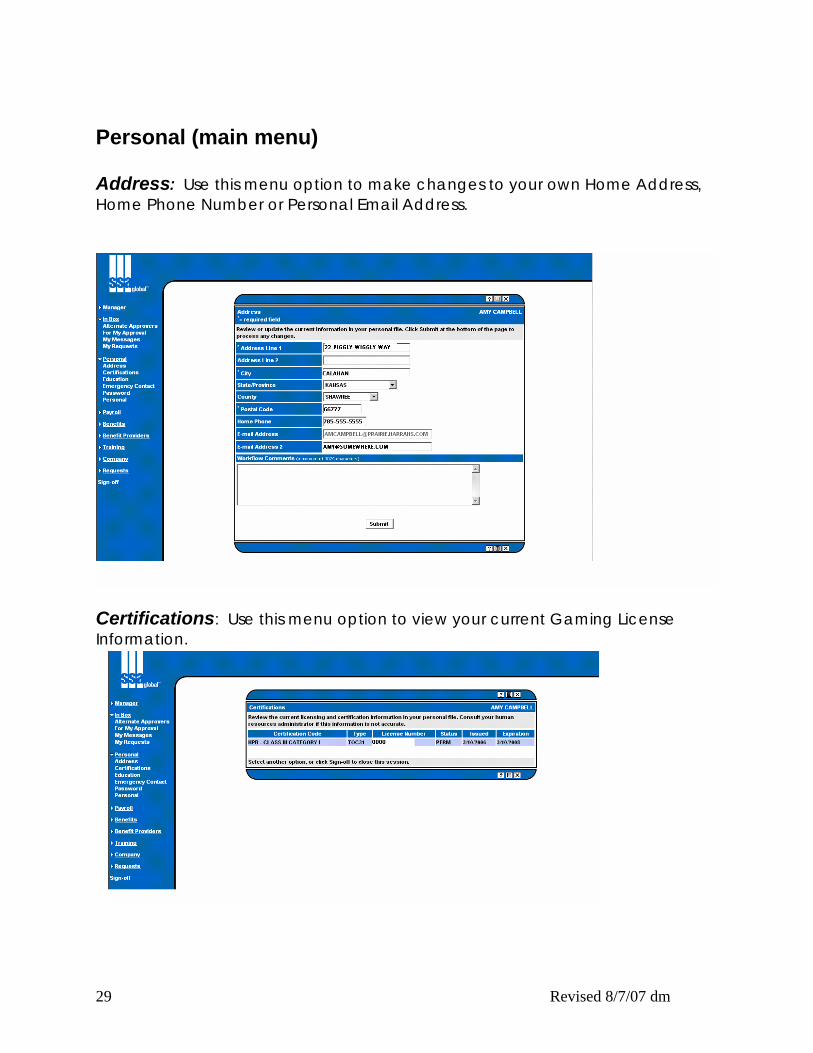
Personal (main menu) Address: Use this menu option to make changes to your own Home Address, Home Phone Number or Personal Email Address.
Certifications: Use this menu option to view your current Gaming License Information.
29 Revised 8/7/07 dm
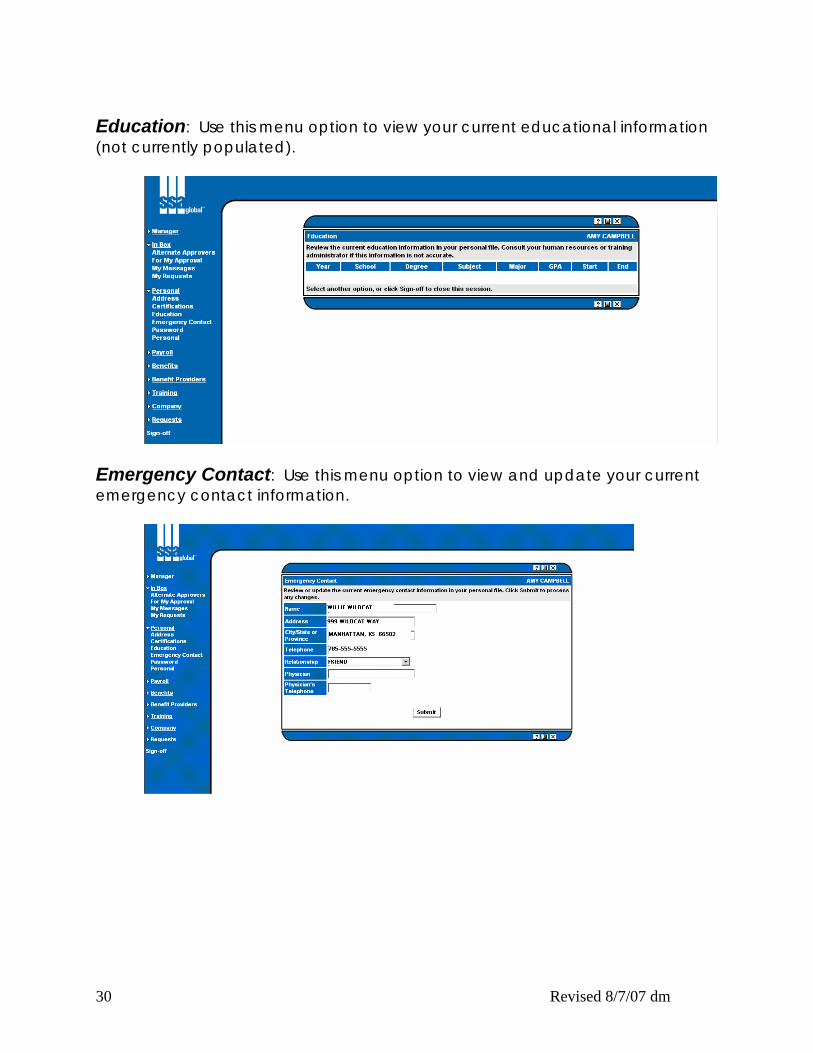
Education: Use this menu option to view your current educational information (not currently populated).
Emergency Contact: Use this menu option to view and update your current emergency contact information.
30 Revised 8/7/07 dm
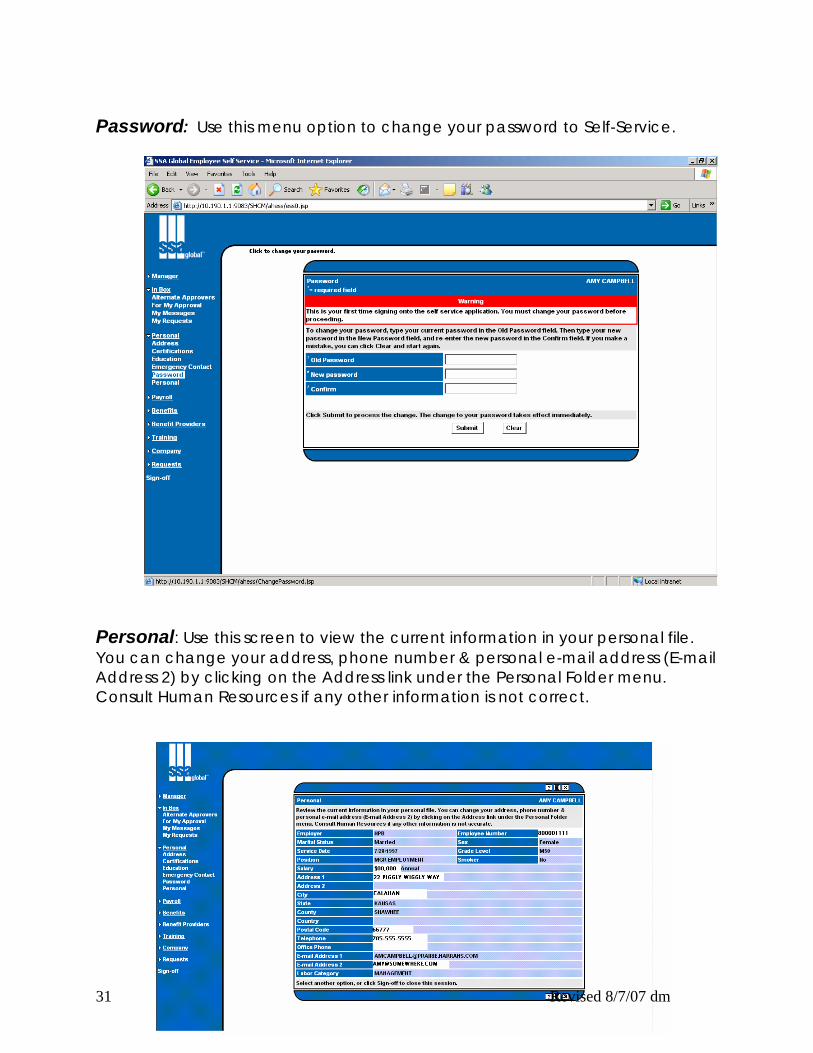
Password: Use this menu option to change your password to Self-Service.
Personal: Use this screen to view the current information in your personal file. You can change your address, phone number & personal e-mail address (E-mail Address 2) by clicking on the Address link under the Personal Folder menu. Consult Human Resources if any other information is not correct.
31 Revised 8/7/07 dm
Payroll (main menu)
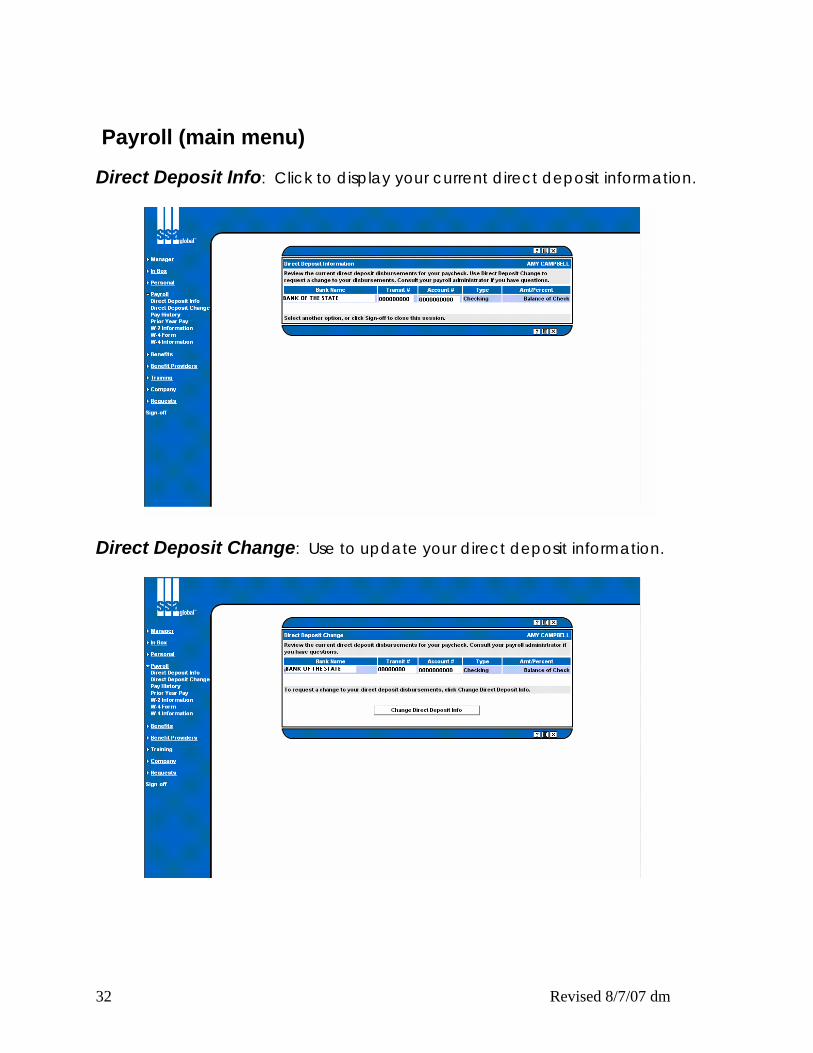
Direct Deposit Info: Click to display your current direct deposit information.
Direct Deposit Change: Use to update your direct deposit information.
32 Revised 8/7/07 dm
Pay History: Use this option to review specific pay history by check.
Prior Year Pay: Use this option to view detailed pay information by year.
W-2 Information: Use this option to view information on specific W-2s.
W-4 Form: Use this option to print a clean, new W-4 Form. Turn in any changes to Human Resources. W-4 Information: Use this option to view your current W-4 tax information.
Benefits (main menu) My Benefits Benefit Change Request EAP Life Insurance SPD Provider Directories Education Reimbursement (Pending) Forms
Benefit Providers (main menu) Medical Dental Vision PT Benefits Info PT Benefits Coverage AFLAC LTD STD Life Insurance 401 K Flexible Spending
Training (main menu) My Training (pending)
33 Revised 8/7/07 dm
34 Revised 8/7/07 dm
Company (main menu) Employee Handbook (Pending) Recruitment
Requests (main menu) IT Requests