Embed Size (px)
Citation preview
KUNTZE.COMCLEAR. CONTROL. CONNECT.
PM 6 - Measuring instrumentpH/ORP/temperature


page 2 of 10
Safety Requirements:
This device has been designed and tested in accordance with the safety regulations for electronic devices.However, its trouble-free operation and reliability cannot be guaranteed unless the standard safety measures and specialsafety advises given in this manual will be adhered to when using the device.1. Trouble-free operation and reliability of the device can only be guaranteed if the device is not subjected to any other climatic
conditions than those stated under "Specification".2. If the device is transported from a cold to a warm environment condensation may cause in a failure of the function. In such a
case make sure the device temperature has adjusted to the ambient temperature before trying a new start-up.3. If device is to be connected to other devices (e.g. via serial interface) the circuitry has to be designed most carefully. Internal
connection in third party devices (e.g. connection GND and earth) may result in not-permissible voltages impairing or destroyingthe device or another device connected.Warning: If device is operated with a defective mains power supply (short circuit from mains voltage to output voltage) this mayresult in hazardous voltages at the device (e.g. sensor socket, serial interface).
4. If there is a risk whatsoever involved in running it, the device has to be switched off immediately and to be marked accordingly toavoid re-starting.Operator safety may be a risk if:- there is visible damage to the device- the device is not working as specified- the device has been stored under unsuitable conditions for a longer time.
In case of doubt, please return device to manufacturer for repair or maintenance.
Operation And Maintainance Advice:a.) When to replace battery:
If and ´bAt´ are shown in the lower display the battery has been used up and needs to be replaced. The device will, however,operate correctly for a certain time.If ´bAt´is shown in the upper display the voltage is too low to operate the device; the battery has been completely used up.Please note: We recommend to take out battery if device is not used for a longer period of time.
b) Treat device and sensor carefully. Use only in accordance with above specification. (do not throw, hit against etc.).Protect plug and socket from soiling.
c) When connecting the temperature probe the connector may not lock to the jack correctly. In such a case hold the connector not atthe case but at the buckling protection of the cable during the plug in.Don't connect electrode canted! If plug is entered correctly, it will slide in smoothly.To disconnect temperature probe do not pull at the cable but at the plugIf plug is entered incorrectly the connecting pins of the plug can be damaged. => Plug can no longer be used and connectingcable needs to be replaced.
d) Mains operation:When using a power supply device please note that operating voltage has to be 10.5 to 12 V DC.Do not apply overvoltage!! Cheap 12V-power supply devices often have excessive no-load voltage. We, therefore, recommendusing regulated voltage power supply devices. Prior to connecting the plug power supply device with the mains supply make sure that the operating voltage stated at the powersupply device is identical to the mains voltage.
e) Display values for damaged electrode cable or if no pH or redox-electrode has been connectedIf no electrode is connected or the connection cable is damaged the display will nevertheless show mV, pH or rH values. Pleasenote that these values can never be correct measuring results!
page 3 of 10
1 2 3
4 5 6
ONOFF max
Store
CAL
minSetMenu Quit
pHmV mVHrH
ATC ok CAL AL Logg pH
mbar
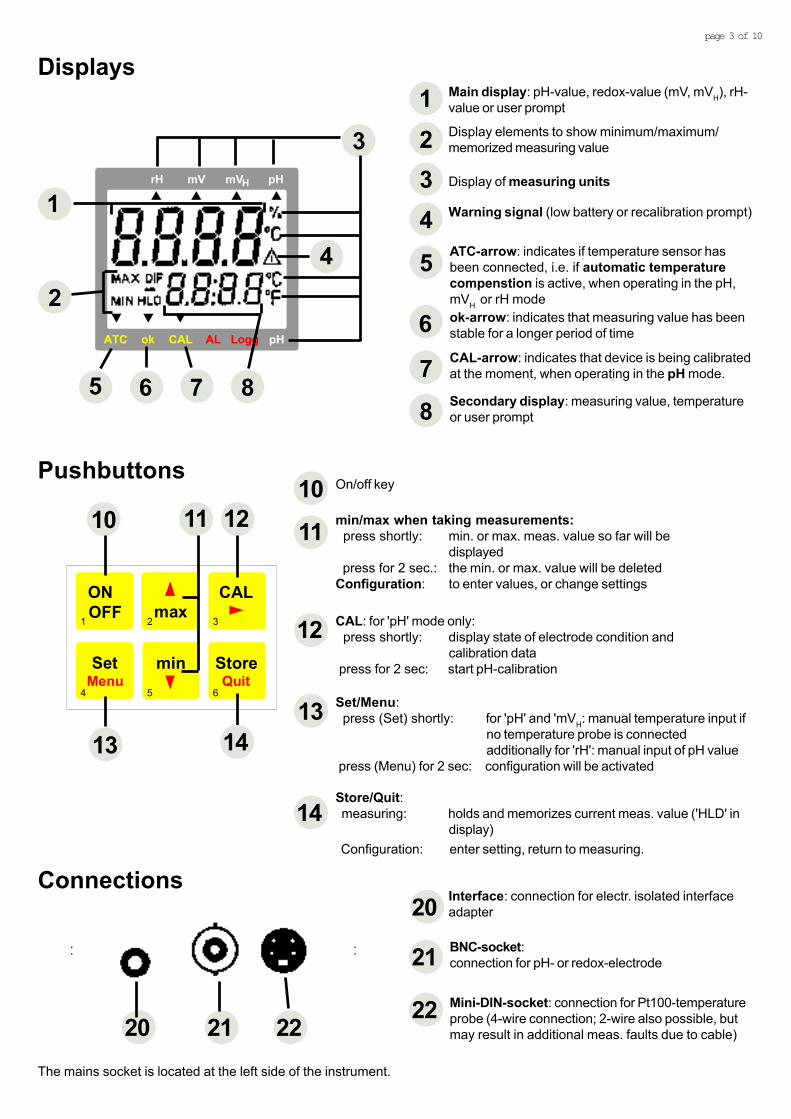
1 Main display: pH-value, redox-value (mV, mVH), rH-value or user prompt
4
3
76
1
2
2 Display elements to show minimum/maximum/memorized measuring value
Display of measuring units34 Warning signal (low battery or recalibration prompt)
ATC-arrow: indicates if temperature sensor hasbeen connected, i.e. if automatic temperaturecompenstion is active, when operating in the pH,mVH or rH mode
5
10 11 12
Pushbuttons
13 14
6 ok-arrow: indicates that measuring value has beenstable for a longer period of time
CAL-arrow: indicates that device is being calibratedat the moment, when operating in the pH mode.7
8 Secondary display: measuring value, temperatureor user prompt
8
10
11
12
On/off key
min/max when taking measurements: press shortly: min. or max. meas. value so far will be
displayed press for 2 sec.: the min. or max. value will be deletedConfiguration: to enter values, or change settings
CAL: for 'pH' mode only: press shortly: display state of electrode condition and
calibration data press for 2 sec: start pH-calibration
Store/Quit: measuring: holds and memorizes current meas. value ('HLD' in
display) Configuration: enter setting, return to measuring.
14
13
Displays
5
Set/Menu: press (Set) shortly: for 'pH' and 'mVH: manual temperature input if
no temperature probe is connectedadditionally for 'rH': manual input of pH value
press (Menu) for 2 sec: configuration will be activated
Connections
20 21 22
20
21
22
Interface: connection for electr. isolated interfaceadapter
BNC-socket:connection for pH- or redox-electrode
Mini-DIN-socket: connection for Pt100-temperatureprobe (4-wire connection; 2-wire also possible, butmay result in additional meas. faults due to cable)
The mains socket is located at the left side of the instrument.
page 4 of 10
Power.off': Selection of Power-off Delay
'Offset': Zero Displacement of Temperature
'Unit': Selection of Temperature Unit °C /°F
'CAL': Selection of Number of Calibration Points (for pH measurements only)
ConfigurationFor configuration of the device press -key for 2 seconds.Choose between the individual values that can be set by pressing the -key again. The individual values are changed bypressing the keys or .Use to leave configuration and to store settings.
2-Pt: the pH-electrode will be calibrated at 2 points (one calibration point in the neutralrange and one calibration point in the acid or basic range)
3-Pt: the pH-electrode will be calibrated at 3 points (one calibration point in the neutral, acidand basic range)
°C: All temperature values in degrees Celsius
°F: All temperature values in degrees Fahrenheit
-10.0°C...10.0°C The zero point of the temperature measurement will be displaced by this or value to compensate for deviations in the sensor and measuring device:
-18.0°F...18.0°F: temperature displayed = temperature measured - Offsetoff: Zero displacement has been deactivated (=0.0°)
1...120: Power-off delay in minutes. Device will be automatically switched off as soon asthis time has elapsed if no key is pressed/no interface communication takes place.
off: automatic power-off function deactivated (continuous operation, e.g. in case ofmains operation)
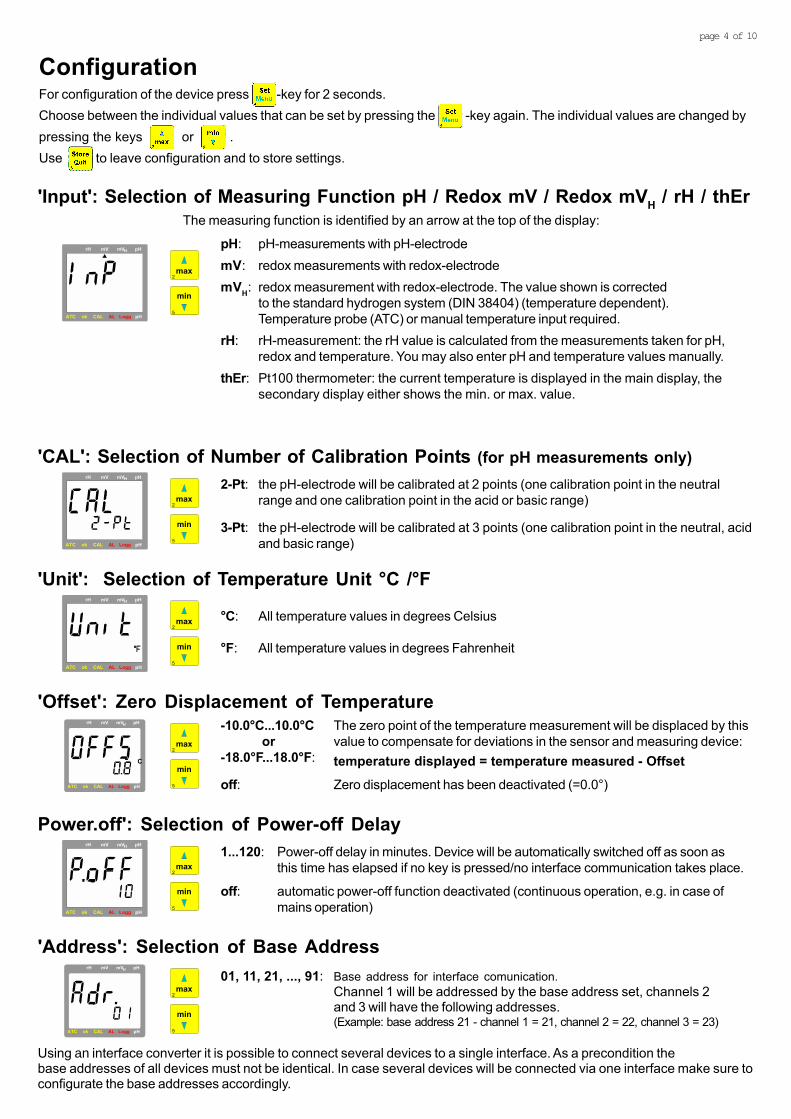
'Input': Selection of Measuring Function pH / Redox mV / Redox mVH / rH / thErThe measuring function is identified by an arrow at the top of the display:
pH: pH-measurements with pH-electrodemV: redox measurements with redox-electrodemVH: redox measurement with redox-electrode. The value shown is corrected
to the standard hydrogen system (DIN 38404) (temperature dependent).Temperature probe (ATC) or manual temperature input required.
rH: rH-measurement: the rH value is calculated from the measurements taken for pH,redox and temperature. You may also enter pH and temperature values manually.
thEr: Pt100 thermometer: the current temperature is displayed in the main display, thesecondary display either shows the min. or max. value.
pHmV mVHrH
ATC ok CAL AL Logg pH
mbar
pHmV mVHrH
ATC ok CAL AL Logg pH
mbar
�C
pHmV mVHrH
ATC ok CAL AL Logg pH
pHmV mVHrH
ATC ok CAL AL Logg pH
mbar
pHmV mVHrH
ATC ok CAL AL Logg pH
mbar
max
min
2
5
max
min
2
5
max
min
2
5
max
min
2
5
max
min
2
5
pHmV mVHrH
ATC ok CAL AL Logg pH
max
min
2
5
Using an interface converter it is possible to connect several devices to a single interface. As a precondition thebase addresses of all devices must not be identical. In case several devices will be connected via one interface make sure toconfigurate the base addresses accordingly.
'Address': Selection of Base Address01, 11, 21, ..., 91: Base address for interface comunication.
Channel 1 will be addressed by the base address set, channels 2and 3 will have the following addresses.(Example: base address 21 - channel 1 = 21, channel 2 = 22, channel 3 = 23)
page 5 of 10
Manual Setting of Temperature When Operating DeviceWithout Temperature ProbeWhen operating in either the pH, mVH or rH mode, the device requires the temperature value of the liquid to be measured.We, therefore, recommend to use with a temperature probe which will be automatically detected; the temperature measuredwill then be used to calculate the measuring values (ATC: automatic temperature compensation).
If no temperature probe is connected, temperature may be entered manually. To do so press the -key shortly.
pHmV mVHrH
ATC ok CAL AL Logg pH
mbar0..80°C: Input of liquid temperature
max
min
2
5
Use the -key to acknowledge input; device returns to measuring.
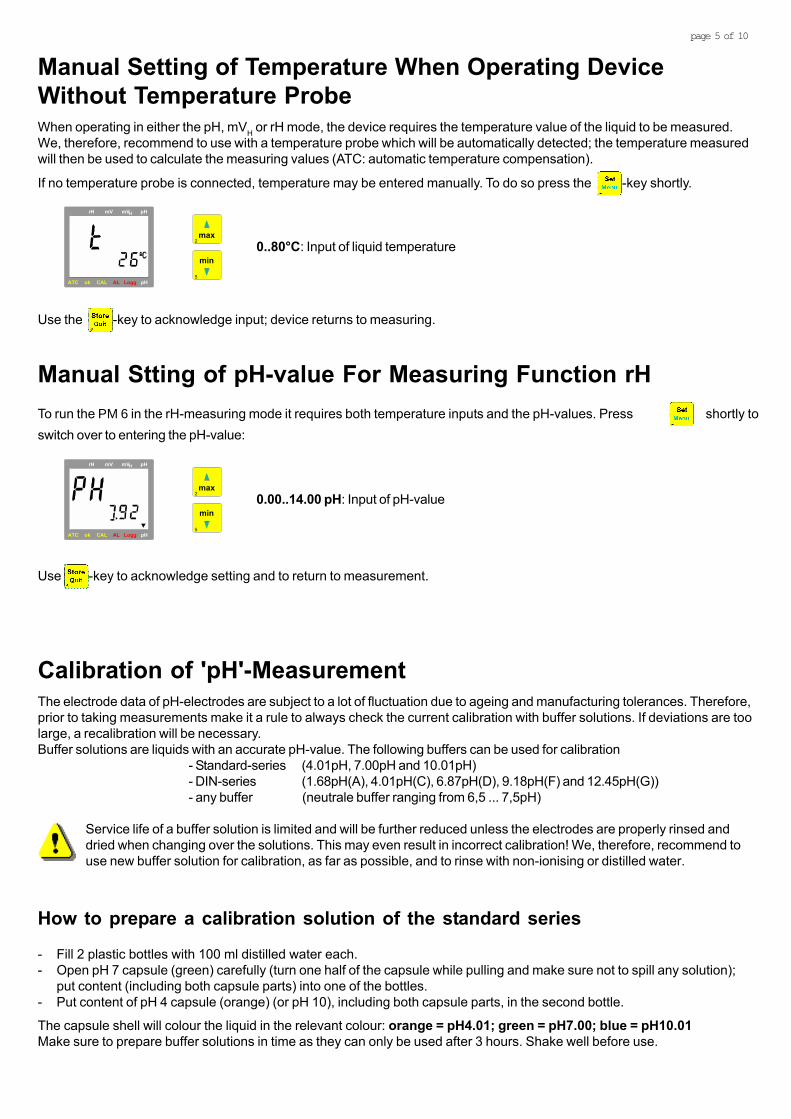
Manual Stting of pH-value For Measuring Function rHTo run the PM 6 in the rH-measuring mode it requires both temperature inputs and the pH-values. Press shortly toswitch over to entering the pH-value:
max
min
2
5
0.00..14.00 pH: Input of pH-value
pHmV mVHrH
ATC ok CAL AL Logg pH
mbar
Use -key to acknowledge setting and to return to measurement.
Calibration of 'pH'-MeasurementThe electrode data of pH-electrodes are subject to a lot of fluctuation due to ageing and manufacturing tolerances. Therefore,prior to taking measurements make it a rule to always check the current calibration with buffer solutions. If deviations are toolarge, a recalibration will be necessary.Buffer solutions are liquids with an accurate pH-value. The following buffers can be used for calibration
- Standard-series (4.01pH, 7.00pH and 10.01pH)- DIN-series (1.68pH(A), 4.01pH(C), 6.87pH(D), 9.18pH(F) and 12.45pH(G))- any buffer (neutrale buffer ranging from 6,5 ... 7,5pH)
Service life of a buffer solution is limited and will be further reduced unless the electrodes are properly rinsed anddried when changing over the solutions. This may even result in incorrect calibration! We, therefore, recommend touse new buffer solution for calibration, as far as possible, and to rinse with non-ionising or distilled water.
How to prepare a calibration solution of the standard series
- Fill 2 plastic bottles with 100 ml distilled water each.- Open pH 7 capsule (green) carefully (turn one half of the capsule while pulling and make sure not to spill any solution);
put content (including both capsule parts) into one of the bottles.- Put content of pH 4 capsule (orange) (or pH 10), including both capsule parts, in the second bottle.
The capsule shell will colour the liquid in the relevant colour: orange = pH4.01; green = pH7.00; blue = pH10.01Make sure to prepare buffer solutions in time as they can only be used after 3 hours. Shake well before use.
page 6 of 10
Please note: Automatic temperature compensation during calibrationBoth the signal of the pH-electrode and the pH-buffer are depending on temperature. If a temperature probe has beenconnected the temperature influence of the electrode will be compensated automatically, both during measuring and duringcalibration. If no sensor is connected, enter actual buffer temperature as accurate as possible (see below).When working with the standard or DIN-buffer series the buffer temperature influences will also be compensated for. If buffersare entered manually, make sure to enter the pH-values of the buffers at the relevant temperature to ensure optimumcalibration of the device.
pHmV mVHrH
ATC ok CAL AL Logg pH
mbarUse -key or -key to enter the temperature of the buffer solution.
Use to take over the value and to display the next calibration step.
no temperature sensor: manual input of temperature of solution 1
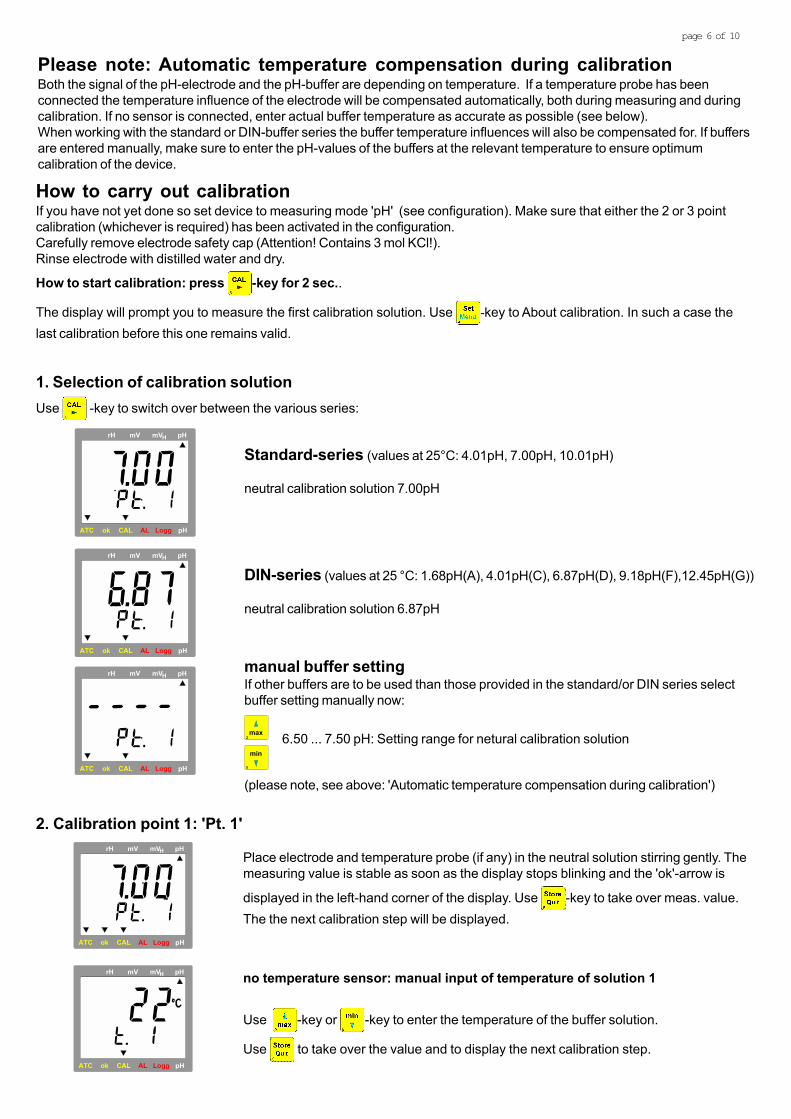
How to carry out calibrationIf you have not yet done so set device to measuring mode 'pH' (see configuration). Make sure that either the 2 or 3 pointcalibration (whichever is required) has been activated in the configuration.Carefully remove electrode safety cap (Attention! Contains 3 mol KCl!).Rinse electrode with distilled water and dry.
How to start calibration: press -key for 2 sec..
The display will prompt you to measure the first calibration solution. Use -key to About calibration. In such a case thelast calibration before this one remains valid.
Place electrode and temperature probe (if any) in the neutral solution stirring gently. Themeasuring value is stable as soon as the display stops blinking and the 'ok'-arrow is
displayed in the left-hand corner of the display. Use -key to take over meas. value.The the next calibration step will be displayed.
pHmV mVHrH
ATC ok CAL AL Logg pH
mbar
2. Calibration point 1: 'Pt. 1'
max
min
2
5
manual buffer settingIf other buffers are to be used than those provided in the standard/or DIN series selectbuffer setting manually now:
6.50 ... 7.50 pH: Setting range for netural calibration solution
(please note, see above: 'Automatic temperature compensation during calibration')
pHmV mVHrH
ATC ok CAL AL Logg pH
mbar
DIN-series (values at 25 °C: 1.68pH(A), 4.01pH(C), 6.87pH(D), 9.18pH(F),12.45pH(G))
neutral calibration solution 6.87pH
Standard-series (values at 25°C: 4.01pH, 7.00pH, 10.01pH)
neutral calibration solution 7.00pH
pHmV mVHrH
ATC ok CAL AL Logg pH
mbar
pHmV mVHrH
ATC ok CAL AL Logg pH
mbar
1. Selection of calibration solutionUse -key to switch over between the various series:
page 7 of 10
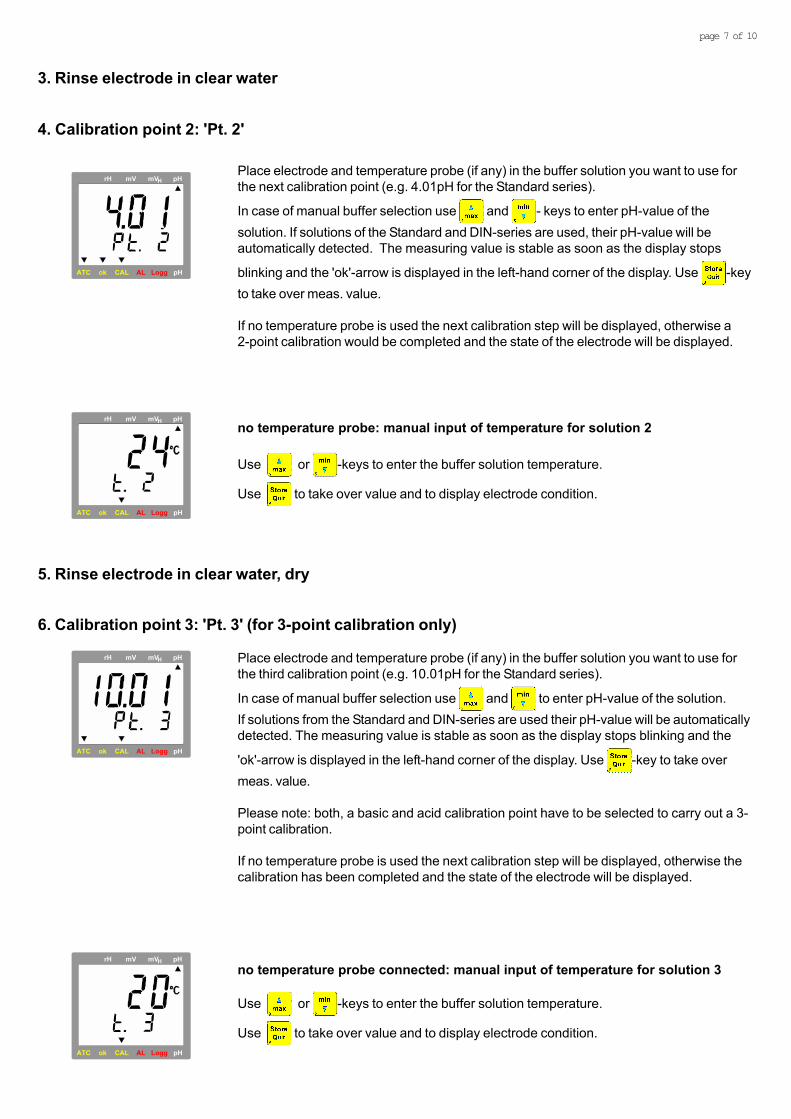
4. Calibration point 2: 'Pt. 2'
Place electrode and temperature probe (if any) in the buffer solution you want to use forthe next calibration point (e.g. 4.01pH for the Standard series).
In case of manual buffer selection use and - keys to enter pH-value of thesolution. If solutions of the Standard and DIN-series are used, their pH-value will beautomatically detected. The measuring value is stable as soon as the display stops
blinking and the 'ok'-arrow is displayed in the left-hand corner of the display. Use -keyto take over meas. value.
If no temperature probe is used the next calibration step will be displayed, otherwise a2-point calibration would be completed and the state of the electrode will be displayed.
3. Rinse electrode in clear water
pHmV mVHrH
ATC ok CAL AL Logg pH
mbar
Use or -keys to enter the buffer solution temperature.
Use to take over value and to display electrode condition.
pHmV mVHrH
ATC ok CAL AL Logg pH
mbar
no temperature probe connected: manual input of temperature for solution 3
Place electrode and temperature probe (if any) in the buffer solution you want to use forthe third calibration point (e.g. 10.01pH for the Standard series).
In case of manual buffer selection use and to enter pH-value of the solution.If solutions from the Standard and DIN-series are used their pH-value will be automaticallydetected. The measuring value is stable as soon as the display stops blinking and the
'ok'-arrow is displayed in the left-hand corner of the display. Use -key to take overmeas. value.
Please note: both, a basic and acid calibration point have to be selected to carry out a 3-point calibration.
If no temperature probe is used the next calibration step will be displayed, otherwise thecalibration has been completed and the state of the electrode will be displayed.
pHmV mVHrH
ATC ok CAL AL Logg pH
mbar
6. Calibration point 3: 'Pt. 3' (for 3-point calibration only)
5. Rinse electrode in clear water, dry
pHmV mVHrH
ATC ok CAL AL Logg pH
mbarUse or -keys to enter the buffer solution temperature.
Use to take over value and to display electrode condition.
no temperature probe: manual input of temperature for solution 2
page 8 of 10
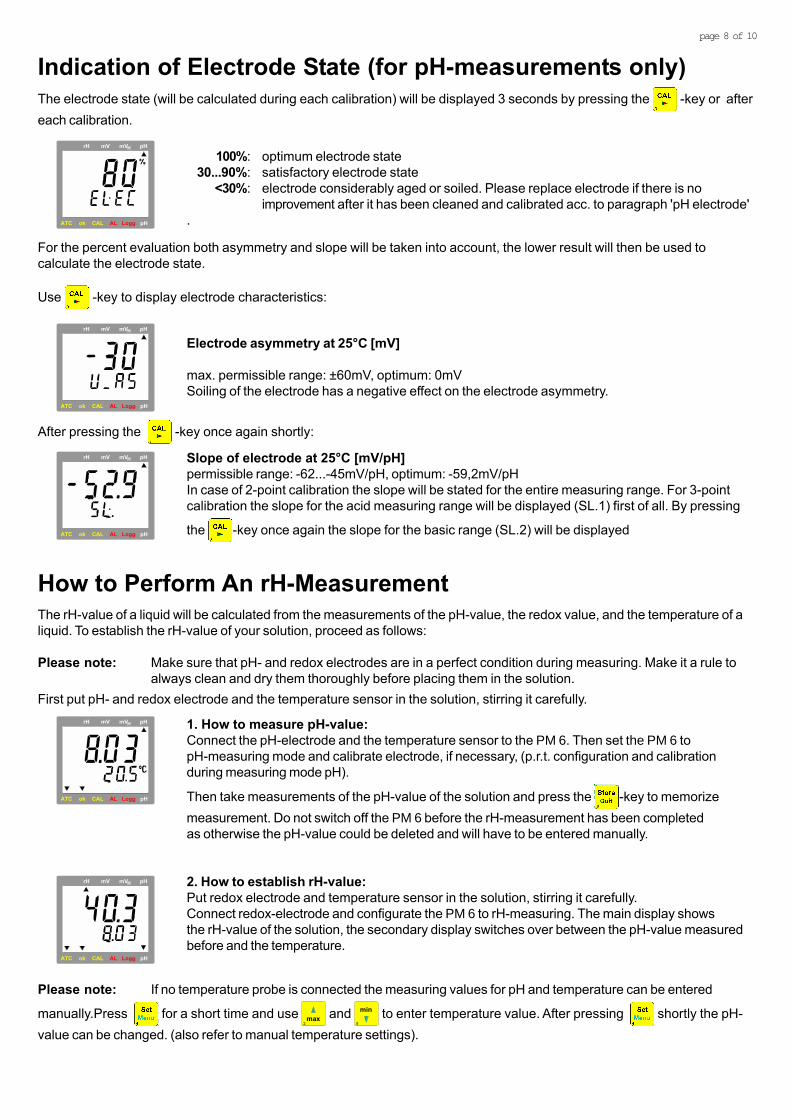
Indication of Electrode State (for pH-measurements only)The electrode state (will be calculated during each calibration) will be displayed 3 seconds by pressing the -key or aftereach calibration.
pHmV mVHrH
ATC ok CAL AL Logg pH
mbar
100%: optimum electrode state30...90%: satisfactory electrode state
<30%: electrode considerably aged or soiled. Please replace electrode if there is noimprovement after it has been cleaned and calibrated acc. to paragraph 'pH electrode'
.
For the percent evaluation both asymmetry and slope will be taken into account, the lower result will then be used tocalculate the electrode state.
Use -key to display electrode characteristics:
How to Perform An rH-MeasurementThe rH-value of a liquid will be calculated from the measurements of the pH-value, the redox value, and the temperature of aliquid. To establish the rH-value of your solution, proceed as follows:
Please note: Make sure that pH- and redox electrodes are in a perfect condition during measuring. Make it a rule toalways clean and dry them thoroughly before placing them in the solution.
First put pH- and redox electrode and the temperature sensor in the solution, stirring it carefully.pHmV mVHrH
ATC ok CAL AL Logg pH
mbar
1. How to measure pH-value:Connect the pH-electrode and the temperature sensor to the PM 6. Then set the PM 6 topH-measuring mode and calibrate electrode, if necessary, (p.r.t. configuration and calibrationduring measuring mode pH).
Then take measurements of the pH-value of the solution and press the -key to memorizemeasurement. Do not switch off the PM 6 before the rH-measurement has been completedas otherwise the pH-value could be deleted and will have to be entered manually.
2. How to establish rH-value:Put redox electrode and temperature sensor in the solution, stirring it carefully.Connect redox-electrode and configurate the PM 6 to rH-measuring. The main display showsthe rH-value of the solution, the secondary display switches over between the pH-value measuredbefore and the temperature.
pHmV mVHrH
ATC ok CAL AL Logg pH
mbarmbarmbar
pHmV mVHrH
ATC ok CAL AL Logg pH
mbar
Electrode asymmetry at 25°C [mV]
max. permissible range: ±60mV, optimum: 0mVSoiling of the electrode has a negative effect on the electrode asymmetry.
After pressing the -key once again shortly:
pHmV mVHrH
ATC ok CAL AL Logg pH
mbar
Slope of electrode at 25°C [mV/pH]permissible range: -62...-45mV/pH, optimum: -59,2mV/pHIn case of 2-point calibration the slope will be stated for the entire measuring range. For 3-pointcalibration the slope for the acid measuring range will be displayed (SL.1) first of all. By pressing
the -key once again the slope for the basic range (SL.2) will be displayed
Please note: If no temperature probe is connected the measuring values for pH and temperature can be entered
manually.Press for a short time and use max2
and min
5
to enter temperature value. After pressing shortly the pH-value can be changed. (also refer to manual temperature settings).
page 9 of 10
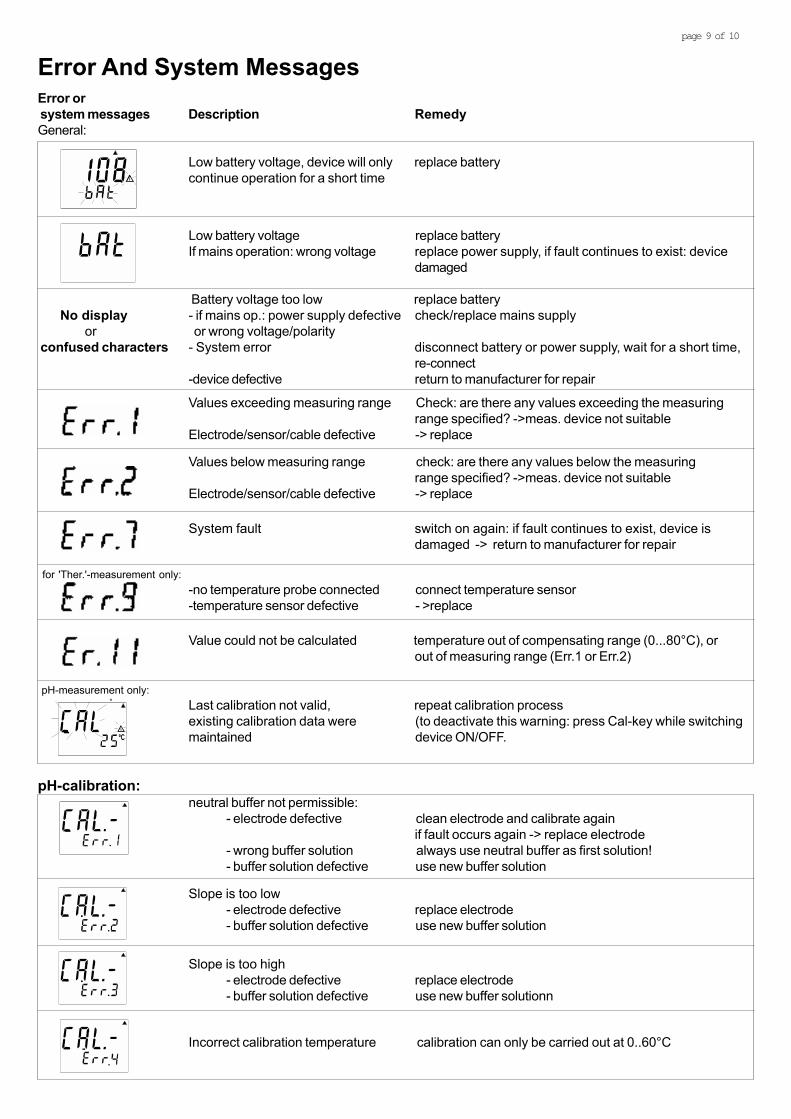
Error And System MessagesError or system messages Description RemedyGeneral:
Low battery voltage, device will only replace batterycontinue operation for a short time
Low battery voltage replace batteryIf mains operation: wrong voltage replace power supply, if fault continues to exist: device
damaged
Battery voltage too low replace battery No display - if mains op.: power supply defective check/replace mains supply or or wrong voltage/polarity confused characters - System error disconnect battery or power supply, wait for a short time,
re-connect-device defective return to manufacturer for repair
Values exceeding measuring range Check: are there any values exceeding the measuringrange specified? ->meas. device not suitable
Electrode/sensor/cable defective -> replace
Values below measuring range check: are there any values below the measuringrange specified? ->meas. device not suitable
Electrode/sensor/cable defective -> replace
System fault switch on again: if fault continues to exist, device isdamaged -> return to manufacturer for repair
for 'Ther.'-measurement only:-no temperature probe connected connect temperature sensor-temperature sensor defective - >replace
Value could not be calculated temperature out of compensating range (0...80°C), orout of measuring range (Err.1 or Err.2)
pH-measurement only:Last calibration not valid, repeat calibration processexisting calibration data were (to deactivate this warning: press Cal-key while switchingmaintained device ON/OFF.
pH-calibration:neutral buffer not permissible:
- electrode defective clean electrode and calibrate againif fault occurs again -> replace electrode
- wrong buffer solution always use neutral buffer as first solution!- buffer solution defective use new buffer solution
Slope is too low- electrode defective replace electrode- buffer solution defective use new buffer solution
Slope is too high- electrode defective replace electrode- buffer solution defective use new buffer solutionn
Incorrect calibration temperature calibration can only be carried out at 0..60°C
H
mbarmbar
mbarmbar
mbarmbar
page 10 of 10
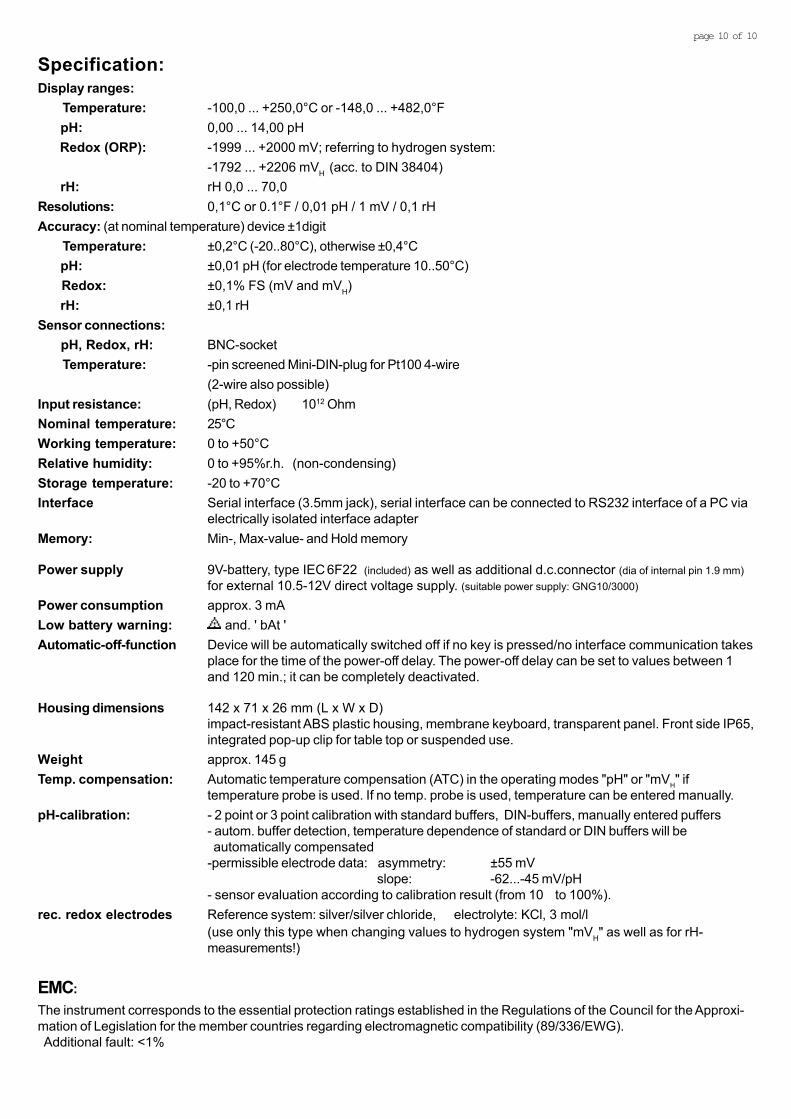
EMC:The instrument corresponds to the essential protection ratings established in the Regulations of the Council for the Approxi-mation of Legislation for the member countries regarding electromagnetic compatibility (89/336/EWG). Additional fault: <1%
Specification:Display ranges: Temperature: -100,0 ... +250,0°C or -148,0 ... +482,0°F pH: 0,00 ... 14,00 pH Redox (ORP): -1999 ... +2000 mV; referring to hydrogen system:
-1792 ... +2206 mVH (acc. to DIN 38404) rH: rH 0,0 ... 70,0Resolutions: 0,1°C or 0.1°F / 0,01 pH / 1 mV / 0,1 rHAccuracy: (at nominal temperature) device ±1digit Temperature: ±0,2°C (-20..80°C), otherwise ±0,4°C pH: ±0,01 pH (for electrode temperature 10..50°C) Redox: ±0,1% FS (mV and mVH) rH: ±0,1 rHSensor connections: pH, Redox, rH: BNC-socket Temperature: -pin screened Mini-DIN-plug for Pt100 4-wire
(2-wire also possible)Input resistance: (pH, Redox) 1012 OhmNominal temperature: 25°CWorking temperature: 0 to +50°CRelative humidity: 0 to +95%r.h. (non-condensing)Storage temperature: -20 to +70°CInterface Serial interface (3.5mm jack), serial interface can be connected to RS232 interface of a PC via
electrically isolated interface adapter Memory: Min-, Max-value- and Hold memory
Power supply 9V-battery, type IEC 6F22 (included) as well as additional d.c.connector (dia of internal pin 1.9 mm)for external 10.5-12V direct voltage supply. (suitable power supply: GNG10/3000)
Power consumption approx. 3 mALow battery warning: and. ' bAt 'Automatic-off-function Device will be automatically switched off if no key is pressed/no interface communication takes
place for the time of the power-off delay. The power-off delay can be set to values between 1and 120 min.; it can be completely deactivated.
Housing dimensions 142 x 71 x 26 mm (L x W x D)impact-resistant ABS plastic housing, membrane keyboard, transparent panel. Front side IP65,integrated pop-up clip for table top or suspended use.
Weight approx. 145 gTemp. compensation: Automatic temperature compensation (ATC) in the operating modes "pH" or "mVH" if
temperature probe is used. If no temp. probe is used, temperature can be entered manually.pH-calibration: - 2 point or 3 point calibration with standard buffers, DIN-buffers, manually entered puffers
- autom. buffer detection, temperature dependence of standard or DIN buffers will be automatically compensated-permissible electrode data: asymmetry: ±55 mV
slope: -62...-45 mV/pH- sensor evaluation according to calibration result (from 10 to 100%).
rec. redox electrodes Reference system: silver/silver chloride, electrolyte: KCl, 3 mol/l(use only this type when changing values to hydrogen system "mVH" as well as for rH-measurements!)

Kuntze Instruments GmbHRobert-Bosch-Str. 7a I 40668 Meerbusch (Germany) I Fon +49 (2150) 7066-0 I Fax -60
[email protected] I www.kuntze.com