Embed Size (px)
Citation preview

2 PSR-E213/YPT-210 Owner’s Manual
PLEASE KEEP THIS MANUAL
This product utilizes batteries or an external power supply (adapter). DO NOT connect this product to any power sup-ply or adapter other than one described in the manual, on the name plate, or specifically recommended by Yamaha.
This product should be used only with the components supplied or; a cart, rack, or stand that is recommended by Yamaha. If a cart, etc., is used, please observe all safety markings and instructions that accompany the accessory product.
SPECIFICATIONS SUBJECT TO CHANGE: The information contained in this manual is believed to be correct at the time of printing. However, Yamaha reserves the right to change or modify any of the specifications with-out notice or obligation to update existing units.
This product, either alone or in combination with an ampli-fier and headphones or speaker/s, may be capable of pro-ducing sound levels that could cause permanent hearing loss. DO NOT operate for long periods of time at a high volume level or at a level that is uncomfortable. If you experience any hearing loss or ringing in the ears, you should consult an audiologist. IMPORTANT: The louder the sound, the shorter the time period before damage occurs.
NOTICE: Service charges incurred due to a lack of knowledge relat-ing to how a function or effect works (when the unit is operating as designed) are not covered by the manufac-turer’s warranty, and are therefore the owners responsibil-ity. Please study this manual carefully and consult your dealer before requesting service.
ENVIRONMENTAL ISSUES: Yamaha strives to produce products that are both user safe and environmentally friendly. We sincerely believe that our products and the production methods used to pro-duce them, meet these goals. In keeping with both the let-ter and the spirit of the law, we want you to be aware of the following:
Battery Notice: This product MAY contain a small non-rechargeable bat-tery which (if applicable) is soldered in place. The average life span of this type of battery is approximately five years. When replacement becomes necessary, contact a quali-fied service representative to perform the replacement.
This product may also use “household” type batteries. Some of these may be rechargeable. Make sure that the battery being charged is a rechargeable type and that the charger is intended for the battery being charged.
When installing batteries, do not mix batteries with new, or with batteries of a different type. Batteries MUST be installed correctly. Mismatches or incorrect installation may result in overheating and battery case rupture.
Warning: Do not attempt to disassemble, or incinerate any battery. Keep all batteries away from children. Dispose of used batteries promptly and as regulated by the laws in your area. Note: Check with any retailer of household type bat-teries in your area for battery disposal information.
Disposal Notice: Should this product become damaged beyond repair, or for some reason its useful life is considered to be at an end, please observe all local, state, and federal regula-tions that relate to the disposal of products that contain lead, batteries, plastics, etc. If your dealer is unable to assist you, please contact Yamaha directly.
NAME PLATE LOCATION: The name plate is located on the bottom of the product. The model number, serial number, power requirements, etc., are located on this plate. You should record the model number, serial number, and the date of purchase in the spaces provided below and retain this manual as a perma-nent record of your purchase.
Model
Serial No.
Purchase Date
SPECIAL MESSAGE SECTION
92-BP (bottom)
Секция за специални съобщения
Внимание! Съществува риск от токов удар. Не отваряйте!За да намалите вероятността от възникване на токов удар, не отваряйте капака или задната стра-ница на продукта. Уреда не съдържа компоненти, които подлежат на сервизно обслужване от страна на потребителя. По отношение на сервизното обслужване, се обръщайте към квалифицирани специалисти.
Разгледайте долната страна на кийбор-да за маркировъчни знаци.Удивителен знак – означава наличието на важни инструкции за безопасна работа с продукта които можете да прочетете в документацията, придружа-ваща продукта.
Знак светкавица предупреждава за наличието на неизолиран проводник във вътрешността на уреда, поради което съществува риск от токов удар.
Забележка: За всички електронни продукти на Ямаха са проведени тестове във самостоятелни ла-боратории за тестване на безопасността на дадено оборудване и е доказано, че в случаите, когато са правилно инсталирани и се използват при нормал-ни условия, всички възможни рискови ситуации са изцяло елиминирани. Не модифицирайте уреда и не упълномощавайте други лица да го модифици-рат, освен ако това не е изрично регламентирано от Ямаха. В случай на извършени модификации е въз-можно отправени искове, във връзка с гаранционни-те условия по обслужването на продукта, да бъдат отхвърлени. Това може да промени и условията за
допълнителни гаранции. Спецификациите могат да бъдат променяни: Информацията, съдържаща се в настоящото ръководство, се счита за коректна, към датата на производство на уреда. Въпреки това, Ямаха си запазва правото, без предвартелно предизвестие, да променя или модифицира тези спецификации, като няма да бъде задължена да нанася корекции във вече съществуващата документация.
Опазване на околната среда: Ямаха се стреми да произвежда уреди, които са едновременно безопасни за употреба и не замърся-ват околната среда. Ние искрено вярваме, че нашите продукти и методите за производство, които използ-ваме за тяхната изработка, отговарят на законовите изисквания за опазване на околната среда и за без-опасност при работа с продукта. Във връзка с това,
обърнете внимание на следното:Бележка за батериите: Възможно е продукта да бъде снабден с малка батерия (която не подлежи на пре-зареждане), запоена на определено място. Средния живот на употреба на този тип батерии е приблизи-телно пет години. Когато е необходимо да смените батерията, свържете се с квалифициран специалист, който може да извърши замяната.Внимание! Не презареждайте батерията, не я отстранявайте или изгаряйте. Пазете батериите далеч от достъпа на деца. Изхвърляйте изхабените батерии, като спазвате изискванията за изхвърляне
на подобни продукти. Кога да изхвърлите уреда: В случай, че продукта не подлежи на поправка или по друга причина той стане негоден за употреба, моля придържайте се към всички местни законови разпоредби, относно изхвър-лянето на продукти, които съдържат олово, батерии, пластмаси и прочие. Забележка: Сервизно обслужване на уреда, вслед-ствие на повреда, получена в резултат на непознава-не на функциите му, не се покриват от гаранцията и следователно, ще бъдат за сметка на собственика на уреда. Моля, прочетете и разучете настоящото ръко-водство и преди да потърсите сервизно обслужване, се консултирайте с вашия дилър.
ЗАПАЗЕТЕ ТАЗИ ИНСТРУКЦИЯ

4 PSR-E213/YPT-210 Owner’s Manual
PRECAUTIONSPLEASE READ CAREFULLY BEFORE PROCEEDING
* Please keep this manual in a safe place for future reference.
WARNINGAlways follow the basic precautions listed below to avoid the possibility of serious injur y or even death from electrical shock, short-circuiting, damages, fire or other hazards. These precautions include, but are not limited to, the following:
• Only use the voltage specified as correct for the instrument. The required voltage is printed on the name plate of the instrument.
• Use the specified adaptor (PA-130 or an equivalent recommended by Yamaha) only. Using the wrong adaptor can result in damage to the instrument or overheating.
• Check the electric plug periodically and remove any dirt or dust which may have accumulated on it.
• Do not place the AC adaptor cord near heat sources such as heaters or radiators, and do not excessively bend or otherwise damage the cord, place heavy objects on it, or place it in a position where anyone could walk on, trip over, or roll anything over it.
• Do not open the instrument or attempt to disassemble the internal parts or modify them in any way. The instrument contains no user-serviceable parts. If it should appear to be malfunctioning, discontinue use immediately and have it inspected by qualified Yamaha service personnel.
• Do not expose the instrument to rain, use it near water or in damp or wet conditions, or place containers on it containing liquids which might spill into any openings.
• Never insert or remove an electric plug with wet hands.
• Do not put burning items, such as candles, on the unit. A burning item may fall over and cause a fire.
• If the AC adaptor cord or plug becomes frayed or damaged, or if there is a sudden loss of sound during use of the instrument, or if any unusual smells or smoke should appear to be caused by it, immediately turn off the power switch, disconnect the adaptor plug from the outlet, and have the instrument inspected by qualified Yamaha service personnel.
CAUTIONAlways follow the basic precautions listed below to avoid the possibility of physical injur y to you or others, or damage to the instrument or other property. These precautions include, but are not limited to, the following:
• When removing the electric plug from the instrument or an outlet, always hold the plug itself and not the cord.
• Unplug the AC power adaptor when not using the instrument, or during electrical storms.
• Do not connect the instrument to an electrical outlet using a multiple-connector. Doing so can result in lower sound quality, or possibly cause overheating in the outlet.
• Always make sure all batteries are inserted in conformity with the +/- polarity markings. Failure to do so might result in overheating, fi re, or battery fluid leakage.
• Always replace all batteries at the same time. Do not use new batteries together with old ones. Also, do not mix battery types, such as alkaline batteries with manganese batteries, or batteries from different makers, or different types of batteries from the same maker, since this can cause overheating, fire, or battery fluid leakage.
• Do not dispose of batteries in fire.
• Do not attempt to recharge batteries that are not intended to be charged.
• When the batteries run out, or if the instrument is not to be used for a long time, remove the batteries from the instrument to prevent possible leakage of the battery fluid.
• Keep batteries away from children.
• If the batteries do leak, avoid contact with the leaked fluid. If the battery fluid should come in contact with your eyes, mouth, or skin, wash immediately with water and consult a doctor. Battery fluid is corrosive and may possibly cause loss of sight or chemical burns.
• Do not expose the instrument to excessive dust or vibrations, or extreme cold or heat (such as in direct sunlight, near a heater, or in a car during the day) to prevent the possibility of panel disfiguration or damage to the internal components.
• Do not use the instrument in the vicinity of a TV, radio, stereo equipment, mobile phone, or other electric devices. Otherwise, the instrument, TV, or radio may generate noise.
• Do not place the instrument in an unstable position where it might accidentally fall over.
Power supply/AC power adaptor
Do not open
Water warning
Fire warning
If you notice any abnormality
Power supply/AC power adaptor
Battery Location
(4)-11 1/2
ИНСТРУКЦИИ ЗА БЕЗОПАСНОСТМоля прочетете внимателно, преди да започнете работа
*Моля, запазете това ръководство
ВНИМАНИЕ!Винаги следвайте общите инструкции за безопасност, описани по-долу, за да се предпазите от сериозни увреждания или дори смърт, поради токов удар, късо съединение, повреди, пожар или други рискови ситуации:
Електрозахранване/Захранващ кабелИзползвайте инструмента само при напрежението, посочено като препоръ-чително за него. То е изписано върху етикет, на самия инструмент.Използвайте само адаптер PA-130, който препоръчва производителя.Използването на неподходящ токоизправиел може да повреди инструмен-та или да причини прегряване.
Периодично проверявайте и почиствайте захранващият кабел и конекто-рите от наслоен прах.
Не разполагайте захранващия адаптер в близост до електронагревателни уреди и радиатори; не огъвайте кабела прекалено много и не го нараня-вайте по какъвто и да е начин; не поставяйте върху него тежки предмети, дръжте го далеч от места, където може да бъде настъпван от премина.
Не отваряйтеНе отваряйте инструмента и не се опитвайте да го разглобявате или да сменяте части от него. Не можете да извършвате ремонт на инструмента или на части от него. В случай на повреда, веднага преустановете употребата му и потърсете
консултация от квалифицирани специалисти на Ямаха.
Предпазване от водаНе излагайте инструмента на дъжд; дръжте го далеч от вода и влага; не поставяйте върху него съдове, съдържащи вода.
Никога не включвайте или изключвайте захранващия кабел с мокри ръце.
Противопожарни меркиНе поставяйте свещи или други горящи предмети върху устройството, които могат да предизвикат запалването му.
В случай, че откриете повредаВ случай, че кабела или щепсела се оголят или прокъсат, или забеле-жите неочаквано спиране на звука по време на употреба, както и ако забележите появата на необичаен мирис или пушек, идващ от него, неза-бавно изключете електрозахранването, изключете адаптера и потърсете консултация от квалифицирани специалисти на Ямаха.
ВНИМАНИЕ!
Електрозахранване/Захранващ кабел Винаги хващайте щепсела, а не кабела, когато го изваждате от инстру-мента или който и да негов изход. В случай, че не използвате инструмента и по време на гръмотевични бури, винаги изключвайте щепсела от електрозахранването. Не включвайте инструмента към електрозахранването като използва-те разклонител. Това може да причини намаляване на качеството на звука, както и прекомерно нагряване на входа.
Разположение на инструментаНе разполагайте инструмента на места, където има прах или вибрации; дръжте го далеч от твърде студена или твърде гореща среда (като пряка слънчева светлина, близо до електронагреватели или в кола, през деня); така ще предпазите панела и съставните компоненти от повреди.
Не използвайте инструмента в близост до телевизор, радио, стерео уредба, мобилен телефон или други електроуреди. Това може да предизвика появата на шум в инструмента, телевизора, радиото.
Не оставяйте инструмента в нестабилна позиция, за да предотврати-те евентуалното му падане.
Работа с батерииВинаги поставяйте батериите в инструмента като следвате маркировката за поляритет. Неправилно поставени батерии могат да причинят прегря-ване, изтичане на електролит или пожар.При подмяна на батериите сменете всички елементи. Не използвайте нови и стари батерии заедно или батерии от различни производители. Не бива да използвате заедно различни типове батерии като например алкални и магнезиеви.
Не излагайте батерии на директен огън.
Не опитвайте да зареждате батерии които не са предназначени за това.Когато батериите се изтощят или предстои дълго време да не използвате инструмента, ивадете батериите от него за да предотвратите изтичането на елетролит.
Пазете батериите от деца.В случай на изтичане на електролит, пазете се от контакт с течността. В случай на попадане на електролит в очите, устата или по кожата ви - измийте мястото обилно с вода и потърсете незабавно лекарска помощ. Флуидът от батериите е силно киселинен и отровен и може да причини отравяне, загуба на зрение или химическо изгаряне.
Винаги следвайте и спазвайте описаните по-долу предпазни мерки, за да предотвратите нараняване или повреда на инструмента и друга собственост. Мерките за безопасност включват, но не се изчерпват със следното:

PSR-E213/YPT-210 Owner’s Manual 5
• Before moving the instrument, remove all connected adaptor and other cables.
• When setting up the product, make sure that the AC outlet you are using is easily accessible. If some trouble or malfunction occurs, immediately turn off the power switch and disconnect the plug from the outlet. Even when the power switch is turned off, electricity is still flowing to the product at the minimum level. When you are not using the product for a long time, make sure to unplug the power cord from the wall AC outlet.
• Use only the stand specified for the instrument. When attaching the stand or rack, use the provided screws only. Failure to do so could cause damage to the internal components or result in the instrument falling over.
• Before connecting the instrument to other electronic components, turn off the power for all components. Before turning the power on or off for all components, set all volume levels to minimum. Also, be sure to set the volumes of all components at their minimum levels and gradually raise the volume controls while playing the instrument to set the desired listening level.
• When cleaning the instrument, use a soft, dry cloth. Do not use paint thinners, solvents, cleaning fluids, or chemical-impregnated wiping cloths.
• Do not insert a finger or hand in any gaps on the instrument.
• Never insert or drop paper, metallic, or other objects into the gaps on the panel or keyboard. If this happens, turn off the power immediately and unplug the power cord from the AC outlet. Then have the instrument inspected by qualified Yamaha service personnel.
• Do not place vinyl, plastic or rubber objects on the instrument, since this might discolor the panel or keyboard.
• Do not rest your weight on, or place heavy objects on the instrument, and do not use excessive force on the buttons, switches or connectors.
• Do not use the instrument/device or headphones for a long period of time at a high or uncomfortable volume level, since this can cause permanent hearing loss. If you experience any hearing loss or ringing in the ears, consult a physician.
Always turn the power off when the instrument is not in use.
When using a power adaptor, even when the power switch is in the “STANDBY” position, electricity is still flowing to the instrument at the minimum level. When you are not using the instrument for a long time, make sure you unplug the AC power adaptor from the wall AC outlet.
Make sure to discard used batteries according to local regulations.
� COPYRIGHT NOTICEThis product incorporates and bundles computer programs and contents in which Yamaha owns copyrights or with respect to which it has license to use others’ copyrights. Such copyrighted materials include, without limitation, all computer soft-ware, style files, MIDI files, WAVE data, musical scores and sound recordings. Any unauthorized use of such programs andcontents outside of personal use is not permitted under relevant laws. Any violation of copyright has legal consequences. DON’T MAKE, DISTRIBUTE OR USE ILLEGAL COPIES.
Copying of the commercially available musical data including but not limited to MIDI data and/or audio data is strictly pro-hibited except for your personal use.
� Trademarks• The company names and product names in this Owner’s Manual are the trademarks or registered trademarks of their respective com-
panies.
Connections
Maintenance
Handling caution
Yamaha cannot be held responsible for damage caused by improper use or modifications to the instrument, or data that is lost or destroyed.
• The illustrations and LCD screens as shown in this owner’s manual are for instructional purposes only, and may appear somewhat different from those on your instrument.
(4)-11 2/2
Преди да преместите инструмента, отстранете всички кабели, свързани към него.При инсталирането, обърнете внимание АС изхода да бъде на лесно достъпно за вас място. В случай на възникване на про-блем или авария, незабавно изключете електрозахранването и отстранете захранващия кабел от контакта на ел.мрежата.
Използвайте стойки и аксесоари одобрени от производителя.Когато монтирате инструмента на стойка или в ракла, затягайте добре всички болтове и връзки.
Свързване на инструментаПреди да свържете инструмента към други електронни ком-поненти, изключете захранването към всеки от компонентите. Преди да изключите захранването към компонентите, намалете до минимум силата на звука. При настройване силата на звука за всички компоненти първоначално намалете до минимум, след което постепенно увеличете до желаното ниво на сила на звука.
ПоддръжкаПочиствайте инструмента само с помощта на мека, суха или леко влажна кърпа. Не използвайте разредители за боя, течно-сти за почистване или мокри кърпи, съдържащи химикали.
Предпазни мерки при употребаНе вкарвайте пръстите си в който и да е от отворите на инструмента. Не пъхайте хартия, метални или други предмети в отворите на панела или кийборда. В случай на попадане на предмет в някой от отворите, незабавно изключете захранването и отстранете захранващия кабел. След това се консултирайте с квалифицирани специалисти. Не поставяйте пластмасови или гумени предмети върху инструмента, тъй като те могат да причинят обезцветяване на панела или кийборда. Не се облягайте върху инструмента и не поставяйте тежки предмети отгоре му. Не използвайтесила при натискане на клавишите или при използване на превключвателите.Не използвайте инструмента продължително време при висока сила на звука, тъй като това може да причини загуба на слуха ви. В случай, че загубите слуха си или получите шумове, незабавно се консултирайте с лекар.
Съхранение и поддръжка на информацияЗаписаната информация може да се загуби при дефектиране на устройството или неправилната му употреба. Запишете важната инфор-мация на личния си компютър.
Ямаха не носи отговорност за повреди, причинени, вследствие на некоректна употреба, направени модификации на инструмента, загубена или унищожена информация.
Когато не използвате инструмента, винаги изключвайте захранването към него.
Илюстрациите и обозначенията на предния панел на инструмента и LCD дисплея показани в тази инструкция, са информативни и могат да бъдат различни от тези на вашия инструмент.
8 PSR-E213/YPT-210 Owner’s Manual
Setting Up
Be sure to do the following operations BEFORE turning on the power.
Although the instrument will run either from an optional AC adaptor or batteries, Yamaha recommends use of an AC adaptor whenever possible. An AC adaptor is more environmentally friendly than batteries and does not deplete resources.
� Using an AC Power Adaptorq Make sure that the power of the instrument is off
(display is blank, except for notation staff).
w Connect the AC power adaptor to the power supply jack.
e Plug the AC adaptor into an AC outlet.
� Using Batteriesq Open the battery compartment cover located on the
instrument’s bottom panel.w Insert the six new alkaline batteries, being careful
to follow the polarity markings on the side of the compartment.
e Replace the compartment cover, making sure that it locks firmly in place.
For battery operation the instrument requires six 1.5V “AA” size, LR6 or equivalent batteries. (Alka-line batteries are recommended.) When battery power becomes too low for proper operation, the volume may be reduced, the sound may be dis-torted, and other problems may occur. When this happens, make sure to replace all batteries, follow-ing the precautions listed below.
Power Requirements
• Use the specified adaptor (PA-130 or an equivalent recommended by Yamaha) only. The use of other adap-tors may result in irreparable damage to both the adaptor and the instrument.
WARNING
• Unplug the AC Power Adaptor when not using the instrument, or during electrical storms.
CAUTION
AC power adaptor AC outlet
w
e
• Never connect or disconnect the AC power adaptor when the power is on and the batteries are installed. Doing so will turn the power off.
CAUTION
• Use alkaline batteries for this instrument. Other types of batteries (including rechargeable batteries) may have sudden drops of power when battery power becomes low.
• Make sure to install the batteries with the proper orienta-tion, maintaining the correct polarity (as shown). Incor-rect battery installation may result in heat, fire and/or leaking of corrosive chemicals.
• When the batteries run down, replace them with a com-plete set of six new batteries. NEVER mix old and new batteries. Do not use different kinds of batteries (e.g. alkaline and manganese) at the same time.
• If the instrument is not to be in use for a long time, remove the batteries from it, in order to prevent possible fluid leakage from the battery.
CAUTION
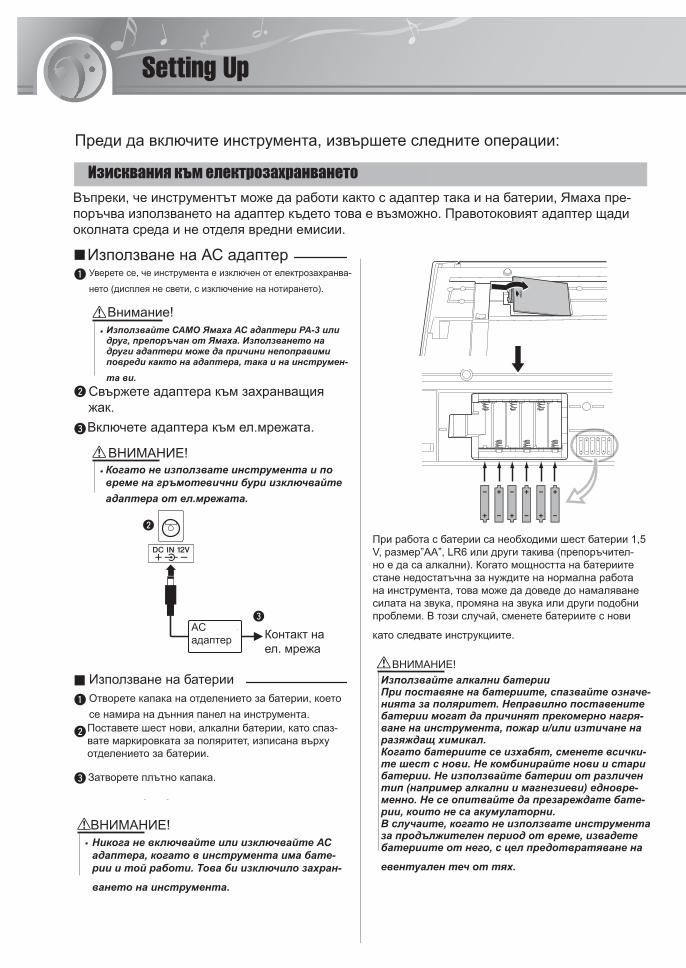
Преди да включите инструмента, извършете следните операции:
Изисквания към електрозахранването
Използване на АС адаптер
Въпреки, че инструментът може да работи както с адаптер така и на батерии, Ямаха пре-поръчва използването на адаптер където това е възможно. Правотоковият адаптер щади околната среда и не отделя вредни емисии.
Уверете се, че инструмента е изключен от електрозахранва-
нето (дисплея не свети, с изключение на нотирането).
Внимание! Използвайте САМО Ямаха АС адаптери РА-3 или друг, препоръчан от Ямаха. Използването на други адаптери може да причини непоправими повреди както на адаптера, така и на инструмен-та ви.
Свържете адаптера към захранващия жак. Включете адаптера към ел.мрежата.
ВНИМАНИЕ! Когато не използвате инструмента и по време на гръмотевични бури изключвайте адаптера от ел.мрежата.
AC адаптер Контакт на
ел. мрежа
Използване на батерииОтворете капака на отделението за батерии, което се намира на дънния панел на инструмента. Поставете шест нови, алкални батерии, като спаз-вате маркировката за поляритет, изписана върху отделението за батерии.
Затворете плътно капака.
ВНИМАНИЕ! Никога не включвайте или изключвайте АС адаптера, когато в инструмента има бате-рии и той работи. Това би изключило захран-
ването на инструмента.
При работа с батерии са необходими шест батерии 1,5 V, размер”АА”, LR6 или други такива (препоръчител-но е да са алкални). Когато мощността на батериите стане недостатъчна за нуждите на нормална работа на инструмента, това може да доведе до намаляване силата на звука, промяна на звука или други подобни проблеми. В този случай, сменете батериите с нови
като следвате инструкциите.
ВНИМАНИЕ!Използвайте алкални батерииПри поставяне на батериите, спазвайте означе-нията за поляритет. Неправилно поставените батерии могат да причинят прекомерно нагря-ване на инструмента, пожар и/или изтичане на разяждащ химикал. Когато батериите се изхабят, сменете всички-те шест с нови. Не комбинирайте нови и стари батерии. Не използвайте батерии от различен тип (например алкални и магнезиеви) едновре-менно. Не се опитвайте да презареждате бате-рии, които не са акумулаторни.В случаите, когато не използвате инструмента за продължителен период от време, извадете батериите от него, с цел предотвратяване на
евентуален теч от тях.
Setting Up
PSR-E213/YPT-210 Owner’s Manual 9
Make all necessary connections BEFORE turning the power on.
The PSR-E213/YPT-210 speakers are automatically shut off when a plug is inserted into this jack. The PHONES/OUTPUT jack also functions as an external output.
You can connect the PHONES/OUTPUT jack to a keyboard amplifier, stereo system, mixer, tape recorder, or other line-level audio device to send the instrument’s output signal to that device.
The sustain function lets you produce a natural sustain as you play by pressing an optional footswitch. Plug the Yamaha FC4 or FC5 footswitch into this jack and use it to switch sustain on and off.
The instrument also features MIDI terminals, allow-ing you to interface the instrument with other MIDI instruments or computers. (For more information, see page 50.)
Press the [STANDBY/ON] switch to turn on the power. Pressing the switch again turns the power off. When you first turn on the power, make sure to turn down the volume of the instrument by pressing the MASTER VOLUME [-] button several times. While playing the keyboard, adjust the volume level by using the MASTER VOLUME [+] and [-] buttons.
All panel settings as well as the settings made via the display are reset to their default values whenever the power is turned off.
Connecting headphones (PHONES/OUTPUT Jack)
Connecting a footswitch (SUSTAIN Jack)
• Avoid listening with the headphones at high volume for long periods of time; doing so may not only result in ear fatigue, it may be damaging to your hearing.
WARNING
• To prevent damage to the speakers, set the volume of the external devices at the minimum setting and turn power off the devices before connecting them. Failure to observe these precautions may result in electric shock or equipment damage. Also, be sure to set the volumes of external devices at their minimum levels and gradually raise the volume controls while playing the instrument to set the desired listening level.
CAUTION
• Make sure that the footswitch plug is properly connected to the SUSTAIN jack before turning on the power.
• Do not press the footswitch while turning the power on. Doing this changes the recognized polarity of the footswitch, result-ing in reversed footswitch operation.
NOTE
Using the MIDI Terminals
Turn on the power
other MIDI instrument
• MIDI cables (sold separately) must be used for connecting to MIDI devices. They can be bought at music stores, etc.
NOTE
• When using a power adaptor, even when the power is off, a small amount of electricity is still being consumed by the instrument. When you are not using the instrument for a long time, make sure to unplug the AC power adaptor from the wall AC outlet, and/or remove the batteries from the instrument.
CAUTION
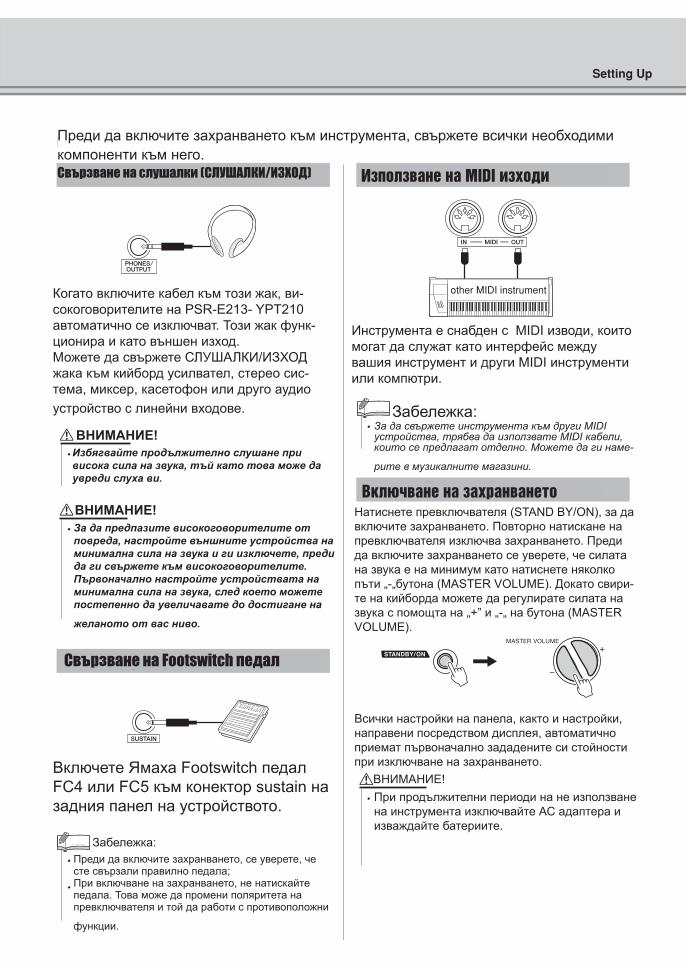
Преди да включите захранването към инструмента, свържете всички необходими компоненти към него.Свързване на слушалки (СЛУШАЛКИ/ИЗХОД)
Когато включите кабел към този жак, ви-сокоговорителите на PSR-E213- YPT210 автоматично се изключват. Този жак функ-ционира и като външен изход.Можете да свържете СЛУШАЛКИ/ИЗХОД жака към кийборд усилвател, стерео сис-тема, миксер, касетофон или друго аудио устройство с линейни входове.
ВНИМАНИЕ!Избягвайте продължително слушане при висока сила на звука, тъй като това може да увреди слуха ви.
За да предпазите високоговорителите от повреда, настройте външните устройства на минимална сила на звука и ги изключете, преди да ги свържете към високоговорителите. Първоначално настройте устройствата на минимална сила на звука, след което можете постепенно да увеличавате до достигане на
желаното от вас ниво.
ВНИМАНИЕ!
Свързване на Footswitch педал
Включете Ямаха Footswitch педал FC4 или FC5 към конектор sustain на задния панел на устройството.
Забележка:Преди да включите захранването, се уверете, че сте свързали правилно педала;При включване на захранването, не натискайте педала. Това може да промени поляритета на превключвателя и той да работи с противоположни
функции.
Използване на MIDI изходи
Инструмента е снабден с MIDI изводи, които могат да служат като интерфейс между вашия инструмент и други MIDI инструменти или компютри.
Забележка:За да свържете инструмента към други MIDI устройства, трябва да използвате MIDI кабели, които се предлагат отделно. Можете да ги наме-
рите в музикалните магазини.
Включване на захранванетоНатиснете превключвателя (STAND BY/ON), за да включите захранването. Повторно натискане на превключвателя изключва захранването. Преди да включите захранването се уверете, че силата на звука е на минимум като натиснете няколко пъти „-„бутона (MASTER VOLUME). Докато свири-те на кийборда можете да регулирате силата на звука с помощта на „+” и „-„ на бутона (MASTER VOLUME).
Всички настройки на панела, както и настройки, направени посредством дисплея, автоматично приемат първоначално зададените си стойности при изключване на захранването.
ВНИМАНИЕ!При продължителни периоди на не използване на инструмента изключвайте АС адаптера и изваждайте батериите.

10 PSR-E213/YPT-210 Owner’s Manual
Panel Controls and Terminals
� Front Panelq [STANDBY/ON] switch ....................................page 9, 24w MASTER VOLUME
[+] button ....................................................... pages 9, 24[-] button ........................................................ pages 9, 24
e LESSON PART[L] button .............................................................page 28[R] button .............................................................page 28
r [LISTEN & LEARN] button..................................page 28t [TIMING] button ...................................................page 29y [WAITING] button ................................................page 30u [FUNCTION] button ..................................... pages 48, 25i [SONG] button ............................................. pages 19, 25o [STYLE] button ............................................ pages 21, 25!0 [VOICE] button ............................................ pages 13, 25!1 Number buttons [0]–[9], [+], [-]...........................page 25!2 [DEMO] button.....................................................page 20!3 [METRONOME ON/OFF] button .........................page 17
!4 [A-B REPEAT] button..........................................page 33!5 [REW] button .......................................................page 20!6 [FF] button ...........................................................page 20!8 [PAUSE] button....................................................page 20
!4 [ACMP ON/OFF] button ......................................page 22!5 [INTRO/ENDING/rit.] button................................page 41!6 [MAIN/AUTO FILL] button...................................page 41!8 [SYNC START] button .........................................page 22
!7 [TEMPO/TAP] button...........................................page 38!9 [START/STOP] button .........................................page 24@0 [PORTABLE GRAND] button ..............................page 14@1 [SOUND EFFECT KIT] button.............................page 16@2 [REVERB ON/OFF] button ..................................page 34@3 Drum Kit...............................................................page 15
� Rear Panel@4 MIDI IN/OUT terminals ........................................page 50@5 SUSTAIN jack.........................................................page 9@6 PHONES/OUTPUT jack .........................................page 9@7 DC IN 12V jack .......................................................page 8
When the Song mode
When the Style mode
w
qe
!4 !5 !7!6
Song List (page 20)
� Front Panel
Описание на функциите
Лицев панел(STAND BY/ON) (ВКЛЮЧЕНО/ИЗКЛЮЧЕНО)(MASTER VOLUME) (СИЛА НА ЗВУКА) контролер„+” бутон „-„ бутон
Режим (LESSON)УРОК (L) (ляв) бутон (R) (десен) бутон
(LISTEN & LEARN) (СЛУШАЙ И УЧИ) бутон (TIMING) (НАСТРОКА НА ВРЕМЕТО) бутон (WAITING) (ИЗЧАКВАНЕ) бутон (FUNCTION) (ФУНКЦИИ) бутон (SONG) (ПЕСЕН) бутон (STYLE) (СТИЛ) бутон (VOICE) (ЗВУК) бутон (Number buttons) бутони цифри (0) – (9), (+), (-) (DEMO) (ДЕМО) бутон (Metronome on/off) (Метроном вкл/изкл) бутон
В режим SONG (ПЕСЕН)(A-B Repeat) (А-Б Повторение) бутон (REW) (НАЗАД) бутон (FF) (НАПРЕД) бутон (PAUSE) (ПАУЗА) бутон
В режим STYLE (СТИЛ)(ACMP ON/OFF) (АКОМПАНИМЕНТ ВКЛ/ИЗКЛ.) (Intro/Ending/rit.) (Интродукция/Завършване/Ритъм ) (Main/Auto Fill) (Основно/Преход) бутон(Sync Start) (Синхро Старт) бутон
(Tempo/Tap) (Темпо/Настройка) бутон (START/STOP) (СТАРТ/СТОП) бутон (Portable Grand) (Звук - Роял) бутон (Sound Effect Kit) (Звукови Ефекти) бутон(Reverb On/Off) (Ехо-ефект : Вкл./Изкл.) бутон (Drum kit) (Ударни инструменти)
Заден панел MIDI In/Out (MIDI Вход/Изход) Вход SUSTAIN (Вход за Sustain педал) Phones/Output (Слушалки/Изход) DC IN 12 V (вход адаптер)
Преден панел
Листа на песните

10 PSR-E213/YPT-210 Owner’s Manual
Panel Controls and Terminals
� Front Panelq [STANDBY/ON] switch ....................................page 9, 24w MASTER VOLUME
[+] button ....................................................... pages 9, 24[-] button ........................................................ pages 9, 24
e LESSON PART[L] button .............................................................page 28[R] button .............................................................page 28
r [LISTEN & LEARN] button..................................page 28t [TIMING] button ...................................................page 29y [WAITING] button ................................................page 30u [FUNCTION] button ..................................... pages 48, 25i [SONG] button ............................................. pages 19, 25o [STYLE] button ............................................ pages 21, 25!0 [VOICE] button ............................................ pages 13, 25!1 Number buttons [0]–[9], [+], [-]...........................page 25!2 [DEMO] button.....................................................page 20!3 [METRONOME ON/OFF] button .........................page 17
!4 [A-B REPEAT] button..........................................page 33!5 [REW] button .......................................................page 20!6 [FF] button ...........................................................page 20!8 [PAUSE] button....................................................page 20
!4 [ACMP ON/OFF] button ......................................page 22!5 [INTRO/ENDING/rit.] button................................page 41!6 [MAIN/AUTO FILL] button...................................page 41!8 [SYNC START] button .........................................page 22
!7 [TEMPO/TAP] button...........................................page 38!9 [START/STOP] button .........................................page 24@0 [PORTABLE GRAND] button ..............................page 14@1 [SOUND EFFECT KIT] button.............................page 16@2 [REVERB ON/OFF] button ..................................page 34@3 Drum Kit...............................................................page 15
� Rear Panel@4 MIDI IN/OUT terminals ........................................page 50@5 SUSTAIN jack.........................................................page 9@6 PHONES/OUTPUT jack .........................................page 9@7 DC IN 12V jack .......................................................page 8
When the Song mode
When the Style mode
w
qe
!4 !5 !7!6
Song List (page 20)
� Front Panel
Panel Controls and Terminals
PSR-E213/YPT-210 Owner’s Manual 11
GrandPno001
001
GrandPno001
001
r
t
!8 !9
y
!3
!2
!1
u
!0
o
i
@2@1@0
@3
Voice List (page 54) Display (page 26)Style List (page 62)
@7@6@5@4
� Rear Panel
Листа на стиловете Листа на гласовете Дисплей
Заден панел
12 PSR-E213/YPT-210 Owner’s Manual
— Quick Guide —Step
1 Changing the Voices
When turning the power on, bars appear at the left side in the display to indicate the value of the master volume.
When you first turn on the power, make sure to turn down the volume of the instrument by pressing the MASTER VOLUME [-] button sev-eral times. While playing the keyboard, adjust the volume level by using the MASTER VOLUME [+] and [-] buttons.
When the power is turned on, the initial value is automatically set to 12 (indicated by six bars in the display).
Turn the power on and adjust the volume
Turning the power on
Adjusting the volume
If you are using the instrument in a quiet place and want a lower vol-ume setting to start with, simultaneously hold down the MASTER VOLUME [-] button and turn on the power with the [STANDBY/ON] switch. This automatically sets the value to 4 (indicated by two bars).
Press the [STANDBY/ON] switch to turn on the power.Press the [STANDBY/ON] switch again to turn the power off.
The volume increases as indicated by the bars in the display.
GrandPno001
001
• The value of master volume cannot be saved.
NOTE
Press the [+] button to increase the volume.
Press the [-] button to lower the volume.
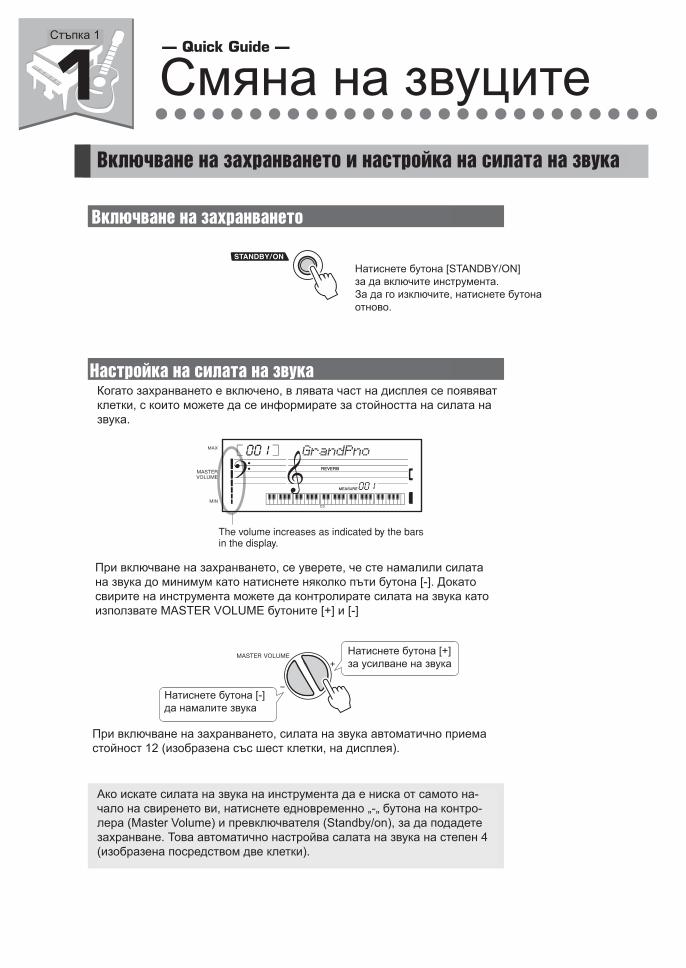
Смяна на звуцитеСтъпка 1
Включване на захранването и настройка на силата на звука
Когато захранването е включено, в лявата част на дисплея се появяват клетки, с които можете да се информирате за стойността на силата на звука.
Настройка на силата на звука
При включване на захранването, силата на звука автоматично приема стойност 12 (изобразена със шест клетки, на дисплея).
Ако искате силата на звука на инструмента да е ниска от самото на-чало на свиренето ви, натиснете едновременно „-„ бутона на контро-лера (Master Volume) и превключвателя (Standby/on), за да подадете захранване. Това автоматично настройва салата на звука на степен 4 (изобразена посредством две клетки).
При включване на захранването, се уверете, че сте намалили силата на звука до минимум като натиснете няколко пъти бутона [-]. Докато свирите на инструмента можете да контролирате силата на звука като използвате MASTER VOLUME бутоните [+] и [-]
Включване на захранването
Натиснете бутона [STANDBY/ON]за да включите инструмента.За да го изключите, натиснете бутона отново.
Натиснете бутона [+]за усилване на звука
Натиснете бутона [-]да намалите звука

PSR-E213/YPT-210 Owner’s Manual 13
Quic
k G
uid
e
In addition to the piano Voice, a wide variety of other instrument Voices can be selected and played, including guitar, trumpet and flute. The Voice selected here becomes the Main Voice.
1 Press the [VOICE] button.The Voice number and name are displayed.
2 Select a Voice.Select the desired Voice by using the number buttons [0]–[9], [+], [-].Refer to the Voice List on page 54.
3 Play the keyboard.
Try selecting and playing different Voices.
Try playing a variety of instrument Voices
GrandPno001
001
Voice number Voice name
Appears when the Voice mode.
Flute065 The Voice shown here becomes the Main Voice for the instrument.
Ste
p 1
Cha
ngin
g th
e Vo
ices
Опитайте да свирите с различни звуци
Натиснете бутона (VOICE). На екрана се изобразява номера и името на избрания звук.
Избор на звук. Можете да избирате с помощта на цифрите от 0 до 9, както и с „+” и „-„. Списък на вида звуци можете да видите на горния панел.
Свирете на клавиатурата
Опитайте да свирите като използвате различни звуци
В допълнение към звука на пиано, разполагате с голямо разнообразие от инструментални гласове,които можете да избирате и с които можете да свирите, като например, китара, трумпет и флейта. Избраният звук фигурира като основен.

14 PSR-E213/YPT-210 Owner’s Manual
When you simply want to play a piano Voice, all you have to do is press one convenient button.
Press the [PORTABLE GRAND] button.The Voice “Grand Piano1 001” will automatically be selected as the Main Voice.
Drum kits are collections of drum and percussion instruments.When drum kits (Voice number 130–142) are selected, you can play different percussion sounds directly from the keyboard.
1 Press the [VOICE] button.
2 Select the desired Drum kit.Select one of the Voice numbers from 130–142 by using the num-ber buttons [0]–[9], [+], [-].
Playing the Grand Piano Voice
Drum kits
Std.Kit1130
Example: 130 Standard Kit 1
Свирене на роял
При натискане на бутона (Portable grand) вие автоматично избира-те основния звук да е на роял.
Когато просто искате да свирите на пиано - всичко което трябва да направите е да натиснете един бутон
Натиснете бутона [PORTABLE GRAND]
УДАРНИ ИНСТРУМЕНТИУдарните инструменти включват барабани и перкусия.
Натиснете бутон VOICE.
Изберете желания ударен инструмент. Избирайте звуци между номера 130 и 142 с помощта на цифрите и бутоните + и -.
Когато изберете ударни инструменти (номер от 130 до 142), можете да просвирвате различни ударни инструмен-ти от клавиатурата.
Пример:

PSR-E213/YPT-210 Owner’s Manual 15
Quic
k G
uid
e
� Drum Kit List
3 Try out each key.
You’ll hear bongo drums, congas, maracas, and more—a compre-hensive variety of drum and percussion sounds.Details on the instruments and key assignments of each drum kit can be found in the Drum Kit List on page 59.
� Example: 130 Standard Kit 1To check which “Standard Kit 1” percussion sounds are assigned to each key, look at the icons printed above the keys.
130 Standard Kit 1
131 Standard Kit 2
132 Room Kit
133 Rock Kit
134 Electronic Kit
135 Analog Kit
136 Dance Kit
137 Jazz Kit
138 Brush Kit
139 Symphony Kit
140 SFX Kit 1
141 SFX Kit 2
142 Sound Effect Kit
Ride C
ymba
l 1
Tam
bour
ine
Cowbe
ll
Vibras
lap
Bongo
L
Hi-Hat
Ope
n
Crash
Cym
bal 1
Hand
Clap
Hi-Hat
Clos
ed
Hi-Hat
Ped
al
Open
Rim S
hot
Side S
tick
Casta
net
Sticks
Brush
Tap
Brush
Slap
Conga
H O
pen
Timba
le L
Agogo
L
Mar
acas
Guiro
Short
Claves
Cuica
Mut
e
Trian
gle M
ute
Shake
r
Chines
e Cym
bal
Ride C
ymba
l Cup
Splash
Cym
bal
Crash
Cym
bal 2
Ride C
ymba
l 2
Bongo
H
Conga
H M
ute
Mid
Tom
L
Mid
Tom
H
High To
m
Snare
H H
ard
Floor T
om L
Low To
m
Floor T
om H
Bass D
rum
Har
d
Bass D
rum
Snare
M
Snare
Roll
Snare
H S
oft
Bass D
rum
Sof
t
Seq C
lick H
Brush
Swirl
Brush
Tap
Swirl
Conga
L
Timba
le H
Agogo
H
Cabas
a
Samba
Whis
tle H
Samba
Whis
tle L
Guiro
Long
Woo
d Bloc
k H
Woo
d Bloc
k L
Cuica
Open
Trian
gle O
pen
Jingle
Bell
s
Bell Tr
ee
C3
Ste
p 1
Cha
ngin
g th
e Vo
ices
Списък на ударните инструменти
Натиснете всеки клавиш
Ще чуете бонгоси, конги, маракаси и други - голямо разно-образие от барабани и перкусии
Пример: 130 Стандартен комплект 1За детайли относно назначените звуци от Стандартен комплект 1 - по-гледнете иконите отпечатани под всеки клавиш.
PSR-E313/YPT-310 Owner’s Manual 17
Quic
k G
uid
e
Step
2 Fun SoundsThis instrument also includes a wide range of unique sound effects. Try out each key and enjoy the sounds! As you try out the various keys you’ll hear the sound of a dog barking, running water, a creaking door and many other unique effects.
1 Press the [VOICE] button.
2 Select the Sound Effect kit.Select Voice number 121 by using the number buttons [0]–[9], [+], [-].
3 Try out each key.
Try out each key and enjoy the sounds. Don’t forget the black keys!You’ll be able to play various sound effects from the keyboard: barking, braying, yelling, and much more.
After trying out these sounds, press the [PORTABLE GRAND] button to reset the instrument Voice to the default setting of Voice “001 Grand Piano.”
SE Kit121
— Quick Guide —
Ste
p 2
Fun
Sou
nds
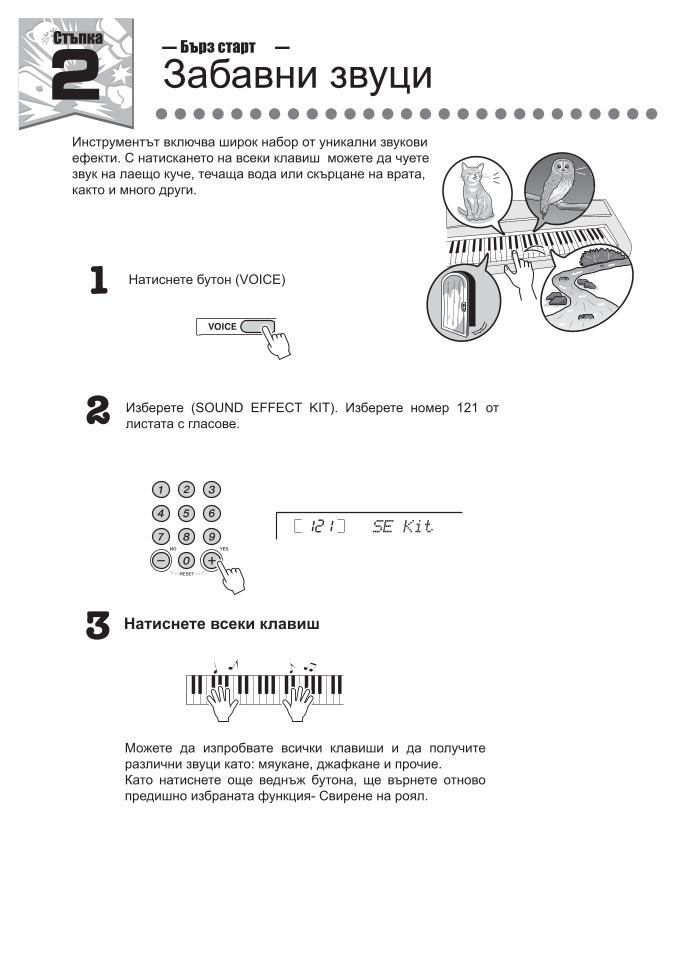
Натиснете бутон (VOICE)
Стъпка Бърз старт
Забавни звуциИнструментът включва широк набор от уникални звукови ефекти. С натискането на всеки клавиш можете да чуете звук на лаещо куче, течаща вода или скърцане на врата, както и много други.
Изберете (SOUND EFFECT KIT). Изберете номер 121 от листата с гласове.
Можете да изпробвате всички клавиши и да получите различни звуци като: мяукане, джафкане и прочие.Като натиснете още веднъж бутона, ще върнете отново предишно избраната функция- Свирене на роял.
Натиснете всеки клавиш
24 PSR-E313/YPT-310 Owner’s Manual
Step
6 Play With The Metronome
The instrument includes a metronome with adjustable tempo and time signature. Play and set the tempo that is most comfortable for you.
Turn the metronome on and start it by pressing the [METRONOME ON/OFF] button.
To stop the metronome, press the [METRONOME ON/OFF] but-ton again.
1 Press the [TEMPO/TAP] button to display the tempo.
2 Set the metronome tempo by using the number buttons [0]–[9], [+], [-].The tempo can be adjusted between 11–280.
Start the metronome
Starting the metronome
Setting the metronome tempo
GrandPno001
11
Displays the current beat.
Tempo090
Tempo value
— Quick Guide —
PSR-E213/YPT-210 Owner’s Manual 17
Quic
k G
uid
e
Step
3 Play With The Metronome
The instrument includes a metronome with adjustable tempo and time signature. Play and set the tempo that is most comfortable for you.
Turn the metronome on and start it by pressing the [METRONOME ON/OFF] button.
To stop the metronome, press the [METRONOME ON/OFF] but-ton again.
1 Press the [TEMPO/TAP] button to display the tempo.
2 Set the metronome tempo by using the number buttons [0]–[9], [+], [-].The tempo can be adjusted between 32–280.
Start the metronome
Starting the metronome
Setting the metronome tempo
GrandPno001
11
Displays the current beat.
Tempo090
Tempo value
— Quick Guide —
Ste
p 3
Pla
y W
ith T
he M
etro
nom
e
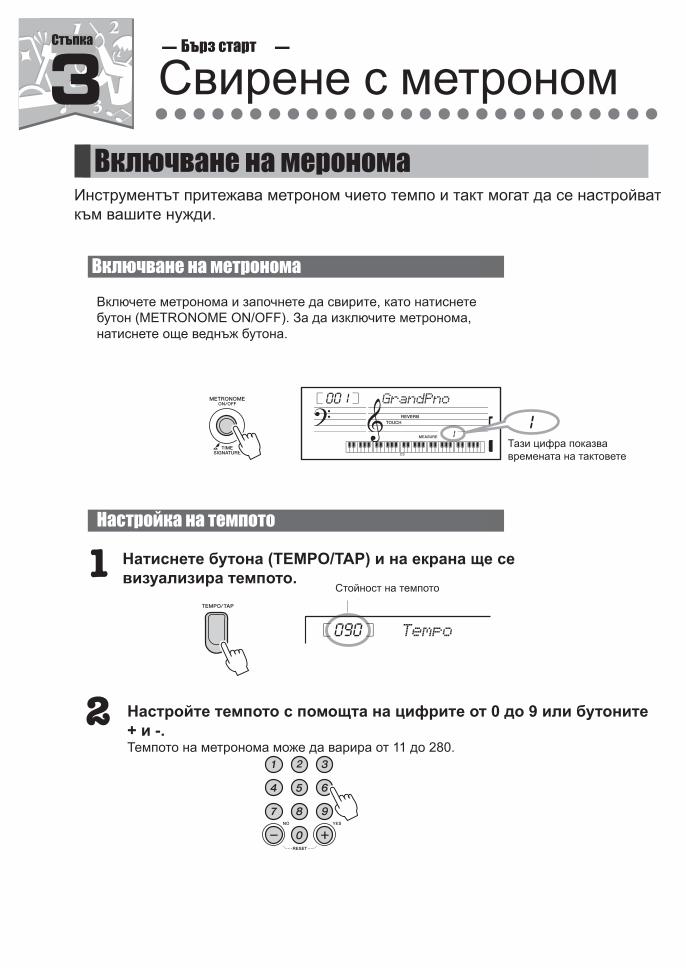
Стъпка Бърз старт
Свирене с метрономВключване на меронома
Инструментът притежава метроном чието темпо и такт могат да се настройваткъм вашите нужди.
Включете метронома и започнете да свирите, като натиснете бутон (METRONOME ON/OFF). За да изключите метронома, натиснете още веднъж бутона.
Включване на метронома
Тази цифра показва времената на тактовете
Настройка на темпото
Натиснете бутона (TEMPO/TAP) и на екрана ще се визуализира темпото.
Стойност на темпото
Настройте темпото с помощта на цифрите от 0 до 9 или бутоните + и -.Темпото на метронома може да варира от 11 до 280.

PSR-E313/YPT-310 Owner’s Manual 25
Quic
k G
uid
e
In this example we’ll set up a 5/8 time signature.
1 Press and hold the [METRONOME ON/OFF] button for longer than a second to select the number of beats per measure function “Time-SigN”.
2 Use the number buttons [0]–[9], [+], [-] to select the number of beats per measure.A chime will sound on the first beat of each measure while the other beats will click. All beats will simply click with no chime at the beginning of each measure if you set this parameter to “00”.The available range is from 0 through 60. Select 5 for this exam-ple.
3 Press the [FUNCTION] button a number of times to select the beat length function “TimeSigD”.The currently selected beat length will be displayed.
4 Use the [+], [-] to select the beat length.Select the required length for each beat: 2, 4, 8, or 16 (half note, quarter note, eighth note, or 16th note). Select 8 for this example.
Setting the Number of Beats per Measure, and the Length of Each Beat
TimeSigN04
Number of beats per measure.
Hold for longer than a second.
• The metronome time signa-ture will synchronize to a style or song that is playing, so these parameters cannot be changed while a style or song is playing.
NOTE
TimeSigD04
The length of one beat.
Ste
p 6
Pla
y W
ith T
he M
etro
nom
e
Настройка на такт, размер и време.
Натиснете и задръжте за време, по-дълго от 1 секунда бутон (Metronome on/off), за да изберете функцията за избор на размера - “TimeSign”.
В този пример ще настроим метронома в размер 5/8
Използвайте цифрите от 0 до 9 и бутоните + и -, за да изберете размера на такта. Високият тон на метронома указва първо време.Можете да избирате размер в диапазон от 0 до 60.
Забележка: Оразмеряването на метронома – Time Signature – ще се синхронизира с Песента и Стила, който свирите. Така, че няма да можете да го променяте по време на вече избраните
Песен или Стил.
Натиснете няколко пъти бутона (Function)за да изберете функцията (TimeSigD) – с нея можете да изберете броя на времената . На екрана ще се появи избраната замомента дължина.
За да настроите дължината на удара, използвайте бутоните + и -. За дължина на всяко тактуване можете да избирате между: половина нота, четвъртина, осмина или шестнайсетина.
Брой на ударите в минута
Задръжте бутона натиснат за около секунда
18 PSR-E313/YPT-310 Owner’s Manual
Step
3 Playing Songs
This instrument has 102 built-in Songs.Listening to a Song.
1 Press the [SONG] button.The Song number and name are displayed.
2 Select the desired Song by using the number buttons [0]–[9], [+], [-].Refer to the Song List on next page.
3 Press the [START/STOP] button.The Song will begin playing.You can stop playback at any time by pressing the [START/STOP] button.
Select and Listen to a Specific Song
001–102 Built in Songs (see next page)
103–107 User Songs (Songs you record yourself).
108– Songs transferred from a computer on page 67
Cruisin001
001
Song number Song name
Appears when the Song mode is active.
• You can play Songs recorded from the instru-ment or transferred from a computer. The procedure for playing these Songs is the same as that of the built-in Songs.
NOTE
— Quick Guide —
Избор и слушане на желана песен
Бърз старт
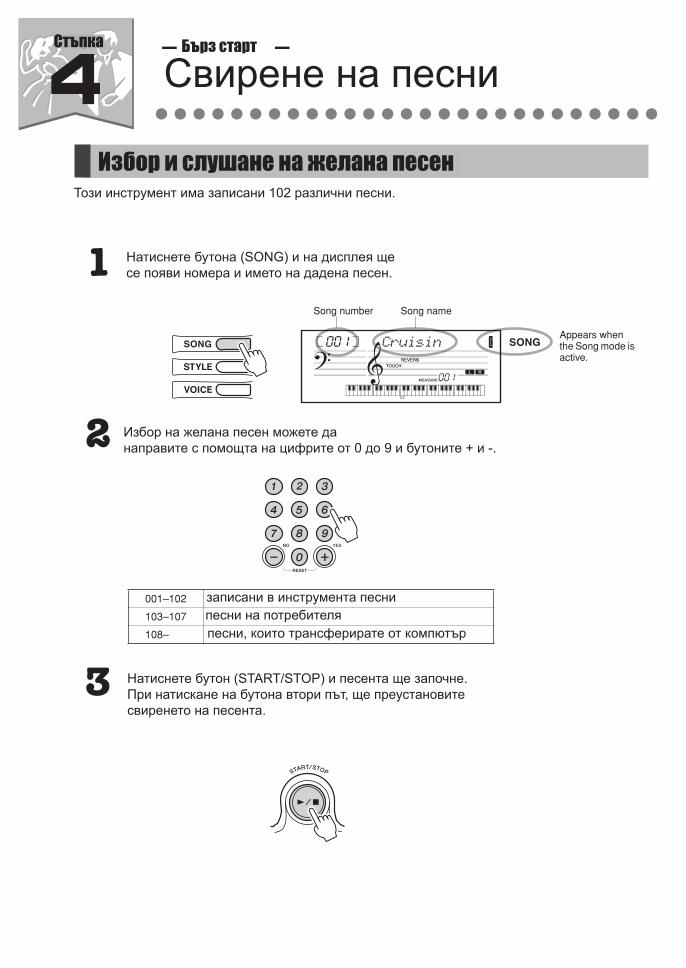
Свирене на песни
Този инструмент има записани 102 различни песни.
Натиснете бутона (SONG) и на дисплея ще се появи номера и името на дадена песен.
Избор на желана песен можете да направите с помощта на цифрите от 0 до 9 и бутоните + и -.
записани в инструмента песнипесни на потребителя песни, които трансфeрирате от компютър
Натиснете бутон (START/STOP) и песента ще започне. При натискане на бутона втори път, ще преустановите свиренето на песента.
PSR-E213/YPT-210 Owner’s Manual 19
Quic
k G
uid
e
Step
4 Playing Songs
This instrument has 102 built-in Songs.Listening to a Song
1 Press the [SONG] button.The Song number and name are displayed.
2 Select the desired Song by using the number buttons [0]–[9], [+], [-].Refer to the Song List on next page.
3 Press the [START/STOP] button.The Song will begin playing.You can stop playback at any time by pressing the [START/STOP] button.
Select and Listen to a Specific Song
Cruisin001
001
Song number Song name
Appears when the Song mode is active.
— Quick Guide —
Ste
p 4
Pla
ying
Son
gs
Стъпка
PSR-E313/YPT-310 Owner’s Manual 19
Quic
k G
uid
e
� Song List
• Songs with an asterisk mark (*) are ones which do not have a left part. Therefore, the lesson is applicable only for the right hand.• Some of the classic and/or traditional songs have been edited for length or for ease in learning, and may not be exactly the same as the original.• A Song Book is available that includes scores for all internal songs (excepting Songs 1–3). To obtain the Song Book, complete the user registration at
the following website. http://music.yamaha.com/registration/
� Other Operations
[REW] button ........... Fast-reverses the Song if pressed during playback (no sound is heard during fast reverse). Decreases the measure number if pressed while playback is stopped.
[FF] button ................ Fast-forwards the Song if pressed during playback. Increases the measure number if pressed while playback is stopped.
[PAUSE] button ........ Temporarily stops playback. Press this button a second time to resume playback from the point at which it was stopped.
� Using the [DEMO] buttonPress the [DEMO] button to play Songs 001, 002, 003, 004, 025, 041, 064, 084, 081, in sequence, and playback will continue repeatedly starting again from the first Song 001.You can stop playback at any time by pressing the [DEMO] button.
No. Song NameTOP PICKS
001 Cruisin002 Jessica003 Castaway
CLASSICAL MELODIES
004* Waltz (The Sleeping Beauty) (P. I. Tchaikovsky)
005* Air (Orchestral Suite) (J. S. Bach)006* Minuetto/Boccherini (L. Boccherini)007* Siciliano/J. S. Bach (J. S. Bach)008* Menuet (L’Arlésienne) (G. Bizet)
009* Slavonic Dances op.72-2 (A. Dvorák)
010* Largo (From the New World) (A. Dvorák)
011* Pizzicato Polka (J. Strauss II)
012* Romanze/Beethoven (L. v. Beethoven)
013* Swan Lake (P. I. Tchaikovsky)014* Sicilienne/Fauré (G. Fauré)015* Méditation (Thaïs) (J. Massenet)016* Serenade/Haydn (F. J. Haydn)017* Grand March (Aida) (G. Verdi)
018* Danza dell’Ore (La Gioconda) (A. Ponchielli)
019* Le Cygne (Le Carnaval des Animaux) (C. Saint-Saëns)
020* L’éléphant (Le Carnaval des Animaux) (C. Saint-Saëns)
021* Fossiles (Le Carnaval des Animaux) (C. Saint-Saëns)
022* Wachet auf, ruft uns die Stimme BWV. 645 (J. S. Bach)TRADITIONAL MELODIES
023* Greensleeves (Traditional)024* Beautiful Dreamer (S. C. Foster)025* Amazing Grace (Traditional)026* Ring de Banjo (S. C. Foster)027* O du lieber Augustin (Traditional)028* London Bridge (Traditional)029* Aura Lee (Traditional)030* Aloha Oe (Q. Liliuokalani)031 Turkey in the Straw (Traditional)032 On Top of Old Smoky (Traditional)033 Grandfather’s Clock (H. C. Work)034 Pop Goes the Weasel (Traditional)035 Mary Had a Little Lamb (Traditional)
ˆ
ˆ
036 Yankee Doodle (Traditional)037 Muffin Man (Traditional)038 Ten Little Indians (Traditional)
039 When the Saints Go Marching In (Traditional)
040 Little Brown Jug (Traditional)041 Down by the Riverside (Traditional)
042 When Irish Eyes Are Smiling (E. R. Ball)
043 Oh! Susanna (S. C. Foster)
044 Battle Hymn of the Republic (Traditional)
045 American Patrol (F. W. Meacham)
046 I’ve Been Working on the Railroad (Traditional)
047 My Darling Clementine (Traditional)048 Camptown Races (S. C. Foster)049 Red River Valley (Traditional)050 Jingle Bells (J. S. Pierpont)
PIANO SOLO051 Für Elise (L. v. Beethoven)
052 Valse op.64-1 “Petit Chien” (F. Chopin)
053 Menuett/Beethoven (L. v. Beethoven)
054 Andante grazioso (Sonate K.331) (W. A. Mozart)
055 24 Preludes op.28-7 (F. Chopin)
056 Melodie (Album für die Jugend) (R. Schumann)
057 Fröhlicher Landmann (Album für die Jugend) (R. Schumann)
058Von fremden Ländern und Menschen (Kinderszenen) (R. Schumann)
059 Träumerei (Kinderszenen) (R. Schumann)
060 Thema (Impromptus D.935-3) (F. Schubert)
061 Menuett BWV. Anh.116 (J. S. Bach)062 Invention Nr.1 (J. S. Bach)063 Gavotte/J. S. Bach (J. S. Bach)064 Arietta/Grieg (E. Grieg)065 To a Wild Rose (E. A. MacDowell)066 Tango/Albeniz (I. Albéniz)
067 La Fille aux Cheveux de Lin (C. A. Debussy)
068 La Chevaleresque (J. F. Burgmüller)
No. Song Name069 Pastorale (J. F. Burgmüller)
070 The Last Rose of Summer (Traditional)
071 Annie Laurie (Traditional)
072 Jeanie with the Light Brown Hair (S. C. Foster)
073 The Entertainer (S. Joplin)PIANO ENSEMBLE
074 Londonderry Air (Traditional)075 Die Lorelei (F. Silcher)076 Home Sweet Home (H. R. Bishop)077 Old Folks at Home (S. C. Foster)078 Scarborough Fair (Traditional)079 Loch Lomond (Traditional)
080 Twinkle Twinkle Little Star (Traditional)
081 Three Blind Mice (Traditional)
082 Wenn ich ein Vöglein wär (Traditional)
083 Believe Me If All Those Endearing Young Charms (Traditional)
084 Funiculi Funicula (L. Denza)085 Nocturne op.9-2 (F. Chopin)
086 Etude op.10-3 “Chanson de L’adieu” (F. Chopin)
087 Ave Maria/J. S. Bach - Gounod (J. S. Bach/C. F. Gounod)
088 Jesus bleibet meine Freude (J. S. Bach)
089 Menuett BWV. Anh.114 (J. S. Bach)
090 Piano Concerto No.21 2nd mov. (W. A. Mozart)
091 Der Vogelfänger bin ich ja (W. A. Mozart)
092 Romanze (Serenade K.525) (W. A. Mozart)
093 Die Schlittenfahrt K.605-3 (W. A. Mozart)
094 Ave Verum Corpus (W. A. Mozart)095 Liebesträume Nr.3 (F. Liszt)096 O Mio Babbino Caro (G. Puccini)097 Chanson du Toreador (G. Bizet)098 Frühlingslied (F. Mendelssohn)099 Ode to Joy (L. v. Beethoven)100 O Christmas Tree (Traditional)101 Deck the Halls (Traditional)102 Silent Night (F. Gruber)
No. Song Name
Ste
p 3
Pla
ying
Son
gs
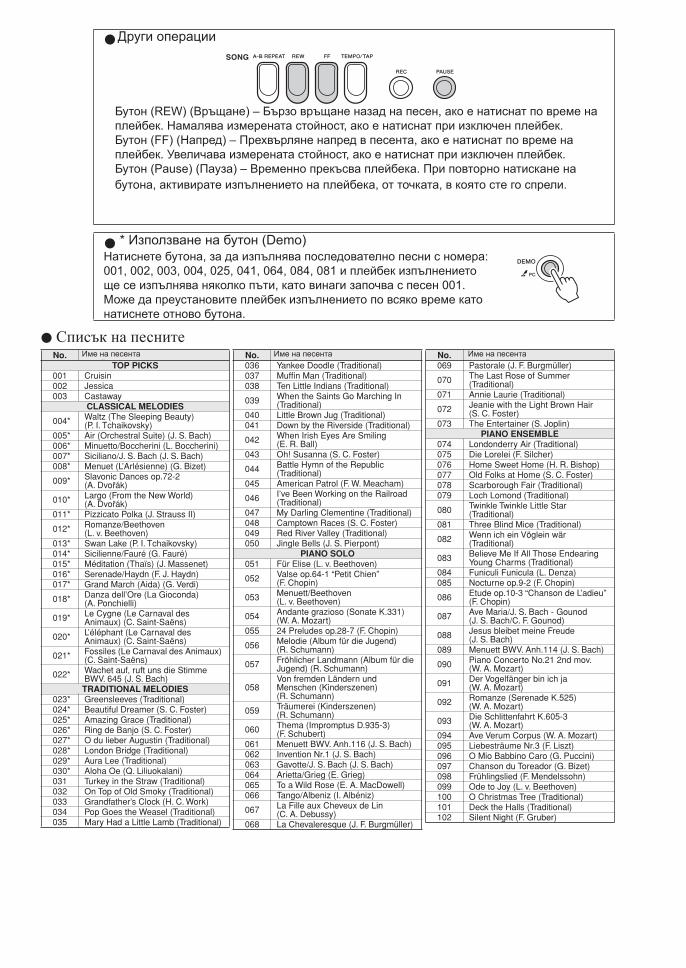
Други операции
Бутон (REW) (Връщане) – Бързо връщане назад на песен, ако е натиснат по време на плейбек. Намалява измерената стойност, ако е натиснат при изключен плейбек. Бутон (FF) (Напред) – Прехвърляне напред в песента, ако е натиснат по време на плейбек. Увеличава измерената стойност, ако е натиснат при изключен плейбек.Бутон (Pause) (Пауза) – Временно прекъсва плейбека. При повторно натискане на бутона, активирате изпълнението на плейбека, от точката, в която сте го спрели.
* Използване на бутон (Demo) Натиснете бутона, за да изпълнява последователно песни с номера: 001, 002, 003, 004, 025, 041, 064, 084, 081 и плейбек изпълнението ще се изпълнява няколко пъти, като винаги започва с песен 001. Може да преустановите плейбек изпълнението по всяко време като натиснете отново бутона.
Списък на песнитеИме на песента Име на песента Име на песента

20 PSR-E313/YPT-310 Owner’s Manual
Step
4 Play with a Style
The Style feature provides backing and rhythm parts in a wide variety of musical categories, including rock, blues, techno and much more. Here’s how to play a rhythm of a Style. The rhythm sound consists of percussion instruments.
1 Press the [STYLE] button.The Style number and name are displayed.
2 Select a Style.Select the desired Style by using the number buttons [0]–[9], [+], [-].Refer to the Style List on page 76.
You can also select commercially available Style Files. To do this load the Style Files from the computer to the instrument, and then register the style data starting with to style number 107. (Refer to the information on transferring data on page 67 and registering styles on page 54.) You can play Style Files in the same way that you play the internal styles. If the Style File has not been regis-tered, “No Data” will be displayed when selecting style number 107.
3 Press the [START/STOP] button.The Style rhythm will start.You can stop playback at any time by pressing the [START/STOP] button.
Selecting a rhythm of a Style
8BtModrn001
001
Style number Style name
Appears when the Style mode is active.
HH Light016
• Since the Pianist category Styles (098–106) have no rhythm parts, no sound will be produced if you start rhythm-only playback. To use these Styles, turn on the auto accompaniment and play the keyboard as described on pages 21–22. (The bass and chord accompaniment parts will sound.)
NOTE
— Quick Guide —
PSR-E213/YPT-210 Owner’s Manual 21
Quic
k G
uid
e
Step
5 Play with a Style
The Style feature provides backing and rhythm parts in a wide variety of musical categories, including rock, blues, techno and much more. Here’s how to play a rhythm of a Style. The rhythm sound consists of percussion instruments.
1 Press the [STYLE] button.The Style number and name are displayed.
2 Select a Style.Select the desired Style by using the number buttons [0]–[9], [+], [-].Refer to the Style List on page 62.
3 Press the [START/STOP] button.The Style rhythm will start.You can stop playback at any time by pressing the [START/STOP] button.
Selecting a rhythm of a Style
8BtModrn001
001
Style number Style name
Appears when the Style mode is active.
HH Light016
• Since the Pianist category Styles (093–100) have no rhythm parts, no sound will be produced if you start rhythm-only playback. To use these Styles, turn on the auto accompaniment and play the keyboard as described on pages 22–23. (The bass and chord accompaniment parts will sound.)
NOTE
— Quick Guide —
Ste
p 5
Pla
y w
ith a
Sty
le
Свирене с ритъм
Натиснете бутон (STYLE).
Избор на ритъм от банка СтилБанка “Стилове” [Style] предлага ритмичен съпровод в разнообразни музи-кални стилове, като рок, блус, техно и много други. Тук ще разберем как да свирим с този съпровод.
Номера и името на стила ще се появят на дисплея.
Изберете желания стил с помощта на цифрите от 0 до 9 и бутоните + и -.
Изберете стил
Можете също така да изберете да ползвате Стилове, предлагани в мрежата. За да се възползвате от тази опция, прехвърлете файловете със Стилове от компютъра на инструмента; след това регистрирайте данните за стила като започнете от номер 107; можете да ползвате тези стилове по същия начин, както стиловете, записани фабрично в инструмента.
Номер на стила Име на стила
Този надпис се появява когато е активен режим “СТИЛ”
Натиснете бутон (START/STOP) и инструмента ще започне да свири според избрания от вас стил. С повторно натискане на бутона ще спрете свиренето в този стил.
Бърз стартСтъпка

PSR-E313/YPT-310 Owner’s Manual 21
Quic
k G
uid
e
On the previous page, you’ve learned how to select your favorite rhythm of a Style. Here, you’ll learn how to expand on that rhythm with bass and chord backing, and use all of it as your accom-paniment as you play.
1 Press the [STYLE] button and then select a Style.
2 Turn auto accompaniment on.Press the [ACMP ON/OFF] button.Press the [ACMP ON/OFF] button again to turn the auto accom-paniment off.
3 Turn SYNC START on.Press the [SYNC START] button.
When the Sync Start standby mode is engaged, Style playback will begin as soon as you play a chord in the accompaniment range of the keyboard. You can turn off Sync Start standby mode by pressing the [SYNC START] button.
Playing with a Style
� When auto accompaniment is on ...The keys to the left of the Split Point (54; F#2) will play only chords.This is known as the “Auto Accompaniment range.”
8BtModrn001
001
Appears when auto accompaniment is on
• You can change the Split Point. Refer to “Setting the Split Point” on page 46.
NOTE
Split Point (54; F#2)
Auto Accompani-ment range
8BtModrn001
001
Flashes when Sync Start is on.
Ste
p 4
Pla
y w
ith a
Sty
le
Натиснете бутон (Style) и изберете желания от вас стил.
Свирене с акомпаниментНа предишната страница научихме как да изберете предпочитан ритъм от банка “Style”. Сега ще научим как да обогатим този ритъм с бас и хармоничен съпровод и да използваме този акомпанимент докато свирим
За да включите акомпанимент натиснете бутон (ACMP On/Off). За да изключите акомпанимента, натиснете втори път бутона.
При включен Авто Акомпанимент, клавишите вляво от разделната точка (54, F#2) ще свирят само акорди.
Забележка: Можете да промените зададената Разделна точка като използвате функцията “Setting Split Point”.
Включване на функция Sync Start. Натиснете бутона Sync Start.
При активиран режим на готовност Sync Start, избрания от вас стил ще звучи на плейбек, докато вие свирите на струнни инструменти с клавиатурата. Можете да използвате и двете си ръце, за да свирите. При повторно натискане на този бутон, функцията ще бъде преустановена.
Тези символи мигат когато функцията Sync е активирана

22 PSR-E313/YPT-310 Owner’s Manual
4 The Style will begin playing as soon as you play a chord in the accompaniment range of the keyboard.Not sure how to play chords? No problem! This instrument is capable of playing chords even if you only play one key. Try playing one, two or three keys (any notes will do) in the auto accompaniment range of the keyboard. Different keys will pro-duce different results.Refer to page 55 for detailed instructions for playing chords.
5 Try playing other chords with your left hand and play a melody with your right hand.
6 You can stop playback at any time by pressing the [START/STOP] button.
Auto Accompani-ment range
Split Point
Auto Accompani-ment range
Split Point
Автоматичният акомпанимент стартира едновременно с натискането на клавиш или изсвирването на акорд.Незнаете как се свирят акорди? Няма проблем! Този инструмент може да свири акорди дори да сте натиснали само един клавиш. С натискането на клавиш в зоната за авто акомпанимент, инструментът сам хармонизира в зададената от клавиша тоналност. Различните тонове на клавиатурата - дават различни резултати.
Опитайте да задавате тоналността на автоакомпанимента с лявата ръка, а с дясната свирете мелодия
Точка на разделяне на зоната за автоакомпанимент.
Точка на разделяне на зоната за автоакомпанимент.
Автоакомпанимента можете да спрете с натискане на бутон Start/Stop

24 PSR-E213/YPT-210 Owner’s Manual
GrandPno001
001
Press the [STANDBY/ON] switch to turn on the power.Press the [STANDBY/ON] switch again to turn the power OFF.
Turning the power on
Pressing the MASTER VOLUME [+] and [-] buttons.
Adjusting the volume
Press the [-] button to lower the vol-ume.
Press the [+] button to increase the volume.
Press the [START/STOP] button after pressing the [SONG] or [STYLE] button to start play-back of the selected Song or Style (rhythm).
About the [START/STOP] button
The “Press & Hold” symbol that appears next to some buttons indicates that the button can be pressed and held for longer than a second to call up a related or different function.
The “Press & Hold” Symbol
Basic Operation and Displays
Basic Operation
Основни операции и дисплеи
Основни опрерации
Включване на захранването
Натиснете бутон [STANDBY] за да включите инструментаНатиснете отново е бутон [STANDBY]за да го изключите.
Регулиране силата на звука
С натискане на бутоните [+] и [-]
Натиснете бутона [-] за намаляване на звука
Натиснете бутона [+] за усилване на звука
Бутон [START/STOP]
Натиснете бутона [START/STOP] след като сте натиснали бутон [SONG] или [STYLE] за да стартирате избраните песен или ритъм.
Символът “Press & Hold
Когато видите този символ до някой от бутоните, това означава, че натиснат за повече от секунда този бутон извик-ва различна фунция.

PSR-E213/YPT-210 Owner’s Manual 25
Basic Operation and Displays
When you select a basic function, the name and number of the currently selected Song, Style and Voice is shown. From this display, you can select the desired Song, Style or Voice.
Press a button to select a basic function
Press the [SONG] button to select a Song.
Press the [STYLE] button to select a Style.
Press the [VOICE] button to select a Voice.
The [FUNCTION] button contains 16 settings. Each time you press the [FUNC-TION] button, the setting item is selected in sequence, and the value of the selected item can be changed in the display.
Function Settings (page 48)
� Number buttons [0]–[9]The number buttons can be used to directly enter a Song, Style or Voice number or parameter value.For numbers that start with one or two zeroes, the first zeroes can be omitted
� [+], [-] buttonsPress the [+] button briefly to increase the value by 1, or press the [-] button briefly to decrease the value by 1. Press and hold either button to continuously increase or decrease the value in the corresponding direction.
Set the number or value
Press number but-tons [0], [0], [2].
GrandPn2002
Example: Selecting Voice 002, Grand Piano2.
Press briefly to decrease.
Press briefly to increase.
Бутони за основните функции
Натиснете бутон [SONG] за даизберете песен
Натиснете бутон [STYLE] за даизберете ритъм
Натиснете бутон [VOICE] за даизберете инструмент
Когато избирате от основните функционални бутони, иметои номерът на избраните песен, ритъм или инструмент се изписват на дисплея. Дисплеят Ви помага в избора на песенинструмент и ритъм.
Избор на номер и стойност
Бутони с номера от [0] до [9]Тези бутони можете да използвате за да извикате директно песен, ритъм или инструмент.
Пример: Избор на инструмент 002, Роял 2
Бутони [+] и [-]Натиснете бутон [+] за да завишите стойността с едини-ца, или натиснете бутон [-] за да намалите стойността с единица. Ако задържите продължително натиснати тези бутони, стойностите ще се увеличат или намалят с няколко единици.
Натиснете за да намалите стойност
Натиснете за да завишите стойност
Бутон FUNCTION
Този бутон има 16 функцииС всяко натискане на този бутон една от тези функции се изобразява на дисплея.

U.R.G., Pro Audio & Digital Musical Instrument Division, Yamaha Corporation© 2007 Yamaha Corporation
WH70640 XXXPOTYX.X-01A0 Printed in China
Yamaha Home Keyboards Home Page (English Only) http://music.yamaha.com/homekeyboard
Yamaha Manual Libraryhttp://www.yamaha.co.jp/manual/
Официален вносител и сервиз“ДИНАКОРД - България” ЕООД1528, Т.Ц. “ЕВРОПА” София,бул. “Искърско шосе” № 7тел.: 02/ 978 20 25 (централа - 5 линии)e-mail: [email protected] - продажби [email protected] - сервизwww.pro-technica.com