Embed Size (px)
Citation preview

KE
EP
ING
TH
E W
OR
LD
SE
WIN
G
Use
r’s
Guid
e

Thi
s ho
usho
ld s
ewin
g m
achi
ne is
des
igne
d to
com
ply
with
IE
C/E
N 6
0335
-2-2
8 an
d U
L15
94.
IMPO
RTA
NT
SA
FET
Y IN
STRU
CT
ION
SW
hen
usi
ng
an e
lect
rica
l ap
plia
nce
, bas
ic s
afet
y pre
cautio
ns
should
alw
ays
be
follo
wed
, in
cludin
g th
e fo
llow
ing:
Rea
d a
ll in
stru
ctio
ns
bef
ore
usi
ng
this
house
hold
sew
ing
mac
hin
e.
DA
NG
ER - T
o re
duce
the
ris
k of
ele
ctri
c sh
ock:
•
A s
ewin
g m
achin
e sh
ould
nev
er b
e le
ft u
nat
tended
when
plu
gged
in. Alw
ays
unplu
g th
is s
ewin
g m
achin
e from
the
elec
tric
outle
t im
med
iate
ly a
fter
usi
ng
and b
efore
cle
anin
g.•
Alw
ays
unplu
g be
fore
rel
ampin
g. R
epla
ce b
ulb
with
sam
e ty
pe
rate
d 5
Wat
t.
WA
RN
ING
- To
redu
ce t
he r
isk
of b
urns
, r
e,
elec
tric
sho
ck, o
r in
jury
to
pers
ons:
•
Do n
ot al
low
to b
e use
d a
s a
toy.
Clo
se a
tten
tion is
nec
essa
ry w
hen
this
sew
ing
mac
hin
e is
use
d b
y or
nea
r ch
ildre
n a
nd infi rm
per
sons.
•
Use
this
sew
ing
mac
hin
e only
for
its inte
nded
use
as
des
crib
ed in this
man
ual
. U
se
only
attac
hm
ents
rec
om
men
ded
by
the
man
ufa
cture
r as
conta
ined
in this
man
ual
.•
Nev
er o
per
ate
this
sew
ing
mac
hin
e if it has
a d
amag
ed c
ord
or
plu
g, if it
is n
ot
work
ing
pro
per
ly, if it has
bee
n d
ropped
or
dam
aged
, or
dro
pped
into
wat
er. Ret
urn
th
e se
win
g m
achin
e to
the
nea
rest
auth
orize
d d
eale
r or
serv
ice
cente
r fo
r ex
amin
atio
n,
repai
r, e
lect
rica
l or
mec
han
ical
adju
stm
ent.
•
Nev
er o
per
ate
the
sew
ing
mac
hin
e w
ith a
ny
air
open
ings
blo
cked
. K
eep v
entil
atio
n
open
ings
of th
e se
win
g m
achin
e an
d foot co
ntrolle
r free
fro
m the
accu
mula
tion o
f lin
t, dust
, an
d loose
clo
th.
•
Kee
p fi n
gers
aw
ay fro
m a
ll m
ovi
ng
par
ts. Sp
ecia
l ca
re is
required
aro
und the
sew
ing
mac
hin
e nee
dle
.•
Alw
ays
use
the
pro
per
nee
dle
pla
te. The
wro
ng
pla
te c
an c
ause
the
nee
dle
to b
reak
.•
Do n
ot use
ben
t nee
dle
s.•
Do n
ot pull
or
push
fab
ric
while
stit
chin
g. I
t m
ay d
efl e
ct the
nee
dle
cau
sing
it to
bre
ak.
•
Switc
h the
sew
ing
mac
hin
e off (
“0”)
when
mak
ing
any
adju
stm
ent in
the
nee
dle
are
a,
such
as
thre
adin
g nee
dle
, ch
angi
ng
nee
dle
, th
read
ing
bobbin
, or
chan
ging
pre
sser
fo
ot,
etc.
•
Alw
ays
unplu
g se
win
g m
achin
e fr
om
the
elec
tric
al o
utle
t w
hen
rem
ovi
ng
cove
rs,
lubrica
ting,
or
when
mak
ing
any
oth
er u
ser
serv
icin
g ad
just
men
ts m
entio
ned
in the
inst
ruct
ion m
anual
.•
Nev
er d
rop o
r in
sert a
ny
obje
ct into
any
open
ing.
•
Do n
ot use
outd
oors
.•
Do n
ot oper
ate
wher
e ae
roso
l (s
pra
y) p
roduct
s ar
e bei
ng
use
d o
r w
her
e oxy
gen is
bei
ng
adm
inis
trat
ed.
•
To d
isco
nnec
t, tu
rn a
ll co
ntrols
to the
off (
“0”)
posi
tion, th
en r
emove
plu
g fr
om
outle
t.•
Do
not un
plu
g by
pul
ling
on c
ord.
To
unplu
g, g
rasp
the
plu
g, n
ot the
cor
d.
SAV
E T
HES
E IN
STRU
CT
ION
S
Tabl
e of
Con
tent
sL
earn
yo
ur P
lati
num
2
Ove
rvie
w -
Fron
t 2
Ove
rvie
w -
Rea
r 3
Acc
esso
ry T
ray
3A
cces
sorie
s 3
Unp
ack
your
sew
ing
mac
hine
4
Con
nect
to th
e Po
wer
Sup
ply
4Pa
ck A
way
Aft
er S
ewin
g 5
Acc
esso
ry T
ray
5Sp
ool P
ins
6T
hrea
ding
the
Upp
er T
hrea
d 7
Nee
dle
Thr
eade
r 8
Thr
eadi
ng fo
r Tw
in N
eedl
e 9
Bob
bin
Win
ding
10
Plac
ing
the
Bob
bin
in th
e M
achi
ne
10W
indi
ng fr
om th
e N
eedl
e 11
Nee
dles
12
Cha
ngin
g th
e N
eedl
e 12
Pres
ser F
eet
13C
hang
ing
the
Pres
ser F
oot
14Pr
esse
r Foo
t Pre
ssur
e
14Pr
esse
r Foo
t Lev
er
14T
hrea
d Te
nsio
n 15
Low
erin
g th
e Fe
ed T
eeth
16
Fun
ctio
ns a
nd I
nfo
disp
lay
17
The
Tou
ch P
anel
18
Stitc
h Se
lect
ion
20A
lpha
bet (
Plat
inum
755
) 21
Sew
ing
Adv
isor (
Plat
inum
715
/735
) 22
Icon
s on
the
Info
Disp
lay
(Pla
tinum
715
/735
) 25
Icon
s on
the
Info
Disp
lay
(Pla
tinum
755
) 27
Prog
ram
min
g 29
Sew
ing
33U
tility
Sew
ing
35B
utto
nhol
es
44B
utto
n 47
Car
e o
f yo
ur P
lati
num
49
Trou
ble
Shoo
ting
52
Inde
x 54

1 2 3 5 6
4
789
1011
1312 14 15
1617
1819
2021
22 23 24 25 26
27
28 29
Lea
rn y
ou
r P
lati
nu
m
Ove
rvie
w -
Fron
t1
Lid
2 D
ial t
o se
t pre
sser
foot
pre
ssur
e3
Thr
ead
take
-up
leve
r4
Thr
ead
tens
ion
5 Pr
e-te
nsio
n di
sc6
Dia
l to
set t
hrea
d te
nsio
n7
Sens
or B
utto
nhol
e Fo
ot s
ocke
t8
Ligh
t9
Nee
dle
thre
ader
10 N
eedl
e ba
r11
Pre
sser
foot
12 F
ree
arm
13 B
obbi
n co
ver
14 B
ase
plat
e15
Fee
d te
eth
up/d
own
dial
16 P
ress
er fo
ot b
ar a
nd p
ress
er fo
ot a
nkle
17 N
eedl
e cl
amp
scre
w
18 T
hrea
d te
nsio
n di
sk fo
r bob
bin
win
ding
19
Mai
n sp
ool p
in20
Spo
ol h
olde
rs21
Bob
bin
win
ding
gui
des
22 A
uxila
ry s
pool
pin
23 B
obbi
n w
inde
r spi
ndle
24
Bob
bin
stop
25 T
hrea
d cu
tter f
or b
obbi
n w
indi
ng26
Han
dwhe
el27
Inf
oDisp
lay
and
Touc
h Pa
nel
28 P
ower
sw
itch,
con
nect
ors
for p
ower
su
pply
and
foot
con
trol
29 R
uler
(inc
hes
and
cent
imet
ers)
Lear
n yo
ur P
lati
num
2

30
3231 33
34
35
36
37
38
41
39
40
43
44
42
45 Lea
rn y
ou
r P
lati
nu
m
Ove
rvie
w -
Rea
r30
Han
dle
31 P
ress
er fo
ot li
fter
32 T
hrea
d cu
tter
33 N
eedl
e th
read
er A
cces
sory
Tra
y34
Spa
ce fo
r acc
esso
ries
35 S
pace
for p
ress
er fe
et36
Spa
ce fo
r bob
bins
Acc
esso
ries
Nee
dles
Thr
ead
spoo
lsPr
esse
r fee
t A, B
, C, D
, E, J
. Pr
esse
r foo
t H (o
nly
Plat
inum
715
/735
).Q
uilte
r’s 1
/4"
Piec
ing
Foot
P (o
nly
Plat
inum
755
). Se
nsor
But
tonh
ole
Foot
( on
ly P
latin
um
735/
755)
.
37 B
rush
38 S
titch
pla
te o
pene
r (to
be
atta
ched
to th
e br
ush)
39 S
crew
driv
er40
Sea
m ri
pper
41 C
lear
ance
pla
te42
Bob
bins
43 F
elt p
ad44
Lig
ht b
ulb
rem
over
45 S
pool
hol
ders
3

3 1
2
Lea
rn y
ou
r P
lati
nu
m
Unp
ack
your
sew
ing
mac
hine
1 Pl
ace
the
mac
hine
on
a ta
ble
or c
abin
et,
rem
ove
the
pack
agin
g an
d lif
t off
the
cove
r.
2 R
emov
e th
e pa
ckin
g m
ater
ial,
the
foot
co
ntro
l and
na
lly th
e pr
otec
tion
cove
r.
3 T
he m
achi
ne is
del
iver
ed w
ith a
n ac
ces-
sory
bag
and
a m
ain
cord
.
4 W
ipe
off
the
mac
hine
, par
ticul
arly
ar
ound
the
need
le a
nd n
eedl
e pl
ate
to
rem
ove
any
soil
befo
re s
ewin
g.
Con
nect
to
the
Pow
er S
uppl
yA
mon
g th
e ac
cess
orie
s yo
u w
ill
nd
the
mai
n co
rd. O
n th
e un
ders
ide
of th
e m
achi
ne y
ou w
ill
nd in
form
atio
n ab
out
the
pow
er s
uppl
y (V
) and
the
freq
uenc
y (H
z).
Befor
e plu
ggin
g in
the f
oot c
ontro
l, ch
eck to
ensu
re
that
it is
of
type “
FR4”
(see
unde
rside
of
foot
cont
rol).
1 Ta
ke o
ut th
e co
rd fr
om th
e fo
ot c
on-
trol
. Con
nect
the
foot
con
trol
cor
d to
th
e fr
ont s
ocke
t on
the
botto
m ri
ght
side
of th
e m
achi
ne.
2 C
onne
ct th
e po
wer
cor
d to
the
rear
so
cket
on
the
botto
m ri
ght s
ide
of th
e m
achi
ne.
3 W
hen
you
pres
s the
pow
er sw
itch
to
ON
, bot
h th
e m
achi
ne a
nd th
e lig
ht a
re
switc
hed
on.
For
the
US
A a
nd C
anad
aT
his
sew
ing
mac
hine
has
a p
olar
ized
plu
g (o
ne
blad
e w
ider
than
the
othe
r). T
o re
duce
the
risk
of e
lect
ric s
hock
, thi
s pl
ug is
inte
nded
to
t in
a po
lariz
ed o
utle
t onl
y on
e w
ay. I
f th
e pl
ug d
oes
not
t fu
lly in
the
outle
t, re
vers
e th
e pl
ug. I
f it
still
doe
s no
t t,
con
tact
a q
uali
ed
elec
tric
ian
to
inst
all t
he p
rope
r out
let.
Do
not m
odify
the
plug
in
any
way
.
4

1
Lea
rn y
ou
r P
lati
nu
m
Pack
Aw
ay A
fter
Sew
ing
1 Pr
ess
the
pow
er s
witc
h to
turn
off
the
mac
hine
.
2 U
nplu
g th
e co
rd fr
om th
e w
all s
ocke
t r
st a
nd th
en fr
om th
e m
achi
ne.
3 W
ind
the
mai
n co
rd a
roun
d yo
ur h
and
and
plac
e th
e co
rd in
the
pock
et o
f th
e ha
rd c
over
.
4 U
nplu
g th
e fo
ot c
ontr
ol c
ord
from
the
mac
hine
. Win
d th
e fo
ot c
ontr
ol c
ord
arou
nd y
our h
and
and
plac
e it
in th
e sp
ace
of th
e fo
ot c
ontr
ol.
5 C
heck
to e
nsur
e th
at a
ll ac
cess
orie
s ar
e in
the
acce
ssor
y tr
ay. S
lide
the
tray
on
to
the
mac
hine
aro
und
the
free
arm
.
6 Pl
ace
the
foot
con
trol
, with
the
unde
r-sid
e to
war
ds y
ou,
ttin
g in
to th
e re
cess
of
the
acce
ssor
y tr
ay a
t the
rear
sid
e of
th
e m
achi
ne.
Acc
esso
ry T
ray
In th
e ac
cess
ory
tray
ther
e ar
e sp
ecia
l pla
ces
for p
ress
er fe
et, a
nd b
obbi
ns p
lus
spac
e fo
r nee
dles
and
oth
er a
cces
sorie
s. St
ore
the
acce
ssor
ies
in th
e tr
ay s
o th
ey a
re e
asily
ac
cess
ible
.
Rem
ove
the
Acc
esso
ry T
ray
To u
se th
e fr
ee a
rm -
rem
ove
the
acce
s-so
ry tr
ay. W
hen
atta
ched
, the
re is
a p
last
ic
hook
that
kee
ps th
e ac
cess
ory
tray
lock
ed
to th
e m
achi
ne. T
here
is a
but
ton
on th
e le
ft u
nder
side
of th
e ac
cess
ory
tray
(1) t
hat
is us
ed to
unl
ock
and
rem
ove
it. P
ress
the
butto
n up
war
ds a
nd s
lide
the
acce
ssor
y tr
ay
to th
e le
ft, p
assin
g th
e st
op p
ositi
on, a
nd
rem
ove
it.
5
Lea
rn y
ou
r P
lati
nu
m
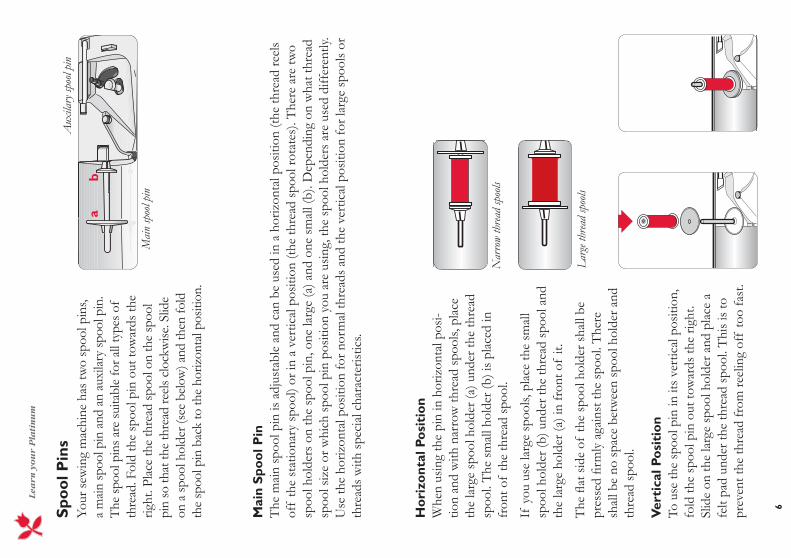
Spoo
l Pin
sYo
ur s
ewin
g m
achi
ne h
as tw
o sp
ool p
ins,
a m
ain
spoo
l pin
and
an
auxi
lary
spoo
l pin
. T
he sp
ool p
ins a
re su
itabl
e fo
r all
type
s of
thre
ad. F
old
the
spoo
l pin
out
tow
ards
the
right
. Pla
ce th
e th
read
spoo
l on
the
spoo
l pi
n so
that
the
thre
ad re
els c
lock
wise
. Slid
e on
a sp
ool h
olde
r (se
e be
low
) and
then
fold
th
e sp
ool p
in b
ack
to th
e ho
rizon
tal p
ositi
on.
ba
Aux
ilary
spoo
l pin
Mai
n sp
ool p
in
Nar
row
thre
ad sp
ools
Lar
ge th
read
spoo
ls
Hor
izon
tal P
osit
ion
Whe
n us
ing
the
pin
in h
oriz
onta
l pos
i-tio
n an
d w
ith n
arro
w th
read
spo
ols,
plac
e th
e la
rge
spoo
l hol
der (
a) u
nder
the
thre
ad
spoo
l. T
he s
mal
l hol
der (
b) is
pla
ced
in
fron
t of
the
thre
ad s
pool
.
If y
ou u
se la
rge
spoo
ls, p
lace
the
smal
l sp
ool h
olde
r (b)
und
er th
e th
read
spo
ol a
nd
the
larg
e ho
lder
(a) i
n fr
ont o
f it.
The
at
sid
e of
the
spoo
l hol
der s
hall
be
pres
sed
rm
ly a
gain
st th
e sp
ool.
The
re
shal
l be
no s
pace
bet
wee
n sp
ool h
olde
r and
th
read
spo
ol.
Vert
ical
Pos
itio
nTo
use
the
spoo
l pin
in it
s ve
rtic
al p
ositi
on,
fold
the
spoo
l pin
out
tow
ards
the
right
. Sl
ide
on th
e la
rge
spoo
l hol
der a
nd p
lace
a
felt
pad
unde
r the
thre
ad s
pool
. Thi
s is
to
prev
ent t
he th
read
from
reel
ing
off
too
fast
.
Mai
n Sp
ool P
inT
he m
ain
spoo
l pin
is a
djus
tabl
e an
d ca
n be
use
d in
a h
oriz
onta
l pos
ition
(the
thre
ad re
els
off
the
stat
iona
ry s
pool
) or i
n a
vert
ical
pos
ition
(the
thre
ad s
pool
rota
tes)
. The
re a
re tw
o sp
ool h
olde
rs o
n th
e sp
ool p
in, o
ne la
rge
(a) a
nd o
ne s
mal
l (b)
. Dep
endi
ng o
n w
hat t
hrea
d sp
ool s
ize
or w
hich
spo
ol p
in p
ositi
on y
ou a
re u
sing,
the
spoo
l hol
ders
are
use
d di
ffer
ently
. U
se th
e ho
rizon
tal p
ositi
on fo
r nor
mal
thre
ads
and
the
vert
ical
pos
ition
for l
arge
spo
ols
or
thre
ads
with
spe
cial
cha
ract
erist
ics.
6

b
a
Lea
rn y
ou
r P
lati
nu
m
Aux
ilary
Spo
ol P
inT
he a
uxila
ry s
pool
pin
is u
sed
whe
n w
indi
ng
a bo
bbin
from
a s
econ
d sp
ool o
f th
read
or
for a
sec
ond
spoo
l whe
n se
win
g w
ith a
twin
ne
edle
.W
hen
usin
g th
e au
xila
ry s
pool
pin
, pla
ce th
e la
rge
spoo
l hol
der a
nd a
felt
pad
unde
r the
th
read
spo
ol.
Thr
eadi
ng t
he U
pper
Thr
ead
Whe
n th
read
ing
the
uppe
r thr
ead,
mak
e su
re th
at th
e pr
esse
r foo
t is
raise
d an
d th
e ne
edle
is in
the
up p
ositi
on.
1 Pu
ll th
e sp
ool p
in o
ut. P
lace
the
spoo
l on
the
spoo
l pin
with
spo
ol h
olde
r (f
ollo
w th
e in
stuc
tions
on
prev
ious
pa
ge).
The
thre
ad s
hall
reel
clo
ckw
ise.
Push
the
spoo
l pin
bac
k in
.
Hol
d th
e th
read
nea
r the
spo
ol u
sing
your
righ
t han
d. U
se y
our l
eft h
and
to
brin
g th
e en
d of
the
thre
ad in
the
dire
c-tio
n of
the
arro
w o
n th
e m
achi
ne.
2 B
ring
the
thre
ad in
to th
e pr
e-te
nsio
n th
read
gui
de (a
). B
ring
the
thre
ad d
own
betw
een
the
thre
ad te
nsio
n di
scs
(b).
3 C
ontin
ue th
read
ing
in th
e di
rect
ion
indi
-ca
ted
by th
e ar
row
s. B
ring
the
thre
ad
from
the
right
whe
n th
read
ing
into
the
slot o
n th
e ta
ke-u
p le
ver.
4 Pu
ll th
e th
read
into
the
last
gui
de ju
st
abov
e th
e ne
edle
.
5 T
he n
eedl
e is
thre
aded
from
fron
t to
back
(see
nee
dle
thre
ader
for f
urth
er
inst
ruct
ions
).
6 Pl
ace
the
thre
ad u
nder
the
pres
ser f
oot
and
into
the
thre
ad c
utte
r, pu
ll it
dow
n-w
ards
to c
ut it
.
7
aa
1. 3. 4. 5.
2.
Lea
rn y
ou
r P
lati
nu
m
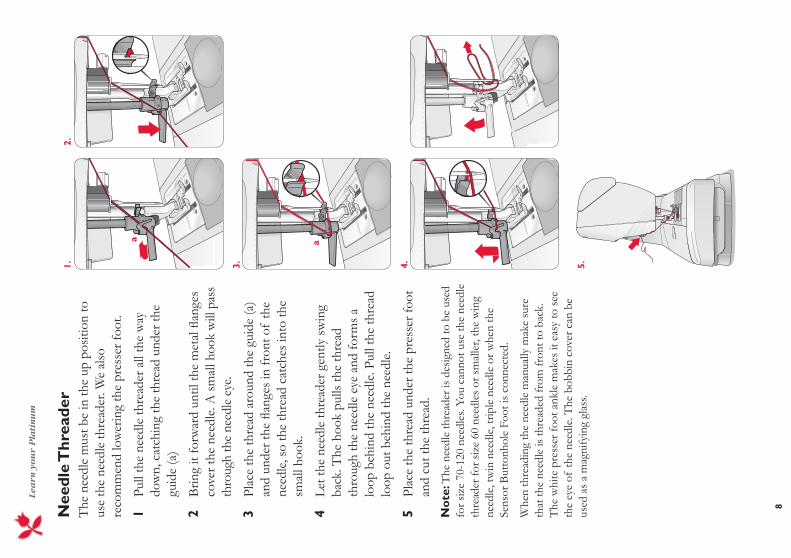
Nee
dle
Thr
eade
rT
he n
eedl
e m
ust b
e in
the
up p
ositi
on to
us
e th
e ne
edle
thre
ader
. We
also
re
com
men
d lo
wer
ing
the
pres
ser f
oot.
1 Pu
ll th
e ne
edle
thre
ader
all
the
way
do
wn,
cat
chin
g th
e th
read
und
er th
e gu
ide
(a)
2 B
ring
it fo
rwar
d un
til th
e m
etal
an
ges
cove
r the
nee
dle.
A s
mal
l hoo
k w
ill p
ass
thro
ugh
the
need
le e
ye.
3 Pl
ace
the
thre
ad a
roun
d th
e gu
ide
(a)
and
unde
r the
an
ges
in fr
ont o
f th
e ne
edle
, so
the
thre
ad c
atch
es in
to th
e sm
all h
ook.
4 Le
t the
nee
dle
thre
ader
gen
tly s
win
g ba
ck. T
he h
ook
pulls
the
thre
ad
thro
ugh
the
need
le e
ye a
nd fo
rms
a lo
op b
ehin
d th
e ne
edle
. Pul
l the
thre
ad
loop
out
beh
ind
the
need
le.
5 Pl
ace
the
thre
ad u
nder
the
pres
ser f
oot
and
cut t
he th
read
.N
ote
: The
nee
dle
thre
ader
is d
esig
ned
to b
e us
ed
for s
ize
70-1
20 n
eedl
es. Y
ou c
anno
t use
the
need
le
thre
ader
for s
ize
60 n
eedl
es o
r sm
alle
r, th
e w
ing
need
le, t
win
nee
dle,
trip
le n
eedl
e or
whe
n th
e Se
nsor
But
tonh
ole
Foot
is c
onne
cted
.
Whe
n th
read
ing
the
need
le m
anua
lly m
ake
sure
th
at th
e ne
edle
is th
read
ed fr
om fr
ont t
o ba
ck.
The
whi
te p
ress
er fo
ot a
nkle
mak
es it
eas
y to
see
th
e ey
e of
the
need
le. T
he b
obbi
n co
ver c
an b
e us
ed a
s a
mag
nify
ing
glas
s.
8
Lea
rn y
ou
r P
lati
nu
m
Thr
eadi
ng fo
r Tw
in N
eedl
e S
witc
h of
f th
e m
ain
switc
h.
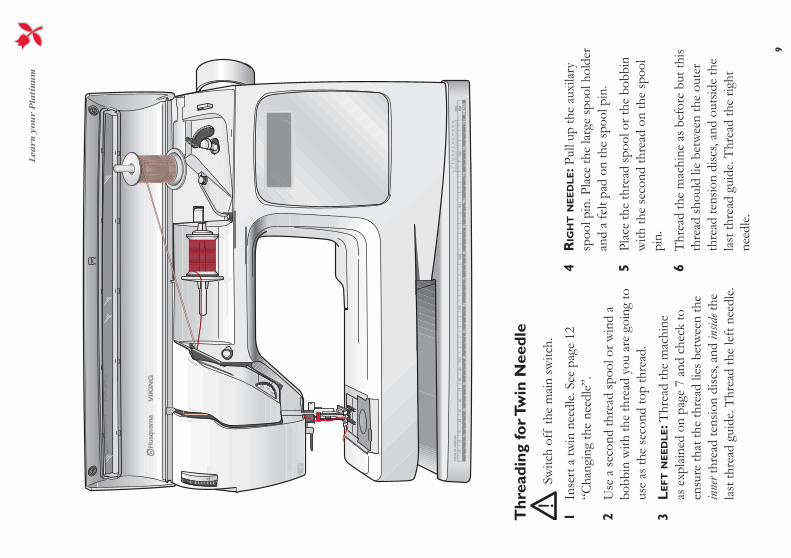
1 In
sert
a tw
in n
eedl
e. S
ee p
age
12
“Cha
ngin
g th
e ne
edle
”.
2 U
se a
sec
ond
thre
ad s
pool
or w
ind
a bo
bbin
with
the
thre
ad y
ou a
re g
oing
to
use
as th
e se
cond
top
thre
ad.
3 L
EF
T N
EE
DL
E: T
hrea
d th
e m
achi
ne
as e
xpla
ined
on
page
7 a
nd c
heck
to
ensu
re th
at th
e th
read
lies
bet
wee
n th
e in
ner t
hrea
d te
nsio
n di
scs,
and
insid
e the
la
st th
read
gui
de. T
hrea
d th
e le
ft n
eedl
e.
4 R
IGH
T N
EE
DL
E: P
ull u
p th
e au
xila
ry
spoo
l pin
. Pla
ce th
e la
rge
spoo
l hol
der
and
a fe
lt pa
d on
the
spoo
l pin
.
5 Pl
ace
the
thre
ad s
pool
or t
he b
obbi
n w
ith th
e se
cond
thre
ad o
n th
e sp
ool
pin.
6 T
hrea
d th
e m
achi
ne a
s be
fore
but
this
thre
ad s
houl
d lie
bet
wee
n th
e ou
ter
thre
ad te
nsio
n di
scs,
and
outs
ide
the
last
thre
ad g
uide
. Thr
ead
the
right
ne
edle
.
9

ab
cd
12
10
15
b
a
b
c
1.2.
3.4.
Lea
rn y
ou
r P
lati
nu
m
Plac
ing
the
Bob
bin
in t
he M
achi
neTu
rn o
ff th
e m
ain
switc
h.
1 R
emov
e th
e bo
bbin
cov
er b
y sli
ding
it
tow
ards
you
.
2 Pl
ace
the
bobb
in in
the
bobb
in c
ase
with
the
mar
kafa
cing
up
and
the
thre
ad to
the
left
of
the
bobb
in. T
he b
obbi
n w
ill th
en ro
tate
co
unte
r clo
ckw
ise w
hen
pulli
ng o
ut th
e th
read
.
3 Pl
ace
your
ng
er o
n th
e bo
bbin
to k
eep
it fr
om tu
rnin
g as
you
pul
l the
thre
ad
rmly
to
the
right
and
then
to th
e le
ft in
to th
e te
nsio
n sp
ring
(a) u
ntil
it ‘‘c
licks
’’ in
to p
lace
.
4 C
ontin
ue th
read
ing
arou
nd (b
) and
to th
e rig
ht o
f an
d th
en le
ft in
to th
e th
read
cut
ter
(c).
Rep
lace
the
cove
r (1)
. Pul
l the
thre
ad to
th
e le
ft to
cut
it (2
).
Bob
bin
Win
ding
1
Plac
e an
em
pty
bobb
in o
n th
e bo
bbin
sp
indl
e at
the
fron
t of
the
mac
hine
(the
m
arka
faci
ng u
p). P
ush
the
bobb
in
spin
dle
dow
n.
2 Pl
ace
the
larg
e sp
ool h
olde
r and
a fe
lt pa
d un
der t
he s
pool
on
the
auxi
lary
sp
ool p
in.
3 B
ring
the
thre
ad in
to th
e th
read
tens
ion
guid
e (a
), an
d un
der t
hrea
d gu
ide
(b)
then
ove
r thr
ead
guid
e (c
) as
illus
trat
ed.
Not
e: D
epen
ding
on
thre
ad q
ualit
y, ta
ke th
e th
read
one
or t
wo
turn
s ar
ound
the
bobb
in th
read
te
nsio
n gu
ide
(a).
4 Fr
om a
bove
win
d a
few
turn
s of
thre
ad
cloc
kwise
aro
und
the
bobb
in a
nd in
to
the
thre
ad c
utte
r (d)
.
5 Pr
ess
the
foot
con
trol
. Whe
n th
e bo
bbin
is fu
ll, th
e w
indi
ng w
ill s
top
auto
mat
ical
ly. R
emov
e th
e bo
bbin
and
cu
t off
the
thre
ad. B
ring
the
bobb
in
spin
dle
up.
!
10

Lea
rn y
ou
r P
lati
nu
m
Win
ding
from
the
Nee
dle
Mak
e su
re th
at th
e pr
esse
r foo
t and
the
need
le a
re in
the
up p
ositi
on. U
se o
nly
the
orig
inal
Hus
qvar
na V
ikin
g gr
een
bobb
ins.
Onl
y use
a m
etal p
resse
r foo
t whe
n bo
bbin
win
ding
fro
m th
e need
le.
To w
ind,
follo
w th
e in
stru
ctio
ns fo
r “B
obbi
n w
indi
ng”.
The
diff
eren
ce is
that
th
e th
read
is b
roug
ht u
p fr
om th
e ne
edle
, un
der t
he p
resse
r foo
t and
to th
e rig
ht o
ver
thre
ad g
uide
(c).
Not
e: W
e do
not
reco
mm
end
win
ding
spe
cial
ty
thre
ads
such
as
invi
sible
or o
ther
str
etch
y th
read
s th
roug
h th
e ne
edle
. Ins
tead
see
“B
obbi
n W
ind-
ing”
.
11
AB
C
a b
Lea
rn y
ou
r P
lati
nu
m
Not
e: C
hang
e th
e ne
edle
oft
en a
nd a
lway
s us
e a
stra
ight
nee
dle
with
a s
harp
poi
nt (a
).
A d
amag
ed n
eedl
e (b
) can
cau
se s
kipp
ed s
titch
es,
brea
kage
of
need
les
or s
napp
ing
of th
read
. A
dam
aged
nee
dle
can
also
dam
age
the
need
le p
late
an
d/or
fabr
ic.
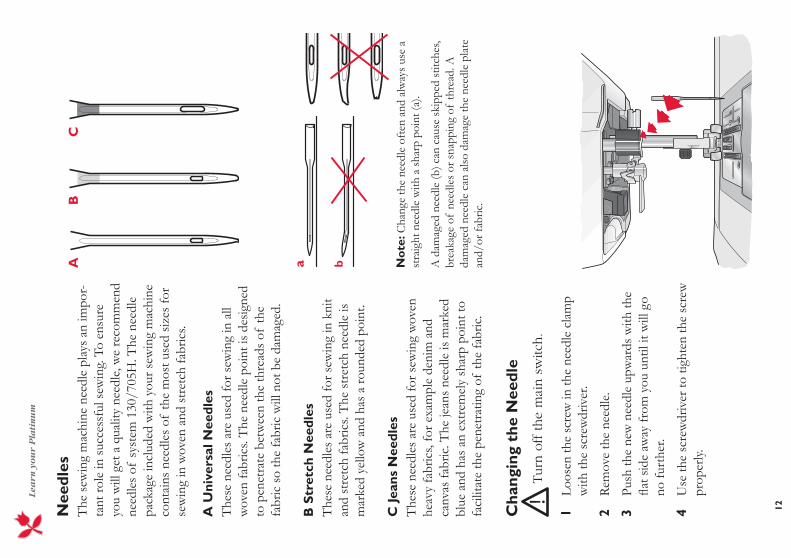
Nee
dles
The
sew
ing
mac
hine
nee
dle
play
s an
impo
r-ta
nt ro
le in
suc
cess
ful s
ewin
g. T
o en
sure
yo
u w
ill g
et a
qua
lity
need
le, w
e re
com
men
d ne
edle
s of
sys
tem
130
/705
H. T
he n
eedl
e pa
ckag
e in
clud
ed w
ith y
our s
ewin
g m
achi
ne
cont
ains
nee
dles
of
the
mos
t use
d siz
es fo
r se
win
g in
wov
en a
nd s
tret
ch fa
bric
s.
A U
nive
rsal
Nee
dles
The
se n
eedl
es a
re u
sed
for s
ewin
g in
all
wov
en fa
bric
s. T
he n
eedl
e po
int i
s de
signe
d to
pen
etra
te b
etw
een
the
thre
ads
of th
e fa
bric
so
the
fabr
ic w
ill n
ot b
e da
mag
ed.
B S
tret
ch N
eedl
es
The
se n
eedl
es a
re u
sed
for s
ewin
g in
kni
t an
d st
retc
h fa
bric
s. T
he s
tret
ch n
eedl
e is
mar
ked
yello
w a
nd h
as a
roun
ded
poin
t.
C Je
ans
Nee
dles
The
se n
eedl
es a
re u
sed
for s
ewin
g w
oven
he
avy
fabr
ics,
for e
xam
ple
deni
m a
nd
canv
as fa
bric
. The
jean
s ne
edle
is m
arke
d bl
ue a
nd h
as a
n ex
trem
ely
shar
p po
int t
o fa
cilit
ate
the
pene
trat
ing
of th
e fa
bric
.
Cha
ngin
g th
e N
eedl
eTurn
off the
mai
n s
witc
h.
1 Lo
osen
the
scre
w in
the
need
le c
lam
p w
ith th
e sc
rew
driv
er.
2 R
emov
e th
e ne
edle
.
3 Pu
sh th
e ne
w n
eedl
e up
war
ds w
ith th
e a
t sid
e aw
ay fr
om y
ou u
ntil
it w
ill g
o no
furt
her.
4 U
se th
e sc
rew
driv
er to
tigh
ten
the
scre
w
prop
erly.
12
!

Lea
rn y
ou
r P
lati
nu
m
Uti
lity
Foot
AFi
tted
on th
e se
win
g m
achi
ne u
pon
deliv
ery.
Thi
s fo
ot is
use
d m
ainl
y fo
r str
aigh
t stit
chin
g an
d zi
gzag
stit
chin
g w
ith a
stit
ch le
ngth
long
er th
an
1.0.
Uti
lity
Foot
BW
hen
sew
ing
satin
zig
zag
stitc
hes
with
less
than
1.
0 m
m s
titch
leng
th; o
ther
util
ity s
titch
es o
r de
cora
tive
stitc
hes
use
this
foot
. The
tunn
el a
t the
bo
ttom
of
the
foot
is d
esig
ned
to fe
ed s
moo
thly
ov
er th
e st
itche
s.
But
tonh
ole
Foot
CT
his
butto
nhol
e fo
ot h
as g
uide
line
s to
det
erm
ine
butto
nhol
e le
ngth
. The
mid
dle
mar
k gi
ves
a 9/
16''
(15
mm
) but
toni
ng e
dge.
The
two
tunn
els
on th
e bo
ttom
of
the
foot
ens
ures
a s
moo
th fe
ed o
ver
the
butto
nhol
e co
lum
ns.
Blin
d H
em F
oot
DT
his
foot
is u
sed
for b
lind
hem
stit
ches
. The
inne
r ed
ge o
f th
is fo
ot g
uide
s th
e fa
bric
. The
bot
tom
of
the
foot
is d
esig
ned
to ri
de a
long
the
hem
edg
e.
Zip
per
Foot
ET
his
is th
e zi
pper
foot
and
can
be
snap
ped
on
eith
er to
the
right
or t
o th
e le
ft o
f th
e ne
edle
. Thi
s m
akes
it e
asy
to s
ew o
n bo
th s
ides
of
the
zipp
er.
Pre
sser
Fo
ot
H (P
lati
num
715
/735
)
Thi
s fo
ot w
ith a
glid
e pl
ate
unde
rnea
th, i
s us
ed
whe
n se
win
g fo
am, p
last
ic, o
r lea
ther
, min
i miz
ing
the
risk
of th
ese
mat
eria
ls st
icki
ng to
the
foot
.
Edgi
ng F
oot
J T
his
foot
is u
sed
for o
verc
astin
g, s
eam
and
ove
r-ca
stin
g, i.
e. s
titch
es w
hich
hav
e a
stitc
h w
idth
of
5.0
and
5.5
mm
. Stit
ches
form
ove
r the
pin
whi
ch
prev
ents
puc
kerin
g at
the
edge
of
the
fabr
ic.
Pres
ser
Feet
The
re a
re a
num
ber o
f pr
esse
r fee
t for
diff
eren
t pur
pose
s su
pplie
d w
ith y
our s
ewin
g m
achi
ne:
13

a
b
1.2.
Lea
rn y
ou
r P
lati
nu
m
Qui
lter
’s 1/
4" P
ieci
ng F
oot
P (P
lati
num
755
)
Thi
s fo
ot is
use
d w
hen
piec
ing
quilt
blo
cks.
The
foot
has
dist
ance
mar
ks 1
/4"
(6 m
m)
and
1/8"
(3 m
m).
Sens
or B
utto
nhol
e Fo
ot
(Pla
tinu
m 7
35/7
55)
Whe
n co
nnec
ted
to th
e m
achi
ne it
giv
es
a bu
ttonh
ole
leng
th
tting
the
butto
n siz
e th
at h
as b
een
ente
red
into
the
mac
hine
. The
m
iddl
e m
ark
give
s a
9/16
'' (1
5 m
m) b
utto
n-in
g ed
ge.
Rea
d m
ore a
bout
diff
eren
t opt
ional
pre
sser f
eet in
th
e Acce
ssory
User
’s G
uide
.
Cha
ngin
g th
e Pr
esse
r Fo
ot
Turn
off the
mai
n s
witc
h.
1 M
ake
sure
that
the
need
le is
in th
e hi
ghes
t pos
ition
. Pul
l the
pre
sser
foot
to
war
ds y
ou.
2 Li
ne u
p th
e cr
oss
pin
on th
e fo
ot w
ith
the
gap
in th
e pr
esse
r foo
t ank
le. P
ress
ba
ck u
ntil
the
foot
sna
ps in
to p
lace
.
Pres
ser
Foot
Pre
ssur
e (a
)T
he p
ress
er fo
ot p
ress
ure
is ad
just
ed w
ith
the
dial
foun
d un
der t
he li
d on
you
r sew
ing
mac
hine
. Nor
mal
set
ting
is ar
ound
four
. T
he h
ighe
r the
num
ber t
he m
ore
pres
sure
th
e fo
ot p
uts
on th
e fa
bric
. Kni
t and
sof
t fa
bric
s sh
ould
be
sew
n at
low
er p
ress
ure.
Pres
ser
Foot
Lev
er (b
)T
he p
ress
er fo
ot is
raise
d an
d lo
wer
ed w
ith
the
pres
ser f
oot l
ever
. The
pre
sser
foot
m
ust b
e lo
wer
ed w
hen
sew
ing.
By
raisi
ng th
e pr
esse
r foo
t lev
er a
nd th
en
pres
s it u
pwar
ds, t
he li
ft he
ight
of
the
pres
ser f
oot c
an b
e ra
ised
to e
xtra
hei
ght i
n or
der t
o sli
de th
ick
proj
ects
und
er th
e fo
ot.
!
14

a
1
2
3
Lea
rn y
ou
r P
lati
nu
m
Thr
ead
Tens
ion
Use
the
reco
mm
ende
d th
read
tens
ion
set-
ting
give
n on
the
Info
Disp
lay.
You
can
adju
st th
e to
p th
read
tens
ion
for
spec
ial f
abric
s an
d/or
tech
niqu
es. T
o ad
just
, tu
rn th
e nu
mbe
red
tens
ion
dial
(a).
The
hi
gher
the
num
ber t
he h
ighe
r the
tens
ion.
N
orm
ally
top
thre
ad te
nsio
n is
set t
o ar
ound
4. W
hen
sew
ing
butto
nhol
es a
nd d
ecor
ativ
e st
itche
s set
thre
ad te
nsio
n to
aro
und
3.
Whe
n to
pstit
chin
g w
ith a
coa
rse
thre
ad in
th
ick
fabr
ic, in
crea
se th
e te
nsio
n to
7-9
.
Cor
rect
and
inco
rrec
t th
read
ten
sion
To u
nder
stan
d th
e co
rrec
t thr
ead
tens
ion,
se
w a
few
sam
ple
zigz
ag s
titch
es a
t diff
eren
t se
tting
s.
1 B
egin
with
a te
nsio
n th
at is
too
loos
e,
i.e. s
et a
t the
low
est n
umbe
r. T
he
bobb
in th
read
will
lie
stra
ight
and
the
top
thre
ad w
ill b
e dr
awn
to th
e un
der-
side
of th
e fa
bric
.
2 If
you
set
the
tens
ion
at th
e hi
ghes
t nu
mbe
r, th
e to
p th
read
mig
ht b
reak
an
d th
e se
am m
ay p
ucke
r and
/or t
hrea
d br
eaks
.
3 T
he c
orre
ct th
read
tens
ion
is se
t whe
n th
e th
read
s in
terlo
ck in
the
mid
dle
of
both
fabr
ic la
yers
or,
in th
e ca
se o
f de
cora
tive
stitc
hes,
on th
e un
ders
ide.
Mak
e a
few
test
s on
a s
crap
pie
ce o
f th
e fa
bric
you
are
goi
ng to
sew
and
che
ck th
e te
nsio
n.
15

Lea
rn y
ou
r P
lati
nu
m
Low
erin
g th
e Fe
ed T
eeth
The
feed
teet
h ar
e lo
wer
ed w
hen
you
turn
th
e di
al o
n th
e fr
ont o
f th
e fr
ee a
rm to
the
left
.
Turn
the
dial
to th
e rig
ht
if
you
wish
to ra
ise th
e fe
ed te
eth.
The
feed
te
eth
will
raise
as
you
begi
n to
sew
. The
fe
ed te
eth
shou
ld b
e lo
wer
ed w
hen
sew
ing
on b
utto
ns a
nd fo
r fre
e-m
otio
n w
ork.
16

FUN
CT
ION
S A
ND
INFO
DIS
PLAY

F
un
ctio
ns
an
d I
nfo
Dis
pla
y
18
By
touc
hing
the
SP
EE
D b
utto
n yo
u ca
n sw
itch
betw
een
the
thre
e sp
eed
rang
es. I
f yo
u ha
ve re
duce
d th
e sp
eed
man
ually
, you
r se
tting
is re
tain
ed a
nd k
ept f
or a
ll st
itche
s un
til y
our s
ewin
g m
achi
ne is
turn
ed o
ff.
Rev
erse
RE
VE
RS
E is
touc
hed
to s
ew in
reve
rse.
Whe
n th
e bu
tton
is re
leas
ed, y
our s
ewin
g m
achi
ne
sew
s fo
rwar
ds. T
he lo
nges
t rev
erse
stit
ch
leng
th is
3 m
m.
For p
erm
anen
t rev
erse
, tou
ch th
e bu
tton
twic
e in
qui
ck s
ucce
ssio
n be
fore
sta
rtin
g to
se
w. T
he re
vers
e se
win
g is
indi
cate
d by
an
icon
on
the
Info
Disp
lay.
Your
sew
ing
mac
hine
sew
s in
reve
rse
until
yo
u to
uch
the
butto
n ag
ain.
Stit
ch le
ngth
Whe
n yo
u se
lect
a s
titch
, you
r sew
ing
mac
hine
aut
omat
ical
ly s
ets
the
best
stit
ch
leng
th. T
he s
et le
ngth
is v
isibl
e on
the
Info
-D
ispla
y ab
ove
the
stitc
h le
ngth
but
tons
. Yo
u ca
n ch
ange
the
stitc
h le
ngth
by
touc
h-in
g ei
ther
the
(+) o
r (-)
butto
n.
Sti
tch
wid
thT
he s
titch
wid
th is
set
in th
e sa
me
way
as
the
stitc
h le
ngth
. The
set
wid
th is
visi
ble
on th
e In
foD
ispla
y ab
ove
the
stitc
h w
idth
bu
tton.
T
he w
idth
can
be
adju
sted
bet
wee
n 0
and
6 m
m. I
f st
raig
ht s
titch
is s
elec
ted,
the
wid
th
butto
n is
used
to a
djus
t the
nee
dle
posit
ion.
The
Tou
ch P
anel
Nee
dle
Stop
Up/
Dow
n (P
lati
num
755
)
NE
ED
LE S
TO
P P
OS
ITIO
N is
use
d to
set
the
need
le s
top
posit
ion
up o
r dow
n.
Sto
pS
TO
P is
use
d to
con
clud
e a
stitc
h. Y
our
sew
ing
mac
hine
fast
ens
the
thre
ad a
nd
stop
s au
tom
atic
ally
whe
n a
stitc
h or
stit
ch
sequ
ence
has
bee
n co
mpl
eted
. ST
OP is
ca
ncel
led
whe
n yo
u to
uch
the
butto
n ag
ain
or b
y se
lect
ing
a ne
w s
titch
. Whe
n S
TO
P is
ac
tive,
an ic
on is
show
n on
the
Info
Disp
lay.
The
stop
-func
tion
can
be p
rogr
amm
ed.
Fix
FIX
is u
sed
to ti
e of
f st
itche
s. W
hen
the
butto
n is
touc
hed,
an
icon
is v
isibl
e on
th
e In
foD
ispla
y. B
y to
uchi
ng th
e bu
tton
agai
n th
e fu
nctio
n ca
n be
turn
ed o
ff. W
hen
begi
nnin
g to
sew
, you
r sew
ing
mac
hine
se
ws
a fe
w ti
e of
f st
itche
s an
d go
es o
n w
ith
the
sele
cted
stit
ch. T
ouch
FIX
whi
le s
ewin
g an
d yo
ur s
ewin
g m
achi
ne s
ews
a fe
w ti
e of
f st
itche
s an
d st
ops
auto
mat
ical
ly.
Spe
ed (P
lati
num
755
)
The
max
imum
sew
ing
spee
d is
900
rpm
.
All
stitc
hes
in y
our s
ewin
g m
achi
ne h
ave
a pr
e-se
t, re
com
men
ded
sew
ing
spee
d. W
hen
you
sele
ct a
stit
ch y
our s
ewin
g m
achi
ne
auto
mat
ical
ly s
ets
the
corr
ect s
ewin
g sp
eed.
Plat
inum
715
/735
Plat
inum
755
Fu
nct
ion
s a
nd
In
foD
isp
lay
19
Mem
ory
(Pla
tinu
m 7
55)
Your
sew
ing
mac
hine
has
two
diff
eren
t m
emor
ies
whe
re p
rogr
amm
ed c
ombi
natio
ns
can
be s
aved
. Eac
h m
emor
y ho
lds
up to
30
stit
ches
or l
ette
rs. T
he b
utto
n is
used
to
adva
nce
to th
e m
emor
y re
quire
d in
PR
OG
or
RE
P. T
he a
ctiv
e m
emor
y nu
mbe
r is
show
n in
th
e lo
wer
righ
t cor
ner o
f th
e In
foD
ispla
y.
CLR
Touc
h th
is bu
tton
in P
RO
G to
del
ete
the
who
le o
r a p
art o
f a
prog
ram
(see
pag
e 26
). W
hen
a pr
ogra
m in
a m
emor
y ha
s be
en
dele
ted,
the
stitc
h nu
mbe
r is
clea
red
on th
e In
foD
ispla
y.
Sti
tch
Men
usTo
uch
the
stitc
h m
enu
butto
n to
ste
p be
twee
n th
e st
itch
men
us. T
he c
urre
ntly
se
lect
ed m
enu
is in
dica
ted
in th
e O
verv
iew
W
indo
w.
Plat
inum
755
has
35
utili
ty s
titch
es (m
enu
1) a
nd 7
0 de
cora
tive
stitc
hes
(men
u 2-
3).
Plat
inum
735
has
21
utili
ty s
titch
es (m
enu
1) a
nd 4
2 de
cora
tive
stitc
hes
(men
u 2-
3).
Plat
inum
715
has
21
utili
ty s
titch
es (m
enu
1) a
nd 2
1 de
cora
tive
stitc
hes
(men
u 2)
.
The
util
ity s
titch
es a
re v
isibl
e on
the
Touc
h Pa
nel a
nd th
e de
cora
tive
stitc
hes
are
pic-
ture
d in
side
the
lid.
Alp
habe
t M
enu
(Pla
tinu
m 7
55)
The
Pla
tinum
755
has
an
alph
abet
- O
utlin
e B
lock
. Tou
ch th
e al
phab
et m
enu
butto
n an
d “A
..” is
sho
wn
on th
e In
foD
ispla
y.
Mir
ror
Side
to
Side
Touc
h th
is bu
tton
to m
irror
the
sele
cted
st
itch
side
to s
ide.
If
this
butto
n is
touc
hed
whe
n st
raig
ht s
titch
with
left
nee
dle
posi-
tion
is se
lect
ed, t
he n
eedl
e po
sitio
n is
chan
ged
from
left
to ri
ght.
If to
uche
d in
R
EP, t
he w
hole
stit
ch c
ombi
natio
n is
mir-
rore
d (s
ee p
age
26).
Mir
ror
End
to E
nd (P
lati
num
755
)
Touc
h th
is bu
tton
to m
irror
the
sele
cted
st
itch
end
to e
nd. I
f to
uche
d in
RE
P, t
he
who
le s
titch
com
bina
tion
is m
irror
ed (s
ee
page
26)
. If
a S
TO
P is
pro
gram
med
at t
he
end
of a
com
bina
tion,
and
the
com
bina
tion
is m
irror
ed e
nd to
end
, the
ST
OP w
ill b
e pl
aced
at t
he b
egin
ning
inst
ead.
FU
NC
Touc
h th
is bu
tton
to s
tep
betw
een
the
dif-
fere
nt m
odes
on
your
sew
ing
mac
hine
. T
here
are
thre
e di
ffer
ent m
odes
; NO
RM
, P
RO
G a
nd R
EP. T
he N
OR
M m
ode
(nor
mal
se
win
g m
ode)
is a
lway
s ac
tive
whe
n th
e m
achi
ne is
turn
ed o
n. T
ouch
onc
e to
act
i-va
te th
e P
RO
G m
ode
(use
d w
hen
prog
ram
-m
ing)
, the
n to
uch
agai
n to
ent
er th
e R
EP
mod
e th
at is
use
d to
sew
a p
rogr
amm
ed
com
bina
tion.
Tou
ch a
gain
to re
turn
to
NO
RM
mod
e. T
he a
ctiv
e m
ode
is in
dica
ted
on th
e In
foD
ispla
y.
A
rrow
But
tons
The
se b
utto
ns a
re u
sed
to a
dvan
ce o
r re
turn
with
in a
pro
gram
med
seq
uenc
e.
F
un
ctio
ns
an
d I
nfo
Dis
pla
y
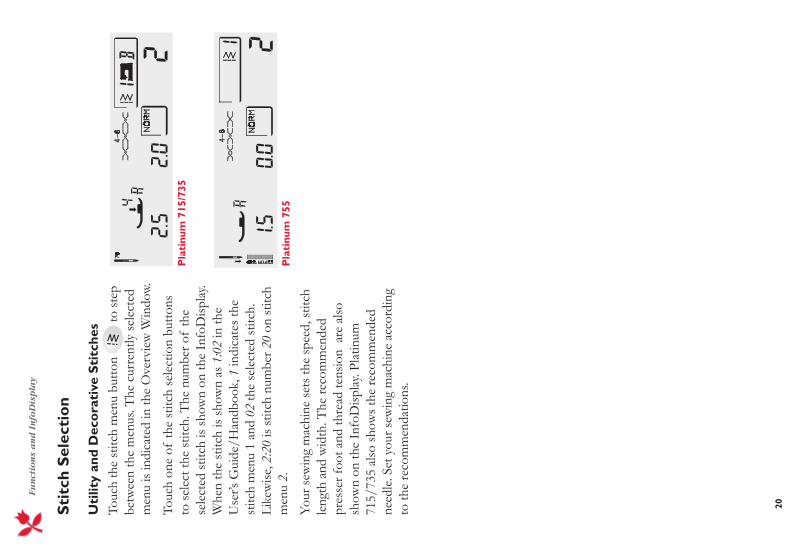
20Stit
ch S
elec
tion
Uti
lity
and
Dec
orat
ive
Stit
ches
To
uch
the
stitc
h m
enu
butto
n to
ste
p be
twee
n th
e m
enus
. The
cur
rent
ly s
elec
ted
men
u is
indi
cate
d in
the
Ove
rvie
w W
indo
w.
Touc
h on
e of
the
stitc
h se
lect
ion
butto
ns
to s
elec
t the
stit
ch. T
he n
umbe
r of
the
sele
cted
stit
ch is
sho
wn
on th
e In
foD
ispla
y. W
hen
the
stitc
h is
show
n as
1:0
2 in
the
Use
r’s G
uide
/Han
dboo
k, 1
indi
cate
s th
e st
itch
men
u 1
and
02 th
e se
lect
ed s
titch
. Li
kew
ise, 2
:20
is st
itch
num
ber 2
0 on
stit
ch
men
u 2.
Your
sew
ing
mac
hine
set
s th
e sp
eed,
stit
ch
leng
th a
nd w
idth
. The
reco
mm
ende
d pr
esse
r foo
t and
thre
ad te
nsio
n a
re a
lso
show
n on
the
Info
Disp
lay.
Plat
inum
71
5/73
5 al
so s
how
s th
e re
com
men
ded
need
le. S
et y
our s
ewin
g m
achi
ne a
ccor
ding
to
the
reco
mm
enda
tions
.
Plat
inum
715
/735
Plat
inum
755

Fu
nct
ion
s a
nd
In
foD
isp
lay
21
Alp
habe
t (P
lati
num
755
)
Touc
h th
e al
phab
et m
enu
butto
n a
nd
“A..”
is s
how
n on
the
Info
Disp
lay.
Touc
h a
lette
r (sh
own
in re
d on
the
stitc
h se
lect
ion
butto
ns) t
o se
lect
it. T
he n
umbe
r of
the
butto
n w
ill b
e sh
own
on th
e In
fo-
Disp
lay.
For i
nsta
nce
the
lette
r E c
orre
-sp
onds
to s
titch
sel
ectio
n bu
tton
num
ber 5
.
Alp
habe
t M
enu
Whe
n th
e A
lpha
bet m
enu
butto
n
is to
uche
d, “A
..” is
sho
wn
in O
verv
iew
W
indo
w in
dica
ting
that
upp
er c
ase
lette
rs
are
sele
cted
. You
can
cho
ose
betw
een
uppe
r ca
se le
tters
, low
er c
ase
lette
rs o
r num
bers
/sp
ecia
l cha
ract
ers
by to
uchi
ng th
e A
lpha
bet
men
u bu
tton
a se
cond
and
a th
ird ti
me.
On
the
Info
Disp
lay
“a..”
is s
how
n fo
r low
er
case
lette
rs a
nd “
1..”
for n
umbe
rs/s
peci
al
char
acte
rs.
Upp
er ca
se an
d low
er ca
se let
ters
Num
bers/
Speci
al ch
arac
ters
Out
line B
lock
alph
abet
Butto
n nu
mbe
r

F
un
ctio
ns
an
d I
nfo
Dis
pla
y
22Sew
ing
Adv
isor
(Pla
tinu
m 7
15/7
35)
Your
sewi
ng m
achi
ne fe
atur
es th
e exc
lusiv
e Hus
q-va
rna
Vik
ing S
ewin
g Adv
isor.
It is
alwa
ys a
ctive
an
d is
locat
ed a
t the
bot
tom
of
the T
ouch
Pan
el.
Whe
n be
ginni
ng a
sewi
ng p
rojec
t, to
uch
your
fabr
ic typ
e and
weig
ht th
en to
uch
the t
echni
que y
ou d
esire
to
sew.
Your
selec
ted fa
bric
is “r
emem
bere
d” u
ntil
the n
ext
time y
ou ch
ange
it.
The S
ewin
g Adv
isor s
ets th
e best
stitc
h, st
itch
length
, stit
ch w
idth
and
sewi
ng sp
eed fo
r you
r pr
oject.
You
r sew
ing m
achi
ne a
lso gi
ves y
ou re
com
-m
enda
tions
on
thre
ad te
nsion
, pre
sser f
oot p
ressu
re
and
press
er foo
t for
the s
electe
d fa
bric
and
techn
ique
.
Fabr
ic S
elec
tion
Wov
en o
r K
nit
The
diff
eren
ce b
etw
een
wov
en a
nd k
nit
fabr
ic is
the
way
the
thre
ads
are
put
toge
ther
. Wov
en fa
bric
s ar
e m
ade
of tw
o th
read
sys
tem
s, w
arp
leng
thw
ise a
nd w
eft
cros
swise
that
inte
rsec
t at s
trai
ght a
ngle
s. A
kni
t fab
ric is
mad
e of
one
thre
ad s
yste
m
with
inte
rlace
d st
itche
s. A
kni
t fab
ric u
sual
ly
has
stre
tch.
A
s a
gene
ral r
ule,
ent
er W
oven
for s
tabl
e fa
bric
s th
at h
ave
no s
tret
ch a
nd S
tret
ch fo
r fa
bric
s th
at h
ave
stre
tch.
WO
VE
N L
IGH
T: c
hiff
on, o
rgan
za,
batis
te, s
ilkie
s, w
ool c
halli
s, et
c.
WO
VE
N M
ED
IUM
: cal
ico,
qui
lting
fa
bric
s, w
ool c
repe
, and
bro
adcl
oth,
et
c.
WO
VE
N H
EA
VY: d
enim
, woo
l sui
ting
and
coat
ing,
can
vas,
etc.
ST
RE
TC
H L
IGH
T: c
harm
euse
nyl
on,
singl
e kn
it je
rsey
s, et
c.
ST
RE
TC
H M
ED
IUM
: dou
ble
knit,
ve
lour
, plu
sh, s
wim
wea
r, et
c.ST
RE
TC
H H
EA
VY: s
wea
ter k
nits,
ee
ce,
etc.
Knit
fabr
icW
oven
fabr
ic
Plat
inum
735
Plat
inum
715
Fu
nct
ion
s a
nd
In
foD
isp
lay
23
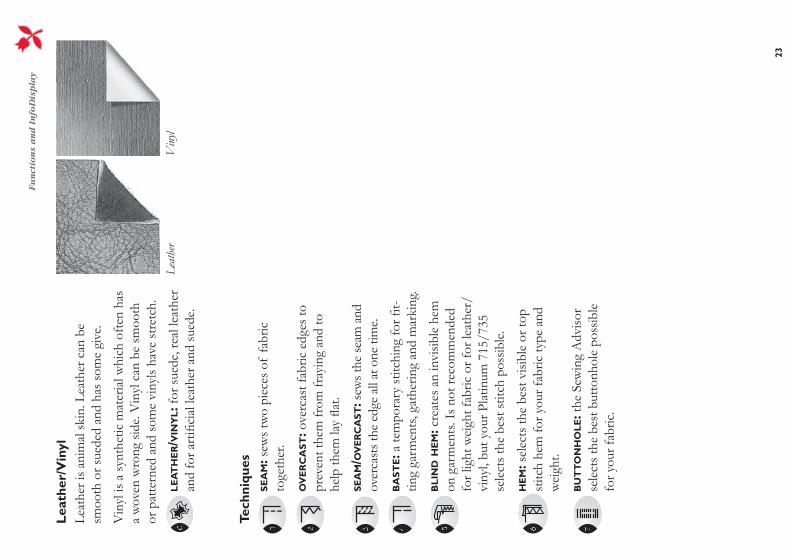
Lea
ther
Vin
yl
Leat
her/
Vin
ylLe
athe
r is
anim
al s
kin.
Lea
ther
can
be
smoo
th o
r sue
ded
and
has
som
e gi
ve.
Vin
yl is
a s
ynth
etic
mat
eria
l whi
ch o
ften
has
a
wov
en w
rong
sid
e. V
inyl
can
be
smoo
th
or p
atte
rned
and
som
e vi
nyls
have
str
etch
.
LE
AT
HE
R/V
INY
L: f
or s
uede
, rea
l lea
ther
an
d fo
r art
i ci
al le
athe
r and
sue
de.
Tech
niqu
esS
EA
M: s
ews
two
piec
es o
f fa
bric
to
geth
er.
OV
ER
CA
ST: o
verc
ast f
abric
edg
es to
pr
even
t the
m fr
om fr
ayin
g an
d to
he
lp th
em la
y a
t.
SE
AM
/OV
ER
CA
ST: s
ews t
he se
am a
nd
over
cast
s the
edg
e al
l at o
ne ti
me.
BA
ST
E: a
tem
pora
ry s
titch
ing
for
t-tin
g ga
rmen
ts, g
athe
ring
and
mar
king
.
BL
IND
HE
M: c
reat
es a
n in
visib
le h
em
on g
arm
ents
. Is
not r
ecom
men
ded
for l
ight
wei
ght f
abric
or f
or le
athe
r/vi
nyl,
but y
our P
latin
um 7
15/7
35
sele
cts
the
best
stit
ch p
ossib
le.
HE
M: s
elec
ts th
e be
st v
isibl
e or
top
stitc
h he
m fo
r you
r fab
ric ty
pe a
nd
wei
ght.
BU
TT
ON
HO
LE: t
he S
ewin
g A
dviso
r se
lect
s th
e be
st b
utto
nhol
e po
ssib
le
for y
our f
abric
.

2B
F
un
ctio
ns
an
d I
nfo
Dis
pla
y
24How
to
Use
the
Sew
ing
Adv
isor
Your
fabr
ic s
elec
tion
stay
s ac
tive
until
an
othe
r fab
ric is
sel
ecte
d, a
nd th
e la
st fa
bric
se
lect
ed is
alw
ays
reta
ined
in th
e m
emor
y -
even
whe
n th
e m
achi
ne is
turn
ed o
ff.
Whe
n to
uchi
ng a
fabr
ic b
utto
n, th
e le
tter
corr
espo
ndin
g to
that
fabr
ic a
ppea
rs in
the
Ove
rvie
w W
indo
w in
dica
ting
the
sele
ctio
n.
Aft
er y
ou h
ave
sele
cted
the
desir
ed fa
bric
, se
lect
the
tech
niqu
e of
you
r cho
ice.
You
ca
n th
en v
iew
the
stitc
h nu
mbe
r and
all
the
defa
ult r
ecom
men
datio
ns.
The
set
tings
mad
e on
the
SE
WIN
G A
DV
I-S
OR a
re a
lway
s vi
sible
in th
e O
verv
iew
W
indo
w. T
he le
tter i
ndic
ates
the
fabr
ic a
nd
the
num
ber t
he te
chni
que.
If
anot
her s
titch
th
an th
e on
e re
com
men
ded
by th
e S
EW
ING
A
DV
ISO
R is
sel
ecte
d, th
e se
lect
ed fa
bric
re
mai
ns.

12
34
5
1315
1617
18
67
89
1011
12
14
Fu
nct
ion
s a
nd
In
foD
isp
lay
25
Icon
s on
the
Info
Dis
play
(Pla
tinu
m 7
15/7
35)
On
the
Info
Disp
lay,
ther
e ar
e al
way
s ic
ons
that
giv
e yo
u al
l inf
orm
atio
n yo
u ne
ed to
obt
ain
the
best
sew
ing
resu
lt po
ssib
le. S
ome
icon
s ar
e al
way
s ac
tive
and
som
e ap
pear
onl
y in
spe
-ci
c s
ituat
ions
. The
icon
s vi
sible
on
the
Info
Disp
lay
are
liste
d an
d ex
plai
ned
belo
w.
Gen
eral
Icon
s1
NE
ED
LE: r
ecom
men
ded
need
le fo
r the
se
lect
ed fa
bric
.
2 In
dica
tes
MIR
RO
R S
IDE T
O S
IDE is
se
lect
ed.
3 T
he re
com
men
ded
PR
ES
SE
R F
OO
T P
RE
S-
SU
RE
4 In
dica
tes
that
the
ST
OP f
unct
ion
is ac
tive.
5 In
dica
tes
that
the
FIX
func
tion
is ac
tive.
6 In
dica
tes
that
ST
AB
ILIZ
ER s
houl
d be
us
ed.
7 T
he re
com
men
ded
TH
RE
AD
TE
NS
ION
Ove
rvie
w W
indo
w
8 I
ndic
ates
that
the
ST
ITC
H M
EN
U is
act
ive.
9 In
dica
tes
the
sele
cted
ST
ITC
H M
EN
U.
10 In
dica
tes
that
the
sew
ing
mac
hine
has
a
SE
WIN
G A
DV
ISO
R.
11, 1
2 S
EW
ING
AD
VIS
OR
T
he s
elec
ted
fabr
ic (l
ette
r) a
nd
sew
ing
tech
niqu
e (n
umbe
r) a
re s
how
n ne
xt to
the
Sew
ing
Adv
isor i
con.
13 T
he S
TIT
CH
LE
NG
TH
14 T
he re
ccom
ende
d P
RE
SS
ER F
OO
T
15 In
dica
tes
that
RE
VE
RS
E is
act
ive.
Fo
r Dar
ning
Stit
ch (n
o 18
), Ta
perin
g St
itch
(no
19) o
r whe
n se
win
g st
ep b
y st
ep b
utto
nhol
es, a
as
hing
icon
indi
-ca
tes
that
you
nee
d to
touc
h R
EV
ER
SE to
ch
ange
dire
ctio
n.
16 T
he S
TIT
CH
WID
TH
17 T
he s
elec
ted
MO
DE
18 T
he n
umbe
r of
the
SE
LE
CT
ED
ST
ITC
H

1921
2322
20
F
un
ctio
ns
an
d I
nfo
Dis
pla
y
26But
tonh
ole
Icon
s (P
lati
num
715
/735
) 19
Rec
omm
ends
a c
orde
d bu
ttonh
ole.
20 W
hen
sew
ing
step
by
step
but
tonh
oles
, a
ash
ing
icon
indi
cate
s th
at y
ou n
eed
to to
uch
RE
VE
RS
E to
mov
e be
twee
n th
e di
ffer
ent p
arts
of
the
butto
nhol
e.
Whe
n th
e Sen
sor B
utto
nhole
Foo
t is
conn
ected
(Pla
tinum
735
).
21 I
ndic
ates
that
the
Sens
or B
utto
nhol
e Fo
ot is
con
nect
ed. I
f th
e ic
on
ashe
s, lin
e up
the
whi
te ra
nge
on th
e w
heel
w
ith th
e w
hite
mar
k on
the
foot
.
22 S
et B
UT
TO
N S
IZE, b
y to
uchi
ng th
e st
itch
leng
th (+
) or (
-) b
utto
n. B
y to
uchi
ng
CL
R, y
ou c
an s
tep
betw
een
setti
ng th
e bu
ttonh
ole
size
and
butto
nhol
e de
nsity
.
23 T
he b
utto
n sy
mbo
l ind
icat
es th
at th
e bu
tton
size
is sh
own
on 2
2.
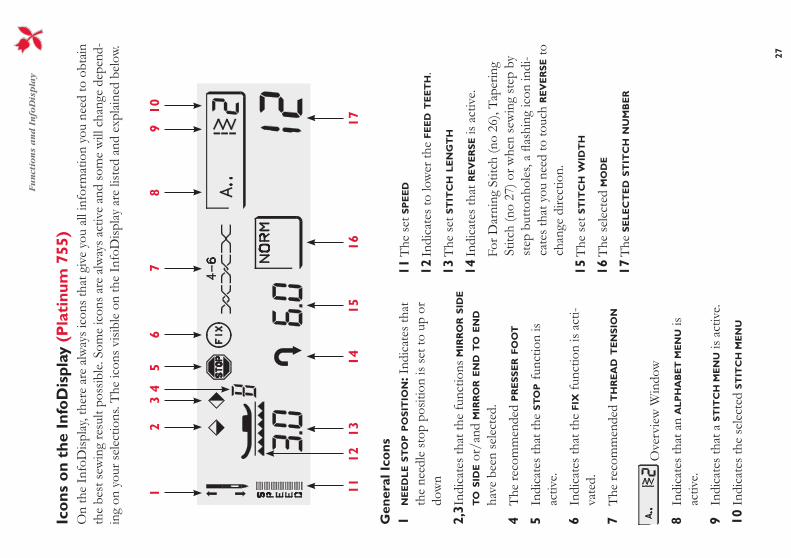
12
34
56
78
910
1112
1314
1516
17
Fu
nct
ion
s a
nd
In
foD
isp
lay
27
Gen
eral
Icon
s1
NE
ED
LE S
TO
P P
OS
ITIO
N: I
ndic
ates
that
th
e ne
edle
sto
p po
sitio
n is
set t
o up
or
dow
n
2,3 I
ndic
ates
that
the
func
tions
MIR
RO
R S
IDE
TO
SID
E o
r/an
d M
IRR
OR E
ND
TO
EN
D
have
bee
n se
lect
ed.
4 T
he re
com
men
ded
PR
ES
SE
R F
OO
T
5 In
dica
tes
that
the
ST
OP f
unct
ion
is ac
tive.
6 In
dica
tes
that
the
FIX
func
tion
is ac
ti-va
ted.
7 T
he re
com
men
ded
TH
RE
AD
TE
NS
ION
Ove
rvie
w W
indo
w
8 I
ndic
ates
that
an
AL
PH
AB
ET
ME
NU
is
activ
e.
9 I
ndic
ates
that
a S
TIT
CH
ME
NU
is a
ctiv
e.
10 I
ndic
ates
the
sele
cted
ST
ITC
H M
EN
U
Icon
s on
the
Info
Dis
play
(Pla
tinu
m 7
55)
On
the
Info
Disp
lay,
ther
e ar
e al
way
s ic
ons
that
giv
e yo
u al
l inf
orm
atio
n yo
u ne
ed to
obt
ain
the
best
sew
ing
resu
lt po
ssib
le. S
ome
icon
s ar
e al
way
s ac
tive
and
som
e w
ill c
hang
e de
pend
-in
g on
you
r sel
ectio
ns. T
he ic
ons
visib
le o
n th
e In
foD
ispla
y ar
e lis
ted
and
expl
aine
d be
low.
11 T
he s
et S
PE
ED
12 In
dica
tes
to lo
wer
the
FE
ED
TE
ET
H.
13 T
he s
et S
TIT
CH
LE
NG
TH
14 In
dica
tes
that
RE
VE
RS
E is
act
ive.
Fo
r Dar
ning
Stit
ch (n
o 26
), Ta
perin
g St
itch
(no
27) o
r whe
n se
win
g st
ep b
y st
ep b
utto
nhol
es, a
as
hing
icon
indi
-ca
tes
that
you
nee
d to
touc
h R
EV
ER
SE to
ch
ange
dire
ctio
n.
15 T
he s
et S
TIT
CH
WID
TH
16 T
he s
elec
ted
MO
DE
17 T
he S
EL
EC
TE
D S
TIT
CH
NU
MB
ER

1819
2122
23
20
F
un
ctio
ns
an
d I
nfo
Dis
pla
y
28Prog
ram
min
g Ic
ons
(Pla
tinu
m 7
55)
18 P
RO
G o
r RE
P is
disp
laye
d in
dica
ting
whe
ther
you
are
in th
e pr
ogra
mm
ing
mod
e or
if y
ou a
re in
the
repe
at m
ode
to s
ew y
our p
rogr
am.
19 A
num
ber i
ndic
atin
g th
e A
CT
IVE
ME
MO
RY
But
tonh
ole
Icon
s (P
lati
num
755
)
20 W
hen
sew
ing
step
by
step
but
tonh
oles
, a
ash
ing
icon
indi
cate
s th
at y
ou n
eed
to to
uch
RE
VE
RS
E to
mov
e be
twee
n th
e di
ffer
ent p
arts
of
the
butto
nhol
e.
Whe
n th
e Sen
sor B
utto
nhole
Foo
t is c
onne
cted.
21 S
EN
SO
R B
UT
TO
NH
OL
E F
OO
T is
con
-ne
cted
.
22 S
et B
UT
TO
N S
IZE, b
y to
uchi
ng th
e st
itch
leng
th (+
) or (
-) b
utto
n.
By
touc
hing
CL
R, y
ou c
an s
tep
betw
een
setti
ng th
e bu
ttonh
ole
size
and
butto
n-ho
le d
ensit
y.
23 T
he b
utto
n sy
mbo
l ind
icat
es th
at th
e bu
tton
size
is sh
own
on 2
2.

Fu
nct
ion
s a
nd
In
foD
isp
lay
29
Prog
ram
min
g
Plat
inum
715
/735
You
can
prog
ram
stitc
hes i
nto
com
bina
tions
. The
pr
ogra
m is
aut
omat
ically
save
d in
the m
achi
ne
mem
ory a
nd is
reta
ined
even
whe
n th
e mac
hine
is
turn
ed o
ff.
Plat
inum
755
You
can
prog
ram
stitc
hes a
nd le
tters
into
com
bina
-tio
ns. S
ave t
he p
rogr
amm
ed co
mbi
natio
ns in
the
perm
anen
t mem
ories
. A p
rogr
amm
ed st
itch
com
bi-
natio
n th
at is
save
d is
reta
ined
in th
e mem
ory e
ven
when
the m
achi
ne is
turn
ed o
ff.
PRO
G m
ode
Whe
n pr
ogra
mm
ing,
the
Sew
ing
Adv
isor
on P
latin
um 7
15/7
35 is
not
act
ive.
Tou
ch
FU
NC to
act
ivat
e th
e P
RO
G m
ode.
Mem
orie
s (P
lati
num
755
)To
uch
M to
sel
ect m
emor
y. T
he M
and
the
num
ber t
hat f
ollo
ws
indi
cate
s th
e ac
tive
mem
ory.
The
re a
re tw
o di
ffer
ent m
emor
ies
(M1
and
M2)
. Eac
h m
emor
y ho
lds
up to
30
stitc
hes,
whi
ch m
eans
that
you
can
pro
gram
an
d sa
ve u
p to
60
stitc
hes
and/
or le
tters
.
Whe
n ac
tivat
ing
PR
OG
, the
mem
ory
prev
ious
ly u
sed
is ac
tive.
To
save
you
r pr
ogra
mm
ed c
ombi
natio
n in
the
othe
r m
emor
y, se
lect
it b
y to
uchi
ng M
bef
ore
pro-
gram
min
g ne
w s
titch
es.
Mov
e be
twee
n pr
ogra
mm
ed s
titc
hes
Use
the
arro
w b
utto
ns to
mov
e be
twee
n th
e st
itche
s to
che
ck w
hat h
as b
een
pro-
gram
med
. On
the
Info
Disp
lay
you
see
the
num
ber o
f th
e se
lect
ed s
titch
in th
e pr
o-gr
amm
ing
sequ
ence
.
To s
ew th
e st
itch
prog
ram
touc
h F
UN
C
butto
n to
act
ivat
e th
e R
EP m
ode.
Not
e (P
lati
num
755
): W
hen
prog
ram
min
g, y
ou
can
decr
ease
the
spac
e be
twee
n le
tters
. Tou
ch
whe
n th
e nu
mbe
rs/s
peci
al c
hara
cter
s m
enu
is ac
tive,
to p
rogr
am s
hort
reve
rse
stitc
hes.
The
m
ore
reve
rse
stitc
hes
you
prog
ram
the
shor
ter t
he
dist
ance
to th
e ne
xt e
nter
ed le
tter.

F
un
ctio
ns
an
d I
nfo
Dis
pla
y
30Del
ete
Stit
ches
or
Prog
ram
sIf
ther
e is
a st
itch
or le
tter c
ombi
natio
n in
the
mem
ory,
touc
h C
LR to
cle
ar th
e m
emor
y. T
he m
emor
y is
clea
red
from
the
curr
ent p
ositi
on to
the
end.
To
relo
ad a
de
lete
d pr
ogra
m, t
ouch
CL
R a
gain
bef
ore
you
ente
r new
stit
ches
or b
efor
e to
uchi
ng
the
arro
w b
utto
ns.
Prog
ram
Sti
tche
s (P
lati
num
715
/735
)
The
mem
ory
hold
s up
to 3
0 st
itche
s. To
pr
ogra
m th
e st
itch
com
bina
tion
show
n:
• To
uch
FU
NC to
act
ivat
e P
RO
G.
• Se
lect
stit
ch 2
:03
(Pla
tinum
71
5) /
2:0
5 (P
latin
um 7
35).
The
num
ber
appe
ars
on th
e In
foD
ispla
y. To
ent
er th
e st
itch,
touc
h th
e rig
ht a
rrow
but
ton
to
mov
e to
the
next
stit
ch p
ositi
on. O
ther
-w
ise th
e st
itch
sele
cted
nex
t will
repl
ace
the
stitc
h al
read
y en
tere
d.
• Se
lect
2:0
3 (P
latin
um 7
15) /
2:0
5 (P
lati-
num
735
) aga
in. T
ouch
. M
ove
for-
war
d w
ith th
e rig
ht a
rrow
but
ton.
To s
ew th
e st
itch
prog
ram
touc
h F
UN
C
butto
n to
act
ivat
e th
e R
EP m
ode.
No
te: I
f yo
u w
ant t
o se
w y
our p
rogr
amm
ed
stitc
h co
mbi
natio
n on
ly o
nce,
touc
h in
RE
P.
You
can
also
pro
gram
ST
OP in
PR
OG
. The
pro
-gr
amm
ed S
TO
P w
ill b
e in
dica
ted
by
on
the
Info
Disp
lay.

Fu
nct
ion
s a
nd
In
foD
isp
lay
31
Prog
ram
Sti
tche
s an
d Le
tter
s (P
lati
num
755
)
To p
rogr
am th
e st
itch
com
bina
tion
show
n:
• To
uch
FU
NC to
act
ivat
e P
RO
G.
• Se
lect
stit
ch m
enu
3.
• Se
lect
stit
ch 3
:24.
The
num
ber a
ppea
rs
on th
e In
foD
ispla
y.
• To
uch
to m
irror
imag
e th
e st
itch
end
to e
nd.
Whi
le p
rogr
amm
ing
a co
mbi
natio
n, y
ou
need
to m
ove
forw
ard
with
the
right
arr
ow
butto
n to
ent
er th
e st
itch.
Oth
erw
ise th
e st
itch
or le
tter s
elec
ted
next
will
repl
ace
the
stitc
h al
read
y en
tere
d.
To p
rogr
am “
E”
in u
pper
cas
e le
tters
, tou
ch
the
Alp
habe
t men
u bu
tton
once
. “A
..” is
vi
sible
on
the
Info
Disp
lay.
• Se
lect
“E
”. T
he n
umbe
r 5 a
ppea
rs o
n th
e In
foD
ispla
y. M
ove
forw
ard
with
the
right
ar
row
but
ton.
To p
rogr
am “
rika”
in lo
wer
cas
e le
tters
, se
lect
low
er c
ase
lette
rs w
ith th
e A
lpha
bet
men
u bu
tton.
Whe
n th
e lo
wer
cas
e m
enu
is ac
tive,
a..
is vi
sible
in th
e O
verv
iew
W
indo
w
• To
uch
r, th
e nu
mbe
r 18
appe
ars
on th
e In
foD
ispla
y. M
ove
forw
ard
with
the
right
ar
row
but
ton.
Con
tinue
to e
nter
the
let-
ters
: i, k
, and
a in
the
sam
e m
anne
r.
Sele
ct s
titch
men
u 3
to p
rogr
am th
e la
st
deco
rativ
e st
itch.
• Se
lect
stit
ch 3
:24.
The
num
ber a
ppea
rs
on th
e In
foD
ispla
y.
To s
ew th
e st
itch
prog
ram
touc
h F
UN
C
butto
n to
act
ivat
e th
e R
EP m
ode.
No
te: I
f yo
u w
ant t
o se
w y
our p
rogr
amm
ed
stitc
h co
mbi
natio
n on
ly o
nce,
touc
h in
RE
P.
You
can
also
pro
gram
ST
OP in
PR
OG
. The
pro
-gr
amm
ed S
TO
P w
ill b
e in
dica
ted
by
on
the
Info
Disp
lay.

F
un
ctio
ns
an
d I
nfo
Dis
pla
y
32Cha
nge
or A
dd a
Sti
tch
or L
ette
rA
ny s
titch
can
be
chan
ged
in P
RO
G w
hen
the
stitc
h nu
mbe
r is
show
n on
the
Info
Dis-
play
. On
Plat
inum
755
you
can
also
cha
nge
lette
rs. S
impl
y st
ep th
roug
h th
e se
quen
ce
with
the
arro
w b
utto
ns u
ntil
you
see
the
num
ber o
f th
e st
itch
or le
tter y
ou w
ould
lik
e to
cha
nge,
and
sel
ect t
he c
orre
ct s
titch
to
repl
ace
it.
Adj
ust
Stit
ches
in a
Pro
gram
If y
ou w
ant t
o ad
just
a s
titch
in a
pro
-gr
amm
ed s
eque
nce,
use
the
arro
w b
utto
ns
to s
tep
to th
e st
itch.
On
Plat
inum
755
you
ca
n al
so a
djus
t let
ters
. You
can
adj
ust t
he
stitc
h le
ngth
and
wid
th o
r mirr
or im
age
a st
itch/
lette
r.
The
adj
ustm
ents
will
aut
omat
ical
ly b
e st
ored
in th
e pe
rman
ent m
emor
y.
Sew
you
r Pr
ogra
mTo
sew
you
r pro
gram
, tou
ch F
UN
C to
brin
g up
the
RE
P m
ode.
Pre
sser
foot
B is
reco
m-
men
ded.
A s
top
is in
dica
ted
by a
sto
p sig
n sy
mbo
l.
To c
heck
you
r stit
ch s
eque
nce,
use
the
arro
w b
utto
ns to
mov
e fo
rwar
d/ba
ckw
ard
in th
e se
quen
ce.
Sew
you
r pro
gram
on
a st
abili
zed
piec
e of
fa
bric
.
Mir
ror
Enti
re S
titc
h Pr
ogra
mIn
RE
P y
ou c
an m
irror
imag
e th
e en
tire
pro-
gram
sid
e to
sid
e. O
n Pl
atin
um 7
55 y
ou c
an
also
mirr
or im
age
the
entir
e pr
ogra
m e
nd
to e
nd. T
he c
hang
es w
ill n
ot b
e sa
ved
in th
e pe
rman
ent m
emor
y.
Plat
inum
715
/735
Plat
inum
755
Plat
inum
715
/735
Plat
inum
755
SEW
ING

So
me
fabrics
hav
e a
lot of ex
cess
dye
whic
h c
an c
ause
dis
colo
ratio
n o
n o
ther
fab
ric
but al
so o
n y
our
sew
ing
mac
hin
e. T
his
dis
colo
ring
may
be
very
diffi cu
lt or
imposs
i-ble
to r
emove
.
Fl
eece
and d
enim
fab
ric
in e
spec
ially
red
and b
lue
often
conta
in a
lot of ex
cess
dye
.
If y
ou s
usp
ect th
at y
our
fabric/
read
y-to
-wea
r ga
rmen
t co
nta
ins
a lo
t of ex
cess
dye
,
alw
ays
pre
-was
h it bef
ore
sew
ing/
embro
ider
ing
to a
void
the
dis
colo
ring.
S
ewin
g
34

St
raig
ht s
titch
can
also
be
used
for t
op-
stitc
hing
. For
a m
ore
visib
le to
pstit
ch,
leng
then
the
stitc
h an
d us
e he
avie
r thr
ead
with
larg
er s
ize
need
le.
Uti
lity
Sew
ing
Seam
A se
am se
ws t
wo
piec
es o
f fa
bric
toge
ther
w
ith a
seam
allo
wan
ce th
at u
suall
y w
ill b
e pr
esse
d op
en. I
n m
ost c
ases
edg
es o
f th
e se
am a
llow
ance
are
ni
shed
with
an
over
cast
st
itch
befo
re se
win
g th
e se
am.
Fabr
ic: W
oven
med
ium
, cut
in tw
o.75
571
5 / 7
35
1:02
Sew
:•
Plac
e fa
bric
s rig
ht s
ides
toge
ther
. Put
the
fabr
ic in
pos
ition
und
er th
e pr
esse
r foo
t. Li
ne u
p th
e ed
ge w
ith th
e 5/
8'' (
15 m
m)
seam
gui
de.
• Lo
wer
the
pres
ser f
oot a
nd s
tep
on th
e fo
ot c
ontr
ol.
• Se
w a
sea
m. C
ut th
e th
read
s w
hen
n-
ished
.
Seam
s in
stre
tch
fabr
ic m
ust s
tretc
h w
ith th
e fa
bric.
The
Lig
htni
ng S
titch
(Stre
tch
Stitc
h)
mak
es a
stre
tchy
seam
that
is su
itabl
e fo
r se
win
g to
geth
er p
ieces
of
light
stre
tch
fabr
ic.
Fabr
ic: S
tret
ch li
ght,
cut i
n tw
o.75
571
5 / 7
35
1:04
Sew
:
• Pl
ace
fabr
ic p
iece
s rig
ht s
ides
toge
ther
. Pu
t the
fabr
ic in
pos
ition
und
er th
e pr
esse
r foo
t. Li
ne u
p th
e ed
ge w
ith th
e 3/
8'' (
10 m
m) s
eam
gui
de.
• Lo
wer
the
pres
ser f
oot a
nd s
tep
on th
e fo
ot c
ontr
ol.
• Se
w a
sea
m. C
ut th
e th
read
s w
hen
n-
ished
.
Stra
ight s
titch
L
ightn
ing s
titch
Sew
ing
35
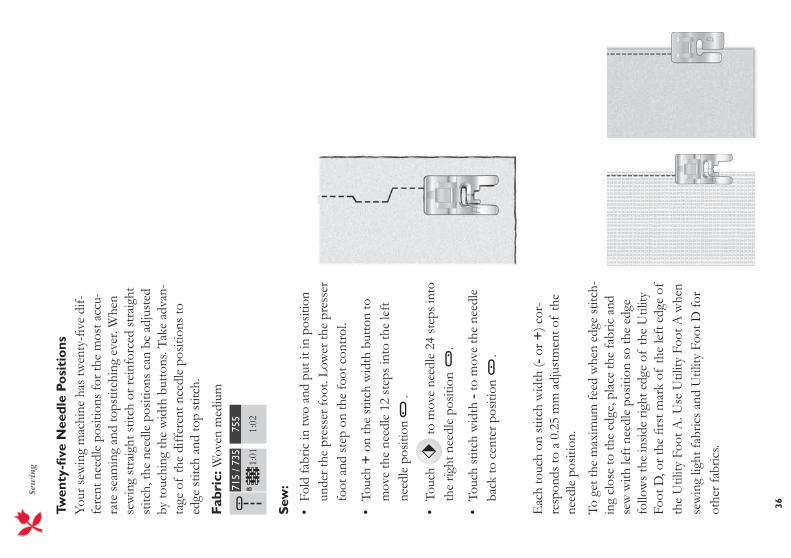
Twen
ty-
ve N
eedl
e Po
siti
ons
Your
sew
ing
mac
hine
has
twen
ty-
ve d
if-fe
rent
nee
dle
posit
ions
for t
he m
ost a
ccu-
rate
sea
min
g an
d to
pstit
chin
g ev
er. W
hen
sew
ing
stra
ight
stit
ch o
r rei
nfor
ced
stra
ight
st
itch,
the
need
le p
ositi
ons
can
be a
djus
ted
by to
uchi
ng th
e w
idth
but
tons
. Tak
e ad
van-
tage
of
the
diff
eren
t nee
dle
posit
ions
to
edge
stit
ch a
nd to
p st
itch.
Fabr
ic: W
oven
med
ium
755
715
/ 735 1:01
1:02
Sew
:•
Fold
fabr
ic in
two
and
put i
t in
posit
ion
unde
r the
pre
sser
foot
. Low
er th
e pr
esse
r fo
ot a
nd s
tep
on th
e fo
ot c
ontr
ol.
• To
uch
+ o
n th
e st
itch
wid
th b
utto
n to
m
ove
the
need
le 1
2 st
eps
into
the
left
ne
edle
pos
ition
.
• To
uch
to m
ove
need
le 2
4 st
eps
into
th
e rig
ht n
eedl
e po
sitio
n .
• To
uch
stitc
h w
idth
- to
mov
e th
e ne
edle
ba
ck to
cen
ter p
ositi
on
.
Eac
h to
uch
on s
titch
wid
th (-
or +
) cor
-re
spon
ds to
a 0
.25
mm
adj
ustm
ent o
f th
e ne
edle
pos
ition
.
To g
et th
e m
axim
um fe
ed w
hen
edge
stit
ch-
ing
clos
e to
the
edge
, pla
ce th
e fa
bric
and
se
w w
ith le
ft n
eedl
e po
sitio
n so
the
edge
fo
llow
s th
e in
side
right
edg
e of
the
Util
ity
Foot
D, o
r the
rs
t mar
k of
the
left
edg
e of
th
e U
tility
Foo
t A. U
se U
tility
Foo
t A w
hen
sew
ing
light
fabr
ics
and
Util
ity F
oot D
for
othe
r fab
rics.
S
ewin
g
36

Bas
te
Bas
ting
is te
mpo
rary
stit
chin
g fo
r tt
ing
garm
ents
, gat
herin
g an
d m
arki
ng.
Your
Pla
tinum
reco
mm
ends
redu
cing
the
tens
ion
so th
e th
read
s ar
e ea
sy to
rem
ove
or
pull
for g
athe
ring.
Fabr
ic: W
oven
med
ium
, cut
in tw
o. P
lace
th
e fa
bric
s rig
ht s
ides
toge
ther
. Put
the
fabr
ic in
pos
ition
und
er th
e pr
esse
r foo
t.75
571
5 / 7
35
1:07
Sea
m a
llow
ance
: 5/8
'' (1
5 m
m)
Sew
:
• Lo
wer
the
pres
ser f
oot a
nd s
tep
on th
e fo
ot c
ontr
ol.
• St
itch
alon
g th
e se
am li
ne.
• C
ut th
e th
read
s w
hen
nish
ed.
• Pu
ll bo
bbin
thre
ad to
rem
ove
the
stitc
h-in
g.
Gat
heri
ngU
se a
slig
htly
long
er s
titch
than
nor
mal
st
raig
ht s
titch
, 3.5
-5.0
. Alw
ays
sew
two
gath
erin
g th
read
s ne
xt to
eac
h ot
her.
• Pl
ace
a sin
gle
thic
knes
s of
fabr
ic u
nder
th
e pr
esse
r foo
t and
stit
ch.
• St
itch
a se
cond
row
nex
t to
the
rst
.
• Pu
ll bo
th b
obbi
n th
read
s to
gat
her f
abric
. B
e ca
refu
l not
to p
ull t
hem
out
.
Sew
ing
37
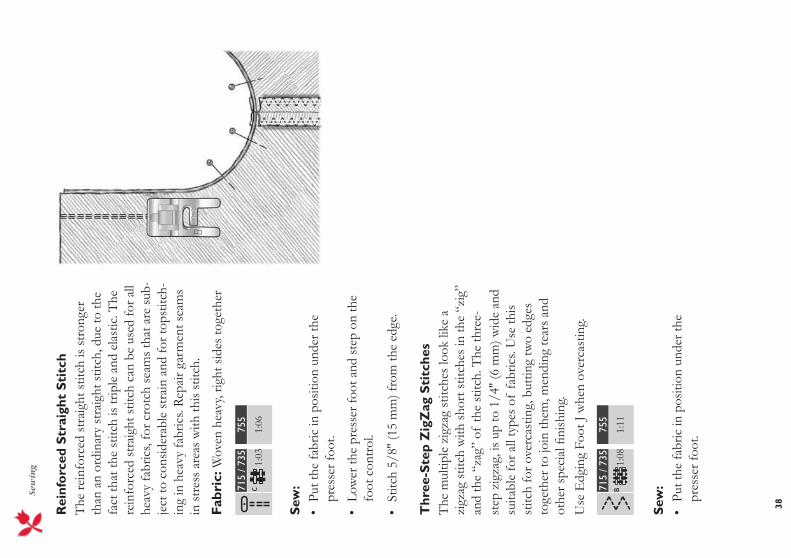
Rei
nfor
ced
Stra
ight
Sti
tch
The
rein
forc
ed s
trai
ght s
titch
is s
tron
ger
than
an
ordi
nary
str
aigh
t stit
ch, d
ue to
the
fact
that
the
stitc
h is
trip
le a
nd e
last
ic. T
he
rein
forc
ed s
trai
ght s
titch
can
be
used
for a
ll he
avy
fabr
ics,
for c
rotc
h se
ams
that
are
sub
-je
ct to
con
sider
able
str
ain
and
for t
opst
itch-
ing
in h
eavy
fabr
ics.
Rep
air g
arm
ent s
eam
s in
str
ess
area
s w
ith th
is st
itch.
Fabr
ic: W
oven
hea
vy, r
ight
sid
es to
geth
er
755
715
/ 735 1:03
1:06
Sew
:•
Put t
he fa
bric
in p
ositi
on u
nder
the
pres
ser f
oot.
• Lo
wer
the
pres
ser f
oot a
nd s
tep
on th
e fo
ot c
ontr
ol.
• St
itch
5/8'
' (15
mm
) fro
m th
e ed
ge.
Thr
ee-S
tep
Zig
Zag
Sti
tche
sT
he m
ultip
le z
igza
g st
itche
s lo
ok li
ke a
zi
gzag
stit
ch w
ith s
hort
stit
ches
in th
e “z
ig”
and
the
“zag
” of
the
stitc
h. T
he th
ree-
step
zig
zag,
is u
p to
1/4
'' (6
mm
) wid
e an
d su
itabl
e fo
r all
type
s of
fabr
ics.
Use
this
stitc
h fo
r ove
rcas
ting,
but
ting
two
edge
s to
geth
er to
join
them
, men
ding
tear
s an
d ot
her s
peci
al
nish
ing.
U
se E
dgin
g Fo
ot J
whe
n ov
erca
stin
g.
755
715
/ 735 1:08
1:11
Sew
:•
Put t
he fa
bric
in p
ositi
on u
nder
the
pres
ser f
oot.
S
ewin
g
38
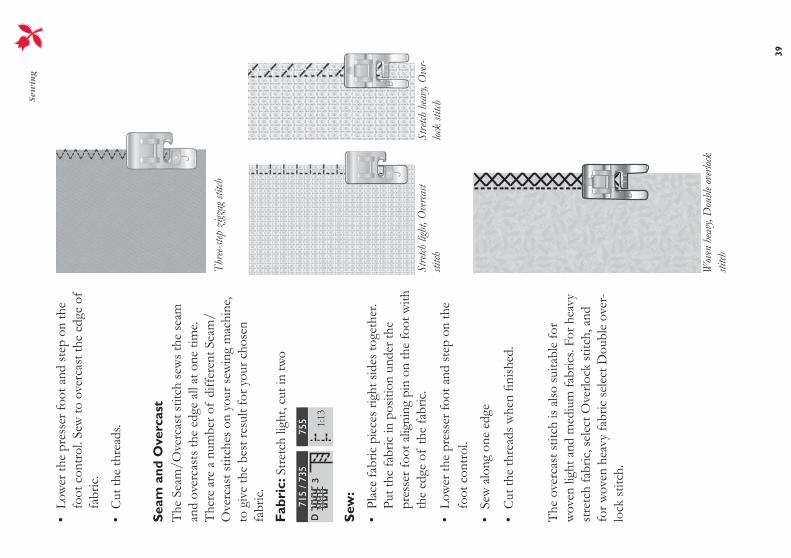
Thre
e-step
zigz
ag st
itch
• Lo
wer
the
pres
ser f
oot a
nd s
tep
on th
e fo
ot c
ontr
ol. S
ew to
ove
rcas
t the
edg
e of
fa
bric
.
• C
ut th
e th
read
s.
Seam
and
Ove
rcas
tT
he S
eam
/Ove
rcas
t stit
ch s
ews
the
seam
an
d ov
erca
sts
the
edge
all
at o
ne ti
me.
T
here
are
a n
umbe
r of
diff
eren
t Sea
m/
Ove
rcas
t stit
ches
on
your
sew
ing
mac
hine
, to
giv
e th
e be
st re
sult
for y
our c
hose
n fa
bric
.
Fabr
ic: S
tret
ch li
ght,
cut i
n tw
o
755
715
/ 735
1:13
Sew
:
• Pl
ace
fabr
ic p
iece
s rig
ht s
ides
toge
ther
. Pu
t the
fabr
ic in
pos
ition
und
er th
e pr
esse
r foo
t alig
ning
pin
on
the
foot
with
th
e ed
ge o
f th
e fa
bric
.
• Lo
wer
the
pres
ser f
oot a
nd s
tep
on th
e fo
ot c
ontr
ol.
• Se
w a
long
one
edg
e
• C
ut th
e th
read
s w
hen
nish
ed.
The
ove
rcas
t stit
ch is
also
sui
tabl
e fo
r w
oven
ligh
t and
med
ium
fabr
ics.
For h
eavy
st
retc
h fa
bric
, sel
ect O
verlo
ck s
titch
, and
fo
r wov
en h
eavy
fabr
ic s
elec
t Dou
ble
over
-lo
ck s
titch
.
Stre
tch li
ght,
Ove
rcast
stitch
Stre
tch h
eavy
, Ove
r-loc
k sti
tch
Wov
en h
eavy
, Dou
ble o
verlo
ck
stitch
Sew
ing
39
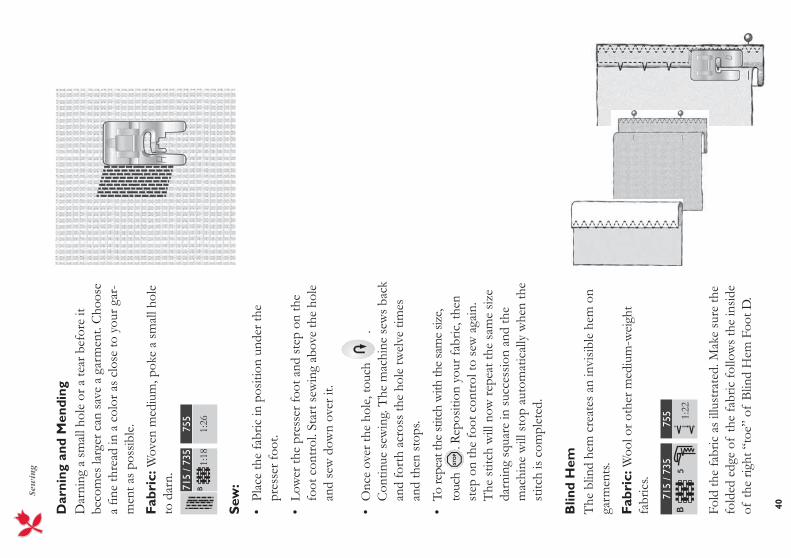
Dar
ning
and
Men
ding
Dar
ning
a s
mal
l hol
e or
a te
ar b
efor
e it
beco
mes
larg
er c
an s
ave
a ga
rmen
t. C
hoos
e a
ne
thre
ad in
a c
olor
as
clos
e to
you
r gar
-m
ent a
s po
ssib
le.
Fabr
ic: W
oven
med
ium
, pok
e a
smal
l hol
e to
dar
n.
755
715
/ 735 1:18
1:26
Sew
:
• Pl
ace
the
fabr
ic in
pos
ition
und
er th
e pr
esse
r foo
t.
• Lo
wer
the
pres
ser f
oot a
nd s
tep
on th
e fo
ot c
ontr
ol. S
tart
sew
ing
abov
e th
e ho
le
and
sew
dow
n ov
er it
.
• O
nce
over
the
hole
, tou
ch
. C
ontin
ue s
ewin
g. T
he m
achi
ne s
ews
back
an
d fo
rth
acro
ss th
e ho
le tw
elve
tim
es
and
then
sto
ps.
• To
repe
at th
e st
itch
with
the
sam
e siz
e, to
uch
. Rep
ositi
on y
our f
abric
, the
n st
ep o
n th
e fo
ot c
ontr
ol to
sew
aga
in.
The
stit
ch w
ill n
ow re
peat
the
sam
e siz
e da
rnin
g sq
uare
in s
ucce
ssio
n an
d th
e m
achi
ne w
ill s
top
auto
mat
ical
ly w
hen
the
stitc
h is
com
plet
ed.
Blin
d H
emT
he b
lind
hem
cre
ates
an
invi
sible
hem
on
garm
ents
.
Fabr
ic: W
ool o
r oth
er m
ediu
m-w
eigh
t fa
bric
s.
755
715
/ 735
1:22
Fold
the
fabr
ic a
s ill
ustr
ated
. Mak
e su
re th
e fo
lded
edg
e of
the
fabr
ic fo
llow
s th
e in
side
of th
e rig
ht “
toe”
of
Blin
d H
em F
oot D
.
S
ewin
g
40
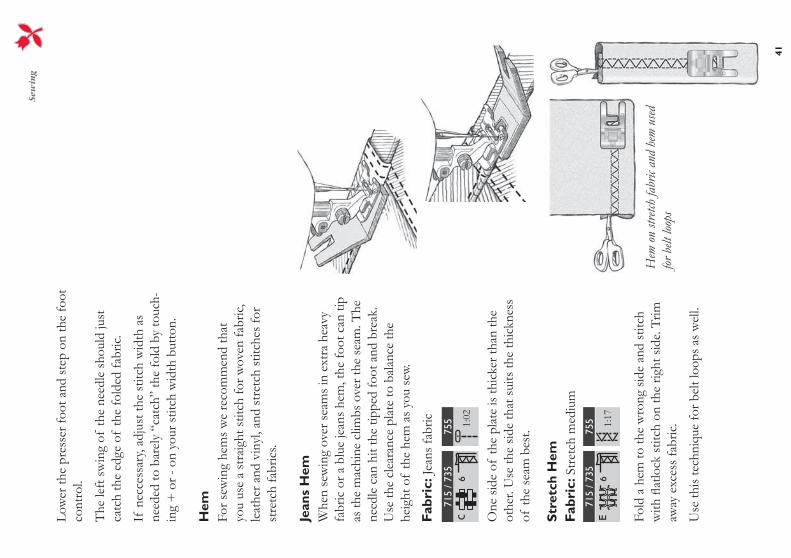
Low
er th
e pr
esse
r foo
t and
ste
p on
the
foot
co
ntro
l.
The
left
sw
ing
of th
e ne
edle
sho
uld
just
ca
tch
the
edge
of
the
fold
ed fa
bric
.
If n
ecce
ssar
y, ad
just
the
stitc
h w
idth
as
need
ed to
bar
ely
“cat
ch”
the
fold
by
touc
h-in
g +
or -
on
your
stit
ch w
idth
but
ton.
Hem
For s
ewin
g he
ms
we
reco
mm
end
that
yo
u us
e a
stra
ight
stit
ch fo
r wov
en fa
bric
, le
athe
r and
vin
yl, a
nd s
tret
ch s
titch
es fo
r st
retc
h fa
bric
s.
Jean
s H
emW
hen
sew
ing
over
sea
ms
in e
xtra
hea
vy
fabr
ic o
r a b
lue
jean
s he
m, t
he fo
ot c
an ti
p as
the
mac
hine
clim
bs o
ver t
he s
eam
. The
ne
edle
can
hit
the
tippe
d fo
ot a
nd b
reak
. U
se th
e cl
eara
nce
plat
e to
bal
ance
the
heig
ht o
f th
e he
m a
s yo
u se
w.
Fabr
ic: J
eans
fabr
ic75
571
5 / 7
35
1:02
One
sid
e of
the
plat
e is
thic
ker t
han
the
othe
r. U
se th
e sid
e th
at s
uits
the
thic
knes
s of
the
seam
bes
t.
Stre
tch
Hem
Fabr
ic: S
tret
ch m
ediu
m75
571
5 / 7
35
1:17
Fold
a h
em to
the
wro
ng s
ide
and
stitc
h w
ith
atlo
ck s
titch
on
the
right
sid
e. T
rim
away
exc
ess
fabr
ic.
Use
this
tech
niqu
e fo
r bel
t loo
ps a
s w
ell.
Hem
on
stretc
h fa
bric
and
hem
used
for
belt
loop
s
Sew
ing
41

Cen
ter
Zip
per
Fabr
ic: W
oven
med
ium
755
715
/ 735
1:02
Sew
the
two
fabr
ics
toge
ther
alo
ng a
5/8
'' (1
5 m
m) s
eam
line
up
to th
e no
tch
at th
e zi
pper
pla
cem
ent. 75
571
5 / 7
35
1:07
Bas
te th
e zi
pper
are
a of
the
seam
toge
ther
. Pr
ess
the
seam
ope
n. P
lace
the
zipp
er ri
ght
side
to th
e pr
esse
d op
en s
eam
allo
wan
ce.
755
715
/ 735 1:05
1:08
Rem
ove
the
pres
ser f
oot.
Set s
titch
wid
th to
6
mm
, to
bart
ack
bast
e zi
pper
in p
lace
. Set
th
e pr
esse
r foo
t pre
ssur
e to
2. L
ower
the
feed
teet
h by
turn
ing
the
dial
on
the
free
ar
m to
. M
ove
the
fabr
ic to
stit
ch a
se
ries
of b
arta
cks
over
the
zipp
er to
hol
d it
in p
lace
.
Turn
the
feed
teet
h di
al to
sew
ing
posit
ion
and
the
feed
teet
h w
ill c
ome
up a
uto-
mat
ical
ly w
hen
you
star
t sew
ing.
Sew
:•
On
Plat
inum
715
/735
sel
ect s
trai
ght
stitc
h an
d ad
just
stit
ch w
idth
to 6
.0 fo
r le
ft n
eedl
e po
sitio
n st
raig
ht s
titch
.
O
n Pl
atin
um 7
55, s
elec
t stit
ch 1
:01.
• Se
t you
r Pla
tinum
acc
ordi
ng to
the
inst
ruct
ions
on
the
Info
Disp
lay.
• T
here
are
two
bars
on
the
foot
so
you
can
snap
on
the
foot
to th
e rig
ht o
r lef
t of
the
need
le. S
nap
on Z
ippe
r Foo
t E to
th
e rig
ht o
f th
e ne
edle
.
S
ewin
g
42

• Pl
ace
the
fabr
ic, r
ight
sid
e up
, und
er th
e zi
pper
foot
. Low
er th
e pr
esse
r foo
t and
st
ep o
n th
e fo
ot c
ontr
ol.
• B
egin
stit
chin
g ac
ross
the
botto
m, p
ivot
th
e fa
bric
and
stit
ch th
e rig
ht s
ide
of th
e zi
pper
to th
e to
p.
• To
avo
id fa
bric
shi
ftin
g, s
ew th
e le
ft
side
of th
e zi
pper
in th
e sa
me
dire
ctio
n.
Snap
on
the
zipp
er fo
ot to
the
left
of
the
need
le. T
ouch
fo
r rig
ht n
eedl
e po
si-tio
n st
raig
ht s
titch
.
• B
egin
stit
chin
g ac
ross
the
botto
m, p
ivot
th
e fa
bric
and
stit
ch th
e le
ft s
ide
of th
e zi
pper
sew
ing
from
the
botto
m to
the
top.
• R
emov
e ba
rtac
ks a
nd b
astin
g st
itche
s.
No
te: T
o ad
just
the
posit
ion
of th
e st
itchi
ng
line,
adj
ust t
he n
eedl
e po
sitio
n. T
ouch
stit
ch
wid
th -
(min
us) t
o m
ove
the
need
le to
war
ds
the
cent
er p
ositi
on.
Sew
ing
43
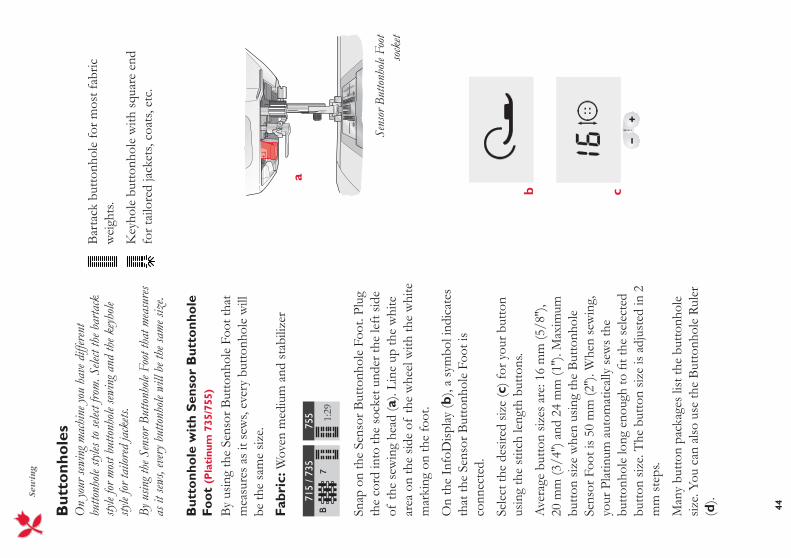
But
tonh
oles
On
your
sewi
ng m
achi
ne yo
u ha
ve d
iffer
ent
butto
nhole
style
s to
select
from
. Sele
ct th
e bar
tack
sty
le for
mos
t but
tonh
ole se
wing
and
the k
eyho
le sty
le for
tailo
red
jack
ets.
By u
sing t
he S
enso
r But
tonh
ole F
oot t
hat m
easu
res
as it
sews
, eve
ry b
utto
nhole
will
be t
he sa
me s
ize.
But
tonh
ole
wit
h Se
nsor
But
tonh
ole
Foot
(Pla
tinu
m 7
35/7
55)
By
usin
g th
e Se
nsor
But
tonh
ole
Foot
that
m
easu
res
as it
sew
s, ev
ery
butto
nhol
e w
ill
be th
e sa
me
size.
Fabr
ic: W
oven
med
ium
and
sta
biliz
er
755
715
/ 735
1:29
Snap
on
the
Sens
or B
utto
nhol
e Fo
ot. P
lug
the
cord
into
the
sock
et u
nder
the
left
sid
e of
the
sew
ing
head
(a).
Line
up
the
whi
te
area
on
the
side
of th
e w
heel
with
the
whi
te
mar
king
on
the
foot
.
On
the
Info
Disp
lay
(b),
a sy
mbo
l ind
icat
es
that
the
Sens
or B
utto
nhol
e Fo
ot is
co
nnec
ted.
Sele
ct th
e de
sired
siz
e (c
) for
you
r but
ton
usin
g th
e st
itch
leng
th b
utto
ns.
Ave
rage
but
ton
sizes
are
: 16
mm
(5/8
''),
20 m
m (3
/4'')
and
24
mm
(1'')
. Max
imum
bu
tton
size
whe
n us
ing
the
But
tonh
ole
Sens
or F
oot i
s 50
mm
(2'')
. Whe
n se
win
g,
your
Pla
tinum
aut
omat
ical
ly s
ews
the
butto
nhol
e lo
ng e
noug
h to
t t
he s
elec
ted
butto
n siz
e. T
he b
utto
n siz
e is
adju
sted
in 2
m
m s
teps
.
Man
y bu
tton
pack
ages
list
the
butto
nhol
e siz
e. Y
ou c
an a
lso u
se th
e B
utto
nhol
e R
uler
(d
).
Bar
tack
but
tonh
ole
for m
ost f
abric
w
eigh
ts.
Key
hole
but
tonh
ole
with
squ
are
end
for t
ailo
red
jack
ets,
coat
s, et
c.
Sens
or B
utto
nhole
Foo
t so
cket
a
b c
S
ewin
g
44

The
but
tonh
ole
size
need
ed w
ill v
ary
with
th
e th
ickn
ess
and
styl
e of
you
r but
ton.
A
lway
s st
itch
a sa
mpl
e bu
ttonh
ole
on
scra
ps
rst.
Sew
the
But
tonh
ole:
•
Fold
fabr
ic in
two
and
plac
e st
abili
zer i
n be
twee
n.
• M
ark
the
butto
nhol
e lo
catio
n on
you
r fa
bric
.
• Pl
ace
the
fabr
ic u
nder
the
Sens
or B
utto
n-ho
le F
oot.
The
mea
sure
men
t whe
el c
an
be ra
ised
to a
sto
p, w
hich
mak
es it
eas
ier
to p
lace
the
fabr
ic u
nder
the
pres
ser f
oot.
Use
the
mar
king
s on
the
left
toe
of th
e Se
nsor
But
tonh
ole
Foot
to p
ositi
on th
e ga
rmen
t edg
e. A
lign
the
edge
of
the
garm
ent w
ith th
e m
iddl
e m
ark
to h
ave
5/8'
' (15
mm
) fro
m th
e ed
ge to
the
but-
tonh
ole.
• Lo
wer
the
Sens
or B
utto
nhol
e Fo
ot a
nd
step
on
the
foot
con
trol
. A s
trai
ght s
titch
is
sew
n ba
ckw
ards
, ind
icat
ing
the
left
but
-to
nhol
e co
lum
n, th
en th
e sa
tin c
olum
n is
sew
n fo
rwar
ds. T
his
is re
peat
ed fo
r the
rig
ht c
olum
n. T
he b
arta
cks
are
auto
mat
ic
(see
illu
stra
tion
1). Y
our s
ewin
g m
achi
ne
stop
s w
hen
the
butto
nhol
e is
com
plet
ed.
No
te: W
hen
sew
ing
butto
nhol
es w
ithou
t sa
tin s
titch
es o
r whe
n us
ing
But
tonh
ole
Foot
C, t
he s
ewin
g st
eps
are
diff
eren
t (th
ere
is no
str
aigh
t stit
ch s
tep)
. (Se
e ill
ustr
atio
n 2)
d 1. S
ewin
g dire
ction
for s
atin
stitc
h bu
ttonh
oles s
ewn
with
the S
enso
r But
tonh
ole F
oot
The m
arki
ngs o
n th
e left
toe
gives
a 5/
8'' (
15 m
m) b
ut-
toni
ng ed
ge
2. S
ewin
g dire
ction
for b
utto
nhole
s with
out s
atin
sti
tches
or sa
tin st
itch
butto
nhole
s sew
n wi
th B
ut-
tonh
ole F
oot C
Sew
ing
45
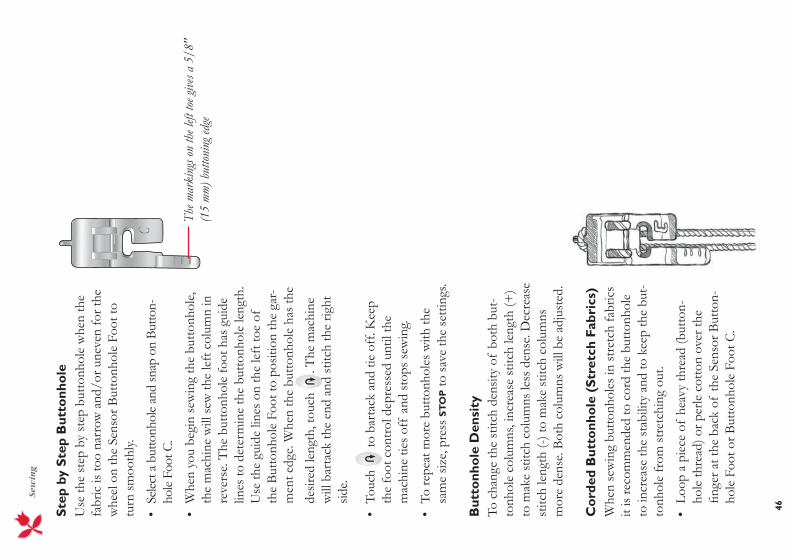
Step
by
Step
But
tonh
ole
Use
the
step
by
step
but
tonh
ole
whe
n th
e fa
bric
is to
o na
rrow
and
/or u
neve
n fo
r the
w
heel
on
the
Sens
or B
utto
nhol
e Fo
ot to
tu
rn s
moo
thly.
• Se
lect
a b
utto
nhol
e an
d sn
ap o
n Bu
tton-
hole
Foo
t C.
• W
hen
you
begi
n se
win
g th
e bu
ttonh
ole,
th
e m
achi
ne w
ill s
ew th
e le
ft c
olum
n in
re
vers
e. T
he b
utto
nhol
e fo
ot h
as g
uide
lin
es to
det
erm
ine
the
butto
nhol
e le
ngth
. U
se th
e gu
ide
lines
on
the
left
toe
of
the
But
tonh
ole
Foot
to p
ositi
on th
e ga
r-m
ent e
dge.
Whe
n th
e bu
ttonh
ole
has
the
desir
ed le
ngth
, tou
ch
. The
mac
hine
w
ill b
arta
ck th
e en
d an
d st
itch
the
right
sid
e.
• To
uch
to b
arta
ck a
nd ti
e of
f. K
eep
the
foot
con
trol
dep
ress
ed u
ntil
the
mac
hine
ties
off
and
sto
ps s
ewin
g.
• To
repe
at m
ore
butto
nhol
es w
ith th
e sa
me
size,
pre
ss S
TO
P to
sav
e th
e se
tting
s.
But
tonh
ole
Den
sity
To c
hang
e th
e st
itch
dens
ity o
f bo
th b
ut-
tonh
ole
colu
mns
, inc
reas
e st
itch
leng
th (+
) to
mak
e st
itch
colu
mns
less
den
se. D
ecre
ase
stitc
h le
ngth
(-) t
o m
ake
stitc
h co
lum
ns
mor
e de
nse.
Bot
h co
lum
ns w
ill b
e ad
just
ed.
Cor
ded
But
tonh
ole
(Str
etch
Fab
rics
)W
hen
sew
ing
butto
nhol
es in
str
etch
fabr
ics
it is
reco
mm
ende
d to
cor
d th
e bu
ttonh
ole
to in
crea
se th
e st
abili
ty a
nd to
kee
p th
e bu
t-to
nhol
e fr
om s
tret
chin
g ou
t.
• Lo
op a
pie
ce o
f he
avy
thre
ad (b
utto
n-ho
le th
read
) or p
erle
cot
ton
over
the
nge
r at t
he b
ack
of th
e Se
nsor
But
ton-
hole
Foo
t or B
utto
nhol
e Fo
ot C
.
The m
arki
ngs o
n th
e left
toe g
ives a
5/8
'' (1
5 m
m) b
utto
ning
edge
S
ewin
g
46
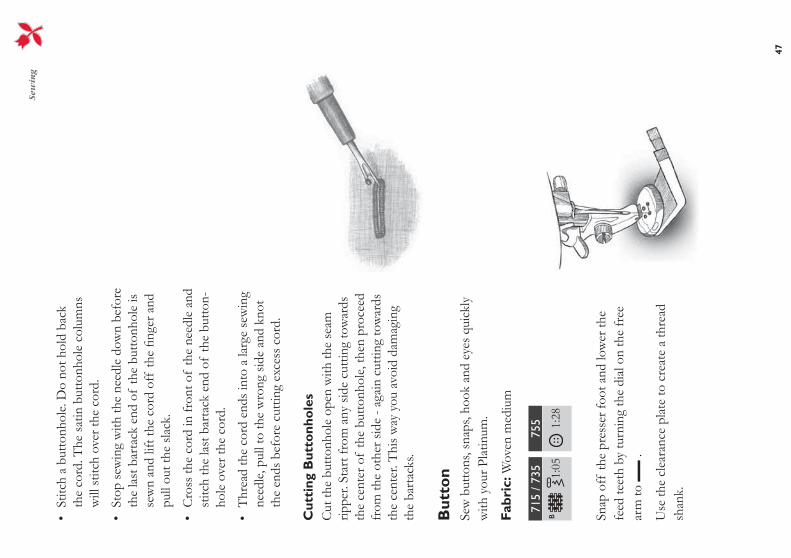
• St
itch
a bu
ttonh
ole.
Do
not h
old
back
th
e co
rd. T
he s
atin
but
tonh
ole
colu
mns
w
ill s
titch
ove
r the
cor
d.
• St
op s
ewin
g w
ith th
e ne
edle
dow
n be
fore
th
e la
st b
arta
ck e
nd o
f th
e bu
ttonh
ole
is se
wn
and
lift t
he c
ord
off
the
nge
r and
pu
ll ou
t the
sla
ck.
• C
ross
the
cord
in fr
ont o
f th
e ne
edle
and
st
itch
the
last
bar
tack
end
of
the
butto
n-ho
le o
ver t
he c
ord.
• T
hrea
d th
e co
rd e
nds
into
a la
rge
sew
ing
need
le, p
ull t
o th
e w
rong
sid
e an
d kn
ot
the
ends
bef
ore
cutti
ng e
xces
s co
rd.
Cut
ting
But
tonh
oles
Cut
the
butto
nhol
e op
en w
ith th
e se
am
rippe
r. St
art f
rom
any
sid
e cu
tting
tow
ards
th
e ce
nter
of
the
butto
nhol
e, th
en p
roce
ed
from
the
othe
r sid
e - a
gain
cut
ting
tow
ards
th
e ce
nter
. Thi
s w
ay y
ou a
void
dam
agin
g th
e ba
rtac
ks.
But
ton
Sew
but
tons
, sna
ps, h
ook
and
eyes
qui
ckly
w
ith y
our P
latin
um.
Fabr
ic: W
oven
med
ium
755
715
/ 735 1:05
1:28
Snap
off
the
pres
ser f
oot a
nd lo
wer
the
feed
teet
h by
turn
ing
the
dial
on
the
free
ar
m to
.
Use
the
clea
ranc
e pl
ate
to c
reat
e a
thre
ad
shan
k.
Sew
ing
47
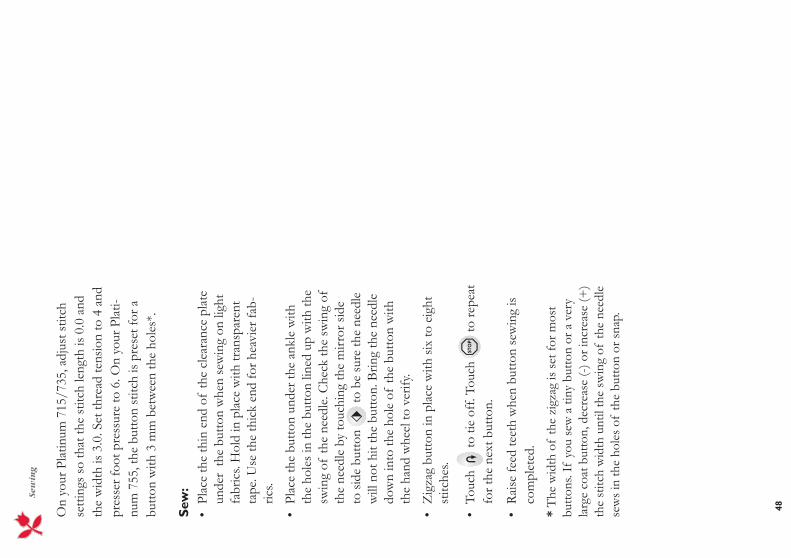
On
your
Pla
tinum
715
/735
, adj
ust s
titch
se
tting
s so
that
the
stitc
h le
ngth
is 0
.0 a
nd
the
wid
th is
3.0
. Set
thre
ad te
nsio
n to
4 a
nd
pres
ser f
oot p
ress
ure
to 6
. On
your
Pla
ti-nu
m 7
55, t
he b
utto
n st
itch
is pr
eset
for a
bu
tton
with
3 m
m b
etw
een
the
hole
s*.
Sew
: •
Plac
e th
e th
in e
nd o
f th
e cl
eara
nce
plat
e un
der
the
butto
n w
hen
sew
ing
on li
ght
fabr
ics.
Hol
d in
pla
ce w
ith tr
ansp
aren
t ta
pe. U
se th
e th
ick
end
for h
eavi
er fa
b-ric
s.
• Pl
ace
the
butto
n un
der t
he a
nkle
with
th
e ho
les
in th
e bu
tton
lined
up
with
the
swin
g of
the
need
le. C
heck
the
swin
g of
th
e ne
edle
by
touc
hing
the
mirr
or s
ide
to s
ide
butto
n to
be
sure
the
need
le
will
not
hit
the
butto
n. B
ring
the
need
le
dow
n in
to th
e ho
le o
f th
e bu
tton
with
th
e ha
nd w
heel
to v
erify
.
• Z
igza
g bu
tton
in p
lace
with
six
to e
ight
st
itche
s.
• To
uch
to ti
e of
f. To
uch
to re
peat
fo
r the
nex
t but
ton.
• R
aise
feed
teet
h w
hen
butto
n se
win
g is
com
plet
ed.
* T
he w
idth
of
the
zigz
ag is
set
for m
ost
but to
ns. I
f yo
u se
w a
tiny
but
ton
or a
ver
y la
rge
coat
but
ton,
dec
reas
e (-
) or i
ncre
ase
(+)
the
stitc
h w
idth
unt
il th
e sw
ing
of th
e ne
edle
se
ws
in th
e ho
les
of th
e bu
tton
or s
nap.
S
ewin
g
48

CA
RE
OF
YOU
R P
LAT
INU
M

50Cha
ngin
g th
e Li
ght
Bul
b
Turn
off
the
mai
n sw
itch.
Onl
y us
e lig
ht b
ulbs
of
a ty
pe a
s in
dica
ted
on th
e fr
ont o
f th
e m
achi
ne (1
2V, 5
W).
The
y ar
e av
aila
ble
at y
our a
utho
rized
Hus
q-va
rna
Vik
ing
deal
er.
1 Pl
ace
the
light
bul
b re
mov
er w
ith th
e de
ep h
ole,
mar
ked
OU
T, a
roun
d th
e bu
lb.
D
o no
t tur
n th
e bu
lb, j
ust p
ull i
t out
to
rem
ove
it.
2 W
hen
inse
rtin
g a
new
ligh
t bul
b pl
ace
the
light
bul
b re
mov
er w
ith th
e sh
allo
w
hole
, mar
ked
IN, a
roun
d th
e ne
w b
ulb.
In
sert
it b
y pu
shin
g it
up.
1 2
! Ca
re o
f yo
ur
Pla
tin
um

1015
1015
51
1
2
Car
e of
the
Mac
hine
To k
eep
your
sew
ing
mac
hine
ope
ratin
g w
ell,
clea
n it
ofte
n. N
o lu
bric
atio
n (o
iling
) is
need
ed.
Turn
off
the
mai
n sw
itch.
Cle
anin
gW
ipe
the
exte
rior s
urfa
ces
of y
our s
ewin
g m
achi
ne w
ith a
sof
t clo
th to
rem
ove
any
dust
or l
int b
uilt
up.
Cle
an t
he B
obbi
n A
rea
Rem
ove
the
pres
ser f
oot a
nd s
lide
off
the
bobb
in c
over
. Low
er th
e fe
ed te
eth.
Pla
ce
the
stitc
h pl
ate
open
er o
n th
e br
ush,
and
th
en in
the
rece
ss a
t the
rear
of
the
stitc
h pl
ate.
Tur
n to
war
d yo
u to
pop
off
the
stitc
h pl
ate.
Cle
an th
e fe
ed te
eth
with
the
brus
h.
Cle
anin
g U
nder
the
Bob
bin
Are
aW
hen
lint b
uild
s up
, the
are
a un
der t
he
bobb
in c
ase
mus
t be
clea
ned.
Rem
ove
the
bobb
in c
ase
hold
er (1
) cov
er-
ing
the
fron
t par
t of
the
bobb
in c
ase
(2).
Rem
ove
the
bobb
in c
ase
by li
ftin
g it
up.
Cle
an w
ith th
e br
ush.
Rep
lace
the
bobb
in c
ase
and
the
bobb
in
case
hol
der.
Rep
laci
ng t
he S
titc
h Pl
ate
With
feed
teet
h do
wn,
pla
ce th
e st
itch
plat
e ab
out 5
mm
in fr
ont o
f th
e re
ar e
dge
and
push
it b
ack.
Slid
e on
the
bobb
in c
over
. R
aise
the
feed
teet
h.
!
Ca
re o
f yo
ur
Pla
tin
um

52Trou
ble
Shoo
ting
Any
Tim
e You
Exp
erie
nce
a Pr
oble
m W
hen
Sew
ing:
• In
sert
new
nee
dle
size
and
type
as
reco
mm
ende
d on
the
Info
Disp
lay.
• R
ethr
ead
the
top
and
bobb
in th
read
s.•
Use
diff
eren
t spo
ol p
in p
ositi
ons
(ver
tical
or h
oriz
onta
l).•
Use
thre
ad n
ets
and
qual
ity th
read
. We
reco
mm
end
the
sam
e se
win
g th
read
on
top
and
bobb
in fo
r gen
eral
sew
ing.
Fo
r dec
orat
ive
sew
ing
we
reco
mm
end
embr
oide
ry th
read
on
top
and
regu
lar
sew
ing
thre
ad o
n bo
bbin
.
Fabr
ic P
ucke
rs?
• C
heck
nee
dle,
it c
ould
be
dam
aged
.•
Inse
rt n
ew n
eedl
e siz
e an
d ty
pe a
s re
com
men
ded
on th
e In
foD
ispla
y.•
Ret
hrea
d to
p an
d bo
bbin
thre
ads.
• C
hang
e th
read
type
to m
atch
be
r and
se
win
g te
chni
que.
• U
se q
ualit
y th
read
.•
Shor
ten
stitc
h le
ngth
.•
Use
sta
biliz
er.
• C
heck
you
r thr
ead
tens
ion.
Skip
ped
Stit
ches
?•
Che
ck n
eedl
e, it
cou
ld b
e da
mag
ed.
• C
hang
e ne
edle
to re
com
men
ded
size
and
type
.•
Be
sure
the
need
le is
inse
rted
cor
rect
ly
and
all t
he w
ay in
to th
e cl
amp.
• R
ethr
ead
top
and
bobb
in th
read
s.•
Use
reco
mm
ende
d pr
esse
r foo
t. •
Turn
mac
hine
off
and
on
to re
set.
• C
onsu
lt yo
ur d
eale
r for
ser
vice
.
Nee
dle
Bre
aks?
• U
se c
are
not t
o pu
ll fa
bric
whe
n se
win
g.•
Inse
rt n
ew n
eedl
e siz
e an
d ty
pe a
s re
com
men
ded
on th
e In
foD
ispla
y•
Inse
rt n
eedl
e co
rrec
tly a
s pa
ge 1
2 ex
plai
ns.
Poor
Ten
sion
?•
Ret
hrea
d to
p an
d bo
bbin
- us
e qu
ality
th
read
.•
Inse
rt n
ew n
eedl
e siz
e an
d ty
pe a
s re
com
men
ded
on th
e In
foD
ispla
y.•
Follo
w re
com
men
datio
ns fo
r thr
ead
ten-
sion.
• Fo
llow
reco
mm
enda
tions
for s
tabi
lizer
.
Top
Thr
ead
Bre
aks?
• D
oes
thre
ad fe
ed s
moo
thly
/not
ca
tchi
ng?
• U
se th
read
net
s an
d qu
ality
thre
ad. F
or
spec
ial t
hrea
ds s
uch
as m
etal
lic e
tc p
leas
e co
nsul
t you
r Acc
esor
y U
ser’s
Gui
de fo
r sp
ecia
l nee
dle
reco
mm
enda
tions
. •
New
nee
dle
size
and
type
as
the
Info
Dis-
play
reco
mm
ends
. •
Ret
hrea
d to
p an
d bo
bbin
thre
ads
- che
ck
for c
orre
ct th
read
ing.
• Tr
y di
ffer
ent s
pool
pin
pos
ition
s (h
ori-
zont
al o
r ver
tical
).•
If s
titch
pla
te h
ole
is da
mag
ed, r
epla
ce
stitc
h pl
ate.
• Is
the
corr
ect s
pool
hol
der u
sed
in fr
ont
of th
e th
read
?
Fabr
ic D
oes
Not
Mov
e?•
Feed
teet
h up
.•
Incr
ease
stit
ch le
ngth
.
Ca
re o
f yo
ur
Pla
tin
um

53
Bob
bin
Thr
ead
Bre
aks?
• W
ind
a ne
w b
obbi
n.•
Rep
lace
the
bobb
in in
the
mac
hine
, che
ck
corr
ect t
hrea
ding
, pag
e 10
. •
If s
titch
pla
te h
ole
is da
mag
ed -
repl
ace
stitc
h pl
ate.
• C
lean
bob
bin
area
.
Bob
bin
Win
ds Ir
regu
larl
y?• C
hec
k th
read
ing
for
bobbin
win
din
g.
Wro
ng S
titc
h, Ir
regu
lar
or N
arro
w S
titc
hes?
• Tu
rn m
achi
ne o
ff a
nd o
n to
rese
t.•
Cha
nge
need
le, r
ethr
ead
top
and
bobb
in
thre
ads.
• U
se s
tabi
lizer
.
Mac
hine
Sew
s Sl
owly
?•
Che
ck s
peed
.•
Rem
ove
stitc
h pl
ate
and
brus
h lin
t fro
m
bobb
in a
nd te
eth
area
.•
Hav
e th
e se
win
g m
achi
ne s
ervi
ced
at
your
dea
ler.
Mac
hine
Will
Not
Sew
?•
Put b
obbi
n w
inde
r spi
ndle
up
into
se
win
g po
sitio
n.•
Che
ck p
lugs
are
all
the
way
into
mac
hine
.•
Che
ck w
all p
lug
and
pow
er to
wal
l plu
g.•
Hav
e th
e se
win
g m
achi
ne s
ervi
ced.
Unb
alan
ced
But
tonh
ole
s?If
nec
cess
ary,
for s
peci
ality
fabr
ics,
you
have
the
poss
ibili
ty to
adj
ust t
he b
utto
nhol
e ba
lanc
e. T
o ba
lanc
e th
e st
itch
dens
ity o
f th
e rig
ht b
utto
nhol
e co
lum
n, to
uch
both
arr
ow
butto
ns a
t the
sam
e tim
e un
til th
e ba
lanc
e ic
on is
visb
le o
n th
e In
foD
ispla
y.
Use
the
stitc
h le
ngth
but
tons
to a
djus
t the
ba
lanc
e. (-
) will
mak
e th
e st
itche
s in
the
right
col
umn
clos
er to
geth
er (m
ore
dens
e).
(+) w
ill m
ake
the
stitc
hes
furt
her a
part
(les
s de
nse)
.
By
touc
hing
the
CL
R b
utto
n th
e m
achi
ne
retu
rns
to s
titch
leng
th/b
utto
n siz
e m
ode.
T
he b
alan
ce s
ettin
g w
ill re
mai
n un
til y
our
sew
ing
mac
hine
is tu
rned
off
.
Not
e: O
nly
the
right
sid
e st
itch
colu
mn
will
be
adju
sted
. Bal
ance
it to
the
left
stit
ch c
olum
n.
Hav
e yo
ur s
ewin
g m
achi
ne S
ervi
ced
Reg
ular
ly b
y yo
ur H
usqv
arna
Vik
ing
Dea
ler!
If y
ou h
ave
follo
wed
this
trou
ble
shoo
t-in
g in
form
atio
n an
d st
ill a
re h
avin
g se
win
g pr
oble
ms,
take
the
sew
ing
mac
hine
to y
our
deal
er. I
f th
ere
is a
spec
i c
prob
lem
, it i
s a
grea
t hel
p to
test
sew
with
you
r thr
ead
on a
sc
rap
of y
our s
ewin
g fa
bric
and
brin
g it
to
your
dea
ler.
A s
ewin
g sa
mpl
e w
ill o
ften
giv
e m
uch
bette
r inf
orm
atio
n th
an w
ords
.
Non
-Ori
gina
l Par
ts a
nd A
cces
sori
esT
he s
ewin
g m
achi
ne w
arra
nty
does
not
co
ver a
ny d
efec
t or d
amag
e ca
used
by
use
of n
on-o
rigin
al a
cces
sorie
s or
par
ts.
Ca
re o
f yo
ur
Pla
tin
um

Inde
x
Acc
esso
ry T
ray
3A
djus
t an
entir
e st
itch
prog
ram
32
Adj
ust s
titch
es in
a p
rogr
am
32A
rrow
but
tons
19
Aux
ilary
spo
ol p
in
7
Bas
te
37
Bob
bin
plac
ing
in th
e m
achi
ne
10w
indi
ng
10B
uilt-
in m
emor
y 19
, 29
But
tonh
ole
bala
nce
53co
rded
46
cutti
ng
47de
nsity
46
Rul
er
45Se
nsor
Foo
t 4
4st
ep b
y st
ep
46B
utto
n, s
ewin
g on
47
Car
e of
you
r Pla
tinum
49
-51
Cha
ngin
g lig
ht b
ulbs
50
need
le
12pr
esse
r foo
t 14
Cle
anin
g
51bo
bbin
are
a 51
unde
r the
bob
bin
area
51
Cle
aran
ce p
late
41
Con
nect
ing
the
foot
con
trol
4
the
mac
hine
4
Cor
ded
butto
nhol
e 46
Cor
rect
thre
ad te
nsio
n 15
Cut
ting
butto
nhol
e 47
Dar
ning
40
Del
ete
stitc
hes
or p
rogr
ams
30
Fau
lt- n
ding
52
-53
Feed
teet
h, lo
wer
ing
16FI
X
18Fo
ot c
ontr
ol
4, 5
FUN
C
19Fu
nctio
nFU
NC
19
NO
RM
19
PRO
G
19R
EP
19Fu
nctio
n bu
ttons
18
Gat
herin
g 37
Icon
s on
the
Info
Disp
lay
25, 2
7In
corr
ect t
hrea
d te
nsio
n 15
Kni
t fab
ric
22
Lea
ther
2
3Li
ghtn
ing
Stitc
h 35
Low
erin
g th
e fe
ed te
eth
16
Mai
n sp
ool p
in
6M
emor
y 19
, 29
Men
u Stitc
h 20
Alp
habe
t 21
Alp
habe
t sub
men
u 21
Mirr
or s
ide
to s
ide
19, 3
2M
irror
end
to e
nd
19, 3
2
Nee
dle
chan
ging
12
defe
ctiv
e 12
posit
ions
36
stop
up/
dow
n 18
Thr
eade
r 8
Nee
dles
12
NO
RM
19
Out
line
Blo
ck A
lpha
bet
21O
verv
iew
2-
3
In
dex
54

Pac
king
aw
ay a
fter
sew
ing
5Pl
acin
g th
e ac
cess
orie
s 5
Plac
ing
the
bobb
in in
the
mac
hine
10
Pres
ser f
eet
13Pr
esse
r foo
tch
ange
14
leve
r 14
pres
sure
14
PRO
G
19, 2
9Pr
ogra
mm
ing
29-3
2Le
tters
and
stit
ches
31
Rei
nfor
ced
Stra
ight
Stit
ch
38R
emov
e th
e st
itch
plat
e 51
Rem
ove
the
acce
ssor
y tr
ay
5R
epla
ce th
e st
itch
plat
e 51
RE
P 19
Rev
erse
but
ton
18
Sen
sor B
utto
nhol
e Fo
ot
3, 1
4, 4
4 Se
win
g bu
tton
47
spee
d 18
zipp
er
42Sp
ool h
olde
rs
6Sp
ool p
in
Mai
n sp
ool p
in
6A
uxila
ry s
pool
pin
7
Step
by
step
but
tonh
ole
46St
itch
leng
th
18St
itch
plat
e 51
Stitc
h se
lect
ion
men
us
19St
itch
sele
ctio
n 20
utili
ty a
nd d
ecor
ativ
e 20
alph
abet
s 21
alph
abet
sub
men
u 21
Stitc
h w
idth
18
STO
P 18
, 30
Stra
ight
Stit
ch
35St
retc
h St
itch
35
Tab
le o
f co
nten
ts
1T
hrea
d te
nsio
n 15
Thr
eadi
ng
bobb
in
10ne
edle
8
top
thre
ad
7tw
in n
eedl
e 9
Trou
ble
shoo
ting
52-5
3Tw
enty
- ve
nee
dle
posit
ions
36
Twin
nee
dle
thre
adin
g 9
Unp
ack
Plat
inum
4
Util
ity S
ewin
g 33
-48
Wov
en fa
bric
2
2W
indi
ng fr
om th
e ne
edle
11
Zig
zag
Stitc
hes
38Z
ippe
r 42
In
dex
55


We
rese
rve
the
righ
t to
chan
ge the
mac
hin
e eq
uip
men
t an
d
the
ass o
rt m
ent of ac
cess
ories
with
out prior
notic
e, o
r m
ake
modifi
catio
ns
to the
per
form
ance
or
des
ign.
Such
modifi
catio
ns,
how
ever
, w
ill a
lway
s be
to the
ben
efi t
of th
e use
r an
d the
pro
duct
.
Ple
ase
note
that
on d
isposa
l, th
is p
roduct
must
be
safe
ly r
ecyc
led in a
ccord
ance
with
rel
evan
t N
atio
nal
le
gisl
atio
n r
elat
ing
to e
lect
rica
l/el
ectronic
pro
duct
s. I
f in
doubt ple
ase
conta
ct y
our
reta
iler
for
guid
ance
.

VSM
Gro
up A
B • S
E-56
1 84
Hus
kvar
na, S
wed
enw
ww
.hus
qvar
navi
king
.com
412 99 26-26C • InHouse • © 2006 VSM Group AB • All rights reserved • Printed in Sweden on environmentally-friendly paper