Embed Size (px)
Citation preview
219/224
User’s Guide
Type A
This houshold sewing machine is designed to comply with IEC/EN 60335-2-28 and UL1594
IMPORTANT SAFETY INSTRUCTIONSWhen using an electrical appliance, basic safety precautions should always be followed, including the following:
Read all instructions before using this household sewing machine.
DANGER - To reduce the risk of electric shock:• A sewing machine should never be left unattended when plugged in. Always
unplug this sewing machine from the electric outlet immediately after using and before cleaning.
• Always unplug before relamping. Replace bulb with same type rated 15 Watt.WARNING - To reduce the risk of burns, fi re, electric shock, or injury to persons:• This sewing machine is not intended for use by persons (including children)
with reduced physical, sensory or mental capabilities, or lack of experience and knowledge, unless they have been given supervision or instruction concerning use of the sewing machine by a person responsible for their safety.
• Children should be supervised to ensure that they do not play with the sewing machine.
• Use this sewing machine only for its intended use as described in this manual. Use only attachments recommended by the manufacturer as contained in this manual.
• Never operate this sewing machine if it has a damaged cord or plug, if it is not working properly, if it has been dropped or damaged, or dropped into water. Return the sewing machine to the nearest authorized dealer or service center for examination, repair, electrical or mechanical adjustment.
• Never operate the sewing machine with any air openings blocked. Keep ventilation openings of the sewing machine and foot controller free from the accumulation of lint, dust, and loose cloth.
• Keep fi ngers away from all moving parts. Special care is required around the sewing machine needle.
• Always use the proper needle plate. The wrong plate can cause the needle to break.• Do not use bent needles.• Do not pull or push fabric while stitching. It may defl ect the needle causing it to
break.• Switch the sewing machine off (“0”) when making any adjustment in the needle
area, such as threading needle, changing needle, threading bobbin, or changing presser foot, etc.
• Always unplug sewing machine from the electrical outlet when removing covers, lubricating, or when making any other user servicing adjustments mentioned in the instruction manual.
• Never drop or insert any object into any opening.• Do not use outdoors.• Do not operate where aerosol (spray) products are being used or where oxygen is
being administrated.• To disconnect, turn all controls to the off (“0”) position, then remove plug from
outlet.• Do not unplug by pulling on cord. To unplug, grasp the plug, not the cord.
SAVE THESE INSTRUCTIONSFor the USA and CanadaThis sewing machine has a polarized plug (one blade wider than the other). To reduce the risk of electric shock, this plug is intended to fi t in a polarized outlet only one way. If the plug does not fi t fully in the outlet, reverse the plug. If it still does not fi t, contact a qualifi ed electrician to install the proper outlet. Do not modify the plug in any way.

1
Name of Parts 2-3Extension Table 4To Store Foot Control 4Standard Accessories 5
GETTING READY TO SEW
Connecting the Machine to thePower Supply 6Controlling Sewing Speed 7Up/Down Needle Position Button 8Reverse Stitch Button 8Pressure Adjusting Dial 8Dropping the Feed Teeth 9Sewing Light 9Presser Foot Lifter 10To Remove and Attach the Presser Foot 10To Remove and Attach Presser Foot Ankle 10Changing the Needle 11Needle and Thread chart 11Winding the Bobbin Setting the Spool 12 Removing the Bobbin 12 Winding the Bobbin 13 Inserting the Bobbin 14Threading the Machine 15To Use Needle Threader 16Drawing Up Bobbin Thread 17Pattern Selector Dial 18Stitch Length Dial 18Zigzag Width Control 19Infi nite Needle Position 19Balancing Needle Thread Tension 20Straight Stitching 21 Starting to Sew 21 Changing Sewing Direction 21
Finishing Sewing 22Straight Stitching on Heavy Fabrics 23Seam Allowance Lines 23
UTILITY STITCHING
Zigzag Stitching 24Overcasting 24Seam/Overcast stitch 25Multiple ZigZag 25Reinforced Straight Stitch 26Lightening Stitch 26Sewing Buttons 27Automatic Buttonhole 28-31Corded Buttonhole 32Manual Buttonhole 33-34Zipper Sewing 35-38Blind Stitch Hemming 39Decorative Satin Stitch Patterns 40Stretch Stitch Patterns 40Adjusting Stretch Stitch Balance 41Smocking 42Quilting 43Pin Tucking 44Shell Tuck 44Fagoting 45Patch Work 45Applique 46
CARE OF YOUR MACHINE
Cleaning the Hook Assembly Areaand Feed Teeth 47Replacing the Bobbin Holder 48Troubleshooting 49-50
TABLE OF CONTENTS

2
Name of parts (Model 224)
01. Bobbin winder stopper
02. Bobbin winder spindle
03. Extra spool pin mounting hole
04. Spool holder
05. Spool pin
06. Thread tension dial
07. Thread take-up lever
08. Pressure adjusting dial
09. Face plate
10. Thread cutter
11. Needle threader
12. Needle plate
13. Extension table
14. Hook cover plate
15. Hook cover plate release button
16. Up/down needle position
button
17. Reverse stitch button
18. Speed setting lever
19. Pattern selector dial
20. Stitch length dial
21. Pattern indicating window
22. Zigzag width control lever
23. Presser foot
24. Needle
25. Needle clamp screw
26. Foot holder
27. Thumb screw
28. Carrying handle
29. Handwheel
30. Feed balance dial
31. Power switch
32. Machine sockets
33. Drop feed lever
34. Free arm
35. Buttonhole lever
36. Presser foot lifter
010203040506
07
08
09
10
11
12
1314
1516 17
18
19
20
21
22
23
24
25
26
27
28
29
30
3132
33
34
35
36

3
010203040506
07
08
09
10
11
1213
1415
16
17
18
19
20
21
22
23
24
25
26
27
28
29
30
31
32
33
Name of parts (Model 219)
01. Bobbin winder stopper
02. Bobbin winder spindle
03. Extra spool pin mounting hole
04. Spool holder
05. Spool pin
06. Thread tension dial
07. Thread take-up lever
08. Pressure adjusting dial
09. Face plate
10. Thread cutter
11. Needle plate
12. Extension table
13. Hook cover plate
14. Hook cover plate release button
15. Reverse stitch button
16. Pattern selector dial
17. Stitch length dial
18. Pattern indicating window
19. Zigzag width control lever
20. Presser foot
21. Needle
22. Needle clamp screw
23. Foot holder
24. Thumb screw
25. Carrying handle
26. Handwheel
27. Feed balance dial
28. Power switch
29. Machine socket
30. Drop feed lever
31. Free arm
32. Buttonhole lever
33. Presser foot lifter

4
(2)(1)
(2)
(1)(3)
Extension TableThe extension table provides added sewing surface and can be easily removed for free arm sewing.
For free arm sewingRemove the extension table by pulling it away from the machine, as illustrated.
(1) Pin
(2) Hole
To Store Foot Control
1. Insert the foot control in the extension table.2. Plug the cord into the holes on the table. (1) Plug (2) Holes3. Fold the cord as illustrated and store in the table. (3) Cord

5
01 02
03 04
05
0607
08
09
1011
12 13
14 15
16
Standard Accessories
01. C: Overcast foot
02. E: Zipper foot
03. G: Blind hem foot
04. B: Transparent buttonsewing/
but ton hole foot
05. R: Automatic buttonhole foot
06. Set of needles
07. Bobbins
08. Screwdriver
09. Lint brush
10. Seam ripper
11. Quilter´s guide
12. Large spool holder
13. Small spool holder
14. Additional spool pin
15. Spool pin felt
16. Storage place
(Open the extension table and
store the standard accessories.)

6
Connecting the Machine to the Power Supply (for Model 224)
After switching off the power 1 , connect the plugs in the order of 2, 4 and 6.
1. Power switch 2. Foot control plug 3. Foot control socket 4. Machine power plug 5. Machine power socket 6. Power supply plug 7. Wall outlet
Connecting the Machine to the Power Supply (for Model 219)
Before connecting the power, make sure the voltage and frequency of the machine conform to your electrical power supply.Switch off the power, fi t the nonreversible plug into the machine socket and connect the power supply plug.Switch on the power.
1. Power switch 2. Machine power plug 3. Machine power socket 4. Power supply plug 5. Wall outlet
GETTING READY TO SEW
1
2
34
5
6
7
1
23
45

7
Controlling Sewing Speed
Speed Setting Lever (for Model 224)The maximum sewing speed can be controlled by the speed setting lever.
Foot Controller (Model 224)Sewing speed can be varied by the foot control.Foot controller type C-21365 for use with sewing machine Model 224
Foot Controller (Model 219)Sewing speed can be varied by the foot control.Foot controller type YC-482J (for USA and Canada only) or YC-190 for use with sewing machine Model 219
Note: Some fabrics have a lot of excess dye which can cause discoloration on other fabric but also on your sewing machine. This discoloring may be very diffi cult or impossible to remove.
Fleece and denim fabric in especially red and blue often contain a lot of excess dye.
If you suspect that your fabric/ready-to-wear garment contains a lot of excess dye, always pre-wash it before sewing/embroidering to avoid the discoloring.

8
Needle Up/Down Position But ton (for Model 224)
When you press this button, the needle will go up or down.If the needle is up and you press this button, the needle will go down to its lowest position.If the needle is down and you press this button, the needle will go up to its highest position.
Reverse Stitch Button
As long as you keep the reverse stitch button depressed, the machine sews backwards.
Presser foot PressureAdjusting Dial
The presser foot pressure adjusting dial should be set at 3 for regular sewing.Reduce the pressure to 2 for applique, cutwork, drawnwork, basting and em broi dery for better maneuverability of fabric.
Velours and knits with a lot of stretch may require a 1 setting.

9
Sewing LightThe sewing light is located behind the face plate. To change the bulb, take the face plate off the sewing machine by removing the set screw.
Caution: Unplug the power supply before changing the bulb and wait
until the bulb has cooled down before touch ing it.
(1) Model 224 (12V, 5W) To remove ........ Draw out slowlyTo replace ........ Push in
(2) Model 219 (15W)To remove ......... Push and twist to the
left.To replace ......... Push and twist to the
right.
Dropping the Feed Teeth* For button sewing and free motion sewing, drop the feed teeth.* When fi nished sewing, raise the feed teeth.
Drop feed lever is located to the back and underneath the free arm bed.
1. To raise the feed teeth. 2. To drop the feed teeth.1
2
(1) (2)
Note: The feed teeth must always be up for normal sewing.

10
(3)
(2)
(1)
(3)
(2)
(1)
(1)(2)
(3)
1 2
1
2
Presser Foot LifterThe presser foot lifter raises and lowers your presser foot.
You can raise it about 0.6 cm (1/4˝) higher than the normal raised position for easy removal of the presser foot or to help you place heavy fabric under it.
(1) Presser foot lifter (2) Normal raised position (3) Extra lift position
Unplug the power supply before changing the presser foot.
1. Press the red button on the back of the presser foot ankle. The presser foot will drop off.2. Place the selected presser foot so the pin on the foot lies just under
the groove of the foot ankle. Lower the ankle to lock the
foot in place.
(1) Red button (2) Groove (3) Pin
To Remove and Attach the Press er Foot Ankle1. To Remove Remove the thumb screw by turn
ing the screw counterclockwise with the screwdriver.
(1) Thumb screw
2. To Attach Match the hole in foot ankle with
the threaded hole in the presser bar. Fit the thumb screw into the hole Tighten the screw by turning it clock wise.
To Remove and Attachthe Press er Foot

11
Needle and Thread Chart
(2)(1)
(1)
(3)
1 2Changing the Needle1. Raise the needle by pressing the up/down
needle position button and lower the presser foot.
Turn off the power switch.
Loosen the needle clamp screw by turning it coun ter clock wise. Remove the needle from the clamp.
2. Insert the new needle into the needle clamp with the fl at side to the rear. When
inserting the needle into the clamp push it up as far as it will go and tighten the clamp screw fi rmly.
(1) Needle clamp screw (2) Pin (3) Flat side of the needle
Needle size
No. 60 (#7)No. 70 (#10)
No. 75 (#11)No. 80 (#12)
No. 80 (#12)
No. 90 (#14)
No. 100 (#16)
Stretch needleNo. 70 (#10)
Fabric
Fine silkCrepe de chine
PoplinPure Silk
Broad clothCottonWool
Denim
Tricot
Cotton thread size
70 - 80
50 - 60
40 - 50
30 - 40
30
70 - 80
Silk thread size
100 - 140
80 - 100
60 - 70
50 - 60
45 - 50
100 - 140

12
Winding the Bobbin
Settting the Spool
Lift up the spool pin and place the spool of thread on it with the thread coming off the spool as shown.
Press the large spool holder fi rmly against the spool of thread with the fl at side of the spool holder against the spool of the thread.
(1) Large spool holder (2) Small spool holder
Removing the Bobbin
Gently slide the bobbin cover plate release button to the right and remove the cover plate.
Lift out the bobbin.
(1) Bobbin cover plate release button (2) Bobbin cover plate
(1)
(2)
(1)
(2)

13
Winding the Bobbin
1. Guide the thread around the thread guide.2. Thread through the hole in the bob bin
from the inside to the outside. Put the bobbin on the bobbin winder spindle.
3. Slide it to the right.
Caution: Never move the bobbin winder spindle when the machine is running.
4. With the free end of the thread held in your hand, depress the foot control. Stop the machine when it has made a few turns, and cut the thread close to the hole in the bobbin.
5. Depress the foot control again. When the bobbin is fully wound, it will stop automatically. Return the bobbin winder to its original position by moving the spindle to the left, and cut the thread as shown.
To use the additional spool pin, set the felt and the spool as shown above.
(1) Additional spool pin (2) Felt (3) Additional spool pin hole
A
B
1
2
3
4
5
(2)
(1)
(3)

14
Inserting the Bobbin1. Place the bobbin in the bobbin holder
with the thread running counter-clockwise.
2. Guide the thread into the notch A on the front side of the bobbin holder. Draw the thread to the left, sliding it between the tension spring blades.
3. Continue to draw the thread lightly until the thread slips into notch B.
Note: Check the threading by referring to the chart shown on the bobbin cover plate.
4. Pull out about 15 cm (6 inches) of thread and attach the bobbin cover plate.
A
B
1
2
3
4

15
Raise the thread take-up lever to its highest position by turning the handwheel toward you.
Raise the presser foot with the presser foot lifter and pass the thread in the order from 1 to 5 .
1. Bring the thread from the spool and pass it through the thread guide.
Then draw it down along the right slot.
2. Guide the thread around the bottom of the thread guide plate from right to left, then draw it upward.
3. Firmly draw the thread from right to left over the take-up lever and down into the take-up lever eye. Then guide it down along the left slot.
4. Slide the thread from the left behind the needle bar thread guide.
5. Thread the needle from front to back.
Threading the Machine
1
3
24
5
1
2
3
4, 5

16
To Use Needle Threader (for Model 224)
1. Raise the needle to its highestposition. Lower the needle threader as far as it
will go.
2. Push the knob in the direction of the arrow in the illustration, and insert the hook into the needle eye.
Bring the thread around the guide and under the hook.
(1) Guide (2) Hook
3. Push the knob in the direction of the arrow in the illustration, and draw the thread loop to the back of the needle.
4. Raise the needle threader knob slowly to draw the thread loop up.
Pass the end of the thread through the needle eye by pulling the thread loop to the back.
1
2
3
4
(1)
(2)

17
Drawing Up Bobbin Thread
1. Raise the presser foot and hold the needle thread lightly with your left hand.
2. Press the up/down needle position button twice to pick up the bobbin
thread. Draw up the needle thread forming a
loop of bobbin thread.
(1) Needle thread (2) Bobbin thread
1
2
3
(1)(2)
3. Pull 15 cm (6 inches) of both threads back and under the presser foot.

18
1
2
(Model 224)
(Model 219)
A BC
Pattern Selector Dial
A. Recommended stitch lengthB. Set any stitch lengthC. Reset in di ca tion for buttonhole
Turn the pattern selector dial to indicate a selected pattern on the pattern indicating window.
(1) Pattern selector dial(2) Pattern indication window
Note: Always raise the needle above the fabric and presser foot before you turn the pattern selector dial.
Stitch Length Dial
The higher the number, the longer the stitch length. You can select the suitable stitch length for fabrics that you plan to sew.
(1) Stitch length dial(2) Setting mark
Note: Always raise the needle above the fabric and presser foot before you turn the stitch length dial.
(1)
(2)
(2)
(1)

19
Zigzag Width Control
The higher the number, the wider the stitch width becomes.
Note: Always raise the needle above the fabric and presser foot before you turn the zigzag width control.
Infi nite Needle Position
When pattern number 14 is selected and the stitch width control is activated, you can move the needle between center and left needle positions.

20
(1)
(2)
(3)
(4)Balancing Needle Thread Ten sion
The needle thread and the bobbin thread should interlock in the center of two layers of fabric in straight seams.
To obtain better zigzag stitches, the needle thread tension should be slightly weaker than in the case of straight sewing. The needle thread should appear slightly on the reverse side of the fabric.
(1) Needle thread(2) Bobbin thread(3) Right side(4) Wrong side
To loosen needle thread tensionLoosen the needle thread tension by moving the dial to a lower number.
To tighten needle thread tensionTighten the needle thread tension by moving the dial to a higher number.

21
0 1 2 3 4 5 614
(1) (2) (3)
(4)
(5)
Straight Stitching
(1) Stitch selector: 14
(2) Stitch width: 0 or 6
(3) Stitch length: 1.5 - 4
(4) Top thread tension: 2 - 6
(5) Presser foot: A: Zigzag foot
Starting to SewRaise the presser foot and position the fabric next to a seam guide line on the needle plate (see page 23).Lower the needle to the point where you want to start.Lower the presser foot and pull the threads toward the back. Depress the foot control.Gently guide the fabric along the seam guide line letting the fabric feed naturally.
Changing Sewing DirectionStop the machine and bring the needle down into the fabric by pressing the up/down needle position button (or by turning the handwheel for Model 219).
Raise the presser foot.
Pivot the fabric around the needle to change sewing direction as desired.
Lower the presser foot.

22
Finishing Sewing1. To fasten the ends of seams, press the
reverse button and sew several reverse stitches.
2. Raise the presser foot. Remove the fabric, and draw the threads to the back.
3. Cut the thread using the thread cutter.
The threads are cut the proper length for starting the next seam.
1
2
3

23
Straight Stitching on HeavyFabrics
1. Lower the needle into the fabric at the point where you wish to start sewing.
Press the small black button on the zigzag foot with your left hand to
lock the presser foot to the fabric.
2. Lower the presser foot with your right hand, keeping pressure on the black button with your left hand.
3. Release the black button and start sewing.
(1) Black button
Seam Allowance Lines
The seam guides on the needle plate and bobbin cover plate help you measure the seam width.
(1) Seam allowance lines
Number 15 20 1/2 5/8 3/4 Distance (cm) 1.5 2.0 1.3 1.6 1.9
Note: The numbers indicate the distance between the middle needle position and the seam allowance lines.
Turning a Square CornerStop stitching and lower the needle when the fabric edge facing you lines up with the cornering guides as shown.Raise the presser foot and turn the fabric to line up to the edge with the 1.6 cm (5/8 inch) seam guide.Lower the presser foot and begin stitching in the new direction. (2) Cornering guides
(1)
(1)
(2)

24
13
13
UTILITY STITCHING
Zigzag Stitching
(1) Stitch selector: 13
(2) Stitch width: 0 - 6
(3) Stitch length: 0.5 - 3
(4) Top thread tension: 3 - 5
(5) Presser foot: A: Zigzag foot
Simple zigzag stitching is widely used for overcasting, applique and sewing on buttons.
Overcasting
(1) Stitch selector: 13
(2) Stitch width: 5 or 6
(3) Stitch length: 1 - 2
(4) Top thread tension: 4 - 7
(5) Presser foot: C: Overcast
foot
This type of stitch is used on the seam allowance to prevent fabrics from fraying at raw edges.
It can be used to fi nish a hem edge.
Place the edge of the fabric next to the black guide of foot C . (6) Black guide
(1) (2) (3)
(4)
(5)
(1) (2) (3)
(4)
(5)
(6)

25
19
12
(1) (2)
(3) (4)
(5)
(1) (2) (3)
(4)
(5)
Seam/Overcast Stitch
(1) Stitch selector: 19
(2) Stitch width: 5 or 6
(3) Top thread tension: 4 - 7
(4) Presser foot: C: Overcast
foot
* Stitch length: Set any length
Place the edge of the fabric next to the black guide on the foot and brush guide.
The wires on this foot prevent light weight fabric from rolling and creating a ridge. As you sew the needle falls off the fabric wrapping the threads around the raw edge to prevent raveling.
(5) Black guide
Multiple ZigZag
(1) Stitch selector: 12
(2) Stitch width: 3 - 6
(3) Stitch length: 0.5 - 1.5
(4) Top thread tension: 4 - 6
(5) Presser foot: A: Zigzag foot
This stitch is used to fi nish the seam allowance on synthetics and other fabrics that tend to pucker.Place your fabric to allow a 1.6 cm (5/8 inch) seam.
Trim the extra seam allowance edge after sewing as illustrated.
Note: Be careful not to cut the stitch es.

26
16
15
0 1 2 3 4 5 6
Reinforced Straight Stitch
(1) Stitch selector: 16
(2) Stitch width: 0 or 6
(3) Top thread tension: 3 - 6
(4) Presser foot: A: Zigzag foot
* Stitch length: Set any length
This strong, durable stitch is recommended where both elasticity and strength are needed to ensure comfort and durability.Use it to reinforce areas such as crotch and armhole seams.Also use it when constructing items such as backpacks for extra reinforcement.The stitch is sewn with two stitches forward and one stitch backward, forming a seam that does not rip easily.Garments should be basted for fi tting before seaming.
Lightening Stitch
(1) Stitch selector: 15
(2) Stitch width: 4 - 5
(3) Top thread tension: 3 - 6
(4) Presser foot: A: Zigzag foot
* Stitch length: Set any length
This stitch is used for seaming tricot and light weight knit fabrics, it permits the seam to be pressed completely fl at and prevent thread breaking with stretch fabric seams.For a 1.5 cm (5/8 inch) seam, use the 2 cm (6/8 inch) marking on the needle plate. When sewing light weight knit fabrics, set the pressure dial at 1 or 2.
(1) (2)
(3) (4)
(1) (2)
(3) (4)

27
130 1 2 3 4 5 6
Sewing Buttons
(1) Stitch selector: 13
(2) Stitch width: 3 - 3.5
(3) Top thread tension: 4 - 7
(4) Presser foot: B: Trans par ent
buttonsewing
foot
(5) Feed teeth lowered
* Stitch length: Set any length
Tape the button over the placement mark. A pin can be placed on top the foot to form a shank. Before lowering the foot, test the needle swing, making sure the needle drops in each hole.
Adjust the stitch width if necessary and lower the foot.
Align both holes of the button with the needle swing, lower the foot and depress the foot control.
Sew about 10 stitches, then pull out approximately 20 cm (8 inches) of both the needle and bobbin thread and cut.
Pull the needle thread down through the hole in the button (so it is between the hole and fabric). Now, pull the needle thread fi rmly to draw the bobbin thread up through the fabric.Wind one thread clockwise around the shank, the other counterclockwise.Finally, tie the 2 threads together.
Note: When sewing on the button is completed, raise the feed teeth.
(1) (2)
(3)
(4)
(5)

28
1 0
1
(1) (2)
(4)
(3)
(5)
1.
2.
(1)
(2)
(3)
(4)
Automatic Buttonhole(1) Stitch selector: 1(2) Stitch width: 4 - 6(3) Stitch length: 0.5 - 1 (4) Top thread tension: 2 - 5(5) Presser foot: R: Automatic buttonhole foot
* The size of buttonhole is au to mat i cal ly set by placing the button in the automatic buttonhole foot R.
* The button holder of the foot takes a but-ton size up to 2.5 cm (1 inch) in diame-ter.
* Make a test buttonhole on a fabric sam-ple duplicating the interfacing and seams of the actual garment.
* Place the button on the fabric sam ple and mark the top and bottom to deter-mine the position of the but ton hole.
* Use interfacing on stretch fabrics.* Use stabilizer under all fabrics
1. Attach the automatic buttonhole foot R. Make sure the groove on the holder catches the pin on the foot when lowering the presser foot.
(1) Groove (2) Pin
2. Pull the button holder to the back, and place the button in it. Push it together tightly on the button.
(3) Button holder If the button is extremely thick, make a test buttonhole. If it is diffi cult to fi t the button through the test buttonhole, lengthen the size by pulling back the button holder which will increase the buttonhole length.(4) Gap

29
3. Pull the buttonhole lever downward as far as it will go.
(5) Buttonhole lever
4. Draw both threads to the left under the foot. Insert the garment under the foot, and lower the needle at the starting point.
Then lower the automatic buttonhole foot.
(6) Needle thread (7) Bobbin thread (8) Hole (9) Starting point
Note: Make sure there is no gap between the slider and the spring holder.
If there is a gap, the length of the rows will be different, as shown.
(10) Slider (11) Spring holder (12) Difference (13) There should be no gap.
3
4
(13)
(5)
(8)
(6)
(9)
(7)
(10)
(11)
(12)

30
1 2
5
6
5. Sew slowly and stop the machine at the starting point when the but ton hole is completed.
Step 1: First the front bartack and left row is sewn.Step 2: Next the back bartack, a locking stitch and the right row is sewn.
6. Cut both needle and bobbin threads leaving about 10 cm (4 inches) of thread ends loose. Draw the needle thread to the wrong side of the fabric by pulling the bobbin thread.
Then, knot the threads. Place a pin on the rear side of the
bartack position so that you do not need to worry about cutting the end of the buttonhole stitch. Then cut the opening with a seam ripper.
(To sew a series of same-size buttonholes)To reset the buttonhole sewing function, select a different stitch pattern with the pattern selector dial 2, then return it to the buttonhole.

31
0
1
7. When fi nished, push the button hole lever up as far as it will go.7
To adjust button-hole stitch density.Set the stitch length dial between 0.5 and 1.0 to adjust the buttonhole stitch density.

32
1 0
1
Corded Buttonhole
(1) Stitch selector: 1
(2) Stitch width: 4 - 6
(3) Stitch length: 0.5 - 1
(4) Top thread tension: 2 - 5
(5) Presser foot: R: Automatic
buttonhole
foot1. Use the same procedure as described in automatic buttonhole sewing steps.
Note: Set the stitch width to match the thickness of the cord used.
(1) With the buttonhole foot raised, hook the fi ller cord on the spur at the back of the buttonhole foot.
Bring the ends toward you under the
buttonhole foot, clearing the front end. Hook the fi ller cord into the forks on the front of automatic buttonhole foot R to hold them tight.
Lower the needle into the garment where the buttonhole will start and lower the foot.
2. Depress the foot control gently and sew the buttonhole. Each side of the buttonhole and the bartacks will be sewn over the cord.
Remove the fabric from the machine and cut the sewing threads only.
(2) Needle thread (3) Bobbin thread (4) Starting point
3. Pull the left end of the fi ller cord to tighten it. Thread the end of the cord
through a darning needle, draw to the wrong side of the fabric and cut.
Note: To cut the buttonhole opening, refer to the instructions on page 30.
(1) (2) (3)
(4) (5)
(1)
(2)
(4)
(3)
1
2
3

33
1 0
1
1.
2,
(1) (2) (3)
(4) (5)
(1)
(2)(3)
Manual Buttonhole
(1) Stitch selector: 1
(2) Stitch width: 4 - 6
(3) Stitch length: 0.5 - 1
(4) Top thread tension: 2 - 5
(5) Presser foot: B: Trans par ent
buttonhole
foot
Note: If the diameter of the button is more than 2.5 cm (1 inch), a buttonhole must be made manually as follows.
1. Attach the buttonhole foot B.
2. Pull the buttonhole lever downward as far as it will go.
3. Lower the needle into the garment where the buttonhole is to start, and lower the foot.
(1) Needle thread (2) Bobbin thread (3) Starting point
3

34
4. Sew the front bartack and left row, then stop the machine after sewing the desired total length of but ton hole.
5. Pull the buttonhole lever toward you.
6. Sew the back bartack and right row, then stop the machine at the starting point.
7. When fi nished, push the buttonhole lever up as far as it will go.
4
5
6
7
35
0 1 2 3 4 5 614
(3) (4)
(1) (2) (3)
(4) (5)
(1)(2)
(1)(2)
(5)
(6)
(4)(3)
(8)
(9) (7)
1
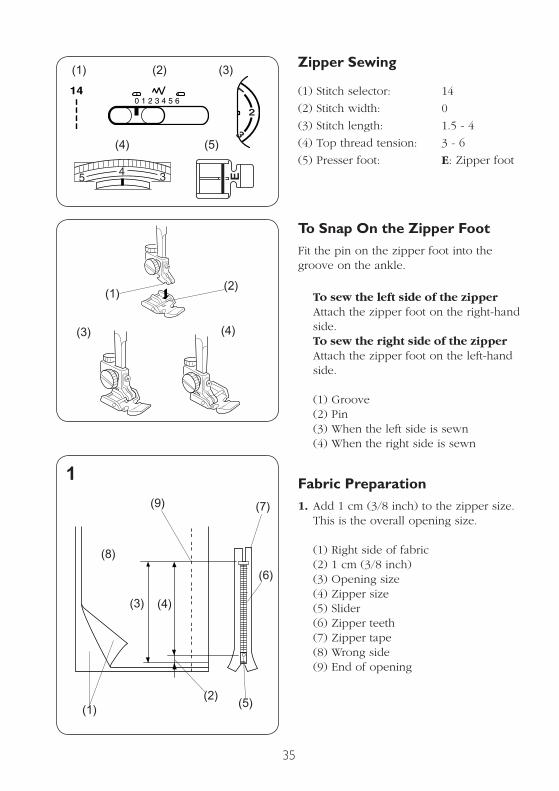
Zipper Sewing
(1) Stitch selector: 14
(2) Stitch width: 0
(3) Stitch length: 1.5 - 4
(4) Top thread tension: 3 - 6
(5) Presser foot: E: Zipper foot
To Snap On the Zipper FootFit the pin on the zipper foot into the groove on the ankle.
To sew the left side of the zipper Attach the zipper foot on the right-hand
side. To sew the right side of the zipper Attach the zipper foot on the left-hand
side.
(1) Groove (2) Pin (3) When the left side is sewn (4) When the right side is sewn
Fabric Preparation1. Add 1 cm (3/8 inch) to the zipper size. This is the overall opening size.
(1) Right side of fabric (2) 1 cm (3/8 inch) (3) Opening size (4) Zipper size (5) Slider (6) Zipper teeth (7) Zipper tape (8) Wrong side (9) End of opening

36
2. Place right sides of fabric together and sew to the end of the zipper opening. Reverse stitch to lock the stitches.
Manually increase the stitch length to 4 and sew the zipper opening.
(10) 2 cm (3/4 inch) (11) 11.3 cm (Stitch length) (12) Reverse stitch (13) End of opening (14) Straight stitch
To Sew1. Fold back the left seam allowance. Turn under the right seam allowance to form a 0.2 to 0.3 cm (1/8 inch) fold. Place the zipper teeth next to this fold and pin in place.
2. Attach the zipper foot with the pin on the right hand side. Lower the zipper foot on the top side at the bottom of the zipper so that the needle pierces the fabric next to the fold and the zipper tape. (1) Lower fabric (2) End of opening (3) Stitch line (4) 0.3 cm (1/8 inch) (5) Wrong side of fabric (6) Opening size (7) Fold (8) Basting stitch line
(1)
(2) (3)
(4)
(6)
(5)
(7)(8)
(3)
(5)
2
1
2

37
3
4
(9)
(10)
(9)
(11)
(12)
3. Sew through all layers next to the fold. Stop just before the zipper foot reaches the slider on the zipper tape. Lower the needle slightly into the fabric. Raise the zipper foot and open the zipper. Lower the foot and stitch the remainder of the seam.
(9) Slider (10) 5 cm (2 inches)
4. Close the zipper and spread the fabric fl at with the right side facing up. Baste the opened fabric and zipper tape together.
(11) Basting stitch (12) Zipper tape

38
5
6
(14)
(13)
5. Remove the zipper foot and reattach it on its left side. Guide the edge of the
foot along the zipper teeth and stitch through the garment and zipper tape. Stop about 5 cm (2 inches) from the top of the zipper.
(13) Remove the basting stitches (14) Reverse stitches (0.7 - 1cm)
6. Lower the needle slightly into the fabric, raise the foot, remove the
basting stitches and open the zipper. Lower the foot and stitch the remainder
of the seam, making sure the fold is even.
39
0 1 2 3 4 5 6
(1) (2) (3)
(4) (5)
(2)
(1) (2)
(1)
(3)(4)
(5)
(6)
(7)
(8)
1
2
3
4
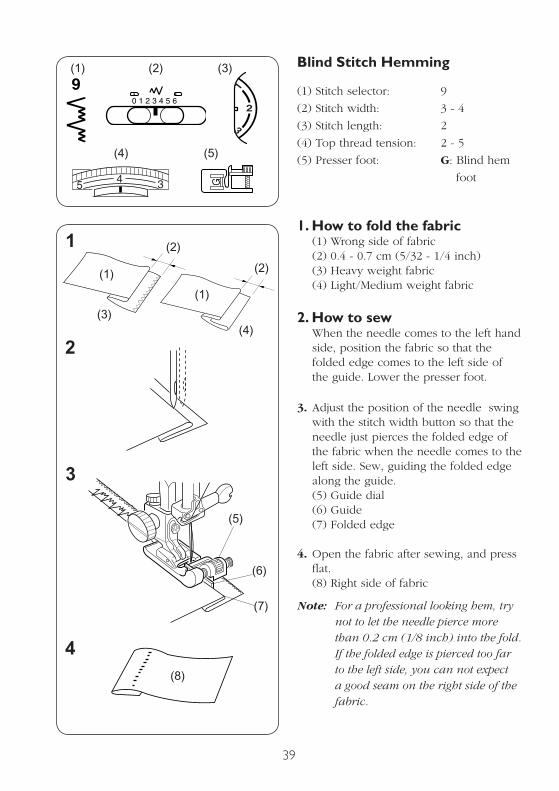
Blind Stitch Hemming
(1) Stitch selector: 9
(2) Stitch width: 3 - 4
(3) Stitch length: 2
(4) Top thread tension: 2 - 5
(5) Presser foot: G: Blind hem
foot
1. How to fold the fabric (1) Wrong side of fabric (2) 0.4 - 0.7 cm (5/32 - 1/4 inch) (3) Heavy weight fabric (4) Light/Medium weight fabric
2. How to sew When the needle comes to the left hand
side, position the fabric so that the folded edge comes to the left side of the guide. Lower the presser foot.
3. Adjust the position of the needle swing with the stitch width button so that the needle just pierces the folded edge of the fabric when the needle comes to the left side. Sew, guiding the folded edge along the guide.
(5) Guide dial (6) Guide (7) Folded edge
4. Open the fabric after sewing, and press fl at.
(8) Right side of fabric
Note: For a professional looking hem, try not to let the needle pierce more than 0.2 cm (1/8 inch) into the fold. If the folded edge is pierced too far to the left side, you can not expect a good seam on the right side of the fabric.

40
0
1
2 3 4 5 6
15 16 17 18 19 20 21 22 23 24
(1) (2)
(4) (5)(3)
(1)
(2)
(3)
(4)
Decorative Satin Stitch Patterns
(1) Stitch selector: 2 - 6
(2) Stitch width: 3 - 6
(3) Stitch length: 0.5
(4) Top thread tension: 2 - 5
(5) Presser foot: A: Zigzag
foot
Satin stitches are used for decorative stitches on blankets, linens, tableclothes and napkins. It is also especially attractive in applique.
Note: Use tear-away stabilizer under fabric.
Sew a row of stitches and adjust the thread tension so the upper thread appears on the reverse side of the fabric. Test the stitch on a sample of the actual fabric fi rst.
Stretch Stitch Patterns
(1) Stitch selector: 15 - 24 (Model 224) 15 - 19 (Model 219)(2) Stitch width: 3 - 6(3) Top thread tension: 2 - 4(4) Presser foot: A: Zigzag
foot*Stitch length: Set any length
The stretch stitch does not actually stretch as it is being sewn, but is stitched in a forward and backward motion (sometimes called a reverse action stitch), so that it will expand when the fabric stretches instead of breaking. This stitch can also be used for topstitching on all fabrics
Note: We recommend a stretch needle for stretch, knit or organdy fabric to prevent skipped
stitches.

41
(A) (B)
Adjusting Stretch Stitch Balance
If stretch stitch patterns are uneven when sewn on a particular fabric, adjust them with the feed balance dial.
(1) Feed balance dial (2) Standard mark (3) Setting mark (4) Example: Pattern 18
To Adjust distorted patterns
(A) If patterns are compressed, correct by
turning the dial in the direction of
( + ).
(B) If patterns are drawn out, correct by
turning the dial in the direction of ( - )
(4)
(1)(2)
(3)

42
18 24
(1) (2)
(3) (4)
(1)
(1)
Smocking
(1) Stitch selector: 18 or 24
(Mod el 224)
(2) Stitch width: 3 - 6
(3) Top thread tension: 3 - 5
(4) Presser foot: A: Zigzag foot
*Stitch length: Set any length
With the manual stitch length at 11.3 cm (4.5 inch), sew straight lines 1 cm (3/8 inch) apart, across the area to be smocked.
A looser needle thread tension will make gathering easier. Knot the threads along one edge.
Pull the bobbin threads and distribute the gathers evenly.
Secure the threads at the other end.
Reduce the tension and pressure if necessary and sew pattern stitches be tween the straight seams.
Pull out the gathering stitches.
(1) 1 cm (3/8 inch)

43
0 1 2 3 4 5 614
(1) (2) (3)
(4)
(5)
(6)
(1)
(2)
(3)
(4)
t
Quilting
(1) Stitch selector: 14
(2) Stitch width: 0 or 6
(3) Stitch length: 1.5 - 4
(4) Top thread tension: 3 - 6
(5) Presser foot: A: Zigzag
foot
(6) Quilter
The quilting guide will help to keep the stitching lines straight.
Loosen the quilt guide holding screw.
Slide the quilt guide in the opening to the desired width and tighten the screw.
Sew, guiding the quilt guideover the previous row of stitching.
(1) Quilt Guide holding screw (2) Hole (3) Quilt Guide (4) Distance

44
0 1 2 3 4 5 614
11
(1) (2) (3)
(4)
(5)
(1)
(2)
(1) (2) (3)
(4)
(5)
Pin Tucking(1) Stitch selector: 11
(2) Stitch width: 5 - 6
(3) Stitch length: 2 - 3
(4) Top thread tension: 6 - 8
(5) Presser foot: G:Blind stitch
hem foot
Fold the fabric with wrong sides together on the foldline. Position the fabric so that the needle pierces 0.1 to 0.2 cm (1/16 inch) inside from the folded edge and lower the presser foot. Turn the guide screw and move the sliding guide next to the folded edge. Sew guiding the folded edge along the sliding guide. Press the pin tucks to one side.
(1) Guide screw (2) Sliding guide
Shell Tuck(1) Stitch selector: 11
(2) Stitch width: 5 - 6
(3) Stitch length: 2
(4) Top thread tension: 6 - 8
(5)Presser foot: B:Transparent
buttonhole
footNote: Use a lightweight fabric such as
tricot. Fold and stitch on the bias.
Set the stitch width and length as you desire.You may need to tighten the top thread slightly.Allow the needle to just clear the folded edge of the fabric when it zigzags.If you sew rows of shell stitches, space the rows 1.5 cm (5/8 inch) apart.You can sew shell stitches on knits or soft silky wovens in any direction.

45
10 20
12
(1) (2) (3)
(4) (5)
(1) (2) (3)
(4)
(5)
(1) (1)
Fagoting
(1) Stitch selector: 8, 10
20 (Model 224)
(2) Stitch width: 3 - 6
(3) Stitch length: 1
*Set any length for pattern 20
(4) Top thread tension: 2 - 5
(5) Presser foot: A: Zigzag foot
Fold under each fabric edge 1.5 cm (1/2 inch) and press.Pin the two edges a tear-away stabilizer backing 0.3 cm (1/8 inch) apart.Sew slowly, guiding the fabric so the needle catches the folded edge on each side.Remove the backing when fi nished.
Patch Work
(1) Stitch selector: 8, 12
(2) Stitch width: 5 - 6
(3) Stitch length: 1
(4) Top thread tension: 2 - 5
(5) Presser foot: A: Zigzag foot
Sew seam and press seam allowance open.
Sew pattern stitch on right side of garment centering over the seam line.
(1) Right side of fabric

46
130 1 2 3 4 5 6
(1) (2) (3)
(4)
(5)
(6)
(1)
Applique
(1) Stitch selector: 13
(2) Stitch width: 3 - 5
(3) Stitch length: 0.5 - 1
(4) Top thread tension: 3 - 5
(5) Presser foot: B:Transparent
buttonhole
foot
(6) Presser Dial: 2
Baste (or fuse with iron-on fusible web) ap pli que pieces on the fabric.
Stitch around the applique making sure the needle falls along the outer edge of the applique.
When sewing corners, lower the needle down into the fabric. Raise the presser foot and pivot the fabric to the right or left.
Note: When applique sewing is fi nished, return the pressure dial to 3.

47
Cleaning the Hook Assembly Area and Feed Teeth
1. Remove the presser foot and needle. Remove the screw on the left side of the needle plate with the screwdriver supplied with the machine.
2. Remove the needle plate and take out the bobbin.
Lift up the bobbin holder and remove it.
3. Brush out dust and lint.
4. Clean the feed teeth and hook as sem bly area with the lint brush.
5. Wipe out gently with a soft, dry cloth.
Note: You may also use a vacuum cleaner.
CautionBefore performing any of the
following,make sure that the sewing machine is unplugged from the power source. Do not dismantle the machine other than explained on this page.
CARE OF YOUR MACHINE
(1)
1
2
3
4
5

48
Replacing the Bobbin Holder
1-2. Insert the bobbin holder so that the knob fi ts next to the stopper in the hook assembly area.
(1) Knob (2) Stopper
3. Insert the bobbin. Replace the needle plate, inserting the
two needle plate guide pins into the holes in the needle plate.
Replace the screw.
(3) Guide hole (4) Screw
After cleaning, be sure to replace the needle and presser foot.
1
2
3
(1)
(2)
(3)
(3)
(4)

49
Troubleshooting
Condition
The needle thread breaks.
The bobbin thread breaks.
The needle breaks.
Skipped stitches
Seam puckering
Cause
1. The needle thread is not threaded properly.2. The needle thread tension is too tight.3. The needle is bent or blunt.4. The needle is incorrectly inserted.5. The needle thread and the bobbin thread are not set properly under (drawn to the rear of ) the presser foot when sewing is starting.6. The fabric is not drawn to the rear when sewing is fi nished.7. The thread is too heavy or too fi ne for the needle.8. The thread is old and brittle.
1. The bobbin thread is not threaded properly in the bobbin holder.2. Lint has collected in the bobbin holder.3. The bobbin is damaged and doesn´t turn smoothly.
1. The needle is incorrectly inserted.2. The needle is bent or blunt.3. The needle clamp screw is loose.4. The fabric is not drawn to the rear when sewing is fi nished.5. The needle is too fi ne for the fabric being sewn.
1. The needle is incorrectly inserted.2. The needle is bent or blunt.3. The needle and/or threads are not suitable for the work being sewn.4. A blue tipped needle is not being used for sewing stretch, very fi ne fabrics or synthetics.5. The needle thread is not threaded properly.6. The wrong needle is used.
1. The needle thread tension is not tight.2. The needle thread is not threaded properly.3. The needle is too heavy for the fabric being sewn.4. The stitch length is too long for the fabric.5. The presser foot pressure is not correctly adjusted.
Reference
Refer to page 15
Refer to page 20Refer to page 11Refer to page 11Refer to page 21
Refer to page 22
Refer to page 11
Refer to page 14
Refer to page 47Change the bobbin.
Refer to page 11Refer to page 11Refer to page 11Refer to page 22
Refer to page 11
Refer to page 11Refer to page 11Refer to page 11
Refer to page 11
Refer to page 15
Change the needle.
Refer to page 20Refer to pages 14, 15
Refer to page 11
Make stitch denser.Refer to page 8

50
Troubleshooting, continued
Condition
The fabric is not feeding smoothly.
Gathering
The machine does not work.
Patterns are distorted.
The automatic buttonhole stitches are not working.
Noisy operation
Cause
1. The feed teeth are packed with lint.2. The stitches are too fi ne.3. The feed teeth were not raised after being lowered.
1. The needle thread tension is too loose.2. The needle is too heavy or light for the fabrics being sewn.
1. The machine is not plugged in.2. A thread is caught in the hook assembly area.3. The bobbin winder spindle is still in the winding position.
1. The stitch is not balanced.2. The stitch lenght is too long or too short
1. The stitch density is not suitable for the fabric being sewn.2. Interfacing is not being used with stretch fabrics.
1. There is thread caught in the hook assembly area.2. Lint has built up in the bobbin holder or hook assembly are.
Reference
Refer to page 47Make stitch coarserRefer to page 9
Refer to page 20Refer to page 11
Refer to page 6Refer to page 47Refer to page 13
Refer to page 42
Refer to pages 28, 31
Refer to page 28
Refer to page 47Refer to page 47


We reserve the right to change the machine equipment and the ass ort ment of accessories without prior notice, or make modifi cations to the performance or design.Such modifi cations, however, will always be to the benefi t of the user and the product.
Please note that on disposal, this product must be safely recycled in accordance with relevant National legislation relating to electrical/electronic products. If in doubt please contact your retailer for guidance.

412
68 0
3-26
D •
InH
ouse
• ©
2001
-200
4 V
SM G
roup
AB
• All
righ
ts r
eser
ved
• Pr
inte
d in
Sw
eden
on
envi
ronm
enta
lly-fr
iend
ly p
aper