Embed Size (px)
DESCRIPTION
Learn the basics of photoshop
Citation preview
Adobe Photoshop Elements 8 Basic Overview and Editing Guide
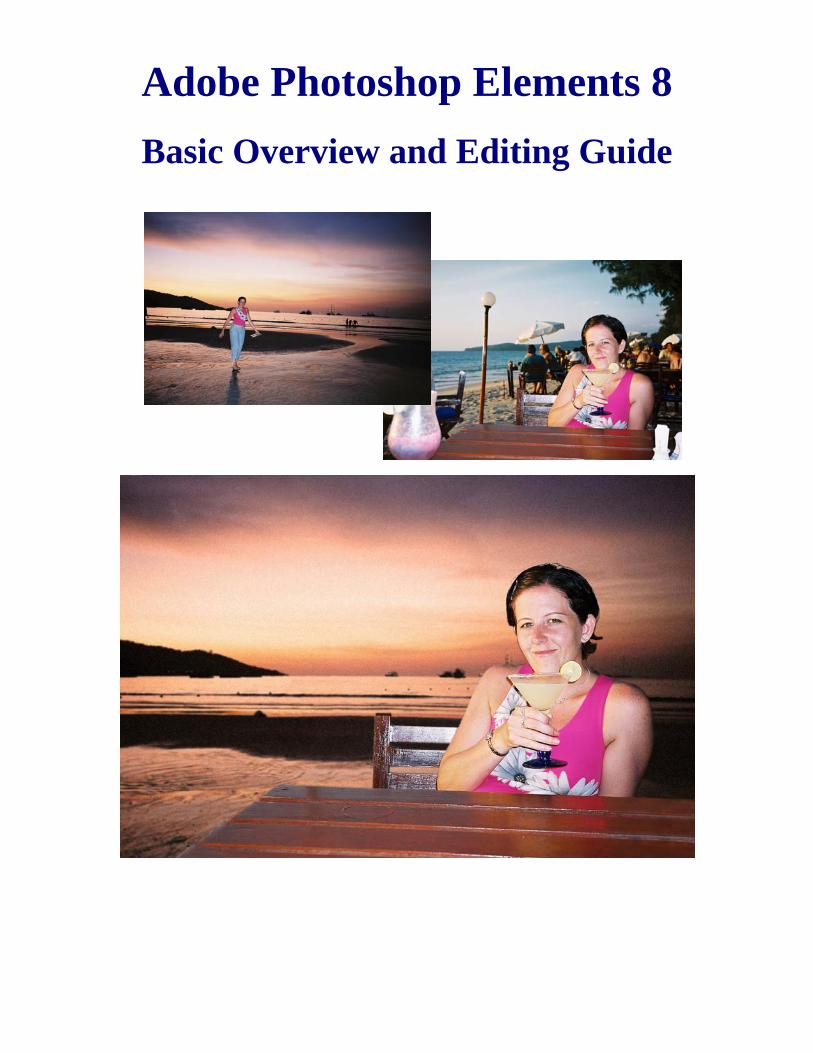
Choose Organize and Edit.
Choose Advanced Dialog. See next page for Advanced Dialog.
Organize Using Photoshop to get your photographs organized. Every time you open Photoshop Elements you are presented with the welcome screen,
at this point you have two options, Organize or Edit. The Organizer is surprisingly useful
as it will allow you to sort your photographs out in a manner that will save you time to
find the photo you need when you need it.
Importing Photos for Windows users.
When you are connecting your media files to your computer a window will appear giving
you several options as to what you want to do. This may not occur with every windows
version; the feature may also be turned off.
Importing Photos for Mac users
When you are connecting your media files to your computer you will see a new icon on
your desktop appear. This you can locate when you import in Photoshop.

To import images without automation you will need to click on Organize on the
Photoshop Elements welcome screen. Once open select File>Get Photos and
Videos>From Camera or Card Reader. You will then be prompted with this panel.
There are some handy tools here that can save you time later.
1. Location. Browse your computer to select where you want your photos stored.
You will have the option to create a new folder.
2. Create Subfolder(s). This will allow for automation creation of folder that is
named with the date or you can choose Custom Groups (Advanced), which will
work it out for and give options for folder types.
3. Rename Files. You can also change your file names here so all that you select
have the same file name with a sequential number after it.
4. Advanced Options. You have several tick boxes here.
1
2
3
4
5
6
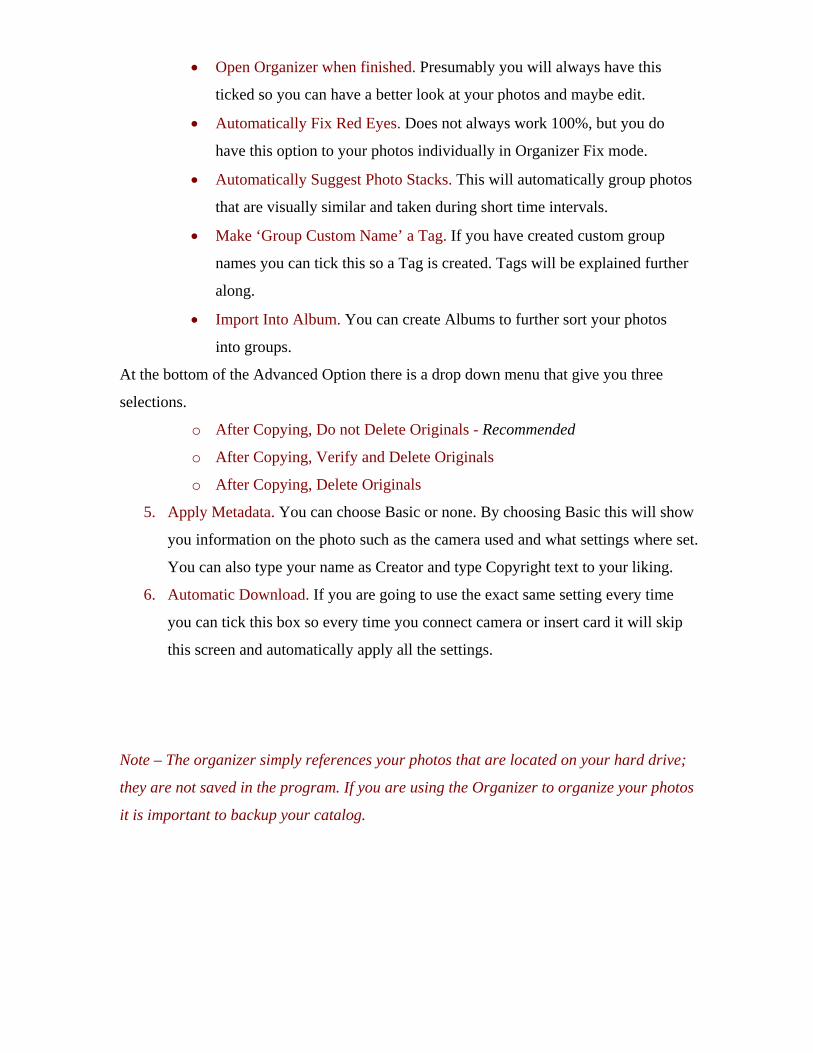
• Open Organizer when finished. Presumably you will always have this
ticked so you can have a better look at your photos and maybe edit.
• Automatically Fix Red Eyes. Does not always work 100%, but you do
have this option to your photos individually in Organizer Fix mode.
• Automatically Suggest Photo Stacks. This will automatically group photos
that are visually similar and taken during short time intervals.
• Make ‘Group Custom Name’ a Tag. If you have created custom group
names you can tick this so a Tag is created. Tags will be explained further
along.
• Import Into Album. You can create Albums to further sort your photos
into groups.
At the bottom of the Advanced Option there is a drop down menu that give you three
selections.
o After Copying, Do not Delete Originals - Recommended
o After Copying, Verify and Delete Originals
o After Copying, Delete Originals
5. Apply Metadata. You can choose Basic or none. By choosing Basic this will show
you information on the photo such as the camera used and what settings where set.
You can also type your name as Creator and type Copyright text to your liking.
6. Automatic Download. If you are going to use the exact same setting every time
you can tick this box so every time you connect camera or insert card it will skip
this screen and automatically apply all the settings.
Note – The organizer simply references your photos that are located on your hard drive;
they are not saved in the program. If you are using the Organizer to organize your photos
it is important to backup your catalog.
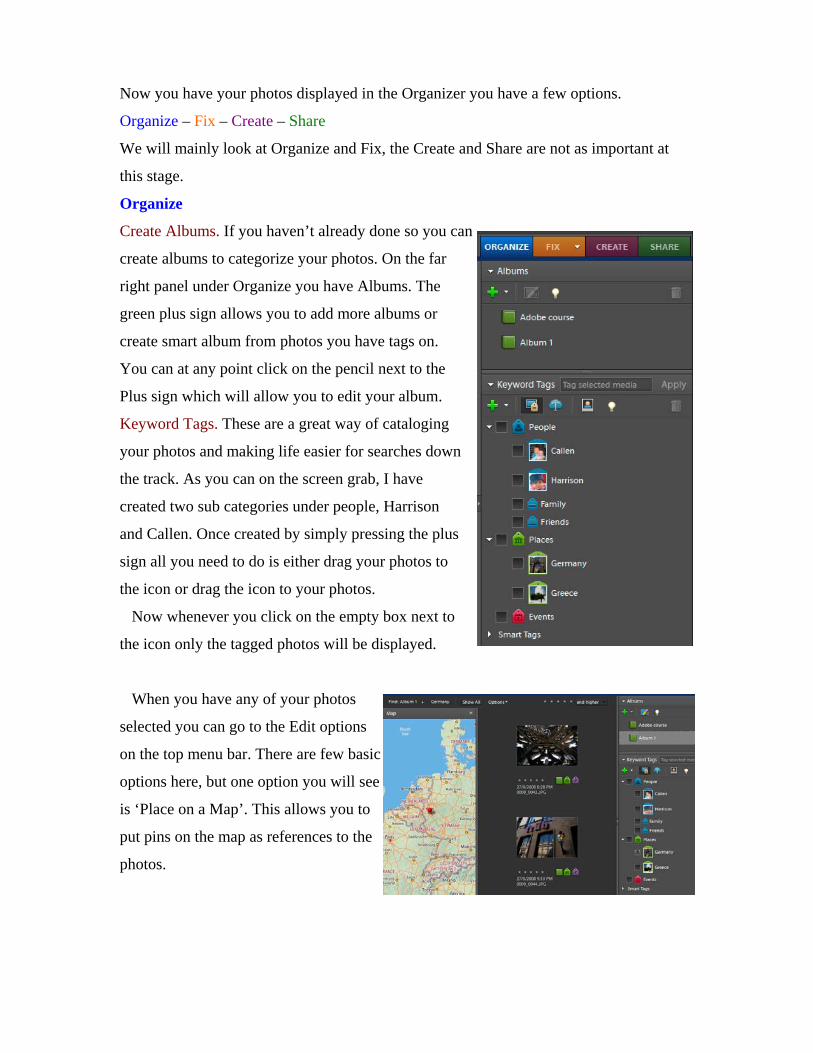
Now you have your photos displayed in the Organizer you have a few options.
Organize – Fix – Create – Share
We will mainly look at Organize and Fix, the Create and Share are not as important at
this stage.
Organize
Create Albums. If you haven’t already done so you can
create albums to categorize your photos. On the far
right panel under Organize you have Albums. The
green plus sign allows you to add more albums or
create smart album from photos you have tags on.
You can at any point click on the pencil next to the
Plus sign which will allow you to edit your album.
Keyword Tags. These are a great way of cataloging
your photos and making life easier for searches down
the track. As you can on the screen grab, I have
created two sub categories under people, Harrison
and Callen. Once created by simply pressing the plus
sign all you need to do is either drag your photos to
the icon or drag the icon to your photos.
Now whenever you click on the empty box next to
the icon only the tagged photos will be displayed. When you have any of your photos
selected you can go to the Edit options
on the top menu bar. There are few basic
options here, but one option you will see
is ‘Place on a Map’. This allows you to
put pins on the map as references to the
photos.
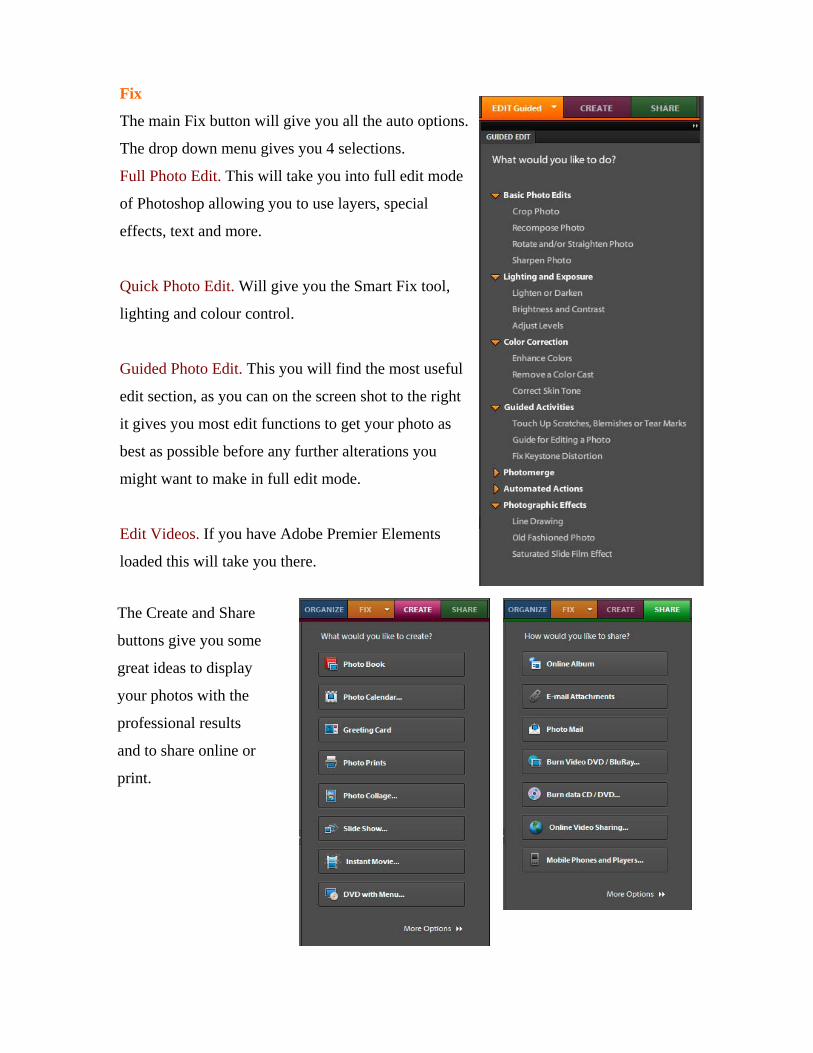
Fix
The main Fix button will give you all the auto options.
The drop down menu gives you 4 selections.
Full Photo Edit. This will take you into full edit mode
of Photoshop allowing you to use layers, special
effects, text and more.
Quick Photo Edit. Will give you the Smart Fix tool,
lighting and colour control.
Guided Photo Edit. This you will find the most useful
edit section, as you can on the screen shot to the right
it gives you most edit functions to get your photo as
best as possible before any further alterations you
might want to make in full edit mode.
Edit Videos. If you have Adobe Premier Elements
loaded this will take you there.
The Create and Share
buttons give you some
great ideas to display
your photos with the
professional results
and to share online or
print.
Edit Using the Full Edit of Photoshop Elements. Now that you have organized your photos you can further enhance, alter or manipulate
them. I have been using Abobe Photoshop for over 15 years, but it is only in the last few
years that I have found Adobe Photoshop Elements has progressed enough that it allows
more than enough options to do most of what can be done in full Photoshop for majority
of photo enthusiasts.
The following pages will guide you through some of the main edits and alterations I
have been asked to do over the years. Once you have gained confidence in using some of
these tools the only limitation is your imagination.
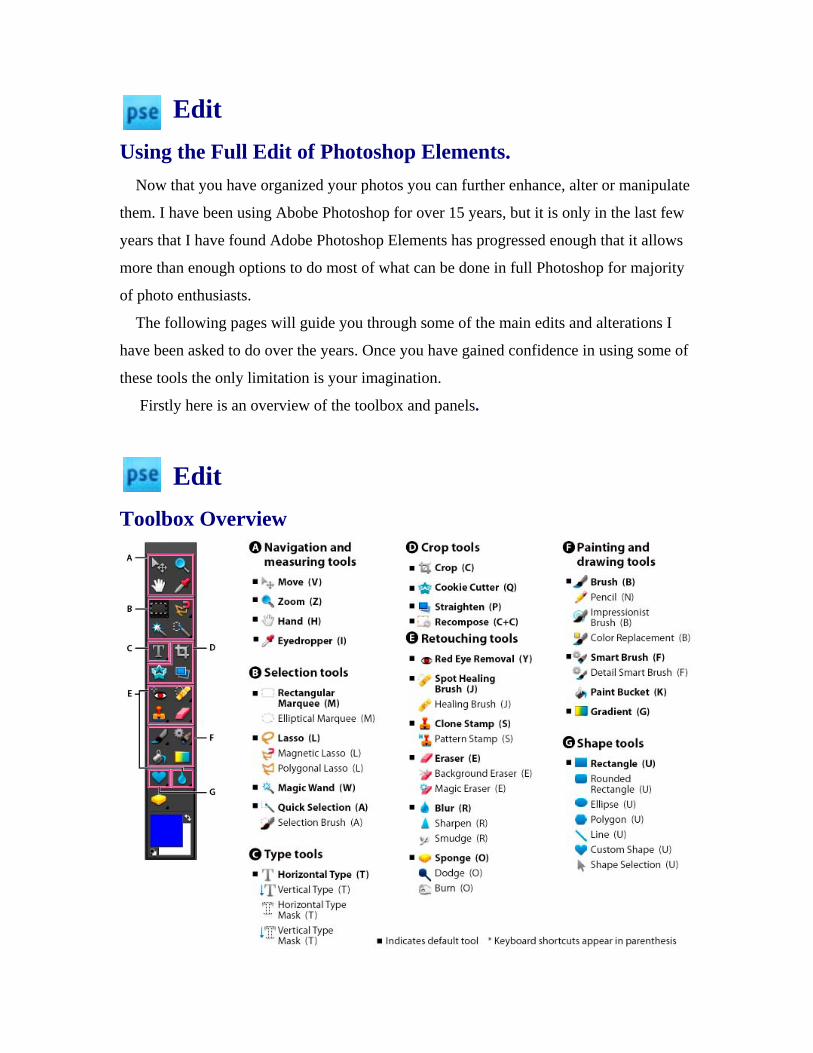
Firstly here is an overview of the toolbox and panels.
Edit Toolbox Overview
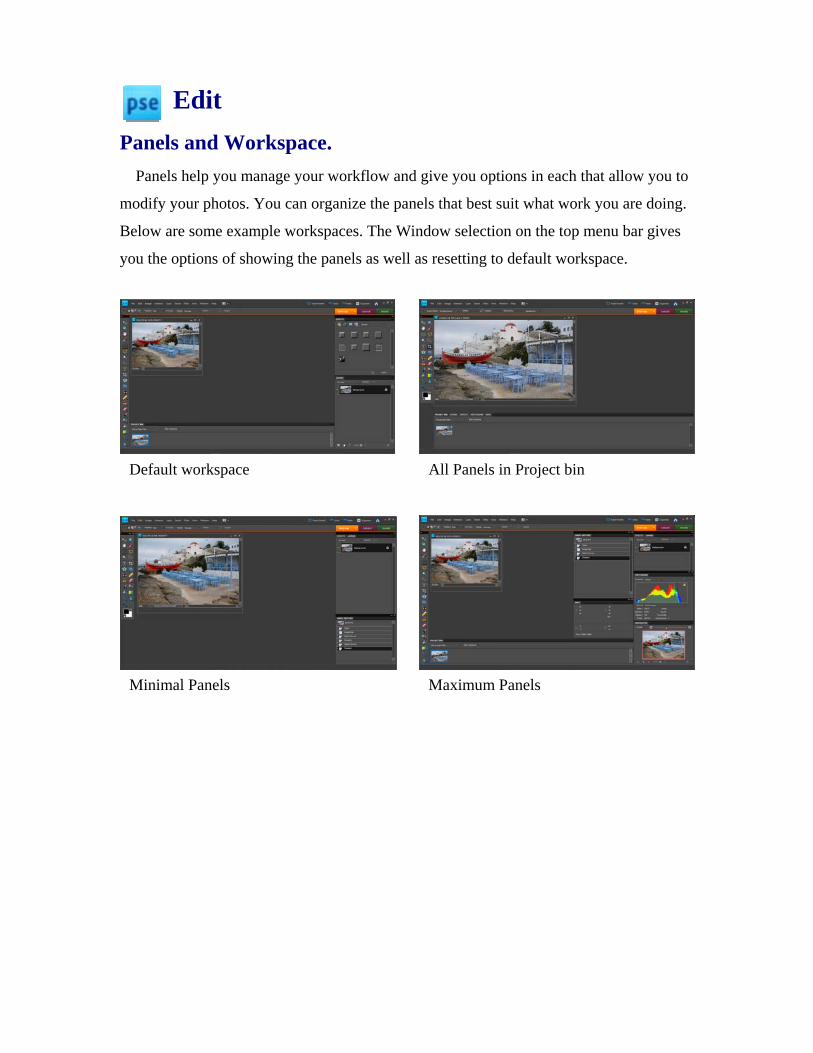
Edit Panels and Workspace. Panels help you manage your workflow and give you options in each that allow you to
modify your photos. You can organize the panels that best suit what work you are doing.
Below are some example workspaces. The Window selection on the top menu bar gives
you the options of showing the panels as well as resetting to default workspace.
Default workspace All Panels in Project bin
Minimal Panels Maximum Panels
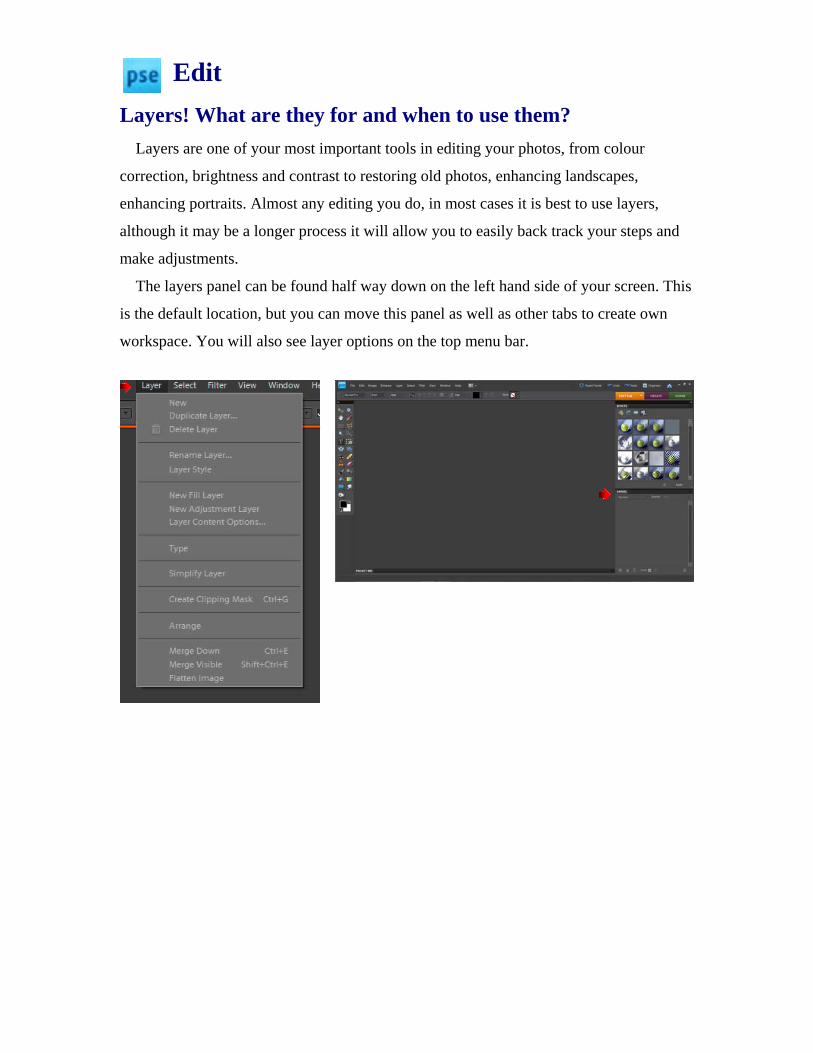
Edit Layers! What are they for and when to use them? Layers are one of your most important tools in editing your photos, from colour
correction, brightness and contrast to restoring old photos, enhancing landscapes,
enhancing portraits. Almost any editing you do, in most cases it is best to use layers,
although it may be a longer process it will allow you to easily back track your steps and
make adjustments.
The layers panel can be found half way down on the left hand side of your screen. This
is the default location, but you can move this panel as well as other tabs to create own
workspace. You will also see layer options on the top menu bar.
Edit This lesson will show you how to create a new photograph from two different
photographs. You will be shown several tools that you may not need to use but will give
you a better understanding of how these tools work and how best to use them.
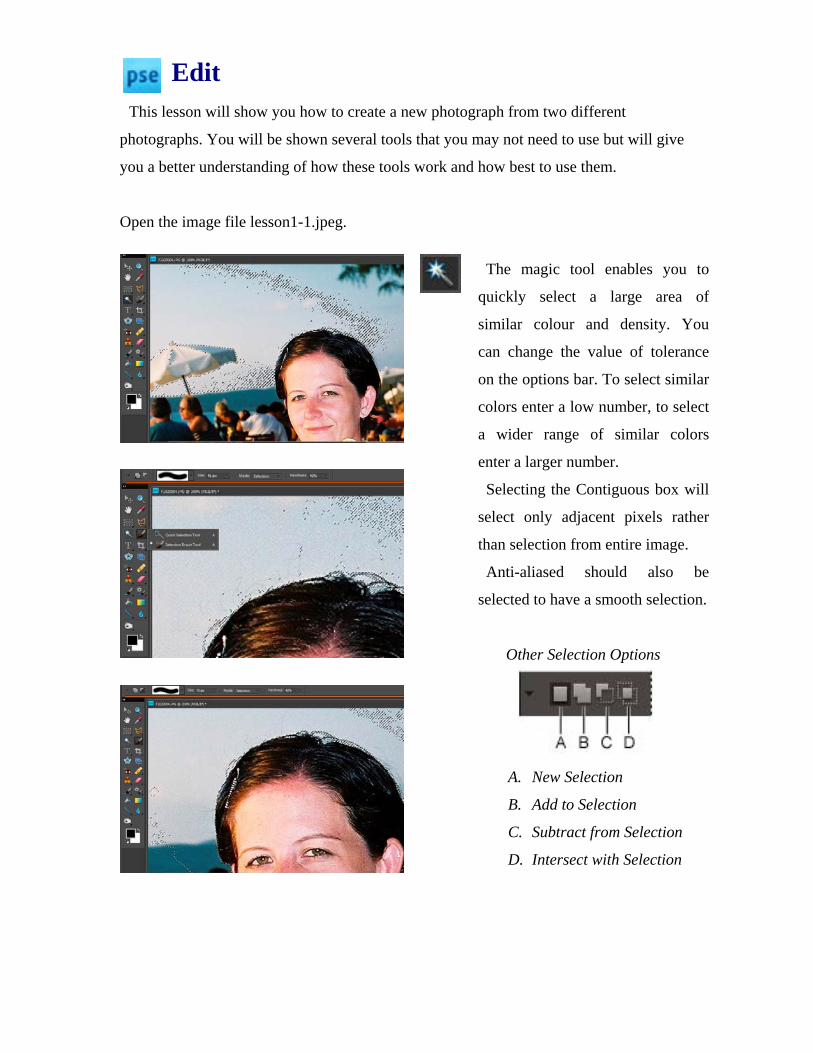
Open the image file lesson1-1.jpeg.
The magic tool enables you to
quickly select a large area of
similar colour and density. You
can change the value of tolerance
on the options bar. To select similar
colors enter a low number, to select
a wider range of similar colors
enter a larger number.
Selecting the Contiguous box will
select only adjacent pixels rather
than selection from entire image.
Anti-aliased should also be
selected to have a smooth selection.
Other Selection Options
A. New Selection
B. Add to Selection
C. Subtract from Selection
D. Intersect with Selection
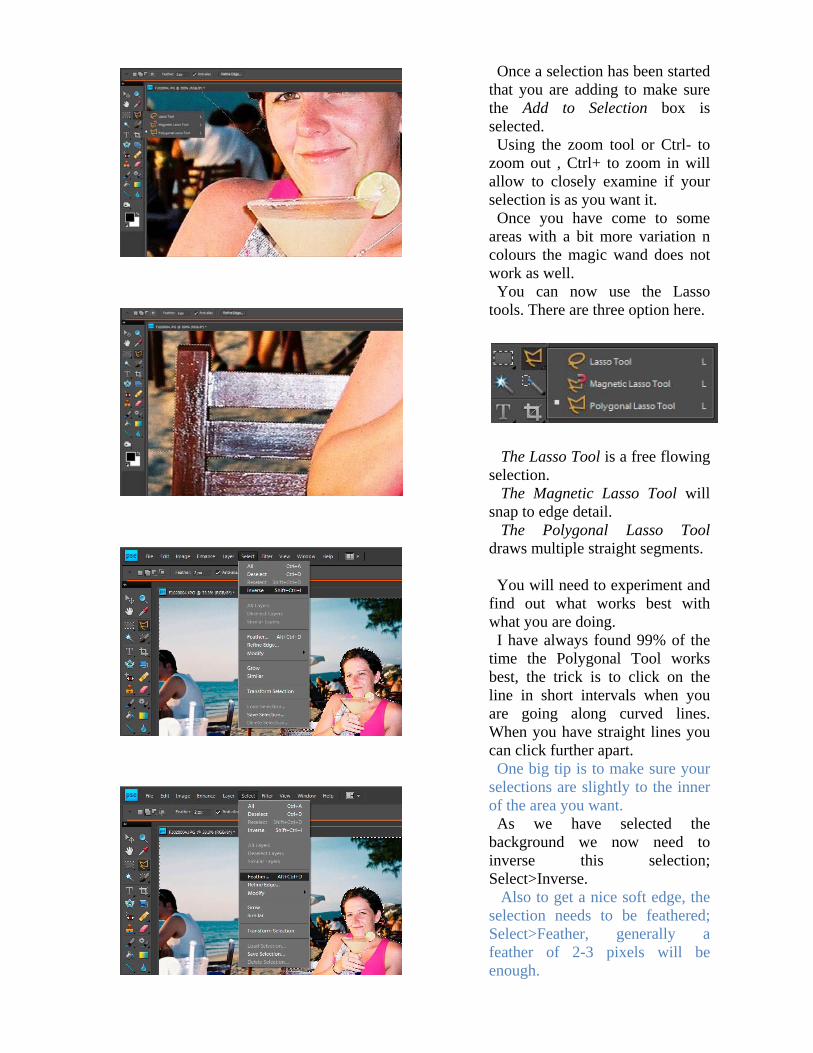
Once a selection has been started that you are adding to make sure the Add to Selection box is selected. Using the zoom tool or Ctrl- to zoom out , Ctrl+ to zoom in will allow to closely examine if your selection is as you want it. Once you have come to some areas with a bit more variation n colours the magic wand does not work as well. You can now use the Lasso tools. There are three option here. The Lasso Tool is a free flowing selection. The Magnetic Lasso Tool will snap to edge detail. The Polygonal Lasso Tool draws multiple straight segments. You will need to experiment and find out what works best with what you are doing. I have always found 99% of the time the Polygonal Tool works best, the trick is to click on the line in short intervals when you are going along curved lines. When you have straight lines you can click further apart. One big tip is to make sure your selections are slightly to the inner of the area you want. As we have selected the background we now need to inverse this selection; Select>Inverse. Also to get a nice soft edge, the selection needs to be feathered; Select>Feather, generally a feather of 2-3 pixels will be enough.
You can save this selection for future use in case you want to slightly alter your selection;
Select>Save Selection, when you want this selection again; Select>Load Selection.
The image file Lesson1-1.jpeg is not needed for the moment so this can be dragged
down to the project bin.
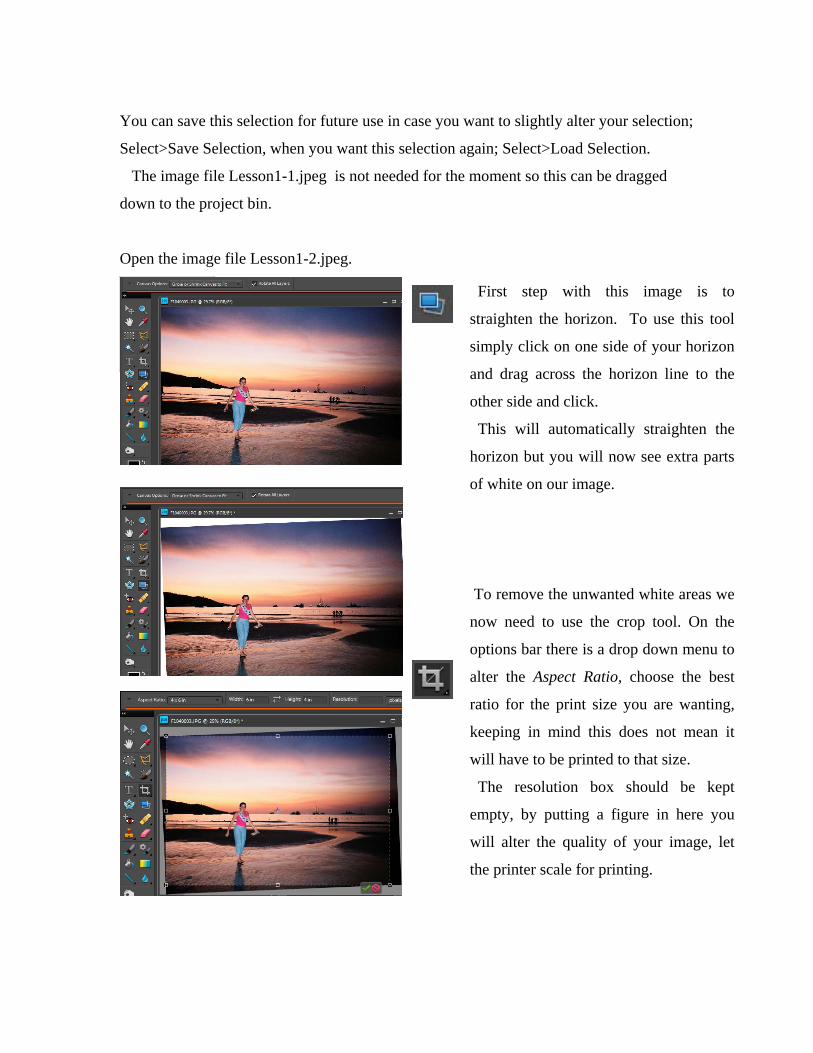
Open the image file Lesson1-2.jpeg.
First step with this image is to
straighten the horizon. To use this tool
simply click on one side of your horizon
and drag across the horizon line to the
other side and click.
This will automatically straighten the
horizon but you will now see extra parts
of white on our image.
To remove the unwanted white areas we
now need to use the crop tool. On the
options bar there is a drop down menu to
alter the Aspect Ratio, choose the best
ratio for the print size you are wanting,
keeping in mind this does not mean it
will have to be printed to that size.
The resolution box should be kept
empty, by putting a figure in here you
will alter the quality of your image, let
the printer scale for printing.
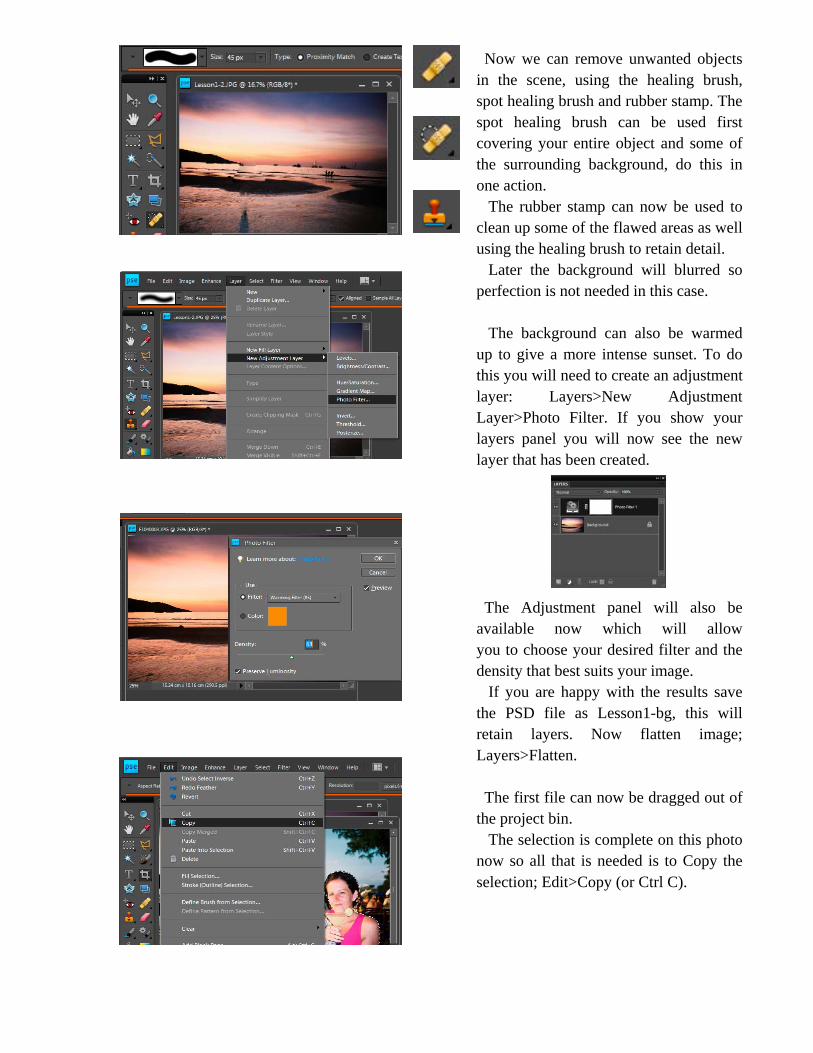
Now we can remove unwanted objects in the scene, using the healing brush, spot healing brush and rubber stamp. The spot healing brush can be used first covering your entire object and some of the surrounding background, do this in one action. The rubber stamp can now be used to clean up some of the flawed areas as well using the healing brush to retain detail. Later the background will blurred so perfection is not needed in this case. The background can also be warmed up to give a more intense sunset. To do this you will need to create an adjustment layer: Layers>New Adjustment Layer>Photo Filter. If you show your layers panel you will now see the new layer that has been created. The Adjustment panel will also be available now which will allow you to choose your desired filter and the density that best suits your image. If you are happy with the results save the PSD file as Lesson1-bg, this will retain layers. Now flatten image; Layers>Flatten. The first file can now be dragged out of the project bin. The selection is complete on this photo now so all that is needed is to Copy the selection; Edit>Copy (or Ctrl C).
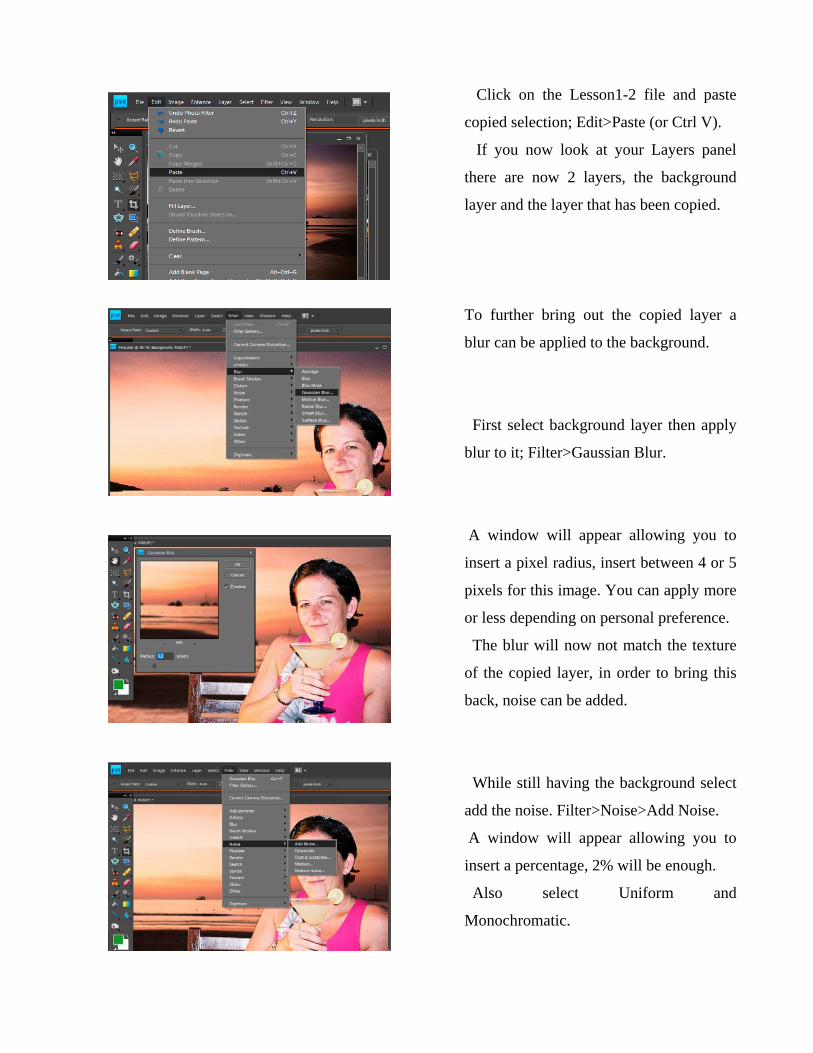
Click on the Lesson1-2 file and paste
copied selection; Edit>Paste (or Ctrl V).
If you now look at your Layers panel
there are now 2 layers, the background
layer and the layer that has been copied.
To further bring out the copied layer a
blur can be applied to the background.
First select background layer then apply
blur to it; Filter>Gaussian Blur.
A window will appear allowing you to
insert a pixel radius, insert between 4 or 5
pixels for this image. You can apply more
or less depending on personal preference.
The blur will now not match the texture
of the copied layer, in order to bring this
back, noise can be added.
While still having the background select
add the noise. Filter>Noise>Add Noise.
A window will appear allowing you to
insert a percentage, 2% will be enough.
Also select Uniform and
Monochromatic.
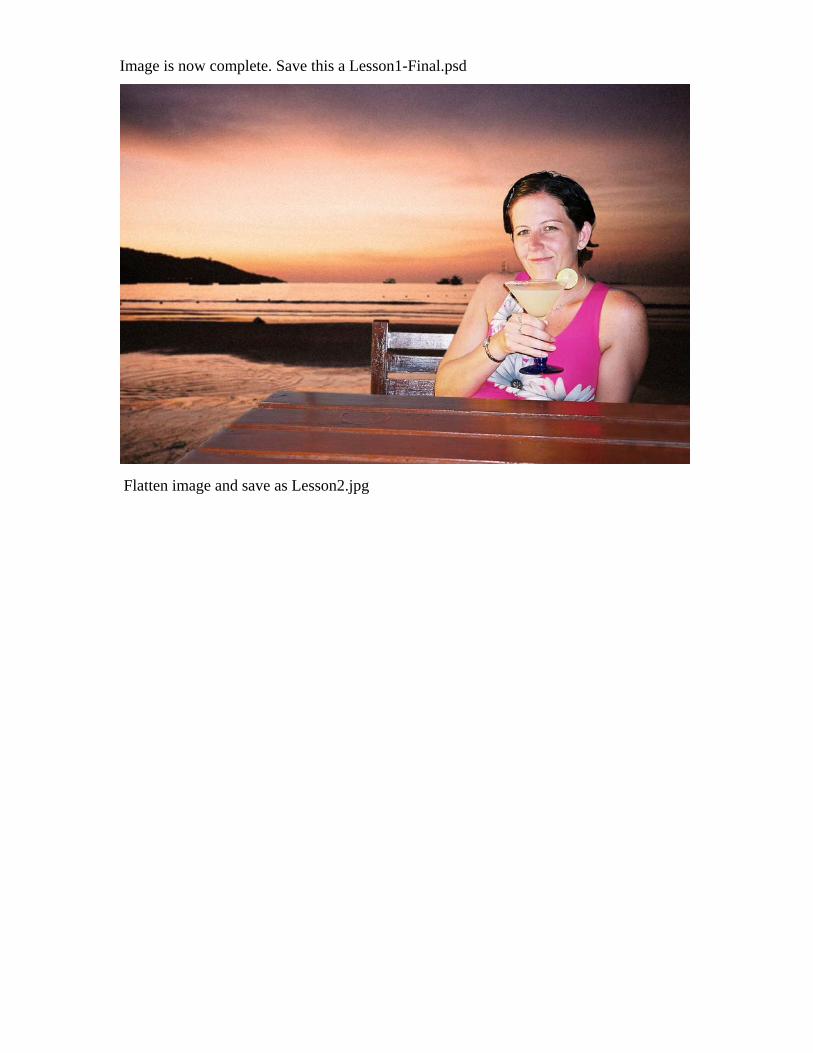
Image is now complete. Save this a Lesson1-Final.psd
Flatten image and save as Lesson2.jpg
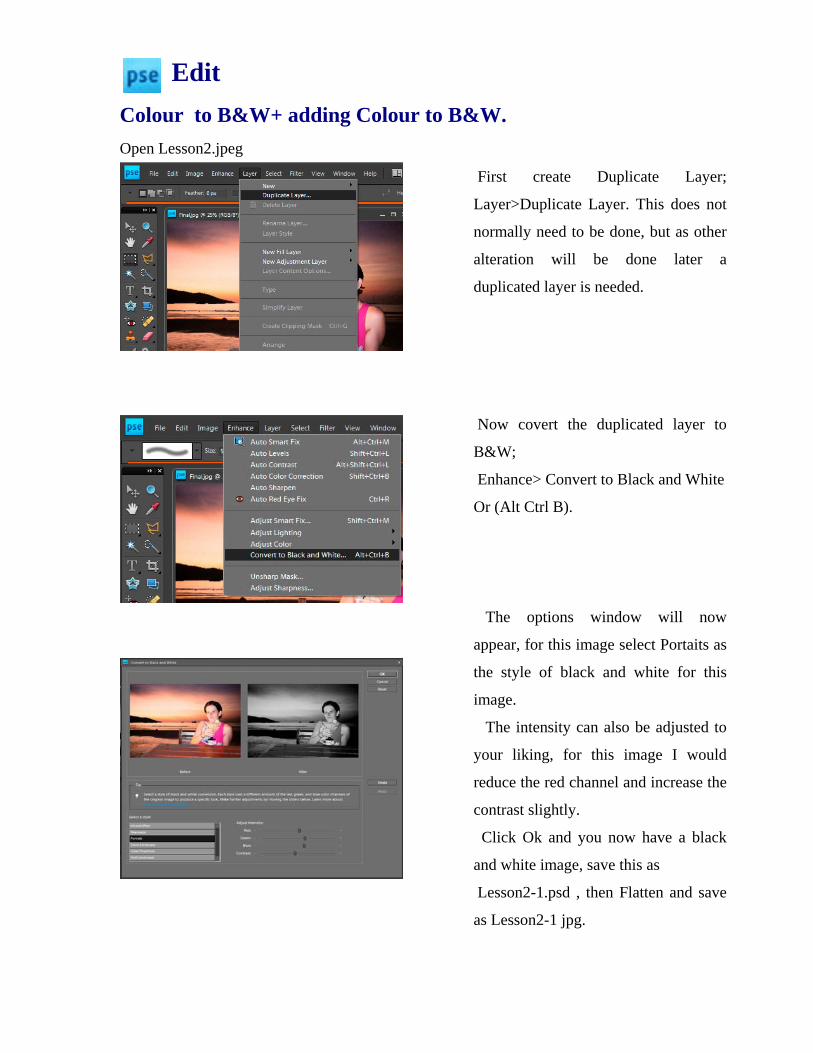
Edit Colour to B&W+ adding Colour to B&W. Open Lesson2.jpeg
First create Duplicate Layer;
Layer>Duplicate Layer. This does not
normally need to be done, but as other
alteration will be done later a
duplicated layer is needed.
Now covert the duplicated layer to
B&W;
Enhance> Convert to Black and White
Or (Alt Ctrl B).
The options window will now
appear, for this image select Portaits as
the style of black and white for this
image.
The intensity can also be adjusted to
your liking, for this image I would
reduce the red channel and increase the
contrast slightly.
Click Ok and you now have a black
and white image, save this as
Lesson2-1.psd , then Flatten and save
as Lesson2-1 jpg.
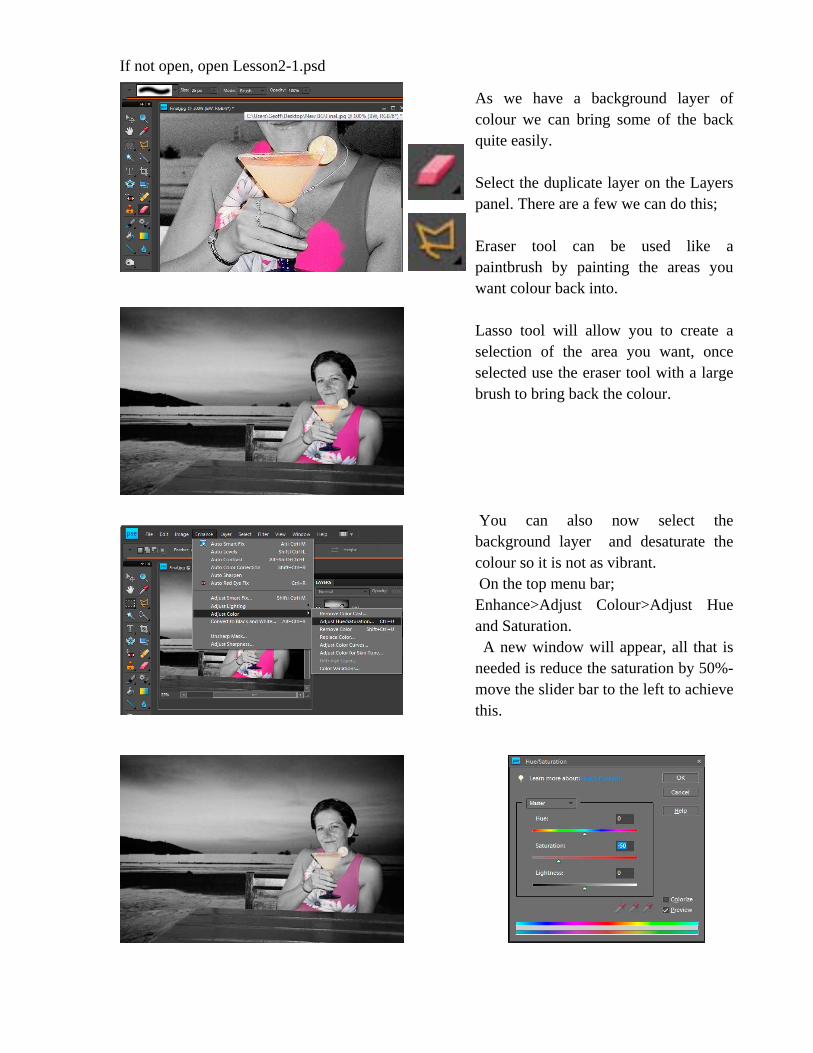
If not open, open Lesson2-1.psd
As we have a background layer of colour we can bring some of the back quite easily. Select the duplicate layer on the Layers panel. There are a few we can do this; Eraser tool can be used like a paintbrush by painting the areas you want colour back into. Lasso tool will allow you to create a selection of the area you want, once selected use the eraser tool with a large brush to bring back the colour. You can also now select the background layer and desaturate the colour so it is not as vibrant. On the top menu bar; Enhance>Adjust Colour>Adjust Hue and Saturation. A new window will appear, all that is needed is reduce the saturation by 50%-move the slider bar to the left to achieve this.