Embed Size (px)
Citation preview

Phonak TargetStep-by-step Guide
Fitting hearing aids in Phonak Target fitting software
The Phonak Target fitting software is intended to be used by qualified hearing care professionals to configure, program, and fit hearing aids to client-specific requirements. This guide provides detailed information on how to navigate a hearing aid fitting in Phonak Target 7.1.9.
2 Return to Content
ContentIf you wish to skip to a specific section, click on the name below and it will immediately take you to the desired section. For a quick return to the Content page, click [return to Content] on the bottom of each page.
Overview 3Setup 4Trial & tools 5Training mode 5Audiogram and RECD 6Client view 6Preparation of the hearing aids 7Connect the hearing aids 7Transfer fitting 7Instruments 8Feedback & real ear test 8AudiogramDirect 10Global tuning 11TargetMatch 12Verification assistant 13Fine tuning 14Curve display views 17SoundRecover2 20Tinnitus Balance 21DataLogging 23Device options 24Junior mode 25ActiveVent™ fitting considerations 26CROS fitting 28Bimodal fitting considerations 28Remote Support 30Finishing the fitting session 31
3 Return to Content
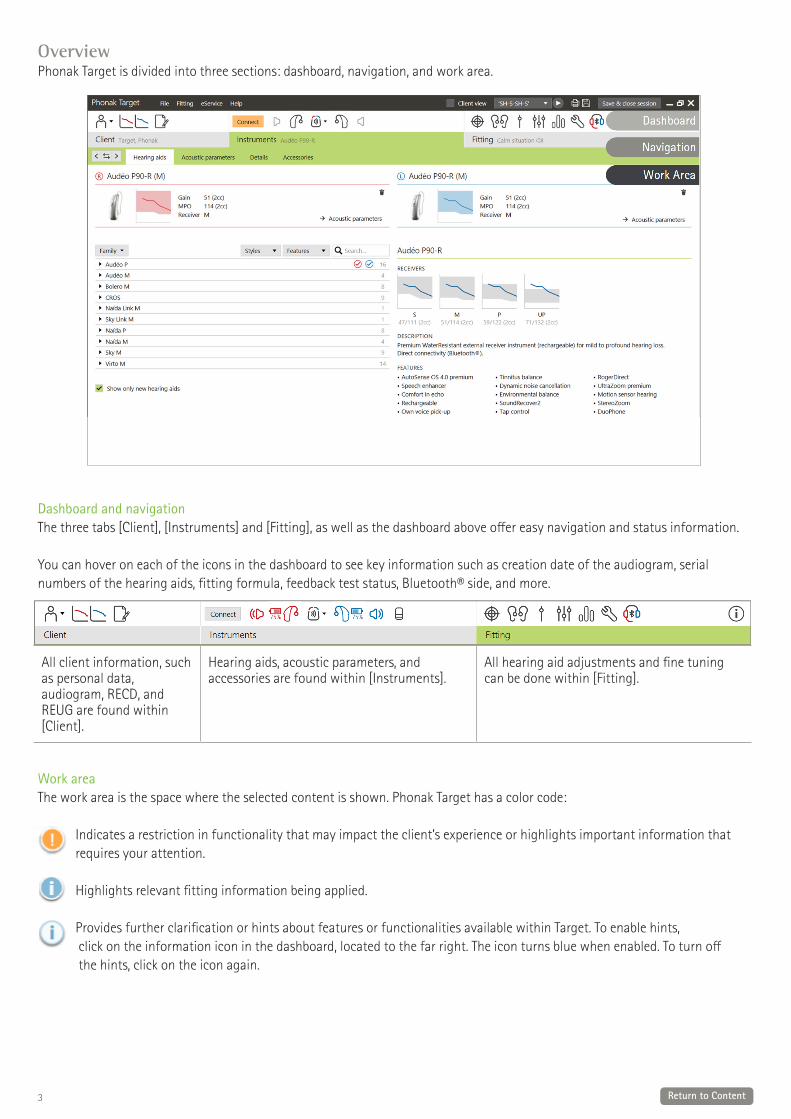
OverviewPhonak Target is divided into three sections: dashboard, navigation, and work area.
Dashboard and navigation The three tabs [Client], [Instruments] and [Fitting], as well as the dashboard above offer easy navigation and status information.
You can hover on each of the icons in the dashboard to see key information such as creation date of the audiogram, serial numbers of the hearing aids, fitting formula, feedback test status, Bluetooth® side, and more.
Work areaThe work area is the space where the selected content is shown. Phonak Target has a color code:
Indicates a restriction in functionality that may impact the client’s experience or highlights important information that requires your attention.
Highlights relevant fitting information being applied.
Provides further clarification or hints about features or functionalities available within Target. To enable hints, click on the information icon in the dashboard, located to the far right. The icon turns blue when enabled. To turn off the hints, click on the icon again.
All client information, such as personal data, audiogram, RECD, and REUG are found within [Client].
Hearing aids, acoustic parameters, and accessories are found within [Instruments].
All hearing aid adjustments and fine tuning can be done within [Fitting].
4 Return to Content
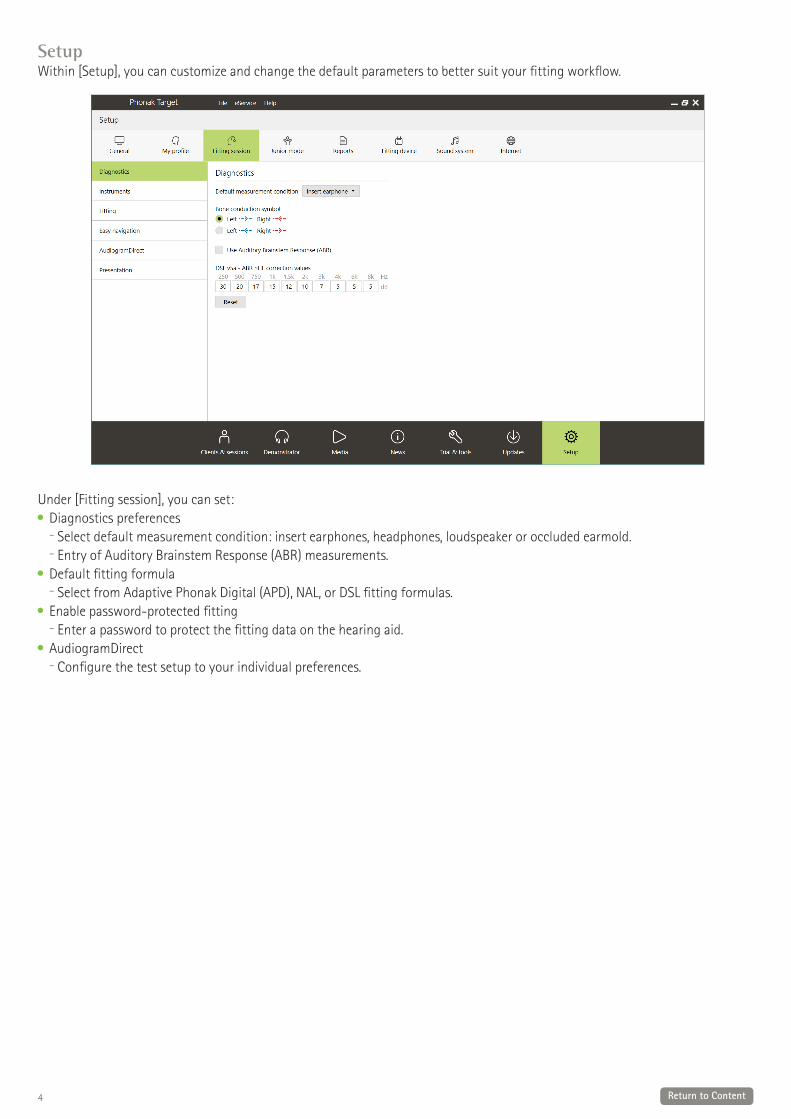
Setup Within [Setup], you can customize and change the default parameters to better suit your fitting workflow.
Under [Fitting session], you can set:Diagnostics preferences- Select default measurement condition: insert earphones, headphones, loudspeaker or occluded earmold.- Entry of Auditory Brainstem Response (ABR) measurements. Default fitting formula - Select from Adaptive Phonak Digital (APD), NAL, or DSL fitting formulas. Enable password-protected fitting - Enter a password to protect the fitting data on the hearing aid. AudiogramDirect - Configure the test setup to your individual preferences.
5 Return to Content
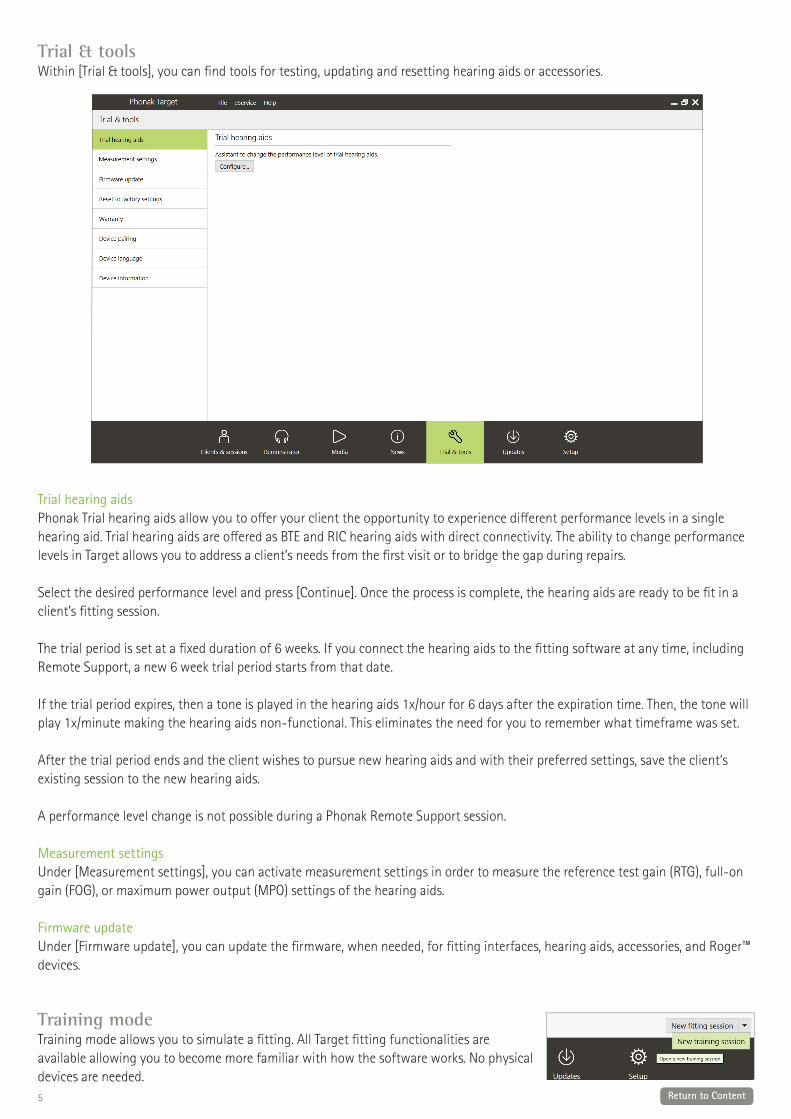
Trial & tools Within [Trial & tools], you can find tools for testing, updating and resetting hearing aids or accessories.
Trial hearing aids Phonak Trial hearing aids allow you to offer your client the opportunity to experience different performance levels in a single hearing aid. Trial hearing aids are offered as BTE and RIC hearing aids with direct connectivity. The ability to change performance levels in Target allows you to address a client’s needs from the first visit or to bridge the gap during repairs.
Select the desired performance level and press [Continue]. Once the process is complete, the hearing aids are ready to be fit in a client’s fitting session.
The trial period is set at a fixed duration of 6 weeks. If you connect the hearing aids to the fitting software at any time, including Remote Support, a new 6 week trial period starts from that date.
If the trial period expires, then a tone is played in the hearing aids 1x/hour for 6 days after the expiration time. Then, the tone will play 1x/minute making the hearing aids non-functional. This eliminates the need for you to remember what timeframe was set.
After the trial period ends and the client wishes to pursue new hearing aids and with their preferred settings, save the client‘s existing session to the new hearing aids.
A performance level change is not possible during a Phonak Remote Support session.
Measurement settingsUnder [Measurement settings], you can activate measurement settings in order to measure the reference test gain (RTG), full-on gain (FOG), or maximum power output (MPO) settings of the hearing aids.
Firmware updateUnder [Firmware update], you can update the firmware, when needed, for fitting interfaces, hearing aids, accessories, and Roger™ devices.
Training modeTraining mode allows you to simulate a fitting. All Target fitting functionalities are available allowing you to become more familiar with how the software works. No physical devices are needed.
6 Return to Content
To access training mode, click on the down arrow next to [New fitting session]. Anything done in training mode cannot be saved. Select the hearing aids you wish to simulate from the hearing aid list within [Instruments]. Click on [Connect] to begin the simulation.
Audiogram and RECD AudiogramUsing Phonak Target within Noah™The audiogram data from Noah will be automatically imported into Target and taken into account for the pre-calculation. A history of all audiograms is visible by clicking on [History].
Using Phonak Target as standaloneIn a standalone version of Phonak Target, enter the audiogram in the [Audiogram] screen within [Client]. To have an overview of the client’s audiograms from previous fitting sessions, they can be added to the history by clicking on [+ Add to history].
Ensure the correct audiogram transducer has been selected (headphones, insert ear phones, occluded earmold, loudspeaker, ABR – insert earphone, and ABR – occluded earmold).
If the client has conductive hearing loss, enter in the bone conduction thresholds. All fitting formulas (DSL, NAL and APD) have compensation for bone conduction.
The speech spectrum and sound samples can be layered over the audiogram to support or assist with counseling. Click on [Show speech spectrum], [Show pictograms] and/or [SPLogram in client view]. Refer to the Client view section below for more information.
RECDRECD values can be accessed via [Client] then [RECD].
When entering RECD values, Target will ask you to confirm how you performed the RECD you are entering, including which earpiece (insert earphone vs earmold) and which coupler (ITE vs BTE coupler) were used. Once this information has been provided, enter the RECD values.
If a BTE coupler (HA-2 coupler) was selected, you will also need to indicate which measurement equipment was used (AudioScan test box or other). The AudioScan BTE coupler has a shorter tubing length compared to the other manufacturers and this needs to be taken into account.
When a HA-2 coupler or HA-4 coupler is used, some verification equipment automatically convert the measured RECD values to a HA-1 RECD equivalent. Therefore, verify which measured RECD values are displayed in the verification equipment before entering them into Target. If the verification equipment has already converted the RECD values to HA-1 RECD equivalent values, select the ITE coupler instead of the BTE coupler in Target. This is to ensure the information entered into Target is consistent to what is displayed in the verification equipment.
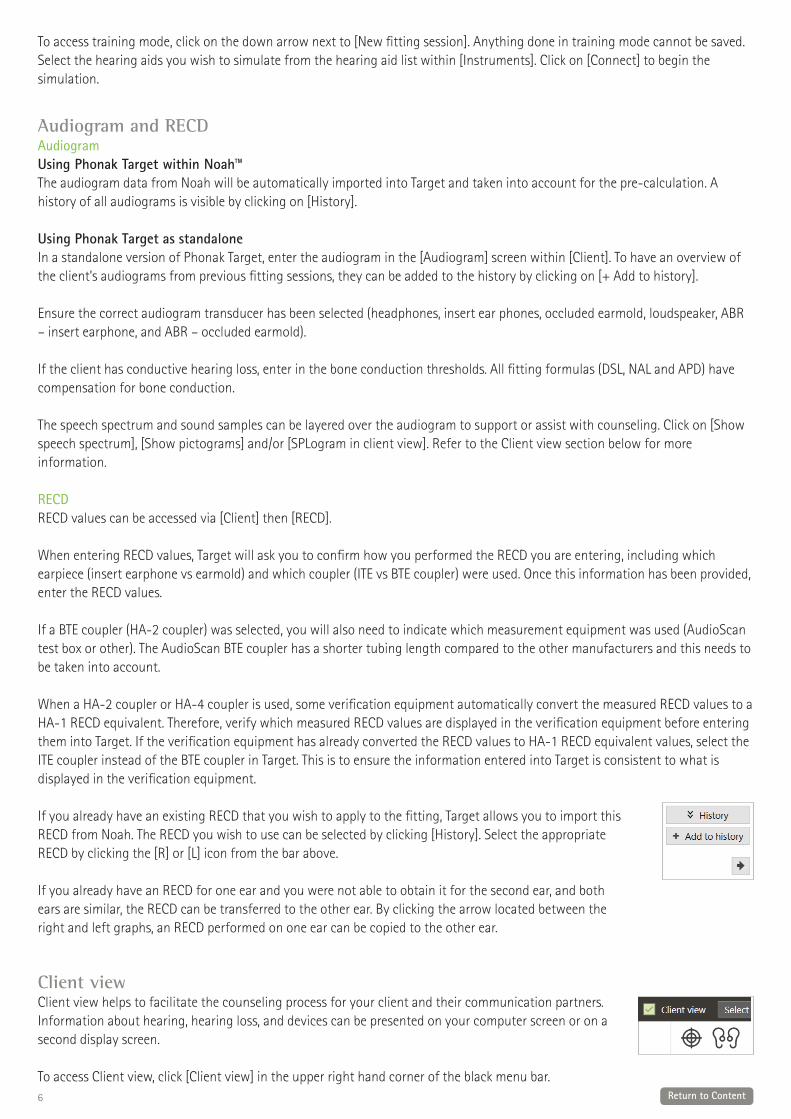
If you already have an existing RECD that you wish to apply to the fitting, Target allows you to import this RECD from Noah. The RECD you wish to use can be selected by clicking [History]. Select the appropriate RECD by clicking the [R] or [L] icon from the bar above.
If you already have an RECD for one ear and you were not able to obtain it for the second ear, and both ears are similar, the RECD can be transferred to the other ear. By clicking the arrow located between the right and left graphs, an RECD performed on one ear can be copied to the other ear.
Client view Client view helps to facilitate the counseling process for your client and their communication partners. Information about hearing, hearing loss, and devices can be presented on your computer screen or on a second display screen.
To access Client view, click [Client view] in the upper right hand corner of the black menu bar.
7 Return to Content
Preparation of the hearing aids iCube II or Noahlink Wireless™No cables to the hearing aids are needed. Just insert the battery and turn on the hearing aid by closing the battery compartment. For rechargeable, turn on the hearing aid.
NOAHlink™ or Hi-Pro® Connect the programing cables to the hearing aids and the fitting device. Please use Phonak labeled cables.
Connect the hearing aids Within the client’s fitting session confirm that the correct fitting interface is shown. To change the fitting device, use the pull down arrow next to the fitting device in the dashboard.
Click [Connect] to start the fitting. The connected hearing aids will appear in the dashboard. Hearing aids available for pairing will automatically appear.
If a hearing aid is not found, open/close the battery door or turn off/on the rechargeable hearing aids to initiate pairing mode.
Press the multifunction button on the hearing aid to highlight it in the list when multiple hearing aids are available or to confirm the side to assign to a client. Hearing aids which have been fitted together are identified as a linked pair.
Automatic selection of experience levelPhonak Target automatically pre-selects the experience level for new fittings using Adaptive Phonak Digital by looking at the fitting session history. This sets the foundation for a more individualized initial fit and leverages all the benefits of AutoSense OS™ for your client.
The experience level has an influence on the hearing aids’ global gain settings. The global gain settings can be adjusted under [Global tuning].
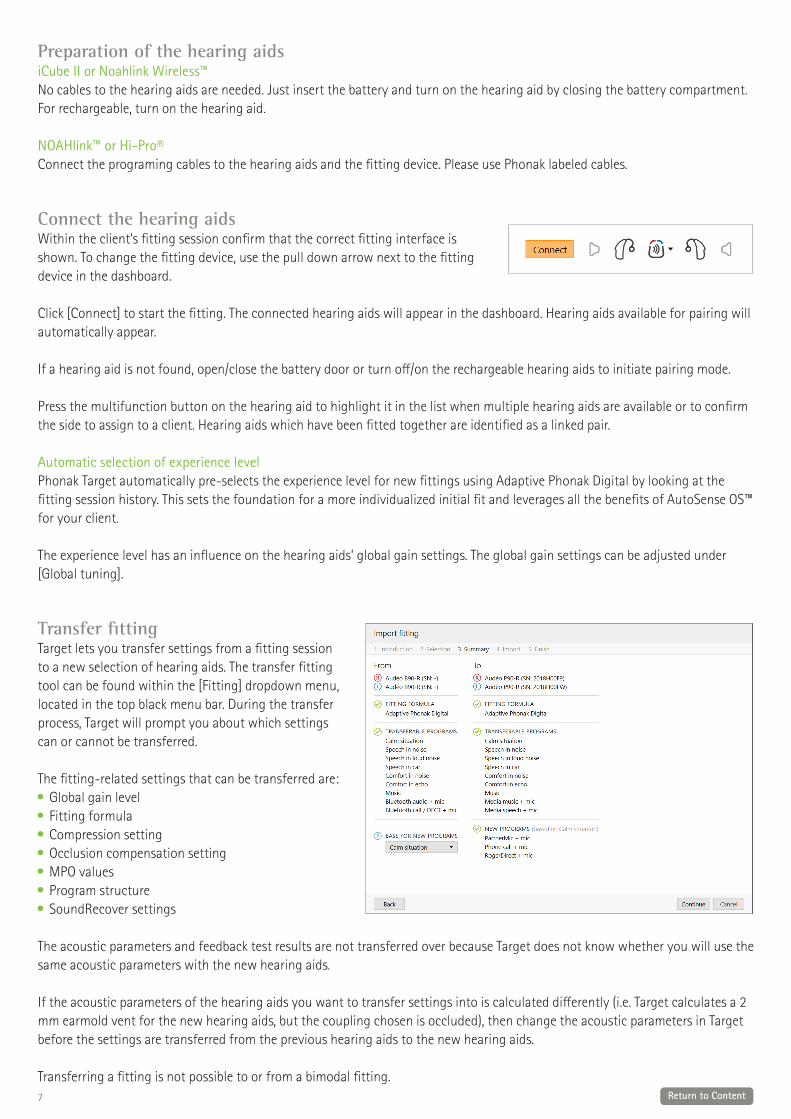
Transfer fittingTarget lets you transfer settings from a fitting session to a new selection of hearing aids. The transfer fitting tool can be found within the [Fitting] dropdown menu, located in the top black menu bar. During the transfer process, Target will prompt you about which settings can or cannot be transferred.
The fitting-related settings that can be transferred are: Global gain levelFitting formulaCompression settingOcclusion compensation setting MPO valuesProgram structureSoundRecover settings
The acoustic parameters and feedback test results are not transferred over because Target does not know whether you will use the same acoustic parameters with the new hearing aids.
If the acoustic parameters of the hearing aids you want to transfer settings into is calculated differently (i.e. Target calculates a 2 mm earmold vent for the new hearing aids, but the coupling chosen is occluded), then change the acoustic parameters in Target before the settings are transferred from the previous hearing aids to the new hearing aids.
Transferring a fitting is not possible to or from a bimodal fitting.
8 Return to Content
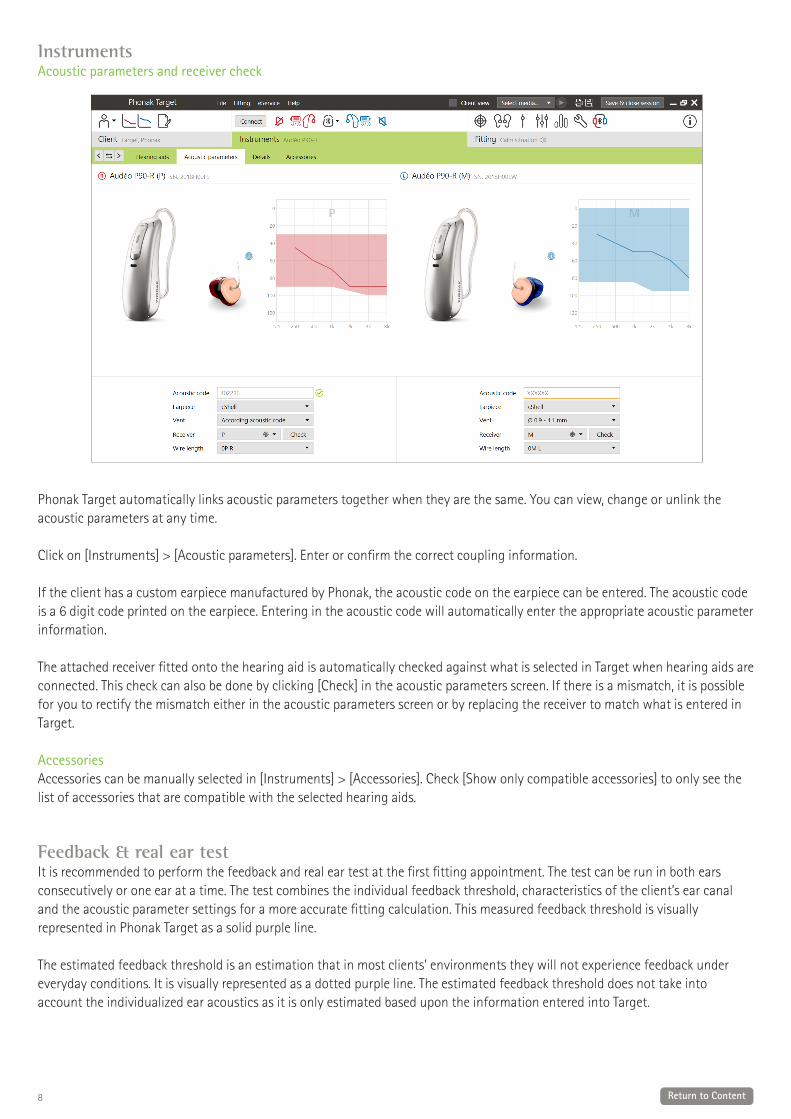
Instruments Acoustic parameters and receiver check
Phonak Target automatically links acoustic parameters together when they are the same. You can view, change or unlink the acoustic parameters at any time.
Click on [Instruments] > [Acoustic parameters]. Enter or confirm the correct coupling information.
If the client has a custom earpiece manufactured by Phonak, the acoustic code on the earpiece can be entered. The acoustic code is a 6 digit code printed on the earpiece. Entering in the acoustic code will automatically enter the appropriate acoustic parameter information.
The attached receiver fitted onto the hearing aid is automatically checked against what is selected in Target when hearing aids are connected. This check can also be done by clicking [Check] in the acoustic parameters screen. If there is a mismatch, it is possible for you to rectify the mismatch either in the acoustic parameters screen or by replacing the receiver to match what is entered in Target.
Accessories Accessories can be manually selected in [Instruments] > [Accessories]. Check [Show only compatible accessories] to only see the list of accessories that are compatible with the selected hearing aids.
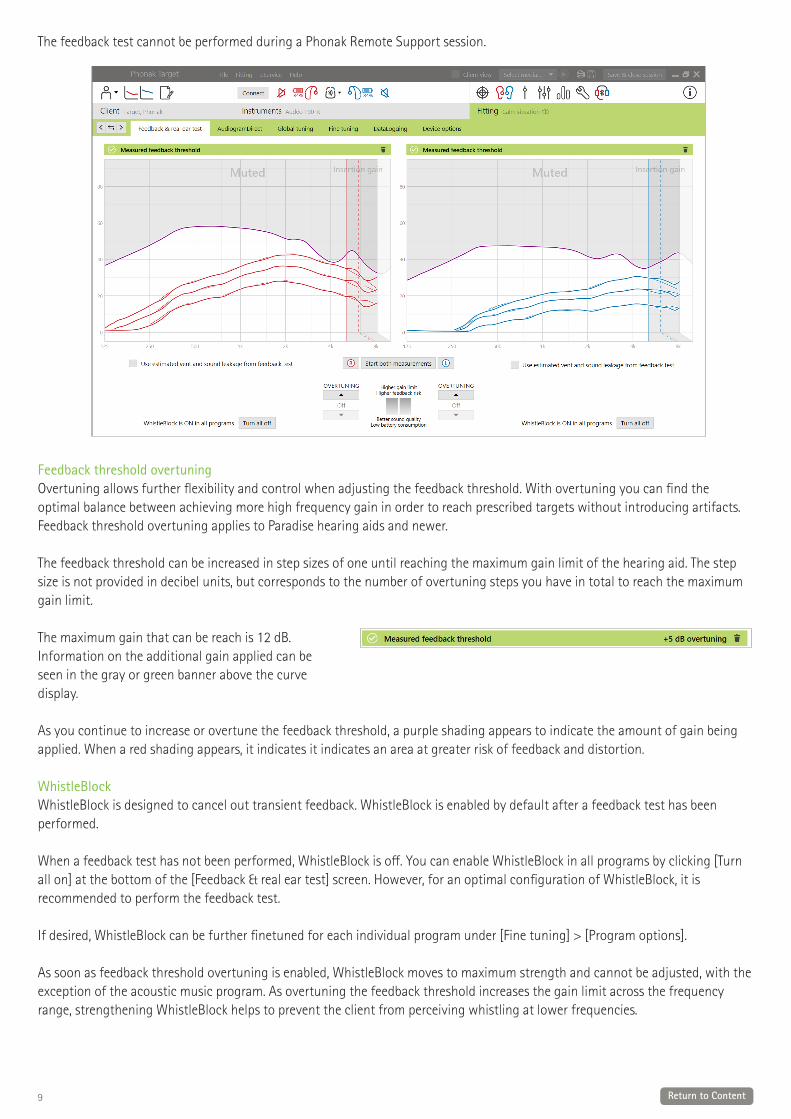
Feedback & real ear test It is recommended to perform the feedback and real ear test at the first fitting appointment. The test can be run in both ears consecutively or one ear at a time. The test combines the individual feedback threshold, characteristics of the client’s ear canal and the acoustic parameter settings for a more accurate fitting calculation. This measured feedback threshold is visually represented in Phonak Target as a solid purple line.
The estimated feedback threshold is an estimation that in most clients’ environments they will not experience feedback under everyday conditions. It is visually represented as a dotted purple line. The estimated feedback threshold does not take into account the individualized ear acoustics as it is only estimated based upon the information entered into Target.
9 Return to Content
The feedback test cannot be performed during a Phonak Remote Support session.
Feedback threshold overtuningOvertuning allows further flexibility and control when adjusting the feedback threshold. With overtuning you can find the optimal balance between achieving more high frequency gain in order to reach prescribed targets without introducing artifacts. Feedback threshold overtuning applies to Paradise hearing aids and newer.
The feedback threshold can be increased in step sizes of one until reaching the maximum gain limit of the hearing aid. The step size is not provided in decibel units, but corresponds to the number of overtuning steps you have in total to reach the maximum gain limit.
The maximum gain that can be reach is 12 dB. Information on the additional gain applied can be seen in the gray or green banner above the curve display.
As you continue to increase or overtune the feedback threshold, a purple shading appears to indicate the amount of gain being applied. When a red shading appears, it indicates it indicates an area at greater risk of feedback and distortion.
WhistleBlock WhistleBlock is designed to cancel out transient feedback. WhistleBlock is enabled by default after a feedback test has been performed.
When a feedback test has not been performed, WhistleBlock is off. You can enable WhistleBlock in all programs by clicking [Turn all on] at the bottom of the [Feedback & real ear test] screen. However, for an optimal configuration of WhistleBlock, it is recommended to perform the feedback test.
If desired, WhistleBlock can be further finetuned for each individual program under [Fine tuning] > [Program options].
As soon as feedback threshold overtuning is enabled, WhistleBlock moves to maximum strength and cannot be adjusted, with the exception of the acoustic music program. As overtuning the feedback threshold increases the gain limit across the frequency range, strengthening WhistleBlock helps to prevent the client from perceiving whistling at lower frequencies.
10 Return to Content
Use estimated vent and sound leakage from feedback test Clicking [Use estimated vent and sound leakage from feedback test] replaces the acoustic vent information entered into the acoustic parameters screen. You are using the information from the feedback test to determine the actual venting of the earpiece. Checking the box will change the pre-calculation of the fitting.
The checkbox is available only if the system can do the vent estimation.
It is recommended to check the box: when fitting a dome earpiece as fitting of the domes can vary significantly across individuals. with custom earpieces that do not have an acoustic code. (Custom earpiece was not manufactured by Phonak.) when the venting on the earpiece has been modified by the hearing care professional.
The checkbox is not available when: the client is 10 years or younger. the fitting is more occluded or the feedback threshold has a high ceiling. With a more occluded fitting or a high feedback threshold, there is no vent to predict as sound leakage is minimal. there is excessive sound leakage coming from the vent. The amount of sound leakage is more than what Target would expect from the entered information in the acoustic parameters screen. This could occur if the client has an abnormally large ear canal volume. fitting Universal SlimTip and ActiveVent™ receiver.
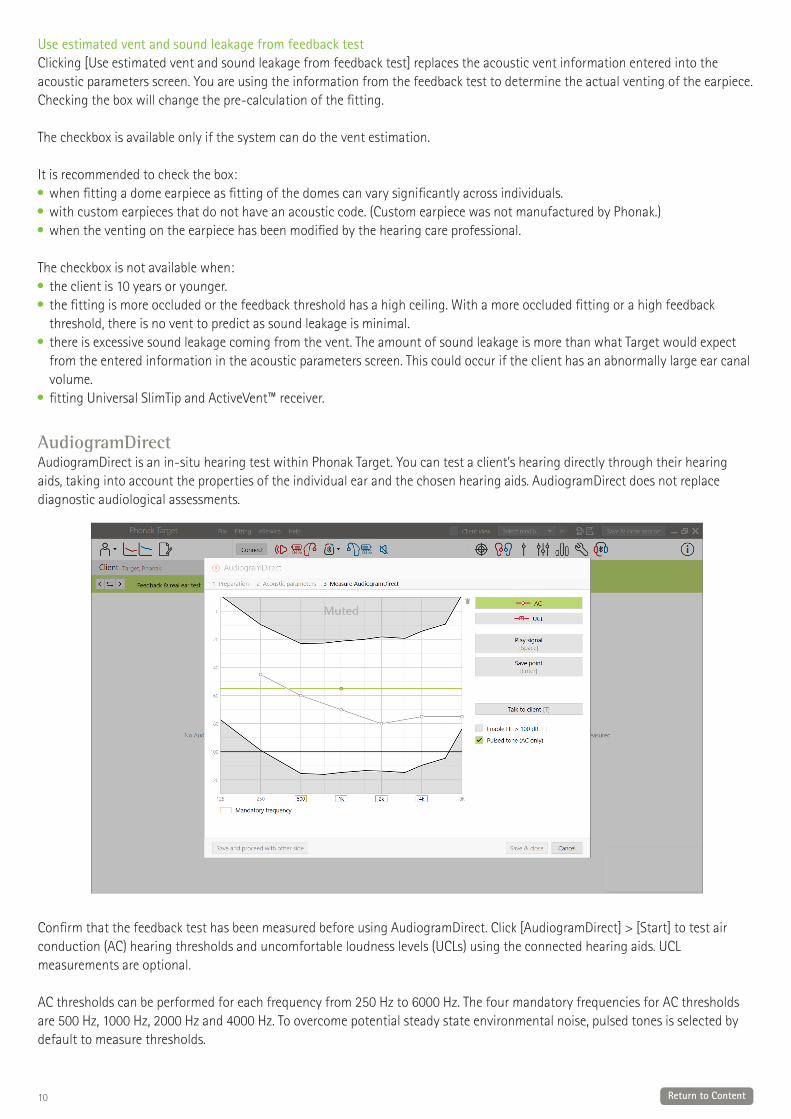
AudiogramDirectAudiogramDirect is an in-situ hearing test within Phonak Target. You can test a client’s hearing directly through their hearing aids, taking into account the properties of the individual ear and the chosen hearing aids. AudiogramDirect does not replace diagnostic audiological assessments.
Confirm that the feedback test has been measured before using AudiogramDirect. Click [AudiogramDirect] > [Start] to test air conduction (AC) hearing thresholds and uncomfortable loudness levels (UCLs) using the connected hearing aids. UCL measurements are optional.
AC thresholds can be performed for each frequency from 250 Hz to 6000 Hz. The four mandatory frequencies for AC thresholds are 500 Hz, 1000 Hz, 2000 Hz and 4000 Hz. To overcome potential steady state environmental noise, pulsed tones is selected by default to measure thresholds.
11 Return to Content
Navigate AudiogramDirect using the computer keyboard or mouse. To switch between the frequencies using the computer keyboard, press the [Arrow] keys. Play the tone signal by pressing the [Space] bar and save the threshold using the [Enter] key or the [S] key. Talk to the client by pressing the [T] key.
To switch between the frequencies using the mouse, click on the frequency you wish to test and play the tone signal by clicking and holding [Play signal]. To save the measured threshold, double click on the point you wish to save. Talk to the client by clicking [Talk to client].
By default, Target will recalculate the hearing aid settings based on AudiogramDirect results, unless this option is manually unchecked.
Previous hearing tests can be compared and reviewed by clicking on [History].
UCL measurements are disabled during a Phonak Remote Support session.
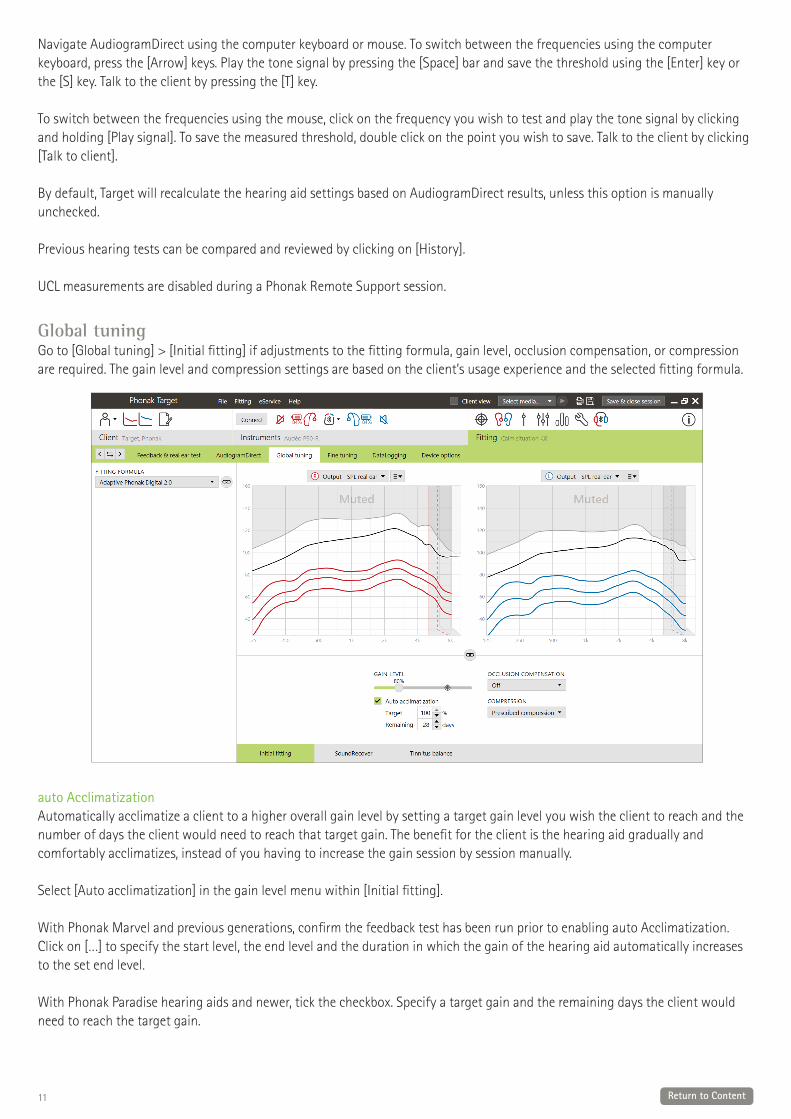
Global tuningGo to [Global tuning] > [Initial fitting] if adjustments to the fitting formula, gain level, occlusion compensation, or compression are required. The gain level and compression settings are based on the client’s usage experience and the selected fitting formula.
auto AcclimatizationAutomatically acclimatize a client to a higher overall gain level by setting a target gain level you wish the client to reach and the number of days the client would need to reach that target gain. The benefit for the client is the hearing aid gradually and comfortably acclimatizes, instead of you having to increase the gain session by session manually.
Select [Auto acclimatization] in the gain level menu within [Initial fitting].
With Phonak Marvel and previous generations, confirm the feedback test has been run prior to enabling auto Acclimatization. Click on […] to specify the start level, the end level and the duration in which the gain of the hearing aid automatically increases to the set end level.
With Phonak Paradise hearing aids and newer, tick the checkbox. Specify a target gain and the remaining days the client would need to reach the target gain.
12 Return to Content
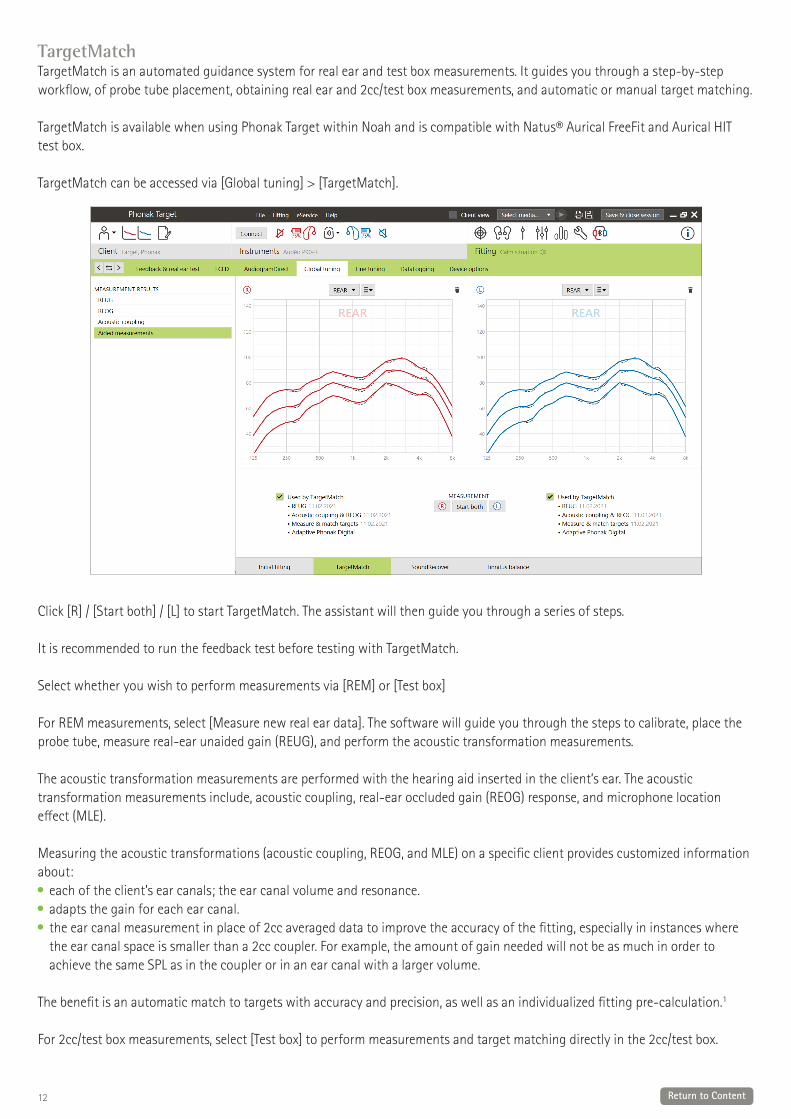
TargetMatchTargetMatch is an automated guidance system for real ear and test box measurements. It guides you through a step-by-step workflow, of probe tube placement, obtaining real ear and 2cc/test box measurements, and automatic or manual target matching.
TargetMatch is available when using Phonak Target within Noah and is compatible with Natus® Aurical FreeFit and Aurical HIT test box.
TargetMatch can be accessed via [Global tuning] > [TargetMatch].
Click [R] / [Start both] / [L] to start TargetMatch. The assistant will then guide you through a series of steps.
It is recommended to run the feedback test before testing with TargetMatch.
Select whether you wish to perform measurements via [REM] or [Test box]
For REM measurements, select [Measure new real ear data]. The software will guide you through the steps to calibrate, place the probe tube, measure real-ear unaided gain (REUG), and perform the acoustic transformation measurements.
The acoustic transformation measurements are performed with the hearing aid inserted in the client’s ear. The acoustic transformation measurements include, acoustic coupling, real-ear occluded gain (REOG) response, and microphone location effect (MLE).
Measuring the acoustic transformations (acoustic coupling, REOG, and MLE) on a specific client provides customized information about:
each of the client’s ear canals; the ear canal volume and resonance.adapts the gain for each ear canal.the ear canal measurement in place of 2cc averaged data to improve the accuracy of the fitting, especially in instances where the ear canal space is smaller than a 2cc coupler. For example, the amount of gain needed will not be as much in order to achieve the same SPL as in the coupler or in an ear canal with a larger volume.
The benefit is an automatic match to targets with accuracy and precision, as well as an individualized fitting pre-calculation.1
For 2cc/test box measurements, select [Test box] to perform measurements and target matching directly in the 2cc/test box.
13 Return to Content
Probe tube placement Guided probe tube placement is a function that assists you with placing the probe tube at the correct insertion depth. It is available for clients age 10 years and above, and designed to be used with nonsurgical adult ears.
Click [R Start] / [L Start] to begin the REUG measurement with guided probe tube placement.
Once the probe tube is placed at the ear opening, click [Start] or press the power button on the Aurical FreeFit to start the guided probe tube placement. Carefully move the probe tube towards the eardrum as indicated. The values are presented in millimeters and match the scale on the probe tubes provided by Natus. The green check mark indicates when the probe tube is at the correct position.
Click [Measure] or press the power button on the Aurical FreeFit to start the REUG measurement.
Real ear measurementsInsert the hearing aids into the client‘s ears. Make sure the probe tube position does not change while inserting the hearing aids.
Click on [Start measurement] to measure the acoustic coupling, REOG, and MLE.
Select the program that will be active during the aided response measurements and how you wish to perform verification.Automatic match – automatically run the measurements and adjust the hearing aid output to match targets. Manual match – manually adjust hearing aid responses to match targets.Measure responses only – measure hearing aid responses only without adjusting the hearing aid.
For test box measurements, you will be reminded to place the hearing aids into the test box. Click on [Start measurement] to obtain the hearing aid responses.
Click [Save] to apply the changes to the fitting and store all measurements to Noah. The results can be reviewed afterwards either in Otosuite or Phonak Target.
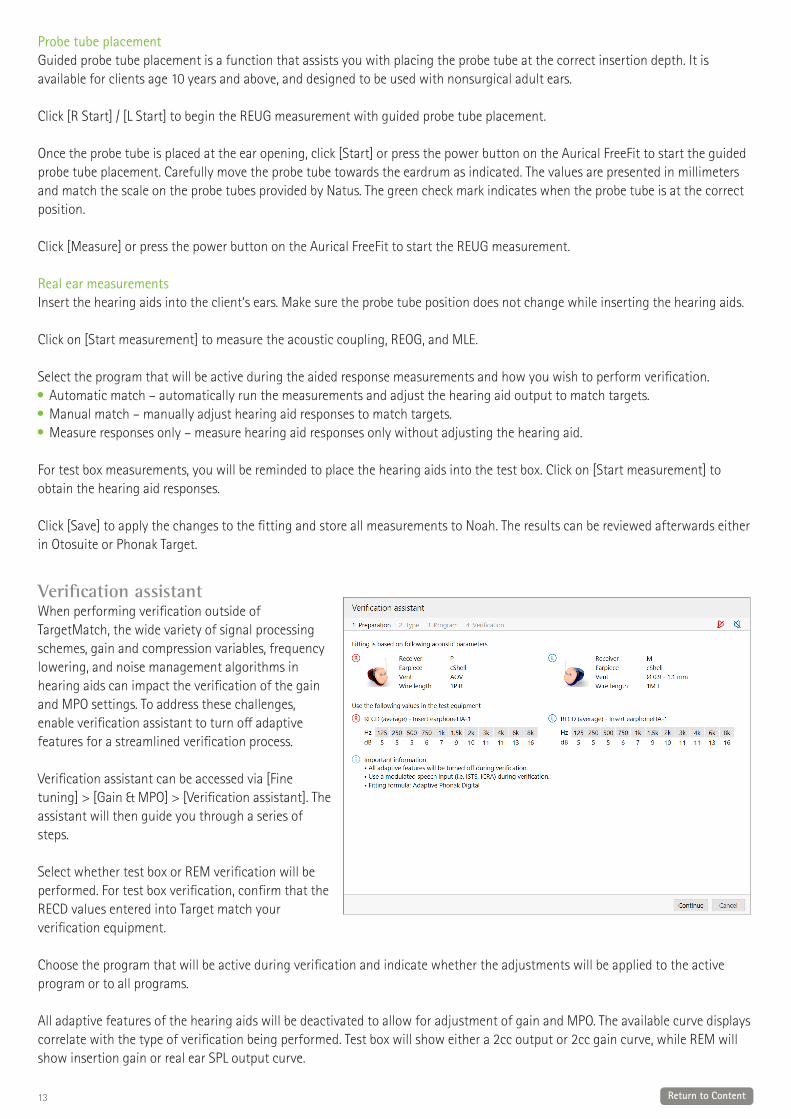
Verification assistant When performing verification outside of TargetMatch, the wide variety of signal processing schemes, gain and compression variables, frequency lowering, and noise management algorithms in hearing aids can impact the verification of the gain and MPO settings. To address these challenges, enable verification assistant to turn off adaptive features for a streamlined verification process.
Verification assistant can be accessed via [Fine tuning] > [Gain & MPO] > [Verification assistant]. The assistant will then guide you through a series of steps.
Select whether test box or REM verification will be performed. For test box verification, confirm that the RECD values entered into Target match your verification equipment.
Choose the program that will be active during verification and indicate whether the adjustments will be applied to the active program or to all programs.
All adaptive features of the hearing aids will be deactivated to allow for adjustment of gain and MPO. The available curve displays correlate with the type of verification being performed. Test box will show either a 2cc output or 2cc gain curve, while REM will show insertion gain or real ear SPL output curve.
14 Return to Content
To enable SoundRecover2 go to [SoundRecover] on the lower part of the window. To change the settings click, on [Adjust SoundRecover].
Click [Apply] to confirm any adjustments made and return to the standard fitting mode. SoundRecover2 will be reactivated at default. If there is a need to discard any adjustments made during verification, click [Cancel].
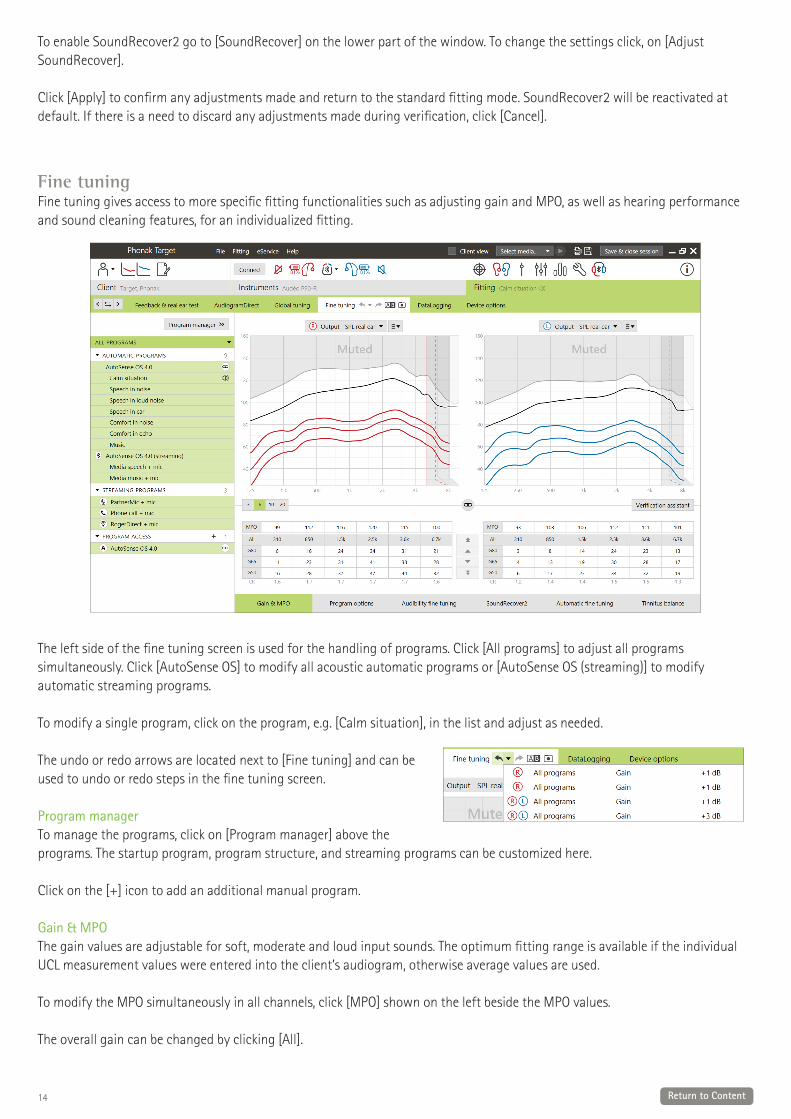
Fine tuning Fine tuning gives access to more specific fitting functionalities such as adjusting gain and MPO, as well as hearing performance and sound cleaning features, for an individualized fitting.
The left side of the fine tuning screen is used for the handling of programs. Click [All programs] to adjust all programs simultaneously. Click [AutoSense OS] to modify all acoustic automatic programs or [AutoSense OS (streaming)] to modify automatic streaming programs.
To modify a single program, click on the program, e.g. [Calm situation], in the list and adjust as needed.
The undo or redo arrows are located next to [Fine tuning] and can be used to undo or redo steps in the fine tuning screen.
Program managerTo manage the programs, click on [Program manager] above the programs. The startup program, program structure, and streaming programs can be customized here.
Click on the [+] icon to add an additional manual program.
Gain & MPOThe gain values are adjustable for soft, moderate and loud input sounds. The optimum fitting range is available if the individual UCL measurement values were entered into the client’s audiogram, otherwise average values are used.
To modify the MPO simultaneously in all channels, click [MPO] shown on the left beside the MPO values.
The overall gain can be changed by clicking [All].

15 Return to Content
The gain or MPO values can be changed by clicking on the up or down arrow next to the table. You have the option to make one step changes (single arrow) or three step changes (double arrow). These steps do not equal to changes in decibels.
If you wish to view the compression ratio for each frequency channel, they are shown in the row directly underneath the gain values.
Program options Program options can be adjusted from the default settings. The features can be activated, deactivated, or changed instrength for each program individually. The available ranges within each scale are visible and depend upon performance level.
Speech EnhancerSpeech Enhancer is an adaptive algorithm designed to enhance the peaks of a speech signal in quiet situations. It is featured in Calm situation and it is on by default when the global gain level is set to 90% or above. Speech Enhancer is available with Paradise hearing aids and newer.
When Speech Enhancer is active, it will apply up to 10 dB additional gain in the following circumstances: Speech between 30-50 dB input level is detectedInput signal SNR is >0dB
When adjusting the Speech Enhancer slider, the maximum gain that can be achieved is 10 dB. For optimal use of Speech Enhancer, verify that the feedback threshold is not limiting available headroom.
Dynamic Noise CancellationDynamic Noise Cancellation is a spatial noise cancellation feature that works in combination with a directional beamformer to improve the SNR in challenging situations. It is microphone dependent so it is only activated when the beamformer is fully activated and switches off as soon as the SNR reaches 18 dB and higher.
It is featured in Speech in noise and Speech in loud noise programs only. Dynamic Noise Cancellation is available with Paradise hearing aids and newer.
It is recommended to allow Dynamic Noise Cancellation to be adjusted and personalized for each situation by the client using the myPhonak app, especially as the acoustic environment greatly differs from situation to situation.
Motion Sensor HearingMotion Sensor Hearing changes the beamformer setting to Real Ear Sound and deactivates Dynamic Noise Cancellation when having a conversation while walking in a noisy environment. It only activates when the AutoSense OS classification is Speech in noise or Speech in loud noise.
Motion Sensor Hearing is on wide (Real Ear Sound) by default, but the other values are mixed (fixed directional), narrow (UltraZoom) and off. The more you move the slider to the left, the narrower the microphone mode will become.
Motion Sensor Hearing is available with Paradise rechargeable hearing aids and newer.
Soft noise reduction Soft noise reduction reduces gain for very soft input sounds, such as fans, air conditioners and clock ticking. It is for softer input broadband sounds around 30 to 35 dB.
This feature is available with Paradise hearing aids and newer and replaces the TK/Gain 35 dB tab.
The Soft noise reduction slider is available in all programs. The default setting is off.
When adjusting the slider to a strong setting, the amount of gain attenuation applied increases. The amount of attenuation applied across the frequency range depends on the acoustic characteristics of the incoming signal. The maximum amount of attenuation that can be achieved is 20 dB within a frequency band.
16 Return to Content
NoiseBlockNoiseBlock is a single channel noise reduction method that works in frequency bands. NoiseBlock works well for stationary noise sources and omnidirectional microphone settings.
NoiseBlock is available in all programs. When adjusting the slider to a stronger setting, the amount of gain attenuation applied increases. The maximum attenuation that can be achieved is 10 dB.
Streaming activation behavior For hearing aids with direct connectivity, the default switching behavior to access streaming can be modified (TV Connector, Roger, PartnerMic™):
Automatic - the hearing aids will automatically switch and receive a streamed signal (default).Manual – no beep is heard and the program is added as the last program.Manual (with beep) - a beep is heard in the hearing aids and the client manually accepts to receive a streamed signal.
RogerDirect™ + mic The options to set microphone directionality and microphone attenuation relative to the Roger signal can be set in [Program options].
The three microphone options available are omnidirectional, Real Ear Sound and fixed directional. To change the default microphone option, move the hearing aid microphone slider.
The hearing aid microphone is set to 0 dB attenuation to ensure awareness of surrounding sounds.
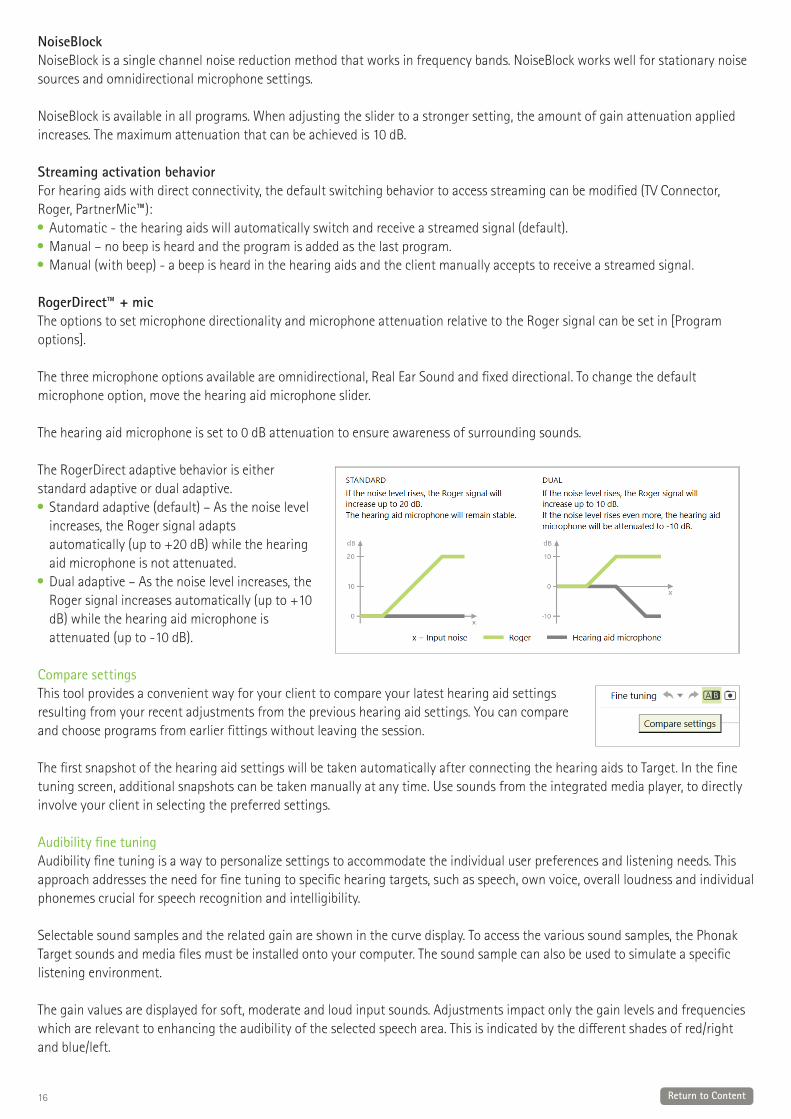
The RogerDirect adaptive behavior is either standard adaptive or dual adaptive.
Standard adaptive (default) – As the noise level increases, the Roger signal adapts automatically (up to +20 dB) while the hearing aid microphone is not attenuated.Dual adaptive – As the noise level increases, the Roger signal increases automatically (up to +10 dB) while the hearing aid microphone is attenuated (up to -10 dB).
Compare settingsThis tool provides a convenient way for your client to compare your latest hearing aid settings resulting from your recent adjustments from the previous hearing aid settings. You can compare and choose programs from earlier fittings without leaving the session.
The first snapshot of the hearing aid settings will be taken automatically after connecting the hearing aids to Target. In the fine tuning screen, additional snapshots can be taken manually at any time. Use sounds from the integrated media player, to directly involve your client in selecting the preferred settings.
Audibility fine tuning Audibility fine tuning is a way to personalize settings to accommodate the individual user preferences and listening needs. This approach addresses the need for fine tuning to specific hearing targets, such as speech, own voice, overall loudness and individual phonemes crucial for speech recognition and intelligibility.
Selectable sound samples and the related gain are shown in the curve display. To access the various sound samples, the Phonak Target sounds and media files must be installed onto your computer. The sound sample can also be used to simulate a specific listening environment.
The gain values are displayed for soft, moderate and loud input sounds. Adjustments impact only the gain levels and frequencies which are relevant to enhancing the audibility of the selected speech area. This is indicated by the different shades of red/right and blue/left.
17 Return to Content
Automatic fine tuning Automatic fine tuning is a situation-based fine tuning tool. The available adjustments are dependent on the client’s evaluation of the sound situation. The fine tuning steps are clearly displayed before the action will be applied.
Depending on the selected program, a recommended sound sample is pre-selected. The sound samples can be played to simulate the listening environment. In order to access the sound samples, ensure the Phonak Target sounds and media files have been installed onto your computer.
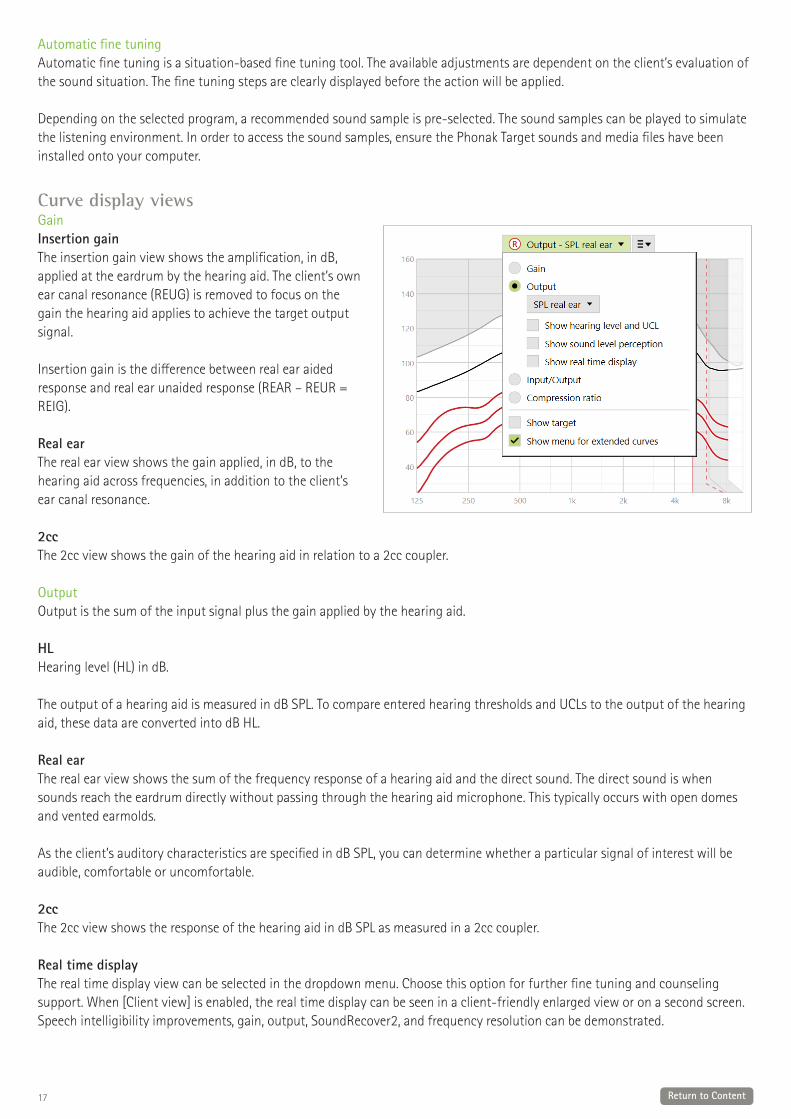
Curve display views Gain Insertion gainThe insertion gain view shows the amplification, in dB, applied at the eardrum by the hearing aid. The client’s own ear canal resonance (REUG) is removed to focus on the gain the hearing aid applies to achieve the target output signal.
Insertion gain is the difference between real ear aided response and real ear unaided response (REAR – REUR = REIG).
Real earThe real ear view shows the gain applied, in dB, to the hearing aid across frequencies, in addition to the client’s ear canal resonance.
2cc The 2cc view shows the gain of the hearing aid in relation to a 2cc coupler.
OutputOutput is the sum of the input signal plus the gain applied by the hearing aid.
HL Hearing level (HL) in dB.
The output of a hearing aid is measured in dB SPL. To compare entered hearing thresholds and UCLs to the output of the hearing aid, these data are converted into dB HL.
Real earThe real ear view shows the sum of the frequency response of a hearing aid and the direct sound. The direct sound is when sounds reach the eardrum directly without passing through the hearing aid microphone. This typically occurs with open domes and vented earmolds.
As the client’s auditory characteristics are specified in dB SPL, you can determine whether a particular signal of interest will be audible, comfortable or uncomfortable.
2ccThe 2cc view shows the response of the hearing aid in dB SPL as measured in a 2cc coupler.
Real time displayThe real time display view can be selected in the dropdown menu. Choose this option for further fine tuning and counseling support. When [Client view] is enabled, the real time display can be seen in a client-friendly enlarged view or on a second screen. Speech intelligibility improvements, gain, output, SoundRecover2, and frequency resolution can be demonstrated.
18 Return to Content
Input/outputThe input/output curve represents the aided output in dB SPL real ear or 2cc for a selected frequency, plotted against increasing input level on the x-axis.
The input/output curve can be used to adjust the kneepoints and compression.
With open fittings, it is recommended to use the 1000 Hz or 2000 Hz view. At lower frequencies you see more of the venting effects.
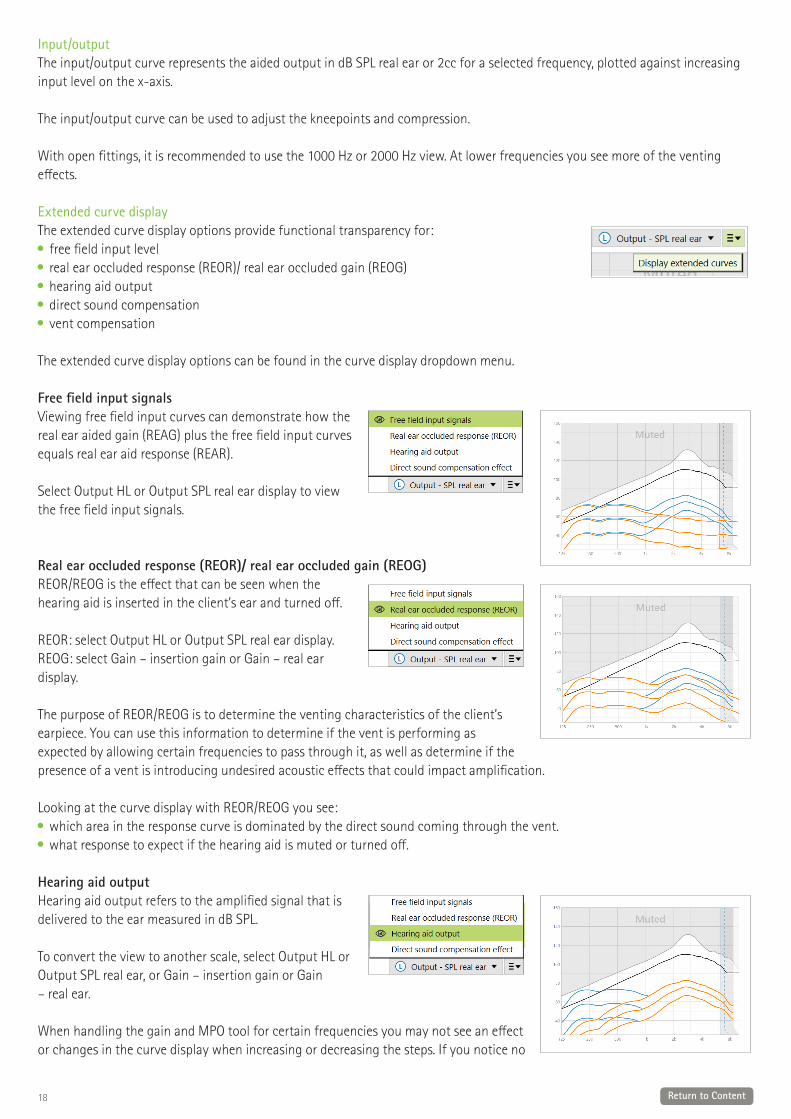
Extended curve display The extended curve display options provide functional transparency for:
free field input levelreal ear occluded response (REOR)/ real ear occluded gain (REOG) hearing aid output direct sound compensationvent compensation
The extended curve display options can be found in the curve display dropdown menu.
Free field input signalsViewing free field input curves can demonstrate how the real ear aided gain (REAG) plus the free field input curves equals real ear aid response (REAR).
Select Output HL or Output SPL real ear display to view the free field input signals.
Real ear occluded response (REOR)/ real ear occluded gain (REOG)REOR/REOG is the effect that can be seen when the hearing aid is inserted in the client’s ear and turned off. REOR: select Output HL or Output SPL real ear display. REOG: select Gain – insertion gain or Gain – real ear display.
The purpose of REOR/REOG is to determine the venting characteristics of the client’s earpiece. You can use this information to determine if the vent is performing as expected by allowing certain frequencies to pass through it, as well as determine if the presence of a vent is introducing undesired acoustic effects that could impact amplification.
Looking at the curve display with REOR/REOG you see:which area in the response curve is dominated by the direct sound coming through the vent.what response to expect if the hearing aid is muted or turned off.
Hearing aid output Hearing aid output refers to the amplified signal that is delivered to the ear measured in dB SPL.
To convert the view to another scale, select Output HL or Output SPL real ear, or Gain – insertion gain or Gain – real ear.
When handling the gain and MPO tool for certain frequencies you may not see an effect or changes in the curve display when increasing or decreasing the steps. If you notice no
19 Return to Content
effect in the curve display when handling certain frequencies, you can view the hearing aid output curve together with the REOR view to further understand why.
The hearing aid output and the REOR displays can be used to identify where and at which frequencies the direct sound is masking the hearing aid output. As a result, fine tuning in this frequency range does not result in any perceivable changes.
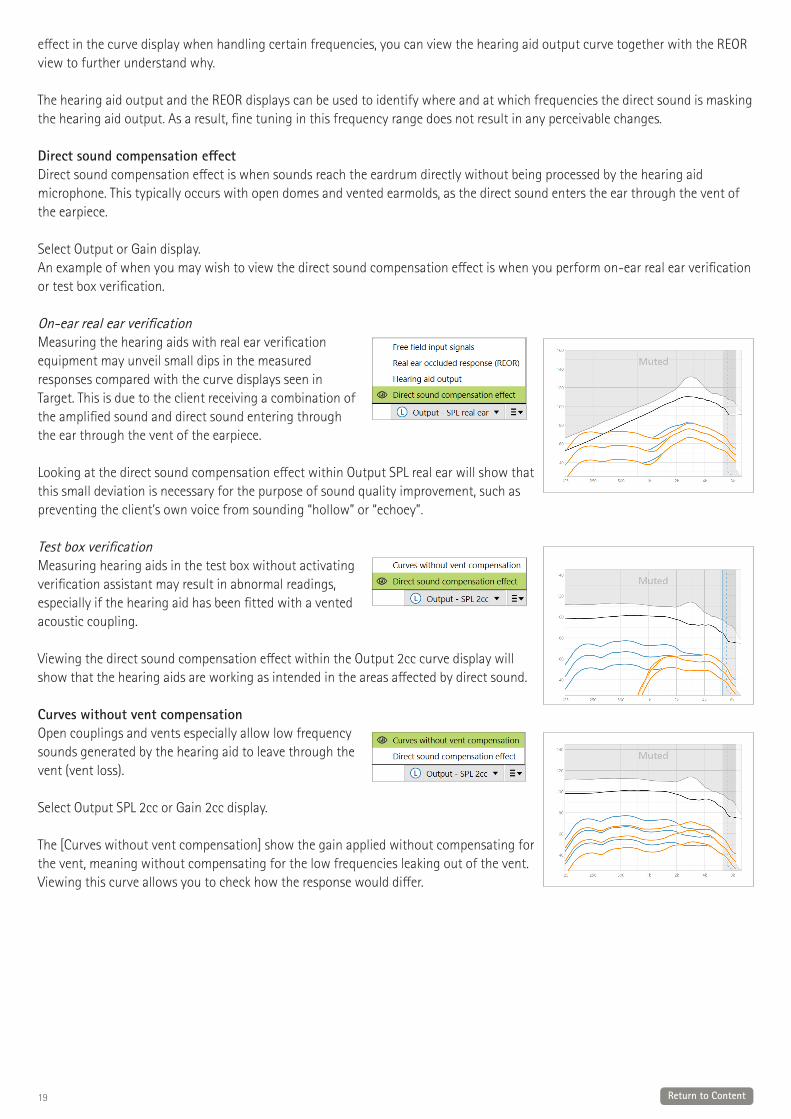
Direct sound compensation effect Direct sound compensation effect is when sounds reach the eardrum directly without being processed by the hearing aid microphone. This typically occurs with open domes and vented earmolds, as the direct sound enters the ear through the vent of the earpiece.
Select Output or Gain display.An example of when you may wish to view the direct sound compensation effect is when you perform on-ear real ear verification or test box verification.
On-ear real ear verificationMeasuring the hearing aids with real ear verification equipment may unveil small dips in the measured responses compared with the curve displays seen in Target. This is due to the client receiving a combination of the amplified sound and direct sound entering through the ear through the vent of the earpiece.
Looking at the direct sound compensation effect within Output SPL real ear will show that this small deviation is necessary for the purpose of sound quality improvement, such as preventing the client’s own voice from sounding “hollow” or “echoey”.
Test box verificationMeasuring hearing aids in the test box without activating verification assistant may result in abnormal readings, especially if the hearing aid has been fitted with a vented acoustic coupling.
Viewing the direct sound compensation effect within the Output 2cc curve display will show that the hearing aids are working as intended in the areas affected by direct sound.
Curves without vent compensation Open couplings and vents especially allow low frequency sounds generated by the hearing aid to leave through the vent (vent loss).
Select Output SPL 2cc or Gain 2cc display.
The [Curves without vent compensation] show the gain applied without compensating for the vent, meaning without compensating for the low frequencies leaking out of the vent. Viewing this curve allows you to check how the response would differ.
20 Return to Content
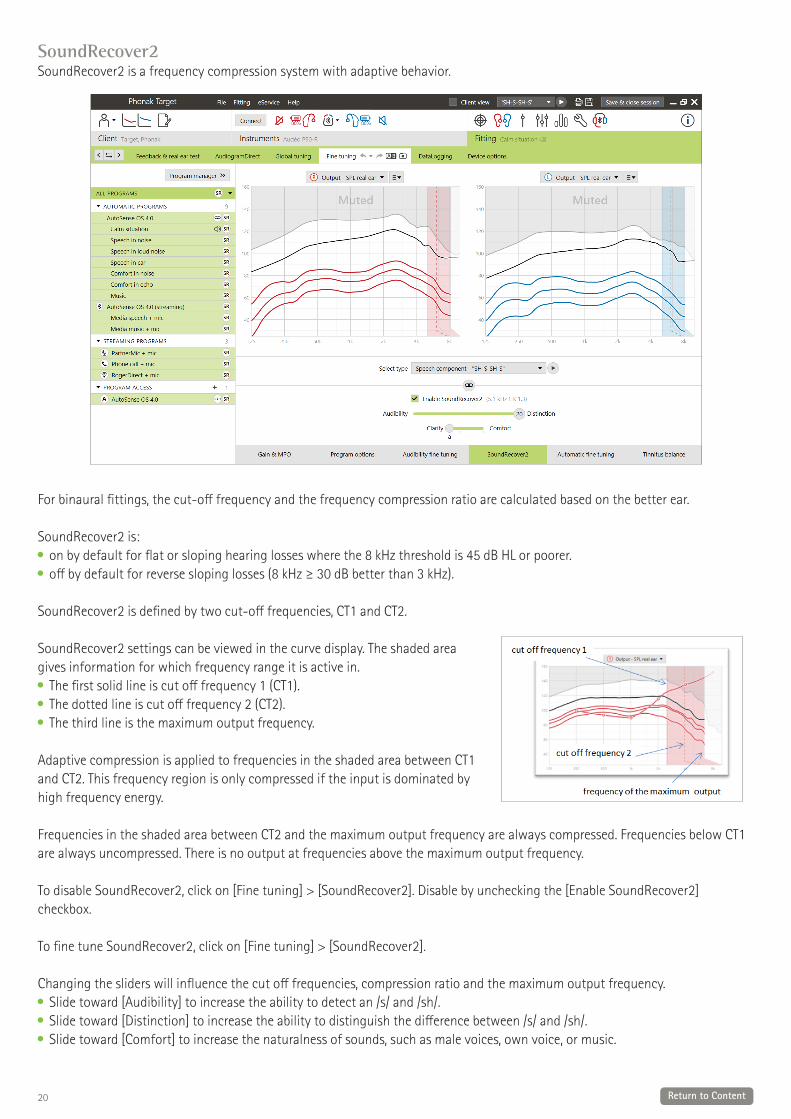
SoundRecover2SoundRecover2 is a frequency compression system with adaptive behavior.
For binaural fittings, the cut-off frequency and the frequency compression ratio are calculated based on the better ear.
SoundRecover2 is: on by default for flat or sloping hearing losses where the 8 kHz threshold is 45 dB HL or poorer. off by default for reverse sloping losses (8 kHz ≥ 30 dB better than 3 kHz).
SoundRecover2 is defined by two cut-off frequencies, CT1 and CT2.
SoundRecover2 settings can be viewed in the curve display. The shaded area gives information for which frequency range it is active in.
The first solid line is cut off frequency 1 (CT1).The dotted line is cut off frequency 2 (CT2). The third line is the maximum output frequency.
Adaptive compression is applied to frequencies in the shaded area between CT1 and CT2. This frequency region is only compressed if the input is dominated by high frequency energy.
Frequencies in the shaded area between CT2 and the maximum output frequency are always compressed. Frequencies below CT1 are always uncompressed. There is no output at frequencies above the maximum output frequency.
To disable SoundRecover2, click on [Fine tuning] > [SoundRecover2]. Disable by unchecking the [Enable SoundRecover2] checkbox.
To fine tune SoundRecover2, click on [Fine tuning] > [SoundRecover2].
Changing the sliders will influence the cut off frequencies, compression ratio and the maximum output frequency. Slide toward [Audibility] to increase the ability to detect an /s/ and /sh/.Slide toward [Distinction] to increase the ability to distinguish the difference between /s/ and /sh/.Slide toward [Comfort] to increase the naturalness of sounds, such as male voices, own voice, or music.
21 Return to Content
During fine tuning, it is recommended to adjust the [Audibility/Distinction] slider first. The [Clarity/Comfort] slider will reset each time the [Audibility/Distinction] slider is adjusted in order to optimize sound quality for low and mid frequency sounds.
Tinnitus BalanceThe Tinnitus Balance noise generator is available in all four performance levels of Phonak hearing aids (excluding Phonak Sky™ pediatric products). Phonak does not have any recommended clinical fitting guidelines for fitting Tinnitus Balance to children under the age of 18 years.
The noise produced provides a means of sound enrichment that can be used as part of a tinnitus management program, either in the context of masking or sound therapy.
The spectral characteristics of the noise generator can be adjusted to meet each client’s specific needs. The default characteristics are calculated based on the client’s audiogram; alternatively, white or pink noise can be selected. The noise generator can be incorporated into the automatic program or an additional manual program.
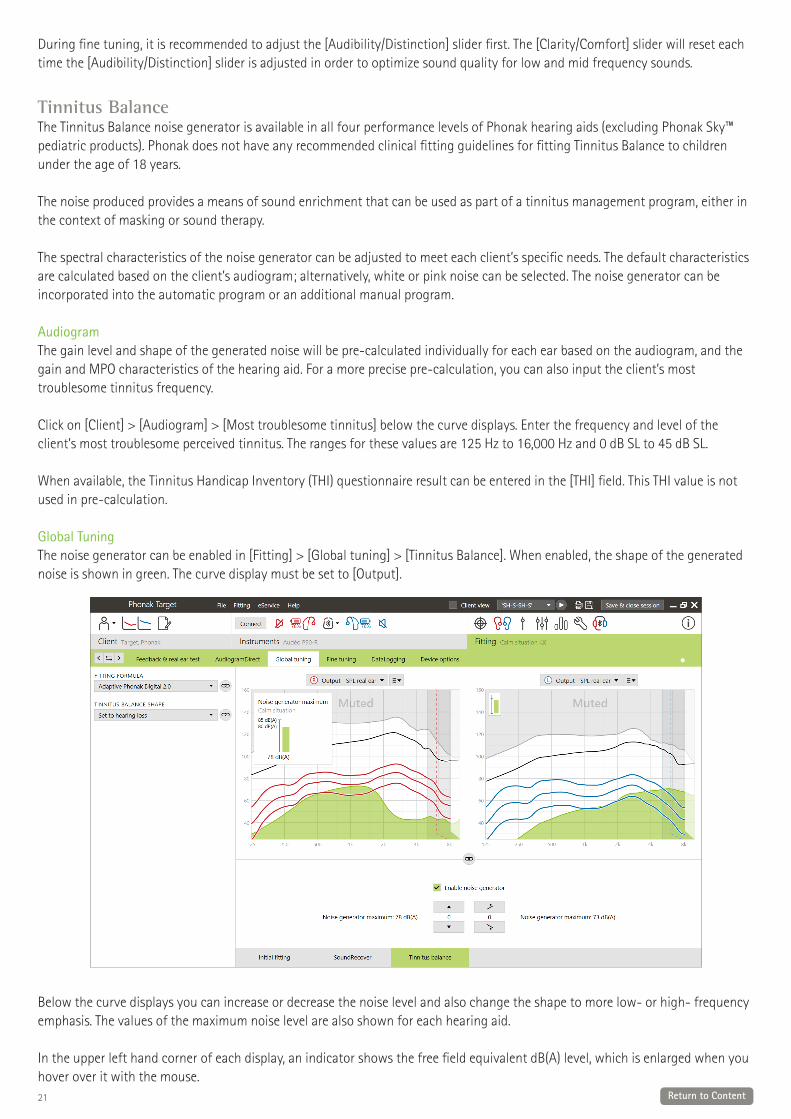
AudiogramThe gain level and shape of the generated noise will be pre-calculated individually for each ear based on the audiogram, and the gain and MPO characteristics of the hearing aid. For a more precise pre-calculation, you can also input the client’s most troublesome tinnitus frequency. Click on [Client] > [Audiogram] > [Most troublesome tinnitus] below the curve displays. Enter the frequency and level of the client’s most troublesome perceived tinnitus. The ranges for these values are 125 Hz to 16,000 Hz and 0 dB SL to 45 dB SL.
When available, the Tinnitus Handicap Inventory (THI) questionnaire result can be entered in the [THI] field. This THI value is not used in pre-calculation.
Global TuningThe noise generator can be enabled in [Fitting] > [Global tuning] > [Tinnitus Balance]. When enabled, the shape of the generated noise is shown in green. The curve display must be set to [Output].
Below the curve displays you can increase or decrease the noise level and also change the shape to more low- or high- frequency emphasis. The values of the maximum noise level are also shown for each hearing aid.
In the upper left hand corner of each display, an indicator shows the free field equivalent dB(A) level, which is enlarged when you hover over it with the mouse.
22 Return to Content
Within the dropdown menu of [Tinnitus Balance shape], the default, [Set to hearing loss], can be changed to [Set to white noise] or [Set to pink noise].
High noise levelsThe maximum output level of the Tinnitus Balance noise generator is limited to 85 dB(A). In accordance to common noise exposure guidelines, a warning message will be shown when the noise generator level exceeds 80 dB(A). If this occurs, the recommended maximum wearing time per day will appear below the maximum noise level. Also, the color of the Tinnitus Balance noise generator shape will change from green to orange.
Fine tuningMore detailed adjustments to the Tinnitus Balance noise generator can be found in [Fine tuning] > [Tinnitus Balance]. Access to every channel of the chosen hearing aid allows for a precise adjustment to the loudness and shape of the generated noise.
Changes to the noise generator within the automatic programs will be automatically applied to all AutoSense OS programs (i.e. noise is constant across all automatic programs). The majority of tinnitus clients will utilize amplification and the noise generator in all situations, therefore when enabled, the noise generator is on by default within all automatic programs and added manual programs.
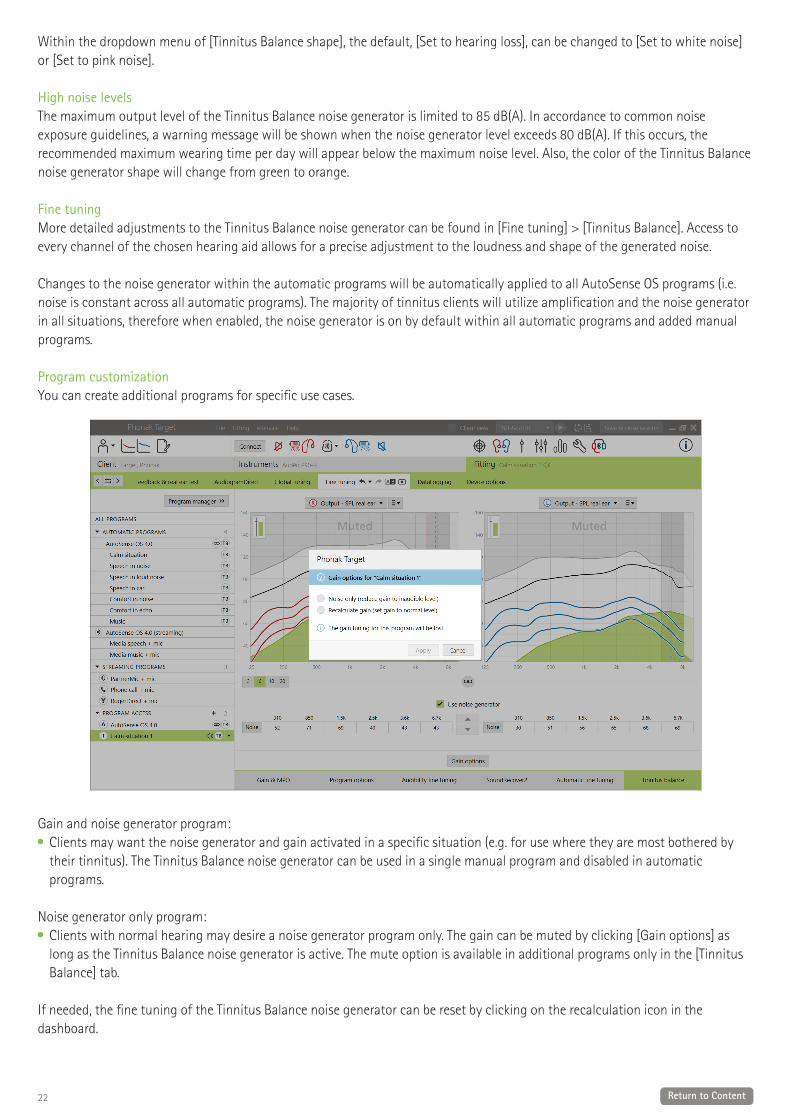
Program customizationYou can create additional programs for specific use cases.
Gain and noise generator program:Clients may want the noise generator and gain activated in a specific situation (e.g. for use where they are most bothered by their tinnitus). The Tinnitus Balance noise generator can be used in a single manual program and disabled in automatic programs.
Noise generator only program:Clients with normal hearing may desire a noise generator program only. The gain can be muted by clicking [Gain options] as long as the Tinnitus Balance noise generator is active. The mute option is available in additional programs only in the [Tinnitus Balance] tab.
If needed, the fine tuning of the Tinnitus Balance noise generator can be reset by clicking on the recalculation icon in the dashboard.
23 Return to Content
In [Fitting] > [DataLogging], you can review adjustments to the noise generator made by the client. This option is only available if you have selected the volume control to access changes to the generated noise, instead of the hearing aid gain.
By clicking [Device options] you can configure the volume control behavior to control either the hearing aid gain or noise generator levels.
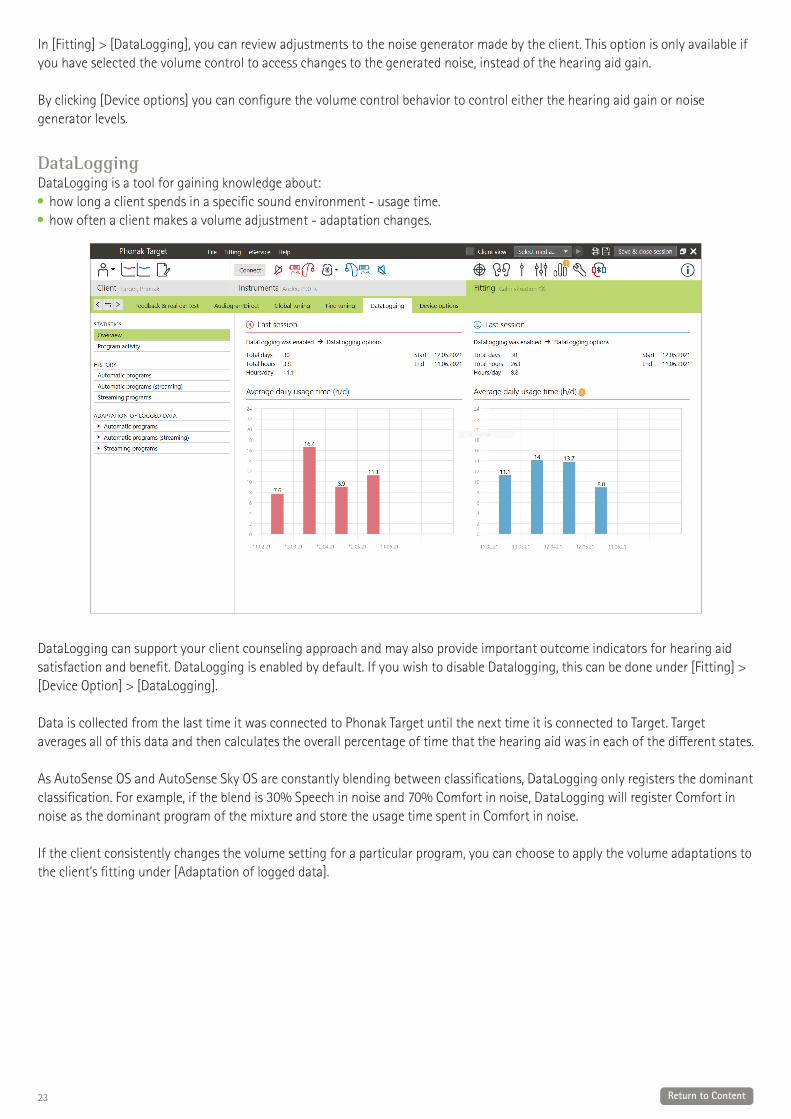
DataLogging DataLogging is a tool for gaining knowledge about:
how long a client spends in a specific sound environment - usage time.how often a client makes a volume adjustment - adaptation changes.
DataLogging can support your client counseling approach and may also provide important outcome indicators for hearing aid satisfaction and benefit. DataLogging is enabled by default. If you wish to disable Datalogging, this can be done under [Fitting] > [Device Option] > [DataLogging].
Data is collected from the last time it was connected to Phonak Target until the next time it is connected to Target. Target averages all of this data and then calculates the overall percentage of time that the hearing aid was in each of the different states.
As AutoSense OS and AutoSense Sky OS are constantly blending between classifications, DataLogging only registers the dominant classification. For example, if the blend is 30% Speech in noise and 70% Comfort in noise, DataLogging will register Comfort in noise as the dominant program of the mixture and store the usage time spent in Comfort in noise.
If the client consistently changes the volume setting for a particular program, you can choose to apply the volume adaptations to the client’s fitting under [Adaptation of logged data].
24 Return to Content
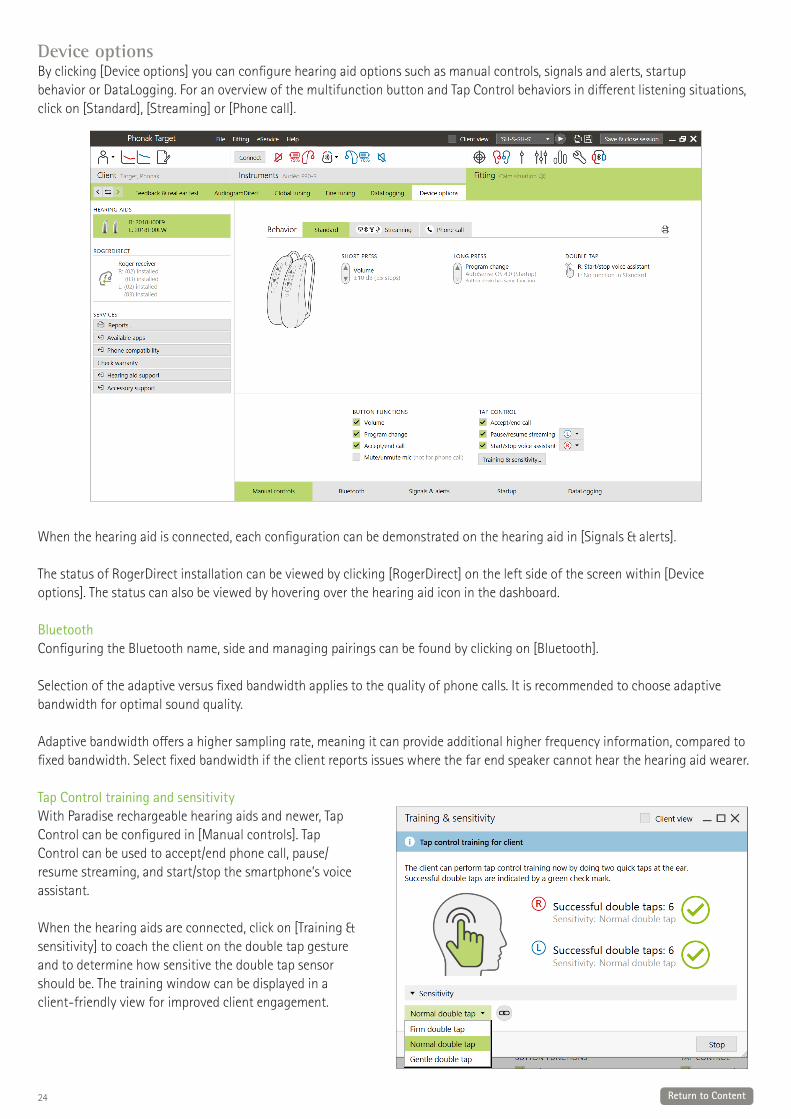
Device optionsBy clicking [Device options] you can configure hearing aid options such as manual controls, signals and alerts, startupbehavior or DataLogging. For an overview of the multifunction button and Tap Control behaviors in different listening situations, click on [Standard], [Streaming] or [Phone call].
When the hearing aid is connected, each configuration can be demonstrated on the hearing aid in [Signals & alerts].
The status of RogerDirect installation can be viewed by clicking [RogerDirect] on the left side of the screen within [Device options]. The status can also be viewed by hovering over the hearing aid icon in the dashboard.
BluetoothConfiguring the Bluetooth name, side and managing pairings can be found by clicking on [Bluetooth].
Selection of the adaptive versus fixed bandwidth applies to the quality of phone calls. It is recommended to choose adaptive bandwidth for optimal sound quality.
Adaptive bandwidth offers a higher sampling rate, meaning it can provide additional higher frequency information, compared to fixed bandwidth. Select fixed bandwidth if the client reports issues where the far end speaker cannot hear the hearing aid wearer.
Tap Control training and sensitivity With Paradise rechargeable hearing aids and newer, Tap Control can be configured in [Manual controls]. Tap Control can be used to accept/end phone call, pause/resume streaming, and start/stop the smartphone’s voice assistant.
When the hearing aids are connected, click on [Training & sensitivity] to coach the client on the double tap gesture and to determine how sensitive the double tap sensor should be. The training window can be displayed in a client-friendly view for improved client engagement.
25 Return to Content
The default setting for sensitivity is “Normal double tap”. The setting “Firm double tap” means a strong double tap motion is needed to activate Tap Control. The setting “Gentle double tap” means a light double tap motion is sufficient to activate Tap Control.
When the client double taps successfully, a green check mark appears.
Indicator light Indicator light is only available with Phonak Sky hearing aids and the Phonak Naída™ Link M hearing aid. There are five light patterns that can be activated or deactivated by checking the box beside each option under [Indicator light] within [Device Options]. The options include:
Device onRoger accessLow batteryVolume changeProgram change
When the hearing aid is connected, each pattern can be demonstrated on the hearing aid by clicking the [Demo] button beside each option.
Client reports In [Device options], there is the option to email or print a customizable fitting report for the client to take home. The report contains device information, as well as program information. The report can be printed in several languages based on the client’s preference. The report can also be printed with larger fonts to improve readability.
Junior mode Depending on the age of the child, Junior mode offers age specific DSL or NAL defaults and hearing aid configurations optimized to meet the needs of children. Junior mode includes four age ranges:
0-3 years 4-8 years 9-12 years 13-18 years
These default settings are endorsed by the Phonak Pediatric Advisory Board and National Acoustics Laboratory. They provide a starting point for flexible and efficient pediatric fittings. Within [Setup], you can customize and change the Junior mode default parameters to better suit your pediatric fitting workflow.
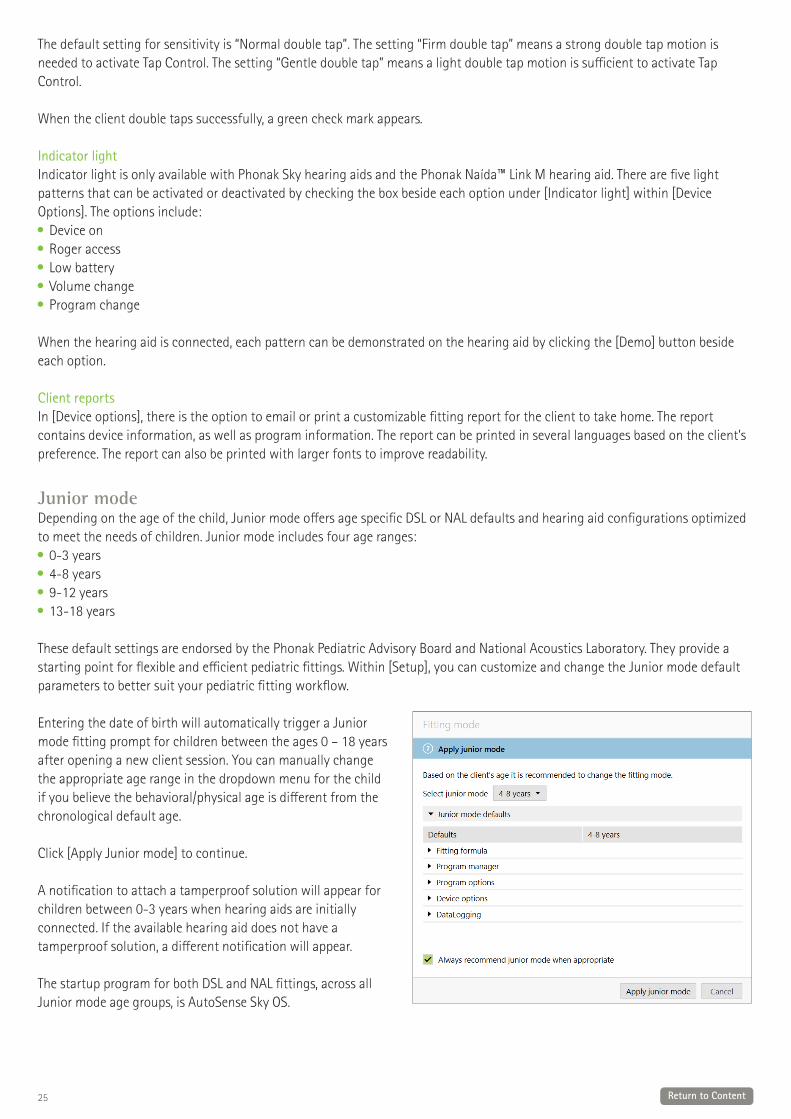
Entering the date of birth will automatically trigger a Junior mode fitting prompt for children between the ages 0 – 18 years after opening a new client session. You can manually change the appropriate age range in the dropdown menu for the child if you believe the behavioral/physical age is different from the chronological default age.
Click [Apply Junior mode] to continue.
A notification to attach a tamperproof solution will appear for children between 0-3 years when hearing aids are initially connected. If the available hearing aid does not have a tamperproof solution, a different notification will appear.
The startup program for both DSL and NAL fittings, across all Junior mode age groups, is AutoSense Sky OS.
26 Return to Content
Overview of Junior mode DSL default settingsProgram structure 0-3 years 4-8 years 9-12 years 13-18 yearsStartup AutoSense Sky OS AutoSense Sky OS AutoSense Sky OS AutoSense Sky OSRoger/DAI+Mic Real Ear Sound Fixed directional Fixed directional Fixed directionalIndicator light Enabled Enabled Disabled DisabledPush button Disabled Disabled Enabled EnabledVolume control Disabled Disabled Enabled Enabled
Overview of Junior mode NAL default settingsProgram structure 0-3 years 4-8 years 9-12 years 13-18 yearsStartup AutoSense Sky OS AutoSense Sky OS AutoSense Sky OS AutoSense Sky OSRoger/DAI+Mic Fixed directional Fixed directional Fixed directional Fixed directionalIndicator light Enabled Enabled Disabled DisabledPush button Disabled Disabled Enabled EnabledVolume control Disabled Disabled Enabled Enabled
ActiveVent fitting considerations ActiveVent is a receiver with a mechanical vent that can be steered to open or close based on the classified sound environment or signal. It is compatible with Phonak Audéo™ Paradise rechargeable hearing aids and newer.
ActiveVent is suited for clients with mild to moderate hearing loss.
ActiveVent is not recommended for clients with tinnitus, hyperacusis or phonophobia. It is not recommended for clients with excessive cerumen or with moisture-related issues. ActiveVent is not recommended for clients under 18 years of age as it has not been validated with children.
ActiveVent receiver is only compatible with APD 2.0, APD Contrast 2.0, and NAL fitting formulas. It is not compatible with DSL fitting formulas.
Acoustic characteristics ActiveVent receiver has similar acoustic characteristics as the M receiver. The acoustic vent properties are similar to a vented dome and an occluded earpiece. The open state is equivalent to 3.5 mm vent and the closed state is equivalent to an occluded custom earpiece.
ActiveVent can be fitted with two alternative earpieces: Universal SlimTip AV or customized Titanium SlimTip AV.
The Universal SlimTip AV is made of silicone and can be used to demo the benefit of ActiveVent in the clinic. The Universal SlimTip AV is to be used as a temporary earpiece while the custom earpiece is being made. The Titanium SlimTip AV is made of medical grade titanium and is custom made to the client’s ear anatomy.
Feedback & real ear testThe ActiveVent status is set to open when the feedback test is performed.
A feedback test is recommended, especially when fitting the Universal SlimTip AV as this can allow you to verify if the fit is appropriate for the client. If the feedback threshold appears to limit the amount of gain available or reduce available headroom, reevaluate the SlimTip shape chosen.
Program optionsTo modify the ActiveVent status for each program, click [Program options].
The ActiveVent status is set to open in the following AutoSense OS acoustic programs: Calm situation Speech in noise Comfort in noise Comfort in echo
27 Return to Content
The vent status is not adjustable in the above programs, as they are automatic blending programs. However, if you create a manual program, for example, Speech in noise, and choose to unlink it from AutoSense OS, you would be able to adjust the ActiveVent status in the manual Speech in noise program if needed.
You have the flexibility to modify the ActiveVent status in all the other programs. These include the: exclusive AutoSense OS programs (Speech in loud noise, Speech in Car, and Music)streaming programsmanual programs not linked to AutoSense OS
Fine tuning When fine tuning in individual programs, consider if the ActiveVent status is appropriate for that individual program before making gain changes. When toggling between the open and closed vent status, you see the gain changes reflected in the curve display. Changing the vent status may be sufficient in addressing a client’s subjective sound quality reports. If the vent status selected is appropriate, then proceed with additional fine tuning changes, if needed. Each time you switch between programs or vent status within Target, it is possible the client will perceive the vent status changing. Mute functionEnable the mute function to enhance the streaming quality for the client. The mute function can be enabled in the [Device options] screen. With a long press down on the multifunction button, the hearing aid microphones become muted. This allows the client to enjoy listening to media streaming with reduced environmental noise.
Checking ActiveVent receiver functionalityThe receiver [Check] within the client session will indicate if there is a mismatch between the receiver information entered into Target compared to what is physically connected to the hearing aid. However, it cannot indicate if ActiveVent itself is functioning correctly.
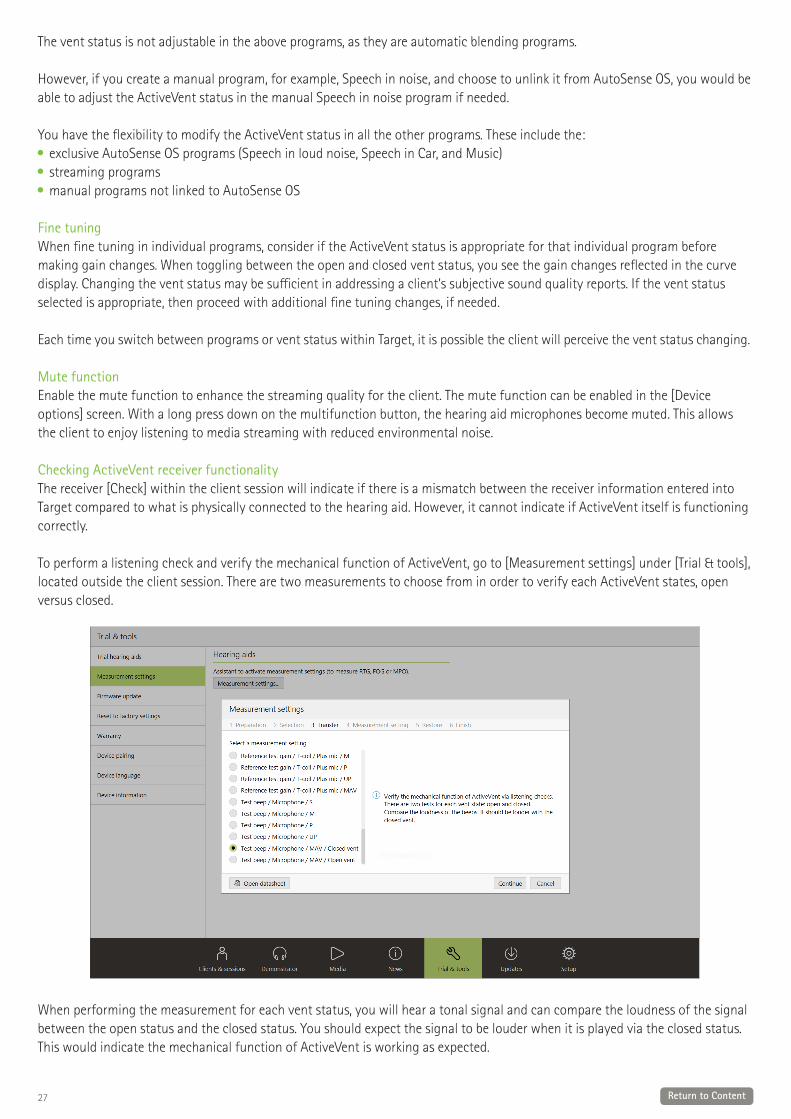
To perform a listening check and verify the mechanical function of ActiveVent, go to [Measurement settings] under [Trial & tools], located outside the client session. There are two measurements to choose from in order to verify each ActiveVent states, open versus closed.
When performing the measurement for each vent status, you will hear a tonal signal and can compare the loudness of the signal between the open status and the closed status. You should expect the signal to be louder when it is played via the closed status. This would indicate the mechanical function of ActiveVent is working as expected.
28 Return to Content
CROS fitting When entering in audiogram information, it is recommended to enter the audiogram information for both ears, even if the better hearing ear is within normal hearing limits. The reason for this is because Target sets a 40 dB HL flat hearing loss for an empty audiogram. For a client with normal hearing in the better hearing ear, this can result in overamplification.
CROS P can be fit with Audéo P hearing aids using Noahlink Wireless. CROS P wirelessly transmits sound to the Audéo P hearing aid via Binaural VoiceStream Technology (BVST).
As soon as you unmute and enable both the CROS microphone and hearing aid microphone in Target, a notification appears stating that BVST will activate. The CROS P system will briefly reboot. This is an automatic reboot and the client may hear the hearing aid briefly turn off and back on again. The wireless connection between the CROS transmitter and the hearing aid is enabled.
To adjust the loudness ratio between the CROS transmitter and the hearing aid, click [CROS Balance] within [Global tuning]. To adjust the microphone mode for the CROS transmitter, click [Program options] within [Fine tuning].
Click [Device options] to adjust the manual control settings for the CROS P system. By default, the multifunction button on the CROS transmitter is enabled for CROS Balance. The multifunction button on the hearing aid is enabled for volume change.
When streaming from accessories, the CROS signal will be paused. The CROS signal will automatically resume when streaming is stopped. The hearing aid will switch back to the startup program and the reconnection beeps between the hearing aid and CROS will be presented.
Bimodal fitting considerationsThe Phonak Naída Link M can be used in a bimodal fitting with an Advanced Bionics (AB) Naída™ CI M90 sound processor. The Phonak Sky™ Link M can be used in a bimodal fitting with an AB Sky CI™ M sound processor.
In the bimodal hearing solution, the hearing aid and sound processor work together in a coordinated, dynamic way. For example, when the listening environment changes, the switch to a different hearing program applies automatically to both the hearing aid and the sound processor. Furthermore, the connectivity options available for the hearing aid function seamlessly with the sound processor.
Open the fitting session and confirm that the Noahlink Wireless is shown. Connect both the hearing aid and the sound processor to start the fitting. Devices available for pairing will automatically appear. Following connection of the hearing aid and the sound processor to the client’s fitting session, Target will automatically align the program structure and device options of the hearing aid to match the sound processor.
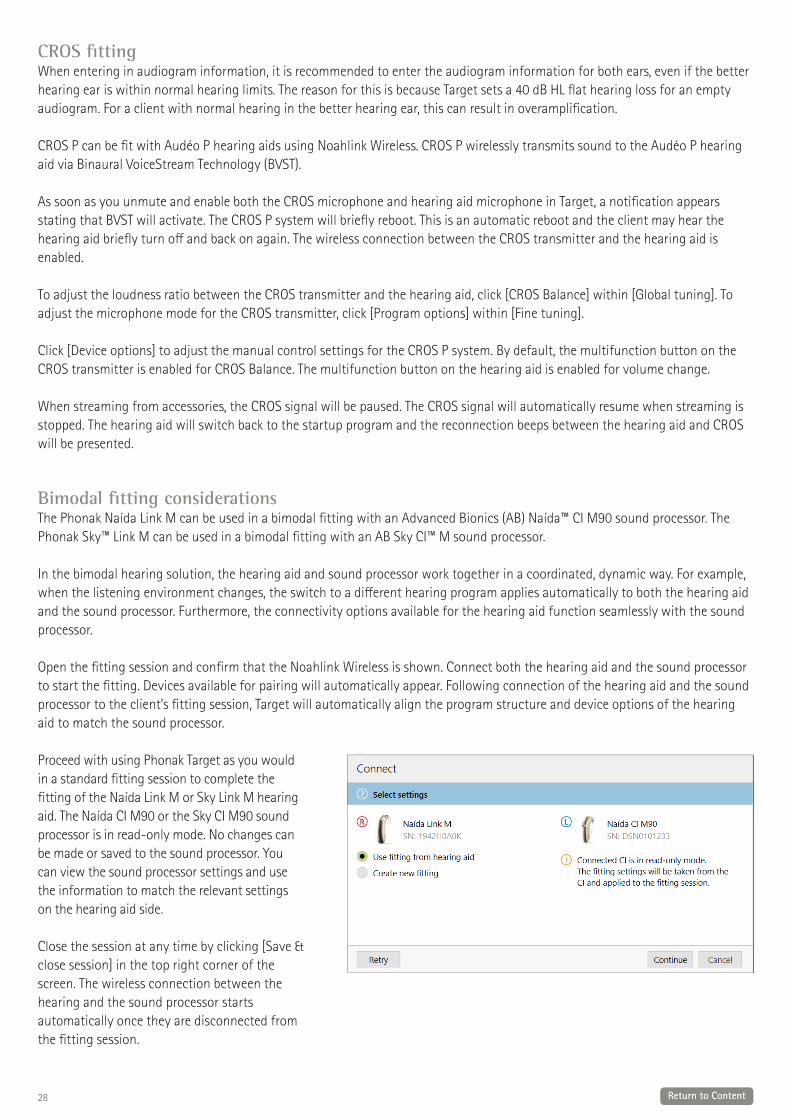
Proceed with using Phonak Target as you would in a standard fitting session to complete the fitting of the Naída Link M or Sky Link M hearing aid. The Naída CI M90 or the Sky CI M90 sound processor is in read-only mode. No changes can be made or saved to the sound processor. You can view the sound processor settings and use the information to match the relevant settings on the hearing aid side.
Close the session at any time by clicking [Save & close session] in the top right corner of the screen. The wireless connection between the hearing and the sound processor starts automatically once they are disconnected from the fitting session.
29 Return to Content
Fitting formulaWith adult bimodal fittings, Target may prompt you to select Adaptive Phonak Digital (APD) Bimodal as the fitting formula. Recalculate the fitting to align the hearing aid to APD Bimodal recommendations. When using APD Bimodal, it aligns the frequency response, loudness growth, and compression between the hearing aid and the sound processor.
With pediatric bimodal fittings, it is recommended to use a fitting formula that has been validated with children, such as DSL and NAL fitting formulas. DSL and NAL fitting formulas are designed to optimize speech intelligibility and speech development in children.
Please note that APD Bimodal has not been validated with children.
The fitting formula can always be changed as desired in [Global tuning] under [Fitting].
Modifiable hearing aid settingsAccessible functionalities that can be modified on the hearing aid include:
acoustic parametersfeedback and real ear testfitting formula fine tuning of gain and MPOprogram option settings within each program. The program structure cannot be changed.SoundRecover2signals and alerts
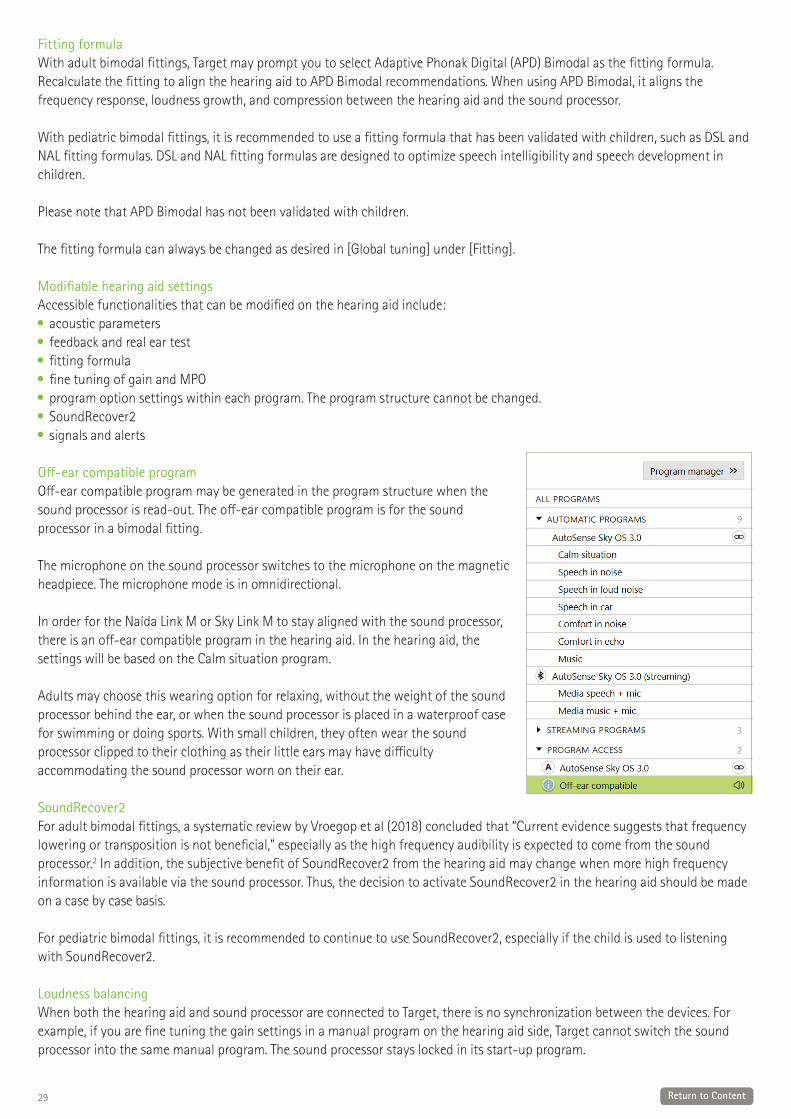
Off-ear compatible programOff-ear compatible program may be generated in the program structure when the sound processor is read-out. The off-ear compatible program is for the sound processor in a bimodal fitting.
The microphone on the sound processor switches to the microphone on the magnetic headpiece. The microphone mode is in omnidirectional.
In order for the Naída Link M or Sky Link M to stay aligned with the sound processor, there is an off-ear compatible program in the hearing aid. In the hearing aid, the settings will be based on the Calm situation program.
Adults may choose this wearing option for relaxing, without the weight of the sound processor behind the ear, or when the sound processor is placed in a waterproof case for swimming or doing sports. With small children, they often wear the sound processor clipped to their clothing as their little ears may have difficulty accommodating the sound processor worn on their ear.
SoundRecover2For adult bimodal fittings, a systematic review by Vroegop et al (2018) concluded that “Current evidence suggests that frequency lowering or transposition is not beneficial,” especially as the high frequency audibility is expected to come from the sound processor.2 In addition, the subjective benefit of SoundRecover2 from the hearing aid may change when more high frequency information is available via the sound processor. Thus, the decision to activate SoundRecover2 in the hearing aid should be made on a case by case basis.
For pediatric bimodal fittings, it is recommended to continue to use SoundRecover2, especially if the child is used to listening with SoundRecover2.
Loudness balancingWhen both the hearing aid and sound processor are connected to Target, there is no synchronization between the devices. For example, if you are fine tuning the gain settings in a manual program on the hearing aid side, Target cannot switch the sound processor into the same manual program. The sound processor stays locked in its start-up program.
30 Return to Content
Therefore, for loudness balancing within specific programs, it is recommended to only connect the hearing aid to Target, after the sound processor settings have been saved to Target. In this way the client can manually change the program on the sound processor to the same program that needs fine tuning on the hearing aid side.
Remote Support Phonak Remote Support is designed to support the client’s fitting by providing hearing aid care from a distance. If the client needs adjustments to their compatible Phonak hearing aid settings, this can be done in real time, in their own environment, e.g. at home, rather than in a clinic.
RequirementsLatest Phonak Target software version available for optimal experience. Most current myPhonak app version installed on the client’s mobile phone. Advanced PhonakPro account activated with Remote Support. (Only applicable in certain countries.)An initial hearing aid fitting must be performed in the clinic.Computer with an integrated webcam or microphone or an external webcam and microphone connected to the computer. For better sound quality, use headphones with a microphone connection.Stable internet connection (Wi-Fi, LAN or 4G) with at least 5 Mbit/s of data transfer connection for uploads and downloads. Clients using 4G may incur additional charges for data usage depending upon their cellular data contract.
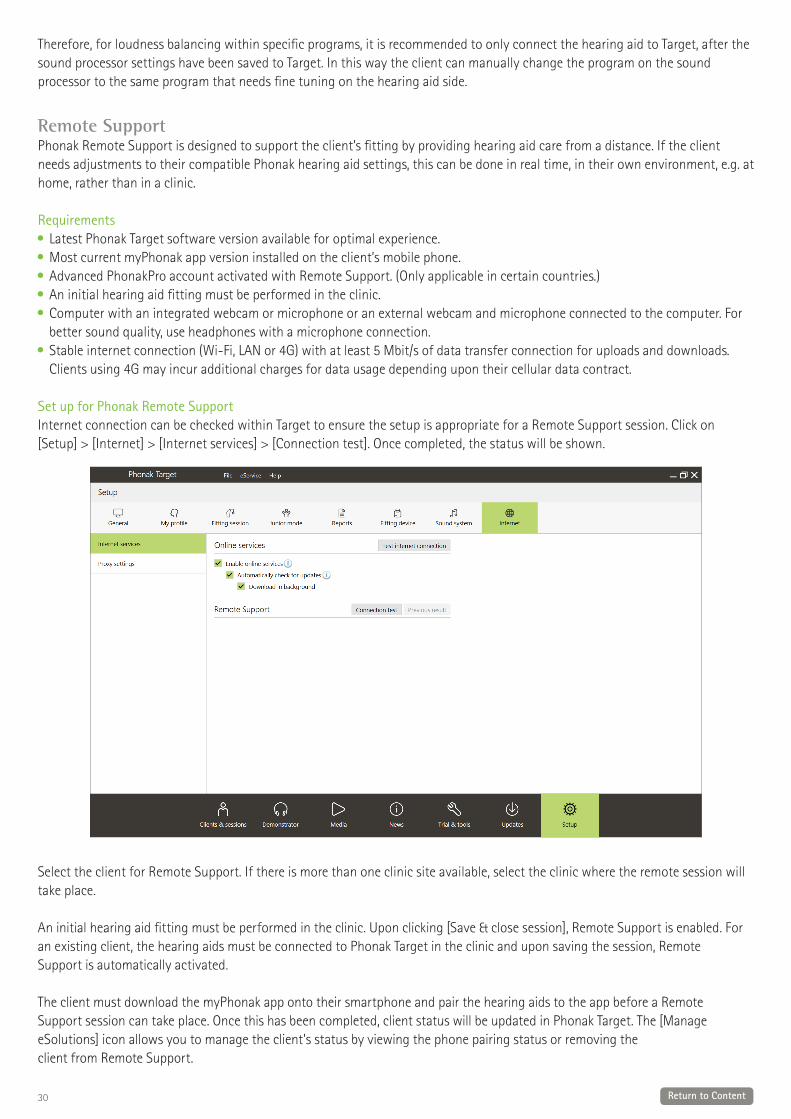
Set up for Phonak Remote Support Internet connection can be checked within Target to ensure the setup is appropriate for a Remote Support session. Click on [Setup] > [Internet] > [Internet services] > [Connection test]. Once completed, the status will be shown.
Select the client for Remote Support. If there is more than one clinic site available, select the clinic where the remote session will take place.
An initial hearing aid fitting must be performed in the clinic. Upon clicking [Save & close session], Remote Support is enabled. For an existing client, the hearing aids must be connected to Phonak Target in the clinic and upon saving the session, RemoteSupport is automatically activated.
The client must download the myPhonak app onto their smartphone and pair the hearing aids to the app before a RemoteSupport session can take place. Once this has been completed, client status will be updated in Phonak Target. The [Manage eSolutions] icon allows you to manage the client’s status by viewing the phone pairing status or removing theclient from Remote Support.
31 Return to Content
Begin the video call and follow up sessionAt the time of the appointment, click on [Start Remote Support]. You and your client will be connected to the video call. You may have to wait for the client to enter the Phonak Remote Support session with the myPhonak app.
Once connected, you will see and hear your client. Make sure the video and microphone on your computer are enabled. Switching between an integrated or external microphone or webcam can be performed before or during a session by clicking on the settings icon which is located at the top right hand corner of the Remote Support screen.
As soon as the client enters the Remote Support session and has accepted the camera and microphone requests on their smartphone, both videos are displayed on the screen.
It is recommended that the client has new batteries in their hearing aids or sufficient charge in their rechargeable hearing aids before connecting to the Remote Support session.
Click on [Open fitting session] to open the client’s fitting session in Phonak Target. Click on [Connect] to connect to the hearing aids.
The icon is visible when you have established connection with the client`s hearing aids. Once the hearing aids are connected, use Phonak Target as you typically would in a follow-up session. The hearing aids are live and any adjustments you make are sent to the hearing aids in real-time.
The following functions are not available during the Remote Support session. Feedback and real ear test cannot be performed.MPO cannot be increased.
It is not possible to end Phonak Remote Support with the client until the fitting session in Target has been saved and closed. In the event that the connection between the client’s hearing aids and Target gets interrupted during an active Remote Support session, the hearing aids will reboot and keep the last valid fitting.
After fitting is complete, click on [Save & close session] to save the fitting to the hearing aids and Target.
To end the Phonak Remote Support session, click on
to end the call. Target will ask if you wish to close the Phonak Remote Support session. Click [Yes] to confirm and disconnect from your client’s smartphone.
Finishing the fitting sessionYou can close the session at any time by clicking [Save & close session] in the top right corner of the screen. Select the items to save. The save dialog will confirm the successful save of the hearing aids. After the save, Phonak Target will guide you to the start screen. If you are working under Noah, you can go back to Noah by clicking on [Back to NOAH] at the top right corner of the start screen.
1 Latzel M, Denys S, Anderson S, Francart T, Wouters J, Appleton-Huber J. An integrated REM system with proven accuracy and reliability. Hearing Review. 2017;24(10):36-39.2 Vroegop, J. L., Goedegebure, A., & Van Der Schroeff, M. P. (2018). How to optimally fit a hearing aid for bimodal cochlear implant users: A systematic review. Ear and Hearing,
39(6), 1039–1045. https://doi.org/10.1097/AUD.0000000000000577
The Bluetooth® wordmark and logos are registered trademarks owned by the Bluetooth SIG, Inc. and any use of such marks by Sonova AG is under license.
029-
1154
-02/
V1.0
0/20
21-0
8/cr
aft ©
202
1 So
nova
AG
All
right
s re
serv
ed
life is on
At Phonak, we believe that well-hearing equates to well-being and is essential to living life to the fullest. For more than 70 years, we have remained passionate about creating a world where ‘life is on’ for everyone. Our innovative hearing solutions are designed for people of all ages and all degrees of hearing loss, to connect socially, thrive mentally and emotionally.
www.phonak.com
Sonova AG · Laubisrütistrasse 28CH-8712 Stäfa · Switzerland
Sonova Deutschland GmbHMax-Eyth-Str. 20 70736 Fellbach-Oeffingen · Germany