Embed Size (px)
DESCRIPTION
Photography
Citation preview

VOLUME 23 CREATE GREAT IMAGES WITH YOUR DIGITAL CAMERA
LEARN ALL ABOUT• GEAR & HOW TO PACK IT
• COLOR & COMPOSITION
• NATURE’S GLORY & CHALLENGES
• EXPEDITIONS & GUIDES
INTO THE WILDOUTDOOR & ADVENTURE
PHOTOGRAPHY
Photos © David Shaw
photographic.com
SIM HOME TECH SERIES

4*(."�64#�%PDL
Update, adjust & personalize. Customization never thought possible. Sold separately.
*$0/0$-"45*$�
The world’s first F1.8 zoom.
An F1.8 zoom, the 18-35mm lens is
designed for APS-C format cameras.
Allowing greater creative possibilities
by setting new standards in photographic
history.
SIGMA Corporation of America | 15 Fleetwood Court | Ronkonkoma, NY 11779, U.S.A. | Tel: (631) 585-1144 | www.SigmaPhoto.comFollow us Twitter @sigma_photo and Facebook.com/sigmacorporationofamerica
Case and Hood LH780-06 included.USA 4 Year Service Protection
�����NN�'����%$�)4.

OUTDOOR & ADVENTURE PHOTOGRAPHY • 3
© David Shaw
OUTDOOR & ADVENTURE PHOTOGRAPHY
4 Editor’s Notesby George Schaub
Articles & Images by David Shaw
5 IntroductionInto The Wild
6 Wild PlacesOff The Beaten Track
10 Be A Naturalist FirstKnow Your Subject: Get Better Images
14 Surviving AdversityPacking, Protection And Precautions
17 Visual ToolsColor, Line & Composition
23 Expedition CruisingUsing Excursions To Get You There
28 Photographing The Aurora BorealisNature’s Light Show
32 Black And White In The WildThe Power Of The Monochrome Image
37 Travel PortraiturePeople You Meet Along The Way
41 Creative BlurThe Energy Around You
46 Working With Outdoor FlashAn Extra Burst Of Light
Table Of Contents

4 • PETERSEN’S PHOTOGRAPHIC DIGITAL PHOTOGRAPHY GUIDE • VOL. 23
P.O. BOX 7 • TITUSVILLE, FL • 32780
Publisher Ron Leach
Editorial Director George Schaub
Contributing Editor David Shaw
Associate Editor Cynthia Boylan
Art Director Richard K. Leach
Associate Art Director Mary McDonel
Production Manager Christina Poncé
Ad Operations Coordinator Kari Watters
Administrative Assistant/
Customer Service Sherry Swim
Ordering Information • (800) 829-3340, (386) 447-6318
Shutterbug, PO Box 420235,
Palm Coast, FL 32142-0235
Please include name, address,
and phone number on inquiry.
Advertising Account Executives:
Genny Breslin (321) 225-3127
Joanne George (321) 225-3130
Advertising Assistant:
Robin Beecherl (321) 225-3144
FAX (321) 225-3146 • [email protected]
Source Interlink Media, LLC
CEO Scott P. Dickey
President Chris Argentieri
EVP, Chief Financial
Officer & Treasurer Bill Sutman
EVP, General Manager David Algire
EVP, Chief Creative Officer Alan Alpanian
SVP, Finance Dan Bednar
EVP, Enthusiast Automotive Doug Evans
EVP, Chief Content Officer Angus MacKenzie
EVP, Chief Analytics Officer John Marriott
EVP, Chief Procurement Officer Kevin Mullan
SVP, Business Development Tyler Schulze
EVP, Sales & Marketing Eric Schwab
Digital Media
Chief Technology Officer,
Digital Media Raghu Bala
SVP, Digital Marketing Craig Buccola
SVP, Digital Product
Development Todd Busby
VP, Product Management Geoff DeFrance
Consumer Marketing, Enthusiast Media
Subscription Company, Inc.
VP, Consumer Marketing Tom Slater
VP, Retention & Operations
Fulfillment Donald T. Robinson III
Any submissions or contributions from readers shall
be subject to and governed by Source Interlink
Media’s User Content Submission Terms and
Conditions, which are posted at http://privacy.
sourceinterlinkmedia.com/submissions.html.
Reprints: Contact Wright’s Media at
877-652-5295 (281-419-5725 outside the
U.S. and Canada) to purchase quality custom
reprints or e-prints of articles appearing in
this publication.
Copyright © 2014 by Source Interlink
Magazines, LLC. All rights reserved. Printed in
the USA.
WWW.PHOTOGRAPHIC.COM
adverse conditions that would
test the best of us in our efforts
to make startling and exciting
images. David Shaw is one of
them, and we are very pleased
to be able to showcase his
work and go behind the scenes
with him to discover his tools,
techniques and—perhaps most
importantly—his point of view
about his work and the world.
In this issue, David takes
us along as he heads into
the frozen areas at the top
and bottom of the world, the
jungles along the Equator and
into the backcountry where
nature is unspoiled—or at
the least untrammeled by
summer crowds. He shares
important tips on packing and
the type of gear that best suits
the work and how he keeps
(often delicate) photographic
equipment safe from the
intruding elements.
Gear, however, is only one
aspect of the challenges one
faces in these environments.
As important is the attitude
and state of mind he brings
to the work, and his respect
for and admiration of what is
around him. He stresses an
awareness of where he is and
the behavior of the animals
(and the weather) he seeks to
photograph. He encourages
those who wish to work in these
beautiful areas to thoroughly
research their benefits and
understand their pitfalls. To
use that understanding to both
enhance the experience and be
safe as you travel.
David also brings his technical
and compositional expertise
to the fore. He discusses ways
of seeing and using the tools
of the photographic craft
to make great images. He
covers both color and B&W,
the visual guidelines he uses
in his work and methods for
capturing the essence of what
is before him. He also reveals
his way of making portraits as
he travels, as well as working
with flash outdoors to bring
an extra touch of light to the
images. While aperture and
shutter speed techniques are
important, of course, he brings
these tools into the context of
his vision and expression.
I don’t know about you,
but one of my bucket list
excursions is photographing
the aurora borealis (the
Northern Lights) that, in some
parts of the world, fill the
winter sky. David’s portfolio
of these natural light shows has
made this quest even
more accessible, with tips
and techniques for making
images that show them in all
of their glory.
While you could view
this issue as an armchair
adventure, it is my hope that
it inspires you to begin to
consider photographing in
the wild places of the world
something that could be a
part of your own photographic
adventures. Taking his advice
and experience to heart will
certainly make it a richer and
more attainable endeavor.
THERE IS A small group of photographers who earn
their living by working in the wild places of the world
and capture images that show us the power and
the glory of nature in its most raw and challenging
form. They brave the elements and obstacles to
get these images. Often having to struggle with
Editor’s Notes Into The Wild
by George Schaub
OUTDOOR & ADVENTURE PHOTOGRAPHY

OUTDOOR & ADVENTURE PHOTOGRAPHY • 5
IntroductionInto The Wild
by David Shaw
OUTDOOR & ADVENTURE PHOTOGRAPHY
IT WAS THROUGH photography that I
realized wild places held deeper value
than an outdoor playground. The world
through a lens, surrounded by black
borders, isolated, cropped and focused was
appealing. But the image was capable of
lying, of clipping out the nearby road, the tourists,
power-lines and the discarded plastic bottle.
Through a camera, the most trafficked landscapes
could become silent, isolated—and yes—wild.
When I lowered the camera the world came
rushing back: cars buzzed, people chattered and
exhaust fumes rose. At roadside viewpoints, the
images could be lovely, but the reality was not so
picturesque. I did not want my world to just look as
wild as it did in photos; I wanted it to feel wild too.
On family vacations as a kid, I was filled with
disappointment when I discovered that the iconic
images of Yellowstone Falls were made just
feet from a large parking lot, and that most of
the apparently wild valleys of the Rockies were
populated by roads. That disappointment drove
me to wander further and venture deeper into the
remaining wild country. I sought places where the
feeling of wildness in my photos was as intense as
the actual experience.
That journey continues. I now live in a small cabin
north of Fairbanks, Alaska. From the trail of out my
front door I can—quite literally—walk for miles and
miles and not encounter a road. And as much as
wild places have become a part of my daily life, they
also have become inseparable from my profession.
My work as an outdoor photographer often draws
me into wild places, but one of the most rewarding
is sharing the experience with others. During the
short Alaska summer I guide wilderness trips
into the arctic mountains of the Brooks Range.
There, the rivers and hidden valleys are ripe with
photographic opportunities, and the images of these
wild places do not lie.
This issue of the Petersen’s Photographic Digital
Photography Guide is dedicated to wild places. Here
you’ll find articles not just on gear, technique and
destinations, but also on finding your own vision and
how to explore creative photography in unexpected
(and sometimes difficult) places. It’s not all about
the backcountry because different cultures, people
and even backyard adventures share elements with
the wild.
Wilderness is increasingly rare and constantly
under threat. Through photography we have the
opportunity to influence attitudes and create
change. We can share what that few will ever see,
and hopefully help people to understand that the
wilderness is worthy of protection and far more
valuable than dollars.
About The AuthorDavid Shaw is a professional photographer,
writer, guide and wildlife biologist. He lives in
Fairbanks, Alaska with his partner Amy, a dog and
a cat. His images and articles have been published
in hundreds of magazines, calendars, textbooks
and advertising campaigns. He leads wilderness
photography workshops and natural history tours
during Alaska’s short summer for Arctic Wild (www.
arcticwild.com). During the northern winter Dave
often travels south to guide expedition cruises to
Antarctica and the Southern Ocean or explore the
incredible landscapes, cultures and wildlife of South
America with his camera. Check out Dave’s website
for more images, information on his workshops and
tours, and read his compelling blog of photography
adventures at www.wildimagephoto.com.
© David Shaw

6 • PETERSEN’S PHOTOGRAPHIC DIGITAL PHOTOGRAPHY GUIDE • VOL. 23
OUTDOOR & ADVENTURE PHOTOGRAPHY
Wild PlacesOff The Beaten Track
THE WORLD HAS turned into a heavily photographed place. Iconic locations
such as the Grand Tetons over the Snake River, El Capitan from the meadows,
or the carved stone of Antelope Canyon have been photographed millions upon
millions of times. The landscape masters made the first imagesÑand in the years
sinceÑphotographers have flocked to these places to stand, quite literally, in the
footsteps of the greats.
IÕve been there. IÕve
photographed Denali from
Wonder Lake (#1) on a dozen
occasions and waited for the
salmon to jump into the bearÕs
mouth at BrookÕs Falls (#2). IÕve
stood, camera in hand, watching
the water pour over Iguazu Falls
in Argentina (#3) and peered
over the Grand Canyon from the
South Rim (#4). There is a real
pleasure in making images from
those places, and yet there is the
gnawing sensation that IÕm not
making anything new.
Early in my career I submitted a
selection of images to a regional
stock agency. Included in the
portfolio were several photos of
which I was particularly proud:
Denali from Wonder Lake. A few
days later I received an email
from the editor at the agency,
ÒThe quality of your images is
fine, but the last thing we need
is more photos of Denali from
Wonder Lake.Ó I quickly learned
that originality scores points but
repetition does not.
That lesson taken to heart, I
ventured out again, this time to
those places that havenÕt seen so
many clicking shutters. In wild
places, we rarely have the luxury
of imitation. Where few people
travel, we have the opportunity to
make something entirely our own.
It isnÕt easy to shoot in
little-traveled areas. Access
can be difficult or expensive
and infrastructure is lacking.
ArtisticallyÑas noted aboveÑwe
canÕt get away with copying the
works of others, because often,
there is no work to copy. These
are creative challenges unlike 2
1Photos © David Shaw

OUTDOOR & ADVENTURE PHOTOGRAPHY • 7
those we normally encounter.
What gear to bring, and how to protect that
equipment from the elements are usually at the
top of the list of questions I get from clients
on wilderness trips. And while these things are
important, gear is rarely the limiting factor in
making successful images in the wild. Throughout
this issue I’ll talk about technique and equipment,
3
4

8 • PETERSEN’S PHOTOGRAPHIC DIGITAL PHOTOGRAPHY GUIDE • VOL. 23
OUTDOOR & ADVENTURE PHOTOGRAPHY
6 7
5Photos © David Shaw
OUTDOOR & ADVENTURE PHOTOGRAPHY • 9
but I’ve peppered the chapters liberally with
some aspects that I feel are often overlooked,
and yet every bit as important (perhaps even
more important) than what lens to choose. That
is creativity.
New PerspectivesOne of the joys of learning to shoot in the wild
is that it teaches us to explore new perspectives
when we return to the more visited parts of the
world. The Grand Canyon, or the well-photographed
monoliths of Yosemite, can be portrayed in new and
exciting ways, simply because we have learned not
to imitate, but to create.
A couple of years ago I floated the Grand Canyon
in March on a personal permit. The canyon, of all
our nation’s National Parks, has probably been
photographed the most. The iconic views from the
rims are seen in post-cards and calendars in every
bookstore in the country. But drop below the rim
to hike to the bottom and wander the slot canyons,
stand by the big water of the Colorado, and the
perspective is much different and much more rare.
It’s challenging down there in the depths, the
sunlight only penetrates so deep when it is midday.
Shadows are dark and sunlight bright. And yet the
views are vastly different from those we commonly
see from the rim. The images I made from the
riverbank (#5), the side canyons (#6) and at night
(#7) are not the usual perspectives,
and I did not rely on the images of
others to find my compositions.
These photographs are mine alone
and that makes me appreciate them
even more.
Time And ConditionsAnother challenge of photography in
these more difficult to access places
is that our time is often limited. We
go in to the wild with visions of what
we want to capture: landscapes,
action or wildlife (in perfect light of
course). But because we are passing
through these locations on a float down a river, on
a backpacking trip, or even on a cruise, we don’t
have the time to linger and wait for those perfect
conditions. Rather we must take what we are
offered and make the most of it.
I’ve seen clients angrily pack away their cameras
in frustration because rain or fog overwhelmed
our location. And yet some of my favorite images
of the places I’ve visited were made under such
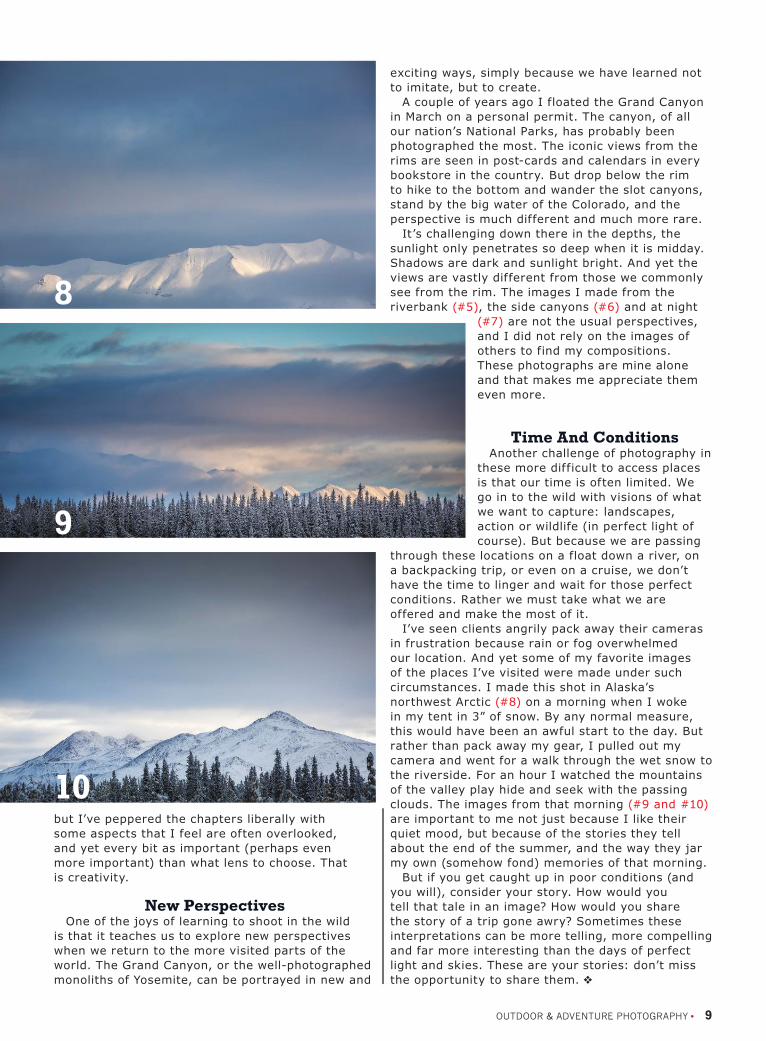
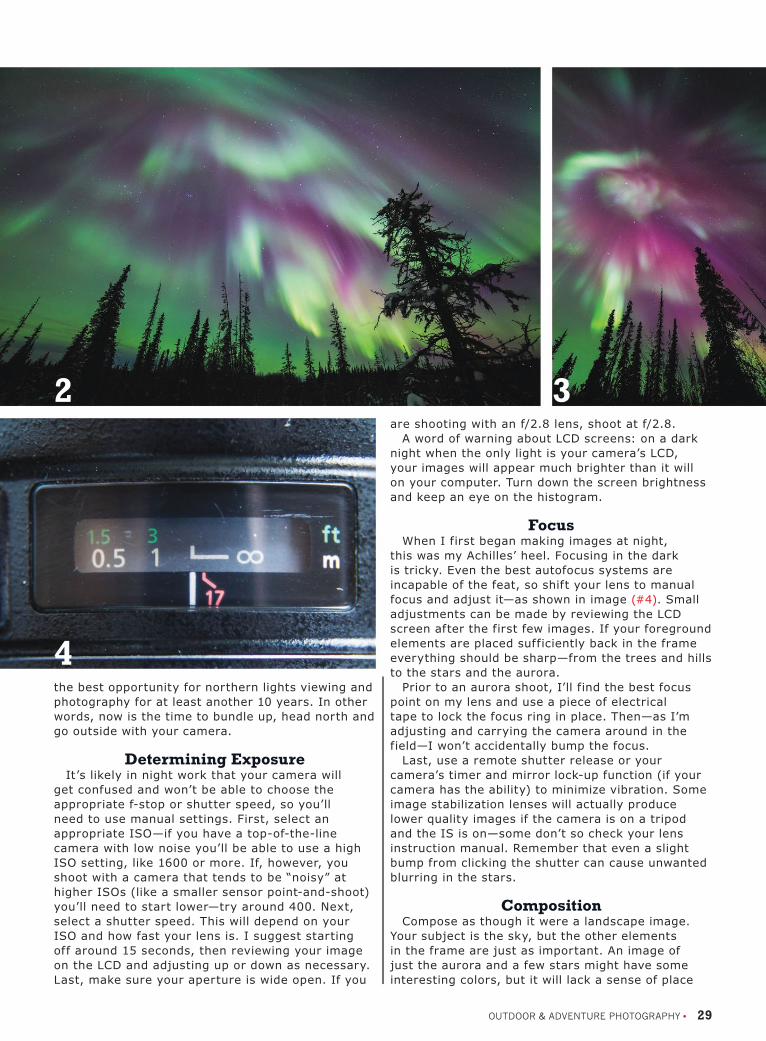
circumstances. I made this shot in Alaska’s
northwest Arctic (#8) on a morning when I woke
in my tent in 3” of snow. By any normal measure,
this would have been an awful start to the day. But
rather than pack away my gear, I pulled out my
camera and went for a walk through the wet snow to
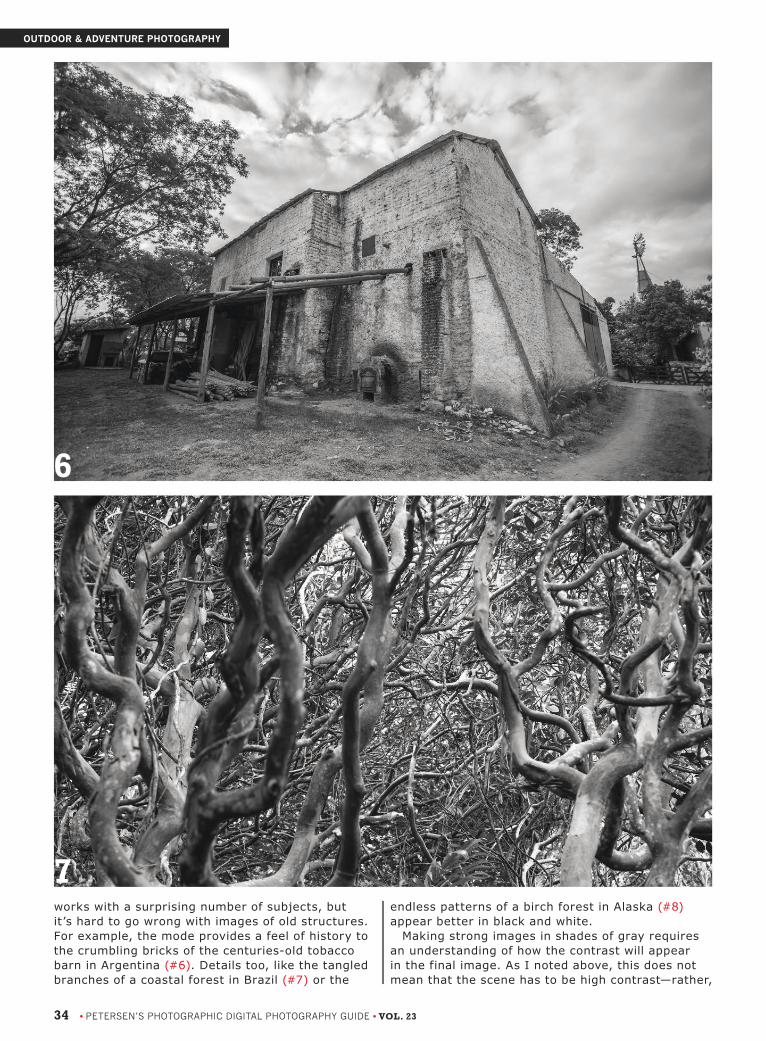
the riverside. For an hour I watched the mountains
of the valley play hide and seek with the passing
clouds. The images from that morning (#9 and #10)
are important to me not just because I like their
quiet mood, but because of the stories they tell
about the end of the summer, and the way they jar
my own (somehow fond) memories of that morning.
But if you get caught up in poor conditions (and
you will), consider your story. How would you
tell that tale in an image? How would you share
the story of a trip gone awry? Sometimes these
interpretations can be more telling, more compelling
and far more interesting than the days of perfect
light and skies. These are your stories: don’t miss
the opportunity to share them.
8
9
10

10 • PETERSEN’S PHOTOGRAPHIC DIGITAL PHOTOGRAPHY GUIDE • VOL. 23
OUTDOOR & ADVENTURE PHOTOGRAPHY
Be A Naturalist First
Know Your Subject: Get Better Images
IT WAS OCTOBER, late autumn around my
cabin north of Fairbanks, Alaska. The birds
had ceased their summer chorus and the
forest was quiet. Up until the start of the
month, there were still quite a few around.
Orange-crowned Warblers gave occasional
twittery calls, a stray White-crowned Sparrow made
a loud tree-top chirp and Sandhill Cranes (#1), high
overhead, trumpeted their way south.
Only a few species of birds can withstand the
brutal temperatures, snow cover and darkness
of winter in Alaska’s interior. But those few are
admirable creatures. Black-capped and Boreal
Chickadees are equipped with an amazing ability
to store fat and conserve heat. While species like
the tiny Boreal Owl (#2) rely on the carelessness of
others to survive the long winter.
What, you might ask; does any of this have to
do with photography? Well, I’m getting to that. But
first, it has to do with being a naturalist. I know a
lot about birds because I’ve studied them for years.
I love birds. This may sound strange, but I’d give
up my photography equipment before I’d give up
my binoculars.
1Photos © David Shaw

OUTDOOR & ADVENTURE PHOTOGRAPHY • 11
Know Your SubjectTo be a better photographer you first, and
foremost, must understand your subject. I don’t
care if you are striving to be a studio portrait
photographer or to shoot weddings, wildlife or
landscapes. Making connections and understanding
your focus is the single most important factor in
improving your images. In wilderness and nature
photography, this means you’ve got to be a naturalist.
Consider for a moment outdoor subject matter.
The world is a constantly shifting place. Weather
and light move across the landscape, changing the
appearance of our images minute to minute. Birds
and mammals cross the scene with the seasons.
These are the mysteries of outdoor photography
and one of the reasons that these subjects are so
compelling (and frustrating) and lure so many.
However, the mysteries that face us in landscape
and wildlife photography have answers, if you are
willing to dedicate the time to solve them.
Season And PlaceYour photography will benefit most if you focus
your research. Consider the subject matter you
wish to photograph. Is it a particular landscape; an
event like the northern lights; or a certain species
of wildlife? To get the most out of limited time, you
must have an understanding of the subject. You
can’t photograph the aurora in Alaska during the
summer (it’s daylight all the time), so you better
plan your trip in the winter. If there is a bird species
you’ve been wanting to photograph, you need to
know its preferred habitat, what times of year
it’s present, and whether the plumages vary from
season to season. From there you may wish to dive
in further by learning the bird’s song, nesting habits
or behavior, all so you can more efficiently find it in
the field.
A few years ago I led a couple of photographers
on a trip into the Arctic National Wildlife Refuge of
northern Alaska (#3). They were bird specialists and
so June—the busiest time of year for arctic birds—
was selected. We further focused the trip onto the
coastal plains, where shorebirds, ducks, loons and
other species breed in abundance. There were a few
focal species, one of which was the Buff-breasted
Sandpiper, a lovely, and increasingly rare, little
shorebird that has a remarkable breeding display. I
read up on the species and learned that they prefer
the drier patches of coastal tundra for their dancing
grounds. Within a short time, we found them (#4)
because we knew where to look and what to expect.
32
4

12 • PETERSEN’S PHOTOGRAPHIC DIGITAL PHOTOGRAPHY GUIDE • VOL. 23
OUTDOOR & ADVENTURE PHOTOGRAPHY
Similarly, last year I made a trip
across northern Argentina. One
of my goals was to photograph
in the Esteros del Ibera (#5)—a
sprawling tropical wetland complex
just south of the Paraguay border.
My trip in the dry season assured
we’d be able to get to the pampas
outpost town where the wetlands
began, and that the water-loving
wildlife would not be spread out
over the tens of thousands of acres
of flooded lowlands surrounding
the Ibera. Thanks to good planning
I was able to photograph species
like the Rufescent Tiger-heron (#6),
Southern Lapwing (#7), Spectacled
Caiman (#8) and the South American
Gray Fox (#9).
These are the background efforts
that have nothing to do with
operating a camera and yet have
everything to do with making
better images.
But this kind of legwork is not
limited to wildlife. I once got a call
from a photographer who wanted to
come to interior Alaska to shoot the
autumn colors. He planned to arrive
in mid-October, assuming that would
be peak color. If he hadn’t done
his homework—by calling me—he
would have had a very disappointing
experience. Alaska’s interior in
mid-October is often draped in the
first snow of winter and the colors long
faded from the trees. I encouraged
him to rethink his schedule.
Photos © David Shaw
5
6
7

OUTDOOR & ADVENTURE PHOTOGRAPHY • 13
Online Resources
We can also learn a lot about the landscapes
themselves, even in the less photographed wild
places of the world. Google Earth (www.google.
com/earth/), for example, is a wonderful tool for
8
109
11
planning photography expeditions. The “Street
View” function allows a virtual perspective on any
landscape, and is remarkably true to life. The view
up the little-traveled Kugrak Valley in Gates of
the Arctic National Park (#10) is an example. Not
many people visit the Kugrak. In fact, I suspect no
more than a handful per year venture far into that
steep-walled valley. But Google Earth’s street view
provides an excellent representation (#11). Scouting
locations can now be done, at least in part, on your
computer and even a handheld device. Combine the
tools in Google Earth with your handheld GPS and
you can be guided right where you want to go.
The more we understand our surroundings, the
better our images will become. When we understand
the stories of the landscape and wildlife, we can
better know how to make our images tell those
stories. Sometimes the best thing we can do for our
photography doesn’t even involve a camera.

14 • PETERSEN’S PHOTOGRAPHIC DIGITAL PHOTOGRAPHY GUIDE • VOL. 23
OUTDOOR & ADVENTURE PHOTOGRAPHY
Surviving AdversityPacking, Protection And Precautions
A FEW YEARS ago I was guiding a
17-day paddling trip down the Noatak
River in Alaska’s western Brooks
Range. For the first 3 days we had
lovely weather. Sunshine danced
over the rugged mountains and
warmed the autumn air to shirtsleeve temperatures.
On the fourth morning, I woke to the patter of rain
on my tent. For the next 2 weeks, it seemed as
though I heard nothing else. The river rose and
rose, rapidly reaching a frightening flood stage and
making paddling a dangerous daily routine.
High water, rain, wind and cold all combined to
make a challenging photographic situation. And yet
I wasn’t unproductive, and came away from that trip
with some images that I really liked (#1, #2 & #3).
I was successful because I was prepared. I had the
right equipment, packed securely away in dry boxes
and bags. Equally important, I had the right mental
1
Photos © David Shaw
2
3

OUTDOOR & ADVENTURE PHOTOGRAPHY • 15
attitude and maintained my ability
to be creative despite the stress
of the journey, and the far from
ideal weather.
EquipmentWhat gear should I bring?
It’s a common question, and
unfortunately not one with a simple
answer. A great deal depends
on the kind of trip. On some
wilderness journeys it’s possible to
pack everything plus the kitchen
sink (#4). More often trips into the
wild country require a minimalist
attitude. During the summer of
2013, I was artist in residence at
Gates of the Arctic National Park
in the Brooks Range of Alaska.
The residency was not a stay in
a comfortable cabin with a view
of the mountains; rather, it was
a 10-day, 70-mile backcountry
journey through the core of the
park. Everything from the food
to tent to a sleeping bag and the
camera gear had to be carried
on my back (#5). For that trip I
carried what I consider to be the
bare minimum: A D-SLR (Canon
5D Mark III), a general zoom lens
(Canon 24-105L) and a small—but
good quality—point and shoot
(Canon S95). A few memory cards
and spare batteries rounded out
the kit. I won’t deny it, there were
times when I desperately wanted
more flexibility, but the gear was
relatively light, and didn’t limit my
ability to cover the miles necessary
for the trip.
Though minimalist, that kit I
carried through the Brooks Range
is not atypical for backpacking.
Occasionally, I’ll add a compact
telephoto or a wide angle and—on
shorter journeys—I’ll always carry a
compact tripod, but that’s about it.
River trips and basecamps (#6)
offer a bit more flexibility and a
broader range of gear that can be
carried. To the above list I’ll add a
telephoto like a 70-200mm with a
1.4x teleconverter or a broad range
zoom (100-400mm or similar). If
there is likely to be wildlife—and
weight is really not an issue—
then I’ll go ahead and pack a big
telephoto, like my 500mm f/4.
In short, backcountry journeys
require that you make decisions
about your equipment. You won’t be
able to carry everything you want,
so assess your photographic goals 6
5
4

16 • PETERSEN’S PHOTOGRAPHIC DIGITAL PHOTOGRAPHY GUIDE • VOL. 23
OUTDOOR & ADVENTURE PHOTOGRAPHY
and determine the bare minimum of what you’ll
need to meet those goals, and go from there.
PackingOnce you decide what equipment to carry, the
next challenge is figuring out how to keep that gear
safe and secure. For many trips, from international
travel to river trips, my SLR and lenses stay dry and
protected in a Pelican case (www.pelican.com, #7).
Importantly, these boxes are not just waterproof
(and padded) they are also completely airtight.
The case protects completely from everything from
rain to submersion. Pelicans are highly durable and
resistant to crushing.
The airtight quality is important even when
the box never encounters liquid water. Extreme
humidity, such as that found in the tropics, is
dangerous to cameras and other electronics. On
trips lasting just a week or 10-days there are few
concerns. But when the trips extend into multiple
weeks or months, humidity becomes the enemy. By
keeping your equipment in an airtight case equipped
with a desiccant such as silica gel, it is possible to
not only protect your gear from humidity but also
remove moisture from cameras and lenses.
If the bulk and weight of a Pelican are too great, a
second choice—which I rely on for backpacking—are
small, lightweight roll-top dry bags such as those
made by Sea to Summit (www.seatosummit.com).
These are constructed of waterproof nylon, and
though I wouldn’t trust them completely during a
full submersion, they are a heck of a lot better than
nothing at all.
Weather and water aside, the most important
thing you can do to protect your expensive gear
is be careful. A camera carelessly left atop the
7
Photos © David Shaw
8
9pontoon of a raft is likely to meet an untimely end
on the river bottom.
TravelTraveling with expensive camera gear can be
another, and equally daunting, challenge. I spend a
lot of time traveling from North America to nations
in South and Central America and I’ve rarely
had trouble with the security of my gear. That
said, I still take some precautions. First, I don’t
carry bags that shout “Camera Equipment HERE!”
Rather, I keep my kit in normal looking backpacks
and luggage and leave the camera-specific
packs behind.
In public, my camera lives in a daypack, similar
to what every other tourist wears. When an
opportunity arises, I’ll pull it out and make the shot.
Keeping the camera out of sight also can help when
approaching people for portraits. Big cameras draw
attention so think about investing in a good compact
camera for public areas.
What gear to bring and how to protect it is not
the only hurdle of photography in wild places. As
I mentioned above, we usually do not have the
luxury of shooting in well-photographed places. The
landscapes we encounter in the wild are rarely, if
ever, photographed and so we must rely on our own
creativity and patience. Too, we must cope with
frustrations. Like my trip down the Noatak River
I mentioned above, the weather isn’t always what
we hope. We may not have perfect light; it may
rain a lot; it may snow, or blow or be frigidly cold.
But even the unpleasant experiences can generate
unique images (#8 and #9). Even if your images
aren’t the prettiest, I guarantee you’ll be happy you
made them.

OUTDOOR & ADVENTURE PHOTOGRAPHY • 17
OUTDOOR & ADVENTURE PHOTOGRAPHY
Visual ToolsColor, Line & Composition
PHOTOGRAPHY HAS AN extraordinary
emphasis on gear. Cameras with
X-number of megapixels, lenses of all
shapes and sizes, tripods of carbon,
aluminumÑor whatever space-age
material is the current trendÑmemory
cards, filters, flashes, gels, remote triggers,
reflectors, umbrellas, soft-boxes and batteries.
Pause. Take a breath.
All of these products are marketed in a way that
encourages us to believe that THIS will be just the
ticket to the cover of National Geographic. And
though each of these tools has its place, not one
of them will turn you into an artist. You wouldnÕt
hand the best brush, paint and canvas in the world
to some person on the street and expect them
to suddenly become the next Georgia OÕKeefe.
Photography, like any art form, starts in the mind
and leads to the camera.
Landscape photography is a demanding
discipline. Most photographers shoot the landscape
opportunistically. Look! Pretty mountains! (snap,
snap, snap) A sunset! (click, click, click) Sometimes
this works. Sometimes the light, the weather and
the location fall into place and you find yourself
right where you need to be, exactly when you need
to be there. But mostly, it doesnÕt. Good landscape
images require thought, planning andÑabove allÑ
mindfulness.
Successful images of the landscape work not
just because there is pretty scenery in pretty light
(though these things are unquestionably important).
They work because the elements in the frame relate
to one another. ItÕs been said over and over again:
good images tell stories.
The way our eyes pass through the frame is how
we read that story. We arenÕt even necessarily
aware of it when we see a good image but the
elements come together, relate, contrast and
juxtapose in a pleasing way.
© David Shaw
1

18 • PETERSEN’S PHOTOGRAPHIC DIGITAL PHOTOGRAPHY GUIDE • VOL. 23
OUTDOOR & ADVENTURE PHOTOGRAPHY
Now that’s all well and good from a
philosophy of photography perspective,
but how do we make that happen
in the field? A good first step is in
understanding how the colors and
compositional elements affect the viewer.
Balance
Good images have visual balance.
Here we aren’t talking about mass,
size or weight but the visual impact
of each element in a composition. In
other words, how that aspect draws the
eye. Each of the parts of an image I
discuss below (color, lines, planes and
layers) can have different amounts of
impact. There are two primary types
of visual balance: symmetrical and
relative. Image (#1) shows a patch of
Lupines growing in a green meadow in
symmetrical balance with one another.
The cluster of flowers is equally
distributed across the frame and neither
side is “heavier” with the subject
than the other. This is a common,
and straightforward, compositional
structure. Relative balance can be
provided by counterweight, such as
the equal importance of the mountains
and clouds (#2). Relative balance can
also be provided by a small element
being disproportionately important in
the frame (#3). Where the small,
bright green alpine lake carries as
much visual weight as the larger, darker
mountains toward the back right of the
frame. (This composition also takes
advantage of the classic “S” curve as
visually appealing.)
While a “balanced” image often works,
the converse is true: an “unbalanced”
image can also work for you. Unbalance
can provide an edge to an image.
It might lead a viewer to feeling
uncomfortable or unsettled, and this
may be exactly what you are going for.
Consider how you want your image to
feel to a viewer, and don’t limit yourself
to a single recipe.
Color
Red, orange, yellow, green, blue,
indigo and violet (an easy acronym is
ROY G BIV) and every other shade in
the spectrum have an effect on us.
Some are cool and calming, others
are full of energy and strength.
Understanding these and how they
relate to one another is one of the great
tools to creative composition. But for
simplicity’s sake, let’s start with the 3
primary colors.
2
3
4

OUTDOOR & ADVENTURE PHOTOGRAPHY • 19
Blue is cold. The day
can be blistering hot,
but if there are deep
blues in your image, the
photograph will not feel
that way. When I think of
blue, I think of ice (#4),
water and the evening sky
(#5). Images can be made
entirely of blue and still be
entirely successful.
Yellow is hot. It shouts
sunshine, flowers and
warm days. It makes an
image feel warm even
when the reality isn’t; the
day I made this forest
image (#6) it was well
below zero. Yellow is rare
and draws the eye, like the
neck of a sleeping penguin
(#7). It is a color that will
rarely dominate an outdoor
6
7
5Photos © David Shaw

OUTDOOR & ADVENTURE PHOTOGRAPHY
scene. Rather, it is a highlight,
a pop (#8) and when presented
large it will become the subject.
Whether you mean it to or not.
Red. Oh Red, how I love and
hate you. Red is mean and
beautiful. Red draws the eye like
the bulls eye on a target (#9).
Red will grab you and hold on.
Images dominated by red are
dramatic and strong (#10), but
can be overwhelming. If there is
something red in my image, it is
intentional and important.
Next time you venture out with
your camera, consider the colors.
Think about how they relate to
one another. How warm and
cool tones interact, the feelings
that emerge as a result of the
combination and how they relate
to the story that you are trying
to tell. Do they influence where
your eye goes? Does the impact
of your subject change due to
its color?
LinesThere are two types of lines in
photography: literal and implied.
Literal lines are those clearly
visible in the frame, a winding
stream (#11) or a tree trunk.
Implied lines have no physical
connection and yet our eyes
move naturally between elements
that seem disjointed: a series of
stones, patches of clouds (#12),
or even the direction a human or
animal subject is looking (#13).
Lines provide a progression
within the image. Try this
exercise: Find a compelling
image—any image will do—and
take a pen and mark where your
eyes first focus on the photo.
Then draw a line as your eye
wanders through the frame
from element to element. In all
likelihood, your eye will have
followed implied or physical lines
through the frame.
Images that force the viewer’s
eyes out of the frame are rarely
successful because they provide
an immediate exit. Unless that
exit is part of the story being
told, you want your viewer to
linger on the photo for as long
as possible. Lines are the
story’s narrative. 9
20 • PETERSEN’S PHOTOGRAPHIC DIGITAL PHOTOGRAPHY GUIDE • VOL. 23
8Photos © David Shaw
More on page 22

13
OUTDOOR & ADVENTURE PHOTOGRAPHY • 21
10
12 11

22 • PETERSEN’S PHOTOGRAPHIC DIGITAL PHOTOGRAPHY GUIDE • VOL. 23
OUTDOOR & ADVENTURE PHOTOGRAPHY
Planes And LayersPlanes provide a sense
of depth and dimensionality. A
road disappearing creates a
trapezoidal shape on the image
(#14), which provides a sense
of distance. We know that in
reality a road isn’t shaped like
a trapezoid and so our brain
interprets the 2-dimensional
shape as depth. Textured skies
(#15) or disappearing rivers (#11)
are all examples of planes.
Think of layers as pages in a
book—image (#16) is an example.
The photo shows a foreground
layer (flowers and a boulder) a
middle ground (the fading tundra)
and the background (dark, distant
mountains). While these elements
are not planes (when viewed
alone they do not provide a
sense of depth) but when viewed
together the scale is clear. The
complementary forms of the rock
and the mountain help provide
the illusion of depth.
The elements we’ve just
examined: Balance, Color,
Lines, Planes and Layers are a
simplified look at the structure
of images. Think of these as
building blocks. The way they
combine and interact with each
other drives the success or failure
of an image. Explore them and
then study your own and other’s
successful (and unsuccessful)
photos. Eventually these elements
will come together like the pieces
of a puzzle and you’ll be another
step forward on your way to
making better photographs.
14
16
15Photos © David Shaw

OUTDOOR & ADVENTURE PHOTOGRAPHY • 23
OUTDOOR & ADVENTURE PHOTOGRAPHY
Expedition CruisingUsing Excursions To Get You There
I WAS STANDING at the
tiller of a zodiac with 10
clients aboard when I
realized I was utterly lost.
I motored along through
a maze of towering blue
ice somewhere near the south
end of the Lemaire Channel on
the Antarctic Peninsula. Where, I
wondered, was our ship? Hiding
my nervousness, I smiled and
pointed out a group of proposing
Gentoo Penguins. Pretending the
zodiac cruise was going just as I’d
planned, while secretly searching
for something, anything familiar to
guide me back.
It wasn’t a bad place to be lost,
actually. The bergs, grounded out
in the shallows, were amazing.
Their walls reached 40 or 50
feet from the glass-clear water
and were carved into monoliths
and arches—forms which would
have been at home in the desert
Southwest. The sun shone and
water (that had last been liquid
thousands of years before)
streamed from the ice in rivulets
(#1). The patterns were compelling
and my camera and those of the
clients were popping like corn.
Then, like a mirage, we came
around a great tabular iceberg
to see the bow of the ship just a
quarter mile away. The ship, an
expedition-sized cruise vessel,
seemed miniature in the context of
the ice and the mountains beyond.
I breathed a sigh of relief.
Choosing The CruiseThe world’s oceans are wild
places, too. They are access
routes to undeveloped coastlines
like the Arctic, remote islands
such as the Galapagos or the
Photos © David Shaw
1
2

24 • PETERSEN’S PHOTOGRAPHIC DIGITAL PHOTOGRAPHY GUIDE • VOL. 23
OUTDOOR & ADVENTURE PHOTOGRAPHY
glaciers and cold icy waters of
the Antarctic.
Ships are the only practical way
to reach these places, and there is
no better vessel for photography
than nimble expedition ships (#2,
#3 & #4). These crafts generally
hold less than 150 passengers—
small when compared to a standard
cruise liner. Some ships in this
category are custom built for
the purpose, but many others
are refurbished icebreakers or
research vessels. While size, age
and comfort level vary, expedition
ships have one thing in common: all
are equipped with Zodiacs capable
of shuttling clients back and forth
from ship to shore (#5).
There are a host of companies
providing these trips—some are
photography specific and others are
general natural or human history
excursions. Which you choose will
depend on your personal interest,
how much you want to share
the interests of your traveling
companions and, of course, cost.
To be frank, these voyages aren’t
cheap. As I was writing this article
I did a quick survey of companies
running 10-day trips to the
Antarctic Peninsula from southern
Argentina. I found prices varying
from under $4000 to over $11,000
per person. Costs relate to the
comfort and services of the ship
and the focus of the cruise.
Focus-specific trips like
photography or birding tend to
be at the more expensive end of
the range. While general natural
history trips on lower-end vessels
are the most affordable options.
Gear SelectionUnlike many wilderness trips,
expedition cruises do not limit
the amount of photo gear you can
bring. Still, it’s not necessary to
pack every lens and accessory
you own. I once watched a
photographer at the airport in
Ushuaia, Argentina, wearing a
fully loaded camera backpack with
2 monster tripods strapped to
the sides and wheeling a second
rolling camera bag with a third
tripod lashed aboard. He struggled
down the jet way, fought loudly
with a flight attendant who wanted
him to check one of his bags and
eventually took up most of an
Photos © David Shaw
4
3
5

OUTDOOR & ADVENTURE PHOTOGRAPHY • 25
overhead bin to fit all of his stuff.
Please, I beg you—don’t be
that guy.
At the very least, you want
to be able to easily handle your
own equipment. As I write these
words, I’m prepping to guide on
a series of trips up the western
coast of South America. I’ve
chosen to bring along 2 D-SLR
bodies, a wide-angle zoom
(17-40mm or 16-35mm), a
mid-range zoom (24-105mm), a
telephoto zoom (70-200mm) and
a large telephoto prime (500mm)
with a 1.4x teleconverter. A
polarizing filter, batteries and
memory cards round out the kit.
I’m also packing a laptop
computer and an external hard
drive to back up my images.
That’s a lot of stuff by my usual
wilderness standards, but it is not
so much that I can’t easily handle
it on my own.
Due to likely bad weather, and
the certainty of splashy zodiac
rides, the final thing you need to
include is a river-rafter’s dry bag.
Select one (with backpack straps)
that is large enough to hold
your gear.
The Photographic Experience
Shooting from the ship can be
great fun. The amount of wildlife
seen at sea is a surprise to many
travelers. Whales and seals are
frequent visitors, albatross, gulls,
petrels and other seabird species
are often seen following the ship
(#6, #7). However, the moment
for photographing these species is
fleeting so here are two things
to remember.
First—whenever possible—be on
deck looking. When the PA system
announces a sighting you won’t
have to run for the deck, you’ll
already be there making photos.
Second, have your gear ready. I
would have missed this ephemeral
light (#8) if I hadn’t been outside
when it appeared over the
albatross colony on Steeple Jason
Island in the Falklands. When I’m
moving around the ship, I usually
carry a pair of binoculars over my
shoulders and a small bag with my
camera mounted with a telephoto
zoom. Tripods are useless on
board (the vibration from the
7
6
8

26 • PETERSEN’S PHOTOGRAPHIC DIGITAL PHOTOGRAPHY GUIDE • VOL. 23
OUTDOOR & ADVENTURE PHOTOGRAPHY
ship’s engines will be channeled straight through
the legs to your camera) so any lens you use will
need to be hand-held. However you carry your
equipment, be sure to leave one hand free for the
ship in case there is an unexpected wave.
While shooting from deck is fun—and a great
way to spend your days at sea—most images on
expedition cruises will be made from either shore or
a zodiac. On shore, the experience is much like any
other coastal location. Remember that you are in a
wild place, among wild animals (#9). Don’t approach
too close and keep the welfare of your subjects
as your top priority. Also, be aware that you may
be surrounded with photographers and other
passengers so watch out for people in your frames
(#10). Explore cautiously and pay attention to the
expedition staff; it isn’t uncommon in some parts
of the world for bad weather to cut a landing short.
Shortly after I made this image the wind began to
roar, and that calm water was quickly turned into 5
foot crashing waves (#11).
In the zodiac, photography gets a little more
difficult (#12). You’ll be sharing your boat with 8
to 10 others and disorganization will make that
rubber dingy feel really small, really fast. First,
be considerate. Second, be careful. A careless
step backward and you’ll end up soaked, cold,
embarrassed and with ruined camera equipment.
Stand up only after you’ve been granted permission
from your driver. Photographers closest to the
subject need to stay seated or kneel so the people
on the other side of the zodiac can see and shoot Photos © David Shaw
9
10

OUTDOOR & ADVENTURE PHOTOGRAPHY • 27
over their heads from a standing
position. Tripods are out of the
question. During zodiac cruises
I use a waist-belt style camera
bag for extra lenses, filters and
memory cards. Two lenses are
usually sufficient—a wide-angle
zoom and a telephoto zoom.
Expedition cruising is
incredibly fun. It allows the
luxury of good food and comfort
while photographing dramatic
landscapes and abundant
wildlife. But due to the costs and
distances, such trips are often
once-in-a-lifetime experiences
so choose carefully. Oh, and one
more thing, if you get seasick
come prepared with some strong
medications. Those wild oceans
can get pretty rough. Trust me,
I know...
Here are a few things to investigate before booking:
1. How many days will you have at your destination? For example, it takes 2.5 to 3 days to reach Antarctica
from Ushuaia, Argentina—thus half of a 10-day trip is at sea.
2. How much time is provided on land? I’ve worked as a guide and lecturer for a couple of different
companies and this can vary wildly from one trip to the next. Some companies make every effort to get
you on shore, even during bad weather days, others will not. Contact the company and ask.
3. Activity level. Some trips are mostly cruises with some relaxed outings on shore. Others offer strenuous
hikes, sea kayaking options or even scuba and snorkeling.
11
12

28 • PETERSEN’S PHOTOGRAPHIC DIGITAL PHOTOGRAPHY GUIDE • VOL. 23
OUTDOOR & ADVENTURE PHOTOGRAPHY
Photographing The Aurora BorealisNature’s Light Show
THE AURORA BOREALIS
(or Northern Lights)
are, let’s face it, weird.
They consist of swirling
green, purple and red
curtains hanging in the
dark northern sky. They’re magical
and otherworldly. But it’s all physics
and it works a little like this: the sun
(like the earth) has weather patterns,
swirling tornado-like storms, areas
of high activity known as sunspots
and towering flares that occasionally
kick charged plasma out into the
solar system. Occasionally, one of
those big eruptions (called Coronal
Mass Ejections or CMEs) sends its
magnetically charged particles hurtling
toward us. As the CME approaches the
Earth our own magnetic field draws the
material to the north and south where
it enters the atmosphere. The charged
particles interact with the gases and
burst into light like a neon sign.
The colors of the lights vary
according to which gases are
encountered at what elevations,
making the aurora a constantly
changing phenomenon. The normal
green color (#1) is created by oxygen—
about 60 miles up. The rare red
auroras are also related to oxygen in
the atmosphere but much higher—200
miles (#2). Blues and purples are
created by ionic nitrogen, which also
creates the rippling edges of the
curtains (#3).
The sun’s weather goes in cycles.
About every 10 years there is a peak
in the activity and the auroras become
more frequent. This year (2014) is the
peak and, if predictions hold, will be 1Photos © David Shaw
OUTDOOR & ADVENTURE PHOTOGRAPHY • 29
the best opportunity for northern lights viewing and
photography for at least another 10 years. In other
words, now is the time to bundle up, head north and
go outside with your camera.
Determining ExposureIt’s likely in night work that your camera will
get confused and won’t be able to choose the
appropriate f-stop or shutter speed, so you’ll
need to use manual settings. First, select an
appropriate ISO—if you have a top-of-the-line
camera with low noise you’ll be able to use a high
ISO setting, like 1600 or more. If, however, you
shoot with a camera that tends to be “noisy” at
higher ISOs (like a smaller sensor point-and-shoot)
you’ll need to start lower—try around 400. Next,
select a shutter speed. This will depend on your
ISO and how fast your lens is. I suggest starting
off around 15 seconds, then reviewing your image
on the LCD and adjusting up or down as necessary.
Last, make sure your aperture is wide open. If you
are shooting with an f/2.8 lens, shoot at f/2.8.
A word of warning about LCD screens: on a dark
night when the only light is your camera’s LCD,
your images will appear much brighter than it will
on your computer. Turn down the screen brightness
and keep an eye on the histogram.
FocusWhen I first began making images at night,
this was my Achilles’ heel. Focusing in the dark
is tricky. Even the best autofocus systems are
incapable of the feat, so shift your lens to manual
focus and adjust it—as shown in image (#4). Small
adjustments can be made by reviewing the LCD
screen after the first few images. If your foreground
elements are placed sufficiently back in the frame
everything should be sharp—from the trees and hills
to the stars and the aurora.
Prior to an aurora shoot, I’ll find the best focus
point on my lens and use a piece of electrical
tape to lock the focus ring in place. Then—as I’m
adjusting and carrying the camera around in the
field—I won’t accidentally bump the focus.
Last, use a remote shutter release or your
camera’s timer and mirror lock-up function (if your
camera has the ability) to minimize vibration. Some
image stabilization lenses will actually produce
lower quality images if the camera is on a tripod
and the IS is on—some don’t so check your lens
instruction manual. Remember that even a slight
bump from clicking the shutter can cause unwanted
blurring in the stars.
CompositionCompose as though it were a landscape image.
Your subject is the sky, but the other elements
in the frame are just as important. An image of
just the aurora and a few stars might have some
interesting colors, but it will lack a sense of place
2
4
3

30 • PETERSEN’S PHOTOGRAPHIC DIGITAL PHOTOGRAPHY GUIDE • VOL. 23
OUTDOOR & ADVENTURE PHOTOGRAPHY
5Photos © David Shaw
6
7

OUTDOOR & ADVENTURE PHOTOGRAPHY • 31
Equipment
A tripod is an absolute necessity—the long exposures required by night photography require a stable
platform. A D-SLR is the best option, though I’ve seen good results with advanced point-and-shoot cameras.
Whichever camera you choose, it must be capable of manual shutter speed and aperture settings. Most
wide-angle lenses will suffice but the faster that lens the better. My primary aurora lens is a 14mm f/2.8.
A wide-angle allows you to show as much of the sky and foreground as you wish. And a fast lens like an
f/2.8 (or better) will permit shorter shutter speeds, which means less trailing in the stars, less wind-motion
in the trees and better definition of the curves and pillars of the aurora.
You definitely have to dress for the occasion. Since the aurora primarily occurs at far northern (or southern)
latitudes and only at night, it is likely be cold, and sometimes extremely cold, when you are out shooting.
Long underwear, thick socks, gloves or mitts, oversized winter boots, down pants and a jacket are my
standard gear.
Have some plastic Ziploc style bags big enough for your camera and lenses. If you pack your gear in these
before you return indoors it keeps condensation from building up on your equipment. If it’s cold—which it
likely will be—keep a couple of chemical hand-warmers in your pocket with a spare battery. Batteries don’t
last long in the cold, so having a spare could save your evening. And last, don’t forget a headlamp—you’ll
need one for navigating in the dark.
or depth and a poorly composed foreground will be a distraction.
Select a tree or a cabin, mountain, person, rock, or whatever and
compose carefully (#5, #6, #7 and #8).
The night sky offers creative possibilities unlike those in any
other genre of photography. Long exposures can cause otherwise
obstructing clouds to create new patterns in the sky (#9). And
active techniques like “light painting” the foreground with the
beam of a headlamp or a flashlight can provide a compelling level
of depth and detail (#10).
Aurora photography is a tricky pursuit. We spend a lot of time
discussing the techniques and equipment. We worry about how
our gear and ourselves will stand up in the cold. But none of that
matters if we don’t find the lights themselves and THAT is the
hardest part. The lights are fickle, difficult to predict and the
clouds seem to obscure the skies on the most promising nights.
The unpleasant fact about shooting the northern lights is that you
have to be out there, looking, waiting and hoping. There is no
tool in our kit to replace patience and persistence. You’ve got to
be there. 8
9 10

32 • PETERSEN’S PHOTOGRAPHIC DIGITAL PHOTOGRAPHY GUIDE • VOL. 23
OUTDOOR & ADVENTURE PHOTOGRAPHY
Black And White In The WildThe Power Of The Monochrome Image
THERE IS SOMETHING elegant about
the monochrome image. Black and
white photos harken back to the
early days of photography, when
the process of making an image was
akin to magic. Things are easier now.
Though digital—all ones and zeroes—lacks the
tangibility of film. Shooting in black and white offers
us the opportunity to return to a film mindset, a
time when thoughtfulness and purpose were the
requirements for making an image.
During the first days of September, I was guiding
a group of paddlers down a little-travelled river in
northwest Alaska. It was my final trip of the season,
the days were crisp and the air had the feel of snow.
One morning, mid-way through the trip, I woke and
peered cautiously out of my tent. It was snowing
lightly and everything was coated in 3” of the white
stuff. I crawled out and looked around. It wasn’t
as bad as it first looked. The mountains across the
valley were striped in patches of sunlight and the
textured clouds above showed occasional portholes
to the blue sky. I grabbed my camera.
The river, flowing in sweeping curves through the
1

OUTDOOR & ADVENTURE PHOTOGRAPHY • 33
snow-covered gravel bars was perfect for black and
white (#1). Mentally, I pulled the color out of the
scene (it wasn’t hard, there was little to begin with).
I looked for the darkest and the lightest parts of
my composition. Considering how they interacted
with each other. I composed and shot, composed
and shot, concentrating on the texture, pattern and
contrast—the keys to black and white.
Like that snowy morning, certain days and
subjects will just scream for black and white.
Interestingly, successful monochrome images can
be made under high contrast situations. In fact,
high contrast is often at the heart of the image’s
effectiveness and is eminently suitable for a black
and white interpretation (#2). But black and white
also has a wonderful quality in flat light, like on
the foggy day when I made this image of rocks
emerging from the lake (#3). Other times it’s the
subject that will dictate the need for color—or the
lack of it. The caribou skull on a stormy day looked
flat and boring in color (#4), but in black and white
it provides a compelling subject (#5). Monochrome
3 4
5
2Photos © David Shaw
34 • PETERSEN’S PHOTOGRAPHIC DIGITAL PHOTOGRAPHY GUIDE • VOL. 23
OUTDOOR & ADVENTURE PHOTOGRAPHY
works with a surprising number of subjects, but
it’s hard to go wrong with images of old structures.
For example, the mode provides a feel of history to
the crumbling bricks of the centuries-old tobacco
barn in Argentina (#6). Details too, like the tangled
branches of a coastal forest in Brazil (#7) or the
endless patterns of a birch forest in Alaska (#8)
appear better in black and white.
Making strong images in shades of gray requires
an understanding of how the contrast will appear
in the final image. As I noted above, this does not
mean that the scene has to be high contrast—rather,
6
7

OUTDOOR & ADVENTURE PHOTOGRAPHY • 35
you must understand how the existing contrast
will be translated onto the final image after
post-processing.
Ansel Adams, one of the unquestioned masters
of black and white, understood the importance of
developing (though of course his work took place
in the darkroom instead of on a computer). In his
classic book The Print, he states, “The point I wish
to emphasize is the dual nature of printing: it is
both a carrying to completion of the visualized
image and a fresh creative activity in itself.” Adams
understood that an image captured in the field was
incomplete. Though the tools have changed, his
wisdom remains as apt as ever.
Color And Black & WhiteSometimes, despite forgetting a black and white
mindset, I’ve gotten lucky. A number of years ago I
was on a solo photography trip in Bolivia. During my
exploration of the country I spent a week touring
the high, dry (and profoundly weird) altiplano of
the Atacama Desert. There, not far south of the
equator, the sweet light of morning and evening
was brief while the majority of the daylight hours
were spent under searing, high elevation sunlight.
The light was flat, hot and extremely high contrast.
Knowing I wasn’t likely to return to the area any
time soon, I made scores of photos regardless of
the light. Most of those images, later viewed on my
computer, were unsurprisingly disappointing. The
light was miserable and flat.
At the time I failed to see the potential of those
images but fortunately, rather than delete them, I
left the photos to linger on my hard drive. Recently,
I was browsing through my Lightroom catalog
and encountered a few of those forgotten shots.
9 10
8Photos © David Shaw

36 • PETERSEN’S PHOTOGRAPHIC DIGITAL PHOTOGRAPHY GUIDE • VOL. 23
OUTDOOR & ADVENTURE PHOTOGRAPHY
Inspired, I converted them to black and white.
I added some contrast, dodged and burnt and
watched something entirely new appear from the
bland original (#9 and #10).
Black and white is a great medium that
encourages us to be thoughtful in our photography.
It teaches us to look at a subject critically and
consider not how it looks in reality, but how the
final image will appear. Work with purpose and your
images will reflect the effort.
Black and white comes alive in post-processing, and
while a full guide is beyond the scope of this issue,
here are a few things to consider as you experiment
with your images. Most digital cameras have settings
dedicated to black and white. Do not use these. The
in-camera black and white conversions are primitive
compared to those in Adobe Photoshop or Lightroom
(www.adobe.com) and plug-ins from companies like
onOne Software (www.ononesoftware.com) and Nik
(www.google.com/nikcollection). It is far better to
capture the image in color with the Raw format and
later convert it to black and white in the computer.
Black and white images usually appear most
compelling when the blacks are black and the whites
are white. In other words, the histogram of your final
image should cover the whole graph (#11) without
cutting out too much on either side.
Some portions of the image will require more or
less contrast and brightness than others. The
Tools in Lightroom and other programs designed
to selectively dodge and burn (lighten and darken,
respectively) are vital when processing a black and
white photo. Look at the difference in the impact of
these two interpretations of the same scene. One
was “converted” to black and white using software
(#12) and the final is the result of some further work
on contrast—darkening and lightening select areas
of the frame (#13). This is the type of potential that
resides in every image file (black and white or color)
and exploring the processing options will help you
to attain great results.
13
11
12Photos © David Shaw

OUTDOOR & ADVENTURE PHOTOGRAPHY • 37
OUTDOOR & ADVENTURE PHOTOGRAPHY
Travel PortraiturePeople You Meet Along The Way
IT WAS A crazy day
in Cuzco, Peru. The
streets were full of
people waving signs,
banners and flags
bearing the symbol
of Tupac AmaruÑthe final
leader of the Incas. In the
plaza, kids were kicking soccer
balls, families dined on picnic
lunches spread out on blankets
and teenagers walked hand in
hand. There were smiles and
waves of greeting. I wandered
around with my camera in hand,
snapping the occasional photo
but mostly just looking.
As I crossed the plaza, I
caught the eye of a nattily
dressed old man who was
sitting on a park bench. I
nodded and smiled but before
turning away, I saw he had an
old medium-format camera
slung around his neck. That
made me stop. Instead of
walking away I turned and
sat down next to him. In my
somewhat passable Spanish we
talked about photography. Using
my digital camera I showed
him some of my images from
the day; he described some
of his. After a few minutes, I
asked him if I could make his
portrait and he agreed. I rose
and framing the cathedral
behind him, I snapped exactly
two exposures (#1). I checked
the images, and then turned
the camera to show my new
friend the shots. He smiled and
with that I shook his hand and
wandered on.
Technical MattersThe human connection is 1
© David Shaw

38 • PETERSEN’S PHOTOGRAPHIC DIGITAL PHOTOGRAPHY GUIDE • VOL. 23
OUTDOOR & ADVENTURE PHOTOGRAPHY
2
4
3Photos © David Shaw

OUTDOOR & ADVENTURE PHOTOGRAPHY • 39
6
the hardest and the most important part of travel
portrait photography, but there are some technical
aspects that are important as well. As to lighting—I
look for natural, soft light. Window light, an open
door, cloudy days, the shade of a tree or an awning,
all of these can make excellent portrait light.
“Almost never” is direct sunlight the best choice.
The image of the old woman spinning yarn (#2) was
made at mid-morning on a piercingly bright day on
an island in Lake Titicaca. The light is good because
I found this woman in the shade of a stonewall,
where her faded cloak and sweater went nicely
with the stones behind her. The same is true of the
Quechua man knitting (#3). Hot, bright light was the
rule of the day but the shade and the reflected light
of the whitewashed buildings provided a soft,
even light.
Most any lens will work but, in general, it’s best
to avoid a very wide-angle lens, which can be great
for street work but not for portraits—as working too
close can distort your subject’s face. Anything from
a 30mm on up can work. Longer lenses do a great
job of isolating your subject, while the shorter ones
can incorporate the setting. Your choice will depend
on your vision for the final image and what you
feel comfortable carrying. I opportunistically made
the portrait of a young indigenous girl (#4) with a
500mm f/4 from 15 or 20 yards away, while I was
photographing birds. A long lens will separate your
subject from the background while shorter lenses
are better for environmental portraits.
7
5

40 • PETERSEN’S PHOTOGRAPHIC DIGITAL PHOTOGRAPHY GUIDE • VOL. 23
Approaching a complete stranger, perhaps one with whom you don’t share a common language, can be
terrifying. Here are a few tips that I’ve used successfully in my travels. 1. Keep your camera out of sight
as you approach.
2. Ask them (even in gestures) a question about themselves: their name, family, what they are working
on or something about the city in which they live. It can be anything, the important thing is to show that
you are interested in them as a person.
3. Often that first question will lead to a conversation. Take advantage of that. Chat, crack a joke and
become friends.
4. Once your subject is comfortable, pull out your camera and ask to take a photo.
5. Always (always) ask first.
With permission granted, the photography begins. I will raise the camera and take a quick snap during
which the person will inevitably give an uncomfortable smile and stare right at the camera. With the snap
of the shutter, the subject often relaxes. Here, I ask another question. If it’s a craftsman I might ask to
see them work. To a local on the street, I’ll ask something about a visible landmark, anything to return
to the conversation—but I don’t lower my camera. It usually doesn’t take long before a natural bearing
returns and I can continue snapping photos.
Making Contact, Making Pictures
OUTDOOR & ADVENTURE PHOTOGRAPHY
interesting than a simple portrait. Similarly, the
photo of a child peering out from his family’s hut
(#8) is as much about the place (and the living
conditions) as it is about the face of the child.
Learning to share the stories of your subjects
through an image is one of the most important and
challenging aspects of travel portraiture.
Few elements of travel say more about a place
than the local people, but photographing them takes
tact and sometimes requires you to leave your
comfort zone. The faces at our destinations provide
a sense of humanity to an image collection that may
otherwise be dominated by landscapes or wildlife.
Some of my most rewarding travel experiences have
involved reaching out to a stranger, making a friend
and, perhaps, making a good photograph.
Travel portraits may not be the best time to break
out your top of the line D-SLR with a vertical grip
and your 70-200mm f/2.8 lens. These set-ups—while
delivering top quality images—will be intimidating
to your subject. Think smaller. An SLR is great,
but keep your lens choice compact. Alternatively a
good point and shoot, a mirrorless or a rangefinder
camera can be a great option.
Focus On The Eyes The image of a young boy in an Amazonian village
(#5) would not be nearly so compelling if I’d focused
elsewhere. The portrait I made of my guide (#6) in
the lovely evening sunlight breaks this “rule” but
this is more a character statement and adds a slight
touch of mystery to the subject. In retrospect, I
probably should
have asked him
tip his face up just
an inch, but at
the moment this
seemed right.
While up close
photos with eye
contact can provide
a nice personal
touch to an image,
environmental or
action portraits
tell stories about
the people. I
made the photo
of a young monk
in a monastery in
Bhutan on a windy
afternoon (#7).
The bright billowing
robe contrasting
with the stone
corridor makes the
image far more 8© David Shaw

OUTDOOR & ADVENTURE PHOTOGRAPHY • 41
OUTDOOR & ADVENTURE PHOTOGRAPHY
Creative BlurThe Energy Around You
FOR MOST IMAGES,
sharpness is
desired and
desirable. All
too often IÕve
been frustrated
(at times practically brought
to tears) over an otherwise
lovely image that, because of
poor focus or motion blur, is
ruined. Yet, when that lack of
focus is purposeful, some very
pleasing results can be created.
Ones that express the rush of
color and energy in all the wild
places weÕve discussed. Call it
modern art or impressionistic
renditionsÑwhatever. TheyÕre
an interpretation of the world
around us that only a camera,
or a painter, can create and
although I donÕt make a habit of
them I do see them as a valid
way to express the world in
another way. The only thing you
need on the camera side is one
that you can focus manually,
although even autofocus can be
used with some of these effects.
Panning BlursIt was a cloudy, late autumn
day. The leaves of the birches
and aspens lay like a golden
carpet on the ground. I walked
up a trail not far from my home
and when I was forced to step
over a small, wet area a clump of
tussock grass caught my eye.
The blades of grass were
turning rusty brown and dull
yellow. Only small sprigs of
green remained in the mix. First
I made a few images with varying depths-of-field,
some showing just the grass tips in focus (#1).
Then I slowed down the shutter speed to 1/8th
of a second and panned the camera parallel to
the direction of the spreading grass blades to
create Òblurs.Ó
The process is simple. The camera must be in
motion for the entire length of the exposure (longer
than 1/15 of a second). If the motion pauses, starts
too soon or ends too early then elements of the
image will retain detail and the clean washes of
color will be less effective. Here is the same cluster
of grass using a vertical pan (#2).
I moved a few feet down the trail where a patch
of fireweed was a brilliant mix of red, orange and
green. First, I tried a quickly panned blur (#3)
followed by a slower movement (#4). The results
are two very different interpretations.
Colorful subjects are well suited to abstract blurs,
but donÕt limit yourself. A snowy walk in the forest
Photos © David Shaw
1
2

42 • PETERSEN’S PHOTOGRAPHIC DIGITAL PHOTOGRAPHY GUIDE • VOL. 23
OUTDOOR & ADVENTURE PHOTOGRAPHY
on a dim morning can also yield an interesting
interpretation of the scene (#5) even when a
standard landscape image would fail due to poor or
boring light.
Zoom BlursJust as the name implies, this technique requires
a zoom lens. These fun images often retain a
sense of the subject and can work to make creative
portraits, flower shots, landscapes, wildlife, action
or almost anything. Just as the camera must be
in motion throughout the entire exposure during
panning blurs, here the zoom must be in motion.
Start out with a stable subject, such as a patch of
flowers (#6). Begin your zoom, click the shutter
and don’t stop zooming until the exposure is over.
Try 1/10th of a second as a starting point. Zoom
blurs can create interesting effects of busy or
confused subjects, even a dense colony of King
Penguins (#7).
Subject BlurFor the previous techniques, it’s the camera or the
lens that needs to be in motion. But for this method,
the camera stays steady while your subject moves.
This is probably the most common use of blur in
photography and the results can be everything from
completely abstract to clear representations of your
3 5
4Photos © David Shaw

OUTDOOR & ADVENTURE PHOTOGRAPHY • 43
68
7 9
subject. Landscape images frequently incorporate
this technique to create the pleasing, soft-textured
feel of water.
Moving water, whether it’s a stream or a river
(#8) or waves on a beach (#9), is a great subject
for creative blurs. Exposures generally need to be
long—depending on the speed of the water. Slowly
rippling waves may require several seconds to blur
nicely (#10), while a fast tumbling creek or waterfall
may require only 1/15th of a second to create a
suitable sense of motion. Either way, the exposures
are long enough that you’ll need a solid tripod to
support you camera.
There are times when shooting slow might cause
overexposure, since the aperture might “max
out” at its narrowest setting. Keep the ISO as low
as possible and if you are still overexposing the
scene use a polarizer or a neutral density filter to
restrict the amount of light—neither will affect the
color. ND filters come in varying “strengths” (or
light restricting powers) with the higher numbers
indicating greater stopping power. Lacking those
add-on filters, shooting in low light will often
remove any problems.
While water is the obvious subject for this kind of
photography, don’t limit yourself to it. I was atop
a tundra ridge with my camera on a cool, windy
evening and I wasn’t having much luck. Just a few
minutes before I was about to lose the sun and give
up for the day, I noticed one of the many patches of
grass reaching out of the tundra. It sat on the edge
of the ridge right where the last of the day’s light
would catch it. I waited a few minutes for the sun
to move off the surrounding vegetation, leaving just

44 • PETERSEN’S PHOTOGRAPHIC DIGITAL PHOTOGRAPHY GUIDE • VOL. 23
OUTDOOR & ADVENTURE PHOTOGRAPHY
the blowing stems of dry grass in the light. I made a
single 1/4 of a second exposure the moment before
the light faded. The slow speed was enough to blur
the wind-blown grass to washes of gold (#11).
Action BlursBlurs, as we’ve seen with other subjects, are a great
way to imply motion in moving water and blowing
grass. But blurs can also be a very effective tool for
11
10Photos © David Shaw
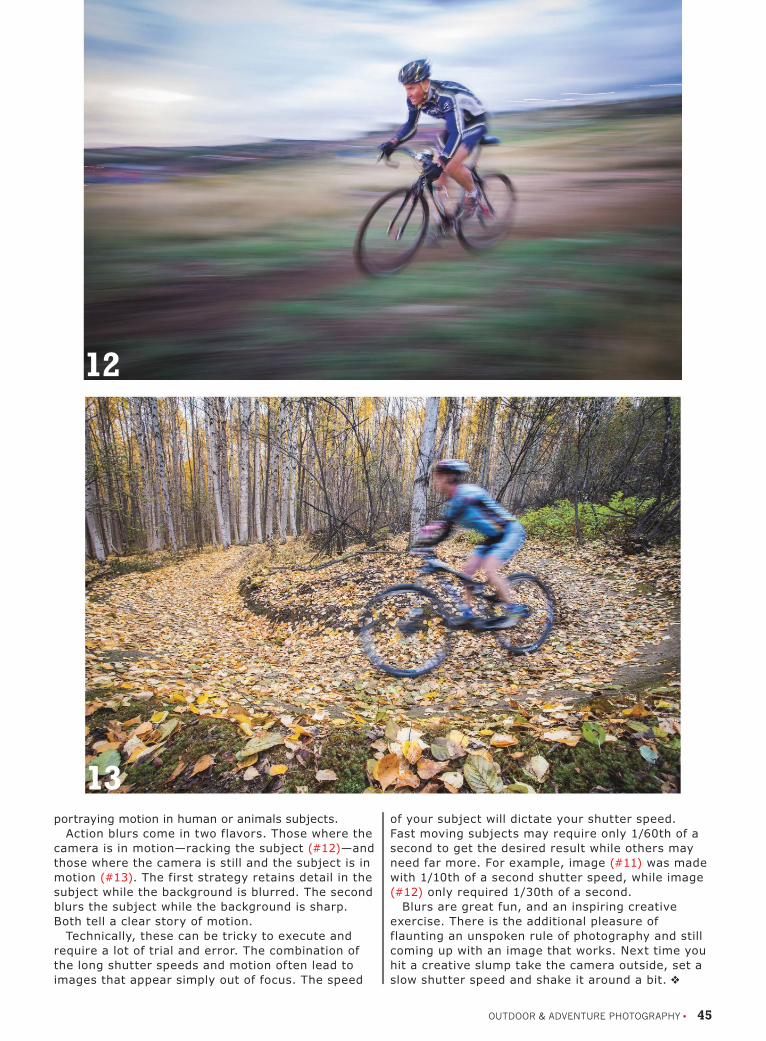
OUTDOOR & ADVENTURE PHOTOGRAPHY • 45
portraying motion in human or animals subjects.
Action blurs come in two flavors. Those where the
camera is in motion—racking the subject (#12)—and
those where the camera is still and the subject is in
motion (#13). The first strategy retains detail in the
subject while the background is blurred. The second
blurs the subject while the background is sharp.
Both tell a clear story of motion.
Technically, these can be tricky to execute and
require a lot of trial and error. The combination of
the long shutter speeds and motion often lead to
images that appear simply out of focus. The speed
of your subject will dictate your shutter speed.
Fast moving subjects may require only 1/60th of a
second to get the desired result while others may
need far more. For example, image (#11) was made
with 1/10th of a second shutter speed, while image
(#12) only required 1/30th of a second.
Blurs are great fun, and an inspiring creative
exercise. There is the additional pleasure of
flaunting an unspoken rule of photography and still
coming up with an image that works. Next time you
hit a creative slump take the camera outside, set a
slow shutter speed and shake it around a bit.
12
13
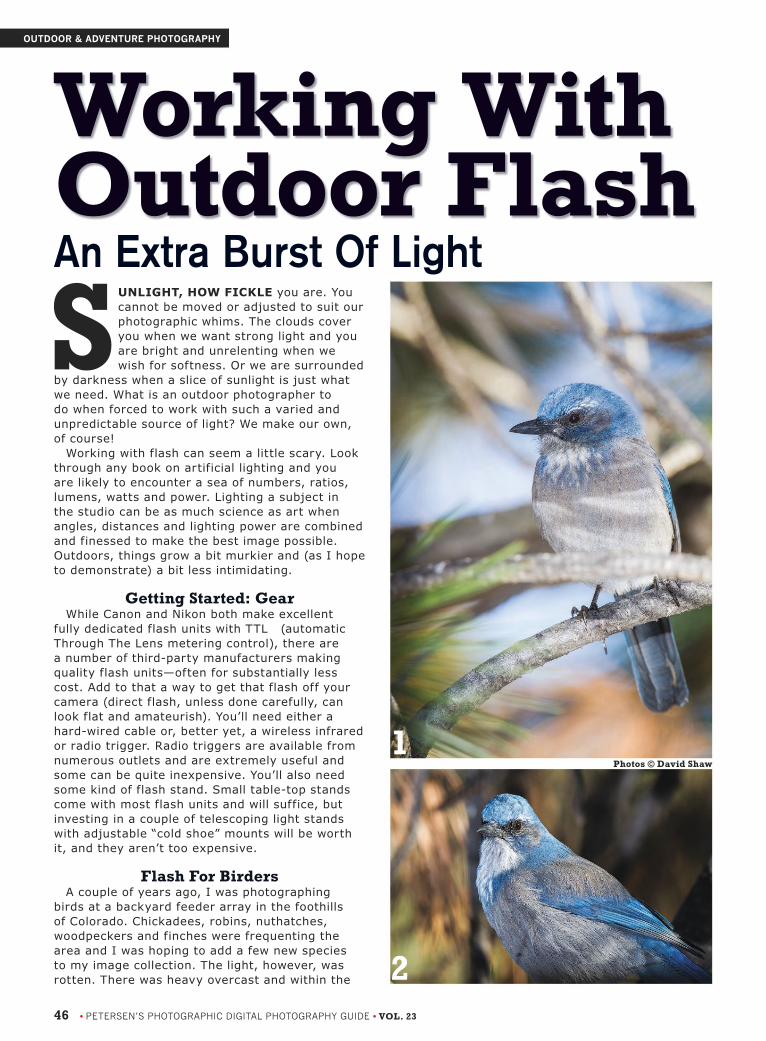
46 • PETERSEN’S PHOTOGRAPHIC DIGITAL PHOTOGRAPHY GUIDE • VOL. 23
OUTDOOR & ADVENTURE PHOTOGRAPHY
Working With Outdoor FlashAn Extra Burst Of Light
SUNLIGHT, HOW FICKLE you are. You
cannot be moved or adjusted to suit our
photographic whims. The clouds cover
you when we want strong light and you
are bright and unrelenting when we
wish for softness. Or we are surrounded
by darkness when a slice of sunlight is just what
we need. What is an outdoor photographer to
do when forced to work with such a varied and
unpredictable source of light? We make our own,
of course!
Working with flash can seem a little scary. Look
through any book on artificial lighting and you
are likely to encounter a sea of numbers, ratios,
lumens, watts and power. Lighting a subject in
the studio can be as much science as art when
angles, distances and lighting power are combined
and finessed to make the best image possible.
Outdoors, things grow a bit murkier and (as I hope
to demonstrate) a bit less intimidating.
Getting Started: GearWhile Canon and Nikon both make excellent
fully dedicated flash units with TTL (automatic
Through The Lens metering control), there are
a number of third-party manufacturers making
quality flash units—often for substantially less
cost. Add to that a way to get that flash off your
camera (direct flash, unless done carefully, can
look flat and amateurish). You’ll need either a
hard-wired cable or, better yet, a wireless infrared
or radio trigger. Radio triggers are available from
numerous outlets and are extremely useful and
some can be quite inexpensive. You’ll also need
some kind of flash stand. Small table-top stands
come with most flash units and will suffice, but
investing in a couple of telescoping light stands
with adjustable “cold shoe” mounts will be worth
it, and they aren’t too expensive.
Flash For BirdersA couple of years ago, I was photographing
birds at a backyard feeder array in the foothills
of Colorado. Chickadees, robins, nuthatches,
woodpeckers and finches were frequenting the
area and I was hoping to add a few new species
to my image collection. The light, however, was
rotten. There was heavy overcast and within the
Photos © David Shaw
1
2

OUTDOOR & ADVENTURE PHOTOGRAPHY • 47
dense branches of the pines where the birds were
loafing, it was dim indeed. After a few fruitless
efforts resulting in blurred or gray images I pulled
out a flash, radio triggers and a stand.
I set up the flash to my right and raised the stand
to a position about equal with my head and few feet
away. I pointed it at an area where the birds were
frequenting, set up my camera and lens on a tripod
and waited.
Within moments birds started moving through my
frame. A scrub jay perched briefly in the open and
with a click of the shutter and pop of the flash I was
able to assess my set-up. I found a harsh shadow
from a branch was thrown across the bird (#1)
so I moved the flash a bit closer to me and tried
again (#2). With the next exposure the angle of the
light was just right and I kept on working. A downy
woodpecker (#3), a red-breasted nuthatch (#4),
an American robin (#5) and other species came
through what looks like a patch of low-angle sun.
But it wasn’t sunlight—it was the magic of flash.
Later I shifted locations down near the ground,
where the snow provided a clean white backdrop.
The flash created a nearly cutout, studio-like look
3
5
4

48 • PETERSEN’S PHOTOGRAPHIC DIGITAL PHOTOGRAPHY GUIDE • VOL. 23
to the images. In fact,
I’ve sold several of these
images just for that reason
(#6 & #7).
Flash And The Landscape
On clear nights—after
the sun has slipped
below the horizon—the
sky becomes a smear of
deepening blue. The pale
light creates deep shadows
and black silhouettes.
It’s called the “blue hour”
and it is the time between
sunset (or sunrise) and
when true darkness (or
daylight) takes over. By
the time the blue has
erupted in the sky, most
photographers have
packed up their gear and
headed home. They are
missing out.
Blue hour and other night
photography techniques
can be, and often are,
entirely successful without
any artificial light. So
first it is necessary to
determine whether extra
light is even desired and
don’t assume that it is.
Unlike astral
photography, when it’s
easiest to pre-focus your
camera to the infinity
line and leave it, during
the blue hour foreground
elements are often
the subject (#8 & #9).
Therefore you’ll need to
constantly be adjusting
the focus. Since most
cameras will not be able
to autofocus in the near
darkness, you’ll have to set
it manually. Manual focus
can be tricky in the dark—
our eyes are not always
the best at distinguishing
between a sharp and a
slightly unsharp subject.
To avoid disappointment,
use your camera’s LCD to
confirm the focus on a test
shot and then adjust it as
necessary. Once it’s set,
don’t touch it again until
you change compositions.
Exposure is perhaps the
most difficult aspect of
OUTDOOR & ADVENTURE PHOTOGRAPHY
7
8
6Photos © David Shaw

OUTDOOR & ADVENTURE PHOTOGRAPHY • 49
blue hour photography, particularly when
flash is incorporated. Rely on your camera’s
histogram, not just the image on the LCD
screen when you are determining your
exposure. (LCD screens are notoriously
difficult to interpret in low-light conditions.)
Blue hour images are naturally dark and so
a graph pushed to the left is fine, but watch
out that it isn’t too far over. You will want
at least some definition in the dark areas
of your image. If you are adding a flash,
watch the highlights to make sure that you
aren’t burning them through overexposure.
Integrating Flash I was photographing on a winter
evening along a ridge in Colorado’s Front
Range. The sun had set some time before
and the sky was a deep, rich blue. The
small scrubby trees made perfect black
silhouettes in front of the darkening sky
(#10). When I spotted a small spindly
Pinion Pine perched atop a rock outcrop.
I set up my camera and tripod, composed
the image, determined the exposure
and clicked the shutter. The result was a
pleasing composition of blues and blacks
(#11). But I knew I could take the scene
further. I wanted some texture to provide
depth to the rocky foreground, and show
details in the hardy little tree.
I reached into my pack and pulled out
a flash, a tabletop stand and a couple of
cheap radio-triggers. I set the flash up on
a boulder a few feet above the ground and
about 10 feet to my left, pointed it toward
the tree and turned the power down low,
then I snapped the shutter again. The pop
of light provided some pale illumination to
the foreground but the color of the flash,
toned to emulate daylight was too white—
garish in these circumstances.
Again I reached for my pack, this
time pulling out a sheet of CTO (Color
Temperature Orange) gel, which I attached
over the flash with Velcro. Again, I snapped
the shutter. Glowing on the LCD was exactly
the image I wanted (#12). The warm light
was just a splash across the scene, almost
like a last beam of sunlight. The depth,
11 12
10
9

50 • PETERSEN’S PHOTOGRAPHIC DIGITAL PHOTOGRAPHY GUIDE • VOL. 23
color and texture made visible by the use of the
flash greatly improved the photograph.
A bit of light on a scene can change the tone of a
blue hour image. Light can warm the photo and pull
elements from the darkness. And yet, flash is risky.
Shortly after I made the successful image of the
pinion, I tried a new, broader landscape composition
using the same technique (#13). Clearly, the light on
the foreground shrubs is unnatural, yet it provides
a new element. It’s been years since I made the
image and I’m still unsure how I feel about it.
Light PaintingAnother technique for lighting large subjects
is “light painting”. This method requires only a
flashlight and a long shutter speed. Light painting
is so named because during the course of the
exposure you “paint” the light across your image.
This can be the entire foreground or you can be
more selective.
I made this image during a stay at a farm
in northern Argentina (#14). The mix of porch
lights, the headlights of a passing car and my own
headlamp combine to create an image that (aside
from the sky) is lit entirely by non-flash, artificial
light. The long, 15-second, shutter speed allowed
sufficient time to light the scene.
Artificial light adds a new element to outdoor
photography that—unlike the weather, the sun
or the activity of wildlife—is actually under our
control. Yet, flash does complicate things and I use
it judiciously, but knowledge of how to add your
own light outdoors can become another tool in your
kit. With it you can make images that are otherwise
impossible and exploring the options it affords can
be great fun.
14
13Photos © David Shaw
OUTDOOR & ADVENTURE PHOTOGRAPHY

6/$0.130.*4*/(�
Quality, reliability and versatility.
The 17-70mm F2.8-4 lens, designed for
APS-C format cameras, delivers stunning
images in a lens 30% smaller than
conventional models.
SIGMA Corporation of America | 15 Fleetwood Court | Ronkonkoma, NY 11779, U.S.A. | Tel: (631) 585-1144 | www.SigmaPhoto.comFollow us Twitter @sigma_photo and Facebook.com/sigmacorporationofamerica
Case and Hood LH780-03 included.
*OS is not available for Pentax and Sony mount
USA 4 Year Service Protection
�����NN�'������%$�
.BDSP�04�)4.
4*(."�64#�%PDL
Update, adjust & personalize. Customization never thought possible. Sold separately.

������NN�'�������
%$�."$30�04�)4.Case, hood (LH676-01) included. USA 4 Year Service Protection
A standard superzoom offering
outstanding optical performance
throughout the entire zoom range.
The definitive ultra-compact all-in-one
lens for the high-megapixel era.
UPGRADE.
4*(."�64#�%PDL
Update, adjust & personalize. Customization never thought possible. Sold separately.
SIGMA Corporation of America | 15 Fleetwood Court | Ronkonkoma, NY 11779, U.S.A. | Tel: (631) 585-1144 | www.SigmaPhoto.comFollow us Twitter @sigma_photo and Facebook.com/sigmacorporationofamerica
![[English] - media.ao.com · Volum de depozitare alimente proaspete [ L ] Volum de depozitare în frigider [ L ] Volum de depozitare alimente congelate [ L ] Patru stele [ L ] Două](https://img.pdfslide.us/doc/110x75/5e0ff5387a7c6c670478fe4a/english-mediaaocom-volum-de-depozitare-alimente-proaspete-l-volum-de-depozitare.jpg)