Embed Size (px)
Citation preview

Combo Ver July 2015 www.CompStone.com
Outdoor Living
Pergola Assembly Guide
Pictured above: Custom 18’ X 18’ Compstone PergolaNote: Waterfall bar not included
2
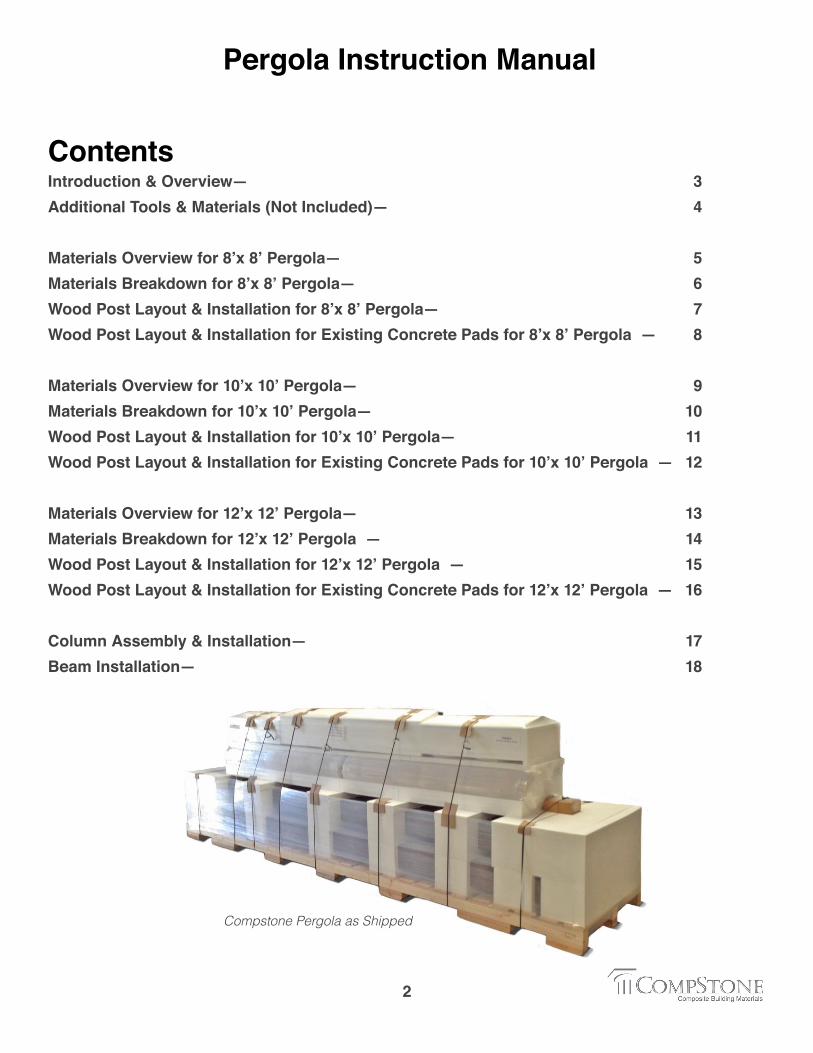
ContentsIntroduction & Overview— 3Additional Tools & Materials (Not Included)— 4 Materials Overview for 8’x 8’ Pergola— 5Materials Breakdown for 8’x 8’ Pergola— 6Wood Post Layout & Installation for 8’x 8’ Pergola— 7Wood Post Layout & Installation for Existing Concrete Pads for 8’x 8’ Pergola — 8
Materials Overview for 10’x 10’ Pergola— 9Materials Breakdown for 10’x 10’ Pergola— 10Wood Post Layout & Installation for 10’x 10’ Pergola— 11Wood Post Layout & Installation for Existing Concrete Pads for 10’x 10’ Pergola — 12
Materials Overview for 12’x 12’ Pergola— 13Materials Breakdown for 12’x 12’ Pergola — 14Wood Post Layout & Installation for 12’x 12’ Pergola — 15Wood Post Layout & Installation for Existing Concrete Pads for 12’x 12’ Pergola — 16
Column Assembly & Installation— 17Beam Installation— 18
Pergola Instruction Manual
Compstone Pergola as Shipped
3
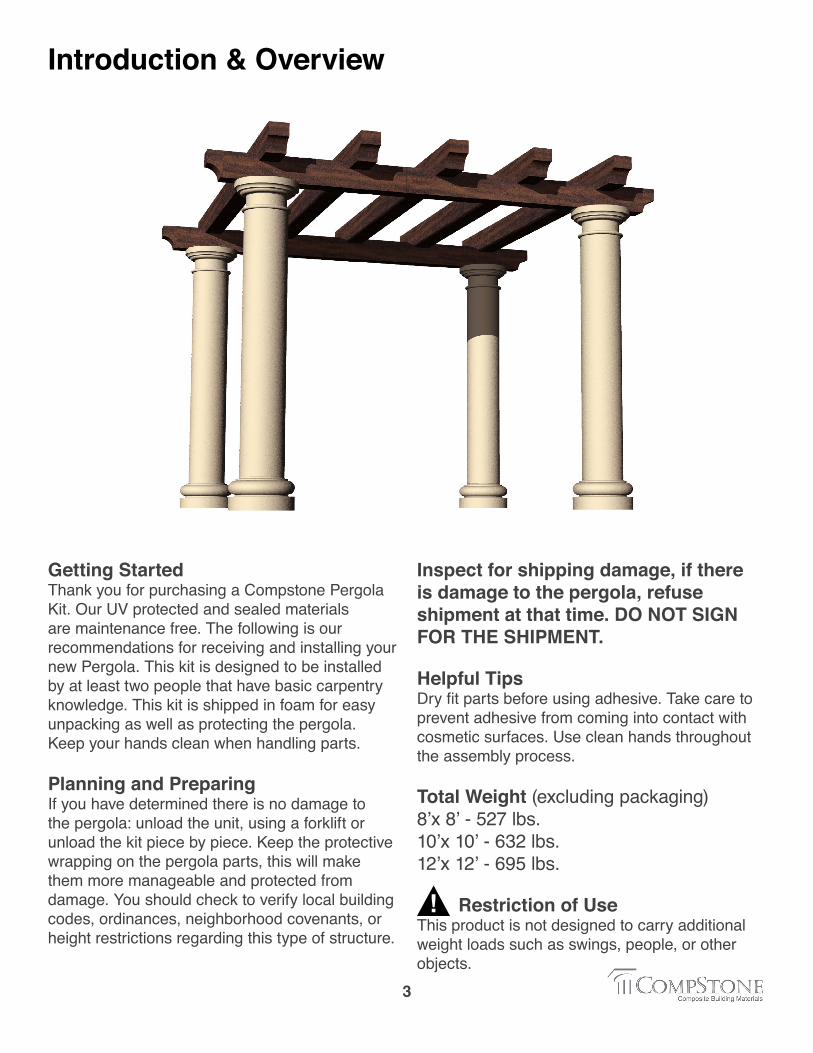
Introduction & Overview
Getting StartedThank you for purchasing a Compstone Pergola Kit. Our UV protected and sealed materials are maintenance free. The following is our recommendations for receiving and installing your new Pergola. This kit is designed to be installed by at least two people that have basic carpentry knowledge. This kit is shipped in foam for easy unpacking as well as protecting the pergola. Keep your hands clean when handling parts.
Planning and PreparingIf you have determined there is no damage to the pergola: unload the unit, using a forklift or unload the kit piece by piece. Keep the protective wrapping on the pergola parts, this will make them more manageable and protected from damage. You should check to verify local building codes, ordinances, neighborhood covenants, or height restrictions regarding this type of structure.
Inspect for shipping damage, if there is damage to the pergola, refuse shipment at that time. DO NOT SIGN FOR THE SHIPMENT.
Helpful TipsDry fit parts before using adhesive. Take care to prevent adhesive from coming into contact with cosmetic surfaces. Use clean hands throughout the assembly process.
Total Weight (excluding packaging)8’x 8’ - 527 lbs.10’x 10’ - 632 lbs. 12’x 12’ - 695 lbs.
Restriction of UseThis product is not designed to carry additional weight loads such as swings, people, or other objects.
!
4
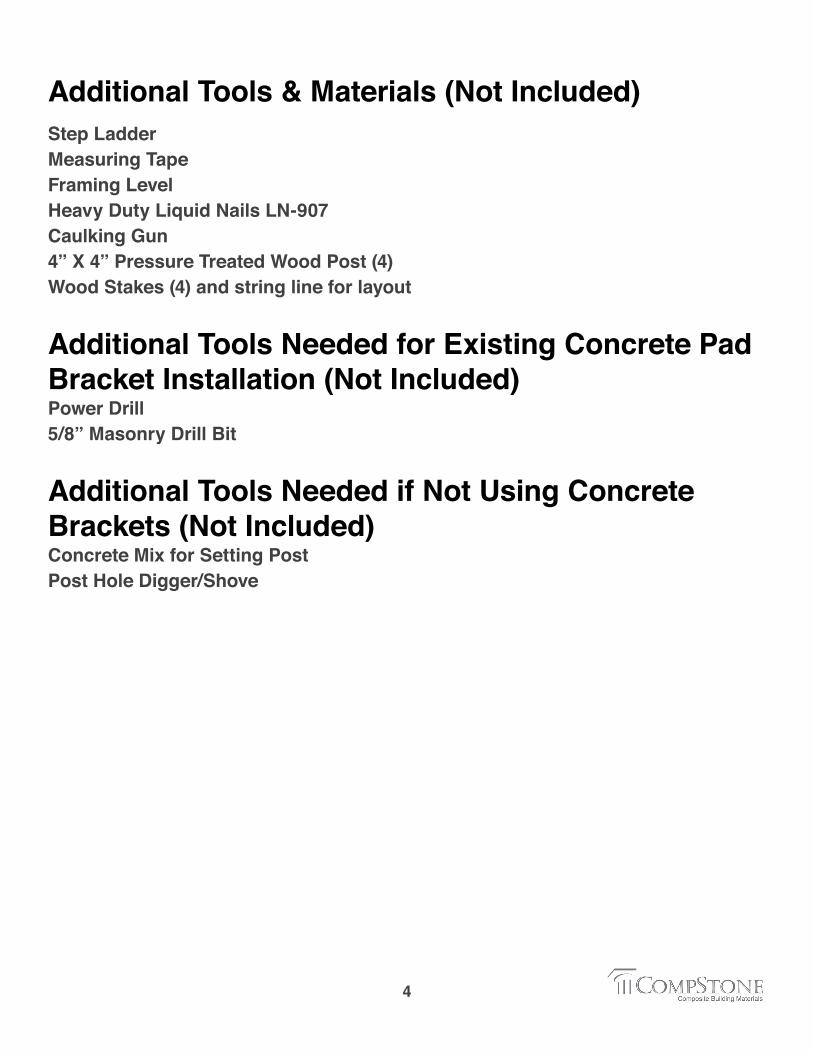
Additional Tools & Materials (Not Included)Step LadderMeasuring TapeFraming Level Heavy Duty Liquid Nails LN-907Caulking Gun4” X 4” Pressure Treated Wood Post (4)Wood Stakes (4) and string line for layout
Additional Tools Needed for Existing Concrete Pad Bracket Installation (Not Included)Power Drill5/8” Masonry Drill Bit
Additional Tools Needed if Not Using Concrete Brackets (Not Included)Concrete Mix for Setting PostPost Hole Digger/Shove
5
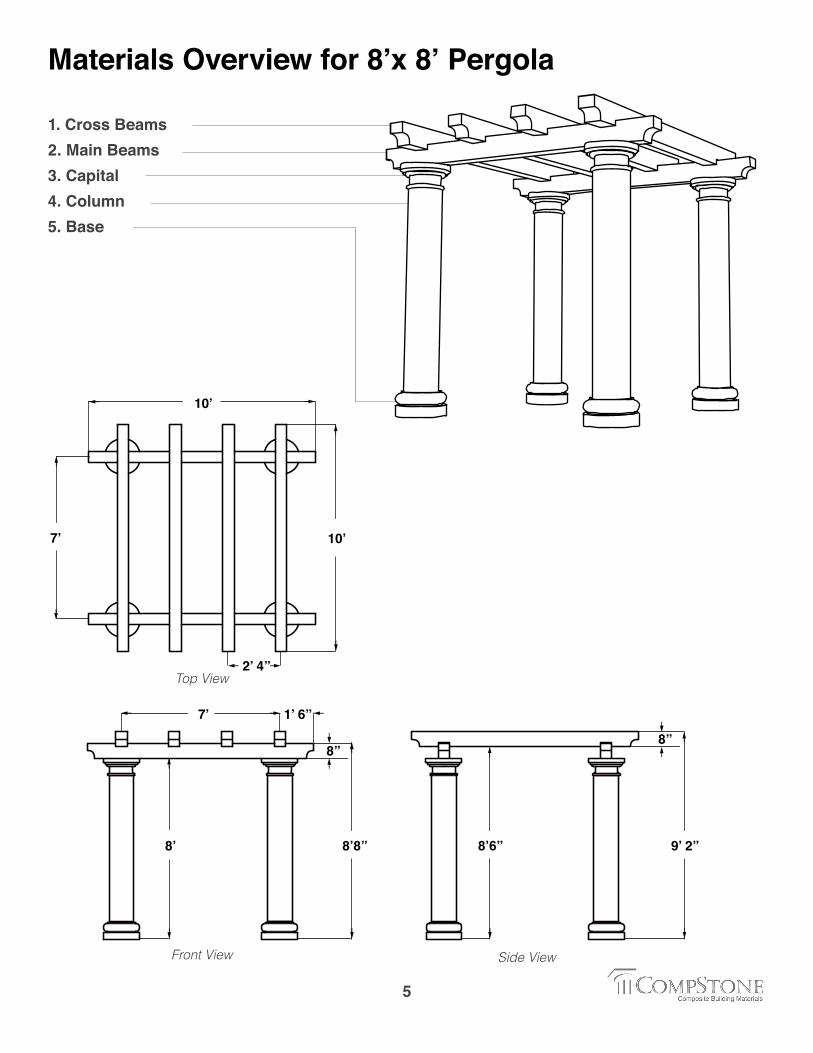
Materials Overview for 8’x 8’ Pergola
Top View
Front View Side View
1. Cross Beams2. Main Beams3. Capital 4. Column 5. Base
10ʼ
2 ̓4”
1 ̓6”
8”
7ʼ
10ʼ
8”
9 ̓2”8ʼ6”8ʼ8”8ʼ
7ʼ
6
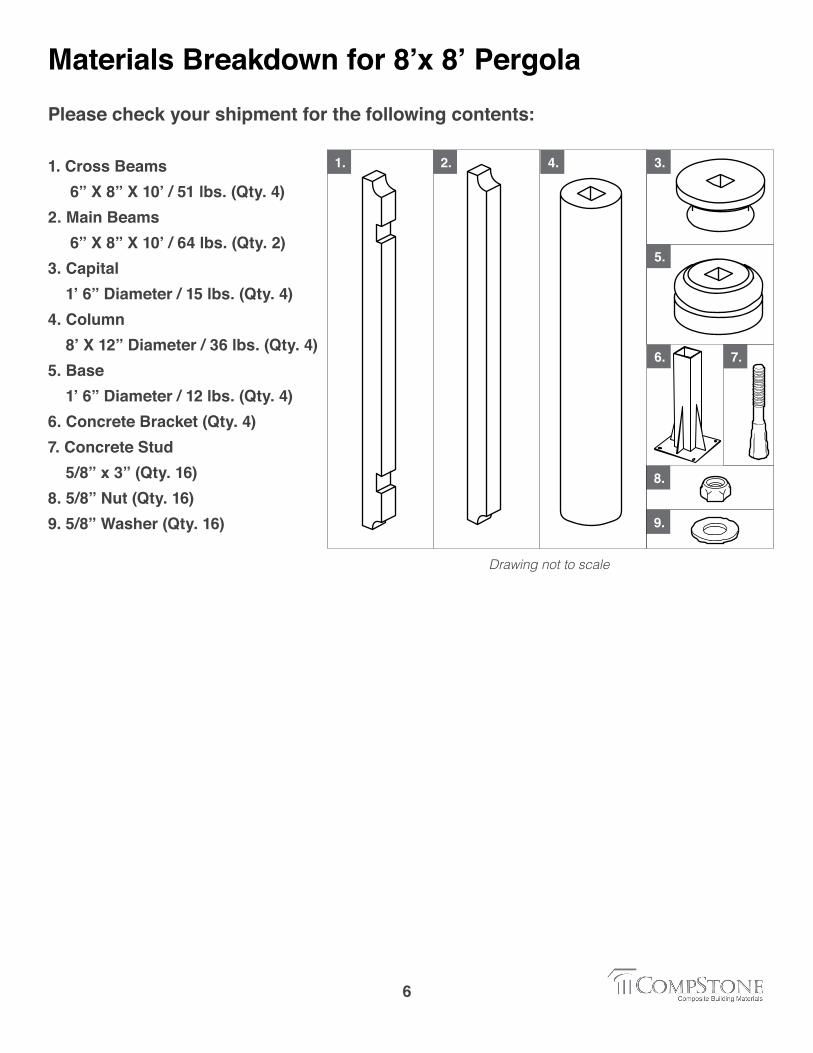
Materials Breakdown for 8’x 8’ PergolaPlease check your shipment for the following contents:
1. Cross Beams 6” X 8” X 10’ / 51 lbs. (Qty. 4)2. Main Beams 6” X 8” X 10’ / 64 lbs. (Qty. 2)3. Capital 1’ 6” Diameter / 15 lbs. (Qty. 4) 4. Column 8’ X 12” Diameter / 36 lbs. (Qty. 4) 5. Base 1’ 6” Diameter / 12 lbs. (Qty. 4)6. Concrete Bracket (Qty. 4)7. Concrete Stud 5/8” x 3” (Qty. 16)8. 5/8” Nut (Qty. 16)9. 5/8” Washer (Qty. 16)
Drawing not to scale
9.
8.
7.
1. 2. 4. 3.
5.
6.
7
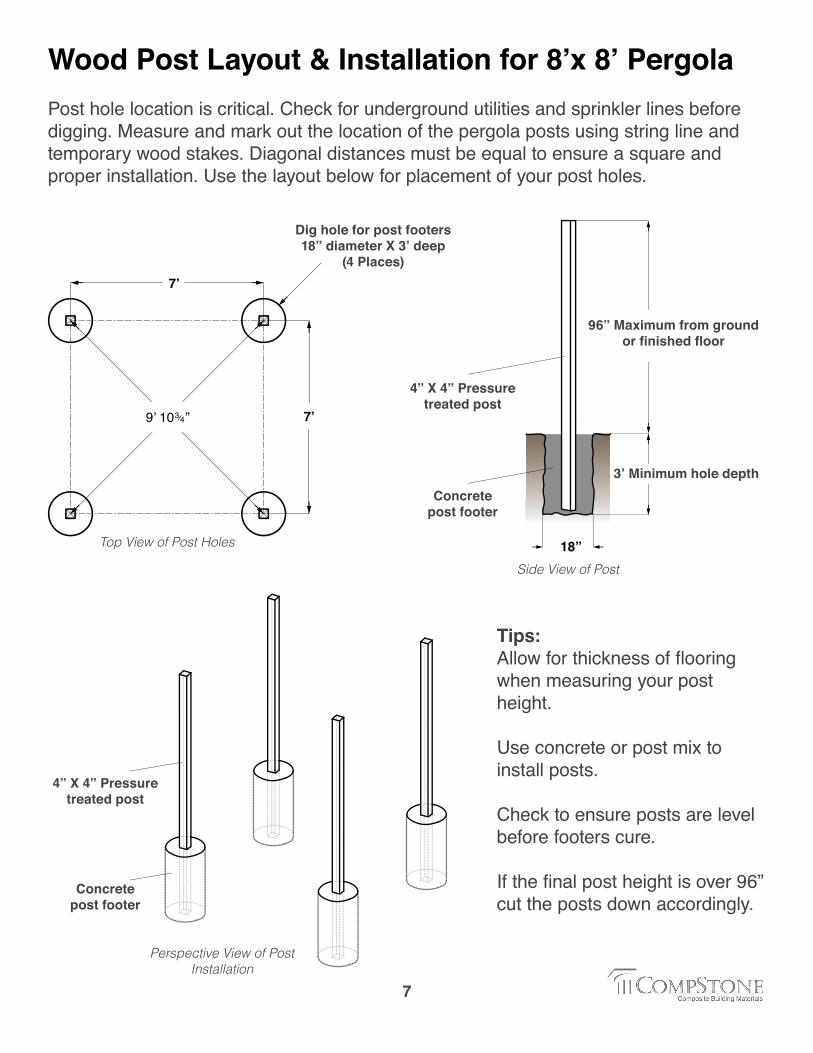
Wood Post Layout & Installation for 8’x 8’ PergolaPost hole location is critical. Check for underground utilities and sprinkler lines before digging. Measure and mark out the location of the pergola posts using string line and temporary wood stakes. Diagonal distances must be equal to ensure a square and proper installation. Use the layout below for placement of your post holes.
Tips:Allow for thickness of flooring when measuring your post height.
Use concrete or post mix to install posts.
Check to ensure posts are level before footers cure.
If the final post height is over 96” cut the posts down accordingly.
Dig hole for post footers18” diameter X 3’ deep
(4 Places)
4” X 4” Pressure treated post
4” X 4” Pressure treated post
Concrete post footer
Top View of Post Holes
Side View of Post
Concrete post footer
3’ Minimum hole depth
96” Maximum from ground or finished floor
Perspective View of Post Installation
18”
7ʼ
7ʼ
9ʼ 10 ”

8
Wood Post Layout & Installation for Existing Concrete Pads for 8’x 8’ Pergola Identifying the location for your Wood Post installation is critical. Measure and mark out the location of the pergola posts using string line. Diagonal distances must be equal to ensure a square and proper installation. Place the concrete brackets in the center of each post location and using the bracket as a guide, drill (4), 5/8” diameter 3” deep holes into concrete. Insert the 3” stud, place the bracket over the bolt and tighten the nuts as pictured below. Once secured, insert the 4x4 post into the 4” tube. Use the layout below for placement of your post brackets.
Tips:Allow for thickness of flooring when measuring your post height.
To install studs, screw on nut, hammer into concrete, then unscrew before placing bracket.
If the final post height is over 96” cut the posts down accordingly.
Check to ensure posts are level before installing pergola.
Drill (4), 3” deep holes for bracket studs (4 Places)
4” X 4” Pressure treated post
ConcreteBracket
Top View of Post LocationPerspective View of Bracket Installation
5/8” Nut5/8” Washer
5/8” x 3” Concrete Stud
96” Maximum from concrete or finished floor
Perspective View of Post Installation on Concrete
7ʼ
7ʼ
9ʼ 10 ”
9
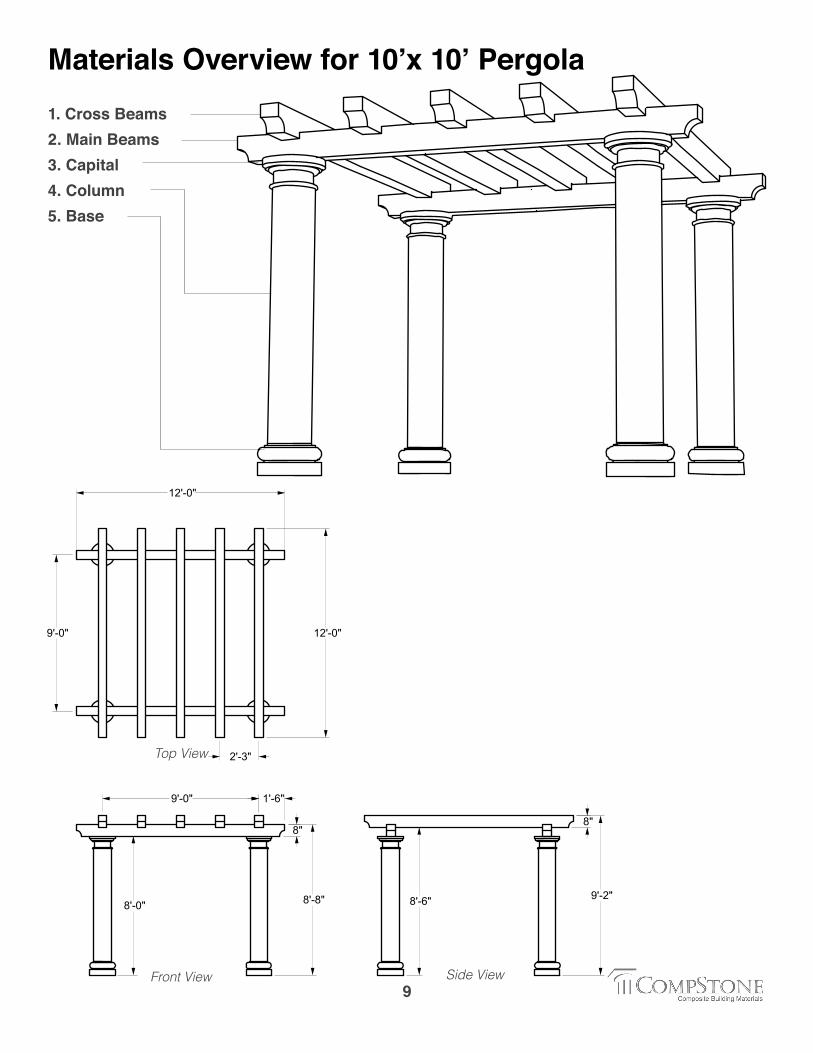
Materials Overview for 10’x 10’ Pergola
Top View
Front View Side View
1. Cross Beams2. Main Beams3. Capital 4. Column 5. Base
9'-0"
2'-3"
12'-0"
12'-0"
8'-0" 8'-8"
8"
1'-6"9'-0"
9'-2"8'-6"
8"

10
Materials Breakdown for 10’x 10’ PergolaPlease check your shipment for the following contents:
1. Cross Beams 6” X 8” X 12’ / 51 lbs. (Qty. 5)2. Main Beams 6” X 8” X 12’ / 64 lbs. (Qty. 2)3. Capital 1’ 6” Diameter / 15 lbs. (Qty. 4) 4. Column 8’ X 12” Diameter / 36 lbs. (Qty. 4) 5. Base 1’ 6” Diameter / 12 lbs. (Qty. 4)6. Concrete Bracket (Qty. 4)7. Concrete Stud 5/8” x 3” (Qty. 16)8. 5/8” Nut (Qty. 16)9. 5/8” Washer (Qty. 16)
Drawing not to scale
9.
8.
7.
1. 2. 4. 3.
5.
6.
11
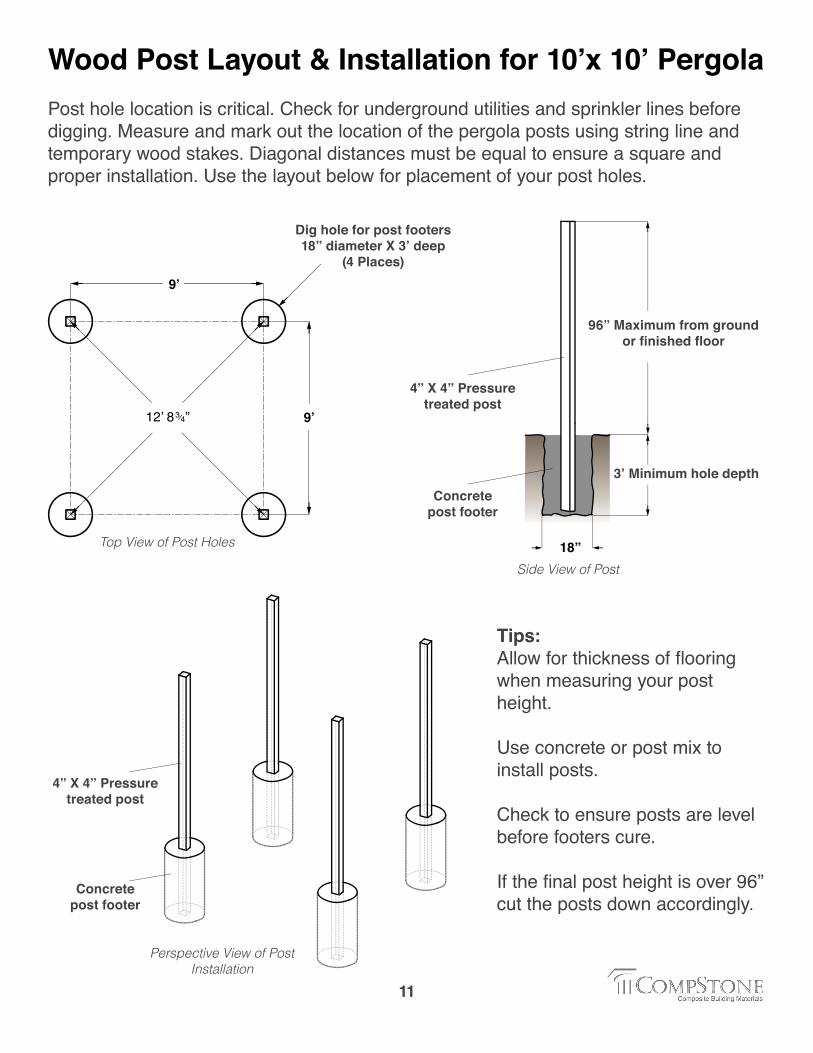
Wood Post Layout & Installation for 10’x 10’ PergolaPost hole location is critical. Check for underground utilities and sprinkler lines before digging. Measure and mark out the location of the pergola posts using string line and temporary wood stakes. Diagonal distances must be equal to ensure a square and proper installation. Use the layout below for placement of your post holes.
Tips:Allow for thickness of flooring when measuring your post height.
Use concrete or post mix to install posts.
Check to ensure posts are level before footers cure.
If the final post height is over 96” cut the posts down accordingly.
Dig hole for post footers18” diameter X 3’ deep
(4 Places)
4” X 4” Pressure treated post
4” X 4” Pressure treated post
Concrete post footer
Top View of Post Holes
Side View of Post
Concrete post footer
3’ Minimum hole depth
96” Maximum from ground or finished floor
Perspective View of Post Installation
18”
9ʼ
9ʼ
12ʼ 8 ”

12
Wood Post Layout & Installation for Existing Concrete Pads for 10’x 10’ Pergola Identifying the location for your Wood Post installation is critical. Measure and mark out the location of the pergola posts using string line. Diagonal distances must be equal to ensure a square and proper installation. Place the concrete brackets in the center of each post location and using the bracket as a guide, drill (4), 5/8” diameter 3” deep holes into concrete. Insert the 3” stud, place the bracket over the bolt and tighten the nuts as pictured below. Once secured, insert the 4x4 post into the 4” tube. Use the layout below for placement of your post brackets.
Tips:Allow for thickness of flooring when measuring your post height.
To install studs, screw on nut, hammer into concrete, then unscrew before placing bracket.
If the final post height is over 96” cut the posts down accordingly.
Check to ensure posts are level before installing pergola.
Drill (4), 3” deep holes for bracket studs (4 Places)
4” X 4” Pressure treated post
ConcreteBracket
Top View of Post Location
Perspective View of Bracket Installation
5/8” Nut5/8” Washer
5/8” x 3” Concrete Stud
96” Maximum from concrete or finished floor
Perspective View of Post Installation on Concrete
9ʼ
9ʼ
12ʼ 8 ”
13
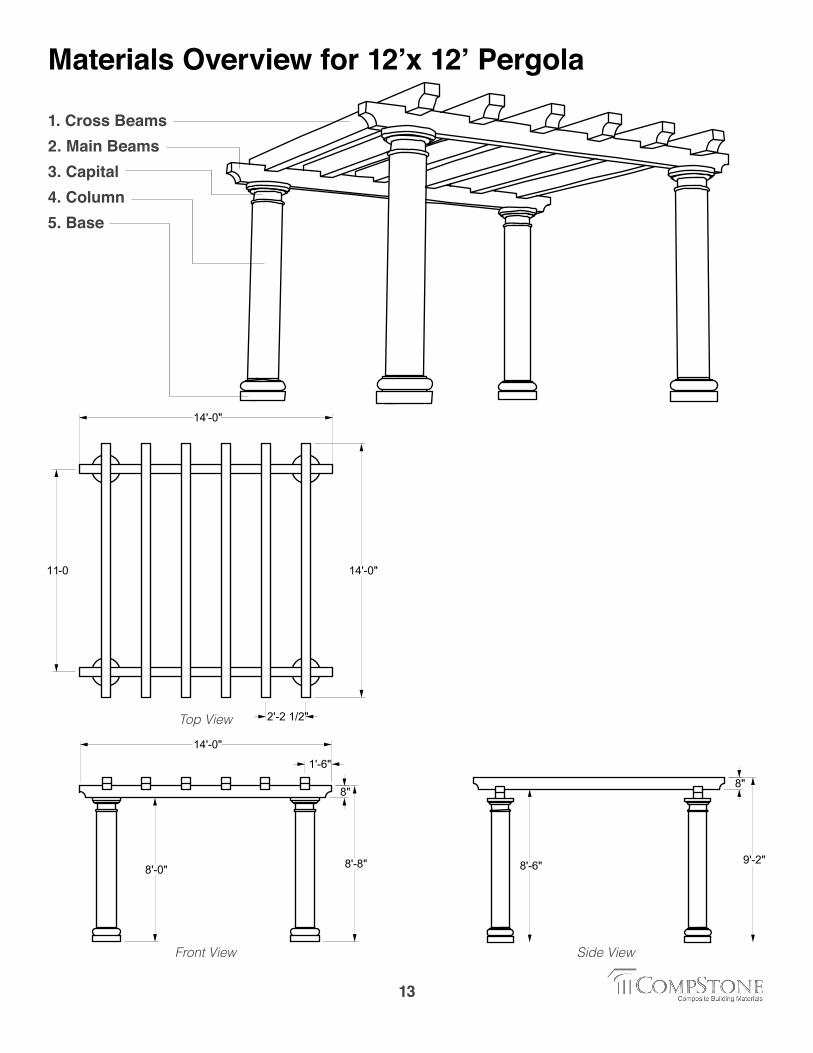
Materials Overview for 12’x 12’ Pergola
Top View
Front View Side View
1. Cross Beams2. Main Beams3. Capital 4. Column 5. Base
8"
8'-6" 9'-2"
14'-0"
8'-8"8'-0"
1'-6"
8"
14'-0"
11-0
2'-2 1/2"
14'-0"
14
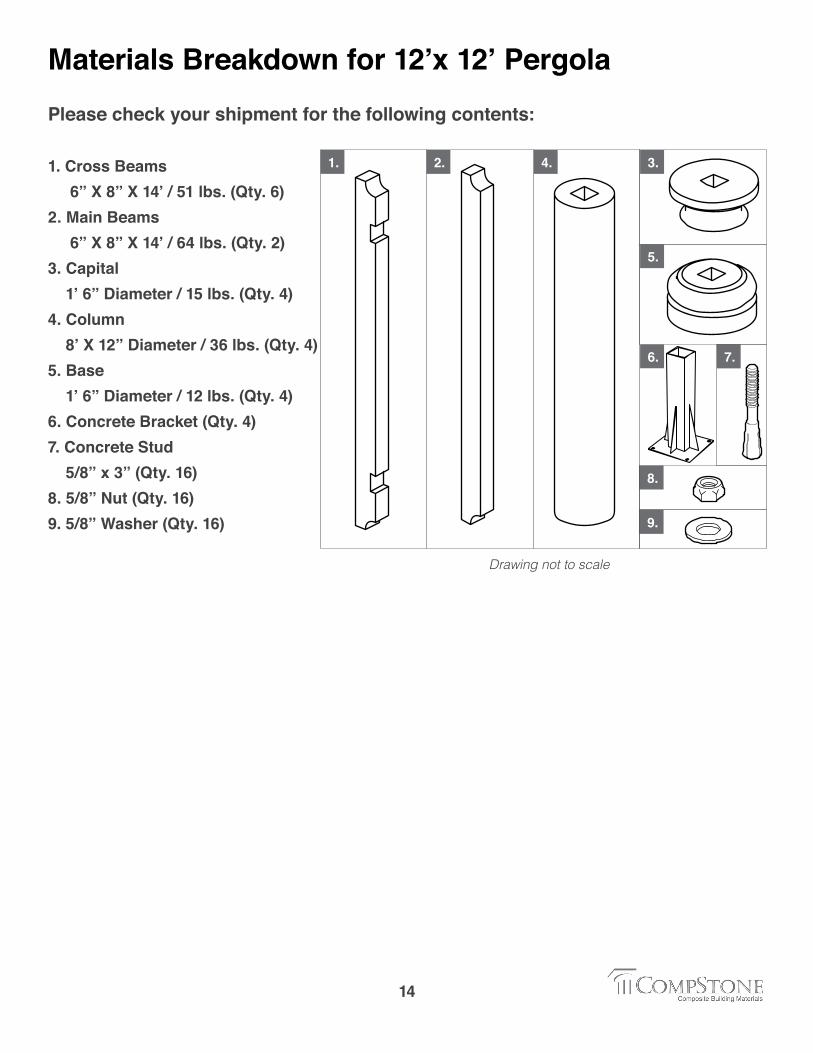
Materials Breakdown for 12’x 12’ Pergola Please check your shipment for the following contents:
1. Cross Beams 6” X 8” X 14’ / 51 lbs. (Qty. 6)2. Main Beams 6” X 8” X 14’ / 64 lbs. (Qty. 2)3. Capital 1’ 6” Diameter / 15 lbs. (Qty. 4) 4. Column 8’ X 12” Diameter / 36 lbs. (Qty. 4) 5. Base 1’ 6” Diameter / 12 lbs. (Qty. 4)6. Concrete Bracket (Qty. 4)7. Concrete Stud 5/8” x 3” (Qty. 16)8. 5/8” Nut (Qty. 16)9. 5/8” Washer (Qty. 16)
Drawing not to scale
9.
8.
7.
1. 2. 4. 3.
5.
6.
15
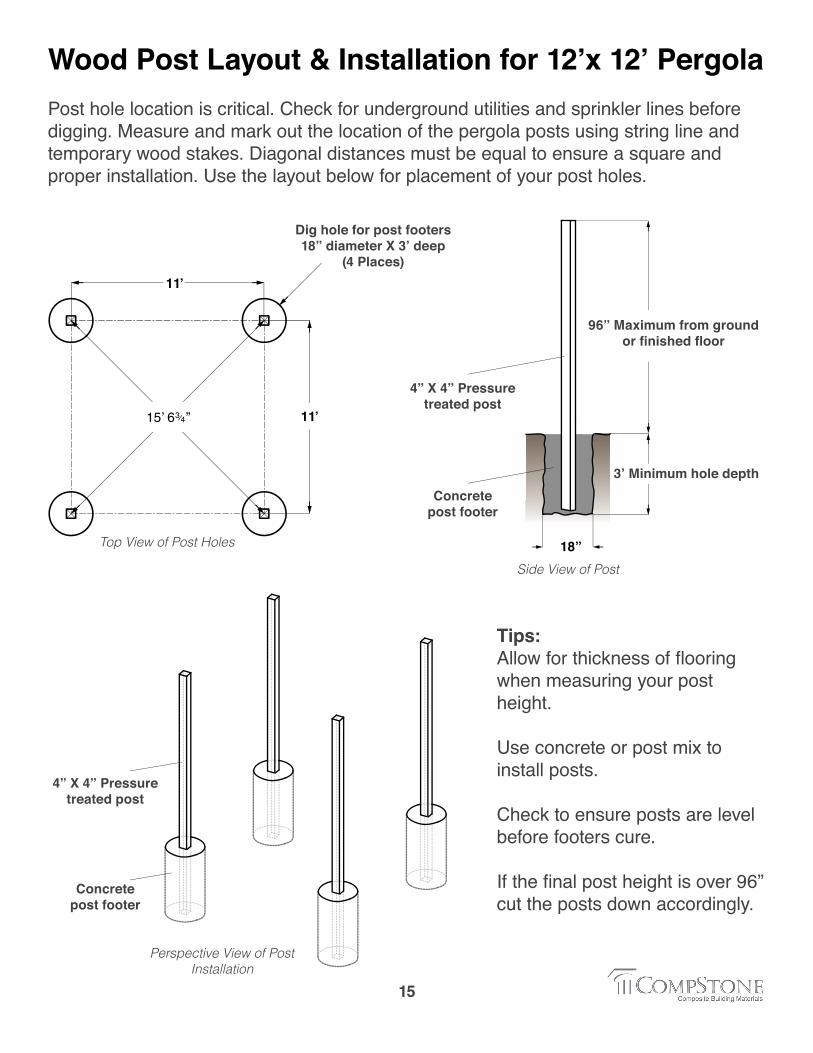
Wood Post Layout & Installation for 12’x 12’ Pergola Post hole location is critical. Check for underground utilities and sprinkler lines before digging. Measure and mark out the location of the pergola posts using string line and temporary wood stakes. Diagonal distances must be equal to ensure a square and proper installation. Use the layout below for placement of your post holes.
Tips:Allow for thickness of flooring when measuring your post height.
Use concrete or post mix to install posts.
Check to ensure posts are level before footers cure.
If the final post height is over 96” cut the posts down accordingly.
Dig hole for post footers18” diameter X 3’ deep
(4 Places)
4” X 4” Pressure treated post
4” X 4” Pressure treated post
Concrete post footer
Top View of Post Holes
Side View of Post
Concrete post footer
3’ Minimum hole depth
96” Maximum from ground or finished floor
Perspective View of Post Installation
11ʼ
18”
11ʼ
15ʼ 6 ”

16
Wood Post Layout & Installation for Existing Concrete Pads for 12’x 12’ Pergola Identifying the location for your Wood Post installation is critical. Measure and mark out the location of the pergola posts using string line. Diagonal distances must be equal to ensure a square and proper installation. Place the concrete brackets in the center of each post location and using the bracket as a guide, drill (4), 5/8” diameter 3” deep holes into concrete. Insert the 3” stud, place the bracket over the bolt and tighten the nuts as pictured below. Once secured, insert the 4x4 post into the 4” tube. Use the layout below for placement of your post brackets.
Tips:Allow for thickness of flooring when measuring your post height.
To install studs, screw on nut, hammer into concrete, then unscrew before placing bracket.
If the final post height is over 96” cut the posts down accordingly.
Check to ensure posts are level before installing pergola.
Drill (4), 3” deep holes for bracket studs (4 Places)
4” X 4” Pressure treated post
ConcreteBracket
Top View of Post Location
Perspective View of Bracket Installation
5/8” Nut5/8” Washer
5/8” x 3” Concrete Stud
96” Maximum from concrete or finished floor
Perspective View of Post Installation on Concrete
11ʼ
11ʼ
15ʼ 6 ”
17
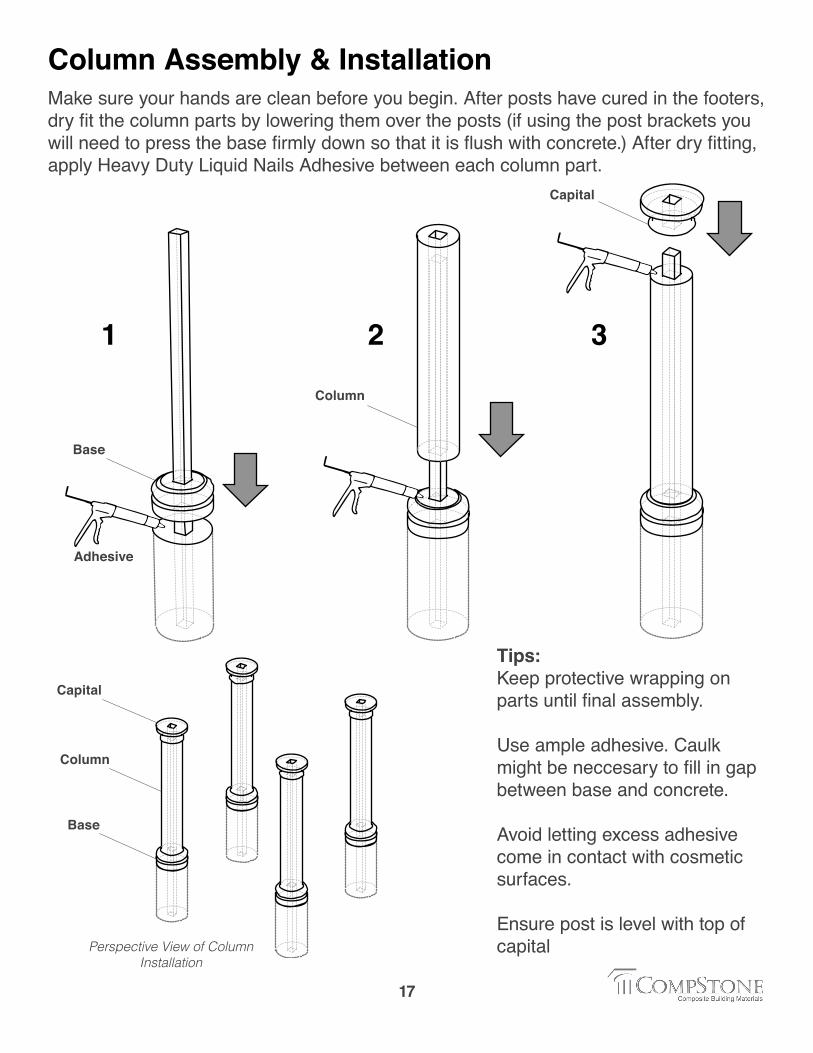
Column Assembly & InstallationMake sure your hands are clean before you begin. After posts have cured in the footers, dry fit the column parts by lowering them over the posts (if using the post brackets you will need to press the base firmly down so that it is flush with concrete.) After dry fitting, apply Heavy Duty Liquid Nails Adhesive between each column part.
Tips:Keep protective wrapping on parts until final assembly.
Use ample adhesive. Caulk might be neccesary to fill in gap between base and concrete.
Avoid letting excess adhesive come in contact with cosmetic surfaces.
Ensure post is level with top of capital
1 2 3
Adhesive
Base
Base
Column
Column
Capital
Capital
Perspective View of Column Installation
18
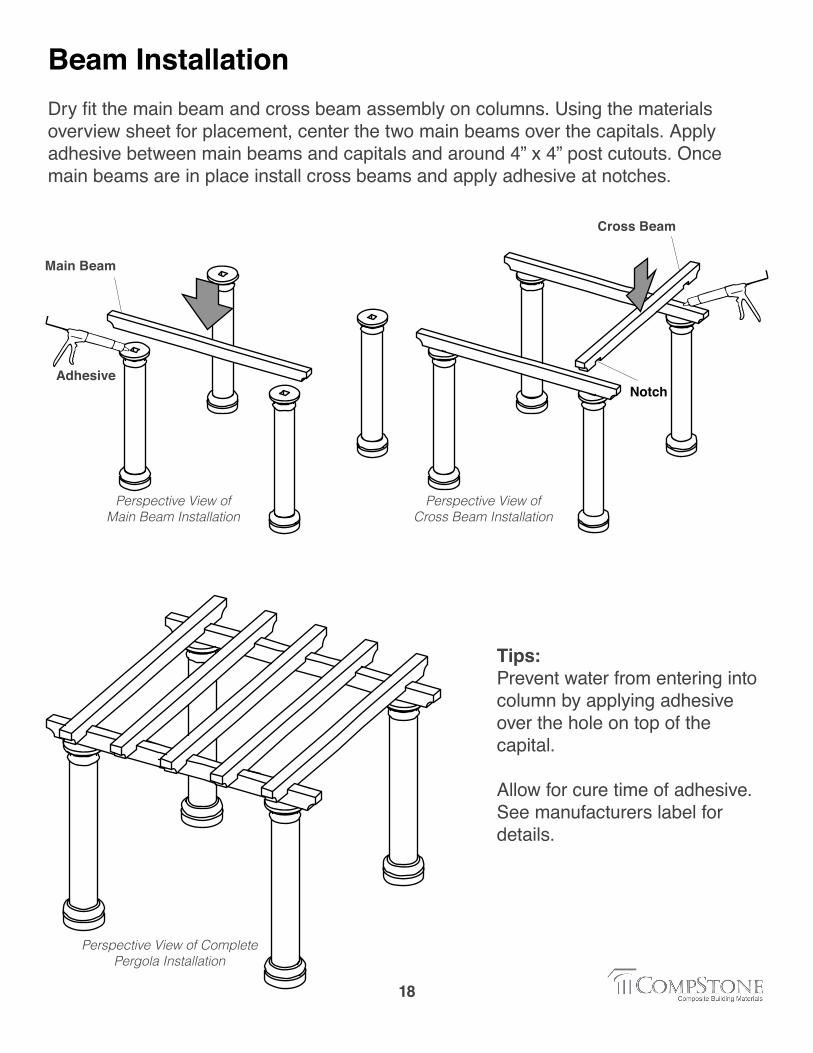
Beam InstallationDry fit the main beam and cross beam assembly on columns. Using the materials overview sheet for placement, center the two main beams over the capitals. Apply adhesive between main beams and capitals and around 4” x 4” post cutouts. Once main beams are in place install cross beams and apply adhesive at notches.
Tips:Prevent water from entering into column by applying adhesive over the hole on top of the capital.
Allow for cure time of adhesive. See manufacturers label for details.
Perspective View of Complete Pergola Installation
Perspective View of Cross Beam Installation
Perspective View of Main Beam Installation
Adhesive
Main Beam
Cross Beam
Notch

Combo Ver July 2015 www.CompStone.com
Please read entire instruction manual thoroughly prior to the construction of your pergola. If you have any
questions please contact our technical department at [email protected]