Embed Size (px)
Citation preview

1 | P a g e
PENTALQUARTZ FABRICATION & INSTALLATION MANUAL
I. INTRODUCTION
1. P u r p o s e The purpose of this manual is to outline the basic technical requirements and provide suggestions and guidelines related to the fabrication and installation of PentalQuartz.
2. T e r m i n o l o g y The phrase “PentalQuartz” when used in this document refers to any engineered stone slab, tile or cut to size forms manufactured, marketed, and sold by Pental Granite & Marble or its approved distributors or agents. "The Customer" used in this document refers to any person, firm or company placing an order with Pental Granite & Marble or its approved distributors ("the Company") for the purchase of PentalQuartz. "Product Manual" used in this document refers to the technical information, specification, design, fabrication, maintenance and other data relating to the use and application of PentalQuartz.
3. G e n e r a l P r o d u c t I n f o r m a t i o n PentalQuartz is a composite of natural minerals and rocks, mainly quartz, bound with resin, pigments and other fillers. PentalQuartz is manufactured using the most advanced and latest technology from Breton SPA of Italy. PentalQuartz is a high quality solid non-porous surface product that is resistant to scratches, heat, stains and water. PentalQuartz requires minimal maintenance, and when properly cared for, can remain in impeccable condition for years. PentalQuartz is manufactured using the world renowned Breton Stone technology (Breton SPA of Italy). The quality of engineered stone will vary from brand to brand depending on the quality of resin and raw materials used in the manufacture of the stone. PentalQuartz has been manufactured using the highest quality of raw materials, as specified and recommended by Breton.
4. L i m i t a t i o n s & R e s p o n s i b i l i t i e s We have taken care to provide complete information in this document. This information should be used as a guide in the design, installation and care of PentalQuartz. No warranty, however implied or expressed, is given in relation to the procedures outlined in this Product Manual except that which is required by law. Pental Granite & Marble assumes that the designers, fabricators, and installers using PentalQuartz are familiar with all aspects outlined in this Product Manual and strictly adhere to the recommendations and specifications described herein. Any deviation from the recommended guidelines may result in the products not performing as expected and may result in the warranty becoming null and void. Though every care and precaution has been taken in the preparation of this document, Pental Granite & Marble assumes no responsibility for errors and/or omissions, or for the damages resulting from the use of information contained in this Product Manual. Pental Granite & Marble shall not be liable for any loss of profit or any other loss or damage caused or alleged to have been caused either directly or indirectly as a result of any person solely relying upon any information contained in this Product Manual.

2 | P a g e
Pental Granite & Marble reserves the right to change or modify this Product Manual or its electronic version from time to time without notice, it is the responsibility of the Consumer to consult or contact Pental Granite & Marble for the latest version or updates.
II. APPLICATIONS for PentalQuartz
1. I n t e r i o r A p p l i c a t i o n s PentalQuartz is ideal for use in interior applications such as: kitchen countertops, bathroom vanities, tub and shower surrounds, fireplace mantles, walls, stairs, restaurants, hotels, hospitals, and laboratories, and also wherever high quality, sanitary, and low maintenance countertops are required. Exposure to unfiltered direct sunlight may result in color change and/or warping. Most windows manufactured in the last 30 years block a sufficient amount of the UV rays to prevent color change or warping, however it should be taken into account, especially in older homes. It is advisable to avoid direct unfiltered sunlight over a prolonged period on the surfaces used in the above applications.
2. F i r e p l a c e M a n t l e A p p l i c a t i o n s PentalQuartz can be used for fireplace mantles but is not recommended for fireplace surrounds. PentalQuartz should not make contact with the firebox or surfaces exceeding 212 °F (100 °C). Exposure to temperatures above 212°F may result in localized seam separation or material cracking if not properly installed.
3. E x t e r i o r A p p l i c a t i o n s Pental Granite & Marble does not recommend PentalQuartz for use in exterior applications. Its use in an exterior application will void the warranty.
III. PRODUCT SPECIFICATIONS 1. S l a b S i z e s
PentalQuartz can be manufactured in a wide range of sizes and thicknesses to accommodate any application. However, some may be available on a special order bases only. For information about availability, minimum purchase quantities, and lead time, please contact your sales representative. PentalQuartz slab sizes:
1.2cm (1/2”) – 3000mm x 1200mm (119x55) – Select colors only 2cm (3/4”) – 3000mm x 1400mm (119 x 55) 3cm (1 3/16”) – 3000mm x 1400mm (119 x 55) 3cm (1 3/16”) – 2997.2mm x 1400mm (118 x 26) – Select colors only 2cm (3/4”) – 3302mm x 1651mm (130 x 65) – Select colors only 3cm (1 3/16”) – 3302mm x 1651mm (130 x 65) – Select colors only
2. C o l o r & F i n i s h
PentalQuartz has a color palette ranging from the subtle white and beige tones to darker blues, browns, and blacks. PentalQuartz slabs are generally available in the polished finish, while select colors are available in a honed, brushed, or satin finish. However, a honed finish may be supplied to special projects in other colors on a case by case basis.
3 | P a g e
3. C o l o r C o n s i s t e n c y a n d T o n a l C h a r a c t e r i s t i c s Variation in slab and tile color may occur from batch to batch due to the location from which the natural material is sourced. The composition of natural particles used in the products may sometimes produce minor irregularities such as crazing in the grains, blotches, spots, or colored particles. Such imperfections are generally accepted by the industry. PentalQuartz is a non-porous product, but very fine micro pores could be present in certain colors/finishes and is unavoidable during the manufacturing process. It is the responsibility of the fabricator to visually verify color match of any slabs to be fabricated and installed prior to cutting.
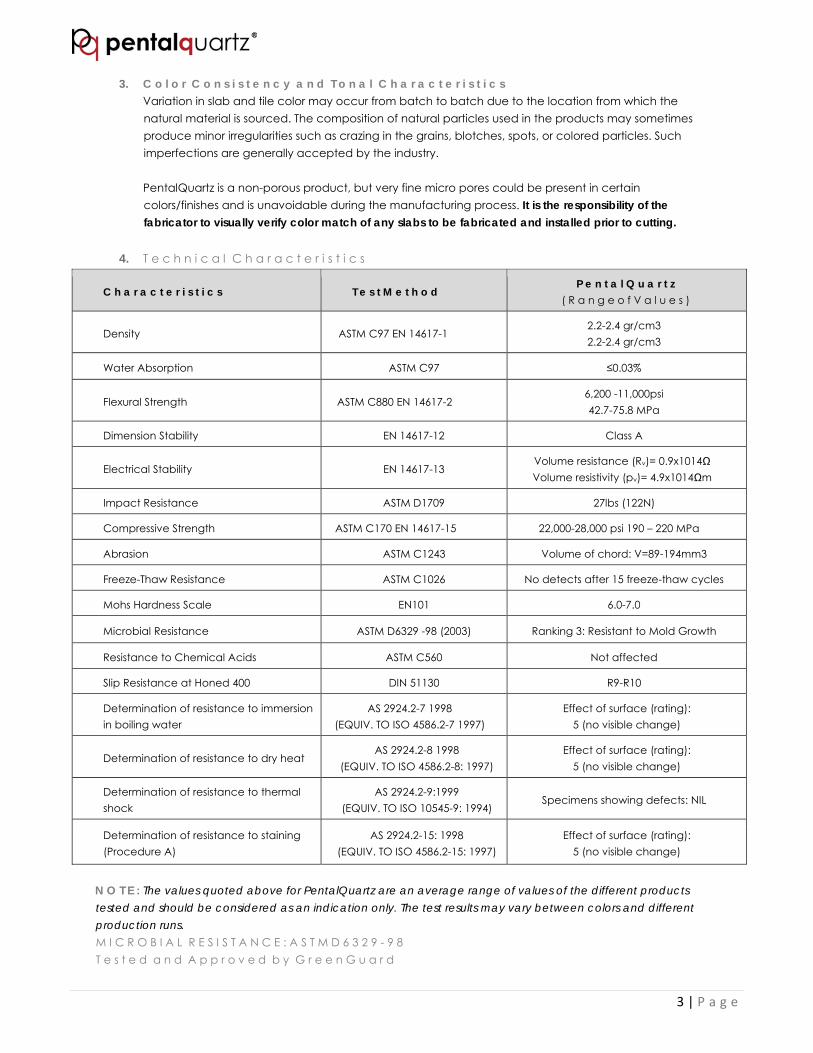
4. T e c h n i c a l C h a r a c t e r i s t i c s
C h a r a c t e r i s t i c s T e s t M e t h o d P e n t a l Q u a r t z
( R a n g e o f V a l u e s )
Density ASTM C97 EN 14617-1 2.2-2.4 gr/cm3 2.2-2.4 gr/cm3
Water Absorption ASTM C97 ≤0.03%
Flexural Strength ASTM C880 EN 14617-2 6,200 -11,000psi 42.7-75.8 MPa
Dimension Stability EN 14617-12 Class A
Electrical Stability EN 14617-13 Volume resistance (Rv)= 0.9x10¹⁴Ω Volume resistivity (pv)= 4.9x10¹⁴Ωm
Impact Resistance ASTM D1709 27lbs (122N)
Compressive Strength ASTM C170 EN 14617-15 22,000-28,000 psi 190 – 220 MPa
Abrasion ASTM C1243 Volume of chord: V=89-194mm3
Freeze-Thaw Resistance ASTM C1026 No detects after 15 freeze-thaw cycles
Mohs Hardness Scale EN101 6.0-7.0
Microbial Resistance ASTM D6329 -98 (2003) Ranking 3: Resistant to Mold Growth
Resistance to Chemical Acids ASTM C560 Not affected
Slip Resistance at Honed 400 DIN 51130 R9-R10
Determination of resistance to immersion in boiling water
AS 2924.2-7 1998 (EQUIV. TO ISO 4586.2-7 1997)
Effect of surface (rating): 5 (no visible change)
Determination of resistance to dry heat AS 2924.2-8 1998
(EQUIV. TO ISO 4586.2-8: 1997) Effect of surface (rating):
5 (no visible change)
Determination of resistance to thermal shock
AS 2924.2-9:1999 (EQUIV. TO ISO 10545-9: 1994)
Specimens showing defects: NIL
Determination of resistance to staining (Procedure A)
AS 2924.2-15: 1998 (EQUIV. TO ISO 4586.2-15: 1997)
Effect of surface (rating): 5 (no visible change)
N O T E : The values quoted above for PentalQuartz are an average range of values of the different products tested and should be considered as an indication only. The test results may vary between colors and different production runs. M I C R O B I A L R E S I S T A N C E : A S T M D 6 3 2 9 - 9 8 T e s t e d a n d A p p r o v e d b y G r e e n G u a r d

4 | P a g e
IV. GENERAL INSTRUCTIONS
1. T a k i n g D e l i v e r y When taking delivery of PentalQuartz, please make sure of the following: Check all the slabs for uniformity of color and granulometry (aggregate distribution) as slabs may
vary in color and granulometry from batch to batch. Check the slabs for any surface defects including: Contamination of grains, fine fissures, stains,
chipping, warping, and thickness variation. Do not transport slabs horizontally and use proper “A” frames to transport the slabs. Always keep the
polished surface protected and remove any sharp tools or implements from the vicinity of the slabs to avoid scratches on the polished surface.
If you detect any of the above defects after taking delivery of the slabs, and prior to cutting, do not proceed with the processing and return the slabs immediately.
2. P r o d u c t I d e n t i f i c a t i o n
Each slab has a label with a serial number label on one side. This number is also referenced on your packing list. Serial number(s) of installed slabs must be given to the owner of the property of the installation for proper processing of the warranty. If a slab is cut and used on two different installations, the serial number for the slab must be given to the owner of each property so they may each register their installation. The act of splitting the slab between different installations will not have any bearing on the warranty, as long as the installations would otherwise meet the warranty criteria. Any removal or intentional alteration of identifying information will void the material warranty.
V. DESIGN AND INSTALLATION GUIDE
1. F a b r i c a t i n g P e n t a l Q u a r t z Care should be taken when cutting and fabricating PentalQuartz. Tension within the slab can cause cracking. Following these simple rules can minimize the chance of this occurring. For a plunge cut, prior to beginning the cut, drill a 1” relief hole at the termination point of the cut.
Always cut towards the relief hole.
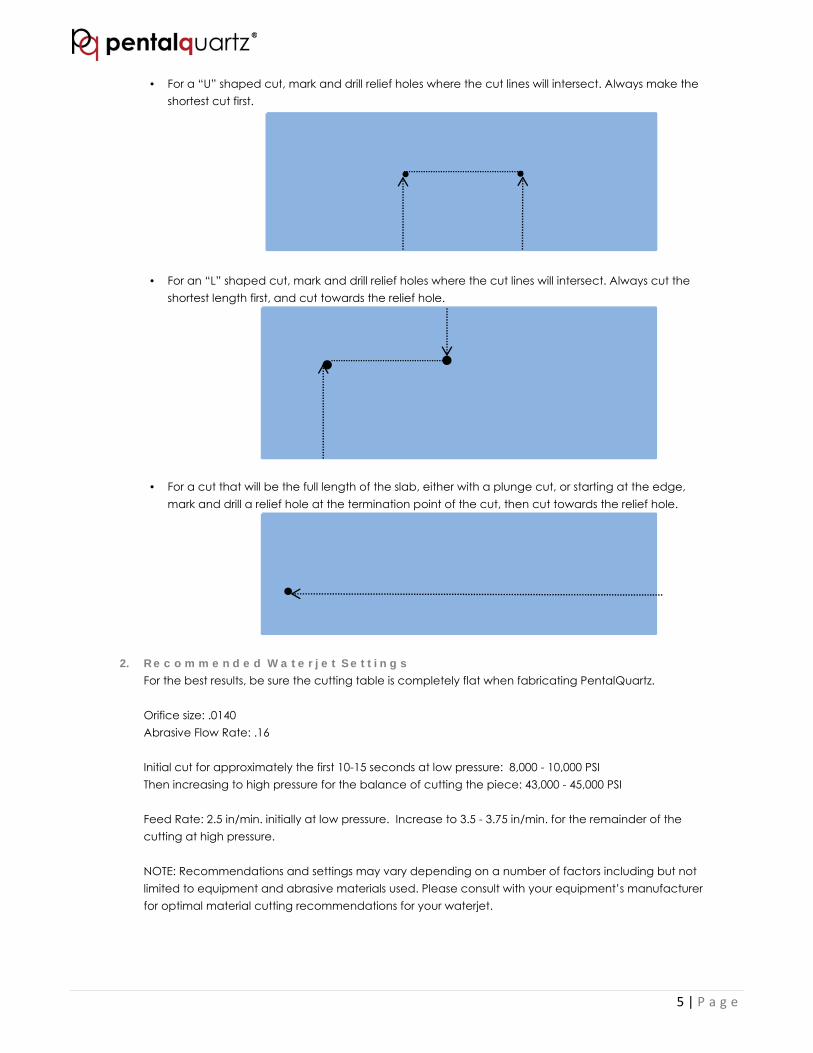
5 | P a g e
For a “U” shaped cut, mark and drill relief holes where the cut lines will intersect. Always make the shortest cut first.
For an “L” shaped cut, mark and drill relief holes where the cut lines will intersect. Always cut the shortest length first, and cut towards the relief hole.
For a cut that will be the full length of the slab, either with a plunge cut, or starting at the edge, mark and drill a relief hole at the termination point of the cut, then cut towards the relief hole.
2. R e c o m m e n d e d W a t e r j e t S e t t i n g s For the best results, be sure the cutting table is completely flat when fabricating PentalQuartz.
Orifice size: .0140 Abrasive Flow Rate: .16 Initial cut for approximately the first 10-15 seconds at low pressure: 8,000 - 10,000 PSI Then increasing to high pressure for the balance of cutting the piece: 43,000 - 45,000 PSI Feed Rate: 2.5 in/min. initially at low pressure. Increase to 3.5 - 3.75 in/min. for the remainder of the cutting at high pressure. NOTE: Recommendations and settings may vary depending on a number of factors including but not limited to equipment and abrasive materials used. Please consult with your equipment’s manufacturer for optimal material cutting recommendations for your waterjet.
6 | P a g e
3. K i t c h e n / V a n i t y C a b i n e t s Prior to installing countertops, the cabinets and base units should be checked for the following: Strength and stability; the cabinets and substrate base should be able to withstand weight in excess
of 12lbs per Sq. Ft. All units are fastened to both the wall and between the base units. Cabinets are leveled properly. The top of the cabinets must be plumb, true, and flat. Make sure
that the level does not vary more than 1/16” over 10’. Remove any nails, screws or sharp edges from the surfaces where the tops would be placed.
4. I n s t a l l a t i o n o f C o u n t e r t o p s
No two kitchen countertops are the same, however there are some general guidelines for installing PentalQuartz countertops. As long as the base cabinets are level and they allow for the support outlined below, no additional support is needed when installing 3cm material. When installing any material less than 3cm in thickness, you must ensure the countertop has proper support. For material less than 3cm thick, the base supporting the countertop can either be Complete Perimeter support or Complete Underlay support. Rarely will all the walls be perfectly square. Be sure to make allowances for such imperfections prior
to cutting. Clearance of at least 1/8” should be maintained between the PentalQuartz surface and surrounding walls.
Countertops should be placed on a very sound and solid frame or a base which is perfectly plumb, level and true.
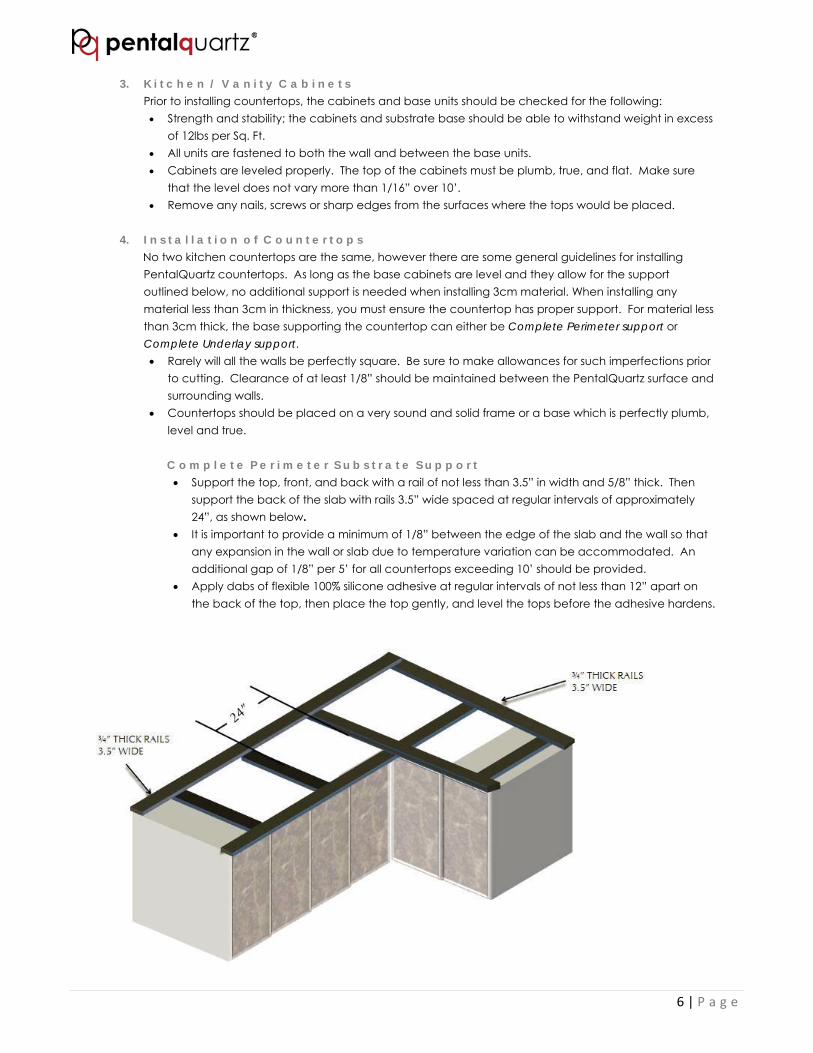
C o m p l e t e P e r i m e t e r S u b s t r a t e S u p p o r t Support the top, front, and back with a rail of not less than 3.5” in width and 5/8” thick. Then
support the back of the slab with rails 3.5” wide spaced at regular intervals of approximately 24”, as shown below.
It is important to provide a minimum of 1/8” between the edge of the slab and the wall so that any expansion in the wall or slab due to temperature variation can be accommodated. An additional gap of 1/8” per 5’ for all countertops exceeding 10’ should be provided.
Apply dabs of flexible 100% silicone adhesive at regular intervals of not less than 12” apart on the back of the top, then place the top gently, and level the tops before the adhesive hardens.
7 | P a g e
C o m p l e t e U n d e r l a y S u b s t r a t e S u p p o r t Alternately, the complete surface area of the countertop can be supported over the kitchen cabinets with a full width self-supporting underlay made up of plywood with a minimum thickness of 5/8”.
5. P l a n n i n g a n d I n s t a l l a t i o n o f C o u t n e r t o p s w i t h J o i n t s & C u t O u t s .
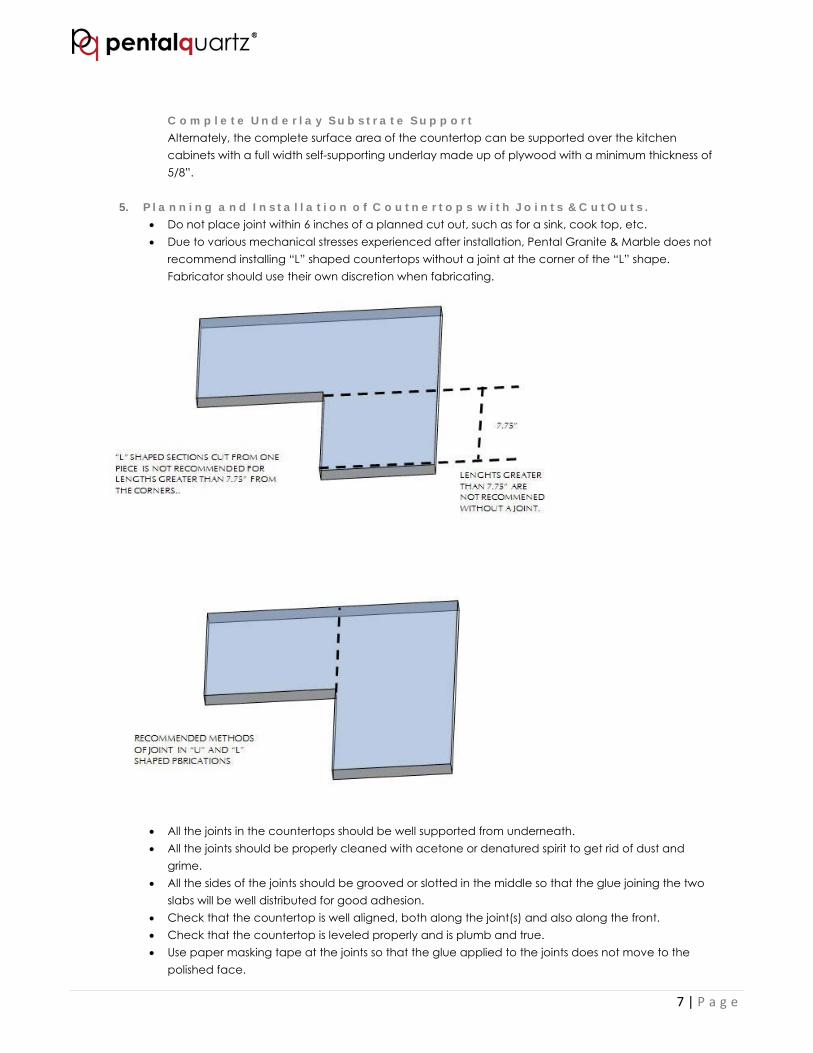
Do not place joint within 6 inches of a planned cut out, such as for a sink, cook top, etc. Due to various mechanical stresses experienced after installation, Pental Granite & Marble does not
recommend installing “L” shaped countertops without a joint at the corner of the “L” shape. Fabricator should use their own discretion when fabricating.
All the joints in the countertops should be well supported from underneath. All the joints should be properly cleaned with acetone or denatured spirit to get rid of dust and
grime. All the sides of the joints should be grooved or slotted in the middle so that the glue joining the two
slabs will be well distributed for good adhesion. Check that the countertop is well aligned, both along the joint(s) and also along the front. Check that the countertop is leveled properly and is plumb and true. Use paper masking tape at the joints so that the glue applied to the joints does not move to the
polished face.
8 | P a g e
Ensure that the joints are perfect and then place clamps at the joints until the adhesive sets properly.
Once set, remove the masking tape and clean off any excess adhesive from the contact surface with acetone or denatured spirit.
Do not fasten any mechanical fasteners like screws and nails directly into PentalQuartz. Seams should not be placed directly over a dishwasher or other appliance that may radiate heat.
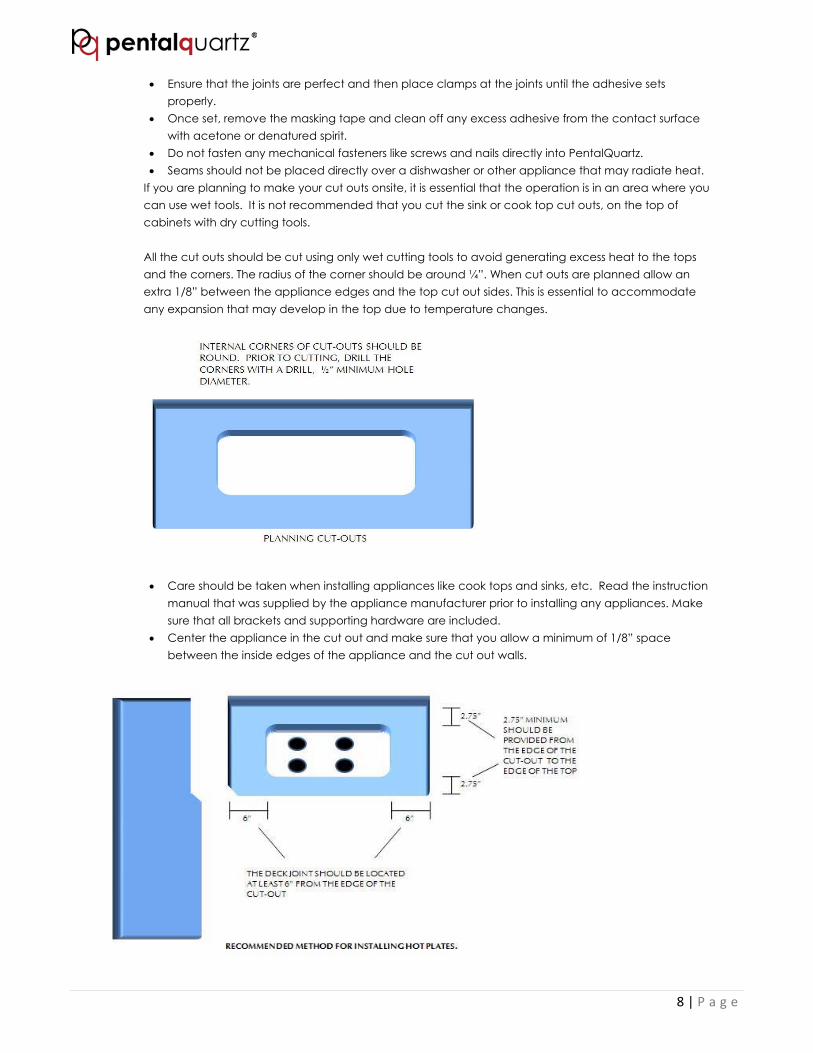
If you are planning to make your cut outs onsite, it is essential that the operation is in an area where you can use wet tools. It is not recommended that you cut the sink or cook top cut outs, on the top of cabinets with dry cutting tools. All the cut outs should be cut using only wet cutting tools to avoid generating excess heat to the tops and the corners. The radius of the corner should be around ¼”. When cut outs are planned allow an extra 1/8” between the appliance edges and the top cut out sides. This is essential to accommodate any expansion that may develop in the top due to temperature changes.
Care should be taken when installing appliances like cook tops and sinks, etc. Read the instruction
manual that was supplied by the appliance manufacturer prior to installing any appliances. Make sure that all brackets and supporting hardware are included.
Center the appliance in the cut out and make sure that you allow a minimum of 1/8” space between the inside edges of the appliance and the cut out walls.
9 | P a g e
Position all the appliances in place and make sure that the seals provided with the appliances are properly placed prior to tighten the fasteners. All fasteners should be only finger tight, never use force in tightening the fasteners.
Any appliances weighing more than 11lbs should be adequately supported by the cabinet frames.
All of the joints between the countertop and the appliance edges can be sealed with a high quality
transparent flexible sealant. Clean any excess sealant immediately. Uneven thermal distribution may occur in areas above dishwashers and over hot water plumbing
systems which may cause the top to crack. To avoid this, all the hot water plumbing should be thermally insulated. It is a good practice to make the tap holes slightly oversized so that the hot plumbing system is not in direct contact with the product.
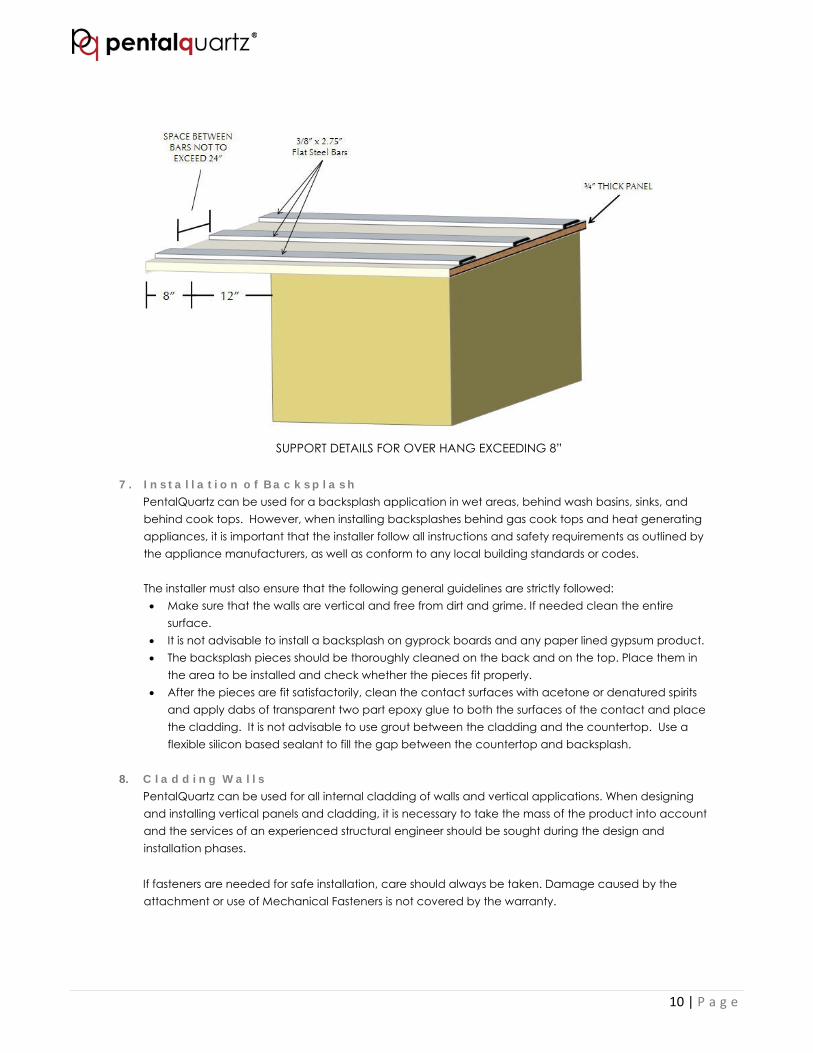
6. O v e r h a n g a n d S u p p o r t i n g B r a c k e t s
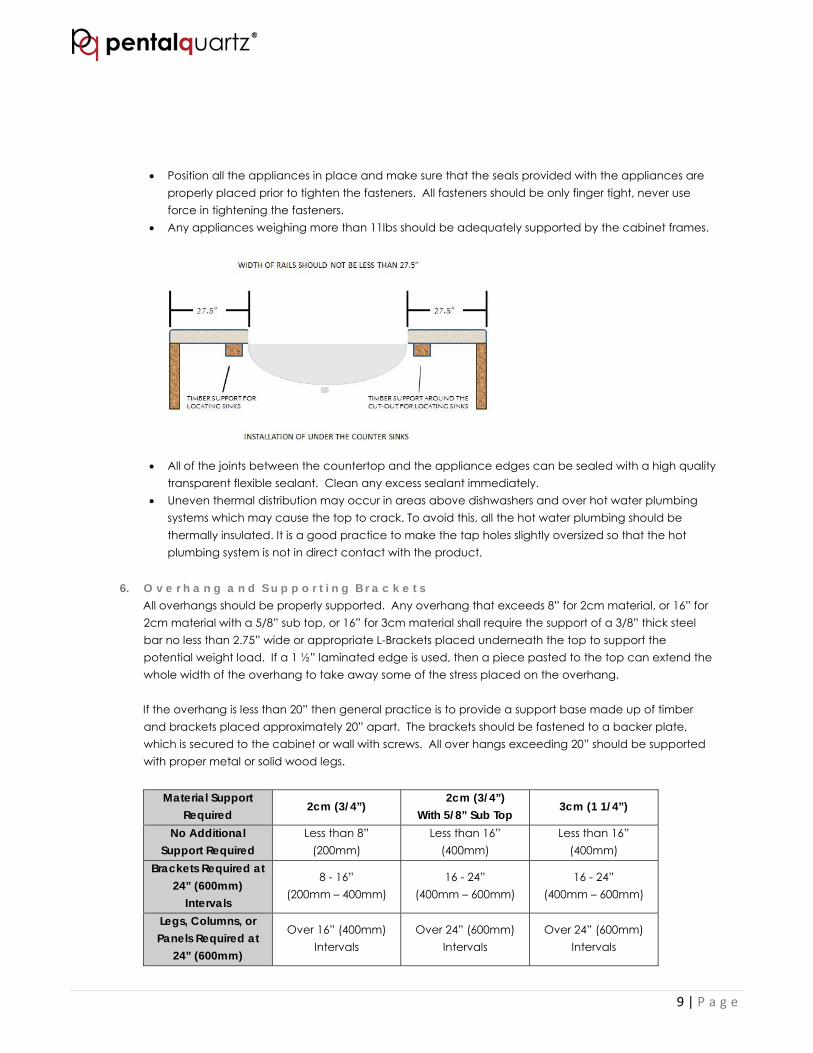
All overhangs should be properly supported. Any overhang that exceeds 8” for 2cm material, or 16” for 2cm material with a 5/8” sub top, or 16” for 3cm material shall require the support of a 3/8” thick steel bar no less than 2.75” wide or appropriate L-Brackets placed underneath the top to support the potential weight load. If a 1 ½” laminated edge is used, then a piece pasted to the top can extend the whole width of the overhang to take away some of the stress placed on the overhang. If the overhang is less than 20” then general practice is to provide a support base made up of timber and brackets placed approximately 20” apart. The brackets should be fastened to a backer plate, which is secured to the cabinet or wall with screws. All over hangs exceeding 20” should be supported with proper metal or solid wood legs.
Material Support
Required 2cm (3/4”)
2cm (3/4”) With 5/8” Sub Top
3cm (1 1/4”)
No Additional Support Required
Less than 8” (200mm)
Less than 16” (400mm)
Less than 16” (400mm)
Brackets Required at 24” (600mm)
Intervals
8 - 16” (200mm – 400mm)
16 - 24” (400mm – 600mm)
16 - 24” (400mm – 600mm)
Legs, Columns, or Panels Required at
24” (600mm)
Over 16” (400mm) Intervals
Over 24” (600mm) Intervals
Over 24” (600mm) Intervals
10 | P a g e
SUPPORT DETAILS FOR OVER HANG EXCEEDING 8”
7 . I n s t a l l a t i o n o f B a c k s p l a s h
PentalQuartz can be used for a backsplash application in wet areas, behind wash basins, sinks, and behind cook tops. However, when installing backsplashes behind gas cook tops and heat generating appliances, it is important that the installer follow all instructions and safety requirements as outlined by the appliance manufacturers, as well as conform to any local building standards or codes. The installer must also ensure that the following general guidelines are strictly followed: Make sure that the walls are vertical and free from dirt and grime. If needed clean the entire
surface. It is not advisable to install a backsplash on gyprock boards and any paper lined gypsum product. The backsplash pieces should be thoroughly cleaned on the back and on the top. Place them in
the area to be installed and check whether the pieces fit properly. After the pieces are fit satisfactorily, clean the contact surfaces with acetone or denatured spirits
and apply dabs of transparent two part epoxy glue to both the surfaces of the contact and place the cladding. It is not advisable to use grout between the cladding and the countertop. Use a flexible silicon based sealant to fill the gap between the countertop and backsplash.
8. C l a d d i n g W a l l s
PentalQuartz can be used for all internal cladding of walls and vertical applications. When designing and installing vertical panels and cladding, it is necessary to take the mass of the product into account and the services of an experienced structural engineer should be sought during the design and installation phases. If fasteners are needed for safe installation, care should always be taken. Damage caused by the attachment or use of Mechanical Fasteners is not covered by the warranty.
11 | P a g e
9. F a b r i c a t i n g W h i t e a n d V e i n e d C o l o r s Due to the Cristolbalite content inside several PentalQuartz colors, special care is needed when fabricating the colors listed below:
BQ100 Thassos BQ8220 Lattice BQ8440 Venatino BQ8270 Calacatta BQ8530 Carrara BQ8550 Onixaa BQ8628 Statuario BQ8660 Avenza BQ8670 Borghini BQ8669 White Macaubas BQ8815 Misterio BQ8912 Arabescato BQ8818 Crema Chiffon BQ8668 Icelake
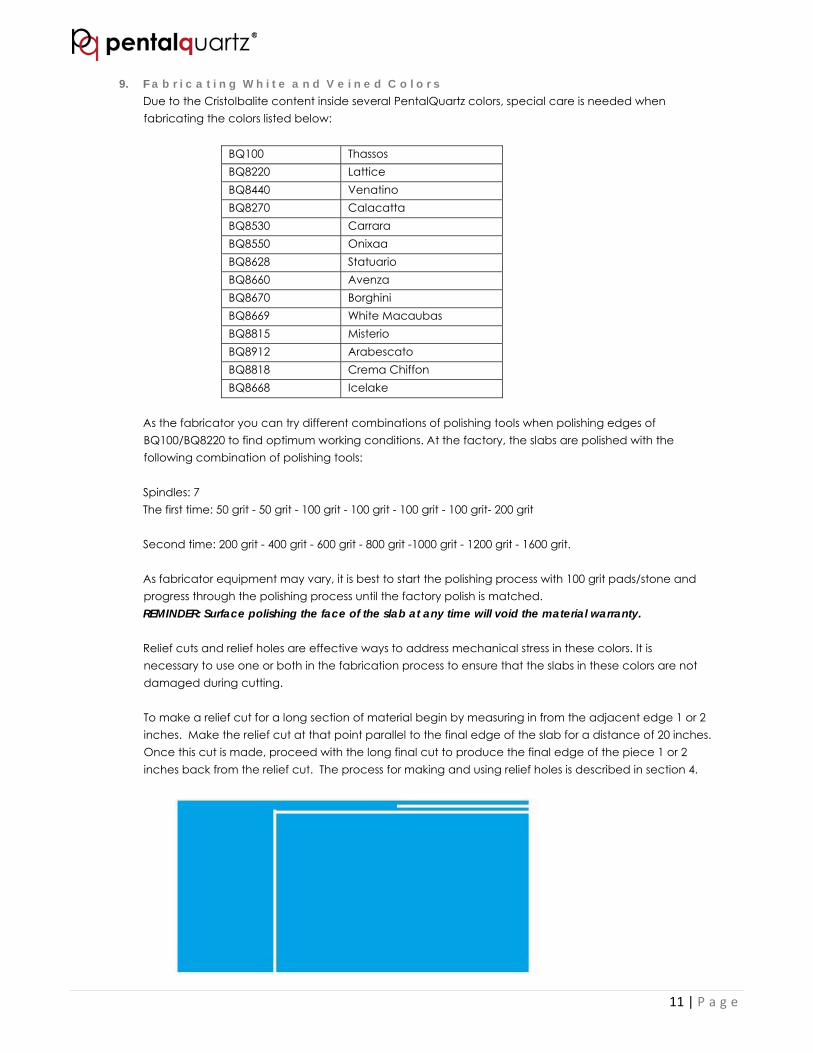
As the fabricator you can try different combinations of polishing tools when polishing edges of BQ100/BQ8220 to find optimum working conditions. At the factory, the slabs are polished with the following combination of polishing tools: Spindles: 7 The first time: 50 grit - 50 grit - 100 grit - 100 grit - 100 grit - 100 grit- 200 grit Second time: 200 grit - 400 grit - 600 grit - 800 grit -1000 grit - 1200 grit - 1600 grit. As fabricator equipment may vary, it is best to start the polishing process with 100 grit pads/stone and progress through the polishing process until the factory polish is matched. REMINDER: Surface polishing the face of the slab at any time will void the material warranty. Relief cuts and relief holes are effective ways to address mechanical stress in these colors. It is necessary to use one or both in the fabrication process to ensure that the slabs in these colors are not damaged during cutting. To make a relief cut for a long section of material begin by measuring in from the adjacent edge 1 or 2 inches. Make the relief cut at that point parallel to the final edge of the slab for a distance of 20 inches. Once this cut is made, proceed with the long final cut to produce the final edge of the piece 1 or 2 inches back from the relief cut. The process for making and using relief holes is described in section 4.
12 | P a g e
1 0 . I n s t a l l a t i o n o f T i l e s
As with any tile application it is important to follow the correct method for affixing the tile that is most suitable for that specific application. Installers tend to affix engineered tiles in the same way they handle ceramic tiles, using adhesives meant for ceramic tiles. However, such practices have led to failures in installation. The environment of every tile installation is different, and the installations can be handled in a number of ways. If the final installation is to function successfully, it is important for installers to consider the following characteristics of materials that affect different aspects of an installation. Differential movement Structural deflections Foundation movements Thermal movements Moisture movements Radiant Heat Source Dimensional stability
Most importantly, the thermal movement (expansion and contraction) of engineered tiles should be taken into consideration when designing a tiling system. Engineered stones have a much higher linear thermal expansion when compared to natural stones and ceramic tiles. Moisture movements both permanent and reversible may occur due to moisture content of the environment. Engineered stones have been known to possess appreciable reversible moisture movement. Dimensional stability refers to the ability of an engineered stone tile to resist curling or warping when exposed to water contained in the adhesives. When the tile surface absorbs moisture, the surface of the wet side expands more than the dry side, and the result is that tiles tend to warp. Adhesive manufacturers have vast experience in the installation of a tiling system using Engineered Stones. Accordingly, we strongly recommend that the installer consult the relevant manufacturers and seek their advice prior to installation of PentalQuartz slab and tile. Custom Building Products: http://www.custombuildingproducts.com Mapei: http://www.mapei.com Laticrete: http://www.laticrete.com Pental Granite & Marble, Inc. does not accept any responsibility nor does it recommend a particular method of installation. It is the responsibility of the installer/buyer to design the tiling system based on the advice obtained from the engineered tile adhesive manufacturers.
VI. CARE & MAINTENANCE
PentalQuartz is a high quality solid non-porous product that is resistant to scratches, heat, and stains. However, PentalQuartz is not heat, stain and scratch proof. PentalQuartz requires minimal maintenance and the following care and maintenance guidelines will help to keep the surface in impeccable condition for years.
1. G e n e r a l R o u t i n e C a r e a n d M a i n t e n a n c e
PentalQuartz is highly resistant to stains caused by fruit juices, liquid food coloring, coffee, tea, wine, grapes, soft drinks, paints, nail polish and remover, automotive fluids, and permanent markers. Should a spill occur, wipe off the stained area with any commonly available multi-purpose cleaner or household
13 | P a g e
detergent and then rinse the area with water immediately. For more stubborn spills and stains, repeat the procedure several times and use a soft, non-metallic scouring pad to remove the stain. It is possible that some of the stubborn stains may leave a light mark or very slight discoloration of the stone.
2 . P r e v e n t i n g H e a t D a m a g e t o C o u n t e r t o p s
PentalQuartz is designed and manufactured to withstand moderate heat but the product is not heat proof. The Thermal Shock resistance is increased with the increase of the thickness of the material; 3cm slabs are far more resistant to heat than a 1.2cm slab. Like any other composite material, PentalQuartz may be damaged by a sudden and/or lasting exposure to high temperatures, mainly at the edges and cut outs of the product, resulting in cracks. To prevent thermal shock, discoloration or other damages, it is necessary to use insulating pads or trivets when putting hot objects on the surface, and not to expose the surface to open flames or prolonged contact with very hot pots. We always recommend using a hot pad or trivet, especially when using cooking appliances such as electric frying pans, crock pots, or roaster ovens.
3. U s e o f C o m m o n K i t c h e n I m p l e m e n t s Common kitchen implements including sharp knives won’t harm PentalQuartz, however continued cutting in the same area directly on the surface may dull the polished finish over time. Care should be taken when moving heavy objects to avoid dropping heavy kitchen tools on the PentalQuartz surface.
4. R e m o v i n g F o r e i g n M a t e r i a l s
If food, chewing gum, nail polish, paint or any other foreign material is found sticking to the top/floor, simply scrape away the material with a sharp blade or sharp plastic scraper. The use of a metal scraper may leave grey metal marks on the surface, and nylon non-abrasive scouring pad can easily remove them. Wash and rinse the surface in the normal way with water.
5. E x p o s u r e t o C h e m i c a l s a n d S o l v e n t s
PentalQuartz can be permanently damaged by prolonged exposure to strong chemicals and solvents. It is advisable not to use hydrofluoric acid, or any product such as oven cleaners or drain cleaners containing trichlorethane or methylene chloride and paint strippers.
6. E x p o s u r e t o D i r e c t S u n l i g h t
When exposed to direct sunlight PentalQuartz slabs and tiles may result in color change and warping. It is advisable to avoid direct sunlight over a prolonged period.
7. M a i n t e n a n c e o f F l o o r s
Dust, grit, and barrier materials from the floors should be removed on a daily basis by sweeping with a soft brush. Sand, rocks or other debris can scratch the Quartz Based Tile floor and those surfaces should always be kept free from dust, sand and soil. PentalQuartz surfaces can be easily cleaned with warm water and mild household detergent using a standard mop. Make sure the floor is completely dry before allowing people to walk on it.
8. M a i n t e n a n c e o f H o n e d a n d S a t i n F i n i s h e s
PentalQuartz is offered in several finishes including polished, honed, satin, and brushed. Just as each finish has a different look, it also has slightly different characteristics. Some colors are available in our HONED or SATIN finish which offers the soft appearance of a lower sheen compared to the POLISHED finish. The HONED and SATIN finishes require slightly more maintenance than our polished finished materials. Since the honed or satin finish actually creates more surface area to the material it has the potential to show more signs of living from daily use. Possible marks from metal cookware or utensils, fingerprints, food and beverages, and other items placed on, or moved across the countertop, may be visible on the surface. Most marks can be easily removed with a

14 | P a g e
cloth or sponge, or by using household cleaners such as a cleaning eraser or carefully scrubbing with a sponge and a non-abrasive cleaner such as Soft Scrub Advanced Cleaner®. Over time the Honed or Satin finish will develop character and a patina unique to each customer. Honed and satin finishes can be cleaned using the same products and methods as other finishes. Please see our care and maintenance guide at: PentalQuartz.com Be aware of the unique characteristics of honed and satin finishes; these will be more likely to show scuffs, marks, and fingerprints, and will require more frequent or intense cleaning and maintenance to keep them free from marks. The warranty issued by Pental Granite & Marble for PentalQuartz covers manufacturing defects, however the temporary marks that commonly occur on honed and satin finishes are inherent to the material, and are not covered under the terms of the warranty.
9. C l e a r S h i p p i n g P l a s t i c R e m o v a l PentalQuartz is protected during transportation by a protective plastic cover. The plastic and its acrylic adhesive should be removed using the method described below. Strip away plastic sheeting. Wash away the remaining adhesive with “warm” water and a small amount of mild soap. Warm is
defined as between 104°-120° Fahrenheit. Clean the whole surface of the slab. Wait for 5-10 minutes. Repeat steps 2 and 3 as necessary until the surface is free of adhesive. Rinse with cool water.
Note: Do NOT use chemicals such as alcohol or acetone! The use of solvents to remove the film causes the adhesive to dissolve and create a chemical reaction which may change the appearance of the slab surface and will not be covered under the product warranty.
10. A d v i c e t o t h e I n s t a l l e r It is the duty of the installer to advise customers of the important aspects of Care and Maintenance for PentalQuartz.
Please visit the link below to learn more about safety when cutting natural stone and engineered stone slabs. Please keep in touch with OSHA and MIA for the most updated information. http://www.marble-institute.com/silica/
Technical Bulletin Proper use of Chemicals on quartz surfaces
While quartz is very resistant to various chemicals, there is a risk of damage to the finished surface from prolonged exposure to certain chemicals. Proper use of acetone and other chemicals:
1. Acetone may safely be used to remove excess adhesive near edge details and material seams. Acetone may also be used to clean the finished surface of Pental Quartz of stains, fabrication markings, or templating residue.
2. Acetone should be applied to a cloth for cleaning and not poured directly on the material surface.
3. Chemical bottles or metal cans should not be left on the material surface as it is possible to trap liquid under the container and cause damage to the Pental Quartz finish.
4. Acetone soaked cloths should not be placed or left on the material surface for prolonged periods of time as this can cause damage to the material finish.
5. It is possible for acetone or other chemicals to become trapped under the protective plastic on slabs during the fabrication process. In order to avoid this potential issue it is again recommended to only apply acetone to a cloth for cleaning and not pour the liquid on the slab surface. Make sure to clean any spills immediately and remove plastic from any areas exposed to the chemical spill.
6. Below is a list of other chemicals that could potentially damage or affect the finish on Pental Quartz. This list is not all inclusive as there are other potential chemicals that may damage the material. The degree of any damage experienced may vary based upon the chemical, concentration, and the length of time of exposure.
• Dyes, stains, drain cleaners, oven cleaners, paint thinner or strippers. • Stone sealers, enhancers, agers, or other topical treatments. • Solvents such as acetone, nail polish, lacquer thinner, or bleach (short‐term exposure is
acceptable for purpose of cleaning difficult stains, but these chemicals should be removed and thoroughly rinsed away within five minutes of application)
• Chlorinated solvents such as trichloroethylene or methylene chloride • Benzene, toluene, methyl ethyl ketone • Concentrated acids such as hydrocyanic acid, hydrofluoric acid, hydrochloric acid,
sulfuric acid, nitric acid, or muriatic acid. • Chemicals with high alkaline/PH levels above 8.5
In case of contact with any of the above chemicals, immediately rinse thoroughly with water.