Embed Size (px)
Citation preview
PDF2DTP for InDesign User Guide
©2018 Markzware

PDF2DTP Table of Contents
PDF2DTP System Requirements................................................................................................................. 3License Agreement ...................................................................................................................................... 4PDF2DTP Quick Start .................................................................................................................................. 5PDF2DTP for InDesign Installation on Mac.................................................................................................. 7PDF2DTP Successful Activation ................................................................................................................ 12PDF2DTP Failed Activation........................................................................................................................ 15PDF2DTP for InDesign Proxy Setup .......................................................................................................... 16PDF2DTP for InDesign Registration .......................................................................................................... 18PDF2DTP for InDesign Mac Deactivation & Removal ............................................................................... 21PDF2DTP Troubleshooting ........................................................................................................................ 25PDF2DTP Menu & Preferences ................................................................................................................. 27PDF2DTP Conversion Notes ..................................................................................................................... 33PDF2DTP for InDesign Known Limitations ................................................................................................ 42

PDF2DTP System Requirements
PDF2DTP for InDesign Mac System Requirements
System Requirements:
• Mac OS X 10.6.8 or higher• A valid license for Adobe InDesign® CC-2019, CC-2018, CC-2017, CC-2015, CC-2014, CC, CS6• Internet connection to activate and register PDF2DTP• Adobe recommended hardware requirements to run your version of InDesign
PDF2DTP for InDesign
Page 310/12/18 1:04 PM ©2018 Markzware

License Agreement
PDF2DTP for InDesign Bundle is a Subscription based license
The PDF2DTP for InDesign Bundle is sold as a subscription based license. This means when your subscriptionperiod is complete, all products in the PDF2DTP for InDesign bundle will no longer activate. If you wish to continueusing PDF2DTP for InDesign you will need to renew your subscription or purchase a new subscription.
Your Subscription Includes All Updates Free of Charge
Your Subscription Includes All Updates Free of Charge through the end date of your subscription term. Once yoursubscription has expired, PDF2DTP will no longer activate and you will need to either renew your license orpurchase a new subscription.
Some Products in the Bundle are As-Is products and are Unsupported but Available
The PDF2DTP for InDesign Bundle Subscription contains multiple Plug-Ins.
If you do not find the download you are looking for, please scroll down to the bottom of the download page and clickon the words Additional Versions. This will reveal versions of PDF2DTP that are available for download. Many ofthese versions are no longer supported, but are available "just in case" someone wants to access them.
License Model
This bundle includes several plug-ins. The license model is such that the Plug-Ins are licensed to be used on asingle computer. This means for example if you have InDesign CC and CS6 loaded on the same Mac computer youare licensed to run both PDF2DTP for InDesign CC and InDesign CS6 on that Mac.
PDF2DTP for InDesign
Page 410/12/18 1:04 PM ©2018 Markzware

PDF2DTP Quick Start
PDF2DTP Up and Running Quickly
Select Convert PDF… from the PDF2DTP menu
Locate the PDF file
Locate the PDF file you want to convert and then click the Open button.
PDF2DTP Conversion
PDF2DTP will begin converting your PDF file into an InDesign file.
PDF2DTP for InDesign
Page 510/12/18 1:04 PM ©2018 Markzware

Converted PDF
Once the PDF conversion has completed, you will have a new InDesign file. You can now edit this file in the familiarInDesign environment.
Don't forget to Save
Once you are done making your edits and tweaks, don't forget to Save the file.
PDF2DTP for InDesign Preferences
For more control over your PDF conversion or to change the Default Settings, check out the PDF2DTP forInDesign Menu and Preferences Section of this manual.
That's all there is to it.
PDF2DTP for InDesign
Page 610/12/18 1:04 PM ©2018 Markzware

PDF2DTP for InDesign Installation on Mac
PDF2DTP For InDesign ZIP File
When you have completed your download of PDF2DTP For InDesign you will have a zip file that needs to bedecompressed.
PDF2DTP For InDesign Decompressed ZIP File
On most Macs you can simply double-click on the PDF2DTP For InDesign zip file and this will produce a folder.Double-click on this folder to reveal the PDF2DTP For InDesign Installer.
If you receive a checksum error when decompressing the ZIP file, use the built in macOS ZIP Utility to decompressthe ZIP file. This can be accessed by highlighting the ZIP file, then Right-Clicking (or Control-Clicking) the ZIP file.From the popup menu, select Open With and then select the first item at the top of the list. (For macOS 10.7 andhigher this should be called Archive Utility.app).
PDF2DTP for InDesign
Page 710/12/18 1:04 PM ©2018 Markzware

PDF2DTP For InDesign Installer
Double-click on the Setup icon to start the PDF2DTP For InDesign installation process.
PDF2DTP for InDesign
Page 810/12/18 1:04 PM ©2018 Markzware

PDF2DTP For InDesign Setup Window
When you first run the installer you have the option to Install or Uninstall. By default Install is selected. To proceed,click the Continue button.
**You may exit the installer by pressing Command-Q on your keyboard.
PDF2DTP for InDesign
Page 910/12/18 1:04 PM ©2018 Markzware

Installer Destination
The installer will look on your mounted drives for an appropriate host application. If it finds one, you will bepresented with a screen showing the host application found and its location. If this is the correct host applicationand path, then click the Install button (1). You can change where PDF2DTP is installed by clicking the ChangeInstall Location… button (2) and selecting another location. Please remember when selecting a custom locationfor install that it must be the proper version of InDesign for the PDF2DTP Plug-In you are installing and it must be avalid installation of InDesign.
PDF2DTP for InDesign
Page 1010/12/18 1:04 PM ©2018 Markzware

PDF2DTP For InDesign - Successful Installation
Once the installer has successfully completed, you will see a confirmation screen. The screen shows you wherePDF2DTP was installed. Click Close to exit the screen and begin using PDF2DTP.
PDF2DTP for InDesign
Page 1110/12/18 1:04 PM ©2018 Markzware

PDF2DTP Successful Activation
Start Up InDesign
After you have installed PDF2DTP for InDesign, start up InDesign
PDF2DTP for InDesign
Page 1210/12/18 1:04 PM ©2018 Markzware

PDF2DTP for InDesign - Attempting to Activate
The very first time you start up InDesign after installing PDF2DTP, the Plug-In will attempt to contact Markzware'sLicense Server and activate your product. This should be a fairly transparent process, but may take a few minutes.If the Plug-In is able to contact the License Server, you will be activated. First you will see an Attempting toactivate screen. This screen can be present for up to several minutes, so please be patient. You can click theClose button to dismiss the screen and if the PDF2DTP Plug-In is able to successfully activate you will see thescreen shown in the next step once activation has completed.
PDF2DTP for InDesign
Page 1310/12/18 1:04 PM ©2018 Markzware

PDF2DTP for InDesign - Successful Activation
If PDF2DTP can successfully activate, you will see the Activation complete screen. Click the Close button todismiss this screen and start using PDF2DTP. At this time you should also have the PDF2DTP for InDesignRegistration Screen visible. Please fill out the Registration form before starting to use PDF2DTP for InDesign.
Should you have any issues we have provided links on the Activation Complete screen to contact Markzware TechSupport.
PDF2DTP for InDesign
Page 1410/12/18 1:04 PM ©2018 Markzware

PDF2DTP Failed Activation
If you see the application is not activated screen, this is a reminder to Activate your product. If for any reasonPDF2DTP for InDesign was unable to reach our License Server, you can usually still run the product for a limitedtime, but every time you start up InDesign you will be presented with the application is not activated screenreminding you to take action by the specified date.
VERY IMPORTANT!!!--- If you do not Activate PDF2DTP for InDesign by the date listed on your screen, YOUMAY LOSE YOUR LICENSE
If you continuously see this window, you need to contact Markzware Tech Support and get this issue cleared up.Otherwise after the specified date, your license will be disabled. The grace period to activate is long enough andthe reminders should be annoying enough that you will take action and contact Markzware before the expirationdate arrives.
PDF2DTP for InDesign
Page 1510/12/18 1:04 PM ©2018 Markzware

PDF2DTP for InDesign Proxy Setup
If you are unable to connect to the internet due to a proxy server, PDF2DTP has some built in features that mighthelp.
PDF2DTP for InDesign Enter Proxy Information
Access the proxy settings by clicking on the word here
You may need to contact your IT or Support person to obtain proper information for proxy setup.
Once you enter the requested information, click on the Save button and then click on the Close button.
**Please Note - The Proxy information you enter is specific to your company or setup. Markzware does not controlnor have your Proxy log in information.
PDF2DTP for InDesign
Page 1610/12/18 1:04 PM ©2018 Markzware

PDF2DTP for InDesign Successful Activation
If the proxy data you entered allows you to contact the Markzware License Server, you will eventually see asuccessful activation screen.
If you do not get a successful activation screen, please first check that you have entered in the correct Proxy Serverdata. If after re-checking your proxy data entries, you still cannot activate, please contact Markzware TechnicalSupport.
PDF2DTP for InDesign
Page 1710/12/18 1:04 PM ©2018 Markzware

PDF2DTP for InDesign Registration
Why should you register your software?
If you are not Registered you may be denied Tech Support as we do not know who you are and what product youhave a license to use.
PDF2DTP for InDesign Registration Screen
Please register your version of PDF2DTP for InDesign.
PDF2DTP for InDesign
Page 1810/12/18 1:04 PM ©2018 Markzware

PDF2DTP for InDesign Registration Required Field
Although your email address is the only required field to register PDF2DTP for InDesign, it is strongly suggestedyou at least provide your Name and a phone number as well.
PDF2DTP for InDesign
Page 1910/12/18 1:04 PM ©2018 Markzware

PDF2DTP for InDesign Thank You For Registering
Once you have successfully submitted your PDF2DTP for InDesign Registration form you will receive a Thank Youscreen. Click the Close button to dismiss this screen. At this point you are ready to start using PDF2DTP.
PDF2DTP for InDesign
Page 2010/12/18 1:04 PM ©2018 Markzware

PDF2DTP for InDesign Mac Deactivation & Removal
While this section shows how to deactivate and remove PDF2DTP for InDesign CC Mac, the same general stepsapply to PDF2DTP for InDesign CS6 for Mac. The name of the Setup file to double-click will reflect the version ofInDesign you are running.
PDF2DTP Uninstall/Deactivate & Move to another computer on Mac
To begin the deactivation process, run the PDF2DTP Installer by double-clicking on the Setup icon. This is thesame installer you used when first installing PDF2DTP. If you do not have your installer available, you may re-download it from the url that came with your original order. Make sure and Quit InDesign before you run theSetup program.
PDF2DTP for InDesign
Page 2110/12/18 1:04 PM ©2018 Markzware
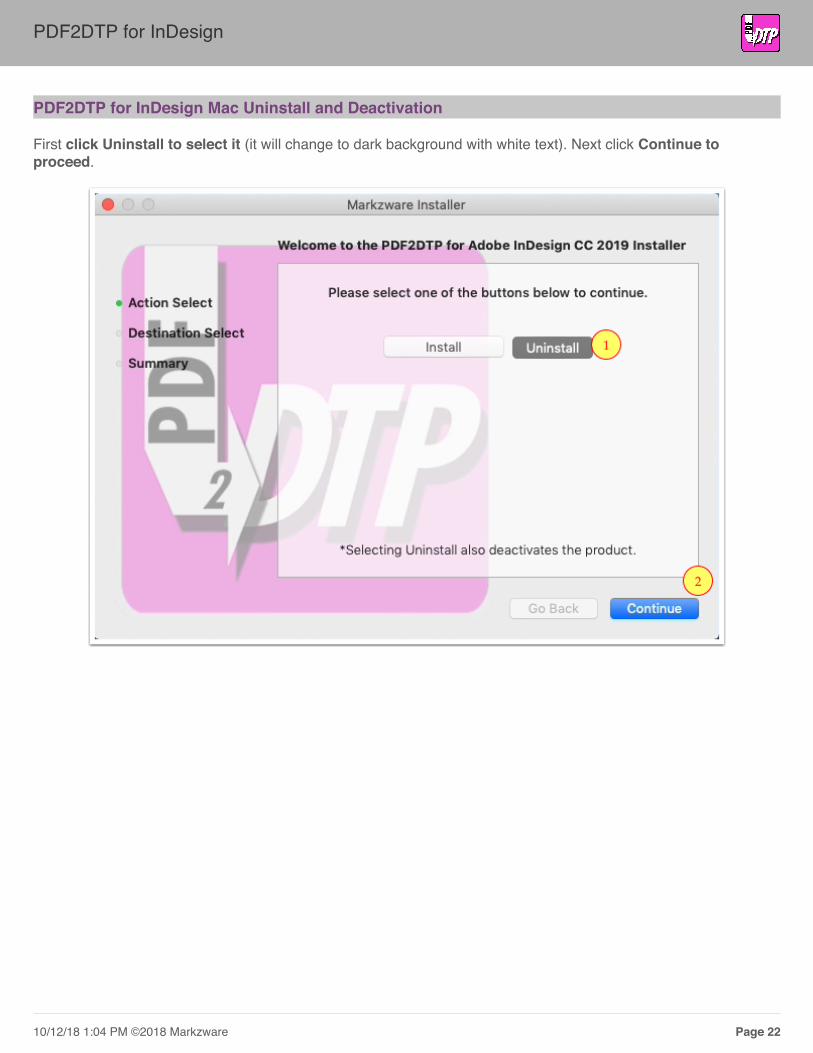
PDF2DTP for InDesign Mac Uninstall and Deactivation
First click Uninstall to select it (it will change to dark background with white text). Next click Continue toproceed.
PDF2DTP for InDesign
Page 2210/12/18 1:04 PM ©2018 Markzware

PDF2DTP for InDesign Mac - Confirm host application location
The path to the host application will be displayed. If this is the correct path, click Uninstall to remove anddeactivate PDF2DTP.
PDF2DTP for InDesign
Page 2310/12/18 1:04 PM ©2018 Markzware

PDF2DTP for InDesign Mac - Uninstall Confirmation
Once the Uninstall process has completed you will see a status screen. Click Close to dismiss the screen.PDF2DTP has now been removed and deactivated from the copy of InDesign shown in the confirmation window.When you restart InDesign, PDF2DTP should no longer be present.
PDF2DTP for InDesign
Page 2410/12/18 1:04 PM ©2018 Markzware

PDF2DTP Troubleshooting
The installer Runs, but PDF2DTP does not show up in InDesign
First, check in your InDesign/Plug-Ins/Filters folder to see if a folder named Markzware exists. If it does it shouldcontain the PDF2DTP Plug-In. If the PDF2DTP Plug-In is located in the InDesign/Plug-Ins/Filters/Markzwarefolder, then it may be corrupt. So please delete the PDF2DTP Plug-In and perform a manual install of PDF2DTPusing the following procedure -
**Note, this procedure shows how to manually install PDF2DTP for InDesign CC 2019. If you are runninganother version of InDesign, you can still follow the "general" flow of this procedure, but you WILL NEEDTO change the InDesign folder where you place your PDF2DTP Plug-In AND each version of InDesign usesa unique version of the PDF2DTP Plug-In, for example, the PDF2DTP Plug-In for InDesign CC 2017 will notrun under InDesign CC 2018 or CC 2019. Make sure you have downloaded the proper PDF2DTP Plug-In forthe version of InDesign you are using.
A) Decompress the ZIP file PDF2DTP_for_CC2019_Mac_v2.XX.XX_mcXX.zip
B) Inside the PDF2DTP_for_CC2019_Mac_v2.XX.XX_mcXX folder, navigate to the View Files/Plugins folder
C) Inside this folder is the actual PDF2DTP Plug-In.
D) Leave the folder from step C open as you will be copying the PDF2DTP Plug-In to its new home in just a bit
E) Navigate to your InDesign CC 2019 application folder
F) Inside the InDesign CC 2019 folder will be a folder named Plug-Ins, open this folder
G) Create a new folder named Filters inside the Plug-Ins folder (if it already exists, skip this step)
H) Open the Filters folder from step G
I) Create a new folder named Markzware inside the Filters folder (if it already exists, skip this step)
J) Copy the PDF2DTPv2.X_CC2019.InDesignPlugin from step C into the Plug-Ins/Filters/Markzware folder
You can now re-launch InDesign CC2019.
You see a message that PDF2DTP has not been Activated and must be Activated by a certain dateAND THE DATE SHOWN IS IN THE PAST
This message usually indicates that your PDF2DTP Subscription License has expired.
First visit your unique download page and check the status of your license. If your license shows as expired, thereshould be a link to renew your license.
If you do not know your unique download link and the license is registered to you, visit https://markzware.com/support/faq/#LostLicense and enter in your email address to retrieve your license info. If this fails, please fill out ouronline Tech Support form and provide your license id, so we can attempt to assist you.
PDF2DTP for InDesign
Page 2510/12/18 1:04 PM ©2018 Markzware

My file won't convert or crashes when I try to convert it
If you're up for a bit of Troubleshooting, try disabling all of PDF2DTP's Preferences and then try and convert yourfile. If this works it may get you going, but we would still like to see your file and see if we can figure out what theissue is. If you know enabling a certain PDF2DTP Preference causes your file to crash, please let us know whenyou send us your file.
You can submit your problematic file by going to the Markzware/PDF2DTP/Help menu and then clicking onSupport Website. This will bring up our online Technical Support Form with your License ID already filled in.Please fill out the form and under the Description area, please provide any details that may help us troubleshootyour file. Don't forget to upload your original PDF file. If you have multiple files or would like to upload both theoriginal PDF and the file PDF2DTP produced, place all files in a single folder and ZIP up that folder. You can thensubmit just a single ZIP file.
Manually Uninstalling PDF2DTP
You can manually Uninstall PDF2DTP by doing the following
1. Make sure InDesign is not running2. Navigate to your InDesign/Plug-Ins/Filters/Markzware folder3. Move the PDF2DTP Plug-In to the Trash4. Empty the Trash5. When you restart InDesign you should no longer see the PDF2DTP Menu.
PDF2DTP for InDesign
Page 2610/12/18 1:04 PM ©2018 Markzware

PDF2DTP Menu & Preferences
The PDF2DTP for InDesign Menu
Once PDF2DTP for InDesign has been properly installed and activated you will see a new menu in InDesign calledMarkzware. Under the Markzware menu you will see the PDF2DTP for InDesign menu. Following is an overview ofeach menu item:
1. Convert PDF… - allows you to select and convert a PDF file. All pages in the PDF file will be converted.The settings used will be the currently set values under the Preferences area.
2. Convert Page Range… - allows you to select a PDF file to convert, but it also allows you to specify arange of pages to convert. The settings used will be the currently set values under the Preferences area
3. Preferences… - will bring up the PDF2DTP for InDesign Preferences window where you can set certainparameters and options for the conversion of PDF files
4. Help… - will bring up a help/about window
PDF2DTP for InDesign Help… Menu Item
When you select the Help… menu item you will be presented with a small window that contains several things:
1. The version number of PDF2DTP for InDesign you are running. This version will be asked for should youcontact Tech Support.
2. Link to the PDF2DTP for InDesign online manual. Clicking this will open up your default web browser andtake you to the online PDF2DTP for InDesign manual.
3. Link to the Markzware Tech Support Request Form. Clicking on this will open up your default web browserand take you to the Markzware Online Technical Support Form. The form should have your License ID pre-pasted in to save you some time.
PDF2DTP for InDesign
Page 2710/12/18 1:04 PM ©2018 Markzware

PDF2DTP for InDesign General Preferences
1. Select the “Show Preferences Before Converting” checkbox in order to display the Preferences windowprior to the conversion process. If this feature is disabled, PDF2DTP will use the last settings to convertyour files until you manually change your preferences. To view the Preferences window at any time - Gothe to Markzware->PDF2DTP menu and select Preferences…
2. Select the “Convert Page Range” checkbox to convert a selected range of pages. When the preferenceis enabled, you will prompted for the start and ending page numbers you wish to convert prior to beginningthe conversion process.
PDF2DTP for InDesign Document Settings
1. Select the “Save Document” checkbox to automatically save your new document to the designated folderupon completion of the conversion.
2. Save To - This area allows you to select the destination folder of your InDesign file and Images. By defaultthis is in your Users->Documents->PDF2DTP->PDF2InDesign folder. If you wish to save your convertedfile elsewhere, you can select "PDF Folder", which will save the InDesign file in the same folder as theoriginal PDF, or you can select a custom destination by selecting "Other folder" and then selecting thedestination of your choice.
3. Select "Overwrite Existing Folder" to overwrite an existing file conversion. If this is unchecked, every timeyou convert a file PDF2DTP will create a new job folder. If you wish to have different versions of aconverted PDF file, then you should leave this unchecked. If you would like future conversions of the samePDF to overwrite older conversions of the job, then you should check this box. **Note - when this isunchecked, it can increase the amount of hard disk space required because multiple versions of the sameconverted file will be stored to disk.
4. The Folder area shows the path where your InDesign file will be saved. This is a nice visual confirmation ofwhere things will be saved.
PDF2DTP for InDesign
Page 2810/12/18 1:04 PM ©2018 Markzware

PDF2DTP for InDesign Text Settings
1. Select the "Substitute Missing Fonts" checkbox to substitute missing fonts with the application’s defaultfont. Leave this item unchecked if you eventually plan on locating and activating missing fonts. You can setthe application default font by editing the style when no documents are open in InDesign. When theconversion is complete the application will display a list of missing fonts at which time you can change fontsas desired, or you can edit character and paragraph styles. Note that switching fonts may cause a differentor undesirable text flow. This is due to the fact that the calculations for the text attributes are based on theinfo contained in the PDF for the original fonts.
2. Select the “Scale Text” checkbox to scale the text using a substituted font (usually horizontally) so thatcharacters closely match their original positions.
3. Select the "CharStyles"checkbox to add Character Styles to your converted document. This will allow youto easily make global changes to your text. These CharStyles are created by PDF2DTP. Any CharStyles inthe original document are lost when a PDF is created.
4. Select the "ParaStyles" checkbox to add Paragraph Styles to your converted document which will likewiseallow you to make global changes to your text. These ParaStyles are created by PDF2DTP. AnyParaStyles in the original document are lost when a PDF is created.
5. "Replace Unknown Characters With" allows you to replace unknown characters with either a "spacecharacter" or a "tilde character". The tilde character ~ is selected by default.
6. Select “Edit Unknown Characters" to bring up a special Glyph Editing window that allows you tomanually select replacement glyphs for unknown characters. This is designed to improve the quality of yourconversion. Instead of getting ~'s or spaces when unknown characters are encountered.
7. If you use the Edit Unknown Characters feature, for every font encountered, PDF2DTP writes out a specialfile containing your choices for replacing unknown characters for that particular font. This file is then"automatically referenced" for every future conversion which references this particular font. Selecting“Always Show the Characters Editor" allows you to edit these files using the Characters Editor. It doesthis by showing the Characters Editor window regardless of whether PDF2DTP is referencing an existingfont substitution file or you are creating a new font substitution file. This allows you to edit choices you havemade regarding character substitution in the past as you now can access an existing character set file.
PDF2DTP for InDesign
Page 2910/12/18 1:04 PM ©2018 Markzware

PDF2DTP for InDesign Objects Settings
1. Select "Page Numbering" to have PDF2DTP check for number boxes in the footer area of the PDF and ifencountered add these page numbers to the converted InDesign file.
2. Select "Chain Text Boxes" to instruct PDF2DTP to automatically connect similar sized text boxes into asingle chained story. **NOTE - Using this feature may cause text reflow which in many cases can beadjusted by manually resizing certain text boxes in the chained flow or adjusting font size or tracking.
3. When "Tables" is selected, PDF2DTP will attempt to create a true table object based on text boxes andtheir surrounding lines. If PDF2DTP is unable to create a true table, text boxes and lines will remain asseparate objects.
4. Select "Groups" to instruct PDF2DTP to attempt to combine objects it thinks are a group within the PDF.This can allow faster screen refreshes after conversion.
5. "Include Pasteboard Items and Reg. Marks" instructs PDF2DTP to convert items outside the page area.This can include printer marks and other items found on the pasteboard.
6. If your PDF contains a lot of small vector objects and is sluggish to edit due to screen redraw being slow,then by selecting "Replace "Marked Content"" and setting an object count you will instruct PDF2DTP toskip objects that exceed the specified count and instead replace the entire object with a gray placeholderbox. At a later time you can then locate and place the original drawing back into the file.
PDF2DTP for InDesign
Page 3010/12/18 1:04 PM ©2018 Markzware

PDF2DTP for InDesign Images Settings
1. Select the “Save Image Previews” checkbox to save the image previews in the PDF to the conversionfolder, otherwise the previews will have no link (similar to a pasted PICT). Since these images have noknown pathname they will be given names such as “Image09-p03.tif” (where the last number is the pagenumber on which the picture box resides).
2. Select the “Reuse Duplicates” checkbox to save only one image preview file if there are any duplicates inwhich case each occurrence of the preview in the document will use the same file. This preference isuseful because it can speed up the conversion process especially when the same large preview is used onmultiple pages. The file name will be formed by using the page number of the first occurrence of thepreview in the document with a plus sign (“+”) appended to the preview file name.
3. Select the “Clipping Paths” checkbox to save the Clipping Path in the preview file.4. Select the “ICC Profiles” checkbox to save an ICC Profile, if defined in the PDF, to the preview file.5. Select the “Duotones EPS” checkbox to save the image preview to a Duotone EPS if the color space is
defined as DeviceN and uses named Spot colors (i.e. “PANTONE 123 C”).6. Select the “Save Missing Images (OPI)” checkbox to create a file in the conversion folder for a missing
image which has a known name. This allows you to eventually update the images upon locating theoriginals.
7. "Unlink Images" is related to the Save Image Previews and the Save Missing Images (OPI) preferences.If a PDF contains an image path (i.e., OPI data) and PDF2DTP can locate that image, it will link to it. If noOPI data is present in the PDF, or the image pointed to by OPI data cannot be found, then, if Save ImagePreviews is unchecked, the image will be listed with a Status of No Disk File under the Links window. IfSave Image Previews is checked, then PDF2DTP will attempt to create a preview image and name it usingthe following format: Image01-p01.tif, where Image01 represents the number of the image on a page andp01 represents the page in the document where the image is located.
PDF2DTP for InDesign
Page 3110/12/18 1:04 PM ©2018 Markzware

PDF2DTP Interactive Settings Part 1
1. Select "Hyperlinks" to instruct PDF2DTP to convert data for hyperlinks.2. Select "Bookmarks" to instruct PDF2DTP to convert data for Bookmarks, this can include Table of
Contents for PDFs created from InDesign files.3. Select "Buttons and Forms" to instruct PDF2DTP to convert Buttons and Forms. These items when
converted can be exported out of InDesign by using the Interactive Settings during PDF export.4. Select "Appearance Only" to instruct PDF2DTP to convert Buttons and Forms as regular, non-interactive
objects. These should appear visually the same as the original Button or Form, but no longer retain anyinteractive properties.
5. Select "Separate Layer" to instruct PDF2DTP to convert Buttons and Forms objects onto a new layernamed "Buttons and Forms Layer". Doing this will allow you to hide these objects. This is usually needed tohide these types of objects for a print based job.
PDF2DTP Interactive Settings Part 2
1. Select "Annotations" to convert various markup items such as Insert Text, Strike Thru and Underline.2. Select "Comments" to convert Comments.3. Select "Author" to include the name of the Author of a comment.4. Select "Date" to include the Date a comment was created or modified.5. Select "Reply" to include the text of a Reply to a comment if present.6. Select "Drawing Markups" to convert annotation markups such as arrows, ovals, rectangles and lines.7. Select "Apply Annotation Notes" to include the chosen Annotation Notes (Author, Date, Reply and
Location).
PDF2DTP for InDesign
Page 3210/12/18 1:04 PM ©2018 Markzware

PDF2DTP Conversion Notes
PDF (Portable Document Format) is an open standard for document exchange. This file format created by AdobeSystems in 1993 is used for representing documents in a manner independent of application software, hardware,and operating systems. Each PDF file encapsulates a complete description of a fixed-layout flat document,including the text, fonts, graphics, and other information needed to display it.
PDF2DTP for InDesign is an extremely valuable utility that converts a PDF to an editable application document. Iffor example you discover you have lost your original document but only have a PDF you can convert the PDF backinto a document thus saving a lot of time it would otherwise take to re-create the document from scratch by hand.However, a conversion may not reproduce the original document 100% and there are several limitations of whichyou need to be aware of (See the list later in this manual).
It helps to always think of a PDF as a “drawing” and that because the conversion process is quite complex thesoftware sometimes needs to make an “educated guess” where the end-result may not be a completely satisfactoryconversion. In other words you will no doubt need to make some manual changes to compensate. By a “drawing”we mean a PDF contains specific information in order to render the fonts and images on the computer screen, or toprint the PDF. For example, a PDF can contain certain “glyphs” which are comprised of drawing commands whichenable the data to be drawn or printed, but the original TEXT characters may not be defined within the PDF and soa conversion to an actual story may not even be possible.
A PDF often contains embedded fonts so that it can be displayed or printed on any platform. However, if the fontsare missing (or not activated at the time) then the document created by the conversion will have limitations or textflow problems.
A PDF also often contains images but the links to the original file path may not be known. The images may also bedown-sampled (lower resolution) and this poses a problem if you intend to create a document and wish to use theoriginal hi-res images.
Therefore, the actual goal isn’t necessarily to obtain a 100% conversion back to the original document. The onlyreal way to achieve a complete “full circle” is to embed the generated PDF with additional data that will serve as“hints” to assist a conversion tool to be able to perform an accurate conversion. This could include information forStyles Sheets, Guidelines and so forth, not to mention saving the image pathnames.
If you do run into some problems, please feel free to contact Markzware Technical support so that we can learnhow to improve and provide the best conversion solutions for you.
PDF2DTP for InDesign - ParaStyle and CharStyle
If the “ParaStyle” or “CharStyle” Preferences are selected then for each major text attribute change a Paragraph orCharacter Style will be conveniently added to the document. This allows you to easily make global changes to thetext by simply editing the Style.
Important Note! --- PDF files do not carry any style names defined in the original document used to create thePDF. PDF2DTP creates its own Para and Char Styles based on what it detects during conversion. So if you have aseries of style names you always use, these will not appear in the converted file. What you may be able to do isrename the Para or Char styles PDF2DTP created during conversion to match the style names in your originaldocument.
PDF2DTP for InDesign
Page 3310/12/18 1:04 PM ©2018 Markzware

PDF2DTP for InDesign - ParaStyle and CharStyle Names
The Paragraph Style name will include settings such as Leading and Indents while the Character Style name willinclude the name of the font and the point size.
PDF2DTP for InDesign - The "+"
Note that some Character or Paragraph Styles will have a plus sign “+” in front or at the end of their names on theStyles palette indicating the selected text has local formatting changes that deviate from the Style settings. In thiscase you can option-click the Style to override the formatting and apply the exact attributes of the Style.
PDF2DTP for InDesign - How PDFs Render Text
It’s important to understand how a PDF renders text. The PDF contains various commands to move to a locationand draw a character. The PDF also contains the width of the character so that it can know where to draw the nextcharacter. However, a space character is often absent from the text stream. In this case, after a word has beendrawn, the next command will be to move a short distance further to the right to draw the character that begins thenext word. A problem arises in determining what to do with this “gap” in the text drawings. PDF2DTP performsseveral calculations in order to come up with the best estimate on how to handle the “gap”, such as to insert aSpace character, or to apply tracking (a form of letter-spacing) or to insert a Tab if the spatial distance is fairlygreat.
PDF2DTP for InDesign - Underlined Text
There can be problems with text that was underlined in the original document. The PDF will draw a word and thendraw a line underneath. PDF2DTP attempts to detect this situation and if discovered will apply the Underlineattribute to the text. Otherwise a line object will be created. Note that Underlines are set using the default line offsetand width. A Character Style for the Underline will be conveniently created so that the settings can be easilychanged.
PDF2DTP for InDesign - Text Box Boundaries
A text box is the calculated boundary for a group of lines of text. PDF2DTP works by calculating the endingpositions for a series of related lines that will determine the rectangle that can be formed to fully encompass thegroup of lines. The text box will then be used to determine various paragraph attributes such as Justifications andIndents. In some cases PDF2DTP makes a determination that a specific line of text may not relate very well toprevious lines in which case a new text box will be started.
PDF2DTP for InDesign - Text Flow
Text “flow” is another major problem for a conversion, especially when a referenced font is missing. In some casesthe text will not break as desired on each line, thus causing the last part of the story to overflow the box at thebottom. In this case, a common remedy is to simply widen the text box manually to see if you can get the text toflow better.
PDF2DTP for InDesign
Page 3410/12/18 1:04 PM ©2018 Markzware

PDF2DTP for InDesign - Down sampled Images
Images can often pose a major problem when considering a goal of attempting to convert the PDF back to thesame level of quality as the original document. In many cases the PDF was generated where images have beendown-sampled to a lower resolution, thus making it physically impossible to reach the goal of a flawless, exactduplicate of the original document.
The example shown is a PDF file created using QuarkXPress where the original placed images were 305dpi. TwoPDF files were created out of QuarkXPress one using the Press Quality settings and one using the Low Qualitysettings. As you can see PDF2DTP can only extract the quality of image that was originally set when the PDF filewas created.
PDF2DTP for InDesign
Page 3510/12/18 1:04 PM ©2018 Markzware

PDF2DTP for InDesign - OPI
It is important to understand a term known as “OPI” which stands for “Open Prepress Interface”. This is where alow-resolution image is placed on the document page as a “placement holder” for a higher resolution image storedin a known location. The hi-res image, which is of course a much larger file, will be located and used in place of thelo-res picture at print time. If an image in the PDF is available on disk then a link to it will be created. If a PDF wasgenerated with no OPI comments then the original image name and location will of course be unknown. If youchoose “Save Missing Images” from the PDF2DTP Preferences a preview file will be conveniently created using theoriginal name.
PDF2DTP for InDesign - Found Links
If the link to the original image is known, PDF2DTP will import the file. If the image cannot be located then it willconvert the lo-res picture preview stored in the PDF. A problem arises due to the fact that the preview is comprisedof only those pixels that are viewable within the picture box. If you were to locate and import the original image thenits offset in the picture box may change if the image dimensions are greater than the picture box.
PDF2DTP for InDesign - Standard OPI Disabled at PDF Creation Time
Most PDFs are generated by an application where the Export PDF “Use OPI” setting is not turned on in which casethe PDF will not contain a name for the image. The link to the path location of the original image is thereforeunknown.
PDF2DTP for InDesign - Clipping Paths
If the original image exists it will be imported and the application will use the default Clipping Path for the image (ifone exists). If the image is missing, or no link exists, you can add a Clipping Path to the created preview file byselecting the PDF2DTP “Clipping Paths” Preference.
If a conversion reveals a picture box where the image is not being shown properly, for example is only partiallydisplayed, the first trick to try is to examine the Clipping Path. This can be done in the application by either editingthe points of the path or by deleting the path altogether.
PDF2DTP for InDesign
Page 3610/12/18 1:04 PM ©2018 Markzware

PDF2DTP for InDesign - Color Conversion Tips
Colors are converted based on their definitions in the PDF. Some colors may not look the same as when the PDF isdisplayed by a viewer or the colors may not be exactly equal to the colors used by the original document. This canoccur for several reasons. When a PDF is generated from a document, the application will use specific PDF Outputsettings which may cause color conversions, such as CMYK to RGB.
It is important to understand the effects of using an application’s Export PDF settings if you have the intention ofever wanting to convert the PDF in the future back to the same quality as the original document. Just as colors canbe altered, images can be downsized to a lower resolution making it impossible to convert the preview to match theoriginal image quality. If fonts are embedded then this too can become a huge issue if the original fonts cannot belocated and activated. Therefore, it is often a good idea to learn how to Export a PDF not only for the desireddestination, such as a printing device, computer screen or to display in a web browser, but also to create a highquality PDF that can be used for a much more precise conversion back to a document. The additional high qualityPDF can serve as a “backup” of your document in case you ever lose it whereas having only a low quality PDF mayresult in conversion issues due to the limitations dictated by the original Export settings.
PDF2DTP for InDesign - Spot Colors
If the PDF defines a color by name (called a “Spot” color) then PDF2DTP will add the color to the document’s Colorpalette based on the closest color model supported according to the color’s name. The most common color modelsare all supported, including ANPA, DIC, FOCOLTONE, HKS, PANTONE, TOYO, TRUMATCH, etc.
It is possible that a Pantone color, for example, defined by the original application that created the PDF may nothave the exact same color values as the application using the PDF2DTP Plug-In even though they use the samecolor name.
If a PDF does not contain named colors then this means it was generated by an application which had PDF Outputpreferences set to export all colors to RGB or CMYK. Even though the original document may have used Spotcolors, a PDF created using only CMYK will of course not contain any named Spot colors
PDF2DTP for InDesign - Process Colors
The naming convention for Process colors (which have no names defined in the PDF) are dependent upon theapplication. Some applications handle Process colors using percentages from 0% to 100% for the RGB or CMYKchannels whereas other applications may use numerical values 0 to 255.
PDF2DTP for InDesign
Page 3710/12/18 1:04 PM ©2018 Markzware

PDF2DTP for InDesign - Fill and Frame
In desktop publishing applications you can create a tint box with a fill and frame as one single object. However,PDF2DTP currently will create separate objects: one for the fill and another for the line around the edges of thebox.
In the sample shown, the frames were intentionally moved out of place on the converted PDF to show that theframes are separate from the fills.
PDF2DTP for InDesign - Blends
A PDF sometimes defines a Blend as a series of lines that are drawn with changing colors. Because this wouldcause too many line objects to be created, PDF2DTP will examine the lines to determine if a simple Blend can beused for the box with the Starting and Ending colors.
PDF2DTP for InDesign
Page 3810/12/18 1:04 PM ©2018 Markzware

PDF2DTP for InDesign - Table Conversion Tips
A “table” consists of drawing commands defined in the PDF that will first display the text followed by lines to formthe cells. If the “Table” preference is turned on, PDF2DTP will attempt to examine the objects in order to create atrue table object. Otherwise, if the “Table” preference is turned off then the text and lines will be converted asseparate objects.
In the following sample, a true table was created when the PDF (which was originally created in InDesign) wasconverted into an InDesign document.
If you try converting a file and it hangs or crashes, try it again but this time disable the Table Preference. In manycases your file may convert, but will not contain actual tables.
PDF2DTP for InDesign - Drop Shadow As An Image
A Drop Shadow is sometimes defined in a PDF as an image in which case it is not possible to determine that it isreally supposed to be a Drop Shadow. In these cases the drop shadow will be converted as an image.
PDF2DTP for InDesign - Drop Shadow and Missing Font
Text which has a Drop Shadow can pose a problem especially if the font is missing because the text characters willnot correctly match the positions of the individual shadows.
PDF2DTP For InDesign - Trim Size
The document size of the converted PDF will be based on what is called the “Trim” area as defined by the PDF.This may be different than the dimensions displayed by a PDF viewer that uses the CropBox area.
PDF2DTP For InDesign - Media Size
A PDF may define a “Media” area which consists of a larger size which will contain various markings suchregistration targets and slugs. Typically you can direct PDF2DTP to ignore these objects by turning off “IncludePasteboard Items” in the Preferences.
PDF2DTP for InDesign
Page 3910/12/18 1:04 PM ©2018 Markzware

PDF2DTP For InDesign - Bleed
A PDF may define a “Bleed” area which is slightly larger than the page size.
PDF2DTP For InDesign - Bad PDFs
Sometimes a PDF can become corrupted and cannot be displayed in a PDF viewer. In this case try usingPDF2DTP for it has built-in routines that will attempt to salvage the document as much as possible. Although thisis not PDF2DTP's main feature, it may come in handy in certain cases. Salvaging a document usually involvesskipping things during conversion, so the converted document almost always has missing items under thesecircumstances.
PDF2DTP For InDesign - Subpar Conversion Results
If a PDF does not convert very well, especially if the PDF was created many years ago, try opening it and re-savingit in a PDF editor, such as Acrobat, and retry the conversion. Most PDF editors have the capability of repairing orimproving the PDF, or perhaps allowing you to save to a higher version.
PDF2DTP For InDesign - Printers Marks
If you see Printers Marks such as fold and trim marks, try disabling the Include Pasteboard Items Preference.This will not convert any items outside the trim area.
PDF2DTP for InDesign - Missing Fonts
Missing fonts (fonts which are not active when performing a conversion) pose the biggest problems. Calculationsfor text positions are based on information (such as character widths) provided by the PDF according to the originalfonts and therefore text may flow undesirably until the fonts are located and activated.
PDF2DTP for InDesign
Page 4010/12/18 1:04 PM ©2018 Markzware

PDF2DTP for InDesign - Unknown Character or Glyph
If for some reason a character used in the PDF cannot be converted it will be substituted with either a space or atilde. There is now a feature called Characters Editor that when enabled allows you to control the characters thatget substituted for missing characters or glyphs. While this may take you a bit more time up front, the end result isfar superior than having to deal with spaces and tildes (~) throughout a converted file.
PDF2DTP for InDesign - Substitute Missing Fonts Enabled
If you turn on the “Substitute Missing Fonts” preference then missing (inactive) fonts will be substituted with theapplication’s default font (commonly Minion Pro, Times, Arial or Helvetica, etc.) The actual font will be based on the“Normal” character style which can be changed manually to a different default replacement font (usually by editingthe style sheet when no documents are open, or by changing the application’s font substitution preferences).Enabling "Substitute Missing Fonts" may often result in a more desirable text flow, especially when combined withthe “Scale Text” Preference.
Important Note*** - Based on in-house testing, enabling the Scale Text option dramatically increases the time ittakes a conversion to complete. You may want to consider using this option on a range of pages instead of entiredocuments, especially if the document is long and has many text styles used in it.
PDF2DTP for InDesign - Substitute Missing Fonts Disabled
When the conversion is complete the application may display a list of missing fonts at which time you can changethem as desired, or you can edit the style sheets at any time in the future.
PDF2DTP for InDesign
Page 4110/12/18 1:04 PM ©2018 Markzware

PDF2DTP for InDesign Known Limitations
PDF2DTP for InDesign and Embedded Fonts in PDF Files
An embedded font poses a problem where the information in the PDF will be sufficient to draw the glyphs(characters), but there may be no equivalent Unicode character values given, thus making a conversion to TEXTimpossible. In these cases you will get question marks {?) displayed instead of actual text unless you enable theEdit Unknown Characters preference and manually select replacement characters.
PDF2DTP for InDesign and Document Page Size
The resulting converted document page size will be based on the Trim area with all registration marks positionedoutside the page boundary.
PDF2DTP for InDesign and Line Styles
Some Line Styles, such as Triple, are not supported and will convert as separate lines.
PDF2DTP for InDesign and Underlines
Underlines are set using the default line offset and width.
PDF2DTP for InDesign and Colors Used in PDF Files
Colors are converted based on their definition in the PDF. Some colors may not look the same on screen as theoriginal PDF colors.
PDF2DTP for InDesign and OPI Comments
If an image in the PDF is available on disk a link will be created. If a PDF was generated with no OPI commentsthen the original image name and location will of course be unknown. In this case choose “Save Missing Images”from the Preferences to create a preview file.
PDF2DTP for InDesign and No Defined Image Path
When an image has no path defined in the PDF the preview data saved inside the PDF is only for the viewablearea, which could be a mere sliver of the original image. The preview created by PDF2DTP for InDesign willaccommodate this problem by generating a large image file in order to better replace the image and retain theoffsets once the original image is found.
PDF2DTP for InDesign
Page 4210/12/18 1:04 PM ©2018 Markzware