Embed Size (px)
Citation preview
February 2018 ACA Instructions Page 1 of 30
PAYROLL
AFFORDABLE CARE ACT
1094-C & 1095-C PROCESSING
Computer Arts, Inc. Help Desk Support
(208) 955-0151 local (800) 365-9335
Don’t forget to check our website for additional Payroll information.
http://www.gocai.com
February 2018 ACA Instructions Page 2 of 30
UNDERSTANDING ACA REQUIREMENTS
It is important to understand what you are reporting, and what information the IRS is requiring. It is
recommended that you look at the information you are reporting, review it carefully.
Employers with 50 or more full-time employees (including full-time equivalent employees) in the previous year use
Forms 1094-C and 1095-C to report the information required under sections 6055 and 6056 about offers of health
coverage and enrollment in health coverage for their employees. Form 1094-C must be used to report to the IRS
summary information for each ALE Member and to transmit Forms 1095-C to the IRS. Form 1095-C is used to
report information about each employee to the IRS and to the employee. Forms 1094-C and 1095-C are used in
determining whether an ALE Member owes a payment under the employer shared responsibility provisions under
section 4980H. Form 1095-C is also used in determining the eligibility of employees for the premium tax credit.
ALE Members that offer employer-sponsored self-insured coverage also use Form 1095-C to report information to
the IRS and to employees about individuals who have minimum essential coverage under the employer plan and
therefore are not liable for the individual shared responsibility payment for the months that they are covered
under the plan.
An ALE Member must furnish a Form 1095-C to each of its full-time employees by March 2nd of the year following
the year to which the Form 1095-C relates.
This is explained in the IRS documentation https://www.irs.gov/Affordable-Care-Act/Employers.
Your calculation of hours for ACA reporting is based on hours worked in a calendar month. Do not
confuse it with hours worked in a Pay Period.
Computer Arts Inc. does not provide tax, legal or accounting advice. This document has been prepared for
informational purposes only and is not intended to provide, and should not be relied on for, tax, legal or
accounting advice. You should consult your own tax, legal and accounting advisors before engaging in any
transaction.
February 2018 ACA Instructions Page 3 of 30
ACA TERMINOLOGY
ACA Hours Worked - An hour of service is each hour for which an employee is paid, or entitled to payment, for the performance of duties for the employer, and each hour for which an employee is paid, or entitled to payment.
Applicable Large Employer (ALE) - An ALE is, for a particular calendar year, any single employer, or group of employers treated as an Aggregated ALE Group, that employed an average of at least 50 full-time employees (including full-time equivalent employees) on business days during the preceding calendar year.
Designated Governmental Entity (DEG) - A DGE is a person or persons that are part of or related to the Governmental Unit that is the ALE Member and that is appropriately designated for purposes of these reporting requirements.
Full Time Employee - For purposes of Forms 1094-C and 1095-C, the term “full-time employee” means a full-time employee as defined under section 4980H and the related regulations. An employee is full time if they worked at least 30 hours per week or 130 hours of service in a calendar month.
Full Time Equivalent (FTE) - A combination of employees, each of whom individually is not treated as a full-time employee because he or she is not employed on average at least 30 hours of service per week with an employer, but who, in combination, are counted as the equivalent of a full-time employee solely for purposes of determining whether the employer is an ALE. For rules on how to determine full-time equivalent employees, see Regulations section 54.4980H-2(c).
Limited Non-Assessment Period (LNP) - A Limited Non-Assessment Period generally refers to a period during which an ALE Member will not be subject to an assessable payment under section 4980H(a), and in certain cases section 4980H(b), for a full-time employee, regardless of whether that employee is offered health coverage during that period. i.e. The waiting period until the employee is eligible for health insurance.
Minimum Essential Coverage (MEC) - Although various types of health coverage may qualify as minimum essential coverage, for purposes of these instructions, minimum essential coverage refers to health coverage under an eligible employer-sponsored plan. For more details on minimum essential coverage, see Minimum essential coverage in Pub. 974.
Minimum Value (MV) (affordable coverage) - A plan provides minimum value if the plan pays at least 60% of the costs of benefits for a standard population and provides substantial coverage of inpatient hospitalization services and physician services. An offer of coverage under a plan that fails to provide substantial coverage of inpatient hospitalization and physician services should be reported on Form 1095-C as not providing minimum value, even if an employer qualifies for the section 4980H transition rule under Notice 2014-69, 2014-48 I.R.B. 903 at https://www.irs.gov/pub/irs-drop/n-14-49.pdf.
Offer of Health Coverage - An ALE Member makes an offer of coverage to an employee if it provides the employee an effective opportunity to enroll in the health coverage (or to decline that coverage) at least once for each plan year.
Qualifying Offer - A Qualifying Offer is an offer of MEC providing minimum value to one or more full-time employees for all calendar months during the calendar year for which the employee was a full-time employee for whom a section 4980H assessable payment could apply, with an Employee Required Contribution for each month not exceeding 9.5 % (as adjusted) of the mainland single federal poverty line divided by 12, provided that the offer includes an offer of MEC to the employee’s spouse and dependents (if any).

February 2018 ACA Instructions Page 4 of 30
ACA REPORTS
ACA Base Hours (PR004ACA) – The ACA Base Hours report prints all employees and their daily base hours who were classified as Salary anytime during the year. All employees on this report should have an amount in the total hour’s column.
ACA Base Hours Worksheet (PR003ACA) – The base hours worksheet is used as a worksheet, it lists all employees and gives you the space to write in each employees base hours. (This is usually used for customers using the CAI ACA program for the first time)
ACA Hourly Rate Audit (PR013ACA) – This report displays all employees less than the amount you put into the filter. If there are positions on this report that are used only for rate increases i.e. used to increase a wage by .10 cents per hour for being bilingual that have hours logged that you don’t want included in their ACA hours worked they need to be flagged to be excluded.
ACA Hours Balancing (PR006ACA) – The ACA balancing report is used as an auditing report for CAI for counties who are using the CAI ACA program for the first time.
ACA Hours Work By Month (PR012ACA) - This reports does two things:
1. Allows you to audit employees hours worked which affects the codes used on the 1095-C transmittal/form and determines if they were supposed to be offered insurance. NOTE: At this point if you find an error in their hours it needs to be corrected prior to creating your 1095-C transmittal.
2. Reports the counties full time equivilant employee totals by month for determining the counties ALE status.
The report lists all employees who were employeed in the calendar year. It adds up the employees ACA hours worked for each month based on ACA rules and classifies them into three groups, Full Time (>= 130 hours), Part Time (< 130 hours) and LNP (waiting period).
ACA Hours Worked (PR005ACA) (used for table balancing by CAI)
1095C Edit Report (PR1095ED) - This report gives you a summary view of the employee’s 1095’s and information. NOTE: This is an Edit report, so changes can be made before submitting the file to the IRS and employee.
1095-C IRS Form (PR1095) – Form 1095-C is used to report information about each employee to the IRS and to the employee. The Form 1095-C includes information about the health insurance coverage offered to your employee. Form 1095-C, Part II, includes information about the coverage, if any, you (the employer) offered to the employee and their spouse and dependent(s).
1094-C IRS Form (PR1094) - Form 1094-C must be used to report to the IRS summary information for each ALE Member and to transmit Forms 1095-C to the IRS. Employers with 50 or more full-time employees (including full-time equivalent employees) in the previous year use Forms 1094-C to report the information required under sections 6055 and 6056 about offers of health coverage and enrollment in health coverage for their employees.
Web Time Entered by Employee (PRW140) – This report shows the hours entered by employee which can help with ACA hours worked. This report can be run for the year or for a certain date range for all employees or for a specific employee.
February 2018 ACA Instructions Page 5 of 30
THE ACA PROCESS -CREATING 1094-C AND 1095-C FORMS
STEP 1 – DAILY TIME
Make sure all daily time has been entered into the CAI Payroll System for all non-salary positions.
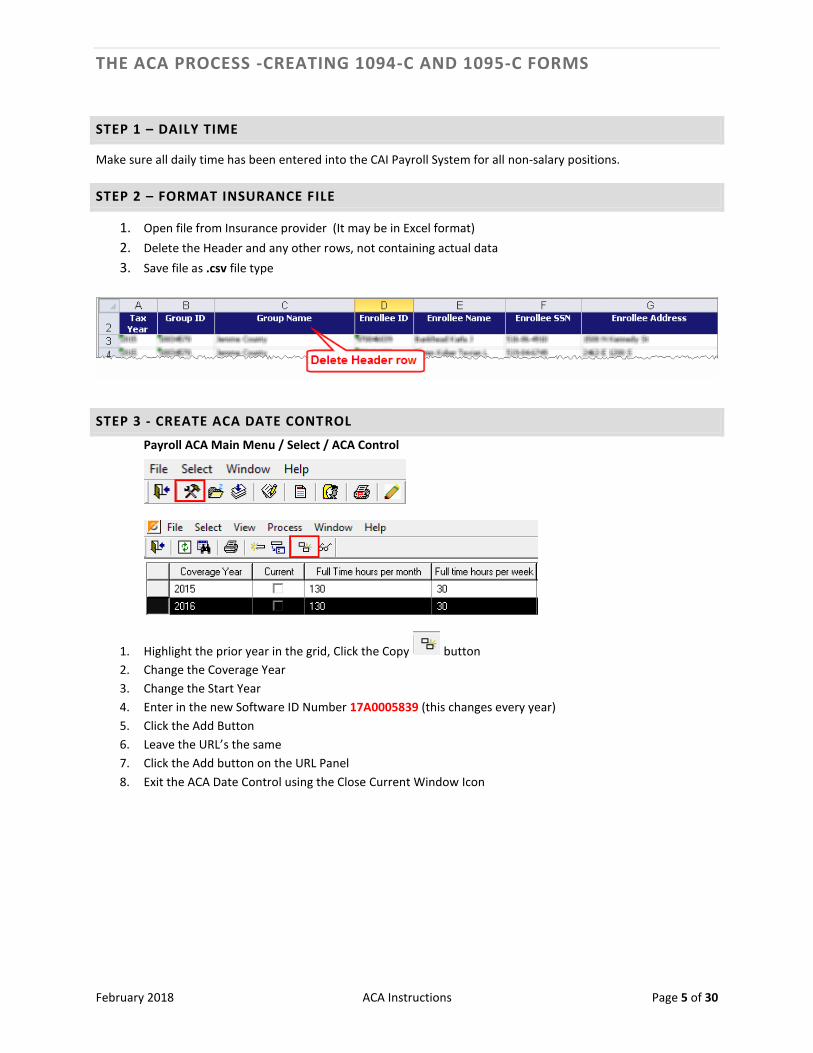
STEP 2 – FORMAT INSURANCE FILE
1. Open file from Insurance provider (It may be in Excel format)
2. Delete the Header and any other rows, not containing actual data
3. Save file as .csv file type
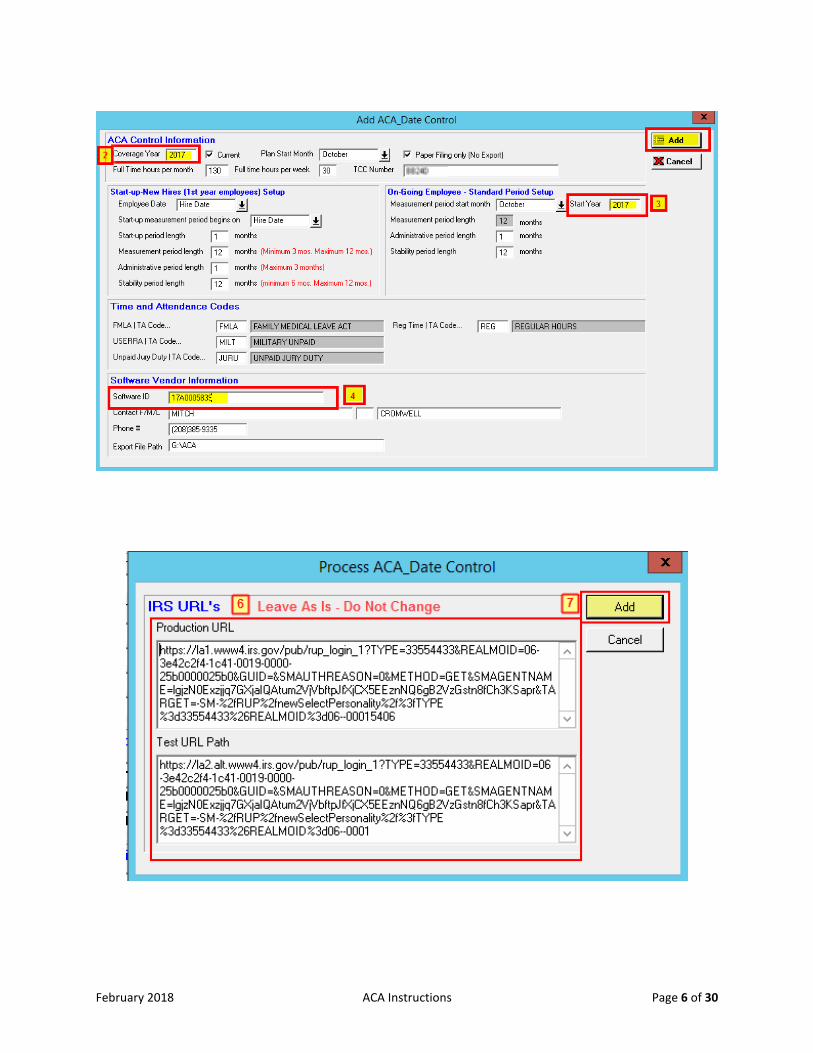
STEP 3 - CREATE ACA DATE CONTROL
Payroll ACA Main Menu / Select / ACA Control
1. Highlight the prior year in the grid, Click the Copy button
2. Change the Coverage Year
3. Change the Start Year
4. Enter in the new Software ID Number 17A0005839 (this changes every year)
5. Click the Add Button
6. Leave the URL’s the same
7. Click the Add button on the URL Panel
8. Exit the ACA Date Control using the Close Current Window Icon
February 2018 ACA Instructions Page 6 of 30
February 2018 ACA Instructions Page 7 of 30
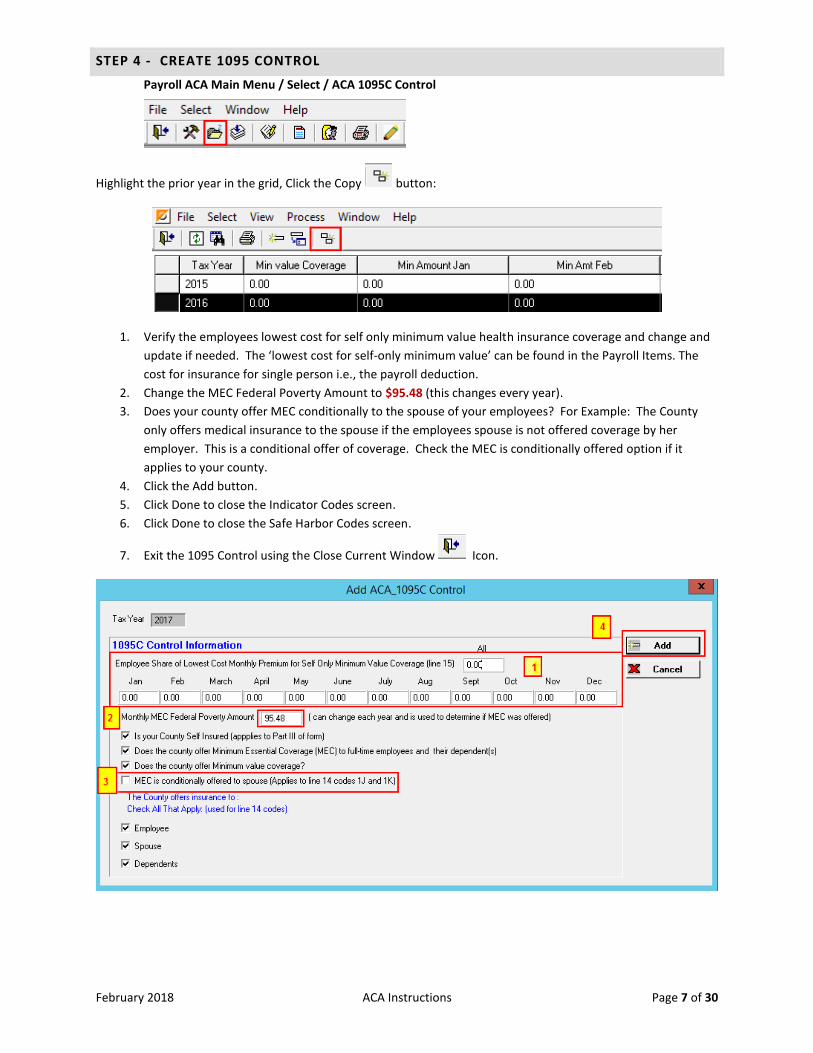
STEP 4 - CREATE 1095 CONTROL
Payroll ACA Main Menu / Select / ACA 1095C Control
Highlight the prior year in the grid, Click the Copy button:
1. Verify the employees lowest cost for self only minimum value health insurance coverage and change and
update if needed. The ‘lowest cost for self-only minimum value’ can be found in the Payroll Items. The
cost for insurance for single person i.e., the payroll deduction.
2. Change the MEC Federal Poverty Amount to $95.48 (this changes every year).
3. Does your county offer MEC conditionally to the spouse of your employees? For Example: The County
only offers medical insurance to the spouse if the employees spouse is not offered coverage by her
employer. This is a conditional offer of coverage. Check the MEC is conditionally offered option if it
applies to your county.
4. Click the Add button.
5. Click Done to close the Indicator Codes screen.
6. Click Done to close the Safe Harbor Codes screen.
7. Exit the 1095 Control using the Close Current Window Icon.
February 2018 ACA Instructions Page 8 of 30
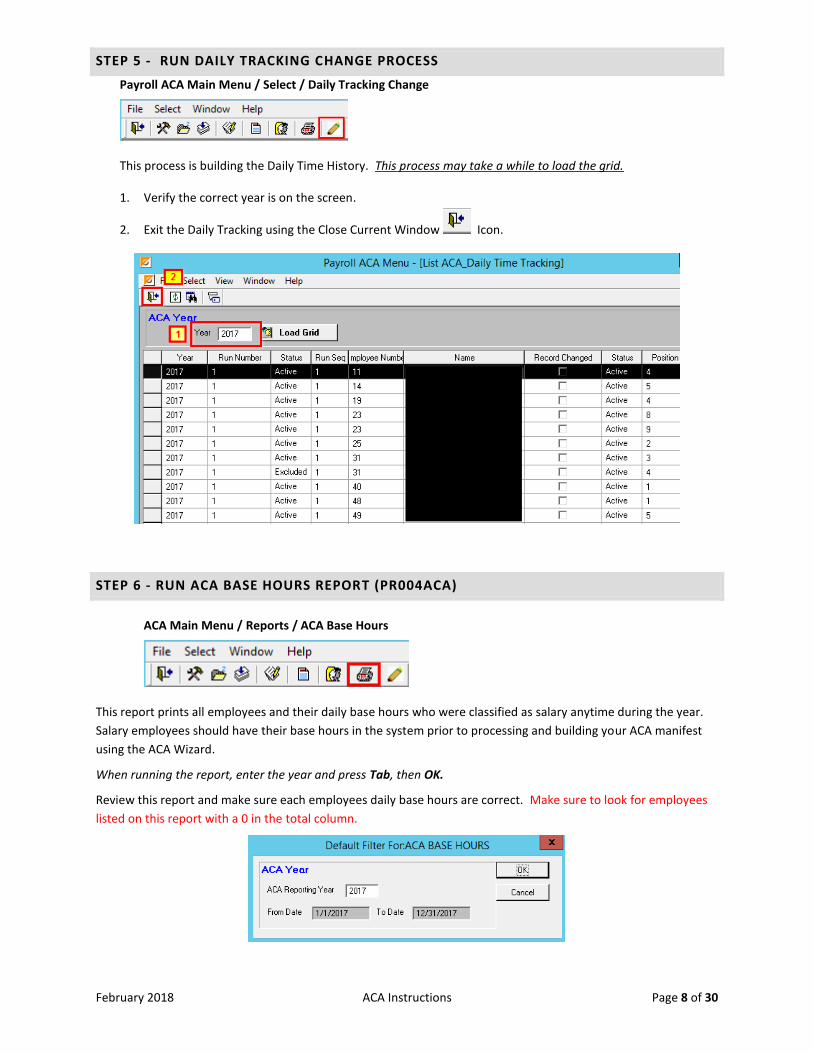
STEP 5 - RUN DAILY TRACKING CHANGE PROCESS
Payroll ACA Main Menu / Select / Daily Tracking Change
This process is building the Daily Time History. This process may take a while to load the grid.
1. Verify the correct year is on the screen.
2. Exit the Daily Tracking using the Close Current Window Icon.
STEP 6 - RUN ACA BASE HOURS REPORT (PR004ACA)
ACA Main Menu / Reports / ACA Base Hours
This report prints all employees and their daily base hours who were classified as salary anytime during the year.
Salary employees should have their base hours in the system prior to processing and building your ACA manifest
using the ACA Wizard.
When running the report, enter the year and press Tab, then OK.
Review this report and make sure each employees daily base hours are correct. Make sure to look for employees
listed on this report with a 0 in the total column.
February 2018 ACA Instructions Page 9 of 30
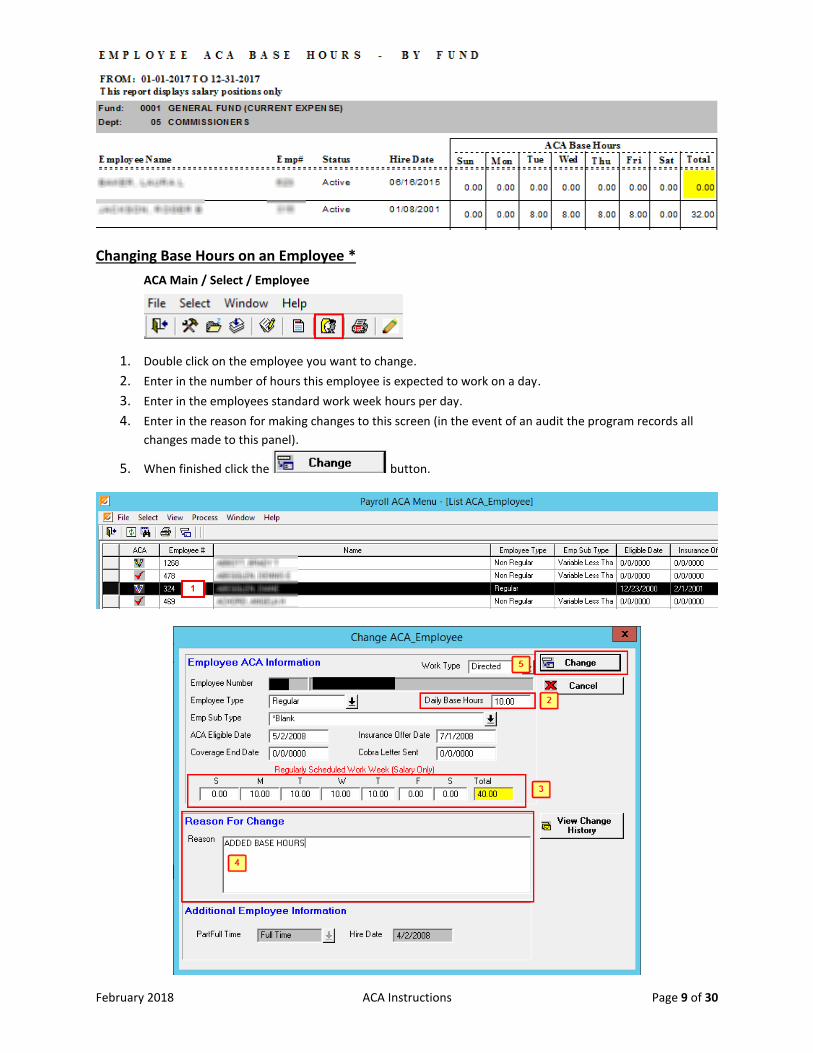
Changing Base Hours on an Employee *
ACA Main / Select / Employee
1. Double click on the employee you want to change.
2. Enter in the number of hours this employee is expected to work on a day.
3. Enter in the employees standard work week hours per day.
4. Enter in the reason for making changes to this screen (in the event of an audit the program records all
changes made to this panel).
5. When finished click the button.
February 2018 ACA Instructions Page 10 of 30
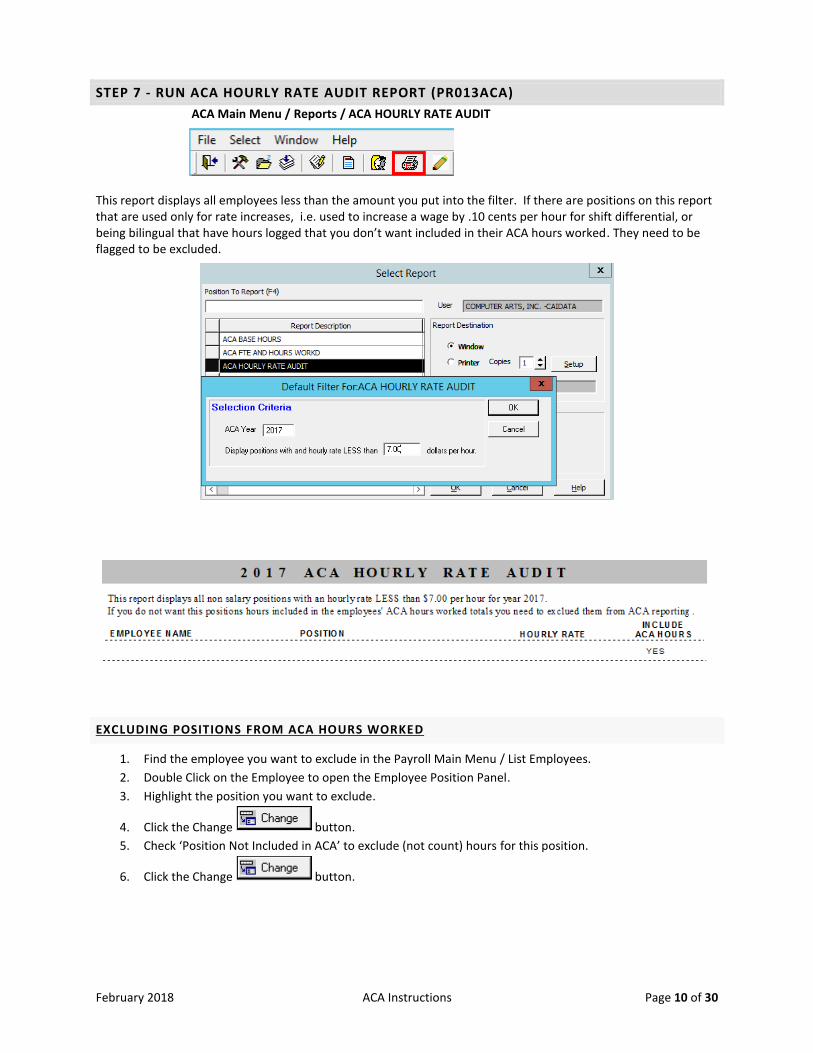
STEP 7 - RUN ACA HOURLY RATE AUDIT REPORT (PR013ACA)
ACA Main Menu / Reports / ACA HOURLY RATE AUDIT
This report displays all employees less than the amount you put into the filter. If there are positions on this report that are used only for rate increases, i.e. used to increase a wage by .10 cents per hour for shift differential, or being bilingual that have hours logged that you don’t want included in their ACA hours worked. They need to be flagged to be excluded.
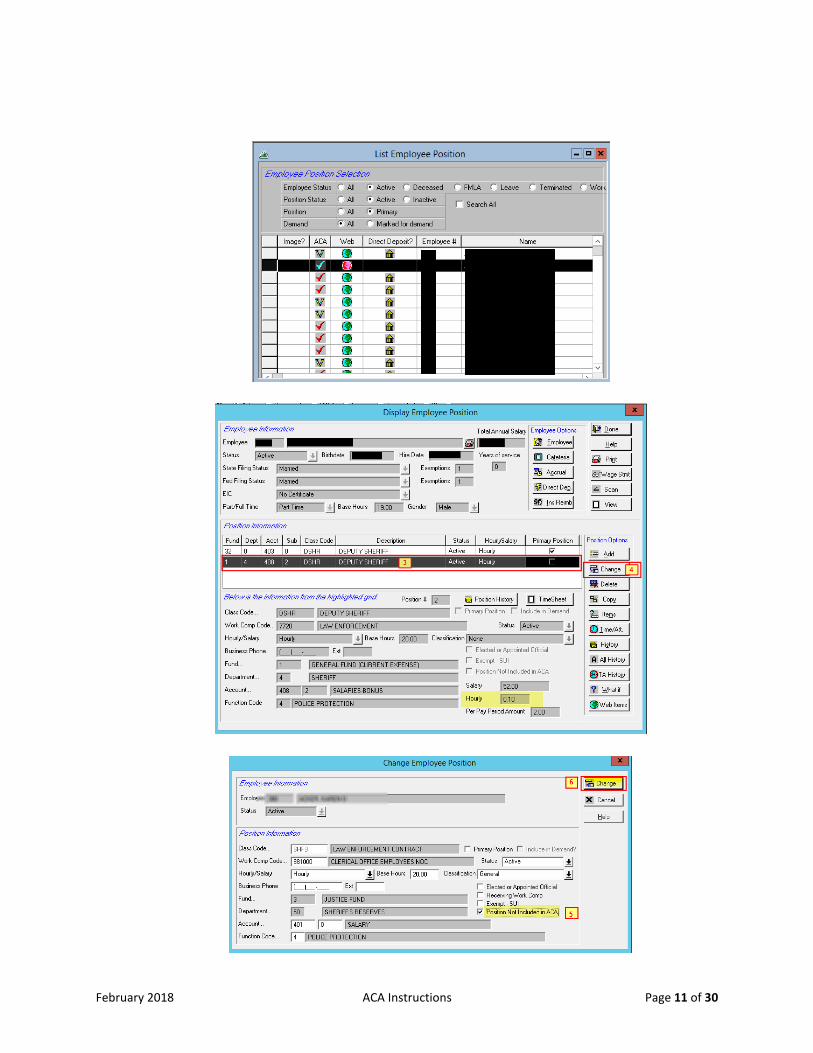
EXCLUDING POSITIONS FROM ACA HOURS WORKED
1. Find the employee you want to exclude in the Payroll Main Menu / List Employees.
2. Double Click on the Employee to open the Employee Position Panel.
3. Highlight the position you want to exclude.
4. Click the Change button.
5. Check ‘Position Not Included in ACA’ to exclude (not count) hours for this position.
6. Click the Change button.
February 2018 ACA Instructions Page 11 of 30
February 2018 ACA Instructions Page 12 of 30
* After you make changes to your employee’s positions you will need to repeat Step 5, run the Daily Tracking
Change . Also, re-run the ACA Base Hours report (PR004ACA) and the ACA Hourly Rate Audit report
(PR013ACA) and review after your changes.
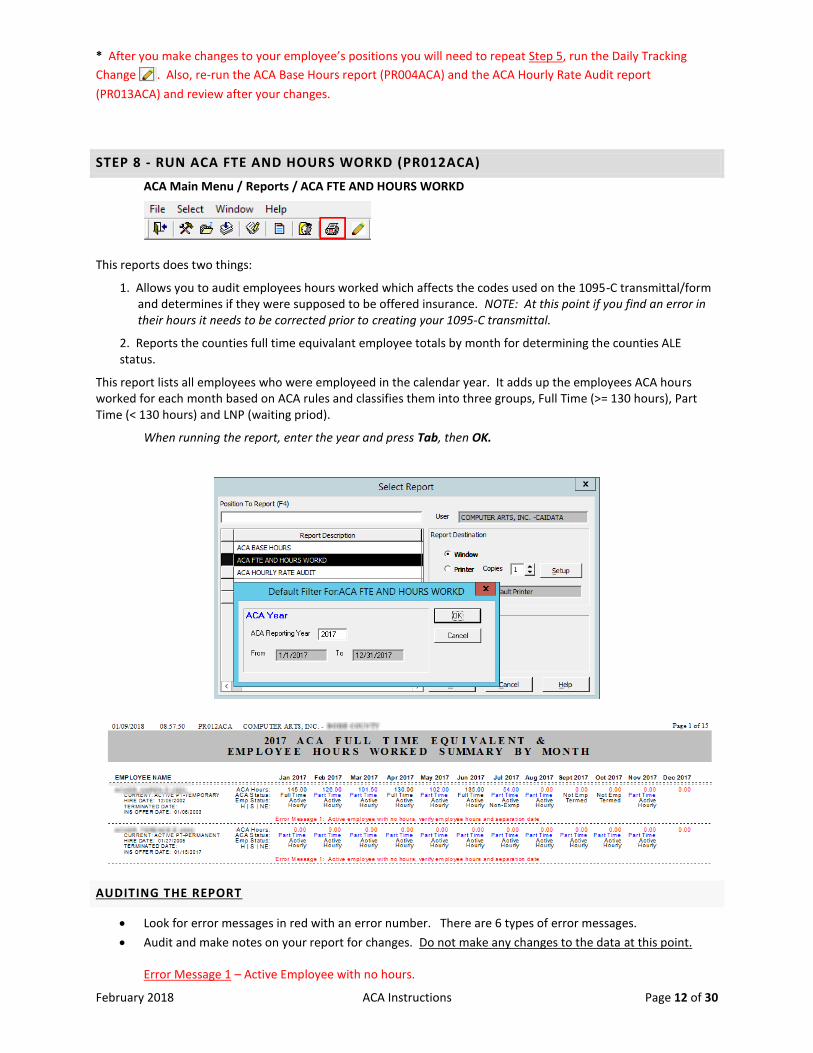
STEP 8 - RUN ACA FTE AND HOURS WORKD (PR012ACA)
ACA Main Menu / Reports / ACA FTE AND HOURS WORKD
This reports does two things:
1. Allows you to audit employees hours worked which affects the codes used on the 1095-C transmittal/form and determines if they were supposed to be offered insurance. NOTE: At this point if you find an error in their hours it needs to be corrected prior to creating your 1095-C transmittal.
2. Reports the counties full time equivalant employee totals by month for determining the counties ALE status.
This report lists all employees who were employeed in the calendar year. It adds up the employees ACA hours worked for each month based on ACA rules and classifies them into three groups, Full Time (>= 130 hours), Part Time (< 130 hours) and LNP (waiting priod).
When running the report, enter the year and press Tab, then OK.
AUDITING THE REPORT
Look for error messages in red with an error number. There are 6 types of error messages.
Audit and make notes on your report for changes. Do not make any changes to the data at this point.
Error Message 1 – Active Employee with no hours.
February 2018 ACA Instructions Page 13 of 30
*Possible scenario - The employee shows as Active but is on Unpaid Leave
Why this is important – Typically an active employee would have hours worked. If they don’t have hours worked its usually an identifier that there is a problem with their hire or termination date.
If the employee is on Unpaid leave and you left them as Active this creates a problem. This is the reason it is so important to correctly update the status of your employees, if they are on any type of Unpaid Leave. Otherwise, they are counted as an Active employee.
Action – Verify the Hire Date and/or Termination date. If an employee has hours worked on the last day of the month, but the Hire Date is the first day of the following month, this is conflicting. You should fix the dates in ACA. NOTE: You have the ability to update the Hire and Termination dates, for the purpose of ACA only.
*Make notes on your report for changes that need to be made.
Error Message 2 – Employee is not employed and has hours worked.
What does this error mean? - If an employee has hours worked they must be employed. Most of the time, this identifies a problem with their hire date or termination date.
What do I do? - Verify the Hire Date and/or Termination date. If an employee has hours worked on the last day of the month, but the Hire Date is the first day of the following month, this is conflicting. You have to fix the dates in ACA. You have the ability to update the Hire and Termination dates, for the purpose of ACA only.
*Make notes on your report for changes that need to be made.
Error Message 3 – Employee is in LNP with no hours.
Error Message 4 – Employee has an Excess of Hours (over 200 hrs in month) worked.
What does this error mean? - The purpose of this is to bring to your attention that the employee has more than the average hours worked per month. It may identify an error in the employees daily time entered.
What do I do? - Verify the hours in time and attendance. Any issues regarding hours worked should have been resolved prior to this point, you cannot make any changes to the hours worked. You may also run report Web Time Entered by Employee (PRW140). This report is ran from Payroll / Main / Reports. The report displays all of the hours entered by employee. So if you selected to Exclude any hours for example shift differential, then you will need to subtract those hours, on the report, to verify the number of hours worked. If the hours worked are correct, it is ok to leave them as they are.
*Make notes on your report for changes that need to be made.
Error Message 5 – Employee has no insurance offer date.
What does this error mean? - The purpose of this is to bring to your attention that the employee does not have an insurance offer date. The offer date is one of the components used in determining the 1095-C codes on line 14.
What do I do? – It is okay for employees to have a blank insurance offer date. Typically, part time employees or employees who never made it out of their LNP (waiting period) would not have an insurance offer date. If you have an employee who is full time and you truly did not offer them insurance that is also ok. This error is simply something you need to review and if it is accurate then leave it blank.
NOTE: This does not affect any of the dates already stored in the Payroll system. It will not affect PERSI and is for ACA reporting.
*Make notes on your report for changes that need to be made
February 2018 ACA Instructions Page 14 of 30
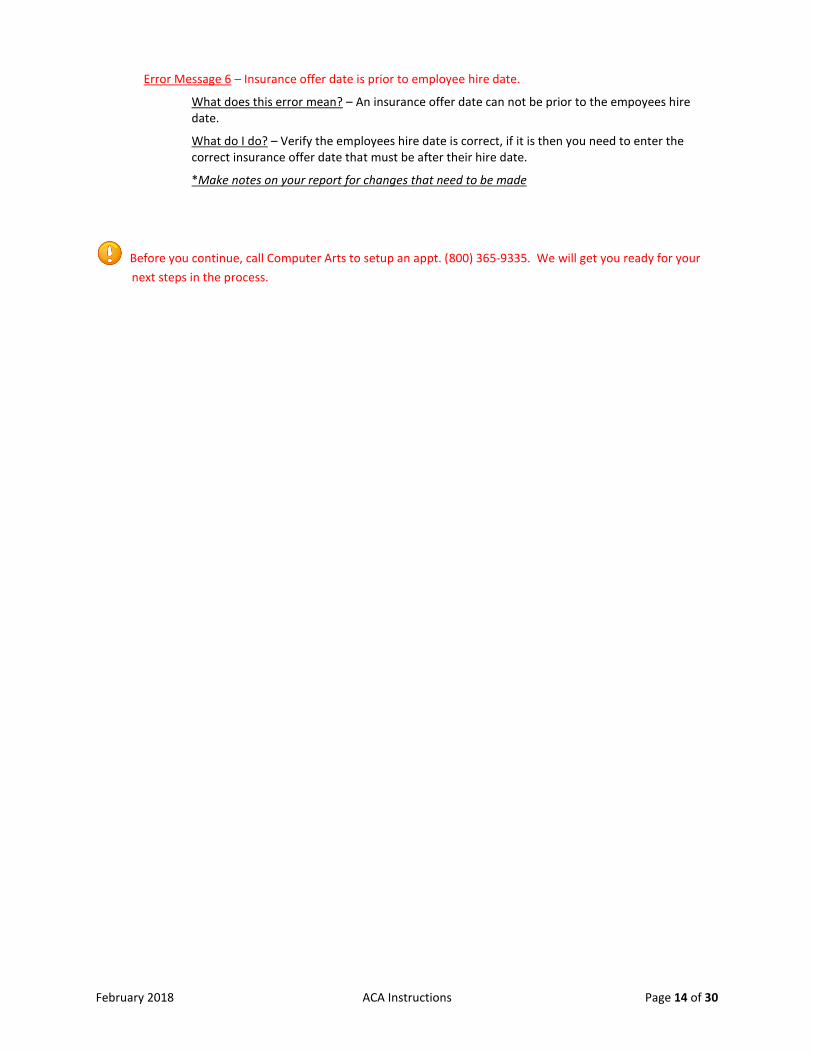
Error Message 6 – Insurance offer date is prior to employee hire date.
What does this error mean? – An insurance offer date can not be prior to the empoyees hire date.
What do I do? – Verify the employees hire date is correct, if it is then you need to enter the correct insurance offer date that must be after their hire date.
*Make notes on your report for changes that need to be made
Before you continue, call Computer Arts to setup an appt. (800) 365-9335. We will get you ready for your
next steps in the process.
February 2018 ACA Instructions Page 15 of 30
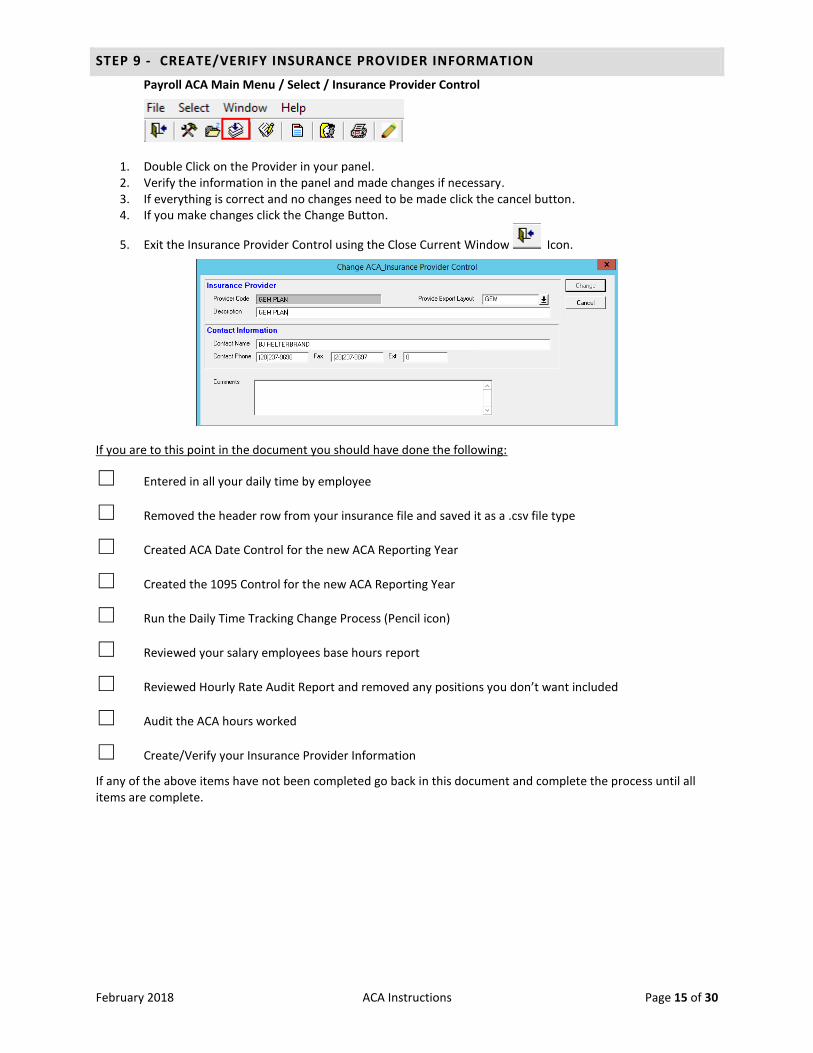
STEP 9 - CREATE/VERIFY INSURANCE PROVIDER INFORMATION
Payroll ACA Main Menu / Select / Insurance Provider Control
1. Double Click on the Provider in your panel. 2. Verify the information in the panel and made changes if necessary. 3. If everything is correct and no changes need to be made click the cancel button. 4. If you make changes click the Change Button.
5. Exit the Insurance Provider Control using the Close Current Window Icon.
If you are to this point in the document you should have done the following:
□ Entered in all your daily time by employee
□ Removed the header row from your insurance file and saved it as a .csv file type
□ Created ACA Date Control for the new ACA Reporting Year
□ Created the 1095 Control for the new ACA Reporting Year
□ Run the Daily Time Tracking Change Process (Pencil icon)
□ Reviewed your salary employees base hours report
□ Reviewed Hourly Rate Audit Report and removed any positions you don’t want included
□ Audit the ACA hours worked
□ Create/Verify your Insurance Provider Information
If any of the above items have not been completed go back in this document and complete the process until all items are complete.
February 2018 ACA Instructions Page 16 of 30
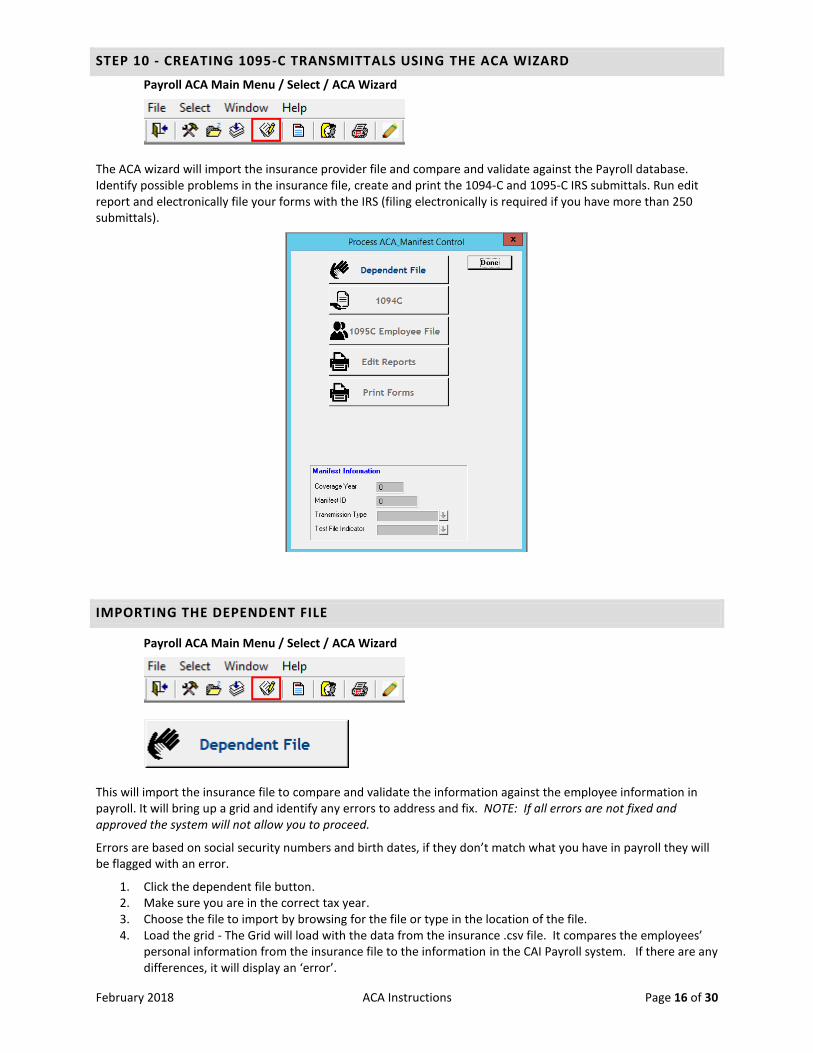
STEP 10 - CREATING 1095-C TRANSMITTALS USING THE ACA WIZARD
Payroll ACA Main Menu / Select / ACA Wizard
The ACA wizard will import the insurance provider file and compare and validate against the Payroll database. Identify possible problems in the insurance file, create and print the 1094-C and 1095-C IRS submittals. Run edit report and electronically file your forms with the IRS (filing electronically is required if you have more than 250 submittals).
IMPORTING THE DEPENDENT FILE
Payroll ACA Main Menu / Select / ACA Wizard
This will import the insurance file to compare and validate the information against the employee information in payroll. It will bring up a grid and identify any errors to address and fix. NOTE: If all errors are not fixed and approved the system will not allow you to proceed.
Errors are based on social security numbers and birth dates, if they don’t match what you have in payroll they will be flagged with an error.
1. Click the dependent file button. 2. Make sure you are in the correct tax year. 3. Choose the file to import by browsing for the file or type in the location of the file. 4. Load the grid - The Grid will load with the data from the insurance .csv file. It compares the employees’
personal information from the insurance file to the information in the CAI Payroll system. If there are any differences, it will display an ‘error’.
February 2018 ACA Instructions Page 17 of 30
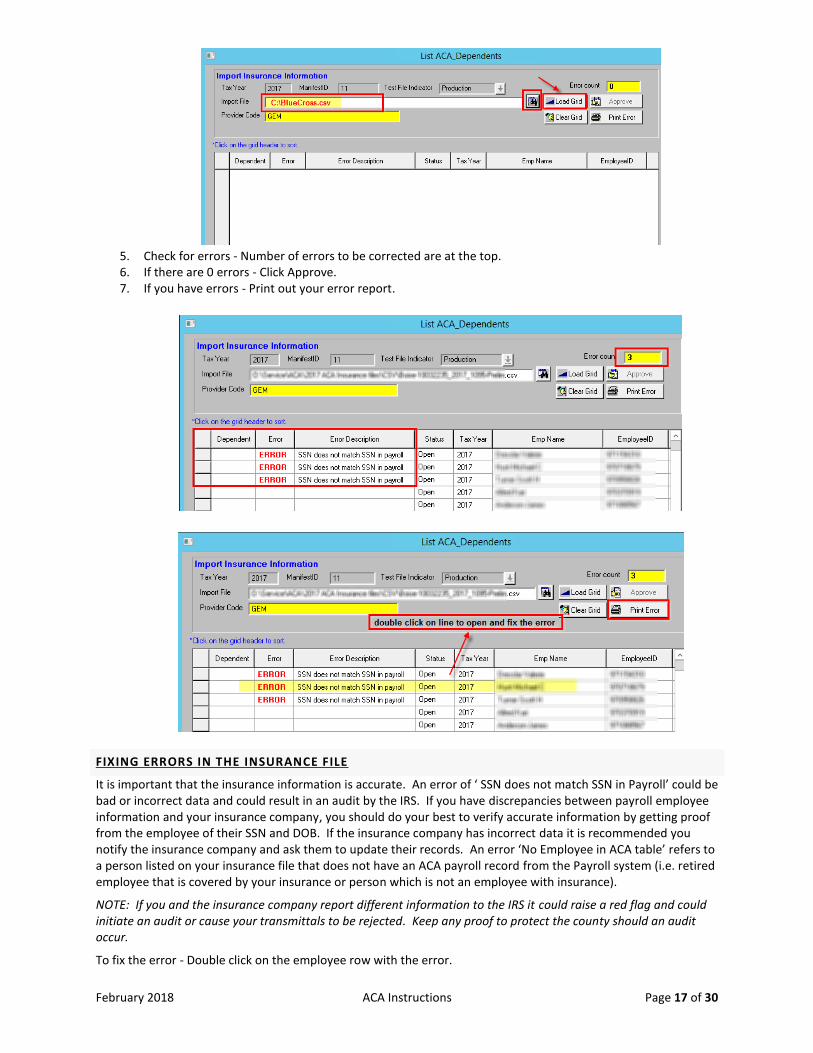
5. Check for errors - Number of errors to be corrected are at the top. 6. If there are 0 errors - Click Approve. 7. If you have errors - Print out your error report.
FIXING ERRORS IN THE INSURANCE FILE
It is important that the insurance information is accurate. An error of ‘ SSN does not match SSN in Payroll’ could be bad or incorrect data and could result in an audit by the IRS. If you have discrepancies between payroll employee information and your insurance company, you should do your best to verify accurate information by getting proof from the employee of their SSN and DOB. If the insurance company has incorrect data it is recommended you notify the insurance company and ask them to update their records. An error ‘No Employee in ACA table’ refers to a person listed on your insurance file that does not have an ACA payroll record from the Payroll system (i.e. retired employee that is covered by your insurance or person which is not an employee with insurance).
NOTE: If you and the insurance company report different information to the IRS it could raise a red flag and could initiate an audit or cause your transmittals to be rejected. Keep any proof to protect the county should an audit occur.
To fix the error - Double click on the employee row with the error.
February 2018 ACA Instructions Page 18 of 30
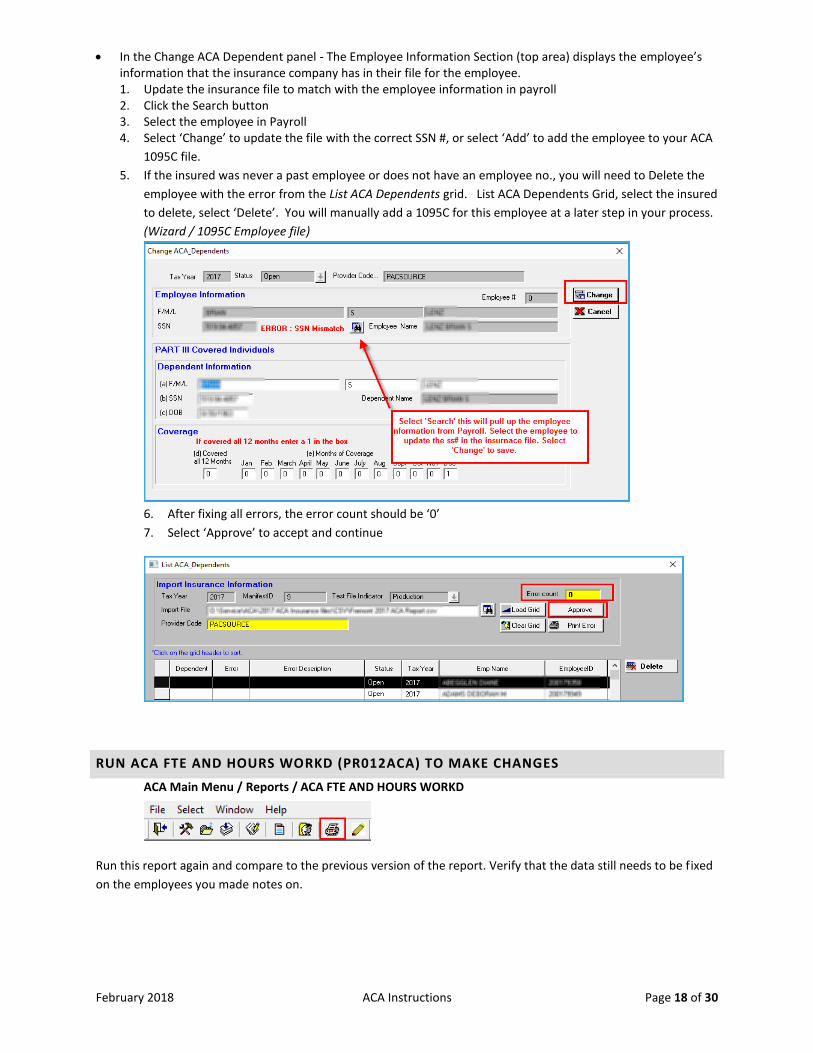
In the Change ACA Dependent panel - The Employee Information Section (top area) displays the employee’s information that the insurance company has in their file for the employee. 1. Update the insurance file to match with the employee information in payroll 2. Click the Search button 3. Select the employee in Payroll 4. Select ‘Change’ to update the file with the correct SSN #, or select ‘Add’ to add the employee to your ACA
1095C file.
5. If the insured was never a past employee or does not have an employee no., you will need to Delete the
employee with the error from the List ACA Dependents grid. List ACA Dependents Grid, select the insured
to delete, select ‘Delete’. You will manually add a 1095C for this employee at a later step in your process.
(Wizard / 1095C Employee file)
6. After fixing all errors, the error count should be ‘0’
7. Select ‘Approve’ to accept and continue
RUN ACA FTE AND HOURS WORKD (PR012ACA) TO MAKE CHANGES
ACA Main Menu / Reports / ACA FTE AND HOURS WORKD
Run this report again and compare to the previous version of the report. Verify that the data still needs to be fixed
on the employees you made notes on.
February 2018 ACA Instructions Page 19 of 30
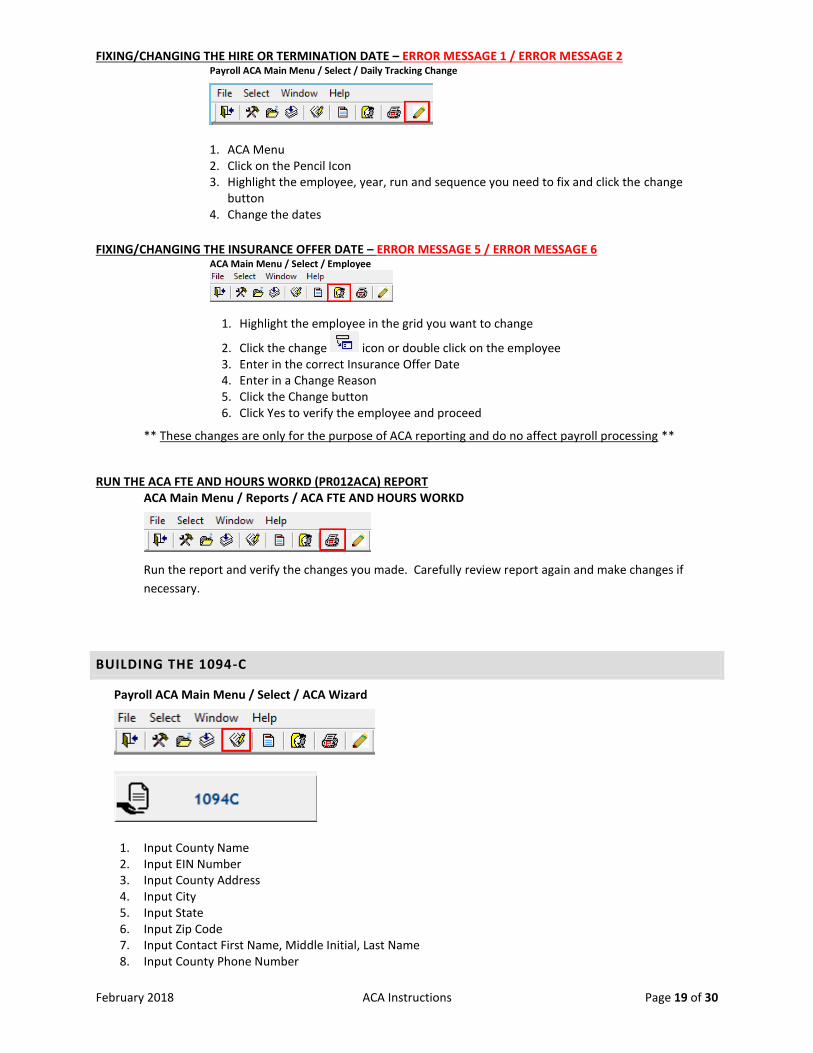
FIXING/CHANGING THE HIRE OR TERMINATION DATE – ERROR MESSAGE 1 / ERROR MESSAGE 2 Payroll ACA Main Menu / Select / Daily Tracking Change
1. ACA Menu 2. Click on the Pencil Icon 3. Highlight the employee, year, run and sequence you need to fix and click the change
button 4. Change the dates
FIXING/CHANGING THE INSURANCE OFFER DATE – ERROR MESSAGE 5 / ERROR MESSAGE 6 ACA Main Menu / Select / Employee
1. Highlight the employee in the grid you want to change
2. Click the change icon or double click on the employee 3. Enter in the correct Insurance Offer Date 4. Enter in a Change Reason 5. Click the Change button 6. Click Yes to verify the employee and proceed
** These changes are only for the purpose of ACA reporting and do no affect payroll processing **
RUN THE ACA FTE AND HOURS WORKD (PR012ACA) REPORT ACA Main Menu / Reports / ACA FTE AND HOURS WORKD
Run the report and verify the changes you made. Carefully review report again and make changes if
necessary.
BUILDING THE 1094-C
Payroll ACA Main Menu / Select / ACA Wizard
1. Input County Name 2. Input EIN Number 3. Input County Address 4. Input City 5. Input State 6. Input Zip Code 7. Input Contact First Name, Middle Initial, Last Name 8. Input County Phone Number
February 2018 ACA Instructions Page 20 of 30
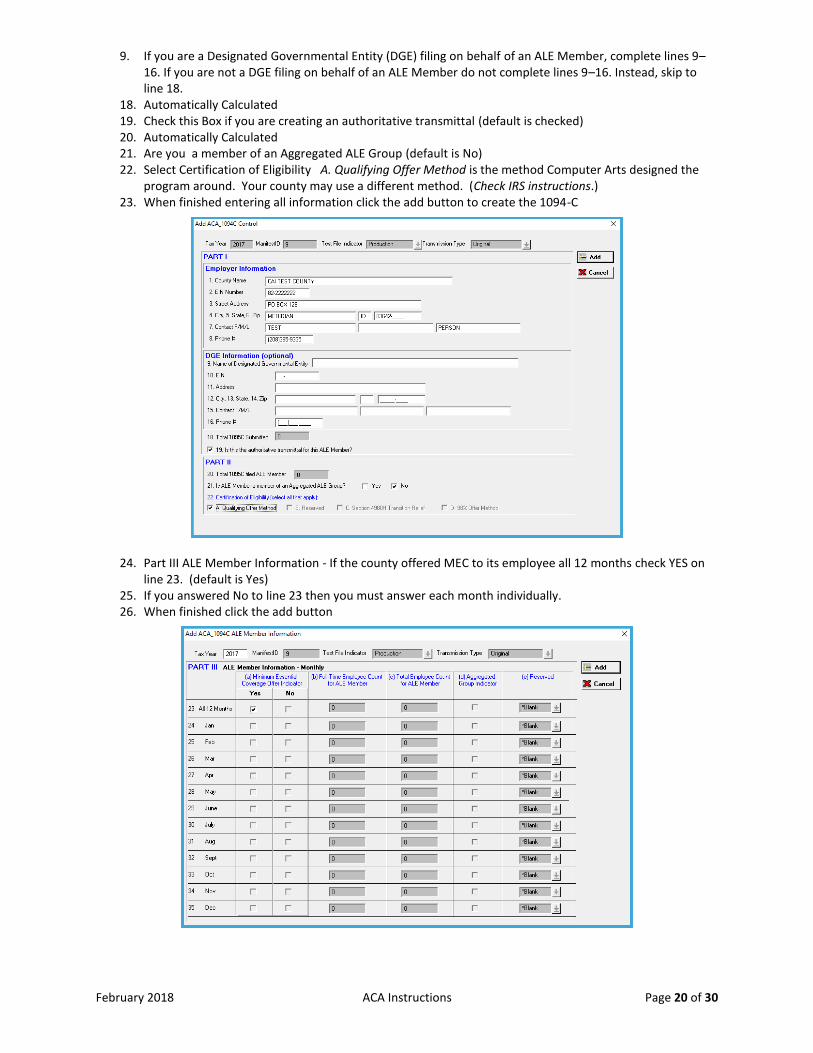
9. If you are a Designated Governmental Entity (DGE) filing on behalf of an ALE Member, complete lines 9–16. If you are not a DGE filing on behalf of an ALE Member do not complete lines 9–16. Instead, skip to line 18.
18. Automatically Calculated 19. Check this Box if you are creating an authoritative transmittal (default is checked) 20. Automatically Calculated 21. Are you a member of an Aggregated ALE Group (default is No) 22. Select Certification of Eligibility A. Qualifying Offer Method is the method Computer Arts designed the
program around. Your county may use a different method. (Check IRS instructions.) 23. When finished entering all information click the add button to create the 1094-C
24. Part III ALE Member Information - If the county offered MEC to its employee all 12 months check YES on line 23. (default is Yes)
25. If you answered No to line 23 then you must answer each month individually. 26. When finished click the add button
February 2018 ACA Instructions Page 21 of 30
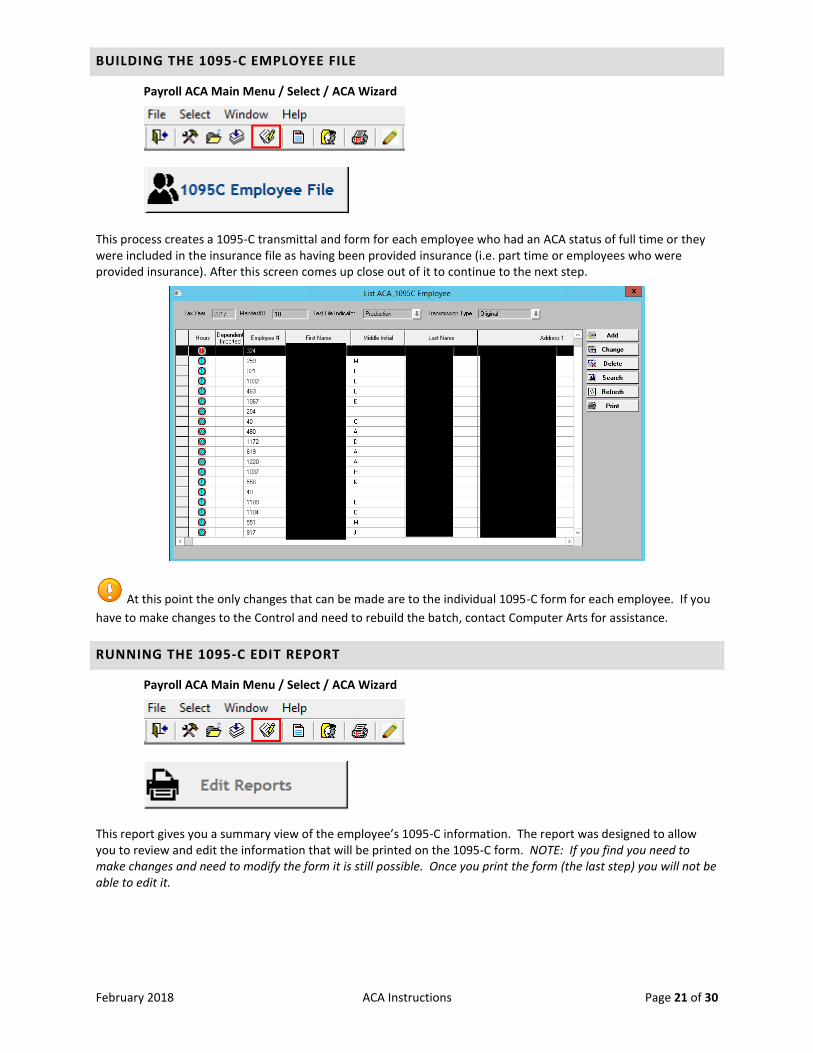
BUILDING THE 1095-C EMPLOYEE FILE
Payroll ACA Main Menu / Select / ACA Wizard
This process creates a 1095-C transmittal and form for each employee who had an ACA status of full time or they were included in the insurance file as having been provided insurance (i.e. part time or employees who were provided insurance). After this screen comes up close out of it to continue to the next step.
At this point the only changes that can be made are to the individual 1095-C form for each employee. If you
have to make changes to the Control and need to rebuild the batch, contact Computer Arts for assistance.
RUNNING THE 1095-C EDIT REPORT
Payroll ACA Main Menu / Select / ACA Wizard
This report gives you a summary view of the employee’s 1095-C information. The report was designed to allow you to review and edit the information that will be printed on the 1095-C form. NOTE: If you find you need to make changes and need to modify the form it is still possible. Once you print the form (the last step) you will not be able to edit it.
February 2018 ACA Instructions Page 22 of 30
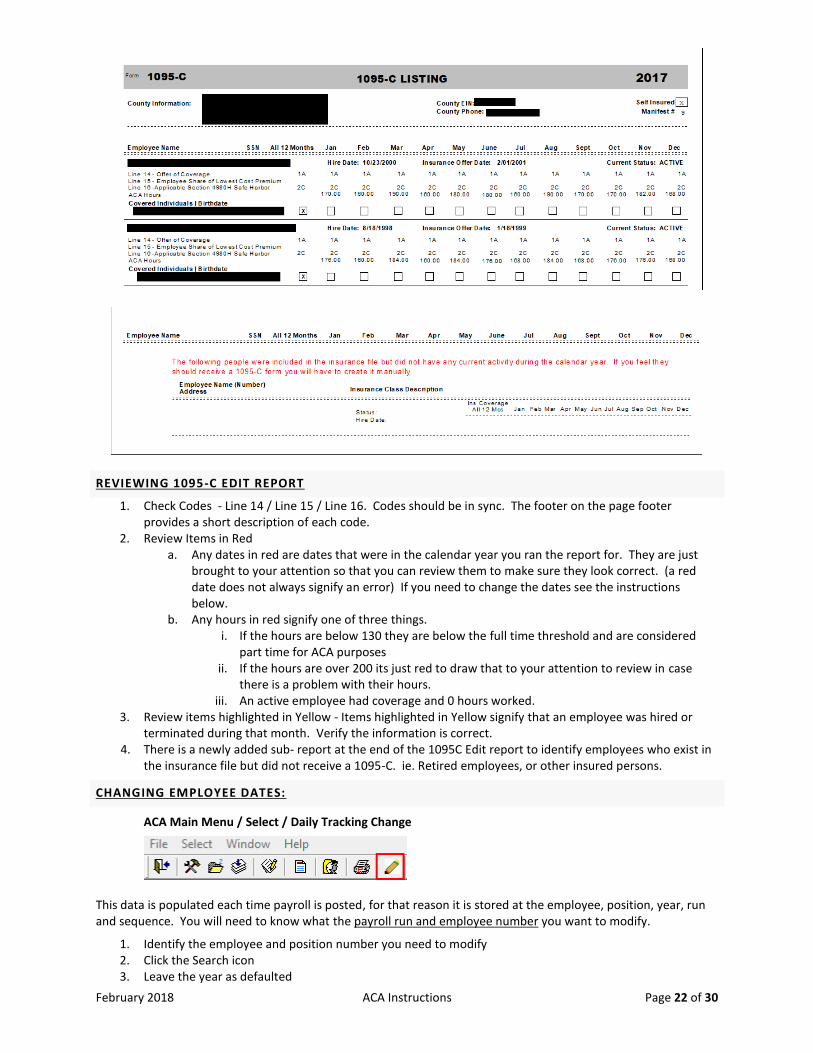
REVIEWING 1095-C EDIT REPORT
1. Check Codes - Line 14 / Line 15 / Line 16. Codes should be in sync. The footer on the page footer provides a short description of each code.
2. Review Items in Red a. Any dates in red are dates that were in the calendar year you ran the report for. They are just
brought to your attention so that you can review them to make sure they look correct. (a red date does not always signify an error) If you need to change the dates see the instructions below.
b. Any hours in red signify one of three things. i. If the hours are below 130 they are below the full time threshold and are considered
part time for ACA purposes ii. If the hours are over 200 its just red to draw that to your attention to review in case
there is a problem with their hours. iii. An active employee had coverage and 0 hours worked.
3. Review items highlighted in Yellow - Items highlighted in Yellow signify that an employee was hired or terminated during that month. Verify the information is correct.
4. There is a newly added sub- report at the end of the 1095C Edit report to identify employees who exist in the insurance file but did not receive a 1095-C. ie. Retired employees, or other insured persons.
CHANGING EMPLOYEE DATES:
ACA Main Menu / Select / Daily Tracking Change
This data is populated each time payroll is posted, for that reason it is stored at the employee, position, year, run and sequence. You will need to know what the payroll run and employee number you want to modify.
1. Identify the employee and position number you need to modify 2. Click the Search icon 3. Leave the year as defaulted
February 2018 ACA Instructions Page 23 of 30
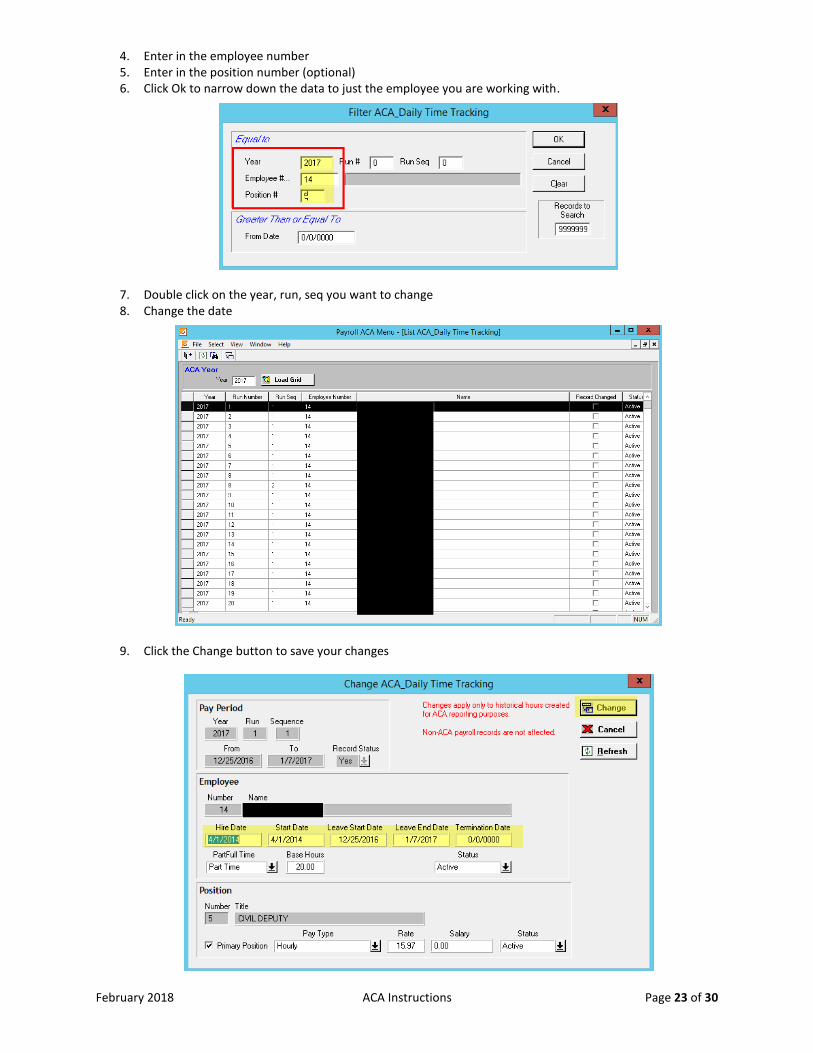
4. Enter in the employee number 5. Enter in the position number (optional) 6. Click Ok to narrow down the data to just the employee you are working with.
7. Double click on the year, run, seq you want to change 8. Change the date
9. Click the Change button to save your changes
February 2018 ACA Instructions Page 24 of 30
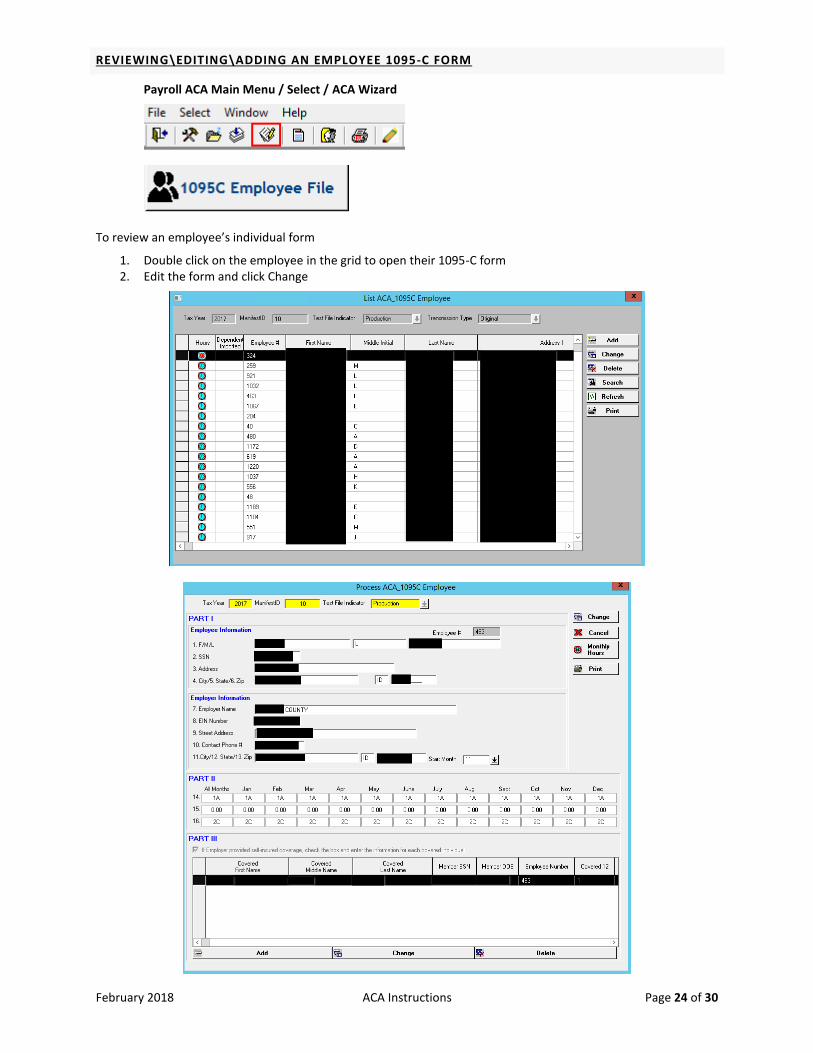
REVIEWING\EDITING\ADDING AN EMPLOYEE 1095-C FORM
Payroll ACA Main Menu / Select / ACA Wizard
To review an employee’s individual form
1. Double click on the employee in the grid to open their 1095-C form 2. Edit the form and click Change

February 2018 ACA Instructions Page 25 of 30
To Add a 1095-C manually, from the Employee 1095C Employee File grid, select Add.
Enter the Employee # (you will need to enter a fictitous no. that does not already exist. It will need to be a different no. for each person you are adding manually. This is only for ACA purposes and it will not save the persons name and employee no. to Payroll. Complete entering in the persons information.
This form needs to be complete, with a code in line 14. You may need to refer to the IRS instructions to determine the correct code to be used. If you selected ‘County is Self-Insured’ on the 1095C Control - you will need to complete Section III. Review ALL the information. Select Add
Once all information is correct and verified, and you are ready to print your IRS submittal forms then proceed to the next step. To be sure, you can rerun your hours worked and edit reports if needed.
RUNNING EDIT REPORTS TO VERIFY CHANGES:
ACA Main Menu / Reports / ACA Hours Worked (PR0012ACA)
February 2018 ACA Instructions Page 26 of 30
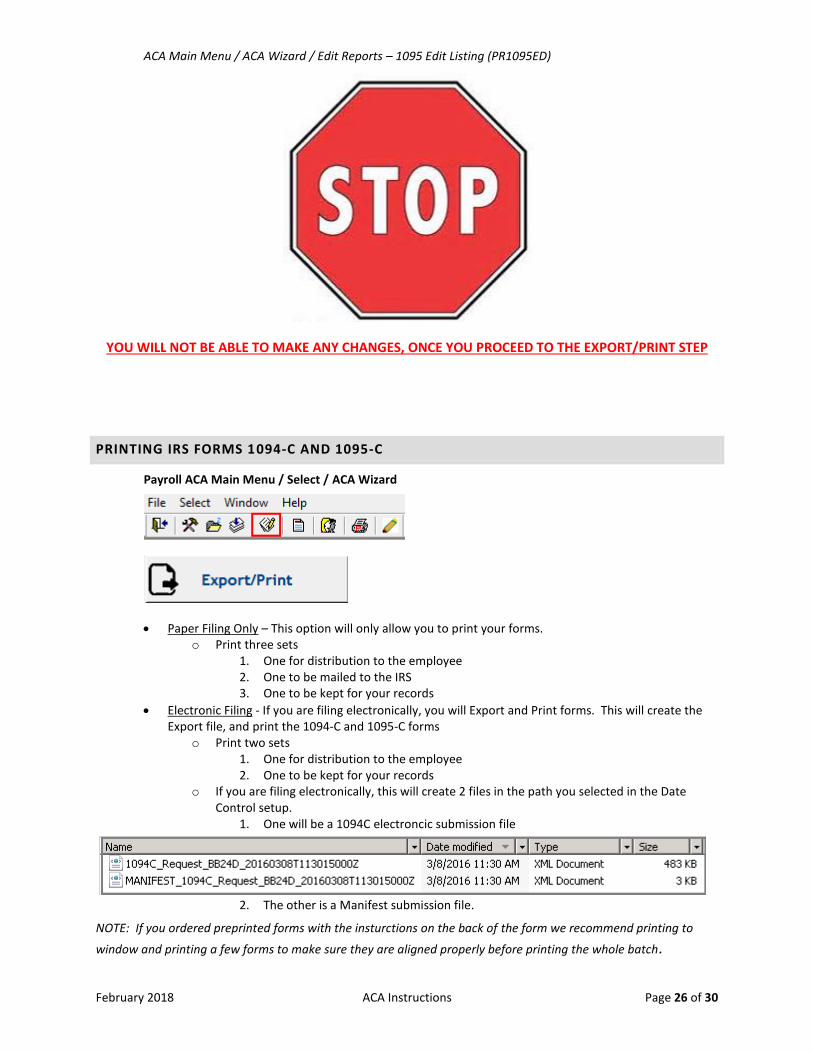
ACA Main Menu / ACA Wizard / Edit Reports – 1095 Edit Listing (PR1095ED)
YOU WILL NOT BE ABLE TO MAKE ANY CHANGES, ONCE YOU PROCEED TO THE EXPORT/PRINT STEP
PRINTING IRS FORMS 1094-C AND 1095-C
Payroll ACA Main Menu / Select / ACA Wizard
Paper Filing Only – This option will only allow you to print your forms. o Print three sets
1. One for distribution to the employee 2. One to be mailed to the IRS 3. One to be kept for your records
Electronic Filing - If you are filing electronically, you will Export and Print forms. This will create the Export file, and print the 1094-C and 1095-C forms
o Print two sets 1. One for distribution to the employee 2. One to be kept for your records
o If you are filing electronically, this will create 2 files in the path you selected in the Date Control setup.
1. One will be a 1094C electroncic submission file
2. The other is a Manifest submission file.
NOTE: If you ordered preprinted forms with the insturctions on the back of the form we recommend printing to
window and printing a few forms to make sure they are aligned properly before printing the whole batch.
February 2018 ACA Instructions Page 27 of 30
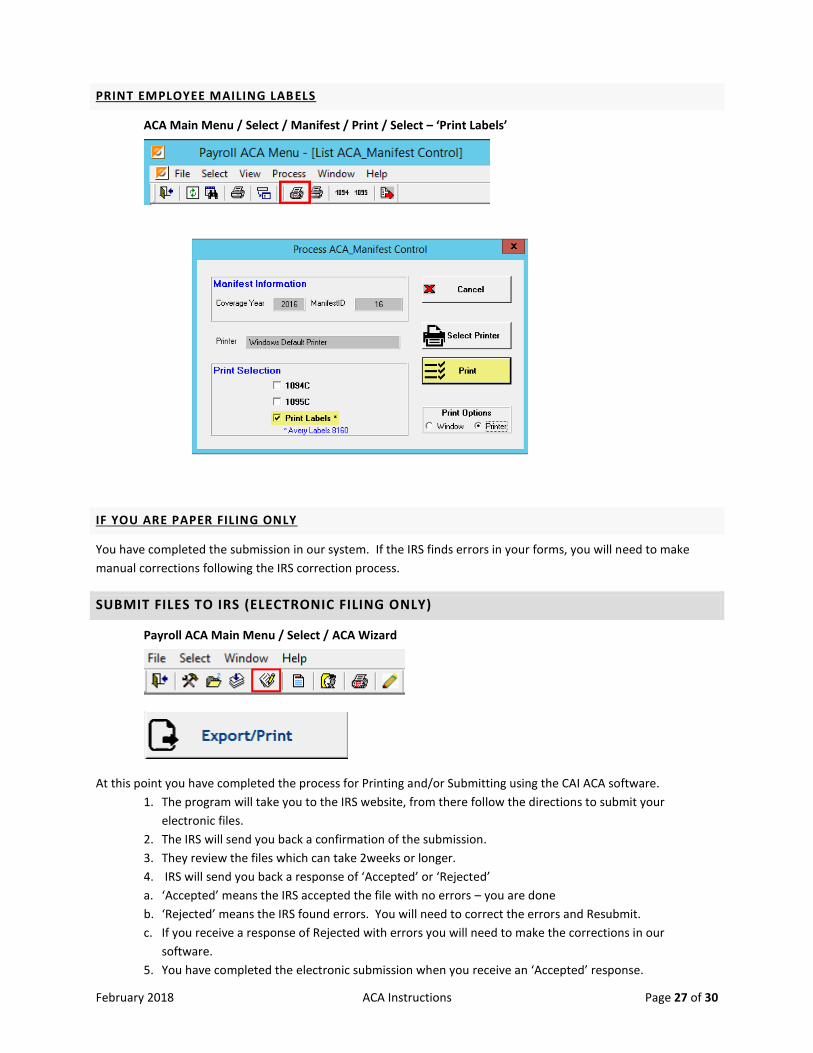
PRINT EMPLOYEE MAILING LAB ELS
ACA Main Menu / Select / Manifest / Print / Select – ‘Print Labels’
IF YOU ARE PAPER FILING ONLY
You have completed the submission in our system. If the IRS finds errors in your forms, you will need to make
manual corrections following the IRS correction process.
SUBMIT FILES TO IRS (ELECTRONIC FILING ONLY)
Payroll ACA Main Menu / Select / ACA Wizard
At this point you have completed the process for Printing and/or Submitting using the CAI ACA software.
1. The program will take you to the IRS website, from there follow the directions to submit your
electronic files.
2. The IRS will send you back a confirmation of the submission.
3. They review the files which can take 2weeks or longer.
4. IRS will send you back a response of ‘Accepted’ or ‘Rejected’
a. ‘Accepted’ means the IRS accepted the file with no errors – you are done
b. ‘Rejected’ means the IRS found errors. You will need to correct the errors and Resubmit.
c. If you receive a response of Rejected with errors you will need to make the corrections in our
software.
5. You have completed the electronic submission when you receive an ‘Accepted’ response.
February 2018 ACA Instructions Page 28 of 30
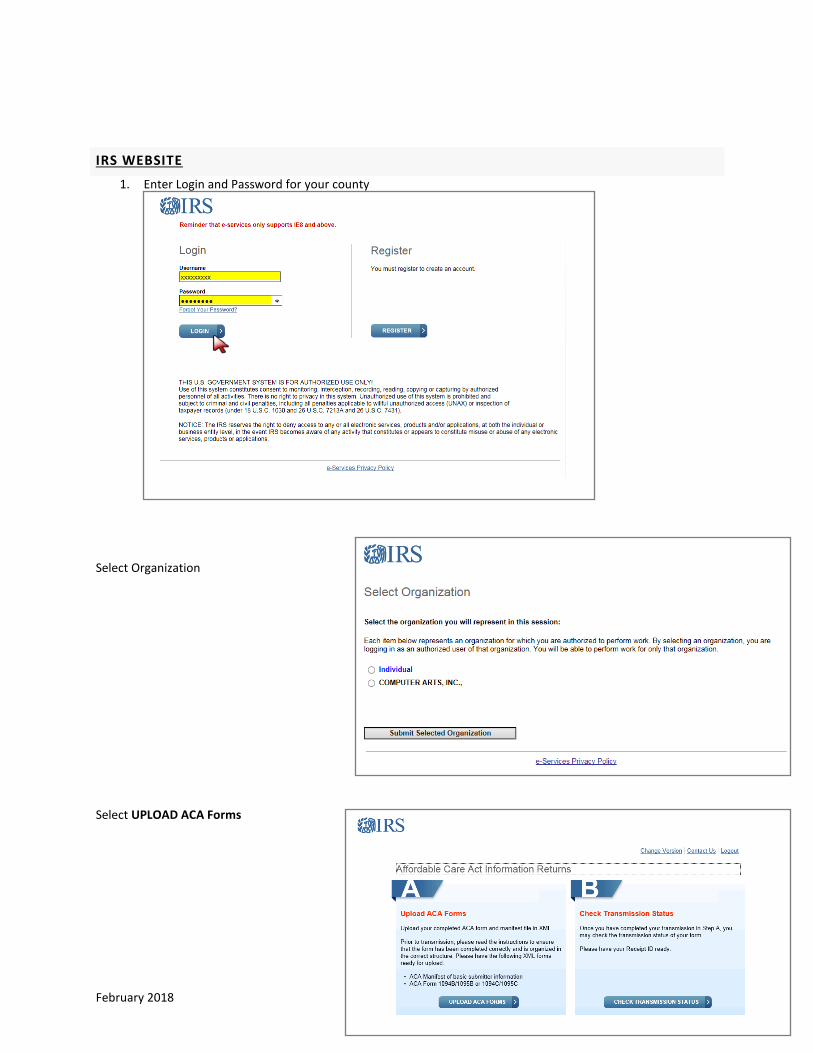
IRS WEBSITE
1. Enter Login and Password for your county
Select Organization
Select UPLOAD ACA Forms
February 2018 ACA Instructions Page 29 of 30
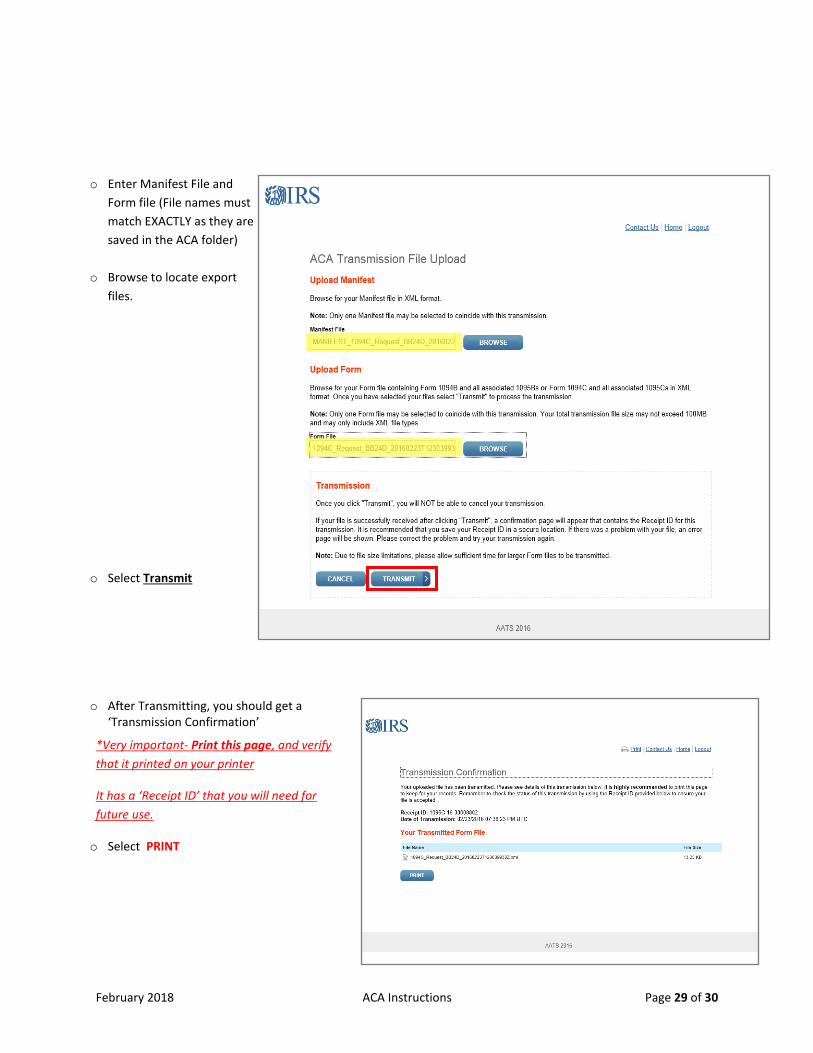
o Enter Manifest File and
Form file (File names must
match EXACTLY as they are
saved in the ACA folder)
o Browse to locate export
files.
o Select Transmit
o After Transmitting, you should get a ‘Transmission Confirmation’
*Very important- Print this page, and verify
that it printed on your printer
It has a ‘Receipt ID’ that you will need for
future use.
o Select PRINT
February 2018 ACA Instructions Page 30 of 30
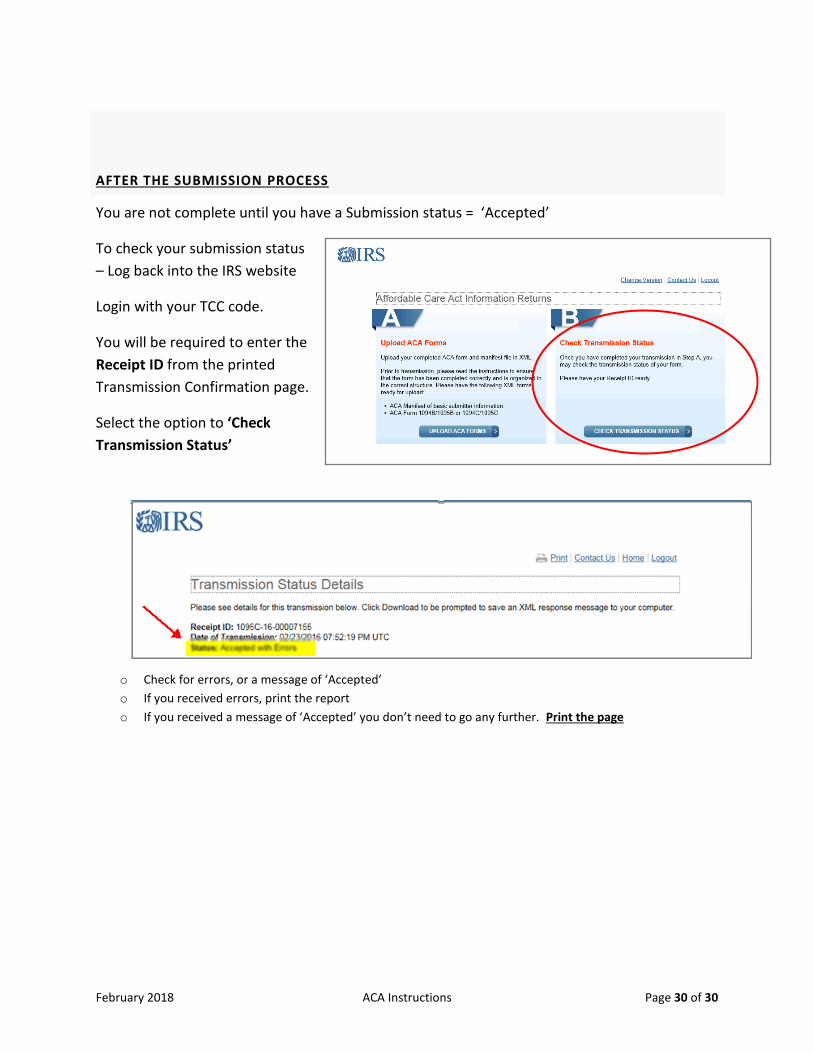
AFTER THE SUBMISSION PROCESS
You are not complete until you have a Submission status = ‘Accepted’
To check your submission status
– Log back into the IRS website
Login with your TCC code.
You will be required to enter the
Receipt ID from the printed
Transmission Confirmation page.
Select the option to ‘Check
Transmission Status’
o Check for errors, or a message of ‘Accepted’
o If you received errors, print the report
o If you received a message of ‘Accepted’ you don’t need to go any further. Print the page