Embed Size (px)
Citation preview
Pattern # 211 Baby Mila’s Tulip Sleeve Top & Dress Page 1 of 25
www.TheSimpleLifeCompany.com 2/8/2018 Version 1 © Simple Life Pattern Company 2018
Pattern # 211 Baby Mila’s Tulip Sleeve Top & Dress Page 2 of 25
www.TheSimpleLifeCompany.com 2/8/2018 Version 1 © Simple Life Pattern Company 2018
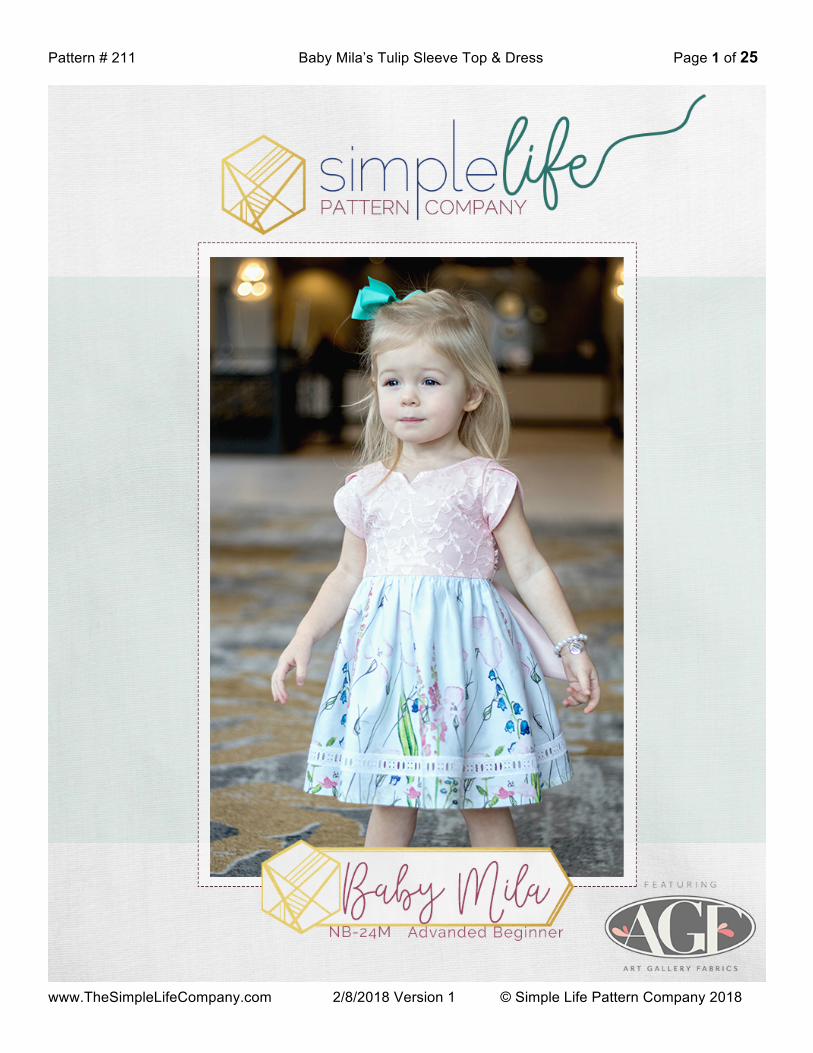
Size Chart NB 0-3 3-6 6-9 9-12 12-18 18-24
Chest 12” 14” 16” 17” 18” 19” 20”
Weight 5-8 lbs 8-12 lbs 12-16 lbs 16-20 lbs 20-24 lbs 24-26 lbs 26-39 lbs
Height 18-21” 21-24” 24-26” 26-28” 28-30” 30-32” 32-34”
Waist 13” 15” 16” 16.5” 17” 18” 19” Finished Length – top shoulder to hem
NB 0-3 3-6 6-9 9-12 12-18 18-24
Top 9.5” 11” 12” 12.5” 13.25” 14.5” 15”
Dress 12.5” 14” 15” 15.75” 16.5” 17.75” 18.75”
Fabric Requirements
(Yards – based on 44/45” fabric)
Size Bodice & Lining Top Dress Tulip
Sleeve Accent
Strip Hem Band Back Bow
NB 3/8 1/4 1/2 1/8 1/8 1/4 1/2
0-3 3/8 3/8 5/8 1/8 1/8 1/4 1/2
3-6 3/8 3/8 5/8 1/8 1/8 1/4 1/2
6-9 3/8 1/2 3/4 1/4 1/8 1/4 1/2
9-12 1/2 1/2 3/4 1/4 1/8 1/4 1/2
12-18 1/2 5/8 7/8 1/4 1/8 1/4 1/2
18-24 1/2 5/8 7/8 1/4 1/8 1/4 1/2
Materials Needed
• All-purpose zipper. Sizes NB, 0-3, 3-6, 6-9: 7” zipper. Sizes 9-12, 12-18,18-24: 9” zipper • Pellon EZ Steam Tape 1/4” (optional) • Frixion Pen/ Fabric marker (optional)
Pattern # 211 Baby Mila’s Tulip Sleeve Top & Dress Page 3 of 25
www.TheSimpleLifeCompany.com 2/8/2018 Version 1 © Simple Life Pattern Company 2018
Tips & Notes: • Please read through the entire pattern before beginning. • All seam allowances are 3/8”, unless otherwise stated. • Finish your seams with a serger or zig zag stitch to prevent fraying. • For a professional look, press your garment when instructed. • When instructed, topstitch your garment. This will give you professional results. TIP: I
always increase my stitch length to 3.0 – I feel a longer topstitch length looks better. If you do this, be sure to put your stitch length back to 2.5 for regular sewing.
• Gathering can be tedious - I find it easiest to turn my tension to the highest tension and my stitch length to the longest stitch. Before you start sewing, pull up the bobbin thread and pull the top thread and bobbin thread out so you have about a 5” tail before you sew. From there, I adjust by hand to fit the length I need.
• When printing your pattern pieces, make sure “Auto portrait / landscape” is ticked and scaling is set to “None.”
• You do not need to print the entire pattern. You can print the pattern pieces then follow the tutorial on your computer.
• Once you print your pattern pieces, match up the lines and rectangles, tape, and then cut out the pieces. You can then cut the size you want or use freezer paper / stabilizer and trace the size you need so you don’t cut into the original pattern. This is helpful and saves paper and ink if you need to make multiple sizes.
Notes for this pattern:
• Fabric Recommendations: woven cottons, chambray, linen, voile, etc. You can use most light and medium weight fabrics.
• When sharing your creations: use #SLPco #SLPcoBaby and #SLPcoMila so everyone can search your creations for inspiration. If you want to see other people’s creation, then search for these hash tags on your favorite social media sites.
Choose your options:
• Top or Dress • Skirt: Simple or with an accent strip • Sleeves: Tulip or Sleeveless • Optional Large Back Bow
Pattern # 211 Baby Mila’s Tulip Sleeve Top & Dress Page 4 of 25
www.TheSimpleLifeCompany.com 2/8/2018 Version 1 © Simple Life Pattern Company 2018
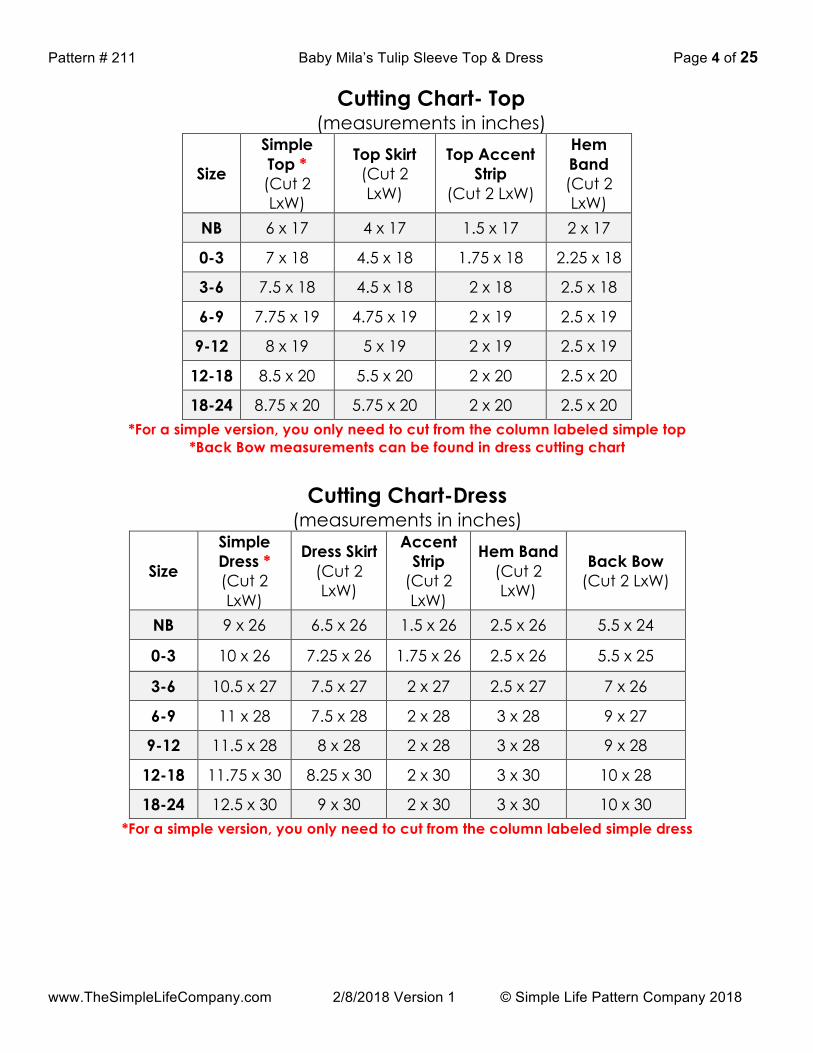
Cutting Chart- Top (measurements in inches)
Size
Simple Top * (Cut 2 LxW)
Top Skirt (Cut 2 LxW)
Top Accent Strip
(Cut 2 LxW)
Hem Band (Cut 2 LxW)
NB 6 x 17 4 x 17 1.5 x 17 2 x 17
0-3 7 x 18 4.5 x 18 1.75 x 18 2.25 x 18
3-6 7.5 x 18 4.5 x 18 2 x 18 2.5 x 18
6-9 7.75 x 19 4.75 x 19 2 x 19 2.5 x 19
9-12 8 x 19 5 x 19 2 x 19 2.5 x 19
12-18 8.5 x 20 5.5 x 20 2 x 20 2.5 x 20
18-24 8.75 x 20 5.75 x 20 2 x 20 2.5 x 20 *For a simple version, you only need to cut from the column labeled simple top
*Back Bow measurements can be found in dress cutting chart
Cutting Chart-Dress (measurements in inches)
Size
Simple Dress * (Cut 2 LxW)
Dress Skirt (Cut 2 LxW)
Accent Strip
(Cut 2 LxW)
Hem Band (Cut 2 LxW)
Back Bow (Cut 2 LxW)
NB 9 x 26 6.5 x 26 1.5 x 26 2.5 x 26 5.5 x 24
0-3 10 x 26 7.25 x 26 1.75 x 26 2.5 x 26 5.5 x 25
3-6 10.5 x 27 7.5 x 27 2 x 27 2.5 x 27 7 x 26
6-9 11 x 28 7.5 x 28 2 x 28 3 x 28 9 x 27
9-12 11.5 x 28 8 x 28 2 x 28 3 x 28 9 x 28
12-18 11.75 x 30 8.25 x 30 2 x 30 3 x 30 10 x 28
18-24 12.5 x 30 9 x 30 2 x 30 3 x 30 10 x 30 *For a simple version, you only need to cut from the column labeled simple dress
Pattern # 211 Baby Mila’s Tulip Sleeve Top & Dress Page 5 of 25
www.TheSimpleLifeCompany.com 2/8/2018 Version 1 © Simple Life Pattern Company 2018
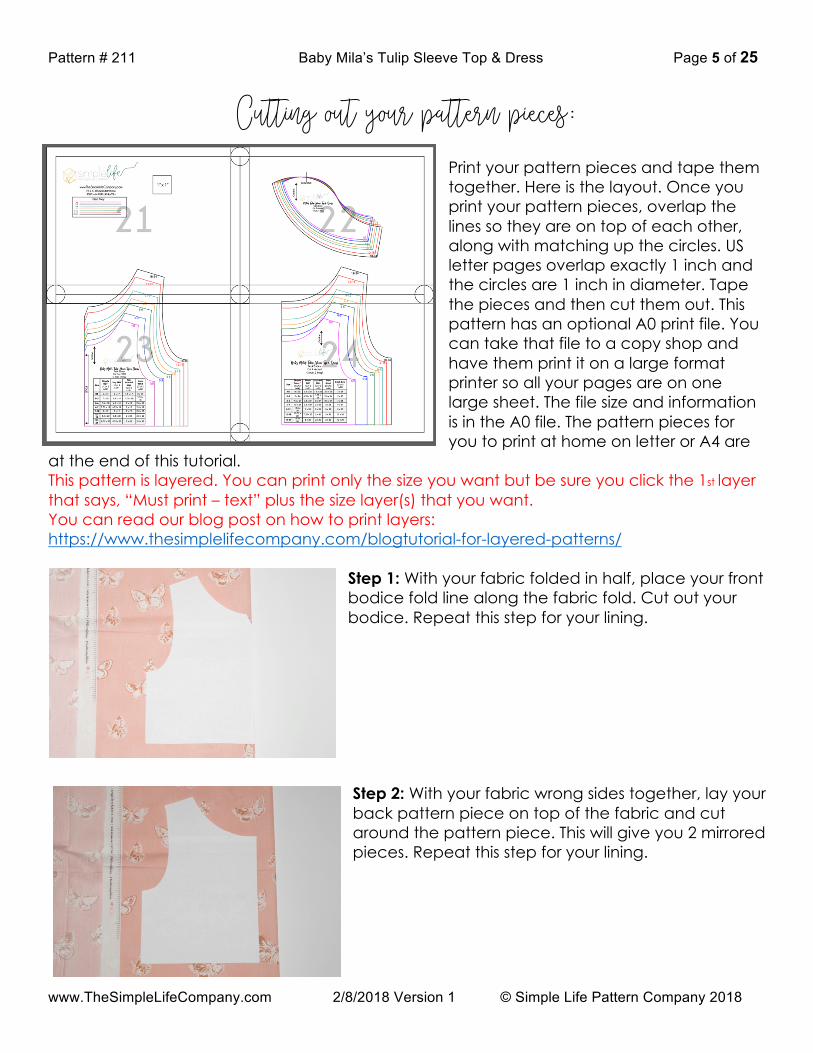
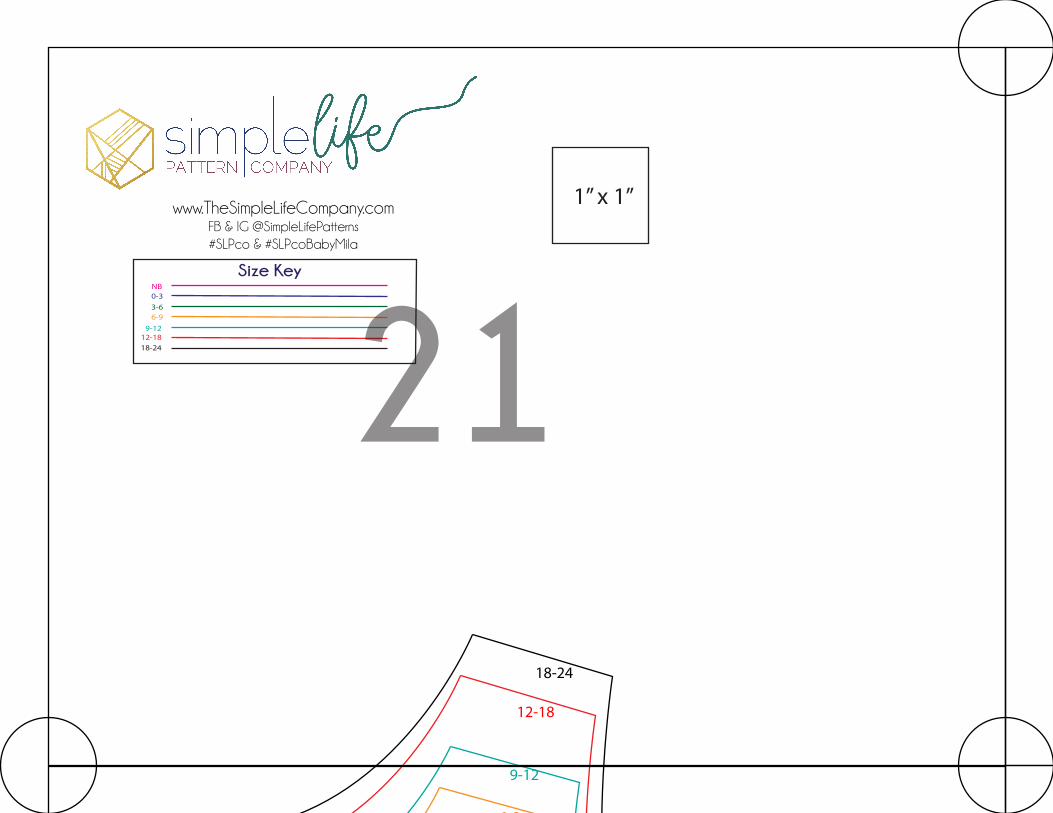
Cutting out your pattern pieces: Print your pattern pieces and tape them together. Here is the layout. Once you print your pattern pieces, overlap the lines so they are on top of each other, along with matching up the circles. US letter pages overlap exactly 1 inch and the circles are 1 inch in diameter. Tape the pieces and then cut them out. This pattern has an optional A0 print file. You can take that file to a copy shop and have them print it on a large format printer so all your pages are on one large sheet. The file size and information is in the A0 file. The pattern pieces for you to print at home on letter or A4 are
at the end of this tutorial. This pattern is layered. You can print only the size you want but be sure you click the 1st layer that says, “Must print – text” plus the size layer(s) that you want. You can read our blog post on how to print layers: https://www.thesimplelifecompany.com/blogtutorial-for-layered-patterns/
Step 1: With your fabric folded in half, place your front bodice fold line along the fabric fold. Cut out your bodice. Repeat this step for your lining.
Step 2: With your fabric wrong sides together, lay your back pattern piece on top of the fabric and cut around the pattern piece. This will give you 2 mirrored pieces. Repeat this step for your lining.
Pattern # 211 Baby Mila’s Tulip Sleeve Top & Dress Page 6 of 25
www.TheSimpleLifeCompany.com 2/8/2018 Version 1 © Simple Life Pattern Company 2018
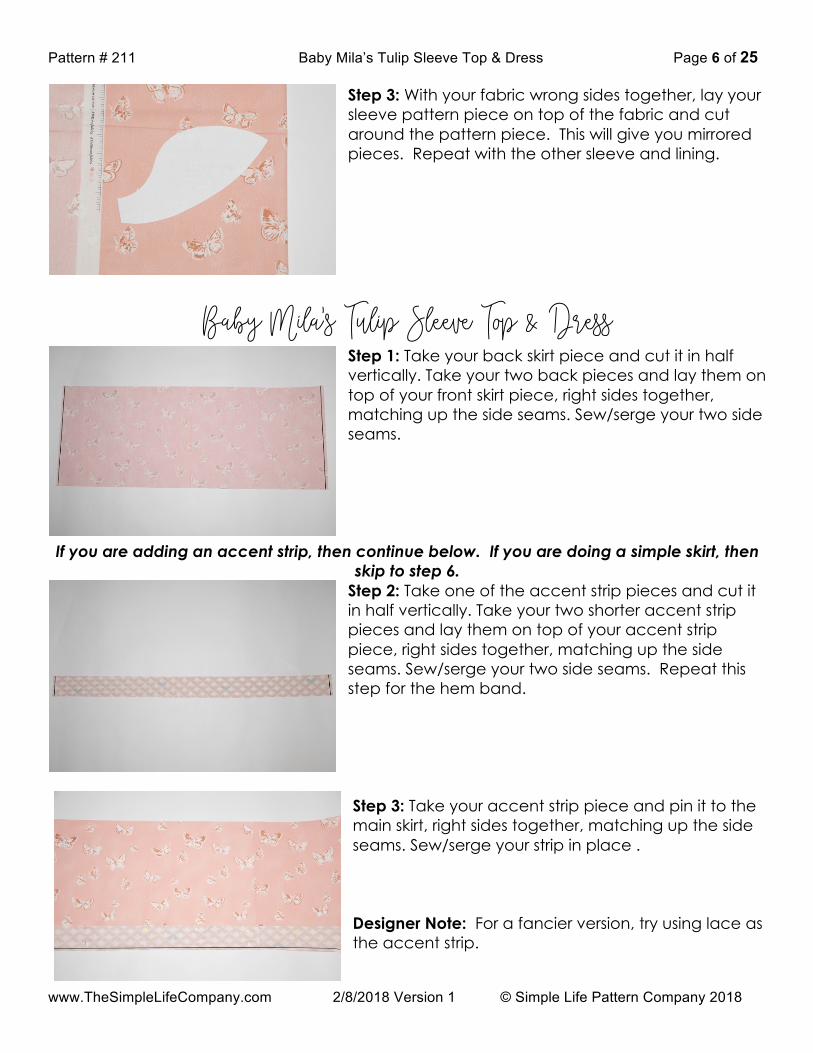
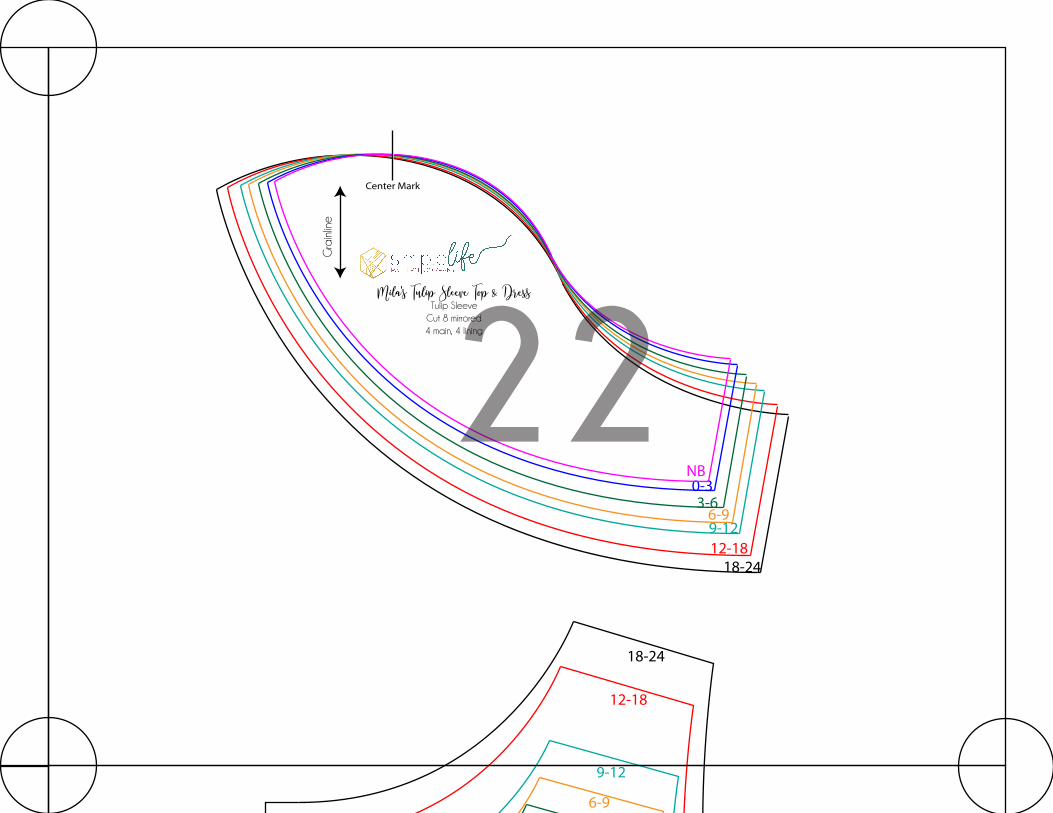
Step 3: With your fabric wrong sides together, lay your sleeve pattern piece on top of the fabric and cut around the pattern piece. This will give you mirrored pieces. Repeat with the other sleeve and lining.
Baby Mila’s Tulip Sleeve Top & Dress Step 1: Take your back skirt piece and cut it in half vertically. Take your two back pieces and lay them on top of your front skirt piece, right sides together, matching up the side seams. Sew/serge your two side seams.
If you are adding an accent strip, then continue below. If you are doing a simple skirt, then skip to step 6.
Step 2: Take one of the accent strip pieces and cut it in half vertically. Take your two shorter accent strip pieces and lay them on top of your accent strip piece, right sides together, matching up the side seams. Sew/serge your two side seams. Repeat this step for the hem band. Step 3: Take your accent strip piece and pin it to the main skirt, right sides together, matching up the side seams. Sew/serge your strip in place . Designer Note: For a fancier version, try using lace as the accent strip.
Pattern # 211 Baby Mila’s Tulip Sleeve Top & Dress Page 7 of 25
www.TheSimpleLifeCompany.com 2/8/2018 Version 1 © Simple Life Pattern Company 2018
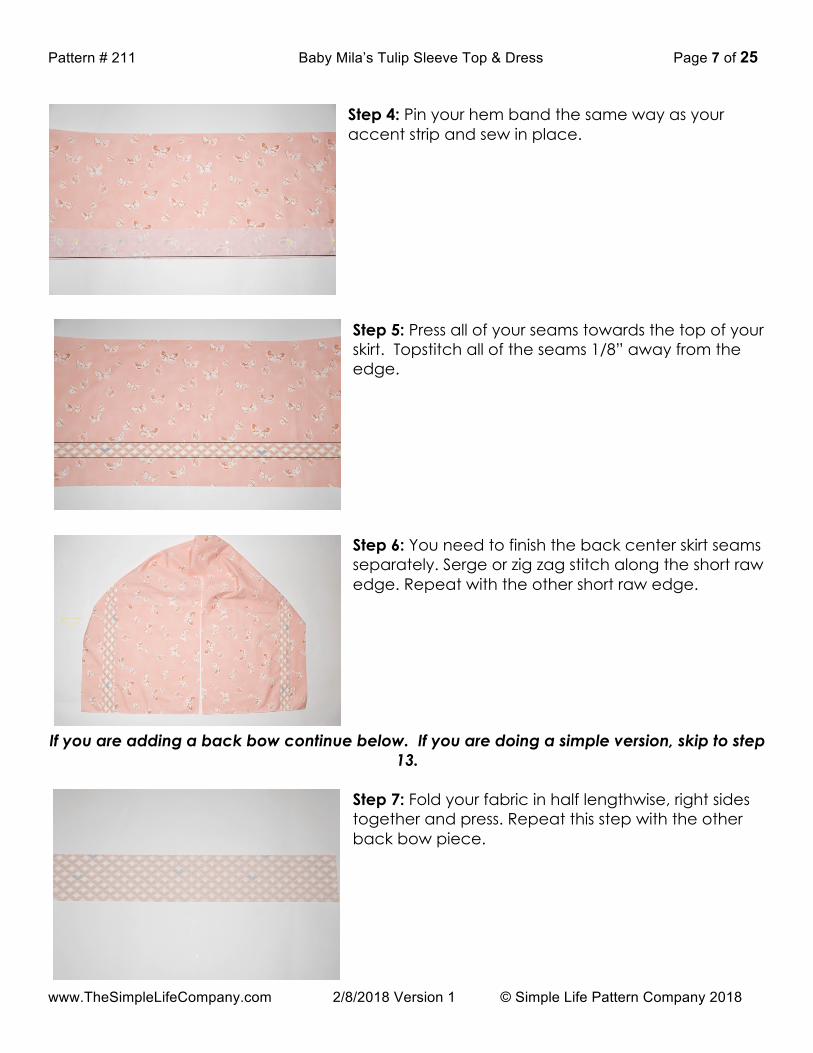
Step 4: Pin your hem band the same way as your accent strip and sew in place. Step 5: Press all of your seams towards the top of your skirt. Topstitch all of the seams 1/8” away from the edge.
Step 6: You need to finish the back center skirt seams separately. Serge or zig zag stitch along the short raw edge. Repeat with the other short raw edge.
If you are adding a back bow continue below. If you are doing a simple version, skip to step 13.
Step 7: Fold your fabric in half lengthwise, right sides together and press. Repeat this step with the other back bow piece.
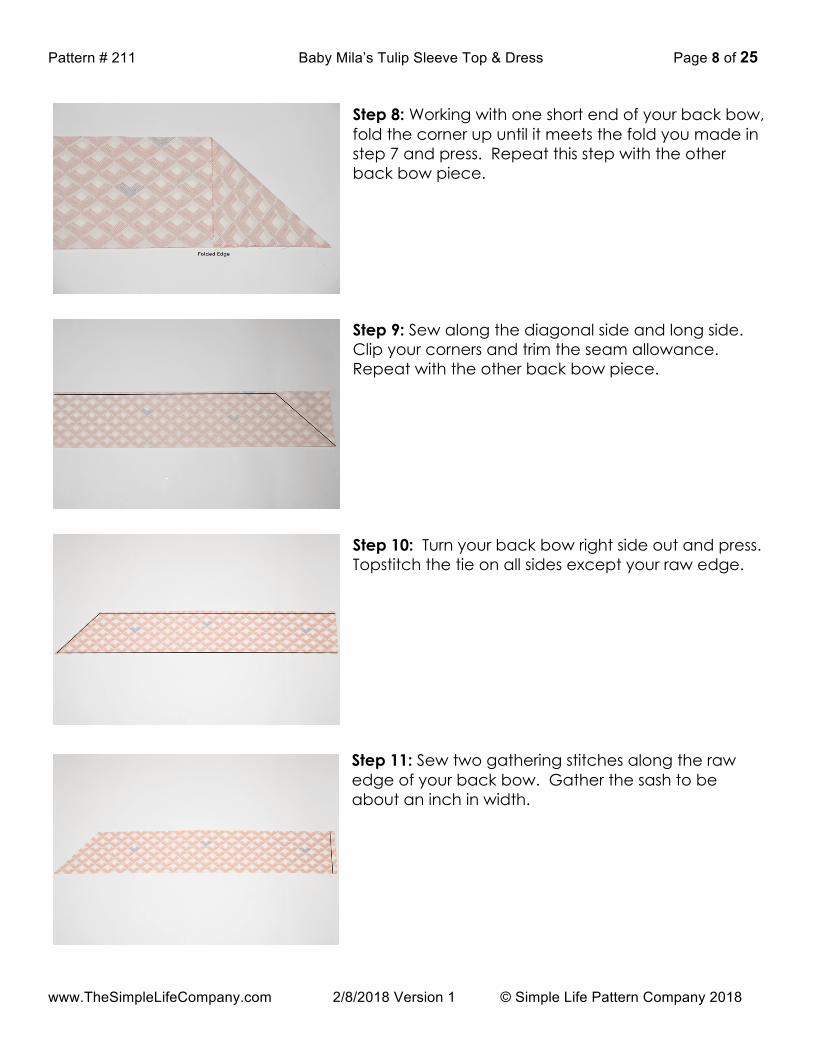
Pattern # 211 Baby Mila’s Tulip Sleeve Top & Dress Page 8 of 25
www.TheSimpleLifeCompany.com 2/8/2018 Version 1 © Simple Life Pattern Company 2018
Step 8: Working with one short end of your back bow, fold the corner up until it meets the fold you made in step 7 and press. Repeat this step with the other back bow piece. Step 9: Sew along the diagonal side and long side. Clip your corners and trim the seam allowance. Repeat with the other back bow piece. Step 10: Turn your back bow right side out and press. Topstitch the tie on all sides except your raw edge.
Step 11: Sew two gathering stitches along the raw edge of your back bow. Gather the sash to be about an inch in width.
Pattern # 211 Baby Mila’s Tulip Sleeve Top & Dress Page 9 of 25
www.TheSimpleLifeCompany.com 2/8/2018 Version 1 © Simple Life Pattern Company 2018
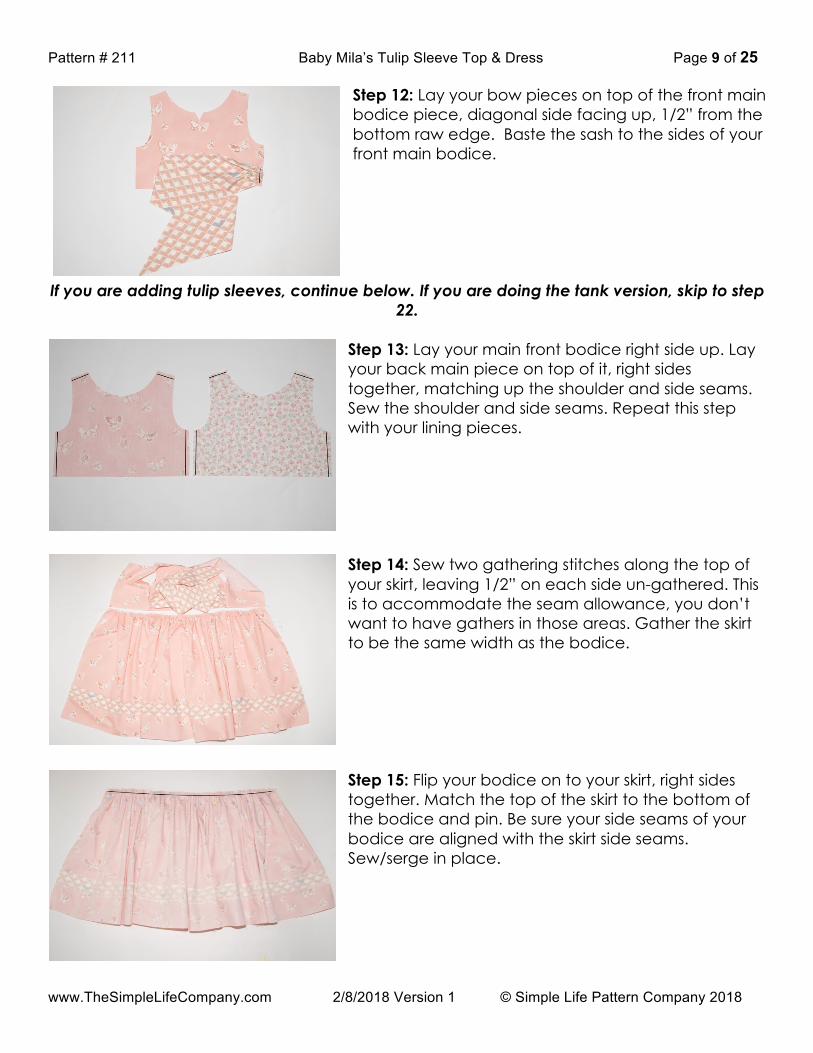
Step 12: Lay your bow pieces on top of the front main bodice piece, diagonal side facing up, 1/2” from the bottom raw edge. Baste the sash to the sides of your front main bodice.
If you are adding tulip sleeves, continue below. If you are doing the tank version, skip to step 22.
Step 13: Lay your main front bodice right side up. Lay your back main piece on top of it, right sides together, matching up the shoulder and side seams. Sew the shoulder and side seams. Repeat this step with your lining pieces.
Step 14: Sew two gathering stitches along the top of your skirt, leaving 1/2” on each side un-gathered. This is to accommodate the seam allowance, you don’t want to have gathers in those areas. Gather the skirt to be the same width as the bodice.
Step 15: Flip your bodice on to your skirt, right sides together. Match the top of the skirt to the bottom of the bodice and pin. Be sure your side seams of your bodice are aligned with the skirt side seams. Sew/serge in place.

Pattern # 211 Baby Mila’s Tulip Sleeve Top & Dress Page 10 of 25
www.TheSimpleLifeCompany.com 2/8/2018 Version 1 © Simple Life Pattern Company 2018
Step 16: Take your zipper and place it right side down along the left side of your back bodice piece. Align the zipper so the top stopper is 1/2” below the top edge. Unzip your zipper and pin it along the edge. Pin it to about 3” below the bodice/skirt seam. Using your zipper foot, sew the zipper in place about 1/4” from the zipper teeth to your last pin (3” from the seam). You don’t want to sew too close, if you do, the zipper will get caught on the fabric. Be sure to backstitch at the beginning and end. Step 17: Turn your zipper and bodice right sides out. Zip up your zipper and using a washable pen, mark where your bodice seam is and your stop point on the other side of the zipper.
Step 18: Take the other side of your dress and fold it in half, matching the raw edge to the zipper fabric. Match up your bodice seam to the mark you made on your zipper and pin. Place a pin at your stop mark so you know you have to stop sewing at that pin. Carefully unzip your zipper. Now you can continue to pin the zipper in place. Sew your zipper in place using the same seam allowance as the other side. Be sure to backstitch at the beginning and end.
Double check all your alignments. If the seams don’t match up, you can rip one side out and adjust.
Pattern # 211 Baby Mila’s Tulip Sleeve Top & Dress Page 11 of 25
www.TheSimpleLifeCompany.com 2/8/2018 Version 1 © Simple Life Pattern Company 2018
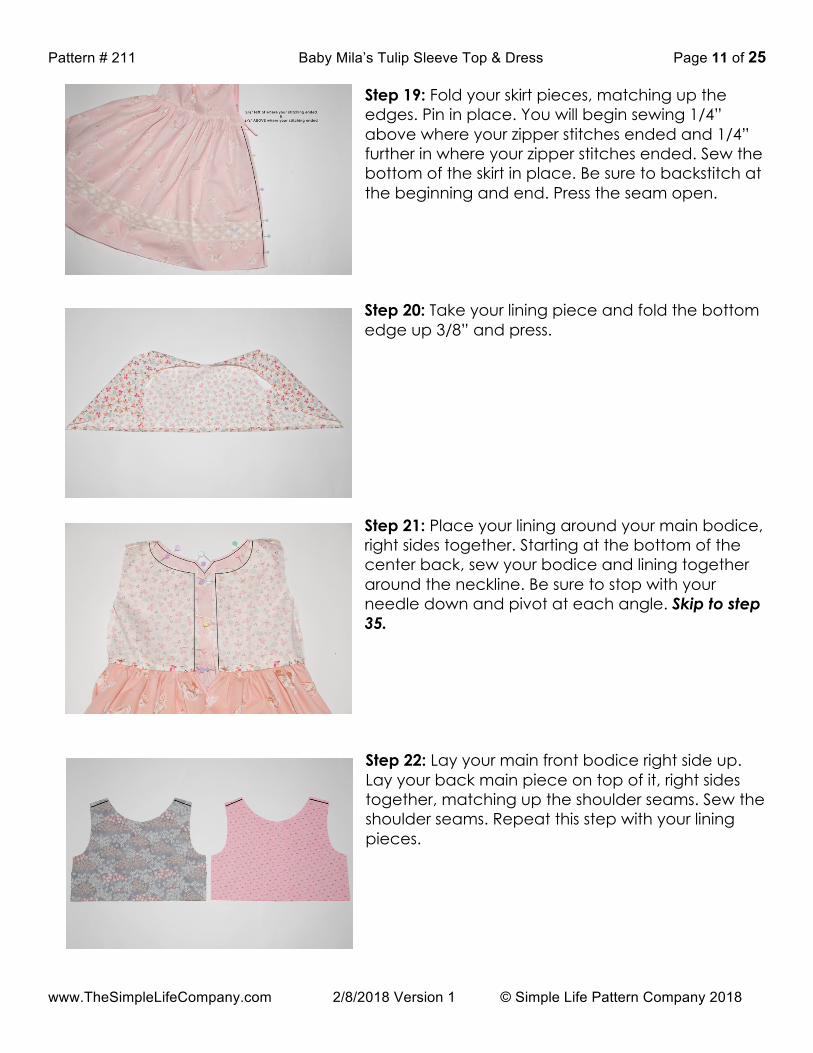
Step 19: Fold your skirt pieces, matching up the edges. Pin in place. You will begin sewing 1/4” above where your zipper stitches ended and 1/4” further in where your zipper stitches ended. Sew the bottom of the skirt in place. Be sure to backstitch at the beginning and end. Press the seam open.
Step 20: Take your lining piece and fold the bottom edge up 3/8” and press. Step 21: Place your lining around your main bodice, right sides together. Starting at the bottom of the center back, sew your bodice and lining together around the neckline. Be sure to stop with your needle down and pivot at each angle. Skip to step 35.
Step 22: Lay your main front bodice right side up. Lay your back main piece on top of it, right sides together, matching up the shoulder seams. Sew the shoulder seams. Repeat this step with your lining pieces.
Pattern # 211 Baby Mila’s Tulip Sleeve Top & Dress Page 12 of 25
www.TheSimpleLifeCompany.com 2/8/2018 Version 1 © Simple Life Pattern Company 2018
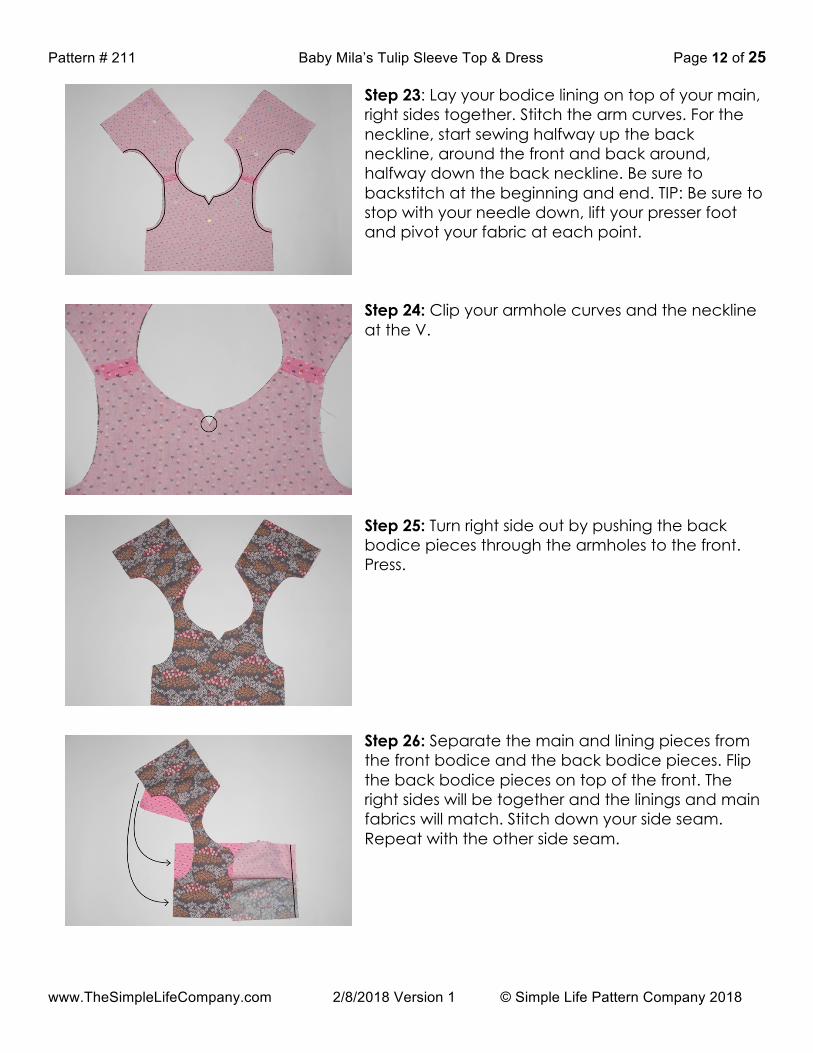
Step 23: Lay your bodice lining on top of your main, right sides together. Stitch the arm curves. For the neckline, start sewing halfway up the back neckline, around the front and back around, halfway down the back neckline. Be sure to backstitch at the beginning and end. TIP: Be sure to stop with your needle down, lift your presser foot and pivot your fabric at each point.
Step 24: Clip your armhole curves and the neckline at the V. Step 25: Turn right side out by pushing the back bodice pieces through the armholes to the front. Press.
Step 26: Separate the main and lining pieces from the front bodice and the back bodice pieces. Flip the back bodice pieces on top of the front. The right sides will be together and the linings and main fabrics will match. Stitch down your side seam. Repeat with the other side seam.
Pattern # 211 Baby Mila’s Tulip Sleeve Top & Dress Page 13 of 25
www.TheSimpleLifeCompany.com 2/8/2018 Version 1 © Simple Life Pattern Company 2018
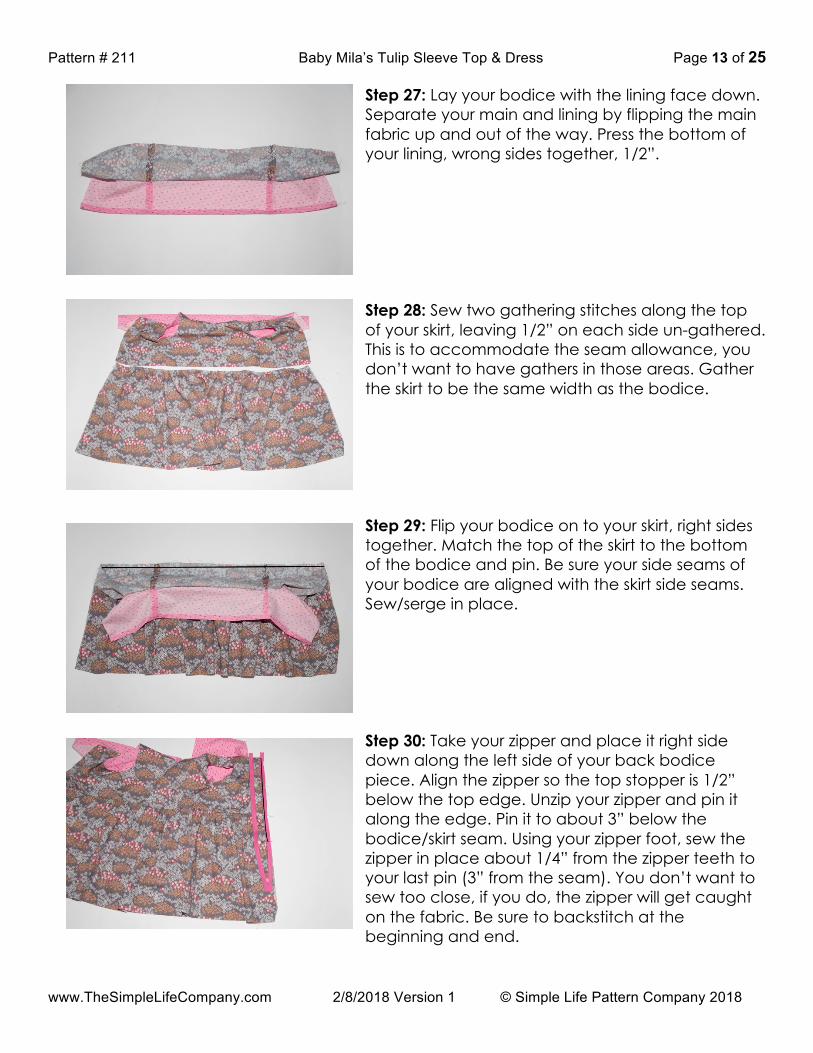
Step 27: Lay your bodice with the lining face down. Separate your main and lining by flipping the main fabric up and out of the way. Press the bottom of your lining, wrong sides together, 1/2”. Step 28: Sew two gathering stitches along the top of your skirt, leaving 1/2” on each side un-gathered. This is to accommodate the seam allowance, you don’t want to have gathers in those areas. Gather the skirt to be the same width as the bodice.
Step 29: Flip your bodice on to your skirt, right sides together. Match the top of the skirt to the bottom of the bodice and pin. Be sure your side seams of your bodice are aligned with the skirt side seams. Sew/serge in place. Step 30: Take your zipper and place it right side down along the left side of your back bodice piece. Align the zipper so the top stopper is 1/2” below the top edge. Unzip your zipper and pin it along the edge. Pin it to about 3” below the bodice/skirt seam. Using your zipper foot, sew the zipper in place about 1/4” from the zipper teeth to your last pin (3” from the seam). You don’t want to sew too close, if you do, the zipper will get caught on the fabric. Be sure to backstitch at the beginning and end.
Pattern # 211 Baby Mila’s Tulip Sleeve Top & Dress Page 14 of 25
www.TheSimpleLifeCompany.com 2/8/2018 Version 1 © Simple Life Pattern Company 2018
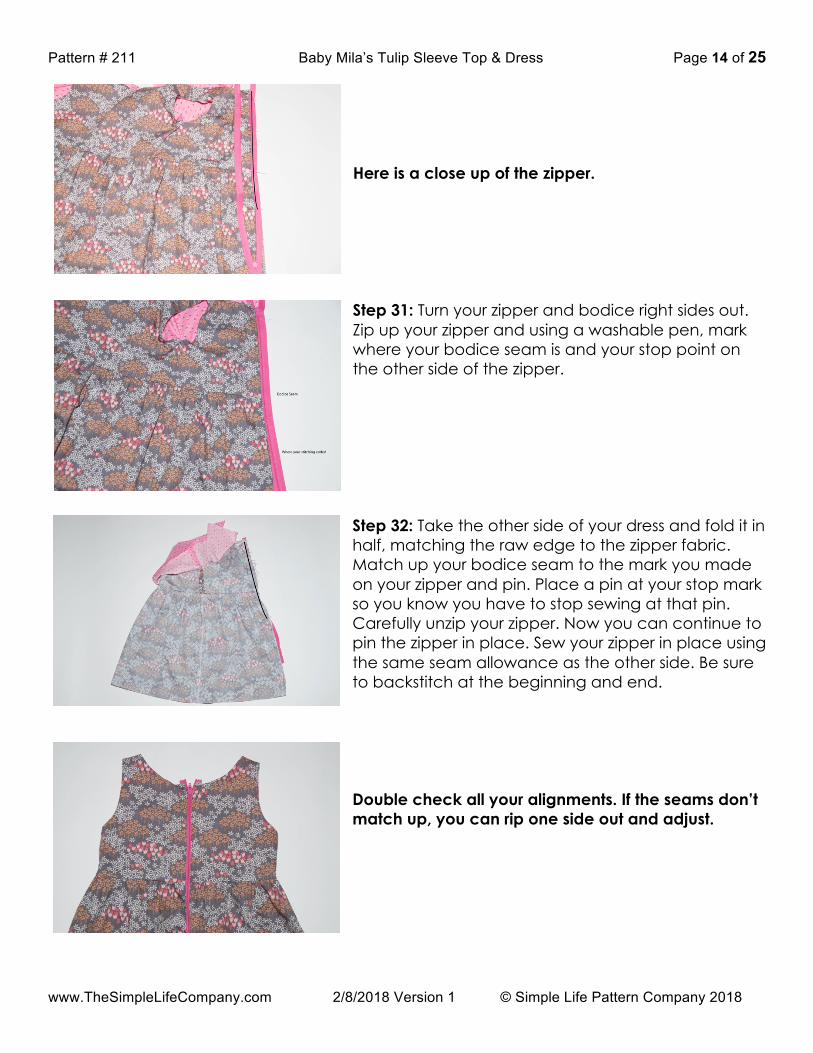
Here is a close up of the zipper.
Step 31: Turn your zipper and bodice right sides out. Zip up your zipper and using a washable pen, mark where your bodice seam is and your stop point on the other side of the zipper.
Step 32: Take the other side of your dress and fold it in half, matching the raw edge to the zipper fabric. Match up your bodice seam to the mark you made on your zipper and pin. Place a pin at your stop mark so you know you have to stop sewing at that pin. Carefully unzip your zipper. Now you can continue to pin the zipper in place. Sew your zipper in place using the same seam allowance as the other side. Be sure to backstitch at the beginning and end.
Double check all your alignments. If the seams don’t match up, you can rip one side out and adjust.

Pattern # 211 Baby Mila’s Tulip Sleeve Top & Dress Page 15 of 25
www.TheSimpleLifeCompany.com 2/8/2018 Version 1 © Simple Life Pattern Company 2018
Step 33: Fold your skirt pieces, matching up the edges. Pin in place. You will begin sewing 1/4” above where your zipper stitches ended and 1/4” further in where your zipper stitches ended. Sew the bottom of the skirt in place. Be sure to backstitch at the beginning and end. Press the seam open. Step 34: Flip your lining so it is right sides together with your main fabric, align the bottom with your skirt seam. Pin the center back and the unsewn part of your angle. Sew in place. Step 35: OPTIONAL: If you have 1/4” Pellon EZ steam, place it around the bottom of the bodice where you folded the fabric up. Lightly press it in place. Once it is cool, remove the paper. Step 36: Flip your lining down so it covers your skirt seam allowance. If you used steam a seam, you can press the lining over the seam. Be sure to do a small section at a time. If you didn’t use steam a seam, pin the lining to the main pieces, being sure to pin very well and that the lining is covering the skirt seam.
Pattern # 211 Baby Mila’s Tulip Sleeve Top & Dress Page 16 of 25
www.TheSimpleLifeCompany.com 2/8/2018 Version 1 © Simple Life Pattern Company 2018
Step 37: Topstitch the bodice seam and the neckline all at once, 1/8” from the edge. Start at the center back left side, topstitch across the back bodice, front bodice and back to the other side of your back bodice. Once you get to the zipper, with your needle in the down position, lift your presser foot and pivot to sew up the back bodice, around the neckline and back down the other side of the back bodice. Continue to sew down and around the zipper. Stop and backstitch when you get to the skirt seam.
If you are adding tulip sleeves, then continue below. If not, then skip to step 44.
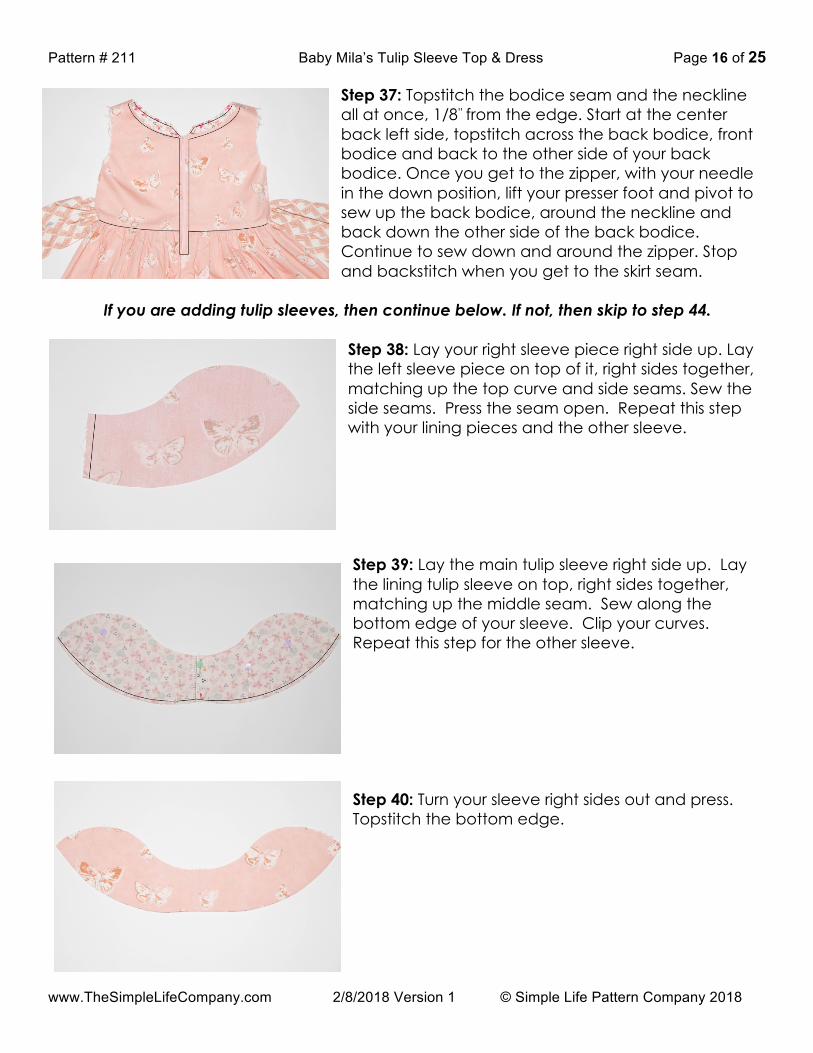
Step 38: Lay your right sleeve piece right side up. Lay the left sleeve piece on top of it, right sides together, matching up the top curve and side seams. Sew the side seams. Press the seam open. Repeat this step with your lining pieces and the other sleeve.
Step 39: Lay the main tulip sleeve right side up. Lay the lining tulip sleeve on top, right sides together, matching up the middle seam. Sew along the bottom edge of your sleeve. Clip your curves. Repeat this step for the other sleeve. Step 40: Turn your sleeve right sides out and press. Topstitch the bottom edge.

Pattern # 211 Baby Mila’s Tulip Sleeve Top & Dress Page 17 of 25
www.TheSimpleLifeCompany.com 2/8/2018 Version 1 © Simple Life Pattern Company 2018
Step 41: With the sleeve lining side facing up, fold the front of your sleeve towards the center. Repeat this step with the other sleeve going the opposite direction.
Step 42: Fold the back sleeve piece over the front sleeve piece, matching up the center marking and pin. Baste in place. Repeat this step with the other sleeve going the opposite direction.
Step 43: With your dress wrong sides out, and your sleeves right sides out, slide one sleeve into the armhole with the tulip facing the front of your bodice, matching up the sleeve seam to the bodice seam. Pin in place and double check placement before sewing. Sew/ serge sleeve in place. Repeat with the other sleeve.
Here is another view of the sleeve direction
Pattern # 211 Baby Mila’s Tulip Sleeve Top & Dress Page 18 of 25
www.TheSimpleLifeCompany.com 2/8/2018 Version 1 © Simple Life Pattern Company 2018
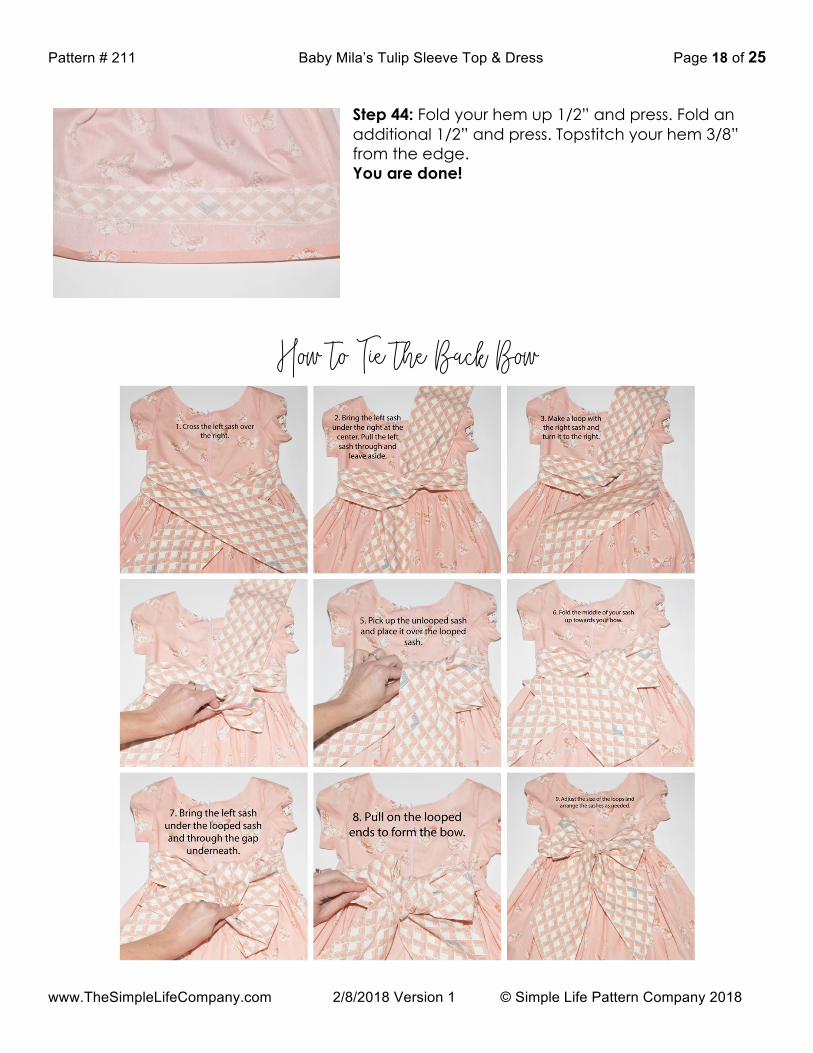
Step 44: Fold your hem up 1/2” and press. Fold an additional 1/2” and press. Topstitch your hem 3/8” from the edge. You are done!
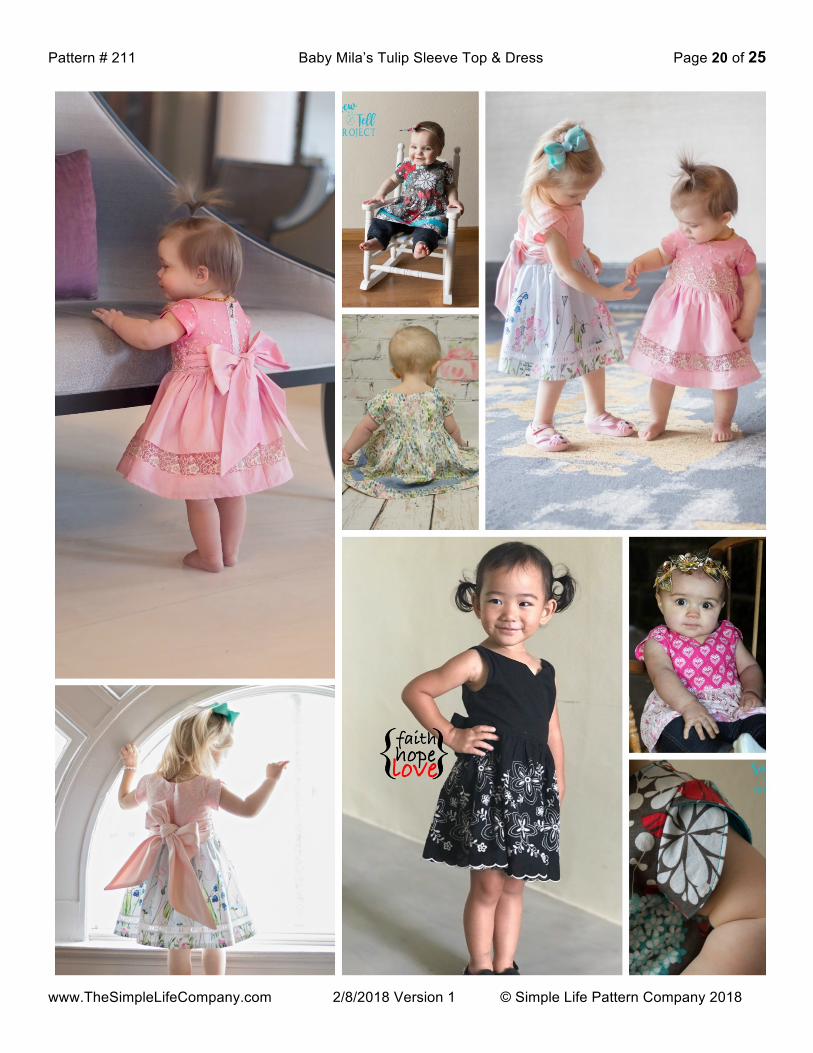
How to Tie the Back Bow
Pattern # 211 Baby Mila’s Tulip Sleeve Top & Dress Page 19 of 25
www.TheSimpleLifeCompany.com 2/8/2018 Version 1 © Simple Life Pattern Company 2018
Cover photo courtesy of S Taylor Threads.
Fabric kindly provided by Art Gallery Fabrics. #ArtGalleryFabrics
Thread kindly provided by Aurifil Thread.
#ThreadMatters #AurifilThread
Thank you for purchasing a Simple Life Pattern Co. pattern! To view our blog, see more patterns, shop for fabric, and free tutorials, visit the website at
www.thesimplelifecompany.com
We are always working on new patterns so be sure to check us out on the following social media sites.
Join us on Facebook for all the latest patterns, sales, coupons, and to find inspiration for your next project. www.facebook.com/simplelifepatterns
Come join our FAN GROUP on facebook www.facebook.com/groups/SLPco
Follow us on Facebook & Instagram @SimpleLifePatterns
Follow us on YouTube @SimpleLifePatternCompany
Follow us on Pinterest @SLPco
Baby Mila’s Tulip Sleeve Top & Dress: #SLPco #SLPcoBaby& #SLPcoMila
This tutorial, pattern pieces, and all of its contents are copyright protected and property of Simple Life Pattern Company, LLC and cannot be reproduced in any way or form. Photocopying, emailing, or distributing patterns in any form is illegal and punishable by law. This tutorial is for personal use and small-scale business use. If you choose to sell a product using a Simple Life Pattern Company pattern, please give credit to us where you post photos of the pattern. If you would like to purchase a manufacturing license for this pattern, or have any questions or concerns, please contact Katie Skoog at [email protected]
Pattern # 211 Baby Mila’s Tulip Sleeve Top & Dress Page 20 of 25
www.TheSimpleLifeCompany.com 2/8/2018 Version 1 © Simple Life Pattern Company 2018
18-24
12-18
9-12
6-9
www.TheSimpleLifeCompany.comFB & IG @SimpleLifePatterns#SLPco & #SLPcoBabyMila
18-2412-18
9-126-93-60-3NB
Size Key
1” x 1”
21
18-24
18-24
12-18
12-18
9-12
9-12
6-9
6-93-6
0-3NB
22Mila’s Tulip Sl�ve Top & Dre�
Tulip SleeveCut 8 mirrored4 main, 4 lining
Center Mark
Gra
inlin
e
18-24
12-18
12-18
9-12
9-12
6-9
6-9
3-6
3-6
0-3
0-3
NB
NB
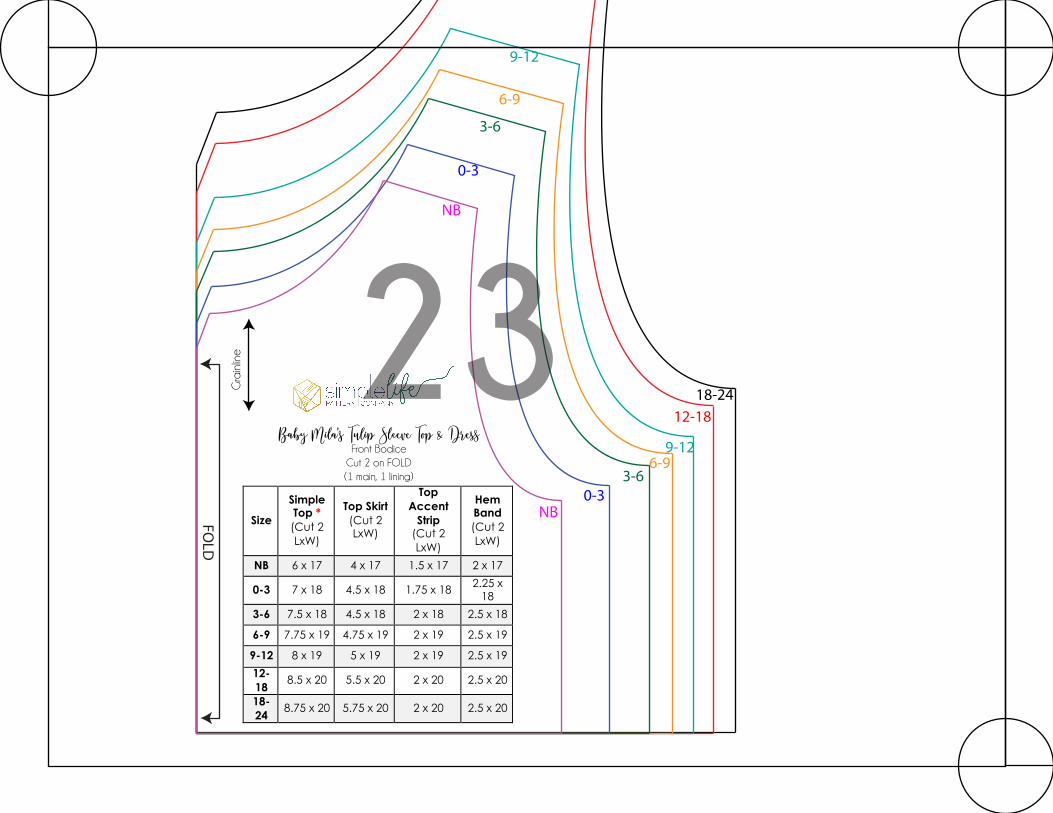
Baby Mila’s Tulip Sl�ve Top & Dre�Front Bodice
Cut 2 on FOLD(1 main, 1 lining)
Gra
inlin
e 23
FOLD
Size
Simple Top * (Cut 2 LxW)
Top Skirt (Cut 2 LxW)
Top Accent
Strip (Cut 2 LxW)
Hem Band (Cut 2 LxW)
NB 6 x 17 4 x 17 1.5 x 17 2 x 17
0-3 7 x 18 4.5 x 18 1.75 x 18 2.25 x 18
3-6 7.5 x 18 4.5 x 18 2 x 18 2.5 x 18
6-9 7.75 x 19 4.75 x 19 2 x 19 2.5 x 19
9-12 8 x 19 5 x 19 2 x 19 2.5 x 19 12-18 8.5 x 20 5.5 x 20 2 x 20 2.5 x 20
18-24 8.75 x 20 5.75 x 20 2 x 20 2.5 x 20
18-2412-18
9-12
9-12
6-9
6-9
3-6
3-6
0-3
0-3
NB
NB
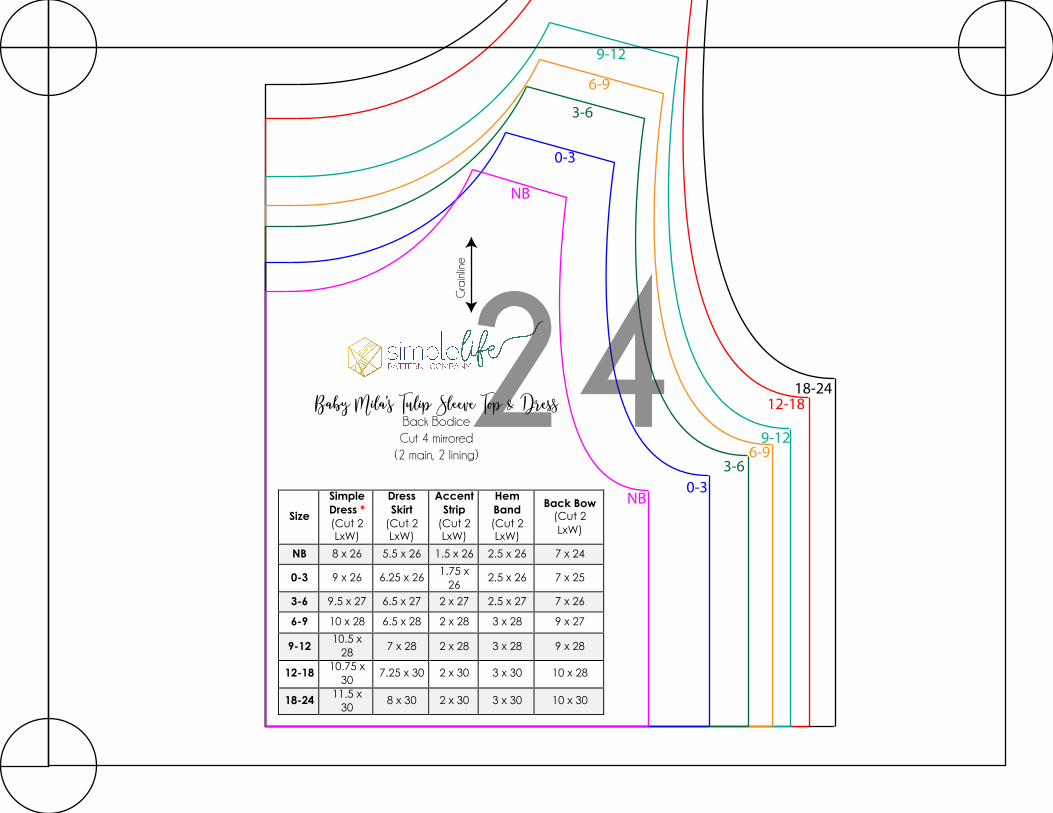
Baby Mila’s Tulip Sl�ve Top & Dre�Back BodiceCut 4 mirrored
(2 main, 2 lining)G
rain
line
24Size
Simple Dress * (Cut 2 LxW)
Dress Skirt
(Cut 2 LxW)
Accent Strip
(Cut 2 LxW)
Hem Band (Cut 2 LxW)
Back Bow (Cut 2 LxW)
NB 8 x 26 5.5 x 26 1.5 x 26 2.5 x 26 7 x 24
0-3 9 x 26 6.25 x 26 1.75 x 26 2.5 x 26 7 x 25
3-6 9.5 x 27 6.5 x 27 2 x 27 2.5 x 27 7 x 26
6-9 10 x 28 6.5 x 28 2 x 28 3 x 28 9 x 27
9-12 10.5 x 28 7 x 28 2 x 28 3 x 28 9 x 28
12-18 10.75 x 30 7.25 x 30 2 x 30 3 x 30 10 x 28
18-24 11.5 x 30 8 x 30 2 x 30 3 x 30 10 x 30


![[4333] – 211](https://img.pdfslide.us/doc/110x75/62164c3085004a118c644876/4333-211.jpg)