Embed Size (px)
Citation preview

1
Build the Spitfire: Step-By-Step ™
Pack 30
™
Stages 115-118

2
Build the Spitfire: Step-By-Step ™
Contents
Stage Parts Pages
115
1 - Fuselage plate 22 - Fuselage plate 43 - Fuselage plate 54 - Fuselage plate 85 - Template
400-403
116
1 - Fuselage plate 22 - Fuselage plate 43 - Fuselage plate 54 - Fuselage plate 85 - Template
404-406
1171 - Painting template 1 2 - Painting template 2 3 - Air intake cover
407-409
118 1 - Cockpit front2 - Cockpit closing mechanism 410-413

400
Build the Spitfire: Step-By-Step ™
Sand all over the fuselage using a sanding block. To check that the sanding is even, place a spare panel on the fuselage to make sure that it sits flat.
Take 3 x 3mm strips from previous stages and cut pieces to size to fill the space behind the cockpit and glue them in place. With a sanding block, sand them level with the edge of the frames.
1 2
This stage’s parts You will need
Stage 115
1 - Fuselage plate 22 - Fuselage plate 43 - Fuselage plate 54 - Fuselage plate 85 - Template
Glue Nails Sanding blockFilePen
5
3412
Knife Rivet markerAwl Cylinder

401
Build the Spitfire: Step-By-Step ™
Apply glue and attach fuselage plate 13 behind plate 12. Make holes with the awl and put a nail in each corner of the plate. Test-fit nails in the holes and cut off any part of them that protrudes on the inside of the fuselage. Then glue them into place.
5
Sand the plates on their inner sides so they will adhere better. Glue the two plates shown in the picture onto the fuselage. Make holes at the circled points with an awl and secure the plates with nails. Use a file or sanding block to smooth the outer edges (dotted lines).
4
Find fuselage plate 4 from Stage 115, plate 19 from Stage 102, plate 12 from Stage 100, and plates 13, 14 and 18 from Stage 101. Score any details according to the templates. These plates make up the right side of the fuselage.
3
Place fuselage plate 19 against the top of fuselage plate 13, matching the central groove with the rear wall of the cockpit. Use a pen to mark the fold lines of the plate.
6
2
2
402
Build the Spitfire: Step-By-Step ™
With a knife, cut the plate at the height of the area behind the cockpit (dotted line). Glue the plate in place. When the glue is dry, fit a nail into the bottom corners. Then fold the forward part of the plate over, and glue it inside the cockpit.
Shape fuselage plate 14 around a cylindrical object such as a spray can, so that it matches the curvature of the fuselage (see inset picture). Position the plate on the body to check that it fits, then glue and nail it, as with the other plates. The small arrows above indicate the positions of the nails.
Glue fuselage plate 18, forward of plate 13. Fold the top over into the cockpit, as with plate 13, and glue. Fit a nail into the bottom corners.
7
9
8

403
Build the Spitfire: Step-By-Step ™
Place the wing underneath the fuselage to make sure that both pieces fit together. Plate 14 must line up with the other body plates on the wing, as shown by the dotted line.
Your fuselage should now look like this. Keep it ready for the next stage and store any unused parts to one side.
10
11
404
Build the Spitfire: Step-By-Step ™
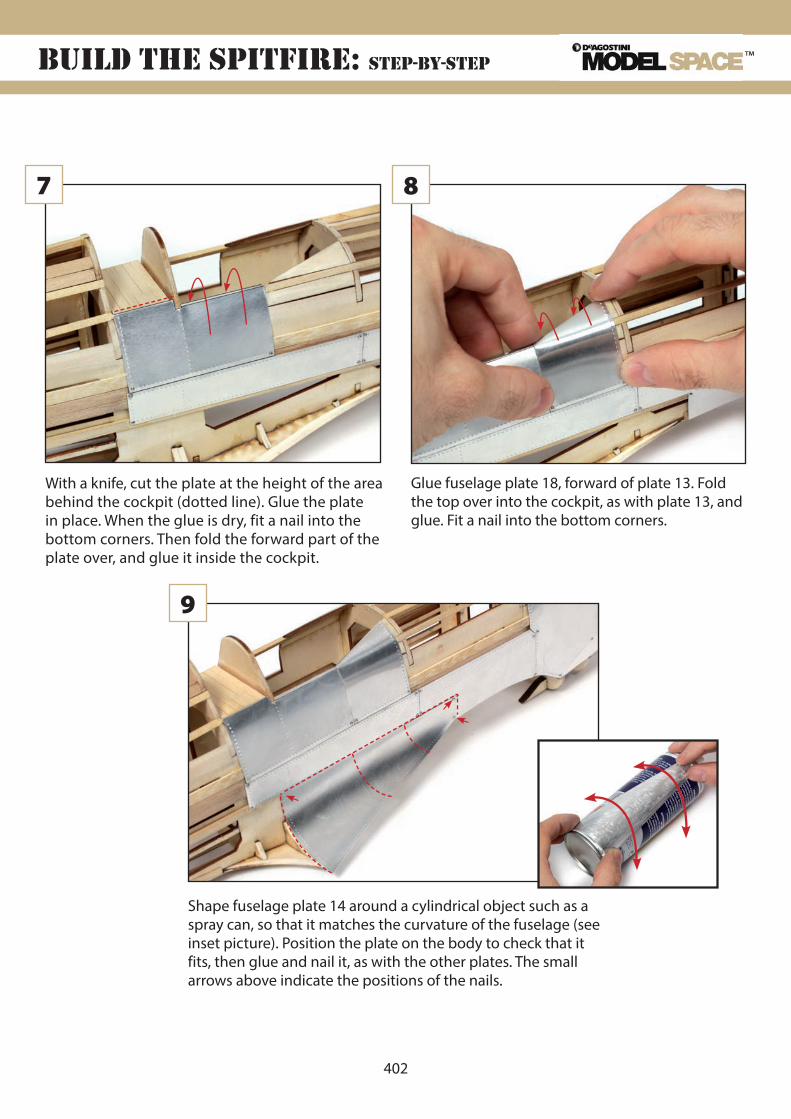
Sand the plates on their inner sides so they will adhere better. Glue plate 4 onto the left side of the fuselage. Make holes for the nails in the same places as the right plate. Smooth the edges.
1 2
This stage’s parts You will need
Stage 116
1 - Fuselage plate 22 - Fuselage plate 43 - Fuselage plate 54 - Fuselage plate 85 - Template
Glue Nails Sanding blockSawFile
5
3412
2
2
Find fuselage plate 4 (Stage 115), plate 11 (Stage 104), plate 12 (Stage 89), plates 13, 14 and 18 (Stage 99) and plates 15 and 17 (Stage 102). Score them with the rivet marker according to the templates.
Marker pen CylinderRivet marker

405
Build the Spitfire: Step-By-Step ™
Place plate 6 in position. Mark where the area behind the cockpit corresponds to on the plate.
5
With a small saw, cut away the wooden strip shown in the picture between the dotted lines. Then file the ends smooth.
4
Check that plates 12 and 13 fit in place and line up on the fuselage. Glue the plates in place and nail in the same way as the corresponding plates on the right side.
3
Cut off the excess, as shown in the photo by the dotted line. Glue and nail the plate in place.
6

406
Build the Spitfire: Step-By-Step ™
Bend fuselage plate 14 around a cylindrical object to give the curvature shown in the picture. After checking that it fits, glue and nail it in place.
Bend plate 11 around a cylindrical object so that it matches the curve of the top of the fuselage. After checking the fit, glue and nail the plate in place.
10
Take fuselage plate 17, and glue and nail it in place. When the glue is dry, fold the edge over (dotted line), and glue inside the cockpit.
Put fuselage plate 18 in place, as shown, and fold the top over, so it is inside the cockpit. Glue and nail in place.
The left side of the fuselage should now look like this. Store any unused parts to one side.
8
11
7
9

407
Build the Spitfire: Step-By-Step ™
Cut some 3 x 3mm wooden strips to fit in the engine cover, as shown, and glue into place. Smooth the engine cover with a sanding block to ensure an even shape.
Take fuselage plate 1 from Stage 86. Bend it around a cylinder (inset) to fit the curve of the engine cover. Sand the inside of the plate and glue in place.
1
This stage’s parts You will need
Stage 117
1 - Painting template 1 2 - Painting template 2 3 - Air intake cover
Sanding block Glue Round fileTweezersKnife
2
3
2 1

408
Build the Spitfire: Step-By-Step ™
Place the engine cover on the aircraft body to ensure that the two pieces fit perfectly.
5
Apply glue to the inside of the engine cover to strengthen the join between the framework and the fuselage plates.
4
Take the two engine cover plate 2 pieces, provided with Stages 115 and 116, and bend to fit the curve of the cover. Sand the inside of the pieces and glue into place.
3
Find the tube for the fuselage lights supplied with Stage 35 and insert in the left hole near the floor of the cockpit, as shown by the small arrow (top inset). Pull the tube through the body to the hole in the tail, then glue it at both ends and cut off the excess tube flush with the end of the tail.
6

409
Build the Spitfire: Step-By-Step ™
Take the tube from Stage 36 and insert it into the second hole near the floor of the cockpit, level with the other tube.
Use a small round file to make a shallow slot in the bottom of the frame, as shown.
Bring the tube to the top of the fuselage and make a hole in the wooden strip at the distance indicated in the photo. Glue the tube in place and cut off the excess.
Insert the remaining tube in the third hole in the frame and feed the tube down to the slot you have just made. Glue both ends into place.
7
9
8
10
11
45mm
The fuselage should now look like this. Keep any unused parts and store carefully.

410
Build the Spitfire: Step-By-Step ™
Find the fuselage plates 20 (Stage 102), plate 16 (Stage 104), plates 8 (Stages 99 and 101), plates 6 (Stages 89 and 100) and plate 3 (Stage 72). Add details with the rivet marker according to the template, keeping both sides symmetrical.
Take fuselage plate 3 and bend it into shape to fit the top of the fuselage just behind the cockpit.
1 2
This stage’s parts You will need
Stage 118
1 - Cockpit front2 - Cockpit closing mechanism
Sanding block Glue NailsRound file Rivet marker
2
1
PenKnife

411
Build the Spitfire: Step-By-Step ™
Sand, glue and nail fuselage plate 6 on the side of the aircraft. Its position is shown by the dotted lines in the photo.
5
Make a hole in the plate corresponding with the mark (large arrow) of sufficient size to accommodate the LED. Glue the plate in place. Fit nails in the corners of the plate and at the points indicated by the smaller arrows.
4
Place the curved plate on the fuselage and, with a pen, mark where the end of the tube emerges from the fuselage.
3
Hold plate 8 against the side of the fuselage under plate 6, in the position shown in the photo. Draw a line with a marker to show where the plate overlaps the bottom of the fuselage (lower dotted line). Cut this section of th plate off with a knife.
6

412
Build the Spitfire: Step-By-Step ™
File the back of the plate, glue and nail it in place on the fuselage, level with the other pieces.
7
Shape a plate 20 to fit, then glue and nail into position. Remember that you have spare plates if you need to make any replacements.
8
Take fuselage plate 16 and glue it to the upper arch of the frame, as shown.
9

413
Build the Spitfire: Step-By-Step ™
Put the second plate 20 on the right side of the fuselage in the corresponding place to see that it fits. Sand, glue and nail it. Ensure that both sides are symmetrical.
11
The fuselage should look like this. Store any unused parts to one side.
10