Embed Size (px)
Citation preview
D P J C O A T I N G S Y S T E M S Head Office: 2/25 Jersey Road, Bayswater. Victoria 3153 Ph: 1800 062 301 Fax: (03) 9720 8540 Email: [email protected]
w w w . p o o l p a i n t o n l i n e . c o m . a u
E P O X Y P R E P A R A T I O N
& A P P L I C A T I O N G U I D E
P R E P A R A T I O N : The preparation of the surface to be coated is the most important step in coating a swimming pool. Please read thoroughly the preparation & application notes provided below and follow them precisely for a trouble-free DIY project.
(A) CEMENT RENDER, MARBLESHEEN® /QUARTZON® or PEBBLEMIX® POOLS: NEW CEMENT RENDER ONLY - 1/ New cement render should consist of fresh cement and clean sand only. Concrete shells must be left for at least three (3) weeks prior to coating to ensure that the concrete has properly cured and hydrated prior to sealing with LUXAPOOL. Thin finishing render less than 10mm, may be coated after 72 hours, but must be free from loosely adhering sand, debris…etc. Do not use any waterproofing agents or cement additives in the render as this may affect the adhesive properties of the paint. Rectify any sign of ground water intrusion before surface treatment.
2/ Remove all contamination, laitance and loose surface matter by grit blasting, acid etching, grinding or hand rubbing using a hardwood block until a clean, dry and dust free surface results. (Allow new cement render to hydrate for at least than twenty-one (21) days old before commencing preparation)
MARBLESHEEN®/ QUARTZON®, PEBBLEMIX® & OLD or NEW CEMENT RENDER - 1/ Clean suntan lotion, make-up, body fat, etc… off walls & floor with CORROCLEAN (non-caustic detergent/sanitizer) especially concentrating on the areas just below the tile line, steps and flat surfaces where most oily substances would collect. This is a critical part of the preparation of all pools and must be carried out even if the pool is acid etched.
2/ Wet down all surfaces, and then allow loose water to run-off. While the surface is still wet, acid etch with hydrochloric acid (also known as “Spirits of Salts”) mixed as detailed below (see “Acid etching solution concentrations”). Mix in a plastic watering can (not metal as the acid will cause rust), and always ensure you add the acid to water (not visa-versa). (Hint: Leave hose lightly running in pool while acid washing to ensure dilution of acid on the floor of the pool, also to enable quick access to fresh water if any is spilled on skin or splashed into eyes) Allow acid to react on the surface for 5 -10 minutes. Do not allow the acid to dry on the surface. High-pressure water-blast or hose down thoroughly with water in the direction of the sump, at the same time removing any loose sand, soils or render with a stiff broom. The pool surface, when etched correctly, should have a rough, “sand-papery feel” to the touch (cement render, Quatzon or Marblesheen). It is important to concentrate on a small, workable, section at a time. This will ensure that no acid residue is deposited onto the surface. Pump out waste acid water and debris. (Hint: just prior to pumping out the wastewater add a tablespoon of bi-carb soda or Corroclean to neutralise acid)
3/ Rinse down once again, with CORROCLEAN to neutralise any remaining acid. Follow with a thorough rinse with fresh water. (Note: Rinse until no foaming is present) Pump out remaining water and sludge, vacuum smaller granules off the floor when pool is dry just prior to painting. Allow the pool surface to dry a minimum of 3-4 warm, sunny days. The pool surface must be thoroughly dry prior to painting. High moisture content can cause failure of the LUXAPOOL® coating. Test a small area of the pool one-day prior to painting by taping a small patch of plastic to the pool floor in the morning. Remove the plastic around mid-afternoon and observe the underside (the side touching the pool surface). IF THERE ARE DROPLETS OF WATER PRESENT ON THE PLASTIC THEN THE MOISTURE CONTENT IS TOO HIGH. DO NOT PAINT UNTIL THE POOL IS THOROUGHLY DRY.
4/ Over the well-etched, totally clean & dry surface, apply a coat of LUXAPOOL® Epoxy Primer-Sealer. In addition to providing good adhesion, the Primer-Sealer eliminates surface pinholes and seals in water-soluble salts, which could lead to premature blistering, flaking and peeling of the paint. Do not apply the Primer-Sealer if the temperature is below 10°C or if there is moisture present on the surface. It is best to apply the paint between 8 - 11 am, and out of direct sunlight. Do not apply later than this time as early dew can cause water spotting or blooming, which will affect the adhesion of the paint causing failure. Apply the LUXAPOOL® Primer-Sealer without thinning, allowing 24 hours curing time prior to applying the first coat of LUXAPOOL® Epoxy Coating finish. Do not leave longer than 36 - 48 hours (@20
0C) before re-coating.
2
(B) PREVIOUSLY PAINTED & FIBREGLASS SHELL POOLS: (NOTE: The LUXAPOOL® Primer-Sealer can not be used if any amount of paint remains on the surface of the pool as it may cause lifting due to the high solvent content of the primer/sealer. LUXAPOOL® epoxy finish can be applied over aged epoxy enamels & high build epoxies as well as sound fibreglass. To test whether the existing coated substrate is suitable for re-coating with LUXAPOOL® epoxy, place Acetone on a cloth and rub several dry areas of pool surface, if the coated surface softens, “wrinkles” or becomes sticky, then the surface is not suitable to be painted with LUXAPOOL® epoxy, and probably has been previously painted with a Chlorinated Rubber based coating or some other coating. Please consult us for further information & advice. If the Acetone only removes existing oxides, and does not affect any layer of existing paint, then this surface is suitable to be re-painted with LUXAPOOL® epoxy. * Do these tests in a few varied areas all over the pool as some times many layers of paint exist. If results vary over different layers, we would recommend that all existing paint is removed by sandblasting, water-blasting (above 5,000 psi) or mechanical sanding (only for small areas of coating removal). This appraisal of the type of coating and suitability to re-coat with LUXAPOOL epoxy is the user’s responsibility solely. 1/ Clean suntan oil, body fat and loose sanding powder off walls with CORROCLEAN especially concentrating on the areas just below the tile line, steps and flat surfaces where most oils & soils collect. This is a critical part of the preparation of the pre-painted & fibreglass pools and must be carried out even if the pool is sandblasted. 2/ Remove all flaking or loosely adhering paint, scale or blisters. (This can be achieved either by sandblasting, water blasting or heavy mechanical sanding with a flexible disk sander). All fibreglass and /or remaining existing painted surfaces must be thoroughly abraded by ideally abrasive ‘whip’ blasting in order to achieve the necessary mechanical “key” for the first coat of LUXAPOOL® Epoxy. Abrasive blasting is the ideal surface preparation over old existing coatings. Domestically available high pressure (up to 2,000psi) water blasting only is NOT an adequate alternative surface preparation technique, unless commercial ultra high-pressure water (above 5,000psi) is utilised to basically remove all coatings back to the substrate, any remaining coating will still however require sanding to provide a “key” Alternatively, if abrasive blasting is not utilised, use mechanical sanding (using a high speed grinder with a flexible backing pad - coarse papers (20 – 40 grit size) to sand/grind down the entire pool surface (including the floor) to provide mechanical profile and to provide an extra mechanical “key” for the LUXAPOOL® to bond to the aged painted surface. Failure to adequately abrade the existing coating thoroughly can result in adhesive failure of the new epoxy coating. NOTE (Fibreglass pools): In some cases fibreglass pools are covered with a whitish surface deposit. This deposit is often either UV damage to the gel coat or calcification (a build-up of excess calcium on the pool surface). This deposit must be removed by abrading the fibreglass pool surface. Soaking with dilute Hydrochloric Acid or Muriatic Acid, applied with a plastic watering can, and scrubbing with a nylon broom may also assist in removal such deposits. 3/ Starting with a dry surface, clean up and repair all surface irregularities. On cement rendered pools use an approved epoxy-concrete repair system (such as SELLEYS® Aqua-knead-It, or equivalent) or standard cement render for large areas (repair must have a depth of at least 5mm) Generally a render having sand to cement ratio of 2:1 - 3:1 is suitable. All suspect areas of a fibreglass surface must be repaired with a suitable fibreglass repair kit, before final sanding. Pay particular attention to these sections, especially if they appear as blisters or larger raised areas, as they will likely become a source of coating failure if they are not treated properly. Allow to cure over night and then sand back to a smooth surface. 4/ Hose pool down again & drain wastewater, remaining flakes of paint and sludge. Vacuum all small particles from pool floor. The pool is now ready to be coated with LUXAPOOL®.
NOTES: PREPARATION * CORROCLEAN PREWASH should be diluted at approx. 2 tablespoon per 10lt bucket of water in all the above preparation procedures. Although CORROCLEAN PREWASH is non-caustic, it is highly alkaline, and care should be taken in its use, even when diluted. Rubber gloves should be worn to prevent irritation of skin and protective goggles/glasses to protect eyes.
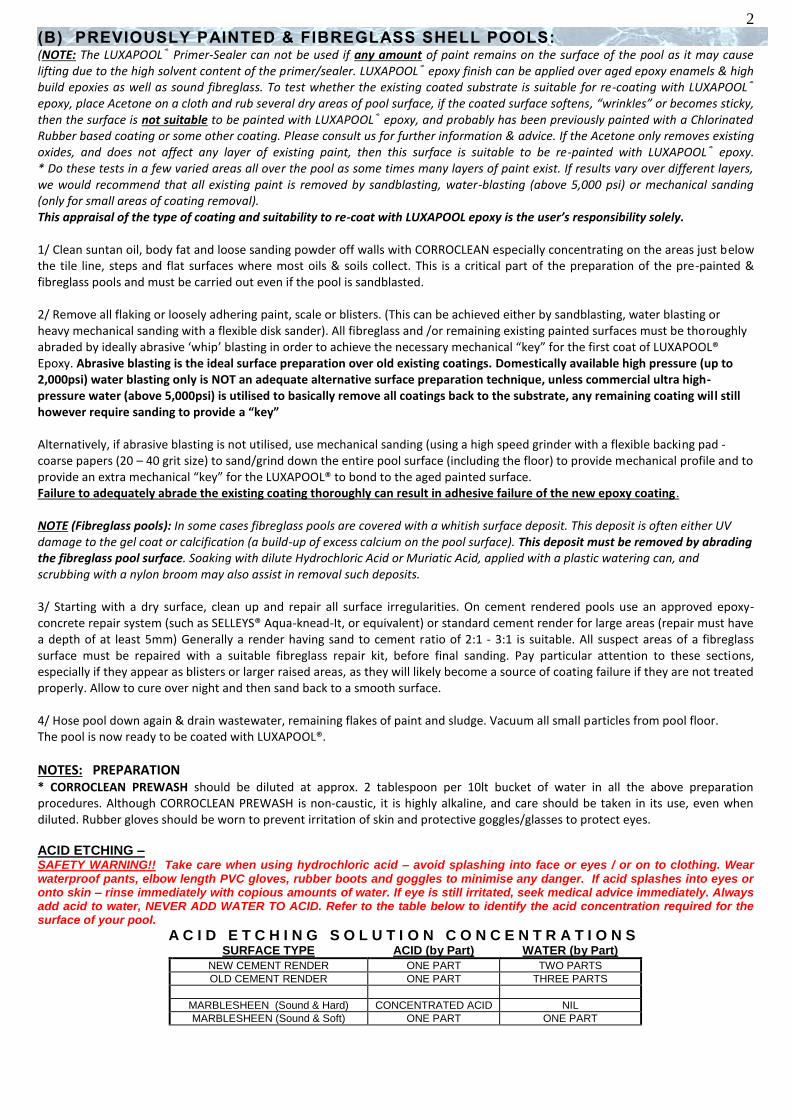
ACID ETCHING – SAFETY WARNING!! Take care when using hydrochloric acid – avoid splashing into face or eyes / or on to clothing. Wear waterproof pants, elbow length PVC gloves, rubber boots and goggles to minimise any danger. If acid splashes into eyes or onto skin – rinse immediately with copious amounts of water. If eye is still irritated, seek medical advice immediately. Always add acid to water, NEVER ADD WATER TO ACID. Refer to the table below to identify the acid concentration required for the surface of your pool.
A C I D E T C H I N G S O L U T I O N C O N C E N T R A T I O N S SURFACE TYPE ACID (by Part) WATER (by Part)
NEW CEMENT RENDER ONE PART TWO PARTS
OLD CEMENT RENDER ONE PART THREE PARTS
MARBLESHEEN (Sound & Hard) CONCENTRATED ACID NIL
MARBLESHEEN (Sound & Soft) ONE PART ONE PART
3
A P P L I C A T I O N Prior to painting, check the weather forecast. Three (3) consecutive rain free days is ideal for the painting process. Defer painting if rain is expected. The presence of rain during the painting process may discolour the coating or cause paint failure. The best time for application is between 8 - 11am (during spring and summer – later if painting is carried out during autumn or early winter). If LUXAPOOL® is applied later than this, ensure that early dew or rain is not forecast, as this will cause water spotting or white marking to occur on newly painted surfaces (especially with darker colours). LUXAPOOL® can be only be applied at temperatures between 10
oC and up to 25
oC (check the lid of the part B / hardener component to ensure the correct hardener is
being used as compared to the intended application temperatures). Extreme heat or hot winds however will cause the coating surface to dry too quickly, thus reducing adhesion, possibly causing solvent boil & blisters (especially with darker colours) and also increasing paint fumes for the applicator. For these reasons it is not advisable to apply LUXAPOOL® on very hot, dry days, unless all painting works can be completed well before the high temperatures or when direct hot sunlight/winds are present (ie. Carry out very early in the morning after dew has burnt off) Do not apply LUXAPOOL in the evening after a very hot day as the pool shell may still be hot. Note: All epoxy coatings such as LUXAPOOL®, will routinely “dull off” and oxidise when exposed to sunlight, chemicals, & sudden swings in the PH levels or incorrect total alkalinity. This does not affect the paints performance as a protective coating and will not result in bubbling and flaking of the coating. This oxidisation is progressively worse depending of the darkness of the colour chosen (ie. White the least affected 8 – 10 years, and Black the worst affected- 2 – 4 years)
MIXING: * ALWAYS MIX & USE WHOLE PACKS. NEVER USE PART PACKS * (As even a 5% miscalculation of the correct component proportions will cause defective curing) Drain LUXAPOOL® part A (Base) into a plastic 10lt bucket, scrape sides and bottom of tin to ensure all solids and pigment are removed (if this is not carried out variations in colour and covering capacity may occur) – stir just part A component to ensure it is mixed totally. Add part B (Hardener) to base (be sure to drain the tin completely) and stir well, ensuring a complete blend of hardener with base (mix only one kit at a time). Allow to stand for 15 minutes @ 15- 20
oC, then mix again. The pot life (i.e. the time
it takes for the whole 3.5lt unit to set hard) will be approximately 1 hour depending on the temperature of the paint itself. HINT: Don’t keep as yet unused tins of Luxapool in the direct sunlight during hot weather as this will reduce pot life drastically when the two components are mixed, alternately keep tins in a warm enviornment during cold weather to ensure paint viscosity and curing time is maintained. Also ensure that all units of Part A to be used for the final coat are from the same batch, otherwise the Part A ONLY should be “boxed” (i.e. mixed together) to ensure a totally uniform colour in all Part A components to be used. (don’t add hardener until you have boxed all the Part A together and then poured them back to into the original tins to the correct quantity level) Thinners may be added to the first coat (Use Luxapool thinners only) up to a maximum of 5% to assist with ease of application. Make sure that all Part B cans are either all summer or all winter hardeners.
APPLICATION: LUXAPOOL® is best applied by roller. The ideal roller cover is a 10 –12mm lambswool cover, however due to their high cost, polyester roller covers can also be used (these rollers need to be “de-fluffed” first). All rollers and brushes can only be used once, so no matter which roller cover or brush is used, these should be thrown away after each coat is complete. Coverage should be between 25 – 30 M
2 approx. per 3.5lt unit / per coat, depending on the surface type and roughness. Use a brush to cut -in under
the tile line, corners of steps, fixtures & around the hydrostatic valve at the bottom PRIOR to commencing rolling.(Hint: don’t use masking tape on the tiles as the epoxy will adhere it to the tile edge making it difficult to remove once the paint is cured.)
When applying LUXAPOOL®, allow the painted area to “stand” for approximately 10 minutes after application. If small bubbles appear during this “standing” phase they can be eliminated by lightly draping a wet roller (not loaded) over the surface. It is important to only lightly touch the paint surface. This bursts the bubbles allowing the resulting crater to flow and re-form into a uniform film. Only practice this technique if there are many bubbles on the surface and only within the first 10 - 15 minutes of painting. (*Some amount of bubbles is unavoidable and will nearly always form when applying paints outside on to a porous surface) The existence of these bubbles is due to entrapment of air within the surface (once painted). The bubbles rise due to expansion from heat. This can be minimised greatly by utilising a protective shade-cloth. The occurrence of these bubbles is also affected by surface type and texture. Avoiding all bubbles is impossible, however minimising their numbers is achievable. Any milky discolouration (bloom) caused by unpredicted rain, evening dew, or high humidity, should be thoroughly removed by abrading with a medium-grade sanding paper (40-60 grit) prior to application of the second or third coat.
Application of a second or third coat may be commenced as soon as the preceding coat is traffickable (usually overnight). Subsequent coats of LUXAPOOL® should ideally be applied within a two (2) day/ (48 hour) period. If time between coats is over two (2) days, satisfactory adhesion can be obtained by carrying-out a light sand of the entire painted surface to provide a “mechanical key” for the next coat. Choose a “guaranteed” fine day for the final coat and ensure no rain or dew will effect final coat for at least eight (8) hours @ 20
oC (longer if temperatures are lower) after application. A milky discolouration may be caused by early rain or
dew, depending on the temperature at the time; these often can be removed or reduced by scrubbing with a scouring pad with an abrasive cream (i.e. Ajax etc.).
Clean up all equipment in LUXAPOOL® thinners (it is recommended that brushes & rollers are allowed to harden then are disposed of as domestic waste, rather than cleaned with solvent) but do not leave rollers soaking in as epoxy will harden even under solvent. The longer a newly painted pool is allowed to dry prior to filling the better the ultimate coating quality and longevity. Ideally allow the coating to cure for 5 days at an average daytime temperature of 20
0C, prior to filling the pool. If a coating has not had adequate
4 drying time and is filled prematurely its colour & gloss will be damaged. This is seen as cloudy, uneven colour distribution on the last coat. DO NOT add chemicals / Salt for at least 3 - 5 days after application of the final coat. Application at very low temperatures can result in accelerated chalking of the coating. It is best to apply the coating during late spring, summer & early autumn. Application during winter months may result in a prematurely chalky surface. IMPORTANT WARNING: The new coating can be very slippery when first applied, this should subside after a short period (3 – 6mths), depending on pool chemistry & environmental conditions. During this period care should be exercised when entering & exiting the pool. Alternately, rubber matting could be place on steps, ect… temporarily to improve traction in these areas.
LUXAPOOL® is not a waterproofing product. LUXAPOOL® should not be applied above the waterline as it will stain & chalk. Stable pool chemistry determines the longevity of the epoxy coating. Fluctuating pool chemistry will damage your epoxy coating. For best results maintain pH between 7.4 & 7.8 and maintain Total Alkalinity at a minimum of 140-160 ppm. Calcium hardness should ideally be 280 ppm – 320 ppm, and maybe higher for darker colours. Minimise use of acid where possible. Keep chlorine levels at a minimum. Excessively high chlorine levels will degrade your coating. Poor pool chemistry maintenance will accelerate chalking & degradation of the epoxy coating. Once the pool has been filled it is important to maintain the surface. Brushing down your pool every 4 - 6 weeks will maintain a coating integrity & improve longevity. This is especially important at the start of each season to remove winter build-up of oxides.
H E A L T H W A R N I N G LUXAPOOL® IS A TWO COMPONENT, AMINE CURED EPOXY RESIN COATING SYSTEM AND CAN CAUSE RESPIRATORY AND SKIN IRRITATION IN SOME CASES. PROTECTIVE CLOTHING (eg. GLOVES, GLASSES, ETC…) SHOULD BE WORN DURING USE. DO NOT SPEND PROLONGED PERIODS INHALING FUMES (MIX LUXAPOOL® OUTSIDE THE POOL TO ENSURE NO EXCESSIVE CONCENTRATION OF FUMES), REST PERIODS BETWEEN KITS IS RECOMMENDED. NEVER WIPE LARGE AREAS OF THE POOL SURFACE WITH THINNERS OR LUXAPOOL® THINNERS. IF AFFECTED IN ANY WAY BY THE USE OF LUXAPOOL®, STOP USING THE MATERIAL AND SEEK MEDICAL ADVICE BEFORE PROCEEDING. MATERIAL SAFETY DATA SHEETS FOR ALL LUXAPOOL® PRODUCTS ARE AVAILABLE ON REQUEST OR AT OUR WEBSITE.
L U X A P O O L ® F A C T S
LUXAPOOL® Swimming Pool Epoxy Coating is a high performance coating product, however there are certain characteristics associated with all epoxy coatings. Your awareness of these will assist you in understanding your new LUXAPOOL® epoxy pool coating.
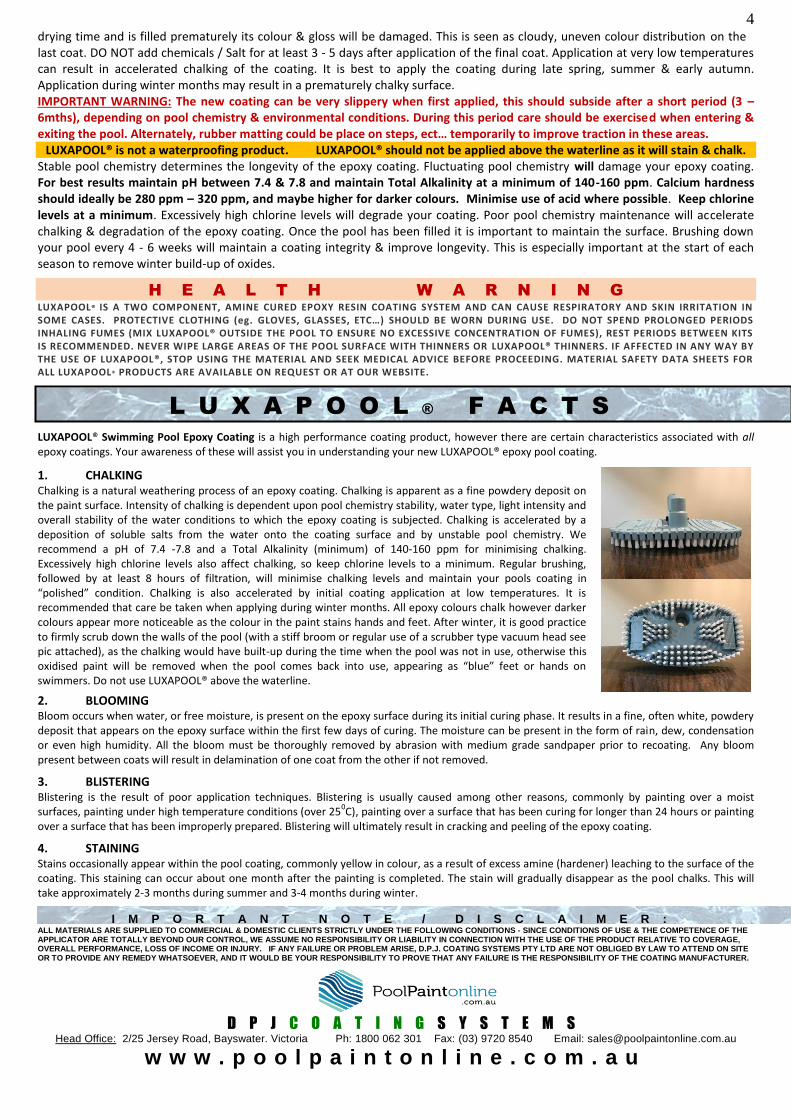
1. CHALKING Chalking is a natural weathering process of an epoxy coating. Chalking is apparent as a fine powdery deposit on the paint surface. Intensity of chalking is dependent upon pool chemistry stability, water type, light intensity and overall stability of the water conditions to which the epoxy coating is subjected. Chalking is accelerated by a deposition of soluble salts from the water onto the coating surface and by unstable pool chemistry. We recommend a pH of 7.4 -7.8 and a Total Alkalinity (minimum) of 140-160 ppm for minimising chalking. Excessively high chlorine levels also affect chalking, so keep chlorine levels to a minimum. Regular brushing, followed by at least 8 hours of filtration, will minimise chalking levels and maintain your pools coating in “polished” condition. Chalking is also accelerated by initial coating application at low temperatures. It is recommended that care be taken when applying during winter months. All epoxy colours chalk however darker colours appear more noticeable as the colour in the paint stains hands and feet. After winter, it is good practice to firmly scrub down the walls of the pool (with a stiff broom or regular use of a scrubber type vacuum head see pic attached), as the chalking would have built-up during the time when the pool was not in use, otherwise this oxidised paint will be removed when the pool comes back into use, appearing as “blue” feet or hands on swimmers. Do not use LUXAPOOL® above the waterline.
2. BLOOMING Bloom occurs when water, or free moisture, is present on the epoxy surface during its initial curing phase. It results in a fine, often white, powdery deposit that appears on the epoxy surface within the first few days of curing. The moisture can be present in the form of rain, dew, condensation or even high humidity. All the bloom must be thoroughly removed by abrasion with medium grade sandpaper prior to recoating. Any bloom present between coats will result in delamination of one coat from the other if not removed.
3. BLISTERING Blistering is the result of poor application techniques. Blistering is usually caused among other reasons, commonly by painting over a moist surfaces, painting under high temperature conditions (over 25
0C), painting over a surface that has been curing for longer than 24 hours or painting
over a surface that has been improperly prepared. Blistering will ultimately result in cracking and peeling of the epoxy coating.
4. STAINING Stains occasionally appear within the pool coating, commonly yellow in colour, as a result of excess amine (hardener) leaching to the surface of the coating. This staining can occur about one month after the painting is completed. The stain will gradually disappear as the pool chalks. This will take approximately 2-3 months during summer and 3-4 months during winter.
I M P O R T A N T N O T E / D I S C L A I M E R : ALL MATERIALS ARE SUPPLIED TO COMMERCIAL & DOMESTIC CLIENTS STRICTLY UNDER THE FOLLOWING CONDITIONS - SINCE CONDITIONS OF USE & THE COMPETENCE OF THE APPLICATOR ARE TOTALLY BEYOND OUR CONTROL, WE ASSUME NO RESPONSIBILITY OR LIABILITY IN CONNECTION WITH THE USE OF THE PRODUCT RELATIVE TO COVERAGE, OVERALL PERFORMANCE, LOSS OF INCOME OR INJURY. IF ANY FAILURE OR PROBLEM ARISE, D.P.J. COATING SYSTEMS PTY LTD ARE NOT OBLIGED BY LAW TO ATTEND ON SITE OR TO PROVIDE ANY REMEDY WHATSOEVER, AND IT WOULD BE YOUR RESPONSIBILITY TO PROVE THAT ANY FAILURE IS THE RESPONSIBILITY OF THE COATING MANUFACTURER.
D P J C O A T I N G S Y S T E M S
Head Office: 2/25 Jersey Road, Bayswater. Victoria Ph: 1800 062 301 Fax: (03) 9720 8540 Email: [email protected]
w w w . p o o l p a i n t o n l i n e . c o m . a u