Embed Size (px)
Citation preview

Portable Network Kit Setup Guide - for the MikroTik hEX PoE Last revision: 2017-10-10 Introduction This guide will walk you through the process of setting up a Portable Network Kit (PNK), using a set of pre-made software images and configuration files. The guide assumes you have the necessary hardware listed in the next section. There will be some allowance for alternate hardware, such as a different router or set of Access Points, but the software images and configurations were made for a very specific set of hardware. This guide assumes you have access to an Internet connection to set up the kit the first time - after the PNK is configured, an Internet connection is no longer required. What you need To start, you will need the following equipment and supplies:
● One Raspberry Pi computer - model 3B recommended. ● One power supply for Raspberry Pi ● One 8GB or larger MicroSD card - 32GB or larger card recommended ● One computer with an Ethernet port and SD card slot, or USB adapters for those things ● One MikroTik hEX PoE router, or similar device ● One or more Ubiquiti UniFi AC APs or AC Mesh devices ● Three or more Ethernet cables
1

This is considered the basic set of hardware for the PNK. You may also need a power strip to plug in all of your devices and your computer simultaneously. Next, you will need to download the following software, and install it on your system:
● ImageUSB - https://www.osforensics.com/tools/write-usb-images.html This will be used later to write the pre-configured Raspberry Pi system onto a microSD card. You will also need to download the following pre-made images:
● Raspberry Pi pre-installed system - <link> ● MikroTik hEX PoE configuration file - <link>
If you are not using a MikroTik hEX PoE for your PNK, you can skip the download of that file. Setting Up the Raspberry Pi Now, plug the microSD card into the SD card adapter, and insert that into your computer’s SD card slot. If you do not have an SD card slot in your computer, you will need to use an external USB SD / microSD card adapter. These are sometimes available as a kit when you purchase a microSD card.
You will need to also “unzip”, or decompress the file for the Raspberry Pi image. Open the file and extract the “PNK-Raspberry-Pi-image-2017-10-04.zip” file to your system. Remember where you extracted the file! Open imageUSB, and say yes to the “user account control” prompt that comes up if necessary. Then select the SD card in the list of devices in the top section of the window, labeled “Step 1”.
2
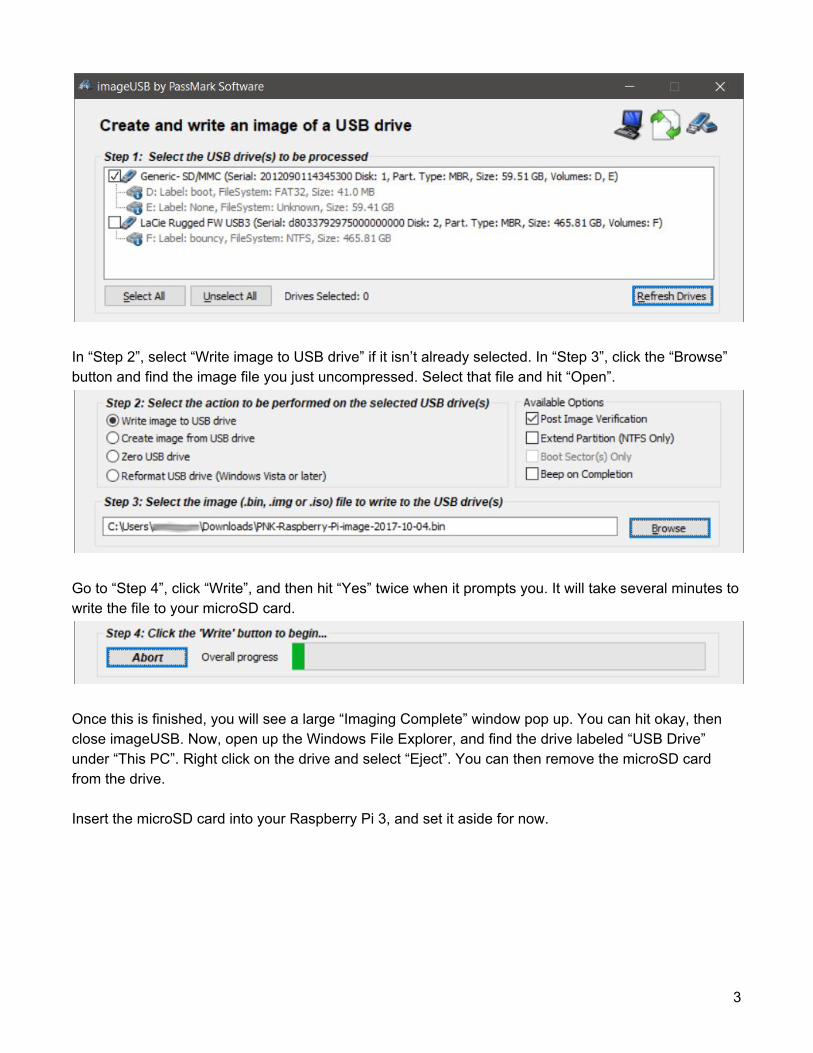
In “Step 2”, select “Write image to USB drive” if it isn’t already selected. In “Step 3”, click the “Browse” button and find the image file you just uncompressed. Select that file and hit “Open”.
Go to “Step 4”, click “Write”, and then hit “Yes” twice when it prompts you. It will take several minutes to write the file to your microSD card.
Once this is finished, you will see a large “Imaging Complete” window pop up. You can hit okay, then close imageUSB. Now, open up the Windows File Explorer, and find the drive labeled “USB Drive” under “This PC”. Right click on the drive and select “Eject”. You can then remove the microSD card from the drive. Insert the microSD card into your Raspberry Pi 3, and set it aside for now.
3

Setting Up a Router Now, we will load a configuration file onto the MikroTik hEX PoE. This device is fairly powerful, but still low cost. You can use other routers, as long as they have the ability to set local DNS hostnames. A list of the configuration settings you will need for an alternate router can be found at the end of this document. First, unpackage and plug in the hEx PoE. Plug in an Ethernet cable between your Internet router and the first port on the device, labeled “1”. This is the WAN port. Next, connect an Ethernet cable between your computer and the first LAN port on the router, labeled “2”. Now, plug in the power adapter for the router, and wait a few minutes. You will hear it beep a few times.
4

Your computer should receive an IP address from the router, in the 192.168.88.X range. The router itself has the IP address of 192.168.88.1 when it comes from the factory. Now, in your web browser, go to the URL http://192.168.88.1. The router may bring up a login screen - the default user of “admin”, with no password should be set. You should be able to just click “Login” to proceed.
From here, we need to run the “Quick Set” wizard, where you can configure some of the initial settings.
The only item to change is “NAT”. The box next to this option should be checked. Then scroll down a bit further, and set the password for your router. This should be something strong, that you can remember but someone else will not be able to guess. Click the “Apply Configuration” button at the bottom of the screen to apply these settings.
5

Now, you must update the firmware for the router. This is to make sure we have the right set of features on the device, and the latest bug fixes and security updates. Scroll back up to the top, then click the “WebFig” button in the upper right-hand corner of the screen. Then, in the menu on the left side of the page, go to “System”, then “Packages”. Click the button at the top of the screen that says “Check For Updates”. It should bring up a screen that shows the update “Channel” to use, as well as the information on the “Installed Version” and “Latest Version” of the software that is available. The “Channel” pull down menu should be set to “current”. If there is a new version of the firmware for the router, hit the “Update” button.
6

It will take a few minutes to download the new packages and install them. When everything is finished updating, you will get a prompt to reboot the system. Confirm this, and wait a few minutes for the firmware file to install, and the router to reboot. You may need to reload the page in the web browser once the device has finished rebooting. Now, you should load the configuration file on the router. Return to the main “WebFig” page on the router, and click “Files” in the left-hand menu.
On the new page that loads, next to the box that reads “Upload:”, click the “Choose File” box. A system dialog should open - browse to the location where you saved the hEX PoE configuration file, select the file, then hit “Open” to upload the file to the router. You should see the file appear in the list with some other folders or files on the system. Now, click the “Terminal” button in the upper right hand corner of the screen. You will get a text prompt at the bottom of the new screen that appears that looks like:
[admin@MikroTik] > Or something similar. If you do not see the prompt, hit the Enter key on your computer a few times. Then, paste the following text into the browser, and hit Enter:
/import file-name=MikroTik_hEx_config.rsc
7

You should see the text “Configuration updated successfully”, or something similar. At this point, you can go back to the “WebFig” menu, or move on to the rest of the setup. Connecting all the parts If you want to connect the PNK to the Internet, you can plug the connection into Port 1 on the router. It is set up to receive an IP address automatically via DHCP. Now, connect the Raspberry Pi to the router and power it on. You can use ports 2 through 5 for connections to network equipment, such as your computer, the Raspberry Pi, or UniFi Access Points (APs). Port 1 is only for the Internet connection.
8

From here, your computer should be able to access all of the services on the Raspberry Pi. You can go to the main landing page for the server by accessing the URL http://pnkserver/. There should be an overview of everything installed on the server. If you wish to access the various services directly, you can use the links below:
Wordpress ● Homepage: http://pnkserver/ ● Dashboard: http://pnkserver/wp-admin/
Etherpad
● Pad creation: http://pnkserver:9001/ ● Admin: http://pnkserver:9001/admin/plugins
Surfer file management
● Web interface: http://pnkserver:3020/_admin/ Hack.chat rooms
● Main page: http://pnkserver:8081 ● Each room: http://pnkserver:8081/?roomname
UniFi Controller:
● Login: https://pnkserver:8443
Usernames and logins can, and should, all be changed. Instructions for this can be found below.
9

Further Software Setup If your microSD card was larger than 8GB, you will need to run a few commands to use the full capacity of the card. This must be done on the command line of the Raspberry Pi. If you don’t have a program that can log in to the Raspberry Pi via SSH, you will need to download and install an SSH client:
● Putty: https://www.chiark.greenend.org.uk/~sgtatham/putty/latest.html Once this is done, launch the PuTTY program, and put the hostname “pnkserver” in the “Host Name (or IP address)” field. Then hit “Open” at the bottom of the screen.
You will be presented with a console “Login as:” prompt. Type “pi”, and hit Enter. For the “pi@pnkserver’s password:” prompt, type “raspberry”, and hit Enter.
10

From here, type the following command: sudo raspi-config
You will be presented with a blue and grey configuration screen. Use the arrow keys to select “7 Advanced Options”, then hit Enter. On the next screen, select “A1 Expand Filesystem” and hit Enter. The screen will change, then present you with a dialog saying “Root partition has been resized”. Hit Enter to go back to the main menu.
Now, select “1 Change User Password”, and hit Enter. You will be presented with a prompt to change the password for the “pi” user. Select a strong password that you will not forget, and others will not guess. This is important for the security of the Raspberry Pi server. Now, scroll down to “Finish”, and hit Enter again. You will be presented with a prompt asking you if you want to reboot the Raspberry Pi. Hit Enter to select “Yes”. You will be disconnected from the Raspberry Pi. You can close the PuTTY window at this point.
11

Now, you may want to login and change the password for the Wordpress user, or create additional users so more than one person can create posts and content in Wordpress. Go back to your web browser, and type in the following URL: http://pnkserver/wp-admin. You will be presented with a Wordpress login prompt.
Use the username “admin”, and the password “wordpress-admin” to log in to the Dashboard. In the menu that comes up, click “Users”, and either edit the “admin” user in that screen, or add additional users using the “Add New” button at the top of the page. Make sure you use strong passwords that you will remember and other people cannot guess. After that, you should edit the post for the main page of the site, so the passwords there are not listed anymore. Go to “Posts”, then click “Services on this server”. You can edit the text on this page normally, then hit the “Update” button on the right-hand side of the page when you are finished. You can then navigate to other menu items, or close the window. Setting up Access Points Finally, we want to connect at least one Wi-Fi Access Point to the PNK so we can connect multiple computers and mobile devices to the network. To do this, we will need to connect Ubiquiti UniFi APs to the network, then open the UniFi controller and “adopt” them so they load a configuration and become part of the network. If you haven’t plugged in any UniFi APs to the router yet, do so now. You will need two Ethernet cables: one for the connection between the router and the PoE adapter “LAN” port, and another to run between the PoE adapter “PoE” port and the Access Point itself. Once the APs are plugged in, you will need to open the UniFi controller. Click on the link on the PNK Server main page, or browse to https://pnkserver:8443 - you will see a security or privacy warning,
12

similar to the EdgeRouter X. The UniFi controller also uses a self-signed certificate, so you will get another error page. This is normal - accept the error and move on. You will see an “UniFi” login prompt. Use “admin” for the username, and “unifi-admin” for the password. Hit “Sign In”.
You will be presented with the main dashboard for the UniFi Controller. On the left-hand side of the screen is the menu. Click the “Circle within a circle” icon to bring up the “Devices” menu.
In the devices menu, you should see a list of the UniFi APs you have plugged in. If you see a “No devices found” message, just wait a few minutes and the APs should appear in the list. Once a device appears, you will see an entry similar to this:
13

The Device Name, IP Address, and Model will most likely all be different. On the right-hand side of this list, you may see several buttons, but you are looking for a “+” icon and text that says “Adopt”.
Click the adopt button, and wait for the Access Point to configure and connect to the network. At this point, you should have a wireless network named “PNK-Wireless”. You can now connect wireless devices to this Access Point, and browse to all of the services on the PNK Server. You should also change the admin password for the UniFi Controller. There is a “Gears” icon in the lower left hand corner of the screen, click that then proceed to “Admins” in the menu that appears. Next to the line for “admin”, you should see an “Edit” button. Click this, then enter the current administrator password of “unifi-admin”, then a new password for the UniFi Controller below this. It should be something strong that you will remember, but others will not be able to guess. At this point, you are finished with configuring your PNK!
14


![E] o K: />](https://img.pdfslide.us/doc/110x75/62ae10130cb5f774517922aa/e-o-k-gt.jpg)