Embed Size (px)
Citation preview
OWNER’S GUIDE | TOTAL GYM CORE TRAINER™
2
CongratulationsThank you for choosing Total Gym® products and services. Total Gym functional incline training equipment has set the standard for physical rehabilitation, athletic training and sports performance for more than 30 years.
As one of the most innovative designs for core strengthening, we trust your Total Gym Core Trainer™ will provide you with unsurpassed service and versatility year after year in the clinical or commercial setting.
Your Total Gym product arrives with some assembly required. Simply follow the directions for Assembly and Set-up and in minutes your Core Trainer will be operational.
In this Owner’s Guide, you will find information about your Total Gym Core Trainer and its component parts, operation, maintenance and care. Additionally, you will find usage and safety tips, as well as precautions to help ensure the safety of your clients and warranty information. Please save this guide and refer to it in the future.
We value you as a customer and your feedback is important to us. If you have any questions or need further information about your Total Gym Core Trainer, please contact our customer service department at (858) 586-6080 or email [email protected].
Yours in health,
Jesse CampanaroPresident
CONGRATULATIONS
3
TABLE OF CONTENTSTOTAL GYM CORE TRAINER™ OWNER’S GUIDE | TABLE OF CONTENTS
Safety Precautions ................................................................................................. 4
Specifications and Limitations ............................................................................... 5
Parts Identifier ........................................................................................................6
Assembly Instructions .........................................................................................7/8
Glideboard: Roller Removal and Assembly ..........................................................8/9
Pad Replacement ...................................................................................................9
Maintenance and Care ...........................................................................................9 Maintenance Schedule ........................................................................................... 9
Getting Started ..................................................................................................... 10
Exercise Instructions ............................................................................................10
Warranty Information ............................................................................................ 11 USA Warranty .......................................................................................................11 Limited Warranty ..................................................................................................11 Warranty Claims ...................................................................................................11
Table of Contents

4
SAFETY PRECAUTIONS
TOTAL GYM CORE TRAINER™ OWNER’S GUIDE | SAFETY PRECAUTIONS
• Beforestartingthisoranyexerciseprogram,consultyourphysician,whocanassistinplanningaprogramthatisageandabilityappropriate.Certainexerciseprogramsor types of equipment may not be suitable for all people. Ensure that your clients are abletoparticipateinanexerciseprogramonthisequipmentwithoutinjury.
• Donotoverexert,orallowyourclientstooverexertusingthisequipmentorperforminganyexerciseprogramonthisequipment.Ifanypainortightnessinthechestoccurs, an irregular heartbeat, shortness of breath, faintness, nausea or dizziness is experiencedbyyouoryourclientstoptheexercisesessionimmediatelyandensurethataphysicianisconsultedbeforeresuminganyexerciseprogram.(Cliniciansandtrainers should follow these recommendations if these symptoms are observed in clients.)
• Thisproductisdesignedandintendedforcommercialuse.Cliniciansandtrainersshould inform clients of and monitor their adherence to all safety precautions. Use only as instructed.
• DonotpermitanyonetostandontheTotalGymCoreTrainer™oruseitasfurniture.Children should only use the Core Trainer when closely attended and supervised by an adult.DonotleavechildrenorclinicalpatientsunattendedonTotalGymequipment.
• Donotpermitanyonetostandontheinstructionalplacard.
• Parentsandothersinchargeofchildrenshouldresponsiblymonitorchildrenwhosenaturalplayinstinctandfondnessofexperimentingcanleadtosituationsandbehaviorfor which the training equipment is not intended.
• Ifchildrenareallowedtousetheequipment,theirmentalandphysicaldevelopmentand above all their temperament should be taken into account. They should be controlled and instructed in the correct use of the equipment.
• Theequipmentisundernocircumstancessuitableasachildren’stoy.
• Keepfingers,looseclothingandhairawayfrommovingparts.Wearappropriateexerciseattireandtielonghairback.
• InspectyourTotalGymCoreTrainerbeforeeachusetoensureproperoperation.Checkallpartsforwearbeforeeachuse.DonotuseyourTotalGymCoreTrainerifit
is not completely assembled or if it has been damaged in any manner. Contact Total Gym Customer Service for replacement parts or repairs.
• FollowinstructionsinthisOwner’sGuideforusingtheunit.Improperusecouldresultinsevereorfatalinjury.YourTotalGymCoreTrainermustbeboltedtotheflooronaflat,solidsurfacewithnonskidmaterialunderneath.Keeptheareaarounditfreefromobstructions.TheTotalGymCoreTrainerisratedatamaximumuserweightcapacityof 350 lbs. [160 kg.].
WARNING: READ ALL INSTRUCTIONS BEFORE USING TOTAL GYM CORE TRAINER
1. Inspect your Total Gym Core Trainer unit before each use to ensure proper operation. Donotusethisequipmentunlessallmovingpartsareworkingproperly.Followall maintenance and care instructions found in this Owner’s Guide and on the equipment labels.
2. Close supervision is necessary when the Total Gym Core Trainer is used by or near children,disabledorinjuredpersons.
3. Care should be taken at all times when getting on and off your Total Gym Core Traineroranyexerciseequipment.Fallingonorofftheproductcouldresultininjury,orpossiblydeath.Followthe“GettingStarted”instructionsforusingtheunitfoundin this Owner’s Guide.
4. Use your Total Gym Core Trainer only for its intended use.
5. Keepfingers,looseclothingandhairawayfromallmovingparts.
Safety Precautions
SPECS & LIMITATIONS
5
TOTAL GYM CORE TRAINER™ OWNER’S GUIDE | SAFETY PRECAUTIONS
SPECS & LIMITATIONS
TOTAL GYM CORE TRAINER™ OWNER’S GUIDE | SPECIFICATIONS AND LIMITATIONS
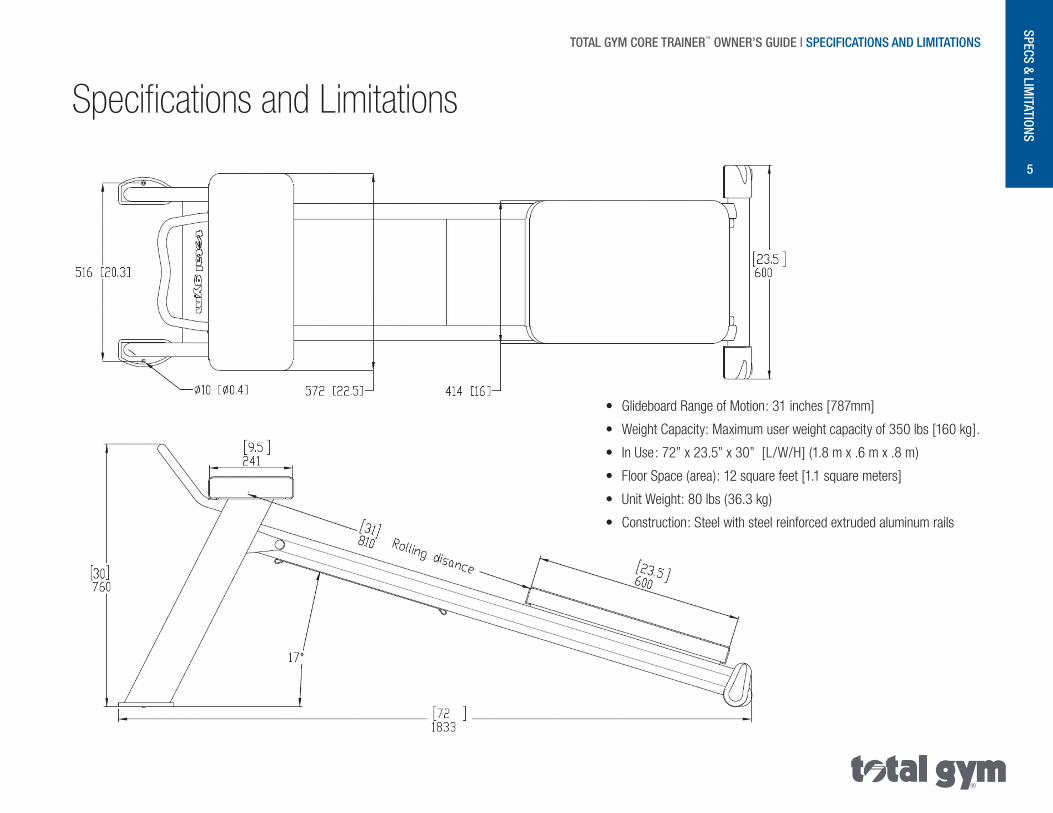
Specifications and Limitations
• GlideboardRangeofMotion:31inches[787mm]
• WeightCapacity:Maximumuserweightcapacityof350lbs[160kg].
• InUse:72”x23.5”x30”[L/W/H](1.8mx.6mx.8m)
• FloorSpace(area):12squarefeet[1.1squaremeters]
• UnitWeight:80lbs(36.3kg)
• Construction:Steelwithsteelreinforcedextrudedaluminumrails
SPECS & LIMITATIONS
6
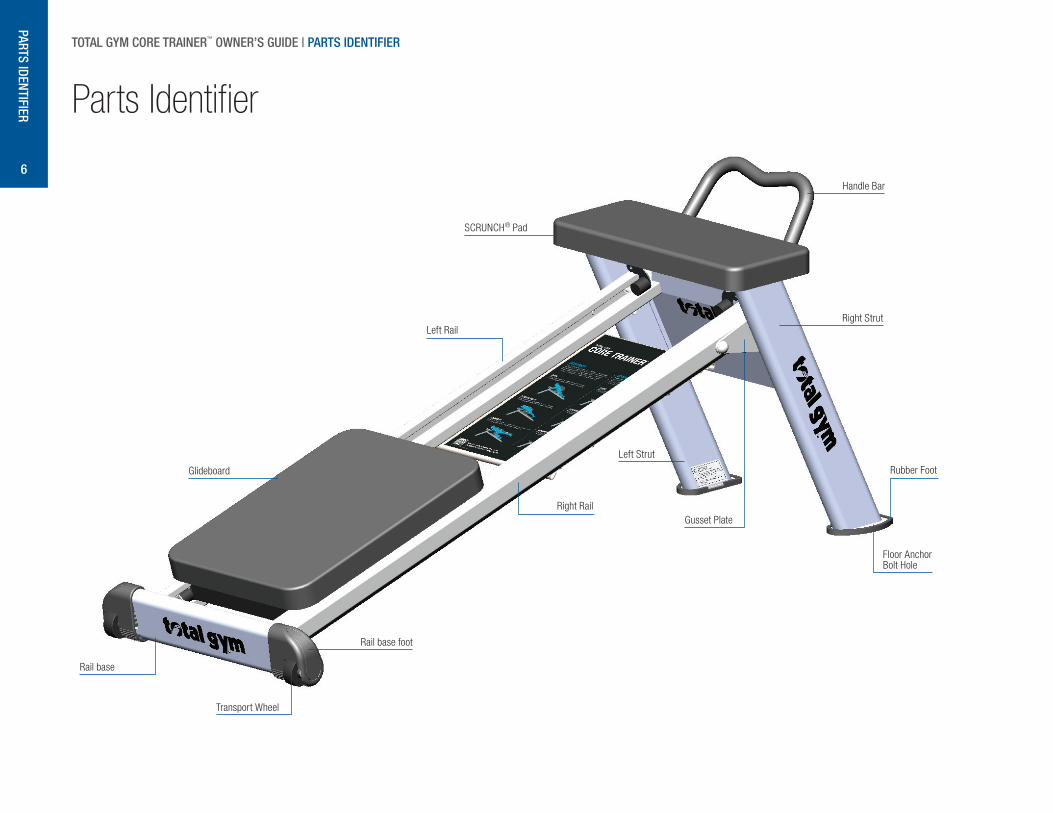
Parts Identifier
RightStrut
FloorAnchorBoltHole
RubberFoot
Gusset Plate
Left Strut
HandleBar
SCRUNCH® Pad
LeftRail
Glideboard
Railbasefoot
Transport Wheel
Railbase
TOTAL GYM CORE TRAINER™ OWNER’S GUIDE | PARTS IDENTIFIER
RightRail
PARTS IDENTIFIER
7
ASSEMBLY
TOTAL GYM CORE TRAINER™ OWNER’S GUIDE | ASSEMBLY INSTRUCTIONS
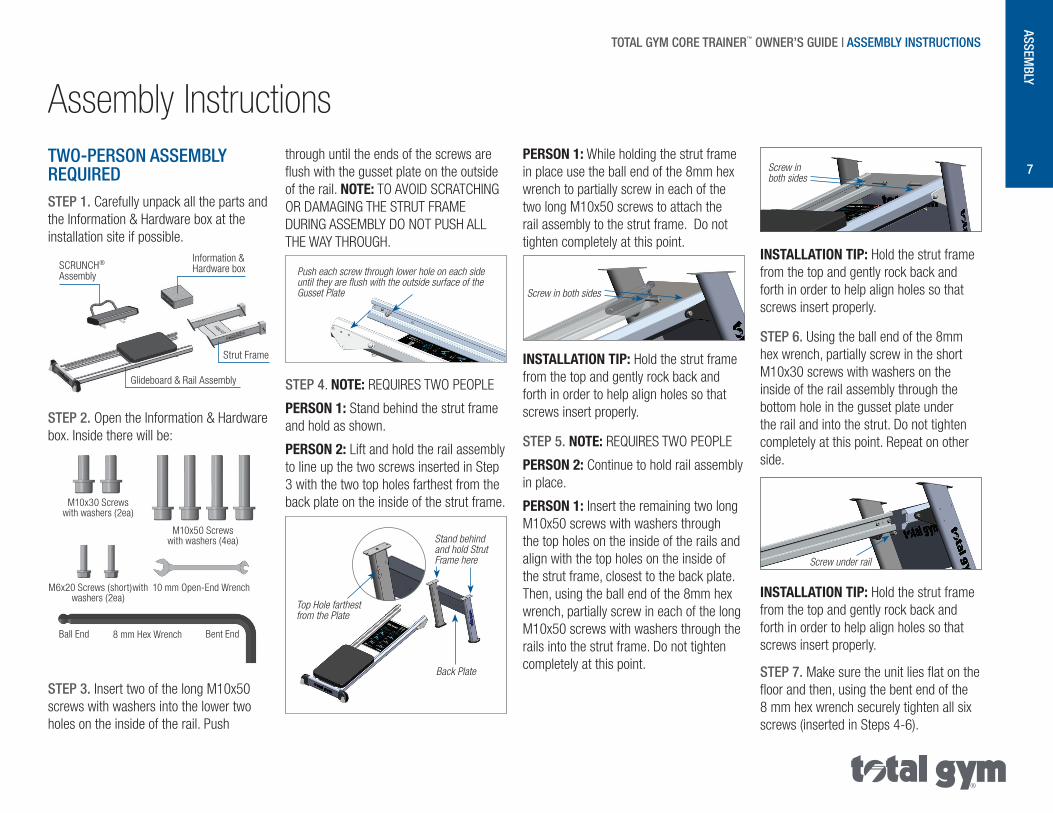
Assembly InstructionsTWO-PERSON ASSEMBLY REQUIREDSTEP 1. Carefully unpack all the parts and theInformation&Hardwareboxattheinstallation site if possible.
Information & HardwareboxSCRUNCH®
Assembly
StrutFrame
Glideboard&RailAssembly
STEP 2. OpentheInformation&Hardwarebox.Insidetherewillbe:
10 mm Open-End Wrench
M10x30Screwswith washers (2ea)
M6x20Screws(short)withwashers (2ea)
M10x50Screwswith washers (4ea)
BentEndBallEnd
STEP 3. InserttwoofthelongM10x50screws with washers into the lower two holes on the inside of the rail. Push
through until the ends of the screws are flushwiththegussetplateontheoutsideof the rail. NOTE:TOAVOIDSCRATCHINGORDAMAGINGTHESTRUTFRAMEDURINGASSEMBLYDONOTPUSHALLTHEWAYTHROUGH.
Push each screw through lower hole on each side until they are fl ush with the outside surface of the Gusset Plate
STEP 4. NOTE:REQUIRESTWOPEOPLE
PERSON 1: Stand behind the strut frame and hold as shown.
PERSON 2: Lift and hold the rail assembly to line up the two screws inserted in Step 3 with the two top holes farthest from the back plate on the inside of the strut frame.
Top Hole farthest from the Plate
Back Plate
Stand behind and hold Strut Frame here
PERSON 1: While holding the strut frame inplaceusetheballendofthe8mmhexwrench to partially screw in each of the twolongM10x50screwstoattachtherailassemblytothestrutframe.Donottighten completely at this point.
Screw in both sides
INSTALLATION TIP:Holdthestrutframefrom the top and gently rock back and forth in order to help align holes so that screws insert properly.
STEP 5. NOTE:REQUIRESTWOPEOPLE
PERSON 2: Continue to hold rail assembly in place.
PERSON 1: Insert the remaining two long M10x50screwswithwashersthroughthe top holes on the inside of the rails and align with the top holes on the inside of the strut frame, closest to the back plate. Then,usingtheballendofthe8mmhexwrench, partially screw in each of the long M10x50screwswithwashersthroughtherailsintothestrutframe.Donottightencompletely at this point.
Screw in both sides
INSTALLATION TIP:Holdthestrutframefrom the top and gently rock back and forth in order to help align holes so that screws insert properly.
STEP 6. Using the ball end of the 8mm hexwrench,partiallyscrewintheshortM10x30screwswithwashersontheinside of the rail assembly through the bottom hole in the gusset plate under therailandintothestrut.Donottightencompletelyatthispoint.Repeatonotherside.
Screw under rail
INSTALLATION TIP:Holdthestrutframefrom the top and gently rock back and forth in order to help align holes so that screws insert properly.
STEP 7. Makesuretheunitliesflatonthefloorandthen,usingthebentendofthe8mmhexwrenchsecurelytightenallsixscrews (inserted in Steps 4-6).
8mmHexWrench
8
ASSEMBLY
TOTAL GYM CORE TRAINER™ OWNER’S GUIDE | ASSEMBLY INSTRUCTIONS
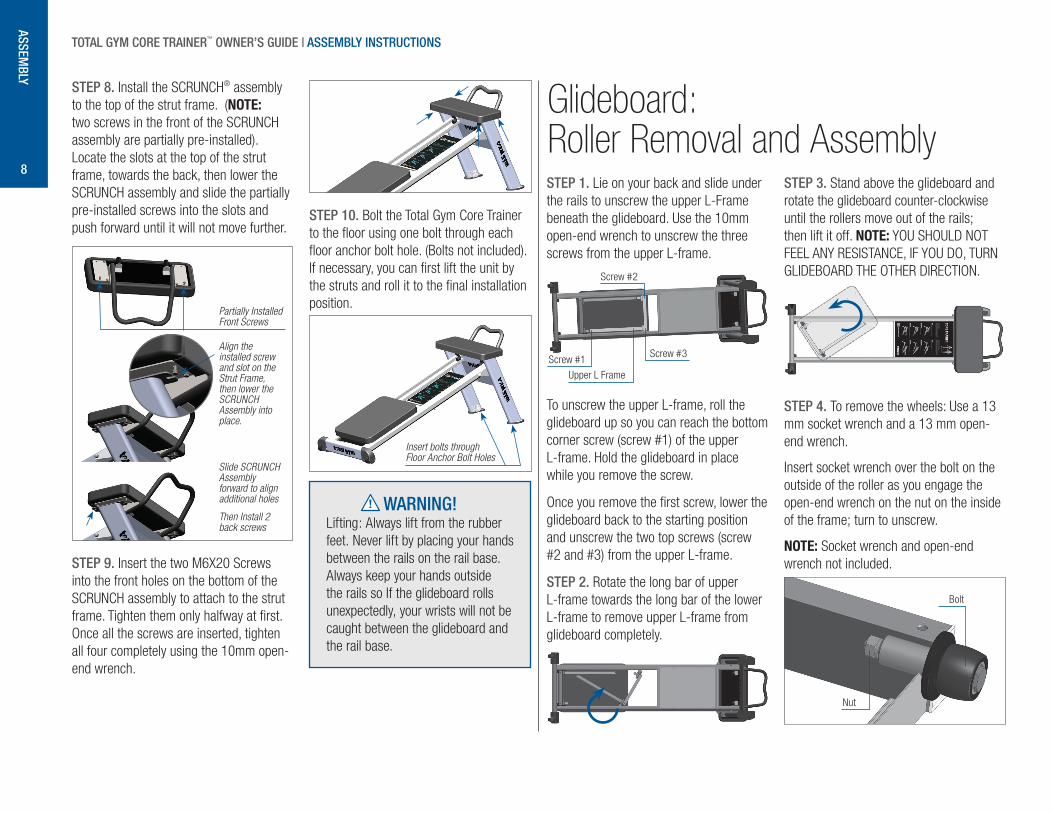
Glideboard: Roller Removal and AssemblySTEP 1. Lie on your back and slide under therailstounscrewtheupperL-Framebeneath the glideboard. Use the 10mm open-end wrench to unscrew the three screws from the upper L-frame.
UpperLFrame
Screw #1Screw #3
Screw #2
To unscrew the upper L-frame, roll the glideboard up so you can reach the bottom corner screw (screw #1) of the upper L-frame.Holdtheglideboardinplacewhile you remove the screw.
Once you remove the fi rst screw, lower the glideboard back to the starting position and unscrew the two top screws (screw #2 and #3) from the upper L-frame.
STEP 2. RotatethelongbarofupperL-frame towards the long bar of the lower L-frame to remove upper L-frame from glideboard completely.
STEP 3. Stand above the glideboard and rotate the glideboard counter-clockwise until the rollers move out of the rails; then lift it off. NOTE:YOUSHOULDNOTFEELANYRESISTANCE,IFYOUDO,TURNGLIDEBOARDTHEOTHERDIRECTION.
STEP 4. Toremovethewheels:Usea13mm socket wrench and a 13 mm open-end wrench.
Insert socket wrench over the bolt on the outside of the roller as you engage the open-end wrench on the nut on the inside of the frame; turn to unscrew.
NOTE: Socket wrench and open-end wrench not included.
Nut
Bolt
STEP 8. InstalltheSCRUNCH® assembly to the top of the strut frame. (NOTE: twoscrewsinthefrontoftheSCRUNCHassembly are partially pre-installed). Locate the slots at the top of the strut frame, towards the back, then lower the SCRUNCHassemblyandslidethepartiallypre-installed screws into the slots and push forward until it will not move further.
Partially InstalledFront Screws
Align the installed screw and slot on the Strut Frame, then lower the SCRUNCH Assembly into place.
Slide SCRUNCH Assembly forward to align additional holes
Then Install 2 back screws
STEP 9. Insert the two M6X20 Screws into the front holes on the bottom of the SCRUNCHassemblytoattachtothestrutframe. Tighten them only halfway at fi rst. Once all the screws are inserted, tighten all four completely using the 10mm open-end wrench.
STEP 10. BolttheTotalGymCoreTrainertothefloorusingoneboltthrougheachflooranchorbolthole.(Boltsnotincluded).If necessary, you can fi rst lift the unit by the struts and roll it to the fi nal installation position.
Insert bolts through Floor Anchor Bolt Holes
WARNING!Lifting:Alwaysliftfromtherubberfeet.Neverliftbyplacingyourhandsbetween the rails on the rail base. Always keep your hands outside the rails so If the glideboard rolls unexpectedly,yourwristswillnotbecaught between the glideboard and the rail base.
9
MAINTENANCE
TOTAL GYM CORE TRAINER™ OWNER’S GUIDE | MAINTENANCE
STEP 5. Replacetherollersasneededand reinstall the bolt and nut.
Tightenjustenoughsothatthewheelcanroll but does not slide lengthwise on the axle.DONOTOVERTIGHTEN.
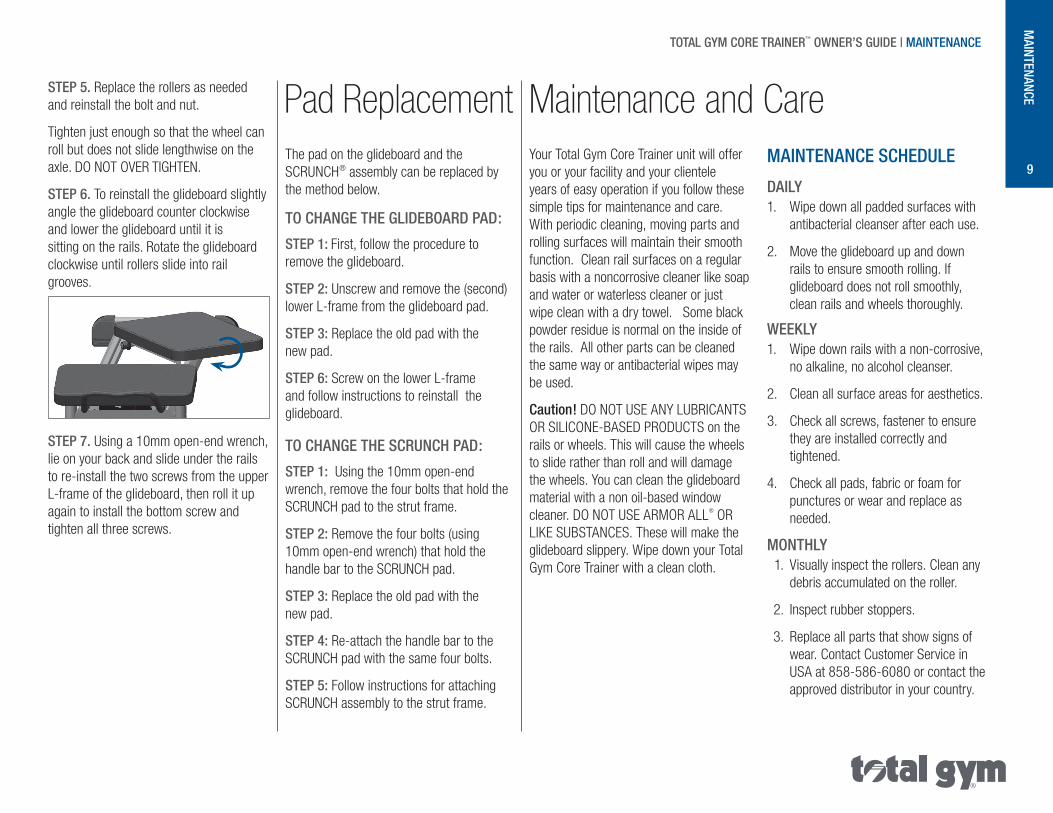
STEP 6. To reinstall the glideboard slightly angle the glideboard counter clockwise and lower the glideboard until it is sittingontherails.Rotatetheglideboardclockwise until rollers slide into rail grooves.
STEP 7. Using a 10mm open-end wrench, lie on your back and slide under the rails to re-install the two screws from the upper L-frame of the glideboard, then roll it up again to install the bottom screw and tighten all three screws.
Maintenance and CareYour Total Gym Core Trainer unit will offer you or your facility and your clientele years of easy operation if you follow these simple tips for maintenance and care. With periodic cleaning, moving parts and rolling surfaces will maintain their smooth function. Clean rail surfaces on a regular basis with a noncorrosive cleaner like soap andwaterorwaterlesscleanerorjustwipe clean with a dry towel. Some black powder residue is normal on the inside of the rails. All other parts can be cleaned the same way or antibacterial wipes may be used.
Caution!DONOTUSEANYLUBRICANTSORSILICONE-BASEDPRODUCTSontherails or wheels. This will cause the wheels to slide rather than roll and will damage the wheels. You can clean the glideboard material with a non oil-based window cleaner.DONOTUSEARMORALL®ORLIKESUBSTANCES.Thesewillmaketheglideboard slippery. Wipe down your Total Gym Core Trainer with a clean cloth.
The pad on the glideboard and the SCRUNCH® assembly can be replaced by the method below.
TO ChANGE ThE GLIDEBOARD PAD:
STEP 1: First,followtheproceduretoremove the glideboard.
STEP 2: Unscrew and remove the (second) lower L-frame from the glideboard pad.
STEP 3:Replacetheoldpadwiththenew pad.
STEP 6: Screw on the lower L-frame and follow instructions to reinstall the glideboard.
TO ChANGE ThE SCRUNCh PAD:
STEP 1: Using the 10mm open-end wrench, remove the four bolts that hold the SCRUNCHpadtothestrutframe.
STEP 2:Removethefourbolts(using10mm open-end wrench) that hold the handlebartotheSCRUNCHpad.
STEP 3:Replacetheoldpadwiththenew pad.
STEP 4:Re-attachthehandlebartotheSCRUNCHpadwiththesamefourbolts.
STEP 5:FollowinstructionsforattachingSCRUNCHassemblytothestrutframe.
Pad ReplacementMAINTENANCE SChEDULE
DAILY1. Wipe down all padded surfaces with
antibacterial cleanser after each use.
2. Move the glideboard up and down rails to ensure smooth rolling. If glideboard does not roll smoothly, clean rails and wheels thoroughly.
WEEkLY1. Wipe down rails with a non-corrosive,
no alkaline, no alcohol cleanser.
2. Clean all surface areas for aesthetics.
3. Check all screws, fastener to ensure they are installed correctly and tightened.
4. Check all pads, fabric or foam for punctures or wear and replace as needed.
MONThLY 1. Visually inspect the rollers. Clean any
debris accumulated on the roller.
2. Inspect rubber stoppers.
3.Replaceallpartsthatshowsignsofwear. Contact Customer Service in USA at 858-586-6080 or contact the approved distributor in your country.
10
Getting StartedAs a facility offering the use of the Total Gym Core Trainer to customers, or as a personal user of the product, you – the owner of the product – assumes the responsibility to become familiar with the guidelines relative to safe use of the product and to convey these guidelines to allusers.Readallsafety,warningsandusage instructions before using the Total Gym Core Trainer. Care and maintenance for this product are included to promote safe,enjoyableuseofthisequipment.
When using your Total Gym Core Trainer, wear athletic shoes and comfortable lightweightclothing.Beforeyoubegin,check to ensure that all parts are in place andworkingproperly.Beginyourexerciseprogram with the basic moves provided. Asyourproficiencyincreases,adjustyourbody position to increase the intensity. Remembertocontroltheglideboardatalltimes, particularly when getting on or off your Total Gym Core Trainer.
WARNING! Always control the glideboard while mounting, dismounting or moving your Total Gym Core Trainer. Total Gym Core Trainer is rated at a maximumuserweightcapacityof350 lbs [160 kg].
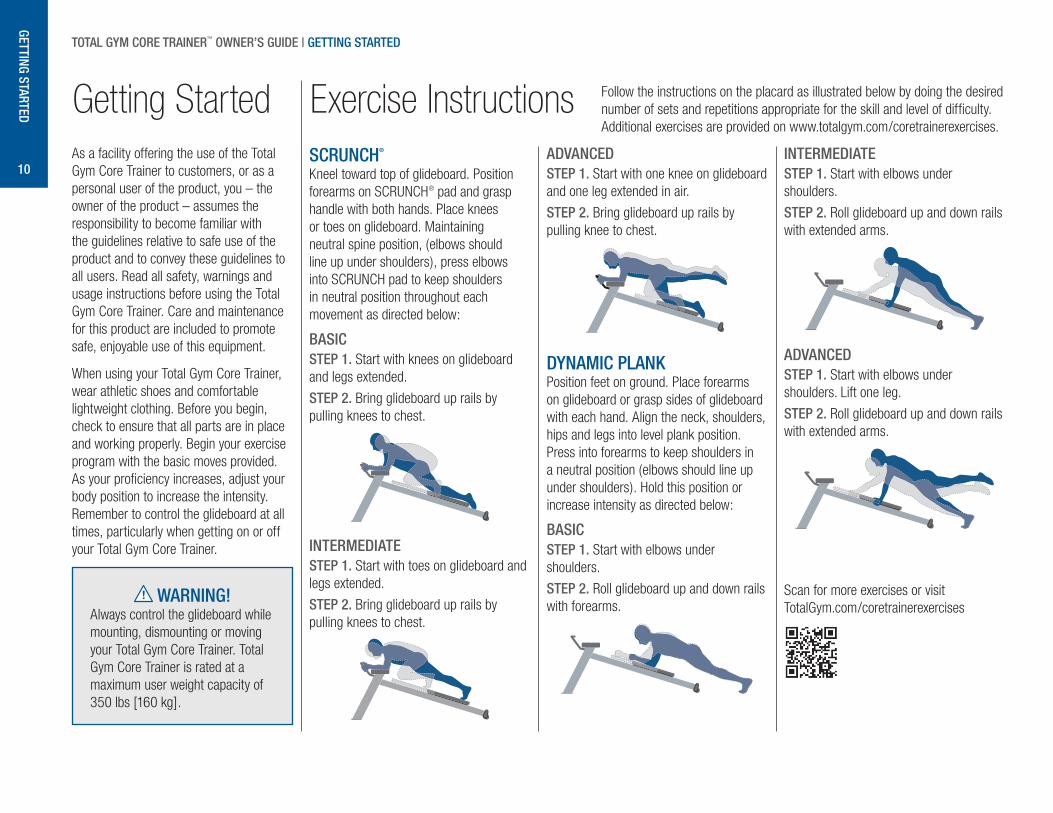
Exercise InstructionsSCRUNCh®
Kneeltowardtopofglideboard.PositionforearmsonSCRUNCH® pad and grasp handle with both hands. Place knees or toes on glideboard. Maintaining neutral spine position, (elbows should line up under shoulders), press elbows intoSCRUNCHpadtokeepshouldersin neutral position throughout each movementasdirectedbelow:
BASICSTEP 1. Start with knees on glideboard andlegsextended.
STEP 2.Bringglideboarduprailsbypulling knees to chest.
INTERMEDIATESTEP 1. Start with toes on glideboard and legsextended.
STEP 2.Bringglideboarduprailsbypulling knees to chest.
ADVANCEDSTEP 1. Start with one knee on glideboard andonelegextendedinair.
STEP 2.Bringglideboarduprailsbypulling knee to chest.
DYNAMIC PLANkPosition feet on ground. Place forearms on glideboard or grasp sides of glideboard with each hand. Align the neck, shoulders, hips and legs into level plank position. Press into forearms to keep shoulders in a neutral position (elbows should line up undershoulders).Holdthispositionorincreaseintensityasdirectedbelow:
BASICSTEP 1. Start with elbows under shoulders.
STEP 2.Rollglideboardupanddownrailswith forearms.
INTERMEDIATESTEP 1. Start with elbows under shoulders.
STEP 2.Rollglideboardupanddownrailswithextendedarms.
ADVANCEDSTEP 1. Start with elbows under shoulders. Lift one leg.
STEP 2.Rollglideboardupanddownrailswithextendedarms.
ScanformoreexercisesorvisitTotalGym.com/coretrainerexercises
TOTAL GYM CORE TRAINER™ OWNER’S GUIDE | GETTING STARTED
GETTING STARTED
Followtheinstructionsontheplacardasillustratedbelowbydoingthedesirednumber of sets and repetitions appropriate for the skill and level of diffi culty. Additionalexercisesareprovidedonwww.totalgym.com/coretrainerexercises.
11USA WARRANTYWarranties outside the USA may vary. Contact your local authorized distributor for details.
TOTAL GYM CORE TRAINERTM
CommercialWarranty: Frame-5years;Parts&Upholstery-1year;Foam&Rubber-90days
LIMITED WARRANTY Improper use of Total Gym Core Trainer:Defectsordamagethatresultfromimproperuseareexcludedfromcoverage.
Unauthorized Service or Modification: Defectsordamagethatresultfromservice,maintenance,repairs,adjustment,installationoralterationconductedbyanyoneotherthanTotalGymoritsauthorizedrepresentativesareexcludedfromcoverage.
WARRANTY CLAIMSTotal Gym®treatswarrantyclaimsasapriority.Toprocessthesequickly,aReturnMerchandiseAuthorization(RMA)numberisrequiredtoproperlylinkyourmerchandisewith your claim. Total Gym does not accept returned merchandise without an accompanyingRMAnumber.ContactTotalGymCustomerServiceDepartmentat858-586-6080ifyouaremakingawarrantyclaim.ArepresentativewillissueyouanRMAnumber and instructions for proper packaging of the equipment for shipping.
Warranty InformationIMPORTANT: Save your invoice. Please retain packaging instructions. US Customer ServiceCenter:858-586-6080.ShippingDamage:FOBorigin,unlessotherwisespecified.
Total Gym accepts no responsibility for damage in shipping. Total Gym does, however, make every effort to facilitate the satisfactory resolution of claims made against delivery agents for damage during shipping. If the package appears to have sustained damage in shipping, or if the Total Gym appears to have shifted in delivery but no damage is evident, retaintheshippingboxesuntiltheTotalGymhasbeenfullyassembledtoensurethereisno functional damage that is not initially visible. In the event of damage during shipping, retainingtheshippingboxeshelpstofacilitateyourclaimagainsttheshipper.Takephotographsofdamagedboxesorcontentsbeforeopening.
PURChASE RECORD Retainthiscopyforyourrecords.
DatePurchased __________________________________________________
PurchasedFrom __________________________________________________
ModelName:TotalGymCoreTrainer,Part#5700-01
SerialNumber ___________________________________________________
TotalGym.comCustomerService:858.586.6080
TOTAL GYM CORE TRAINER™ OWNER’S GUIDE | WARRANTY INFORMATIONW
ARRANTY INFO