1
CS JP ID Sound Blaster EVO ZxR Quick Start Overview PN 03GH025000000 Rev.A Charge your headset 8 hours before its first use by connecting it to a computer. * Press and hold: Turn on/off the headset. When playing music/movies: Activates/deactivates SBX Pro Studio. When making calls: Activates/deactivates CrystalVoice TM inNoiseReduction. (i) Micro USB port (h) 4-pole Jack OR Connect Your SB EVO ZxR 1 1 概述 概述 (a) 音量控制 (b) 下一首曲目 / 前进按钮 (c) 上一首曲目 / 后退按钮 (d) Active Noise Cancellation (ANC) (e) TalkThrough (TT) (f) 多功能按钮 多功能按钮 用于通话、播放和配对 (g) 电源 | SBX* (h) 4 段插孔 (i) 微型 USB 端口 首次使用前,请将耳麦连接至电脑并对其充电 8 小时。 * 按住:打开/关闭耳麦。 听音乐 / 看电影时:激活/禁用 SBX Pro Studio通话时:激活/禁用 CrystalVoice TM inNoiseReductionSound Blaster 处理实现顶级音效 处理实现顶级音效 1. 连接 连接 SB EVO ZxR 将已启用 NFC 的智能设备轻轻贴在多功能按钮上。* 按住多功能按钮 3 秒钟开始手动配对。* 您可以配对最多两个蓝牙设备至 EVO ZxR 相互切换! 如果耳麦电源耗尽,您可以通过 4 段模拟连接 线连接。 Micro USB-to-USB cable Ultimate Audio with Sound Blaster processing Ultimate Audio with Sound Blaster processing Lightly tap your NFC-enabled smart device on the Multifunction button. * OR Press and hold the Multifunction button for 3 seconds to start pairing it manually. * NFC You can pair up to two Bluetooth-enabled devices with your EVO ZxR and toggle between them! If your headset runs out of power, you can connect it via the 4-pole analog cable. OR * Consult your device’s manual on how to pair. You are not advised to connect 4-pole analog cable and USB cable at the same time. Install the Sound Blaster EVO Control Panel on your computer 1. Visit www.soundblaster.com/QSL/EVOZxR/ 2. Under Latest Downloads, click to download the appropriate package for your operating system. 3. Locate and launch the downloaded file. 4. Setting the default audio device. a. For Windows This setting will be automatically configured after Sound Blaster EVO Control Panel is installed. b. For Mac 1. Go to System Preferences and click Sound. 2. Click the Output tab and select Sound Blaster EVO ZxR. 3. Click the Input tab and select Sound Blaster EVO ZxR. Visit the Apple's App Store or Google Play Store to download the Sound Blaster Central. Unlock the World of Sound Blaster 2 2 OR (f) Multifunction Button for calls, playback & pairing (a) Volume Control (e) TalkThrough (TT) (d) Active Noise Cancellation (ANC) (g) Power | SBX* (b) Next Track / Forward Button (c) Previous Track / Rewind Button Product Registration Other Information Registering your product ensures you receive the most appropriate service and product support available. You can register your product during installation or at www.creative.com/register. Please note that your warranty rights are not dependent on registration. Supplementary documentation for this product includes a detailed user guide, DoC and safety and regulatory information. These documents can be downloaded on the www.soundblaster.com/QSL/EVOZxR/ site. Keep this document for future reference. 微型 USB USB 连接线 A B Connecting to a Power Supply Twist it clockwise gently until it locks firmly in place. Twist counterclockwise to unlock and remove the plug head. Wall outlet using USB power adapter* (Charging time: up to 5 hours) *DC 5V, 1A * 请参考设备使用手册获取如何配对的详情。 綜述 綜述 (a) 音量控制 (b) 下一個曲目 / 前進按鈕 (c) 上一個曲目 / 後退按鈕 (d) Active Noise Cancellation (ANC) (e) TalkThrough (TT) (f) 多功能按鈕 多功能按鈕 用於通話、播放和配對 (g) 電源 | SBX* (h) 4-pole 插孔 (i) 微型 USB 連接埠 首次使用前,請將耳機麥克風連接至電腦並充電 8 小時。 * 按住:開啟/關閉耳機麥克風。 聽音樂 / 看電影時:啟用/禁用 SBX Pro Studio通話時:啟用/禁用 CrystalVoice TM inNoiseReductionSound Blaster 處理實現終極音效 處理實現終極音效 連接至電源 連接至電源 1. 連接 連接 SB EVO ZxR 將已啟用 NFC 的智慧型裝置輕輕貼在多功能按鈕上。* 按住多功能按鈕 3 秒開始手動配對。* 您可以配對最多兩個藍牙裝置至 EVO ZxR 相互切換! 如果耳機麥克風電量已耗盡,您可以透過 4-pole 類比連接線進行連接。 建议您不要同时连接 4 段模拟连接线和 USB 连接线。 访问 Apple App Store Google Play Store 下载 Sound Blaster Central. 在电脑上安装 在电脑上安装 Sound Blaster EVO 控制面板 控制面板 1. 访问 www.soundblaster.com/QSL/EVOZxR/ 2. 在最近下载中,单击 来下载适合您的操 作系统的软件。 3. 找到并运行下载的文件。 4. 设置默认音频设备。 a. 针对 针对 Windows Sound Blaster EVO 控制面板安装完毕后,此 设置将被自动配置。 b. 针对 针对 Mac 1. 进入系统偏好设置 系统偏好设置,然后单击声音 声音2. 单击输出 输出选项卡,然后选择 Sound Blaster EVO ZxR. 3. 单击输入 输入选项卡,然后选择 Sound Blaster EVO ZxR. 2. 解锁 解锁 Sound Blaster 世界 世界 微型 USB USB 連接線 牆壁插座(使用 USB 電源充電器*(充電時間:最長 5 小時) *DC 5V, 1A (a) 輕輕地順時針旋轉直到其位置固定。 (b) 逆時針旋轉解除鎖定並將插頭移除。 * 參閱裝置的手冊獲取有關如何配對的詳情。 概要 (a) ボリューム コントロール (b) [次トラック/早送り] ボタン (c) [前トラック/早戻し] ボタン (d) アクティブノイズキャンセル (ANC) (e) トークスルー (TT) (f) マルチファンクションボタン 通話、再生、およびペアリング用 (g) 電源 | SBX* (h) 4 極ジャック または (i) マイクロUSBポート ヘッドセットを初回使用する前に、コンピューターに接続し 8時間充電します。 * 押し続ける:ヘッドセットの電源をオン/オフします。電源 がオンの場合、次の機能がお使いになれます。 ミュージック/ムービーの再生中(BluetoothUSB、アナ ログ): SBX Pro Studioが有効/無効になります。 通話中(Bluetooth): CrystalVoice TM inNoiseReduction が有効/無効になります。 Sound Blaster クオリティのオーディオ 電源への接続 1. SB EVO ZxRを接続 マルチファンクションボタンに、 NFCを有効にしたスマ ート デバイスを軽くタップします。 * または マルチファンクションボタンを3秒間押し続けてペアリ ングを手動で開始します。 * Bluetooth対応のデバイスを最高2台までEVO ZxRペアリングし、切り替えて使用できます。 ヘッドセットの電源が切れた場合、 4極アナログ ケー ブルで接続できます。 4 極アナログ ケーブルとUSBケーブルを同時に接続するこ とはできません。 AppleApp StoreまたはGoogle Play StoreSound Blaster Centralをダウンロードしてください。 または Sound Blaster EVO コントロール パネルをコンピュ ーターにインストールします 1. www.soundblaster.com/QSL/EVOZxR/ を開きま す。 2. [最新のダウンロード] で、 をクリックし、 お使いのオペレーティング システムに適したパッケ ージをダウンロードします。 3. ダウンロードしたファイルをダブルクリックして起動し ます。 4. デフォルトのオーディオ デバイスを設定します。 a. Windows の場合 この設定は、 Sound Blaster EVOコントロール ネルのインストール後に自動的に実行されます。 b. Macの場合 1. [システム環境設定] を開き、 [サウンド] をク リックします。 2. [出力] タブをクリックし、 [Sound Blaster EVO ZxR] を選択します。 3. [入力] タブをクリックし、 [Sound Blaster EVO ZxR] を選択します。 2. ソフトウェアのインストール または マイクロ USB-to-USB ケーブル USB電源アダプター*を使ってコンセントに差し込みます* (充電時間:約5時間) *DC 5V1A (a) しっかりと固定されるまで、ACプラグをゆっくり時計回り に回します。 (b) 反時計回りに回してロックを解除し、ACプラグを外します。 * お使いのNFC対応デバイスのNFC感度や仕様等によって は、タップでの自動ペアリングが行えない場合があります。そ の際は手動でペアリングを行なって下さい。ペアリングの方 法については、デバイスの取扱説明書を御覧下さい。 Ikhtisar (a) Kontrol Volume (b) Tombol Trek Selanjutnya/Maju (c) Tombol Trek Sebelumnya/Mundur (d) Active Noise Cancellation (ANC) (e) TalkThrough (TT) (f) Tombol Multifungsi untuk panggilan, pemutaran, & pemasangan (g) Daya | SBX* (h) Jek 4 kutub ATAU (i) Port Micro USB Isi daya headset Anda selama 8 jam sebelum digunakan untuk pertama kalinya dengan menghubungkannya ke komputer. * Tekan dan tahan: Nyalakan/matikan headset. Ketika memutar musik/film: Mengaktifkan/menonaktifkan SBX Pro Studio. Ketika melakukan panggilan: Mengaktifkan/menonaktifkan CrystalVoice TM inNoiseReduction. Audio Tercanggih dengan pemrosesan Sound Blaster Menghubungkan ke Catu Daya 1. Hubungkan SB EVO ZxR Anda Ketuk lembut perangkat pintar berkemampuan NFC Anda pada tombol Multifungsi. * ATAU Tekan dan tahan tombol Multifungsi selama 3 detik untuk mulai memasangkannya secara manual. * Anda bisa memasang hingga dua perangkat berkemampuan Bluetooth dengan EVO ZxR Anda dan menggunakannya secara bergantian! Jika headset Anda kehabisan daya, Anda bisa menghubungkannya melalui kabel analog 4 kutub. Anda tidak disarankan untuk menghubungkan kabel analog 4 kutub dan kabel USB secara bersamaan. Kunjungi Apple's App Store atau Google Play Store untuk men-download Sound Blaster Central. ATAU Instal Sound Blaster EVO Control Panel pada komputer Anda 1. Kunjungi www.soundblaster.com/QSL/EVOZxR/ 2. Berdasarkan Download Terbaru, klik untuk men-download paket yang sesuai untuk sistem operasi Anda. 3. Cari dan buka file yang telah di-download. 4. Mengatur perangkat audio default. a. Untuk Windows Pengaturan ini secara otomatis terkonfigurasi setelah Sound Blaster EVO Control Panel terinstal. b. Untuk Mac 1. Buka System Preferences (Preferensi Sistem), lalu klik Sound (Suara). 2. Klik tab Output (Keluaran), lalu pilih Sound Blaster EVO ZxR. 3. Klik tab Input (Masukan), lalu pilih Sound Blaster EVO ZxR. 2. Singkap Dunia Sound Blaster ATAU Kabel micro USB ke USB Stopkontak di dinding yang menggunakan adaptor daya USB* (Waktu pengisian: hingga 5 jam) *DC 5V, 1A (a) Putar searah jarum jam secara perlahan sampai terkunci dengan kencang pada tempatnya. (b) Putar berlawanan arah jarum jam untuk membuka dan melepas ujung colokan. * Baca buku panduan perangkat Anda tentang cara pemasangan. CT KR TR 개요 개요 (a) 볼륨 컨트롤 (b) 다음 트랙/앞으로 감기 버튼 (c) 이전 트랙 /되감기 버튼 (d) Active Noise Cancellation (ANC) (e) TalkThrough (TT) (f) 다기능 다기능 버튼 버튼 통화, 재생 페어링용 (g) 전원 | SBX* (h) 4또는 또는 (i) 마이크로 USB 포트 헤드셋을 처음 사용하기 전에 컴퓨터에 연결하여 8시간 동안 충전하십시오. * 누르기: 헤드셋을 켜거나 끕니다. 음악/영화를 재생할 : SBX Pro Studio활성화하거나 비활성화합니다. 통화 : CrystalVoice TM inNoiseReduction활성화하거나 비활성화합니다. Sound Blaster 처리 처리 기능을 기능을 적용한 적용한 최고의 최고의 오디오 오디오 전원 전원 공급 공급 장치 장치 연결 연결 1. SB EVO ZxR 연결 연결 NFC 지원 스마트 기기의 다기능 버튼을 가볍게 누르십시오. * 또는 또는 수동으로 페어링을 시작하려면 다기능 버튼을 3동안 누르십시오. * Bluetooth 지원 장치를 2대까지 EVO ZxR페어링한 서로 전환할 있습니다! 헤드셋 전원이 고갈되면 4아날로그 케이블을 사용해 연결할 있습니다. 4아날로그 케이블 USB 케이블을 동시에 연결하는 것은 좋지 않습니다. Apple App Store 또는 Google Play 스토어를 방문해 Sound Blaster Central다운로드하십시오. 또는 또는 컴퓨터에 컴퓨터에 Sound Blaster EVO 제어판 제어판 설치 설치 1. www.soundblaster.com/QSL/EVOZxR/ 방문하십시오 방문하십시오. 2. 최신 다운로드에서 눌러 운영 체제에 맞는 적절한 패키지를 다운로드하십시오. 3. 다운로드한 파일을 찾아 실행하십시오. 4. 기본 오디오 장치 설정. a. Windows경우 경우 설정은 Sound Blaster EVO 제어판을 설치하면 자동 구성됩니다. b. Mac경우 경우 1. 시스템 시스템 기본 기본 설정 설정으로 이동한 다음 사운드 사운드클릭합니다. 2. 출력 출력 탭을 클릭하고 Sound Blaster EVO ZxR선택합니다. 3. 입력 입력 탭을 클릭하고 Sound Blaster EVO ZxR선택합니다. 2. Sound Blaster 의 세계로 들어와 보세요 의 세계로 들어와 보세요 또는 또는 마이크로 USB-to-USB 케이블 USB 전원 어댑터를 사용하는 벽면 콘센트* (충전 시간: 최대 5시간) *DC 5V, 1A (a) 제 위치에 견고히 잠길 때까지 시계 방향으로 부드럽게 돌리십시오. (b) 시계 반대 방향으로 돌려 잠금을 풀고 플러그 헤드를 제거하십시오. * 페어링 방법은 장치 설명서를 참조하십시오. Genel Bakış (a) Ses Düzeyi Denetimi (b) Sonraki Parça / İleri Sar Düğmesi (c) Önceki Parça / Geri Sar Düğmesi (d) Active Noise Cancellation (ANC) (e) TalkThrough (TT) (f) Çok İşlevli Düğme arama, oynatma ve eşleştirme için (g) Power | SBX* (h) 4 Kutuplu Jak VEYA (i) Mikro USB bağlantı noktası İlk kullanımdan önce kulaklığınızı bilgisayara bağlayarak 8 saat şarj edin. * Basılı tutun: Kulaklığı açar / kapatır. Müzik / video oynatırken: SBX Pro Studio'yu etkinleştirir / devre dışı bırakır. Arama yaparken: CrystalVoice TM inNoiseReduction'ı etkinleştirir / devre dışı bırakır. Sound Blaster işlemcisiyle Üstün Ses Kalitesi Güç kaynağına bağlama 1. SB EVO ZxR'nizi Bağlayın Çok işlevli düğmedeki NFC özellikli akıllı cihazınıza hafifçe dokunun. * VEYA Cihazı manuel olarak eşleştirmeye başlamak için Çok işlevli düğmeyi 3 saniye boyunca basılı tutun. * EVO ZxR'nizle iki adede kadar Bluetooth özellikli cihazı eşleştirebilir ve bu cihazlar arasında geçiş yapabilirsiniz! Kulaklığınızın pili biterse, kulaklığı 4 kutuplu analog kabloyla bağlayabilirsiniz. 4 kutuplu analog kablonun ve USB kablosunun aynı anda bağlanması önerilmez. Sound Blaster Central'ı indirmek için Apple'a ait Apple Store'u veya Google Play Store'u ziyaret edin. VEYA Sound Blaster EVO Control Panel'i bilgisayarınıza yükleyin 1. www.soundblaster.com/QSL/EVOZxR/ adresini ziyaret edin. 2. İşletim sisteminize uygun paketi indirmek için Latest Downloads (En Son İndirilenler) altındaki 'u (İndir) tıklatın. 3. İndirilen dosyayı bulun ve çalıştırın. 4. Varsayılan ses cihazını ayarlama. a. Windows için Bu ayar, Sound Blaster EVO Control Panel yüklenir yüklenmez otomatik olarak yapılandırılacaktır. b. Mac için 1. Sistem Tercihleri’ne gidin ve Ses'i tıklatın. 2. Çıkış sekmesini tıklatın ve Sound Blaster EVO ZxR'yi seçin. 3. Giriş sekmesini tıklatın ve Sound Blaster EVO ZxR'yi seçin. 2. Sound Blaster Dünyasının Kapılarını Aralayın VEYA Mikro USB-USB kablo USB güç adaptörü kullanarak duvar prizinde* (Şarj süresi: 5 saate kadar) *DC 5V, 1A (a) Sıkıca yerine oturuncaya kadar yavaşça saat yönünde çevirin. (b) Fiş başlığını gevşetmek ve yerinden çıkarmak için saat yönünün tersine çevirin. * Eşleştirmenin nasıl yapılacağı ile ilgili bilgi almak için cihazınızın kılavuzuna başvurun. Turkey RoHS Statement EEE Yönetmeliğine Uygundur Model No./ 型号 型号: GH0250 连接至电源 连接至电源 建議您不要同時連接 4-pole 類比連接線和 USB 接線。 請訪問 Apple App Store Google Play Store 下載 Sound Blaster Central. 在電腦上安裝 在電腦上安裝 Sound Blaster EVO 控制台 控制台 1. 訪問 www.soundblaster.com/QSL/EVOZxR/ 2. 在最新下載中,單按 來下載適合您的作 業系統的軟體。 3. 找到並執行下載的檔案。 4. 設定預設音效裝置。 a. 針對 針對 Windows Sound Blaster EVO 控制台安裝完畢後,此設 定將被自動組態。 b. 針對 針對 Mac 1. 進入系統偏好設定 系統偏好設定,然後單按聲音 聲音2. 單按輸出 輸出標籤,然後選擇 Sound Blaster EVO ZxR3. 單按輸入 輸入標籤,然後選擇 Sound Blaster EVO ZxR2. 解鎖 解鎖 Sound Blaster 世界 世界 电源插座(使用 USB 电源适配器*(充电时间:长达 5 小时) *DC 5V, 1A (a) 轻轻地顺时针旋转直至归位。 (b) 逆时针旋转解除锁定并将插头卸下。 Notice for Taiwan

Overview 1 Connect Your SB EVO ZxR Unlock the …ccfiles.creative.com/manualdn/Manuals/TSD/12951...Tekan dan tahan tombol Multifungsi selama 3 detik untuk mulai memasangkannya secara

  • Upload
    ledang

  • View
    213

  • Download
    0

Embed Size (px)

Citation preview

CS JP ID

So

un

d B

last

er E

VO

ZxR

Qu

ick

Sta

rtOverview

PN 03GH025000000 Rev.A

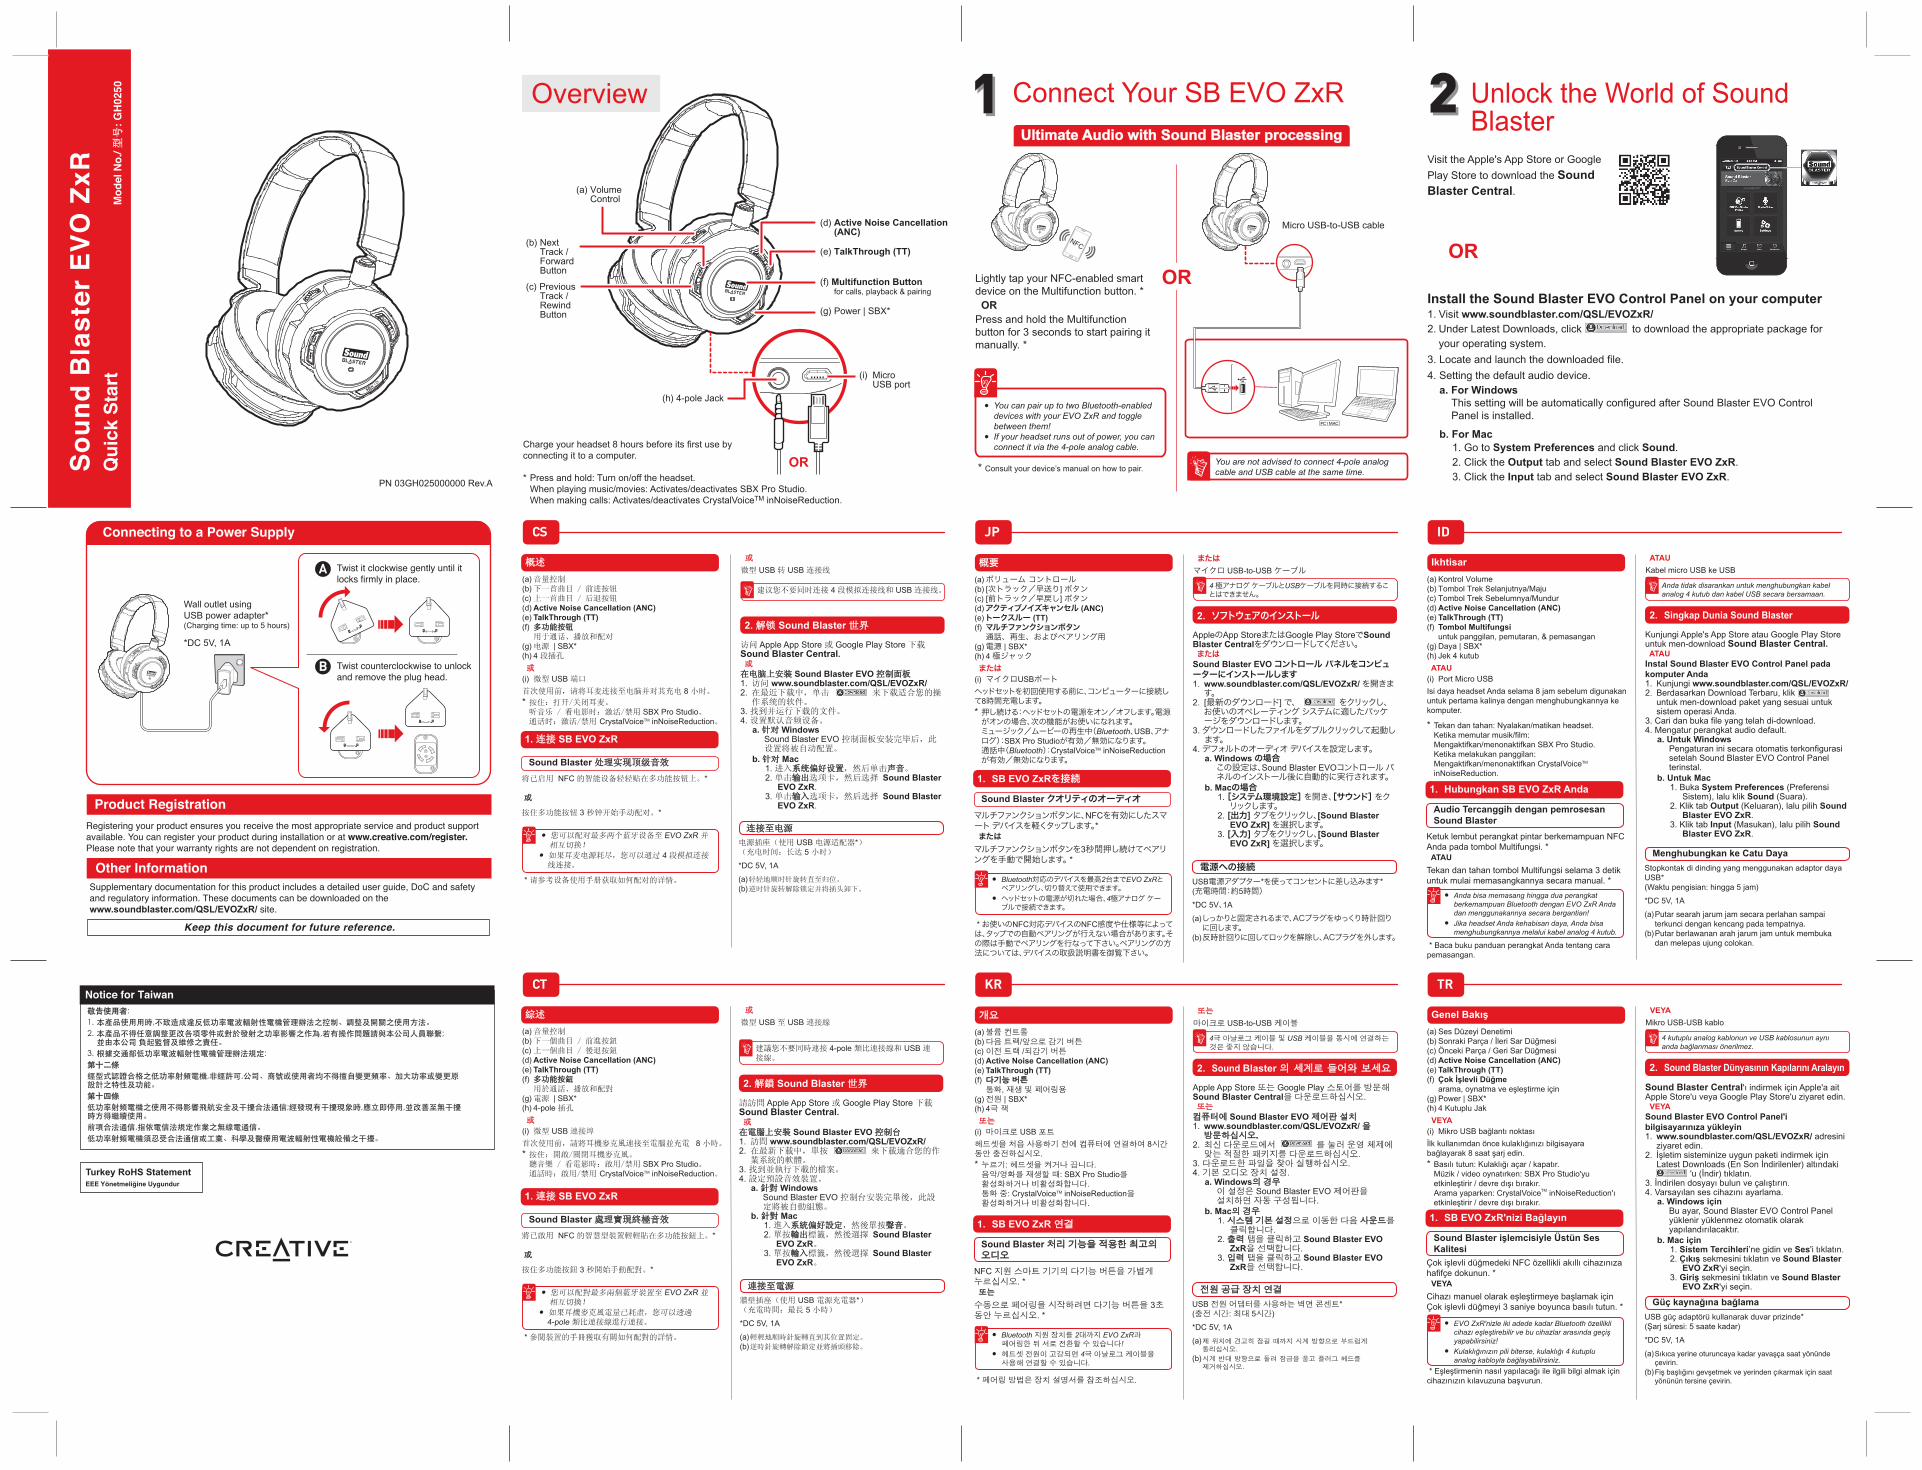
Charge your headset 8 hours before its first use byconnecting it to a computer.

* Press and hold: Turn on/off the headset. When playing music/movies: Activates/deactivates SBX Pro Studio. When making calls: Activates/deactivates CrystalVoiceTM inNoiseReduction.

(i) Micro USB port

(h) 4-pole Jack

OR

Connect Your SB EVO ZxR11

概述概述

(a) 音量控制(b) 下一首曲目 / 前进按钮(c) 上一首曲目 / 后退按钮(d) Active Noise Cancellation (ANC)(e) TalkThrough (TT)(f) 多功能按钮多功能按钮 用于通话、播放和配对(g) 电源 | SBX* (h) 4 段插孔

或 (i) 微型 USB 端口 首次使用前,请将耳麦连接至电脑并对其充电 8 小时。

* 按住:打开/关闭耳麦。 听音乐 / 看电影时:激活/禁用 SBX Pro Studio。 通话时:激活/禁用 CrystalVoiceTM inNoiseReduction。

Sound Blaster 处理实现顶级音效处理实现顶级音效

1. 连接连接 SB EVO ZxR

将已启用 NFC 的智能设备轻轻贴在多功能按钮上。* 或

按住多功能按钮 3 秒钟开始手动配对。*

● 您可以配对最多两个蓝牙设备至 EVO ZxR 并相互切换!

● 如果耳麦电源耗尽,您可以通过 4 段模拟连接线连接。

Micro USB-to-USB cable

Ultimate Audio with Sound Blaster processingUltimate Audio with Sound Blaster processing

Lightly tap your NFC-enabled smart device on the Multifunction button. * OR Press and hold the Multifunction button for 3 seconds to start pairing it manually. *

NFC

● You can pair up to two Bluetooth-enabled devices with your EVO ZxR and toggle between them!

● If your headset runs out of power, you can connect it via the 4-pole analog cable.

OR

* Consult your device’s manual on how to pair.You are not advised to connect 4-pole analog cable and USB cable at the same time.

Install the Sound Blaster EVO Control Panel on your computer1. Visit www.soundblaster.com/QSL/EVOZxR/2. Under Latest Downloads, click to download the appropriate package for

your operating system.3. Locate and launch the downloaded file.4. Setting the default audio device. a. For Windows This setting will be automatically configured after Sound Blaster EVO Control

Panel is installed.

b. For Mac 1. Go to System Preferences and click Sound. 2. Click the Output tab and select Sound Blaster EVO ZxR. 3. Click the Input tab and select Sound Blaster EVO ZxR.

Visit the Apple's App Store or Google Play Store to download the Sound Blaster Central.

Unlock the World of Sound Blaster22

OR(f) Multifunction Button for calls, playback & pairing

(a) Volume Control

(e) TalkThrough (TT)

(d) Active Noise Cancellation (ANC)

(g) Power | SBX*

(b) Next Track / Forward Button

(c) Previous Track / Rewind Button

Product Registration

Other Information

Registering your product ensures you receive the most appropriate service and product support available. You can register your product during installation or at www.creative.com/register.Please note that your warranty rights are not dependent on registration.

Supplementary documentation for this product includes a detailed user guide, DoC and safety and regulatory information. These documents can be downloaded on the www.soundblaster.com/QSL/EVOZxR/ site.

Keep this document for future reference.

或 微型 USB 转 USB 连接线A

B

Connecting to a Power Supply

Twist it clockwise gently until it locks firmly in place.

Twist counterclockwise to unlock and remove the plug head.

Wall outlet using USB power adapter*(Charging time: up to 5 hours)

*DC 5V, 1A

* 请参考设备使用手册获取如何配对的详情。

綜述綜述

(a) 音量控制(b) 下一個曲目 / 前進按鈕(c) 上一個曲目 / 後退按鈕(d) Active Noise Cancellation (ANC)(e) TalkThrough (TT)(f) 多功能按鈕多功能按鈕 用於通話、播放和配對(g) 電源 | SBX* (h) 4-pole 插孔

或 (i) 微型 USB 連接埠 首次使用前,請將耳機麥克風連接至電腦並充電 8 小時。

* 按住:開啟/關閉耳機麥克風。 聽音樂 / 看電影時:啟用/禁用 SBX Pro Studio。 通話時:啟用/禁用 CrystalVoiceTM inNoiseReduction。

Sound Blaster 處理實現終極音效處理實現終極音效

連接至電源連接至電源

1. 連接連接 SB EVO ZxR

將已啟用 NFC 的智慧型裝置輕輕貼在多功能按鈕上。* 或

按住多功能按鈕 3 秒開始手動配對。*

● 您可以配對最多兩個藍牙裝置至 EVO ZxR 並相互切換!

● 如果耳機麥克風電量已耗盡,您可以透過 4-pole 類比連接線進行連接。

建议您不要同时连接 4 段模拟连接线和 USB 连接线。

访问 Apple App Store 或 Google Play Store 下载 Sound Blaster Central. 或在电脑上安装在电脑上安装 Sound Blaster EVO 控制面板控制面板1. 访问 www.soundblaster.com/QSL/EVOZxR/2. 在最近下载中,单击 来下载适合您的操

作系统的软件。3. 找到并运行下载的文件。4. 设置默认音频设备。 a. 针对针对 Windows Sound Blaster EVO 控制面板安装完毕后,此

设置将被自动配置。 b. 针对针对 Mac 1. 进入系统偏好设置系统偏好设置,然后单击声音声音。 2. 单击输出输出选项卡,然后选择 Sound Blaster

EVO ZxR. 3. 单击输入输入选项卡,然后选择 Sound Blaster

EVO ZxR.

2. 解锁解锁 Sound Blaster 世界世界

或 微型 USB 至 USB 連接線

牆壁插座(使用 USB 電源充電器*)(充電時間:最長 5 小時)

*DC 5V, 1A(a) 輕輕地順時針旋轉直到其位置固定。

(b) 逆時針旋轉解除鎖定並將插頭移除。

* 參閱裝置的手冊獲取有關如何配對的詳情。

概要(a) ボリューム コントロール(b) [次トラック/早送り] ボタン(c) [前トラック/早戻し] ボタン(d) アクティブノイズキャンセル (ANC)(e) トークスルー (TT)(f) マルチファンクションボタン 通話、再生、およびペアリング用(g) 電源 | SBX* (h) 4 極ジャック または (i) マイクロUSBポート ヘッドセットを初回使用する前に、コンピューターに接続して8時間充電します。* 押し続ける:ヘッドセットの電源をオン/オフします。電源がオンの場合、次の機能がお使いになれます。

ミュージック/ムービーの再生中(Bluetooth、USB、アナログ):SBX Pro Studioが有効/無効になります。

通話中(Bluetooth):CrystalVoiceTM inNoiseReductionが有効/無効になります。

Sound Blaster クオリティのオーディオ

電源への接続

1. SB EVO ZxRを接続

マルチファンクションボタンに、NFCを有効にしたスマート デバイスを軽くタップします。* または マルチファンクションボタンを3秒間押し続けてペアリングを手動で開始します。 *

● Bluetooth対応のデバイスを最高2台までEVO ZxRとペアリングし、切り替えて使用できます。

● ヘッドセットの電源が切れた場合、4極アナログ ケーブルで接続できます。

4 極アナログ ケーブルとUSBケーブルを同時に接続することはできません。

AppleのApp StoreまたはGoogle Play StoreでSound Blaster Centralをダウンロードしてください。 またはSound Blaster EVO コントロール パネルをコンピューターにインストールします1. www.soundblaster.com/QSL/EVOZxR/ を開きます。

2. [最新のダウンロード] で、 をクリックし、お使いのオペレーティング システムに適したパッケージをダウンロードします。

3. ダウンロードしたファイルをダブルクリックして起動します。

4. デフォルトのオーディオ デバイスを設定します。 a. Windows の場合 この設定は、Sound Blaster EVOコントロール パ

ネルのインストール後に自動的に実行されます。 b. Macの場合 1. [システム環境設定] を開き、[サウンド] をク

リックします。 2. [出力] タブをクリックし、[Sound Blaster

EVO ZxR] を選択します。 3. [入力] タブをクリックし、[Sound Blaster

EVO ZxR] を選択します。

2. ソフトウェアのインストール

または マイクロ USB-to-USB ケーブル

USB電源アダプター*を使ってコンセントに差し込みます*(充電時間:約5時間)*DC 5V、1A(a) しっかりと固定されるまで、ACプラグをゆっくり時計回りに回します。

(b) 反時計回りに回してロックを解除し、ACプラグを外します。 * お使いのNFC対応デバイスのNFC感度や仕様等によっては、タップでの自動ペアリングが行えない場合があります。その際は手動でペアリングを行なって下さい。ペアリングの方法については、デバイスの取扱説明書を御覧下さい。

Ikhtisar(a) Kontrol Volume(b) Tombol Trek Selanjutnya/Maju(c) Tombol Trek Sebelumnya/Mundur(d) Active Noise Cancellation (ANC)(e) TalkThrough (TT)(f) Tombol Multifungsi untuk panggilan, pemutaran, & pemasangan(g) Daya | SBX* (h) Jek 4 kutub ATAU (i) Port Micro USBIsi daya headset Anda selama 8 jam sebelum digunakan untuk pertama kalinya dengan menghubungkannya ke komputer.

* Tekan dan tahan: Nyalakan/matikan headset. Ketika memutar musik/film:

Mengaktifkan/menonaktifkan SBX Pro Studio. Ketika melakukan panggilan:

Mengaktifkan/menonaktifkan CrystalVoiceTM inNoiseReduction.

Audio Tercanggih dengan pemrosesan Sound Blaster

Menghubungkan ke Catu Daya

1. Hubungkan SB EVO ZxR Anda

Ketuk lembut perangkat pintar berkemampuan NFC Anda pada tombol Multifungsi. * ATAU Tekan dan tahan tombol Multifungsi selama 3 detik untuk mulai memasangkannya secara manual. *

● Anda bisa memasang hingga dua perangkat berkemampuan Bluetooth dengan EVO ZxR Anda dan menggunakannya secara bergantian!

● Jika headset Anda kehabisan daya, Anda bisa menghubungkannya melalui kabel analog 4 kutub.

Anda tidak disarankan untuk menghubungkan kabel analog 4 kutub dan kabel USB secara bersamaan.

Kunjungi Apple's App Store atau Google Play Store untuk men-download Sound Blaster Central. ATAUInstal Sound Blaster EVO Control Panel pada komputer Anda1. Kunjungi www.soundblaster.com/QSL/EVOZxR/2. Berdasarkan Download Terbaru, klik

untuk men-download paket yang sesuai untuk sistem operasi Anda.

3. Cari dan buka file yang telah di-download.4. Mengatur perangkat audio default. a. Untuk Windows Pengaturan ini secara otomatis terkonfigurasi

setelah Sound Blaster EVO Control Panel terinstal.

b. Untuk Mac 1. Buka System Preferences (Preferensi

Sistem), lalu klik Sound (Suara). 2. Klik tab Output (Keluaran), lalu pilih Sound

Blaster EVO ZxR. 3. Klik tab Input (Masukan), lalu pilih Sound

Blaster EVO ZxR.

2. Singkap Dunia Sound Blaster

ATAU Kabel micro USB ke USB

Stopkontak di dinding yang menggunakan adaptor daya USB*(Waktu pengisian: hingga 5 jam)*DC 5V, 1A(a) Putar searah jarum jam secara perlahan sampai

terkunci dengan kencang pada tempatnya.(b) Putar berlawanan arah jarum jam untuk membuka

dan melepas ujung colokan. * Baca buku panduan perangkat Anda tentang cara pemasangan.

CT KR TR

개요개요

(a) 볼륨 컨트롤(b) 다음 트랙/앞으로 감기 버튼(c) 이전 트랙 /되감기 버튼(d) Active Noise Cancellation (ANC)(e) TalkThrough (TT)(f) 다기능다기능 버튼버튼 통화, 재생 및 페어링용(g) 전원 | SBX* (h) 4극 잭 또는또는 (i) 마이크로 USB 포트

헤드셋을 처음 사용하기 전에 컴퓨터에 연결하여 8시간 동안 충전하십시오.* 누르기: 헤드셋을 켜거나 끕니다. 음악/영화를 재생할 때: SBX Pro Studio를

활성화하거나 비활성화합니다. 통화 중: CrystalVoiceTM inNoiseReduction을

활성화하거나 비활성화합니다.

Sound Blaster 처리처리 기능을기능을 적용한적용한 최고의최고의 오디오오디오

전원전원 공급공급 장치장치 연결연결

1. SB EVO ZxR 연결연결

NFC 지원 스마트 기기의 다기능 버튼을 가볍게 누르십시오. * 또는또는 수동으로 페어링을 시작하려면 다기능 버튼을 3초 동안 누르십시오. *

● Bluetooth 지원 장치를 2대까지 EVO ZxR과 페어링한 뒤 서로 전환할 수 있습니다!

● 헤드셋 전원이 고갈되면 4극 아날로그 케이블을 사용해 연결할 수 있습니다.

4극 아날로그 케이블 및 USB 케이블을 동시에 연결하는 것은 좋지 않습니다.

Apple App Store 또는 Google Play 스토어를 방문해 Sound Blaster Central을 다운로드하십시오. 또는또는컴퓨터에컴퓨터에 Sound Blaster EVO 제어판제어판 설치설치1. www.soundblaster.com/QSL/EVOZxR/ 을

방문하십시오방문하십시오.2. 최신 다운로드에서 를 눌러 운영 체제에

맞는 적절한 패키지를 다운로드하십시오.3. 다운로드한 파일을 찾아 실행하십시오.4. 기본 오디오 장치 설정. a. Windows의 경우경우 이 설정은 Sound Blaster EVO 제어판을

설치하면 자동 구성됩니다. b. Mac의 경우경우 1. 시스템시스템 기본기본 설정설정으로 이동한 다음 사운드사운드를

클릭합니다. 2. 출력출력 탭을 클릭하고 Sound Blaster EVO

ZxR을 선택합니다. 3. 입력입력 탭을 클릭하고 Sound Blaster EVO

ZxR을 선택합니다.

2. Sound Blaster 의 세계로 들어와 보세요의 세계로 들어와 보세요

또는또는 마이크로 USB-to-USB 케이블

USB 전원 어댑터를 사용하는 벽면 콘센트*(충전 시간: 최대 5시간)*DC 5V, 1A(a) 제 위치에 견고히 잠길 때까지 시계 방향으로 부드럽게

돌리십시오.

(b) 시계 반대 방향으로 돌려 잠금을 풀고 플러그 헤드를 제거하십시오.

* 페어링 방법은 장치 설명서를 참조하십시오.

Genel Bakış(a) Ses Düzeyi Denetimi(b) Sonraki Parça / İleri Sar Düğmesi(c) Önceki Parça / Geri Sar Düğmesi(d) Active Noise Cancellation (ANC)(e) TalkThrough (TT)(f) Çok İşlevli Düğme arama, oynatma ve eşleştirme için(g) Power | SBX* (h) 4 Kutuplu Jak VEYA (i) Mikro USB bağlantı noktası İlk kullanımdan önce kulaklığınızı bilgisayara bağlayarak 8 saat şarj edin.* Basılı tutun: Kulaklığı açar / kapatır. Müzik / video oynatırken: SBX Pro Studio'yu

etkinleştirir / devre dışı bırakır. Arama yaparken: CrystalVoiceTM inNoiseReduction'ı

etkinleştirir / devre dışı bırakır.

Sound Blaster işlemcisiyle Üstün Ses Kalitesi

Güç kaynağına bağlama

1. SB EVO ZxR'nizi Bağlayın

Çok işlevli düğmedeki NFC özellikli akıllı cihazınıza hafifçe dokunun. * VEYA Cihazı manuel olarak eşleştirmeye başlamak için Çok işlevli düğmeyi 3 saniye boyunca basılı tutun. *

● EVO ZxR'nizle iki adede kadar Bluetooth özellikli cihazı eşleştirebilir ve bu cihazlar arasında geçiş yapabilirsiniz!

● Kulaklığınızın pili biterse, kulaklığı 4 kutuplu analog kabloyla bağlayabilirsiniz.

4 kutuplu analog kablonun ve USB kablosunun aynı anda bağlanması önerilmez.

Sound Blaster Central'ı indirmek için Apple'a ait Apple Store'u veya Google Play Store'u ziyaret edin. VEYASound Blaster EVO Control Panel'i bilgisayarınıza yükleyin1. www.soundblaster.com/QSL/EVOZxR/ adresini

ziyaret edin.2. İşletim sisteminize uygun paketi indirmek için

Latest Downloads (En Son İndirilenler) altındaki 'u (İndir) tıklatın.

3. İndirilen dosyayı bulun ve çalıştırın.4. Varsayılan ses cihazını ayarlama. a. Windows için Bu ayar, Sound Blaster EVO Control Panel

yüklenir yüklenmez otomatik olarak yapılandırılacaktır.

b. Mac için 1. Sistem Tercihleri’ne gidin ve Ses'i tıklatın. 2. Çıkış sekmesini tıklatın ve Sound Blaster

EVO ZxR'yi seçin. 3. Giriş sekmesini tıklatın ve Sound Blaster

EVO ZxR'yi seçin.

2. Sound Blaster Dünyasının Kapılarını Aralayın

VEYA Mikro USB-USB kablo

USB güç adaptörü kullanarak duvar prizinde*(Şarj süresi: 5 saate kadar)*DC 5V, 1A(a) Sıkıca yerine oturuncaya kadar yavaşça saat yönünde

çevirin.(b) Fiş başlığını gevşetmek ve yerinden çıkarmak için saat

yönünün tersine çevirin. * Eşleştirmenin nasıl yapılacağı ile ilgili bilgi almak için cihazınızın kılavuzuna başvurun.

Turkey RoHS StatementEEE Yönetmeliğine Uygundur

Mo

del

No

./ 型号

型号

: G

H02

50

连接至电源连接至电源

建議您不要同時連接 4-pole 類比連接線和 USB 連接線。

請訪問 Apple App Store 或 Google Play Store 下載 Sound Blaster Central. 或在電腦上安裝在電腦上安裝 Sound Blaster EVO 控制台控制台1. 訪問 www.soundblaster.com/QSL/EVOZxR/2. 在最新下載中,單按 來下載適合您的作

業系統的軟體。3. 找到並執行下載的檔案。4. 設定預設音效裝置。 a. 針對針對 Windows Sound Blaster EVO 控制台安裝完畢後,此設

定將被自動組態。 b. 針對針對 Mac 1. 進入系統偏好設定系統偏好設定,然後單按聲音聲音。 2. 單按輸出輸出標籤,然後選擇 Sound Blaster

EVO ZxR。 3. 單按輸入輸入標籤,然後選擇 Sound Blaster

EVO ZxR。

2. 解鎖解鎖 Sound Blaster 世界世界

电源插座(使用 USB 电源适配器*)(充电时间:长达 5 小时)

*DC 5V, 1A(a) 轻轻地顺时针旋转直至归位。

(b) 逆时针旋转解除锁定并将插头卸下。

FAQNotice for Taiwan