Embed Size (px)
Citation preview
OVEM_Vacuum_Unit_Easy_Setup_Guide_V1.0_EN_28-10-15.docx Revision 1.0 / 28.10.2015 Seite 1 von 19
Topic: OVEM Quick setup Guide – Quick setup guide pack 28.10.2015
Who To: Commissioning / Maintenance Revision 1.0
OVEM QUICK SETUP GUIDE PACK
OVEM_Vacuum_Unit_Easy_Setup_Guide_V1.0_EN_28-10-15.docx Revision 1.0 / 28.10.2015 Seite 2 von 19
Topic: OVEM Quick setup Guide – Quick setup guide pack 28.10.2015
Who To: Commissioning / Maintenance Revision 1.0
OVEM QUICK SETUP GUIDE PACK
The following document is a Quick set-up guide for the Vacuum generator OVEM-20-H-B-G(P)O-OE-N-2P for installations within Volvo Cars.
Please note: For more detailed information, please consult the manufacturer’s manual which is the primary reference for correct
and safe use is.
Prepared by Marc Mertens - ISM Festo BE Johan Thielemans- Festo BE

OVEM_Vacuum_Unit_Easy_Setup_Guide_V1.0_EN_28-10-15.docx Revision 1.0 / 28.10.2015 Seite 3 von 19
Topic: OVEM Quick setup Guide – Quick setup guide pack 28.10.2015
Who To: Commissioning / Maintenance Revision 1.0 Page Index
Page Index .................................................................................................................................................................................................................................... 3
1. Safety .................................................................................................................................................................................................................................. 4
2. Notes .................................................................................................................................................................................................................................. 5
3. Connections ........................................................................................................................................................................................................................ 6
4. OVEM Layout ...................................................................................................................................................................................................................... 7
5. Flow Diagrams .................................................................................................................................................................................................................... 8
6. Typical Vacuum Distribution .............................................................................................................................................................................................. 9
7. Single point lesson for showing settings for Output A ..................................................................................................................................................... 10
8. Single point lesson for editing settings for Output A ....................................................................................................................................................... 11
9. Single point lesson for setting Duration Pulse ................................................................................................................................................................. 12
10. General Principal of operation ......................................................................................................................................................................................... 13
11. LS power saver Troubleshooting ...................................................................................................................................................................................... 14
12. Troubleshooting Table 1 (Manual Extract)....................................................................................................................................................................... 15
13. Troubleshooting Table 2 (Manual Extract)....................................................................................................................................................................... 16
14. Vacuum Generator - circuit .............................................................................................................................................................................................. 17
15. Vacuum Generator - circuit single valve .......................................................................................................................................................................... 18
16. Vacuum Generator - circuit valve terminal ...................................................................................................................................................................... 19
OVEM_Vacuum_Unit_Easy_Setup_Guide_V1.0_EN_28-10-15.docx Revision 1.0 / 28.10.2015 Seite 4 von 19
Topic: OVEM Quick setup Guide – Quick setup guide pack 28.10.2015
Who To: Commissioning / Maintenance Revision 1.0
1. Safety
• Please read the relevant manual on the OVEM vacuum handling unit to ensure safe use of the unit, available on the Festo Website.
• Compressed air is dangerous, depressurise systems before carrying out installation / maintenance tasks.
OVEM_Vacuum_Unit_Easy_Setup_Guide_V1.0_EN_28-10-15.docx Revision 1.0 / 28.10.2015 Seite 5 von 19
Topic: OVEM Quick setup Guide – Quick setup guide pack 28.10.2015
Who To: Commissioning / Maintenance Revision 1.0
2. Notes
1. The correct size/type unit must have been selected to suit the relevant application. The laval nozzle size width of available units varies from 05/07/10/14/20. (Volvo cars default = 20). Full reference code for projects is: OVEM-20-H-B-G(P)O-0E-N-2P
2. The unit should be mounted to allow access to top & front, 3 button controls, to allow removal and cleaning of filter elements and unrestricted exhaust. It is designed for internal use only.
3. The OVEM unit requires an air supply, set up to 4 bar pressure (max.), with a flow adequate to suit the application, see manual/software for relevant calculations. By default, when the air supply is connected, vacuum will be generated.
4. The unit requires a 24VDC power supply cable with provision for two outputs and one input. Pre SEPT. 2015 part ref #171175.
OVEM_Vacuum_Unit_Easy_Setup_Guide_V1.0_EN_28-10-15.docx Revision 1.0 / 28.10.2015 Seite 6 von 19
Topic: OVEM Quick setup Guide – Quick setup guide pack 28.10.2015
Who To: Commissioning / Maintenance Revision 1.0
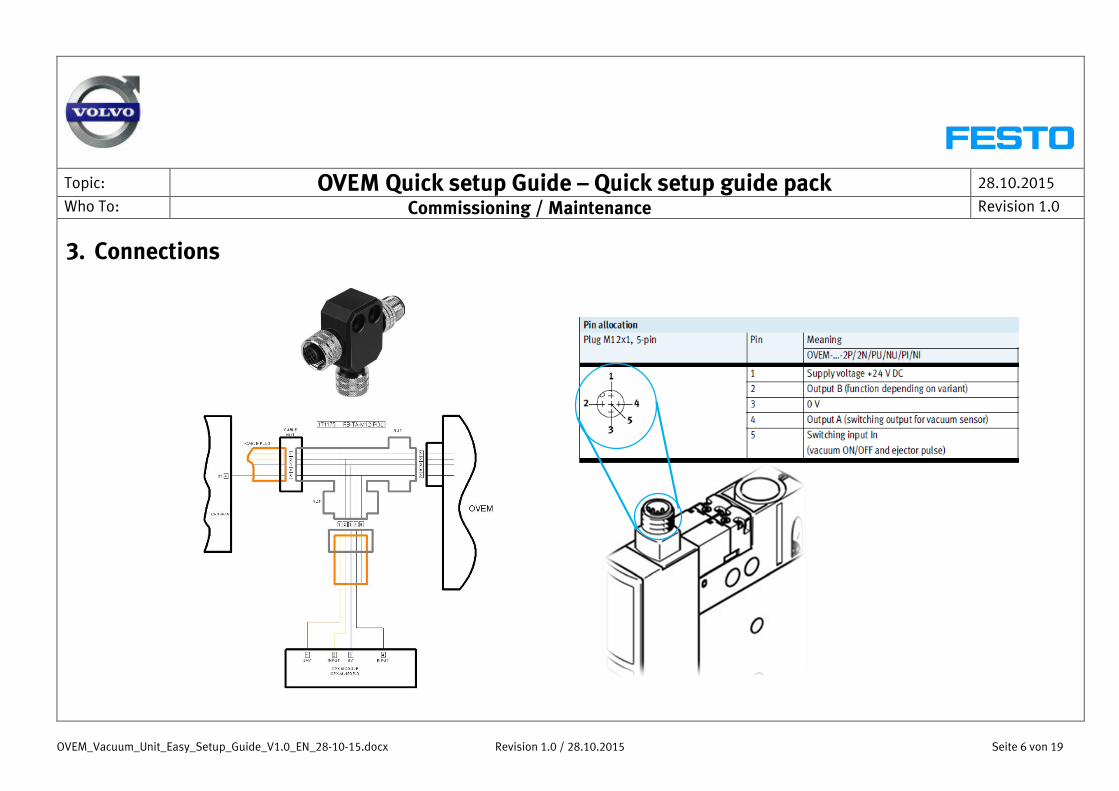
3. Connections
OVEM_Vacuum_Unit_Easy_Setup_Guide_V1.0_EN_28-10-15.docx Revision 1.0 / 28.10.2015 Seite 7 von 19
Topic: OVEM Quick setup Guide – Quick setup guide pack 28.10.2015
Who To: Commissioning / Maintenance Revision 1.0
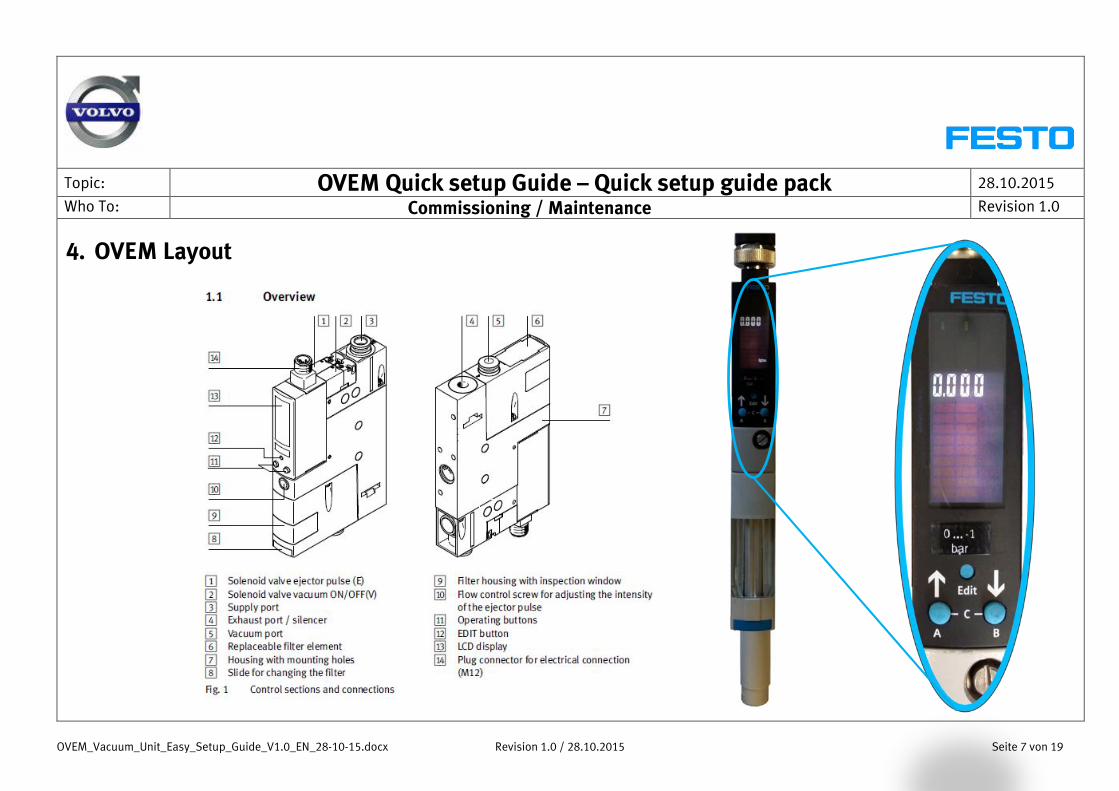
4. OVEM Layout
OVEM_Vacuum_Unit_Easy_Setup_Guide_V1.0_EN_28-10-15.docx Revision 1.0 / 28.10.2015 Seite 8 von 19
Topic: OVEM Quick setup Guide – Quick setup guide pack 28.10.2015
Who To: Commissioning / Maintenance Revision 1.0
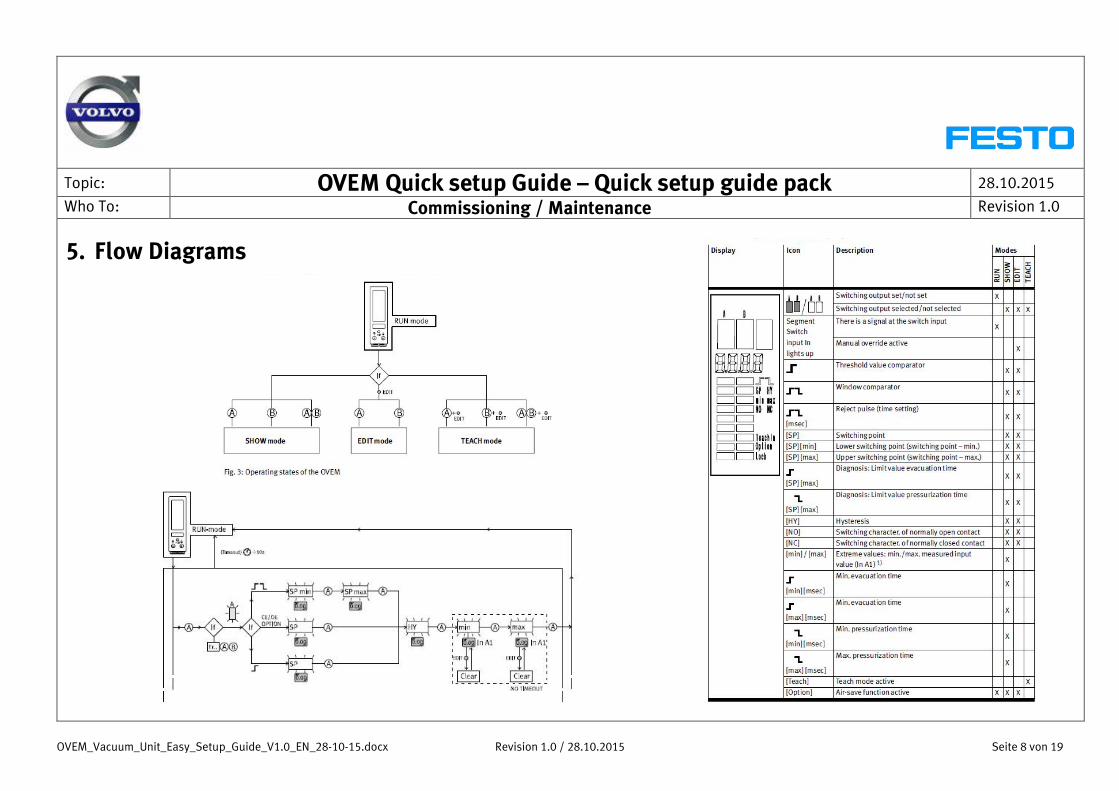
5. Flow Diagrams
OVEM_Vacuum_Unit_Easy_Setup_Guide_V1.0_EN_28-10-15.docx Revision 1.0 / 28.10.2015 Seite 9 von 19
Topic: OVEM Quick setup Guide – Quick setup guide pack 28.10.2015
Who To: Commissioning / Maintenance Revision 1.0
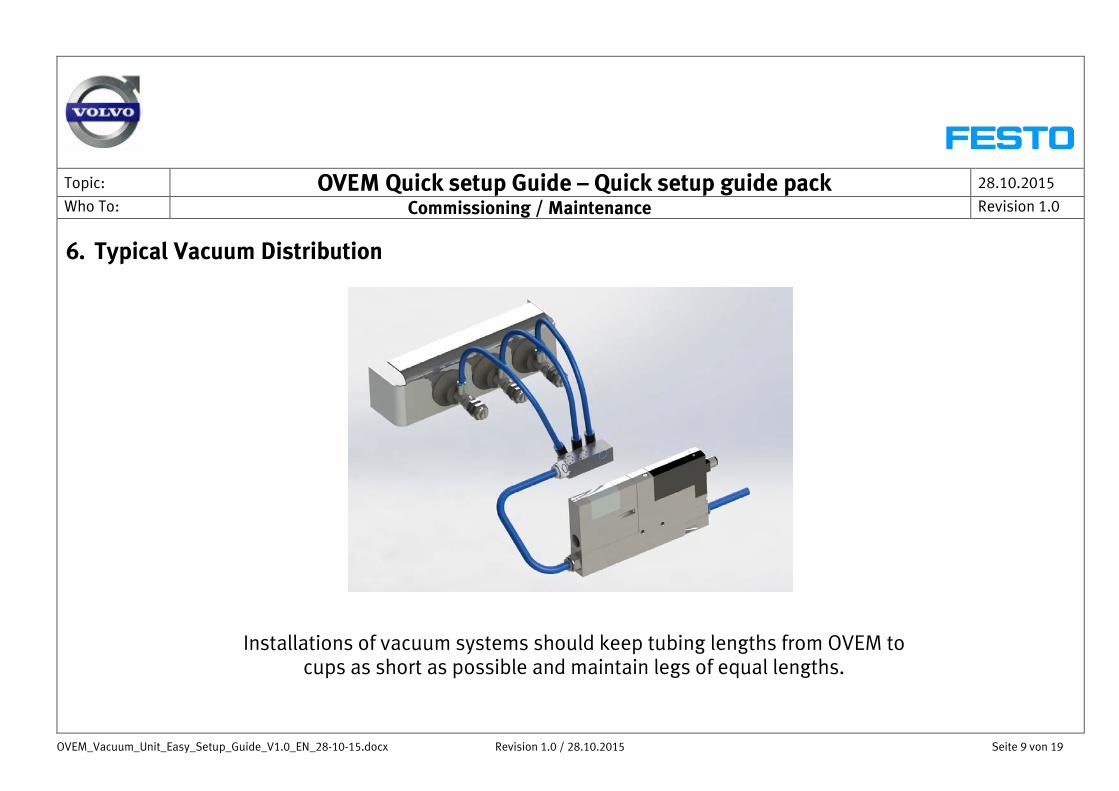
6. Typical Vacuum Distribution
Installations of vacuum systems should keep tubing lengths from OVEM to cups as short as possible and maintain legs of equal lengths.
OVEM_Vacuum_Unit_Easy_Setup_Guide_V1.0_EN_28-10-15.docx Revision 1.0 / 28.10.2015 Seite 10 von 19
Topic: OVEM Quick setup Guide – Quick setup guide pack 28.10.2015
Who To: Commissioning / Maintenance Revision 1.0
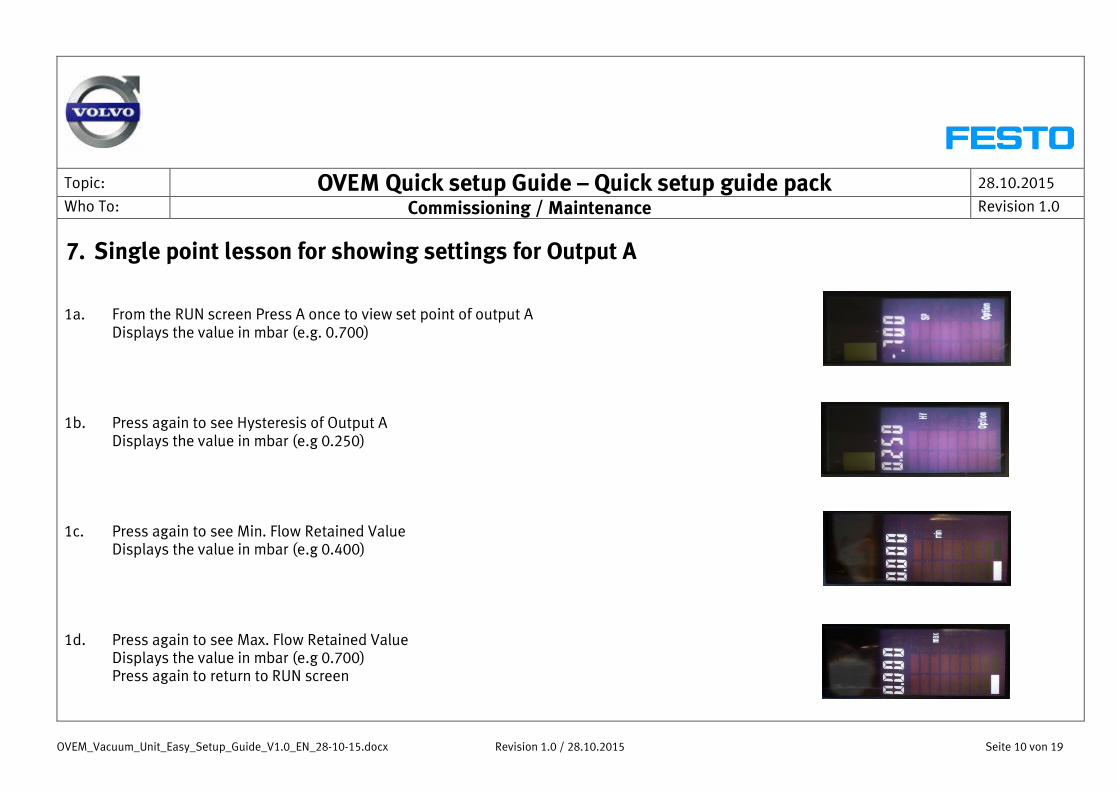
7. Single point lesson for showing settings for Output A 1a. From the RUN screen Press A once to view set point of output A Displays the value in mbar (e.g. 0.700) 1b. Press again to see Hysteresis of Output A Displays the value in mbar (e.g 0.250) 1c. Press again to see Min. Flow Retained Value Displays the value in mbar (e.g 0.400) 1d. Press again to see Max. Flow Retained Value Displays the value in mbar (e.g 0.700) Press again to return to RUN screen
OVEM_Vacuum_Unit_Easy_Setup_Guide_V1.0_EN_28-10-15.docx Revision 1.0 / 28.10.2015 Seite 11 von 19
Topic: OVEM Quick setup Guide – Quick setup guide pack 28.10.2015
Who To: Commissioning / Maintenance Revision 1.0
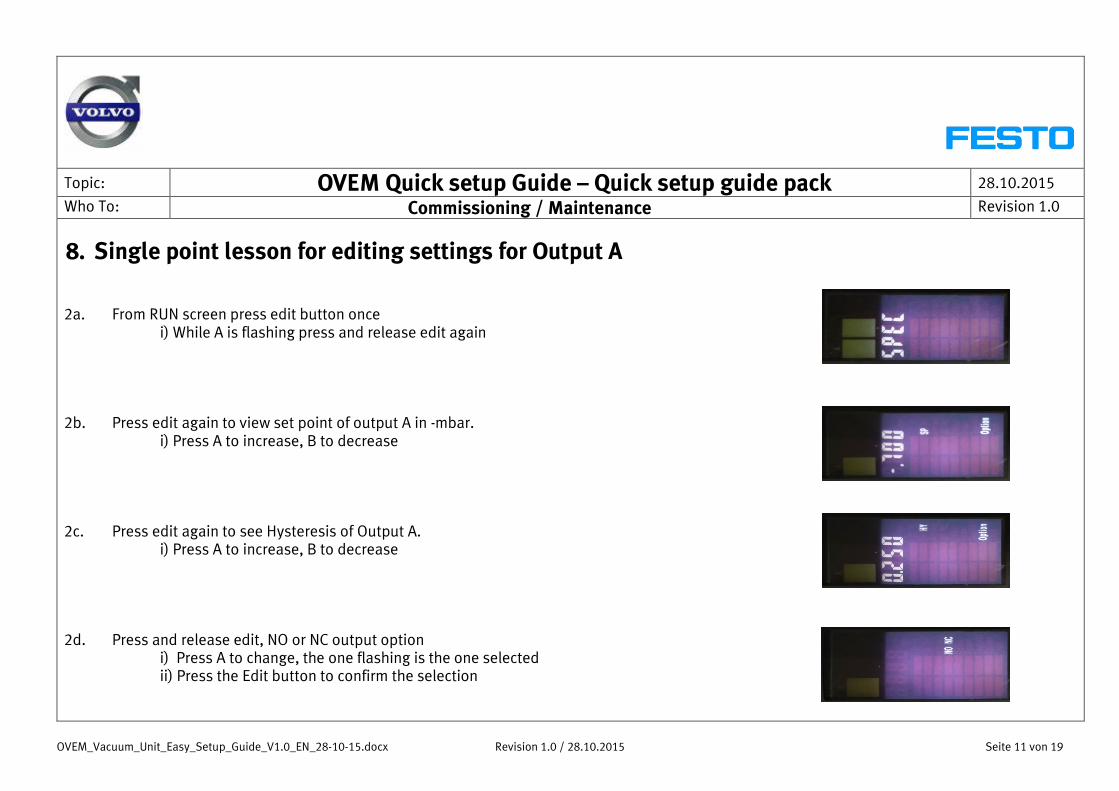
8. Single point lesson for editing settings for Output A 2a. From RUN screen press edit button once i) While A is flashing press and release edit again 2b. Press edit again to view set point of output A in -mbar. i) Press A to increase, B to decrease 2c. Press edit again to see Hysteresis of Output A. i) Press A to increase, B to decrease 2d. Press and release edit, NO or NC output option i) Press A to change, the one flashing is the one selected ii) Press the Edit button to confirm the selection
OVEM_Vacuum_Unit_Easy_Setup_Guide_V1.0_EN_28-10-15.docx Revision 1.0 / 28.10.2015 Seite 12 von 19
Topic: OVEM Quick setup Guide – Quick setup guide pack 28.10.2015
Who To: Commissioning / Maintenance Revision 1.0
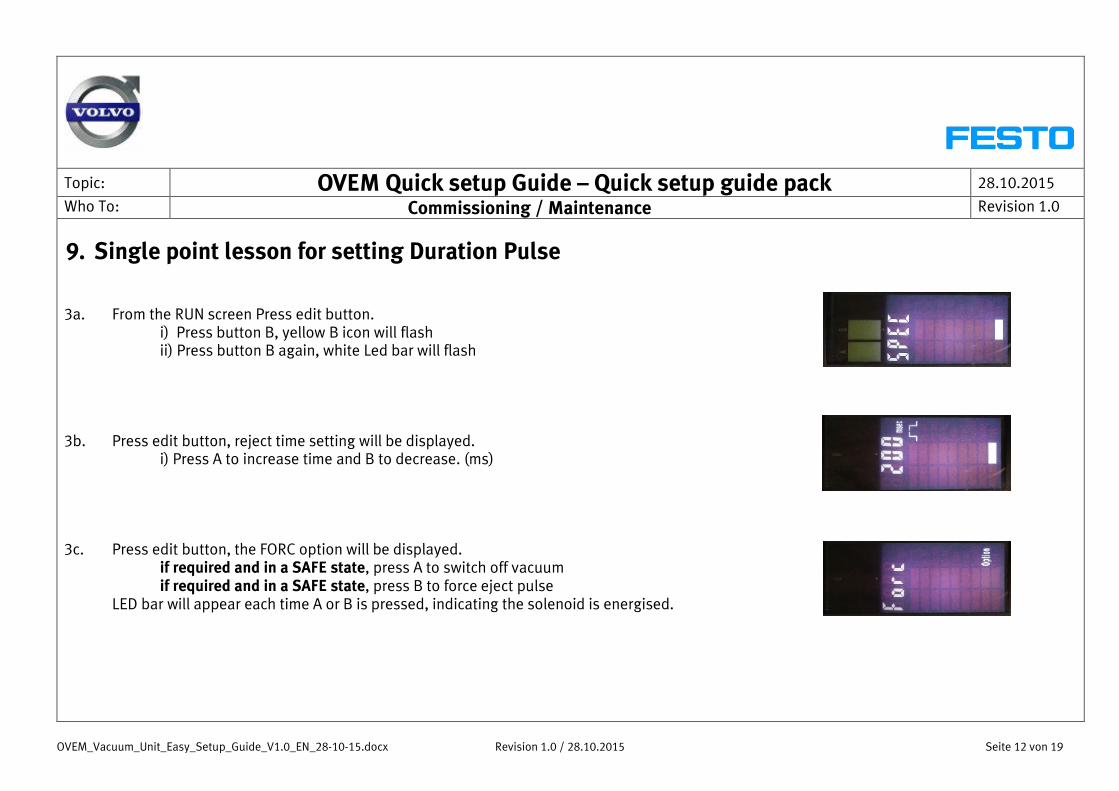
9. Single point lesson for setting Duration Pulse 3a. From the RUN screen Press edit button. i) Press button B, yellow B icon will flash ii) Press button B again, white Led bar will flash 3b. Press edit button, reject time setting will be displayed. i) Press A to increase time and B to decrease. (ms) 3c. Press edit button, the FORC option will be displayed. if required and in a SAFE state, press A to switch off vacuum if required and in a SAFE state, press B to force eject pulse LED bar will appear each time A or B is pressed, indicating the solenoid is energised.

OVEM_Vacuum_Unit_Easy_Setup_Guide_V1.0_EN_28-10-15.docx Revision 1.0 / 28.10.2015 Seite 13 von 19
Topic: OVEM Quick setup Guide – Quick setup guide pack 28.10.2015
Who To: Commissioning / Maintenance Revision 1.0
10. General Principal of operation
1. Vacuum cups come in good contact with part, vacuum turned on. (output off). 2. A good seal contact allows vacuum level to climb to set point. 3. If set point reached, output A/B is switched, output is given to controls, and next operation can be enabled. 4. If LS (power saver function) is enabled and good part contact seal is achieved, the air consumption will shut off provided the vacuum is within
the set parameters (e.g. threshold hysteresis), if after more than 1 second the vacuum drops below the set level then the air consumption will switch back on to raise the level of vacuum back to the required set level again. This process will continue until the part needs to be removed, thus reducing air consumption.
5. When the part needs to be removed, the reject input signal needs to be applied by the control system. 6. While the reject signal is applied, it switches off the vacuum solenoid, and drives the reject solenoid for the set time only (40 - 9999ms.
Default =200ms) (See Page 11 to change). 7. The flow of air during the reject time set can be increased or decreased by the turning the screw on the front of the OVEM unit, clockwise
reduces flow, anti-clockwise increases flow. It is important that the balance of reject time, flow (front screw) speed of breakaway, allow the part to break free of the vacuum cups completely.
8. The Vacuum will come back on again as soon as the reject input is removed.
OVEM_Vacuum_Unit_Easy_Setup_Guide_V1.0_EN_28-10-15.docx Revision 1.0 / 28.10.2015 Seite 14 von 19
Topic: OVEM Quick setup Guide – Quick setup guide pack 28.10.2015
Who To: Commissioning / Maintenance Revision 1.0
11. LS power saver Troubleshooting
Description
Remedy
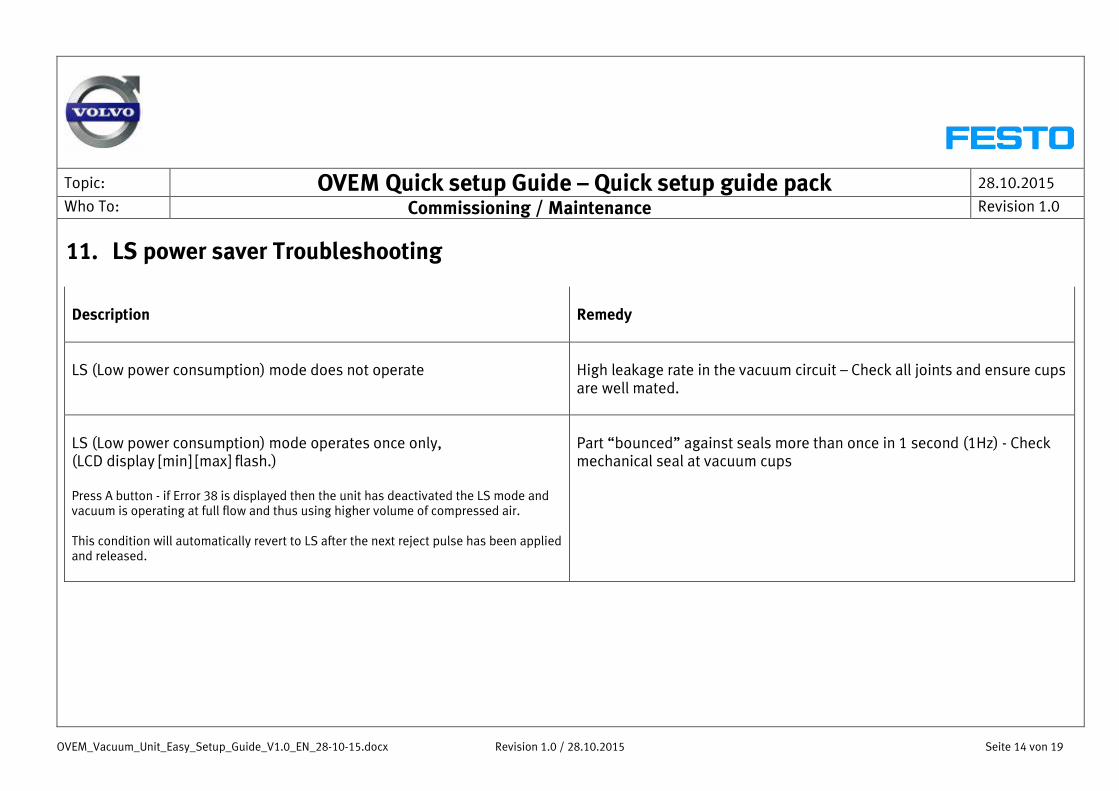
LS (Low power consumption) mode does not operate
High leakage rate in the vacuum circuit – Check all joints and ensure cups are well mated.
LS (Low power consumption) mode operates once only, (LCD display [min] [max] flash.) Press A button - if Error 38 is displayed then the unit has deactivated the LS mode and vacuum is operating at full flow and thus using higher volume of compressed air. This condition will automatically revert to LS after the next reject pulse has been applied and released.
Part “bounced” against seals more than once in 1 second (1Hz) - Check mechanical seal at vacuum cups
OVEM_Vacuum_Unit_Easy_Setup_Guide_V1.0_EN_28-10-15.docx Revision 1.0 / 28.10.2015 Seite 15 von 19
Topic: OVEM Quick setup Guide – Quick setup guide pack 28.10.2015
Who To: Commissioning / Maintenance Revision 1.0
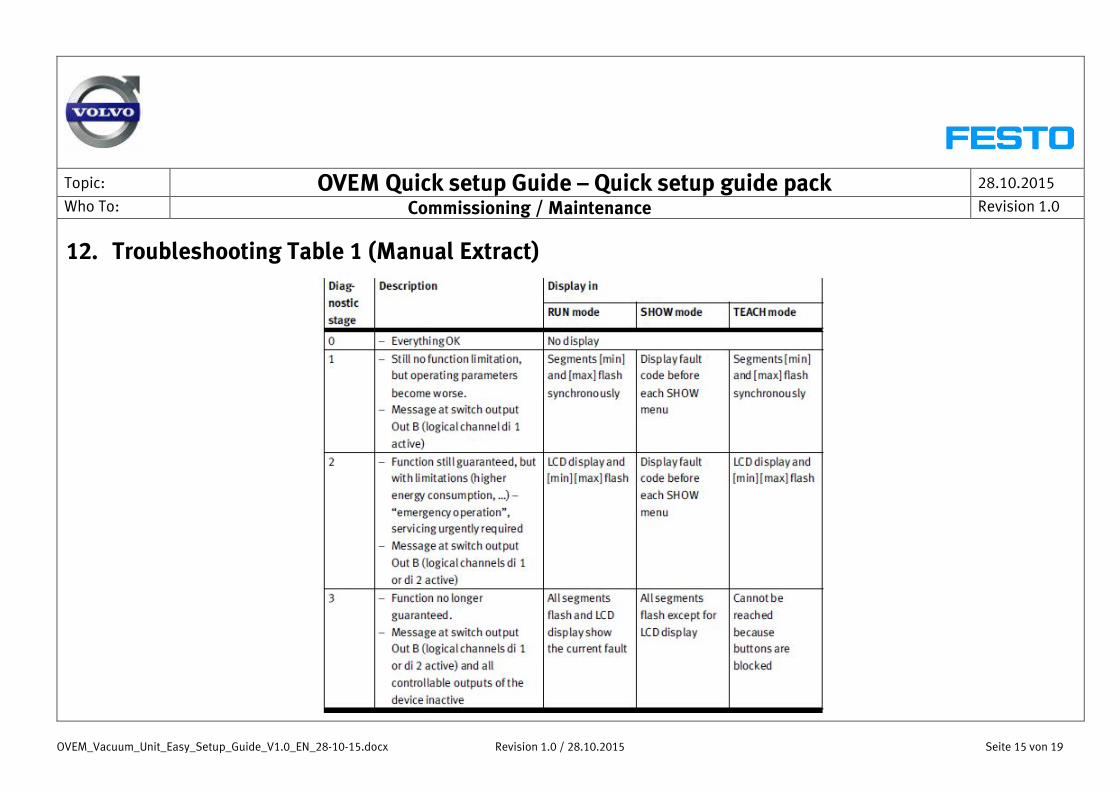
12. Troubleshooting Table 1 (Manual Extract)
OVEM_Vacuum_Unit_Easy_Setup_Guide_V1.0_EN_28-10-15.docx Revision 1.0 / 28.10.2015 Seite 16 von 19
Topic: OVEM Quick setup Guide – Quick setup guide pack 28.10.2015
Who To: Commissioning / Maintenance Revision 1.0
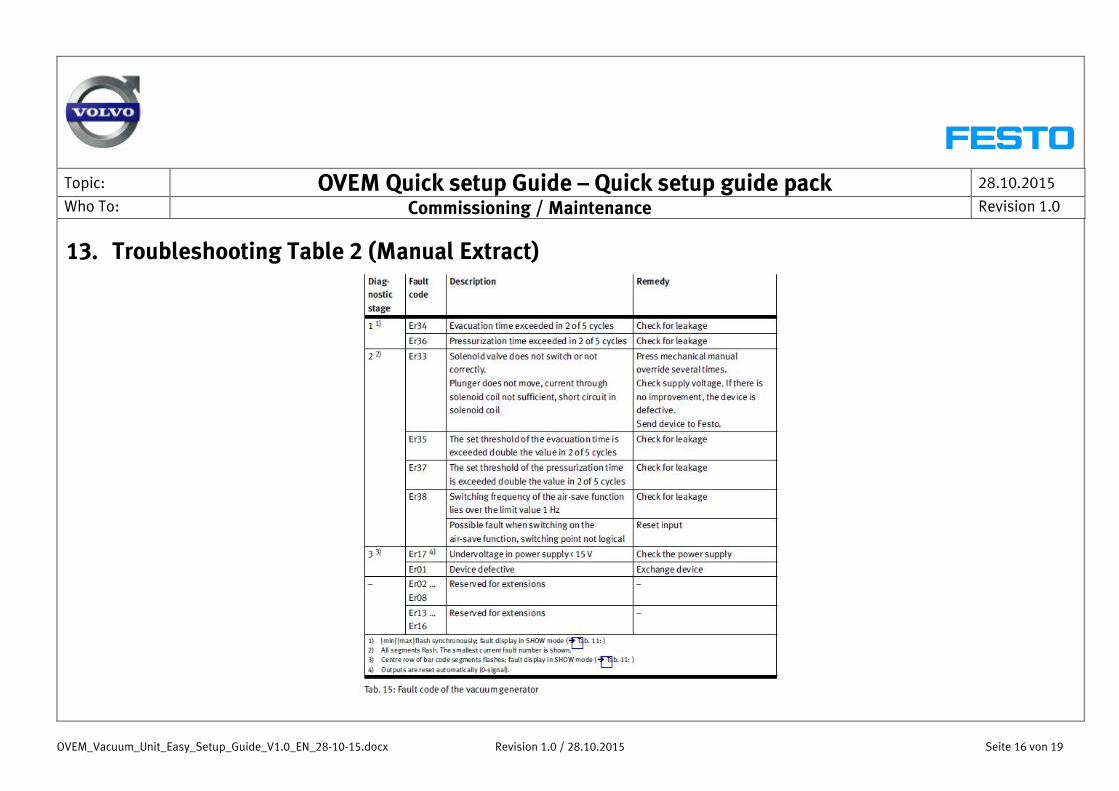
13. Troubleshooting Table 2 (Manual Extract)
OVEM_Vacuum_Unit_Easy_Setup_Guide_V1.0_EN_28-10-15.docx Revision 1.0 / 28.10.2015 Seite 17 von 19
Topic: OVEM Quick setup Guide – Quick setup guide pack 28.10.2015
Who To: Commissioning / Maintenance Revision 1.0
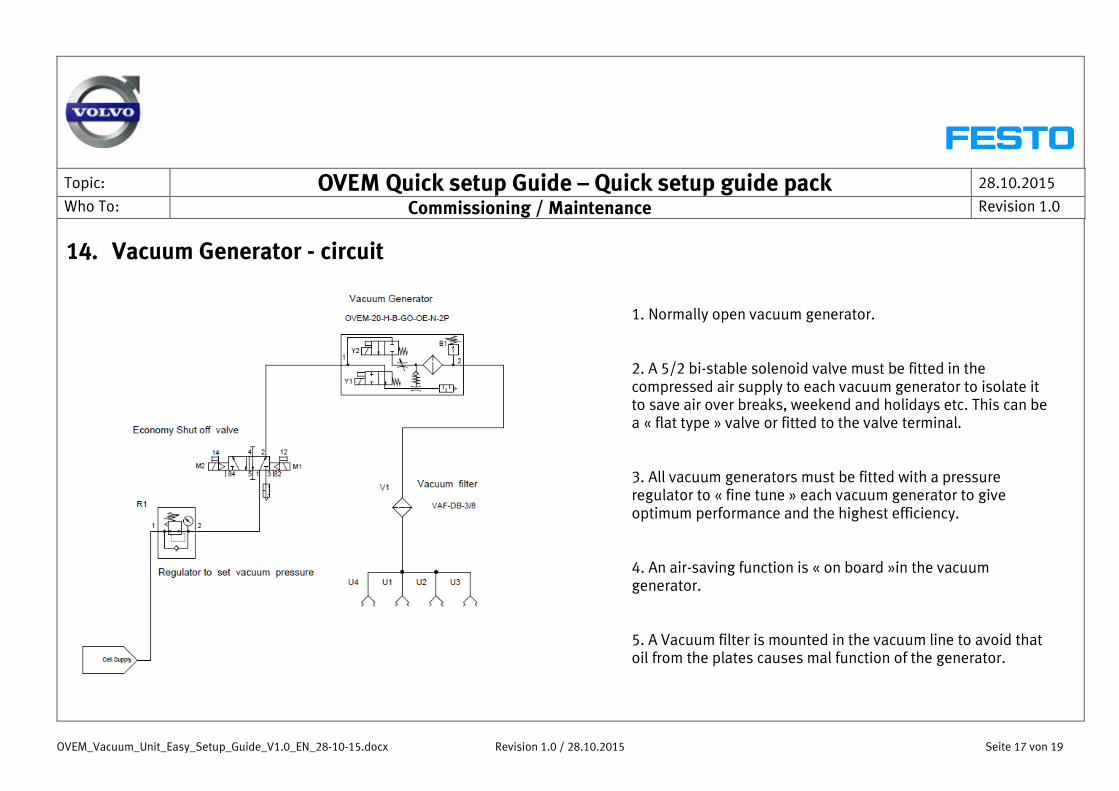
14. Vacuum Generator - circuit
1. Normally open vacuum generator. 2. A 5/2 bi-stable solenoid valve must be fitted in the compressed air supply to each vacuum generator to isolate it to save air over breaks, weekend and holidays etc. This can be a « flat type » valve or fitted to the valve terminal. 3. All vacuum generators must be fitted with a pressure regulator to « fine tune » each vacuum generator to give optimum performance and the highest efficiency. 4. An air-saving function is « on board »in the vacuum generator. 5. A Vacuum filter is mounted in the vacuum line to avoid that oil from the plates causes mal function of the generator.
OVEM_Vacuum_Unit_Easy_Setup_Guide_V1.0_EN_28-10-15.docx Revision 1.0 / 28.10.2015 Seite 18 von 19
Topic: OVEM Quick setup Guide – Quick setup guide pack 28.10.2015
Who To: Commissioning / Maintenance Revision 1.0
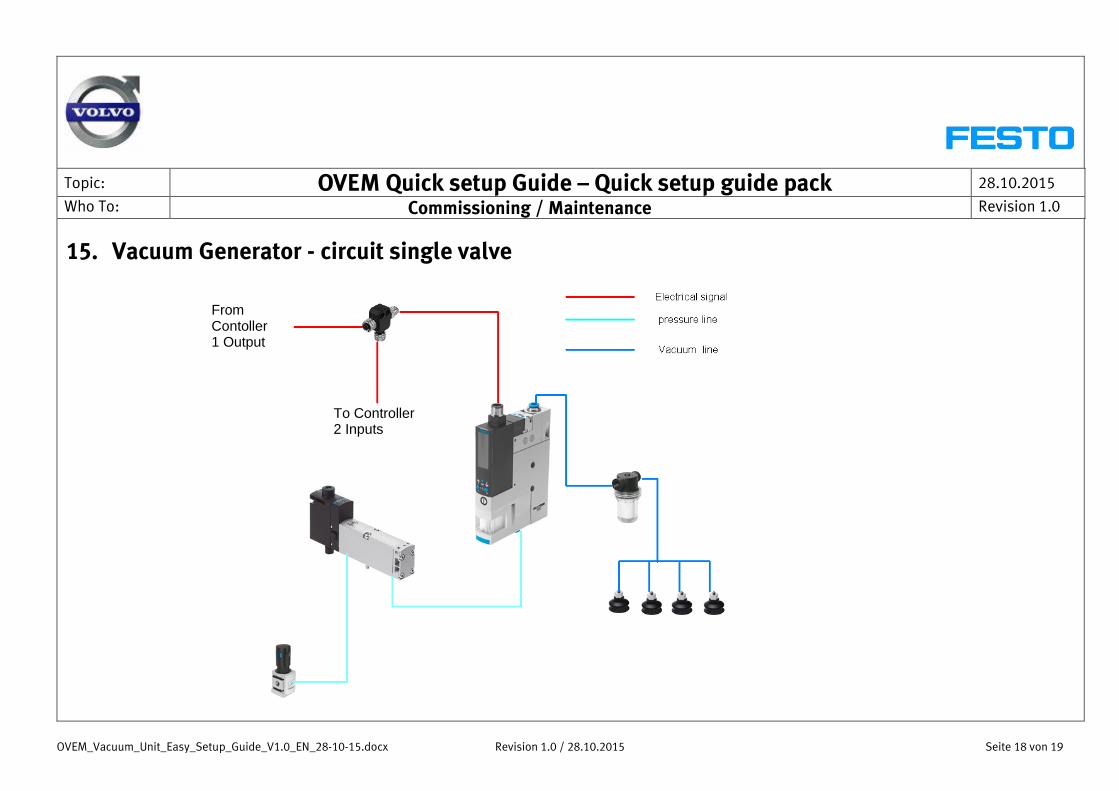
15. Vacuum Generator - circuit single valve
To Controller 2 Inputs
From Contoller 1 Output
OVEM_Vacuum_Unit_Easy_Setup_Guide_V1.0_EN_28-10-15.docx Revision 1.0 / 28.10.2015 Seite 19 von 19
Topic: OVEM Quick setup Guide – Quick setup guide pack 28.10.2015
Who To: Commissioning / Maintenance Revision 1.0
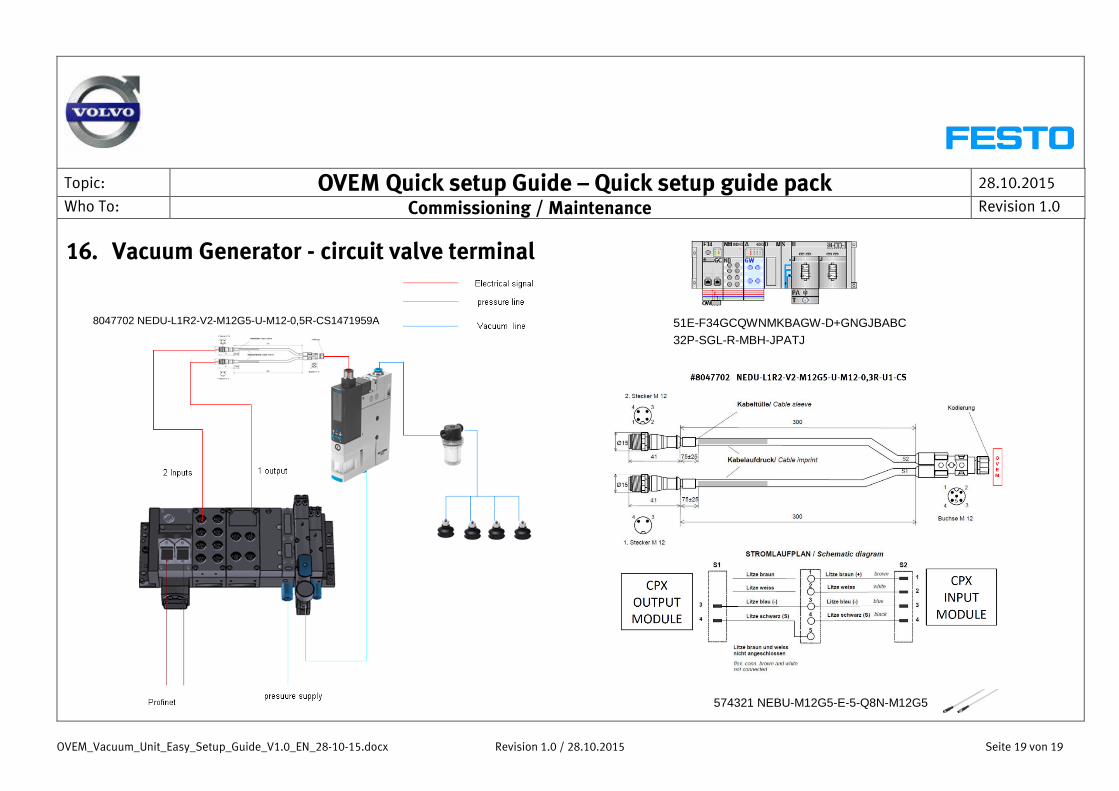
16. Vacuum Generator - circuit valve terminal
51E-F34GCQWNMKBAGW-D+GNGJBABC 32P-SGL-R-MBH-JPATJ
8047702 NEDU-L1R2-V2-M12G5-U-M12-0,5R-CS1471959A
574321 NEBU-M12G5-E-5-Q8N-M12G5