Embed Size (px)
Citation preview

1/14#Otis
Otis by

2/14#Otis
The Otis crew neck T-shirt for babies and boys is a relaxed fit basic with shaped sleeves, patch
pocket and features a polo button placket. This style looks great in a solid color or a print.
1 - 18 months2 - 14 years
Otis by
3/14#Otis
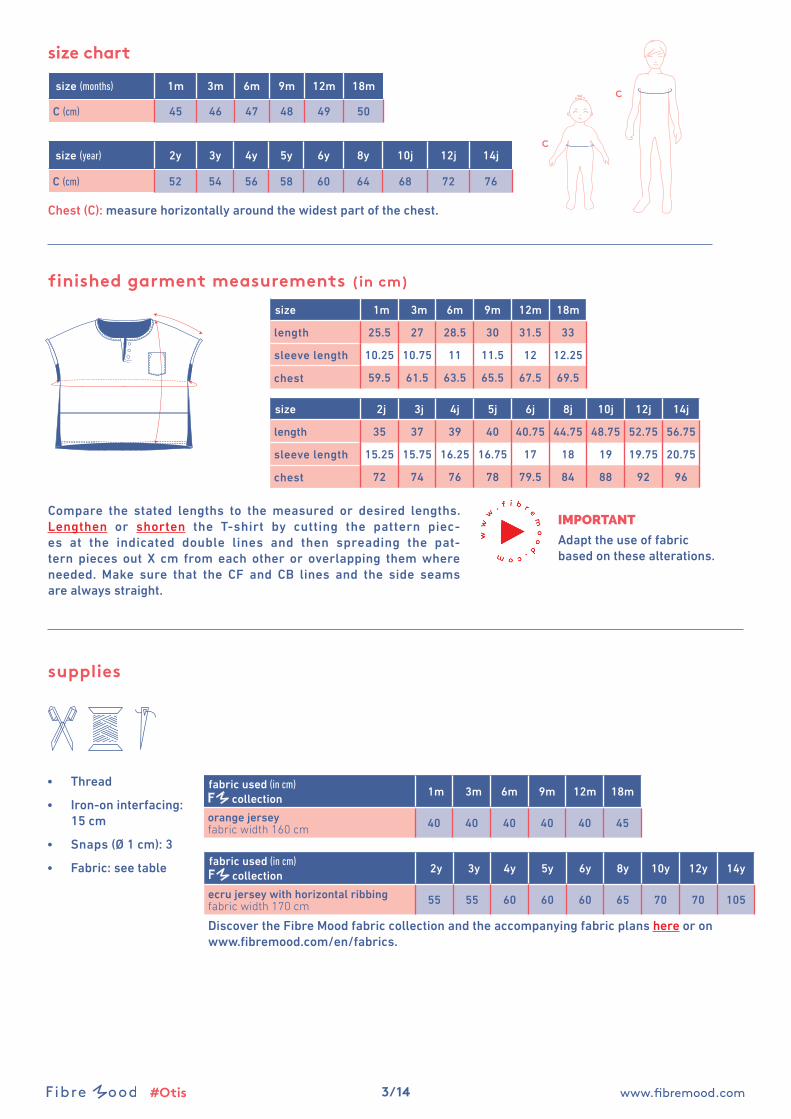
finished garment measurements (in cm)
size chart
supplies
• Thread
• Iron-on interfacing: 15 cm
• Snaps (Ø 1 cm): 3
• Fabric: see table
IMPORTANT Adapt the use of fabric based on these alterations.
Compare the stated lengths to the measured or desired lengths. Lengthen or shorten the T-shirt by cutting the pattern piec-es at the indicated double lines and then spreading the pat-tern pieces out X cm from each other or overlapping them where needed. Make sure that the CF and CB lines and the side seams are always straight.
fabric used (in cm) collection
2y 3y 4y 5y 6y 8y 10y 12y 14y
ecru jersey with horizontal ribbing fabric width 170 cm 55 55 60 60 60 65 70 70 105
Discover the Fibre Mood fabric collection and the accompanying fabric plans here or on www.fibremood.com/en/fabrics.
C
C
size (months) 1m 3m 6m 9m 12m 18m
C (cm) 45 46 47 48 49 50
yysize (year) 2y 3y 4y 5y 6y 8y 10j 12j 14j
C (cm) 52 54 56 58 60 64 68 72 76
Chest (C): measure horizontally around the widest part of the chest.
fabric used (in cm) collection
1m 3m 6m 9m 12m 18m
orange jersey fabric width 160 cm 40 40 40 40 40 45
size 2j 3j 4j 5j 6j 8j 10j 12j 14j
length 35 37 39 40 40.75 44.75 48.75 52.75 56.75
sleeve length 15.25 15.75 16.25 16.75 17 18 19 19.75 20.75
chest 72 74 76 78 79.5 84 88 92 96
size 1m 3m 6m 9m 12m 18m
length 25.5 27 28.5 30 31.5 33
sleeve length 10.25 10.75 11 11.5 12 12.25
chest 59.5 61.5 63.5 65.5 67.5 69.5

4/14#Otis
fabric advice
pattern pieces & seam allowances (in cm)
To prepare the pattern before cutting you must first add the illustrated seam allowances around the paper pattern pieces as shown below.
1. front: 1x
2. back: 1x on fabric fold
3. chest pocket: 1x
4. polo placket LF: 1x
5. polo placket RF: 1x
6. neckline binding: 1x
7. armhole binding: 2x. You will need to draw this pattern piece yourself using the measurements in the table provided (in cm):
Make the Otis T-shirt in a jersey, i.e. a knit fabric. This could be a cotton, viscose or wool knit and may or may not include elastane or Lycra content Cotton jersey is perfect for T-shirts, especially during the hot summer months – that’s because it's breathable and highly moisture-absorbent. Cotton is also easy to care for. You can also make the Otis T-shirt in a rib knit, Piqué knit (polo fabric) or jacquard jersey. Discover the Fibre Mood fabric collection and the accompanying fabric layouts here or at www.fibremood.com/en/fabrics.
size 1m 3m 6m 9m 12m 18m 2y 3y 4y 5y 6y 8y 10y 12y 14y
height 3 3 3 3 3 3 3 3 3 3 3 3 3 3 3
width 23.75 24.75 26 27 28.25 29.25 29.5 29.75 30 30.25 31 32.5 33.75 35.25 36.5
7
1 6
4 53
20
00
0
0
00 0
0
0
0
0
0 000
0
1 1
1
1
111
11
2 2
0
00 0
0
fabric used (in cm) standard 1m 3m 6m 9m 12m 18m 2y 3y 4y 5y 6y 8y 10y 12y 14y
fabric width 140 cm 40 40 40 45 45 45 55 55 60 90 95 100 110 120 130
The corresponding fabric layout can be found on the last page of these sewing instructions.
IMPORTANT
The pieces highlighted in light yellow have iron-on
interfacing attached to the wrong side.

5/14#Otis
Mark the following important points on the pattern:
• The position of the snaps by using a needle and basting thread ( ) to indicate the middle of the ( ).
• The chest pocket, the tip of the cutting line and the tip of the polo placket by sewing through the centre of the ( ) with needle and basting thread ( ).
Mark the important points on the outline of the pattern:
• Snip ( Don't cut past 0.5 cm!) the pattern paper and fabric where a single vertical line (I) and double vertical lines (II) has/have been indicated.
• Cut a small corner out of the fabric at a V notch or at the finished hemline.
• Cut a small corner (V notch) out of the pieces that lie on the fabric fold to mark the middle of these pieces.

6/14#Otis
sewing instructions
The method used to finish sewing the garment seams depends on the fabric used. The pieces are always sewn together with right
sides facing, unless stated otherwise.
1Finish the top of the pocket (3) using an overlock stitch, then press over at the V notches. Sew in place.
Press the remaining pocket edges to the wrong side.
F front
B back
RF right front
LF left front
CF centre front
CB centre back
right side
wrong side
iron-on interfacing
3

7/14#Otis
Pin the pocket at the place indicated on the front (1). Sew in place right next to the edge. At the top, sew reinforcement triangles on both sides.
For the plackets (4) and (5), finish the bottom and sides without basting threads using an overlock stitch.
Press a small square of iron-on interfacing onto the front, centered over the lower basting threads.
Cut into the front along the cutting line up to the basting thread.
Place the non-overlocked side of the placket LF (4) right next to the cutting line, with the basting threads matched perfectly. Begin stitching at 2 mm in from the edge, taper-ing off towards nothing at the basting thread.
1
4 5RFLF
1
1
1
LF4
2 mm

8/14#Otis
Fold the polo placket over to the wrong side.
2 Pin and sew the shoulder seams of the front and back (2).
Finish the raw edges together using an overlock stitch. Press the seam allowance toward the front.
3Fold the short side of the neckline binding (6) that has double snips over to the wrong side.
Press the binding as follows:• Press the binding in half lengthwise with the right side
of the fabric facing out. Open out again.• Press both raw edges in to meet the pressed fold line.
1
LF4
1
LF
1
4
2
2
1
2
6
6

9/14#Otis
Pin the piping to the neckline along the wrong side of the shirt with the corresponding snips matched (The right side of the neckline binding should face the wrong side of the shirt).
The single snip close to the short side of the neckline binding should line up with the unfinished edge of the CF (RF), while the V notch should line up with the CB V notch and the pressed side of the binding with the finished edge should line up with the CF (LF).
Fold the binding over to the right side, placing the pressed edge of the binding over the previous stitching. Sew this in place right next to the edge.
Press the RF placket (5) in half lengthwise at the V notches with the right side of the fabric facing out. Open back out.
Place the placket RF next to the cutting line with the bast-ing threads matched perfectly. The snip at the top of the placket should line up with the finished top edge of the T-shirt.Sew towards the basting thread at 2 mm from the edge.
Fold the placket RF onto the pressed fold line with the right side facing in. Overlock the top of the placket edge.
6
2
14
1
2
6
2
5
RF LF
5
2
1
2 mm
RF LF
2
1
5

10/14#Otis
Turn the placket inside out and fold the seam allowance at the bottom of the placket to the wrong side of the piece. Lay everything flat and secure the placket by stitching in the ditch up to the basting thread.
Neatly pin the plackets to each other and stitch a horizontal line between the basting threads to secure them in place.
Add another row of top stitching 0.5 cm away from the previous stitching.
4 Press the armhole binding (7) in half lengthwise with the wrong sides facing Press each raw edge in to meet the centre line.Press the binding in half lengthwise once again.
Fold the binding in half widthwise and make a V notch to mark the shoulder seam.
RVP LVP
0,5 cm
7
7

11/14#Otis
Pin the binding to the armhole along the wrong side of the arm hole (The right side of the piping should face the wrong side.). Sew in place in the first fold line.
Fold the binding over to the right side, placing the pressed edge of the binding over the previous stitching. Sew this in place right next to the edge.
Pin and sew the side seams together.
Finish the raw edges together using an overlock stitch. Press the seam allowance towards the front.
5Finish the hem using an overlock stitch.
Fold the hem up to the V notches and sew in place all the way around witin the overlock stitching.
7
1
2
7
1
2
712
2
2
2

12/14#Otis
Add another row of top stitching 0.5 cm away from the previous stitching.
6 Attach the snaps.
0,5 cm
13/14#Otis
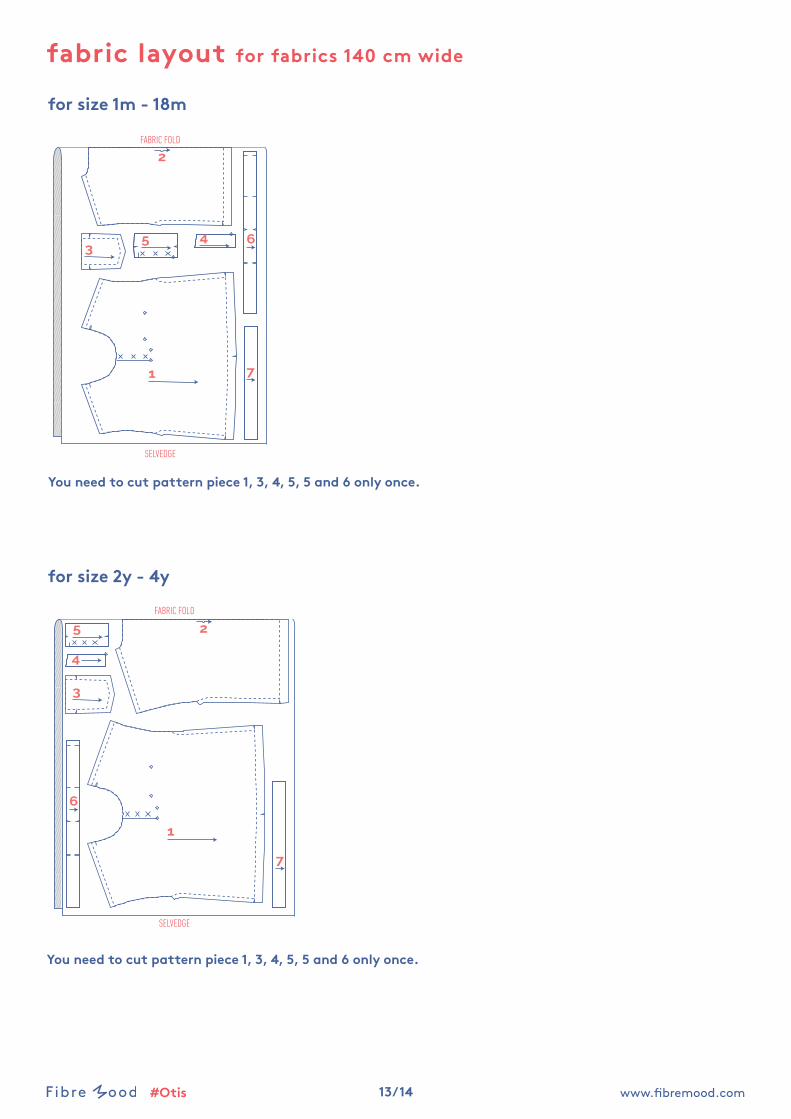
FABRIC FOLD
SELVEDGE
for size 1m - 18m
fabric layout for fabrics 140 cm wide
2
1
35 4 6
7
for size 2y - 4y
2
1
3
5
4
6
7
FABRIC FOLD
SELVEDGE
You need to cut pattern piece 1, 3, 4, 5, 5 and 6 only once.
You need to cut pattern piece 1, 3, 4, 5, 5 and 6 only once.

14/14#Otis
for size 5y - 14y
2
1
3
5 4
6
7
FABRIC FOLD
SELVEDGE
You need to cut pattern piece 1, 3, 4, 5, 5 and 6 only once.