Embed Size (px)
Citation preview
Page 1 of 59
Born-digital Accession and Ingest Procedure Manual
Updated June 2018
Table of Contents ACCESSION PROCEDURES ............................................................................................................................. 3
Receipt of Donations:................................................................................................................................ 3
Submission Information Package Agreement: .......................................................................................... 4
BORN-DIGITAL AND DIGITIZED DONATION REGISTRATION PROCEDURES ................................................... 5
Criteria for Moving to Immediate Ingest .................................................................................................. 8
Basic Workflow ......................................................................................................................................... 9
INGEST PROCEDURE .................................................................................................................................... 10
BitCurator Software Overview ................................................................................................................ 10
BitCurator Tools ...................................................................................................................................... 10
Feature: Forensic Disk Imaging ........................................................................................................... 10
Feature: File system analysis and reporting ....................................................................................... 11
Feature: Identification of private and individually identifying information ....................................... 11
Feature: Metadata Export ................................................................................................................... 11
Bagger ..................................................................................................................................................... 12
BITCURATOR Workflow ............................................................................................................................... 12
Photographing and Numbering Media: .................................................................................................. 12
To “Safe Mount” Your Device: ................................................................................................................ 13
Creating a Disk Image: ............................................................................................................................ 14
Forensic Processing: Data Analysis & Metadata Extraction ................................................................... 19
Generating Human Readable Reports from the Bulk Extractor Reports: ............................................... 22
Creating a Bag of the Disk Image and Reports:....................................................................................... 27
BitCurator Example Reports: .................................................................................................................. 30
ACCESS COPIES ............................................................................................................................................ 32
How to Provide Access to Born-digital Material: .................................................................................... 32
APPENDIX A: ................................................................................................................................................ 34
SIP for City of Austin Departments (COA): .............................................................................................. 34
SIP for General Public Donations: ........................................................................................................... 39
Deed of Gift for General Public Donations ............................................................................................. 45
Page 2 of 59
APPENDIX B: ................................................................................................................................................ 47
Dublin Core Metadata ............................................................................................................................. 47
APPENDIX C: ................................................................................................................................................ 50
PBCore Schema: ...................................................................................................................................... 50
APPENDIX D: ................................................................................................................................................ 51
How to Deal With Photographs & Architectural Drawings ..................................................................... 51
How Do I Deal With: Viruses ................................................................................................................... 51
APPENDIX E: ................................................................................................................................................ 52
File Naming Conventions ........................................................................................................................ 52
Collection Number .............................................................................................................................. 52
Computer Media Number (CM number) ............................................................................................ 52
Computer Media Photographs ........................................................................................................... 53
Naming Video Files .............................................................................................................................. 53
Naming General Collection (Cataloged in Bibliocommons) Video Files: ............................................ 54
Disk Image ........................................................................................................................................... 55
Bulk Extractor Reports ............................................................................................................................ 55
BitCurator Reports .................................................................................................................................. 55
Bag .......................................................................................................................................................... 56
Server Folders ..................................................................................................................................... 56
APPENDIX F: ................................................................................................................................................ 58
Example of Folder/File Hierachy: ............................................................................................................ 58
APPENDIX G: ............................................................................................................................................... 59
Troubleshooting ...................................................................................................................................... 59
Page 3 of 59
The purpose of this manual is to provide step-by-step instructions for how the Austin History Center
(AHC) will accession, ingest, and stabilize born-digital material received from City of Austin departments
and general public donations. This manual is the third step in developing a workflow for handling born-
digital materials in the absence of a digital repository infrastructure and a digital archivist. As the official
repository for City government records and local Austin history, the AHC is committed to taking these
important preliminary steps to stabilize and provide access to electronic records in the medium-term.
ACCESSION PROCEDURES
Receipt of Donations: Who & What:
The AHC will accept electronic records from City of Austin (CoA) departments once these
records have met their retention period.
The AHC will accept electronic records from individuals and organizations if they fall within
the AHC collecting policy guidelines
o See: S:\SHARED\Administrative Records\Administration and Management\Policies
andProcedures\approvedpolicies&procs\Admin_Collection_Policy\ahc_collection_d
evelopment_policy_UPDATE.doc)
City of Austin:
How: Currently the AHC will accession electronic records that reside on, or are transferred
to, external physical media, or via SFTP as outlined below.
This requires City of Austin departments to transfer electronic records to physical media (ex.
CD, DVD, hard drive, flash drive etc.) prior to appraisal, accession, ingest, and stabilization by
the AHC.
CoA departments may send the AHC physical media via Interoffice mail and indicate if the
media may be permanently retained or if the file must be extracted and imaged and the
media returned.
The loan period for physical media from CoA department is three months
The AHC may also arrange to visit City offices with an AHC hard drive to acquire electronic
records. This schedule will be negotiated between AHC staff and an external department
representative to find a mutually agreed upon time, bearing in mind record retention
deadlines.
Electronic file transfers from APL will be transferred via our shared drive:
o The APL Records Analyst will transfer files that have been subject to Archival Review
to be transferred via our shared drive to the _____folder.
Electronic file transfers from other COA department will be transferred via __________
Individuals & Organizations from the general public:
How: Currently the AHC will accession electronic records that reside on, or are transferred to,
external physical media, or via Secure File Transfer Protocol defined as:
Page 4 of 59
SFTP with Google Drive ([email protected]). Commands and data are encrypted in
order to prevent passwords and other sensitive information from being exposed to the
network in plain text.
For transfers to or from patrons, a folder with the patron’s name will be created in the
Google drive directory. Files can be uploaded to or downloaded from the patron’s file
per a secure link shared via email by the Digital Archivist or Media Archivist.
Said folder(s) will be deleted after SFTP is completed and file donations are ingested
and/or file requests are downloaded.
Patron requests of photographic images, maps, or architectural drawings/plans are
subject to reproduction and license fees.
Other patron requests for text/manuscript digital files will be subject to our Reference
Services policies that entitle the patron to up to 5 FREE digital files (totaling 15 minutes
of staff research time). Requests for additional digital files associated with more detailed
research questions are subject to a fee. The Austin History Center offers limited
research assistance through the mail and email, including photocopies or digital
surrogates of newspaper articles, manuscript materials, and obituaries. The AHC charges
a $15.00 non-refundable fee that entitles you to one obituary or up to 30 minutes of
staff research time and up to 5 pages of photocopies/digital files ($16.24 for Texas
residents due to sales tax).
Electronic records donated to the AHC on external physical media are considered property
of the AHC and the City and will not be returned, unless requested by the donor.
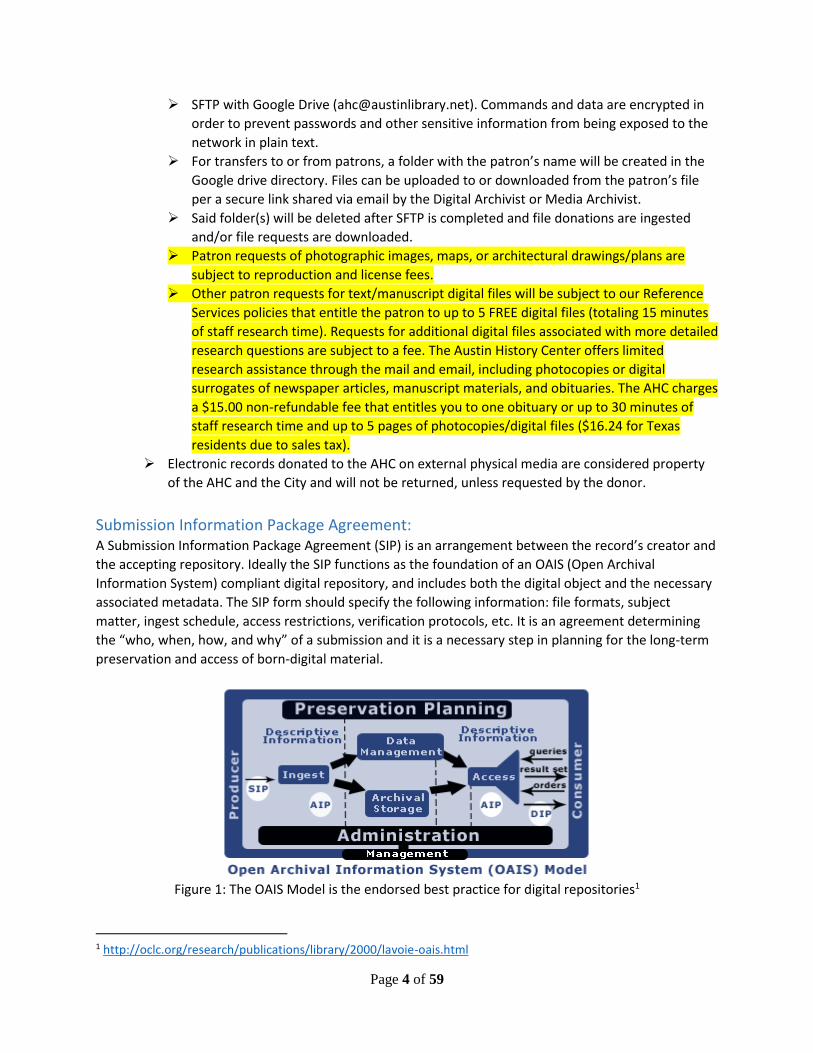
Submission Information Package Agreement: A Submission Information Package Agreement (SIP) is an arrangement between the record’s creator and
the accepting repository. Ideally the SIP functions as the foundation of an OAIS (Open Archival
Information System) compliant digital repository, and includes both the digital object and the necessary
associated metadata. The SIP form should specify the following information: file formats, subject
matter, ingest schedule, access restrictions, verification protocols, etc. It is an agreement determining
the “who, when, how, and why” of a submission and it is a necessary step in planning for the long-term
preservation and access of born-digital material.
Figure 1: The OAIS Model is the endorsed best practice for digital repositories1
1 http://oclc.org/research/publications/library/2000/lavoie-oais.html
Page 5 of 59
In order to accession electronic records from City departments and individuals/organizations
from the general public, an authorized City department official or donor, respectively, must fill
out the Deed of Gift to the best of their knowledge and ability. For COA records transfers and
larger donations from the general public a SIP form (See Appendix A for a copy of SIP
agreements) will also need to be completed.
An additional portion of the SIP is reserved for AHC staff. This section is to be filled out by
the registrar and/or the Digital Archivist.
BORN-DIGITAL AND DIGITIZED DONATION REGISTRATION PROCEDURES Deed of Gift with Submission Information Package (SIP) Condensed form will be given to most donors. In
some cases the full SIP will be used (City of Austin transfer or significant born-digital donation).
1. All donations, regardless of format, are first submitted to the Registrar. Donations on physical
media storage are placed on the donation cart. If donation is transferred via the cloud then just
the Deed of Gift is placed on shelf above field collection boxes marked Cloud Digital Donation
DOG to ensure timely registration in case of expiring links.
2. Determination about donation collecting unit location (AF, archival collection, general collection,
etc.) is decided by Registrar in conjunction with the Collection Unit/Archivist responsible for
donation (not the Digital Archivist (DG))
3. Registrar enters information into the Registration Database
a. Extent and description will sometimes have to be filled out by the DA if not recorded on
the SIP
4. If donation is an archives collection Registrar creates entry in the ArchivesIndex
a. Registrar sets Access to “Advance Notice Required” and adds note to ProcessNote Field
that DA is processing
b. FormatGeneral – choose digital records AND relevant format
c. FormatElectronic – choose original storage medium/transfer type
d. Location - digital storage
e. Extent will sometimes have to be filled out by the DA if not recorded on the SIP
5. Transfer to Digital Archivist
a. If donation is all born-digital/digitized materials
i. Registrar places registered Deed of Gift (DOG) on Digital Archivist shelf for pick-
up, if Registration database needs to be updated with extent Registrar will add
post-it note to DOG
ii. Digital Archivist picks up DOG, updates the Registration database with extent,
description of materials as necessary
iii. Digital Archivist ingests donation (see Digital Records Processing Manual)
iv. Digital Archivist emails appropriate archivist as to location and status of
donation with standard subject line “Donation Ingest Complete” and cc: the
Registrar; collecting unit archivist is now responsible for processing the
materials including updating the ArchivesIndex (if relevant) with index terms
and extent
v. If donation is addition to existing collection with EAD Finding Aid, DA will update
Archives Index Status Field to FA-Additions, add note to ProcessNote field with
date and short description of content.
Page 6 of 59
vi. DA returns DOG to Registrar with digital storage location and any notes about
anomalies to be filed
vii. Original storage media is shelved
b. If donation is part of a hybrid archival collection with physical storage media
i. Registrar leaves digital storage media in box with the rest of the collection,
places a post-it note on the actual box to designate location of storage media.
ii. Places DOG of DA shelf
iii. When ready to ingest digital items the DA removes the storage media replace
with temporary Separation Sheet indicating the type of materials removed
iv. DA ingests donation
v. Digital Archivist emails appropriate archivist as to location and status of
donation with standard subject line “Donation Ingest Complete” and cc: the
Registrar; collecting unit archivist is now responsible for processing the
materials including updating the ArchivesIndex with index terms and extent
vi. If addition to existing collection with EAD Finding Aid, DA will update Archives
Index Status Field to FA-Additions, add note to ProcessNote field with date and
short description of content.
vii. DA returns DOG to Registrar with digital storage location and any notes about
anomalies to be filed
viii. Original storage media is shelved
ix. Separation sheet is removed when collection is processed and finding aid is
created
c. If donation is part of a hybrid archival collection delivered through cloud
i. Registrar places DOG of DA shelf
ii. DA ingests donation
iii. Digital Archivist emails appropriate archivist as to location and status of
donation with standard subject line “Donation Ingest Complete” and cc: the
Registrar; collecting unit archivist is now responsible for processing the
materials including updating the ArchivesIndex with index terms
iv. If addition to existing collection with EAD Finding Aid, DA will update Archives
Index Status Field to FA-Additions, add note to ProcessNote field with date and
short description of content.
v. DA returns DOG to Registrar with digital storage location and any notes about
anomalies to be filed
6. Once the registrar has notified the Digital Archivist of born-digital accessions received
(particularly with mixed collections),_a separation form will be filled out by the digital archivist
and placed in the box (if one already exists) before the media with born-digital content is
removed and transferred to the Digital Archivist.
7. The registrar will also place born-digital accessions received via media such as flash drives and
optical discs on the Digital Archivist’s shelf in the Archival Collections Office.
8. All media should be photographed with a digital camera to catalog and preserve any
transcriptions on the media as well as provide a visual representation of the media to be bagged
with the disk image. Photographs should include any transcriptions and any model/serial
Page 7 of 59
number/manufacturer information on the media. (The photos will be placed in a folder and
renamed according to the file naming conventions in Appendix F.)
9. CDs and DVDs should be routed to the Digital Archivist for registration. The digital archivist will
fill out a separation form, remove the media from the box (if it is a mixed media collection) and
place the form in the box. The Registration and Archives Index databases have fields for extent
in GB for electronic records which also requires entry. Insert CD or DVD into Dell USB optical disk
drive, connected to Tableau T8-R2 write blocker, and obtain extent and format information
using the LCD screen on the Tableau T8-R2.
10. Hard drives and other USB media should be routed to the Digital Archivist for registration.
a. To acquire the extent and format of hard drives and USB media, utilize the Tableau T8-
R2 forensic USB Bridge write blocker. Record this extent in the Registration database.
b. This will ensure the media’s content and metadata are not inadvertently compromised
or altered
11. 3.5” floppy disks may should be routed to the Digital Archivist for registration
c. Insert floppy disk into Dell USB 3.5” floppy disk drive, connected to Tableau T8-R2 write
blocker, and obtain extent and format information using the same method outlined
above. Record this extent in the Registration database.
For all born-digital donations during the registration process: If the extent and format (mime
types) are vastly disproportionate from what has been indicated in the SIP, the Processing
Archivist should contact the appropriate party before proceeding with registration
Digital Processing Log:
S:\SHARED\Operational Records\Reference and Access\Archives and
Manuscripts\digital_processing_log
The purpose of the digital processing log spreadsheet is to describe and track the media throughout the accession, registration, and ingest process, to establish physical and intellectual control over the media. Also, the log serves as a record for verifying the reliability, authenticity, and integrity of born-digital material in the long-term. The media log captures registration information, ingest checksums, and tracks statistics such as loss for various types of media, viruses, and the extent of the AHC’s born-digital holdings. Metadata related to the content of the files is entered along with notes regarding the content or about processing issues.
Physical control entails counting, labeling, and numbering physical media (floppy disks, CDs, DVDs etc.) or gaining control via virtual transfer, although the AHC is not currently capable of electronic transfers.
The following columns should be included in the digital processing log:
Donor number (this will indicate where the physical media is stored on the shelving in the Digital Archivist’s office)
CM number (the computer media number is a unique identifier that traces captured data to its original disk or drive. The CM number of a particular disk will carry over to the

Page 8 of 59
image made from it. The CM number will be named according to the file naming
conventions outlined in Appendix F.) Media Type (CD, DVD, Flash media, hard drive, etc. using the list in Appendix C) Photographed? Folder title (if removed from a corresponding text collection folder) Disk Readable with PC, Mac, Unknown. Original Folder Name (if this was pulled from a mixed collection file folder) Original File Name (if access copies of files will be renamed then the original file name
needs to be recorded here) Access File Name Date of Ingest (the date disk images are created) Size (in GB)
Transcript information (any writing on the media such as drives or optical media) Actions taken (include software or hardware used and results obtained) Operator Disk Image Created Bad Sectors Checksums_MD5 Checksums_SHA-1 Checksums_SHA-256 Notes (list any content notes or issues with processing here) Bag created, validated, and moved to N: drive/Isilon server Files Normalized (we will only normalize access copies)
Access Files Renamed Metadata Creation Date (if known include the original creation date) Added to Archives Index (update all fields in the Archives Index with the exception of
TARO name and Posted to TARO fields) Finding Aid Additions Needed/Completed (add any notes to track your FA additions)
Criteria for Moving to Immediate Ingest The AHC will only register, accession, and ingest born-digital material, physical media, and file types for
material with which it has the technological capability to stabilize, render, and provide access to.
If a born-digital donation contains media or file types that fall outside the criteria listed
above, the registrar will either:
Return material to the donor, as agreed upon in the SIP
Dispose of or transfer the materials to the appropriate location or institution, as
agreed upon in the SIP
Retain the media, (ex. due to record retention laws) and describe the nature of
the accession hold on the SIP and in the Archives Index and Registration
databases.
Page 9 of 59
All media that is retained, even if it cannot be presently ingested, should still be entered into
the media log spreadsheet and kept in the Digital Archivist’s office
Digital materials that form part of a hybrid donation will be ingested in tandem with the
processing of the donation’s physical components on a schedule to be coordinated between
the Processing Archivist and the Digital Archivist. (For additional information regarding
hybrid collections see Appendix C)
Standalone born-digital donations which meet the above criteria will be ingested by the
Digital Archivist using the BitCurator software, as time permits.
Basic Workflow AHC’s basic workflow in regards to registration and post born-digital material processing is as follows:
1. Registrar
a. Will notify the Digital Archivist to remove digital media from mixed collections and fill
out a separation form to be placed in the box. For accessions that are born-digital-only
the Registrar will give the Digital Archivist the collection number and donor number(s)
on a copy of the Deed of Gift and SIP Form.
2. Digital Archivist
a. Will number media and take photos
i. If media is from a mixed collection, media will be returned to the collection box
and labelled accordingly with “Restricted” “Master copy” written on the
sleeve/folder.
ii. If entire collection consists of born-digital media, all transfer media will be
stored in the Digital Archivist’s office.
b. Will create forensic disk images and reports using the BitCurator workflow
c. Will create archival bag of disk image and BitCurator reports using Bagger
d. Will create access copies of files using BitCurator Disk Image Access. Note: there may be
cases, especially with video, where we have to create access copies via another means.
This will be judged on a case-by-case basis per the Digital Archivist).
e. Will create Access Copies folder, Master Copies folder, Bags folder on N: and Q: drives
f. Will place files into appropriate folder on the N: and Q: drives
g. Will create backup of bags on DA external drive
h. Will keep and store all original media
3. Digital Archivist (or other staff archivist responsible for the collection)
a. Will process digital files (with assistance from digital archivist as needed)
b. Will create finding aid, or update an existing finding aid per the instructions in the
processing manual.
c. Will load access copies for the Reading Room Digital Access workstation or create a disk
and place in box with collection or in digital collections box in reading room for digital-
only collections.
d. Will update the Archives Index and Registration Index databases with extent and
description information.
Page 10 of 59
INGEST PROCEDURE AHC’s intent in utilizing BitCurator is to capture born-digital material in its most complete state (a disk
image) and extract as much metadata as possible to facilitate the appraisal, selection, processing, and
preservation of this material in the future. Bagger is an additional tool used to validate and maintain the
integrity and authenticity of the born-digital material, ensuring it remains unaltered until future
processing will occur.
BitCurator Software Overview “The BitCurator Environment is built on a stack of free and open source digital forensics tools and
associated software libraries, modified and packaged for increased accessibility and functionality for
collecting institutions.”2 This software was selected by the AHC for ingest and pre-processing of born-
digital material because it meets all accession requirements to prepare born-digital materials for long-
term preservation and access, and generate information to support additional selection, arrangement
and description activities.
BitCurator Features Include:
Forensic disk imaging
Creates a disk image without altering the original disk, gathers metadata about
the disk, documents how the disk image was created – includes a software write
blocker
File system analysis and reporting
Looks at the structure of information on the disk including the disk format,
amount of space used, file directory, individual file formats (mime types), and
exports report as DFXML.
Identification of private and individually identifying information
Looks for private information such as social security numbers, email address,
phone numbers – this depends on the information being in the exact expected
format (ex. 989-411-3212)
Export of technical and other metadata
Creates easy to read reports from DFXML to PDF, including graphs on file types
BitCurator Tools In order to fulfill the above features, BitCurator offers the following tools. Below you will find a
description of each tool.
Feature: Forensic Disk Imaging Tool: Safe Mount
Blocks disk images and devices attached to BitCurator (including USB drives and hard drives) from being writable
Devices and images are mounted read-only, so the files and file structures they contain can be accessed without inadvertently making changes to the files or the metadata
This tool performs essentially the same function as a hardware write-blocker
2 http://www.bitcurator.net/bitcurator/
Page 11 of 59
Maintains integrity and authenticity of archival materials during and after ingest Tool: Guymager
Captures bit-identical images from magnetic (floppy disks), optical (CDs), solid-state (SSDs and flash drives), and hybrid media. Disk images can be captured in three different formats, including raw (just the bit stream), E01 (Expert Witness Format, the standard format used by the AHC), and AFF (Advanced Forensic Format)
Maintains the integrity of the material by capturing the entire bit stream Captures the entire file structure and all content (including data about deleted files) as it was on
the original media in a compressed or uncompressed format
Feature: File system analysis and reporting Tool: Fiwalk
A function of the BitCurator Reporting Tool, Fiwalk produces a DFXML (Digital Forensics XML) report on the contents of a disk image
Fiwalk analyzes the disk image and produces an XML file detailing file system hierarchy within the disk image, including files and folders, deleted materials, and information in unallocated space. It also extracts metadata about each file, including date of last access and modification, file type, the user who created the file, file size and the physical location of the file on the disk (byte run)
This XML file will be used by the BitCurator Annotated Reporting tool to generate a human readable report
Extracts creation, access and modification metadata from files without changing that metadata. Tool: BitCurator Reporting Tool
BitCurator Reporting Tool brings together the various outputs from Bulk Extractor, fiwalk and the annotation tool to generate both machine and human readable reports
The Annotated Features tab matches the "features" found by bulk_extractor with their corresponding file on the disk image. This step is necessary because bulk_extractor locates features by scanning the bit stream, not the file system. The annotated features report acts as a bridge between the output from bulk_extractor and the DFXML report from fiwalk to create a report that not only locates a feature, but also identifies the specific file in which it can be found
In addition to being able to run fiwalk, the annotation reports, and the BitCurator forensic reports individually, the BitCurator Reporting Tool allows the Digital Archivist to execute the entire process at once with the "Run All" tab
Allows repository to create and maintain information about collection: metadata, directory structures, file type and contents, access restrictions. Also allows new reports to be generated as new information is required
Feature: Identification of private and individually identifying information Tool: Bulk Extractor
Scans files using a variety of scanners (pdf, image files, email, zip files, etc.) to search for potentially sensitive data, including geolocation metadata, email addresses, Facebook accounts, phone numbers, credit card numbers, and Social Security numbers. Deleted files are also scanned
Can be used to search for specific character strings (i.e.. specific names or terms) across multiple files and file types
Feature: Metadata Export Exports technical metadata from DFXML files (created by fiwalk and other forensics tools) to
common preservation and archival metadata formats, which can be incorporated into other stable standards, like METS and EAD.
Page 12 of 59
BitCurator generates PREMIS (preservation) metadata for each data forensics tool that is used on a disk image, providing an accurate record of provenance for each stage of processing. This will be useful to the AHC digital archivist in the future
Allows data collected/created by the other forensics tools to be exported and used by other archival software (ex. Archivematica) and to be incorporated into collection documentation (inventories and finding aids
Creates documentation of all forensics tools used by the archivist, maintaining a record of provenance for the collection and ensuring its integrity
Bagger Bagger is a tool, created by the Library of Congress. It produces a package of data files according to the
BagIt specification. BagIt is “a hierarchical file packaging format for the exchange of generalized digital
content. A "bag" has just enough structure to safely enclose descriptive "tags" and a "payload" but does
not require any knowledge of the payload's internal semantics.”3 To “bag” born-digital material allows
the archivist to verify that the digital content retained its integrity and fixity during the course of a
transfer.
The BagIt structure is as follows:
A directory called <bagname>
The <bagname> directory contains a subdirectory called data (it must be called “data”). This
subdirectory is where the content files are placed
The <bagname> directory contains at least two files:
A manifest that lists the checksum and path for each content file stored in the /data
subdirectory
A filed called bagit.txt that indicates the Bagit version and character encoding used for
creating the bag
The <bagname> directory may also contain an optional bag-info.txt file that contains
information about the bag contents
A bag is complete if every file listed in the manifests is present, and if every file is accounted for in a
manifest. A bag is valid if it is complete and if each checksum matches the checksums at the time the
bag was created. Once bags have been moved out of the BitCurator environment, they should be
verified on a regular basis to ensure their integrity and monitor bitrot.
Bagger is present in the BitCurator 1.0 (and higher) environment. Instructions for using Bagger may
be found in the BitCurator Workflow.
BITCURATOR Workflow
Photographing and Numbering Media: The media should be physically numbered using the naming conventions in Appendix F (this number will
be the CM number of the media) by one of the following methods:
3 http://tools.ietf.org/html/draft-kunze-bagit-05
Page 13 of 59
For small USB Flash drives: Use a paper CD/DVD envelope and write the CM number on the
envelope
For CD/DVDs: Write the CM number on the disk and keep the disk in the original case, if the disk
has no original case after writing the CM number on the disk place the disk in a paper CD/DVD
envelope
The media should also be photographed to save any relevant metadata, manufacturer, and other
information that is on the media. These files will be placed in the disk folders in folder named using the
naming conventions in Appendix F. The files will also be named according to the file naming conventions
in Appendix F.
To “Safe Mount” Your Device: There are a couple ways you can Safe Mount your device/media. You can use the Tableau forensic
bridge. This write blocker allows the host computer to read from the target drive but blocks all write
requests. All you have to do connect a USB port from your drive to the Tableau and then plug in the USB
port from the Tableau bridge to the Digital Processing laptop. Or you can Safe Mount your device using
the following method:
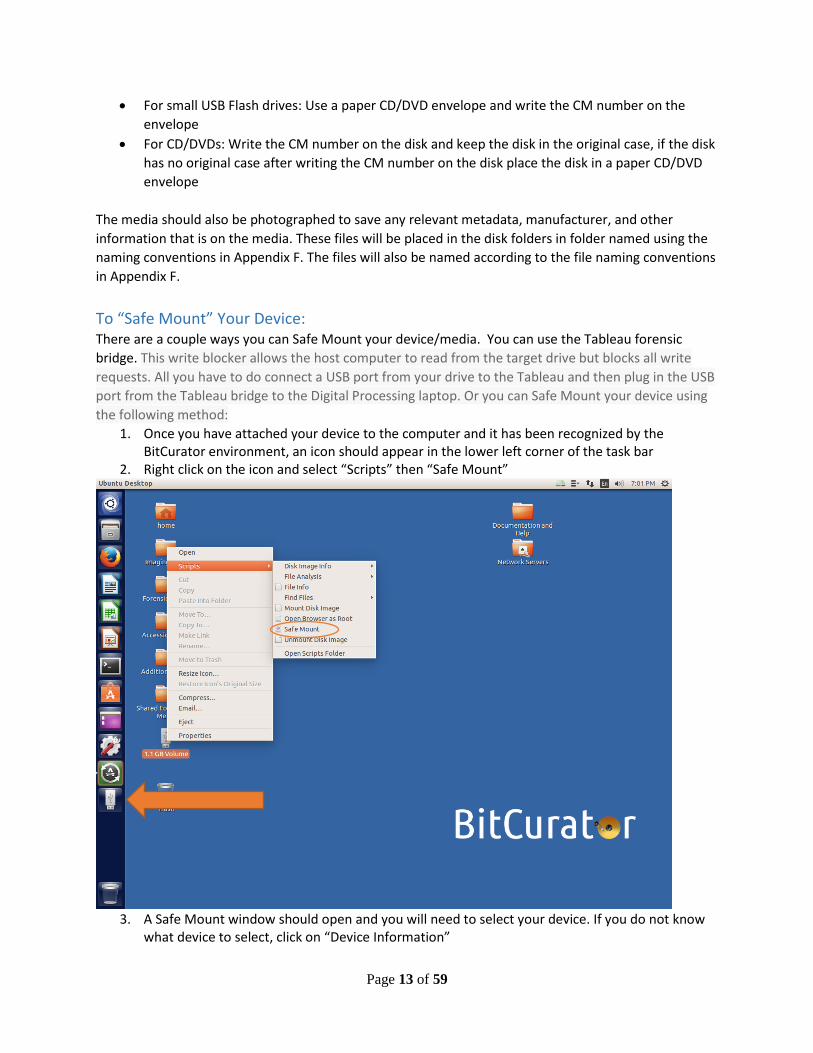
1. Once you have attached your device to the computer and it has been recognized by the BitCurator environment, an icon should appear in the lower left corner of the task bar
2. Right click on the icon and select “Scripts” then “Safe Mount”
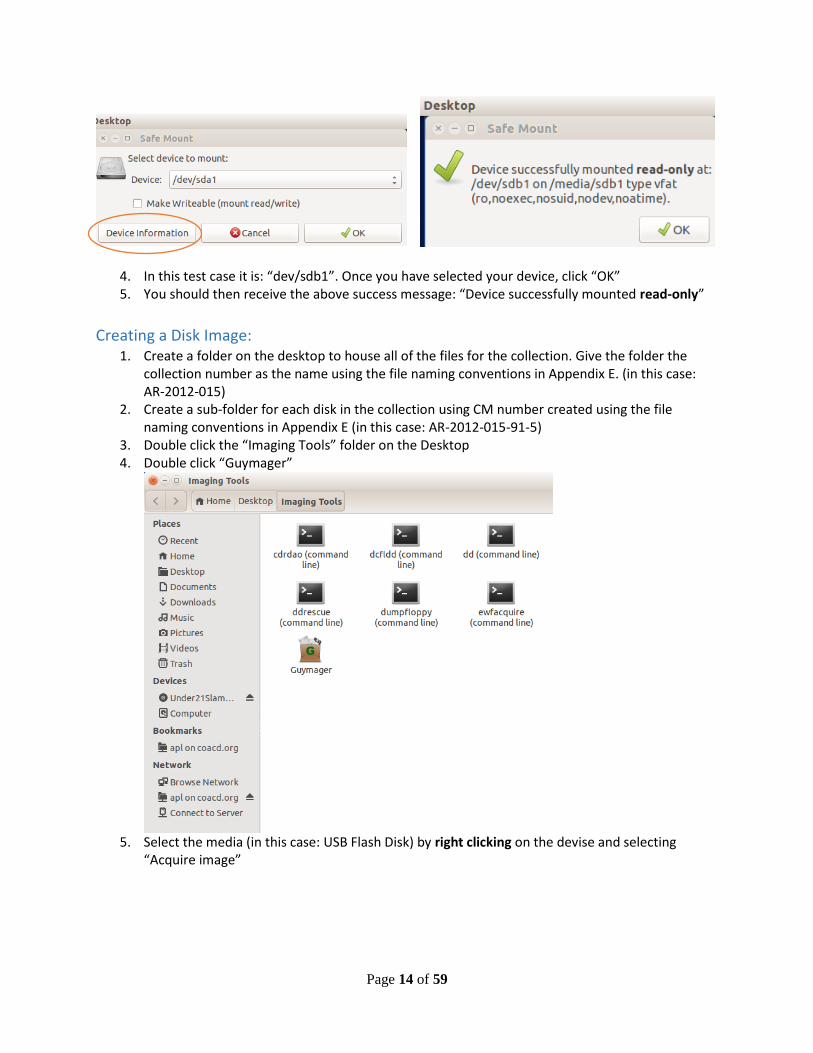
3. A Safe Mount window should open and you will need to select your device. If you do not know
what device to select, click on “Device Information”
Page 14 of 59
4. In this test case it is: “dev/sdb1”. Once you have selected your device, click “OK” 5. You should then receive the above success message: “Device successfully mounted read-only”
Creating a Disk Image: 1. Create a folder on the desktop to house all of the files for the collection. Give the folder the
collection number as the name using the file naming conventions in Appendix E. (in this case: AR-2012-015)
2. Create a sub-folder for each disk in the collection using CM number created using the file naming conventions in Appendix E (in this case: AR-2012-015-91-5)
3. Double click the “Imaging Tools” folder on the Desktop 4. Double click “Guymager”
5. Select the media (in this case: USB Flash Disk) by right clicking on the devise and selecting
“Acquire image”
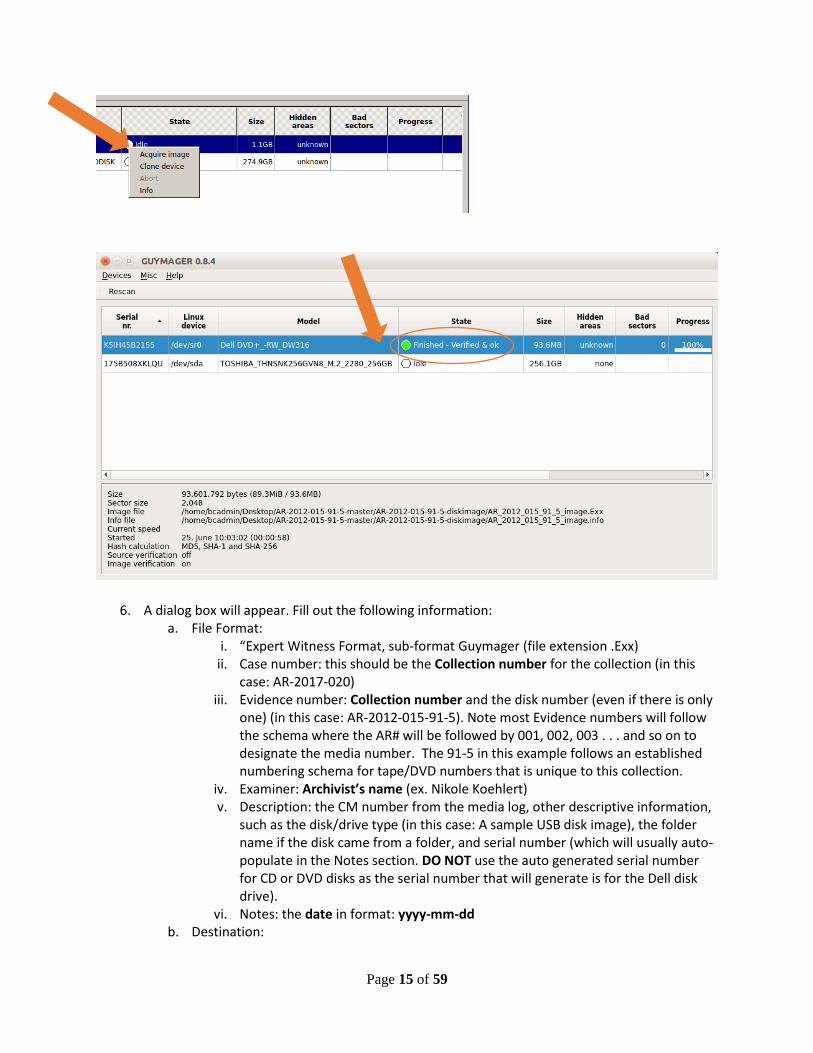
Page 15 of 59
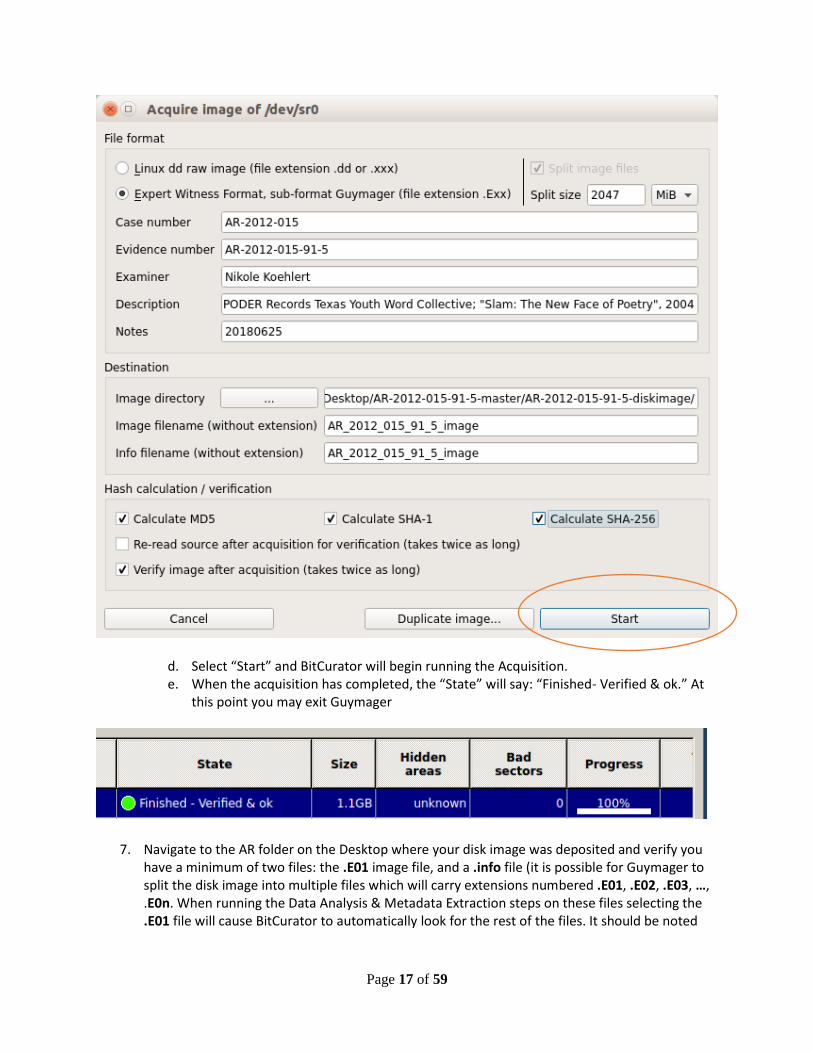
6. A dialog box will appear. Fill out the following information: a. File Format:
i. “Expert Witness Format, sub-format Guymager (file extension .Exx) ii. Case number: this should be the Collection number for the collection (in this
case: AR-2017-020) iii. Evidence number: Collection number and the disk number (even if there is only
one) (in this case: AR-2012-015-91-5). Note most Evidence numbers will follow the schema where the AR# will be followed by 001, 002, 003 . . . and so on to designate the media number. The 91-5 in this example follows an established numbering schema for tape/DVD numbers that is unique to this collection.
iv. Examiner: Archivist’s name (ex. Nikole Koehlert) v. Description: the CM number from the media log, other descriptive information,
such as the disk/drive type (in this case: A sample USB disk image), the folder name if the disk came from a folder, and serial number (which will usually auto-populate in the Notes section. DO NOT use the auto generated serial number for CD or DVD disks as the serial number that will generate is for the Dell disk drive).
vi. Notes: the date in format: yyyy-mm-dd b. Destination:
Page 16 of 59
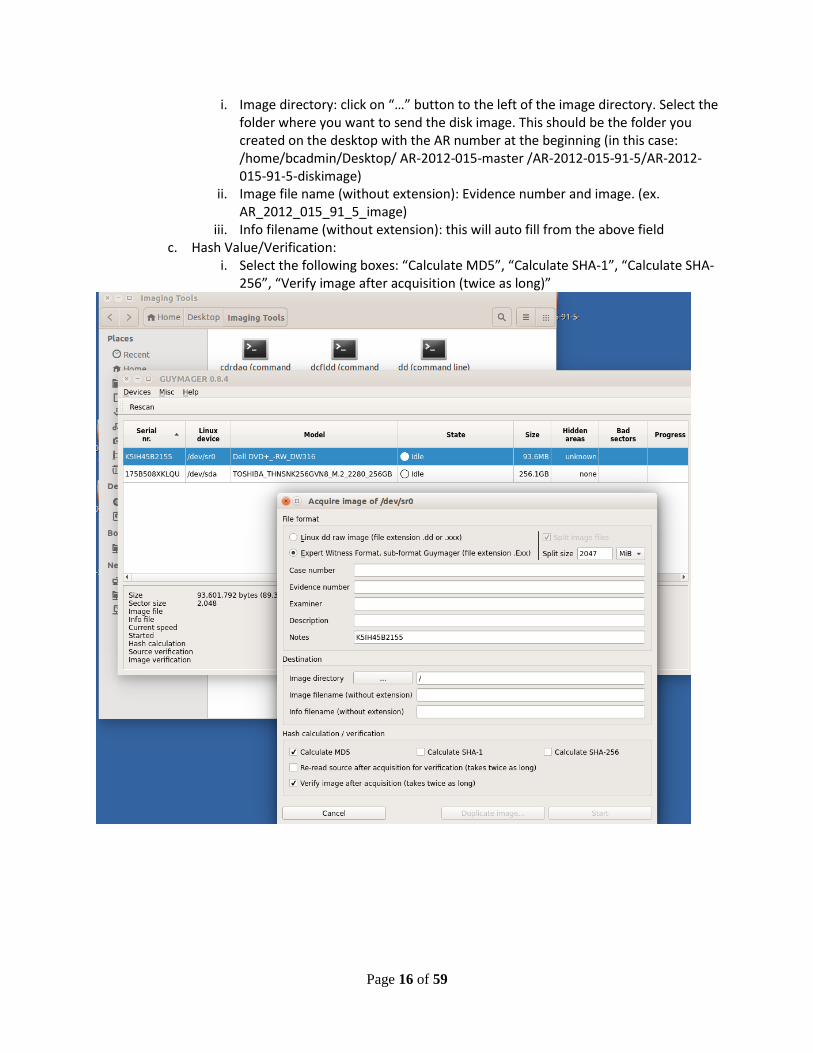
i. Image directory: click on “…” button to the left of the image directory. Select the folder where you want to send the disk image. This should be the folder you created on the desktop with the AR number at the beginning (in this case: /home/bcadmin/Desktop/ AR-2012-015-master /AR-2012-015-91-5/AR-2012-015-91-5-diskimage)
ii. Image file name (without extension): Evidence number and image. (ex. AR_2012_015_91_5_image)
iii. Info filename (without extension): this will auto fill from the above field c. Hash Value/Verification:
i. Select the following boxes: “Calculate MD5”, “Calculate SHA-1”, “Calculate SHA-256”, “Verify image after acquisition (twice as long)”
Page 17 of 59
d. Select “Start” and BitCurator will begin running the Acquisition. e. When the acquisition has completed, the “State” will say: “Finished- Verified & ok.” At
this point you may exit Guymager
7. Navigate to the AR folder on the Desktop where your disk image was deposited and verify you have a minimum of two files: the .E01 image file, and a .info file (it is possible for Guymager to split the disk image into multiple files which will carry extensions numbered .E01, .E02, .E03, …, .E0n. When running the Data Analysis & Metadata Extraction steps on these files selecting the .E01 file will cause BitCurator to automatically look for the rest of the files. It should be noted
Page 18 of 59
that it is possible to choose the size of the splits for files in the previous steps making it possible to purposely only have one .E01 file.)
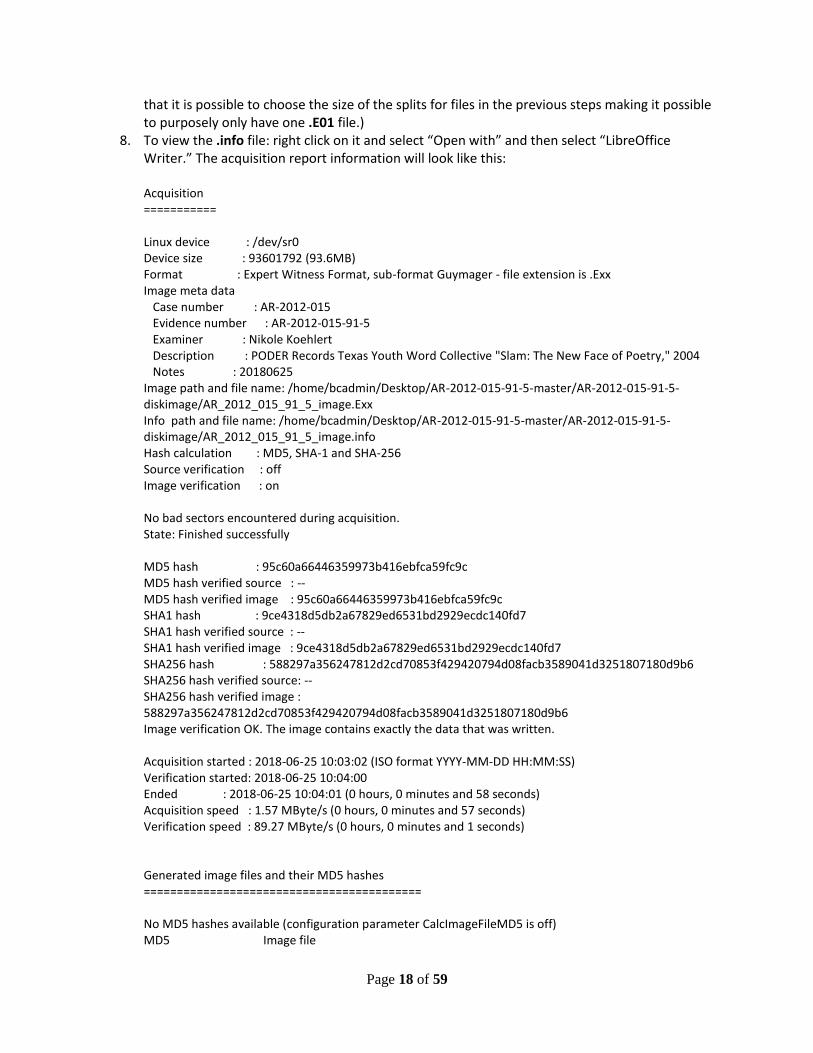
8. To view the .info file: right click on it and select “Open with” and then select “LibreOffice Writer.” The acquisition report information will look like this: Acquisition =========== Linux device : /dev/sr0 Device size : 93601792 (93.6MB) Format : Expert Witness Format, sub-format Guymager - file extension is .Exx Image meta data Case number : AR-2012-015 Evidence number : AR-2012-015-91-5 Examiner : Nikole Koehlert Description : PODER Records Texas Youth Word Collective "Slam: The New Face of Poetry," 2004 Notes : 20180625 Image path and file name: /home/bcadmin/Desktop/AR-2012-015-91-5-master/AR-2012-015-91-5-diskimage/AR_2012_015_91_5_image.Exx Info path and file name: /home/bcadmin/Desktop/AR-2012-015-91-5-master/AR-2012-015-91-5-diskimage/AR_2012_015_91_5_image.info Hash calculation : MD5, SHA-1 and SHA-256 Source verification : off Image verification : on No bad sectors encountered during acquisition. State: Finished successfully MD5 hash : 95c60a66446359973b416ebfca59fc9c MD5 hash verified source : -- MD5 hash verified image : 95c60a66446359973b416ebfca59fc9c SHA1 hash : 9ce4318d5db2a67829ed6531bd2929ecdc140fd7 SHA1 hash verified source : -- SHA1 hash verified image : 9ce4318d5db2a67829ed6531bd2929ecdc140fd7 SHA256 hash : 588297a356247812d2cd70853f429420794d08facb3589041d3251807180d9b6 SHA256 hash verified source: -- SHA256 hash verified image : 588297a356247812d2cd70853f429420794d08facb3589041d3251807180d9b6 Image verification OK. The image contains exactly the data that was written. Acquisition started : 2018-06-25 10:03:02 (ISO format YYYY-MM-DD HH:MM:SS) Verification started: 2018-06-25 10:04:00 Ended : 2018-06-25 10:04:01 (0 hours, 0 minutes and 58 seconds) Acquisition speed : 1.57 MByte/s (0 hours, 0 minutes and 57 seconds) Verification speed : 89.27 MByte/s (0 hours, 0 minutes and 1 seconds) Generated image files and their MD5 hashes ========================================== No MD5 hashes available (configuration parameter CalcImageFileMD5 is off) MD5 Image file
Page 19 of 59
n/a AR_2012_015_91_5_image.E01
9. Now that the disk has been imaged, you must eject it from the system. Note that even if it is not mounted you will still want to do this so the operating system knows the original media is no longer available.
a. To eject: Right click on disk icon in the doc and click “Eject”
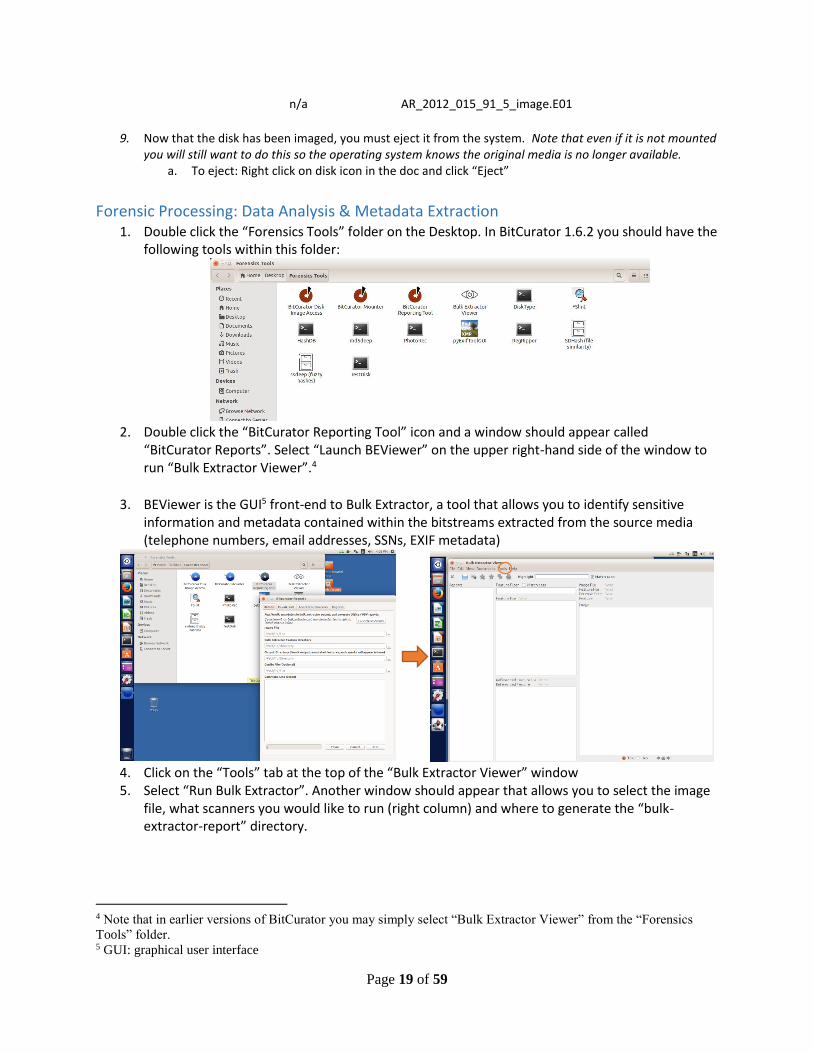
Forensic Processing: Data Analysis & Metadata Extraction 1. Double click the “Forensics Tools” folder on the Desktop. In BitCurator 1.6.2 you should have the
following tools within this folder:
2. Double click the “BitCurator Reporting Tool” icon and a window should appear called
“BitCurator Reports”. Select “Launch BEViewer” on the upper right-hand side of the window to run “Bulk Extractor Viewer”.4
3. BEViewer is the GUI5 front-end to Bulk Extractor, a tool that allows you to identify sensitive information and metadata contained within the bitstreams extracted from the source media (telephone numbers, email addresses, SSNs, EXIF metadata)
4. Click on the “Tools” tab at the top of the “Bulk Extractor Viewer” window 5. Select “Run Bulk Extractor”. Another window should appear that allows you to select the image
file, what scanners you would like to run (right column) and where to generate the “bulk-extractor-report” directory.
4 Note that in earlier versions of BitCurator you may simply select “Bulk Extractor Viewer” from the “Forensics
Tools” folder. 5 GUI: graphical user interface
Page 20 of 59
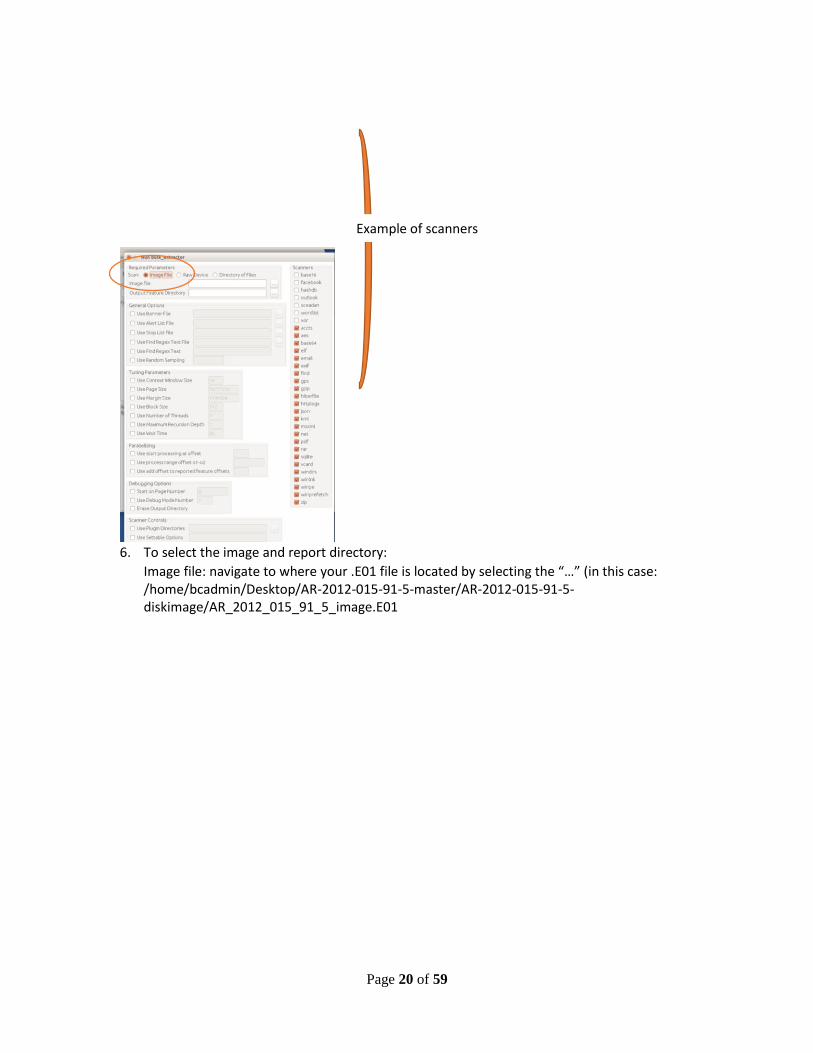
6. To select the image and report directory:
Image file: navigate to where your .E01 file is located by selecting the “…” (in this case: /home/bcadmin/Desktop/AR-2012-015-91-5-master/AR-2012-015-91-5-diskimage/AR_2012_015_91_5_image.E01
Example of scanners
Page 21 of 59
Page 22 of 59
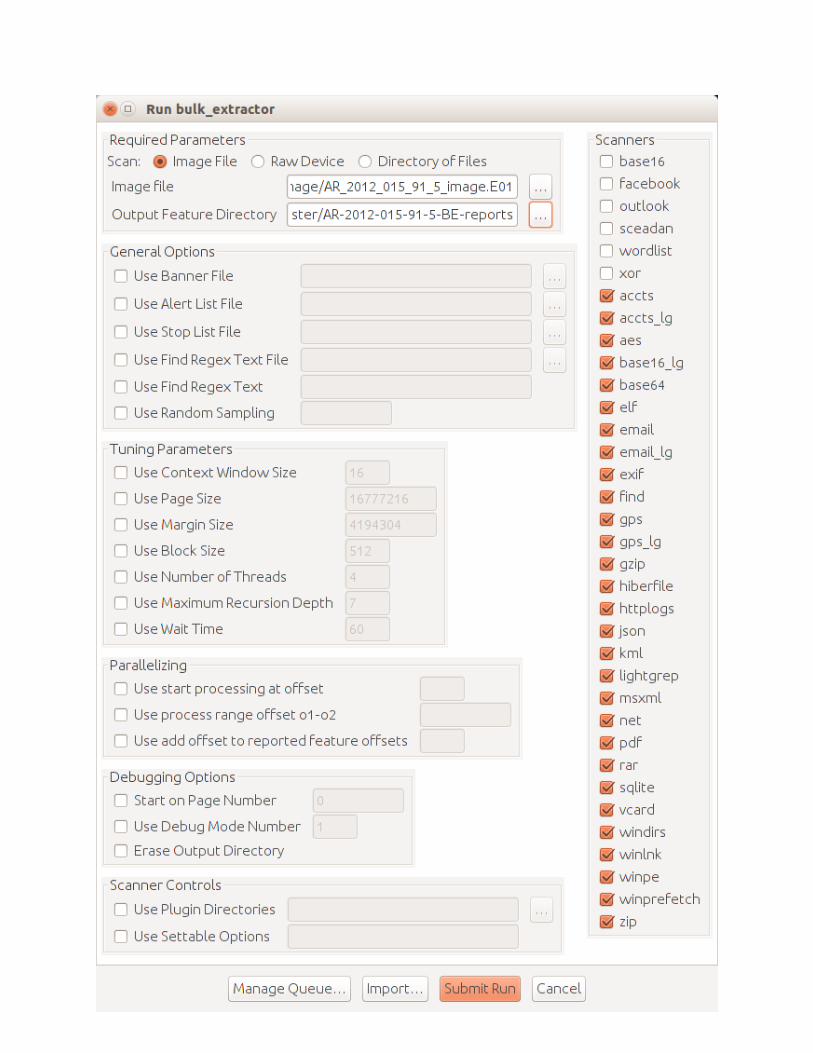
7. Output Feature Directory: This is the folder you created within your AR folder on the Desktop named using the file naming conventions in Appendix E. Navigate to your test data folder and then type “AR-2012-015-91-5-BE-reports” so the fill file path is “/home/bcadmin/Desktop/ AR-2012-015-master /AR-2012-015-91-5/AR-2012-015-91-5-BE-reports”. Note that to select a folder you must double click it, not just click and highlight the folder.
8. Click “Submit Run” at the bottom of the dialog box to run the Bulk Extractor. Note that in order to see the “Submit Run” button, the “Run bulk_extractor” window must be expanded to full screen.
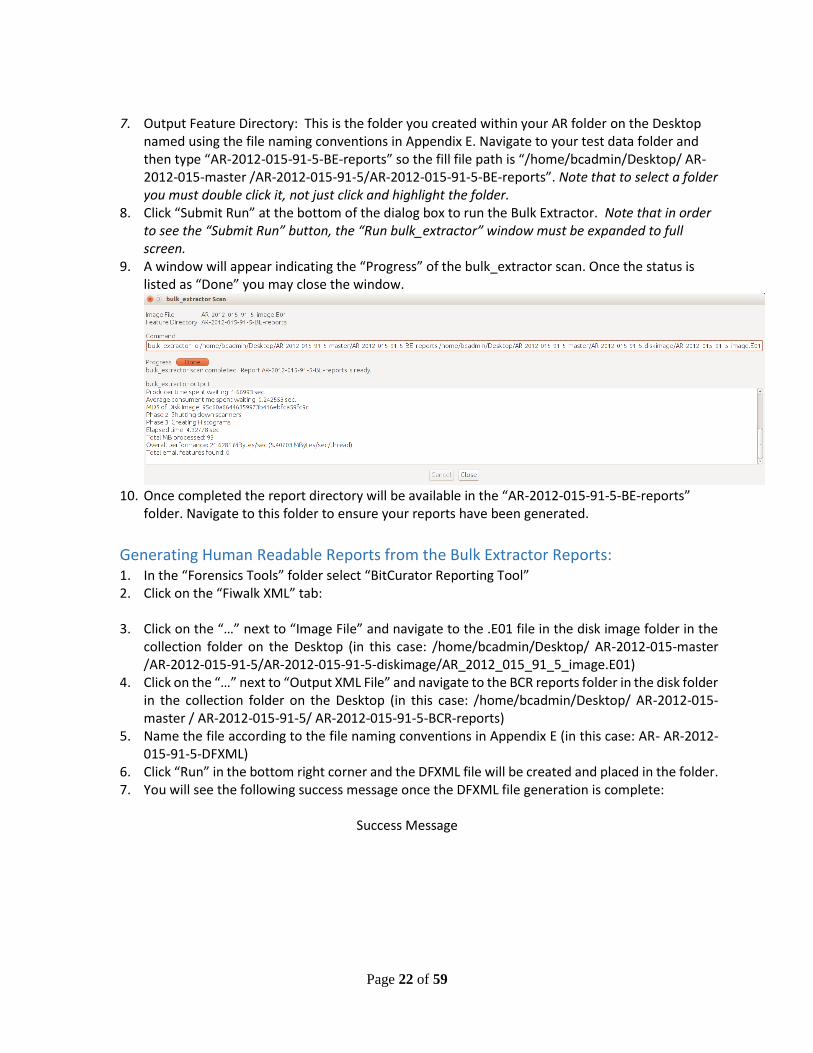
9. A window will appear indicating the “Progress” of the bulk_extractor scan. Once the status is listed as “Done” you may close the window.
10. Once completed the report directory will be available in the “AR-2012-015-91-5-BE-reports”
folder. Navigate to this folder to ensure your reports have been generated.
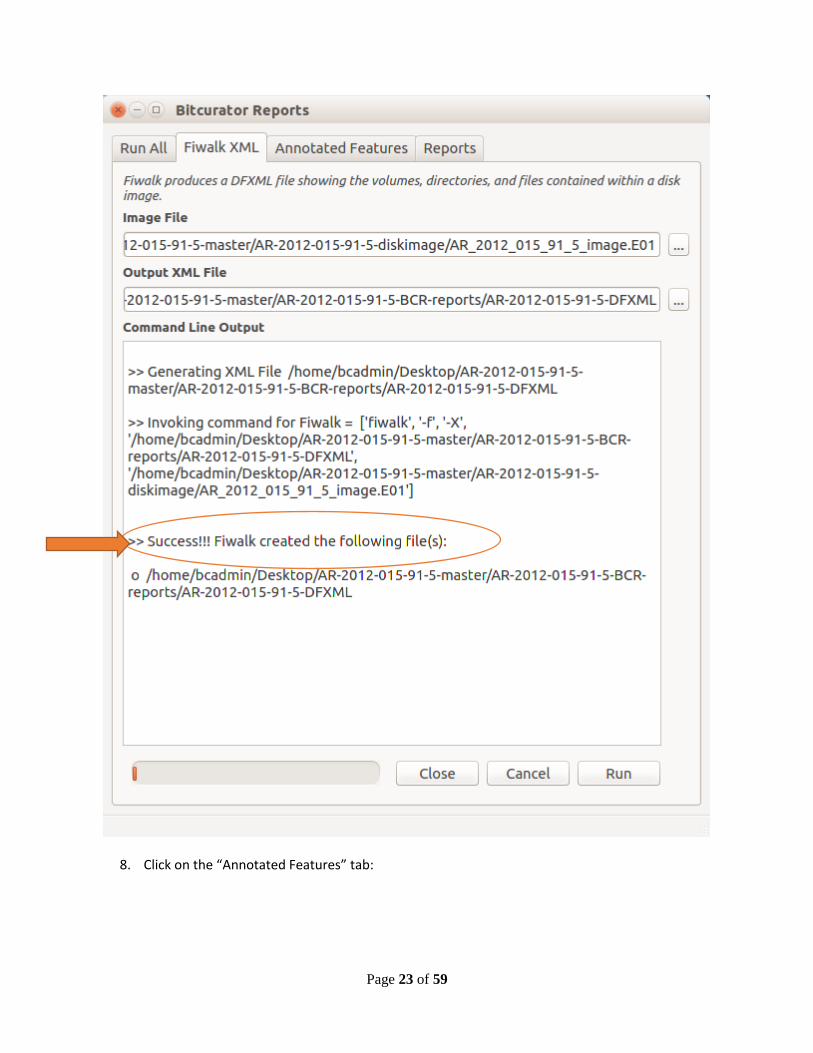
Generating Human Readable Reports from the Bulk Extractor Reports: 1. In the “Forensics Tools” folder select “BitCurator Reporting Tool” 2. Click on the “Fiwalk XML” tab:
3. Click on the “…” next to “Image File” and navigate to the .E01 file in the disk image folder in the
collection folder on the Desktop (in this case: /home/bcadmin/Desktop/ AR-2012-015-master /AR-2012-015-91-5/AR-2012-015-91-5-diskimage/AR_2012_015_91_5_image.E01)
4. Click on the “…” next to “Output XML File” and navigate to the BCR reports folder in the disk folder in the collection folder on the Desktop (in this case: /home/bcadmin/Desktop/ AR-2012-015-master / AR-2012-015-91-5/ AR-2012-015-91-5-BCR-reports)
5. Name the file according to the file naming conventions in Appendix E (in this case: AR- AR-2012-015-91-5-DFXML)
6. Click “Run” in the bottom right corner and the DFXML file will be created and placed in the folder. 7. You will see the following success message once the DFXML file generation is complete:
Success Message
Page 23 of 59
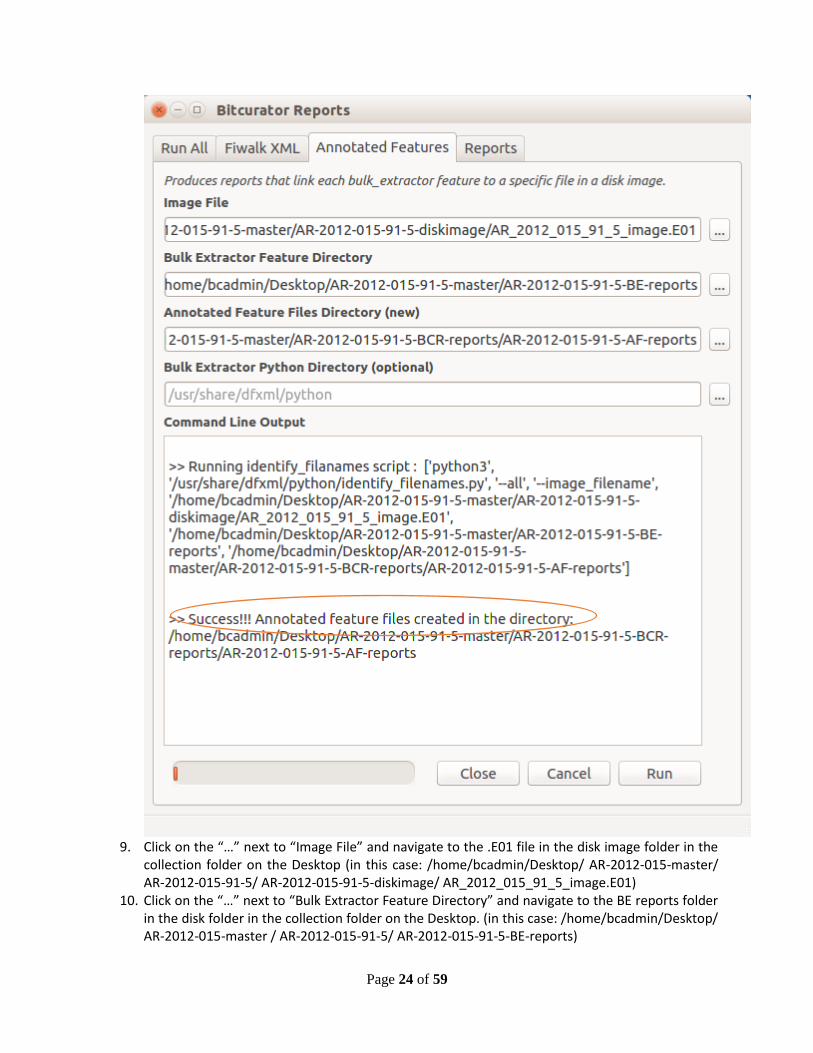
8. Click on the “Annotated Features” tab:
Page 24 of 59
9. Click on the “…” next to “Image File” and navigate to the .E01 file in the disk image folder in the
collection folder on the Desktop (in this case: /home/bcadmin/Desktop/ AR-2012-015-master/ AR-2012-015-91-5/ AR-2012-015-91-5-diskimage/ AR_2012_015_91_5_image.E01)
10. Click on the “…” next to “Bulk Extractor Feature Directory” and navigate to the BE reports folder in the disk folder in the collection folder on the Desktop. (in this case: /home/bcadmin/Desktop/ AR-2012-015-master / AR-2012-015-91-5/ AR-2012-015-91-5-BE-reports)
Page 25 of 59
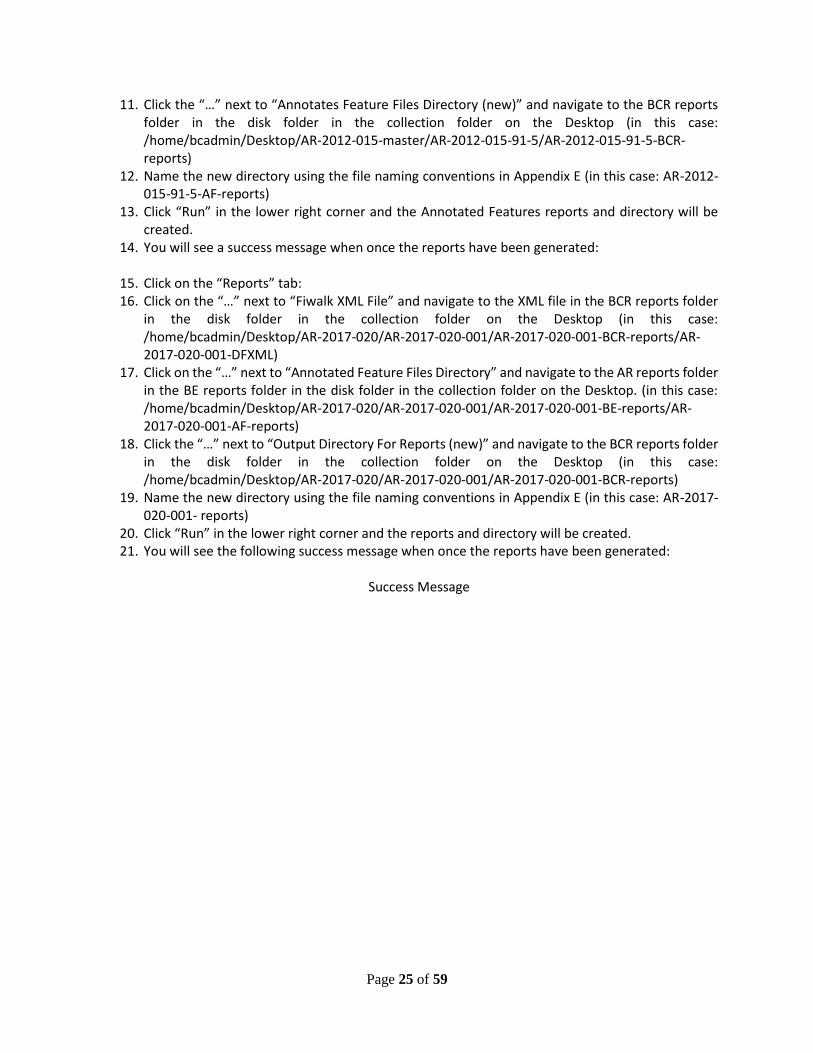
11. Click the “…” next to “Annotates Feature Files Directory (new)” and navigate to the BCR reports folder in the disk folder in the collection folder on the Desktop (in this case: /home/bcadmin/Desktop/AR-2012-015-master/AR-2012-015-91-5/AR-2012-015-91-5-BCR-reports)
12. Name the new directory using the file naming conventions in Appendix E (in this case: AR-2012-015-91-5-AF-reports)
13. Click “Run” in the lower right corner and the Annotated Features reports and directory will be created.
14. You will see a success message when once the reports have been generated:
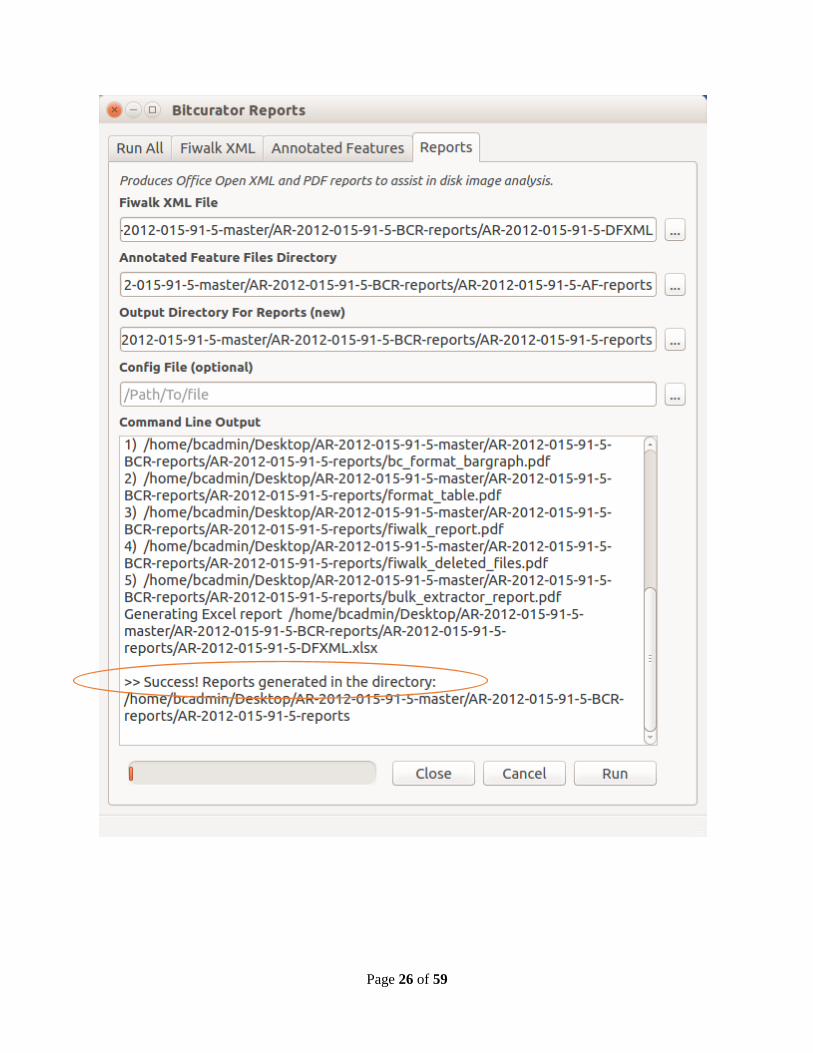
15. Click on the “Reports” tab: 16. Click on the “…” next to “Fiwalk XML File” and navigate to the XML file in the BCR reports folder
in the disk folder in the collection folder on the Desktop (in this case: /home/bcadmin/Desktop/AR-2017-020/AR-2017-020-001/AR-2017-020-001-BCR-reports/AR-2017-020-001-DFXML)
17. Click on the “…” next to “Annotated Feature Files Directory” and navigate to the AR reports folder in the BE reports folder in the disk folder in the collection folder on the Desktop. (in this case: /home/bcadmin/Desktop/AR-2017-020/AR-2017-020-001/AR-2017-020-001-BE-reports/AR-2017-020-001-AF-reports)
18. Click the “…” next to “Output Directory For Reports (new)” and navigate to the BCR reports folder in the disk folder in the collection folder on the Desktop (in this case: /home/bcadmin/Desktop/AR-2017-020/AR-2017-020-001/AR-2017-020-001-BCR-reports)
19. Name the new directory using the file naming conventions in Appendix E (in this case: AR-2017-020-001- reports)
20. Click “Run” in the lower right corner and the reports and directory will be created. 21. You will see the following success message when once the reports have been generated:
Success Message
Page 26 of 59
Page 27 of 59
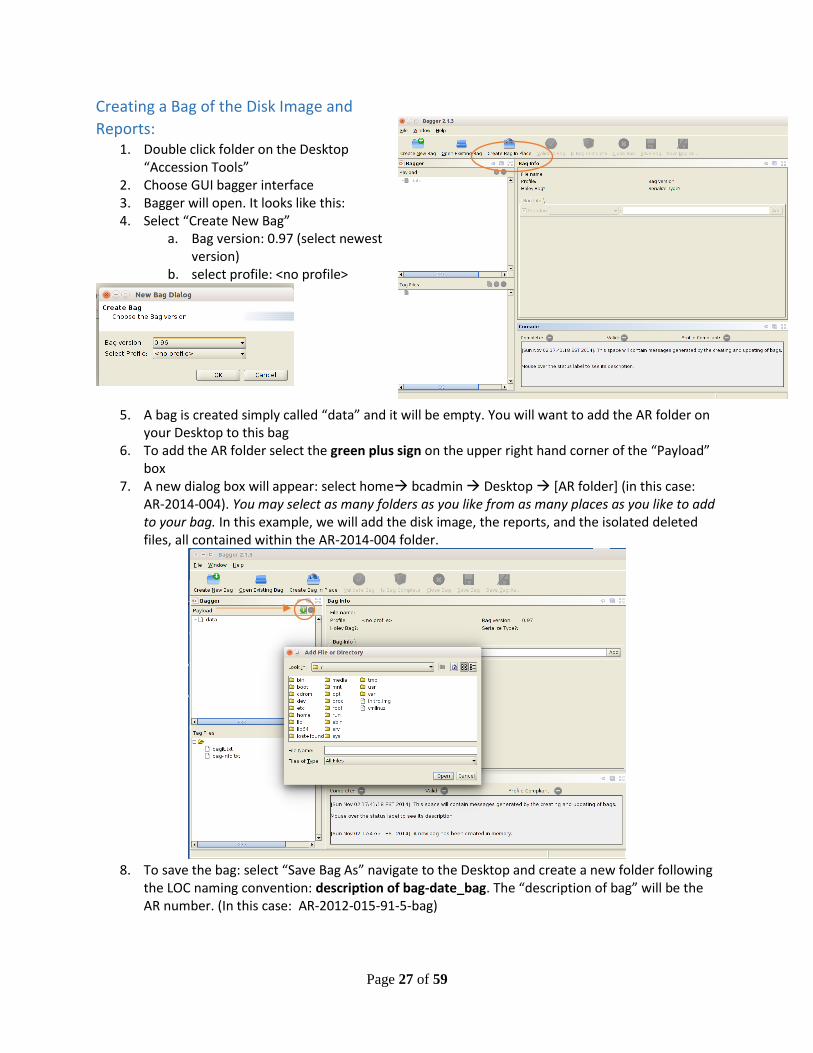
Creating a Bag of the Disk Image and
Reports: 1. Double click folder on the Desktop
“Accession Tools” 2. Choose GUI bagger interface 3. Bagger will open. It looks like this: 4. Select “Create New Bag”
a. Bag version: 0.97 (select newest version)
b. select profile: <no profile>
5. A bag is created simply called “data” and it will be empty. You will want to add the AR folder on your Desktop to this bag
6. To add the AR folder select the green plus sign on the upper right hand corner of the “Payload” box
7. A new dialog box will appear: select home bcadmin Desktop [AR folder] (in this case: AR-2014-004). You may select as many folders as you like from as many places as you like to add to your bag. In this example, we will add the disk image, the reports, and the isolated deleted files, all contained within the AR-2014-004 folder.
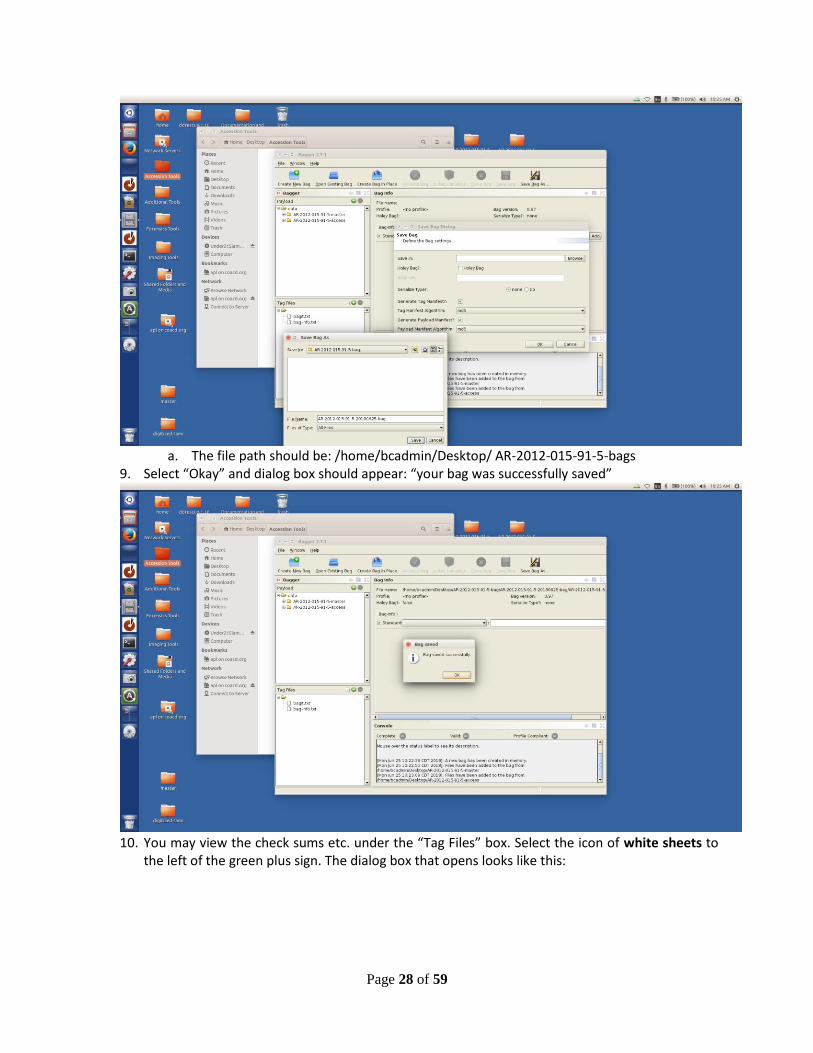
8. To save the bag: select “Save Bag As” navigate to the Desktop and create a new folder following
the LOC naming convention: description of bag-date_bag. The “description of bag” will be the AR number. (In this case: AR-2012-015-91-5-bag)
Page 28 of 59
a. The file path should be: /home/bcadmin/Desktop/ AR-2012-015-91-5-bags
9. Select “Okay” and dialog box should appear: “your bag was successfully saved”
10. You may view the check sums etc. under the “Tag Files” box. Select the icon of white sheets to
the left of the green plus sign. The dialog box that opens looks like this:
Page 29 of 59
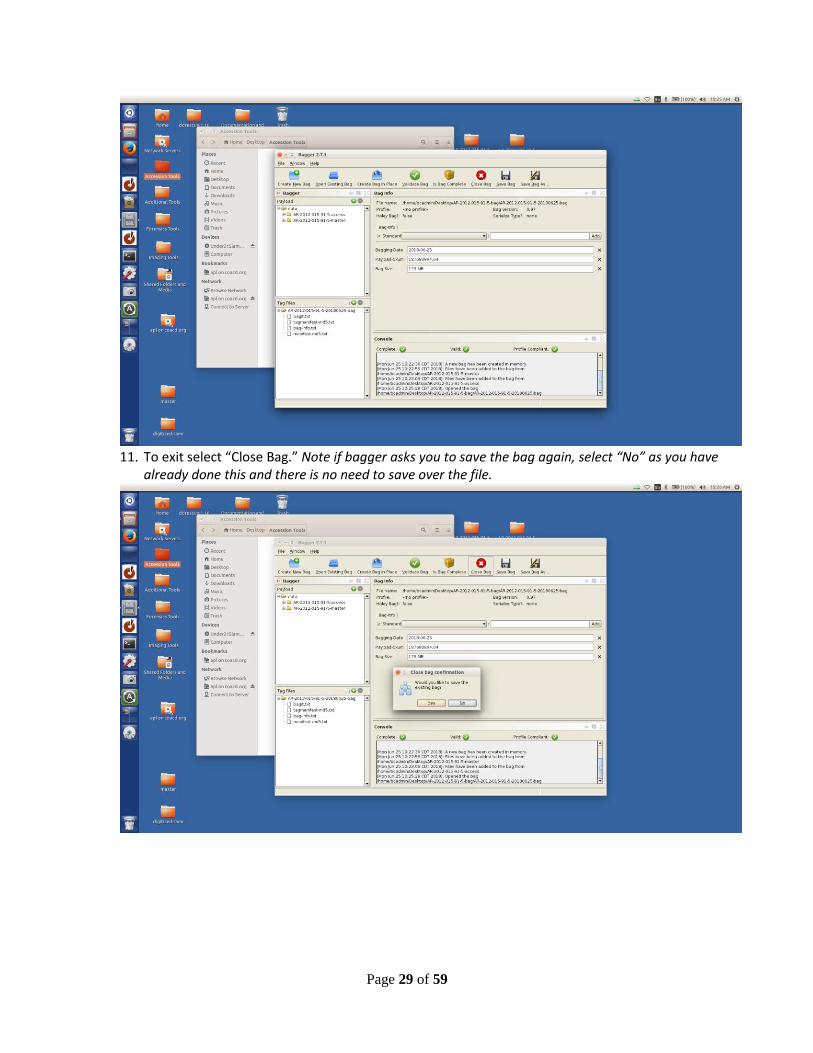
11. To exit select “Close Bag.” Note if bagger asks you to save the bag again, select “No” as you have
already done this and there is no need to save over the file.
Page 30 of 59
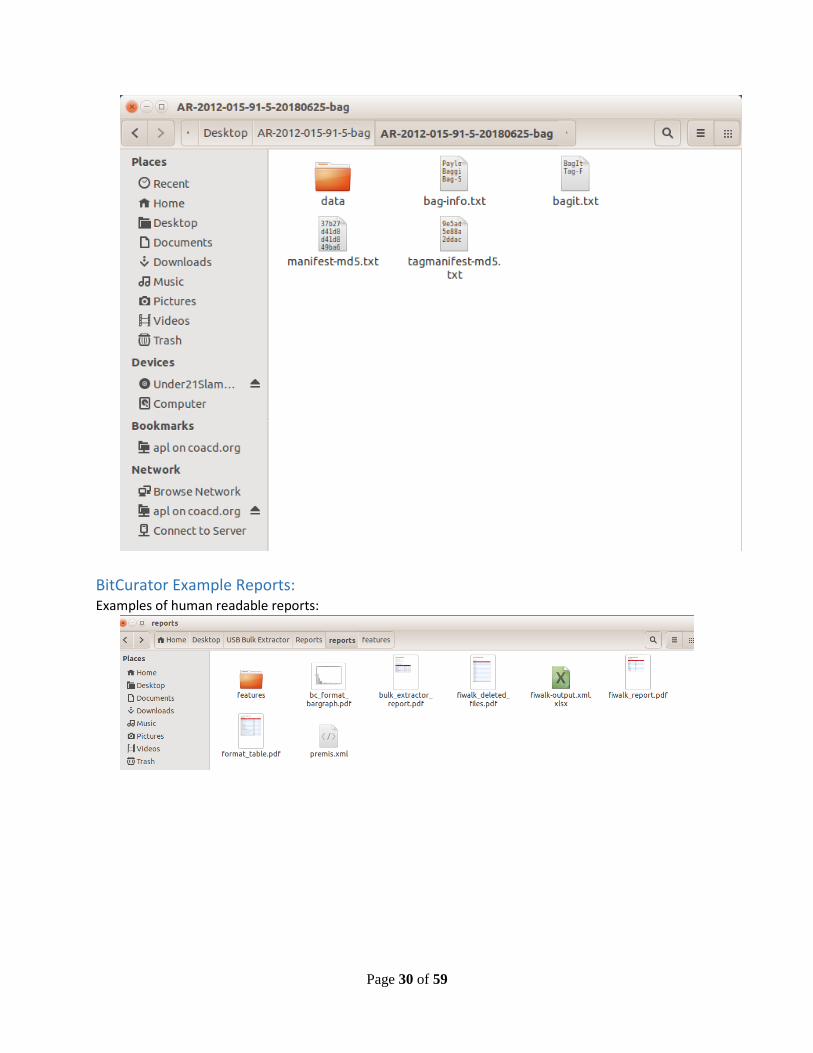
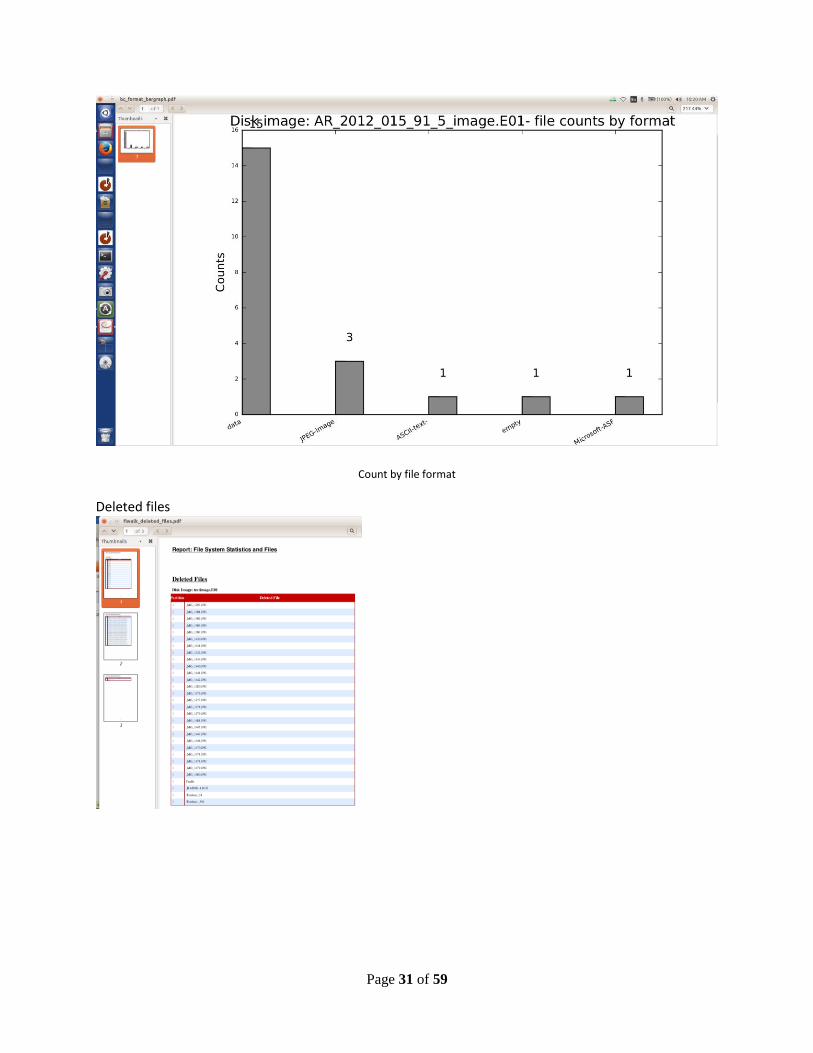
BitCurator Example Reports: Examples of human readable reports:
Page 31 of 59
Count by file format
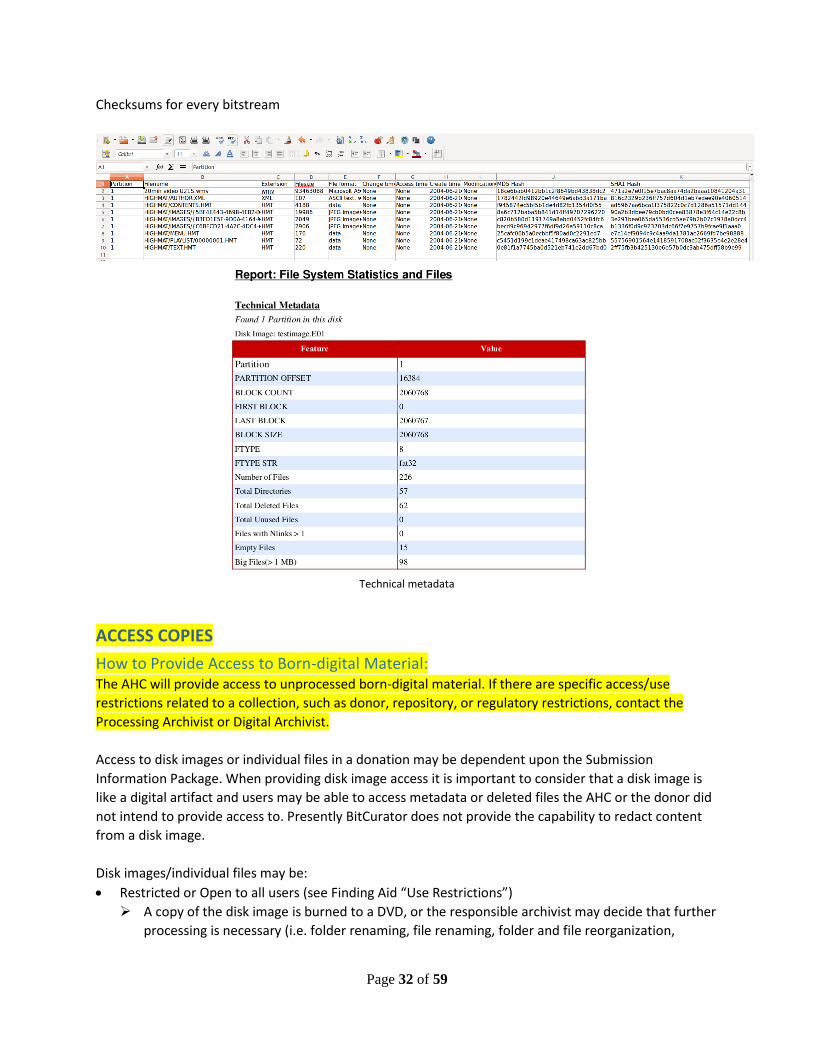
Deleted files
Page 32 of 59
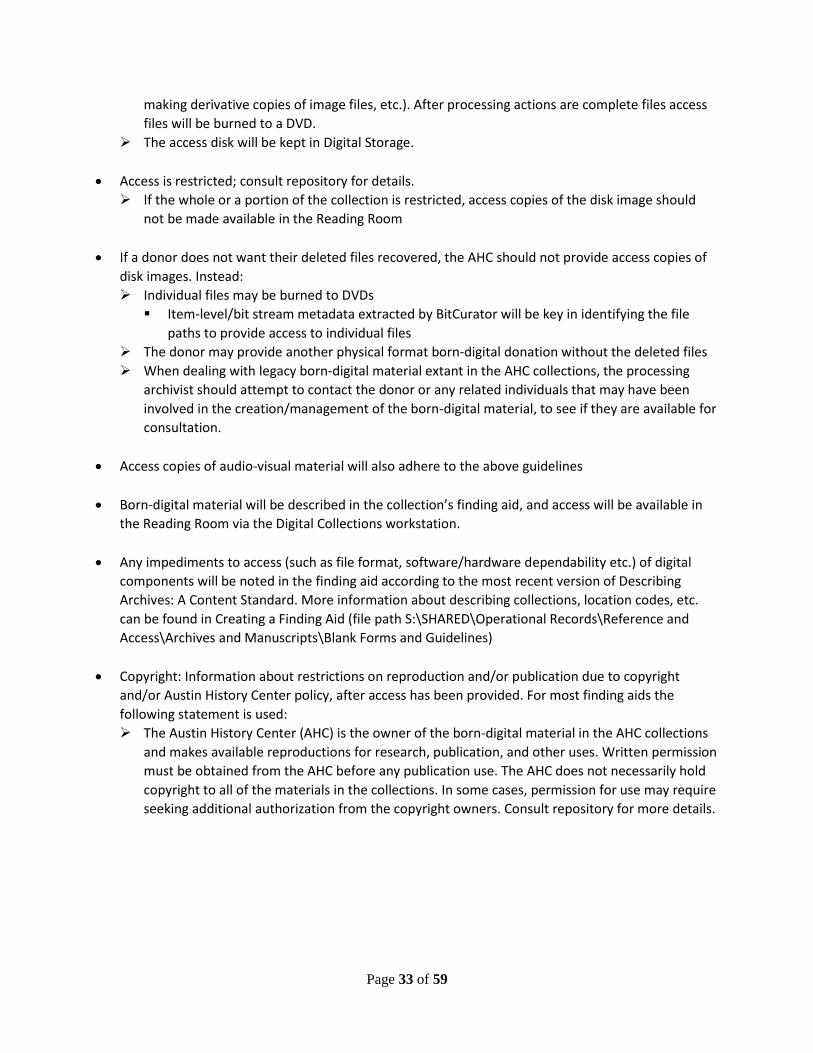
Checksums for every bitstream
Technical metadata
ACCESS COPIES
How to Provide Access to Born-digital Material: The AHC will provide access to unprocessed born-digital material. If there are specific access/use
restrictions related to a collection, such as donor, repository, or regulatory restrictions, contact the
Processing Archivist or Digital Archivist.
Access to disk images or individual files in a donation may be dependent upon the Submission
Information Package. When providing disk image access it is important to consider that a disk image is
like a digital artifact and users may be able to access metadata or deleted files the AHC or the donor did
not intend to provide access to. Presently BitCurator does not provide the capability to redact content
from a disk image.
Disk images/individual files may be:
Restricted or Open to all users (see Finding Aid “Use Restrictions”)
A copy of the disk image is burned to a DVD, or the responsible archivist may decide that further
processing is necessary (i.e. folder renaming, file renaming, folder and file reorganization,
Page 33 of 59
making derivative copies of image files, etc.). After processing actions are complete files access
files will be burned to a DVD.
The access disk will be kept in Digital Storage.
Access is restricted; consult repository for details.
If the whole or a portion of the collection is restricted, access copies of the disk image should
not be made available in the Reading Room
If a donor does not want their deleted files recovered, the AHC should not provide access copies of
disk images. Instead:
Individual files may be burned to DVDs
Item-level/bit stream metadata extracted by BitCurator will be key in identifying the file
paths to provide access to individual files
The donor may provide another physical format born-digital donation without the deleted files
When dealing with legacy born-digital material extant in the AHC collections, the processing
archivist should attempt to contact the donor or any related individuals that may have been
involved in the creation/management of the born-digital material, to see if they are available for
consultation.
Access copies of audio-visual material will also adhere to the above guidelines
Born-digital material will be described in the collection’s finding aid, and access will be available in
the Reading Room via the Digital Collections workstation.
Any impediments to access (such as file format, software/hardware dependability etc.) of digital
components will be noted in the finding aid according to the most recent version of Describing
Archives: A Content Standard. More information about describing collections, location codes, etc.
can be found in Creating a Finding Aid (file path S:\SHARED\Operational Records\Reference and
Access\Archives and Manuscripts\Blank Forms and Guidelines)
Copyright: Information about restrictions on reproduction and/or publication due to copyright
and/or Austin History Center policy, after access has been provided. For most finding aids the
following statement is used:
The Austin History Center (AHC) is the owner of the born-digital material in the AHC collections
and makes available reproductions for research, publication, and other uses. Written permission
must be obtained from the AHC before any publication use. The AHC does not necessarily hold
copyright to all of the materials in the collections. In some cases, permission for use may require
seeking additional authorization from the copyright owners. Consult repository for more details.

Page 34 of 59
APPENDIX A:
SIP for City of Austin Departments (COA):
Submission Information Package Agreement for City of Austin Department
Electronic Records
In order for the Austin History Center (AHC) to ingest, preserve, and distribute your submission,
your reporting of the following information is necessary. Please sign and return this form to the
AHC.
PLEASE FILL OUT THE FOLLOWING SECTIONS:
The following agreement is between __________________________ and the AHC for the
electronic records described below and all individual collections and sub-collections resulting
from this submission agreement.
I. Proposed data sets for archiving
Creator/Department:
Submitter:
Business Function/Files Description:
Retention: Archival Review ☐ Permanent☐ COA Record Series #
Date(s) Created:
Date of Last Modification/Use:
File Types: Word ☐ Excel ☐ PowerPoint ☐ Access ☐ PDF ☐ SharePoint ☐ .txt ☐ .db☐
.csv ☐ .tiff ☐ .jpg ☐ .wav ☐ .mp3 ☐ .wma ☐ .aiff ☐ .mpa ☐ .avi ☐ .flv ☐ .mov ☐ .mp4
☐ .mpg ☐ .wmv ☐ Other ____________________________________________________
Page 35 of 59
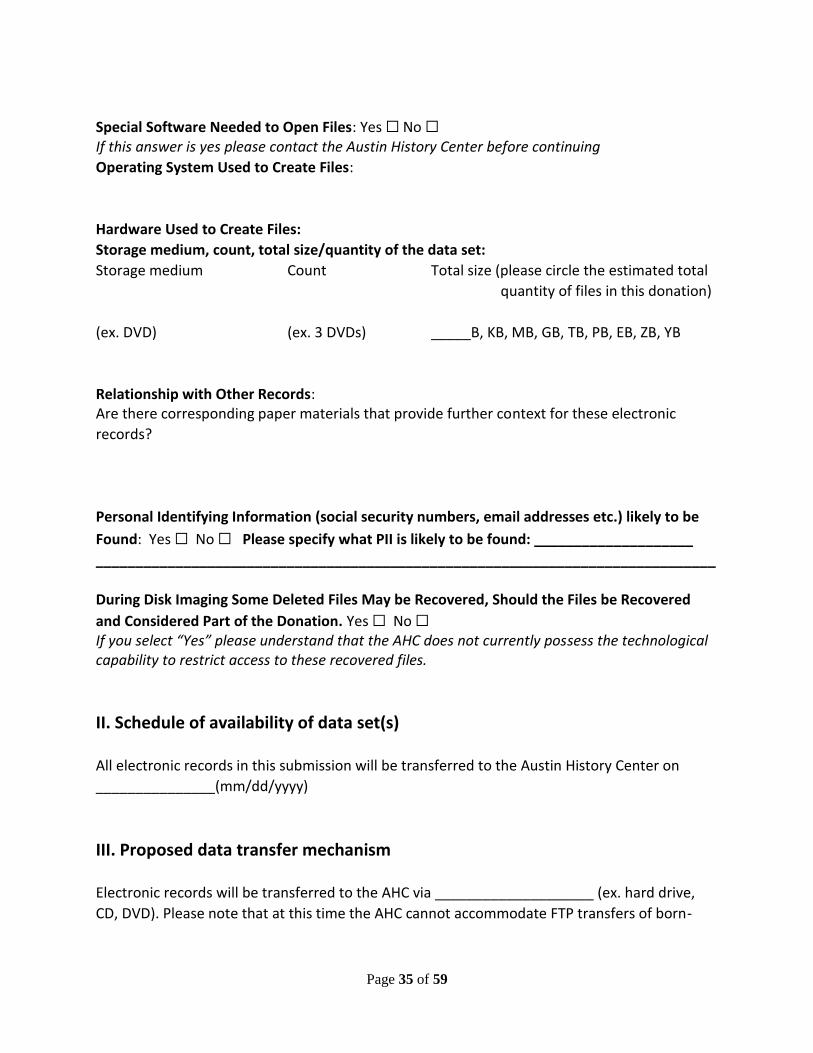
Special Software Needed to Open Files: Yes ☐ No ☐ If this answer is yes please contact the Austin History Center before continuing
Operating System Used to Create Files:
Hardware Used to Create Files:
Storage medium, count, total size/quantity of the data set:
Storage medium Count Total size (please circle the estimated total
quantity of files in this donation)
(ex. DVD) (ex. 3 DVDs) _____B, KB, MB, GB, TB, PB, EB, ZB, YB
Relationship with Other Records: Are there corresponding paper materials that provide further context for these electronic
records?
Personal Identifying Information (social security numbers, email addresses etc.) likely to be
Found: Yes ☐ No ☐ Please specify what PII is likely to be found: ____________________
______________________________________________________________________________
During Disk Imaging Some Deleted Files May be Recovered, Should the Files be Recovered
and Considered Part of the Donation. Yes ☐ No ☐ If you select “Yes” please understand that the AHC does not currently possess the technological capability to restrict access to these recovered files.
II. Schedule of availability of data set(s)
All electronic records in this submission will be transferred to the Austin History Center on
_______________(mm/dd/yyyy)
III. Proposed data transfer mechanism
Electronic records will be transferred to the AHC via ____________________ (ex. hard drive,
CD, DVD). Please note that at this time the AHC cannot accommodate FTP transfers of born-
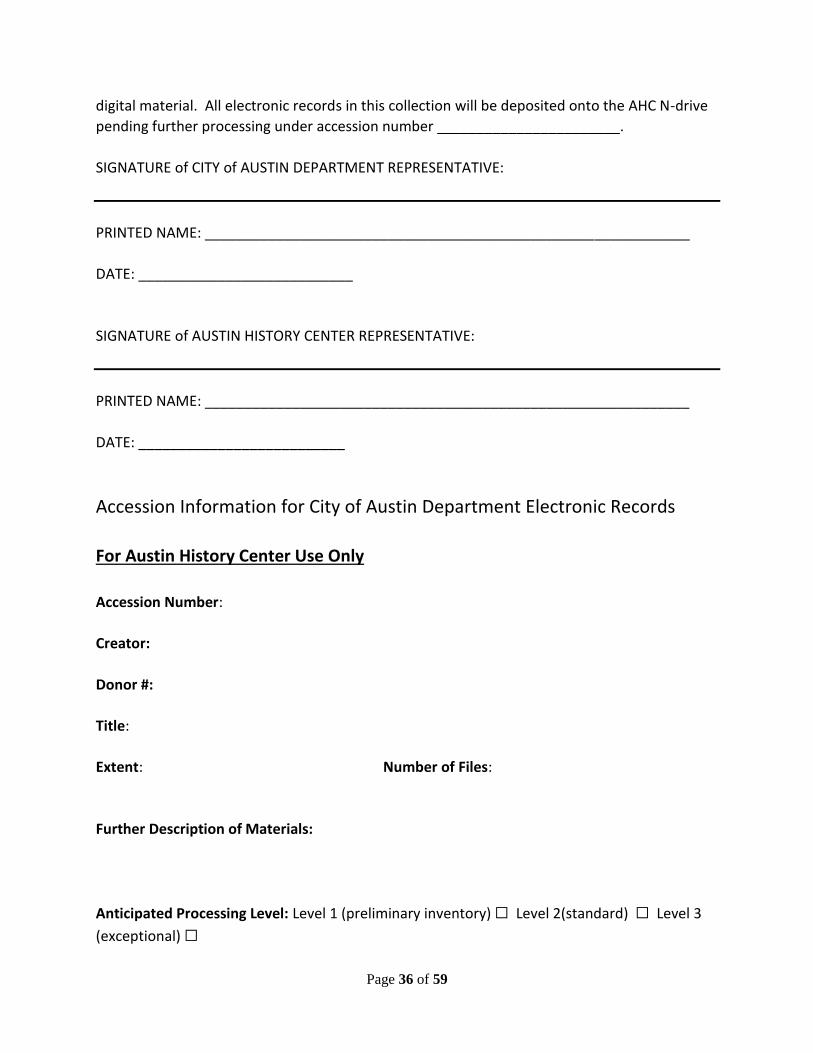
Page 36 of 59
digital material. All electronic records in this collection will be deposited onto the AHC N-drive
pending further processing under accession number _______________________.
SIGNATURE of CITY of AUSTIN DEPARTMENT REPRESENTATIVE:
PRINTED NAME: _____________________________________________________________
DATE: ___________________________
SIGNATURE of AUSTIN HISTORY CENTER REPRESENTATIVE:
PRINTED NAME: _____________________________________________________________
DATE: __________________________
Accession Information for City of Austin Department Electronic Records
For Austin History Center Use Only
Accession Number:
Creator:
Donor #:
Title:
Extent: Number of Files:
Further Description of Materials:
Anticipated Processing Level: Level 1 (preliminary inventory) ☐ Level 2(standard) ☐ Level 3
(exceptional) ☐
Page 37 of 59
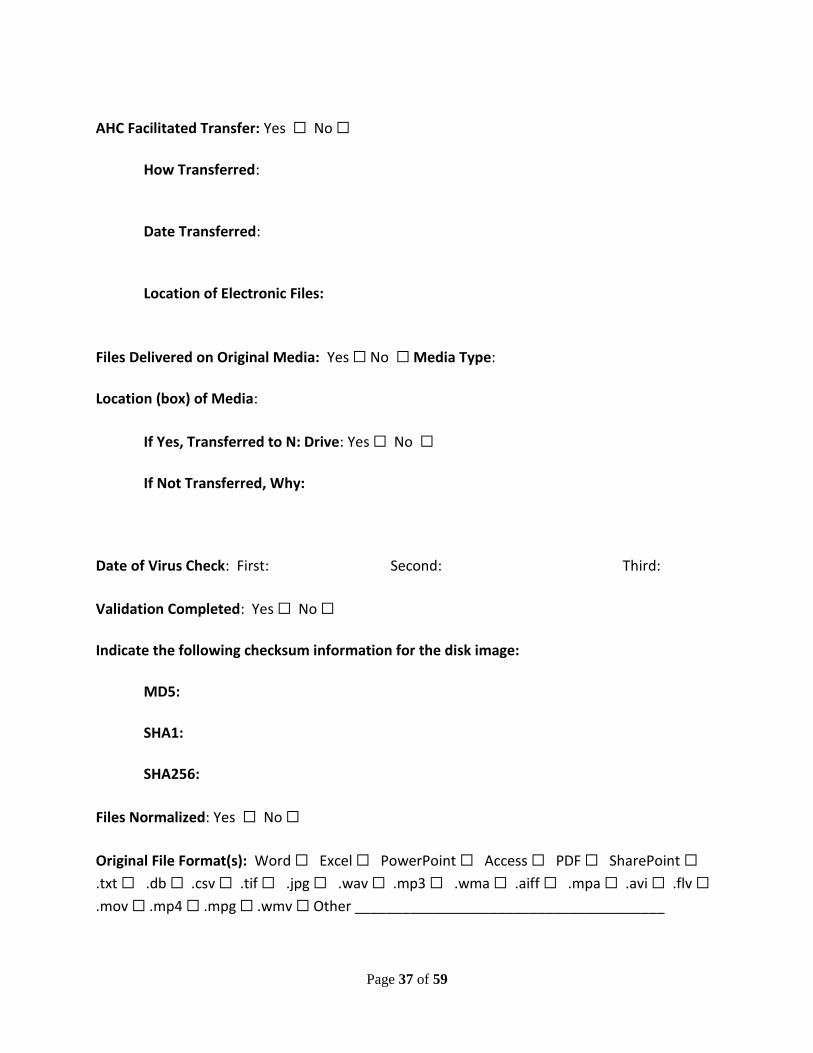
AHC Facilitated Transfer: Yes ☐ No ☐
How Transferred:
Date Transferred:
Location of Electronic Files:
Files Delivered on Original Media: Yes ☐ No ☐ Media Type:
Location (box) of Media:
If Yes, Transferred to N: Drive: Yes ☐ No ☐
If Not Transferred, Why:
Date of Virus Check: First: Second: Third:
Validation Completed: Yes ☐ No ☐
Indicate the following checksum information for the disk image:
MD5:
SHA1:
SHA256:
Files Normalized: Yes ☐ No ☐
Original File Format(s): Word ☐ Excel ☐ PowerPoint ☐ Access ☐ PDF ☐ SharePoint ☐
.txt ☐ .db ☐ .csv ☐ .tif ☐ .jpg ☐ .wav ☐ .mp3 ☐ .wma ☐ .aiff ☐ .mpa ☐ .avi ☐ .flv ☐
.mov ☐ .mp4 ☐ .mpg ☐ .wmv ☐ Other _______________________________________
Page 38 of 59
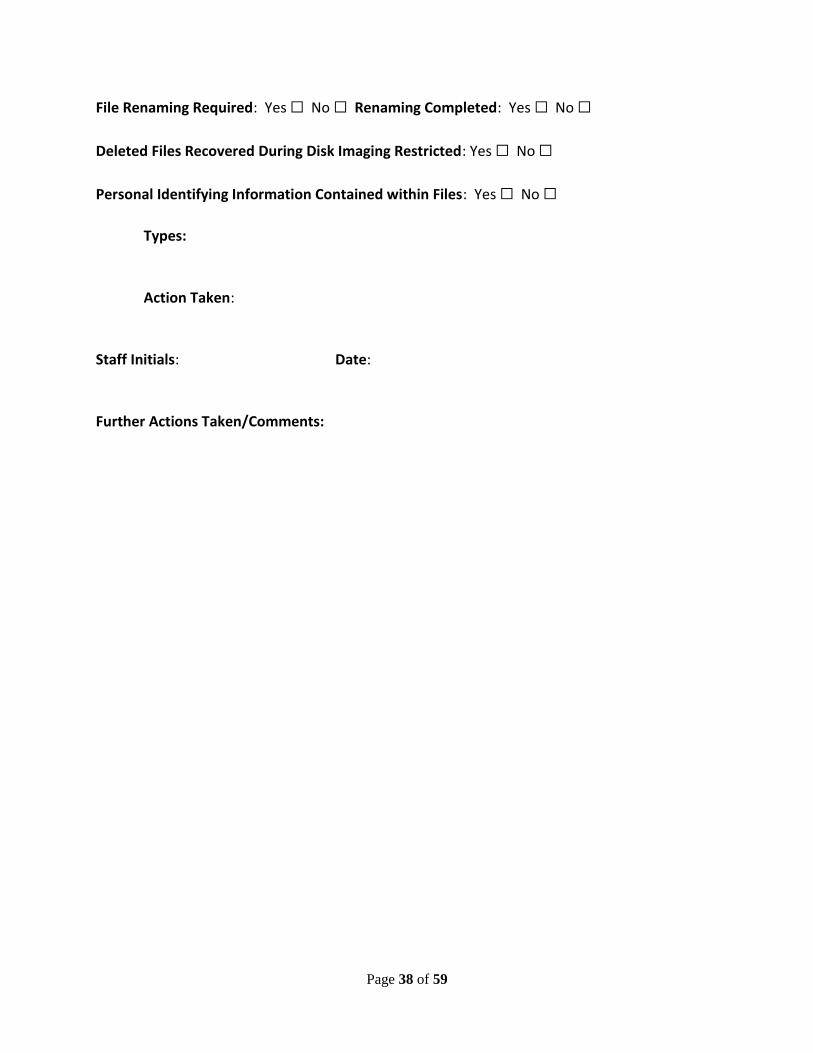
File Renaming Required: Yes ☐ No ☐ Renaming Completed: Yes ☐ No ☐
Deleted Files Recovered During Disk Imaging Restricted: Yes ☐ No ☐
Personal Identifying Information Contained within Files: Yes ☐ No ☐
Types:
Action Taken:
Staff Initials: Date:
Further Actions Taken/Comments:
Page 39 of 59
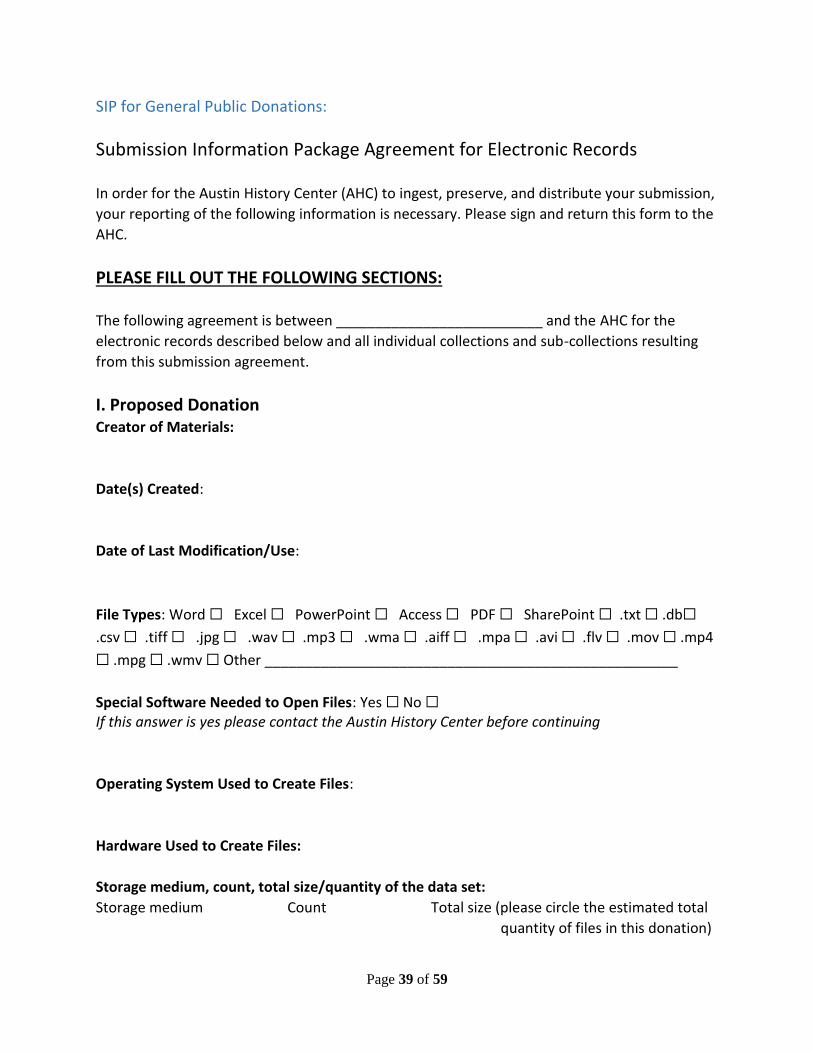
SIP for General Public Donations:
Submission Information Package Agreement for Electronic Records
In order for the Austin History Center (AHC) to ingest, preserve, and distribute your submission,
your reporting of the following information is necessary. Please sign and return this form to the
AHC.
PLEASE FILL OUT THE FOLLOWING SECTIONS:
The following agreement is between __________________________ and the AHC for the
electronic records described below and all individual collections and sub-collections resulting
from this submission agreement.
I. Proposed Donation Creator of Materials:
Date(s) Created:
Date of Last Modification/Use:
File Types: Word ☐ Excel ☐ PowerPoint ☐ Access ☐ PDF ☐ SharePoint ☐ .txt ☐ .db☐
.csv ☐ .tiff ☐ .jpg ☐ .wav ☐ .mp3 ☐ .wma ☐ .aiff ☐ .mpa ☐ .avi ☐ .flv ☐ .mov ☐ .mp4
☐ .mpg ☐ .wmv ☐ Other ____________________________________________________
Special Software Needed to Open Files: Yes ☐ No ☐ If this answer is yes please contact the Austin History Center before continuing
Operating System Used to Create Files:
Hardware Used to Create Files:
Storage medium, count, total size/quantity of the data set:
Storage medium Count Total size (please circle the estimated total
quantity of files in this donation)
Page 40 of 59
(ex. DVD) (ex. 3 DVDs) _____B, KB, MB, GB, TB, PB, EB, ZB, YB
Relationship with Other Records: Are there corresponding paper materials that provide further context for these electronic
records?
Personal Identifying Information (social security numbers, email addresses etc.) likely to be
Found: Yes ☐ No ☐ Please specify what is likely to be found: _______________________
______________________________________________________________________________
During Disk Imaging Some Deleted Files May be Recovered, Should the Files be Recovered
and Considered Part of the Donation. Yes ☐ No ☐ If you select “Yes” please understand that the AHC does not currently possess the technological capability to restrict access to these recovered files.
Access Restrictions:
II. Proposed Transfer Mechanism and Schedule of availability
Electronic records will be transferred to the AHC via ____________________ (ex. hard drive,
CD, DVD). All electronic records in this submission will be transferred to the AHC on
_______________(mm/dd/yyyy)
III. Withdrawal Policy
If one or more of the donated items do not fall within the AHC’s collection guidelines, the
repository will: Dispose of or transfer the materials to the appropriate location or institution ☐
Return the material to you ☐
IV. Copyright Interests Please read and initial one option:
___ I represent and warrant that I am the owner of the copyright in all or some of the materials
I am donating. (Pleas indicate below the materials for which you control copyright and the
nature of your copyright control, e.g. sole/joint owner, heir, literary executor, trustee, etc.)
______________________________________________________________________________
______________________________________________________________________________
______________________________________________________________________________
Page 41 of 59
___ I do not own copyright in any of the donated materials
___ To the best of my knowledge the copyright interests are controlled by:
Name: __________________________________________________________________
Address: ________________________________________________________________
Telephone: ____________________________ Email: ____________________________
V. Copyright Conveyance If you have indicated that you own copyright in some or all of the donated materials, please
initial one option:
___ I wish to transfer, convey and assign to the AHC and the City all copyright interests,
including renewals and extensions to the copyrights, of the above-described donated materials.
___ I do not wish to transfer or convey any of the copyright I own to the AHC or the City, but I
give permission for the AHC and the City to make copies of the materials for AHC users
according to the Fair Use Doctrine and to use the materials in AHC-sponsored exhibitions,
displays and publications. Users wishing to publish repoductions may do so with the restrictions
explained in restriction code ___ (indicate code number).
___ I wish to retain copyright until (indicate date) ____________ after which time all copyright
interests, including renewals and extensions to the copyrights, of the above-described donated
materials will be transferred, conveyed and assigned to the AHC and the City. Until that time
users wishing to publish reproductions may do so with the restrictions explained in restriction
code ___ (indicate code number).
I represent that I am the sole owner of the materials described above and that I have full right and authority to
donate these materials to the Austin History Center (“AHC”). I hereby donate to the AHC all rights, title, and
interest that I possess to the materials described above. I understand that AHC policies that the material may be
made available for research on an unrestricted basis. I understand that the donations I am making are permanent
donations. The City Of Austin does not advise donors on tax matters and suggests that donors direct any questions
regarding donations as charitable contributions to the donor’s tax advisor or an office of the Internal Revenue
Service. The City Of Austin does not appraise donations but will make the materials available for appraisal upon
the request of the donor.
DONOR’S SIGNATURE:
PRINTED NAME: _____________________________________________________________
DATE: ___________________________
Page 42 of 59
AUSTIN HISTORY CENTER REPRESENTATIVE’S SIGNATURE:
PRINTED NAME: _____________________________________________________________
DATE: ___________________________
Accession Information for General Public Donations of Electronic Records
For Austin History Center Use Only
Accession Number:
Creator:
Donor #:
Title:
Extent: Number of Files:
Further Description of Materials:
Anticipated Processing Level: Level 1 (preliminary inventory) ☐ Level 2(standard) ☐ Level 3
(exceptional) ☐
AHC Facilitated Transfer: Yes ☐ No ☐
How Transferred:
Date Transferred:
Location of Electronic Files:
Page 43 of 59
Files Delivered on Original Media: Yes ☐ No ☐ Media Type:
Location (box) of Media:
If Yes, Transferred to N: Drive: Yes ☐ No ☐
If Not Transferred, Why:
Date of Virus Check: First: Second: Third:
Validation Completed: Yes ☐ No ☐
Indicate the following checksum information for the disk image:
MD5:
SHA1:
SHA256:
Files Normalized: Yes ☐ No ☐
Original File Format(s): Word ☐ Excel ☐ PowerPoint ☐ Access ☐ PDF ☐ SharePoint ☐
.txt ☐ .db ☐ .csv ☐ .tif ☐ .jpg ☐ .wav ☐ .mp3 ☐ .wma ☐ .aiff ☐ .mpa ☐ .avi ☐ .flv ☐
.mov ☐ .mp4 ☐ .mpg ☐ .wmv ☐ Other _______________________________________
File Renaming Required: Yes ☐ No ☐ Renaming Completed: Yes ☐ No ☐
Deleted Files Recovered During Disk Imaging Restricted: Yes ☐ No ☐
Personal Identifying Information Contained within Files: Yes ☐ No ☐
Types:
Action Taken:

Page 44 of 59
Staff Initials: Date:
Further Actions Taken/Comments:
**The BitCurator Workflow may be accessed here: ________**(give the file path on the Shared drive
where the workflow will be stored)
Page 45 of 59
Deed of Gift for General Public Donations
Page 46 of 59
Page 47 of 59
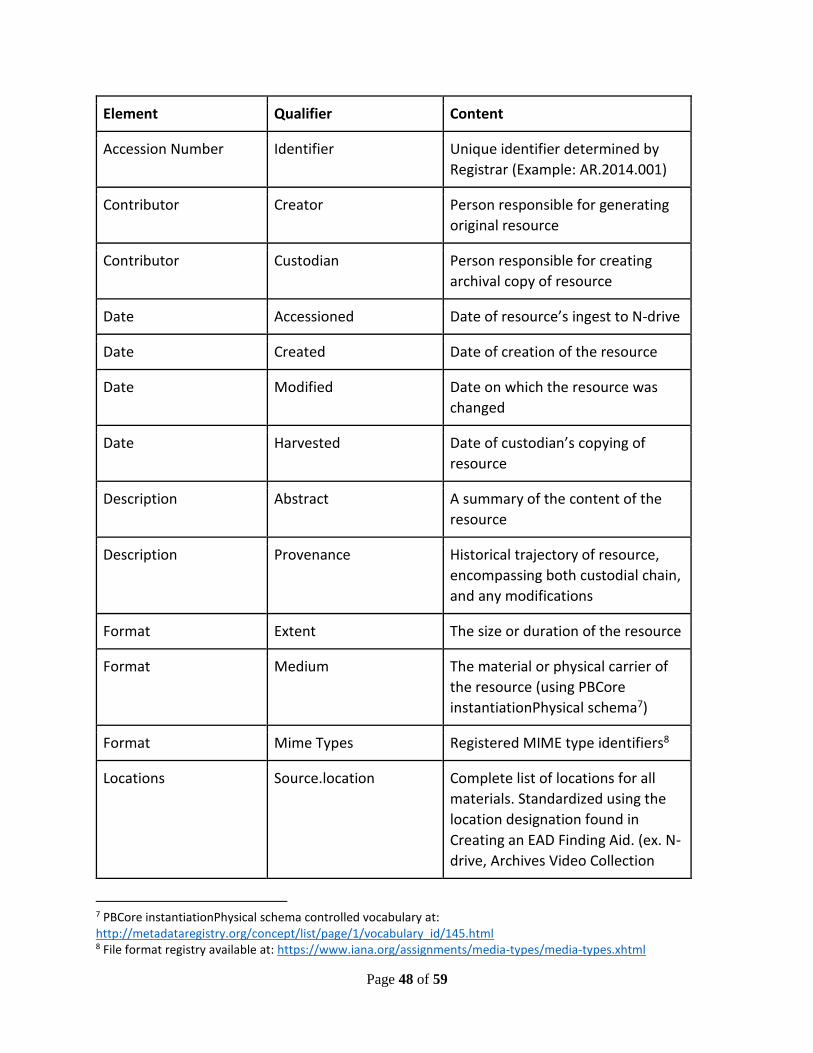
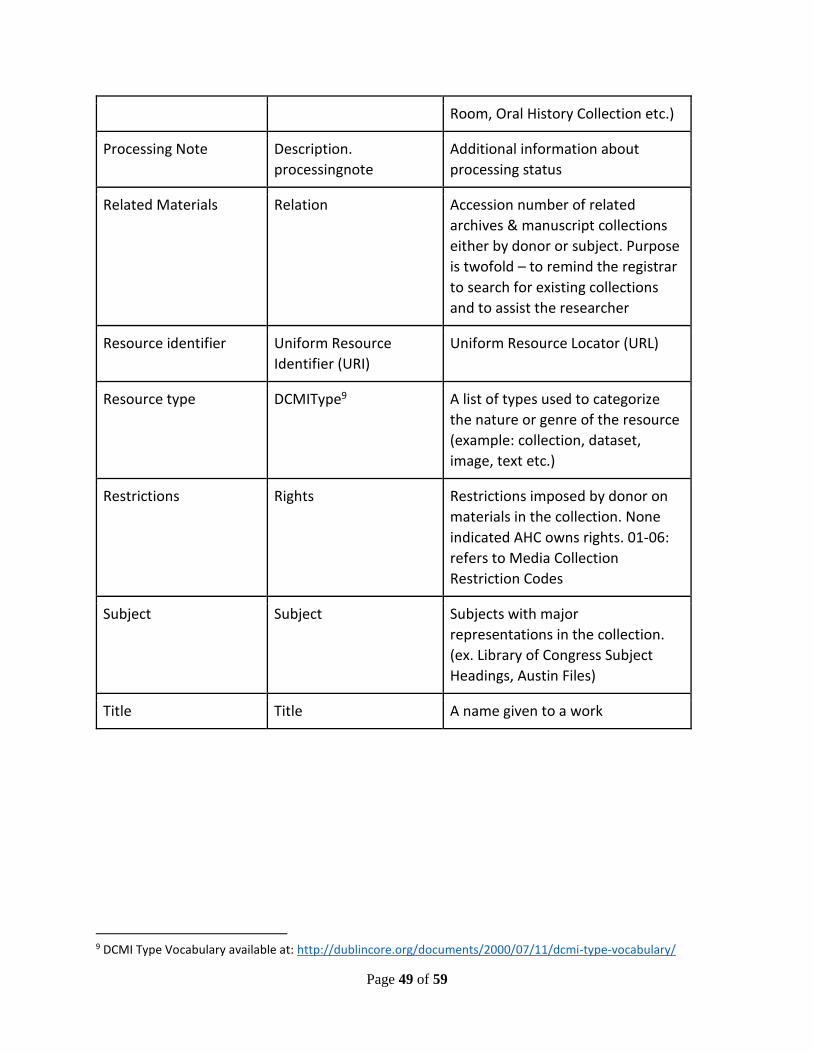
APPENDIX B: Below is the Dublin Core Metadata Table to be used by AHC staff when completing the SIP
Dublin Core Metadata6 Required (if known and/or available):
6 *Qualified Dublin Core available at: http://dublincore.org/documents/2000/07/11/dcmes-qualifiers/
Page 48 of 59
Element Qualifier Content
Accession Number Identifier Unique identifier determined by
Registrar (Example: AR.2014.001)
Contributor Creator Person responsible for generating
original resource
Contributor Custodian Person responsible for creating
archival copy of resource
Date Accessioned Date of resource’s ingest to N-drive
Date Created Date of creation of the resource
Date Modified Date on which the resource was
changed
Date Harvested Date of custodian’s copying of
resource
Description Abstract A summary of the content of the
resource
Description Provenance Historical trajectory of resource,
encompassing both custodial chain,
and any modifications
Format Extent The size or duration of the resource
Format Medium The material or physical carrier of
the resource (using PBCore
instantiationPhysical schema7)
Format Mime Types Registered MIME type identifiers8
Locations Source.location Complete list of locations for all
materials. Standardized using the
location designation found in
Creating an EAD Finding Aid. (ex. N-
drive, Archives Video Collection
7 PBCore instantiationPhysical schema controlled vocabulary at: http://metadataregistry.org/concept/list/page/1/vocabulary_id/145.html 8 File format registry available at: https://www.iana.org/assignments/media-types/media-types.xhtml
Page 49 of 59
Room, Oral History Collection etc.)
Processing Note Description.
processingnote
Additional information about
processing status
Related Materials Relation Accession number of related
archives & manuscript collections
either by donor or subject. Purpose
is twofold – to remind the registrar
to search for existing collections
and to assist the researcher
Resource identifier Uniform Resource
Identifier (URI)
Uniform Resource Locator (URL)
Resource type DCMIType9 A list of types used to categorize
the nature or genre of the resource
(example: collection, dataset,
image, text etc.)
Restrictions Rights Restrictions imposed by donor on
materials in the collection. None
indicated AHC owns rights. 01-06:
refers to Media Collection
Restriction Codes
Subject Subject Subjects with major
representations in the collection.
(ex. Library of Congress Subject
Headings, Austin Files)
Title Title A name given to a work
9 DCMI Type Vocabulary available at: http://dublincore.org/documents/2000/07/11/dcmi-type-vocabulary/
Page 50 of 59
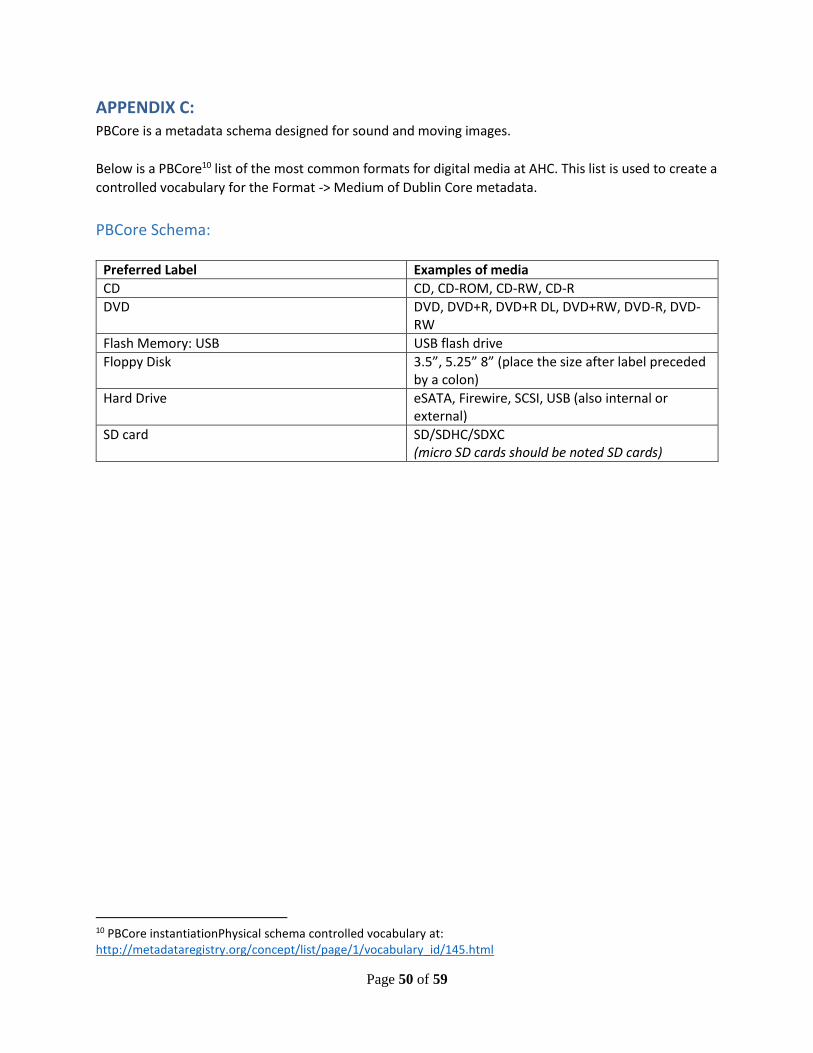
APPENDIX C: PBCore is a metadata schema designed for sound and moving images.
Below is a PBCore10 list of the most common formats for digital media at AHC. This list is used to create a
controlled vocabulary for the Format -> Medium of Dublin Core metadata.
PBCore Schema:
Preferred Label Examples of media
CD CD, CD-ROM, CD-RW, CD-R
DVD DVD, DVD+R, DVD+R DL, DVD+RW, DVD-R, DVD-RW
Flash Memory: USB USB flash drive
Floppy Disk 3.5”, 5.25” 8” (place the size after label preceded by a colon)
Hard Drive eSATA, Firewire, SCSI, USB (also internal or external)
SD card SD/SDHC/SDXC (micro SD cards should be noted SD cards)
10 PBCore instantiationPhysical schema controlled vocabulary at: http://metadataregistry.org/concept/list/page/1/vocabulary_id/145.html
Page 51 of 59
APPENDIX D:
How to Deal With Photographs & Architectural Drawings Established procedures are already in place for the processing of photographic and architectural
drawings-only born-digital material. The BitCurator Workflow will be added to the beginning of
these established processing procedures.
After initial ingest and stabilization by the Digital Archivist, the collection will be routed to:
Processing Archivist (for architectural donations)
Photography and Media Archivist (for photographic donations)
who will perform additional processing using established procedures.
How Do I Deal With: Viruses This section will need to be flushed out once we have a collection with a planted virus to test.
The AHC will not register, accession, or ingest any born-digital material that contains a virus
BitCurator currently utilizes ClamAV/ClamTK, an opensource antivirus engine, which is extant in the
Linux environment. ClamTK is the GUI front end of ClamAV and scans disk images and files for
viruses and malware. These files are quarantined.
Action to be taken once files are quarantined: TBD
Page 52 of 59
APPENDIX E:
File Naming Conventions The diverse nature of digital content means that there are times when it is desirable to make changes to
it before it is ingested into the preservation system. These changes are classed under the term
“preconditioning.” This pre-conditioning of born-digital files can include an alteration to (or the addition
of) file extensions to better facilitate file format identification and/or the removal of unsupported
characters in the file name; this enables more stable storage of the files in the preservation system’s
storage database. Regardless of the change being imposed, one must be able to demonstrate that the
action will not affect the intellectual content of the file. What is more, two key operating rules must be
followed: “All changes must be reversible,” and all changes must have “a system-based provenance note
that clearly describes the change that has been made to the file.”
Under normal conditions, all operating systems support file names consisting of 255 characters. It is,
however, advised to restrict file names to about 30 characters, including the period “.” and extension, as
some operating systems are unable to handle very long paths, which can lead to copying errors.
Many of the rules for file names also apply for directory names. Often, the file naming is integrated with
the directory structure rules, the file name replicating to some degree the structure. In this case, it is
important that the file name does not depend on its location in the structure for its uniqueness but that
it can function independently as a file identifier. Other than this, the directory structure should comply
with the following minimum requirements:
Restrict folder names to 30 characters
Restrict the amount of subfolders to five (not counting the root folder).
All folders mentioned will be sub-folders of the main collection folder. (Example of file/folder hierarchy
available in Appendix F.)
Collection Number Assign a collection number to each discrete set of born-digital materials that comes into the AHC to be
ingested, using the Call # and replacing periods with hyphens (-).
Examples:
AR-2014-025
AR-2013-015
Computer Media Number (CM number) Assign a computer media number (CM number) to each piece of transfer media (CDs, DVDs, hard drives,
flash media) that falls under one collection number, using the following convention: collection number
followed by a hyphen (-) followed by a three-digit ascending sequential number starting at 001. The CM
number will also be used as the folder name for components related to that piece of media.
Examples:
AR-2013-025-001
AR-2013-025-002
Page 53 of 59
Note: Files transferred electronically will follow the same numbering schema but the three-digit number
after the AR# will not be indicative of a media number, but of a file number.
Computer Media Photographs Name each image taken of the transfer media using the CM number followed by a hyphen (-) followed
by a two-digit ascending sequential number starting at 01.
Examples:
AR-2013-025-001-01
AR-2013-025-002-01
AR-2013-025-002-02
Save these images together in a folder named with the CM number followed by a hyphen (-) followed by
“media-photographs.”
Examples:
AR-2013-025-001-media-photographs
AR-2013-025-002-media-photographs
Naming Video Files Video ID: The unique number associated with the video.
For videos, the ID is: Archives Number + unique 3-digit tape number
Example: AR-1994-094-001.avi Faces of Austin Collection
Collection: Legacy Collections and the General Video Collection
For digitized videos created before 2018, video files ID names were either entered with the Archives
Number followed by a 3 or 6 digit tape number. You will need to consult the Digitized Video Database
to find which tape numbering schema was used to choose the correct tape number ID for any additions
to existing collections.
file:///\\coacd.org\apl\ahcshare\SHARED\Operational Records\Collection
Development\Recordings\video collection\Digitization Data\Digitized Video Database 2016.accdb
Files that become part of the General Video Collection will follow the following naming convention.
Archives Number + unique 6-digit tape number AR-YYYY-XXXXXX.
Example: AR-2009-073-000261.mov
AR.2009.073 is the accession number for all videos accessioned into this general collection. The 6 digit
number after the AR# corresponds with the next available number in the General Collection Videos
Database. This follows that numbering schema for the actual analog tapes.
file:///S:\SHARED\Operational Records\Collection Development\Recordings\video
collection\AR.2009.073_GeneralCollectionVideos.accdb
Naming video clips: Use the accession record number followed by the disk/media 3 digit number and a 3
digit clip number, starting with “a” then “b” “c” etc. for each additional clip:

Page 54 of 59
AR# + media number (if applicable) + file number + clip letter extension “a”, “b”, “c” . . .
AR-2013-025-001-001a For clip 1
AR-2013-025-001-001b For clip 2 AR-2013-025-001-001c For clip 3 . . . and so on
Note: For rare occasions where there are access copies made splicing together bookmarked video back
into a complete episode the following naming convention will apply: AR# + media number + 3 digit
episode number.
For example, the Austin Coffee House show access copies are named as follows:
AR# + media number (if applicable) + file number
AR-2013-001-001-001, AR-2013-001-001-002, AR-2013-001-001-003 and so on.
The 3 digit number after the AR# in this case refers to each episode. This is the case for the access
copies ONLY.
Naming General Collection (Cataloged in Bibliocommons) Video Files: For digital files that will be added to the General Collection Catalog, there are several processes that
need to be completed. Assign catalog tape numbers with the Dewey Number (with hyphen in place of
period). Do not include spaces. Put a hyphen between video/media media description and the call
number as follows:
Example: A-VHS-976-4Te.mov Texas Time Travels tape number: AVHS 976.4 Te
Page 55 of 59
Disk Image Name the disk images taken through Guymager using the CM number followed by an underscore (_)
followed by “image.” (The underscore is a character requirement of the BitCurator environment).
Examples:
AR_2013_025_001_image
AR_2013_025_002_image
Save the disk images in a folder named using the CM number followed by a hyphen (-) followed by
“diskimage.”
Example:
AR-2013-025-001-diskimage
Bulk Extractor Reports Name the report through the Bulk Extractor GUI using the CM number followed by a hyphen (-) followed
by “BE-reports.”
Examples:
AR-2013-025-001-BE-reports
AR-2013-025-002-BE-reports
Save the reports in a folder named using the CM number followed by a hyphen (-) followed by “BE-
reports.” (See above examples.)
BitCurator Reports Create a folder named using the CM number followed by a hyphen (-) followed by “BCR-reports.”
Example:
AR-2013-025-001-BCR-reports
DFXML (Digital Forensics XML) Name the DFXML report through the BitCurator Reports GUI using the CM number followed by a hyphen
(-) followed by “DFXML.”
Examples:
AR-2013-025-001-DFXML
AR-2013-025-002-DFXML
Save the reports in the BCR-reports folder for the collection.
Page 56 of 59
Annotated Features Name the directory Annotated Features reports through the BitCurator Reports GUI using the CM
number followed by a hyphen (-) followed by “AF-report.”
Examples:
AR-2013-025-001-AF-report
AR-2013-025-002-AF-report
Reports Name the directory for Reports through the BitCurator Reports GUI using the CM number followed by a
hyphen (-) followed by “reports.”
Examples:
AR-2013-025-001-reports
AR-2013-025-002-reports
Bag Name the bag in the Bagger GUI using the LOC naming convention of description of bag-date-bag where
description of bag is the CM number and date is expressed in the format yyyymmdd.
Examples:
AR-2013-025-001-20170726-bag
AR-2013-025-002-20170726-bag
Server Folders There are three main folders that need to be made on the server to house collection materials: Master,
Access, and Bags.
Master
Name the Master folder using the Collection number followed by a hyphen (-) followed by “master.”
Example:
AR-2013-025-master
Access
Name the Access folder using the Collection number followed by a hyphen (-) followed by “access.”
Example:
AR-2013-025-access
Bags
Name the Bag folder using the Collection number followed by a hyphen (-) followed by “bags.”
Example:

Page 57 of 59
AR-2013-025-bags
AR-2013-025-001-20170726-bag
(Here you will see the bagged content.)

Page 58 of 59
APPENDIX F:
Example of Folder/File Hierachy:
N:
AR-2013-025
born-digital
AR-2013-025-master
AR-2013-025-001 (one folder per disk)
AR-2013-025-001-diskimage
AR_2013_025_001_image.E01
AR-2013-025-001-BE-reports
(there will be many txt reports that are
placed in the folder by Bulk Extractor)
AR-2013-025-001-BCR-reports
AR-2013-025-001-DFXML
AR-2013-025-001-AF-report (will be created
through BCR GUI)
AR-2013-025-001-reports (will be created
through BCR GUI)
AR-2013-025-001-media-photographs (media 1) AR-2013-025-001-01-media-photograph
AR-2013-025-001-02-media-photograph
AR-2013-025-002-media-photographs (media 2) AR-2013-025-002-01-media-photograph
AR-2013-025-002-02-media-photograph
AR-2013-025-access
AR-2013-025-001 (one folder per disk)
---- (dump of files retrieved using BitCurator Disk
Image Access)
AR-2013-025-bags
AR-2013-025-001-20170726-bag.zip (this is a zipped
version of the Master folder that should only be used for
hash validation or to create a new master copy if
something were to happen to the Master)(there will be a
bag for each disk)
digitized-ahc
digitized-tami
digitized (meaning digitized by donor/creator)
Page 59 of 59
APPENDIX G:
Troubleshooting
1. If disk is taking a long time to image or is receiving many bad sectors while running Guymager.
Either abort the disk image in Guymager or let it continue as it is still possible to get a complete
and usable disk image with large amounts of bad sectors recorded or with the disk image taking
considerable amounts of time. For example, successful and complete disk images have been
collected from disk images with upwards of 340,000 bad sectors recorded and taking longer
than 24 hours to complete the imaging process.
If it is decided to abort the disk image, it is possible to get a disk image in the ISO format using
the Linux disk duplication (dd) command using the steps below. **This should only be used if
confident in skills working at the command line as this can cause extreme harm to the system if
run incorrectly.**
1. Open Terminal.
2. Navigate to the disk image folder. (ex. AR-2013-025-001-diskimage)
3. Use the following command to create an ISO disk image.
dd if=/dev/cdrom of=[filename].iso
Replace [filename] with the name of the disk image name (ex. AR-2013-025-001-image)