Embed Size (px)
Citation preview
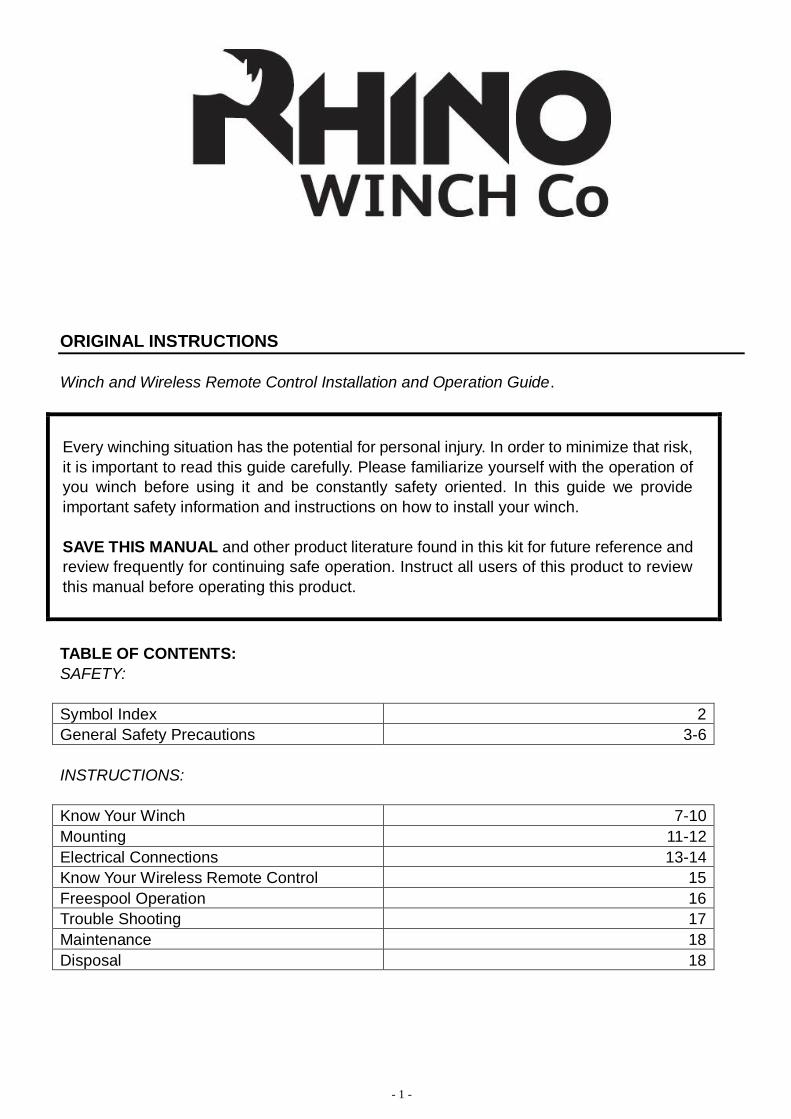
- 1 -
ORIGINAL INSTRUCTIONS
Winch and Wireless Remote Control Installation and Operation Guide.
Every winching situation has the potential for personal injury. In order to minimize that risk,
it is important to read this guide carefully. Please familiarize yourself with the operation of
you winch before using it and be constantly safety oriented. In this guide we provide
important safety information and instructions on how to install your winch.
SAVE THIS MANUAL and other product literature found in this kit for future reference and
review frequently for continuing safe operation. Instruct all users of this product to review
this manual before operating this product.
TABLE OF CONTENTS:
SAFETY:
Symbol Index 2
General Safety Precautions 3-6
INSTRUCTIONS:
Know Your Winch 7-10
Mounting 11-12
Electrical Connections 13-14
Know Your Wireless Remote Control 15
Freespool Operation 16
Trouble Shooting 17
Maintenance 18
Disposal 18
- 2 -
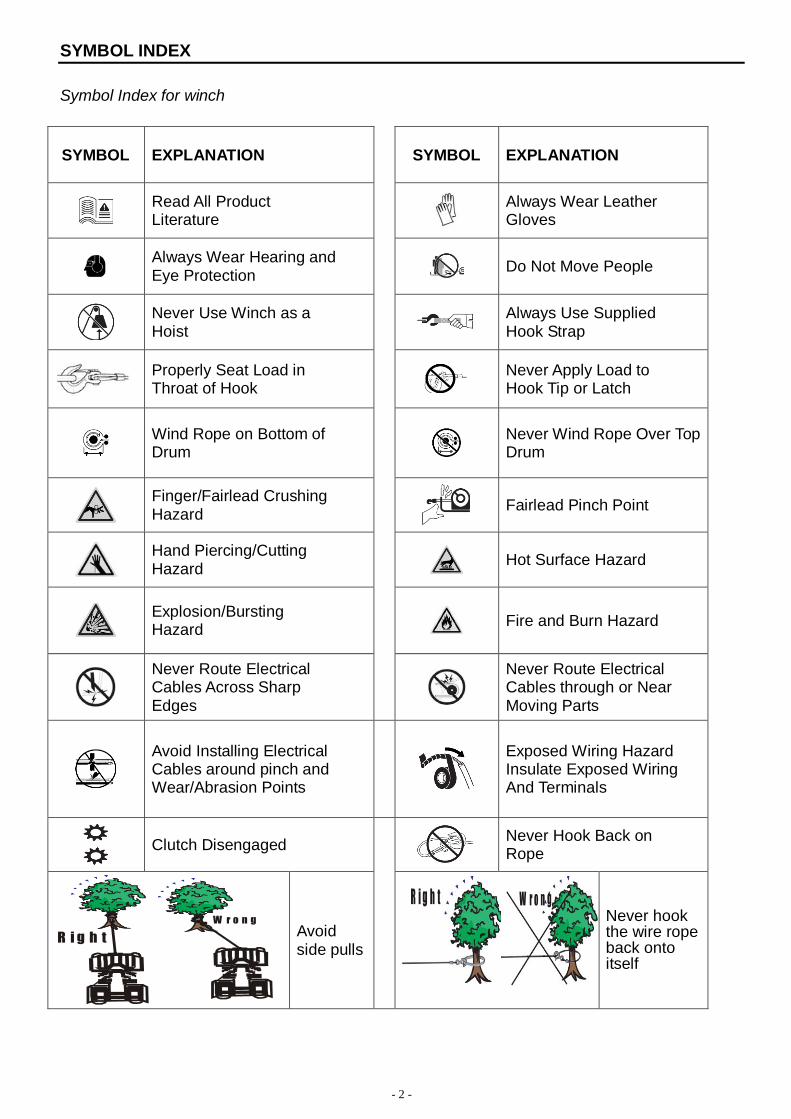
SYMBOL INDEX
Symbol Index for winch
SYMBOL EXPLANATION
SYMBOL EXPLANATION
Read All Product Literature
Always Wear Leather Gloves
Always Wear Hearing and Eye Protection
Do Not Move People
Never Use Winch as a Hoist
Always Use Supplied Hook Strap
Properly Seat Load in Throat of Hook
Never Apply Load to Hook Tip or Latch
Wind Rope on Bottom of Drum
Never Wind Rope Over Top Drum
Finger/Fairlead Crushing Hazard
Fairlead Pinch Point
Hand Piercing/Cutting Hazard
Hot Surface Hazard
Explosion/Bursting Hazard
Fire and Burn Hazard
Never Route Electrical Cables Across Sharp Edges
Never Route Electrical Cables through or Near Moving Parts
Avoid Installing Electrical Cables around pinch and Wear/Abrasion Points
Exposed Wiring Hazard Insulate Exposed Wiring And Terminals
Clutch Disengaged
Never Hook Back on Rope
R i g h t
W r o n g
Avoid side pulls
R i g h t W r o n g
Never hook the wire rope back onto itself
- 3 -
GENERAL SAFETY PRECAUTIONS
Warnings and Cautions
As you read these instructions, you will see WARNINGS, CAUTIONS, NOTICES and NOTES.
Each message has a specific Purpose. WARNINGS are safety messages that indicate a
potentially hazardous situation, which, if not avoided could result in serious injury or death.
CAUTIONS are safety messages that indicate a potentially hazardous situation, which, if not
avoided, could result in minor or moderate injury. A CAUTION may also be used to alert against
unsafe practice. CAUTIONS and WARNINGS identify the hazard, indicate how to avoid the
hazard, and advise of the probable consequence of not avoiding the hazard. NOTICES are
messages to avoid property damage. NOTES are additional information to help you complete a
procedure. PLEASE WORK SAFELY!
FCC Regulation
This device complies with Part 15 of the FCC Rule. Operation is subject to the following two
conditions:
This device may not cause harmful interference.
This device must accept any interference received, including interference that may cause
undesired operation.
This equipment has been tested and found to comply with the limits for a Class B digital device,
pursuant to part 15 of the FCC Rules. These limits are designed to provide reasonable protection
against harmful interference in a residential installation. This equipment generates, uses and
can radiate radio frequency energy, and if not installed and used in accordance with the
instructions, may cause harmful interference to radio communications. However, there is no
guarantee that interference will not occur in a particular installation. If this equipment does cause
harmful interference to radio or television reception, which can be determined by turning the
equipment off and on, the user is encouraged to try to correct the interference by one or more of
the following measures:
Reorient or relocate the receiving antenna. Increase the separation between the
equipment and receiver.
Connect the equipment into an outlet on a circuit different from that to which the receiver
is connected.
Consult the dealer or an experienced radio/TV technician for help.

- 4 -
GENERAL SAFETY PRECAUTIONS
W A R N I N G W A R N I N G
MOVING PARTS ENTANGLEMENT HAZARD Failure to observe these instructions could lead to serious injury or death.
Winching Safety: 1. Always Know Your Winch. Take time to fully read the
Instructions in Order to understand your winch and its operations.
2. Never exceed winch or winch rope rated capacity. Double line using a snatch block to reduce winch load.
3. Always wear heavy leather gloves when handling winch rope.
4. Never use winch or winch rope for towing. Shock loads can damage, overload and break rope.
5. Never use a winch to secure a load. 6. Never operate this winch when under the influence of
drugs, alcohol or medication 7. Never operate this winch if you are under 16 years of age. Installation Safety: 1. Always choose a mounting location that is sufficiently
strong to withstand the maximum pulling capacity of your winch.
2. Always use class8.8 metric (grade 5) or better hardware. 3. Never weld mounting bolts. 4. Always use factory approved mounting hardware,
components, and accessories. 5. Never use bolts that are too long. 6. Always confirm required bolt length to ensure proper
thread engagement. 7. Always complete the winch installation and hook
attachment before installing the wiring. 8. Always keep hands clear of winch rope, hook loop, hook
and fairlead opening during installation, operation, and when spooling in or out.
9. Always position fairlead with warning readily visible on top. 10. Always pre-stretch rope and re-spool under load before
use. Tightly wound rope reduces chances of ”binding”, which can damage the rope.
MOVING PARTS ENTANGLEMENT HAZARD Failure to observe these instructions could lead to serious injury or death. General Safety: Always inspect winch rope, hook, and slings before
operating winch. Frayed, kinked or damaged winch rope must be replaced immediately. Damaged components must be replaced before operation. Protect parts from damage.
Always remove any element or obstacle that may interfere with safe operation of the winch.
Always be certain the anchor you select will withstand the load and the strap or chain will not slip.
Always use supplied hook strap whenever spooling winch rope in or out, during installation and during operation.
Always require operators and bystanders to be aware of vehicle and or load.
Always be aware of stability of vehicle and load during winching, keep others away. Alert all bystanders of an unstable condition.
Always unspool as much winch rope as possible when rigging. Double line or pick distant anchor point.
Always take time to use appropriate rigging techniques for a winch pull.
Never touch winch rope or hook while someone else is at the control switch or during winching operation.
Never engage or disengage clutch if winch is under load, winch rope is in tension or drum is moving.
Never touch winch rope or hook while under tension or under load.
Always stand clear of winch rope and load and keep others away while winching.
Never use vehicle to pull load on winch rope. Combined load or shock load can damage, over load and break rope.
Never wrap winch rope back onto itself. Use a choker chain or tree trunk protector on the anchor.
Never use remote when vehicle is not in line of sight of operator.
Never pair more than one winch and one remote together at the same time.
- 5 -
GENERAL SAFETY PRECAUTIONS
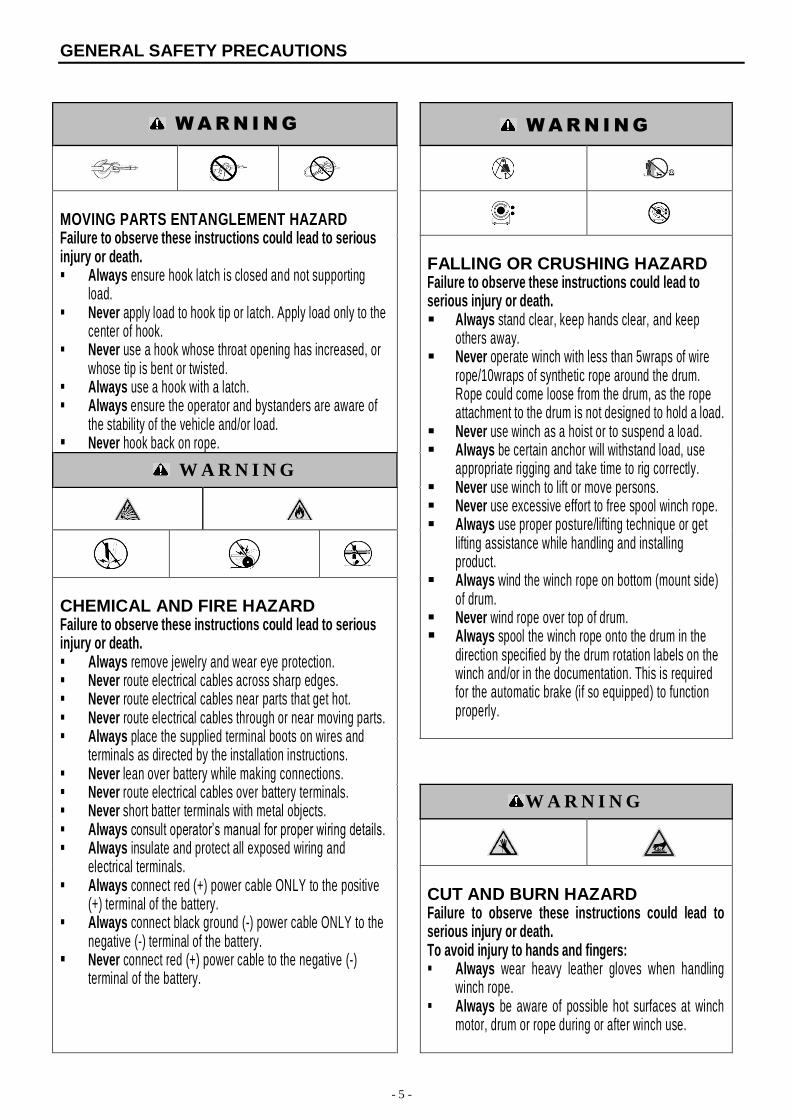
W A R N I N G
W A R N I N G
MOVING PARTS ENTANGLEMENT HAZARD Failure to observe these instructions could lead to serious injury or death. Always ensure hook latch is closed and not supporting
load. Never apply load to hook tip or latch. Apply load only to the
center of hook. Never use a hook whose throat opening has increased, or
whose tip is bent or twisted. Always use a hook with a latch. Always ensure the operator and bystanders are aware of
the stability of the vehicle and/or load. Never hook back on rope.
FALLING OR CRUSHING HAZARD Failure to observe these instructions could lead to serious injury or death. Always stand clear, keep hands clear, and keep
others away. Never operate winch with less than 5wraps of wire
rope/10wraps of synthetic rope around the drum. Rope could come loose from the drum, as the rope attachment to the drum is not designed to hold a load.
Never use winch as a hoist or to suspend a load. Always be certain anchor will withstand load, use
appropriate rigging and take time to rig correctly. Never use winch to lift or move persons. Never use excessive effort to free spool winch rope. Always use proper posture/lifting technique or get
lifting assistance while handling and installing product.
Always wind the winch rope on bottom (mount side) of drum.
Never wind rope over top of drum. Always spool the winch rope onto the drum in the
direction specified by the drum rotation labels on the winch and/or in the documentation. This is required for the automatic brake (if so equipped) to function properly.
W A R N I N G
CHEMICAL AND FIRE HAZARD Failure to observe these instructions could lead to serious injury or death. Always remove jewelry and wear eye protection. Never route electrical cables across sharp edges. Never route electrical cables near parts that get hot. Never route electrical cables through or near moving parts. Always place the supplied terminal boots on wires and
terminals as directed by the installation instructions. Never lean over battery while making connections. Never route electrical cables over battery terminals. Never short batter terminals with metal objects. Always consult operator’s manual for proper wiring details. Always insulate and protect all exposed wiring and
electrical terminals. Always connect red (+) power cable ONLY to the positive
(+) terminal of the battery. Always connect black ground (-) power cable ONLY to the
negative (-) terminal of the battery. Never connect red (+) power cable to the negative (-)
terminal of the battery.
W A R N I N G
CUT AND BURN HAZARD Failure to observe these instructions could lead to serious injury or death. To avoid injury to hands and fingers: Always wear heavy leather gloves when handling
winch rope. Always be aware of possible hot surfaces at winch
motor, drum or rope during or after winch use.

- 6 -
GENERAL SAFETY PRECAUTIONS
C A U T I O N
C A U T I O N
MOVING PARTS ENTANGLEMENT HAZARD Failure to observe these instructions could lead to serious injury or death. To avoid injury to hands and fingers: Never leave winch remote control where it can be
activated during free spooling, ringing, or when the winch is not being used.
Never leave the wireless winch remote control turned on when installing, free spooling, rigging or servicing winch, or when the winch is not being used.
CUT AND BURN HAZARD Failure to observe these instructions could lead to minor or moderate injury. Never let winch rope slip through your hands.
This manual provides instructions on how to install and operate your winch and operating your Wireless Remote Control.
SAFETY
When installing your winch system, read and follow all mounting and safety instructions. Always use caution when working with electricity and remember to verify that no exposed electrical connections exist before energizing your winch circuit. For specifications and performance data, refer to the specification sheet supplied in this manual.
N O T I C E
N O T I C E
R i g h t
W r o n g
R i g h t W r o n g
AVOID WINCH AND EQUIPMENT DAMAGE Always avoid side pulls which can pile up winch rope at
one end of the drum. This can damage winch rope or winch.
Always ensure the clutch is fully engaged or disengaged. Always use care to not damage the vehicle frame when
anchoring to a vehicle during a winching operation. Never submerge winch in water, if not IP68 rated. Always store the remote control in a protected, clean dry
area.
Never hook the wire rope back onto itself because you
could damage the wire rope .Use a strap. Avoid continuous pulls from extreme angles as this will
cause the wire rope to pile up on one end of the drum. This can jam the can jam the wire rope of the winch.

- 7 -
KNOW YOUR WINCH
Before you begin, you should familiarize yourself with your winch and each of its components;
(V, TV series (with the Article Number PL-Vxx, PL-TVxx)
No. Name Qty. No. Name Qty.
1 Motor box cover 1 15 2-stage planetary 1
2 Motor rotor 1 16 1-stage planetary 1
3 Motor outer barrel 1 17 Gear outer barrel 1
4 Motor base 1 18 Clutch handle 1
5 Motor steel sleeve 1 19 Sun gear 1
6 Sliding bearing 2 20 Gear box cover washer 1
7 Support bar 2 21 Gear box cover 1
8 Drum 1 22 Control box 1
9 Transmission shaft 1 23 Wireless remote 1
10 Gear box base 1 24 Remote control handle 1
11 Steel gasket 2 25 Hook 1
12 3-stage inner gear 1 26 Rope 1
13 3-stage planetary 1 27 4-Roller fairlead 1
14 1& 2-stage inner gear 1

- 8 -
KNOW YOUR WINCH
P, TP series (with the Article Number PL-Pxx, PL-TPxx)
No. Name Qty. No Name Qty
1 Motor box cover 1 15 1& 2-stage inner gear 1
2 Motor rotor 1 16 Sun gear 1
3 Motor outer barrel 1 17 1-stage planetary 1
4 Motor base 1 18 2-stage planetary 1
5 Sliding bearing 2 19 3-stage planetary 1
6 Motor steel sleeve 1 20 3-stage inner gear 1
7 Transmission shaft 1 21 Drum 1
8 Support bar 2 22 Wireless remote 1
9 Gear box base 1 23 Remote control handle 1
10 Steel gasket 1 24 Hook 1
11 Gear box cover washer 1 25 Safty belt 1
12 Gear box 1 26 Rope 1
13 “O” shape ring 1 27 4-Roller fairlead 1
14 Clutch handle 1 1

- 9 -
KNOW YOUR WINCH
H series (with the Article Number PL-Hxx)
No Name Qty No Name Qty No Name Qty
1 M5*25 bolts 8 16 3-stage inner gear 1 31 Fairlead 1
2 Gear box cover 1 17 M8*25 bolts 4 32 M12*25 bolts 2
3 Clutch base 1 18 Steel gasket 1 33 12 plain washer 2
4 Clutch bar 1 19 Gear box base 1 34
12 flexible washer 2
5 Nut 1 20 Sliding bearing 2 35 M12 nut 2
6 Clutch handle 1 21 Gasket 2 36 Safty belt 1
7 M4*20 bolts 1 22 Drum 1 37 3/4 Hook 1
8 5M set screw 1 23 Supporting plate 1 38 Rope team 1
9 Oilless bearing 1 24 Solenoid team 1 39 M10 nut 4
10 1&2-stage inner gear 1 25 Control box cover 1 40 10 plain washer 4
11 Hexagon sun gear 1 26 M4.8*20 tapping screw 1 41 10 flexible washer 4
12 1-stage planetary 1 27 Brake team 1 42 M10*35 bolts 4
13 2-stage planetary 1 28 Motor team 1 43 Wireless remote 1
14 Flexible set ring 1 29 Transmission shaft 1 44 Remote control grip 1
15 3-stage planetary 1 30 Mounting plate 1

- 10 -
KNOW YOUR WINCH
Motor:
Winch Drum:
Winch Rope:
Transmission:
Control Box:
Remote Control Handle:
Wireless Remote Control:
The winch motor is powered by the vehicle’s battery. The motor
provides power to the gear mechanism, which turns the winch
drum and winds the winch rope.
The winch drum is the cylinder onto which the winch rope feeds.
The drum is driven by the motor and drive train. Its direction can
be changed using the remote handle or wireless remote control.
The winch rope’s diameter and length are determined by the
winch’s load capacity and design. Wrapped around the winch
drum and fed through the fairlead, the winch rope is looped at the
end to accept the hook’s clevis pin.
The reduction gear converts the winch motor power into a large
pulling force. The gear train design makes it possible for the winch
to be lighter and more compact.
Using electrical power from the vehicle’s battery, the control
box’s contactor switches power to the motor, enabling the operator
to change the direction of the winch drum rotation.
Connecting to the control box and getting power during
connecting. The operator can control the direction of drum rolling
by pressing the button switch. The drum will stop automatically
when the button is released. The operator can control the winch
within 3 meters distance (the length of wire defaults to 3 meters).
The wireless remote control already finished pairing to your winch
system, which is powered by batteries inside. The remote can be
activated before use by turning the remote switch on or pressing
the activation button. There is a signal receiving antenna in the
control box and the available distance of the remote is 30 metres.
- 11 -
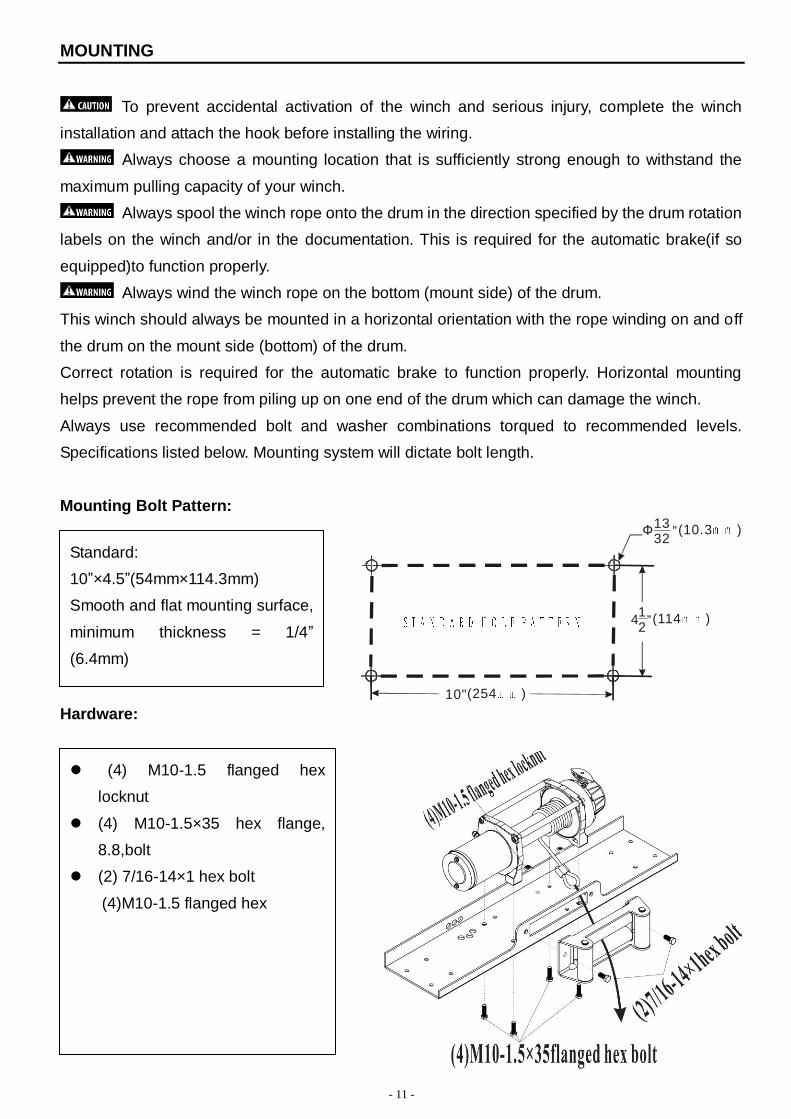
MOUNTING
To prevent accidental activation of the winch and serious injury, complete the winch
installation and attach the hook before installing the wiring.
Always choose a mounting location that is sufficiently strong enough to withstand the
maximum pulling capacity of your winch.
Always spool the winch rope onto the drum in the direction specified by the drum rotation
labels on the winch and/or in the documentation. This is required for the automatic brake(if so
equipped)to function properly.
Always wind the winch rope on the bottom (mount side) of the drum.
This winch should always be mounted in a horizontal orientation with the rope winding on and off
the drum on the mount side (bottom) of the drum.
Correct rotation is required for the automatic brake to function properly. Horizontal mounting
helps prevent the rope from piling up on one end of the drum which can damage the winch.
Always use recommended bolt and washer combinations torqued to recommended levels.
Specifications listed below. Mounting system will dictate bolt length.
Mounting Bolt Pattern:
Ф1332
”(10.3 )
12
”(114 )4
10"(254 ) Hardware:
Standard:
10”×4.5”(54mm×114.3mm)
Smooth and flat mounting surface,
minimum thickness = 1/4”
(6.4mm)
(4) M10-1.5 flanged hex
locknut
(4) M10-1.5×35 hex flange,
8.8,bolt
(2) 7/16-14×1 hex bolt
(4)M10-1.5 flanged hex

- 12 -
MOUNTING
Mount Winch:
1. Choose a mounting location that is sufficiently strong enough to withstand the maximum
pulling capacity of your winch.
2. Install your mounting bracket if necessary
3. Fasten fair lead to mounting bracket using
the (2) bolts specified above
4. Set the (4) flanged nuts into pockets of winch
feet
5. Thread the hook loop end of the rope
through the opening of the mounting bracket
and fairlead.
Note: Dot remove plastic wrap from
remaining rope on drum at this time.
6. Set winch in mount, install bolts and tighen
them.
WARNING Always confirm required bolt
length to ensure proper thread engagement.
7. Attach hook to winch rope loop, attach hook strap to hook
8. Remove plastic wrap from remaining rope on drum
Mounting your winch is now complete. Check all hardware to be sure it is tight and to torque. You
can now move on to Install the Wiring.
- 13 -
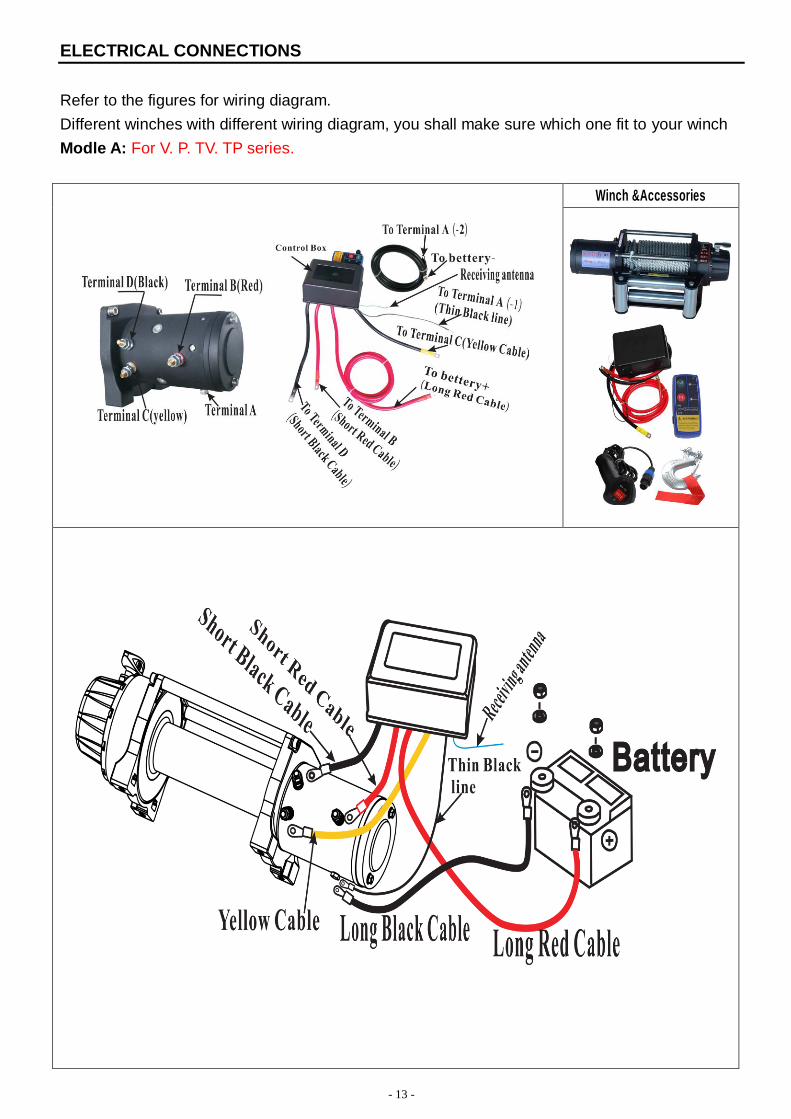
ELECTRICAL CONNECTIONS
Refer to the figures for wiring diagram.
Different winches with different wiring diagram, you shall make sure which one fit to your winch
Modle A: For V. P. TV. TP series.
Winch &Accessories

- 14 -
ELECTRICAL CONNECTIONS
Modle B:. For H series (Intergration type of heavy duty winches)
Winch & Accessories

- 15 -
KNOW YOUR WIRELESS REMOTE
Before you begin, you should familiarize yourself with our Wireless Remote Control and each of its
functions.
Model A: for wireless remote controller with blue shell
Note: Battery is in back and keep away from water
Model B: for wireless remote controller with cartoon style and with switch button
Note: Turn off the remote (indicator light off) when not in use, to prevent the loss of battery
Model C: for wireless remote controller with cartoon style and without switch button
Note: Turn off the remote (indicator light off) when not in use, to prevent the loss of battery

- 16 -
FREESPOOL OPERATION
Pull and turn the clutch knob to the “Freespool” position. Activate the winch in Cable Out to check
the drum rotation direction. If the drum rotates in the wrong direction, recheck your wiring. If there
is a load on the rope, the clutch knob may not pull out easily. DO NOT FORCE THE CLUTCH
KNOB. Release tension on the clutch by jogging out some of the rope. Check that there are at
least five turns of wire rope/ 10 turns of synthetic rope left on the drum. Re-engaged the drum by
returning the clutch knob to the “Engaged” position. Different winches with different clutches as the
followed figures, you shall make sure which one fit to your winch.
C a u t i o n Clutch must be fully engaged before winching. Never engage clutch knob while
drum is turning. If the winch motor stalls, do not continue to apply power.
Winch Clutch Freespool operation
Up and down 90°
Up and down 90°
Turn 180°
Turn 180°
Turn 180°
Turn 180°

- 17 -
TROUBLE SHOOTING
Trouble Shooting/Error Conditions
When the winch fails to operate after several attempts,or if theris any fault operation while winching. Check
followings.
Symptom Possible cause Solution
Winch will not
operate
Cut Circuit or loosing Check battery cable
The remote battery is critically low Replace or charge battery
Wireless signal strength is low Decrease distance between remote
control and winch.
Damaged over load protector Replace over load protector
Loose connection of wirings Checking all wirings
Damaged or stuck solenoid Replace solenoid
Defective remote control Check winch operation with an
auxillary switch
Damaged motor or worn carbon brush Replace motor or carbon brush
Winch control pack is Under water.
Wireless signal will not transmit under
water
Winch control pack needs to be above
water to receive wireless signal.
Motor runs in
one direction
Broken wiring or bad connection Reconnect or replace wiring
Damaged or stuck solenoid Replace solenoid
Switch inoperative Replace switch
Dropt or lost wiring Replace wiring and tighten
Drum will not
free spool
Freespool not dis-engaged Engaged freespool
Damaged brake or freespool assembly Repalce brake or freespool assembly
Damaged drum bushes Replace drum bushes
Damaged gear box Replace gear box
No brake
Damaged on inoperative pressed spring Replace pressed spring
Disengaged freespool Engaged freespool
Damaged inner gear plate Replace inner gear plate
Damaged inner gear Replace inner gear
Winch runs
opposite
direction
Motor leads crossed Reverse electric connections to motor
Solenoid control crossed Reverse black and red wires on
solenoid
Remote control or trigger switch crossed Reverse electric connections
Motor runs
extremely hot
Long period of operation Stop operation and make it cool
Over load Reduce load
Damaged or inoperative of brake Replace or repair the brake

- 18 -
MAINTENANCE
DISPOSAL
Batteries should not be disposed of in general household waste. Observe the local waste disposal
regulations, details of which can be obtained from your local authority.
All electrical and electronic equipment must be disposed of separately from general household
waste using the sites designated by local authorities.
If a product displays this symbol of a crossed-out wheelie bin, the product is subject to European
Directive 2012/19/EC.
The appropriate disposal and separate collection of used equipment serve to prevent potential
harm to the environment and health. They are a prerequisite for the re-use and recycling of used
electrical and electronic equipment.
For further information on disposing of your used equipment, please contact your local authority or
your refuse collection service.
Check Before first
operation
After each
use Every 90 days
Take time to fully read the Instructions and/or
Operations Guide, and/or Basic Guide to Winching
Techniques. in order to understand your winch and
its operations
√
Check fasteners and make sure they are tight and to
proper torque. Replace damaged fasteners. √ √
Verify wiring to all components is correct and be
certain that all connections are tight. √ √
Verify there is no exposed/bare wiring. terminals or
cable insulation damage (chafing/cutting). Cover any
exposures with terminal boots. Repair or replace
damaged electrical cable.
√ √
Inspect rope for damage. Replace rope immediately
if damaged. √ √ √
Keep winch, rope and switch control free from
contaminants. Use a clean rag or towel to remove
any dirt and debris.
√
Check and place/replace the battery of wireless
remote control √ √
Turn off the power after use √
- 19 -
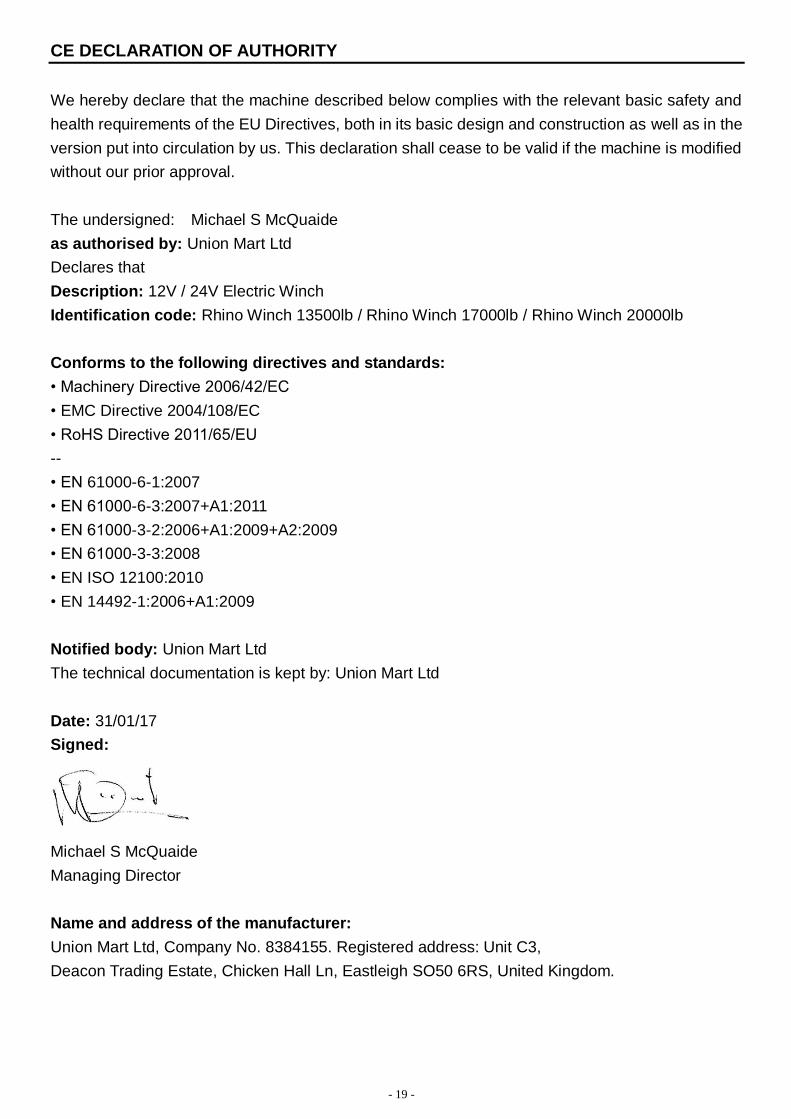
CE DECLARATION OF AUTHORITY
We hereby declare that the machine described below complies with the relevant basic safety and
health requirements of the EU Directives, both in its basic design and construction as well as in the
version put into circulation by us. This declaration shall cease to be valid if the machine is modified
without our prior approval.
The undersigned: Michael S McQuaide
as authorised by: Union Mart Ltd
Declares that
Description: 12V / 24V Electric Winch
Identification code: Rhino Winch 13500lb / Rhino Winch 17000lb / Rhino Winch 20000lb
Conforms to the following directives and standards:
• Machinery Directive 2006/42/EC
• EMC Directive 2004/108/EC
• RoHS Directive 2011/65/EU
--
• EN 61000-6-1:2007
• EN 61000-6-3:2007+A1:2011
• EN 61000-3-2:2006+A1:2009+A2:2009
• EN 61000-3-3:2008
• EN ISO 12100:2010
• EN 14492-1:2006+A1:2009
Notified body: Union Mart Ltd
The technical documentation is kept by: Union Mart Ltd
Date: 31/01/17
Signed:
Michael S McQuaide
Managing Director
Name and address of the manufacturer:
Union Mart Ltd, Company No. 8384155. Registered address: Unit C3,
Deacon Trading Estate, Chicken Hall Ln, Eastleigh SO50 6RS, United Kingdom.

- 20 -