Embed Size (px)
Citation preview

Organic Cocoa Production:
A guide for Farmer Field Schools in Sierra Leone
Adapted from: S. David. 2005. Learning about sustainable cocoa production: a guide for participatory farmer training. 1. Integrated crop and pest management. Sustainable Tree Crops Program, International Institute of Tropical Agriculture, Yaoundé, Cameroon. March 2005 version
With contributions from Cora Dankers, FAO and Chris Newell, Twin, UK
and
training material developed by the Farmer Field Schools of the Programme Feed the Nation, Sierra Leone,
Ministry of Agriculture and FAO
Compiled for the FAO project GCP/RAF/404/GER Increasing incomes and food security of
small farmers in West and Central Africa through exports of organic and fair-trade tropical
products , financed by the Government of the Federal Republic of Germany
The designations employed and the presentation of material in this information product do not imply the expression of any opinion whatsoever on the part of the Food and Agriculture Organization of the United Nations (FAO) concerning the legal or development status of any country, territory, city or area or of its authorities, or concerning the delimitation of its frontiers or boundaries. Copyright statements: Some modules come directly from the manual of the Sustainable Tree Crops Program by S. David (ed.) 2005. These modules are identified in the module title by “1STCP: Farmer Training Guide on ICPM Cocoa.” The STCP allows free copying and distributions on a non-commercial basis provided that the source is acknowledged. The correct citation for these modules is: S. David. 2005. Learning about sustainable cocoa production: a guide for participatory farmer training. 1. Integrated crop and pest management. Sustainable Tree Crops Program, International Institute of Tropical Agriculture, Yaoundé, Cameroon. March 2005 version For the full STCP manual: Sustainable Tree Crops Program Regional Office International Institute of Tropical Agriculture (IITA) B.P 2008 (Messa), Yaoundé, Cameroon International mailing: c/o Lambourn Ltd. Carolyn House, 26 Dingwall Road Croydon, CR9 3EE, U.K http://www.treecrops.org http://www.iita.org Email: [email protected] For the other modules the following applies: All rights reserved. Reproduction and dissemination of material in this information product for educational or other non-commercial purposes are authorized without any prior written permission from the copyright holders provided the source is fully acknowledged. Reproduction of material in this information product for resale or other commercial purposes is prohibited without written permission of the copyright holders. Applications for such permission should be addressed to the Chief, Electronic Publishing Policy and Support Branch, Communication Division, FAO, Viale delle Terme di Caracalla, 00153 Rome, Italy or by e-mail to [email protected]
© FAO [2007] The Food and Agriculture Organization of the United Nations encourages the dissemination of material contained in this publication, provided that reference is made to the source.
Contents
CURRICULUM ......................................................................................................................... 3
Part I: REHABILITATION ....................................................................................................... 6
Rehabilitating a cocoa farm................................................................................................ 7
Underbrushing.................................................................................................................... 8
Sanitation............................................................................................................................ 9
Pruning ............................................................................................................................. 10
Shade management........................................................................................................... 12
Discovery learning exercise 1: Agro-Ecosystem Analysis .............................................. 13
Discovery learning exercise 2: Basic function of different parts of the plant.................. 21
Discovery learning exercise 3: Pruning older cocoa trees ............................................... 24
Discovery learning exercise 4: Impact of shading on humidity in a cocoa farm ............. 29
Discovery learning exercise 5: Impact of humidity and the role of diseased pods in
spreading black pod.......................................................................................................... 31
Discovery learning exercise 6: Deciding whether to rehabilitate or replant a cocoa farm
.......................................................................................................................................... 33
Part 2: HARVESTING AND PRIMARY PROCESSING ...................................................... 37
Harvesting, pod storage and breaking .............................................................................. 38
Fermentation..................................................................................................................... 40
Drying............................................................................................................................... 43
Discovery learning exercise 7: Impact of harvesting time on fermentation and cocoa
quality............................................................................................................................... 44
Discovery learning exercise 8: Impact of duration of fermentation on bean quality....... 46
Discovery learning exercise 9: Impact of quantity of beans on the fermentation process
and cocoa quality.............................................................................................................. 48
Discovery learning exercise 10: Drying cocoa on raised mats ........................................ 51
Part 3: THE CO-OPERATIVE, ITS MEMBERS AND ITS ROLE IN MARKETING.......... 53
The role of the co-operative in marketing........................................................................ 54
The responsibilities of co-operative members ................................................................. 55
Gender .............................................................................................................................. 56
Discovery learning exercise 11: Collective marketing .................................................... 57
Discovery learning exercise 12: Responsibilities of co-operative members.................... 59
Discovery learning exercise 13: Women’s and men’s characteristics and their capabilities
in participating in co-operative meetings and committee’s ............................................. 60
Discovery learning exercise 14: Women’s and men’s roles in cocoa production ........... 62
Cocoa-FFS calendar of activities (for Sierra Leone situation) ............................................... 63
2
Glossary of technical terms 1STCP: Farmer Training Guide on ICPM Cocoa
Cambium The layer of tissue between the wood and the innermost bark of a tree Canker A spot where the bark and cambium tissue is damaged or dead
because of an infection caused by black pod fungus Chupon Vertical stem or shoot (water shoot) Epiphyte A type of plant (e.g. some mosses and ferns) that grows on another
plant or object but is not rooted in soil. It does not directly harm the other plant
Imago The sexually mature stage of an insect's life cycle Integrated crop and pest management
The best mix of pest management techniques which include crop management methods, use of improved planting material/varieties, preserving/manipulating biological agents and the use of
chemical pesticides Jorquette The point at which the vertical stem changes to fan growth Larva (pl. larvae) Any young insect from the time that it hatches from the egg
until it becomes a pupa, or chrysalis Natural enemy A living organism that kills, injures or causes disease in other
living organisms Nymph The immature stage in an insect life cycle Pest A living organism that we consider harmful because it attacks and
damages crops Pesticide Any poison that kills a living organism. This includes insecticides (to kill
insects), fungicides (to kill fungi) and herbicides (to kill weeds) Predator An animal that hunts and eats other animals. This is one type of natural
enemy Spore Disease “seeds” of a fungus Systemic fungicide Fungicides that are absorbed by the cocoa tree

3
CURRICULUM
Farmer Field School Curriculum for organic and/or fair-trade cocoa farmers associations or co-operatives
GCP/RAF/404/GER
Farmer Field Schools on Cocoa Rehabilitation and Primary Processing
Objective: Participants produce export quality cocoa in sufficient quantities to fulfil export contracts
Rationale: 1. The purpose of cocoa association is to provide cocoa and coffee farmers with the opportunity to trade their produce through a member owned organizations 2. To have access to enough good-quality cocoa members should employ best organic practices in their plantation management and post-harvest practices. 3. The farmer field school can also contribute to a better understanding of the role and functioning of the association/co-operative and to prepare its members to take part in the decision making process. Expected results - Members obtain greater understanding of the agro-ecosystem of cocoa plantations and understand the purpose of the various crop husbandry activities - Members are able to produce good-quality cocoa - Members know the role of their association/co-operative in the cocoa supply chain and the services they can expect from their organization - Members know their own responsibility as a member and understand why they have to pay their membership fees and participate in the democratic decision making structure - Members are aware of gender issues within the organization Methodology:
- Farmer Field School Methodology. The organic cocoa FFS in Sierra Leone made use of group dynamic and energizer exercises that were developed for the FFS programme Operation Feed the Nation (among other rice FFS), which are not included in this manual.
- Group formation on the basis of the association/co-operative existing structure.
- This manual serves as technical background material, making use of the IITA manual on sustainable cocoa production but with adaptations for use in the Sierra Leonean context and with a view that farmers comply with organic standards. IPM and organic agriculture are based on the same agro-ecological
4
principles, however, in IPM pesticides may still be used as a last resort, whereas that option does not exist in organic agriculture.
Topic Constraints What farmers need to know How agro-ecosystem analysis
How to make systematic observations in their fields Basic plant physiology What is a good yield? When need to rehabilitate?
see page 7 exercise 1, 2 and 6
Timing of under-brushing
Why? : weeds compete for water and nutrients When? : depend on weed development. Before harvest
see page 8, exercise 1 and 2
Sanitation Farmers do leave black pods on the tree
A diseased pod will easily spread the disease within the plantation
See page 9, exercise 5
Pruning - Farmers think that cutting branches decreases harvest - Trees have been neglected for so long that it is difficult to know where to start - Lack of equipment
- Basic knowledge of how a plant grows - Growth pattern of cocoa tree - Too many branches compete with pods for nutrients and water - Shape pruning allows for better development of canopy: better light distribution and easier harvest - Better aeration controls diseases - Use of cutlass damages tree: use saw and pruning scissors
see page 10, exercise 2, 3 and 6
Shade management
- What are undesirable species? These will be first choice to remove - Effect of too much shade: cocoa grows higher and thinner and more black pod disease - Effect of too little shade: capsids and trees dry out in dry season - Cut selectively to desirable shade level - If shade trees die slowly the cocoa has time to adapt to more light, therefore use ring barking
see page 11, exercise 4 and 5
harvest Farmers claim lack of time due to swamp rice
- Do not include overripe or infected pods - Harvest at least every 2 weeks the whole plantation - Flower cushions are very vulnerable: use of cutlass may damage cushions : therefore use pruning scissors - Remove regularly overripe and infected pods, because they will spread black pod disease
see page 39, exercise 7
Pod splitting Farmers split with cutlass
- Ensure you have only perfectly ripe pods - Ways how to split without using cutlass - Keeping the pods too long risks germination and loss of quality, therefore start processing as soon as harvest is complete
see page 39
Fermenting Most farmers ferment for only 4 days, others ferment longer but do
- Why ferment: to develop chocolate flavour and kills germ - Line cylindrical basket
see page 41, exercise 8 and 9
5
not mix regularly enough
- Scoop beans from pod in basket - Leave for 2 days, than mix every day for total of 7 days fermentation - How to conduct cut-test - You need a minimum quantity for good fermentation
Drying Farmers are afraid of weight losses that will lower income (traders pay per weight and do not pay more for better quality)
- The co-operative will not buy if not properly dried - Dry until it is dry! (there is no fixed time) - Mat on sticks is better than drying floor because: dries quicker, no goats walking through, easy to scoop up when suddenly rains - Crunch test
see page 44, exercise 10
Collective Marketing
Farmers think they sell to co-operative as to any other buyer, even if they are member
- Co-operative is not a buyer but sells the cocoa of its members on behalf of its members - They themselves are the co-operative - For the co-operative to succeed they should sell their good quality cocoa through the co-operative
see page 55, exercise 11
Members often do not pay their dues.
The services that the co-operative provides to its members do cost money.
Some members do not attend the FFS regularly
The FFS is a service of the co-operative to its members to increase cocoa production and quality, so that the members will receive a better income
Some villages were not represented at the Annual General Assembly
When you are not present, you can not object to a decision and can not make suggestions for change
The responsibilities of co-operative members
Farmers are often indebted and forced to sell their cocoa to traders
- without cocoa there is no co-operative - the co-operative does not have an interest to train farmers to improve cocoa quality if farmers then sell to traders
See page 56, exercise 12
Gender In meetings, women are often represented by their husbands. Women’s participation in decision making is limited.
Women also have an interest in the family’s cocoa plantation and cocoa sales. They may have a different view than their husbands and therefore also need a voice in the co-operative’s democratic decision making processes.
See page 57, exercise 13 and 14
A calendar is provided at the end of the manual, guiding the schools when it is most appropriate to discuss a certain issue.

6
Part I: REHABILITATION
7
Rehabilitating a cocoa farm Adapted from: 1STCP: Farmer Training Guide on ICPM Cocoa
Importance Many cocoa farms in West Africa are old (more than 40 years) and have low yields due to the age of trees as well as other factors such as poor maintenance. This is especially true in Sierra Leone where many farms have been abandoned during the war. A healthy cocoa tree produces 25 pods per year that results in approximately 2 pounds of dry cocoa. As a guideline, yield per year can be divided into:
o Good (20 or more pods per tree) o Average (15-18 pods per tree) o Poor (10 or less pods per tree)
This means that trees producing 10 or less pods a year are unproductive and you should think about what you need to do to improve their productivity.
There are three approaches:
o Rehabilitation: bringing existing trees into better production. This involves underbrushing, pruning of cocoa trees, removing too much shade and removing all diseased and pest-infected pods and mistletoe. It may also involve cleaning out clogged drainage ditches and adding organic matter to renew soil nutrients. Many of the technical bulletins and learning exercises focus on rehabilitation techniques.
o Regeneration: Grafting new plant material onto the old root system
o Replanting
See: Discovery learning exercise 1 on “Agro-ecosystem analysis” See: Discovery learning exercise 6 on “Deciding whether to rehabilitate or replant a cocoa farm”
8
Underbrushing
Importance Weeds compete with cocoa trees for nutrients and water from the soil. Weeds also increase the humidity in the farm. Too many weeds on a farm make it more difficult to walk around to do the other tasks such as pruning and harvesting.
When to do underbrushing In some farms weeds grow faster than in other farms. For example farms close to river beds have more water in the soil so weeds grow faster. These farms need more underbrushing per year than dryer farms where weeds grow slower. Therefore: underbrushing needs to be done when there are too many weeds. In any case, farmers should underbrush just before harvest and at the beginning of the dry season. Most farms need 3 or 4 underbrushings per year.
See: Discovery learning exercise 1 on “Agro-ecosystem analysis” See: Discovery learning exercise 2 on “The Basic function of the different parts of the plant”

9
Sanitation
Importance Black pods can easily spread the black pod disease within the plantation Constraints Farmers can not sell the black pods, so “harvesting” the black pods seems just extra work Due to the neglect during the war there is too much shade and trees have not been pruned. As a result many cocoa trees have grown thin and high and it is difficult to reach the pods. Best practises Remove all black pods immediately after every underbrushing. Idea: Some farmer field schools organised themselves in teams, with the men doing the underbrushing and the women following to remove the pods. Remove all black pods immediately after every harvest of mature pods At the end of the season there should be no black pods left in the plantation
See: Discovery learning exercise 5: Impact of humidity and the role of diseased pods in spreading black pod disease

10
Pruning Adapted from: 1STCP: Farmer Training Guide on ICPM Cocoa
Importance
• Cocoa trees produce more branches and leaves than they need in order to be strong enough to compete with other trees. The more branches a tree grows, the more energy and “food” it must provide to these branches which reduces the size and number of pods that reach maturity.
• The best cocoa tree has one stem only and two or three main branches,
with enough side branches and leaves to capture most of the sunlight. Removing unnecessary branches by pruning is therefore important for increasing production and reducing pests and diseases.
Pruning leads to:
• Reduced pests and diseases and therefore increased production: Tall trees with a lot of branches attract rats and squirrels. Black pod disease spreads quickly in the warm, humid atmosphere found in unpruned cocoa farms. In addition, there are often more diseased and dead pods in unpruned farms where the disease can live. Pruning reduces the number of unnecessary branches, and allows more light and wind to pass through the branches which reduces pest and disease levels.
• Easier harvesting: You will get more profit from your farm if you harvest all pods on a regular basis. It is difficult to harvest pods that are very high up in an unpruned tree.
Constraints Farmers think that cutting branching decreases the number of pods. Therefore they are not willing to cut healthy branches Trees have been neglected for so long due to the war that it is difficult to know where to start Farmers have a lack of good pruning equipment and therefore use the cutlass that easily damages the cocoa tree. Best practices There are three types of pruning: architecture, shape and maintenance pruning.
• Architectural pruning is done when trees are young (up to 4 years of age). The purpose of this type of pruning is to make sure the trees do not grow too tall, and have the right shape. If trees are not properly pruned at this age, they will become too tall for you to properly manage.
11
• The purpose of shape pruning is to give cocoa trees a shape that allows them to capture the most sunlight with the fewest branches, without leaving holes in the canopy (see “Pruning older cocoa trees”). This is done by removing branches that trees do not need.
� Shape pruning is best done at the beginning of the rainy season, after most
leaves have dropped and trees have no pods yet. Leave enough branches and leaves to make sure little or no sunlight reaches the ground, as this will increase weeds. You can prune cocoa trees more severely when there is shade from other trees
• Removing new shoots and new branches that are not needed for the health and strength of the tree throughout the year is called maintenance pruning.
� Maintenance pruning can be done at any time of the year
• Tall trees take more effort to prune than small trees, but it is worth the effort. If trees are too tall to prune (or even to harvest), consider rehabilitation options. Trees that have not been pruned for a long time need to be “reshaped”.
� If the main stem is still healthy and its main branches are still bearing pods,
remove all the unwanted side branches that have grown later, including watershoots
� If the main stem and branches are too old and unproductive, choose a watershoot that can develop into a new main stem. Progressively cut/saw all the other branches and the main stem away. A suitable watershoot that can be used for rejuvenation is a watershoot that is still low at the time of pruning. It needs to get a lot of light quickly so that it will develop the first jorquette at a height of about 1 to 1.5 meters. If it does not get enough light it will grow too high and thin and will not form a properly shaped tree.
See: Discovery learning exercise 2 on “Basic functions of the parts of the plant” See: Discovery learning exercise 3 on “Pruning older cocoa trees” See: Discovery learning exercise 6 on “Deciding to rehabilitate or renew a cocoa farm”
12
Shade management Importance Shade trees have an important function in the cocoa farm. The more shade, the more humidity. If there is not enough shade, the farm gets too dry in the dry season. If there is too much shade, the farm gets too humid in the rainy season. Shade suppresses the level of capsid attack but increases the incidence of black pod disease. It is therefore very important to balance the level of shade. Farmers should know what is the right level of shade.
Best practices If your farm has too much shade, you must remove some of the shade trees or remove some branches of the shade trees First step: Are there any trees that are harmful to cocoa trees?
� Remove them first! Second step: Trees that remain smaller or of equal height as cocoa trees – even when fully grown - do not provide any shade and only get in the way.
� Remove trees that are not really shade trees Third step: Select the other shade trees you want to remove.
� Try to select them in such a way that the remaining shade trees will have an evenly distributed canopy above the cocoa trees that will provide an even layer of shade.
How to remove big shade trees? Felling shade trees with a chain saw may harm the cocoa trees: - the shade tree may fall on the cocoa trees - the shade is removed too abruptly and the cocoa trees do not have time to adapt to the increased levels of sunlight.
It is better to let shade trees die slowly. The amount of sunlight in the farm will increase slowly and the cocoa trees have time to adapt.
� The best way to let shade trees die slowly is by ring barking. Avoid the use of fire: fire may damage the cocoa trees.
See: Discovery learning exercise 4: Impact of shading on humidity in a cocoa farm See: Discovery learning exercise 5: Impact of humidity and the role of diseased pods in spreading black pod disease
13
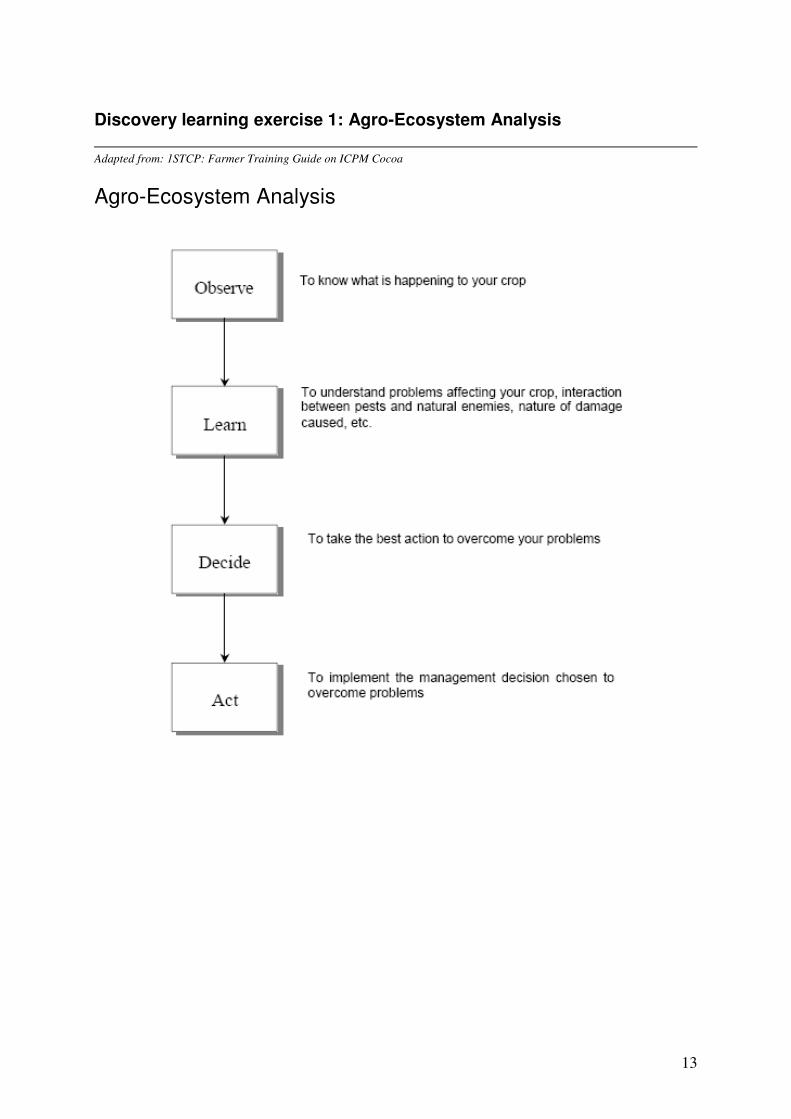
Discovery learning exercise 1: Agro-Ecosystem Analysis
Adapted from: 1STCP: Farmer Training Guide on ICPM Cocoa
Agro-Ecosystem Analysis
14
Learning objectives
• Improve participants’ observational skills and decision-making abilities
• Teach farmers the need to make management decisions based on close observation of the agro-ecosystem
Materials In the field:
• Exercise books
• ruler
• Pencils
• Sharpeners
• Erasers
• plastic bags and pots
• Note book
• Cutlass
• material to label trees Back at the central point
• flip chart
• Markers NOTE: It is important to bring Agro-EcoSystem Analysis (AESA) presentations and notes from the previous FFS-AESA session Procedure Preparing to start AESA/ first session 1st session in June: Each farmers should select a plot in his/her plantation where he/she is executing all the recommendations from the Farmer Field School (= the do-everything plot). Each farmer should also select a part of the plantation where nothing will be done, except underbrushing when necessary to access the plot (= the do-nothing plot). Each plot should be around 100 by 100 feet. Identify and mark these plots during the first FFS meeting. Randomly select and tag 5 trees in each plot. Make sure the tag is from durable material and attached well so that it will still be there after 6 months. Divide participants into 5 groups. Each group goes to a different plantation and makes observations in both the do-everything and the do-nothing plot. Each group selects one person to record all data (this task can be rotated among group members).
15
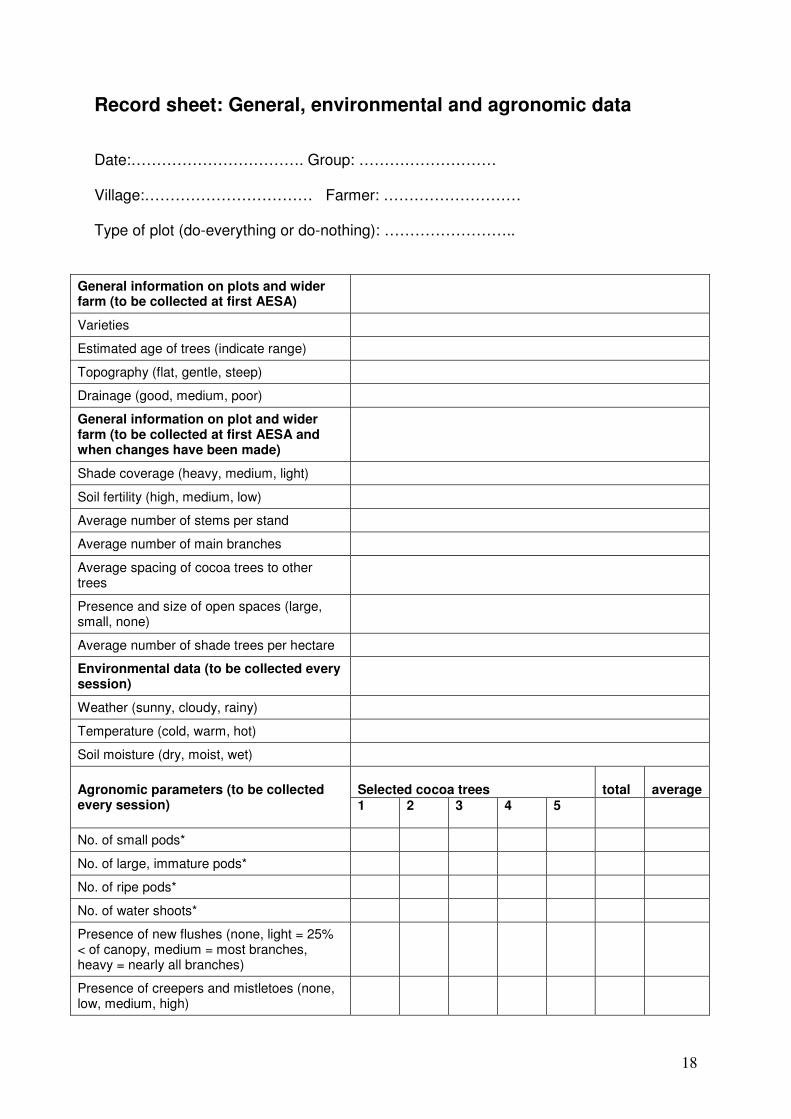
During this first AESA in June, start by doing a rapid field walk in the both plots. Record the following information on cocoa trees in the two plots and the whole farm (see AESA record sheet)
• Varieties
• Estimated age of trees (indicate range)
• Topography (flat, gentle, steep)
• Drainage (good, medium, poor)
• Shade coverage (heavy, medium, light, unshaded)
• Soil fertility (high, medium, low)
• Average number of stems per stand
• Average number of main branches
• Average spacing of cocoa trees to other trees
• Presence and size of open spaces (large, small, none)
• Average number of shade trees per hectare/acre Next AESA session After the first session in June, make observations in the two plots at each first session of the month. Divide again in 5 groups and go to 5 different plantations. Observations need to be made early in the morning (about 7 a.m.). At each session, record the following conditions at the time you made the observations:
• Weather (sunny, cloudy, rainy)
• Temperature (cold, warm, hot)
• Soil moisture (dry, moist, wet) For convenience and due to problems with using ladders, most observations are made up to 2 metres high in the tree, but observations on rodent damage should be made above 2 metres. Of the two sets of 5 tress that were tagged, record the following agronomic observations each first session of the month:
• Number of small pods
• Number of large, immature pods
• Number of ripe pods
• Number of water-shoots (chupons)
• Presence of new flushes (none, light, medium, heavy)
• Presence of creepers and mistletoes (none, low, medium, high) At each AESA session, carefully observe the selected trees for insects and diseases. Count all insects you can find and indicate whether they are a pest or beneficial. Collect any insects that you do not know in bottles or plastic bags and take them back to the meeting place to see if other participants can identify them. If you recognise the disease, record them. If you don’t recognise them, collect them in bottles or plastic bags and take them back to the meeting place.
16
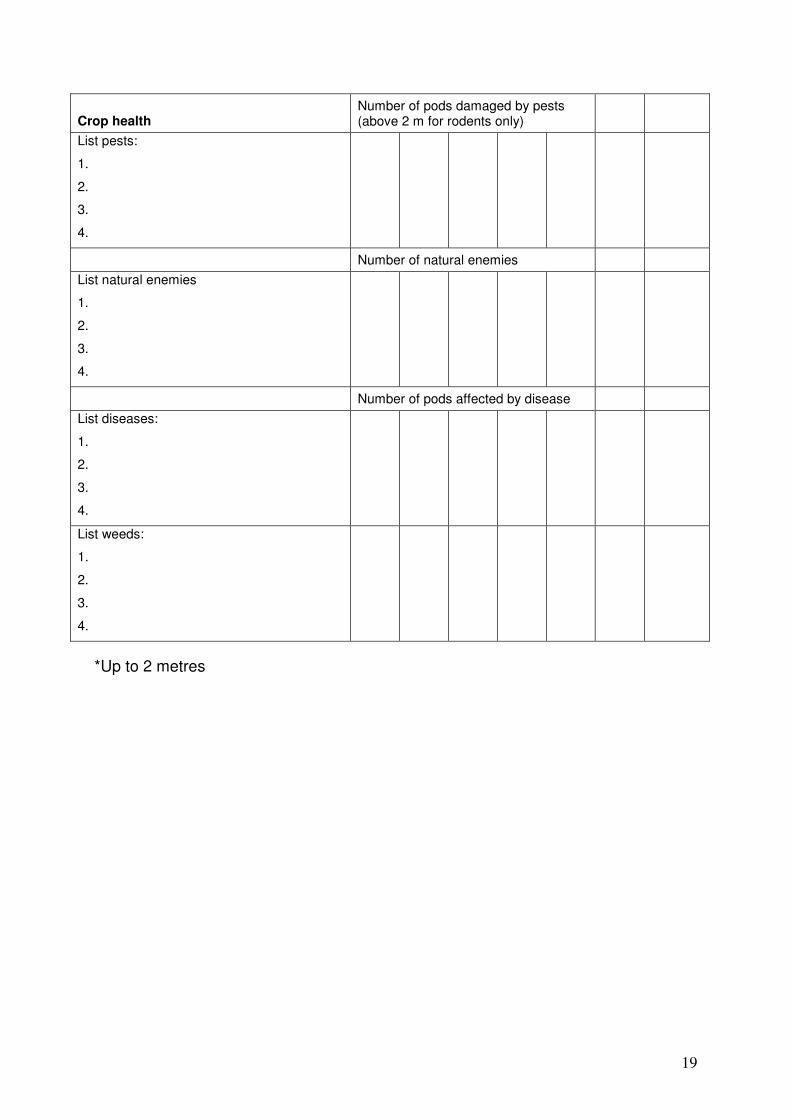
Record the following pest and disease observations:
• Number of pods damaged by pests (above two metres for rodents)
• Number of natural enemies
• Number of pods affected by disease After counting the total number of insects and diseased pods found on the five trees, calculate the average for each tree, that is the total number found divided by 5. Record the following observations only when relevant changes have been made on the do-everything plots:
• Shade coverage (heavy, medium, light, unshaded)
• Soil fertility (high, medium, low)
• Average number of stems per stand
• Average number of main branches
• Average spacing of cocoa trees
• Presence and size of open spaces (large, small, none)
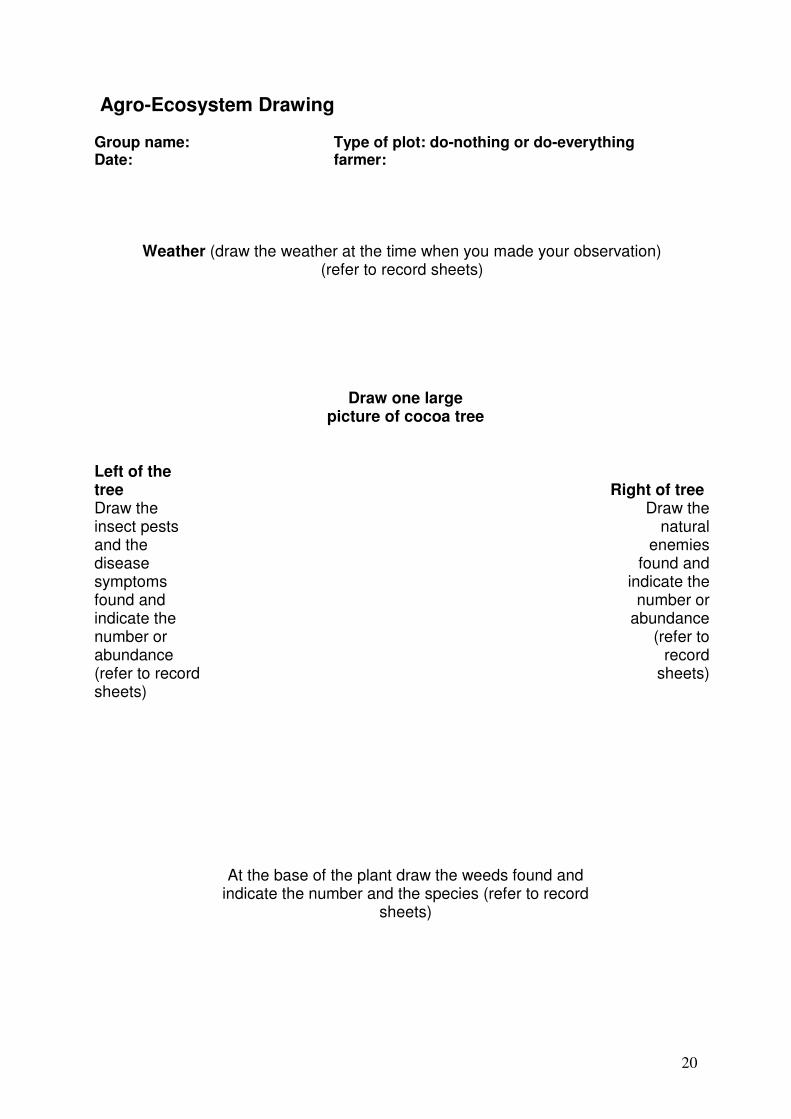
• Average number of shade trees per hectare/acre Agro-ecosystem drawing In a shaded area close to the field, each group draws all the observations made in the field on flip chart paper. Draw a single representative cocoa tree at its present state of growth, with the sun or clouds symbolising weather conditions. Show weeds found and indicate the number and species. To the right of the tree draw the natural enemies found and indicate the number or abundance. To the left of the tree, draw the insect pests and the disease symptoms found and indicate the number or abundance. Agro-ecosystem analysis After a discussion, group members analyse and interpret field information. They discuss the growing stage of the plant and compare the number of pods, water-shoots (chupons), presence of new flushes and creepers, mistletoes etc. between the observed trees. They also compare the diseases observed and the number and type of pests and natural enemies. The group draws conclusions about the overall situation compared to the previous AESA. They list observations of specific problem areas in the AESA drawing and indicate the possible causes. Agro-ecosystem decision-making The final stage of the AESA is the decision-making. Group members should ask:
� What needs to be done to do to address the observed problems? � If something needs to be done, how, when and what will be the impact on
the agro-ecosystem? Did we observe something that we do not understand? List action decisions under the group recommendation column in the AESA drawing.
17
Small groups report A representative of each small group presents its findings and conclusions to the whole group for further discussion, questioning and refinement. Participants are encouraged to challenge and ask the presenting group questions. Sometimes, the decision made by a group is modified or rejected by the rest of the school. If a group made any observations that they did not understand, this is the moment to ask help from their colleagues An important role of the facilitator is to draw out differences observed between the FP and ICPM plots by asking, for example:
� Is there a difference in the average and total number of small/large/mature pods counted on trees in the FP and ICPM plots? How do we explain this difference?
� Is there a difference in the number of pods affected by disease? How do we explain this difference? � Is there a difference in the number of pods damaged by pests? How do we explain this difference? After presentations, the school must agree on what action decisions to be implemented and when. These decisions are implemented by each farmer on their own do-everything plot. The participants, whose plantation was not observed this time, will do the observation alone after the FFS session and record the data and observations and bring the notes to the next session. If the observations in the do-everything plot are similar to the 5 plots discussed at the FFS, the farmer will implement the same decisions on the do-everything plot. If there are still questions, the facilitator will try to contact the facilitator in a neighbouring village to find out if the other school has made similar observations and if they have found the answer to the question. It is important, however, to realise that not all topics identified by AESA can be addressed during the FFS training cycle. Participants may continue some topics, for example those requiring long-term research or demonstrations, after the FFS training cycle.
18
Record sheet: General, environmental and agronomic data Date:……………………………. Group: ……………………… Village:…………………………… Farmer: ……………………… Type of plot (do-everything or do-nothing): ……………………..
General information on plots and wider farm (to be collected at first AESA)
Varieties
Estimated age of trees (indicate range)
Topography (flat, gentle, steep)
Drainage (good, medium, poor)
General information on plot and wider farm (to be collected at first AESA and when changes have been made)
Shade coverage (heavy, medium, light)
Soil fertility (high, medium, low)
Average number of stems per stand
Average number of main branches
Average spacing of cocoa trees to other trees
Presence and size of open spaces (large, small, none)
Average number of shade trees per hectare
Environmental data (to be collected every session)
Weather (sunny, cloudy, rainy)
Temperature (cold, warm, hot)
Soil moisture (dry, moist, wet)
Selected cocoa trees
total
average
Agronomic parameters (to be collected every session)
1 2 3 4 5
No. of small pods*
No. of large, immature pods*
No. of ripe pods*
No. of water shoots*
Presence of new flushes (none, light = 25% < of canopy, medium = most branches, heavy = nearly all branches)
Presence of creepers and mistletoes (none, low, medium, high)
19
Crop health
Number of pods damaged by pests (above 2 m for rodents only)
List pests:
1.
2.
3.
4.
Number of natural enemies
List natural enemies
1.
2.
3.
4.
Number of pods affected by disease
List diseases:
1.
2.
3.
4.
List weeds:
1.
2.
3.
4.
*Up to 2 metres
20
Agro-Ecosystem Drawing Group name: Type of plot: do-nothing or do-everything Date: farmer:
Weather (draw the weather at the time when you made your observation) (refer to record sheets)
Left of the tree
Draw one large picture of cocoa tree
Right of tree
Draw the insect pests and the disease symptoms found and indicate the number or abundance (refer to record sheets)
At the base of the plant draw the weeds found and indicate the number and the species (refer to record
sheets)
Draw the natural
enemies found and
indicate the number or
abundance (refer to
record sheets)
21
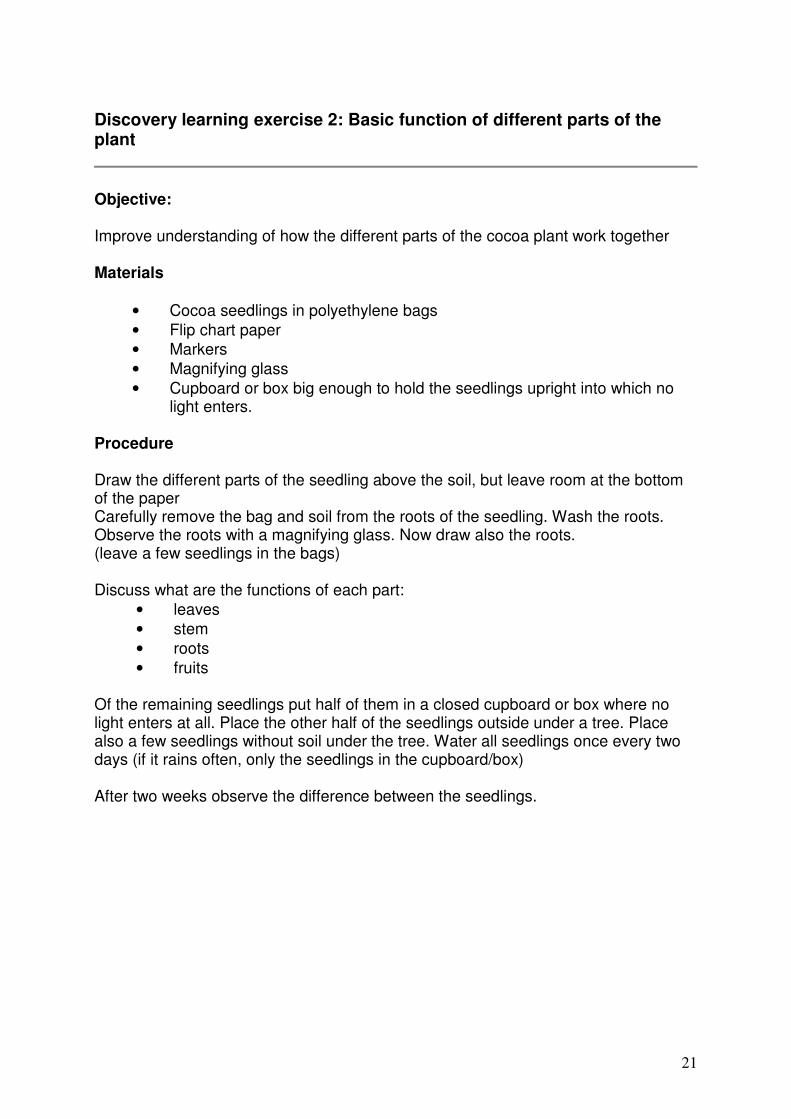
Discovery learning exercise 2: Basic function of different parts of the plant
Objective: Improve understanding of how the different parts of the cocoa plant work together Materials
• Cocoa seedlings in polyethylene bags
• Flip chart paper
• Markers
• Magnifying glass
• Cupboard or box big enough to hold the seedlings upright into which no light enters.
Procedure Draw the different parts of the seedling above the soil, but leave room at the bottom of the paper Carefully remove the bag and soil from the roots of the seedling. Wash the roots. Observe the roots with a magnifying glass. Now draw also the roots. (leave a few seedlings in the bags) Discuss what are the functions of each part:
• leaves
• stem
• roots
• fruits
Of the remaining seedlings put half of them in a closed cupboard or box where no light enters at all. Place the other half of the seedlings outside under a tree. Place also a few seedlings without soil under the tree. Water all seedlings once every two days (if it rains often, only the seedlings in the cupboard/box) After two weeks observe the difference between the seedlings.
22
Guide questions for discussion
1) What would happen if the plant had no roots? 2) What did you see through the magnifying glass when you were watching
the roots? 3) What happened to the seedlings without soil? Why? 4) What happened with the seedlings in the cupboard? Why? 5) What colour are healthy leaves? 6) What colour are dead leaves? 7) What happens when you ring bark a tree? Why?
23
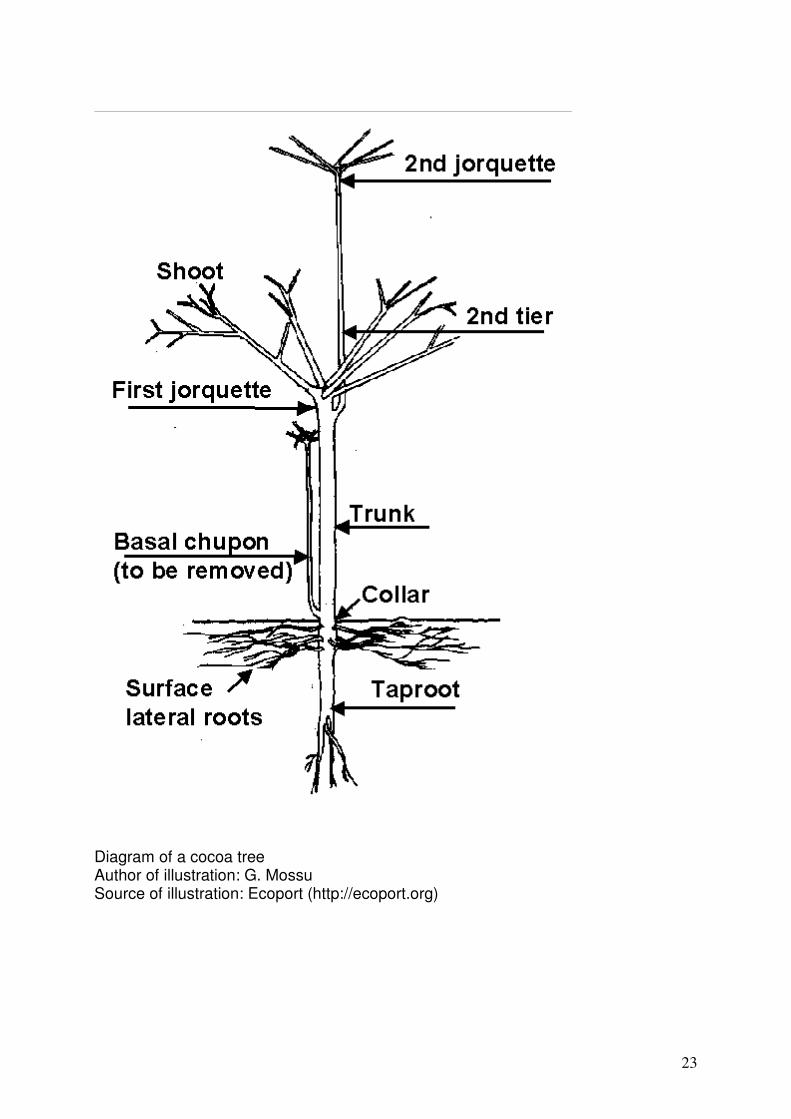
Diagram of a cocoa tree Author of illustration: G. Mossu Source of illustration: Ecoport (http://ecoport.org)
24
Discovery learning exercise 3: Pruning older cocoa trees
Source: 1STCP: Farmer Training Guide on ICPM Cocoa
Learning objective To help farmers understand and implement pruning of cocoa trees more than 5 years old Materials
• Un-pruned cocoa trees
• Machete/cutlass, small saws (use pruning saws if available) or other pruning tools such as pruning shears and extended pruning shears on a stick with pull rope for reaching higher branches
• Ladder
• Flip chart paper
• Markers
• Paint or other material to label trees Procedure Discussion Start a discussion on local practices, knowledge and beliefs on pruning. Guide questions for discussion: What is pruning? Why would you prune your trees? What benefits does pruning offer? What are the hazards or problems you have experienced? How do you prune your trees? When is the best time to prune? What tools have you used? How did you learn to prune your trees? Write responses on a flip chart. This recognises the farmers’ existing beliefs, knowledge, and experience regarding pruning. It also gives the facilitator a baseline idea of the pruning capabilities of participants.
25
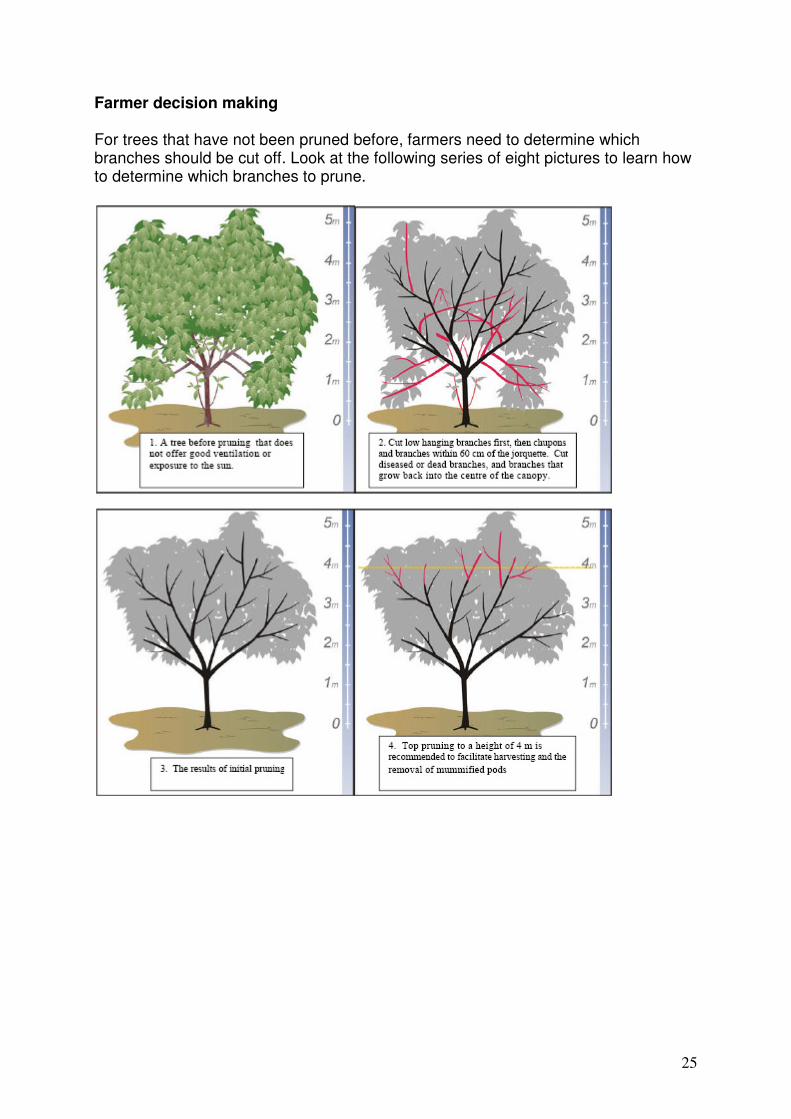
Farmer decision making For trees that have not been pruned before, farmers need to determine which branches should be cut off. Look at the following series of eight pictures to learn how to determine which branches to prune.
26
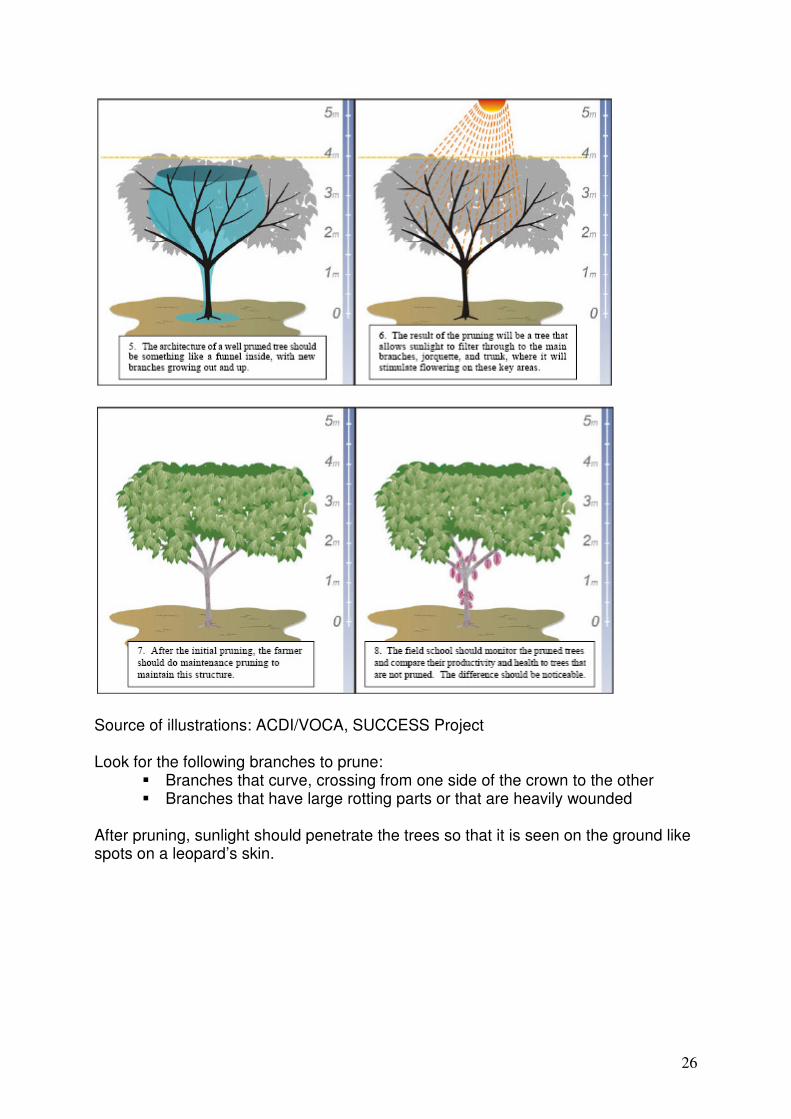
Source of illustrations: ACDI/VOCA, SUCCESS Project Look for the following branches to prune:
� Branches that curve, crossing from one side of the crown to the other � Branches that have large rotting parts or that are heavily wounded
After pruning, sunlight should penetrate the trees so that it is seen on the ground like spots on a leopard’s skin.
27
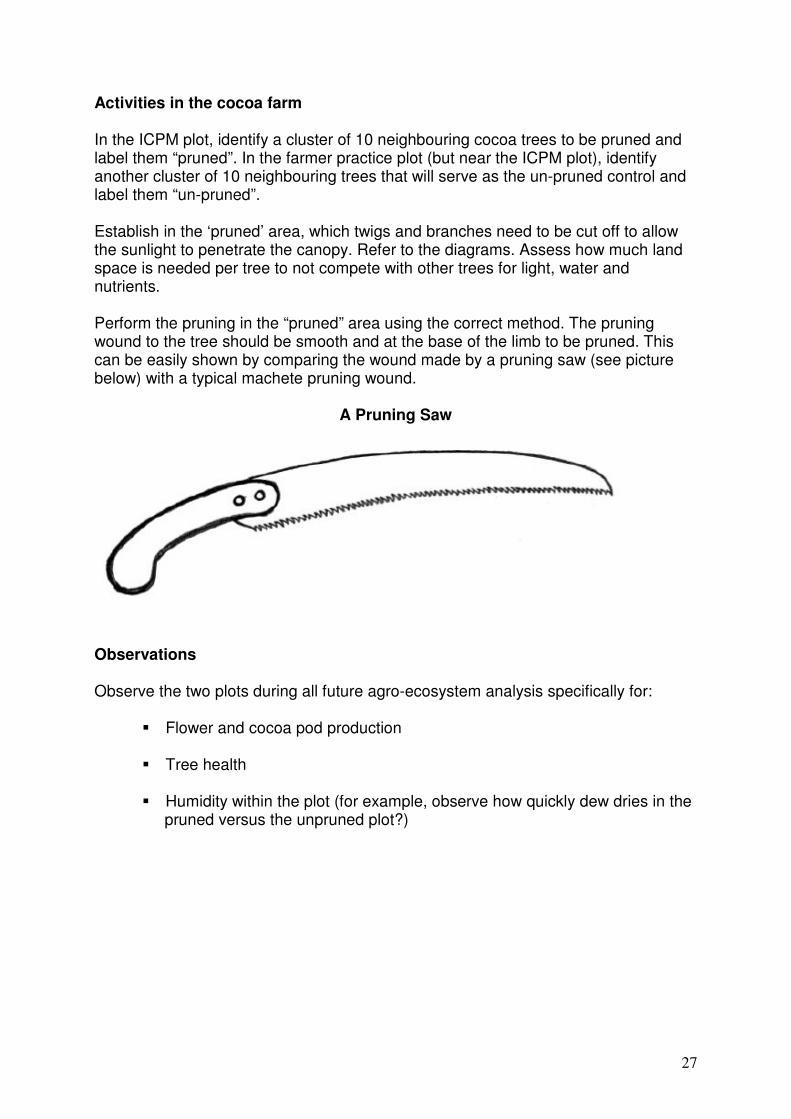
Activities in the cocoa farm In the ICPM plot, identify a cluster of 10 neighbouring cocoa trees to be pruned and label them “pruned”. In the farmer practice plot (but near the ICPM plot), identify another cluster of 10 neighbouring trees that will serve as the un-pruned control and label them “un-pruned”. Establish in the ‘pruned’ area, which twigs and branches need to be cut off to allow the sunlight to penetrate the canopy. Refer to the diagrams. Assess how much land space is needed per tree to not compete with other trees for light, water and nutrients. Perform the pruning in the “pruned” area using the correct method. The pruning wound to the tree should be smooth and at the base of the limb to be pruned. This can be easily shown by comparing the wound made by a pruning saw (see picture below) with a typical machete pruning wound.
A Pruning Saw
Observations Observe the two plots during all future agro-ecosystem analysis specifically for:
� Flower and cocoa pod production � Tree health � Humidity within the plot (for example, observe how quickly dew dries in the pruned versus the unpruned plot?)
28
Guide questions for discussion
1) Considering the amount of labour involved in pruning, do you think it is a worthwhile exercise? Why / why not?
2) What will be the consequences if the farmer does not prune his/her trees?
3) Can the farmer expect a high yield if he/she is not able to perform pruning?
4) What diseases or insects are able to enter the rotting wounds created by the decaying pruning stumps?
5) If a farmer feels that he/she does not need to invest any energy or capital in his/her farm, do you think this is sensible or not? Why / why not?

29
Discovery learning exercise 4: Impact of shading on humidity in a cocoa farm
Source: 1STCP: Farmer Training Guide on ICPM Cocoa
Cocoa in much of West Africa is grown in a mixed crop system with shade trees. Many of these shade trees include economically valuable species such as the African plum (Dacryodes edulis), kola nut (Cola nitida), and guava (Psidium guajava), as well as several timber species (e.g. Chlorophora excelsa). Others are left for their compatibility as shade species. There is, however, a trade-off between shade and pest and disease management. Shade has been shown to suppress the level of attack by mirids while, on the other hand, increasing the incidence of black pod disease, because of the effect on humidity. Learning objective To help farmers understand the relationship between shade and humidity in a cocoa farm and its relation to specific cocoa pests Materials
• Cocoa farm with different shading levels
• Small hand sprayer
• Water
• 3 watches
• Flip chart paper
• Markers Procedure In the cocoa farm, select three niches with different shading levels:
� Excessive shading � Moderate shading � Little or no shading
Divide participants into 3 groups and assign them to one of the shade niches. One person in each group should have a watch. Spray cocoa pods with water using a hand sprayer until the water forms a droplet on the tip of the pods. Ask each group to record the time it takes for the cocoa pods to dry in each niche. While waiting for the cocoa pods to dry, ask each group to describe the neighbour tree species present in the each niche by making the following observations: � Neighbour trees density (spacing) � Neighbour trees height � Neighbour trees crown shape
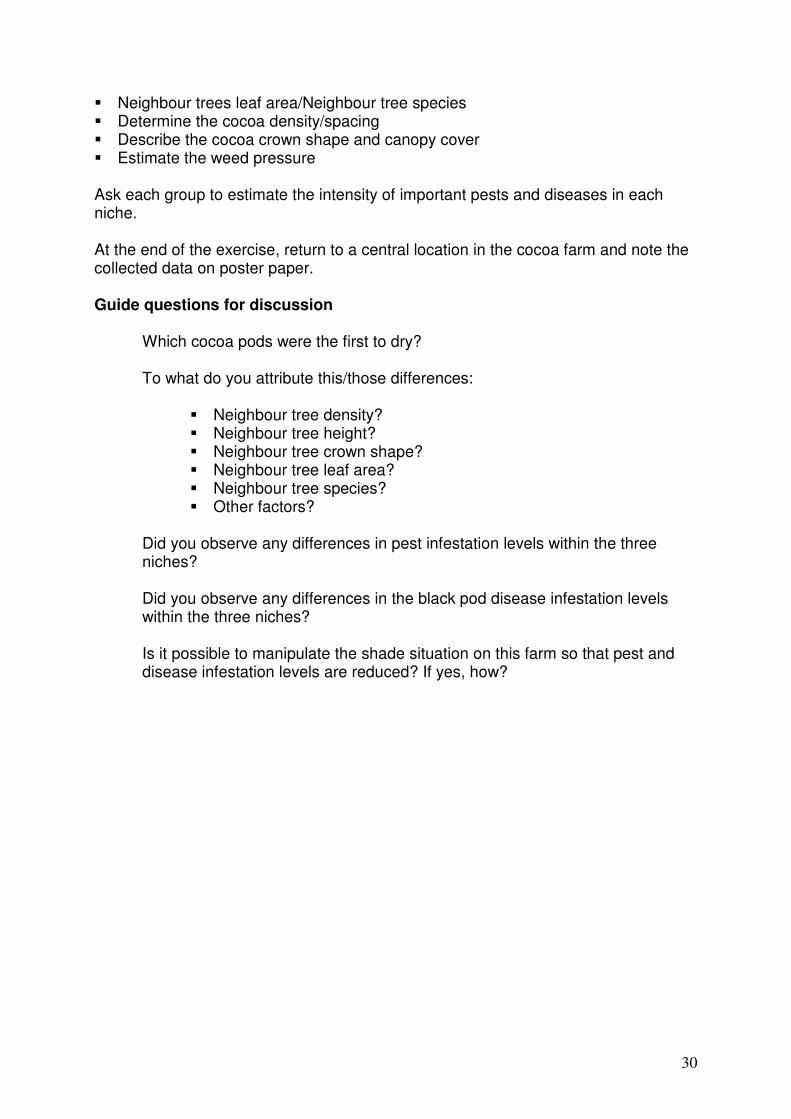
30
� Neighbour trees leaf area/Neighbour tree species � Determine the cocoa density/spacing � Describe the cocoa crown shape and canopy cover � Estimate the weed pressure Ask each group to estimate the intensity of important pests and diseases in each niche. At the end of the exercise, return to a central location in the cocoa farm and note the collected data on poster paper. Guide questions for discussion
Which cocoa pods were the first to dry? To what do you attribute this/those differences:
� Neighbour tree density? � Neighbour tree height? � Neighbour tree crown shape? � Neighbour tree leaf area? � Neighbour tree species? � Other factors?
Did you observe any differences in pest infestation levels within the three niches? Did you observe any differences in the black pod disease infestation levels within the three niches? Is it possible to manipulate the shade situation on this farm so that pest and disease infestation levels are reduced? If yes, how?
31
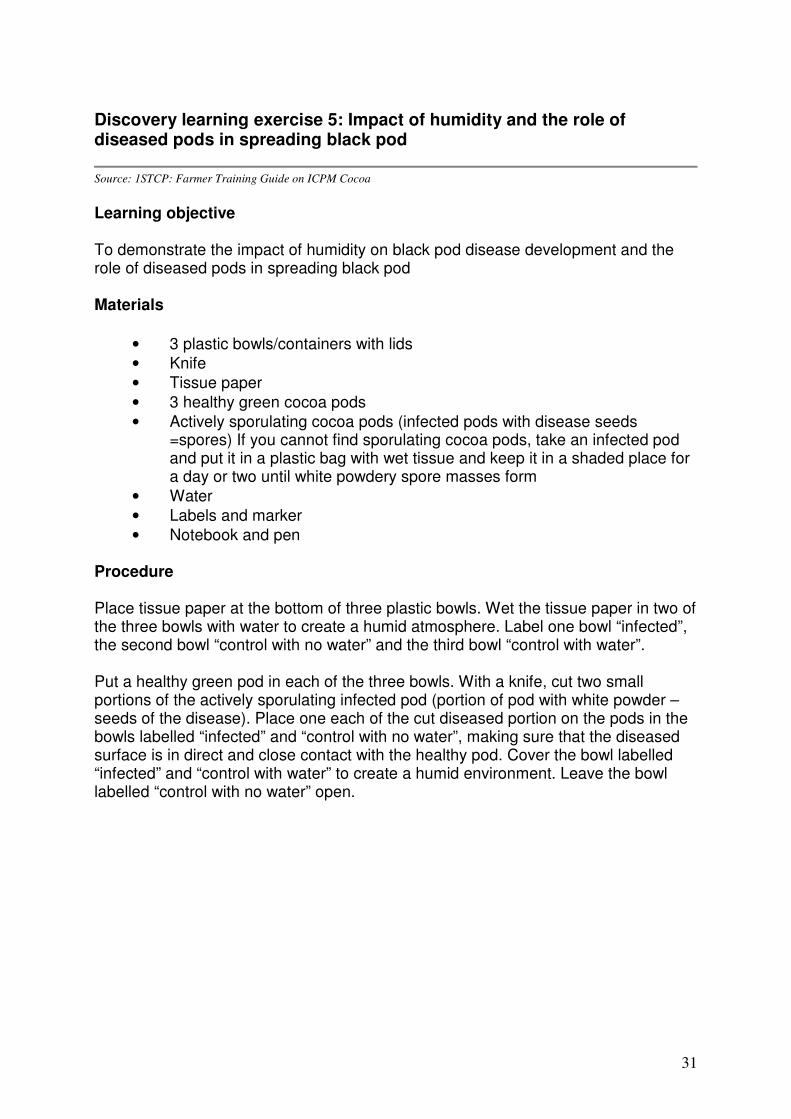
Discovery learning exercise 5: Impact of humidity and the role of diseased pods in spreading black pod
Source: 1STCP: Farmer Training Guide on ICPM Cocoa
Learning objective To demonstrate the impact of humidity on black pod disease development and the role of diseased pods in spreading black pod Materials
• 3 plastic bowls/containers with lids
• Knife
• Tissue paper
• 3 healthy green cocoa pods
• Actively sporulating cocoa pods (infected pods with disease seeds =spores) If you cannot find sporulating cocoa pods, take an infected pod and put it in a plastic bag with wet tissue and keep it in a shaded place for a day or two until white powdery spore masses form
• Water
• Labels and marker
• Notebook and pen Procedure Place tissue paper at the bottom of three plastic bowls. Wet the tissue paper in two of the three bowls with water to create a humid atmosphere. Label one bowl “infected”, the second bowl “control with no water” and the third bowl “control with water”. Put a healthy green pod in each of the three bowls. With a knife, cut two small portions of the actively sporulating infected pod (portion of pod with white powder –seeds of the disease). Place one each of the cut diseased portion on the pods in the bowls labelled “infected” and “control with no water”, making sure that the diseased surface is in direct and close contact with the healthy pod. Cover the bowl labelled “infected” and “control with water” to create a humid environment. Leave the bowl labelled “control with no water” open.
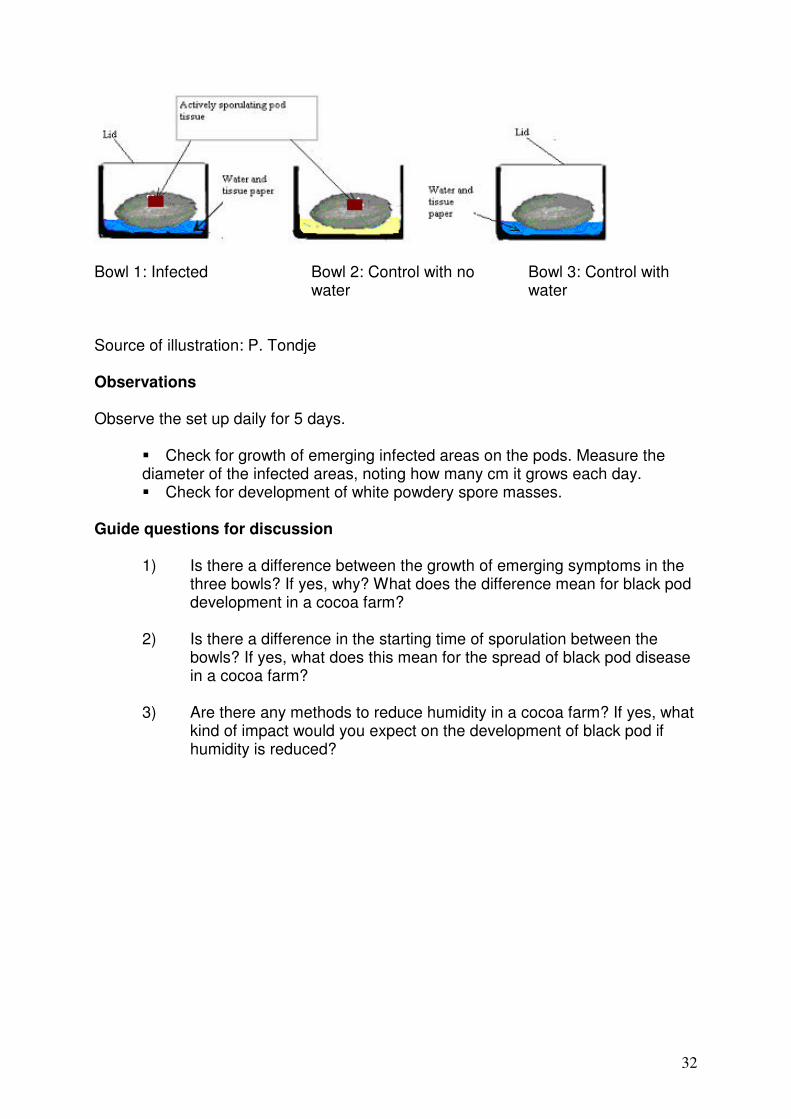
32
Bowl 1: Infected
Bowl 2: Control with no water
Bowl 3: Control with water
Source of illustration: P. Tondje
Observations Observe the set up daily for 5 days.
� Check for growth of emerging infected areas on the pods. Measure the diameter of the infected areas, noting how many cm it grows each day. � Check for development of white powdery spore masses.
Guide questions for discussion
1) Is there a difference between the growth of emerging symptoms in the three bowls? If yes, why? What does the difference mean for black pod development in a cocoa farm?
2) Is there a difference in the starting time of sporulation between the
bowls? If yes, what does this mean for the spread of black pod disease in a cocoa farm?
3) Are there any methods to reduce humidity in a cocoa farm? If yes, what
kind of impact would you expect on the development of black pod if humidity is reduced?
33
Discovery learning exercise 6: Deciding whether to rehabilitate or replant a cocoa farm
Adapted from: 1STCP: Farmer Training Guide on ICPM Cocoa
Many cocoa farmers in West and Central Africa have old farms inherited from their fathers, while others have abandoned their farms during periods of war or for various reasons, including low cocoa prices, low production, lack of labour or farm ownership disputes. They are faced with the difficult decision of how to improve cocoa productivity. Farmers need to make a series of decisions based on systematic observations of their farms to improve productivity. Learning objective To help farmers make decisions on renewing cocoa farms based on a systematic process that considers tree performance and income goals Note: As a general guideline, this protocol should be covered toward the end of an FFS cycle and after farmers have learned about pruning. Materials
• Cocoa field
• Calculator (if available)
• Paper/flip chart Procedure Conduct an interactive session and a field exercise to collect information on age of the trees, production per area (hectares or acres) and yield. This protocol may require two sessions to complete. Calculating cocoa productivity and income Start a discussion about productivity of cocoa farms, listing all factors that contribute to it. These include: age of trees, production per area (acre/hectare), pests and diseases, quality of farm management (as indicated by number of times the farm is brushed, frequency of pruning, frequency of removing of damaged, diseased pods and parasitic plants), field drainage, presence of other trees for shade, fruit and other uses. List all responses on a flip chart. Ask farmers how they make decisions about replanting and discuss the positive and negative aspects of their decision making process. Estimate annual yield of the field per area (acre or hectare) or pods per tree. Note that a healthy cocoa tree produces 25 pods per year that results in approximately 1 kg of dry cocoa. As a guideline, yield per year can be divided into: good (20 or more pods per tree), average (15-18 pods per tree) and poor (10 or less pods per tree). Ask farmers to set an average income goal for a 1-hectare/acre farm for use during this exercise based on desirable yields and farm gate price. For example, a fully planted hectare of land planted in 3 metre x 3 metre spacing will have approximately
34
1100 cocoa trees. 1100 trees at 800 grams/tree (in this example we assume 20 pods per tree) results in 880 kg/ha (0.80 x 1100). With a farm gate price of leones…/kg the farmer income would be leones…/year. Compare this desirable income with farmers’ average income based on farmers’ records of the sacks sold, weight sold or gross income from cocoa sales. Calculate size of the cocoa field by using the most appropriate method. Determine the number of productive trees by counting the trees in a hectare/acre that produce10 or more pods. Do not count small underdeveloped trees, diseased trees etc. By knowing the field size and the number of productive trees, you can determine the number of productive trees per land area (hectare or acres). Write up all the above results on the flip chart. Making the decision to replant or rehabilitate Ask farmers what they do when they notice a reduction in production. Referring back to the discussion on what factors contribute to cocoa productivity, point out that the most important factor determining productivity of a farm is good farming practice. Others include the age of trees, the number of productive trees per land area and yield per tree. Using the information collected when calculating cocoa productivity and income, go through the following decision tree to decide whether to replant or rehabilitate the farm. Since replanting is best taught using demonstrations, farmers who are interested in replanting should be directed to extension staff that have been trained on this topic.
Note: Replanting offers the opportunity to introduce better varieties: ask if they are available
35
Decision making process for replanting or rehabilitation
36
Guide questions for discussion 1. Why do some farmers not take care of their cocoa farms? 2. What factors affect the productivity of cocoa trees? 3. What do farmers do when they notice a decline in cocoa productivity? 4. When should a farmer replant a farm? 5. How do farmers make decisions about replanting? Can this decision making process be improved? How? 6. Is replanting worthwhile, considering the cost? Why / why not? 7. Where can farmers get training or information on replanting techniques in this area? 8. Compare replanting with heavy pruning. Which is better? Why?
37
Part 2: HARVESTING AND PRIMARY PROCESSING
38
Harvesting, pod storage and breaking Adapted from: 1STCP: Farmer Training Guide on ICPM Cocoa
Importance of correct harvesting practices
• Harvesting is the start of the post-harvest process that determines the quality of the beans to be sold, which will be used by the cocoa and chocolate industry. Getting any of the post-harvest steps wrong can lead to poor quality beans
• If you harvest too early, or too frequently, you are likely to collect unripe pods. Pods that are still green or partly green have more solid pulp (with less sugar content) and the beans may be hard to break up. Unripe pulp gives rise to clumps of beans and leads to poor fermentation
• Harvesting early in the season and at the end can mean that you will not have enough pods/beans to make a good fermentation heap
• Harvesting too late leads to overripe pods with the pulp drying up, and in extreme cases, the beans may start to germinate. Lack of pulp will not give a good fermentation. Also, germinated beans will not ferment well, and the hole caused by the emerging shoot will allow mould inside the bean
• Before fermenting, you can store unopened pods for no longer than 5 - 7 days as storage allows the pulp to increase in sugar content, which causes faster fermentation. Storing pods for longer than 7 days may allow mould to damage the beans and/or encourage the beans to germinate.
Farmer practices
• Some farmers harvest pods too early for various reasons including the desire to sell their cocoa quickly to get money. This leads to poor fermentation. Other farmers delay harvesting due to lack of labour, waiting for the rains to stop or for other reasons. Harvesting late may lead to poor fermentation and loss of beans as a result of mould and germination. Leaving over-ripe pods on trees also encourages disease
• Some farmers damage the beans when using a cutlass for pod breaking by cutting too deeply. Damaged beans should be thrown away. It is better not to use a cutlass at all
• Children should never use cutlasses to break pods, as they may injure themselves. They may be involved in pod breaking after school, using a short stick
• Many farmers store pods for too long which may cause the beans to start to germinate.
Best practices
� Harvest the whole farm at least every two weeks � Break the pods and start fermentation as soon as the whole farm is harvested

39
� If possible, avoid the use of a machete to open pods, because of the danger of damaging beans and cutting the hand. Use a short stick, a stone or a piece of angle iron, filed to form an edge that is about the same depth as the thickness of the husk of an average cocoa pod.
See: Discovery learning activity 7: Impact of harvesting time on fermentation and cocoa quality
40
Fermentation
Importance
• Proper fermentation is important because it stops germination and gives the beans a good taste when roasted
• Fermentation is necessary to begin the process of developing the cocoa/chocolate flavour needed by chocolate manufacturers Cocoa/chocolate flavour develops fully when beans are roasted. When you roast unfermented beans, the beans taste horrible!
• Flavour development begins when the temperature of the beans is raised to a high enough level during fermentation
• The level of heat required to start the flavour development process only occurs in fermentation heaps/baskets with at least 50 pounds of wet beans. The temperature does not get high enough to start flavour development in a fermentation heap with a smaller quantity of beans
• The first part of the fermentation is done by bacteria that do not need air. Therefore the first two days the heap is not mixed. The second part of the fermentation process is done by bacteria that do need air. Therefore, after the first two days the heap must be turned/mixed thoroughly every day to allow air to reach all the beans
• Ferment beans for a total of 7 days (this is to be confirmed by experiment).
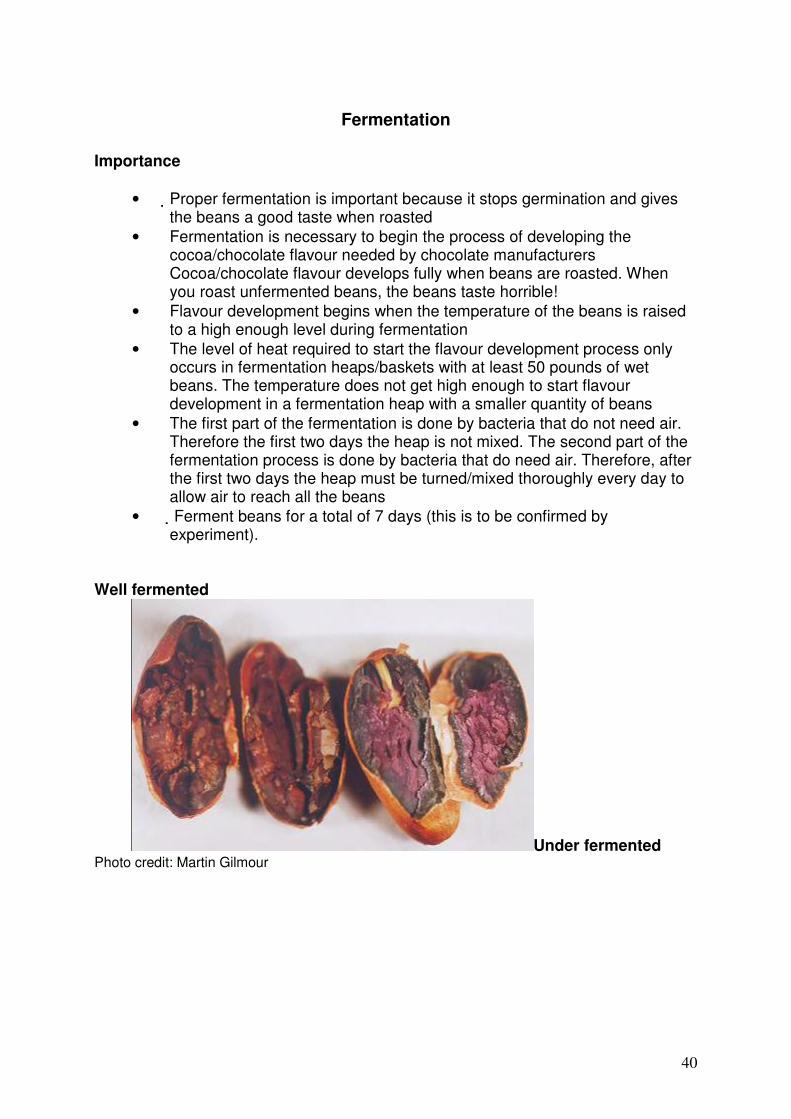
Well fermented
Under fermented
Photo credit: Martin Gilmour
41
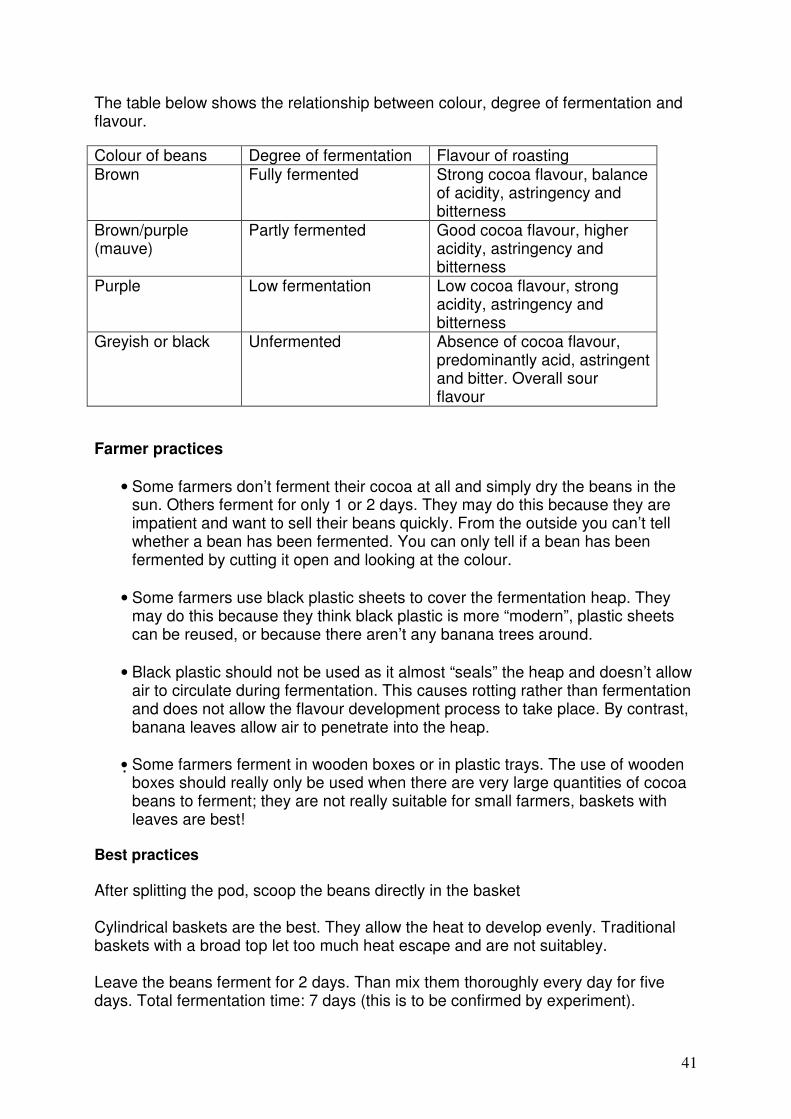
The table below shows the relationship between colour, degree of fermentation and flavour.
Colour of beans Degree of fermentation Flavour of roasting Brown Fully fermented Strong cocoa flavour, balance
of acidity, astringency and bitterness
Brown/purple (mauve)
Partly fermented Good cocoa flavour, higher acidity, astringency and bitterness
Purple Low fermentation Low cocoa flavour, strong acidity, astringency and bitterness
Greyish or black Unfermented Absence of cocoa flavour, predominantly acid, astringent and bitter. Overall sour flavour
Farmer practices
• Some farmers don’t ferment their cocoa at all and simply dry the beans in the sun. Others ferment for only 1 or 2 days. They may do this because they are impatient and want to sell their beans quickly. From the outside you can’t tell whether a bean has been fermented. You can only tell if a bean has been fermented by cutting it open and looking at the colour.
• Some farmers use black plastic sheets to cover the fermentation heap. They may do this because they think black plastic is more “modern”, plastic sheets can be reused, or because there aren’t any banana trees around.
• Black plastic should not be used as it almost “seals” the heap and doesn’t allow air to circulate during fermentation. This causes rotting rather than fermentation and does not allow the flavour development process to take place. By contrast, banana leaves allow air to penetrate into the heap.
• Some farmers ferment in wooden boxes or in plastic trays. The use of wooden
boxes should really only be used when there are very large quantities of cocoa beans to ferment; they are not really suitable for small farmers, baskets with leaves are best!
Best practices After splitting the pod, scoop the beans directly in the basket Cylindrical baskets are the best. They allow the heat to develop evenly. Traditional baskets with a broad top let too much heat escape and are not suitabley. Leave the beans ferment for 2 days. Than mix them thoroughly every day for five days. Total fermentation time: 7 days (this is to be confirmed by experiment).
42
See: Discovery learning exercise 8: The effect of different lengths of fermentation times See: Discovery learning exercise 9: The effect of different quantities of beans on the fermentation process
43
Drying
• Fermented cocoa must be dried. Drying cocoa beans reduces the growth of mould and helps improve the flavour. Dried cocoa beans are easier to store and to transport.
• In the rainy season beans dry more slowly than in the dry season. There is no fixed drying time. Dry as long as necessary to get the beans dry!
• A properly fermented and dried bean should be brown in colour when you cut the bean in half.
Farmer practices Some farmers think cement drying floors are better because they are more modern. But drying floors do not let air pass and get too hot: the beans “boil”. Also there is a risk that goats or children walk through over the beans and damage them. Best practises
� Put mats on sticks. Spread the beans in a thin layer on the mat. Whenever you pass and see a bad bean, pick it off the mat.
� Advantage of using mats: if it suddenly starts raining you can easily scoop the
beans up and bring them inside. With the mats on sticks, the beans also dry faster.
� Dry until the beans are dry!
See: Discovery learning exercise 10: Drying cocoa on raised mats

44
Discovery learning exercise 7: Impact of harvesting time on fermentation and cocoa quality
Source: 1STCP: Farmer Training Guide on ICPM Cocoa
Several factors account for the poor quality of cocoa produced by some farmers. These include harvesting pods at the wrong time, poor fermentation and drying methods. Farmers harvest cocoa pods at the wrong time for many reasons including the desire to get income quickly, lack of knowledge about the quantity of fresh beans needed for fermentation and the relationship between harvesting time and quality. Learning objective Improve understanding of the maturation stages of cocoa pods and the physical aspects of cocoa quality Materials
• Flip chart paper
• Markers
• 30-40 kg of fresh cocoa beans, preferably of the same variety, collected from the following types of pods:
� 1st lot: Immature, green pods � 2nd lot: Ripe pods, that is, pods that are half or 3/4 yellow � 3rd lot: Over ripe pods, that is pods that are orange � 4th lot: Pods attacked by black pod disease
Note: It is preferable to use beans from participants’ own farms rather than from the FFS plots so as not to affect the harvest data
• Materials usually used for fermentation
• Fresh banana leaves
• Four trays
• 1 very sharp pocket knife
• Labels for the four fermentation lots
• Materials usually used for sun drying, for example, a cement or raised platform Procedure At harvest time, tour the FFS plot with participants, asking them to point out which pods are ready for harvesting and which are not. Return to a central place. List on a flip chart the factors farmers consider when deciding when to harvest. Discuss to what extent each factor provides flexibility for harvesting later.
Cover the four lots of beans to be fermented with the banana leaves and place heavy objects on top of each pile.
45
Ferment and dry as usual for the specific varieties. After drying, randomly select 100 seeds from each lot and put them on the four trays. With the pocket-knife, cut each bean longitudinally and observe physical aspects. Observations
� Take a handful of dried beans from each lot and squeeze between your fingers. Note which beans make a cracking sound.
� Observe and compare the difference in colour between the different lots of cocoa � .Observe and compare the physical aspects of the cut seeds and determine the
number/percentages of: � Brown/purple or purple, compact beans � Germinated beans � Flat beans
Guide questions for discussion
1) Are there colour differences between the beans from the different lots? What is the difference? 2) Which lots have the worst quality beans? 3) What do you think explains the defects that you observe? 4) Do the differences between the lots of cocoa affect price? How? 5) What have you learned from this exercise? 6) What is the ideal amount for a fermentation heap? Why is the amount
in a fermentation heap important? 7) What can farmers who harvest small quantities at a time do to increase
their fermentation load?
46
Discovery learning exercise 8: Impact of duration of fermentation on bean quality
Farmers often feel under pressure to sell their cocoa as quickly as possible so they do not ferment the beans properly. Only good quality, well fermented cocoa can be sold for export and it is important that the cocoa is fermented properly. Learning objective To improve understanding of the fermentation process and learn how to recognise when beans are properly fermented. Materials
• Flip chart paper
• Markers
• 90 kg (200lbs) cocoa beans from properly ripe pods
• 2 cylindrical fermentation basket
• Banana leaves
• Sharp pocket knife Note Use beans from participants’ own farms rather than from the FFS plots so as not to affect the harvest data Procedure Allow the participants to select properly ripe, healthy pods, these should be split and the beans prepared for fermentation in the normal way (removal of damaged beans, pod debris etc.). Line the cylindrical baskets with banana leaves and fill them with equal quantities of cocoa beans. Allow to ferment for 2 days (48 hours). Stir the beans in each basket very thoroughly using hands (carefully because the mass of beans will be very hot) or a wooden paddle. Do not use any metal tools. Re-cover the tops of the baskets with the banana leaves. After a further 24 hours stir the beans again, very thoroughly. Remove a sample of 100 beans from each basket, do not take the beans from just one place but from everywhere in the mass of beans. The sample beans will be very messy and sticky. Re-cover the baskets to allow fermentation to continue. Keep the 2 samples separate S1 and S2) and using the pocket knife cut the beans in half lengthwise. Examine the cut beans and record the numbers of each colour found.
47
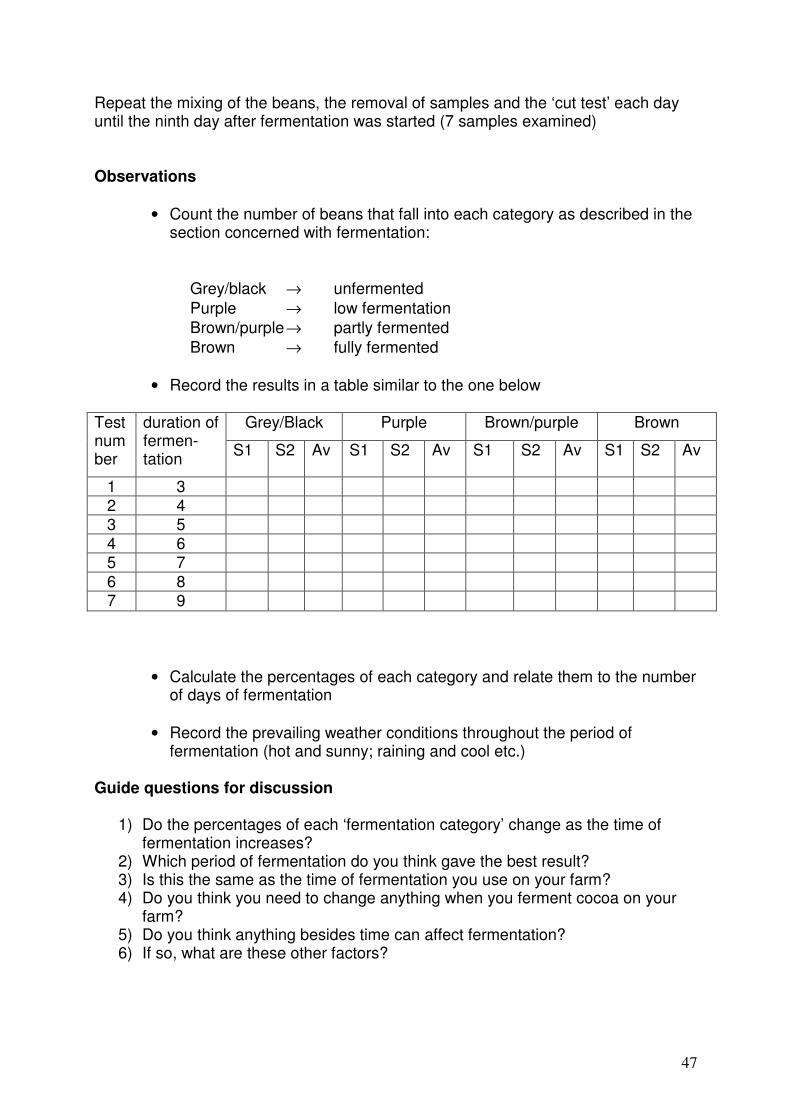
Repeat the mixing of the beans, the removal of samples and the ‘cut test’ each day until the ninth day after fermentation was started (7 samples examined) Observations
• Count the number of beans that fall into each category as described in the section concerned with fermentation:
Grey/black → unfermented
Purple → low fermentation
Brown/purple → partly fermented
Brown → fully fermented
• Record the results in a table similar to the one below
Grey/Black Purple Brown/purple Brown Test number
duration of fermen-tation
S1 S2 Av S1 S2 Av S1 S2 Av S1 S2 Av
1 3 2 4 3 5 4 6 5 7
6 8 7 9
• Calculate the percentages of each category and relate them to the number of days of fermentation
• Record the prevailing weather conditions throughout the period of fermentation (hot and sunny; raining and cool etc.)
Guide questions for discussion
1) Do the percentages of each ‘fermentation category’ change as the time of fermentation increases?
2) Which period of fermentation do you think gave the best result? 3) Is this the same as the time of fermentation you use on your farm? 4) Do you think you need to change anything when you ferment cocoa on your
farm? 5) Do you think anything besides time can affect fermentation? 6) If so, what are these other factors?
48
Discovery learning exercise 9: Impact of quantity of beans on the fermentation process and cocoa quality
This exercise should be carried out after the correct fermentation time has been established with Exercise 8 Cocoa trees that are very old or badly maintained do not yield many pods, this means that some farmers have only a small quantity of beans to ferment, particularly if they harvest at irregular intervals, whenever they think they have the time between other tasks, such as harvesting their rice. Successful fermentation depends on the mass of cocoa beans becoming hot very quickly and this is not possible if there is only a small quantity of beans in the basket. Learning objective To find out what quantity of cocoa beans is required to obtain successful fermentation and produce good quality cocoa Materials
• Flip chart paper
• Markers
• 160 kg (350 lbs) cocoa beans from properly ripe pods
• Scale
• 3 cylindrical fermentation baskets
• Labels for baskets
• Banana leaves
• Sharp pocket knife Note Use beans from participants’ own farms rather than from the FFS plots so as not to affect the harvest data Procedure Allow the participants to select properly ripe, healthy pods; these should be split and the beans prepared for fermentation in the normal way (removal of damaged beans, pod debris etc.). Line the 3 cylindrical baskets with banana leaves, label them 50, 100 and 200 and put 50lbs, 100lbs and 200lbs of fresh cocoa beans into the appropriate basket. Cover as for normal fermentation. Allow to ferment for 2 days (48 hours) and then stir the beans in each basket very thoroughly using hands (carefully because the mass of beans may be very hot) or a wooden paddle. Do not use any metal tools. Re-cover the baskets with the banana leaves.
49
After a further 24 hours stir the beans again very thoroughly and re-cover. Stir the beans thoroughly every 24 hours until the number of days that gave the best result in Discovery Learning Exercise 8 have passed from the time the beans were first placed in the baskets (likely to be around 4 stirrings)
Day 1 Day 2 Day 3 Day x Day x+1
Day x+2
Day x+3
Add beans
Allow heat to
generate
Stir
Stir
Stir
Stir
Remove beans and test
On the final day remove 3 samples of 100 beans from each basket and using the sharp knife, cut the sample beans in half lengthwise. Examine the beans and record the numbers of each fermentation category present; this is determined by colour, as explained in the section concerned with Fermentation and Discovery Learning Exercises 7 and 8. Observations
• Count the number of beans in each sample that fall into each category as described in the section concerned with fermentation:
Grey/black → unfermented
Purple → low fermentation
Brown/purple → partly fermented
Brown → fully fermented
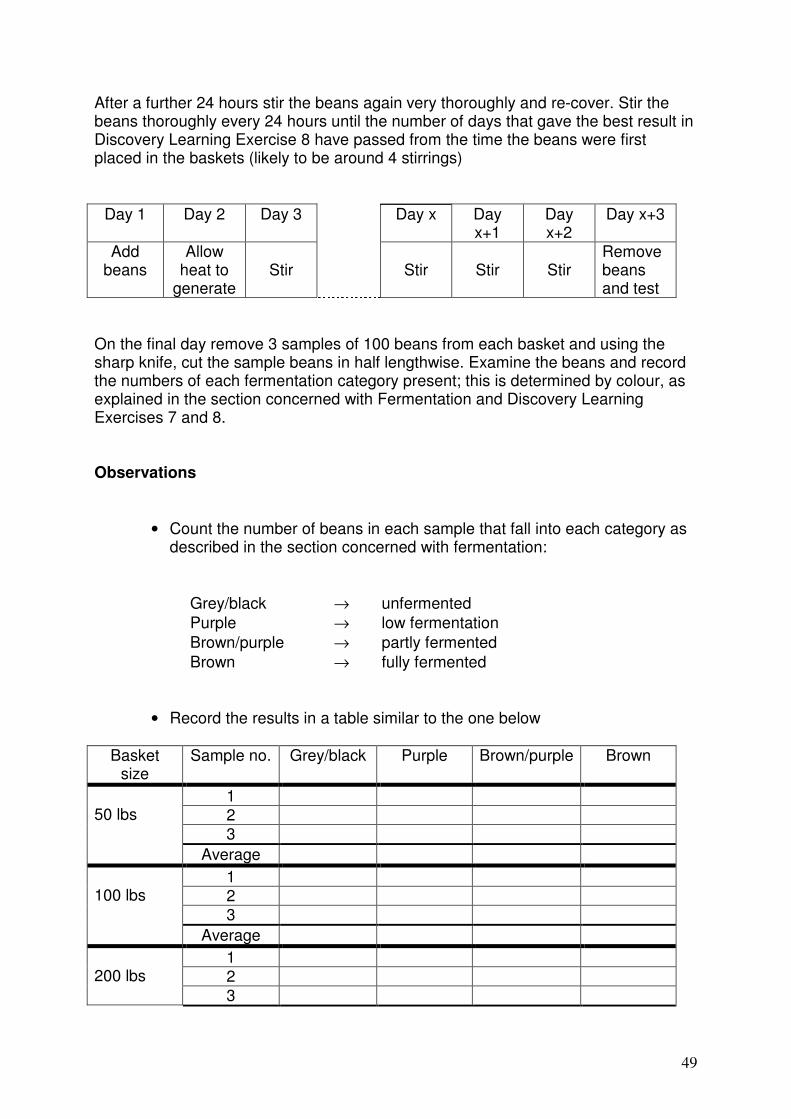
• Record the results in a table similar to the one below
Basket size
Sample no. Grey/black Purple Brown/purple Brown
1 2 3
50 lbs
Average
1 2 3
100 lbs
Average
1 2
200 lbs
3
50
Average
• Calculate the percentages of each category and relate them to the weight of beans in the basket
• Record the prevailing weather conditions throughout the period of fermentation (hot and sunny; raining and cool etc.)
Guide questions for discussion
1) Do the percentages of each ‘fermentation category’ differ according to the weight of cocoa beans in the fermentation basket?
2) Which weight of cocoa gave the best result? 3) Why do you think the quantity of beans in the basket might affect the
fermentation? 4) What weight of coca beans (size of basket) do you use on your farm? 5) Do you think you should change the way you ferment your cocoa to improve
the quality? 6) Do you know of any other ways that you can ferment your cocoa? 7) What do think the advantages or disadvantages of these alternative methods
might be? If the quantity of cocoa beans to get good fermentation is important, how will you ensure that you have the correct quantity after each harvest?
51
Discovery learning exercise 10: Drying cocoa on raised mats
Adapted from: 1STCP: Farmer Training Guide on ICPM Cocoa
Proper drying is important for ensuring good cocoa quality. While drying on cemented floors is common among cocoa farmers in West Africa, the process can be improved through simple technologies such as using raised, covered mats. Learning objective To dry cocoa faster and protect drying cocoa from contamination, dew and rain Materials
• Cement floors (at least 2 m x 2 m size)
• Mats made from the rachis of palm fronds (at least 2 m x 2 m size) raised1.2 m from the ground on wooden supports
• About 100 pounds of well fermented cocoa beans
• 2 cocoa bean mixing paddles
• Flip chart and markers
Procedure Introduce the subject of drying and the objectives of the exercise. Ask participants to form two groups. One group will dry their cocoa on a cement floor; the other will dry cocoa on a raised mat. Ask each group to spread out at least 25 kg of beans (with a thickness of 3-4 cm) to dry using the relevant method. During the first two days, each group should mix the beans every hour and then three or four times per day. Ensure that the group working with the mat brings the beans inside if it rains. After spreading out the beans, facilitate a discussion of the benefits, ease of use and potential problem of each drying method. Over the next two weeks, each group is responsible for drying the beans until they are fully dried. Groups should note any problems or observation related to the drying process, as well as the time it takes to fully dry the beans. After 2 weeks, ask each group to report on the method they observed; organise a discussion by the whole school on the two methods. If facilities permit a third treatment can be included. It is similar to the raised mat, but allows the cocoa to be covered with a waterproof sheet to protect the drying cocoa from any rainfall.
52
Guide questions for discussion 1) What are the differences between the drying methods used? 2) Which method dried the beans faster? 3) Which method best protects the beans from contamination or damage? 4) How much does each method cost? Which method is easier and cheaper to
use? 5) What are the limitations of each method and how can they be overcome?
53
Part 3: THE CO-OPERATIVE, ITS MEMBERS AND ITS ROLE IN MARKETING
54
The role of the co-operative in marketing
Importance After putting so much effort into producing cocoa, farmers want to get a good price. But one farmer alone can not negotiate very well with a trader. If the trader thinks the price is too high, he will just go to the next farmer. If farmers are organised and together produce cocoa of the highest quality they can better negotiate as a group. As a group, farmers can also organise other things together. You have already benefited from that: this Farmer Field School was organized by the co-operative. Farmers’ perception Many the co-operative members think they sell to the co-operative as any other company. But they are members of the co-operative. The co-operative is owned by them. So they are selling to themselves. Best practices
� In fact farmers do not sell to the co-operative. But the co-operative, as a collective organisation, sells the cocoa on behalf of its members.
� To make the co-operative a successful organisation, its members should sell
all their good-quality cocoa through the co-operative. See: Discovery learning exercise 11 on collective marketing
55
The responsibilities of co-operative members
Importance The co-operative is a member-based organization. The members own the co-operative. It is therefore important that they participate in its decision making. It is also important that they know why they have become a member, what are the benefits of being a co-operative member. The co-operative spends money to deliver these benefits, and therefore members need to pay registration and annual fees. It is not fair if some members pay their fees and other members do not. The co-operative organises Farmer Field Schools. These can be of large benefit to the farmers, but only if they attend regularly. The co-operative spends money and makes efforts to organise the FFS. If farmers do not come, these expenses and efforts have been made for nothing. In addition, farmers learn through the FFS how to produce good quality cocoa, so that the co-operative can sell it for a good price. If farmers do not attend regularly, their cocoa will remain of poor quality and the price they receive will remain low as well. Current situation Members often do not pay their fees. Some members do not attend the FFS regularly. Some villages were not represented at the Annual General Meeting. Farmers are often indebted with traders and therefore forced to sell their cocoa to them instead of through the co-operative. Best practices All members pay their fees. The amount of the fees is decided by the Annual General Meeting, but should reflect the costs of running the co-operative. All villages send the established number of representatives to the Annual General Meeting so that they have a voice in the decisions about the co-operative. All farmers participate regularly in the FFS session or give due notice to the facilitator if they can not attend a session for specific reasons. All members make their good-quality cocoa available to the co-operative. They will only sell to other buyers if the co-operative does not have the demand or possibility to sell their cocoa. See: Discovery learning exercise 12: Responsibilities of co-operative members
56
Gender
Importance The co-operative membership is open to all cocoa and coffee producers in the chiefdoms served by the co-operative, irrespective of gender, religion, tribe or race. Husbands and wives can also register as individual members. The co-operative also stimulates participation of women in its decision making structure. Nevertheless, such an active role in decision making is not common practice in Sierra Leone. Best practices The co-operative members understand that women and men have different biological characteristics but can have similar social characteristics. The co-operative members understand that both men and women are capable to represent the interest of their village in co-operative meetings and committee’s. Men and women may have different roles in society and therefore can have a different point of view. Therefore it is important that both men and women are represented in the meetings at different levels of the co-operative structure. See: discovery learning exercise 13 and 14
57
Discovery learning exercise 11: Collective marketing
Learning objective If you join forces, your negotiating position becomes better Material - As many eggs as there are participants (or cassava roots or bananas or yams or other items that farmers may sell). - Sufficient money (in the egg example 5,000 leones in coins/notes of 500 leones) Procedure First round The facilitator selects among the participants 1 trader. The rest of the participants will have to spread out in the room as far from each other as possible. The facilitator will go outside the room to give the trader the following instruction and the 5,000 leones in coins/notes of 500 leones. It is important the other participants do not hear this. Instruction to trader: “You are a trader from town. A shop in town needs 10 eggs. They promise to pay you 5,000 leones (500 leones per egg). You travel to ... village (name of FFS village) to buy the eggs from the farmers. The transport costs 1000 leones. So to make a profit, you need to buy the 10 eggs for less than 4000 leones, or less than 400 leones per egg. You know that the price the farmer normally gets in the village market is 300 leones.” Then the facilitator presents the trader to the participants: “This is trader .... from .... (name of town). He travels to your village to buy eggs. In your village market 1 egg normally costs 300 leones. The trader has first gone to the market but the eggs were not fresh. But as a result he knows the market price of 300 leones. The trader will negotiate with each of you individually to buy your egg. You want the highest possible price, but the trader wants to pay the cheapest price possible. The trader only needs 10 eggs. There are many more eggs, so some of you will not be able to sell your egg. Those of you who do not manage to sell to the trader will have to sell it in your village market for 300 leones.” “The trader also faced transport costs to come here of 1000 leones.” Now the trader starts negotiating with the farmers one by one for their eggs. When somebody offers a good price, (s)he buys the egg, until (s)he has bought 10 eggs. After the trader has bought the 10 eggs, the facilitator notes on the flip chart the price paid for each egg. The average price per egg is calculated. No discussion is held at this point!
58
second round Now the exercise is repeated. Another trader is selected. When the trader is outside the room, the facilitator instructs the group. Group instruction: “You have decided to form an association. You select a representative and give your eggs to the representative. The representative is going to negotiate for the whole group. of course you want to sell as many eggs as possible, but also for the best price possible” The facilitator gives the 5,000 leones to the trader (but no instructions!). The representative presents him/herself to the trader and they start their negotiations. After the representative sold as many eggs for the best possible price, the facilitator put the total price on the flip chart. He calculates the average sales prices per egg for the farmer. Now also the profit the trader made in the first round is calculated. (With the knowledge of the maximum price of 5,000 leones for 10 eggs that the shopkeeper was prepared to pay.) Guide questions for discussion: - In which case was the average farmer price for the sold eggs the highest? - Were the number of eggs sold to the trader the same in both cases? - What was the main difference in the negotiations between the two rounds? - Did the farmers sell their eggs to the representative? - The time of the representative was not compensated. But what if the representative needs to work for the association every day and he does not have time any more to work on his farm? - In the last case, maybe still some eggs were not sold and it was not clear whose egg was sold and whose egg was not sold. How could the association solve this problem? - Are there similarities between the village representative selling eggs, and the co-operative exporting cocoa? And differences?
59
Discovery learning exercise 12: Responsibilities of co-operative members
Learning objective: When becoming a member of the co-operative you will not only share in the benefits, but also in the responsibilities Procedure Ask why the participants have become member of the co-operative and list them on the flip chart. Leave a lot of space between all the reasons. When all reasons (=benefits) have been listed, discuss them one by one. For example, one reason may have been to participate in the FFS. Now ask the participants what is necessary for the FFS to function well. Another reason to become member may be to sell their cocoa. What makes the co-operative capable to sell their cocoa? The result on the flip chart may look a bit as follow: reason to become a member what does the co-operative need to
deliver this benefit to its members? to sell cocoa
a buyer transport/a truck a store cocoa from farmers ....
to receive a high price
good quality cocoa a good buyer a good negotiator for the contract ....
to participate in the FFS
facilitator flip charts, markers etc. participants ....
Now go through the list of “needs”. Ask the participants for which of these “needs” the farmers are directly responsible? (selling cocoa to the co-operative, cocoa quality, participating in FFS etc.) For which “needs” is the co-operative as an organization responsible? (store etc.) And who makes sure these things are organised? Does this cost money? How is this paid for? Who is making the decisions of what is most important and what is less important? Who decides how high membership fees are? Can we now complete the list of responsibilities of the co-operative members? (Make sure that paying membership fees and participating in village meetings and election of village representatives is part of the list)
60
Discovery learning exercise 13: Women’s and men’s characteristics and their capabilities in participating in co-operative meetings and committee’s
adapted from: FAO/MARD/CFWS, 1996, Vietnam National IPM Programme Field guide on gender and IPM
Objectives Discuss and analyze statements about the characteristics and roles of women and men in relation to their participation in co-operative village executive committee’s, Annual General Meetings and the co-operative Management Board. Material Flip chart, markers, an AGREE FACE and a DISAGREE FACE Procedure Draw a picture of a woman on the top left side of the chart and a picture of a man on the top right. Ask the participants to describe characteristics of men and women and list them under the pictures. Make sure there is are at least two characteristics that can not be changed (women give birth, men can grow a beard, men are usually physically stronger than women etc.), that there are at least two typical activities (for example that women cook the meals, men get drunk more often, men are responsible for the cash crops and women for the food crops) and at least two characteristics or capabilities that can be changed (such as: women are more sensitive, men are better speakers in public, men stick to their decisions, women listen better, more men can read and write/speak better English etc.). Now stick up the AGREE FACE and the DISAGREE FACE in two different places. Divide the participants in small groups of about 5 persons. Read one of the non-changeable characteristics and ask the participants if they all agree with this characteristic. The groups decide and the representative of the group moves to the appropriate face. Ask the representatives of the groups to explain why their group chose that position. Now repeat this exercise by reading one of the typical activities. Now repeat this exercise again for one of the changeable characteristics or capabilities. Guide questions for discussion What female and male characteristics can not be changed? Are these characteristics very important for the capabilities of women and men to participate in co-operative meetings and committee’s?
61
Are there some characteristics that are true for most women or most men but not always? Why? Of all the characteristics and capabilities identified, which ones are important for participation in co-operative meetings and committee’s? What is more important, the differences between the average male and average female characteristics or the differences between two individual people? Are women prepared to elect men in their village executive committee? Are men prepared to elect women in their village executive committee?
62
Discovery learning exercise 14: Women’s and men’s roles in cocoa production
Adapted from: FAO/MARD/CFWS, 1996, Vietnam National IPM Programme Field guide on gender and IPM
Objective: Discuss and analyze the roles and responsibilities of women and men in cocoa production. Discuss who should participate in co-operative decision making about cocoa. Material Flip chart and marker Procedure List all the activities discussed in the FFS programme: 1. field work - underbrushing - pruning - shade management - removal of diseased pods 2. harvest and primary processing - harvesting - storage of pods - pod splitting - fermentation - drying - storage of dried beans 3. marketing - price negotiation/selling Ask the participants for each activity if the activity is done by women or by men or by both. Guide questions for discussion When we look at the roles of women and men in cocoa productions, is it important for women to participate in the FFS? And for men? And is it important for men to participant in the co-operative meetings and committees? And for women?
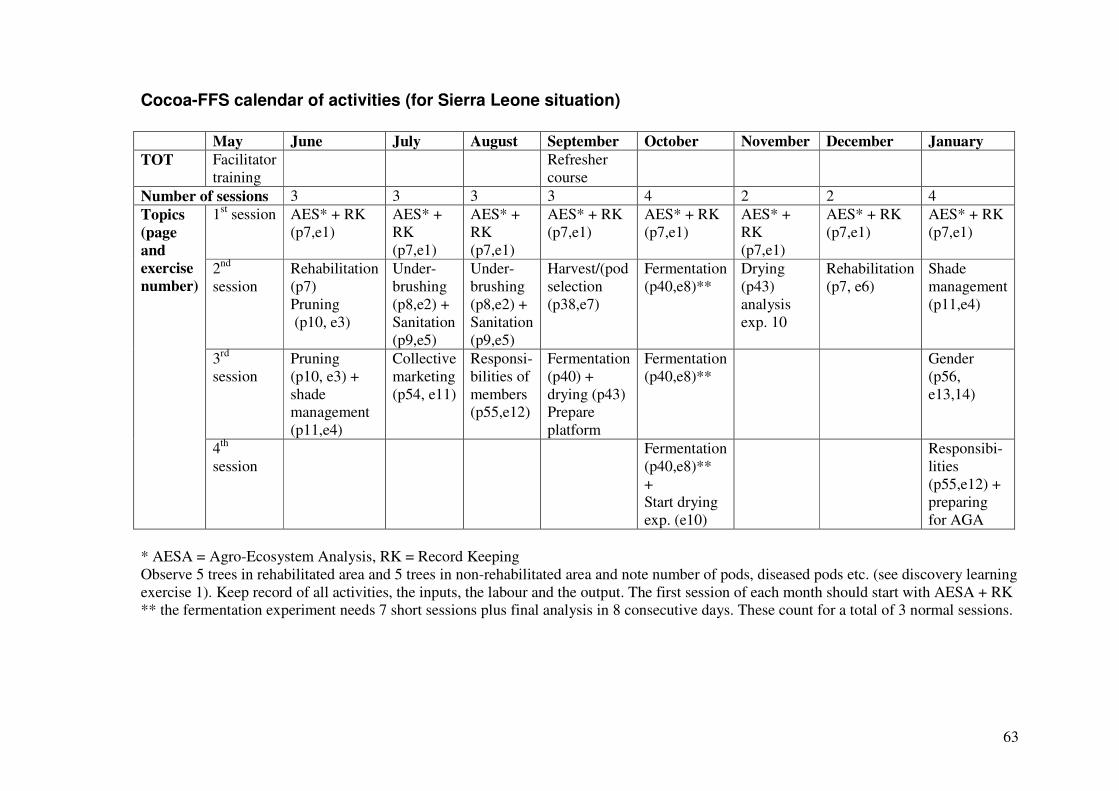
63
Cocoa-FFS calendar of activities (for Sierra Leone situation)
May June July August September October November December January
TOT Facilitator
training
Refresher
course
Number of sessions 3 3 3 3 4 2 2 4
1st session AES* + RK
(p7,e1)
AES* +
RK
(p7,e1)
AES* +
RK
(p7,e1)
AES* + RK
(p7,e1)
AES* + RK
(p7,e1)
AES* +
RK
(p7,e1)
AES* + RK
(p7,e1)
AES* + RK
(p7,e1)
2nd
session
Rehabilitation
(p7)
Pruning
(p10, e3)
Under-
brushing
(p8,e2) +
Sanitation
(p9,e5)
Under-
brushing
(p8,e2) +
Sanitation
(p9,e5)
Harvest/(pod
selection
(p38,e7)
Fermentation
(p40,e8)**
Drying
(p43)
analysis
exp. 10
Rehabilitation
(p7, e6)
Shade
management
(p11,e4)
3rd
session
Pruning
(p10, e3) +
shade
management
(p11,e4)
Collective
marketing
(p54, e11)
Responsi-
bilities of
members
(p55,e12)
Fermentation
(p40) +
drying (p43)
Prepare
platform
Fermentation
(p40,e8)**
Gender
(p56,
e13,14)
Topics
(page
and
exercise
number)
4th
session
Fermentation
(p40,e8)**
+
Start drying
exp. (e10)
Responsibi-
lities
(p55,e12) +
preparing
for AGA
* AESA = Agro-Ecosystem Analysis, RK = Record Keeping
Observe 5 trees in rehabilitated area and 5 trees in non-rehabilitated area and note number of pods, diseased pods etc. (see discovery learning
exercise 1). Keep record of all activities, the inputs, the labour and the output. The first session of each month should start with AESA + RK
** the fermentation experiment needs 7 short sessions plus final analysis in 8 consecutive days. These count for a total of 3 normal sessions.