Embed Size (px)
Citation preview

IONA Technologies PLCSeptember 2000
Orbix Wonderwall Administrator’s Guide

Orbix is a Registered Trademark of IONA Technologies PLC. While the information in this publication is believed to be accurate, IONA Technologies PLC makes no warranty of any kind to this material including, but not limited to, the implied warranties of merchantability and fitness for a particular purpose. IONA Technologies PLC shall not be liable for errors contained herein, or for incidental or consequential damages in connection with the furnishing, performance or use of this material.Java is a trademark of Sun Microsystems, Inc.
COPYRIGHT NOTICENo part of this publication may be reproduced, stored in a retrieval system or transmitted, in any form or by any means, photocopying, recording or otherwise, without prior written consent of IONA Technologies PLC. No third party intellectual property right liability is assumed with respect to the use of the information contained herein. IONA Technologies PLC assumes no responsibility for errors or omissions contained in this book. This publication and features described herein are subject to change without notice.
Copyright © 1991-2000 IONA Technologies PLC. All rights reserved.
All products or services mentioned in this manual are covered by the trademarks, service marks, or product names as designated by the companies who market those products.
M 2 4 6 9

Contents
Preface viiAudience viiOrganisation of this Guide ixDocument Conventions xii
Chapter 1 An Introduction to Wonderwall 1Internet Security Overview 1Wonderwall and the Firewall 2Wonderwall Features 3Wonderwall and the IIOP Protocol 5
Chapter 2 Getting Started with Wonderwall 7The Grid Application 8
The IDL Specification 9The Orbix Java Client 10
The Configuration File 12Basic Configuration and Ports 13Object Specifiers 14Access Control 15
Example iiopproxy.cf File 17Factory Objects 18HTTP Server 20Logging Output 22
Chapter 3 IORs and IIOP 25IOR Format 26
Orbix C++/Orbix Java Object Key Format 29Representations of an IOR 30
Internet Inter-ORB Protocol (IIOP) 32IIOP Message Formats 33
Request Message 34Reply Message 36CancelRequest Message 37LocateRequest Message 37
iii

O rb i x Wond e rw a l l A dm in i s t r a t o r ’ s G u i d e
LocateReply Message 38CloseConnection Message 38MessageError Message 38
Chapter 4 Interoperability and Wonderwall Operational Details 39Object References 39Proxification 41
The Proxification Process 41Non-Orbix Client 44Non-Orbix Server 45Connection Establishment 46
A Normal IIOP Connection 46An IIOP Connection Through Wonderwall 47A More Complicated Connection: Using Object Factories 48
Factory Objects and IORs 50Implications for Developers 52
Chapter 5 Using Wonderwall with Orbix C++ and Orbix Java 55
Using Wonderwall with Orbix Java as an Intranet Request-Router 56Using Wonderwall as a Firewall Proxy 58Orbix Java Built-In Wonderwall Support 61
Configuring Orbix Java to Use Wonderwall 61Configuring Orbix Java to Use HTTP Tunnelling 62
Deployment Scenarios 65Scenario 1- Deploying OrbixNames Servers 65Scenario 2 - Deploying Multiple OrbixNames Servers behind Wonderwall 69Scenario 3 - A Sample Grid Applet 73Scenario 4 - Deploying an Orbix Server behind Wonderwall 76
Chapter 6 SSL Enabled Wonderwall: Operational Details 81Introduction 82An Overview of SSL Security 82
Authentication in SSL 82Privacy of SSL Communications 85Integrity of SSL Communications 85
An Overview of OrbixSSL 86OrbixSSL Essentials 87
iv

Con t e n t s
Sample Bank Application Overview 89Running the Application without SSL 90Running the Application with SSL 92
Providing Certificates for the Servers 96Using the OrbixSSL Configuration File 97Specifying which Certificates to Accept 99
Initializing OrbixSSL 100Initializing OrbixSSL Configuration 101Making Private Keys Available to Servers 101Making a Private Key Available to a Server Program 101Making a Private Key Available to OrbixNames 103Making a Private Key Available to the Orbix Daemon 103
Deploying an SSL-enabled Application in a Wonderwall Configuration 105Daemon Configuration on Server Side 108Client Configuration 108Wonderwall Configuration 109
Wonderwall, Applets and SSL 113Client Configuration 116
Signing the Applet 119Signing an Applet Using Netscape’s Signing Tools 119Signing an Applet Using Microsoft’s Signing Utilities 123
Chapter 7 The WonderwallConfiguration Tool 129
The iiopproxy.cf File 130Starting the Wonderwall Configuration Tool 130
GUI Configuration Tool Main Window 131Object Specifier Window 132Access Control List Window 134Ports and Hostnames Window 136SSL Window 137Logging and Timeouts Window 138Edit As Text Window 139
Chapter 8 The WonderwallLog Analysis Viewer 141
The Wonderwall iiopproxy Server 141Starting the Wonderwall Log Analysis Viewer 142
v

O rb i x Wond e rw a l l A dm in i s t r a t o r ’ s G u i d e
Log Analysis Viewer Main Window 142Filters 145Timestamps 146
Chapter 9 Transformers 147Transformer Architecture 148Using Transformers 151
The Transformer IDL 151Implementing Transformers 153Configuration 155
Appendix A iiopproxy and iortool 157
Appendix B Configuration 165
Appendix C Firewall Installation on UNIX 183
Index 187
vi

PrefaceThe Internet Inter-ORB Protocol (IIOP) was introduced as part of the Common Object Request Broker Architecture (CORBA) 2.0 General Inter-ORB Protocol (GIOP). IIOP facilitates the use of distributed CORBA objects over the Internet or an intranet.
Typical Internet security involves the use of a firewall to restrict access to hosts on a local network. Wonderwall is IONA Technologies’ implementation of the firewall model. It addresses the security issues that arise when you allow clients running on external networks to communicate with objects running on an internal network.
This guide presents details of Wonderwall’s implementation of the firewall model and addresses security issues arising from deploying CORBA clients on external networks.
Orbix documentation is periodically updated. New versions between releases are available at this site:
http://www.iona.com/docs/orbix/orbix33.html
If you need assistance with Orbix or any other IONA products, contact IONA at [email protected]. Comments on IONA documentation can be sent to [email protected].
AudienceThis guide is aimed at system administrators who wish to set up a Wonderwall environment and programmers who wish to develop Orbix and OrbixWeb applications that communicate across network boundaries through Wonderwall.
This guide does not assume that the reader has any knowledge of firewall security issues. This guide assumes that programmers have significant knowledge of Orbix and OrbixWeb programming.
In addition to communications between Orbix, or OrbixWeb, applications, Wonderwall supports communications between applications developed with OrbixSSL. OrbixSSL allows Orbix and OrbixWeb applications to communicate
vii

O rb i x Wond e rw a l l A dm in i s t r a t o r ’ s G u i d e
using Secure Sockets Layer (SSL) security. To use SSL with Wonderwall, you must have an installed copy of OrbixSSL. When this guide describes SSL support in Wonderwall, it assumes that you have OrbixSSL and the associated documentation.
viii
P r e f a c e
Organisation of this GuideThis guide contains the following chapters and appendices:
Chapter 1, “An Introduction to Wonderwall”This chapter provides an overview of Internet security and describes how Wonderwall was developed according to the firewall model.
Chapter 2, “Getting Started with Wonderwall”
This chapter explains how to get started with Wonderwall. It details how to set up and configure Wonderwall.
Chapter 3, “IORs and IIOP”This chapter discusses the Interoperable Object Reference (IOR), the mechanism used to establish communication between clients and servers, and the Internet Inter-ORB Protocol (IIOP) in detail, describing IOR formats and IIOP message formats respectively.
Chapter 4 “Interoperability and Wonderwall Operational Details”
This chapter discusses issues associated with interoperability. For example, object references, proxification, connection establishment, factory objects, and IORs. Wonderwall is fully interoperable.
Chapter 5 “Using Wonderwall with Orbix C++ and Orbix Java”OrbixWeb contains built-in support for Wonderwall. This chapter describes how Wonderwall can be used with OrbixWeb as either an intranet request-router or as a firewall proxy. It also details how to use Wonderwall as a firewall technology for distributed Orbix applications.
ix

O rb i x Wond e rw a l l A dm in i s t r a t o r ’ s G u i d e
Chapter 6, “SSL Enabled Wonderwall: Operational Details”The primary role of Wonderwall in a security infrastructure is to provide a firewall for IIOP traffic and it provides integrated support for SSL. This chapter provides an overview of SSL and OrbixSSL. It provides an outline of how an OrbixSSL-enabled application can be deployed in a Wonderwall scenario.
Chapter 7, “The Wonderwall Configuration Tool”This chapter explains how to use the Wonderwall GUI Configuration Tool to modify default security configuration settings for Wonderwall. It does this by editing the iiopproxy.cf file which stores the configuration settings for your Wonderwall installation.
Chapter 8, “The Wonderwall Log Analysis Viewer”
This chapter describes the Wonderwall Log Analysis Viewer which allows you to view, edit, and modify log files via a graphical user interface.
Chapter 9, “Transformers”Transformers allow encryption of messages prior to transmission via the TCP/IP protocol. This chapter introduces transformers by describing how they can be used with Wonderwall.
Appendix A, “iiopproxy and iortool”This appendix describes the iiopproxy process which is responsible for implementing the firewall, and the iortool utility which is responsible for manipulating object references.
Appendix B, “Configuration”
This appendix describes the Wonderwall configuration file under the following headings: basic settings, list of IORs, access control list, and SSL security.
x

P r e f a c e
Appendix C, “Firewall Installation on UNIX”
This appendix describes the configuration steps involved in installing a firewall on UNIX.
xi

O rb i x Wond e rw a l l A dm in i s t r a t o r ’ s G u i d e
Document ConventionsThis document uses the following typographical and keying conventions:
This guide uses the following keying conventions:
Constant width Constant width words or characters represent source code or system values you must use literally, such as commands, options, and path names.
Italic Italic words in normal text represent emphasis and new terms.
Italic words or characters in code and commands represent variable values you must supply, such as arguments or commands or path names for your particular system.
< > Some command examples use angle brackets to represent variable values you must supply. For example,
<Wonderwall location>
...
.
.
.
Horizontal or vertical ellipses in format and syntax descriptions indicate that material has been eliminated to simplify a discussion.
[ ] Brackets enclose optional items in format and syntax descriptions.
{ } Braces enclose a list from which you must choose an item in format and syntax descriptions.
| A vertical bar separates items in a list of choices enclosed in { } (braces) in format and syntax descriptions.
xii

1An Introduction to Wonderwall
Wonderwall, developed according to the firewall model, addresses security issues arising from using CORBA over the Internet. This chapter introduces Wonderwall—an object-oriented and flexible approach to security.
Internet Security OverviewThe Internet Inter-ORB Protocol (IIOP), a specialization of the CORBA General Inter-ORB Protocol (GIOP), paves the way for using distributed CORBA objects over the Internet. This opening up of the Internet, however, brings its own problems and risks. There will always be a few users willing to exploit any security loopholes to cause damage to your system. Some level of security is necessary to keep these intrusions at bay. A typical approach to Internet security is to use a firewall to restrict access to hosts on your local network. The basic model is to direct all traffic to and from the internal network through a single access point that can monitor and control every transmitted message.
There are firewalls currently available that restrict access to a local network in a variety of ways—for example, access to certain hosts and certain commands can be limited. However, in a distributed object environment such as CORBA, it is important that security should have an object focus to it. Experience has shown that it is bad practice to implement security which is too coarse-grained. Users presented with a choice between two levels of security, one which is too
1

O rb i x Wond e rw a l l A dm in i s t r a t o r ’ s G u i d e
restrictive and another which is too permissive, will inevitably choose the permissive level of security on occasion—and consequently a breach appears in the network defences.
Wonderwall is developed according to the firewall model and addresses the security issues arising from using CORBA over the Internet. It provides a flexible, object-oriented approach to security allowing control of access to individual objects even down to the level of individual operations on objects.
Wonderwall and the FirewallWonderwall is a firewall proxy server that is specifically designed to filter, control, and log IIOP traffic between Orbix clients on the exterior (the Internet), and Orbix servers on the interior (the intranet). As such, Wonderwall monitors the IIOP requests and applies access control rules to determine whether to permit or block the request.
A typical approach to building a firewall involves restricting Internet access to a single IP port on a single host for each service. This host will be the only host which is physically connected to the Internet and the restriction to using a single well known IP port provides an additional safeguard.
A refinement of this model involves making the firewall host a dedicated, secure host, known as a bastion host. The bastion host is dedicated exclusively to the role of gateway to the Internet and its configuration can be hardened to make it extra secure against unwanted incursions. This approach has the clear advantage that much of the security effort can be focused on this one machine. For example, many directories on the bastion host can be made read only to root without inconveniencing anyone.
A typical approach to building firewall proxy servers for each of the Internet services to be made available. Additionally, these proxy servers are usually deployed on a bastion host. This is a host which is both connected to the external network, the internet, and the internal network. Wonderwall follows this pattern and implements an IIOP proxy server. The role of the server process is to listen to incoming messages on the well-known IP port and to pass on these messages to the internal network, after subjecting them to access control rules. When any potentially hostile or forbidden messages are encountered, these are blocked and not passed on to the internal network.
2

An I n t r odu c t i o n t o Wonde rwa l l
Wonderwall FeaturesTraditional and typical firewall infrastructure, composed of packet filtering routers and application level proxies, can be used for protecting distributed CORBA application environments. However, the complexity of such environments increase the potential security loopholes. Administration and management overheads for the security policy would also increase. When using traditional firewall mechanisms when applied to distributed CORBA environments, Wonderwall can be used to establish an enclave of servers for which it controls access.
In contrast, Wonderwall which adheres to the application proxy firewall model, but at the same time uses message filtering techniques in the application of security policy is a simple stand-alone process, which requires no special privileges, forks or processes, and interacts with the bastion host in a simple manner.
Wonderwall’s IIOP firewall proxy server has the following features which contribute to strengthening the security of an internal network:
• The use of a bastion host is facilitated.
The model on which Wonderwall is built supports the use of a bastion host as the basis of your firewall. You have only to install the Wonderwall server on the bastion host and it will act as a liaison between the outside world and your internal network. Alternatively, you can install Wonderwall on a regular host if you prefer.
• Messages are filtered.
All messages arriving on the server’s well known port are filtered. Wonderwall is not just a facility to monitor initial connections to CORBA objects. For example, it will continue to monitor (and potentially block) all messages which pass between an external client and the internal CORBA object.
• Message filtering based on Request header.
A number of message types are defined for the IIOP protocol and any or all of these can be blocked if necessary. The most important group of incoming messages are the Request messages which are used to invoke methods on CORBA objects. Wonderwall provides comprehensive filtering of these messages based on the content of the Request message
3

O rb i x Wond e rw a l l A dm in i s t r a t o r ’ s G u i d e
header. This header provides all information needed to provide effective filtering. For example, the identity of the target object and the intended operation name. Request messages can be checked rapidly and passed to the internal network with little performance overhead.
• Fine-grained control of security.
Wonderwall provides the kind of fine-grained control of security which is needed for a distributed object environment. It allows you to control access to individual objects and, moreover, to allow or deny access to specific methods defined on that object. There are a number of other criteria which can be checked as will be seen later.
• Message logging.
The logging facility of Wonderwall (which can be configured to focus on particular kinds of events) is a powerful facility for tracing the history of suspicious message exchanges. It is also broadly useful as a debugging and monitoring facility.
• Blocks messages unless specifically allowed.
Wonderwall observes and promotes good security practice. For example, its approach to filtering is that everything is forbidden unless it is expressly allowed.
• Promotes simplicity of proxy server.
According to Wonderwall, a proxy server ought to behave simply and predictably.
• Secure communications.
By means of its integrated SSL support, Wonderwall supports end to end security between client and target servers.
• Authentication.
As part of the SSL infrastructure, Wonderwall can authenticate agents on both sides of the firewall, that is, both clients and servers.
Chapter 2 “Getting Started with Wonderwall” explains how to set up and configure Wonderwall which is also fully interoperable. For further information, refer to Chapter 4, “Interoperability and Wonderwall Operational Details”.
Before learning how to use Wonderwall, however, it is necessary to have an elementary understanding of the IIOP protocol itself.
4

An I n t r odu c t i o n t o Wonde rwa l l
Wonderwall and the IIOP ProtocolThe IIOP protocol specifies the way in which CORBA messages are encoded for transmission. In particular, it specifies a universal format for the transmission of operation invocations across the Internet. This makes it possible for clients of one ORB to send operation invocations to any ORB across the Internet, and also to correctly interpret any return values received.
When an IIOP client sends a message to a remote object, it requires an Interoperable Object Reference (IOR) which stores the addressing information for that object. For the IIOP protocol, an IOR will include the following information:
• The name of the host on which the object resides.
• The port it listens to.
• Its object key (a string of bytes identifying the object).
When a CORBA client invokes on a target CORBA object, that is, it uses an IOR, it does so using the IIOP protocol. This invocation opens a TCP connection to the host and port contained in the IOR. The client’s ORB then sends and receives IIOP messages over this connection. If multiple objects use the same host and port, the client can use the same connection to communicate with the other objects.
The IIOP model is based around two main message types: a Request and a Reply. Clients send Requests, and servers send Replies. There is also a set of message types used to handle unexpected error conditions or timeouts. Refer to ““Reply Message” on page 36 for further information.
In the same way that a filtering router can filter packets based on the packet header, Wonderwall filters incoming Requests based on the following information gleaned from the message header:
• The object key of the object being invoked on, which is used to identify the server it is destined for.
• The name of the operation being invoked.
• The IP address of the client.
• The message type.
• Any IOP Service Contexts.
5

O rb i x Wond e rw a l l A dm in i s t r a t o r ’ s G u i d e
• The principal of the client’s invoker.
Refer to “HTTP Server” on page 19 and Appendix A, “iiopproxy and iortool” (page 157) for further details on the filtering mechanism and how it is specified. The body of Request messages cannot be filtered without knowledge of the Interface Definition Language (IDL) used to define the operations and parameters for each object, so only the message header parameters can be used in a filter.
In the present version of Wonderwall, any Reply messages which pass from the internal server out to the client are not filtered.
The basic component of Wonderwall is the executable iiopproxy. This process is intended to run on the bastion host listening for IIOP requests on a specified TCP port. Any requests which arrive on this port from external hosts are filtered so that access can be restricted to certain CORBA objects or operations behind the firewall.
You can control the filtering of packets by editing the configuration file iiopproxy.cf. This file allows you to specify a flexible set of rules for either allowing or denying access to certain objects or operations.
Once a given request has been allowed through the firewall, the process iiopproxy forwards it to the proper location on the internal network. The iiopproxy does this by looking up its own database of IORs which include all the externally accessible CORBA objects.
In the following chapter, “Getting Started with Wonderwall”, an example of a configuration file is given and the database of IORs set up so that the firewall can pass on requests to a couple of objects on the internal network.
6

2Getting Started with Wonderwall
This chapter introduces basic security concepts by describing how to set up and configure Wonderwall. To achieve this, it shows how to deploy an application using Wonderwall.
To achieve this, we define an IDL interface implement a server using Orbix, and develop an Orbix Java client.
The sample Orbix Java client developed talks to an Orbix Java or Orbix C++ server. An example configuration file is given and a database of IORs set up so that Wonderwall can pass on requests to objects on the internal network.
Versions of the client application described in this chapter are located in the grid demonstration directory of your Wonderwall installation.
Wonderwall is also fully interoperable. Issues associated with interoperability are discussed in Chapter 4 “Interoperability and Wonderwall Operational Details”.
7
O rb i x Wond e rw a l l A dm in i s t r a t o r ’ s G u i d e
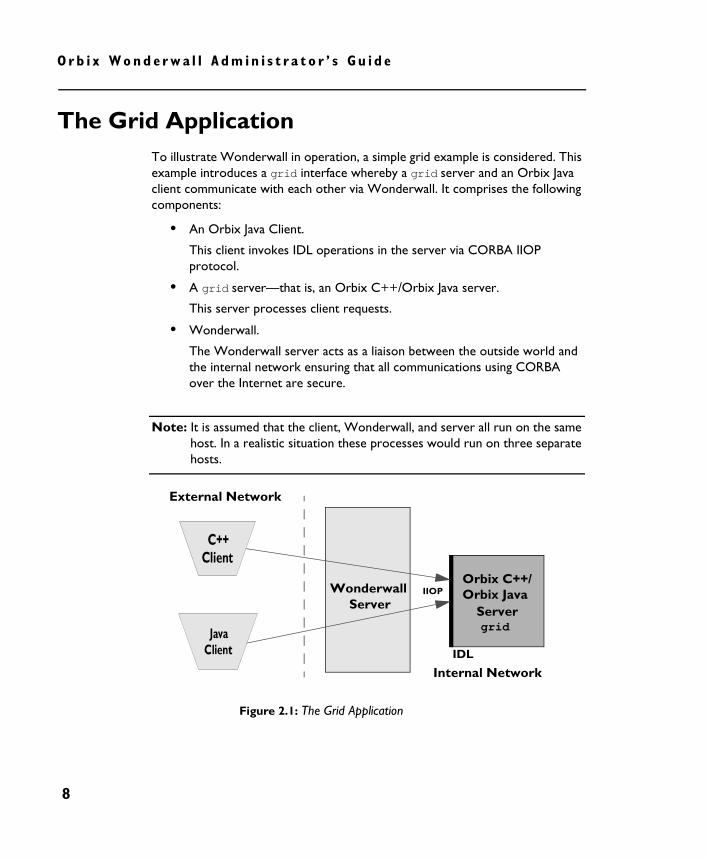
The Grid ApplicationTo illustrate Wonderwall in operation, a simple grid example is considered. This example introduces a grid interface whereby a grid server and an Orbix Java client communicate with each other via Wonderwall. It comprises the following components:
• An Orbix Java Client.
This client invokes IDL operations in the server via CORBA IIOP protocol.
• A grid server—that is, an Orbix C++/Orbix Java server.
This server processes client requests.
• Wonderwall.
The Wonderwall server acts as a liaison between the outside world and the internal network ensuring that all communications using CORBA over the Internet are secure.
Note: It is assumed that the client, Wonderwall, and server all run on the same host. In a realistic situation these processes would run on three separate hosts.
Figure 2.1: The Grid Application
WonderwallOrbix C++/
IIOP
Server
External Network
Internal Network
gridServer
Orbix Java
IDL
8
Ge t t i n g S t a r t e d w i t h Wonde rwa l l
The IDL Specification
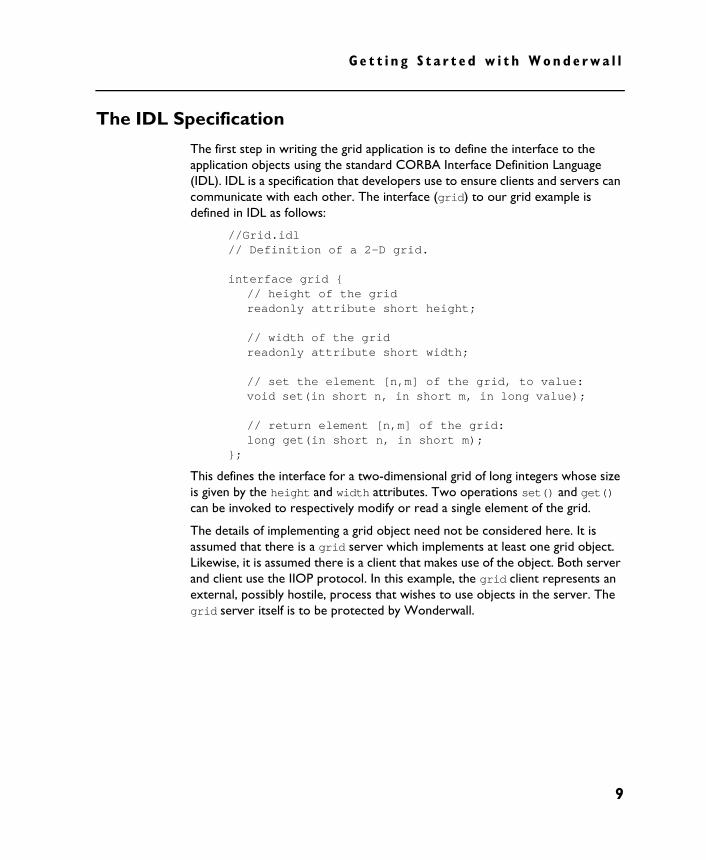
The first step in writing the grid application is to define the interface to the application objects using the standard CORBA Interface Definition Language (IDL). IDL is a specification that developers use to ensure clients and servers can communicate with each other. The interface (grid) to our grid example is defined in IDL as follows:
//Grid.idl// Definition of a 2-D grid.
interface grid {// height of the gridreadonly attribute short height;
// width of the gridreadonly attribute short width;
// set the element [n,m] of the grid, to value:void set(in short n, in short m, in long value);
// return element [n,m] of the grid:long get(in short n, in short m);
};
This defines the interface for a two-dimensional grid of long integers whose size is given by the height and width attributes. Two operations set() and get() can be invoked to respectively modify or read a single element of the grid.
The details of implementing a grid object need not be considered here. It is assumed that there is a grid server which implements at least one grid object. Likewise, it is assumed there is a client that makes use of the object. Both server and client use the IIOP protocol. In this example, the grid client represents an external, possibly hostile, process that wishes to use objects in the server. The grid server itself is to be protected by Wonderwall.
9

O rb i x Wond e rw a l l A dm in i s t r a t o r ’ s G u i d e
The Orbix Java Client
Once the grid interface has been implemented, an Orbix Java client application can be written to access grid objects. A simple client binds to a grid server using the Orbix _bind() mechanism to connect to an object behind Wonderwall, and subsequently make invocations on that object.
These concepts are illustrated in the following code sample. The Orbix _bind() call is used to connect to a grid object behind Wonderwall—invocations are then made on that object.
// Javapackage gridtest;
import IE.Iona.Orbix Java._CORBA;import IE.Iona.Orbix Java.CORBA.SystemException;
public class Client {...public static void main(String args[]) {
_grid gRef = null;
try {1 gRef = gridHelper._bind("grid1:GridSrv",
"Host");}catch (SystemException se) {
System.out.println(se.toString());}...
}};
10

Ge t t i n g S t a r t e d w i t h Wonde rwa l l
The code is explained as follows:
In order for the client to interact with a target object, it must first have an object reference or IOR for that object. Typically in an Orbix environment, an IOR is obtained either from the naming service using the _bind() call or via some tertiary medium such as the file systems.
1. The _bind() call contacts the Wonderwall proxy and establishes an IIOP connection. The first argument to _bind() is of the form "marker:server", where marker is a string identifying the object within a particular server. The second argument "host" specifies the host where the Wonderwall proxy is running.
The _bind() call is used in this instance to obtain the object reference of the target object. This generally involves the client contacting the daemon and being redirected to the target. The_bind() call typically initiates a series of interactions with the Orbix daemon associated with the target object, to obtain a reference for the target object.
From the client perspective in a proxy scenario, the Wonderwall host is the target host for the server object. Thus the _bind() call takes the Wonderwall host as an argument. The client’s ORB initiates interaction with Wonderwall as if it were talking to the daemon. Wonderwall looksup its IOR table for an Orbix daemon reference. Then it applies its access control policy and passes on the client ORB daemon request (which is either a locate_request or a proprietary getIIOPDetails invocation). Thus all requests for the daemon go through Wonderwall.
The more standard way of configuring such proxified environments is, to have a proxified object reference for the naming service, configured into the client side ORB. The client can then use the naming service to obtain references for server objects. These in turn, can be automatically proxified by Wonderwall.
For non-Orbix Java clients or if, for some reason _bind() is not used, it is necessary to understand the concepts underlying IORs and the process of proxification of IORs. Refer to “Proxification” on page 41 for further information.
Orbix Java also supports a transparent Wonderwall connection mechanism using the IT_IIOP_PROXY_PREFERRED and IT_HTTP_TUNNEL_PREFERRED and associated configuration parameters. Refer to “Using Wonderwall with Orbix C++ and Orbix Java” on page 55 for further information.
11

O rb i x Wond e rw a l l A dm in i s t r a t o r ’ s G u i d e
The Configuration FileEach installation of Wonderwall includes a configuration file that allows you to specify how applications use Wonderwall security. At the heart of Wonderwall’s operation is the Wonderwall security configuration file, iiopproxy.cf, which specifies the security policy for your system.
Creating the Wonderwall configuration file iiopproxy.cf is the first stage in setting up the firewall. During startup, the file iiopproxy.cf is read by the firewall server iiopproxy. Subsequent changes made to iiopproxy.cf affects new clients—any existing client sessions are not affected by the changes.
Note: The Wonderwall GUI Configuration Tool can also be used to create the Wonderwall security configuration file. Refer to “The Wonderwall Configuration Tool” on page 129 for further information.
12

Ge t t i n g S t a r t e d w i t h Wonde rwa l l
For the grid example, a sample Wonderwall configuration file is detailed—refer to “Example iiopproxy.cf File” on page 16. This sample Wonderwall configuration file comprises the following sections:
• Basic Configuration and Ports.
• Object Specifiers.
• Access Control List.
A brief explanation for each line in each section is given. Full explanations of fields, however, can be found in Appendix A on page 121.
Basic Configuration and Ports
In this section of the “Example iiopproxy.cf File” on page 16, lines beginning with a ‘#’ character are comments. Trailing comments on a line are also allowed. Further details include the following:
Line Explanation
port 1570 This port specifies that Wonderwall listens for requests on TCP port 1570.
orbixd-iiop-port 1571 This port refers to the port where the Orbix daemon listens for IIOP messages on the internal network. It is essential to specify this port number if you are going to be using the Orbix daemon. Wonderwall needs to know which port the Orbix daemon is listening on, in order to interact with it.
domain your.domain.com This entry gives the DNS domain name of the host where Wonderwall is running.
log requests replies This entry tells Wonderwall to log all IIOP request and reply messages.
http-port and http-files These entries are used to configure the optional HTTP server capability of Wonderwall. Refer to “HTTP Server” on page 19 for further information.
13

O rb i x Wond e rw a l l A dm in i s t r a t o r ’ s G u i d e
Object Specifiers
The next section of the “Example iiopproxy.cf File” on page 16 lists all of the objects that might be made available through Wonderwall. The Wonderwall proxy uses this list to construct an internal table of known objects. The general form of these entries is as follows:
object tag [wildwildcardflags] object-specifier
This entry declares a tag which is used to refer to the specified object throughout the configuration file. The optional wild field is used to refer to categories of objects, rather than a single object, and is discussed in “List of IORs” on page 170. The object-specifier can be specified in a number of ways (refer to Appendix A).
At present, Wonderwall supports four different forms of object-specifier as follows:
All of these forms of object-specifier are explained in detail in “Representations of an IOR” on page 30 and “List of IORs” on page 170.
The bind format is the simplest specifier to use. This format requires that Wonderwall is able to contact an Orbix C++ or Orbix Java daemon in order to locate the server. If using a non-Orbix server, read Chapter 4 “Interoperability
Object-specifier Definition
bind An object-specifier beginning with the keyword "bind" is used to specify the object using a pseudo-bind syntax (which closely resembles the syntax of _bind() as used by a regular Orbix Java client).
IOR: An object-specifier that begins with the characters "IOR:" introduces an IOR coded as a standard CORBA stringified object reference.
RXR: An object-specifier that begins with the characters "RXR:" introduces an IOR encoded using the readable-hex-representation.
/ An object-specifier that begins with a "/" or "\" is assumed to be the absolute pathname of a file where the IOR is stored (either in "IOR:" or "RXR:" format).
14

Ge t t i n g S t a r t e d w i t h Wonde rwa l l
and Wonderwall Operational Details” and use one of the three other object-specifiers. If using an Orbix C++ or Orbix Java server, it is possible to use the bind format as given in the “Example iiopproxy.cf File” on page 16. For example:
object grid_1 bind("grid1:GridSrv","gridHost") interface grid
The pseudo bind function has a similar format to _bind in the Orbix Java client. This example specifies an object with marker grid1, held by the server named GridSrv, found on host gridHost. The trailing fields interface grid (which must be present) specify that the object is of type grid.
The last entry of this section, allow-unlisted-objects on, gives you a powerful mechanism for extending the list of known objects. When set to on (the default setting), any time a client attempts to access an unlisted object, Wonderwall automatically updates and adds the object reference to its table of known objects. This considerably relieves the burden of administration required for a minimal configuration of Wonderwall.
Note: Because an object is automatically listed in this way, this does not mean that the client has permission to connect to the object. That is determined by the Access Control List (ACL).
In some high security networks, the administrator can switch this option to off.
Access Control
Access control rules are applied to the filtered IIOP requests and they determine whether that request should be passed or blocked. Access control rules begin with keywords allow or deny. Whenever a request arrives at the Wonderwall server, these rules are checked in sequence until a rule is found which definitely denies access or definitely allows access to the target object.
In the example configuration file, iiopproxy.cf shown in Figure x.x, access control rules are specified for the grid objects, grid_1 and grid_2, allowing the specified operation on these objects. Additionally, access to grid_2 is allowed from IP address, ipaddr 10.23.67.1 only. Access is denied to all requests that contain service contexts.
15

O rb i x Wond e rw a l l A dm in i s t r a t o r ’ s G u i d e
The first rule given here is deny servicecontexts *. A service context is a mechanism which allows extra information to be added to an IIOP request (or reply) for use by the CORBA services. In keeping with the firewall philosophy that anything not expressly permitted is denied, it is considered safer to forbid all requests with a service context attached.
The next few rules have a form similar to the following:
allow object grid_1 op _get_height
This states that the request is allowed if it is to be invoked on object grid_1 and the operation name is _get_height. The operation name _get_height derives from the attribute name height. For every attribute, such as height, there are two operation identifiers associated with it: _get_height and _set_height. If the attribute is declared readonly, there will be only one operation, _get_height.
The rules applying to the object grid_2 are specified in a slightly different way, as follows:
allow object grid_2 ipaddr 10.23.67.1 op _get_height
This stipulates that if the request is to invoke on object grid_2 and the IP address of the invoking host is 10.23.67.1 and the operation is _get_height, the request is allowed.
The last line of the Access Control List is as follows:
allow object grid_2 ipaddr 10.23.67.1 op set log
This specifies that the operation set is allowed on object grid_2 when the host has an IP address 10.23.67.1. In addition, the final keyword log specifies that all such requests should be logged (in this example, the logging is superfluous since all incoming and outgoing requests and replies are logged anyway).
It is important to understand how Wonderwall parses the Access Control List. It starts at the beginning of the list, reading each rule in sequence, until it finds a rule which unambiguously allows or denies a request. Wonderwall then stops and does not read any more rules. This approach makes it easy to predict how Wonderwall interprets the Access Control List.
A non-intuitive side effect of this algorithm is that it is permissible to have contradictory rules. The resolution of any conflict is simple: the first rule takes precedence.
16

Ge t t i n g S t a r t e d w i t h Wonde rwa l l
Example iiopproxy.cf File######################################################
# A sample Wonderwall configuration file.port 1570orbixd-iiop-port 1571 # Use the Orbix IIOP port.domain your.domain.comlog requests replieshttp-port 0http-files /####################################################### Database of Objects.object grid_1 bind("grid1:GridSrv","gridHost") interface gridobject grid_2 bind("grid2:GridSrv","gridHost") interface gridallow-unlisted-objects on####################################################### On to the access control list!# Disallow any IOP Service Contexts, at least until we need# them... who knows what could be put in here?#deny servicecontexts *# Allow general access to grid_1,# except for the "set" operation.#allow object grid_1 op _get_heightallow object grid_1 op _get_widthallow object grid_1 op get# Allow access to grid_2 from our link to a semi-trusted# network, but log any "set" operations.#allow object grid_2 ipaddr 10.23.67.1 op _get_heightallow object grid_2 ipaddr 10.23.67.1 op _get_widthallow object grid_2 ipaddr 10.23.67.1 op getallow object grid_2 ipaddr 10.23.67.1 op set log# File ends here -- if the message has not matched a rule# until now, it will be denied automatically.######################################################
17

O rb i x Wond e rw a l l A dm in i s t r a t o r ’ s G u i d e
Factory ObjectsOne of the interesting features of CORBA is that it allows you to pass back and forth object references inside Request or Reply messages, where they might appear either as parameters or return values. This provides a powerful mechanism for clients to obtain references to new objects. The term Factory Interface is applied to any interface which can create a new object and return a reference to this object. Individual instances of a Factory Interface are known as Factory Objects.
Consider the following example of a Factory Interface:
// IDLtypedef string MarkerString;
interface GridFactory {// Make an object of type ‘grid’// and return the object’s marker.MarkerString makeGrid();
};
This particular interface, because it returns an Orbix marker instead of an Interoperable Object Reference, is an Orbix specific example of a Factory. The marker gives an Orbix Java client enough information to find the object using the pseudo _bind() mechanism.
The existence of Factory Objects poses special problems for the Wonderwall administrator. Object level security is based on the idea that a finite number of objects are listed and it is known whether they can safely be accessed from outside. A Wonderwall administrator must consider not only whether the Factory Object is safe, but also whether objects created by the Factory can be considered safe. This also applies to the related idea of Finder Objects, which do not actually create new objects, but could return object references not listed in the Wonderwall configuration.
Nevertheless, there are compelling reasons for making use of both Factory and Finder objects. Consider, for example, accessing a database through a firewall that represents its records in the form of CORBA objects. Because the number of objects is likely to be considerable, it would be impractical to list them all in the Wonderwall configuration file. A Finder object is a more practical way of providing access to the records.
18

Ge t t i n g S t a r t e d w i t h Wonde rwa l l
Assume that there is a given Factory Object, such as GridFactory, which needs to be used through the firewall. This implies that Wonderwall must provide a means of accessing both the Factory Object and objects created by that Factory.
Wonderwall provides the following form of entry in the configuration file for specifying Factories1:
server tag object-specifier
The server keyword is used to define a tag which refers to all of the objects on a particular server. The object given by the object-specifier refers to an object which can be used to make the initial connection to the server. Usually this will be the factory object. For example, the GridFactory object can be listed as follows:
server gridFactory \bind(":FactorySrv", "gridHost") interface
GridFactory
The tag gridFactory can now be used to refer to all objects on the FactorySrv server, irrespective of marker, or interface name. Therefore a line such as the following in the Access Control List can be used to give away access to all objects on that server:
allow object gridFactory
Note: Because the object type of the tag gridFactory is wildcarded, it is legal to specify a rule such as the following: allow object gridFactory operation _get_height
The operation _get_height does not appear in the interface GridFactory, only in interface grid. The appearance of interface GridFactory, in the previous object specifier, is just a placeholder. Any operation at all, from any interface, can be specified in a rule with a server tag.
1. This is equivalent to the following construction: object tag wild marker,ifmarker object-specifierThe server keyword is provided as a convenience for defining Factory objects (refer to Appendix B).
19

O rb i x Wond e rw a l l A dm in i s t r a t o r ’ s G u i d e
Note: Wonderwall's support for factories is dependent on using Orbix C++ or Orbix Java objects, as it needs to understand the object key format. For more details on the object key format, refer to “Orbix C++/Orbix Java Object Key Format” on page 29.
HTTP ServerThe Wonderwall proxy normally listens for all IIOP messages on a single dedicated port. It monitors this port and redistributes IIOP Request messages to servers behind the firewall.
However, an IIOP port is not yet a standard feature of most firewalls. Until this port becomes established in client-side firewalls, it will be necessary to use HTTP tunnelling to smuggle IIOP messages through the HTTP port.
This approach requires a HTTP server. A HTTP server is required to recognise that some HTTP messages can contain data which is meant to be interpreted as an IIOP message. For this reason, the Wonderwall proxy has had the full functionality of a HTTP server added to it.
This functionality of Wonderwall is illustrated in Figure 2.2 on page 20. The process iiopproxy is capable of listening on two ports: one of these is a dedicated IIOP port and the other is a HTTP port (usually port 80).
20

Ge t t i n g S t a r t e d w i t h Wonde rwa l l
Figure 2.2: Internal Architecture of the Wonderwall Proxy Server
When iiopproxy listens on the HTTP port, it functions as a full-function HTTP server. Any normal HTTP requests that arrive cause it to search a designated directory, and return a copy of the requested Web page (if it can be found). However, this HTTP server also has the intelligence to recognise when a tunnelled IIOP message arrives via HTTP. In such a case, it extracts the IIOP message and passes it on to the IIOP gateway.
It does not matter to the gateway whether an IIOP message arrives through the dedicated port or by way of HTTP. The message is still subject to the same filtering mechanism regulated by the configuration file, as described in “The Configuration File” on page 12.
IIOP port HTTP port
Message Filter
Internal Network
HTTP Server
21

O rb i x Wond e rw a l l A dm in i s t r a t o r ’ s G u i d e
The configuration of the HTTP server only requires two parameters to be set in the configuration file. These are as follows:
http-port porthttp-files directory
The http-port is used to set the port where the iiopproxy listens for HTTP requests. The keyword http-files is used to specify the directory where files can be retrieved to service ordinary HTTP requests.
If you specify http-port 0, then HTTP functionality is not enabled and iiopproxy listens only on the dedicated IIOP port for ordinary IIOP messages.
Logging OutputThe log from the Wonderwall server iiopproxy is sent by default to the standard output. Typically, the user redirects this output to a log file. It is possible to specify what goes into the log file by editing the configuration file and Wonderwall is very flexible in this respect. In the “Example iiopproxy.cf File” on page 16, the line log requests replies ensures that all IIOP requests and replies passing in or out through Wonderwall are logged. The log essentially records all the information available in the request or reply headers.
The logged output, when an IIOP message is forwarded, generally takes the following format:
forwarded:<client> -> <servername>: [Message v1.x:<size>bytes: Request <request id>, op [ObjectKey "<objectkey>"]::[<operation>] from "<principal>", respond?
<response expected>]
forwarded: <client> <- <servername>: [Message v1.x: <size>bytes: Reply <request id>, reply status <replystatus>]
22

Ge t t i n g S t a r t e d w i t h Wonde rwa l l
Consider a sample log output generated by a client invoking on the grid via Wonderwall:
IIOP connection opened: [ultra:64023]starting server for activated object "grid"forwarded: [ultra:64023] -> [grid]: [Message v1.0, 82 bytes:
Request 0, op [ObjectKey"RXR::%5cultra.dublin.iona.ie:grid:0::IR:grid_"]::[_get_height] from "RXR:jmason", respond? y]
forwarded: [ultra:64023] <- [grid]: [Message v1.0, 14 bytes:Reply 0, reply status NO_EXCEPTION]
The logging facility also allows the full request and reply bodies to be logged. The rules for the Access Control List also let you dictate that requests or replies be logged only in specific circumstances. For full details of the logging options available, refer to Appendix A.
23

O rb i x Wond e rw a l l A dm in i s t r a t o r ’ s G u i d e
24

3IORs and IIOP
Wonderwall provides firewall security for applications that communicate using the IIOP protocol. An understanding of the IIOP protocol, as detailed in this chapter, is therefore indispensable for the proper use of Wonderwall and highlights the issues that affect security. The CORBA interoperability specification defines both the mechanism by which clients establish communication with a server, and the details of message formats and data coding.
The following issues are addressed in this chapter:
• IOR: The key concept which CORBA uses to enable clients to connect to servers is the Interoperable Object Reference (IOR) as discussed in “IOR Format” on page 26.
• IIOP: The message formats and data coding are discussed in “Internet Inter-ORB Protocol (IIOP)” on page 32.
In terms of security implications for the client side, IIOP is not another Java. It does not download executables onto the client machine and it is quite benign. It provides a protocol that enables a client to contact a remote server and call remote functions on this server. Data can pass between client and server, in the form of parameters, but nothing is sent by the server to be executed on the client side.
25

O rb i x Wond e rw a l l A dm in i s t r a t o r ’ s G u i d e
The server, on the other hand, is in need of some protection because it allows clients to remotely invoke operations that run on the server’s host. Wonderwall provides protection for servers which might expose security loopholes and it also restricts access to certain operations that the server does not wish to make available to remote clients.
IOR FormatTo identify objects in a distributed object system, CORBA uses the concept of an object reference. Once an application has an object reference, it has all the information it needs to connect to the object and make remote invocations on the object’s methods.
The notion of an object reference is an abstract one. To the application CORBA programmer it can be represented simply as a C++ pointer. Individual ORB vendors can have their own proprietary representation of an object reference.
However, as part of the infrastructure for an interoperability protocol, CORBA also specifies a universal format for object references known as the Interoperable Object Reference (IOR). This enables the information about an object reference to be either stored or communicated directly to clients in a form which is universally understood. All ORB vendors are required to support this form of object reference.
The information encoded in an IOR (as used in conjunction with the TCP/IP protocol) consists of the following pieces of information:
• The type of the object.
The type of the object is equivalent to the name of the IDL interface which is used to define the object. For example, in “The IDL Specification” on page 9, an IDL interface is defined for objects of type grid.
• The host where the object can be found.
• The port number of the server for that object.
The host and port together give us the connection information required to contact the server.
• An object key (a string of bytes identifying the object).
The object key is used by the server itself to locate the object.
26

I O R s a nd I I O P
Figure 3.1 outlines the format of an IOR in great detail giving a schematic view of the information held in an IOR. The upper part of Figure 3.1 shows the overall format of an IOR as follows:
• It begins with the string type_id which gives the type of the object,
equivalent to the name of the interface defining the object1.
• A sequence of profiles preceded by a profile_count follows. Two profiles are shown preceded by a profile_count of 2.
A profile contains essentially all the information which is needed to find an object. The facility to specify more than one profile in an IOR is a useful feature which allows future extensions to the use of IORs. For example, an IOR can specify a number of possible locations for an object. If a client does not succeed in connecting to the location specified in the first profile, the client can try the next profile in the sequence instead. Wonderwall supports the use of IORs with multiple profiles.
Figure 3.1: The Format of an Interoperable Object Reference and Profile
1. To be precise this field holds the RepositoryId for the type of object.
type_id profile_count
protocol version host port object_key
"IDL:Account:1.0" 2 profile profile
reserved"Fred"1571"host.com"0
27

O rb i x Wond e rw a l l A dm in i s t r a t o r ’ s G u i d e
The lower part of Figure 3.1 on page 27 shows the details contained in a single profile as follows:
• The connection information stored in a profile is specific to a particular underlying protocol. For this reason the first field is a protocol_tag. In this example, the tag value is zero to indicate a TCP/IP transport protocol.
• This is followed by the Version field which consists of a major and a minor version number.
• The next two fields provide the host and IP port needed to establish communication with the remote server.
• The object_key is a field which is used by the remote server to locate the object being accessed. There can also be additional fields at the end but these are currently not used and are reserved for future expansions to the protocol.
It may seem surprising that the format of an object_key is not specified by CORBA. However, this fact does not affect interoperability nor make the IOR any less portable. The object_key is used only by the server to identify the object referred to. The client needs to have a copy of the object_key but does not need to interpret it in any way. As far as the client is concerned, the key is just an opaque code (in fact, a sequence of bytes) which it passes to a server in order to identify an object. The server, which originally assigned the object_key, then makes active use of the key to find the object.
This outline of an IOR is only intended to be schematic although it does include all essential information which is supplied in a typical IOR. The formal specification of an IOR is given in terms of IDL data types. For the complete specification of an IOR, refer to the CORBA interoperability specification.
28

I O R s a nd I I O P
Orbix C++/Orbix Java Object Key Format
Orbix C++ and Orbix Java object keys in IORs have the same format as Orbix-protocol object references. They take the following the form:
:\host:serverName:marker:IR_host:IR_Server:interfaceMarker
These fields are defined as follows:
host The host name of the target object.
serverName The name of the target object’s server as registered in the Implementation Repository and also as specified to CORBA::BOA::impl_is_ready(), CORBA::BOA::object_is_ready() or set by setServerName().
For a local object in a server, this is that server’s name (if known)—otherwise it is the process’ identifier.
The server name is known if the server is launched by Orbix, if the server is launched manually and the server name is passed to impl_is_ready(), or if the server name has been set by CORBA::ORB::setServerName().
marker The object’s marker name. This is either chosen by the application or is a string of digits chosen by Orbix.
IR_host The name of a host running an Interface Repository that stores the target object’s IDL definition. This field is typically blank.
IR_server The string IR or IFR, depending on the version of Orbix C++ or Orbix Java in use.
interfaceMarker The target object’s interface. If called on a proxy, this cannot be the object’s true (most derived) interface—it may be a base interface.
29

O rb i x Wond e rw a l l A dm in i s t r a t o r ’ s G u i d e
Representations of an IOR
A portable representation of an IOR is a basic requirement. Typically, an IOR is created by the server which supports the corresponding object. The IOR is then publicised in order to make it available to prospective client processes. Once a client obtains a copy of the IOR it will then be able to connect to the object.
To assist publication of an IOR, it must be possible to convert it to a string format which is not subject to any conversions when communicated from place to place. For this reason, CORBA specifies a standard string format for IORs. The following is an example of such a string:
IOR:000000000000000d49444c3a677269643a312e300000000000000001000000000000004c0001000000000015756c7472612e6475626c696e2e696f6e612e696500000963000000283a5c756c7472612e6475626c696e2e696f6e612e69653a677269643a303a3a49523a67726964003a
It consists of the characters IOR: followed by a series of hexadecimal numbers. Every byte of the original IOR is translated into a two-digit hexadecimal number. This standard string format is simple and resistant to corruption, however, interpreting the content of the IOR is difficult.
A typical IOR is not really as opaque as this. To make IORs more comprehensible, Wonderwall can use its own format known as the Readable Hex Representation (RXR). The RXR format is a hybrid format which mixes plain ASCII characters with hexadecimal numbers. As an example, consider the RXR representation of the preceding object reference:
RXR:_______%0dIDL:grid:1.0_______%01_______L_%01_____%15ultra.dublin.iona.ie__%09c___(:%5cultra.dublin.iona.ie:grid:0::IR:grid_:
The RXR format is provided in order to provide readable logging messages and a convenient way to specify strings of octets. It incorporates concepts from the URL encoding for HTTP (RFC 1738). RXR format strings are written as follows:
RXR:<version><string>
The 4-character upper-case string RXR: must be present at the start. The <version> specifier is optional and can be omitted. If it is present, it takes the form %vX where the X character encodes a format identification character ranging from 0 to 9, a to z, and A to Z. If this version specifier is not present, version 0 is assumed. This document describes RXR format version 0.
30

I O R s a nd I I O P
Each octet of the octet string is stored, in order, in the <string> specifier. Octets must be encoded if they have no printable representation in the US-ASCII coded character set, if the use of the corresponding character is unsafe, or if the corresponding character is reserved for some other interpretation within this representation format.
The octets which must be encoded are as follows (the values are specified in hexadecimal, and ranges are inclusive): any octet from 00 to 20, octets 22, 23, 25, 27, and 3B, octets between 5B and 60, octets from 7B to FF. Here is an annotated list of ostensibly-printable octets deemed unsafe:
The encoding methods are as follows:
• For non-NUL (hex 00) octets, a ‘%’ (percent) character is stored in the string, followed by the high-order nibble of the octet encoded in hexadecimal, followed by the low-order nibble encoded in the same way.
• The character ‘_’(underscore) is used to encode a NUL (hex 00) character. An example RXR encoded IOR from OrbixNames is as follows:
RXR:_______%20IDL:CosNaming/NamingContext:1.0____%01_______W_%01_____%10192.122.221.136_a%eb_____7:%5cultra.dublin.iona.ie:NS:::IR:CosNaming%5fNamingContext_
Octet value Special use
% Used to signify octet-encoding.
_ Used to signify null-encoding.
# ; Can be used as a comment.
’ "(space) Can be used as a string delimiter.
‘ [ ] | { } ~ \ ^ Can be corrupted by gateways or shells.
31

O rb i x Wond e rw a l l A dm in i s t r a t o r ’ s G u i d e
Internet Inter-ORB Protocol (IIOP)The IIOP protocol is a special case of the General Inter-ORB Protocol (GIOP). The GIOP specification provides a general framework for protocols to be built on top of specific transport layers. The IIOP protocol is the specialisation of GIOP which is built on top of TCP/IP.
Many aspects of IIOP discussed in this section apply equally to any GIOP protocol, but no attempt is made to distinguish the different elements of the specification here.
In general, the IIOP specification has three main elements:
• Transport management requirements.
The transport management requirements give a high level view of the semantics of setting up and ending connections. The roles of client and server and the respective functions of each are outlined at this level. The protocol described is connection oriented with well-defined roles for client and server.
• Definition of CDR coding.
The second element of the IIOP specification is the Common Data Representation (CDR). This transfer syntax specifies a coding for all IDL types: including basic types, structured types, object references (in the form of IORs), and pseudo-object types such as TypeCodes. The CDR coding translates IDL types into a series of bytes to make up an octet stream (the CORBA name for a raw memory buffer).
A feature of CDR is its ability to deal with the different kinds of byte ordering required by different hardware types: both big-endian and little-endian byte ordering is supported. The convention adopted is that the sender of a message sends data using its native byte ordering (and sets a flag in the message header to indicate the ordering used). The receiver of a message is obliged to detect the byte ordering used and carry out any conversion, if it is required. The advantage of this convention is that when both sender and receiver use the same byte ordering, no conversion is required resulting in considerable gain in efficiency.
• IIOP message formats.
The third element of the IIOP specification is the message format. This is discussed in the following section, “IIOP Message Formats”.
32

I O R s a nd I I O P
IIOP Message FormatsThe IIOP protocol defines seven types of message format. The messages allow clients to pass invocations to servers and receive replies which can be either normal or indicate some error status. Some additional messages are available to help manage the connection.
The two most important message formats are the Request and Reply message formats. An operation which has been declared in the IDL interface for an object is invoked by a client using a Request message. The client usually waits for a Reply message from the server (unless the operation has been declared to be oneway) which normally contains a return value, or possibly an error condition.
The other five messages are all concerned with managing some aspect of the connection and their roles are discussed in the following sections.
Typically, IIOP messages fit into one of three formats as follows:
1. A GIOP message header only.
2. A GIOP message header followed by a message header specific to the message type.
3. A GIOP message header followed by a specific message header and message body.
In all cases, a message begins with a GIOP header. The form of the GIOP message header is illustrated in Figure 3.2 as follows:
Figure 3.2: The Format of a GIOP Message and Message Header
Message header Message body
GIOP Message size
message_type
flagsminor
major
GIOP header
33

O rb i x Wond e rw a l l A dm in i s t r a t o r ’ s G u i d e
The fields in the header can be described as follows:
• The four characters “GIOP” serve to identify the protocol.
• The GIOP version number (major and minor) is used to create the message.
• A flag byte is currently only used to indicate the byte ordering.
• An integer is used to indicate the message type.
• The message size (excluding the GIOP header itself).
This summarises all information which is sent to the GIOP header. For a formal specification of the exact header format, consult the CORBA specification.
To use Wonderwall effectively, the following sections sufficiently describe the purpose and usage of the different IIOP message formats. For complete details of the message formats, however, consult the CORBA specification.
Request Message
A Request message allows a client application to invoke an operation on a remote server. The message contains all the information which is needed for the invocation including the identity of the object, the operation name, and any parameters associated with the operation. Because a Request message is designed specifically to invoke operations which have been declared in an IDL interface, the message format is designed to support all of the syntax which can appear in an IDL operation definition.
The message consists of a Request header followed by a Request body. An outline of the Request header is shown in Figure 3.3 on page 35. It consists of the following fields:
• The service_contexts field allows service specific context information to be passed along with a Request. Intended for use in conjunction with
the CORBA services to carry extra information along with the Request2, the service contexts are not needed in the core specification of CORBA.
2. This field is used by the Transaction Service, for example.
34

I O R s a nd I I O P
• The request_id field is used to uniquely identify a Request emanating from a client so that the client can later match a received Reply with its corresponding Request (the corresponding Reply is tagged with the same request_id).
• The response_expected flag is used to indicate whether the Request is oneway or not. A normal Request has response_expected set equal to TRUE.
• The next field is an array of three bytes reserved for future use.
• The object_key field is used at the server end to identify the object which is being invoked.
• The operation field is simply a string giving the name of the operation being invoked.
• The requesting_principal field identifies the user making the request. That is, it is simply the user name of the person running the client.
Figure 3.3: The Format of a Request Message Header
Figure 3.3 illustrates all of the information available in the Request header. The Request header is of particular importance to the operation of Wonderwall because Wonderwall carries out its filtering based upon the contents of the Request header. Appendix A on page 157 verifies all rules for filtering requests based on the contents of this header.
GIOP header
requesting_principal
operation
service_contexts object_key
reserved
response_expected
request_id
35

O rb i x Wond e rw a l l A dm in i s t r a t o r ’ s G u i d e
The Request also has an associated Request body. The body of the Request consists essentially of a list of the operation parameters followed by any context strings for the operation.3 It is possible for the body of the Request to be empty—for example, if the Request was made for an operation which took no parameters and omitted a context clause.
Because filtering done by Wonderwall is based entirely on the Request header, there is no need for it to parse, or alter in any way, the Request body. This fact simplifies the filtering process significantly—ensuring the simple and efficient filtering and forwarding of request messages.
Reply Message
A Reply message is normally sent by a server in response to a client Request message. The Reply message consists of a GIOP header followed by a Reply header and a Reply body. The usual intent of a Reply message is to pass back a return value for an operation and to indicate the completion status for the operation.
The Reply header does not pass as much information as a Request header and typically consists of the following three fields:
1. The service_context field which is similar to the service context described in connection with a Request message.
2. The request_id field which is used to match this Reply to the client Request which gave rise to it. That is, all Replies are paired off with their corresponding Request and the request_id is a unique (per client) identifier used to match Request and Reply.
3. The reply_status field is used to indicate whether this is a normal Reply or if some error condition occurred in the server.
3. These context strings have nothing to do with service contexts. They are effectively middleware environment parameters and they will only be passed if a context clause appears at the end of an operation definition in IDL.
36

I O R s a nd I I O P
The reply_status is used to toggle between a number of different Reply types so that a Reply message is almost like four messages rolled into one. The possible values for reply_status are as follows:
The Reply is routinely used by the Orbix daemon to dynamically allocate a port to a server process which has been automatically forked by the daemon.
CancelRequest Message
A CancelRequest message is sent by the client to the server to indicate that the client is no longer interested in receiving a Reply to a particular message. However, it is not an error if the server sends the Reply anyway.
LocateRequest Message
A LocateRequest message can be sent from client to server to probe for the location of a remote object. It is advantageous to send this message before sending a large Request on a connection which has just been opened.
NO_EXCEPTION This is the normal Reply type. The body of this Reply type contains any return, out, or inout parameters which have been declared in the IDL for the operation.
USER_EXCEPTION This status indicates that a user exception has been raised in the server. The body of this Reply type contains the details of the user exception.
SYSTEM_EXCEPTION This status indicates that a system exception occurred. The body of the Reply indicates the kind of system exception raised.
LOCATION_FORWARD This is a special kind of Reply which a server can use to let a client know that it does not hold the object to which the Request refers. The body of a LOCATION_FORWARD reply contains a new IOR for the object. The client can use the new IOR to resend the Request to the new location (this is done transparently as part of the IIOP protocol).
37

O rb i x Wond e rw a l l A dm in i s t r a t o r ’ s G u i d e
LocateReply Message
A LocateReply message is sent from server to client in response to a LocateRequest message. There are three kinds of LocateReply message which the server can send as follows:
1. The UNKNOWN_OBJECT response indicates that the server does not hold the object and neither does it know where to find it.
2. The OBJECT_HERE response indicates that the server holds the object and communication can proceed as normal.
3. The OBJECT_FORWARD response indicates that the server does not hold the object but it does know of a forwarding location for the object. In this case, and in this case only, the LocateReply message has a body. This LocateReply body contains the new IOR.
CloseConnection Message
A CloseConnection message is sent by the server to the client to tell the client that it intends to close the connection.
MessageError Message
A MessageError message can be sent by either the client or the server. It is used within the IIOP protocol to indicate that the last message received was either corrupted or incorrectly formatted in some way. It consists only of a GIOP header with the message type set to MessageError.
38

4Interoperability and Wonderwall Operational Details
The IIOP protocol was introduced to facilitate interoperability between ORBs supplied by different vendors. For the most part, the use of this protocol is transparent to the user—the main difference is that your ORB is able to talk to many different ORBs, as a result of sharing a common protocol.
Object ReferencesOne aspect of IIOP which the user should be aware of is that the information required to make an initial connection to an ORB must be passed around by some means other than using the IIOP protocol. A connection is established between client and remote server with the help of an Interoperable Object Reference (IOR), which details the location of the object and the information needed to connect to the server.
There are two main formats of an IOR as follows:
1. An encoded IOR format is used to transmit IORs inside an IIOP message.
2. A stringified IOR format is used to communicate an IOR by any convenient means—refer to “Representations of an IOR” on page 30 for further information.
39

O rb i x Wond e rw a l l A dm in i s t r a t o r ’ s G u i d e
This stringified IOR is typically given to a client to allow it to bootstrap the initial connection to a server. Subsequent IORs can be obtained from the server via the IIOP protocol itself.
Normally the server, which holds the object, creates an IOR for the object and makes this public in some way. The four main ways in which an IOR can be made known to a client are as follows:
1. The server can create a stringified IOR and write this IOR to a file in a well-known location which is accessible to the client.
2. The server can register the IOR with the CORBA Naming Service. The Naming Service, as detailed in the CORBA specification, is basically a database that associates names with object references. (A client requires just a single bootstrap reference to the Naming Server in order to access all of the IORs stored there.)
3. An IOR can be sent inside an IIOP message. This applies to any IDL operation which features an interface name as a parameter or return type.
4. The Orbix-specific bind mechanism (used for an Orbix C++ or Orbix Java client talking to an Orbix C++ or Orbix Java server) can be used. The client initially makes contact with the Orbix daemon and the daemon helps the client to determine the IOR of the required object. In such a case, the client does not need an IOR to get started—bind provides an alternative bootstrap mechanism.
Of these four methods, the first two provide the most general interoperable way of bootstrapping initial connections.
Wonderwall is based on the use of two IORs for each object: the real IOR and the proxified IOR. The real IOR is used by servers operating behind the firewall. The proxified version of the IOR is publicised and made generally available outside the firewall. This is detailed in the following sections.
40

I n t e r o p e r ab i l i t y a n d Wond e rw a l l O p e r a t i o n a l D e t a i l s
ProxificationAs a general convention on the Internet, frequently used servers are assigned to a dedicated port. For example, most HTTP servers operate on port 80, most Internet mail servers operate on port 25, and so on. Whenever contact with a remote host is made, connection to a particular service by opening a socket on its well known port can be established. Wonderwall fits this convention by providing a single dedicated port for IIOP messages.
A port number is embedded directly into every IOR and can have any value. If a large number of CORBA servers are active on a given host, then a large number of ports may be in use for IIOP communications. From a CORBA perspective, this makes sense, as each of these processes is a dedicated server carrying out a specific sort of task.
From a firewall perspective, however, the use of multiple IIOP ports poses difficulties. It is undesirable, from a security point of view, to allow the use of multiple ports on the bastion host. Firewall practice is based on collating all messages of a single protocol type, and passing them through a single port.
Wonderwall uses a single IIOP port on the bastion host. Any IORs which are used remotely should point at the Wonderwall host and port. The IORs generated by servers on the internal network feature a range of hosts and ports, depending on where they were generated. These IORs are suitable for use on the internal network since they allow direct IIOP connections to be established behind the firewall. However, giving them away to users on the Internet is undesirable—because they facilitate direct connections to internal hosts, and a properly constructed firewall (in any case) would make them unusable across the Internet.
It is thus necessary to modify the real IORs before making them available on the Internet—a process referred to as the proxification of an IOR. The principle of proxification is illustrated in Figure 4.1 and Figure 4.2 on page 42.
The Proxification Process
Looking at Figure 4.1 on page 42, when a client is communicating with Obj, it has the illusion that the object lives on the Wonderwall server. The IOR which is used to contact this object must have the host and port of server W (the Wonderwall proxy server) embedded, along with the object_key for Obj.
41

O rb i x Wond e rw a l l A dm in i s t r a t o r ’ s G u i d e
Figure 4.1: Apparent Location of Object, in Wonderwall Proxy Server
In reality, the object lives behind the firewall and is located on server S in the internal network (see Figure 4.2). The real IOR for this object has the host and port of server S embedded in it, along with the object_key for Obj. Wonderwall acts as a proxy for this server, forwarding any messages it receives from the client (subject to filtering by the Access Control List).
Figure 4.2: Actual Location of Object, in Server S
WObj
host=Wport=Wkey=Obj
C
C ObjW
S
host=Sport=Skey=Obj
42

I n t e r o p e r ab i l i t y a n d Wond e rw a l l O p e r a t i o n a l D e t a i l s
The only difference between the real and the public IOR is the value of the embedded host and port. The host and port embedded in the real IOR must be changed. The resulting IOR is a proxified IOR.
Proxification can be carried out using the iortool utility which comes with Wonderwall. First the real IOR for Obj on server S is written to a file, say real.ref, in stringified form1. Then the real IOR is proxified with the following command:
% iortool -ior -proxify \-host wonderwall_host -port wonderwall_port \real.ref > proxy.ref
This takes the IOR stored in file real.ref (which can either be in IOR or RXR format) and replaces the current host and port embedded in the IOR by wonderwall_host and wonderwall_port instead. The result of this proxification process is written to the file proxy.ref in IOR format.
Note: The IOR format is the portable string representation, as defined by CORBA.
1. Refer to “Representations of an IOR” on page 30 and consult your ORB programming guide for instructions on how to generate a stringified version of the real IOR.
43

O rb i x Wond e rw a l l A dm in i s t r a t o r ’ s G u i d e
Non-Orbix ClientIf using a non-Orbix client to connect to a server via Wonderwall, you do not have the option of using the bind mechanism. The interoperable approach is based on the use of proxified object references, as described in “Proxification” on page 41. A proxified object reference is obtained (see “The Proxification Process” on page 41) and this proxified reference is publicised using one of the methods discussed in “Object References” on page 39. If the client has access to this IOR in string format, a connection can be established to the server using code similar to the following code sample. This sample assumes that the remote object is of type grid:
// C++main () {
...char *proxifiedIOR;CORBA::Object_var objVar;...// Read the proxified IOR into a string buffer// pointed to by proxifiedIOR....// Convert the string to an object reference.objVar = CORBA::Orbix.string_to_object(proxifiedIOR);...// Assume that this is the proxified IOR for a// grid object. Perform a _narrow()grid_var myGridVar = grid::_narrow(objVar);...
}
A reference myGridVar is obtained to the desired grid object.
Note: Error handling has been omitted from this example for clarity, but in a real situation it is imperative to enclose the calls in a try/catch clause.
It is generally more difficult for a client to get a reference to its first object, whether it is via a stringified object reference, as described in the preceding code sample, or via the Name Server. If this first object is either a Finder or Factory object, then subsequent object references can be obtained more easily.
44

I n t e r o p e r ab i l i t y a n d Wond e rw a l l O p e r a t i o n a l D e t a i l s
Non-Orbix ServerFor non-Orbix servers, the main restriction is that they are not able to respond to the Orbix bind mechanism. This affects the Wonderwall proxy, because it is the Wonderwall proxy which attempts to make direct connections with servers behind the firewall. Wonderwall is not able to specify objects using the bind syntax in its configuration file. For example, if you want to make an object known to Wonderwall, the following line should not be included in your configuration file:
object grid_1 bind("grid1:GridSrv","gridHost") interface grid
Instead, the following steps should be carried out:
• Obtain a copy of the real IOR for the object in CORBA string format—consult your ORB programming guide for instructions on how to do this. This IOR is needed if you want to generate a Proxified IOR for a non-Orbix client.
• Copy this string to a file in a convenient location, for example, as follows:
/etc/iors/grid1.ref
• Make this object known to Wonderwall by including the appropriate line in the configuration file as follows:
object grid_1 /etc/iors/grid1.ref
There are a few alternatives you can use for the object-specifier field—see “List of IORs” on page 170. However, the approach outlined here is probably the most convenient for the interoperable case.
45

O rb i x Wond e rw a l l A dm in i s t r a t o r ’ s G u i d e
Connection EstablishmentThis section explains some of the steps involved in establishing a connection through Wonderwall. By involving the daemon in the process of connection establishment, it is possible to have servers launched automatically. This means that the server is contacted in a sequence of steps, beginning with an initial connection to the daemon. It is for this reason that the configuration keyword orbixd-iiop-port must be set equal to the value of the daemon port—knowledge of this port is needed to facilitate communication with the daemon process.
A Normal IIOP Connection
Figure 4.3: Establishing a Normal Connection
Figure 4.3 describes a normal IIOP connection as follows:
• Client C requests the IOR for server object S2—a Java applet could get this from an applet tag. This contains the connection details of the activation agent—for example, the Orbix daemon on the server’s host.
2. An Orbix Java client can use the bind mechanism as an alternative.
Orbix Daemon (D)
Client (C)
Server (S)
host=Dport=Dobject key=S
(1a)
(1b)
(1c)
(1d)
(1e)
Request
Locate_Forward
Request
46

I n t e r o p e r ab i l i t y a n d Wond e rw a l l O p e r a t i o n a l D e t a i l s
• (1a, b): C opens a TCP/IP connection to host D, port D.
• (1c): C sends the request message to D (the Orbix Daemon). D responds with a LOCATION_FORWARD Reply message containing the real location of S.
• (1d): C opens a TCP/IP connection to host S, port S.
• (1e): C sends the request message to S.
Note: This example assumes the use of a non-persistent server. Persistent servers do not require the presence of an activation agent—for Orbix, the Orbix daemon is an activation agent. In such a case, the IOR in the first step would contain the connection details of S rather than D, and the second and third steps would not be necessary.
An IIOP Connection Through Wonderwall
Figure 4.4: Establishing a Connection Through Wonderwall
Orbix Daemon (D)
Client (C)
Server (S)
(2a)
(2b)
(2c)
(2d)
(2e)
Request
Activation
Locate_Forward
(2f)
Wonderwall (W)
host=Dport=Dobject key=S
hpo
Request
hpo
host=Dport=Dobject key=S
47

O rb i x Wond e rw a l l A dm in i s t r a t o r ’ s G u i d e
Figure 4.4 on page 47 describes the process of establishing a typical IIOP connection through Wonderwall as follows:
• Wonderwall W requests the IOR for server object S. This is copied into the configuration file by the system administrator.
• (2a, b): Client C requests the proxified IOR for server object S using the same method as described in “A Normal IIOP Connection” on page 46.
• (2c): C opens a TCP/IP connection to host W, port W, and sends the request message to W.
• (2d): W reads the request, finds the IOR in its configuration that matches the object key used in the request, and opens a connection to host D, port D. An activation request is sent to the daemon, causing the server S to startup. D responds to the activation request with the connection details for S.
• (2e): W opens a connection to S using the details from D.
• (2f): W forwards the request message to S, forwards any replies back to C, and so on until the connection closes.
Note: Again, this assumes the use of non-persistent servers. Persistent servers use the connection details of S rather than D—in such a case, the fourth step is skipped.
A More Complicated Connection: Using Object Factories
Figure 4.5 on page 49 describes a connection using object factories. Factory objects are server objects which create objects to handle requests. Figure 4.5 also applies to servers which return IORs so that clients can bind to objects.
Wildcard flags used in Figure 4.5 indicate that an IOR in the Wonderwall configuration file can be used to match in an approximate manner. Different wildcard flags are required to support other situations. To reduce clutter in Figure 4.5, the server-activation stage has been omitted.
48
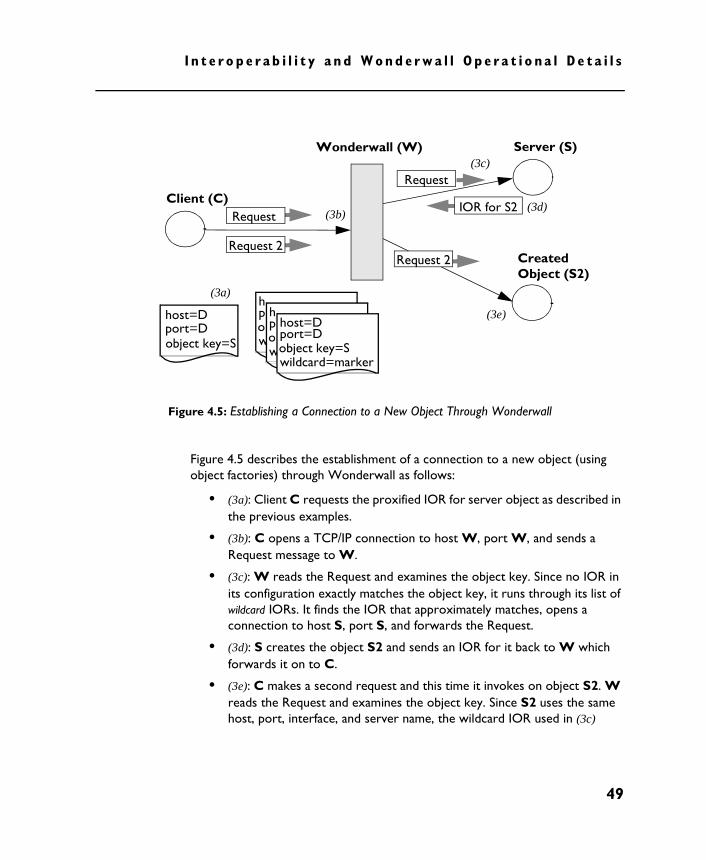
I n t e r o p e r ab i l i t y a n d Wond e rw a l l O p e r a t i o n a l D e t a i l s
Figure 4.5: Establishing a Connection to a New Object Through Wonderwall
Figure 4.5 describes the establishment of a connection to a new object (using object factories) through Wonderwall as follows:
• (3a): Client C requests the proxified IOR for server object as described in the previous examples.
• (3b): C opens a TCP/IP connection to host W, port W, and sends a Request message to W.
• (3c): W reads the Request and examines the object key. Since no IOR in its configuration exactly matches the object key, it runs through its list of wildcard IORs. It finds the IOR that approximately matches, opens a connection to host S, port S, and forwards the Request.
• (3d): S creates the object S2 and sends an IOR for it back to W which forwards it on to C.
• (3e): C makes a second request and this time it invokes on object S2. W reads the Request and examines the object key. Since S2 uses the same host, port, interface, and server name, the wildcard IOR used in (3c)
Server (S)
Client (C)
(3a)
(3b)
(3c)
(3e)
Request
Request 2
Wonderwall (W)
Request
Request 2
(3d)
Created Object (S2)
IOR for S2
host=Dport=Dobject key=S
hpow
p
wo
hhost=Dport=Dobject key=Swildcard=marker
49

O rb i x Wond e rw a l l A dm in i s t r a t o r ’ s G u i d e
matches this Request as well. A connection is opened to host S, port S (the addressing information in this IOR), and the Request is passed to object S2.
Note: Objects S and S2 might not share the same connection details. In such a case, a separate wildcard IOR would be necessary listing the known details of S2.
Factory Objects and IORsFactory objects typically employ a method which is used to create a CORBA object on the server to which an interoperable object reference is returned. For example, a general version of a GridFactory could be defined as follows:
// IDLinterface GridFactory {
// Make an object of type ‘grid’// and return an IOR.grid makeGrid();
};
The makeGrid() operation returns an object reference to an object of type grid. This type of interface, however, poses problems for the firewall.
Typically, the default behaviour of an operation such as makeGrid() is to generate an object reference which points directly at the object on the server itself. But this object reference is not useful on the Internet because it points at a server on the internal network, behind the firewall. The operation of the firewall is designed to prevent direct access to such internal servers.
A solution to this is to change the default behaviour of the server, so that any object references it returns will refer to the Wonderwall host and port instead. That is, the Factory object should generate proxified object references instead of real object references. Refer to the programming manual for your ORB for further information on this.
50

I n t e r o p e r ab i l i t y a n d Wond e rw a l l O p e r a t i o n a l D e t a i l s
Another solution, one which is more interoperable and can be implemented without change to either client or server code, is to use the proxify parameter in the Access Control List. This causes Wonderwall to proxify object references returned by the named operation.
To allow external access to objects generated by the Factory object, in addition to implementing the GridFactory interface, you will need to add to the Wonderwall configuration file. A typical approach is the following:
• Generate a real IOR for the GridFactory object and store it in a convenient location. For example:
/etc/iors/GridFactory_real.ref
• Declare a tag in the Wonderwall configuration file which refers to all of the objects on the same server as GridFactory. For example:
server GridFactory/etc/iors/GridFactory_real.ref
• Use this tag in a rule to allow access to all objects in the GridFactory server as follows:
allow object GridFactory
This configuration allows any proxified object references, generated by GridFactory, to be used by the external network irrespective of marker or interface type. Using the server keyword to generate a tag allows you to regulate permissions, a server at a time. Currently, this form of wildcarding is supported only for Orbix C++ and Orbix Java.
Factory Objects and the “Proxify” Parameter
Wonderwall supports automatic proxification of returned IORs as they pass through the proxy. To proxify the IOR returned by the makeGrid operation, use the proxify parameter in a rule as follows:
allow object GridFactory op makeGrid proxify
51

O rb i x Wond e rw a l l A dm in i s t r a t o r ’ s G u i d e
Implications for DevelopersFrom a developer’s perspective, the use of Wonderwall has minimal impact. Once the server is ready to be made available to the Internet, the IOR and the list of required operations are passed on to the firewall administrator who assesses the security of the server and updates the Wonderwall configuration file. Alternatively, an Orbix C++ or Orbix Java server allows you to use the bind form of an object-specifier in the configuration file (as explained in “List of IORs” on page 170).
Generally, on the client side it is only necessary to ensure that the client receives a copy of the proxified IOR so that it can establish an initial connection. In the special case of an Orbix Java client, the procedure is simplified so that an Orbix Java client transparently connects to the server via Wonderwall—if a direct connection is blocked by a firewall.
Callbacks
A firewall unfriendly feature of the IIOP protocol is its use of dynamic port assignment. Firewalls are based around the idea of ports, protocols and services mapping to one another. For example, the SMTP protocol for Internet mail runs on port 25; thus a connection from a client to a server on port 25 is used for sending mail. Since IIOP dynamically creates and assigns ports, this no longer applies so the usual paradigm of opening up a single port to support a particular protocol cannot be assumed.
This is of particular relevance for callbacks. If the client’s site is not protected by a firewall, the callback mechanism in the current IIOP specification is unlikely to work successfully. This is because it relies on the server opening a TCP connection to the client using a dynamically assigned port. If the client’s site is protected by a firewall, this connection is blocked. The typical scenario of opening a well-known port does not apply here.
In such a case, a possibility to consider is to extend the existing IIOP specification to allow the callback to use the same connection as that used for the initial incoming invocation from the client. Until this is standardised, however, the above model will be restricted to the usual Internet client-driven paradigm. In CORBA terminology this means that invocations can only be issued
52

I n t e r o p e r ab i l i t y a n d Wond e rw a l l O p e r a t i o n a l D e t a i l s
from the client site to the backend service behind the firewall. Objects resident in a client application/applet behind a firewall cannot act as CORBA servers receiving requests from objects resident in the backend service.
Note: Although callbacks are not supported, the Requests can of course be two way.
Orbix C++ and Orbix Java deals with this problem by extending IIOP to provide bi-directional IIOP. With Orbix Java 3 or Orbix 2.3c and later, callbacks can be delivered from server to client regardless of any firewalls between the two ORBs.
53

O rb i x Wond e rw a l l A dm in i s t r a t o r ’ s G u i d e
54

5Using Wonderwall with Orbix C++ and Orbix Java
Deploying distributed CORBA applications in Internet or intranet environments, where inter domain interactions occur, raises a requirement for screening and monitoring these interactions. Wonderwall achieves this by providing a proxy service. Thus Orbix C++ and Java servers can be protected against errant clients. Additionally, Orbix Java clients and applets can avail of the inbuilt support for Wonderwall to navigate enterprise firewalls to avail of CORBA services.
Because Orbix Java contains built-in support for Wonderwall, Wonderwall can be used as either:
• A simple intranet request-routing server—which passes IIOP messages from your applet, via the web server, to the target server.
• A full-blown firewall proxy—which can filter, control, and log your IIOP traffic.
The remainder of this chapter discusses using Wonderwall as a firewall technology for distributed Orbix applications.
55
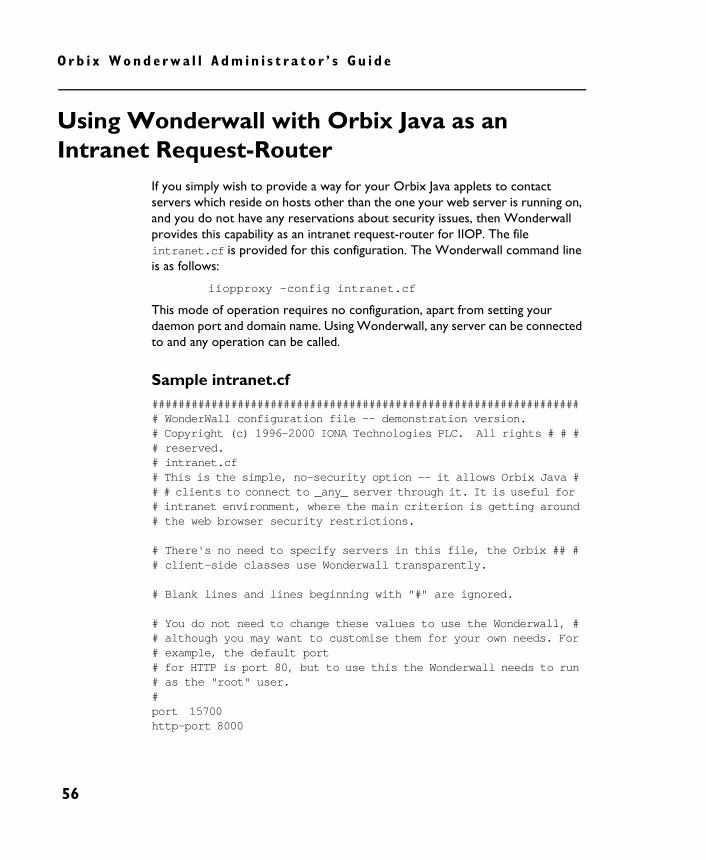
O rb i x Wond e rw a l l A dm in i s t r a t o r ’ s G u i d e
Using Wonderwall with Orbix Java as an Intranet Request-Router
If you simply wish to provide a way for your Orbix Java applets to contact servers which reside on hosts other than the one your web server is running on, and you do not have any reservations about security issues, then Wonderwall provides this capability as an intranet request-router for IIOP. The file intranet.cf is provided for this configuration. The Wonderwall command line is as follows:
iiopproxy -config intranet.cf
This mode of operation requires no configuration, apart from setting your daemon port and domain name. Using Wonderwall, any server can be connected to and any operation can be called.
Sample intranet.cf################################################################## WonderWall configuration file -- demonstration version.# Copyright (c) 1996-2000 IONA Technologies PLC. All rights # # ## reserved.# intranet.cf# This is the simple, no-security option -- it allows Orbix Java ## # clients to connect to _any_ server through it. It is useful for# intranet environment, where the main criterion is getting around# the web browser security restrictions.
# There's no need to specify servers in this file, the Orbix ## ## client-side classes use Wonderwall transparently.
# Blank lines and lines beginning with "#" are ignored.
# You do not need to change these values to use the Wonderwall, ## although you may want to customise them for your own needs. For# example, the default port# for HTTP is port 80, but to use this the Wonderwall needs to run# as the "root" user.#port 15700http-port 8000
56

U s i n g Wonde rwa l l w i t h O r b i x C++ a nd O r b i x J a v a
# Change this to reflect the location of your Orbix Java applets...# HTTP documents are searched for in this directory and its # # ## subdirectories.#http-files <root_directory_for_http_files>
# You need to set this to your DNS domain.#domain your.domain.here.com
# You need to make sure this matches whatever you're using with ## Orbix or Orbix Java, in the common.cfg file or Orbix Java.cfgfile.#orbixd-iiop-port 1571
log requests replies
# These three lines will turn off the security restrictions, ## allowing any server to be contacted.#strict-host-matching offallow-unlisted-objects onallow
Clients interacting with target servers which reside inside Wonderwall, need to obtain IORs which have been proxified. Otherwise, the client’s invocation will not successfully route through Wonderwall.
57

O rb i x Wond e rw a l l A dm in i s t r a t o r ’ s G u i d e
Using Wonderwall as a Firewall ProxyTo run Wonderwall in a traditional secure mode, use the file secure.cf as an example of the configuration you should use. This mode of operation requires that the target objects and operations be listed in the configuration file. For further details, refer to Appendix B, “Configuration”, which provides a guide to using Wonderwall’s access control lists and object specifiers. In secure.cf there are three basic categories of statements:
• iiopproxy configuration
• object specifiers
• access control rules
Sample secure.cf################################################################## WonderWall configuration file -- demonstration version.# Copyright (c) 1996-2000 IONA Technologies PLC. All rights # # ## reserved.# secure.cf## This file provides the high-security, firewall proxy mode of # ## operation.# It must be updated with any servers you wish to use.## DO NOT USE THIS FILE IN A PRODUCTION ENVIRONMENT WITHOUT CHECKING# IT FIRST!#port 1570
# By default, HTTP service is disabled. To enable it, put in a port# number here, and uncomment and edit the "http-files" parameter ## to reflect where your HTTP documents are kept. The standard HTTP# port is 80.
http-port 0# http-files <root_directory_for_http_files>
# Make sure to fill in your DNS domain here.#
58

U s i n g Wonde rwa l l w i t h O r b i x C++ a nd O r b i x J a v a
domain your.domain.here.com
# You need to make sure this matches whatever you're using with ## Orbix or Orbix Java, in the Orbix.cfg file.#orbixd-iiop-port 1571
log requests replies#################################################################
deny # THIS LINE STOPS ALL TRAFFIC -- REMOVE BEFORE USE
# Allow clients to talk to the Orbix daemon, and get server impl ## details# (which is required to support the _bind() call). If you plan only# to use IORs for connecting, then strip this out.##object orbixd bind (":IT_daemon", "grid_svr_host") interface # ## # # IT_daemon#allow object orbixd op getIIOPDetails
# allow access to the grid demo server, and the operations # # # ## available there.##object grid bind (":grid", "grid_svr_host") interface grid#allow objectgrid op _IT_PING# The Orbix "ping object" operation#allow objectgrid op _get_width#allow objectgrid op _get_height#allow objectgrid op get#allow objectgrid op set
# anything unmatched by end-of-file is automatically denied # # ## anyway.
In secure.cf, Wonderwall is configured in vanilla IIOP proxy mode. It listens on port 1570 for IIOP traffic. All IIOP requests received on this port are subject to the access control rules, which determine whether or not they are passed on to the target server. Other configuration statements indicate that the http
59

O rb i x Wond e rw a l l A dm in i s t r a t o r ’ s G u i d e
services of Wonderwall are disabled, that is, the http-port is set to zero which disables the http server. There is a placeholder for the domain relevant to Wonderwall’s deployment.
The daemon port behind the firewall is specified as 1571. Thus, Wonderwall can manufacture the IT_daemons IOR using this port. Logging is turned on to record the headers from requests and replies. This sample configuration file specifies the ultimate firewall in which all IIOP traffic destined for port 1570 is blocked as specified by the deny rule. At the end of the configuration file, examples of object specifiers and access control rules are provided but are commented out.
Two object specifiers are given; one for the Orbix daemon and one for the grid server objects, as per the following statements:
object orbixd bind(“:IT_daemon”, “grid_svr_host”)interface IT_daemon
object grid bind(“:grid”, “grid_svr_host”)interface grid
Associated with these objects are the access rules which allow the operation getIIOPDetails on the daemon and the operations _get, _set, _get_height, _get_width, and _IT_PING on the grid objects. The relevance of placing an object specifier in the configuration file is that it identifies the set of object references for which Wonderwall allows access as defined by the security policy in the access control rules.
When the bind syntax is used, Wonderwall probes for the object to determine that it is a valid object. This occurs during Wonderwall’s initialization, when it processes its configuration file. This also occurs for each new client connection. Wonderwall reloads its configuration file at this time and creates an individual IOR table for that client connection. Wonderwall generates an IOR for the target object using the information in the bind statement and using the port of the Orbix daemon. Hence, the significance of the orbixd-iiop-port setting in the Wonderwall configuration file.
The host information and interface information for the synthesized IOR is obtained from the bind statement. This initiates Wonderwall’s interaction with the Orbix daemon to establish the true IOR for the object. Wonderwall then sends a ‘ping’ message to verify that the object truely exists and is available. If it is, the IOR is added to the IOR table.
60

U s i n g Wonde rwa l l w i t h O r b i x C++ a nd O r b i x J a v a
Orbix Java Built-In Wonderwall SupportOrbix Java provides automatic built-in support for Wonderwall at the client-side. This allows Orbix Java to transparently attempt to connect to any IIOP servers via Wonderwall if a connection attempt fails using the default direct socket connection mechanism. It also means that Wonderwall can be used to:
• Provide HTTP tunnelling for Orbix Java applets.
• Provide automatic intranet routing capability for Orbix Java applets, in order to avoid browser security restrictions.
• Use Orbix Java applications and applets with Wonderwall, with no code changes.
Configuring Orbix Java to Use Wonderwall
In order for Orbix Java to use Wonderwall, it must be configured with the Wonderwall location details. The following configuration parameters are used for this purpose:
Orbix Java.IT_IIOP_PROXY_HOSTOrbix Java.IT_IIOP_PROXY_PORT
The IT_IIOP_PROXY_HOST parameter should contain the name of the host on which Wonderwall is running. The IIOP_PROXY_PORT parameter should contain its IIOP port. These parameters can be set using any of the supported configuration mechanisms. For further information, refer to the release notes of the Orbix Java version you are using. For example, a fragment of a HTML file which uses applet parameters is as follows:
<applet code=GridApplet.class height=300 width=400><param name="Orbix Java.IT_IIOP_PROXY_HOST"
value="wwall.iona.com"><param name="Orbix Java.IT_IIOP_PROXY_PORT" value="1570">
</applet>
61

O rb i x Wond e rw a l l A dm in i s t r a t o r ’ s G u i d e
Configuring Orbix Java to Use HTTP Tunnelling
HTTP tunnelling is a mechanism for traversing client-side firewalls. Each IIOP Request message is encoded in HTTP base-64 encoding, and a HTTP form query is sent to Wonderwall, containing the IIOP message as query data. The IIOP Reply is then sent as a HTTP response.
Using HTTP tunnelling allows your applets to be used behind a client’s firewall, even when a direct connection (or even a DNS lookup of Wonderwall’s hostname) is impossible. Additionally, it provides a mechanism whereby Orbix Java applets can over come some sandbox restrictions, and provide access to CORBA servers which execute on a host other than that of the servering web server, for example Wonderwall.
In order to use HTTP tunnelling, you must use the new ORB.init() API call to initialise Orbix Java. The ORB.init() function must be called by all clients and servers in a CORBA system before they can make use of the underlying ORB. For further information, refer to the Orbix Programmer’s Guide Java Edition and the release notes of the Orbix Java version you are using.
This allows Orbix Java to retrieve the codebase from which the applet was loaded. The codebase tag specifies an applet in the location from which the applet is downloaded. If there is no codebase specified, then the web server that has served the applet’s HTML files is contacted, and the applet class is requested from the same base location as the HTML file. The codebase is then used to find Wonderwall’s interface for HTTP tunnelling. This is a pseudo-CGI-script called /cgi-bin/tunnel. For further information on what the codebase is used for in Java, refer to the following URL: http://www.javasoft.com/.
Note: Although Wonderwall supports HTTPS tunnelling, currently the only protocol value supported in Orbix Java for HTTP tunnelling is http. Nonetheless, Wonderwall can also serve html pages and applets over HTTPS.
62

U s i n g Wonde rwa l l w i t h O r b i x C++ a nd O r b i x J a v a
Because an untrusted Java applet is only permitted to connect to the server named in the codebase parameter, Wonderwall should be used as the web server which provides the applet’s classes. However, it is permissible to provide your main web site’s HTML and images from another web server, such as Apache, IIS or Netscape, and simply refer to the Wonderwall web server in the applet tag, as follows:
[ in the file http://www.iona.com/demo.html ]
<applet code=GridApplet.classcodebase=http://wwall.iona.com/GridApplet/classesheight=300 width=400>
</applet>
With this setup, your HTML and images are loaded from the main web site (www.iona.com) and your applet code is loaded from wwall.iona.com—as a result, the applet can open connections to that host. For greater efficiency, it is advisable to make a ZIP, JAR, and/or CAB file containing the classes used by your applet and store them on the Wonderwall site as well. Regardless of whether you are using Wonderwall, this is generally a very good idea.
It is also feasible to provide a Wonderwall setup to support HTTP tunnelling on the same machine as the real HTTP server, by using a different port number from the default port 80. However, bear in mind that some sites can only support HTTP traffic on port 80, the standard port, so this may restrict your applets’ potential audience.
You should ensure that the applet’s classes are available in the directory you named in the codebase URL. In the previous example, this would be GridApplet/classes. This directory path is relative to the directory named in the Wonderwall configuration file’s http-files parameter.
If you want an application to use HTTP tunnelling, or would prefer to override an applet’s HTTP tunnelling setup, three more configuration parameters are provided:
Orbix Java.IT_HTTP_TUNNEL_HOSTOrbix Java.IT_HTTP_TUNNEL_PORTOrbix Java.IT_HTTP_TUNNEL_PROTO
The IT_HTTP_TUNNEL_HOST parameter should contain the name of the host on which Wonderwall is running. The IT_HTTP_TUNNEL_PORT parameter should contain its HTTP port. The IT_HTTP_TUNNEL_PROTO parameter should contain the protocol used.
63

O rb i x Wond e rw a l l A dm in i s t r a t o r ’ s G u i d e
Note: Currently, the only protocol value supported for HTTP tunnelling is http.
Wonderwall supports HTTP 1.1 and HTTP 1.0’s Keep-Alive extension. This means that TCP connections between the client and Wonderwall (or between a HTTP proxy and Wonderwall) will be kept alive. That is, more than one HTTP request can be sent across them. This greatly increases the efficiency of HTTP.
Additionally, the connection preference of the client should be specified by setting the Orbix Java property IT_HTTP_TUNNEL_PREFERRED (either in the Orbix Java.cfg file or programmatically using setConfigItem.)
Alternatively, if the client wishes to communicate via Wonderwall using IIOP, then setting the property IT_IIOP_PROXY_PREFERRED is used. It should be noted that Orbix Java’s default connection order, that is, when the client has not explicitly set the above properties, is to try the IIOP proxy first and then to attempt HTTP tunnel. Also, note that IIOP proxying takes precedence over HTTP tunnelling. Thus, if IT_IIOP_PROXY_PREFERRED is set, this overrides tunnelling.
64

U s i n g Wonde rwa l l w i t h O r b i x C++ a nd O r b i x J a v a
Deployment ScenariosIn this section, we look at a number of scenarios for deploying Wonderwall with Name Servers.
Scenario 1- Deploying OrbixNames Servers
Figure 5.1: Deploying OrbixNames Server
This scenario depicts the deployment of an OrbixNames server behind Wonderwall, with a client outside the firewall having access to it. If it is required to deploy an OrbixNames server behind Wonderwall and permit it to be used by clients outside the firewall, then it is necessary to:
1. Obtain an object reference for the initial_naming_context or root context of the naming service.
2. Proxify this object reference.
65

O rb i x Wond e rw a l l A dm in i s t r a t o r ’ s G u i d e
3. Configure this object reference into the client side orb so that it can be obtained by a resolve_initial_references invocation of the client's orb.
4. Make the naming service object reference known to Wonderwall.
5. Specify the access policy
To get the naming service IOR, run the OrbixNames server with the -I option, for example, ns -I nsior.ref. The name server writes out the IOR to the file nsior.ref. Proxify the IOR with the iortool.
To configure the proxified IOR into the client side orb, it is necessary to update various Orbix configuration files. It is recommended that the orbixnames3.cfg is not used at the client side. Add an entry in the common.cfg for both the C++ orb and Java orb as follows:
Common {Services {
NameService = "IOR:proxified-ior ";};
};
Orbix Java {IT_INITIAL_REFERENCES = "NameService
IOR:proxified-ior";};
If the initial reference entry for Orbix Java is made in the common.cfg, then it should not be duplicated in the Orbix Java.cfg file.
There are some restrictions relating to proxification that you should be aware of when using OrbixNames in a Wonderwall scenario. Wonderwall only proxifies referenced objects which are the return values of an operation. It does not proxify object references in the following cases:
1. Object references returned as out parameters.
2. Object references which are contained within structured types, for example, a structure or a sequence either in return types or as out parameters.
66

U s i n g Wonde rwa l l w i t h O r b i x C++ a nd O r b i x J a v a
######################################################
# WonderWall configuration file - deploying orbixnames# behind a firewall
#
port 15000
http-port 0
http-files /
proxy-ior-file F:\Iona\Wonderwall\bin\wwall.ior
domain your.domain.com
log requests replies
log-to-syslog no
# dynamic update of the connections IOR table; # # # ## especially needed when
# factory object and factory methods are involved
allow-unlisted-objects on
# This is required to use bind() and transformers.
orbixd-iiop-port 1670
# Allow sufficient time for the server to start
server-open-timeout 600
object orbixd bind (":IT_daemon", "amirza")interface IT_daemon
allow object orbixd
##
## Rule For NamingService - these are quite liberal in# that we are
67

O rb i x Wond e rw a l l A dm in i s t r a t o r ’ s G u i d e
## to allow all operation on the NamingContext # # # ## interface.
##
server ns <path-to-orbixnames-ior-file>/nsior.ref
allow object ns proxify
## alternatively the naming service could be made readonly only
## allowing resolve operations
##
## Rule for bank server
##
server bankserver <path to bank serverior>\bankserver.ior
# allow object bankserver
allow object bankserver op _IT_PING
# allow object bankserver op _start_server
allow object bankserver
deny
68

U s i n g Wonde rwa l l w i t h O r b i x C++ a nd O r b i x J a v a
Scenario 2 - Deploying Multiple OrbixNames Servers behind Wonderwall
An example of a required specification:
1. One name service is running on host name_server_host1. The server staff is registered with the daemon as IT_Demo/Names/staff. The server staff contains a number of objects of type person. Each object is registered with the name service.
2. A second name service is running on host name_server_host2. The server staff is registered with the daemon as IT_Demo/Names/staff. The server staff contains a number of objects of type person. Each object is registered with the name service.
Both of the name services are independent and keep their data in their own corresponding repositories.
Wonderwall is running on a bastion host ww_firewall.
The clients are running on NT boxes. They may or may not have an Orbix daemon running.
Configuration Steps
On host name_server_host1:1. Start the name service manually using the command to generate an IOR
for the naming service running on name_server_host1 as follows:
ns -I ns1_ior.ref
2. Copy the file ns1_ior.ref to the Wonderwall host ww_firewall and the client host.
On host name_server_host2:1. Start the name service manually using the command to generate an IOR
for the naming service running on name_server_host2 as follows:
ns -I ns2_ior.ref
69

O rb i x Wond e rw a l l A dm in i s t r a t o r ’ s G u i d e
2. Copy the file ns2_ior.ref to the Wonderwall host ww_firewall and the client host.
It is assumed that the Orbix daemon is running on both hosts, that the staff servers are registered using the putit command and the server is running.
On the Wonderwall host ww_firewall:
It is assumed that Wonderwall is installed, licensed and can be started using the following command:
iiopproxy -config iiopproxy.cf
Additional tools, such as, iortool are included with the Wonderwall installation.
Proxification of Name Service IORsProxify the name service IORs using the following command:
iortool -ior -proxify -host ww_firewall -port16000 ns1_ior.ref > ns1_proxified_ior.ref
and
iortool -ior -proxify -host ww_firewall -port16000 ns2_ior.ref > ns2_proxified_ior.ref
To verify that proxification has completed correctly, that is, in the files ns1_proxified_ior.ref and ns2_proxified_ior.ref, check that the Wonderwall host and port replaces the name service host and port.
IORs can be viewed using the following commands:
iortool -long ns1_ior.ref
or
iortool -long ns2_ior.ref
Wonderwall Configuration File SettingsIn the Wonderwall configuration file, add the following settings:
• Set the orbix-iiop-port to the chosen port for the Orbix daemon on different hosts.
70

U s i n g Wonde rwa l l w i t h O r b i x C++ a nd O r b i x J a v a
• Set the allow-unlisted-objects variable to on. This provides for dynamic update of Wonderwall’s IOR table with object references retrieved from the naming service. These object references are subject to appropriate access control upon subsequent use by the Orbix client.
allow-unlisted-objects on
Object SpecifiersIn the Wonderwall configuration file, specify the objects to be controlled:
object ORBIXD_1 bind (:IT_daemon,name_server_host1) interface IT_daemon
server NS_1 <IOR for name service on name_server_host1, that is, as in the file ns1_ior.ref>
object ORBIXD_2 bind (:IT_daemon,name_server_host2) interface IT_daemon
server NS_2 <IOR for name service on name_server_host2, that is, as in the file ns2_ior.ref>
Access Control Rules
In the Wonderwall configuration file, specify ACL entries to allow access to the naming services running on hosts name_server_host1 and name_server_host2:
allow object ORBIXD_1 proxifyallow object NS_1 proxify
allow object ORBIXD_2 proxifyallow object NS_2 proxify
The proxify statement in the above rule ensures that any IOR returned by an operation on the Orbix daemons and on the naming service has its host and port of the target object replaced with that of the host and port of Wonderwall.
Specify ACL entries for accessing specific objects registered in the name services using either the bind rule or IORs.
71

O rb i x Wond e rw a l l A dm in i s t r a t o r ’ s G u i d e
object person_1 wild marker bind (:IT_Demo/Names/staff, name_server_host1) interface person
allow object person_1
Similarly,
object person_2 wild marker bind (:IT_Demo/Names/staff, name_server_host2) interface person
allow object person_2
These steps are repeated for all objects in the name services, ensuring that the /deny rule is applied. Setting strict_host_matching to off allows Wonderwall to perform DNS lookup for host IP addresses.
Details of all keywords and command syntax are provided in Appendix B.
Client Side Configuration1. Edit iona.cfg
Remove the entry line for the naming service, that is, orbixnames3.cfg.
2. Edit common.cfg
Add the "services" scope inside the "common" scope. In the services scope, add one or more name services. The application policy determines whether clients are allowed to use all the name services running on different hosts or only a selected name service. It is assumed, in this example, that clients are allowed to access both naming services, that is, the name service on name_server_host1 and the name service on name_server_host2. Proxified IORs for name services are used so to imply that both of them are running on the Wonderwall host ww_firewall.
Common {. . Usual entries in common.cfg
Services {NameService1="<Proxified IOR for NS onname_server_host1,
ns1_proxified_ior.ref>";
72

U s i n g Wonde rwa l l w i t h O r b i x C++ a nd O r b i x J a v a
NameService2="<Proxified IOR for NS onname_server_host2,
ns2_proxified_ior.ref>";};
};
If clients are restricted to a specific naming service, then a proxified IOR for that particular name service is added to the common.cfg file. As clients can be on different hosts, each host should be configured accordingly.
3. Edit the client code
When invoking resolve_initial_references for the name service, a specific naming service name should be used, for example,
....CORBA::Object_var obj =orb->resolve_initial_references("NameService1");
or
CORBA::Object_var obj =orb->resolve_initial_references("NameService2");...
Scenario 3 - A Sample Grid Applet
A sample configuration is shown for a grid applet demo. In this configuration Wonderwall listens for IIOP requests on port 16000 and service http requests on port 16001.
Two objects are specified; namely that of the Orbix daemon and test1, which is the grid server object. All operations are permitted on the Orbix daemon. This is necessary should the client wish to invoke a _bind() call on a target object via Wonderwall. The list of operations for the grid object are given, together with the esoteric _IT_PING, which is proprietary to all Orbix objects and is used during the location and activation interactions.
All other operations or IIOP requests are denied via the deny rule.
### Grid Applet Demo ###
### [Wonderwall setup for wwallGridHttp demo]####
73
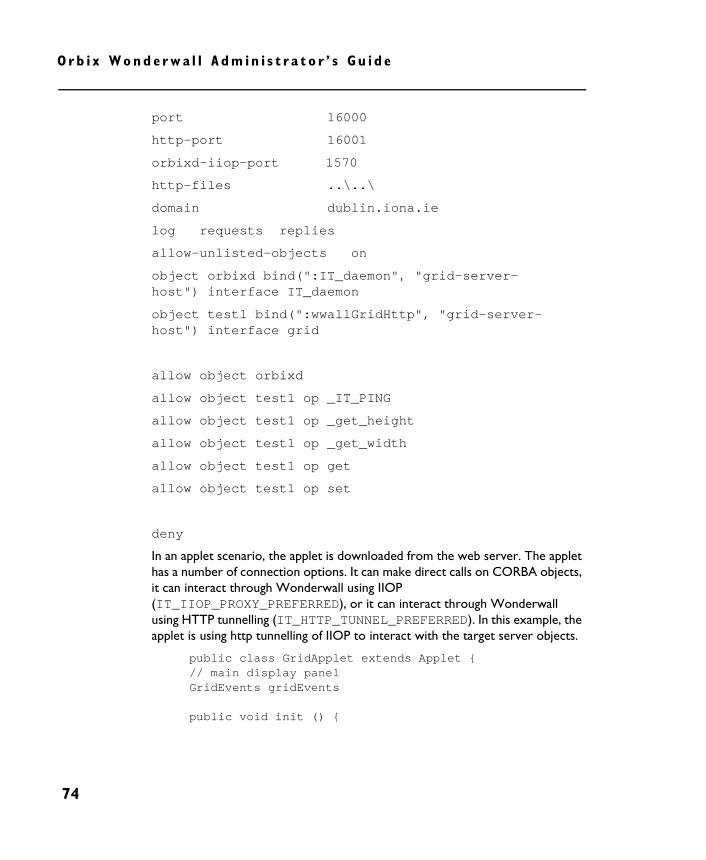
O rb i x Wond e rw a l l A dm in i s t r a t o r ’ s G u i d e
port 16000
http-port 16001
orbixd-iiop-port 1570
http-files ..\..\
domain dublin.iona.ie
log requests replies
allow-unlisted-objects on
object orbixd bind(":IT_daemon", "grid-server-host") interface IT_daemon
object test1 bind(":wwallGridHttp", "grid-server-host") interface grid
allow object orbixd
allow object test1 op _IT_PING
allow object test1 op _get_height
allow object test1 op _get_width
allow object test1 op get
allow object test1 op set
deny
In an applet scenario, the applet is downloaded from the web server. The applet has a number of connection options. It can make direct calls on CORBA objects, it can interact through Wonderwall using IIOP (IT_IIOP_PROXY_PREFERRED), or it can interact through Wonderwall using HTTP tunnelling (IT_HTTP_TUNNEL_PREFERRED). In this example, the applet is using http tunnelling of IIOP to interact with the target server objects.
public class GridApplet extends Applet {// main display panelGridEvents gridEvents
public void init () {
74

U s i n g Wonde rwa l l w i t h O r b i x C++ a nd O r b i x J a v a
1 ORB.init (this, null);
// setting these here is easier than in the HTML file.// However the HOST, PORT ones are set in the HTML because// it's easier for the build process to do it there; the// build process needs to do it for the demos in order to// provide better automatic demo running.
2 _CORBA.Orbix.setConfigItem ("OrbixJava.IT_HTTP_TUNNEL_PREFERRED", "true");_CORBA.Orbix.setConfigItem ("OrbixJava.IT_HTTP_TUNNEL_PROTO", "http");_CORBA.Orbix.setConfigItem ("OrbixJava.IT_HTTP_TUNNEL_PORT", "16001");_CORBA.Orbix.setConfigItem ("OrbixJava.IT_HTTP_TUNNEL_HOST", "ww-host");gridEvents = new GridEvents ();
// add panel to appletthis.add (gridEvents);}}
public class GridEvents extends GridPanel {// grid proxy objectpublic grid gRef;
// some other methods ....
public void bindObject () {String tmp;String markerServer;String hostName;
// get server name from text fieldif ((tmp = nameField.getText ()) == null)markerServer = "";elsemarkerServer = ":" + tmp;
// get host name from text fieldhostName = hostField.getText ();
75

O rb i x Wond e rw a l l A dm in i s t r a t o r ’ s G u i d e
// bind to server objecttry {
3 gRef = gridHelper.bind (markerServer, hostName);}catch (SystemException se) {displayMsg ("Connect failed.\n" + "Unexpected exception:\n"+ se.toString ());return;}
displayMsg ("Connect succeeded.");}
}; // class GridEvents
1. Applets initialisation ORB.init is called to initialise the ORB and permits the correct downloading of the applets classes for a specified codebase.
2. Set the communication preference to use tunnelling
3. The GridEvents object in the applet uses bind to obtain a reference to the target server object.
Scenario 4 - Deploying an Orbix Server behind Wonderwall
The following example examines Wonderwall deployed in the bank server scenario. The bank server manages an Account object, allowing clients to create different types of account objects, and supports the IDL. Below is the setup necessary for the IDL demo.
# [Wonderwall setup for idl_demo demo]
port 16000orbixd-iiop-port 1570domain your.domain.comlog requests repliesallow-unlisted-objects on
object orbixd bind(“:IT_daemon”, “bank_svr_host”)interface IT_daemon
allow object orbixd proxify
76

U s i n g Wonde rwa l l w i t h O r b i x C++ a nd O r b i x J a v a
object test1 wild marker,ifmarkere:\iona\Wonderwall\demo\configs\wwall-real.ref
allow object test1 op _IT_PING
# bank operations
allow object test1 op newAccount proxifyallow object test1 op newCurrentAccount proxifyallow object test1 op deleteAccountallow object test1 op getAIBallow object test1 op getCollegeGreenAIB
# account operationsallow object test1 op _get_balanceallow object test1 op makeLodgementallow object test1 op makeWithdrawal
# currentAccount operationsallow object test1 op _get_overdraftLimit
deny
The IDL code necessary for the Account demo.
//IDL// a simple description of a bank account//interface account {
readonly attribute float balance;void makeLodgement (in float f);void makeWithdrawal (in float f);
};
//// a simple description of a bank current account//interface currentAccount : account {
readonly attribute float overdraftLimit;};
77

O rb i x Wond e rw a l l A dm in i s t r a t o r ’ s G u i d e
//// a bank simply manufactures accounts//// bank::reject is raised if a duplicate accountname// is found//interface bank {
exception reject {string reason;};account newAccount (in string name) raises
(reject);currentAccount newCurrentAccount (in string
name, in float limit) raises (reject);void deleteAccount (in account a);
};
From a Wonderwall perspective, the bank server operations return object references. If these object references are to be validly used by the client, they must be proxified. That is, the location information contained in the IORs cannot be exposed beyond the firewall. Instead, it is necessary that the location details in the IOR are substituted with those of Wonderwall. This consists of manipulating the IOR profiles and exchanging the host and port of the target object with Wonderwall’s host and port. This is the role of the 'proxify' keyword in the allow rules. As this test scenario contains a number of factory objects and factory methods, the allow-unlisted-objects rule is turned on. This facilitates the update of Wonderwall's IOR table for a particular client connection.
The Object specifier for the 'test1' object is of interest. It should be noted that test1 is a local tag relevant to Wonderwall. It does not signify a name for the target object in the server. The object specifier wild cards on marker (object key) and on interface marker. It is necessary, in this instance, to permit access to all objects in the target bank server as per the access control rules.
Thus by specifying allow_unlisted_objects on and using the proxify option in the allow rules, clients can dynamically obtain proxified object references to target objects and use them via Wonderwall.
To highlight the proxification process, it is informative to look at the sample IORs generated, as shown below.
78

U s i n g Wonde rwa l l w i t h O r b i x C++ a nd O r b i x J a v a
The identity of the target object is, in fact, specified in the file wwall-real.ref, which contains the following:
IOR {
Type ID: "IDL:bank:1.0"
Number of Profiles: 2
Profile 0 (TAG_INTERNET_IOP) {
IIOP Version: 1.0
Host: "bank-server-host.dublin.iona.ie"
Port: 1570
Object Key: "RXR::%5cproxify-server-host.dublin.iona.ie:proxify:0::IFR:bank_"
}
Profile 1 (TAG_MULTIPLE_COMPONENTS) {
TaggedComponent 0 (OMG range) (TAG_ORB_TYPE) {
Component Body: "RXR:%01_%88_0%5fTI"
}
}
}
Note: The type of the interface in the type id is that of bank.
The proxified version of the above IOR substitutes Wonderwall’s host and port for the target server object's host and port. In the above case, the port of the target object is that of the daemon host and port. This effectively creates a persistent IOR, as the daemon's port is constant for a particular installation.
Thus, whenever a target object is to be located, the request is sent to the daemon initially, which responds with a LOCATION_FORWARD in the response and the IOR of the target object in the body of the reply. Additionally, note that the proxification of the IOR has added a third profile to the IOR, which conforms to IIOP version 1.1.
IOR {
Type ID: "IDL:bank:1.0"
Number of Profiles:3
79

O rb i x Wond e rw a l l A dm in i s t r a t o r ’ s G u i d e
Profile 0 (TAG_INTERNET_IOP) {
IIOP Version: 1.0
Host: "wonderwall-host.dublin.iona.ie"
Port: 16000
Object Key: "RXR::%5cbank-server-host.dublin.iona.ie:proxify:0::IFR:bank_"
}
Profile 1 (TAG_MULTIPLE_COMPONENTS) {
TaggedComponent 0 (OMG range) (TAG_ORB_TYPE) {
Component Body: "RXR:%01_%88_0%5fTI"
}
}
Profile 2 (TAG_INTERNET_IOP) {
IIOP Version: 1.1
Host: "wonderwall-host.dublin.iona.ie"
Port: 16000
Object Key: "RXR::%5cbank-server-host.dublin.iona.ie:proxify:0::IFR:bank_"
}
}
80

6SSL Enabled Wonderwall: Operational Details
The primary role of Wonderwall in a security infrastructure is to provide a firewall for IIOP traffic. Additionally, the demand for more complete security solutions for enterprise CORBA applications brings with it the requirement for authentication and secure communications, as exhibited by the use of SSL.
To satisfy this demand, and in keeping with the Orbix security strategy, Wonderwall provides integrated support for SSL. Thus secure CORBA interactions via Wonderwall can be assured. This chapter provides an overview of SSL and OrbixSSL. It provides an outline of how an OrbixSSL-enabled application can be deployed in a Wonderwall scenario.
81

O rb i x Wond e rw a l l A dm in i s t r a t o r ’ s G u i d e
IntroductionDistributed CORBA applications can include Internet enabled or ready components. Such enterprise applications span multiple domains in their execution, and this execution includes inter domain interactions. Such interactions must be assured in terms of authenticity, confidentiality and integrity. Therefore, there is an ever increasing requirement to employ SSL technology to support these requirements. Orbix and Wonderwall provides integrated support for SSL. OrbixSSL integrates Orbix with the Secure Sockets Layer (SSL), thus providing secure CORBA interactions over insecure networks.
An Overview of SSL SecuritySSL provides authentication, privacy, and integrity for communications across TCP/IP connections. Authentication allows an application to verify the identity of another application with which it communicates. Privacy ensures that data transmitted between applications can not be eavesdropped on or understood by a third party. Integrity allows applications to detect if data was modified during transmission.
Authentication in SSL
SSL uses Rivest Shamir Adleman (RSA) public key cryptography for authentication. In public key cryptography, each application has an associated public key and private key. Data encrypted with the public key can be decrypted only with the private key. Data encrypted with the private key can be decrypted only with the public key.
Public key cryptography allows an application to prove its identity by encoding data with its private key. As no other application has access to this key, the encoded data must derive from the true application. Any application can check the content of the encoded data by decoding it with the application’s public key.
82

S S L E n a b l e d Wonde rwa l l : O p e r a t i o n a l D e t a i l s
The SSL Handshake Protocol
Consider the example of two applications, a client and a server. The client connects to the server and wishes to send some confidential data. Before sending application data, the client must ensure that it is connected to the required server and not to an impostor.
When the client connects to the server, it confirms the server identity using the SSL handshake protocol. A simplified explanation of how the client executes this handshake in order to authenticate the server is as follows:
1. The client initiates the SSL handshake by sending the initial SSL handshake message to the server.
2. The server responds by sending its certificate to the client. This certificate verifies the server's identity and contains its public key.
3. The client extracts the public key from the certificate and encrypts a symmetric encryption algorithm session key with the extracted public key.
4. The server uses its private key to decrypt the encrypted session key which it will use to encrypt and decrypt application data passing to and from the client. The client will also use the shared session key to encrypt and decrypt messages passing to and from the server.
For a complete description of the SSL handshake, refer to the Netscape Communications SSL V3.0 specification, available from www.netscape.com.
The SSL protocol permits a special optimized handshake in which a previously established session can be resumed. This has the advantage of not needing expensive public key computations. The SSL handshake also facilitates the negotiation of ciphers to be used in a connection.
The SSL protocol also allows the server to authenticate the client. Client authentication, which is supported by OrbixSSL, is optional in SSL communications.
As any application can have a public and private key pair, the transfer of the public key must be accompanied by additional information that proves the key is associated with the true server and not some other application. For this reason, the key is transmitted as part of a certificate.
83

O rb i x Wond e rw a l l A dm in i s t r a t o r ’ s G u i d e
Certificates in SSL Authentication
The public key is transmitted as part of a certificate. A certificate is used to ensure that the public key submitted is in fact the public key which belongs to the submitter. For the certificate to be acceptable to the client, it must have been digitally signed by a certification authority (CA) that the client explicitly trusts.
The International Telecommunications Union (ITU) recommendation X.509 defines a standard format for certificates. SSL authentication uses X.509 certificates to transfer information about an application’s public key.
An X.509 certificate includes the following data:
• The name of the entity identified by the certificate.
• The public key of the entity.
• The name of the certification authority that issued the certificate.
The role of a certificate is to match an entity name to a public key. A CA is a trusted authority that verifies the validity of the combination of entity name and public key in a certificate. You must specify trusted CAs in order to use OrbixSSL.
According to the SSL protocol, it is unnecessary for applications to have access to all certificates. Generally, each application only needs to access its own certificate and the corresponding issuing certificates. Clients and servers supply their certificates to applications that they want to contact during the SSL handshake. The nature of the SSL handshake is such that there is nothing insecure in receiving the certificate from an as yet untrusted peer. The certificate will be checked to make sure that it has been digitally signed by a trusted CA and the peer will have to prove its identity during the handshake.
84

S S L E n a b l e d Wonde rwa l l : O p e r a t i o n a l D e t a i l s
Privacy of SSL Communications
When a client authenticates a server, confidential data sent by the client can be encoded by the server’s public key. It is only the actual server application that is able to decode this data, using the corresponding private key.
Immediately after authentication, an SSL client application sends an encoded data value to the server. This unique session encoded value is a key to a symmetric cryptographic algorithm.
A symmetric cryptographic algorithm is an algorithm in which a single key is used to encode and decode data. Once the server has received such a key from the client, all subsequent communications between the applications can be encoded using the agreed symmetric cryptographic algorithm. This feature strengthens SSL security.
Examples of symmetric cryptographic algorithms used to maintain privacy in SSL communications are the Data Encryption Standard (DES) and RC4.
Integrity of SSL Communications
The authentication and privacy features of SSL ensure that applications can exchange confidential data that cannot be understood by an intermediary. However, these features do not protect against the modification of encrypted messages transmitted between applications.
To detect if an application has received data modified by an intermediary, SSL adds a message authentication code (MAC) to each message. This code is computed by applying a function to the message content and the secret key used in the symmetric cryptographic algorithm.
An intermediary cannot compute the MAC for a message without knowing the secret key used to encrypt it. If the message is corrupted or modified during transmission, the message content does not match the MAC. SSL automatically detects this error and rejects corrupted messages.
85

O rb i x Wond e rw a l l A dm in i s t r a t o r ’ s G u i d e
An Overview of OrbixSSLSecure Sockets Layer (SSL) provides data security for applications that communicate across networks. SSL is a transport layer security protocol layered between the application protocols and TCP/IP.
Orbix applications communicate using the CORBA standard Internet Inter-ORB Protocol (IIOP) or IONA Technologies’ proprietary Orbix protocol. These application-level protocols are layered above the transport-level protocol TCP/IP. OrbixSSL applications communicate using IIOP or the Orbix protocol layered above SSL. Figure 6.1 on page 87 illustrates how the SSL protocol layer integrates with Orbix communications.
All OrbixSSL components, including the Orbix daemon and Orbix utilities, and all OrbixSSL applications can communicate using SSL. OrbixSSL imposes few requirements on administrators and programmers who wish to support SSL communications in Orbix applications.
86

S S L E n a b l e d Wonde rwa l l : O p e r a t i o n a l D e t a i l s
Figure 6.1: The Role of SSL in Orbix Client/Server Communications
OrbixSSL administrators use a single configuration file to configure a high-level security policy for a distributed system. OrbixSSL programmers develop standard Orbix applications that automatically communicate using SSL. The details of the SSL protocol are hidden, but programmers can use the OrbixSSL application programming interface (API) to customize SSL communications.
OrbixSSL EssentialsOrbixSSL provides SSL security for communications between components of your CORBA applications. This chapter shows you how to SSL enable an existing application.
87

O rb i x Wond e rw a l l A dm in i s t r a t o r ’ s G u i d e
Using OrbixSSL, your CORBA applications benefit from the authentication, privacy, and integrity of SSL communications. When you create an OrbixSSL application, you must supply the information necessary to complete the authentication process. OrbixSSL then ensures the privacy and integrity of your communications without any intervention from you.
The SSL handshake enables components of your OrbixSSL application to authenticate each other. To ensure every SSL handshake completes successfully, each authenticated component must be able to access its certificate and private key.
There are two ways to provide this information to OrbixSSL applications. Administrators can use the OrbixSSL configuration file. Programmers can use the OrbixSSL application programming interface (API). This section demonstrates the use of basic administration and some essential programming, with respect to SSL securing your application.
88

S S L E n a b l e d Wonde rwa l l : O p e r a t i o n a l D e t a i l s
Sample Bank Application OverviewThe Orbix demos directory contains several demonstration programs, including a basic banking application, located in the banksimple subdirectory. In this application, an Orbix server creates a single object that implements the IDL interface Bank.
The server uses OrbixNames to associate a name with the Bank object. To begin communicating with the server, a client gets a reference to the Bank object from OrbixNames.
The client uses the Bank object to create Account objects. An Account object allows a client to manipulate a single bank account; for example, to query the balance of the account or deposit money in the account.
The IDL definitions for this application are as follows:
module BankSimple {typedef float CashAmount;
interface Account;
interface Bank {Account create_account (in string name);Account find_account (in string name);
};
interface Account {readonly attribute string name;readonly attribute CashAmount balance;void deposit (in CashAmount amount);void withdraw (in CashAmount amount);
};};
89

O rb i x Wond e rw a l l A dm in i s t r a t o r ’ s G u i d e
Running the Application without SSL
Without SSL, this application runs as follows:
1. The bankserver gets an object reference for the ‘root context’ in the name server. This is achieved either by a _bind() call on the NamingContext call or by the standard mechanism of a resolve_initial_references() call.
2. The bankserver binds a name to a Bank object in the name service.
3. The client gets a reference for the name service.
4. The client resolves a name for the Bank object within the name service and retrieves the appropriate object reference.
5. The client ‘narrows’ the object reference to that of the Bank object. The client can now invoke operations on the object, for example the
operation create_account(). 1
6. The factory method create_account() returns a reference to the Account object. The client can then invoke operations on the Account object.
Examining an IOR from such interactions, shows that it is composed of a number of profiles. Each of these profiles provide contact details for the object:
• The host and port of the server
• End point within the server, that is, the object key.
This series of interactions are shown in Figure 6.2.
1. Interaction 5 may have a level of indirection depending on whether the Bank object reference contains the Orbixd host and port or the transient port of the server. For an object reference associated with a name binding in the naming service, the former is the most likely case.
90

S S L E n a b l e d Wonde rwa l l : O p e r a t i o n a l D e t a i l s
Figure 6.2: Running the Banking Application
S e r v e r H o s t
C lie n t H o s t
C lie n t
O rb ix D aem on
S e r ve r
O rb ixN am es
1
2
3
4
5
6
91

O rb i x Wond e rw a l l A dm in i s t r a t o r ’ s G u i d e
Running the Application with SSL
When using SSL, each component of the application that acts as a server must be able to prove its identity. On first contact with another component, a server must be able to supply its certificate and encrypt messages with its private key. In this example, there are three servers: the bank server, the Orbix daemon, and the OrbixNames server.
With SSL, the application runs as shown in Figure 6.3:
1. The server gets a reference to OrbixNames. Implicitly, the server contacts the Orbix daemon.
The Orbix daemon supplies its certificate to the server. The server uses this certificate to check the identity of the daemon.
2. The server uses OrbixNames to associate a name with the Bank object.
OrbixNames supplies its certificate to the server. The server checks the identity of OrbixNames.
3. The client gets a reference to OrbixNames. Implicitly, the client contacts the Orbix daemon.
The Orbix daemon supplies its certificate to the client. The client checks the identity of the Orbix daemon.
4. The client uses OrbixNames to get a reference to the Bank object.
OrbixNames supplies its certificate to the client. The client checks the identity of OrbixNames.
5. The client calls operation create_account() on the Bank object. Implicitly, the client contacts the Orbix daemon over the secure connection that is already established. The client then contacts the server.
The server supplies its certificate to the client. The client checks the identity of the server.
The server processes the call to create_account() and returns a reference to an Account object.
6. The client calls operations on the Account object over a secure connection.
With SSL security, the identity of the servers can be verified and assured and the interaction among the components can take place over a secure transport.
92

S S L E n a b l e d Wonde rwa l l : O p e r a t i o n a l D e t a i l s
To run this example, you must:
1. Provide each server with access to its certificate.
2. For each component that acts as a client, provide information about which certificates to accept.
3. Add OrbixSSL initialization code to the client and server programs.
4. Provide each server with access to its private key.
Steps1 and 2 are accomplished using OrbixSSL administration, while steps 3 and 4 require application code modification.
Examining an IOR for an SSL enabled Bank object and comparing it with a vanilla IOR - it can be seen that there is an additional profile which identifies the contact details which should be used for secure communications with the object.
Figure 6.3: Running the Banking Application with SSL Security
S e r ve r H o s t
C lie n t H o s t
O rb ix D a em o n
S e r ve r
O rb ixN am es
1
2
3
4
5
6
D aem onC e r tific a te
D aem onC e r tific a te
O rb ixN am esC e r t ifca te
O rb ixN am esC e r tifca te
S e r ve r C e r tifc a teC lien t
93

O rb i x Wond e rw a l l A dm in i s t r a t o r ’ s G u i d e
Example IOR for an SSL Enabled Application
IOR {
Type ID: "IDL:BankSimple/Account:1.0"
Number of Profiles: 3
Profile 0 (TAG_INTERNET_IOP) {
IIOP Version: 1.0
Host: "bankserver-host.some-domain.com"
Port: 1670
Object Key: "RXR::%5cbankserver-host.some-domain.com:BankServer:0::IFR:bank_"
}
Profile 1 (TAG_INTERNET_IOP) {
IIOP Version: 1.1
Host: " bankserver-host.some-domain.com "
Port: 1670
Object Key: "RXR::%5cbankserver-host.some-domain.com:BankServer:0::IFR:bank_"
}
Profile 2 (TAG_MULTIPLE_COMPONENTS) {
TaggedComponent 0 (OMG range)(TAG_SSL_SEC_TRANS) {
SSL Target Supports: 126
SSL Target Requires: 126
94
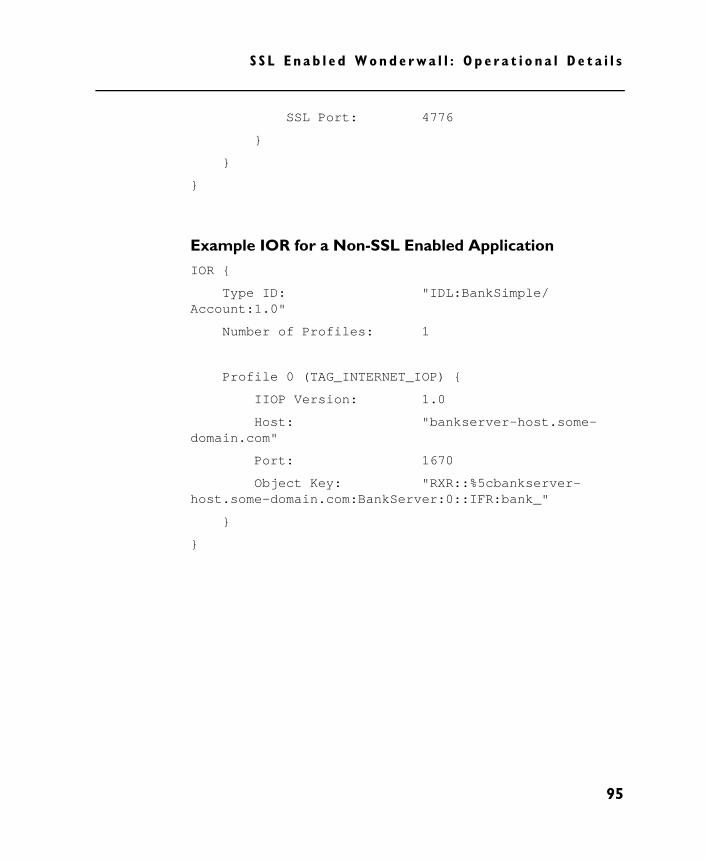
S S L E n a b l e d Wonde rwa l l : O p e r a t i o n a l D e t a i l s
SSL Port: 4776
}
}
}
Example IOR for a Non-SSL Enabled Application
IOR {
Type ID: "IDL:BankSimple/Account:1.0"
Number of Profiles: 1
Profile 0 (TAG_INTERNET_IOP) {
IIOP Version: 1.0
Host: "bankserver-host.some-domain.com"
Port: 1670
Object Key: "RXR::%5cbankserver-host.some-domain.com:BankServer:0::IFR:bank_"
}
}
95

O rb i x Wond e rw a l l A dm in i s t r a t o r ’ s G u i d e
Providing Certificates for the ServersIn the banking application, the servers use demonstration certificates installed with OrbixSSL. Each certificate has a corresponding file in the OrbixSSL certificates directory. The certificates for the banking application are shown in Table 6.1.
The orbix certificate is a general demonstration certificate for use with standard Orbix servers. The secure_bank_server certificate is a demonstration certificate specific to the bank server. Each of the demonstration certificates is signed by the OrbixSSL demonstration certificate authority (CA), called demo_ca_1.
WARNING: These certificates are completely insecure. Use them for OrbixSSL demonstration programs only. Do not use them in a deployed system. In a deployed system, you must create your own customized certificates for components of your application. The certificates for a deployed system should be signed by a CA that you can trust. Never trust the CA demo_ca_1. The process of creating and signing certificates is described in detail in the Managing Certificates chapter of the OrbixSSL C++ Programmer’s and Administrator’s Guide.
Server Certificate File
Bank demos/secure_bank_server
OrbixNames services/orbix_names
Orbix daemon services/orbix
Table 6.1: Demonstration Certificates Used by the Banking Application
96

S S L E n a b l e d Wonde rwa l l : O p e r a t i o n a l D e t a i l s
Using the OrbixSSL Configuration File
The OrbixSSL configuration file, orbixssl.cfg, enables you to specify how your applications use SSL. By default, this application is located in the config directory of your installation.
The OrbixSSL configuration file assigns values to OrbixSSL configuration variables. To enable SSL security, ensure that the configuration file includes the following setting:
OrbixSSL {IT_DISABLE_SSL = "FALSE";
};
If the value OrbixSSL.IT_DISABLE_SSL is set to TRUE, your system does not use SSL security.
Configuring All OrbixSSL ProgramsTwo OrbixSSL configuration variables allow a server to access its certificate:
• IT_CERTIFICATE_PATH specifies the directory in which the certificate file is stored in the file system.
• IT_CERTIFICATE_FILE specifies the name of the server’s certificate file. Usually, you specify that this file is stored relative to the IT_CERTIFICATE_PATH directory.
The OrbixSSL configuration file uses the standard Orbix configuration syntax. By default, the variable IT_CERTIFICATE_PATH is set to the location of the OrbixSSL certificates directory, in the configuration scope OrbixSSL, for example:
OrbixSSL {IT_CERTIFICATE_PATH =
"/opt/iona/OrbixSSL/certificates";};
Variables set in the OrbixSSL configuration scope apply to all OrbixSSL applications, although you can override the values later in the configuration file.
97

O rb i x Wond e rw a l l A dm in i s t r a t o r ’ s G u i d e
Configuring a Single Program
To set the value of IT_CERTIFICATE_FILE for the banking server, append the following text to the file orbixssl.cfg on the server host:
Finance {BankingSystem {
IT_CERTIFICATE_FILE =OrbixSSL.IT_CERTIFICATE_PATH +"demos/secure_bank_server";
};};
The configuration scope Finance.BankingSystem is a custom scope for use by the banking server. You can create any number of custom scopes for your applications in orbixssl.cfg.
“Initializing OrbixSSL Configuration” on page 101 describes how you associate a specific configuration scope with an OrbixSSL program. The program then uses the settings defined in that scope. If a variable is not defined in the program scope, the program reads the variable setting from the scope OrbixSSL.
Configuring OrbixNamesTo set the value of IT_CERTIFICATE_FILE for the OrbixNames server, append the following text to the file orbixssl.cfg on the server host:
OrbixNames {Server {
IT_SECURITY_POLICY = "SECURE";IT_CERTIFICATE_FILE =
OrbixSSL.IT_CERTIFICATE_PATH +"services/orbix_names";
};};
98

S S L E n a b l e d Wonde rwa l l : O p e r a t i o n a l D e t a i l s
Configuring the Orbix Daemon
To set the value of IT_CERTIFICATE_FILE for the Orbix daemon, append the following text to the file orbixssl.cfg on the server host:
Orbix {orbixd {
IT_CERTIFICATE_FILE =OrbixSSL.IT_CERTIFICATE_PATH +"services/orbix";
};};
Specifying which Certificates to Accept
Every certificate is signed by a CA. When a client receives a certificate from a server, the client checks that the certificate is signed by a trusted CA. If the client trusts the CA, it accepts the certificate and connects to the server, otherwise it rejects the certificate.
When running an OrbixSSL application, you must specify a list of CAs that the application should trust. To do this, you first concatenate the certificate files for each trusted CA into a single file. You then use the OrbixSSL configuration variable IT_CA_LIST_FILE to specify the name and location of this file.
The banking example uses the insecure OrbixSSL demonstration CA, demo_ca_1. The CA certificate list file, which initially contains only the demo_ca_1 certificate, is located in the OrbixSSL ca_listsdirectory.
To specify that components of the banking example should accept certificates signed by demo_ca_1, add the following text to orbixssl.cfg on both the client and server hosts:
OrbixSSL {IT_CA_LIST_FILE = "OrbixSSL directory/ca_lists/demo_ca_list_1";
};
Replace OrbixSSL directory with the actual location of your OrbixSSL installation.
99

O rb i x Wond e rw a l l A dm in i s t r a t o r ’ s G u i d e
Initializing OrbixSSLAn OrbixSSL program initializes OrbixSSL using the OrbixSSL API. To get access to the OrbixSSL API, include the file IT_SSL.h in your programs:
#include <IT_SSL.h>
The OrbixSSL API contains a single initialization function that your OrbixSSL programs can call. This function is IT_SSL::init() and is defined as follows:
class IT_SSL {public:
virtual int init();};
To call this function, use the globally available object OrbixSSL. For example, to initialize OrbixSSL in the banking client program, add the following code to the file client.cxx:
#include <IT_SSL.h>...
int main (int argc, char *argv[]) {try {
if (OrbixSSL.init() != IT_SSL_SUCCESS) {cout << "OrbixSSL initialization failed."
<< endl;return 1;
}...
}...
}
To initialize OrbixSSL in the banking server program, add the same code to the file server.cxx.
For OrbixSSL initialization to succeed, you must call the function IT_SSL::init() before your OrbixSSL program attempts to make any Orbix function calls. This includes calls to Orbix API functions that implicitly make remote calls, such as CORBA::ORB::impl_is_ready().
100

S S L E n a b l e d Wonde rwa l l : O p e r a t i o n a l D e t a i l s
Initializing OrbixSSL Configuration
As described in “Using the OrbixSSL Configuration File” on page 97, the example server uses the configuration scope Finance.BankingSystem. To specify that the server uses this scope, add the following code to server.cxx:
#include <IT_SSL.h>...
int main (int argc, char *argv[]) {try {
// Call IT_SSL::init()....
// Initialize configuration scope.if (OrbixSSL.initScope("Finance.BankingSystem") != IT_SSL_SUCCESS)
return 1;}...
}
The OrbixSSL function IT_SSL::initScope() associates a custom scope in the OrbixSSL configuration file with you program.
Making Private Keys Available to Servers
By default, OrbixSSL expects the private key associated with a certificate to be appended to the certificate file. OrbixSSL expects the private key to be stored in encrypted Privacy Enhanced Mail (PEM) format; for example, all the OrbixSSL demonstration certificates have appended private keys in this format.
When a private key is encrypted in this way, you can access it only using a corresponding pass phrase. Specifying this private key pass phrase is a very important part of making a private key available to a server program.
Making a Private Key Available to a Server Program
The banking server uses the certificate file secure_bank_server in the OrbixSSL certificates/demos directory. This file has the associated private key appended, as expected by OrbixSSL.
101

O rb i x Wond e rw a l l A dm in i s t r a t o r ’ s G u i d e
When you run the server, it must supply its private key pass phrase to OrbixSSL. This allows OrbixSSL to read the private key and the server to encrypt data with this key, which is a critical part of SSL authentication.
The OrbixSSL API includes a single function that allows you to specify the pass phrase for your server. In the C++ API, this function is defined as:
class IT_SSL {public:
virtual intsetPrivateKeyPassword (char* password);
...};
In the banking example, you can complete the server application by calling this function. To do this, add this function call to the server file server.cxx as follows:
#include <IT_SSL.h>...
int main (int argc, char *argv[]) {try {
if (OrbixSSL.init() != IT_SSL_SUCCESS) {cout << "OrbixSSL initialization failed."
<< endl;return 1;
}if (OrbixSSL.setPrivateKeyPassword
("demopassword") != IT_SSL_SUCCESS) {cout << "Private key pass phrase error."
<< endl;return 1;
}}...
}
In this example, the pass phrase is hard coded in the server program. In fact, this is insecure and useful only for demonstration purposes. In a deployed system, you must provide a secure mechanism for retrieving the server pass phrase. There are two fundamental approaches to this problem in OrbixSSL: an administrative approach, described in the Managing Pass Phrases chapter of the
102

S S L E n a b l e d Wonde rwa l l : O p e r a t i o n a l D e t a i l s
OrbixSSL C++ Programmer’s and Administrator’s Guide and a programmatic approach, described in the Programming with OrbixSSL chapter of the OrbixSSL C++ Programmer’s and Administrator’s Guide.
Making a Private Key Available to OrbixNames
Unlike an OrbixSSL server program, OrbixNames requires that the private key associated with a certificate is available in a separate file. The private key can also be appended to the certificate file, but OrbixNames ignores this appended key.
The OrbixNames demonstration certificate is associated with the private key file orbix_names.jpk in the OrbixSSL certificates/services directory. To specify this, add the following text to the OrbixSSL configuration file:
OrbixNames {Server {
IT_PRIVATEKEY_FILE =OrbixSSL.IT_CERTIFICATE_PATH +"services/orbix_names.jpk";
};};
This text assumes that you have already assigned the value of IT_CERTIFICATE_PATH in the OrbixSSL scope.
When you run the OrbixNames server, it requests that you input the pass phrase for its private key. Using the demonstration certificate, the pass phrase is demopassword.
Making a Private Key Available to the Orbix Daemon
As described in “Configuring the Orbix Daemon” on page 99, you can use the OrbixSSL configuration file to specify which certificate the Orbix daemon uses. When you run the Orbix daemon, it automatically uses the private key pass phrase associated with the demonstration certificate orbix. This pass phrase, demopassword, is established when you install OrbixSSL.
If you configure the daemon to use a different certificate, you must update the daemon executable with the pass phrase for the corresponding private key. To run the example described in this chapter, it is not necessary to do this.
103

O rb i x Wond e rw a l l A dm in i s t r a t o r ’ s G u i d e
To update the daemon, use the OrbixSSL update command. For example, on UNIX use the following command:
update orbixd "passphrase" 0
On Windows, use the following command:
update orbixd.exe "passphrase" 0
104

S S L E n a b l e d Wonde rwa l l : O p e r a t i o n a l D e t a i l s
Deploying an SSL-enabled Application in a Wonderwall Configuration
This section outlines the basic configuration changes required for an SSL-enabled application in a Wonderwall environment. A number of configurations are possible when Wonderwall is introduced into your application environment, which fall into two broad categories; fully secure and semi secure.
The fully secure scenario as shown in Figure 6.4, has all the components of the application communicating using SSL. That is to say, there is end to end security between the client and the target servers. For semi-secure configuration, there is end to end security between the client and Wonderwall, while the application servers behind the firewall run insecurely.
Figure 6.4: A Fully Secure Banking Application
Figure 6.4 details the certificate exchanges and authentication among the various components for a Wonderwall enabled scenario. The following exchanges and authentication takes place:
105

O rb i x Wond e rw a l l A dm in i s t r a t o r ’ s G u i d e
1. The Orbix daemon authenticates itself with the bank server.
2. The OrbixNames server authenticates itself with the bank server.
3. The Orbix daemon authenticates itself with Wonderwall.
4. The bank server authenticates itself with Wonderwall.
5. The OrbixNames server authenticates itself with Wonderwall.
6. Wonderwall authenticates itself with the bank client.
In a semi secure scenario, a number of additional possibilities exist. For example, all the servers behind the firewall run insecurely or only some of them run insecurely. The main difference with a Wonderwall deployment, is that, from the client perspective, it is authenticating Wonderwall during its connection establishment and Wonderwall must provide a certificate. Additionally, any object references that the client uses are proxified. Therefore, the client does not interact directly with any of the servers in this scenario but rather with Wonderwall, who then forwards the interaction to the relevant server as appropriate. This is because Wonderwall is an iiopproxy and acts as an intermediary between the client and any of the servers the client wishes to invoke.
The impact of this is most noticeable when using the naming service. The client side Orbix must be configured appropriately to pick up a proxified version of the naming service’s root context. When the client obtains the root context or initial naming context of the naming service, for example, by means of a resolve_initial_reference() call, the IOR retrieve is a proxified IOR. See Chapter 5, “Scenario 1- Deploying OrbixNames Servers” on page 65 for more details.
As an initial example, consider a ‘semi-secure’ scenario. In this instance, secure communications occur between the client and the Wonderwall, while insecure communications take place beyond the firewall. This is shown in Figure 6.x.
When Wonderwall is involved in any security scenario, all IIOP traffic passes through it. Wonderwall filters the IIOP requests and applies the security policy defined by the access control rules. Thus in the bank example, none of the servers inside the firewall are directly accessible by the client. Therefore, the client communicates directly with Wonderwall only. In order for the client to make successful contact with these servers, a relevant object specifier should be present in Wonderwall’s configuration file. This makes the relevant set of target objects known to Wonderwall, for which access is controlled.
106

S S L E n a b l e d Wonde rwa l l : O p e r a t i o n a l D e t a i l s
Figures 6.5 shows how Wonderwall intervenes in the interaction between the client and target servers.
Figure 6.5: A Partially Secure Configuration
The client obtains a reference for the root context in the name service, it resolves this to obtain a reference for the bankserver object and it interacts with this object to create an account.
These series of interactions are:
1. The resolve_initial_reference() call is on the ORB and this returns a proxified IOR for the root context which has been configured into the ORB.
2. The invocation of ‘resolve’ on this NamingContext object initiates a flurry of SSL activity, in which the client authenticates Wonderwall.
107

O rb i x Wond e rw a l l A dm in i s t r a t o r ’ s G u i d e
3. Wonderwall supplies its certificate and public key, and an SSL connection is established over which IIOP traffic flows. Wonderwall receives an IIOP request message containing the ‘resolve’ call. Wonderwall looks up its IOR table, searching for the root context IOR. It finds it and applies the access control rules.
4. The resolve request is further processed by Wonderwall contacting the daemon and obtaining a redirect to the name service.
5. Wonderwall sends the resolve to the Name Server and gets back the IOR for the name binding. This IOR is proxified.
6. Wonderwall returns the response with the proxified IOR to the client.
In this scenario, the main difference between this and the non-Wonderwall scenario, is that SSL pertains only to the client to Wonderwall connection and it is Wonderwall that the client authenticates. For a more secure mode of operation, it is most likely that Wonderwall should authenticate the client also. This is done by setting ssl_authenticate_client to on.
All other communication behind the firewall takes place insecurely.
Refer to the chapter on “Managing Certificates” in the OrbixSSL Programmer’s and Administrator’s Guide for further details on certificate administration.
Daemon Configuration on Server Side
As the servers inside the firewall are running in secure or in non-SSL mode, it is necessary to set the Orbix daemon security policy to ‘semi-secure’ in the OrbixSSL.cfg file. Additionally, it is necessary to obtain an IOR for the bank server and make this available to Wonderwall in the configuration file using an object specifier rule, using the IOR, or bind syntax for an object specifier. If it is necessary to configure the servers in secure mode, additional settings are required in the SSL configuration file. For information on configuring the server, see “Using the OrbixSSL Configuration File” on page 97.
Client Configuration
The client should be configured and initialized as required by OrbixSSL, see “Using the OrbixSSL Configuration File” on page 97 for more information. Note that the Name Service IOR is a proxified IOR. The name service is executing
108

S S L E n a b l e d Wonde rwa l l : O p e r a t i o n a l D e t a i l s
from behind the firewall. The client’s ORB needs to be configured with an IOR for the naming service in order to satisfy a resolve_initial_reference(“NameService”).
The exposure of the real IOR for the name service is not possible in a firewall scenario. Thus, the IOR of the name service must be proxified before it can be configured into the client side ORB. Thus, obtain the name service IOR as usual with the following command:
ns -I nsior.ref
Then proxify this IOR with the command:
iortool -ior -proxify - sslport <ww-ssl-port>-host <wonderwall-host> -port <wonderwall-host> nsior.ref nsior-proxified.ref
Executing the following command, verifies that the proxification has occurred.
iortool -long nsior-proxified.ref
The client’s ORB is configured to pick up this IOR by means of an entry in the common.cfg file.
common {......services {
NameService=”IOR:.......”;};
};
The IOR in this instance is that which is obtained by the proxification process.
Wonderwall Configuration
port 16000
http-port 0
http-files <path-to-wwall-ior-file>
proxy-ior-file F:\Iona\Wonderwall\bin\sslGrid\wwall.ior
domain foo.bar.com
log requests replies
109

O rb i x Wond e rw a l l A dm in i s t r a t o r ’ s G u i d e
log-to-syslog no
allow-unlisted-objects on
# orbix daemon port
orbixd-iiop-port 1670
# 10 minutes, takes a LONG time for an SSL server to start
server-open-timeout 600
ssl-library F:\Iona\Wonderwall\bin\iiopproxy301_ssl.dll
ssl-port 17000
# https-port 16005
ssl-ca-file F:\Iona\Wonderwall\bin\bank-server\demo_ca_1
ssl-cert-file F:\Iona\Wonderwall\bin\bank-server\wonderwall
ssl-key-file F:\Iona\Wonderwall\bin\bank-server\wonderwall.pk
# name service configuration
ssl-authenticate-clients yes
ssl-authenticate-servers no
ssl-invocation-policy secure-accept secure-connectinsecure-connect insecure-accept
# ssl-session-caching client server
object orbixd bind (":IT_daemon", "bank-server-host")interface IT_daemon
allow object orbixd
110

S S L E n a b l e d Wonde rwa l l : O p e r a t i o n a l D e t a i l s
##
## Rule for SSLbankserver
##
server bank-object
<path-to-bank-server-ior>
# allow object test1
allow object bank-object op _IT_PING
# allow object bank-object op _start_server
allow object bank-object op _get_height
allow object bank-object op _get_width
allow object bank-object op get
allow object bank-object op set
server NS <path-to ns-ior> ns-ior.ref
allow NS resolve proxify
deny
Edit the iiopproxy.cf file as follows:
• Set ssl-port to an un-used port.
• Set ssl-library parameter to the correct libiiopproxy_301 library file.
• Set ssl-cert-file to a correct X.509 certificate file.
• Set ssl-key-file to a correct PEM file.
• Set ssl-ca-file to a correct (trusted) Certificate Authority file that is also used by the Server.
• Set ssl-ca-directory to the location where the Certificate Authority file resides.
• Set ssl-authenticate-clients to on.
• Set ssl-invocation-policy to secure-accept insecure-accept
secure-connect insecure-connectthat allows connections of all types.
111

O rb i x Wond e rw a l l A dm in i s t r a t o r ’ s G u i d e
• Run wwupdate using the correct password and library location.
112

S S L E n a b l e d Wonde rwa l l : O p e r a t i o n a l D e t a i l s
Wonderwall, Applets and SSLEnterprise distributed applications, when they are deployed over the Internet or over a corporate intranet invariably have applet components in then. These mobile pieces of code can add increased dynamics to web based transactions. Thus, when integrated with CORBA they can increase the richness of the service access available to the web application.
Applets, however, when executed in a browser, do so in a constrained or restricted environment. These restrictions are an integral part of a Java environment security model, as supported by the language and the security manager (of the browser). Some of these restrictions are mitigated with the evolution of the Java security model. Nonetheless, they are still very relevant for a wide range of present day deployment scenarios.
Therefore, for the context of these presentations, where a CORBA enabled applet is deployed in an enterprise setting, Wonderwall together with Orbix Java's intergrated Wonderwall support, provide a set of facilities for reducing the applet's execution environment restrictions. This opens up a range of possibilities for such web based distributed applications, yet it does not compromise the security of the client or target server installations.
The main restrictions that a downloaded applet is subjected to are:
• No access to the local file system.
• No ability to launch programs.
• Not permitted to read or update system properties.
• Cannot instantiate certain classes, for example, ClassLoader, SecurityManager, SocketImplFactory.
• Can only open connection to the serving host.
• Cannot accept incoming connections or act as a server.
Some of these restrictions can be diluted when an applet is signed. Nonetheless, even when some or all these restriction are removed, most notably those relating to network communications, an enterprise still needs to protect its assets through the deployment of various security mechanisms. In the case of Internet deployment, the use of firewalls is most prevalent.
113

O rb i x Wond e rw a l l A dm in i s t r a t o r ’ s G u i d e
Wonderwall and Orbix Java with their integrated support for HTTP tunnelling provide a mechanism for navigating firewalls and opening up the range of CORBA services available to CORBA-enabled applets. The security of a Wonderwall deployment can be increased further with the use of SSL at the Wonderwall end and the OrbixSSL enabling of the client. This ensures confidentiality and integrity of network communications.
In a general scenario with an Orbix Java-enabled applet, it initializes the ORB and the OrbixSSL runtime during its initialization. In order for the applet to do meaningful work it needs to obtain object references for target objects with which it wishes to interact. This can be done using the OrbixNames naming service, or the Orbix bind mechanism or via some other mechanism.
The Wonderwall configuration file for this SSL-enabled applet is very similar to that used for SSL application deployment. In this instance, HTTP services are disabled. IIOP and IIOP/SSL traffic occur on port 16000 and 17000 respectively. allow-unlisted-object is switched on to facilitate dynamic update of the IOR table for a client connection. Wonderwall's SSL module is enabled by setting the configuration item ssl-library.
This selection initiates Wonderwall attempt to load the DLL or the shared object of Wonderwall’s SSL module. The locations of the certification authority's certificate file, Wonderwall's certificate file and key file are also specified. Clients are authenticated in this configuration, while servers behind the firewall are not; they run insecurely and are trusted. The object specifier rules and the access control rules are similar to the vanilla IIOP access rules. One point to note with this applet example, is that, HTTP tunnelling is not being used. In this scenario, the applet is downloaded and makes IIOP/SSL invocations through Wonderwall.
Note: It is desired to have secure communications between the client and Wonderwall. To achieve this in a tunnelled scenario, it would be necessary to tunnel over HTTPS. This is not a supported option in Orbix Java. Wonderwall, however, can serve html pages and Java applets over HTTPS.
114

S S L E n a b l e d Wonde rwa l l : O p e r a t i o n a l D e t a i l s
port 16000
http-port 0
http-files /
proxy-ior-file F:\Iona\Wonderwall\bin\sslGrid\wwall.ior
domain foo.bar.com
log requests replies
log-to-syslog no
allow-unlisted-objects on
# orbix daemon port
orbixd-iiop-port 1670
# 10 minutes, takes a LONG time for an SSL server to start
server-open-timeout 600
ssl-library F:\Iona\Wonderwall\bin\iiopproxy301_ssl.dll
ssl-port 17000
# https-port 16005
ssl-ca-file F:\Iona\Wonderwall\bin\sslGrid\demo_ca_1
ssl-cert-file F:\Iona\Wonderwall\bin\sslGrid\wonderwall
ssl-key-file F:\Iona\Wonderwall\bin\sslGrid\wonderwall.pk
ssl-authenticate-clientsyes
ssl-authenticate-serversno
ssl-invocation-policy secure-accept secure-connectinsecure-connect insecure-accept
# ssl-session-caching client server
115

O rb i x Wond e rw a l l A dm in i s t r a t o r ’ s G u i d e
object orbixd bind (":IT_daemon", "grid-demo-host")interface IT_daemon
allow object orbixd
##
## Rule for wwsslAppletGrid
##
server grid-objectF:\IONA\ORBIXSSL\demos\wwsslGridApplet\java\server.ior
# allow object test1
allow object grid-object op _IT_PING
# allow object grid-object op _start_server
allow object grid-object op _get_height
allow object grid-object op _get_width
allow object grid-object op get
allow object grid-object op set
deny
Client Configuration
From the client perspective, a number of programming and administrative actions need to be carried out. These preparatory steps include:
• SSL-enabling the applet and setting the appropriate Orbix Java properties to ensure successful interaction through Wonderwall.
• Building, packaging and signing the applet.
• Deploying the applet on the web server.
The applet needs to be configured with respect to Orbix Java to interact via the iiopproxy in Wonderwall. This can be achieved programmatically with setConfigItem and administratively via property settings in the OrbixJava.cfg files, as shown:
116
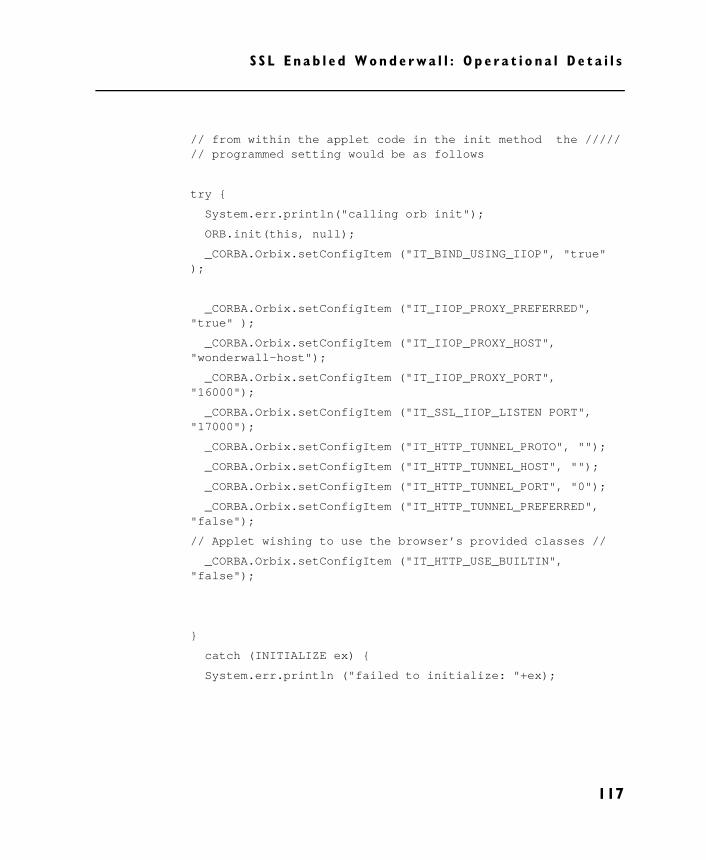
S S L E n a b l e d Wonde rwa l l : O p e r a t i o n a l D e t a i l s
// from within the applet code in the init method the /////// programmed setting would be as follows
try {
System.err.println("calling orb init");
ORB.init(this, null);
_CORBA.Orbix.setConfigItem ("IT_BIND_USING_IIOP", "true");
_CORBA.Orbix.setConfigItem ("IT_IIOP_PROXY_PREFERRED","true" );
_CORBA.Orbix.setConfigItem ("IT_IIOP_PROXY_HOST","wonderwall-host");
_CORBA.Orbix.setConfigItem ("IT_IIOP_PROXY_PORT","16000");
_CORBA.Orbix.setConfigItem ("IT_SSL_IIOP_LISTEN PORT","17000");
_CORBA.Orbix.setConfigItem ("IT_HTTP_TUNNEL_PROTO", "");
_CORBA.Orbix.setConfigItem ("IT_HTTP_TUNNEL_HOST", "");
_CORBA.Orbix.setConfigItem ("IT_HTTP_TUNNEL_PORT", "0");
_CORBA.Orbix.setConfigItem ("IT_HTTP_TUNNEL_PREFERRED","false");
// Applet wishing to use the browser’s provided classes //
_CORBA.Orbix.setConfigItem ("IT_HTTP_USE_BUILTIN","false");
}
catch (INITIALIZE ex) {
System.err.println ("failed to initialize: "+ex);
117

O rb i x Wond e rw a l l A dm in i s t r a t o r ’ s G u i d e
Administratively the Orbix Java configuration file Orbix Java.cfg that is downloaded has the following settings:
#Orbix Java.cfg setting for WonderWall interactions
IT_HTTP_TUNNEL_PORT="0";
IT_HTTP_TUNNEL_HOST="";
IT_HTTP_TUNNEL_PREFERRED="false";
IT_HTTP_TUNNEL_PROTO="";
IT_IIOP_PROXY_HOST="wonderwall-host";
IT_IIOP_PROXY_PORT="16000";
IT_IIOP_PROXY_PREFERRED="true";
#Security
IT_SSL_IIOP_LISTEN_PORT="17000";
The variable IT_SSL_IIOP_LISTEN_PORT should be set to “0" in the Orbix Java3.cfg file, that is, in the <IONA_ROOT>\configs directory at the client site (not the downloaded Orbix Java.cfg), so that it is a different file that is loaded in the web server classes directory.
Edit iona.cfg file in the web_documents\classes directory. Change cfg_dir value to ".\". This allows the web client to import the configuration files. Do not include the orbixnames3.cfg in this file.
The web server needs to be set up for the applets deployment. It is possible to use the HTTP server facilities of Wonderwall to serve up the applet.
For applet deployment, do the following:
1. Create a classes directory in the web documents directory.
2. Place Applet.html, X509.cacert in the web documents directory.
3. Place the following files in the classes directory:
i. Classes.jar
ii.demo_ca_1.der
iii.demo_privkey.de
118

S S L E n a b l e d Wonde rwa l l : O p e r a t i o n a l D e t a i l s
iv.demo_server_1.der
v. iona.cfg
vi. orbixssl.cfg
vii.ErrorMsgs
viii.ErrorMsgs.java
ix.Common.cfg
x. Orbix3.cfg
xi.Orbixnames3.cfg
xii.Orbix Java3.cfg
Ensure that the web server is able to export x509.cacert type of certificates as MIME Type.
Signing the AppletThere are a number of ways to sign the applet, and these depend mainly on the browser being used. This section provides two examples of signing applet code using:
1. Netscape's signing tools.
2. Microsoft's JDK signing utilities.
Signing an Applet Using Netscape’s Signing Tools
The general outline of this procedure is as follows:
1. Create a CA (Certificate Authority) for use within Netscape's browser and sign an applet with it using Netscape's signing tools.
2. Import the generated CA certificate into a browser from a web server.
Pre-requisites for this task are:
1. Download Netscape's signing tool (signtool.exe) from
http://developer.netscape.com/software/signedobj/jarpack.html
2. Ensure the signtool.exe is on your PATH.
119

O rb i x Wond e rw a l l A dm in i s t r a t o r ’ s G u i d e
3. We recommend that you use Netscape 4.05 (or later). Also, from the "Communicator" menu, open your browser's Java Console to check that the Java version is 1.1.4 (or later).
Communicator can be updated by following Netscape's "smart update procedure" at
http://www.netscape.com/downloadsu1.html.
Creating a Browser CA and Signed Applet1. Copy the following directory into ./classes, while maintaining the
directory structure:
[Main Orbix Javadirectory]\classes\wwsslGridAppletDemo
2. Unzip the following jar files to the ./classes directory
[OTM root directory]\lib\Orbix Java.jar
[OTM root directory]\lib\orbixssl.jar
..\MSSecurity.jar (contained in the parent directory) in the order given. The unzip application may request whether it should overwrite files or not . You should allow it to overwrite the files generated by unzipping Orbix Java.jar by the respective overlapping files generated by unzipping OrbixSSL.jar.
You should now find the following directories under the ./classes directory:
com
IE
javax
org
wwsslGridAppletDemo
uk
Netscape
3. Set an arbitrary password on your Netscape database. This ensures security to the Netscape database and is set as follows:
120

S S L E n a b l e d Wonde rwa l l : O p e r a t i o n a l D e t a i l s
From the "Communicator" menu, choose "Security info", then "Passwords" and finally "Change Password", to launch the dialog to set your password.
4. In a console and from the current directory, generate test keys and a signing certificate (CA) with the following command:
signtool -G <Name of Certificate Authority> -d<Netscape user Dir>
For example, on Win32:
signtool -G "IONA Test Certificate" -d "C:\ProgramFiles\Netscape\Users\<user_name>"
For example, on UNIX:
signtool -G "IONA TestCertificate" -d "/home/<user_name>/.netscape"
Signtool requests the following pieces of information (sample answers are shown here):
Certificate common name: IONA Test Certificate
Organization: Iona Technologies
Organization Unit: Engineering Project
State/Province: Dublin
Country: IE
Username: Acme
Email address: [email protected]
This step produces a file in c:\appsign named x509.cacert; this is the certificate that the browser imports.
5. Shutdown your web-browsers before proceeding with this step. You now sign the jar with the CA, by running the following from the console. (As before, you'll need to change the argument to -d.)
For example, on Win32:
signtool -d "C:\ProgramFiles\Netscape\Users\<user_name>" -k
"IONA Test Certificate" -Z classes.jar .\classes
121

O rb i x Wond e rw a l l A dm in i s t r a t o r ’ s G u i d e
For example, on UNIX:
signtool -d "/home/<user_name>/.netscape/" -k
"IONATestCertificate" -Z classes.jar ./classes
6. Running the following commands checks the validity of the newly created classes.jar file. (Again, edit the argument to -d)
signtool -d "C:\ProgramFiles\Netscape\Users\<user_name>" -w classes.jar
signtool -d "C:\ProgramFiles\Netscape\Users\<user_name>" -v classes.jar
You now have a CA that can be used within a browser (x509.cert) and an applet that is signed by the CA ./classes/classes.jar.
Instructions for importing a CA into the Browser
Netscape Communicator needs to import the test CA certificate x509.cacert from the web server and add it as a CA that it trusts.
Once the browser has accepted a certificate, it trusts applets signed by the CA concerned (such as our signed applet) and grants them privileges they request on your computer. The following steps are required :
1. Ensure your web server can export the CA file extension as type MIME. For some web servers this is automatic. For apache ( 1.3b7 tested) the file :
<Apache_root>\Apache\conf\mime.types
must contain the line application/x-x509-ca-cert cacert.
For other web-server software, you or your webmaster may have to associate this MIME-type with the file extension .cacert.
2. The applet (applet.html) shipped has been formatted to import the certificate when you click on the link "Click here to import the certificate". However, you must also configure Netscape to invoke the import certificate wizard when x509.cert extension is clicked on.
To do this make sure that Navigator has a MIME type of
application/x-x509-ca-cert (in Preferences, in the Navigator/Applications panel). If it does not, create one with this information, for example, for Windows:
Description of type: Internet Security Certificate
122

S S L E n a b l e d Wonde rwa l l : O p e r a t i o n a l D e t a i l s
File extension: CER CRT DER CACERT
MIME type: application/x-x509-ca-cert
Application to use: C:\WINNT\system32\rundll32.exec:\winnt\system32\inetcpl.cpl,SiteCert_RunFromCmdLine %1
3. When you click on the link specified in applet.html, you see the import wizard, which guides you through the steps for accepting the CA as one of your trusted CAs in your browser. Accept the certificate and verify that it exists as one of your signers via the security icon on your navigator menu bar.
Note: Whenever you need to reload your applet into the browser, you should ensure that it loaded via the web server and not the cache in the browser. Delete history (edit->preferences) and cache (edit->preferences->advanced->cache) and restart your browser. This is the safest option.
Signing an Applet Using Microsoft’s Signing Utilities
Prerequisite software tools and actions for this signing task include:
Microsoft's SDK-Java product includes a set of signing utilities.
SDK-Java can be downloaded from:
http://www.microsoft.com/java/download.htm.
Once installed, the signing utilities can be found in the following directory:
[Main SDK-Java directory]\Bin\PackSign
Make sure that the directory containing these files is in your PATH.
To sign the applet, do the following:
1. Copy the following directory into ./classes, while maintaining the directory structure:
[Main Orbix Javadirectory]\classes\sslGridAppletDemo
2. Unzip the following jar files into the ./classes directory
123

O rb i x Wond e rw a l l A dm in i s t r a t o r ’ s G u i d e
[Main Orbix directory]\lib\Orbix Java.jar
[Main Orbix directory]\lib\orbixssl.jar ..\MSsecurity.jar ( contained in the parent directory) in the order given.
The following directories can now be found under the ./classes directory:
com
IE
javax
org
sslGridAppletDemo
uk
3. On a DOS console, with the necessary additions made to PATH, change directory to signingMS. Open cabdir.bat in a text-editor and set the values for the CERT_FILE and KEY_FILE variables to point to Cert.spc and Mykey.pvk respectively. Run cabdir.bat from the command-line as follows:
cabdir classes sslapplet
The general syntax for running cabdir.bat is:
cabdir [directory] [applet_name]
4. Place the following files on your web-server, at the location where you normally store HTML files for your website.
applet.html
classes\
classes\classes.cab
classes\demo_ca_1.der
classes\demo_privkey.der
classes\demo_server_1.der
Applet.html can be found in the parent directory. Only the classes.jar file needs to be copied to the webserver.
Your Microsoft browser when loading the applet from the webserver picks up automatically the newly signed jar file.
124

S S L E n a b l e d Wonde rwa l l : O p e r a t i o n a l D e t a i l s
SSL Enabled Applet Code Example
Within the applet code itself, it is necessary to perform a number of operations, as alluded to previously. The init method of the applet might be programmed as follows, in the case where the Orbix Java Wonderwall properties are set in the Orbix Java.cfg file:
public void init (){
PolicyEngine.assertPermission (PermissionID.SYSTEM );
try{
1 ORB.init(this, null);}catch (INITIALIZE ex){
System.err.println ("failed to initialize:"+ex);
}try{
2 downloadCertData();}
catch ( Exception ex ){
System.err.println ( "Exceptiondownloading cert data" );
System.err.println ( "Do you have thecertificates available on" );
System.err.println ( "the web server?");
System.err.println ( ex );ex.printStackTrace();return;
}
3 if ( initSSL() == false ){
System.err.println ( "Failed toinitialise SSL" );
return;}
125

O rb i x Wond e rw a l l A dm in i s t r a t o r ’ s G u i d e
4 gridEvents = new GridEvents ();this.add (gridEvents);
PolicyEngine.revertPermission (PermissionID.SYSTEM );
}
1. The applet initialises the ORB.
2. Downloads the SSL certificate information.
3. Initialises the OrbixSSL runtime.
4. Processes end user interactions and invokes the target servers. An additional consideration with this interaction, is that, if the applet is only ever going to communicate via Wonderwall, then the download of the SSL certificate information is not necessary.
Initialising the OrbixSSL runtime, performs the following operations:
private boolean initSSL(){
if ( caCertData == null || certData == null|| keyData == null )
return false;1 IT_SSL ssl = IT_SSL.init();
try{
2 IT_X509Cert caCert = new IT_X509Cert ( caCertData );3 IT_X509Cert certChain[] = new IT_X509Cert[2];
certChain[0] = new IT_X509Cert ( certData);
certChain[1] = caCert;4 ssl.setApplicationCertChain ( certChain );5 ssl.setRSAPrivateKeyFromDer ( keyData );
6 ssl.addTrustedCert ( caCert );}catch ( Exception ex ){
System.err.println ( "Got exception duringSSL initialisation" );
ex.printStackTrace();
126

S S L E n a b l e d Wonde rwa l l : O p e r a t i o n a l D e t a i l s
return false;}return true;
}
1. Initialise OrbixSSL and obtain a reference to the ssl runtime object.
2. Allocate an X509 certificate object.
3. Create a certificate chain.
4. Initialise and store the applications certificate and the certification authority's certificate in the chain
5. Specify the applications private key.
6. Add a certificate to the list of Certification Authority certificates (certificates issued by the owner of one of the trusted certificate authority, and is acceptable to the application).
127

O rb i x Wond e rw a l l A dm in i s t r a t o r ’ s G u i d e
128

7The WonderwallConfiguration Tool
The Wonderwall Configuration Tool allows you to change the default security configuration settings for Wonderwall using a graphical user interface. The Configuration Tool edits the iiopproxy.cf file which stores the configuration settings for your Wonderwall installation. This chapter describes how to use the Wonderwall Configuration Tool.
Default security configuration settings may need to be changed for a variety or reasons, including:
• Enabling or disabling parts of Wonderwall functionality.
• Altering the use of specific port numbers.
The Wonderwall Configuration Tool can be used to make these configuration changes.
129

O rb i x Wond e rw a l l A dm in i s t r a t o r ’ s G u i d e
The iiopproxy.cf FileThe iiopproxy.cf file holds configuration information for Wonderwall. It is located in the Wonderwall installation directory. A default iiopproxy.cf file is created by the installation process. For further information on the iiopproxy.cf file, refer to “The Configuration File” on page 12.
Starting the Wonderwall Configuration ToolThere are two ways to start the Wonderwall GUI Configuration Tool.
• To start the GUI Configuration Tool from the command line, enter the following:wwconfig
• To start the GUI Configuration Tool from the Windows Start menu:
xiii.Select the Windows Programs menu
xiv.Select the Wonderwall sub-menu.
xv. Select the Edit Configuration File from the options displayed.
When the GUI Configuration Tool is invoked, it automatically loads its settings from the default location.
The GUI Configuration Tool startup window is shown in Figure 7.1 on page 131.
130

T h e Wonde rwa l l C on f i g u r a t i o n T o o l
GUI Configuration Tool Main Window
The GUI Configuration Tool main startup window consists of a number of tabs, each containing configuration information for different areas of Wonderwall functionality. To load a configuration file, select File<Symbol>ÆOpen Config File.
To access the options in a specific tab, select that tab. The Objects tab deals with all the objects which might be made available through Wonderwall. The Access Control tab deals with the access control list which either denies access or allows access to the target object. The Ports and Hostnames tab deals with the ports and hostnames on which Wonderwall listens and runs, respectively.
Figure 7.1: Orbix Wonderwall Configuration Tool
131

O rb i x Wond e rw a l l A dm in i s t r a t o r ’ s G u i d e
Object Specifier Window
The Objects window allows you to select or specify an object which can be made available through Wonderwall. To make an object available, select an object from the list of objects displayed or enter the Object Name and Object Type in the corresponding text fields.
After you select the object, select the Edit button. This allows you to load the object’s IOR using the Edit window (Figure 7.3 on page 133). Wonderwall supports four different forms of object-specifier—refer to “Object Specifiers” on page 14 for further information.
Figure 7.2: Orbix Wonderwall Object Specifier Window
132

T h e Wonde rwa l l C on f i g u r a t i o n T o o l
For further information on object specifiers, refer to “Representations of an IOR” on page 30 and “List of IORs” on page 170.
Figure 7.3: Loading IORs
133

O rb i x Wond e rw a l l A dm in i s t r a t o r ’ s G u i d e
Access Control List Window
The Access Control window lists all the access control list entries which ultimately control access to servers, objects and clients, in order of importance. To change the order of the allow and deny rules, select the Move Rule Up and Move Rule Down buttons.
From this window it is also possible to add a new rule, remove a rule from the list, and edit an existing rule. For example, Figure 7.5 on page 135 displays ACL rule number one which is as follows:
Allow IIOP message if the target object matches orbixd.
Figure 7.4: Orbix Wonderwall Access Control List Window
134

T h e Wonde rwa l l C on f i g u r a t i o n T o o l
Note that (unused) here means that the setting is not used to determine whether access is allowed or denied.
For further information on access control lists, refer to “Access Control” on page 15 and page 173.
Figure 7.5: The Orbix Wonderwall Edit Rule Window
135

O rb i x Wond e rw a l l A dm in i s t r a t o r ’ s G u i d e
Ports and Hostnames Window
The ports available to launched servers can be modified in the Ports and Hostnames window of the GUI Configuration Tool. It is generally only necessary to change default settings if there is a clash with ports used by an existing system, or if a directory needs to be specified to enable HTTP service.
Parameters set in this window must map directly to existing configuration parameters.
Ports must be specified—everything else is optional.
Figure 7.6: Orbix Wonderwall Ports and Hostnames Window
136

T h e Wonde rwa l l C on f i g u r a t i o n T o o l
SSL Window
OrbixSSL allows Orbix applications to communicate using Secure Sockets Layer (SSL) security. These applications use SSL as a protocol layer below IIOP. Orbix Wonderwall allows you to filter SSL communications between external and internal applications. To configure SSL filtering, use the SSL window.
For a description of the Wonderwall SSL configuration settings, refer to Appendix B, “Configuration”. For detailed information about how OrbixSSL programs use SSL security, refer to the OrbixSSL documentation.
Figure 7.7: The Orbix Wonderwall SSL Window
137

O rb i x Wond e rw a l l A dm in i s t r a t o r ’ s G u i d e
Logging and Timeouts Window
The Logging and Timeouts window allows you to customise all logging and timeouts for your system.
Figure 7.8: Orbix Wonderwall Logging and Timeouts Window
138
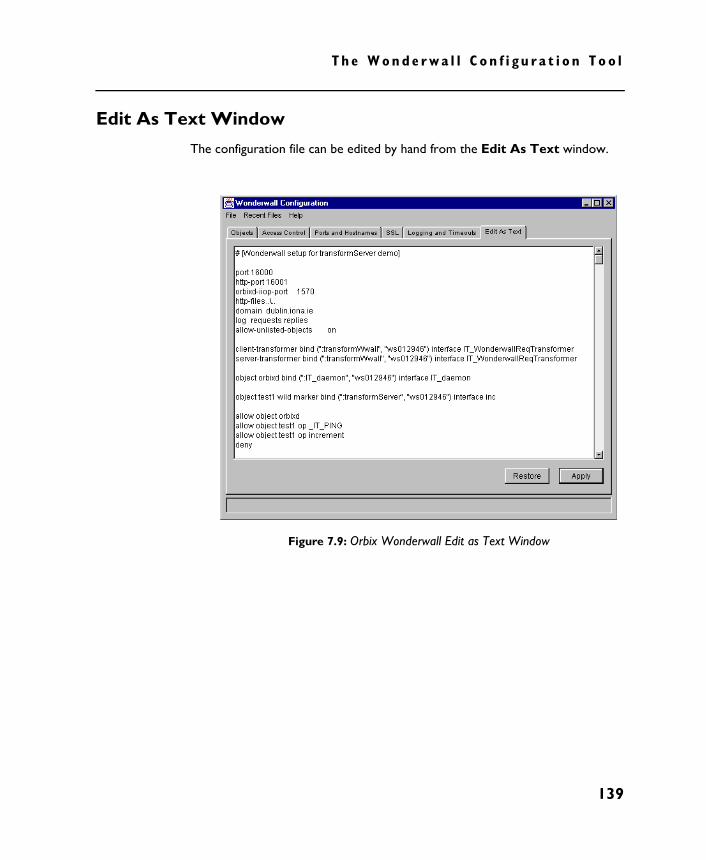
T h e Wonde rwa l l C on f i g u r a t i o n T o o l
Edit As Text Window
The configuration file can be edited by hand from the Edit As Text window.
Figure 7.9: Orbix Wonderwall Edit as Text Window
139

O rb i x Wond e rw a l l A dm in i s t r a t o r ’ s G u i d e
140

8The WonderwallLog Analysis Viewer
The Wonderwall Log Analysis Viewer allows you to view log files using a graphical user interface. This chapter describes how to use the Log Analysis Viewer and provides descriptions of options available.
The Wonderwall iiopproxy ServerThe log from the Wonderwall server iiopproxy is sent by default to the standard error file descriptor, stderr. Using the iiopproxy process which implements Wonderwall, this output is typically redirected to a specified named log file with the -log logfile switch. For further information on iiopproxy, refer to Appendix A.
It is possible to specify exactly what goes into the log file by editing the configuration file, iiopproxy.cf. For further information, refer to “The Configuration File” on page 12.
141

O rb i x Wond e rw a l l A dm in i s t r a t o r ’ s G u i d e
Starting the Wonderwall Log Analysis ViewerThere are two ways to start the Wonderwall Log Analysis Viewer.
• To start the Wonderwall Log Analysis Viewer from the command line, enter the following command: wwlogviewer
• To start the Wonderwall Log Analysis Viewer from the Windows Start menu, do the following:
i. Select the Windows Programs menu.
ii. Select the Wonderwall sub-menu.
iii. Select View Wonderwall Log from the options displayed.
When the Log Analysis Viewer is invoked, it automatically loads its settings from the default location.
Log Analysis Viewer Main Window
The Log Analysis Viewer main startup window consists of a number of menus each containing information for different areas of log analysis—see Figure 8.1 on page 143.
Menu Description
File To load a log file, select File<Symbol>ÆOpen Log File. All sessions in the log file are loaded by default—see Figure 8.2 on page 144.
View To view a log file in segments, select View<Symbol>ÆShow Session— select a session, then select View Session. The name of the current session is displayed in the title bar.
Filters This menu allows you to open, save, and edit filter sets—see Figure 8.3 on page 145.
Timestamps This menu allows you to switch on/off the following options: timestamps, thread ID, process ID, and log message type—see Figure 8.4 on page 146.
Recent This menu displays the most recent logs opened.
142

Th e Wond e rw a l l L o g An a l y s i s V i ewe r
Figure 8.1: Wonderwall Log Analysis Viewer Startup Window
143

O rb i x Wond e rw a l l A dm in i s t r a t o r ’ s G u i d e
Figure 8.2: Loaded Log File
144

Th e Wond e rw a l l L o g An a l y s i s V i ewe r
Filters
All the filters defined are listed in the Edit Filter Set window. From this window, you can define how you want each filter to appear in the log file. For example, Figure 8.3 defines an IORs(stringified) filter containing a regular expression of the string pattern. IOR:\S+ is the regular expression of the string pattern to search for. If a line matches this filter, it highlights the words (that is, show the words in...) in the log file.
Figure 8.3: The Edit Filter Set Window
145

O rb i x Wond e rw a l l A dm in i s t r a t o r ’ s G u i d e
Timestamps
The following options may be switched on/off from the Timestamps menu:
Figure 8.4: Timestamps Options
Timestamps Selecting Timestamps On displays the date and time of the log. For example: [1998/03/27 12:40:49]
Microseconds Selecting Microseconds On displays microseconds. For example: [.000150]
Thread ID Selecting Thread ID On displays the thread ID number. For example: [thread 240]
Process ID Selecting Process ID On displays, for example: [pid 1972]
Log Message Type
Selecting Log Message Type On displays the Log message type. For example: [warning]
146

9Transformers
Several internal layers of Orbix separate a simple remote invocation—as seen by application level programming—from the final construction and transmission of a message via TCP/IP. In doing so, Orbix offers the user a chance to customise its behaviour by providing hooks at a number of levels. For example:
• When an Orbix operation is called on the client side, it can be intercepted straight away using a Smart Proxy to customise its behaviour.
• Orbix provides another hook in the form of Filter objects which can inspect (and modify) a Request object.
• Finally, after the full contents of a Request have been marshalled into a raw buffer, Orbix provides access to the buffer via a mechanism known as a Transformer.
Transformers are useful for a number of reasons. One of the main uses of a transformer is to allow encryption of the message prior to transmission via the TCP/IP protocol. This provides the user with an added level of security which is desirable in many situations. If your site has a policy of encrypting all messages prior to transmission, you will find that the support provided by Wonderwall for transformers allows you to insert a firewall with no disruption to the encryption process.
147
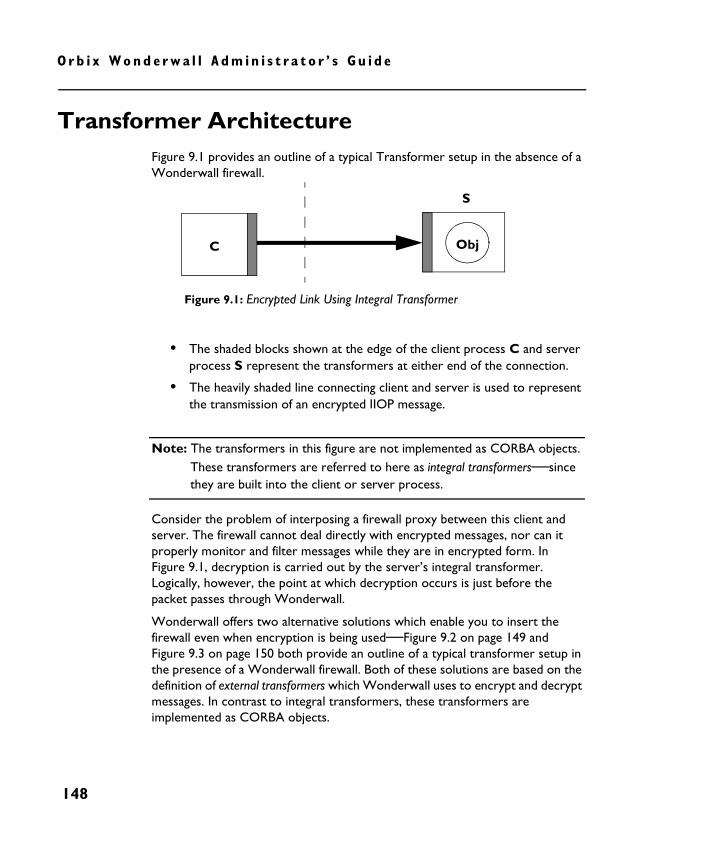
O rb i x Wond e rw a l l A dm in i s t r a t o r ’ s G u i d e
Transformer ArchitectureFigure 9.1 provides an outline of a typical Transformer setup in the absence of a Wonderwall firewall.
Figure 9.1: Encrypted Link Using Integral Transformer
• The shaded blocks shown at the edge of the client process C and server process S represent the transformers at either end of the connection.
• The heavily shaded line connecting client and server is used to represent the transmission of an encrypted IIOP message.
Note: The transformers in this figure are not implemented as CORBA objects. These transformers are referred to here as integral transformers—since they are built into the client or server process.
Consider the problem of interposing a firewall proxy between this client and server. The firewall cannot deal directly with encrypted messages, nor can it properly monitor and filter messages while they are in encrypted form. In Figure 9.1, decryption is carried out by the server’s integral transformer. Logically, however, the point at which decryption occurs is just before the packet passes through Wonderwall.
Wonderwall offers two alternative solutions which enable you to insert the firewall even when encryption is being used—Figure 9.2 on page 149 and Figure 9.3 on page 150 both provide an outline of a typical transformer setup in the presence of a Wonderwall firewall. Both of these solutions are based on the definition of external transformers which Wonderwall uses to encrypt and decrypt messages. In contrast to integral transformers, these transformers are implemented as CORBA objects.
C Obj
S
148

T r a n s f o rme r s
The first solution is shown schematically in Figure 9.2 where a single client transformer TC is implemented to handle encrypted messages arriving from remote clients. This model may be appropriate when the main perceived risk to security is the external network.
Figure 9.2: Encrypted Link Using Wonderwall
• When an encrypted Request message arrives from the client, Wonderwall first sends the message out to the external, client transformer TC.
• The transformer returns a decrypted message (indicated by a thin line) to Wonderwall. The Wonderwall proxy is then able to monitor and filter this Request message as normal and if allowed by the Access Control List, the Request is forwarded to the Server S.
• When the server responds to the client with a Reply message, the reverse procedure is followed.
The unencrypted message is sent from server to Wonderwall, which might log the message, then passed to the client transformer TC for encryption, then relayed by Wonderwall back to the client in encrypted form.
In this case, the messages which circulate on the internal network are left in unencrypted form. Wonderwall provides a single point of decryption and encryption for all messages entering and leaving the internal network.
TC
W Obj
S
C
149

O rb i x Wond e rw a l l A dm in i s t r a t o r ’ s G u i d e
Figure 9.3: Wonderwall Inserted Into Encrypted Link
In Figure 9.3, Wonderwall offers an alternative solution enabling you to insert the firewall even when encryption is being used. In this model, encypted messages are circulated on both the internal and external networks. The advantage of deploying Wonderwall in this way is that the firewall can be inserted where an encrypted link already exists. No disruption is caused and the server needs no modification. This requires the use of two external transformers: the first transformer is the client transformer TC which exchanges encrypted messages with the client, and the second transformer is the server transformer TS which exchanges encrypted messages with the server. Sandwiched between these two transformers is the monitoring and filtering portion of Wonderwall performing all its operations on unencrypted messages.
TC
Obj
S
W
TS
C
150

T r a n s f o rme r s
Using TransformersThe external transformers, which Wonderwall uses, are defined as CORBA objects. They are not built into the Wonderwall server process. You are free to implement these transformer objects (both client and server transformer) in whatever way you like. Wonderwall defines an IDL interface for the transformer objects which you must use when writing your implementation. Wonderwall can be configured so that it automatically calls your transformer objects as needed. This is explained in the following sections.
The Transformer IDL
The external transformers used by Wonderwall, both client TC and server TS, are instances of the CORBA interface IT_WonderwallReqTransformer. The IDL interface is illustrated as follows:
// IDL//// Wonderwall client/server Transformer interface:
typedef sequence<octet> iiopMessage;
interface IT_WonderwallReqTransformer {
exception TransformFailedException {string reason;iiopMessage message;
};
void transform (inout iiopMessage data,in string host,in boolean sending)
raises (TransformFailedException);
void transform_exception (inout iiopMessage data,in string host,in boolean sending)
raises (TransformFailedException);};
151

O rb i x Wond e rw a l l A dm in i s t r a t o r ’ s G u i d e
This interface features a single operation transform() which is called whenever Wonderwall needs a message to be transformed. The first argument iiopMessage is the message to be transformed. An iiopMessage is declared to be of type sequence<octet> which is the data type that CORBA typically uses for buffers of bytes. It is perfectly permissible to pass back a transformed buffer which is a different size to the one received from Wonderwall. The next argument is the host which sent the Request (or is about to receive the Reply). The argument sending is used to indicate whether encryption or decryption is required. When a message is sent out of Wonderwall, this flag is true, and encryption is required. When a message is sent inwards, this flag is false, and decryption is required.
There is a single exception TransformFailedException which can be raised by the transformer implementation to abort the message. The user can decide under what circumstances the exception is raised. In a client transformer, Wonderwall reacts to this exception by sending the message buffer included in the exception body back to the client. This way the integral transformer in the client application or applet can handle this message as an indication that the Wonderwall client transformer has failed.
Note: A TransformFailedException should not be thrown during the bind() or narrow() negotiation process, as the client ORB will not know how to handle the exception until communication with the server (via Wonderwall) is established.
If a server transformer throws a failure exception, a MessageError error message will be sent to the server.
The transform_exception operation is used to transform exceptions sent by Wonderwall to the client, if it becomes necessary for one to be raised during the course of operation. Exceptions from server to client are handled using the normal transform operation.
152

T r a n s f o rme r s
Implementing Transformers
The implementation of both client and server transformers is flexible. Apart from keeping to the rule that you should encrypt and decrypt messages when Wonderwall expects, you have complete freedom in implementing the transformers. The transformers can be implemented in any convenient language for which a CORBA mapping exists. They can be implemented in a standalone server, or built into some existing server on the internal network.
The following code sample outlines the skeleton of a client transformer:
// IDLpackage wwallXformerBoth;
import IE.Iona.Orbix Java.CORBA.* ;import java.util.Random;Import IE.Iona.Orbix Java.Features.IT.ReqTransformer;
public class TransformerImpl extends_IT_reqTransformerImplBase {
public boolean transform(iiopMessageHolder data, String host, boolean is_send)
{if (is_send) {
//// Implement an algorithm to encrypt ‘data’//...
}else {
//// Implement an algorithm to decrypt ‘data’//...
}return true ;
}
153

O rb i x Wond e rw a l l A dm in i s t r a t o r ’ s G u i d e
public boolean transform_exception(iiopMessageHolder data, String host, boolean is_send)
{if (is_send) {
//// Implement an algorithm to encrypt ‘data’//...
}else {
//// Implement an algorithm to decrypt ‘data’//...
}return true ;
}}
Note: The encryption algorithm is allowed to change the size of the sequence buffer and return a transformed sequence of a different length. If you wish to do this, you should reallocate the size of the sequence buffer before completing the transformation.
154
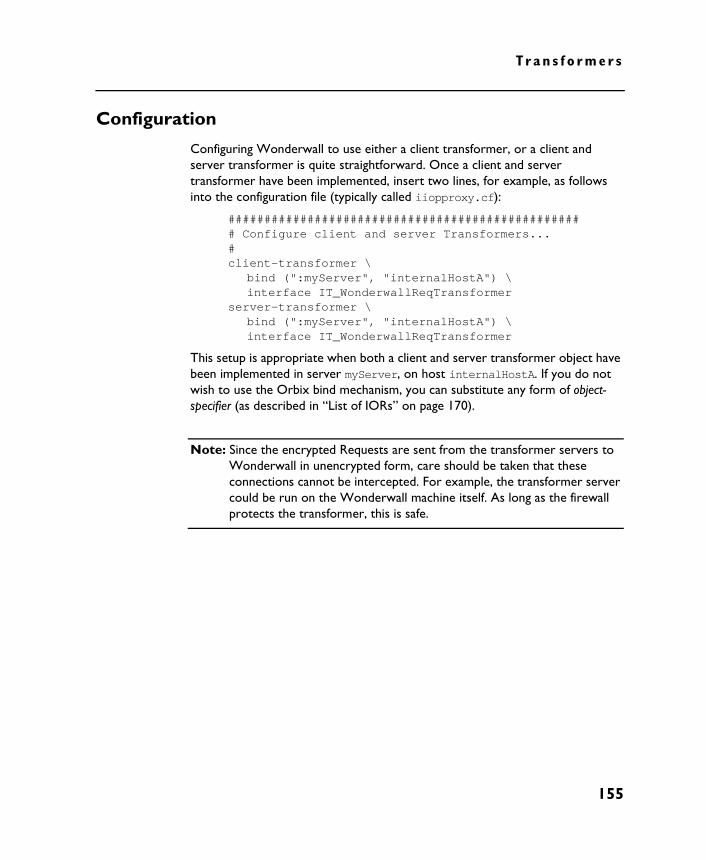
T r a n s f o rme r s
Configuration
Configuring Wonderwall to use either a client transformer, or a client and server transformer is quite straightforward. Once a client and server transformer have been implemented, insert two lines, for example, as follows into the configuration file (typically called iiopproxy.cf):
################################################## Configure client and server Transformers...#client-transformer \
bind (":myServer", "internalHostA") \interface IT_WonderwallReqTransformer
server-transformer \bind (":myServer", "internalHostA") \interface IT_WonderwallReqTransformer
This setup is appropriate when both a client and server transformer object have been implemented in server myServer, on host internalHostA. If you do not wish to use the Orbix bind mechanism, you can substitute any form of object-specifier (as described in “List of IORs” on page 170).
Note: Since the encrypted Requests are sent from the transformer servers to Wonderwall in unencrypted form, care should be taken that these connections cannot be intercepted. For example, the transformer server could be run on the Wonderwall machine itself. As long as the firewall protects the transformer, this is safe.
155

O rb i x Wond e rw a l l A dm in i s t r a t o r ’ s G u i d e
156

Appendix Aiiopproxy and iortool
Orbix Wonderwall is shipped with two binary files: iiopproxy and iortool. The iiopproxy file implements the firewall itself, while iortool is a useful utility for manipulating object references. Both of these commands each have a number of options as detailed in this appendix.
The iiopproxy ProcessThe command iiopproxy is usually run as a daemon process to monitor both the dedicated IIOP port and the HTTP port on the bastion host. It is the key component of the Wonderwall and combines the functionality of the IIOP gateway with a full HTTP server.
The iiopproxy is generally launched automatically using the inetd(8) on UNIX (for further information, refer to Appendix C) and remains permanently active, monitoring the designated ports, until it is explicitly killed.
Syntax of iiopproxy
The syntax of iiopproxy is as follows:
iiopproxy [options]
157

O rb i x Wond e rw a l l A dm in i s t r a t o r ’ s G u i d e
The options supported can consist of one or more of the following switches (these can be set using the GUI in the GUI version of Wonderwall):
-config file Specifies the pathname of the Wonderwall configuration file (refer to Appendix B on page 165). This should be an absolute pathname when iiopproxy is run as a daemon process.
-debug n The debug level can be set to three values: 0, 1 or 2. The value 0 means no diagnostics, 1 means minimal diagnostics, and 2 means high diagnostics. The default is 1.
-fork Causes the proxy to run in a forking mode, creating a subprocess for each new connection from a client. This was the default behaviour in Wonderwall 1.1—the default behaviour now is to use multiple threads in one process.
-fg This debugging option means do not fork when a new connection arrives. Its usefulness is limited unless you are debugging—and it may cause trouble. This option is only available on UNIX.
-help Give usage information on these command switches.
-httpport port Specifies the port to listen on for HTTP requests. This can also be specified in the Wonderwall configuration file—but the value specified by -httpport takes precedence.
-inetd Specifies that the iiopproxy is running from inetd(8) as a daemon process. This causes the inetd process to listen to the ports on behalf of Wonderwall. When this flag is not specified, Wonderwall listens on these ports itself. Wonderwall uses the current user ID as an identification when binding to servers. Hence the servers must be registered using putit, and chmodit'ed so that the user running Wonderwall has invoke and launch rights to the servers. This option is only available on UNIX.
-log logfile Sends the log output into the named file, rather than to stderr, the standard error file descriptor.
158

App en d i x A
Using iiopproxy
When testing Wonderwall, the iiopproxy can typically be run from the command line, as follows:
iiopproxy -debug 2 -config iiopproxy.cf -log iiop.log
where the configuration file is called iiopproxy.cf and the output is logged to the file iiop.log. When running iiopproxy from inetd(8), you would typically use a command line similar to the following on UNIX:
iiopproxy -inetd -config /etc/iiopproxy.cf
The inetd mode is only available on UNIX.
Wonderwall sends its output to the system log by default.
For recommendations on how to set up the iiopproxy to run as a daemon process from inetd(8), refer to Appendix C.
-port port Specifies the dedicated IIOP port for Wonderwall. This can also be specified in the Wonderwall configuration file—but the value specified by -port takes precedence.
-user username Runs as a specified user. If Wonderwall needs to use a privileged port (that is, one under 1024), this switch should be used because it is safer to run as a normal, unprivileged user once the port is acquired. Wonderwall uses the current user ID as an identification when binding to servers. See the -inetd switch. On Windows NT, this option only affects the user ID used to bind to servers.
-v Print version information for iiopproxy.
159
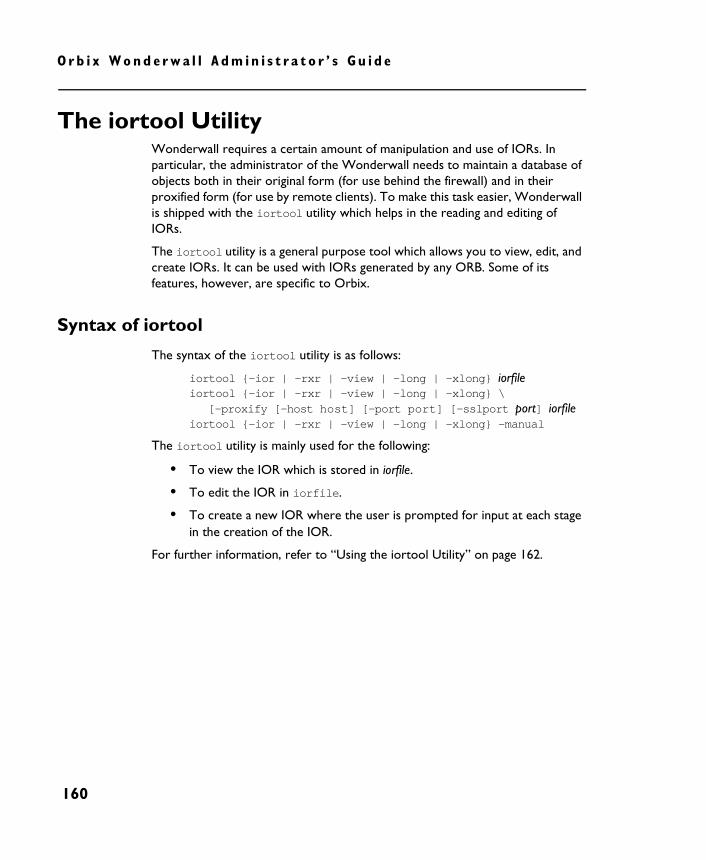
O rb i x Wond e rw a l l A dm in i s t r a t o r ’ s G u i d e
The iortool UtilityWonderwall requires a certain amount of manipulation and use of IORs. In particular, the administrator of the Wonderwall needs to maintain a database of objects both in their original form (for use behind the firewall) and in their proxified form (for use by remote clients). To make this task easier, Wonderwall is shipped with the iortool utility which helps in the reading and editing of IORs.
The iortool utility is a general purpose tool which allows you to view, edit, and create IORs. It can be used with IORs generated by any ORB. Some of its features, however, are specific to Orbix.
Syntax of iortool
The syntax of the iortool utility is as follows:
iortool {-ior | -rxr | -view | -long | -xlong} iorfileiortool {-ior | -rxr | -view | -long | -xlong} \
[-proxify [-host host] [-port port] [-sslport port] iorfileiortool {-ior | -rxr | -view | -long | -xlong} -manual
The iortool utility is mainly used for the following:
• To view the IOR which is stored in iorfile.
• To edit the IOR in iorfile.
• To create a new IOR where the user is prompted for input at each stage in the creation of the IOR.
For further information, refer to “Using the iortool Utility” on page 162.
160

App en d i x A
The options supported by the iortool utility are as follows:
-host host Used, in conjunction with the -proxifyoption, to specify the new proxy host which is embedded in the IOR. If this option is not specified, the host in the IOR is left unchanged.
-ior Specifies that the IOR should be printed in CORBA standard stringified format.
-long Specifies that the IOR should be printed in a long readable format.
-manual Used to create an IOR interactively. The iortool proceeds to create a new IOR and the user is prompted along the way to provide all of the information needed.
-port port Used, in conjunction with the -proxifyoption, to specify the new proxy port number which is embedded in the IOR. If this option is not specified, the port in the IOR is left unchanged.
-proxify Used to specify that the iortool is being used to edit the IOR in iorfile. This option is intended to be followed by either -h host or -p port, or both. It allows the user to easily create a proxified IOR from the given iorfile—by specifying both the proxy host (using -host host) and the proxy port (using -port port).
-rxr Specifies that the IOR should be printed in (Wonderwall specific) a readable hex representation RXR format.
-sslport port Used, in conjunction with the -proxifyoption, to specify the new Secure Sockets Layer (SSL) port number which is embedded in the IOR. This port number is used when communicating with the object using SSL.
-view Specifies that the IOR should be printed in a one-line readable format.
-xlong Specifies that the IOR should be printed in a very long readable format, with the object key and any unrecognised components dumped using the traditional hex dump format instead of RXR format.
161

O rb i x Wond e rw a l l A dm in i s t r a t o r ’ s G u i d e
Using the iortool Utility
One way of using the iortool utility is as a tool for translating IORs between different formats. There are five output formats which can be selected using one of the following flags: -ior, -rxr, -long,-xlong or -view.
For example, given an IOR stored in the gridiiop.ref file of the Wonderwall tmp directory, it can be printed out in the standard IIOP stringified format using the -ior flag as follows:
iortool -ior /tmp/gridiiop.refIOR:000000000000000d49444c3a677269643a312e300000000000000001000000000000004c0001000000000015756c7472612e6475626c696e2e696f6e612e696500000963000000283a5c756c7472612e6475626c696e2e696f6e612e69653a677269643a303a3a49523a67
The -rxr option writes out the IOR in readable hex format RXR (refer to “Representations of an IOR” on page 30 for full details of this format). The RXR format is specific to the Wonderwall. An example of RXR format is as follows:
iortool -rxr /tmp/gridiiop.refRXR:_______%0dIDL:grid:1.0_______%01_______L_%01_____%15ultra.dublin.iona.ie__%09c___(:%5cultra.dublin.iona.ie:grid:0::IR:grid_
The -view option writes the IOR in human readable format. This option can only be used to parse Orbix IORs. For example:
iortool -view /tmp/gridiiop.ref[IOR: type “IDL:grid:1.0”: [IIOP1.0host=ultra.dublin.iona.ie port=2403 \ [ObjectKey“RXR::%5cultra.dublin.iona.ie:grid:0::IR:grid_:”] ]]
Another way of using an IOR is to edit an existing IOR. This is done via the -proxify option (in addition to the output format specifier which is either -
ior, -rxr or -view) which is used in conjunction with the -host and -port options.
162

App en d i x A
For example:
iortool -x -h host.iona.com -p 1570 -i /tmp/gridiiop.refIOR:000000000000000d49444c3a677269643a312e3000000000000000010000000000000048000100000000001270726f7879686f73742e696f6e612e6965000622000000283a5c756c7472612e6475626c696e2e696f6e612e69653a677269643a303a3a49523a6772696400
The new IOR has the specified host and port number embedded in it. These become the host and port which the client attempts to connect to when it uses the new IOR.
Finally the -manual option can be used to create an IOR from scratch. For example, if you enter the following command:
iortool -manual -ior
you are prompted to enter each of the requisite fields of an IOR (as specified by the IIOP standard). The resulting IOR is written to the standard output as an IIOP stringified IOR, as specified by the -ior option.
Note: This is not the standard way of producing IORs. It is recommended that novice users avoid this option altogether.
163

O rb i x Wond e rw a l l A dm in i s t r a t o r ’ s G u i d e
164

165
Appendix BConfiguration
Each installation of Wonderwall includes a configuration file that allows you to specify how applications use Wonderwall security. At the heart of the Wonderwall configuration is its configuration file iiopproxy.cf which specifies the security policy for your system.
The first stage in setting up the Wonderwall firewall, is creating the Wonderwall configuration file iiopproxy.cf. This file is read by the firewall server iioproxy during startup. Subsequent changes made to iiopproxy.cf affects new clients—any existing client sessions are not affected by the changes.
The iiopproxy.cf file takes the format of a standard UNIX configuration file—it is read line-by-line, anything between a ‘#’ (number sign) and the end of a line is ignored as a comment, and entries can be continued onto the next line using the ‘\’ (backslash) character. The configuration entries are also case-sensitive. A sample configuration file can be found in “Example iiopproxy.cf File” on page 17.
It is convenient to divide the contents of the configuration file into four parts as follows:
• Basic Settings.
• List of IORs.
• Access Control List.
• SSL security.
This appendix provides a complete description of all configuration settings.

O rb i x Wond e rw a l l A dm in i s t r a t o r ’ s G u i d e
166
Basic Settingsactivated-port-range lo hi
The TCP/IP port range (inclusive) that an internal server can use. The default lower range is 1024, and the default upper bound is 65535. If you wish to tighten security, you can restrict the port range to whatever is used in the Orbix configuration files, for example, common.cfg files in the IT_DAEMON_SERVER_BASE parameter.
alias-hosts {hostname} [{hostname2}...]
This configuration parameter allows multiple aliases for Wonderwall’s hostname to be listed. If Wonderwall receives an invocation for an object on these hosts, or receives a HTTP message directed for one of these hosts, it recognises it as referring to itself. The default value is the real hostname (and any aliases it may have in DNS).
allow-binary-principals boolean
If the value of boolean is on, then principals (usernames attached to incoming IIOP requests) are sanitised by Wonderwall for server activation purposes, and any non-username characters cause the principal to be replaced with the string iiopproxy. Non-username characters are alphanumeric characters, plus the characters _, -, +, =, . and ,.
domain dns - domain
The DNS domain name used for Wonderwall’s hostname should be specified here.
hostname hostname
Specifies the hostname (or IP address) of the machine that Wonderwall is running on. If this is specified on a machine with multiple IP interfaces, Wonderwall binds to the interface with that hostname. If it is left unset, the hostname is determined automatically.
App en d i x B
167
http-files directory
Sets the directory under which the Wonderwall proxy searches for files when behaving as a HTTP server. The files are fetched in response to HTTP requests incoming on the port specified by http-port. If this parameter is not set, no files can be retrieved through the HTTP server (although HTTP tunnelling will still be possible).
http-idiosyncrasy user-agent idiosyncrasy [...]
Unfortunately, the HTTP support built into the browser’s Java runtime is not always bug-free. As a result, Wonderwall may need to be informed of bugs present in certain versions.
The user-agent string indicates the value used by the Java runtime to identify that particular browser, and is usually (but not always) in the format BrowserName/version; for example, JDK/1.1. Simple glob-style pattern matching can be used here, so JDK/* matches all versions of the JDK.
The idiosyncrasy parameters use the following keywords:
http-keepalive-timeout timeout
Specifies how long, in seconds, Wonderwall should wait for a new message to arrive from a HTTP 1.1 connection before closing it down, requiring the client to reconnect. The default value is 600 seconds.
http-port httpport
Sets the port number which Wonderwall uses to receive HTTP requests and HTTP tunnelled IIOP messages. Typically, this port is set to the standard value 80. If it is set to 0, the HTTP server capability of Wonderwall is disabled.
Keyword Description
none No idiosyncrasies; full HTTP 1.0 or HTTP 1.1 compliance.
newline-after-post Expect to see a redundant newline after every HTTP post operation. Most JDK 1.0.2-derived Java runtimes do this.
no-keepalive Inhibit the use of HTTP Keep-Alive even if the browser says it supports it.

O rb i x Wond e rw a l l A dm in i s t r a t o r ’ s G u i d e
168
iiop-idle-timeout timeout
Specifies how long, in seconds, Wonderwall should wait for a new message to arrive from a client connection before closing it down, requiring the client to reconnect. The default value is 3 hours.
listener-sleep-timeout time_value
Specifies a quiescent period for the main listener thread, during which time Wonderwall does not accept new incoming connections. This is a tuning parameter for Wonderwall when operating under heavy loads and it provides Wonderwall with the facility to reclaim released resources from previous connections which have now terminated. The time value is specified in milliseconds; default zero milliseconds, with the recommended value between 50-100 milliseconds when used.
log [requests] [replies] [request-bodies] [reply-bodies]
Specifies what additional messages should be sent to the system log file.
log-to-syslog [on|off]
Specifies whether the UNIX syslog(3) daemon should receive a copy of any log messages produced by the Wonderwall. This is enabled by default. (This is applicable only on UNIX.)
log-facility facility
Specifies the name of the UNIX syslog(3) facility which Wonderwall should log its output to. The facility parameter should be set to the name of the facility without the leading LOG_ prefix, in lowercase. For example, to cause Wonderwall to log using the LOG_DAEMON facility, use log-facility daemon (This is applicable only on UNIX.)
Flag Information logged
requests Headers of messages sent by client.
replies Headers of messages sent by server.
request-bodies Contents of all request messages.
reply-bodies Contents of all reply messages.

App en d i x B
169
masquerade-as-host {hostname}
If this entry is present, Wonderwall will masquerade as a different hostname. This can be useful if NAT firewalls are used to protect Wonderwall itself. The default setting involves using the real hostname.
orbixd-iiop-port port
If you are using Wonderwall with Orbix C++ or Orbix Java servers on the internal network, and you wish to use the bind form of object-specifier in the Wonderwall configuration file, then it is necessary to specify this port. The port is set to the port which the Orbix daemon uses, on the internal network, to receive IIOP messages. (In the default configuration, this port is 1571. It can also be set explicitly via the environment variable s, in the environment in which the Orbix daemon process runs.)
ping-as-user {username}
This parameter allows a username to be specified so that Wonderwall pings any activated servers as a different user. The default value is the username that Wonderwall is running under.
ping-during-bind [on|off]
This configuration parameter determines whether Wonderwall should ping the Orbix C++/Orbix Java servers listed in its configuration file—when the bind object syntax is used. If this value is switched off, Wonderwall reads its configuration file more quickly. The default value is on.
port port-number
This allows you to specify which port-number Wonderwall listens on. This value can also be specified using the -port command-line parameter when starting the proxy.
pseudo-orbixd boolean
This option only needs to be set if Wonderwall receives messages from certain older versions of Orbix Java clients. It specifies whether Wonderwall should emulate specific aspects of an Orbix daemon (orbixd) in order to allow clients to connect to Wonderwall-protected servers using bind(). The value of boolean can be set to either on or off. The default setting is off.
O rb i x Wond e rw a l l A dm in i s t r a t o r ’ s G u i d e
170
server-open-timeout timeout
Specifies how long, in seconds, Wonderwall should retry connecting to a server which has been activated by its orbixd. The default value is 15 seconds.
strict-host-matching boolean
If the value of boolean is on, hostnames are matched using string comparisons (this is the default). If it is off, hostnames are matched using DNS name resolution.
List of IORsallow-unlisted-objects boolean
If the value of boolean is on, it allows Wonderwall to dynamically update, and add to its internal table of known objects. For example, if a client attempts to connect to an unknown IOR (not registered using object, server or persistent-object), Wonderwall will automatically add this IOR to its internal list of known objects, assuming boolean is on. The default value of boolean is off.
Note: Just because an IOR is automatically added to this list, does not mean that the client is necessarily granted access. All messages must still be filtered by the Access Control List, in the usual way.
object tag [wild wildcardflags] object-specifier
This entry is used to define a tag which is used throughout the configuration file to refer to an object or group of objects. An entry is made in a runtime table which records all objects known to Wonderwall.
At present Wonderwall supports four different forms of object-specifier:
• An object-specifier beginning with the keyword “bind” is used to specify the object using a pseudo-bind syntax. This closely resembles the syntax of _bind() as used by a regular Orbix Java client. For further information, refer to “Object Specifiers” on page 14.

App en d i x B
171
• An object-specifier beginning with the characters “IOR:” introduces an IOR coded as a standard CORBA stringified object reference. For further information, refer to “IOR Format” on page 26.
• An object-specifier beginning with the characters “RXR:” introduces an IOR encoded using the readable-hex-representation. This is explained in detail in “IOR Format” on page 26.
• An object-specifier that begins with a “/” is assumed to be the absolute pathname of a file where the IOR is stored (either in “IOR:” or “RXR:” format).
If the wild parameter is specified, any attempts to match this object with a request from the Internet ignores that aspect of the object key. Since this requires examination of the object key, it is not interoperable and depends on support in the Wonderwall code for the server ORB vendor’s object key format. Currently, Orbix C++ and Orbix Java are supported. The supported parameters for wild are as follows:
The object entry is suitable for listing an IOR whether the respective server is activated or persistent. When an object is listed as an object entry, Wonderwall uses the facilities provided by the IIOP protocol to check the host and port where the server is currently located. Wonderwall uses this new host and port information to forward messages to the server.
This ensures that Wonderwall functions correctly with activated servers. In Orbix, for example, such servers are started automatically and have host and port assigned by the Orbix daemon process. When Wonderwall contacts the daemon via IIOP, it will be told the current host and port of the particular server.
Wildcard flag Effect
host Ignore the hostname used in the object key.
server Ignore the server name used in the object key.
marker Ignore the object marker used in the object key.
ifmarker Ignore the interface marker used in the object key.

O rb i x Wond e rw a l l A dm in i s t r a t o r ’ s G u i d e
172
persistent-object symbol [wildwildcardflags] ior
The persistent-object entry can only be used when the object is in a persistent server. It is almost identical to the object entry. The only difference is that, in this case, Wonderwall assumes the listed ior specifies a direct connection to the server. A precautionary message, to determine the actual host and port, is not sent in advance of the real request. The advantage is a gain in efficiency when used in conjunction with persistent servers.

App en d i x B
173
server tag object-specifier
This is exactly equivalent to the entry:
object tag wild marker ifmarker object-specifier
It generates a tag which can be used to refer to all of the objects common to a particular server (hence the name). It is provided as a standalone keyword because it is useful for tagging Factory objects (refer to “Factory Objects” on page 18).
client-transformer object-specifier
Specifies the object which implements an external client transformer for Wonderwall. A client transformer is not used unless this line is present in the configuration file (refer to “Configuration” on page 155).
server-transformer object-specifier
Specifies the object which implements an external server transformer for Wonderwall. A server transformer is not used unless this line is present in the configuration file (refer to “Configuration” on page 155).
use-ipaddr-in-iors boolean
Specifies whether IORs created by Wonderwall should contain the host's IP address or its hostname. This should be set to true if the hostname Wonderwall is running on is not resolvable using DNS to hosts outside Wonderwall's domain.
Access Control ListThe most important part of the configuration is the Access Control List (ACL). This specifies which operations can be accessed on which objects, along with extra conditions and flags.
The ACL is read from the first rule encountered to the last, and is processed by the ACL testing code in that order. This means that you can specify broad filters first, to remove potentially dangerous or unknown features such as Service Contexts, and then go on to allow specific operations on objects after that.
There is no limit to the number of rules in the ACL. If no rules match the message, it is blocked.

O rb i x Wond e rw a l l A dm in i s t r a t o r ’ s G u i d e
174
Each line is treated as one rule. Longer rules can be continued onto consecutive lines using the ‘\’ (backslash) character.
allow [keyword [parameter]] [keyword [parameter]] ...
This entry allows any request which matches the given rule. Each specified keyword on the line must correspond to the rule to match (sometimes a keyword also has an associated parameter). If a keyword is not specified on a rule line, that aspect of the message is ignored for purposes of the ACL match.
deny [keyword [parameter]] [keyword [parameter]] ...
This entry denies any request which matches the given rule. Each specified keyword on the line must correspond to the rule to match (sometimes a keyword also has an associated parameter). If a keyword is not specified on a rule line, that aspect of the message is ignored for purposes of the ACL match.
Keywords Used in Rules
The following keywords only appear as parameters to the allow or deny rules:
...ipaddr ipaddress[/mask]
Match if the client IP address equals the given ipaddress. The optional mask parameter specifies a bit-wise mask. Only these bits are used to compare the IP addresses.
Some common masks are:
255.255.255.255 all bits (this is the default).
255.255.255.0 class C bits.
255.255.0.0 class B bits.
255.0.0.0 class A bits.
Note: This option should not be relied upon to provide security since the client IP address can be faked.

App en d i x B
175
...attachclientcert
This keyword is used only to filter clients that connect to Wonderwall using Secure Sockets Layer (SSL) security. If this keyword appears in a rule, Wonderwall passes a secure client’s certificate chain to the server. Refer to “SSL Configuration Options” on page 178 for more information.
...log
If this keyword appears in a rule which successfully matches, the message header details are written to the system log. This would be redundant if you had logrequests set in your configuration file as the header would be logged anyway.
...msgtype type
Match on message types. This type can be one of the following: Request, Reply, CancelRequest, LocateRequest, LocateReply, CloseConnection or MessageError. Refer to “Internet Inter-ORB Protocol (IIOP)” on page 32 for more details on IIOP message types.
...object symbol
Match if the object being accessed is identified by symbol (this rule only applies to incoming Requests). The symbol must have already been declared in an earlier object or persistent-object entry.
...object-host hostname
Match if the object being accessed is located on the host identified by hostname.
...op operation
Match if the operation in a Request is the same as the operation string operation (this rule only applies to incoming requests).
...principal p
Match if the principal sending a request message is the same as the readable-hex-representation byte string p (refer to “IIOP Message Formats” on page 33 for further information on this format).
This parameter does not provide any security as principals are very easy to forge.

O rb i x Wond e rw a l l A dm in i s t r a t o r ’ s G u i d e
176
...[not] secureclient
If the keyword secureclient appears in a rule, Wonderwall rejects clients that do not connect using SSL security. If not secureclient is specified, Wonderwall rejects clients that connect using SSL.
...servicecontexts sclist
Match if the incoming request uses one or more IOP Service Contexts and if one or more of the Service Context IDs used is listed in the sclist parameter. IOP Service Contexts are a mechanism which, according to the IIOP specification, allows “service-specific context information” to be passed along with requests and replies. In keeping with the firewall philosophy of “anything not expressly permitted is denied”, it is suggested that these are filtered out until a future stage when they become necessary at which point each can be enabled on a specific basis.
The format of the sclist parameter is as follows:
• Each Context ID is represented as a positive integer. These integer IDs are assigned by the Object Management Group to uniquely denote a particular type of Service Context.
• Multiple Context IDs can be listed, separated by ‘,’ (comma) characters.
• A range of Context IDs can be matched by listing the start ID, a ‘-’ (dash) character, and the end ID.
• The string all is used to match one or more Context IDs, and the string max is used to denote the upper bound of the Context ID range.
For example:
deny servicecontexts 1-3,5,7,9-20deny servicecontexts 0-5,7-max # all except 6deny servicecontexts all # one or more Service Contexts
Note: If a rule allowing specific service contexts is followed by a wildcard deny rule, the effect is non-intuitive. A request containing both permitted and denied service contexts would be forwarded, as it would hit the allow rule first. Caution is advised here.

App en d i x B
177
...unlisted-object
Match if the object being accessed is an unlisted object. That is, if it has been dynamically specified as a target by the client-side ORB.
...proxify
Proxify the returned object reference produced by this operation.
SSL SecurityOrbixSSL enables secure communications between Orbix C++, or Orbix Java, applications using Secure Sockets Layer (SSL) security. SSL is a transport layer security protocol layered between application protocols and TCP/IP. OrbixSSL applications communicate using the IIOP layered above SSL.
SSL provides authentication, privacy, and integrity for communications across TCP/IP connections. Authentication allows an application to verify the identity of another application with which it communicates. Privacy ensures that data transmitted between applications can not be eavesdropped on or understood by an intermediary. Integrity allows applications to detect whether data was modified during transmission.
SSL uses Rivest Shamir Adleman (RSA) public key cryptography for authentication. In public key cryptography, each application has an associated public key and private key. Data encrypted with the public key can be decrypted only with the private key. Data encrypted with the private key can be decrypted only with the public key.
Public key cryptography allows an application to prove its identity by encoding data with its private key. As no other application has access to this key, the encoded data must derive from the true application. Any application can confirm the content of the encoded data by decoding it with the application’s public key.
Consider the example of two applications, a client and a server. The client connects to the server and wishes to send some confidential data. Before sending application data, the client must ensure that it is connected to the required server and not to an impostor.

O rb i x Wond e rw a l l A dm in i s t r a t o r ’ s G u i d e
178
When the client connects to the server, it confirms the server identity using the SSL handshake protocol. A simplified explanation of how the client executes this handshake in order to authenticate the server is as follows:
1. The client initiates the SSL handshake by sending the initial SSL handshake message to the server.
2. The server responds by sending its certificate to the client. This certificate verifies the server's identity and contains its public key.
3. The client extracts the public key from the certificate and encrypts a symmetric encryption algorithm session key with the extracted public key.
4. The server uses its private key to decrypt the encrypted session key which it uses to encrypt and decrypt application data passing to and from the client. The client also uses the shared session key to encrypt and decrypt messages passing to and from the server.
For a complete description of the SSL handshake, refer to the Netscape Communications SSL V3.0 specification.
Once a connection has been established between two OrbixSSL programs, subsequent communications are encrypted using a symmetric cryptographic algorithm to ensure privacy. A message authentication code (MAC) is applied to each message to ensure its integrity.
SSL-enabled Wonderwall allows to establish secure connections with Wonderwall. Wonderwall can also establish secure connections with servers on the internal network. Wonderwall also provides support for HTTP tunnelling through secure HTTPS connections.
SSL Configuration Options
Wonderwall supports the following configuration options:
ssl-port portnumber
This configuration parameter specifies the port number for incoming IIOP/SSL messages.

App en d i x B
179
https-port portnumber
This configuration parameter specifies the port number for incoming HTTPS messages.
ssl-library library
To use Wonderwall in SSL-enabled mode, you must set this parameter to the fully qualified file name of the Wonderwall SSL library. On UNIX, this library is called libiiopproxy_ssl. On Windows, the file name depends on the version of Wonderwall you are using, for example the Wonderwall 3.0.1 library is iiopproxy_301.dll.
ssl-cert-file filename
When a client connects to Wonderwall using SSL, Wonderwall must prove its identity to the client. To do this, Wonderwall must have an associated X.509 certificate. This configuration variable specifies the fully qualified file name of Wonderwall’s certificate file. Refer to the OrbixSSL documentation for more information about certificates.
ssl-key-file filename
In addition to an X.509 certificate, Wonderwall must have an associated private key. This key is stored in encrypted privacy enhanced mail (PEM) format and can be appended to the Wonderwall certificate file or stored in a separate file. If the key is stored in a separate file, use this parameter to specify the fully qualified file name.
ssl-ca-file filename
When Wonderwall connects to a secure server on the internal network, it must authenticate the server. During authentication, Wonderwall receives a certificate from the server. It then checks that this certificate is signed by a trusted certificate authority (CA). To do this, Wonderwall must have access to a file that contains the CA certificate. Use this variable to specify the name of this file.
ssl-ca-directory directory
Use this parameter to specify the directory in which the CA file is stored.
O rb i x Wond e rw a l l A dm in i s t r a t o r ’ s G u i d e
180
ssl-authenticate-clients boolean
This boolean variable defaults to on, to indicate that Wonderwall should check the identity of clients that contact it. For client authentication to succeed, the client must be able to supply a certificate signed by a CA in the Wonderwall CA file. When client authentication is enabled, zero-length certificate chains are rejected unless you set ssl-allow-empty-chains.
The variable ssl-authenticate-clients must be set to on if Wonderwall passes client certificates to servers. Refer to the ACL keyword attachcertchain for more information.
ssl-invocation-policy policy
This variable specifies what types of communications Wonderwall supports. It can take a combination of the following values:
ssl-session-caching cache_option
This variable specifies whether or not Wonderwall uses SSL session caching to reuse information from previous connections and optimize reconnections. It take a combination of the following values:
secure-accept Wonderwall accepts connections from secure clients.
insecure-accept Wonderwall accepts connections from insecure clients.
secure-connect Wonderwall can connect to secure servers.
insecure-connect Wonderwall can connect to insecure servers. If you set both secure-connect and insecure-connect, Wonderwall attempts to connect to a server securely first. If this fails, it connects insecurely.
client Wonderwall caches sessions that are created when secure clients connect.
server Wonderwall caches sessions that are created when it connects to secure servers.
off Wonderwall does not use session caching.

App en d i x B
181
ssl-cache-flush-rate rate
When Wonderwall caches sessions, it stores the sessions in an internal table. To stop this table from growing indefinitely, Wonderwall flushes it occasionally. Wonderwall maintains a counter that it increments by one each time it establishes a secure connection with a client or server. When this counter reaches the value specified by rate, redundant information is flushed from the table. The default value is 1000.
ssl-client-ciphers ciphersuites
This variable allows you to specify which ciphers should be used for SSL encryption when communicating with clients. A cipher suite is a combination of the following SSL settings:
• Specification of the key exchange algorithm.
RSA certificates are useful for key exchanges as RSA is a widely used public-key algorithm that can be used for either encryption or digital signing.
• Specification of the cipher to be used.
Permitted ciphers are taken from the following list: RC2, RC4, DES, 3DES_EDE, CBC.
• Specification of the hash algorithm to be used.
Permitted hashes include MD5 and SHA.
The variable ssl-client-ciphers takes a list of ciphersuites. The available values are:
SSLV3_RSA_WITH_RC4_128_SHASSLV3_RSA_WITH_RC4_128_MD5SSLV3_RSA_WITH_3DES_EDE_CBC_SHASSLV3_RSA_WITH_DES_CBC_SHASSLV3_RSA_EXPORT_WITH_DES40_CBC_SHASSLV3_RSA_EXPORT_WITH_RC2_CBC_40_MD5SSLV3_RSA_EXPORT_WITH_RC4_40_MD5SSLV3_EDH_RSA_DES_CBC_SHASSLV3_EDH_DSS_DES_CBC_SHASSLV3_EXP_EDH_RSA_DES_CBCSSLV3_EXP_EDH_DSS_DES_CBC_SHASSLV3_EDH_RSA_DES_CBC3_SHA

O rb i x Wond e rw a l l A dm in i s t r a t o r ’ s G u i d e
182
SSLV3_EDH_DSS_DES_CBC3_SHASSLV3_RSA_WITH_NULL_MD5SSLV3_RSA_WITH_NULL_SHA
Wonderwall attempts to use the ciphersuites in the order in which you specify them. The default ciphers are:
SSLV3_RSA_WITH_RC4_128_SHASSLV3_RSA_WITH_RC4_128_MD5SSLV3_RSA_WITH_3DES_EDE_CBC_SHASSLV3_RSA_WITH_DES_CBC_SHASSLV3_RSA_EXPORT_WITH_DES40_CBC_SHASSLV3_RSA_EXPORT_WITH_RC2_CBC_40_MD5SSLV3_RSA_EXPORT_WITH_RC4_40_MD5
ssl-server-ciphers ciphersuites
This variable specifies the ciphersuites that should be used when connecting to secure servers. The possible values are the same as those for ssl-client-ciphers.
ssl-attach-client-cert boolean
If required, Wonderwall can pass a client’s certificate chain through to an internal server. To do this, Wonderwall uses the IIOP service context mechanism. The certificate chain is passed in a FORWARD_IDENTITY service context in the first IIOP request sent to the server. An additional service context may also be added for the purposes of padding.
To check the contents of the client certificate chain, a server programmer must implement a suitable service context handler to extract the service context information. The service context identifier for the FORWARD_IDENTITY context is 8, the identifier for the padding context is 0x49545F33.
ssl-allow-empty-chains boolean
When ssl-authenticate-clients is set, a connection attempt from a client with an empty certificate chain is rejected. Setting ssl-allow-empty-chains to on allows Wonderwall to accept such connections.

Appendix CFirewall Installation on UNIX
In this configuration, it is assumed that the installer wants as much control as possible over the Wonderwall setup.
To install Wonderwall:
• Copy the iiopproxy executable into whatever directory is used to store the binaries of your firewall proxies.
• Copy the iiopproxy.cf configuration file into the /etc directory or whatever directory you feel is appropriate.
• It is recommended that you create a directory to store the IORs used by the configuration file.
For example, a sub-directory of the directory where the configuration file is stored can be used:
/etc/iors
• Set up the starting mechanism for the Wonderwall process.
You can do this before editing the configuration file since the configuration which comes with the distribution blocks all messages by default.
• Decide whether to run the Wonderwall from inetd(8) or as a standalone process.
For most purposes, running Wonderwall from inetd is sufficient, but if you expect your cross-firewall IIOP usage to be particularly heavy, you can run it standalone.
• Pick a port to run Wonderwall on.
For example, you can use the official Orbix daemon port 1570.
183

O rb i x Wond e rw a l l A dm in i s t r a t o r ’ s G u i d e
Setting PermissionsThe IIOP proxy needs to be able to perform the following system interactions:
• It must be able to read its configuration file and any IORs specified therein.
• If not running from inetd, it must be able to bind to the port.
The IIOP proxy does not need to be able to open or write to any area of the file system, nor does it need to execute commands. On a normal UNIX system, the standard user nobody should be appropriate for these purposes.
External IIOP clients need to be able to contact Wonderwall on port 1570/tcp (or whatever port is used in the configuration file). They also need to be able to open and use connections to the internal hosts named in the configuration file in order to contact Orbix daemons and servers running on these hosts.
Note: If the persistent-object keyword is used throughout the configuration file instead of the object keyword, the Orbix daemon does not need to be accessible.
In order to resolve the names of client hosts, it is preferable for Wonderwall to be able to contact external DNS servers (port 53/udp). However, if this is not possible, the hostnames of connecting clients are not logged and no bad side effects occur. Information from external DNS servers is not used in any security-critical context.
184

App en d i x C
Setting up the Proxy From inetdTo run the proxy from inetd:
• Add the following line to /etc/inetd.conf:
iiop stream tcp nowait nobody /usr/local/etc/iiopproxy iiopproxy -inetd -config /etc/iiopproxy.cf
Note: This line should not contain a line-break, there is no white space before or after this line, and you may need to change the paths if the Wonderwall binary and/or configuration file is installed in a different location.
• Add the following line to /etc/services (the white space between iiop and 1570 should be a tab):
iiop 1570/tcp
To cause inetd(8) to read its configuration again, find its process ID using ps and kill -1 it. Do this on Solaris 2.x or other SVR4-based systems as follows:
% ps -ef | grep inetdroot 117 1 0 09:18:38 ? 0:00 /usr/sbin/inetd -s
The PID is the second argument.
% kill -1 117
Setting up the Proxy to Run StandaloneIf you choose to run Wonderwall standalone, things are easier. Run the iiopproxy binary and it starts listening for new connections on whatever port is specified in the configuration file. In order to ensure it has started when the machine boots, you need to add its invocation to the system boot scripts.
185

O rb i x Wond e rw a l l A dm in i s t r a t o r ’ s G u i d e
186

IndexAaccess control list 15, 165
keywordsallow 15attachclientcert 175deny 15ipaddr 174log 175msgtype 175object 175, 177op 175principal 175secureclient 176servicecontexts 176
rulesallow 174deny 174
activated servers 166allow, ACL rule 174an OrbixWeb client 10asymmetric cryptography 83attachclientcert, ACL keyword 175authentication 82
Bbasic configuration and ports 13bastion hosts 2bind 14, 170
CCA 84
demonstration CAs 96list file 99specifying trusted CAs 99
callbacks 52CancelRequest message 37CDR 32certificates 83, 84
demonstration 96
Certification Authority. See CACloseConnection message 38configuration 165
access control list 15, 173basic configuration, ports 13basic settings 166object-specifiers 14rules
http-port 167port 169pseudo-orbixd 169
tool 25configuration file 12, 97configuration parameters, OrbixWeb 61configuration tool 25
access control list window 134edit as text window 139iiopproxy.cf file 130invoking 130logging and timeouts window 138object specifier window 132ports and hostnames window 136startup window 131
configuring 98connection establishment 46cryptography
asymmetric 83RSA. See RSA cryptographysymmetric 83, 85
Ddaemon, Orbix 103Data Encryption Standard 85demonstration CAs 96demonstration certificates 96deny, ACL rule 174DES 85
Eencrypted link using integral transformer 148encrypted link using Wonderwall 149example application 8
187

O rb i x Wonde rwa l l A dm i n i s t r a t o r ’ s G u i d e
Ffactory objects 18, 50
IORs 50proxify parameter 51
features of Wonderwall 3file, configuration 97filtering 2firewall installation
on UNIX 183setting permissions 184setting proxy from inetd 185setting proxy standalone 185
firewall proxy 58firewalls 2
Ggetting started 7, 18
an OrbixWeb client 10example application 8HTTP server 20IDL specification 9logging output 22the Grid application 8
GIOP 2GUI configuration tool 25
access control list window 134edit as text window 139iiopproxy.cf file 130invokingl 130logging and timeouts window 138object specifier window 132ports and hostnames window 136start up window 131
Hhandshake, SSL 83, 88hashes 181HTTP server 20HTTP tunnelling 62http-port, configuration rule 167https-port, SSL configuration option 179
IIDL specification 9IIOP 2, 5, 25, 32, 86
GIOP message and header 33message formats 33
CancelRequest 37CloseConnection 38
188
LocateReply 38LocateRequest 37MessageError 38Reply 36
Request message 34request message header 35
IIOP connection through Wonderwall 47iiopproxy 6
syntax 157the process 157using 159
iiopproxy.cf 6, 12, 165iiopproxy.cf file 17implementing transformers 153inetd 185init() 100initializing SSL support 100integrity 85International Telecommunications Union 84Internet Inter-ORB Protocol. See IIOPinternet security 1interoperability 129
non-Orbix client 44non-Orbix server 45object references 129proxification 41
intranet request-router 56IOR 5, 14, 170
creating 163editing 162format 26format and profile 27Orbix/OrbixWeb object key format 29representing 30rules
object 170persistent-object 172
viewing 162wildcards 170
IOR format 26IOR format and profile 27IORs 50iortool
syntax 160the utility 160using 162
ipaddr, ACL keyword 174IT_CA_LIST_FILE 99IT_CERTIFICATE_FILE 97IT_CERTIFICATE_PATH 97

I n d e x
IT_PRIVATEKEY_FILE 103IT_SSL 100
init() 100setPrivateKeyPassword() 102
IT_SSL.h 100ITU 84
Kkey exchange algorithm 181keys
private 83, 101public 83
keys, private 103keywords
allow 15attachclientcert 175deny 15ipaddr 174log 175msgtype 175object 175, 177op 175principal 175secureclient 176servicecontexts 176
LLocateReply message 38LocateRequest message 37log analysis viewer
filters 145iiopproxy server 39invoking 142loaded log file 144startup window 142timestamps 146
log, ACL keyword 175logging output 22
MMAC 85message authentication code 85message formats 33
CancelRequest 37CloseConnection 38LocateReply 38LocateRequest 37MessageError 38Reply 36
Request 34MessageError message 38msgtype, ACL keyword 175
Nnon-Orbix client 44non-Orbix server 45normal IIOP connection 46
Oobject factories 48object keys 5, 26object references 129object, ACL keyword 175, 177object, IOR rule 170object-specifiers 14
bind 14, 170IOR 14, 170RXR 14, 170
op, ACL keyword 175Orbix daemon 103OrbixNames 98, 103orbixssl.cfg 97OrbixWeb 147
configuration parameters 61configuring 61, 62
PPEM 101persistent-object, IOR rule 172port, configuration rule 169principal, ACL keyword 175principals 5privacy 85private keys 83, 101, 103profile_count 26profiles 26protocol, SSL handshake 83protocol_tag 26proxification process 41proxify parameter 51proxy servers 2pseudo-orbixd, configuration rule 169public keys 83
RRC4 85Reply message 5, 36representing an IOR 30
189

O rb i x Wonde rwa l l A dm i n i s t r a t o r ’ s G u i d e
Request message 5, 34Request messages 2Rivest Shamir Adleman cryptography. See RSA
cryptographyRSA certificates 181RSA cryptography 82RXR 14, 170RXR format 30, 162
SSecure Sockets Layer. See SSLsecureclient, ACL keyword 176security 2service contexts 5servicecontexts, ACL keyword 176setPrivateKeyPassword() 102SSL 137, 165, 175, 176, 177–182
authentication 82configuration options
https-port 179ssl-allow-empty-chains 182ssl-attach-client-cert 182ssl-authenticate-clients 180ssl-cache-flush-rate 181ssl-ca-directory 179ssl-ca-file 179ssl-cert-file 179ssl-client-ciphers 181ssl-invocation-policy 180ssl-key-file 179ssl-library 179ssl-port 178ssl-server-ciphers 182ssl-session-caching 180
handshake 83, 88initializing 100integrity 85privacy 85
ssl-allow-empty-chains, SSL configuration option 182
ssl-attach-client-cert, SSL configuration option 182
ssl-authenticate-clients, SSL configuration option 180
ssl-cache-flush-rate, SSL configuration option 181ssl-ca-directory, SSL configuration option 179ssl-ca-file, SSL configuration option 179ssl-cert-file, SSL configuration option 179ssl-client-ciphers, SSL configuration option 181ssl-invocation-policy, SSL configuration
190
option 180ssl-key-file, SSL configuration option 179ssl-library, SSL configuration option 179ssl-port, SSL configuration option 178ssl-server-ciphers, SSL configuration option 182ssl-session-caching, SSL configuration option 180starting Wonderwall 7symmetric cryptography 85
TTCP/IP 86the Grid application 8transformer architecture 148transformer IDL 151transformers 141
architecture 148IDL 151implementing 153using 151
trusted CAs 99type_id 26
Uusing transformers 151using Wonderwall and OrbixWeb 147
Wwildcards 48wildcards, IOR rule 170Wonderwall
an OrbixWeb client 10configuration 165
access control list 15, 173basic configuration, ports 13basic settings 166example iiopproxy.cf file 17object-specifiers 14
configuration file 12configuration tool 25connection establishment 46establishing a connection via 47example application 8example iiopproxy.cf file 17factory objects 18features 3firewall 2getting started 7
factory objects 18HTTP server 20

I n d e x
logging output 22IDL specification 9implementing transformers 153interoperability 129log analysis viewer 39logging output 22normal IIOP connection 46proxification 41the Grid application 8transformer architecture 148transformer IDL 151transformers 141using 147using transformers 151using Wonderwall
as a firewall proxy 58as an Intranet request-router 56
using Wonderwall and OrbixWeb 147
XX.509 84
certificates. See certificates
191

O rb i x Wond e rw a l l A dm in i s t r a t o r ’ s G u i d e
192


![Plastic cover Promo sticker LP George.pdf · APPLE APCOR 1 – WONDERWALL MUSIC BY GEORGE HARRISON [fold-down mono] Plastic cover Promo sticker APPLE SAPCOR 1 – WONDERWALL MUSIC](https://img.pdfslide.us/doc/110x75/5fd41fe5a2094b648d6e1270/plastic-cover-promo-sticker-lp-georgepdf-apple-apcor-1-a-wonderwall-music-by.jpg)


![APPLE APCOR 1 WONDERWALL MUSIC BY GEORGE HARRISON … LP George.pdf · APPLE APCOR 1 – WONDERWALL MUSIC BY GEORGE HARRISON [fold-down mono] Plastic cover Promo sticker APPLE SAPCOR](https://img.pdfslide.us/doc/110x75/5e6ce0e3d1a0e734277ff6f5/apple-apcor-1-wonderwall-music-by-george-harrison-lp-georgepdf-apple-apcor-1.jpg)