Embed Size (px)
Citation preview

Oracle MOOC: SQL Fundamentals Week 4
Homework for Lesson 4
Homework is your chance to put what you've learned in this lesson into practice. This
homework is not "graded" and you are encouraged to write additional code beyond what
is asked.
Note:
Ensure you completed the setup instructions provided on the course page, before attempting the homework.
The solutions to the homework are NOT provided. We encourage you to try it out and discuss in the course forum for further learning.
The homework is NOT mandatory to get the course completion award.
Post your questions, comments, or suggestions (if any) in the course forum @ https://community.oracle.com/community/technology_network_community/moocs/sql-fundamentals-2018/week-4
Watch out for:
- Reference video that discussed the corresponding concept in this MOOC.
- Expected output.
Assignment 1
The HR department wants you to create SQL statements to insert, update, and delete
employee data. As a prototype, you use the MY_EMPLOYEE table before giving the
statements to the HR department.
NOTE: Before starting this task, execute the cleanup_4a.sql script from the
labs/cleanup_scripts folder.
1. Run the lab_04_01.sql script from labs/lab_scripts folder to create the
MY_EMPLOYEE table. Describe the structure of the MY_EMPLOYEE table to
identify the column names.

Oracle MOOC: SQL Fundamentals
Copyright © 2017, Oracle and/or its affiliates. All rights reserved. 2
2. Create an INSERT statement to add the first row of data to the MY_EMPLOYEE
table from the following sample data. Do not list the columns in the INSERT
clause. Do not enter all rows yet.
3. Populate the MY_EMPLOYEE table with the second row of the sample data from
the preceding list. This time, list the columns explicitly in the INSERT clause.
4. Confirm your addition to the table.
5. Write an INSERT statement in a dynamic reusable script file to load the next two
rows of sample data into the MY_EMPLOYEE table. The script should prompt for
all the columns (ID, LAST_NAME, FIRST_NAME, USERID, and SALARY).
Save this script to hw4_task1_05.sql file.
1550aropeburAudreyRopeburn5
750cnewmanChadNewman4
1100bbiriBenBiri3
860bdancsBettyDancs2
895rpatelRalphPatel1
SALARYUSERIDFIRST_NAMELAST_NAMEID
1550aropeburAudreyRopeburn5
750cnewmanChadNewman4
1100bbiriBenBiri3
860bdancsBettyDancs2
895rpatelRalphPatel1
SALARYUSERIDFIRST_NAMELAST_NAMEID

Oracle MOOC: SQL Fundamentals
Copyright © 2017, Oracle and/or its affiliates. All rights reserved. 3
6. Populate the table with the next two rows of the sample data listed in step 3 by
running the INSERT statement in the script that you created.
7. Confirm your additions to the table and make the data additions permanent.
8. Change the last name of employee 3 to Drexler.
9. Change the salary to $1,000 for all employees who have a salary less than $900.
10. Verify your changes to the table.
11. Delete Betty Dancs from the MY_EMPLOYEE table. Confirm your changes to the
table.
12. Commit all pending changes.
13. Populate the table with the last row of the sample data listed in step 3 by using the statements in the script that you created in step 6. Run the statements in the script.
Note: Perform the steps (15-21) in one session only.
14. Confirm your addition to the table.
15. Mark an intermediate point in the processing of the transaction.
16. Delete all the rows from the MY_EMPLOYEE table.

Oracle MOOC: SQL Fundamentals
Copyright © 2017, Oracle and/or its affiliates. All rights reserved. 4
17. Confirm that the table is empty.
18. Discard the most recent DELETE operation without discarding the earlier INSERT
operation.
19. Confirm that the new row is still intact.
20. Make the data addition permanent.
21. Modify the hw4_task1_05.sql script such that the USERID is generated
automatically by concatenating the first letter of the first name and the first seven
characters of the last name. The generated USERID must be in lowercase.
Therefore, the script should not prompt for the USERID. Save this script to a file
named hw4_task1_21.sql.
22. Run the hw4_task1_21.sql script to insert the following record:
23. Confirm that the new row was added with the correct USERID.
See 4-2: Inserting Data and 4-3: Modifying and Deleting Data for reference.
1230manthonyMarkAnthony6
SALARYUSERIDFIRST_NAMELAST_NAMEID
1230manthonyMarkAnthony6
SALARYUSERIDFIRST_NAMELAST_NAMEID

Oracle MOOC: SQL Fundamentals
Copyright © 2017, Oracle and/or its affiliates. All rights reserved. 5
Assignment 2
NOTE: Before starting this task, execute the cleanup_4b.sql script from the
labs/cleanup_scripts folder.
1. Create the DEPT table based on the following table instance chart. Save the
statement in the hw4_task2_01.sql script, and then execute the statement in
the script to create the table. Confirm that the table is created.
2. Create the EMP table based on the following table instance chart. Save the
statement in the hw4_task2_02.sql script, and then execute the statement in
the script to create the table. Confirm that the table is created.
Column Name ID NAME
Key Type Primary key
Nulls/Unique
FK Table
FK Column
Data type NUMBER VARCHAR2
Length 7 25

Oracle MOOC: SQL Fundamentals
Copyright © 2017, Oracle and/or its affiliates. All rights reserved. 6
3. Modify the EMP table. Add a COMMISSION column of the NUMBER data type, with
precision 2 and scale 2. Confirm your modification.
4. Modify the EMP table to allow for longer employee last names. Confirm your
modification.
Column Name ID LAST_NAME FIRST_NAME DEPT_ID
Key Type
Nulls/Unique
FK Table DEPT
FK Column ID
Data type NUMBER VARCHAR2 VARCHAR2 NUMBER
Length 7 25 25 7

Oracle MOOC: SQL Fundamentals
Copyright © 2017, Oracle and/or its affiliates. All rights reserved. 7
5. Drop the FIRST_NAME column from the EMP table. Confirm your modification by
checking the description of the table.
6. In the EMP table, mark the DEPT_ID column as UNUSED. Confirm your
modification by checking the description of the table.
7. Drop all of the UNUSED columns from the EMP table.
8. Create the EMPLOYEES2 table based on the structure of the EMPLOYEES table.
Include only the EMPLOYEE_ID, FIRST_NAME, LAST_NAME, SALARY and
DEPARTMENT_ID columns. Name the columns in your new table ID,
FIRST_NAME, LAST_NAME, SALARY and DEPT_ID respectively. Confirm
that the table is created.
9. Alter the status of the EMPLOYEES2 table to READ ONLY.

Oracle MOOC: SQL Fundamentals
Copyright © 2017, Oracle and/or its affiliates. All rights reserved. 8
10. Try to delete all rows in the EMPLOYEES2 table. Observe what happens.
11. Revert the EMPLOYEES2 table to the READ WRITE status. Now try to truncate the
rows again.
12. Drop the EMP, DEPT, and EMPLOYEES2 table.
See 4-4: Creating Tables, 4-5: Defining Constraints, 4-6: Modifying Data Structures
and 4-7: Handling Transactions for reference.
Assignment 3
1. Grant another user query privilege on your table. Then, verify whether that user
can use the privilege.
Note: For this exercise, open another SQL Developer session and connect as a
different user. For example, if you are currently using ora1, open another SQL
Developer session and connect as ora22.
Grant another user (for example, ora22) privilege to view records in
your REGIONS table. Include an option for this user to further grant this
privilege to other users.
Have the user query your REGIONS table.

Oracle MOOC: SQL Fundamentals
Copyright © 2017, Oracle and/or its affiliates. All rights reserved. 9
Have the user pass on the query privilege to a third user, ora23.
Take back the privilege from the user who performs step b.
2. Grant another user query and data manipulation privileges on your COUNTRIES
table. Make sure that the user cannot pass on these privileges to other users.
3. Take back the privileges on the COUNTRIES table granted to another user.
4. Grant another user access to your DEPARTMENTS table. Have the user grant you
query access to his or her DEPARTMENTS table.
5. Query all the rows in your DEPARTMENTS table.
6. Add a new row to your DEPARTMENTS table. ora1 should add Education as
department number 500. ora22 should add Human Resources as department
number 510. Query ora22’s table from ora1 and vice versa.
7. Revoke the SELECT privilege from ora22 and vice versa.
8. Remove the row that you inserted into the DEPARTMENTS table in step 6 and
save the changes.
See 4-8: Controlling User Access for reference.
Assignment 4
1. Query the USER_TABLES data dictionary view to see information about the tables
that you own.
…

Oracle MOOC: SQL Fundamentals
Copyright © 2017, Oracle and/or its affiliates. All rights reserved. 10
2. Query the ALL_TABLES data dictionary view to see information about all the
tables that you can access. Exclude the tables that you own.
…
3. For a specified table, create a script that reports the column names, data types,
and data types’ lengths, as well as whether nulls are allowed. Prompt the user to
enter the table name. Give appropriate aliases to the DATA_PRECISION and
DATA_SCALE columns. Save this script in a file named hw4_task4_03.sql.
For example, if the user enters DEPARTMENTS, the following output results:
Oracle MOOC: SQL Fundamentals
Copyright © 2017, Oracle and/or its affiliates. All rights reserved. 11
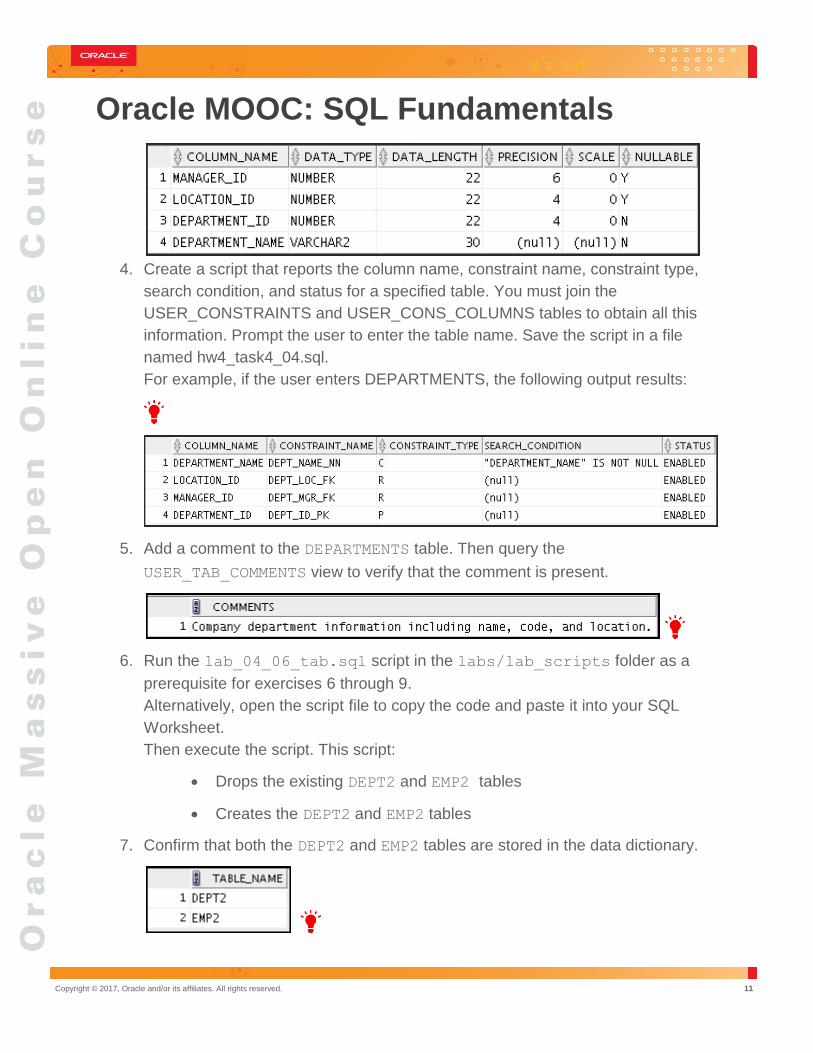
4. Create a script that reports the column name, constraint name, constraint type,
search condition, and status for a specified table. You must join the
USER_CONSTRAINTS and USER_CONS_COLUMNS tables to obtain all this
information. Prompt the user to enter the table name. Save the script in a file
named hw4_task4_04.sql.
For example, if the user enters DEPARTMENTS, the following output results:
5. Add a comment to the DEPARTMENTS table. Then query the
USER_TAB_COMMENTS view to verify that the comment is present.
6. Run the lab_04_06_tab.sql script in the labs/lab_scripts folder as a
prerequisite for exercises 6 through 9.
Alternatively, open the script file to copy the code and paste it into your SQL
Worksheet.
Then execute the script. This script:
Drops the existing DEPT2 and EMP2 tables
Creates the DEPT2 and EMP2 tables
7. Confirm that both the DEPT2 and EMP2 tables are stored in the data dictionary.
Oracle MOOC: SQL Fundamentals
Copyright © 2017, Oracle and/or its affiliates. All rights reserved. 12
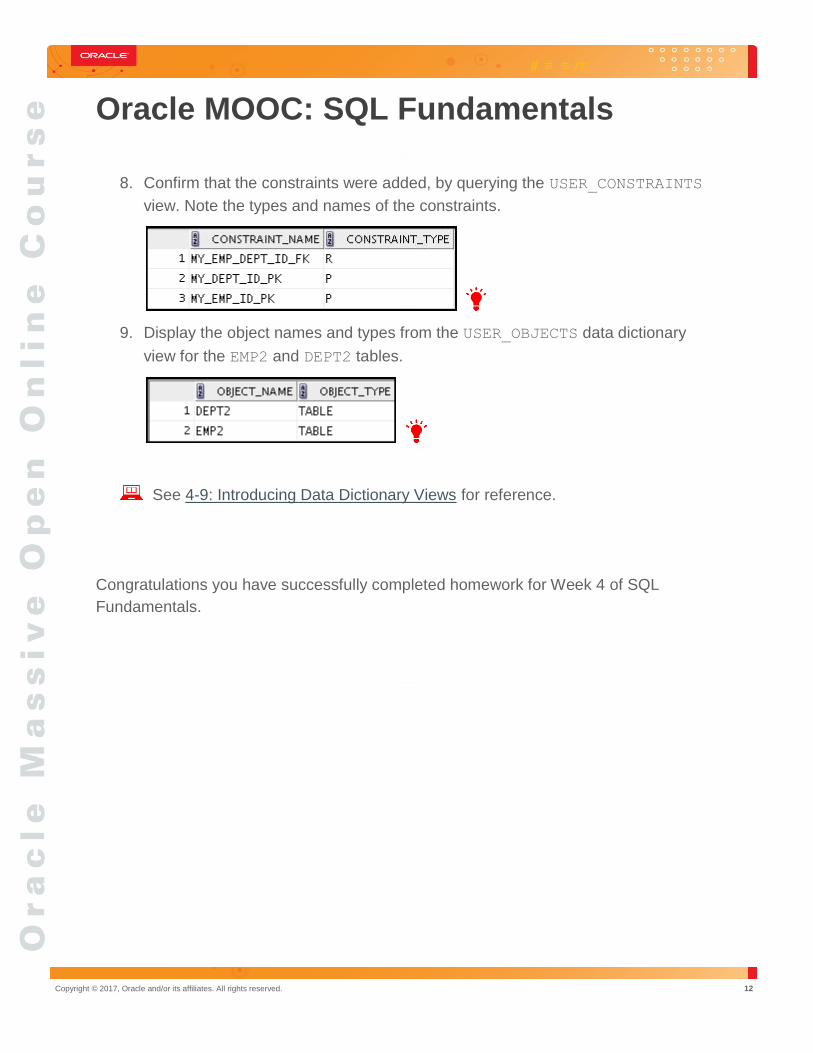
8. Confirm that the constraints were added, by querying the USER_CONSTRAINTS
view. Note the types and names of the constraints.
9. Display the object names and types from the USER_OBJECTS data dictionary
view for the EMP2 and DEPT2 tables.
See 4-9: Introducing Data Dictionary Views for reference.
Congratulations you have successfully completed homework for Week 4 of SQL
Fundamentals.


![[Global HR Forum 2014] MOOC, Flipped Learning, and K-MOOC](https://img.pdfslide.us/doc/110x75/558cda6dd8b42ad0118b45ab/global-hr-forum-2014-mooc-flipped-learning-and-k-mooc.jpg)