Embed Size (px)
Citation preview

Oracle® Access ManagerUpgrade Guide
10g (10.1.4.2.0)
B32416-01
October 2007
Concepts, methods, strategies, and step-by-step instructions for administrators who are responsible for upgrading an earlier installation (including the schema and data) to 10g (10.1.4.0.1). Also described is the zero downtime upgrade method that you can use to upgrade to 10g (10.1.4.2.0).

Oracle Access Manager Upgrade Guide 10g (10.1.4.2.0)
B32416-01
Copyright © 2000, 2007, Oracle. All rights reserved.
Primary Author: Gail Tiberi Flanegin
Contributor: Raj Mishra, Satish Madanwad, Monika Deo, Paresh Borkar, Pradnyesh Rane, Manisha Deshpande, Ramakrishna Narla, Steven Frehe, Ashish Kolli, Gurudatt Shashikumar, Frank Villavicencio, Himadri Pal, Jane Xu, Yogesh Thete, Ketan Phalak.
The Programs (which include both the software and documentation) contain proprietary information; they are provided under a license agreement containing restrictions on use and disclosure and are also protected by copyright, patent, and other intellectual and industrial property laws. Reverse engineering, disassembly, or decompilation of the Programs, except to the extent required to obtain interoperability with other independently created software or as specified by law, is prohibited.
The information contained in this document is subject to change without notice. If you find any problems in the documentation, please report them to us in writing. This document is not warranted to be error-free. Except as may be expressly permitted in your license agreement for these Programs, no part of these Programs may be reproduced or transmitted in any form or by any means, electronic or mechanical, for any purpose.
If the Programs are delivered to the United States Government or anyone licensing or using the Programs on behalf of the United States Government, the following notice is applicable:
U.S. GOVERNMENT RIGHTS Programs, software, databases, and related documentation and technical data delivered to U.S. Government customers are "commercial computer software" or "commercial technical data" pursuant to the applicable Federal Acquisition Regulation and agency-specific supplemental regulations. As such, use, duplication, disclosure, modification, and adaptation of the Programs, including documentation and technical data, shall be subject to the licensing restrictions set forth in the applicable Oracle license agreement, and, to the extent applicable, the additional rights set forth in FAR 52.227-19, Commercial Computer Software--Restricted Rights (June 1987). Oracle USA, Inc., 500 Oracle Parkway, Redwood City, CA 94065.
The Programs are not intended for use in any nuclear, aviation, mass transit, medical, or other inherently dangerous applications. It shall be the licensee's responsibility to take all appropriate fail-safe, backup, redundancy and other measures to ensure the safe use of such applications if the Programs are used for such purposes, and we disclaim liability for any damages caused by such use of the Programs.
Oracle, JD Edwards, PeopleSoft, and Siebel are registered trademarks of Oracle Corporation and/or its affiliates. Other names may be trademarks of their respective owners.
The Programs may provide links to Web sites and access to content, products, and services from third parties. Oracle is not responsible for the availability of, or any content provided on, third-party Web sites. You bear all risks associated with the use of such content. If you choose to purchase any products or services from a third party, the relationship is directly between you and the third party. Oracle is not responsible for: (a) the quality of third-party products or services; or (b) fulfilling any of the terms of the agreement with the third party, including delivery of products or services and warranty obligations related to purchased products or services. Oracle is not responsible for any loss or damage of any sort that you may incur from dealing with any third party.


v
Contents
Preface ............................................................................................................................................................... xxi
Audience..................................................................................................................................................... xxiDocumentation Accessibility ................................................................................................................... xxiRelated Documents .................................................................................................................................. xxiiConventions ............................................................................................................................................. xxiii
What’s New in Oracle Access Manager?.................................................................................... xxv
Product and Component Name Changes............................................................................................ xxvUpgrade Planning, Methodology, and Deployment Scenarios....................................................... xxviiUpgrade Planning and Tracking Summaries..................................................................................... xxviiUpgrade Concepts and Methods ......................................................................................................... xxviiAutomated Upgrade Processes and Manual Tasks........................................................................... xxviiSupport Changes .................................................................................................................................... xxviiGlobalization, System Behaviors, and Backward Compatibility .................................................... xxviiUpgrade Prerequisites and Preparation............................................................................................. xxviiiUpgrading the Schema and Data ........................................................................................................ xxviiiComponent Upgrades .......................................................................................................................... xxviiiCustomization Upgrades ..................................................................................................................... xxviiiAuditing and Reporting Changes....................................................................................................... xxviiiCombining Challenge and Response Attributes on a Panel ............................................................. xxixValidating Your Upgraded Installation ............................................................................................... xxixUpgrading With the Zero Downtime Method.................................................................................... xxixUpgrading With a Switch From Solaris to Linux ............................................................................... xxixTroubleshooting....................................................................................................................................... xxix
Part I Introduction
1 Introduction to Oracle Access Manager Upgrades and Planning
About Upgrading and Upgrade Methodologies ................................................................................ 1-1In-Place Upgrade Method ................................................................................................................ 1-2Zero Downtime Upgrade Method................................................................................................... 1-2
Typical Deployment Scenarios .............................................................................................................. 1-3About Upgrading Identity System Only Deployments................................................................ 1-3About Upgrading Joint Identity System and Access System Deployments.............................. 1-5
In-Place Upgrade Task Overview .......................................................................................................... 1-8

vi
About the Planning Stage .............................................................................................................. 1-11About the Execution Stage for In-Place Upgrades ..................................................................... 1-11
In-Place Upgrade Planning and Deliverables ................................................................................. 1-13Planning Considerations................................................................................................................ 1-14In-place Schema and Data Upgrade Planning ........................................................................... 1-15Customization Upgrade Planning................................................................................................ 1-17Planning Deliverables..................................................................................................................... 1-18
Planning Considerations for System Downtime During In-Place Upgrades ........................... 1-20Minimizing Downtime During In-Place Upgrades.................................................................... 1-22Downtime Assessments for In-Place Upgrades ......................................................................... 1-23Downtime Assessment Example for In-Place Upgrades........................................................... 1-24
Planning Considerations for Extranet and Intranet Deployments.............................................. 1-26Extranet Deployments ................................................................................................................... 1-26Intranet Deployments .................................................................................................................... 1-27
Upgrade Paths ........................................................................................................................................ 1-28Direct Upgrade Paths ..................................................................................................................... 1-28
From Release 6.1.1 ................................................................................................................... 1-28From Release 6.5 ...................................................................................................................... 1-29From Release 7.x ...................................................................................................................... 1-30
Indirect Upgrade Paths .................................................................................................................. 1-31
2 Upgrade Concepts, Strategies, and Methods
Upgrade Terms and Concepts ................................................................................................................ 2-1About Upgrading the Oracle Application Server .............................................................................. 2-2Backup and Recovery Strategies ........................................................................................................... 2-3
Backup Strategies Before Upgrading .............................................................................................. 2-4Backup Strategies After Upgrading ................................................................................................ 2-4Recovery Strategies ............................................................................................................................ 2-5
Zero Downtime Upgrade Start Methods ............................................................................................. 2-7In-Place Upgrade Start Methods .......................................................................................................... 2-7
GUI Method ........................................................................................................................................ 2-8Console Method ................................................................................................................................. 2-8
Upgrade Event Modes ............................................................................................................................ 2-8Automatic Mode................................................................................................................................. 2-8Confirmed Mode ................................................................................................................................ 2-9
Support Deprecated .............................................................................................................................. 2-10Upgrade Strategies When Support is Changed or Deprecated .................................................... 2-11
Upgrading When Third-Party Support Has Changed .............................................................. 2-11Upgrading When Third-Party Support Has Been Deprecated ................................................ 2-13
Upgrading with Manual Web Server Configuration When Support is Deprecated ..... 2-13Upgrading Oracle Access Manager Incrementally When Third-Party Support is Deprecated 2-14
3 About Automated Processes and Manual Tasks
Supported Components and Applications ......................................................................................... 3-1About Automated Upgrade Processing and Events .......................................................................... 3-2Upgraded Items ........................................................................................................................................ 3-5

vii
Preserved Items......................................................................................................................................... 3-6Directory Server Failover .................................................................................................................. 3-7
Impact of the Upgrade on Directory Server Failover ............................................................ 3-7Connection Pool Details .................................................................................................................... 3-8
Impact of the Upgrade on Connection Pools.......................................................................... 3-8Encryption Schemes and the Shared Secret .................................................................................. 3-8
Items that You Must Manually Upgrade ............................................................................................. 3-9Auditing and Access Reporting ....................................................................................................... 3-9C++ Programs.................................................................................................................................. 3-10Challenge and Response Attributes Must Appear on a Panel ................................................. 3-10Customized Styles........................................................................................................................... 3-10Plug-ins ............................................................................................................................................. 3-11
The Latest Patch Set .............................................................................................................................. 3-12
4 System Behavior and Backward Compatibility
Platform Support ...................................................................................................................................... 4-1Obtaining the Latest Patch Set............................................................................................................... 4-2About Upgrading and Backward Compatibility................................................................................ 4-3General Behavior Changes ..................................................................................................................... 4-5
Acquiring and Using Multiple Languages..................................................................................... 4-7Auditing and Access Reporting ....................................................................................................... 4-7Automatic Login and the Password Redirect URL....................................................................... 4-8Automatic Schema Update Support for ADAM ........................................................................... 4-8C++ Programs..................................................................................................................................... 4-8Cache Flush ......................................................................................................................................... 4-8Certificate Store and Localized Certificates ................................................................................... 4-9Compilers for Plug-ins ...................................................................................................................... 4-9Configuration Files ........................................................................................................................ 4-10Connection Pool Details ................................................................................................................. 4-10Console-based Command-line Interfaces.................................................................................... 4-10Customized Styles, Images, and JavaScript ................................................................................ 4-10Database Input and Output........................................................................................................... 4-11Date and Time Formats .................................................................................................................. 4-11Default Product Pages .................................................................................................................... 4-12Detecting Cross-site Scripting and SQL Injection ...................................................................... 4-13Diagnostic Tools for Identity and Access Servers ...................................................................... 4-13Directory Profiles and Database Instance Profiles ..................................................................... 4-13Directory Server Connection Details ........................................................................................... 4-13Directory Server Failover ............................................................................................................... 4-14Directory Server Interface .............................................................................................................. 4-15Directory Structure ......................................................................................................................... 4-15Domain Names, URIs, and URLs ................................................................................................ 4-15Encryption Schemes........................................................................................................................ 4-16Failover and Failback...................................................................................................................... 4-16File and Path Names....................................................................................................................... 4-17Graphical User Interface ................................................................................................................ 4-17HTML Pages .................................................................................................................................... 4-17

viii
LDAP Bind Password..................................................................................................................... 4-17Message and Parameter Files ........................................................................................................ 4-18Migrating User Data At First Login ............................................................................................. 4-18Minimum Number of Search Characters..................................................................................... 4-19Multiple Values in Challenge Phrase and Response Attributes .............................................. 4-19Names Assigned by Administrators and Product Names........................................................ 4-20Namespaces for Policy Data and User Data Stored Separately ............................................... 4-21Object Classes and Attributes........................................................................................................ 4-21obVer Attribute Changes ............................................................................................................... 4-21Password Policies and Lost Password Management................................................................. 4-22Reconfiguring the Logging Framework without a Restart ....................................................... 4-22Support Changes ............................................................................................................................. 4-23Transport Security for the Directory Server................................................................................ 4-23Upgrade Enhancements ................................................................................................................. 4-23Web Components and Backward Compatibility........................................................................ 4-23Web Server Configuration Files .................................................................................................... 4-24Writing a Stack Trace to a Log File ............................................................................................... 4-24XML Catalogs and XSL Stylesheet Encoding ............................................................................. 4-24
Identity System Behavior Changes.................................................................................................... 4-25Challenge and Response Attributes ............................................................................................. 4-26Identity Server Backward Compatability ................................................................................... 4-26Identity System Event Plug-ins..................................................................................................... 4-27
Identity Event Plug-in Backward Compatibility................................................................. 4-27Common Uses of the Identity Event Plug-in API ............................................................... 4-27Identity Event Plug-in Action Types..................................................................................... 4-28Identity Event Plug-in Event Types ...................................................................................... 4-28
IdentityXML and SOAP Requests and Responses ..................................................................... 4-29Java Applets ..................................................................................................................................... 4-29Large Static Groups......................................................................................................................... 4-30Mail Notification Enhancements .................................................................................................. 4-30Minimum Number of Search Characters .................................................................................... 4-30Multi-Step Identity Workflow Engine ......................................................................................... 4-31Oracle Identity Protocol (OIP)....................................................................................................... 4-31Password Policies and Password Management Runtime Changes......................................... 4-31Portal Inserts and the URI Query String...................................................................................... 4-31PresentationXML Directories ........................................................................................................ 4-32Sorting User Search Results ........................................................................................................... 4-32Web Services Code.......................................................................................................................... 4-32XSLProcessor Parameter ................................................................................................................ 4-32
Access System Behavior Changes ...................................................................................................... 4-32Access Server Backward Compatibility....................................................................................... 4-33Access Manager SDK, Access Manager API, and Custom AccessGates ................................ 4-33Authentication Scheme Updates................................................................................................... 4-34Authorization Rules and Access Policies..................................................................................... 4-34Custom Authentication and Authorization Plug-ins and Interfaces....................................... 4-35
Access Server Backward Compatibility................................................................................ 4-35Authentication and Authorization Plug-ins Background.................................................. 4-35

ix
Directory Profiles ........................................................................................................................... 4-36Forms-based Authentication ......................................................................................................... 4-36Impersonation.................................................................................................................................. 4-36Maximum Elements in Session Token Cache ............................................................................. 4-36Oracle Access Protocol (OAP) Updates ....................................................................................... 4-37Policy Manager................................................................................................................................ 4-37Policy Manager API ........................................................................................................................ 4-37Preferred HTTP Host...................................................................................................................... 4-38Shared Secret.................................................................................................................................... 4-38Triggering Authentication Actions After the ObSSOCookie Is Set ......................................... 4-38WebGates.......................................................................................................................................... 4-38
Enhancements Available with Release 10.1.4 Patch Set 1 (10.1.4.2.0) ......................................... 4-39
Part II Upgrading the Schema and Data
5 Preparing for Schema and Data Upgrades
About Schema and Data Upgrades ....................................................................................................... 5-1Considerations for Workflows in Multiple Directories................................................................ 5-2About Preparing For and Performing the In-Place Schema and Data Upgrade ...................... 5-2Error Logging for All Directory Servers ......................................................................................... 5-4
Strategies for Upgrading in a Replicated Environment ................................................................... 5-4About User Data Replication............................................................................................................ 5-5
Failover Configuration............................................................................................................... 5-6Load Balancing Configuration.................................................................................................. 5-6Load Balancing and Failover Configuration........................................................................... 5-6Operation-based Load Balancing Configuration ................................................................... 5-6
About Configuration Data Replication........................................................................................... 5-6Configuring the Challenge/Response Phrase at the Object Class Level ...................................... 5-7Configuring Unique Namespaces for Directory Connection Information................................... 5-7Preparing Your Directory Instances for the Schema and Data Upgrade ....................................... 5-9
Preparing a Directory Server When Its Release is Deprecated ................................................... 5-9Changing the Directory Server Search Size Limit Parameter .................................................. 5-10Active Directory Considerations and Preparation..................................................................... 5-11
Changing the MaxPageSize Parameter................................................................................. 5-11Confirming You Are Using a Schema Master .................................................................... 5-12
Active Directory Application Mode Considerations and Preparation.................................... 5-13IBM Directory Server Considerations and Preparation ............................................................ 5-14Oracle Internet Directory ............................................................................................................... 5-15Siemens DirX Directory Deprecation ........................................................................................... 5-15Sun Directory Server Considerations and Preparation ............................................................. 5-16
Backing Up Existing Oracle Access Manager Data ........................................................................ 5-16Backing up the Earlier Oracle Access Manager Schema ........................................................... 5-17Backing up Oracle Access Manager Configuration and Policy Data ..................................... 5-17Backing Up User and Group Data................................................................................................ 5-18Backing Up Workflow Data........................................................................................................... 5-18Archiving Processed Workflow Instances................................................................................... 5-18

x
Backing Up Existing Directory Instances ......................................................................................... 5-19Halting On-the-fly User Data Migration at First Login Temporarily ......................................... 5-19
Halting On-the-fly Migration of User Data: Phase 1 ................................................................ 5-20Preparing Host Computers for Master Components...................................................................... 5-21Adding An Earlier Identity System to Use as a Master for the In-place Method ..................... 5-21
Defining Additional Instances in the Existing System Console ............................................... 5-22Installing the Master COREid Server Instance ........................................................................... 5-25Installing the Master WebPass ...................................................................................................... 5-26Setting Up the Master Identity System for the In-place Schema and Data Upgrade............ 5-27
Adding an Earlier Access Manager to Use as a Master for the In-Place Method ..................... 5-28Installing the Master Access Manager for the In-place Schema and Data Upgrade............. 5-29Setting Up the Master Access Manager for the In-place Method ............................................ 5-30
Specifying Directory Server Details and Data Locations ................................................... 5-31Configuring Authentication Schemes................................................................................... 5-32Finishing the Master Access Manager Setup ....................................................................... 5-33
Finishing Preparation for the In-Place Schema and Data Upgrade ............................................ 5-33
6 Upgrading Identity System Schema and Data In Place
About Upgrading the Identity System Schema and Data ................................................................ 6-1Upgrading the Schema and Data In Place with the Master Identity Server................................. 6-3
Master Identity System Schema and Data Upgrade Prerequisites ............................................ 6-4Starting the Master Identity Server Upgrade................................................................................. 6-5Specifying the Target Directory and Languages ........................................................................... 6-5Updating the Identity System Schema and Data........................................................................... 6-7Enabling Multi-Language Capability.............................................................................................. 6-8Upgrading Identity Server Configuration Files............................................................................. 6-9Upgrading the Software Developer Kit (SDK) Configuration ................................................. 6-12Finishing and Verifying the Master COREid Server Upgrade................................................. 6-13
Upgrading the Master WebPass.......................................................................................................... 6-13Master WebPass Upgrade Prerequisites ..................................................................................... 6-14Starting the Master WebPass Upgrade, Specifying a Target Directory and Languages ...... 6-14Upgrading WebPass Configuration Files and Web Server Configuration............................. 6-15Finishing and Verifying the Master WebPass Upgrade ............................................................ 6-16
Verifying the Identity System Schema and Data Upgrade ........................................................... 6-16Uploading Directory Server Index Files ........................................................................................... 6-17
Verifying and Uploading Oracle Internet Directory and Sun Directory Indexes ................. 6-20Verifying and Uploading Novell eDirectory Indexes................................................................ 6-21
Renaming Audit Files After Upgrading the Schema and Data.................................................... 6-21Backing Up Upgraded Identity Data ................................................................................................. 6-22Halting On-the-fly Migration of User Data: Phase 2 ..................................................................... 6-22Recovering From an Identity System Schema or Data Upgrade Failure .................................... 6-25Looking Ahead....................................................................................................................................... 6-25
7 Upgrading Access System Schema and Data In Place
About Access System Schema and Data Upgrades ........................................................................... 7-1Upgrading the Schema and Data with the Master Access Manager Component........................ 7-3
Access System Schema and Data Upgrade Prerequisites ............................................................ 7-3

xi
Starting the Master Access Manager Upgrade ............................................................................. 7-4Specifying the Target Directory and Languages ........................................................................... 7-4Updating the Access System Schema and Policy Data................................................................. 7-5Upgrading the Access Manager and Web Server Configuration Files ..................................... 7-6Finishing and Verifying the Access System Schema and Data Upgrade................................... 7-9
Uploading Directory Server Index Files .............................................................................................. 7-9Verifying the Access Schema and Data Upgrade ............................................................................... 7-9Creating a Temporary Directory Profile For Access System Upgrades ...................................... 7-10Backing Up Upgraded Policy Data .................................................................................................... 7-12Recovering From an Access System Schema or Data Upgrade Failure ...................................... 7-13Looking Ahead....................................................................................................................................... 7-13
Part III Upgrading Components
8 Preparing Components for the Upgrade
Checking Compatibility with Previous Releases .............................................................................. 8-1Copying Custom Identity Event Plug-ins ........................................................................................... 8-2Preparing Earlier Customizations ......................................................................................................... 8-2Preparing the Default Logout in the Policy Manager ....................................................................... 8-3Preparing Host Computers ..................................................................................................................... 8-3
Changing Read Permissions on Password Files............................................................................ 8-4Confirming Free Disk Space ............................................................................................................. 8-4
Preparing Release 6.x Environments .................................................................................................... 8-4Adding Packages for Release 6.5.0.x .............................................................................................. 8-4Adding Packages for Release 6.5.2.x Patch .................................................................................... 8-6
Preparing Multi-Language Installations ............................................................................................. 8-7Backing Up File System Directories, Web Server Configurations, and Registry Details .......... 8-7
Backing Up the Existing Component Installation Directory ....................................................... 8-7Backing Up the Existing Web Server Configuration File ............................................................. 8-8Backing Up Windows Registry Data............................................................................................... 8-9
Stopping Servers and Services .............................................................................................................. 8-9Logging in with Appropriate Administrative Rights .................................................................... 8-10
9 Upgrading Remaining Identity System Components In Place
About In-Place Identity System Upgrades .......................................................................................... 9-1Upgrading Remaining Identity Servers In Place ............................................................................... 9-3
Identity Server Upgrade Prerequisites ........................................................................................... 9-3Starting the Identity Server Upgrade .............................................................................................. 9-4Specifying the Target Directory and Languages .......................................................................... 9-4Upgrading Identity Server Configuration Files............................................................................. 9-6Upgrading the Software Developer Kit Configuration ................................................................ 9-6Finishing and Verifying the Identity Server Upgrade.................................................................. 9-7
Upgrading Remaining WebPass Instances In Place .......................................................................... 9-8WebPass Upgrade Prerequisites ..................................................................................................... 9-9Starting the WebPass Upgrade, Specifying the Target Directory and Languages .................. 9-9Upgrading WebPass Configuration Files and Web Server Configuration File ..................... 9-10

xii
Finishing and Verifying the WebPass Upgrade ......................................................................... 9-11Validating the In-place Identity System Upgrade .......................................................................... 9-11Backing Up Upgraded Identity Component Information............................................................. 9-12Recovering From an In-place Identity Component Upgrade Failure ......................................... 9-12Looking Ahead....................................................................................................................................... 9-12
10 Upgrading Access System Components In Place
About In-place Access System Component Upgrades ................................................................... 10-1Upgrading Remaining Policy Managers In Place ........................................................................... 10-2
In-place Policy Manager Upgrade Prerequisites ........................................................................ 10-3Starting the Policy Manager Upgrade, Specifying a Target Directory and Languages........ 10-4Upgrading Policy Manager and Web Server Configuration Files ........................................... 10-5Finishing and Verifying the Policy Manager Upgrade ............................................................. 10-5
Upgrading Access Servers In Place.................................................................................................... 10-6In-place Access Server Upgrade Prerequisites ........................................................................... 10-6Starting the Access Server Upgrade, Specifying a Directory and Languages........................ 10-7Upgrading Access Server Configuration Files............................................................................ 10-8Finishing and Verifying the Access Server Upgrade................................................................. 10-9
Upgrading WebGates In Place ............................................................................................................ 10-9In-place WebGate Upgrade Prerequisites ................................................................................ 10-10Starting the WebGate Upgrade, Specifying a Target Directory and Languages ................. 10-11Upgrading WebGate and Web Server Configuration Files .................................................... 10-11Finishing and Verifying the WebGate Upgrade....................................................................... 10-12
Backing Up Upgraded Access System Component Directories ................................................. 10-13Recovering From an In-place Access System Upgrade Failure .................................................. 10-13Looking Ahead..................................................................................................................................... 10-14
Part IV Upgrading Your Customizations
11 Upgrading Integration Components and an Independently Installed SDK
Upgrading Third-Party Integration Connectors.............................................................................. 11-1Integration Upgrade Prerequisites .............................................................................................. 11-2Starting the Integration Connector Upgrade ............................................................................. 11-2Upgrading Security Provider for WebLogic SSPI ..................................................................... 11-3Finishing the Integration Connector Upgrade............................................................................ 11-3
Upgrading Independently Installed Software Developer Kits.................................................... 11-4SDK Upgrade Prerequisites .......................................................................................................... 11-5Starting the SDK Upgrade, Specifying a Target Directory and Languages ........................... 11-5Upgrading the SDK Configuration and Verifying the Upgrade.............................................. 11-6
Backing Up Upgraded Integration Connector or SDK Data......................................................... 11-6Recovering From an Integration Connector or SDK Upgrade Failure........................................ 11-7Looking Ahead....................................................................................................................................... 11-7
12 Upgrading Your Identity System Customizations
Prerequisites and Guidelines.............................................................................................................. 12-1Upgrading Auditing and Access Reporting for the Identity System.......................................... 12-2

xiii
Upgrading Auditing and Reporting with a Microsoft SQL Server ........................................ 12-3Database Record Sizing........................................................................................................... 12-5
Upgrading Auditing and Reporting with an Oracle Database ................................................ 12-6Combining Challenge and Response Attributes on a Panel ........................................................ 12-8Confirming Identity System Failover and Load Balancing .......................................................... 12-9Migrating Custom Identity Event Plug-Ins.................................................................................... 12-10Ensuring Compatibility with Earlier Portal Inserts ..................................................................... 12-11About Custom Items and Upgrades ................................................................................................ 12-11Incorporating Customizations from Release 6.5 and 7.x ............................................................. 12-12Incorporating Customizations from Releases Earlier than 6.5 ................................................... 12-14
Style Customization Prerequisites ............................................................................................. 12-14Recreating Custom Style Directories in 10g (10.1.4.0.1)........................................................... 12-14Customizing New Stylesheets..................................................................................................... 12-16Incorporating Custom Images..................................................................................................... 12-18
gifPathName and jsPathName Variables ........................................................................... 12-18Using New Customized Styles.................................................................................................... 12-20Incorporating JavaScript Customizations.................................................................................. 12-20Handling Language-Specific Message Catalogs....................................................................... 12-21
Handling XSL Stylesheet Messages .................................................................................... 12-21Handling Messages for JavaScript....................................................................................... 12-23
Validating Identity System Customization Upgrades ................................................................. 12-24Backing Up Upgraded Identity System Customizations............................................................. 12-24Recovering from an Identity System Customization Upgrade Failure .................................... 12-24Looking Ahead..................................................................................................................................... 12-24
13 Upgrading Your Access System Customizations
Prerequisites and Guidelines.............................................................................................................. 13-1Upgrading Auditing and Reporting for the Access Server .......................................................... 13-2Confirming Access System Failover and Load Balancing............................................................. 13-3Upgrading Forms-based Authentication .......................................................................................... 13-4Recompiling and Redesigning Custom Authentication and Authorization Plug-Ins ........... 13-5Associating Release 6.1.1 Authorization Rules with Access Policies ......................................... 13-5Assuring Proper Authorization Failure Re-directs After Upgrading from 6.1.1....................... 13-6Updating the ObAMMasterAuditRule_getEscapeCharacter in Custom C Code ..................... 13-7Validating Access System Customization Upgrades...................................................................... 13-7Backing Up Upgraded Access System Customizations ................................................................. 13-7Recovering from an Access System Customization Upgrade Failure......................................... 13-8Looking Ahead....................................................................................................................................... 13-8
Part V Validating the Upgrade
14 Validating the Entire System Upgrade
Validating the Identity System Upgrade .......................................................................................... 14-1Validating Access System Upgrades ................................................................................................. 14-2Restarting On-the-fly User Data Migration for In-place Upgrades ........................................... 14-3Deleting the Temporary Directory Server Profile........................................................................... 14-4

xiv
Reverting Backward Compatibility ................................................................................................... 14-5Reverting Identity Server Backward Compatibility .................................................................. 14-5Reverting Access Server Backward Compatibility..................................................................... 14-5
Part VI Upgrading Using the Zero Downtime Upgrade Method
15 Introduction to the Zero Downtime Upgrade Method
About Zero Downtime Upgrades and Planning ............................................................................. 15-1Deployment Scenarios for Zero Downtime Upgrades .............................................................. 15-2Original and Clone Environments for the Zero Downtime Upgrade Method ...................... 15-3
The Original Environment ..................................................................................................... 15-3The Clone Environment ......................................................................................................... 15-3
Hardware Requirements for Zero Downtime Upgrades .......................................................... 15-6Web Server Requirements for Zero Downtime Upgrades ....................................................... 15-7
Web Server Support for Multiple Oracle Access Manager Releases................................ 15-7Directory Server Requirements for the Zero Downtime Upgrade .......................................... 15-8Schema and Data Upgrades with the Zero Downtime Upgrade Method ............................. 15-9
About The Schema Upgrade ................................................................................................ 15-10About Configuration and Policy Data Upgrades.............................................................. 15-11User-Data Migration and Multiple Values in Challenge and Response Attributes for LPM.. 15-12
Preparation Tasks for the Zero Downtime Method................................................................. 15-12Validation During a Zero Downtime Upgrade ........................................................................ 15-14Customization Upgrades Using the Zero Downtime Upgrade Method .............................. 15-15
Zero Downtime Upgrade Tasks and Sequencing ......................................................................... 15-16Duration of Zero Downtime Tasks and Validation ...................................................................... 15-21
About Isolating the Original and Cloned Environments ........................................................ 15-22About Retrieving Changes to the Original Branch Before Upgrading Original Instances 15-23
Zero Downtime Upgrade Tools and Processes .............................................................................. 15-23About Mkbranch Mode Processing............................................................................................ 15-26About Schema Mode Processing ................................................................................................ 15-28About Clone Mode Processing.................................................................................................... 15-30About Original Mode (Prod) Processing ................................................................................... 15-33
Backup and Recovery Strategies for Zero Downtime Upgrades ............................................... 15-33Recovery ......................................................................................................................................... 15-35Rolling Back ................................................................................................................................... 15-36Reinstating Original Windows Registry Entries During a Rollback Operation .................. 15-36
Developing a Plan for a Zero Downtime Upgrade ....................................................................... 15-37
16 Upgrading the Schema, Data, and Clone System
Prerequisites Before Starting a Zero Downtime Upgrade ............................................................ 16-1Preparing the Original Installation for a Zero Downtime Upgrade .......................................... 16-2
Bringing Host Computers to Oracle Access Manager 10g (10.1.4.0.1) Support Levels ........ 16-3Preparing Directory Server Instances and Data ......................................................................... 16-4Adding New Hardware or Earlier Instances to Your Deployment......................................... 16-4Adding Profiles for Planned COREid Server Clones in the System Console......................... 16-5Adding Profiles for Planned WebPass Clones in the System Console.................................... 16-7

xv
Associating WebPass Clone Profiles with COREid Server Clone Profiles ............................ 16-9Viewing Details for Existing COREid Servers Associated with a WebPass.................. 16-10Associating a COREid Server Clone with a WebPass Clone........................................... 16-10
Adding New Directory Server Profiles for Cloned COREid Servers .................................... 16-11About Entries for Access Manager Clones ................................................................................ 16-14Adding a Profile for Access Server Clones................................................................................ 16-14Creating New Directory Server Profiles for Access System Clones ...................................... 16-16Associating Original WebGates with Access Server Clones .................................................. 16-17
Alternative Procedure to Associate Original WebGates and Clone Access Servers.... 16-19Recovering From Issues With Information Entered in the System Console ........................ 16-21Rolling Back to the Starting Point After Entering Clone Details............................................ 16-21
Cloning Earlier Components for a Zero Downtime Upgrade .................................................... 16-21About Creating Clones ................................................................................................................. 16-22Setting Up the File System and Creating Clone Instances ...................................................... 16-24Creating A New Web Server Instance for Cloned Web Components................................... 16-26Rolling Back Changes After Cloning Components.................................................................. 16-27
About Destination Creation and Obtaining Tools for a Zero Downtime Upgrade ............... 16-28Destination Creation: Extracting 10g (10.1.4.0.1) Libraries and Files ................................... 16-28Obtaining Tools: Applying Release 10.1.4 Patch Set 1 (10.1.4.2.0) ........................................ 16-31
Copying Configuration and Policy Data to a New Branch in the LDAP Directory Server .. 16-33About Creating and Populating a New Branch in the LDAP Directory Server .................. 16-33Creating and Populating a New oblix Branch....................................................................... 16-36Recovering from Problems With Populating the New Branch .............................................. 16-39Rolling Back Changes Made for the New oblix Branch ....................................................... 16-39
Configuring Cloned Components and Services............................................................................ 16-40Configuring Cloned COREid Server Services and Details .................................................... 16-41Configuring Cloned WebPass Instances to Operate with Cloned COREid Servers ........... 16-45Setting Up the Cloned COREid System to Use the New Branch ........................................... 16-48Setting Up Cloned Access Managers to Use the New Branch................................................ 16-51
Updating Cloned Access Manager Web Server Configuration Files ............................ 16-52Setting Up the Cloned Access Manager to use the New Branch .................................... 16-53
Configuring Cloned Access Servers ........................................................................................... 16-55Isolating Environments ................................................................................................................ 16-58
Isolating the Clone Setup and Providing WebGate Coverage ....................................... 16-59About Isolating the Original Setup ..................................................................................... 16-60
Rolling Back Changes for Reconfigured Clones....................................................................... 16-60Upgrading the Schema During a Zero Downtime Upgrade ....................................................... 16-61
About Upgrading the Schema..................................................................................................... 16-61Upgrading the Identity System Schema .................................................................................... 16-64Upgrading the Access System Schema ..................................................................................... 16-65
Validating Successful Operations in Your Environment............................................................. 16-67Validating Identity System Operations .................................................................................... 16-67Validating Access System Operations........................................................................................ 16-68Rolling Back After the Schema Upgrade ................................................................................... 16-69
Upgrading the Cloned Identity System ....................................................................................... 16-70Turning Off the Access Server Cache Flush.............................................................................. 16-71Preparing Cloned Identity System Components for the Upgrade ........................................ 16-71

xvi
Upgrading Cloned COREid Servers........................................................................................... 16-72Upgrading Cloned WebPass Instances ...................................................................................... 16-77Validating the Upgraded Cloned Identity System................................................................... 16-82Backing Up Upgraded Identity System Clones ........................................................................ 16-82Recovering From a Cloned Identity System Upgrade Failure ............................................... 16-83Rolling Back After Upgrading Identity System Clones .......................................................... 16-83Looking Ahead .............................................................................................................................. 16-84
Renaming Audit Files After Upgrading Identity System Clones.............................................. 16-85Upgrading SDKs and Identity System Customizations .............................................................. 16-86Upgrading the Cloned Access System ............................................................................................ 16-87
Preparing Cloned Access System Components for the Upgrade .......................................... 16-87Upgrading Cloned Access Manager Instances ......................................................................... 16-88Upgrading Cloned Access Servers ............................................................................................. 16-94Validating the Upgraded Cloned Access System..................................................................... 16-98Backing Up Upgraded Access System Clones .......................................................................... 16-98Recovering from a Failed Cloned Access System Component Upgrade.............................. 16-98Rolling Back After Upgrading Access System Clones............................................................. 16-99Looking Ahead .............................................................................................................................. 16-99
Upgrading SDKs, Integration Connectors, and Access System Customizations ................. 16-100
17 Upgrading the Original System
Prerequisites For Original Upgrades with the Zero Downtime Method ................................... 17-1Retrieving Changes in the Original Branch Before Upgrading Originals................................. 17-2Reconfiguring Domain Name Systems (DNS) to Use Upgraded Clones .................................. 17-3Upgrading Your Original Identity System ....................................................................................... 17-4
About Upgrading Original Identity System Instances .............................................................. 17-4Turning Off the Access Server Cache Flush................................................................................ 17-6Preparing Original Identity System Components for the Upgrade ........................................ 17-7Upgrading Original COREid Servers that are Associated with a Single WebPass ............... 17-7Configuring Upgraded Original COREid Servers ................................................................ 17-12Upgrading An Original Associated WebPass Instance ........................................................... 17-14Configuring the Upgraded Original WebPass for Upgraded COREid Servers................... 17-19Adding a Temporary Directory Profile for Original Access System Upgrades .................. 17-21About Creating Individual Profiles for WebGates that Share a Profile ............................... 17-23Setting Up the Upgraded Original Identity System................................................................. 17-24Validating the Upgraded Original Identity System................................................................. 17-26Backing Up the Upgraded Original Identity System............................................................... 17-26Recovering From an Original Identity System Upgrade Failure ........................................... 17-27Rolling Back After Upgrading the Original Identity System ................................................ 17-27Looking Ahead ............................................................................................................................. 17-28
Upgrading SDKs and Identity System Customizations .............................................................. 17-29Upgrading Your Original Access System ....................................................................................... 17-30
About Upgrading Original Access System Instances .............................................................. 17-30Preparing Original Access System Components for the Upgrade......................................... 17-32Creating Individual Profiles for WebGates that Share a Profile ........................................... 17-32Upgrading An Original Access Manager Instance .................................................................. 17-34Setting Up the Upgraded Original Access Manager ............................................................... 17-39
xvii
Setting Up the Original Access Manager to Use the New Branch.................................. 17-39Configuring Original Access Servers to Use the New Branch .............................................. 17-41Upgrading Original Access Server Instances ........................................................................... 17-44Upgrading Original WebGates ................................................................................................... 17-48
Upgrading Original WebGates ............................................................................................ 17-49Reconfiguring Upgraded WebGates ................................................................................... 17-53
Validating the Upgraded Original Access System................................................................... 17-55Backing Up the Upgraded Original Access System................................................................. 17-55Recovering From an Original Access System Upgrade Failure ............................................. 17-55Rolling Back After Upgrading the Original Access System.................................................... 17-56Looking Ahead ............................................................................................................................. 17-56
Upgrading SDKs, Integration Connectors, and Access System Customizations ................... 17-57Validating the Entire Upgraded Original Environment .............................................................. 17-57Starting On-the-fly User Data Migration ....................................................................................... 17-58Reconfiguring Domain Name Systems to Use the Upgraded Original Deployment............ 17-58Deleting the Temporary Directory Server Profile......................................................................... 17-58Reverting Backward Compatibility ................................................................................................. 17-59Removing the Cloned System After Upgrading Originals ......................................................... 17-59
Part VII Appendixes
A Oracle Access Manager Directory Structure Changes
About the 10g (10.1.4.0.1) Directory Structure.................................................................................... A-1\lang Directory and \langtag Subdirectories................................................................................ A-2\logs Directory .................................................................................................................................. A-3\obsymbols Directory ...................................................................................................................... A-3\reports Directory............................................................................................................................. A-3\scoreboard Directory...................................................................................................................... A-3\WebServices Directory................................................................................................................... A-3
Identity Server Directories .................................................................................................................... A-3WebPass Directories................................................................................................................................ A-4Directories for Access System Components ...................................................................................... A-5
Subdirectories for the Policy Manager........................................................................................... A-6Subdirectories for the Access Server .............................................................................................. A-7Subdirectories for WebGate............................................................................................................. A-7
PresentationXML Directories................................................................................................................ A-7PresentationXML Directories with Oracle Access Manager Release 6.5 and Later ................ A-8PresentationXML Directories Before Oracle Access Manager 6.5.............................................. A-9Message Storage ............................................................................................................................. A-10
B Migrating from a Solaris Platform to a Linux Platform While Upgrading
About Migrating from a Solaris Platform to a Linux Platform ...................................................... B-1Considerations for Upgrades with a Solaris to Linux Switch ........................................................ B-4
Considerations for Identity Server and Policy Manager Components ..................................... B-4Considerations for Oracle Access Manager Web Components.................................................. B-5
Prerequisites and Preparation............................................................................................................... B-5

xviii
Preparing Your Linux Host ............................................................................................................ B-5Installing Oracle Access Manager 10g (10.1.4.0.1) Components on the Linux Host ............... B-6Making Earlier Installation Directories on Solaris Available to the Linux Host ..................... B-8Finishing Host Preparation.............................................................................................................. B-8
Upgrading Identity System Components while Switching to Linux ........................................... B-9Upgrading Identity Servers while Switching to Linux................................................................ B-9Upgrading WebPass Instances while Switching to Linux ........................................................ B-10Finishing the Identity System Upgrade After Switching to Linux ......................................... B-11
Re-configuring the Identity Server for Its Linux Host........................................................ B-11Reconfiguring WebPass To Communicate with the Identity Server on Linux............... B-12
Validating and Backing up the Upgraded Identity System...................................................... B-13Validating your Identity System Upgrade........................................................................... B-14Backing Up Upgraded Identity Component Information ................................................. B-14
Upgrading Access System Components while Switching to Linux ............................................ B-14Upgrading Policy Manager Instances while Switching to Linux............................................. B-15Upgrading Access Servers while Switching to Linux................................................................ B-16Upgrading WebGates while Switching to Linux........................................................................ B-17Finishing the Access System Upgrade with a Solaris to Linux Switch ................................... B-18
Reconfiguring Access Servers ................................................................................................ B-18Reconfiguring WebGate.......................................................................................................... B-19
Validating and Backing up the Upgraded Access System........................................................ B-20Validating the Upgraded Access System ............................................................................. B-20Backing Up Upgraded Access System Component Directories........................................ B-21
Recovering From an Identity Component Upgrade Failure ......................................................... B-21Recovering From an Access System Upgrade Failure .................................................................... B-22
C Upgrade Process and Utilities
About Upgrade Events ........................................................................................................................... C-1MigrateOAM Script for Zero Downtime Upgrades ......................................................................... C-6Primary Utility: obmigratenp................................................................................................................ C-6File Upgrade: obmigratefiles................................................................................................................. C-7Message and Parameter Upgrade: obmigrateparamsg..................................................................... C-9Schema Upgrade: obmigrateds ........................................................................................................... C-12Data Upgrade: obmigratedata ............................................................................................................. C-14Web Server Upgrade: obmigratews ................................................................................................... C-16Component-Specific Upgrades ........................................................................................................... C-17
Identity Server: obMigrateNetPointOis ....................................................................................... C-17WebPass: obMigrateNetPointWP ................................................................................................. C-18Policy Manager: obMigrateNetPointAM..................................................................................... C-19Access Server: obMigrateNetPointAAA...................................................................................... C-19WebGate: obMigrateNetPointWG................................................................................................ C-20Software Developer Kit (SDK): obMigrateNetPointASDK....................................................... C-20
D Manual Schema and Data Upgrades
About Upgrading Schema and Data Manually ................................................................................. D-1Upgrading the Schema Manually ........................................................................................................ D-1About Upgrading Data Manually ........................................................................................................ D-3

xix
Upgrading Data Manually..................................................................................................................... D-4Suppressing Automatic Data Upgrades ........................................................................................ D-5Upgrading the Configuration Tree Manually............................................................................... D-6Removing Obsolete Schema Elements for Release 6.5 and 7.0 .................................................. D-7
Cleaning Up Obsolete Elements During Identity Server Upgrades................................... D-8Cleaning Up Obsolete Elements During Policy Manager Upgrades ................................. D-9
Uploading the Generated LDIF....................................................................................................... D-9Upgrading User Data Manually ................................................................................................... D-10
Sample Default obmigratenpparams.lst File ................................................................................... D-12Sample data_520_to_600_xxx.lst ......................................................................................................... D-16
E Upgrading Sun Web Server Version 4 to Version 6 on Windows 2000
Upgrading Sun Web Server version 4.x to version 6 ........................................................................ E-1Configuring the New Web Server Instance........................................................................................ E-2
Configuring magnus.conf ................................................................................................................ E-2Configuring obj.conf ........................................................................................................................ E-3
Troubleshooting....................................................................................................................................... E-5
F Planning and Tracking Summaries
About Planning for the Upgrade.......................................................................................................... F-2Summary of General Details Needed for Upgrade Planning......................................................... F-4Summary of Information Needed for Directory Server Instances ................................................ F-6Summary of DIT and Object Definition Details .............................................................................. F-7Summary of Directory Server/RDBMS Profile Details ................................................................... F-8Summary of Database Instance Profile Details................................................................................. F-9Summary of Details Needed for Earlier Identity Servers ............................................................. F-10Summary of Details Needed for Earlier WebPass Instances ........................................................ F-12Summary of Details Needed for Earlier Policy Manager Instances............................................ F-13Summary of Details Needed for Earlier Access Servers................................................................ F-15Summary of Details Needed for Earlier WebGates/AccessGates ................................................ F-17Summary of Details for Integration Components and Independently Installed SDKs ......... F-19Summary of Details Needed for Customizations ........................................................................... F-20Summary of Schema and Data Preparation Tasks .......................................................................... F-22Summary of Upgrading Schema and Data: In-Place Upgrade Method...................................... F-24Summary of Component Preparation Tasks ................................................................................... F-25Summary of In-Place Upgrade Tasks ................................................................................................ F-26Summary of a Zero Downtime Upgrade Tasks ............................................................................... F-27Summary for Integration Connector/SDK Upgrade Tasks ........................................................... F-31Summary for Customization Upgrade Tasks ................................................................................... F-32Summary of Validating the Entire Upgrade..................................................................................... F-33
G Troubleshooting the Upgrade Process
Accessing Log Files ................................................................................................................................. G-2Accessing Data Issues............................................................................................................................. G-3Access Server Not Processing Earlier WebGate Data Properly ...................................................... G-3Auditing and Access Reporting Issues ............................................................................................... G-3

xx
Authentication Failures.......................................................................................................................... G-4Authorization Failure Re-direct Problems After Upgrading from 6.1.1 ....................................... G-5Challenge and Response Phrase Issues .............................................................................................. G-5Challenge Response Might Not Convert Properly ........................................................................... G-5Compatibility of Earlier Plug-ins in the Upgraded Environment ................................................. G-6Customized Styles, Images, and JavaScript ....................................................................................... G-6Deleting the vpd.properties File .......................................................................................................... G-7Ensuring Compatibility with Earlier Portal Inserts ......................................................................... G-7Failover and Load Balancing Issues in Upgraded Environments.................................................. G-7Identity Server Not Processing Data from Earlier Plug-ins ............................................................ G-7IdentityXML Calls Fail After WebGate Install.................................................................................. G-8LDAP Add Errors in a Replicated Environment ............................................................................... G-8Manual Schema Upload Fails ............................................................................................................... G-9Mime_types -related Customizations Not Retained ........................................................................ G-9Page Not Found Error While Accessing the Access or Identity URL .......................................... G-10Searches Are Slow ................................................................................................................................. G-10Simple Mode Password File Not Converted During Upgrade..................................................... G-10Troubleshooting Sun Web Server Upgrades .................................................................................... G-12Users Cannot Log In ............................................................................................................................. G-14File Required for WebSphere Application Server 6.1 Registrytester is Missing...................... G-14Weblogic Connectors Simple Mode Password File is Not Migrated .......................................... G-14WebSphere Application Server and Portal Server Upgrades ....................................................... G-15Zero Downtime Upgrade Issues......................................................................................................... G-15
No Registry Key for Upgraded Web Component Clones with IIS v5 .................................... G-15Generating a New Registry Key To Use When Rolling Back an Original Instance Upgrade......... G-16
Index
xxi
Preface
This Upgrade Guide provides information about upgrading currently installed Oracle Access Manager components to 10g (10.1.4.0.1) on supported platforms. Included are considerations, prerequisites, step-by-step instructions, and summaries to help ensure your success. Also described is the zero downtime upgrade method that you can use to upgrade to 10.1.4.2.0.
This book covers upgrades for Oracle Access Manager components only. For details about upgrading Oracle Application Server components, see Oracle Application Server Upgrade and Compatibility Guide. If you are using the zero downtime upgrade method, see Part VI.
This Preface covers the following topics:
■ Audience
■ Documentation Accessibility
■ Related Documents
■ Conventions
This Upgrade Guide primarily uses new product and component names. For more information, see "What’s New in Oracle Access Manager?" on page -xxv.
AudienceThis guide targets the needs of anyone who is responsible to upgrade any Oracle Access Manager component to the latest release. If Oracle Access Manager is not installed, see the Oracle Access Manager Installation Guide.
This document assumes that you are familiar with your network architecture, your LDAP directory, and firewall and internet security.
Documentation AccessibilityOur goal is to make Oracle products, services, and supporting documentation accessible, with good usability, to the disabled community. To that end, our documentation includes features that make information available to users of assistive technology. This documentation is available in HTML format, and contains markup to facilitate access by the disabled community. Accessibility standards will continue to
Note: Oracle Access Manager was previously known as "Oblix NetPoint" and "Oracle COREid".
xxii
evolve over time, and Oracle is actively engaged with other market-leading technology vendors to address technical obstacles so that our documentation can be accessible to all of our customers. For more information, visit the Oracle Accessibility Program Web site at
http://www.oracle.com/accessibility/
Accessibility of Code Examples in DocumentationScreen readers may not always correctly read the code examples in this document. The conventions for writing code require that closing braces should appear on an otherwise empty line; however, some screen readers may not always read a line of text that consists solely of a bracket or brace.
Accessibility of Links to External Web Sites in DocumentationThis documentation may contain links to Web sites of other companies or organizations that Oracle does not own or control. Oracle neither evaluates nor makes any representations regarding the accessibility of these Web sites.
TTY Access to Oracle Support ServicesOracle provides dedicated Text Telephone (TTY) access to Oracle Support Services within the United States of America 24 hours a day, 7 days a week. For TTY support, call 800.446.2398. Outside the United States, call +1.407.458.2479.
Related DocumentsFor more information, see the following documents in the Oracle Access Manager documentation set:
■ Oracle Access Manager Introduction—Provides an introduction to Oracle Access Manager, a road map to Oracle Access Manager manuals, and a glossary of terms.
■ Oracle Application Server Release Notes—Read these for late breaking Oracle Access Manager details. The release notes are available with the platform-specific documentation. The most current version of the release notes is available on Oracle Technology Network at: http://www.oracle.com/technology/documentation.
■ Oracle Access Manager Patch Set Notes Release 10.1.4 Patchset 1 (10.1.4.2.0) For All Supported Operating Systems. It provides the system requirements and instructions needed to install or de-install the patch set itself, a list of known issues related to the patch set, a list of the platform-specific bugs fixed in this Oracle Access Manager patch set. It provides a list of all generic (common to all operating systems) Oracle Access Manager bugs that have been fixed in this patch set, sorted by component.
■ Oracle Access Manager Installation Guide—Explains how to install and configure the components.
■ Oracle Access Manager Upgrade Guide—Explains how to upgrade earlier releases to the latest major Oracle Access Manager release.
■ Oracle Access Manager Identity and Common Administration Guide—Explains how to configure Identity System applications to display information about users, groups, and organizations; how to assign permissions to users to view and modify the data that is displayed in the Identity System applications; and how to configure workflows that link together Identity application functions, for example, adding basic information about a user, providing additional information about the user,

xxiii
and approving the new user entry, into a chain of automatically performed steps. This book also describes administration functions that are common to the Identity and Access Systems, for example, directory profile configuration, password policy configuration, logging, and auditing.
■ Oracle Access Manager Access Administration Guide—Describes how to protect resources by defining policy domains, authentication schemes, and authorization schemes; how to allow users to access multiple resources with a single login by configuring single- and multi-domain single sign-on; and how to design custom login forms. This book also describes how to set up and administer the Access System.
■ Oracle Access Manager Deployment Guide—Provides information for people who plan and manage the environment in which Oracle Access Manager runs. This guide covers capacity planning, system tuning, failover, load balancing, caching, and migration planning.
■ Oracle Access Manager Customization Guide—Explains how to change the appearance of Oracle Access Manager applications and how to control Oracle Access Manager by making changes to operating systems, Web servers, directory servers, directory content, or by connecting CGI files or JavaScripts to Oracle Access Manager screens. This guide also describes the Access Manager API and the authorization and authentication plug-in APIs.
■ Oracle Access Manager Developer Guide—Explains how to access Identity System functionality programmatically using IdentityXML and WSDL, how to create custom WebGates (known as AccessGates), and how to develop plug-ins. This guide also provides information to be aware of when creating CGI files or JavaScripts for Oracle Access Manager.
■ Oracle Access Manager Integration Guide—Explains how to set up Oracle Access Manager to run with third-party products such as BEA WebLogic, the Plumtree portal, and IBM WebSphere.
■ Oracle Access Manager Schema Description—Provides details about the Oracle Access Manager schema.
■ Oracle Access Manager Configuration Manager Installation and Administration Guide—Provides information about pushing configuration data changes from one Oracle Access Manager 10g (10.1.4.0.1), or Oracle COREid Release 7.0.4, deployment to another. For example, when pushing changes from a development deployment to a pre-production deployment. Included are considerations, prerequisites, and step-by-step instructions to help ensure your success.
ConventionsThe following text conventions are used in this document:
Convention Meaning
boldface Boldface type indicates graphical user interface elements associated with an action, or terms defined in text or the glossary.
italic Italic type indicates book titles, emphasis, or placeholder variables for which you supply particular values.
monospace Monospace type indicates commands within a paragraph, URLs, code in examples, text that appears on the screen, or text that you enter.

xxiv

xxv
What’s New in Oracle Access Manager?
The following sections describe the new features in Oracle Access Manager 10g (10.1.4.0.1) that are described in this manual:
■ Product and Component Name Changes
■ Upgrade Planning, Methodology, and Deployment Scenarios
■ Upgrade Planning and Tracking Summaries
■ Upgrade Concepts and Methods
■ Automated Upgrade Processes and Manual Tasks
■ Support Changes
■ Globalization, System Behaviors, and Backward Compatibility
■ Upgrade Prerequisites and Preparation
■ Upgrading the Schema and Data
■ Component Upgrades
■ Customization Upgrades
■ Auditing and Reporting Changes
■ Combining Challenge and Response Attributes on a Panel
■ Validating Your Upgraded Installation
■ Upgrading With the Zero Downtime Method
■ Upgrading With a Switch From Solaris to Linux
■ Troubleshooting
Product and Component Name ChangesThe original product name, Oblix NetPoint, has changed to Oracle Access Manager. Most component names remain the same. However, there are several important changes that you should know about, as shown in the following table:
Note: For a comprehensive list of new features and functions in Oracle Access Manager 10g (10.1.4.0.1), and a description of where each is documented, see the chapter on What’s New in Oracle Access Manager in the Oracle Access Manager Introduction.

xxvi
Item Was Is
Product Name Oblix NetPoint
Oracle COREid
Oracle Access Manager
Product Name Oblix SHAREid
NetPoint SAML Services
Oracle Identity Federation
Product Name OctetString Virtual Directory Engine (VDE)
Oracle Virtual Directory
Product Release Oracle COREid 7.0.4 Also available as part of Oracle Application Server 10g Release 2 (10.1.2).
Directory Name COREid Data Anywhere Data Anywhere
Component Name COREid Server Identity Server
Component Name Access Manager Policy Manager
Console Name COREid System Console Identity System Console
Identity System Transport Security Protocol
NetPoint Identity Protocol Oracle Identity Protocol
Access System Transport Protocol
NetPoint Access Protocol Oracle Access Protocol
Administrator NetPoint Administrator
COREid Administrator
Master Administrator
Directory Tree Oblix tree Configuration tree
Data Oblix data Configuration data
Software Developer Kit Access Server SDK
ASDK
Access Manager SDK
API Access Server API
Access API
Access Manager API
API Access Management API
Access Manager API
Policy Manager API
Default Policy Domains NetPoint Identity Domain
COREid Identity Domain
Identity Domain
Default Policy Domains NetPoint Access Manager
COREid Access Manager
Access Domain
Default Authentication Schemes
NetPoint None Authentication
COREid None Authentication
Anonymous
Default Authentication Schemes
NetPoint Basic Over LDAP
COREid Basic Over LDAP
Oracle Access and Identity Basic Over LDAP
Default Authentication Schemes
NetPoint Basic Over LDAP for AD Forest
COREid Basic Over LDAP for AD Forest
Oracle Access and Identity for AD Forest Basic Over LDAP
Access System Service AM Service State Policy Manager API Support Mode

xxvii
All legacy references in the product or documentation should be understood to connote the new names.
Upgrade Planning, Methodology, and Deployment ScenariosPlanning details for typical deployment scenarios have been added to this book to assist you and your team. This chapter includes a methodology that you can follow based on the two deployment scenarios. Downtime assessment considerations are included to help you establish a time frame for the upgrade in your environment.
Upgrade Planning and Tracking SummariesPlanning summaries can be used as a guide as you gather information about your existing deployments and begin planning for the upgrade. Tracking summaries are included so that you and your team can quickly follow the progession of activities that must be performed during any upgrade process.
Upgrade Concepts and MethodsThis book provides upgrade concepts and methods, as well as strategies for back up and recovery and for proceeding with an upgrade when certain support has been deprecated.
Automated Upgrade Processes and Manual TasksGet a quick tour of the automated processes and manual tasks involved in the upgrade. Discussions include information about what is preserved during automated processing and what must be handled manually
Support ChangesChanges in supported platforms and versions are discussed in this book.
Globalization, System Behaviors, and Backward CompatibilityA new chapter has been added that describes system behavior changes between earlier Oracle Access Manager releases and 10g (10.1.4.0.1). For example, Oracle Access Manager 10g (10.1.4.0.1) has undergone a process to provide globalization support for
See Also: Chapter 1, "Introduction to Oracle Access Manager Upgrades and Planning"
See Also: Appendix F, "Planning and Tracking Summaries"
See Also: Chapter 2, "Upgrade Concepts, Strategies, and Methods"
See Also: Chapter 3, "About Automated Processes and Manual Tasks"
See Also:
"Supported Components and Applications" on page 3-1
"Support Deprecated" on page 2-10
"Platform Support" on page 4-1
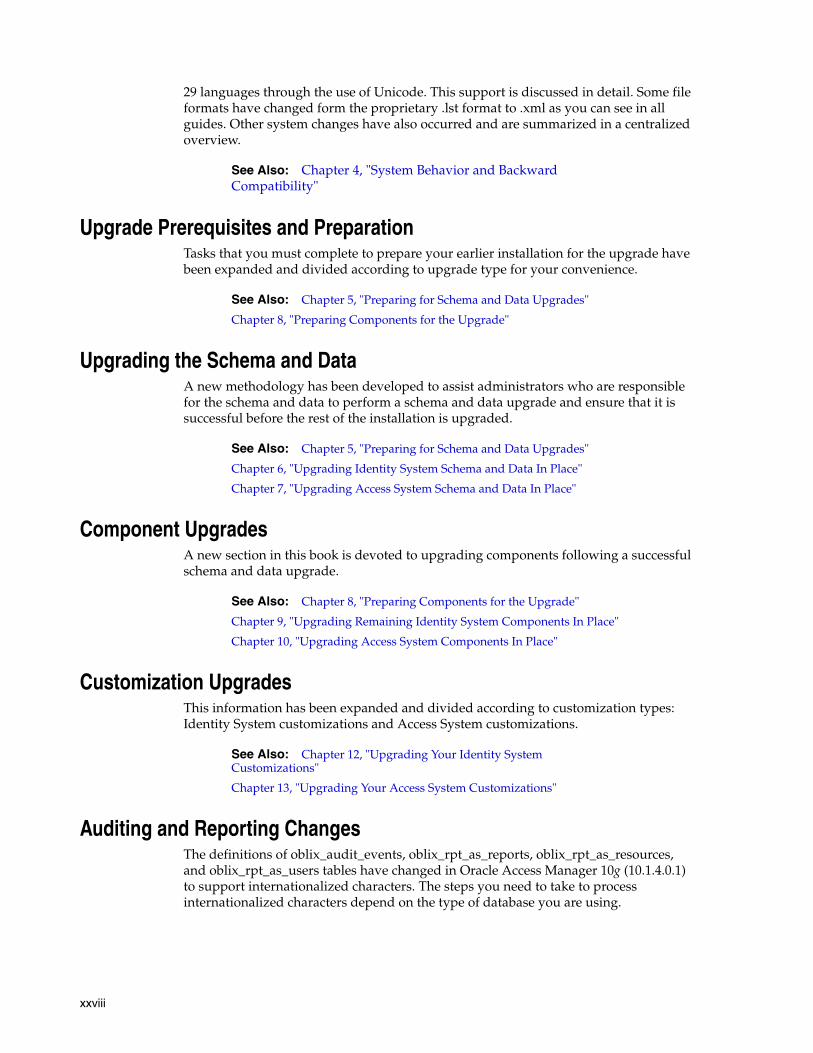
xxviii
29 languages through the use of Unicode. This support is discussed in detail. Some file formats have changed form the proprietary .lst format to .xml as you can see in all guides. Other system changes have also occurred and are summarized in a centralized overview.
Upgrade Prerequisites and PreparationTasks that you must complete to prepare your earlier installation for the upgrade have been expanded and divided according to upgrade type for your convenience.
Upgrading the Schema and DataA new methodology has been developed to assist administrators who are responsible for the schema and data to perform a schema and data upgrade and ensure that it is successful before the rest of the installation is upgraded.
Component UpgradesA new section in this book is devoted to upgrading components following a successful schema and data upgrade.
Customization UpgradesThis information has been expanded and divided according to customization types: Identity System customizations and Access System customizations.
Auditing and Reporting ChangesThe definitions of oblix_audit_events, oblix_rpt_as_reports, oblix_rpt_as_resources, and oblix_rpt_as_users tables have changed in Oracle Access Manager 10g (10.1.4.0.1) to support internationalized characters. The steps you need to take to process internationalized characters depend on the type of database you are using.
See Also: Chapter 4, "System Behavior and Backward Compatibility"
See Also: Chapter 5, "Preparing for Schema and Data Upgrades"
Chapter 8, "Preparing Components for the Upgrade"
See Also: Chapter 5, "Preparing for Schema and Data Upgrades"
Chapter 6, "Upgrading Identity System Schema and Data In Place"
Chapter 7, "Upgrading Access System Schema and Data In Place"
See Also: Chapter 8, "Preparing Components for the Upgrade"
Chapter 9, "Upgrading Remaining Identity System Components In Place"
Chapter 10, "Upgrading Access System Components In Place"
See Also: Chapter 12, "Upgrading Your Identity System Customizations"
Chapter 13, "Upgrading Your Access System Customizations"

xxix
Combining Challenge and Response Attributes on a PanelIn earlier releases, the challenge phrase and response attributes were allowed on different panels of the Profile page of the User Manager, Group Manager, and Organization Manager. In 10g (10.1.4.0.1), however, both the challenge phrase and response attributes must be on the same panel.
Validating Your Upgraded InstallationA new chapter has been added to help you validate the upgraded environment.
Upgrading With the Zero Downtime MethodUsing Release 10.1.4 Patchset 1 (10.1.4.2.0) tools and details in Chapter 15, you can upgrade your deployment while ensuring there is little or no downtime for your customers (zero downtime upgrade method). The resulting deployment will be Release 10.1.4 Patchset 1 (10.1.4.2.0).
Upgrading With a Switch From Solaris to LinuxOracle Access Manager provides a way to upgrade an existing deployment to 10g (10.1.4.0.1) on a Solaris platform while switching to a supported Linux platform. The resulting deployment will be release 10g (10.1.4.0.1).
TroubleshootingA new troubleshooting appendix includes information to help you during all upgrades tasks and processes.
See Also: "Upgrading Auditing and Access Reporting for the Identity System" on page 12-2
"Upgrading Auditing and Reporting for the Access Server" on page 13-2
See Also: "Combining Challenge and Response Attributes on a Panel" on page 12-8
See Also: Chapter 14, "Validating the Entire System Upgrade"
See Also: Chapter 15, "Introduction to the Zero Downtime Upgrade Method"
See Also: Appendix B, "Migrating from a Solaris Platform to a Linux Platform While Upgrading"
See Also: Appendix G, "Troubleshooting the Upgrade Process"

xxx

Part IIntroduction
This part of the book introduces upgrading from earlier product releases to 10g (10.1.4.0.1).
Part I contains the following chapters:
■ Chapter 1, "Introduction to Oracle Access Manager Upgrades and Planning"
■ Chapter 2, "Upgrade Concepts, Strategies, and Methods"
■ Chapter 3, "About Automated Processes and Manual Tasks"
■ Chapter 4, "System Behavior and Backward Compatibility"


Introduction to Oracle Access Manager Upgrades and Planning 1-1
1Introduction to Oracle Access Manager
Upgrades and Planning
This chapter provides an overview of upgrade methods, tasks, and the planning that you must perform before you upgrade. Oracle provides two upgrade methodologies so that you can choose the one that best suits your needs. Unless explicitly stated, information applies equally to both methods. This chapter includes the following topics:
■ About Upgrading and Upgrade Methodologies
■ Typical Deployment Scenarios
■ In-Place Upgrade Task Overview
■ In-Place Upgrade Planning and Deliverables
■ Planning Considerations for System Downtime During In-Place Upgrades
■ Planning Considerations for Extranet and Intranet Deployments
■ Upgrade Paths
About Upgrading and Upgrade MethodologiesThe latest release provides significant enhancements and regulatory compliance over previous releases. For example, each major release provides new features and additional platform support, and can include changes to the schema, data, parameter, or message files.
The term upgrade refers to the process of installing the latest major product release over an earlier product release (whether the earlier release has been patched or not).
Your existing data and configurations are made available to the new release. For example, suppose you have installed Oracle Access Manager 6.1.1 and added new object classes and panels; assigned or delegated administrative rights to key people; created workflows; protected resources with a policy domain; configured authentication schemes and authorization rules; customized the way the product looks or operates; and modified message files. After upgrading to 10g (10.1.4.0.1), you do not need to replicate all the work you had completed on the earlier release. However,
Note: This book primarily uses new product and component names. For example, Oracle Access Manager was formerly known as Oblix NetPoint or Oracle COREid. For details, see "What’s New in Oracle Access Manager?" on page -xxv.

About Upgrading and Upgrade Methodologies
1-2 Oracle Access Manager Upgrade Guide
certain items must be handled manually. For more information about automated processes and manual tasks, see Chapter 3.
Oracle provides two upgrade methodologies so that you can choose the one that best suits your needs:
■ In-Place Upgrade Method
■ Zero Downtime Upgrade Method
In-Place Upgrade Method A in-place upgrade is one where you use Oracle Access Manager 10g (10.1.4.0.1) component installers as you upgrade each earlier component instance in your deployment. Separate platform-specific packages are provided for each component. The same package is used to both install and to upgrade. For example:
Windows: Oracle_Access_Manager10_1_4_0_1_win32_Component.exe Solaris: Oracle_Access_Manager10_1_4_0_1_sparc-s2_Component
The chapters in Part I of this book provide general information that you need to be aware of before you start any upgrade. Specific tasks that you need to perform for a in-place upgrade are described inPart II and Part III of this book.
Unless explicitly stated, information applies equally regardless of the upgrade method that you choose. For example:
■ Part IV explains how to upgrade your customizations, which is a manual task.
■ Part V explains how to validate the upgraded environment to ensure that everything is working properly.
■ Part VII provides a number of appendixes where you will find information that falls outside the scope of the main topics.
Zero Downtime Upgrade MethodThe zero downtime upgrade method (also known as an out-of-place upgrade), is described in Part VI of this book. This method requires that you use the MigrateOAM script that is available only with Oracle Access Manager Release 10.1.4 Patchset 1 (10.1.4.2.0).
The chapters in Part I of this book provide general information that you need to be aware of before you start any upgrade. Unless explicitly stated, information applies equally regardless of the upgrade method that you choose. As you perform the zero downtime upgrade, you will be directed to discussions outside of Part VI that apply to both methods. For example:
■ Part IV explains how to upgrade earlier customizations, which is a manual task.
■ Part V explains how to validate the upgraded environment to ensure that everything is working properly.
Note: Release 10.1.4 Patchset 1 (10.1.4.2.0) is not a full release. Release 10.1.4 Patchset 1 (10.1.4.2.0) component installers cannot be used to install or upgrade components using the in-place upgrade method.

Typical Deployment Scenarios
Introduction to Oracle Access Manager Upgrades and Planning 1-3
■ Part VII provides a number of appendixes where you will find information that falls outside the scope of the main topics, including troubleshooting tips.
Typical Deployment ScenariosThis book covers upgrades for Oracle Access Manager components only. For details about upgrading Oracle Application Server components, see Oracle Application Server Upgrade and Compatibility Guide.
Oracle Access Manager deployments fall into two categories: Identity System only or joint deployments of both the Identity and Access Systems. The upgrade tasks that must be performed, and the sequence in which you perform these tasks, depend upon the type of deployment you have. The topics in this section apply whether you choose to perform a in-place upgrade or you decide to use the zero downtime upgrade method. For more information about deployment types and upgrading, see:
■ About Upgrading Identity System Only Deployments
■ About Upgrading Joint Identity System and Access System Deployments
About Upgrading Identity System Only DeploymentsFigure 1–1 illustrates a very simple Identity System-only deployment. Identified in the figure are the types of information that are upgraded for each Identity System component. As you can see, the Identity System schema and data are also upgraded.
Figure 1–1 Identity System Deployment Overview
The Oracle Access Manager schema and Identity System data reside in the directory server. Identity System schema and data upgrades are performed only once and require write access to information in the directory server.
Identity System Schema and Data UpgradesIdentity System schema and data upgrades include updating the following information types to meet requirements of the latest release:
Directory
Identity Server
Client
OIP
WebPassIdentity Server Upgrade Includes· Program and Library Files, Message
and Parameter Catalogs· System Environment settings
(e.g., Windows Registry)
WebPass Upgrade Includes· Program and Library Files, Message
and Parameter Catalogs· System Environment settings
(e.g., Windows Registry)· Web Server Configuration Files
and Filters
LDAP
Schema and Data Upgrade Includes· Directory Schema · Configuration Data· User and Group Data· Workflow Data

Typical Deployment Scenarios
1-4 Oracle Access Manager Upgrade Guide
■ Oracle Access Manager schema
■ Oracle Access Manager configuration data
■ Oracle Access Manager user and group data and runtime information
■ Oracle Access Manager workflow data
Component information resides in the installation directory of the specific Oracle Access Manager component. The type of information that is upgraded depends on the component type: Oracle Access Manager Server or Oracle Access Manager Web component.
Identity Server Component UpgradesEach Identity Server component upgrade brings the following information up to release 10g (10.1.4.0.1):
■ Program and library files, including message and parameter catalogs, are replaced with the latest versions.
■ Configuration settings, as well as system environment settings (in the Windows registry, for example), are updated to comply with requirements for the latest Identity Server release.
Identity System Web Component UpgradesWebPass is the Identity System Web component. Each WebPass component upgrade brings the following information up to release 10g (10.1.4.0.1):
■ Program and library files, including message and parameter catalogs, are replaced with the latest versions.
■ WebPass configuration settings, as well as system environment settings (in the Windows registry, for example), are updated to comply with requirements for the latest WebPass release.
■ Configuration files and filters for the Web server hosting the WebPass plug-in are updated to accommodate requirements for the latest WebPass release.
Figure 1–2 illustrates the sequence of upgrade tasks that you must perform when you have an Identity System-only deployment and you are using the in-place upgrade method.
See Also: Part VI, if you are using the zero downtime upgrade method.

Typical Deployment Scenarios
Introduction to Oracle Access Manager Upgrades and Planning 1-5
Figure 1–2 Identity System Only In-Place Upgrade Tasks and Sequence
An introduction to each task is described in "About the Execution Stage for In-Place Upgrades" on page 1-11. For information about the zero downtime upgrade method and tasks, see Part VI.
About Upgrading Joint Identity System and Access System DeploymentsFigure 1–3 illustrates a very simple joint deployment of both the Identity System and Access System. Identified in the figure are the types of information that are upgraded for each component. As you can see, both the Identity System and Access System schema and data are also upgraded. The same types of information are upgraded whether you use the in-place upgrade method or the zero downtime upgrade method.
Review Upgrade Concepts and Prepare Upgrade Plan(Chapters 1, 2, 3, 4)(Appendix E: Planning Worksheets)
Upgrade Identity Schema and Data(Chapters 5 and 6)
Prepare and Upgrade Identity System Components(Chapter 8 and 9)
Upgrade Independently Installed SDKs(Chapter 11)
Upgrade Identity Customizations(Chapter 12)
Validate Complete Identity System Upgrade(Chapter 14)

Typical Deployment Scenarios
1-6 Oracle Access Manager Upgrade Guide
Figure 1–3 Joint Identity and Access System Deployment Overview
The Oracle Access Manager schema and Identity and Access System data reside in the directory server. Schema and data upgrades include the information that is described next and require write access to information in the directory server.
Identity System Schema and Data UpgradesEven in a joint Identity and Access System deployment, Identity System schema and data upgrades include updating the following information types to meet the requirements of the latest release:
■ Oracle Access Manager schema
■ Oracle Access Manager configuration data
■ Oracle Access Manager user and group data and runtime information
■ Oracle Access Manager workflow data
Directory
Schema and Data Upgrade includes:· Directory Schema · Configuration Data· User and Group Data· Workflow Data· Policy Data
Identity Server
Policy Manager
WebPass
Access Server
Client
OIP
OAP
WebPass
WebGate
Identity Server Upgrade Includes· Program and Library Files, Message and
Parameter Catalogs· System Environment settings (e.g., Windows Registry)
Upgrade Includes· Program and Library Files, Message and
Parameter Catalogs· System Environment settings
(e.g., Windows Registry)· Web Server Configuration Files and Filters
Upgrade includes· Program and Library Files,
Message and Parameter Catalogs· System Environment settings
(e.g., Windows Registry)
WebPass Upgrade includes· Program and Library Files,
Message and Parameter Catalogs
· System Environment setting(e.g., Windows Registry)
· Web Server ConfigurationFiles and Filters
WebGate Upgrade includes· Program and Library Files, Message
and Parameter Catalogs· System Environment settings
(e.g., Windows Registry)· Web Server Configuration Files
and Filters
LDAP
LDAP
LDAP

Typical Deployment Scenarios
Introduction to Oracle Access Manager Upgrades and Planning 1-7
Access System Schema and Data UpgradesAccess System schema and data upgrades include updating the following information types to meet requirements of the latest release:
■ Oracle Access Manager policy data
■ Additional schema updates are not typically required for the Access System unless you have directory instances configured for use by only the Access System
Component information resides in the installation directory of the specific Oracle Access Manager component. The type of information that is upgraded depends on the component type: Oracle Access Manager Server or Oracle Access Manager Web component. For example:
Identity Server and Access Server UpgradesEach Identity Server and Access Server component upgrade brings the following information up to release 10g (10.1.4.0.1).
■ Program and library files, including message and parameter catalogs, are replaced with the latest versions.
■ Configuration settings, as well as system environment settings (in the Windows registry, for example), are updated to comply with requirements for the latest Identity Server release.
Policy Manager, WebPass, and WebGate UpgradesEach Oracle Access Manager Web component upgrade (Policy Manager, WebPass, and WebGate) brings the following information up to release 10g (10.1.4.0.1):
■ Program and library files, including message and parameter catalogs, are replaced with the latest versions.
■ Configuration settings, as well as system environment settings (in the Windows registry, for example), are updated to comply with requirements for the latest WebPass release.
■ Configuration files and filters for the Web server hosting the Web component plug-in are updated to accommodate requirements for the latest release.
A WebPass must also be installed with each Policy Manager on the same Web server instance, at the same directory level.
Figure 1–4 illustrates the sequence of upgrade tasks that you must perform when you have a joint Identity and Access System deployment and you are using the in-place upgrade method.
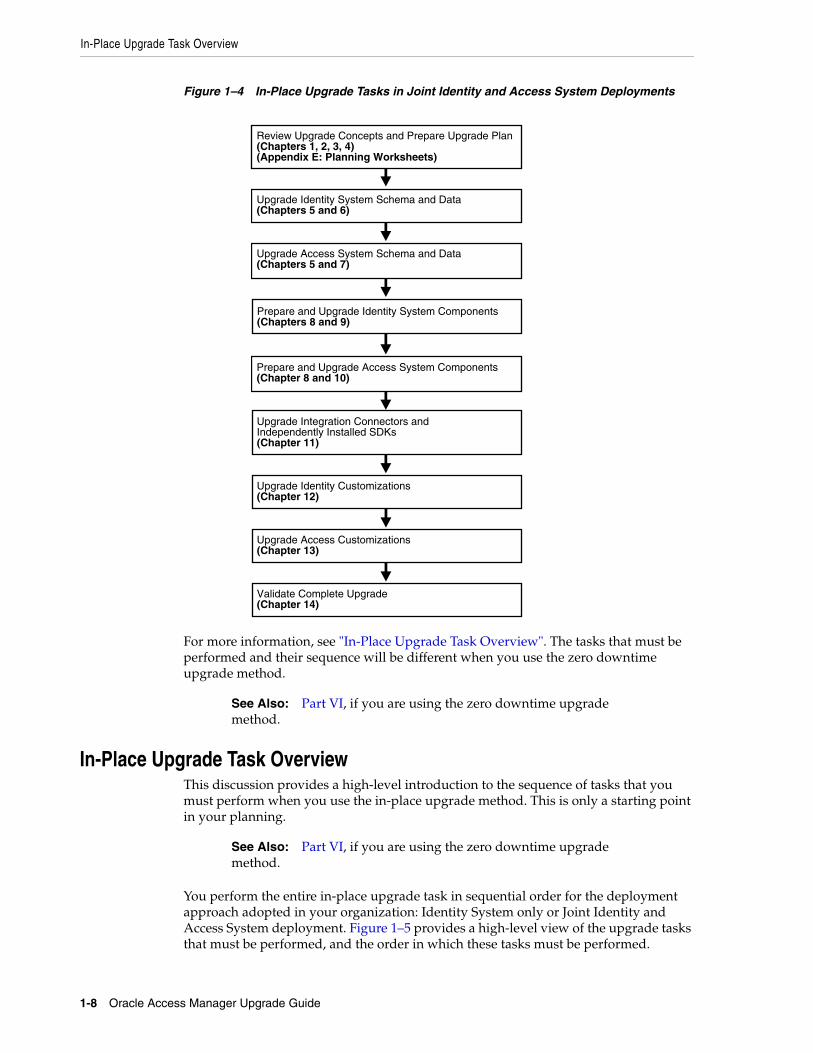
In-Place Upgrade Task Overview
1-8 Oracle Access Manager Upgrade Guide
Figure 1–4 In-Place Upgrade Tasks in Joint Identity and Access System Deployments
For more information, see "In-Place Upgrade Task Overview". The tasks that must be performed and their sequence will be different when you use the zero downtime upgrade method.
In-Place Upgrade Task OverviewThis discussion provides a high-level introduction to the sequence of tasks that you must perform when you use the in-place upgrade method. This is only a starting point in your planning.
You perform the entire in-place upgrade task in sequential order for the deployment approach adopted in your organization: Identity System only or Joint Identity and Access System deployment. Figure 1–5 provides a high-level view of the upgrade tasks that must be performed, and the order in which these tasks must be performed.
See Also: Part VI, if you are using the zero downtime upgrade method.
See Also: Part VI, if you are using the zero downtime upgrade method.
Review Upgrade Concepts and Prepare Upgrade Plan(Chapters 1, 2, 3, 4)(Appendix E: Planning Worksheets)
Upgrade Access System Schema and Data(Chapters 5 and 7)
Upgrade Identity System Schema and Data(Chapters 5 and 6)
Prepare and Upgrade Access System Components(Chapter 8 and 10)
Prepare and Upgrade Identity System Components(Chapters 8 and 9)
Upgrade Integration Connectors and Independently Installed SDKs(Chapter 11)
Upgrade Identity Customizations(Chapter 12)
Upgrade Access Customizations(Chapter 13)
Validate Complete Upgrade(Chapter 14)

In-Place Upgrade Task Overview
Introduction to Oracle Access Manager Upgrades and Planning 1-9
Additional information is provided in "About the Execution Stage for In-Place Upgrades" on page 1-11.
In-Place Upgrade Task Overview
1-10 Oracle Access Manager Upgrade Guide
Figure 1–5 High-Level In-Place Upgrade Task Overview
Planning(This Chapter)(Worksheets Appendix E)
AccessSystem?
Upgrade Schema and DataPlanning (This Chapter)Preparing for (Chapter 5)Identity System (Chapter 6)
Upgrade Identity System Components(Chapter 9)
Validation(Chapter 14)
No
Prepare Remaining Components(Chapter 8)
Yes Upgrade Access System Schema and Data(Chapter 7)
AccessSystem?
No
Yes Upgrade Access System Components(Chapter 10)
Third PartyIntegration
Connectors?
No
No
Yes Upgrade Integration Connectors(Chapter 11)
IndependentlyInstalled SDKs?
Yes Upgrade Independently Installed SDKs(Chapter 11)
No
Customizations?Yes Planning for Customization Upgrades
(This Chapter)
Upgrade Identity Customizations(Chapter 12)
Upgrade Access Customizations(Chapter 13)
In-Place Upgrade Task Overview
Introduction to Oracle Access Manager Upgrades and Planning 1-11
About the Planning StageBefore you start any in-place upgrade activities, it is important to read through this entire chapter. For downtime assessment planning for in-place upgrades, see "Planning Considerations for System Downtime During In-Place Upgrades" on page 1-20.
Whether you perform a in-place upgrade or you use the zero downtime upgrade method, you need to collect and record specific details about your existing deployment. For more information and specific details about planning, see "In-Place Upgrade Planning and Deliverables" on page 1-13. Summary pages are provided to help you gather details about your existing deployment. For more information, see Appendix F.
About the Execution Stage for In-Place UpgradesThis stage is illustrated in Figure 1–5 and outlined next. The sequence of tasks that you must complete is critical to your success. Summaries that can help you track the progress of upgrade tasks in your environment are provided in Appendix F.
Task overview: Performing an upgrade using the in-place method includes 1. Planning: Develop a planning document that defines a detailed approach for each
of your installed environments is described in:.
■ In-Place Upgrade Planning and Deliverables on page 1-13 outline details you need to record for all earlier installed Identity and Access System components, directory servers, Web servers, and applications
■ In-place Schema and Data Upgrade Planning on page 1-15 introduces considerations and sequences for schema and data upgrades
■ Customization Upgrade Planning on page 1-17 discusses considerations and sequences to upgrade earlier customizations
■ Planning Considerations for System Downtime During In-Place Upgrades on page 1-20 introduces strategies to minimize system downtime during the entire upgrade procedure
■ Planning Considerations for Extranet and Intranet Deployments are described on page 1-26
■ Upgrade Paths on page 1-28 outlines starting releases and strategies for each one
2. Upgrading the Schema and Data: Prepare for and upgrade the earlier Oracle Access Manager schema and data as described in the following topics:
■ This chapter: "In-place Schema and Data Upgrade Planning" on page 1-15
■ Chapter 5, "Preparing for Schema and Data Upgrades"
See Also: Part VI, if you are using the zero downtime upgrade method.
Note: Task overviews like the one here outline the tasks that you must perform and provide a pointer to the discussion that provides the information you need to perform the task. For zero downtime tasks, see "Zero Downtime Upgrade Tasks and Sequencing" on page 15-16.

In-Place Upgrade Task Overview
1-12 Oracle Access Manager Upgrade Guide
■ Chapter 6, "Upgrading Identity System Schema and Data In Place"
■ Chapter 7, "Upgrading Access System Schema and Data In Place"
3. Preparing Remaining Components: After the in-place schema and data upgrade, you must prepare other components for the upgrade as described in Chapter 8.
4. Upgrading Identity System Components: Perform in-place Identity System component upgrades as described in Chapter 9 and outlined in the following list:
– Upgrading Remaining Identity Servers In Place, one by one, as described on page 9-3
– Upgrading Remaining WebPass Instances In Place, one by one, on page 9-8
– Validating the In-place Identity System Upgrade on page 9-11
– Backing Up Upgraded Identity Component Information on page 9-12
5. Upgrading Access System Components: Perform the in-place Access System component upgrade as described in Chapter 10 and outlined in the following list:
– Creating a Temporary Directory Profile For Access System Upgrades must be performed after upgrading the Access System schema and data and before upgrading any other Access System components as described on page 7-10
– Upgrading Remaining Policy Managers In Place, one by one, as described on page 10-2
– Upgrading Access Servers In Place on page 10-6
Upgraded Access Servers are automatically backward compatible with earlier WebGates. For more information, see Chapter 4.
– Upgrading WebGates In Place can be staggered and performed gradually over time, as discussed in on page 10-9.
6. Upgrading Third-Party Integration Connectors: Upgrade any Oracle Access Manager connectors for third-party integration components and for the J2EE Application Server (if any are being used) as described on page 11-1.
7. Upgrading Independently Installed Software Developer Kits: Perform this upgrade to ensure the older APIs are upgraded (and ensure that any plug-ins developed using those APIs are compatible and working properly in the upgraded environment) as described on page 11-4.
Note: When you have auditing and access reporting configured for a database in the earlier environment, immediately following each Identity Server upgrade you must import earlier Identity Server auditing data to a new database instance, as discussed in "Upgrading Auditing and Access Reporting for the Identity System" on page 12-2.
Note: When you have auditing and access reporting configured for a database in the earlier environment, immediately following each Identity Server upgrade you must import earlier Identity Server auditing data to a new database instance, as discussed in "Upgrading Auditing and Reporting for the Access Server" on page 13-2.

In-Place Upgrade Planning and Deliverables
Introduction to Oracle Access Manager Upgrades and Planning 1-13
8. Upgrading Customizations: This task can be started well in advance of other tasks and performed in a separate environment to reduce the amount of system downtime as described in:
■ This chapter: Customization Upgrade Planning on page 1-17
■ Chapter 12, "Upgrading Your Identity System Customizations"
■ Chapter 13, "Upgrading Your Access System Customizations"
9. Validating the Upgrade: After all other work is completed, you can verify system operation as described in Chapter 14, "Validating the Entire System Upgrade".
In-Place Upgrade Planning and DeliverablesOracle strongly recommends that before starting any in-place upgrade task, you and your team become familiar with all topics suggested in Figure 1–6, and the overview that follows the figure. While many of the planning deliverables are the same whether you perform an in-place upgrade or a zero downtime upgrade, if you are using the zero downtime upgrade method look for details in "Developing a Plan for a Zero Downtime Upgrade" on page 15-37.
Figure 1–6 In-Place Upgrade Planning Overview
Task overview: Planning for an in-place upgrade 1. Review the following information in this chapter to get a high-level overview of
the upgrade task, considerations, planning deliverables, deployment scenarios, and starting points. For more information, see:
■ Planning Considerations
■ Planning Deliverables
■ In-place Schema and Data Upgrade Planning
■ Customization Upgrade Planning
■ Planning Considerations for System Downtime During In-Place Upgrades
START
Review Automated Processes and Manual Tasks (Chapter 3)
Review Upgrade Concepts and Methods (Chapter 2)
Review Functional Differences Between the Latest System Behaviors and Previous System Behaviors (Chapter 4)
Review Scenarios and Planning Considerations and Take Inventory of Your Existing Environment (This Chapter)

In-Place Upgrade Planning and Deliverables
1-14 Oracle Access Manager Upgrade Guide
■ Planning Considerations for Extranet and Intranet Deployments
■ Upgrade Paths
2. Review Chapter 2 to gain a deeper understanding of the upgrade concepts and the methods and strategies you will use, and to learn about any applications and components that have been deprecated (no longer officially supported).
3. Review Chapter 3 to learn about the sequence of events that occur during the program-driven component upgrade, as well as what is preserved and what requires manual handling by you.
4. Investigate the functional differences between earlier releases and Oracle Access Manager 10g (10.1.4.0.1) in the centralized summary provided in Chapter 4, "System Behavior and Backward Compatibility".
Planning ConsiderationsAs you begin to plan for the upgrade in your environment, be sure to take the following considerations in to account:
■ Deployment Scenarios: The upgrade task should be performed in a sequential order in relation to the deployment approach adopted in your organization: Identity System only versus Joint Identity and Access System; intranet versus extranet; number and type of installed environments.
For example, if your earlier Identity System-only release is an intranet-only deployment with three different LDAP environments (one for Development, another for Test/Demonstration, and one Production deployment), the upgrade process should be performed and fine tuned in the smaller environments before ultimately being performed in your production environment. For more information about intranet or extranet deployments, see "Planning Considerations for Extranet and Intranet Deployments" on page 1-26.
■ Stability: Each environment that you upgrade should currently be running a stable and appropriately installed release. In other words earlier Oracle Access Manager configurations in each existing environment must be confirmed to be stable and complete before you start upgrading.
A good approach to validate that the existing environment is stable is to develop a deterministic test script and run it both before and after the upgrade. For example, the script could exercise a full end-to-end transaction by requesting a single page that requires authentication and authorization and a workflow request (all triggered by a single page request).
■ Administrative Access: Schema upgrade operations (as well as other upgrade operations) require administrative access with write permissions to the directory server and Oracle Access Manager files.
■ Schema and Data Upgrades: Preparing an earlier master Identity System (formerly known as the COREid System) and Policy Manager (formerly known as the Access Manager component) is a critical first step to performing a schema and data upgrade. For more information, see "In-place Schema and Data Upgrade Planning" on page 1-15.
Note: During component upgrades, backward compatibility with earlier plug-ins and WebGates is automatically enabled. However, the system might behave differently than in earlier releases.
In-Place Upgrade Planning and Deliverables
Introduction to Oracle Access Manager Upgrades and Planning 1-15
■ Customization Upgrades: This is primarily a manual process. Oracle recommends that you complete any testing and alterations in a development environment before redeploying these in a shared or production environment. For more information, see "Customization Upgrade Planning" on page 1-17.
In-place Schema and Data Upgrade Planning The schema and data upgrade must be performed by someone with administrator privileges that include write access to the directory and files. The sequence of tasks you must perform to upgrade your earlier Oracle Access Manager schema and data to 10g (10.1.4.0.1) depend on the type of deployment you have (Identity System only or both the Identity and Access Systems).
The methodology for upgrading the schema and data is new and designed to help you ensure that the schema and data are properly upgraded before you start upgrading other components. This will differ slightly, depending upon your original installation.
Identity System Only: When you have only the Identity System deployed (with one or more Identity Servers and WebPass instances), you perform the schema and data upgrade, then complete other upgrade tasks as indicated in the next overview.
Task overview: Upgrading the schema and data in place with only an Identity System installed 1. Prepare and backup directory instances and data for the Identity System as
described in Chapter 5.
2. Add an earlier instance of the following components to create a master environment for the schema and data upgrade:
– One earlier Identity Server instance (formerly known as the NetPoint or COREid Server) as a secondary server for your original master read/write directory server instances. The directory server administrator will use this instance as the Master Identity Server when upgrading the schema and data.
– One earlier WebPass to communicate with the master Identity Server you added
For more information, see "Adding An Earlier Identity System to Use as a Master for the In-place Method" on page 5-21.
3. Upgrade the added master Identity System components and accept the automatic schema and data upgrade in the sequence in the following list:
– Upgrade the master Identity Server, schema, and data (then upload directory index files).
– Upgrade the master WebPass (there is no schema nor data upgrade here).
– Validate the Identity System schema and data upgrade.
For more information about the in-place schema and data upgrade, see Chapter 6.
4. Prepare, then upgrade (and verify) remaining Identity System components, then integration components, then independently installed SDKs, and redeploy upgraded Identity System customizations in the sequence shown in Figure 1–5, "High-Level In-Place Upgrade Task Overview".
Joint Identity and Access System: When your installation includes both the Identity and Access Systems, the overall process is a bit different as outlined in the next overview. In both cases, the directory server administrator will use the master

In-Place Upgrade Planning and Deliverables
1-16 Oracle Access Manager Upgrade Guide
environment that is added before upgrading the Identity and Access System schema and data. However, the sequence differs after that.
Task overview: Upgrading the Identity and Access System schema and data in-place1. Prepare for the in-place schema and data upgrade, and backup directory instances
and data for both the Identity and Access System as described in Chapter 5.
2. Add an earlier instance of the following components:
– One earlier Identity Server instance (formerly known as the NetPoint or COREid Server) as a secondary server for your original master read/write directory server instances.
– One earlier WebPass to communicate with the master Identity Server you added
For more information, see "Adding An Earlier Identity System to Use as a Master for the In-place Method" on page 5-21.
– One earlier Policy Manager instance (formerly known as the Access Manager component) as a secondary server for your original master read/write directory server instances. For more information, see "Adding an Earlier Access Manager to Use as a Master for the In-Place Method" on page 5-28.
3. Upgrade Identity Schema and Data: Upgrade the added master components and accept the automatic schema and data upgrade in the sequence in the following list:
– Upgrade the master Identity Server, schema, and data (then upload directory index files).
– Upgrade the master WebPass (there is no schema nor data upgrade here).
– Validate the Identity System schema and data upgrade.
For more information about ugrading the Identity schema and data in place, see Chapter 6.
4. Upgrade Access System Schema and Data: Upgrade the added master component and accept the automatic Access System schema and data upgrade in the following sequence:
– Upgrade the master Policy Manager, Access System schema and policy data, then upload directory index files.
– Validate the Access System schema and data upgrade.
For more information about upgrading the Access System schema and data in place, see Chapter 7.
5. Access System: Create a temporary directory profile to provide write access to policy data by the Access Server for later WebGate upgrades, as described in "Creating a Temporary Directory Profile For Access System Upgrades" on page 7-10.
6. Prepare, then upgrade (and verify) remaining Identity components, then Access System components, then integration components, then independently installed SDKs, and redeploy Identity System customizations then Access System customizations, as shown in Figure 1–5, "High-Level In-Place Upgrade Task Overview".

In-Place Upgrade Planning and Deliverables
Introduction to Oracle Access Manager Upgrades and Planning 1-17
Customization Upgrade PlanningCustomized configurations built around your earlier Oracle Access Manager installation must be manually tested for compatibility and upgraded for 10g (10.1.4.0.1). These include front-end customizations created using IdentityXML, PresentationXML, and the Access Manager API (formerly known as the Access Server API or simply as the Access API). Also included are back-end customizations created with the Identity Event API, Authentication API, Authorization API (including AccessGates and plug-ins).
Testing and upgrading earlier customizations is primarily a manual process that can take some development time. It is important to plan ahead to ensure that your customizations can be redeployed into a shared environment quickly (for example, for QA, Integration, or Production).
Recommendation: Upgrading customizations and plug-ins 1. Start well in advance of other upgrades and review customization considerations
in "Planning Considerations for System Downtime During In-Place Upgrades" on page 1-20.
2. Develop deterministic test scripts to run both before and after the upgrade to exercise a full end-to-end transaction.
For example, the script could request a single page that requires authentication and authorization and a workflow request (all triggered by a single page request). Test scripts that verify the behavior of your earlier customizations help you ensure that these work as expected and produce the same result, both before and after the upgrade. Your test scripts will depend on the specific customization being exercised.
3. Compile and test the code, and the instructions you developed to explain how to configure the customization in a given environment.
4. In your existing environment, test the earlier customization (styles, AccessGates, or plug-ins for example) to ensure it is working as expected.
5. Install 10g (10.1.4.0.1) in a small development environment (ideally a sandbox-type setting) where the dependency on the overall Oracle Access Manager deployment is minimal. For details, see the Oracle Access Manager Installation Guide.
6. In the 10g (10.1.4.0.1) sandbox, test the earlier customization and perform any manual steps needed to upgrade the customization to operate with 10g (10.1.4.0.1) functionality.
7. Upgrade Oracle Access Manager in the test or development environment, as described in "In-Place Upgrade Task Overview" on page 1-8.
8. When the test or development environment upgrade is successful, you can redeploy the compiled binaries and custom components, then upgrade your production environment.
For information about specific customizations, see:
■ Planning Considerations for System Downtime During In-Place Upgrades on page 1-20
■ Chapter 12, "Upgrading Your Identity System Customizations"
■ Chapter 13, "Upgrading Your Access System Customizations"
See Also: Part VI if you are performing a zero downtime upgrade.

In-Place Upgrade Planning and Deliverables
1-18 Oracle Access Manager Upgrade Guide
Planning DeliverablesPlanning deliverables include preparing a document where you define and record a detailed plan that identifies how the upgrade tasks will be performed within each environment. You can reduce the amount of system downtime by fine tuning the plan and tasks to meet the specific needs of each environment and to take into account the number of servers, downtime windows, and the like.
In addition, Oracle recommends that you prepare a detailed inventory of all earlier components and customizations. The details that you need to record for each component and the environment are described next. Planning summary pages provided in Appendix F.
Task overview: Developing your planning deliverables 1. Create a Planning Document: Define and record a detailed plan identifying how
the upgrade process will be performed for each environment. For more information, see also:
■ Planning Considerations for System Downtime During In-Place Upgrades on page 1-20
■ Planning Considerations for Extranet and Intranet Deployments on page 1-26
2. Take Inventory of the Earlier Deployment: If you have not already recorded the exact details of the earlier environment, be sure to include details for Identity and Access components, directory servers, Web servers, and applications as indicated in Table 1–1. Planning summary pages provided in Appendix F.
Table 1–1 Inventory of Earlier Deployment Details
Detail Types Description
Environment Details Transport security mode; Simple, Cert, or Open
Root CA details if certificate mode is used
Any host definition type entries relevant to NetPoint (for example, /etc/host)
Identity Server Inventory Workflows, search bases and ACLs
Object definition details for all objects managed through NetPoint, if possible
Auditing configuration details
Password policy configuration
Access Server Inventory Policy domains, authentication schemes, resource definitions, host identifiers
Auditing configuration
Directory profile information
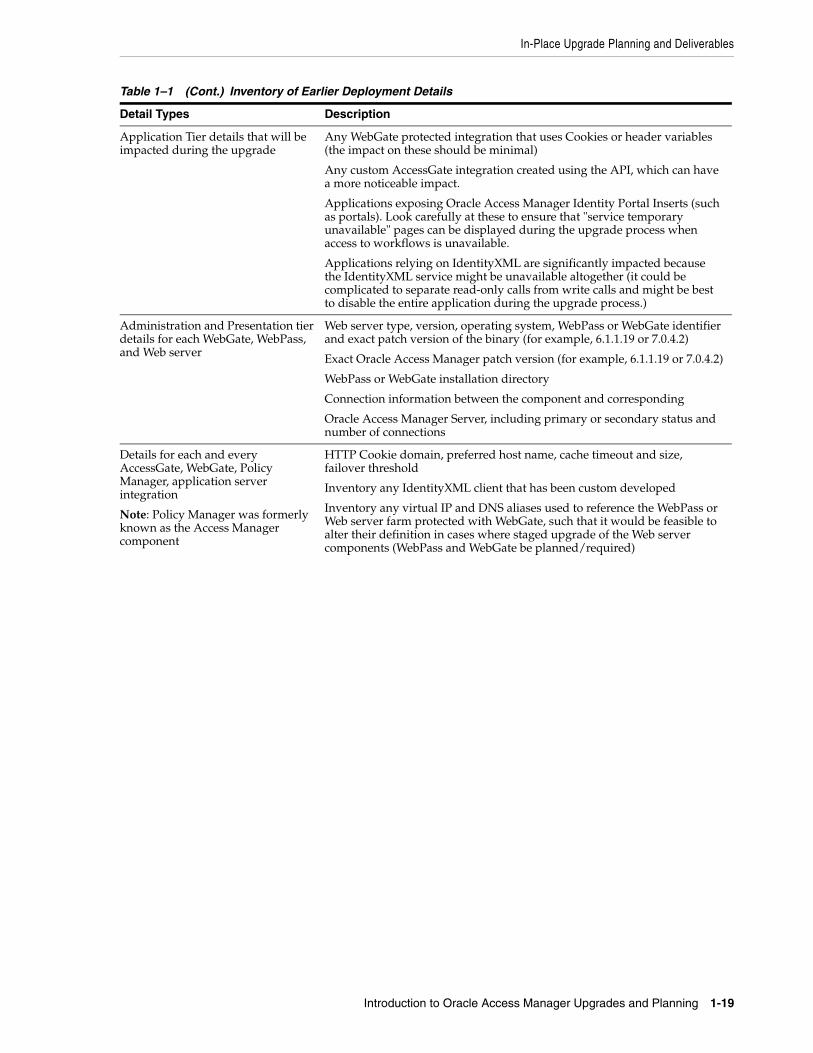
In-Place Upgrade Planning and Deliverables
Introduction to Oracle Access Manager Upgrades and Planning 1-19
Application Tier details that will be impacted during the upgrade
Any WebGate protected integration that uses Cookies or header variables (the impact on these should be minimal)
Any custom AccessGate integration created using the API, which can have a more noticeable impact.
Applications exposing Oracle Access Manager Identity Portal Inserts (such as portals). Look carefully at these to ensure that "service temporary unavailable" pages can be displayed during the upgrade process when access to workflows is unavailable.
Applications relying on IdentityXML are significantly impacted because the IdentityXML service might be unavailable altogether (it could be complicated to separate read-only calls from write calls and might be best to disable the entire application during the upgrade process.)
Administration and Presentation tier details for each WebGate, WebPass, and Web server
Web server type, version, operating system, WebPass or WebGate identifier and exact patch version of the binary (for example, 6.1.1.19 or 7.0.4.2)
Exact Oracle Access Manager patch version (for example, 6.1.1.19 or 7.0.4.2)
WebPass or WebGate installation directory
Connection information between the component and corresponding
Oracle Access Manager Server, including primary or secondary status and number of connections
Details for each and every AccessGate, WebGate, Policy Manager, application server integration
Note: Policy Manager was formerly known as the Access Manager component
HTTP Cookie domain, preferred host name, cache timeout and size, failover threshold
Inventory any IdentityXML client that has been custom developed
Inventory any virtual IP and DNS aliases used to reference the WebPass or Web server farm protected with WebGate, such that it would be feasible to alter their definition in cases where staged upgrade of the Web server components (WebPass and WebGate be planned/required)
Table 1–1 (Cont.) Inventory of Earlier Deployment Details
Detail Types Description

Planning Considerations for System Downtime During In-Place Upgrades
1-20 Oracle Access Manager Upgrade Guide
Planning Considerations for System Downtime During In-Place UpgradesDuring an upgrade in any environment, system downtime is inevitable. Oracle recommends that you pay special attention to planning and coordinating with any external party that might be directly or indirectly impacted during the upgrade.
Most Oracle Access Manager deployments provide a mission-critical element of the enterprise infrastructure by supporting applications. For example, suppose Oracle Access Manager is protecting access to an employee portal, and providing a registration service for new users. During the upgrade, new users might not be able to register. Moreover, there could be a window of time during which access to the portal
Oracle Access Manager Server Tier (for each Identity and Access Server
Exact patch level (6.1.1.19 or 7.0.4.2, for example)
Installation directory for the Identity or Access Server
Installation directory for the associated WebPass or WebGate
TCP port number for the service for example, port 6021)
Host name (DNS) and Identity (formerly COREid) Server identifier
For the Access Server note the status of the Access Management flag (on or off)
Inventory any customizations performed
Identify any Identity Event plug-ins
For the Access Server, note any customized authentication or authorization plug-ins
Record any file-based changes such as changes in globalparams.xml or .lst files
Record any PresentationXML and XSL stylesheet customizations
Are the Identity Server (and Access Server) configured to audit to files or a database
For Unix systems, record the user name and group membership for the Identity Server (formerly known as the COREid Server)
Directory Server Tier Exact directory server version and patch level for example, Sun ONE v5.2 SP2)
Directory server DNS name and Port
Transport security mode: LDAP, LDAPS, ADSI
Binding credentials used by Oracle Access Manager
DIT and schema objects used in Oracle Access Manager
Master/replica configuration details
For more information, see "In-place Schema and Data Upgrade Planning" on page 1-15
Customization Assessment and Planning
Ensure that any custom developed plug-ins, Access Manager API clients, IdentityXML clients, PresentationXML customizations, Portal Inserts, and customized styles are compatible with Oracle Access Manager 10g (10.1.4.0.1). This is primarily a manual process. For more information, see:
■ Customization Upgrade Planning
■ Planning Considerations for System Downtime During In-Place Upgrades
See Also: Part VI for details about a zero downtime upgrade.
Table 1–1 (Cont.) Inventory of Earlier Deployment Details
Detail Types Description
Planning Considerations for System Downtime During In-Place Upgrades
Introduction to Oracle Access Manager Upgrades and Planning 1-21
and any of the protected applications is not available. This can present significant impact to end users.
This discussion provides information to help you determine the amount of downtime required for the upgrade process and manual upgrade tasks in your environment. There will be some disruption to the services provided by Oracle Access Manager during some portion of the process. However, you can take steps to minimize the overall amount of service downtime. For example, if Oracle Access Manager is deployed in three environments: Development, Test/Demonstration, and Production, then upgrade tasks should be first tried in Development and fine tuned before ultimately being performed in production.
Recommendation: Upgrading each deployment in your environment 1. Perform the entire upgrade task, illustrated next, in your Development
environment.
2. When your Development environment is successfully upgraded and confirmed to be running properly, perform the entire upgrade task again in your Test/Demonstration environment.
3. When your Test/Demonstration environment upgrade is successfully completed and running properly, you perform the entire upgrade task in your Production environment.
This approach helps you gauge the time it takes to perform the upgrade in your environment and ensure that all customizations and plug-ins are working properly before you start upgrading in a production environment. This also helps ensure that your production environment upgrade will go smoothly and quickly with fewer service interruptions.
The emphasis is on reducing the impact on availability of Oracle Access Manager (formerly Oblix NetPoint or Oracle COREid) service during the upgrade. One goal of this approach is to identify tactics that can help reduce overall upgrade time and minimize service impact. As you perform upgrade tasks within each environment, you can develop strategies and optimizations that significantly streamline the overall task.
Oracle recommends careful planning to minimize the operational impact of upgrading your earlier environment. Oracle cannot guarantee that a service outage is not required to complete the upgrade.
When planning the upgrade for each environment, it is important to take into account the criticality and number of applications that depend on Oracle Access Manager. This can increase with each environment. Pay special attention to coordinating the change process that the upgrade represents to the environment as a whole. It is important to work with the application owners to ensure that end user impact is properly managed. Standard procedures such as a change control process, scheduled maintenance windows, off hours operation windows, and others should be considered when planning the Oracle Access Manager upgrade.
When assessing the impact of the Oracle Access Manager upgrade, take inventory and categorize the various applications that depend on Oracle Access Manager. This can include applications protected by the Access System, or applications that leverage the Identity System for identity administration functions, as well as the impact on the underlying directory environments. Directory environments are particularly important because the upgrade process requires a directory schema update. In many environments, upgrading the directory schema is a highly privileged operation handled by a directory administration group.

Planning Considerations for System Downtime During In-Place Upgrades
1-22 Oracle Access Manager Upgrade Guide
As you take inventory and categorize the various applications, be sure to estimate potential outage windows for each application. This will help set and manage end-user expectations. The estimated duration of outage windows will vary depending on the type of application (whether it is Access System or Identity System dependent) and the estimated duration of the upgrade tasks. For the production environment, estimates can be extrapolated from the experience gained when performing upgrade tasks and fine tuning in your Development and Testing/Demonstration environments.
For more information, see:
■ Minimizing Downtime During In-Place Upgrades
■ Downtime Assessments for In-Place Upgrades
■ Downtime Assessment Example for In-Place Upgrades
Minimizing Downtime During In-Place UpgradesThe upgrade process will require some downtime of enterprise applications that rely on Oracle Access Manager for identity administration, authentication, and authorization. There are a few upgrade tasks that can occur without impacting these applications. Table 1–2 outlines lists the upgrade tasks, their downtime impact, and planning considerations to minimize downtime where applicable.
Table 1–2 Minimizing Downtime
Upgrade Task Downtime Impact Steps to Reduce Downtime
Upgrade Planning None N/A. Review the planning chapters, prepare a compendium of documentation as you take inventory of your environment. To reduce the probability of human errors, use the tracking summaries to track progress as you complete upgrade tasks.
For more information about planning and tracking summaries, see Appendix F.
Preparing for Schema and Data upgrades None N/A
Upgrading the Schema and Data All Oracle Access Manager servers are down and all consumers of Oracle Access Manager are impacted.
Make backups and be prepared with recovery procedures in case of problems. Validate the process in stage environment before trying in production.
Upgrading Oracle Access Manager components
All Oracle Access Manager servers are down and all consumers of Oracle Access Manager are impacted.
Make backups and be prepared with recovery procedures in case of problems. Validate the process in stage environment before trying in production.Validate the upgrade in a staging environment before upgrading in production.
Upgrading Third-Party Integration Connectors
Only those third-party environments in which the deployment has chosen to upgrade the connectors.
Validate the upgrade in a staging environment before upgrading in production. Consider that Oracle Access Manager is backward compatible with earlier environments, as described in Chapter 4, which can be exploited to minimize downtime.

Planning Considerations for System Downtime During In-Place Upgrades
Introduction to Oracle Access Manager Upgrades and Planning 1-23
Downtime Assessments for In-Place UpgradesPerhaps the greatest amount of time spent in upgrading occurs during the planning process, which occurs offline. Careful planning can help reduce the overall amount of downtime needed to upgrade each environment in your enterprise.
The second greatest amount of time spent in the upgrade task occurs when preparing for the schema and data upgrade.
Less time will be spent actually upgrading components. Depending on your deployment and the amount of customization, some time must be allotted for any manual tasks needed to ensure that your earlier customizations are compatible with 10g (10.1.4.0.1) and are successfully redeployed. However, customizations can be handled outside the shared environment and have minimal impact on system downtime.
The following considerations are provided to help you understand the overall upgrade impact and downtime in your environment. Additional information is provided in "Downtime Assessment Example for In-Place Upgrades" on page 1-24.
■ Planning and taking inventory of your existing environment, as discussed in this chapter and other chapters in Part I, is a zero downtime activity. Careful planning can actually help reduce the amount of system downtime during actual upgrade tasks.
■ Schema and data upgrades (introduced in "In-place Schema and Data Upgrade Planning" on page 1-15 and described in Part II) will take the greatest amount of time, and includes:
– Preparing your LDAP directory instances and data
– Making backup copies of all data, installation directories, and Windows registry entries that include Oracle Access Manager information before the upgrade
– Preparing a master system to use during the actual schema upgrade
– Performing the actual schema upgrade
– Performing the actual data upgrade, which depends upon the number of workflows and workflow steps and the number of access policies, domains, and protected resources
– Verifying that the schema and data upgrade was successful
■ Preparing and upgrading all other Oracle Access Manager components, and Web server configuration upgrades, as described in Part III, for the most part does not require system downtime.
Upgrading Independently Installed SDKs
Only those environments where an independently installed SDK must be upgraded are impacted.
Validate the upgrade in a staging environment before upgrading in production. Consider that Oracle Access Manager is backward compatible with earlier environments, as described in Chapter 4, which can be exploited to minimize downtime.
Upgrading Customizations Deployment services that rely on Identity or Access System customizations are impacted.
Apply customizations in a staging environment first, to resolve issues. Then apply them in a production environment.
Validating the Upgrade None N/A
Table 1–2 (Cont.) Minimizing Downtime
Upgrade Task Downtime Impact Steps to Reduce Downtime

Planning Considerations for System Downtime During In-Place Upgrades
1-24 Oracle Access Manager Upgrade Guide
■ Manually processing customized stylesheets, plug-ins, forms-based authentication, audit to database implementations, and the like, as described in Part IV, can be performed outside the shared environment (which greatly reduces the amount of system downtime required)
■ Verifying that the upgrade was a success, as discussed in Part V does not result in system downtime.
Downtime Assessment Example for In-Place UpgradesThe following estimates are provided to give you an idea of the amount of time it takes to upgrade an earlier deployment that includes approximately 100 workflows, 500 policy domains, 2500 access policies, and 1700 protected resources.
Identity System Downtime Assessment■ Planning and Taking Inventory (of the currently installed environment): Zero
downtime. This task is performed outside the environment, before the upgrade. For more information, see "Planning Deliverables" on page 1-18.
■ Preparing for the Schema and Data Upgrade: ~1 hour and includes:
– Developing Strategies for Upgrading in a Replicated Environment
– Configuring the Challenge/Response Phrase at the Object Class Level
– Configuring Unique Namespaces for Directory Connection Information
– Preparing Your Directory Instances for the Schema and Data Upgrade
– Preparing Host Computers for Master Components
– Adding An Earlier Identity System to Use as a Master for the In-place Method
■ Directory Server Backups: ~15 to 30 minutes For more information, see "Backup and Recovery Strategies" on page 2-3.
■ File system Backups: ~15 minutes. For more information, see "Backup and Recovery Strategies" on page 2-3.
■ Schema Upgrade: ~20 minutes
■ Data Upgrade: ~1.5 hours
■ Identity System Component Upgrades: ~5 minutes for each component (Identity Server and WebPass) instance, which includes parameter/message upgrades and Web server configuration upgrades.
■ Identity System Customization Upgrades (Zero Downtime): The following manual tasks can be performed ahead of the production environment upgrade and outside the shared environment. As a result, there is no system downtime for these activities:
– Install and set up a fresh 10g (10.1.4.0.1) Identity System to use when testing and upgrading customizations, as described in the Oracle Access Manager Installation Guide.
– Auditing and Access Reporting: Create a new database instance for use with 10g (10.1.4.0.1), as described in "Upgrading Auditing and Access Reporting for the Identity System" on page 12-2.
– Portal Inserts: "Ensuring Compatibility with Earlier Portal Inserts" on page 12-11.
Planning Considerations for System Downtime During In-Place Upgrades
Introduction to Oracle Access Manager Upgrades and Planning 1-25
– Custom Identity Event Plug-ins: Redesign and recompile custom plug-ins as described in "Migrating Custom Identity Event Plug-Ins" on page 12-10.
– Styles: Incorporate stylesheet/javascript/msgcatalog/gif customizations from prior releases, as described in Chapter 12.
– Validation: Use procedures in "Validating Identity System Customization Upgrades" on page 12-24.
■ Identity System Customization Redeployment: ~30 minutes. If you perform the manual customization tasks in the preceding list before upgrading, you need only copy the required files to appropriate directories after upgrading components. This should significantly reduce the amount of downtime during the production environment upgrade.
■ Identity System Customization After Upgrading: ~1 hour to finish tasks described in the following topics in Chapter 12:
– Upgrading Auditing and Access Reporting for the Identity System on page 12-2.
– Combining Challenge and Response Attributes on a Panel on page 12-8.
– Confirming Identity System Failover and Load Balancing on page 12-9
– Validating Identity System Customization Upgrades on page 12-24
■ Identity System, Total Downtime: ~5 hours
Access System Downtime Assessment■ Planning and Taking Inventory (of the current installed environment): Zero
downtime. This task is performed outside the environment, before the upgrade. For more information, see "Planning Deliverables" on page 1-18.
■ Preparing for the Access System Schema and Data Upgrade: ~1 hour and includes:
– Developing Strategies for Upgrading in a Replicated Environment
– Configuring the Challenge/Response Phrase at the Object Class Level
– Configuring Unique Namespaces for Directory Connection Information
– Preparing Your Directory Instances for the Schema and Data Upgrade
– Preparing Host Computers for Master Components
– Adding an Earlier Access Manager to Use as a Master for the In-Place Method
■ Directory Server Backups: ~15 to 30 minutes. For more information, see "Backup and Recovery Strategies" on page 2-3.
■ File system Backups: ~15 minutes. For more information, see "Backup and Recovery Strategies" on page 2-3.
■ Access System Schema Upgrade: ~20 minutes
■ Access System Data Upgrade: ~2 hours
■ Access System Component Upgrades: ~5 minutes for each component instance (Policy Manager, Access Server, WebGate), which includes parameter/message upgrades and Web server configuration upgrades.
■ Access System Customization Upgrades (Zero Downtime): Several manual tasks can be performed ahead of the production environment upgrade and outside the shared environment. As a result, there is no system downtime for these activities:

Planning Considerations for Extranet and Intranet Deployments
1-26 Oracle Access Manager Upgrade Guide
– Install and set up a fresh 10g (10.1.4.0.1) Access System to use when testing upgraded customizations, as described in the in the Oracle Access Manager Installation Guide.
– Auditing and Access Reporting: Complete this task for the Access Server, as described in "Upgrading Auditing and Reporting for the Access Server" on page 13-2.
– Forms-based Authentication: Perform activities in "Upgrading Forms-based Authentication" on page 13-4.
– Custom Authentication and Authorization Plug-ins: "Recompiling and Redesigning Custom Authentication and Authorization Plug-Ins" is described on page 13-5.
– Updating the ObAMMasterAuditRule_getEscapeCharacter in Custom C Code is described on page 13-7.
– Validation: Validating Access System Customization Upgrades is described on page 13-7.
■ Access System Customization Redeployment: ~30 minutes. If you perform the manual customization tasks in the preceding list before upgrading, you need only copy the required files to appropriate directories after upgrading components. This should significantly reduce the amount of downtime during the production environment upgrade.
■ Access System Customization After Upgrading: ~1 hour to perform tasks in the following topics in Chapter 13:
– Upgrading Auditing and Reporting for the Access Server on page 13-2.
– Associating Release 6.1.1 Authorization Rules with Access Policies on page 13-5
– Assuring Proper Authorization Failure Re-directs After Upgrading from 6.1.1 on page 13-6
– Validating Access System Customization Upgrades on page 13-7
■ Access System Total: ~5.5 hours of downtime
Therefore, to upgrade both the Identity and Access Systems in this environment will take about 11 hours for tasks that require system downtime.
Planning Considerations for Extranet and Intranet DeploymentsExisting earlier Oracle Access Manager deployments can be classified into two primary categories: Extranet (B2B,G2C, B2C) and Intranet (B2E, G2E) deployments. These are, of course, generic categories. However, for the purposes of understanding deployment demographics these should provide relevant patterns.
For more information, see the topics:
■ Extranet Deployments
■ Intranet Deployments
Extranet Deployments Extranet deployments are those where you have:
■ A relatively large user population (over 20 thousand users)

Planning Considerations for Extranet and Intranet Deployments
Introduction to Oracle Access Manager Upgrades and Planning 1-27
■ The user population is being served through a relatively small number of applications (less than 20)
■ The applications are integrated with NetPoint (Oracle Access Manager), and are typically consolidated in a portal
The most typical characteristics for extranet deployments include:
■ A higher complexity on the Identity System deployment relative to the Access System
■ A large number of workflows (self-registration, self-service, delegated administration) typically involving Identity Event plug-ins (customizations)
■ Sophisticated delegated administration requirements, often involving various user types (at a minimum four levels of administrative roles/access) and reliance on ACLs, groups, and other objects.
■ User interface customizations (accomplished using XSL stylesheets, PresentationXML, and IdentityXML) because the majority of the requirements center on identity administration of a large number of users and ease of use is a paramount driver. The majority of implementations will exhibit front end user interfaces built on top of IdentityXML.
■ Features such as lost password management are very commonly configured.
■ A relatively small software footprint (for example, only a handful of servers—2 to 4 servers at each tier—often distributed between a few data centers), and a very low tolerance for downtime because the applications that rely on Oracle Access Manager are often business critical.
■ Commonly the directory environment is dedicated to Oracle Access Manager and the applications it supports. Therefore, there is a bit more control over the directory service in conjunction with Oracle Access Manager from an operational perspective. There are a relatively small number of stakeholders from the application side (typically belonging to a common line of business.)
Performing the upgrade to 10g (10.1.4.0.1) with minimal service disruption in such a highly complex environment can be challenging.
Intranet Deployments Intranet deployment environments are typically:
■ Internal facing portals with a relatively small user population (less than 20 thousand users)
■ The user population is being served through a relatively large number of applications (more than 20) integrated with NetPoint (also known as Oracle Access Manager)
The most typical characteristics for intranet deployments include:
■ A greater prevalence of the Access System customizations, if any, are typically:
– On the front-end at the login page (or login front-end)
– Or using custom built AccessGates
– Or on the back-end using customized authentication or authorization plug-ins developed with the APIs

Upgrade Paths
1-28 Oracle Access Manager Upgrade Guide
■ A relatively large number of applications (over 20) being protected where the emphasis is primarily on authentication and single-sign on (SSO), with a significant number of application-level integrations.
■ A high number of BEA WebLogic and IBM WebSphere Application Server integrations using Oracle Access Manager connectors for these servers.
■ Often the Identity System is either not widely deployed, or deployed only to an administrator user community (for example, the help desk, IT department, or system administrators).
■ Password management features are not typically configured or used, because Oracle Access Manager often relies on the same back end store as the NOS (AD), and it is rare to see self-registration workflows.
■ These environments tend to have a broad footprint, especially at the WebGate/AccessGate tier, with a high number of Web servers and Application servers with WebGate to Access Server ratios in the range of 10:1.
■ On the Access Server tier, intranet deployments tend to be global and geographically distributed, with a handful of servers deployed in each location.
■ The directory environment is often shared, because it is the employee directory or even the NOS directory (AD). Therefore, the number of dependencies associated to the directory is high (meta-directories, provisioning solutions, NOS logon, white pages, and the like). As a result, changes and operational impact to the directory is very rigorously managed. Many stakeholders need to be coordinated with in a change-control process, and tight operational windows are allowed. On the application front, there tends to be more flexibility on server availability, and applications tend to be "clustered" by line of business, geography, or security requirements. Therefore, the impact can be segregated.
Upgrade PathsThis discussion introduces the paths available when upgrading from an earlier release to Oracle Access Manager 10g (10.1.4.0.1), when using the in-place upgrade methodology. The path that is available to you depends upon your starting release (the release from which you are starting the upgrade) as described in:
■ Direct Upgrade Paths
■ Indirect Upgrade Paths
Direct Upgrade PathsFollowing discussions describe several direct paths that are available to upgrade an earlier release:
■ From Release 6.1.1
■ From Release 6.5
■ From Release 7.x
From Release 6.1.1 Release 6.1.1 deployments are typically large in terms of the number of components deployed at each tier of the architecture, as well as other systems and applications. Oracle Access Manager 6.1.1 is an English only release.

Upgrade Paths
Introduction to Oracle Access Manager Upgrades and Planning 1-29
During the upgrade, each component installer automatically implements product changes for each release between the starting release 6.1.1 and the 10.1.4 release. This includes automatically enabling the multi-language capability. If you are upgrading from release 6.1.1:
■ You can use the in-place methodology with Oracle Access Manager 10g (10.1.4.0.1) installers to perform a direct upgrade to 10g (10.1.4.0.1). After the upgrade you can apply Release 10.1.4 Patchset 1 (10.1.4.2.0).
■ You can upgrade directly to Oracle Access Manager 10.1.4.2.0 using the zero downtime methodology and tools that are available with Release 10.1.4 Patchset 1 (10.1.4.2.0). After this upgrade, you do not need to apply the patch set because component instances are already release 10.1.4.2.0.
Every environment requires some preparation before starting the upgrade, as discussed in Chapter 5 and Chapter 8. There are no additional caveats and conditions when upgrading directly from release 6.1.1.
From Release 6.5 Release 6.5.0 introduced multi-language support for French and German in addition to providing and enabling English language messages. When you have any Oracle Access Manager 6.5 release:
■ You can use the in-place methodology with Oracle Access Manager 10g (10.1.4.0.1) installers to perform a direct upgrade to 10g (10.1.4.0.1). After the upgrade you can apply Release 10.1.4 Patchset 1 (10.1.4.2.0).
■ You can upgrade directly to Oracle Access Manager 10.1.4.2.0 using the zero downtime methodology and tools that are available with Release 10.1.4 Patchset 1 (10.1.4.2.0). After this upgrade, you do not need to apply the patch set because component instances are already release 10.1.4.2.0.
Table 1–3 discusses the various 6.5 releases. During the direct upgrade from any Oracle Access Manager 6.5.x release, each component installer automatically implements product changes for each release between release 6.5.0 and the later Oracle Access Manager release.
To retain earlier multi-language functionality, you must include 10g (10.1.4.0.1) Language Packs in the same directory as the 10g (10.1.4.0.1) installation package that you use to upgrade the component. Otherwise, only the English language is used. You can install additional supported languages after the upgrade, as described in the Oracle Access Manager Installation Guide.
See Also: Part VI, if you are using the zero downtime upgrade method.
Table 1–3 Upgrade Paths from Oracle Access Manager 6.5 Releases
Starting From Upgrading To Caveat
6.5.0.x is an international release (English, German, French)
10g (10.1.4.0.1)
10g (10.1.4.2.0)
Before the upgrade, complete activities in "Adding Packages for Release 6.5.0.x" on page 8-4. See also, "Preparing Multi-Language Installations" on page 8-7.

Upgrade Paths
1-30 Oracle Access Manager Upgrade Guide
From Release 7.x With the exception of release 7.0.4 (which is an international release that was available as part of Oracle Application Server 10g Release 2 (10.1.2)), all 7.x releases are English only. Typically, NetPoint 7.x environments are newer and less complex than NetPoint 6.5 or 6.1.1 environments. You can either upgrade to 10g (10.1.4.0.1) and apply the patch set or you can use the zero downtime method, as follows:
■ You can use the in-place methodology with Oracle Access Manager 10g (10.1.4.0.1) installers to perform a direct upgrade to 10g (10.1.4.0.1). After the upgrade you can apply Release 10.1.4 Patchset 1 (10.1.4.2.0).
■ You can upgrade directly to Oracle Access Manager 10.1.4.2.0 using the zero downtime methodology and tools that are available with Release 10.1.4 Patchset 1 (10.1.4.2.0). After this upgrade, you do not need to apply the patch set because component instances are already release 10.1.4.2.0.
Table 1–4 provides a brief overview of 7.x releases. During the direct upgrade from any 7.x release, each component installer automatically implements product changes for each release between 7.0 and Oracle Access Manager 10g (10.1.4.0.1) and enables multi-language capability. To retain earlier multi-language functionality (or to install new languages), you can include 10g (10.1.4.0.1) Language Packs in the same directory as the 10g (10.1.4.0.1) installation package. Otherwise, only the English language is used.
6.5.1 is an English-only release that introduced support for Active Directory Application Mode (ADAM) as a back end directory.
10g (10.1.4.0.1)
10g (10.1.4.2.0)
No caveats or special requirements. Upgrade as described in this guide.
6.5.2.x is an English-only release 10g (10.1.4.0.1)
10g (10.1.4.2.0)
Before upgrading an installation patched to 6.5.2, complete activities in "Adding Packages for Release 6.5.2.x Patch" on page 8-6.
6.5.3.x is an English-only WebGate release
Use 10g (10.1.4.0.1)
10g (10.1.4.2.0)
No caveats. Upgrade as described in "Upgrading WebGates In Place" on page 10-9
If you are using the zero downtime upgrade method, upgrade as described in Part VI.
Table 1–4 Upgrade Paths from Series 7.x Releases
Starting From Upgrading To Caveat
Release 7.0 Use 10g (10.1.4.0.1)
10g (10.1.4.2.0)
No caveats other than including Language Packs to upgrade languages if these are installed.
For in-place upgrades, see Part II for details about upgrading the schema and data, and Part III for details about upgrading components.
For the zero downtime upgrade method, see Part VI.
Release 7.0.1, and later, provide additional platform certifications and parameter and message updates. Going forward, new GIFs, XSL, HTML, images, or similar files can be included in a patch release.
Use 10g (10.1.4.0.1)
10g (10.1.4.2.0)
No caveats other than including Language Packs to upgrade languages if these are installed.
For in-place upgrades, see Part II for details about upgrading the schema and data, and Part III for details about upgrading components.
For zero downtime upgrades, see Part VI.
Table 1–3 (Cont.) Upgrade Paths from Oracle Access Manager 6.5 Releases
Starting From Upgrading To Caveat
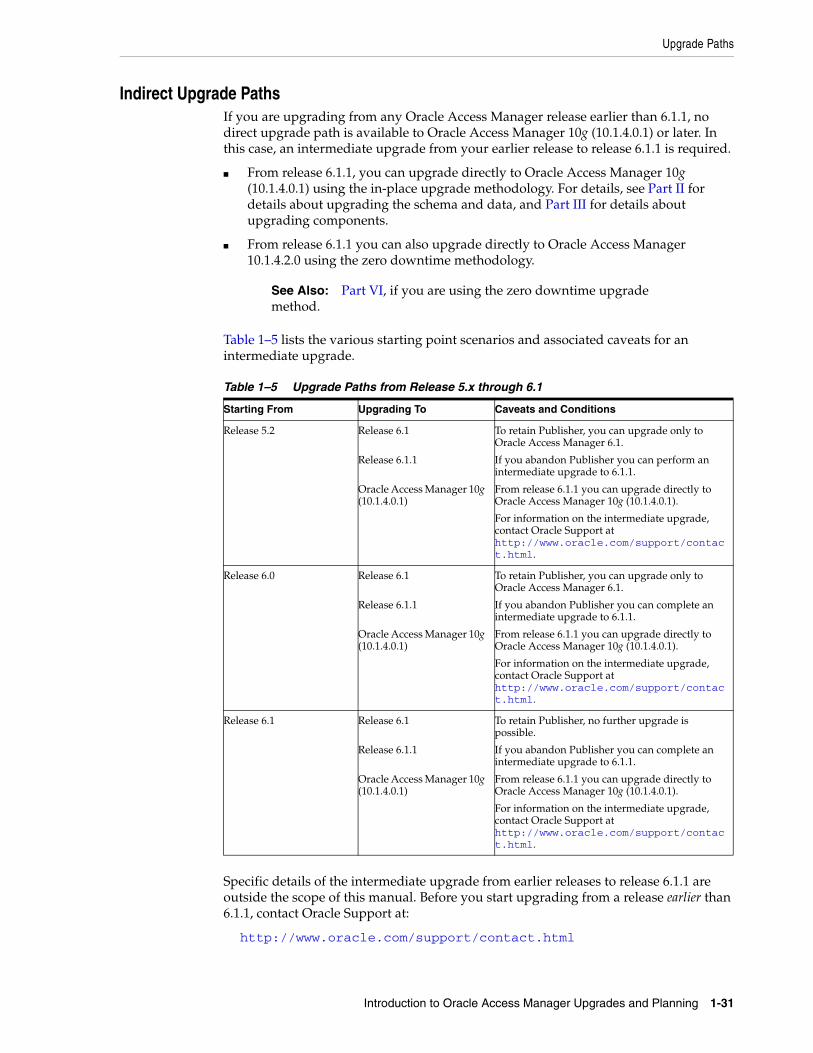
Upgrade Paths
Introduction to Oracle Access Manager Upgrades and Planning 1-31
Indirect Upgrade PathsIf you are upgrading from any Oracle Access Manager release earlier than 6.1.1, no direct upgrade path is available to Oracle Access Manager 10g (10.1.4.0.1) or later. In this case, an intermediate upgrade from your earlier release to release 6.1.1 is required.
■ From release 6.1.1, you can upgrade directly to Oracle Access Manager 10g (10.1.4.0.1) using the in-place upgrade methodology. For details, see Part II for details about upgrading the schema and data, and Part III for details about upgrading components.
■ From release 6.1.1 you can also upgrade directly to Oracle Access Manager 10.1.4.2.0 using the zero downtime methodology.
Table 1–5 lists the various starting point scenarios and associated caveats for an intermediate upgrade.
Specific details of the intermediate upgrade from earlier releases to release 6.1.1 are outside the scope of this manual. Before you start upgrading from a release earlier than 6.1.1, contact Oracle Support at:
http://www.oracle.com/support/contact.html
See Also: Part VI, if you are using the zero downtime upgrade method.
Table 1–5 Upgrade Paths from Release 5.x through 6.1
Starting From Upgrading To Caveats and Conditions
Release 5.2 Release 6.1
Release 6.1.1
Oracle Access Manager 10g (10.1.4.0.1)
To retain Publisher, you can upgrade only to Oracle Access Manager 6.1.
If you abandon Publisher you can perform an intermediate upgrade to 6.1.1.
From release 6.1.1 you can upgrade directly to Oracle Access Manager 10g (10.1.4.0.1).
For information on the intermediate upgrade, contact Oracle Support at http://www.oracle.com/support/contact.html.
Release 6.0 Release 6.1
Release 6.1.1
Oracle Access Manager 10g (10.1.4.0.1)
To retain Publisher, you can upgrade only to Oracle Access Manager 6.1.
If you abandon Publisher you can complete an intermediate upgrade to 6.1.1.
From release 6.1.1 you can upgrade directly to Oracle Access Manager 10g (10.1.4.0.1).
For information on the intermediate upgrade, contact Oracle Support at http://www.oracle.com/support/contact.html.
Release 6.1 Release 6.1
Release 6.1.1
Oracle Access Manager 10g (10.1.4.0.1)
To retain Publisher, no further upgrade is possible.
If you abandon Publisher you can complete an intermediate upgrade to 6.1.1.
From release 6.1.1 you can upgrade directly to Oracle Access Manager 10g (10.1.4.0.1).
For information on the intermediate upgrade, contact Oracle Support at http://www.oracle.com/support/contact.html.

Upgrade Paths
1-32 Oracle Access Manager Upgrade Guide

Upgrade Concepts, Strategies, and Methods 2-1
2Upgrade Concepts, Strategies, and Methods
This chapter introduces upgrade concepts, strategies, and processing methods. Unless explicitly stated, the information in this chapter applies equally to in-place upgrades and to zero downtime upgrades. Topics in this chapter include:
■ Upgrade Terms and Concepts
■ About Upgrading the Oracle Application Server
■ Backup and Recovery Strategies
■ Zero Downtime Upgrade Start Methods
■ In-Place Upgrade Start Methods
■ Upgrade Event Modes
■ Support Deprecated
■ Upgrade Strategies When Support is Changed or Deprecated
For an introduction to Oracle Access Manager, a road map to related manuals, and a glossary of terms, see the Oracle Access Manager Introduction.
Upgrade Terms and ConceptsThis section describes the difference between a full release and a patch set, differences between numbering of various releases, and incremental upgrades.
Oracle Access Manager 10g (10.1.4.0.1) is a full release that includes all component packages, libraries, and files needed for a fresh installation or a in-place upgrade. Release 10g (10.1.4.0.1) component installation programs control both installation and upgrade processing.
Oracle Access Manager Release 10.1.4 Patch Set 1 (10.1.4.2.0) is a patch set, not a full release. A patch release provides fixes to known problems. The Release 10.1.4 Patch Set 1 (10.1.4.2.0) also includes some new features and functions, including the MigrateOAM script that can be used with only the zero downtime upgrade methodology:
■ In-Place Upgrade Method: This method requires release 10g (10.1.4.0.1) component installers to upgrade existing components where they currently reside.
Note: There are several important name changes that you should know about. Be sure to review "Product and Component Name Changes" on page -xxv. This manual uses the new names, even when referring to earlier releases.

About Upgrading the Oracle Application Server
2-2 Oracle Access Manager Upgrade Guide
■ Zero Downtime Upgrade Method: This method requires the MigrateOAM script that is available only with Release 10.1.4 Patch Set 1 (10.1.4.2.0), as described in Part IV.
Your earlier installation might include patches. However, you do not need to apply patches to the earlier installation before upgrading. For details about applying the latest patch set after upgrading, see "The Latest Patch Set" on page 3-12.
Starting with release 10g (10.1.4.0.1), Oracle Access Manager uses the Oracle product numbering scheme. A major release is identified by the first three numbers (10.1.4, for example) of a five segment product number. The last two digits of an Oracle product number represent the maintenance and patch release numbers (10.1.4.0.0), respectively:
Oracle Release Numbering: 10.1.4.0.1 n . n . n (Major) . Maintenance . Patch
Earlier release numbers consisted of four elements:
Earlier Release Numbering: 7.0.4.2 Major_release . Minor_release . Maintainence_release . Patch_release
During an upgrade, automated processing occurs incrementally from the earliest release to the latest. Upgrade processing handles the differences between release numbering schemes seamlessly. During the upgrade, a minor release (or maintenance release or patch release) is recognized as a major release. For example, 6.5.5.3 is recognized as 6.5.
The following process overview outlines the automated processing that occurs during a component upgrade. This sequence occurs regardless of the methodology you are using. In this example, the starting release is 6.1.1. While your starting release might be different, the incremental upgrade from each earlier release occurs automatically during every component upgrade.
Process overview: Automatic Incremental upgrades 1. The first increment brings your installation from release 6.1.1 to release 6.5.
2. The second increment brings your installation from release 6.5 to release 7.0.
3. Third increment brings your installation from release 7.0 to 10g (10.1.4.0.1).
Release 10.1.4 Patch Set 1 (10.1.4.2.0) is not a full release. This means that Release 10.1.4 Patch Set 1 (10.1.4.2.0) installers cannot be used to install or upgrade components using the in-place upgrade method.
About Upgrading the Oracle Application ServerIf your system environment includes Oracle Application Server components, you can upgrade these to 10g (10.1.4.0.1) by following the instructions in the Oracle Application Server Upgrade and Compatibility Guide.
The upgrade procedures for Oracle Access Manager are documented separately from the Oracle Application Server upgrade procedures because the two products are installed separately.
Note: To upgrade from releases earlier than 6.1.1, contact Oracle Support at http://www.oracle.com/support/contact.html.

Backup and Recovery Strategies
Upgrade Concepts, Strategies, and Methods 2-3
Backup and Recovery StrategiesRegardless of the upgrade methodology you choose, it is important to make back up copies of certain information both before and after upgrading. Figure 2–1 illustrates the types of information that Oracle recommends you back up. Unless you have the Access System installed, you can ignore details for the Policy Manager, Access Server, and WebGate.
Figure 2–1 Back Up Strategies
As depicted in As discussed in Chapter 1, the installation directory for each component includes the following information types:
■ Program and library files
■ Message and parameter catalogs
■ Component-specific configuration files (and in some cases failover configuration files and the software developer kit (SDK) configurations)
A WebPass must also be installed with each Policy Manager on the same Web server instance, at the same directory level.
For more information, see:
■ Backup Strategies Before Upgrading
■ Backup Strategies After Upgrading
Directory
Back Up:· Directory Schema · Configuration Data· User and Group Data· Workflow Data· Policy Data
Identity Server
WebPassPolicy Manager
Access Server
Client
OIP
OAP
WebPass
WebGate
Back Up· Product Installation Directory· Windows Registry
Back Up· Product Installation Directory· Windows Registry· Web Server Configuration
Back Up· Product Installation Directory· Windows Registry
Back Up· Product Installation Directory· Windows Registry· Web Server
Configuration
Back Up· Product Installation Directory· Windows Registry· Web Server Configuration
LDAP
LDAP
LDAP

Backup and Recovery Strategies
2-4 Oracle Access Manager Upgrade Guide
■ Recovery Strategies
Backup Strategies Before UpgradingOracle recommends that you perform certain back up activities before upgrading to help restore an earlier environment in the unlikely event that you want to do this following an upgrade. Table 2–1 provides more information. If you are using the zero downtime upgrade method, see also Part VI.
Backup Strategies After UpgradingAfter you have completed and verified each component upgrade, Oracle recommends that you back up the upgraded information listed in Table 2–2. This will enable you to restore an upgraded environment to the newly upgraded status should this be needed. You will perform some of the same tasks after upgrading as you did before the upgrade. Only this time, the target will be the newly upgraded instance. If you are using the zero downtime upgrade method, see also Part VI.
Table 2–1 Back Up Strategies Before Upgrading
Back Up the Following Information Types As Described In
Oracle Access Manager Schema
The upgraded schema offers backward compatibility with the earlier schema, as far back as release 6.1.1. However, you cannot roll back a schema upgrade using any Oracle-provided tools. Some directory server vendors provide tools that you can use to back up the schema. If you backed up the earlier schema using external tools before upgrading, you should be able to reinstate the backup copy if you decide to roll back to the original release.
Chapter 5: Backing up the Earlier Oracle Access Manager Schema
Oracle Access Manager Configuration and Policy Data Chapter 5: Backing up Oracle Access Manager Configuration and Policy Data
Oracle Access Manager User and Group Data Chapter 5: Backing Up User and Group Data
Oracle Access Manager Workflow Data Chapter 5: Backing Up Workflow Data
Processed Workflows Chapter 5: Archiving Processed Workflow Instances
Existing Directory Instances Chapter 5: Backing Up Existing Directory Instances
Earlier Installed Component File System Directory (and any Customization Directories)
Note: With the zero downtime upgrade method, you will create a source that provides details for the upgrade and also becomes a backup copy of the instance. As a result, you do not need to explicitly back up the installation directory. However, you must still take care of customizations. For more information, see Part VI.
Chapter 5: Backing Up the Existing Component Installation Directory
Web Server Configuration Files Chapter 8: Backing Up the Existing Web Server Configuration File
Windows Registry Chapter 8: Backing Up Windows Registry Data
Table 2–2 Back Up Strategies After Upgrading
Back Up the Following Information Types After Upgrading As Described In
Existing Directory Instances Chapter 5: Backing Up Existing Directory Instances
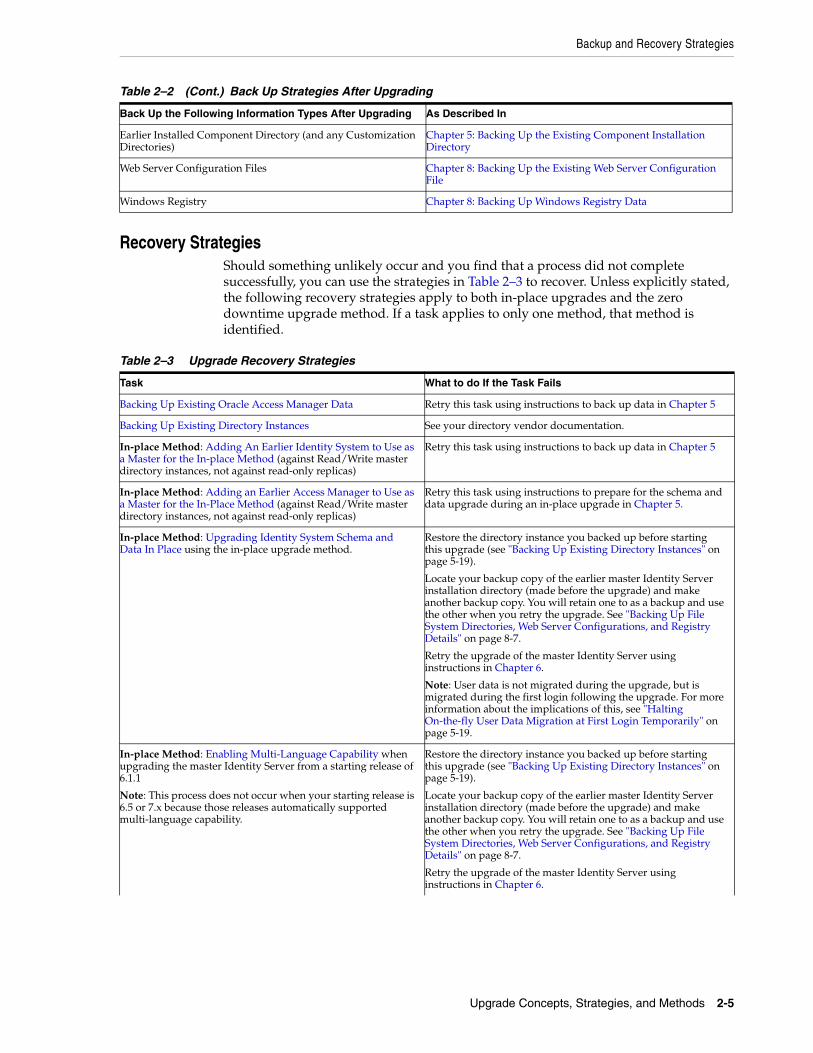
Backup and Recovery Strategies
Upgrade Concepts, Strategies, and Methods 2-5
Recovery StrategiesShould something unlikely occur and you find that a process did not complete successfully, you can use the strategies in Table 2–3 to recover. Unless explicitly stated, the following recovery strategies apply to both in-place upgrades and the zero downtime upgrade method. If a task applies to only one method, that method is identified.
Earlier Installed Component Directory (and any Customization Directories)
Chapter 5: Backing Up the Existing Component Installation Directory
Web Server Configuration Files Chapter 8: Backing Up the Existing Web Server Configuration File
Windows Registry Chapter 8: Backing Up Windows Registry Data
Table 2–3 Upgrade Recovery Strategies
Task What to do If the Task Fails
Backing Up Existing Oracle Access Manager Data Retry this task using instructions to back up data in Chapter 5
Backing Up Existing Directory Instances See your directory vendor documentation.
In-place Method: Adding An Earlier Identity System to Use as a Master for the In-place Method (against Read/Write master directory instances, not against read-only replicas)
Retry this task using instructions to back up data in Chapter 5
In-place Method: Adding an Earlier Access Manager to Use as a Master for the In-Place Method (against Read/Write master directory instances, not against read-only replicas)
Retry this task using instructions to prepare for the schema and data upgrade during an in-place upgrade in Chapter 5.
In-place Method: Upgrading Identity System Schema and Data In Place using the in-place upgrade method.
Restore the directory instance you backed up before starting this upgrade (see "Backing Up Existing Directory Instances" on page 5-19).
Locate your backup copy of the earlier master Identity Server installation directory (made before the upgrade) and make another backup copy. You will retain one to as a backup and use the other when you retry the upgrade. See "Backing Up File System Directories, Web Server Configurations, and Registry Details" on page 8-7.
Retry the upgrade of the master Identity Server using instructions in Chapter 6.
Note: User data is not migrated during the upgrade, but is migrated during the first login following the upgrade. For more information about the implications of this, see "Halting On-the-fly User Data Migration at First Login Temporarily" on page 5-19.
In-place Method: Enabling Multi-Language Capability when upgrading the master Identity Server from a starting release of 6.1.1
Note: This process does not occur when your starting release is 6.5 or 7.x because those releases automatically supported multi-language capability.
Restore the directory instance you backed up before starting this upgrade (see "Backing Up Existing Directory Instances" on page 5-19).
Locate your backup copy of the earlier master Identity Server installation directory (made before the upgrade) and make another backup copy. You will retain one to as a backup and use the other when you retry the upgrade. See "Backing Up File System Directories, Web Server Configurations, and Registry Details" on page 8-7.
Retry the upgrade of the master Identity Server using instructions in Chapter 6.
Table 2–2 (Cont.) Back Up Strategies After Upgrading
Back Up the Following Information Types After Upgrading As Described In

Backup and Recovery Strategies
2-6 Oracle Access Manager Upgrade Guide
In-place Method: Upgrading Access System Schema and Data In Place
Restore the directory instance you backed up before starting this upgrade (see "Backing Up Existing Directory Instances" on page 5-19).
Locate your backup copy of the earlier master Access Manager installation directory (made before the upgrade) and make another backup copy. You will retain one to as a backup and use the other when you retry the upgrade. See "Backing Up File System Directories, Web Server Configurations, and Registry Details" on page 8-7.
Retry the upgrade of the master Access Manager using instructions in Chapter 7.
Uploading Directory Server Index Files Retry this task using instructions in "Uploading Directory Server Index Files" on page 6-17.
In-place Method: Upgrading Components Identity Server, WebPass, Policy Manager (formerly known as the Access Manager component)), Access Server, or WebGate
Locate your backup copy of the earlier component installation directory (made before the upgrade) and make another backup copy. You will retain one to as a backup and use the other when you retry the upgrade. See "Backing Up File System Directories, Web Server Configurations, and Registry Details" on page 8-7.
Retry this step and specify the earlier component installation directory when asked for the installation directory. See Part III, "Upgrading Components".
Zero Downtime Method: Adding Profiles for Clones Retry this task using instructions in "Recovering From Issues With Information Entered in the System Console" on page 16-21.
Zero Downtime Method: Cloning Instances for a Zero Downtime Upgrade
Remove the clone file system subdirectory and retry this task as described in "Cloning Earlier Components for a Zero Downtime Upgrade" on page 16-21.
Zero Downtime Method: Creating and Populating a New Branch in the Directory Server
Perform steps in "Recovering from Problems With Populating the New Branch" on page 16-39.
Zero Downtime Method: Reconfiguring Clones To Use the New Branch
Retry this task and ensure that all specifications are correct, as described in "Configuring Cloned Components and Services" on page 16-40.
Zero Downtime Method: Schema Upgrades If you created a back up copy of the schema using external tools, you might be able to restore the schema.
Zero Downtime Method: Clone Upgrades Copy the source file system directory. Remove the destination file system directory. Restore the backed up Web server configuration file, and import the backed up Windows registry entry, if needed. For more information, see:
For more information, see the following topics:
■ Recovering From a Cloned Identity System Upgrade Failure on page 16-83
■ Recovering from a Failed Cloned Access System Component Upgrade on page 16-98
Retry the clone system upgrade as described in following topics:
■ Upgrading the Cloned Identity System on page 16-70
■ Upgrading the Cloned Access System on page 16-87
Table 2–3 (Cont.) Upgrade Recovery Strategies
Task What to do If the Task Fails

In-Place Upgrade Start Methods
Upgrade Concepts, Strategies, and Methods 2-7
Additional information on recovering from an upgrade failure can be found throughout this book. Specific troubleshooting information is located in Appendix G.
Zero Downtime Upgrade Start MethodsThere is only one way to start zero downtime upgrade processing and that is by obtaining the 10.1.4.2.0 MigrateOAM script and using it from the command line.
For more information, see "Zero Downtime Upgrade Tools and Processes" on page 15-23.
In-Place Upgrade Start Methods As mentioned earlier, you use the corresponding 10g (10.1.4.0.1) component installer to begin each component upgrade. You can launch the installer using either the graphical user interface (GUI method) or the command-line interface (Console method).
Either Method: Regardless of the method you choose, the sequence of events and prompts are nearly identical. In later chapters, minor differences are identified as they occur during a specific sequence. If you see something that does not apply to your environment or installation, you can ignore it. Also, whether you launch the upgrade using GUI or Console method, you will be asked to choose a mode (Automatic versus Confirmed), as described in "Upgrade Event Modes" on page 2-8.
For more information, see:
■ GUI Method
■ Console Method
Zero Downtime Method: Original Instance Upgrades Remove the destination file system directory. Restore the backed up Web server configuration file, and import the backed up Windows registry entry, if needed. For more information, see the following topics:
■ Recovering From an Original Identity System Upgrade Failure on page 17-27
■ Recovering From an Original Access System Upgrade Failure on page 17-55
Retry the original instance upgrade, as described in following topics:
■ Upgrading Your Original Identity System on page 17-4
■ Upgrading Your Original Access System on page 17-55
Upgrading Your Identity System Customizations Retry this task using instructions in Chapter 12
Upgrading Your Access System Customizations Retry this task using instructions in Chapter 13
Note: These methods do not apply when using tools for the zero downtime upgrade method. For more information about the zero downtime upgrade tools, see "Zero Downtime Upgrade Tools and Processes" on page 15-23.
Table 2–3 (Cont.) Upgrade Recovery Strategies
Task What to do If the Task Fails

Upgrade Event Modes
2-8 Oracle Access Manager Upgrade Guide
GUI MethodThis method is the default for Windows systems when you select the installation package from the file system. For example:
Oracle_Access_Manager10_1_4_0_1_win32_Identity_Server.exe
Console MethodThe command-line method (also known as Console method) is the default for Unix systems. For example:
./ Oracle_Access_Manager10_1_4_0_1_sparc-s2_Identity_Server
Upgrade Event Modes Regardless of the method you are using, in-place or zero downtime, at some point during upgrade processing you will be asked to select either Automatic mode or Confirmed mode:
------------------------------------- Please specify the mode for migration: '1' - Automatic (recommended) Each step is performed automatically. No interaction from the user is required. '2' - Confirmed Each step needs confirmation from the user. Enter choice ( '1' or '2' ) : --------------------------------------------
For more information about each of these processing modes, see:
■ Automatic Mode
■ Confirmed Mode
Automatic ModeOracle recommends that you choose the Automatic mode. This mode provides declarative messages to keep you informed as the upgrade progresses. For example:
Creating original folders ... ---------------------------------------------------- Copying general configuration files OK. ---------------------------------------------------- Updating parameter catalogs ... OK. ----------------------------------------------------
From time to time in Automatic mode, you are asked to respond to specific queries that require your acceptance before being initiated (or simply acknowledging that you are ready to continue). For example when upgrading the master Identity Server and
Note: . These modes apply whether you are performing an in-place upgrade or a zero downtime upgrade and regardless of the mode in which you might be running the installer (GUI method or the Console method).

Upgrade Event Modes
Upgrade Concepts, Strategies, and Methods 2-9
master Access Manager, you are asked to accept an automatic schema and data upgrade as indicated in this example:
Oracle Access Manager schema migration ...
Retrieving Oracle configuration parameters ... OK. The following directory server's schema will be updated: Host:DNShostname.domain.com Port: port# Type:ns NOTE: If you do not want to migrate schema at this time, type 'SKIP'. Please type 'Yes" to proceed:
For more information about the sequence of automated processes and events, see Chapter 3.
Confirmed ModeIf you select Confirmed mode during a component upgrade, you are presented with a question before each and every event (not just those that require acceptance during Automatic mode). The types of messages you see in Confirmed mode are shown here:
Copy general configurations files? '1' - Yes '2' - No Enter choice ( '1' or '2' ) : 1 OK.
In Confirmed mode, each event is performed only after you accept by entering the number 1. If you enter the number 2, the event is skipped and you are then asked to accept or decline the next event.
Confirmed mode is recommended for use in only the following situations when you need to conditionally run, skip, and re-run certain event in a component upgrade. For example:
■ Upgrade Strategies When Support is Changed or Deprecated: Suppose a release 6.1.1 WebPass resides on a computer with a Web server version that is not supported by 10g (10.1.4.0.1). In this case, you must upgrade the 6.1.1 WebPass incrementally, as follows.
– Retain the Web server version that is supported for the release 6.1.1 WebPass.
– After initiating the WebPass upgrade and selecting Console mode, you accept activities to upgrade the WebPass from the release 6.1.1 to the next Oracle Access Manager release that supports the existing Web server version (to release 6.5 for example). You decline activities to upgrade WebPass further and accept updating the Web server configuration with 6.1.1 to 6.5 information.
– After the incremental WebPass upgrade, you must upgrade the Web server to a version that is supported by the next WebPass release using your vendor documentation as a guide.
Note: In both Automatic and Confirmed mode, you are informed as the program completes each step of the upgrade process. This guide provides information using Automatic mode, both for brevity and because this is the recommended method.

Support Deprecated
2-10 Oracle Access Manager Upgrade Guide
– After upgrading the Web server, you complete another incremental WebPass upgrade in Console mode by skipping the release 6.1.1 to 6.5 events that were already completed and continuing to the next component release that supports the existing Web server.
For more information, see "Upgrade Strategies When Support is Changed or Deprecated" on page 2-11.
■ Correcting Information: Suppose you provide incorrect information during an component upgrade (or another problem arises). In this case, you can also use Confirmed mode to conditionally re-run a step. For example, suppose you entered incorrect information while upgrading the Identity Server. When the upgrade finishes, you can re-run it in Confirmed mode to skip events that completed successfully the first time (and enter correct information for unsuccessful events the second time). For instance, if you forgot to change the schema domain, you can re-run the upgrade using Confirmed mode and fix the problem.
– Continue the component upgrade as far as you can despite entering incorrect information.
– Restart the component upgrade and choose Confirmed mode.
– Skip any events that completed successfully during the initial component upgrade.
– Accept and perform any events that were not successful (and restate any incorrect information).
– Confirm that the in-place upgrade was successful as described in Part III.
– Perform all other tasks in sequence, as described in "In-Place Upgrade Task Overview" on page 1-8.
– When all upgrade tasks are performed, validate the complete system upgrade as described in Part V.
Support DeprecatedTable 2–4 describes the items for which support is not longer officially available.
Table 2–4 Deprecated in 10g (10.1.4.0.1)
Component Comments
IDLink Support was deprecated in release 6.1. If your earlier installation includes Oblix IDLink, you are notified while upgrading the Identity Server. To continue using Oblix IDLink, you must retain the earlier release.
Publisher Support was deprecated in release 6.0. Publisher cannot operate at the same time as release 6.1 or later. Oracle Access Manager 10g (10.1.4.0.1) provides reporting, auditing, and logging enhancements. You can create, view, and configure reports within the User, Group, and Organization Manager applications. For more information, see the Oracle Application Server Release Notes.
NetPoint Certificate Process Server (CPS)
Support was deprecated in release 7.0. If your earlier installation includes the CPS, following the upgrade you will have to request and install any new certificates through a third-party vendor.
NetPoint Associate Portal Services (APS)
Support was deprecated in release 6.5 when NetPoint SAML Services (now Oracle COREid Federation) became the preferred method to provide access privileges across multiple associated portals and DNS domains. APS remains deprecated.
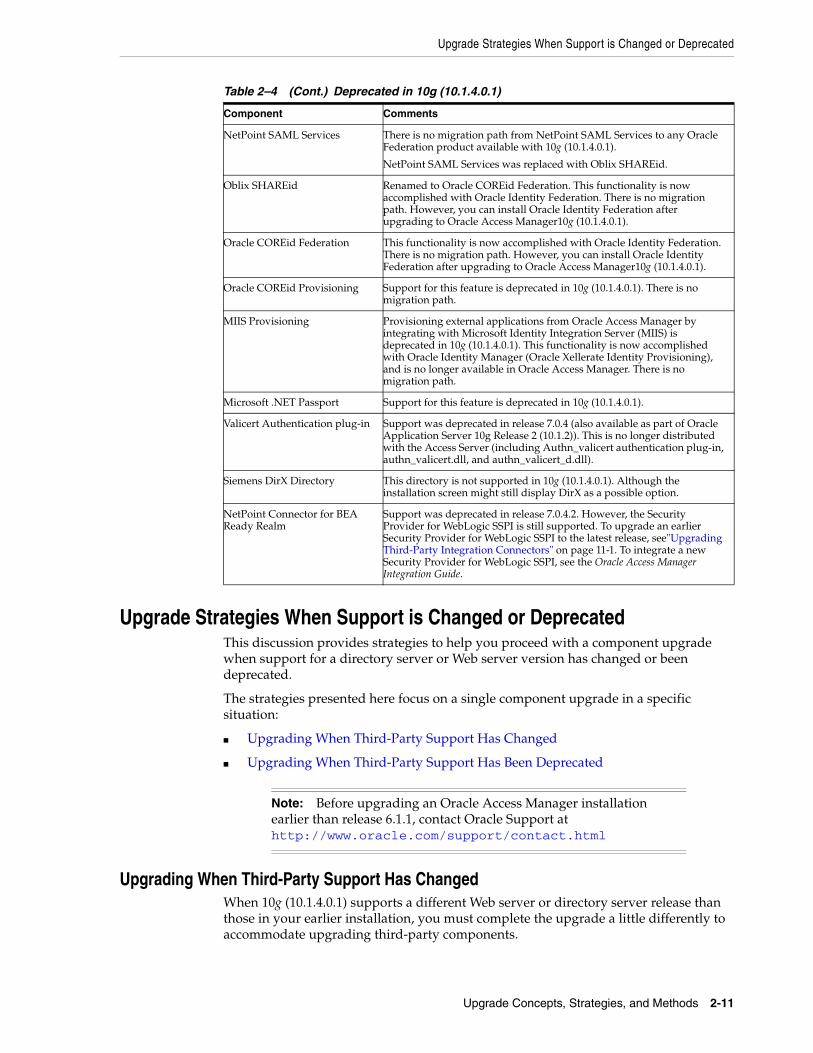
Upgrade Strategies When Support is Changed or Deprecated
Upgrade Concepts, Strategies, and Methods 2-11
Upgrade Strategies When Support is Changed or DeprecatedThis discussion provides strategies to help you proceed with a component upgrade when support for a directory server or Web server version has changed or been deprecated.
The strategies presented here focus on a single component upgrade in a specific situation:
■ Upgrading When Third-Party Support Has Changed
■ Upgrading When Third-Party Support Has Been Deprecated
Upgrading When Third-Party Support Has ChangedWhen 10g (10.1.4.0.1) supports a different Web server or directory server release than those in your earlier installation, you must complete the upgrade a little differently to accommodate upgrading third-party components.
NetPoint SAML Services There is no migration path from NetPoint SAML Services to any Oracle Federation product available with 10g (10.1.4.0.1).
NetPoint SAML Services was replaced with Oblix SHAREid.
Oblix SHAREid Renamed to Oracle COREid Federation. This functionality is now accomplished with Oracle Identity Federation. There is no migration path. However, you can install Oracle Identity Federation after upgrading to Oracle Access Manager10g (10.1.4.0.1).
Oracle COREid Federation This functionality is now accomplished with Oracle Identity Federation. There is no migration path. However, you can install Oracle Identity Federation after upgrading to Oracle Access Manager10g (10.1.4.0.1).
Oracle COREid Provisioning Support for this feature is deprecated in 10g (10.1.4.0.1). There is no migration path.
MIIS Provisioning Provisioning external applications from Oracle Access Manager by integrating with Microsoft Identity Integration Server (MIIS) is deprecated in 10g (10.1.4.0.1). This functionality is now accomplished with Oracle Identity Manager (Oracle Xellerate Identity Provisioning), and is no longer available in Oracle Access Manager. There is no migration path.
Microsoft .NET Passport Support for this feature is deprecated in 10g (10.1.4.0.1).
Valicert Authentication plug-in Support was deprecated in release 7.0.4 (also available as part of Oracle Application Server 10g Release 2 (10.1.2)). This is no longer distributed with the Access Server (including Authn_valicert authentication plug-in, authn_valicert.dll, and authn_valicert_d.dll).
Siemens DirX Directory This directory is not supported in 10g (10.1.4.0.1). Although the installation screen might still display DirX as a possible option.
NetPoint Connector for BEA Ready Realm
Support was deprecated in release 7.0.4.2. However, the Security Provider for WebLogic SSPI is still supported. To upgrade an earlier Security Provider for WebLogic SSPI to the latest release, see"Upgrading Third-Party Integration Connectors" on page 11-1. To integrate a new Security Provider for WebLogic SSPI, see the Oracle Access Manager Integration Guide.
Note: Before upgrading an Oracle Access Manager installation earlier than release 6.1.1, contact Oracle Support at http://www.oracle.com/support/contact.html
Table 2–4 (Cont.) Deprecated in 10g (10.1.4.0.1)
Component Comments

Upgrade Strategies When Support is Changed or Deprecated
2-12 Oracle Access Manager Upgrade Guide
The following overview outlines the sequence you need to complete when you must upgrade an Oracle Access Manager component in addition to upgrading a Web server (or directory server) instance to meet 10g (10.1.4.0.1) requirements. This is provided to give you an idea of how to proceed in this situation and is not meant to provide all steps needed to accomplish the task. See your vendor documentation for information about third-party components and other chapters in this guide for details about Oracle Access Manager components and validation steps.
For example, when 10g (10.1.4.0.1) supports the same Web server or directory server versions as your earlier installed Oracle Access Manager release, you simply upgrade each component once and accept changes to third-party configuration files. However, during an upgrade, third-party configuration files are not updated in their entirety. Instead, only the delta is applied (the difference between changes for the old release and changes for 10g (10.1.4.0.1). For this reason, you cannot simply install a new Web server instance and specify the path to it during an upgrade.
Task overview: Upgrading Oracle Access Manager together with third-party product versions1. Compare support requirements under the Certify tab at Oracle MetaLink, as
follow:
a. Go to Oracle MetaLink at the following URL:
https://metalink.oracle.com
b. Log in to Oracle MetaLink as directed
c. Click the Certify tab.
d. Click View Certifications by Product
e. Select the Application Server option and click Submit.
f. Choose Oracle Identity Manager and click Submit.
g. Click Oracle Identity Management Certification Information 10g (10.1.4.0.1) (html) to display the Oracle Identity Management page.
h. Click the link for Section 6, "Oracle Access Manager Certification" to display the certification matrix.
2. Directory Server Upgrade: If this applies to your environment, perform the activities in the following list:
■ Use instructions in Chapter 5 to back up current directory instances and data (and to create and prepare master instances of the earlier Identity Server, WebPass, and Policy Manager against the existing directory server).
Note: If you are performing a zero downtime upgrade, see Part VI.
Note: The strategies outlined here presume that you have completed all appropriate preparation tasks, and that you are following steps provided elsewhere in this guide. Preparation, verification, and recovery steps are not repeated here. Steps to upgrade the specific Oracle Access Manager component are not repeated here.

Upgrade Strategies When Support is Changed or Deprecated
Upgrade Concepts, Strategies, and Methods 2-13
■ Stop all Identity Server services and follow instructions in your vendor documentation to upgrade a third-party directory server to the new level supported by 10g (10.1.4.0.1).
■ Perform and validate the schema and data on the upgraded directory instance upgrade using the master Identity Server and Policy Manager as described in:
– Chapter 6, "Upgrading Identity System Schema and Data In Place"
– Chapter 7, "Upgrading Access System Schema and Data In Place"
3. Web Server Upgrades amid Oracle Access Manager Upgrades: If your environment includes an earlier Web server version than is supported by10g (10.1.4.0.1), prepare components and perform upgrade activities as prescribed in this manual with the following differences:
■ Oracle Access Manager Web Component Upgrades: When you upgrade Web components, accept the automatic Web server configuration file update for the currently installed Web server.
■ Web Server Upgrade: Use your vendor documentation to back up an older third-party Web server then upgrade it to the new level supported by 10g (10.1.4.0.1).
■ Manually update the Web server configuration file for 10g (10.1.4.0.1) following the Web server upgrade. For more information, see the Oracle Access Manager Installation Guide.
4. Complete other activities as described in this manual, then validate the upgrade as described in Chapter 14, "Validating the Entire System Upgrade".
Upgrading When Third-Party Support Has Been DeprecatedIn some cases, you might discover that Oracle Access Manager 10g (10.1.4.0.1) does not support an earlier Web Server or directory server release. For example, the release 6.1 Policy Manager supports Sun (formerly iPlanet) 4.x Web server. However, from Oracle Access Manager 6.5 onward this Web server release is not supported.
When 10g (10.1.4.0.1) does not support an earlier Web Server or directory release, you must complete the upgrade as outlined in:
■ Upgrading with Manual Web Server Configuration When Support is Deprecated
■ Upgrading Oracle Access Manager Incrementally When Third-Party Support is Deprecated
Upgrading with Manual Web Server Configuration When Support is DeprecatedWhen 10g (10.1.4.0.1) support does not include your earlier release Web Server, you can use the strategy here to upgrade to 10g (10.1.4.0.1). For example, from Oracle Access Manager 6.5 onward the Sun (formerly iPlanet) 4.x Web server is not
Note: You cannot apply Oracle Access Manager-related Web server configuration changes to a new Web server instance.
Note: Before upgrading an installation earlier than release 6.1.1, contact Oracle Support at http://www.oracle.com/support/contact.html

Upgrade Strategies When Support is Changed or Deprecated
2-14 Oracle Access Manager Upgrade Guide
supported. As a result, during the upgrade from Oracle Access Manager release 6.1.1 to release 6.5 the Web server configuration files are not automatically updated. Instead, you must install the Sun 6.x Web server and run EditObjConf and ManageObjConf manually to update the Web server configuration files for Oracle Access Manager release 6.5, 7.x, and 10g (10.1.4.0.1).
The following task overview is provided to give you an idea of how to proceed in this situation and is not meant to provide all steps needed to accomplish the task.
Task overview: Upgrading when Web server support was deprecated1. Upgrade your earlier Oracle Access Manager installation to 10g (10.1.4.0.1),
including all Web components (WebPass, Policy Manager, and WebGate).
2. Create an instance of the Web server that is supported by 10g (10.1.4.0.1) using your vendor documentation as a guide.
3. Run the EditObjConf tool for WebPass, Policy Manager (formerly the Access Manager component), then WebGate, as needed.
WebComponent_install_dir\identity|access\oblix\apps\common\bin \EditObjConf.exe
4. Run the ManageObjConf tool for WebPass, Policy Manager, then WebGate, as needed.
WebComponent_install_dir\identity|access\oblix\apps\common\bin \ManageObjConf.exe
5. Perform the component validation step to ensure that it upgraded properly as described in Part III.
Upgrading Oracle Access Manager Incrementally When Third-Party Support is DeprecatedThe following method describes an incremental upgrade that you can use when the latest Oracle Access Manager release is not compatible with both the currently installed Web server (or directory server) release, and the currently supported release.
In this case, the goal is to use Confirmed mode to upgrade the Oracle Access Manager component incrementally to a release that supports both the earlier Web server (or directory server) release and a later interim Web server (or directory server) release. You repeat the process to incrementally upgrade the Oracle Access Manager component and the third-party component until both are in sync with 10g (10.1.4.0.1).
As you complete this task in confirmed mode, you accept appropriate processes while skipping those that take the Oracle Access Manager component too far. Then, you migrate your earlier Web server (or directory server) to the newer supported release.
Note: The strategies outlined here presume that you have completed appropriate preparation tasks, and that you are following steps provided elsewhere in this guide. Preparation, verification, and recovery steps are not repeated here. Steps to upgrade the specific Oracle Access Manager component are not repeated here. Release numbers in examples are provided for illustration only.
Note: Web server configuration files are not automatically updated.

Upgrade Strategies When Support is Changed or Deprecated
Upgrade Concepts, Strategies, and Methods 2-15
This might involve a sequence of manual steps to true up the configuration files for the new instance. You might need to repeat this sequence until you have upgraded both the third-party component to a release supported by 10g (10.1.4.0.1), and the Oracle Access Manager is upgraded to 10g (10.1.4.0.1).
In the following task overview, a WebPass upgrade is interspersed with a Web server upgrade. The strategies outlined here presume that you have completed appropriate preparation tasks, and that you are following steps provided elsewhere in this guide. Preparation, verification, and recovery steps are not repeated here. Steps to upgrade the specific Oracle Access Manager component are not repeated here. See also "Console Method" on page 2-8.
Task overview: Upgrading incrementally when Web server support is deprecated1. On the computer hosting the earlier Oracle Access Manager Web component
(WebPass, Policy Manager, or WebGate), start the upgrade using 10g (10.1.4.0.1) installers. For example:
Start Upgrading: WebPass 5.2 on Sun ONE Web Server 4.1
2. In Confirmed mode, accept processes that upgrade the Oracle Access Manager Web component only to the next major release that supports the current Web server. For example, in this case you upgrade only to 6.0:
From: WebPass 5.2
To: WebPass 6.0
3. Accept the automatic Web server configuration file update, and finish the component upgrade for this incremental release.
4. Migrate the current Web server to the latest level supported by the interim WebPass release, using your vendor documentation as a guide. For example:
From: Sun ONE Web Server 4.1 (supported by Oracle Access Manager 5.2)
To: Sun ONE Web Server 6.0 (supported by Oracle Access Manager 6.0)
5. Restart the WebPass upgrade, use Confirmed mode to skip processes already completed and accept upgrade processes that upgrade WebPass to a later release that supports the upgraded Web server. For example:
From: WebPass 6.0
To: WebPass 6.1.1
6. Accept the automatic Web server configuration file update, and finish this incremental component upgrade.
Note: Release numbers in examples are provided for illustration only. Before upgrading an installation earlier than release 6.1.1, contact Oracle Support at http://www.oracle.com/support/contact.html
Note: Skip any processes that would upgrade this component to a release that does not support the current environment.

Upgrade Strategies When Support is Changed or Deprecated
2-16 Oracle Access Manager Upgrade Guide
7. Repeat steps in this list as needed until you reach and meet 10g (10.1.4.0.1) support requirements for the third-party component and upgrade the Oracle Access Manager component to 10g (10.1.4.0.1).
8. Validate the WebPass upgrade as described in "Finishing and Verifying the WebPass Upgrade" on page 9-11.
For more information, see Appendix E. If needed, see "Preparing a Directory Server When Its Release is Deprecated" on page 5-9.
About Automated Processes and Manual Tasks 3-1
3About Automated Processes and Manual
Tasks
This chapter introduces both the automated processes that are initiated when you start a component upgrade and manual tasks that you must perform. Unless explicitly stated, information in this chapter applies to both in-place upgrades and to zero downtime upgrades. Topics in this chapter include:
■ Supported Components and Applications
■ About Automated Upgrade Processing and Events
■ Upgraded Items
■ Preserved Items
■ Items that You Must Manually Upgrade
■ The Latest Patch Set
Supported Components and Applications All Oracle Access Manager releases support the following components:
■ Identity Server (formerly known as the COREid Server), WebPass, Policy Manager (formerly known as the Access Manager component), Access Server, WebGate, and Software Developer Kit
■ Oracle Access Manager applications, which are integral to components, include the Identity System Console, User Manager, Group Manager, Organization Manager, the Selector, the Access System Console, Policy Manager (formerly known as the Access Manager), and other applications
■ Integration components such as the Security Provider for WebLogic SSPI and Connector for WebSphere, as well as single sign-on (SSO), provisioning, portal and application server integrations are supported. Complete implementation details are described in the Oracle Access Manager Integration Guide
For information about system requirements and changes, see "Platform Support" on page 4-1.
Note: The Simple Network Management Protocol (SNMP) has not changed and does not require an upgrade.

About Automated Upgrade Processing and Events
3-2 Oracle Access Manager Upgrade Guide
About Automated Upgrade Processing and EventsWhen you upgrade each component, the newest product release is installed over an earlier product release in the same location. This section introduces the program-driven processes that occur during component upgrades.
Out-of-place Zero Downtime Upgrade: This is initiated using the 10g (10.1.4.2.0) MigrateOAM script from a command-line. In this case, you must manually enter the mode for the operation, and other arguments and parameters that are then passed to the underlying utilities. Unless explicitly stated, the information in this section applies equally to the zero downtime upgrade method. For additional information about automated processing, see "Zero Downtime Upgrade Tools and Processes" on page 15-23. For details about the source and destination creation and other preparation tasks, see "Preparation Tasks for the Zero Downtime Method" on page 15-12.
In-place Upgrade: This is initiated using the corresponding Oracle Access Manager 10g (10.1.4.0.1) installer. The arguments that are needed by the underlying utilities are gathered by the installer during processing. The program controls the sequence of events and messages automatically. The process requires very little input from you. After you start an upgrade and specify the file system directory where the component to be upgraded resides, you are asked if you want to upgrade the earlier version of the component.
When you accept the upgrade option, the earlier source directory is renamed with the addition of a time stamp (yearmonthday_hourminutesecond). This time-stamped source contains earlier original files that are sometimes accessed to compare content or extract customized information.
Sample Time-Stamped File System Directory:
\IdentityServer_install_dir_20060422_141440\identity
After the source directory is renamed with a time stamp, the target directory is created and new files are extracted to the target. For example:
Sample Target File System Directory: \IdentityServer_install_dir\identity
All Upgrade Methods: If the target file system directory (known as a destination when using the zero downtime upgrade method) does not match the earlier component installation path, a component instance is installed (not upgraded).
You can choose to have individual upgrade events performed automatically or with your confirmation, as described in "Upgrade Event Modes" on page 2-8.
New folders are created in the target file system path as needed. While the directory structure for Oracle Access Manager release 6.5, release 7.0, and 10g (10.1.4.0.1) are the same, they differ from earlier releases. For details, see Appendix A.
Figure 3–1 and the process overview that follows it describe a typical component upgrade. The processing that is required for each component is driven by the utilities that are called automatically during the process. Figure 3–1depicts an in-place upgrade. There are slight variations, depending upon the method you are using:
■ In-place Method: This is depicted. After you start the component installation program, you see a Welcome message and you are asked to provide specific input (such as the file system path to the component’s installation directory). As automated processing continues, you are asked to accept an operational method (Automatic versus Confirmed), or simply acknowledge that you are ready to continue.
■ Zero Downtime Method: After you manually enter the command line containing arguments and specifications for the component instance, these are passed to the

About Automated Upgrade Processing and Events
About Automated Processes and Manual Tasks 3-3
utilities that control the upgrade. Starting with process 3 in Figure 3–1, internal processing is similar regardless of the method you are using. For more information about the zero downtime upgrade script and modes, see Chapter 15.
Figure 3–1 Automated Program-Driven Events During an In-place Upgrade
If you are using the in-place method, processing starts when you launch the 10g (10.1.4.0.1) installer. If you are using the zero downtime method, processing starts with process 3, after you start the 10g (10.1.4.2.0) MigrateOAM script.
During each component upgrade, additions and changes (from each major release to the next major release to release 10g (10.1.4.0.1)) are implemented As a result, the sequence of events and messages will repeat automatically until all changes between your starting release and 10g (10.1.4.0.1) are incorporated.
Process overview: During a component upgrade1. In-place Method: After you launch the 10g (10.1.4.0.1) component installer, and an
earlier source directory is detected in the same location, you are asked if you want to upgrade. When you accept the upgrade, the source directory is renamed with a time stamp.
Note: Process overviews, such as the one here, identify automated processes. After you initiate the process, you might be asked to accept or acknowledge certain events. Skipping or declining an event is sometimes an option.
Start Welcome install_dir
Target Directory Created and Files Extracted
Older Source Detected Source Directory Renamed1
2
obmigratenp3
obmigratefiles (Program and Library Files)4
obmigrateparamsg (Message and Parameter Catalogs)5
obmigrateds and obmigratedata (Schema and Data Files)6
obmigratews (Web Server Configuration)7
Component-Specific Utility8
Finish9

About Automated Upgrade Processing and Events
3-4 Oracle Access Manager Upgrade Guide
2. In-place Method: The target directory is created and 10g (10.1.4.0.1) files are extracted into it. The English language is upgraded automatically. Other installed languages are upgraded when you include appropriate 10g (10.1.4.0.1) Language Packs for each installed language in the same directory as the 10g (10.1.4.0.1) component installer.
3. Both Methods: A utility (obmigratenp) is called by the component installer to determine the release you are upgrading from as well as the release you are upgrading to. obmigratenp internally detects which features need to be upgraded for this particular component and which other utilities to use for those upgrades. When your installation includes multiple languages, obmigratenp migrates message catalogs.
4. Both Methods: A utility (obmigratefiles) is called to upgrade earlier program and library files.
5. Both Methods: A utility (obmigrateparamsg) is called to upgrade earlier message and parameter catalog files.
6. Schema and Data Upgrades Only: Two utilities (obmigrateds and obmigratedata) are called automatically to initiate Oracle Access Manager schema and data upgrades.
Zero Downtime Method: The schema and data are upgraded independently. For more information, see "Schema and Data Upgrades with the Zero Downtime Upgrade Method" on page 15-9.
In-Place Method: The schema and data are upgraded together with the master Identity Server (and master Policy Manager when your installation includes the Access System). During subsequent Identity Server (and Policy Manager) upgrades, the initial schema and data upgrade is detected and this portion of the process is skipped. Oracle recommends that you upgrade the Oracle Access Manager schema and data automatically. These upgrades use LDIF files that are specific to your directory server. Each LDIF file includes only changes from one release of Oracle Access Manager to the next. As a result, the schema and data upgrade will repeat one time for each release from your starting release to 10g (10.1.4.0.1). For more information, see Part II.
7. Web Server Configuration Updates Only: A utility (obmigratews) is called to perform a selective Web server configuration file and filter upgrade, to accommodate changes for newer releases of Policy Manager, WebPass, and WebGate.
8. Both Methods: A component-specific utility is selected and run to make changes to related registry entries for Windows, plug-ins, and other files. The component’s configuration files are updated. For more information, see "Component-Specific Upgrades" on page C-17.
During each component upgrade, one or more log files will be produced to inform you if any problem should arise. If a log file is created, a message during the upgrade
Note: If you upgrade an existing multi-language implementation without 10g (10.1.4.0.1) Language Packs, you will lose multi-language functionality.
See Also: "Upgraded Items" next, "Preserved Items" on page 3-6, and "Items that You Must Manually Upgrade" on page 3-9

Upgraded Items
About Automated Processes and Manual Tasks 3-5
process indicates the name and location of the file. In general, you can find upgrade log files in:
Log File Path:
\Component_install_dir\identity|access\oblix\tools\migration_tools\toolname.log
where \Component_install_dir is the directory where the specific component is installed; identity|access represents the system to which the component belongs (Identity System or Access System, respectively); and toolname represents the name of the utility that produced the log.
Each log file contains information about a particular activity that occurs during the component upgrade. For example, a separate log file might be generated for file upgrades, or message and parameter upgrades, or the Oracle Access Manager schema upgrade to name a few. For information about specific log files and their content, see Appendix C.
In addition, the log files here are created to inform you of any ldap specific errors:
■ During Identity Server data migration, error_output_fromversion_to_toversion_osd.ldif file is created in the IdentityServer_install_dir\identity\oblix\tools\migration_tools\obmigratedata directory.
■ During Policy Manager data migration, error_output_fromversion_to_toversion_psc.ldif file is created in the PolicyManager_install_dir\access\oblix\tools\migration_tools\obmigratedata directory
For the zero downtime upgrade, a new log file is also provided to log activities performed during the make branch (Mkbranch) operation of the MigrateOAM script. For details, see "Zero Downtime Upgrade Tools and Processes" on page 15-23.
For details about using log files, and other troubleshooting tips, see Appendix G.
Upgraded ItemsRegardless of which methodology you choose, either in-place or zero downtime, the following items are upgraded during component upgrades:
■ Program and library files
■ Message and parameter catalogs
■ The Oracle Access Manager schema and configuration and policy data are upgraded only with the master Identity Server and Policy Manager installed for this purpose
■ Web server configuration files and filters are upgraded only for Web components (WebPass, Policy Manager, WebGate)
■ Component-specific information, including component configuration files and system environment settings such as registry entries for Win32
■ Product and component names are changed as described in "Product and Component Name Changes" on page -xxv
■ Certain configuration files, including those for failover and the software developer kit (SDK) are upgraded as indicated in the following list:
– Identity Server: sample_failover.xml
– Access Server: failover files

Preserved Items
3-6 Oracle Access Manager Upgrade Guide
– SDK Configuration: The upgrade is invoked automatically as the last step when upgrading the Identity Server (and integration components that rely on the Software Developer Kit libraries). Oracle recommends that you accept the automatic upgrade to preserve current configuration settings. Otherwise, you must reconfigure the SDK later using the configureAccessGate tool, as described in Chapter 11.
Preserved ItemsThe following information applies regardless of the upgrade methodology that you choose: either in-place or zero downtime.
Any names assigned by an administrator during product installation and configuration are retained during an upgrade (not changed). Therefore if you have named a service "COREid Identity Server" or "NetPoint Identity Server" these names will be the same in the upgraded environment.
Earlier authentication schemes and policy domains assigned by administrators are also retained during the upgrade. After the upgrade, these names are still available.
The items in the following list are preserved in the time-stamped directory and copied into the new target directory:
■ certificate files (simple/cert mode)
■ password.xml and .lst (.lst is converted to .xml for the Access System)
■ configuration files (.oblix/config, .oblix/data)
■ obnavigation.xml
■ oblixpppcatalog.lst—not converted to .xml
■ cert7.db
Starting with release 7.0 and continuing with 10g (10.1.4.0.1), the default certificate store format and name has changed to cert8.db from cert7.db. After the upgrade, the old certificate store is used. 10g (10.1.4.0.1) (and release 7.x) work with both the cert7.db (upgraded environments) and cert8.db (new installations) certificate store. See "Certificate Store and Localized Certificates" on page 4-9.
For additional information, see the topics:
■ Directory Server Failover
■ Connection Pool Details
■ Encryption Schemes and the Shared Secret
See Also: "Directory Server Failover" on page 3-7 and Chapter 4, "System Behavior and Backward Compatibility"
Note: Only supported components are upgraded. For more information, see "Support Deprecated" on page 2-10.
Note: The following topics apply regardless of the upgrade methodology that you choose: either in-place or zero downtime. For more information about system behavior and backward compatibility, see Chapter 4.

Preserved Items
About Automated Processes and Manual Tasks 3-7
Directory Server FailoverStarting with the Access System release 6.5, directory profiles are created during Policy Manager setup and are used by the Access System to access user directory data. These profiles replace the UserDB.lst and GroupDB.lst files and the UserDBFailover.lst and GroupDBFailover.lst configuration files that were used in earlier releases of the Access System.
During the Access System upgrade from release 6.1.1, new directory profiles are created based on the UserDB.lst and GroupDB.lst files and the UserDBFailover.lst and GroupDBFailover.lst configuration files.
Your earlier implementation might also include failover between an Identity Server and the directory server. The Identity Server failover configuration has resided in the directory server profiles since release 5.2. As a result, during the Identity Server upgrade there is no migration of parameters from failover configuration files to directory profiles. Although the schema itself has changed, migration of these changes is performed automatically during the upgrade.
Impact of the Upgrade on Directory Server FailoverStarting with release 6.5, the Access System began partially using directory profiles and database instances for accessing user data. Directory profiles replace the UserDB.lst, GroupDB.lst, UserDBFailover.lst, and GroupDBFailover.lst configuration files that were used in earlier Access System releases. During the incremental upgrade to release 6.5, directory profiles for the Access Server are automatically created and replace certain earlier configuration files where:
■ Primary directory server information was stored in: AccessServer_install_dir/access/oblix/config/UserDB.lst and GroupDB.lst
■ Information for all the failover and load-balancing directory servers (primary and secondary) was stored in: AccessServer_install_dir/access/oblix/config/UserDBFailover.lst and GroupDBFailover.lst
When creating the Directory Server Profile for the Policy Manager, directory server credentials are read from PolicyManager_install_dir/access/oblix/config/userDB.lst.
Profiles are not created for Policy Manager failover servers. In the case of release 6.1, if the policy tree was on a separate directory server a profile for policy data existed.
After upgrading the Identity System and Access System, it is a good idea to validate your failover and load balancing configurations and to test that these are still operating as expected. For details, see discussions in:
■ Chapter 12, "Upgrading Your Identity System Customizations"
■ Chapter 13, "Upgrading Your Access System Customizations"
See also "Connection Pool Details" next.
Note: If the configuration tree is in the user directory server and under the user node, then the configuration directory profile is not created. Otherwise, a configuration directory profile is created using directory server information from PolicyManager_install_dir/oblix/config/ldap/configdb.lst and marked for use only by the Policy Manager.

Preserved Items
3-8 Oracle Access Manager Upgrade Guide
Connection Pool DetailsAs described in the Oracle Access Manager Deployment Guide, the number of connections opened to the directory is specified by the Initial Connections parameter in the Database Instance Profile. More connections are opened, as needed, until they equal the number specified by Maximum Connections parameter in the database instance profile. Connections remain open until the Identity or Access Server shuts down or the directory server stops responding. Those connections are then pooled and used by the Identity and Access Server.
There might be some impact when upgrading the Access System, depending on the earlier configuration of Oracle Access Manager to each directory server used. For details, see "Confirming Access System Failover and Load Balancing" on page 13-3.
See also the previous discussion on "Directory Server Failover".
Impact of the Upgrade on Connection PoolsThere might be some impact when upgrading, depending on the earlier configuration of Oracle Access Manager to each directory server used. For instance:
■ Identity System Connection Pools: There is no impact. Initial Connections and Maximum Connections specified in the database instance profile are retained and will operate as they did previously.
■ Access System Connection Pools Before release 6.5: Values for the Initial Connections and Maximum Connections in the UserDB.lst and UserDBFailover.lst might not be retained. After upgrading Access System components, it is a good idea to verify the values in the database instance profile of the newly created directory server profile.
■ On NDS: For concurrent authentication requests on NDS directory servers, Oracle recommends that you increase the connection pool size to something higher than the default (1) for the user directory profile using the System Console.
Encryption Schemes and the Shared Secret The shared secret encryption algorithm is an Oracle Access Manager-wide setting. It affects all encrypted cookies. For example, the ObSSOCookie cookie is encrypted using a configurable encryption scheme known as a shared secret. During the upgrade, the earlier encryption scheme is retained.
In release 7.0.4 and earlier, WebGates/AccessGates handled encryption and decryption using the shared secret value. Starting in 10g (10.1.4.0.1), however, the Access Server handles encryption/decryption. As a result, the shared secret is no longer needed on WebGate.
Oracle recommends that you upgrade earlier WebGates. However, earlier WebGates can coexist with 10g (10.1.4.0.1) Access Servers when specific conditions are met. For more information on encryption schemes, the shared secret, Access Servers, and WebGates in Chapter 4.
Note: Starting with Oracle Access Manager release 7.0, connection pooling was consolidated to support failover across the entire system. The directory connection pool does not depend on directory type.

Items that You Must Manually Upgrade
About Automated Processes and Manual Tasks 3-9
Items that You Must Manually UpgradeThe following topics apply regardless of the upgrade methodology you choose: in-place upgrades or zero downtime upgrades. Items that require you to perform manual upgrade tasks to ensure compatibility and proper operation with release 10g (10.1.4.0.1) include:
■ Auditing and Access Reporting
■ C++ Programs
■ Customized Styles
■ Plug-ins
In addition to the topics in the preceding list, see details in:
■ Chapter 8: "Preparing Earlier Customizations"
■ Chapter 12, "Upgrading Your Identity System Customizations"
■ Chapter 13, "Upgrading Your Access System Customizations"
Auditing and Access ReportingOracle Access Manager 10g (10.1.4.0.1) supports the Unicode standard. To support all the languages available with Oracle Access Manager 10g (10.1.4.0.1), the definitions of auditing and reporting tables have changed. Simply upgrading or altering existing database instances and tables is not supported and could result in permanent truncation and loss of existing data.
After upgrading the Identity System (and Access System), you need to create a new database instance to operate with 10g (10.1.4.0.1). To upload the new Audit table schema to support the auditing of 10g (10.1.4.0.1) UTF-8 data and writing this data to the new SQL Server instance, you must create a new oblix_audit_events table. This schema upgrade includes datatype changes within Audit table columns. Next you need to create tables for the reporting application (oblix_rpt_as_reports, oblix_rpt_as_resources, and oblix_rpt_as_users) in 10g (10.1.4.0.1).
To query or generate any report that requires data from both the old and new database, you need to import data from the original instance into the new instance before you start auditing with 10g (10.1.4.0.1). This is an optional step that might or might not be needed in your environment.
The steps you need to perform, even when you have an English only environment, depend on the type of database you are using. For details, see:
■ Chapter 12, "Upgrading Your Identity System Customizations"
■ Chapter 13, "Upgrading Your Access System Customizations"
■ See also "Auditing and Access Reporting" on page 4-7
Note: Retain the earlier database to preserve the original data. Importing earlier data can result in some data loss through truncation. However, if you do not import old data before you start auditing, you cannot generate any report that requires the data from both the old and new database.

Items that You Must Manually Upgrade
3-10 Oracle Access Manager Upgrade Guide
C++ ProgramsYou will need to recompile C++ programs created with the Software Developer Kit and Oracle Access Manager APIs following that upgrade, for the reasons stated in "Plug-ins" on page 3-11.
For more information about C++ programs and upgrading these for the Identity and Access Systems, see Chapter 4, Chapter 12, and Chapter 13 respectively.
Challenge and Response Attributes Must Appear on a PanelIn earlier releases, the challenge phrase and response attributes were allowed on different panels of Profile pages. In 10g (10.1.4.0.1), however, both the challenge phrase and response attributes must be on the same panel. In 10g (10.1.4.0.1), challenge phrases and responses are displayed one after the other even though these are not configured one after the other in the panel.
For details about combining challenge and response attributes on a single panel, see "Combining Challenge and Response Attributes on a Panel" on page 12-8.
Customized StylesDefault product stylesheets are periodically updated by Oracle to instantiate improvements. For example, to support multiple languages, the location of java scripts, stylesheets, and images changed starting with Oracle Access Manager release 6.5. The directory structure introduced with release 6.5 continues with 10g (10.1.4.0.1).
Upgraded functionality depends, in part, on stylesheet files in the new release \style0 and \shared directories.
It is important to understand the new file hierarchy and stylesheet structure before you can successfully migrate custom images and stylesheets to 10g (10.1.4.0.1). If you simply copy the old stylesheets, images, JavaScript files, and related items to the new release, Oracle Access Manager can experience problems.
The following files must be processed manually after the upgrade:
■ XSL stylesheets
■ Images (.gifs for Oracle Access Manager)
■ JavaScript Files
Note: Oracle recommends that you begin migrating your earlier customizations in a test environment well before you begin upgrading components. This will help reduce system downtime when upgrading your production environment and redeploying customizations.
Note: If files in your earlier Oracle Access Manager \style0 directory were customized, you must manually edit the newer version files in \style0 and \shared directories after the upgrade.
Items that You Must Manually Upgrade
About Automated Processes and Manual Tasks 3-11
For details about upgrading Identity System customizations, see Chapter 12. For details about the Oracle Access Manager directory structure, see Appendix A, "Oracle Access Manager Directory Structure Changes".
Plug-insPlug-in behavior has changed in recent releases. Following are important details that you need to be aware of with regard to custom plug-ins.
All earlier plug-ins send and receive data using Latin-1 encoding. Starting with 10g (10.1.4.0.1), Oracle Access Manager components and plug-ins send and receive data in UTF-8 format. Identity and Access Servers that are upgraded to 10g (10.1.4.0.1) provide backward compatibility with earlier plug-ins using Latin-1 encoding automatically. However, to send and receive internationalized data, earlier plug-ins should be redesigned to communicate using UTF-8 encoding. This includes Identity Event plug-ins and custom authentication and authorization plug-ins. For more information about globalization, see Chapter 4.
Starting with Oracle Access Manager release 7.0, components on Solaris and Linux are compiled using the GCC v3.3.2 C++ compiler to address multi-threading issues encountered with earlier compiler releases. This means that after the upgrade, you must recompile custom plug-ins from release 5.x or 6.x using GCC v3.3.2 C++ compiler. This includes Identity Event plug-ins and custom authentication and authorization plug-ins. You must use the GCC v3.3.2 compiler, regardless of the one that is provided by your Operating System.
Identity Event API Plug-Ins: Some plug-ins are copied during the upgrade; however, Identity Event API plug-ins are not. After the upgrade you must move earlier Identity Event plug-ins. These plug-ins might also need to be re-compiled or re-designed. For more information, see "Migrating Custom Identity Event Plug-Ins" on page 12-10.
Authentication and Authorization Plug-Ins: After the Access System upgrade, see "Recompiling and Redesigning Custom Authentication and Authorization Plug-Ins" on page 13-5. Also, the Oracle Access Manager Access Administration Guide provides more information about:
■ Adding customized plug-ins and parameters to an authentication scheme to be used for any of the scheme's steps
■ Installing a custom authorization plug-in on application servers that you want to protect and creating custom schemes that include custom plug-ins to perform different (or additional) tasks from those of the default scheme
Note: Oracle recommends that you begin migrating your earlier customizations in a test environment well before you begin upgrading components. This will help reduce system downtime when upgrading your production environment and redeploying customizations.
Note: Release 7.0 plug-ins as well as earlier plug-ins implemented as executables or those using a scripting language (such as perl) do not require recompiling after the upgrade. However, to send and receive internationalized data, earlier plug-ins should be redesigned to communicate using UTF-8 encoding.

The Latest Patch Set
3-12 Oracle Access Manager Upgrade Guide
The Latest Patch SetOracle recommends that you obtain and apply the latest patch set to obtain the latest fixes to known issues. Release 10.1.4 Patch Set 1 (10.1.4.2.0) also includes some new functionality, as described in the chapter that describes what is new, in the Oracle Access Manager Introduction.
In-place Method: After upgrading to Oracle Access Manager 10g (10.1.4.0.1), Oracle recommends that you obtain and apply the latest patch set to each upgraded instance. For more information, see the Oracle Access Manager Patch Set Notes Release 10.1.4 Patchset 1 (10.1.4.2.0) For All Supported Operating Systems.
Zero Downtime Method: In this case, each component instance was upgraded using the 10g (10.1.4.2.0) MigrateOAM script and the instance is already release 10g (10.1.4.2.0). You do not need to apply Release 10.1.4 Patch Set 1 (10.1.4.2.0). However, if a later patch set is available, you should obtain and apply it.
Note: Oracle recommends that you begin migrating your earlier customizations in a test environment well before you begin upgrading components. This will help reduce system downtime when upgrading your production environment and redeploying customizations. For more information, see "Customization Upgrade Planning" on page 1-17.

System Behavior and Backward Compatibility 4-1
4System Behavior and Backward
Compatibility
This chapter provides a centralized summary of expected system behaviors and changes between Oracle Access Manager 10g (10.1.4.0.1) and earlier releases. In addition to behavior and product changes for 10g (10.1.4.0.1), there are enhancements available with Release 10.1.4 Patch Set 1 (10.1.4.2.0). Unless explicitly stated, release 10g (10.1.4.0.1) and release 10g (10.1.4.2.0) operate in the same way. Behaviors that have not changed are, for the most part, not included in this chapter.
This chapter provides the following topic categories:
■ Platform Support
■ Obtaining the Latest Patch Set
■ About Upgrading and Backward Compatibility
■ General Behavior Changes
■ Identity System Behavior Changes
■ Access System Behavior Changes
■ Enhancements Available with Release 10.1.4 Patch Set 1 (10.1.4.2.0)
Platform SupportThere are no significant changes in platform support between releases 7.0.4 (also available as part of Oracle Application Server 10g Release 2 (10.1.2)) and 10g (10.1.4.0.1). However, there are significant differences in support prior to release 7.0.4 and 10g (10.1.4.0.1).
For the latest support information, see details under the Certify tab on:
Note: For a quick reference table of Oracle Access Manager 10g (10.1.4.0.1) behaviors (as well as an overview of new functions and features), see the Oracle Access Manager Introduction. See also "Product and Component Name Changes" on page -xxv.
10g (10.1.4.0.1) refers to any Oracle Access Manager release in the 10.1.4 series, including base 10g (10.1.4.0.1) installations as well as those which include the 10.1.4.2.0 patch set. For a brief description of enhancements available in the latest patch set, see Oracle Access Manager Patch Set Notes Release 10.1.4 Patchset 1 (10.1.4.2.0) For All Supported Operating Systems.
Obtaining the Latest Patch Set
4-2 Oracle Access Manager Upgrade Guide
http://metalink.oracle.com
To use Metalink 1. Navigate to MetaLink at https://metalink.oracle.com.
2. Log in to MetaLink as directed
3. Click the Certify tab.
4. Click View Certifications by Product
5. Select the Application Server option and click Submit.
6. Choose Oracle Identity Manager and click Submit.
7. Click Oracle Identity Management Certification Information 10g (10.1.4.0.1) (html) to display the Oracle Identity Management page.
8. Click the link for Section 6, "Oracle Access Manager Certification" to display the certification matrix.
For a quick reference table of components and third-party products that are no longer supported, see "Support Deprecated" on page 2-10.
Obtaining the Latest Patch SetOracle Access Manager 10g (10.1.4.0.1) is a major release, not a patch set. Oracle Access Manager 10g (10.1.4.0.1) is a patch set (also known as Release 10.1.4 Patch Set 1 (10.1.4.2.0)). A patch set is a mechanism for delivering fully tested and integrated product fixes.
Patch sets can include new functionality. For example, only Release 10.1.4 Patch Set 1 (10.1.4.2.0) provides the tools required for the zero downtime upgrade method. For more information about the enhancements available with 10g (10.1.4.2.0), see "Enhancements Available with Release 10.1.4 Patch Set 1 (10.1.4.2.0)" on page 4-39.
Oracle recommends that you apply the latest patch set as described in Oracle Access Manager Patch Set Notes Release 10.1.4 Patchset 1 (10.1.4.2.0) For All Supported Operating Systems. However, before you do, review the following considerations:
■ When you install Oracle Access Manager 10g (10.1.4.0.1) and then apply Release 10.1.4 Patch Set 1 (10.1.4.2.0), the component instances are considered to be 10g (10.1.4.0.1). In this case you must remove Release 10.1.4 Patch Set 1 (10.1.4.2.0) before you can apply subsequent patch sets.
You can install fresh 10g (10.1.4.0.1) instances using 10g (10.1.4.0.1) packages, and then apply Release 10.1.4 Patch Set 1 (10.1.4.2.0).
■ When you upgrade to Oracle Access Manager 10g (10.1.4.0.1) using the in-place method, you can then apply Release 10.1.4 Patch Set 1 (10.1.4.2.0). In this case, component instances are considered to be release 10g (10.1.4.0.1). Before installing future patch sets, you must remove Release 10.1.4 Patch Set 1 (10.1.4.2.0).
After an in-place upgrade, you can install fresh 10g (10.1.4.0.1) instances to expand the environment, and then apply Release 10.1.4 Patch Set 1 (10.1.4.2.0).
■ When you upgrade using the zero downtime upgrade method, you use tools available with Oracle Access Manager Release 10.1.4 Patch Set 1 (10.1.4.2.0). To obtain these tools, before the upgrade you will extract 10g (10.1.4.0.1) component libraries and files and apply Release 10.1.4 Patch Set 1 (10.1.4.2.0). After the upgrade, instances are considered to be release 10g (10.1.4.2.0). As a result, you

About Upgrading and Backward Compatibility
System Behavior and Backward Compatibility 4-3
cannot remove Release 10.1.4 Patch Set 1 (10.1.4.2.0) before you apply subsequent patch sets.
Before a zero downtime upgrade, you can expand the environment by adding earlier instances and then upgrading as described in Part VI. However, you cannot use Release 10.1.4 Patch Set 1 (10.1.4.2.0) packages to install a fresh instance.
For more information about what is included in Release 10.1.4 Patch Set 1 (10.1.4.2.0), see "Enhancements Available with Release 10.1.4 Patch Set 1 (10.1.4.2.0)" on page 4-39.
The information in the following procedure explains how to obtain Release 10.1.4 Patch Set 1 (10.1.4.2.0). There might be a later patch set available. Oracle recommends that you always apply the latest patch set.
To obtain Release 10.1.4 Patch Set 1 (10.1.4.2.0) 1. Go to Oracle MetaLink Web site and obtain Release 10.1.4 Patch Set 1 (10.1.4.2.0),
as follows:
a. Navigate to MetaLink at https://metalink.oracle.com.
b. Log in to MetaLink as directed.
c. Click the Patches & Updates tab.
d. Click Quick Links to the Latest Patchsets, Mini Packs, and Maintenance Packs
e. Double-click Oracle Oblix COREid, under the label "Latest Oracle Server/Tools Patchsets".
f. Locate and select the latest patch set for 10g (10.1.4.0.1) from the table at the bottom of the page. For example, select 5957301 to obtain Release 10.1.4 Patch Set 1 (10.1.4.2.0).
g. From the Platform or Language list, select the appropriate platform for your deployment and then click Download.
2. Use instructions in the Oracle Access Manager Patch Set Notes Release 10.1.4 Patchset 1 (10.1.4.2.0) For All Supported Operating Systems to prepare your environment before applying the patch set.
3. Use instructions in the Oracle Access Manager Patch Set Notes Release 10.1.4 Patchset 1 (10.1.4.2.0) For All Supported Operating Systems to apply Release 10.1.4 Patch Set 1 (10.1.4.2.0) to each 10g (10.1.4.0.1) component instance.
4. Perform any post application tasks that are in the Oracle Access Manager Patch Set Notes Release 10.1.4 Patchset 1 (10.1.4.2.0) For All Supported Operating Systems to ensure that your environment is operating properly.
About Upgrading and Backward CompatibilityOracle recommends that you maintain an upgraded environment according to the conditions that apply to the upgrade method that was used in your environment. The following list explains the considerations:
■ Perform an in-place upgrade using 10g (10.1.4.0.1) packages and then apply Release 10.1.4 Patch Set 1 (10.1.4.2.0). To expand this environment after upgrading, you can add new 10g (10.1.4.0.1) instances and apply Release 10.1.4 Patch Set 1 (10.1.4.2.0).
■ Perform a zero downtime upgrade and expand the environment before upgrading by add earlier instances as described in Part VI. You cannot use Release 10.1.4
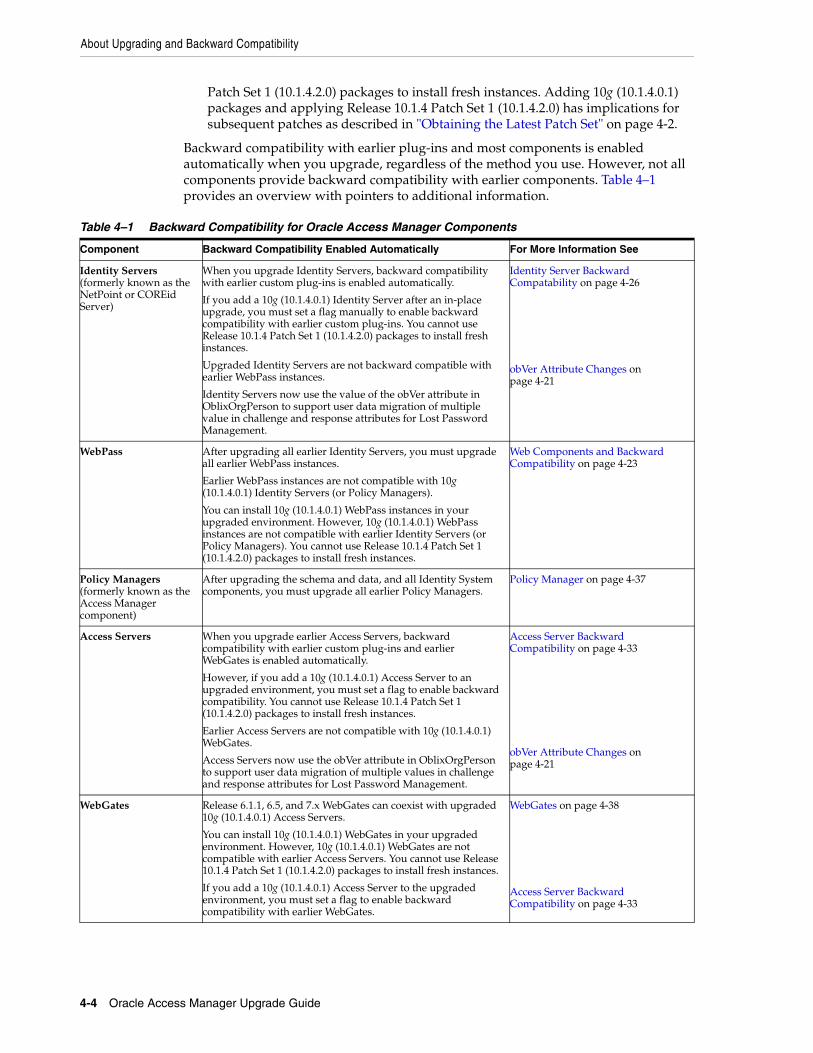
About Upgrading and Backward Compatibility
4-4 Oracle Access Manager Upgrade Guide
Patch Set 1 (10.1.4.2.0) packages to install fresh instances. Adding 10g (10.1.4.0.1) packages and applying Release 10.1.4 Patch Set 1 (10.1.4.2.0) has implications for subsequent patches as described in "Obtaining the Latest Patch Set" on page 4-2.
Backward compatibility with earlier plug-ins and most components is enabled automatically when you upgrade, regardless of the method you use. However, not all components provide backward compatibility with earlier components. Table 4–1 provides an overview with pointers to additional information.
Table 4–1 Backward Compatibility for Oracle Access Manager Components
Component Backward Compatibility Enabled Automatically For More Information See
Identity Servers (formerly known as the NetPoint or COREid Server)
When you upgrade Identity Servers, backward compatibility with earlier custom plug-ins is enabled automatically.
If you add a 10g (10.1.4.0.1) Identity Server after an in-place upgrade, you must set a flag manually to enable backward compatibility with earlier custom plug-ins. You cannot use Release 10.1.4 Patch Set 1 (10.1.4.2.0) packages to install fresh instances.
Upgraded Identity Servers are not backward compatible with earlier WebPass instances.
Identity Servers now use the value of the obVer attribute in OblixOrgPerson to support user data migration of multiple value in challenge and response attributes for Lost Password Management.
Identity Server Backward Compatability on page 4-26
obVer Attribute Changes on page 4-21
WebPass After upgrading all earlier Identity Servers, you must upgrade all earlier WebPass instances.
Earlier WebPass instances are not compatible with 10g (10.1.4.0.1) Identity Servers (or Policy Managers).
You can install 10g (10.1.4.0.1) WebPass instances in your upgraded environment. However, 10g (10.1.4.0.1) WebPass instances are not compatible with earlier Identity Servers (or Policy Managers). You cannot use Release 10.1.4 Patch Set 1 (10.1.4.2.0) packages to install fresh instances.
Web Components and Backward Compatibility on page 4-23
Policy Managers (formerly known as the Access Manager component)
After upgrading the schema and data, and all Identity System components, you must upgrade all earlier Policy Managers.
Policy Manager on page 4-37
Access Servers When you upgrade earlier Access Servers, backward compatibility with earlier custom plug-ins and earlier WebGates is enabled automatically.
However, if you add a 10g (10.1.4.0.1) Access Server to an upgraded environment, you must set a flag to enable backward compatibility. You cannot use Release 10.1.4 Patch Set 1 (10.1.4.2.0) packages to install fresh instances.
Earlier Access Servers are not compatible with 10g (10.1.4.0.1) WebGates.
Access Servers now use the obVer attribute in OblixOrgPerson to support user data migration of multiple values in challenge and response attributes for Lost Password Management.
Access Server Backward Compatibility on page 4-33
obVer Attribute Changes on page 4-21
WebGates Release 6.1.1, 6.5, and 7.x WebGates can coexist with upgraded 10g (10.1.4.0.1) Access Servers.
You can install 10g (10.1.4.0.1) WebGates in your upgraded environment. However, 10g (10.1.4.0.1) WebGates are not compatible with earlier Access Servers. You cannot use Release 10.1.4 Patch Set 1 (10.1.4.2.0) packages to install fresh instances.
If you add a 10g (10.1.4.0.1) Access Server to the upgraded environment, you must set a flag to enable backward compatibility with earlier WebGates.
WebGates on page 4-38
Access Server Backward Compatibility on page 4-33
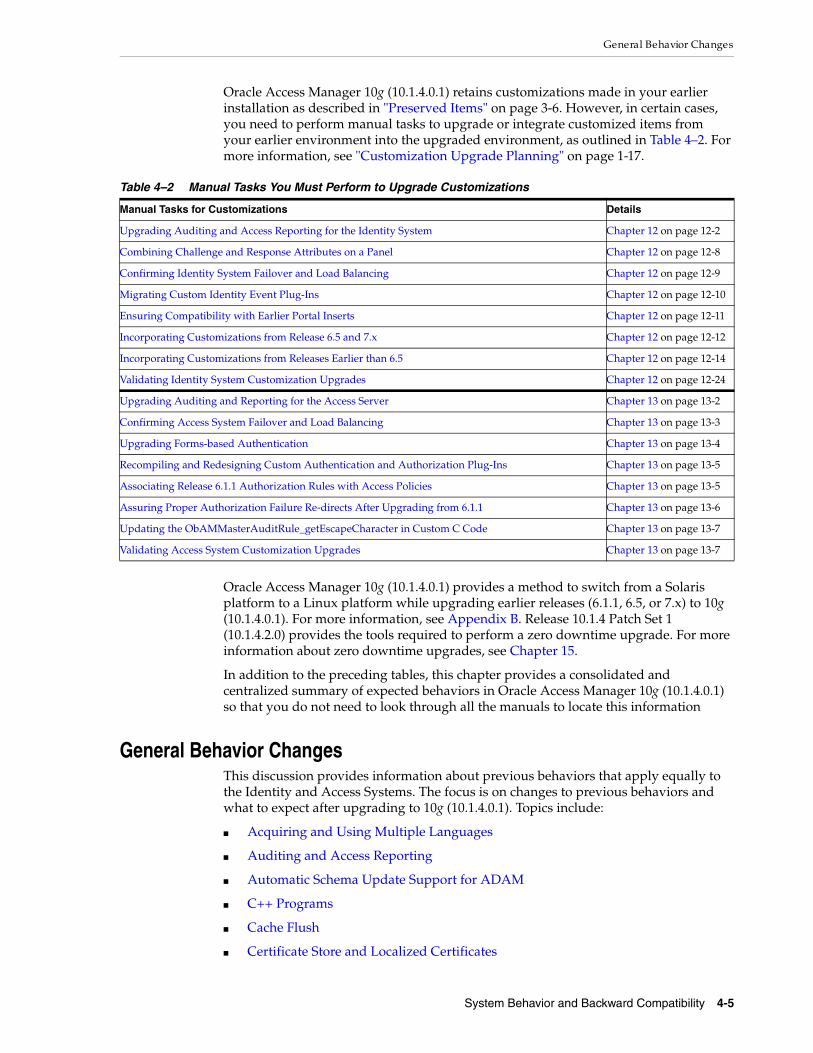
General Behavior Changes
System Behavior and Backward Compatibility 4-5
Oracle Access Manager 10g (10.1.4.0.1) retains customizations made in your earlier installation as described in "Preserved Items" on page 3-6. However, in certain cases, you need to perform manual tasks to upgrade or integrate customized items from your earlier environment into the upgraded environment, as outlined in Table 4–2. For more information, see "Customization Upgrade Planning" on page 1-17.
Oracle Access Manager 10g (10.1.4.0.1) provides a method to switch from a Solaris platform to a Linux platform while upgrading earlier releases (6.1.1, 6.5, or 7.x) to 10g (10.1.4.0.1). For more information, see Appendix B. Release 10.1.4 Patch Set 1 (10.1.4.2.0) provides the tools required to perform a zero downtime upgrade. For more information about zero downtime upgrades, see Chapter 15.
In addition to the preceding tables, this chapter provides a consolidated and centralized summary of expected behaviors in Oracle Access Manager 10g (10.1.4.0.1) so that you do not need to look through all the manuals to locate this information
General Behavior ChangesThis discussion provides information about previous behaviors that apply equally to the Identity and Access Systems. The focus is on changes to previous behaviors and what to expect after upgrading to 10g (10.1.4.0.1). Topics include:
■ Acquiring and Using Multiple Languages
■ Auditing and Access Reporting
■ Automatic Schema Update Support for ADAM
■ C++ Programs
■ Cache Flush
■ Certificate Store and Localized Certificates
Table 4–2 Manual Tasks You Must Perform to Upgrade Customizations
Manual Tasks for Customizations Details
Upgrading Auditing and Access Reporting for the Identity System Chapter 12 on page 12-2
Combining Challenge and Response Attributes on a Panel Chapter 12 on page 12-8
Confirming Identity System Failover and Load Balancing Chapter 12 on page 12-9
Migrating Custom Identity Event Plug-Ins Chapter 12 on page 12-10
Ensuring Compatibility with Earlier Portal Inserts Chapter 12 on page 12-11
Incorporating Customizations from Release 6.5 and 7.x Chapter 12 on page 12-12
Incorporating Customizations from Releases Earlier than 6.5 Chapter 12 on page 12-14
Validating Identity System Customization Upgrades Chapter 12 on page 12-24
Upgrading Auditing and Reporting for the Access Server Chapter 13 on page 13-2
Confirming Access System Failover and Load Balancing Chapter 13 on page 13-3
Upgrading Forms-based Authentication Chapter 13 on page 13-4
Recompiling and Redesigning Custom Authentication and Authorization Plug-Ins Chapter 13 on page 13-5
Associating Release 6.1.1 Authorization Rules with Access Policies Chapter 13 on page 13-5
Assuring Proper Authorization Failure Re-directs After Upgrading from 6.1.1 Chapter 13 on page 13-6
Updating the ObAMMasterAuditRule_getEscapeCharacter in Custom C Code Chapter 13 on page 13-7
Validating Access System Customization Upgrades Chapter 13 on page 13-7

General Behavior Changes
4-6 Oracle Access Manager Upgrade Guide
■ Compilers for Plug-ins
■ Configuration Files
■ Connection Pool Details
■ Console-based Command-line Interfaces
■ Customized Styles, Images, and JavaScript
■ Database Input and Output
■ Date and Time Formats
■ Default Product Pages
■ Detecting Cross-site Scripting and SQL Injection
■ Diagnostic Tools for Identity and Access Servers
■ Directory Profiles and Database Instance Profiles
■ Directory Server Connection Details
■ Directory Server Failover
■ Directory Server Interface
■ Directory Structure
■ Domain Names, URIs, and URLs
■ Encryption Schemes
■ Failover and Failback
■ File and Path Names
■ Graphical User Interface
■ HTML Pages
■ LDAP Bind Password
■ Message and Parameter Files
■ Migrating User Data At First Login
■ Minimum Number of Search Characters
■ Multiple Values in Challenge Phrase and Response Attributes
■ Names Assigned by Administrators and Product Names
■ Namespaces for Policy Data and User Data Stored Separately
■ Object Classes and Attributes
■ obVer Attribute Changes
■ Password Policies and Lost Password Management
■ Reconfiguring the Logging Framework without a Restart
■ Support Changes
■ Transport Security for the Directory Server
■ Upgrade Enhancements
■ Web Components and Backward Compatibility
■ Web Server Configuration Files

General Behavior Changes
System Behavior and Backward Compatibility 4-7
■ Writing a Stack Trace to a Log File
■ XML Catalogs and XSL Stylesheet Encoding
Acquiring and Using Multiple LanguagesEarly product releases provided messages for end users and administrators in only the English language. Starting with release 6.5, support for translatable messages was provided through Language Packs for certain Latin-1 languages (French and German). Oracle Access Manager 10g (10.1.4.0.1) provides support for nearly a dozen Administrator languages and over two dozen end-user languages, as described in the Oracle Access Manager Introduction.
After installing Oracle-provided Language Packs, you must enable all languages to be used, then configure Oracle Access Manager to use the installed languages by entering display names for attributes, tabs, and panels. See the Oracle Access Manager Installation Guide and Oracle Access Manager Identity and Common Administration Guide for details about installing and enabling multiple languages after the upgrade.
When upgrading to (or installing) 10g (10.1.4.0.1), you choose the language (locale) to be used as the default for Administrative tasks. Administrative information for the Identity System Console, Access System Console, and Policy Manager can be displayed in only installed Administrator languages. In earlier releases, a drop-down list of languages appeared in the top-right corner of the System Console. However, this is not available in 10g (10.1.4.0.1). The only way to select the language is by changing the browser setting on the user’s or administrator’s computer. If administrative pages are requested in any user language (based on the language selected for the browser), the language that was selected as the default Administrator language during product installation (or upgrades) is used to display administrative pages.
Messages in Oracle Access Manager stylesheets depend upon a language. Beginning with release 6.5 multiple language capability, messages have been brought out of the stylesheets and defined separately as variables in msgctlg.xsl (and msgctlg.js for JavaScript files). In addition, each stylesheet has a corresponding language-specific thin wrapper stored in IdentityServer_install_dir\identity\oblix\lang\langTag\style0. Each wrapper in \style0 includes the main language-neutral stylesheet stored in IdentityServer_install_dir\identity\oblix\lang\shared. The purpose of this new thin wrapper is to segregate the main functionality of the stylesheet template, which is language independent, from language-specific messages in the stylesheets. For more information, see the Oracle Access Manager Customization Guide.
For more information, see "Console-based Command-line Interfaces" on page 4-10.
Auditing and Access ReportingThe Crystal Reports package is no longer provided with the Oracle Access Manager package. You must obtain this product from the vendor.
Oracle Access Manager 10g (10.1.4.0.1) supports the Unicode standard. To support all the languages available with Oracle Access Manager 10g (10.1.4.0.1), the definitions of auditing and reporting tables have changed. Simply upgrading or altering existing database instances and tables is not supported and could result in permanent truncation and loss of existing data. For more information, see "Auditing and Access Reporting" on page 3-9.
For the steps you need to take to ensure a properly working auditing and reporting environment after upgrading Oracle Access Manager components to 10g (10.1.4.0.1), see auditing and access reporting topics in:

General Behavior Changes
4-8 Oracle Access Manager Upgrade Guide
■ Chapter 12, "Upgrading Your Identity System Customizations"
■ Chapter 13, "Upgrading Your Access System Customizations"
Also, when configuring Audit Policies in the Identity System Console, you can specify a list of profile attributes for every audit record. Profile attributes (Full Name, Employee Number, Department Number, and the like) are specific to the user performing the action/event being audited (Search or View Profile or Modify Profile, for example). The purpose of profile attributes is to help you identify the user performing the action/event.
Automatic Login and the Password Redirect URLUsing an enhancement in Release 10.1.4 Patch Set 1 (10.1.4.2.0), users can be logged in automatically after changing their password. To configure automatic login, the change password redirect URL must include STLogin=%applySTLogin% as a parameter.
The following is an example of a change password redirect URL that logs the user in:
/http://hostname:portnumber/identity/oblix/apps/lost_password_mgmt/bin/lost_password_mgmt.cgi? program=redirectforchangepwd&login=%login%%userid%&backURL=% HostTarget%%RESOURCE%&STLogin=%applySTLogin%&target=top
To implement this with a form-based authentication scheme, you must configure the challenge parameter creds by supplying the user name credential parameter as the first token, the password credential parameter as the second token, then any other credential parameters.
See the Oracle Access Manager Identity and Common Administration Guide for details.
Automatic Schema Update Support for ADAMThis has been removed due to an ldifde.exe tool licensing issue. For ADAM, the schema must be updated manually. For details, see the Oracle Access Manager Installation Guide.
C++ ProgramsWhen upgrading from releases earlier than 7.0, you might need to recompile C++ programs created with the Access Manager SDK and Oracle Access Manager APIs following the upgrade. For more information, see:
■ Identity System Event Plug-ins
■ Access Manager SDK, Access Manager API, and Custom AccessGates
■ Custom Authentication and Authorization Plug-ins and Interfaces
Cache FlushA 10g (10.1.4.0.1) Identity Server cannot flush the cache of an earlier Access Server. To eliminate any problems, be sure to upgrade your Access Servers to 10g (10.1.4.0.1).
For more information, see "Access Server Backward Compatibility" on page 4-33.
WARNING: To avoid exposing a challenge phrase or response attribute, Oracle recommends that you do not select these as profile attributes for auditing. If you add a challenge phrase or response as a profile attribute, it is audited in proprietary encoded format.

General Behavior Changes
System Behavior and Backward Compatibility 4-9
Certificate Store and Localized CertificatesCommunication between a directory server and Oracle Access Manager Servers, and the Policy Manager can be either open (no security) or use the Secure Sockets Layer (SSL). SSL-enabled requires a signer’s certificate (root certification Authority (CA) certificate) in Base64 format from a third-party Certificate Authority.
Three transport security modes are provided for communication between Web clients (WebPass and Identity Server and between Policy Manager and WebPass and between Access Server and WebGate. These security modes are Open, Simple (Oracle-provided), and Cert (third-party CA).
In both Simple and Cert mode, Oracle Access Manager components use X.509 digital certificates only. This includes Cert Authentication between WebGates and the Access Server where the standard cert-decode plug-in decodes the certificate and passes certificate information to the standard credential_mapping authentication plug-in.
Both Oracle and third-party vendors provide localized certificates for LDAP SSL communication between components and the directory server and for Oracle Access Manager components installed in Cert mode. With localization and UTF-8 support in 10g (10.1.4.0.1), you can request and add localized certificates containing non-ASCII text in all fields except Email and Country (according to x509 standards). After receiving a localized certificate, you must install it using one of the Oracle Access Manager command-line tools as described in the Oracle Access Manager Identity and Common Administration Guide. If the server is running a non-English operating system, you might want to set the Oracle National Language Support NLS_LANG or COREID_NLS_LANG environment variables (or both) to override the automatic server locale detection as described in the Oracle Access Manager Installation Guide. Setting these variables is optional because Oracle Access Manager automatically detects and uses the server locale.
Starting with Oracle Access Manager 7.0 (also available as part of Oracle Application Server 10g Release 2 (10.1.2)), the default certificate store format and name has changed from cert7.db to cert8.db for LDAP SSL certificates. When you upgrade to 10g (10.1.4.0.1), the old certificate store (cert7.db) is used. Oracle Access Manager 10g (10.1.4.0.1) works with both the cert7.db (upgraded environments) and cert8.db (new installations) certificate stores. You are not required to manually generate a new certificate store after upgrading. However, this will happen transparently whenever you add, modify, or delete certificates using configureAAAServer, setup_ois, or setup_accessmanager utilities that automatically modify the certificate store format and name to cert8.db.
For more information, see the Oracle Access Manager Identity and Common Administration Guide.
Compilers for Plug-insStarting with Oracle Access Manager release 7.0, components on Solaris and Linux are compiled using the GCC v3.3.2 C++ compiler to address multi-threading issues encountered with earlier compiler releases. This means that after the upgrade, you must recompile custom plug-ins from release 5.x or 6.x using GCC v3.3.2 C++ compiler. This includes Identity Event plug-ins and custom authentication and authorization plug-ins.
For more information, see:
■ Migrating Custom Identity Event Plug-Ins
■ Recompiling and Redesigning Custom Authentication and Authorization Plug-Ins

General Behavior Changes
4-10 Oracle Access Manager Upgrade Guide
Configuration Files Previous versions of Oracle Access Manager managed certain information (including but not limited to directory connection information and WebGate parameters) solely through XML and LST configuration files. In 10g (10.1.4.0.1), Oracle Access Manager provides the ability to manage this information through the graphical user interface (GUI). See also "Directory Server Connection Details" on page 4-13 and "WebGates" on page 4-38.
Connection Pool DetailsStarting with Oracle Access Manager release 7.0, connection pooling was consolidated to support failover across the entire system. The directory connection pool does not depend on directory type.
There might be some impact when upgrading, depending on the earlier configuration of Oracle Access Manager to each directory server used:
■ Identity System Connection Pools: There is no impact. Initial Connections and Maximum Connections specified in the database instance profile are retained and will operate as they did previously.
■ Access System Connection Pools Before Release 6.5: Values for Initial Connections and Maximum Connections in the UserDB.lst and UserDBFailover.lst might not be retained. After upgrading Access System Components, it is a good idea to verify the values in the database instance profile of the newly created directory server profile.
■ On NDS: For concurrent authentication requests on NDS directory servers, Oracle recommends that you increase the connection pool size to something higher than the default (1) for the user directory profile using the System Console.
See also "Directory Server Failover" on page 4-14.
Console-based Command-line InterfacesOracle Access Manager provides console-based command-line tools that can be used by administrators to configure Access and Identity components. 10g (10.1.4.0.1) command-line tools automatically detect the server locale and use it for processing. You can optionally set either the COREID_NLS_LANG or NLS_LANG environment variables (or both), which toggle auto-detection off and take precedence over the server locale.
To ensure correct behavior of command-line interfaces with a non-English operating system, the Master Administrator must complete several tasks as described in the Oracle Access Manager Installation Guide.
Customized Styles, Images, and JavaScriptDefault product stylesheets are periodically updated by Oracle to instantiate improvements. Upgraded functionality depends, in part, on stylesheet files in the latest \style0 and \shared directories.
Customized .XSL style files, images, and JavaScript files are not migrated during the upgrade. If your earlier Oracle Access Manager installation includes customized
WARNING: You must use the GCC v3.3.2 compiler, regardless of the compiler that might be provided with the Operating System.

General Behavior Changes
System Behavior and Backward Compatibility 4-11
images, JavaScript files, and stylesheets, you need to complete manual processing to use these with 10g (10.1.4.0.1). If you use a style other than the Oracle Access Manager default Classic Style, you need to manually include those changes in 10g (10.1.4.0.1) stylesheets, images, and JavaScript files.
Starting in Oracle Access Manager 6.5, you need to reference images using the two variables ($gifPathName and jsPathName) to make your customization language and style independent.
To support multiple languages, the location of java scripts, stylesheets, and images changed starting with Oracle Access Manager release 6.5. The directory structure introduced with release 6.5 continues with 10g (10.1.4.0.1).
Database Input and OutputEarlier releases used the Latin-1 character set. With 10g (10.1.4.0.1), Oracle Access Manager supports the Unicode character set and internationalized characters (Chinese, Japanese, Arabic, and the like).
In new installations, Oracle recommends that you choose a Unicode character set for your database. If you upgrade an earlier installation to 10g (10.1.4.0.1), be sure to change your database character set to Unicode.
In earlier releases with the Latin-1 character set, the varchar type for columns of audit and reporting related tables was sufficient. 10g (10.1.4.0.1), the audit record can contain data with non Latin-1 characters. For more information, see "Auditing and Access Reporting" on page 4-7.
Date and Time FormatsFormats differ between the Identity System and Access System, as follows:
Identity System: In the 10g (10.1.4.0.1) Identity System, the date format remains the same as in the last release and is not internationalized (on the Diagnostics page and Ticket Information page for example). However, month names taken from Identity System message catalogs will be displayed in the locale specified by the browser.
As in earlier releases, date order formats (MM/DD/YYYY versus /MM/YYYY and the like) can be configured by modifying object class attributes in the Identity System Console as described in the Oracle Access Manager Identity and Common Administration Guide. On the Ticket Information page, the date is displayed in the format specified in the obDateType parameter in the globalparams.xml file. Weekday names do not appear anywhere within the Identity System.
Access System: In the 10g (10.1.4.0.1) Access System, month names, the date-order format (MM/DD/YYYY versus DD/MM/YYYY), and weekday names are displayed according to the locale specified for the browser. In the Access System, month and weekday names are not taken from message catalog files. The following information can vary from one locale to another:
Note: Any style directories created in the earlier installation are saved, not migrated, and are stored in the renamed (backup) source directory during the upgrade. After upgrading the Identity System, you must complete manual processing to use customized styles with 10g (10.1.4.0.1). See "Incorporating Customizations from Releases Earlier than 6.5" on page 12-14.

General Behavior Changes
4-12 Oracle Access Manager Upgrade Guide
Access System Date Format: In the Access System only, the date format is internationalized and will appear in the locale specified for the browser. In India, for example, the date format is typically expressed as DD/MM/YYYY. In the United States the date format is typically expressed as MM/DD/YYYY.
Access System Month Names: Earlier releases presented the names of months from language-specific message catalogs on the server. However, this meant that the user would see the month name in the server’s locale. In the 10g (10.1.4.0.1) Access System, the name of the month will reflect the user’s browser locale.
Access System Weekday Names: In earlier releases, the names of weekdays (like the names of the month) were taken from language-specific message catalogs in the server’s locale. In the Access System 10g (10.1.4.0.1), the name of the day will reflect the locale specified by the user’s browser.
Access System Time Zone List: In earlier releases, the names of the location/city appeared with the Greenwich Mean Time (GMT) offset. However, the location/offset pair was not static because of the daylight savings time rule.
In 10g (10.1.4.0.1), the Time zone list shows only the offset expressed as Universal Time Coordinated (UTC) plus or minus from 00:00 to 12:00 hours. For example, UTC-00:00 or UTC+01:00 or UTC-03:30, and so on.
You will see examples of these behaviors on the Access Server Diagnostics page; the Timing Conditions page under the Authorization Rules in access policies created in the Policy Manager; on the Manage Reports page under the System Management tab in the Access System Console; and the Manage Sync Records page under the System Management tab of the Access System Console.
Default Product PagesWith Oracle Access Manager 10g (10.1.4.0.1), there can be only one static HTML page at the address /identity/oblix/index.html and one static HTML page at the address /access/oblix/index.html.
These static product pages always use the default Administrator language selected during Identity Server and Access Server installation at this location. Starting with release 6.5, the product supported multiple Latin-1 languages (French, German). The default product page behavior remains the same as in previous releases.
Note: Month names, and weekday names, (both full and abbreviated) have been removed from the globalmsg.xml file. Time zone locations have been removed from the oblixadminmsg.xml and policyservcenmsg.xml. These files are located in \AccessServer_install_dir\access\oblix\lang\en-us.
Note: Universal Time Coordinated (UTC) is also known as Coordinated Universal Time and sometimes as Universal Coordinated Time. All are abbreviated as UTC and refer to the standard time common to every place in the world (formerly and still widely referred to as Greenwich Mean Time (GMT) or World Time. UTC reflects the mean solar time along the Earth's prime meridian. The Time format remains the same as it was in the last release (7.0, also available as part of Oracle Application Server 10g Release 2 (10.1.2).

General Behavior Changes
System Behavior and Backward Compatibility 4-13
See also "HTML Pages" on page 4-17.
Detecting Cross-site Scripting and SQL InjectionRelease 10.1.4 Patch Set 1 (10.1.4.2.0) provides enhancements for detecting and handling cross-site scripting and SQL injection. These enhancements guard against malicious data entry in the Oracle Access Manager user applications and administration consoles.
Diagnostic Tools for Identity and Access ServersRelease 10.1.4 Patch Set 1 (10.1.4.2.0) includes new diagnostic tools for the Identity and Access Server to help you work with an Oracle Technical Support representative to troubleshoot problems.
The diagnostic tools enable you to do the following:
■ Obtain hard-to-locate information about component configuration and behavior.
■ Automatically capture events that immediately precede a core dump.
■ Manually capture a stack trace of any event in the Identity or Access System.
See the Oracle Access Manager Identity and Common Administration Guide for details.
Directory Profiles and Database Instance ProfilesStarting with release 5.2, the Identity System included directory profiles and database instances. Starting with release 6.5, the Access System began partially using directory profiles and database instances for accessing user data. Directory profiles replace the UserDB.lst, GroupDB.lst, UserDBFailover.lst, and GroupDBFailover.lst configuration files that were used in earlier Access System releases.
A directory profile (also known as a directory server profile) contains the connection information for one or more directory servers that share the same namespace and operational requirements for Read, Write, Search, and so on. The connection information includes a name, a domain or namespace to which it applies, a directory type, and a set of operations.
Each directory profile can contain multiple primary/secondary "database instances". Each database instance profile represents connection information to and for a single directory server, including connection pool information.
A directory profile is created automatically each time you install an Identity Server, Policy Manager, or Access Server and specify new directory server connection information. You can create additional directory server profiles for load balancing and failover.
When you upgrade an earlier Policy Manager or Access Server, a message appears during the interval to release 6.5 informing you that a new directory profile was created. The message "DB Profiles created" refers to the directory server profile. During the creation of new Access System directory profiles, connection pool values from earlier configuration files cannot be retained. After the upgrade, you need to verify these values in the Database Instance profile of the newly created directory profile. See also "Connection Pool Details" on page 4-10.
Directory Server Connection Details Previous versions of Oracle Access Manager managed directory connection information solely through XML configuration files. Recently, Oracle Access Manager
General Behavior Changes
4-14 Oracle Access Manager Upgrade Guide
provided the ability to manage this information through the interface using the Directory Profile page in the Identity System Console and the Access System Console. However, some configuration and policy data are still managed through the XML files. See also "Directory Profiles and Database Instance Profiles" on page 4-13.
Directory Server FailoverThe Identity Server failover configuration has resided in the directory server profile in the System Console since release 5.2. Starting with release 6.5:
■ A directory server profile is created for the master directory server as well as any failover directory servers.
■ Directory server information from certain configuration files is used to create one Database Instance Profile each for all configured primary (and secondary) directory servers.
For example, during the incremental upgrade to release 6.5, directory profiles for the Access Server are automatically created and replace certain earlier configuration files where:
– Primary directory server information was stored in:
AccessServer_install_dir/access/oblix/config/UserDB.lst and GroupDB.lst
– Information for all the failover and load-balancing directory servers (primary and secondary) was stored in:
AccessServer_install_dir/access/oblix/config/UserDBFailover.lst
and GroupDBFailover.lst
■ When creating the directory server profile for the Policy Manager, directory server credentials are read from PolicyManager_install_dir/access/oblix/config/userDB.lst.
■ Profiles are not created for Policy Manager failover servers. In the case of release 6.1, if the policy tree was on a separate directory server a profile for policy data existed.
■ The Access Server will handle multiple directory servers following data upgrades.
After upgrading, to verify that the failover configuration you had in the previous release operates as expected see:
■ Confirming Identity System Failover and Load Balancing
■ Confirming Access System Failover and Load Balancing
Former .lst files are transformed into .xml files, as described in "Message and Parameter Files" on page 4-18. See also "Connection Pool Details" on page 4-10.
An enhancement with Release 10.1.4 Patch Set 1 (10.1.4.2.0) provides a new parameter in globalparams.xml named LDAPOperationTimeout sets an amount of time that
Note: If the configuration tree is in the user directory server and under the user node, then the configuration directory profile is not created. Otherwise, a configuration directory profile is created using directory server information from PolicyManager_install_dir/oblix/config/ldap/configdb.lst and marked for use only by the Policy Manager.

General Behavior Changes
System Behavior and Backward Compatibility 4-15
the Identity Server, Access Server, or Policy Manager waits for a response from the directory server for a single entry of a search result before the component fails over to a secondary server, if one is configured.
A heartbeat_ldap_connection_timeout_in_millis parameter in globalparams.xml determines the time limit for establishing a connection with the directory server. If the time limit is reached, the Identity and Access Servers start establishing connections with another directory server. This parameter enables the Identity and Access Servers to proactively identify when a directory server is down, and it enables failover without requiring an incoming directory service request and a subsequent TCP timeout.
See the chapter on failover in the Oracle Access Manager Deployment Guide and the appendix on parameter files in the Oracle Access Manager Identity Customization Guide for details.
Directory Server InterfaceThe 10g (10.1.4.0.1) directory server interface reads, processes, and stores data in UTF-8 encoding. Earlier releases behaved in this same way. Therefore, there is no impact in upgraded environments. Oracle Access Manager used UTF-8 encoding for directory server communications even in earlier releases
Directory StructureProduct releases before release 6.5 did not include any language directories, because English was the only language. When you install 10g (10.1.4.0.1) components, you can name the top-level directory as you like. During installation, Oracle Access Manager appends an identifier is appended to the directory name you assign to identify the type of components installed therein. For example, the top-level structure is:
■ OracleAccessManager\access: Created with the installation of the Access Server
■ OracleAccessManager\identity: Created with the installation of the Identity Server
■ OracleAccessManager\webcomponent: Created with the installation of Oracle Access Manager Web components (WebPass, Access Manager, WebGate)
Release 6.5 through 10g (10.1.4.0.1) installations provide a language directory containing a named subdirectory for each installed language (which contains .XML message catalog files for various applications that you can customize):
IdentityServer_install_dir\identity\oblix\lang\en-us: English messages IdentityServer_install_dir\identity\oblix\lang\fr-fr: French messages IdentityServer_install_dir\identity\oblix\lang\shared: default global stylesheets in all languages
For more information, see Appendix A.
Domain Names, URIs, and URLs As in earlier releases of the product, 10g (10.1.4.0.1) supports ASCII characters for domain names and Uniform Resource Identifiers (URIs). The most common form of a URI is a Web page address (a subset of the URI is known as a Uniform Resource Locator or URL).
With Oracle Access Manager10g (10.1.4.0.1), there is no support for international characters in domain names (internationalized domain names) nor in the Uniform

General Behavior Changes
4-16 Oracle Access Manager Upgrade Guide
Resource Identifiers (internationalized resource identifiers) nor, by extension, in the URL.
Encryption SchemesStarting in Oracle Access Manager release 7, AES became the encryption scheme used by Access System components. The Identity System continues to use RC6 encryption for Lost Password Management responses.
The shared secret encryption algorithm is an Oracle Access Manager-wide setting that affects all encrypted cookies. For example, the ObSSOCookie cookie is encrypted using a configurable encryption key known as a shared secret.
■ For shared secret keys used in release 5.x, the RC4 encryption scheme was recommended.
■ For shared secret keys used in release 6.x, the RC6 encryption scheme was recommended. (RC6 encryption is deprecated in Oracle Access Manager 10g (10.1.4.0.1), and its support will be deprecated in future releases.)
■ AES is a new encryption scheme introduced in release 7.0 which continues in to 10g (10.1.4.0.1). AES is the default encryption scheme.
In environments that include earlier WebGates, the earliest encryption algorithm should be used.
For more information, see "Shared Secret" on page 4-38 and details about setting encryption schemes in the Oracle Access Manager Access Administration Guide.
Failover and FailbackOracle Access Manager release 7 introduced a heartbeat polling mechanism to facilitate immediate failover to a secondary directory server when the number of connections in the connection pool is less than the specified threshold level. Additionally, a failback mechanism facilitates switching from the secondary directory server back to the primary server as soon as the preferred connection has been recovered.
The heartbeat feature polls all the primary directory server connections periodically to verify the availability of the directory service (and by implication, the network). You configure the polling interval by setting the Sleep For (Seconds) parameter for each Directory Profile in the System Console as described in the Oracle Access Manager Identity and Common Administration Guide.
When the host cannot be reached, further attempts to connect to that host are blocked for the specified the Sleep For interval, rather than for the TCP timeout used previously.
A new heartbeat_ldap_connection_timeout_in_millis parameter in globalparams.xml determines the timeout interval for establishing a connection. The default value for this parameter is 4000 (4 seconds). See the Oracle Access Manager Deployment Guide.
If the directory service is not available, the heartbeat mechanism immediately initiates failover to the secondary directory server. Thus, failover can take place without being triggered by an incoming directory service request and a subsequent TCP timeout.
In situations where the enterprise network performance is poor, the heartbeat feature can trigger false alarms and tear down already-established connections. Therefore, the heartbeat_enabled parameter in the globalparams.xml files enables you to activate

General Behavior Changes
System Behavior and Backward Compatibility 4-17
or deactivate the heartbeat mechanism in response to current network conditions. By default the heartbeat feature is activated.
File and Path NamesAs with earlier releases, only ASCII characters are supported in file and path names.
Graphical User InterfaceA number of changes have been made to improve and clarify the Web-based graphical user interface. These changes are introduced in the Oracle Access Manager Introduction and are illustrated throughout the suite of manuals.
HTML PagesEach Identity System application, such as the User Manager, Group Manager, and Org Manager, generates HTML for each page within the application. Access System components, such as the Policy Manager and WebGate, generate HTML pages. In earlier releases, HTML pages were generated and displayed using a superset of the Latin-1 character set.
In 10g (10.1.4.0.1), all HTML pages generated by Oracle Access Manager use UTF-8 encoding. This encoding is communicated to Web browsers using the Content-Type HTTP header and META tags.
UTF-8 encoding is rendered correctly on all supported browsers with the Unicode version of the font to be used. For browser support, see the Oracle Access Manager Installation Guide.
Certain Web servers (Apache, for example) allow administrators to specify the default encoding using the Content-Type HTTP header. However if the Web server setting specifies a different character encoding, Oracle Access Manager HTML pages are displayed incorrectly.
See also, "Default Product Pages" on page 4-12.
LDAP Bind PasswordRelease 10.1.4 Patch Set 1 (10.1.4.2.0) provides an enhancement in the form of ModifyLDAPBindPassword. This command enables you to periodically update the LDAP bind password for the directory servers that communicate with Oracle Access Manager components in Oracle Access Manager configuration files.
Using the ModifyLDAPBindPassword command, you can reset the LDAP bind password without restarting any servers or re-running setup.
See the chapter on reconfiguring the system in the Oracle Access Manager Deployment Guide for details.
Note: Be sure that all file and path names include only English language characters. In file and path names, no international characters are allowed.
Note: To prevent incorrect behavior, Oracle recommends disabling such Web server settings.

General Behavior Changes
4-18 Oracle Access Manager Upgrade Guide
Message and Parameter FilesPrior to release 6.5, Oracle Access Manager messages were controlled by an XML file for a specific application and stored in application specific directories. For example:
IdentityServer_install_dir/identity/oblix/apps/appname/bin/appnamemsg.xml
where IdentityServer_install_dir is the directory where the Identity Server is installed and appname matches a specific application, as follows:
groupservcenter--Group Manager
objservcenter--Organization Manager
userservcenter--User Manager
In 10g (10.1.4.0.1), these message files now reside in language-specific directories. For example: IdentityServer_install_dir/identity/oblix/lang/langTag/oblixbasemsg.xml.
Earlier release also provided a mix of parameter and message catalogs in .xml and .lst (proprietary) format. For example, Access System and SNMP Agent messages and parameters were stored in .LST files. To accommodate translation, .lst files were converted to .xml.
During an upgrade to Oracle Access Manager10g (10.1.4.0.1), any customizing in earlier message and parameter catalogs is preserved automatically. Also, .lst files are converted to XML format.
New installations of Oracle Access Manager10g (10.1.4.0.1) include .xml parameter and message catalog files. The exception to this rule includes files that are used during an upgrade to Oracle Access Manager10g (10.1.4.0.1), such as ois_520_to_600_msg.lst, which remain in the proprietary .lst format. 10g (10.1.4.0.1) upgrade tools use .lst message and parameter catalogs.
Migrating User Data At First LoginRelease 10.1.4 Patch Set 1 (10.1.4.2.0) includes a new parameter in the globalparams.xml, file MigrateUserDataTo1014. This parameter comes into play only when you upgrade using the zero downtime upgrade method described in Chapter 15. The parameter is used by the Identity Server and Access Server during a user’s first login after upgrading using the zero downtime upgrade method.
This user data migration is also known as on-the-fly user data migration. This migration impacts the obVer attribute in user or person entries in the directory server (OblixOrgPerson). It also impacts the challenge and response attributes for Lost Password Management. Multiple values in challenge and response attributes were introduced with Oracle Access Manager 10g (10.1.4.0.1). No other user data attributes are migrated during a user’s first login.
There are two possible values for MigrateUserDataTo1014the globalparams.xml, file:
■ true: A value of true enables the automatic migration of a user’s Lost Password Management challenge parameters during their first login (whether a user or an administrator).
The value is set to true by default in the following situations:
Note: During the upgrade, messages are displayed in English.

General Behavior Changes
System Behavior and Backward Compatibility 4-19
– After you install Oracle Access Manager 10g (10.1.4.0.1) and then apply Release 10.1.4 Patch Set 1 (10.1.4.2.0). This results in an Oracle Access Manager 10g (10.1.4.0.1) instance of the component.
– After you perform an in-place upgrade to Oracle Access Manager 10g (10.1.4.0.1) and then apply Release 10.1.4 Patch Set 1 (10.1.4.2.0). This results in an Oracle Access Manager 10g (10.1.4.0.1) instance of the component.
■ false: A value of false halts the automatic migration of a user’s Lost Password Management challenge parameters during their first login.
The value is set to false by default only when you upgrade using the zero downtime upgrade method. During a zero downtime upgrade, you install Oracle Access Manager 10g (10.1.4.0.1) and then apply Release 10.1.4 Patch Set 1 (10.1.4.2.0) before finishing the upgrade. As a result, components are upgraded to Oracle Access Manager 10.1.4.2.0.
After finishing the zero downtime upgrade and validating that it is successful, you must change the MigrateUserDataTo1014 parameter value to true in the globalparams.xml file of each 10.1.4.2.0 Identity Server and Access Server. Automatic propagation of changes to globalparams.xml is not provided. As mentioned in the first bullet, a value of true starts the automatic migration of a user’s Lost Password Management challenge parameters during their first login.
A globalparams.xml file is located in the following directories:
IdentityServer_install_dir/identity/oblix/apps/common/bin
WebPass_install_dir/Webcomponent/identity/oblix/apps/common/bin
PolicyManager_install_dir/Webcomponent/access/oblix/apps/common/bin
AccessServer_install_dir/access/oblix/apps/common/bin
Only the 10.1.4.2.0 Identity Server and Access Server use the MigrateUserDataTo1014 parameter. In general, some parameters in the globalparams.xml file are the same for all components while other parameters are specific to only a few components. For more information about the content of the globalparams.xml file, see the Oracle Access Manager Customization Guide.
Minimum Number of Search CharactersIn earlier releases, you needed to enter at least three characters when performing a search in Identity System applications. In 10g (10.1.4.0.1) there is no minimum number of characters required. As in earlier releases, you can control the minimum number of characters that users must enter in the search field as described in Oracle Access Manager Customization Guide.
Multiple Values in Challenge Phrase and Response AttributesIn earlier releases, the lost password management feature supported only a single challenge and a single response. The challenge phrase and response attribute in user entries contained only a single value. For example:
ChallengeAttribute: what is your name?
See Also: "Multiple Values in Challenge Phrase and Response Attributes" on page 4-19
"obVer Attribute Changes" on page 4-21
"Introduction to the Zero Downtime Upgrade Method" on page 15-1

General Behavior Changes
4-20 Oracle Access Manager Upgrade Guide
ResponseAttribute: xxxxxxxx (where xxxxxxxx is the encrypted form of the name)
In earlier releases, the obVer attribute in user or person entries in the directory server (OblixOrgPerson, for example) indicated the current release for informational purposes only.
Oracle Access Manager 10g (10.1.4.0.1) supports multiple values in challenge phrases and response attributes, and expects these in encoded format (with @n# as a delimiter between multiple values). For example:
ChallengeAttribute: what is your name?@1#what is your school name?@2# ResponseAttribute: xxxxxxxx (where xxxxxxxx is the encrypted form of the name@1#SGschool@2#)
ChallengeAttribute: what is your name?@1# ResponseAttribute: xxxxxxxx (where xxxxxxxx is the encrypted form of the name@1#)
Oracle Access Manager 10g (10.1.4.0.1) uses the obVer attribute in the user entry (OblixOrgPerson) to indicate the encoding for challenge phrase and response attributes for lost password management. For more information, see "obVer Attribute Changes" on page 4-21.
Names Assigned by Administrators and Product NamesSome product and component names have changed as you will see after an installation or upgrade. During an upgrade, earlier product, component, and functions names are changed to the new name. For example, in 10g (10.1.4.0.1), the default Policy domains are Identity Domain and Access Domain and the default authentication schemes are Oracle Access and Identity, Oracle Access and Identity for AD Forest, and Anonymous. These new names replace earlier names during the upgrade.
Certain function names have revised to noun phrases the Access and Identity Systems as noun phrases. The AM Service State name has changed to Policy Manager API Support Mode. For more information, see "Product and Component Name Changes" on page -xxv.
Any names assigned by an administrator during installation and configuration are retained during an upgrade (not changed). Therefore if you have named a service "COREid Identity Server" or "NetPoint Identity Server" these names will be the same in the upgraded environment. Your earlier authentication schemes and policy domains are also retained as is during the upgrade. See also "Preserved Items" on page 3-6.
Note: OblixOrgPerson is one user object class; however, your deployment might include others. For example, your deployment might include both OblixOrgPerson and gensiteorgperson.
Note: In the delimiter @n# between multiple values, n is the number of the challenge or response. With Oracle Access Manager 10g (10.1.4.0.1), even a single value for the challenge and response uses the encoded format.

General Behavior Changes
System Behavior and Backward Compatibility 4-21
Namespaces for Policy Data and User Data Stored SeparatelyBefore release 6.5, the namespaces for Policy data and user data stored in two separate directories had to be unique. During an upgrade to 10g (10.1.4.0.1) you need to confirm this uniqueness to ensure that multi-language capability can be enabled.
For more information, see "Configuring Unique Namespaces for Directory Connection Information" on page 5-7.
Object Classes and AttributesThere have been several schema changes. For more information, see Oracle Access Manager Schema Description.
obVer Attribute ChangesThe obVer attribute identifies the current Oracle Access Manager release and is one of several attributes in the class description of many Oracle Access Manager schema objects. For example, the obVer attribute is part of oblixPanel, oblixConfig, oblixLocation, oblixMetaAttribute, oblixEnum, and OblixOrgPerson to name only a few.
Until release 10g (10.1.4.0.1), the obVer attribute was purely informational. However starting with release 10g (10.1.4.0.1), the obVer attribute is used by the Identity and Access Servers to support encoding of multiple values in challenge phrase and response attributes for lost password management. In this case, Oracle Access Manager 10g (10.1.4.0.1) reads the obVer attribute in:
■ oblixConfig class: The structural class defines the container node for the Oracle Access Manager configuration data.
In oblixConfig, the obVer attribute always exists and indicates the COREid or Oracle Access Manager release.
■ OblixOrgPerson class: The auxiliary class used for associating Oracle Access Manager person information with the class configured as the structural person object class.
In OblixOrgPerson obVer might or might not exist. When obVer does not exist in a user entry, the value is assumed to be less than 10.1.4.0.
Oracle Access Manager 10g (10.1.4.0.1) uses the obVer value in the OblixOrgPerson class in the following ways:
■ An obVer vale of less than 10.1.4.0 indicates that there is a single value for the challenge phrase and the response with no encoding. For example:
ChallengeAttribute: what is your name? ResponseAttribute: xxxxxxxx (encrypted form of Ramakrishna)
■ An obVer value of 10.1.4.0 or greater indicates that the challenge phrase and response attributes are encoded (with @n# as a delimiter between multiple values, where n is the number of the challenge or response). For example:
ChallengeAttribute: what is your name?@1#what is your school name?@2# ResponseAttribute: xxxxxxxx (where xxxxxxxx is the encrypted form of the name@1#SGschool@2#)
ChallengeAttribute: what is your name?@1# ResponseAttribute: xxxxxxxx (where xxxxxxxx is the encrypted form of the name@1#
General Behavior Changes
4-22 Oracle Access Manager Upgrade Guide
When you upgrade from an earlier release to Oracle Access Manager 10g (10.1.4.0.1), configuration data stored in the oblix tree is migrated automatically and the value of the obVer attribute is changed to 10.1.4.0. However, user data is not migrated until the first login following the upgrade. This means that the obVer attribute value remains less than 10.1.4.0 in user data (in the OblixOrgPerson class). In this case, during the first login the user data is migrated and:
■ The existing challenge phrase and response values are encoded (@1# is appended to the existing values automatically).
■ The value of the obVer attribute in user data (the OblixOrgPerson class) is set to the value of the obVer attribute in migrated configuration data in the root node of the oblix tree (oblixConfig).
For more information about multiple values in challenge phrase and response attributes, see "Multiple Values in Challenge Phrase and Response Attributes" on page 4-19.
Password Policies and Lost Password ManagementThis release contains password policy and password management enhancements. You can configure the minimum and maximum number of characters users can specify in a password. For lost password management, you can set multiple challenge-response pairs, create multiple style sheets, and configure other aspects of the user’s lost password management experience. You can also redirect users back to the originally requested page after resetting a password. For more information, see the Oracle Access Manager Identity and Common Administration Guide.
Oracle Access Manager 10g (10.1.4.0.1) uses the value of the obVer attribute in the user entry (OblixOrgPerson) to indicate the encoding for challenge phrase and response attributes. This has implications when upgrading from an earlier release to Oracle Access Manager 10g (10.1.4.0.1).
Reconfiguring the Logging Framework without a RestartIn 10g (10.1.4.0.1), you can reconfigure the logging framework without restarting the servers. To do this an administrator must manually update the log configuration for each component:
Identity Server WebPass Policy Manager
Caution: The first time a user logs in after the upgrade to 10g (10.1.4.0.1), that user entry is migrated immediately. Any existing challenge and response values for that user are encoded (@1# is appended to the end) and the obVer attribute value is changed to 10.1.4.0. However if you restore your earlier release, the rollback process does not revert these changes. If you rollback to your previous release, the obVer value in the user entry in the OblixOrgPerson class remains 10.1.4.0 and challenge and response values remain encoded format.
To temporarily stop the immediate migration of user data (also known as on-the-fly migration) during an in-place upgrade, see "Halting On-the-fly User Data Migration at First Login Temporarily" on page 5-19. This is not needed during a zero downtime upgrade.
General Behavior Changes
System Behavior and Backward Compatibility 4-23
Access Server WebGate
Changes to logging parameters take effect within one minute, rather than requiring you to restart the server where the changes were made. For more information, see the Oracle Access Manager Identity and Common Administration Guide.
Support ChangesThere have been a number of changes in supported platforms and third-party versions. You can now locate complete platform support details under the Certify tab at https://metalink.oracle.com.
Transport Security for the Directory ServerWhen you configure SSL mode for the directory server, only server authentication is supported. Client certificates are not supported. Oracle Access Manager verifies the server certificate against the Root CA certificate that you imported during product setup. For more information, see the Oracle Access Manager Identity and Common Administration Guide.
Upgrade EnhancementsOracle Access Manager 10g (10.1.4.0.1) provides a method to switch from a Solaris platform to a Linux platform while upgrading earlier releases (6.1.1, 6.5, or 7.x) to 10g (10.1.4.0.1). For more information, see Appendix B.
Release 10.1.4 Patch Set 1 (10.1.4.2.0) provides the tools required to perform a zero downtime upgrade.
Web Components and Backward CompatibilityEarlier WebPass instances are not compatible with 10g (10.1.4.0.1) Identity Servers (or Policy Managers). After upgrading all earlier Identity Servers, you must upgrade all earlier WebPass instances. The exception to this rule is when you upgrade the schema and data against the master Identity System that you add for this purpose. For more information about in-place upgrades, see Part II.
You can install 10g (10.1.4.0.1) WebPass instances in your upgraded environment. However, 10g (10.1.4.0.1) WebPass instances are not compatible with earlier Identity Servers (or Policy Managers). You cannot use Release 10.1.4 Patch Set 1 (10.1.4.2.0) packages to install fresh instances.
Release 6.1.1, 6.5, and 7.x WebGates can coexist with upgraded Access Servers. You can install 10g (10.1.4.0.1) WebGates in your upgraded environment. However, 10g (10.1.4.0.1) WebGates are not compatible with earlier Access Servers. Fore more information, see "WebGates" on page 4-38.
If you add a 10g (10.1.4.0.1) Access Server to the upgraded environment, you must set a flag to enable backward compatibility with earlier WebGates. For more information, see "Access Server Backward Compatibility" on page 4-33.
See Also: Part VI, if you are using the zero downtime upgrade method.

General Behavior Changes
4-24 Oracle Access Manager Upgrade Guide
Web Server Configuration FilesSecurity-related changes have been implemented to ensure that sensitive data in the following directories cannot be viewed directly through a browser:
■ Configuration files from /access or /identity/oblix/config/*.*
■ Log files from /access or /identity/oblix/log/*.* directory
The importantnotes.txt file has been removed and the information that was in this file is now documented in an appendix in the Oracle Access Manager Installation Guide.
There have been no changes for globalization and UTF-8 support in any Web server configuration files.
Writing a Stack Trace to a Log FileAn enhancement in Release 10.1.4 Patch Set 1 (10.1.4.2.0) enables Oracle Access Manager to write a stack trace to a log file when there is a core dump. To enable this functionality, you turn on logging at any minimal level. You can send the log file that contains the stack trace information to Oracle, along with a report of the problem.
See the appendix on troubleshooting in the Oracle Access Manager Identity and Common Administration Guide for details.
XML Catalogs and XSL Stylesheet Encoding This discussion outlines the encoding schemes you will see in XML message and parameter catalog files and XSL stylesheet files, and what to specify if you customize these files. See also "Acquiring and Using Multiple Languages" on page 4-7.
ISO-8859-1 Encoding: For pure English text, there is no difference between ISO-8859-1 encoding and UTF-8 encoding. For this reason, the encoding scheme for English language XML message and XSL files remains ISO-8859-1. The following example shows an XML message file (auditmsg.xml), from an English directory (\lang\en-us):
\IdentityServer_install_dir\identity\oblix\lang\en-us\auditmsg.xml
<?xml version="1.0" encoding="ISO-8859-1" ?> - <MessageCtlg xmlns="http://www.oblix.com" CtlgName="auditmsg"> ...
The next example illustrates an XSL stylesheet wrapper (style.xsl), which is the same in all language directories: English \lang\en-us, or German \lang\de-de, or Japanese \lang\ja-jp, and so on). The only difference in these files is the language designation specified by the langtag item in the last line of this example, which will differ from language to language:
\IdentityServer_install_dir\identity\oblix\lang\langtag\style0\style.xsl
<?xml version="1.0" encoding="ISO-8859-1" ?> - <!-- Copyright (c) 1996-2005, Oracle All Rights Reserved. --> - <xsl:stylesheet version="1.0" xmlns:xsl="http://www.w3.org/1999/XSL/Transform"
Note: XML files in earlier product releases might continue to specify encoding="ISO-8859-1", while earlier LST files that have been converted to XML use UTF-8 encoding. See also "Message and Parameter Files" on page 4-18.
Identity System Behavior Changes
System Behavior and Backward Compatibility 4-25
xmlns:oblix="http://www.oblix.com/"> <xsl:variable name="styleName">style0/</xsl:variable> <xsl:variable name="localeName">langtag</xsl:variable> ...
UTF-8 Encoding: For non-English languages, XML message files have encoding set as UTF-8, because ISO-8859-1 encoding cannot represent all characters in all languages. The sample file shown next is from the German language directory \IdentityServer_install_dir\identity\oblix\lang\de-de\auditmsg.xml:
<?xml version="1.0" encoding="UTF-8" ?> - <MessageCtlg xmlns:oblix="http://www.oblix.com" CtlgName=""> <Message MsgTag="ExAuditInitHandler">ExçêpäìÖÑExç ÖççürrêdÖçç ìÑì ähêä AüdìäAü MÖdülêMÖ ìÑìäìàlìzàäìÖÑìÑìäì. ThêT êxçêpäìÖÑêxç säàçksä ìsì: %1.</Message> ...
Even within the English language directory (\lang\en-us) some files state UTF-8 encoding because this encoding scheme is universal. For example, the English version of data_types.xml is:
<?xml version="1.0" encoding="UTF-8" ?> <?xml version="1.0" encoding="UTF-8" ?> - <MessageCtlg xmlns="http://www.oblix.com" CtlgName="data_types.xml"> <Message MsgTag="OB_BIN">Binary</Message> <Message MsgTag="OB_DN">Distinguished Name</Message> <Message MsgTag="OB_TEL">Telephone</Message> ...
In other language directories, German for example, the same file appears as:
<?xml version="1.0" encoding="UTF-8" ?> - <MessageCtlg xmlns:oblix="http://www.oblix.com" CtlgName=""> <Message MsgTag="OB_BIN">BìÑàryBì</Message> <Message MsgTag="OB_DN">DìsäìÑgüìshêdDìsä NàmêN</Message> <Message MsgTag="OB_TEL">TêlêphÖÑêTêl</Message> ...
For more information about XSL stylesheets and wrapper files, see the Oracle Access Manager Customization Guide. See also, "XSLProcessor Parameter" on page 4-32.
Identity System Behavior ChangesThis discussion provides information about previous Identity System behaviors with a focus on changes and what to expect after upgrading to 10g (10.1.4.0.1). Topics include:
■ Challenge and Response Attributes
■ Identity Server Backward Compatability
■ Identity System Event Plug-ins
■ IdentityXML and SOAP Requests and Responses
■ Java Applets
Note: When customizing XML and XSL files, you can choose either encoding="ISO-8859-1" or encoding="UTF-8". In either case, the Oracle Access Manager XML parser reads the encoding tag in the file for correct processing.

Identity System Behavior Changes
4-26 Oracle Access Manager Upgrade Guide
■ Large Static Groups
■ Mail Notification Enhancements
■ Minimum Number of Search Characters
■ Multi-Step Identity Workflow Engine
■ Oracle Identity Protocol (OIP)
■ Portal Inserts and the URI Query String
■ Password Policies and Password Management Runtime Changes
■ PresentationXML Directories
■ Sorting User Search Results
■ Web Services Code
■ XSLProcessor Parameter
Challenge and Response AttributesIn earlier releases, the challenge phrase and response attributes were allowed on different panels of the User Profile page. In 10g (10.1.4.0.1), however, both the challenge phrase and response attributes must be on the same panel. In 10g (10.1.4.0.1), challenge phrases and responses are displayed one after the other even though these are not configured one after the other in the panel.
If a panel contains only the challenge attribute, it will be displayed in the User Profile page without a response. If the panel contains only the response (without the challenge attribute), the response will not be displayed in User Profile Page at all. For details about combining these on a single panel, see "Combining Challenge and Response Attributes on a Panel" on page 12-8.
IdentityXML changes have also been made for this feature. For details, see the Oracle Access Manager Developer Guide.
Identity Server Backward Compatability Starting with 10g (10.1.4.0.1), the Identity Server uses UTF-8 encoding and plug-in data will contain UTF-8 data. Earlier plug-ins send and receive data in Latin-1 encoding.
When you upgrade earlier Identity Servers, backward compatibility with earlier custom plug-ins is enabled automatically. In this case, a new flag (encoding) is added to the oblixpppcatalog.lst file automatically to ensure backward compatibility with earlier plug-ins. A backward-compatible Identity Server continues to send data to earlier plug-ins in Latin-1 encoding.
For more information, see the discussion on backward compatibility in "Identity System Event Plug-ins", next. See also "Cache Flush" on page 4-8. Upgraded Identity Servers are not backward compatible with earlier WebPass instances.
Caution: When you add a new 10g (10.1.4.0.1) Identity Server to an upgraded environment, you must manually edit IdentityServer_install_dir\identity\oblix\apps\common\bin\oblixpppcatalog.lst to enable communication with earlier plug-ins and interfaces that need backward compatibility for Latin-1 data. For details, see the Oracle Access Manager Installation Guide. You cannot use Release 10.1.4 Patch Set 1 (10.1.4.2.0) packages to install fresh instances.

Identity System Behavior Changes
System Behavior and Backward Compatibility 4-27
Identity System Event Plug-insThe Identity Event Plug-in API is a standard component installed with the Identity Server that enables you to extend base Identity System functionality by developing your own small applications (called actions) to perform custom business logic and integrate with external systems. The Identity System makes certain data available to the actions, which are then allowed to modify the data and influence the outcome of the event.
Starting with 10g (10.1.4.0.1), the Identity Server uses UTF-8 encoding; plug-in data will contain UTF-8 data. Also, on Solaris and Linux, plug-ins earlier than release 7.x must be re-compiled using the GCC v3.3.2 C++ compiler as described in "Plug-ins" on page 3-11.
Identity Event Plug-in Backward CompatibilityIn earlier releases, data was sent to Identity Event plug-ins using Latin-1 encoding. In an upgraded environment, any earlier Identity Event plug-in still uses Latin-1 encoding. You might need to redesign earlier custom plug-ins to use UTF-8 encoding. In some cases, however, you might want 10g (10.1.4.0.1) Identity Servers to communicate with earlier plug-ins.
Backward compatibility with earlier Identity Event plug-ins is automatic when you upgrade an earlier Identity Server to 10g (10.1.4.0.1). During the upgrade, a new flag is added to the oblixpppcatalog.lst file (encoding). A backward-compatible Identity Server continues to send data to earlier plug-ins in Latin-1 encoding; earlier plug-ins receive and send data in Latin-1 encoding. There is no change in plug-in data encoding.
When you add a new 10g (10.1.4.0.1) Identity Server to an upgraded environment, you need manually set the encoding flag in the Identity Server oblixpppcatalog.lst to enable communication with earlier plug-ins and interfaces.
The catalog is stored in IdentityServer_install_dir\oblix\apps\common\bin\oblixpppcatalog.lst. It contains event handler entries and their mapping to the various events. The format of the entries is:
actionName;exectype;netpointparam1,...;path;execparam,...;apiVersion;encoding;
The next sample line shown here illustrates how to use the encoding flag to enable backward compatibility with Latin-1 plug-ins:
userservcenter_view_post;lib;;..\..\..\unsupported\ppp\ppp_dll \ppp_dll.dll;PostProcessingTest;Latin-1;
Common Uses of the Identity Event Plug-in APICommon uses of the Identity Event Plug-in API include password validation, integration, and provisioning. For example, you can develop an event handler for password management events that use the Identity Event API and add this event handler to the Oracle Access Manager password policy function. Or, you can develop
Note: In the catalog file, the encoding flag is similar to the apiVersion flag, which sets the version of the Event API to be used by the event handler. As described in the catalog file, apiVersion can be used to set backward compatibility for the Event API. For example, if apiVersion is set to preNP60 then the API format for versions prior to Oracle Access Manager v60 and Latin-1 encoding is used by default. In this case, setting the encoding flag is redundant.

Identity System Behavior Changes
4-28 Oracle Access Manager Upgrade Guide
an event handler for the Enable step of each registration workflow instance to either update the remote database using the RDBMS vendor’s API or to generate a unique string in the required format and pass it back to the Identity System to use as the uid attribute value. For details, see the Oracle Access Manager Developer Guide
Identity Event Plug-in Action TypesAn action is a unit of external logic (also known as an event handler) written by a developer and configured by an Oracle Access Manager administrator to execute in response to a particular event. Actions might perform their tasks without accessing external components, or use any available mechanism to access third-party applications and resources such as Web services, RDBMS services, and ERP applications. You connect actions to the event using the oblixpppcatalog.lst file. At startup the Identity Server reads the catalog, which identifies the events that have actions. When an event occurs, the server executes the associated action.
There are three types of actions with the Identity Event Plug-in API:
■ LIB Action: A function within a shared library (DLL on Windows systems) that the Identity Server calls. Once dynamically loaded, the action executes in the same process space as the Identity Server and has direct access through API functions to data objects held by the server. The Identity Server sends a C++ object containing plug-in data to the library.
■ MANAGEDLIB Action: A function for Windows systems only, written in any .NET language for which a Microsoft Intermediate Language (MIL) compiler exists. MIL instructions are compiled once into native machine instructions and stored in dynamic memory, then executed by the Microsoft .NET Common Language Runtime (CLR). MANAGEDLIB actions are similar to LIB actions with the benefits of managed code. The Identity Server sends a C++ object containing plug-in data to the library.
■ EXEC Action: A standalone executable program that run in their own process space. Communication with the Identity Server is limited to startup parameters and an XML stream for input, and an XML stream plus an exit status code for output. Actions can also use any other APIs, such as an LDAP Identity Event Plug-in.
Identity Event Plug-in Event TypesAn event is a state change within the Identity System. Examples of events include when a request is received and is about to be passed to an application (such as the User Manager view program), or results have been generated by an application (such as the Group Manager search program), or a user has entered a challenge response while attempting a password reset, or an attribute on a profile page for an application (such as the Organization Manager) has been modified, or a workflow ticket awaiting approval the by corporate IT group has been approved.
The most frequently used type of events are pre-processing and post-processing events, which are generated in pairs. Each application (User, Group, or Org Manager) contains a number of programs (view, search, and so on) that generate HTML for each page within the application. Each program recognizes the event pair. Pre-processing events are generated before the program begins to create the page and allows an event handler to work with a request before it reaches a program. The Post-processing event is generated after the program has created the page and before responding to the user with an HTML page. The post-processing event allows an event handler to work with the results of processing a request.

Identity System Behavior Changes
System Behavior and Backward Compatibility 4-29
IdentityXML and SOAP Requests and ResponsesRather than interacting with the application through a browser, you can write a program. IdentityXML provides a programmatic interface for carrying out the actions that a user can perform when accessing an Identity System application from a browser. IdentityXML enables you to process simple actions and multi-step workflows to change user, group, and organization object profiles. IdentityXML allows external applications to access Identity System functions.
Starting with release 6.5, certain syntax changes were made for IdentityXML requests. Earlier syntax should still operate without problem. For new syntax descriptions, see the Oracle Access Manager Developer Guide.
In 10g (10.1.4.0.1), UTF-8 encoding is used for XML pages, for SOAP/IdentityXML requests, and for Identity Event Plug-in data sent to executables. Earlier releases used ISO-8859-1 encoding (also known as Latin-1).
To provide backward compatibility, 10g (10.1.4.0.1) supports IdentityXML requests in both ISO-8859-1 encoding and UTF-8. For XML documents written to disk, both ISO-8859-1 and UTF-8 encoding are supported. IdentityXML responses are emitted in the same encoding format as the request. Therefore, when a request uses Latin-1 encoding (encoding="ISO-8859-1") the response uses Latin-1 encoding; when a request uses UTF-8 encoding, the response uses UTF-8 encoding.
If an IdentityXML request uses encoding="ISO-8859-1" and the response to it contains any characters outside the Latin-1 character set, the response containing such characters is garbled. For example, when encoding="ISO-8859-1" is used for the request and the response includes Japanese or Arabic characters, such characters in the response are garbled.
IdentityXML changes have also been made in 10g (10.1.4.0.1) to accommodate challenge and response phrase changes. For details, see the Oracle Access Manager Developer Guide.
Java AppletsAn applet is a small program that is sent to a user along with a Web page. Java applets perform interactive animations, immediate calculations, or other simple tasks without having to send a user request back to the server.
In earlier releases, the Identity System Console included a drop-down list that enumerated the languages that were installed and configured in the product. When the user changed the language in this list, applets and other pages would be rendered in the selected language. For example, a user working in an English locale could work with applets displayed in a European language simply by selecting the language in the drop-down list. This model worked well for only European languages.
With the introduction of multibyte languages, such as Japanese, the model has changed to ensure that multibyte characters are rendered correctly. The language list has been eliminated from the Identity System Console. A user working in an English locale cannot view applets in multibyte languages. To work with applets in a
Note: Oracle recommends that you use encoding="UTF-8" in new 10g (10.1.4.0.1) installations. In upgraded environments, Oracle recommends that you use encoding="ISO-8859-1" for backward compatibility.

Identity System Behavior Changes
4-30 Oracle Access Manager Upgrade Guide
multibyte language, the locale on the user’s computer must be set to the same language.
There are no JavaScript changes that impact the user experience.
Large Static GroupsWith Release 10.1.4 Patch Set 1 (10.1.4.2.0), if a static group is too large (over 10,000 members, for example) you can modify the default evaluation method for the group using the LargeStaticGroups parameter in globalparams.xml. For more information on this parameter, see the Oracle Access Manager Customization Guide.
If you use this feature, you must make appropriate changes in your Identity System configuration to ensure that subgroups of the modified group are still searched and evaluated as intended. See the chapter on performance tuning in the Oracle Access Manager Deployment Guide for details.
Mail Notification EnhancementsIdentity Server sends notification mails for various functions, such as attribute modification, workflows, containment limit, and others. The formats that are available for mail include text only, rich HTML, and MHTML (MIME encapsulation of aggregate documents, such as HTML. Both asynchronous and synchronous modes are supported when sending mail. The Identity Server communicates directly with the mail server using the SMTP protocol.
Earlier releases used ISO-8859-1 (Latin-1) "Q" encoding for the header messages, which is a recommended standard when most of the characters to be encoded are in the ASCII character set. In 10g (10.1.4.0.1) uses UTF-8 "B" (Base64 encoding) encoding is used.
MIME headers for all non-MHTML mail message are set as follows:
MIME-Version: 1.0 Content-Type: text/plain; charset=UTF-8; Content-Transfer-Encoding: 8bit
Minimum Number of Search Characters In previous releases, you needed to enter at least three characters when performing a search in Identity System applications (User Manager, Group Manager, and Organization Manager). In 10g (10.1.4.0.1) there is no minimum number of characters required. By default, you can enter no characters. As in previous releases, to help users narrow their search criteria you can control the minimum number of characters that users must enter in the search field by setting the searchStringMinimumLength parameter in oblixadminparams.xml. See the Oracle Access Manager Customization Guide for details.
Note: There is a known limitation of Java applets in JDK1.1.7. Oracle Access Manager 10g (10.1.4.0.1), applets with non-ASCII data can only be displayed properly on computers running with a native encoded operating system. Setting browser encoding will not work.

Identity System Behavior Changes
System Behavior and Backward Compatibility 4-31
Multi-Step Identity Workflow EngineYou can model your business processes in the Identity System using workflows. In earlier releases, you could use workflows to issue, revoke, and renew certificates. However, this is no longer supported.
Oracle Identity Protocol (OIP)The Oracle Identity Protocol (formerly known as the NetPoint or COREid Identity Protocol) facilitates communication between Identity Servers and associated WebPass instances. There are no changes in the protocol for globalization. See also "Oracle Access Protocol (OAP) Updates" on page 4-37.
Password Policies and Password Management Runtime ChangesYou can use the Identity System to define policies to constrain passwords. These policies are enforced at runtime and include such items as:
■ Minimum password length
■ Minimum number of uppercase characters
■ Minimum number of lowercase characters
■ Minimum number of non-alphanumeric characters
■ and the like
In 10g (10.1.4.0.1), internationalized characters are supported in password policies.
In earlier releases, password policies worked only with Latin1 characters when enforcing policy constraints. There are no Password Management runtime changes.
Portal Inserts and the URI Query StringA Web page address is commonly known as a Uniform Resource Locator (URL), which is a subset of the Uniform Resource Identifier (URI). The encoding of data in the query string of the URI has changed from Latin-1 (in earlier releases) to UTF-8 encoding in 10g (10.1.4.0.1).
In new 10g (10.1.4.0.1) installations, the change is transparent. However, earlier Portal Inserts in installations that have been upgraded to 10g (10.1.4.0.1) require modification. After upgrading the environment to 10g (10.1.4.0.1), you must change the encoding of the query string in earlier Portal Inserts from Latin-1 to UTF-8.
The HTTP standard does not provide any mechanism for a browser to specify the encoding of the query string. Oracle Access Manager 10g (10.1.4.0.1) cannot detect query string character encoding and assumes it to be UTF-8. The 10g (10.1.4.0.1) Identity Server cannot process Latin-1 data from earlier Portal Inserts.
See Also: "Password Policies and Lost Password Management" on page 4-22
Note: After upgrading the environment to 10g (10.1.4.0.1), you must change the encoding of the query string in earlier Portal Inserts from Latin-1 to UTF-8.

Access System Behavior Changes
4-32 Oracle Access Manager Upgrade Guide
PresentationXML DirectoriesBefore release 6.5, the PresentationXML library was provided under two directories and distributed depending upon how the files were likely to be used. For example, stylesheets that define the default Oracle Access Manager Classic Style were maintained in flat files in the file system directory \IdentityServer_install_dir\identity\oblix\apps\AppName. Starting with release 6.5, and continuing through 10g (10.1.4.0.1), the PresentationXML library are now stored in different directories:
IdentityServer_install_dir\identity\oblix\apps\AppName\binIdentityServer_install_dir\identity\oblix\lang\langTagIdentityServer_install_dir\identity\oblix\lang\langTag\style0IdentityServer_install_dir\identity\oblix\lang\shared
WebPass_install_dir\identity\oblix\lang\langTagWebPass_install_dir\identity\oblix\lang\langTag\style0WebPass_install_dir\identity\oblix\lang\sharedWebPass_install_dir\identity\oblix\WebServices\XMLSchema
For more information, see "About Custom Items and Upgrades" on page 12-11.
Sorting User Search ResultsIn the User Manager, Group Manager and Org. Manager, search results are sorted using a locale-based case insensitive method when you click the column heading (Full Name, for example) in the search results table.
Web Services CodeOracle Access Manager now provides sample code for implementing Web services using IdentityXML. For more information, see the Oracle Access Manager Developer Guide.
XSLProcessor ParameterRelease 10.1.4 Patch Set 1 (10.1.4.2.0) provides an enhancement when using IdentityXML. With Release 10.1.4 Patch Set 1 (10.1.4.2.0), the XSLProcessor parameter in the globalparams.xml file indicates the processor to use when generating the page. The only officially supported value, default, indicates that the XDK processor should be used. The values XALAN or DGXT can be used for testing.
See the appendix on configuration parameters in the Oracle Access Manager Customization Guide for details. See also "XML Catalogs and XSL Stylesheet Encoding" on page 4-24.
Access System Behavior ChangesThis discussion provides information about previous behaviors of the Access System. The focus is on what to expect after upgrading to 10g (10.1.4.0.1). Topics include:
■ Access Server Backward Compatibility
■ Access Manager SDK, Access Manager API, and Custom AccessGates
■ Authorization Rules and Access Policies
■ Custom Authentication and Authorization Plug-ins and Interfaces
■ Directory Profiles

Access System Behavior Changes
System Behavior and Backward Compatibility 4-33
■ Forms-based Authentication
■ Impersonation
■ Maximum Elements in Session Token Cache
■ Oracle Access Protocol (OAP) Updates
■ Policy Manager
■ Policy Manager API
■ Preferred HTTP Host
■ Shared Secret
■ Triggering Authentication Actions After the ObSSOCookie Is Set
■ WebGates
Access Server Backward CompatibilityIn releases before 10g (10.1.4.0.1), cookie encryption and decryption was handled by WebGate/AccessGate. However, cookie encryption and decryption is now handled by the Access Server. For this reason, earlier Access Servers are not compatible with 10g (10.1.4.0.1) WebGates. See also "Encryption Schemes" on page 4-16.
Starting with Oracle Access Manager 10g (10.1.4.0.1), the Access Server uses UTF-8 encoding and plug-in data will contain UTF-8 data. Earlier plug-ins send and receive data in Latin-1 encoding.
When you upgrade earlier Access Servers, backward compatibility with earlier custom plug-ins and earlier WebGates is enabled automatically. In this case, a new parameter "IsBackwardCompatible" Value="true" is set in the Access Server globalparams.xml file automatically. This provides backward compatibility that enables the Access Server to continue to send (and receive) data to earlier custom authentication and authorization plug-ins in Latin-1 encoding (and earlier custom plug-ins will set data in Latin-1 encoding). In addition, the Access Server maintains backward compatibility with earlier WebGates and custom AccessGates that continue to encrypt/decrypt cookies
For more information, see "Custom Authentication and Authorization Plug-ins and Interfaces" on page 4-35 and "Oracle Access Protocol (OAP) Updates" on page 4-37.
Access Manager SDK, Access Manager API, and Custom AccessGatesThe Access Manager SDK (formerly known as the Access Server SDK) is an optional component that provides all the documentation, resources, and code samples that you need to construct simple custom AccessGate servlets or applications for each of the supported development platforms. AccessGates are Access Server clients (or agents) that process user requests for access to resources within the LDAP domain protected
Caution: When you add a new 10g (10.1.4.0.1) Access Server to an upgraded environment, you must manually set "IsBackwardCompatible" Value="true" in the new Access Server globalparams.xml to enable communication with earlier plug-ins and interfaces, as well as earlier WebGates and custom AccessGates. For details, see the Oracle Access Manager Installation Guide. You cannot use Release 10.1.4 Patch Set 1 (10.1.4.2.0) packages to install fresh instances.

Access System Behavior Changes
4-34 Oracle Access Manager Upgrade Guide
by Oracle Access Manager. The code for processing user requests can be embedded in a plug-in or written as a standalone application.
After installing the Access Manager SDK, you can use the Access Manager API (formerly known as the Access Server API) to write custom AccessGate code in any of the four supported development languages: Java, C and C++, and C# (.NET). The four implementations are functionally equivalent even though each takes advantage of platform-specific features to implement the API.
While you can select any of the four implementations as the development language interface you use to write your custom AccessGate code, your code will interact with underlying C++ binaries in the API, as described in the Oracle Access Manager Developer Guide.
When you develop custom AccessGates using the 10g (10.1.4.0.1) C and C++ Access Manager APIs, data is sent and received in UTF-8 encoding automatically. In earlier releases, data was sent and received in Latin-1 encoding.
For the C# (.NET) Managed Code implementation of the Access Manager API, there have been no external changes for 10g (10.1.4.0.1). The C# .NET implementation internally uses UTF-16 encoding, which was converted to Latin-1 in earlier Oracle Access Manager releases. 10g (10.1.4.0.1) Access Servers and C# AccessGates use UTF-8 encoding automatically.
For Java interfaces and the Java implementation of the Access Manager API, there have been no external changes for 10g (10.1.4.0.1). JNI calls use UTF-16 encoded Java string objects. Earlier Oracle Access Manager releases converted this data to Latin-1. 10g (10.1.4.0.1) Access Servers and AccessGates use UTF-8 encoding automatically.
Custom AccessGates (and WebGates) no longer perform cookie encryption and decryption. As a result, these components no longer need the shared secret key.
Authentication Scheme UpdatesIn 10g (10.1.4.0.1) it is no longer necessary to disable an authentication scheme before you modify it. Also, in 10g (10.1.4.0.1) you can configure an authentication scheme that allows the user to log in for a period of time rather than a single session.
Authorization Rules and Access PoliciesIn release 6.1.1, Authorization Rules were attached to particular access policies. Starting with release 6.5 (and later), Authorization rules are grouped under a different tab (named "Authorization Rules").
During an upgrade, the name of an Authorization Rule is shifted to the Authorization Rules tab. In addition, the name becomes a combination of the Policy name to which the rule belongs, followed by the Authorization Rule name: PolicyName_AuthorizationRuleName. For more information about recognizing and handling Authorization Rules after the upgrade, see "Associating Release 6.1.1 Authorization Rules with Access Policies" on page 13-5.
Note: The 10g (10.1.4.0.1) Access Manager SDK and custom 10g (10.1.4.0.1) AccessGates are not backward compatible with earlier Access Servers, nor with the earlier Access Manager SDK and AccessGates. However, you can use earlier AccessGates with 10g (10.1.4.0.1) Access Servers that are enabled to be backward compatible. See also "Oracle Access Protocol (OAP) Updates" on page 4-37.

Access System Behavior Changes
System Behavior and Backward Compatibility 4-35
Also, a new authorization inconclusive state was introduced in release 7.x (apart from authorization success and failure states). When your earlier installation included authorization failure redirects, you need to complete a procedure after the upgrade to specify an explicit Deny rule and to change Allow takes precedence to Yes under the General tab of the authorization rule. For more information, see "Assuring Proper Authorization Failure Re-directs After Upgrading from 6.1.1" on page 13-6.
Custom Authentication and Authorization Plug-ins and InterfacesWith 10g (10.1.4.0.1) there are some changes and backward compatibility, considerations as described here.
Authentication is the process of determining that a user trying to access a protected resource is who they say they are. Authorization is the process of determining that an authenticated user has access rights for the protected resource. The Access Server uses both authentication and authorization controls to limit access to resources that it protects, and provides defined interfaces that interact with authentication and authorization plug-ins.
You can either use standard authentication and authorization plug-ins or create your own custom plug-ins using the Oracle Access Manager Authentication Plug-In API and Authorization Plug-In API. Each custom plug-in implements the appropriate interface (authentication or authorization). Depending on the plug-in, the interface is activated to pass relevant information between the Access Server and the plug-in. Methods within the interface parse the data.
Before 10g (10.1.4.0.1), the Authentication Plug-In API and Authorization Plug-In API for C used Latin-1 encoding for data exchanged between the Access Server and the custom plug-ins. However, 10g (10.1.4.0.1) the Authentication Plug-In API and Authorization Plug-In API for C use UTF-8 encoding for plug-in processing.
There is no change for .NET (managed code) plug-ins, which continue to use the same API interface as in earlier releases of Oracle Access Manager.
Access Server Backward CompatibilityYou might need to redesign earlier custom plug-ins to use UTF-8 encoding. In some cases, however, you might want 10g (10.1.4.0.1) Access Servers to communicate with earlier plug-ins.
An earlier Access Server that is upgraded to 10g (10.1.4.0.1) provides backward compatibility automatically. However, when you add a new 10g (10.1.4.0.1) Access Server to an upgraded environment, you need manually set backward compatibility. For more information, see "Access Server Backward Compatibility" on page 4-33.
Authentication and Authorization Plug-ins BackgroundThis discussion provides an overview of authentication and authorization plug-ins in Oracle Access Manager.
Authentication is governed by authentication rules. Authentication rules use authenticating schemes; the schemes use one or more plug-ins to test the credentials provided by a user. Standard authentication plug-ins are provided as part of the Access Server installation or you can create your own custom plug-ins using the Authentication Plug-In API.
Authorization is governed by a policy domain that includes an authorization expression among a set of default rules that specify how resources for this domain are protected. Authorization rules are combined to create authorization expressions. When you create a rule, you include an authorization scheme in it. You can use the

Access System Behavior Changes
4-36 Oracle Access Manager Upgrade Guide
authorization scheme provided by the Access System or configure one or more custom ones schemes that include custom plug-ins created using the Authorization Plug-In API.
Directory Profiles Release 6.5 introduced support for directory server profiles for the Access Server and Policy Manager. During a Policy Manager upgrade from any release before 7.x, a new directory server profile is added automatically. However, the values for Initial Connections and Maximum Connections are not retained during the Policy Manager upgrade
After upgrading, Oracle recommends that you verify and validate that new directory server profiles were properly created and that load-balancing and failover settings in Access System directory server profiles are configured as expected.
For more information, see "Directory Profiles and Database Instance Profiles" on page 4-13.
Forms-based Authentication10g (10.1.4.0.1) WebGates accept input data only in UTF-8 encoding. As a result, in 10g (10.1.4.0.1), form-based authentication supports non-ASCII login credentials (username/password). When you use form-based authentication with 10g (10.1.4.0.1) WebGates, you must ensure that character set encoding for the login form is set to UTF-8.
To set the login form encoding to UTF-8 after an upgrade, see "Upgrading Forms-based Authentication" on page 13-4.
ImpersonationIn addition to configuring impersonation for resources on a computer that is protected by a WebGate, you can extend impersonation to other resources on the network. This is known as assigning a Delegate impersonation level to the client and is available with Release 10.1.4 Patch Set 1 (10.1.4.2.0).
See the chapter on Windows Impersonation in the Oracle Access Manager Integration Guide.
Maximum Elements in Session Token CacheIn earlier releases, the default value for this parameter was 100000. However, in Oracle Access Manager 10g (10.1.4.0.1), the default value has changed to 10000. You can find this parameter by navigating to the Access System Console, Access System Configuration tab, Access Server Configuration function. Look on the Details for Access Server page.
For more information, see the Oracle Access Manager Access Administration Guide.
Note: Basic Authentication fails with non-ASCII login credentials. Use form-based authentication for non-ASCII login credentials. Use Basic Authentication with ASCII login credentials.
Access System Behavior Changes
System Behavior and Backward Compatibility 4-37
Oracle Access Protocol (OAP) UpdatesThe Oracle Access Protocol (formerly known as the NetPoint or COREid Access Protocol) enables communication between Access System components during user authentication and authorization. WebGates and AccessGates store the user information required for authentication and authorization for example, (login name, password, headers, and the like). The data is serialized and sent to the Access Server where it is deserialized. The Access Server sends results back to the Access clients.
In earlier product releases, Latin-1 encoding was used for data as it was sent and received. In 10g (10.1.4.0.1), UTF-8 encoding is used. An updated Oracle Access Protocol is provided to accommodate both globalization and shared secret generation for 10g (10.1.4.0.1) Access Servers.
In new 10g (10.1.4.0.1) installations, you do not need to take any action. The latest version of Oracle Access Protocol is used for all communication between Access Servers and associated WebGates/AccessGates, as well as between Access Servers and new standard and custom authentication and authorization plug-ins.
In upgraded environments, Access Server backward compatibility is provided as discussed in "Access Server Backward Compatibility" on page 4-33.
See also "Oracle Identity Protocol (OIP)" on page 4-31.
Policy ManagerAfter upgrading all Identity System components, you must upgrade all earlier Policy Managers (formerly known as the Access Manager component).
Policy Manager APIThe Access System provides programmatic access to most of the functions provided by the Policy Manager graphical user interface (GUI). However, you can use the Policy Manager API (formerly known as the Access Management API) to create and manage policy domains and their contents or to allow custom applications to access the authentication, authorization, and auditing services of the Access Server. As in earlier releases, the 10g (10.1.4.0.1) Policy Manager API provides Java, C, and C# (.NET managed code) bindings for classes.
In earlier releases, ObAMMasterAuditRule_getEscapeCharacter returned the audit escape character.
In Oracle Access Manager 10g (10.1.4.0.1):
■ In the C language API, the ObAMMasterAuditRule_getEscapeCharacter remains and you can continue using this. However, the audit escape character must be an ASCII character; otherwise the return value is incorrect. In this case, you must modify your C code to use the new API.
■ On Java clients, the ObAMMasterAuditRule_getEscapeCharacter works correctly and you can continue using this even when the audit escape character is not an ASCII character.
■ In the C language API, a new ObAMMasterAuditRule_getUTF8EscapeCharacter has been added, which returns a pointer to the UTF-8 encoded audit escape character.

Access System Behavior Changes
4-38 Oracle Access Manager Upgrade Guide
Preferred HTTP HostThis WebGate configuration parameter is now mandatory and must be configured with an appropriate value whenever a WebGate is added (from the Access System Console, select Access System Configuration, Add New AccessGate). This must be done before WebGate installation.
The Preferred HTTP Host parameter defines how the hostname appears in all HTTP requests as users attempt to access the protected Web server. The hostname within the HTTP request is translated into the value entered into this field (regardless of the way the hostname was defined in an HTTP request from a user). This safeguard prevents a hacker from constructing a malicious HTTP request that could bypass the WebGate. For more information, see the Oracle Access Manager Access Administration Guide.
Shared SecretIn earlier releases, the shared secret was stored in the directory server and cookie encryption and decryption was accomplished by WebGates and custom AccessGates. In 10g (10.1.4.0.1), the shared secret remains in the directory server; however, cookie encryption and decryption is accomplished by the Access Server. As a result, WebGates and AccessGates no longer need the shared secret key.
If you change the shared secret during a user session, the user does not need to re-authenticate. If a cookie is being decrypted with the old shared secret and the cookie is refreshed, it is encrypted with the new shared secret. For more information, see the Oracle Access Manager Access Administration Guide.
For details about Access Servers, see "Access Server Backward Compatibility" on page 4-33. For details about WebGates, see "WebGates" on page 4-38. See also "Encryption Schemes" on page 4-16.
Triggering Authentication Actions After the ObSSOCookie Is SetYou can cause authentication actions to be executed after the ObSSOCookie is set. Typically, authentication actions are triggered after authentication has been processed and before the ObSSOCookie is set. However, in a complex environment, the ObSSOCookie might be set before a user is redirected to a page containing a resource. In this case, you can configure an authentication scheme to trigger these events. See also Oracle Access Manager Access Administration Guide.
WebGatesRelease 6.1.1, 6.5, and 7.x WebGates can coexist with upgraded Access Servers. You can install 10g (10.1.4.0.1) WebGates in your upgraded environment. However, 10g (10.1.4.0.1) WebGates are not compatible with earlier Access Servers.
The WebGateStatic.lst file available in earlier releases no longer exists. Instead, with 10g (10.1.4.0.1) WebGates you configure such parameters as IPValidation and IPValidationExceptions from the Access System Console, as described in the Oracle Access Manager Access Administration Guide.
In releases before 10g (10.1.4.0.1), cookie encryption and decryption was handled by WebGate/AccessGate. However starting with 10g (10.1.4.0.1), cookie encryption and decryption is now handled by the Access Server.
The code for WebGates has been rewritten so that 10g (10.1.4.0.1) WebGates and AccessGates share the same code base. For more information, see the Oracle Access Manager Developer Guide.

Enhancements Available with Release 10.1.4 Patch Set 1 (10.1.4.2.0)
System Behavior and Backward Compatibility 4-39
Oracle recommends that you upgrade all earlier WebGate even though these can coexist with 10g (10.1.4.0.1) Access Servers. In environments that include a mix of WebGate releases, use the encryption scheme that corresponds to the earliest WebGate. For example:
■ Use RC4 as the encryption scheme if you have release 5.x and 10g (10.1.4.0.1) WebGates co-existing in the same system.
■ Use RC6 as the encryption scheme if you have release 6.x and 10g (10.1.4.0.1) WebGates co-existing in the same system.
■ Use the AES encryption scheme if you have only release 7.0 or 10g (10.1.4.0.1) WebGates co-existing in the same system.
As discussed earlier, if you install a 10g (10.1.4.0.1) Access Server in an upgraded environment that includes earlier WebGates/AccessGates, you must manually configure the Access Server for backward compatibility. For more information, see "Access Server Backward Compatibility" on page 4-33. You cannot use Release 10.1.4 Patch Set 1 (10.1.4.2.0) packages to install fresh instances.
Enhancements Available with Release 10.1.4 Patch Set 1 (10.1.4.2.0) Oracle Access Manager 10g (10.1.4.2.0) provides additional functionality to several key features. The following table provides a summary of the additional features that are available with Release 10.1.4 Patch Set 1 (10.1.4.2.0).
Table 4–3 New Features with Release 10.1.4 Patch Set 1 (10.1.4.2.0)
Feature Description More Information
Documentation: Deployment overview and back up and recovery strategies
A new chapter has been added to describe various deployment strategies and scenarios for Oracle Access Manager. For details, see the chapter on deployment scenarios in the Oracle Access Manager Deployment Guide.
A new chapter has been added to outline various back up and recovery strategies for Oracle Access Manager installations. For details, see the chapter on back up and recovery strategies in the Oracle Access Manager Deployment Guide.
Zero downtime upgrade method
You can now perform an upgrade without shutting down service to your Oracle Access Manager customers. The zero downtime upgrade method is provided as an alternative to the in-place upgrade.
Part VI describes how you can perform a zero downtime upgrade.
Upgrade parameter to halt automatic user data migration using zero downtime method
A new parameter in the globalparams.xml file, MigrateUserDataTo1014, is used by the Identity Server and Access Server during a zero downtime upgrade. The value of MigrateUserDataTo1014 halts automatic user data migration when a user first logs in after upgrading. Only the multiple challenge and response attributes for Lost Password Management are affected.
See "Migrating User Data At First Login" on page 4-18.
Upgrade while Switching from a Solaris platform to a Linux platform
Appendix B explains how you can upgrade to 10g (10.1.4.0.1) while making a switch from a Solaris platform to a Linux platform. You cannot perform this task if you are using the zero downtime upgrade method.
Functions for updating the LDAP bind password
You may need to periodically update the LDAP bind password for the directory servers that communicate with Oracle Access Manager components. For example, you may want to update the LDAP bind password to comply with government regulations.
Functionality for updating the LDAP bind password has been added in this release.
See the Oracle Access Manager Deployment Guide for details.
Note that in previous releases, after updating the LDAP bind password, it was necessary to re-run setup. In this release, it is no longer necessary to rerun setup.

Enhancements Available with Release 10.1.4 Patch Set 1 (10.1.4.2.0)
4-40 Oracle Access Manager Upgrade Guide
Assigning a Delegate impersonation level to the client
In addition to configuring impersonation for resources on a computer that is protected by a WebGate, you can extend impersonation to other resources on the network. This is known as assigning a Delegate impersonation level to the client.
See the chapter on Windows Impersonation in the Oracle Access Manager Integration Guide for details.
New configuration parameters for IdentityXML
When using IdentityXML, the XSLProcessor parameter in the file globalparams.xml indicates the processor to use when generating the page. The only officially supported value, default, indicates that the XDK processor should be used. The values XALAN or DGXT can be used for testing.
See the appendix on configuration parameters in the Oracle Access Manager Customization Guide for details.
Enhancements to xsl files Enhancements have been made to certain xsl files to support a JavaScript-related fix and a number of large-group-related fixes. These xsl files are available when you apply the 10.1.4.2.0 patch set.
For more information, see the Oracle Access Manager Customization Guide. For steps you must perform after applying Release 10.1.4 Patch Set 1 (10.1.4.2.0), see Oracle Access Manager Patch Set Notes Release 10.1.4 Patchset 1 (10.1.4.2.0) For All Supported Operating Systems.
Log the time consumed by different types of calls to external components
You can now generate logs that show details about the time consumed by different types of calls to external components. Using this information, you can better assess whether requests to specific components are taking longer than expected.
For more information, see the Oracle Access Manager Identity and Common Administration Guide.
Group performance is improved
For large static groups, for example, groups with over 10,000 members, operations that involve the group can cause memory to spike.
Group performance has been improved in this release. However, if you find that a large static group still affects performance, you can modify the default evaluation method for the group using the LargeStaticGroups parameter in globalparams.xml.
There are a number of additional actions that you can take to improve the performance of large groups.
See the chapter on performance tuning in the Oracle Access Manager Deployment Guide for details.
Oracle Instant Client binaries
Oracle Instant Client binaries are now shipped with the Identity Server and Access Server. When auditing to a database, this eliminates the requirement for a 10.1.0.5 ORACLE_HOME on the computer that hosts them.
NLS libraries and data files
Even if an environment variable is set to ORACLE_HOME or ORA_NLS10, or a third-party Web component refers to a different version of the NLS libraries and data files than the one used by Oracle Access Manager, Oracle Access Manager components choose NLS data files from the oracle_access_manager_component_install_dir. For more information, see the Oracle Access Manager Installation Guide.
Table 4–3 (Cont.) New Features with Release 10.1.4 Patch Set 1 (10.1.4.2.0)
Feature Description More Information

Enhancements Available with Release 10.1.4 Patch Set 1 (10.1.4.2.0)
System Behavior and Backward Compatibility 4-41
Limit the number of retries that the WebGate performs for a non-responsive server
A WebGate-to-Access Server timeout threshold specifies how long (in seconds) the WebGate waits for the Access Server to respond before it considers it unreachable and attempts the request on a new connection. However, if the Access Server takes longer to service a request than the value of the timeout threshold, the WebGate abandons the request and retries the request on a new connection. Note that the new connection that is returned from the connection pool can be to the same Access Server, depending on your connection pool settings. Additionally, other Access Servers may also take longer to process the request than the time allowed by the threshold. In these cases, the WebGate can continue to retry the request until the Access Servers are shut down.
You can now configure a limit on the number of retries that the WebGate performs for a non-responsive server using the client_request_retry_attempts parameter. This is a user-defined parameter in the Access System. The default value for this parameter is -1. Setting the parameter value to -1 (or not setting it at all) allows an infinite number of retries.
See the Oracle Access Manager Access Administration Guide for details.
Preferred HTTP Host With Oracle Access Manager 10.1.4.0.1, the Preferred HTTP Host field became required. This introduced issues for environments that support virtual hosting.
In 10g (10.1.4.2.0), to support virtual hosts you set the Preferred HTTP Host value to HOST_HTTP_HEADER for most Web hosts or SERVER_NAME (Apache only). Additional configuration is required for IIS.
See the chapter on configuring Access Servers and AccessGates in the Oracle Access Manager Access Administration Guide for details.
New diagnostic tools The Access Server and Identity Server have new diagnostic tools to help you work with an Oracle Technical Support representative to troubleshoot problems.
The diagnostic tools enable you to do the following:
■ Obtain hard-to-locate information about component configuration and behavior.
■ Automatically capture events that immediately precede a core dump.
■ Manually capture a stack trace of any event in the Identity or Access System.
See the Oracle Access Manager Identity and Common Administration Guide for details.
Log file enhancements Operating system error information is now included in the logs. For example, when an attempt to create a listener thread fails, the error code returned on GetLastError() is added to the log files.
The webpass.xml file poll tracking refresh parameter is configurable
When setting up multiple Identity Servers or modifying WebPass, administrators can now configure the PollTrackingRefreshInterval in the webpass.xml file. This interval should be configured in seconds. There are implications when setting up multiple Identity Servers or modifying a WebPass instance.
See the Oracle Access Manager Identity and Common Administration Guide for details.
Users can be logged in automatically after changing their password
To configure automatic login, the change password redirect URL must include STLogin=%applySTLogin% as a parameter.
The following is an example of a change password redirect URL that logs the user in:
/http://machinename:portnumber/identity/oblix/apps/lost_password_mgmt/bin/lost_password_mgmt.cgi? program=redirectforchangepwd&login=%login%%userid%&backURL=% HostTarget%%RESOURCE%&STLogin=%applySTLogin%&target=top
To implement this with a form-based authentication scheme, you must configure the challenge parameter creds by supplying the user name credential parameter as the first token, the password credential parameter as the second token, then any other credential parameters.
See the Oracle Access Manager Identity and Common Administration Guide for details.
Table 4–3 (Cont.) New Features with Release 10.1.4 Patch Set 1 (10.1.4.2.0)
Feature Description More Information

Enhancements Available with Release 10.1.4 Patch Set 1 (10.1.4.2.0)
4-42 Oracle Access Manager Upgrade Guide
Write a stack trace to a log file
If Oracle Access Manager experiences a core dump, it can now write a stack trace to a log file. To enable this functionality, you turn on logging at any minimal level.
You can send the log file that contains the stack trace information to Oracle, along with a report of the problem.
See the appendix on troubleshooting in the Oracle Access Manager Identity and Common Administration Guide for details.
New parameters for directory server failover
A new parameter in globalparams.xml named LDAPOperationTimeout sets an amount of time that the Identity Server, Access Server, or Policy Manager waits for a response from the directory server for a single entry of a search result before the component fails over to a secondary server, if one is configured.
A heartbeat_ldap_connection_timeout_in_millis parameter in globalparams.xml determines the time limit for establishing a connection with the directory server. If the time limit is reached, the Identity and Access Servers start establishing connections with another directory server. This parameter enables the Identity and Access Servers to proactively identify when a directory server is down, and it enables failover without requiring an incoming directory service request and a subsequent TCP timeout.
See the chapter on failover in the Oracle Access Manager Deployment Guide and the appendix on parameter files in the Oracle Access Manager Customization Guide for details.
Resetting the LDAP bind password in configuration files
You may need to periodically update the LDAP bind password for the directory servers that communicate with Oracle Access Manager components. The ModifyLDAPBindPassword command enables you to reset the LDAP bind password in the Oracle Access Manager configuration files. You can reset the LDAP bind password without restarting any servers or re-running setup.
See the chapter on reconfiguring the system in theOracle Access Manager Deployment Guide for details.
Directory server searches are minimized for certain operations
In previous releases, it could take a long time to create a large number of policy domains and URL prefixes in the Policy Manager. In this release, searches to the directory server have been minimized for these operations, resulting in better performance for these operations.
Assigning a Delegate impersonation level to the client
In addition to configuring impersonation for resources on the computer that is protected by a WebGate, you can extend impersonation to other resources on the network. This is known as assigning a Delegate impersonation level to the client.
Note that the information on impersonation has moved from the Oracle Access Manager Access Administration Guide to the Oracle Access Manager Integration Guide
See the chapter on configuring impersonation in the Oracle Access Manager Integration Guide for details.
Integration Support Enhanced
Release 10.1.4 Patch Set 1 (10.1.4.2.0):
Integration support includes SharePoint Office Server 2007. See the chapter on integrating with SharePoint in the Oracle Access Manager Integration Guide for details.
Integration support with SAP NetWeaver is provided. See the chapter on integrating with SAP in the Oracle Access Manager Integration Guide for details.
Integration support with Siebel in a multi-domain Active Directory environment is provided. See the chapter on integrating with Siebel in the Oracle Access Manager Integration Guide for details.
Integration support with Weblogic 9.2 is provided. See the chapter on integrating with WebLogic in the Oracle Access Manager Integration Guide for details.
Integration support with WebSphere 6.1 is provided. See the chapter on integrating with WebSphere in the Oracle Access Manager Integration Guide for details.
Table 4–3 (Cont.) New Features with Release 10.1.4 Patch Set 1 (10.1.4.2.0)
Feature Description More Information

Part IIUpgrading the Schema and Data
This part of the book explains how to prepare your earlier environment for the schema and data upgrade, then how to upgrade the schema and data with master components installed for this purpose.
Part II contains the following chapters:
■ Chapter 5, "Preparing for Schema and Data Upgrades"
■ Chapter 6, "Upgrading Identity System Schema and Data In Place"
■ Chapter 7, "Upgrading Access System Schema and Data In Place"


Preparing for Schema and Data Upgrades 5-1
5Preparing for Schema and Data Upgrades
This chapter is intended for directory server administrators who are responsible for maintaining and updating directory schemas and data. Here you will find information on preparing the environment for the Oracle Access Manager (formerly known as Oblix NetPoint or Oracle COREid) schema and data upgrade. The following topics provide information to help you prepare your environment:
■ About Schema and Data Upgrades
■ Strategies for Upgrading in a Replicated Environment
■ Configuring the Challenge/Response Phrase at the Object Class Level
■ Configuring Unique Namespaces for Directory Connection Information
■ Preparing Your Directory Instances for the Schema and Data Upgrade
■ Backing Up Existing Oracle Access Manager Data
■ Backing Up Existing Directory Instances
■ Halting On-the-fly User Data Migration at First Login Temporarily
■ Preparing Host Computers for Master Components
■ Adding An Earlier Identity System to Use as a Master for the In-place Method
■ Adding an Earlier Access Manager to Use as a Master for the In-Place Method
■ Finishing Preparation for the In-Place Schema and Data Upgrade
About Schema and Data UpgradesThere are several types of data used by Oracle Access Manager: user data, configuration data, and policy data. User data refers to the enterprise identity store (LDAP) that Oracle Access Manager is configured to work against. Configuration is metadata pertaining to Oracle Access Manager configuration that is stored in directory. Policy data is metadata pertaining to access policies that is stored in the directory.
Zero Downtime Method: The schema upgrade occurs independently. Data upgrades occur when you upgrade the clone of the first installed COREid Server and first installed Access Manager. In discussions about the schema and data upgrade for the
Note: Unless explicitly stated, the information in this chapter applies equally to both upgrade methods. If your starting Oracle Access Manager release is earlier than 6.1.1, contact Oracle Support before upgrading: http://www.oracle.com/support/contact.html

About Schema and Data Upgrades
5-2 Oracle Access Manager Upgrade Guide
in-place method, you can substitute the concept of the "master" Identity Server and Policy Manager with the zero downtime concept of the clone of the first installed Identity Server and Access Manager. See also "Schema and Data Upgrades with the Zero Downtime Upgrade Method" on page 15-9.
In-place Method: A schema upgrade occurs when you upgrade the master Identity Server. Configuration data is also upgraded during the master Identity Server (formerly known as the COREid Server) upgrade. When you upgrade additional Identity Server instances, the initial schema and data upgrade is detected automatically. Further Identity System schema and data upgrades are not requested.
Policy data is upgraded with the master Policy Manager (formerly known as the Access Manager component). When the configuration tree and policy node are in the same directory server, the master Identity Server upgrade touches only configuration data. Policy data is upgraded only when the master Policy Manager is upgraded. If you have a large number of entries in the configuration tree, data migration can take a while to complete.
Additional schema updates are not typically required with policy data unless you have several directory instances configured as shown here:
Directory_1 communicates with the Identity System
Directory_2 communicates with the Identity System and Access System
Directory_3 communicates with the Access System
In such cases, the Oracle Access Manager schema and configuration data are upgraded on Directory_1 and Directory_2 during the master Identity Server upgrade. The schema and policy data are upgraded on Directory_2 and Directory_3 during the master Policy Manager upgrade.
Both Methods: No schema upgrade occurs during Access Server, WebPass, or WebGate upgrades. A data upgrade occurs automatically during each Access Server upgrade and a directory server profile is created for each Access Server.
For more information, see:
■ Considerations for Workflows in Multiple Directories
■ About Preparing For and Performing the In-Place Schema and Data Upgrade
■ Error Logging for All Directory Servers
Considerations for Workflows in Multiple DirectoriesOracle recommends that you keep all workflows on one directory server. When workflows are stored on multiple directory servers, you cannot automatically upgrade the schema and data.
If your installation includes workflows on separate directory servers, you must manually upgrade the schema and data. In this case, see Appendix D.
About Preparing For and Performing the In-Place Schema and Data UpgradeOracle recommends that you record details about your existing deployment as summarized in Appendix F. Summaries that can help you track the completion of upgrade tasks in your environment are also provided in Appendix F.
Figure 5–1 illustrates the tasks involved in preparing for and performing the schema and data upgrade when you use the in-place upgrade method. Additional information follows the figure. For details about performing a schema and data upgrade when you

About Schema and Data Upgrades
Preparing for Schema and Data Upgrades 5-3
choose the zero downtime upgrade method, see "Schema and Data Upgrades with the Zero Downtime Upgrade Method" on page 15-9.
Figure 5–1 Schema and Data Upgrade Task Overview for In-Place Upgrades
Task overview: Preparing for and performing in-place schema and data upgrades 1. Review the following topics to gain an understanding of the conditions that might
govern the sequence and tasks you must perform:
■ In-place Schema and Data Upgrade Planning (Chapter 1)
■ Strategies for Upgrading in a Replicated Environment (this chapter)
2. Prepare Directory Instances and Data: Perform the tasks in the following list to prepare your directory instances and data for the upgrade, as described in:
■ Configuring Unique Namespaces for Directory Connection Information
■ Configuring the Challenge/Response Phrase at the Object Class Level
■ Preparing Your Directory Instances for the Schema and Data Upgrade
ReplicatedEnvironment?
Review Schema and Data Planning(Chapter 1)
Add an Earlier Master Environment · Identity System (Identity Server and WebPass) · Policy Manager (only if the Access System is currently installed)(This Chapter)
No
Prepare Your Directory Instances and Data(This Chapter)
Finish Preparing For the Schema and Data Upgrade(This Chapter)
Upgrade Identity System Schema and Data(Chapter 6)
Prepare and Upgrade Other Components(Part III)
YesReview Strategies(This Chapter)
AccessSystem?
No
Yes Upgrade Access System Schema and Data(Chapter 7)

Strategies for Upgrading in a Replicated Environment
5-4 Oracle Access Manager Upgrade Guide
■ Backing Up Existing Oracle Access Manager Data
■ Backing Up Existing Directory Instances
■ Halting On-the-fly User Data Migration at First Login Temporarily
3. Perform the next set of tasks to create a master environment of secondary servers for your original master Read/Write directory server instances:
■ Preparing Host Computers for Master Components
■ Adding An Earlier Identity System to Use as a Master for the In-place Method
■ Adding an Earlier Access Manager to Use as a Master for the In-Place Method
4. Finish preparing for the schema and data upgrade as described in "Finishing Preparation for the In-Place Schema and Data Upgrade" on page 5-33.
5. Upgrade the schema and data in sequence, as described in:
■ Chapter 6, "Upgrading Identity System Schema and Data In Place"
■ Chapter 7, "Upgrading Access System Schema and Data In Place"
6. When the schema and data upgrade is successful, prepare for and upgrade the remaining components as described in Part III.
Error Logging for All Directory ServersDuring data migration, the following two files are created, regardless of your directory server type. Both contain new Oracle Access Manager data, generated after applying the upgrade for the specific incremental release. The older Oracle Access Manager tree is deleted and the appropriate file is uploaded to generate the upgraded tree:
■ During Identity Server data migration, output_fromversion_to_toversion_osd.ldif is created in the IdentityServer_install_dir\identity\oblix\tools\migration_tools\obmigratedata directory.
■ During Policy Manager data migration, output_fromversion_to_toversion_psc.ldif file is created in the PolicyManager_install_dir\access\oblix\tools\migration_tools\obmigratedata directory
Additionally, the files listed next are created to log any ldap specific errors as follows:
■ During Identity Server data migration, error_output_fromversion_to_toversion_osd.ldif file is created in the IdentityServer_install_dir\identity\oblix\tools\migration_tools\obmigratedata directory.
■ During Policy Manager data migration, error_output_fromversion_to_toversion_psc.ldif file is created in the PolicyManager_install_dir\access\oblix\tools\migration_tools\obmigratedata directory
For more information, see "Accessing Log Files" on page G-2.
Strategies for Upgrading in a Replicated EnvironmentThis discussion introduces additional tasks that Oracle recommends you perform when upgrading in a replicated environment.
Your deployment can employ the use of replicas to increase system availability and improve performance. Using replicas in a failover configuration helps increase system availability, which is important for enterprise-class applications. Replicas can be used in load-balancing configurations to enhance the performance and throughput of the application.

Strategies for Upgrading in a Replicated Environment
Preparing for Schema and Data Upgrades 5-5
To help keep down time to a minimum, Oracle recommends that you disable replication until the upgrade is complete and all features have been validated to work correctly. Presuming that the Identity Server, Policy Manager, Access Server, and all plug-ins that might contact the directory are configured properly, disabling replication (with Active Directory, for example) helps Oracle Access Manager remain in service during the upgrade. One set of servers can work with the original directory information (release 7.0.4, for example) while upgrading to 10g (10.1.4.0.1). The 10g (10.1.4.0.1) schema is backward compatible with the release 7.0.4 schema as long as you do not delete Oracle Access Manager attributes from any Oracle Access Manager object classes.
When performing the next tasks, use your directory vendor documentation as a guide unless otherwise indicated. Additional information follows the task overview.
Task overview: Upgrading in a replicated environment1. Disable the replication agreement, if possible.
2. Prepare for and perform the schema and data upgrade as outlined in the previous task overview. If you are using the zero downtime method, see Part VI.
3. Stop the Identity Server, Policy Manager, and Access Server from the original deployment.
4. Re-establish the replication agreement.
5. Push changes to the replicas.
6. After changes have been pushed to the replicas, then upgrade the components configured against these replicas as described in Part III. If you are using the zero downtime method, see Part VI.
For more information, see:
■ About User Data Replication
■ About Configuration Data Replication
About User Data ReplicationYour deployment can be architected to leverage user data replicas in various ways. For example, to achieve failover or load-balancing and the like, as described in the following discussions:
■ Failover Configuration
■ Load Balancing Configuration
■ Load Balancing and Failover Configuration
■ Operation-based Load Balancing Configuration
Note: If you are using the zero downtime upgrade method, you can disable the replication agreement before upgrading the schema and enable it after upgrading the data. For more information, see Part VI.
Note: The upgrade tools automatically detect that the schema and data have been upgraded and these steps are suppressed when upgrading remaining components.

Strategies for Upgrading in a Replicated Environment
5-6 Oracle Access Manager Upgrade Guide
Failover ConfigurationSuppose that you have one master directory server (named M) and one replica (named R). To setup a failover configuration, you need one DB Profile configured with the primary server named M and a secondary server named R. In this case, Oracle Access Manager will failover to R when M is not reachable.
Upgrade Consideration: This directory server configuration with replica will be a multi-master deployment. Hence, user schema should be uploaded against the master instance M.
Load Balancing ConfigurationThis scenario is quite similar to the failover configuration in the preceding discussion. Except that in this situation there are multiple primary LDAP servers to help balance the load. For example, suppose that you have one master directory server (named M) and one replica (named R). To setup a load-balancing configuration, you will create one DB Profile with two primary servers configured. In this case, both server M and R will be configured as primary.
Upgrade Consideration: This is the same consideration as in the failover configuration in the preceding discussion. The directory server configuration with replica will be a multi-master deployment. Therefore, the user schema should be uploaded against the master instance (M).
Load Balancing and Failover ConfigurationIn this configuration you will have multiple primary servers along with secondary servers configured. Let us consider that you have one master directory server (say M) and two replicas (say R1 and R2). There will be one DB Profile configured with two primary servers as M and R1, and there will be one secondary server, R2.
You can configure the 'Failover threshold' for this DB Profile as 1 to indicate that after one primary server goes down start using secondaries along with remaining primaries.
Upgrade Consideration: This too is the same consideration as in the failover configuration in the preceding discussion. The directory server configuration with replica will be a multi-master deployment. Therefore, the user schema should be uploaded against the master instance (M).
Operation-based Load Balancing ConfigurationThis deployment configuration is typically employed when you have one Read/Write master and one read-only replica. For example, suppose that the Read/Write master is M and the read-only replica is R. In this case, you must configure two DB Profiles for the same namespace. One DB profile will allow only write operations to occur against M. The other DB Profile will allow only read & bind operations against R. Oracle Access Manager will use the appropriate profile based on the requested operation.
Upgrade Consideration: This is not a multi-master deployment of directory servers. During the upgrade, the schema should be upgraded only against the master (M), because the replica (R) is read-only.
About Configuration Data ReplicationReplicated configuration data can be leveraged by Oracle Access Manager in failover configurations. In this scenario there is one master directory server (named M) containing the configuration data and another Read/Write replica (named R). There is one DB Profile configured with primary instance (M) and secondary instance (R).
Configuring Unique Namespaces for Directory Connection Information
Preparing for Schema and Data Upgrades 5-7
Upgrade Consideration: This is a multi-master deployment. Schema and data upgrades should be done only against one instance (M). This applies to both Identity System and Access System (policy) data.
Configuring the Challenge/Response Phrase at the Object Class Level If Challenge and Response attributes are configured at the Employees tab level (rather than at the object class level), then the configuration data upgrade might not complete correctly. Oracle recommends that before starting the upgrade you ensure that the Challenge and Response attributes are configured at the object class level.
To configure the challenge/response phrase as the object class level 1. Login into COREid System Console, as usual.
2. Navigate to the Common Configuration tab, then click Object Classes in the left pane.
3. If attributes P and Q are configured as Challenge and Response attributes, then recollect the object class to which P and Q belongs.
4. On the Configure Object Classes page, click the object class to which the P and Q attributes belong.
5. On the View Object Class page, click the Modify Attributes button.
6. In the attribute configuration applet, ensure that when attribute P is selected in the Attributes list, the Challenge semantic type is highlighted in the Semantic Types list.
7. If the Challenge semantic type is not highlighted, select the Challenge semantic type and save this.
8. Repeat with attribute R for the Response semantic type.
For more information, see your earlier version of the Oblix NetPoint or Oracle COREid Administration Guide (Volume 1 if you have a two volume set).
Configuring Unique Namespaces for Directory Connection InformationEach directory server profile contains connection information for a directory that includes the profile name, a domain or namespace to which it applies, a directory type, and a set of operational requirements for Read, Write, Search, and so on. A default directory server profile is created automatically each time you install the Identity Server and specify new directory server connection information.
Note: Oracle Access Manager does not allow load-balancing for configuration data. The same is true for policy data replication.
Note: User data is not migrated during the upgrade, but is migrated during the first login following the upgrade. For more information about the implications of this during an in-place upgrade, see "Halting On-the-fly User Data Migration at First Login Temporarily" on page 19. If you are using the zero downtime method, see "User-Data Migration and Multiple Values in Challenge and Response Attributes for LPM" on page 15-12.

Configuring Unique Namespaces for Directory Connection Information
5-8 Oracle Access Manager Upgrade Guide
Before release 6.5, the directory namespaces for policy data and user data had to be unique when the data was stored in two separate directories. During the upgrade to 10g (10.1.4.0.1), you must confirm this uniqueness to ensure that multi-language capability can be enabled.
When your environment includes one of the following situations, you need to perform the following procedure before upgrading to ensure that namespaces are unique and do not overlap with other directory server profile namespaces:
■ When earlier Oracle Access Manager installation with configuration data or policy data is stored in a different directory server than user data
■ If the namespace for the configuration DN or policy base assigned during Identity System setup matches the searchbase and you upgrade without ensuring unique configuration and policy data namespaces, the automated process to enable multi-language capability during the master Identity Server upgrade might fail. In the case of a zero downtime upgrade, this capability is enabled when you upgrade the clone of the first Identity Server.
Using third-party tools is outside the scope of this manual. For more information about how to ensure that the namespace is unique on the directory server, see the documentation for your directory server. For more information about configuring LDAP directory server profiles, see your earlier Oblix NetPoint or Oracle COREid Administration Guide. For details about re-running Identity System, Policy Manager, or Access Server setup, see your earlier Oblix NetPoint or Oracle COREid Administration Guide.
To ensure namespace uniqueness and reconfigure if needed1. On the directory server, ensure that the namespace for configuration data is
unique and does not overlap any other namespace. .
2. On the directory server, ensure that the namespace for policy data is unique on the directory server and does not overlap any other namespace.
3. Using the COREid System Console, configure LDAP Directory Server profiles to include unique namespaces for configuration data and policy data. For example:
COREid System Console, System Admin, System Configuration
Configure Directory Options, Profile_Link
Namespace: Enter a unique namespace
4. Restart Identity Servers.
5. Re-run Identity System setup, as described in your earlier Oblix NetPoint or Oracle COREid Administration Guide.
6. Re-run Policy Manager setup, as described in your earlier Oblix NetPoint or Oracle COREid Administration Guide.
7. Re-run Access Server setup, as described in your earlier Oblix NetPoint or Oracle COREid Administration Guide.
Note: Exceptions to overlapping namespaces include a directory server profile for a Microsoft Active Directory subdomain, and the directory server profile containing the configuration DN.

Preparing Your Directory Instances for the Schema and Data Upgrade
Preparing for Schema and Data Upgrades 5-9
Preparing Your Directory Instances for the Schema and Data UpgradeBefore starting an upgrade, Oracle recommends that you perform all tasks outlined in the following overview to prepare your directory instances for the schema and data upgrade.
Task overview: Preparing directory instances for the schema and data upgrade 1. Review supported directory servers, as follows:
a. Navigate to MetaLink at https://metalink.oracle.com.
b. Log in to MetaLink as directed
c. Click the Certify tab.
d. Click View Certifications by Product
e. Select the Application Server option and click Submit.
f. Choose Oracle Identity Manager and click Submit.
g. Click Oracle Identity Management Certification Information 10g (10.1.4.0.1) (html) to display the Oracle Identity Management page.
h. Click the link for Section 6, "Oracle Access Manager Certification" to display the certification matrix.
2. Directory Release Deprecated: Perform activities in "Preparing a Directory Server When Its Release is Deprecated" on page 5-9.
3. Perform activities in "Changing the Directory Server Search Size Limit Parameter" on page 5-10.
4. Review considerations for your directory server and ensure that your environment meets all requirements as described in:
■ Active Directory Considerations and Preparation
■ Active Directory Application Mode Considerations and Preparation
■ IBM Directory Server Considerations and Preparation
■ Oracle Internet Directory
■ Siemens DirX Directory Deprecation
■ Sun Directory Server Considerations and Preparation
5. Back up all directory instances containing Oracle Access Manager data, using instructions from your directory vendor.
6. Proceed to "Backing Up Existing Oracle Access Manager Data" on page 5-16.
Preparing a Directory Server When Its Release is DeprecatedIf your directory server release is no longer supported, you can upgrade earlier directory server profiles in Oracle Access Manager and the directory server as outlined next, then upgrade to 10g (10.1.4.0.1).
Preparing Your Directory Instances for the Schema and Data Upgrade
5-10 Oracle Access Manager Upgrade Guide
Task overview: Installing a new directory server when its release is deprecated1. Check the latest support information for Oracle Access Manager 10g (10.1.4.0.1), as
follows:
a. Navigate to MetaLink at https://metalink.oracle.com.
b. Log in to MetaLink as directed
c. Click the Certify tab.
d. Click View Certifications by Product
e. Select the Application Server option and click Submit.
f. Choose Oracle Identity Manager and click Submit.
g. Click Oracle Identity Management Certification Information 10g (10.1.4.0.1) (html) to display the Oracle Identity Management page.
h. Click the link for Section 6, "Oracle Access Manager Certification" to display the certification matrix.
2. Before starting an upgrade, install a 10g (10.1.4.0.1)-supported directory server using your vendor documentation as a guide.
3. In your earlier Oracle Access Manager installation, reconfigure directory server profiles (and database instance profiles contained within) before you start the upgrade to 10g (10.1.4.0.1). For details, see your earlier Oblix NetPoint or Oracle COREid Administration Guide (Volume 1 if you have a two volume set).
4. In your earlier Oracle Access Manager installation, change the directory server as follows:
From the COREid System Console select System Configuration, Configure Directory Server Options, click Directory Server, change any settings as needed.
5. Re-run Identity System setup, as described in your earlier Oblix NetPoint or Oracle COREid Administration Guide (Volume 1 if you have a two volume set), to ensure that configuration files are properly updated.
6. Before starting the upgrade, perform all relevant tasks in this chapter. If you are using the in-place upgrade method, add a master Identity Server (formerly known as the COREid Server), WebPass, and Policy Manager (formerly known as the Access Manager component) configured against the new directory. If you are using the zero downtime method, see Part VI.
7. Upgrade using the method you have chosen as described in this manual.
Changing the Directory Server Search Size Limit Parameter Before starting the upgrade you need to verify that the value of the directory server’s search size limit parameter is greater than the number of entries in your configuration tree. The default value for this parameter varies from directory to directory. See your vendor documentation for complete details.
Note: Use the next overview as a guide and see your vendor documentation for specific details about administering the directory server. See also "Upgrade Strategies When Support is Changed or Deprecated" on page 2-11.
Preparing Your Directory Instances for the Schema and Data Upgrade
Preparing for Schema and Data Upgrades 5-11
There are no specific rules to determine a suitable value for this parameter. As a result, the process of defining and verifying the correct value is an iterative one, as described in the next procedure.
To set an appropriate value for the directory server’s size limit parameter 1. Check the suitability of the existing value of the directory server’s size limit
parameter using the ldapsearch command to retrieve all nodes in your configuration tree to retrieve all entries. For example:
ldapsearch.exe -h host -p port-D bindDN -w password -b config_root -s sub (objectclass=*) Dn
In the preceding command, the bindDN is the one that was specified during your earlier Identity System setup (formerly known as COREid).
■ If the result of the ldapsearch command is successful, there should be no problem during data migration and you can skip the rest of this procedure.
■ If the ldapsearch results in a message about exceeding the size limit, complete step 2.
2. Increment the value of the directory server’s size limit parameter using information available in your vendor documentation, then repeat step 1.
For example, try setting the value to 10000 (or a promising value for your environment) then complete another ldapsearch to see if this is successful. If this also exceeds the size limit, you must repeat step 2 until the ldapsearch command executes successfully.
3. After a successful ldapsearch, retain the successful search size limit value until you finish upgrading.
4. After a successful upgrade, you can set the size limit parameter to its original value.
Active Directory Considerations and PreparationIf you have Active Directory as a backend directory server, be sure to review the following information and perform any tasks needed for your environment before upgrading:
■ Changing the MaxPageSize Parameter
■ Confirming You Are Using a Schema Master
Changing the MaxPageSize ParameterBefore starting the upgrade you need to verify that the value of the search size limit parameter (MaxPageSize) is greater than the number of entries in your configuration tree. The MaxPageSize parameter specifies the maximum number of entries to return in a search operation. The default value for the MaxPageSize parameter is 1000. If the number of entries in your configuration tree is greater than the value set for the MaxPageSize parameter, the Oracle Access Manager data migration process might fail.
Note: If the number of entries in your configuration tree is greater than the value of the directory server’s size limit parameter, then the Oracle Access Manager data upgrade process might fail.

Preparing Your Directory Instances for the Schema and Data Upgrade
5-12 Oracle Access Manager Upgrade Guide
To view the existing value of the MaxPageSize parameter and set a new value1. Use the ntdsutil tool at the command prompt to display the current value of the
MaxPageSize parameter, as shown in the following transcript. For example:
C:\Documents and Settings\Administrator ntdsutilntdsutil: ldap policiesldap policy: connectionsserver connections: connect to server <machine_name> Binding to <machine_name> ...Connected to <machine_name> using credentials of locally logged on userserver connections: qldap policy: show values
2. Use the ntdsutil tool at the command prompt to set a new MaxPageSize value and view the changes, as shown in the following transcript. For example:
C:\Documents and Settings\Administrator ntdsutilntdsutil: ldap policiesldap policy: connectionsserver connections: connect to server <machine_name> Binding to <machine_name> ...Connected to <machine_name> using credentials of locally logged on userserver connections: qldap policy: set MaxPageSize to <new_value>ldap policy: commit changesldap policy: show values
To choose an appropriate value for this parameter, see "Changing the Directory Server Search Size Limit Parameter" on page 5-10.
Confirming You Are Using a Schema Master Active Directory, schema modifications can only be completed against a schema master. You can skip this discussion if your earlier environment is configured to use an Active Directory schema master.
If you are not using a schema master, the following procedure can be completed on Windows 2000 platforms. Otherwise, see the Microsoft knowledge base article 285172 "To Enable Schema Updates by Means of the Registry" (previously published under Q285172P) on the Microsoft support Web site.
To enable the schema to be modified1. Open your Active Directory schema plug-in, which is often located in
Administrative Tools.
2. Right-click the top node for the schema and select Operations Master to display the Change Schema Master dialog.
3. Check the box beside "The Schema may be modified on this Domain Controller", then click OK.
Note: The example shown here is based on Active Directory running on Microsoft Windows 2000 Advanced Server. These details might vary for other versions. See your Active Directory documentation for specific details for your version.

Preparing Your Directory Instances for the Schema and Data Upgrade
Preparing for Schema and Data Upgrades 5-13
Active Directory Application Mode Considerations and PreparationBefore starting the upgrade you must verify that the value of the size limit parameter is greater than the number of entries in your configuration tree. For details, see "Changing the Directory Server Search Size Limit Parameter" on page 5-10.
With ADAM as the directory server, there is no support for obsolete schema cleanup during the upgrade. With ADAM, you must update the schema manually during the upgrade process. However, after manually upgrading the schema, you can accept the automatic data upgrade and complete the component upgrade process.
Support for ADAM started with release 6.5. When upgrading ADAM, Oracle Access Manager provides the following schema files for manual upgrades to configuration and user directories:
IdentityServer_install_dir\identity\oblix\tools\migration_tools\ osd_650_to_700_schema_adam.ldif user_650_to_700_schema_adam.ldif policy_650_to_700_schema_adam (only when user and configuration data are stored separately)
osd_700_to_1014_schema_adam.ldif user_700_to_1014_schema_adam.ldif policy_700_to_1014_schema_adam (only when user and configuration data are stored separately)
Each file contains only the specific schema modifications between the named releases. This means:
■ If you are upgrading from release 6.5, you must upload the 650_to_700 files during the incremental upgrade from release 6.5 to 7.0. In this case, you must also upload the 700_to_1014 files during the incremental upgrade from release 7.0 to 10g (10.1.4.0.1).
■ If you are upgrading directly from release 7.0 to 10g (10.1.4.0.1), you need only upload the 700_to_1014 files during the incremental upgrade from 7.0.
A sample ldifde command to manually update the ADAM schema is shown here and described in Table 5–1. For more information, see your Microsoft documentation:
ldifde -k -b "<user_distinguished_name>""<domain_name>""<user_password>" -c"<GUID>"<ADAM_instance_ID> -i -f ADAM_oblix_schema_add -s <ADAM_server_name> -t <port>
Note: There are no specific files needed during the upgrade when you are using statically-linked auxiliary classes.

Preparing Your Directory Instances for the Schema and Data Upgrade
5-14 Oracle Access Manager Upgrade Guide
IBM Directory Server Considerations and PreparationBefore starting the upgrade you must verify that the value of the size limit parameter is greater than the number of entries in your configuration tree. For details, see "Changing the Directory Server Search Size Limit Parameter" on page 5-10.
During the first Identity Server and Policy Manager upgrade, the user under whom the IBM SecureWay directory server runs must have read and write access to Oracle Access Manager schema files and to the directory containing the schema files. During the upgrade, you might be prompted to copy the schema files. The upgrade program provides instructions on where to copy them.
The next task overview is provided as a guide in the event that the IBM directory server in your earlier installation is not supported in 10g (10.1.4.0.1). Any references to a specific product release is provided for illustration only.
Task overview: Upgrading with an unsupported IBM Directory Server 1. Check the latest support information for Oracle Access Manager 10g (10.1.4.0.1), as
follows:
a. Navigate to MetaLink at https://metalink.oracle.com.
b. Log in to MetaLink as directed
Table 5–1 ldifde Command Description for ADAM
Option Description
-k This option ignores errors.
-b "<user_distinguished_name>" "<domain_name>" "<user_password>
For example:
cn=administrator,o=oblix.com,c=us password
To extend the schema, the values represent:
■ user_distinguished_name: a Windows security principal user name
■ domain_name: domain name of the computer where ADAM is installed
■ user_password: password
-c "<GUID>" <ADAM_instance_ID> In this option, "<GUID>" should be retained as is, not replaced by any value; do include the quotes. <ADAM_instance_ID> should be substituted by the ADAM root DSE using tools like ldp.exe. When the initial connection is made, the root DSE is shown. For example, an ADAM root DSE value might be EC31B31B-19FC-4FD4-8590-3BD57D6A3E77.
-i
-f <filename>
The -i option specifies the import option.
The -f option identifies a file name; the value identifies the file you are importing. For example:
ADAM_oblix_schema_add.ldif
ADAMAuxSchema.ldif
-s <ADAM_server_name> This value is the name of the computer where ADAM is installed.
-t <port > This value is the port number on which this instance listens for the schema update (an open port is needed).
Note: See your vendor documentation for explicit information about administering your directory server. See also "Upgrade Strategies When Support is Changed or Deprecated" on page 2-11.

Preparing Your Directory Instances for the Schema and Data Upgrade
Preparing for Schema and Data Upgrades 5-15
c. Click the Certify tab.
d. Click View Certifications by Product
e. Select the Application Server option and click Submit.
f. Choose Oracle Identity Manager and click Submit.
g. Click Oracle Identity Management Certification Information 10g (10.1.4.0.1) (html) to display the Oracle Identity Management page.
h. Click the link for Section 6, "Oracle Access Manager Certification" to display the certification matrix.
2. Before starting the Oracle Access Manager upgrade, you must upgrade your earlier IBM Directory Server (for example, v4.x) data and schema to IBM Directory Server version 5.1 using information available in your IBM documentation.
3. Before starting the upgrade to 10g (10.1.4.0.1), complete activities in "Changing the Directory Server Search Size Limit Parameter" on page 5-10.
4. Use 10g (10.1.4.0.1) installation packages to upgrade Oracle Access Manager components as described in this guide.
Oracle Internet DirectoryBefore starting the upgrade you must verify that the value of the orclsizelimit parameter is greater than the number of entries in your configuration tree. This specifies the maximum number of entries to return in a search operation. For Oracle Internet Directory the size limit parameter is orclsizelimit. The default value for this parameter is 1000. To choose an appropriate value for this parameter, see "Changing the Directory Server Search Size Limit Parameter" on page 5-10.
To view the existing value of the orclsizelimit parameter or set a new value 1. Open Oracle Directory Manager (ODM).
2. In the left navigator pane, expand the Oracle Internet Directory Servers.
3. Select the Directory Server instance to which you have configured your earlier release of Oracle Access Manager.
4. In this instance page (right pane), select the System Operational Attributes tab.
The "Query Entry Return Limit" parameter on this page refers to the orclsizelimit.
The value in the text box against this Query Entry Return Limit parameter, shows the existing value for the orclsizelimit parameter.
5. Modify the value in the text box against the Query Entry Return Limit parameter, then apply the changes.
Siemens DirX Directory DeprecationOracle Access Manager 10g (10.1.4.0.1) does not support Siemens DirX directory. There is no migration path with this directory.
Note: The example in the following procedure is based on Oracle Internet Directory version 10.1.2 running on Microsoft Windows 2000 Advanced Server. These details might vary for other versions. See your Oracle Internet Directory documentation for specific details for your version.

Backing Up Existing Oracle Access Manager Data
5-16 Oracle Access Manager Upgrade Guide
Sun Directory Server Considerations and PreparationBefore starting the upgrade you must verify that the currently directory server release is supported. If not, see "Preparing a Directory Server When Its Release is Deprecated" on page 5-9. Also, you need to ensure that the value of the size limit parameter is greater than the number of entries in your configuration tree. On a Sun (formerly iPlanet) directory server is nsslapd-sizelimit (Size Limit). This specifies the maximum number of entries to return in a search operation. The default value for this parameter is 2000. To choose an appropriate value for this parameter, see "Changing the Directory Server Search Size Limit Parameter" on page 5-10.
To view the existing value of the nsslapd-sizelimit parameter and set a new value1. Open the iPlanet console.
2. In Servers and Applications tab, expand the tree in the left pane to show a list of all existing Directory server instances.
3. Select the Directory Server instance to which you have configured COREid.
4. Open the management window of the selected instance.
5. In the opened window, select the Configuration tab.
6. Select the Performance tab to display the existing value of this size limit parameter.
7. Modify the value in the size limit parameter text box, then save the changes.
Backing Up Existing Oracle Access Manager DataAs discussed in Chapter 2, Oracle recommends that you back up existing data before performing certain upgrade tasks. Figure 5–2 shows the types of data to back up before starting an upgrade, regardless of the method you are using.
Figure 5–2 Data to Back Up
Note: The example is based on iPlanet 5.1 running on Microsoft Windows 2000 Professional. These details might vary for other versions. See your Sun directory documentation for specific details for your version.
DirectoryServer
Directory ServerInstances
Oracle Access Manager Data Windows RegistryData
Web ServerConfiguration Files
User andGroup Data
WorkflowData
Configurationand Policy Data
Schema
InstallationDirectories
CustomizationDirectories
Backing Up Existing Oracle Access Manager Data
Preparing for Schema and Data Upgrades 5-17
For more information about the data that you need to back up, see the following topics in this chapter:
■ Backing up the Earlier Oracle Access Manager Schema
■ Backing up Oracle Access Manager Configuration and Policy Data
■ Backing Up User and Group Data
■ Backing Up Workflow Data
■ Archiving Processed Workflow Instances
■ Backing Up Existing Directory Instances
■ Chapter 8 includes details about:
– Backing Up the Existing Component Installation Directory
– Backing Up the Existing Web Server Configuration File
– Backing Up Windows Registry Data
Backing up the Earlier Oracle Access Manager SchemaThe upgraded schema offers backward compatibility with the earlier schema, as far back as release 6.1.1. However, you cannot roll back a schema upgrade using any Oracle-provided tools. Some directory server vendors provide tools that you can use to back up the schema. If you back up the earlier schema using external tools before upgrading, you should be able to reinstate the backup copy if you decide to roll back to the original release.
Before starting the upgrade, Oracle recommends that you use tools provided by your directory vendor to backup the schema for your existing directory server instances. For example, Sun ONE directory server stores the schema in the slapd-instance-nameconfig/schema/99user.ldif file.
For more information, see your directory vendor documentation. Not all directory server vendors provide tools to back up the schema.
Backing up Oracle Access Manager Configuration and Policy Data Before starting the upgrade Oracle recommends that you manually export the Oracle Access Manager configuration and policy data to an ldif file. This file can be used to restore the setup in the unfortunate event of an upgrade failure.
Most vendors provide a directory server console application that can be used to export the directory data into an ldif file. Alternatively you can execute an ldapsearch for the configuration- and policy base at the sub-tree level. In this case, you can use a filter such as (objectclass=*) and re-direct the output of the search to an ldif file.
To back up configuration and policy data1. Perform the Ldapsearch command.
2. In the command, specify the configuration/policy base to back up user and group data.
Ldapsearch –h hostname -p port> D bind_dn -w password -s sub –b config/policy base dn (objectclass=*) > backup_cp_data.ldif

Backing Up Existing Oracle Access Manager Data
5-18 Oracle Access Manager Upgrade Guide
Backing Up User and Group DataThe steps to backup the user and group data are similar to those in "Backing up Oracle Access Manager Configuration and Policy Data" on page 5-17. However, in this case, you specify the searchbase.
For components installed on Windows platform, Oracle recommends that you backup the Windows registry entries for the component in addition to the user and group data.
To back up user and group data 1. Perform the Ldapsearch command.
2. In the command, specify the searchbase to back up user and group data.
Ldapsearch –h hostname -p port> D bind_dn -w password -s sub –b searchbase dn (objectclass=*) > backup_ug_data.ldif
3. Windows: Complete activities in "Backing Up Windows Registry Data" on page 8-9.
Backing Up Workflow DataUnless you chose to store workflows separately by configuring appropriate DB Profiles, workflow data is automatically backed up as part of the configuration data. When workflows are stored separately, you must perform similar steps to back up workflow data as you did when "Backing up Oracle Access Manager Configuration and Policy Data" on page 5-17.
The only difference when backing up workflow data separately, is that you specify the namespace of the workflow database instance profile in the Ldapsearch command, as shown in the procedure here. For example, if the database instance profile is named workflow_namespace, that is what you include in the command.
For components installed on Windows platform, Oracle recommends that you backup the Windows registry entries for the component in addition to the user and group data.
To back up workflow data 1. Perform the Ldapsearch command.
2. In the command, specify the workflow to back up user and group data.
Ldapsearch –h hostname -p port> D bind_dn -w password -s sub –b workflow_namespace (objectclass=*) > backup_wf_data.ldif
3. Windows: Complete activities in "Backing Up Windows Registry Data" on page 8-9.
To speed up searching for tickets, you also need to archive processed workflow instances, as described next.
Archiving Processed Workflow InstancesWorkflow instances, including those that have been completed and processed by the workflow participants, are stored in the directory server. During the upgrade, workflow data is not disturbed or deleted.
Before starting the upgrade, Oracle recommends that you archive all processed workflow instances. Archived instances are stored in an ldif file in IdentityServer_
Halting On-the-fly User Data Migration at First Login Temporarily
Preparing for Schema and Data Upgrades 5-19
install_dir/identity/oblix/data/common/wfinstance.ldif. This provides a record of the processed workflows and can help speed up the search for workflow tickets.
To archive your processed workflow instances to speed up searching for tickets 1. Navigate to the COREid System Console, as usual.
2. From the User Manager, Group Manager, or Organization Manager application, select Requests.
3. On the Monitor Requests page, fill in the search criteria and search for tickets.
4. If any results are returned, select these and click the Archive button.
A file is created named wfinstance.ldif and stored in the IdentityServer_install_dir/identity/oblix/data/common directory.
Backing Up Existing Directory InstancesTo help with a recovery strategy, Oracle recommends that you back up any directory instances containing Oracle Access Manager data before you start the upgrade.
Use instructions from your directory vendor to accomplish this task. Describing third-party tools is outside the scope of this manual.
Halting On-the-fly User Data Migration at First Login TemporarilyUser data is not migrated during the upgrade, but is migrated during the first login following the upgrade. You perform the activities in this discussion when performing an in-place upgrade only, after backing up data and before preparing host computers.
As discussed in Chapter 4, when you upgrade from an earlier release to Oracle Access Manager 10g (10.1.4.0.1), the configuration data stored in the oblix tree of the directory server is migrated automatically and the value of the obVer attribute is changed to 10.1.4.0. However, user data (multiple values in challenge and response attributes for Lost Password Management only) is not migrated until the first login following the upgrade. This means that the obVer attribute value remains less than 10.1.4.0 in user data (in the OblixOrgPerson class).
Unless you temporarily halt the immediate (also known as on-the-fly) user data migration as described in the task overview, the first time a user logs in after the upgrade to 10g (10.1.4.0.1) that user entry is immediately migrated. Any existing challenge and response values for that user are encoded (@1# is appended to the end) and the obVer attribute value for that user is changed to 10.1.4.0 in the OblixOrgPerson class. However the rollback process does not revert these changes. If you rollback to the previous release, the obVer value in the user entry in the OblixOrgPerson class remains 10.1.4.0 and challenge and response values remain encoded format.
Task overview: Halting, then restarting user data migration at first login 1. Right now, before starting the upgrade, perform activities in the procedure
"Halting On-the-fly Migration of User Data: Phase 1" on page 5-20; then finish all other activities in this chapter.
Note: If you are using the zero downtime method, this migration is halted automatically until you start it. For more information, see "User-Data Migration and Multiple Values in Challenge and Response Attributes for LPM" on page 15-12.
Halting On-the-fly User Data Migration at First Login Temporarily
5-20 Oracle Access Manager Upgrade Guide
2. Perform activities in Chapter 6 in sequence to upgrade the Identity System schema and data, then perform steps the procedure "Halting On-the-fly Migration of User Data: Phase 2" on page 6-22.
3. Perform remaining in-place upgrade tasks, as described in Chapters 7 through 13.
4. Validate your deployment as described in Chapter 14 to ensure that it is operating as expected and that it does not need to be rolled back to the earlier release.
5. After validating that your upgraded deployment does not need to be rolled back to the earlier release, perform steps in "Restarting On-the-fly User Data Migration for In-place Upgrades" on page 14-3.
Halting On-the-fly Migration of User Data: Phase 1 Phase 1 includes setting the obVer attribute for the Master Administrator entry and then upgrading the schema and data to 10g (10.1.4.0.1). Phase 2 occurs after the schema and data upgrade. In Phase 2, you remove the Challenge and Response semantic types at both the tab level and the object class level.
Before performing the following Phase 1 procedure, there are several conditions to take into account:
■ If OblixOrgPerson does not exist in the objectclass list of the user entry, then you must first add it as described in step 1. Otherwise, start with step 2.
■ After performing the last step, the lost password management feature will not work.
After temporarily halting on-the-fly migration of user data at first login, Oracle recommends that you stop processing or performing the following actions to ensure that user data will maintain backward compatibility:
■ Stop processing workflow tickets: for example, create user, change attributes, and the like.
■ Stop modifying Challenge and Response attributes from the Modify Profile page.
To temporarily stop the immediate migration of user data (Phase 1)1. Add OblixOrgPerson to the Master Administrator’s user entry, if needed:
ldapmodify.exe -h <Host> \ -p <Port> -D <Bind DN> -w <Bind Password> \ -f <ldif file containing attribute to be added>
The format of LDIF file to be created when adding OblixOrgPerson to the objectclass list is as follows. This example is for the Netscape Directory Server:
dn: <Administrator DN> changetype: modify add: objectclass
Note: Phase 2 is a one time activity that must be performed after upgrading the Identity System schema and data and before any administrator or user login, even when you have a joint Identity and Access System deployment.

Adding An Earlier Identity System to Use as a Master for the In-place Method
Preparing for Schema and Data Upgrades 5-21
objectclass: OblixOrgPerson
2. Set the obVer attribute for the Master Administrator entry in the LDAP directory server to 7.0.4 using the following command:
ldapmodify.exe -h <Host> \ -p <Port> -D <Bind DN> -w <Bind Password> \ -f <ldif file containing attribute to be modified>
The format of LDIF file to be created is as follows. This example is for the Netscape Directory Server:
dn: <Administrator DN> changetype: modify replace: obver obver: 7.0.4
3. Finish remaining preparation tasks as described in this chapter.
4. Perform a schema and data upgrade for your deployment as described in Chapter 6, which includes instructions to perform Phase 2 of this procedure in "Halting On-the-fly Migration of User Data: Phase 2" on page 6-22.
For details about restarting user data migration after validating the success of the upgrade for the entire deployment, see "Restarting On-the-fly User Data Migration for In-place Upgrades" on page 14-3.
Preparing Host Computers for Master ComponentsYour next activity is to prepare host computers for the master components you will add and use when upgrading the schema and data. The master components include an earlier Identity Server, WebPass (and Policy Manager (formerly the Access Manager component) if you have the Access System installed).
For details about preparing host computers before installing master components, see the following topics in Chapter 8:
■ Preparing Host Computers
■ Logging in with Appropriate Administrative Rights
After preparing host computers for the master components, proceed to "Adding An Earlier Identity System to Use as a Master for the In-place Method" on page 5-21.
Joint Identity and Access System: If you also have the Access System installed, you perform tasks in "Adding an Earlier Access Manager to Use as a Master for the In-Place Method" on page 5-28 after adding the master Identity System. If you do not have the Access System installed, skip Access System-related activities.
Whether your installation includes the Access System or not, you will upgrade the Identity System schema and data after completing activities in this chapter.
Adding An Earlier Identity System to Use as a Master for the In-place Method
You complete activities here to add one (earlier) Identity Server instance (formerly known as the COREid Server) and WebPass to your existing installation. This additional Identity System will be used as a secondary server for your original master

Adding An Earlier Identity System to Use as a Master for the In-place Method
5-22 Oracle Access Manager Upgrade Guide
Read/Write directory server instances. Upgrading the schema and data against these master components helps ensure that the schema and data upgrade is successful before you upgrade the rest of your earlier installation.
The master instance that you add here can be installed on any computer you choose that meets 10g (10.1.4.0.1) requirements. However, the master instance that you add need not be configured for things like auditing and access reporting (even if this is configured for other Identity Servers in your environment). The master instance that you add here has a single purpose and that is to be used during the schema and data upgrade. After upgrading your entire Identity System environment, you can retain this additional instance or remove it without impacting the rest of the upgraded environment.
Setting up master Identity System for the schema and data upgrade is described next.
Task overview: Adding a master Identity System for the schema and data upgrade includes1. Defining Additional Instances in the Existing System Console
2. Installing the Master COREid Server Instance
3. Installing the Master WebPass
4. Setting Up the Master Identity System for the In-place Schema and Data Upgrade
Before you begin, confirm that you have completed tasks in Table 5–2. Failure to complete prerequisites might adversely affect your upgrade.
Defining Additional Instances in the Existing System ConsoleThe Identity Server instance that you will add requires a WebPass. Before you can install either, however, you must define details for the additional instances in the
Note: If you are upgrading while switching from a Solaris platform to Linux, you can skip this step. The Identity System instances that you install on a Linux host will serve as master components. For more information about upgrading while switching from a Solaris platform to Linux, see Appendix B.
Note: When your earlier installation includes languages other the English, this additional instance should be installed with the same Language Packs.
Table 5–2 Master Identity Server Installation Prerequisites
Master Identity Server Installation Prerequisites
Perform all preparation activities in this chapter.
■ If you have a multi-language environment, move 10g (10.1.4.0.1) Identity System Language Packs for currently installed languages into the same directory as the earlier COREid Server installer that you will use here.
■ Check host compatibility in your earlier version of the Oblix NetPoint or Oracle COREid Installation Guide and complete any installation prerequisites needed for this COREid Server instance.
Review information in the introductory chapters in Part I.

Adding An Earlier Identity System to Use as a Master for the In-place Method
Preparing for Schema and Data Upgrades 5-23
existing COREid System Console. For additional details, see your earlier Oblix NetPoint or Oracle COREid Administration Guide (Volume 1 if you have a two volume set).
To add information for additional components in the System Console1. Add information about the new WebPass instance in the COREid System Console.
For example:
■ Navigate to the existing COREid System Console, as usual. For example:
http://hostname:port/identity/oblix/
where hostname refers to computer that hosts the existing WebPass Web server; port refers to the HTTP port number of the existing WebPass Web server instance; and \identity\oblix connects to the COREid System Console.
■ In the COREid System Console, select System Configuration, then select Configure WebPass and click the Add button.
■ On the Add a new WebPass page, fill in the following information:
– Name: A unique identifier for this WebPass instance (it might include a release number and port number). For example: WebPass_611_6047.
– Hostname: The name full DNS name of the computer hosting this WebPass instance. You can install this instance anywhere; there are no caveats.
– Port: The port number on which this WebPass instance will listen.
– Maximum Connections: The maximum number of connections this WebPass opens to COREid Servers. Set this value to 1 for the COREid Server you will add.
– Transport Security: Select the security method used for communications between the Identity Server and its Web clients.
– Maximum Session Time (Hours): The maximum period of time that a connection between the WebPass and Identity Server can remain open. When the time expires, the connection closes and a new one is opened.
– Failover Threshold: The minimum number of connections to Primary COREid Servers.
– CoreID Server Timeout Threshold: The period (in seconds) that the WebPass attempts to contact a non-responsive COREid Server before WebPass considers the server unreachable and attempts to contact another. If a value is not specified, it indicates that there is no timeout.
– Sleep For (seconds): The interval at which WebPass checks its connection with the COREid Server.
Note: For clarity, this discussion uses earlier terminology that you will see onscreen.
Note: Transport security between all Identity System components (Identity Servers and WebPass instances) must match: either all open, all Simple mode, or all Cert.

Adding An Earlier Identity System to Use as a Master for the In-place Method
5-24 Oracle Access Manager Upgrade Guide
– Save the information.
2. Add details for the additional COREid Server instance in the COREid System Console. For example:
■ In the COREid System Console, select System Configuration, then select Configure COREid Servers and click the Add button.
■ On the Add a new COREid Server page, fill in the following information:
– Name: A unique identifier for this COREid Server instance (it can include a release number and port number). For example: COREidServer_611_6047.
– Hostname: The name full DNS name of the computer hosting this COREid Server instance. You can install this instance anywhere; there are no caveats.
– Port: The port number on which this instance will communicate with its Web clients (WebPass).
– Transport Security: Select the security method used for communications between the COREid Server and WebPass.
– Maximum Session Time (Hours): Type the maximum period of time that a connection between the WebPass and Identity Server can remain open. When the time expires, the connection closes and a new one is opened.
– Number of Threads: Type the maximum for number of concurrent requests that the Identity Server is allowed.
– Save the information.
3. In the System Console, associate this COREid Server with the WebPass and specify the priority as Secondary. For example:
■ From the COREid System Console, select System Configuration, then click Configure WebPass.
■ In the List all WebPasses page, click the link for the WebPass you just defined.
■ In the Details of WebPass page, click List COREid Servers.
■ In the page listing Primary and Secondary servers associated with this WebPass, click Add.
■ From the Select Server list (on the Add a new COREid Server to the WebPass page), click select the server you added a moment ago.
■ Indicate that this is a Secondary server.
■ In the Number of connections box, specify the maximum number of connections the WebPass instance opens to this COREid Server (the minimum is 1).
■ Click Add to associate this COREid Server with the WebPass.
4. Proceed to "Installing the Master COREid Server Instance", next.
Note: Transport security between all Identity System components (Identity Servers and WebPass instances) must match: either all open, all Simple mode, or all Cert.
Adding An Earlier Identity System to Use as a Master for the In-place Method
Preparing for Schema and Data Upgrades 5-25
Installing the Master COREid Server InstanceAfter defining the new instance in the System Console, you must perform this procedure using the earlier COREid Server installer.
During this installation, you must install this instance on the host you specified in the System Console. Also, you must indicate that this is not the first COREid Server for this directory server.
This procedure provides abbreviated steps to complete this task. For more information, see your earlier Oblix NetPoint or Oracle COREid Installation Guide.
To install an earlier identity Server for the schema and data upgrade 1. Move earlier installed Identity System Language Packs into the same directory as
the earlier COREid Server installer.
2. Log in as a user with administrator privileges to modify product configuration files, then launch the earlier COREid Server installer, as usual. For example:
■ GUI Method, Windows:
NetPoint6_1_1_Win32_COREid_Server.exe
■ Console Method, Solaris:
./ NetPoint6_1_1_sparc-s2_COREid_Server
The Welcome screen appears.
3. Specify a new installation directory for this component.
4. Languages: Be sure to include and specify all languages that are currently installed in your existing environment.
5. Choose the same transport security mode for this COREid Server that was specified in the System Console.
6. Specify configuration parameters for this instance based on the information you added to the COREid System Console. For example:
■ Name: Enter the unique name for this Identity Server. For example: COREidServer_611_6047.
■ Hostname: Enter the DNS hostname of the computer where you are installing this instance, as specified in the System Console.
■ Port: Enter the port number on which this COREid Server communicates with its clients, as specified in the System Console.
7. Specify directory server details for this instance (to ensure that it is installed as a secondary server for your original master Read/Write directory server instances). For example:
■ Select No when asked if this is the first COREid Server to be installed for the directory server.
■ Check the box beside the appropriate communication option (whether SSL-enabled or not) between this COREid Server and the directory server.
Caution: During this component installation, do not update the schema or data. For clarity, this discussion uses earlier terminology that you will see on-screen.

Adding An Earlier Identity System to Use as a Master for the In-place Method
5-26 Oracle Access Manager Upgrade Guide
■ Complete the transport security dialog according to the mode you chose earlier.
■ Select the option that describes your environment. For example, Configuration data will be in the user data directory or whatever is appropriate for your environment.
■ Select No when asked if you want to update the schema.
8. Finish the installation as usual.
9. Start the COREid Server service to confirm that the instance is installed and operating properly.
10. Proceed to "Installing the Master WebPass", next.
Installing the Master WebPassAfter installing the master COREid Server instance, you now need to install a master WebPass as you defined it in the System Console.
To install the master WebPass 1. Move earlier installed Identity System Language Packs into the same directory as
the earlier WebPass installer, if applicable.
2. Log in as a user with administrator privileges to modify the product and Web Server configuration files, then launch the earlier WebPass installer.
■ GUI Method, Windows:
NetPoint6_1_1_Win32_API_WebPass
■ Console Method, Solaris:
./ NetPoint6_1_1_sparc-s2_API_WebPass
The Welcome screen appears.
3. Dismiss the Welcome screen and respond to the administrator question based upon your platform.
4. Choose the installation directory. For example:
\OracleAccessManager\Webcomponent
5. Languages: If asked, choose a Default Locale to use for the Administrator language and any other Locales to install, then continue.
6. Choose the same transport security mode for the WebPass as you did for the Identity Server.
7. Enter unique information for this WebPass:
■ Name: A unique name for this WebPass: WebPass_611_ABC
■ Hostname: DNS hostname of the COREid Server with which this WebPass should communicate: Identity_DNS_hostname
■ Port: Port number of the COREid Server with which this WebPass should communicate: Identity_port
8. Complete the transport security details based on your earlier specification.
Note: Do not update the schema or data during this installation.

Adding An Earlier Identity System to Use as a Master for the In-place Method
Preparing for Schema and Data Upgrades 5-27
9. Automatically update your Web server configuration file as indicated.
10. Confirm Web server permissions, as needed.
11. Establish communication with the Identity Server as follows:
■ Stop the WebPass Web server instance.
■ Stop then restart Identity Server service.
■ Start the WebPass Web server instance.
12. Proceed to "Setting Up the Master Identity System for the In-place Schema and Data Upgrade".
Setting Up the Master Identity System for the In-place Schema and Data UpgradeAfter installing the additional COREid Server and WebPass, you must now set these up against your original master Read/Write directory server instances.
To set up the master Identity System for the schema and data upgrade1. Stop all COREid Server services, if you haven't already.
2. Start the new COREid Server service only.
3. Navigate to the COREid System Console, as usual. For example:
4. Click the Setup button.
5. Specify directory information as follows:
■ Specify your existing user data directory server type. For example: Sun.
■ Specify the existing user data directory server details based on your installation. For example:
– Host—The user data directory server DNS hostname
– Port Number—The user data directory server port number
– Root DN—The user data directory server bind DN
– Root Password—Password for the bind DN
– Directory Server Security Mode—Unsecured or SSL-enabled between the user data directory server and Identity Server
– Is Configuration data stored in this directory also?—Yes (default) or No
■ On the new page that asks you to specify the location of user and configuration data, enter the configuration bind DN and user data searchbase to be used. For example:
Note: You might be prompted to upload the schema to your LDAP server. However, this is not required because this step has already been done.
Note: If user data is stored separately from configuration data, a similar page appears where you can enter information for the configuration data directory. However, that sequence is not repeated here.

Adding an Earlier Access Manager to Use as a Master for the In-Place Method
5-28 Oracle Access Manager Upgrade Guide
– Configuration DN—o=my-company,c=us
– Searchbase—o=my-company,c=us
6. On the COREid Setup Complete page, click Done.
7. Create a summary of details for the master Identity Server and WebPass, as described in Appendix F.
8. Proceed as follows for your environment: If you have an existing Access System in your environment, proceed with
■ Existing Access System: Complete activities in "Adding an Earlier Access Manager to Use as a Master for the In-Place Method".
■ Identity System Only: Proceed to Chapter 6 for details about Identity System schema and data upgrades for the in-place upgrade method.
Adding an Earlier Access Manager to Use as a Master for the In-Place Method
This task must be completed only when your existing installation includes the Access System. You to create a master Access Manager (now known as the Policy Manager) as secondary server for your original master Read/Write directory server instances. This new instance will be used later during the Access System schema and data upgrade.
You will use this master to upgrade the existing Access System schema and data. You do not need to associate and install another Access Server nor a WebGate.
When your original Access Manager component is configured to use SSL-enabled communication with the directory server, the master that you add must also be configured to use SSL-enabled communication with the directory.
In addition to the procedures in this chapter, you can refer to your earlier version of the Oblix NetPoint or Oracle COREid Access Administration Guide (Volume 2 if you have a two volume set).
Task overview: Adding an earlier Access Manager as a master includes1. Installing the Master Access Manager for the In-place Schema and Data Upgrade
2. Setting Up the Master Access Manager for the In-place Method
Note: When setting up the instance as a secondary COREid Server, you are not prompted for Person or Group objectclass details. Instead, after specifying the location of user data and configuration data, the COREid Setup Complete page appears providing a Done button.
Note: If you are upgrading while switching from a Solaris platform to Linux, you can skip this step. The 10g (10.1.4.0.1) Access Manager instance that you install on a Linux host will serve the same purpose. For more information about upgrading while switching from a Solaris platform to Linux, see Appendix B.
Note: If your earlier installation does not include the Access System, you can skip this discussion.

Adding an Earlier Access Manager to Use as a Master for the In-Place Method
Preparing for Schema and Data Upgrades 5-29
Before you begin, confirm that you have completed tasks in Table 5–3. Failure to complete prerequisites might adversely affect your upgrade.
Installing the Master Access Manager for the In-place Schema and Data UpgradeAfter installing and setting up the master Identity System (formerly known as the COREid System), you can install an earlier Access Manager (now known as the Policy Manager) instance to use as a master for the policy data upgrade.
Again, the steps provided here are abbreviated. For more information, see your earlier Oblix NetPoint or Oracle COREid Installation Guide.
To install an earlier Access Manager for the schema and data upgrade 1. Move earlier installed Access System Language Packs into the same directory as
the earlier Access Manager installer, if applicable.
2. Log in as a user with administrator privileges to modify product and Web server configuration files, then launch the earlier Access Manager installer.
■ GUI Method, Windows:
NetPoint6_1_1_Win32_API__Access_Manager.exe
■ Console Method, Solaris:
./ NetPoint6_1_1_sparc-s2_API_Access_Manager
3. Dismiss the Welcome screen, and respond to the question about administrator rights based on your platform.
4. Choose the same installation directory as the WebPass. For example:
\OracleAccessManager\Webcomponent
5. Languages: If asked about languages, choose a Default Locale to use for the Administrator language and any other Locales (languages) to install, then click Next.
6. Respond when asked where policy data is stored and specify directory server details for this instance. For example:
■ Select your directory server type.
■ Respond to the question about where policy data is stored.
■ Select No when asked if you want to update the schema.
Table 5–3 Master Access Manager Installation Prerequisites
Master Access Manager Installation Prerequisites
Perform all preparation activities in this chapter, including "Adding An Earlier Identity System to Use as a Master for the In-place Method" on page 5-21, and:
■ If you have a multi-language environment, move 10g (10.1.4.0.1) Identity System Language Packs for currently installed languages into the same directory as the earlier WebPass installer that you will use here.
■ Check host compatibility in your earlier version of the Oblix NetPoint or Oracle COREid Installation Guide and complete any installation prerequisites needed for this COREid Server instance.
Review introductory information within chapters in Part I.
Note: Do not update the schema and data during this installation.

Adding an Earlier Access Manager to Use as a Master for the In-Place Method
5-30 Oracle Access Manager Upgrade Guide
■ On a Solaris system, when policy data is stored with other Oracle Access Manager (formerly known as NetPoint or COREid) data you are asked about the communication method for the existing directory server.
■ On a Windows system, when policy data is stored with other Oracle Access Manager data you are asked about communication with the directory server.
7. Specify the transport security mode this Policy Manager will use to communicate with the rest of the Access System.
8. Automatically update your Web server configuration file for this instance and specify the path to your Web server configuration file (then apply changes if you are using a Sun Web server).
9. Stop the Policy Manager Web server instance, stop and restart the Identity Server service, then start the Policy Manager Web server instance.
10. Finish the installation as usual, verify any Web server permissions, then proceed to "Setting Up the Master Access Manager for the In-place Method".
Setting Up the Master Access Manager for the In-place MethodThe earlier Access Manager you just added must be set up to communicate with your original master Read/Write directory server instances. The following procedures guide you as you make the connections that are necessary for this communication.
During setup, specifications are saved whenever you click the Next button. If you leave setup and restart it later, you are returned to the same place.
To start setting up the master Access Manager for the in-place method1. Make sure your Web server is running.
2. Navigate to the Access System Console from your browser by specifying the URL of the WebPass instance that connects to the Policy Manager. For example:
http://hostname:port/access/oblix
where hostname refers to computer that hosts the WebPass Web server; port refers to the HTTP port number of the WebPass Web server instance; and \access\oblix connects to the Access System Console.
You will see the main Access System page.
3. Click the Access System Console link.
You are informed that the application is not yet set up.
4. Click the Setup button.
The next page asks about the directory server type.
Note: Do not update the schema or data during this installation.
Note: Transport security between all Access System components must match: either all open, all Simple mode, or all Cert. When your original Access Manager component is configured to use SSL-enabled communication with the directory server you must choose SSL for this master component.

Adding an Earlier Access Manager to Use as a Master for the In-Place Method
Preparing for Schema and Data Upgrades 5-31
Specifying Directory Server Details and Data LocationsYou need to specify details about the directory servers where user data, configuration data, and policy data are currently stored. You will be asked to provide information about the directory server for each type of data.
To specify directory server details1. Select your user data directory server type, then click Next.
2. Specify the user data directory server details based on your installation, then click Next. For example:
■ Machine: The user data directory server DNS hostname
■ Port Number: The user data directory server port number
■ Root DN: The user data directory server bind DN
■ Root Password: The password for the bind DN
3. Select your configuration data directory server type, then click Next.
Next you are informed that you can store your user data and configuration data either in the same directory or in separate directories and asked to choose a configuration for your deployment.
4. Choose the item that describes where you user data and configuration data are stored (together or separately), then click Next.
■ If the data is stored together, you are asked where policy data should be stored. In this case, continue with step 5.
■ If the data is stored separately, you are asked to specify details for the configuration data directory server before you continue.
5. Choose the item that describes where your policy data and configuration data are stored (together or separately), then click Next.
■ If the data is stored together, continue with step 6.
■ If the data is stored separately, you are asked to specify details for the policy data directory server before you continue.
The Setup Help button appears on the next page, which you can select to obtain additional information during the setup process. You are now asked to specify the location of the configuration DN, searchbase, and policy base.
Note: For Active Directory, a Domain Name field is included to fill in. With ADSI, a User-Principle-Name field is included where you enter the UserPrincipleName of the Root DN, such as:[email protected].
Note: The configuration DN, searchbase, and policy base can be at the same level or at different levels of the directory tree. However, when the searchbase and the policy base are in separate directories, they must have unique DNs. That is, the searchbase cannot be o=oblix,<Policy Base> or ou=oblix,<Policy Base> if they are in separate directories. Similarly, the policy base and the configuration DN cannot be same if they are in separate directories.
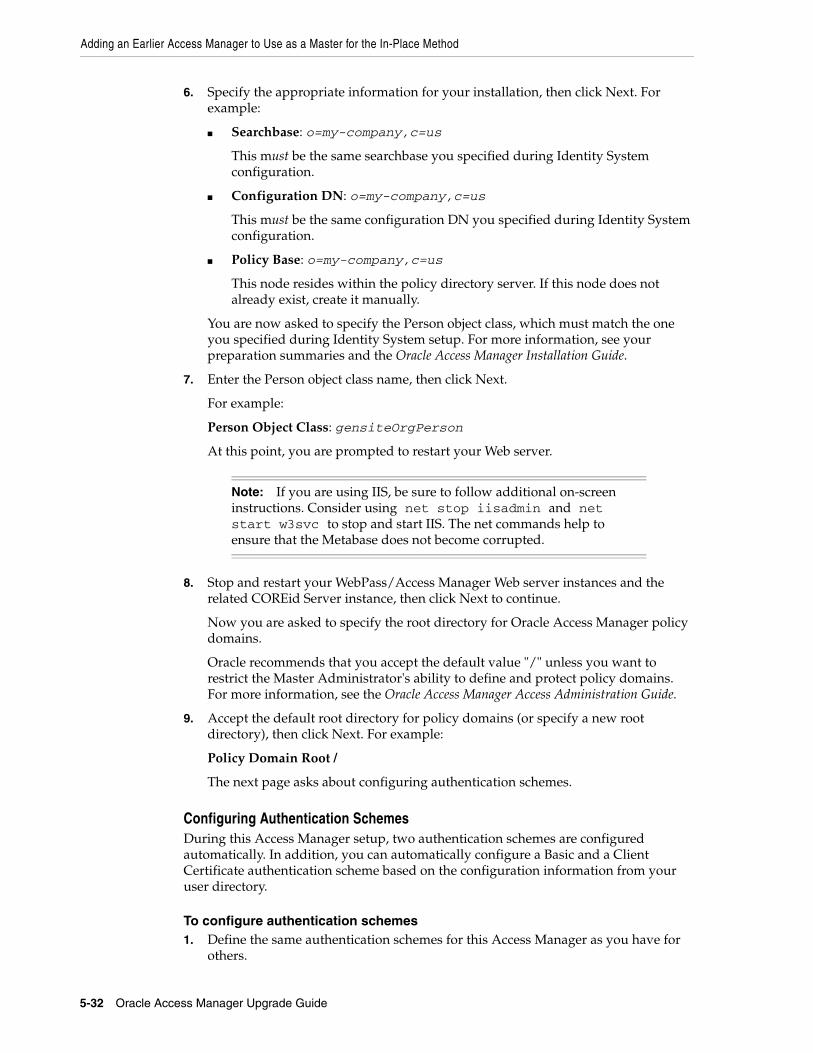
Adding an Earlier Access Manager to Use as a Master for the In-Place Method
5-32 Oracle Access Manager Upgrade Guide
6. Specify the appropriate information for your installation, then click Next. For example:
■ Searchbase: o=my-company,c=us
This must be the same searchbase you specified during Identity System configuration.
■ Configuration DN: o=my-company,c=us
This must be the same configuration DN you specified during Identity System configuration.
■ Policy Base: o=my-company,c=us
This node resides within the policy directory server. If this node does not already exist, create it manually.
You are now asked to specify the Person object class, which must match the one you specified during Identity System setup. For more information, see your preparation summaries and the Oracle Access Manager Installation Guide.
7. Enter the Person object class name, then click Next.
For example:
Person Object Class: gensiteOrgPerson
At this point, you are prompted to restart your Web server.
8. Stop and restart your WebPass/Access Manager Web server instances and the related COREid Server instance, then click Next to continue.
Now you are asked to specify the root directory for Oracle Access Manager policy domains.
Oracle recommends that you accept the default value "/" unless you want to restrict the Master Administrator's ability to define and protect policy domains. For more information, see the Oracle Access Manager Access Administration Guide.
9. Accept the default root directory for policy domains (or specify a new root directory), then click Next. For example:
Policy Domain Root /
The next page asks about configuring authentication schemes.
Configuring Authentication SchemesDuring this Access Manager setup, two authentication schemes are configured automatically. In addition, you can automatically configure a Basic and a Client Certificate authentication scheme based on the configuration information from your user directory.
To configure authentication schemes1. Define the same authentication schemes for this Access Manager as you have for
others.
Note: If you are using IIS, be sure to follow additional on-screen instructions. Consider using net stop iisadmin and net start w3svc to stop and start IIS. The net commands help to ensure that the Metabase does not become corrupted.

Finishing Preparation for the In-Place Schema and Data Upgrade
Preparing for Schema and Data Upgrades 5-33
2. Configure the same policies to protect Oracle Access Manager-related (formerly NetPoint or COREid) URLs.
Finishing the Master Access Manager SetupYou finalize setting up the master Access Manager component as follows.
To finalize the master Access Manager setup1. Complete the set up process as described onscreen.
2. Create a summary of details for the master Access Manager, as described in Appendix F.
Proceed to "Finishing Preparation for the In-Place Schema and Data Upgrade".
Finishing Preparation for the In-Place Schema and Data UpgradeThe following tasks should be performed on the master instances that you have added to use during the schema and data upgrade. Topics that describe how to prepare components for the upgrade can be found in Chapter 8.
Task overview: Finishing preparation for the in-place schema and data upgrade is explained in following topics1. Preparing Release 6.x Environments on page 8-4 (if needed)
2. Preparing Multi-Language Installations on page 8-7 (if needed)
3. Backing Up the Existing Component Installation Directory of master components is described on page 8-7
4. Backing Up the Existing Web Server Configuration File of master Web components is described on page 8-8
5. Windows: Backing Up Windows Registry Data of master components is described on page 8-9 (if needed)
6. Stopping Servers and Services is described on page 8-9
7. Logging in with Appropriate Administrative Rights is described on page 8-10
8. When you finish all preparation tasks, you are ready to upgrade the Identity System schema and data in place, as described in Chapter 6.
Note: In this specific case, where you plan to use this Access Manager setup to upgrade the existing Access System schema and data, you do not need to associate and install another Access Server nor a WebGate.
Note: You perform these activities even if you are upgrading while switching from a Solaris platform to Linux as described in Appendix B.
Finishing Preparation for the In-Place Schema and Data Upgrade
5-34 Oracle Access Manager Upgrade Guide

Upgrading Identity System Schema and Data In Place 6-1
6Upgrading Identity System Schema and Data
In Place
This chapter is intended to be used by directory server administrators who are responsible for updating directory schemas and data. This chapter focuses on upgrading the Oracle Access Manager (formerly known as Oblix NetPoint or Oracle COREid) Identity System schema and data using the in-place method. The following topics are provided:
■ About Upgrading the Identity System Schema and Data
■ Upgrading the Schema and Data In Place with the Master Identity Server
■ Upgrading the Master WebPass
■ Verifying the Identity System Schema and Data Upgrade
■ Uploading Directory Server Index Files
■ Renaming Audit Files After Upgrading the Schema and Data
■ Backing Up Upgraded Identity Data
■ Halting On-the-fly Migration of User Data: Phase 2
■ Recovering From an Identity System Schema or Data Upgrade Failure
■ Looking Ahead
About Upgrading the Identity System Schema and DataFigure 6–1 illustrates the tasks you must perform to complete the Identity System schema and data upgrade. Additional notes follow the figure. You will see references to the Identity Server (formerly known as the NetPoint or COREid Server). Refer to your own planning summaries and use the tracking summaries in Appendix F to check your progress.
Note: If you are using the zero downtime method, skip this chapter and see Part VI. If your starting Oracle Access Manager release is earlier than 6.1.1, contact Oracle Support before upgrading: http://www.oracle.com/support/contact.html

About Upgrading the Identity System Schema and Data
6-2 Oracle Access Manager Upgrade Guide
Figure 6–1 Identity System Schema and Date Upgrade Task
Task overview: Upgrading the Identity System schema and data 1. Complete all prerequisite tasks outlined in "Master Identity System Schema and
Data Upgrade Prerequisites" on page 6-4.
2. Upgrade the newly added master Identity Server and accept the automatic schema and data upgrade as explained in "Upgrading the Schema and Data In Place with the Master Identity Server" on page 6-3.
3. Upgrade the master WebPass you added, as discussed in "Upgrading the Master WebPass" on page 6-13
4. Confirm the upgrade was successful, as described in "Verifying the Identity System Schema and Data Upgrade" on page 6-16.
5. Upgrade Successful: Perform remaining activities in the following sequence:
Note: Problems During the Upgrade: Review any recovery details that are present in the procedure and look for specific troubleshooting tips in Appendix G.
Complete all Prerequisites(Chapter 5)
Start from 6.1.1, 6.5, or 7x?Use 10.1.4 Installers
ExistingAccess System?
No
Upgrade Access System Schema and Policy Data(Chapter 7)
Upgrade Identity System Schema and Data(Master Identity Server Only)(This Chapter)
Upgrade Master WebPass(This Chapter)
Confirm Upgrade is Sucessful(This Chapter)
Upload Directory Server Index Files(This Chapter)
Back Up Upgrade Data(This Chapter)
Halt User Data Migration Phase 2(This Chapter)
Yes

Upgrading the Schema and Data In Place with the Master Identity Server
Upgrading Identity System Schema and Data In Place 6-3
■ Uploading Directory Server Index Files
■ Backing Up Upgraded Identity Data
■ Halting On-the-fly Migration of User Data: Phase 2
6. Upgrade Not Successful: Proceed to "Recovering From an Identity System Schema or Data Upgrade Failure" on page 6-25.
Summaries that can help you track the completion of upgrade tasks in your environment are provided in Appendix F.
Upgrading the Schema and Data In Place with the Master Identity ServerIn this task, you will use the 10g (10.1.4.0.1) Identity Server installer to upgrade the earlier COREid Server instance that you added as a master for this purpose. After launching the 10g (10.1.4.0.1) Identity Server installer, the sequence of events and questions to which you must respond are directed by the program.
Figure 6–2 illustrates the program-driven process and decision points where you are asked to provide specific responses to continue. Each box in the diagram points to a similarly named discussion that guides you through the procedure. You must complete all procedures for a successful upgrade.
Figure 6–2 Identity System Schema and Data Upgrade Process
Task overview: Upgrading the schema and data with the master Identity Server includes 1. Starting the Master Identity Server Upgrade on page 6-5 describes how to launch
the upgrade using your preferred method (GUI or Console).
Start Identity Server Upgrade1
Specify Target Directory and Languages2
Upgrade Identity System Schema and Data(Master Identity Server only)3
Enable Multi-Language Capability (Master Identity Server only)4
Upgrade Identity Server Configuration Files5
Upgrade SDK Configuration (all Identity Servers)6
Finish and Verify the Upgrade7

Upgrading the Schema and Data In Place with the Master Identity Server
6-4 Oracle Access Manager Upgrade Guide
2. Specifying the Target Directory and Languages on page 6-5 describes how you indicate the directory where the existing component is installed as well as any languages to upgrade.
3. Updating the Identity System Schema and Data on page 6-7 describes how to accept the automatic schema and data upgrade.
■ Oracle recommends that you accept the automatic schema and data upgrade for the master Identity Server.
■ Later, when upgrading remaining COREid Servers, the upgraded schema and data are detected automatically; related messages and events are suppressed.
4. Enabling Multi-Language Capability on page 6-8 describes the automated process that occurs only when you upgrade a release 6.1.1 master COREid Server.
5. Upgrading Identity Server Configuration Files on page 6-9 describes how to apply changes to the component-specific configuration files.
6. Upgrading the Software Developer Kit (SDK) Configuration on page 6-12 shows how to accept or decline the SDK configuration changes.
7. Finishing and Verifying the Master COREid Server Upgrade on page 6-13 describes critical actions that you need to take to determine the success of the upgrade.
Master Identity System Schema and Data Upgrade Prerequisites Before you begin upgrading the schema and data with the master Identity Server, ensure that you have completed the tasks in Table 6–1. Failure to complete prerequisites might adversely affect your upgrade.
Note: With ADAM you must manually upgrade the schema; however, the data upgrade is automatic. For more information, see "Active Directory Application Mode Considerations and Preparation" on page 5-13.
Note: Enabling multi-language capability is automatically skipped if your starting release is 6.5 or 7.x.
Note: If this master COREid Server does not have caching configured, you can decline the automatic SDK configuration upgrade.
Table 6–1 Schema and Data Upgrade Prerequisites
Schema and Data Upgrade Prerequisites
Perform all required schema and data preparation steps in Chapter 5.
■ If you have a multi-language environment, see also "Preparing Multi-Language Installations" on page 8-7.
■ If you are upgrading a release 6.x installation, see also "Preparing Release 6.x Environments" on page 8-4
Familiarize yourself with information in the introductory chapters in Part I

Upgrading the Schema and Data In Place with the Master Identity Server
Upgrading Identity System Schema and Data In Place 6-5
Starting the Master Identity Server UpgradeThis manual uses the GUI method and Automatic mode to illustrate the sequence of events, sample responses, and messages you might see. In this manual, differences are noted as needed. Even in Automatic mode, you are required to respond to questions about the schema and data upgrade.
If a step does not relate to your environment, you can ignore it. For example, if you have a Windows environment, ignore steps for Unix and vice versa:
■ Windows: If you are logged in with administrator rights, click Next.
■ Unix: Specify the username and group that the component will use, then click Next.
The sample upgrade explained in the following procedure starts from a release 6.1.1 installation and includes enabling a multi-language environment.
To start the master Identity Server upgrade1. Ensure that all prerequisites are completed as described in "Master Identity System
Schema and Data Upgrade Prerequisites".
2. Turn off the master COREid Server service and log in as a user with the appropriate administrator privileges to update the schema and Oracle Access Manager files.
3. Launch the 10g (10.1.4.0.1) Identity Server installer as usual. For example:
GUI Method, Windows: Oracle_Access_Manager10_1_4_0_1_win32_Identity_Server.exe
Console Method, Solaris: ./Oracle_Access_Manager10_1_4_0_1_sparc-s2_Identity_Server
The Welcome screen appears.
4. Dismiss the Welcome screen by clicking Next.
5. Respond to the administrator question based upon your platform. For example:
■ Windows: If you are logged in with administrator rights, click Next (otherwise click Cancel, log in as a user with administrator privileges, then restart the installation).
■ Unix: Specify the username and group that the Identity Server will use, then click Next. Typically, the defaults are "nobody."
6. Proceed as described in "Specifying the Target Directory and Languages" next.
Specifying the Target Directory and LanguagesIn this sequence, you must specify the same target directory for the upgrade as the master COREid Server you just installed. When the earlier component is detected, you are asked if you want to upgrade. When you accept the upgrade, the target directory is created and 10g (10.1.4.0.1) files are extracted into it.
After the target directory is created, you are asked to select the languages to upgrade. Unless you have 10g (10.1.4.0.1) Language Packs stored in the same directory as the 10g (10.1.4.0.1) Identity Server installer, only English is upgraded. After upgrading,
Note: If errors are reported during the process, check the named log file and look for specific troubleshooting details in Appendix G.
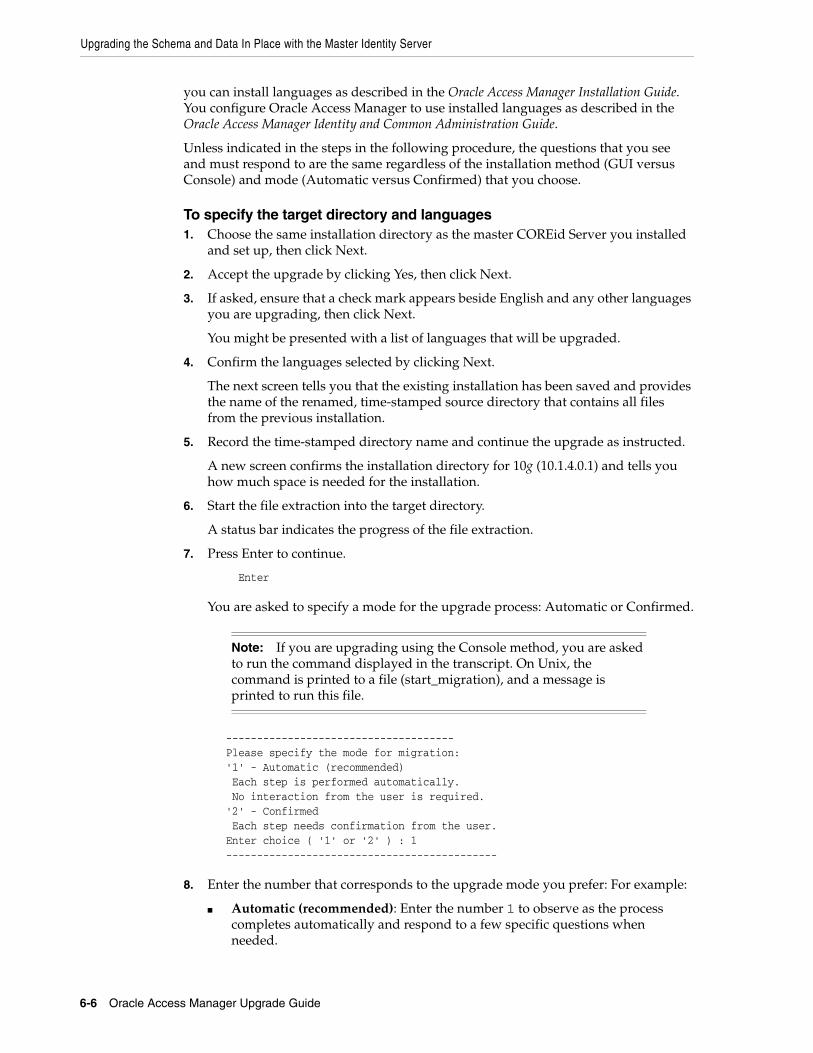
Upgrading the Schema and Data In Place with the Master Identity Server
6-6 Oracle Access Manager Upgrade Guide
you can install languages as described in the Oracle Access Manager Installation Guide. You configure Oracle Access Manager to use installed languages as described in the Oracle Access Manager Identity and Common Administration Guide.
Unless indicated in the steps in the following procedure, the questions that you see and must respond to are the same regardless of the installation method (GUI versus Console) and mode (Automatic versus Confirmed) that you choose.
To specify the target directory and languages1. Choose the same installation directory as the master COREid Server you installed
and set up, then click Next.
2. Accept the upgrade by clicking Yes, then click Next.
3. If asked, ensure that a check mark appears beside English and any other languages you are upgrading, then click Next.
You might be presented with a list of languages that will be upgraded.
4. Confirm the languages selected by clicking Next.
The next screen tells you that the existing installation has been saved and provides the name of the renamed, time-stamped source directory that contains all files from the previous installation.
5. Record the time-stamped directory name and continue the upgrade as instructed.
A new screen confirms the installation directory for 10g (10.1.4.0.1) and tells you how much space is needed for the installation.
6. Start the file extraction into the target directory.
A status bar indicates the progress of the file extraction.
7. Press Enter to continue.
Enter
You are asked to specify a mode for the upgrade process: Automatic or Confirmed.
------------------------------------- Please specify the mode for migration: '1' - Automatic (recommended) Each step is performed automatically. No interaction from the user is required. '2' - Confirmed Each step needs confirmation from the user. Enter choice ( '1' or '2' ) : 1 --------------------------------------------
8. Enter the number that corresponds to the upgrade mode you prefer: For example:
■ Automatic (recommended): Enter the number 1 to observe as the process completes automatically and respond to a few specific questions when needed.
Note: If you are upgrading using the Console method, you are asked to run the command displayed in the transcript. On Unix, the command is printed to a file (start_migration), and a message is printed to run this file.

Upgrading the Schema and Data In Place with the Master Identity Server
Upgrading Identity System Schema and Data In Place 6-7
■ Confirmed: Enter the number 2 to receive a prompt that you must respond to before each activity.
The declarative messages in this guide are based on Automatic mode. In this case, you are informed as folders are created, files are copied, and catalogs are upgraded. For example:
Creating original folders ... ---------------------------------------------------- Copying general configuration files OK. ---------------------------------------------------- Updating parameter catalogs ... OK. ----------------------------------------------------
When the upgrade program connects with the directory server, a transcript appears as shown next.
Starting migration (6.1.1 -> 6.5.0) ---------------------------------------------------- Oracle Access Manager schema migration ... ----------------------------------------------------
9. Regardless of the mode you have chosen, continue with "Updating the Identity System Schema and Data", next.
Updating the Identity System Schema and DataOracle recommends that you upgrade the schema and data automatically. Aside from the instructions related to specific directory servers, the upgrade transcript is similar regardless of the from and to versions or the directory server type.
Unless you are upgrading from Oracle Access Manager 7.0, some portions of the transcript will repeat during the component-specific upgrade sequence. For example if you are upgrading from release 6.1.1, a portion of the dialog will appear once during the upgrade to release 6.5, then repeat during the upgrade to release 7, then repeat again during the upgrade to release 10g (10.1.4.0.1).
The following steps presume that you have chosen Automatic mode. Even so, you will be asked to respond to certain questions.
To upgrade the schema and data1. Review the information about the schema upgrade and note the from and to
versions. For example:
Oracle Access Manager schema migration ...
Retrieving Oracle configuration parameters ... OK. The following directory server's schema will be updated: Host:DNShostname.domain.com Port: port#
Note: All schema modifications can be applied to only a master Read/Write directory instance (not against a read-only replica, if any). For more information, see "Strategies for Upgrading in a Replicated Environment" on page 5-4.

Upgrading the Schema and Data In Place with the Master Identity Server
6-8 Oracle Access Manager Upgrade Guide
Type:ns NOTE: If you do not want to migrate schema at this time, type 'SKIP'. Please type 'Yes" to proceed:
2. At the prompt, type the full word "yes" to load the schema.
yes
The program updates the schema, while the transcript keeps you informed:
Updating schema. Please wait ... OK. -------------------------------------------------
During this step, configuration data is also retrieved, parameters are upgraded, and you are informed in the transcript.
3. At the prompt, type the full word "yes" to load the data.
yes
The program converts configuration data, removes older configuration data that is no longer needed, imports new configuration parameters, and so on, while the transcript keeps you informed.
4. Continue as instructed, and proceed to "Enabling Multi-Language Capability" on page 6-8.
Enabling Multi-Language CapabilityIf your starting release is 6.5 or later, this process does not occur and you can skip this discussion. releases 6.5 and 7.x automatically support a multi-language environment. As a result, when you start upgrading from release 6.5 or 7.x, this event is skipped automatically.
Enabling multi-language capability occurs only during the incremental upgrade of the schema and configuration data from release 6.1.1 to release 6.5. During this phase, the \lang directory structure is included in your upgraded environment and the \en-us subdirectory is provided. Other language subdirectories are included for each additional language that you are upgrading. For more information, see Appendix A.
The following sample shows the messages that keep you informed, and actions you need to take, during the multiple language enabling sequence. In Automatic mode, the only input required from you is acknowledgment of the events.
Note: You are asked if you want to migrate (upgrade) the schema. Do not skip this activity. With ADAM, automatic schema updates are not supported. See "Active Directory Application Mode Considerations and Preparation" on page 5-13.
Note: You are asked if you want to migrate (upgrade) the data. Do not skip this activity.

Upgrading the Schema and Data In Place with the Master Identity Server
Upgrading Identity System Schema and Data In Place 6-9
To respond during the multi-language sequence1. Read the messages on language upgrades.
For example:
------------------------------------- Oracle Access Manager language migration.... Retrieving Oracle configuration parameters... OK. Support for multiple languages is not enabled. Performing language migration... Updating language migration parameters... OK.
The following directory server's data will be updated to support multiple languages:
Host:DNShostname.domain.com Port: port# Type:ns
The default language (detected from your existing installation) is: en-us Press <Enter> to continue
2. Press the Enter key to continue:
ENTER
The transcript now describes that data is converted for enabling multiple languages and that new language migration data is being imported.
3. At the prompt following successful language migration, press the Enter key to continue:
ENTER
Upgrading Identity Server Configuration FilesEach component upgrade includes a sequence of events that upgrade the component configuration files. Depending on your starting release, aspects of the sequence might repeat to bring the earlier release up to 10g (10.1.4.0.1) incrementally. For example, if your starting release is 6.1.1 the schema and data are upgraded with component configuration data for release 6.5. During the component sequence in the next procedure, the schema and data are upgraded again for release 7.0, then again for 10g (10.1.4.0.1).
In Automatic mode, you must type the full word "yes" or press the Enter key when asked to continue the upgrade through each sequence of events.
To accept the Identity Server configuration file changes 1. Read the messages regarding the component upgrade. For example:
Note: Your environment might vary. If interim schema and data upgrade messages appear, respond to continue. Do not skip any events. However, if interim schema upgrade messages do not appear, skip to step 5.

Upgrading the Schema and Data In Place with the Master Identity Server
6-10 Oracle Access Manager Upgrade Guide
Updating component-specific configuration ... OK. Starting migration ( 6.5.0 -> 7.0.0 )... ------------------------------------- Oracle Access Manager schema migration.... Retrieving Oracle configuration parameters... OK.
The following directory server's schema will be updated: Host:DNShostname.domain.com Port: port# Type:ns NOTE: If you do not want to migrate schema at this time, type 'SKIP'.
Please type 'yes' to proceed:
2. If Interim Schema Upgrade Messages Appear: Type the full word "yes," when asked on the screen, then review the next set of messages and proceed with step 3.
yes
Updating schema. Please wait... OK. Retrieving User configuration parameters... OK. ------------------------------------- Oracle Access Manager data migration.... Retrieving Oracle configuration parameters... OK. Could not detect the language for your installation!
Checking product version... Version not up to date. Performing Configuration data migration... Updating Oracle migration parameters...
The following directory server's schema will be updated: Host:DNShostname.domain.com Port: port# Type:ns NOTE: If you do not want to migrate schema at this time, type 'SKIP'.
Please type 'yes' to proceed:
3. Respond when requested to continue and review messages to track the process. For example:
OK. Converting Configuration data. Please wait... .......................... OK. Removing old Configuration data. Please wait... .......................... .......................... ............ OK.
Cleaning up obsolete schema from the directory. Deleting obsolete schema for osd. Please wait... Importing new Configuration data. Please wait ...
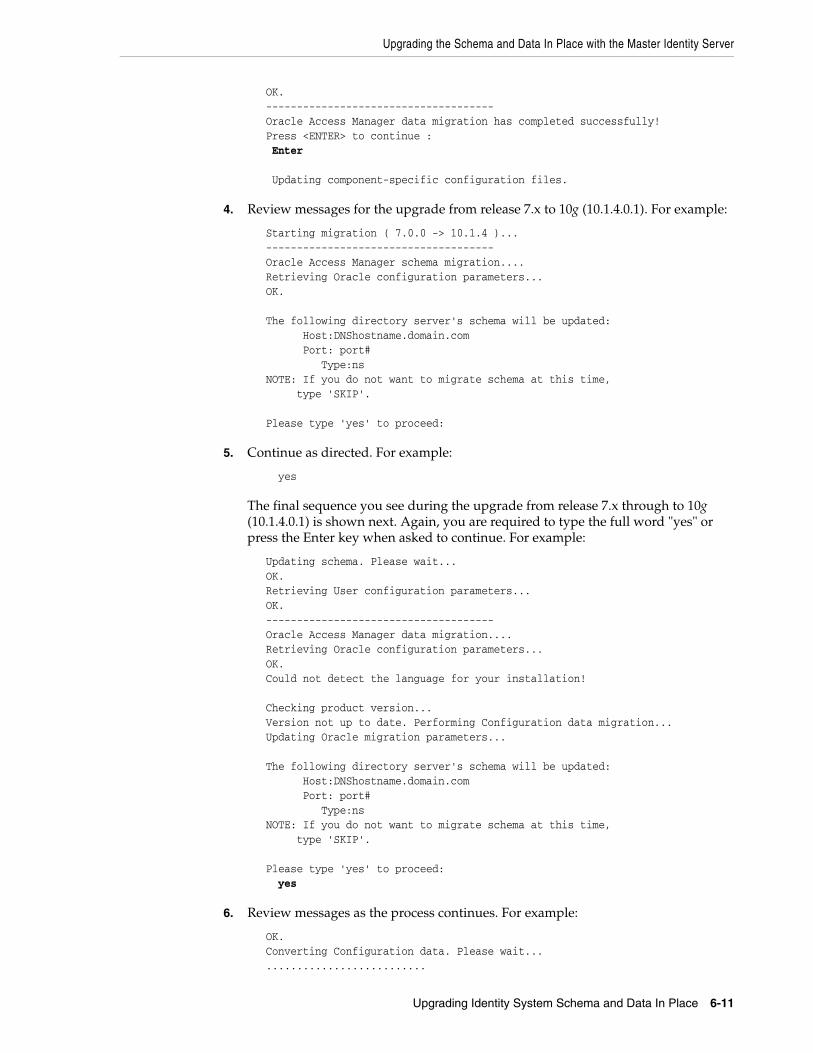
Upgrading the Schema and Data In Place with the Master Identity Server
Upgrading Identity System Schema and Data In Place 6-11
OK. ------------------------------------- Oracle Access Manager data migration has completed successfully! Press <ENTER> to continue : Enter
Updating component-specific configuration files.
4. Review messages for the upgrade from release 7.x to 10g (10.1.4.0.1). For example:
Starting migration ( 7.0.0 -> 10.1.4 )... ------------------------------------- Oracle Access Manager schema migration.... Retrieving Oracle configuration parameters... OK.
The following directory server's schema will be updated: Host:DNShostname.domain.com Port: port# Type:ns NOTE: If you do not want to migrate schema at this time, type 'SKIP'.
Please type 'yes' to proceed:
5. Continue as directed. For example:
yes
The final sequence you see during the upgrade from release 7.x through to 10g (10.1.4.0.1) is shown next. Again, you are required to type the full word "yes" or press the Enter key when asked to continue. For example:
Updating schema. Please wait... OK. Retrieving User configuration parameters... OK. ------------------------------------- Oracle Access Manager data migration.... Retrieving Oracle configuration parameters... OK. Could not detect the language for your installation!
Checking product version... Version not up to date. Performing Configuration data migration... Updating Oracle migration parameters...
The following directory server's schema will be updated: Host:DNShostname.domain.com Port: port# Type:ns NOTE: If you do not want to migrate schema at this time, type 'SKIP'.
Please type 'yes' to proceed: yes
6. Review messages as the process continues. For example:
OK. Converting Configuration data. Please wait... ..........................

Upgrading the Schema and Data In Place with the Master Identity Server
6-12 Oracle Access Manager Upgrade Guide
OK. Removing old Configuration data. Please wait... .......................... .......................... OK. Importing new Configuration data. Please wait ... OK. ------------------------------------- Oracle Access Manager data migration has completed successfully! Press <ENTER> to continue :
7. Continue when asked and review the final message. For example:
Enter
Updating component-specific configuration files... OK.
Migration has completed successfully! Press <ENTER> to continue : -----------------------+++++++++++++--------------
8. Proceed with "Upgrading the Software Developer Kit (SDK) Configuration" next.
Upgrading the Software Developer Kit (SDK) ConfigurationThis event can be skipped when you are upgrading a master COREid Server that has not been configured to use the SDK. However, if the SDK was configured for this COREid Server, Oracle recommends that you upgrade the configuration now to preserve current settings.
To skip the SDK upgrade for the master COREid Server instance1. Enter the appropriate number to respond to the question (about migrating the
SDK), based on this instance in your environment.
This component has the Access Server SDK installed
Would you like to automatically migrate the SDK at this time?
Note: If you do not want to migrate the SDK at this time, you will need to reconfigure the SDK after migration has finished by running the 'configureAccessGate' program '1' - Yes '2' - No Enter choice ( '1' or '2' ) : 2
2. Press Enter to continue when asked. For example:
Enter
3. Go to "Finishing and Verifying the Master COREid Server Upgrade".
Note: If you do not upgrade current SDK configuration settings, these are not preserved and you must reconfigure them later using the configureAccessGate tool. See the Oracle Access Manager Identity and Common Administration Guide.

Upgrading the Master WebPass
Upgrading Identity System Schema and Data In Place 6-13
Finishing and Verifying the Master COREid Server UpgradeYou complete this procedure to finish the upgrade of the master COREid Server and the Identity System schema and data.
To finish the master COREid Server upgrade1. Start the COREid Server service to confirm that it will start (notice that the name
has not changed from the one originally assigned).
2. COREid Server Service Does Not Start: See troubleshooting tips in Appendix G.
3. Check the migration log files for any errors reported during the schema or data upgrade. See "Accessing Log Files" on page G-2.
4. Upgrade Not Successful: Proceed to "Recovering From an Identity System Schema or Data Upgrade Failure" on page 6-25.
5. Upgrade Successful: Proceed with "Upgrading the Master WebPass" next.
Upgrading the Master WebPassAfter upgrading the master Identity Server, you must upgrade the master WebPass instance. There is no WebPass connection to a directory server. Therefore, there is no schema or data upgrade during a WebPass upgrade.
When upgrading WebPass (and other Oracle Access Manager Web components), the component-specific upgrade includes both Web component and Web server configuration file updates. There are no differences between upgrading the master WebPass now and upgrading subsequent WebPass instances later on.
Figure 6–3 illustrates the program-driven WebPass upgrade process and the points at which you need to provide specific input or acknowledge events. Additional comments follow the figure.
Figure 6–3 Master WebPass Upgrade Process
Task overview: Upgrading master WebPass includes1. Starting the Master WebPass Upgrade, Specifying a Target Directory and
Languages
2. Upgrading WebPass Configuration Files and Web Server Configuration
Note: The new product term for COREid Server is Identity Server, which will be used in the remainder of this guide. For more information, see "Product and Component Name Changes" on page -xxv.
StartSpecify Directory and Languages1
Upgrade Component and Web Server Configuration Files2
Finish and Verify the Upgrade3

Upgrading the Master WebPass
6-14 Oracle Access Manager Upgrade Guide
3. Finishing and Verifying the Master WebPass Upgrade
Again, unless you are upgrading from release 7, certain processes repeat automatically for each major release until you reach 10g (10.1.4.0.1).
Master WebPass Upgrade Prerequisites Before you begin upgrading the master WebPass instance, check Table 6–2 to ensure you have completed all tasks. Failure to complete prerequisites can adversely affect your upgrade.
Starting the Master WebPass Upgrade, Specifying a Target Directory and LanguagesThe sample upgrade described here starts from release 6.1.1 using the GUI method and Automatic mode. The sequence of events and messages directed by the program require very little input from you. Much of this is similar to upgrading the master Identity Server. The target directory for the 10g (10.1.4.0.1) master WebPass upgrade must be the same as the earlier component.
To start the master WebPass upgrade1. Ensure that all prerequisites are completed as described in "Master WebPass
Upgrade Prerequisites".
2. Turn off this WebPass Web server instance.
3. Log in as a user with the administrator privileges to update the WebPass and Web server configuration.
4. Locate and launch the 10g (10.1.4.0.1) WebPass installer for your Web server. For example:
GUI Method Windows: Oracle_Access_Manager10_1_4_0_1_win32_NSAPI_WebPass.exe
Console Method Solaris: ./Oracle_Access_Manager10_1_4_0_1_sparc-s2_NSAPI_WebPass
The Welcome screen appears.
5. Dismiss the Welcome screen, then respond when asked about your administrator rights.
6. Choose the directory that contains the earlier WebPass instance.
Table 6–2 WebPass Upgrade Prerequisites
WebPass Upgrade Prerequisites
Upgrade the master Identity Server as described in "Upgrading the Schema and Data In Place with the Master Identity Server" on page 6-3.
Complete all component preparation activities in Chapter 8 for this WebPass instance, and:
■ If you have a multi-language environment, see "Preparing Multi-Language Installations" on page 8-7
■ If you are upgrading a release 6.x installation, see "Preparing Release 6.x Environments" on page 8-4
Note: If errors are reported at any time during the process, check the named log file. See "Accessing Log Files" on page G-2.
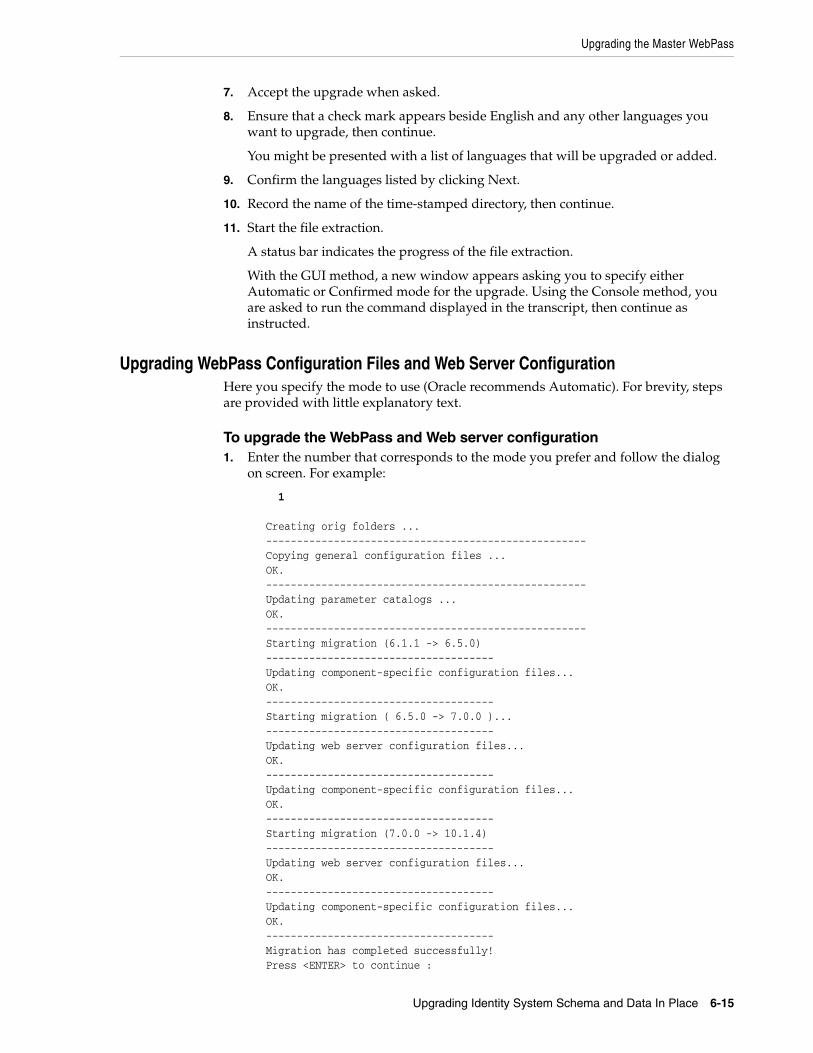
Upgrading the Master WebPass
Upgrading Identity System Schema and Data In Place 6-15
7. Accept the upgrade when asked.
8. Ensure that a check mark appears beside English and any other languages you want to upgrade, then continue.
You might be presented with a list of languages that will be upgraded or added.
9. Confirm the languages listed by clicking Next.
10. Record the name of the time-stamped directory, then continue.
11. Start the file extraction.
A status bar indicates the progress of the file extraction.
With the GUI method, a new window appears asking you to specify either Automatic or Confirmed mode for the upgrade. Using the Console method, you are asked to run the command displayed in the transcript, then continue as instructed.
Upgrading WebPass Configuration Files and Web Server ConfigurationHere you specify the mode to use (Oracle recommends Automatic). For brevity, steps are provided with little explanatory text.
To upgrade the WebPass and Web server configuration1. Enter the number that corresponds to the mode you prefer and follow the dialog
on screen. For example:
1
Creating orig folders ... ---------------------------------------------------- Copying general configuration files ... OK. ---------------------------------------------------- Updating parameter catalogs ... OK. ---------------------------------------------------- Starting migration (6.1.1 -> 6.5.0) ------------------------------------- Updating component-specific configuration files... OK. ------------------------------------- Starting migration ( 6.5.0 -> 7.0.0 )... ------------------------------------- Updating web server configuration files... OK. ------------------------------------- Updating component-specific configuration files... OK. ------------------------------------- Starting migration (7.0.0 -> 10.1.4) ------------------------------------- Updating web server configuration files... OK. ------------------------------------- Updating component-specific configuration files... OK. ------------------------------------- Migration has completed successfully! Press <ENTER> to continue :

Verifying the Identity System Schema and Data Upgrade
6-16 Oracle Access Manager Upgrade Guide
2. Press the Enter Key.
Enter
If the Access System is also configured, you need to create a DB Profile manually after first WebPass component upgrade is completed and before upgrading the first Policy Manager. The profile gives the Access Server write permission to Policy data in the directory server and will be used whileupgrading the WebGate component. The profile can be deleted after allthe WebGates are successfully upgraded.
Directory permissions copied ...C:\NetPoint\WebComponent\identity_20060223_180406\oblix)C:\NetPoint\WebComponent\identity\oblix)---------------------------------------------------Migration has completed successfully!Press <ENTER> to continue.
3. Conclude the master WebPass upgrade and proceed to the next discussion, "Finishing and Verifying the Master WebPass Upgrade".
Finishing and Verifying the Master WebPass UpgradeYou finish this master WebPass upgrade as described in the following procedure.
To finish the master WebPass upgrade1. Apply Web server changes, if needed.
2. Stop, then restart Identity Server service.
3. Start the WebPass Web server instance.
4. Web Server Does Not Start: See troubleshooting tips in Appendix G.
5. Check the migration log files for any errors reported during the master WebPass upgrade. See "Accessing Log Files" on page G-2.
6. Upgrade Successful: Proceed with "Verifying the Identity System Schema and Data Upgrade" next.
7. Upgrade Not Successful: Proceed to "Recovering From an Identity System Schema or Data Upgrade Failure" on page 6-25.
Verifying the Identity System Schema and Data UpgradeYou complete this task to confirm that the Identity System upgrade has been successful.
To verify the schema and data upgrade1. Check to ensure that the schema contains 10g (10.1.4.0.1) attributes
obPolicyEnabled and objectclass oblixLPMPolicy.
Note: If you have a joint deployment that includes the Access System, you create a temporary directory profile after finishing all activities in this chapter and after upgrading the Access System schema and data with the master Access Manager component upgrade. Details are provided in the next chapter.

Uploading Directory Server Index Files
Upgrading Identity System Schema and Data In Place 6-17
2. View the configuration node in the configuration directory server and confirm that the value of the obver attribute is 10.1.4.0.
3. Upgrade Successful: Perform the tasks in the following list, as described in:
■ Uploading Directory Server Index Files
■ Backing Up Upgraded Identity Data
■ Halting On-the-fly Migration of User Data: Phase 2
■ Looking Ahead
4. Upgrade Not Successful: Proceed to "Recovering From an Identity System Schema or Data Upgrade Failure" on page 6-25.
Uploading Directory Server Index FilesDuring the master Identity Server (and master Access Manager if you have the Access System installed) upgrade, schema files that include only changes from one release to the next are used to upgrade the existing schema. As a result, the schema and data upgrade repeats for each major product release (for example, from release 6.1.1 to release 6.5, from release 6.5 to release 7.x, and from release 7.x to release 10g (10.1.4.0.1)).
For many directory servers, the indexes are automatically updated during the schema and data upgrade. However, when your Oracle Access Manager deployment includes Sun (formerly iPlanet) directory, Novell eDirectory (NDS), and Oracle Internet Directory, you must manually update the directory index files after upgrading the master Identity Server (and master Policy Manager), you need to update the directory index files. The files you use to perform this task are stored in:
IdentityServer_install_dir/identity/oblix/data.ldap/common
PolicyManager_install_dir/access/oblix/data.ldap/common
Two index files are provided for each directory server upgrade: the Sun (formerly iPlanet) directory, Novell eDirectory (NDS), and Oracle Internet Directory. One file contains the complete set of 10g (10.1.4.0.1) attributes for the user data index and the other contains the complete set of 10g (10.1.4.0.1) attributes for the Oracle Access Manager configuration and policy data index, respectively:
■ iPlanet5_user_index_add.ldif and iPlanet5_oblix_index_add.ldif
■ NDS_user_index_add.ldif and NDS_oblix_index_add.ldif
■ OID_user_index_add.ldif and OID_oblix_schema_index_add.ldif
If policy data is stored on the same directory instance as user data, the _oblix_index_add.ldif is added once after first Identity Server upgrade only. However, if the policy data is stored on a different directory instance, you must upload the oblix_index_add.ldif file after both the first (Master) Identity Server upgrade and after the first (Master) Policy Manager upgrade.

Uploading Directory Server Index Files
6-18 Oracle Access Manager Upgrade Guide
Table 6–3 provides a list of the specific attributes to which indexes might need to be manually applied after schema and data upgrades. These apply to all directory servers except Oracle Internet Directory. As mentioned earlier, for most directories the indexes are automatically updated during the schema and data upgrade. However, for Sun, Novell eDirectory, and Oracle Internet Directory you must manually upload directory index files, as described in this chapter.
Note: In addition to uploading the index files mentioned earlier for your specific directory server, you will also need to manually add an index for the obpolicykeyword attribute after the master Policy Manager (formerly known as the Access Manager component) upgrade (if you have Access System configured). The obpolicykeyword attribute is currently missing from all 10g (10.1.4.0.1) index ldif files and cannot be added automatically during the master Policy Manager upgrade.
Table 6–3 Indexed Attributes for All Directories Except Oracle Internet Directory
Specific Attributes
obactionname
obactordn
obapp
obattr
obclass
obdatecreated
obdateprocessed
obdirectreports
obentrycondition
obgroupadministrator
obgroupcreator
obgroupdynamicfilter
obgroupexpandeddynamic
obgrouppuredynamic
obgroupsubscribemessage
obgroupsubscribenotification
obgroupsubscriptionfilter
obgroupsubscriptiontype
obgroupunsubscribemessage
obid
obindirectmanager
oblocationdn
oblocationname
oblocationtitle
oblockedby

Uploading Directory Server Index Files
Upgrading Identity System Schema and Data In Place 6-19
obname
obobjectclass
obpaneltype
obparentlocationdn
obparentstep
obparentworkflow
obparticipant
obpasswordpolicyid
obpolicyconditiongroupStr
obpolicyconditionuidStr
obready
obrectangle
obresourceattribute
obresourceoperation
obresourcetype
obresourceuidStr
obretrycount
obtargetdn
obuniquememberStr
obuseraccountcontrol
obwfinstanceid
obwfstatus
obwfstepid
obwfstepinstid
obwftypename
obworkflowname
obworkflowtype
obwftargetlabel
obworkflowdn
obworkflowstepdn
obisworkflowprovisioned
obdynamicparticipantsset
obLPMName
oburlprefix
obSiteDomainID
obHostContext
obdescription
Table 6–3 (Cont.) Indexed Attributes for All Directories Except Oracle Internet Directory
Specific Attributes

Uploading Directory Server Index Files
6-20 Oracle Access Manager Upgrade Guide
The steps you must complete to update the indexes depend on your directory server type, as described in:
■ Verifying and Uploading Oracle Internet Directory and Sun Directory Indexes
■ Verifying and Uploading Novell eDirectory Indexes
Verifying and Uploading Oracle Internet Directory and Sun Directory IndexesThe goal here is to obtain the newly introduced indexes associated with 10g (10.1.4.0.1) attributes and ignore any earlier indexes that might be present. If you see errors this is because your environment might already include existing indexes that belong to an earlier release. You can use the Continuous Mode option to continue adding new 10g (10.1.4.0.1) attributes in the event that one or more attributes were found to be indexed in an earlier release
To upload the Sun (formerly iPlanet) or Oracle Internet Directory index files1. Oracle Internet Directory: Manually execute directory-specific commands or the
directory Administrator Interface to confirm that the indexes have been added using information in the Oracle Access Manager Schema Description as a guide.
2. Sun (formerly iPlanet): Manually execute directory-specific commands or the directory Administrator Interface to confirm that the indexes have been added using Table 6–3 as a guide.
3. Locate the appropriate files for your directory server. For example:
IdentityServer_install_dir/identity/oblix/data.ldap/common /OID_user_index_add.ldif
4. Run the ldapmodify command (or use any import tool provided by your directory vendor) and use the Continuous Mode option to avoid any errors that can result when an earlier indexed attribute is found. For example
\IdentityServer_install_dir\identity\oblix\tools\ldap_tools\ldapmodify
run ldapmodify.exe –h DS_hostname -p DS_port_number -D bind_dn -w password -f OID_user_index_add.ldif -a -e reject_filename -c
5. Repeat step 2 using the directory_oblix_schema_index_add.ldif for your specific directory.
6. When finished, proceed to "Backing Up Upgraded Identity Data" on page 6-22.
obpolicyKeyword
Note: If you do not upload the indexes for iPlanet and NDS directories, the product will work. However, searching will be inefficient and impact performance. If you do not upload the indexes for Oracle Internet Directory, users will not be able to log in.
Table 6–3 (Cont.) Indexed Attributes for All Directories Except Oracle Internet Directory
Specific Attributes
Renaming Audit Files After Upgrading the Schema and Data
Upgrading Identity System Schema and Data In Place 6-21
Verifying and Uploading Novell eDirectory IndexesWhen you have Novell eDirectory, the goal is to obtain the newly introduced indexes associated with 10g (10.1.4.0.1) attributes and ignore any earlier indexes that might be present. However, in this case, you cannot use the Continuous Mode option.
To confirm or update indexes for Novell eDirectory1. Manually execute NDS-specific commands or the NDS Administrator Interface to
confirm that the indexes have been added using Table 6–3 as a guide.
2. If needed, manually execute NDS-specific commands or the NDS Administrator Interface to upload the indexes.
3. Manually index the obpolicykeyword attribute using the appropriate NDS-specific commands or the NDS Administrator Interface.
4. When finished, proceed to "Backing Up Upgraded Identity Data".
Renaming Audit Files After Upgrading the Schema and DataAfter upgrading the schema and data from releases earlier than 7.0, you must perform this task to correct the path name of audit files. If you have upgraded from release 7.x, you can skip this activity.
When upgrading the master Identity Server and the schema and data from any release earlier than 700, the audit file name is changed by prefixing the path to the master Identity Server.
If your deployment includes multiple Identity Servers, the audit file name for each will be prefixed by the same installation directory path as the Identity Server from which the data upgrade is performed. The result is that your original configuration is lost during the Identity Server upgrade. For example, suppose you have two release 611 Identity Server instances with audit files stored as follows:
\oblix\engine\auditfile_1.lst \oblix\engine\auditfile_2.lst
In the sample path names shown here, the audit files can be stored in different directory paths.
After the upgrade, however, both audit files will be stored in the directory path of the Identity Server that was used with the schema and data upgrade. For example:
D:\611\ois_one\identity\oblix\engine\auditfile_1.lst D:\611\ois_one\identity\oblix\engine\auditfile_2.lst
To recover your audit files after upgrading multiple Identity Servers, you must perform the following task to change audit file paths to reflect the appropriate path to specific Identity Server instances. If you are performing a zero downtime upgrade, you perform this task only for clones.
To recover your original audit file names after upgrading Identity Servers1. After upgrading the schema and data, go to the Identity System Console and log
in as usual.
Caution: If you are performing a zero downtime upgrade, see Chapter 15.

Backing Up Upgraded Identity Data
6-22 Oracle Access Manager Upgrade Guide
http://hostname:port/identity/oblix
where hostname refers to computer that hosts the Web server; port refers to the HTTP port number of the WebPass Web server instance; and /identity/oblix connects to the Identity System Console.
2. From the Identity System Console, click System Configuration, then click Identity Servers.
3. Select the name of an Identity Server to display the information for this instance.
4. Check the Audit File Name field, to see if the path name is correct.
If the path name is correct, click Cancel and then repeat steps 3 and 4 to check the audit file path name of another instance. If the path name is not correct, proceed to step 5.
5. Click the Modify button at the bottom of the page.
6. On the Modify page, change the path name in the Audit File Name field to the correct path for this instance and then click Save. For example:
From: \oblix\engine\auditfile_2.lst To: D:\611\ois_two\identity\oblix\engine\auditfile_2.lst
7. Restart the Identity Server whose details you just updated if it is running.
8. Repeat all steps in this procedure for each Identity Server instances.
Backing Up Upgraded Identity DataAfter you finish the schema and data upgrade, Oracle recommends that you back up the 10g (10.1.4.0.1) component directory and directory server instances. This will enable you to easily restore your environment to the newly upgraded state should that be a requirement.
To back up critical information after the upgrade 1. Back up the 10g (10.1.4.0.1) Identity Server directory and store it in a new location.
2. Back up upgraded directory server instances using your directory vendor documentation as a guide.
3. Back up Identity System data as described in"Backing Up Existing Oracle Access Manager Data" on page 5-16.
4. Windows: Back up the upgraded registry for the component as described in "Backing Up Windows Registry Data".
5. WebPass Web Server: Back up the upgraded Web server configuration file using your vendor documentation as a guide.
6. Proceed to "Looking Ahead" on page 6-25.
Halting On-the-fly Migration of User Data: Phase 2 You perform Phase 2 for an in-place upgrade only, after completing all other activities in this chapter. You can skip this if Phase 1 was not performed before the upgrade; however, a roll back operation cannot revert migrated user data. For more information, see Chapter 5.
Halting On-the-fly Migration of User Data: Phase 2
Upgrading Identity System Schema and Data In Place 6-23
This discussion provides the information you need to perform Phase 2 of the procedure to halt immediate (also known as on-the-fly) migration of user data (multiple values in challenge and response attributes for Lost Password Management only) at first login.
During Phase 1, the obVer attribute for the Master Administrator entry was set before the schema and data upgrade as described in Chapter 5. During Phase 2 you must reset the obVer value for the configuration base to 7.0.4 and remove the Challenge and Response semantic types at both the tab level and the object class level.
When you finish this Phase 2 procedure, Oracle recommends that you stop processing or performing the following actions to ensure that user data will maintain its backward compatibility:
■ Stop processing workflow tickets: for example, create user, change attributes, and the like.
■ Stop modifying challenge and response attributes from the Modify Profile page.
To temporarily stop the immediate migration of user data (Phase 2)1. After upgrading the schema and data, change the value of obVer in the
configuration base to 7.0.4 as follows:
ldapmodify.exe -h <Host> \ -p <Port> -D <Bind DN> -w <Bind Password> \ -f <ldif file containing attribute to be modified>
A bind DN for configuration data (also known as the configuration DN) is similar to the searchbase for user data. The configuration bind DN must be specified to identify the node in the DIT under which the Oracle Access Manager schema and all configuration data is stored for the Identity and Access Systems.
The format of LDIF file to be created is as follows. This example is for the Netscape Directory Server:
dn: o=oblix,<configuration DN> changetype: modify replace: obver obver: 7.0.4
2. Restart the master Identity Server.
Note: If you are performing an upgrade using the zero downtime method, you can skip this activity.
Note: You must perform Phase 2 now, after upgrading the schema and data and before any administrator or user login, even if you have a joint Identity and Access System deployment.
Caution: When you finish this Phase 2 procedure, lost password management will not work.

Halting On-the-fly Migration of User Data: Phase 2
6-24 Oracle Access Manager Upgrade Guide
3. Go to the Identity System Console by specifying the URL for your environment, and then log in as the Master Administrator. For example:
http://hostname:port/identity/oblix
In the URL example, hostname refers to computer that hosts the WebPass Web server; port refers to the HTTP port number of the WebPass Web server instance; /identity/oblix connects to the Identity System Console (formerly known as the COREid System Console).
4. Tab Level: Disable the Challenge and Response semantic types at the tab level, as follows:
a. Click Identity System Console, click User Manager Configuration, and then click Tabs.
b. From the Existing Tabs listed on the page, select Employees to display information about this Person class tab on the View Tab page.
c. On the View Tab page, click Modify Attributes to open the Modify Attributes page.
d. From the Attribute list select the attribute that is configured with Challenge as the Semantic Type, set the Semantic Type to None and click Save.
e. From the Attribute list select the attribute that is configured with Response as the Semantic Type, set the Semantic Type to None and click Save.
f. Click Done.
5. Object Class Level: Remove the Challenge and Response semantic types at the object class level, as follows:
a. Click Identity System Console, click Common Configuration, and then click Object Classes.
b. Select the person object class from the list, then click Modify Attributes to open the Modify Attributes page.
c. From the Attribute list select the attribute that is configured with Challenge as the Semantic Type, set the Semantic Type to None and click Save.
d. From the Attribute list select the attribute that is configured with Response as the Semantic Type, set the Semantic Type to None and click Save.
e. Click Done.
6. Proceed to "Looking Ahead" on page 6-25.
For details about restarting user data migration after validating that your deployment is successfully upgraded, see "Restarting On-the-fly User Data Migration for In-place Upgrades" on page 14-3.
Note: Object Classes on the View Tab page might include OblixOrgPerson and others (gensiteorgperson, for example). The obVer attribute is a member of only the OblixOrgPerson class. There is no impact to other object classes.

Looking Ahead
Upgrading Identity System Schema and Data In Place 6-25
Recovering From an Identity System Schema or Data Upgrade FailureIf the schema and data upgrade was not successful, you can perform the following steps to rollback this upgrade, then try again.
To recover from an unsuccessful schema and data upgrade 1. Restore the directory instance that you backed up before the upgrade to recover
the earlier schema and data from backup.
2. Restore the earlier component installation directory that you backed up before the upgrade (to recover the earlier environment), then back it up again. You will retain one of the earlier directories as a backup copy and use one to restart the upgrade
3. Windows: Restore the backed up registry for the component.
4. WebPass Web Server: Restore the backed up Web server configuration file.
5. Using a backup copy of your earlier information and component installation directory, restart the upgrade, as described in "Upgrading the Schema and Data In Place with the Master Identity Server" on page 6-3.
Looking AheadUpgraded Identity System components send and receive information sent in UTF-8 encoding. Earlier components send and receive data in Latin-1 encoding. As a result, the 10g (10.1.4.0.1) Identity System does not work with an earlier Access System.
When all earlier Identity System components are successfully upgraded, proceed as appropriate for your earlier installation. For example:
■ Identity System Only: When your earlier installation does not include the Access System, you can complete activities in the following sequence using information in:
– Chapter 8, "Preparing Components for the Upgrade"
– Chapter 9, "Upgrading Remaining Identity System Components In Place"
– Chapter 11, "Upgrading Integration Components and an Independently Installed SDK"
– Chapter 12, "Upgrading Your Identity System Customizations" after upgrading all Identity System components.
– Chapter 14, "Validating the Entire System Upgrade"
■ Joint Identity and Access Systems: When your earlier installation does include the Access System, you must complete activities in the next sequence using information in:
– Chapter 7, "Upgrading Access System Schema and Data In Place"
– Chapter 8, "Preparing Components for the Upgrade"
– Chapter 9, "Upgrading Remaining Identity System Components In Place"
– Chapter 10, "Upgrading Access System Components In Place"
Note: Step 4 is only for WebPass. If only your master WebPass upgrade failed, skip step 1 in the procedure here and complete step 4.

Looking Ahead
6-26 Oracle Access Manager Upgrade Guide
– Chapter 11, "Upgrading Integration Components and an Independently Installed SDK"
– Chapter 12, "Upgrading Your Identity System Customizations" after upgrading all Identity System components.
– Chapter 13, "Upgrading Your Access System Customizations"
– Chapter 14, "Validating the Entire System Upgrade"
For more information about expected system behaviors, see Chapter 4.
Upgrading Access System Schema and Data In Place 7-1
7Upgrading Access System Schema and Data
In Place
If your installation does not include Access System components, you can skip this chapter. This chapter is intended to be used by directory server administrators who are responsible for maintaining and updating directory schemas and data.
This chapter explains what you must do and the order in which you must perform the Access System schema and data upgrade in place. Topics include:
■ About Access System Schema and Data Upgrades
■ Upgrading the Schema and Data with the Master Access Manager Component
■ Uploading Directory Server Index Files
■ Verifying the Access Schema and Data Upgrade
■ Creating a Temporary Directory Profile For Access System Upgrades
■ Backing Up Upgraded Policy Data
■ Recovering From an Access System Schema or Data Upgrade Failure
■ Looking Ahead
About Access System Schema and Data UpgradesAfter upgrading the Identity System schema and data (with the master Identity Server and including a master WebPass upgrade), you are ready to upgrade the Access System schema and data.
Figure 7–1 illustrates the Access System schema and data upgrade tasks. As you can see, in addition to performing and verifying this upgrade you must create a temporary directory profile for later Access System component upgrades. Additional notes follow the figure. Refer to your own planning summaries and use the tracking summaries in Appendix F to check your progress.
Note: If you are using the zero downtime method, skip this chapter and see Part VI. If your starting Oracle Access Manager release is earlier than 6.1.1, contact Oracle Support before upgrading: http://www.oracle.com/support/contact.html
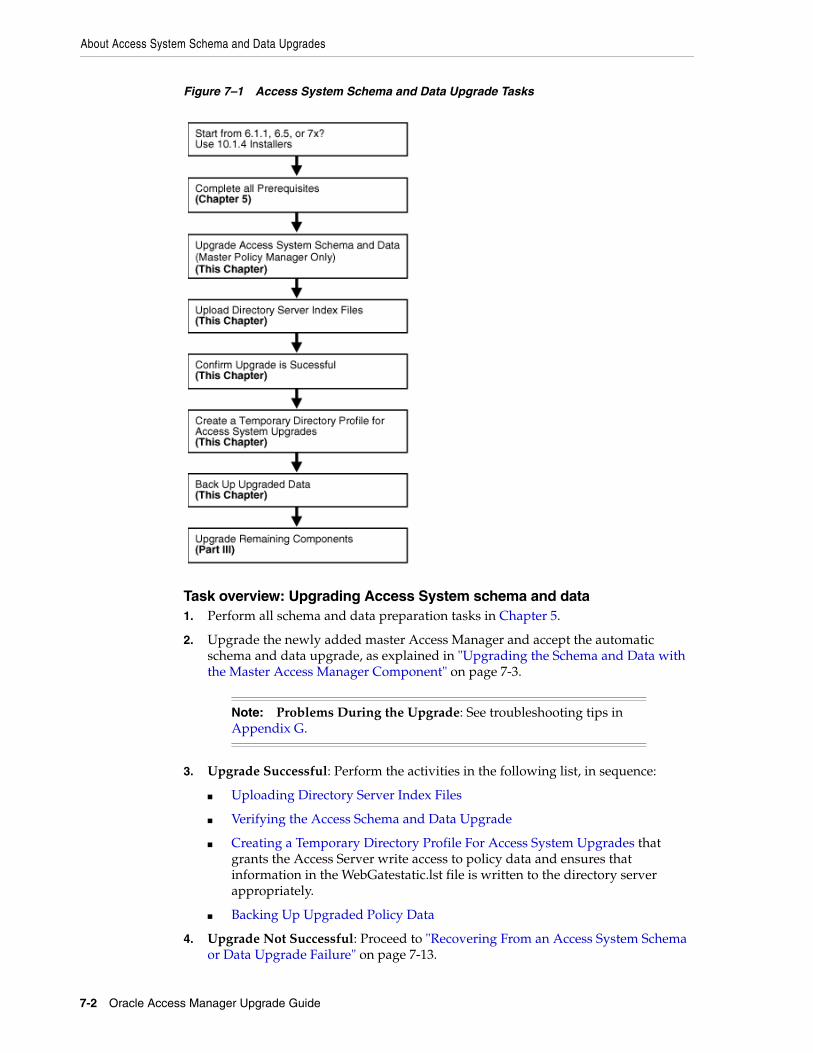
About Access System Schema and Data Upgrades
7-2 Oracle Access Manager Upgrade Guide
Figure 7–1 Access System Schema and Data Upgrade Tasks
Task overview: Upgrading Access System schema and data 1. Perform all schema and data preparation tasks in Chapter 5.
2. Upgrade the newly added master Access Manager and accept the automatic schema and data upgrade, as explained in "Upgrading the Schema and Data with the Master Access Manager Component" on page 7-3.
3. Upgrade Successful: Perform the activities in the following list, in sequence:
■ Uploading Directory Server Index Files
■ Verifying the Access Schema and Data Upgrade
■ Creating a Temporary Directory Profile For Access System Upgrades that grants the Access Server write access to policy data and ensures that information in the WebGatestatic.lst file is written to the directory server appropriately.
■ Backing Up Upgraded Policy Data
4. Upgrade Not Successful: Proceed to "Recovering From an Access System Schema or Data Upgrade Failure" on page 7-13.
Note: Problems During the Upgrade: See troubleshooting tips in Appendix G.

Upgrading the Schema and Data with the Master Access Manager Component
Upgrading Access System Schema and Data In Place 7-3
Upgrading the Schema and Data with the Master Access Manager Component
During this task, you upgrade the master Access Manager component (now known as the Policy Manager) instance that you added for this purpose, and accept the automatic schema and data upgrade.
Figure 7–2 illustrates the program-driven upgrade process and the points at which you must respond during this upgrade.
Figure 7–2 Access System Schema and Policy Data Upgrade Process
Task overview: Upgrading the Access System schema and data includes1. Starting the Master Access Manager Upgrade
2. Specifying the Target Directory and Languages
3. Updating the Access System Schema and Policy Data
4. Upgrading the Access Manager and Web Server Configuration Files
5. Finishing and Verifying the Access System Schema and Data Upgrade
Access System Schema and Data Upgrade PrerequisitesBefore you begin upgrading the master Access Manager, check the tasks in Table 7–1 to ensure you have completed these.
Failure to complete prerequisites can adversely affect your upgrade.
Table 7–1 Access System Schema and Data Upgrade Prerequisites
Access System Schema and Data Upgrade Prerequisites
Familiarize yourself with information in Part I, "Introduction"
Perform all required steps for schema and data preparation in Chapter 5.
■ If you have a multi-language environment, see "Preparing Multi-Language Installations" on page 8-7.
■ If you are upgrading a release 6.x installation, see "Preparing Release 6.x Environments" on page 8-4.
Start Policy Manager Upgrade1
Specify Target Directory and Languages2
Upgrade Access System Schema and Data(Master Policy Manager only)3
Upgrade Policy Manager Configuration Files4
Finish and Verify the Upgrade5

Upgrading the Schema and Data with the Master Access Manager Component
7-4 Oracle Access Manager Upgrade Guide
Starting the Master Access Manager Upgrade Again, you use the 10g (10.1.4.0.1) Policy Manager installer for your specific Web server to launch the upgrade. The sample upgrade described here starts from release 6.1.1. The GUI method and recommended Automatic mode are used to illustrate messages you see, responses you give, and the sequence of events. Your starting release and environment might differ.
To start the Access System schema and data upgrade (master Access Manager)1. Confirm that you have completed all prerequisites for this upgrade, as listed in
"Access System Schema and Data Upgrade Prerequisites".
2. Log in as a user with the appropriate administrator privileges to upgrade the schema and Oracle Access Manager files.
3. Stop the master Access Manager Web server.
4. Locate and launch the 10g (10.1.4.0.1) Policy Manager installer using your preferred method:
GUI Method, Windows:
Oracle_Access_Manager10_1_4_0_1_Win32_NSAPI_PolicyManager.exe
Console Method, Solaris:
./Oracle_Access_Manager10_1_4_0_1_sparc-s2_NSAPI_PolicyManager
The Welcome screen appears.
5. Dismiss the Welcome screen.
6. Respond to the administrator question based upon your platform. For example:
Specifying the Target Directory and LanguagesYou specify the same target directory as the master Access Manager component. When you accept the upgrade, the target directory is created and 10g (10.1.4.0.1) files are extracted into it. You are then asked to select the languages that you would like to upgrade.
To specify the target Access Manager directory and languages1. Choose the directory where you installed the instance you added, then click Next.
2. Accept the upgrade by clicking Yes, then click Next
3. Ensure that a check mark appears beside English and any other languages you are upgrading, then click Next.
Perform the Identity System schema and data upgrade, and back up upgraded data, as described in Chapter 6.
Note: Should an error occur, the name of the log file that contains information about the error is identified on the screen. For more information, see "Accessing Log Files" on page G-2.
Table 7–1 (Cont.) Access System Schema and Data Upgrade Prerequisites
Access System Schema and Data Upgrade Prerequisites

Upgrading the Schema and Data with the Master Access Manager Component
Upgrading Access System Schema and Data In Place 7-5
4. Confirm the languages listed.
5. Record the time-stamped directory name and continue.
6. Note the amount of disk space required, then start the file extraction into the target directory.
You are asked to specify a mode for the upgrade process: Automatic or Confirmed.
If you are using Console method, the installation script exits and a transcript appears. Run the command in the transcript then continue with step 9. (On Unix, the command is printed to a file (start_migration), and a message is printed to run this file.)
7. Press the number for your choice., then review messages that appear. For example:
1
Creating orig folders ...----------------------------------------------------Copying general configuration filesOK.----------------------------------------------------Updating parameter catalogs ...OK.----------------------------------------------------
8. Proceed with "Updating the Access System Schema and Policy Data" next.
Updating the Access System Schema and Policy DataOracle recommends that you accept the automatic update of the schema and data. The Access System schema and data are upgraded as follows:
■ If Oracle Access Manager policy data is stored in the same directory as user and configuration data, the schema was updated during the master Identity Server upgrade. In this case, only policy data is updated during the master Access Manager upgrade.
■ If Oracle Access Manager policy data is stored separately from user and configuration data, both the schema and policy data are upgraded during the master Access Manager upgrade.
The first update is detected automatically and you are not asked about schema or data updates during remaining Access Manager upgrades.
Starting with release 6.5, the Access System began using directory server profiles and database instance profiles for accessing user data. As a result, during the incremental upgrade from 6.1.1 to 6.5, a message informs you that a directory server profile is created ("DB Profiles created"), as illustrated in the next procedure. If your starting release is 6.5 or later, you won’t see this message.
To upgrade the Access System schema and policy data1. Review the messages and note the directory path when it appears.
-------------------------------------Starting migration 6.1.1 -> 6.5.0 )...-------------------------------------Oracle Access Manager schema migration.... Retrieving Policy configuration parameters... OK.-------------------------------------

Upgrading the Schema and Data with the Master Access Manager Component
7-6 Oracle Access Manager Upgrade Guide
Oracle Access Manager data migration.... Retrieving Policy configuration parameters... OK.Checking Access Policy versionVersion not up to date. Performing Access Policy data migrationUpdating Access Policy migration parameters..
The following directory server's schema will be updated:Host:DNShostname.domain.comPort: port#Type:ns
NOTE: If you do not want to migrate schema at this time,type 'SKIP'.Please type 'yes' to proceed:
2. Type the full word "yes" to update policy data, which can also include a schema upgrade. For example:
Yes OK
The transcript continues.
-------------------------------------Converting Access Policy data. Please wait.......OKRemoving old Access Policy data. Please wait ..........OKImporting new Access Policy data. Please wait ...OK-----------------------------Oracle Access Manager data migration has completed successfully.Press <ENTER> to continue :
3. Press the Enter Key when the data upgrade completes and continue with the retrieval of Oracle Access Manager configuration parameters and database profile creation (if your starting release was 7.x you will not see the DB Profiles created message.
-------------------------------------Retrieving Oracle configuration parameters...DB Profiles created.-----------------------------
4. Continue with "Upgrading the Access Manager and Web Server Configuration Files" next.
Upgrading the Access Manager and Web Server Configuration Files During this sequence the component-configuration upgrade is completed for the master Access Manager. This includes Web server configuration updates and policy data configuration parameters.
To upgrade the Web Server and Access Manager configuration1. Review messages and respond appropriately for your environment when asked.
-------------------------------------

Upgrading the Schema and Data with the Master Access Manager Component
Upgrading Access System Schema and Data In Place 7-7
Updating web server configuration files...Connecting to server ...Done.OK.-------------------------------------Updating component-specific configuration files...OK.-------------------------------------Starting migration ( 6.5.0 -> 7.0.0 )...-------------------------------------Oracle Access Manager schema migration....Retrieving Policy configuration parameters...OK.-------------------------------------Checking Access Policy version ...Version not up to date. Performing Access Policy data migration ...
Updating Access Policy migration parameters...The following directory server's schema will be updated:Host:DNShostname.domain.comPort: port#Type:nsNOTE: If you do not want to migrate schema at this time,type 'SKIP'.Please type 'yes' to proceed:
2. Continue the upgrade as directed.
yes
The process continues, as indicated here.
Converting Access Policy data. Please wait........OK.Removing old Access Polidy data. Please wait ........OK.Cleaning up obsolete schema from the directory.Deleting Obsolete schema for policy. Please wait.Importing new Access Policy data. Please wait...OK.-----------------------------------------Oracle Access Manager data migration has completed successfully.Press <ENTER> to continue :
3. Respond after the data upgrade and notice that Web server configuration and component-specific upgrades occur next.
Enter-------------------------------------Updating web server configuration files...OK.-------------------------------------Updating component-specific configuration files...OK.-------------------------------------Starting migration ( 6.5.0 -> 7.0.0 )...-------------------------------------Oracle Access Manager schema migration....Retrieving Policy configuration parameters...

Upgrading the Schema and Data with the Master Access Manager Component
7-8 Oracle Access Manager Upgrade Guide
OK.-------------------------------------Oracle Access Manager data migration....Retrieving Policy configuration parameters...OK.-------------------------------------Checking Access Policy version ...Version not up to date. Performing Access Policy data migration ...
Updating Access Policy migration parameters...The following directory server's schema will be updated:Host:DNShostname.domain.comPort: port#Type:nsNOTE: If you do not want to migrate schema at this time,type 'SKIP'.Please type 'yes' to proceed:
4. Type the full word "yes" to continue.
yes
OK.Converting Access Policy data. Please wait...OK.Removing old Access Policy data. Please wait ...OK.Importing new Access Policy data. Please wait...OK.----------------------------------------Oracle Access Manager data migration has completed successfully.Press <ENTER> to continue :
5. Continue with component-specific configuration for release 7.0 to 10g (10.1.4.0.1), if needed:
EnterUpdating component-specific configuration files....Converting Access Policy data. Please wait...OK.Removing old Access Policy data. Please wait ...OK.Importing new Access Policy data. Please wait...OK.----------------------------------------Oracle Access Manager data migration has completed successfully.Press <ENTER> to continue :
Directory permissions copied ...C:\NetPoint\WebComponent\access_20060223_180406\oblix)C:\NetPoint\WebComponent\access\oblix)---------------------------------------------------Migration has completed successfully!Press <ENTER> to continue.
6. When this phase completes, continue as instructed on the screen and proceed to "Finishing and Verifying the Access System Schema and Data Upgrade".
Verifying the Access Schema and Data Upgrade
Upgrading Access System Schema and Data In Place 7-9
Finishing and Verifying the Access System Schema and Data UpgradeYou finish the master Access Manager upgrade as described next.
To finish and verify the Access System schema and data upgrade1. Apply any changes to the Web server configuration file, if needed.
2. Start the upgraded Access Manager Web server to confirm that this upgrade was successful.
3. Web Server Does Not Start: See troubleshooting tips in Appendix G.
4. View Access Manager migration log files and error ldifs to see if they contain any errors. See "Accessing Log Files" on page G-2.
5. Upgrade Successful: Proceed with "Uploading Directory Server Index Files" on page 7-9 to ensure that all attributes are included for the Access System schema and data (and be sure to manually add an index for the obpolicykeyword attribute.
6. Upgrade Not Successful: Proceed to "Recovering From an Access System Schema or Data Upgrade Failure" on page 7-13.
Uploading Directory Server Index FilesThis procedure is the same as the one you completed after upgrading the Identity System schema and data.
For Access System data, be sure to manually add an index for the obpolicykeyword attribute. For more information, complete appropriate activities for your environment in "Uploading Directory Server Index Files" on page 6-17.
After uploading index files for the Access System, continue with "Verifying the Access Schema and Data Upgrade", next.
Verifying the Access Schema and Data UpgradeYou complete this procedure to validate the Access System schema and data upgrade.
To verify the Access System schema and data upgrade1. Using your directory administration console, confirm that the schema contains all
the object classes and attributes as defined in the Oracle Access Manager Schema Description.
2. Using your directory administration console, verify that all the indexes have been added.
3. Different Directory Server Instances: Perform the steps in the following list to ensure that the schema was also updated:
■ View the configuration node in the configuration directory server and confirm that the value of the obver attribute is 10.1.4.0.
Note: The new product term for the Access Manager component is Policy Manager, which will be used in the remainder of this guide. For more information, see "Product and Component Name Changes" on page -xxv.

Creating a Temporary Directory Profile For Access System Upgrades
7-10 Oracle Access Manager Upgrade Guide
■ Check to ensure that the schema contains 10g (10.1.4.0.1) attributes obPolicyEnabled and objectclass oblixLPMPolicy.
4. Upgrade Successful: Proceed as indicated in the next list:
■ Creating a Temporary Directory Profile For Access System Upgrades
■ Backing Up Upgraded Policy Data
■ Looking Ahead
5. Upgrade Not Successful: Proceed to "Recovering From an Access System Schema or Data Upgrade Failure" on page 7-13.
Creating a Temporary Directory Profile For Access System UpgradesAfter upgrading the master Policy Manager, and before upgrading any other Access System component, a Master Access Administrator must create a specific temporary directory server profile using the Identity System Console. This profile grants the Access Server write access to policy data stored in the directory server and updated during the Policy Manager upgrade.
During WebGate upgrades, the Access Server gathers configuration information stored in the WebGatestatic.lst file and updates the directory server using the temporary directory profile created for this purpose. After writing information to the directory server, the Access Server returns status information to the WebGate. Any unknown parameters in the WebGateStatic.lst file are moved to the directory server.
In earlier releases, WebGate configuration parameters were stored in the WebGatestatic.lst file. However, in Oracle Access Manager 10g (10.1.4.0.1), WebGate configuration is accomplished using the Access System Console. Proper migration of earlier WebGate configuration parameters during an upgrade is required to enable you to change the parameter values, and add new ones, using the Access System Console. After upgrading a WebGate to 10g (10.1.4.0.1), you must use the System Console to adjust parameters. You cannot continue to use the WebGatestatic.lst file after upgrading.
Guidelines for the Temporary Directory ProfileWhen creating this temporary directory profile you must:
■ Assign a profile name of migration_wgstatic_profile; do not use another name.
■ Create the migration_wgstatic_profile for the directory where the policy data is stored. If your user, configuration, and policy data are stored together on a single directory, create this new profile for that directory. However, if your policy data is stored in the same directory as configuration data, create this new profile for that directory.
Note: If you are using the zero downtime upgrade method, go to"Adding a Temporary Directory Profile for Original Access System Upgrades" on page 17-21.
Note: Upgrading any Access System components before creating this profile could result in a failed upgrade. The exception to this rule is the master Policy Manager that you upgraded with the Access System schema and data.
Creating a Temporary Directory Profile For Access System Upgrades
Upgrading Access System Schema and Data In Place 7-11
■ Assign permissions for all operations to the migration_wgstatic_profile.
■ Use the same namespace as the policy base stored in PolicyManager_install_dir/access/oblix/config/configInfo.xml. The value of the ldapPolicyBase parameter should be used: for example, obapp=PSC, o=Oblix, o=company,c=us.
■ If your directory server supports LDAP referrals, enable LDAP referrals in this temporary directory server profile. A referral directs a client request to another server to find requested information in another location. See the Oracle Access Manager Identity and Common Administration Guide for details.
■ If the policy data directory server is SSL-enabled, the CA certificate is needed by the Access Server to connect to the directory. The CA certificate must be manually added (using the certutil tool) to the certificate store in AccessServer_install_dir/access/oblix/config/cert8.db or cert7.db. However, if the existing policy data directory used by the Access Server is already in SSL mode and uses the same CA certificate, this step need not be done.
To create the temporary directory server profile for the Access Server1. Navigate to the Identity System Console (formerly known as the COREid System
Console). For example:
http://hostname:port/identity/oblix/
2. From the Identity System Console, click the System Configuration tab.
3. Click Directory Profiles to display the Configure Profiles page.
4. Locate the Configure LDAP Directory Server Profiles section and click Add to display the Create Directory Server Profile page.
5. Fill in the following information for this temporary profile: In the Name field, enter the following name and the namespace for your environment:
Name: migration_wgstatic_profile
Name Space: obapp=PSC,o=Oblix,o=company,c=us
where the Name Space is the value of the LDAP PolicyBase parameter in PolicyManager_install_dir/oblix/config/configInfo.lst
6. Select the All Operations button to give this profile permission to perform all operations.
7. In the Used By field, select the Access Servers option.
Next you must create a database instance profile where you identify the directory server where your policy data is stored. If your policy data is stored on a separate directory server, the new database instance profile should be created for that directory server. If user, configuration, and policy data are all on one directory server, the new database instance profile should be created for that directory server
8. In the Database Instances section of the Create Directory Server Profile page, click Add.
Important: This procedure must be completed before upgrading any additional Access System components. For more information about directory server profiles, see the Oracle Access Manager Identity and Common Administration Guide.

Backing Up Upgraded Policy Data
7-12 Oracle Access Manager Upgrade Guide
The Create Database Instance page appears.
9. Fill in the following information to configure a database instance profile for your policy data directory server:
Name: Machine: Port: Root DN: Root DN Password:
For more information, see the Oracle Access Manager Identity and Common Administration Guide for details.
10. In the Flags field, if your directory supports LDAP referrals click the LDAP referrals check box if appropriate for your environment.
See the Oracle Access Manager Identity and Common Administration Guide for details on configuring LDAP referrals.
11. Save the database instance profile and the associated directory server profile.
12. If the policy directory server operates in SSL mode, the Access Server requires a CA certificate to connect to it.
If the policy directory server uses the same CA certificate as the Access Server, no additional configuration is required. Otherwise, you must add the CA certificate (cert8.db or cert7.db) to the certificate store in the following directory:
AccessServer_install_dir/oblix/config
Where AccessServer_install_dir is the directory where the Access Server was installed. See the appendix on adding a new certificate store in the Oracle Access Manager Installation Guide for details.
13. Proceed to "Backing Up Upgraded Policy Data" next.
Backing Up Upgraded Policy DataAs mentioned earlier, Oracle recommends that you finish the schema and data upgrade by backing up the 10g (10.1.4.0.1) component directory and directory server instances. This will enable you to easily restore your environment to the newly upgraded state should that be a requirement.
To back up critical policy information after the upgrade 1. Back up the upgraded 10g (10.1.4.0.1) Policy Manager directory and store it in a
new location.
2. Back up upgraded directory server instances using your directory vendor documentation as a guide.
3. Backup upgraded policy data, as described in "Backing up Oracle Access Manager Configuration and Policy Data" on page 5-17.
4. Back up the upgraded Web server configuration file as described in your vendor documentation.
5. Windows: Back up Windows registry data, if required, as described in "Backing Up Windows Registry Data" on page 8-9.
6. Proceed to "Looking Ahead" on page 7-13.

Looking Ahead
Upgrading Access System Schema and Data In Place 7-13
Recovering From an Access System Schema or Data Upgrade FailureIf the schema and data upgrade was not successful, you can perform the following steps to rollback this upgrade, then try again.
To recover from an unsuccessful Access System schema and data upgrade1. Restore the directory instance that you backed up before the upgrade to recover
the earlier schema and data from backup.
2. Restore the earlier component installation directory that you backed up before the upgrade (to recover the earlier environment), then back it up again. You will retain one of the earlier directories as a backup copy and use one to restart the upgrade.
3. Policy Manager Web Server: Restore the earlier Web server configuration file.
4. Windows: Restore the backed up registry, if needed.
5. Using a backup copy of your earlier data and component installation directory, restart the upgrade, as described in "Upgrading the Schema and Data with the Master Access Manager Component" on page 7-3.
Looking AheadAfter upgrading the Access System schema and data, proceed in sequence with the following chapters and tasks:
■ Chapter 8, "Preparing Components for the Upgrade"
■ Chapter 9, "Upgrading Remaining Identity System Components In Place"
■ Chapter 10, "Upgrading Access System Components In Place"
■ Chapter 11, "Upgrading Integration Components and an Independently Installed SDK"
■ Chapter 12, "Upgrading Your Identity System Customizations"
■ Chapter 13, "Upgrading Your Access System Customizations"
■ Chapter 14, "Validating the Entire System Upgrade"
For more information about expected system behaviors, see Chapter 4.

Looking Ahead
7-14 Oracle Access Manager Upgrade Guide

Part IIIUpgrading Components
This part of the book describes how to upgrade your earlier Identity and Access System components to 10g (10.1.4.0.1) after upgrading the schema and data.
Part III contains the following chapters:
■ Chapter 8, "Preparing Components for the Upgrade"
■ Chapter 9, "Upgrading Remaining Identity System Components In Place"
■ Chapter 10, "Upgrading Access System Components In Place"
■ Chapter 11, "Upgrading Integration Components and an Independently Installed SDK"


Preparing Components for the Upgrade 8-1
8Preparing Components for the Upgrade
This chapter provides important information to help you prepare your earlier environment before you begin upgrading remaining Identity and Access System components. Refer to your own planning documents and use the summaries in Appendix F to track your progress.
Unless explicitly stated, you perform these activities regardless of the upgrade method you are using. For details about zero downtime upgrades, see Part IV. You also perform these tasks when you are upgrading while switching from a Solaris platform to Linux as described in Appendix B. Topics in this chapter include:
■ Checking Compatibility with Previous Releases
■ Copying Custom Identity Event Plug-ins
■ Preparing Earlier Customizations
■ Preparing the Default Logout in the Policy Manager
■ Preparing Host Computers
■ Preparing Release 6.x Environments
■ Backing Up File System Directories, Web Server Configurations, and Registry Details
■ Stopping Servers and Services
■ Logging in with Appropriate Administrative Rights
Checking Compatibility with Previous ReleasesThere are several actions you need to take to confirm compatibility between your earlier installation and 10g (10.1.4.0.1). As mentioned in Chapter 2, support for some items has been deprecated. In some cases, you might need to decide how to proceed given the support changes.
To confirm compatibility with 10g (10.1.4.0.1)1. Review "Support Deprecated" on page 2-10
2. Review 10g (10.1.4.0.1) platform support, as described here:
Note: New product and component names are used in this chapter even when referring to the earlier product and components. For example, Oracle Access Manager is used instead of Oblix NetPoint or Oracle COREid. For more information, see "What’s New in Oracle Access Manager?" on page -xxv.

Copying Custom Identity Event Plug-ins
8-2 Oracle Access Manager Upgrade Guide
a. Navigate to MetaLink at https://metalink.oracle.com.
b. Log in to MetaLink as directed
c. Click the Certify tab.
d. Click View Certifications by Product
e. Select the Application Server option and click Submit.
f. Choose Oracle Identity Manager and click Submit.
g. Click Oracle Identity Management Certification Information 10g (10.1.4.0.1) (html) to display the Oracle Identity Management page.
h. Click the link for Section 6, "Oracle Access Manager Certification" to display the certification matrix.
3. When directory server or Web server versions or platform support has changed, see "Upgrade Strategies When Support is Changed or Deprecated" on page 2-11, for information about how to proceed.
Copying Custom Identity Event Plug-insAll standard plug-ins are copied during the upgrade, as are custom authorization and authentication plug-ins. However, custom Identity Event plug-ins created using the Identity Event Plug-in API are not copied during the upgrade.
Oracle recommends that you complete the following procedure to prepare custom Identity Event plug-ins for possible redesign before the upgrade, in a small isolated environment or (zero downtime clone environment).
To copy Identity Event Plug-ins before the upgrade1. Before the upgrade, create a directory for your old Identity Event plug-ins in the
top level of your Identity Event API directory.
2. Copy custom Identity Event plug-ins in to the new directory.
3. Proceed to "Preparing Earlier Customizations" next.
Preparing Earlier CustomizationsOracle recommends that you start manually processing customizations in your existing environment well in advance of upgrading components. This should occur in a test or development environment to minimize service disruptions. After completing the upgrade and testing your customizations, you can deploy them in the upgraded environment as discussed in "Customization Upgrade Planning" on page 1-17.
For many customizations, you can start work before upgrading components, regardless of the upgrade method you are using. However, a few customization upgrades can be accomplished only after upgrading components.
Note: If you are using the zero downtime upgrade method, Oracle recommends that you perform customization upgrades early and test these thoroughly within the upgraded clone environment. For more information, see also "Customization Upgrades Using the Zero Downtime Upgrade Method" on page 15-15.

Preparing Host Computers
Preparing Components for the Upgrade 8-3
Identity System: The overview here lists Identity System customization work that must be performed and where to find details within Chapter 12.
Task overview: Upgrading earlier Identity System customizations includes 1. Upgrading Auditing and Access Reporting for the Identity System on page 12-2
2. Combining Challenge and Response Attributes on a Panel on page 12-8
3. Confirming Identity System Failover and Load Balancing on page 12-9
4. Migrating Custom Identity Event Plug-Ins on page 12-10
5. Ensuring Compatibility with Earlier Portal Inserts on page 12-11
6. Incorporating Customizations from Release 6.5 and 7.x on page 12-12
7. Incorporating Customizations from Releases Earlier than 6.5 on page 12-14
Joint Identity and Access System: In addition to the Identity System work that is outlined in the previous task overview, you must also upgrade earlier Access System customizations. The next overview outlines Access System customization upgrades that you need to perform manually. For details, see Chapter 13.
Task overview: Upgrading earlier Access System customizations includes 1. Upgrading Auditing and Reporting for the Access Server on page 13-2
2. Upgrading Forms-based Authentication on page 13-4
3. Recompiling and Redesigning Custom Authentication and Authorization Plug-Ins on page 13-5
4. Associating Release 6.1.1 Authorization Rules with Access Policies on page 13-5
5. Assuring Proper Authorization Failure Re-directs After Upgrading from 6.1.1 on page 13-6
6. Updating the ObAMMasterAuditRule_getEscapeCharacter in Custom C Code on page 13-7
For more information, see "About Upgrading and Backward Compatibility" on page 4-3.
Preparing the Default Logout in the Policy ManagerBefore the upgrade, the default logout should be unprotected in the Policy Manager. Otherwise, after the upgrade, users will be challenged when they click the Logout link.
To prepare the default logout for an upgrade1. Confirm that the default logout is not protected in the Policy Manager.
2. If you use oblogout.cgi for WebGate logouts, be sure that it is installed on the target server.
Preparing Host ComputersPreparing computers hosting the earlier installation includes the following procedures:
■ Changing Read Permissions on Password Files
■ Confirming Free Disk Space

Preparing Release 6.x Environments
8-4 Oracle Access Manager Upgrade Guide
For additional information, see "Backing Up File System Directories, Web Server Configurations, and Registry Details" on page 8-7.
Changing Read Permissions on Password FilesIf you are running the Identity System using Simple or Cert mode, your password.xml file in the IdentityServer_install_dir\identity\oblix\config directory is not readable. The same issue applies to the Access System password.lst file in install_dir\access\oblix\config.
To prepare password files for the upgrade1. For Identity System upgrades, assign read permissions to password.xml for the
duration of the upgrade process. See also, "Logging in with Appropriate Administrative Rights" on page 8-10.
2. Reset password.xml to the desired permissions after the upgrade is complete.
3. For Access System upgrades, repeat the steps in this list on the password.lst file.
Confirming Free Disk SpaceYou need enough disk space on the computer hosting the earlier component for both the earlier Oracle Access Manager release and the new release.
To confirm you have enough disk space1. Check the Oracle Access Manager Installation Guide for the disk space required for
the new component.
2. On the computer hosting the component to be upgraded, check the amount of disk space required for the earlier installation that will be retained in a renamed time-stamped source directory.
Preparing Release 6.x EnvironmentsTo ensure success when upgrading certain Oracle Access Manager 6.x installations (excepting 6.5.1), you must add specific bundles in to your original Component_install_dir in addition to the standard 10g (10.1.4.0.1) installation packages. Discussions here identify additional files needed when you are starting the upgrade from specific releases only:
■ Adding Packages for Release 6.5.0.x
■ Adding Packages for Release 6.5.2.x Patch
Adding Packages for Release 6.5.0.x During the upgrade to 10g (10.1.4.0.1), the installer for each component creates a directory named "orig" and compares the environment to ensure appropriate files are upgraded. The original Oracle Access Manager 6.5.0 release did not provide an upgrade capability and, therefore, did not create a file named "orig".
WARNING: Use only the files that are relevant to your specific installation. See also "Preparing Multi-Language Installations" on page 8-7.
Preparing Release 6.x Environments
Preparing Components for the Upgrade 8-5
As a result, before you upgrade from Oracle Access Manager 6.5.0.x, you must extract and add the following packages to your original Component_install_dir.
To obtain the 65_orig packages 1. Obtain the 65_orig packages listed in the preceding list from Oracle MetaLink, as
follows:
a. In your browser, enter the following URL:
https://metalink.oracle.com
b. Log in to MetaLink, as usual.
c. From the Quick Find list, select Patch Number.
d. Enter 5724938 in the field beside Quick Find Patch Number, then click the Go button.
The results of your search are displayed with the description: UNABLE TO LOCATE MIGRATION BUNDLE FOR 6.5-10.1.4 UPGRADE.
e. Click the Download button and follow instructions on the screen, then proceed with step 2.
2. Extract (untar) the files to the original installation directory for each component.
This creates a new directory named "orig" for each component. For example: Component_install_dir/identity/oblix/orig (or Component_install_dir/access/oblix/orig).
3. Finish preparing your environment as described in this chapter and:
■ If your installation includes a release 6.5.2.x patch set, see "Adding Packages for Release 6.5.2.x Patch"
■ If your installation includes multiple languages, see "Preparing Multi-Language Installations" on page 8-7
Extract 65-orig Packages to the Original Component_install_dir
Netpoint_65_orig_en_COREid_Server_msg.zip
Netpoint_65_orig_COREid_Server_param.zip
Netpoint_65_orig_en_Access_Manager_msg.zip
Netpoint_65_orig_Access_Manager_param.zip
Netpoint_65_orig_en_WebPass_msg.zip
Netpoint_65_orig_WebPass_param.zip
Netpoint_65_orig_en_Access_Server_msg.zip
Netpoint_65_orig_Access_Server_param.zip
Netpoint_65_orig_en_WebGate_msg.zip
Netpoint_65_orig_WebGate_param.zip
Netpoint_65_orig_en_AccessServerSdk_msg.zip
Note: The Platform is automatically specified as Microsoft Windows 2000 because the bundles contain only text files that can be used on any platform; there are no binary files.

Preparing Release 6.x Environments
8-6 Oracle Access Manager Upgrade Guide
Adding Packages for Release 6.5.2.x PatchDuring the upgrade, the 10g (10.1.4.0.1) component installerrs create a directory named "orig" and compare the environment to ensure appropriate files are upgraded. If you originally installed release 6.5.0.x, then patched it to 6.5.2.x, you must extract and add the following packages to your original Component_install_dir before the upgrade.
To obtain the 6.5.2 packages 1. Obtain the 652 packages in the preceding list from Oracle MetaLink, as follows:
a. In your browser, enter the following URL:
https://metalink.oracle.com
b. Log in to MetaLink, as usual.
c. From the Quick Find list, select Patch Number.
d. Enter 5724938 in the field beside Quick Find Patch Number, then click the Go button.
The results of your search are displayed with the description: UNABLE TO LOCATE MIGRATION BUNDLE FOR 6.5-10.1.4 UPGRADE.
e. Click the Download button and follow instructions on the screen, then proceed to step 2.
Extract 652_orig Packages to the Original Component_install_dir
Netpoint_652_orig_en_COREid_Server_msg.zip
Netpoint_652_orig_COREid_Server_param.zip
Netpoint_652_orig_en_WebPass_msg.zip
Netpoint_652_orig_WebPass_param.zip
Netpoint_652_orig_en_Access_Manager_msg.zip
Netpoint_652_orig_Access_Manager_param.zip
Netpoint_652_orig_en_Access_Server_msg.zip
Netpoint_652_orig_Access_Server_param.zip
Netpoint_652_orig_en_WebGate_msg.zip
Netpoint_652_orig_WebGate_param.zip
Netpoint_652_orig_AccessServerSdk_param.zip
Netpoint_652_orig_en_AccessServerSdk_msg.zip
Note: You complete the next procedure only if the 6.5.2 patch was applied to a 6.5.0 installation. If your 6.5.2 installation was installed without a patch, ignore this procedure.
Note: The Platform is automatically specified as Microsoft Windows 2000 because the bundles contain only text files that can be used on any platform; there are no binary files.

Backing Up File System Directories, Web Server Configurations, and Registry Details
Preparing Components for the Upgrade 8-7
2. Extract (untar) these to the original installation directory for each component.
This creates a new directory named "orig" for each component. For example: Component_install_dir/identity/oblix/orig (or Component_install_dir/access/oblix/orig).
3. If your installation includes multiple languages, see "Preparing Multi-Language Installations" on page 8-7.
4. Finish preparing your environment as described in this chapter and start the upgrade.
Preparing Multi-Language InstallationsIf you upgrade a multi-language installation without including the corresponding 10g (10.1.4.0.1) Language Packs, you will lose the multi-language functionality. When you include 10g (10.1.4.0.1) Language Packs to the same directory as the 10g (10.1.4.0.1) installer, you can preserve your multi-language capability. After upgrading, you can add new languages as described in the Oracle Access Manager Installation Guide.
To add multi-language functionality after upgrading:
■ In-place Method: You can install 10g (10.1.4.0.1) Language Packs independently, after upgrading in place to 10g (10.1.4.0.1).
■ Zero Downtime Method: You can install 10g (10.1.4.0.1) Language Packs independently, after creating the 10g (10.1.4.0.1) destination and before applying in place to Release 10.1.4 Patch Set 1 (10.1.4.2.0).
To preserve existing multi-language functionality 1. Locate and add any 10g (10.1.4.0.1) Language Packs that correspond to your earlier
installed languages to the same directory as the 10g (10.1.4.0.1) component installer.
2. Upgrade your earlier installation as described in this manual for the method you have chosen.
Backing Up File System Directories, Web Server Configurations, and Registry Details
Oracle recommends that you complete activities in the topics here before upgrading to help ensure that you can roll back to the original installation should any problem arise:
■ Backing Up the Existing Component Installation Directory
■ Backing Up the Existing Web Server Configuration File
■ Backing Up Windows Registry Data
Backing Up the Existing Component Installation DirectoryBefore starting each component (or customization) upgrade, Oracle recommends that you back up the installation directory for the earlier instance and store this backup in a
Note: There is no independent Language Pack for English (en-us) because this is the default language. There are no 10g (10.1.4.2.0) Language Packs.

Backing Up File System Directories, Web Server Configurations, and Registry Details
8-8 Oracle Access Manager Upgrade Guide
different location. This will enable you to retrieve the original directory later should you need to restore the environment and rerun the upgrade.
In-place Method: As described earlier, a time-stamped directory of original files is created when you upgrade each component using the in-place upgrade. This system-generated directory contains earlier original files that are sometimes accessed to compare content or extract customized information. The time-stamped directory is stored in the same location as the upgraded 10g (10.1.4.0.1) directory. For example:
C:\611\identity_server\identity
C:\611\identity_server\identity_20060714_1701
To back up the existing installed directory1. On the computer hosting the component you will upgrade, locate the current
installation directory. For example:
C:\611\identity_server\identity
2. Copy the directory and store the copy in a new location. For example:
D:\611_backup\identity_server\identity
Backing Up the Existing Web Server Configuration FileBefore starting any Web server component upgrade (WebPass, Policy Manager, WebGate), Oracle recommends that you back up the existing Web server configuration file and store this backup in a different location.
The files to be backed up will vary, depending upon the Web server type. For example:
■ Netscape or Sun One Web Server: back up the obj.conf and magnus.conf files
■ All Apache-based Web Servers (including Apache v1 and v2 Web Servers, IBM HTTP Server (IHS) powered by Apache, and Oracle HTTP Server (OHS)): back up httpd.conf
■ Internet Information Services (IIS) Web Servers): use the Microsoft Configuration Backup/Restore feature as described in the following procedure.
■ Domino Web Servers: Oracle recommends that you capture screen shots of each page of the Web server configuration using the Web server’s graphical user interface (GUI). If needed, you can refer to the screens to reconfigure the Domino Web server if you need to restore or roll back to the earlier configuration. Domino does not maintain any configuration file that can be backed up.
To back up the existing Web Server configuration file 1. On the computer hosting the Web component you will upgrade, locate the existing
Web server configuration file. For example:
C:/IHS_install_dir/conf/httpd.conf
Note: When you use the zero downtime upgrade method, you will create a source. The source becomes a backup directory that remains intact during the upgrade. For zero downtime upgrades, you do not need to create a backup copy of the installation directory. For more information about this method, see Part VI.

Stopping Servers and Services
Preparing Components for the Upgrade 8-9
2. Copy the Web server configuration file and store the copy in a new location. For example:
D:/IHS_install_dir/conf/httpd.conf
3. IIS 5: Perform the following steps.
a. Right click the computer name in the Internet Information Services (IIS) Manager MMC snap-in.
b. Click Backup/Restore Configuration.
c. Click the Create Backup button.
4. IIS 6: Perform the following steps.
a. Right click the computer name in the Internet Information Services (IIS) Manager MMC snap-in.
b. Click All Tasks, click Backup/Restore Configuration.
c. Click the Create Backup button.
5. Domino Web servers: Reconfigure the Web server using the GUI and screen shots of the previous configuration.
Backing Up Windows Registry DataBefore starting each component upgrade on a Microsoft Windows system, Oracle recommends that you back up any registry data that includes Oracle Access Manager (formerly NetPoint or COREid) data.
To back up Windows Registry data1. Run the regedit command
2. Chose the key "My Computer\HKEY_LOCAL_MACHINE\SOFTWARE\Oblix\Oblix NetPoint"
3. Click "Registry" in the menu then select "Export registry file…" in the drop-down. menu.
4. Specify the export file name in the "Export Registry File" dialog.
5. Save the exported registry file to a known location.
Again, this will enable you to roll back to the previous installed environment and restart the upgrade, should a failure occur. Refer to your Windows documentation for details.
Stopping Servers and ServicesBefore you start to upgrade to10g (10.1.4.0.1), you must stop the earlier server or service on the computer hosting the component to be upgraded.
For example, if you use WebPass, you need to stop the Web server on which the WebPass is installed. For an Identity Server, you need to stop the Identity Server service. For Identity Servers, you can use the following command to ensure that all Identity Server processes have been stopped on Solaris computers:
ps -ef | grep IdentityServer_install_dir

Logging in with Appropriate Administrative Rights
8-10 Oracle Access Manager Upgrade Guide
For Access Servers, ensure that all Access Server processes are completely shutdown before upgrading to the 10g (10.1.4.0.1) Access Server. To ensure that all Access Server processes have been stopped on Solaris computers, use the command shown next:
ps -ef | grep AccessServer_install_dir
Any still-running Access Server processes can be terminated using the kill -9 command.
IIS users: Stop the IIS Admin Service.
To stop servers or services before the upgrade1. Locate the computer hosting the component you will upgrade.
2. Stop the Web server (WebPass, Policy Manager, and WebGate) or the service (Identity Server and Access Server).
3. If you are upgrading any integration components, stop the corresponding Application or Portal Server. For example if you are upgrading Security Provider for WebLogic SSP, you must stop the corresponding WebLogic Application Server.
Logging in with Appropriate Administrative RightsWhether you upgrade or install an Oracle Access Manager component, you must log in as a user with administrative rights. On Solaris, you need to run the upgrade as the user who installed the previous release of Oracle Access Manager, or as a user with higher privileges.
Whenever a schema and data upgrade is involved in the upgrade process, you need to login as a user who has permission to change the schema and data in the directory server. In other words, the bind DN you use must have permission to update the directory.
To login before the upgrade1. Ensure that you have a userid and password that provides the rights you need to
perform the upgrade as well as any schema and data changes that occur during the upgrade.
2. On the computer hosting the component to upgrade, log in as a user with administrative rights.
Upgrading Remaining Identity System Components In Place 9-1
9Upgrading Remaining Identity System
Components In Place
Activities in this chapter are intended for administrators responsible to upgrade earlier Identity System components (Identity Servers (formerly known as COREid Servers) and WebPass instances. Topics include:
■ About In-Place Identity System Upgrades
■ Upgrading Remaining Identity Servers In Place
■ Upgrading Remaining WebPass Instances In Place
■ Validating the In-place Identity System Upgrade
■ Backing Up Upgraded Identity Component Information
■ Recovering From an In-place Identity Component Upgrade Failure
■ Looking Ahead
About In-Place Identity System UpgradesEnsure that the schema and data have been upgraded in place, as described in Part II. Activities in this chapter must be completed in the sequence described herein:
■ After upgrading the Identity System schema and data as described in Part II (and if you have an existing Access System, after upgrading the Access System schema and data as described in Chapter 7)
■ After preparing Identity system components as described in Chapter 8, which might be performed just before upgrading each specific component instance
To upgrade remaining Identity System components in place, you use corresponding 10g (10.1.4.0.1) component installers and specify the same target directory as the existing component.
When your starting 6.5 or 7.x release includes multiple languages, you should upgrade these to retain your existing multiple language functionality.
Note: If you are using the zero downtime method, skip this chapter and see Part VI. If your starting Oracle Access Manager release is earlier than 6.1.1, contact Oracle Support before upgrading: http://www.oracle.com/support/contact.html.

About In-Place Identity System Upgrades
9-2 Oracle Access Manager Upgrade Guide
Figure 9–1 provides an overview of the in-place Identity System upgrade tasks. Additional details follow the graphic.
Figure 9–1 In-place Identity System Upgrade Task Overview
Task overview: Upgrading Identity System components in place1. Upgrade remaining Identity Servers, one by one, as described in "Upgrading
Remaining Identity Servers In Place" on page 9-3.
2. Audit to Database: If auditing to a database is configured in your earlier installation, before restarting the upgraded Identity Server service you must perform certain tasks manually to ensure proper auditing in 10g (10.1.4.0.1). See "Upgrading Auditing and Access Reporting for the Identity System" on page 12-2.
3. Upgrade remaining WebPass components, one by one, as described in"Upgrading Remaining WebPass Instances In Place" on page 9-8.
4. Perform activities in "Validating the In-place Identity System Upgrade" on page 9-11 to ensure that the upgrade is successful.
5. Component Upgrade Successful: Proceed to "Backing Up Upgraded Identity Component Information" on page 9-12.
6. Component Upgrade Not Successful: Proceed to "Recovering From an In-place Identity Component Upgrade Failure" on page 9-12.
Note: If you experience problems during any component upgrade, see "Accessing Log Files" on page G-2 and other troubleshooting tips in Appendix G.
Start from 6.1.1, 6.5, or 7x?Use 10.1.4 Installers
Upgrade Remaining Identity Servers one by one (This Chapter)
Upgrade Remaining WebPass Instances one by one(This Chapter)
Validate Identity System Upgrades(This Chapter)
Back Up Upgraded Identity Information(This Chapter)
Audit toDatabase?
No
Perform Manual Audit Upgrade Tasks(Chapter 12)
Yes

Upgrading Remaining Identity Servers In Place
Upgrading Remaining Identity System Components In Place 9-3
Upgrading Remaining Identity Servers In PlaceFigure 9–2 illustrates the sequence of events during the program-driven upgrade process for remaining Identity Servers (and the decision points where you are asked to provide specific responses or input). These are a subset of the processes that occur during the schema and data upgrade, because the program automatically detects those changes and suppresses messages related to those events during subsequent Identity Server upgrades.
Figure 9–2 Remaining Identity Server Upgrade Process, In Place
Task overview: Upgrading remaining Identity Servers includes1. Starting the Identity Server Upgrade
2. Specifying the Target Directory and Languages
When upgrading remaining Identity Servers, you won’t be asked about schema and data upgrades, because those upgrades are detected automatically.
3. Upgrading Identity Server Configuration Files
4. Upgrading the Software Developer Kit Configuration
Oracle recommends that you accept the Software Developer kit (SDK) configuration upgrade for each Identity Server during the component upgrade. Certain Identity server functions depend on the SDK configuration.
5. Finishing and Verifying the Identity Server Upgrade
Identity Server Upgrade Prerequisites Before you begin upgrading remaining Identity Servers, check the tasks in Table 9–1 and be sure to perform all tasks for each component instance before the upgrade. Failure to complete the prerequisites can adversely affect your upgrade.
Note: If you experience problems during any component upgrade, see "Accessing Log Files" on page G-2 and other troubleshooting tips in Appendix G.
Start Identity Server Upgrade1
Specify Target Directory and Languages2
Upgrade Identity Server Configuration Files3
Upgrade SDK Configuration (all Identity Servers)4
Finish and Verify the Upgrade5
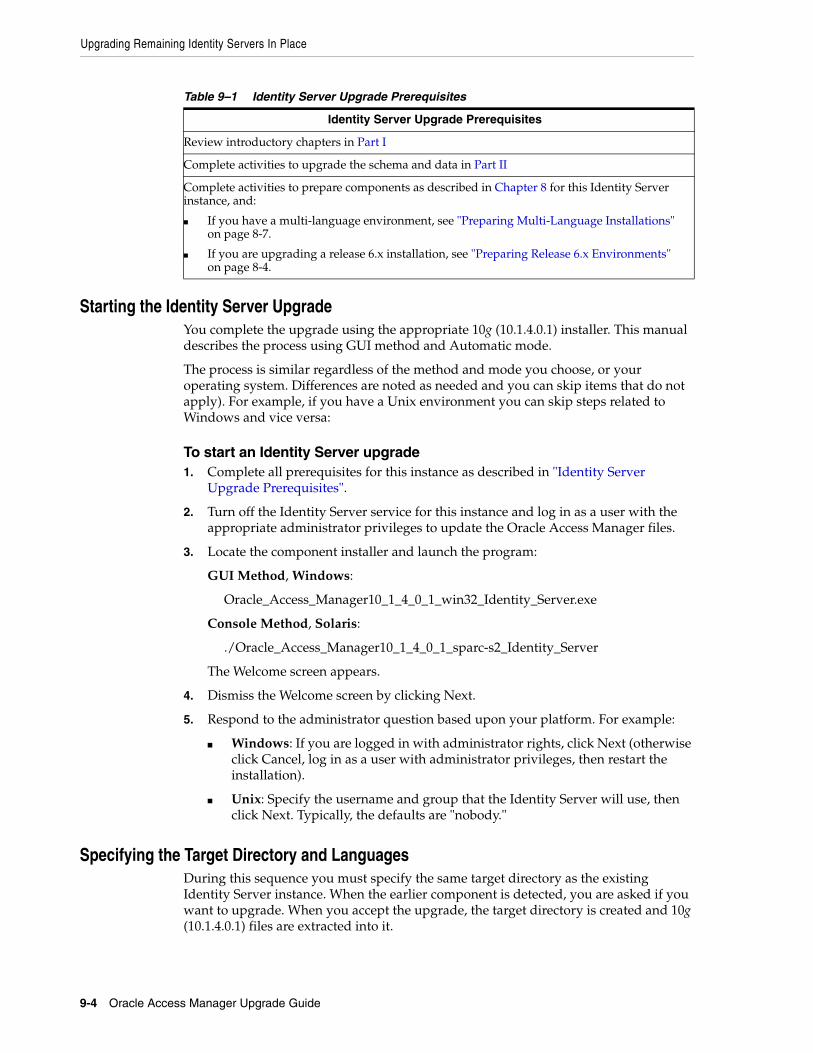
Upgrading Remaining Identity Servers In Place
9-4 Oracle Access Manager Upgrade Guide
Starting the Identity Server UpgradeYou complete the upgrade using the appropriate 10g (10.1.4.0.1) installer. This manual describes the process using GUI method and Automatic mode.
The process is similar regardless of the method and mode you choose, or your operating system. Differences are noted as needed and you can skip items that do not apply). For example, if you have a Unix environment you can skip steps related to Windows and vice versa:
To start an Identity Server upgrade1. Complete all prerequisites for this instance as described in "Identity Server
Upgrade Prerequisites".
2. Turn off the Identity Server service for this instance and log in as a user with the appropriate administrator privileges to update the Oracle Access Manager files.
3. Locate the component installer and launch the program:
GUI Method, Windows:
Oracle_Access_Manager10_1_4_0_1_win32_Identity_Server.exe
Console Method, Solaris:
./Oracle_Access_Manager10_1_4_0_1_sparc-s2_Identity_Server
The Welcome screen appears.
4. Dismiss the Welcome screen by clicking Next.
5. Respond to the administrator question based upon your platform. For example:
■ Windows: If you are logged in with administrator rights, click Next (otherwise click Cancel, log in as a user with administrator privileges, then restart the installation).
■ Unix: Specify the username and group that the Identity Server will use, then click Next. Typically, the defaults are "nobody."
Specifying the Target Directory and Languages During this sequence you must specify the same target directory as the existing Identity Server instance. When the earlier component is detected, you are asked if you want to upgrade. When you accept the upgrade, the target directory is created and 10g (10.1.4.0.1) files are extracted into it.
Table 9–1 Identity Server Upgrade Prerequisites
Identity Server Upgrade Prerequisites
Review introductory chapters in Part I
Complete activities to upgrade the schema and data in Part II
Complete activities to prepare components as described in Chapter 8 for this Identity Server instance, and:
■ If you have a multi-language environment, see "Preparing Multi-Language Installations" on page 8-7.
■ If you are upgrading a release 6.x installation, see "Preparing Release 6.x Environments" on page 8-4.

Upgrading Remaining Identity Servers In Place
Upgrading Remaining Identity System Components In Place 9-5
Even when your earlier environment is English only, you are asked to confirm the language to use as the default locale (default Administrator language). You are also asked to specify any languages to upgrade. You can install additional Language Packs after upgrading, as described in the Oracle Access Manager Installation Guide.
Unless indicated in the next steps the questions that you must respond to are the same regardless of your chosen installation method and mode.
To specify the target directory and languages1. Choose the same installation directory as the earlier Identity Server, then click
Next.
2. Accept the upgrade by clicking Yes, then click Next.
3. Ensure that a check mark appears beside English and any other languages you want to upgrade, then click Next.
You might be presented with a list of languages that will be upgraded.
4. Confirm the languages listed by clicking Next.
The next screen tells you that the existing installation has been saved and provides the time-stamped directory name containing all files from the previous installation.
5. Continue the upgrade by clicking Next.
A new screen confirms the installation directory for 10g (10.1.4.0.1) and tells you how much space is needed for the installation.
6. Start the file extraction into the target directory by clicking Next.
A status bar indicates the progress of the file extraction.
7. Press Enter to continue.
Enter
You are asked to specify a mode for the upgrade process: Automatic or Confirmed.
------------------------------------- Please specify the mode for migration: '1' - Automatic (recommended) Each step is performed automatically. No interaction from the user is required. '2' - Confirmed Each step needs confirmation from the user. Enter choice ( '1' or '2' ) : 1 --------------------------------------------
8. Enter the number that corresponds to the upgrade mode you prefer: For example:
■ Automatic (recommended): Enter the number 1 to observe as the process completes automatically and respond to a few specific questions when needed.
Note: If you are installing in using the Console method, you are asked to run the command displayed in the transcript. On Unix, the command is printed to a file (start_migration), and a message is printed to run this file.

Upgrading Remaining Identity Servers In Place
9-6 Oracle Access Manager Upgrade Guide
■ Confirmed: Enter the number 2 to receive a prompt that you must respond to before each and every event during the entire Identity Server upgrade process.
The declarative messages in this guide are based on the Automatic mode. In this case, you are informed as folders are created, files are copied, and catalogs are upgraded. For example:
Creating original folders ... ---------------------------------------------------- Copying general configuration files OK. ---------------------------------------------------- Updating parameter catalogs ... OK. ----------------------------------------------------
When the upgrade program connects with the directory server, a transcript appears as shown next.
Starting migration (6.1.1 -> 6.5.0) ----------------------------------------------------
9. Regardless of the mode you have chosen, continue with "Upgrading Identity Server Configuration Files", next.
Upgrading Identity Server Configuration FilesComponent-specific configuration files are upgraded during this sequence. Depending on your starting release, aspects of the sequence might be repeated to bring your starting release up to 10g (10.1.4.0.1) incrementally. For example if your starting release is 6.1.1, component configuration files are incrementally upgraded to release 6.5, then again to release 7.0, then again to 10g (10.1.4.0.1).
During this sequence, you must type the full word "yes" or press the Enter key when asked to continue the upgrade through each sequence. In the example here, however, not all messages are shown.
To accept Identity Server-specific changes 1. Review messages for the migration to 10g (10.1.4.0.1).
2. Continue as directed, and review the final message. For example:
Enter
Updating component-specific configuration files... OK.
Migration has completed successfully! Press <ENTER> to continue : -----------------------+++++++++++++--------------
3. Proceed with "Upgrading the Software Developer Kit Configuration" next.
Upgrading the Software Developer Kit ConfigurationThe following functions in the Identity System require the Software Developer Kit (SDK, formerly known as the Access Server SDK (or Access SDK)):
■ Automatic cache flush between the Identity System and Access System
■ Automatic login to the Access System after self-registration

Upgrading Remaining Identity Servers In Place
Upgrading Remaining Identity System Components In Place 9-7
The SDK might have been manually configured to enable required functions, as described in your earlier version of the Oblix NetPoint or Oracle COREid Administration Guide (Volume 1 if you have a two volume set).By default, the SDK is installed in \IdentityServer_install_dir\identity.
If your environment was configured to perform these functions, Oracle recommends that you upgrade the SDK during each Identity Server upgrade to preserve current configuration settings. When you accept the SDK upgrade, the process is launched automatically.
To upgrade the SDK configuration during the Identity Server upgrade1. Review the SDK statements.
This component has the Access Server SDK installed
Would you like to automatically migrate the SDK at this time?
Note: If you do not want to migrate the SDK at this time, you will need to reconfigure the SDK after migration has finished by running the 'configureAccessGate' program '1' - Yes '2' - No Enter choice ( '1' or '2' ) :
2. Respond to the question about migrating the SDK based on your environment.
1
3. Continue as directed, then specify a mode for the SDK upgrade process: Automatic or Confirmed.
------------------------------------- Please specify the mode for migration: '1' - Automatic (recommended) Each step is performed automatically. No interaction from the user is required. '2' - Confirmed Each step needs confirmation from the user. Enter choice ( '1' or '2' ) : 1-------------------------------------------- 1
4. Continue as directed, then go to "Finishing and Verifying the Identity Server Upgrade" next.
Finishing and Verifying the Identity Server UpgradeYou complete this procedure to finish the upgrade for this Identity Server.
Note: If you do not accept the automatic SDK configuration upgrade now, current SDK configuration settings are not preserved and you must reconfigure the SDK later using the configureAccessGate tool. For details, see the Oracle Access Manager Identity and Common Administration Guide. If the SDK was not configured for this specific Identity Server, you can skip this event when asked.

Upgrading Remaining WebPass Instances In Place
9-8 Oracle Access Manager Upgrade Guide
To finish and verify the Identity Server upgrade1. Auditing and Access Reporting: If your earlier installation included auditing and
access reporting, go immediately to "Upgrading Auditing and Access Reporting for the Identity System" on page 12-2 before performing step 2.
2. Start the Identity Server service to confirm that it will start (notice that the name has not changed from the one originally assigned).
3. Identity Server Service Does Not Start: See troubleshooting tips in Appendix G.
4. Check the migration log files for any errors reported during the upgrade, as described in "Accessing Log Files" on page G-2.
5. Upgrade Not Successful: Proceed to "Recovering From an In-place Identity Component Upgrade Failure" on page 9-12.
6. Upgrade Successful: Upgrade every earlier Identity Server instance in your environment.
7. After upgrading all earlier Identity Server instances, proceed to "Upgrading Remaining WebPass Instances In Place" next.
Upgrading Remaining WebPass Instances In PlaceAfter all Identity Servers are upgraded in place, you can begin upgrading WebPass instances in place.
With WebPass, there is no connection to a directory server and, therefore, no schema or data upgrades. The component-specific upgrade includes both WebPass configuration files and Web server configuration updates. There are no differences between upgrading the master WebPass (accomplished earlier for the schema and data upgrade) and upgrading remaining WebPass instances.
Again, unless you are upgrading from release 7, the process repeats for each major release until you reach 10g (10.1.4.0.1).
Figure 9–3 illustrates events in the program-driven WebPass upgrade process as well and the points at which you must provide input.
Figure 9–3 In-place WebPass Upgrade Processes
Caution: When your earlier environment includes auditing to a database, do not start the Identity Server service until you finish tasks in "Upgrading Auditing and Access Reporting for the Identity System" on page 12-2.
StartSpecify Directory and Languages1
Upgrade Component and Web Server Configuration Files2
Finish and Verify the Upgrade3

Upgrading Remaining WebPass Instances In Place
Upgrading Remaining Identity System Components In Place 9-9
Task overview: Upgrading remaining WebPass instances includes1. Starting the WebPass Upgrade, Specifying the Target Directory and Languages
2. Upgrading WebPass Configuration Files and Web Server Configuration File
3. Finishing and Verifying the WebPass Upgrade
WebPass Upgrade Prerequisites Before you begin upgrading any WebPass instance, check Table 9–2 to ensure you have completed all tasks. Failure to complete prerequisites can adversely affect your upgrade.
Starting the WebPass Upgrade, Specifying the Target Directory and Languages The sample WebPass upgrade described here starts from release 6.1.1. The sequence of events and messages is directed by the program with very little input from you.
To start the WebPass upgrade1. Complete all prerequisites for this instance as described in "WebPass Upgrade
Prerequisites" on page 9-9.
2. Turn off this WebPass Web server.
3. Log in as a user with the administrator privileges to update the Web server configuration and Oracle Access Manager files.
4. Locate and launch the appropriate 10g (10.1.4.0.1) WebPass installer for this instance. For example:
GUI Method Windows: Oracle_Access_Manager10_1_4_0_1_win32_NSAPI_WebPass.exe
Console Method, Solaris: ./Oracle_Access_Manager10_1_4_0_1_sparc-s2_NSAPI_WebPass
The Welcome screen appears.
5. Dismiss the Welcome screen, then r.espond when asked about your administrator rights.
6. Specify the directory that contains the earlier WebPass instance.
7. Accept the upgrade when asked.
8. Ensure that a check mark appears beside English and any other languages you have or want installed, then continue.
You might be presented with a list of languages that will be upgraded or added.
Table 9–2 WebPass Upgrade Prerequisites
WebPass Upgrade Prerequisites
Upgrade all Identity Servers as described in "Upgrading Remaining Identity Servers In Place" on page 9-3.
Complete tasks to prepare this WebPass as described in Chapter 8, and:
■ If you have a multi-language environment, see "Preparing Multi-Language Installations" on page 8-7.
■ If you are upgrading a release 6.x installation, see "Preparing Release 6.x Environments" on page 8-4.

Upgrading Remaining WebPass Instances In Place
9-10 Oracle Access Manager Upgrade Guide
9. Confirm the languages listed by clicking Next.
10. Record the name of the time-stamped directory, then continue.
11. Start the file extraction.
A status bar indicates the progress of the file extraction.
Using the GUI method a new window appears asking you to specify either Automatic or Confirmed mode for the upgrade. Using the Console method, you are asked to run the command displayed in the transcript, then continue as instructed.
Upgrading WebPass Configuration Files and Web Server Configuration FileFor brevity, steps are provided with little explanatory text. The command provided in the Console method transcript is referenced but not shown.
To upgrade the WebPass and Web server configuration1. Enter the number that corresponds to the mode you prefer and follow the dialog
on screen. For example:
------------------------------------- Please specify the mode for migration: '1' - Automatic (recommended) Each step is performed automatically. No interaction from the user is required. '2' - Confirmed Each step needs confirmation from the user. Enter choice ( '1' or '2' ) : 1 --------------------------------------------
1
Creating orig folders ... ---------------------------------------------------- Copying general configuration files ... OK. ---------------------------------------------------- Updating parameter catalogs ... OK. ---------------------------------------------------- Starting migration (6.1.1 -> 6.5.0) ------------------------------------- Updating component-specific configuration files... OK. ------------------------------------- Starting migration ( 6.5.0 -> 7.0.0 )... ------------------------------------- Updating web server configuration files... OK. ------------------------------------- Updating component-specific configuration files... OK. ------------------------------------- Starting migration (7.0.0 -> 10.1.4) ------------------------------------- Updating web server configuration files... OK. ------------------------------------- Updating component-specific configuration files...
Validating the In-place Identity System Upgrade
Upgrading Remaining Identity System Components In Place 9-11
OK. ------------------------------------- Migration has completed successfully! Press <ENTER> to continue :
2. Continue as requested.
Enter
If the Access System is also configured, you need to create a DB Profile manually after first WebPass component upgrade is completed and before upgrading the first Policy Manager. The profile gives the Access Server write permission to Policy data in the directory server and will be used whileupgrading the WebGate component. The profile can be deleted after allthe WebGates are successfully upgraded.
Changing ownership of directory ... (C:\NetPoint\webcomponent-iis\identity_20060426_163742\oblix ) -> (C:\NetPoint\webcomponent-iis\identity\oblix ) -------------------------------------
3. Conclude the WebPass upgrade and proceed to the next discussion, "Finishing and Verifying the WebPass Upgrade".
Finishing and Verifying the WebPass UpgradeYou finish this WebPass upgrade as described in the following steps.
To finish the WebPass upgrade1. Apply Web server changes, if needed.
2. Stop, then restart the associated Identity Server service.
3. Start the WebPass Web server instance.
4. Web Server Does Not Start: See troubleshooting tips in Appendix G.
5. Check the migration log files for any errors reported during the upgrade, as described in "Accessing Log Files" on page G-2.
6. Upgrade Not Successful: Proceed to "Recovering From an In-place Identity Component Upgrade Failure" on page 9-12.
7. Upgrade Successful: Upgrade every WebPass instance in your environment.
8. After upgrading all WebPass instances, proceed to "Validating the In-place Identity System Upgrade" next.
Validating the In-place Identity System UpgradeIt is a good idea to quickly validate the following items to ensure that the overall Identity System upgrade was successful.
To confirm your in-place Identity System upgrade1. Delete all Web browser caches once the upgrade is complete.
Note: Ignore the message about creating a temporary directory profile. This was performed after the schema and data upgrade.

Backing Up Upgraded Identity Component Information
9-12 Oracle Access Manager Upgrade Guide
2. Make sure your Identity Server service and WebPass Web server instance are running.
3. Check that your message and parameter catalog customizations have been preserved. For example, if you have changed any message in a particular message catalog file, then it needs to be retained.
4. Proceed to "Backing Up Upgraded Identity Component Information" next.
Backing Up Upgraded Identity Component InformationAs mentioned earlier, Oracle recommends that you finish each component upgrade by backing up the upgraded 10g (10.1.4.0.1) component directory. This will enable you to easily restore your environment to the newly upgraded state should that be needed.
To back up critical information after the upgrade 1. Back up the 10g (10.1.4.0.1) component directory and store it in a new location.
2. WebPass Web Server: Back up the upgraded Web server configuration file, if required, using instructions from your vendor.
3. Windows: Back up the upgraded registry for the component as described in "Backing Up Windows Registry Data" on page 8-9.
4. Proceed to "Looking Ahead" on page 9-12.
Recovering From an In-place Identity Component Upgrade FailureIf a component upgrade was not successful, you can perform the following steps to rollback this upgrade, then try again.
To recover from an unsuccessful Identity component upgrade1. Restore the earlier component installation directory that you backed up before the
upgrade (to recover the earlier environment), then back it up again. You will retain one of the earlier directories as a backup copy and use one to restart the upgrade.
2. WebPass Web Server: Restore the upgraded Web server configuration file, if required.
3. Windows: Restore the backed up registry for the component.
4. Using a backup copy of your earlier component installation directory (and Web server configuration, if needed), restart the upgrade as described in this chapter.
Looking AheadUpgraded Identity System components send and receive information in UTF-8 encoding. Earlier components send and receive data in Latin-1 encoding. As a result, the 10g (10.1.4.0.1) Identity System does not work with earlier Access System components.
When all earlier Identity System components are successfully upgraded, proceed as appropriate for your earlier installation. For example:
■ Identity System Only: When your earlier installation does not include the Access System, you can complete activities in the following sequence using information in:

Looking Ahead
Upgrading Remaining Identity System Components In Place 9-13
– Chapter 11, "Upgrading Integration Components and an Independently Installed SDK"
– Chapter 12, "Upgrading Your Identity System Customizations" after upgrading all Identity System components.
– Chapter 14, "Validating the Entire System Upgrade"
■ Joint Identity and Access System: In this case, you must complete activities in the sequence listed next using information in:
– Chapter 10, "Upgrading Access System Components In Place"
– Chapter 11, "Upgrading Integration Components and an Independently Installed SDK"
– Chapter 12, "Upgrading Your Identity System Customizations" after upgrading all Identity System components.
– Chapter 13, "Upgrading Your Access System Customizations"
– Chapter 14, "Validating the Entire System Upgrade"
For more information about expected system behaviors, see Chapter 4.

Looking Ahead
9-14 Oracle Access Manager Upgrade Guide

Upgrading Access System Components In Place 10-1
10Upgrading Access System Components In
Place
Activities in this chapter are intended for administrators responsible to upgrade an earlier Access System components. If your environment does not include Access System components, you can skip this chapter. If you are using the zero downtime method, see Part VI. Topics in this chapter include:
■ About In-place Access System Component Upgrades
■ Upgrading Remaining Policy Managers In Place
■ Upgrading Access Servers In Place
■ Upgrading WebGates In Place
■ Backing Up Upgraded Access System Component Directories
■ Recovering From an In-place Access System Upgrade Failure
■ Looking Ahead
About In-place Access System Component UpgradesBefore you can use Oracle Access Manager access policies, you must upgrade the Access System components. Tasks in this chapter must be performed:
■ After upgrading the schema and data as described in Part II
■ After upgrading remaining Identity System components in as described in Chapter 9
■ After preparing individual Access System components as described in Chapter 8, which can be performed just before upgrading each specific instance
To upgrade remaining Access System component in place, you use corresponding 10g (10.1.4.0.1) component installers and specify the same target directory as the existing component.
When your starting 6.5 or 7.x release includes multiple languages, you should upgrade these to retain your existing multiple language functionality.
Figure 10–1 provides an overview of in-place Access System upgrade tasks.
Note: You must upgrade the Access System before upgrading integration components or an independently installed SDK.

Upgrading Remaining Policy Managers In Place
10-2 Oracle Access Manager Upgrade Guide
Figure 10–1 In-place Access System Upgrade Tasks
Task overview: Upgrading Access System components in place includes1. Upgrading Remaining Policy Managers In Place
2. Upgrading Access Servers In Place
3. Audit to Database: If you have auditing to a database configured in your earlier installation, before restarting the upgraded Access Server service you must perform certain tasks manually to ensure proper auditing in 10g (10.1.4.0.1). See "Upgrading Auditing and Reporting for the Access Server" on page 13-2.
4. Upgrading WebGates In Place: This activity does not need to occur all at one time because upgraded Access Servers are automatically backward compatible with earlier WebGates.
5. Component Upgrade Successful: Proceed to "Backing Up Upgraded Access System Component Directories" on page 10-13. This task should be performed after every component successful upgrade to enable you to quickly roll back to this upgrade if needed.
6. Component Upgrade Not Successful: Proceed to "Recovering From an In-place Access System Upgrade Failure" on page 10-13.
Upgrading Remaining Policy Managers In PlaceThe name Policy Manager (formerly known as the Access Manager component) is used throughout this chapter. The master Policy Manager upgrade occurred with the Access System schema and data upgrade.
Note: If you experience problems during any component upgrade, see "Accessing Log Files" on page G-2 and other troubleshooting tips in Appendix G.
Upgrade Remaining Policy Managers one by one(This Chapter)
Start from 6.1.1, 6.5, or 7x?Use 10.1.4 Installers
Upgrade Access Servers one by one(This Chapter)
Upgrade WebGates one by one over time(This Chapter)
Back Up Upgraded Access Information(This Chapter)
Audit toDatabase?
No
Perform Manual Audit Upgrade Tasks(Chapter 13)
Yes
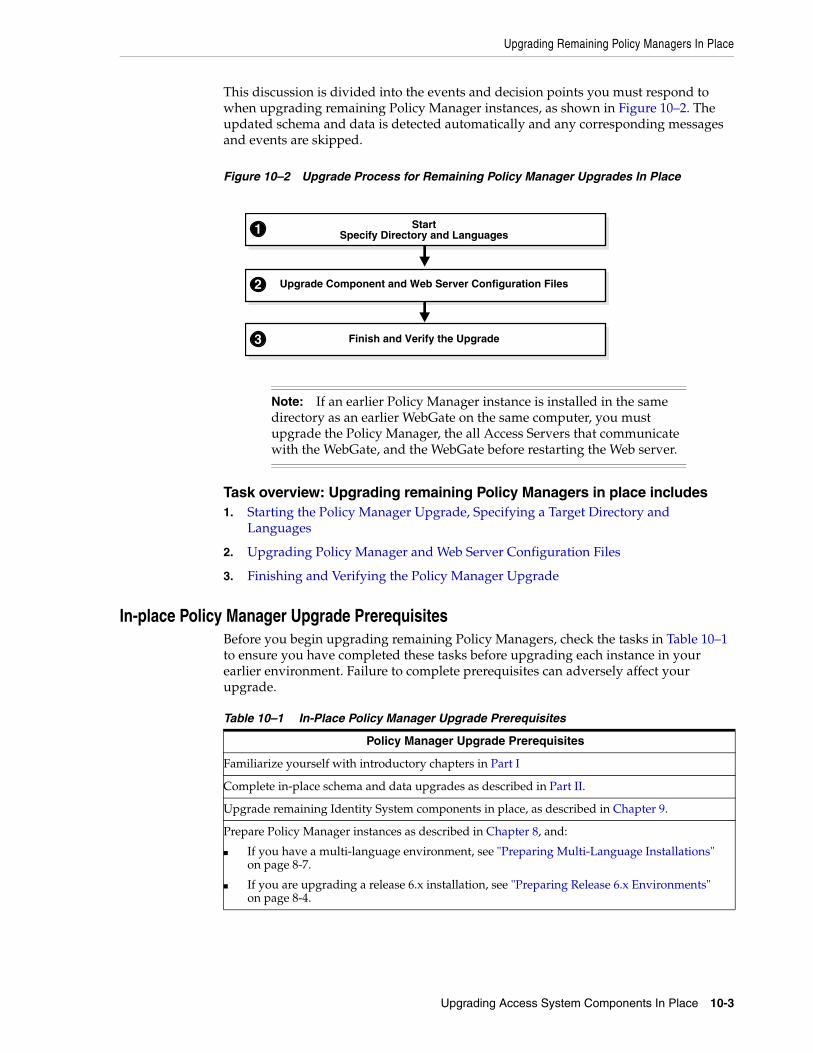
Upgrading Remaining Policy Managers In Place
Upgrading Access System Components In Place 10-3
This discussion is divided into the events and decision points you must respond to when upgrading remaining Policy Manager instances, as shown in Figure 10–2. The updated schema and data is detected automatically and any corresponding messages and events are skipped.
Figure 10–2 Upgrade Process for Remaining Policy Manager Upgrades In Place
Task overview: Upgrading remaining Policy Managers in place includes1. Starting the Policy Manager Upgrade, Specifying a Target Directory and
Languages
2. Upgrading Policy Manager and Web Server Configuration Files
3. Finishing and Verifying the Policy Manager Upgrade
In-place Policy Manager Upgrade PrerequisitesBefore you begin upgrading remaining Policy Managers, check the tasks in Table 10–1 to ensure you have completed these tasks before upgrading each instance in your earlier environment. Failure to complete prerequisites can adversely affect your upgrade.
Note: If an earlier Policy Manager instance is installed in the same directory as an earlier WebGate on the same computer, you must upgrade the Policy Manager, the all Access Servers that communicate with the WebGate, and the WebGate before restarting the Web server.
Table 10–1 In-Place Policy Manager Upgrade Prerequisites
Policy Manager Upgrade Prerequisites
Familiarize yourself with introductory chapters in Part I
Complete in-place schema and data upgrades as described in Part II.
Upgrade remaining Identity System components in place, as described in Chapter 9.
Prepare Policy Manager instances as described in Chapter 8, and:
■ If you have a multi-language environment, see "Preparing Multi-Language Installations" on page 8-7.
■ If you are upgrading a release 6.x installation, see "Preparing Release 6.x Environments" on page 8-4.
StartSpecify Directory and Languages1
Upgrade Component and Web Server Configuration Files2
Finish and Verify the Upgrade3

Upgrading Remaining Policy Managers In Place
10-4 Oracle Access Manager Upgrade Guide
Starting the Policy Manager Upgrade, Specifying a Target Directory and LanguagesIn this sequence you start the process, specify the same target directory as the earlier Policy Manager component, and specify languages to upgrade.
Again, the steps here use GUI method and the recommended Automatic mode to illustrate messages you see, responses you give, and the sequence of events. The sample upgrade in this procedure starts from a release 6.1.1. Your starting release and environment might differ.
To start the Policy Manager upgrade, and specify a target directory and languages1. Confirm that all prerequisites described in "In-place Policy Manager Upgrade
Prerequisites" on page 10-3 have been completed for this instance.
2. Stop the Policy Manager Web server instance and log in as a user with the appropriate administrator privileges to update the Oracle Access Manager files.
3. Locate and launch the installation program using your preferred method:
GUI Method, Windows:
Oracle_Access_Manager10_1_4_0_1_Win32_NSAPI_PolicyManager.exe
Console Method, Solaris:
./Oracle_Access_Manager10_1_4_0_1_sparc-s2_NSAPI_PolicyManager
The Welcome screen appears.
4. Dismiss the Welcome screen as directed, then respond to the administrator question based upon your platform.
5. Choose the directory where you installed the earlier release, then continue as directed.
6. Accept the upgrade by clicking Yes, then click Next
7. Ensure that a check mark appears beside English and any other languages you have installed, then click Next.
8. Confirm the languages listed by clicking Next.
9. Record the time-stamped directory name, then click Next to continue.
10. Note the amount of disk space required, then click Next to start the file extraction into the target directory.
You are asked to specify a mode for the upgrade process: Automatic or Confirmed.
If you are using Console method, the installation script exits and a transcript appears. Run the command in the transcript then continue with step 9. (On Unix, the command is printed to a file (start_migration), and a message is printed to run this file.)
11. Press the number of your choice., then review messages that appear. For example:
1
Creating orig folders ...----------------------------------------------------
Note: Skip any details that do not apply to your installation. For example if you have a Unix environment, skip Windows details.

Upgrading Remaining Policy Managers In Place
Upgrading Access System Components In Place 10-5
Copying general configuration filesOK.----------------------------------------------------Updating parameter catalogs ...OK.----------------------------------------------------
12. Continue with "Upgrading Policy Manager and Web Server Configuration Files".
Upgrading Policy Manager and Web Server Configuration FilesDuring this sequence the component-specific upgrade is performed. With the Policy Manager, this includes Web server configuration updates and upgrades for Policy Manager configuration parameters.
The following procedure provides only an abbreviated set of messages to give you an idea of what to expect. Your environment will vary.
To upgrade the Web Server and Policy Manager1. Review messages and respond appropriately for your environment when asked.
-------------------------------------Updating web server configuration files...Connecting to server ...Done.OK.-------------------------------------Updating component-specific configuration files...OK.-------------------------------------Starting migration ( 6.5.0 -> 7.0.0 )...-------------------------------------Please type 'yes' to proceed:
2. Continue with component-specific configuration for release 7.0 or 10g (10.1.4.0.1), if needed.
EnterUpdating component-specific configuration files.
3. Review the message to confirm the upgrade finished successfully.
Directory permissions copied ... C:\NetPoint\WebComponent\access_20060223_190102\oblix) C:\NetPoint\WebComponent\access\oblix) --------------------------------------------------- Migration has completed successfully! Press <ENTER> to continue.
4. When this phase completes, continue as instructed, then proceed to "Finishing and Verifying the Policy Manager Upgrade".
Finishing and Verifying the Policy Manager UpgradeYou finish the upgrade as described in this procedure.
To finish the Policy Manager upgrade1. Apply any changes to the Web server configuration file, if needed.

Upgrading Access Servers In Place
10-6 Oracle Access Manager Upgrade Guide
2. Start the Web server to confirm that this upgrade was successful.
3. Policy Manager Web Server Does Not Start: See troubleshooting tips in Appendix G.
4. View Policy Manager migration log files to see if they contain any errors. See "Accessing Log Files" on page G-2.
5. Upgrade Successful: Perform activities in "Backing Up Upgraded Access System Component Directories" on page 10-13 for this instance, then continue upgrading remaining Policy Managers.
6. Upgrade Not Successful: Proceed to "Recovering From an In-place Access System Upgrade Failure" on page 10-13.
7. When all Policy Managers are upgraded and backed up, proceed with "Upgrading Access Servers In Place" next.
Upgrading Access Servers In PlaceThis discussion is divided into the events and decision points you will encounter when upgrading Access Server instances, as shown in Figure 10–3. There is no Web server involved in Access Server upgrades.
Figure 10–3 In-place Access Server Upgrade Process and Tasks
Task overview: Upgrading the Access Server in place includes1. Starting the Access Server Upgrade, Specifying a Directory and Languages
2. Upgrading Access Server Configuration Files
3. Finishing and Verifying the Access Server Upgrade
In-place Access Server Upgrade PrerequisitesBefore you begin upgrading the Access Server, check the tasks inTable 10–2 to ensure you have completed these tasks. Failure to complete prerequisites can adversely affect your upgrade.
Important: If an earlier Policy Manager component is installed in the same directory as an earlier WebGate on the same computer, you must upgrade the Policy Manager, the all Access Servers that communicate with the WebGate, and the WebGate before restarting the Web server.
StartSpecify Directory and Languages1
Upgrade Access Server Configuration Files2
Finish and Verify the Upgrade3

Upgrading Access Servers In Place
Upgrading Access System Components In Place 10-7
Starting the Access Server Upgrade, Specifying a Directory and LanguagesThe sample upgrade here starts from an existing Oracle Access Manager 6.1.1 installation. Again, you specify the same target directory as the earlier component, and languages to upgrade.
To start the Access Server upgrade and specify a target directory and languages 1. Confirm that all prerequisites described in "In-place Access Server Upgrade
Prerequisites" have been completed.
2. Log in as a user with the appropriate administrator privileges to update the Oracle Access Manager files.
3. Stop the Access Server service.
4. Locate and launch the program in your preferred method:
GUI Method, Windows:
Oracle_Access_Manager10_1_4_0_1_Win32_AccessServer.exe
Console Method, Solaris:
./Oracle_Access_Manager10_1_4_0_1_sparc-s2_AccessServer
The Welcome screen appears.
5. Dismiss the Welcome screen, then r.espond to the next question based upon your platform.
6. Choose the directory where you installed the earlier component, then click Next.
7. Accept the upgrade by clicking Yes, then click Next.
8. Select a default administrator language from the list, and any others you are upgrading.
9. Ensure that a check mark appears beside English and any other languages you are upgrading, then click Next.
10. Confirm the languages, and click Next.
11. Record the time-stamped directory name, then click continue as directed.
12. Start the file extraction into the target directory.
Table 10–2 In-place Access Server Upgrade Prerequisites
Access Server Upgrade Prerequisites
Familiarize yourself with introductory chapters in Part I
Perform in-place schema and data upgrade as described in Part II.
Upgrade remaining Identity System components in place, as described in Chapter 9.
Upgrade all Policy Managers in place as described in "Upgrading Remaining Policy Managers In Place" on page 10-2.
Perform preparation activities for the instance as described in Chapter 8, and:
■ If you have a multi-language environment, see "Preparing Multi-Language Installations" on page 8-7.
■ If you are upgrading a release 6.x installation, see "Preparing Release 6.x Environments" on page 8-4.

Upgrading Access Servers In Place
10-8 Oracle Access Manager Upgrade Guide
13. Proceed to "Upgrading Access Server Configuration Files".
Upgrading Access Server Configuration FilesThis sequence includes upgrading message and parameter catalogs, creating a directory profile for the Access Server, and completing the component configuration upgrade.
This example starts from Oracle Access Manager 6.1.1. If you started with another release, numbers in the following sequence will differ.
To upgrade the Access Server configuration files1. Type a 1 to use Automatic mode (or 2 for Confirmed mode), then review and
respond to messages as they appear. For example:
1
Messages begin.
Creating orig folders...-------------------------------------Copying general configuration files...OK.-------------------------------------Updating parameter catalogs...OK.-------------------------------------Starting migration ( 6.1.1 -> 6.5.0 )...DBProfiles created.-------------------------------------Updating component-specific configuration files...OK.Please note the name of the Oracle Access Manager Access Server service : NetPoint AAA Server (aaa-viking)OK.-------------------------------------Starting migration ( 6.5.0 -> 7.0.0 )...-------------------------------------Updating component-specific configuration files...OK.Please note the name of the Oracle Access Manager Access Server service : NetPoint AAA Server (aaa-viking)OK.-------------------------------------Starting migration ( 7.0.0 -> 10.1.4 )...-------------------------------------Updating component-specific configuration files...OK.-------------------------------------Migration has completed successfully!Press <ENTER> to continue:-------------------------------------
2. Record the name of the Access Server service, then press Enter.
3. Press Enter.
This completes the sequence, and the usual ReadMe information appears.

Upgrading WebGates In Place
Upgrading Access System Components In Place 10-9
Finishing and Verifying the Access Server UpgradeYou finish the upgrade of each instance as described in the next procedure.
To finish the Access Server upgrade1. Auditing and Access Reporting: If your earlier installation included auditing and
access reporting, go immediately to "Upgrading Auditing and Reporting for the Access Server" on page 13-2 before performing step 2.
2. Start the Access Server service. For example, if you do not store the server password in the password.lst file, use the following command:
start_access_server -P mypassword port -d -t 61
Certain command options can disable the hide option and cause a password to appear in the command line.
3. Provide the password at the prompt, if needed.
On an IBM SecureWay directory server, the next time you start the Access Server it can take a few minutes for the dialog requesting the PEM pass phrase to appear.
4. Access Server Service Does Not Start: See troubleshooting tips in Appendix G.
5. View Access Server migration log files to see if they contain any errors. See "Accessing Log Files" on page G-2.
6. Upgrade Not Successful: Proceed to "Recovering From an In-place Access System Upgrade Failure" on page 10-13.
7. Upgrade Successful: Perform activities in "Backing Up Upgraded Access System Component Directories" on page 10-13 for this instance, then repeat the procedure to upgrade all Access Servers in your environment.
8. After upgrading all Access Servers, you can continue with:
■ Upgrading WebGates In Place, next.
■ For other options, see "Looking Ahead" on page 10-14.
Upgrading WebGates In PlaceOracle recommends that you upgrade all WebGates. However, this does not need to occur all at one time. As mentioned before, earlier WebGates can communicate with upgraded Access Servers, which have backward compatibility automatically enabled during the upgrade. For details, see "Access System Behavior Changes" on page 4-32.
Before you start upgrading WebGates in place, however, be aware of the following important changes. When you upgrade a WebGate, the WebGateStatic.lst configuration file is removed. Configuration parameters that resided in this file move to the directory server and are made available through the AccessGate Configuration function in the Access System Console.
During a WebGate upgrade, the upgrade tool communicates with the Access Server to send configuration information from the WebGatestatic.lst file to be written to the
Caution: If you have auditing to a database configured in your earlier environment, before restarting the Access Server service be sure to complete appropriate activities in "Upgrading Auditing and Reporting for the Access Server" on page 13-2.
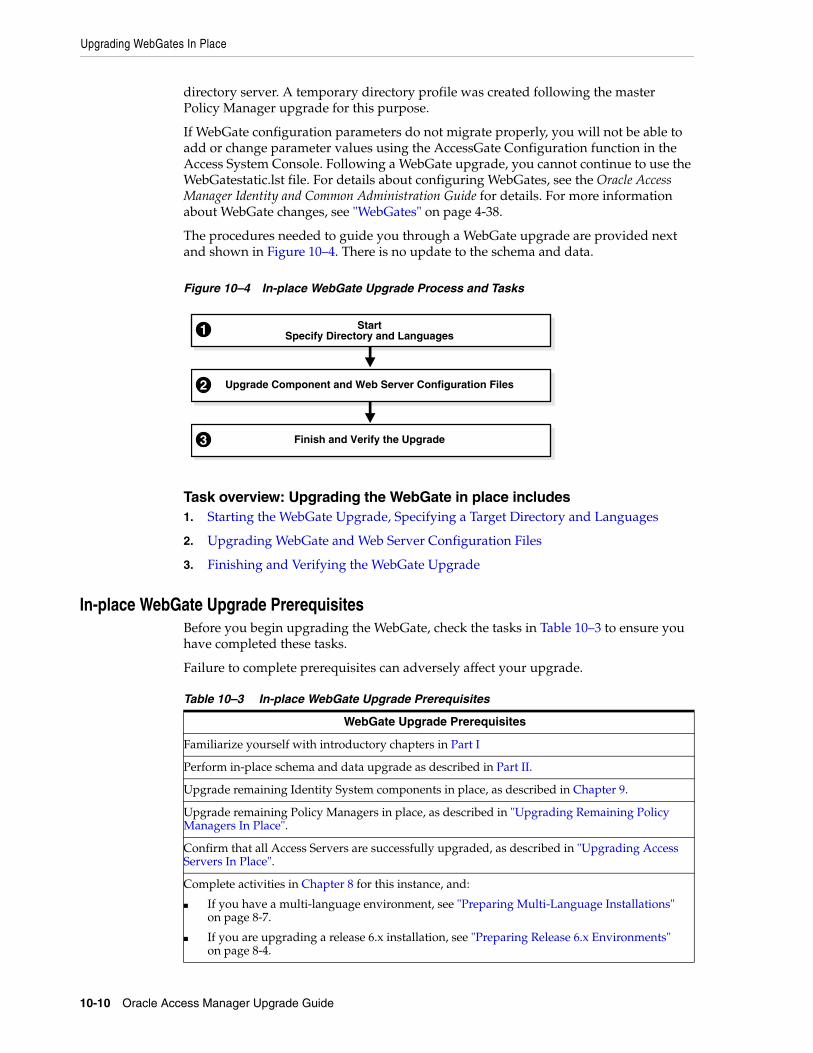
Upgrading WebGates In Place
10-10 Oracle Access Manager Upgrade Guide
directory server. A temporary directory profile was created following the master Policy Manager upgrade for this purpose.
If WebGate configuration parameters do not migrate properly, you will not be able to add or change parameter values using the AccessGate Configuration function in the Access System Console. Following a WebGate upgrade, you cannot continue to use the WebGatestatic.lst file. For details about configuring WebGates, see the Oracle Access Manager Identity and Common Administration Guide for details. For more information about WebGate changes, see "WebGates" on page 4-38.
The procedures needed to guide you through a WebGate upgrade are provided next and shown in Figure 10–4. There is no update to the schema and data.
Figure 10–4 In-place WebGate Upgrade Process and Tasks
Task overview: Upgrading the WebGate in place includes1. Starting the WebGate Upgrade, Specifying a Target Directory and Languages
2. Upgrading WebGate and Web Server Configuration Files
3. Finishing and Verifying the WebGate Upgrade
In-place WebGate Upgrade Prerequisites Before you begin upgrading the WebGate, check the tasks in Table 10–3 to ensure you have completed these tasks.
Failure to complete prerequisites can adversely affect your upgrade.
Table 10–3 In-place WebGate Upgrade Prerequisites
WebGate Upgrade Prerequisites
Familiarize yourself with introductory chapters in Part I
Perform in-place schema and data upgrade as described in Part II.
Upgrade remaining Identity System components in place, as described in Chapter 9.
Upgrade remaining Policy Managers in place, as described in "Upgrading Remaining Policy Managers In Place".
Confirm that all Access Servers are successfully upgraded, as described in "Upgrading Access Servers In Place".
Complete activities in Chapter 8 for this instance, and:
■ If you have a multi-language environment, see "Preparing Multi-Language Installations" on page 8-7.
■ If you are upgrading a release 6.x installation, see "Preparing Release 6.x Environments" on page 8-4.
StartSpecify Directory and Languages1
Upgrade Component and Web Server Configuration Files2
Finish and Verify the Upgrade3

Upgrading WebGates In Place
Upgrading Access System Components In Place 10-11
Starting the WebGate Upgrade, Specifying a Target Directory and LanguagesThis is the same process as other upgrades you have completed. You start the upgrade, specify the same target directory as the earlier WebGate, and indicate the languages to upgrade. The sample here starts from release 6.1.1. Your environment might vary.
To launch the WebGate upgrade, and specify a target directory and languages1. Confirm that all prerequisites described in "In-place WebGate Upgrade
Prerequisites" have been completed.
2. Stop the WebGate Web server instance, then log in as a user with the appropriate administrator privileges to update the Oracle Access Manager files.
3. Locate and launch the program in your preferred method:
GUI Method, Windows:
Oracle_Access_Manager10_1_4_0_1_Win32_NSAPI_WebGate.exe
Console Method, Solaris:
./Oracle_Access_Manager10_1_4_0_1_sparc-s2_NSAPI_WebGate
The Welcome screen appears.
4. Dismiss the Welcome screen as instructed, then respond to the administrator question based upon your platform.
5. Choose the directory where you installed the earlier WebGate, then continue as directed.
6. Accept the upgrade, then continue.
7. Ensure that a check mark appears beside English and any other languages you have installed, then continue.
8. Confirm the languages that will be upgraded and continue.
9. Record the time-stamped directory name, then continue.
10. Note the amount of disk space required, then click Next.
You complete activities according to the method you have chosen for the upgrade and respond as needed to continue.
11. Proceed to "Upgrading WebGate and Web Server Configuration Files".
Upgrading WebGate and Web Server Configuration FilesDuring this sequence the WebGate configuration files, and Web server configuration upgrades occur. Very little input from you is required during this automated process.
To upgrade the WebGate and Web server configuration files1. Type a 1 to continue in Automatic mode (or 2 for Confirmed mode), then review
and respond to messages as they appear. For example:
1
Note: On Windows, the path to directory security permissions is logged in obmigratenp.log.

Upgrading WebGates In Place
10-12 Oracle Access Manager Upgrade Guide
Messages scroll by as the process continues.
Creating orig folders...-------------------------------------Copying general configuration files...OK.-------------------------------------Updating parameter catalogs...OK.-------------------------------------Starting migration ( 6.1.1 -> 6.5.0 )...-----------------------------Updating component-specific configuration files...OK.-------------------------------------Starting migration ( 6.5.0 -> 7.0.0 )...-------------------------------------Updating web server configuration files...OK.-----------------------------Updating component-specific configuration files...OK.-------------------------------------Starting migration ( 7.0.0 -> 10.1.4 )...-------------------------------------Updating web server configuration files...OK.-----------------------------Updating component-specific configuration files...OK.-------------------------------------Starting the WebgateStatic.lst Migration ...Completed the WebgateStatic.lst Migration successfully.OK.
Directory permissions copied...C:\NetPoint\access\webcomponent-iis\access_20040426_164541\oblix ) -> (C:\NetPoint\access\webcomponent-iis\access\oblix )-------------------------------------Migration has completed successfully!Press <ENTER> to continue:-------------------------------------
2. Continue as directed, then proceed to "Finishing and Verifying the WebGate Upgrade".
Finishing and Verifying the WebGate UpgradeThere are a few differences when finishing the WebGate upgrade, relative to other component upgrades. For example, you need to ensure that the Access Management service for the WebGate is turned off.
To finish the WebGate upgrade1. Apply any changes to the Web server configuration file, if needed.
2. Turn off the Access Management service for this WebGate: In the Access System Console, click Access System Configuration, then click AccessGate Configuration and click the link for the WebGate and see the Oracle Access Manager Access Administration Guide for details.

Recovering From an In-place Access System Upgrade Failure
Upgrading Access System Components In Place 10-13
3. Start the WebGate Web server.
4. WebGate Web Server Does Not Start: See troubleshooting tips in Appendix G.
5. View WebGate migration log files to see if they contain any errors. See "Accessing Log Files" on page G-2.
6. Confirm that the WebGate performs as expected and that your 10g (10.1.4.0.1) environment is working. For more information, see Chapter 4.
7. Upgrade Successful: Perform activities in "Backing Up Upgraded Access System Component Directories" on page 10-13 for this instance, then continue upgrading earlier WebGates.
8. Upgrade Not Successful: Proceed to "Recovering From an In-place Access System Upgrade Failure" on page 10-13.
9. Continue upgrading WebGates or proceed to "Looking Ahead" on page 10-14.
Backing Up Upgraded Access System Component DirectoriesAs mentioned earlier, Oracle recommends that you finish each component upgrade by backing up the 10g (10.1.4.0.1) component directory after verifying that it is working properly. This will enable you to easily restore your environment to the newly upgraded state should that be a requirement.
To back up critical information after the upgrade 1. Back up the 10g (10.1.4.0.1) component directory and store it in a new location.
2. Web Server: Back up the upgraded Web server configuration file, if needed, using your vendor documentation as a guide.
3. Windows: Back up Windows registry data, if required, as described in "Backing Up Windows Registry Data" on page 8-9.
4. Proceed to "Looking Ahead" on page 10-14.
Recovering From an In-place Access System Upgrade FailureIf the component was not successful, you can perform the following steps to rollback this upgrade, then try again.
To recover from an unsuccessful in-place Access System component upgrade1. Restore the earlier component installation directory that you backed up before the
upgrade (to recover the earlier environment), then back it up again. You will retain one of the earlier directories as a backup copy and use one to restart the upgrade.
2. Web Server: Restore the backed up Web server configuration file, if required for this component (Policy Manager or WebGate).
3. Windows: Restore the backed up registry for the component, if needed for this instance.
4. Using a backup copy of your earlier component installation directory (and Web server configuration, if needed), restart the component upgrade as described in this chapter.

Looking Ahead
10-14 Oracle Access Manager Upgrade Guide
Looking AheadUpgraded Access System components send and receive information sent in UTF-8 encoding. Earlier components send and receive data in Latin-1 encoding. When all earlier Access System components are successfully upgraded, proceed to the following chapters and perform tasks as described:
■ Chapter 11, "Upgrading Integration Components and an Independently Installed SDK"
■ Chapter 12, "Upgrading Your Identity System Customizations"
■ Chapter 13, "Upgrading Your Access System Customizations"
■ Chapter 14, "Validating the Entire System Upgrade"
For more information about expected system behaviors, see Chapter 4.

Part IVUpgrading Your Customizations
This part of the book describes how to upgrade your earlier customizations to ensure compatibility with 10g (10.1.4.0.1) functionality.
Part IV contains the following chapters:
■ Chapter 12, "Upgrading Your Identity System Customizations"
■ Chapter 13, "Upgrading Your Access System Customizations"


Upgrading Integration Components and an Independently Installed SDK 11-1
11Upgrading Integration Components and an
Independently Installed SDK
When your installation includes only the Identity System, you can skip the upgrade of Access System integration connectors and upgrade the independently installed SDK. However, when your earlier installation includes the Access System and Oracle Access Manager integration connectors for certain third-party products, you must upgrade integration connectors before upgrading the SDK.
Unless explicitly stated, the information in this chapter applied equally to both upgrade methods. Topics in this chapter include
■ Upgrading Third-Party Integration Connectors
■ Upgrading Independently Installed Software Developer Kits
■ Backing Up Upgraded Integration Connector or SDK Data
■ Recovering From an Integration Connector or SDK Upgrade Failure
■ Looking Ahead
Upgrading Third-Party Integration ConnectorsWhen your environment includes the following integrations, you must complete procedures here to ensure compatibility with 10g (10.1.4.0.1) and:
■ Security Provider for WebLogic SSPI
■ Oracle Access Manager Connector for WebSphere
The task here is similar to other upgrades. The example provided in this chapter illustrates how to upgrade the Oracle Access Manager Security Provider for WebLogic SSPI. However, the procedures are similar for other integration connectors.
For the latest information about configuring release 10g (10.1.4.0.1) integrations, see the Oracle Access Manager Integration Guide.
Task overview: Upgrading third-party Integrations includes1. Completing Integration Upgrade Prerequisites.
2. Starting the Integration Connector Upgrade
Note: You must upgrade the Access System before upgrading integration components or an independently installed SDK. If you are using the zero downtime method, see also Part VI.

Upgrading Third-Party Integration Connectors
11-2 Oracle Access Manager Upgrade Guide
3. Upgrading Security Provider for WebLogic SSPI
4. Finishing the Integration Connector Upgrade
The sample upgrade here starts from a Oracle Access Manager 6.1.1 installation. Your starting release might differ.
Integration Upgrade Prerequisites Failure to complete prerequisites in Table 11–1 can adversely affect your upgrade.
Starting the Integration Connector Upgrade This is similar to upgrading other components. Should an error occur, the name of the log file that contains information about the error is identified. Skip any details that do not apply to your installation.
The sample upgrade in this procedure starts from an installation that is integrated with the Oracle Security Provider for WebLogic SSPI. Your environment might vary.
To launch the integration connector upgrade1. Ensure that you have completed prerequisites for this instance as described in
"Integration Upgrade Prerequisites".
2. Stop the corresponding Application/Portal Server. For example if you are upgrading Security Provider for WebLogic SSPI then you must stop the corresponding WebLogic Application server.
3. Log in as a user with administrator privileges.
4. Locate and launch the 10g (10.1.4.0.1) installer in your preferred method:
GUI Method, Windows: Oracle_Access_Manager10_1_4_0_1_Win32_BEA_WL_SSPI.exe
Table 11–1 Integration Upgrade Prerequisites
Integration Upgrade Prerequisites
Schema and Data upgrade is successful as described in Part II.
Component upgrades are successful as described in Part III.
Perform all required steps to prepare components as discussed in Chapter 8, and:
■ If you have a multi-language environment, see "Preparing Multi-Language Installations" on page 8-7.
■ If you are upgrading a release 6.x installation, see "Preparing Release 6.x Environments" on page 8-4.
WebSphere: When upgrading the Oracle Access Manager Connector for WebSphere:
■ To run the Web Content Management Portlet on the 5.1.x Portal Server, ensure that wmmGenerateExtId="false" in the Portal Server wmm.xml, wmm_custom.xml, and wmm_DB.xml files.
■ To run the Web Content Management Portlet on the 5.0.x Portal Server, ensure that wmmGenerateExtId="false" in the Portal Server wmm.xml file.
Weblogic: Ensure that the NetPointProvidersConfig.properties file in your current connector installation directory is synchronized with the one in your Weblogic server's domain directory.
Stop the corresponding Application/Portal Server. For example if you are upgrading Security Provider for WebLogic SSPI then you must stop the corresponding WebLogic Application server.
Upgrading Third-Party Integration Connectors
Upgrading Integration Components and an Independently Installed SDK 11-3
Console Method, Solaris: ./Oracle_Access_Manager10_1_4_0_1_sparc-s2_BEA_WL_SSPI
The Welcome screen appears.
5. Dismiss the Welcome screen by clicking Next, then respond to the question about administrator privileges based upon your platform.
6. Choose the directory where you installed the earlier integration component, then click continue as directed.
7. Accept the upgrade by clicking Yes, then click Next.
8. Complete any language questions, as described earlier, then click Next.
9. When the status screen indicates that this phase is complete, click Next.
10. Proceed to "Upgrading Security Provider for WebLogic SSPI" next.
Upgrading Security Provider for WebLogic SSPI This procedure is the similar to other component upgrades. However, it does include several steps that are unique to the Security Provider for WebLogic SSPI.
To upgrade the Security Provider for WebLogic SSPI1. Choose an upgrade mode: Automatic or Confirmed.
2. Follow the prompts onscreen.
The GUI exits, and a command-line window appears with messages that keep you informed.
-------------------------------------Starting migration (6.1.1 -> 6.5.0) ----------------------------------------------------Updating component-specific configuration files ...OK.----------------------------------------------------Starting migration (6.5.0 -> 7.0.0) ----------------------------------------------------Updating component-specific configuration files ...OK.----------------------------------------------------Starting migration (7.0.0 -> 10.1.4) ----------------------------------------------------Updating component-specific configuration files ...OK.----------------------------------------------------Migration has completed successfully!Press <ENTER> to continue :
3. Upgrade the software developer kit (SDK); otherwise, current SDK configuration settings are not preserved and you must reconfigure the SDK later using the configureAccessGate tool, as described in the Oracle Access Manager Access Administration Guide.
Finishing the Integration Connector UpgradeIf you are upgrading the Security Provider for WebLogic SSPI, complete the following steps.

Upgrading Independently Installed Software Developer Kits
11-4 Oracle Access Manager Upgrade Guide
To finish the Security Connector upgrade1. Copy the appropriate mbean jar file from following location. For example:
From: SecurityProvider_install_dir/oblix/lib/mbeantypes
To: WebLogic_Home/server/lib/mbeantypes
2. Copy the files here from your SecurityProvider_install_dir to your WebLogic domain folder.
NetPointProvidersConfig.properties
NetPointResourceMap.conf (only for the Application Server domain)
3. Start the Application/Portal/Web server to confirm that this upgrade was successful.
4. Server Does Not Start: Confirm that you have performed all tasks and specified all information accurately. Look for troubleshooting tips in Appendix G.
5. View migration log files to see if they contain any errors. See "Accessing Log Files" on page G-2.
6. Upgrade Successful: Perform activities in "Backing Up Upgraded Integration Connector or SDK Data" on page 11-6 for this instance, then continue upgrading earlier Policy Managers.
7. Upgrade Not Successful: Proceed to "Recovering From an Integration Connector or SDK Upgrade Failure" on page 11-7.
8. After upgrading all integration connectors, proceed with "Upgrading Independently Installed Software Developer Kits" next.
Upgrading Independently Installed Software Developer KitsThe SDK (formerly known as the Access Server SDK) is now named the Access Manager SDK in 10g (10.1.4.0.1).
You need to upgrade any independently installed SDK as described here. The SDK upgrade that is invoked automatically as the last step when upgrading components bundled with the SDK (the Identity Server and Oracle Access Manager Security Connector for WebSphere SSPI, for example), has no impact on independently installed SDKs.
Task overview: Upgrading the Software Developer Kit includes1. Completing all SDK Upgrade Prerequisites
2. Starting the SDK Upgrade, Specifying a Target Directory and Languages
3. Upgrading the SDK Configuration and Verifying the Upgrade
Note: If you are upgrading the integration component for WebSphere Application Server and Portal Server, you must copy the NetPointCMR.jar file to the Portal_install_dir and the NetPointWASRegistry.jar file and jobaccess.jar to the WAS_install_dir then restart the servers. See the Oracle Access Manager Integration Guide for details.
Upgrading Independently Installed Software Developer Kits
Upgrading Integration Components and an Independently Installed SDK 11-5
SDK Upgrade Prerequisites Before you begin upgrading the Software Developer Kit, check the tasks in Table 11–2 to ensure you have performed these. Failure to complete prerequisites can adversely affect your upgrade.
Starting the SDK Upgrade, Specifying a Target Directory and LanguagesThe sample upgrade here starts from a release 6.1.1 installation. Your starting release and environment might vary. Should an error occur, the name of the log file that contains information about the error is identified.
You can skip any details that do not apply to your installation.
To launch the SDK upgrade1. Confirm that all activities in "SDK Upgrade Prerequisites" have been completed.
2. Turn off the server or service then log in as a user with administrator privileges.
3. Locate and launch the program in your preferred method:
GUI Method, Windows: Oracle_Access_Manager10_1_4_0_1_Win32_AccessServerSDK.exe
Console Method, Solaris: ./Oracle_Access_Manager10_1_4_0_1_sparc-s2_AccessServerSDK
The Welcome screen appears.
4. Dismiss the Welcome screen, then respond to the administrator question based upon your platform.
5. Choose the directory where you installed the earlier SDK, then click Next
6. Accept the upgrade by clicking Yes, then click Next.
7. Ensure that a check mark appears beside English and any other languages you have installed, then click Next.
8. Confirm the languages listed by clicking Next.
9. Record the time-stamped directory name, then continue.
10. Record the amount of disk space required, then start the file extraction into the target directory.
11. Unix—Run the command indicated, then press Enter to continue.
Table 11–2 SDK Upgrade Prerequisites
SDK Upgrade Prerequisites
Complete activities in Part II.
Complete activities in Part III, as needed for your environment.
Integration Components: Upgrade integration components, as described in "Upgrading Third-Party Integration Connectors" on page 11-1, if appropriate for your environment.
Perform all required steps in Chapter 8 for this instance and host, and:
■ If you have a multi-language environment, see "Preparing Multi-Language Installations" on page 8-7.
■ If you are upgrading a release 6.x installation, see "Preparing Release 6.x Environments" on page 8-4.

Backing Up Upgraded Integration Connector or SDK Data
11-6 Oracle Access Manager Upgrade Guide
12. Proceed to "Upgrading the SDK Configuration and Verifying the Upgrade" next.
Upgrading the SDK Configuration and Verifying the UpgradeThis procedure requires little input from you.
To upgrade the SDK configuration1. Specify either Automatic or Confirmed, then continue.
Status messages about the upgrade start scrolling by:
-------------------------------------Starting migration ( 6.1.1 -> 6.5.0 )...-------------------------------------Copying general configuration files...OK.-------------------------------------Updating message catalogs...OK.-------------------------------------Updating parameter catalogs...OK.-------------------------------------Updating component-specific configuration files...OK.--------------------------------------
The sequence will repeat until 10g (10.1.4.0.1) is reached, then you will see the message:
-------------------------------------Migration has completed successfully!Press <ENTER> to continue :
2. Finish the upgrade as directed, then restart the server service.
3. Server or Service Does Not Start: Confirm that you have performed all tasks and specified all information accurately. Look for troubleshooting tips in Appendix G.
4. View migration log files to see if they contain any errors. See "Accessing Log Files" on page G-2.
5. Upgrade Successful: Perform activities in "Backing Up Upgraded Integration Connector or SDK Data" on page 11-6.
6. Upgrade Not Successful: Proceed to "Recovering From an Integration Connector or SDK Upgrade Failure" on page 11-7.
7. Repeat for each independently installed SDK in your environment, then see "Looking Ahead" on page 11-7.
Backing Up Upgraded Integration Connector or SDK DataAs mentioned earlier, Oracle recommends that you finish each component upgrade by backing up the 10g (10.1.4.0.1) component directory after verifying that it is working properly. This will enable you to easily restore your environment to the newly upgraded state should that be a requirement.

Looking Ahead
Upgrading Integration Components and an Independently Installed SDK 11-7
To back up critical information after the integration connector or SDK upgrade 1. Back up the upgraded 10g (10.1.4.0.1) integration connector or SDK directory and
store it in a new location.
2. Web Server: Back up the upgraded Web server configuration file, if needed, using your vendor documentation as a guide.
3. Back up Windows registry data if required.
Recovering From an Integration Connector or SDK Upgrade FailureIf the component was not successful, you can perform the following steps to rollback this upgrade, then try again.
To recover from an unsuccessful integration connector or SDK upgrade1. Restore the earlier directory that you backed up before this upgrade (to recover the
earlier environment), then back it up again. You will retain one of the earlier directories as a backup copy and use one to restart the upgrade.
2. Windows: Restore the backed up registry for the component (to recover the earlier environment).
3. Web Server: Restore the earlier backed up Web server configuration file, if required for this component (to recover the earlier environment).
4. Using a backup copy of your earlier environment, restart the upgrade as described in this chapter.
Looking AheadUpgraded Identity and Access System components send and receive information sent in UTF-8 encoding. Earlier components send and receive data in Latin-1 encoding. To continue the upgrade, proceed as appropriate for your earlier installation. For example:
■ Identity System Only: When your earlier installation does not include the Access System, you complete activities in the sequence listed here using information in:
– Chapter 12, "Upgrading Your Identity System Customizations"
– Chapter 14, "Validating the Entire System Upgrade"
■ Joint Identity and Access System: In this case, you must complete activities in the following sequence using information in:
– Chapter 12, "Upgrading Your Identity System Customizations"
– Chapter 13, "Upgrading Your Access System Customizations"
– Chapter 14, "Validating the Entire System Upgrade"
For more information about expected system behaviors, see Chapter 4.

Looking Ahead
11-8 Oracle Access Manager Upgrade Guide

Upgrading Your Identity System Customizations 12-1
12Upgrading Your Identity System
Customizations
Tasks in this chapter are intended for administrators who are responsible to upgrade and redeploy earlier Identity System customizations. Oracle recommends that you upgrade and then test your upgraded customizations in a small isolated environment.
Unless explicitly stated, the information in this chapter applies to both upgrade methods. The tasks you perform will depend on what was implemented in your earlier installation. You can skip any task that is not relevant for your earlier environment. This chapter includes the following topics:
■ Prerequisites and Guidelines
■ Upgrading Auditing and Access Reporting for the Identity System
■ Combining Challenge and Response Attributes on a Panel
■ Confirming Identity System Failover and Load Balancing
■ Migrating Custom Identity Event Plug-Ins
■ Ensuring Compatibility with Earlier Portal Inserts
■ About Custom Items and Upgrades
■ Incorporating Customizations from Release 6.5 and 7.x
■ Incorporating Customizations from Releases Earlier than 6.5
■ Validating Identity System Customization Upgrades
■ Backing Up Upgraded Identity System Customizations
■ Recovering from an Identity System Customization Upgrade Failure
■ Looking Ahead
Prerequisites and GuidelinesBefore starting to upgrade any Identity System customizations, Oracle recommends that you:
Note: When you are performing a zero downtime upgrade, Oracle recommends that you perform these tasks and test your upgraded customizations in the cloned environment. For more information, see "Customization Upgrades Using the Zero Downtime Upgrade Method" on page 15-15.

Upgrading Auditing and Access Reporting for the Identity System
12-2 Oracle Access Manager Upgrade Guide
■ Review information in "Customization Upgrade Planning" on page 1-17 if you are performing an in-place upgrade. If you are performing a zero downtime upgrade, see "Customization Upgrades Using the Zero Downtime Upgrade Method" on page 15-15.
■ Back up the file system directory that contains the earlier customization and store the copy in a new location to help you if you need to roll back to this later.
After completing and testing each upgraded customization, Oracle recommends that you back up the directory containing the upgraded customization and store it in a new location.
Upgrading Auditing and Access Reporting for the Identity SystemIf your earlier installation was configured for auditing and access reporting, you need to complete specific activities in this discussion before starting your Identity Server after the upgrade. If your earlier installation was not configured for auditing and access reporting, you can skip this discussion.
Oracle Access Manager 10g (10.1.4.0.1) supports the Unicode standard. The Oracle equivalent for the Unicode UTF-8 standard is the AL32UTF8 character set. The code used to process this character set resides within the libraries bundled with each Oracle Access Manager 10g (10.1.4.0.1) component and is installed automatically. To support all the languages available with Oracle Access Manager 10g (10.1.4.0.1), the definitions of auditing and reporting tables have changed.
After upgrading the first Identity Server, you need to create a new database instance to operate with 10g (10.1.4.0.1). All Identity and Access Servers audit to the same database instance. Therefore, you need only create a new database instance following the upgrade of the first Identity Server (not for additional Identity Server instances nor for the Access Server).
You need to upload the new Audit table schema (to support the auditing of 10g (10.1.4.0.1) UTF-8 data and the writing of this data to the new SQL Server instance). To accomplish this, you must create a new oblix_audit_events table for the auditing application. This schema upgrade includes datatype changes within the Audit table columns, as discussed in "Database Record Sizing" on page 12-5.
Next you need to create tables for the reporting application (oblix_rpt_as_reports, oblix_rpt_as_resources, and oblix_rpt_as_users) in 10g (10.1.4.0.1).
To query or generate any report that requires data from both the old and new database, you need to import data from the original database instance into the new instance before you start auditing with 10g (10.1.4.0.1). For each Identity Server instance (and Access Server instance), you import earlier audit data into the new audit database
WARNING: Retain your earlier auditing database to preserve the original data. Simply upgrading or altering existing database instances and tables is not supported and could result in permanent truncation and loss of existing data.
Note: Whether you have only one or multiple Identity Server instances, you set up a new audit database instance, upload the audit schema, and create new tables for the reporting application only once.

Upgrading Auditing and Access Reporting for the Identity System
Upgrading Your Identity System Customizations 12-3
instance. Otherwise, you cannot generate any report that requires data from both the old and new database.
Finally, you need to change the DSN (ODBC Data Source Name used by the RDBMS profile of audit & reporting applications) to refer to the new database instance. If you have multiple Identity Servers on the same computer, be sure to upgrade all instances on the computer before you change the DSN to refer to the new database. For each Identity Server instance (and Access Server instance), you need to change the DSN to refer to the new database instance.
If you observe any problem with the characters (for example, Latin-1) after importing data and before auditing with 10g (10.1.4.0.1):
■ For the first Identity Server, you need to create a new database instance with the proper configuration and import your original data again.
■ For later Identity Servers, you need to delete all newly inserted audit records (which can be differentiated with the help of the serverId field) and try importing them again.
Even when you have an English only environment, certain steps depend on the type of database you are using. For more information, see:
■ Upgrading Auditing and Reporting with a Microsoft SQL Server
■ Upgrading Auditing and Reporting with an Oracle Database
Upgrading Auditing and Reporting with a Microsoft SQL Server The default character set for the Microsoft SQL Server is UCS-2 (also known as UTF-16 Unicode format). UCS-2 includes all languages supported by Oracle Access Manager 10g (10.1.4.0.1) and mimics the way in which the 32-bit Windows kernel stores information so that data does not need to be converted to another format. As a result, no character set change is required for the Microsoft SQL Server for Oracle Access Manager 10g (10.1.4.0.1) globalization support.
Earlier data might be truncated during the import, as described in "Database Record Sizing" on page 12-5.
Refer to the task overview here for the sequence of tasks you must perform. For more information about individual steps, including uploading the audit schema, see the Oracle Access Manager Identity and Common Administration Guide.
Task overview: Ugrading auditing and reporting with a Microsoft SQL Server 1. Retain the original database, as is, to preserve your original data.
2. After upgrading the first Identity Server (and before restarting the Identity Server Service), set up a new audit database instance for 10g (10.1.4.0.1) using instructions in the Oracle Access Manager Identity and Common Administration Guide.
3. Create a new oblix_audit_events table for the 10g (10.1.4.0.1) auditing application (which will upload the 10g (10.1.4.0.1) schema definition). For information about uploading the audit schema, see the Oracle Access Manager Identity and Common Administration Guide.
Note: Be sure to retain the earlier database to preserve the original data. Importing earlier data can result in truncation of data and some data loss.

Upgrading Auditing and Access Reporting for the Identity System
12-4 Oracle Access Manager Upgrade Guide
4. Create new oblix_rpt_as_reports, oblix_rpt_as_resources, and oblix_rpt_as_users. tables for the 10g (10.1.4.0.1) reporting application as described in the Oracle Access Manager Identity and Common Administration Guide.
5. Review information in "Database Record Sizing" on page 12-5.
6. Optional: Import the earlier data audited by this Identity Server instance into the 10g (10.1.4.0.1) database and confirm that it is imported successfully. You will repeat this step for each Identity Server instance.
The serverId field in audit table indicates the ID of the Identity Server that audited that record. Based on the serverId field, it is feasible to differentiate the records audited by each Identity Server instance. The same rule applies to the Access Server, as discussed later.
7. Change the DSN (ODBC Data Source Name used by the RDBMS profile of audit & reporting applications) on this computer to refer to the new database instance. For example:
Figure 12–1 Create a New Data Source to SQL Server Window
8. Start the Identity Server service.
Note: You complete steps 1 through 4 for only the first Identity Server in your environment (even when you have multiple Identity Servers).
Note: If you have multiple Identity Servers on the same computer, be sure to upgrade all Identity Server instances on this computer before you change the DSN to refer to the new database. In this case, skip to step 9.
Upgrading Auditing and Access Reporting for the Identity System
Upgrading Your Identity System Customizations 12-5
The Identity Server will now audit and store data in the new database instance. However, other Identity Servers (and Access Servers) will continue to audit and store data in the old database instance.
9. Upgrade all other Identity Server instances as follows:
■ Upgrade the next Identity Server instance but do not restart the Identity Server service.
■ Repeat step 6 to import data for this Identity Server instance.
■ Repeat step 7 to change the DSN (ODBC Data Source Name used by the RDBMS profile of the audit & reporting applications) on this computer to refer to the new database instance.
■ Repeat step 8 to restart the Identity Server service on this computer.
■ Repeat this step (9) for all Identity Servers in your environment.
10. After upgrading all Identity Server instances, upgrade all WebPass instances then complete the rest of the Identity System deployment-specific activities in this chapter before starting to upgrade the Access System.
11. Start auditing, as described in the Oracle Access Manager Identity and Common Administration Guide.
Database Record SizingFor the SQL Server, the maximum length of a database record is 8096 bytes. The Oracle Access Manager Audit table contains 27 columns (23 of which are of type varchar). The previous Oracle Access Manager (release 7.0.4, also available as part of Oracle Application Server 10g Release 2 (10.1.2)) record size was 23 columns * varchar(255) + four additional columns), which equals less than the SQL Server maximum of 8096 bytes for each database record.
To support UTF-8 data in Oracle Access Manager 10g (10.1.4.0.1), the column types have changed from varchar(255) to nvarchar(170). When the column data type is nvarchar, the SQL Server stores data in UTF-16 encoding. In this case, 23 columns * nvarchar(170) * 2 + four additional columns equals slightly less than 8096 bytes.
In earlier Oracle Access Manager releases, only values greater than 255 characters were truncated. In 10g (10.1.4.0.1), however, any column value that exceeds 170 characters is truncated before inserting the record into the SQL Server audit database.
For the reasons stated earlier, upgrading the existing database could result in permanent data loss. Therefore, with the SQL Server you need to retain the original database as is, create and set up a new database, a new Audit Table for Oracle Access Manager with the 10g (10.1.4.0.1) schema definition, then create new auditing and reporting tables.
As stated earlier, you can import data from the original database instance into the new database instance (which might be truncated) in order to query or generate any report that requires data from both the old and new database. You will still have the original database instance and data.
Note: If you have multiple Identity Servers on the same computer, be sure to upgrade all Identity Server instances on this computer before you change the DSN to refer to the new database.
Upgrading Auditing and Access Reporting for the Identity System
12-6 Oracle Access Manager Upgrade Guide
See "Task overview: Ugrading auditing and reporting with a Microsoft SQL Server" on page 12-3 and the Oracle Access Manager Identity and Common Administration Guide for more information.
Upgrading Auditing and Reporting with an Oracle DatabaseAs described earlier, to support all the languages available with Oracle Access Manager 10g (10.1.4.0.1), the definitions of oblix_audit_events, oblix_rpt_as_reports, oblix_rpt_as_resources, and oblix_rpt_as_users tables have changed. After upgrading the first Identity Server, you need to create a new Oracle database instance with AL32UTF8 as character set and UTF-8 as National character set.
You must complete activities outlined in the task overview here because upgrading the database instance and tables is not supported. For more information about the steps, including uploading the audit schema, see the Oracle Access Manager Identity and Common Administration Guide and your vendor documentation.
Task overview: Ugrading auditing and reporting with an Oracle database1. Retain the original database as is, to preserve your original data for import.
2. After upgrading the first Identity Server, set up a new Oracle audit database instance with AL32UTF8 as the character set and UTF8 as the National character set for the Oracle database. See also the Oracle Access Manager Identity and Common Administration Guide.
3. Create a new oblix_audit_events table for the 10g (10.1.4.0.1) auditing application (which will upload the 10g (10.1.4.0.1) schema definition). For information about uploading the audit schema, see the Oracle Access Manager Identity and Common Administration Guide.
4. Create new oblix_rpt_as_reports, oblix_rpt_as_resources, and oblix_rpt_as_users. tables for the 10g (10.1.4.0.1) reporting application as described in the Oracle Access Manager Identity and Common Administration Guide.
To query or generate any report that requires data from both the old and new database, you need to import data from the original instance into the new instance before you start auditing with 10g (10.1.4.0.1).
5. Import earlier data audited by this Identity Server instance into the 10g (10.1.4.0.1) database and confirm that it imported successfully using your Oracle database documentation for details.
Note: Upgrading the database instance and tables is not supported.
Note: You complete steps 1 through 4 for only the first Identity Server in your environment (even when you have multiple Identity Servers).

Upgrading Auditing and Access Reporting for the Identity System
Upgrading Your Identity System Customizations 12-7
6. Change the DSN (ODBC Data Source Name used by the RDBMS profile of audit & reporting applications) on this computer to refer to the new database instance. See your vendor documentation for details about performing this task. For example:
Figure 12–2 Microsoft ODBC for Oracle Window
7. Start the Identity Server service.
The Identity Server will now audit and store data in the new database instance. However, other Identity Servers (and Access Servers) will continue to audit and store data in the old database instance.
8. Upgrade all other Identity Server instances as follows:
Note: You will repeat this step for each Identity Server instance. There is no truncation of data during the import, because the Audit table column size is 255 characters. If after importing data and before auditing with 10g (10.1.4.0.1) you observe any problem in characters (Latin-1), create a new database instance with the proper configuration (including but not limited to AL32UTF8 as character set and UTF-8 as National character set) and import your original again.
Note: If you have multiple Identity Servers on the same computer, be sure to upgrade all Identity Server instances on this computer before you change the DSN to refer to the new database. In this case, skip to step 7.

Combining Challenge and Response Attributes on a Panel
12-8 Oracle Access Manager Upgrade Guide
■ Upgrade the next Identity Server instance but do not restart the Identity Server service.
■ Repeat step 5 to import data for this Identity Server instance.
■ Repeat step 6 to change the DSN (ODBC Data Source Name used by the RDBMS profile of the audit & reporting applications) on this computer to refer to the new database instance.
■ Repeat step 7 to restart the Identity Server service on this computer.
■ Repeat this step (8) for all Identity Servers in your environment.
9. After upgrading all Identity Server instances, proceed with following activities:
■ Rename audit files after upgrading Identity Servers as described in "Renaming Audit Files After Upgrading the Schema and Data" on page 6-21.
■ Upgrade remaining WebPass instances and perform other activities as described in Chapter 9.
■ Perform remaining Identity System deployment-specific activities in this chapter before starting to upgrade the Access System
■ Start auditing, as described in the Oracle Access Manager Identity and Common Administration Guide
Combining Challenge and Response Attributes on a PanelIn earlier releases, the challenge phrase and response attributes were allowed on different panels of the Profile page of the User Manager, Group Manager, and Organization Manager. In 10g (10.1.4.0.1), however, both the challenge phrase and response attributes must be on the same panel. In 10g (10.1.4.0.1), challenge phrases and responses are displayed one after the other even though these are not configured one after the other in the panel.
If a panel contains only the challenge phrase attribute, it will be displayed on the Profile page without a response. If the panel contains only the response (without the challenge phrase), the response will not be displayed in Profile Page at all.
If challenge and response attributes are present in different panels in Identity System application configuration pages (User Manager Configuration, Group Manager Configuration, or Org. Manager Configuration), you must move these into a single panel.
The next task overview outlines the steps you need to perform to combine the challenge phrase and response attributes on a single panel. For more information about configuring Tab Profile Pages and Panels, configuring attributes, and assigning challenge and response semantic types to attributes for lost password management, see the Oracle Access Manager Identity and Common Administration Guide.
Note: If you have multiple Identity Servers on the same computer, be sure to upgrade all Identity Server instances on this computer before you change the DSN to refer to the new database.
Note: If your original installation included both the challenge phrase and response attribute on a single panel, you can skip this discussion.

Confirming Identity System Failover and Load Balancing
Upgrading Your Identity System Customizations 12-9
The User Manager Configuration page was selected in this example. However, the procedure is similar if you modify panels on Group Manager Configuration or Org. Manager Configuration pages.
Task overview: Combine challenge and response attributes on a single panel1. Navigate to the Modify Panels page containing the Response attribute. For
example:
Identity System Console, User Manager Configuration Tabs existing_tab_link (for Response attribute panel) View Object Profile, Configure Panels panel_name, Modify
The Modify Panel page appears.
2. Remove the Response Attribute: From the list of attributes on the Modify Panel page, locate the Response attribute and select ---- from the list, then click the Save button.
3. Add the Response Attribute: Navigate to the Modify Panel page containing the challenge phrase attribute, click the Add button, then select the Response attribute and click the Save button.
Identity System Console, User Manager Configuration Tabs existing_tab_link (for Challenge attribute panel) View Object Profile, Configure Panels panel_name, Modify
IdentityXML changes have also been made for this feature. For details, see the Oracle Access Manager Developer Guide. See also "Challenge Response Might Not Convert Properly" on page G-5.
Confirming Identity System Failover and Load BalancingYour earlier implementation might include failover between an Identity Server and the directory server. The Identity Server failover configuration has resided in the directory server profile since release 5.2. As a result, there is no migration of parameters from failover configuration files to directory profiles. Although the schema itself has changed, migration of these changes is performed automatically during the upgrade.
There is also no impact on Identity System connection pools. The values for Initial Connections and Maximum Connections specified in the Database Instance profile are retained and will operate as they did previously.
During the upgrade, you do not need to complete any special handling for failover or load balancing. After upgrading Identity System components, simply test to ensure that any failover or load balancing that you had previously configured for the Identity System is still operating as expected.
You can use the following procedure to view details in the Database Instance Profile before testing.
Note: For concurrent authentication requests on NDS directory servers, Oracle recommends that you increase the connection pool size to something higher than the default (1) for the user directory profile using the System Console.

Migrating Custom Identity Event Plug-Ins
12-10 Oracle Access Manager Upgrade Guide
To view failover, load balancing, and connection pool details for the Identity System1. From the Identity System Console, select System Configuration, Directory Profiles.
2. Under the heading Configure LDAP Directory Server Profiles, select the name of the Profile you want to check.
3. On the Directory Server Profile page, confirm the servers that use the failover information and confirm that the information matches previous settings. For example:
■ Maximum Active Servers
■ Failover Threshold
■ Sleep For (Seconds)
■ Max. Session Time (Min.)
4. Locate the Database Instances list on the Directory Server Profile page and select the name of the Database Instance Profile you want to check.
5. In the Database Instance Profile, verify the values for Initial Connections and Maximum Connections.
6. Make any changes needed and save the profile.
7. Perform a test to ensure that everything is working as expected.
For more information about configuring failover and load balancing, see the Oracle Access Manager Deployment Guide.
Migrating Custom Identity Event Plug-InsWhen your original installation included custom Identity Event Plug-ins, Oracle recommends that you complete this activity immediately after upgrading all Identity System components.
Earlier Identity Event Plug-ins are not copied during the upgrade. At a minimum, you need to move your earlier plug-ins from the renamed source directory to the target directory as indicated in the procedure here.
To send or receive internationalized data you need to re-design plug-ins to use UTF-8 encoding. Also, on Solaris and Linux, plug-ins earlier than release 7.x must be re-compiled using the GCC v3.3.2 C++ compiler. For more information, see "Plug-ins" on page 3-11.
To use earlier custom Identity Event plug-ins with 10g (10.1.4.0.1) 1. Create a folder in the top level of your Identity Event API directory and copy your
earlier Identity Event plug-ins in to the new directory.
2. Redesign Identity Event plug-ins to use UTF-8 encoding, if desired.
3. Recompile release 5.2 or 6.x plug-ins on Solaris and Linux platforms using the GCC v3.3.2 compiler.
Note: Release 7.0 plug-ins as well as earlier plug-ins implemented as executables or those using a scripting language (such as perl) do not require recompiling after the upgrade. However, to send and receive internationalized data, earlier plug-ins should be redesigned to communicate using UTF-8 encoding.

About Custom Items and Upgrades
Upgrading Your Identity System Customizations 12-11
4. Complete any testing to ensure your plug-ins are working properly with 10g (10.1.4.0.1).
5. When using plug-ins that send and receive data in Latin-1 encoding, ensure that any new Identity Servers added to the upgraded environment are backward compatible as described in Chapter 4.
Authentication and authorization plug-ins also need to be recompiled or redesigned after the upgrade, as discussed in "Recompiling and Redesigning Custom Authentication and Authorization Plug-Ins" on page 13-5.
Ensuring Compatibility with Earlier Portal InsertsOracle Access Manager 10g (10.1.4.0.1) cannot detect query string character encoding and assumes it to be UTF-8. An earlier Identity Server that you upgrade to 10g (10.1.4.0.1) has backward compatibility enabled to process Latin-1 data from earlier Portal Inserts. Oracle recommends that you change the encoding of the query string in earlier Portal Inserts from Latin-1 to UTF-8.
10g (10.1.4.0.1) supports two encoding formats for IdentityXML requests: ISO-8859-1 (Latin-1) and UTF-8. The response, however, will be in UTF-8 encoding only. Within this required string you can use a tag to select an encoding specification:
■ With new 10g (10.1.4.0.1) installations, use the UTF-8 encoding tag (encoding="UTF-8"), as shown here.
<?xml version="1.0" encoding="UTF-8" ?>
■ For backward compatability with older plug-ins in an upgraded environment, use the Latin-1 encoding tag (encoding="ISO-8859-1"). For example:
<?xml version="1.0" encoding="ISO-8859-1" ?>
For more information about customizing portal inserts, see the Oracle Access Manager Customization Guide.
About Custom Items and UpgradesCustomized .XSL style files, images, and JavaScript files are not migrated during the upgrade. If your previous installation includes significant changes to earlier XSL stylesheets, or if you use a style other than the Oracle Access Manager default Classic Style, you need to manually include those changes in 10g (10.1.4.0.1) stylesheets, images, and JavaScript files.
WARNING: You must use the GCC v3.3.2 compiler, regardless of the compiler that might be provided with the Operating System.
Note: If you add a 10g (10.1.4.0.1) Identity Server to an upgraded environment, you must manually enable backward compatability with older plug-ins by including the Latin-1 encoding tag in IdentityServer_install_dir\identity\oblix\apps\common\bin\oblixpppcatalog.lst. For details, see the Oracle Access Manager Installation Guide.

Incorporating Customizations from Release 6.5 and 7.x
12-12 Oracle Access Manager Upgrade Guide
When you view the Customize Styles page in the upgraded 10g (10.1.4.0.1), style names are listed to reflect the style definitions maintained in the directory server as Oracle Access Manager configuration data. However, it is important to note that the customized style files themselves are not migrated, which is why the procedures in this chapter are required.
To illustrate this, suppose a system-level change was made to the 10g (10.1.4.0.1) basic.xsl stylesheet to accommodate a new feature. In this case, copying an earlier release of basic.xsl to replace the 10g (10.1.4.0.1) basic.xsl will not guarantee that the new feature will work (because the new feature requires the 10g (10.1.4.0.1) basic.xsl stylesheet).
During the upgrade to 10g (10.1.4.0.1)
■ Files in the earlier \style0 directory are replaced, not migrated.
■ The original files are saved in the renamed source directory.
For example:
IdentityServer_install_dir_timestamp\identity\oblix\apps\specific_app\ui\style0\name.xsl
■ Any style directories that you have created in the earlier installation are saved, not migrated, and are stored in the renamed (backup) source directory created during the upgrade.
The process you must complete to include earlier customized styles in the upgraded 10g (10.1.4.0.1) environment differ depending on your starting release. For more information, see the appropriate topic for your environment:
■ Incorporating Customizations from Release 6.5 and 7.x
■ Incorporating Customizations from Releases Earlier than 6.5
Incorporating Customizations from Release 6.5 and 7.xIncluding customized styles from release 6.5 or 7.x in the upgraded 10g (10.1.4.0.1) environment is a fairly straight forward process.
WARNING: If you simply copy earlier stylesheets, you might receive stylesheet bug reports or experience unpredictable behavior when using new features designed to work with new stylesheets.
Note: As discussed earlier, the directory structure has changed starting with Oracle Access Manager release 6.5 and continuing through 10g (10.1.4.0.1) to accommodate multiple languages. Of specific interest for activities in this chapter are the differences in the PresentationXML directories and message storage, described in Appendix A.
WARNING: Do not attempt to copy earlier stylesheets to upgraded locations. Instead, you must use procedures in this chapter to alter new stylesheets so they reflect changes in earlier stylesheets.

Incorporating Customizations from Release 6.5 and 7.x
Upgrading Your Identity System Customizations 12-13
To incorporate styles created with release 6.5 or 7.x1. Locate any information about changes and customizations made to the release 6.5
or 7.x environment to use those as a guide when completing the following tasks.
2. Preserving Custom Styles Directories: Copy your release 6.5 or 7.x custom language-specific style directories from the renamed source to the 10g (10.1.4.0.1) Identity Server language directories. For example:
From: IdentityServer_timestamp_install_dir/identity/oblix/lang/langtag/ YourStyleName
To: IdentityServer_install_dir/identity/oblix/lang/langtag/ YourStyleName
3. Preserving Custom Images: Copy your release 6.5 or 7.x (or new) custom images from the renamed source directory to the 10g (10.1.4.0.1) WebPass directories. For example:
From: WebPass_timestamp_install_dir/identity/oblix/lang/langtag/style0
To: WebPass_install_dir/identity/oblix/lang/langtag/style0
4. Transferring Stylesheet Customizations: This is a multiple step process where you inspect individual messages from the release 6.5 or 7.x catalog to the 10g (10.1.4.0.1) catalog and manually copy these to the 10g (10.1.4.0.1) catalog. For example:
■ Inspect Earlier Message Changes and Additions: In your release 6.5 or 7.x renamed source directory, manually inspect any changes to messages in msgctlg.xsl (new messages added or original message was changed) in:
From: IdentityServer_timestamp_install_dir/identity/oblix/lang/langtag /msgctlg.xsl
■ Copy Individual Message Changes: Manually edit the 10g (10.1.4.0.1) msgctlg.xsl file to match the release 6.5 or 7.x version.You can copy information from the release 6.5 or 7.x file into the 10g (10.1.4.0.1) version:
To: IdentityServer_install_dir/identity/oblix/lang/langtag/msgctlg.xsl
■ Copy Individual Stylesheet Changes: In the release 6.5 or 7.x stylesheet in the renamed source directory, identify any changes then edit the 10g (10.1.4.0.1) stylesheet files to match the earlier version. You can copy any changes to the 10g (10.1.4.0.1) version.
5. Preserving JavaScript Customizations: This is a two step process that must be performed for each installed language.
■ Inspect earlier message changes and additions: In the release 6.5 or 7.x renamed source directory, identify any JavaScript code changes in the msgctlg.js file, then manually copy these to the 10g (10.1.4.0.1) version. For example:
From: WebPass_timestamp_install_dir/identity/oblix/lang/langtag/msgctlg.js
To: WebPass_install_dir/identity/oblix/lang/langtag/msgctlg.js
Note: Oracle recommends that you locate all recorded changes made in the release 6.5 or 7.x environment before starting and track all operations as you complete them in the 10g (10.1.4.0.1) environment.

Incorporating Customizations from Releases Earlier than 6.5
12-14 Oracle Access Manager Upgrade Guide
■ Copy individual JavaScript customization: In the release 6.5 or 7.x renamed source directory, identify any Javascript code changes and then manually copy these to 10g (10.1.4.0.1).
For complete details about customized styles, see the Oracle Access Manager Customization Guide.
Incorporating Customizations from Releases Earlier than 6.5If you have upgraded from release 6.5 or later (or your earlier installation did not include custom images, styles, or JavaScript that you want to use with 10g (10.1.4.0.1)), you can skip this discussion.
For a successful stylesheet upgrade, you must complete all procedures in this chapter. The stylesheet upgrade task has been divided into several functional procedures that you can use as a guide.
Task overview: Incorporating custom styles includes1. Completing activities in Style Customization Prerequisites.
2. Recreating Custom Style Directories in 10g (10.1.4.0.1)
3. Customizing New Stylesheets
4. Incorporating Custom Images
5. Using New Customized Styles
6. Incorporating JavaScript Customizations
7. Handling Language-Specific Message Catalogs
Style Customization Prerequisites Before you begin upgrading stylesheets, check Table 12–1 to ensure you have properly prepared the environment for this task. Failure to complete prerequisites can adversely affect your upgrade.
Recreating Custom Style Directories in 10g (10.1.4.0.1)As you re-create (add) custom style directories to Oracle Access Manager in following steps, you must use the same style names and the same style file system locations that were used before the upgrade. See the Oracle Access Manager Identity and Common Administration Guide for additional information.
To add custom styles in 10g (10.1.4.0.1) 1. Complete tasks in "Style Customization Prerequisites" on page 12-14.
2. Log in to the upgraded Identity System Console and navigate to the Configure Styles page.
For example:
Table 12–1 Identity Style Customization Prerequisites
Style Customization Prerequisites
Finish "Upgrading Remaining Identity System Components In Place" on page 12-1 and confirm that the upgraded system is working properly
Review "About Custom Items and Upgrades" on page 12-11.

Incorporating Customizations from Releases Earlier than 6.5
Upgrading Your Identity System Customizations 12-15
Identity System Console, System Configuration, Configure Styles
3. Enable Classic Style as the default stylesheet if this is not currently the default.
4. Delete the placeholders for your customized styles listed on the Customize Styles page.
5. From the Customize Styles page, click the Add Style button.
The Add Styles page appears.
6. On the Add Style page, fill in the Name and (file system) Directory Name fields using the same style name and file system location used before the upgrade.
For example:
Name Pastel
Directory Name Pastel
The next step enables Oracle Access Manager to create the appropriate file system directory structure automatically and copy the upgraded default stylesheets into it.
7. Select Classic Style in the Copy From list, then click the Save button.
For example:
Copy From Classic Style
Save
Your new custom style directory duplicates \style0 and contains wrapper stylesheets that point to default global stylesheets in the \shared directory (when you selected Copy From Classic Style).
8. Repeat previous steps 4 through 7, to re-create in Oracle Access Manager each customized style from the earlier installation.
For additional information, see the Oracle Access Manager Identity and Common Administration Guide
The new style name is listed in the Customize Styles page and one or more directories were created to hold the new wrapper stylesheets.
9. Select a new style as your default style, as follows:
a. Click the Setup Default Style button to display the Set Default Style page.
b. Click the Make Default button beside your new style name, then click Save.
10. Check your file system for the new style directory name you specified.
You are ready to start the next procedure, "Customizing New Stylesheets" on page 12-16, to include earlier customizations in the new stylesheets.
Note: You cannot delete the Classic Style maintained in the \style0 file system directory because this style is required by the Identity System Console.
Incorporating Customizations from Releases Earlier than 6.5
12-16 Oracle Access Manager Upgrade Guide
Customizing New StylesheetsAt this point, you must edit a copy of each new-default stylesheet using your own originally customized files as a guide. It is a good idea to take notes about your work as you go.
Locating and selectively copying stylesheets is an iterative process that you complete one stylesheet at a time, as described in the Oracle Access Manager Customization Guide, including:
■ Base stylesheets
■ Stylesheets included in base stylesheets
■ Specific function-related stylesheets identified for the program in the application's registration file
■ Stylesheets included in the function-related stylesheet
To verify that a stylesheet has been successfully applied, just launch the page and perform a visual check.
Task overview: Customizing New Stylesheets1. Complete the procedure "Recreating Custom Style Directories in 10g (10.1.4.0.1)"
on page 12-14.
2. Follow the steps in the procedure "To customize new stylesheets" on page 12-17 to:
■ Locate, in the renamed source directory, a customized earlier stylesheet to use as a reference.
■ Locate, in your new custom directory, the wrapper stylesheet that corresponds to your earlier customized stylesheet.
■ Locate, in your upgraded \shared directory, the default stylesheet that corresponds to the new wrapper.
■ Overwrite the new wrapper stylesheet in your new custom style directory with the new-default stylesheet from the 10g (10.1.4.0.1) \shared directory.
■ Edit the new-default stylesheet using your earlier customized file as a guide.
3. Replace messages in stylesheets, as described in "Handling Language-Specific Message Catalogs" on page 12-21.
See the Oracle Access Manager Customization Guide for more information about stylesheet structure and content, and how to customize these.
Remember that your new custom style directory duplicates the default \style0 and contains wrapper stylesheets that point to default stylesheets in the \shared directory. You cannot be assured that a wrapper file will be called before the actual stylesheet because both the common registration file and the application's own registration file call stylesheets according to an internal ordering.
In addition, the stylesheets in the \shared directory are used with all languages and applications and should be retained as is. Eventually your custom directory will
WARNING: Do not copy the original customized file into any upgraded directory. Do not copy content from the original customized file into any upgraded file. Do not attempt to copy all new-default stylesheets into your custom directory at once.

Incorporating Customizations from Releases Earlier than 6.5
Upgrading Your Identity System Customizations 12-17
contain a copy of all stylesheets, including those identified in the application's registration file and in oblixbasereg.xml. Even if you do not need to edit a stylesheet, it must be copied to your custom directory.
To customize new stylesheets1. In the renamed source directory created during the upgrade, select and open one
original customized stylesheet file.
For example:
\IdentityServer_install_dir_timestamp\identity\oblix\apps\AppName\ui\style0\name.xsl
2. In your new custom directory, locate and open the wrapper stylesheet that corresponds to your earlier customized stylesheet.
For example:
\IdentityServer_install_dir\identity\oblix\lang\en-us\Pastel\name.xsl
3. In the new wrapper stylesheet, review the "include href=" statements for files that are included and record these names and paths.
For example:
<?xml version="1.0" encoding="ISO-8859-1"?>- <!-- Copyright (c) 1996-2005, Oracle Inc. All Rights Reserved. -->- <xsl:stylesheet version="1.0" xmlns:xsl="http://www.w3.org/1999/XSL/Transform"xmlns:oblix="http://www.oblix.com/"><xsl:include href="./name.xsl" /><xsl:include href="../name.xsl" /><xsl:include href="../../shared/name.xsl" /></xsl:stylesheet>
Next you need to overwrite the wrapper file in your new custom directory with a copy of the new-default stylesheet you intend to customize.
4. In the 10g (10.1.4.0.1) \shared directory, locate and copy the new-default stylesheet that corresponds to your original customized stylesheet, as indicated:
Copy From \shared
\IdentityServer_install_dir\identity\oblix\lang\shared\name.xsl
Copy To new custom directory
\IdentityServer_install_dir\identity\oblix\lang\en-us\Pastel\name.xsl
5. In your new custom directory, locate and edit the copied-default stylesheet to reflect changes made to the earlier customized file, and record your changes.
6. Repeat the steps in this list as you locate and copy each related default stylesheet to your new custom directory, then customize it to match changes in the earlier customized release:
Note: For the Access System, there are only JavaScript changes; no stylesheets. You must update the stylesheet for each "style" directory for each language. Oracle recommends that you perform these steps to retain all customizations for one language first, then simply copy the updated file to other "style" directories and remaining languages.

Incorporating Customizations from Releases Earlier than 6.5
12-18 Oracle Access Manager Upgrade Guide
■ Base stylesheets
■ Stylesheets included in base stylesheets
■ Specific function-related stylesheets identified for the program in the application's registration file
■ Stylesheets included in the function-related stylesheet
7. Ensure that file system access control for your new custom style directories and files is set to match the ownership and permissions of \style0.
8. Restart the Identity Server.
9. To verify that a stylesheet has been successfully applied, just launch the page and perform a visual check.
10. Continue with "Incorporating Custom Images" on page 12-18.
Incorporating Custom ImagesIf your earlier installation did not include custom images that you want to use with 10g (10.1.4.0.1), you can skip this discussion.
In earlier versions of Oracle Access Manager, images were distributed throughout the installation directory and referred to with respect to the application path. From 10g (10.1.4.0.1) onward, images are language dependent and are consolidated into a single directory. When installations include multiple languages, you will have multiple \langTag directories. For directory details, see Appendix A.
■ Identity System images are in the directory:
\WebPass_install_dir\identity\oblix\lang\langTag\style0
■ Access System images are in the following directory:
\install_dir\access\oblix\lang\langTag\style0
gifPathName and jsPathName VariablesDue to the change in location of all image files, a new gifPathName variable is defined in wrapper stylesheet style.xsl. In addition to style.xsl, the msgctlg.js file also includes the gifPathName variable to mention the path for image locations:
IdentityServer_install_dir\oblix\lang\langTag\style0\style.xslIdentityServer_install_dir\oblix\lang\langTag\msgctlg.js
A language independent stylesheet in the \shared directory picks up the images from the modified image path mentioned by the gifPathName variable. This is important for two reasons:
■ It prevents hard-coding of URLs in the stylesheets and makes it easier to reuse the same stylesheet across styles.When customizing stylesheets, you should use this global variable whenever constructing a URL path to a GIF or other image.
■ It incorporates the current language and current style tag and generates the correct path.
Note: All common images require a copy for each language.

Incorporating Customizations from Releases Earlier than 6.5
Upgrading Your Identity System Customizations 12-19
For more information about msgctlg files, see "Handling Language-Specific Message Catalogs" on page 12-21.
Example—style.xsl with variables highlightedThe style.xsl wrapper resides in the \style0 directory and can reside in your custom directory:
IdentityServer_install_dir\identity\oblix\lang\en-us\style0\style.xslIdentityServer_install_dir\identity\oblix\lang\en-us\Custom\style.xsl
<?xml version="1.0" encoding="ISO-8859-1"?>- <!-- Copyright (c) 1996-2005, Oracle Inc. All Rights Reserved. -->- <xsl:stylesheet version="1.0" xmlns:xsl="http://www.w3.org/1999/XSL/Transform"xmlns:oblix="http://www.oblix.com/"> <xsl:variable name="styleName">style0</xsl:variable> <xsl:variable name="localeName">en-us</xsl:variable>- <xsl:variable name="gifPathName"> ../../../lang/ <xsl:value-of select="$localeName" /> / <xsl:value-of select="$styleName" /> </xsl:variable> <xsl:variable name="jsPathName">../../../lang/shared</xsl:variable> ... </xsl:stylesheet>
For 10g (10.1.4.0.1), you need to reference images using the two variables ($gifPathName and jsPathName) to make your customization language and style independent. To do so, modify your 10g (10.1.4.0.1) stylesheet with the corresponding <img src="{$gifPathName}/<custom gif name>.gif"/> reference as described in the next procedure.
To incorporate custom images1. Copy all custom images from the renamed source directory to the target (repeat
this for each language):
From—source_directory_timestamp
To target—WebPass_install_dir\identity\oblix\lang\langTag\style0
2. Copy all custom images for the Access System from the source directory to the target:
From—source_directory_timestamp
To target—install_dir\access\oblix\lang\langTag\style2
3. Modify the image source path name in 10g (10.1.4.0.1) stylesheets in your custom directory:
For example:
Note: Stylesheets refer to the gifPathName variable to locate the image directory. JavaScript files refer to the jsPathName variable.
Note: You need to replace the image path in the 10g (10.1.4.0.1) stylesheet you are modifying.
Incorporating Customizations from Releases Earlier than 6.5
12-20 Oracle Access Manager Upgrade Guide
\IdentityServer_install_dir\identity\oblix\lang\Pastel
4. For Releases Before 6.5: Change image path to use the $gifPathName variable.
For example, suppose the image source is mentioned in the Oracle Access Manager 6.1 stylesheet:
install_dir\oblix\apps\common\ui\style0\navbar.xslas:
<img src="../../common/ui/style0/T1oblixnetpoint.gif"/>
You must change the image path for 10g (10.1.4.0.1) as follows:
<img src="{$gifPathName}/T1oblixnetpoint.gif"/>
5. See also:
■ Using New Customized Styles
■ Incorporating JavaScript Customizations
■ Handling Language-Specific Message Catalogs
Using New Customized StylesBefore you can use the new customized style, you need to complete the task here.
Task overview: Using new customized styles1. Copy images and styles to WebPass to create a custom style directory structure on
WebPass and include all images in this structure, as described in the Oracle Access Manager Customization Guide.
2. Test your customized style, as described in the Oracle Access Manager Customization Guide.
3. Propagate new stylesheets to other Identity Servers and WebPass hosts, as described in the Oracle Access Manager Customization Guide.
4. Continue with:
■ Incorporating JavaScript Customizations
■ Handling Language-Specific Message Catalogs
Incorporating JavaScript CustomizationsIf your earlier installation did not include JavaScript customization that you want to use with 10g (10.1.4.0.1), you can skip this discussion.
In 10g (10.1.4.0.1), JavaScript files are located in:
WebPass_install_dir\identity\oblix\lang\shared
Like stylesheets, language-specific pop-up messages in JavaScript files are replaced with variables defined in:
install_dir\identity\oblix\lang\langTag\msgctlg.js
Note: Due to extensive coverage in the Oracle Access Manager Customization Guide. The specific details are outlined but not repeated here.

Incorporating Customizations from Releases Earlier than 6.5
Upgrading Your Identity System Customizations 12-21
JavaScript files are not present in the \lang\langTag directory except in the msgctlg.js file. The steps needed to migrate JavaScript files are similar to those you used earlier to migrate stylesheet changes.
To incorporate JavaScript files 1. In the time-stamped source directory created during the upgrade, locate your
earlier customized JavaScript files on the computer hosting the upgraded WebPass.
2. In the 10g (10.1.4.0.1) \lang\shared directory on the WebPass, locate and copy your new-default JavaScript files to retain for future use.
3. Edit the 10g (10.1.4.0.1) JavaScript files in the \lang\shared directory on the WebPass to reflect changes made in the earlier release and record your changes, or see "Handling Language-Specific Message Catalogs" on page 12-21.
Handling Language-Specific Message CatalogsAll custom styles are stored under the \langtag directories, even when your customized functionality is language independent. The procedure here applies to environments that are upgraded from releases prior to 6.5 because these have embedded message customizations in the stylesheet itself. This only applies to 6.1 customers using single language. If the changes are done for English, then the product will pick up the English message properly.
As discussed elsewhere, multiple languages are available for use with 10g (10.1.4.0.1). Messages that were once in stylesheets are language dependent and are now defined separately as variables in message catalogs. See also Appendix A.
The new Oracle Access Manager directory structure consolidates all message catalogs for JavaScript files, XSL, and HTML.
■ As the name suggests any language-specific files will be located in \lang\langTag.
■ Any non-language specific objects are located within \lang\shared.
All the stylesheets have a language-specific wrapper in \lang\langTag\style0 which includes the main language-neutral release stylesheet in \lang\shared. This new wrapper segregates the main stylesheet functionality, which is language independent, from language-specific messages.
Language-specific messages are referred to through variables in message catalog files, as discussed in:
■ Handling XSL Stylesheet Messages
■ Handling Messages for JavaScript
Handling XSL Stylesheet MessagesThe messages for stylesheets are defined in the message catalog:
\IdentityServer_install_dir\identity\oblix\lang\langTag\msgctlg.xsl
You need to ensure that all displayable strings in your earlier stylesheets are placed in the 10g (10.1.4.0.1) stylesheet message catalog.
For example, suppose you have customized a Oracle Access Manager 6.1 stylesheet, navbar.xsl, in:
\IdentityServer_install_dir\identity\oblix\apps\common\ui\style0\navbar.xsl

Incorporating Customizations from Releases Earlier than 6.5
12-22 Oracle Access Manager Upgrade Guide
where a message reads as:
<xsl:text> << Click here to return to the previous application(s). </xsl:text>
In the 10g (10.1.4.0.1) stylesheet:
\IdentityServer_install_dir\identity\oblix\lang\shared\navbar.xsl
you need to modify the message to read:
<xsl:text> << <xsl:value-of select="$MPrevAppln"/> </xsl:text>
and ensure that MPrevAppln is defined in the 10g (10.1.4.0.1) message catalog:
\IdentityServer_install_dir\identity\oblix\lang\langTag\msgctlg.xsl
as follows:
<xsl:variable name="MPrevAppln">Click here to return to the previous application(s). </xsl:variable>
To handle language-specific message catalogs for XSL stylesheets1. Locate the earlier stylesheet containing the customized message.
For example:
\IdentityServer61_install_dir\identity\oblix\apps\common\ui\style0\navbar.xsl
<xsl:text> << Click here to return to the previous application(s). </xsl:text>
If you have already copied the stylesheet to your custom directory, skip to step 3.
2. If you have not yet overwritten the wrapper file with the corresponding stylesheet, copy the corresponding 10g (10.1.4.0.1) stylesheet to your custom directory.
For example:
Copy from
\IdentityServer_install_dir\identity\oblix\lang\shared\navbar.xsl
Copy to
\IdentityServer_install_dir\identity\oblix\lang\langTag\Custom_dir\navbar.xsl
3. In the 10g (10.1.4.0.1) stylesheet in your custom directory, modify the message to use the appropriate message catalog parameter.
For example:
<xsl:text> << <xsl:value-of select="$MPrevAppln"/> </xsl:text>
4. In the 10g (10.1.4.0.1) message catalog, ensure that the message parameter is defined.
\IdentityServer_install_dir\identity\oblix\lang\langTag\msgctlg.xsl
<xsl:variable name="MPrevAppln">Click here to return to the previous application(s). </xsl:variable>
5. Restart the Identity Server and WebPass so the changes take affect.

Incorporating Customizations from Releases Earlier than 6.5
Upgrading Your Identity System Customizations 12-23
Handling Messages for JavaScriptLanguage-specific pop-up messages in JavaScript are also replaced by variables, which are defined in:
\WebPass_install_dir\install_dir\identity\oblix\lang\langTag\msgctlg.js
This message catalog is divided into sections that show the messages for specific JavaScript files, several of which are named:
misc.js ... atickets.js wfqs.js deactivateuser.js confirm.js ...
You need to ensure that all displayable strings are placed in the message catalog, and the message catalog must be referenced through the I18N_GetMsg function.
For example, the code in the earlier JavaScript file:
\install_dir\identity\oblix\apps\admin\bin\admin.js
that pops up a message:
alert("Room must have a name.")
now appears in:
\WebPass_install_dir\identity\oblix\lang\shared\admin.js
as:
alert(I18N_GetMsg('MRoomNameReq'))
where MRoomName is defined in:
\WebPass_install_dir\install_dir\identity\oblix\lang\langTag\msgctlg.js
as:
MESSAGE_CATALOG[ 'MRoomNameReq' ] = "Room must have a name.";
To handle language-specific message catalogs for JavaScript files1. Ensure that all displayable strings are placed in the 10g (10.1.4.0.1) message
catalog:
\WebPass_install_dir\identity\oblix\lang\langTag\msgctlg.js
2. Ensure that the 10g (10.1.4.0.1) message catalog is referenced through the I18N_GetMsg function (which is automatically loaded) located in:
\WebPass_install_dir\identity\oblix\lang\shared\i18n.js
3. Restart the Identity Server and WebPass so changes take affect.
Note: Oracle recommends that you do not customize files in the \shared directory and, instead, copy files from \shared into your custom directory before customizing.
Validating Identity System Customization Upgrades
12-24 Oracle Access Manager Upgrade Guide
Validating Identity System Customization UpgradesYou need to test your upgraded Identity System customizations in a test or development environment before deploying these in an upgraded production environment.
To validate Identity System customization upgrades1. Verify that your customizations have been restored properly by performing
specific operations that will exercise the upgraded customizations. For example, for workflow PPP plug-ins you need to run appropriate workflows.
2. Verify that auditing and access reporting is working properly.
3. Perform a visual inspection of the user interface if you customized any stylesheets and the like.
4. Upgrade Not Successful: Proceed to "Recovering from an Identity System Customization Upgrade Failure" on page 12-24.
5. Upgrade Successful: Proceed to "Backing Up Upgraded Identity System Customizations" next.
Backing Up Upgraded Identity System CustomizationsAs mentioned earlier, Oracle recommends that you finish each upgrade by backing up the appropriate 10g (10.1.4.0.1) directory. This will enable you to easily restore your environment to the newly upgraded state should that be a requirement.
To back up Identity System customizations after the upgrade 1. Back up the 10g (10.1.4.0.1) directory that contains the upgraded Identity System
customizations and store it in a new location.
2. Proceed as described in "Looking Ahead" on page 12-24.
Recovering from an Identity System Customization Upgrade FailureIf an Identity System customization was not successful, you can perform the following steps to rollback this upgrade, then try again.
To recover from an unsuccessful Identity System customization upgrade1. Restore the earlier customization files or directory that you backed up before the
upgrade (to recover the earlier customization), then back it up again. You will retain one as a backup copy and use one in the next step.
2. Using a backup copy of your earlier customization files, restart the upgrade as described in this chapter.
Looking AheadAfter ensuring that your previous Identity System customizations are integrated and operating properly in the upgraded environment, see Chapter 13 for details about upgrading Access System customization upgrades.
If you do not have an Access System in your environment, proceed to validating your upgraded environment as described in Chapter 14. If you are using the zero downtime upgrade method, see also Part VI.

Upgrading Your Access System Customizations 13-1
13Upgrading Your Access System
Customizations
Tasks in this chapter are intended for administrators who are responsible to upgrade and redeploy earlier Access System customizations. Oracle recommends that you upgrade and then test your upgraded customizations in a small isolated environment.
Unless explicitly stated, the information in this chapter applies to both upgrade methods. The tasks you perform will depend on what was implemented in your earlier installation. You can skip any task that is not relevant for your earlier environment. This chapter includes the following topics:
■ Prerequisites and Guidelines
■ Upgrading Auditing and Reporting for the Access Server
■ Confirming Access System Failover and Load Balancing
■ Upgrading Forms-based Authentication
■ Recompiling and Redesigning Custom Authentication and Authorization Plug-Ins
■ Associating Release 6.1.1 Authorization Rules with Access Policies
■ Assuring Proper Authorization Failure Re-directs After Upgrading from 6.1.1
■ Updating the ObAMMasterAuditRule_getEscapeCharacter in Custom C Code
■ Validating Access System Customization Upgrades
■ Backing Up Upgraded Access System Customizations
■ Recovering from an Access System Customization Upgrade Failure
■ Looking Ahead
Prerequisites and GuidelinesBefore starting to upgrade any Access System customizations, Oracle recommends that you:
■ Upgrade and redeploy any Identity System customization upgrades, as described in Chapter 12.
Note: When you are performing a zero downtime upgrade, Oracle recommends that you perform these tasks and test your upgraded customizations in the cloned environment. For more information, see "Customization Upgrades Using the Zero Downtime Upgrade Method" on page 15-15.

Upgrading Auditing and Reporting for the Access Server
13-2 Oracle Access Manager Upgrade Guide
■ Review information in "Customization Upgrade Planning" on page 1-17.
■ Back up the directory containing the earlier customization and store it in a new location to help you if you need to roll back to this later.
After completing and testing each upgraded customization, Oracle recommends that you back up the directory containing the upgraded customization and store it in a new location.
Upgrading Auditing and Reporting for the Access Server As discussed earlier, you need to complete a few activities to ensure that your auditing and access reporting environment is properly set up for Oracle Access Manager 10g (10.1.4.0.1). To complete activities for the Access Server, you will use information available in the file:
AccessServer_install_dir\oblix\reports\crystal\audit.sql
The procedures are similar to those you performed for the Identity Server, as outlined next. For details about individual steps within the task here, including uploading the audit schema, see the Oracle Access Manager Identity and Common Administration Guide. For general information about the procedures, see "Upgrading Auditing and Access Reporting for the Identity System" on page 12-2.
Task overview: Upgrading auditing and reporting with a Microsoft SQL Server 1. Retain the original database, as is, to preserve your original data.
2. After upgrading all Policy Managers, upgrade the first Access Server (but do not restart the Access Server Service).
3. If you are using an MS SQL database, review information in "Database Record Sizing" on page 12-5.
4. To query or generate any report that requires data from both the old and new database, you need to import the earlier data audited by each Access Server instance into the 10g (10.1.4.0.1) database and confirm that it is imported successfully. You will repeat this step for each Access Server instance that you upgrade.
The serverId field in audit table indicates the ID of the Access Server that audited that record. Based on the serverId field, it is feasible to differentiate the records audited by each Access Server. The same rule applies to the Identity Servers.
5. Change the DSN (ODBC Data Source Name used by the RDBMS profile of audit & reporting applications) on this computer to refer to the new database instance.
6. Start the Access Server service.
Note: With an MS SQL database instance, earlier data might be truncated, as described in "Database Record Sizing" on page 12-5. There is no data truncation with an Oracle database instance.
Note: If you have multiple Access Servers on the same computer, be sure to upgrade all Access Server instances on this computer before you change the DSN to refer to the new database.

Confirming Access System Failover and Load Balancing
Upgrading Your Access System Customizations 13-3
The Access Server will now audit and store data in the new database instance. However, other Access Servers will continue to audit and store data in the old database instance.
7. Upgrade all other Access Server instances as follows:
■ Upgrade the next Access Server instance but do not restart the Access Server service.
■ Repeat step 4 to import data for this Access Server instance.
■ Repeat step 5 to change the DSN (ODBC Data Source Name used by the RDBMS profile of the audit & reporting applications) on this computer to refer to the new database instance.
■ Repeat step 6 to restart the Access Server service on this computer.
■ Repeat this step (7) for all Access Servers in your environment.
8. After upgrading all Access Server instances, you complete the rest of the Access System deployment-specific activities in this chapter. You can upgrade WebGates as described in"Upgrading WebGates In Place" on page 10-9.
9. Start auditing, as described in the Oracle Access Manager Identity and Common Administration Guide.
Confirming Access System Failover and Load BalancingIf your previous Access System installation was configured for failover or load balancing, it is a good idea to verify that these configurations are still working properly.
During Policy Manager Upgrades: When creating the Directory Server Profile during the incremental upgrade to release 6.5, directory server credentials are read from:
PolicyManager_install_dir/access/oblix/config/userDB.lst
If the configuration tree is in the user directory server and under the user node, then the configuration directory profile is not created. Otherwise, a configuration directory profile is created using directory server information from:
PolicyManager_install_dir/oblix/config/ldap/configdb.lst
The configuration directory profile is marked for use only by the Policy Manager. Profiles are not created for Policy Manager failover servers. In the case of release 6.1, if the policy tree was on a separate directory server a profile for policy data existed.
During Access Server Upgrades: Profiles are not created for the configuration or policy trees at this time. Before release 6.5, Access System connection pools values for Initial Connections and Maximum Connections appeared in the UserDB.lst and UserDBFailover.lst. These might not be retained. Also, many .lst files have been transformed into .xml files as part of the globalization effort.
After upgrading Access System Components, it is a good idea to verify the values for Initial Connections and Maximum Connections in the Database Instance profile of the newly created Directory Server profile.
Note: If you have multiple Access Servers on the same computer, be sure to upgrade all Access Server instances on this computer before you change the DSN to refer to the new database.

Upgrading Forms-based Authentication
13-4 Oracle Access Manager Upgrade Guide
To confirm failover, load balancing, and connection pool details after the Access System upgrade1. From the Access System Console, select System Configuration, Server Settings.
2. Under the heading Configure LDAP Directory Server Profiles, select the name of the Profile you want to check.
3. On the Directory Server Profile page, confirm the servers that use the failover information and confirm that the information matches previous settings. For example:
■ Maximum Active Servers
■ Failover Threshold
■ Sleep For (Seconds)
■ Max. Session Time (Min.)
4. Locate the Database Instances list on the Directory Server Profile page and select the name of the Database Instance Profile you want to check.
5. In the Database Instance Profile, verify the values for Initial Connections and Maximum Connections.
6. Make any changes needed and save the profile.
7. Perform a test to ensure that everything is working as expected.
For more information about configuring failover and load balancing, see the Oracle Access Manager Deployment Guide.
Upgrading Forms-based AuthenticationAs discussed in Chapter 4, in 10g (10.1.4.0.1), form-based authentication supports non-ASCII login credentials (username/password). When you use form-based authentication with 10g (10.1.4.0.1) WebGates, you must ensure that character set encoding for the login form is set to UTF-8.
To set the login form encoding to UTF-8 for 10g (10.1.4.0.1)1. Add the following META tag to the HEAD tag of the login form HTML page.
<META http-equiv="Content-Type" content="text/html;charset=utf-8">
2. If you upgrade an earlier WebGate to 10g (10.1.4.0.1), you must also update the login form HTML page after upgrading.
Note: For concurrent authentication requests on NDS directory servers, Oracle recommends that you increase the connection pool size to something higher than the default (1) for the user directory profile using the System Console.
Note: Basic Authentication fails with non-ASCII login credentials. Use form-based authentication for non-ASCII login credentials. Use Basic Authentication with ASCII login credentials.

Associating Release 6.1.1 Authorization Rules with Access Policies
Upgrading Your Access System Customizations 13-5
Recompiling and Redesigning Custom Authentication and Authorization Plug-Ins
Custom Access System plug-ins are copied into the target directory during the Access Server upgrade. However, as discussed earlier, earlier plug-ins send and receive data in Latin-1 encoding.
To send or receive internationalized data you need to re-design plug-ins to use UTF-8 encoding. Also, on Solaris and Linux, release 5.2 and 6.x plug-ins must be re-compiled using the GCC v3.3.2 C++ compiler. For more information, see "Plug-ins" on page 3-11.
To use authentication and authorization plug-ins1. Redesign custom authentication and authorization plug-ins to use UTF-8
encoding, if desired.
2. Recompile release 5.2 or 6.x plug-ins on Solaris and Linux platforms using the GCC v3.3.2 compiler.
3. Complete any testing to ensure your plug-ins are working properly with 10g (10.1.4.0.1).
4. When using plug-ins that send and receive data in Latin-1 encoding, ensure that any new Access Servers added to the upgraded environment are backward compatible as described in Chapter 4.
Associating Release 6.1.1 Authorization Rules with Access PoliciesIf you upgraded from release 6.5 or later, you can skip this discussion.
During an upgrade, the names of any release 6.1.1 Authorization Rules move to the Authorization Rules tab of the corresponding policy domain. In addition, the original rule is renamed with a combination of the name of the Policy to which the rule belongs, followed by the Authorization Rule name: PolicyName_AuthorizationRuleName.
For example, suppose your 6.1.1 installation includes a Policy Domain (named MyPolicyDomain) with two policies (named P1 and P2). And suppose that you have three Authorization Rules associated with these two policies: rules "A1" and "A2" are associated with policy P1, and rule A3 is associated with policy P2. In this case, after the upgrade you will find the following (under the Authorization Rules tab of MyPolicyDomain):
P1_A1
P1_A2
P2_A3
Note: Release 7.0 plug-ins as well as earlier plug-ins implemented as executables or those using a scripting language (such as perl) do not require recompiling after the upgrade. However, to send and receive internationalized data, earlier plug-ins should be redesigned to communicate using UTF-8 encoding.
WARNING: You must use the GCC v3.3.2 compiler, regardless of the compiler that might be provided with the Operating System.

Assuring Proper Authorization Failure Re-directs After Upgrading from 6.1.1
13-6 Oracle Access Manager Upgrade Guide
To confirm Release 6.1.1 Policy Domain Authorization Rule names 1. After upgrading from release 6.1.1, navigate to the Policy Manager/Access System
Console using the appropriate URL for your environment. For example:
http://hostname:port/access/oblix
where hostname refers to computer that hosts the Web server; port refers to the HTTP port number of the WebPass Web server instance; and /access/oblix connects to the Policy Manager and Access System Console.
2. On the Access System landing page, select the Policy Manager link.
3. On the main Policy Manager page, select My Policy Domains on the left side of the page.
4. On the My Policy Domains page, select the link to one of your earlier Policy Domains: DomainName.
5. On the domain page, select the Authorization Rules tab.
6. On the Authorization Rules page, look for the renamed rules which are sorted alphabetically.
Assuring Proper Authorization Failure Re-directs After Upgrading from 6.1.1
Each authorization rule in your Policy Domains might include Allow Access and Deny Access conditions. The Allow Access condition of the rule specifies who is authorized to access a protected resource. The Deny Access condition of an authorization rule specifies the end users and groups of users who are explicitly denied access to a resource protected by the rule. If Allow Access or Deny Access conditions (or both) are specified and they do not apply to a user, the user is not qualified by the rule. If a user is unqualified by a rule, by default the user is denied access to the requested resource.
A new authorization state was introduced in release 7.x (apart from authorization success and failure states). This new state is "inconclusive". To accommodate this new state when your earlier installation included authorization failure redirects, you complete the procedure here to specify an explicit Deny rule and to change Allow takes precedence to Yes on the General panel of the authorization rule.
To reset your Authorization Rule1. After upgrading from release 6.1.1, navigate to the Policy Manager/Access System
Console using the appropriate URL for your environment. For example:
http://hostname:port/access/oblix
where hostname refers to computer that hosts the Web server; port refers to the HTTP port number of the WebPass Web server instance; and /access/oblix connects to the Policy Manager and Access System Console.
2. On the Access System landing page, select the Policy Manager link.
3. On the main Policy Manager page, select My Policy Domains on the left side of the page.
4. On the My Policy Domains page, select the link to one of your earlier Policy Domains: DomainName.
5. On the domain page, select the Authorization Rules tab.
Backing Up Upgraded Access System Customizations
Upgrading Your Access System Customizations 13-7
6. On the Authorization Rules page, look for the renamed rules which are sorted alphabetically and select the rule you want to modify.
7. On the General panel, confirm that Allow takes precedence is set to Yes.
8. Select the Deny Access panel, then create or modify a rule to specify the users and groups who are denied access to resources protected by this rule (using the People, Role, Rule, and IP Address controls) as indicated in the Oracle Access Manager Access Administration Guide.
Updating the ObAMMasterAuditRule_getEscapeCharacter in Custom C Code
If your earlier installation does not use C code created with the Policy manager, that includes the ObAMMasterAuditRule_getEscapeCharacter you can skip this discussion.
An object of the ObAMMasterAuditRule class represents the master audit rule, which specifies global audit parameters and defaults to be used if there is no audit rule specified for a specific policy. In earlier releases, ObAMMasterAuditRule_getEscapeCharacter returned the audit escape character. In 10g (10.1.4.0.1), the C language API the ObAMMasterAuditRule_getEscapeCharacter remains and you can continue using this. However, the audit escape character must be an ASCII character; otherwise the return value is incorrect.
You might need to modify your C code to use the new ObAMMasterAuditRule_getUTF8EscapeCharacter, which returns a pointer to the UTF-8 encoded audit escape character.
For more information, see "Policy Manager API" on page 4-37. For details about using the Policy Manager API, see the Oracle Access Manager Developer Guide.
Validating Access System Customization UpgradesYou need to test your upgraded Access System customizations in a test or development environment before deploying these in an upgraded production environment.
To validate Access System customization upgrades1. Verify that your customizations have been restored properly by performing
specific operations that will exercise the upgraded customizations.
2. Verify that auditing and access reporting is working properly.
3. Upgrade Not Successful: Proceed to "Recovering from an Access System Customization Upgrade Failure" on page 13-8.
4. Upgrade Successful: Proceed to "Backing Up Upgraded Access System Customizations" next.
Backing Up Upgraded Access System CustomizationsAs mentioned earlier, Oracle recommends that you finish each upgrade by backing up the appropriate 10g (10.1.4.0.1) directory. This will enable you to easily restore your environment to the newly upgraded state should that be a requirement.

Recovering from an Access System Customization Upgrade Failure
13-8 Oracle Access Manager Upgrade Guide
To back up Access System customizations after upgrading them 1. Back up the 10g (10.1.4.0.1) directory that contains the upgraded customizations
and store it in a new location.
2. When all customizations are completed and redeployed, proceed to validating operations as described in Chapter 14.
Recovering from an Access System Customization Upgrade FailureIf an Access System customization was not successful, you can perform the following steps to rollback this upgrade, then try again.
To recover from an unsuccessful Access System component upgrade1. Restore the earlier customization files or directory that you backed up before the
upgrade (to recover the earlier customization), then back it up again. You will retain one as a backup copy and use one in the next step.
2. Using a backup copy of your earlier customization files, restart the upgrade as described in this chapter.
Looking AheadAfter ensuring that your previous Access System customizations are integrated and operating properly in the upgraded environment, see Chapter 14.
If you are using the zero downtime upgrade method, see also Part VI.

Part VValidating the Upgrade
This part of the book helps you validate the success of the entire upgrade.
Part V contains the following chapters:
■ Chapter 14, "Validating the Entire System Upgrade"


Validating the Entire System Upgrade 14-1
14Validating the Entire System Upgrade
Activities in this chapter should be performed after upgrading the schema and data, after upgrading Identity System components, after upgrading Access System components, after upgrading integration components, SDKs, and customizations. Unless explicitly stated, topics in this chapter apply equally to both upgrade methods. Topics in this chapter include:
■ Validating the Identity System Upgrade
■ Validating Access System Upgrades
■ Restarting On-the-fly User Data Migration for In-place Upgrades
■ Deleting the Temporary Directory Server Profile
■ Reverting Backward Compatibility
Validating the Identity System UpgradeAfter upgrading, Oracle recommends that you perform tasks to validate that you can access and use the Identity System Console and applications. For more information about these tasks, see the Oracle Access Manager Identity and Common Administration Guide.
To validate your Identity System upgrade1. Identify the COREid System applications and functions that are affected by your
upgrade and develop a plan to test these.
2. Delete all Web browser caches once the upgrade is complete.
3. Ensure that your Identity Server service and WebPass Web server instance are running.
4. Navigate to the Identity System Console from your browser by specifying the appropriate URL. For example:
http://hostname:port/identity/oblix
Note: If you are using the zero downtime upgrade method, you will perform these tasks after upgrading the schema, the data, the clone system, and the original system. For more information, see "Validating Successful Operations in Your Environment" on page 16-67.

Validating Access System Upgrades
14-2 Oracle Access Manager Upgrade Guide
where hostname refers to computer that hosts the Web server; port refers to the HTTP port number of the WebPass Web server instance; /identity/oblix connects to the Identity System Console.
The Oracle Access Manager landing page should appear.
5. Landing Page Does Not Appear: Confirm that you have specified information accurately. Look for troubleshooting tips in Appendix G.
6. Perform any of the tasks listed next to verify operations, and use your own test plan as a guide:
– View the directory server profile for this Identity Server by selecting Identity System Console, System Configuration, Directory Profiles, link_to_this_profile
– Set up panels in the User Manager, Group Manager, Organization Manager.
– Set up object-based searchbases in the User Manager.
– Set up access controls in the User Manager, Group Manager, or Organization. Manager.
– Create workflow definitions.
– Configure options such as the mail server and session settings.
Validating Access System Upgrades You can complete any of the next steps to validate that the Access System schema and data upgrade have been successful. For more information, see Oracle Access Manager Access Administration Guide.
To verify a successful Access System upgrade1. Identify the Access System functions that are affected by your upgrade and
develop a plan to test these.
2. Ensure your Policy Manager Web server and WebPass Web server instance are running.
3. Delete all Web browser caches once the upgrade is complete
4. Navigate to the Access System Console from your browser by specifying the appropriate URL. For example:
http://hostname:port/access/oblix
where hostname refers to computer that hosts the Web server; port refers to the HTTP port number of the WebPass Web server instance; /access/oblix connects to the Access System Console.
The Oracle Access Manager landing page should appear.
5. Landing Page Does Not Appear: Confirm that you have specified information accurately. Look for troubleshooting tips in Appendix G.
6. Log in to the Policy Manager/Access System Console as a Master Administrator.
Note: If you are using the zero downtime upgrade method, you will perform these tasks after upgrading the schema, the data, the clone system, and the original system. For more information, see "Validating Successful Operations in Your Environment" on page 16-67.

Restarting On-the-fly User Data Migration for In-place Upgrades
Validating the Entire System Upgrade 14-3
7. Complete the following tasks, and refer to your own test plan to ensure that the Access System is working properly. For example:
■ Display configuration details for an authentication scheme by clicking the link that corresponds to the scheme.
■ Define or modify a policy domain.
■ Explore the Access System Console.
■ Access a protected resource to confirm that login is working.
8. Log out, as usual.
Restarting On-the-fly User Data Migration for In-place Upgrades You can skip this discussion if you performed a zero downtime upgrade, or if you did not halt on-the-fly user data migration during an in-place upgrade.
You use the procedure here to restart on-the-fly user data migration only if you performed an in-place upgrade and only:
■ When immediate (on-the-fly) user data migration was temporarily halted as described in Chapter 5. If on-the-fly user data migration was not halted, you can skip this procedure.
■ After validating that your upgraded deployment is operating as expected and that no rollback to the earlier release is needed
In the following procedure you must reconfigure the attributes used for challenge and response at both the tab level and the object class level.
To restart on-the-fly user data migration1. Tab Level: Reconfigure the Challenge and Response semantic types at the tab
level, as follows:
a. Click Identity System Console, then click User Manager Configuration, click Tabs.
b. Select Employees from the list, then click Modify Attributes to open the Modify Attributes page.
c. From the Attribute list select the attribute that is used for Challenge, set the Semantic Type to Challenge and the Display Type to Single Line Text, then click Save.
d. From the Attribute list select the attribute that is used for Response, set the Semantic Type to Response and the Display Type to Password, then click Save.
e. Click Done.
2. Object Class Level: Reconfigure the Challenge and Response semantic types at the object class level, as follows:
Note: If you roll back to an earlier release after performing activities here, any user data that has been migrated will not be reverted.
Note: If you performed an upgrade using the zero downtime method, skip this activity.

Deleting the Temporary Directory Server Profile
14-4 Oracle Access Manager Upgrade Guide
a. Click Identity System Console, then click Common Configuration, click Object Classes.
b. Select the person object class from the list, then click Modify Attributes to open the Modify Attributes page.
c. From the Attribute list select the attribute that is used for Challenge, set the Semantic Type to Challenge and the Display Type to Single Line Text, then click Save.
d. From the Attribute list select the attribute that is used for Response, set the Semantic Type to Response and the Display Type to Password, then click Save.
e. Click Done.
3. Set the obVer attribute for oblixConfig (the configuration data root node in the LDAP directory server) to 10.1.4.0 as follows:
ldapmodify.exe -h <Host> \ -p <Port> -D <Bind DN> -w <Bind Password> \ -f <ldif file containing attribute to be modified>
The format of LDIF file to be created is as follows. This example is for the Netscape Directory Server:
dn: o=oblix,<configuration DN> changetype: modify replace: obver obver: 10.1.4.0
4. Restart all upgraded Identity Servers and Access Servers.
Deleting the Temporary Directory Server ProfileRegardless of the method you used for the Access System upgrade, an administrator created a temporary directory profile to grant the Access Server write access to policy data stored in the directory server. This temporary directory profile was required when the Access Server gathered configuration information stored in the WebGatestatic.lst file and updated the directory server during WebGate upgrades.
After upgrading all earlier WebGates and confirming proper operation of the upgraded WebGates, you can delete the temporary directory server profile.
To delete the temporary directory server profile1. From the Access System Console, click the System Configuration tab.
2. Click Server Settings.
3. In the Configure LDAP Directory Server Profiles section, click the check box for the profile that you want to delete.
4. Click Delete.
Note: Do not perform this task until all earlier WebGates in your environment have been upgraded and verified to be working.

Reverting Backward Compatibility
Validating the Entire System Upgrade 14-5
5. When all earlier custom plug-ins and WebGates have been successfully upgraded and backward compatibility is no longer needed, proceed to "Reverting Backward Compatibility" next.
Reverting Backward CompatibilityRegardless of the upgrade method that you used, backward compatibility with earlier custom plug-ins (and WebGates/AccessGates) was enabled automatically during earlier Identity Server and Access Server upgrades.
After upgrading all older plug-ins, WebGates and AccessGates, and confirming that the entire system upgrade has been successful, Oracle recommends that you disable (revert) backward compatibility.
The steps you complete to revert backward compatibility are similar to those used to manually enable backward compatibility. For more information, see:
■ Reverting Identity Server Backward Compatibility
■ Reverting Access Server Backward Compatibility
Reverting Identity Server Backward CompatibilityAfter extending your custom Identity plug-ins to support UTF-8, you perform the steps in this procedure on every Identity Server in your environment whether backward compatibility was enabled automatically or manually.
To revert backward compatibility on Identity Servers 1. Upgrade all Identity System customizations as described in Chapter 12.
2. Redeploy all upgraded Identity System customizations and verify that all are working as expected.
3. Locate and open the Identity Server oblixpppcatalog.lst file in IdentityServer_install_dir\identity\oblix\apps\common\bin\oblixpppcatalog.lst.
4. Set the encoding flag from Latin-1 to encoding after the ApiVersion flag (if there is one) to provide backward compatibility for Latin-1 data. For example:
From:
userservcenter_view_pre;lib;;..\..\..\unsupported\ppp\ppp_dll\ ppp_dll.dll;Publisher_USC_PreProcessingTest_PPP_Automation;;Latin-1
To:
userservcenter_view_pre;lib;;..\..\..\unsupported\ppp\ppp_dll\ ppp_dll.dll;Publisher_USC_PreProcessingTest_PPP_Automation;;encoding
5. Repeat as needed for entries in this file.
6. Save the file.
7. Restart the Identity Server service.
8. Repeat for each Identity Server in the upgraded environment to revert backward compatibility.
Reverting Access Server Backward CompatibilityAfter verifying that your custom Access System plug-ins were redesigned to support UTF-8, and after upgrading all WebGates/AccessGates successfully, backward

Reverting Backward Compatibility
14-6 Oracle Access Manager Upgrade Guide
compatibility is no longer needed. In this case, Oracle recommends that you manually set "IsBackwardCompatible" Value="false" in all Access Server globalparams.xml files.
Whether backward compatibility was enabled automatically or manually, you perform the steps in this procedure on every Access Server in your environment.
To revert backward compatibility on Access Servers 1. Upgrade all Access System customizations as described in Chapter 13.
2. Redeploy all upgraded Access System customizations and verify that all are working as expected.
3. Locate and open the Access Server globalparams.xml file in AccessServer_install_dir\access\oblix\apps\common\bin\globalparams.xml.
4. Set "IsBackwardCompatible" Value="false". For example:
<SimpleList <NameValPair ParamName="IsBackwardCompatible" Value="false"> </NameValPair></SimpleList>
5. Save the file.
6. Restart the Access Server service.
7. Repeat for each Access Server in the upgraded environment.

Part VIUpgrading Using the Zero Downtime
Upgrade Method
This part of the book helps you perform and validate an upgrade using the zero downtime method.
Part VI contains the following chapters:
■ Chapter 15, "Introduction to the Zero Downtime Upgrade Method"
■ Chapter 16, "Upgrading the Schema, Data, and Clone System"
■ Chapter 17, "Upgrading the Original System"


Introduction to the Zero Downtime Upgrade Method 15-1
15Introduction to the Zero Downtime Upgrade
Method
Release 10.1.4 Patch Set 1 (10.1.4.2.0) includes new tools and updated utilities to support a zero downtime upgrade methodology for mission-critical deployments. Oracle recommends that you review all information about the zero downtime upgrade method to ensure that this approach is the right one for your enterprise. This chapter introduces the zero downtime upgrade methodology and includes the following topics:
■ About Zero Downtime Upgrades and Planning
■ Duration of Zero Downtime Tasks and Validation
■ Zero Downtime Upgrade Tasks and Sequencing
■ Zero Downtime Upgrade Tools and Processes
■ Backup and Recovery Strategies for Zero Downtime Upgrades
■ Developing a Plan for a Zero Downtime Upgrade
About Zero Downtime Upgrades and PlanningThe zero downtime methodology is an alternative to the in-place upgrade methodology that is described in Part II and Part III of this book. The zero downtime upgrade methodology is also known as an out-of-place upgrade for reasons that are described in this chapter. Before you decided which method is appropriate for use when upgrading your deployment, Oracle recommends that you read all information about zero downtime upgrades as well as the in-place upgrade.
The zero downtime upgrade method is available as an option for those who want to upgrade with very little disruption to their original deployment and the services that are provided to internal and external customers. The zero downtime method provides the following features for mission-critical deployments:
■ Eliminates most Oracle Access Manager service downtime during the upgrade
■ Separates the Oracle Access Manager schema upgrade from Oracle Access Manager data upgrades
■ Separates the upgrade of attributes and objectclasses
■ Enables you to roll back changes and return to your starting position at any stage
Note: If you are using the in-place upgrade method, skip this chapter.

About Zero Downtime Upgrades and Planning
15-2 Oracle Access Manager Upgrade Guide
Oracle Access Manager Release 10g (10.1.4.2.0) is a patch set release, as described in Chapter 1. Oracle Access Manager Release 10g (10.1.4.2.0) provides the tools that you need to perform a zero downtime upgrade. You can use the zero downtime upgrade method to upgrade directly to Oracle Access Manager release 10g (10.1.4.2.0) from releases as early as 6.1.1. For example, you can use this method to upgrade directly:
■ From Release 6.1.1
■ From Release 6.5
■ From Release 7.x
If your starting release is earlier than 6.1.1, you cannot upgrade directly. For more information, see "Indirect Upgrade Paths" on page 1-31. For more information about upgrade paths, see Chapter 1.
Some situations are not appropriate for the zero downtime upgrade method. For example, do not use the zero downtime method:
■ If your starting release is Oracle Access Manager 10g (10.1.4.0.1), you can apply Release 10.1.4 Patch Set 1 (10.1.4.2.0) to each 10g (10.1.4.0.1) component instance. Do not use the zero downtime upgrade method. For more information, see the Oracle Access Manager Patch Set Notes Release 10.1.4 Patchset 1 (10.1.4.2.0) For All Supported Operating Systems.
■ If you are performing a switch from a Solaris platform to a Linux platform while upgrading from an earlier release, follow instructions in Appendix B. Afterward, you can apply Release 10.1.4 Patch Set 1 (10.1.4.2.0) to the 10g (10.1.4.0.1) components as described in the Oracle Access Manager Patch Set Notes Release 10.1.4 Patchset 1 (10.1.4.2.0) For All Supported Operating Systems. Do not use the zero downtime upgrade method in this case.
The following topics provide more information about the zero downtime upgrade method:
■ Deployment Scenarios for Zero Downtime Upgrades
■ Original and Clone Environments for the Zero Downtime Upgrade Method
■ Hardware Requirements for Zero Downtime Upgrades
■ Web Server Requirements for Zero Downtime Upgrades
■ Directory Server Requirements for the Zero Downtime Upgrade
■ Schema and Data Upgrades with the Zero Downtime Upgrade Method
■ Preparation Tasks for the Zero Downtime Method
■ Validation During a Zero Downtime Upgrade
■ Customization Upgrades Using the Zero Downtime Upgrade Method
Deployment Scenarios for Zero Downtime UpgradesA zero downtime upgrade can be performed with any deployment type or scenario. For example, you can perform a zero downtime upgrade on a development or test area or on a full production deployment. The deployment category can be either extranet or
Note: Oracle recommends that you review all information about the zero downtime method before you decide whether it is the right choice for your deployment and before you perform any upgrade tasks.

About Zero Downtime Upgrades and Planning
Introduction to the Zero Downtime Upgrade Method 15-3
intranet. For more information about deployment scenarios and categories, see Chapter 1 and the Oracle Access Manager Deployment Guide.
Oracle recommends that you first use the zero downtime upgrade method in a small, isolated deployment. After performing the zero downtime upgrade and validating that this method produced the results that you expected in a small area, you can use the zero downtime method to upgrade a larger deployment. The tasks that you perform are the same regardless of the size or complexity of your deployment.
For more information about the duration of the zero downtime upgrade task and processing, see "Duration of Zero Downtime Tasks and Validation" on page 15-21.
Original and Clone Environments for the Zero Downtime Upgrade MethodThe zero downtime upgrade method is also known as an out-of-place upgrade method because you will be working with two complete environments:
■ The Original Environment
■ The Clone Environment
The Original Environment This topic describes the original deployment and the role that it plays during a zero downtime upgrade. When you upgrade using the zero downtime method, your original Oracle Access Manager instances remain intact.
During a zero downtime upgrade, original instances typically remain on the same computer where they were installed. However, before upgrading a component you can change the hardware or the operating system or Web server. For more information, see "Hardware Requirements for Zero Downtime Upgrades" on page 15-6.
Original instances use the original configuration and policy data. This data is stored in the original branch of the LDAP directory server that was specified when you installed the components. For more information, see "Schema and Data Upgrades with the Zero Downtime Upgrade Method" on page 15-9.
Original instances provide a source for the copied instances (known as clones) that you will create and upgrade. Creating, upgrading and validating the clone system enables you to leave the original instances and data intact. For more information, see "The Clone Environment".
Original instances continue to serve all customers while you upgrade clones and validate the cloned system upgrade. You upgrade original component instances only when you are satisfied that the upgraded cloned environment is operating as expected.
Oracle recommends that you upgrade customizations early on in the upgrade process, so that you can test these thoroughly. When you use the zero downtime upgrade method, you can upgrade customizations and test these with the upgraded cloned environment. For more information, see "Customization Upgrades Using the Zero Downtime Upgrade Method" on page 15-15.
The Clone Environment At the center of the zero downtime upgrade method is a copy of each earlier Oracle Access Manager instance in your original deployment. The copy is referred to as a clone. You will also have a copy of the original oblix branch. This topic describes the clone setup and the role that it plays during a zero downtime upgrade.

About Zero Downtime Upgrades and Planning
15-4 Oracle Access Manager Upgrade Guide
Using the zero downtime upgrade method, you will create a clone of each component instance that resides in the original deployment (except WebGates).
The clone file system is a back up copy of the original file system. In later tasks, you will rename each clone subdirectory to create a source for the clone upgrade. The source becomes the back up copy of the component and remains intact while the destination that contains the 10.1.4.2.0 tools, libraries, and files, is upgraded. The original file system is untouched during clone upgrades.
You can install another instance of an earlier release Oracle Access Manager component to use as a clone. For example, if you have original instances operating with an IIS Web server on a Windows platform you need to place the clone on a different computer host. After you install the earlier instance on the new host you need to copy any customizations and configuration changes from the original instance to the newly installed clone. If the instance uses either Simple or Cert mode to communicate with existing components, you must copy the \config subdirectory from the original instance to the newly installed instance to ensure that all certificates are in order.
For example, suppose that you have a small distributed sandbox-type deployment with one instance each of the COREid Server (now named the Identity Server), WebPass, Access Manager (now named the Policy Manager), Access Server, and WebGate. Figure 15–1 shows both the original and clone instances in this sample environment.

About Zero Downtime Upgrades and Planning
Introduction to the Zero Downtime Upgrade Method 15-5
Figure 15–1 Original and Clone Instances for a Zero Downtime Upgrade
As you can see in Figure 15–1, you will have a clone component instance for each original instance except WebGates. The clones can reside on the same computer host as the original; however, they can reside on a different computer host if you prefer. For more information, see "Hardware Requirements for Zero Downtime Upgrades" on page 15-6.
WebGates: You do not clone WebGates because you can delay WebGate upgrades. Delaying WebGate upgrades is possible because an upgraded Access Server provides backward compatibility with earlier WebGates and earlier custom plug-ins. This backward compatibility is enabled automatically when you upgrade an earlier Access Server. As a result, you will configure original WebGates to work with cloned Access Servers and delay WebGate upgrades. For more information about backward compatibility, see Chapter 4.
Having only one WebGate will result in downtime when upgrading that WebGate (or when rolling back). Oracle recommends that you have more than one WebGate to avoid downtime. Alternatively, you can keep the older WebGate and not upgrade it because it will work with the upgraded Access Server.
Access Servers: Each WebGate upgrade requires that at least one Access Server configured for that WebGate is running. This is required to enable the migration of information from the WebGateStatic.lst file to the WebGate profile in the System Console.

About Zero Downtime Upgrades and Planning
15-6 Oracle Access Manager Upgrade Guide
SDK and Integration Connectors: In addition to delaying WebGate upgrades, you can delay upgrading the Software Developer Kit (SDK). Any item that must be handled manually can be upgraded at any time. For more information about manual tasks, see Chapter 3.
Separate Web Server for Clones: On computers that are hosting Web components, you need a separate Web server instance to serve the clone WebPass and Access Manager instances. For more information, see "Hardware Requirements for Zero Downtime Upgrades".
LDAP Directory Server: Also shown in Figure 15–1 is the LDAP directory. It contains the Oracle Access Manager schema that was installed when you installed the earlier original components, as well as the original branch where configuration and policy data are stored. The clone setup uses a copy of the data (there is no copy of the schema) from your original environment.
For the clone setup, you will create a new branch in the same LDAP directory server instance and populate the new branch with a copy of the original configuration and policy data. The original branch remains intact. After populating the new branch, you will reconfigure cloned components to use the new branch. After this reconfiguration, the clone component replicates the original. The original environment continues to use the original branch and the data in the original branch. For more information, see "Schema and Data Upgrades with the Zero Downtime Upgrade Method".
After upgrading the clones, you will validate the upgraded environment to ensure that it is operating as expected with the upgraded schema and data in the new branch. After validation, you can use the upgraded clones to serve in place of original components while you upgrade the originals. For an introduction to validation tasks, see "Validation During a Zero Downtime Upgrade".
Hardware Requirements for Zero Downtime UpgradesOriginal instances reside on existing hardware. When you create a clone instance, Oracle recommends that clone resides on the computer that is hosting the original instance. However, you can create the clone on any computer that meets Oracle Access Manager 10g (10.1.4.2.0) requirements.
If you would like to upgrade hardware or change the operating system or Web server within your deployment, Oracle recommends that you do this before starting the zero downtime upgrade. Whether you use existing systems or choose to enhance these, you must ensure that the system is supported by Oracle Access Manager 10g (10.1.4.2.0). For more information, see "Bringing Host Computers to Oracle Access Manager 10g (10.1.4.0.1) Support Levels" on page 16-3.
Clone component identifiers and service names will be different from those for the original instance. As a result, there is no need to place Identity Server or Access Server clones on a different computer host when you have an IIS Web server on the same computer as an original Identity Server or Access Server instance. For more information, see "Web Server Requirements for Zero Downtime Upgrades".
Currently supported Unix-based platforms include Linux and Solaris. Any Reference to Unix refers only to currently supported Unix-based platforms.
Note: If you plan to add hardware to the existing deployment, you will need to install the earlier Oracle Access Manager instance on a supported platform before you start the upgrade.

About Zero Downtime Upgrades and Planning
Introduction to the Zero Downtime Upgrade Method 15-7
You can start the zero downtime upgrade when all systems are ready.
Web Server Requirements for Zero Downtime Upgrades The cloned WebPass and Access Manager require a separate Web server instance. The Web server instance for the clone should be the same Web server type and release that is used with the original Web component instance. For example, if you are using an Oracle HTTP Server (OHS) based on Apache 2.0.5.2, you should use the same Web server for the clone. There are no cloned WebGates.
The following guidelines apply to Web server instances for cloned Web components:
■ If you have only one set of Web components on a single host computer, configured for a single Web server instance, you will need only one new Web server instance to service the clones.
■ If you have a more complex deployment, where Web components are distributed across multiple host computers, you will need one new Web server instance on each computer that is hosting cloned Web components.
■ If you have more than one Web server configured for more than one pair of WebPass or Access Manager components, you will need a similar pairing of Web server instances for the clone.
■ If you have other applications that are protected by Oracle Access Manager using the original Web server instance, you should also clone these applications to use the Web server instance that you create for the cloned Web components.
■ When cloning earlier IIS Web components on a Windows system, the Windows registry is not updated for the clone. This might cause issues because the IIS Web server requires the entries for Web components in the registry. For more information, see "Reinstating Original Windows Registry Entries During a Rollback Operation" on page 15-36.
Oracle recommends that you do not have more than one instance of the IIS Web server on a host computer. If the original component uses an IIS Web server, Oracle recommends that you create the clone on a different host; the name of the host computer will differ for the clone.
Web Server Support for Multiple Oracle Access Manager ReleasesYou must perform Identity System set up for each upgraded COREid Server and WebPass association. You must set up each upgraded Access Manager. However, Web server instances cannot support Oracle Access Manager Web components that are at different release levels (6.1.1 and 10.1.4, for example). This is especially true on Unix-based systems.
There are implications for setting up the upgraded Identity System and Access Manager, whether it is a clone or an original system. All Web components that are serviced by a single Web server instance (WebPass, Access Manager, and WebGates), must be at the same release level before you restart the Web server. When you have a single Web server instance serving more than one Oracle Access Manager Web component, the Web server must remain stopped until all serviced Web components on the host computer are upgraded.
You cannot set up the upgraded Identity System or Access Manager (whether you are upgrading the clone setup or the original setup) until all Oracle Access Manager Web components that are serviced by the Web server instance have been upgraded to 10g (10.1.4.2.0).

About Zero Downtime Upgrades and Planning
15-8 Oracle Access Manager Upgrade Guide
The following conditions apply when you are ready to set up either the upgraded clone or upgraded original system:
■ Identity System Only:
– A single Web Server instance cannot service multiple WebPass instances.
– You can set up the Identity System after upgrading the only WebPass.
■ Joint Identity and Access System: You must delay setting up the Identity System and the Access Manager until you have upgraded all Web components that are serviced by a single Web server instance.
In the clone environment you upgrade COREid Servers, and serviced WebPass and Access Manager instances before setting up the Identity System and the Access System. There are no WebGate clones. In the original environment, you must upgrade all serviced WebPass, Access Manager, and WebGate instances.
– When a WebPass and Access Manager both use the same Web server instance, delay Identity System setup until after the serviced Access Manager instances are upgraded.
– When the same Web server instance is used by WebPass, Access Manager, and WebGate, delay Identity System setup until after you upgrade all serviced Web components.
– If you have an Access Manager and WebGate installed in the same directory, you must postpone reconfiguring that Access Manager until the WebGate is upgraded.
– You must upgrade components in the proper sequence on each host (COREid Server, WebPass, Access Manager, Access Server, and WebGate). Do not upgrade a WebGate before upgrading the Access Server on the same host.
You upgrade components on each host in a specific order. There is no need to wait for all the Web components throughout the environment to be upgraded before you set up the Identity System and Access Manager.
Directory Server Requirements for the Zero Downtime UpgradeAs you prepare your original environment for the zero downtime upgrade, you will be instructed to review the topics in the following list and perform any tasks that are applicable to in your environment. These topics are located in Chapter 5:
■ Strategies for Upgrading in a Replicated Environment
Your deployment might employ the use of replicas to increase system availability and improve performance. Oracle recommends that you disable replication until the upgrade is complete and all features have been validated to work correctly.
■ Configuring the Challenge/Response Phrase at the Object Class Level
Oracle recommends that before starting the upgrade you ensure that the Challenge and Response attributes are configured at the object class level. If Challenge and Response attributes are configured at the Employees tab level (rather than at the object class level), then the configuration data upgrade might not complete correctly.
■ Configuring Unique Namespaces for Directory Connection Information
Each directory server profile contains connection information for a directory that includes the profile name, a domain or namespace to which it applies, a directory type, and a set of operational requirements for Read, Write, Search, and so on. To

About Zero Downtime Upgrades and Planning
Introduction to the Zero Downtime Upgrade Method 15-9
ensure that namespaces are unique and do not overlap with other directory server profile namespaces, when earlier Oracle Access Manager installation with configuration data or policy data is stored in a different directory server than user data you need to configure unique namespaces before upgrading.
■ Preparing Your Directory Instances for the Schema and Data Upgrade
This task includes verifying that the directory server is supported, that specific considerations for your directory server type have been taken into account, and that you have verified that the value of the directory server’s search size limit parameter is greater than the number of entries in your configuration tree.
Schema and Data Upgrades with the Zero Downtime Upgrade Method When you installed and set up the first COREid Server instance and the first Access Manager instance in your original environment, the Oracle Access Manager schema and configuration and policy data were added to the LDAP directory server. This topic outlines the implications of the schema upgrade and data upgrades when you use the zero downtime method
■ You will create a new branch in the LDAP directory server and store a copy of your current configuration and policy data there for the clone system to use.
■ The schema is upgraded all at one time and is upgraded separately from configuration and policy data. For more information, see "About The Schema Upgrade" on page 15-10.
■ Data in the new branch is upgraded when you upgrade the clone of the first installed COREid Server (and in some cases when you upgrade the clone of the first installed Access Manager). Data in the original branch is not upgraded and is available for use by the original system until that system is upgraded. For more information, see "About Configuration and Policy Data Upgrades" on page 15-11.
■ Multiple values that are configured as challenge and response attributes for Lost Password Management are migrated during the user’s first login after the upgrade. This migration is halted automatically until you upgrade original instances. For more information, see "User-Data Migration and Multiple Values in Challenge and Response Attributes for LPM" on page 15-12.
■ Lost password management functions are available for use in the upgraded cloned system. However, multiple challenge and responses for lost password management cannot be used without modifying the user data.
■ Parameter catalogs and message files are upgraded with each individual component (whether clone or original). For more information about processing during upgrades, see "Zero Downtime Upgrade Tools and Processes" on page 15-23.
Both the schema upgrade and the data upgrade relies on Lightweight Directory Interchange Format (LDIF) files. An LDIF file is an ASCII format file that you can use to exchange and synchronize data between Lightweight Directory Access Protocol (LDAP) servers. There are LDIF files for each specific LDAP directory server.
Each LDIF file includes only the changes from one Oracle Access Manager release to the next. As a result, the data upgrade sequence will repeat one time for each release between your starting release and 10g (10.1.4.2.0). For example, if you are upgrading from release 6.1.1, the schema upgrade (and data upgrade) occurs as follows:
■ From release 6.1.1 to release 6.5
■ From release 6.5 to release 7.0
About Zero Downtime Upgrades and Planning
15-10 Oracle Access Manager Upgrade Guide
■ From release 7.0 to 10.1.4
About The Schema UpgradeThis topic provides an introduction to the schema upgrade that you perform using the zero downtime upgrade method.
The Oracle Access Manager schema is usually enhanced for each major Oracle Access Manager release. For example, when Identity Server functionality is enhanced it might refer to a greater number of schema attributes and object classes than previous releases. The schema upgrade must be performed by someone who has directory server administrator privileges that includes write access to the LDAP directory server and files.
With the zero downtime upgrade method, the schema upgrade is separate from data upgrades. The schema upgrade occurs all at one time. You can ensure that the schema upgrade was successful before you upgrade any components (or the configuration and policy data).
Before upgrading the schema, Oracle recommends that you create a new branch within the same LDAP directory server instance that is used by the original instances. After creating the new branch, you populate it with a copy of the original configuration and policy data. The clone setup will use this new branch and will mirror the original environment without disrupting the original environment. For more information about how this is done for the zero downtime upgrade, see "About Mkbranch Mode Processing" on page 15-26. The new branch in the directory server will not include a copy of the schema.
After populating the new branch and configuring cloned instances to use the new branch, you can upgrade the schema in the LDAP directory server. If you have only the Identity System deployed, or if you have a joint Identity and Access System with configuration and policy data stored together, you perform the task to upgrade the schema one time only: with the clone of the first installed COREid Server. When configuration and policy data are stored separately, you also need to upgrade the Access System schema. For more information about how this is done using the zero downtime upgrade, see "About Schema Mode Processing" on page 15-28.
The upgraded schema offers backward compatibility with the earlier schema, as far back as release 6.1.1. However, Oracle Access Manager does not provide automated tools to roll back a schema upgrade. Some directory server vendors provide tools that you can use to back up the schema. If you did back up the schema before upgrading the schema, you should be able to reinstate the earlier schema if you decide to roll back to the original release. For more information, see "Backup and Recovery Strategies for Zero Downtime Upgrades" on page 15-33.
Both the original setup and the clone setup use the upgraded schema. After upgrading the schema, Oracle recommends that you perform validation tasks to ensure that everything is operating properly. For more information, see "Validating Successful Operations in Your Environment" on page 16-67.
For details about upgrading the schema, see "Upgrading the Schema During a Zero Downtime Upgrade" on page 16-61.
Caution: The zero downtime upgrade tools do not provide an automated way to roll back a schema upgrade.

About Zero Downtime Upgrades and Planning
Introduction to the Zero Downtime Upgrade Method 15-11
About Configuration and Policy Data UpgradesThis topic introduces the configuration and policy data upgrade that occurs when you upgrade certain cloned components.
As discussed in Chapter 1, Identity System data includes:
■ Oracle Access Manager configuration data
■ Oracle Access Manager user and group data and runtime information
■ Oracle Access Manager workflow data
In a joint Identity and Access System, the Access System data includes Oracle Access Manager access policy data.
Original instances use only the configuration and policy data that is stored in the original branch in the LDAP directory server. The original branch was set up when you installed the first COREid Server and first Access Manager in the original environment. Clone components use only the configuration and policy data that is stored in the new branch in the LDAP directory server. Configuration and policy data are upgraded in the new branch only. The original branch of the LDAP directory server remains untouched.
After you upgrade the schema, you can start upgrading clone instances and the configuration and policy data in the new branch. Data upgrades occur as follows:
■ If you have only the Identity System deployed, or if you have a joint Identity and Access System with configuration and policy data stored together, data is upgraded when you upgrade the clone of the first installed COREid Server.
■ If you have a joint Identity and Access System deployed with configuration and policy data stored in different directory servers, the access policy data is upgraded when you upgrade the clone of the first installed Access Manager.
During subsequent COREid Server (and Access Manager) clone upgrades, the initial data upgrade is detected and data upgrade activities are skipped. For more information about data upgrades for a zero downtime upgrade, see "About Clone Mode Processing" on page 15-30.
No data is upgraded during original component upgrades with the zero downtime upgrade method. After upgrading original components, you will reconfigure these to use the new branch.
Any changes that are made to the original setup after creating and populating the new branch in the LDAP directory server will not be available in the clone setup. Similarly, any changes that are made to the clone setup will not be available in the original environment. Oracle recommends that you enforce a moratorium on changes to the original environment that affect configuration and policy data. Otherwise, you must repopulate the new branch of the LDAP directory server and upgrade clones a second time before you can upgrade original instances. For more information, see "About Retrieving Changes to the Original Branch Before Upgrading Original Instances" on page 15-23.
Validation: Oracle recommends that you perform a number of validation activities to ensure that the clone and original environments are operating as expected following the schema upgrade (and the data upgrade). For more information about validation, see "Validation During a Zero Downtime Upgrade" on page 15-14.
See Also: "User-Data Migration and Multiple Values in Challenge and Response Attributes for LPM" on page 15-12.
About Zero Downtime Upgrades and Planning
15-12 Oracle Access Manager Upgrade Guide
User-Data Migration and Multiple Values in Challenge and Response Attributes for LPMUser data is not upgraded. The original searchbase is used by both the clone setup and the original setup.
Multiple values that are configured in challenge and response attributes for lost password management (LPM) are migrated with the first user login after the upgrade. No other user data attributes are migrated during a user’s first login.
When you use the zero downtime upgrade method, you do not need to manually halt the migration of multiple values in challenge and response attributes for lost password management. Instead, this migration is automatically halted as a result of using the MigrateOAM script in Clone mode.
Even though the migration of multiple values in challenge and response attributes for LPM are suspended until you manually enable them, the lost password management functionality remains available for use.
Using the zero downtime upgrade method, you must manually restart user data migration after validating that your upgraded clone and original setup does not need to be rolled back to the earlier release.
You will only restart the migration of user data at first login at the end of the zero downtime task, after upgrading and validating your original setup. After upgrading and validating the upgraded cloned setup, you will not restart the migration of user data.
For more information about multiple values in challenge and response attributes for lost password management, see "Migrating User Data At First Login" on page 4-18.
Preparation Tasks for the Zero Downtime MethodThe following overview outlines the topics where you will find the preparation tasks that you must perform during a specific phase of the zero downtime upgrade. You do not need to perform these tasks now. The topics are provided as an introduction only and will be presented in the order in which they are to be used.
Topic overview: Preparation tasks for each phase are described in■ Chapter 16
– Preparing the Original Installation for a Zero Downtime Upgrade
– Preparing Cloned Identity System Components for the Upgrade
– Preparing Cloned Access System Components for the Upgrade
■ Chapter 17
– Preparing Original Identity System Components for the Upgrade
– Preparing Original Access System Components for the Upgrade
Some of the preparation tasks that you will be instructed to perform are specific to zero downtime upgrades and are described in detail in the topics in the previous list. Other preparation tasks apply to both upgrade methods. In this later case, you will be directed to the actual details located in other chapters. For example, Chapter 5 provides steps to help you prepare for a schema and data upgrade when upgrading the clone of the first installed COREid Server and first installed Access Manager. Chapter 8 provides steps to help you prepare components.
About Zero Downtime Upgrades and Planning
Introduction to the Zero Downtime Upgrade Method 15-13
About Preparing the Original Installation: Preparing the original installation includes adding profiles to the original System Console for cloned components. Regardless of the component or method, you need to prepare the host system and prepare earlier customizations. If you are upgrading a Web component, you will be instructed to back up the existing Web server configuration files. On Windows systems, you will be instructed to back up the Windows registry details for the component. When preparing a release 6.x environment or a multi-language installation there are other preparation activities.
About Preparing for Schema and Data Upgrades: When you upgrade the schema, you are instructed to back up the directory server instance and the schema. You will use vendor-supplied tools to perform these tasks as described in Chapter 5. Data upgrades occur when you upgrade the clone of the first installed COREid Server and Access Manager. The following list identifies the tasks that you will be directed to perform to prepare for data upgrades:
■ Clone of First Installed COREid Server: Perform the following backup activities as described in Chapter 5:
■ Backing up Oracle Access Manager Configuration and Policy Data
■ Backing Up User and Group Data
■ Backing Up Workflow Data
■ Archiving Processed Workflow Instances
■ Clone of First Installed All Access Manager: Back up policy data, as described in Chapter 5.
About Preparing for Component Upgrades: Each Operating System provides a hierarchical tree structure where files are organized for storage and retrieval. After performing other preparation activities and before you upgrade each instance (whether clone or original), you will ensure that you have the 10g (10.1.4.2.0) MigrateOAM script in an appropriate location for that component. These activities are summarized as follows:
■ Source Creation: You must rename the subdirectory that contains the instance (whether the instance is a clone or an original instance) to create a source for the upgrade. In this guide, the source file system path will include "_source" as an identifier after the subdirectory is renamed. For example: np611\ois_01\identity_source
Each source provides all the configuration details for the corresponding instance. This information will be extracted during the instance upgrade. The source is not upgraded and can be used as a backup copy of the earlier instance.
■ Destination Creation: Extract 10g (10.1.4.0.1) Identity Server libraries and files and specify the same file system path that the clone (or the original instance if you are upgrading an original instance) had before you renamed it. In other words, the
Note: If you do not perform all recommended preparation steps, you might not be able to recover from a problem or to roll back to the original release.
Note: You must create the source first because the destination will replace the clone or original location in the file system.

About Zero Downtime Upgrades and Planning
15-14 Oracle Access Manager Upgrade Guide
destination path must exactly match the path of the clone or original subdirectory before it was renamed to create the source. In this manual, the destination path is sometimes referred to as destination_dir.
The 10g (10.1.4.0.1) component libraries and files provide the foundation for the patch, and a destination for information that is extracted from the source during the upgrade. For more information, see "Destination Creation: Extracting 10g (10.1.4.0.1) Libraries and Files" on page 16-28.
■ Obtaining the Tools: Apply Release 10.1.4 Patch Set 1 (10.1.4.2.0) to the 10g (10.1.4.0.1) instance to obtain the tools needed for the upgrade.
After the upgrade, this destination will include the instance that was upgraded to 10g (10.1.4.2.0) based on the source configuration details (and an updated Windows registry entry if it is on a Windows platform). For more information, see "Obtaining Tools: Applying Release 10.1.4 Patch Set 1 (10.1.4.2.0)" on page 16-31.
For more information about original and clone environments, see the next topic.
Validation During a Zero Downtime UpgradeValidation during a zero downtime upgrade is critical at several points. This topic introduces validation steps that you will use to ensure proper operations of cloned components and original components throughout the zero downtime upgrade process.
After upgrading the schema, you should confirm that both the clone environment and the original environment is operating without problem with the upgraded schema. Validation after the schema upgrade includes:
■ Confirming that the original environment is operating properly with the upgraded schema.
■ Confirming that the clone environment is operating properly with the upgraded schema.
After validating operations with the upgraded schema, you can begin upgrading cloned components. During certain clone upgrades, configuration data and policy data are upgraded:
■ When you have only the Identity System deployed, or if you have a joint Identity and Access System with configuration and policy data stored together, data is upgraded when you upgrade the clone of the first installed COREid Server.
■ When you have a joint Identity and Access System with configuration and policy data stored separately, access policy data is upgraded when you upgrade the clone of the first installed Access Manager.
Steps that you need to perform to validate that a particular task is successful are often embedded as steps within the procedure. You will see and perform these steps when you upgrade a clone instance and an original instance. Embedded steps help you determine that the procedure was successful. In addition, individual validation topics are provided at the conclusion of a sequence of procedures to help you validate results in the context of the overall system.
Task overviews like the one that follows provide an outline of the tasks that you must perform and provide a cross-reference link to the topic where you will find the information. In some cases, the description itself is a link to the information. If, as is the case in the following task overview, multiple items refer to the same topic, a general link is provided. For more information about the following task overview, see "Validating Successful Operations in Your Environment" on page 16-67.
About Zero Downtime Upgrades and Planning
Introduction to the Zero Downtime Upgrade Method 15-15
Task overview: Validation of clone and original instance upgrades1. After upgrading and setting up the clone system, which includes upgrading all
components, all customizations, and other manual upgrade tasks), you will proceed as outlined here:
■ Identity System Clones: Validating the Upgraded Cloned Identity System
■ Access System Clones: Validating the Upgraded Cloned Access System
2. After upgrading and setting up the original system, you will proceed as follows:
■ Original Identity System: Perform Identity System validation activities in Chapter 14
■ Original Access System: Perform Access System validation activities in Chapter 14
To help you with the more in-depth validation tasks, Oracle recommends that you develop deterministic test scripts to run both before and after your tasks to exercise a full end-to-end transaction. For more information, see "Customization Upgrades Using the Zero Downtime Upgrade Method".
If you plan a lengthy validation period, Oracle recommends that you completely isolate the clone and original setups. For more information, see the topic "About Isolating the Original and Cloned Environments" on page 15-22, in the section "Duration of Zero Downtime Tasks and Validation".
Customization Upgrades Using the Zero Downtime Upgrade MethodCustomized configurations that are built around your earlier Oracle Access Manager installation must be manually tested for compatibility before upgrading the original deployment. Oracle recommends that you upgrade your customizations and test these thoroughly with the upgraded clone system.
Customizations include those created for the front-end using IdentityXML, PresentationXML, and the Access Manager API (formerly known as the Access Server API or simply as the Access API). Also included are back-end customizations created with the Identity Event API, Authentication API, Authorization API (including AccessGates and plug-ins).
Testing and upgrading earlier customizations is primarily a manual process that can take some development time. It is important to plan ahead to ensure that your customizations can be redeployed into a shared environment quickly (for example, for QA, Integration, or Production).
Recommendation: Upgrading customizations and plug-ins 1. Start well in advance of other upgrades and review customization considerations
here.
2. Develop deterministic test scripts to run both before and after the upgrade to exercise a full end-to-end transaction.
Note: While not as critical when performing a zero downtime upgrade, you might find some information in "Planning Considerations for System Downtime During In-Place Upgrades" on page 1-20 helpful.

Zero Downtime Upgrade Tasks and Sequencing
15-16 Oracle Access Manager Upgrade Guide
For example, the script could request a single page that requires authentication and authorization and a workflow request (all triggered by a single page request). Test scripts that verify the behavior of your earlier customizations help you ensure that these work as expected and produce the same result, both before and after the upgrade. Your test scripts will depend on the specific customization being exercised.
3. Compile and test the code, and the instructions you developed to explain how to configure the customization in a given environment.
4. In your original environment, test the earlier customization (styles, AccessGates, or plug-ins for example) to ensure that these are working properly.
5. To create a 10g (10.1.4.2.0) development deployment (ideally a sandbox-type setting) where the dependency on the overall Oracle Access Manager services is minimal:
a. Install 10g (10.1.4.0.1) in a small, isolated deployment. For installation details, see the Oracle Access Manager Installation Guide.
b. Use instructions in the Oracle Access Manager Patch Set Notes Release 10.1.4 Patchset 1 (10.1.4.2.0) For All Supported Operating Systems to apply Release 10.1.4 Patch Set 1 (10.1.4.2.0) to your 10g (10.1.4.0.1) component instance.
6. In the 10g (10.1.4.2.0) sandbox, test the earlier customization and perform any manual steps that are needed to upgrade the customization to operate with 10g (10.1.4.2.0) functionality. For information about specific customizations, see:
■ Chapter 12, "Upgrading Your Identity System Customizations"
■ Chapter 13, "Upgrading Your Access System Customizations"
7. Perform a zero downtime upgrade to upgrade the schema, data, and clones as described in "Zero Downtime Upgrade Tasks and Sequencing" on page 15-16.
8. After upgrading clones, integrate the upgraded custom components.
9. Validate the upgraded cloned environment as described in Chapter 14.
10. When you are satisfied that your upgraded customizations and upgraded cloned environment are working together without problem, finish the zero downtime upgrade by upgrading original components. For more information, see the following topics:
a. Upgrading Your Original Identity System
b. Upgrading Your Original Access System
11. Finish by integrating upgraded customizations with the upgraded original environment and validate operations. For more information, see "Validating the Entire Upgraded Original Environment" on page 17-57.
Zero Downtime Upgrade Tasks and SequencingThis section provides an overview of the tasks that must be performed when using the zero downtime upgrade methodology. Before undertaking any activity, Oracle recommends that you review all information about the zero downtime upgrade method and then decide if it is right for your environment.
See Also: "Duration of Zero Downtime Tasks and Validation" on page 15-21.

Zero Downtime Upgrade Tasks and Sequencing
Introduction to the Zero Downtime Upgrade Method 15-17
When you use the zero downtime upgrade method, all tasks must be performed in the sequence that is illustrated in Figure 15–2. All tasks are required regardless of the size or type of deployment you are upgrading. For example, you might first use the zero downtime upgrade method in a small sandbox-type setting to get familiar with all procedures and tasks. You might then perform these same tasks in a larger deployment. The overview that follows Figure 15–2 provides additional information about each task and includes links to specific topics containing all the details.

Zero Downtime Upgrade Tasks and Sequencing
15-18 Oracle Access Manager Upgrade Guide
Figure 15–2 Zero Downtime Upgrade Tasks and Sequence
Task overview: Upgrading using the zero downtime method and tools 1. Study every detail about the zero downtime upgrade method before you start any
zero downtime upgrade activities.

Zero Downtime Upgrade Tasks and Sequencing
Introduction to the Zero Downtime Upgrade Method 15-19
2. Develop your plan for a zero-downtime upgrade. For more information, see "Developing a Plan for a Zero Downtime Upgrade" on page 15-37.
3. Prepare each host computer and earlier component instance for cloning. To perform this task you will:
a. Bring the host computer of each existing component up to a level that is supported by 10g (10.1.4.0.1). For more information, see Bringing Host Computers to Oracle Access Manager 10g (10.1.4.0.1) Support Levels on page 16-3.
b. Prepare directory server instances, as described in "Preparing Directory Server Instances and Data" on page 16-4.
c. Add new hardware or earlier instances to expand, if desired, as explained in "Adding New Hardware or Earlier Instances to Your Deployment" on page 16-4.
d. Add entries in the System Console for each clone instance that you will create (one clone for each original component and instance in the deployment). For more information about specific tasks, see the topics listed in Table 15–1.
e. Create a new Web server instance on each computer that is hosting cloned Web components and update the Web server configuration file by running server configuration update tools available with the original release.
4. Create a clone of each earlier component’s installation directory in the file system (except WebGates). For more information, see "Cloning Earlier Components for a Zero Downtime Upgrade" on page 16-21. You do not need to create WebGate clones because the upgraded Access Server provides backward compatibility with earlier WebGates. For more information, see "Access Server Backward Compatibility" on page 4-33.
5. When instructed to do so, you must obtain the 10g (10.1.4.2.0) tools for zero downtime upgrade processing, as described in "About Destination Creation and Obtaining Tools for a Zero Downtime Upgrade" on page 16-28.
Caution: Before you perform any tasks using the zero downtime upgrade method, read through all information to gain a full understanding of what you must do.
Table 15–1 Summary of Profiles for Clone Instances for a Zero Downtime Upgrade
Topics that Describe How to Add Profiles for Clone Instances
Adding Profiles for Planned COREid Server Clones in the System Console on page 16-5
Adding Profiles for Planned WebPass Clones in the System Console on page 16-9
Associating WebPass Clone Profiles with COREid Server Clone Profiles on page 16-9
Adding New Directory Server Profiles for Cloned COREid Servers on page 16-11
There are no profiles for Access Manager clones, as described in "About Entries for Access Manager Clones" on page 16-14
Adding a Profile for Access Server Clones on page 16-14
Creating New Directory Server Profiles for Access System Clones on page 16-16
Do not add entries for WebGate clones. Instead, perform activities in "Associating Original WebGates with Access Server Clones" on page 16-17.
Zero Downtime Upgrade Tasks and Sequencing
15-20 Oracle Access Manager Upgrade Guide
For example, you will perform the following tasks as part of populating a new branch in the LDAP directory server, as part of upgrading the schema, as part of upgrading each cloned instance, and as part of upgrading each original instance:
a. Extract fresh 10g (10.1.4.0.1) component libraries and files for the instance to be upgraded: Identity Server, WebPass, Policy Manager, Access Server (and WebGate only when upgrading an original WebGate instance). Details are centralized in the topic, "Destination Creation: Extracting 10g (10.1.4.0.1) Libraries and Files" on page 16-28.
b. Obtain and apply the Release 10.1.4 Patch Set 1 (10.1.4.2.0) to the 10g (10.1.4.0.1) libraries and files (also known as an instance) to obtain the MigrateOAM script that is required for zero downtime upgrade processing. Details are centralized in the topic, "Obtaining Tools: Applying Release 10.1.4 Patch Set 1 (10.1.4.2.0)" on page 16-31.
For more information about zero downtime tools and processing, see "Zero Downtime Upgrade Tools and Processes" on page 15-23.
6. Create a new branch in the same LDAP directory server that is used by the original environment, and then populate the new branch with a copy of the original configuration and data. You will use a function in the 10g (10.1.4.2.0) MigrateOAM script. For more information, see "Copying Configuration and Policy Data to a New Branch in the LDAP Directory Server" on page 16-33.
7. Configure the clones to use the new branch in the LDAP directory server by using command-line tools in the cloned component directory. You will use a function in the 10g (10.1.4.2.0) MigrateOAM script. For more information, see "Configuring Cloned Components and Services" on page 16-40.
8. Upgrade the schema in the LDAP directory server. You will use a function in the 10g (10.1.4.2.0) MigrateOAM script. For more information, see "Upgrading the Schema During a Zero Downtime Upgrade" on page 16-61.
9. Validate your environments to ensure that both original and cloned components are working without problem with the upgraded schema. For more information, see "Validating Successful Operations in Your Environment" on page 16-67.
10. Upgrade cloned components using a function in the 10g (10.1.4.2.0) MigrateOAM script and then validate the upgraded cloned environment:
a. Cloned Identity System: Upgrade and validate Identity System clones. For more information, see "Upgrading the Cloned Identity System" on page 16-70. Configuration data in the new branch of the LDAP directory server is upgraded when you upgrade the clone of the first installed COREid Server. This activity includes tasks in "Renaming Audit Files After Upgrading Identity System Clones" on page 16-85.
b. Cloned Access System: Upgrade and validate Access System clones. For more information, see "Upgrading the Cloned Access System" on page 16-87. Policy data in the new branch of the LDAP directory server is upgraded when you upgrade the clone of the first installed Access Manager.
11. Perform any manual tasks to upgrade and integrate customizations so that you can test these with the upgraded cloned system:
■ Upgrade integration connectors and independently installed software developer kits (SDKs). For more information, see Chapter 11.
■ Upgrade Identity System customizations. For more information, see Chapter 12.

Duration of Zero Downtime Tasks and Validation
Introduction to the Zero Downtime Upgrade Method 15-21
■ Upgrade Access System customizations. For more information, see Chapter 13.
12. Perform an in-depth validation of the entire upgraded cloned system to ensure that everything is operating without problem. For more information, see Chapter 14.
13. Changes to original data in the original branch: Repopulate a new branch with updated original data and then perform a new clone upgrade and validation tasks. Before you make your decision, see "About Retrieving Changes to the Original Branch Before Upgrading Original Instances" on page 15-23. For steps, see "Retrieving Changes in the Original Branch Before Upgrading Originals" on page 17-2.
14. Reconfigure network failover so that the clones substitute for original components while the originals are upgraded. For more information, see "Reconfiguring Domain Name Systems (DNS) to Use Upgraded Clones" on page 17-3.
15. Upgrade original components, reconfigure originals to use the new branch in the LDAP directory server, and then confirm that the original upgraded components are operating without problem. You will use a function in the 10g (10.1.4.2.0) MigrateOAM script to:
a. Upgrade the Original Identity System: Upgrade, reconfigure, and validate the original Identity System. For more information, see "Upgrading Your Original Identity System" on page 17-4.
b. Upgrade the Original Access System: Upgrade, reconfigure, and validate the original Access System. For more information, see "Upgrading Your Original Access System" on page 17-30.
16. Upgrade and integrate original customizations. For more information, see "Validating the Entire Upgraded Original Environment" on page 17-57.
a. Original Identity System Customizations: Upgrade, and then validate as described in "Upgrading SDKs and Identity System Customizations" on page 17-29.
b. Original Access System Customizations: Upgrade, and then validate as described in"Upgrading SDKs, Integration Connectors, and Access System Customizations" on page 17-57.
17. After confirming that you will not roll back to either the earlier cloned or original deployment, start automatic user data migration. For more information, see "Starting On-the-fly User Data Migration" on page 17-58.
18. Finish the upgrade as follows:
■ Reconfiguring Domain Name Systems to Use the Upgraded Original Deployment on page 17-58
■ Deleting the Temporary Directory Server Profile on page 17-58
■ Reverting Backward Compatibility on page 17-59
■ Removing the Cloned System After Upgrading Originals on page 17-59
Duration of Zero Downtime Tasks and ValidationThe actual length of time that is needed to upgrade and validate a deployment using the zero downtime method depends on the size and complexity of your original deployment. For example, when you have only one instance of each component in a
Duration of Zero Downtime Tasks and Validation
15-22 Oracle Access Manager Upgrade Guide
joint Identity and Access System deployment with minimal plug-ins and customizations, it can take you a week to perform a zero downtime upgrade. This includes all tasks from planning through upgrading the schema and upgrading the data and the cloned environment.
Of course, validation must be performed to ensure that the upgrade was successful. You will want to perform validation tasks after upgrading the schema, after upgrading clones, after upgrading any customizations, and after upgrading the original instances. to ensure that the upgrade was successful. The deeper your validation is, the more time you need to perform it.
To help you with validation tasks, Oracle recommends that you develop deterministic test scripts to run both before and after your tasks to exercise a full end-to-end transaction. For more information, see "Customization Upgrades Using the Zero Downtime Upgrade Method" on page 15-15.
Oracle recommends that you use the upgraded clone setup to explore release 10g (10.1.4.2.0) features. All functions will be available, including lost password management. However, the migration of multiple values in challenge and response attributes for lost password management will be suppressed. For more information, see "User-Data Migration and Multiple Values in Challenge and Response Attributes for LPM" on page 15-12.
The more time that you spend getting acquainted with release 10g (10.1.4.2.0) features, the longer the period before you upgrade the original components. If you want to use the upgraded clone setup for a considerable amount of time (2 to 3 months, for example), Oracle recommends that you perform specific activities to completely uncouple the clone environment from the original environment. For more information, see "About Isolating the Original and Cloned Environments" on page 15-22.
Oracle recommends that you do not change any data in the original deployment after you populate the new branch with original configuration and policy data. However, the decision to change data or not is strictly up to you. If any changes are made to the original setup during your validation of the cloned environment, you will need to take additional steps to copy the updated original data into the new branch and then upgrade the clones a second time. This will ensure that the data changes made in the original deployment are stored in the new branch of the directory before you set up network failover so that the clones replace the originals. Once the upgraded cloned environment replaces the original, it could take several weeks to upgrade the original environment.
Oracle recommends that you allow a time frame of about 3 months for upgrading and evaluation using the zero downtime method in a large scale, customized deployment.
About Isolating the Original and Cloned EnvironmentsThis task is optional. If you plan to use the upgraded clone setup for a considerable amount of time (2 to 3 months, for example), Oracle recommends that you completely isolate the upgraded clone environment from the original environment.
The clone and original systems will operate independently and will use different branches of the LDAP directory server in any case. Isolating the two environments has no impact on the schema or data. Both the clone and original systems will use the upgraded schema.
You can perform these tasks either before upgrading the clone setup or after upgrading the clone setup and validating that it is fully operational, or not at all. There are implications if you choose to perform this optional task.

Zero Downtime Upgrade Tools and Processes
Introduction to the Zero Downtime Upgrade Method 15-23
Before you decide if or when to perform this task, consider the following implications for a roll back and restart of the zero downtime upgrade:
■ Without original profiles in the clone System Console. In this case, there are no implications for roll back
■ Without clone profiles in the original System Console, you must re-enter these if you roll back and then restart the clone upgrade.
You must also re-enter clone profiles in the original System Console if you decide to create another new branch that includes changes made to original data during the clone system upgrade and validation period. For details about retrieving changes made to original data, see the next topic.
For steps to isolate environments, see "Isolating Environments" on page 16-58.
About Retrieving Changes to the Original Branch Before Upgrading Original InstancesYou can use the upgraded clone system to perform validation tasks and to get acquainted with 10g (10.1.4.2.0) functions. For example, you can create new access policies and alter configuration data in the upgraded clone system.
Any changes that you make to the upgraded clone system are stored in the new branch of the LDAP directory server. These changes cannot be migrated to the original branch and cannot be used by original components.The new branch is not accessible by the original system until after you upgrade and reconfigure original components to use the new branch.
Lost password management functions are available for use in the upgraded clone system. However, multiple challenge and responses for lost password management cannot be used without modifying the user data. For more information, see "User-Data Migration and Multiple Values in Challenge and Response Attributes for LPM" on page 15-12.
In the upgraded clone system, you can also customize stylesheets and files to test new customizations. You can retain new customizations in the upgraded clone environment. If you have customized files, you can transfer these to the upgraded original environment after you finish upgrading the originals.
If changes are made to the original branch in the LDAP directory server, after you create the new branch and before you upgrade the original, you can choose to retrieve it before you can upgrade original instances. This is an optional task that has implications for isolated environments. For details, see "Retrieving Changes in the Original Branch Before Upgrading Originals" on page 17-2.
Zero Downtime Upgrade Tools and ProcessesThe zero downtime upgrade method uses the MigrateOAM script that is available only with Oracle Access Manager Release 10.1.4 Patch Set 1 (10.1.4.2.0). To obtain the tool, you will install one instance of each Oracle Access Manager 10g (10.1.4.0.1) component, and then apply Release 10.1.4 Patch Set 1 (10.1.4.2.0) to each 10g (10.1.4.0.1) component. For more information, see "About Destination Creation and Obtaining Tools for a Zero Downtime Upgrade" on page 16-28.
The MigrateOAM script provides the following functional modes to help you perform specific tasks during the zero downtime upgrade:
■ Mkbranch: Populates the new branch that you create in the original LDAP directory server instance with a copy of the original configuration and policy data.

Zero Downtime Upgrade Tools and Processes
15-24 Oracle Access Manager Upgrade Guide
■ Schema: Upgrades the schema in the LDAP directory server, which will be used by both the original and the clone environment.
■ Clone: Upgrades clone components and upgrades configuration and policy data in the new branch.
■ Prod: Upgrades original components, which must be reconfigured to use the new branch.
Table 15–2 provides a general summary of the mode arguments and specifications that are required with the MigrateOAM script. Individual procedures for the zero downtime upgrade activities provide the exact arguments and specifications for that task.
Table 15–2 MigrateOAM Argument and Specifications Summary
MigrateOAM Arguments Values and Specifications
File system path to the 10g (10.1.4.2.0) MigrateOAM script
Change to the 10g (10.1.4.2.0) file system path where the MigrateOAM script resides for the instance and the task that you are performing. For example:
Windows clone_np\identity\oblix\tools\migration_tools
Unix /home/clone_np/identity/oblix/tools/migration_tools
-script name Windows: MigrateOAM. bat
Unix:MigrateOAM.sh
-M Mode Specify the appropriate mode for the task that you are performing:
■ Mkbranch: populates the new branch in the LDAP directory server with a copy of the original configuration and policy data
■ Schema: upgrades the schema in the LDAP directory server
■ Clone: upgrades a cloned component and upgrades configuration and policy data in the new branch of the LDAP directory server when you upgrade the clone of the first installed COREid Server and first installed Access Manager
■ Prod: upgrades an original component
-C component Specify the appropriate component designation for the task:
■ OIS: Identity Server
■ WP: WebPass
■ AM: Access Manager
■ AAA: Access Server
■ WG: WebGate, which is used only for original instance upgrades
-F nnn Specify the number that identifies your earlier release. For example:
■ 610: if your starting release is either 6.1 or 6.1.1
■ 650: if your starting release is 6.5 or 6.5.x
■ 700: if your starting release is 7.x
-T 1014 Specify 1014 as the "to" release, the release to which this component will be upgraded.

Zero Downtime Upgrade Tools and Processes
Introduction to the Zero Downtime Upgrade Method 15-25
As with other command line tools, you must enter all arguments and specifications as a single line. In this manual, and on your screen, the line will wrap and might look something like the following example:
cd \1014\identity\oblix\tools\migration_tools>MigrateOAM.bat -M Mkbranch -C OIS -F 610 -T 1014 -S "C:\clone_np\ois_01\identity" -D "C:\1014\identity" -I "C:\1014\identity"
Processing begins when you press the Enter key. Messages and prompts keep you informed about what is occurring. The same sequence of messages and prompts will appear for each operational sequence from your starting release (6.1.1 for example) to the latest release, 10g (10.1.4.2.0) which might be referred to as simply 10.1.4. This means that you might see a sequence of messages and prompts more than once.
Oracle recommends that you accept and conduct operations using the Automatic operational mode when asked and that you do not skip any processes. The Confirmed operational mode requires more interaction from you and could result in a skipped operation that could lead to an unsuccessful outcome.
-S "source directory" Specify the full path (in quotation marks) to the renamed file system directorythat contains the earlier source information for the specified component (whether clone or original instance). For example:
■ Identity Server: -S "C:\IdentityServer_install_dir\identity_source"
■ WebPass: -S "C:\WebPass_install_dir\webcomponent\identity_source"
■ Access Manager: -S "C:\AccessManager_install_dir\webcomponent\access_source"
■ Access Server: -S "C:\AccessServer_install_dir\access_source"
■ WebGate: -S "C:\WebGate_install_dir\webgate\access_source", which is used only for original instance upgrades
Note: The source provides configuration details for the existing earlier component. This file system directory remains intact during any upgrade activities.
-D "destination directory" Specify the full path (in quotation marks) to the file system directory that contains the 10g (10.1.4.2.0) MigrateOAM script for the component instance. For example:
■ Identity Server: -D "C:\IdentityServer_install_dir\identity"
■ WebPass: -D "C:\WebPass_install_dir\webcomponent\identity"
■ Access Manager: -D "C:\AccessManager_install_dir\webcomponent\access"
■ Access Server: -D "C:\AccessServer_install_dir\access"
■ WebGate: -D "C:\WebGate_install_dir\webgate\access", which is used only for original instance upgrades
Note: The destination contains 10g (10.1.4.2.0) information, which will be updated based upon details from the earlier source directory.
-I "installation directory" The installation directory should always match the destination. For example:
■ Identity Server: -I "C:\IdentityServer_install_dir\identity"
■ WebPass: -I "C:\WebPass_install_dir\webcomponent\identity"
■ Access Manager: -I "C:\AccessManager_install_dir\webcomponent\access"
■ Access Server: -I "C:\AccessServer_install_dir\access"
■ WebGate: -I "C:\WebGate_install_dir\webgate\access", which is used only for original instance upgrades
Note: This file system directory is referenced by the script and underlying tools. It contains the 10g (10.1.4.2.0) script and tools.
Table 15–2 (Cont.) MigrateOAM Argument and Specifications Summary
MigrateOAM Arguments Values and Specifications

Zero Downtime Upgrade Tools and Processes
15-26 Oracle Access Manager Upgrade Guide
During each component upgrade, one or more log files are produced. These files are created if any problem occurred. If a log file is created, a message during the upgrade process indicates the name and location of the file.
For some operations, the MigrateOAM script calls utilities that are used during an in-place upgrade. Each log file contains information about a particular activity that occurs during the component upgrade. For example, a separate log file might be generated for file upgrades, or message and parameter upgrades, or the Oracle Access Manager schema upgrade, to name a few. For information about specific log files and their content, see Appendix C.
The MigrateOAM script produces a single log file when you use Mkbranch mode. The Mkbranch log file is stored in the destination file system path. For example:
\destination_dir\identity|access\oblix\tools\migration_tools\ makebranch.log
where \destination_dir is the file system directory for the specific component libraries and files that were extracted and patched; identity|access represents the system to which the component belongs (Identity System or Access System, respectively); and makebranch.log is the name of the file.
In addition, the following log files are created to inform you of any LDAP-specific errors:
■ During Identity Server data migration, error_output_fromversion_to_toversion_osd.ldif file is created in the destination file system path for the specific component. For example, IdentityServer_destination_dir\identity\oblix\tools \migration_tools\obmigratedata directory in the file system.
■ During Policy Manager data migration, error_output_fromversion_to_toversion_psc.ldif file is created in the destination file system path. For example: PolicyManager_destination_dir\access\oblix\tools\migration_tools\obmigratedata directory in the file system
For details about using log files, see Appendix G.
For more information about the processes and utilities that are called for each mode, see the following topics:
■ About Mkbranch Mode Processing
■ About Schema Mode Processing
■ About Clone Mode Processing
■ About Original Mode (Prod) Processing
About Mkbranch Mode ProcessingThis topic introduces the MigrateOAM script Mkbranch mode, which is used to populate a new branch in the LDAP directory server with a copy of the original configuration and policy data.
Before you use this mode, you must manually create the new branch node as a child node of original configuration base (also known as the configuration DN) and policy base (also known as the policy DN). For example:
Original Configuration DN: o=company,c=us New Configuration DN: o=Newbranch,o=company,c=us
Original Policy Base: o=Policy_base,o=company,c=us

Zero Downtime Upgrade Tools and Processes
Introduction to the Zero Downtime Upgrade Method 15-27
New Policy Base: o=NewPolicyBase,o=Policy_base,o=company,c=us
The new branch must be in the same LDAP directory server instance as the original branch. The original branch will not be altered. You can define the new config DN as follows:
■ o=Newbranch,<OldConfigDN> and o=NewPolicyBase,<oldPolicyBase>
■ o=Newbranch,o=company,c=us where o=company,c=us is the old config DN
■ o=Newbranch,dc=us,dc=company,dc=com where dc=us,dc=company,dc=com is the old config DN
During Mkbranch mode processing, a copy of the data is modified for the new configuration DN or policy DN and then imported into an ldif file. The imported data is then exported from the new ldif file into the new branch.
The tools that are called and the processes that are automatically performed during the Mkbranch operation are shown in Figure 15–3.
When you have only the Identity System, there is no policy data. In this case, you use the Mkbranch mode with only the clone of the first installed COREid Server. The original configuration data is copied into the new branch.
When you have a joint Identity and Access System and configuration and policy data are stored together in the same LDAP directory server node, data is copied together when you use the Mkbranch mode with the clone of the first installed COREid Server. However, if policy data is stored in a different branch or on a different directory instance, you must repeat the Mkbranch operation with the clone of the first installed Access Manager to copy policy data into the new branch.
Figure 15–3 Overview of MigrateOAM MkBranch Function and Processes
Process overview: Populating the new branch with MigrateOAM1. After you enter the Mkbranch command and specifications, the earlier source
directory is detected in the file system.
2. The directory connection is established and the new configuration DN is requested:
■ Data in the original branch is read and copied.

Zero Downtime Upgrade Tools and Processes
15-28 Oracle Access Manager Upgrade Guide
■ The copy is massaged for the new configuration DN (and policy DN if both are stored together), and exported to an LDIF file. A success or failure message appears.
■ The copied data is imported from the LDIF file to the new branch.
■ A success or failure message appears.
■ This sequence repeats when you have configuration and policy data stored separately and you use Mkbranch mode with the clone of the first Access Manager component that was installed and set up.
About Schema Mode ProcessingThis topic introduces the schema upgrade processing that occurs when you execute the MigrateOAM script in Schema mode.
With the zero downtime upgrade method, a schema upgrade is performed only with cloned components that interface with the directory server: Identity Server and Policy Manager. The number of times that you must perform a schema upgrade depends on the way in which data is stored. For more information, see "Upgrading the Schema During a Zero Downtime Upgrade" on page 16-61.
During the schema upgrade, any differences between an earlier schema release and the next release are uploaded to your directory server using the required schema ldif file for your specific directory server. Every schema ldif file includes entries to modify the schema based on the difference between two versions.
Schema upgrades (like all other upgrades) occur incrementally. This means that the earlier release is upgraded to the next-latest release, the resulting schema is upgraded to the next-latest release, and so on until all interim schema changes between your original release and the latest release are completed. Obsolete schema elements are deleted during the upgrade.
After the upgrade, you can review the following log files for more information about the processing:
destination_dir\identity|access\oblix\tools\migration_tools\obmigratenp.log
destination_dir\identity|access\oblix\tools\migration_tools\obmigrateschema.log
When you execute the MigrateOAM script in Schema mode, processes to upgrade the schema in the LDAP directory server are launched, as shown in Figure 15–4.
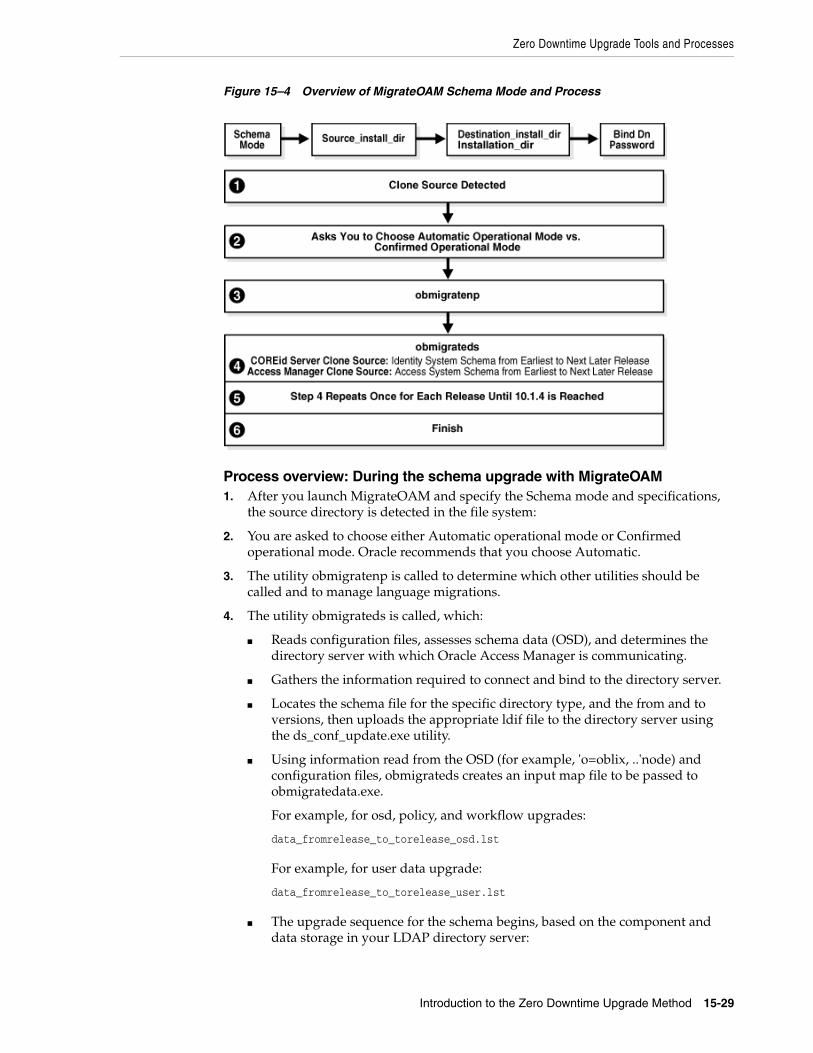
Zero Downtime Upgrade Tools and Processes
Introduction to the Zero Downtime Upgrade Method 15-29
Figure 15–4 Overview of MigrateOAM Schema Mode and Process
Process overview: During the schema upgrade with MigrateOAM1. After you launch MigrateOAM and specify the Schema mode and specifications,
the source directory is detected in the file system:
2. You are asked to choose either Automatic operational mode or Confirmed operational mode. Oracle recommends that you choose Automatic.
3. The utility obmigratenp is called to determine which other utilities should be called and to manage language migrations.
4. The utility obmigrateds is called, which:
■ Reads configuration files, assesses schema data (OSD), and determines the directory server with which Oracle Access Manager is communicating.
■ Gathers the information required to connect and bind to the directory server.
■ Locates the schema file for the specific directory type, and the from and to versions, then uploads the appropriate ldif file to the directory server using the ds_conf_update.exe utility.
■ Using information read from the OSD (for example, 'o=oblix, ..'node) and configuration files, obmigrateds creates an input map file to be passed to obmigratedata.exe.
For example, for osd, policy, and workflow upgrades:
data_fromrelease_to_torelease_osd.lst
For example, for user data upgrade:
data_fromrelease_to_torelease_user.lst
■ The upgrade sequence for the schema begins, based on the component and data storage in your LDAP directory server:

Zero Downtime Upgrade Tools and Processes
15-30 Oracle Access Manager Upgrade Guide
– First Installed COREid Server, the Identity System schema is upgraded starting from the earliest release to the next later release (from 6.1.1 to 6.5, for example).
– First Installed Access Manager: The Access System schema is upgraded starting from the earliest release to the next later release (from 6.1.1 to 6.5, for example). For more information, see "Upgrading the Schema During a Zero Downtime Upgrade" on page 16-61.
5. Step 4 repeats as needed, to continue the upgrade from the point where it concluded to the next later release (from 6.5 to 7.x, for example); this continues until release 10.1.4 is reached.
6. You are asked to confirm and conclude.
About Clone Mode ProcessingThis topic introduces the processing that occurs when you use MigrateOAM Clone mode to upgrade clone components. Configuration and policy data in the new branch of the LDAP directory server are also upgraded, as follows:
When the newer release of Oracle Access Manager include a new Oracle Access Manager-specific data organization or values, data upgrades occur in much the same way as the schema upgrade. The delta between the old and new versions is determined and the appropriate data ldifs are provided so they can be uploaded to the directory server. An incremental upgrade is performed between each major release and the next major release until you have completed the upgrade. After the upgrade, Oracle Access Manager can identify and use the data present in the directory and run smoothly.
A data upgrade can occur only with Oracle Access Manager components that interface with the directory server: Identity Server and Policy Manager.
Files that contain both object-class and attribute mappings are provided for this purpose. The object and attribute mapping files reside in the obmigratedata file system directory. For example:
IdentityServer_install_dir\identity|access\oblix\tools\migration_tools\ obmigratedata
The MigrateOAM script processing that occurs when you use the Clone mode is shown in Figure 15–5. The copied configuration data in the new branch of the LDAP directory server is upgraded only when you upgrade the clone of the first installed COREid Server. Copied policy data in the new branch of the LDAP directory server is upgraded only when you upgrade the clone of the first installed Access Manager. Data in the original branch of the LDAP directory server remains intact and untouched.
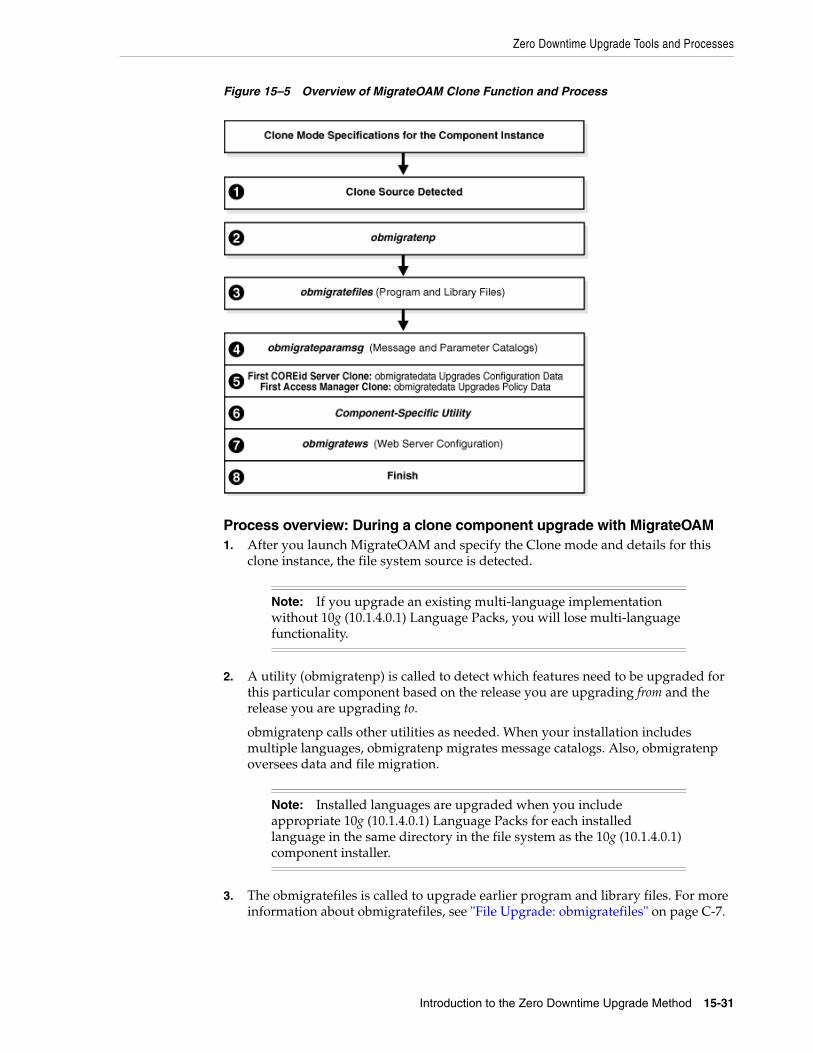
Zero Downtime Upgrade Tools and Processes
Introduction to the Zero Downtime Upgrade Method 15-31
Figure 15–5 Overview of MigrateOAM Clone Function and Process
Process overview: During a clone component upgrade with MigrateOAM1. After you launch MigrateOAM and specify the Clone mode and details for this
clone instance, the file system source is detected.
2. A utility (obmigratenp) is called to detect which features need to be upgraded for this particular component based on the release you are upgrading from and the release you are upgrading to.
obmigratenp calls other utilities as needed. When your installation includes multiple languages, obmigratenp migrates message catalogs. Also, obmigratenp oversees data and file migration.
3. The obmigratefiles is called to upgrade earlier program and library files. For more information about obmigratefiles, see "File Upgrade: obmigratefiles" on page C-7.
Note: If you upgrade an existing multi-language implementation without 10g (10.1.4.0.1) Language Packs, you will lose multi-language functionality.
Note: Installed languages are upgraded when you include appropriate 10g (10.1.4.0.1) Language Packs for each installed language in the same directory in the file system as the 10g (10.1.4.0.1) component installer.
Zero Downtime Upgrade Tools and Processes
15-32 Oracle Access Manager Upgrade Guide
4. obmigrateparamsg is called to upgrade earlier message and parameter catalog files. For more information about obmigrateparamsg, see "Message and Parameter Upgrade: obmigrateparamsg" on page C-9.
5. Data Upgrades: obmigrateds is called in NoSchema mode for a data only (not schema) upgrade. The data upgrade occurs in a sequence that brings the data from the earlier release to the next latest release until the data is upgraded for 10.1.4.
obmigrateds is called only with the clone of the first COREid Server that you installed and set up (and the clone of the first Access Manager that you installed and set up). During subsequent clone upgrades, the data upgrade is detected and skipped.
No data in the original branch of the LDAP directory server is upgraded. For more information about data upgrades, see "About Configuration and Policy Data Upgrades" on page 15-11. For more information about obmigrateds, see "Schema Upgrade: obmigrateds" on page C-12.
6. A component-specific utility is selected and run to make changes to related registry entries for Windows, plug-ins, and other files. The component’s configuration files are updated in a sequence that repeats from your earlier release to the next latest release, and so on until 10.1.4 is reached. This might be interspersed with data upgrades when you are upgrading the clone of the first installed COREid Server (or Access Manager). A single tool is called for the corresponding component upgrade, as follows:
a. Identity Server: obMigrateNetPointOis upgrades existing registry entry for the Identity Server to reflect the newer release; modifies PPP catalog if needed; modifies password from password.xml, if needed; re-creates proper uninstall_info.txt. For details, see "Identity Server: obMigrateNetPointOis" on page C-17.
b. WebPass: obMigrateNetPointWP upgrades existing registry entry for the WebPass to reflect the newer release; modifies password from password.xml, if needed. For details, see "WebPass: obMigrateNetPointWP" on page C-18
c. Policy Manager: obMigrateNetPointAM upgrades registry entry for Policy Manager; modifies password encryption from password.lst, if needed; copies your custom plug-ins to the target installation directory from your renamed source directory. For details, see "Policy Manager: obMigrateNetPointAM" on page C-19.
d. Access Server: obMigrateNetPointAAA upgrades registry entry for Access Server; modifies password encryption, if needed; copies your custom plug-ins from your renamed source directory to the target installation directory; upgrades the following failover files:
AppDB.lst—converted to .xml
ConfigDB.lst—converted to .xml
Group.lst—if present, converted to .xml
UserDB.lst—if present, converted to .xml
WebResrcDB.lst—converted to .xml
Note: The password written in the Oracle Access Manager 5.2, password.xml and password.lst files is not encrypted; however, later versions encrypt this. Encryption occurs automatically during an upgrade.
Backup and Recovery Strategies for Zero Downtime Upgrades
Introduction to the Zero Downtime Upgrade Method 15-33
For more information about the items that are upgraded and converted, see "Upgraded Items" on page 3-5. For details about the obmigratenp utility, see "Access Server: obMigrateNetPointAAA" on page C-19.
e. WebGate: You will not clone WebGates.
f. SDK: obMigrateNetPointASDK is called by obmigratenp to accomplish an Access Manager SDK upgrade.
The SDK upgrade will be invoked automatically as the last step when upgrading components bundled with SDK (Identity Server and the Oracle Access Manager Connector for WebSphere).For more information about "Software Developer Kit (SDK): obMigrateNetPointASDK" on page C-20.
7. Web Server Configuration Updates: A utility (obmigratews) is called to perform a selective Web server configuration file and filter upgrade, to accommodate changes for newer releases of WebPass, Access Manager, and WebGate. For more information, see "Web Server Upgrade: obmigratews" on page C-16.
8. Process concludes with final remarks.
About Original Mode (Prod) ProcessingThis topic discusses the differences between upgrading with MigrateOAM in Prod mode (production or original instance mode) versus Clone mode.
The processing that occurs when you upgrade original components using the MigrateOAM script in Prod mode is nearly the same as when you upgrade clone components using MigrateOAM script in Clone mode.
In Prod mode, the following exception applies: obmigrateds is not called; no schema or data upgrades occur when upgrading the first COREid Server or Access Manager that was installed.
After upgrading original components, you must reconfigure the upgraded originals to use upgraded data in the new branch of the LDAP directory server. This is explained in detail in Chapter 17.
Backup and Recovery Strategies for Zero Downtime UpgradesMany of the same back up and recovery strategies that are discussed for in-place upgrades also apply to a zero downtime upgrade. Rather than repeat the same information with zero downtime procedures, you will be instructed to find the information in the original location in this manual. Table 15–3 lists the information that you will be instructed to back up and the location of that information in this manual.
Note: If you decline the automatic SDK upgrade, current SDK configuration settings are not preserved and you must reconfigure SDK using the configureAccessGate tool, as described in the Oracle Access Manager Access Administration Guide.

Backup and Recovery Strategies for Zero Downtime Upgrades
15-34 Oracle Access Manager Upgrade Guide
The following details will give you an idea of what to expect during a zero downtime upgrade. Do not perform these tasks now.
The Zero Downtime Schema Upgrade: The upgraded schema offers backward compatibility with the earlier schema, as far back as release 6.1.1. However, you cannot roll back a schema upgrade using any Oracle-provided tools. If you backed up the earlier schema using external tools before upgrading, you should be able to reinstate the backup copy if you decide to roll back to the original release. Look for details in Chapter 5.
The Zero Downtime Data Upgrade: Data in the original branch of the directory server is not modified during a zero downtime upgrade. However, it is a good idea to perform the data backup tasks in Table 15–3 before you create and populate the new branch in the LDAP directory server during the zero downtime upgrade.
Oracle Access Manager Instance Upgrades: With the zero downtime upgrade method you do not need to back up the original instance file system directory. The source that you will create remains intact during an upgrade and becomes a back up copy. For more information, see "Preparation Tasks for the Zero Downtime Method" on page 15-12. Source creation does not take care of Web server configuration details or Windows registry details for an instance. For details about backing these up before each instance upgrade, see Chapter 8.
Backing Up After Upgrading: Most tasks finish with specific steps that help you quickly assess whether the procedure was successful or not successful. Oracle recommends that you finish upgrading the Identity System (whether clone or original) and validate that it is fully operational before you back up upgraded Identity System information. If you have a joint Identity and Access System, upgrade and validate the Access System (whether clone or original) before you back up the upgraded Access System.
The information that you back up is similar whether you have upgraded a clone or the original instance. For instance, you will back the upgraded component file system directory and customization directories, as well as Web server configuration file and the Windows registry entry if needed.
Table 15–4 lists the topics that discuss backing up after zero downtime upgrade tasks.
Table 15–3 Back Up Strategies Before a Zero Downtime Upgrade
Back Up the Following As Described In
Oracle Access Manager Schema Chapter 5: Backing up the Earlier Oracle Access Manager Schema
Oracle Access Manager Configuration and Policy Data Chapter 5: Backing up Oracle Access Manager Configuration and Policy Data
Oracle Access Manager User and Group Data Chapter 5: Backing Up User and Group Data
Oracle Access Manager Workflow Data Chapter 5: Backing Up Workflow Data
Processed Workflows Chapter 5: Archiving Processed Workflow Instances
Existing Directory Instances Chapter 5: Backing Up Existing Directory Instances
Web Server Configuration Files Chapter 8: Backing Up the Existing Web Server Configuration File
Windows Registry Chapter 8: Backing Up Windows Registry Data

Backup and Recovery Strategies for Zero Downtime Upgrades
Introduction to the Zero Downtime Upgrade Method 15-35
When something does not operate as expected after a zero downtime upgrade task (whether the instance is a clone or an original), you can pursue one of the following courses of action:
■ Recovery
■ Rolling Back
■ Reinstating Original Windows Registry Entries During a Rollback Operation
RecoveryRecovery is a process where you can perform steps to restore the earlier instance (either cloned or original), and then try the upgrade again.
Chapter 2 provides general information about recovery procedures that you can follow. For more information, see Table 2–3, " Upgrade Recovery Strategies" on page 2-5. In addition:
■ Each zero downtime upgrade task includes one or more steps to help you assess if there is any problem with the specific instance at the end of the task. Rrecovery steps that you can perform immediately are generally included.
■ Specific recovery topics are provided for the zero downtime upgrade method. For details, see Table 15–5.
Table 15–4 Back Up Strategies After a Zero Downtime Upgrade
Back Up the Following As Described In
Upgraded Cloned Identity System Chapter 16: Backing Up Upgraded Identity System Clones
Upgraded Cloned Access System Chapter 16: Backing Up Upgraded Access System Clones
Upgraded Original Identity System Chapter 17: Backing Up the Upgraded Original Identity System
Upgraded Original Access System Chapter 17: Backing Up the Upgraded Original Access System
Caution: Recovery strategies can be successful only when you have performed appropriate backup tasks when instructed to do so.
Table 15–5 RecoveryTopics for a Zero Downtime Upgrade
Task See Topic in
Create Clone Profiles Chapter 16: Recovering From Issues With Information Entered in the System Console
Creating and Populating a New Branch in the Directory Server
Chapter 16: Recovering from Problems With Populating the New Branch
Identity System Clone Upgrade Chapter 16: Recovering From a Cloned Identity System Upgrade Failure
Access System Clone Upgrade Chapter 16: Recovering from a Failed Cloned Access System Component Upgrade
Original Identity System Upgrade
Chapter 17: Recovering From an Original Identity System Upgrade Failure
Original Access System Upgrade Chapter 17: Recovering From an Original Access System Upgrade Failure

Backup and Recovery Strategies for Zero Downtime Upgrades
15-36 Oracle Access Manager Upgrade Guide
Rolling BackRolling back is a process where you undo everything that you have done and return to the original setup and the starting point of the zero downtime upgrade. You will have only your original installation and the original release level after rolling back.
Having only one WebGate will result in downtime when rolling back. Oracle recommends that you have more than one WebGate to avoid downtime. Alternatively, you can keep the older WebGate and not upgrade it because it will work with the upgraded Access Server.
For information about Windows registry entries during a rollback operation, see "Reinstating Original Windows Registry Entries During a Rollback Operation".
Reinstating Original Windows Registry Entries During a Rollback OperationThis topic explains how to reinstate the registry entry when you are rolling back after upgrading original component instances that are installed on a Windows platform. This topic is not relevant for other platforms.
During Oracle Access Manager component installation on a Windows platform, a Windows registry entry is created for the instance. The Windows registry entry always points to the installed location and the product release (Oracle Access Manager release 6.1.1 for example). The registry entry is created after specific installation phases based on the type of Oracle Access Manager component you are installing:
■ When you install an Identity Server or Access Server, the Windows registry entry is created after you specify the service name for the instance.
■ When you install Web components (WebPass, Policy Manager, and WebGate), there is no service name. In this case, the Windows registry entry is created after the libraries and files are extracted into the specified installation path.
Windows registry details are not transferable. As a result, you cannot copy libraries and files from one installed location to another and then use the services in the new
Table 15–6 Rolling Back During a Zero Downtime Upgrade
Task See Topics In
Clone Profiles in the System Conslle
Chapter 16: Rolling Back to the Starting Point After Entering Clone Details
Cloning Instances Chapter 16: Rolling Back Changes After Cloning Components
Creating and Populating a New Branch in the Directory Server
Chapter 16: Rolling Back Changes Made for the New oblix Branch
Reconfiguring Clones To Use the New Branch
Chapter 16: Rolling Back Changes for Reconfigured Clones
Schema Upgrades Chapter 16: Rolling Back After the Schema Upgrade
Data Upgrade or Identity System Clone Upgrades
Chapter 16: Rolling Back After Upgrading Identity System Clones
Data Upgrade or Access System Clone Upgrades
Chapter 16: Rolling Back After Upgrading Access System Clones
Original Identity System Upgrades
Chapter 17: Rolling Back After Upgrading the Original Identity System
Original Access System Upgrades
Chapter 17: Rolling Back After Upgrading the Original Access System

Developing a Plan for a Zero Downtime Upgrade
Introduction to the Zero Downtime Upgrade Method 15-37
location. However, when you upgrade a component, the original registry is deleted and a new entry is created for the latest release. This means:
■ After upgrading, the Windows registry will contain only the entry for the upgraded instance in the destination file system path.
■ After upgrading, you cannot roll back and use the original instance unless you can reinstate the original registry entry. Otherwise, the Oracle Access Manager service will fail.
To help ensure and streamline the roll back procedure, Oracle recommends that you back up the Windows registry entry for each original instance immediately before you start upgrade activities for the instance. This means that before you rename the original file system path to create a source for the zero downtime upgrade, you must back up the original Windows registry entry. In fact, Step 1 of each upgrade procedure directs you to perform specific preparation tasks that are described in detail in Chapter 8. Backing up file system directories, Web server configuration files, and Windows registry details are among those tasks.
The following approaches are available to reinstate the original registry entry when you roll back:
■ Recommended: Back up the original registry entry before you rename the original instance file system path to create an upgrade source.
Oracle recommends that you export registry details for the instance (whether clone or original) before starting upgrade activities for each instance. This enables you to import the registry entry if you decide to roll back to the original release.
■ Alternative: Reinstall the original instance during the rollback task.
If you do not have a backup registry entry to import during a rollback, there is no automated way to reinstate the entry. In this case, you must start the original component installation anew. After the registry entry is created, you will end the installation process and then copy original configuration details from the source that was renamed before the upgrade. For details, see "Generating a New Registry Key To Use When Rolling Back an Original Instance Upgrade" on page G-16 in the appendix on troubleshooting.
Developing a Plan for a Zero Downtime UpgradeBefore you start any zero downtime upgrade activities, it is important to read through this entire chapter. For downtime assessment planning for in-place upgrades, see "Duration of Zero Downtime Tasks and Validation" on page 15-21.
Whether you perform an in-place upgrade or you use the zero downtime upgrade method, you need to develop a solid plan for prerequisite and upgrade tasks. Your planning deliverables will include an inventory of details that you have gathered for all existing component instances in your deployment.
You need to collect and record specific details about each component and instance in your original deployment. Planning and tracking summaries are provided in Appendix F.
When developing a plan for a zero downtime upgrade, you perform the following tasks. After your planning is complete, you are ready to start upgrading as described in Chapter 16.

Developing a Plan for a Zero Downtime Upgrade
15-38 Oracle Access Manager Upgrade Guide
Figure 15–6 Developing a Zero Downtime Upgrade Plan
Task overview: Developing a plan for a zero downtime upgrade1. Review all information about the zero downtime upgrade in this chapter, and in
Chapter 16 and Chapter 17.
2. Take all zero downtime upgrade considerations into account as you begin to develop your plan For example:
■ Identify original components to be upgraded immediately, and record details in your planning documents. For more information, see the sumamries in Appendix F.
■ Identify components that can be upgraded later (dormant Access Servers, WebGates, and the Software Developer Kit (SDK)).
■ Develop a plan to manually migrate items that are not upgraded automatically, as described in "Items that You Must Manually Upgrade" on page 3-9.
3. Take the following general planning considerations into account:
■ Deployment Scenarios: The upgrade task should be performed in a sequential order in relation to the deployment approach adopted in your organization: Identity System only versus Joint Identity and Access System; intranet versus extranet; number and type of installed environments.
For example, if you have an earlier Identity System-only release deployed for intranet-only use with three different LDAP environments (one for Development, another for Test/Demonstration, and one Production deployment), the upgrade process should be performed and fine tuned in the smaller environments before ultimately being performed in your production environment. For more information about deployment types, see .
■ Stability: Each deployment that you upgrade should currently be running a stable and appropriately installed release. In other words, each earlier Oracle Access Manager configuration must be confirmed to be stable and complete before you start upgrading.

Developing a Plan for a Zero Downtime Upgrade
Introduction to the Zero Downtime Upgrade Method 15-39
A good approach to validate that the original environment is stable is to develop a deterministic test script and run it both before and after the upgrade. For example, the script could exercise a full end-to-end transaction by requesting a single page that requires authentication and authorization and a workflow request (all triggered by a single page request). This script can also help you validate that a task was successful and that the system is still operating without problem after upgrading clones or original components.
■ Administrative Access: Schema upgrade operations (as well as other upgrade operations) require administrative access with write permissions to the LDAP directory server and Oracle Access Manager files.
■ Schema and Data Upgrades: These are performed independently when you use the zero downtime upgrade method. For more information, see "Schema and Data Upgrades with the Zero Downtime Upgrade Method" on page 15-9.
■ Customization Upgrades: This is primarily a manual process. Oracle recommends that you complete any testing and alterations in a development environment before redeploying these in a shared or production environment. For more information, see "Customization Upgrades Using the Zero Downtime Upgrade Method" on page 15-15.
4. Take Inventory of the Earlier Deployment: If you have not already recorded the exact details of the earlier Oracle Access Manager installation, be sure to include details for Identity and Access components, LDAP directory servers, Web servers, and applications as indicated in Table 15–7 (repeated from Chapter 1). Planning summaries that you can either use as a reference or duplicate and fill in are provided in Appendix F.
Table 15–7 Inventory of Earlier Deployment Details
Detail Types Description
Environment Details Transport security mode; Simple, Cert, or Open
Root CA details if certificate mode is used
Any host definition type entries relevant to NetPoint (for example, /etc/host)
Identity Server Inventory Workflows, search bases and ACLs
Object definition details for all objects managed through NetPoint, if possible
Auditing configuration details
Password policy configuration
Access Server Inventory Policy domains, authentication schemes, resource definitions, host identifiers
Auditing configuration
Directory profile information

Developing a Plan for a Zero Downtime Upgrade
15-40 Oracle Access Manager Upgrade Guide
Application Tier details that will be impacted during the upgrade
Any WebGate protected integration that uses Cookies or header variables (the impact on these should be minimal)
Any custom AccessGate integration created using the API, which can have a more noticeable impact.
Applications exposing Oracle Access Manager Identity Portal Inserts (such as portals). Look carefully at these to ensure that "service temporary unavailable" pages can be displayed during the upgrade process when access to workflows is unavailable.
Applications relying on IdentityXML are significantly impacted because the IdentityXML service might be unavailable altogether (it could be complicated to separate read-only calls from write calls and might be best to disable the entire application during the upgrade process.)
Administration and Presentation tier details for each WebGate, WebPass, and Web server
Web server type, version, operating system, WebPass or WebGate identifier and exact patch version of the binary (for example, 6.1.1.19 or 7.0.4.2)
Exact Oracle Access Manager patch version (for example, 6.1.1.19 or 7.0.4.2)
WebPass or WebGate installation directory in the file system
Connection information between the component and corresponding
Oracle Access Manager Server, including primary or secondary status and number of connections
Details for each and every AccessGate, WebGate, Policy Manager, application server integration
Note: Policy Manager was formerly known as the Access Manager component
HTTP Cookie domain, preferred host name, cache timeout and size, failover threshold
Inventory any IdentityXML client that has been custom developed
Inventory any virtual IP and DNS aliases used to reference the WebPass or Web server farm protected with WebGate, such that it would be feasible to alter their definition in cases where staged upgrade of the Web server components (WebPass and WebGate be planned/required)
Table 15–7 (Cont.) Inventory of Earlier Deployment Details
Detail Types Description

Developing a Plan for a Zero Downtime Upgrade
Introduction to the Zero Downtime Upgrade Method 15-41
Oracle Access Manager Server Tier (for each Identity and Access Server)
Exact patch level (6.1.1.19 or 7.0.4.2, for example)
Installation directory for the Identity or Access Server
Installation directory for the associated WebPass or WebGate
TCP port number for the service for example, port 6021)
Host name (DNS) and Identity (formerly COREid) Server identifier
For the Access Server, note the status of the Access Management flag (on or off)
Inventory any customizations performed
Identify any Identity Event plug-ins
For the Access Server, note any customized authentication or authorization plug-ins
Record any file-based changes such as changes in globalparams.xml or .lst files
Record any PresentationXML and XSL stylesheet customizations
Are the Identity Server (and Access Server) configured to audit to files or a database
For Unix systems, record the user name and group membership for the Identity Server (formerly known as the COREid Server)
LDAP Directory Server Tier Exact LDAP directory server version and patch level for example, Sun ONE v5.2 SP2)
LDAP directory server DNS name and Port
Transport security mode: LDAP, LDAPS, ADSI
Binding credentials used by Oracle Access Manager
DIT and schema objects used in Oracle Access Manager
Master/replica configuration details
For more information, see "Schema and Data Upgrades with the Zero Downtime Upgrade Method" on page 15-9.
Customization Assessment and Planning
Ensure that any custom developed plug-ins, Access Manager API clients, IdentityXML clients, PresentationXML customizations, Portal Inserts, and customized styles are compatible with Oracle Access Manager 10g (10.1.4.0.1). This is primarily a manual process. For more information, see:
■ Customization Upgrades Using the Zero Downtime Upgrade Method
■ Duration of Zero Downtime Tasks and Validation
Table 15–7 (Cont.) Inventory of Earlier Deployment Details
Detail Types Description

Developing a Plan for a Zero Downtime Upgrade
15-42 Oracle Access Manager Upgrade Guide

Upgrading the Schema, Data, and Clone System 16-1
16Upgrading the Schema, Data, and Clone
System
This chapter describes how to upgrade the schema, the data, and how to create and upgrade a clone system when you are using the zero downtime upgrade method. Oracle recommends that you review all information about the zero downtime upgrade method to ensure that this approach is the right one for your enterprise. This chapter provides the following topics:
■ Prerequisites Before Starting a Zero Downtime Upgrade
■ Preparing the Original Installation for a Zero Downtime Upgrade
■ Cloning Earlier Components for a Zero Downtime Upgrade
■ About Destination Creation and Obtaining Tools for a Zero Downtime Upgrade
■ Copying Configuration and Policy Data to a New Branch in the LDAP Directory Server
■ Configuring Cloned Components and Services
■ Upgrading the Schema During a Zero Downtime Upgrade
■ Validating Successful Operations in Your Environment
■ Upgrading the Cloned Identity System
■ Renaming Audit Files After Upgrading Identity System Clones
■ Upgrading SDKs and Identity System Customizations
■ Upgrading the Cloned Access System
■ Upgrading SDKs, Integration Connectors, and Access System Customizations
Prerequisites Before Starting a Zero Downtime UpgradeOracle recommends that before you start the zero downtime upgrade you become familiar with the following information:
■ General information about deployments; upgrade planning, concepts and methods; and upgrade processing as described in Part I of this book.
Note: If you are using the in-place upgrade method, skip this chapter.

Preparing the Original Installation for a Zero Downtime Upgrade
16-2 Oracle Access Manager Upgrade Guide
■ Details about in-place upgrades, as described in Part II and Part III, include some preparation tasks that are relevant regardless of the upgrade method that you choose.
■ Details about performing manual customization upgrade tasks, as described in Part IV of this book. These tasks must be performed manually regardless of the upgrade method you are using.
■ General validation tasks are introduced in Part V. Tasks that you perform with the zero downtime upgrade method are described in "Validating Successful Operations in Your Environment" on page 16-67.
■ All information about zero downtime upgrades, as described in this chapter and in Chapter 15 and Chapter 17.
New product terms are used in this chapter when referring to the Oracle Access Manager 10.1.4 components and System Console. Earlier product terms (COREid Server and Access Manager) are used when referring to original instances before they are upgraded and to clones of original component instances. The name COREid System Console is used when referring to activities that you perform using the earlier (original) System Console. For details about name changes with Oracle Access Manager, see "Product and Component Name Changes" on page xxv.
Preparing the Original Installation for a Zero Downtime Upgrade This section describes the unique planning and preparation tasks that are related to the clone system that you will create for the zero downtime upgrade method. If you do not perform all preparation steps, you might not be able to recover from a problem or to roll back after a failed upgrade.
To start, you must add new component profiles for the clones that you will create. To do this, you will use the existing (original) COREid System Console. In addition, you need to add new LDAP directory server profiles for the copy of the original oblix tree that you will create in a new branch of the LDAP directory server.
When creating new profiles, you will use the original COREid System Console. If you have a joint Identity and Access System, you will also use the original Access System Console. For example:
■ Identity System Only: You must perform tasks 1 through 6 in the following task overview.
■ Joint Identity and Access System: You must perform all tasks in the following task overview.
Task overview: Preparing your original installation for a zero downtime upgrade includes 1. Bringing Host Computers to Oracle Access Manager 10g (10.1.4.0.1) Support
Levels
2. Preparing Directory Server Instances and Data
3. Adding New Hardware or Earlier Instances to Your Deployment
Note: Task overviews include a description of the task and a link to the topic where you will find the information you need to perform the task. In some task overviews, like the one here, the description is the actual topic heading and link.

Preparing the Original Installation for a Zero Downtime Upgrade
Upgrading the Schema, Data, and Clone System 16-3
4. Adding Profiles for Planned COREid Server Clones in the System Console
5. Adding Profiles for Planned WebPass Clones in the System Console
6. Associating WebPass Clone Profiles with COREid Server Clone Profiles
7. Adding New Directory Server Profiles for Cloned COREid Servers
8. Joint Identity and Access System: After performing tasks 1-7, perform the following tasks:
a. Adding a Profile for Access Server Clones
b. Creating New Directory Server Profiles for Access System Clones
c. Associating Original WebGates with Access Server Clones: You perform this task because you will defer WebGate upgrades and will not have WebGate clones.
Bringing Host Computers to Oracle Access Manager 10g (10.1.4.0.1) Support Levels Before starting the upgrade, you must ensure that all computers that are hosting earlier components and the LDAP directory server are supported by Oracle Access Manager 10g (10.1.4.2.0). If you want to add new computers to the deployment or upgrade the Operating System or Web server, Oracle recommends that you set up these systems before you start the upgrade.
You can find the latest support information on the Oracle MetaLink Web site at:
http://metalink.oracle.com
To verify support and bring host computers up to supported levels 1. Find the latest support information on Oracle MetaLink, as follows:
a. Go to Oracle MetaLink:
http://metalink.oracle.com
b. Log in to Oracle MetaLink as directed
c. Click the Certify tab.
d. Click View Certifications by Product
e. Select the Application Server option and click Submit.
f. Choose Oracle Identity Manager and click Submit.
g. Click Oracle Identity Management Certification Information 10g (10.1.4.0.1) (html) to display the Oracle Identity Management page.
h. Click the link for Section 6, "Oracle Access Manager Certification" to display the certification matrix.
2. Upgrade the host computer Operating System, Web Server, or Directory Server as needed using instructions provided in your vendor documentation.
3. Add new to host cloned components or to host additional earlier instances, and then see "Adding New Hardware or Earlier Instances to Your Deployment".
Note: The only profiles in the System Console for Access Managers are related to the directory server profile used by Access Manager.

Preparing the Original Installation for a Zero Downtime Upgrade
16-4 Oracle Access Manager Upgrade Guide
Describing how to bring an older system up to currently supported levels is outside the scope of this manual. For information about upgrading the host computer, operating system, and Web server, see your vendor documentation.
Preparing Directory Server Instances and DataThis topic is presented as an overview of tasks that you will be instructed to perform.
Unique Namespaces for Directory Connections: Each directory server profile contains connection information that includes the profile name, a domain or namespace to which it applies, a directory type, and a set of operational requirements for Read, Write, Search, and so on. Before you add a new directory server profile for use by clones, Oracle recommends that you ensure that the namespace is unique on the directory server.
Configuring the Challenge/Response Phrase at the Object Class Level: If Challenge and Response attributes are configured at the Employees tab level (rather than at the object class level), then the configuration data upgrade might not complete correctly. Oracle recommends that before starting other activities in this task, that you ensure that the Challenge and Response attributes are configured at the object class level.
Preparing Directory Instances: This includes changing the directory server search size limit parameter, and performing any other tasks that are relevant for you specific directory server type.
Replicated Environment: When you have a replicated environment, you can disable the replication agreement before you work on the master and then enable the agreement when you are ready to push changes out to the replicas. For example, disable it before upgrading the schema and enable it after ugrading the data.
Oracle recommends that you review the topics in Chapter 5 that are listed next and perform tasks as needed.
Task overview: Preparing directory server instances before a zero downtime upgrade includes1. Configuring Unique Namespaces for Directory Connection Information
2. Configuring the Challenge/Response Phrase at the Object Class Level
3. Preparing Your Directory Instances for the Schema and Data Upgrade
4. Reviewing Strategies for Upgrading in a Replicated Environment and applying these when needed.
Adding New Hardware or Earlier Instances to Your DeploymentThis procedure is optional. There are a number of reasons that you might consider adding new hardware or earlier instances to your existing deployment before starting the upgrade. For instance:
■ When you want to expand your deployment to add more host computers or earlier component instances
■ When you have original instances operating with an IIS Web server on a Windows platform, you need to place the clone on a different computer host.
In this case, you also need to install the earlier component instance (as a clone) on the new host and then copy any customizations and configuration changes from
See Also: "Upgrade Strategies When Support is Changed or Deprecated" on page 2-11.

Preparing the Original Installation for a Zero Downtime Upgrade
Upgrading the Schema, Data, and Clone System 16-5
the original file system to the clone file system. If the instance uses either Simple or Cert mode to communicate with existing components, you must copy the \config subdirectory from the original instance to the newly installed instance to ensure that all certificates are in order.
Oracle recommends that you perform these tasks before you begin other upgrade activities. If you are adding components, Oracle recommends that you perform a complete installation for each earlier component that you want to add. You can add hardware and install and setup additional earlier component instances using the following procedure as a guide.
To add hardware and additional component instances before the upgrade1. Review hardware considerations in the following topics before you add any new
hardware to host additional earlier components or to host cloned components:
■ Hardware Requirements for Zero Downtime Upgrades on page 15-6
■ Bringing Host Computers to Oracle Access Manager 10g (10.1.4.0.1) Support Levels
2. Set up the new system as needed to host components, as described in the preparation chapter of your earlier Oracle COREid or Oblix NetPoint Installation Guide.
3. Install additional earlier components using instructions in your earlier Oblix NetPoint or Oracle COREid Installation Guide, and the following considerations:
■ All Components: Perform prerequisite tasks for the specific components that you will install, as described in the preparation chapter of your earlier Oracle COREid or Oblix NetPoint Installation Guide.
■ All Components: Answer questions and perform activities based on appropriate specifications for your earlier installation.
■ Identity Server: Answer No when asked if this is the first Identity Server for this LDAP directory server.
4. Confirm that the component installations were successful and that all earlier components are operating properly.
5. Add profiles in the original System Console for the new instance, and then add profiles for all planned clones.
Adding Profiles for Planned COREid Server Clones in the System ConsoleBefore you can clone an original COREid Server instance you must add an entry for the clone in the original COREid System Console. Only Master Administrators and Master Identity (or Master Access) Administrators can access the COREid System Console.
Clone details should be the same as the original instance with the following exceptions:
■ A different instance name for the clone is recommended. If you use the same instance name, Oracle recommends that you move the clone to a different host.
■ A different port number is needed for the clone instance to communicate with other clone instances.
■ The name of the host computer might differ.

Preparing the Original Installation for a Zero Downtime Upgrade
16-6 Oracle Access Manager Upgrade Guide
To add entries for COREid Servers clones, you need either NetPoint Administrator or Master Identity Administrator login credentials and privileges.
The following procedure uses a release 6.1.1 installation. Your release and details will vary. For more information, see your Oracle COREid Administration Guide.
To add a profile for a COREid Server clone in the System Console 1. In your browser, enter the path to the original COREid System Console. For
example:
https://hostname:port/identity/oblix
In this sample URL, hostname is the name of the computer on which the WebPass is installed and port is the Web server port for the WebPass. You can log in using the HTTP or HTTPS protocol.
2. Click COREid System Console, and log in as a user who is authorized as a Master Administrator or Master Identity Administrator.
3. In the System Console, click System Admin and then click System Configuration.
4. Select Configure COREid Server in the left navigation pane.
5. When the List all COREid Servers page appears, double click the name of an existing COREid Server to display its specifications and then print these to use as a reference.
6. Click System Admin, click System Configuration, select Configure COREid Server, and then click the Add button.
7. On the Add a New COREid Server page fill in details for this clone as follows:
■ Name: The unique name of the clone instance, which can include the port number for this clone. For example: clone_ois_7022.
■ Hostname: The name of the computer on which the cloned COREid Server will be running, which can be a different host from the original.
■ Port: A new port number for the cloned COREid Server. For example: 7022.
■ All remaining information should be the same for the clone as it is for the original COREid Server instance.
Figure 16–1 provides a sample page with values filled in.
Note: You can find Directory Server Details, including the transport security mode used between this instance and the LDAP directory server, on the Configure LDAP directory server page. For example: click Configure Directory Options, and then look for the Directory Server Security Mode beneath Directory Server Details on the Configure Directory Server page. For additional information, click the name of the LDAP Directory Server Profile.

Preparing the Original Installation for a Zero Downtime Upgrade
Upgrading the Schema, Data, and Clone System 16-7
Figure 16–1 Sample Release 6.1.1 Add a new COREid Server Page with Clone Details
8. Click Save to finish and keep the new information (or Cancel to exit without saving).
9. Repeat the steps in this procedure to define a new instance for each cloned COREid Server that will be added and upgraded.
10. Proceed as follows:
a. Successful: Continue with "Adding Profiles for Planned WebPass Clones in the System Console".
b. Not Successful: If there is a problem with an entry in the System Console, see "Recovering From Issues With Information Entered in the System Console" on page 16-21.
Adding Profiles for Planned WebPass Clones in the System ConsoleBefore you clone an existing WebPass instance you must add an entry in the original COREid System Console that mirrors the specifications for the existing WebPass. Only Master Administrators and Master Identity (or Master Access) Administrators can access the COREid System Console.

Preparing the Original Installation for a Zero Downtime Upgrade
16-8 Oracle Access Manager Upgrade Guide
The Windows registry is not updated when you clone components. This can cause issues because the IIS Web server requires the entries for Web components in the registry. If the original Web component uses an IIS Web server, you should store the clone on a different Windows host with a fresh IIS Web server installation. In this case, the hostname of the computer will differ for the clone.
Differences between the details for the original instance and details for the clone instance include the clone instance name and the Web server port number for the clone.
■ A different instance name for the clone is recommended. If you use the same instance name, Oracle recommends that you move the clone to a different host.
■ A different port number is needed for the clone instance to communicate with other clone instances.
■ The name of the host computer might differ.
To add entries for WebPass clones, you need either NetPoint Administrator or Master Identity Administrator login credentials and privileges. The following procedure provides the steps you must perform and is based upon a release 6.1.1 installation. For more information, see your Oracle COREid Administration Guide.
To add WebPass Profiles for clones in the System Console1. From the COREid System Console click the System Admin tab, then click the
System Configuration tab, and then click WebPass in the left column.
The List all WebPasses page appears.
2. Click the name of a WebPass instance to display its specifications, and then print these to use as a reference.
3. From the List all WebPasses page, click Add.
The Add a new WebPass page appears.
4. On the Add a new WebPass page, enter information for the clone as follows:
■ Name: The name of the WebPass instance clone, which can include the port number for this clone. For example: clone_webpass_84.
■ Hostname: The name of the computer on which the cloned WebPass instance will run; it might differ from the host of the original instance.
■ Port: A new port number for the cloned WebPass and new Web server. For example: 84.
■ All remaining information should be the same for the clone as it is for the original WebPass instance.
Note: You cannot change the name you save with this instance. To change the name, delete this instance and reconfigure it with a different name.

Preparing the Original Installation for a Zero Downtime Upgrade
Upgrading the Schema, Data, and Clone System 16-9
Figure 16–2 Sample Release 6.1.1 Add a new WebPass Page with Clone Details
5. Click Save to finish defining details for the cloned WebPass (or Cancel to exit without saving).
6. Repeat the steps in this procedure to define a clone instance for each WebPass in your original installation.
7. Proceed as follows:
a. Successful: Continue with "Associating WebPass Clone Profiles with COREid Server Clone Profiles".
b. Not Successful: If there is a problem with an entry in the System Console, see "Recovering From Issues With Information Entered in the System Console" on page 16-21.
Associating WebPass Clone Profiles with COREid Server Clone Profiles You must now associate COREid Server clones with WebPass clones using the System Console. The associations for clones must mirror original COREid Server and WebPass associations. As a result, you must perform two procedures.
The following task overview provides the steps you must perform and is based upon a release 6.1.1 installation. For more information, see your Oracle COREid Administration Guide.
Task overview: Associating COREid Server clones with WebPass clones includes 1. Viewing Details for Existing COREid Servers Associated with a WebPass
2. Associating a COREid Server Clone with a WebPass Clone

Preparing the Original Installation for a Zero Downtime Upgrade
16-10 Oracle Access Manager Upgrade Guide
Viewing Details for Existing COREid Servers Associated with a WebPassThe following procedure explains how to view details for existing COREid Servers that are associated with a specific WebPass instance. This information will come into play in two ways:
■ Cloned Environment: You can ensure that your cloned environment includes the same associations that you find in the original installation.
■ Original Environment: You will upgrade original COREid Servers that are associated with a WebPass, and then you will upgrade the associated WebPass before upgrading other COREid Server instances.
To view existing COREid Server and WebPass associations1. From the COREid System Console, click the System Admin tab, the System
Configuration tab, and then click Configure WebPass in the left navigation pane.
The List all WebPasses page appears. From this page you can add, modify, or delete a WebPass.
2. In the List all WebPasses page, click the name of an original WebPass (not a clone).
The Details for WebPass page appears.
3. Click the List Identity Servers button.
A page appears that lists the primary and secondary servers configured for the existing WebPass.
4. Print the page to use as a reference and, if needed, click the name for a COREid Server to view details for it.
The Details for Identity Server page appears.
Associating a COREid Server Clone with a WebPass CloneYou perform activities in the following procedure to associate COREid Server clones with appropriate WebPass clones. You will base your association decisions on information that you collected in the previous procedure, "Viewing Details for Existing COREid Servers Associated with a WebPass" on page 16-10.
To associate a COREid Server clone with a WebPass clone1. From the COREid System Console, click the System Admin tab, the System
Configuration tab, and then click Configure WebPass in the left navigation pane.
2. In the List all WebPasses page, click the name of a WebPass clone.
3. In the Details for WebPass page, click List COREid Servers to display a page listing the Primary and Secondary servers associated with the WebPass (which might be empty).
4. Click Add.
5. In the Select Server drop-down list, select a COREid Server clone that is to be associated with the WebPass clone.
6. Based on information for the original association, indicate whether this clone COREid Server is a Primary or Secondary server and ensure that this and other information for this association mirror the original association.
This information is required for COREid-related load balancing and fail over.
7. Click Add to associate this COREid Server clone with the WebPass clone (or click Cancel to terminate this operation and start over).
Preparing the Original Installation for a Zero Downtime Upgrade
Upgrading the Schema, Data, and Clone System 16-11
8. Repeat the steps in this procedure to associate all COREid Server clones with WebPass clones to be used during the zero downtime upgrade.
Adding New Directory Server Profiles for Cloned COREid ServersYou must perform this task to add new directory server profiles for planned clones only when the original directory server profiles are separate for each COREid Server (Access Manager, and Access Server). If original directory server profiles are in use by all existing COREid Servers and Access Servers, you can skip this task.
Only Master Administrators and Master Identity Administrators can access the COREid System Console. You must add as many directory profiles for clone instances as you have existing directory profiles for original instances. The profile will serve only the clone instances and will be named differently than the original profile.
The new branch is created in the same LDAP directory server where the original oblix configuration and policy branches are present. There is no change in the LDAP directory server computer name or port number for the new branch.
If you have Database Instance Profiles configured in your original installation, any new LDAP directory server profile that you create for Identity Servers and Access Servers will use the same DB instances. However, the Database Instance Profiles will use the namespace (also known as the searchbase for user data) of the new branch.
If you have multiple searchbases (known as a disjoint searchbase), the new profile will use the same disjoint searchbase as the original profile used. Disjoint searchbases must be set up manually.
The following procedure uses a release 6.1.1 System Console. Your environment might vary and your details will be different. For information, see your earlier NetPoint or Oracle COREid Administration Guide.
To enter a new LDAP directory server profile for Identity System clones1. Ensure that the directory server is ready, as described in "Preparing Directory
Server Instances and Data" on page 16-4.
2. From the COREid System Console click the System Admin tab, then click the System Configuration tab, then click Configure Directory Options in the left column.
3. Click Configure Directory Options in the left column.
4. On the Configure Server profiles page, click the name of an existing directory profile to display its specifications, and then print these to use as a reference.
5. On the Configure Directory Server profiles page, click the Add button under the label Configure LDAP Directory Server Profiles to display the Create Directory Server Profile page.
6. On the Create Directory Server Profile page add a name for this profile, the original searchbase, the clone servers that will use this profile, and use the original profile as a guide to fill in details about the LDAP directory server.
■ Name: The name of this profile, which will be used by clones (for example, it will be used by a cloned COREid Server instance).
This name is for informational purposes only. The Identity System uses the naming convention default <Identity Server id> for all default LDAP directory server profiles that are automatically created during COREid System installation. However, this profile will be used only by cloned components.
Preparing the Original Installation for a Zero Downtime Upgrade
16-12 Oracle Access Manager Upgrade Guide
■ Name Space: The original searchbase specified for the original LDAP directory server profile, which is used by both the new branch and the original branch.
■ In the Used by area of the page, select the clone servers (not the original servers) that will use this profile.
■ All remaining details should be the same for this clone profile as for the original profile.
7. Click the option beside Enable Profile.
Your profile for the clone might look something like Figure 16–3.
Note: Use caution that this namespace does not overlap with other LDAP directory server profile namespaces. Overlapping name spaces result in duplicate entries. Exceptions to overlapping name spaces include a LDAP directory server profile for a Microsoft Active Directory sub-domain, and the LDAP directory server profile containing the oblix configuration base (also known as the configuration DN).

Preparing the Original Installation for a Zero Downtime Upgrade
Upgrading the Schema, Data, and Clone System 16-13
Figure 16–3 Sample Release 6.1.1 Create Directory Server Profile Page for the Clone
8. Select Save, Cancel, or Reset as needed.
9. Click OK to confirm your addition.
10. Proceed as follows:
a. Successful, Identity System Only: Repeat this entire procedure as needed to create a new directory server profile to serve clone instances for each existing directory server profile. Then see "About Destination Creation and Obtaining Tools for a Zero Downtime Upgrade" on page 16-28.
b. Successful, Joint Identity and Access System: Proceed with "Adding a Profile for Access Server Clones" on page 16-14.
c. Not Successful: Proceed to "Recovering From Issues With Information Entered in the System Console" on page 16-21.
For information, see your earlier NetPoint or Oracle COREid Administration Guide.
Note: You will not restart Identity Servers or Access Servers to enable the new profile until the clones are ready to use.

Preparing the Original Installation for a Zero Downtime Upgrade
16-14 Oracle Access Manager Upgrade Guide
About Entries for Access Manager ClonesThere are no entries in the System Console for Access Managers and none are needed for their clones. The only System Console entries relating to the Access Manager pertain to directory profiles that are used by the Access Manager. Continue as follows:
■ Identity System Only: Proceed to "Cloning Earlier Components for a Zero Downtime Upgrade" on page 16-21.
■ Joint Identity and Access System: Proceed to the next topic, "Adding a Profile for Access Server Clones".
Adding a Profile for Access Server ClonesYou perform the following task only if your original installation is a joint Identity and Access System deployment. Otherwise, skip to "Cloning Earlier Components for a Zero Downtime Upgrade" on page 16-21.
Before creating Access Server clones, you must add a new instance for each clone in the Access System Console. Most clone specifications should mirror those of the original Access Server that the clone will temporarily replace.
■ A different instance name for the clone is recommended. If you use the same instance name, Oracle recommends that you move the clone to a different host.
■ A different port number is needed for the clone instance to communicate with other clone instances.
■ The name of the host computer might differ.
To add entries for Access Server clones, you need either NetPoint Administrator or Master Access Administrator login credentials and privileges.
The following procedure uses a release 6.1.1 installation. Your release and details will vary. For more information, see earlier NetPoint or Oracle COREid Administration Guide.
To add a profile for each planned Access Server clone1. Go to the original Access System Console from your browser. For example:
http://hostname:port/access/oblix
In the sample URL, hostname refers to computer that hosts the Web server; port refers to the HTTP port number of the WebPass Web server instance; /access/oblix connects to the Access System Console.
2. Click the Access System Console link.
3. From the Access System Console, Click the Access System Configuration tab, then click Access Server Configuration when the side navigation bar appears.
4. Click the name of an existing Access Server instance to display its specifications, and then print these to use as a reference.
5. Click Access Server Configuration in the side navigation bar, then click Add.
6. On the Add a New Access Server page, fill in details for this clone as follows:
■ Name: The name of the clone Access Server instance, which can include a port number for the clone if desired. For example: clone_aaa_7023
■ Hostname: The name of the computer on which the cloned Access Server will run, which might differ from the existing Access Server host.
■ Port: A new port number for the cloned Access Server. For example: 7023

Preparing the Original Installation for a Zero Downtime Upgrade
Upgrading the Schema, Data, and Clone System 16-15
■ All remaining information should be the same for the clone as it is for the original Access Server instance.
Figure 16–4 shows a completed page for this example. Your details will vary.
Figure 16–4 Sample Release 6.1.1 Add a new Access Server Page for a Clone
7. Click Save to finish defining details for the cloned Access Server (or Cancel to exit without saving).
8. Repeat the steps in this procedure to define a new instance for each cloned Access Server to be upgraded using the zero downtime method.
9. Proceed as follows:
a. Successful: Continue with "Creating New Directory Server Profiles for Access System Clones" on page 16-16.
b. Not Successful: If there is a problem with an entry in the System Console, see "Recovering From Issues With Information Entered in the System Console" on page 16-21.

Preparing the Original Installation for a Zero Downtime Upgrade
16-16 Oracle Access Manager Upgrade Guide
Creating New Directory Server Profiles for Access System ClonesIn joint Identity and Access System deployments, you might need to create new directory profile instances for planned clones for Access Server instances. You perform this task only when the original directory profiles are separate for each COREid Server (Access Manager, and Access Server). If original directory profiles are in use by all existing COREid Servers and Access Servers, you can skip this task.
Only Master Administrators and Master Access Administrators can access the Access System Console. You must add as many directory server profiles for clone instances as you have existing directory server profiles for original instances. The profile will server only the clone instances and will be named differently than the original profile.
A default directory profile is created for the Access Server during Access Server installation. LDAP directory server details and directory server profiles that are available in the Access System Console include those for configuration data and policy data.
If you install more than one Access Server instance, each server uses the same default LDAP directory server profile. If you modify a shared LDAP directory server profile for a particular Access Server instance, all of the other Access Server instances are affected. If you do not also change the profiles for these servers, you will receive a warning whenever you:
■ View the server configuration
■ Restart the server
■ Reconfigure the server
Each directory server profile contains connection information that includes the profile name, a domain or namespace to which it applies, a directory type, and a set of operational requirements for Read, Write, Search, and so on. Before you add a new directory server profile for use by clones, Oracle recommends that you ensure that the namespace is unique on the directory server.
The following procedure describes how to add directory server profiles for Access System clones using the original Access System Console. In this example, a release 6.1.1 Access System is presented. Your Access System release and details might vary.
To add a directory profile for cloned Access System components1. Ensure that the directory server is ready, as described in "Preparing Directory
Server Instances and Data" on page 16-4.
2. From the original Access System Console, click System Configuration, then click View Server Settings.
The View Server Settings page appears.
3. Beneath the Configure LDAP Directory Server Profiles label, click the name of a directory profile for the Access Manager to display the original specifications, and then print these to use as a reference.
4. Click View Server Settings in the left column, and then click Add under the Configure LDAP Directory Server Profiles label to display the Create Directory Server Profile page.
5. On the Create Directory Server Profile page, fill in the name and namespace for this clone profile, select the clone servers that will use this profile, and then use the original profile as a guide to fill in LDAP directory server details.

Preparing the Original Installation for a Zero Downtime Upgrade
Upgrading the Schema, Data, and Clone System 16-17
■ Name: The name for this profile to be used by the cloned Access System components.
■ Name space: The original searchbase for user data.
■ In the Used by area of the page, select the clone servers (not the original servers) that will use this profile.
■ All remaining details should be the same for this profile as for the original profile.
6. Select Enable Profile.
7. Select Save, Cancel, or Reset as needed.
8. Click OK to confirm your addition.
9. Repeat all steps in this procedure to create a new profile instance for each original profile used by the Access Manager.
10. Repeat the steps in this procedure to create as many new directory server profiles for Access Server clones as you have existing directory server profiles used by original Access Servers.
11. Proceed as follows:
a. Successful: Continue with "Associating Original WebGates with Access Server Clones".
b. Not Successful: If there is a problem with an entry in the System Console, see "Recovering From Issues With Information Entered in the System Console" on page 16-21.
Associating Original WebGates with Access Server Clones Do not create a clone of any WebGate instance. Instead, Oracle recommends that you configure original WebGates to operate with cloned Access Server.
Each original WebGate must be reconfigured to operate with a cloned Access Server as a secondary server. This is accomplished manually by adding the clone Access Server as a secondary Access Server for each original WebGate.
In general, earlier Access Servers are not compatible with later WebGates. For example, if you have a release 6.1.1 Access Server it will not be compatible with a release 6.5 or later WebGate. However, when you upgrade an earlier Access Server, backward compatibility with earlier custom plug-ins and earlier WebGates is enabled automatically. As a result, you can delay original WebGate upgrades. For more information about backward compatibility, see Chapter 4.
Note: You will not restart the Access Manager Web servers or Access Server service to enable the new profile until the clones are ready to use.
Note: There are no entries in the System Console for Access Managers and none needed for their clones. The only System Console entries relating to the Access Manager pertain to directory profiles that are used by the Access Manager.

Preparing the Original Installation for a Zero Downtime Upgrade
16-18 Oracle Access Manager Upgrade Guide
You will not create a clone of any original WebGate. Instead, you will configure original WebGates to work with cloned Access Servers. Should you decide to uncouple the original and clone environments at some point, see "About Isolating the Original and Cloned Environments" on page 15-22.
The procedure here uses a release 6.1.1 System Console. Your system and your details will vary. For information, see your earlier NetPoint or Oracle COREid Administration Guide. For an alternative procedure, see "Alternative Procedure to Associate Original WebGates and Clone Access Servers" on page 16-19.
To associate an Access Server clone with an original WebGate 1. From the Access System Console, click Access System Configuration and then
click AccessGate Configuration.
2. Click an original WebGate name on the List all NetPoint AccessGates page.
3. Click Add to configure an Access Server clone to communicate with this original WebGate.
4. Select an Access Server clone from the Select Server list.
5. From the Select priority options, choose Secondary.
6. In the Number of connections field, type the maximum number of connections this WebGate clone can establish to this Access Server clone.
The default is 1. Your page might look like the sample in Figure 16–5.
Figure 16–5 Sample Release 6.1.1 Page When Associating a WebGate Original with an Access Server Clone
7. Click Add to complete the configuration of this server, or click Back to return to the previous screen.
8. Click the link to display a summary and print this page for use later.
Note: Having only one WebGate will result in downtime when upgrading that WebGate (or when rolling back). Oracle recommends that you have more than one WebGate to avoid downtime.

Preparing the Original Installation for a Zero Downtime Upgrade
Upgrading the Schema, Data, and Clone System 16-19
9. Repeat Step 3 through Step 7 to associate another original WebGate with an Access Server clone, if needed.
10. Proceed as follows:
a. Successful: Continue with "Cloning Earlier Components for a Zero Downtime Upgrade" on page 16-21.
b. Not Successful: If there is a problem with an entry in the System Console, see "Recovering From Issues With Information Entered in the System Console" on page 16-21.
Alternative Procedure to Associate Original WebGates and Clone Access ServersIf you have a significant number of WebGates, you might find it quicker to use this alternative method to associate original WebGates with Access Server clones. This alternative method involves modifying the following ldif template and then importing it.
Example 16–1 WebGate Reconfiguration LDIF Template
Entry 1dn: obname=%UniqueIdentifier%,obapp=PSC,o=Oblix,%OblixBase% obname: %UniqueIdentifier%obMaxAAAServerConnections: %NoOfConnections%obServerID: obname=%AAASeverId%,obapp=PSC,o=Oblix,%OblixBase% objectClass: topobjectClass: oblixAAAServerIDNodeobver: %OAMVer%
Entry 2dn: obname=%WebGateId%,obapp=PSC,o=Oblix,%OblixBase%changetype: modifyreplace: %ServerType% %ServerType%: %ExistingAAAS%:%UniqueIdentifier% The following procedure guides you as you edit the WebGate template to associate Access Servers and WebGates.
To edit the template for your environment1. Edit Entry 1 as follows:
■ Replace the %UniqueIdentifier% with a unique timestamp of your choosing, for example:
20070101T44444444444
■ Replace %OblixBase% with the original Oblix Base for example:
Note: This template will configure only one WebGate at a time. To configure multiple WebGates you need to create and concatenate individual WebGate templates.
Note: When editing Entry 2, you can use the %AAASeverId% and %WebGateId% together as a unique identifier.If the WebGate has no existing Access Servers configured to work with it, then you must replace "replace: %ServerType%: " in Entry 2 with "add: %ServerType%".

Preparing the Original Installation for a Zero Downtime Upgrade
16-20 Oracle Access Manager Upgrade Guide
o=company,c=us
■ Replace %AAASeverId% with the clone Access Server's identifier, for example:
AAA_new
■ Replace %NoOfConnections% with the maximum number of connections to named Access Server, for example:
1
■ Replace %OAMVer% with your current WebGate release, for example:
6.1.0
For more information about release numbering see details about the -f option in Table 15–2, " MigrateOAM Argument and Specifications Summary" on page 15-24.
2. Edit Entry 2 as follows:
■ Replace %OblixBase% with the original Oblix Base for example, for example:
o=company,c=us
■ Replace %WebGateId% with the WebGate name that was entered into the System Console when the WebGate was set up, for example:
WebGate_one
■ Replace %ServerType% with "obAAAPrimaryServerID" if this is a primary server connection (or with "obAAASecondaryServerID" if this is a secondary server connection to the WebGate.
■ Replace the %ExistingAAAS% with the value of the %ServerType% attribute, for example:
obAAAPrimaryServerID
For more information about specifying release numbers, see details about the -f option in Table 15–2, " MigrateOAM Argument and Specifications Summary" on page 15-24.
■ Replace %UniqueIdentifier% with the Timestamp that you specified in entry 1, for example:
20070101T44444444444
3. Compare your edited file to the one shown in Example 16–2.
4. Import this LDIF file to the LDAP directory server.
5. Verify that the association appears in the Access System Console.
6. Repeat this entire sequence for the next WebGate that you want to reconfigure.
Example 16–2 Sample Edited WebGate Template
Entry 1dn: obname=20070101T44444444445,obapp=PSC,o=Oblix,o=company,c=us obname: 20070101T44444444445obMaxAAAServerConnections: 1 obServerID: obname=Reconf_AAA2,obapp=PSC,o=Oblix,o=company,c=usobjectClass: topobjectClass: oblixAAAServerIDNode

Cloning Earlier Components for a Zero Downtime Upgrade
Upgrading the Schema, Data, and Clone System 16-21
obver: 6.1.0
Entry 2dn: obname=Reconf_WG,obapp=PSC,o=Oblix,o=company,c=uschangetype: modifyreplace: obAAAPrimaryServerID obAAAPrimaryServerID: 20070228T21065545822:20070101T44444444445
Recovering From Issues With Information Entered in the System ConsoleIf you discover a problem with an entry for a clone instance, you can click the Cancel button during profile entry and start the profile anew.
If you see a problem after entering information, you can either modify the profile in the System Console or you can delete the profile altogether and start a new one for the clone.
To recover from issues when entering clone details 1. Using the System Console, perform the following activities as appropriate and as
described in your earlier NetPoint or Oracle COREid Administration Guide.
■ Re-select or re-enter the information, or click the Cancel button.
■ Select the profile and click the Modify button to modify a saved profile.
■ Select the profile and click the Delete button to remove the profile.
2. Re-enter the information for the clone in the System Console, if needed.
Rolling Back to the Starting Point After Entering Clone DetailsRolling back returns you to the starting point, where you have only the original setup in its original configuration. All clone entries will be removed, and any other changes that you have made for the cloned environment will also be removed.
To roll back at this stage, you can remove the clones and the Web Server instance that was created for clones. You also need to remove entries added in your original System Console for clone components.
To roll back to the starting point after entering clone details 1. In the original System Console, remove entries added for all clones.
2. Undo any other changes that you have made to support the cloned environment.
3. Continue to use your original installation, or begin the upgrade anew.
Cloning Earlier Components for a Zero Downtime UpgradeThis section describes how to clone original component instances when performing a zero downtime upgrade. You must create a clone of each original component instance in the deployment that you are upgrading. Your original instances remain intact and continue to provide services to users while you perform operations on the clones.
You will need a new Web server instance for cloned Web components. If you have additional applications protected by Oracle Access Manager using the original Web server instance, you should also clone these applications. These cloned applications will use the Web server instance that you create for the cloned Web components. For more information, see "Web Server Requirements for Zero Downtime Upgrades" on page 15-7.

Cloning Earlier Components for a Zero Downtime Upgrade
16-22 Oracle Access Manager Upgrade Guide
For more information, see the following topics:
■ About Creating Clones
■ Setting Up the File System and Creating Clone Instances
■ Creating A New Web Server Instance for Cloned Web Components
About Creating ClonesOracle recommends that you keep cloned instances on the same computer that is hosting the original component. However, this is not a requirement. If you want to add a new computer and install another earlier instance, Oracle recommends that you do so before you create any clones. For more information, see "Adding New Hardware or Earlier Instances to Your Deployment" on page 16-4.
After adding entries to the System Console for each planned Oracle Access Manager clone, you are ready to clone the original components. You will start by creating a clone file system directory structure. You will then copy each original-component’s file system directory into the clone file system. Each clone instance will provide source information during the instance upgrade.
Figure 16–6 shows a sample installation on the left (the original). In this example, the original top-level file system path is named np611. It is expanded to show component directories and subdirectories in a tree structure. This example includes two instances of each component (labeled with _01 and _02). Your environment will be different. In the center of Figure 16–6, is the clone folders that were created as containers. On the right, the clone structure is shown as it will look after populating it by copying original component subdirectories into the appropriate clone folder.
Note: Cloning components is a manual task that you perform as described in this topic. Do not use np_sync to clone directories for a zero downtime upgrade. Do not clone WebGate instances.

Cloning Earlier Components for a Zero Downtime Upgrade
Upgrading the Schema, Data, and Clone System 16-23
Figure 16–6 Original and Clone Directory Hierarchies in the File System
Guidelines for Creating a CloneOracle recommends that you follow these guidelines when creating a clone:
■ The clone can reside on the same disk partition or on a different partition on the computer hosting the original component instance. For more information, see "Hardware Requirements for Zero Downtime Upgrades" on page 15-6.
■ The clone file system name must have at least one difference when compared with the original directory name in the file system. For example, name the clone directory differently at the top level: clone_np, for example.
■ The clone file system directory can use the same structure as the original instance, which is a good practice. However, maintaining the original structure in the clone file system is not required. During later zero downtime upgrade tasks, you will be instructed to extract 10g (10.1.4.0.1) libraries and files to the clone setup and then apply the Release 10.1.4 Patch Set 1 (10.1.4.2.0).
■ Including a release number in the clone directory path might cause confusion after upgrading the clones. You can eliminate release numbers in cloned path names.
■ If your original installation includes a separately installed Software Developer Kit (SDK), you must also clone the SDK.
Note: You will not create a clone of earlier WebGates. As a result, the clone directory in the file system does not include WebGate directories.

Cloning Earlier Components for a Zero Downtime Upgrade
16-24 Oracle Access Manager Upgrade Guide
Setting Up the File System and Creating Clone InstancesThe procedure in this section provides step-by-step instructions to help you clone your original components (except WebGates).
Table 16–1 outlines the sample path names that are used in this procedure. In this example, the original directory structure is set up to contain two instances of each component (labeled _01 and _02 in this example) to provide load balancing. The sample clone file system structure matches the original structure. Your environment will be different.
Back Up Copy: After populating the clone file system with a copy of each original instance on the host, the clone instance provides a back up copy of the original. In later tasks, you will rename each clone subdirectory to create a source for the clone upgrade. The source becomes a back up copy and remains intact while the destination that contains the 10.1.4.2.0 tools, libraries, and files, is upgraded based on information from the source. The original file system is untouched during clone upgrades.
The sample path names that are used for the zero downtime upgrade method illustrate an environment that includes multiple instances of each component. The sample that illustrates multiple instances was selected to help reinforce the actions that are needed for each and every instance. The sample path names are not intended to recommend a particular distribution of components in your installation.
Added Components: You can install another instance of an earlier release Oracle Access Manager component to use as a clone. For example, if you have original instances operating with an IIS Web server on a Windows platform you need to place the clone on a different computer host. After you install the earlier instance on the new host you need to remove the installer and then copy any customizations and configuration changes from the original instance to the newly installed clone. If the instance uses either Simple or Cert mode to communicate with existing components, you must copy the \config subdirectory from the original instance to the newly installed instance to ensure that all certificates are in order.
Table 16–1 Sample Original and Clone Path Names for Zero Downtime Upgrades
Original File System Directory Structure Clone File System Directory Structure
Note: This sample original file system includes two instances of each component stored independently.
np611
aaa_01
aaa_02
ois_01
ois_02
webcomponent_01
webcomponent_02
webgate_01
webgate_02
SDK
Note: If your original installation includes a separately installed Software Developer Kit (SDK), you must also clone the SDK.
Create a clone file system that mirrors the original so that you can populate it. For example:
clone_np
aaa_01
aaa_02
ois_01
ois_02
webcomponent_01
webcomponent_02
webgate_01
webgate_02
asdk_01\
Note: Only the top-level clone file system directory must have a different name from the original. Clone subdirectories can be named after the originals.
Cloning Earlier Components for a Zero Downtime Upgrade
Upgrading the Schema, Data, and Clone System 16-25
In the following procedure, you will replace sample path names with appropriate names from your deployment. Your environment will be different and might not include multiple instances of one component on a single host, nor all components on a single host.
To clone earlier component instances for a zero downtime upgrade 1. Create a new top-level file system directory to act as a container for clones. For
example:
a. Create a container for clones. For example:
Original top-level directory: np611
Create clone: clone_np
b. Create a clone COREid Server file system directory for each instance in your original file system. For example:
c. Create clone Web component file system directories, as needed, to provide a container for cloned subdirectories. For example:
d. Create clone Access Server directories, as needed, to provide a container for cloned subdirectories. For example:
e. Do not create a clone WebGate directory.
f. SDK: Create clone Access SDK directories if your original installation includes this. For example:
2. Populate the clone file system directory by copying original component instances into the clone structure. For example:
a. Copy each original COREid Server subdirectory into the clone structure. For example:
Original COREid Server File System Create Clone File System
np611\ois_01 clone_np\ois_01
np611\ois_02 clone_np\ois_02
Original Web Component File System Create Clone File System
np611\webcomponent_01 clone_np\webcomponent_01
np611\webcomponent_02 clone_np\webcomponent_02
Original Access Server File System Create Clone File System
np611\aaa_01 clone_np\aaa_01
np611\aaa_02 clone_np\aaa_02
Original SDK File System Create Clone File System
np611\asdk_01\AccessServerSDK clone_np\asdk_01\AccessServerSDK
np611\asdk_02\AccessServerSDK clone_np\asdk_02\AccessServerSDK

Cloning Earlier Components for a Zero Downtime Upgrade
16-26 Oracle Access Manager Upgrade Guide
b. Copy each original WebPass directory into the clone structure. For example:
c. Copy each original Access Manager structure into the clone structure. For example:
d. Copy each original Access Server instance into the clone structure. For example:
e. Do not copy an original WebGate directory into a clone directory.
f. SDK: Copy the original SDK directory into the clone directory. For example:
3. Repeat Steps 1 and 2 on every host in your original deployment to create a clone each original component instance.
4. After cloning, proceed to "Creating A New Web Server Instance for Cloned Web Components".
Creating A New Web Server Instance for Cloned Web ComponentsA new Web server instance is required for cloned Web components. This new Web server instance will be used by upgraded clones while the original installation is upgraded. For more information, see "Hardware Requirements for Zero Downtime Upgrades" on page 15-6.
If you have additional applications protected by Oracle Access Manager, be sure to clone these applications and configure them to use the Web server instance that is configured for clones.
Copy Original COREid Server Directory To the Clone File System
np611\ois_01\identity clone_np\ois_01\identity
np611\ois_02\identity clone_np\ois_02\identity
Copy Original WebPass Directory To the Clone File System
np611\webcomponent_01\identity clone_np\webcomponent_01\identity
np611\webcomponent_02\identity clone_np\webcomponent_02\identity
Copy Original Access Manager Directory To the Clone File System
np611\webcomponent_01\access clone_np\webcomponent_01\access
np611\webcomponent_02\access clone_np\webcomponent_02\access
Copy Original Access Server Directory To the Clone File System
np611\aaa_01\access clone_np\aaa_01\access
np611\aaa_02\access clone_np\aaa_02\access
Copy Original SDK Directory To the Clone File System
np611\asdk_01\AccessServerSDK clone_np\asdk_01\AccessServerSDK
np611\asdk_02\AccessServerSDK clone_np\asdk_02\AccessServerSDK

Cloning Earlier Components for a Zero Downtime Upgrade
Upgrading the Schema, Data, and Clone System 16-27
When you have one Web server instance serving multiple Web components, the Web server must be shut down before you upgrade the first Web component (WebPass, for example) and must remain shut down until you upgrade the last serviced Web component. You will be instructed to shut down the Web server in future procedures. For all Web server requirements, see "Web Server Requirements for Zero Downtime Upgrades" on page 15-7.
To create a new Web server instance for cloned Web components 1. Go to Oracle MetaLink and confirm that the new Web server is supported for
Oracle Access Manager Release 10.1.4 Patch Set 1 (10.1.4.2.0):
a. Go to Oracle MetaLink at the following URL:
https://metalink.oracle.com
b. Log in to Oracle MetaLink as directed
c. Click the Certify tab.
d. Click View Certifications by Product
e. Select the Application Server option and click Submit.
f. Choose Oracle Identity Manager and click Submit.
g. Click Oracle Identity Management Certification Information 10g (10.1.4.0.1) (html) to display the Oracle Identity Management page.
h. Click the link for Section 6, "Oracle Access Manager Certification" to display the certification matrix.
2. Use your Web server vendor documentation as a guide as you install the new Web server instance. Installing the Web server is outside the scope of this manual.
3. Create clones of any additional applications that are protected by the original Oracle Access Manager installation and this Web server, and configure the application clones to use the Web server instance for Oracle Access Manager clones.
Rolling Back Changes After Cloning ComponentsIf you find a problem with a cloned instance, you can use Step 1 in the following procedure to recover and start anew. Otherwise, use all steps to roll back all changes and return to your original installation.
If you perform all steps, every trace of cloned components will be removed. In this case, you can either restart the zero downtime upgrade from the beginning, or use the in-place method described elsewhere in this manual, or continue using your original environment.
To recover or roll back after cloning a component instance 1. Shut down clone services and Web servers, and delete the cloned file system
directory from the host computer.
2. Remove the Web server instance for the cloned Web component.
Note: To continue cloning, return to the procedure "To clone earlier component instances for a zero downtime upgrade" on page 16-25.

About Destination Creation and Obtaining Tools for a Zero Downtime Upgrade
16-28 Oracle Access Manager Upgrade Guide
3. Remove any cloned applications that operate with this Web server instance.
4. Repeat all steps for each clone on each computer host.
5. From the original System Console, delete entries for clones using instructions in your earlier NetPoint or Oracle COREid Administration Guide.
6. Confirm that your original setup is operating properly.
About Destination Creation and Obtaining Tools for a Zero Downtime Upgrade
This task must be performed for each and every instance in the deployment that you are upgrading, whether it is a small sandbox-type deployment or a full production deployment.
The tools that support the zero downtime upgrade method are provided with Oracle Access Manager Release 10.1.4 Patch Set 1 (10.1.4.2.0). You obtain the zero downtime upgrade tools by extracting 10g (10.1.4.0.1) component libraries and files (also known as an instance) and then applying Release 10.1.4 Patch Set 1 (10.1.4.2.0) to the instance. Additional information is provided in the following topics:
■ Destination Creation: Extracting 10g (10.1.4.0.1) Libraries and Files
■ Obtaining Tools: Applying Release 10.1.4 Patch Set 1 (10.1.4.2.0)
You can review the information in the previous topics. However, do not perform these tasks now. Instead, wait until you are referred to these tasks as you make a new branch in the directory server, or as you upgrade the schema, or as you upgrade clone instances, or as you upgrade original instance. To avoid repeating information, the following topics will direct you to this section.
Topic overview: Creating a destination and obtaining tools is needed in■ This chapter
– Copying Configuration and Policy Data to a New Branch in the LDAP Directory Server
– Upgrading the Schema During a Zero Downtime Upgrade
– Upgrading the Cloned Identity System
– Upgrading the Cloned Access System
■ Chapter 17
– Upgrading Your Original Identity System
– Upgrading Your Original Access System
Destination Creation: Extracting 10g (10.1.4.0.1) Libraries and Files Before you can perform any zero downtime upgrade activities, you must create a destination file system path and extract the appropriate Oracle Access Manager 10g (10.1.4.0.1) libraries and files for the component that will be involved. After creating the destination, you can apply Release 10.1.4 Patch Set 1 (10.1.4.2.0) to the instance.
You will perform this task before you make a new branch in the LDAP directory server or upgrade the schema, and before you can upgrade each clone or original instance.
Destination Path Names: You must create a source before you start extracting libraries and files for clone and original instance upgrades. The destination path that you

About Destination Creation and Obtaining Tools for a Zero Downtime Upgrade
Upgrading the Schema, Data, and Clone System 16-29
assign must exactly match the clone or original path before you renamed it to create a source. During library and file extraction, a default file system directory path is provided:
Windows Platforms: \Program Files\NetPoint\
Unix Platforms: /opt/netpoint/ (all lowercase)
You can change default path name to suit any requirements for your enterprise. If you change the default name to something else, Oracle recommends that you use consistent naming conventions for all platforms. For instance, the Windows Operating System allows spaces in a path name while Unix-based systems do not. For consistency, you might use an underscore rather than a space in path names on all platforms.
The following path name designations help you identify individual components:
■ \identity is appended automatically to all Identity System path names, including Web component path names, regardless of any changes you might make. For example, a COREid Server might be installed as clone_np\identity.
■ \access is appended automatically to all Access System path names, including Web component path names, regardless of any changes you might make. For example, an Access Server might be installed as clone_np\access.
■ \webcomponent is part of the default path for WebPass and Policy Manager. However, \identity or \access are automatically appended. If you remove \webcomponent it is not automatically appended.
– A WebPass might be installed as clone_np\webcomponent\identity.
– A Policy Manager (formerly known as the Access Manager) might be installed as clone_np\webcomponent\access.
■ WebGate default path names vary depending on your platform and Web server type. Following are several examples that you might see if your original deployment is installed as np611.
– Win32 ISAPI WebGate: \np611\webgate
– Win32 OHS2 WebGate: \np611\WebComponent\access
– Win32 NSAPI WebGate: \np611\WebGate\access
– Linux Apache2 WebGate: /home/np611/webgate
– Linux OHS2 WebGates: /home/np611/webgate
– and so on.
Using the zero downtime method, WebGate upgrades are deferred until you upgrade the original Access System. You can install the latest WebGate even though you will not use it until the very end of the zero downtime upgrade tasks. For more information about source and destination creation, see "Preparation Tasks for the Zero Downtime Method" on page 15-12.
The following information should be taken into account before you begin extracting and patching 10g (10.1.4.0.1) components:
Locations and Details: Libraries and files are extracted with specific location and configuration details. Certain details are not transferable. For example, on a Windows platform, the registry entry points to the original location. As a result, you cannot copy libraries and files from one location and reuse these in another location.

About Destination Creation and Obtaining Tools for a Zero Downtime Upgrade
16-30 Oracle Access Manager Upgrade Guide
To obtain the 10g (10.1.4.2.0) tools that are required to perform a zero downtime upgrade, you must extract 10g (10.1.4.0.1) component libraries and files for each installed instance and then apply Release 10.1.4 Patch Set 1 (10.1.4.2.0). After applying the patch, you will have the 10g (10.1.4.2.0) files and tools needed for the upgrade (whether it is for a clone instance or for an original instance). The 10g (10.1.4.2.0) file system directory becomes the destination that is used during the earlier instance upgrade. For example:
■ For Each Clone Instance Upgrade: You will first rename the existing clone file system to create a source for the upgrade. You will extract 10g (10.1.4.0.1) component libraries and files into the clone file system, and then apply the 10g (10.1.4.2.0) patch. For example, if you are upgrading a COREid Server clone, the 10.1.4 libraries and files might be extracted to a file system directory that is named clone_np\identity.
■ For Each Original Instance Upgrade: You will first rename the existing original file system to create a source for the upgrade. You will extract 10g (10.1.4.0.1) component libraries into the original file system directory (for example, in np611\identity), and then apply the 10g (10.1.4.2.0) patch.
Languages: When your earlier installation includes languages other than English, the 10g (10.1.4.0.1) libraries and files that you extract should include the same Language Packs as the original instance.
Set Up and Validation Caveats: After extracting 10g (10.1.4.0.1) component libraries and files and applying Release 10.1.4 Patch Set 1 (10.1.4.2.0), you will not have a fully configured instance. However you will have everything that you need to perform zero downtime upgrade activities, including a destination directory for the instance to be upgraded.
Cleaning Up the Obsolete Schema: After extracting the Identity Server and Policy Manager component libraries and files, the kCleanupObsoleteSchema parameter in the obmigratedsparams.lst file is set to false. This will ensure that the obsolete schema is not cleaned up. As a result, the original system can coexist with the cloned system. If you have only the Identity System, you perform steps only for the Identity Server.
WebGates: These upgrades can be deferred until all other components are upgraded. You extract 10g (10.1.4.0.1) WebGate libraries and files and patch these only when upgrading original WebGate instances. If you decide to uncouple your clone and original deployments, you will need to add new WebGates to the upgraded clone system to replace original WebGates. For more information, see "About Isolating the Original and Cloned Environments" on page 15-22.
The following task overview describes specific extraction requirements to support out-of-place zero downtime upgrades. You will not perform a full component installation. Instead, you will extract only the component libraries and files and then stop the installation process.
Task overview: Destination creation1. Ensure that the host computer meets all Oracle Access Manager 10g (10.1.4.0.1)
requirements.
Note: Do not extract any 10g (10.1.4.0.1) component libraries and files until you are instructed to do so during later zero downtime upgrade tasks. You will only extract component libraries and files; you will not perform a full installation.

About Destination Creation and Obtaining Tools for a Zero Downtime Upgrade
Upgrading the Schema, Data, and Clone System 16-31
For more information, see "Hardware Requirements for Zero Downtime Upgrades" on page 15-6 and "Bringing Host Computers to Oracle Access Manager 10g (10.1.4.0.1) Support Levels" on page 16-3.
2. When directed to do so in later procedures, perform the following extraction tasks on the computer that is hosting the instance to be upgraded (whether a clone or an original instance).
a. Perform any prerequisite tasks as described in the discussion that directed you here.
b. Locate and launch the appropriate Oracle Access Manager 10g (10.1.4.0.1) component installer for the instance and platform. For more information, see the Oracle Access Manager Installation Guide.
c. Respond to questions about the license, and about languages. For details about languages, see the Oracle Access Manager Installation Guide.
d. When asked for the installation directory, specify the destination path for the instance (this typically must match the name of the clone or original instance before it was renamed to create the source). For example: \clone_np.
e. Write the destination path in your planning document if you have not already done so. For example: \clone_np\identity.
You are notified that the component libraries and files are being installed (extracted), which can take several seconds.
f. When all component libraries and files are extracted, click Cancel.
g. Proceed to "Obtaining Tools: Applying Release 10.1.4 Patch Set 1 (10.1.4.2.0)".
Obtaining Tools: Applying Release 10.1.4 Patch Set 1 (10.1.4.2.0) After extracting 10g (10.1.4.0.1) component libraries and files to create a destination path for the upgrade (whether clone or original), you must apply Release 10.1.4 Patch Set 1 (10.1.4.2.0). You apply the patchset to the destination to obtain the script and utilities that are required for an out-of-place zero downtime upgrade. The file system path will not change when you apply the patch.
As you patch component libraries and files, a backup folder is created that contains the files that should be restored if you remove the patch. The backup files are stored in the identity|access folder, at the same level as the \oblix directory. For example, when you patch the Identity Server, the back up directory is located in:
IdentityServer_install_dir\identity\backup-Oracle-101401RCn-binary_parameter IdentityServer_install_dir\identity\backup-Oracle-101401RCn-message_ en-us
Release 10.1.4 Patch Set 1 (10.1.4.2.0) Application and Removal ConditionsBefore you can apply Oracle Access Manager Release 10.1.4 Patch Set 1 (10.1.4.2.0), you must ensure that the host computer meets 10g (10.1.4.2.0) support requirements. In addition, the following conditions apply:
■ When you install Oracle Access Manager 10g (10.1.4.0.1) and then apply Release 10.1.4 Patch Set 1 (10.1.4.2.0), the component instances are considered to be 10g
Note: Do not continue the installation. You have all that you need to apply the patch.

About Destination Creation and Obtaining Tools for a Zero Downtime Upgrade
16-32 Oracle Access Manager Upgrade Guide
(10.1.4.0.1) even though you will have 10g (10.1.4.2.0) functionality. In this case you must remove Release 10.1.4 Patch Set 1 (10.1.4.2.0) before you can apply subsequent patch sets for 10g (10.1.4.0.1).
■ When you upgrade using the zero downtime upgrade method you will extract Oracle Access Manager 10g (10.1.4.0.1) component libraries and files, and then apply Release 10.1.4 Patch Set 1 (10.1.4.2.0) before upgrading. When upgrading, you will use the 10g (10.1.4.2.0) MigrateOAM script to upgrade the earlier component instance. As a result, upgraded components are considered to be release 10g (10.1.4.2.0). In this case, you cannot remove the Release 10.1.4 Patch Set 1 (10.1.4.2.0) before you apply any subsequent patches for 10g (10.1.4.0.1).
■ When you upgrade using the in-place upgrade method, you are using 10g (10.1.4.0.1) installers. The resulting instance is release 10g (10.1.4.0.1). After an in-place upgrade, Oracle recommends that you apply Release 10.1.4 Patch Set 1 (10.1.4.2.0). In this case the component instances are considered to be 10g (10.1.4.0.1) even though you will have 10g (10.1.4.2.0) functionality. You must remove Release 10.1.4 Patch Set 1 (10.1.4.2.0) before you can apply subsequent patches for 10g (10.1.4.0.1).
The following procedure provides steps to obtain the patch set and steps to help you verify that the patch set was properly applied. Details patch set application instructions are located in the Oracle Access Manager Patch Set Notes Release 10.1.4 Patchset 1 (10.1.4.2.0) For All Supported Operating Systems.
To obtain and apply the Release 10.1.4 Patch Set 1 (10.1.4.2.0) 1. Go to Oracle MetaLink Web site and select 5957301 to obtain Release 10.1.4 Patch
Set 1 (10.1.4.2.0), as follows:
a. Navigate to Oracle MetaLink.
https://metalink.oracle.com
b. Log in to Oracle MetaLink as directed.
c. Click the Patches & Updates tab.
d. Click Quick Links to the Latest Patchsets, Mini Packs, and Maintenance Packs
e. Click Oracle Oblix COREid, under the label "Latest Oracle Server/Tools Patchsets".
f. Locate and select the latest patch set for 10g (10.1.4.0.1) from the table at the bottom of the page. For example, select 5957301 to obtain Release 10.1.4 Patch Set 1 (10.1.4.2.0).
g. From the Platform or Language list, select the appropriate platform for your environment and then click Download.
h. Review the patch set documentation for instructions on applying or removing the patch set packages; you can also review the bugs fixed with this patch set.
2. Use instructions in the Oracle Access Manager Patch Set Notes Release 10.1.4 Patchset 1 (10.1.4.2.0) For All Supported Operating Systems to apply Release 10.1.4 Patch Set 1 (10.1.4.2.0) to your 10g (10.1.4.0.1) component libraries and files:
■ Identity Server
■ WebPass
■ Policy Manager

Copying Configuration and Policy Data to a New Branch in the LDAP Directory Server
Upgrading the Schema, Data, and Clone System 16-33
■ Access Server
■ WebGate
3. Confirm that the version file in the destination path is updated to 10g (10.1.4.2.0) (npversion_component.txt). For example:
IdentityServer_install_dir\identity\oblix\config\np1014_is.txt
WebPass_install_dir\webcomponent\identity\oblix\config\np1014_wp.txt
PolicyManager_install_dir\webcomponent\access\oblix\config\np1014_am.txt
AccessServer_install_dir\access\oblix\config\np1014_aaa.txt
WebGate_install_dir\webgate\identity\oblix\config\np1014_wg.txt
4. Verify that the history of the files in Install_Log was updated automatically, by looking for: Component_install_dir\identity or Component_install_dir\access.
5. Look for the back up files that were created during the patch operation. For example:
IdentityServer_install_dir\identity\backup-Oracle-101401RCn-binary_parameter IdentityServer_install_dir\identity\backup-Oracle-101401RCn-message_en-us
6. Back up the Web server configuration file using instructions from your vendor and details in "Backing Up the Existing Web Server Configuration File" on page 8-8.
7. Windows: Back up the updated registry data for the patched component as described in "Backing Up Windows Registry Data" on page 8-9.
Copying Configuration and Policy Data to a New Branch in the LDAP Directory Server
After creating clones, you need to create a new branch in the LDAP directory server and then copy the configuration and policy data from the original oblix branch into the new branch. Copied information includes details such as workflow specifications and configuration data that govern the appearance and functionality of the Identity System and Access System.
After populating the new branch with a copy of the data, you will reconfigure cloned components to use the new branch. Your original installation will continue to use the original branch. Only during the final zero downtime upgrade tasks, will you upgrade and reconfigure original components to use the new branch.
For complete instructions, see the following topics:
■ About Creating and Populating a New Branch in the LDAP Directory Server
■ Creating and Populating a New oblix Branch
You might also need the topic, "Rolling Back Changes Made for the New oblix Branch" on page 16-39.
About Creating and Populating a New Branch in the LDAP Directory ServerOracle Access Manager supports storing user data, Oracle Access Manager configuration data, and policy data on a single directory server.Alternatively, you can store user data separately on one directory server type and Oracle Access Manager configuration and policy data on a different type of directory server. For example, you

Copying Configuration and Policy Data to a New Branch in the LDAP Directory Server
16-34 Oracle Access Manager Upgrade Guide
might store user data in Active Directory and Oracle Access Manager configuration and policy data on ADAM (or Oracle Internet Directory).
When storing user data on a separate directory server type from configuration and policy data, observer the following guidelines:
■ Ensure that all user data is stored on the same directory server type.
■ Ensure that configuration and policy data are stored on the same type of directory server.
You must manually create the new branch node to contain the copy of the configuration and policy data. Generally this is created as a child node of original configuration base (also known as the configuration DN) and policy base (also known as the policy DN). When data is stored separately you can create parallel nodes.
Identity System Only: When you have only the Identity System, there is no policy data. In this case, you perform this procedure for only the clone of the first COREid Server that was installed and set up. In this case, the configuration data is copied.
Joint Identity and Access System: When you have a joint Identity and Access System with configuration and policy data stored together in the same LDAP directory server node, both are copied at one time. However, if policy data is stored in a different branch or on a different directory instance, you must repeat this operation with the clone of the first installed Access Manager to copy policy data into the new branch.
Suspend Operations, All Environments: Oracle recommends that you start this procedure by notifying all administrators to suspend operations that would result in the alteration, addition, or removal of information in the LDAP directory server. This suspension should last from the time you copy the data until you finish all zero downtime upgrade activities. Here is a partial list of operations that should be suspended:
■ Processing workflow tickets
■ Applet-based modifications such as workflow creation, change, or removal
■ Modifying user profiles
■ Modifications to "Challenge" and "Response" attributes
■ Creating, changing, or deleting new policies
■ Creating, changing, or deleting authentication schemes
■ Creation of host identifiers
■ Creating of deleting directory server profiles
■ Updating object classes
■ Updating the access attribute control, delegated administrators, or setting the searchbase
■ Any other operations that result in the alteration, addition, or removal of information in the LDAP directory server
After suspending operations, you will create the new node for configuration and policy data. Oracle recommends that you back up the directory server instance and your earlier Oracle Access Manager data in the original branch in the LDAP directory server.

Copying Configuration and Policy Data to a New Branch in the LDAP Directory Server
Upgrading the Schema, Data, and Clone System 16-35
Obtaining the Tools: Before you populate the new branch, you need to extract 10g (10.1.4.0.1) Identity Server component libraries and files, and apply Release 10.1.4 Patch Set 1 (10.1.4.2.0) as described in "About Destination Creation and Obtaining Tools for a Zero Downtime Upgrade" on page 16-28. You will then run the MigrateOAM script in Mkbranch mode from the 10g (10.1.4.2.0) Identity Server directory.
If you have a joint Identity and Access System, you must also extract 10g (10.1.4.0.1) Policy Manager component libraries and files, and apply Release 10.1.4 Patch Set 1 (10.1.4.2.0). You then run the MigrateOAM script in Mkbranch mode from the 10g (10.1.4.2.0) Policy Manager file system directory.
When you extract the libraries and files, you can specify any installation path that you like. After extracting the libraries and files, the 10g (10.1.4.2.0) MigrateOAM script might be located in a path similar to the following sample:
Windows:
1014\identity\oblix\tools\migration_tools\MigrateOAM.bat 1014\webcomponent\access\oblix\tools\migration_tools\MigrateOAM.bat
Linux:
/home/1014/identity/oblix/tools/migration_tools/MigrateOAM.sh /home//1014/webcomponent/access/oblix\tools\migration_tools/ MigrateOAM.sh
In this situation, you do not need to create a source and you do not need to name the destination after an existing instance. In the sample path names:
■ 1014\identity refers to the file system directory where the 10g (10.1.4.2.0) Identity Server component libraries and files reside.
■ 1014\webcomponent\access refers to the file system directory where the 10g (10.1.4.2.0) Policy Manager (formerly known as the Access Manager component) component libraries and files reside.
Using MigrateOAM: Table 16–2 shows the arguments that you must supply to copy configuration and policy data from the original branch in the LDAP directory server into the new branch. The new branch node must exist in the LDAP directory server before you use the script. The MigrateOAM script will call utilities that prompt you for the new configuration DN and policy DN and then automatically copy configuration and policy data from the original branch in the LDAP directory server into the new branch. Sample file system path names are provided to help illustrate the task. Your details will be different.
Note: There are no tools to automatically enforce the suspension of operations that affect your data. There is an alternative that you can use if data in your original environment is changed after you upgrade the clone system and before you upgrade the original system. For more information, see "About Retrieving Changes to the Original Branch Before Upgrading Original Instances" on page 15-23.

Copying Configuration and Policy Data to a New Branch in the LDAP Directory Server
16-36 Oracle Access Manager Upgrade Guide
The full command and options for configuration data must be entered as one contiguous line.
During execution, messages keep you informed about the process and you are asked to specify the location of the new ConfigDN. In this case, the configuration DN defines the new node in the directory tree under which the copied information is to be stored.
If configuration data and policy data are stored separately, you are asked for the new Policy base when you run the Mkbranch command with the clone of the first installed Access Manager. In this case, the policy base defines the new node in the directory tree under which the copied information is to be stored.
For more information about the storage of user data, configuration data, and policy data, as well as details about searchbases and configuration and policy DNs, see the Oracle Access Manager Installation Guide.
Creating and Populating a New oblix BranchYou use the procedure in this topic to create a new branch in the LDAP directory server, and then populate it with a copy of the configuration and policy data from the original branch.
Table 16–2 MigrateOAM Mkbranch Command Summary
MigrateOAM Mkbranch Parameters Values and Operations
-M Mkbranch Specify Mkbranch as the mode. The Mkbranch mode is required to copy the schema and configuration and policy data from the original branch to the new branch in the LDAP directory server.
-C component Specify OIS (Identity Server) to copy configuration data and policy data.
Specify AM (Access Manager) to copy policy data that is stored separately from configuration data.
-F nnn Specify the number that identifies your earlier release. For example: 610 (for 6.1 or 6.1.1), 650 (for 6.5.x), or 700 (for 7.x)
-T 1014 Specify1014 as the release to which this data will eventually be upgraded.
-S "source directory" Specify the full path to the directory that contains the cloned Identity Server or Access Manager (in quotation marks). For example:
■ Identity Server: -S "C:\clone_np\ois_01\identity"
■ Access Manager: -S "C:\clone_np\webcomponent_01\access"
-D "destination directory" Specify the full path to the directory that contains the latest MigrateOAM script for the component you have specified (in quotation marks). For example:
■ Identity Server: -D "C:\1014\identity"
■ Access Manager: -D "C:\1014\webcomponent\access"
-I "installation directory" The installation directory should be the same as the specified destination. For example:
■ Identity Server: -D "C:\1014\identity"
■ Access Manager: -D "C:\1014\webcomponent\access"
Caution: Oracle recommends that you review all information about making a new branch before you perform activities here.

Copying Configuration and Policy Data to a New Branch in the LDAP Directory Server
Upgrading the Schema, Data, and Clone System 16-37
The following procedure includes sample configuration and policy DNs for both an original branch and a new branch. Also included, are sample path names for the libraries and files that you extract and patch as well as sample paths names for a clone of the first installed COREid Server and the clone of the first installed Access Manager. Your environment and specifications will be different.
To copy existing configuration and policy data to a new branch 1. Ensure that the directory server is ready, as described in "Preparing Directory
Server Instances and Data" on page 16-4.
2. Notify administrators to suspend any operations that will add, change, or remove configuration or policy data from the LDAP directory server until all components are upgraded and configured to use the new branch (including clones and original instances). For more information, see the list of operations earlier in this topic.
3. Configuration and Policy Data are Stored Together: Create a new node in the LDAP directory server to contain copied configuration data. For example:
Original Configuration DN: o=company,c=us New Configuration DN: o=Newbranch,o=company,c=us
4. Configuration and Policy Data are Stored Separately: Perform Step 3 for configuration data, and then create a new node in the LDAP directory server (as a child node of your original policy base) to contain copied policy data. For example:
Original Policy Base: o=Policy_base,o=company,c=us New Policy Base: o=NewPolicyBase,o=Policy_base,o=company,c=us
5. Back up the original branch in the LDAP directory server and perform the following tasks as described in Chapter 5 topics:
■ Backing up Oracle Access Manager Configuration and Policy Data
■ Backing Up User and Group Data
■ Backing Up Workflow Data
■ Archiving Processed Workflow Instances
6. On the computer hosting the clone of the first COREid Server that was installed and set up:
a. Destination Creation: Extract 10g (10.1.4.0.1) Identity Server component libraries and files into a new destination path. For more information, see "Destination Creation: Extracting 10g (10.1.4.0.1) Libraries and Files" on page 16-28. For example:
1014\identity
b. Obtaining the Tools: Apply Release 10.1.4 Patch Set 1 (10.1.4.2.0) to the Identity Server component libraries and files that you just extracted, as described in "Obtaining Tools: Applying Release 10.1.4 Patch Set 1 (10.1.4.2.0)" on page 16-31.
7. Change to the file system path that contains the 10g (10.1.4.2.0) MigrateOAM script for the Identity Server instance. For example:
cd 1014\identity\oblix\tools\migration_tools

Copying Configuration and Policy Data to a New Branch in the LDAP Directory Server
16-38 Oracle Access Manager Upgrade Guide
8. Enter the following command on one line, without breaks, to run MigrateOAM in Mkbranch mode and then specify the new configuration DN when it is requested. For example:
1014\identity\oblix\tools\migration_tools>MigrateOAM.bat -M Mkbranch -C OIS -F 610 -T 1014 -S "C:\clone_np\ois_01\identity" -D "C:\1014\ \identity" -I "C:\1014\identity"
... Enter new ConfigDN : o=Newbranch,o=company,c=us The tool ran successfully Press enter key to continue ... ENTER ... Importing data to directory server..... The tool ran successfully Press enter key to continue ... ENTER
9. Proceed as follows:
■ Copy Successful, Data Stored Together (or Identity System Only): A message tells you that data was imported to the LDAP directory server and that the tool ran successfully. Proceed to "Validating Successful Operations in Your Environment" on page 16-67 before you configure cloned components to use the new branch.
■ Copy Successful, Separate Data: When you have configuration and policy data stored separately in a joint Identity and Access System, proceed to Step 9.
■ Copy Not Successful: Perform activities in "Recovering from Problems With Populating the New Branch" on page 16-39. Also, see the MakeBranch.log file in destination_dir/oblix/tools/MakeBranch.log.
10. On the computer hosting the clone of the first Access Manager that was installed and set up:
a. Destination Creation: Extract 10g (10.1.4.0.1) Policy Manager component libraries and files in a new destination path. For more information, see "Destination Creation: Extracting 10g (10.1.4.0.1) Libraries and Files" on page 16-28. For example:
1014\webcomponent
b. Obtaining the Tools: Apply Release 10.1.4 Patch Set 1 (10.1.4.2.0) to the Policy Manager component libraries and files that you just extracted, as described in "Obtaining Tools: Applying Release 10.1.4 Patch Set 1 (10.1.4.2.0)" on page 16-31.
11. Copy the policy data if it is stored separately, as follows.
a. Change to the file system path containing the 10g (10.1.4.2.0) MigrateOAM script for the Policy Manager instance. For example:
cd 1014\webcomponent\access\oblix\tools\migration_tools
Note: Do not repeat these steps with any other COREid Server instance. Making a new branch is a one time activity with a single COREid Server. If you have a joint Identity and Access System with configuration and policy data stored separately, you will perform Step 9.

Copying Configuration and Policy Data to a New Branch in the LDAP Directory Server
Upgrading the Schema, Data, and Clone System 16-39
b. Run MigrateOAM in Mkbranch mode for the Policy Manager to copy policy data that is stored separately to the new branch, and respond to prompts appropriately for your environment. For example:
1014\webcomponent\access\oblix\tools\migration_tools>MigrateOAM.bat -M Mkbranch -C AM -F 610 -T 1014 -S "C:\clone_np\webcomponent_01\access" -D "C:\1014\webcomponent\access" -I "C:\1014\webcomponent\access"
...Enter new Policy Base : o=NewPolicyBase,o=Policy_base,o=company,c=us The tool ran successfullyPress enter key to continue ... ENTER...Importing data to directory server.....The tool ran successfullyPress enter key to continue ... ENTER....
c. Copy Successful: A message tells you that data was imported to the LDAP directory server and that the tool ran successfully. Proceed to "Validating Successful Operations in Your Environment" on page 16-67 before you configure cloned components to use the new branch.
d. Copy Not Successful: Perform activities in "Recovering from Problems With Populating the New Branch". Also see the MakeBranch.log file in destination_dir/oblix/tools/MakeBranch.log.
Recovering from Problems With Populating the New BranchIf the directory connection failed during the Mkbranch operation, ensure that the LDAP directory server is live and online.
You can check the MakeBranch.log file in destination_dir/oblix/tools/MakeBranch.log to locate the point of failure. For example, the setup.xml file might not have been read.
You can remove the new configuration and policy node that you added to the LDAP directory server so that you can retry the procedure "Copying Configuration and Policy Data to a New Branch in the LDAP Directory Server" anew.
If you do not want to continue upgrading and you want to return to the earlier release, see "Rolling Back Changes Made for the New oblix Branch".
Rolling Back Changes Made for the New oblix BranchIf you have a problem after populating the new branch, you might need to roll back changes.
You can perform Step 1 to remove the new nodes that you added to the LDAP directory server, and then create and populate the branch anew. You can perform all steps in the following procedure to undo all changes to the environment for the zero downtime upgrade and return to the original setup and release.
Note: Do not repeat these steps with any other Access Manager instance. Making a new branch is a one time activity with a single Access Manager.

Configuring Cloned Components and Services
16-40 Oracle Access Manager Upgrade Guide
After rolling back all changes, you will have only the original installation and release available for use. In this case you can use the original installation, or start an in-place upgrade, or restart the zero downtime upgrade from the beginning.
To roll back changes made for the new oblix branch 1. Remove the branches in the LDAP directory server that were added for the new
configuration and policy DNs.
2. Remove the following from host computers:
■ Clone file system directories
■ 10g (10.1.4.0.1) component libraries and files to which you applied Release 10.1.4 Patch Set 1 (10.1.4.2.0)
■ Any file system directories that you have added or that were added automatically as part of any upgrade process
■ The Web server instance for the clones, and any cloned applications that are protected by Oracle Access Manager and that operate with this Web server
3. From the original System Console, remove all clone profiles.
4. Confirm that your original setup is operating properly.
Configuring Cloned Components and ServicesYou perform activities in this section only after creating the new branch (or branches) in the LDAP directory server that were contain a copy of the configuration and policy data.
To ensure that all cloned components are configured properly and that the Identity System and Access System are configured to operate with the data in the new branch, you perform tasks in this section with every cloned component instance. Individual topics in the following task overview provide step-by-step instructions that you can follow when you are ready to do so.
Task overview: Reconfiguring cloned components to use the new branch includes 1. Configuring Cloned COREid Server Services and Details
2. Configuring Cloned WebPass Instances to Operate with Cloned COREid Servers
3. Setting Up the Cloned COREid System to Use the New Branch
4. Setting Up Cloned Access Managers to Use the New Branch
5. Configuring Cloned Access Servers
6. Rolling Back Changes for Reconfigured Clones
Removing Setup Files: At the start of some tasks outlined in the previous overview, you will be instructed to remove several items:
■ setup.*
■ configInfo.*
Note: You should not have a cloned WebGate. There is no need to reconfigure the SDK.

Configuring Cloned Components and Services
Upgrading the Schema, Data, and Clone System 16-41
■ \ldap subdirectory (if there is one)
New versions of these files will be generated during reconfiguration and set up. At the conclusion of the browser-based set up procedures that you perform in tasks 3 and 4, these files will contain the new configuration DN and policy DN. Removing these files when instructed will help ensure that the Identity Server service will start up after set up.
Configuring Cloned COREid Server Services and Details You perform the following procedure using command-line tools that are available within each cloned COREid Server file system directory. On a Windows system, you first need to configure the clone COREid Server service. On all systems, you need to configure the cloned component based on the information for the clone in the System Console.
Windows: To add the cloned COREid Server service entry to the Windows registry, you first run config_ois.exe. The config_ois.exe tool is stored in the file system directory of the clone: \identity\oblix\apps\common\bin. The sample path shown next contains two COREid Server clones, which are used for load balancing. Your environment will be different. For example:
clone_np\ois_01\identity\oblix\apps\common\bin\config_ois.exe clone_np\ois_02\identity\oblix\apps\common\bin\config_ois.exe and so on.
Table 16–3 lists the options and parameters that you will use with the config_ois tool. When you have multiple COREid Server clones, you must perform this task for each instance individually.
The command must be entered as one line without breaks. As the command runs, messages keep you informed.
All Platforms: You run the setup_ois (Windows) and start_setup_ois (non-Windows) tool to configure the host name, port, and other details for the cloned instance. When
Note: In tool names, the abbreviation "ois" refers to the Oracle Identity Server
Table 16–3 Options for config_ois (Windows Only)
Command Options Operation
-i "clone_dir" Specifies the full directory path (in quotation marks) to the cloned COREid Server. For example:
Windows: -i "C:\clone_np\ois_01\identity"
Unix: -i "/home/clone_np/ois_01/identity"
-v clone_COREidServer_service Specifies the unique name of this cloned COREid Server Service.
-a install Specifies the action to be performed. In this case, use install as the action.
Note: Be sure to specify the information for each clone instance based on what is entered in the System Console for that instance.

Configuring Cloned Components and Services
16-42 Oracle Access Manager Upgrade Guide
you run this tool, you will use only the -i option and specify the cloned instance file system path, as shown in Table 16–4.
Be sure to enter the command and parameters on a single line. You will be prompted to provide details for the cloned instance, including:
■ The unique clone COREid Identifier
■ The clone COREid Server Hostname
■ The port on which the clone COREid Server listens.
■ The security mode for the clone.
■ Whether this is the first installed COREid Server: Answer No
Be sure to specify information for each clone instance based on the information for the instance in the System Console. Answer "No" when asked if this is the first COREid Server in the installation. When you have multiple COREid Server clones, you must perform this task for each instance individually.
When the command finishes, the clone is reconfigured based on the information that you supplied. The ois_server_config.xml file in clone_dir\identity\oblix\config file system directory will reflect the details that you supplied. For more information about these tools, see your Oblix NetPoint or Oracle COREid Administration Guide.
Browser-Based Setup: After reconfiguring the cloned COREid Server, you need to reconfigure the cloned WebPass. After reconfiguring WebPass, you will also need to perform a browser-based setup for the cloned Identity System. Details are provided in later topics as you need them.
Audit Policy Data for a Joint Identity and Access System: During COREid Server reconfiguration in a joint Identity and Access System, audit policy values might be returned to original default values as shown in Table 16–5. Step 1 of the following reconfiguration procedure directs you to export your audit policy data to a Lightweight Directory Interchange Format (LDIF) file using an external tool. After reconfiguring the clone, you then import this data. LDIF files are ASCII format files that you can use to exchange and synchronize data between Lightweight Directory Access Protocol (LDAP) servers using an external tool. Details about using external tools is outside the scope of this manual.
Specific file system paths and other details in the following procedure are shown only as an example. Your details will be different.
Table 16–4 setup_ois and start_setup_ois parameters
Command Options Operation
-i "clone_dir" Specifies the full file system path (in quotation marks) to the cloned COREid Server. For example:
Windows: -i "C:\clone_np\ois_01\identity"
Unix: -i "/home/clone_np/ois_01/identity"
Table 16–5 Example of Audit Policies Before and After Reconfiguring COREid Server Clones
Event NameApplication Auditing Enabled Audit Success Audit Failure
Before Reconfiguring Search Yes Yes Yes
After Reconfiguring Search Yes No Yes
Configuring Cloned Components and Services
Upgrading the Schema, Data, and Clone System 16-43
To reconfigure the cloned COREid Server service1. Audit Policy Correction for a Joint Identity and Access System: On a computer
hosting the cloned COREid Server, export the following nodes to a backup LDIF file (you perform this step one time only):
obname=common,obpolicyContainerId=WebResrcDB, obcontainerId=Policies, o=oblix, your_new_configuration_DN
obname=corpdir,obpolicyContainerId=WebResrcDB, obcontainerId=Policies, o=oblix,your_new_configuration_DN
obname=objservcenter,obpolicyContainerId=WebResrcDB, obcontainerId=Policies, o=oblix,your_new_configuration_DN
obname=userservcenter,obpolicyContainerId=WebResrcDB, obcontainerId=Policies, o=oblix, your_new_configuration_DN
obname=groupservcenter,obpolicyContainerId=WebResrcDB, obcontainerId=Policies, o=oblix, your_new_configuration_DN
2. On a computer hosting the cloned COREid Server instance, delete the following files from the file system path \identity\oblix\config directory. For example:
clone_np\ois_01\identity\oblix\config
■ setup.xml*
■ configInfo.xml*
■ \ldap subdirectory (if there is one)
3. Windows, config_ois: Perform the following steps to set up the registry entry for this clone:
a. Change to the file system path that contains the config_ois tool for this clone. For example:
cd \clone_np\ois_01\identity\oblix\apps\common\bin\config_ois.exe
b. Run the config_ois.exe tool using the -i, -v, and-a parameters with specifications for this cloned instance. For example:
config_ois.exe -i "C:\clone_np\ois_01\identity" -v clone_COREid_Service -a install
c. Confirm that the COREid Server service entry was added to the Windows registry and that the component’s messagedll.dll library was copied to the Windows/system32/messagedll.dll directory.
4. Change to the cloned file system path that contains the COREid Server set up tool:
Windows: clone_np\ois_01\identity\oblix\tools/setup/setup_ois
Unix: /home/clone_np/ois_01/identity/oblix/tools/setup/start_setup_ois
5. Run the tool using the following command parameters and provide specifications for your cloned COREid Server service and environment:
Windows:
setup_ois.exe -i "C:\clone_np\ois_01\identity"
Unix:
./start_setup_ois -i "/home/clone_np/ois_01/identity"

Configuring Cloned Components and Services
16-44 Oracle Access Manager Upgrade Guide
6. Follow the on-screen prompts and respond with details for this cloned COREid Server instance and COREid Server service.
a. Unique COREid Identifier: Enter the name of the clone COREid Service that you entered in the System Console.
b. COREid Server Hostname: Enter the DNS hostname where the clone COREid Server resides.
c. COREid Server Port: Enter the port on which the clone COREid Server listens, as specified in the System Console.
d. Security Mode [open\simple\cert]: Enter the mode that is specified in the System Console.
e. Do you want to set up SSL between the COREid Server and the Directory Server [y/n]: Respond appropriately for your original connection.
f. First COREid Server: Answer "No" when asked if this is the first COREid Server in the installation.
7. Check the ois_server_config.xml file in the clone file system path: \identity\oblix\config file system directory to ensure that it includes the details that you supplied during Step 6.
8. Proceed as follows:
■ Successful: If the information appears in the file mentioned in step 7, the operation was successful. Proceed to Step 9.
■ Not Successful: If the configuration DN does not appear in the files mentioned in step 7, the operation failed. In this case, see "Rolling Back Changes for Reconfigured Clones" on page 16-60.
9. Restart the cloned COREid Server service, and proceed as follows:
■ Successful: Proceed to Step 10 if you have a joint Identity and Access System. Otherwise, skip to step 11.
■ Not Successful: Confirm that the cloned COREid Server service is running.
10. Repeat steps 2 through 7 to configure and check every cloned COREid Server instance.
Continue with Step 11 only after configuring every cloned COREid Server instance.
11. Audit Policy Correction for a Joint Identity and Access System: Perform the following steps (one time only) to replace default audit policy data with your original audit policy data:
a. Delete the following nodes from the new branch in the directory (your new configuration DN):
obname=common,obpolicyContainerId=WebResrcDB, obcontainerId=Policies, o=oblix, your_new_configuration_DN
obname=corpdir,obpolicyContainerId=WebResrcDB, obcontainerId=Policies, o=oblix,your_new_configuration_DN
obname=objservcenter,obpolicyContainerId=WebResrcDB, obcontainerId=Policies, o=oblix,your_new_configuration_DN
obname=userservcenter,obpolicyContainerId=WebResrcDB,

Configuring Cloned Components and Services
Upgrading the Schema, Data, and Clone System 16-45
obcontainerId=Policies, o=oblix, your_new_configuration_DN
obname=groupservcenter,obpolicyContainerId=WebResrcDB, obcontainerId=Policies, o=oblix, your_new_configuration_DN
b. Import the LDIF file that you created for audit policy data correction in Step 1.
12. Proceed to "Configuring Cloned WebPass Instances to Operate with Cloned COREid Servers".
Configuring Cloned WebPass Instances to Operate with Cloned COREid ServersYou use the procedure in this topic using command-line tools that are stored in the cloned WebPass file system directory. The tools enable you to reconfigure your cloned WebPass to communicate with cloned COREid Servers. This task is divided into the following phases:
■ Web server configuration
■ WebPass set up
Web Server Configuration: The tool that you use to configure a new Web server instance to operate with this WebPass clone is included in the file system path of the cloned WebPass. For example:
Windows: clone_np\webcomponent_01\identity\oblix\apps\common\ bin\toolname
Unix-based Systems: /home/clone_np/webcomponent_01/identity/oblix/tools/ setup/InstallTools/toolname
In the example, the term Unix-based systems refers to supported platforms such as Linux and Solaris. In the sample path clone_np\webcomponent_01\identity refers to one of two cloned WebPass instances on this host. The Web server configuration tool name depends upon the type of Web server you are using. For example:
■ EditObjConf is used for Sun (formerly Netscape/iPlanet) Web servers
■ EditHttpConf is used for Apache, Oracle HTTP Server (OHS), and IBM HTTP (IHS) Web servers
■ configureIIS4webpass.bat is used for Microsoft Internet Information Server (IIS Web server for Windows environments)
The Web server configuration tool is interactive. You must provide all requested details for the WebPass clone.
During the update, the Web server configuration file is backed up automatically. The backup files are stored in the same directory as the original configuration file. For example, if your Web server instance is Apache the backup files are http.conf.ORIG, http.conf.ORIG1, http.conf.ORIG2. If you are using an iPlanet/SunOne Web server, configuration files are magnus.conf and obj.conf, which are stored as:
iPlanet/SunOne: WebServer_install_dir/https-instanceName/config
You need to restart the Web server instance each time you update the Web server configuration file. Changes will not take effect until you restart the Web server.
WebPass Set Up: After configuring the Web server to operate with the WebPass clone, you use the WebPass set up tool to enable the cloned WebPass to communicate with the cloned COREid Server. The tool is included in each cloned WebPass file system path but is named differently depending on the platform. For example:

Configuring Cloned Components and Services
16-46 Oracle Access Manager Upgrade Guide
Windows: clone_np\webcomponent_01\identity\oblix\tools\setup\setup_ webpass
Unix: /home/clone_np/webcomponent_01/identity/oblix/tools/setup/start_setup_ webpass
In the example, Unix refers to supported Unix-based platforms such as Linux and Solaris. Options for tool are shown in Table 16–6. When running this tool, you can specify only the -i option and all other information will be requested automatically. If you have multiple WebPass clone instances, you must repeat this operation with each clone instance.
The command should be entered as one line, without breaks. As the command is performed, messages keep you informed and you might be asked to supply information for this WebPass clone. Be sure to specify information for the specific instance and environment.
The following procedure provides the steps that you need to perform. Steps 1 through 4 are related to Web server reconfiguration. In this example, the EditObjConf is used as an example. Steps 5 through 8 describe WebPass reconfiguration. After reconfiguring all WebPass clone instances, you perform step 9. Path and host names in following steps are presented as an example. Your details will be different.
To modify a cloned WebPass to operate with the cloned COREid Server 1. Change to the file system path that contains the Web server configuration update
tool for the cloned WebPass. For example:
cd Windows: clone_np\webcomponent_01\identity\oblix\apps\common\ bin\toolname
Unix: /home/clone_np/webcomponent_ 01/identity/oblix/tools/setup/ InstallTools/toolname
Table 16–6 Options for setup_webpass and start_setup_webpass
Command Options Operation
-i "WebPass_clone_dir" Specifies the full directory path to (in quotation marks) your cloned WebPass is stored. For example:
Windows: -i "C:\clone_np\webcomponent_01\identity"
Unix: -i "/home/clone_np/webcomponent_01/identity"
-q -n WebPass _name Specifies the unique name of this WebPass clone.
-h clone_COREidServer_Hostname Specifies the computer name where the cloned COREid Server resides.
-p clone_COREidServer_port_# Specifies the port number of the computer where the cloned COREid Server resides.
-s mode Specifies the transport security mode for the cloned COREid Server and cloned WebPass: open or simple or cert.
-P simple|cert mode password Specifies the password for either the Simple or Cert transport security mode.
-c request|install Specifies a certificate request or installation
Configuring Cloned Components and Services
Upgrading the Schema, Data, and Clone System 16-47
In this sample path, clone_np\webcomponent_01\identity is the file system where the cloned WebPass resides and EditObjConf is the name of the Web server configuration update tool for this (Sun) Web server.
2. Run the update tool using the -f, -d, and -i options with specifications for the cloned WebPass, and then respond to prompts with details for your environment. For example:
Windows:
EditObjConf.exe -f "C:\clone_Webserver_config_dir" -d "C:\clone_np\ webcomponent_01\identity" -i
Unix:
./EditObjConf -f "/home/clone_Webserver_config_dir" -d "/home/clone_np/ webcomponent_01/identity" -i
3. Note the location of the backed up Web server configuration file that is created automatically during this operation.
4. Restart the Web server.
5. Proceed as follows:
■ Successful: Status messages tell you that this operation was successful. Afterward, you can compare the back up copy of the Web server configuration file with the updated version. Proceed to Step 5.
■ Not Successful: Proceed to "Rolling Back Changes for Reconfigured Clones" on page 16-60.
6. Change to the file system path that contains the set up utility for the cloned WebPass instance. For example:
cd Windows: clone_np\webcomponent_01\identity\oblix\tools\setup\setup_ webpass
Unix: /home/clone_np/webcomponent_01/identity/oblix/tools/setup/start_setup_ webpass
7. Run the tool using the following options (see also Table 16–6) and specifications for your cloned environment. For example:
setup_webpass -i "C:\clone_np\webcomponent_01\identity"
8. Follow the on-screen prompts and respond with details for this cloned WebPass and the associated COREid Server clone.
a. Unique WebPass Identifier: Enter the name of the clone WebPass that appears in the System Console.
b. COREid Server Hostname: Enter the DNS hostname where the associated clone COREid Server resides.
c. COREid Server Port: Enter the port on which the associated cloned COREid Server listens, as specified in the System Console.
d. Security Mode [open\simple\cert]: Enter the mode that is specified in the System Console.
9. Proceed as follows:

Configuring Cloned Components and Services
16-48 Oracle Access Manager Upgrade Guide
■ Successful: Proceed to Step 9.
■ Not Successful: Proceed to "Rolling Back Changes for Reconfigured Clones" on page 16-60.
10. Repeat this entire procedure to reconfigure every cloned WebPass.
11. When all cloned WebPass instances are reconfigured, proceed to "Setting Up the Cloned COREid System to Use the New Branch".
Setting Up the Cloned COREid System to Use the New BranchAfter configuring all cloned COREid Servers and WebPass instances, you perform tasks in this topic to set up the cloned COREid System to use the new configuration DN.
During this browser-based set up, you will need to provide some details from the original installation: for example, the LDAP directory server type, the location of user data, and the searchbase that was defined when you set up the original COREid System. You can locate these details in the setup.xml file within the original file system path of the first COREid Server to be installed. In this example, the file will be stored within np611\ois_01\identity\oblix\config\setup.xml. For more information about setting up the COREid System, see your earlier NetPoint or Oracle COREid Installation Guide.
Extra Directory Profiles for Split Directory Configurations: When you have data stored separately, extra directory server profiles might be created during the COREid Server reconfiguration. For example, you might have user data stored in Active Directory and policy and configuration data stored in ADAM.
All the directory server profiles are stored in the directory server under obcontainerId=DBAgents,o=Oblix,<Config DN>. When a profile is created during system setup, the name in the System Console is same in the backend directory server under the mentioned node. However, when profiles are manually created, the nodes in the backend directory server are created with a timestamp as their name. Example 16–3, illustrates a directory profile created in a typical 10.1.4 installation.
Example 16–3 LDAP Directory Profile for Oracle Access Manager
obcontainerId=DBAgents,o=Oblix,dc=us,dc=oracle,dc=com-obname=default-IDSERVER,obcontainerId=DBAgents, o=Oblix,dc=us,dc=oracle,dc=com-obname=AccessManager_setup_user_profile,obcontainerId=DBAgents, o=Oblix,dc=us,dc=oracle,dc=com-obname=AccessServer_default_user_profile,obcontainerId=DBAgents, o=Oblix,dc=us,dc=oracle,dc=com
After setting up the clone COREid Server and WebPass, you need to check for and then delete the "Oblix Base" profile for the original COREid Server because this profile does not include the new configuration DN. Before you set up the Access Manager clone, you will also need to delete the "Policy Base" profile for the original Access Manager because it does not include the new policy DN.
Tools to Remove Extra Directory Server Profiles: When the profiles are in a consistent state, you can delete them from the System Console. However, if you cannot delete the
Note: Removing "Oblix Base" and "Policy Base" profiles for the original COREid Server and the original Access Server is required only when data is stored in a split directory server configuration.

Configuring Cloned Components and Services
Upgrading the Schema, Data, and Clone System 16-49
older profiles using the System Console, you will have to use external tools to perform the removal.
The following procedure provides the steps that you must perform to set up the clone COREid System for the new branch. Path and host names are provided as an example only. Your details will be different. For more information about setting up the COREid System, see your Oblix NetPoint or Oracle COREid Installation Guide.
To set up the cloned COREid System with the new branch 1. Locate original details for the installation in the setup.xml in the original COREid
Server installation directory. For example:
Original: np611\identity_01\oblix\config\setup.xml
2. Ensure that the Web server that is serving the clone WebPass is running and go to the cloned COREid System Console, as usual. For example:
Clone:
http://hostname:port/identity/oblix/
In the sample URL, hostname refers to computer that hosts the cloned WebPass Web server; port refers to the HTTP port number of the new Web server instance for the WebPass clone; and /identity/oblix connects to the cloned COREid home page that includes the COREid System Console link.
The cloned WebPass will connect to the cloned COREid Server and launch the setup page.
3. Click the COREid (or Identity) System Console link.
The clone System Console setup page appears.
4. Click the Setup button.
5. Follow the on-screen instructions and those here to set up the cloned Identity System:
a. Confirm LDAP directory server details for the new directory branch.
b. Enter the root bind DN for user data.
c. Enter the new configuration DN and the original user data searchbase. For example:
Configuration DN—o=Newbranch,o=company,c=us
Searchbase—Supply the original searchbase
d. Finish this setup procedure leaving all other details as they are.
e. Restart the clone COREid Server service when instructed to do so by an on-screen message.
6. Go to the \identity\oblix\config file system directory and confirm that the new information you supplied appears in the following files:
Note: While using external tools is outside the scope of this manual, you can view an example of steps to remove an extra profile using the LDP Console program in "Alternative: Using the External LDP Console to remove a profile" on page 16-51. These are only an example.

Configuring Cloned Components and Services
16-50 Oracle Access Manager Upgrade Guide
■ setup.xml
■ configInfo.xml
■ \ldap directory
7. Go to the clone COREid System Console and verify that the Directory Server profile for the cloned COREid Server has the new configuration DN, as follows:
a. Go to your clone COREid System Console, as usual.
http://hostname:port/identity/oblix/
b. From the COREid System Console click the System Admin tab, then click the System Configuration tab.
c. Click Configure Directory Options in the left column to display the Configure Profiles page.
d. Click the name of an existing directory profile to display its specifications.
e. Confirm that the new configuration DN appears in the profile.
8. Extra Directory Profiles in a Split Directory Server Configuration: When you have data stored in different directory servers, perform the following steps to remove any directory profiles that contain original (older) configuration or policy DNs in a split directory server situation:
a. From your clone COREid System Console, click the System Admin tab, then click the System Configuration tab.
b. Click Configure Directory Options in the left column of the System Configuration tab.
c. On the Configure Directory Server profiles page, check the box beside the name of any new directory profile that was created during this reconfiguration.
d. Click the Delete button to remove the extraneous LDAP directory server profile.
e. When prompted, click OK to confirm your decision.
9. Restart cloned COREid Server services (and Access Manager Web servers).
10. Proceed as follows:
■ Configuration Successful, Identity System Only: Proceed to "Upgrading the Schema During a Zero Downtime Upgrade" on page 16-61.
■ Configuration Successful, Joint Identity and Access System: Proceed to "Setting Up Cloned Access Managers to Use the New Branch" on page 16-40.
Note: Do not select or delete the original LDAP directory server profile, or any profile that you or the team added for the cloned set up.
Note: If you cannot delete the profile using the System Console you need to use external tools to remove the older profiles as described in "Alternative: Using the External LDP Console to remove a profile" on page 16-51.

Configuring Cloned Components and Services
Upgrading the Schema, Data, and Clone System 16-51
■ Configuration Not Successful: Remove the files named in Step 6 and re-run setup_ois (Windows) or start_setup_ois (non-Windows) as described in "Configuring Cloned COREid Server Services and Details" on page 16-41. Otherwise, see "Rolling Back Changes for Reconfigured Clones" on page 16-60.
If you need to remove an extra profile using an external tool, the following sample procedure might be helpful. Using external tools is outside the scope of this manual.
Alternative: Using the External LDP Console to remove a profile1. Open the Console using ldp.exe.
2. From the Connection tab, select Connect.
3. Enter the LDAP directory server computer name and port, and then click OK.
4. Select the Bind from the Connection tab.
5. In the User text box, enter the bind DN for your LDAP directory server; enter the password; ensure that the domain is unchecked; click OK.
Success is indicated by an message saying "Authenticated....". Otherwise, an error message appears.
6. Proceed as follows:
■ Successful: Proceed with Step 7.
■ Not Successful: Retry the bind operation again and ensure that you enter the exact bind DN and password.
7. Select Tree from the View tab.
8. Enter the configuration DN (Identity Server or policy DN for the Access Manager) for the LDAP directory server, then click OK.
9. Select the new node that was created during the make branch operation (Mkbranch).
10. Within the new node, locate the node that starts with the following:
obcontainerId=DBAgents,OU=Oblix,OU=NewNode.....
11. Within the node you located, check for extra profiles by looking for attribute values (mostly identified by profile name).
12. After confirming the extra profile is to be deleted, right-click the profile and then select Delete.
13. Verify the node in the DN field; if it is the correct one, check all boxes (extended, synchronous and recursive), and then click OK.
14. Ensure that you receive a message confirming the removal. For example "deleted 1 entries."
Setting Up Cloned Access Managers to Use the New BranchYou perform this task only if you have a joint Identity and Access System. Otherwise, skip to "Upgrading the Cloned Identity System" on page 16-70.
This task is divided into two parts.
Task overview: Configuring cloned Access Managers to use the new branch 1. Updating Cloned Access Manager Web Server Configuration Files

Configuring Cloned Components and Services
16-52 Oracle Access Manager Upgrade Guide
2. Setting Up the Cloned Access Manager to use the New Branch
Updating Cloned Access Manager Web Server Configuration Files The steps that you perform to configure cloned Access Managers to operate with the new branch in the LDAP directory server are similar to the steps that you have already performed for the cloned COREid System. In this case, you update the Web server configuration file using the tools provided in your cloned Access Manager file system directory.
Web Server Configuration: The tool that you use to update the Web server configuration to operate with the cloned Access Manager resides in the cloned Access Manager file system path. For example:
Windows: clone_np\webcomponent_01\access\oblix\apps\common\bin\toolname
Unix: /home/clone_np/webcomponent_01/access/oblix/tools/setup/InstallTools/ toolname
In the sample path, clone_np\webcomponent_01\access refers to one of two cloned Access Manager instances. The name of the Web server configuration tool depends upon the type of Web server that you are using. For example:
■ EditObjConf is used for Sun (formerly Netscape/iPlanet) Web servers
■ EditHttpConf is used for Apache, Oracle HTTP Server (OHS), and IBM HTTP (IHS) Web servers
■ configureIIS4accesssystem.bat is used for Microsoft Internet Information Server (IIS Web server for Windows environments)
The command must be entered on one line with no breaks. During the update, the Web server configuration file is backed up automatically. The backup files are stored in the same directory as the original configuration file. For example, if your Web server instance is Apache the backup files are http.conf.ORIG, http.conf.ORIG1, http.conf.ORIG2. If you are using an iPlanet/SunOne Web server, configuration files are magnus.conf and obj.conf, which are stored as:
iPlanet/SunOne: WebServer_install_dir/https-instanceName/config
You need to restart the Web server instance each time you update the Web server configuration file. Changes will not take effect until you restart the Web server.
The following procedure provides the steps that you need to perform. Path and host names are presented as an example only. Your details will vary.
To modify a cloned Access Manager Web server 1. Change to the file system path that contains the appropriate update tool for the
Web server serving the clone Access Manager. For example:
cd Windows: clone_np\webcomponent_01\access\oblix\apps\common\bin\ toolname
Unix: /home/clone_np/webcomponent_01/access/oblix/tools/setup/InstallTools/ toolname
2. Run the tool using the -f, -d, and -i options, and specifications for your cloned Access Manager; respond to any prompts with details for your environment. For example:

Configuring Cloned Components and Services
Upgrading the Schema, Data, and Clone System 16-53
Windows:
EditObjConf.exe -f "C:\clone_Webserver_config_dir" -d "C:\clone_np\ webcomponent_01\access" -i
Unix:
./EditObjConf -f "/home/clone_Webserver_config_dir" -d "/home/clone_np/ webcomponent_01\access" -i
In the sample path name, clone_Webserver_config_dir is the directory for the Web server configuration file that will be used with the cloned Access Manager.
3. Note the location of the backed up Web server configuration file that is created automatically during this operation.
4. Restart the Web server instance and confirm that the Access Manager Web server configuration update was successful and proceed as follows:
■ Successful: Proceed to "Setting Up the Cloned Access Manager to use the New Branch".
■ Not Successful: Proceed to "Rolling Back Changes for Reconfigured Clones" on page 16-60.
Setting Up the Cloned Access Manager to use the New BranchAfter updating the configuration file of the Web server for the clone Access Manager, you need to set up the cloned Access Manager. You perform this task to use the cloned Access Manager is using the new configuration DN and policy DN.
During this browser-based setup you will need to provide details from the original installation. For example, you need to provide the LDAP directory server type, the location of user data, the searchbase, and the Person Object Class that was defined when you set up the original COREid System. You can locate the Person Object Class and other details in the setup.xml file within the original COREid Server file system. For example, np611\ois_01\identity\oblix\config\ setup.xml.
You will also need to supply new information, including the new branch in the directory where configuration and policy data are stored.
The following procedure provides the steps that you need to perform. Path and host names are presented as an example only. Your details will be different. For more information about setting up the Access Manager, see also your NetPoint or Oracle COREid Installation Guide.
To set up a cloned Access Manager to operate with the new branch 1. Locate details for the original installation in the setup.xml file of the original
COREid Server. For example:
Original Installation: np611\identity_01\oblix\config\setup.xml
2. Delete the following files in the file system path for the cloned Access Manager instance. For example:
clone_np\webcomponent_01\access\oblix\config
Note: If your starting release is 6.1.1, you will have files named setup.lst and configInfo.lst rather than setup.xml and configInfo.xml.

Configuring Cloned Components and Services
16-54 Oracle Access Manager Upgrade Guide
■ setup.*
■ setup_am.*
■ configInfo
■ \ldap subdirectory (if there is one)
3. Ensure that the Access Manager Web server is running.
4. Go to the clone Access System Console.
http://hostname:port/access/oblix/
In the sample URL, hostname refers to computer that hosts the clone WebPass; port refers to the HTTP port number of the new Web server instance for the WebPass clone; /access/oblix connects to the clone Access System Console.
The WebPass will connect to the cloned Access System Console.
5. Click the clone Access System Console link to display the Setup page, and then click the Setup button.
6. Set up the Access Manager to use the new configuration DN and policy base, as follows:
a. Enter and confirm LDAP directory server details, including the LDAP directory server type and the location and details for user data and configuration data.
b. Enter information for user data (the original search base), and the new configuration DN and new policy DN (base). For example:
Search Base—Enter the original searchbase.
Configuration DN—o=Newbranch,o=company,c=us
Policy Base——o=NewPolicyBase,o=Policy_base,o=company,c=us
c. Proceed through remaining Access Manager setup pages and leave all other details as they are.
d. Enter the original Person Object Class that was selected during the original COREid System setup.
e. Restart the Web server and Identity Server service when instructed to do so.
f. After the Web server restarts, click Next and accept the default Policy Domain Root (or specify the root for your original installation).
g. Continue, but do not configure authentication schemes or policies to protect NetPoint URLs.
h. Click done when set up is complete.
7. Verify that the Directory Server profile has the new configuration DN and policy base, as follows:
a. Go to the clone Access System Console, as usual.
http://hostname:port/access/oblix/
b. Click Access System Console, click System Configuration, then click Server Settings.
c. Click the Directory Server link to display the Directory Server Configuration page.

Configuring Cloned Components and Services
Upgrading the Schema, Data, and Clone System 16-55
d. Confirm that the configuration DN and the policy base are correct for the new branch in the directory, and then click Cancel.
e. Extra Directory Profiles in a Split Directory Server Configuration: Check for and remove any extra directory server profiles that might have been added for the Access Manager and Access Server. For more information, refer to the discussion about extra profiles in "Setting Up the Cloned COREid System to Use the New Branch" on page 16-48 and see Oracle Access Manager Identity and Common Administration Guide.
8. Proceed as follows:
■ Successful: Proceed with Step 9.
■ Not Successful: Remove the files named in Step 2 and re-run browser-based setup as described in this procedure. Otherwise, perform to "Rolling Back Changes for Reconfigured Clones" on page 16-60.
9. In the configuration files for this clone instance, confirm that the new configuration DN appears. For example:
clone_np\webcomponent_01\access\oblix\config
■ setup.* (setup.xml is the name on the COREid Server but setup.lst was used for Access Manager 7.0 and earlier)
■ setup_am*
■ configInfo
10. Proceed as follows:
■ Successful: If the new configuration DN and policy base appear in the files mentioned in step 9, the operation was successful. Proceed to Step 11.
■ Not Successful: If the new configuration DN and policy base do not appear in the files mentioned in step 9, the operation failed. In this case, perform this entire procedure again. Otherwise, see "Rolling Back Changes for Reconfigured Clones" on page 16-60.
11. Repeat the following procedures to reconfigure every cloned Access Manager instance:
■ Updating Cloned Access Manager Web Server Configuration Files
■ Setting Up the Cloned Access Manager to use the New Branch
12. When all cloned Access Manager instances are reconfigured, proceed to "Configuring Cloned Access Servers".
Configuring Cloned Access ServersYou perform this task only if you have a joint Identity and Access System deployed. Otherwise, skip to "Upgrading the Cloned Identity System" on page 16-70.
You will use the configureAAAserver.exe tool (Windows) to perform this procedure. On Unix-based platforms this tool is called start_configureAAAServer. The tool is
Note: Do not select or delete the original LDAP directory server profile, or any profile that you or the team added for the cloned set up.

Configuring Cloned Components and Services
16-56 Oracle Access Manager Upgrade Guide
stored in the file system path for the instance. The name of the file differs between platforms. For example:
Windows: clone_np\aaa_01\access\oblix\tools\configureAAAServer\ configureAAAServer.exe
Unix: /home/clone_np/aaa_01/access/oblix/tools/configureAAAServer/ start_configureAAAServer
These are interactive tools. After starting the tool, you will be asked to provide details for the cloned Access Server, including:
■ The transport security mode for the cloned Access Server
■ The security mode in which the user directory is running
■ The host computer on which the user directory resides
■ The port number on which the user directory listens
■ The bind DN of the user directory
■ The password of the user directory
■ The directory type for user data
■ The location where copied oblix (configuration) data is stored
■ The new configuration DN
■ The new policy base
■ The cloned Access Server ID
■ Start the Access Server service
■ Specify failover information if you want to
The information that you enter for each clone must match the information for the clone that appears in the System Console.
Extra directory profiles might be created for cloned Access Servers during this reconfiguration. You will be instructed to remove any extra directory profiles when you verify the reconfigured Access System.
Path and host names in the following procedure are samples only. Your details will be different. For more information, see the NetPoint or Oracle COREid Administration Guide for information on the configureAAAserver tool and LDAP directory server configurations.
To reconfigure a cloned Access Server to use the new branch1. Change to the file system path that contains the configureAAAserver tool for the
clone Access Server. For example:
cd Windows: clone_np\aaa_01\access\oblix\tools\configureAAAServer\ configureAAAServer.exe
Unix: /home/clone_np/aaa_01/access/oblix/tools/configureAAAServer /start_configureAAAServer
2. Run the tool using the install option. For example:
Windows:

Configuring Cloned Components and Services
Upgrading the Schema, Data, and Clone System 16-57
configureAAAServer.exe install "C:\clone_np\aaa_01\access"
Unix:
./start_configureAAAServer install "/home/clone_np/aaa_01/access"
3. Read the on-screen prompts and specify details for your clone when prompted.
■ The transport security mode for the cloned Access Server
■ The security mode in which the user directory is running
■ The host computer on which the user directory resides
■ The port number on which the user directory listens
■ The bind DN of the user directory
■ The password of the user directory
■ The directory type for user data
■ The location where copied oblix (configuration) data is stored
■ The new configuration DN
■ The new policy base
■ The cloned Access Server ID
■ Start the Access Server service
■ Specify failover information if you want to
4. Write the name of the cloned Access Server service, then restart the service (do not specify or update the failover information).
5. Confirm that the information you entered is included in the aaa_server_config.xml file (in the clone_np\aaa_01\access\oblix\config\aaa_server_config.xml).
6. Proceed as follows:
■ Successful: If the new policy base appears in the files mentioned in step 6, the operation was successful. Proceed to Step 7.
■ Not Successful: If the new policy base does not appear in the files mentioned in step 5, the operation failed. In this case:
– Check migration log files for any errors reported during the upgrade, as described in "Accessing Log Files" on page G-2.
– Check your event and Access Server log output files. For more information about logging and log output files, see the Oracle Access Manager Identity and Common Administration Guide.
– See "Rolling Back Changes for Reconfigured Clones" on page 16-60.
7. Verify that the LDAP directory server profile for the cloned Access Server has the new configuration DN and policy base, as follows:
a. Go to the clone Access System Console, as usual.
http://hostname:port/acces/oblix/
b. Click Access System Console, click System Configuration, then click Server Settings.
c. Click the Directory Server link to display the Directory Server Configuration page.

Configuring Cloned Components and Services
16-58 Oracle Access Manager Upgrade Guide
d. Confirm that the new configuration DN and the policy base are correct for the copied directory, and then click Cancel.
e. Extra Directory Profiles in a Split Directory Server Configuration: Check for and remove any extra directory server profiles that might have been added for the Access Manager and Access Server. For more information, refer to the discussion about extra profiles in "Setting Up the Cloned COREid System to Use the New Branch" on page 16-48 and see the Oracle Access Manager Identity and Common Administration Guide.
8. Proceed as follows:
■ Successful: Perform this entire procedure to configure each Access Server clone and then proceed to step 10.
■ Not Successful: Proceed to "Rolling Back Changes for Reconfigured Clones" on page 16-60.
9. When all Access Server clones are configured for the new policy base, proceed to "Upgrading the Schema During a Zero Downtime Upgrade" on page 16-61.
Isolating EnvironmentsThis task is optional. This is helpful when you plan to have an extended testing and familiarization period with the upgraded cloned environment. The clone environment and the original environment are upgraded and operate independently whether you perform this optional task or not. The two environments will share the upgraded schema, whether you perform this optional task or not.
You can perform this optional task at any time after you reconfigure clones to use the new branch in the LDAP directory. You can add new WebGates to the cloned environment. However, adding new WebGates can only be done after upgrading the entire clone setup. Until then, retain original WebGates that are associated with cloned Access Servers.
You can choose to isolate either the clone environment, the original environment, or both environments:
■ Immediately after reconfiguring clones
■ Immediately after upgrading clones
■ Not at all
As discussed in "About Isolating the Original and Cloned Environments" on page 15-22, if the clone profiles are removed from the original System Console and you decide to perform a roll back and restart the clone upgrade, you must re-enter the clone profiles. Also, if you decide to retrieve new information that was added to the original branch you will need to reconfigure and upgrade clone instances again. In this case, you will need clone profiles in the original System Console.
Note: Do not select or delete the original LDAP directory server profile, or any profile that you or the team added for the cloned set up.
Caution: Retain original WebGates that are associated with cloned Access Servers until you have upgraded the entire clone system.

Configuring Cloned Components and Services
Upgrading the Schema, Data, and Clone System 16-59
For more information about isolating environments, see the following topics:
■ Isolating the Clone Setup and Providing WebGate Coverage
■ About Isolating the Original Setup
Isolating the Clone Setup and Providing WebGate Coverage This task is optional. This procedure explains how you can isolate the upgraded clone setup.
To isolate the clone setup, you remove original instance profiles from the clone System Console. Within the clone setup, you will need to replace original WebGates with new WebGates. However, you can add new WebGates to the cloned environment only after upgrading the entire clone setup.
In an Identity System only environment, you disable or remove original COREid Server and WebPass profiles from the clone System Console. In a joint Identity and Access System, you also disable or remove original Access Server from the clone System Console.
Before you disable or remove original WebGate profiles that are associated with Access Server clones, you must add new WebGate instances to replace the functionality of the originals. You can add new WebGates to the cloned environment only after upgrading the entire clone setup. Until then, retain original WebGates that are associated with cloned Access Servers.
Oracle recommends that you have more than one WebGate to avoid downtime. Alternatively, you can keep the older WebGate and not upgrade it because it will work with the upgraded Access Server. Having only one WebGate will result in downtime when upgrading that WebGate (or when rolling back).
To isolate the clone setup and provide WebGate coverage 1. In the clone System Console:
■ Disable or remove profiles for original COREid Servers
■ Disable or remove profiles for original WebPass instances
■ Disable or remove original Directory Profiles
■ Disable or remove profiles for original Access Server
■ Do not disable or remove the profiles of original WebGates that are associated with clone Access Servers until you have upgraded the entire clone system.
2. Add New WebGates After Upgrading and Validating the Upgraded Clone System:
a. In the clone Access System Console, add specifications for a new WebGate that match those of an original WebGate that is associated with a clone Access Server.
b. In the clone Access System Console, associate the new WebGate with an Access Server clone.
Note: The WebGate name and port should be unique. For more information, see the Oracle Access Manager Installation Guide.

Configuring Cloned Components and Services
16-60 Oracle Access Manager Upgrade Guide
c. Install a 10g (10.1.4.0.1) WebGate and assign the WebGate identifier that you just added in the clone Access System Console, as described in the Oracle Access Manager Installation Guide.
d. Apply the Release 10.1.4 Patch Set 1 (10.1.4.2.0) to the new WebGate, as described in the Oracle Access Manager Patch Set Notes Release 10.1.4 Patchset 1 (10.1.4.2.0) For All Supported Operating Systems.
e. Add as many new WebGates to the upgraded clone setup as you need by repeating Steps a through d.
3. Test the cloned system to ensure that it is operating properly with the new WebGates.
4. In the clone Access System Console, disable profiles for all original WebGates that are associated with Access Server clones.
About Isolating the Original SetupThis task is optional.
To isolate the original setup, you can disable or remove all clone profiles from the original System Console. In the System Console, there are no profiles for Access Managers. There are no clone WebGate instances or profiles.
To isolate the original setup1. In the original System Console:
■ Disable or remove clone COREid Server profiles from the original System Console
■ Disable or remove clone WebPass profiles from the original System Console
■ Disable or remove clone Directory Profiles from the original System Console
■ Disable or remove clone Access Server profiles from the original System Console
2. Test the original system to ensure that it is operating properly.
3. Before you upgrade original instances, Oracle recommends that you:
■ Determine whether you need to reconcile changes that might have been made in the original system or not. For details, see "About Retrieving Changes to the Original Branch Before Upgrading Original Instances" on page 15-23.
■ Ensure that the clone setup is providing service to your customers. For details, see "Reconfiguring Domain Name Systems (DNS) to Use Upgraded Clones" on page 17-3.
Rolling Back Changes for Reconfigured ClonesTo recover from a single issue and continue with a zero downtime upgrade, you can perform Step 1 and then re-create the clone and reconfigure it. Performing all steps in the following procedure will removes all traces of the cloned configuration from host computers and the System Console.
Caution: You can add new WebGates to the cloned environment only after upgrading the entire clone setup. Until then, retain cloned Access Server profiles that are associated with original WebGates.

Upgrading the Schema During a Zero Downtime Upgrade
Upgrading the Schema, Data, and Clone System 16-61
If you want to use the original release (or switch to using the in-place method described elsewhere in this manual), perform all steps in the following procedure.
To roll back changes for reconfigured clone components1. Shut down clone services and Web servers and remove the clone file system
directory.
2. Remove the following items from host computers:
■ Clone file system
■ 10g (10.1.4.0.1) component libraries and files to which you applied Release 10.1.4 Patch Set 1 (10.1.4.2.0)
■ Any file system directories that you have added or that were added automatically as part of any upgrade process
■ The Web server instance for the clones
■ The branches in the LDAP directory server that were added for the new configuration and policy DNs
3. From the original System Console, remove all clone profiles if they exist.
4. Confirm that your original setup is operating properly.
Upgrading the Schema During a Zero Downtime UpgradeOracle recommends that you upgrade the schema after configuring earlier cloned components to use the data in the new branch of the LDAP directory server. There is only one schema and it is used by both originals and clones.
Only the schema is upgraded during this operation. The Identity System schema includes objectclasses and their attributes. Depending on how your data is stored, you might need to upgrade the Access System schema. For more information, see the following topics:
■ About Upgrading the Schema
■ Upgrading the Identity System Schema
■ Upgrading the Access System Schema
About Upgrading the SchemaThis topic describes considerations and methods for upgrading the schema. The terms "first installed COREid Server" and "first installed Access Manager" refer to the first instance of the respective component that was installed and set up in the original environment. These are the instances that were used when you added the schema to the directory server and initially set up the original Identity and Access Systems.
To upgrade the schema you will use the 10g (10.1.4.2.0) MigrateOAM script. It will be available in the destination file system path that is created when you extract 10g (10.1.4.0.1) Identity Server libraries and files and then apply Release 10.1.4 Patch Set 1 (10.1.4.2.0).
If you need to upgrade the Access System schema, you will also need the 10g (10.1.4.2.0) MigrateOAM script that is available in the destination file system path that is created when you extract the 10g (10.1.4.0.1) Policy Manager libraries and files and then apply Release 10.1.4 Patch Set 1 (10.1.4.2.0).

Upgrading the Schema During a Zero Downtime Upgrade
16-62 Oracle Access Manager Upgrade Guide
Guidelines for Upgrading the Schema with the Zero Downtime Upgrade MethodYou might perform the schema upgrade more than once, depending on how data is stored in your environment. The following guidelines will help you determine how to approach the schema upgrade in your environment:
■ All Data Stored Together: If you have user data, configuration data (sometimes referred to as oblix data), and policy data stored together in the same directory server (or when you have no Access System and no policy data), you execute MigrateOAM in Schema mode with the clone of the first installed COREid Server instance and provide the bind credentials for the single LDAP directory server.
■ User Data Stored Separately from Configuration and Policy Data: If you have user data in one directory server and configuration and policy data in another, you must execute MigrateOAM in Schema mode, as follows:
– One time with the clone of the first installed COREid Server instance using bind credentials for user data
– Another time with the clone of the first installed COREid Server using credentials for the configuration and policy data.
■ All Data Stored Separately: If you have user data in one directory server, configuration data in another, and policy data in a third, you must run MigrateOAM in Schema mode as indicated here:
– One time with the clone of the first installed COREid Server instance and user data credentials
– A second time with the clone of the first installed COREid Server instance and configuration data credentials
– A third time with the clone of the first installed Access Manager instance and policy data credentials
■ User Data Stored in Multiple Directory Servers: Each directory server can have different credentials. In this case, you need to run MigrateOAM in Schema mode once for each directory server where you have user data stored (and specify the credentials for the particular directory server each time you run the script).
When you have user data divided across more than one directory server, before you upgrade the schema you must upload the appropriate directoryserver_user_schema_add.ldif for all but the first directory server instance. The first directory server instance is the one that was specified when you initially installed and set up the original COREid Server. This is when the initial directory server profile was created. Additional directory server profiles were added at a later time. As a result, the schema that was uploaded during installation is not automatically loaded for other directory server instances.
Each ldif file is prefixed with a specific directory server type. The directoryserver_user_schema_add.ldif file is located in the clone of the COREidServer_install_dir \identity\oblix\data\common file system directory. In most cases, you use the ldapmodify tool to perform the update. For example:
ldapmodify –h DS_hostname -p DS_port_number -D bind_dn -w password -a –c -f iPlanet_user_schema_add.ldif
For more information about manual schema update files, see the Oracle Access Manager Installation Guide.
The example in this chapter presumes that you have configuration data and policy data stored separately. In this case, you will need to upgrade the Identity System
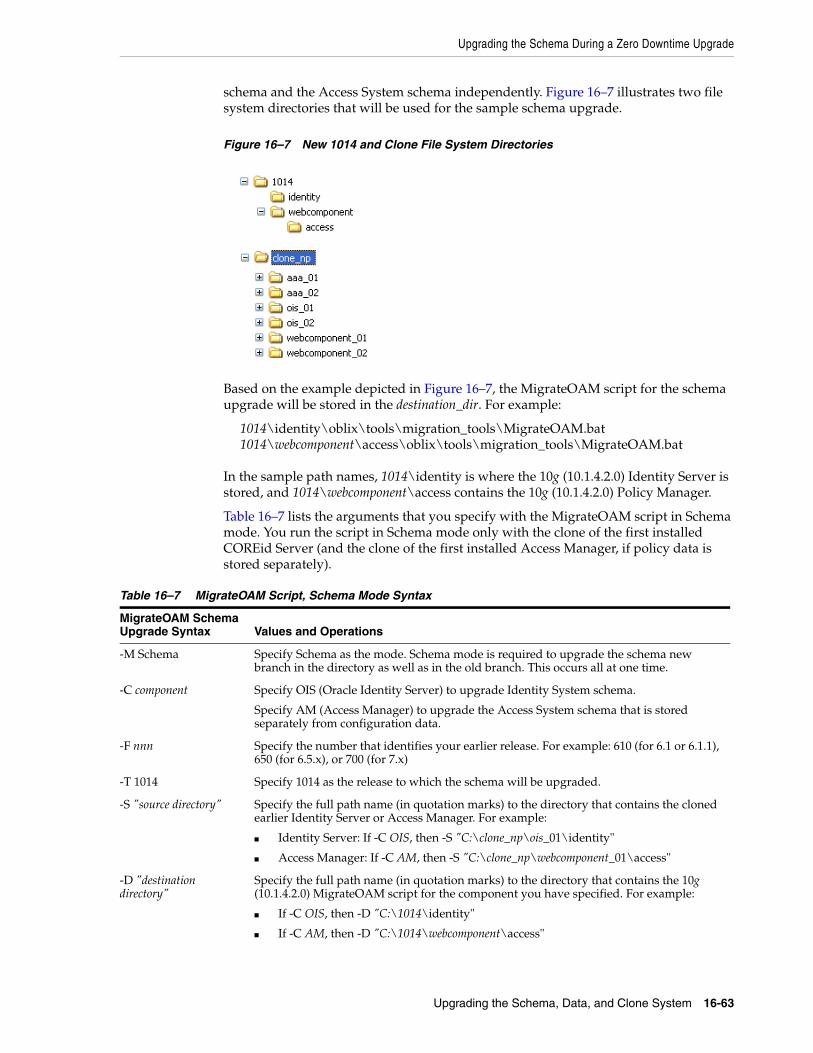
Upgrading the Schema During a Zero Downtime Upgrade
Upgrading the Schema, Data, and Clone System 16-63
schema and the Access System schema independently. Figure 16–7 illustrates two file system directories that will be used for the sample schema upgrade.
Figure 16–7 New 1014 and Clone File System Directories
Based on the example depicted in Figure 16–7, the MigrateOAM script for the schema upgrade will be stored in the destination_dir. For example:
1014\identity\oblix\tools\migration_tools\MigrateOAM.bat 1014\webcomponent\access\oblix\tools\migration_tools\MigrateOAM.bat
In the sample path names, 1014\identity is where the 10g (10.1.4.2.0) Identity Server is stored, and 1014\webcomponent\access contains the 10g (10.1.4.2.0) Policy Manager.
Table 16–7 lists the arguments that you specify with the MigrateOAM script in Schema mode. You run the script in Schema mode only with the clone of the first installed COREid Server (and the clone of the first installed Access Manager, if policy data is stored separately).
Table 16–7 MigrateOAM Script, Schema Mode Syntax
MigrateOAM Schema Upgrade Syntax Values and Operations
-M Schema Specify Schema as the mode. Schema mode is required to upgrade the schema new branch in the directory as well as in the old branch. This occurs all at one time.
-C component Specify OIS (Oracle Identity Server) to upgrade Identity System schema.
Specify AM (Access Manager) to upgrade the Access System schema that is stored separately from configuration data.
-F nnn Specify the number that identifies your earlier release. For example: 610 (for 6.1 or 6.1.1), 650 (for 6.5.x), or 700 (for 7.x)
-T 1014 Specify 1014 as the release to which the schema will be upgraded.
-S "source directory" Specify the full path name (in quotation marks) to the directory that contains the cloned earlier Identity Server or Access Manager. For example:
■ Identity Server: If -C OIS, then -S "C:\clone_np\ois_01\identity"
■ Access Manager: If -C AM, then -S "C:\clone_np\webcomponent_01\access"
-D "destination directory"
Specify the full path name (in quotation marks) to the directory that contains the 10g (10.1.4.2.0) MigrateOAM script for the component you have specified. For example:
■ If -C OIS, then -D "C:\1014\identity"
■ If -C AM, then -D "C:\1014\webcomponent\access"

Upgrading the Schema During a Zero Downtime Upgrade
16-64 Oracle Access Manager Upgrade Guide
The schema upgrade process and messages will be repeated for every release between your starting release (6.1.1 for example) and the latest release. This means that you will see the same sequence of messages and prompts when the schema is upgraded. Oracle recommends that you use Automatic rather than Confirmed mode for the quickest upgrade. Oracle also recommends that you do not skip any processes. For more information, see "About Schema Mode Processing" on page 15-28.
For details and steps to upgrade the schema, see the following topics:
■ Upgrading the Identity System Schema
■ Upgrading the Access System Schema
Upgrading the Identity System SchemaYou use the following procedure to upgrade the Identity System schema. Both clone and original component instances will use the upgraded schema.
The upgraded schema offers backward compatibility with the earlier schema. If you back up the earlier schema before upgrading, using a third-party utility, you should be able to reinstate the backup copy if you decide to roll back to the original release. Details about external utilities is outside the scope of this manual.
Depending on how your data is stored, you might have to perform the Identity System schema upgrade more than one time. For more information, see details in "Guidelines for Upgrading the Schema with the Zero Downtime Upgrade Method" on page 16-62.
Path names and the starting release in the following procedure are samples only, as shown in Table 16–7. Your path names and starting release might differ.
To upgrade the Identity System schema1. Perform activities to back up the schema before the upgrade, as described in
"Backing up the Earlier Oracle Access Manager Schema" on page 5-17.
2. Ensure that the directory server is ready, as described in "Preparing Directory Server Instances and Data" on page 16-4.
3. Upload schema update files when you have user data stored on multiple directory servers, as described at the beginning of this topic. For example:
-I "installation directory" The installation directory should be the same as the destination directory. For example:
■ -I "C:\1014\identity"
■ -I "C:\1014\webcomponent\access"
-B "bind DN" Specify the distinguished name in quotation marks ("cn=Directory Manager", for example) that has full permissions for the user and configuration branches of the directory information tree (DIT). Oracle Access Manager will access the LDAP directory server as this account.
-W Bind password Specify the password for the user specified as the bind DN.
Caution: Oracle recommends that you review all information about upgrading the schema before you begin the following procedure. There is no automated way to roll back a schema upgrade.
Table 16–7 (Cont.) MigrateOAM Script, Schema Mode Syntax
MigrateOAM Schema Upgrade Syntax Values and Operations

Upgrading the Schema During a Zero Downtime Upgrade
Upgrading the Schema, Data, and Clone System 16-65
clone_np\ois_01\identity\oblix\data\common\iPlanet_user_ schema_add.ldif
ldapmodify –h DS_hostname -p DS_port_number -D bind_dn -w password -a –c -f iPlanet_user_schema_add.ldif
4. Change to the file system path that contains the MigrateOAM script for the 10g (10.1.4.2.0) Identity Server. For example:
1014\identity\oblix\tools\migration_tools\MigrateOAM.bat
5. Run MigrateOAM in Schema mode to start upgrading your Identity System schema. For example:
MigrateOAM -M Schema -C OIS -F 610 -T 1014 -S "C:\clone_np\ois_01\ identity" -D "C:\1014\identity" -I "C:\1014\identity" -b "cn=bindDN" -W password
6. Respond to prompts during each sequence as follows:
a. Use Automatic mode for each sequence so that you do not need to confirm each process.
b. Do not skip any processes.
7. Review the log files (obmigratenp.log and obmigrateschema.log in destination_dir\identity\oblix\tools\migration_tools\to see if any errors occurred. For more information, see Appendix C.
8. Verify that the upgrade was successful and proceed as follows.
■ Successful with Data Stored Together (or Identity System Only): Proceed to "Validating Identity System Operations" on page 16-67.
■ Successful with Policy Data Stored Separately: Proceed to "Upgrading the Access System Schema" on page 16-65 before you validate operations as described in "Validating Successful Operations in Your Environment" on page 16-67.
■ Not Successful: Proceed to "Rolling Back After the Schema Upgrade" on page 16-69.
Upgrading the Access System Schema You perform this task only when the following conditions apply to your cloned and original environments:
■ If you have a joint Identity and Access System deployed
■ If configuration data is stored separately from policy data
■ If you have upgraded the Identity System schema for the LDAP directory containing user data
For more information, see "Guidelines for Upgrading the Schema with the Zero Downtime Upgrade Method" on page 16-62.
When these conditions apply to your environment, you perform steps in the following procedure using the clone of the first Access Manager that was installed and set up. You will run the MigrateOAM script from the 10g (10.1.4.2.0) Policy Manager directory. This is the same script that was used to make the new policy branch. It should already be stored in a file system directory on the computer hosting the clone of the first installed Access Manager: 1014\webcomponent\access, for example.
Upgrading the Schema During a Zero Downtime Upgrade
16-66 Oracle Access Manager Upgrade Guide
Running MigrateOAM in Schema mode to upgrade the Access System schema is similar to running MigrateOAM in schema mode to upgrade the Identity System schema. For example, as described in Table 16–7, you specify Access System details as follows:
■ -C AM
■ -S "C:\clone_np\webcomponent_01\access" is the source directory for the clone of one of two Access Manager instances on this host computer
■ -D "C:\1014\webcomponent\access" is the destination for the Access System schema upgrade, which contains the 10g (10.1.4.2.0) Policy Manager libraries and files and the MigrateOAM script
■ -I "C:\1014\webcomponent\access" is the same as the destination
The upgrade occurs for every release between your starting release and the latest release. Oracle recommends that you use Automatic rather than Confirmed mode for the quickest upgrade. Oracle also recommends that you do not skip any processes.
Path names and the starting release in the following procedure are samples only, as shown in Table 16–7. Your path names and starting release might differ.
To upgrade the Access System schema1. IIS Web Server: If the cloned Access Manager is operating with an IIS Web server,
remove the 10g (10.1.4.2.0) Policy Manager installer before starting this procedure. For example:
Oracle_Access_Manager10_1_4_0_1__sparc-s2_NSAPI_Access_Manager.exe
2. Change to the file system path that contains the MigrateOAM script for the 10g (10.1.4.2.0) Policy Manager. For example:
clone_np\1014\webcomponent\access\oblix\tools\migration_tools\ MigrateOAM.bat
3. Run MigrateOAM in Schema mode and specify arguments for the clone of the first installed Access Manager. For example:
MigrateOAM -M Schema -C AM -F 610 -T 1014 -S "C:\clone_np\webcomponent_01\access" -D "C:\clone_np\1014\webcomponent\access" -I "C:\clone_np\1014\ webcomponent\access" -b "cn=bindDN" -W password
4. Use Automatic mode for each sequence so that you do not need to confirm each process.
5. Review the log files (ogmigratenp.log and obmigrateschema.log) in the destination_dir to see if any errors occurred.
6. Verify that the Access System schema upgrade was successful and proceed as follows:
■ Successful: Proceed to "Validating Successful Operations in Your Environment" on page 16-67.
■ Not Successful: Proceed to "Rolling Back After the Schema Upgrade" on page 16-69.
Caution: Oracle recommends that you review all information about upgrading the schema before you begin the following procedure.
Validating Successful Operations in Your Environment
Upgrading the Schema, Data, and Clone System 16-67
Validating Successful Operations in Your EnvironmentThe topics in this section describe how to validate successful operations in both your original and cloned environments at several critical points. The steps that you use are the same regardless of the environment you are validating (clone or original).
You will need to perform validation steps in both clone and original environments. Be sure to use the URL for the environment you are validating:
■ Clone Environment: Use only URLs to your cloned System Console.
■ Original Environment: Use only URLs to your original System Console.
Task overview: Validating successful operations 1. After the schema upgrade, validate operations in the cloned environment using
URLs to your:
■ Cloned environment
■ Original environment
2. After clone upgrades, perform validation activities using URLs to your clone System Console.
3. After original upgrades, perform validation tasks using URLs to your original System Console.
The following list summarizes the environment in which you perform this validation:
■ Identity System: Perform steps in "Validating Identity System Operations" on page 16-67.
■ Joint Identity and Access System: Perform steps to validate the Identity System and then perform steps in "Validating Access System Operations" on page 16-68.
Validating Identity System Operations To validate that the Identity System is working properly, you will perform tasks using the COREid System Console and applications that rely on the schema and data.
The following procedure provides steps and an outline of activities that you might perform to validate Identity System operations. Step 6 includes several suggestions about activities that you might want to perform. However, the actual tasks that you perform will depend on your environment. For example:
■ If you are validating an original installation, be sure to use appropriate URLs to original components.
■ If you are validating a cloned setup, use URLs to cloned components.
To validate a successfully operating Identity System 1. Identify the COREid System applications and functions that are affected by your
upgrade and develop a plan to test these.
2. Ensure all COREid Server services and WebPass Web server instances are running.
Caution: Oracle recommends that you do not make any changes to the data during the validation process. It is vital to learn whether the upgrade was successful by validating the system with the existing data only.

Validating Successful Operations in Your Environment
16-68 Oracle Access Manager Upgrade Guide
3. Go to the COREid System Console from your browser by specifying the appropriate URL for your setup (clone versus original). For example:
http://hostname:port/identity/oblix
In the sample URL, hostname refers to computer that hosts the Web server; port refers to the HTTP port number of the WebPass Web server instance; /identity/oblix connects to the COREid System Console.
The COREid landing page appears.
4. Landing Page Does Not Appear: Ensure that your COREid Server Service and WebPass Web server instance are running and confirm that you have entered the correct URL for the COREid System Console.
5. Log in as a Master Administrator.
6. Using the COREid System Console or applications, perform the following tasks, or others, to validate that the schema upgrade was successful:
– Review panels in the User Manager, Group Manager, or Organization Manager.
– Verify audit policies for the User Manager, Group Manager, or Organization Manager.
– Review attribute access control policies in the User Manager, Group Manager, or Organization Manager.
– Review the Master Auditing Policy and the Global Auditing Policy, if appropriate.
– Verify Password and Lost Password policies.
– Validate any workflow configuration details.
– Review object class definitions.
– Verify Identity Server and WebPass definitions; server settings; administrator information; and directory options.
7. Proceed as needed for your environment.
■ Successful: Proceed as needed for your environment and the next task you need to perform. For more information about the next task, see "Zero Downtime Upgrade Tasks and Sequencing" on page 15-16.
■ Not Successful: Proceed to "Rolling Back After the Schema Upgrade" on page 16-69.
Validating Access System OperationsYou perform activities in this topic only if you have a joint Identity and Access System deployed. Otherwise, skip this topic.
To validate Access System operations, you perform tasks in the Access System Console and applications that rely on the schema and data.
■ If you are validating an original setup, be sure to use URLs to original components.
■ If you are validating a cloned setup, specify URLs to cloned components.
The following procedure provides steps and an outline of activities that you might perform to validate Access System operations. Step 6 includes several suggestions

Validating Successful Operations in Your Environment
Upgrading the Schema, Data, and Clone System 16-69
about activities that you might want to perform. However, the actual tasks that you perform will depend on your setup. For example:
To verify a successfully operating Access System 1. Identify the Access System applications and functions that might be affected and
develop a plan to test these.
2. Ensure your Access Manager Web server and WebPass Web server instances are running.
3. Go to the Access System Console from your browser by specifying the appropriate URL for your environment (clone versus original). For example:
http://hostname:port/access/oblix
In the sample URL, hostname refers to computer that hosts the Web server; port refers to the HTTP port number of the WebPass Web server instance; /access/oblix connects to the Access System Console.
The Access System landing page appears.
4. Landing Page Does Not Appear: Ensure that your Identity Server Service and WebPass Web server instance are running and confirm that you have entered the correct URL for the Access System Console.
5. Log in to the Access System Console as a Master Administrator.
6. Perform any of the following tasks, or others, to validate the upgraded schema:
■ Review Access Server, Access Server Cluster, and Access Client details.
■ Validate authentication and authorization scheme details that are affected.
■ Examine reports data.
■ Review affected policy domains.
■ Review host identifiers
7. Proceed as follows:
■ Successful: Proceed as needed for your environment and the next task you need to perform. For more information about the next task, see "Zero Downtime Upgrade Tasks and Sequencing" on page 15-16.
■ Not Successful: Proceed to "Rolling Back After the Schema Upgrade" on page 16-69.
Rolling Back After the Schema UpgradeUsing this procedure will undo all changes, except the schema upgrade, so that you can return to your original setup. After performing this task you will have only the original setup and the upgraded schema.
The latest schema provides backward compatibility with your earlier schema. There are no automated tools to undo the schema upgrade. If you backed up the schema
Caution: Oracle recommends that you do not make any changes to the data during the validation process. It is vital to learn whether the upgrade was successful by validating the system with the existing data only.

Upgrading the Cloned Identity System
16-70 Oracle Access Manager Upgrade Guide
using external tools before the upgrade, you might be able to reinstate the original schema. Details about external tools are outside the scope of this manual.
To roll back after the schema upgrade 1. Shut down clone services and Web servers.
2. Remove the following from host computers:
■ Clone file system directories
■ 10g (10.1.4.0.1) component libraries and files to which you applied Release 10.1.4 Patch Set 1 (10.1.4.2.0)
■ Any file system directories that you have added or that were added automatically as part of any upgrade process
■ The Web server instance for the clones
■ The branches in the LDAP directory server that were added for the new configuration and policy DNs
3. From the original System Console, remove all clone profiles.
4. If you backed up the schema using external tools before the upgrade, you might be able to reinstate the original schema.
5. Confirm that your original setup is operating properly.
Upgrading the Cloned Identity System After upgrading the schema and then validating successful operations, you are ready to upgrade cloned Identity System components.
When you upgrade the clone of the first installed COREid Server, configuration data that is stored in the new branch of the LDAP directory server is also upgraded. For more information about Identity System data, see "About Configuration and Policy Data Upgrades" on page 15-11.
The sequence of tasks that you must perform are outlined in the following topic and task overview. For more information, see individual topics for background details and step-by-step procedures that you can follow.
Task overview: Upgrading the cloned Identity System1. Joint Identity and Access System: Turning Off the Access Server Cache Flush
2. Preparing Cloned Identity System Components for the Upgrade, which includes backing up configuration data before you upgrade the clone of the first installed COREid Server instance
3. Upgrading Cloned COREid Servers
4. Upgrading Cloned WebPass Instances
5. Validating the Upgraded Cloned Identity System
6. Backing Up Upgraded Identity System Clones
Note: When you have a single Web server instance serving more than one Oracle Access Manager Web component, the Web server must remain stopped until all serviced Web components on the host computer are upgraded.

Upgrading the Cloned Identity System
Upgrading the Schema, Data, and Clone System 16-71
7. Renaming Audit Files After Upgrading Identity System Clones
8. Upgrading SDKs and Identity System Customizations
For information about recovering if there is a problem, see "Recovering From a Cloned Identity System Upgrade Failure" on page 16-83. For a look at what is next, see "Looking Ahead" on page 16-84.
Turning Off the Access Server Cache FlushIf you have a joint Identity and Access System deployment, before upgrading cloned components you must turn off the Access Server cache flush for each COREid Server (both clones and original COREid Servers). To do this, you locate the basedbparams.xml file in the following directory in both the original and cloned environment:
COREidServer_install_dir\identity\oblix\data\common\basedbparams.xml
and change the doAccessServerFlush parameter from true to false, as indicated in the following procedure.
To turn off the access server cache flush1. Locate the basedbparams.xml file in the following file system path:
\identity\oblix\data\common. For example:
clone_np\ois_01\identity\oblix\data\common\basedbparams.xml
np611\ois_01\identity\oblix\data\common\basedbparams.xml
2. Open the basedbparams.xml and edit the doAccessServerFlush parameter as follows:
From:
<SimpleList> <NameValPair ParamName="doAccessServerFlush" Value="true" /></SimpleList>
To:
<SimpleList> <NameValPair ParamName="doAccessServerFlush" Value="false" /></SimpleList>
3. Restart the COREid Server service (on the computer that is hosting the instance you just modified).
4. Repeat this procedure for each cloned (and original) COREid Server.
Preparing Cloned Identity System Components for the UpgradeThe procedures to prepare components for an upgrade are described in detail in Chapter 8 of this book. You must perform most of the same preparation tasks for cloned components before upgrading each clone, whether you perform a zero downtime upgrade or a in-place upgrade.
The following task overview outlines the tasks that you will be asked to perform for each clone before you upgrade it. The topics are located in Chapter 8.

Upgrading the Cloned Identity System
16-72 Oracle Access Manager Upgrade Guide
Task overview: Preparing cloned Identity System components for the upgrade includes1. Copying Custom Identity Event Plug-ins
2. Preparing Earlier Customizations
3. Preparing Host Computers, which includes the following topics:
■ Changing Read Permissions on Password Files
■ Confirming Free Disk Space
4. Preparing Release 6.x Environments
5. Preparing Multi-Language Installations
6. Backing Up File System Directories, Web Server Configurations, and Registry Details
7. Stopping Servers and Services
8. Logging in with Appropriate Administrative Rights
9. Clone of the First Installed COREid Server: In addition to the activities in Steps 1-8, perform activities in Chapter 5, "Backing Up Existing Oracle Access Manager Data", which includes:
■ Backing up Oracle Access Manager Configuration and Policy Data
■ Backing Up User and Group Data
■ Backing Up Workflow Data
■ Archiving Processed Workflow Instances
Upgrading Cloned COREid ServersThis topic describes all activities that must be performed to upgrade individual COREid Server clones on each computer host. At the end of this topic you will find a step-by-step procedure that walks you through all activities in detail.
Before you begin upgrading the clones, take the following considerations into account:
Clone of the First Installed COREid Server: When you upgrade the clone of the first COREid Server that you installed, the configuration data in the new branch of the LDAP directory server is upgraded in addition to component-specific data.Before you start this upgrade, Oracle recommends that you back up the configuration data in the new branch of the LDAP directory server.
All COREid Server Clones: No configuration data upgrade occurs when upgrading other COREid Server clones. However, the component-specific configuration is upgraded with each COREid Server clone upgrade. This includes registry entries for Windows, plug-ins, and component configuration files.
Note: With the zero downtime upgrade method, you do not need to create a backup of the file system directory. Instead, you will create a source that becomes a backup.
Caution: Oracle recommends that you review all information in this topic before proceeding with the activities.
Upgrading the Cloned Identity System
Upgrading the Schema, Data, and Clone System 16-73
Windows Registry Entries: When you upgrade from an earlier release to the later release, registry entries for the originally installed release are deleted and new entries are created for the latest release. After upgrading an instance, the registry entry for the earlier release is no longer available. Oracle recommends that you back up the registry for the source before the upgrade. For more information, see "Reinstating Original Windows Registry Entries During a Rollback Operation" on page 15-36.
Source, Destination, and Tools: You will start each upgrade by performing steps to ensure that for each cloned instance you have the 10g (10.1.4.2.0) MigrateOAM script in an appropriate location. These activities are introduced in "Preparation Tasks for the Zero Downtime Method" on page 15-12 and are summarized as follows:
■ Source Creation: In the clone path, rename the subdirectory that contains the clone to create a source for the upgrade. The source also serves as a back up copy of the instance.
■ Destination Creation: Extract 10g (10.1.4.0.1) Identity Server libraries and files and specify the same file system directory path that the clone had before you renamed it.
■ Obtaining the Tools: Apply Release 10.1.4 Patch Set 1 (10.1.4.2.0) to the 10g (10.1.4.0.1) instance to obtain the tools for the zero downtime upgrade.
To help illustrate the activities that you will be instructed to perform, Table 16–8 organizes sample file system path names in to columns that describe the progression of actions that you will take. Additional information follows Table 16–8. The sample path names are for Windows platforms. The paths in your environment might differ.
Table 16–8 organizes information to illustrate the steps that you will be instructed to perform before you start to upgrade individual clones:
■ Column 1, Clone Path (left), identifies the file system path of individual cloned instances. In this example, two instances are used for load balancing purposes. This sample is on a Windows platform; your environment might be different.
■ Column 2, Source Creation (center), provides an example of how you will rename the subdirectory of each clone instance to create a source (which is also a backup) for the clone upgrade.
Table 16–8 Activities to Prepare for a Clone COREid Server Instance Upgrade
1 Clone Path 2 Source Creation 3 Destination Creation and Obtaining Tools
Identity Server Instances
clone_np\ois_01\identity
clone_np\ois_02\identity
Rename the subdirectory that contains each clone instance. For example:
clone_np\ois_01\ identity_source
clone_np\ois_02\ identity_source
Note: You perform this step for each clone instance
After creating the source (see column 2):
A. Extract 10g (10.1.4.0.1) Identity Server component libraries and files and specify the clone path as the installation (destination) directory. For example:
clone_np\ois_01\identity
Note: The destination path of the 10g (10.1.4.0.1) instance must exactly match the path of the clone before renaming (see column 1).
See "Destination Creation: Extracting 10g (10.1.4.0.1) Libraries and Files" on page 16-28.
B. Apply Release 10.1.4 Patch Set 1 (10.1.4.2.0) to the 10g (10.1.4.0.1) instance to obtain the tools for this upgrade.
See "Obtaining Tools: Applying Release 10.1.4 Patch Set 1 (10.1.4.2.0)" on page 16-31.
C. Repeat steps A and B for each clone instance.
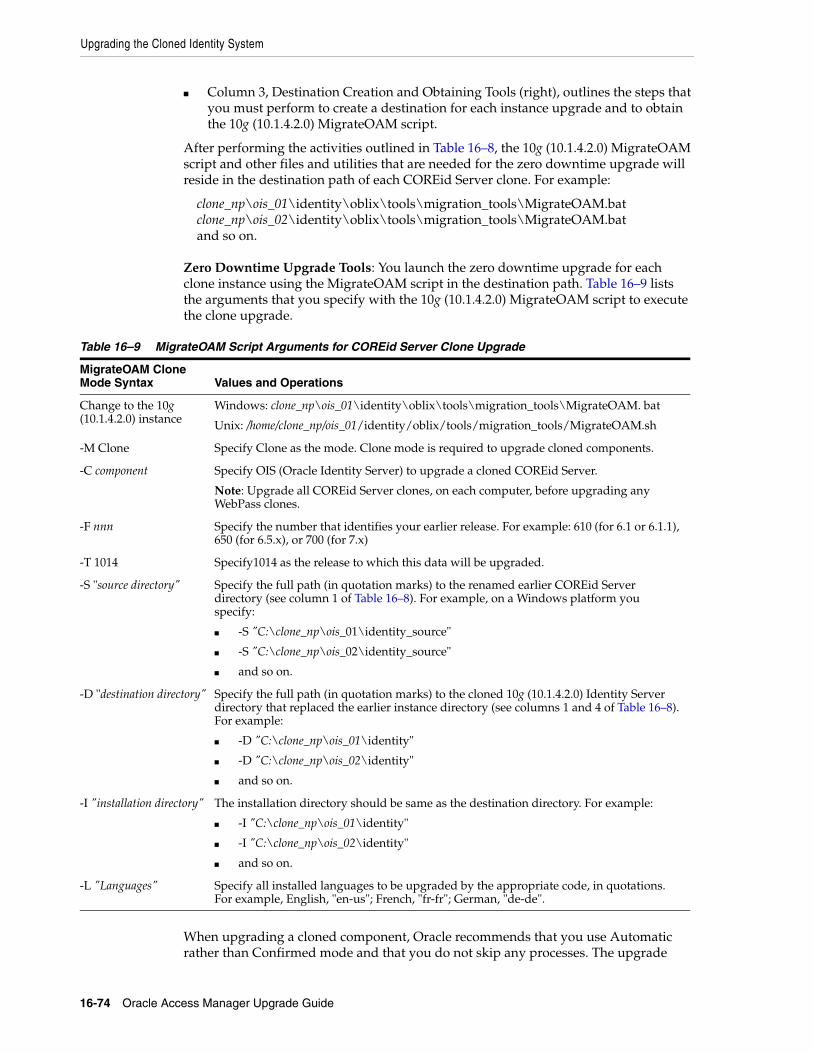
Upgrading the Cloned Identity System
16-74 Oracle Access Manager Upgrade Guide
■ Column 3, Destination Creation and Obtaining Tools (right), outlines the steps that you must perform to create a destination for each instance upgrade and to obtain the 10g (10.1.4.2.0) MigrateOAM script.
After performing the activities outlined in Table 16–8, the 10g (10.1.4.2.0) MigrateOAM script and other files and utilities that are needed for the zero downtime upgrade will reside in the destination path of each COREid Server clone. For example:
clone_np\ois_01\identity\oblix\tools\migration_tools\MigrateOAM.bat clone_np\ois_02\identity\oblix\tools\migration_tools\MigrateOAM.bat and so on.
Zero Downtime Upgrade Tools: You launch the zero downtime upgrade for each clone instance using the MigrateOAM script in the destination path. Table 16–9 lists the arguments that you specify with the 10g (10.1.4.2.0) MigrateOAM script to execute the clone upgrade.
When upgrading a cloned component, Oracle recommends that you use Automatic rather than Confirmed mode and that you do not skip any processes. The upgrade
Table 16–9 MigrateOAM Script Arguments for COREid Server Clone Upgrade
MigrateOAM Clone Mode Syntax Values and Operations
Change to the 10g (10.1.4.2.0) instance
Windows: clone_np\ois_01\identity\oblix\tools\migration_tools\MigrateOAM. bat
Unix: /home/clone_np/ois_01/identity/oblix/tools/migration_tools/MigrateOAM.sh
-M Clone Specify Clone as the mode. Clone mode is required to upgrade cloned components.
-C component Specify OIS (Oracle Identity Server) to upgrade a cloned COREid Server.
Note: Upgrade all COREid Server clones, on each computer, before upgrading any WebPass clones.
-F nnn Specify the number that identifies your earlier release. For example: 610 (for 6.1 or 6.1.1), 650 (for 6.5.x), or 700 (for 7.x)
-T 1014 Specify1014 as the release to which this data will be upgraded.
-S "source directory" Specify the full path (in quotation marks) to the renamed earlier COREid Server directory (see column 1 of Table 16–8). For example, on a Windows platform you specify:
■ -S "C:\clone_np\ois_01\identity_source"
■ -S "C:\clone_np\ois_02\identity_source"
■ and so on.
-D "destination directory" Specify the full path (in quotation marks) to the cloned 10g (10.1.4.2.0) Identity Server directory that replaced the earlier instance directory (see columns 1 and 4 of Table 16–8). For example:
■ -D "C:\clone_np\ois_01\identity"
■ -D "C:\clone_np\ois_02\identity"
■ and so on.
-I "installation directory" The installation directory should be same as the destination directory. For example:
■ -I "C:\clone_np\ois_01\identity"
■ -I "C:\clone_np\ois_02\identity"
■ and so on.
-L "Languages" Specify all installed languages to be upgraded by the appropriate code, in quotations. For example, English, "en-us"; French, "fr-fr"; German, "de-de".
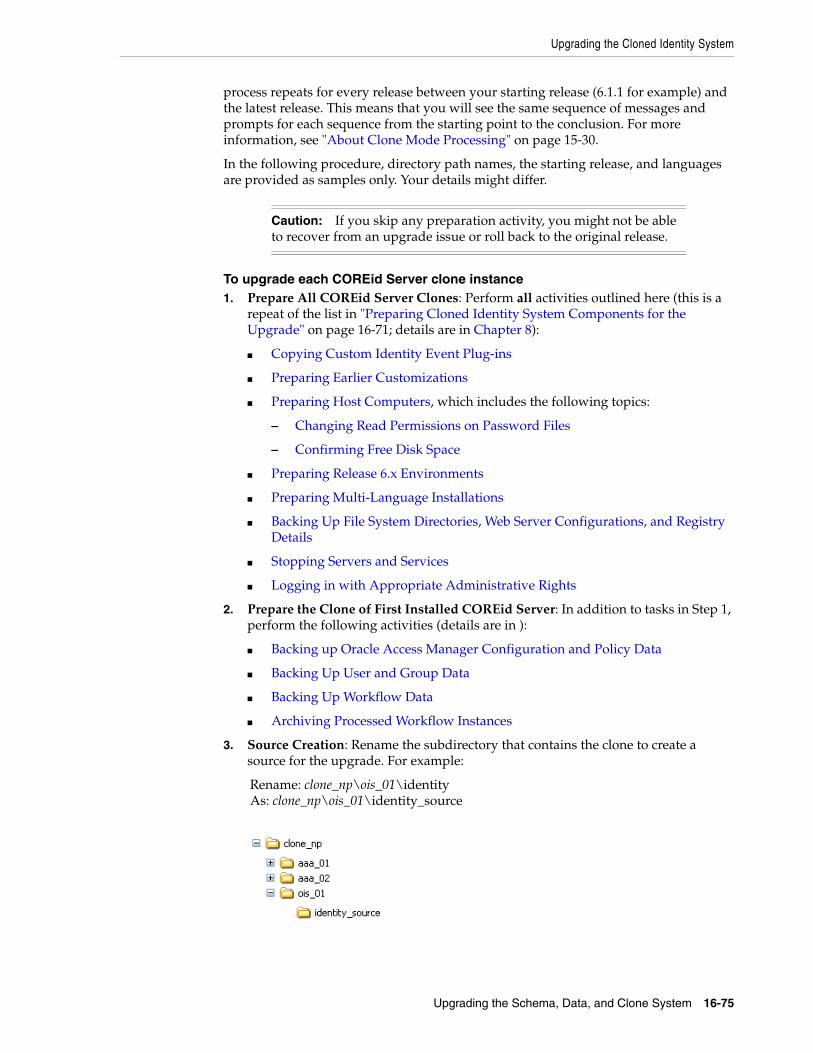
Upgrading the Cloned Identity System
Upgrading the Schema, Data, and Clone System 16-75
process repeats for every release between your starting release (6.1.1 for example) and the latest release. This means that you will see the same sequence of messages and prompts for each sequence from the starting point to the conclusion. For more information, see "About Clone Mode Processing" on page 15-30.
In the following procedure, directory path names, the starting release, and languages are provided as samples only. Your details might differ.
To upgrade each COREid Server clone instance1. Prepare All COREid Server Clones: Perform all activities outlined here (this is a
repeat of the list in "Preparing Cloned Identity System Components for the Upgrade" on page 16-71; details are in Chapter 8):
■ Copying Custom Identity Event Plug-ins
■ Preparing Earlier Customizations
■ Preparing Host Computers, which includes the following topics:
– Changing Read Permissions on Password Files
– Confirming Free Disk Space
■ Preparing Release 6.x Environments
■ Preparing Multi-Language Installations
■ Backing Up File System Directories, Web Server Configurations, and Registry Details
■ Stopping Servers and Services
■ Logging in with Appropriate Administrative Rights
2. Prepare the Clone of First Installed COREid Server: In addition to tasks in Step 1, perform the following activities (details are in ):
■ Backing up Oracle Access Manager Configuration and Policy Data
■ Backing Up User and Group Data
■ Backing Up Workflow Data
■ Archiving Processed Workflow Instances
3. Source Creation: Rename the subdirectory that contains the clone to create a source for the upgrade. For example:
Rename: clone_np\ois_01\identity As: clone_np\ois_01\identity_source
Caution: If you skip any preparation activity, you might not be able to recover from an upgrade issue or roll back to the original release.
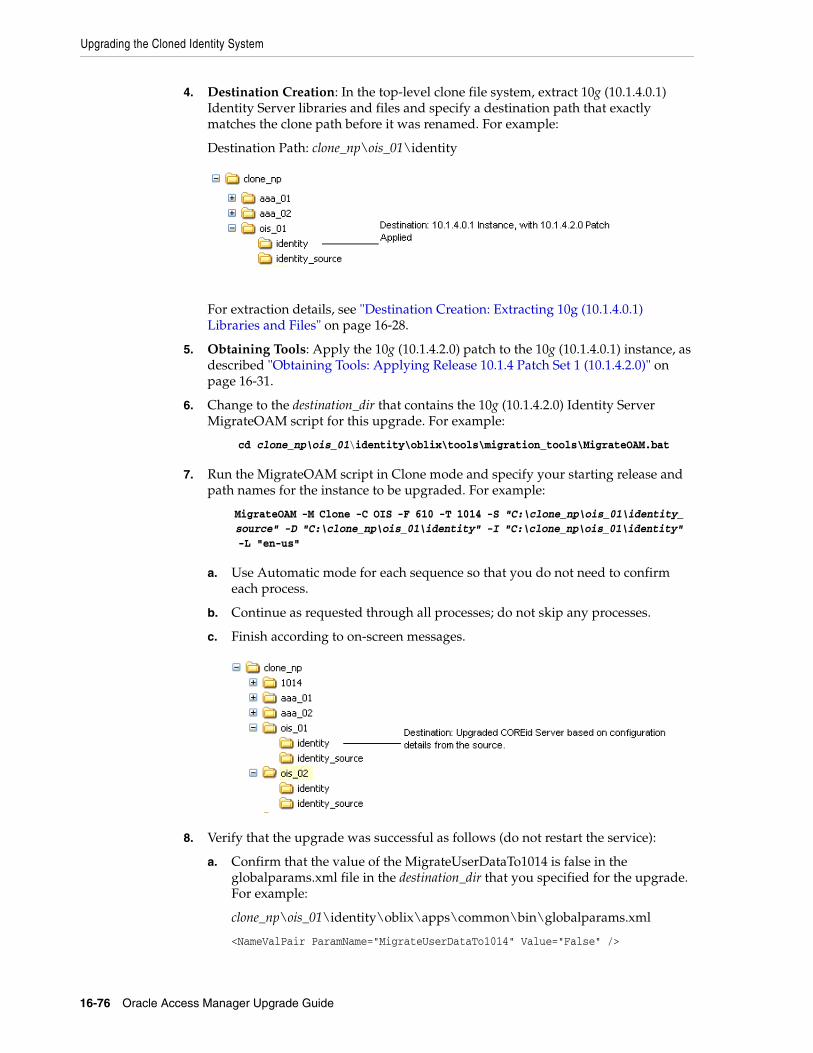
Upgrading the Cloned Identity System
16-76 Oracle Access Manager Upgrade Guide
4. Destination Creation: In the top-level clone file system, extract 10g (10.1.4.0.1) Identity Server libraries and files and specify a destination path that exactly matches the clone path before it was renamed. For example:
Destination Path: clone_np\ois_01\identity
For extraction details, see "Destination Creation: Extracting 10g (10.1.4.0.1) Libraries and Files" on page 16-28.
5. Obtaining Tools: Apply the 10g (10.1.4.2.0) patch to the 10g (10.1.4.0.1) instance, as described "Obtaining Tools: Applying Release 10.1.4 Patch Set 1 (10.1.4.2.0)" on page 16-31.
6. Change to the destination_dir that contains the 10g (10.1.4.2.0) Identity Server MigrateOAM script for this upgrade. For example:
cd clone_np\ois_01\identity\oblix\tools\migration_tools\MigrateOAM.bat
7. Run the MigrateOAM script in Clone mode and specify your starting release and path names for the instance to be upgraded. For example:
MigrateOAM -M Clone -C OIS -F 610 -T 1014 -S "C:\clone_np\ois_01\identity_ source" -D "C:\clone_np\ois_01\identity" -I "C:\clone_np\ois_01\identity" -L "en-us"
a. Use Automatic mode for each sequence so that you do not need to confirm each process.
b. Continue as requested through all processes; do not skip any processes.
c. Finish according to on-screen messages.
8. Verify that the upgrade was successful as follows (do not restart the service):
a. Confirm that the value of the MigrateUserDataTo1014 is false in the globalparams.xml file in the destination_dir that you specified for the upgrade. For example:
clone_np\ois_01\identity\oblix\apps\common\bin\globalparams.xml
<NameValPair ParamName="MigrateUserDataTo1014" Value="False" />

Upgrading the Cloned Identity System
Upgrading the Schema, Data, and Clone System 16-77
b. Auditing and Access Reporting: If your earlier installation included auditing and access reporting:
b1) Go immediately to "Upgrading Auditing and Access Reporting for the Identity System" on page 12-2 before performing any other steps.
b2) If this is a second or subsequent COREid Server upgrade, you must also perform activities in "Renaming Audit Files After Upgrading Identity System Clones" on page 16-85.
c. Start the upgraded COREid Server service to confirm that it will start (notice that the name has not changed from the one originally assigned).
d. Identity Server Service Does Not Start: Check your event and Identity Server log output files. For more information about logging and log output files, see the Oracle Access Manager Identity and Common Administration Guide.
e. Check migration log files for any errors reported during the upgrade, as described in "Accessing Log Files" on page G-2.
f. Windows: Verify that the registry entry is updated by running the Registry editor (regedit) using one of the following methods:
In the Registry Editor Window, click My Computer, HKEY_LOCAL_MACHINE, SYSTEM, CurrentControlSet, Services, and then look for ObOISServer-<Service Name>. Within this, check the Image path.
View the registry entryHKEY_LOCAL_MACHINE, SOFTWARE,Oblix,Oblix Netpoint. Check for the respective installed version and, under that, check the entry for ObOISServer-<Service Name>.
g. Verify that the version file in the destination path is updated for 10.1.4 (npversion_component.txt). For example:
clone_np\ois_01\identity\oblix\config\np1014_is.txt
h. Confirm that the ois_server_config.xml has the correct information for the instance that you upgraded.
i. Upgrade Not Successful: Proceed to "Recovering From a Cloned Identity System Upgrade Failure" on page 16-83.
j. Upgrade Successful: Proceed to Step 9.
9. Repeat all steps in this procedure for other cloned COREid Server instances on this host.
10. When all cloned COREid Servers on a single host are upgraded, you can upgrade WebPass instances on the host. For more information, see "Upgrading Cloned WebPass Instances".
Upgrading Cloned WebPass InstancesThis topic describes how to upgrade WebPass clones. The activities that you perform when upgrading WebPass clones are similar to those that were performed when upgrading COREid Server clones. You will create a source, a destination, and obtain the tools that you need for the upgrade. You run MigrateOAM in Clone mode.
Caution: Oracle recommends that you review all information about about upgrading clones before you begin activities here.

Upgrading the Cloned Identity System
16-78 Oracle Access Manager Upgrade Guide
To help illustrate some of the activities that you will perform, Table 16–10 organizes sample path names in columns that describe the progression of actions that you will take. Additional information follows Table 16–10. The sample path names are for Windows platforms. The paths in your environment might differ.
For more information the source and destination creation described in Table 16–10, see "Preparation Tasks for the Zero Downtime Method" on page 15-12.After performing activities in Table 16–10, the latest MigrateOAM script will be stored in the destination_dir. For example:
clone_np\webcomponent_01\identity\oblix\tools\migration_tools\MigrateOAM.bat clone_np\webcomponent_02\identity\oblix\tools\migration_tools\MigrateOAM.bat and so on.
Table 16–11 lists the arguments that you specify with the 10g (10.1.4.2.0) MigrateOAM script to execute the clone upgrade for each individual WebPass.
Table 16–10 Activities to Prepare for a Clone WebPass Instance Upgrade
1 Clone Path 2 Source Creation 3 Destination Creation and Obtaining Tools:
WebPass Instances
clone_np\webcomponent_ 01\identity
clone_np\webcomponent_ 02\identity
Rename the subdirectory containing each clone instance. For example:
clone_np\webcomponent_ 01\identity_source
clone_np\webcomponent_ 02\identity_source
After creating the source (see column 2):
A. Extract 10g (10.1.4.0.1) WebPass component libraries and files and specify the clone path as the installation (destination) directory. For example:
clone_np\webcomponent_01\identity
Note: The destination path of the 10g (10.1.4.0.1) instance must exactly match the path of the clone before it was renamed (see column 1).
See "Destination Creation: Extracting 10g (10.1.4.0.1) Libraries and Files" on page 16-28.
B. Apply Release 10.1.4 Patch Set 1 (10.1.4.2.0) to the 10g (10.1.4.0.1) instance to obtain the tools.
See "Obtaining Tools: Applying Release 10.1.4 Patch Set 1 (10.1.4.2.0)" on page 16-31.
C. Repeat steps A and B for each clone instance.
Table 16–11 MigrateOAM Script for WebPass Clone Upgrades
MigrateOAM Clone Mode Syntax Values and Operations
-M Clone Specify Clone as the mode. The clone mode is required to upgrade cloned components.
-C component Specify WP to upgrade a cloned WebPass.
Note: Upgrade all WebPass clones, on each computer, before upgrading any Access System clones.
-F nnn Specify the number that identifies your earlier release. For example: 610 (for 6.1 or 6.1.1), 650 (for 6.5.x), or 700 (for 7.x)
-T 1014 Specify1014 as the release to which this data will be upgraded.
-S "source directory" Specify the full path (in quotation marks) to the renamed earlier WebPass directory (see column 2 of Table 16–10). For example, when you have multiple instances:
■ -S "C:\clone_np\webcomponent_01\identity_source"
■ -S "C:\clone_np\webcomponent_02\identity_source"
■ and so on

Upgrading the Cloned Identity System
Upgrading the Schema, Data, and Clone System 16-79
WebPass clone upgrades do not affect the schema or data. Like other component upgrades, a WebPass upgrades includes component-specific configuration upgrades, parameter catalog, and message file upgrades. Like all Web compoent upgrades, WebPass upgrades includes Web server configuration changes.
You will see messages and prompts for each sequence from your starting release to the conclusion. Oracle recommends that you use Automatic rather than Confirmed mode for the quickest upgrade and to ensure that you do not skip any processes.
In the following procedure, file system paths, the starting release, and languages are provided as samples only.
To upgrade each cloned WebPass instance 1. Prepare Each WebPass Clone: Perform all activities outlined here (this is a repeat
of the list in "Preparing Cloned Identity System Components for the Upgrade" on page 16-71; details are in Chapter 8):
■ Copying Custom Identity Event Plug-ins
■ Preparing Earlier Customizations
■ Preparing Host Computers, which includes the following topics:
– Changing Read Permissions on Password Files
– Confirming Free Disk Space
■ Preparing Release 6.x Environments
■ Preparing Multi-Language Installations
-D "destination directory" Specify the full path (in quotation marks) to the cloned 10g (10.1.4.2.0) WebPass directory that replaced the earlier instance directory (see columns 1 and 4 of Table 16–10). For example:
■ -D "C:\clone_np\webcomponent_01\identity"
■ -D "C:\clone_np\webcomponent_02\identity"
■ and so on
-I "installation directory" The installation directory should be same as the destination directory. For example:
■ -I "C:\clone_np\webcomponent_01\identity"
■ -I "C:\clone_np\webcomponent_02\identity"
■ and so on.
Note: Refer to Table 16–10 for details about path names and directory content.
-L "Languages" Specify all installed languages to be upgraded by the appropriate code, in quotations. For example, English, "en-us"; French, "fr-fr"; German, "de-de".
-W "Web server type" Specify the appropriate code for the Web Server used by this clone, in quotations. For example, "nsapi", "apache2", "isapi", "apache", "ihs", "ohs", "ohs2", "domino".
Caution: When you have one Web server instance serving multiple Oracle Access Manager Web component clones, you must upgrade all serviced Web component clones before restarting the Web server.
Table 16–11 (Cont.) MigrateOAM Script for WebPass Clone Upgrades
MigrateOAM Clone Mode Syntax Values and Operations

Upgrading the Cloned Identity System
16-80 Oracle Access Manager Upgrade Guide
■ Backing Up File System Directories, Web Server Configurations, and Registry Details
■ Stopping Servers and Services
■ Logging in with Appropriate Administrative Rights
2. Source Creation: Rename the subdirectory that contains the WebPass clone to create a source for the upgrade. For example:
Rename: clone_np\webcomponent_01\identity As: clone_np\webcomponent_01\identity_source
3. Destination Creation: In the top-level clone file system, extract 10g (10.1.4.0.1) WebPass libraries and files and specify a destination path that exactly matches the clone before you renamed it. For example:
Destination Path: clone_np\webcomponent_01\identity
For a destination path example, see column 1 of Table 16–10. For more information, see "Destination Creation: Extracting 10g (10.1.4.0.1) Libraries and Files" on page 16-28.
4. Obtaining Tools: Apply the 10g (10.1.4.2.0) patch to the 10g (10.1.4.0.1) instance, as described "Obtaining Tools: Applying Release 10.1.4 Patch Set 1 (10.1.4.2.0)" on page 16-31.
5. Change to the destination_dir that contains the 10g (10.1.4.2.0) MigrateOAM script for this WebPass upgrade. For example:
cd clone_np\webcomponent_01\identity\oblix\tools\migration_tools\ MigrateOAM. bat
6. Run the MigrateOAM script in Clone mode and specify details for your starting release and path names for this instance. For example:
MigrateOAM -M Clone -C WP -F 610 -T 1014 -S "C:\clone_np\webcomponent_01\ identity_source" -D "C:\clone_np\webcomponent_01\identity" -I "C:\clone_np\ webcomponent_01\identity" -L "en-us" -W "nsapi"
a. Use Automatic mode for each sequence so that you do not need to confirm each process.
Note: If you do not perform all preparation steps that are appropriate for this component, you might not be able to recover from a problem or to roll back after a failed upgrade.

Upgrading the Cloned Identity System
Upgrading the Schema, Data, and Clone System 16-81
b. Accept Web server configuration changes by specifying the full directory path name to the Web server configuration file for which this clone is configured.
c. Continue as requested through all processes; do not skip any processes.
d. Finish according to on-screen messages.
The destination now contains upgraded information based on the source.
7. Verify that the WebPass clone upgrade was successful as follows:
a. Apply Web server changes, if needed.
b. Stop, then restart the associated Identity Server service.
c. When all Web components on this host are upgraded, start the WebPass Web server instance.
d. Web Server Does Not Start: Perform the following activities:
Check event logs and the WebPass log output file. For more information about logging and log output files, see the Oracle Access Manager Identity and Common Administration Guide.
Check the Web server-specific configuration file. If you have IIS configured as the Web server for this instance, ensure that the transfilter with its green status in ISAPI filters. For more information, see the Oracle Access Manager Installation Guide.
e. Check the migration log files for any errors reported during the upgrade, as described in "Accessing Log Files" on page G-2.
f. Windows: Verify that the registry entry is updated by running the Registry editor (regedit) and:
View the registry entry HKEY_LOCAL_MACHINE, SOFTWARE,Oblix,Oblix Netpoint. Check for the respective installed version and, under that, check the entry for WebPass.
g. Verify that the version file in the destination path is updated for 10.1.4 (npversion_component.txt). For example:
destination_dir\oblix\config\np1014_wp.txt
Note: When you have one Web server instance servicing multiple Oracle Access Manager Web components, you must upgrade all serviced Web components before restarting the Web server. For more information, see "Web Server Support for Multiple Oracle Access Manager Releases" on page 15-7.

Upgrading the Cloned Identity System
16-82 Oracle Access Manager Upgrade Guide
h. Check the webpass.xml file to ensure that it includes the details for this instance: destination_dir\identity\oblix\apps\webpass\bin\webpass.xml.
i. Upgrade Not Successful: Proceed to "Recovering From a Cloned Identity System Upgrade Failure" on page 16-83.
j. Upgrade Successful: Repeat this entire procedure to upgrade every cloned WebPass instance.
8. After upgrading all WebPass instances, proceed to "Validating the Upgraded Cloned Identity System" on page 16-82.
Validating the Upgraded Cloned Identity SystemAfter upgrading the clone Identity System, Oracle recommends that you quickly validate the following items to ensure that the upgrade was successful.
Oracle recommends that you perform this task after upgrading clones, and after upgrading independently installed SDKs and Identity System customizations. For more information, see also:
To validate your cloned Identity System upgrade1. Delete all Web browser caches once the upgrade is complete.
2. Make sure all Identity Server services and WebPass Web server instances are running.
3. Check that your message and parameter catalog customizations have been preserved. For example, if you have changed any message in a particular message catalog file, then it needs to be retained. For example:
destination_dir\identity\...
4. Perform the same activities that you performed after upgrading the Identity System schema. For details, see "Validating Successful Operations in Your Environment" on page 16-67.
5. Perform tasks in the following sections and then validate the upgraded environment again:
■ Renaming Audit Files After Upgrading Identity System Clones
■ Upgrading SDKs and Identity System Customizations
6. Proceed to "Backing Up Upgraded Identity System Clones".
7. Joint Identity and Access System: Only after confirming that system is operating without problem, should you proceed to "Upgrading the Cloned Access System" on page 16-87.
8. No Access System: Finish all validation tests and tasks before you proceed to Chapter 17 and start upgrading original instances.
Backing Up Upgraded Identity System ClonesOracle recommends that you back up the upgraded cloned Identity System after validating that it is operating properly. This will enable you to easily restore your environment to the newly upgraded state should that be needed.

Upgrading the Cloned Identity System
Upgrading the Schema, Data, and Clone System 16-83
To back up critical information after the upgrade 1. Back up the upgraded destination file system directory. This is similar to backing
up an existing component installation directory. For details, see "Backing Up the Existing Component Installation Directory" on page 8-7.
2. Web Server: Back up the upgraded Web server configuration file using instructions from your vendor and details in "Backing Up the Existing Web Server Configuration File" on page 8-8.
3. Windows: Back up Windows Registry data for the destination as described in "Backing Up Windows Registry Data" on page 8-9.
4. Proceed to "Looking Ahead" on page 16-84.
Recovering From a Cloned Identity System Upgrade FailureIf a cloned Identity System component upgrade was not successful, you can perform the following steps to restore the earlier clone instance, and then try the component upgrade again. The source file system directory was not upgraded and remains intact.
If you do not want to continue with the zero downtime upgrade, see "Rolling Back After Upgrading Identity System Clones" on page 16-83.
To recover from an unsuccessful cloned Identity System upgrade1. Back up the clone source. You will retain a backup copy when you restart the clone
upgrade. For example:
Copy the Clone Source: clone_np\ois_01\identity_source To: backup_clone_np\ois_01\identity_source
2. Remove the destination (the 10g (10.1.4.0.1) component libraries and files to which you have applied the Release 10.1.4 Patch Set 1 (10.1.4.2.0)).
3. Web Server: Restore the backed up Web server configuration file, if required for a cloned WebPass.
4. Windows: Restore (import) the backed up registry entry for the source instance.
5. Extract the 10g (10.1.4.0.1) component libraries and files for the instance to upgrade, and then apply Release 10.1.4 Patch Set 1 (10.1.4.2.0) as described in "About Destination Creation and Obtaining Tools for a Zero Downtime Upgrade" on page 16-28.
6. Restart the instance upgrade.
Rolling Back After Upgrading Identity System Clones You can use the following procedure to roll back all changes and return to your original installation. When you finish this operation, you will have no clones in your environment and no clone entries in your System Console.
You cannot roll back the schema upgrade unless you used an external utility to back up the schema before it was upgraded. Details about using external tools to back up and recover the schema is outside the scope of this manual.
To roll back after upgrading Identity System clones 1. Shut down clone services and Web servers.
2. Remove the following items from host computers:
Upgrading the Cloned Identity System
16-84 Oracle Access Manager Upgrade Guide
■ Clone file system directories
■ 10g (10.1.4.0.1) component libraries and files to which you applied Release 10.1.4 Patch Set 1 (10.1.4.2.0)
■ Any file system directories that you have added or that were added automatically as part of any upgrade process
■ The Web server instance for the clones
■ The branches in the LDAP directory server that were added for the new configuration and policy DNs
3. From the original System Console, remove all clone profiles.
4. If you have a back up copy of the schema before the upgrade, you might be able to reinstate the original schema.
5. Confirm that your original setup is operating properly.
Looking AheadUpgraded Identity System components send and receive information in UTF-8 encoding. Earlier components send and receive data in Latin-1 encoding. As a result, the 10g (10.1.4.0.1) Identity System does not work with earlier Access System components and might not work with earlier Identity System customizations. For more information about expected system behaviors and backward compatibility, see Chapter 4.
When all original Identity System components are successfully upgraded, proceed as needed based on the configuration for your earlier installation. For example:
■ Identity System Only: When your earlier installation does not include the Access System, you must perform activities in the sequence described in "Task overview: Remaining Identity System only upgrade activities" on page 16-84.
■ Joint Identity and Access System: When your earlier installation includes the Access System and Oracle Access Manager integration connectors for certain third-party products, you must upgrade integration connectors before upgrading the SDK. In this case, perform tasks as described in "Task overview: Remaining joint Identity and Access System activities" on page 16-85.
Task overview: Remaining Identity System only upgrade activities 1. Perform tasks in "Renaming Audit Files After Upgrading Identity System Clones"
on page 16-85 as needed.
2. Finish by performing tasks in "Upgrading SDKs and Identity System Customizations" on page 16-86.
3. Perform as many tests and familiarization activities as your enterprise dictates before upgrading original instances.
4. After your validation period ends, proceed to Chapter 17 and upgrade original instances:
Caution: When your earlier installation includes the Access System, you must upgrade integration connectors before upgrading the SDK.

Renaming Audit Files After Upgrading Identity System Clones
Upgrading the Schema, Data, and Clone System 16-85
Task overview: Remaining joint Identity and Access System activities 1. Finishing Cloned Identity System Upgrades: Proceed to the following topics in
this chapter and perform tasks as directed in:
■ Renaming Audit Files After Upgrading Identity System Clones
■ Upgrading SDKs and Identity System Customizations
2. Finishing Cloned Access System Upgrades: Proceed to the following topics in this chapter and perform tasks as described in:
a. Upgrading the Cloned Access System
b. Upgrading SDKs, Integration Connectors, and Access System Customizations
3. Perform as many tests and familiarization activities as your enterprise dictates before upgrading original instances.
4. After your own validation period ends, proceed to Chapter 17 and upgrade original instances.
Renaming Audit Files After Upgrading Identity System ClonesAfter upgrading Identity System clones from releases earlier than 7.0, you must perform this task to correct the path name of audit files for original COREid Servers. If you have upgraded from release 7.x, you can skip this activity.
When upgrading from any release earlier than 700, the audit file name is changed by prefixing the path to the source COREid Server that was specified when using the MigrateOAM script in Clone mode. For example:
Clone Path: clone_np\ois_01\identity Source Path: clone_np\ois_01\identity_source
If your environment includes multiple COREid Servers, the audit file name for each will be prefixed by the same file system path as the source COREid Server from which the clone upgrade is performed. As a result, your original configuration is lost during the upgrade. For example, suppose you have two original release 611 COREid Server instances with audit files stored as follows:
\oblix\engine\auditfile_1.lst \oblix\engine\auditfile_2.lst
In the sample path names here, the audit files might be stored in different file system paths. However, after the clone upgrade, both audit files will be stored in the path of the COREid Server that was specified as the source during the clone upgrade. For example:
clone_np\ois_01\identity_source\oblix\engine\auditfile_1.lst clone_np\ois_01\identity_source\oblix\engine\auditfile_2.lst
To recover your audit files after upgrading the clones, you must perform the following task to change audit file paths to reflect the appropriate path to specific original COREid Server instances.
Caution: You perform this task for all original COREid Servers only after the upgrading clones.
Upgrading SDKs and Identity System Customizations
16-86 Oracle Access Manager Upgrade Guide
To recover your original audit file names after upgrading Identity System clones 1. After upgrading the clones, go to the clone COREid System Console and log in as
usual.
http://hostname:port/identity/oblix
where hostname refers to computer that hosts the Web server for the cloned WebPass; port refers to the HTTP port number of the Web server instance; and /identity/oblix connects to the COREid System Console.
2. From the COREid System Console, click System Configuration, and then click Identity Servers.
3. Select the name of an original COREid Server to display the information for this instance.
4. Check the Audit File Name field, to see if the path name is correct.
If the path name is correct, click Cancel and then repeat steps 3 and 4 to check the audit file path name of another instance. If the path name is not correct, proceed to Step 5.
5. Click the Modify button at the bottom of the page.
6. On the Modify page, change the path name in the Audit File Name field to the correct path for this instance and then click Save. For example:
From: \oblix\engine\auditfile_2.lst To: C:\np611\ois_02\identity\oblix\engine\auditfile_2.lst
7. Restart the original COREid Server whose details you just updated if it is running.
8. Repeat all steps in this procedure for each clone and original COREid Server instance.
9. Proceed to "Upgrading SDKs and Identity System Customizations".
Upgrading SDKs and Identity System CustomizationsOracle recommends that you upgrade your Identity System customizations and any independently installed software developer kits (SDKs) and then validate that the entire upgraded cloned Identity System is operating properly.
The following overview describes where to locate the information for each task.
Task overview: Remaining Identity System only upgrade activities 1. Proceed as needed for your environment:
■ Identity System Only: Upgrade independently installed SDKs and Integration Connections as described in Chapter 11.
■ Joint Identity and Access System: Upgrade the Access System before performing tasks in Chapter 11.
2. Upgrade your Identity System customizations as described in Chapter 12:
■ Upgrading Auditing and Access Reporting for the Identity System
■ Combining Challenge and Response Attributes on a Panel
■ Confirming Identity System Failover and Load Balancing
■ Migrating Custom Identity Event Plug-Ins

Upgrading the Cloned Access System
Upgrading the Schema, Data, and Clone System 16-87
■ Ensuring Compatibility with Earlier Portal Inserts
■ About Custom Items and Upgrades
■ Incorporating Customizations from Release 6.5 and 7.x
■ Incorporating Customizations from Releases Earlier than 6.5
■ Validating Identity System Customization Upgrades
3. Proceed as follows:
■ Joint Identity and Access System: Go to "Upgrading the Cloned Access System".
■ Identity System Only: Perform tasks in "Validating Successful Operations in Your Environment" on page 16-67 before you start upgrading originals.
Upgrading the Cloned Access SystemYou perform tasks in this section only if you have a joint Identity and Access System and you have completed all tasks to upgrade and validate the cloned Identity System and rename audit files. Otherwise, skip this topic and see Looking Ahead on page 16-84 for details about how to proceed.
The tasks that you must perform are outlined in the following task overview. Individual topics are provided with background details and step-by-step procedures that you can follow.
Task overview: Upgrading the cloned Access System1. Preparing Cloned Access System Components for the Upgrade
2. Upgrading Cloned Access Manager Instances
3. Upgrading Cloned Access Servers
4. Validating the Upgraded Cloned Access System
5. Backing Up Upgraded Access System Clones
6. Upgrading SDKs, Integration Connectors, and Access System Customizations
For information about recovering if there is a problem, see "Recovering from a Failed Cloned Access System Component Upgrade" on page 16-98. When you finish your preview of activities here, see "Looking Ahead" on page 16-99 to familiarize yourself with activities that Oracle recommends you perform before upgrading the original system.
Preparing Cloned Access System Components for the UpgradeThe procedures that you perform to prepare components for an upgrade are described in detail in Chapter 8. You must perform many of the same preparation tasks for cloned Access System components before upgrading each clone. Some of these tasks are similar to those that you performed when upgrading cloned Identity System components.
Upgraded Access Servers provide backward compatibility with earlier WebGates. As a result, you can delay WebGate upgrades until you upgrade the originals. You can also delay upgrading the Software Developer Kit (SDK). Items that must be handled manually can be migrated at any time. For more information about backward compatibility, see Chapter 4.

Upgrading the Cloned Access System
16-88 Oracle Access Manager Upgrade Guide
The preparation tasks that you must perform for Access System clones are outlined in the following overview. You will be instructed to perform these tasks as you upgrade each clone.
Task overview: Preparing cloned Access System instances for the upgrade includes1. Preparing Earlier Customizations
2. Preparing the Default Logout in the Policy Manager
3. Preparing Host Computers, which includes the following topics:
■ Changing Read Permissions on Password Files
■ Confirming Free Disk Space
4. Preparing Release 6.x Environments
5. Preparing Multi-Language Installations
6. Backing Up File System Directories, Web Server Configurations, and Registry Details
7. Stopping Servers and Services
8. Logging in with Appropriate Administrative Rights
9. Clone of the First Installed Access Manager: In addition to the activities in Steps 1-8, perform activities in Chapter 5, "Backing up Oracle Access Manager Configuration and Policy Data".
Upgrading Cloned Access Manager InstancesUpgrading an Access Manager cline is similar to the upgrading WebPass clones.
You start by performing steps to ensure that for each cloned Access Manager instance you have the latest MigrateOAM script in an appropriate location. The following tasks are introduced in "Preparation Tasks for the Zero Downtime Method" on page 15-12 and are summarized next:
■ Source Creation: Rename the subdirectory that contains the clone to create a source for the upgrade and a back up copy of the clone.
Note: If you do not perform all preparation steps, you might not be able to recover from a problem or to roll back after a failed upgrade.
Note: With the zero downtime upgrade method, you do not need to create a backup copy of the clone file system directory. Instead, you will rename the file system path to use as a source during the upgrade. The source becomes a backup that remains intact during the upgrade.
Caution: Oracle recommends that you review all information in this topic before proceeding with the activities.

Upgrading the Cloned Access System
Upgrading the Schema, Data, and Clone System 16-89
■ Destination Creation: Extract 10g (10.1.4.0.1) Policy Manager libraries and files and specify the specify a destination path that exactly matches the clone before you renamed it.
■ Obtaining the Tools: Apply Release 10.1.4 Patch Set 1 (10.1.4.2.0) to the 10g (10.1.4.0.1) instance to obtain the tools needed for the upgrade.
To help illustrate these tasks, Table 16–12 organizes sample file system path names in columns that describe the progression of actions that you will take. Additional information follows Table 16–12. The sample path names are for Windows platforms. The paths in your environment might differ.
After performing activities outlined in Table 16–12, the latest MigrateOAM script will be stored in the destination path. For example:
clone_np\webcomponent_01\access\oblix\tools\migration_tools\MigrateOAM.bat clone_np\webcomponent_02\access\oblix\tools\migration_tools\MigrateOAM.bat and so on.
Table 16–13 lists the arguments that you specify with the 10g (10.1.4.2.0) MigrateOAM script to execute the Clone mode for each Access Manager clone upgrade.
Table 16–12 Activities to Prepare for a Clone Access Manager Instance Upgrade
1 Clone Path 2 Source Creation 3 Destination Creation and Obtaining Tools
Access Manager Instances
clone_np \webcomponent_01 \access
clone_np \webcomponent_02 \access
Rename the subdirectory containing each clone in column 1. For example:
clone_np \webcomponent_01 \access_source
clone_np \webcomponent_02 \access_source
After creating the source (see column 2):
A. Extract 10g (10.1.4.0.1) Policy Manager libraries and files and specify the clone path before you renamed it as the installation (destination) directory. For example:
clone_np\webcomponent_01\access
Note: The destination path of the 10g (10.1.4.0.1) instance must exactly match the path of the clone before it was renamed (see column 1).
See "Destination Creation: Extracting 10g (10.1.4.0.1) Libraries and Files" on page 16-28.
B. Apply Release 10.1.4 Patch Set 1 (10.1.4.2.0) to the 10g (10.1.4.0.1) instance to obtain the tools.
See "Obtaining Tools: Applying Release 10.1.4 Patch Set 1 (10.1.4.2.0)" on page 16-31.
C. Repeat steps A and B for each clone instance.
Table 16–13 MigrateOAM Script for Access Manager Clone Upgrades
MigrateOAM Clone Mode Syntax Values and Operations
-M Clone Specify Clone as the mode. Clone mode is required to upgrade cloned components.
-C component Specify AM to upgrade a cloned Access Manager.
Note: Upgrade all Access Manager clones, on each computer, before upgrading any Access Server clones.
-F nnn Specify the number that identifies your earlier release. For example: 610 (for 6.1 or 6.1.1), 650 (for 6.5.x), or 700 (for 7.x)
-T 1014 Specify1014 as the release to which this data will be upgraded.

Upgrading the Cloned Access System
16-90 Oracle Access Manager Upgrade Guide
Clone of the First Installed Access Manager: When you upgrade the clone of the first Access Manager that you installed, the access policy data in the new branch of the LDAP directory server is upgraded in addition to component-specific data. Before you start this upgrade, Oracle recommends that you back up the policy data in the new branch of the LDAP directory server.
All Access Manager Clones: Upgrade processing for Access Manager clones includes Web server-related changes. Additionally, there are parameter catalogs and message files and compnent-specific changes.
When upgrading clones, you will see messages and prompts for each sequence from your starting release to the latest release.Oracle recommends that you use Automatic mode for the quickest upgrade and that you do not skip any processes.
Web Servers: When you have one Web server instance servicing multiple Oracle Access Manager Web components, you must upgrade all serviced Web components before restarting the Web server. For more information, see "Web Server Support for Multiple Oracle Access Manager Releases" on page 15-7
Windows Registry: Windows registry entries are updated when you upgrade the instance. Oracle recommends that you back up the registry entry for the source before you upgrade the instance. For more information, see "Reinstating Original Windows Registry Entries During a Rollback Operation" on page 15-36.
In the following procedure, the path names, starting release, and languages are samples only. Your details will be different.
-S "source directory" Specify the full path (in quotation marks) to the renamed earlier Access Manager directory (see column 2 of Table 16–12). For example, when you have multiple instances:
■ -S "C:\clone_np\webcomponent_01\access_source"
■ -S "C:\clone_np\webcomponent_02\access_source"
■ and so on
-D "destination directory" Specify the full path (in quotation marks) to the cloned 10g (10.1.4.2.0) Access Manager directory that replaced the earlier instance (see columns 1 and 4 of Table 16–12). For example:
■ -D "C:\clone_np\webcomponent_01\access"
■ -D "C:\clone_np\webcomponent_02\access"
■ and so on
-I "installation directory" The installation directory should be same as the destination directory. For example:
■ -I "C:\clone_np\webcomponent_01\access"
■ -I "C:\clone_np\webcomponent_02\access"
■ and so on
Note: Refer to Table 16–12 for details about path names and directory content.
-L "Languages" Specify all installed languages to be upgraded by the appropriate code, in quotations. For example, English, "en-us"; French, "fr-fr"; German, "de-de".
-W Web server type Specify the appropriate code for the Web Server used by this clone, in quotations. For example, "nsapi", "apache2", "isapi", "apache", "ihs", "ohs", "ohs2", "domino".
Table 16–13 (Cont.) MigrateOAM Script for Access Manager Clone Upgrades
MigrateOAM Clone Mode Syntax Values and Operations

Upgrading the Cloned Access System
Upgrading the Schema, Data, and Clone System 16-91
To upgrade cloned Access Manager instances 1. All Access Manager Clones: Perform all activities outlined in "Preparing Cloned
Access System Components for the Upgrade" on page 16-87, which can be found in Chapter 8 and includes:
■ Preparing Earlier Customizations
■ Preparing the Default Logout in the Policy Manager
■ Preparing Host Computers, which includes:
– Changing Read Permissions on Password Files
– Confirming Free Disk Space
■ Preparing Release 6.x Environments
■ Preparing Multi-Language Installations
■ Backing Up File System Directories, Web Server Configurations, and Registry Details
■ Stopping Servers and Services
■ Logging in with Appropriate Administrative Rights
2. Clone of the First Access Manager: In addition to activities in Step 1, back up policy data in the new branch as described in "Backing up Oracle Access Manager Configuration and Policy Data" on page 5-17.
3. Source Creation: Rename the subdirectory that contains the Access Manager clone to create a source for the upgrade. For example:
Rename: clone_np\webcomponent_01\access As: clone_np\webcomponent_01\access_source
4. Destination Creation: Extract 10g (10.1.4.0.1) Policy Manager libraries and files and specify a destination path that exactly matches the clone path before it was renamed. For example:
Note: If you do not perform all preparation steps, you might not be able to recover from a problem or to roll back after a failed upgrade.
Note: You do not need to create a backup copy of the clone file system directory. Instead, you will rename the path to use as a source.

Upgrading the Cloned Access System
16-92 Oracle Access Manager Upgrade Guide
Destination Path: clone_np\webcomponent_01\access
For a destination path example, see Table 16–12, column 1. For more information, see "Destination Creation: Extracting 10g (10.1.4.0.1) Libraries and Files" on page 16-28.
5. Obtaining Tools: Apply the 10g (10.1.4.2.0) patch to the 10g (10.1.4.0.1) instance, as described "Obtaining Tools: Applying Release 10.1.4 Patch Set 1 (10.1.4.2.0)" on page 16-31.
6. Change to the destination_dir that contains the 10g (10.1.4.2.0) MigrateOAM script for this Policy Manager instance. For example:
clone_np\webcomponent_01\access\oblix\tools\migration_tools\MigrateOAM. bat
7. Run the MigrateOAM script in clone mode and specify your starting release and path names. For example:
MigrateOAM -M Clone -C AM -F 610 -T 1014 -S "C:\clone_np\webcomponent_01\ access_source" -D "C:\clone_np\webcomponent_01\access" -I "C:\clone_np\ webcomponent_01\access" -L "en-us" -W "nsapi"
a. Use Automatic mode for each sequence so that you do not need to confirm each process.
b. Accept access policy data changes if you are asked.
c. Accept Web server configuration changes by specifying the full directory path to the Web server configuration file for which this clone is configured.
d. Continue as requested through all processes; do not skip any processes.
e. Finish according to on-screen messages.
When you finish, the destination directory contains the upgraded instance with configuration details based on the source.

Upgrading the Cloned Access System
Upgrading the Schema, Data, and Clone System 16-93
8. Verify that the cloned Access Manager upgrade was successful as follows:
a. Apply Web server changes, if needed.
b. Check the migration log files for any errors reported during the upgrade, as described in "Accessing Log Files" on page G-2.
c. Windows: Verify that the registry entry is updated by running the Registry editor (regedit) and:
View the registry entry HKEY_LOCAL_MACHINE, SOFTWARE,Oblix,Oblix Netpoint. Check for the respective installed version and, under that, check the entry for Access Manager.
d. Stop, then restart the associated Identity Server service.
e. When all Web components on this host are upgraded, start the Web server instance for the cloned WebPass and Access Manager.
f. Web Server Does Not Start: Perform the following activities:
Check event logs and the Access Manager log output file. For more information about logging and log output files, see the Oracle Access Manager Identity and Common Administration Guide.
Check the Web server-specific configuration file. If you have IIS configured as the Web server for this instance, ensure that the transfilter with its green status in ISAPI filters. For more information, see the Oracle Access Manager Installation Guide.
g. Upgrade Not Successful: Proceed to "Recovering from a Failed Cloned Access System Component Upgrade" on page 16-98.
h. Upgrade Successful: Repeat this entire procedure to upgrade every cloned Access Manager instance on this host, and then proceed to "Upgrading Cloned Access Servers" on page 16-94.
9. Upgrade all cloned Access Manager instances on all host computers.
Note: The Web server instance that is serving clone components must remain shut down until all serviced components are upgraded. For more information, see "Web Server Support for Multiple Oracle Access Manager Releases" on page 15-7.
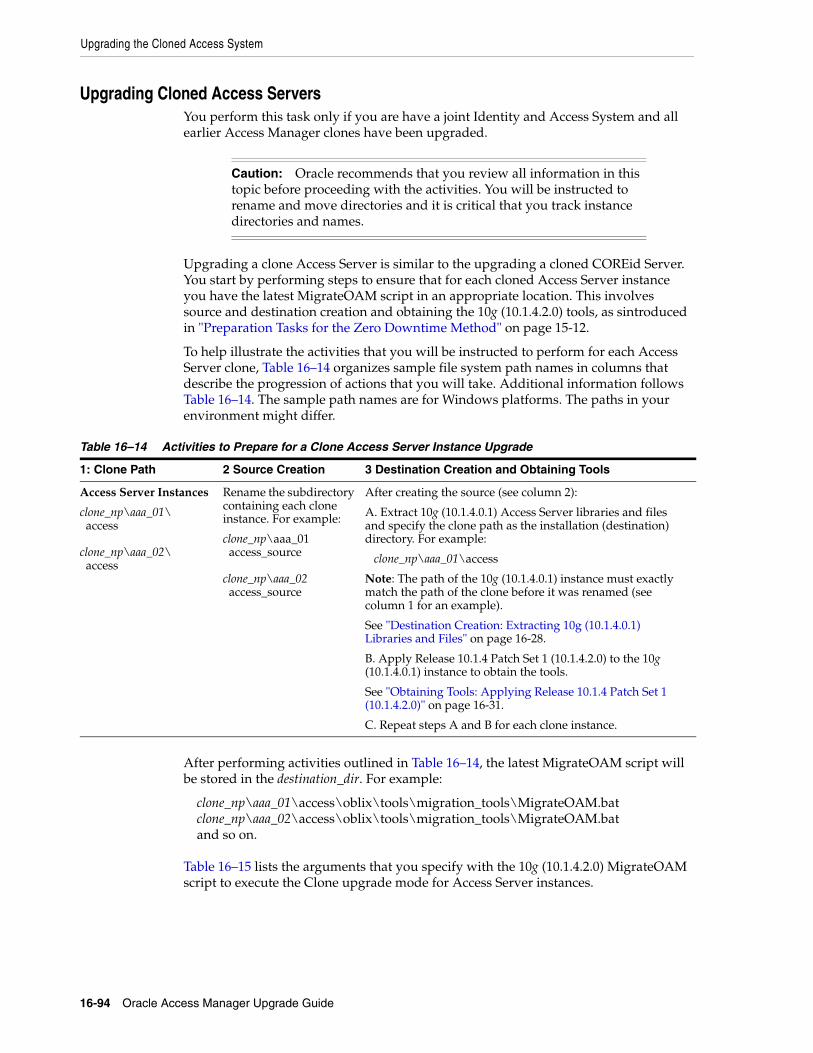
Upgrading the Cloned Access System
16-94 Oracle Access Manager Upgrade Guide
Upgrading Cloned Access ServersYou perform this task only if you are have a joint Identity and Access System and all earlier Access Manager clones have been upgraded.
Upgrading a clone Access Server is similar to the upgrading a cloned COREid Server. You start by performing steps to ensure that for each cloned Access Server instance you have the latest MigrateOAM script in an appropriate location. This involves source and destination creation and obtaining the 10g (10.1.4.2.0) tools, as sintroduced in "Preparation Tasks for the Zero Downtime Method" on page 15-12.
To help illustrate the activities that you will be instructed to perform for each Access Server clone, Table 16–14 organizes sample file system path names in columns that describe the progression of actions that you will take. Additional information follows Table 16–14. The sample path names are for Windows platforms. The paths in your environment might differ.
After performing activities outlined in Table 16–14, the latest MigrateOAM script will be stored in the destination_dir. For example:
clone_np\aaa_01\access\oblix\tools\migration_tools\MigrateOAM.bat clone_np\aaa_02\access\oblix\tools\migration_tools\MigrateOAM.bat and so on.
Table 16–15 lists the arguments that you specify with the 10g (10.1.4.2.0) MigrateOAM script to execute the Clone upgrade mode for Access Server instances.
Caution: Oracle recommends that you review all information in this topic before proceeding with the activities. You will be instructed to rename and move directories and it is critical that you track instance directories and names.
Table 16–14 Activities to Prepare for a Clone Access Server Instance Upgrade
1: Clone Path 2 Source Creation 3 Destination Creation and Obtaining Tools
Access Server Instances
clone_np\aaa_01\ access
clone_np\aaa_02\ access
Rename the subdirectory containing each clone instance. For example:
clone_np\aaa_01 access_source
clone_np\aaa_02 access_source
After creating the source (see column 2):
A. Extract 10g (10.1.4.0.1) Access Server libraries and files and specify the clone path as the installation (destination) directory. For example:
clone_np\aaa_01\access
Note: The path of the 10g (10.1.4.0.1) instance must exactly match the path of the clone before it was renamed (see column 1 for an example).
See "Destination Creation: Extracting 10g (10.1.4.0.1) Libraries and Files" on page 16-28.
B. Apply Release 10.1.4 Patch Set 1 (10.1.4.2.0) to the 10g (10.1.4.0.1) instance to obtain the tools.
See "Obtaining Tools: Applying Release 10.1.4 Patch Set 1 (10.1.4.2.0)" on page 16-31.
C. Repeat steps A and B for each clone instance.
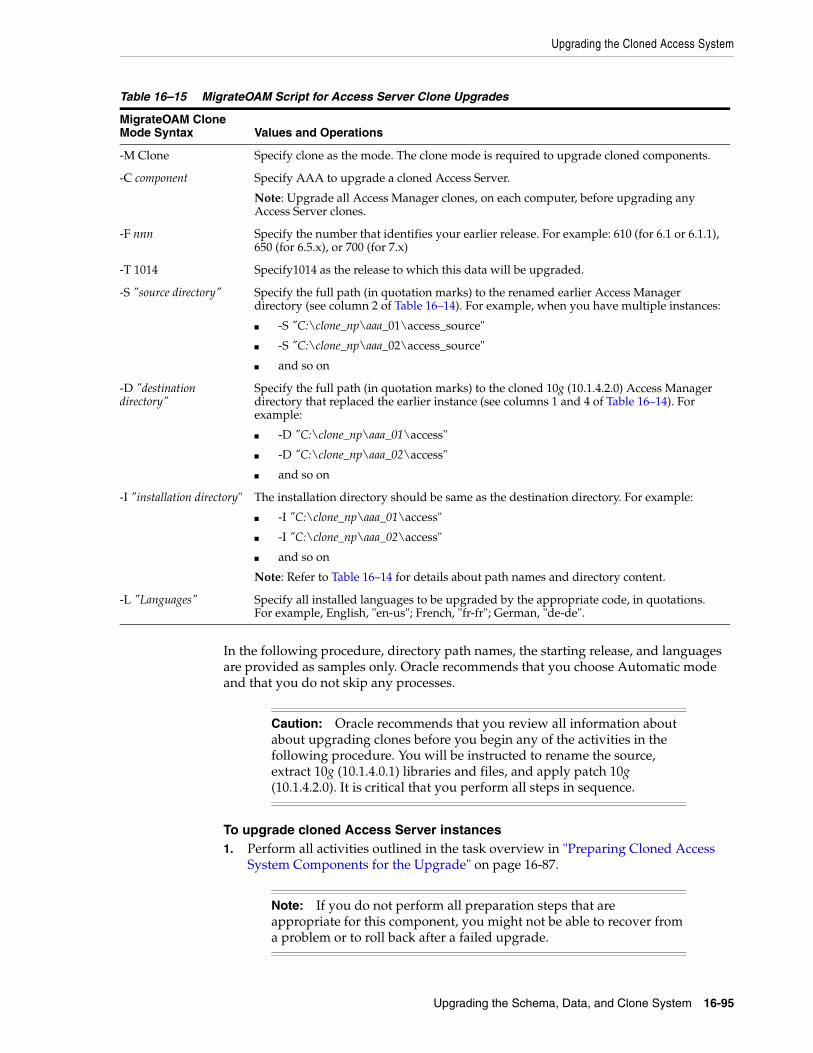
Upgrading the Cloned Access System
Upgrading the Schema, Data, and Clone System 16-95
In the following procedure, directory path names, the starting release, and languages are provided as samples only. Oracle recommends that you choose Automatic mode and that you do not skip any processes.
To upgrade cloned Access Server instances 1. Perform all activities outlined in the task overview in "Preparing Cloned Access
System Components for the Upgrade" on page 16-87.
Table 16–15 MigrateOAM Script for Access Server Clone Upgrades
MigrateOAM Clone Mode Syntax Values and Operations
-M Clone Specify clone as the mode. The clone mode is required to upgrade cloned components.
-C component Specify AAA to upgrade a cloned Access Server.
Note: Upgrade all Access Manager clones, on each computer, before upgrading any Access Server clones.
-F nnn Specify the number that identifies your earlier release. For example: 610 (for 6.1 or 6.1.1), 650 (for 6.5.x), or 700 (for 7.x)
-T 1014 Specify1014 as the release to which this data will be upgraded.
-S "source directory" Specify the full path (in quotation marks) to the renamed earlier Access Manager directory (see column 2 of Table 16–14). For example, when you have multiple instances:
■ -S "C:\clone_np\aaa_01\access_source"
■ -S "C:\clone_np\aaa_02\access_source"
■ and so on
-D "destination directory"
Specify the full path (in quotation marks) to the cloned 10g (10.1.4.2.0) Access Manager directory that replaced the earlier instance (see columns 1 and 4 of Table 16–14). For example:
■ -D "C:\clone_np\aaa_01\access"
■ -D "C:\clone_np\aaa_02\access"
■ and so on
-I "installation directory" The installation directory should be same as the destination directory. For example:
■ -I "C:\clone_np\aaa_01\access"
■ -I "C:\clone_np\aaa_02\access"
■ and so on
Note: Refer to Table 16–14 for details about path names and directory content.
-L "Languages" Specify all installed languages to be upgraded by the appropriate code, in quotations. For example, English, "en-us"; French, "fr-fr"; German, "de-de".
Caution: Oracle recommends that you review all information about about upgrading clones before you begin any of the activities in the following procedure. You will be instructed to rename the source, extract 10g (10.1.4.0.1) libraries and files, and apply patch 10g (10.1.4.2.0). It is critical that you perform all steps in sequence.
Note: If you do not perform all preparation steps that are appropriate for this component, you might not be able to recover from a problem or to roll back after a failed upgrade.

Upgrading the Cloned Access System
16-96 Oracle Access Manager Upgrade Guide
2. Source Creation: Rename the subdirectory that contains the Access Server clone to create a source for the upgrade. For example:
Rename: clone_np\aaa_01\access As: clone_np\aaa_01\access_source
3. Destination Creation: Extract 10g (10.1.4.0.1) Access Server component libraries and files and specify a destination path that exactly matches the clone before it was renamed. For example:
Destination Path: clone_np\aaa_01\access
For a destination example, see Table 16–14, column 1. For more information, see "Destination Creation: Extracting 10g (10.1.4.0.1) Libraries and Files" on page 16-28.
4. Obtaining Tools: Apply the 10g (10.1.4.2.0) patch to the 10g (10.1.4.0.1) instance, as described "Obtaining Tools: Applying Release 10.1.4 Patch Set 1 (10.1.4.2.0)" on page 16-31.
5. Change to the destination that contains the 10g (10.1.4.2.0) MigrateOAM script for this Access Server upgrade. For example:
cd clone_np\aaa_01\access\oblix\tools\migration_tools\MigrateOAM.bat
6. Run the 10g (10.1.4.2.0) MigrateOAM script in clone mode and specify your starting release and path names. For example:
MigrateOAM -M Clone -C AAA -F 610 -T 1014 -S "C:\clone_np\aaa_01\access_source" -D "C:\clone_np\aaa_01\access" -I "C:\clone_np\aaa_01\access" -L "en-us"
a. Use Automatic mode for each sequence so that you do not need to confirm each process.
b. Accept any data changes if you are asked to do so.

Upgrading the Cloned Access System
Upgrading the Schema, Data, and Clone System 16-97
c. Continue as requested through all processes; do not skip any processes.
d. Finish according to on-screen messages.
The destination now contains an upgraded instance based on the source.
7. Auditing and Access Reporting: If your earlier installation included auditing and access reporting, go immediately to "Upgrading Auditing and Access Reporting for the Identity System" on page 12-2 before performing any other steps.
8. Verify that the Access Server clone upgrade was successful as follows:
a. Start the Access Server service (notice that the name has not changed from the one originally assigned). For example, if you do not store the server password in the password.lst file, use the following command:
start_access_server -P mypassword port -d -t 61
Certain command options might disable the hide option and cause a password to appear in the command line.
b. Provide the password at the prompt, if needed.
On an IBM SecureWay LDAP directory server, the next time you start the Access Server it can take a few minutes for the dialog requesting the PEM pass phrase to appear.
c. Access Server Service Does Not Start: Check your event and Access Server log output files. For more information about logging and log output files, see the Oracle Access Manager Identity and Common Administration Guide.
d. Check the migration log files for any errors reported during the upgrade, as described in "Accessing Log Files" on page G-2.
e. Check the aaa_server_config.xml file to ensure that it includes the correct information for this upgraded clone.
f. Confirm that the value of the MigrateUserDataTo1014 is false in the globalparams.xml file for this instance. For example:
clone_np\aaa_01\access\oblix\apps\common\bin\globalparams.xml
<NameValPair ParamName="MigrateUserDataTo1014" Value="False" />
g. Windows: Verify that the registry entry is updated by running the Registry editor (regedit) using one of the following methods:
In the Registry Editor Window, click My Computer, HKEY_LOCAL_MACHINE, SYSTEM, CurrentControlSet, Services, and then look for ObAAAServer-<Service Name>. Within this, check the Image path.
View the registry entry HKEY_LOCAL_MACHINE, SOFTWARE,Oblix,Oblix Netpoint. Check for the respective installed version and, under that, check the entry for ObAAAServer-<Service Name>.
h. Upgrade Not Successful: Proceed to "Recovering from a Failed Cloned Access System Component Upgrade" on page 16-98.
i. Upgrade Successful: Repeat this entire procedure to upgrade remaining Access Server clone instances.
9. After upgrading all Access Server instances, proceed to "Validating the Upgraded Cloned Access System" on page 16-98.

Upgrading the Cloned Access System
16-98 Oracle Access Manager Upgrade Guide
Validating the Upgraded Cloned Access SystemOracle recommends that you validate the upgraded cloned Access System when all cloned components are upgraded.
To validate your cloned Access System upgrade1. Delete all Web browser caches.
2. Ensure that all Identity Server services and WebPass Web server instances are running, and Policy Manager Web server instances and Access Server services.
3. Perform the same activities that you performed after upgrading the Access System schema. For details, see "Validating Successful Operations in Your Environment" on page 16-67.
4. Perform Access System customization upgrades, as described in Chapter 13.
5. Confirm that the upgraded Access System is operating properly with the upgraded customizations and plug-ins. For details, see "Validating Successful Operations in Your Environment" on page 16-67.
6. Proceed to "Backing Up Upgraded Access System Clones".
7. When you are certain that your upgraded clone environment is operating properly, including your upgraded customizations, proceed to Chapter 17 and start upgrading original instances.
Oracle recommends that you do not start user data migration until you have upgraded and validated all original instances.
Backing Up Upgraded Access System ClonesOracle recommends that after validating a successful upgrade you back up critical information. This will enable you to easily restore your environment to the newly upgraded state should that be a requirement.
To back up critical information after the Access System clone upgrade 1. Back up all upgraded destination file system directories. This is similar to backing
up an existing component installation directory. For details, see "Backing Up the Existing Component Installation Directory" on page 8-7.
2. Web Server for Clones: Back up upgraded Web server configuration files using instructions from your vendor and details in"Backing Up the Existing Web Server Configuration File" on page 8-8.
3. Windows: Back up Windows Registry data for the upgraded clone as described in "Backing Up Windows Registry Data" on page 8-9.
Recovering from a Failed Cloned Access System Component UpgradeIf the cloned component upgrade was not successful, you can perform the following steps to undo a few changes, then retry the instance upgrade again.
The source file system directory is a back up copy of the cloned instance before the upgrade. The source provides information during the upgrade. The source file system directory remains intact.
If you want to remove all traces of the cloned system, see "Rolling Back After Upgrading Access System Clones" on page 16-99.

Upgrading the Cloned Access System
Upgrading the Schema, Data, and Clone System 16-99
To recover from an unsuccessful Access System clone upgrade1. Back up the clone source. You will retain the backup copy when you restart the
clone upgrade. For example:
Copy the clone: clone_np\aaa_01\access To: backup_clone\aaa_01\access
2. Remove the 10g (10.1.4.0.1) component libraries and files to which you have applied the Release 10.1.4 Patch Set 1 (10.1.4.2.0).
3. Extract the 10g (10.1.4.0.1) component libraries and files for the instance to upgrade, and then apply Release 10.1.4 Patch Set 1 (10.1.4.2.0).
4. Web Server for Clones: Restore the backed up Web server configuration file, if required for a cloned WebPass.
5. Windows: Restore (import) the backed up registry entry for the source instance.
6. Restart the clone upgrade as described in this chapter.
Rolling Back After Upgrading Access System ClonesYou can use the following procedure to roll back all changes made to this point and to return to your original setup.
You cannot roll back the schema upgrade unless you used an external utility to back up the schema before upgrading the schema. Details about using external tools to back up and recover the schema is outside the scope of this manual.
To roll back after cloned Access System upgrades 1. Confirm that the original setup is operating properly and serving customers.
2. Shut down clone services and Web servers that service clones.
3. Remove the following items from host computers:
■ Clone file system directories
■ 10g (10.1.4.0.1) component libraries and files to which you applied Release 10.1.4 Patch Set 1 (10.1.4.2.0)
■ Any file system directories that you have added or that were added automatically as part of any upgrade process
■ The Web server instance for the clones
■ The branches in the LDAP directory server that were added for the new configuration and policy DNs
4. From the original System Console, remove all clone profiles.
5. If you have a back up copy of the schema before the upgrade, you might be able to reinstate the original schema using external tools.
6. Confirm that your original setup is operating properly.
Looking AheadEarlier components send and receive data in Latin-1 encoding. The ugpraded Access Server uses UTF-8 encoding and plug-in data will contain UTF-8 data. For more information about expected system behaviors, see Chapter 4.
Upgrading SDKs, Integration Connectors, and Access System Customizations
16-100 Oracle Access Manager Upgrade Guide
When all earlier Access System clones are successfully upgraded, proceed as indicated in the following task overview.
Task overview: Remaining joint Identity and Access System activities include1. Finishing Cloned Access System Upgrades: Proceed to the following topics::
a. Upgrading SDKs, Integration Connectors, and Access System Customizations
b. Validating Successful Operations in Your Environment
2. Perform as many tests and familiarization activities as your enterprise dictates before upgrading original instances.
Upgrading SDKs, Integration Connectors, and Access System Customizations
Oracle recommends that you upgrade any customizations and test these with the upgraded clone Access System, as described in Chapter 13. The following overview outlines the tasks that you should perform.
Task overview: Upgrading SDKs, Integration Connectors, and Access System Customizations1. Chapter 11
■ Upgrading Third-Party Integration Connectors
■ Upgrading Independently Installed Software Developer Kits
2. Chapter 13
■ Upgrading Auditing and Reporting for the Access Server
■ Confirming Access System Failover and Load Balancing
■ Upgrading Forms-based Authentication
■ Recompiling and Redesigning Custom Authentication and Authorization Plug-Ins
■ Associating Release 6.1.1 Authorization Rules with Access Policies
■ Assuring Proper Authorization Failure Re-directs After Upgrading from 6.1.1
■ Updating the ObAMMasterAuditRule_getEscapeCharacter in Custom C Code
■ Validating Access System Customization Upgrades
3. Perform tasks in "Validating Successful Operations in Your Environment" on page 16-67.
Caution: You must upgrade the Access System before upgrading integration components or an independently installed SDK
Upgrading the Original System 17-1
17Upgrading the Original System
This chapter describes how to upgrade your original system using the zero downtime upgrade method. Oracle recommends that you review all information about the zero downtime upgrade method to ensure that this approach is the right one for your enterprise. This chapter includes the following topics:
■ Prerequisites For Original Upgrades with the Zero Downtime Method
■ Retrieving Changes in the Original Branch Before Upgrading Originals
■ Reconfiguring Domain Name Systems (DNS) to Use Upgraded Clones
■ Upgrading Your Original Identity System
■ Upgrading SDKs and Identity System Customizations
■ Upgrading Your Original Access System
■ Upgrading SDKs, Integration Connectors, and Access System Customizations
■ Starting On-the-fly User Data Migration
■ Reconfiguring Domain Name Systems to Use the Upgraded Original Deployment
■ Deleting the Temporary Directory Server Profile
■ Reverting Backward Compatibility
■ Removing the Cloned System After Upgrading Originals
Prerequisites For Original Upgrades with the Zero Downtime MethodConfirm that you and your team have performed the following zero downtime upgrade tasks, as described in Chapter 16:
■ Creating and populating a new branch in the LDAP directory server
■ Upgrading the Schema
■ Upgrading data in the new branch of the LDAP directory server
■ Upgrading the clone system
■ Upgrading SDKs, integration connectors, and customizations
■ Validating the upgraded clone system
■ Backing up the upgraded clone system
Note: If you are using the in-place upgrade method, skip this chapter.

Retrieving Changes in the Original Branch Before Upgrading Originals
17-2 Oracle Access Manager Upgrade Guide
■ Familiarizing yourself with 10g (10.1.4.2.0) features and functions
Retrieving Changes in the Original Branch Before Upgrading OriginalsIf changes are made to the original system after you create the new branch in the LDAP directory server for the clones and before you upgrade the original, the changes are stored in the original branch in the LDAP directory server (or in configuration files). In this case, before you upgrade original instances you might want to create another new branch in the LDAP directory server to contain the very latest version of the original data.
After creating the newest branch and populating it with the latest data from the original system, you will reconfigure the clones to use the newest branch and then upgrade the clones anew. The following overview outlines the tasks that you must perform if you choose to complete this task. Here are a few considerations:.
■ You can reuse the existing clone profiles in the original System Console. However, if you isolated the original system by removing clone profiles, you must add new clone profiles.
■ You can reuse the existing clone file system and source subdirectories on each host.
■ You will reconfigure the clone source to use the newest branch in the LDAP directory server.
■ You must delete the destination that was created and upgraded based on details from the source.
■ You will create a new destination before upgrading the clone.
■ If you have new instances, you will want to create clones and add profiles to the original System Console.
■ If you have new customizations, you will need to upgrade these manually and test them thoroughly with the upgraded cloned system.
Task overview: Retrieving changes to data in the original branch before upgrading original instances1. Immediately before upgrading the original system:
a. Ensure the original system is running properly and serving customers.
b. Shut down all clone servers and services.
c. In the LDAP directory Server, remove the new branches that were added for the clone system.
d. Retain the clone file system on each host computer, and retain each source that was created before upgrading each clone instance.
e. In the clone file system path, remove each upgraded destination because these are configured to use the branch that you deleted in Step c.
2. In the LDAP directory server, create a newer branch and populate it with the latest version of original configuration and policy data. For details, see "Copying Configuration and Policy Data to a New Branch in the LDAP Directory Server" on page 16-33.
Note: If you remove the clone file system and source, you will need to create these anew.

Reconfiguring Domain Name Systems (DNS) to Use Upgraded Clones
Upgrading the Original System 17-3
3. No Clone File System or No Source: If you removed a clone file system or source in Step 1, you need to create the clone anew. For details, see "Cloning Earlier Components for a Zero Downtime Upgrade" on page 16-21.
4. In the original System Console, ensure that all clone instances have a profile.
5. Absent Clone Profiles in the Original System Console: Add a profile to the original System Console for each clone instance that does not have a profile. For details, see "Preparing the Original Installation for a Zero Downtime Upgrade" on page 16-2.
6. Configure each clone to use the newest branch. For more information, see "Configuring Cloned Components and Services" on page 16-40, and consider the following:
■ If you retained the cloned source in Step 1, you will reconfigure the source to use the newest branch.
■ If you created new clones in Step 3, you will not yet have a source and instead must reconfigure the clone instance
7. Upgrade the reconfigured clones using instructions in "Upgrading the Cloned Identity System" on page 16-70 and the following:
a. Skip the Source Creation step if you reconfigured an existing source to use the newest branch in Step 6.
b. Perform steps to create a destination and obtain 10g (10.1.4.2.0) tools for each clone instance upgrade.
c. Upgrade Identity System instances as described in "Upgrading the Cloned Identity System" on page 16-70.
d. Perform tasks in "Renaming Audit Files After Upgrading Identity System Clones" on page 16-85.
e. Upgrade Access System instances as described in "Upgrading the Cloned Access System" on page 16-87.
8. Validate the upgraded clone system as described in "Validating Successful Operations in Your Environment" on page 16-67.
9. Go to "Reconfiguring Domain Name Systems (DNS) to Use Upgraded Clones" on page 17-3.
10. Upgrade the originals as described in the following topics, which are located in this chapter:
a. Upgrading Your Original Identity System
b. Upgrading Your Original Access System
c. Validating the Entire Upgraded Original Environment
d. Starting On-the-fly User Data Migration
e. Reconfiguring Domain Name Systems to Use the Upgraded Original Deployment
f. Removing the Cloned System After Upgrading Originals
Reconfiguring Domain Name Systems (DNS) to Use Upgraded ClonesWhen you are completely satisfied that the upgraded cloned system is fully operational, it can function as a failover system for your original setup. Until you
Upgrading Your Original Identity System
17-4 Oracle Access Manager Upgrade Guide
perform this task, the production setup is serving your user community and the upgraded clone setup is not available to customers.
To avoid any downtime when upgrading original servers, the requests to the original servers must be redirected either to the cloned servers that have been upgraded or to other original servers. There are several ways to achieve this redirection:
■ You can configure the DNS to redirect requests that target original COREid Server and WebPass system URLs to cloned Identity Server and WebPass system URLs.
■ You can set up load balancing to ensure that requests that target original COREid Server and WebPass components are redirected to cloned and upgraded Identity Server and WebPass components (or other original COREid Server and WebPass components).
Reconfiguring DNS to redirect network traffic is outside the scope of this manual. For more information about setting up load balancing, see theOracle Access Manager Deployment Guide.
Upgrading Your Original Identity SystemAfter reconfiguring your network to use upgraded clones in place of original components, you are ready to upgrade your original Identity System components. Topics in this section include:
■ About Upgrading Original Identity System Instances
■ Turning Off the Access Server Cache Flush
■ Preparing Original Identity System Components for the Upgrade
■ Upgrading Original COREid Servers that are Associated with a Single WebPass
■ Configuring Upgraded Original COREid Servers
■ Upgrading An Original Associated WebPass Instance
■ Configuring the Upgraded Original WebPass for Upgraded COREid Servers
■ Adding a Temporary Directory Profile for Original Access System Upgrades
■ About Creating Individual Profiles for WebGates that Share a Profile
■ Setting Up the Upgraded Original Identity System
■ Validating the Upgraded Original Identity System
■ Backing Up the Upgraded Original Identity System
■ Recovering From an Original Identity System Upgrade Failure
■ Rolling Back After Upgrading the Original Identity System
About Upgrading Original Identity System InstancesThe differences and similarities between upgrading original components and upgrading cloned components are summarized in this topic. Explicit details and steps are provided in later discussions that you will see when you perform the upgrade tasks.
Caution: Oracle recommends that you review all information in this section before performing any activities.

Upgrading Your Original Identity System
Upgrading the Original System 17-5
Similarities When Upgrading Originals versus Clones: Upgrading original instances is similar to upgrading clones in the following ways:
■ Source Creation: You rename the subdirectory that contains the clone to create a source for the upgrade.
■ Destination Creation: You extract fresh 10g (10.1.4.0.1) component libraries and files and specify the original file system path (the path that the source had before you renamed it).
■ Obtaining Tools and Upgrading: You apply Release 10.1.4 Patch Set 1 (10.1.4.2.0) to the 10g (10.1.4.0.1) instance to obtain the tools needed for the upgrade.
■ Messages: The upgrade process provides messages and prompts for every major release between your starting release (6.1.1 for example) and the latest release (10g (10.1.4.0.1)). Oracle recommends that you use Automatic rather than Confirmed mode for the quickest upgrade and that you do not skip any processes. For more information, see "About Original Mode (Prod) Processing" on page 15-33. The destination that you specify during the upgrade will be upgraded and include 10g (10.1.4.2.0) based on the source details.
■ Registry Entries: When you upgrade on a Windows platform, the registry entry for the originally installed instance and release is deleted and a new entry is created for the latest release. After upgrading an instance, the registry entry for the earlier release is no longer available.
■ Web Servers that Service Multiple Web Components: A Web server instance cannot support components that are at different Oracle Access Manager release levels (6.1.1 versus 10.14, for example). The Web server must remain off until all serviced Web components are upgraded. For more information, see "Web Server Support for Multiple Oracle Access Manager Releases" on page 15-7.
Differences When Upgrading Originals versus Clones: All COREid Server clones were upgraded before upgrading any WebPass instances. However, with original COREid Servers, you upgrade only the original instances that are associated with a single WebPass and then you upgrade the associated WebPass.
After each COREid Server upgrade, you reconfigure the upgraded instance to operate with the new branch in the LDAP directory server. Only after upgrading all original COREid Server instances that are associated with a single WebPass will you upgrade the associated WebPass. The following additional conditions will apply when upgrading original Identity System instances:
■ Identity System Only Deployment: You perform the following activities, in order:
– Configure the upgraded WebPass to operate with associated original COREid Servers.
– Upgrade and then reconfigure original COREid Servers that are associated with a different WebPass, and then upgrade and reconfigure that WebPass.
– Repeat this sequence until all original COREid Servers and WebPass instances are upgraded.
– After Upgrading and Reconfiguring All Original Identity System Components: Set up the upgraded Identity System.
Caution: Oracle recommends that you review all information in this section before performing any activities.

Upgrading Your Original Identity System
17-6 Oracle Access Manager Upgrade Guide
■ Joint Identity and Access System: After reconfiguring the first upgraded WebPass, you must add a temporary directory profile for the original Access Server upgrade. For more information, see "Adding a Temporary Directory Profile for Original Access System Upgrades" on page 17-21.
Before upgrading the first Access Manager, you must ensure that each WebGate has its own profile. For details, see "About Creating Individual Profiles for WebGates that Share a Profile" on page 17-23.
Task overview: Upgrading original Identity System components 1. Locate the association details for original COREid Servers and WebPass instances,
which might have been printed when performing activities in "Viewing Details for Existing COREid Servers Associated with a WebPass" on page 16-10.
2. Perform any prerequisite activities before upgrading each original instance. For more information, see "Preparing Original Identity System Components for the Upgrade" on page 17-7.
3. Upgrade original COREid Server instances that are associated with a single WebPass, as described in "Upgrading Original COREid Servers that are Associated with a Single WebPass" on page 17-7.
4. Reconfigure each upgraded original COREid Server to use the new branch in the LDAP directory server, as described in "Configuring Upgraded Original COREid Servers" on page 17-12.
5. Upgrade the WebPass instance that is associated with upgraded original COREid Servers, as described in "Upgrading An Original Associated WebPass Instance" on page 17-14.
6. Configure the upgraded WebPass instance, as described in"Configuring the Upgraded Original WebPass for Upgraded COREid Servers" on page 17-19.
7. Joint Identity and Access System: Add a temporary directory profile for use when upgrading Access System components, as described in "Adding a Temporary Directory Profile for Original Access System Upgrades" on page 17-21.
8. Repeat steps in this task overview to upgrade other original Identity System components in the following order:
■ Upgrade a COREid Server instance that is associated with a different WebPass
■ Reconfigure the upgraded original COREid Server to use the new directory branch
■ Upgrade the associated WebPass instance
■ Reconfigure the upgraded WebPass instance
9. When all Identity System components are upgraded, perform steps in "Validating the Upgraded Original Identity System".
For information about recovering if there is a problem, see "Recovering From an Original Identity System Upgrade Failure" on page 17-27. For a look at what follows original Identity System upgrade tasks, see Looking Ahead on page 17-28.
Turning Off the Access Server Cache FlushIf you have a joint Identity and Access System deployment, this task should have been performed for original components before you upgraded the clones. If it was not performed for original components earlier, it must be performed before you continue. For details, see "Turning Off the Access Server Cache Flush" on page 17-6.

Upgrading Your Original Identity System
Upgrading the Original System 17-7
Preparing Original Identity System Components for the UpgradeThe procedures to prepare components for an upgrade are described in detail in Chapter 8. You must perform most of the same preparation tasks before upgrading each original component using the zero downtime method. The following overview outlines the tasks that you will perform for each original instance upgrade. Details are provided in independent topics in Chapter 8.
Task overview: Preparing original Identity System components for a zero downtime upgrade includes these tasks (described in Chapter 8)1. Preparing Earlier Customizations
2. Copying Custom Identity Event Plug-ins
3. Preparing Host Computers
– Changing Read Permissions on Password Files
– Confirming Free Disk Space
4. Preparing Release 6.x Environments
5. Preparing Multi-Language Installations
6. Backing Up File System Directories, Web Server Configurations, and Registry Details
7. Stopping Servers and Services
8. Logging in with Appropriate Administrative Rights
Upgrading Original COREid Servers that are Associated with a Single WebPassThis topic describes all activities that must be performed to upgrade original COREid Server instances that are associated with the same WebPass. At the end of this topic you will find a procedure that provides you with all the steps.
To help illustrate the activities that you will be instructed to perform, Table 17–1 provides sample file system path names in columns that illustrate the progression of actions that you will take before upgrading each instance. Additional information
Note: Be sure to locate details about original COREid Server and WebPass associations. You must upgrade COREid Servers associated with a particular WebPass before upgrading the associated WebPass or other COREid Servers. For more information, see "Viewing Details for Existing COREid Servers Associated with a WebPass" on page 16-10.
Note: With the zero downtime upgrade method, you do not need to back up the file system directory for each instance. Instead, you will rename the original path to use as a source during the upgrade.
Caution: Oracle recommends that you review all information in this topic before proceeding with the activities. You will be instructed to rename and move directories and it is imperative that you track where you are and what directories you are using.

Upgrading Your Original Identity System
17-8 Oracle Access Manager Upgrade Guide
follows the table. The sample path names are for Windows platforms. The paths in your environment might be different.
After performing the activities outlined in Table 17–1, the 10g (10.1.4.2.0) MigrateOAM script will be available in the destination. For example:
np611\ois_01\identity\oblix\tools\migration_tools\MigrateOAM.bat
For more information about source and destination creation, see "Preparation Tasks for the Zero Downtime Method" on page 15-12.
Table 17–2 lists the arguments that you specify to upgrade original COREid Servers using the 10g (10.1.4.2.0) MigrateOAM script for the instance.
Table 17–1 Activities to Prepare for an Original COREid Server Instance Upgrade
1 Original Path 2 Source Creation 3 Destination Creation and Obtaining Tools
COREid Server Instance
np611\ois_01\identity
In the original file system, rename the subdirectory containing each original instance. For example:
np611\ois_01\identity_source
After creating the source (see column 2):
A. Extract 10g (10.1.4.0.1) Identity Server component libraries and files and specify the original path as the installation directory. For example:
np611\ois_01\identity
Note: The destination path of the 10g (10.1.4.0.1) instance must exactly match the path that the original had before it was renamed (see column 1).
See "Destination Creation: Extracting 10g (10.1.4.0.1) Libraries and Files" on page 16-28.
B. Apply Release 10.1.4 Patch Set 1 (10.1.4.2.0) to the 10g (10.1.4.0.1) instance to obtain the tools.
See "Obtaining Tools: Applying Release 10.1.4 Patch Set 1 (10.1.4.2.0)" on page 16-31.
C. Repeat steps A and B for each clone instance.
Table 17–2 MigrateOAM Prod Arguments for Original COREid Server Upgrades
MigrateOAM Original (Production) Mode Syntax Values and Operations
-M Prod Specify Prod as the mode to upgrade original components. The production mode is required to upgrade original components.
-C OIS Specify OIS to upgrade an original COREid Server.
Note: Upgrade each COREid Server original that is associated with a single original WebPass. There are no schema or data upgrades with original COREid Servers.
-F nnn Specify the number that identifies your earlier release. For example: 610 (for 6.1 or 6.1.1), 650 (for 6.5.x), or 700 (for 7.x)
-T 1014 Specify1014 as the release to which this data will be upgraded.
-S "source directory" Specify the full path (in quotation marks) to the renamed original COREid Server directory (see column 1 of Table 17–1). For example:
■ -S "C:\np611\ois_01\identity_source"

Upgrading Your Original Identity System
Upgrading the Original System 17-9
For more information about the script and Prod mode, see "About Original Mode (Prod) Processing" on page 15-33.
In the following procedure any file system path names, starting release value, and languages are provided as samples only. Your details might be different.
To upgrade original COREid Servers associated with a single WebPass 1. Determine the associations between your original COREid Server and WebPass
instances. For example:
a. From the COREid System Console, click the System Admin tab, the System Configuration tab, and then click Configure WebPass in the left navigation pane.
b. In the List all WebPasses page, click the name of an original WebPass (not a clone).
c. From the Details for WebPass page, click the List Identity Servers button.
A page appears that lists the primary and secondary servers configured for the existing WebPass.
d. Print the page to use as a reference or simply determine which COREid Server instances must be upgraded for this WebPass.
e. Repeat these steps for each WebPass and document the original COREid Servers for the associated WebPass.
2. Preparation: Perform tasks for the instance, as described in "Preparing Original Identity System Components for the Upgrade" on page 17-7, which includes:
■ Preparing Earlier Customizations
■ Copying Custom Identity Event Plug-ins
■ Preparing Host Computers
– Changing Read Permissions on Password Files
– Confirming Free Disk Space
■ Preparing Release 6.x Environments
-D "destination directory" Specify the full path (in quotation marks) to the 10g (10.1.4.2.0) Identity Server directory that replaced the original instance directory (see columns 1 and 4 of Table 17–1). For example:
■ -D "C:\np611\ois_01\identity"
-I "installation directory" The installation directory should be the same as the destination directory. For example:
■ -I "C:\np611\ois_01\identity"
-L "Languages" Specify all installed languages to be upgraded by the appropriate code, in quotations. For example, English, "en-us"; French, "fr-fr"; German, "de-de".
Caution: If you do not perform all preparation activities that are appropriate for this component, it might limit your ability to recover or roll back from an upgrade issue.
Table 17–2 (Cont.) MigrateOAM Prod Arguments for Original COREid Server Upgrades
MigrateOAM Original (Production) Mode Syntax Values and Operations

Upgrading Your Original Identity System
17-10 Oracle Access Manager Upgrade Guide
■ Preparing Multi-Language Installations
■ Backing Up File System Directories, Web Server Configurations, and Registry Details
■ Stopping Servers and Services
■ Logging in with Appropriate Administrative Rights
3. Source Creation: Rename the subdirectory that contains the original COREid Server instance to create a source for the upgrade. For example:
Rename: np611\ois_01\identity As Sample Path: np611\ois_01\identity_source
You are ready to add 10g (10.1.4.0.1) libraries and files for this instance upgrade.
4. Destination Creation: Extract 10g (10.1.4.0.1) Identity Server libraries and files and specify a destination path that exactly matches the original path before it was renamed. For example:
Destination Path: np611\ois_01\identity
For a destination path example, see column 1 of Table 17–1. For more information, see "Destination Creation: Extracting 10g (10.1.4.0.1) Libraries and Files" on page 16-28.
5. Obtaining the Tools: Apply the 10g (10.1.4.2.0) patch to the 10g (10.1.4.0.1) instance, as described in "Obtaining Tools: Applying Release 10.1.4 Patch Set 1 (10.1.4.2.0)" on page 16-31.
When your file system is set up, you are ready to upgrade the instance.
Note: With the zero downtime upgrade method, you do not need to back up the file system directory for each instance. Instead, you will rename the original path to use as a source during the upgrade.
Caution: Do not copy existing 10g (10.1.4.0.1) libraries and files.
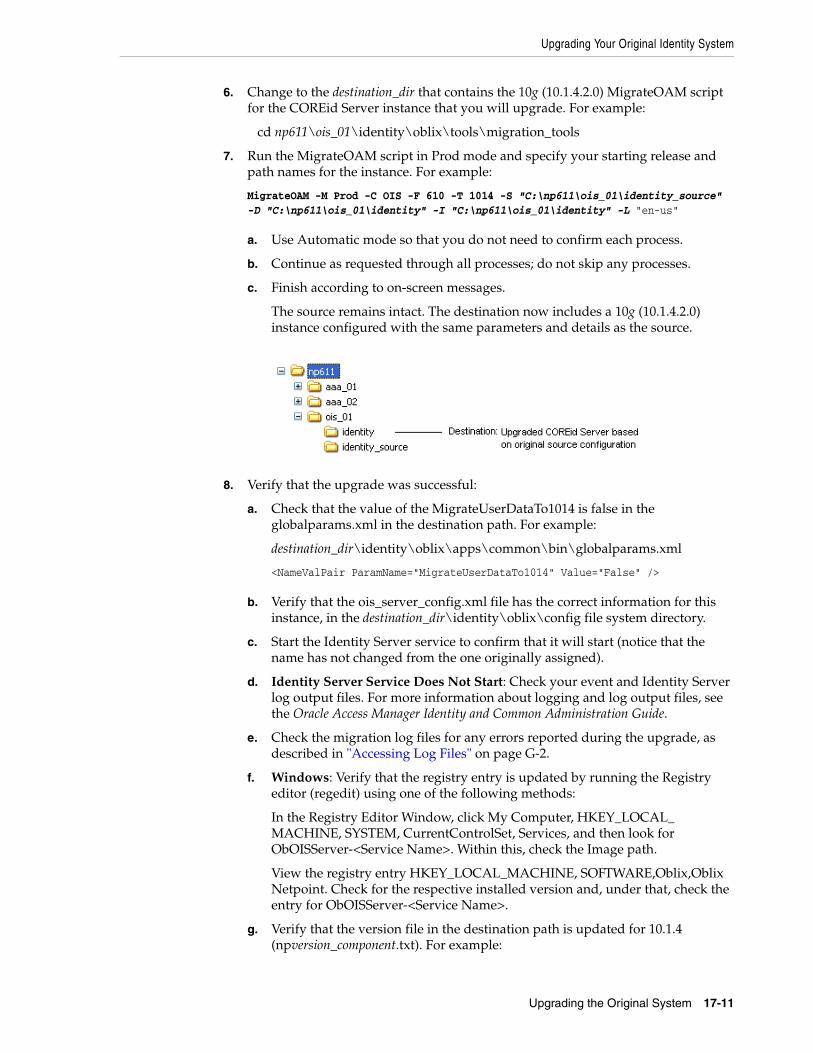
Upgrading Your Original Identity System
Upgrading the Original System 17-11
6. Change to the destination_dir that contains the 10g (10.1.4.2.0) MigrateOAM script for the COREid Server instance that you will upgrade. For example:
cd np611\ois_01\identity\oblix\tools\migration_tools
7. Run the MigrateOAM script in Prod mode and specify your starting release and path names for the instance. For example:
MigrateOAM -M Prod -C OIS -F 610 -T 1014 -S "C:\np611\ois_01\identity_source" -D "C:\np611\ois_01\identity" -I "C:\np611\ois_01\identity" -L "en-us"
a. Use Automatic mode so that you do not need to confirm each process.
b. Continue as requested through all processes; do not skip any processes.
c. Finish according to on-screen messages.
The source remains intact. The destination now includes a 10g (10.1.4.2.0) instance configured with the same parameters and details as the source.
8. Verify that the upgrade was successful:
a. Check that the value of the MigrateUserDataTo1014 is false in the globalparams.xml in the destination path. For example:
destination_dir\identity\oblix\apps\common\bin\globalparams.xml
<NameValPair ParamName="MigrateUserDataTo1014" Value="False" />
b. Verify that the ois_server_config.xml file has the correct information for this instance, in the destination_dir\identity\oblix\config file system directory.
c. Start the Identity Server service to confirm that it will start (notice that the name has not changed from the one originally assigned).
d. Identity Server Service Does Not Start: Check your event and Identity Server log output files. For more information about logging and log output files, see the Oracle Access Manager Identity and Common Administration Guide.
e. Check the migration log files for any errors reported during the upgrade, as described in "Accessing Log Files" on page G-2.
f. Windows: Verify that the registry entry is updated by running the Registry editor (regedit) using one of the following methods:
In the Registry Editor Window, click My Computer, HKEY_LOCAL_MACHINE, SYSTEM, CurrentControlSet, Services, and then look for ObOISServer-<Service Name>. Within this, check the Image path.
View the registry entry HKEY_LOCAL_MACHINE, SOFTWARE,Oblix,Oblix Netpoint. Check for the respective installed version and, under that, check the entry for ObOISServer-<Service Name>.
g. Verify that the version file in the destination path is updated for 10.1.4 (npversion_component.txt). For example:

Upgrading Your Original Identity System
17-12 Oracle Access Manager Upgrade Guide
destination_dir\identity\oblix\config\np1014_is.txt
h. In your upgraded cloned environment, verify that WebGate protection is still working by accessing a protected resource.
9. Proceed as follows:
■ Upgrade Successful:
– Perform activities in "Configuring Upgraded Original COREid Servers" on page 17-12.
– Repeat all steps in this procedure for other original COREid Server instances that are associated with the same WebPass.
– When all original COREid Servers that are associated with the same WebPass are upgraded and configured, proceed to "Upgrading An Original Associated WebPass Instance" on page 17-14.
■ Upgrade Not Successful: Proceed to "Recovering From an Original Identity System Upgrade Failure" on page 17-27.
Configuring Upgraded Original COREid Servers After each original COREid Server is upgraded, you must reconfigure the instance. This is the much like the procedure that you performed to reconfigure clone instances.
The tools that you use to reconfigure your original upgraded COREid Server instances are stored in the destination directory that you specified when upgrading the original instance. The abbreviation "ois" refers to the Oracle Identity Server.
Windows Systems: The registry entry was updated when you upgraded the original instance. As a result, you do not need to run config_ois.exe to add the upgraded COREid Server service entry to the Windows registry.
All Systems: You run setup_ois (Windows) or start_setup_ois (non-Windows) from the file system destination that you specified during the upgrade to configure the host name, port, and other details for the upgraded instance. For example:
Windows: np611\ois_01\identity\oblix\tools/setup/setup_ois
Unix: /home/np611/ois_01/identity/oblix/tools/setup/start_setup_ois
In the example, Unix refers to supported Unix-based platforms such as Linux and Solaris. When you run this tool, you will use only the -i option and specify the destination file system directory that was used when upgrading the instance: -i "destination_dir".
You enter the command and parameters on a single line. You will be prompted to provide details for the original upgraded instance, including:
■ The unique original COREid Identifier
■ The original COREid Server Hostname
■ The port on which the original COREid Server listens.
■ The security mode for the original COREid Server.
Note: Starting with 10g (10.1.4.0.1), the name "COREid Server" was changed to "Identity Server".

Upgrading Your Original Identity System
Upgrading the Original System 17-13
■ Whether this is the first installed COREid Server: Answer Yes if it is; otherwise, answer No.
Be sure to specify information for the original instance that is entered in the original System Console. When you upgrade the first COREid Server that was installed in this environment, Answer Yes when asked if this is the first COREid Server in the installation. For other COREid Servers, answer No.
When the command finishes, the original upgraded COREid Server is reconfigured based on the information that you supplied. You can verify the changes in the ois_server_config.xml file in the destination_dir\identity\oblix\config file system directory. This file should include the details that you supplied during the configuration. For more information about these tools, see your Oblix NetPoint or Oracle COREid Administration Guide.
Removing Setup Files: You will be instructed to remove the following files before starting the reconfiguration:
■ setup.*
■ configInfo.*
■ \ldap subdirectory (if there is one)
New versions of these files will be generated during reconfiguration and setup. At the conclusion of the browser-based setup procedure that you will perform, these files will contain the new configuration DN. Removing these files when instructed will help ensure that the Identity Server service will start up after setup.
The information in the following procedure is an example only. Your details will be different.
To reconfigure original upgraded COREid Servers 1. Delete the following files from the destination_dir\identity\oblix\config file
system directory that was specified for the instance (for example, np611\ois_01\identity):
■ setup.*
■ configInfo.*
■ \ldap subdirectory
2. Change to the file system destination_dir containing the COREid Server setup tool for this upgraded instance. For example:
Windows: np611\ois_01\identity\oblix\tools/setup/setup_ois
Unix: /home/np611/ois_01/identity/oblix/tools/setup/start_setup_ois
In the example, Unix refers to supported Unix-based platforms such as Linux and Solaris.
3. Run the command using the following parameters and specifications for your original instance. For example:
Note: Be sure to specify information for the original instance that is entered in the original System Console. When you upgrade the first COREid Server that was installed in this environment, Answer Yes when asked if this is the first COREid Server in the installation. For other COREid Servers, answer No.

Upgrading Your Original Identity System
17-14 Oracle Access Manager Upgrade Guide
Windows:
setup_ois.exe -i "C:\np611\ois_01\identity"
Unix:
./start_setup_ois -i "/home/np611/ois_01/identity"
4. Follow the on-screen prompts and respond with details for your original upgraded COREid Server and COREid Server service.
a. Unique original COREid Identifier: Enter the name of the original COREid Service.
b. COREid Server Hostname: Enter the DNS hostname where the original upgraded COREid Server resides.
c. COREid Server Port: Enter the port on which the original upgraded COREid Server listens.
d. Security Mode [open\simple\cert]: Enter the mode that is specified in the System Console for the original upgraded COREid Server instance.
e. Do you want to setup SSL between the COREid Server and the Directory Server [y/n]: Respond appropriately for your original connection.
f. First COREid Server: Answer Yes if it is the first installed COREid Server instance; otherwise, answer No.
5. Check the ois_server_config.xml file in destination_dir\identity\oblix\config file system directory to ensure that it includes the details that you supplied during the operation.
6. Proceed as follows:
■ Successful: If the file mentioned in Step 5 contains the information you specified, the operation was successful. Proceed to Step 7.
■ Not Successful: If the information does not appear in the files mentioned in Step 5, the operation failed. In this case, see "Recovering From an Original Identity System Upgrade Failure" on page 17-27.
7. Restart the original upgraded COREid Server service, and proceed as follows:
■ More COREid Servers Associated with the Same WebPass: Repeat steps to upgrade the next original COREid Server that is associated with this WebPass, as described in "Upgrading Original COREid Servers that are Associated with a Single WebPass" on page 17-7.
■ No More COREid Servers Associated with the Same WebPass: Proceed to "Upgrading An Original Associated WebPass Instance" on page 17-14.
Upgrading An Original Associated WebPass InstanceAfter upgrading original COREid Servers that are associated with a specific WebPass, you are ready to upgrade the original associated WebPass. The activities that you perform when upgrading original WebPass instances, are very similar to the activities that you performed to upgrade WebPass clones.
Caution: Oracle recommends that you review all information in this topic before proceeding with NY activities.

Upgrading Your Original Identity System
Upgrading the Original System 17-15
You start by performing steps to ensure that for each cloned WebPass instance you have the 10g (10.1.4.2.0) MigrateOAM script in an appropriate location. To help illustrate the activities that you will be instructed to perform, Table 17–3 organizes sample directory path names in columns that describe the progression of actions that you will take. The sample path names are for Windows platforms. The paths in your environment might be different.
After performing activities outlined in Table 17–3, the 10g (10.1.4.2.0) MigrateOAM script will be stored in the destination that you created. For example:
np611\webcomponent_01\identity\oblix\tools\migration_tools\MigrateOAM.bat and so on.
For more source and destination creation in Table 17–3, see "Preparation Tasks for the Zero Downtime Method" on page 15-12.
Table 17–4 lists the arguments that you specify with the 10g (10.1.4.2.0) MigrateOAM script to execute the original upgrade for each individual WebPass.
Table 17–3 Activities to Prepare for an Original WebPass Instance Upgrade
1 Original Path 2 Source Creation 3 Destination Creation and Obtaining Tools
WebPass Instances
np611\webcomponent_01\identity
In the original file system, rename the subdirectory containing each original instance. For example:
np611\webcomponent_01\identity_source
After creating a source for the original instance upgrade:
A. Extract 10g (10.1.4.0.1) WebPass libraries and files and specify the original path before it was renamed as the installation (destination) directory. For example:
np611\webcomponent_01\identity
Note: The path of the 10g (10.1.4.0.1) instance must exactly match the path of the original instance before it was renamed (see column 1).
See "Destination Creation: Extracting 10g (10.1.4.0.1) Libraries and Files" on page 16-28.
B. Apply Release 10.1.4 Patch Set 1 (10.1.4.2.0) to the 10g (10.1.4.0.1) instance to obtain the tools.
See "Obtaining Tools: Applying Release 10.1.4 Patch Set 1 (10.1.4.2.0)" on page 16-31.
C. Repeat steps A and B for each clone instance.
Table 17–4 MigrateOAM Script for Original WebPass Upgrades
MigrateOAM Original Mode Syntax Values and Operations
-M Prod Specify Prod as the mode, which is required to upgrade original components.
-C WP Specify WP to upgrade an original WebPass component.
Note: Upgrade each WebPass original after upgrading all COREid Servers that are associated with that WebPass. Upgrade all original WebPass instances before upgrading any Access System originals.
-F nnn Specify the number that identifies your earlier release. For example: 610 (for 6.1 or 6.1.1), 650 (for 6.5.x), or 700 (for 7.x)
-T 1014 Specify1014 as the release to which this data will be upgraded.

Upgrading Your Original Identity System
17-16 Oracle Access Manager Upgrade Guide
Upgrading an original WebPass instance does not impact the schema and data but does include a Web server configuration upgrade. During the upgrade of the original WebPass, you will see messages and prompts for each sequence from your starting release to the conclusion. Oracle recommends that you use Automatic rather than Confirmed mode for the quickest upgrade. Oracle also recommends that you do not skip any processes.
In the following procedure, sample file system directory path names, starting release, and languages are provided to help illustrate activities that you must perform.
To upgrade an original WebPass instance1. Preparation: See "Preparing Original Identity System Components for the
Upgrade" on page 17-7, which includes:
■ Copying Custom Identity Event Plug-ins
■ Preparing Earlier Customizations
-S "source directory" Specify the full path (in quotation marks) to the renamed earlier WebPass directory (see column 2 of Table 17–3). For example, when you have multiple instances:
■ -S "C:\np611\webcomponent_01\identity_source"
■ -S "C:\np611\webcomponent_02\identity_source"
■ and so on
-D "destination directory" Specify the full path (in quotation marks) to the original 10g (10.1.4.2.0) WebPass directory that replaced the earlier instance directory (see columns 1 and 4 of Table 17–3). For example:
■ -D "C:\np611\webcomponent_01\identity"
■ -D "C:\np611\webcomponent_02\identity"
■ and so on
-I "installation directory" The installation directory should be the same as the destination directory. For example:
■ -I "C:\np611\webcomponent_01\identity"
■ -I "C:\np611\webcomponent_02\identity"
■ and so on.
Note: Refer to Table 17–3 for details about path names and directory content.
-L "Languages" Specify all installed languages to be upgraded by the appropriate code, in quotations. For example, English, "en-us"; French, "fr-fr"; German, "de-de".
-W "Web server type" Specify the appropriate code for the Web Server used by this original, in quotations. For example, "nsapi", "apache2", "isapi", apache", "ihs", "ohs", "ohs2", "domino".
Note: When you have a single Web server instance serving more than one Oracle Access Manager Web component, the Web server must remain stopped until all serviced Web components on the host computer are upgraded.
Caution: If you do not perform all preparation tasks, you might not be able to roll back or recover from an upgrade issue.
Table 17–4 (Cont.) MigrateOAM Script for Original WebPass Upgrades
MigrateOAM Original Mode Syntax Values and Operations

Upgrading Your Original Identity System
Upgrading the Original System 17-17
■ Preparing Host Computers
– Changing Read Permissions on Password Files
– Confirming Free Disk Space
■ Preparing Release 6.x Environments
■ Preparing Multi-Language Installations
■ Backing Up File System Directories, Web Server Configurations, and Registry Details
■ Stopping Servers and Services
■ Logging in with Appropriate Administrative Rights
2. Source Creation: Rename the subdirectory that contains the original WebPass to create a source for the upgrade. For example:
Rename: np611\webcomponent_01\identity As: np611\webcomponent_01\identity_source
3. Destination Creation: Extract 10g (10.1.4.0.1) WebPass libraries and files and specify the original path (before it was renamed) as the destination. For example:
Sample Path: np611\webcomponent_01\identity
For a destination example, see column 1 of Table 17–3. For more information, see "Destination Creation: Extracting 10g (10.1.4.0.1) Libraries and Files" on page 16-28.
Note: With the zero downtime upgrade method, you do not need to back up the file system directory for each instance.

Upgrading Your Original Identity System
17-18 Oracle Access Manager Upgrade Guide
4. Obtaining the Tools: Apply the 10g (10.1.4.2.0) patch to the 10g (10.1.4.0.1) instance, as described "Obtaining Tools: Applying Release 10.1.4 Patch Set 1 (10.1.4.2.0)" on page 16-31.
When your original file system is set up according to the steps in this procedure, you are ready to upgrade the original WebPass.
5. Change to the file system destination that contains the 10g (10.1.4.2.0) MigrateOAM script for the instance to be upgraded. For example:
destination_dir\webcomponent_01\identity\oblix\tools\migration_tools
6. Run the 10g (10.1.4.2.0) MigrateOAM script in Prod mode and specify your starting release, path names, language, and Web server type. For example:
MigrateOAM -M Prod -C WP -F 610 -T 1014 -S "C:\np611\webcomponent_01\identity_ source" -D "C:\np611\webcomponent_01\identity" -I "C:\np611\webcomponent_ 01\identity" -L "en-us" -W "nsapi"
a. Use Automatic mode for each sequence so that you do not need to confirm each process.
b. Accept Web server configuration changes by specifying the full directory path name to the Web server configuration file for which this original is configured.
c. Continue as requested through all processes; do not skip any processes.
d. Finish according to on-screen messages.
The destination has been upgraded using configuration details from the source.
7. Verify that the upgrade was successful, as follows:
a. Apply Web server changes, if needed, and check the Web server-specific configuration file. If you have IIS configured as the Web server for this instance, ensure that the transfilter with its green status in ISAPI filters. For more information, see the Oracle Access Manager Installation Guide.
b. Windows: Verify that the registry entry is updated by running the Registry editor (regedit) and:
Note: When you have a single Web server instance serving more than one Oracle Access Manager Web component, the Web server must remain shut down until all serviced Web components on the host computer are upgraded.

Upgrading Your Original Identity System
Upgrading the Original System 17-19
View the registry entry HKEY_LOCAL_MACHINE, SOFTWARE,Oblix,Oblix Netpoint. Check for the respective installed version and, under that, check the entry for WebPass.
c. Check migration log files for any errors reported during the upgrade, as described in "Accessing Log Files" on page G-2.
8. Proceed as follows:
a. WebPass Upgrade Successful: Proceed with "Configuring the Upgraded Original WebPass for Upgraded COREid Servers".
b. Upgrade Not Successful: Proceed to "Recovering From an Original Identity System Upgrade Failure" on page 17-27.
9. After upgrading and configuring all original WebPass instances, proceed to "Setting Up the Upgraded Original Identity System" on page 17-24.
Configuring the Upgraded Original WebPass for Upgraded COREid ServersYou use the following procedure after upgrading the WebPass instance. In this case, you use the WebPass setup tool to reconfigure the instance to communicate with the original upgraded COREid Server.
The WebPass setup tool is included in each upgraded destination on all platforms. On windows platforms the tool is named setup_webpass.exe and on non-Windows systems it is named start_setup_wepbass. The tool is located in the upgraded WebPass destination in the file system. For example:
np611\webcomponent_01\identity\oblix\tools\setup\setup_WebPass
Options for the tool are shown in Table 17–5. When running this tool, you can specify only the -i option and all other information will be requested automatically. If you have multiple WebPass instances, you must repeat this operation with each original instance.
Note: When upgrading an original WebPass instance, the Web server configuration is also updated. No further Web server configuration update is needed.
Table 17–5 Options for setup_webpass (and start_setup_webpass) for an Original Instance
Command Options Operation
-i "Upgrade_Destination_dir" Specifies the file system directory where your upgraded original WebPass is stored (the destination that was specified during the upgrade). For example: "C:\np611\webcomponent_01\identity".
-q -n WebPass _name Specifies the unique name of this original WebPass instance.
-h associated_COREidServer_Hostname Specifies the computer name where the associated original COREid Server resides.
-p associated_COREidServer_port_# Specifies the port number of the computer where the associated original COREid Server resides.
-s mode Specifies the transport security mode for the associated original COREid Server and original WebPass: open or simple or cert.

Upgrading Your Original Identity System
17-20 Oracle Access Manager Upgrade Guide
As the command is performed, messages keep you informed. Be sure to supply any information for your environment that is requested during the operation.
The following procedure provides the sequence of steps that you need to perform. File System path names are presented as an example. Your details will vary.
To modify an upgraded original WebPass to operate with the upgraded COREid Server 1. Change to the file system destination that was specified for this original WebPass
upgrade and locate the setup_WebPass (or start_setup_webpass) utility. For example:
Windows: np611\webcomponent_01\identity\oblix\tools\setup\setup_webpass Unix: /home/np611/webcomponent_01/identity/oblix/tools/setup/start_setup_ webpass
2. Run the utility using the specifications for this upgraded original WebPass. For example:
setup_webpass -i "C:\np611\webcomponent_01\identity"
3. Follow the on-screen prompts and respond with details for this original upgraded WebPass and the associated original upgraded COREid Server.
a. Unique WebPass Identifier: Enter the name of the original WebPass that appears in the System Console.
b. COREid Server Hostname: Enter the DNS hostname where the associated original COREid Server resides.
c. COREid Server Port: Enter the port on which the original associated COREid Server listens, as specified in the System Console.
d. Security Mode [open\simple\cert]: Enter the mode that is specified in the System Console.
4. Not Successful: Proceed to "Rolling Back After Upgrading the Original Identity System" on page 17-27.
5. Successful: Proceed as follows:
■ Identity System Only:
– COREid Servers Associated with a Different WebPass: Perform steps in "Upgrading Original COREid Servers that are Associated with a Single WebPass" on page 17-7, and then upgrade the associated WebPass.
– No More WebPass Instances to Upgrade: Perform steps in "Setting Up the Upgraded Original Identity System" on page 17-24.
■ Joint Identity and Access System:
-P simple|cert mode password Specifies the password for either the Simple or Cert transport security mode.
-c request|install Specifies a certificate request or installation.
Table 17–5 (Cont.) Options for setup_webpass (and start_setup_webpass) for an Original Instance
Command Options Operation

Upgrading Your Original Identity System
Upgrading the Original System 17-21
– First Upgraded WebPass: Perform steps in "Adding a Temporary Directory Profile for Original Access System Upgrades" on page 17-21.
– COREid Servers Associated with a Different WebPass: Upgrade the next set of COREid Servers as described in "Upgrading Original COREid Servers that are Associated with a Single WebPass" on page 17-7, and then upgrade the associated WebPass.
– No More WebPass Instances to Upgrade: Perform steps in "Setting Up the Upgraded Original Identity System" on page 17-24.
Adding a Temporary Directory Profile for Original Access System Upgrades If you have a joint Identity and Access System, you must perform this task after upgrading and reconfiguring the first original WebPass instance. You perform this task using the operational upgraded clone Identity System.
This task is performed by a Master Access Administrator if there is no LDAP directory profile that grants write permission to policy data for the original Access Server. This task is performed after upgrading the first original WebPass instance, and before upgrading any original Access System component. The temporary profile grants the original Access Server write access to the policy data stored in the new branch of the directory server. You create the temporary directory profile using the upgraded clone Identity System Console.
During WebGate upgrades, the Access Server gathers configuration information stored in the WebGatestatic.lst file and updates the LDAP directory server using the temporary directory profile created for this purpose. After writing information to the LDAP directory server, the Access Server returns status information to the WebGate. Any unknown parameters in the WebGateStatic.lst file are moved to the LDAP directory server.
In earlier releases, WebGate configuration parameters were stored in the WebGatestatic.lst file. However, starting with Oracle Access Manager 10g (10.1.4.0.1), you must configure WebGates parameters such as IPValidation and IPValidationExceptions from the System Console, as described in the Oracle Access Manager Access Administration Guide. Proper migration of earlier WebGate configuration parameters during an upgrade is required because the WebGateStatis.lst file is deleted.
Guidelines for the Temporary Directory Profile When creating this temporary directory profile you must:
■ Assign a profile name of migration_wgstatic_profile; do not use another name.
■ Create the migration_wgstatic_profile for the directory where the policy data is stored. For example:
– If your user, configuration, and policy data are stored together on a single LDAP directory server, create this new profile for that LDAP directory server.
– If your policy data is stored in the same LDAP directory server as configuration data, create this new profile for that LDAP directory server.
■ Assign permissions for all operations to the migration_wgstatic_profile.
Note: Upgrading any additional WebPass instances or any Access System components before creating this profile could result in a failed upgrade.
Upgrading Your Original Identity System
17-22 Oracle Access Manager Upgrade Guide
■ Use the same namespace as the <ldapOblixBase> (for the new branch) that is stored in the clone AccessManager_dir/access/oblix/config/configInfo.xml. For example, obapp=PSC,o=Oblix, <New_Config_DN>.
■ If your LDAP directory server supports LDAP referrals, enable LDAP referrals in this temporary LDAP directory server profile. A referral directs a client request to another server to find requested information in another location. For more information, see the Oracle Access Manager Identity and Common Administration Guide.
■ If the policy data LDAP directory server is SSL-enabled, the CA certificate is needed by the Access Server to connect to the LDAP directory server. The CA certificate must be manually added (using the certutil tool) to the certificate store in the original AccessServer_install_dir/access/oblix/config/cert8.db or cert7.db. However, if the existing policy data directory used by the Access Server is already in SSL mode and uses the same CA certificate, this step is not needed.
■ If multiple WebGates share a single AccessGate profile in the Access System Console, you must also perform tasks in "Creating Individual Profiles for WebGates that Share a Profile" on page 17-32 before you upgrade any original Access Manager instance.
To create the temporary LDAP directory server profile for the Access Server1. Navigate to the clone Identity System Console (formerly known as the COREid
System Console) in your cloned environment. For example:
http://hostname:port/identity/oblix/
2. From the cloned Identity System Console, click the System Configuration tab.
3. Click Directory Profiles to display the Configure Profiles page.
4. Locate the Configure LDAP Directory Server Profiles section and click Add to display the Create Directory Server Profile page.
5. Fill in the information for this temporary profile: In the Name field enter the following name, and in the Name Space field enter the namespace for your environment:
Name: migration_wgstatic_profile
Name Space: obapp=PSC,o=Oblix, <New_Config_DN>
In the example, the Name Space is obapp=PSC, <ldapOblixBase>, as defined in the configInfo.xml that is stored in your clone AccessManager_dir/oblix/config file system path.
6. Select the All Operations button to give this profile permission to perform all operations.
7. In the Used By field, select the Access Servers option.
Next you must create a database instance profile where you identify the LDAP directory server where your policy data is stored. If your policy data is stored on a
Important: The following procedure must be completed before upgrading any additional WebPass instances and any Access System components. For more information about LDAP directory server profiles, see the Oracle Access Manager Identity and Common Administration Guide.

Upgrading Your Original Identity System
Upgrading the Original System 17-23
separate LDAP directory server, the new database instance profile should be created for that LDAP directory server. If user, configuration, and policy data are all on one LDAP directory server, the new database instance profile should be created for that LDAP directory server
8. In the Database Instances section of the Create Directory Server Profile page, click Add.
The Create Database Instance page appears.
9. Fill in the following information to configure a database instance profile for your policy data LDAP directory server:
Name: Machine: Port: Root DN: Root DN Password:
For more information, see the Oracle Access Manager Identity and Common Administration Guide for details.
10. In the Flags field, if your directory supports LDAP referrals click the LDAP referrals check box if appropriate for your environment.
See the Oracle Access Manager Identity and Common Administration Guide for details on configuring LDAP referrals.
11. Save the database instance profile and the associated LDAP directory server profile.
12. If the policy LDAP directory server operates in SSL mode, the Access Server requires a CA certificate to connect to it.
If the policy LDAP directory server uses the same CA certificate as the Access Server, no additional configuration is required. Otherwise, you must add the CA certificate (cert8.db or cert7.db) to the certificate store in the following original file system path:
AccessServer_install_dir\oblix\config\cert8.db or cert7.db
Where AccessServer_install_dir is the file system path where the original Access Server is installed. For more information on adding a new certificate store, see the Oracle Access Manager Installation Guide.
13. Proceed as follows:
■ Multiple WebGates Share An AccessGate Profile: Go to "About Creating Individual Profiles for WebGates that Share a Profile".
■ Another WebPass Instance to Upgrade: Go to "Upgrading Original COREid Servers that are Associated with a Single WebPass" on page 17-7.
■ No Other WebPass Instances to Upgrade: Go to "Setting Up the Upgraded Original Identity System" on page 17-24.
■ Not Successful: Delete this temporary directory profile and create a new one.
About Creating Individual Profiles for WebGates that Share a Profile Before you upgrade an Access Manager original, you need to add an individual profile in the clone System Console for each WebGate that shares an AccessGate profile. You

Upgrading Your Original Identity System
17-24 Oracle Access Manager Upgrade Guide
are notified about this when you upgrade WebPass, however, you do not need to perform this task until you are ready to upgrade the Access Manager original.
For more information, see "Creating Individual Profiles for WebGates that Share a Profile" on page 17-32.
Setting Up the Upgraded Original Identity SystemAfter configuring all upgraded original COREid Servers and WebPass instances, you must set up the upgraded Identity System to use the new configuration DN. You must perform this task for each individual Identity Server and WebPass association.
Web Server Requirements: All Oracle Access Manager Web components (WebPass, Access Manager, and WebGates), must be the same release (10g (10.1.4.2.0)) before you restart the Web server. This means that you cannot set up the Identity System or Access Manager until all Oracle Access Manager Web components have been upgraded. See Table 17–6 for conditions
For more information, see "Web Server Support for Multiple Oracle Access Manager Releases" on page 15-7.
Extra Directory Profiles in a Split Directory Server Configuration: In this situation, you might find extra directory profiles are added during the setup operation. You will be instructed to remove the extra profiles. For more information, see "Setting Up the Cloned COREid System to Use the New Branch" on page 16-48.
You use the following procedure only when your environment is ready. In this procedure, file system path names are presented as an example. Your details will be different. For more information about setting up the Identity System, see the Oracle Access Manager Installation Guide.
To set up the upgraded original Identity System to use the new branch1. Confirm that your environment is ready based on the following conditions.
2. Ensure that the original WebPass Web server is running and go to the upgraded original Identity System Console, as usual.
http://hostname:port/identity/oblix/
Table 17–6 Conditions for Upgraded Original System Setup
System Readiness to Restart Web Server
Identity System Only: Last WebPass has been upgraded.
Joint Identity and Access System:
WebPass and Access Manager use the same Web server instance
Delay Identity System setup until after original serviced Access Manager components are upgraded
Access Manager and WebGates in the same directory
Upgrade WebGate before reconfiguring Access Manager
One Web server instance serves multiple Oracle Access Manager Web components
Upgrade all serviced Web components before restarting the Web server instance
All Web components on the host computer are upgraded, including WebGates
Perform activities in:
■ "Setting Up the Upgraded Original Identity System" on page 17-24
■ "Setting Up the Upgraded Original Access Manager" on page 17-39

Upgrading Your Original Identity System
Upgrading the Original System 17-25
In the sample URL, hostname refers to computer that hosts the Web server for the original WebPass that you have upgraded; port refers to the HTTP port number of the WebPass Web server instance; /identity/oblix connects to the Identity System Console.
3. Click the Identity System Console link.
The System Console setup page appears.
4. Click the Setup button.
5. Follow on-screen instructions and those here to set up the Identity System (see also your Oracle Access Manager Installation Guide for more information):
a. Confirm LDAP directory server details for the new directory branch.
b. Enter the configuration bind DN and user data searchbase to be used.
Configuration DN—o=Newbranch,o=company,c=us
Searchbase—Supply the original searchbase
c. Finish this setup and leave all other setup details as they are.
d. Restart the new Identity Server service when instructed to do so during setup.
6. Go to the Identity System Console and verify that the Directory Server profile for upgraded original Identity Servers use the new configuration DN. For example:
a. Go to the Identity System Console, as usual.
http://hostname:port/identity/oblix/
b. From the Identity System Console click the System Configuration tab.
c. Click Directory Profiles in the left column to display the Configure Profiles page.
d. Click the name of an existing directory profile for an original Identity Server to display its specifications.
e. Confirm that the new configuration DN appears in the profile.
f. Extra Directory Profiles in a Split Directory Configuration: Check for and remove any extra directory profiles that might have been added when upgraded Identity Servers were reconfigured. For more information, refer to the discussion about extra profiles in "Setting Up the Cloned COREid System to Use the New Branch" on page 16-48 and see Oracle Access Manager Identity and Common Administration Guide.
7. Check the setup.xml file to ensure that the new configuration DN is listed (\identity\oblix\config directory):
■ setup.xml*
■ configInfo.xml*
■ configInfo.lst*
■ \ldap subdirectory (if there is one)
8. Restart the Web server and the upgraded Identity Server service.
9. Proceed as follows:
■ Configuration Successful, Joint Identity and Access System: Proceed to "Upgrading Your Original Access System" on page 17-30.

Upgrading Your Original Identity System
17-26 Oracle Access Manager Upgrade Guide
■ Configuration Successful, Identity System Only: Proceed to "Validating the Entire Upgraded Original Environment" on page 17-57.
■ Configuration Not Successful: Remove the files named in Step 7 and re-run browser-based setup as described in this procedure. Otherwise, perform activities in "Rolling Back After Upgrading the Original Identity System" on page 17-27.
Validating the Upgraded Original Identity SystemOracle recommends that you quickly validate the following items to ensure that the overall upgrade of your original Identity System was successful.
To validate your upgraded original Identity System 1. Delete all Web browser caches once the upgrade is complete.
2. Make sure all upgraded original Identity Server services and WebPass Web server instances are running.
3. Check that your message and parameter catalog customizations have been preserved. For example, if you have changed any message in a particular message catalog file, then it needs to be retained.
4. Perform all validation activities for the upgraded Identity System, as described in "Validating Identity System Operations" on page 16-67.
5. Proceed to "Backing Up the Upgraded Original Identity System".
Backing Up the Upgraded Original Identity SystemOracle recommends that you validate successful operations and then perform the following back up tasks. This will enable you to easily restore your environment to the newly upgraded and validated state should that be needed. These tasks are described in detail in Chapter 8.
To back up critical information after upgrading original Identity System components 1. Back up the upgraded destination file system directory. This is similar to backing
up an existing component installation directory. For details, see "Backing Up the Existing Component Installation Directory" on page 8-7.
2. Web Server: Back up the upgraded Web server configuration file using instructions from your vendor and details in"Backing Up the Existing Web Server Configuration File" on page 8-8.
3. Windows: Back up Windows Registry data as described in "Backing Up Windows Registry Data" on page 8-9.
4. Proceed to"Looking Ahead" on page 17-28.
Note: The Web server instance should remain shut down until all serviced Web components have been upgraded.
Note: These are the same activities that you performed when validating operations with the upgraded Identity System schema.
Upgrading Your Original Identity System
Upgrading the Original System 17-27
Recovering From an Original Identity System Upgrade FailureIf an original Identity System component upgrade was not successful, you can perform the following steps to restart this upgrade.
The source directory was not touched during the upgrade and can be reused.
To recover from an unsuccessful original Identity System upgrade1. Back up the source file system directory anew. You will retain one to use as a
backup copy and use one to restart the upgrade.
2. For the instance to be retried, remove the 10g (10.1.4.0.1) libraries and files to which you applied Release 10.1.4 Patch Set 1 (10.1.4.2.0).
3. For the instance to be retried, install 10g (10.1.4.0.1) libraries and files and apply Release 10.1.4 Patch Set 1 (10.1.4.2.0)
4. Web Server: Restore the backed up Web server configuration file, if required.
5. Windows: Restore the backed up Registry data for the component.
6. Using a backup copy of your earlier original component installation directory (and Web server configuration, if needed), restart the upgrade as described in the appropriate topic.
Rolling Back After Upgrading the Original Identity System This task is optional. You can use the following procedure to roll back all changes and return to your original installation. When you finish this operation, you will only your original setup and release.
You cannot roll back the schema upgrade unless you used an external utility to back up the schema before it was upgraded. Details about using external tools to back up and reinstate the schema is outside the scope of this manual. No automated tools are provided to roll back the schema upgrade.
To roll back after upgrading Identity System originals 1. Confirm that your clone setup is operating properly and serving customers.
2. Shut down the upgraded original service or Web server.
3. Remove any 10g (10.1.4.2.0) destination file system directories that were added for the original upgrade.
4. Remove any other file system directories that were added automatically or that you added.
5. Restore the original instance file system path by renaming the source.
6. Windows: For each original instance on a Windows platform, import the back up copy of the Windows registry entry for this component.
7. Web Server Configuration: Restore the backup copy of original Web server configuration files.
Note: If there is no back up copy of the Windows registry entry, you must perform specific steps to generate a new registry entry. For more information, see "Reinstating Original Windows Registry Entries During a Rollback Operation" on page 15-36.

Upgrading Your Original Identity System
17-28 Oracle Access Manager Upgrade Guide
8. Restart the original service or Web server.
9. Repeat all steps for each upgraded original.
10. In the original System Console, remove entries for the clones
11. If you have a back up copy of the original schema before upgrading, you might be able to reinstate the copy using external tools.
12. Confirm that the original setup is operating properly, and then configure the DNS to enable the original setup to serve customers. For more information, see "Reconfiguring Domain Name Systems (DNS) to Use Upgraded Clones" on page 17-3.
13. Roll back the upgraded clone setup, which includes all clone file system directories, any Web server instances created for clones, the new branch that was created in the LDAP directory server. Also remove entries added to the original System Console for clone components. For more information, see:
■ Rolling Back Changes Made for the New oblix Branch in Chapter 16
■ Rolling Back After Upgrading Identity System Clones in Chapter 16
Looking Ahead Upgraded original Identity System components send and receive information in UTF-8 encoding. Earlier components send and receive data in Latin-1 encoding. As a result, the 10g (10.1.4.0.1) Identity System does not work with earlier Access System components. For more information about expected system behaviors, see Chapter 4.
Proceed as follows:
■ Identity System Only: Finish the upgrade as described in "Task overview: Remaining original Identity System upgrade activities".
■ Joint Identity and Access System: You must upgrade integration connectors before upgrading the SDK. In this case, perform tasks as described in "Task overview: Remaining original joint Identity and Access System activities" on page 17-29.
Task overview: Remaining original Identity System upgrade activities1. Proceed to "Upgrading SDKs and Identity System Customizations" on page 17-29.
2. Go to "Validating the Entire Upgraded Original Environment" on page 17-57.
3. Perform as many tests as your enterprise dictates, and then proceed to following topics:
■ Starting On-the-fly User Data Migration
■ Reconfiguring Domain Name Systems to Use the Upgraded Original Deployment
■ Deleting the Temporary Directory Server Profile
■ Reverting Backward Compatibility
■ Removing the Cloned System After Upgrading Originals
Note: When you have a joint Identity and Access System, you must perform activities in the following sequence using information in this chapter and others.
Upgrading SDKs and Identity System Customizations
Upgrading the Original System 17-29
Task overview: Remaining original joint Identity and Access System activities 1. Finishing Original Identity System Upgrades: Perform tasks in "Upgrading SDKs
and Identity System Customizations".
2. Perform Original Access System Upgrades: Perform tasks as directed in:
a. Upgrading Your Original Access System
b. Upgrading SDKs, Integration Connectors, and Access System Customizations
c. Validating the Entire Upgraded Original Environment
3. Finish the Zero Downtime Upgrade: After your own validation period ends, proceed to:
■ Starting On-the-fly User Data Migration
■ Reconfiguring Domain Name Systems to Use the Upgraded Original Deployment
■ Deleting the Temporary Directory Server Profile
■ Reverting Backward Compatibility
■ Removing the Cloned System After Upgrading Originals
Upgrading SDKs and Identity System Customizations Oracle recommends that you upgrade your Identity System customizations and any independently installed software developer kits (SDKs) and then validate that the entire upgraded original Identity System is operating properly.
Task overview: Remaining original Identity System upgrade activities 1. Proceed as needed for your environment:
■ Identity System Only: Upgrade independently installed SDKs and Integration Connections as described in Chapter 11.
■ Joint Identity and Access System: Upgrade the Access System before performing tasks in Chapter 11.
2. Upgrade original Identity System customizations as described in Chapter 12, which includes:
■ Upgrading Auditing and Access Reporting for the Identity System
■ Combining Challenge and Response Attributes on a Panel
■ Confirming Identity System Failover and Load Balancing
■ Migrating Custom Identity Event Plug-Ins
■ Ensuring Compatibility with Earlier Portal Inserts
■ About Custom Items and Upgrades
■ Incorporating Customizations from Release 6.5 and 7.x
■ Incorporating Customizations from Releases Earlier than 6.5
■ Validating Identity System Customization Upgrades
3. Proceed as follows:
■ Joint Identity and Access System: Go to "Upgrading Your Original Access System".

Upgrading Your Original Access System
17-30 Oracle Access Manager Upgrade Guide
■ Identity System Only: Proceed to tasks in Table 17–7:
Upgrading Your Original Access SystemAfter upgrading your original Identity System, you are ready to upgrade your original Access System using the zero downtime method.
Topics in this section include:
■ About Upgrading Original Access System Instances
■ Preparing Original Access System Components for the Upgrade
■ Creating Individual Profiles for WebGates that Share a Profile
■ Upgrading An Original Access Manager Instance
■ Setting Up the Upgraded Original Access Manager
■ Configuring Original Access Servers to Use the New Branch
■ Upgrading Original Access Server Instances
■ Upgrading Original WebGates
■ Validating the Upgraded Original Access System
■ Backing Up the Upgraded Original Access System
■ Recovering From an Original Access System Upgrade Failure
■ Rolling Back After Upgrading the Original Access System
■ Looking Ahead
About Upgrading Original Access System InstancesThe differences and similarities between upgrading original Access System components and upgrading cloned components are summarized here. Explicit details and steps are provided in later topics in this section.
Similarities When Upgrading Originals versus Clones: Upgrading original instances is similar to upgrading clones in the following ways:
■ Source Creation: You rename the subdirectory that contains the original to create a source for the upgrade.
Table 17–7 Finishing the Upgrade for Identity System Only Deployment
Finishing the Original Identity System Upgrade
Validating the Entire Upgraded Original Environment
Starting On-the-fly User Data Migration
Reconfiguring Domain Name Systems to Use the Upgraded Original Deployment
Deleting the Temporary Directory Server Profile
Reverting Backward Compatibility
Removing the Cloned System After Upgrading Originals
Caution: Oracle recommends that you review all information in this section before performing any activities.

Upgrading Your Original Access System
Upgrading the Original System 17-31
■ Destination Creation: You extract fresh 10g (10.1.4.0.1) component libraries and files into the same path that the original had before you renamed it.
■ Obtaining Tools and Upgrading: You apply Release 10.1.4 Patch Set 1 (10.1.4.2.0) to the 10g (10.1.4.0.1) instance to obtain the tools needed for the upgrade.
■ Messages: Messages and prompts keep you informed. Use Automatic mode and do not skip any processes. For more information, see "About Original Mode (Prod) Processing" on page 15-33. The destination is upgraded based on source details.
■ Registry Entries: After upgrading, the registry entry for the earlier release is no longer available.
■ Web Servers that Service Multiple Web Components: The Web server must remain shut down, as described in "Web Server Support for Multiple Oracle Access Manager Releases" on page 15-7.
Differences When Upgrading Originals versus Clones: After upgrading each Access Manager instance, you reconfigure it to operate with the upgraded schema and data in the new branch of the LDAP directory server. Take the following items into account:
■ All original Access Manager components must be upgraded and reconfigured before you upgrade any Access Server instances.
■ Before restarting any original Access Server after reconfiguring an upgraded original Access Manager, log in to the Access System Console from any upgraded original Access Manager and delete the profiles that were created and named Access_Manager_user_setup_profile and Access_Server_setup_user_profile.
After upgrading all Access Manager components, you can start the task of upgrading original Access Servers. In this case, you first back up configuration data in the new branch and then reconfigure the original Access Server. After reconfiguring the original Access Server, you start the upgrade.
The following task overview outlines the sequence of procedures that you perform. You must upgrade all Access Managers on a host before upgrading Access Servers on the host. You must upgrade all Access Servers on a host before upgrading WebGates on the same host.
Task overview: Upgrading original Access System components 1. Locate the association details for original Access Servers and WebGate instances
using the Access System Console. For more information, see your NetPoint or Oracle COREid Administration Guide.
2. Preparation: See "Preparing Original Access System Components for the Upgrade" on page 17-32, when directed to do so.
3. Access Manager: See the following topics and perform tasks when directed:
a. Upgrading An Original Access Manager Instance on page 17-34
b. Setting Up the Upgraded Original Access Manager on page 17-39
4. Access Servers: Tasks with original Access Servers must be performed in reverse order compared with tasks for clones:
a. Configuring Original Access Servers to Use the New Branch on page 17-41.
b. Upgrading Original Access Server Instances on page 17-44
5. WebGates: Perform tasks in "Upgrading Original WebGates" on page 17-48.
6. Validation and Backup: Perform the following tasks:
Upgrading Your Original Access System
17-32 Oracle Access Manager Upgrade Guide
a. Validating the Upgraded Original Access System on page 17-55
b. Backing Up the Upgraded Original Access System on page 17-55
7. SDKs, Integration Connectors, and Access System Customizations:
■ Upgrading SDKs, Integration Connectors, and Access System Customizations on page 17-57
■ Validating the Entire Upgraded Original Environment on page 17-57
For information about recovering if there is a problem, see "Recovering From an Original Access System Upgrade Failure" on page 17-55.
Preparing Original Access System Components for the UpgradeThe procedures to prepare each component for an upgrade are described in detail in Chapter 8. You must perform most of the same preparation tasks before upgrading each original Access System component using the zero downtime method. The following overview outlines the tasks that you will perform for each original instance upgrade. Details are provided in independent topics in Chapter 8.
Task overview: Preparing original Access System components for the upgrade includes the following topics1. Creating Individual Profiles for WebGates that Share a Profile
2. Preparing the Default Logout in the Policy Manager
3. Preparing Host Computers
– Changing Read Permissions on Password Files
– Confirming Free Disk Space
4. Preparing Release 6.x Environments
5. Preparing Multi-Language Installations
6. Backing Up File System Directories, Web Server Configurations, and Registry Details
7. Stopping Servers and Services
8. Logging in with Appropriate Administrative Rights
Creating Individual Profiles for WebGates that Share a Profile Before you upgrade an original Access Manager instance, you need to add an individual profile in the clone System Console for each WebGate that shares an AccessGate profile. If each WebGate is defined by its own individual profile, you can skip this task.
When each WebGate has an individual profile defined in the Access System Console, the content of the WebGateStatic.lst file is migrated to the LDAP directory server under the attribute obcompoundata. After the data is migrated, the WebGatestatic.lst file is removed from the WebGate_install_dir file system path automatically. When you
Note: WYou do not need to back up the file system directory. Instead, you will rename the original path to use as a source. The source becomes a backup that remains intact during the upgrade.

Upgrading Your Original Access System
Upgrading the Original System 17-33
have more than one WebGate sharing the same profile, however, the following error when upgrading the second WebGate that uses the profile:
"The WebGate Profile is being shared by many WebGate Instances. WebgateStatic.lst has already been migrated. However the contents do not match between the WebgateStatic.lst of this WebGate Instance and the migrated one. Please create a new WebGate Entry for this WebGate Instance. ...."
Before upgrading any WebGate that shares a profile with another WebGate, you need to:
■ Add a separate and unique AccessGate profile for each original WebGate that currently shares a profile.
■ Ensure that the new profile contains specifications based on details in the existing WebGateStatic.lst file
■ Back up, and then delete the WebGateStatic.lst file from the original WebGate_install_dir
A release 6.1.1. WebGateStatic.lst file is shown next. For more information about the details in this file, see your Oblix NetPoint or Oracle COREid Administration Guide. All parameters in this file are now provided on the AccessGate profile page in the Release 10.1.4 Patch Set 1 (10.1.4.2.0) Access System Console.
BEGIN:vCompoundList DenyOnNotProtected:false CachePragmaHeader:no-cache CacheControlHeader:no-cache IPValidation:false # Set UseIISBuiltinAuthentication to true # if you are using MSPassport or Integrated # Windows Authentication on this machine. # Otherwise leave it set to false # Only used for IIS UseIISBuiltinAuthentication:false #IPValidationExceptions: #BEGIN:vList #nn.nn.nn.nn #nn.nn.nn.nn #END:vList WaitForFailover:-1 ( Access Server Timeout Threshold in the AccessGate Profile)END:vCompoundList
Both the WaitForFailover parameter and the replacement Access Server Timeout Threshold in the AccessGate Profile control the TCP/IP timeout between the WebGate and the Access Servers with which the WebGate communicates. The default value is -1, which means that the network default TCP/IP timeout value is used.
The following procedure outlines how to add a new profile to prepare WebGates that share a profile. For more information, see Oracle Access Manager Access Administration Guide.
To create an individual profile for each original WebGate1. Locate the WebGateStatic.lst file for the WebGate that needs an individual profile,
make a back up copy of the file, and then print the details. For example:
WebGate_install_dir\access\oblix\apps\webgate\WebGateStatic.lst
2. Go to the clone Access System Console, as usual.
Upgrading Your Original Access System
17-34 Oracle Access Manager Upgrade Guide
http://hostname:port/access/oblix/
3. Click the Access System Console link, click Access System Configuration, and then click Add New AccessGate in the left navigation pane.
4. On the Add New AccessGate page, add unique details for this specific WebGate:
■ AccessGate Name: The name of this WebGate instance, which cannot contain spaces, a colon ":", the pound sign "#", or non-English keyboard characters.
■ Description: Optional summary that will help you identify this WebGate later on.
■ Hostname: The name or IP address of the server hosting this WebGate.
■ Port: The Web server port protected by this WebGate
■ AccessGate Password: An alphanumeric string to identity this WebGate to an Access Server.
■ Re-type AccessGate Password: Re-type the password.
5. Fill in remaining fields based on information in the WebGateStatic.lst file for the instance, and then save the profile.
6. Associate this new profile with an original Access Server, on the Details for AccessGate page as follows:
a. On the Details for AccessGate page, click the List Access Servers (or List Clusters) button at the bottom of the page.
b. Click the Add button to advance to the Add a new Access Server page.
c. Select an Access Server from the Select Server list, specify a priority, and define the number of Access Servers (connections) to which this WebGate can connect. For example:
Select server—Same as earlier profile Select priority—Same as earlier profile Number of connections—Same as earlier profile
d. Click the Add button to complete the association.
e. Click the link to display a summary and print this page for use later
7. Delete the WebGateStatic.lst file from WebGate installation directory before you upgrade the WebGate.
8. Repeat this procedure for each WebGate that is sharing a profile.
9. Complete all other zero downtime upgrade tasks in order.
Upgrading An Original Access Manager InstanceThe activities that you perform when upgrading original Access Manager instances, are similar to the activities that you performed to upgrade Access Manager clones.
Note: This password must be the same one that was specified when you installed the WebGate.

Upgrading Your Original Access System
Upgrading the Original System 17-35
You start by ensuring that you have the source, destination, and tools defined for the instance upgrade. To help illustrate these activities, Table 17–8 organizes sample file system paths in columns that describe the progression of actions that you will perform. Additional information follows the table. The sample path names are for Windows platforms. The paths in your environment might differ.
After performing the activities outlined in Table 17–8, the 10g (10.1.4.2.0) MigrateOAM script will be stored in the destination_dir. For example:
np611\webcomponent_01\access\oblix\tools\migration_tools\MigrateOAM.bat np611\webcomponent_02\identity\oblix\tools\migration_tools\MigrateOAM.bat and so on.
For more information about source and destination creation, see "Preparation Tasks for the Zero Downtime Method" on page 15-12.
Table 17–9 lists the arguments that you specify with the 10g (10.1.4.2.0) MigrateOAM script to execute the original instance upgrade for each individual Access Manager.
Caution: Oracle recommends that you review all information in this topic before proceeding with the activities. You will be instructed to rename and create file system directories.
Table 17–8 Activities to Prepare for an Original Access Manager Instance Upgrade
1 Original Path 2 Source Creation 3 Destination Creation and Obtaining Tools
Access Manager Instances
np611\webcomponent_01\access
np611\webcomponent_02\access
In the original file system, rename the subdirectory containing each original instance. For example:
np611\webcomponent_01\access_source
np611\webcomponent_02\access_source
After creating the source (see column 2):
A. Extract 10g (10.1.4.0.1) Policy Manager libraries and files and specify the original path as the installation (destination) directory. For example:
np611\webcomponent_01\access
Note: The destination path of the 10g (10.1.4.0.1) instance must exactly match the original path before it was renamed (see column 1).
See "Destination Creation: Extracting 10g (10.1.4.0.1) Libraries and Files" on page 16-28.
B. Apply Release 10.1.4 Patch Set 1 (10.1.4.2.0) to the 10g (10.1.4.0.1) instance to obtain the tools.
See "Obtaining Tools: Applying Release 10.1.4 Patch Set 1 (10.1.4.2.0)" on page 16-31.
C. Repeat steps A and B for each clone instance.
Table 17–9 MigrateOAM Script for Original Access Manager Instance Upgrades
MigrateOAM Original Mode Syntax Values and Operations
-M Prod Specify Prod as the mode, which is required to upgrade original components.
-C AM Specify AM to upgrade an original Access Manager component.
Note: Upgrade each original Access Manager after upgrading all Identity System components and before upgrading any original Access Servers.
-F nnn Specify the number that identifies your earlier release. For example: 610 (for 6.1 or 6.1.1), 650 (for 6.5.x), or 700 (for 7.x)
-T 1014 Specify1014 as the release to which this data will be upgraded.
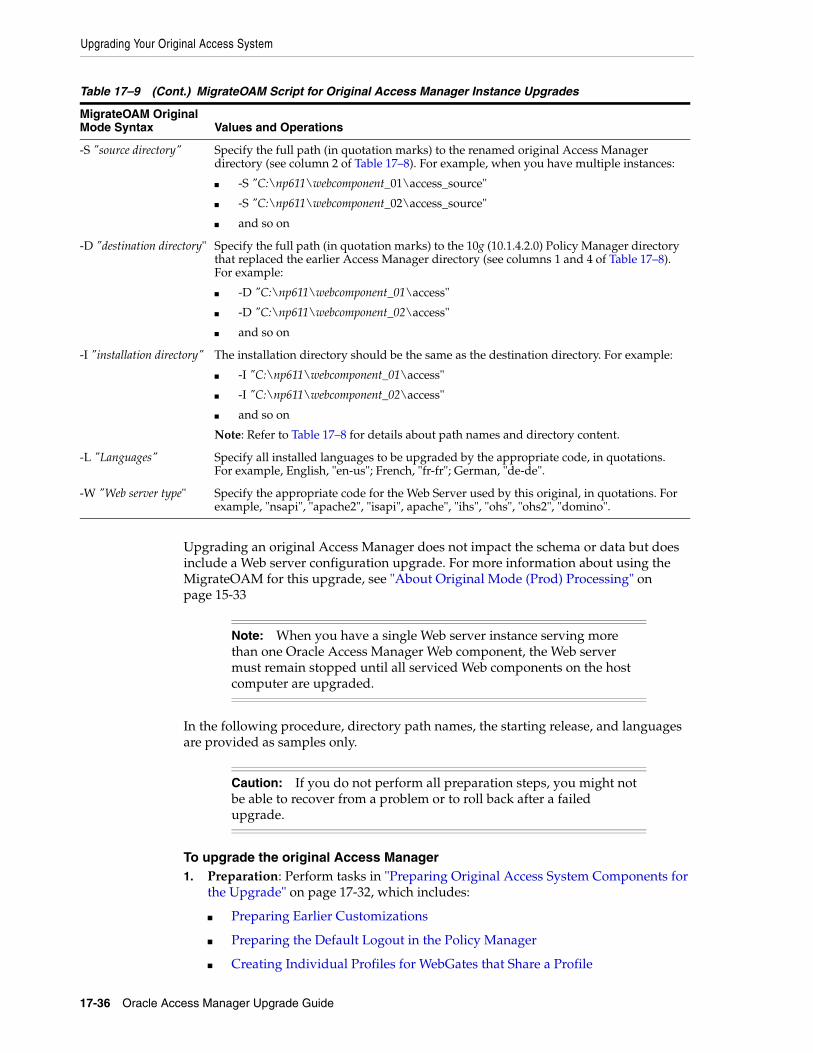
Upgrading Your Original Access System
17-36 Oracle Access Manager Upgrade Guide
Upgrading an original Access Manager does not impact the schema or data but does include a Web server configuration upgrade. For more information about using the MigrateOAM for this upgrade, see "About Original Mode (Prod) Processing" on page 15-33
In the following procedure, directory path names, the starting release, and languages are provided as samples only.
To upgrade the original Access Manager 1. Preparation: Perform tasks in "Preparing Original Access System Components for
the Upgrade" on page 17-32, which includes:
■ Preparing Earlier Customizations
■ Preparing the Default Logout in the Policy Manager
■ Creating Individual Profiles for WebGates that Share a Profile
-S "source directory" Specify the full path (in quotation marks) to the renamed original Access Manager directory (see column 2 of Table 17–8). For example, when you have multiple instances:
■ -S "C:\np611\webcomponent_01\access_source"
■ -S "C:\np611\webcomponent_02\access_source"
■ and so on
-D "destination directory" Specify the full path (in quotation marks) to the 10g (10.1.4.2.0) Policy Manager directory that replaced the earlier Access Manager directory (see columns 1 and 4 of Table 17–8). For example:
■ -D "C:\np611\webcomponent_01\access"
■ -D "C:\np611\webcomponent_02\access"
■ and so on
-I "installation directory" The installation directory should be the same as the destination directory. For example:
■ -I "C:\np611\webcomponent_01\access"
■ -I "C:\np611\webcomponent_02\access"
■ and so on
Note: Refer to Table 17–8 for details about path names and directory content.
-L "Languages" Specify all installed languages to be upgraded by the appropriate code, in quotations. For example, English, "en-us"; French, "fr-fr"; German, "de-de".
-W "Web server type" Specify the appropriate code for the Web Server used by this original, in quotations. For example, "nsapi", "apache2", "isapi", apache", "ihs", "ohs", "ohs2", "domino".
Note: When you have a single Web server instance serving more than one Oracle Access Manager Web component, the Web server must remain stopped until all serviced Web components on the host computer are upgraded.
Caution: If you do not perform all preparation steps, you might not be able to recover from a problem or to roll back after a failed upgrade.
Table 17–9 (Cont.) MigrateOAM Script for Original Access Manager Instance Upgrades
MigrateOAM Original Mode Syntax Values and Operations

Upgrading Your Original Access System
Upgrading the Original System 17-37
■ Preparing Host Computers
– Changing Read Permissions on Password Files
– Confirming Free Disk Space
■ Preparing Release 6.x Environments
■ Preparing Multi-Language Installations
■ Backing Up File System Directories, Web Server Configurations, and Registry Details
■ Stopping Servers and Services
■ Logging in with Appropriate Administrative Rights
2. Source Creation: Rename the subdirectory that contains the original Access Manager to create a source for the upgrade. For example:
Rename: np611\webcomponent_01\access As: \np611\webcomponent_01\access_source
3. Destination Creation: Extract 10g (10.1.4.0.1) Policy Manager libraries and files and specify a destination path that exactly matches the original before you renamed it. For example:
Destination Path: np611\webcomponent_01\access
or a destination path example, see column 1 of Table 17–8. For more information, see "Destination Creation: Extracting 10g (10.1.4.0.1) Libraries and Files" on page 16-28.
4. Obtaining the Tools: Apply the 10g (10.1.4.2.0) patch to the 10g (10.1.4.0.1) instance, as described "Obtaining Tools: Applying Release 10.1.4 Patch Set 1 (10.1.4.2.0)" on page 16-31.
When your file system is set up appropriately, you are ready to upgrade the original instance.
5. Change to the destination_dir that includes the 10g (10.1.4.2.0) MigrateOAM script for the instance that you will upgrade. For example:
np611\webcomponent_01\access
Note: With this upgrade method, you do not need to back up the file system directory.
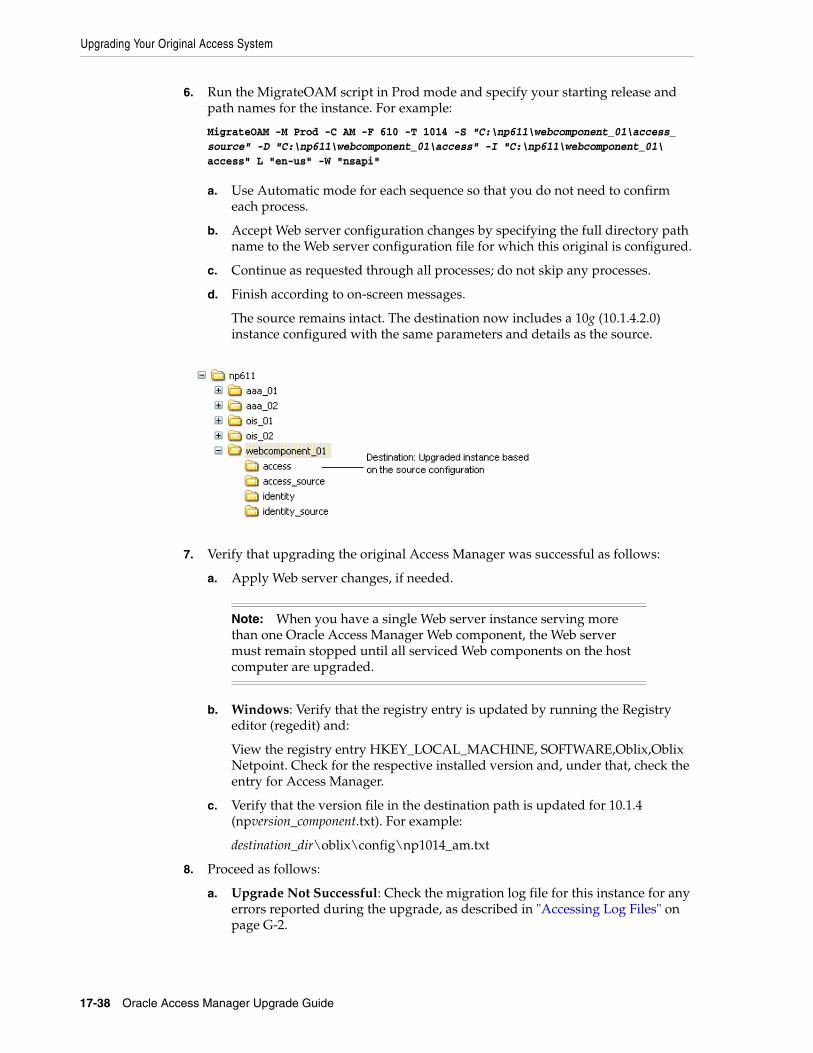
Upgrading Your Original Access System
17-38 Oracle Access Manager Upgrade Guide
6. Run the MigrateOAM script in Prod mode and specify your starting release and path names for the instance. For example:
MigrateOAM -M Prod -C AM -F 610 -T 1014 -S "C:\np611\webcomponent_01\access_ source" -D "C:\np611\webcomponent_01\access" -I "C:\np611\webcomponent_01\ access" L "en-us" -W "nsapi"
a. Use Automatic mode for each sequence so that you do not need to confirm each process.
b. Accept Web server configuration changes by specifying the full directory path name to the Web server configuration file for which this original is configured.
c. Continue as requested through all processes; do not skip any processes.
d. Finish according to on-screen messages.
The source remains intact. The destination now includes a 10g (10.1.4.2.0) instance configured with the same parameters and details as the source.
7. Verify that upgrading the original Access Manager was successful as follows:
a. Apply Web server changes, if needed.
b. Windows: Verify that the registry entry is updated by running the Registry editor (regedit) and:
View the registry entry HKEY_LOCAL_MACHINE, SOFTWARE,Oblix,Oblix Netpoint. Check for the respective installed version and, under that, check the entry for Access Manager.
c. Verify that the version file in the destination path is updated for 10.1.4 (npversion_component.txt). For example:
destination_dir\oblix\config\np1014_am.txt
8. Proceed as follows:
a. Upgrade Not Successful: Check the migration log file for this instance for any errors reported during the upgrade, as described in "Accessing Log Files" on page G-2.
Note: When you have a single Web server instance serving more than one Oracle Access Manager Web component, the Web server must remain stopped until all serviced Web components on the host computer are upgraded.

Upgrading Your Original Access System
Upgrading the Original System 17-39
b. Upgrade Successful: Proceed to "Setting Up the Upgraded Original Access Manager" if all Web components on this host are upgraded. Otherwise, skip to "Upgrading Original Access Server Instances" on page 17-44.
9. Upgrade and set up all original Access Manager instances.
Setting Up the Upgraded Original Access Manager After upgrading each Access Manager instance, you reconfigure it to operate with the upgraded schema and data in the new branch of the LDAP directory server. Be sure to take the conditions in Table 17–10 into account:
You use the following procedure to set up the original Access Manager after upgrading. This procedure provides the sequence of steps that you need to perform. File System path names are presented as an example. Your details will be different. For more information about setting up the Identity System, see the Oracle Access Manager Installation Guide.
Setting Up the Original Access Manager to Use the New BranchDuring this procedure, you will need to provide some details from the original installation, including the LDAP directory server type, the location of user data and the searchbase, and the Person Object Class. This information was defined when the original COREid System was set up. The Person Object Class and other details were obtained when setting up the Access Manager clone. If you do not have access to the original, you can obtain it from the setup.xml file in the original COREid Server source directory. For example, the source in this example would be np611\ois_01\identity_source\oblix\config\setup.xml, for example).
You will also need to supply new information, including the new branch in the LDAP directory server where configuration and policy data are stored.
The following procedure provides the sequence of steps that you need to perform. File System path names are presented as an example. Your details will vary.
Table 17–10 Access Manager Setup Conditions for Zero Downtime Upgrades
Condition Action
Access Manager and WebGates are in the same directory
Postpone reconfiguring this Access Manager until the WebGate is upgraded
One Web server instance is servicing other Web components
Upgrade all serviced Web components before restarting the Web server instance
All Web components for this Web server instance are upgraded
Perform activities in:
■ "Setting Up the Upgraded Original Identity System" on page 17-24, if needed
■ "Setting Up the Upgraded Original Access Manager" on page 17-39
■ Before restarting any original Access Server service after reconfiguring an upgraded original Access Manager, log in to the Access System Console from any upgraded original Access Manager and delete the profiles that were created and named Access_Manager_user_setup_profile and Access_Server_setup_user_profile

Upgrading Your Original Access System
17-40 Oracle Access Manager Upgrade Guide
To reconfigure the original Access Manager to use the new branch 1. Obtain details about the original source COREid Server from the setup.xml file.
For example: np611\webcomponent_01\identity_source\oblix\config\setup.xml.
2. Delete the following files from the upgrade destination that was specified for the instance: for example, np611\webcomponent_01\access\oblix\config:
■ setup.*
■ configInfo.*
■ \ldap subdirectory
3. Ensure that the original Access Manager Web server is running and go to the original Access System Console, as usual.
http://hostname:port/access/oblix/
In the sample URL, hostname refers to computer that hosts the original upgraded WebPass; port refers to the HTTP port number of the WebPass Web server instance; /access/oblix connects to the original Access System Console.
4. Click the Access System Console link to display the Setup page, and then click the Setup button.
5. Set up the Access Manager to use the new configuration DN and policy base, as follows (see also your Oracle Access Manager Installation Guide for more information).
a. Enter and confirm LDAP directory server details, including the directory server type and the location and details for user data and configuration data.
b. Enter the information for user data (original search base), and for configuration data (configuration DN) and policy data (Policy Base) in the new branch of the directory server. For example:
Search Base—Enter the original searchbase.
Configuration DN— o=Newbranch,o=company,c=us
Policy Base——o=NewPolicyBase,o=Policy_base,o=company,c=us
c. Proceed through remaining Access Manager setup pages and leave all other setup details as they are.
d. Enter the Person Object Class, which was selected during the original earlier COREid System set up.
e. Restart the Web server and Identity Server service when instructed to do so.
f. After the Web server restarts, click Next and continue by accepting the default Policy Domain Root (or specifying the root for your original installation).
g. Continue, but do not configure authentication schemes or policies to protect NetPoint URLs.
h. Click done when setup is complete.
Note: This information is located in the setup.xml file of the original COREid Server: np611\ois_01\identity\oblix\config\setup.xml, for example.

Upgrading Your Original Access System
Upgrading the Original System 17-41
6. Verify that the Directory Server profile has the new configuration DN and policy base, as follows:
a. Go to the Access System Console, as usual.
http://hostname:port/access/oblix/
b. Click Access System Console, click System Configuration, then click Server Settings.
c. Click Server Settings in the left column and then click the Directory Server link.
d. On the Directory Server Configuration page, confirm that the Configuration Base (also known as the configuration DN) and Policy Base reflect the new branch.
e. Check for and delete any extra directory profiles that might have been added and named Access_Manager_user_setup_profile and Access_Server_setup_user_profile.
7. Proceed as follows:
■ Successful: Proceed with Step 8.
■ Not Successful: Set up the Access Manager anew by performing procedure again and be sure to specify all information correctly.
8. In the following upgraded and updated Access Manager configuration files, confirm that the new configuration DN appears. For example, in np611\webcomponent\access_01\oblix\config:
■ setup.*
■ setup_am*
■ configInfo
9. Proceed as follows:
■ Successful: If the new configuration DN and policy base appear in the files mentioned in step 8, the operation was successful. Proceed to Step 10.
■ Not Successful: If the new configuration DN and policy base do not appear in the files mentioned in step 8, the operation failed. In this case, see "Rolling Back After Upgrading the Original Access System" on page 17-56.
10. Repeat the following procedures to upgrade and set up each original Access Manager.
■ Preparing Original Access System Components for the Upgrade
■ Upgrading An Original Access Manager Instance
■ Setting Up the Upgraded Original Access Manager, as appropriate for the Web server conditions in your environment
11. When all original Access Manager instances are upgraded, proceed to "Configuring Original Access Servers to Use the New Branch" on page 17-41.
Configuring Original Access Servers to Use the New Branch You perform this task only if you have a joint Identity and Access System deployed. Otherwise, skip to "Validating the Entire Upgraded Original Environment" on

Upgrading Your Original Access System
17-42 Oracle Access Manager Upgrade Guide
page 17-57. Ensure that all original Access Manager instances on the computer host have been upgraded.
Before you reconfigure each original Access Server, you must back up the original branch in the LDAP directory server, and then archive processed workflows. The original branch data that you need includes configuration and policy data, user and group data, workflow data. In addition, you need to back up the original instance \config file system subdirectory, which contains directory server configuration details for the original branch. This is needed for a successful roll back operation if you choose to roll back.
After performing the backup activities, you are ready to reconfigure the instance touse the new branch. However, the Access Server Service should be started only after you upgrade the instance. Do not restart the Access Server Service after reconfiguring the instance.
You will use the configureAAAserver.exe tool (Windows) or start_configureAAAServer (Unix-based systems) for this task. The tool is located in each original Access Server directory. For example:
Windows: np611\aaa_01\access\oblix\tools\configureAAAServer\ configureAAAServer.exe
Unix: /home/np611/aaa_01/access/oblix/tools/configureAAAServer\start_ configureAAAServer
Extra directory profiles might be created for original Access Servers during the reconfiguration. You will be instructed to remove any extra directory profiles when you verify the reconfigured Access System.
In the example, Unix refers to supported Unix-based platforms such as Linux and Solaris. When running the tool, you will be asked to provide details for the original Access Server. File system path names in the following procedure are samples only. Your details will be different.
To reconfigure an original Access Server to use the new branch1. Preparing the Original Branch: Back up the branch that is used by the original
installation. See Chapter 5 and perform the following tasks:
■ Backing up the Earlier Oracle Access Manager Schema
■ Backing up Oracle Access Manager Configuration and Policy Data
■ Backing Up User and Group Data
■ Backing Up Workflow Data
■ Archiving Processed Workflow Instances
2. Preparing the File System: Back up the \config directory for the instance to be reconfigured; \config is located in the original AccessServer_install_dir file system path. For example:
np611\aaa_01\access\oblix\config
Caution: If you do not perform all preparation tasks for the instance, you might not be able to recover if there is a problem or to roll back to the original instance.

Upgrading Your Original Access System
Upgrading the Original System 17-43
3. Locate and run the tool for your platform in the original AccessServer_install_dir. For example:
Windows: np611\aaa_01\access\oblix\tools\configureAAAServer\ configureAAAserver.exe
configureAAAServer.exe install "C:\np611\aaa_01\access"
Unix: /home/np611/aaa_01/access/oblix/tools/configureAAAServer/ start_configureAAAServer
./start_configureAAAServer install "/home/np611/aaa_01/access"
4. Follow the on-screen prompts and provide details for your original instance when prompted. For example:
■ The transport security mode for the original instance
■ The security mode in which the user data directory is running
■ The host computer on which the user data directory resides
■ The port number on which the user data directory listens
■ The bind DN of the user data directory
■ The password of the user data directory
■ The directory type for user data
■ The location where new oblix (configuration) data is stored
■ The new configuration DN
■ The new policy base
■ The original instance Access Server ID
See the NetPoint or Oracle COREid Administration Guide for information on the configureAAA tool and LDAP directory server configurations.
5. Write the name of the original instance Access Server service, but do not specify or update failover information; do not start the Access Server service until the instance has been upgraded.
■ Successful: Proceed to Step 6.
■ Not Successful: Proceed to"Recovering From an Original Access System Upgrade Failure" on page 17-55.
6. Confirm that the new information that you entered during reconfiguration is included in the aaa_server_config.xml file in the \config file system subdirectory in the original AccessServer_install_dir. For example:
np611\aaa_01\access\oblix\config\aaa_server_config.xml
7. Confirm that the value of the MigrateUserDataTo1014 is false in the globalparams.xml file for this instance. For example:
np611\aaa_01\access\oblix\apps\common\bin\globalparams.xml
<NameValPair ParamName="MigrateUserDataTo1014" Value="False" />
8. Proceed as follows:
■ Successful: If the new policy base appears in the file mentioned in Step 6, the operation was successful. Proceed to Step 9.

Upgrading Your Original Access System
17-44 Oracle Access Manager Upgrade Guide
■ Not Successful: If the new policy base does not appear in the files mentioned in step 6, the operation failed. In this case, see "Recovering From an Original Access System Upgrade Failure" on page 17-55.
9. After Access Manager Set Up: Verify that the Directory Server profile for the original Access Server instance has the new configuration DN and policy base, as follows:
a. Go to the original Access System Console, as usual.
http://hostname:port/access/oblix/
b. Click Access System Console, click System Configuration, then click Server Settings.
c. Click the Directory Server link to display the Directory Server Configuration page.
d. Confirm that the new configuration DN and the policy base are correct, and then click Cancel.
e. Extra Profiles in a Split Directory Server Configuration: Check for and remove any extra directory profiles that might have been added when Access Servers were reconfigured. For more information, see "Setting Up the Cloned COREid System to Use the New Branch" on page 16-48 and the Oracle Access Manager Identity and Common Administration Guide.
10. Proceed as follows:
■ Successful: Proceed to "Upgrading Original Access Server Instances" to upgrade this instance.
■ Not Successful: Proceed to "Recovering From an Original Access System Upgrade Failure" on page 17-55, and start again.
11. Repeat all steps in this procedure and in "Upgrading Original Access Server Instances" with each original Access Server instance, before proceeding to "Upgrading Original WebGates".
Upgrading Original Access Server Instances This topic describes all activities that must be performed to upgrade an original Access Server instance after you have reconfigured it. This topic concludes with a step-by-step procedure that walks you through all activities.
During original Access Server upgrades, parameter catalogs and component-specific configuration files are upgraded. Table 17–11 provides sample directory path names in columns that describe the progression of actions that you will perform. Additional information follows the table. The sample file system path names are for Windows platforms. The paths in your installation might differ.
Note: The Web Server instance on the host computer must remain stopped until all Web components (WebPass, Access Manager, and WebGate) on the host computer have been upgraded.
Caution: Oracle recommends that you review all information in this topic before starting.

Upgrading Your Original Access System
Upgrading the Original System 17-45
After performing the activities outlined in Table 17–11, the 10g (10.1.4.2.0) MigrateOAM script will be available in the destination path for original Access Server instances. For example:
np611\aaa_01\access\oblix\tools\migration_tools\MigrateOAM.bat np611\aaa_02\access\oblix\tools\migration_tools\MigrateOAM.bat and so on.
Table 17–12 lists the arguments that you specify with the 10g (10.1.4.2.0) MigrateOAM script to upgrade original Access Servers.
Table 17–11 Activities to Prepare for an Original Access Server Instance Upgrade
1 Original Path 2 Source Creation 3 Destination Creation and Obtaining Tools
Access Server Instances
np611\aaa_01\accessnp611\aaa_02\access
In the original file system, rename the subdirectory containing each original instance. For example:
np611\aaa_01\access_sourcenp611\aaa_02\access_source
After creating the source (see column 2):
A. Extract 10g (10.1.4.0.1) Access Server libraries and files and specify original path as the installation (destination) directory. For example:
np611\aaa_01\access
Note: The destination path of the 10g (10.1.4.0.1) instance must exactly match the original path before it was renamed (see column 1).
See "Destination Creation: Extracting 10g (10.1.4.0.1) Libraries and Files" on page 16-28.
B. Apply Release 10.1.4 Patch Set 1 (10.1.4.2.0) to the 10g (10.1.4.0.1) instance to obtain the tools.
See "Obtaining Tools: Applying Release 10.1.4 Patch Set 1 (10.1.4.2.0)" on page 16-31.
C. Repeat steps A and B for each clone instance.
Table 17–12 MigrateOAM Production Arguments for Original Access Server Upgrades
MigrateOAM Original (Production) Mode Syntax Values and Operations
-M Prod Specify Prod as the mode to upgrade original components. The production mode is required to upgrade original components.
-C AAA Specify AAA to upgrade an original Access Server.
Note: Upgrade each original Access Server before upgrading original WebGates.
-F nnn Specify the number that identifies your earlier release. For example: 610 (for 6.1 or 6.1.1), 650 (for 6.5.x), or 700 (for 7.x)
-T 1014 Specify1014 as the release to which this data will be upgraded.
-S "source directory" Specify the full path (in quotation marks) to the renamed original Access Server directory (see column 1 of Table 17–11). For example:
■ -S "C:\np611\aaa_01\access_source"
■ -S "C:\np611\aaa_02\access_source"
■ and so on.

Upgrading Your Original Access System
17-46 Oracle Access Manager Upgrade Guide
In the following procedure, directory path names, the starting release, and languages are provided as samples only. Your details will differ.
To upgrade original Access Server instances 1. Preparation: Perform tasks in "Preparing Original Access System Components for
the Upgrade" on page 17-32, which includes:
■ Preparing Earlier Customizations
■ Preparing the Default Logout in the Policy Manager
■ Creating Individual Profiles for WebGates that Share a Profile
■ Preparing Host Computers
– Changing Read Permissions on Password Files
– Confirming Free Disk Space
■ Preparing Release 6.x Environments
■ Preparing Multi-Language Installations
■ Backing Up File System Directories, Web Server Configurations, and Registry Details
■ Stopping Servers and Services
■ Logging in with Appropriate Administrative Rights
-D "destination directory" Specify the full path (in quotation marks) to the 10g (10.1.4.2.0) Access Server directory that replaced the original instance directory (see columns 1 and 4 of Table 17–11). For example:
■ -D "C:\np611\aaa_01\access"
■ -D "C:\np611\aaa_02\access"
■ and so on.
-I "installation directory" The installation directory should be the same as the destination directory. For example:
■ -I "C:\np611\aaa_01\access"
■ -I "C:\np611\aaa_02\access"
■ and so on.
-L "Languages" Specify all installed languages to be upgraded by the appropriate code, in quotations. For example, English, "en-us"; French, "fr-fr"; German, "de-de".
Caution: If you do not perform all preparation steps, you might not be able to recover from a problem or to roll back after a failed upgrade.
Note: With this upgrade method, you do not need to back up the file system directory.
Table 17–12 (Cont.) MigrateOAM Production Arguments for Original Access Server Upgrades
MigrateOAM Original (Production) Mode Syntax Values and Operations

Upgrading Your Original Access System
Upgrading the Original System 17-47
2. Source Creation: Rename the subdirectory that contains the original Access Server instance to create a source for the upgrade. For example:
Rename: np611\aaa_01\access As: np611\aaa_01\access_source
3. Destination Creation: Extract 10g (10.1.4.0.1) Access Server libraries and files and specify a destination path that exactly matches the original before you renamed it. For example:
Destination Path: np611\aaa_01\access
The destination path must exactly match the source before it was renamed in Step 2. For a destination example, see Table 17–11. For extraction details, see "Destination Creation: Extracting 10g (10.1.4.0.1) Libraries and Files" on page 16-28.
4. Obtaining the Tools: Apply the 10g (10.1.4.2.0) patch to the 10g (10.1.4.0.1) instance, as described "Obtaining Tools: Applying Release 10.1.4 Patch Set 1 (10.1.4.2.0)" on page 16-31.
When your file system is set up appropriately, you are ready to upgrade the original instance.
5. Change to the destination_dir that includes the 10g (10.1.4.2.0) MigrateOAM script for the instance that you will upgrade. For example:
np611\aaa_01\access
6. Run the MigrateOAM script in Prod mode and specify your starting release and path names for the instance. For example:
MigrateOAM -M Prod -C AAA -F 610 -T 1014 -S "C:\np611\aaa_01\access_source" -D "C:\np611\aaa_01\access" -I "C:\np611\aaa_01\access" -L "en-us"
a. Use Automatic mode for each sequence so that you do not need to confirm each process.
b. Continue as requested through all processes; do not skip any processes.
c. Finish according to on-screen messages.
The source remains intact. The destination now includes a 10g (10.1.4.2.0) instance configured with the same parameters and details as the source.

Upgrading Your Original Access System
17-48 Oracle Access Manager Upgrade Guide
7. Verify that the upgrade was successful as follows:
a. Start the Access Server service. If the Access Server Service Does Not Start:
Check your event and Access Server log output files. For more information about logging and log output files, see the Oracle Access Manager Identity and Common Administration Guide.
Check migration log files for any errors reported during the upgrade, as described in "Accessing Log Files" on page G-2.
b. Windows: Verify that the registry entry is updated by running the Registry editor (regedit) using one of the following methods:
In the Registry Editor Window, click My Computer, HKEY_LOCAL_MACHINE, SYSTEM, CurrentControlSet, Services, and then look for ObAAAServer-<Service Name>. Within this, check the Image path.
View the registry entryHKEY_LOCAL_MACHINE, SOFTWARE,Oblix,Oblix Netpoint. Check for the respective installed version and, under that, check the entry for ObAAAServer-<Service Name>.
c. Verify that the version file in the destination path is updated for 10.1.4. For example:
destination_dir\access\oblix\config\np1014_aaa.txt
d. Upgrade Not Successful: Proceed to "Recovering From an Original Access System Upgrade Failure" on page 17-55.
e. Upgrade Successful: Proceed to step 8.
8. Repeat all steps in this procedure for all other original Access Server instances on this host before proceeding to "Upgrading Original WebGates".
9. Upgrade all Access Server instances.
Upgrading Original WebGatesAfter upgrading Access Server instances on a single host, Oracle recommends that you upgrade the WebGate so that you can finish reconfiguring the system and restart it. The Web Server must remain stopped until all Web components on the host computer have been upgraded.
When multiple WebGates share a single profile in the earlier installation, before upgrading the WebGate you will be instructed to create an individual profile for each WebGate if you have not already done so.
Each WebGate upgrade requires that at least one Access Server configured for that WebGate is running. This is required to enable the migration of information from the WebGateStatic.lst file to the WebGate profile in the System Console.
Note: The Web Server must remain stopped until all Web components on the host computer have been upgraded.

Upgrading Your Original Access System
Upgrading the Original System 17-49
To upgrade original WebGates, see:
■ Upgrading Original WebGates
■ Reconfiguring Upgraded WebGates
Upgrading Original WebGatesDuring WebGate upgrades, profile information is used when migrating information from the original WebGateStatic.lst file. If you have not created the profile as described in "Adding a Temporary Directory Profile for Original Access System Upgrades" on page 17-21, this will be your first step to upgrading.
To help illustrate some activities that you will perform, Table 17–13 organizes sample file system path names in columns that describe the progression of actions that you will take. Additional information follows the table. The sample path names are for Windows platforms. The paths in your installation will be different.
After performing activities outlined in Table 17–13, the 10g (10.1.4.2.0) MigrateOAM script will be stored in the destination you created. For example:
np611\webgate_01\access\oblix\tools\migration_tools\MigrateOAM.bat and so on.
Table 17–14 lists the arguments that you specify with the 10g (10.1.4.2.0) MigrateOAM script to execute the original instance upgrade for each individual WebGate.
Caution: Oracle recommends that you review all information in this topic before proceeding with the activities. You will be instructed to rename and move directories and it is critical that you track instance directories and names.
Table 17–13 Activities to Prepare for an Original WebGate Instance Upgrade
1 Original Path 2 Source Creation 3 Destination Creation and Obtaining Tools
WebGate Instances
np611\webgate_01\ access
In the original file system, rename the subdirectory containing each original instance. For example:
np611\webgate_01\ access_source
After creating the source (see column 2):
A. Extract 10g (10.1.4.0.1) WebGate libraries and files and specify the original path as the installation (destination) directory. For example:
np611\webgate_01\access
Note: The path of the 10g (10.1.4.0.1) instance must exactly match the original path before it was renamed (see column 1).
See "Destination Creation: Extracting 10g (10.1.4.0.1) Libraries and Files" on page 16-28.
B. Apply Release 10.1.4 Patch Set 1 (10.1.4.2.0) to the 10g (10.1.4.0.1) instance to obtain the tools for this upgrade.
See "Obtaining Tools: Applying Release 10.1.4 Patch Set 1 (10.1.4.2.0)" on page 16-31.
C. Repeat steps A and B for each WebGate instance.

Upgrading Your Original Access System
17-50 Oracle Access Manager Upgrade Guide
Upgrading an original WebGate instance includes message and parameter file upgrades, as well as a Web server configuration upgrade.
Each WebGate upgrade requires that at least one Access Server configured for that WebGate is running. This is required to enable the migration of information from the WebGateStatic.lst file to the WebGate profile in the System Console.
In the following procedure, directory path names, the starting release, and languages are provided as samples only.
Table 17–14 MigrateOAM Script for Original WebGate Instance Upgrades
MigrateOAM Original Mode Syntax Values and Operations
-M Prod Specify Prod as the mode, which is required to upgrade original components.
-C WG Specify WG to upgrade an original WebGate component.
-F nnn Specify the number that identifies your earlier release. For example: 610 (for 6.1 or 6.1.1), 650 (for 6.5.x), or 700 (for 7.x)
-T 1014 Specify1014 as the release to which this data will be upgraded.
-S "source directory" Specify the full path (in quotation marks) to the renamed original WebGate directory (see column 2 of Table 17–13). For example, when you have multiple instances:
■ -S "C:\np611\webgate_01\access_source"
■ -S "C:\np611\webgate_02\access_source"
■ and so on
-D "destination directory" Specify the full path (in quotation marks) to the 10g (10.1.4.2.0) WebGate directory that replaced the earlier WebGate directory (see columns 1 and 4 of Table 17–13). For example:
■ -D "C:\np611\webgate_01\access"
■ -D "C:\np611\webgate_02\access"
■ and so on
-I "installation directory" The installation directory should be the same as the destination directory. For example:
■ -I "C:\np611\webgate_01\access"
■ -I "C:\np611\webgate_02\access"
■ and so on.
Note: Refer to Table 17–13 for details about path names and directory content.
-L "Languages" Specify all installed languages to be upgraded by the appropriate code, in quotations. For example, English, "en-us"; French, "fr-fr"; German, "de-de".
-W "Web server type" Specify the appropriate code for the Web Server used by this original, in quotations. For example, "nsapi", "apache2", "isapi", apache", "ihs", "ohs", "ohs2", "domino".
Note: When you have a single Web server instance serving more than one Oracle Access Manager Web component, the Web server must remain stopped until all serviced Web components on the host computer are upgraded.
Caution: If you do not perform all preparation steps, you might not be able to recover from a problem or to roll back after a failed upgrade.

Upgrading Your Original Access System
Upgrading the Original System 17-51
To upgrade the original WebGate 1. Preparation: Perform tasks in "Preparing Original Access System Components for
the Upgrade" on page 17-32, which includes:
■ Preparing Earlier Customizations
■ Preparing the Default Logout in the Policy Manager
■ Creating Individual Profiles for WebGates that Share a Profile
■ Preparing Host Computers
– Changing Read Permissions on Password Files
– Confirming Free Disk Space
■ Preparing Release 6.x Environments
■ Preparing Multi-Language Installations
■ Backing Up File System Directories, Web Server Configurations, and Registry Details
■ Stopping Servers and Services
■ Logging in with Appropriate Administrative Rights
2. Ensure that there is a temporary LDAP directory profile for the Access System, as described in "Adding a Temporary Directory Profile for Original Access System Upgrades" on page 17-21.
3. Confirm that there is a unique, individual profile for each WebGate defined in the Access System Console. For more information, see "About Creating Individual Profiles for WebGates that Share a Profile" on page 17-23.
4. Stop the original WebGate Web server and confirm that at least one Access Server that is configured to operate with this WebGate is running.
5. Source Creation: Rename the subdirectory that contains the original WebGate instance to create a source for the upgrade. For example:
Rename: np611\webgate_01\access As: np611\webgate_01\access_source
6. Destination Creation: Extract 10g (10.1.4.0.1) WebGate libraries and files and specify a destination path that exactly matches the original before you renamed it. For example:
Note: With this upgrade method, you do not need to back up the file system directory.

Upgrading Your Original Access System
17-52 Oracle Access Manager Upgrade Guide
Destination Path: np611\webgate_01\access
For a destination example, see Table 17–13. For extraction details, see "Destination Creation: Extracting 10g (10.1.4.0.1) Libraries and Files" on page 16-28.
7. Obtaining the Tools: Apply the 10g (10.1.4.2.0) patch to the 10g (10.1.4.0.1) destination, as described "Obtaining Tools: Applying Release 10.1.4 Patch Set 1 (10.1.4.2.0)" on page 16-31.
When your file system is set up appropriately, you are ready to upgrade the original instance.
8. Change to the destination_dir that includes the 10g (10.1.4.2.0) MigrateOAM script for the instance that you want to upgrade. For example:
cd np611\webgate_01\access
9. Run the MigrateOAM script in Prod mode and specify your starting release and path names for the instance. For example:
MigrateOAM -M Prod -C WG -F 610 -T 1014 -S "C:\np611\webgate_01\access_ source" -D "C:\np611\webgate_01\access" -I "C:\np611\webgate_01\access" -L "en-us" -W "nsapi"
a. Use Automatic mode for each sequence so that you do not need to confirm each process.
b. Accept Web server configuration changes by specifying the full directory path name to the Web server configuration file for which this original is configured.
c. Continue as requested through all processes; do not skip any processes.
d. Finish according to on-screen messages.
Your destination directory is now upgraded based on the original source configuration.
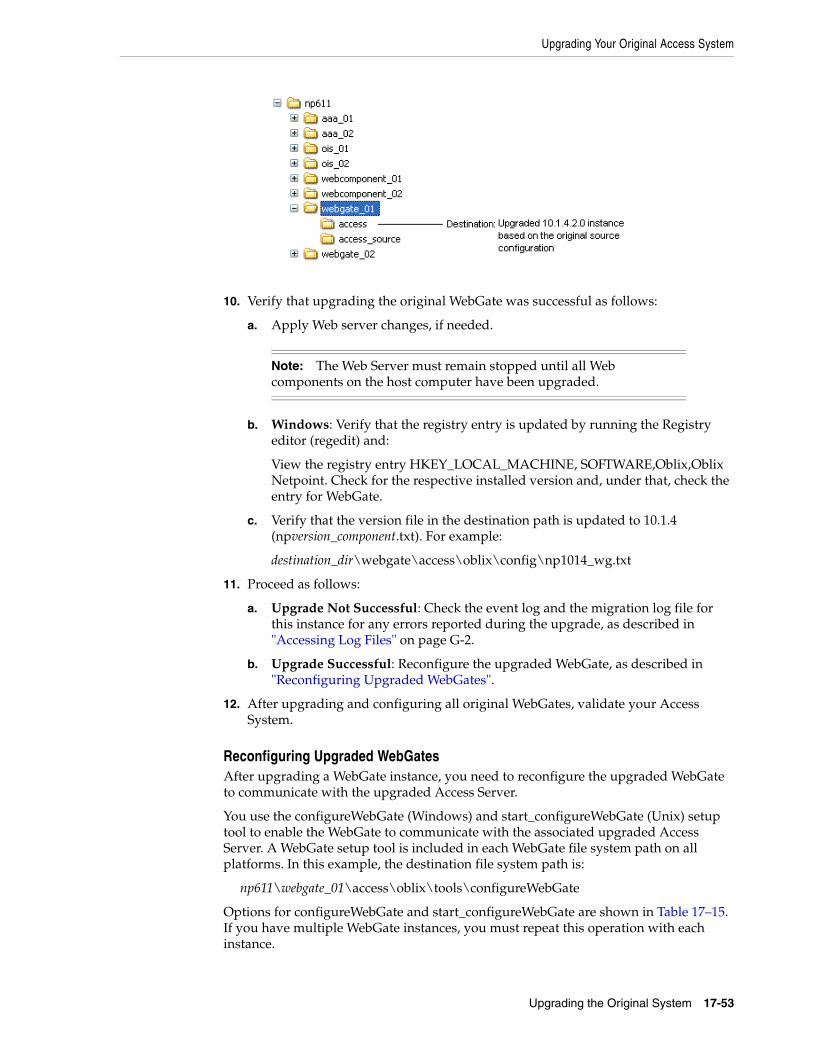
Upgrading Your Original Access System
Upgrading the Original System 17-53
10. Verify that upgrading the original WebGate was successful as follows:
a. Apply Web server changes, if needed.
b. Windows: Verify that the registry entry is updated by running the Registry editor (regedit) and:
View the registry entry HKEY_LOCAL_MACHINE, SOFTWARE,Oblix,Oblix Netpoint. Check for the respective installed version and, under that, check the entry for WebGate.
c. Verify that the version file in the destination path is updated to 10.1.4 (npversion_component.txt). For example:
destination_dir\webgate\access\oblix\config\np1014_wg.txt
11. Proceed as follows:
a. Upgrade Not Successful: Check the event log and the migration log file for this instance for any errors reported during the upgrade, as described in "Accessing Log Files" on page G-2.
b. Upgrade Successful: Reconfigure the upgraded WebGate, as described in "Reconfiguring Upgraded WebGates".
12. After upgrading and configuring all original WebGates, validate your Access System.
Reconfiguring Upgraded WebGatesAfter upgrading a WebGate instance, you need to reconfigure the upgraded WebGate to communicate with the upgraded Access Server.
You use the configureWebGate (Windows) and start_configureWebGate (Unix) setup tool to enable the WebGate to communicate with the associated upgraded Access Server. A WebGate setup tool is included in each WebGate file system path on all platforms. In this example, the destination file system path is:
np611\webgate_01\access\oblix\tools\configureWebGate
Options for configureWebGate and start_configureWebGate are shown in Table 17–15. If you have multiple WebGate instances, you must repeat this operation with each instance.
Note: The Web Server must remain stopped until all Web components on the host computer have been upgraded.

Upgrading Your Original Access System
17-54 Oracle Access Manager Upgrade Guide
As the command is performed, messages keep you informed and you might be asked to supply information for this upgraded WebGate. Be sure to specify information for your environment.
The following procedure provides the sequence of steps that you need to perform. Your details will vary.
To modify a WebGate to communicate with the upgraded Access Server1. Go to the WebGate destination directory that was specified during the upgrade
and locate the configureWebGate (or start_configureWebGate) utility. For example:
Windows: C:\np611\webgate_01\access\oblix\tools\configureWebGate Unix: /home/np611/webgate_01/access/oblix/tools/configureWebGate
2. From the tools directory, run configureWebGate using the following options (see also Table 17–15) and specifications for your original environment. For example:
configureWebGate -i "C:\np611\webgate_01\access" -t WebGate
The command must be entered as one line without breaks.
3. Proceed as directed by on-screen messages:
■ The transport security mode for the original instance
■ The WebGate ID
■ The WebGate password (for simple or cert mode)
■ The Access Server ID
■ The Access Server Host
■ The port number on which the Access Server listens
4. Proceed as follows:
■ Successful: The Message "WebGate installed successfully" appears. Proceed to Step 5 after you back up this information as described in "Backing Up the Upgraded Original Access System" on page 17-55.
■ Not Successful: Proceed to "Recovering From an Original Access System Upgrade Failure" on page 17-55.
5. If the WebGate is in the same directory as the upgraded Access Manager, go to "Setting Up the Upgraded Original Access Manager" on page 17-39. Otherwise, upgrade and reconfigure another WebGate.
6. Upgrade and reconfigure each earlier WebGate.
7. When all WebGate instances are reconfigured, proceed to "Validating the Upgraded Original Access System".
Table 17–15 Command Options for configureWebGate and start_configureWebGate
Command Options Operation
-i "destination_dir" Specifies the full directory path (in quotation marks) to the destination directory used to upgrade this instance. For example:
Windows: "C:\np611\webgate_01\access"
Unix: "/home/np611/webgate_01/access"
-t WebGate Specifies that this operation is for a WebGate.

Upgrading Your Original Access System
Upgrading the Original System 17-55
Validating the Upgraded Original Access SystemOracle recommends that you quickly validate the following items to ensure that the overall upgrade of your original Access System upgrade was successful.
To validate your upgraded original Access System 1. Delete all Web browser caches once the upgrade is complete.
2. Make sure all upgraded original Access Server services and Access Manager and WebGate Web server instances are running.
3. Check that your message and parameter catalog customizations have been preserved. For example, if you have changed any message in a particular message catalog file, then it needs to be retained.
4. Perform all validation tasks for the upgraded Access System, as described in "Validating the Upgraded Original Access System" on page 17-55.
5. Proceed to "Backing Up the Upgraded Original Access System".
Backing Up the Upgraded Original Access SystemOracle recommends that you validate successful operations and then perform back up activities. This will enable you to easily restore your environment to the newly upgraded state should that be needed.
To back up critical information after upgrading original Access System components 1. Back up the upgraded destination file system directory. This is similar to backing
up an existing component installation directory. For details, see "Backing Up the Existing Component Installation Directory" on page 8-7.
2. Web Server: Back up the upgraded Web server configuration file using instructions from your vendor and details in "Backing Up the Existing Web Server Configuration File" on page 8-8.
3. Windows: Back up Windows Registry data as described in "Backing Up Windows Registry Data" on page 8-9.
4. Proceed to "Looking Ahead" on page 17-56, and "Upgrading SDKs, Integration Connectors, and Access System Customizations" on page 17-57.
Recovering From an Original Access System Upgrade FailureIf an original Access System component upgrade was not successful, you can perform the following steps to restore your environment, then try again.
To recover from an unsuccessful original Access System component upgrade1. Back up the source file system directory anew. You will retain one to use as a
backup copy and use one to restart the upgrade.
2. For the instance to be retried, remove the 10g (10.1.4.0.1) libraries and files to which you applied Release 10.1.4 Patch Set 1 (10.1.4.2.0).
3. For the instance to be retried, install 10g (10.1.4.0.1) libraries and files and apply Release 10.1.4 Patch Set 1 (10.1.4.2.0)
4. Web Server: Restore the backed up Web server configuration file, if required.
5. Windows: Restore the backed up Registry data for the component.

Upgrading Your Original Access System
17-56 Oracle Access Manager Upgrade Guide
6. Using a backup copy of your earlier original component installation directory (and Web server configuration, if needed), restart the upgrade as described in the appropriate topic.
Rolling Back After Upgrading the Original Access SystemThis procedure will undo all changes and leave you with your original installation as it was before being upgraded.
Having only one WebGate will result in downtime when rolling back.
To roll back after upgrading the original Access System 1. Confirm that your clone setup is operating properly and serving customers.
2. Shut down the upgraded original service or Web server.
3. Remove any destination file system directories that were added and patched.
4. Restore the original instance file system path by renaming the source.
5. Windows: Import the back up copy of the Windows registry entry for the original instance and release.
6. Web Server Configuration: Restore the backup copy of original Web server configuration files.
7. Restore the back up copy of the Access Server’s \config subdirectory to return to the original configuration.
8. Restart the original service or Web server.
9. Repeat all steps for each upgraded original.
10. In the original System Console, remove entries for the clones
11. If you have a back up copy of the original schema before upgrading, you might be able to reinstate the copy using external tools.
12. Confirm that the original setup is operating properly, and then configure the DNS to enable the original setup to serve customers. For more information, see "Reconfiguring Domain Name Systems (DNS) to Use Upgraded Clones" on page 17-3.
13. Roll back the upgraded clone setup, which includes all clone file system directories, any Web server instances created for clones, the new branch that was created in the LDAP directory server. Also remove entries added to the original System Console for clone components. For more information, see Chapter 16:
■ Rolling Back Changes Made for the New oblix Branch
■ Rolling Back After Upgrading Identity System Clones
■ Rolling Back After Upgrading Access System Clones
Looking Ahead When you have a joint Identity and Access System, you perform activities in the following sequence to finish the upgrade.
Task overview: Remaining joint Identity and Access System activities include1. Upgrading SDKs, Integration Connectors, and Access System Customizations
2. Validating the Entire Upgraded Original Environment

Validating the Entire Upgraded Original Environment
Upgrading the Original System 17-57
3. Starting On-the-fly User Data Migration
4. Reconfiguring Domain Name Systems to Use the Upgraded Original Deployment
5. Deleting the Temporary Directory Server Profile
6. Reverting Backward Compatibility
7. Removing the Cloned System After Upgrading Originals
Upgrading SDKs, Integration Connectors, and Access System Customizations
Oracle recommends that you upgrade any customizations and test these with the upgraded clone Access System. The following overview outlines the tasks that you should perform.
Task overview: Upgrading SDKs, Integration Connectors, and Access System Customizations1. Chapter 11
■ Upgrading Third-Party Integration Connectors
■ Upgrading Independently Installed Software Developer Kits
2. Chapter 13
■ Upgrading Auditing and Reporting for the Access Server
■ Confirming Access System Failover and Load Balancing
■ Upgrading Forms-based Authentication
■ Recompiling and Redesigning Custom Authentication and Authorization Plug-Ins
■ Associating Release 6.1.1 Authorization Rules with Access Policies
■ Assuring Proper Authorization Failure Re-directs After Upgrading from 6.1.1
■ Updating the ObAMMasterAuditRule_getEscapeCharacter in Custom C Code
■ Validating Access System Customization Upgrades: See also "Validating the Entire Upgraded Original Environment", next.
3. This chapter: Validating the Entire Upgraded Original Environment.
Validating the Entire Upgraded Original EnvironmentBefore you validate the entire upgraded original environment, be sure that you have integrated your upgraded customizations which were tested in the clone environment.
See Chapter 14 for details and suggestions to validate the entire upgraded original environment, including the Identity System and Access System. This is the same validation that you performed in "Validating Successful Operations in Your Environment" on page 16-67.
If the upgrade is successful, you can restart automatic user data migration as explained "Starting On-the-fly User Data Migration" on page 17-58.
Caution: You must upgrade the Access System before upgrading integration components or an independently installed SDK
Starting On-the-fly User Data Migration
17-58 Oracle Access Manager Upgrade Guide
Starting On-the-fly User Data MigrationYou use the procedure here to start immediate (on-the-fly) user data migration after validating that your upgraded original environment is operating properly and that you will not be rolling back to the earlier release.
In the following procedure you locate the globalparams.xml.upgrade file in the upgraded and validated environment (clone or original) and change the value of the MigrateUserDataTo1014 parameter from false to true.
To start on-the-fly user data migration after a zero downtime upgrade 1. Locate the globalparams.xml file in the destination path of the upgraded and
validated environment. For example:
np611\ois_01\identity\oblix\apps\common\bin\globalparams.xml
2. Change the value of the MigrateUserDataTo1014 parameter from false to true so that user data migration can start. For example:
<NameValPair ParamName="MigrateUserDataTo1014" Value="True" />
3. Restart the Identity Server Service.
4. If you are certain that the original upgraded system is operating properly, proceed to "Reconfiguring Domain Name Systems to Use the Upgraded Original Deployment".
Reconfiguring Domain Name Systems to Use the Upgraded Original Deployment
When you are completely satisfied that the upgraded original system is fully operational, you can reconfigure the DNS to use the original environment instead of the cloned environment.
Reconfiguring DNS to redirect network traffic is outside the scope of this manual.
When this task is finished, you can proceed to "Deleting the Temporary Directory Server Profile".
Deleting the Temporary Directory Server ProfileAfter upgrading the first original WebPass, an administrator created a temporary directory profile to grant the Access Server write access to policy data stored in the directory server. This temporary directory profile was required when the Access Server gathered configuration information stored in the WebGatestatic.lst file and updated the directory server during WebGate upgrades.
After upgrading all earlier WebGates and confirming proper operation of the upgraded WebGates, you can delete the temporary directory server profile.
Note: If you roll back to an earlier release after performing activities here, any user data that has been migrated will not be reverted.
Note: Do not perform this task until all earlier WebGates in your environment have been upgraded and verified to be working.

Removing the Cloned System After Upgrading Originals
Upgrading the Original System 17-59
For details, see "Deleting the Temporary Directory Server Profile" on page 14-4. When this task is finished, proceed to "Reverting Backward Compatibility" on page 17-59.
Reverting Backward CompatibilityYou might recall that backward compatibility with earlier custom plug-ins (and WebGates/AccessGates) was enabled during Identity and Access Server upgrades.
After upgrading all older plug-ins, WebGates and AccessGates, and confirming that the entire system upgrade has been successful, Oracle recommends that you revert backward compatibility.
The steps that you must perform to manually revert backward compatibility are similar to those used to manually enable backward compatibility. For more information, see the following topics in Chapter 14:
■ Reverting Identity Server Backward Compatibility
■ Reverting Access Server Backward Compatibility
When this task is finished, proceed to "Removing the Cloned System After Upgrading Originals".
Removing the Cloned System After Upgrading OriginalsAfter upgrading and validating the original environment, and after reconfiguring the DNS to use the upgraded original system, you can remove the cloned system if you like.
Task overview: Removing the cloned environment 1. Confirm that your original setup is operating properly and serving customers.
2. Shut down clone services and Web servers.
3. Remove all clone file system directories.
4. In the original System Console, remove entries for the clones.

Removing the Cloned System After Upgrading Originals
17-60 Oracle Access Manager Upgrade Guide

Part VIIAppendixes
This part of the book provides useful information that falls outside the scope of the main topics covered elsewhere in this manual.
Part VII contains the following appendixes:
■ Appendix A, "Oracle Access Manager Directory Structure Changes"
■ Appendix B, "Migrating from a Solaris Platform to a Linux Platform While Upgrading"
■ Appendix C, "Upgrade Process and Utilities"
■ Appendix D, "Manual Schema and Data Upgrades"
■ Appendix E, "Upgrading Sun Web Server Version 4 to Version 6 on Windows 2000"
■ Appendix F, "Planning and Tracking Summaries"
■ Appendix G, "Troubleshooting the Upgrade Process"


Oracle Access Manager Directory Structure Changes A-1
AOracle Access Manager Directory Structure
Changes
If you started the upgrade process from Oracle Access Manager release 6.5 or 7.x, you can skip this chapter because the directory structure remains the same. However, if you started the upgrade from a release earlier than 6.5, there are important directory structure changes that you need to be aware of.
The installed product directory structure remained constant from Oracle Access Manager release 5.2 to release 6.5. With the introduction of localization for multi-language environments in release 6.5, new directories were added, some directories moved, and some were eliminated. This new directory structure is carried forward with 10g (10.1.4.0.1).
Not all new directories reside on all Oracle Access Manager component hosts. This appendix introduces both the earlier directory structure and the new structure.
■ About the 10g (10.1.4.0.1) Directory Structure
■ Identity Server Directories
■ WebPass Directories
■ Directories for Access System Components
■ PresentationXML Directories
About the 10g (10.1.4.0.1) Directory StructureStarting with the release 6.5, a new directory structure was introduced to accommodate the addition of Language Packs that enable you to display static information to users in their native language. Oracle Access Manager provides a new directory named \oblix\oracle\nlstrl that is created for each component during with the automatic installation of the Oracle National Language Support Library.
The top level directory structure for 10g (10.1.4.0.1) looks like the following:
OracleAccessManager\access
OracleAccessManager\identity
OracleAccessManager\webcomponent
In addition, 10g (10.1.4.0.1) provides additional Language Packs and support for multibyte character sets such as Japanese and Chinese.
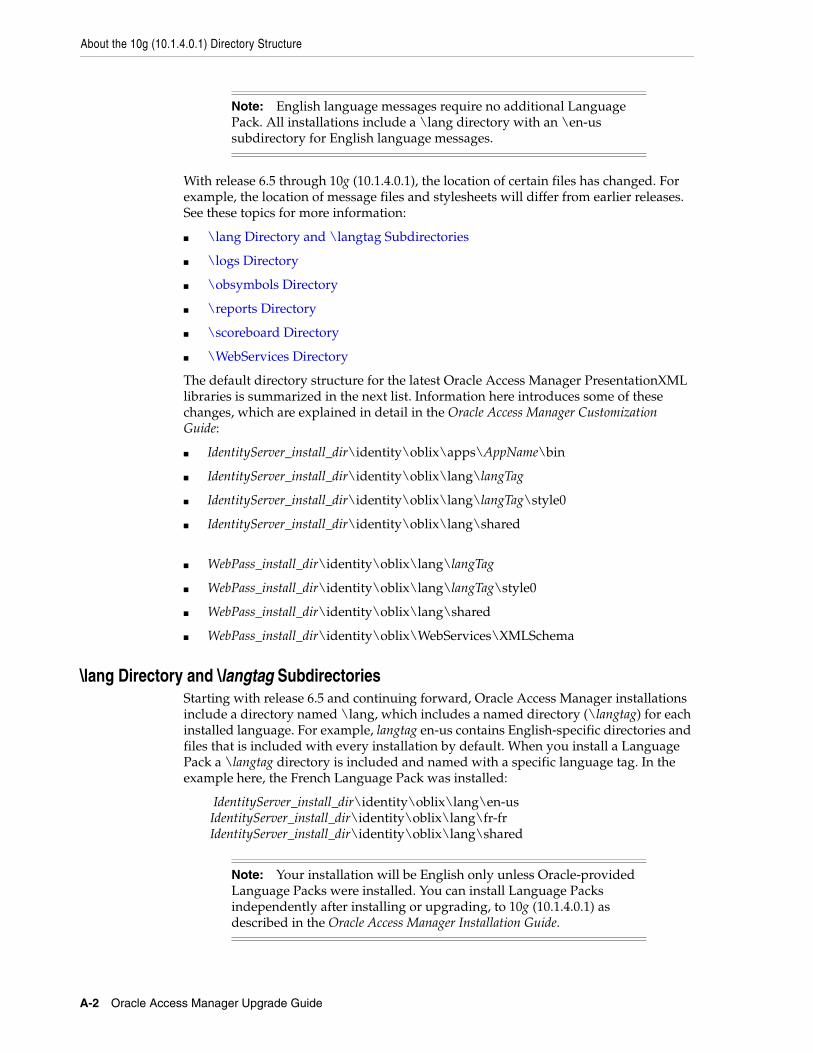
About the 10g (10.1.4.0.1) Directory Structure
A-2 Oracle Access Manager Upgrade Guide
With release 6.5 through 10g (10.1.4.0.1), the location of certain files has changed. For example, the location of message files and stylesheets will differ from earlier releases. See these topics for more information:
■ \lang Directory and \langtag Subdirectories
■ \logs Directory
■ \obsymbols Directory
■ \reports Directory
■ \scoreboard Directory
■ \WebServices Directory
The default directory structure for the latest Oracle Access Manager PresentationXML libraries is summarized in the next list. Information here introduces some of these changes, which are explained in detail in the Oracle Access Manager Customization Guide:
■ IdentityServer_install_dir\identity\oblix\apps\AppName\bin
■ IdentityServer_install_dir\identity\oblix\lang\langTag
■ IdentityServer_install_dir\identity\oblix\lang\langTag\style0
■ IdentityServer_install_dir\identity\oblix\lang\shared
■ WebPass_install_dir\identity\oblix\lang\langTag
■ WebPass_install_dir\identity\oblix\lang\langTag\style0
■ WebPass_install_dir\identity\oblix\lang\shared
■ WebPass_install_dir\identity\oblix\WebServices\XMLSchema
\lang Directory and \langtag SubdirectoriesStarting with release 6.5 and continuing forward, Oracle Access Manager installations include a directory named \lang, which includes a named directory (\langtag) for each installed language. For example, langtag en-us contains English-specific directories and files that is included with every installation by default. When you install a Language Pack a \langtag directory is included and named with a specific language tag. In the example here, the French Language Pack was installed:
IdentityServer_install_dir\identity\oblix\lang\en-us IdentityServer_install_dir\identity\oblix\lang\fr-fr IdentityServer_install_dir\identity\oblix\lang\shared
Note: English language messages require no additional Language Pack. All installations include a \lang directory with an \en-us subdirectory for English language messages.
Note: Your installation will be English only unless Oracle-provided Language Packs were installed. You can install Language Packs independently after installing or upgrading, to 10g (10.1.4.0.1) as described in the Oracle Access Manager Installation Guide.

Identity Server Directories
Oracle Access Manager Directory Structure Changes A-3
Each \langTag subdirectory contains ..XML message catalog files for various applications, which you can customize, as well as other .HTML files. In addition, each \langTag directory contains a \style0 directory.
The \lang\shared directory provides default global stylesheets in all languages. For more information about stylesheets and PresentationXML directories, see "About Custom Items and Upgrades" on page 12-11 and the Oracle Access Manager Customization Guide.
\logs DirectoryThis directory contains Oracle Access Manager log files.
\obsymbols DirectoryThis directory contains .pdb files used for debugging crashes on Windows systems.
\reports DirectoryThis directory contains a subdirectory for Crystal Reports that includes samples and templates.
\scoreboard DirectoryThis directory contains the scoreboard files used by SNMP.
\WebServices DirectoryOn the computer hosting a WebPass, this directory contains subdirectories for Web Services Description Language files; samples; and XMLSchema. For more information, see the Oracle Access Manager Developer Guide.
Identity Server DirectoriesThe Identity Server was formerly known as the NetPoint or COREid Server. There are several new directories for the Identity Server. Some are new starting with release 6.5 and continuing through10g (10.1.4.0.1) and some are new as of 10g (10.1.4.0.1):
IdentityServer_install_dir\identity\oblix
\lang (contains a named directory (langtag) for each installed language and \shared) \langtag (for example, en-us, contains message files in a specific language) \help \style0 (default wrapper stylesheets specific to each application) \shared (default global stylesheets for various applications in all languages) \obsymbols (.pdb files used for debugging crashes on Windows systems) \oracle (files for Oracle National Language Support) \reports (Readme file explaining files and contents) \crystal (Crystal Reports directory) \samples (Crystal Reports samples) \templates (Crystal Reports templates) \scoreboard (Files used by Oracle Access Manager SNMP)
Note: In release 6.5 the \engine directory was removed. Also, in release 6.5 the \orig directory was removed, but returned in release 7.0 and remains in 10g (10.1.4.0.1).

WebPass Directories
A-4 Oracle Access Manager Upgrade Guide
Table A–1 shows the subdirectories and files that are part of 10g (10.1.4.0.1) located in IdentityServer_install_dir\identity\oblix.
WebPass DirectoriesThere are several new directories for WebPass, starting with release 6.5 and continuing through 10g (10.1.4.0.1), as shown:
WebPass_install_dir\identity\oblix
\lang (contains language specific subdirectories as well as \java and \shared) \langtag (is not an exact duplicate of the one on the Identity Server) \style0 (copies of default wrapper stylesheets and image files) \java (resource properties for specified languages) \shared (default global files that WebPass uses in response to requests) \logs \obsymbols (.pdb files used for debugging crashes on Windows systems) \oracle (files for Oracle National Language Support) \WebServices \ samples (Web Services Description Language samples) \WSDL (Web Services Description Language files) \XMLSchema (XML schemas that define elements specific to applications)
Table A–1 IdentityServer_install_dir\identity\oblix Subdirectories
6.5 to 10g (10.1.4.0.1) Earlier Subdirectory File type
\apps \apps Application subdirectories with related files
\config \config Configuration files
\data \data Runtime-related configuration files
\data.ldap \data.ldap LDAP-related configuration files
\include \include Include files for third-party integration
\lang Contains the following subdirectories:
--\shared directory of default global stylesheets
--\en-us (\langtag)language-specific files/directories: -- message files in a specific language --\help directory in a specific language --\style0 (default wrapper stylesheets)
\lib \lib Library files
\logs \logs Log files
\mail \mail Mail files
\obsymbols .pdb files used for debugging crashes on Windows systems
\oracle Files for the Oracle National Support Library
\orig \orig Copies of the parameter files with default settings Oracle Customer Care or Professional Services can use these files during troubleshooting to determine if customization of a file is causing a problem.
\reports Crystal reports samples and templates
\scoreboard Scoreboard files used by SNMP
\tools \tools Utility applications (migration_tools and other directories)
\unsupported \unsupported Useful tools, utilities, and code examples that have not been tested by Oracle Quality Assurance

Directories for Access System Components
Oracle Access Manager Directory Structure Changes A-5
Table A–2lists the subdirectories and files that are part of 10g (10.1.4.0.1) located in WebPass_install_dir\identity\oblix:
Directories for Access System ComponentsThe Access System consists of three components (Policy Manager, Access Server, WebGate). The Access System is optional.
Starting with release 6.5 and continuing through 10g (10.1.4.0.1), there are several new directories for the Access System components:
PolicyManager_install_dir\access\oblix AccessServer_install_dir\access\oblix WebGate_install_dir\access\oblix
The following subdirectories are included for all Access System components:
\lang (contains language specific subdirectories as well as \shared) \langtag (for example, en-us) \docs (Web server setup details and other docs)
Table A–2 WebPass_install_dir\identity\oblix Directories
6.5 to 10g (10.1.4.0.1) Subdirectory Earlier Subdirectory File type
\apps \apps Application subdirectories and files, including the Identity System Administration files
\config \config Configuration files.
\lang Contains the following:
--\en-us and other language-specific subdirectories that are not an exact duplicate of those on the Identity Server
--\java subdirectory
--the \shared directory of default global files that WebPass uses in response to requests
\lib \lib Library files
\logs \logs Log files
\obsymbols .pdb files used for debugging crashes on Windows systems
\oracle Files for the Oracle National Support Library
\orig \orig Copies of the parameter files with default settings Oracle Customer Care or Professional Services can use these files during troubleshooting to determine if customization of a file is causing a problem.
\tools \tools Utility applications (migration_tools and other directories)
\unsupported \unsupported Useful tools, utilities, and code examples that have not been tested by Oracle Quality Assurance
\Webservices XML schema files for specific applications and more
Release 6.5, 7.0 and 10g (10.1.4.0.1) Files
Previous Files Description
.apacheconfig .apacheconfig Directives for Apache Web servers
.nsconfig .nsconfig Directives for Sun (formerly Netscape/iPlanet) Web servers to hide files in the Oracle Access Manager system that should not be viewable from a browser
index.htm index.htm Startup Web page with .htm extension
index.html index.html Startup Web page with .html extension

Directories for Access System Components
A-6 Oracle Access Manager Upgrade Guide
\style2 \obsymbols
The following additional subdirectories are included on the Policy Manager only:
\lang (contains language specific subdirectories as well as \shared) \langtag (for example, en-us) \help \shared (.js files)
The following additional subdirectories are included on the Access Server and WebGate for use with certain third-party integrations:
\lang \langtag \securid-cgi (files for use when integrating RSA SecurID) \securid-forms (files for use when integrating RSA SecurID) \securid-forms-adforest (files for use when integrating RSA SecurID) \securitybridgeforms (files for use when integrating the security bridge)
Subdirectories for the Policy ManagerThe Policy Manager was formerly known as the Access Manager component. Not all directories are available on all Access System components. The following subdirectories and files are part of 10g (10.1.4.0.1) located in the PolicyManager_install_dir\access\oblix:
Table A–3 Policy Manager_install_dir\access\oblix Directories
6.5 to 10g (10.1.4.0.1) Subdirectory Earlier Subdirectory File type
\apps \apps Application subdirectories with related files
\config \config Configuration files
\data \data Runtime-related configuration files
\data.ldap \data.ldap LDAP-related configuration files
\lang Contains the following subdirectories:
--\en-us and other language-specific subdirectories that contain:
--\docs (Web server setup docs)
--\help
--\style2
--\shared (.js files)
\lib \lib Library files
\logs \logs Log files
\obsymbols .pdb files used for debugging crashes on Windows systems
\orig \orig A copy of all message and parameter files required for future migration to newer versions of Oracle Access Manager
\tools \tools Utility applications (migration_tools and other directories)

PresentationXML Directories
Oracle Access Manager Directory Structure Changes A-7
Subdirectories for the Access ServerNot all directories are available on all Access System components. The following subdirectories and files in 10g (10.1.4.0.1) are located in the AccessServer_install_dir\access\oblix as:
Subdirectories for WebGateIn addition to the directories described in"Subdirectories for the Access Server" on page A-6, the directories here are included and WebGate information is added to the WebGate_install_dir\access\oblix:
■ \_ivmWebGate
■ \_uninstWebGate
PresentationXML DirectoriesThe next discussions identify changes for Oracle Access Manager stylesheets and messages as follows:
■ PresentationXML Directories with Oracle Access Manager Release 6.5 and Later
Table A–4 Access Server_install_dir\access\oblix Directories
6.5-10g (10.1.4.0.1) Subdirectory Earlier Subdirectory File type
\apps \apps Application subdirectories with related files
\config \config Configuration files
\data \data Runtime-related configuration files
\data.ldap \data.ldap LDAP-related configuration files
\engine \engine Files used to create and audit messages
\lang Contains the following subdirectories (also on the WebGate host):
--\en-us and other language-specific subdirectories that contain language-specific message catalogs and:
--\docs (Web server setup docs)
--\help
--\securid subdirectories
--\securitybridge subdirectory
--\style2
\lib \lib Library files
\logs \logs Log files
\obsymbols .pdb files used for debugging crashes on Windows systems
\orig \orig Copies of the parameter files with default settings
Oracle Customer Care or Professional Services can use these files during troubleshooting to determine if customization of a file is causing a problem.
\reports Crystal Reports samples and templates(Not on WebGate)
\scoreboard Files used by Oracle Access Manager SNMP(Not on WebGate)
\sdk \sdk Software development kit files(Not on WebGate)
\tools \tools Utility applications (migration_tools and other directories)
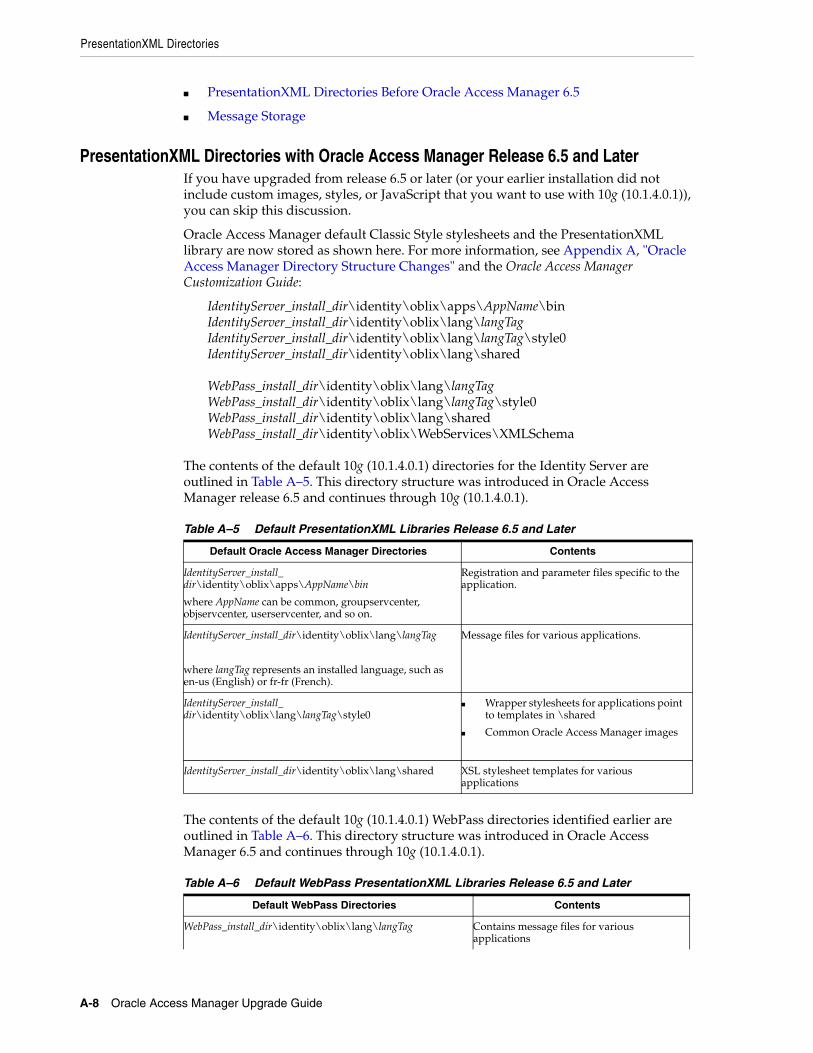
PresentationXML Directories
A-8 Oracle Access Manager Upgrade Guide
■ PresentationXML Directories Before Oracle Access Manager 6.5
■ Message Storage
PresentationXML Directories with Oracle Access Manager Release 6.5 and LaterIf you have upgraded from release 6.5 or later (or your earlier installation did not include custom images, styles, or JavaScript that you want to use with 10g (10.1.4.0.1)), you can skip this discussion.
Oracle Access Manager default Classic Style stylesheets and the PresentationXML library are now stored as shown here. For more information, see Appendix A, "Oracle Access Manager Directory Structure Changes" and the Oracle Access Manager Customization Guide:
IdentityServer_install_dir\identity\oblix\apps\AppName\binIdentityServer_install_dir\identity\oblix\lang\langTagIdentityServer_install_dir\identity\oblix\lang\langTag\style0IdentityServer_install_dir\identity\oblix\lang\shared
WebPass_install_dir\identity\oblix\lang\langTagWebPass_install_dir\identity\oblix\lang\langTag\style0WebPass_install_dir\identity\oblix\lang\sharedWebPass_install_dir\identity\oblix\WebServices\XMLSchema
The contents of the default 10g (10.1.4.0.1) directories for the Identity Server are outlined in Table A–5. This directory structure was introduced in Oracle Access Manager release 6.5 and continues through 10g (10.1.4.0.1).
The contents of the default 10g (10.1.4.0.1) WebPass directories identified earlier are outlined in Table A–6. This directory structure was introduced in Oracle Access Manager 6.5 and continues through 10g (10.1.4.0.1).
Table A–5 Default PresentationXML Libraries Release 6.5 and Later
Default Oracle Access Manager Directories Contents
IdentityServer_install_dir\identity\oblix\apps\AppName\bin
where AppName can be common, groupservcenter, objservcenter, userservcenter, and so on.
Registration and parameter files specific to the application.
IdentityServer_install_dir\identity\oblix\lang\langTag
where langTag represents an installed language, such as en-us (English) or fr-fr (French).
Message files for various applications.
IdentityServer_install_dir\identity\oblix\lang\langTag\style0
■ Wrapper stylesheets for applications point to templates in \shared
■ Common Oracle Access Manager images
IdentityServer_install_dir\identity\oblix\lang\shared XSL stylesheet templates for various applications
Table A–6 Default WebPass PresentationXML Libraries Release 6.5 and Later
Default WebPass Directories Contents
WebPass_install_dir\identity\oblix\lang\langTag Contains message files for various applications

PresentationXML Directories
Oracle Access Manager Directory Structure Changes A-9
For more information about directories and their content, see the Oracle Access Manager Customization Guide.
PresentationXML Directories Before Oracle Access Manager 6.5If you have upgraded from release 6.5 or later (or your earlier installation did not include custom images, styles, or JavaScript that you want to use with 10g (10.1.4.0.1)), you can skip this discussion.
The PresentationXML library was provided under two directories and distributed depending upon how the files were likely to be used. For example, stylesheets that define the default Oracle Access Manager Classic Style are maintained in flat files in the file system directory:
\IdentityServer_install_dir\identity\oblix\apps\AppName
For example:
\IdentityServer_install_dir\identity\oblix\apps\userservcenter\ui\style0\style_name.xls
The pre-6.5 Identity Server directory structure IdentityServer_install_dir\identity\oblix\apps\AppName (common, groupservcenter, and so on) is summarized in Table A–7.
The pre-6.5 WebPass directory structure is summarized in Table A–8. For example, WebPass_install_dir\identity\oblix\apps\AppName (common, groupservcenter, and so on):
WebPass_install_dir\identity\oblix\lang\langTag\style0 ■ Image files used in presenting the page
■ Copies of style0 stylesheets for client-side processing only
WebPass_install_dir\identity\oblix\lang\shared ■ JavaScript files
■ Copies of stylesheets for reference only
WebPass_install_dir\identity\oblix\WebServices\XMLSchema
Contains XML schema files for specific applications
Table A–7 Pre-6.5 Identity Server PresentationXML Libraries
\bin \ui \xmlschema
Dynamically-loadable code for the application, and the registration file, message file(s) and parameter files specific to the application
Stylesheets for the application
(in one or more style directories)
XML schema files specific to the application
Table A–8 Pre-6.5 WebPass PresentationXML Libraries
\bin \ui
JavaScript files Stylesheets and GIFs specific to the application
(in one or more style directories).
Table A–6 (Cont.) Default WebPass PresentationXML Libraries Release 6.5 and Later
Default WebPass Directories Contents

PresentationXML Directories
A-10 Oracle Access Manager Upgrade Guide
For more information, see the Oracle Access Manager Customization Guide for your earlier release.
Message Storage Prior to release 6.5, Oracle Access Manager messages were controlled by an XML file for a specific application. For example:
IdentityServer_install_dir/identity/oblix/apps/appname/bin/appnamemsg.xml
where IdentityServer_install_dir is the directory where the Identity Server is installed and appname matches a specific application, as follows:
groupservcenter--Group Manager
objservcenter--Organization Manager
userservcenter--User Manager
Each appnamemsg.xml file contained multiple paired sets of data, in the form:
<Message MsgTag="the tag name">The tag text</Message>
In 10g (10.1.4.0.1), these message files now reside in specific language directories. For example: IdentityServer_install_dir/identity/oblix/lang/langTag/oblixbasemsg.xml.
For more information, see the Oracle Access Manager Customization Guide.
Migrating from a Solaris Platform to a Linux Platform While Upgrading B-1
BMigrating from a Solaris Platform to a Linux
Platform While Upgrading
This appendix describes how you can upgrade an earlier Oracle Access Manager component installation that resides on a Solaris platform to Oracle Access Manager 10g (10.1.4.0.1) while migrating the component to a Linux platform. The topics in this chapter include:
■ About Migrating from a Solaris Platform to a Linux Platform
■ Considerations for Upgrades with a Solaris to Linux Switch
■ Prerequisites and Preparation
■ Upgrading Identity System Components while Switching to Linux
■ Upgrading Access System Components while Switching to Linux
■ Recovering From an Identity Component Upgrade Failure
■ Recovering From an Access System Upgrade Failure
About Migrating from a Solaris Platform to a Linux PlatformOracle has developed a methodology and a set of procedures that you can use when you want to switch from a Solaris platform to a Linux platform as you upgrade an earlier Oracle Access Manager component. For example, you can upgrade Oracle Access Manager release 6.1.1 components running on Solaris to release 10g (10.1.4.0.1) running on Linux. This methodology allows the upgraded component on the Linux platform to access the same LDAP directory server as the original component on the Solaris platform.
Your deployment most likely includes Oracle Access Manager components on other platforms in addition to Solaris (a heterogeneous deployment). For example, you might be running Oracle Access Manager Identity and Access Servers on Solaris with Oracle Access Manager Web components running on other platforms. The steps in this appendix apply only to the Solaris components that you will migrate to a Linux platform during the upgrade.
The discussion "About the Execution Stage for In-Place Upgrades" on page 1-11 provides a high-level view of the upgrade tasks that you must perform, and the order in which these tasks must be completed for an in-place upgrade. The platform switch from Solaris to Linux while upgrading is similar to other in-place upgrades. You perform planning activities, schema and data preparation and upgrades, and component and customization preparation and upgrades. You upgrade and perform the switch as described in this appendix. Troubleshooting tips and techniques are the same for this type of upgrade as for other in-place upgrades. An upgrade with
About Migrating from a Solaris Platform to a Linux Platform
B-2 Oracle Access Manager Upgrade Guide
platform switch only involves making the Solaris source installation directory available on the Linux platform, running the obmigratenp tool two times for each component as described here, then performing a few reconfigurations due to platform switch. After the upgrade, component validation is the same for this type of upgrade as for other in-place upgrades.
Task overview: Upgrading a component while switching from Solaris to Linux1. Perform planning activities as usual:
a. Perform planning activities as described in Chapter 1.
b. Review concepts as described in Chapter 2.
c. Get familiar with the path and processing that occurs as described in Chapter 3.
d. Review the summary of behaviors and backward compatibility as described in Chapter 4.
2. Perform the schema and data upgrade as follows:
a. Prepare for the schema and data upgrade as described in Chapter 5 with the following exception: Do not install master 10g (10.1.4.0.1) Identity Server, WebPass, and Policy Manager components, which are not needed because the 10g (10.1.4.0.1) components you install on the Linux host will server the same purpose.
b. Upgrade the Identity System schema as described in Chapter 6.
c. Joint Identity and Access System: Upgrade the Access System schema and data as described in Chapter 7.
d. Prepare all remaining earlier Oracle Access Manager components as described in Chapter 8.
3. Prepare the intended Linux hosts as described in "Prerequisites and Preparation" on page B-5, which includes:
a. Preparing Your Linux Host
b. Installing Oracle Access Manager 10g (10.1.4.0.1) Components on the Linux Host
c. Making Earlier Installation Directories on Solaris Available to the Linux Host
d. Finishing Host Preparation
4. Upgrade Identity System components as described in "Upgrading Identity System Components while Switching to Linux" on page B-14, which includes:
a. Upgrading Identity Servers while Switching to Linux
b. Upgrading WebPass Instances while Switching to Linux
c. Finishing the Identity System Upgrade After Switching to Linux
Note: You cannot use the zero downtime upgrade method when performing a switch from a Solaris platform to a Linux platform. Instead, upgrade while making the switch as described in this appendix and then apply the Release 10.1.4 Patchset 1 (10.1.4.2.0) to installed components. For more information, see the Oracle Access Manager Patch Set Notes Release 10.1.4 Patchset 1 (10.1.4.2.0) For All Supported Operating Systems.
About Migrating from a Solaris Platform to a Linux Platform
Migrating from a Solaris Platform to a Linux Platform While Upgrading B-3
d. Validating and Backing up the Upgraded Identity System
5. Upgrade Access System components as described in "Upgrading Access System Components while Switching to Linux" on page B-14, which includes:
a. Upgrading Policy Manager Instances while Switching to Linux
b. Upgrading Access Servers while Switching to Linux
c. Upgrading WebGates while Switching to Linux
d. Finishing the Access System Upgrade with a Solaris to Linux Switch
e. Validating the Upgraded Access System
f. Backing Up Upgraded Access System Component Directories
6. Perform remaining upgrade activities as described in:
a. Chapter 11, "Upgrading Integration Components and an Independently Installed SDK"
b. Chapter 12, "Upgrading Your Identity System Customizations"
c. Chapter 13, "Upgrading Your Access System Customizations"
7. Verify that the upgrade was successful using procedures for all upgrades in Chapter 14.
8. Refer to troubleshooting tips in Appendix G as needed.
When upgrading with a switch from Solaris to Linux, you perform tasks in the same order as you would for other in-place upgrades. However, during an upgrade with a switch from Solaris to Linux, you use the obmigratenp tool that is available with the Oracle Access Manager 10g (10.1.4.0.1) component that you install on the Linux host.
When you run obmigratenp without any parameters, the command prints the meaning of all input parameters. For specific information about obmigratenp and other utilities, see Appendix C. The obmigratenp tool is located in the following directory:
Component_install_dir\identity|access\oblix\tools\migration_tools\obmigratenp
When upgrading with a switch from Solaris to Linux, you specify Confirmed mode when asked so that you can skip certain steps. For instance, upgrades with a switch from Solaris to Linux you must skip Web server configuration updates for Oracle Access Manager Web component and schema and data upgrades. For more information about Confirmed mode, see "Confirmed Mode" on page 2-9.
To upgrade with a switch to Linux from Solaris, you invoke the obmigratenp tool twice for each component, as follows:
■ The first invocation creates the orig folders and performs message catalog migration using a command.
obmigratenp -c <component> -f <from_version> -t <to_version> -s <old_version_Solaris_directory> -d <new_version_Linux_directory> -i <new_version_LINUX_directory> -u <user_name> -g <group_name> -l <comma_separated_list_of_languages_installed>
The user_name and group_name values should be the same as those specified while installing the component on the Linux platform. The -d parameter indicates the destination directory (the new version directory) and -i specifies the directory from which the obmigratenp tool is being invoked. Typically -d and -i have the same value. For example, the first invocation for an Identity Server upgrade might look like the following sample:

Considerations for Upgrades with a Solaris to Linux Switch
B-4 Oracle Access Manager Upgrade Guide
obmigratenp -c ois -f 611 -t 1014 -s /usr/temp/611/identity -d /usr/temp/1014/identity -i /usr/temp/1014/identity -u <gtiberi> -g <admin> -l en-us
■ The second invocation upgrades everything other than the orig folder and message catalog migration. This will involve parameter catalogs, schema, data, component-specific details, registry details (if applicable), and Web server configuration. The second invocation takes the form:
obmigratenp -c <component> -f <from_version> -t <to_version> -s <old_version_Solaris_directory> -d <new_version_Linux_directory> -i <new_version_Linux_directory> -u <user_name> -g <group_name>
An example of the second invocation for an Identity Server component might look like the following:
obmigratenp -c OIS -f 611 -t 1014 -s /usr/temp/611/identity -d /usr/temp/1014/identity -i /usr/temp/1014/identity -u <gtiberi> -g <admin>
Considerations for Upgrades with a Solaris to Linux SwitchDiscussions in this section describe considerations you should take into account before performing an upgrade while switching from a Solaris platform to a Linux platform:
■ Considerations for Identity Server and Policy Manager Components
■ Considerations for Oracle Access Manager Web Components
Considerations for Identity Server and Policy Manager ComponentsThis topic provides considerations for Identity Server and Policy Manager components when preparing for and switching from Solaris to Linux.
The LDAP server contains the earlier release of the Oracle Access Manager schema, which must be upgraded. If you intend to switch to a Linux platform from Solaris during an Identity Server upgrade, do not upload the schema using the component installer. Instead, select No when asked "Is this the first Identity Server installation in the network for this LDAP directory server?"
For Policy Manager, answer No when asked if you want to update the schema automatically when installing on the Linux host.
To summarize these considerations:
■ When installing a 10g (10.1.4.0.1) Identity Server on Linux, select No when asked if this is "... the first Identity Server installation in the network for this LDAP directory server?".
■ When upgrading an Identity Server with a platform switch, accept the schema and data changes.
■ When installing a 10g (10.1.4.0.1) Policy Manager on Linux, select No when asked if you want to automatically update the schema now.
■ When upgrading a Policy Manager with a platform switch, accept the schema and data changes
Prerequisites and Preparation
Migrating from a Solaris Platform to a Linux Platform While Upgrading B-5
Considerations for Oracle Access Manager Web ComponentsFor Oracle Access Manager Web components, the earlier Web server instance for Solaris will not be used. You must install a new Web server instance on the Linux platform before starting the upgrade. This new Web Server for Linux will replace the Web server for Solaris that currently operates with the earlier component.
When installing Oracle Access Manager Web components on a Linux computer, you must update the Web server configuration. However during the Web component upgrade, use Confirmed mode and skip the Web server configuration update when you are asked.
To summarize the considerations for Web components:
■ When installing 10g (10.1.4.0.1) Oracle Access Manager Web components on a Linux host, select the automatic Web server configuration update option.
■ During the upgrade, use Confirmed mode and skip the Web server configuration update.
■ Do not perform a manual Web server configuration update.
Prerequisites and PreparationThis section describes the activities that you must perform before you start upgrading with a switch from Solaris to Linux.
Task overview: Preparing your environment for the upgrade with a switch to Linux1. Preparing Your Linux Host
2. Installing Oracle Access Manager 10g (10.1.4.0.1) Components on the Linux Host
3. Making Earlier Installation Directories on Solaris Available to the Linux Host
4. Finishing Host Preparation
Preparing Your Linux Host Before you start the upgrade, be sure to validate that your Linux platform is supported for Oracle Access Manager 10g (10.1.4.0.1) and that the system is operating properly.
You must download additional GCC runtime libraries (libgcc_s.so.1 and libstdc++.so.5) that are compatible with GCC 3.3.2 and specify the location of these on the local host while installing Oracle Access Manager components.
Finally, a Web server instance is required for use with Oracle Access Manager 10g (10.1.4.0.1) Web components only. After the upgrade and switch to Linux from Solaris, the Linux Web server instance will replace the Web server instance currently in use on the Solaris platform. Ensure that you have write permissions to the new Web server configuration files on Linux.
To prepare and validate your Linux system1. Confirm that your Linux system and Web server instance are supported for Oracle
Access Manager 10g (10.1.4.0.1) on the Oracle Access Manager platform support matrix, as follows:
a. Navigate to MetaLink at https://metalink.oracle.com.
b. Log in to MetaLink as directed
c. Click the Certify tab.
Prerequisites and Preparation
B-6 Oracle Access Manager Upgrade Guide
d. Click View Certifications by Product
e. Select the Application Server option and click Submit.
f. Choose Oracle Identity Manager and click Submit.
g. Click Oracle Identity Management Certification Information 10g (10.1.4.0.1) (html) to display the Oracle Identity Management page.
h. Click the link for Section 6, "Oracle Access Manager Certification" to display the certification matrix.
2. Install additional libraries (libgcc_s.so.1 and libstdc++.so.5) on each Linux host, as follows:
a. Obtain the zip file from the site shown here:
http://download.oracle.com/otn/linux/ias/1012/as_linux_x86_gcc_runtime_lib_704.cpio
b. Extract the following files to the local Linux computer on which you will install one or more Oracle Access Manager components:
libgcc_s.so.1
libstdc++.so.5
c. During Oracle Access Manager installation, specify the location of the libraries on the local computer and continue the installation.
3. Install a Web server instance on each Linux system that will host Oracle Access Manager Web components:
a. Using your Web server vendor documentation as a guide, add a supported Web server instance to your Linux system for use with Oracle Access Manager.
b. Verify that you have write permissions to Web server configuration files on your Linux system.
4. Proceed to "Installing Oracle Access Manager 10g (10.1.4.0.1) Components on the Linux Host".
Installing Oracle Access Manager 10g (10.1.4.0.1) Components on the Linux HostBefore you begin upgrading, you must install Oracle Access Manager 10g (10.1.4.0.1) on the Linux host computer as outlined in the following task overview. When your earlier installation includes languages other than English, this additional instance should be installed with the same Language Packs as the original. This 10g (10.1.4.0.1) installation on Linux provides a foundation for the earlier installation that you will upgrade on Solaris.
The WebGate can be installed to use the same Web server instance as WebPass and Policy Manager to protect these components. If you install the WebGate to protect a Policy Manager and WebPass, the WebGate must be installed in the same directory as
Note: When installing Oracle Access Manager Web components with Oracle HTTP Server (OHS) Web server (or Apache) you are prompted to install as the same user under which the Web server is running. This information is located in the httpd.conf file in the User and Group directive entries. For more information, see the Oracle Access Manager Installation Guide.

Prerequisites and Preparation
Migrating from a Solaris Platform to a Linux Platform While Upgrading B-7
the Policy Manager. For example, if the Policy Manager is installed in \COREid\access\WebComponent, then the WebGate must also be installed there. Other than this, the new installation does not need to mirror the earlier one on Solaris with respect to path names and directory levels.
Setup and Validation Caveats: After installation, you can start the 10g (10.1.4.0.1) Identity Server service on the Linux host to ensure that it is operational. After WebPass installation you can establish communication between the Identity Server and WebPass as described in the Oracle Access Manager Installation Guide. However, do not set up the 10g (10.1.4.0.1) Identity System that you installed on the Linux host. This setup will be migrated from the Solaris host during upgrade. As a result, you will not be able to start the 10g (10.1.4.0.1) Identity System to verify that your Identity Server and WebPass are working together until after the upgrade and switch from Solaris.
There is a similar caveat after installing the 10g (10.1.4.0.1) Policy Manager on a Linux host. The upgraded Policy Manager setup will be migrated from the Solaris host. Do not set up the 10g (10.1.4.0.1) Policy Manager after installation. For complete installation prerequisites and other details, see the Oracle Access Manager Installation Guide.
Task overview: Installing Oracle Access Manager on the Linux host1. Perform all prerequisites mentioned in this chapter.
2. Identity Server: Install the Oracle Access Manager 10g (10.1.4.0.1) Identity Server on the Linux host, as follows:
a. Specify a new installation directory. For example: /user/temp/1014/identity
b. Answer No when asked if this is the first Identity Server installation for this LDAP directory server.
c. After installation, ensure that the Identity Server service is running.
3. WebPass: Install the Oracle Access Manager 10g (10.1.4.0.1) WebPass in a new directory. For example: usr/temp/1014/webpass/identity.
4. Policy Manager: After installing a new Web server instance on this computer, install the Oracle Access Manager 10g (10.1.4.0.1) Policy Manager in a new directory (usr/temp/1014/policymanager/access, for example), and specify the path to the same Web server instance that is used by the new WebPass.
Note: Oracle recommends that you automatically update your Web server configuration file for Oracle Access Manager using the automatic option to avoid errors.
Note: The path names used here are for illustration only. Your path names will differ.
Note: Do not set up the Identity System.
Note: Do not set up the Policy Manager.

Prerequisites and Preparation
B-8 Oracle Access Manager Upgrade Guide
5. Access Server: Install the Oracle Access Manager 10g (10.1.4.0.1) Access Server in a new directory. For example: /user/temp/1014/access
6. WebGate: Install the Oracle Access Manager 10g (10.1.4.0.1) WebGate in a new directory (usr/temp/1014/webgate/access, for example) and specify the path to the same Web server instance used by the new WebPass.
7. Repeat as needed to provide an upgrade foundation for each earlier Oracle Access Manager component instance.
8. Validate that the 10g (10.1.4.0.1) Identity and Access System are operating properly, as described in the Oracle Access Manager Installation Guide.
You are ready to perform activities in "Making Earlier Installation Directories on Solaris Available to the Linux Host".
Making Earlier Installation Directories on Solaris Available to the Linux HostYou must ensure that the directories for earlier components on Solaris are available to the Linux host for the upgrade process. There are two options to achieve this:
■ On the Solaris computer:
– Tar the earlier component installation directory, then
– FTP the earlier directory to the Linux computer where the latest version of the same component will be installed.
■ Cross mount the install folder from the Solaris computer on the Linux computer.
You are ready to finish preparation.
Finishing Host PreparationTable B–1 provides a list of prerequisite activities that should be performed on earlier components before you begin upgrading with a switch to Linux. After performing activities outlined in Table B–1, you can finish prerequisite activities in this chapter to prepare the Linux host that will be involved in the switch from Solaris.
Table B–1 Prerequisites for Upgrading Oracle Access Manager Components with a Switch from Solaris to Linux
Perform the following Activities as Described in Chapter 8
Checking Compatibility with Previous Releases on page 8-1
Copying Custom Identity Event Plug-ins on page 8-2
Preparing Earlier Customizations on page 8-2
Preparing the Default Logout in the Policy Manager on page 8-3
Preparing Host Computers on page 8-3
Preparing Release 6.x Environments on page 8-4
Preparing Multi-Language Installations on page 8-7
Backing Up File System Directories, Web Server Configurations, and Registry Details on page 8-7
Note: Perform this activity on both the earlier release running on Solaris and the latest release running on Linux.
Stopping Servers and Services on page 8-9
Logging in with Appropriate Administrative Rights on page 8-10
Upgrading Identity System Components while Switching to Linux
Migrating from a Solaris Platform to a Linux Platform While Upgrading B-9
Upgrading Identity System Components while Switching to LinuxWhen all prerequisites are completed, you are ready to proceed with the upgrade task and platform switch.
Topics that follow should be performed in order:
■ Upgrading Identity Servers while Switching to Linux
■ Upgrading WebPass Instances while Switching to Linux
■ Finishing the Identity System Upgrade After Switching to Linux
■ Validating and Backing up the Upgraded Identity System
For details about the obmigratenp tool, see Appendix C.
Upgrading Identity Servers while Switching to LinuxYou perform the following steps to upgrade each earlier Identity Server on Solaris while switching to the Linux platform.
To upgrade the Identity Server while switching to Linux from Solaris1. Locate the obmigratenp tool on the Linux host where you installed the Oracle
Access Manager 10g (10.1.4.0.1) component.
usr/temp/1014//identity/oblix/tools/migration_tools/obmigratenp
2. Using appropriate path names for your Identity Servers, run the obmigratenp tool using a command that takes the following form:
obmigratenp -c ois -f 611 -t 1014 -s /usr/temp/611/identity -d /usr/temp/1014/identity -i /usr/temp/1014/identity -u <user_name> -g <group_name> -l en-us
The user_name and group_name values should be the same as those specified while installing the component on the Linux platform. For example:
3. Using appropriate path names for your Identity Servers, run the obmigratenp tool a second time as follows:
obmigratenp -c OIS -f 611 -t 1014 -s /usr/temp/611/identity -d /usr/temp/1014/identity -i /usr/temp/1014/identity -u <user_name> -g <group_name>
4. Auditing and Access Reporting: If your earlier installation included auditing and access reporting, go immediately to "Upgrading Auditing and Access Reporting for the Identity System" on page 12-2 before performing step 5.
Note: The commands in this section use the sample installation path names from "Installing Oracle Access Manager 10g (10.1.4.0.1) Components on the Linux Host" on page B-6. Your path names will differ.
Note: The exact commands must reflect your specific Identity Server deployments. Ensure that you have access to the earlier directory, as described in "Making Earlier Installation Directories on Solaris Available to the Linux Host" on page B-8.
Upgrading Identity System Components while Switching to Linux
B-10 Oracle Access Manager Upgrade Guide
5. On the Linux host, verify that the Identity Server upgrade was successful.
a. Start the Identity Server service to confirm that it will start (notice that the name has not changed from the one originally assigned).
b. Identity Server Service Does Not Start: Confirm that you have performed all tasks and specified all information accurately. Check Identity Server migration log files for any errors reported during the upgrade and look for troubleshooting tips in Appendix G.
c. Upgrade Not Successful: See "Recovering From an Identity Component Upgrade Failure" on page B-21.
d. Upgrade Successful: Backup the instance as described in "Backing Up Upgraded Identity Component Information" on page B-14, then repeat these steps to upgrade every earlier Identity Server instance in your environment, before upgrading WebPass nastiness.
Upgrading WebPass Instances while Switching to LinuxYou perform the following steps to upgrade each earlier WebPass on Solaris while switching to the Linux platform.
To upgrade WebPass while switching to Linux from Solaris1. Locate the obmigratenp tool on the Linux host where you installed the Oracle
Access Manager 10g (10.1.4.0.1) component.
usr/temp/1014/webpass/identity/oblix/tools/migration_tools/obmigratenp
2. Using appropriate path names for your WebPass instances, run the obmigratenp tool using a command that takes the following form:
obmigratenp -c wp -f 611 -t 1014 -s /usr/temp/611/webpass/identity -d /usr/temp/1014/webpass/identity -i /usr/temp/1014/webpass/identity -u <user_name> -g <group_name> -l en-us
The form is based on your specific WebPass example. However it uses a different directory structure.
3. Using appropriate path names for your WebPass instances, run the obmigratenp tool a second time as follows:
obmigratenp -c OIS -f 611 -t 1014 -s /usr/temp/611/webpass/identity -d /usr/temp/1014/webpass/identity -i /usr/temp/1014/webpass/identity -u <user_name> -g <group_name>
4. Verify that the WebPass upgrade was successful on the Linux host.
a. Stop, then restart the associated Identity Server service on the Linux host.
b. Start the WebPass Web server instance on the Linux host.
c. Web Server Does Not Start: Check the log files for any errors reported during the upgrade and look for troubleshooting tips in Appendix G.
Note: The exact commands must reflect your specific WebPass deployments. Ensure that you have access to the earlier component as described in "Making Earlier Installation Directories on Solaris Available to the Linux Host" on page B-8.

Upgrading Identity System Components while Switching to Linux
Migrating from a Solaris Platform to a Linux Platform While Upgrading B-11
d. Upgrade Not Successful: See "Recovering From an Identity Component Upgrade Failure" on page B-21.
e. Upgrade Successful: Back up this instance as described in "Backing Up Upgraded Identity Component Information" on page B-14,then upgrade every WebPass instance in your environment.
f. After upgrading all WebPass instances, proceed to "Finishing the Identity System Upgrade After Switching to Linux".
Finishing the Identity System Upgrade After Switching to Linux Using the procedures described in this chapter, your earlier Oracle Access Manager customizations are preserved. This implies that certain deployment-specific settings were carried over from the Solaris deployment to the Linux deployment. For example, the Identity Server host name and port. Following the upgrade, you must establish new deployment connections to ensure that the upgraded Oracle Access Manager Web components (WebPass) communicate with the Oracle Access Manager servers on Linux, not the earlier Web servers on Solaris.
Depending on the components you have upgraded, you must perform the following activities to finish your Identity System upgrade with a switch to Linux:
■ Re-configuring the Identity Server for Its Linux Host
■ Reconfiguring WebPass To Communicate with the Identity Server on Linux
Re-configuring the Identity Server for Its Linux HostAfter upgrading the Identity Server with a switch to Linux, you must copy the ois_server_config.xml.bak from the original source directory on Solaris to the target directory on the Linux host. Also, you must modify the DNS hostname of the Identity Server and the port to match the Linux server DNS hostname and port. These changes are to be made in the configuration file. The following sample configuration file segment shows the parameters and values that you must change:
<? xml version="1.0" encoding="utf-8"?> <ValNameList xmlns="http://www.oblix.com" ListName="ois_server_config.xml"> <NameValPair ParamName="OISServerID" Value="XXXX"></NameValPair> <NameValPair ParamName="port" Value="YYYY"></NameValPair> <NameValPair ParamName="security" Value="cert"></NameValPair> <NameValPair ParamName="hostname" Value="<machine_name>"></NameValPair> </ValNameList> In the sample segment, you change the value of ParamName="OISServerID" to that of the Identity Server on the Linux host; the value of ParamName="port" is the port number on which the Identity Server listens; the value of ParamName="security" is either cert, simple or open; the value of ParamName="hostname" is the DNS host name of the Linux host.
To reconfigure an upgraded Identity Server for its Linux host1. Locate the ois_server_config.xml.bak file in the following directory on the Solaris
host:
oam1014/identity/oblix/config/ois_server_config.xml.bak
In the path, oam1014 refers to the Identity Server installation directory on the Solaris host (also known as IdentityServer_install_dir.
2. Copy the file as follows:

Upgrading Identity System Components while Switching to Linux
B-12 Oracle Access Manager Upgrade Guide
From the source directory on Solaris: IdentityServer_install_dir/identity/oblix/config/ois_server_config.xml.bak
To the target directory on Linux: IdentityServer_install_dir/identity/oblix/config/ois_server_config.xml.bak
3. Rename the file on the Linux host to:
From: ois_server_config.xml.bak
To: ois_server_config.xml
4. On the Linux host: Open ois_server_config.xml and modify the values of parameters to reflect the Identity Server name, listening port, security, and Linux host in the configuration file:
<? xml version="1.0" encoding="utf-8"?> <ValNameList xmlns="http://www.oblix.com" ListName="ois_server_config.xml"> <NameValPair ParamName="OISServerID" Value="XXXX"></NameValPair> <NameValPair ParamName="port" Value="YYYY"></NameValPair> <NameValPair ParamName="security" Value="cert"></NameValPair> <NameValPair ParamName="hostname" Value="<machine_name>"></NameValPair> </ValNameList>
5. Start the Identity Server service on the Linux host.
6. Validate that the Identity Server service on Linux is communicating with the WebPass on Linux as follows:
a. Restart the Web server on Linux and access the URL to your Identity System Console. For example, http://hostname:port/identity/oblix
b. Login and verify that the Identity Server on Linux is communicating with the WebPass on Linux.
7. After finishing the steps here on each Linux host involved in the switch, proceed to "Reconfiguring WebPass To Communicate with the Identity Server on Linux".
Reconfiguring WebPass To Communicate with the Identity Server on LinuxThis topic includes the procedure that you use to reconfigure the upgraded WebPass instances to communicate with the upgraded Identity Servers after switching to Linux. As described here, you change the refresh parameter in the webpass.xml file to false. You then restart WebPass and enter the Identity System Console where you update the host name and port of Identity Servers as needed that were upgraded and switched to Linux. You finish by restoring the refresh parameter in the webpass.xml file to true and restarting the Web server.
To reconfigure WebPass to communicate with an upgraded Identity Server on Linux1. Locate the webpass.xml file in the WebPass Web component installation directory
on the Linux host. For example:
oam1014\webcomp\nsapi\identity\oblix\apps\webpass\bin\webpass.xml
In the path name, oam1014\webcomp\nsapi refers to the directory where the Oracle Access Manager WebPass for a Sun (formerly Netscape/iPlanet) Web server resides. This portion of the path name is also known as WebPass_install_dir.
2. Open the webpass.xml file in an editor and change the value of the refresh parameter to False, then save the file:

Upgrading Identity System Components while Switching to Linux
Migrating from a Solaris Platform to a Linux Platform While Upgrading B-13
<SimpleList> <NameValPair ParamName="refresh" Value="false" /></SimpleList>
3. Restart the WebPass Web server.
4. Go to the Identity System Console by specifying the appropriate URL for your deployment in your browser. For example:
http://hostname:port/identity/oblix
In the sample URL, hostname refers to computer that hosts the WebPass Web server; port refers to the HTTP port number of the WebPass Web server instance; /identity/oblix connects to the Identity System Console. The main product page should appear with links to Identity System applications.
5. Proceed as follows:
■ Landing Page Appears—Proceed with step 6.
■ Landing Page Does Not Appear—See troubleshooting tips in Appendix G and "Recovering From an Identity Component Upgrade Failure" on page B-21.
6. Select Identity System Console, then login as a user with administrator privileges:
■ Login Successful—Proceed with step 7.
■ Login Not Successful—Ensure that you have logged in as a user with the proper credentials (Master Administrator or Master Identity Administrator).
7. Update Identity Server details as follows:
a. In the Identity System Console, click System Configuration, then select Identity Servers.
b. Click the name of an Identity Server to modify its parameters.
c. Click the Modify button at the bottom of the page.
d. Edit the following parameters on the Modify Identity Server page as needed:
Hostname: Enter the name of the computer on which the Identity Server is running.
Port: Enter the port number on which the Identity Server is listening.
e. Click the Save button at the bottom of the Modify Identity Server page.
8. Restart the Identity Server.
9. Repeat as needed for each Identity Server whose host has changed.
10. Open the webpass.xml file in an editor and change the value of the refresh parameter to False, then save the file:
<SimpleList> <NameValPair ParamName="refresh" Value="true" /></SimpleList>
11. Restart the WebPass Web server.
12. Proceed to "Validating and Backing up the Upgraded Identity System".
Validating and Backing up the Upgraded Identity SystemOracle recommends that you first validate your Identity System upgrade and then back up the upgraded component details. For details, see the following topics:

Upgrading Access System Components while Switching to Linux
B-14 Oracle Access Manager Upgrade Guide
■ Validating your Identity System Upgrade
■ Backing Up Upgraded Identity Component Information
Validating your Identity System UpgradeIt is a good idea to quickly validate the following items to ensure that the overall Identity System upgrade was successful. You can perform a more extensive tests to validate your Identity System upgrade as described in Chapter 14.
To confirm your Identity System upgrade1. Delete all Web browser caches once the upgrade is complete.
2. Make sure your Identity Server service and WebPass Web server instance are running.
3. Check that your message and parameter catalog customizations have been preserved. For example, if you have changed any message in a particular message catalog file, then it needs to be retained.
4. Proceed to "Backing Up Upgraded Identity Component Information".
Backing Up Upgraded Identity Component InformationAs mentioned earlier, Oracle recommends that you finish each component upgrade by backing up the upgraded component directory. This will enable you to easily restore your environment to the newly upgraded state should that be needed.
To back up critical information after the upgrade 1. Back up the latest Identity Server and WebPass component directories on Linux
and store these in a new location.
2. WebPass Web Server: Back up the upgraded Web server configuration file, if required, using instructions from your vendor.
3. Proceed as follows:
■ Identity System Only: Upgrade the software developer kit (SDK) as described in Chapter 11 and then upgrade your Identity System customizations as described in Chapter 12.
■ Joint Identity and Access System: Perform activities in "Upgrading Access System Components while Switching to Linux" before upgrading the software developer kit (SDK).
Upgrading Access System Components while Switching to LinuxIf you do not have a joint Identity and Access System deployment, you can skip this section and proceed instead to Chapter 11 to upgrade the software developer kit (SDK).
After upgrading the Identity System components, you are ready to proceed with the Access System upgrade and platform switch. Activities that follow should be performed in order:
Note: These are the same procedures that appear in Chapter 9 and are intended to be used after upgrading all Identity System components.
Upgrading Access System Components while Switching to Linux
Migrating from a Solaris Platform to a Linux Platform While Upgrading B-15
■ Upgrading Policy Manager Instances while Switching to Linux
■ Upgrading Access Servers while Switching to Linux
■ Upgrading WebGates while Switching to Linux
■ Finishing the Access System Upgrade with a Solaris to Linux Switch
■ Validating and Backing up the Upgraded Access System
For details about the obmigratenp tool, see Appendix C.
Upgrading Policy Manager Instances while Switching to LinuxYou perform the following steps to upgrade each earlier Policy Manager (formerly known as the Access Manager component) on Solaris while switching to the Linux platform.
To upgrade the Policy Manager while switching to Linux from Solaris1. Locate the obmigratenp tool on the Linux host where you installed the Oracle
Access Manager 10g (10.1.4.0.1) component.
usr/temp/1014/policymanager/access/oblix/tools/migration_tools /obmigratenp
2. Using appropriate path names for your Policy Managers, run the obmigratenp tool using a command that takes the following form:
obmigratenp -c am -f 611 -t 1014 -s /usr/temp/611/am/access -d /usr/temp/1014/policyManager/access -i /usr/temp/1014/policyManager/access -u <user_name> -g <group_name> -l en-us
3. Using appropriate path names for your Policy Managers, run the obmigratenp tool a second time as follows:
obmigratenp -c am -f 611 -t 1014 -s /usr/temp/611/am/access -d /usr/temp/1014/policyManager/access -i /usr/temp/1014/policyManager /access -u <user_name> -g <group_name>
4. Verify that the upgrade was successful, as follows:
a. Policy Manager Web Server Does Not Start: Check the Policy Manager migration log files for any errors reported during the upgrade and see troubleshooting tips in Appendix G.
Note: The commands in this section use the sample installation path names from "Installing Oracle Access Manager 10g (10.1.4.0.1) Components on the Linux Host" on page B-6. Your path names will differ.
Note: The exact commands must reflect your specific Policy Manager deployments. Ensure that you have access to the earlier component directory, as described in "Making Earlier Installation Directories on Solaris Available to the Linux Host" on page B-8.

Upgrading Access System Components while Switching to Linux
B-16 Oracle Access Manager Upgrade Guide
b. Upgrade Successful: Perform activities in "Backing Up Upgraded Access System Component Directories" on page B-21 for this instance, then continue upgrading remaining Policy Managers.
c. Upgrade Not Successful: See Proceed to "Recovering From an Access System Upgrade Failure" on page B-22.
d. When all Policy Managers are upgraded, proceed with "Upgrading Access Servers while Switching to Linux".
Upgrading Access Servers while Switching to LinuxYou perform the following steps to upgrade each earlier Access Server on Solaris while switching to the Linux platform.
To upgrade the Access Server while switching to Linux from Solaris1. Locate the obmigratenp tool on the Linux host where you installed the Oracle
Access Manager 10g (10.1.4.0.1) component.
usr/temp/1014/access/oblix/tools/migration_tools/obmigratenp
2. Using appropriate path names for your Access Servers, run the obmigratenp tool using a command that takes the following form:
obmigratenp -c aaa -f 611 -t 1014 -s /usr/temp/611/access -d /usr/temp/1014/access -i /usr/temp/1014/access -u <user_name> -g <group_name> -l en-us
3. Using appropriate path names for your Access Servers, run the obmigratenp tool a second time as follows:
obmigratenp -c aaa -f 611 -t 1014 -s /usr/temp/611/access -d /usr/temp/1014/access -i /usr/temp/1014/access -u <user_name> -g <group_name>
4. Auditing and Access Reporting: If your earlier installation included auditing and access reporting, go immediately to "Upgrading Auditing and Reporting for the Access Server" on page 13-2 before performing step 5.
5. Verify that the upgrade was successful as follows:
a. Start the Access Server service. For example, if you do not store the server password in the password.lst file, use the following command and provide the password at the prompt if needed:
start_access_server -P mypassword port -d -t 61
Certain command options might disable the hide option and cause a password to appear in the command line. On an IBM SecureWay directory server, the next time you start the Access Server it can take a few minutes for the dialog requesting the PEM pass phrase to appear.
Note: The exact commands must reflect your specific Access Server deployments. Ensure that you have access to the component installation directory on Solaris, as described in "Making Earlier Installation Directories on Solaris Available to the Linux Host" on page B-8.

Upgrading Access System Components while Switching to Linux
Migrating from a Solaris Platform to a Linux Platform While Upgrading B-17
b. Access Server Service Does Not Start: Check the Access Server migration log files for any errors reported during the upgrade and look for troubleshooting tips in Appendix G.
c. Upgrade Not Successful: Proceed to "Recovering From an Access System Upgrade Failure" on page B-22.
d. Upgrade Successful: Perform activities in "Backing Up Upgraded Access System Component Directories" on page B-21 for this instance, then repeat the procedure to upgrade all Access Servers in your environment.
e. After upgrading all Access Servers, you can continue with "Upgrading WebGates while Switching to Linux".
Upgrading WebGates while Switching to LinuxYou perform the following steps to upgrade each earlier WebGate on Solaris while switching to the Linux platform.
To upgrade the WebGate while switching to Linux from Solaris1. Locate the obmigratenp tool on the Linux host where you installed the Oracle
Access Manager 10g (10.1.4.0.1) component.
usr/temp/1014/access/oblix/tools/migration_tools/obmigratenp
2. Using appropriate path names for your WebGates, run the obmigratenp tool using a command that takes the following form:
obmigratenp -c wg -f 611 -t 1014 -s /usr/temp/611/wg/access -d /usr/temp/1014/wg/access -i /usr/temp/1014/wg/access -u <user_name> -g <group_name> -l en-us
3. Using appropriate path names for your WebGates, run the obmigratenp tool a second time as follows:
obmigratenp -c wg -f 611 -t 1014 -s /usr/temp/611/wg/access -d /usr/temp/1014/wg/access -i /usr/temp/1014/wg/access -u <user_name> -g <group_name>
4. Verify that the upgrade was successful, as follows:
a. Start the WebGate Web server.
b. WebGate Web Server Does Not Start: Check the Access Server migration log files for any errors reported during the upgrade and see troubleshooting tips in Appendix G.
c. Upgrade Successful: Perform activities in "Backing Up Upgraded Access System Component Directories" on page B-21 for this instance, then continue upgrading earlier WebGates.
d. Upgrade Not Successful: Proceed to "Recovering From an Access System Upgrade Failure" on page B-22.
Note: The exact commands must reflect your specific WebGate deployments. Ensure that you have access to the earlier component directory, as described in "Making Earlier Installation Directories on Solaris Available to the Linux Host" on page B-8.

Upgrading Access System Components while Switching to Linux
B-18 Oracle Access Manager Upgrade Guide
e. Continue upgrading WebGates, and then proceed to "Finishing the Access System Upgrade with a Solaris to Linux Switch".
Finishing the Access System Upgrade with a Solaris to Linux SwitchUsing the procedures described in this chapter, your earlier Oracle Access Manager customizations are preserved. This implies that certain deployment-specific settings were carried over from the Solaris deployment to the Linux deployment. For example, the Access Server host name and port. Following the upgrade, you must establish new deployment connections to ensure that the upgraded Oracle Access Manager Web components communicate with the Oracle Access Manager servers on Linux, not the earlier servers on Solaris.
Depending on the component you have upgraded, you must perform the following activities to finish your upgrade: with a switch to Linux
■ Reconfiguring Access Servers
■ Reconfiguring WebGate
Reconfiguring Access ServersThis topic describes how to reconfigure Access Servers after switching to Linux hosts. You must specify new hostname and port details in the Access System Console, then use the command-line tool named start_configureAAAServer to reconfigure the Access Server.
To reconfigure Access Servers on Linux1. Go to the Access System Console by entering the appropriate URL for your
deployment in a browser window. For example:
http://hostname:port/access/oblix
where hostname refers to computer that hosts the WebPass Web server; port refers to the HTTP (or HTTPS) port number of the WebPass Web server instance; /access/oblix connects to the Access System Console.
2. Proceed as follows:
■ Landing Page Appears—Proceed with step 3.
■ Landing Page Does Not Appear—See troubleshooting tips in Appendix G and "Recovering From an Access System Upgrade Failure" on page B-22.
3. Select the Access System Console link, then log in as a user with Master Administrator privileges.
The Access System Console should appear.
4. Proceed as follows:
■ Login Successful—Proceed with step 4.
■ Login Not Successful—Be certain that you are logging in as a user with the proper credentials (Master Administrator or Master Access Administrator).
5. Update Access Server details as follows:
a. Select the Access System Configuration tab, then click Access Server Configuration when it appears in the left column.
Note: There are no Policy Manager reconfiguration steps needed.
Upgrading Access System Components while Switching to Linux
Migrating from a Solaris Platform to a Linux Platform While Upgrading B-19
b. Click an Access Server name on the List all Access Servers page to view its parameters.
c. Click the Modify button at the bottom of the page to display the Modify Access Server page.
d. Edit the following parameters on the Modify Access Server page as needed:
Hostname: Enter the name of the computer on which the Access Server is running.
Port: Enter the port number on which the Access Server is listening.
e. Click the Save button at the bottom of the Modify Access Server page.
6. Restart the Access Server Service.
7. Repeat as needed for each Access Server whose host has changed.
8. Run the start_configureAAAServer tool, as follows:
a. Locate the configureAAAServer tool:
AccessServer_install_dir/access/oblix/tools/start_configureAAAServer
b. Use the following command with the configureAAAServer tool to set up the Access Server:
configureAAAServer reconfig AccessServer_install_dir
c. Specify the following information for the Access Server:
The transport security mode in which the directory server is running
The host computer on which the directory server resides
The port number on which the directory server listens
The bind DN of the directory server
The password of the directory server
The directory server to which you are connecting
The location where configuration data is stored
The configuration DN
The policy base
The Access Server ID
d. Restart the Access Server.
e. Repeat as needed for each Access Server that was switched to a Linux host.
9. Proceed to "Reconfiguring WebGate".
Reconfiguring WebGateThis topic describes how to reconfigure WebGate to communicate with an Access Server that was switched to a Linux computer. For this, you use only the command-line tool named configureWebGate, and specify the host name for the Linux computer running the upgraded Access Server.
When you run the configureWebGate, you will use the options listed in Table B–2. For more information, see the Oracle Access Manager Access Administration Guide.

Upgrading Access System Components while Switching to Linux
B-20 Oracle Access Manager Upgrade Guide
To modify a WebGate through the command line 1. Locate the configureWebGate tool:
WebGate_install_dir\access\oblix\tools\configureWebGate
In the sample path, WebGate_install_dir is the directory where WebGate is installed on the Linux platform.
2. Run the following command using specific values for your deployment and parameters listed in Table B–2, " configureWebGate Commands". For example:
configureWebGate -i WebGate_install_dir -t WebGate -h Access_Server_Hostname-p Access_Server_Port
3. When you receive confirming messages that WebGate is configured properly, restart the Access Server.
Validating and Backing up the Upgraded Access SystemOracle recommends that you first validate your Access System upgrade and then back up the upgraded component details. For details, see the following topics:
■ Validating the Upgraded Access System
■ Backing Up Upgraded Access System Component Directories
Validating the Upgraded Access SystemThis is the same as the steps provided in Chapter 14.
You can complete any of the next steps to validate that the Access System schema and data upgrade have been successful. For more information, see Oracle Access Manager Access Administration Guide.
To verify a successful Access System upgrade1. Make sure your Policy Manager Web server and WebPass Web server instance are
running.
2. Delete all Web browser caches once the upgrade is complete
3. Navigate to the Access System Console from your browser by specifying the appropriate URL. For example:
http://hostname:port/access/oblix
where hostname refers to computer that hosts the Web server; port refers to the HTTP port number of the WebPass Web server instance; /access/oblix connects to the Access System Console.
The Oracle Access Manager landing page should appear.
Table B–2 configureWebGate Commands
Command Operation
-i WebGate_install_dir Specifies the installation directory for the WebGate.
-t <WebGate> Specifies that this operation is for WebGate.
-h Access Server Host Name Specifies the computer name where the Access Server installed on the Linux host.
-p Access Server Port Specifies the port number on which the Access Server listens on the Linux host.

Recovering From an Identity Component Upgrade Failure
Migrating from a Solaris Platform to a Linux Platform While Upgrading B-21
4. Landing Page Does Not Appear: Confirm that you have specified information correctly. Look for troubleshooting tips in Appendix G.
5. Log in to the Policy Manager/Access System Console as a Master Administrator.
6. Complete one or more of the following tasks, as described in the latest (10g (10.1.4.0.1)) Oracle Access Manager Access Administration Guide. For example:
■ Display configuration details for an authentication scheme by clicking the link that corresponds to the scheme.
■ Define or modify a policy domain.
■ Explore the Access System Console.
■ Access a protected resource to confirm that login is working.
7. Log out, as usual.
Backing Up Upgraded Access System Component DirectoriesAs mentioned earlier, Oracle recommends that you finish each component upgrade by backing up the 10g (10.1.4.0.1) component directory after verifying that it is working properly. This will enable you to easily restore your environment to the newly upgraded state should that be a requirement.
To back up critical Access System information after the upgrade 1. Back up the latest component directory on Linux and store it in a new location.
2. Web Server: Back up the upgraded Web server configuration file, if needed, using your vendor documentation as a guide.
3. Proceed to Chapter 11 and upgrade the software developer kit (SDK).
Recovering From an Identity Component Upgrade FailureIf a component upgrade was not successful, you can perform the following steps to rollback this upgrade, then try again.
To recover from an unsuccessful Identity component upgrade1. Restore the earlier component installation directory that you backed up before the
upgrade (to recover the earlier environment), then back it up again. You will retain one of the earlier directories as a backup copy and use one to restart the upgrade.
2. WebPass Web Server: Restore the upgraded Web server configuration file, if required.
3. Using a backup copy of your earlier component installation directory (and Web server configuration, if needed), restart the upgrade as described in this chapter.
Note: This is an exact repeat of the information in Chapter 10 because there is no difference in the steps whether you are upgrading with a platform switch to Linux or without a switch to Linux.
Note: This is an exact repeat of the information in Chapter 9 because the steps are the same whether you are upgrading on the same platform or performing a switch from Solaris to Linux.

Recovering From an Access System Upgrade Failure
B-22 Oracle Access Manager Upgrade Guide
Recovering From an Access System Upgrade FailureThis is an exact repeat of the information in Chapter 10 because the steps are the same whether you are upgrading on the same platform or performing a switch from Solaris to Linux.
If the component was not successful, you can perform the following steps to rollback this upgrade, then try again.
To recover from an unsuccessful Access System component upgrade1. Restore the earlier component installation directory that you backed up before the
upgrade (to recover the earlier environment), then back it up again. You will retain one of the earlier directories as a backup copy and use one to restart the upgrade.
2. Web Server: Restore the backed up Web server configuration file, if required for this component (Policy Manager or WebGate).
3. Using a backup copy of your earlier component installation directory (and Web server configuration, if needed), restart the component upgrade as described in this chapter.

Upgrade Process and Utilities C-1
CUpgrade Process and Utilities
This chapter provides information about the utilities that are called into operation during the upgrade process.
Topics in this chapter include:
■ About Upgrade Events
■ MigrateOAM Script for Zero Downtime Upgrades
■ Primary Utility: obmigratenp
■ File Upgrade: obmigratefiles
■ Message and Parameter Upgrade: obmigrateparamsg
■ Schema Upgrade: obmigrateds
■ Data Upgrade: obmigratedata
■ Web Server Upgrade: obmigratews
■ Component-Specific Upgrades
About Upgrade EventsWhen you upgrade each component, the newest product release is installed over an earlier product release in the same location. This discussion introduces the program-driven processes that occur during component upgrades.
There will be a few differences when you perform an in-place upgrade versus an out-of-place zero downtime upgrade:
■ In-place upgrades are initiated using the corresponding Oracle Access Manager 10g (10.1.4.0.1) installer. The arguments needed by the underlying utilities are gathered by the installer. During each component upgrade, the program controls the sequence of events and messages automatically. The process requires very little input from you.
■ Out-of-place zero downtime upgrades are initiated using the 10.1.4.2.0 MigrateOAM script from a command-line. In this case, you must manually enter the mode for the operation, and other arguments and parameters, which are then passed to the underlying utilities.
Note: Running the tools manually is not recommended. Oracle strongly recommends that you perform a in-place upgrade as described in Part II and Part III or that you perform a zero downtime upgrade as described in Part VI.
About Upgrade Events
C-2 Oracle Access Manager Upgrade Guide
In-place Upgrades: You initiate a component upgrade using the corresponding Oracle Access Manager 10g (10.1.4.0.1) installer. During each component upgrade, the program controls the sequence of events and messages automatically. The component upgrade process requires very little input from you.
After you start an upgrade and specify the same (target) installation directory where the earlier (source) component resides, you are asked if you want to upgrade the earlier version of the component.
If directory names include spaces, a program might not be invoked properly unless you include quotation marks around each path name in any command you use. For example:
obmigratenp.exe -c ois -f 650 -t 700 -s "C:\Program Files\NetPoint\identity_20060519_134931" -d "C:\Program Files\NetPoint\identity" -i "C:\Program Files\NetPoint\identity"
All Upgrades: Figure C–1 and the process overview that follows it describe a typical component upgrade, which is driven by each program (and the utilities that are called automatically during the process):
■ An in-place upgrade is depicted. After you start the installation program for the component, you see a Welcome message and you are asked to provide specific input (such as an installation path name). As automated processing continues, you are asked to accept an operational method (Automatic versus Confirmed), or simply acknowledge that you are ready to continue.
■ During a zero downtime upgrade, you manually enter a command line that includes arguments and specifications for the MigrateOAM script. The MigrateOAM script passes the arguments and specifications to other utilities that participate or control the upgrade. Starting with process 3 in Figure C–1, internal processing is similar whether you perform an in-place upgrade or a zero downtime upgrade. For more information about the zero downtime upgrade script and modes, see Chapter 15.
WARNING: If your directory names include spaces, be sure to include quotation marks around each path name in any command you use.

About Upgrade Events
Upgrade Process and Utilities C-3
Figure C–1 Program-Driven Events During an In-place Upgrade
Process overview: When an earlier source is detected and you choose to upgrade1. The source directory is renamed with a time stamp.
2. The target directory is created and 10g (10.1.4.0.1) files are extracted into it. The latest release must be extracted to the original target path, and languages for the previous installation are detected.
The English language is upgraded automatically. If 10g (10.1.4.0.1) Language Packs are available in the source directory you can upgrade earlier languages and add new languages.
3. The obmigratenp utility is called (which determines the release you are migrating from as well as the release you are migrating to) and it internally detects which features need to be upgraded for this particular component and which other utilities to use for those upgrades.
When your installation includes multiple languages, obmigratenp:
a. Migrates message catalogs in the default language.
Note: If you upgrade a multi-language implementation without 10g (10.1.4.0.1) Language Packs, you will lose the multi-language functionality.For more information about multi-language implementations, see Chapter 4, "System Behavior and Backward Compatibility".
Start Welcome install_dir
Target Directory Created and Files Extracted
Older Source Detected Source Directory Renamed1
2
obmigratenp3
obmigratefiles (Program and Library Files)4
obmigrateparamsg (Message and Parameter Catalogs)5
obmigrateds and obmigratedata (Schema and Data Files)6
obmigratews (Web Server Configuration)7
Component-Specific Utility8
Finish9

About Upgrade Events
C-4 Oracle Access Manager Upgrade Guide
b. Migrates message catalogs in other selected languages when you have 10g (10.1.4.0.1) Language Packs in the component source directory.
c. Invokes general upgrades, as discussed in "Primary Utility: obmigratenp" on page C-6.
4. The obmigratefiles utility is called to upgrade program and library files.
a. Required files are extracted to the target directory.
b. Required configuration and SSL-related files are copied from the renamed source directory to the target directory, and 10g (10.1.4.0.1) is installed.
For more information, see "File Upgrade: obmigratefiles" on page C-6.
5. The obmigrateparamsg utility is called to upgrade message and parameter catalog files.
a. Required (.xml and .lst) files are identified in renamed source area.
b. Files are modified for the latest release and written to the target directory. With 10g (10.1.4.0.1), .LST files are converted to .XML files and customizations made to the originals are retained in the upgraded files.
For more information, see "Message and Parameter Upgrade: obmigrateparamsg" on page C-9.
6. Schema and Data Upgrades Only: Two utilities (obmigrateds and obmigratedata) are called automatically to initiate Oracle Access Manager schema and data upgrades.
Zero Downtime Upgrades: The schema and data are upgraded independently. For more information, see "Schema and Data Upgrades with the Zero Downtime Upgrade Method" on page 15-9.
In-Place Upgrades: The schema and data are upgraded together with the master Identity Server (and master Policy Manager when your installation includes the Access System). During subsequent Identity Server (and Policy Manager) upgrades, the initial schema and data upgrade is detected and this portion of the process is skipped. Oracle recommends that you upgrade the Oracle Access Manager schema and data automatically, as described in Part II, "Upgrading the Schema and Data". These upgrades use LDIF files that are specific to your directory server. Each LDIF file includes only changes from one release of Oracle Access Manager to the next. As a result, the schema and data upgrade will repeat one time for each release from your starting release to 10g (10.1.4.0.1). For example, if you are upgrading from release 6.1.1, the schema and data upgrade occurs as follows:
■ From release 6.1.1. to release 6.5
■ From release 6.5 to release 7.0
■ From release 7.0 to 10g (10.1.4.0.1)
7. The obmigratews utility is called to perform a selective Web server configuration file and filter upgrade, if needed, to accommodate changes for newer versions of Policy Manager, WebPass, and WebGate.
Changes are added to the Web server configuration file.
Note: For details about each utility and the log file generated by each utility, see later discussions in this appendix.

About Upgrade Events
Upgrade Process and Utilities C-5
For more information, see "Web Server Upgrade: obmigratews" on page C-16.
8. A component-specific utility is used to make changes to related registry entries for Windows, plug-ins, and other files.
For example:
a. Identity Server: obMigrateNetPointOis upgrades existing registry entry for the Identity Server to reflect the newer release; modifies PPP catalog if needed; modifies password from password.xml and .lst, if needed; re-creates proper uninstall_info.txt. For details, see "Identity Server: obMigrateNetPointOis" on page C-17.
b. WebPass: obMigrateNetPointWP upgrades existing registry entry for the WebPass to reflect the newer release; modifies password from password.xml and password.lst, if needed. For details, see "WebPass: obMigrateNetPointWP" on page C-18
c. Policy Manager: obMigrateNetPointAM upgrades registry entry for Policy Manager; modifies password encryption from password.lst, if needed; copies your custom plug-ins to the target installation directory from your renamed source directory. For details, see "Policy Manager: obMigrateNetPointAM" on page C-19.
d. Access Server: obMigrateNetPointAAA upgrades registry entry for Access Server; modifies password encryption, if needed; copies your custom plug-ins from your renamed source directory to the target installation directory; upgrades the following failover files:
AppDB.lst—converted to .xml
ConfigDB.lst—converted to .xml
Group.lst—if present, converted to .xml
UserDB.lst—if present, converted to .xml
WebResrcDB.lst—converted to .xml
For more information, see "Upgraded Items" on page 3-5.
e. WebGate: obMigrateNetPointWG upgrades registry entry for the WebGate; modifies password encryption, if needed. For details, see "WebGate: obMigrateNetPointWG" on page C-20.
f. SDK: obMigrateNetPointASDK is called by obmigratenp to accomplish an Access Manager SDK upgrade.
The SDK upgrade will be invoked automatically as the last step when upgrading components bundled with SDK (Identity Server and the Oracle Access Manager Connector for WebSphere).
Note: The password written in the Oracle Access Manager 5.2, password.xml and password.lst files is not encrypted; however, later versions encrypt this. Encryption occurs automatically during an upgrade.

MigrateOAM Script for Zero Downtime Upgrades
C-6 Oracle Access Manager Upgrade Guide
For details, see "Software Developer Kit (SDK): obMigrateNetPointASDK" on page C-20.
9. Finish as you would any installation.
For details about what must be handled manually, see "Items that You Must Manually Upgrade" on page 3-9.
If you cancel an upgrade after being informed that the component has been installed, you need to complete the following steps to restore your Oracle Access Manager configuration to the original state.
MigrateOAM Script for Zero Downtime UpgradesWhen you perform a zero downtime upgrade, you must use the MigrateOAM script that is available with Oracle Access Manager Release 10g (10.1.4.2.0). For details about the MigrateOAM script and processing, see "Zero Downtime Upgrade Tools and Processes" on page 15-23.
Primary Utility: obmigratenpUsing the in-place ugprade method, the main utility driving a component upgrade is obmigratenp. If you are using the zero downtime upgrde method, the MigrateOAM script drives the process. The obmigrate utility orchestrates the upgrade process for a component from a given major release X to a given major release Y, as described in Table C–1.
Note: If you decline the automatic SDK upgrade, current SDK configuration settings are not preserved and you must reconfigure SDK using the configureAccessGate tool, as described in the Oracle Access Manager Access Administration Guide
Note: Upgrades occur incrementally. This means that the sequence of earlier processes begins and the earlier release is upgraded to the next-major release. Following the component-specific upgrade, the process might repeat automatically until all changes between your original release and the latest release are completed.
Table C–1 The Upgrade Driver obmigratenp
Description Function
obmigratenp.exe ■ Decides and executes any intermediate incremental steps needed to reach a given target release for the component.
■ Invokes other utilities to carry out functions to upgrade the specific component from major release X to major release Y
Path Component_install_dir\identity|access\oblix\tools\migration_tools\obmigratenp
Command Line Run obmigratenp.exe without any parameters. This command prints usage along with the meaning of all input parameters.

File Upgrade: obmigratefiles
Upgrade Process and Utilities C-7
File Upgrade: obmigratefilesobmigratefiles is called by the obmigratenp multiple times to carry out file and folder related upgrades.
File upgrades involve copying required files from the renamed source directory to the target installation directory. The obmigratenp tool calls the obmigratefiles tool, which works on a given map file that specifies:
■ The files to be copied
■ From which source
■ To which target
For more information, see the next process overview.
Process overview: obmigratenp calls obmigratefiles 1. obmigratefiles creates a folder of original files in the source directory in the two
following circumstances, because the release 5.2.0 installer (and the 6.0.0 installer on Solaris) does not create a folder of original files:
■ When you are upgrading from Oracle Access Manager 5.2.0
■ When you are upgrading on Solaris from release 6.0.0
Other Files Used ■ Invokes Language Pack extraction to upgrade the default language, determine which additional languages to upgrade and which will not be upgraded.
■ Reads the message catalog, to print messages to the console or while writing to a log file:
_install_dir\identity|access\oblix\tools\migration_tools\obmigratenpmsg.xml
■ Reads the parameter file, which includes a section for every component and every x to y upgrade:
_install_dir\identity|access\oblix\tools\migration_tools\obmigratenpparams
You can specify whether you want to have a certain type of upgrade for that component by setting flags to "true" or "false" to invoke or skip that function, respectively. When a flag is absent in this file, its value is presumed to be false.
Flags include:
■ kMigrateWS decides whether obmigratews.exe is executed.
■ kMigrateData and kMigrateSchema determines if obmigrateds.exe. Setting either value to true invokes obmigrateds.exe.
■ kMigrateASDK decides whether re-invocation of obmigratenp.exe is called for the Access Manager SDK upgrade.
Output This utility drives the overall upgrade process by invoking various utilities and generating the log files described next.
Log File Generates the log file:
install_dir\identity|access\oblix\tools\migration_tools\obmigratenp.log, which typically contains:
■ Component name, source, and target directory
■ Command line used to invoke each upgrade utility
■ Return status of each upgrade utility
■ Other error and informative messages
Table C–1 (Cont.) The Upgrade Driver obmigratenp
Description Function

File Upgrade: obmigratefiles
C-8 Oracle Access Manager Upgrade Guide
The map file that is used is component_Version_orig_files.lst. For example:
ois_520_orig_files.lst
or
ois_600_orig_files.lst
This folder is further used for the message and parameter upgrade.
2. obmigratefiles creates a folder of original files for the current release in the current installation directory using the map file
component_Version_orig_files.lst.
For example:
ois_600_orig_files.lst
The next time an upgrade occurs from this release to a newer release, the folder of original files for this release will be available to use during the message and parameter upgrade.
3. obmigratefiles copies config files, SSL setup-related files, and the like from the renamed source directory to the target installation directory.
In this case, obmigratefiles works on a given component_base_files. For example:
ois_base_files.lst am_base_files.lst and so on
Base files contain the list of configuration files required for the upgrade. Typically, configuration files do not change. Files and directories in the base file are copied during the upgrade, including failover-related files. Any file and directory clean up occurs as needed. For example, if a particular Oracle Access Manager release deletes a file or introduces additional files, these will be treated appropriately. Suppose a file added in Oracle Access Manager 6.0 is not required in 6.5. In this case, the file will be deleted from the later installation.
a. Upgrade all files listed in the base file.
b. For all source versions from the base file release to the current source release, upgrade files listed in component_source-version_files.lst files.
For example, consider upgrading from Oracle Access Manager 5.2. release-specific files exist for Oracle Access Manager 6.0, 6.5, and 7.0. In this case, step 2 copies files listed in ois_610_files.lst, ois_650_files.lst, and ois_700_files.lst. However, when upgrading from Oracle Access Manager 7.0 to 10g (10.1.4.0.1), the current source release is the base file release, therefore step 2 doesn't occur.
Additionally, release-specific files contain changes specific to only a particular component_source-version_files.lst; information that needs to be copied if you are upgrading from that release and there are some deviations. For example, suppose a file is added in Oracle Access Manager 6.0 and 6.5. In this case, you need files for:
ois_600_files.lst
Note: In case a deleted file exists in the base file, the deleted file will be removed from the base file list itself. Even if it existed in the earlier Oracle Access Manager release, it is no longer needed in the later release.

Message and Parameter Upgrade: obmigrateparamsg
Upgrade Process and Utilities C-9
ois_650_files.lst ois_700_files.lst
Table C–2 provides more information
Message and Parameter Upgrade: obmigrateparamsgThe obmigratenp utility calls the obmigrateparamsg utility with the required file for a specific component.
The Message Upgrade Process: Allows you to upgrade earlier messages with new messages and add new messages for the later release. A customized message will be retained. However, if the number of parameters in the message has changed, only the new message is retained. For example:
Original Message—"Cannot copy file %1"
Customized Message—"Failed copy operation for file %1"
New Message—"Cannot copy file %1 from %2 to %3"
Note: If Oracle Access Manager release 6.1 did not require any changes, ois_610_files.lst is not required.
Table C–2 File Upgrades with obmigratefiles
Description Function
obmigratefiles.exe ■ Reads a given file for a specific component.
■ Copies files from the source directory to the target directory according to the list specified in the file.
■ Processes release-specific files as needed.
Path Component_install_dir\identity|access\oblix\tools\migration_tools\obmigratefiles
Command Line Run obmigratefiles.exe without any parameters. This command prints usage along with the meaning of all input parameters.
Options include:
-m Specifies name of map file to use-s [source_dir] Specifies the source directory.-d [target_dir] Specifies the target directory.-i Specifies the install directory.-l Specifies the language for Message migration.-p Specifies the flag for Language Packs.
Other Files Used To print messages to the console or while writing to a log file, reads the message catalog:
_install_dir\identity|access\oblix\tools\migration_tools\obmigratefilesmsg.xml
Output This utility copies files based on input parameters.
Log File Generates the log file:
install_dir\identity|access\oblix\tools\migration_tools\obmigratefiles.log, which typically contains:
■ Parameters passed to this utility.
■ Status of every copy-instruction mentioned in used map file.
■ Error messages, if any

Message and Parameter Upgrade: obmigrateparamsg
C-10 Oracle Access Manager Upgrade Guide
The Parameter Upgrade Process: Parameter upgrades occur in parameter files. When you have modified parameters in your earlier release of Oracle Access Manager and the new release has modified the same parameter, the obmigrateparamsg utility overwrites the earlier changes. See the log file for changes.
Earlier Oracle Access Manager Versions: Include files named as component_Fromrelease_to_Torelease_msg|param.lst in the directory component_install_dir\identity|access\oblix\tools\migration_tools. For example:
ois_520_to_600_msg.lst ois_520_to_600_param.lst
Use of obmigrateparamsg was an iterative process with upgrades occurring for each incremental release.
Oracle Access Manager 10g (10.1.4.0.1): The migration of parameter and message catalogs is performed in a single process. 10g (10.1.4.0.1) includes files named component_release_param_files.lst and component_release_msg_files.lst. For example:
am_700_param_files.lst am_700_msg_files.lst
Optional hidden parameters from the earlier release are copied into the target. Hidden parameters are those which Oracle Access Manager supports and which you might want to add.
With Oracle Access Manager 10g (10.1.4.0.1), a path within the _param|msg_files.lst file includes a language ID to handle the multi-language feature available as of Oracle Access Manager 6.5. This looks like the example here:
file:/oblix/lang/%lang%/frontpagemsg.xml
When you specify the -p option, the obmigrateparamsg tool upgrades only message catalogs of the specified languages. The installer detects the language/ language of earlier release according to the following decision and pass it to obmigratenp:
■ For 5.2, 6.0 & 6.1–Look into globalparams.xml file for the language tag. For example, language:En_US.
■ For 6.5 and Later–Look in obnls.xml for the list of languages.
Table C–3 provides additional information about obmigrateparamsg.
Note: In the examples shown here, the new message is retained.
Note: As mentioned previously, earlier during the upgrade from release 7.0 to 10g (10.1.4.0.1), .LST files are converted to .XML files and stored in the target directory. Customizations made in earlier .LST catalogs are preserved and appear in the .XML version of the file. No separate manual step is required to preserve customizations.

Message and Parameter Upgrade: obmigrateparamsg
Upgrade Process and Utilities C-11
As discussed in "Mime_types -related Customizations Not Retained" on page G-9, when upgrading from Oracle Access Manager 6.0, multiple entries with the same ParamName in mime_types (.xml and .lst) files are not upgraded:
Table C–3 Message and Parameter Upgrades with obmigrateparamsg
Description Function
obmigrateparamsg.exe ■ Reads a given file for a specific component.
■ Processes given message/parameter files in the .xml file.
For every message/parameter file, obmigrateparamsg:
■ Reads the old release message/parameter file from the renamed source directory.
■ Modifies the message/parameter file as needed.
■ Writes the modified file to the target directory where the new installer has extracted files.
Path Component_install_dir\identity|access\oblix\tools\migration_tools\obmigrateparamsg
Command Line Run obmigrateparamsg.exe with the following parameters:
obmigratparamsg -s source_dir -d target_install_dir-f component_oldversion_param_files.lst-t component_newversion_param_files.lst -l <langids> [-p]
Where
-s source_dir identifies the installation directory of the earlier Oracle Access Manager release.
-d target_install_dir identifies installation directory of latest release of Oracle Access Manager.
Note: This command is executed twice, first for the message catalogs (with the -l option), then for the parameter catalogs (without the -l option). The target_install_dir can be on a different computer from source_dir.
-f component_oldversion_param_files.lst-t component_newversion_param_files.lst-l <language> (-l is to be specified only for message migration)
[-p] Signifies the message catalog upgrade is to happen only for files under the /lang/langTag folder. To facilitate the migration of only message catalogs of the specified languages, this is used by Language Pack installers.
Other Files Used To print messages to the console or while writing to a log file, reads the message catalog:
install_dir\identity|access\oblix\tools\migration_tools\obmigrateparamsgmsg.lst
Output This utility upgrades message/parameter files. The log contains all parameters forcefully overwritten/retained.
Log File Generates the log file:
install_dir\identity|access\oblix\tools\migration_tools\obmigrateparamsg.log, which typically contains:
■ Parameters passed to this utility
■ Name of every parameter/message file mentioned in input file and actions taken on this file. For example, replaced the existing parameter/message value with new value, added/deleted parameter/message, and so on.
■ Error messages, if any.
■ Note: When you modify a parameter/message in the earlier release and the current release includes a new parameter/message, you might want to look at these values because obmigrateparamsg has made decisions that you should be aware of.

Schema Upgrade: obmigrateds
C-12 Oracle Access Manager Upgrade Guide
IdentityServer_install_dir/identity/oblix/apps/admin/bin/mime_types.xml IdentityServer_install_dir/identity/oblix/apps/admin/bin/mime_types.lst
WebPass_install_dir/identity/oblix/apps/admin/bin/mime_types.xml WebPass_install_dir/identity/oblix/apps/admin/bin/mime_types.lst
Schema Upgrade: obmigratedsTypically, the Oracle Access Manager schema is enhanced for each major Oracle Access Manager release. For example, when Identity Server functionality is enhanced it might refer to a greater number of schema attributes and object classes than previous versions.
During your upgrade, any differences between an earlier schema release and the next release are uploaded to your directory server using the required schema ldif file for your specific directory server. Every schema ldif file includes entries to modify the schema based on the difference between two versions. Schema ldif files use the following naming convention.
DataType_fromrelease_to_torelease_schema_DsType.ldif
For example:
osd_650_to_700_schema_ad.ldif policy_650_to_700_schema_nds.ldif and so on.
and reside in the directory with various upgrade map files:
Component_install_dir\identity|access\oblix\tools\migration_tools
During the upgrade, the obmigratenp utility reads the file obmigratenpparams.lst and calls obmigrateds to internally upload schema files when the kMigrateData kMigrateSchema flag is set to true in:
Component_install_dir\identity|access\oblix\tools\migration_tools \obmigratenpparams.lst
Schema upgrades occur incrementally. This means that the earlier release is upgraded to the next-latest release, the resulting schema is upgraded to the next-latest release, and so on until all interim schema changes between your original release and the latest release are completed. Obsolete schema elements are deleted during the upgrade.
A schema upgrade can occur only with Oracle Access Manager components that interface with the directory server: Identity Server, Policy Manager, and Access Server. Table C–4 provides more information about obmigrateds.
Note: Both versions of the file are needed. You can remove MIME types that are no longer needed or add new MIME types to be associated with the particular attribute for further use. Simply edit the mime_types.lst and .xml files for the Identity Server, then copy these into the WebPass_install_dir to replace the earlier version.
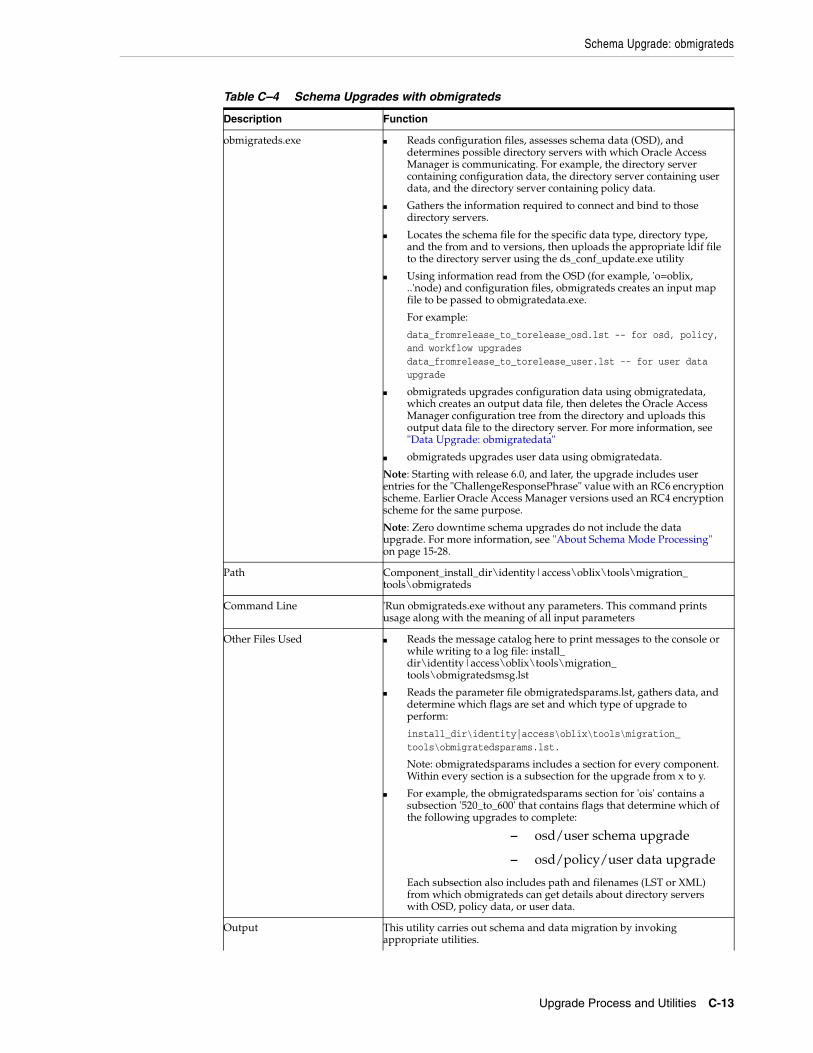
Schema Upgrade: obmigrateds
Upgrade Process and Utilities C-13
Table C–4 Schema Upgrades with obmigrateds
Description Function
obmigrateds.exe ■ Reads configuration files, assesses schema data (OSD), and determines possible directory servers with which Oracle Access Manager is communicating. For example, the directory server containing configuration data, the directory server containing user data, and the directory server containing policy data.
■ Gathers the information required to connect and bind to those directory servers.
■ Locates the schema file for the specific data type, directory type, and the from and to versions, then uploads the appropriate ldif file to the directory server using the ds_conf_update.exe utility
■ Using information read from the OSD (for example, 'o=oblix, ..'node) and configuration files, obmigrateds creates an input map file to be passed to obmigratedata.exe.
For example:
data_fromrelease_to_torelease_osd.lst -- for osd, policy, and workflow upgradesdata_fromrelease_to_torelease_user.lst -- for user data upgrade
■ obmigrateds upgrades configuration data using obmigratedata, which creates an output data file, then deletes the Oracle Access Manager configuration tree from the directory and uploads this output data file to the directory server. For more information, see "Data Upgrade: obmigratedata"
■ obmigrateds upgrades user data using obmigratedata.
Note: Starting with release 6.0, and later, the upgrade includes user entries for the "ChallengeResponsePhrase" value with an RC6 encryption scheme. Earlier Oracle Access Manager versions used an RC4 encryption scheme for the same purpose.
Note: Zero downtime schema upgrades do not include the data upgrade. For more information, see "About Schema Mode Processing" on page 15-28.
Path Component_install_dir\identity|access\oblix\tools\migration_tools\obmigrateds
Command Line 'Run obmigrateds.exe without any parameters. This command prints usage along with the meaning of all input parameters
Other Files Used ■ Reads the message catalog here to print messages to the console or while writing to a log file: install_dir\identity|access\oblix\tools\migration_tools\obmigratedsmsg.lst
■ Reads the parameter file obmigratedsparams.lst, gathers data, and determine which flags are set and which type of upgrade to perform:
install_dir\identity|access\oblix\tools\migration_tools\obmigratedsparams.lst.
Note: obmigratedsparams includes a section for every component. Within every section is a subsection for the upgrade from x to y.
■ For example, the obmigratedsparams section for 'ois' contains a subsection '520_to_600' that contains flags that determine which of the following upgrades to complete:
– osd/user schema upgrade
– osd/policy/user data upgrade
Each subsection also includes path and filenames (LST or XML) from which obmigrateds can get details about directory servers with OSD, policy data, or user data.
Output This utility carries out schema and data migration by invoking appropriate utilities.

Data Upgrade: obmigratedata
C-14 Oracle Access Manager Upgrade Guide
Data Upgrade: obmigratedataWhen the newer release of Oracle Access Manager include a new Oracle Access Manager-specific data organization or values, data upgrades occur in much the same way as the schema upgrade. The delta between the old and new versions is determined and the appropriate data ldifs are provided so they can be uploaded to the directory server. An incremental upgrade is performed between each major release and the next major release until you have completed the upgrade. After the upgrade, Oracle Access Manager can identify and use the data present in the directory and run smoothly.
A data upgrade can occur only with Oracle Access Manager components that interface with the directory server: Identity Server, Policy Manager, and Access Server.
Files that contain both object-class and attribute mappings are provided. The object and attribute mapping files reside in:
install_dir\identity|access\oblix\tools\migration_tools\obmigratedata
The object-class mapping filename is oc_Fromrelease_to_Torelease_map.lst. For example:
oc_520_to_600_map.lst oc_610_to_650_map.lst oc_650_to_700_map.lst
The attribute mapping filenames are appear as:
at_Fromrelease_to_Torelease_map_DataType.lst. For example:
at_520_to_600_map_osd.lst—Oblix schema data at_520_to_600_map_policy.lst—NetPoint policy data at_520_to_600_map_user.lst—User data at_520_to_600_map_wf.lst—Workflow data
as well as files for 600 to 650 and 650 to 700 and 700 to 10g (10.1.4.0.1). For example:
at_600_to_650_map_item.lst at_650_to_700_map_item.lst
where item refers to osd, policy, user, or workflow attribute mapping files.
The obmigrateds utility invokes obmigratedata for data upgrading and passes a map file with initial information—OSD directory, bind DN, password, personoc, groupoc, and the like—to obmigratedata. This map file uses the naming convention:
data_Fromrelease_to_Torelease_osd.lst data_Fromrelease_to_Torelease_user.lst
For example:
Log File Generates the log file:
install_dir\identity|access\oblix\tools\migration_tools\obmigrateds.log
Note: There is no data migration from Oracle Access Manager 6.0.0 release 6.1.0. For this reason, there is no oc_600_to_610_map.lst file.
Table C–4 (Cont.) Schema Upgrades with obmigrateds
Description Function

Data Upgrade: obmigratedata
Upgrade Process and Utilities C-15
data_520_to_600_osd.lst data_520_to_600_psc.lst data_610_to_650_osd.lst data_610_to_650_psc.lst data_650_to_700_osd.lst data_650_to_700_psc.lst data_700_to_1014_osd.lst data_700_to_1014_psc.lst
This is because the upgrade is carried out in steps. For example, if you start from release 520, data is first upgraded from 520 to 600, then from 610 to 650, from 650 to 700, and finally from 700 to 10g (10.1.4.0.1).
See Table C–5 for more information.
Note: There is no data upgrade between release 600 and 610. Starting from release 5.2, you upgrade first to release 6.1.1 using 6.1.1 installers; then you complete the upgrade from 6.1.1 using 10g (10.1.4.0.1).
Table C–5 Data Upgrades with obmigratedata
Description Function
obmigratedata.exe ■ Accepts a file giving basic required information as input for the target directory server (connectivity details, person and group object classes, and so on). The input file instructs the utility about the file used to obtain object-class mapping.
Note: The object class mapping file identifies the file to be used for attribute-level mapping.
■ Reads mapping files, connects to given directory, reads existing data, processes this data based on instructions in the object-class and attribute-mapping files, and creates an output ldif.
Note: All mappings file must be present in
install_dir\identity|access\oblix\tools\migration_tools\obmigratedata
Path Component_install_dir\identity|access\oblix\tools\migration_tools\obmigratedata
Command Line Run obmigratedata.exe with the following parameters.
obmigratedata -f ConfigFileName -i install_dir
where ConfigFileName is the full path of a file that provides all initially required information so this utility can connect to a given directory server. Additionally, this file contains other information such as the object-class mapping file name, log file name, name of the file giving a list of binary attributes, and so on.
Also: install_dir is the target installation directory for this component.
Other Files Used ■ The object class mapping file defined in the input config file
■ The attribute mapping file(s) as mentioned in the object class mapping file
■ The file listing binary attributes (file name is mentioned in the input config file)
■ The message catalog obmigratedatamsg.lst, while printing to the console or writing to a file: install_dir\identity|access\oblix\tools\migration_tools\obmigratedata\obmigratedatamsg.lst

Web Server Upgrade: obmigratews
C-16 Oracle Access Manager Upgrade Guide
Web Server Upgrade: obmigratewsAlong with Policy Manager, WebPass, and WebGate enhancements might come the need for changes in the supporting Web server configuration file. During the upgrade process, you are asked about automatic Web server configuration file updates. Oracle recommends that you update the Web server configuration file automatically, though you can do this manually following the upgrade.
The obmigratenp utility calls obmigratews to complete the Web server configuration update by passing a map file and other parameters to obmigratews. The map file is named and located as follows:
Component_fromrelease_to_torelease_ws_WebserverType.lst install_dir\identity|access\oblix\tools\migration_tools
For example:
am_520_to_600_ws_nsapi.lst
Also, obmigratenp copies the file generated by obmigratews to the original Web server configuration file. Thus the Web server configuration file gets the required changes for the newer release of the component. See Table C–6 for more information.
Output This utility creates an output ldif file whose name is mentioned in the input config file.
Log File Generates the log file:
install_dir\identity|access\oblix\tools\migration_tools\obmigratedata
The name of the log file is mentioned in the input config file.
For example, migration_log_file.lst, which typically contains:
■ Old and new DNs of entries migrated by this utility
■ Success/failure messages for selected migration
■ Other error messages if any
Table C–6 Web Server Configuration Upgrades with obmigratews
Description Function
obmigratews.exe ■ Reads the input map file, modifies content of this file using input values of old and new installation directories.
■ Modifies the given input Web server configuration file according to the content created using the map file.
■ Writes the Web server configuration to a new output file whose name is passed to this utility as one of the parameters.
Path Component_install_dir\identity|access\oblix\tools\migration_tools\obmigratews
Command Line Run obmigratews without any parameters. This command prints usage along with the meaning of all input parameters.
Other Files Used To print messages to the console or while writing to a log file, reads the message catalog:
install_dir\identity|access\oblix\oblix\tools\migration_tools\obmigratewsmsg.lst
Output This utility creates a modified release of the Web server configuration file.
Table C–5 (Cont.) Data Upgrades with obmigratedata
Description Function

Component-Specific Upgrades
Upgrade Process and Utilities C-17
Component-Specific UpgradesEvery component needs special treatment during the upgrade to accommodate specific registry changes, modifying specific files, and the like. As a result, obmigratenp.exe calls the appropriate utility depending upon the component selected for the upgrade. Typical actions taken during this sequence include:
■ Copy/modify specific files
■ Modify existing component specific registry entry
■ Copy specific plug-ins
Each component-specific utility is described as follows:
■ Identity Server: obMigrateNetPointOis
■ WebPass: obMigrateNetPointWP
■ Policy Manager: obMigrateNetPointAM
■ Access Server: obMigrateNetPointAAA
■ WebGate: obMigrateNetPointWG
■ Software Developer Kit (SDK): obMigrateNetPointASDK
Identity Server: obMigrateNetPointOisTo accomplish a Identity Server upgrade, the obmigratenp tool calls the obMigrateNetPointOis tool. See Table C–7 for more information.
Log File Generates the log file:
install_dir\identity|access\oblix\tools\migration_tools\obmigratews.log
Table C–7 Identity Server Upgrade with obMigrateNetPointOis
Description Function
obMigrateNetPointOis.exe ■ Upgrades the existing registry entry for the Identity Server to reflect the newer Oracle Access Manager release.
■ Modifies the PPP catalog file, if required, to ensure it is usable with the newer Oracle Access Manager release.
■ Encrypts the password written in password.xml, when upgrading from Oracle Access Manager 5.2.
■ Deletes install_dir\identity\oblix\tools\setup\uninstall_info.txt, if present, and creates it again with proper information on Windows systems.
Path install_dir\identity\oblix\tools\migration_tools\obMigrateNetPointOis
Command Line Run obMigrateNetPointOis without any parameters. This command prints usage along with the meaning of all input parameters.
Other Files Used To print messages to the console or while writing to a log file, reads the message catalog:
install_dir\identity\oblix\oblix\tools\migration_tools\obMigrateNetPointOismsg.lst
Table C–6 (Cont.) Web Server Configuration Upgrades with obmigratews
Description Function
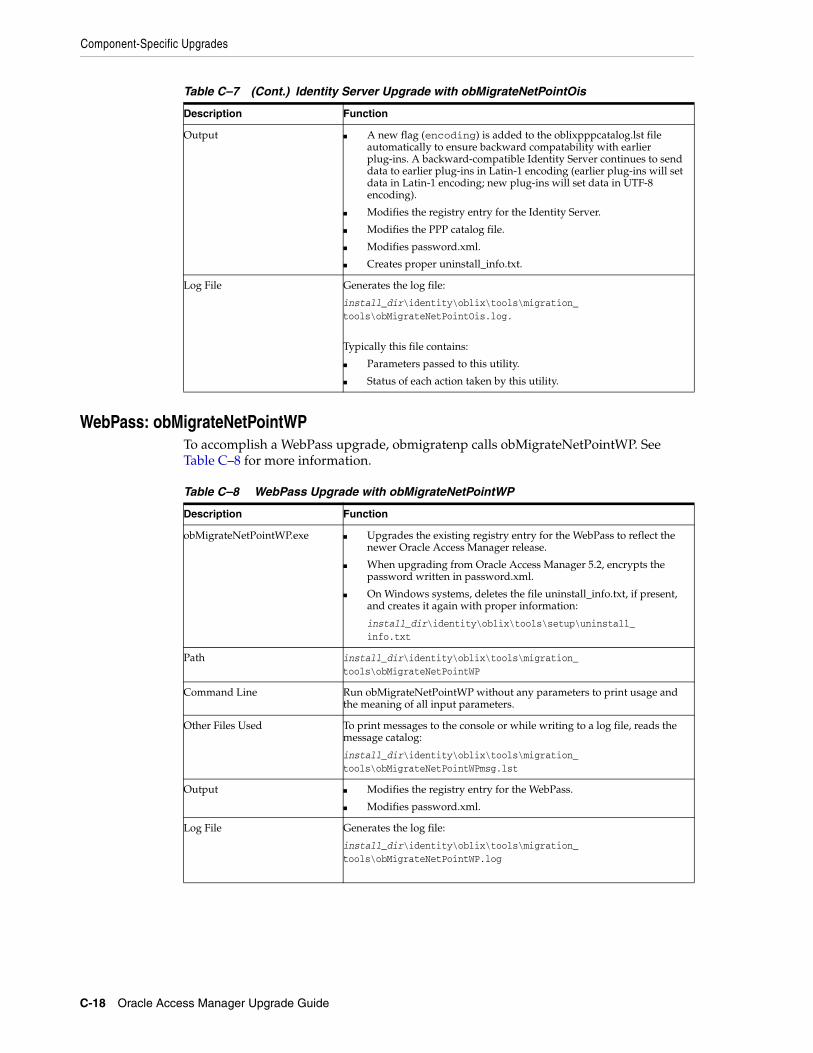
Component-Specific Upgrades
C-18 Oracle Access Manager Upgrade Guide
WebPass: obMigrateNetPointWPTo accomplish a WebPass upgrade, obmigratenp calls obMigrateNetPointWP. See Table C–8 for more information.
Output ■ A new flag (encoding) is added to the oblixpppcatalog.lst file automatically to ensure backward compatability with earlier plug-ins. A backward-compatible Identity Server continues to send data to earlier plug-ins in Latin-1 encoding (earlier plug-ins will set data in Latin-1 encoding; new plug-ins will set data in UTF-8 encoding).
■ Modifies the registry entry for the Identity Server.
■ Modifies the PPP catalog file.
■ Modifies password.xml.
■ Creates proper uninstall_info.txt.
Log File Generates the log file:
install_dir\identity\oblix\tools\migration_tools\obMigrateNetPointOis.log.
Typically this file contains:
■ Parameters passed to this utility.
■ Status of each action taken by this utility.
Table C–8 WebPass Upgrade with obMigrateNetPointWP
Description Function
obMigrateNetPointWP.exe ■ Upgrades the existing registry entry for the WebPass to reflect the newer Oracle Access Manager release.
■ When upgrading from Oracle Access Manager 5.2, encrypts the password written in password.xml.
■ On Windows systems, deletes the file uninstall_info.txt, if present, and creates it again with proper information:
install_dir\identity\oblix\tools\setup\uninstall_info.txt
Path install_dir\identity\oblix\tools\migration_tools\obMigrateNetPointWP
Command Line Run obMigrateNetPointWP without any parameters to print usage and the meaning of all input parameters.
Other Files Used To print messages to the console or while writing to a log file, reads the message catalog:
install_dir\identity\oblix\tools\migration_tools\obMigrateNetPointWPmsg.lst
Output ■ Modifies the registry entry for the WebPass.
■ Modifies password.xml.
Log File Generates the log file:
install_dir\identity\oblix\tools\migration_tools\obMigrateNetPointWP.log
Table C–7 (Cont.) Identity Server Upgrade with obMigrateNetPointOis
Description Function

Component-Specific Upgrades
Upgrade Process and Utilities C-19
Policy Manager: obMigrateNetPointAMTo accomplish an Policy Manager (formerly known as the Access Manager component) upgrade, obmigratenp calls obMigrateNetPointAM. See Table C–9 for more information.
Access Server: obMigrateNetPointAAATo accomplish an Access Server upgrade, the obmigratenp utility calls the obMigrateNetPointAAA utility. See Table C–10 for more information.
Table C–9 Policy Manager Upgrade with obMigrateNetPointAM
Description Function
obMigrateNetPointAM.exe ■ Upgrades the existing registry entry for the Policy Manager to reflect the newer release.
■ When upgrading from release 5.2, encrypts the password written in password.lst.
■ Modifies install_dir\access\oblix\data\common\ldapuserdbparams.lst if required.
■ Copies custom plug-ins from renamed source directory to target directory
Path install_dir\access\oblix\tools\migration_tools\obMigrateNetPointAM
Command Line Run obMigrateNetPointAM without parameters to print usage.
Other Files Used To print messages to the console or while writing to a log file, reads the message catalog:
install_dir\access\oblix\oblix\tools\migration_tools\obMigrateNetPointAMmsg.lst
Output ■ Modifies the registry entry for the Policy Manager.
■ Modifies password.xml.
■ Copies custom plug-ins to target directory.
Log File Generates the log file:
install_dir\access\oblix\tools\migration_tools\obMigrateNetPointAM.log
Table C–10 Access Server Upgrade with obMigrateNetPointAAA
Description Function
obMigrateNetPointAAA.exe ■ Upgrades the existing registry entry for the Policy Manager to reflect the newer release.
■ When upgrading from release 5.2, encrypts the password written in password.lst.
■ Modifies install_dir\access\oblix\data\common\ldapuserdbparams.lst if required.
■ Copies custom plug-ins from renamed source directory to target directory
Path install_dir\access\oblix\tools\migration_tools\obMigrateNetPointAAA
Command Line Run obMigrateNetPointAAA without parameters to print usage.
Other Files Used To print messages to the console or while writing to a log file, reads the message catalog:
install_dir\access\oblix\oblix\tools\migration_tools\obMigrateNetPointAAA.lst
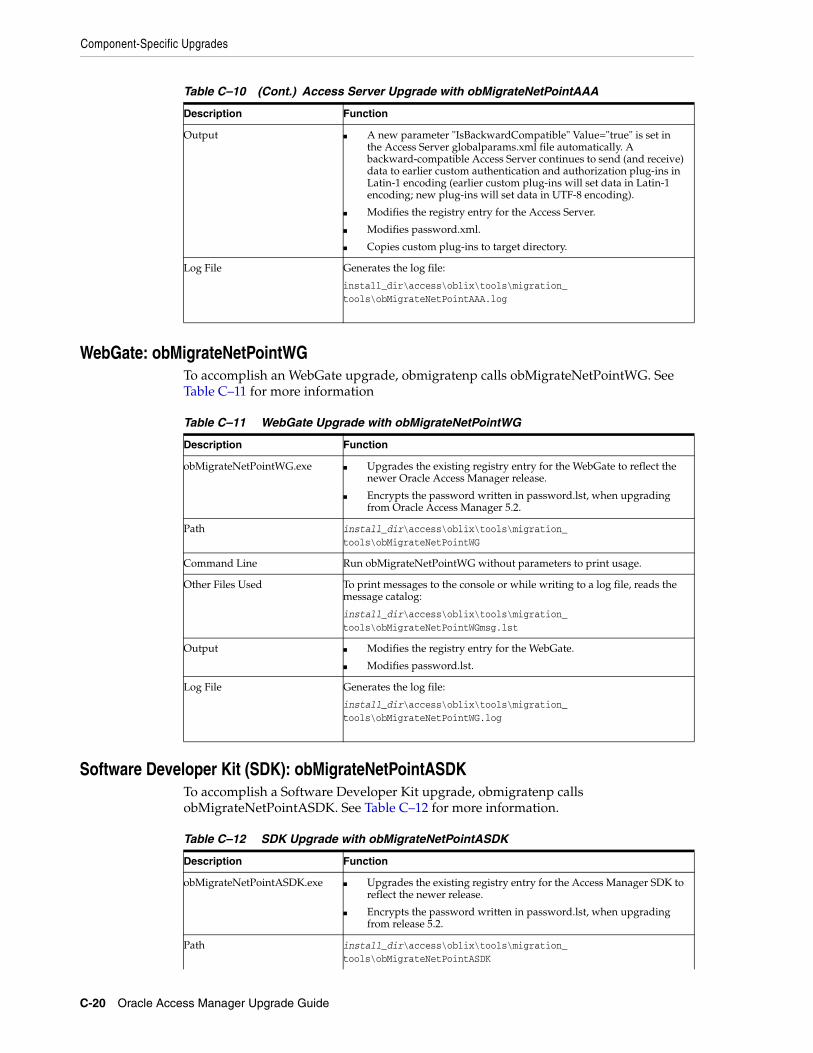
Component-Specific Upgrades
C-20 Oracle Access Manager Upgrade Guide
WebGate: obMigrateNetPointWGTo accomplish an WebGate upgrade, obmigratenp calls obMigrateNetPointWG. See Table C–11 for more information
Software Developer Kit (SDK): obMigrateNetPointASDKTo accomplish a Software Developer Kit upgrade, obmigratenp calls obMigrateNetPointASDK. See Table C–12 for more information.
Output ■ A new parameter "IsBackwardCompatible" Value="true" is set in the Access Server globalparams.xml file automatically. A backward-compatible Access Server continues to send (and receive) data to earlier custom authentication and authorization plug-ins in Latin-1 encoding (earlier custom plug-ins will set data in Latin-1 encoding; new plug-ins will set data in UTF-8 encoding).
■ Modifies the registry entry for the Access Server.
■ Modifies password.xml.
■ Copies custom plug-ins to target directory.
Log File Generates the log file:
install_dir\access\oblix\tools\migration_tools\obMigrateNetPointAAA.log
Table C–11 WebGate Upgrade with obMigrateNetPointWG
Description Function
obMigrateNetPointWG.exe ■ Upgrades the existing registry entry for the WebGate to reflect the newer Oracle Access Manager release.
■ Encrypts the password written in password.lst, when upgrading from Oracle Access Manager 5.2.
Path install_dir\access\oblix\tools\migration_tools\obMigrateNetPointWG
Command Line Run obMigrateNetPointWG without parameters to print usage.
Other Files Used To print messages to the console or while writing to a log file, reads the message catalog:
install_dir\access\oblix\tools\migration_tools\obMigrateNetPointWGmsg.lst
Output ■ Modifies the registry entry for the WebGate.
■ Modifies password.lst.
Log File Generates the log file:
install_dir\access\oblix\tools\migration_tools\obMigrateNetPointWG.log
Table C–12 SDK Upgrade with obMigrateNetPointASDK
Description Function
obMigrateNetPointASDK.exe ■ Upgrades the existing registry entry for the Access Manager SDK to reflect the newer release.
■ Encrypts the password written in password.lst, when upgrading from release 5.2.
Path install_dir\access\oblix\tools\migration_tools\obMigrateNetPointASDK
Table C–10 (Cont.) Access Server Upgrade with obMigrateNetPointAAA
Description Function

Component-Specific Upgrades
Upgrade Process and Utilities C-21
Command Line Run as
obmigrateAccessSDK -fromver <oldVer> -tover <newVer> -srcdir <dir> -dstdir <dir>
Other Files Used To print messages to the console or while writing to a log file, reads the message catalog:
install_dir\oblix\tools\migration_tools\obMigrateNetPointASDKmsg.lst
Output ■ Modifies the registry entry for the Access Manager SDK.
■ Modifies password.lst.
Log File Generates the log file:
install_dir\oblix\tools\migration_tools\obMigrateNetPointASDK.log
Table C–12 (Cont.) SDK Upgrade with obMigrateNetPointASDK
Description Function

Component-Specific Upgrades
C-22 Oracle Access Manager Upgrade Guide

Manual Schema and Data Upgrades D-1
DManual Schema and Data Upgrades
This chapter provides information about the tools and utilities that are called into operation during the upgrade process.
Topics in this chapter include:
■ About Upgrading Schema and Data Manually
■ About Upgrading Schema and Data Manually
■ About Upgrading Data Manually
■ Upgrading Data Manually
■ Sample Default obmigratenpparams.lst File
■ Sample data_520_to_600_xxx.lst
About Upgrading Schema and Data ManuallyOracle recommends that you upgrade the schema and data automatically, as described in Part II. However, errors occur during the upgrade process, you might need to use these instructions to perform an upgrade from one release to another manually.
Completing manual upgrades of the schema and data includes the use of specific utilities provided by Oracle Access Manager. For more information about these utilities, see Appendix C.
In examples in this chapter, release 5.2 is mentioned for illustration only. If you are starting the upgrade from a release earlier than 6.1.1, see "Indirect Upgrade Paths" on page 1-31.
Upgrading the Schema ManuallyWhen upgrading your schema manually, you need to select the appropriate schema file for your directory server and the specific release you are upgrading from and to, as shown in Table D–1.
See also: Appendix C, "Upgrade Process and Utilities"
Note: You might notice gaps in the from and to releases in Table D–1. This occurs when there is no schema or data update for the specific release. For example, there were no schema changes from release 6.0.0 to 6.1.0 and as a result there are no files named ...600_to_610_ schema_....

Upgrading the Schema Manually
D-2 Oracle Access Manager Upgrade Guide
Table D–1 Schema Files
Directory Type Schema Files
Active Directory osd_520_to_600_schema_ad.ldif
policy_520_to_600_schema_ad.ldif
user_520_to_600_schema_ad.ldif
osd_610_to_650_schema_ad.ldif
policy_610_to_650_schema_ad.ldif
user_610_to_650_schema_ad.ldif
osd_650_to_700_schema_ad.ldif
policy_650_to_700_schema_ad.ldif
user_650_to_700_schema_ad.ldif
osd_700_to_1014_schema_ad.ldif
policy_700_to_1014_schema_ad.ldif
user_700_to_1014_schema_ad.ldif
ADAM osd_650_to_700_schema_adam.ldif
policy_650_to_700_schema_adam.ldif
user_650_to_700_schema_adam.ldif
osd_700_to_1014_schema_adam.ldif
policy_700_to_1014_schema_adam.ldif
user_700_to_1014_schema_adam.ldif
IBM SecureWay osd_520_to_600_schema_ibm.ldif
policy_520_to_600_schema_ibm.ldif
user_520_to_600_schema_ibm.ldif
osd_610_to_650_schema_ibm.ldif
policy_610_to_650_schema_ibm.ldif
osd_650_to_700_schema_ibm.ldif
policy_650_to_700_schema_ibm.ldif
user_650_to_700_schema_ibm.ldif
osd_700_to_1014_schema_ibm.ldif
policy_700_to_1014_schema_ibm.ldif
user_700_to_1014_schema_ibm.ldif
Novell e-Directory osd_520_to_600_schema_nds.ldif
policy_520_to_600_schema_nds.ldif
user_520_to_600_schema_nds.ldif
osd_610_to_650_schema_nds.ldif
policy_610_to_650_schema_nds.ldif
osd_650_to_700_schema_nds.ldif
policy_650_to_700_schema_nds.ldif
user_650_to_700_schema_nds.ldif
osd_700_to_1014_schema_nds.ldif
policy_700_to_1014_schema_nds.ldif
user_700_to_1014_schema_nds.ldif
Oracle Internet Directory osd_700_to_1014_schema_oid.ldif
policy_700_to_1014_schema_oid.ldif
user_700_to_1014_schema_oid.ldif
Siemens DirX osd_700_to_1014_schema_dirx.ldif
policy_700_to_1014_schema_dirx.ldif
user_700_to_1014_schema_dirx.ldif

About Upgrading Data Manually
Manual Schema and Data Upgrades D-3
To upgrade the schema manually1. Navigate to the upgrade directory:
IdentityServer_install_dir\identity\oblix\tools\migration_tools
2. Locate the appropriate schema file for the directory server and specific fromrelease_to_release.
3. Invoke the schema upgrade tool ds_conf_update using the command here.
For example:
IdentityServer_install_dir\identity\oblix\tools\ldap_tools \ds_conf_update -f schema_file
where schema_file is the name of the schema file as shown in the samples in Table D–1.
4. Respond to prompts for various options, such as host, port, userid, and password.
Any errors produced while running this tool are printed to stdout. This tool can be used for any directory server that is compatible with Oracle Access Manager 10g (10.1.4.0.1).
About Upgrading Data ManuallyOracle Access Manager includes several files that are called and used during the upgrade from Oracle Access Manager 5.2 to 10g (10.1.4.0.1). You can copy and use these files as a template to display or suppress the prompts you see and respond to during the upgrade. For example, you can allow the prompts to enable automatic data upgrades or you can suppress the prompts to enable manual upgrade.
The template in "Sample Default obmigratenpparams.lst File" on page 12 determines which data upgrade prompts you see during the upgrade from Oracle Access Manager 5.2 to 10g (10.1.4.0.1).
\IdentityServer_install_dir\identity\oblix\tools \migration_tools\obmigratenpparams.lst
Included in this file are sections for upgrades from each major release to the next major release starting with release 5.2 and continuing through release 10g (10.1.4.0.1). A
Sun 4.x and 5.x osd_520_to_600_schema_ns.ldif
policy_520_to_600_schema_ns.ldif
user_520_to_600_schema_ns.ldif
osd_610_to_650_schema_ns.ldif
policy_610_to_650_schema_ns.ldif
osd_650_to_700_schema_ns.ldif
policy_650_to_700_schema_ns.ldif
user_650_to_700_schema_ns.ldif
osd_700_to_1014_schema_ns.ldif
policy_700_to_1014_schema_ns.ldif
user_700_to_1014_schema_ns.ldif
Oracle Virtual Directory Server (VDS)
user_700_to_1014_schema_vde.ldif
Table D–1 (Cont.) Schema Files
Directory Type Schema Files

Upgrading Data Manually
D-4 Oracle Access Manager Upgrade Guide
complete, annotated version of the obmigratenpparams.lst file is shown in "Sample Default obmigratenpparams.lst File" on page 12.
The appropriate value must be supplied for each parameter in the file. For True/False values:
■ A value of True triggers the automatic data upgrade prompt and program.
■ A value of False suppresses the data upgrade prompt and program and can be used when you want a manual data upgrade.
Upgrading Data ManuallyOracle recommends that you upgrade the schema and data automatically. However, when you must upgrade the schema and data manually use the overview here as a guide.
Task overview: Upgrading data manually includes1. Suppressing Automatic Data Upgrades.
2. Upgrading the Configuration Tree Manually.
3. Removing Obsolete Schema Elements for Release 6.5 and 7.0, if you want.
4. Uploading the Generated LDIF.
5. Upgrading User Data Manually.
When you choose manual data upgrades, two files provide parameters for the configuration data and user data in the directory:
\install_dir\identity\oblix\tools\migration_tools\obmigratedata
data_520_to_600_osd.lst—drives the manual upgrade of the Oracle Access Manager configuration data, for example:
osd_migration:true policy_migration:true wf_migration:true user_migration:false
WARNING: The order of parameters in the file might not indicate the upgrade order.
WARNING: Although not recommended, you can suppress automatic upgrades of the Oracle Access Manager configuration data and user data, as described in "Suppressing Automatic Data Upgrades" on page 5. In that case, you must manually upgrade the configuration data and user data as described in "Upgrading User Data Manually" on page 10.
WARNING: Oracle recommends that you upgrade the schema and data automatically.

Upgrading Data Manually
Manual Schema and Data Upgrades D-5
data_520_to_600_user.lst—drives the upgrade of user data, which occurs only during the upgrade from Oracle Access Manager 5.2.x to 6.0.0, for example:
osd_migration:false policy_migration:false wf_migration:false user_migration:true
Both the osd.lst and user.lst files contain similar information. However, procedures must be completed for both user data and configuration data and a specific value must be provided for each parameter in the files. See Table C–7 on page C-17. An annotated example is shown in "Sample data_520_to_600_xxx.lst" on page D-16. See also, "Data Upgrade: obmigratedata" on page C-14.
In addition to the two .lst files mentioned earlier, Oracle Access Manager 10g (10.1.4.0.1) provides the following files:
■ data_610_to_650_multi_lang.lst—multi_lang_migration:true
■ data_610_to_650_osd.lst—osd_migration:true
■ data_610_to_650_psc.lst—psc_migration:true
■ data_650_to_700_osd.lst—osd_migration:true and wf_migration:true
■ data_650_to_700_psc.lst—psc_migration:true
■ data_700_to_1014_osd.lst—osd_migration:true
■ data_700_to_1014_psc.lst—psc_migration:true
Suppressing Automatic Data UpgradesIf you intend to upgrade data manually, you need to suppress automatic data upgrades.
To suppress automatic data upgrades1. Copy the file obmigratenpparams.lst and rename the original to retain it.
For example:
IdentityServer_install_dir\identity\oblix\tools \migration_tools\obmigratenpparams.lst
2. Edit the ois section of the copy and set the values shown in bold, next, to "false" to prohibit automatic data upgrades.
For example:
ois BEGIN:vCompoundList 520_to_600: BEGIN:vNameList: kMigrateData:false kMigrateSchema:false kMigratePublisher:false
Note: A value of True upgrades data. A value of False suppresses the upgrade.

Upgrading Data Manually
D-6 Oracle Access Manager Upgrade Guide
3. Complete a manual data upgrade as described in "Upgrading the Configuration Tree Manually" on page 6.
Upgrading the Configuration Tree ManuallyYou begin upgrading data manually by upgrading the configuration data tree. The following commands provide an example only. Your environment might vary.
To upgrade the configuration tree manually1. Copy the data_fromrelease_to_release_osd.lst file and rename it to retain the
original.
For example:
From
\install_dir\identity\oblix\tools\migration_tools\obmigratedata \data_520_to_600_osd.lst
To
\install_dir\identity\oblix\tools\migration_tools\obmigratedata \config_data_520to600_osd.lst
2. Edit the file to provide the information for your environment based on the annotated sample in "Sample data_520_to_600_xxx.lst" on page 16.
3. Confirm that the configuration tree and data parameter values are true.
osd_migration:true policy_migration:true wf_migration:true
4. Confirm that the user data migration parameter value is false.
user_migration:false
5. Back up (export) the old configuration tree to an LDIF.
6. Locate the obmigratedata tool, then upgrade the configuration tree by running obmigratedata and specifying the name of your updated file. For example:
\IdentityServer_install_dir\identity\oblix\tools \migration_tools\obmigratedata\obmigratedata.exe run obmigratedata.exe -f config_data_520to600_osd.lst -I install_dir
This program generates an LDIF based on the options selected in FunctionalityTBMigrated. The resulting LDIF file will be named as specified by the outputFileName parameter.
7. Delete the existing configuration tree after the OSD upgrade completes.
8. From 6.5 to 10g (10.1.4.0.1)—Before continuing with step 9 when upgrading the Identity Server and Policy Manager, you can proceed to "Removing Obsolete Schema Elements for Release 6.5 and 7.0" next.
9. All Upgrades—Complete the upgrade of configuration data with:
Note: See "Sample Default obmigratenpparams.lst File" on page 12 for sections on individual upgrades from one major release to the next. For example, from 520_to_600, and so on.

Upgrading Data Manually
Manual Schema and Data Upgrades D-7
■ Uploading the Generated LDIF
■ Upgrading User Data Manually
Removing Obsolete Schema Elements for Release 6.5 and 7.0 Oracle provides cleanup files for use during the incremental upgrade sequence between release 6.5 and 7.0. There are no cleanup files for any directory servers for the incremental upgrade sequence between release 7.x and 10g (10.1.4.0.1).
You can skip this procedure if your starting release is 7.0 or if you do not want to remove the obsolete schema from the directory server.
During an upgrade from release 6.5 to 10g (10.1.4.0.1), you can use the following procedures to clean up the obsolete schema elements from the directory server. If you choose to do this, it must be done after the configuration tree is deleted in the manual upgrade flow:
■ During Identity Server upgrades
■ During Policy Manager upgrades
After schema cleanup, LDIF files are available for you to upload to the directory server. Schema files for the configuration schema and the policy schema are separate. As a result, there are two scenarios to consider when you clean up the obsolete schema:
■ Are configuration and policy data stored in same directory server?
■ Are configuration and policy data stored in different directory servers?
Table D–2 shows configuration data cleanup files for specific directory server types.
Table D–3 shows the policy data cleanup files for specific directory server types.
Table D–2 Configuration Data Cleanup Files
Directory Type Schema Cleanup Files
Active Directory osd_650_to_700_schema_delete_ad.ldif
ADAM osd_650_to_700_schema_delete_adam.ldif
IBM SecureWay osd_650_to_700_schema_delete_ibm.ldif
Novell e-Directory osd_650_to_700_schema_delete_nds.ldif
Oracle Internet Directory Support for Oracle Internet Directory was introduced with Oracle COREid release 7.0.4 (also available as part of Oracle Application Server 10g Release 2 (10.1.2)). Therefore, there are no obsolete schema entries to be deleted and no such files for Oracle Internet Directory.
Sun 4.x 5.x
Note: 10g (10.1.4.0.1) does not support Sun 4.x directory servers. See "Sun Directory Server Considerations and Preparation" on page 5-16.
osd_650_to_700_schema_delete_ns.ldif
Table D–3 Policy Data Cleanup Files
Directory Type Schema Cleanup Files
Active Directory policy_650_to_700_schema_delete_ad.ldif
ADAM policy_650_to_700_schema_delete_adam.ldif
IBM SecureWay policy_650_to_700_schema_delete_ibm.ldif

Upgrading Data Manually
D-8 Oracle Access Manager Upgrade Guide
Depending upon your directory server and starting release, you can complete the procedures here more than once:
■ Cleaning Up Obsolete Elements During Identity Server Upgrades
■ Cleaning Up Obsolete Elements During Policy Manager Upgrades
Cleaning Up Obsolete Elements During Identity Server UpgradesUse the following procedure to remove obsolete elements during Identity Server upgrades from release 6.5 to 7.0.
To remove obsolete elements during Identity Server upgrades1. Navigate to the upgrade directory:
IdentityServer_install_dir/identity/oblix/tools/migration_tools
2. Locate the appropriate file for your directory server, as specified in Table D–2, so that you can provide this name in step 3.
3. Take the appropriate action for your environment:
■ Same Directory Server—If configuration data and policy data are in the same directory server, invoke the schema upgrade tool ds_conf_update using the command:
IdentityServer_install_dir/identity/oblix/tools/ldap_tools /ds_conf_update -f schema_file
where schema_file is the name of the schema cleanup file from Table D–2.
■ Different Directory Server—If configuration and policy data are in different directory servers, invoke ds_conf_update twice: once for the configuration schema and a second time for the policy schema as follows:
IdentityServer_install_dir/identity/oblix/tools/ldap_tools /ds_conf_update -f identity/oblix/tools/migration_tools
where schema_file is the name of the appropriate schema cleanup file from Table D–2.
4. Respond to prompts for various options, such as host, port, userid, and password.
5. Continue the upgrade with "Uploading the Generated LDIF" on page 9.
Novell e-Directory policy_650_to_700_schema_delete_nds.ldif
Oracle Internet Directory Support for Oracle Internet Directory was introduced with Oracle COREid release 7.0.4 (also available as part of Oracle Application Server 10g Release 2 (10.1.2)). Therefore, there are no obsolete schema entries to be deleted and no such files for Oracle Internet Directory.
Sun 4.x 5.x
Note: Oracle Access Manager 10g (10.1.4.0.1) does not support Sun 4.x directory servers. See "Sun Directory Server Considerations and Preparation" on page 5-16.
policy_650_to_700_schema_delete_ns.ldif
Table D–3 (Cont.) Policy Data Cleanup Files
Directory Type Schema Cleanup Files
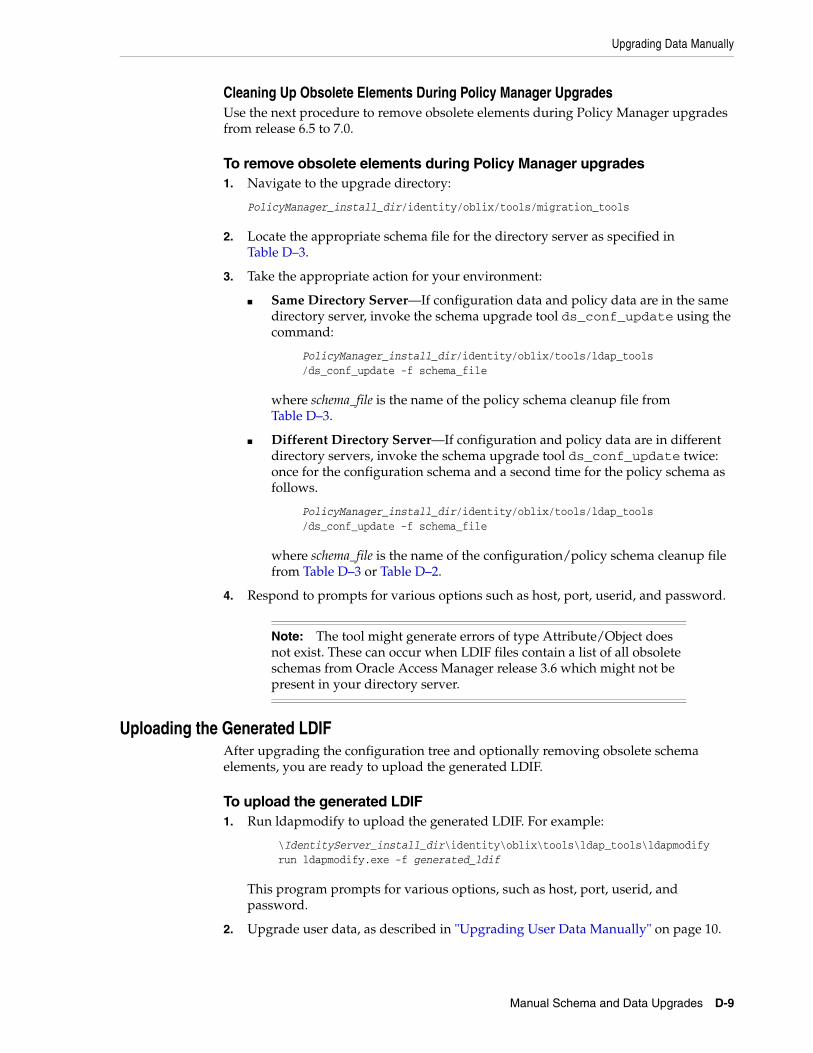
Upgrading Data Manually
Manual Schema and Data Upgrades D-9
Cleaning Up Obsolete Elements During Policy Manager UpgradesUse the next procedure to remove obsolete elements during Policy Manager upgrades from release 6.5 to 7.0.
To remove obsolete elements during Policy Manager upgrades1. Navigate to the upgrade directory:
PolicyManager_install_dir/identity/oblix/tools/migration_tools
2. Locate the appropriate schema file for the directory server as specified in Table D–3.
3. Take the appropriate action for your environment:
■ Same Directory Server—If configuration data and policy data are in the same directory server, invoke the schema upgrade tool ds_conf_update using the command:
PolicyManager_install_dir/identity/oblix/tools/ldap_tools /ds_conf_update -f schema_file
where schema_file is the name of the policy schema cleanup file from Table D–3.
■ Different Directory Server—If configuration and policy data are in different directory servers, invoke the schema upgrade tool ds_conf_update twice: once for the configuration schema and a second time for the policy schema as follows.
PolicyManager_install_dir/identity/oblix/tools/ldap_tools /ds_conf_update -f schema_file
where schema_file is the name of the configuration/policy schema cleanup file from Table D–3 or Table D–2.
4. Respond to prompts for various options such as host, port, userid, and password.
Uploading the Generated LDIFAfter upgrading the configuration tree and optionally removing obsolete schema elements, you are ready to upload the generated LDIF.
To upload the generated LDIF1. Run ldapmodify to upload the generated LDIF. For example:
\IdentityServer_install_dir\identity\oblix\tools\ldap_tools\ldapmodify run ldapmodify.exe -f generated_ldif
This program prompts for various options, such as host, port, userid, and password.
2. Upgrade user data, as described in "Upgrading User Data Manually" on page 10.
Note: The tool might generate errors of type Attribute/Object does not exist. These can occur when LDIF files contain a list of all obsolete schemas from Oracle Access Manager release 3.6 which might not be present in your directory server.
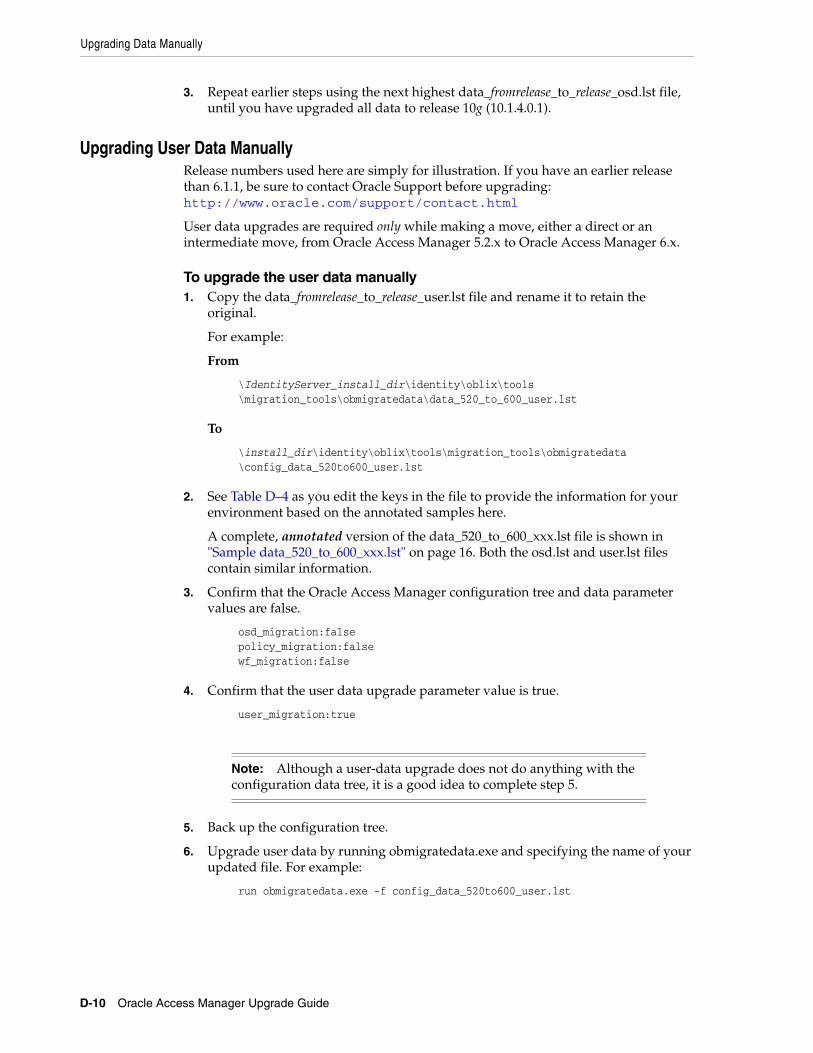
Upgrading Data Manually
D-10 Oracle Access Manager Upgrade Guide
3. Repeat earlier steps using the next highest data_fromrelease_to_release_osd.lst file, until you have upgraded all data to release 10g (10.1.4.0.1).
Upgrading User Data ManuallyRelease numbers used here are simply for illustration. If you have an earlier release than 6.1.1, be sure to contact Oracle Support before upgrading: http://www.oracle.com/support/contact.html
User data upgrades are required only while making a move, either a direct or an intermediate move, from Oracle Access Manager 5.2.x to Oracle Access Manager 6.x.
To upgrade the user data manually1. Copy the data_fromrelease_to_release_user.lst file and rename it to retain the
original.
For example:
From
\IdentityServer_install_dir\identity\oblix\tools \migration_tools\obmigratedata\data_520_to_600_user.lst
To
\install_dir\identity\oblix\tools\migration_tools\obmigratedata \config_data_520to600_user.lst
2. See Table D–4 as you edit the keys in the file to provide the information for your environment based on the annotated samples here.
A complete, annotated version of the data_520_to_600_xxx.lst file is shown in "Sample data_520_to_600_xxx.lst" on page 16. Both the osd.lst and user.lst files contain similar information.
3. Confirm that the Oracle Access Manager configuration tree and data parameter values are false.
osd_migration:false policy_migration:false wf_migration:false
4. Confirm that the user data upgrade parameter value is true.
user_migration:true
5. Back up the configuration tree.
6. Upgrade user data by running obmigratedata.exe and specifying the name of your updated file. For example:
run obmigratedata.exe -f config_data_520to600_user.lst
Note: Although a user-data upgrade does not do anything with the configuration data tree, it is a good idea to complete step 5.

Upgrading Data Manually
Manual Schema and Data Upgrades D-11
Table D–4 Keys to Add or Edit
Key Description
hostname: host name Directory server host
portNo: port number Directory server port
bindDN: DS credentials The DN of the directory server administrator account. This can be found in installdir/oblix/config/ldap/AppDB.xml.
password: encrypted password Password of the directory server administrator account. This can be found in installdir/oblix/config/ldap/AppDB.xml.
directoryType: NS|AD|NDS|IBM
The type of directory server you are running
directoryMode: SSL|OPEN The mode of the directory server you are using. Values can be either SSL or Open.
Oblixnode: ou=Oblix|o=Oblix RDN of the Oracle Access Manager configuration tree
groupOC: name of Group object class
Example: group or groupOfUniqueNames
PersonOC: name of Person object class
Example: user or inetOrgPerson
oldVersion: release number Exact release number of the Oracle Access Manager 5.2 system. This can be found in ./oblix/config/np52_is.txt. Example: 5.2, 5.2.1.12
oldVersionSearchBase: searchbase
The searchbase to use. Typically, this is the global searchbase.
binAttrFileName:at_520_to_600_binary.lst
Accept this file as shown. It contains important information for the upgrade program.
objclassMapFileName:oc_520_to_600_map.lst
Accept this file as shown. It contains important information for the upgrade program.
logFileName: filename Name of the file to receive logging information during the conversion process.
outputFileName: filename Name of the LDIF file to receive the converted data.
missedSuppliedAttrsDetailsFileName: filename
Name of the file to receive workflows containing Provisioned attributes in Oracle Access Manager 5.2. These workflows must be modified manually in the applet to associate the appropriate subflow with them.
WFDefContainer: DN of the workflow definitions container. Example: obcontainerID=workflowDefinitions,OU= oblix,DC=company,DC=com
WFInstanceContainer DN of the workflow instance container. Example: obcontainerId=workflowInstances, OU=oblix,DC=company,DC =com
FunctionalityTBMigrated
BEGIN:vNameList
osd_migration: true|false Perform data upgrades on the configuration tree.
Note: If you are running data upgrades because of errors in an earlier run:
■ During the Identity Server upgrade, ensure that values of osd_migration and wf_migration match (true). policy_migration value should be "false".
■ During Policy Manager upgrades, ensure that values of osd_migration and wf_migration match (false) while policy_migration value is "true".
policy_migration: true|false Refer to details for osd_migration.
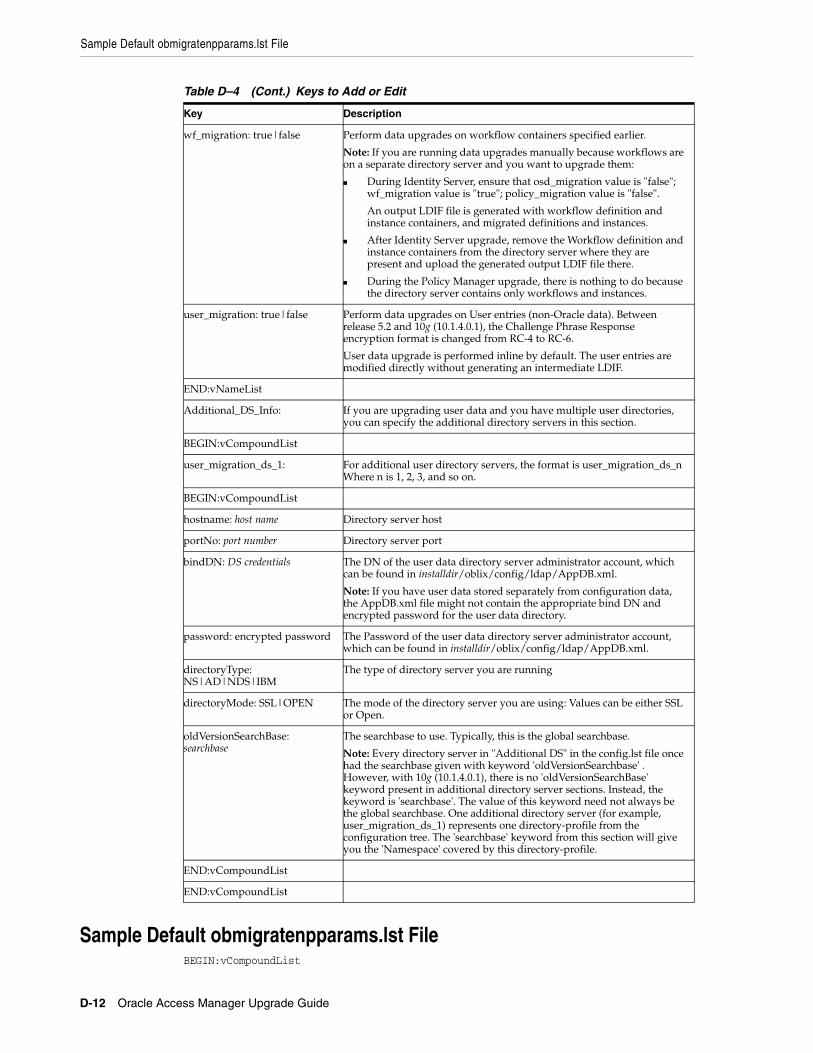
Sample Default obmigratenpparams.lst File
D-12 Oracle Access Manager Upgrade Guide
Sample Default obmigratenpparams.lst FileBEGIN:vCompoundList
wf_migration: true|false Perform data upgrades on workflow containers specified earlier.
Note: If you are running data upgrades manually because workflows are on a separate directory server and you want to upgrade them:
■ During Identity Server, ensure that osd_migration value is "false"; wf_migration value is "true"; policy_migration value is "false".
An output LDIF file is generated with workflow definition and instance containers, and migrated definitions and instances.
■ After Identity Server upgrade, remove the Workflow definition and instance containers from the directory server where they are present and upload the generated output LDIF file there.
■ During the Policy Manager upgrade, there is nothing to do because the directory server contains only workflows and instances.
user_migration: true|false Perform data upgrades on User entries (non-Oracle data). Between release 5.2 and 10g (10.1.4.0.1), the Challenge Phrase Response encryption format is changed from RC-4 to RC-6.
User data upgrade is performed inline by default. The user entries are modified directly without generating an intermediate LDIF.
END:vNameList
Additional_DS_Info: If you are upgrading user data and you have multiple user directories, you can specify the additional directory servers in this section.
BEGIN:vCompoundList
user_migration_ds_1: For additional user directory servers, the format is user_migration_ds_n Where n is 1, 2, 3, and so on.
BEGIN:vCompoundList
hostname: host name Directory server host
portNo: port number Directory server port
bindDN: DS credentials The DN of the user data directory server administrator account, which can be found in installdir/oblix/config/ldap/AppDB.xml.
Note: If you have user data stored separately from configuration data, the AppDB.xml file might not contain the appropriate bind DN and encrypted password for the user data directory.
password: encrypted password The Password of the user data directory server administrator account, which can be found in installdir/oblix/config/ldap/AppDB.xml.
directoryType: NS|AD|NDS|IBM
The type of directory server you are running
directoryMode: SSL|OPEN The mode of the directory server you are using: Values can be either SSL or Open.
oldVersionSearchBase: searchbase
The searchbase to use. Typically, this is the global searchbase.
Note: Every directory server in "Additional DS" in the config.lst file once had the searchbase given with keyword 'oldVersionSearchbase' . However, with 10g (10.1.4.0.1), there is no 'oldVersionSearchBase' keyword present in additional directory server sections. Instead, the keyword is 'searchbase'. The value of this keyword need not always be the global searchbase. One additional directory server (for example, user_migration_ds_1) represents one directory-profile from the configuration tree. The 'searchbase' keyword from this section will give you the 'Namespace' covered by this directory-profile.
END:vCompoundList
END:vCompoundList
Table D–4 (Cont.) Keys to Add or Edit
Key Description

Sample Default obmigratenpparams.lst File
Manual Schema and Data Upgrades D-13
am: Policy Manager Parameters BEGIN:vCompoundList kMigrateLicense:false 520_to_600: BEGIN:vNameList: kMigrateWS:true kMigrateData:false kMigrateSchema:true END:vNameList 600_to_610: BEGIN:vNameList: kMigrateWS:false kMigrateData:false kMigrateSchema:false END:vNameList 610_to_650: BEGIN:vNameList: kMigrateWS:true kMigrateData:true kMigrateSchema:true END:vNameList 650_to_700: BEGIN:vNameList: kMigrateWS:true kMigrateData:true kMigrateSchema:true END:vNameListr 700_to_1014: BEGIN:vNameList: kMigrateWS:false kMigrateData:true kMigrateSchema:true END:vNameListr END:vCompoundList
wg: (WebGate) BEGIN:vCompoundList 520_to_600: BEGIN:vNameList: kMigrateWS:true END:vNameList 600_to_610: BEGIN:vNameList: kMigrateWS:false END:vNameList 650_to_700: BEGIN:vNameList: kMigrateWS:true END:vNameList 700_to_1014: BEGIN:vNameList: kMigrateWS:true END:vNameList END:vCompoundList
wp: (webPass) BEGIN:vCompoundList 520_to_600: BEGIN:vNameList: kMigratePublisher:true

Sample Default obmigratenpparams.lst File
D-14 Oracle Access Manager Upgrade Guide
END:vNameList 600_to_610: BEGIN:vNameList: kMigratePublisher:false END:vNameList 610_to_650: BEGIN:vNameList: kMigratePublisher:false END:vNameList 650_to_700: BEGIN:vNameList: kMigrateWS:true END:vNameList 700_to_1014: BEGIN:vNameList: END:vNameList END:vCompoundList
aaa: (Access Server) Authentication, Authorization, Auditing Parameters BEGIN:vCompoundList 520_to_600: BEGIN:vNameList: kMigrateData:true kMigrateSchema:true END:vNameList 600_to_610: BEGIN:vNameList: kMigrateData:false kMigrateSchema:false END:vNameList 610_to_650: BEGIN:vNameList: kMigrateSchema:false kMigrateData:true END:vNameList 700_to_1014: BEGIN:vNameList: END:vNameList END:vCompoundList
bea: BEGIN:vCompoundList 600_to_610: BEGIN:vNameList: kMigrateASDK:true END:vNameList 650_to_700: BEGIN:vNameList: kMigrateASDK:true END:vNameList END:vCompoundList
idlk:BEGIN:vCompoundList kMigrateLicense:falseEND:vCompoundList
ois: Identity Server Parameters: True triggers automatic data migration BEGIN:vCompoundList kMigrateLicense:false

Sample Default obmigratenpparams.lst File
Manual Schema and Data Upgrades D-15
kMigrateASDK:true 520_to_600: BEGIN:vNameList: kMigrateData:true kMigrateSchema:true kMigratePublisher:true END:vNameList
600_to_610: BEGIN:vNameList: kMigrateASDK:true kMigrateData:false kMigrateSchema:false kMigratePublisher:false
kASDKSubDir:/AccessServerSDK
END:vNameList
610_to_650: BEGIN:vNameList: kMigrateASDK:true kMigrateSchema:true kMigrateData:true kMigratePublisher:false
kASDKSubDir:/AccessServerSDK
END:vNameList
650_to_700: BEGIN:vNameList: kMigrateASDK:true kMigrateData:true kMigrateSchema:true kMigratePublisher:false
kASDKSubDir:/AccessServerSDK
END:vNameList
700_to_1014: BEGIN:vNameList: kMigrateASDK:true kMigrateData:true kMigrateSchema:true kMigratePublisher:false
kASDKSubDir:/AccessServerSDK END:vNameList
END:vCompoundList
was: BEGIN:vCompoundList kMigrateASDK:true 600_to_610: BEGIN:vNameList: kMigrateASDK:true END:vNameList

Sample data_520_to_600_xxx.lst
D-16 Oracle Access Manager Upgrade Guide
650_to_700: BEGIN:vNameList: kMigrateASDK:true END:vNameList END:vCompoundList
END:vCompoundList
Sample data_520_to_600_xxx.lstAgain, release numbers shown here are for illustration only. If your starting release is earlier than 6.1.1, be sure to contact Oracle Support before upgrading: http://www.oracle.com/support/contact.html
Both the osd.lst and user.lst files contain similar information. For additional details, see Table C–7. User migration occurs only during the upgrade from Oracle Access Manager 5.2.x to Oracle Access Manager 6.0.0. When you have ADAM as the directory server with Oracle Access Manager 6.5.1 or later, the directory type to be used is ADAM.
BEGIN:vCompoundList
hostName:<hostName> portNo:<portNo> bindDN:<bindDN> password:<password> Copy encrypted credentials from\COREid\identity\oblix\config\ldap\AppDB.xml directoryMode:<directoryMode> Open or SSL directoryType:<directoryType> NS or AD or NDS or IBM
oldConfigDN:<oldConfigDN> o=company,c=us oldVersionSearchbase:<oldVersionSearchbase>Global Searchbase
binAttrFileName:at_520_to_600_binary.lst objclassMapFileName:oc_520_to_600_map.lst
logFileName:output_520_to_600_osd.log Okay to change outputFileName:output_520_to_600_osd.ldif Okay to change missedSuppliedAttrsDetailsFileName:output_520_to_600_supplied_osd.txt
oblixnode:o=oblix For AD use ou=oblix groupOC:<groupOC> Your Group personOC:<personOC> doUTFConversion:<doUTFConversion> True or False oldVersion:5.2.1.7 Must be specific newVersion:6.0.0 Use proper Release encryptionType:Oblix Changes the encryption scheme from RC4 to RC6; use Oblix unless you have a customized encryption scheme
#We want to know wf-containers names Workflow definition containers WFDefContainer:<wfdefcontainer> WFInstanceContainer:<wfdefcontainer>
FunctionalityTBMigrated: In the following parameters, True migrates automatically; False does not BEGIN:vNameList
osd_migration:true Configuration tree migration (True or False) policy_migration:true

Sample data_520_to_600_xxx.lst
Manual Schema and Data Upgrades D-17
wf_migration:true
user_migration:false (True migrates data, False does not)
END:vNameList
oblixdeletedobjects: BEGIN:vCompoundList ad: BEGIN:vList 0ADEL: CN=Deleted Objects
adam: BEGIN:vList 0ADEL: CN=Deleted Objects END:vList END:vCompoundList
END:vCompoundList

Sample data_520_to_600_xxx.lst
D-18 Oracle Access Manager Upgrade Guide

Upgrading Sun Web Server Version 4 to Version 6 on Windows 2000 E-1
EUpgrading Sun Web Server Version 4 to
Version 6 on Windows 2000
If your earlier Oracle Access Manager environment includes Sun (previously iPlanet) Web server that has been discontinued, you can use the example here to upgrade to a supported Sun Web server release.
■ Upgrading Sun Web Server version 4.x to version 6
■ Configuring the New Web Server Instance
■ Troubleshooting
Upgrading Sun Web Server version 4.x to version 6The new Web server release should be in a separate area of the Windows 2000 file system. Be sure that the Web server 4.1 service is stopped and that the service control window is closed. Otherwise, the 4.1 service will be disabled and marked for deletion, and the new service will not be created. In this state, neither the 4.1 nor the 6.0 Admin Console can operate the server.
To upgrade Sun (iPlanet) version 4.x Web Server to Sun version 61. Install a Sun Web server release 6 on the same Windows 2000 computer that is
currently hosting iPlanet 4.1 and the earlier release of Oracle Access Manager.
2. Make a copy of the earlier magnus.conf and obj.conf files for future reference.
3. Stop Sun Web server 4 using either the Services Window or the Sun Web Server Administration Console, then close the service control window.
Note: Specific release numbers are used only to illustrate the sequence of tasks. Refer to your vendor documentation for complete details about administering your directory server release. Specific details of the intermediate upgrade from earlier Oracle Access Manager releases to release 6.1.1 are outside the scope of this manual. Before you start upgrading from an Oracle Access Manager release earlier than 6.1.1, contact Oracle Support at http://www.oracle.com/support/contact.html.
Note: This procedure provides details for only Windows 2000 and Sun Web server version 4.1 to 6.0 upgrades. This is an example only. For complete support information, see the Certify tab at https://metalink.oracle.com

Configuring the New Web Server Instance
E-2 Oracle Access Manager Upgrade Guide
4. Open the Sun Web server 6 Administration Console, then click the Migrate Server link.
5. In the Sun 6.0 Admin Console, enter the Server Root for the Sun Web server 4 and click the Search button.
The list of server instances under the root node appears.
6. Select the instance you want to migrate, then click the Migrate button.
7. Select the Document Root option, then click Migrate. For example:
Use the new server's document root, Migrate
The migration starts and status messages appear. The old configuration is assimilated into a newly created instance for Sun 6.0.
8. Close this browser window and continue with "Configuring the New Web Server Instance".
Configuring the New Web Server InstanceThe following things need to be done manually:
■ Configuring magnus.conf
■ Configuring obj.conf
Configuring magnus.confYou need to define the logs/access path in magnus.conf for the newly installed Web server instance, as described in the procedure here.
To configure the new Web server instance in magnus.conf1. In the config directory of the migrated instance (6.0 instance area), locate the
magnus.conf file.
2. Search for logs/access in magnus.conf; the path still refers to the old area.
3. In the magnus.conf, update the logs/access path appropriately.
For example, suppose your 4.1 area is D:\NSWS\Server4, and the 6.0 area is G:\iPlanet6WS, you need to make the following change:
From
Init fn=flex-init access="D:/NSWS/Server4/https-hostname/logs/access"format.access="%Ses->client.ip% - %Req->vars.auth-user% [%SYSDATE%]\"%Req->reqpb.clf-request%\" %Req->srvhdrs.clf-status%%Req->srvhdrs.content-length%"
To
Note: If you choose the same document root as the old server, migration will create some incorrect entries in your configuration file. For example, if your Web server contains entries for WebGate, the server's document root will be changed to the WebGate directory and accessing the root using http://server:port/ will show you a directory listing with webgate.dll as the only file. More details about correcting the document root are given later.

Configuring the New Web Server Instance
Upgrading Sun Web Server Version 4 to Version 6 on Windows 2000 E-3
Init fn=flex-init access="G:/iPlanet6WS/https-hostname/logs/access" format.access="%Ses->client.ip% - %Req->vars.auth-user% [%SYSDATE%] \"%Req->reqpb.clf-request%\" %Req->srvhdrs.clf-status% %Req->srvhdrs.content-length%"
If you use this method to add this variable to server.xml, you would have to replace the line in magnus.conf as follows:
From
Init fn=flex-init access="D:/NSWS/Server4/https-hostname/logs/access" format.access="%Ses->client.ip% - %Req->vars.auth-user% [%SYSDATE%] \"%Req->reqpb.clf-request%\"%Req->srvhdrs.clf-status% %Req->srvhdrs.content-length%"
To
Init fn=flex-init access="$accesslog"format.access="%Ses->client.ip% - %Req->vars.auth-user%[%SYSDATE%] \"%Req->reqpb.clf-request%\"%Req->srvhdrs.clf-status% %Req->srvhdrs.content-length%"
4. Continue with "Configuring obj.conf".
Configuring obj.conf In the migrated obj.conf file (in the config directory), the document-root directives are all set improperly. For example, suppose the following section appears in the obj.conf file for your Web server 4.x instance before the migration. Note that the values of the various document-root(s) differ. For example, there is a document root for the Web server (D:/NSWS/Server4/docs) and others for individual objects, shown in bold:
Sample obj.conf 4.x before Migration to 6.0NameTrans fn="NSServletNameTrans" name="servlet"NameTrans fn="pfx2dir" from="/servlet" dir="D:/NSWS/Server4/docs/servlet"name="ServletByExt"NameTrans fn=pfx2dir from=/ns-icons dir="D:/NSWS/Server4/ns-icons"name="es-internal"NameTrans fn=pfx2dir from=/mc-icons dir="D:/NSWS/Server4/ns-icons" name="es-internal"NameTrans fn="pfx2dir" from="/help" dir="D:/NSWS/Server4/manual/https/ug" name="es-internal"NameTrans fn="pfx2dir" from="/manual" dir="D:/NSWS/Server4/manual/https" name="es-internal"NameTrans fn=document-root root="D:/NSWS/Server4/docs"PathCheck fn=nt-uri-cleanPathCheck fn="check-acl" acl="default"......<Object name="access_lost_pwd_mgmt">NameTrans fn="document-root" root="G:/52/webpass/access/oblix/apps/lost_pwd_mgmt/bin"ObjectType fn="type-by-extension"ObjectType fn="force-type" type="text/html"Service fn="OBlost_pwd_mgmt_Service" method="(POST|GET)"
Note: In this newly created 6.0 Web server, the access log location is defined as a variable in server.xml. For example: <VARS accesslog="G:/iPlanet6WS/https-hostname/logs/access" />.
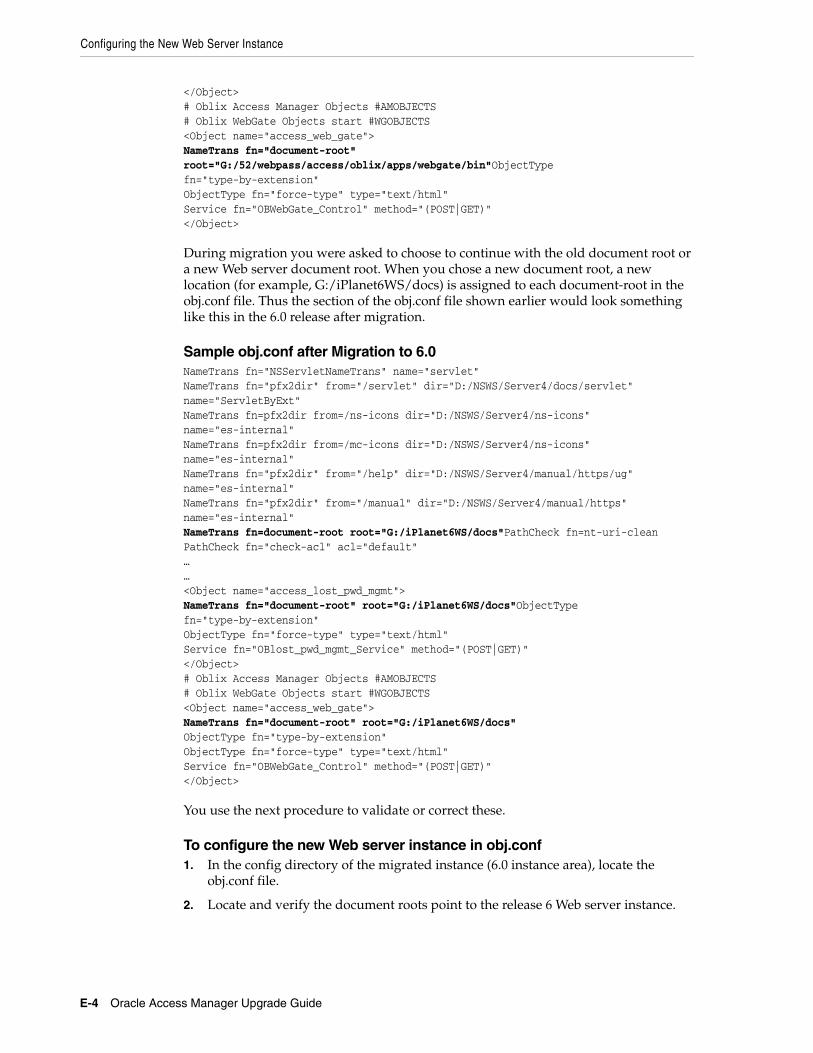
Configuring the New Web Server Instance
E-4 Oracle Access Manager Upgrade Guide
</Object># Oblix Access Manager Objects #AMOBJECTS# Oblix WebGate Objects start #WGOBJECTS<Object name="access_web_gate">NameTrans fn="document-root" root="G:/52/webpass/access/oblix/apps/webgate/bin"ObjectType fn="type-by-extension"ObjectType fn="force-type" type="text/html"Service fn="OBWebGate_Control" method="(POST|GET)"</Object>
During migration you were asked to choose to continue with the old document root or a new Web server document root. When you chose a new document root, a new location (for example, G:/iPlanet6WS/docs) is assigned to each document-root in the obj.conf file. Thus the section of the obj.conf file shown earlier would look something like this in the 6.0 release after migration.
Sample obj.conf after Migration to 6.0NameTrans fn="NSServletNameTrans" name="servlet"NameTrans fn="pfx2dir" from="/servlet" dir="D:/NSWS/Server4/docs/servlet" name="ServletByExt"NameTrans fn=pfx2dir from=/ns-icons dir="D:/NSWS/Server4/ns-icons" name="es-internal"NameTrans fn=pfx2dir from=/mc-icons dir="D:/NSWS/Server4/ns-icons" name="es-internal"NameTrans fn="pfx2dir" from="/help" dir="D:/NSWS/Server4/manual/https/ug" name="es-internal"NameTrans fn="pfx2dir" from="/manual" dir="D:/NSWS/Server4/manual/https" name="es-internal"NameTrans fn=document-root root="G:/iPlanet6WS/docs"PathCheck fn=nt-uri-cleanPathCheck fn="check-acl" acl="default"……<Object name="access_lost_pwd_mgmt">NameTrans fn="document-root" root="G:/iPlanet6WS/docs"ObjectType fn="type-by-extension"ObjectType fn="force-type" type="text/html"Service fn="OBlost_pwd_mgmt_Service" method="(POST|GET)"</Object># Oblix Access Manager Objects #AMOBJECTS# Oblix WebGate Objects start #WGOBJECTS<Object name="access_web_gate">NameTrans fn="document-root" root="G:/iPlanet6WS/docs"ObjectType fn="type-by-extension"ObjectType fn="force-type" type="text/html"Service fn="OBWebGate_Control" method="(POST|GET)"</Object>
You use the next procedure to validate or correct these.
To configure the new Web server instance in obj.conf1. In the config directory of the migrated instance (6.0 instance area), locate the
obj.conf file.
2. Locate and verify the document roots point to the release 6 Web server instance.

Troubleshooting
Upgrading Sun Web Server Version 4 to Version 6 on Windows 2000 E-5
3. Locate and verify that the variable document root is defined in server.xml as follows.
For example
-<VSCLASS id="defaultclass" objectfile="obj.conf" rootobject="default" acceptlanguage="off"> <VARS docroot="g:/iPlanet6WS/docs" /> -<VS id="https-hostname" connections="group1" mime="mime1" urlhosts="lucerne.persistent.co.in" aclids="acl1"> <VARS webapps_file="web-apps.xml" webapps_enable="on" /> <USERDB id="default" database="default" /> </VS> </VSCLASS>
Alternatively, you can change obj.conf without updating server.xml by replacing the line from obj.conf by the following one -
NameTrans fn="pfx2dir" from="/servlet" dir="G:/iPlanet6WS/docs/servlet" name="ServletByExt"
4. Search the migrated obj.conf for any mention of the old install area (in this example, D:/NSWS/Server4) to ensure that the v 6.0 instance of the Web server does not refer to the old install area in any way.
TroubleshootingFor information about troubleshooting this process, see "Troubleshooting Sun Web Server Upgrades" on page G-12.
Note: The following line in obj.conf might still refer to the old location:
NameTrans fn="pfx2dir" from="/servlet"dir="D:/NSWS/Server4/docs/servlet" name="ServletByExt"
In the newly created release 6.0 Web server, this entry is as follows:
NameTrans fn="pfx2dir" from="/servlet" dir="$docroot/servlet"name="ServletByExt"
when the variable document root is defined in server.xml, as shown in step 3.

Troubleshooting
E-6 Oracle Access Manager Upgrade Guide

Planning and Tracking Summaries F-1
FPlanning and Tracking Summaries
This appendix organizes planning details and deliverables, and tracking summaries, into tables that you can use as you prepare for and upgrade your deployments. Planning deliverables include documentation that you prepare where you have defined and recorded a detailed plan that identifies how the upgrade process is to be performed within each of your deployments. Whether you are performing an in-place upgrade or you are using the zero downtime upgrade method, the details that you need to collect for each component and the deployment are the same. Topics in this appendix include:
■ About Planning for the Upgrade
■ Summary of General Details Needed for Upgrade Planning
■ Summary of Information Needed for Directory Server Instances
■ Summary of DIT and Object Definition Details
■ Summary of Directory Server/RDBMS Profile Details
■ Summary of Database Instance Profile Details
■ Summary of Details Needed for Earlier Identity Servers
■ Summary of Details Needed for Earlier WebPass Instances
■ Summary of Details Needed for Earlier Policy Manager Instances
■ Summary of Details Needed for Earlier Access Servers
■ Summary of Details Needed for Earlier WebGates/AccessGates
■ Summary of Details for Integration Components and Independently Installed SDKs
■ Summary of Details Needed for Customizations
■ Summary of Schema and Data Preparation Tasks
■ Summary of Upgrading Schema and Data: In-Place Upgrade Method
■ Summary of Component Preparation Tasks
■ Summary of In-Place Upgrade Tasks
■ Summary of a Zero Downtime Upgrade Tasks
■ Summary for Integration Connector/SDK Upgrade Tasks
■ Summary for Customization Upgrade Tasks
■ Summary of Validating the Entire Upgrade

About Planning for the Upgrade
F-2 Oracle Access Manager Upgrade Guide
About Planning for the UpgradeBefore you start any upgrade activity, Oracle recommends that you review all information related to the upgrade method that you have chosen:
■ Chapter 1 provides an overview of upgrade tasks and planning activities. It includes the following topics:
■ About Upgrading and Upgrade Methodologies
■ Typical Deployment Scenarios
■ In-Place Upgrade Task Overview
■ In-Place Upgrade Planning and Deliverables
■ Planning Considerations for System Downtime During In-Place Upgrades
■ Planning Considerations for Extranet and Intranet Deployments
■ Upgrade Paths
■ Chapter 2 introduces upgrade concepts, strategies, and processing methods. Topics in this chapter include
■ Upgrade Terms and Concepts
■ About Upgrading the Oracle Application Server
■ Backup and Recovery Strategies
■ Zero Downtime Upgrade Start Methods
■ In-Place Upgrade Start Methods
■ Upgrade Event Modes
■ Support Deprecated
■ Upgrade Strategies When Support is Changed or Deprecated
■ Chapter 3 introduces both the automated processes that are initiated when you start a component upgrade and manual tasks that you must perform
Any details that you can access and print in your earlier installation will save you time and eliminate the possibility of errors. For example, consider printing directory server profiles and DB instance profiles, as well as COREid Server, WebPass, Access Server, and WebGate configuration pages. You might want to create and fill in your own documentation while collecting information. In this case, you can use the summaries in this appendix as a guide. Which ever method you choose, your planning
Note: If you are using the zero downtime upgrade method, see also Chapter 15.
Note: If you are using the zero downtime upgrade method, see also Chapter 15.
Note: If you are using the zero downtime upgrade method, see also Chapter 15.

About Planning for the Upgrade
Planning and Tracking Summaries F-3
deliverables provide a point of reference for the information that you collect and use during the upgrade.
For more information, see "In-Place Upgrade Planning and Deliverables"page 1-13 or "Developing a Plan for a Zero Downtime Upgrade" page 15-37.
The tables in this appendix are provided to help you see the details needed and track the progress of tasks that are completed as you and your team perform upgrade activities in your enterprise. You will find information about how to perform each task in chapters within this manual. Most items in the summary are links to more information.
Note: Be sure to store printed information and other recorded details about your installation in a secure location.

Summary of General Details Needed for Upgrade Planning
F-4 Oracle Access Manager Upgrade Guide
Summary of General Details Needed for Upgrade PlanningTable F–1 summarizes the general information that you need to collect when planning for an upgrade.
Table F–1 Details for Your Overall Deployment
Task Subtask Overall Deployment Summary
0 0.1 Deployment Name: ________________________________________________________________
Deployment Type (circle all that apply):
Identity System Only Joint Identity and Access System
Intranet Deployment Extranet Deployment
Development Test/Demo QA Production Other
Master Administrator for this deployment:___________________________________________
Deterministic test script developed by:_______________________________________________
Date of the last validation of system operation:________________________________________
0.2 Total number of each component in this environment:
Identity Servers:____________________________________________________________________
WebPass Instances:_________________________________________________________________
Independently installed SDKs:________________________________________________________
Identity customizations:_____________________________________________________________
If Joint Identity and Access System, enter, total number of:
Policy Managers (formerly known as Access Manager component):_______________________
Access Servers:____________________________________________________________________
WebGates:________________________________________________________________________
Custom AccessGates:_______________________________________________________________
Access customizations:_____________________________________________________________
Integration connectors:_____________________________________________________________
__________________________________________________________________________________
0.3 Total number of (and potential downtime windows for):
Directory Instances for Identity Servers only:__________________________________________
Potential downtime windows:_______________________________________________________
If Joint Identity and Access System:
Directory Instances for Policy Managers only:________________________________________
Potential downtime windows:____________________________________________________
Directory Instances used by both Identity Servers and Policy Managers:_________________
Potential downtime windows:_______________________________________________________
0.4 Applications that depend on this deployment, owners, and potential downtime windows:
__________________________________________________________________________________
__________________________________________________________________________________
__________________________________________________________________________________
__________________________________________________________________________________
__________________________________________________________________________________
__________________________________________________________________________________
__________________________________________________________________________________

Summary of General Details Needed for Upgrade Planning
Planning and Tracking Summaries F-5
0.5 Change control procedures:__________________________________________________________
__________________________________________________________________________________
Scheduled maintenance windows:_____________________________________________________
__________________________________________________________________________________
Off hours operation windows:_______________________________________________________
__________________________________________________________________________________
0.6 Potential Identity System Downtime Estimates:
Preparing for the Identity Schema and Data Upgrade:___________________________________
Directory Server Backups:____________________________________________________________
File System Backups:_________________________________________________________________
Schema Upgrade:___________________________________________________________________
Data Upgrade:_____________________________________________________________________
Identity Server Component Upgrades:________________________________________________
WebPass Instance Upgrades:_________________________________________________________
Identity System Customization Upgrades:_____________________________________________
Identity System Customization Redeployment:_________________________________________
Identity System Customization After Upgrading:_______________________________________
Identity System Upgrade Validation:__________________________________________________
0.7 Potential Access System Downtime Estimates:
Preparing for the Access Schema and Data Upgrade:____________________________________
Directory Server Backups:____________________________________________________________
File System Backups:_________________________________________________________________
Schema Upgrade:___________________________________________________________________
Data Upgrade:______________________________________________________________________
Policy Manager Component Upgrades:________________________________________________
Access Server Component Upgrades:_________________________________________________
WebGate Component Upgrades:_____________________________________________________
Access System Customization Upgrades:______________________________________________
Access System Customization Redeployment:__________________________________________
Access System Customization After Upgrading:_________________________________________
Access System Upgrade Validation:____________________________________________________
Table F–1 (Cont.) Details for Your Overall Deployment
Task Subtask Overall Deployment Summary

Summary of Information Needed for Directory Server Instances
F-6 Oracle Access Manager Upgrade Guide
Summary of Information Needed for Directory Server InstancesTable F–2 summarizes the information that you need for each directory server instance in your existing Oracle Access Manager installation.
Table F–2 Details for Directory Instances
Task Subtask Directory Instance Details
1 1.1 Directory server type:_______________________________________________________________
Directory server version:____________________________________________________________
Directory server patch level:_________________________________________________________
1.2 Directory Server Details
Directory server DNS hostname or IP address:__________________________________________
Directory server port #: ______________________________________________________________
Root bind DN for Oracle Access Manager:______________________________________________
Root password______________________________________________________________________
Searchbase__________________________________________________________________________
Configuration base__________________________________________________________________
Directory server security mode Open SSL
Disjoint searchbase___________________________________________________________________
1.3 Directory Server/RDBMS Profiles (for more information, see specific summary pages for each)
____________________________________________________________________________________
____________________________________________________________________________________
____________________________________________________________________________________
____________________________________________________________________________________
____________________________________________________________________________________
____________________________________________________________________________________
1.4 Master/replica configuration details:
____________________________________________________________________________________
____________________________________________________________________________________
____________________________________________________________________________________
____________________________________________________________________________________
1.5 Types of data in the directory server (circle all that apply):
User Data Configuration Data Policy Data
1.6 Person Object Class__________________________________________________________________
Group Object Class_________________________________________________________________
User full name attribute:_____________________________________________________________
User login ID attribute:_______________________________________________________________
Password attribute:_________________________________________________________________
1.7 User full name attribute:
1.8 User login ID attribute:
1.9 Password attribute:

Summary of DIT and Object Definition Details
Planning and Tracking Summaries F-7
Summary of DIT and Object Definition DetailsTable F–3 summarizes information that you need to collect about the DIT and object definitions. For more information, see Planning Deliverablespage 1-18. If you are performing a zero downtime upgrade, see
Table F–3 DIT and Object Definition Details
Task Subtask DIT and Object Definition Details
2 2.1 Directory server DNS hostname or IP address:__________________________________________
Directory server port #: _____________________________________________________________
2.2 DIT and schema objects used in Oracle Access Manager__________________________________
____________________________________________________________________________________
____________________________________________________________________________________
____________________________________________________________________________________
____________________________________________________________________________________
____________________________________________________________________________________
____________________________________________________________________________________
____________________________________________________________________________________
____________________________________________________________________________________
____________________________________________________________________________________
____________________________________________________________________________________
____________________________________________________________________________________
____________________________________________________________________________________
____________________________________________________________________________________
2.3 Object definition details for all objects managed through Oracle Access Manager:
____________________________________________________________________________________
____________________________________________________________________________________
____________________________________________________________________________________
____________________________________________________________________________________
____________________________________________________________________________________
____________________________________________________________________________________
____________________________________________________________________________________
____________________________________________________________________________________
____________________________________________________________________________________
____________________________________________________________________________________
____________________________________________________________________________________
____________________________________________________________________________________
____________________________________________________________________________________
____________________________________________________________________________________

Summary of Directory Server/RDBMS Profile Details
F-8 Oracle Access Manager Upgrade Guide
Summary of Directory Server/RDBMS Profile DetailsTable F–4 summarizes information that you need to collect about each directory server or RDBMS profile. Consider printing this information from your existing installation.
Table F–4 Details for Directory Server/RDBMS Profiles for Oracle Access Manager
Task Subtask Directory Server/RDBMS Profile Details
3 3.1 Directory server DNS hostname or IP address:___________________________________________
Directory server port #: _______________________________________________________________
3.2 Directory Server Profile
Profile Name____________________________________:___________________________________
Namespace (searchbase): _____________________________________________________________
Directory Type:______________________________________________________________________
Dynamic Auxiliary Classes
3.3 Operations (circle all that apply)
Search Operations: Search Entries Authenticate Users
Read Operations: Read Entry
Write Operations: Create Entry Modify Entry Delete Entry Change Password
3.4 Used by components (record all that apply)
All
Identity Servers:_____________________________________________________________________
____________________________________________________________________________________
____________________________________________________________________________________
Access Servers_______________________________________________________________________
____________________________________________________________________________________
____________________________________________________________________________________
Policy Managers (formerly Access Managers)____________________________________________
____________________________________________________________________________________
____________________________________________________________________________________
3.5 Write Operations: Create Entry Modify Entry Delete Entry Change Password
3.6 Database Instances (for more information, see specific summary pages for each)
____________________________________________________________________________________
____________________________________________________________________________________
____________________________________________________________________________________
____________________________________________________________________________________
____________________________________________________________________________________
____________________________________________________________________________________
____________________________________________________________________________________
3.7 Maximum Active Servers:____________________________________________________________
Failover Threshold:__________________________________________________________________
Sleep for seconds:___________________________________________________________________
Max. Session Time (minutes):_________________________________________________________

Summary of Database Instance Profile Details
Planning and Tracking Summaries F-9
Summary of Database Instance Profile DetailsTable F–5 summarizes information that you need to collect for each database instance profile associated with a directory server instance. Consider printing this information from your existing installation.
Table F–5 Details for DB Instance Profiles
Task Subtask DB Instance Profile Details
4 4.1 Directory Server Instance Name_______________________________________________________
Computer Name hosting the directory instance__________________________________________
Port Number: ______________________________________________________________________
Root DN:___________________________________________________________________________
Root DN Password:__________________________________________________________________
Time Limit:_________________________________________________________________________
Size Limit:__________________________________________________________________________
Flags: SSL Referral Fast Bind (AD only)
Secure Port Number_________________________________________________________________
Initial Connections:__________________________________________________________________
Maximum Connections:______________________________________________________________

Summary of Details Needed for Earlier Identity Servers
F-10 Oracle Access Manager Upgrade Guide
Summary of Details Needed for Earlier Identity ServersTable F–6 summarizes information that you need to collect about each Identity Server.
Table F–6 Details for Existing Identity Servers
Task Subtask Existing Identity Server Details
Prepare for Identity Server Upgrade in Environment:
Total Number of Identity Servers in this environment:
5 Identity Server Details
Installation directory of this Identity Server _____________________________________________
Exact Patch Level____________________________________________________________________
Operating System and Patch Level_____________________________________________________
Installation directory for the associated WebPass_________________________________________
5.1 Default Locale (Administrator Language)
Languages
Language Packs
5.2 Transport security mode between the Identity Server and WebPass:
Open Simple Cert
5.3 Unique Identity Server ID of this instance:______________________________________________
Host name of the computer where the Identity Server is installed__________________________
Port number for Identity Server/WebPass communication________________________________
5.4 Is this the master Identity Server? (There can be only one installed to update the schema/data)
Directory server type___________________ _____________________________________________
For more information for this Directory Instance, see summary____ ______________________
5.5 Security mode between directory server and Identity Server: SSL Open
If SSL, path to the Root CA certificate:
Simple mode only
Global Access Protocol pass phrase
Cert Mode Only
Certificate PEM pass phrase:__________________________________________________________
Path of the certificate request file:______________________________________________________
Path of the certificate file:_____________________________________________________________
Path of the key file:__________________________________________________________________
Path of the chain file:_________________________________________________________________
5.6 (Windows only) Unique Identity Server service name that will differentiate this instance in the Services window if you install several instances of Identity Server):
5.7 Auditing configuration
____________________________________________________________________________________
____________________________________________________________________________________

Summary of Details Needed for Earlier Identity Servers
Planning and Tracking Summaries F-11
5.8 Password policy configuration
____________________________________________________________________________________
5.9 Any customizations (Identity Event plug-ins, styles, Portal Inserts and the like)? See summary pages:
____________________________________________________________________________________
____________________________________________________________________________________
5.10 File-based changes (globalparams.xml, and the like)?
____________________________________________________________________________________
____________________________________________________________________________________
Table F–6 (Cont.) Details for Existing Identity Servers
Task Subtask Existing Identity Server Details

Summary of Details Needed for Earlier WebPass Instances
F-12 Oracle Access Manager Upgrade Guide
Summary of Details Needed for Earlier WebPass InstancesTable F–7 summarizes information that you need to collect for each WebPass, some of which can be printed from the Identity System Console.
Table F–7 Details for Existing WebPass Instances
Task Subtask Existing WebPass Details
6 Prepare for WebPass Instances Upgrade in Environment:
Total Number of WebPass Instances in this environment:
6.1 WebPass Instance Details
Installation directory of this WebPass Instance __________________________________________
Exact Patch Level____________________________________________________________________
Operating System and Patch Level_____________________________________________________
WebPass hostname:_________________________________________________________________
■ Installed for Web server instance:_________________________________________________
■ Web Server Type:_______________________________________________________________
■ Web Server Release:_____________________________________________________________
■ Exact Web Server Patch Level_____________________________________________________
■ Absolute path to the Web server configuration file___________________________________
■ User name (Unix only):__________________________________________________________
■ Group (Unix only):______________________________________________________________
6.2 Default Locale (Administrator Language)
Languages
Language Packs
Same Language Packs as the Identity Server
6.3 Transport security mode between the Identity Server and WebPass:
Open Simple Cert
Simple mode only
Global Access Protocol pass phrase
Cert mode only
Certificate PEM phrase:_______________________________________________________________
Path of the certificate request file:______________________________________________________
Path of the certificate file:_____________________________________________________________
Path of the key file:__________________________________________________________________
Path of the chain file:_________________________________________________________________
6.4 WebPass ID used by Oracle Access Manager to identify the instance:
6.5 DNS hostname of the Identity Server with which this WebPass communicates:_______________
Installation directory for the associated Identity Server___________________________________
Identity Server Port # for communication with WebPass:
6.6 Any customizations?
____________________________________________________________________________________
____________________________________________________________________________________
6.7 File-based changes?
____________________________________________________________________________________
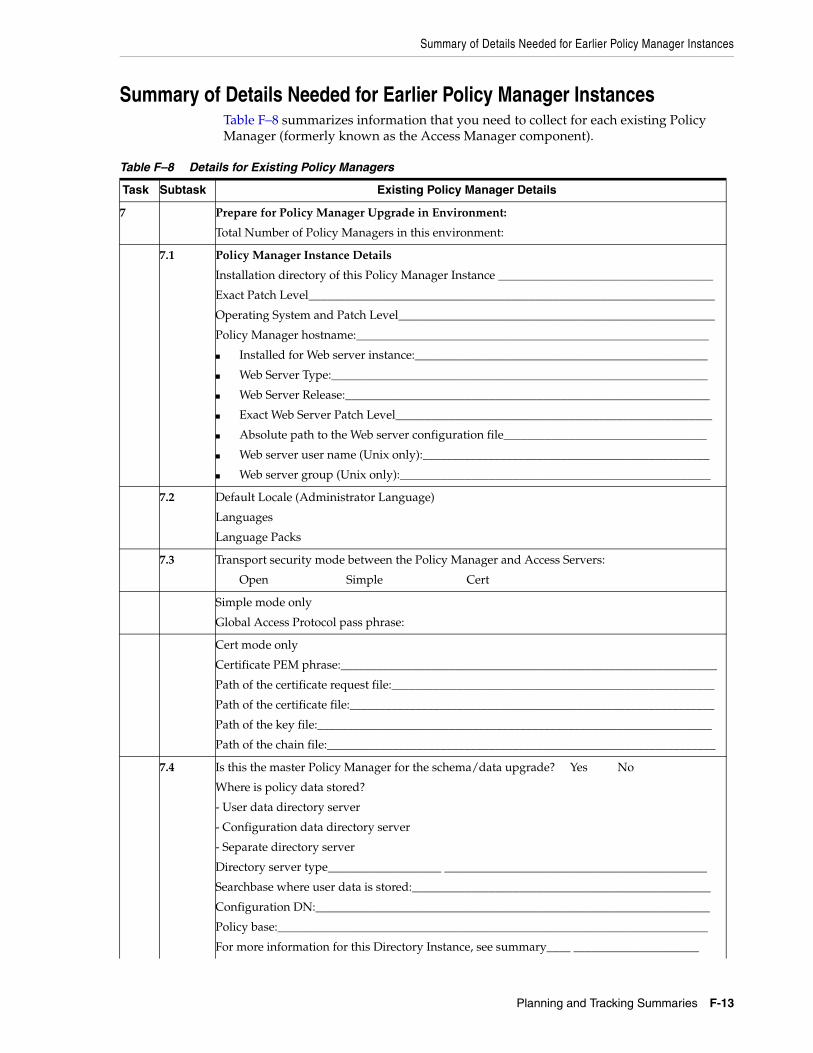
Summary of Details Needed for Earlier Policy Manager Instances
Planning and Tracking Summaries F-13
Summary of Details Needed for Earlier Policy Manager InstancesTable F–8 summarizes information that you need to collect for each existing Policy Manager (formerly known as the Access Manager component).
Table F–8 Details for Existing Policy Managers
Task Subtask Existing Policy Manager Details
7 Prepare for Policy Manager Upgrade in Environment:
Total Number of Policy Managers in this environment:
7.1 Policy Manager Instance Details
Installation directory of this Policy Manager Instance ____________________________________
Exact Patch Level____________________________________________________________________
Operating System and Patch Level_____________________________________________________
Policy Manager hostname:___________________________________________________________
■ Installed for Web server instance:_________________________________________________
■ Web Server Type:_______________________________________________________________
■ Web Server Release:_____________________________________________________________
■ Exact Web Server Patch Level_____________________________________________________
■ Absolute path to the Web server configuration file__________________________________
■ Web server user name (Unix only):________________________________________________
■ Web server group (Unix only):____________________________________________________
7.2 Default Locale (Administrator Language)
Languages
Language Packs
7.3 Transport security mode between the Policy Manager and Access Servers:
Open Simple Cert
Simple mode only
Global Access Protocol pass phrase:
Cert mode only
Certificate PEM phrase:_______________________________________________________________
Path of the certificate request file:______________________________________________________
Path of the certificate file:_____________________________________________________________
Path of the key file:__________________________________________________________________
Path of the chain file:_________________________________________________________________
7.4 Is this the master Policy Manager for the schema/data upgrade? Yes No
Where is policy data stored?
- User data directory server
- Configuration data directory server
- Separate directory server
Directory server type___________________ ____________________________________________
Searchbase where user data is stored:__________________________________________________
Configuration DN:__________________________________________________________________
Policy base:________________________________________________________________________
For more information for this Directory Instance, see summary____ _____________________
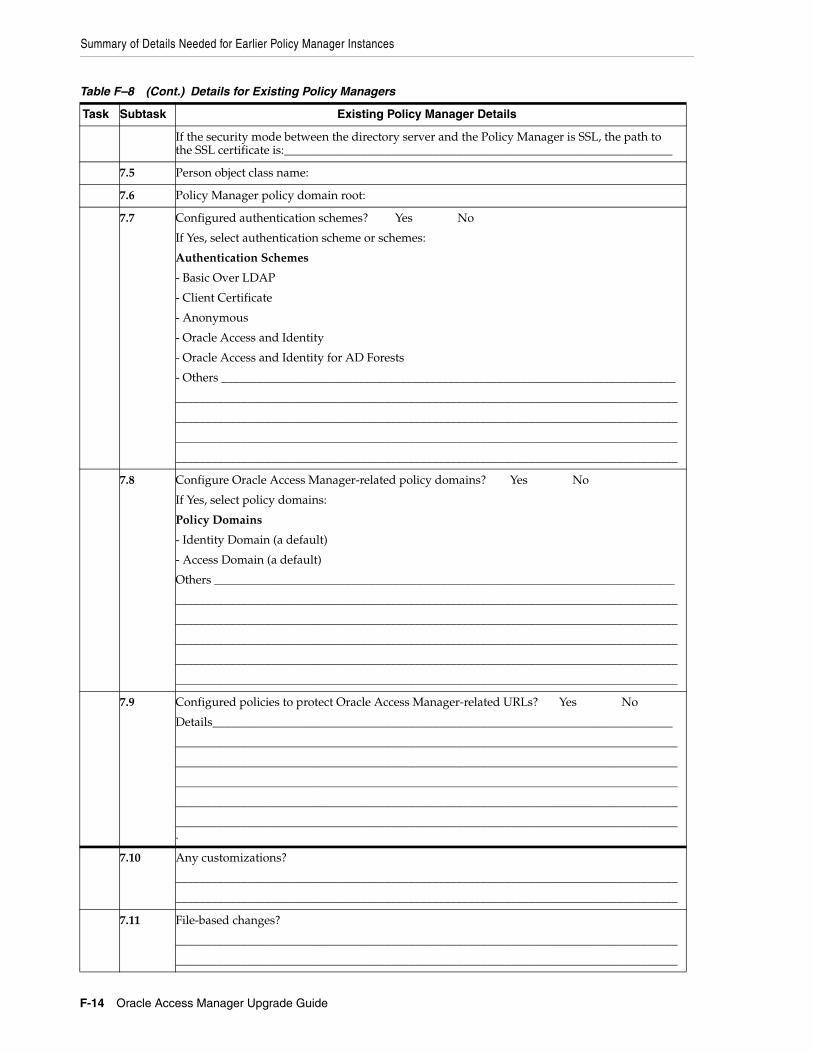
Summary of Details Needed for Earlier Policy Manager Instances
F-14 Oracle Access Manager Upgrade Guide
If the security mode between the directory server and the Policy Manager is SSL, the path to the SSL certificate is:_________________________________________________________________
7.5 Person object class name:
7.6 Policy Manager policy domain root:
7.7 Configured authentication schemes? Yes No
If Yes, select authentication scheme or schemes:
Authentication Schemes
- Basic Over LDAP
- Client Certificate
- Anonymous
- Oracle Access and Identity
- Oracle Access and Identity for AD Forests
- Others ____________________________________________________________________________
____________________________________________________________________________________
____________________________________________________________________________________
____________________________________________________________________________________
____________________________________________________________________________________
7.8 Configure Oracle Access Manager-related policy domains? Yes No
If Yes, select policy domains:
Policy Domains
- Identity Domain (a default)
- Access Domain (a default)
Others _____________________________________________________________________________
____________________________________________________________________________________
____________________________________________________________________________________
____________________________________________________________________________________
____________________________________________________________________________________
____________________________________________________________________________________
7.9 Configured policies to protect Oracle Access Manager-related URLs? Yes No
Details_____________________________________________________________________________
____________________________________________________________________________________
____________________________________________________________________________________
____________________________________________________________________________________
____________________________________________________________________________________
____________________________________________________________________________________.
7.10 Any customizations?
____________________________________________________________________________________
____________________________________________________________________________________
7.11 File-based changes?
____________________________________________________________________________________
____________________________________________________________________________________
Table F–8 (Cont.) Details for Existing Policy Managers
Task Subtask Existing Policy Manager Details

Summary of Details Needed for Earlier Access Servers
Planning and Tracking Summaries F-15
Summary of Details Needed for Earlier Access ServersTable F–9 summarizes information that you need to collect for each earlier Access Server. Consider printing some of this information from the Access System Console.
Table F–9 Details for Existing Access Servers
Task Subtask Access Server Details
8 Access Server Details
Total number of Access Servers
8.1 Access Server Instance Details
Installation directory of this Access Server Instance ______________________________________
Exact Patch Level____________________________________________________________________
Operating System and Patch Level_____________________________________________________
8.2 Access Server Details in the System Console
Access Server name__________________________________________________________________
Access Server host name______________________________________________________________
Port # the Access Server listens to______________________________________________________
Transport security between Access Server and associated WebGate: Open Simple Cert
Associated WebGate ID_______________________________________________________________
Access Management flag On Off
8.3 Default Locale (Administrator Language)
Languages
Language Packs
8.4 Which directory server stores the configuration data?
Same as Policy Manager directory server? Yes No
Configuration DN_________________________________________________________________
If no, see summary for directory server instance________________________________________
Host computer______________________________________________________________________
Port number________________________________________________________________________
Root DN____________________________________________________________________________
Root DN password___________________________________________________________________
Directory type_______________________________________________________________________
Security mode between the configuration data directory server and the Access Server:
Open SSL
8.5 Which directory server stores the policy data?___________________________________________
Policy base__________________________________________________________________________
For more information about the directory server instance, see the summary for____________
___________________________________________________________________________________
8.6 Save PEM phrase in a password file? (Simple and Cert modes only): Yes No
Simple mode only
Global Access Protocol pass phrase:____________________________________________________
Password file________________________________________________________________________

Summary of Details Needed for Earlier Access Servers
F-16 Oracle Access Manager Upgrade Guide
Cert mode only
Certificate PEM phrase:_______________________________________________________________
Password file_______________________________________________________________________
Path of the certificate request file:______________________________________________________
Path of the certificate file:_____________________________________________________________
Path of the key file:__________________________________________________________________
Path of the chain file:_________________________________________________________________
8.7 Auditing configuration
____________________________________________________________________________________
____________________________________________________________________________________
8.8 Any customizations (plug-ins, AccessGates, and the like), see summary pages:
____________________________________________________________________________________
____________________________________________________________________________________
____________________________________________________________________________________
____________________________________________________________________________________
____________________________________________________________________________________
____________________________________________________________________________________
____________________________________________________________________________________
____________________________________________________________________________________
____________________________________________________________________________________
____________________________________________________________________________________
8.9 File-based changes?
____________________________________________________________________________________
____________________________________________________________________________________
Table F–9 (Cont.) Details for Existing Access Servers
Task Subtask Access Server Details
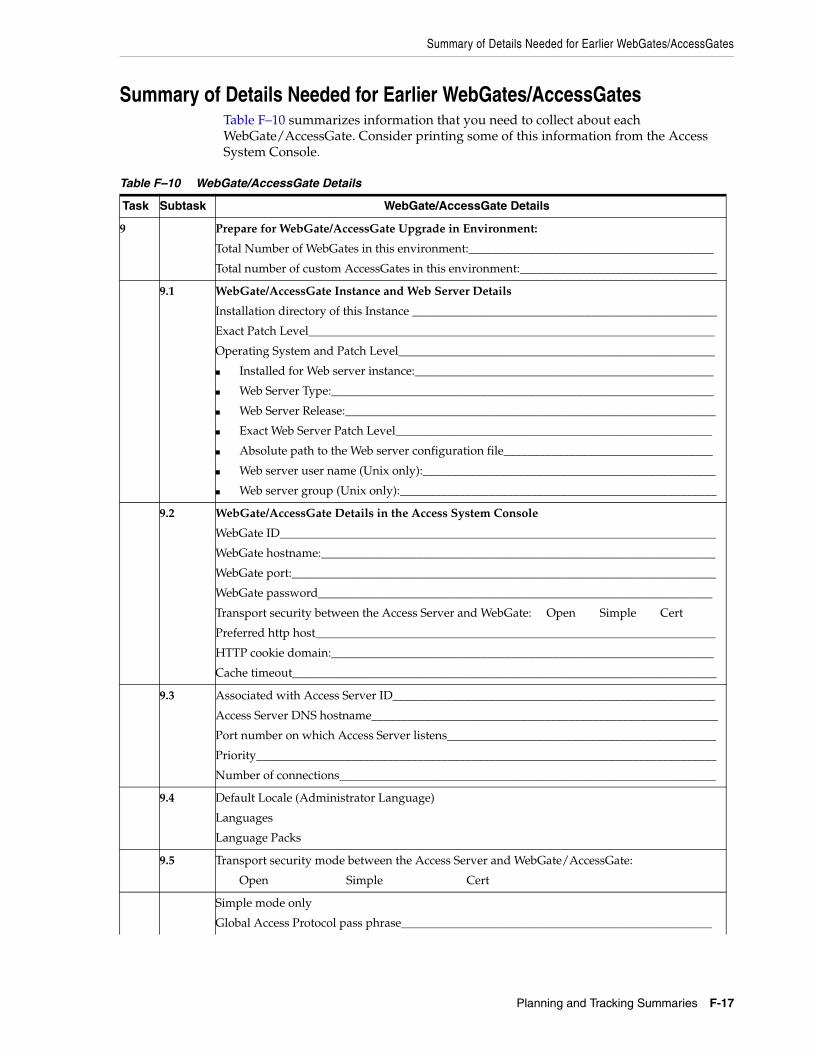
Summary of Details Needed for Earlier WebGates/AccessGates
Planning and Tracking Summaries F-17
Summary of Details Needed for Earlier WebGates/AccessGatesTable F–10 summarizes information that you need to collect about each WebGate/AccessGate. Consider printing some of this information from the Access System Console.
Table F–10 WebGate/AccessGate Details
Task Subtask WebGate/AccessGate Details
9 Prepare for WebGate/AccessGate Upgrade in Environment:
Total Number of WebGates in this environment:_________________________________________
Total number of custom AccessGates in this environment:_________________________________
9.1 WebGate/AccessGate Instance and Web Server Details
Installation directory of this Instance ___________________________________________________
Exact Patch Level____________________________________________________________________
Operating System and Patch Level_____________________________________________________
■ Installed for Web server instance:__________________________________________________
■ Web Server Type:________________________________________________________________
■ Web Server Release:______________________________________________________________
■ Exact Web Server Patch Level_____________________________________________________
■ Absolute path to the Web server configuration file___________________________________
■ Web server user name (Unix only):_________________________________________________
■ Web server group (Unix only):_____________________________________________________
9.2 WebGate/AccessGate Details in the Access System Console
WebGate ID_________________________________________________________________________
WebGate hostname:__________________________________________________________________
WebGate port:_______________________________________________________________________
WebGate password__________________________________________________________________
Transport security between the Access Server and WebGate: Open Simple Cert
Preferred http host___________________________________________________________________
HTTP cookie domain:________________________________________________________________
Cache timeout_______________________________________________________________________
9.3 Associated with Access Server ID______________________________________________________
Access Server DNS hostname__________________________________________________________
Port number on which Access Server listens_____________________________________________
Priority_____________________________________________________________________________
Number of connections_______________________________________________________________
9.4 Default Locale (Administrator Language)
Languages
Language Packs
9.5 Transport security mode between the Access Server and WebGate/AccessGate:
Open Simple Cert
Simple mode only
Global Access Protocol pass phrase____________________________________________________

Summary of Details Needed for Earlier WebGates/AccessGates
F-18 Oracle Access Manager Upgrade Guide
Cert mode only
Certificate PEM phrase:_______________________________________________________________
Path of the certificate request file:______________________________________________________
Path of the certificate file:_____________________________________________________________
Path of the key file:__________________________________________________________________
Path of the chain file:_________________________________________________________________
9.6 Virtual IP and DNS aliases used to reference the WebPass or Web server farm protected with WebGate____________________________________________________________________________
____________________________________________________________________________________
____________________________________________________________________________________
____________________________________________________________________________________
____________________________________________________________________________________
____________________________________________________________________________________
____________________________________________________________________________________
____________________________________________________________________________________
____________________________________________________________________________________
____________________________________________________________________________________
9.7 Any customizations?
____________________________________________________________________________________
____________________________________________________________________________________
9.9 File-based changes?
____________________________________________________________________________________
____________________________________________________________________________________
Table F–10 (Cont.) WebGate/AccessGate Details
Task Subtask WebGate/AccessGate Details

Summary of Details for Integration Components and Independently Installed SDKs
Planning and Tracking Summaries F-19
Summary of Details for Integration Components and Independently Installed SDKs
Table F–11 summarizes information that you need to collect about Oracle Access Manager integration connectors for third-party products as well as independently installed software developer kits (SDKs).
Table F–11 Details for Integration Connectors and Independently Installed SDKs
Task Subtask Integration Connectors and Independently Installed SDK Details
10 Prepare for Upgrade in Environment:
Total Number of Integration Connectors in this environment:_____________________________
Types of Integration Connectors in this environment:____________________________________
____________________________________________________________________________________
____________________________________________________________________________________
Total number of independently installed SDKs in this environment:________________________
10.1 Integration Connector/SDK Instance and Web/App/Portal Server Details
Installation directory of this Connector/SDK ____________________________________________
Exact Patch Level____________________________________________________________________
Operating System and Patch Level_____________________________________________________
■ Installed for Web/App/Portal server instance:______________________________________
■ Web/App/Portal server Type:____________________________________________________
■ Web/App/Portal server Release:__________________________________________________
■ Exact Web/App/Portal server Patch Level__________________________________________
■ Absolute path to the Web/App/Portal server configuration file________________________
■ User name (Unix only):___________________________________________________________
■ Group (Unix only):_______________________________________________________________
10.2 Default Locale (Administrator Language)
Languages
Language Packs

Summary of Details Needed for Customizations
F-20 Oracle Access Manager Upgrade Guide
Summary of Details Needed for CustomizationsTable F–12 summarizes the information you need for each customization. For more information, see "Items that You Must Manually Upgrade"page 3-9.
Table F–12 Details for Existing Customizations
Task Subtask Details of Existing Customizations
11 11.1 Installation directory of the Customization _____________________________________________
Operating System and Patch Level_____________________________________________________
Other Oracle Access Manager components on this computer? Yes No
Identity Server WebPass Policy Manager Access Server WebGate
11.2 Workflows
____________________________________________________________________________________
____________________________________________________________________________________
____________________________________________________________________________________
____________________________________________________________________________________
____________________________________________________________________________________
____________________________________________________________________________________
____________________________________________________________________________________
____________________________________________________________________________________
11.3 Access Control Lists (ACLs)
____________________________________________________________________________________
____________________________________________________________________________________
____________________________________________________________________________________
____________________________________________________________________________________
11.4 Custom Identity Event plug-ins:_______________________________________________________
____________________________________________________________________________________
____________________________________________________________________________________
____________________________________________________________________________________
____________________________________________________________________________________
11.5 PresentationXML customizations
____________________________________________________________________________________
____________________________________________________________________________________
____________________________________________________________________________________
11.6 Styles and XSL stylesheet customizations: ______________________________________________
____________________________________________________________________________________
____________________________________________________________________________________
____________________________________________________________________________________
11.7 IdentityXML clients and applications: __________________________________________________
____________________________________________________________________________________
____________________________________________________________________________________
____________________________________________________________________________________
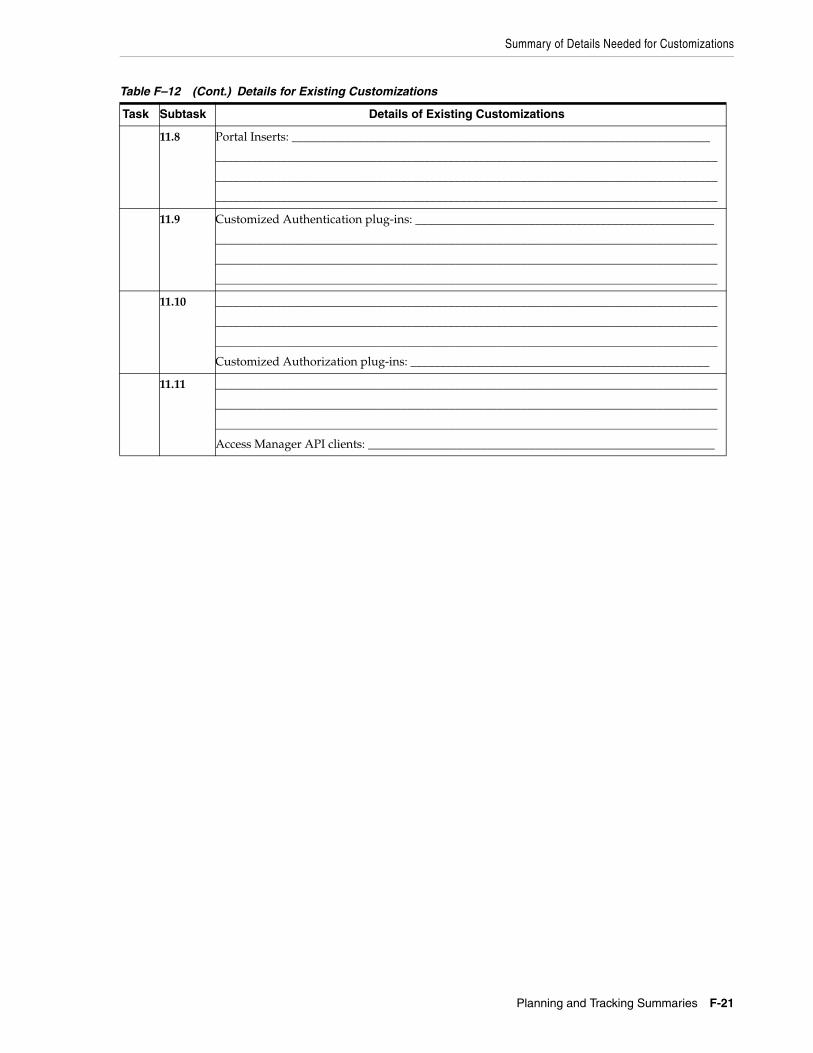
Summary of Details Needed for Customizations
Planning and Tracking Summaries F-21
11.8 Portal Inserts: ______________________________________________________________________
____________________________________________________________________________________
____________________________________________________________________________________
____________________________________________________________________________________
11.9 Customized Authentication plug-ins: __________________________________________________
____________________________________________________________________________________
____________________________________________________________________________________
____________________________________________________________________________________
11.10 ____________________________________________________________________________________
____________________________________________________________________________________
____________________________________________________________________________________
Customized Authorization plug-ins: __________________________________________________
11.11 ____________________________________________________________________________________
____________________________________________________________________________________
____________________________________________________________________________________
Access Manager API clients: __________________________________________________________
Table F–12 (Cont.) Details for Existing Customizations
Task Subtask Details of Existing Customizations

Summary of Schema and Data Preparation Tasks
F-22 Oracle Access Manager Upgrade Guide
Summary of Schema and Data Preparation TasksTable F–13 can help you track the progress of preparing for the schema and data upgrade. The summary includes links to schema and data preparation information in Chapter 5, and to component preparation in Chapter 8.
Unless explicitly stated, all tasks must be performed for both the in-place upgrade or the zero downtime upgrade. For more information about schema and data upgrade when using the zero downtime method, see "Schema and Data Upgrades with the Zero Downtime Upgrade Method"page 15-9.
Table F–13 Summary for Schema and Data Preparation
Done Summary of Schema and Data Preparation Tasks Details
Deployment Name:_________________________________________________________________
Task owner:________________________________________________________________________
Developing Strategies for Upgrading in a Replicated Environment page 5-4
Configuring the Challenge/Response Phrase at the Object Class Level page 5-7
Configuring Unique Namespaces for Directory Connection Information page 5-7
Directory instances involved are described on (identify source)___________________________
___________________________________________________________________________________
Preparing Your Directory Instances for the Schema and Data Upgrade
■ Preparing a Directory Server When Its Release is Deprecated
■ Changing the Directory Server Search Size Limit Parameter
■ Directory-specific procedures in Preparing Your Directory Instances for the Schema and Data Upgrade
page 5-9
page 5-9
page 5-10
page 5-9
Backing Up Existing Oracle Access Manager Data:
■ Backing up the Earlier Oracle Access Manager Schema
■ Backing up Oracle Access Manager Configuration and Policy Data
■ Backing Up User and Group Data
■ Backing Up Workflow Data
■ Archiving Processed Workflow Instances
page 5-16
page 5-17
page 5-17
page 5-18
page 5-18
page 5-18
Backing Up Existing Directory Instances page 5-19
In-Place Upgrade: Preparing Host Computers for Master Components page 5-21
In-Place Upgrade: Adding An Earlier Identity System to Use as a Master for the In-place Method
■ Defining Additional Instances in the Existing System Console
■ Installing the Master COREid Server Instance
■ Installing the Master WebPass
■ Setting Up the Master Identity System for the In-place Schema and Data Upgrade
page 5-21
page 5-22
page 5-25
page 5-26
page 5-27
Joint Identity and Access System Deployments Only
After performing all Identity System schema and data preparation tasks described in this table and in Chapter 5, "Preparing for Schema and Data Upgrades", perform remaining tasks in this table.
In-Place Upgrade: Adding an Earlier Access Manager to Use as a Master for the In-Place Method
■ Installing the Master Access Manager for the In-place Schema and Data Upgrade
■ Setting Up the Master Access Manager for the In-place Method
page 5-28
page 5-29
page 5-30

Summary of Schema and Data Preparation Tasks
Planning and Tracking Summaries F-23
Finishing Preparation for the In-Place Schema and Data Upgrade includes topics in Chapter 8, "Preparing Components for the Upgrade"
■ Preparing Release 6.x Environments
■ Preparing Multi-Language Installations
■ Backing Up the Existing Component Installation Directory
■ Backing Up the Existing Web Server Configuration File
■ Backing Up Windows Registry Data
■ Stopping Servers and Services
■ Logging in with Appropriate Administrative Rights
page 5-33
page 8-7
page 8-7
page 8-7
page 8-8
page 8-9
page 8-9
page 8-10
Table F–13 (Cont.) Summary for Schema and Data Preparation
Done Summary of Schema and Data Preparation Tasks Details

Summary of Upgrading Schema and Data: In-Place Upgrade Method
F-24 Oracle Access Manager Upgrade Guide
Summary of Upgrading Schema and Data: In-Place Upgrade MethodTable F–14 is provided to help you track the progress of upgrading the schema and data when you are using the in-place upgrade method. Identity System details are described in Chapter 6. If you have a joint Identity and Access System deployment, procedures for the Access System are described in Chapter 7.
Note: If you are performing a zero downtime upgrade, skip this topic and instead see "Upgrading the Schema During a Zero Downtime Upgrade"page 16-61.
Table F–14 Summary for In-Place Schema and Data Upgrade
Done Summary of the Schema and Data Upgrade: In-Place Upgrade Method Details
Deployment Name:_________________________________________________________________
Task owner:________________________________________________________________________
Prerequisites, all preparation tasks in Summary of Schema and Data Preparation Tasks page 5-1
Upgrading Identity System Schema and Data In Place
■ Upgrading the Schema and Data In Place with the Master Identity Server
■ Upgrading the Master WebPass
■ Verifying the Identity System Schema and Data Upgrade
■ Uploading Directory Server Index Files
■ Backing Up Upgraded Identity Data
page 6-1
page 6-3
page 6-13
page 6-16
page 6-17
page 6-22
Joint Identity and Access System Deployments Only
After performing all Identity System schema and data upgrade tasks described in this table and in Chapter 6, perform remaining tasks in this table as described in Chapter 7, "Upgrading Access System Schema and Data In Place".
Upgrading Access System Schema and Data In Place
■ Upgrading the Schema and Data with the Master Access Manager Component
■ Uploading Directory Server Index Files
■ Verifying the Access Schema and Data Upgrade
■ Creating a Temporary Directory Profile For Access System Upgrades
■ Backing Up Upgraded Policy Data
page 7-1
page 7-3
page 7-9
page 7-9
page 7-10
page 7-12
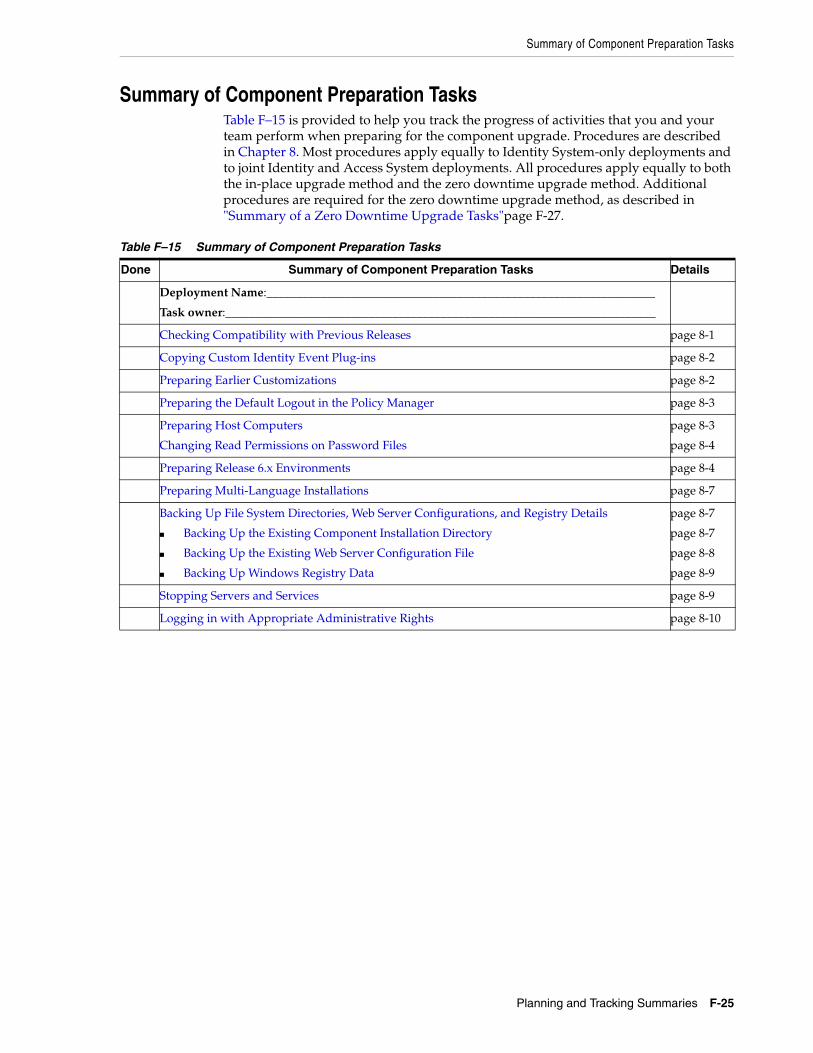
Summary of Component Preparation Tasks
Planning and Tracking Summaries F-25
Summary of Component Preparation Tasks Table F–15 is provided to help you track the progress of activities that you and your team perform when preparing for the component upgrade. Procedures are described in Chapter 8. Most procedures apply equally to Identity System-only deployments and to joint Identity and Access System deployments. All procedures apply equally to both the in-place upgrade method and the zero downtime upgrade method. Additional procedures are required for the zero downtime upgrade method, as described in "Summary of a Zero Downtime Upgrade Tasks"page F-27.
Table F–15 Summary of Component Preparation Tasks
Done Summary of Component Preparation Tasks Details
Deployment Name:_________________________________________________________________
Task owner:________________________________________________________________________
Checking Compatibility with Previous Releases page 8-1
Copying Custom Identity Event Plug-ins page 8-2
Preparing Earlier Customizations page 8-2
Preparing the Default Logout in the Policy Manager page 8-3
Preparing Host Computers
Changing Read Permissions on Password Files
page 8-3
page 8-4
Preparing Release 6.x Environments page 8-4
Preparing Multi-Language Installations page 8-7
Backing Up File System Directories, Web Server Configurations, and Registry Details
■ Backing Up the Existing Component Installation Directory
■ Backing Up the Existing Web Server Configuration File
■ Backing Up Windows Registry Data
page 8-7
page 8-7
page 8-8
page 8-9
Stopping Servers and Services page 8-9
Logging in with Appropriate Administrative Rights page 8-10

Summary of In-Place Upgrade Tasks
F-26 Oracle Access Manager Upgrade Guide
Summary of In-Place Upgrade TasksTable F–16 can help you track the progress of your in-place upgrades. Identity System procedures are described in Chapter 9. Access System procedures are described in Chapter 10. If you are using the zero downtime upgrade method, you can skip this topic and instead see "Summary of a Zero Downtime Upgrade Tasks"page F-27.
Table F–16 Summary of In-Place Upgrade Tasks
Done Summary of In-Place Upgrade Tasks Details
Deployment Name:_________________________________________________________________
Task owner:________________________________________________________________________
Prerequisites, all tasks in Summary of Component Preparation Tasks
Upgrading Remaining Identity Servers In Place
____________________________________________________________________________________
____________________________________________________________________________________
____________________________________________________________________________________
____________________________________________________________________________________
page 9-3
Upgrading Remaining WebPass Instances In Place
____________________________________________________________________________________
____________________________________________________________________________________
____________________________________________________________________________________
____________________________________________________________________________________
page 9-8
Validating the In-place Identity System Upgrade page 9-11
Backing Up Upgraded Identity Component Information page 9-12
Joint Identity and Access System Deployments Only Include
After performing all Identity System upgrade tasks described in this table and in Chapter 9, perform remaining tasks in this table as described in Chapter 10, "Upgrading Access System Components In Place".
Upgrading Remaining Policy Managers In Place
____________________________________________________________________________________
____________________________________________________________________________________
____________________________________________________________________________________
____________________________________________________________________________________
page 10-2
Upgrading Access Servers In Place
____________________________________________________________________________________
____________________________________________________________________________________
____________________________________________________________________________________
____________________________________________________________________________________
page 10-6
Upgrading WebGates In Place
____________________________________________________________________________________
____________________________________________________________________________________
____________________________________________________________________________________
____________________________________________________________________________________
page 10-9
Backing Up Upgraded Access System Component Directories page 10-13

Summary of a Zero Downtime Upgrade Tasks
Planning and Tracking Summaries F-27
Summary of a Zero Downtime Upgrade TasksTable F–17 can help you track the progress your zero downtime upgrade. All procedures are described in chapters located in Part VI.
Table F–17 Summary of Zero Downtime Upgrade Tasks
Summary of Tasks for a Zero Downtime Upgrade
Deployment Name:_________________________________________________________________________
Task owner:________________________________________________________________________________
1 Study every detail about the zero downtime upgrade method before you start
2 Developing a Plan for a Zero Downtime Upgrade, for specific details that you need to gather, see:
■ Summary of General Details Needed for Upgrade Planning
■ Summary of Information Needed for Directory Server Instances
■ Summary of DIT and Object Definition Details
■ Summary of Directory Server/RDBMS Profile Details
■ Summary of Database Instance Profile Details
■ Summary of Details Needed for Earlier Identity Servers
■ Summary of Details Needed for Earlier WebPass Instances
■ Summary of Details Needed for Earlier Policy Manager Instances
■ Summary of Details Needed for Earlier Access Servers
■ Summary of Details Needed for Earlier WebGates/AccessGates
■ Summary of Details for Integration Components and Independently Installed SDKs
■ Summary of Details Needed for Customizations
■ See also "Developing a Plan for a Zero Downtime Upgrade"
3 Preparing the Original Installation for a Zero Downtime Upgrade, Chapter 16
■ Bringing Host Computers to Oracle Access Manager 10g (10.1.4.0.1) Support Levels
■ Adding New Hardware or Earlier Instances to Your Deployment
■ Adding Profiles for Planned COREid Server Clones in the System Console
■ Adding Profiles for Planned WebPass Clones in the System Console
■ Associating WebPass Clone Profiles with COREid Server Clone Profiles
■ Adding New Directory Server Profiles for Cloned COREid Servers
■ Adding a Profile for Access Server Clones
■ Creating New Directory Server Profiles for Access System Clones
■ Associating Original WebGates with Access Server Clones
4 Cloning Earlier Components for a Zero Downtime Upgrade, Chapter 16
■ Setting Up the File System and Creating Clone Instances
■ Creating A New Web Server Instance for Cloned Web Components
5 About Destination Creation and Obtaining Tools for a Zero Downtime Upgrade, Chapter 16, is performed on demand during other operations, as follows:
■ Destination Creation: Extracting 10g (10.1.4.0.1) Libraries and Files
■ Obtaining Tools: Applying Release 10.1.4 Patch Set 1 (10.1.4.2.0)
6 Copying Configuration and Policy Data to a New Branch in the LDAP Directory Server, Chapter 16
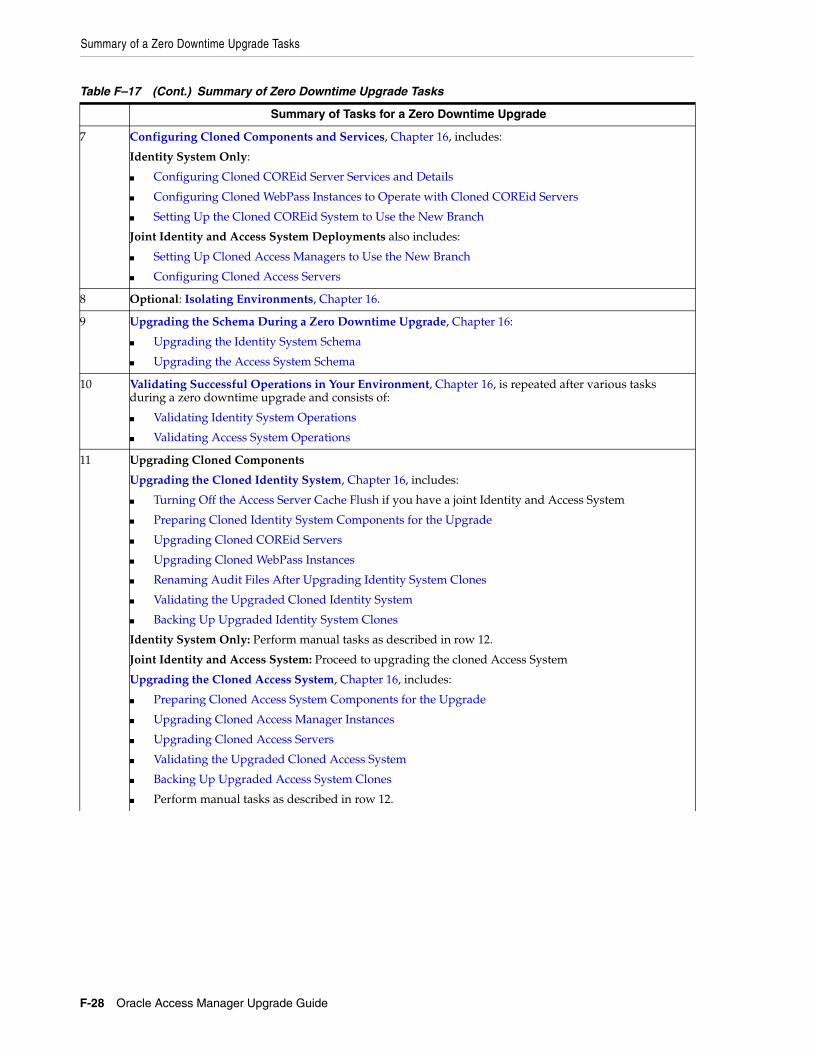
Summary of a Zero Downtime Upgrade Tasks
F-28 Oracle Access Manager Upgrade Guide
7 Configuring Cloned Components and Services, Chapter 16, includes:
Identity System Only:
■ Configuring Cloned COREid Server Services and Details
■ Configuring Cloned WebPass Instances to Operate with Cloned COREid Servers
■ Setting Up the Cloned COREid System to Use the New Branch
Joint Identity and Access System Deployments also includes:
■ Setting Up Cloned Access Managers to Use the New Branch
■ Configuring Cloned Access Servers
8 Optional: Isolating Environments, Chapter 16.
9 Upgrading the Schema During a Zero Downtime Upgrade, Chapter 16:
■ Upgrading the Identity System Schema
■ Upgrading the Access System Schema
10 Validating Successful Operations in Your Environment, Chapter 16, is repeated after various tasks during a zero downtime upgrade and consists of:
■ Validating Identity System Operations
■ Validating Access System Operations
11 Upgrading Cloned Components
Upgrading the Cloned Identity System, Chapter 16, includes:
■ Turning Off the Access Server Cache Flush if you have a joint Identity and Access System
■ Preparing Cloned Identity System Components for the Upgrade
■ Upgrading Cloned COREid Servers
■ Upgrading Cloned WebPass Instances
■ Renaming Audit Files After Upgrading Identity System Clones
■ Validating the Upgraded Cloned Identity System
■ Backing Up Upgraded Identity System Clones
Identity System Only: Perform manual tasks as described in row 12.
Joint Identity and Access System: Proceed to upgrading the cloned Access System
Upgrading the Cloned Access System, Chapter 16, includes:
■ Preparing Cloned Access System Components for the Upgrade
■ Upgrading Cloned Access Manager Instances
■ Upgrading Cloned Access Servers
■ Validating the Upgraded Cloned Access System
■ Backing Up Upgraded Access System Clones
■ Perform manual tasks as described in row 12.
Table F–17 (Cont.) Summary of Zero Downtime Upgrade Tasks
Summary of Tasks for a Zero Downtime Upgrade
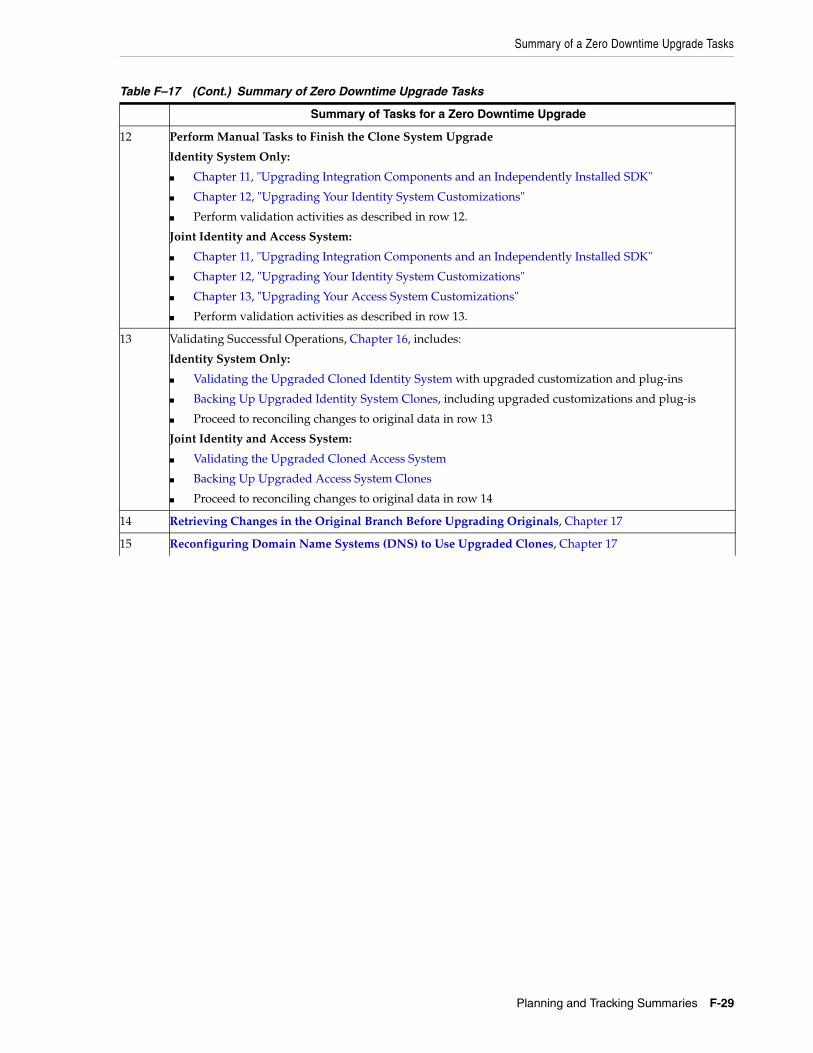
Summary of a Zero Downtime Upgrade Tasks
Planning and Tracking Summaries F-29
12 Perform Manual Tasks to Finish the Clone System Upgrade
Identity System Only:
■ Chapter 11, "Upgrading Integration Components and an Independently Installed SDK"
■ Chapter 12, "Upgrading Your Identity System Customizations"
■ Perform validation activities as described in row 12.
Joint Identity and Access System:
■ Chapter 11, "Upgrading Integration Components and an Independently Installed SDK"
■ Chapter 12, "Upgrading Your Identity System Customizations"
■ Chapter 13, "Upgrading Your Access System Customizations"
■ Perform validation activities as described in row 13.
13 Validating Successful Operations, Chapter 16, includes:
Identity System Only:
■ Validating the Upgraded Cloned Identity System with upgraded customization and plug-ins
■ Backing Up Upgraded Identity System Clones, including upgraded customizations and plug-is
■ Proceed to reconciling changes to original data in row 13
Joint Identity and Access System:
■ Validating the Upgraded Cloned Access System
■ Backing Up Upgraded Access System Clones
■ Proceed to reconciling changes to original data in row 14
14 Retrieving Changes in the Original Branch Before Upgrading Originals, Chapter 17
15 Reconfiguring Domain Name Systems (DNS) to Use Upgraded Clones, Chapter 17
Table F–17 (Cont.) Summary of Zero Downtime Upgrade Tasks
Summary of Tasks for a Zero Downtime Upgrade

Summary of a Zero Downtime Upgrade Tasks
F-30 Oracle Access Manager Upgrade Guide
16 Upgrading Original Components
Upgrading Your Original Identity System, Chapter 17
■ Turning Off the Access Server Cache Flush if you have a joint Identity and Access System
■ Preparing Original Identity System Components for the Upgrade
■ Upgrading Original COREid Servers that are Associated with a Single WebPass
■ Configuring Upgraded Original COREid Servers
■ Upgrading An Original Associated WebPass Instance
■ Configuring the Upgraded Original WebPass for Upgraded COREid Servers
■ Identity System Only:
Perform activities in Setting Up the Upgraded Original Identity System when all Web components are at the same Oracle Access Manager release level
Proceed to validating the upgraded Identity System in row 17
■ Joint Identity System and Access System: Perform the following activities before upgrading a second WebPass or setting up the upgraded original Identity System
Adding a Temporary Directory Profile for Original Access System Upgrades
Setting Up the Upgraded Original Identity System
Upgrading Your Original Access System, Chapter 17
■ Preparing Original Access System Components for the Upgrade
■ Creating Individual Profiles for WebGates that Share a Profile
■ Upgrading An Original Access Manager Instance
■ Setting Up the Upgraded Original Access Manager when all Web components are at the same Oracle Access Manager release
■ Configuring Original Access Servers to Use the New Branch
■ Upgrading Original Access Server Instances
■ Upgrading Original WebGates
■ Proceed to validating successful operations in row 17
17 Validating the Entire Upgraded Original Environment, Chapter 17
Identity System Only:
■ Validating the Upgraded Original Identity System
■ Backing Up the Upgraded Original Identity System
■ Proceed to row 18
Joint Identity and Access System:
■ Validating the Upgraded Original Access System
■ Backing Up the Upgraded Original Access System
■ Proceed to row 18
18 Starting On-the-fly User Data Migration
19 Reconfiguring Domain Name Systems to Use the Upgraded Original Deployment.
Optional: Removing the Cloned System After Upgrading Originals
Table F–17 (Cont.) Summary of Zero Downtime Upgrade Tasks
Summary of Tasks for a Zero Downtime Upgrade

Summary for Integration Connector/SDK Upgrade Tasks
Planning and Tracking Summaries F-31
Summary for Integration Connector/SDK Upgrade Tasks Table F–18 can help you track the progress your integration connector or independently installed SDK upgrades (or both). The procedures are described in Chapter 11, "Upgrading Integration Components and an Independently Installed SDK".
Note: In an Identity System-only deployment, there will be no integration connectors to upgrade. When you have a joint Identity and Access System deployment, you must upgrade integration connectors before independently installed SDKs for the Access System.
Table F–18 Summary of Integration Connector/Independently Installed SDK Upgrade Tasks
Done Summary of Integration Connector/Independently Installed SDK Upgrade Tasks Details
Deployment Name:_________________________________________________________________
Task owner:________________________________________________________________________
Prerequisites, all tasks in Summary of In-Place Upgrade Tasks
Identity System-Only Deployments
Upgrading Independently Installed Software Developer Kits page 11-4
Backing Up Upgraded Integration Connector or SDK Data page 11-6
Joint Identity and Access System Deployments Only
Upgrading Third-Party Integration Connectors page 11-4
Upgrading Independently Installed Software Developer Kits page 11-4
Backing Up Upgraded Integration Connector or SDK Data page 11-6

Summary for Customization Upgrade Tasks
F-32 Oracle Access Manager Upgrade Guide
Summary for Customization Upgrade TasksTable F–19 can help you track the progress of customization upgrades in your environment. Specific Identity System procedures are described in Chapter 12, "Upgrading Your Identity System Customizations". Access System procedures are described in Chapter 13, "Upgrading Your Access System Customizations".
Table F–19 Summary for Customization Upgrade Tasks
Done Summary of Customization Upgrade Tasks Details
Deployment Name:_________________________________________________________________
Task owner:________________________________________________________________________
Prerequisites, all tasks in:
■ Summary of In-Place Upgrade Tasks
■ Summary for Integration Connector/SDK Upgrade Tasks
Identity System-Only Deployments
Upgrading Auditing and Access Reporting for the Identity System page 12-2
Combining Challenge and Response Attributes on a Panel page 12-8
Confirming Identity System Failover and Load Balancing page 12-9
Migrating Custom Identity Event Plug-Ins page 12-10
Ensuring Compatibility with Earlier Portal Inserts page 12-11
Incorporating Customizations from Release 6.5 and 7.x page 12-12
Incorporating Customizations from Releases Earlier than 6.5 page 12-14
Validating Identity System Customization Upgrades page 12-24
Other Customizations (see summary pages)___________________________________________
___________________________________________________________________________________
___________________________________________________________________________________
___________________________________________________________________________________
Backing Up Upgraded Identity System Customizations page 12-24
Access System Customizations Only
Upgrading Auditing and Reporting for the Access Server page 13-2
Confirming Access System Failover and Load Balancing page 13-3
Upgrading Forms-based Authentication page 13-4
Recompiling and Redesigning Custom Authentication and Authorization Plug-Ins page 13-5
Associating Release 6.1.1 Authorization Rules with Access Policies page 13-5
Assuring Proper Authorization Failure Re-directs After Upgrading from 6.1.1 page 13-6
Updating the ObAMMasterAuditRule_getEscapeCharacter in Custom C Code page 13-7

Summary of Validating the Entire Upgrade
Planning and Tracking Summaries F-33
Summary of Validating the Entire UpgradeTable F–20 can you track the progress your validation activities. Specific procedures are described in Chapter 14, "Validating the Entire System Upgrade". If you are using the zero downtime upgrade method, see various topics on"Summary of a Zero Downtime Upgrade Tasks" page F-27.
Validating Access System Customization Upgrades page 13-7
Other Customizations (see summary pages)_____________________________________________
___________________________________________________________________________________
___________________________________________________________________________________
___________________________________________________________________________________
Backing Up Upgraded Access System Customizations page 13-7
Table F–20 Summary for Validating All Upgrades
Done Summary for Validating All Upgrades Details
Deployment Name:_________________________________________________________________
Task owner:________________________________________________________________________
Prerequisites, all tasks in:
■ Summary of In-Place Upgrade Tasks
■ Summary for Integration Connector/SDK Upgrade Tasks
■ Summary for Customization Upgrade Tasks
Identity System-Only Deployments
Validating the Identity System Upgrade page 14-1
Reverting Identity Server Backward Compatibility page 14-5
Joint Identity and Access System Deployments
After performing all Identity System upgrade tasks described in this table, perform remaining tasks in this table to validate the upgraded Access System upgrade.
Validating Access System Upgrades page 14-2
Deleting the Temporary Directory Server Profile page 14-4
Reverting Access Server Backward Compatibility page 14-5
Table F–19 (Cont.) Summary for Customization Upgrade Tasks
Done Summary of Customization Upgrade Tasks Details
Summary of Validating the Entire Upgrade
F-34 Oracle Access Manager Upgrade Guide

Troubleshooting the Upgrade Process G-1
GTroubleshooting the Upgrade Process
In addition to the guidelines and techniques presented throughout this guide, this chapter provides troubleshooting details that you can employ during or after the upgrade process. Topics include:
■ Accessing Log Files
■ Accessing Data Issues
■ Access Server Not Processing Earlier WebGate Data Properly
■ Auditing and Access Reporting Issues
■ Authentication Failures
■ Authorization Failure Re-direct Problems After Upgrading from 6.1.1
■ Challenge and Response Phrase Issues
■ Challenge Response Might Not Convert Properly
■ Compatibility of Earlier Plug-ins in the Upgraded Environment
■ Customized Styles, Images, and JavaScript
■ Deleting the vpd.properties File
■ Ensuring Compatibility with Earlier Portal Inserts
■ Failover and Load Balancing Issues in Upgraded Environments
■ Identity Server Not Processing Data from Earlier Plug-ins
■ IdentityXML Calls Fail After WebGate Install
■ LDAP Add Errors in a Replicated Environment
■ Manual Schema Upload Fails
■ Mime_types -related Customizations Not Retained
■ Page Not Found Error While Accessing the Access or Identity URL
■ Searches Are Slow
■ Simple Mode Password File Not Converted During Upgrade
■ Troubleshooting Sun Web Server Upgrades
■ Users Cannot Log In
■ Weblogic Connectors Simple Mode Password File is Not Migrated
■ WebSphere Application Server and Portal Server Upgrades
■ Zero Downtime Upgrade Issues

Accessing Log Files
G-2 Oracle Access Manager Upgrade Guide
Accessing Log FilesDuring each component upgrade, one or more log files might be produced to inform you if any problem should arise. If a log file is created, a message during the upgrade process indicates the name and location of each log file created. In general, you can find upgrade log files in:
Log File Path:
\Component_install_dir\identity|access\oblix\tools\migration_tools\toolname.log
where \Component_install_dir is the directory where the specific component is installed; identity|access represents the system to which the component belongs (Identity System or Access System, respectively); and toolname represents the name of the utility that produced the log. For example, the following log files might be generated:
General Log Files obmigratenp.log (generated by the main tool obmigratep which calls the other tools) obmigratefiles.log (generated by the obmigratefiles tool that reads a given map-file and copies files from source directory to target directory based upon the mapping list) obmigrateparamsg.log (generated by the obmigrateparamsg tool which performs the parameter and message catalog upgrade) obmigrateds.log (generated by the obmigrateds tool which performs the schema and data upgrade)
Component-specific Log Files obmigrateNetPointOIS.log (Identity Server) obmigrateNetPointWP.log (Webpass) obmigrateNetPointAM.log (Policy Manager) obmigrateNetPointAAA.log (Access Server) obmigrateNetPointWG.log (WebGate)
Zero Downtime Mkbranch Log File makebranch.log (Identity Server and Policy Manager)
Each log file contains information about a particular activity that occurs during the component upgrade. For example, a separate log file might be generated for file upgrades, or message and parameter upgrades, or the Oracle Access Manager schema upgrade to name a few.
In general, log files include the following information that you can use to troubleshoot specific problems:
■ A snapshot of the steps being executed by the respective tool is recorded to help you identify any failure points.
■ Any argument details passed while the tool is executing the tool is logged to help you detect any incorrect values that were passed. This can also help if you need to execute the tool manually.
■ Return code details are logged to help you identify any error being returned. You can communicate the specific error to Oracle Support for analysis.
■ During parameter and message catalog upgrades (performed by the obmigrateparamsg tool) a corresponding log file (obmigrateparamsg.log) shows all files that have got upgraded. This helps you identify any missing files to detect any loss of customizations.

Auditing and Access Reporting Issues
Troubleshooting the Upgrade Process G-3
■ Component-specific log files show the changes that were completed for that specific component. Changes include any component-specific configuration file and registry changes occurring during the upgrade. This helps you identify any upgrade failures for the respective component.
For information about specific log files, their content, and the tools that generate them see Appendix C, "Upgrade Process and Utilities".
Additionally, the following files are created to log any ldap specific errors:
■ During Identity Server data migration, error_output_fromversion_to_toversion_osd.ldif file is created in the IdentityServer_install_dir\identity\oblix\tools\migration_tools\obmigratedata directory.
■ During Policy Manager data migration, error_output_fromversion_to_toversion_psc.ldif file is created in the PolicyManager_install_dir\access\oblix\tools\migration_tools\obmigratedata directory
Accessing Data IssuesIf you receive a "Cannot find <person> Object Class" error after upgrading the schema and data, the problem might be that the master Access Manger component used to upgrade the schema and data did not use the same transport security as the original component.
If the original Access Manager component is installed and configured using SSL-enabled communication with the directory server, then the master component that you add to upgrade the Access System schema and data must also use SSL-enabled communication with the directory server.
For more information, see "Adding an Earlier Access Manager to Use as a Master for the In-Place Method" on page 5-28.
Access Server Not Processing Earlier WebGate Data ProperlyIf you have a newly installed Access Server that does not appear to process information from an earlier WebGate, there might be a backward compatibility problem.
Upgraded Access Servers are automatically enabled for backward compatibility with earlier WebGates. However, if you install a new 10g (10.1.4.0.1) Access Server in an environment that includes earlier WebGates, you must manually set the "IsBackwardCompatible" Value="true" in the newly installed Access Server globalparams.xml to enable communication with earlier plug-ins and interfaces, as well as earlier WebGates and custom AccessGates. See also "Access Server Backward Compatibility" on page 4-33.
Auditing and Access Reporting IssuesIf you had auditing and access reporting configured in your earlier environment, you need to perform specific steps to ensure you can continue using this function. Otherwise, you might notice that some language characters (for example, Chinese or Japanese) in audit records are not being inserted correctly.
The steps you need to take to accommodate globalization changes, even when you have an English only environment, depends on the type of database you are using.

Authentication Failures
G-4 Oracle Access Manager Upgrade Guide
In addition, when upgrading the master Identity Server and the schema and data from any release earlier than 700 the audit file name is changed by prefixing the path to the master Identity Server. If your deployment includes multiple Identity Servers, the audit file name for each will be prefixed by the same Identity Server installation directory path as the Identity Server from which the data upgrade is performed. The result is that your original configuration is lost during the Identity Server upgrade.
The following task overview provides details that you need to correct audit and access reporting issues.
Task overview: Correcting auditing and access reporting issues1. If your environment includes an Oracle database instance for auditing, you can
check to ensure that your database character set is AL32UTF8.
2. Review and complete all steps in "Upgrading Auditing and Access Reporting for the Identity System" on page 12-2.
3. Review and complete all steps in "Renaming Audit Files After Upgrading the Schema and Data" on page 6-21.
4. Review and complete all steps in "Upgrading Auditing and Reporting for the Access Server" on page 13-2.
Authentication FailuresUsers with non Latin-1 login IDs might not be able to log in successfully when using a custom form. This problem can occur when you have internationalized data in your custom login forms, but you have not updated the login HTML encoding to UTF-8.
As discussed in Chapter 4, "System Behavior and Backward Compatibility", in 10g (10.1.4.0.1), form-based authentication supports non-ASCII login credentials (username/password). When you use form-based authentication with 10g (10.1.4.0.1) WebGates, you must ensure that character set encoding for the login form is set to UTF-8.
To correct problems with form-based authentication, see "Upgrading Forms-based Authentication" on page 13-4.
Note: Simply upgrading or altering existing database instances and tables is not supported and could result in permanent truncation and loss of existing data.
Note: If you are using the zero downtime upgrade method, see "Renaming Audit Files After Upgrading Identity System Clones" on page 16-85.
Note: Basic Authentication fails with non-ASCII login credentials. Use form-based authentication for non-ASCII login credentials. Use Basic Authentication with ASCII login credentials.

Challenge Response Might Not Convert Properly
Troubleshooting the Upgrade Process G-5
Authorization Failure Re-direct Problems After Upgrading from 6.1.1Problem: Authorization failure redirects might not work as expected after upgrading from release 6.1.1.
Cause: A new authorization inconclusive state was introduced in release 7.x (apart from authorization success and failure states).
Solution: In the Authorization Rule, be sure to specify an explicit Deny rule and change Allow takes precedence to Yes under the General panel. For more information, see "Assuring Proper Authorization Failure Re-directs After Upgrading from 6.1.1" on page 13-6.
Challenge and Response Phrase IssuesProblem: If your earlier environment has the challenge phrase and response attributes on separate panels, then the response attribute will not be displayed in the Profile page.
Cause: In earlier releases, the challenge phrase and response attributes were allowed on different panels of the Profile page of the User Manager, Group Manager, and Organization Manager. In 10g (10.1.4.0.1), however, both the challenge phrase and response attributes must be on the same panel.
Solution: You need to update your panel definitions to include the response attribute on the same panel as the challenge attribute. For more information, see "Combining Challenge and Response Attributes on a Panel" on page 12-8.
Challenge Response Might Not Convert ProperlyIf you choose to manually migrate data during an upgrade (exporting user data from old instance into new instance which is not recommended), the Challenge Response for lost password management might not convert properly. As a result, some users will not be able to use the lost password feature. For example, when providing a correct response on the Lost Password Management page the user cannot reset the password. Also some users might not be able to set new responses, basically it will complain that the old response is not correct.
The Challenge Response value is encrypted with the shared secret in the CPResponseEncryptionKey node, using the RC6 encryption algorithm. The Challenge Response encryption key contains the attributes:
DN:
cn=CPResponseEncryptionKey,obcontainerId=encryptionKey,o=Oblix,<container>
Attribute: obSecretSize Attribute: obSharedSecret
where Attribute: obSharedSecret is a binary attribute.
See Also: "Multiple Values in Challenge Phrase and Response Attributes" on page 4-19 and "Halting On-the-fly User Data Migration at First Login Temporarily" on page 5-19.
Note: If the configuration tree moved or a different directory server is used in the upgraded environment, the shared secrets might not match.
Compatibility of Earlier Plug-ins in the Upgraded Environment
G-6 Oracle Access Manager Upgrade Guide
To ensure the Challenge Phrase Response is properly converted1. Use caution with the shared secret, which cannot be copied and pasted.
2. Manually document the shared secret in your original configuration tree and add it to the 10g (10.1.4.0.1) configuration tree.
For more information, see "Encryption Schemes and the Shared Secret" on page 3-8 and "Checking Compatibility with Previous Releases" on page 8-1.
Compatibility of Earlier Plug-ins in the Upgraded EnvironmentIf your earlier customized plug-ins are not operating as expected after the upgrade when working with internationalized data (that is, non latin-1 data), you need to redesign these to ensure they can process UTF-8 encoded data. To send or receive internationalized data, earlier custom plug-ins must be redesigned to use UTF-8 encoding.
Also, on Solaris and Linux, plug-ins earlier than release 7.x must be re-compiled using the GCC v3.3.2 C++ compiler, regardless of the compiler that might be provided with the Operating System.
To ensure compatibility of your earlier plug-ins in the upgraded environment, see:
■ Migrating Custom Identity Event Plug-Ins
■ Recompiling and Redesigning Custom Authentication and Authorization Plug-Ins
Customized Styles, Images, and JavaScriptBroken images or the incorrect appearance of a customized Graphical User Interface (GUI) or JavaScript errors is an indication that earlier customizations have not been manually incorporated into the upgraded environment.
As discussed earlier, customized .XSL style files, images, and JavaScript files are not migrated during the upgrade. If your previous installation includes significant changes to earlier XSL stylesheets, or if you use a style other than the Oracle Access Manager default Classic Style, you need to manually include those changes in 10g (10.1.4.0.1) stylesheets, images, and JavaScript files.
For details about migrating customized styles, images, and JavaScript (including message handling), see details in Chapter 12, "Upgrading Your Identity System Customizations".
Note: Release 7.0 plug-ins as well as earlier plug-ins implemented as executables or those using a scripting language (such as perl) do not require recompiling after the upgrade. However, to send and receive internationalized data, earlier plug-ins should be redesigned to communicate using UTF-8 encoding.
WARNING: If you simply copy earlier stylesheets, you might receive stylesheet bug reports or experience unpredictable behavior when using new features designed to work with new stylesheets.

Identity Server Not Processing Data from Earlier Plug-ins
Troubleshooting the Upgrade Process G-7
Deleting the vpd.properties FileIf previous installations and upgrades have left behind a vpd.properties file, you might have trouble when you specify the installation directory. This can occur if a component installation terminates (or is terminated by you) after component files were extracted to the designated installation directory and you simply remove the installation directory without running the Uninstaller. In this case, you are left with an inconsistent vpd.properties file.
Before starting an upgrade you need to remove this file.
To remove the vpd.properties file1. Locate the vpd.properties file. For example:
■ On Windows NT: vpd.properties file is located in c:\WINNT.
■ On Unix: The vpd.properties file is located in the home directory of the user running the installer
2. Delete it.
Ensuring Compatibility with Earlier Portal InsertsAfter the upgrade if you notice that your portal inserts are not working as expected, you need to ensure that your portal insert URLs have been manually updated for UTF-8 encoding. Also, to use internationalized data in PresentationXML requests, these requests must indicate UTF-8 encoding.
Oracle Access Manager 10g (10.1.4.0.1) cannot detect query string character encoding and assumes it to be UTF-8. The 10g (10.1.4.0.1) Identity Server cannot process Latin-1 data from earlier Portal Inserts. After upgrading to 10g (10.1.4.0.1)), you must change the encoding of the query string in earlier Portal Inserts from Latin-1 to UTF-8.
To ensure compatibility with portal inserts in your environment, see "Ensuring Compatibility with Earlier Portal Inserts" on page 12-11.
Failover and Load Balancing Issues in Upgraded EnvironmentsYou should not experience any problems in this area following an upgrade. Refer to following discussions for more information:
■ Confirming Identity System Failover and Load Balancing
■ Confirming Access System Failover and Load Balancing
Identity Server Not Processing Data from Earlier Plug-insIf you have a newly installed Identity Server that does not appear to process information from an plug-in, there might be a backward compatibility problem.
Upgraded Identity Servers are automatically enabled for backward compatibility with earlier plug-ins. However, if you install a new 10g (10.1.4.0.1) Identity Server in an upgraded environment you must manually set the encoding flag in the Identity Server oblixpppcatalog.lst to enable communication with earlier plug-ins and interfaces. See also "Identity Server Backward Compatability" on page 4-26 on page 4-33.
IdentityXML Calls Fail After WebGate Install
G-8 Oracle Access Manager Upgrade Guide
IdentityXML Calls Fail After WebGate InstallIdentityXML calls require authentication credentials. If there is no WebGate protecting WebPass, then the basic credential mechanism is used. This takes the form of username and password embedded in the SOAP request itself. However, when a WebGate is installed later, then the IdentityXML calls must be changed to use a SSO token-based authentication.
The IdentityXML calls need to be changed to first obtain an OBSSOCookie, and then pass that token into all the subsequent calls. An example of how to do this is shown in the Oracle Access Manager Developer Guide. Look for details on code examples of deployed IdentityXML functions, and the ObSSOCookie Example.
LDAP Add Errors in a Replicated EnvironmentIf you are upgrading from Oracle Access Manager 5.2.x on Windows 2000 SP3, you might receive LDAP add errors during the upgrade. If you receive these errors, you might need to set the replication agreements for the computers.
To you receive LDAP add errors in your Windows environment1. Install the Support Tools from the Windows 2000 CD.
2. Run the dcdiag program, optionally using the /v command-line option.
3. Under the Replication test, check for failures.
4. If failures are reported, use the next procedure to troubleshoot LDAP add errors.
To troubleshoot LDAP add errors in a forest1. Confirm that the clocks are synchronized for the domain controllers.
2. On the command line for all domain controllers in the forest, enter the following:
net time /setsntp:machine name
Use the same computer name so there is minimal clock skew.
3. Set the group policy for replication:
a. Open the Users and Computers tool.
b. Go to Domain Controllers, right click, and select Properties.
c. Under the Group Policy tab, select Default Domain Controllers Policy, select Computer Configuration, then click Windows Settings.
d. Select Security Settings, select Local policies, then click User Rights Assignment.
e. From the right hand side, select Access this computer from the network.
f. Add ENTERPRISE DOMAIN CONTROLLERS to the access list.
4. Do a replication using the Sites and Services tool:
1. Go to Sites, select Default-First-site-name, then select Servers.
2. Select the server name.
3. Select NTDS settings.
4. Right click <automatically generated> on the right hand side, and select replicate now.

Mime_types -related Customizations Not Retained
Troubleshooting the Upgrade Process G-9
5. Enter the dcdiag program again on the command line to see if the replication test is now working.
After performing these steps, the schema migration should work properly.
Manual Schema Upload FailsIf you attempt to upload and use the full schema installation files for any directory during the upgrade (instead of using release-specific delta files for an existing schema), the operation will fail. This is because the schema already exists and the files used to upgrade an existing schema provide only the difference between the existing schema and the next release.
For example, suppose you have an installation with ADAM as the directory. If you attempt to upload and install the complete (new installation) schema file (ADAM_oblix_schema_add.ldif andADAM_user_schema_add.ldif) rather than release-specific delta-content files (osd_650_to_700_schema_adam.ldif and policy_650_to_700_schema_adam.ldif) the process will fail. This is because the schema already exists.
Guidelines■ Oracle recommends that you accept automatic schema and data upgrades.
■ If you must manually update the schema and data (for ADAM, for example), use only those release-specific delta-content files provided to upgrade your directory schema.
Mime_types -related Customizations Not RetainedYou might notice that your mime_types-related customizations are not reflected in the attribute configuration applet in the System Console.
When upgrading, multiple entries with the same ParamName in mime_types (.xml and .lst) files are not retained:
IdentityServer_install_dir/identity/oblix/apps/admin/bin/mime_types.xml IdentityServer_install_dir/identity/oblix/apps/admin/bin/mime_types.lst
WebPass_install_dir/identity/oblix/apps/admin/bin/mime_types.xml WebPass_install_dir/identity/oblix/apps/admin/bin/mime_types.lst
The .xml version of the file is used by the Identity Server. The .lst version of the file is used by the WebPass Java applet. Both versions of the file must match. Both versions of the file must reside in the IdentityServer_install_dir and in the WebPass_install_dir.
For example, if your original mime_types.xml file in IdentityServer_install_dir/identity/oblix/apps/admin/bin/mime_types.xml contains the following NameValPair ParamNames:
<NameValPair ParamName="application/postscript" Value="ai1"/><NameValPair ParamName="application/postscript" Value="eps1"/><NameValPair ParamName="application/postscript" Value="ps1"/>
the following entries will occur in the newly upgraded file:
<NameValPair ParamName="application/postscript" Value="ai1"/> (CORRECT)<NameValPair ParamName="application/postscript" Value="eps"/> (INCORRECT)<NameValPair ParamName="application/postscript" Value="ps"/>

Page Not Found Error While Accessing the Access or Identity URL
G-10 Oracle Access Manager Upgrade Guide
(INCORRECT)
For existing user entries, the MIME type is stored along with the user entry in the directory. As a result, there is no impact on existing user entries and Oracle Access Manager installations after the upgrade.
To ensure MIME type files are accurate and available in the upgraded environment1. Edit the Identity Server mime_types.lst file if needed to remove MIME types that
are no longer needed or add new MIME types to be associated with the particular attribute for further use.
2. Edit the Identity Server mime_types.xml file to match your edited mime_types.lst file.
3. Copy both Identity Server mime_types files (.lst and .xml) in to the WebPass_install_dir to replace the earlier version.
Page Not Found Error While Accessing the Access or Identity URL
Problem:A "Page not found." error occurs after upgrading an older WebGate to 10g (10.1.4.0.1).
Cause:Occasionally, earlier Access Servers do not completely shutdown. Upgrading an older Access Server that has processes running results in issues when upgrading older WebGates to 10g (10.1.4.0.1). To avoid issues before upgrading, see "Stopping Servers and Services" on page 8-9.
Solution:Stop the associated Access Servers, terminate any still-running processes (for example, on Solaris platforms use the kill -9 command), then restart the Access Servers.
Searches Are SlowIf you do not upload the indexes for iPlanet and NDS directories, the product will work. However, searching will be inefficient and impact performance.
For details, see "Uploading Directory Server Index Files" on page 6-17.
Simple Mode Password File Not Converted During UpgradeIf the earlier Access Server is in Simple mode before the upgrade, during the upgrade to 10g (10.1.4.0.1) the password.lst file is not converted to password.xml. The result is that the Access Server cannot be started in the Services Window unless you use the command-line parameters to convey the passphrase on startup. Also, after upgrading
Note: Both .lst and .xml versions of the file are needed. You might remove MIME types that are no longer needed or add new MIME types to be associated with the particular attribute for further use. Simply edit the mime_types.lst and .xml files for the Identity Server, then copy these into the WebPass_install_dir to replace the earlier version.
Simple Mode Password File Not Converted During Upgrade
Troubleshooting the Upgrade Process G-11
a WebGate in Simple mode and starting the Web server, the following error might appear:
"Exception thrown during WebGate initialization" Error^Oracle AccessGate API is not initialized.
The initial Access System page appears. However, clicking on any link results in a "Server error" in the browser (no error number) with the error echoed to the console. The system cannot be accessed.
The upgraded area does not have the updated password.xml file.
The following information is a workaround for this problem when the same Simple mode password is being used in the Identity System. In this case, you can copy the password.xml file from the upgraded Identity Server to the upgraded Access Server and WebGate as described in the following procedure.: "Workaround when the same Simple mode password is used in the Identity System". You will be asked about the password immediately after selecting Simple mode.
However, if the password is not the same on the Identity Server as it is on the Access Server, skip to the following procedures. Again, you will be asked about the password immediately after selecting Simple mode:
■ Workaround when the Simple mode password is different on the Identity System and Access Server
■ Workaround when the Simple mode password is different on the Identity System and WebGate
Workaround when the same Simple mode password is used in the Identity System 1. If the same Simple mode password is being used in the Identity System, copy the
password.xml file as follows:
From: <upgraded_IdentityServer_install_dir>/oblix/config/password.xml To: <upgraded_AccessServer_install_dir>/oblix/config /password.xmland To: <upgraded_WebGate_install_dir>/oblix/config/password.xml
2. Start the Access Server.
3. Restart the WebGate Web server.
If the Access System Simple mode password is not the same as the Identity System Simple mode password, you must change the password using the following tools and procedures.
<AccessServer_install_dir>/access/oblix/tools/configureAAAServer <WebGate_install_dir>/access/oblix/tools/configureWebGate
Workaround when the Simple mode password is different on the Identity System and Access Server1. Go to the folder where configureAAAserver is located. For example:
AccessServer_install_dir\access\oblix\tools\configureAAAServer
Note: In releases before 10g (10.1.4.0.1), the password file is named and formatted as password.lst. Starting with release 10g (10.1.4.0.1), the password file is named and formatted as password.xml

Troubleshooting Sun Web Server Upgrades
G-12 Oracle Access Manager Upgrade Guide
2. Run the following executable:
configureAAAServer chpasswd AccessServer_install_dir
3. Responds to prompts as directed on the screen.
4. Restart the Access Server.
Workaround when the Simple mode password is different on the Identity System and WebGate1. Go to the directory:
WebGate_install_dir\access\oblix\tools\configureWebGate
where WebGate_install_dir is the directory in which WebGate is installed.
2. Run the following command:
configureWebGate -i WebGate_install_dir -t WebGate -k
The -k option results in only prompts for the password for Simple or Cert mode transport security.
3. Respond to prompts on the screen.
4. Restart the WebGate Web server.
For more information about the configureAAAServer and configureWebGate tools, see the Oracle Access Manager Access Administration Guide.
Troubleshooting Sun Web Server UpgradesThe release numbers in this discussion are for illustration only and related to the information in Appendix E, "Upgrading Sun Web Server Version 4 to Version 6 on Windows 2000". Specific details of the intermediate upgrade from earlier Oracle Access Manager releases to release 6.1.1 are outside the scope of this manual. Before you start upgrading from a release earlier than Oracle Access Manager 6.1.1, contact Oracle Support at http://www.oracle.com/support/contact.html.
There are several potential issues that might occur after upgrading to Sun release 6.0 Web server and upgrading to the Oracle Access Manager 7.0 Identity System.
During the upgrade, the following entries are added to obj.conf:
NameTrans fn="pfx2dir" from="/identity/oblix" dir="G:/70/webpass/identity/oblix" name="idoblix"……<Object name="idoblix">PathCheck file=".nsconfig" fn="load-config" descend="1"</Object>
However, in the Oracle Access Manager 5.2 Identity System installed on a version 4.1 Web server, the obj.conf does not contain the entries underlined earlier. Even when the version 4 Web server is migrated to release 6 and Oracle Access Manager is upgraded to release 7.0, these entries are not included in obj.conf.
■ If you have enabled cgi for the 4.1 iPlanet instance, the URL prefix and script directory settings are carried over exactly during migration. If this directory is under the version 4.1 document root, you might want to change this directory by:

Troubleshooting Sun Web Server Upgrades
Troubleshooting the Upgrade Process G-13
– Either using the release 6.0 Web server Admin Console (Class manager > Programs)
– Or by hand editing the appropriate line in obj.conf
For example, an example line in the 6.0 obj.conf is shown next:
NameTrans fn="pfx2dir" from="/cgi-bin" dir="D:/NSWS/Server4/docs/cgi-bin" name="shellcgi"
■ In the file jvm12.conf in the Web server config directory, the following line can be found after migration. This property contains references to the old (4.1) bits and is not correctly migrated:
jvm.classpath=D:/NSWS/Server4/plugins/samples/servlets/beans.10/SDKBeans10.jar;D:/NSWS/Server4/plugins/samples/servlets/beans/SDKBeans.jar;D:/NSWS/Server4/bin/https/jar/Bugbase.jar;D:/NSWS/Server4/bin/https/jar/Calljsac.jar
This line should be replaced by the following:
jvm.classpath=G:/iPlanet6WS/plugins/servlets/examples/legacy/beans.10/SDKBeans10.jar
■ Any files or folders that were in your old document-root need to be copied manually to the same structure in the new document-root. This is important if you want the new Web server instance to behave exactly as the old one.
■ As noted earlier, both Admin Consoles (version 4.1 and version 6.0) can operate the server, which work using the 6.0 binaries. The Admin Consoles simply use the Windows NT service to start/stop the server.
From the 4.1 Console, if you delete the old instance the result is deleting the service and the version 4.1 files. If this happens, even the 6.0 Console cannot operate the instance, because the service has been deleted. Since this is not desirable, the following steps are required:
a. Stop the server (from either the version 4.1 or the release 6.0 console or using the NT service).
b. If you want to preserve the logs and the like, back up the old logs directory manually.
c. Delete the version 4.1 instance directory manually.
d. Restart the version 4.1 Admin Console.
This completes the process.
Note: It is a good idea to search the migrated obj.conf for the old install area (in this case D:/NSWS/Server4) to make sure that the 6.0 instance of the server does not refer to the old install area in any way.
Note: The other jars are not to be included in the release 6.0 Web server configuration and have been intentionally left out.
Note: The upgraded server is no longer available for the version 4.1 Admin Console to manage.

Users Cannot Log In
G-14 Oracle Access Manager Upgrade Guide
Users Cannot Log InIf you do not upload appropriate indexes for Oracle Internet Directory after the schema and data upgrade, users will not be able to login.
For details, see "Uploading Directory Server Index Files" on page 6-17.
File Required for WebSphere Application Server 6.1 Registrytester is Missing
Before you enable the NetPointWASRegistry, you need to run the registryTester program to ensure that the NetPointWASRegistry is registered and can successfully connect to the Identity System. A file required to run the registrytester was available in the WAS_install_dir. Today, however, the file is not bundled with the Oracle Access Manager Connector for WebSphere. As a result, you cannot run the registrytester with the Oracle Access Manager Connector for WebSphere 6.1.
Workaround: Copy the sas.jar from an external source (WebSphere Application Server 6.0 installation directory, for example), then set the classpath accordingly. For example:
set CLASSPATH=.:${CLASSPATH}:${INSTALL_DIR}/oblix/lib/NetPointWASRegistry.jar :${INSTALL_DIR}/oblix/lib/jobaccess.jar :${WAS_INSTALL_DIR}/lib/wssec.jar:${WAS_INSTALL_DIR/lib/sas.jar :${WAS_INSTALL_DIR}/lib/j2ee.jar:${WAS_INSTALL_DIR}/java/jre/lib/security.jar :${WAS_INSTALL_DIR}/java/jre/lib/xml.jar
Weblogic Connectors Simple Mode Password File is Not MigratedFor Weblogic and WebSphere connectors running in simple mode, when you upgrade Oracle COREid Release 7.0.4 connector for Weblogic that is running in Simple mode to 10g (10.1.4.0.1), the password.xml file is not migrated. In this case, you are prompted for the NetPoint Transport Password in addition to a user name and password when starting the Weblogic (or WebSphere) server.
Workaround: Before starting the upgrade, you need to add the following to the asdk_base_files.lst file in the directory connector_ install_dir/NetPointSecuProvForWeblogic/oblix/tools/migration_tools. After receiving the message that migration completed successfully, copy the file NetPointProvidersConfig.properties and mbean.jar from the upgraded directory to the Weblogic Portal Domain.
file:/oblix/config/password.lst
1. Before starting the upgrade, add the following to the asdk_base_files.lst file in the directory connector_ install_dir/NetPointSecuProvForWeblogic/oblix/tools/mig ration_tools
file:/oblix/config/password.lst
2. Start upgrading from Oracle COREid Release 7.0.4 to 10g (10.1.4.0.1) and also upgrade the Access Server SDK.
3. After receiving the message that migration completed successfully, copy the file NetPointProvidersConfig.properties and mbean.jar from the upgraded directory to the Weblogic Portal Domain.
Zero Downtime Upgrade Issues
Troubleshooting the Upgrade Process G-15
4. Restart WebLogic.
For more information, see "Finishing the Integration Connector Upgrade" on page 11-3.
WebSphere Application Server and Portal Server UpgradesDuring installation of the integration connector for WebSphere Application Server and Portal Server, you are asked to provide the WebSphere classes directory path so the following files are added:
jobaccess.jar and NetPointWASRegistry.jar
However, during the upgrade of the integration connector for WebSphere Application Server and Portal Server, you are not asked for this directory. Instead, you need to manually copy the three files (listed in the following example) into the directory following the upgrade, then restart the Websphere Application Server and the Portal Server.
jobaccess.jar NetPointWASRegistry.jar NetPointCMR.jar
There is no NetPointCMR.jar in a release 6.5 installation.
For more information, see "Upgrading Third-Party Integration Connectors" on page 11-1.
Zero Downtime Upgrade IssuesThis section discusses issues that are specific only to performing an upgrade using the zero downtime method. If you did not use the zero downtime upgrade method, you can skip this section. Topics here include:
■ No Registry Key for Upgraded Web Component Clones with IIS v5
■ Generating a New Registry Key To Use When Rolling Back an Original Instance Upgrade
No Registry Key for Upgraded Web Component Clones with IIS v5
Issue: Windows Registry is not updated for upgraded cloned Web componentsAfter upgrading a cloned COREid Server and successfully starting the service, the Windows Registry is updated with details for the upgraded clone. However, the Registry is not updated after upgrading a cloned WebPass (or Access Manager) when Microsoft IIS 5.0 is the Web server. Instead, the component is upgraded to release 10.1.4 and the earlier Registry key is removed but there is no new entry under a 10.1.4 key.
Cause:The transfilter for the 10.1.4.2.0 patched Web component was not registered when copying the component to create a clone. As a result, the location is not available in the Registry editor.
Workaround: Perform the following steps1. Stop the upgraded clone COREid Server service.

Zero Downtime Upgrade Issues
G-16 Oracle Access Manager Upgrade Guide
2. Stop the IIS v5 Web server that is running with the upgraded Web component.
3. Rename the original COREid Server directory. For example:
From: np611\ois_01\identity
To: orig_np611\ois_01\identity_1014
4. Rename the original Web component directory.
From: np611\webcomponent_01\identity
To: orig_np611\webcomponent_01\identity_1014
5. Install the 10.1.4.0.1 Identity Server and WebPass and apply the 10.1.4.2.0 patch set, as follows:
■ Use instructions in "About Destination Creation and Obtaining Tools for a Zero Downtime Upgrade" on page 16-28 as a guide.
■ Specify the original COREid Server installation directory as the destination for the 10.1.4.0.1 Identity Server. For example:
Destination: np611\ois_01\identity
■ Apply the 10g (10.1.4.2.0) patch set to the 10.1.4.0.1 Identity Server as described in the Oracle Access Manager Patch Set Notes Release 10.1.4 Patchset 1 (10.1.4.2.0) For All Supported Operating Systems
■ Specify the original (now renamed) WebPass installation directory as the destination for the 10.1.4.0.1 WebPass.For example:
Destination: np611\webcomponent_01\identity
■ Apply the 10g (10.1.4.2.0) patch set to the 10.1.4.0.1 WebPass as described in the Oracle Access Manager Patch Set Notes Release 10.1.4 Patchset 1 (10.1.4.2.0) For All Supported Operating Systems.
6. Proceed with remaining zero downtime upgrade tasks for your environment, as described in Chapter 15.
Generating a New Registry Key To Use When Rolling Back an Original Instance Upgrade
This topic explains how to reinstate the Windows registry entry when you are rolling back after upgrading original component instances that are installed on a Windows platform. This topic is not relevant for other platforms.
To help ensure and streamline the roll back procedure, Oracle recommends that you back up the Windows registry entry for each original instance immediately before you start upgrade activities for the instance. This means that before you rename the original file system path to create a source for the zero downtime upgrade, you must back up the original Windows registry entry. In fact, Step 1 of each upgrade procedure directs you to perform specific preparation tasks that are described in detail in Chapter 8. Backing up file system directories, Web server configuration files, and Windows registry details are among those tasks.
The following approaches are available to reinstate the original registry entry when you roll back:
■ Recommended: Back up the original registry entry before you rename the original instance file system path to create an upgrade source.

Zero Downtime Upgrade Issues
Troubleshooting the Upgrade Process G-17
Oracle recommends that you export registry details for the instance (whether clone or original) before starting upgrade activities for each instance. This enables you to import the registry entry if you decide to roll back to the original release.
■ Alternative: Reinstall the original instance during the rollback task.
If you do not have a backup registry entry to import during a rollback, there is no automated way to reinstate the entry. In this case, you must start the original component installation anew. After the registry entry is created, you will end the installation process and then copy original configuration details from the source that was renamed before the upgrade. For details, see the following procedure.
The following procedure describes how to use the alternative approach when you do not have a back up copy of the original registry entry. This procedure provides sample path names, including:
■ Original Instance (also the upgrade destination): np611\ois_01\identity
■ Source (renamed original): np611\ois_01\identity_source
To generate a Windows registry entry if you don’t have a backup copy to import when rolling back to an original instance1. Confirm that the clone setup is running and providing service to your customers
with original WebGates.
2. Stop the original servers.
3. Confirm that the source path that was created for the instance upgrade differs from the original path.
Source: np611\ois_01\identity_source
4. Remove (or rename) the destination file system that was created for the original instance (the 10g (10.1.4.0.1) component libraries and files with Release 10.1.4 Patch Set 1 (10.1.4.2.0) applied).
Delete (or Rename) Destination: np611\ois_01\identity
5. Start re-installing the original component release to create the registry entry as follows:
a. Locate and launch the original component installer on the computer that is hosting the renamed source. For example: NetPoint6_EN_sparc-s2_COREid_Server.
b. Specify the same installation path that the original instance had. For example: np611\ois_01.
c. Proceed with Step 5 or Step 6 based on the type of component you are installing.
6. COREid or Access Server:
a. Provide the same transport security details as the original instance.
b. Provide the same configuration details as the original instance (the original COREid or Access Server name, host name, and port) to create the registry entry.
c. When you are informed that the service name exists, click Cancel to end the installation process.
d. Proceed to Step 7.
Zero Downtime Upgrade Issues
G-18 Oracle Access Manager Upgrade Guide
7. WebPass, Access Manager, or WebGate: After libraries and files are extracted, Cancel the installation. The registry entry and new directories are created.
8. All Components: Proceed with caution as you replace the freshly installed file system with the renamed source:
a. From the freshly installed file system, delete the fresh \identity (or \access) folder and all subdirectories. For example:
Delete From Freshly Installed File System: \identity (or \access)
b. From the renamed source, copy the \identity (or \access folder and all sub directories. For example:
Copy From Renamed Source: \identity_source
c. To the freshly installed file system, add the copied folder. For example:
Add to Fresh File System: \identity_source
d. In the freshly installed file system, rename the copied folder to match the original name, if needed. For example:
Change in Fresh File System: \identity_source
To: \identity
9. Access Server: Proceed with caution as you copy the backup Access Server \config directory and add this to the freshly installed Access Server file system. For example:
a. Locate and copy the backup Access Server \config directory that was made before the original instance was reconfigured. For example:
Copy From: backup_aaa\config
b. To the newly renamed Access Server file system, add the copied \config folder. For example:
Add to Fresh File System: np611\access\oblix\config
10. WebPass, Access Manager, or WebGate: Reinstate the original Web server configuration files using the back up copy that was made before the instance upgrade. For example:
a. Remove (or rename) the upgraded Web server configuration file for original components.
b. Reinstate the back up copy of the Web server configuration file that contains entries for the earlier Web component (made before you upgraded the original instance).
c. Restart the Web server instance.
11. COREid or Access Server: Restart the Service.
12. When all original components are started, test the original setup to ensure that it is fully operational.

Index-1
Index
Numerics10.1.4.2.0, 4-39
enhancements, 4-39
AAbout
Automated In-Place UpgradesProcessing and Events, 3-2
Clone Mode, ZDTU, 15-30Creating and Populating a New Branch,
ZDTU, 16-33Creating Clones, ZDTU, 16-22Creating Individual Profiles for WebGates that
Share a Profile, 17-23Destination Creation and Obtaining Tools,
ZDTU, 16-28Entries for Access Manager Clones, ZDTU, 16-14Execution Stage In-place, 1-11In-place Identity System Upgrades, 9-1Mkbranch Mode, ZDTU, 15-26Original Mode (Prod), ZDTU, 15-33planning for the upgrade, F-2Planning Stage for in-place method, 1-11Planning, ZDTU, 15-1Preparing For and Performing the Schema and
Data Upgrade, 5-2Schema and Data Upgrades, 5-1Schema Mode, ZDTU, 15-28Upgrade Events, C-1Upgrade Methodologies, 1-2Upgrades and Backward Compatibility, 4-3
Access Servers, 4-4Identity Servers, 4-4Policy Managers, 4-4WebGates, 4-4WebPass, 4-4
Upgrading Identity System Only Deployments, 1-3
Upgrading Joint Identity System and Access System Deployments, 1-5
Upgrading Original Access System, ZDTU, 17-30Upgrading Original Identity System, ZDTU, 17-4Upgrading the Identity System Schema and
Data, 6-1
Upgrading the Schema, ZDTU, 16-61Zero downtime upgrades, 15-1
Access Domainformerly named NetPoint or COREid Access
Manager Domain, xxviAccess Management API
now named Policy Manager API, xxviAccess Management service
WebGate, 10-12Access Manager
clone, ZDTU, 16-14create clone, ZDTU, 16-26now named Policy Manager, xxvi
Access Manager APIformerly named Access Server API, xxvi
Access Manager SDKformerly named Access Server SDK, xxvi
Access Reporting, 3-9Access Server
clone, ZDTU, 16-14reconfiguring, 16-56
create clone, ZDTU, 16-25, 16-26db profile created, 10-8diagnostics, 4-12original, ZDTU
reconfiguring, 17-42Starting the upgrade, in-place, 10-7subdirectories, A-7temporary directory profile, 7-10Upgrade Prerequisitesr, 10-6utility, 15-32, C-5
Access Server APInow named Access Manager API, xxvi
Access Server SDKnow named Access Manager SDK, xxvi
Access SystemBehavior Changes, ZDTU
IPValidation, 17-21IPValidationExceptions, 17-21
Behavior SummaryIntegration Support Enhanced, 4-42
creating a directory profile, ZDTU, 16-16creating a temporary directory profile, in
place, 7-10Customizations, 13-1Directories, A-5

Index-2
Downtime Assessment, 1-25in-place component upgrade, 10-1load-balancing, 13-3plug-ins, 13-5prepare
schema and data, 5-1Schema and Data
Upgrade Prerequisites, 7-3validating the upgrade, 14-2zero downtime upgrade method, 15-8
Access System Behavior Changes, 4-32Access Management API, 4-37Access Manager API, 4-33Access Manager SDK, 4-33Access Server Backward Compatibility, 4-33Access Server SDK, 4-33AccessGates, 4-38AES encryption scheme, 4-39Authentication Scheme Updates, 4-34Authorization Rules and Access Policies, 4-34Custom AccessGates, 4-33Custom Authentication and Authorization
Plug-ins and Interfaces, 4-35Forms-based Authentication, 4-36, 13-4, G-4Impersonation, 4-36IPValidation, 4-38IPValidationExceptions, 4-38Maximum Elements in Session Token Cache, 4-36NetPoint or COREid Access Protocol, 4-37ObAMMasterAuditRule_
getEscapeCharacter, 4-37, 13-7ObAMMasterAuditRule_
getUTF8EscapeCharacter, 4-37, 13-7Oracle Access Protocol (OAP) Updates, 4-37Policy Manager API, 4-37Preferred HTTP Host, 4-38Shared Secret, 4-38Triggering Authentication Actions After the
ObSSOCookie Is Set, 4-38WebGates, 4-38
AccessGateconfigureAccessGate tool, B-20
AccessGate Name field, 17-34AccessGate Password field, 17-34Active Directory, 5-11ADAM, 5-13
ldifde, 5-14schema files, 5-13Windows security principal, 5-14
Adding, in-place upgradeMaster Access Manager for schema and data
upgrades, 5-28Master Identity System for schema and data
upgrade, 5-21Adding, ZDTU
Directory Server Profiles for Cloned COREid Servers, 16-11
Profile for Access Server Clones, 16-14Temporary Directory Profile for Original Access
System Upgrade, 17-21
AES encryption scheme, 4-16AL32UTF8, 12-6Alternative, ZDTU
Associate Original WebGates and Clone Access Servers, 16-19
AM Service State, 4-20now named Policy Manager API Support
Mode, xxviAnonymous authentication scheme
formerly named NetPoint or COREid None, xxviapplications, 3-1Associating
Release 6.1.1 Authorization Rules with Access Policies, 13-5
Associating, ZDTUCOREid Server Clone with a WebPass
Clone, 16-10Original WebGates with Access Server
Clones, 16-17Assuring Proper Authorization Failure Re-directs
After Upgrading from 6.1.1, 13-6audit policy correction, ZDTU, 16-44audit policy data, ZDTU, 16-42auditing, 3-9, 12-2authentication, xxiii
plug-ins, 3-11, 4-9, 13-5scheme
default schemes, xxviauthorization, xxiii
plug-ins, 3-11, 4-9, 13-5
Bbacking up
Access System schema and data, 7-12directories, 8-7Existing Oracle Access Manager Data, 5-16upgraded Access System Component
Directories, 10-13upgraded Access System customizations, 13-7upgraded Identity Component Information, 9-12upgraded Identity schema and data, 6-22upgraded Identity System Customizations, 12-24Upgraded Integration Connector or SDK
Data, 11-6Web server configurations, 8-7Windows registry details, 8-7
backing up, ZDTUafter upgrading, 15-34before the upgrade, 15-34original upgraded Access System, 17-55original upgraded Identity System, 17-26strategies, 15-33Upgraded Access System Clones, 16-98Upgraded Identity System Clones, 16-82
Base stylesheets, 12-16, 12-18Bringing Computers to 10g (10.1.4.0.1) Support
Levels, ZDTU, 16-3browser locale, 4-12

Index-3
CC++ Programs, 3-10catalogs
message, 2-3, 3-5parameter, 2-3, 3-5
cert7.db, 3-6, 4-9cert8.db, 3-6, 4-9Certificate Authority, 4-9certificate files, 3-6challenge and response
encoded format, 4-20, 5-19encoding, 4-21
Challenge Attributes, 3-10challenge phrase, 4-19, 4-21, 12-8, G-5Challenge Response
encryption key, G-5Classic Style, 12-15, A-8, A-9Cleaning Up the Obsolete Schema, ZDTU, 16-30Clone Environment, ZDTU, 15-3clone, ZDTU
components, 16-24Web components, 16-26
Cloning, ZDTUEarlier Components, 16-21
Compatibility, 8-1compiler, 3-11component specific
environment settings, 3-5utility, 3-4, C-5utility, ZDTU, 15-32
component upgrade, ZDTU, 15-34Component_install_dir, 3-5, G-2components, 3-1config_ois.exe , ZDTU, 16-41config_ois.exe, ZDTU, 17-12configuration
data, 1-4, 3-5Cleanup Files, D-7
files, 3-6configuration data
formerly named Oblix data, xxviupgrade, ZDTU, 15-11
configuration data, ZDTU, 15-11new branch, 16-33
configuration DN, 5-8, 5-28, 5-31, 5-32configuration tree
formerly named Oblix tree, xxviconfigureAAAServer, 4-9configureAccessGate tool, B-20configureIIS4accesssystem, ZDTU, 16-52configureIIS4webpass.bat, ZDTU, 16-45configureWebGate command, B-20Configuring
magnus.conf, E-2New Sun Web Server Instance, E-2obj.conf, E-3
Configuring, ZDTUChallenge/Response Phrase at the Object Class
Level, 16-4Cloned Access Servers, 16-55
Cloned Components and Services, 16-40Upgraded Original WebPass, 17-19
Connection Pool, 3-8Console method
Master Access Manager, 5-29Master COREid Server, 5-25Master WebPass, 5-26
Copying, ZDTUConfiguration Data to a New Branchr, 16-33Policy Data to a New Branch, 16-33
COREidnow named Oracle Access Manager, xxvi
COREid Access Manager Domainnow named Access Domain, xxvi
COREid Administratornow named Master Administrator, xxvi
COREid Basic Over LDAP authenticationnow named Oracle Access and Identity, xxvi
COREid for AD Forest Basic Over LDAP authentication
now named Oracle Access and Identity for AD Forest Basic over LDAP, xxvi
COREid Identity Domainnow named Identity Domain, xxvi
COREid None authenticationnow named Anonymous authentication, xxvi
COREid Server, ZDTUconfiguring cloned instances to operate with
cloned WebPass, 16-45configuring cloned servers to use the new
branch, 16-41configuring upgraded originals to use the new
branch, 17-12, 17-41create clone, 16-25, 16-26
COREid System Consolenow named Identity System Console, xxvi
COREID_NLS_LANG, 4-9creating
planning document, 1-18temporary directory profile, Access System in
place, 7-10Creating, ZDTU
Web server instance for clones, 16-26creating, ZDTU
New Directory Server Profiles for Access System Clones, 16-16
Crystal Reports package, 4-7Custom
Images, 12-18Styles, 12-12
CustomizationsAccess System, 13-1Identity Customizations Prerequisites
Summary, 12-14Upgrade Planning, 1-17Upgrade Planning, ZDTU, 15-15
customizedparameters, 3-11plug-ins, 3-11style, 12-20

Index-4
styles, 3-10, 12-15Customizing New Stylesheets, 12-16
Ddata, C-4
In-place Identity System upgrade, 6-1Data Upgrade
obmigratedata, C-14data upgrade utility, 3-4data upgrade, ZDTU, 15-9, 15-34database record, 12-5db profile
Access Server, 10-8default
autnetication schemes, 4-20policy domains, 4-20PresentationXML Libraries
WebPass, A-8PresentationXML libraries, A-8stylesheet, 12-16
DeletingTemporary Directory Server Profile, 14-4
Deleting, ZDTUTemporary Directory Server Profile, 17-58
Deployment Scenarios, ZDTU, 15-2Description field, 17-34Destination Creation, ZDTU, 15-13destination creation, ZDTU, 16-30destination_dir, ZDTU, 15-26Develop a Plan, ZDTU, 15-37Direct Upgrade Paths, 1-28directory
search size limit, 5-10, 5-11search size limit, ZDTU, 15-9
directory profiles, 4-36directory profiles, ZDTU, 16-11, 16-16directory server
failover, 3-7load balancing, 4-14requirements, ZDTU, 15-8upgrade, 2-12
Directory Structure, A-1disjoint searchbase, ZDTU, 16-11Downtime Assessment Example for in-place
method, 1-24
EEditHttpConf, ZDTU, 16-45, 16-52EditObjConf, ZDTU, 16-45, 16-52encoded
challenge and response, 4-20, 5-19encryption
schemes, 4-16encryption schemes, 3-8English language, C-3Enhancements
10.1.4.2.0, 4-39environment details, 1-18
ZDTU, 15-39Error Logging
All Directory Servers, 5-4error_output_fromversion_to_toversion_
osd.ldif, 3-5, 5-4, 15-26, G-3error_output_fromversion_to_toversion_
psc.ldif, 3-5, 5-4, 15-26, G-3Events
in-place upgrades, 3-3Example
style.xsl, 12-19execution stage, 1-11extra directory profiles, ZDTU, 16-48, 16-50extract 10.1.4.2.0 libraries and files, ZDTU, 16-28Extracting
10g (10.1.4.0.1) libraries and files, ZDTU, 16-28Extranet Deployments, 1-26
Ffailback, 4-16failover, 4-16
directory server, 3-7File Upgrades with obmigratefiles, C-9Finishing, in-place method
Access Server Upgrade, 10-9Identity Server Upgrade, 9-7Integration Component Upgrade, 11-3Master Access Manager Upgrade, 7-9Master Identity Server Upgrade, 6-13Master WebPass Upgrade, 6-16Policy Manager Upgrade, 10-5WebGate Upgrade, 10-12WebPass Upgrade, 9-11
GGCC v3.3.2 C++, 12-10, G-6GCC v3.3.2 C++ compiler, 3-11, 13-5General Behavior Changes, 4-5
Acquiring and using multiple languages, 4-7Auditing and Access Reporting, 4-7Automatic Login and the Password Redirect
URL, 4-8Automatic Schema Update Support for
ADAM, 4-8C++ Programs, 4-8Cache Flush, 4-8Certificate Store and Localized Certificates, 4-9Compilers for Plug-ins, 4-9Configuration Files, 4-10Connection Pool Details, 4-10Console-based Command-line Interfaces, 4-10Customized Styles, 4-10Database Input and Output, 4-11Database Instance Profiles, 4-13Date and Time Formats, 4-11Date Format, 4-12Default Product Pages, 4-12Detecting Cross-site Scripting and SQL
Index-5
Injection, 4-13Diagnostic Tools for Access Servers, 4-13Diagnostic Tools for Identity Servers, 4-13Directory Profiles, 4-13Directory Profiles and Database Instance
Profiles, 4-13Directory Server
Connection Details, 4-13Directory Server Failover, 4-14Directory Server Interface, 4-15Directory Structure, 4-15Domain Names, URIs, and URLs, 4-15earlier names, 4-20Encryption Schemes, 4-16Failover and Failback, 4-16File and Path Names, 4-17HTML Pages, 4-17ISO-8859-1 Encoding, 4-24LDAP Bind Password, 4-17Message and Parameter Files, 4-18Minimum Number of Search Characters, 4-19Month Names, 4-12Multiple Challenge Phrase and Response Attribute
Support, 4-19Namespaces for Policy Data and User Data Stored
Separately, 4-21Object Classes and Attributes, 4-21obVer Attribute, 4-21Password Policies and Lost Password
Management, 4-22Reconfiguring the Logging Framework without a
Restart, 4-22Time Zone List, 4-12Transport Security for the Directory Server, 4-23Upgrade Enhancements, 4-23UTF-8 Encoding, 4-25Web Server Configuration Files, 4-24Weekday Names, 4-12Writing a Stack Grace to a Log File, 4-24XML Catalogs and XSL Stylesheet Encoding, 4-24XSL stylesheet, 4-24
gensiteorgperson, 4-20gifPathName, 12-18globalparams.xml, 4-11, 14-6Graphical User Interface, see also GUI, 4-17group data, ZDTU, 15-11groupservcenter, 4-18, A-10GUI Method
Master Access Manager, 5-29GUI method, 2-8
Master COREid Server, 5-25Master WebPass, 5-26
GuidelinesAccess System customizations, 13-1Temporary Directory Profile, 7-10
Guidelines, ZDTUTemporary Directory Profile, 17-21
HHalting
user data migration at first login, 5-19user data migration in place phase 1, 5-20user data migration in place phase 2, 6-22
Hardware Requirements, ZDTU, 15-6heartbeat polling, 4-16heartbeat_enabled, 4-16heartbeat_ldap_connection_timeout_in_millis, 4-16Hostname field, 17-34
IIdentity and Access Server Upgrades, 1-7Identity Domain
formerly named COREid Identity Domain, xxviformerly named NetPoint Identity Domain, xxvi
Identity Event API, 12-10Identity Event Plug-ins, 3-11, 4-9, 12-10Identity Server
Component Upgrades, 1-4Directories, A-3PresentationXML Libraries
Pre-6.5, A-9starting the upgrade, 9-4Upgrade in place
prerequisites, 9-3upgrade utility, C-5upgrade utility, ZDTU, 15-32
Identity Systemconfiguring, 0-xxiiDowntime Assessment, 1-24IdentityXML, 0-xxiiiin-place schema and data upgrade overview in
ioint deployments, 1-6In-place Upgrade Tasks and Sequence, 1-5Overview, 1-3prepare
schema and data, 5-1Schema and Data
In-place upgrade overview, 6-3In-place upgrade prerequisites, 6-4
Schema and Data Upgrade Overview, 1-3upgrade remaining components, 9-1validating the upgrade, 14-1Web Component Upgrades, 1-4
Identity System Behavior ChangesChallenge and Response Attributes, 4-26Identity Server Backward Compatability, 4-26Identity System Event Plug-ins, 4-27IdentityXML and SOAP, 4-29Java Applets, 4-29Large Static Groups, 4-30Mail Notification Enhancements, 4-30Minimum Number of Search Characters, 4-30Multi-Step Identity Workflow Engine, 4-31NetPoint or COREid Identity Protocol, 4-31Oracle Identity Protocol (OIP), 4-31Password Policies and Password Management
Runtime Changes, 4-31

Index-6
Portal Inserts and the URI Query String, 4-31PresentationXML Directories, 4-32Sorting User Search Results, 4-32Web Services Code, 4-32XSLProcessor Parameter, 4-32
Identity System Consoleformerly named COREid System Console, xxvi
IdentityXML, 12-9IDLink, 2-10IIS Web server, ZDTU, 15-7images, 3-10, 12-11, G-6Incorporating Customizations, 12-14Indirect Upgrade Paths, 1-31Initial Connections, 13-3In-place method, 1-2, 1-11, 2-1, 4-2
Access System upgrade, 10-1Planning, 1-11renamed source file system directory, 3-2sample target file system directory, 3-2schema and data upgrade, 6-1Schema and Data Upgrade Planning, 1-15start methods
Console, 2-7GUI, 2-7
Task Overview, 1-8Tasks and Sequences
Joint Identity and Access System Deployments, 1-8
upgrade events, 3-3upgrade Identity System, 9-1
installation, xxiiIntegration
components, 3-1Upgrade Prerequisites, 11-2
internationalized data, 13-5Intranet Deployments, 1-27inventory
earlier environment, 1-18earlier environment, ZDTU, 15-39
Isolating Environments, ZDTU, 16-58Original and Cloned Environments, 15-22Providing WebGate Coverage, 16-59
issue after cloning, 16-27items
upgraded, 3-5
JJavaScript, 12-11, 12-17, 12-23, G-6
files, 3-10Joint Identity and Access System, 1-5jsPathName, 12-18
Llang
Directory, A-2langtag
subdirectories, A-2language capability
enabling during in-place method, 6-8Languages
Master Access Manager, 5-29Master COREid Server, 5-25Master WebPass, 5-26
Languages, ZDTU, 16-30Language-specific
messages, 12-21pop-up messages, 12-23
ldapmodify tool, ZDTU, 16-62ldif file, ZDTU, 16-62ldifde
for ADAM, 5-14library files, 2-3, 3-5load balancing
Access System, 13-3directory server, 4-14
Localized Certificates, 4-9log files
migration_log_file, C-16obmigrateds.log, C-14obmigratefiles.log, C-9obMigrateNetPointAAA.log, C-20obMigrateNetPointAM.log, C-19obMigrateNetPointASDK.log, C-21obMigrateNetPointOis.log, C-18obMigrateNetPointWG.log, C-20obMigrateNetPointWP.log, C-18obmigratenp.log, C-7obmigratenp.log, ZDTU, 16-65obmigrateparamsg.log, C-11obmigratews, C-17path, 3-5, G-2
loginuser data migration, 4-22
logs Directory, A-3Looking Ahead, ZDTU
after upgrading Access System clones, 16-99after upgrading Identity System clones, 16-84
lost password management, 4-19, G-5disabled, 6-23
Mmagnus.conf, E-2manual
configuration tree upgrade, D-6data upgrade, D-3schema upgrade, D-1user data upgrade, D-10
Master Access ManagerConsole Method, 5-29GUI Method, 5-29Languages, 5-29
Master Administratorformerly named COREid Administrator, xxviformerly named NetPoint Administrator, xxvi
Master COREid ServerHostname, 5-24Maximum Session Time (Hours), 5-24
Index-7
Name, 5-24Number of Threads, 5-24Port, 5-24Transport Security, 5-24
Master Identity ServerConsole method, 5-25GUI method, 5-25Languages, 5-25Upgrade, 6-5Upgrade Prerequisites, 6-4
Master WebPassConsole method, 5-26CoreID Server Timeout Threshold, 5-23Failover Threshold, 5-23GUI method, 5-26Hostname, 5-23Languages, 5-26Maximum Connections, 5-23Maximum Session Time (Hours), 5-23Name, 5-23Port, 5-23Sleep For (seconds), 5-23Transport Security, 5-23Upgrade Prerequisites, 6-14Upgrading, 6-13
Maximum Connections, 13-3Message
files, 2-3storage, A-10upgrade process, C-9
Message and Parameter Upgradesobmigrateparamsg, C-11
message catalogs, 3-5, 4-11, 10-8, 12-21, 12-23, C-3methodology
in-place upgrade, 1-2zero downtime upgrade, 1-2
MigrateOAM, ZDTU, 15-23, 16-35Clone upgrade processes, 15-31Mkbranch command for configuration
data, 16-38Mkbranch command for policy data, 16-39Mkbranch command summary, 15-24, 16-36Mkbranch processes, 15-27Original upgrade processes, 15-33Schema upgrade processes, 15-29
migration_log_file, C-16MIME type, G-10mime_types, G-9modes, 2-8Multiple Oracle Access Manager Releases
Web Server Support, 15-7multiple searchbases, ZDTU, 16-11multi-threading issues, 4-9
Nname changes, xxvnamespace, 5-8, 15-9NDS directory servers, 13-4NetPoint
now named Oracle Access Manager, xxviNetPoint Access Manager Domain
now named Access Domain, xxviNetPoint Access Protocol
now named Oracle Access Protocol, xxviNetPoint Administrator
now named Master Administrator, xxviNetPoint Associate Portal Services, 2-10NetPoint Basic Over LDAP authentication
now named Oracle Access and Identity, xxviNetPoint Certificate Process Server, 2-10NetPoint Connector for BEA Ready Realm, 2-11NetPoint for AD Forest Basic Over LDAP
authenticationnow named Oracle Access and Identity for AD
Forest Basic over LDAP, xxviNetPoint Identity Domain
now named Identity Domain, xxviNetPoint Identity Protocol
now named Oracle Identity Protocol, xxviNetPoint None authetication
now named Anonymous authentication, xxviNetPoint SAML Services, 2-11
now named Oracle Identity Federation, xxvinew branch, ZDTU, 16-33
configuring cloned components to use the new branch, 16-40
configuring cloned COREid Servers to use the new branch, 16-41
roll back changes, 16-39NLS_LANG, 4-9nlstrl, A-1
OObAMMasterAuditRule_getEscapeCharacter, 13-7obDateType parameter, 4-11obj.conf, E-3objservcenter, 4-18, A-10Oblix data
now named configuration data, xxviOblix SHAREid, 2-11Oblix tree
now named configuration tree, xxvioblix tree, 4-22oblix_rpt_as_reports, 12-2, 12-6oblix_rpt_as_resources, 12-2, 12-6oblix_rpt_as_users, 12-2, 12-6oblixConfig class, 4-21OblixOrgPerson, 4-18, 4-20, 4-22, 5-20OblixOrgPerson class, 4-21, 5-19oblixpppcatalog.lst, 3-6, 4-26, 12-11, 14-5obmigratedata utility, 3-4, C-4obmigratedata utility, ZDTU, 15-32obmigrateds utility, 3-4, C-4, C-12, C-14obmigrateds.log, C-14obmigratefiles utility, 3-4, C-4, C-7obmigratefiles.log, C-9obMigrateNetPointAAA utility, C-19obMigrateNetPointAAA utility, ZDTU, 15-32

Index-8
obMigrateNetPointAAA.log, C-20obMigrateNetPointAM utility, C-5, C-19obMigrateNetPointAM utility, ZDTU, 15-32obMigrateNetPointAM.log, C-19obMigrateNetPointASDK utility, C-5, C-20obMigrateNetPointASDK utility, ZDTU, 15-33obMigrateNetPointASDK.log, C-21obMigrateNetPointOis utility, C-5, C-17obMigrateNetPointOis utility, ZDTU, 15-32obMigrateNetPointOis.log, C-18obMigrateNetPointWG utility, C-5, C-20obMigrateNetPointWG utility, ZDTU, 15-33obMigrateNetPointWG.log, C-20obMigrateNetPointWP utility, C-5, C-18obMigrateNetPointWP utility, ZDTU, 15-32obMigrateNetPointWP.log, C-18obmigratenp utility, 3-4, C-3, C-6, C-9obmigratenp utility, ZDTU, 15-31obmigratenp.log, C-7obmigratenp.log, ZDTU, 16-65obmigrateparamsg utility, 3-4, C-4obmigrateparamsg.log, C-11obmigratews utility, 3-4, C-4, C-16obmigratews utility, ZDTU, 15-33obmigratews.log, C-17obnavigation.xml, 3-6ObSSOCookie
configuring, 3-8, 4-16obsymbols Directory, A-3Obtain tools, ZDTU, 15-14
Applying Release 10.1.4 Patch Set 1 (10.1.4.2.0), 16-31
obtain tools, ZDTU, 16-32obVer attribute, 4-20, 4-21, 4-22, 5-19, 5-21, 6-23OctetString Virtual Directory Engine (VDE)
now named Oracle Virtual Directory, xxviOlder
WebGates, 4-38Oracle Access and Identity authentication
formerly named NetPoint or COREid Basic Over LDAP, xxvi
Oracle Access and Identity for AD Forest Basic over LDAP
formerly named NetPoint or COREid for AD Forest Basic Over LDAP, xxvi
Oracle Access Managerformerly NetPoint or COREid, xxvi
Oracle Access Protocolformerly named NetPoint Access Protocol, xxvi
Oracle Application Server 10g Release 2 (10.1.2)also available as Oracle COREid 7.0.4, xxvi
Oracle COREid Federation, 2-11Oracle COREid Provisioning, 2-11Oracle COREid release 7.0.4
also available as part of Oracle Application Server 10g Release 2 (10.1.2), xxvi
Oracle Identity Federation, xxviformerly SHAREid, xxvi
Oracle Identity Protocolformerly named NetPoint Identity Protocol, xxvi
Oracle Virtual Directory Serverformerly OctetString Virtual Directory Engine
(VDE), xxviOriginal and Clone Environments, ZDTU, 15-3osd_650_to_700_schema_adam.ldif, 5-13osd_700_to_1014_schema_adam.ldif, 5-13output_fromversion_to_toversion_osd.ldif, 5-4output_fromversion_to_toversion_psc.ldif, 5-4overview
Identity System, 1-3
Ppanels, 12-8, G-5parameter catalogs, 2-3, 3-5, 10-8Parameter Upgrade Process, C-10password.xml, 3-6Person Object Class, 5-32phase 1, in-place
halting user data migration at first login, 5-20phase 2, in place
halting user data migration in place, 6-22Planning
Considerations, 1-14Deliverables, 1-18Extranet and Intranet Deployments, 1-26In-place Method, 1-11summaries, F-1System downtime with in-place method, 1-20zero downtime method, 15-37, 16-2
plug-ins, 3-11policy base, 5-8, 5-31, 5-32policy data, 1-7, 3-5
cleanup files, D-7ZDTU, 15-11zero downtime upgrade method, 16-33, 16-34
policy domaindefault, xxvi
Policy Domain Root, 5-32Policy Manager
formerly named Access Manager, xxvisubdirectories, A-6Upgrade Prerequisites, 10-3upgrade utility, C-5upgrade utility, ZDTU, 15-32Upgrades, 1-7
Policy Manager API, xxvi, 4-20formerly named Access Management API, xxvi
Policy Manager API Support Modeformerly named AM Service State, xxvi
policy_650_to_700_schema_adam, 5-13policy_700_to_1014_schema_adam, 5-13Port field, 17-34Preparing
Components for the upgrade, 8-1Directory Instances and Data, 5-3Master components for in-place method, 1-11Master components for in-place schema and data
upgrade, 5-4Remaining components for in-place method, 1-12

Index-9
schema and data, 5-1Schema and data for in-place method, 1-11
Preparing, ZDTU, 16-2Cloned Access System Components for the
Upgrade, 16-87Cloned Identity System Components, 16-71Directory Server Instances and Data, 16-4Original Access System Components, 17-32Original Identity System Components, 17-7Tasks, 15-12
prerequisitesAccess Server upgrades in place, 10-6Access System customizations, 13-1Access System Schema and Data upgrade in
place, 7-3Identity Customizations, 12-14Identity Server upgrade in place, 9-3Identity System in-place schema and data
upgrade, 6-4Integration Upgrade, 11-2Master WebPass upgrade, 6-14Policy Manager upgrade, 10-3SDK upgrade, 11-5WebGate upgrades, 10-10WebPass upgrades, 9-9ZDTU, 16-1
Original Upgrades, 17-1PresentationXML, A-9PresentationXML Libraries, A-2, A-9
Identity Server, A-8Post 6.5, A-8
Preserved Items, 3-6Procedure
Access Customizationbacking up upgrades, 13-8Recovering from upgrade failure, 13-8To confirm failover, load balancing, and
connection pool details, 13-4To confirm release 6.1.1 Policy Domain
Authorization rule names, 13-6To reset your Authorization Rule, 13-6To use authentication and authorization
plug-ins, 13-5Access Server
To create a temporary directory server profile, 7-11
To finish the upgrade, 10-9To launch the upgrade, 10-7To revert backward compatibility, 14-6To upgrade the Access Server, 10-8
Access SystemTo back up upgraded information, 10-13, B-21To delete the temporary directory server
profile, 14-4To recover from an unsuccessful component
upgrade, 10-13, B-22To recover from an unsuccessful schema and
data upgrade, 7-13To verify a successful Access System
upgrade, 14-2, B-20
AccessGates and WebGatesTo modify a WebGate through the command
line, B-20Authentication
To set the login form encoding to UTF-8 for 10g Release 3 (10.1.4), 13-4
Backing upTo back up critical policy information after the
upgrade, 7-12To back up the existing installed directory, 8-8To back up the existing Web Server
configuration file, 8-8To back up upgraded Access
customizations, 13-8To back up upgraded Identity
information, 9-12, B-14To back up upgraded Identity System
customizations, 12-24To back up Windows Registry data, 8-9upgraded Identity System schema and
data, 6-22upgraded Integration/SDK data, 11-7
Directory IndexesTo confirm or update indexes for Novell
eDirectory, 6-21To upload the Sun (formerly iPlanet) or Oracle
Internet Directory index files, 6-20Identity Customization
backing up upgraded customizations, 12-24recovering from upgrade failure, 12-24To add custom styles in 10g (10.1.4.0.1), 12-14To confirm failover, load balancing, and
connection pool details, 12-10To customize new stylesheets, 12-17To handle language-specific message catalogs
for JavaScript files, 12-23To handle language-specific message catalogs
for XSL stylesheets, 12-22To incorporate custom images, 12-19To incorporate JavaScript files, 12-21To use older custom Identity Event
plug-ins, 12-10Identity Server
To complete a component-specific upgrade, 9-6
To finish the upgrade, 9-8To revert backward compatibility, 14-5To specify the directory and languages, 9-5To start the upgrade, 9-4
Identity Systemrecovering from an unsuccessful
upgrade, 9-12, B-21To confirm your Identity System
upgrade, 9-11, B-14To recover from an unsuccessful schema and
data upgrade, 6-25To validate your Identity System
upgrade, 14-1To verify the schema and data upgrade, 6-16
Integration

Index-10
To finish the integration upgrade, 11-4To launch the upgrade, 11-2To upgrade the Security Provider for WebLogic
SSPI, 11-3Integration/SDK
To back up critical information after the integration/SDK upgrade, 11-7
To recover from an unsuccessful upgrade, 11-7
Manual Data UpgradeTo suppress automatic data upgrades, D-5To upgrade the configuration tree
manually, D-6To upgrade the user data manually, D-10To upload the generated LDIF, D-9
Manual Schema UpgradeTo remove obsolete elements during Identity
Server upgrades, D-8To remove obsolete elements during Policy
Manager upgrades, D-9To upgrade the schema manually, D-3
Master Access ManagerTo configure authentication schemes, 5-32To finalize the master Access Manager
setup, 5-33To finish the upgrade, 7-9To launch the upgrade, 7-4To specify directory server details during set
up, 5-31To specify the target directory, 7-4To start installation, 5-29To start setting up the master, 5-30To upgrade policy data, 7-5To upgrade the configuration files, 7-6
Master Identity ServerTo complete a component-specific
upgrade, 6-9To enable multi-language capability, 6-9To finish the schema and data upgrade, 6-13To install, 5-25To specify the target directory and
languages, 6-6To start the upgrade, 6-5To upgrade the schema and data, 6-7To upgrade the SDK, 6-12
Master Identity SystemTo add information in the System
Console, 5-23To set up, 5-27
Master WebPassTo finish the upgrade, 6-16To install, 5-26To specify the target directory, 6-15To start the upgrade, 6-14
MetaLink, 4-2Policy Manager
To finish the upgrade, 10-5To launch the Policy Manager upgrade, 10-4To upgrade the Web Server/ Policy Manager
configuration files, 10-5
PreparationTo temporarily stop the immediate migration of
user data, 5-20, 6-23Prerequisite
To confirm compatibility, 8-1To confirm you have enough disk space, 8-4To login before the upgrade, 8-10To obtain the 65_orig packages, 8-5To obtain the 6.5.2 packages, 8-6To prepare Identity Event Plug-ins for the
upgrade, 8-2To prepare password files for the upgrade, 8-4To prepare the default logout for an
upgrade, 8-3To preserve existing multi-language
functionality, 8-7To remove the vpd.properties file, G-7To stop servers or services before the
upgrade, 8-10Recovering
Access System component upgrade failure, 10-13, B-22
Integration/SDK upgrade failure, 11-7To recover from an unsuccessful Access System
customization upgrade, 13-8To recover from an unsuccessful Identity
component upgrade, 9-12, B-21To recover from an unsuccessful Identity
System customization upgrade, 12-24To recover from an unsuccessful schema and
data upgrade, 6-25, 7-13upgraded Identity System schema and
data, 6-25Schema and Data Prerequisite
backing up directory instances, 5-19backing up the earlier schema, 5-17To archive your processed workflow
instances, 5-19To back up configuration and policy data, 5-17To back up user and group data, 5-18To back up workflow data, 5-18To change the Active Directory Schema
Master, 5-12To configure the challenge/response phrase as
the object class level, 5-7To prepare an older Sun directory server, 5-10To reconfigure namespaces to ensure
uniqueness, 5-8To set an appropriate value for
nsslapd-sizelimit, 5-16To set an appropriate value for the directory
server’s size limit parameter, 5-11To set MaxPageSize, 5-12To set orclsizelimit, 5-15
SDKTo launch the upgrade, 11-5To upgrade the SDK, 9-7, 11-6
TipsTo ensure the Challenge Phrase Response is
properly converted, G-6

Index-11
To troubleshoot LDAP add errors in a forest, G-8
To you receive LDAP add errors in your Windows environment, G-8
User Data MigrationTo restart one-the-fly user data
migration, 14-3Validating
To validate customization upgrades, 13-7To validate Identity System customization
upgrades, 12-24Verifying
Identity System component upgrade, 9-11, B-14
Identity System schema and data upgrade, 6-16
To verify Access System schema and data upgrade, 7-9
Web serverTo upgrade Sun (iPlanet) version 4.x Web
Server to Sun version 6, E-1WebGate
To finish the upgrade, 10-12To launch the upgrade, 10-11To upgrade, 10-11
WebPassTo confirm your upgrade, 9-11, B-14To finish the upgrade, 9-11To specify the target directory, 9-10To start the WebPass upgrade, 9-9
Procedure, ZDTUAccess Manager, clone
To modify a cloned Access Manager to operate with the new branch, 16-52
To set up a cloned Access Manager to operate with the new branch, 16-53
To upgrade cloned Access Manager instances, 16-91
Access Manager, originalTo modify an original Access Manager for the
new branch, 17-40To upgrade original Access Managers, 17-36
Access Server, cloneTo add a profile for Access Server
clones, 16-14To associate an Access Server clone with an
original WebGate, 16-18To re-configure a cloned Access Server to use
the new branch, 16-56To upgrade cloned Access Server
instances, 16-95Access Server, original
To re-configure an original Access Server for the new branch, 17-42
To upgrade original Access Servers, 17-46Access System, original
To create a temporary directory server profile, 17-22
Audit file namesTo recover original audit file names, 16-86
Backing up, cloneTo back up upgraded Access System
clones, 16-98To back up upgraded Identity clone
information, 16-83Backing up, original
To back up upgraded original Access System components, 17-55
To back up upgraded original Identity System components, 17-26
cloneTo clone earlier component instances, 16-25To isolate the clone and provide WebGate
coverage, 16-59To reconfigure cloned COREid Servers to use
the new branch, 16-43To set up the cloned COREid System with the
new branch, 16-49Using External LDP Console to remove a
profile, 16-51COREid Server, clone
To add an entry for a COREid Server clone in the System Console, 16-6
To associate a COREid Server clone with a WebPass clone, 16-10
To upgrade each COREid Server clone, 16-75To view existing COREid Server and WebPass
associations, 16-10COREid Server, original
To reconfigure original upgraded COREid Servers, 17-13
To upgrade original COREid Servers associated with WebPass, 17-9
Data MigrationTo start on-the-fly user data migration after a
zero downtime upgrade, 17-58Directory Profile
To add a directory server profile for cloned Access System, 16-16
To create a directory server profile for Identity System clones, 16-11
Expand deploymentTo add hardware and components, 16-5
Identity SystemTo validate Identity System operations, 16-67
New branchTo copy existing configuration and policy
data, 16-37Obtain tools
To apply the Release 10.1.4 Patchset 1 (10.1.4.2.0), 16-32
OriginalTo isolate the original system, 16-60
PreparingTo bring host computers up to supported
levels, 16-3Recovering, clone
To recover from a failed Access System clone upgrade, 16-99
To recover from an unsuccessful cloned Identity
Index-12
System upgrade, 16-83To recover from issues when entering clone
details, 16-21Recovering, original
To recover from an unsuccessful original Access System component upgrade, 17-55
To recover from an unsuccessful original Identity component upgrade, 17-27
Roll backTo roll back after the schema upgrade, 16-70To roll back changes made for the new oblix
branch, 16-40Roll back, clone
To recover or roll back after cloning a component, 16-27
To roll back after cloned Access System upgrades, 16-99
To roll back after upgrading Identity System clones, 16-83
To roll back changes for reconfigured clone components, 16-61
To roll back to the starting point after entering clone details, 16-21
Roll back, originalTo roll back after upgrading Identity System
originals, 17-27To roll back after upgrading the original Access
System, 17-56Schema
To upgrade the Access System schema, 16-66To upgrade the Identity System schema, 16-64
ValidateTo validate Identity System operations, 16-67
Validate, cloneTo validate your cloned Access System
upgrade, 16-98To validate your cloned Identity System
upgrade, 16-82To verify Access System operations, 16-69
Validate, originalTo validate the upgraded Identity
System, 17-26To validate your upgraded original Access
System, 17-55Web server
To create a new Web server instance for cloned Web components, 16-27
WebGateTo edit the alternative ldif template, 16-19
WebGate, originalTo associate an Access Server clone with an
original WebGate, 16-18To modify an original WebGate for the
upgraded Access Server, 17-54To upgrade the original WebGate, 17-51
WebPass, cloneTo add WebPass clone details to the System
Console, 16-8To modify a cloned WebPass to operate with a
cloned COREid Server, 16-46
To upgrade each cloned WebPass, 16-79WebPass, original
To modify an upgraded original to operate with the upgraded COREid Server, 17-20
To upgrade an original WebPass, 17-16Process overview
Automatic incremental upgrades, 2-2During a component upgrade, 3-3obmigratenp calls obmigratefiles, C-7When an earlier source is detected and you choose
to upgrade, C-3Process overview, ZDTU
clone instance upgrade processing with MigrateOAM, 15-31
populating the new branch usingMigrateOAM, 15-27
schema upgrade processing with MigrateOAM, 15-29
Profile page, 12-8, G-5program files, 2-3, 3-5propagate stylesheets, 12-20Publisher, 1-31, 2-10
RRC4 encryption scheme, 4-16, 4-39RC6 encryption scheme, 4-16, 4-39Recommendation
Upgrading customizations and plug-ins, 1-17Upgrading each deployment in your
environment, 1-21Recommendation, ZDTU
Upgrading customizations and plug-ins, 15-15Recompiling
Custom Authentication and Authorization Plug-Ins, 13-5
Reconfiguring, ZDTUUpgraded WebGates, 17-53
reconfiguring, ZDTUDomain Name Systems (DNS) to Use Upgraded
Clones, 17-3Domain Name Systems to Use the Upgraded
Original Deployment, 17-58Recovering
Access Customization Upgrade Failure, 13-8Access System
unsuccessful schema and data upgrade, 7-13Access System Customization Upgrade
Failure, 13-8Access System Upgrade Failure, 10-13From an Identity Component Upgrade
Failure, 9-12Identity System
schema and data upgrade failure, 6-25unsuccessful schema and data upgrade, 6-25
Identity System Customization Upgrade Failure, 12-24
Integration Connector or SDK Upgrade Failure, 11-7
recovery, ZDTU, 15-35, 16-27

Index-13
clone details in the System Console, 16-21cloned Identity System Upgrade issue, 16-83Failed Cloned Access System Upgrade, 16-98Populating the New Branch, 16-39strategies, 15-33
RedesigningCustom Authentication and Authorization
Plug-Ins, 13-5Reinstating Original Windows Registry Entries
During a Rollback Operation, 15-36Release 6.1.1, 1-28Release 6.5, 1-29Release 7.x, 1-30Removing Obsolete Schema Elements, D-7Removing, ZDTU
Cloned System After Upgrading Originals, 17-59Renaming Audit Files, ZDTU
After Upgrading Identity System Clones, 16-85reporting, 3-9, 12-2reports Directory, A-3response, 4-21response attributes, 3-10, 4-19, 12-8, G-5restarting
user data migration after halting it, 14-3retrieving, ZDTU
Changes in the Original Branch Before Upgrading Originals, 17-2
Reverting Backward Compatibility, 14-5Reverting, ZDTU
Backward Compatibility after upgrading originals, 17-59
Review, ZDTUAccess Client details, 16-69Access Server Cluster details, 16-69Access Server details, 16-69attribute access control policies, 16-68Global Auditing Policy, 16-68Master Auditing Policy, 16-68object class definitions, 16-68policy domains, 16-69reports data, 16-69
roll backconsideration, 5-19, 14-3
roll back, ZDTUAfter Entering Clone Details, 16-21after upgrading Access System clones, 16-99after upgrading Identity System clones, 16-83changes after cloning, 16-27changes for reconfigured clones, 16-60changes for the new branch, 16-39consideration, 17-58
rollbackconsiderations, 6-22
rolling back, ZDTU, 15-36runtime data, ZDTU, 15-11runtime information, 1-4
SSample
data_520_to_600_xxx, D-16obmigratenpparams.lst, D-12
sample time-stamped file system directory, 3-2sample_failover.xml, 3-5schema, 1-4, 3-5, C-4, C-13
files, D-2files, ADAM manual update, 5-13In-place Identity System upgrade, 6-1upgrade utility, 3-4, C-12
Schema upgrade, ZDTU, 15-9, 15-10schema, ZDTU
upgrade, 16-61scoreboard directory, A-3SDK, 9-6, 11-1
Configuration, 3-6create clone, ZDTU, 16-25, 16-26Upgrade Prerequisites, 11-5utility, 15-33, C-5
search size limit, 5-10, 15-9searchbase, 5-28, 5-31, 5-32Secure Sockets Layer, 4-9Security Provider for WebLogic SSPI, 11-1, 11-3See also MigrateOAM for zero downtime events, 3-3Setting Up, ZDTU
Clone COREid System for the new branch, 16-48Cloned Access Managers for New Branch, 16-51Upgraded Original Access Manager, 17-39Upgraded Original Identity System, 17-24
setup_accessmanager, 4-9setup_ois, 4-9setup_WebPass command options, ZDTU, 16-46shared directory, A-3shared secret, 3-8
configuring, 3-8, 4-16definition, 3-8, 4-16
shared secret key, 4-38SHAREid
now named Oracle Identity Federation, xxviSiemens DirX Directory, 2-11Sleep For interval, 4-16Source Creation, ZDTU, 15-13start_setup_ois, ZDTU, 16-41, 17-12Starting
SDK Upgrade, 11-5Starting the Identity Server Upgrade, 9-4Starting, ZDTU
On-the-fly User Data Migration, 17-58static product pages, 4-12style files, 4-10, 12-11, G-6stylesheets, 3-10, 4-11, 12-14, 12-21, A-8style.xsl, 12-19Summary
Access Server Upgrade Prerequisites, 10-7Component Preparation, F-25Customization Upgrades, F-32Details for Identity Servers, F-10Details needed for customizations, F-20Details of database instance profiles, F-9Details of earlier Access Servers, F-15Details of earlier Policy Manager instances, F-13
Index-14
Details of earlier WebGates/AccessGates, F-17Details of earlier WebPass instances, F-12Details of integration components/independently
installed SDKs, F-19Detials for directory server/RDBMS profiles, F-8Detials for DIT and Object definitions, F-7Identity Server Upgrade Prerequisites, 9-4Information for directory instances, F-6In-Place Upgrade Tasks, F-26Integration Connector/SDK Upgrades, F-31Integration Upgrade Prerequisites, 11-2Master Access Manager Installation
Prerequisites, 5-29Master Access Manager Upgrade
Prerequisites, 7-3Master Identity Server Installation
Prerequisites, 5-22Master Identity Server Upgrade Prerequisites, 6-4Master WebPass Upgrade Prerequisites, 6-14Planning for your overall deployment
upgrade, F-4Policy Manager Upgrade Prerequisites, 10-3Schema and Data Preparation, F-22SDK Upgrade Prerequisites, 11-5Upgrading Schema and Data, In-Place Upgrade
Method, F-24Validating the Entire Upgrade, F-33WebGate Upgrade Prerequisites, 10-10WebPass Upgrade Prerequisites, 9-9Zero Downtime Upgrade, F-27
SunWeb Server
upgrade, E-1Web server
upgrade troubleshooting, E-5Web server upgrade
troubleshooting, G-12support
changes, 4-23deprecated, 2-10third-party products, 2-11
SupportedApplications, 3-1Components, 3-1
Suppressing Automatic Data Upgrades, D-5
TTake Inventory
Earlier Environment, 1-18Take Inventory, ZDTU
Earlier Environment, 15-39target directory, 6-5, 9-4, C-3Task overview
Adding a master Access Manager, 5-28Adding a master Identity System for the schema
and data upgrade includes, 5-22Combine challenge and response attributes on a
single panel, 12-9Completing preparation for the schema and data
upgrade, 5-33Customizing New Stylesheets, 12-16Developing your planning deliverables, 1-18Halting, then restarting user data migration at first
login, 5-19Performing an in-place upgrade, 1-11Planning for the in-place upgrade, 1-13Preparing directory instances for the schema and
data upgrade, 5-9Preparing for and performing schema and data
upgrades, 5-3Ugrading Access Server auditing and reporting
Microsoft SQL Server, 13-2Ugrading Identity System auditing and reporting
Microsoft SQL Server, 12-3Oracle database, 12-6
Upgrading Access System components, 10-2Upgrading Access System schema and data, 7-2Upgrading data manually, D-4Upgrading earlier Access System customizations
includes, 8-3Upgrading earlier Identity System customizations
includes, 8-3Upgrading Identity System components, 9-2Upgrading Identity System schema and data, 6-2,
6-3Upgrading in a replicated environment, 5-5Upgrading incrementally when support is
deprecated, 2-15Upgrading Oracle Access Manager and third-party
versions together, 2-12Upgrading Oracle Access Manager environments
with IBM Directory Server 4.x, 5-14Upgrading remaining Identity Servers
includes, 9-3Upgrading the Access Server, 10-6Upgrading the Access System schema and data
includes, 7-3Upgrading the Identity and Access System schema
and data in-place, 1-16Upgrading the Policy Manager, 10-3Upgrading the schema and data in-place with only
an Identity System, 1-15Upgrading the Software Developer Kit, 11-4Upgrading the WebGate, 10-10Upgrading third-party Integrations, 11-1Upgrading when Web server support was
deprecated, 2-14Using new customized styles, 12-20
Task overview, ZDTUAssociating COREid Server clones with WebPass
clones, 16-9Configuring cloned Access Managers to use the
new branch, 16-51destination creation, 16-30Developing a plan, 15-38Extracting 10g (10.1.4.0.1) libraries and
files, 16-30Preparing cloned Access System instances for the
upgrade includes, 16-88

Index-15
Preparing cloned Identity System components for the upgrade includes, 16-72
Preparing directory server instances, 16-4Preparing original Identity System
components, 17-7Preparing originals for a zero downtime
upgrade, 16-2Reconfiguring cloned components to use the new
branch, 16-40Remaining Identity System only upgrade
tasks, 16-84, 16-86, 17-29Remaining joint Identity and Access System
tasks, 16-85, 17-56Removing the cloned environment, 17-59Retrieving changes to data in the original branch
before upgrading original instances, 17-2Upgrading original Access System
components, 17-31Upgrading original Identity System
components, 17-6Upgrading SDKs, Integration Connectors, and
Access System Customizations, 17-57Upgrading tasks, 15-18Upgrading the cloned Access System, 16-87Upgrading the cloned Identity System, 16-70Validating successful operations, 16-67Validation of clone and original instance
upgrades, 15-15tasks and sequencing, ZDTU, 15-16TCP timeout, 4-16temporarily halting
user data migration at first login phase 1, 5-20temporary directory profile
Access Server, 7-10third-party
support, 2-11timing and duration, ZDTU, 15-21Timing Conditions, 4-12Troubleshooting
Sun Web server upgrade, E-5, G-12upgrade, G-1
troubleshooting, G-1Turning Off the Access Server Cache Flush,
ZDTU, 16-71Typical Deployment Scenarios, 1-3
UU, 16-1UCS-2, 12-3Updating
ObAMMasterAuditRule_getEscapeCharacter in Custom C Code, 13-7
Upgrade, 1-1In-place method planning and deliverables, 1-13paths, 1-28
from 6.5 and 7.x, 1-29, 1-30task overview, in-place method, 1-8
upgradeAccess System Customizations, 13-1
directory server, 2-12enabling multiple language capability, 6-8Identity System components, 9-1Identity System data, 6-7In-place Identity System data, 6-1In-place Identity System schema, 6-1in-place processing, 3-3Master WebPass, 6-13process and utilities, C-1WebPass, 9-8
Upgrade event modesautomatic, 2-8confirmed, 2-8
Upgrade prerequisitesMaster Access Manager, 7-3Policy Manager, 10-3WebGate, 10-10
upgrade processtroubleshooting, G-1
Upgrade Terms and Concepts, 2-1Upgrade Tools and Processes, ZDTU, 15-23upgrade utility, obmigrateds, C-13Upgraded Items, 3-5Upgrading
Access Server, 10-6Access System Components, 10-1Access System in-place overview, 1-12Access System Schema and Data, 7-1Configuration Tree Manually, D-6Customizations in-place overview, 1-13Data Manually, D-3Identity System in-place overview, 1-12Incrementally when support is deprecated, 2-14Master Access Manager, 7-3Policy Manager, 10-2Schema and Data in-place overview, 1-11Schema Manually, D-1Security Provider for WebLogic SSPI, 11-3Software Developer Kit, 11-4Software Developer Kits in-place overview, 1-12Sun Web Server, E-1Third-Party Integration Connectors in-place
overview, 1-12Third-Party Integrations, 11-1User Data Manually, D-10WebGate, 10-9, 10-11
Upgrading, ZDTUAccess System Schema, 16-65Cloned Access Manager Instances, 16-88Cloned Access Servers, 16-94Cloned Access System, 16-87Cloned COREid Servers, 16-72Cloned Identity System, 16-70Cloned WebPass Instances, 16-77Data, 16-1Identity System Schema, 16-64Original Associated WebPass, 17-14Original COREid Servers Associated with a
WebPass, 17-7original system, 17-1
Index-16
Schema, 16-1, 16-61Uploading
Directory Server Index Files, 6-17Directory Server Index Files for Access
System, 7-9user and group data, 1-4user and group data, ZDTU, 15-11user data
migration at first login, 4-22User data directory
Directory Server Security Mode, 5-27Host, 5-27Is Configuration data stored in this
directory, 5-27Port Number, 5-27Root DN, 5-27Root Password, 5-27
user data migrationhalting, 5-19
user data migration, in place, phase 2, 6-22user data, ZDTU, 16-34user_650_to_700_schema_adam.ldif, 5-13user_700_to_1014_schema_adam.ldif, 5-13user-data-migration at first login and ZDTU, 15-12users
authentication of, xxiiiauthorization of, xxiii
userservcenter, 4-18, A-10UTF-16, 12-3utilities, C-1
obmigrated, C-12obmigrateds, C-14obmigratefiles, C-7obMigrateNetPointAAA, C-19obMigrateNetPointAM, C-19obMigrateNetPointASDK, C-20obMigrateNetPointOis, C-17obMigrateNetPointWG, C-20obMigrateNetPointWP, C-18obmigratenp, C-6, C-9obmigratews, C-16
utilitycomponent-specific, 3-4obmigratedata, 3-4, C-4obmigrateds, 3-4, C-4obmigratefiles, 3-4obmigratenp, 3-4obmigrateparamsg, 3-4obmigratews, 3-4
utility, ZDTUcomponent-specific utility, 15-32obmigratedata, 15-32obmigratenp, 15-31obmigratews, 15-33
VValicert Authentication plug-in, 2-11Validating
Access System Customization Upgrades, 13-7
Access System upgrade, 14-2Entire System Upgrade, 14-1Identity Customization Upgrades, 12-24Identity System schema and data upgrade, 6-16Identity System Upgrade, 9-11Identity System upgrade, 14-1
Validating, ZDTUAccess System operations, 16-68administrator information, 16-68audit policies, 16-68authentication schemes, 16-69authorization schemes, 16-69directory options, 16-68entire upgraded original environment, 17-57Identity Server definitions, 16-68Identity System
operations, 16-67Lost Password policies, 16-68Password policies, 16-68review panels, 16-68server settings, 16-68Successful Operations, 16-67Upgraded Cloned Access System, 16-98upgraded cloned Identity System, 16-82upgraded original Access System, 17-55upgraded original Identity System, 17-26WebPass definitions, 16-68workflow configuration details, 16-68
Validation, ZDTU, 15-14verifying Master Access Manager upgrade, 7-9Viewing Details, ZDTU
COREid Servers Associated with a WebPass, 16-10
WWeb Browser Caches, 9-11, 14-1, 14-2, B-14, B-20Web Browser Caches, ZDTU, 16-82, 16-98, 17-26,
17-55Web component
create clone, ZDTU, 16-25, 16-26Upgrades, 1-7
Web serverconfiguration files, 3-5filters, 3-5upgrade, C-16
Web server configuration, ZDTUconfigure for clone Web compnents, 16-45
Web Server Requirements, ZDTU, 15-7Web Server Support
Multiple Oracle Access Manager Releases, 15-7WebGate
configureWebGate command, B-20modifying through command line, B-20subdirectories, A-7Upgrade prerequisites, 10-10Upgrades, 1-7upgrading, 10-9utility, 15-33, C-5
WebGate Reconfiguration LDIF Template,

Index-17
ZDTU, 16-19WebGates, 14-4, 17-58
older, 3-8WebGateStatic.lst file, 4-38Weblogic, 11-2WebPass
create clone, ZDTU, 16-26directories, A-4PresentationXML Libraries, A-9
Pre-6.5, A-9Upgrade Prerequisites, 9-9Upgrades, 1-7Upgrading, 9-8utility, 15-32, C-5
WebPass, ZDTUadding an entry for a clone in the System
Console, 16-7configuring cloned instances to operate with
cloned COREid Servers, 16-45viewing associations with COREid Servers before
cloning, 16-10WebServices Directory, A-3WebSphere, 11-2Windows security principal
ADAM, 5-14workflow data, 1-4, 15-11workflow data, ZDTU, 15-11workflow tickets
stop processing, 6-23wrapper stylesheet, 12-16
Xxml message catalog, A-3XSL stylesheets, 3-10
ZZDTU
adding entries for planned COREid Server clones, 16-5
associating WebPass clone profiles with COREid Server clone profiles, 16-9
audit policy data, 16-42cloning components, 16-22configuring cloned components to use the new
branch, 16-40configuring cloned COREid Servers to use the new
branch, 16-41creating a new directory branch, 16-33directory profiles for clones, 16-11, 16-16extra directory profiles, 16-48extracting 10g (10.1.4.0.1) libraries and files, 16-28kCleanupObsoleteSchema, 16-30languages, 16-30new directory branch, 16-11, 16-16Obtain tools
applying Release 10.1.4 Patchset 1 (10.1.4.2.0), 16-28
updating cloned Access Manager Web server
configuration files, 16-52ZDTU, clone, 16-27
rolling back changes after cloning, 16-27zero downtime method
destination creation, 15-13zero downtime upgrade
Mkbranch log file, 3-5zero downtime upgrade method, 1-2, 2-2, 4-2, 15-11
Access System upgrades, 15-8Also known as ZDTU, 15-1back up strategies, 15-34cleaning up the obsolete schema, 16-30configuration data, 15-11Configuring the Challenge/Response Phrase at the
Object Class Level, 16-4destination_dir, 15-26directory server requirements, 15-8IIS Web server, 15-7obtain tools, 16-32obtaining tools, 15-14policy data, 15-11schema upgrade, 15-10source creation, 15-13tasks and sequencing, 15-16timing and duration, 15-21tools and processes, 15-23

Index-18