Embed Size (px)
Citation preview

Light and its Sources Electromagnetic Spectrum
Visible Sources of LightTransparency of ObjectsReflection and MirrorsRefraction and Lenses
The Visible Spectrum and ColourOptical Devices
OPTICS - SEEING IS BELIEVING!
Including:
October 2001
Written by:
Duff, Moore, Desmond, Micacchi, Morrow, Tallman, Tonner, Turnbull, ...
OpticsEnergy and Control
Length of Unit: approximately: 20 hours
An Integrated Unit for Grade 8
Written using the Ontario Curriculum Unit Planner 2.51 PLNR_01 March, 2001* Open Printed on Oct 26, 2001 at 10:47:51 AM
OpticsEnergy and Control An Integrated Unit for Grade 8
Duff, Moore, Desmond, Micacchi, Morrow, Tallman, Tonner, Turnbull, ...
Duff, Moore, Desmond, Micacchi, Morrow, Tallman, Tonner, Turnbull, ...
Thames Valley District School Board
Thames Valley District School Board
Based on a unit by:
An Integrated Unit for Grade 8Written by:
This unit was written using the Curriculum Unit Planner, 1999-2001, which Planner was developed in the province ofOntario by the Ministry of Education. The Planner provides electronic templates and resources to develop and share unitsto help implement the new Ontario curriculum. This unit reflects the views of the developers of the unit and is notnecessarily those of the Ministry of Education. Permission is given to reproduce this unit for any non-profit educationalpurpose. Teachers are encouraged to copy, edit, and adapt this unit for educational purposes. Any reference in this unitto particular commercial resources, learning materials, equipment, or technology does not reflect any officialendorsements by the Ministry of Education, school boards, or associations that supported the production of this unit.
AcknowledgementsThe developers are appreciative of the suggestions and comments from colleagues involved through theinternal and external review process.
Participating Lead Public School Boards:Mathematics, Grades 1-8Grand Erie District School BoardKawartha Pine Ridge District School BoardRenfrew District School Board
Science and Technology, Grades 1-8Lakehead District School BoardThames Valley District School BoardYork Region District School Board
Social Studies, History and Geography, Grade 1-8Renfrew District School BoardThames Valley District School BoardYork Region District School Board
The following organizations have supported the elementary curriculum unit project through team building andleadership:
The Council of Ontario Directors of EducationThe Ontario Curriculum CentreThe Ministry of Education, Curriculum and Assessment Policy Branch
Written using the Ontario Curriculum Unit Planner 2.51 PLNR_01 March, 2001* Open Printed on Oct 26, 2001 at 10:47:51 AM

Optics Page 1
Energy and Control An Integrated Unit for Grade 8
Task ContextLight is a powerful energy source which is important to human survival. The understanding of its properties allowsfor the harnessing of its powers. In this unit, students will learn about some of the sources and properties of lightand how they are applied in optical devices and used for different purposes.
Task SummaryStudents will investigate the question, "HOW DOES UNDERSTANDING THE PROPERTIES ANDCHARACTERISTICS OF LIGHT HELP US TO ENHANCE OUR QUALITY OF LIFE?". Students will then applyknowledge gained though the unit in order to create an optical device.
Culminating Task AssessmentThe topic of optics contains many properties which can be demonstrated in ways that appear "amazing".Students will work in pairs or individually to create an "optical illusion" that incorporates the concepts studiedin the optics unit. Each illusion will be presented to the class members who will use their knowledge of opticsand light to explain how each illusion was created. The class will then present their illusions, as a show, toother classes.
Links to Prior KnowledgeThroughout the Energy and Control strand of Science & Technology, students have been exposed to commonforms of energy, energy conversion and energy uses. In Grade 4 specifically, students were introduced tothe same basic characteristics and properties of light that will be investigated in this unit. Students alsoidentified different ways in which light is produced and transmitted and technological innovations related tolight.
In the previous year, grade 7 students have studied Heat as the focus of the Energy and Control Strand.Connections and comparisons of the different forms of energies are implicit in many of the activities. Prior tosubtask one, a discussion/review/journal entry about what students know about Heat, and Energy andControl in general is an appropriate way of gauging what prior knowledge the students bring to the OpticsUnit.
Considerations
Notes to Teacher1. Equipment
For reflection and refraction activities, it is highly recommended that, beginning in subtask 4, you use rayboxes. It will be very difficult to achieve the valid results without the listed equipment.
2. I.N.S.I.T.E. MethodYou will find the term "I.N.S.I.T.E. method" used in several of the activities. This is a method of inquiry thatmay help guide your students in their investigations. This method is used in a number of subtasks in the unit.Details about this method are provided in a unit wide blackline master (BLM 8.uw.1). A poster is alsoprovided which may be enlarged and posted in the classroom (BLM 8.uw.2). After students have used themethods in an investigation the Inquiry/I.N.S.I.T.E. rubric (BLM 8.uw.3) may be used to evaluate studentwork. You will also find that the "S.P.I.C.E. model", the model for the design process, available in the unit wideresources (BLM 8.uw4).
3. The Science and Technology Journal using the K.I.L.E. approach
Unit Overview
Written using the Ontario Curriculum Unit Planner 2.51 PLNR_01 March, 2001* Open Printed on Oct 26, 2001 at 10:47:57 AM Page A-1

The K.I.L.E. approach is used thoughout this unit as a way of assessing students' learning in their scienceand technology journal. In the first subtask students will be asked to write down things they know aboutoptics (K) and interesting questions, thoughts, or ideas (I) related to the topic. In the remainder of thesubtasks students will be asked to add information about what they learned (L) in their journals and toprovide examples of situations in which they have experienced this (E). This will provide the teacher with anopportunity to assess students' knowledge, and communication skills as well as their ability to relate learningto the outside world. An assessment rubric for the students' written work using the K.I.L.E. approach in theirscience journal is provided as a blackline master (BLM 8.uw.5).
In order to assist students to be successful communicators in science and technology, students will need tosee models of good journals and will need lessons on journal writing.
Suggested strategies are:a) Explaining Criteria - The teacher explains the criteria for writing a journal entry by demonstrating eachstatement using examples from class journal entries e.g. find all the science and technology words used andcircle these. Next students can use the criteria to assess a piece of scientific writing. The teacher displaysthe writing on an overhead or chart paper and, as a class, the students discuss the piece of writing.
b) Independent Writing - When students have had many experiences in shared writing, then they can recordtheir ideas independently. The teacher can use a rubric to assess the first entry and provide feedback toindividual students in order to improve science and technology writing skills. The information from thisassessment could also be used for the development of class demonstrations in a specific area.
4. IntegrationEach activity is designed to build skills and concepts which will be demonstrated in the summative task.Although these lessons may be taught independently, integrated learning opportunities in other subject areasmay be addressed simultaneously.
Science is a form of knowledge that seeks to describe and explain the natural and physical world and itsplace in our universe. Technology is both a form of knowledge that uses concepts and skills from otherdisciplines (including science) and the application of this knowledge to meet an individual need or specificproblem. Inherent in these studies is the need to both research and communicate ideas and findings,whether through specific use of scientific and technical vocabulary, or through the use of diagrams orillustrations. The study of science and technology is an opportunity for students to reinforce and extendexpectations in other subject areas. When unit or term planning, teachers may wish to take advantage ofopportunities to address and assess expectations from other curricula.
5. AssessmentIn this unit, a variety of assessment strategies and recording devices have been included. The assessmentsprovide the teacher with information on the development of students' skills in all areas of the achievementscale as outlined on page 13 in the Ontario Curriculum, Science and Technology document.
Assessment Accommodation Strategies1. Consult Individual Education Plan and adapt the assessment format (e.g., oral, practical demonstration,interview, construction, tape-recorded test) to suit the needs of the student;2. Allow the student to write the main points and expand verbally;3. Allow additional time, when required for completion;4. Read or clarify questions for the student and encourage student to rephrase questions, in his/her ownwords;5. Provide highlighting of key words or instructions for emphasis;6. Use several assessments to establish ability
6. SafetySafety is an important aspect of any science and technology program. . For more information on safetyconsiderations, please see page 8 and 9 of the Ontario Curriculum, Science and Technology document. Somesafety concerns specific to this unit that might need to be investigated are:-The district's policy (if any) on the use of lasers in the school-The district's policy (if any) on the use of candles/open flames as a light source
Written using the Ontario Curriculum Unit Planner 2.51 PLNR_01 March, 2001* Open Printed on Oct 26, 2001 at 10:47:57 AM Page A-2
- The Science Teachers' Association of Ontario (STAO) "Be Safe" documentThe use of plastic mirrors and lenses for this unit is recommended.
7. Use of BlackLine MastersIncluded in this unit is a large number of blackline masters. Due to the sophisticated scientific materialcovered in the unit and in order to meet the needs of teachers with various backgrounds, it was decided toinclude a broad range of blackline masters. Instead of photocopying all blackline masters the followingstrategies could be used:Have students recreate the BLM as a science journal activity or in a group assignment.Recreate BLM on a bulletin board (e.g., vocabulary/definition and fact bulletin board).Recreate BLM as a wall chart or on chart paper.Copy BLM on acetate and use it on an overhead projector.
8. Classroom AccommodationsAll accommodations must take into account the student's Individual Education Plan. All of the tasks andactivities are designed to accommodate the needs of students at different levels of abilities. Many of theactivities include pictures and/or examples of a step-by-step process. These may be used at the discretionof the teacher for some or all students. As well, teachers can easily adapt the activities to allow foropen-ended, student-directed tasks.Teachers are encouraged to:- involve the student in setting goals for work completion;- encourage risk taking;- provide varied opportunities for peer and/or group interactions (e.g., cooperative learning, sharing);- teach visual strategies for journal writing and/or note making (e.g., use of diagram/picture to representcontent);- provide advance organizers to structure content (e.g., outlines, subtitles, paragraph frames);- encourage the use of lists, advance organizers, personal planner for personal organization;- allow opportunities for alternatives to writing (e.g., graphic representations, drama, media presentations,timelines, collages).
Written using the Ontario Curriculum Unit Planner 2.51 PLNR_01 March, 2001* Open Printed on Oct 26, 2001 at 10:47:57 AM Page A-3

OpticsEnergy and Control An Integrated Unit for Grade 8
Subtask List Page 1List of Subtasks
Light and its Sources In this subtask students will be introduced to the term Optics. As a baseline measure of what thestudents already know, or think they know about the topic, a K.I.L.E. entry will be made in their scienceand technology journals prior to the introductory lessons in this subtask. During this subtask studentswill view a video which presents a general overview of the topic. During the core lesson, studentswill investigate the difference between artificial and natural light.
1
Electromagnetic SpectrumIn this subtask students will be introduced to the entire electromagnetic spectrum. Through teacher-ledlessons, brainstorming sessions and videos, the students will learn that all light energy shares thesame properties. They will also investigate visible light, which is studied in subtask 3 and representsonly a small part of the electromagnetic spectrum.
2
Visible Sources of LightIn this subtask students will explore the visible range of the electromagnetic spectrum (visible light),and begin to categorize different types of light sources, both natural and artificial.
3
Transparency of ObjectsThe students will have the opportunity to investigate what happens to light when it encounters variousmaterials of different properties. The students will explore/investigate materials that allow for the fulltransmission of light are transparent, materials that allow for the partial transmission of light aretranslucent and materials that allow for no transmission of light are opaque.
4
Reflection and MirrorsStudents will investigate the properties of light as they relate to mirrors and reflections. They willexplore what happens when light encounters an opaque object one of the possible outcomes is thereflection of the light. Students will explore and examine the differences in the reflections created byplane mirrors, concave mirrors and convex mirrors.
5
Refraction and LensesStudents will investigate the properties of light as they relate to lenses, prisms and refraction. They willexplore what happens when light encounters a transparent object and the rays of light are notperpendicular to the face of the object (refraction). Students will explore and examine the differencesin the refraction created by lenses and prisms.
6
The Visible Spectrum and ColourBy studying the visible light range of the Electromagnetic Spectrum, the students will investigate howcolour is perceived. They will also investigate Additive and Subtractive Colour Theories.
7
Optical DevicesStudents have had an opportunity to learn what happens when light is reflected and refracted andhave developed a basic understanding of other properties of light. In this subtask, students willresearch optical devices which make use of the properties of light they have studied. Each studentwill make a presentation to the class based on the research.
8
OPTICS - SEEING IS BELIEVING!The topic of optics contains many properties which can be demonstrated in ways that appear"amazing". Students will work in pairs or individually to create an "optical illusion" that incorporates theconcepts studied in the optics unit. Each illusion will be presented to the class members who will usetheir knowledge of optics and light to explain how each illusion was created. The class will thenpresent their illusions, as a show, to other classes.
9
Written using the Ontario Curriculum Unit Planner 2.51 PLNR_01 March, 2001* Open Printed on Oct 26, 2001 at 10:48:03 AM Page B-1
Optics Subtask 1Light and its Sources
Energy and Control An Integrated Unit for Grade 8 mins100
Expectations8s75 – formulate questions about and identify needs and
problems related to the properties and behaviour oflight (e.g., interactions between light and differentmaterials), and explore possible answers andsolutions (e.g., predict and demonstrate how variousliquids will refract a light beam and describe theangle of refraction);
8s77 – use appropriate vocabulary, including correctscience and technology terminology, tocommunicate ideas, procedures, and results (e.g.,use terms such as incidence, reflection, refraction,wavelength, frequency when describing theproperties of light);
DescriptionIn this subtask students will be introduced to the term Optics. As a baseline measure of what the studentsalready know, or think they know about the topic, a K.I.L.E. entry will be made in their science and technologyjournals prior to the introductory lessons in this subtask. During this subtask students will view a video whichpresents a general overview of the topic. During the core lesson, students will investigate the differencebetween artificial and natural light.
GroupingsStudents Working IndividuallyStudents Working As A Whole ClassStudents Working In Small Groups
Teaching / Learning StrategiesBrainstormingDirect TeachingInquiryLearning Log/ Journal
Assessment
Assessment StrategiesExhibition/demonstrationLearning Log
Assessment Recording Devices
Teaching / LearningPart A: Prior Knowledge using the "K.I.L.E. method" / Introduction and Initial Entry in ScienceJournal (20 minutes)
1. Before beginning Activity One, introduce the K.I.L.E. method, which students will use to record informationin their science and technology journals. An explanation of the K.I.L.E. method can be found in the unit-widenotes.
2. Introduce this topic by providing students with a definition of Optics (see Webster's dictionary - definition inNotes to Teacher). Briefly discuss and clarify the definition. Brainstorm to develop a list of words associatedwith the topic. Record the words on chart paper as they are generated.
3. Tell the students you wish to determine what they already know about the topic. This information will berecorded in their science and technology journals. This is the initial step in the K.I.L.E. method.
4. In their journals, under the topic Optics, have students write the title "What I Already Know About Optics"(K). Tell them their task is to generate a list of "facts" to demonstrate their current knowledge of optics. Givethem no more than ten minutes to complete the list. After they have finished this list ask them to write themdown any interesting questions, thoughts or ideas they may have about this topic (I), they may wish toinclude a title "Interesting Questions & Thoughts About Optics". Collect the journals.
5. Using the journals, generate a sample list of what the students have indicated they already know about
Written using the Ontario Curriculum Unit Planner 2.51 PLNR_01 March, 2001* Open Printed on Oct 26, 2001 at 10:48:07 AM Page C-1

Optics Subtask 1Light and its Sources
Energy and Control An Integrated Unit for Grade 8 mins100
Optics and copy this list on chart paper for posting in the room. Similarly, generate lists questions aboutOptics that the students have included in their journal entries. Post the charts in the room and before the nextclass discuss the charts with the students. Indicate that throughout the unit, the charts will be referred to andfacts will be confirmed or proved to be inaccurate and questions raised will be addressed during their studyof Optics.
Part B: Video (20 minutes)
To provide a general introduction to Part B and to help motivate students, show a short video about light oroptics This will also serve as a primer for students who have no background in Optics.
Part C: What is Light Activity (60 minutes)
1. Prior to the lesson, write the question "What Is Light?" on a piece of chart paper. Lead a class discussionof the question, and record student responses and ideas on the chart paper without editing them. Allow 15minutes for this activity. When the activity is finished, tell the students they will review the information on thechart at the end of the unit to add, delete, confirm or edit the answers.
2. Begin the next part of the lesson by telling students they will be examining sources of light. Ask them togive two or three examples of light sources (correct students if they provide answers such as the moon.The moon is not a source of light. It reflects light. Tell them they will be studying the reflection of light later inthe unit. Do not discuss reflection during this class).
3. Group the students in two's, three's or four's and give them a piece of chart paper along with BLM 8.1.1,"Classifying Sources of Light". Review the information on BLM 8.1.1. to ensure students understand thetask. This should provide students with a quick overview of the classification process. Review the example"How to Classify". Allow 20 minutes for students to group or classify the 15 items listed on the bottom of theblackline master. If they finish early, encourage the groups to add additional items to their classificationgroups, using a different coloured marker.
4. Have each group present its chart to the class. Ask the students to explain their answers. Most groupswill have classifications which are accurate. Some groups will have errors which can be corrected byfellow classmates (or the teacher). Post all completed charts.
5. If any groups classified light using the terms ARTIFICIAL and NATURAL (or similar terms), focus on thesecharts at the end of the presentations. If none of the groups classified light in these terms proceed to step 6below. Tell the students that all sources of light fit into these two broad categories and that in futureclasses they will be looking at breaking these categories into subcategories.* NOTE: If the terms artificial or natural appear as category headings, add these terms to one or all of thestudent charts which have this type of grouping.
6. If none of the groups classified light as artificial or natural, then create a two column chart on a new pieceof chart paper. Title one column NATURAL and the other ARTIFICIAL. Discuss the terms:
NATURAL LIGHT: light which occurs without human intervention as a result of a natural process.
ARTIFICIAL LIGHT: light which can only occur because of human invention (technology).
* NOTE: Human intervention does not include the act of creating fire. Fire and the light it generates occurs asa result of a natural process.
Written using the Ontario Curriculum Unit Planner 2.51 PLNR_01 March, 2001* Open Printed on Oct 26, 2001 at 10:48:07 AM Page C-2

Optics Subtask 1Light and its Sources
Energy and Control An Integrated Unit for Grade 8 mins100
Resources
7. Complete the chart with the 15 items on BLM 8.1.1. Finish by reminding the students that they will beexamining these light sources more specifically in a future class.
*Note that teacher answers to BLM 8.1.1 can be found in the "Notes to Teacher" Section of this subtask.
Adaptations
BLM 8.1.1 blm 8.1.1.cwk
an Optics video
Written using the Ontario Curriculum Unit Planner 2.51 PLNR_01 March, 2001* Open Printed on Oct 26, 2001 at 10:48:07 AM Page C-3

Optics Subtask 1Light and its Sources
Energy and Control An Integrated Unit for Grade 8 mins100
Notes to TeacherDefinition
Websters:Optics \Op"tics\, n. [Cf. F. optique, L. optice, See Optic.] That branch of physical science which deals with thenature and properties of light, the laws of its modification by opaque and transparent bodies, and thephenomena of vision.
Classifying Sources of Light: Teacher Answers
LIST OF LIGHT SOURCES
a light bulb - artificiala campfire - natural (fire)the sun - naturala forest fire - naturala flashlight - artificialstars - naturala glow in the dark sticker - natural (coated with phosphorous, a natural element)headlights on a car - artificiala firefly - naturala television screen - artificialfireworks - natural (a chemical reaction when heat energy is applied)a lit candle - natural (fire)propane barbecue flames - natural (fire)a glow in the dark tube necklace - natural (a chemical reaction)a fluorescent light tube - artificial
Note that many of these will seem to be artificial – a glow-in-the-dark tube necklace made of plastic may seem tobe a product of technology; however, the chemicals inside the tube are natural and the reaction created (the"glow") is a natural chemical reaction.
Similarly, glow-in-the-dark stickers are coated with a phosphorescent material. The particles in this materialabsorb radiant (light) energy and emit the energy, as light, over a period of time.
Remember, fire is a natural source of light in any form so don't confuse the necessity of human intervention(e.g., a camper must light a campfire or a cook must light a barbecue) with the actual source of the light. Thesource of the light is fire so it is a natural source.
Teacher Reflections
Written using the Ontario Curriculum Unit Planner 2.51 PLNR_01 March, 2001* Open Printed on Oct 26, 2001 at 10:48:07 AM Page C-4

Optics Subtask 2Electromagnetic Spectrum
Energy and Control An Integrated Unit for Grade 8 mins75
Expectations8s66 – compare the properties of visible light with the
properties of other types of electromagneticradiation, including infrared and ultraviolet rays,X-rays, microwaves, and radio waves;
8s77 – use appropriate vocabulary, including correctscience and technology terminology, tocommunicate ideas, procedures, and results (e.g.,use terms such as incidence, reflection, refraction,wavelength, frequency when describing theproperties of light);
8s79 – communicate the procedures and results ofinvestigations for specific purposes and to specificaudiences, using media works, written notes anddescriptions, charts, graphs, drawings, and oralpresentations (e.g., prepare a brochure informingthe public of the risks of a specific type ofelectromagnetic radiation).
8s80 – describe how energy comes to earth as radiationin a range of wavelengths, some of which arevisible;
DescriptionIn this subtask students will be introduced to the entire electromagnetic spectrum. Through teacher-ledlessons, brainstorming sessions and videos, the students will learn that all light energy shares the sameproperties. They will also investigate visible light, which is studied in subtask 3 and represents only a smallpart of the electromagnetic spectrum.
GroupingsStudents Working Individually
Teaching / Learning StrategiesDemonstrationDirect TeachingLearning Log/ Journal
AssessmentThe Science and Technology JournalAssessment Rubric (BLM 8.uw.5) shouldbe used to assess their journal entry.
Assessment StrategiesObservationLearning Log
Assessment Recording DevicesAnecdotal RecordRubric
Teaching / LearningPart A: The Sun (15 minutes)
1. Ask the students to identify the primary source of light in the world. They should come up with "the Sun".
2. Discuss the question: "Other than light, what else do we get from the Sun?"
3. Remind students that the sun is our primary source of light (or "radiant") energy and heat energy. Heat hasbeen covered in grade seven. Introduce the concept that the visible light is only a small part of the "range" oflight that "radiates" from the sun.
Part B: Properties of Light (40 minutes)
There are five key concepts in this subtask:
- Light radiates in all directions- Light travels in straight lines from the source- Light travels in waves- The frequency of waves affects the length of the wave which in turn affects the energy of the wave. Thatis, short wave lengths have high frequency and high energy while longer wave lengths have lowerfrequency and lower energy.
Written using the Ontario Curriculum Unit Planner 2.51 PLNR_01 March, 2001* Open Printed on Oct 26, 2001 at 10:48:07 AM Page C-5

Optics Subtask 2Electromagnetic Spectrum
Energy and Control An Integrated Unit for Grade 8 mins75
- Visible light is only one form of radiant energy
Prior to the lesson, collect the following materials: a flashlight, a flashlight bulb and flashlight bulb holder froma flashlight. Have a flashlight battery available so you can create a simple circuit to light the bulb.
1. Light Travels in All DirectionsTo introduce this concept use a lamp without a shade. Turn off all of the lights in the room and turn on thelamp. Ask the students, "What can you tell me about the light from this source?" The answer, "It iseverywhere because light travels out in all directions from the source of the light". Now turn the lamp off anduse a flashlight. The flashlight produces a controlled beam of light. This seems to contradict the firststatement. Take the flashlight bulb. Turn off the lights. Light the bulb by connecting it to the flashlight bulbholder circuit. Students should note that once again light radiates in all directions. Examine the mirror whichis behind the bulb in a flashlight. Students should conclude that while the bulb in the flashlight emits light in alldirections, the mirror reflects the light, producing a controlled beam of light. Tell the students that reflectionwill be examined in a future lesson.
2. Light Travels In Straight Lines From Its SourceTo illustrate this concept, use a ray box with a single beam. Turn off all of the lights in the room. The ray boxmay be held vertically along the board or a wall. Ask the students to describe the direction of the light (theanswer should be "a straight line").
Demonstrate that light does not curve or bend around an object, by holding a piece of bristol board orcardboard about a meter above the light beam to "stop" the light. Light simply stops when encountering anobstacle. Discuss this with the students. Ask them to explain what happened.
3. Light Travels in WavesThe next part of the lesson should focus on helping students understand that light travels in waves and, thatall waves are not the same length. Use an overhead of blackline master BLM 8.2.1 "The ElectromagneticSpectrum" to introduce students to the different kinds of radiant energy. Tell them that visible light and theother forms of radiant energy in the spectrum travel in waves. Examine the diagram at the bottom of thepage, and have students describe the properties of the waves along the spectrum. Have students focus onfrequency and wave length and through discussion, draw out the conclusion that the waves get "shorter"and more "frequent" as one moves from left to right along the spectrum.
*note that it is important to remind students that light travels in a straight line from source to destination, but ina wave-like manner.
4. Looking at WavesDisplay blackline master BLM 8.2.2 "Looking at Waves" on the overhead. Look at the diagram of a singlewave. Identify and briefly discuss each of the terms used to describe the components of a wave.Encourage students to use "proper" scientific vocabulary when discussing light waves.
Refer to the wave length diagram to further develop the concept of frequency. Define frequency as simply"how often the same things happen". Explain that the more frequently a wave occurs in a fixed period oftime, the stronger it is and the more energy it has. Conversely, the less frequent the occurrence, the weakerthe wave, and the less energy it has.
Explain that as we move along the electromagnetic spectrum, frequency is described in general terms asranging from "low" to "high" and the waves are described as "long" or "short". Have the students practiceusing the terminology by comparing the waves and rays in the spectrum. (For example: ultraviolet areshorter than radio waves and have a higher frequency.)
Written using the Ontario Curriculum Unit Planner 2.51 PLNR_01 March, 2001* Open Printed on Oct 26, 2001 at 10:48:07 AM Page C-6

Optics Subtask 2Electromagnetic Spectrum
Energy and Control An Integrated Unit for Grade 8 mins75
Resources
5. Visible Light is Only One Form of Radiant EnergyTo conclude this lesson, return to the the blackline master, "The Electromagnetic Spectrum" (BLM 8.2.1) andreview the kinds of rays on the spectrum. Review the relationship between the length, frequency andenergy output of waves. Again allow students to compare the "waves" on the spectrum. Students shouldbe able to conclude that as we move along the spectrum from low frequency, long waves to higherfrequency, short waves, the energy of the rays increases. Again you need only to compare radio waves tox-rays to emphasize this point.
Part C: Science Journal Entry (20 minutes)
1. Provide students with a copy of all three blackline masters used in this subtask. Instruct them to make anentry in their science and technology journals to record what they have learned (the L of the K.I.L.E. method).Encourage them to use proper scientific terminology in their entries.
Adaptations
BLM 8.2.1 blm 8.2.1.cwk
BLM 8.2.2 blm 8.2.2.cwk
a lamp (without shade)
flashlight
flashlight bulb
flashlight bulb holder
ray box
10 gauge insulated copper wire
Batteries (9V or D cell)
Notes to Teacher
Teacher Reflections
Written using the Ontario Curriculum Unit Planner 2.51 PLNR_01 March, 2001* Open Printed on Oct 26, 2001 at 10:48:07 AM Page C-7

Optics Subtask 3Visible Sources of Light
Energy and Control An Integrated Unit for Grade 8 mins60
Expectations8s67 – describe how incandescent, fluorescent, and
phosphorescent sources produce light;8s86 – recognize that energy can be a significant cost in
the manufacture and use of products or systemsand explain how that determines its production(e.g., analyse the costs and benefits of producingand using solar panels).
8s77 – use appropriate vocabulary, including correctscience and technology terminology, tocommunicate ideas, procedures, and results (e.g.,use terms such as incidence, reflection, refraction,wavelength, frequency when describing theproperties of light);
DescriptionIn this subtask students will explore the visible range of the electromagnetic spectrum (visible light), and beginto categorize different types of light sources, both natural and artificial.
GroupingsStudents Working As A Whole ClassStudents Working In Small Groups
Teaching / Learning StrategiesDirect TeachingCollaborative/cooperative LearningBrainstorming
Assessment
Assessment StrategiesObservation
Assessment Recording DevicesAnecdotal Record
Teaching / LearningIn subtask one, students classified a variety of light sources as either natural light or artificial light sources. Inthis subtask, students will classify these light sources into more specific categories.
1. Make an overhead, or chart of the following "Light Sources - Example Chart". Review the items on thischart. Note that the sources of light have been classified into two broad categories "Natural" and "Artificial".
Naturala campfirethe suna forest firestarsa glow in the dark sticker - naturala fireflyfireworksa lit candlepropane barbecue flamesa glow in the dark tube necklace
Artificiala light bulba flashlightheadlights on a cara television screena fluorescent light tube
2. Pose the following question: "Can the sources of light on the chart be grouped into more specificcategories?"
Written using the Ontario Curriculum Unit Planner 2.51 PLNR_01 March, 2001* Open Printed on Oct 26, 2001 at 10:48:07 AM Page C-8

Optics Subtask 3Visible Sources of Light
Energy and Control An Integrated Unit for Grade 8 mins60
Resources
3. Distribute the blackline master "Visible Sources of Light" (BLM 8.3.1). Note that these are the items thatwere sorted in subtask one. Tell the students you want them to reclassify and regroup the items into newcategories based on how the items (objects) produce light.
4. Have the students work in groups of two or four for no more than twenty minutes. Give each group apiece of chart paper and a marker. Remind the students that they should "name" each group or category bygiving it a title. The title should describe why the items have been grouped together.
5. Have each group present their charts to the class. Do not correct any of the presentations. Use leadingquestions to help students evaluate and clarify the groups or categories. Encourage students to suggest anychanges or modifications.
6. At the conclusion of the presentations, display an overhead of BLM 8.3.2 "Visible Sources of Light". Onthe blackline master the items are grouped in categories, but no titles are provided. Examine and discusseach category and have students suggest an appropriate title. They may wish to select a title they used for acategory on their charts. Example answers are as follows.
1. light is produced naturally from a living thing2. light is produced when things are heated up to a high temperature3. light is produced when energy is added to a material so that it glows only while the energy is being added4. light is produced when energy is added to a material so that it glows for a longer period of time, even afterthe energy has stopped being added5. light is produced when chemicals mix
Note that there may be some difficulty with fluorescent light tubes.
7. Provide each student with a copy of BLM 8.3.3. The blackline master provides the scientific terms used todescribe the various ways visible light is produced. Review each of the terms and discuss the explanationsprovided. Have the students re-examine the classifications on BLM 8.3.2 "Visible Sources of Light". Ask thestudents to replace the "general titles" with the correct scientific term. (i.e.. light produced naturally from aliving thing - bioluminescence)
Adaptations
BLM 8.3.1 blm 8.3.1.cwk
BLM 8.3.2 blm 8.3.2.cwk
BLM 8.3.3 blm 8.3.3.cwk
Written using the Ontario Curriculum Unit Planner 2.51 PLNR_01 March, 2001* Open Printed on Oct 26, 2001 at 10:48:07 AM Page C-9

Optics Subtask 3Visible Sources of Light
Energy and Control An Integrated Unit for Grade 8 mins60
Notes to Teacher
Teacher Reflections
Written using the Ontario Curriculum Unit Planner 2.51 PLNR_01 March, 2001* Open Printed on Oct 26, 2001 at 10:48:07 AM Page C-10

Optics Subtask 4Transparency of Objects
Energy and Control An Integrated Unit for Grade 8 mins75
Expectations8s77 – use appropriate vocabulary, including correct
science and technology terminology, tocommunicate ideas, procedures, and results (e.g.,use terms such as incidence, reflection, refraction,wavelength, frequency when describing theproperties of light);
8s65 – identify the properties of visible light throughexperimentation;
8s70 – investigate how objects or media refract, transmit,or absorb light (e.g., non-luminous objects are seenwhen reflected light enters the eye; stars are seenwhen transmitted light enters the eye);
DescriptionThe students will have the opportunity to investigate what happens to light when it encounters variousmaterials of different properties. The students will explore/investigate materials that allow for the fulltransmission of light are transparent, materials that allow for the partial transmission of light are translucent andmaterials that allow for no transmission of light are opaque.
GroupingsStudents Working As A Whole ClassStudents Working In Small Groups
Teaching / Learning StrategiesClassifyingInquiryDirect Teaching
AssessmentThe Science Journal Assessment Rubric(BLM 8.uw.5) should be used to assess theirjournal entry.
Assessment StrategiesObservationLearning Log
Assessment Recording DevicesAnecdotal RecordRubric
Teaching / LearningPart A: The Tramission of Light through Various Materials/Objects (40 minutes)Pre-planning: Students will require a variety of translucent and transparent objects or materials to completethe investigation in this lesson. Ensure they are available prior to the lesson. Note: opaque objects are alsorequired, but they should be readily available in the classroom (i.e.. desks, books, etc.)
1. At the beginning of the class review the properties of light studied to date:- light is a form of energy- light travels out in all directions from the source- light travels in straight lines- light travels in waves
2. Pose the following question before you begin the activity: "What happens to light when it comes intocontact with an object or material?" Have the students brainstorm a list of possible answers and write theseon the board or on a piece of chart paper. Some possible answers may be:- it goes through- it stops- it reflects- some of it goes through- it makes the object hot- it makes the object shine
Written using the Ontario Curriculum Unit Planner 2.51 PLNR_01 March, 2001* Open Printed on Oct 26, 2001 at 10:48:07 AM Page C-11

Optics Subtask 4Transparency of Objects
Energy and Control An Integrated Unit for Grade 8 mins75
- it changes direction- it changes colour
3. Examine the responses, then pose the question, "Why do different things happen to the light when itencounters different objects or materials?" Try to illicit the following response: "Because the objects aredifferent." The properties of the objects or materials the light encounters create the various effects. Tell thestudents they will be examining various objects and materials in the classroom to determine what happens tothe light when it encounters that material. Students will then classify the materials.
4. Hand out the blackline master, "Shining Light at Various Objects" (BLM 8.4.1). The students, working inpairs, will have 20 minutes to complete this task. Quickly review the task:
- using the flashlight in a dark area or in the darkened room- shine a light on a variety of objects/materials- record your observations in the "results" column of the sheet.
Using chart paper, make a chart similar to BLM 8.4.1. Discuss the results of the investigations. On the chartpaper, list the objects/materials investigated, and record student observations. Make sure the observationsare accurate, before recording them on the overhead.
5. After all the objects/materials have been discussed, tell the students you want them to classify the objectsinto three categories:
Transparent Objects/MaterialsAsk the students to identify the objects/materials which allowed "all" the light to pass through, and to explainhow they knew all the light passed through.
Ask the students for the term used to describe these materials (transparent) then develop a definition (i.e..capable of transmitting light so that objects or images can be seen as if there were no intervening materials).
Translucent Objects/MaterialsAsk the students to identify the objects/materials which allowed some "light" to pass through. Ask them howthey knew only some of the light passed through. Answers such as "It was dimmer, or less bright," or "Itwas a different colour," should be given. Ask the class for the word used to describe theseobjects/materials ("translucent"). (i.e.: "Transmitting rays of light without permitting objects to be distinctlyseen; partially transparent.")
Opaque Objects/MaterialsAsk the students to identify the items which allowed no light to pass through. Ask them how they knew nolight passed through. Students may suggest that no light passed through because a shadow was cast.
It is important to point out to students that "a shadow test" is not a reliable way of determining that an objectallows no light to pass through. To demonstrate this, in a darkened room, hold a translucent object close to(not touching) a flashlight. The object should be close to a wall, so a shadow can be seen. The shadowmay make it seem like the object is stopping the transmission of all light. However, if the object is held againstthe flashlight, and the flashlight is turned towards the students, they will see that the object is allowing somelight to pass through and is therefore, translucent. Conduct the same demonstration with an opaque object todemonstrate the difference.
Ask the students to give the word that describes materials or objects that do not allow any light to be passedthrough. Again, some may be familiar with the term "opaque" from a previous year. If no students are able togive the term then introduce the term to them. Define the term. (i.e.: "preventing light from travelling through,
Written using the Ontario Curriculum Unit Planner 2.51 PLNR_01 March, 2001* Open Printed on Oct 26, 2001 at 10:48:07 AM Page C-12

Optics Subtask 4Transparency of Objects
Energy and Control An Integrated Unit for Grade 8 mins75
Resources
and therefore, not allowing you to see through it")
Note: Intensity plays a role in helping students determine whether or not an object is translucent oropaque. Since intensity is the number of rays being emitted from the source, a more intense light sourcemay reveal that an object which at first seems translucent, is actually opaque. You may wish to include abrief discussion of intensity in this lesson.
Part B: Review, Science Journal Entry , Guiding Question (40 minutes)
1. Before the students make a journal entry review the three main concepts developed in this lesson:- When light encounters a transparent object all of the light passes through the object- When light encounters a translucent object some of the light passes through the object- When light encounters an opaque object none of the light passes through the object
2. Students will write an entry about what they learned from this lesson (L. of the K.I.L.E. approach). Remindthe students that including labelled diagrams with explanations is an effective way of recording information.
3. Have students copy the following question into their science and technology journals, "What happens tolight when it does not pass through an object?" As they respond, they will be demonstrating what theyalready know (K). Next, encourage students to record any interesting ideas, questions, or thoughts theymight have about what happens to light when it does not pass through an object (I). Allow them toreinvestigate any of the materials/objects used during the lesson.
Adaptations
BLM 8.4.1 blm 8.4.1.cwk
flashlights
chart paper
Written using the Ontario Curriculum Unit Planner 2.51 PLNR_01 March, 2001* Open Printed on Oct 26, 2001 at 10:48:07 AM Page C-13
Optics Subtask 4Transparency of Objects
Energy and Control An Integrated Unit for Grade 8 mins75
Notes to TeacherLight can pass through some objects and materials but is stopped by others. Materials can be classified into thefollowing three categories:
Transparent – When light strikes a transparent material almost all of the light travels directly through that object.A clear image can be seen (examples: air, shallow water, and clear glass).
Translucent - When light strikes a translucent material, only some of the light passes directly through it. Thelight changes direction many times and is scattered about. As a result, we cannot see a clear image. Theimage usually appears fuzzy and unclear. A strongly translucent material emits mainly shadows (examples:frosted glass, some plastics, and fingernails).
Opaque - When light strikes an opaque material, none of the light passes through. Most materials are opaque.We cannot see through opaque materials. The light is either reflected by the material or absorbed andconverted into heat (examples: your desk, wood, and rock).
Teacher Reflections
Written using the Ontario Curriculum Unit Planner 2.51 PLNR_01 March, 2001* Open Printed on Oct 26, 2001 at 10:48:07 AM Page C-14

Optics Subtask 5Reflection and Mirrors
Energy and Control An Integrated Unit for Grade 8 mins220
Expectations8s65 – identify the properties of visible light through
experimentation;8s71 – identify ways in which the characteristics of mirrors
and convex and concave lenses determine their usein optical instruments (e.g., in a camera, atelescope, binoculars, a microscope);
8s72 – investigate and describe the laws of reflection ofvisible light (e.g., using a plane mirror);
8s75 – formulate questions about and identify needs andproblems related to the properties and behaviour oflight (e.g., interactions between light and differentmaterials), and explore possible answers andsolutions (e.g., predict and demonstrate how variousliquids will refract a light beam and describe theangle of refraction);
8s77 – use appropriate vocabulary, including correctscience and technology terminology, tocommunicate ideas, procedures, and results (e.g.,use terms such as incidence, reflection, refraction,wavelength, frequency when describing theproperties of light);
8s81 – identify ways in which the properties of reflectionare used in everyday situations (e.g., cosmetology,rear-view mirrors in cars, security mirrors, nightreflectors on jackets or bicycles);
DescriptionStudents will investigate the properties of light as they relate to mirrors and reflections. They will explore whathappens when light encounters an opaque object one of the possible outcomes is the reflection of the light.Students will explore and examine the differences in the reflections created by plane mirrors, concave mirrorsand convex mirrors.
GroupingsStudents Working In PairsStudents Working In Small Groups
Teaching / Learning StrategiesDemonstrationExperimentingDirect TeachingCollaborative/cooperative Learning
AssessmentThe Science and Technology JournalAssessment Rubric (BLM 8.uw.4) shouldbe used to assess their journal entry.
Assessment StrategiesExhibition/demonstrationPerformance TaskLearning Log
Assessment Recording DevicesRubric
Teaching / LearningPart A: An Introduction to Reflection (40 minutes)
1. Review the concepts developed in the previous lesson by having the students define/explain: transparent,translucent, opaque.
2. Reiterate the question posed at the end of the last lesson, "What happens to light when it does not passthrough an object?" Do not ask for any answers, but immediately begin with the following demonstration.
3. Have two plane mirrors ready to show to the class. The mirrors should have a backing on one side, suchas a metallic substance or glazed finish. Show the class the mirrors, then turn off the lights. Turn on aflashlight. Place the mirrors between the flashlight and the students. Establish that the object is opaque.Reverse the mirror, so the other side is now facing the light to demonstrate that the result is the same, pointout that although each side has a different surface, the mirror is still opaque.
4. Turn the flashlight off and turn on an overhead. Place both mirrors on the overhead, one with the mirroredsurface down, the other with the mirrored surface up. Remind students that in a previous lesson theylearned that light travels in straight lines. Given this fact, ask them what is happening to the light which is
Written using the Ontario Curriculum Unit Planner 2.51 PLNR_01 March, 2001* Open Printed on Oct 26, 2001 at 10:48:07 AM Page C-15

Optics Subtask 5Reflection and Mirrors
Energy and Control An Integrated Unit for Grade 8 mins220
hitting the mirrored side of the mirror (the answer "reflect" should be given or introduced). Ask the studentsto define "reflect". Tilt the mirror on an angle to reflect light around the room to demonstrate that they areindeed correct. Put the mirror back on the overhead with the mirrored side down.
5. Ask the students what is happening to the light striking the back side of the second mirror. Tilt the secondmirror on an angle to eliminate reflection as a possibility. The students may suggest, "It is being absorbed," or"It is being converted into heat." Challenge them to prove that light energy is being absorbed and convertedinto heat energy. If they suggest touching the back side of the mirror remind them heat energy is produced bythe overhead, so it could merely be heat energy being absorbed. If the students are unable to propose a test,tell them to compare the temperature of the mirror side of the first mirror with the back side of the secondmirror to see which is hotter. Ensure that the mirror side of the first mirror and back side of the second mirrorhave both been on the overhead for an equal length of time. Have a student volunteer touch the mirror side ofthe first mirror and the back side of the second mirror. They should notice that the back side feels hotter.Have the students discuss what they think is happening. Draw out or indicate to the students that the backside of the second mirror must have absorbed some of the light energy, and converted it to heat energy,otherwise the surfaces of the two mirrors would be the same temperature.
6. To review, ask students to summarize what happened when light encountered the two different opaquematerials on the two mirrors. They should be able to explain that when light hit the mirror, it was eitherreflected or absorbed.
7. Have the students make a short journal entry to explain what they learned during this lesson.
Part B: Properties of Light (30 mins)
1. Students will work in pairs or small groups. Provide each pair or group with a ray box and distribute BLM8.5.1 to all students. Following the instructions (1 to 3), students will experiment with the ray boxes toidentify the properties of light. A quick review of the instructions might be beneficial. Caution students thatray boxes are fragile and must be handled gently. The experiments work best in a darkened room.
2. Allow students sufficient time to conduct the experiment, then discuss the questions at the bottom of thepage. Teachers may wish to record student responses on the board or on chart paper. Students can thentransfer this information to their own sheets. Illustrate the convergence and divergence of light on thechalkboard or on the overhead. Convergence: when numerous beams of light come together, often seemingto make one beam. Divergence: when beams of light fan out away from each other, often seeming to comefrom the same point of origin.
3. Note that should the ray box not have a focusing knob then a teacher demonstration with the use of lensesto diverge and converge the beams may be substituted.
Part C: Reflections Using Plane Mirrors (40 mins)
1. Have the students, working in pairs or small groups, set up a ray box to emit a single focussed beam oflight (use the narrow light filter). Have the students play Ray Box Pool (BLM 8.5.2). The aim of Ray Box Poolis to use a mirror to reflect a beam of light into the various pockets of the pool table. Ray Box Pool is acooperative game and works best when partners work together to get the light into the pocket.
2. Distribute a plane (flat) mirror and a copy of BLM 8.5.2 (the pool table) to each group or pair . Instruct thestudents to set up their pool table with the ray box at one end. Be sure that everything fits on the desk(s) ortable where the students are playing, in order not to damage the ray box.
3. Challenge the students to find as many ways as possible to get the light into all six of the pockets (one
Written using the Ontario Curriculum Unit Planner 2.51 PLNR_01 March, 2001* Open Printed on Oct 26, 2001 at 10:48:07 AM Page C-16

Optics Subtask 5Reflection and Mirrors
Energy and Control An Integrated Unit for Grade 8 mins220
pocket at a time). Allow the students about ten to fifteen minutes to play. The ray box must remain in afixed position. However, there are no restrictions on the placement or angle at the mirror. Make sure allstudents have equal opportunity to play.
4. Distribute a second plane mirror, and challenge the students to find as many ways as possible to get thelight into all six of the pockets (one pocket at a time) using both mirrors. Instruct the students that the ray boxmust remain in a fixed position. Students may place one of the mirrors wherever needed and alter its angle,but the second mirror must be aligned along the edge (anywhere along either side or either end) of the pooltable and cannot be angled. Allow the students about ten minutes to complete this challenge.
5. Discuss the concept of the reflection of light with the class. Use the following questions to help guide thediscussion:a) What object did we use in the pool game to change the direction of the beam of light?b) What term do we use when a beam of light is able to bounce off something and change direction?c) What other objects could have been used, other than the mirror, to reflect the beam of light?d) Name ways that we could apply what we learned about light while playing Ray Box Pool to an everydaylife situation (for example, using objects that reflect light on clothing when biking, in-line skating, orexercising; using reflective materials on road signs and lane markers; playing Laser quest; focussing beamsfrom T.V. remotes; angling mirrors to reflect light at or away from objects; making periscopes andkaleidoscopes).
6. Extension ActivityGeometric experiments using mirrors to flip various shapes could be introduced at this time. Most math textbooks have sets of experiments about flips laid out and ready for students to explore.
Part D: The Law of Reflection (40 mins)
1. Before beginning this activity, examine BLM 8.5.3, Reflection - Teacher Information so that the Law ofReflection is understood.
2. Organize the students so that they are working in pairs or in small groups. It is probably preferable if thestudents work in the same groups as before. Have a ray box, a plane mirror, a pencil, a ruler, and aprotractor ready for distribution to each group. Give a copy of both BLM 8.5.4 and BLM 8.5.5 to each groupand instruct the students to use the INSITE method of inquiry to develop and test a hypothesis that comparesthe angle of incidence and the angle of reflection. Instruct the students to use the "Identify", "Narrow", and"Investigate" sections of BLM 8.5.5 as a sample of how to use the INSITE method. They do not need torespond to any of the questions asked in the "Identify" and "Narrow" sections. The students will be requiredto complete the "Hypothesis", "Investigate", "Test", and "Examine" sections of BLM 8.5.5.
3. Teachers may want to have students submit BLM 8.5.4 and BLM 8.5.5 for evaluation. Evaluation criteriamight include: use of ruler and pencil, lines labelled - normal, incident ray, reflected ray, use of arrows onrays, angles measured and labelled, hypothesis clearly stated, test results examined and discussed,conclusions drawn and explained, etc.
*Note that if these are being evaluated, then students should be given the criteria before they begin thetask.
4. Discuss with the students the law of reflection. (The law of reflection states that the angle of incidence isequal to the angle of reflection.) Ask the students to suggest possible real life applications for the law ofreflection. For example, the placement of mirrors for surveillance/security purposes or the angle of mirrorsused in shoe stores.
Written using the Ontario Curriculum Unit Planner 2.51 PLNR_01 March, 2001* Open Printed on Oct 26, 2001 at 10:48:07 AM Page C-17

Optics Subtask 5Reflection and Mirrors
Energy and Control An Integrated Unit for Grade 8 mins220
5. Extension ActivityHave the students use BLM 8.5.6 to examine and explain the ways light reflects off a flat uncreased piece ofaluminium foil and a piece of aluminium foil that has been crinkled. Discuss the students' results andconclusions when they have completed BLM 8.5.6.
Part E: Reflections Using Concave and Convex Mirrors (40 mins)
1. Prior to this lesson, get five or six people (it could be students, but the class would respond better if youused staff) to help you make a video. Give each volunteer a spherical concave/convex mirror (see step 4below) and allow them a few minutes to practice making faces. When they are ready use the video camerato record a ten second shot of each volunteer's reflected image (shoot over the subject's shoulder and zoomin on the mirror). The odder/more humourous the reflected image the better.
2. Connect the video camera to a television so the class can view the tape. Invite the students to play"Whose Face Is It Anyway?". Play back the tape and have the students try to guess who is making the facein the mirror. Pause the playback between each taped subject to give the students a chance to guess who itis.
3. Distribute a spherical concave/convex mirror or a large stainless steel serving spoon to each student in theclass. Have the students examine their own reflection in the spoon. Instruct the students to examine theirreflection using both sides of the spoon.
4. Based on their observations, ask students to discuss how curved mirrors affect the reflection of images.Ensure students understand that curved mirrors can be classified as either concave or convex (a concavemirror has the reflecting surface on the inside of the curve and a convex mirror has the reflecting surface onthe outside of the curve). Concave and convex mirrors can be classified as either cylindrical (cut from acylinder) or spherical (cut from a sphere).
Part F: The Properties of Curved Mirrors (30 mins)
1. Have the students work with a partner. Distribute a rectangular prism, a concave mirror, a convex mirror,and BLM 8.5.7 to each pair. Have the students use the mirrors to create reflected images of the rectangularprism, and have them record their observations in their Science and Technology journals.
2. Discuss the properties of reflected images using concave and convex mirrors. Identify real life devicesthat use concave and convex mirrors. Demonstrate the students' responses using curved mirrors. Reviewand discuss the terms divergence and convergence as they relate to concave and convex mirrors. Concavemirrors make images close to the mirror appear enlarged and images farther from the mirror appear smallerand inverted. Convex mirrors make images appear smaller and farther away than they actually are andprovide a wider field of view than concave mirrors. Some examples of concave and convex mirrors are: atelescope and vehicle rear view mirrors. A telescope collects light from distant object such as a star andreflects that light off a concave mirror and one or more plane mirrors so that we can see the image. Rearview mirrors on the passenger side of cars and a section of the driver side rear view mirror on buses are infact convex mirrors that allow drivers to see other vehicles on the road more easily. Ask students if theyhave ever seen the phrase, "objects in this mirror are closer than they appear" on a car mirror. Ask themwhy they think it only appears on the passenger side mirror.
Adaptations
Written using the Ontario Curriculum Unit Planner 2.51 PLNR_01 March, 2001* Open Printed on Oct 26, 2001 at 10:48:07 AM Page C-18

Optics Subtask 5Reflection and Mirrors
Energy and Control An Integrated Unit for Grade 8 mins220
Resources
BLM 8.5.1 blm 8.5.1.cwk
BLM 8.5.2 blm 8.5.2.cwk
BLM 8.5.3 blm 8.5.3.cwk
BLM 8.5.4 blm 8.5.4.cwk
BLM 8.5.5 blm 8.5.5.cwk
BLM 8.5.6 blm 8.5.6.cwk
BLM 8.5.7 blm 8.5.7.cwk
chart paper
ray boxes
magnetized cards (light filters) for rayboxesplane mirrors
rulers
protractors
stainless steel serving spoons
spherical concave mirrors
spherical convex mirrors
cylindrical concave mirrors
cylindrical convex mirrors
Written using the Ontario Curriculum Unit Planner 2.51 PLNR_01 March, 2001* Open Printed on Oct 26, 2001 at 10:48:07 AM Page C-19

Optics Subtask 5Reflection and Mirrors
Energy and Control An Integrated Unit for Grade 8 mins220
Notes to TeacherRay boxes must be treated carefully. Remind students not to scratch the surface of the mirrors.
Activities with ray boxes (and light in general) work best in darkened rooms.
The experiments that call for ray boxes can be done using high powered flashlights and home made filtersrather than ray boxes. However, these experiments are best done with ray boxes. There are a fewcomplications in the manner in which flashlights are designed that will make it more difficult to use themcompared to ray boxes.
Gather a number of large stainless steel serving spoons, either your own or ones that the students bring inbefore you begin Part E.
Most of the plane mirrors available from educational suppliers are made from a piece of reflective plastic.One of the advantages of these plastic mirrors is that they are flexible. This can come in very handy whenstudying convex and concave mirrors because the plastic mirrors can be bent to take on the shape ofcylindrical concave and convex mirrors. Of course care needs to be taken when bending these plasticmirrors that one does not apply too much force or try to bend them too far.
Plane Mirror Terms
Point of Incidence is the point where normal intersects the reflective surface
Incident ray is the path of the light beam from the light source to the point of incidence
Reflected ray is the path of the reflected light beam from the point of incidence
Angle of Incidence is the angle between the incident ray and normal
Angle of Reflection is the angle between the reflected ray and normal
The Law of Reflection states that the angle of incidence is equal to the angle of reflection
Teacher Reflections
Written using the Ontario Curriculum Unit Planner 2.51 PLNR_01 March, 2001* Open Printed on Oct 26, 2001 at 10:48:07 AM Page C-20

Optics Subtask 6Refraction and Lenses
Energy and Control An Integrated Unit for Grade 8 mins200
Expectations8s82 – explain the function and purpose of combinations
of multiple lenses or lenses and mirrors in opticalsystems (e.g., the source and one or more reflectorsor lenses in cameras, periscopes, telescopes);
8s77 – use appropriate vocabulary, including correctscience and technology terminology, tocommunicate ideas, procedures, and results (e.g.,use terms such as incidence, reflection, refraction,wavelength, frequency when describing theproperties of light);
8s65 – identify the properties of visible light throughexperimentation;
8s71 – identify ways in which the characteristics of mirrorsand convex and concave lenses determine their usein optical instruments (e.g., in a camera, atelescope, binoculars, a microscope);
8s70 – investigate how objects or media refract, transmit,or absorb light (e.g., non-luminous objects are seenwhen reflected light enters the eye; stars are seenwhen transmitted light enters the eye);
8s69 – describe qualitatively how visible light is refracted;
DescriptionStudents will investigate the properties of light as they relate to lenses, prisms and refraction. They will explorewhat happens when light encounters a transparent object and the rays of light are not perpendicular to theface of the object (refraction). Students will explore and examine the differences in the refraction created bylenses and prisms.
GroupingsStudents Working As A Whole ClassStudents Working In Small Groups
Teaching / Learning StrategiesDemonstrationDirect TeachingExperimenting
AssessmentThe Science and Technology JournalAssessment Rubric (BLM 8.UW.5) shouldbe used to assess their journal entry. BLM8.UW.5 should be used to assess BLM8.6.8.
Assessment StrategiesExhibition/demonstrationPerformance TaskQuestions And Answers (oral)Learning Log
Assessment Recording DevicesAnecdotal RecordChecklistRubric
Teaching / LearningPart A: An Introduction to Lenses (40 minutes)
1. Review what happens when light encounters opaque objects. Discuss the terms reflection and absorption.Next, review what happens to light when it encounters a transparent object. Recall that all of the light hitting atransparent object passes (or is transmitted) through the object. Hold up a square or rectangular glass planeand a double convex glass lens. Tell the students that the two objects are made of the same transparentmaterial. Ask the students to identify the only difference between the objects (shape).
2. Have a number of centres around the room to accommodate groups of four or five students. Each centreshould have at least 2 of each of the following lenses: simple convex, simple concave, double convex anddouble concave. Have the lenses drawn on the board and the names of the lenses beside each of thediagrams.
3. Tell the students they will be experimenting with the lenses at each of the stations to determine whathappens to objects as they are viewed through a single lens or lenses in combination. Name each of the
Written using the Ontario Curriculum Unit Planner 2.51 PLNR_01 March, 2001* Open Printed on Oct 26, 2001 at 10:48:07 AM Page C-21

Optics Subtask 6Refraction and Lenses
Energy and Control An Integrated Unit for Grade 8 mins200
lenses (review the terms from the reflection subtask). Discuss the association between the lenses and howthey make objects appear. Hand out BLM 8.6.1 "Working With Lenses". Briefly review the investigation withstudents. Have them to record their observations in their Science and Technology journals. Tell them theywill be expected to discuss their observations in the next lesson. Warn the students to be careful whenhandling the lenses. They are fragile.
Part B: An Introduction to Refraction (60 minutes)
1. Review the kinds of lenses used in Part A. Have the students generalize their observations about eachlens. Remind students that all of the lenses are transparent which means all of the light from an object ispassing through the lens. Discuss with the students that something other than reflection or absorption of lightis occurring.
2. Ask the students to respond to the following question: "What is happening to the light as it passes throughthe lenses?" At the conclusion of this discussion hold up the glass plane and the double convex glass lensused in Part A. Reaffirm that the only difference between objects is their shape. Remind students that lighttravels in straight lines. Use the first page of BLM 8.6.2, "Refraction: The Bending of Light" as an overhead.Point out that the light rays are approaching each lens perpendicular to the face of the lens. Look at thebottom diagram. Ask students what happens when light hits a glass plane (rectangular prism). A window isa practical example of a glass plane. Discuss the fact that the light passes straight through, so they seeexactly what is on the emergent rays on the other side of the plane (rectangular prism).
3. Ask the students to recall what they saw when they viewed an object through a double convex lens.Discuss the fact that the objects appeared bigger than they actually were. Ask them to recall what theyobserved when they viewed objects through lenses other than a glass plane (rectangular prism). Developthe generalization that "objects appear different or changed when viewed through a lens that is not a plane.
4. Examine the top diagram (double convex lens). Through discussion, have the students draw the followingconclusions:- the lens is transparent so we know all the light rays pass through the lens- the object does not appear to be the same when viewed through the lens so the light rays do not passstraight through
5. Examine the two diagrams. Ask the students, "Since the light rays approach both lenses perpendicular tothe surface, what accounts for the difference in the way the images appear?" ( The rays hit the surface ofeach lens at different angles because the surfaces have a different shape. The rays hit the rectangularprism at 90 degrees and pass straight through. However, the rays hit the curved surface of the doubleconvex lens at angles other than 90 degrees, which changes the path of the rays and alters or changes theimage. Use the analogy of a ball hitting a flat wall straight on, versus hitting a curved wall. The path of theball represents the path of a light ray.)
6. Tell the students that in Part C the class will be trying to determine the following, "Does the angle at whichlight rays hit a transparent lens affect the way an image is viewed?"
7. Review the I.N.S.I.T.E. model with the students. Use the I.N.S.I.T.E. model as the basis for the following"teacher demonstration". Employ a question and answer format.
I. Identify the problem (draw out from students)
Does the angle at which a ray of light hits a transparent lens affect the path of the ray as it passes throughthe lens?
Written using the Ontario Curriculum Unit Planner 2.51 PLNR_01 March, 2001* Open Printed on Oct 26, 2001 at 10:48:07 AM Page C-22
Optics Subtask 6Refraction and Lenses
Energy and Control An Integrated Unit for Grade 8 mins200
N. Narrow the problem
What materials will we need? -- ray box and a rectangular prism (teacher tells the students)What are the variables in the problem? -- the angles at which the beam of light from the ray box hits the prism.--the thickness of the transparent object (students answer)How can we see if the path of light changes? -- visually or measurement (students answer)
S. State the Hypothesis
A ray hitting a transparent object (lens) at 90 degrees (perpendicular to the face of the object) will passstraight through the object. If a ray hits a transparent object (lens) at an angle other than 90 degrees, the pathof the ray will change.
I. Investigate and Gather Information/ Test the Hypothesis and Record Observations
Teacher Demonstration
Tape a rectangular prism vertically to the board. Place a ray box with a single beam on the boardperpendicular to the prism so the light beam hits the prism at 90 degrees. Ask the students to predict what willhappen when the ray box is turned on. Turn on the ray box. Light passes straight through the prism.
Turn off the ray box. Change the position of the ray box by rotating it lower so the light beam hits the prism atapproximately 45 degrees. Remind students that in the previous investigation the light rays approached thedouble convex lens and the plane (rectangular prism) at the same angle (90 degrees), but the angle at impactwas different because the surfaces are different. Allowing the light ray to strike the rectangular prism atapproximately 45 degrees, essentially duplicates the way the light rays hit the convex lens. Recalling whathappened when the light rays passed through the lens, ask the students to predict what will happen to thepath of the light ray as it passes through the prism.
Turn on the ray box. The path of the beam changes when it encounters the prism. Describe it as a "bending"of the light.
Repeat the procedure at different angles. This will further reinforce the conclusion.
E. Examine the Results and Write a Conclusion
Discuss the conclusions with the students. (When light encounters a transparent object other than at 90degrees (perpendicular) then light is "bent". As the the size of the angle increases, the degree of refractionincreases.)
8. Introduce the term Refraction and define it as the "bending" of light.
9. Discuss the variable not used in this experiment (thickness) and tell the students that they will examinewhether thickness has an effect on refraction in a later lesson.
10. Hand out page 2 of BLM 8.6.2, "Refraction: The Bending of Light" to each student and have them fill in theemergent rays on the other side of the prisms. Have the students label both the incident rays and theemergent rays.
11. Have the student write a journal entry describing what they learned during this lesson. Remind them thatlabelled diagrams are an effective way of enhancing their entries.
Written using the Ontario Curriculum Unit Planner 2.51 PLNR_01 March, 2001* Open Printed on Oct 26, 2001 at 10:48:07 AM Page C-23

Optics Subtask 6Refraction and Lenses
Energy and Control An Integrated Unit for Grade 8 mins200
Part C: Converging and Diverging Rays (40 minutes)
1. Set up eight stations in the classroom. At each station include a thick and a thin single concave lens, a thickand a thin double concave lens, a thick and a thin single convex lens, a thick and thin double convex lens anda ray box. Hand out blackline masters, "Refraction of Light Through a Lens" (BLM 8.6.3) and "Refraction"(BLM 8.6.4). Briefly review sections I (Identify), N (Narrow) and S (State) so students understand thepurpose of the investigation. Ensure that each group has the materials listed in I (Investigate) then review theprocedures with students. Students are to:- project light rays at each lens and observe what happens as the rays pass through and emerge from thelens;- complete each of the diagrams on BLM 8.6.3 illustrating their observations by drawing the path of the"emergent" rays.NOTE: Remind students to use only a single lens, not a combination of lenses.
2. To conclude the investigation, students complete sections T (Test) and E (Examine).
3. As a class confirm all of the findings. Discuss the terms converge and diverge as they apply to refractedrays. Have the students label each diagram on BLM 8.6.3 using the terms converge and diverge to describehow the light rays are refracted. Introduce and explain the terms incident rays and emergent rays and havethe students label the diagrams with these terms. Allow students to share their conclusions. Throughdiscussion develop a conclusion acceptable to the class. Encourage students to modify their individualconclusions to ensure they are clear and accurate. Have the students hand in their sheets for evaluation atthe end of the class. Use the rubric for the I.N.S.I.T.E. method (BLM 8.uw.3).
Part D: How Light Refracts (30 minutes)
1. Review refraction with the students. Pose the question, "Why do you think the refraction, the 'bending oflight' occurs?". Discuss possible answers with the students. Come to the conclusion that refraction occurswhen light passes through a medium of different density and the beam of light is hitting on an angle other thanperpendicular. Discuss the term medium and relate it to the use of the lenses (light through air andglass/plastic). Ask the students what they think happens to light when it enters a denser medium (it slowsdown) and a less dense medium (it speeds up). Tell them that it is the slowing down and speeding up of lightthrough the different medium that causes refraction to occur.
2. Distribute the blackline master, "How Will Light Refract" (BLM 8.6.5). Tell the students they are to use asingle beam on the raybox to by draw the emergent ray for each diagram.
3. Display a chart paper copy of BLM 8.6.5. Select a student to fill in the emergent ray for each diagram.
4. As a whole class, discuss the findings. Ask the students to describe any patterns they see in the directionof the refraction.
Part E: Science and Technology Journal Entry (30 minutes)
1. Have the students make a journal entry to record what they learned about reflecting and refracting light.Tell the students that they are not to use any of their notes. Remind them to use correct terminology. Whenlabelling diagrams, they should include brief written explanations in their own words if they are unable torecall the correct term.
Part G: The Water Drop Challenge: Extension Activity
1. As a final challenge extension activity, have students complete BLM 8.6.6, "The Water Drop Challenge".
Written using the Ontario Curriculum Unit Planner 2.51 PLNR_01 March, 2001* Open Printed on Oct 26, 2001 at 10:48:07 AM Page C-24

Optics Subtask 6Refraction and Lenses
Energy and Control An Integrated Unit for Grade 8 mins200
Resources
The teacher notes are found on BLM 8.6.7.
Adaptations
BLM 8.6.1 blm 8.6.1.cwk
BLM 8.6.2 blm 8.6.2.cwk
BLM 8.6.3 blm 8.6.3.cwk
BLM 8.6.4 blm 8.6.4.cwk
BLM 8.6.5 blm 8.6.5.cwk
BLM 8.6.6 blm 8.6.6.cwk
BLM 8.6.7 blm 8.6.7.cwk
ruler
ray boxes
simple and double concave lenses
simple and double convex lenses
optical bench (optional)
eye dropper
beaker or water container
newspaper
a rectangular prism
a glass plane
Written using the Ontario Curriculum Unit Planner 2.51 PLNR_01 March, 2001* Open Printed on Oct 26, 2001 at 10:48:07 AM Page C-25

Optics Subtask 6Refraction and Lenses
Energy and Control An Integrated Unit for Grade 8 mins200
Notes to TeacherBackground Information
A lens is a curved transparent device that causes light to refract as it passes through. Lenses have a widevariety of uses, depending on their size and shape. Human eyes are an everyday example of refraction inlenses. While reading, light is reflected off the page, travels to your eyes, and refracts when it enters the lens ofeach eye. Why does this happen?
Scientists discovered that the speed of light differs in different transparent materials. The denser the material is,the slower light travels as it passes through. When light travels from air intodenser glass, it slows down. The change in speed causes the light to change direction. The same thinghappens, for the same reason, if you are running on the beach and then run into the water. The water is denserthan air and slows you down.
Two common lenses are concave and convex . A convex lens is thicker in the middle than at the outside edge. Itcauses light rays to come together. A concave lens is thinner in the middle than at the outside edge, It causeslight rays to spread apart. Combining more than one lens provides people with many interesting optical devices.
Teacher Reflections
Written using the Ontario Curriculum Unit Planner 2.51 PLNR_01 March, 2001* Open Printed on Oct 26, 2001 at 10:48:07 AM Page C-26

Optics Subtask 7The Visible Spectrum and Colour
Energy and Control An Integrated Unit for Grade 8 mins160
Expectations8s68 – identify colours as different wavelengths of light
and explain why objects appear to have colour;8s74 – describe the effect of colour filters on white light
using the subtractive theory.8s73 – explain colour vision using the additive theory;8s77 – use appropriate vocabulary, including correct
science and technology terminology, tocommunicate ideas, procedures, and results (e.g.,use terms such as incidence, reflection, refraction,wavelength, frequency when describing theproperties of light);
8s79 – communicate the procedures and results ofinvestigations for specific purposes and to specificaudiences, using media works, written notes anddescriptions, charts, graphs, drawings, and oralpresentations (e.g., prepare a brochure informingthe public of the risks of a specific type ofelectromagnetic radiation).
DescriptionBy studying the visible light range of the Electromagnetic Spectrum, the students will investigate how colour isperceived. They will also investigate Additive and Subtractive Colour Theories.
GroupingsStudents Working As A Whole ClassStudents Working IndividuallyStudents Working In Small Groups
Teaching / Learning StrategiesDemonstrationDirect TeachingExperimentingHomeworkLearning Log/ Journal
AssessmentThe Science and Technology JournalAssessment Rubric (BLM 8.uw.3) shouldbe used to assess their journal entry.
Assessment StrategiesExhibition/demonstrationLearning LogObservationQuestions And Answers (oral)
Assessment Recording DevicesAnecdotal RecordChecklist
Teaching / LearningPart A: Colour and the Electromagnetic Spectrum (40 minutes)
1. Begin by reviewing what happens when light encounters transparent, translucent, and opaque objects.Review transmission, refraction and reflection. Review the fact that light can also be absorbed andconverted into heat (back side of mirror - subtasks).
2. The colour of light emitted by the sun, or by a flashlight is white. However, when this "white light"encounters a translucent or opaque object, colours are perceived. Discuss this phenomenon with students.Establish the fact that if a colour other than white were emitted from the sun then every object we see wouldbe that colour.
3. Pose the question to the students, "Why do we perceive colour when white light passes through atranslucent or transparent object (lens)?"
4. Conduct the following demonstration to illustrate how a prism refracts light. This demonstration is bestconducted by the teacher because finding the correct angle of incidence in order to create a colour spectrumcan be a time consuming process for students. Prior to the lesson, set up the ray box and prism so you are
Written using the Ontario Curriculum Unit Planner 2.51 PLNR_01 March, 2001* Open Printed on Oct 26, 2001 at 10:48:07 AM Page C-27

Optics Subtask 7The Visible Spectrum and Colour
Energy and Control An Integrated Unit for Grade 8 mins160
sure a colour spectrum will be produced when the classroom lights are turned off. After viewing thedemonstration the following is discussed:- white light is actually a combination of all the colours of the visible spectrum- the colours are created by the refraction of light.
Ask the students if it is possible to explain our perception of colour only by means of refraction of light. Tellthe students in the next lesson that they will be examining why we perceive colour, but for the moment, theywill examine the colours of light.
5. Use an overhead of BLM 8.2.1 (from Subtask 2) to review the electromagnetic spectrum. Throughquestion and answer, reconfirm the following with students: as we move through the spectrum from lowfrequency to high frequency, light waves increase in energy and frequency (number of cycles of a waveper second).
6. Although the students have studied the electromagnetic spectrum in a previous subtask, this is anappropriate time to introduce the unit of measurement for frequency and wavelength because it will helpstudents develop a better understanding of why there are different colours in the visible spectrum. Refer tothe teacher information on BLM 8.7.1. Emphasize the following points in your discussion.- visible light is one part of the electromagnetic spectrum- it is the wavelength and frequency of light waves that determine the characteristics of light in the entirespectrum- within the visible spectrum, colours are distinguished by wavelength, and amplitude determines brightness
Identify the colours in the visible spectrum (ROY G BIV). Note that the colours are measured in nanometers,and listed in order of wavelength from shortest to longest. Refer to the colours and identify the wavelength(in nanometers) of each colour.
7. Tell the students that the human eye is "attuned" to the colours of the visible spectrum and is able todistinguish between colours. A more detailed discussion of the function of the rod and cone cells in the eyesmay occur here, but it is more important for students to understand that the rod and cone cells are parts ofthe human eye which allow us to detect light and distinguish colours.
Part B: Why Objects Have Colour (40 minutes)
1. Prepare the students for the lesson by reviewing the facts established in Part A:-white light radiates from a source (e.g., our Sun)-white light is a combination of all of the colours of the visible spectrum-we can separate the colours of the spectrum by refraction, but refraction cannot explain why translucentand opaque objects have colour
2. Ask the question, "If refraction cannot explain why translucent and opaque objects have colour how dowe perceive objects as having colour?"
3. Hold up a coloured object (choose a primary colour). Ask the students if the object is a light source?(no).Remind the students that we have only seen coloured light as emitted from a light source, so there must beanother explanation as to why the object has colour.
4. Discuss what happens to light when it encounters a transparent object (it passes through or it isrefracted). Ask the students what happens to light that encounters a translucent object. Some light passesthrough, some is refracted, and the rest is reflected, refracted or absorbed. Ask the students what happensto light that encounters an opaque object. It is either reflected or absorbed.
Written using the Ontario Curriculum Unit Planner 2.51 PLNR_01 March, 2001* Open Printed on Oct 26, 2001 at 10:48:07 AM Page C-28

Optics Subtask 7The Visible Spectrum and Colour
Energy and Control An Integrated Unit for Grade 8 mins160
5. Ask the rhetorical question, "How does this relate to colour?" Select a student wearing an article ofclothing in a primary colour; a red shirt for example. Ask the students if the shirt refracts light (no, because itis opaque). Therefore, we can eliminate refraction as the reason the shirt is red. Ask the students to identifythe two remaining possibilities (the light is reflected or absorbed) and ask them to make a scientific guess toexplain what might be happening.
6. Using a question and answer technique, develop the following explanation:- white light containing all the colours of the visible spectrum encounters the shirt- our eyes detect the colour red, which means red light is being reflected and all the other colours are beingabsorbed.
7. Create a general statement (i.e.. "When we look at an object we see a colour because that colour isreflected from the object, while all the other colours are absorbed."
8. Conclude the discussion of colour by making reference to the fact that there are different colours of "red".Ask the students if they can relate this to wavelength and the visible spectrum. They should be able to statethat as the frequency of the waves increases or decreases the properties of the light change. The colour redfor example has its own spectrum. As the frequency of the light within the "red spectrum" changes, we seedifferent colours of red.
9. Have the students make a science and technology journal entry to record what they learned during thislesson. Encourage them to include any interesting ideas, questions or observations. Remind them thatdiagrams are an effective way of communicating information.
Part C: Combining Colours (40 minutes)
1. Have colour filters/paddle filters available for students. Tell the students that they have just learned aboutthe theory behind our perception of colour. Tell them that you want them to explore different colourcombinations by viewing objects through the filters or paddle filters. The filters can be used singly or incombination.
2. After the twenty minutes, ask the students to share their observations. Record the observations on theblackboard. Ask them if there were any surprises (i.e.. unexpected colours, etc.). Again, record theseobservations on the board. It should soon become apparent that when the filters were used, the studentsperceived colours which were not the same as the actual colour of the object, or the colour of the filter.
3. Distribute copies of blackline master "Perceiving Light" (BLM 8.7.2). Display an overhead of BLM 8.7.2and review how the absorption and reflection of light determines our perception of colour. From theinformation recorded on the blackboard, choose a "surprise" or an "unexpected" colour result. For example,"When I looked at Tom's red shirt through the green filter, it looked yellow." If there are enough filtersavailable, have all of the students confirm this observation. Take a red filter and place it on the overhead.Have a student explain why red light is being projected. (White light hits the filter. All colours except red areabsorbed. Red light passes through the filter and is projected/perceived). Place a green filter over the redfilter. A yellow colour should be projected. Distribute blackline master "Combining Light" (BLM 8.7.3) tostudents, and display an overhead of BLM 8.7.3. Using the overhead have the students explain what ishappening when we look at the shirt through the combined filters (red and green). Record this information onthe overhead in the boxes provided, then have the students copy the information onto their sheets. Teacherexplanations are provided on the "Combining Light - Teacher Version" blackline master (BLM 8.7.4).
Part D: The Additive Colour Theory (40 minutes)
1. Review the reason why part of the electromagnetic spectrum is visible. Simply put, the human eye is
Written using the Ontario Curriculum Unit Planner 2.51 PLNR_01 March, 2001* Open Printed on Oct 26, 2001 at 10:48:07 AM Page C-29

Optics Subtask 7The Visible Spectrum and Colour
Energy and Control An Integrated Unit for Grade 8 mins160
Resources
"attuned", or sensitive to the range of the spectrum which has a wavelength between roughly 380 to 780nanometers. Because of this sensitivity, this part of the spectrum is visible. The variations in wavelength (forcolour) and amplitude (for brightness) in this part of the spectrum create what we perceive as colour.
2. Hand out the blackline master entitled, "Additive Colour Theory Investigation" (BLM 8.7.5). Following theprocedures on the blackline master, the students will use colour filters or paddles and flashlights to addcoloured light together to see what colours are produced.
3. After the students have experimented with the lights and filters, reconvene the class and discuss thefindings. The teacher answers version can be found on BLM 8.7.6.
4. The process of adding colours of light together to produce other colours is called the additive colourtheory. This theory applies only to the mixing of light and not the mixing of pigment. The additive light theory isthe more difficult of the two theories for students to understand. The primary colours of light are blue, red andgreen. The secondary colours of light are yellow, cyan (turquoise), and magenta (bright pink). Yellow isproduced when you mix green and red light. Cyan is produced when you mix blue and green light. Magenta isproduced when you mix blue and red light. When all three primary colours of light are present in any formyou produce white light. Example, cyan and red will produce white since cyan is actually green and blue lightcombined.
Adaptations
BLM 8.7.1 blm 8.7.1.cwk
BLM 8.7.2 blm 8.7.2.cwk
BLM 8.7.3 blm 8.7.3.cwk
BLM 8.7.4 blm 8.7.4.cwk
BLM 8.7.5 blm 8.7.5.cwk
BLM 8.7.6 blm 8.7.6.cwk
white paper 1
coffee filters 3
glue 1
construction paper 1
light source (flashlight or ray box) 1
colour filters (cellophane & tissue paperwill work)
1
projection screen or white wall 1
Written using the Ontario Curriculum Unit Planner 2.51 PLNR_01 March, 2001* Open Printed on Oct 26, 2001 at 10:48:07 AM Page C-30

Optics Subtask 7The Visible Spectrum and Colour
Energy and Control An Integrated Unit for Grade 8 mins160
water soluble markers package
Notes to TeacherThe quantity of resources will determine the size of your groups for the Additive Colour Theory Investigation. Itcan be done as a teacher demonstration with your whole class. With responsible students, you could divide yourclass in half and allow students to lead a demonstration. Each group ideally should have three light sources (rayboxes or flashlights).
Teacher Reflections
Written using the Ontario Curriculum Unit Planner 2.51 PLNR_01 March, 2001* Open Printed on Oct 26, 2001 at 10:48:07 AM Page C-31

Optics Subtask 8Optical Devices
Energy and Control An Integrated Unit for Grade 8 mins80
Expectations8s79 – communicate the procedures and results of
investigations for specific purposes and to specificaudiences, using media works, written notes anddescriptions, charts, graphs, drawings, and oralpresentations (e.g., prepare a brochure informingthe public of the risks of a specific type ofelectromagnetic radiation).
8s70 – investigate how objects or media refract, transmit,or absorb light (e.g., non-luminous objects are seenwhen reflected light enters the eye; stars are seenwhen transmitted light enters the eye);
8s82 – explain the function and purpose of combinationsof multiple lenses or lenses and mirrors in opticalsystems (e.g., the source and one or more reflectorsor lenses in cameras, periscopes, telescopes);
8s83 – compare the automatic functions of the humaneye to functions in an automatic camera (e.g.,focusing power, adaptation to brightness);
DescriptionStudents have had an opportunity to learn what happens when light is reflected and refracted and havedeveloped a basic understanding of other properties of light. In this subtask, students will research opticaldevices which make use of the properties of light they have studied. Each student will make a presentation tothe class based on the research.
GroupingsStudents Working In PairsStudents Working In Small Groups
Teaching / Learning StrategiesIssue-based AnalysisModel MakingResearch
Assessment
Assessment StrategiesPerformance TaskObservationSelf Assessment
Assessment Recording DevicesAnecdotal RecordRating Scale
Teaching / Learning1. Review with the students what has been studied about the properties of light. List this information on theboard, an overhead, or chart paper.
2. Tell students that based on our knowledge of the properties of light, optical devices have been developedto perform functions that the eye is not normally capable of performing. These devices, in general, change theway objects are viewed "by the naked eye". They are designed to perform a specific functions.
3. On the board, overhead, or chart paper create a new list entitled "Optical Devices". Have the studentsgenerate a list of optical devices which "change the way objects are normally viewed". Start the list with amagnifying glass. Have the students brainstorm to add to the list. Objects may include:
- cameras- video cameras- microscopes- binoculars- telescopes- glasses/bifocals/contact lenses- film projectors- overheads- televisions- night vision goggles- one way glass
Written using the Ontario Curriculum Unit Planner 2.51 PLNR_01 March, 2001* Open Printed on Oct 26, 2001 at 10:48:07 AM Page C-32

Optics Subtask 8Optical Devices
Energy and Control An Integrated Unit for Grade 8 mins80
Resources
(*note that in the Grade 4 energy unit a periscope and kaleidoscope have already been made/studied)
4. Tell students they must choose an optical device to research. They may select one from the list generatedby the class, or they may choose one of their own after consulting with the teacher. They will be required topresent the device and their research findings to the class. Distribute BLM 8.8.1 "Optical Devices ResearchAssignment". Review the information on BLM 8.8.1 to ensure students understand the components of theassignment.
5. Tell the students that they will have only one in-school period to do the research for their presentation andthat the following class will be the presentation of their device. As this is not the culminating activity, it isimperative that the students find the information quickly, and develop a short effective presentation. Thepresentation should be short (approximately 5-10 minutes) and should include the elements listed in BLM8.8.1.
6. Try to arrange for Internet time to allow students to gather the necessary information for their projects. Itmay be an opportune time to arrange for library or computer-class time. If students elect to create aWordPerfect Presentations multimedia slideshow, computer-skills classes focusing on the use of thesoftware package should occur prior to this lesson. If possible, prior arrangements with other subject areateachers, or block timetabling around this activity would be beneficial.
The presentations of the optical devices will be extended into the culminating activity periods.Two or three students will present prior to each of the periods allotted for the culminatingsubtask.
Adaptations
BLM 8.8.1 blm 8.8.1.cwk
convex lenses 1
disposable cameras 1
Notes to TeacherThe Research and Presentation Assignment on Optical Devices
Students should be able to quickly locate information on optical devices and use the knowledge they havegained about the properties of light to understand how these devices function in a system. The assignment isnot designed to extend beyond the allotted time.
Teacher Reflections
Written using the Ontario Curriculum Unit Planner 2.51 PLNR_01 March, 2001* Open Printed on Oct 26, 2001 at 10:48:07 AM Page C-33

Optics Subtask 9OPTICS - SEEING IS BELIEVING!
Energy and Control An Integrated Unit for Grade 8 mins240
Expectations8s65 – identify the properties of visible light through
experimentation;8s75 – formulate questions about and identify needs and
problems related to the properties and behaviour oflight (e.g., interactions between light and differentmaterials), and explore possible answers andsolutions (e.g., predict and demonstrate how variousliquids will refract a light beam and describe theangle of refraction);
8s76 – plan investigations for some of these answers andsolutions, identifying variables that need to be heldconstant to ensure a fair test and identifying criteriafor assessing solutions;
8s79 – communicate the procedures and results ofinvestigations for specific purposes and to specificaudiences, using media works, written notes anddescriptions, charts, graphs, drawings, and oralpresentations (e.g., prepare a brochure informingthe public of the risks of a specific type ofelectromagnetic radiation).
8s62 • demonstrate an understanding of the properties ofvisible light and the properties of other types ofelectromagnetic radiation, including infrared andultraviolet rays, X-rays, microwaves, and radiowaves;
8s63 • investigate the properties of visible light, includingthe effects of reflection and refraction, andrecognize how these properties are used in opticaldevices;
8s64 • describe ways in which different sources of visiblelight and the properties of light, both natural andartificial, are used by humans for different purposes.
DescriptionThe topic of optics contains many properties which can be demonstrated in ways that appear "amazing".Students will work in pairs or individually to create an "optical illusion" that incorporates the concepts studied inthe optics unit. Each illusion will be presented to the class members who will use their knowledge of optics andlight to explain how each illusion was created. The class will then present their illusions, as a show, to otherclasses.
GroupingsStudents Working In Pairs
Teaching / Learning StrategiesAdvance OrganizerDemonstrationOral ExplanationInquiry
AssessmentAssessment
Students will be assessed:- on their ability to explain the sciencebehind their own optical illusion and theillusions of their classmates- using the design rubric- using the presentation checklist
Assessment StrategiesExhibition/demonstrationPerformance TaskClassroom Presentation
Assessment Recording DevicesRubricChecklist
Teaching / Learning1. Ask the students to think about the experiments and activities on light that have been completed during theunit. Review the properties of light and optics using a concept web. See Notes to Teacher for suggestions.
2. Read the opening paragraph on BLM 8.9.1 with students. Emphasize that because illusionists andmagicians use science to create illusions, there is always an explanation for how they work.
3. Ask the students to think about the experiments and activities done throughout the optics unit and ask howthese demonstrations of the properties of light could be turned into an illusion. Brainstorm a list of possible"illusions" based on the activities already done. See Notes to Teacher for possible answers.
Written using the Ontario Curriculum Unit Planner 2.51 PLNR_01 March, 2001* Open Printed on Oct 26, 2001 at 10:48:07 AM Page C-34

Optics Subtask 9OPTICS - SEEING IS BELIEVING!
Energy and Control An Integrated Unit for Grade 8 mins240
Resources
4. Invite the students to design their own demonstration using one or more property of light and present it asan illusion. Students should work in pairs and should follow the S.P.I.C.E. Method of design as outlined at thebeginning of this document on BLM 8.uw.4. Blackline Master 8.9.1 (BLM 8.9.1) will be used as an organizerfor the illusion activity.
5. Read through the design rubric and presentation rubric with the students to ensure that the criteria for theactivity are clear.
6. Review the timelines for the project. The students will have approximately 4 in-class periods to research,design, test and practice their illusion. During the fifth class, students will present their illusions to theirclassmates. Following this, a presentation, in the form of a show, will be made to at least one other class.
Adaptations
BLM 8.9.1 blm 8.9.1.cwk
BLM 8.9.2 blm 8.9.2.cwk
BLM 8.9.3 blm 8.9.3.cwk
Written using the Ontario Curriculum Unit Planner 2.51 PLNR_01 March, 2001* Open Printed on Oct 26, 2001 at 10:48:07 AM Page C-35

Optics Subtask 9OPTICS - SEEING IS BELIEVING!
Energy and Control An Integrated Unit for Grade 8 mins240
Notes to Teacher1. A review of the properties of light might include:
a) Light travels in straight lines and its intensity decreases with distance from its source.b) Light reflects from a plane mirror according to the law of reflection.c) Light is refracted by transparent materials.d) Light is a form of energye) The visible light spectrum is made up of different coloursf) Visible light is only one part of the electromagnetic spectrum.
It may be necessary to remind students of the various activities in the optics unit that covered each property.
2. Samples of activities that could become an illusion would be:
- using mirrors to make an object appear / disappear- using phosphorescent paint to highlight an illusion- using light and shadow to make an object appear / disappear- bouncing light and /or images off mirrors etc.- home-made cameras, telescopes or other optical devices- backwards writing or mirror images- card tricks using mirrors- changing the colours of light by mixing light and/or pigments- using curved mirrors to reverse images, distort images
Students should be encouraged to come up with their own design for an illusion, based on one or moreproperties of light. If some students find this very difficult, building on one of the lessons from the Optics unit isrecommended.
Teacher Reflections
Written using the Ontario Curriculum Unit Planner 2.51 PLNR_01 March, 2001* Open Printed on Oct 26, 2001 at 10:48:07 AM Page C-36

Black Line Masters:
OpticsEnergy and Control
Appendices
Rubrics:
Resource List:
Unit Expectation List and Expectation Summary:
Written using the Ontario Curriculum Unit Planner 2.51 PLNR_01 March, 2001* Open Printed on Oct 26, 2001 at 10:49:04 AM

OpticsEnergy and Control
Resource List
An Integrated Unit for Grade 8
Page 1
Blackline Master / File
BLM 8.UW.1blm 8.uw.1.cwk
Unit
BLM 8.UW.2blm 8.uw.2.cwk
Unit
BLM 8.UW.3blm 8.uw.3.cwk
Unit
BLM 8.UW.4blm 8.uw.4.cwk
Unit
BLM 8.UW.5blm 8.uw.5.cwk
Unit
BLM 8.1.1blm 8.1.1.cwk
ST 1
BLM 8.2.1blm 8.2.1.cwk
ST 2
BLM 8.2.2blm 8.2.2.cwk
ST 2
BLM 8.3.1blm 8.3.1.cwk
ST 3
BLM 8.3.2blm 8.3.2.cwk
ST 3
BLM 8.3.3blm 8.3.3.cwk
ST 3
BLM 8.4.1blm 8.4.1.cwk
ST 4
BLM 8.5.1blm 8.5.1.cwk
ST 5
BLM 8.5.2blm 8.5.2.cwk
ST 5
BLM 8.5.3blm 8.5.3.cwk
ST 5
BLM 8.5.4blm 8.5.4.cwk
ST 5
BLM 8.5.5blm 8.5.5.cwk
ST 5
BLM 8.5.6blm 8.5.6.cwk
ST 5
BLM 8.5.7blm 8.5.7.cwk
ST 5
BLM 8.6.1blm 8.6.1.cwk
ST 6
BLM 8.6.2blm 8.6.2.cwk
ST 6
BLM 8.6.3blm 8.6.3.cwk
ST 6
BLM 8.6.4blm 8.6.4.cwk
ST 6
BLM 8.6.5blm 8.6.5.cwk
ST 6
BLM 8.6.6blm 8.6.6.cwk
ST 6
BLM 8.6.7blm 8.6.7.cwk
ST 6
BLM 8.7.1blm 8.7.1.cwk
ST 7
BLM 8.7.2blm 8.7.2.cwk
ST 7
BLM 8.7.3blm 8.7.3.cwk
ST 7
BLM 8.7.4blm 8.7.4.cwk
ST 7
BLM 8.7.5blm 8.7.5.cwk
ST 7
BLM 8.7.6blm 8.7.6.cwk
ST 7
BLM 8.8.1blm 8.8.1.cwk
ST 8
BLM 8.9.1blm 8.9.1.cwk
ST 9
BLM 8.9.2blm 8.9.2.cwk
ST 9
BLM 8.9.3blm 8.9.3.cwk
ST 9
Written using the Ontario Curriculum Unit Planner 2.51 PLNR_01 March, 2001* Open Printed on Oct 26, 2001 at 10:49:07 AM Page D-1

OpticsEnergy and Control
Resource List
An Integrated Unit for Grade 8
Page 2
Media
an Optics video ST 1
Material
10 gauge insulated copper wire ST 2
a lamp (without shade) ST 2
Batteries (9V or D cell) ST 2
chart paper ST 4
chart paper ST 5
coffee filters3per person
ST 7
construction paper1per person
ST 7
flashlight ST 2
flashlight bulb ST 2
flashlight bulb holder ST 2
flashlights ST 4
glue1per person
ST 7
ray box ST 2
white paper1per person
ST 7
Equipment / Manipulative
a glass plane ST 6
a rectangular prism ST 6
beaker or water container ST 6
colour filters (cellophane & tissue paper willwork)
1per group
ST 7
convex lenses1per group
ST 8
cylindrical concave mirrorsper group
ST 5
cylindrical convex mirrorsper group
ST 5
disposable cameras1per group
ST 8
eye dropper ST 6
light source (flashlight or ray box)1per group
ST 7
magnetized cards (light filters) for ray boxesper group
ST 5
newspaper ST 6
optical bench (optional)per class
ST 6
plane mirrorsper group
ST 5
projection screen or white wall1per class
ST 7
protractorsper person
ST 5
ray boxesper group
ST 5
ray boxesper group
ST 6
rulerper person
ST 6
rulersper person
ST 5
simple and double concave lensesper group
ST 6
simple and double convex lensesper group
ST 6
spherical concave mirrorsper group
ST 5
Written using the Ontario Curriculum Unit Planner 2.51 PLNR_01 March, 2001* Open Printed on Oct 26, 2001 at 10:49:07 AM Page D-2

OpticsEnergy and Control
Resource List
An Integrated Unit for Grade 8
Page 3
spherical convex mirrorsper group
ST 5
stainless steel serving spoonsper group
ST 5
water soluble markerspackageper group
ST 7
Written using the Ontario Curriculum Unit Planner 2.51 PLNR_01 March, 2001* Open Printed on Oct 26, 2001 at 10:49:07 AM Page D-3

Classifying Sources of Light
Classify: to group based upon similarities Characteristics: a characteristic is a typical or noticeable quality of someone or something Criteria: a standard, rule, or test on which a judgment or decision can be based.
Look at the following 15 sources of light listed on the bottom of this page. Your group will classify the items based upon certain characteristics or criteria.
1. Look at all of the items on the list.
2. Discuss ways to classify the items. You must use a minimum of two groups or categories.
3. Choose the categories you wish to use. Create the required number of columns on chart paper. Put a heading on each column to identify the categories. Copy each item on the list into the correct column.
EXAMPLE:
How to Classify List of items: water, rocks, a table, juice, a necklacePossible groups/categories SOLIDS: rocks, a table, a necklaceLIQUIDS: water, juice
LIST OF LIGHT SOURCES
a light bulba campfirethe suna forest firea flashlightstarsa glow in the dark stickerheadlights on a cara fireflythe northern lightsfireworksa lit candlepropane barbeque flamesa glow in the dark tube necklacea fluorescent light tube
BLM 8.1.1

The Electromagnetic Spectrum
Lower < Frequency > Higher
Radio Waves Infrared Rays
Visible Light
Ultraviolet Rays
X – Rays Gamma Rays
Cosmic Rays
Longer < Wave Length > Shorter
BLM 8.2.1
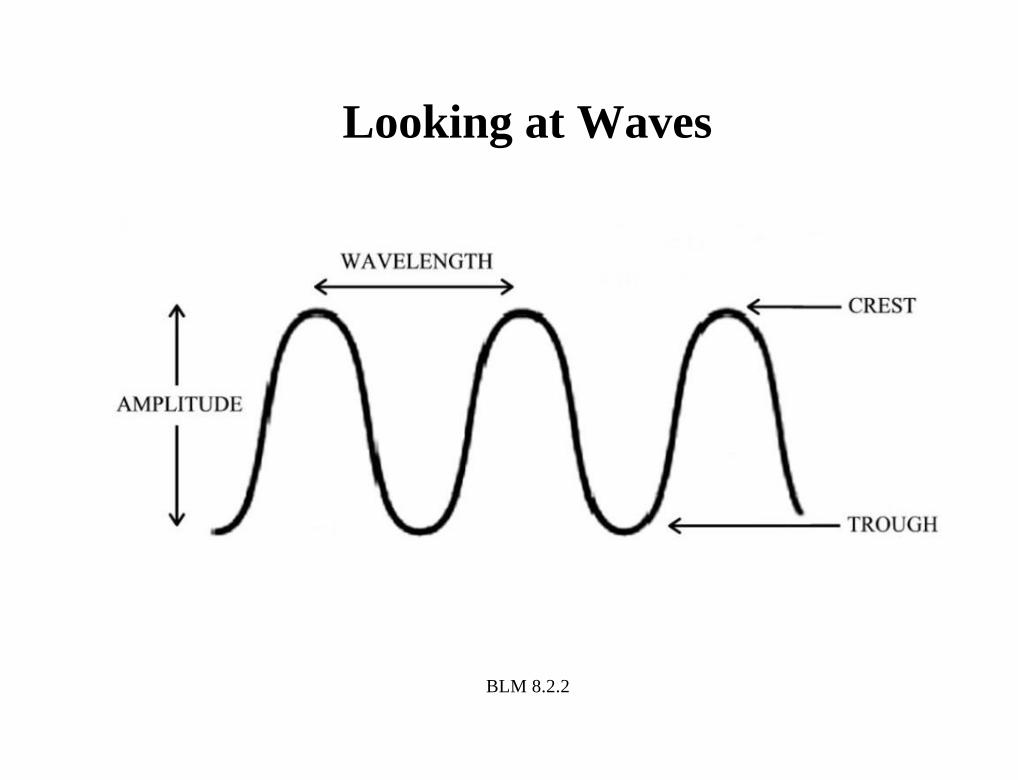
Looking at Waves
BLM 8.2.2

Visible Sources of Light
a campfire
stars
a flashlight
headlights on a car
a television screen
a fluorescent light tube
a glow in the dark sticker - natural
a light bulb
a firefly
fireworks
the sun
a lit candle
a forest fire
propane barbeque flames
a glow in the dark tube necklace
1. Sort these objects into various groups (categories) considering HOW these objects produce light.
2. Name the groups (categories) by giving each a title that best describes the grouping or the reason the items belong to the group.
3. Make a rough draft on the bottom or back of this sheet.
4. Copy a final draft onto chart paper for presentation.
blm 8.3.1
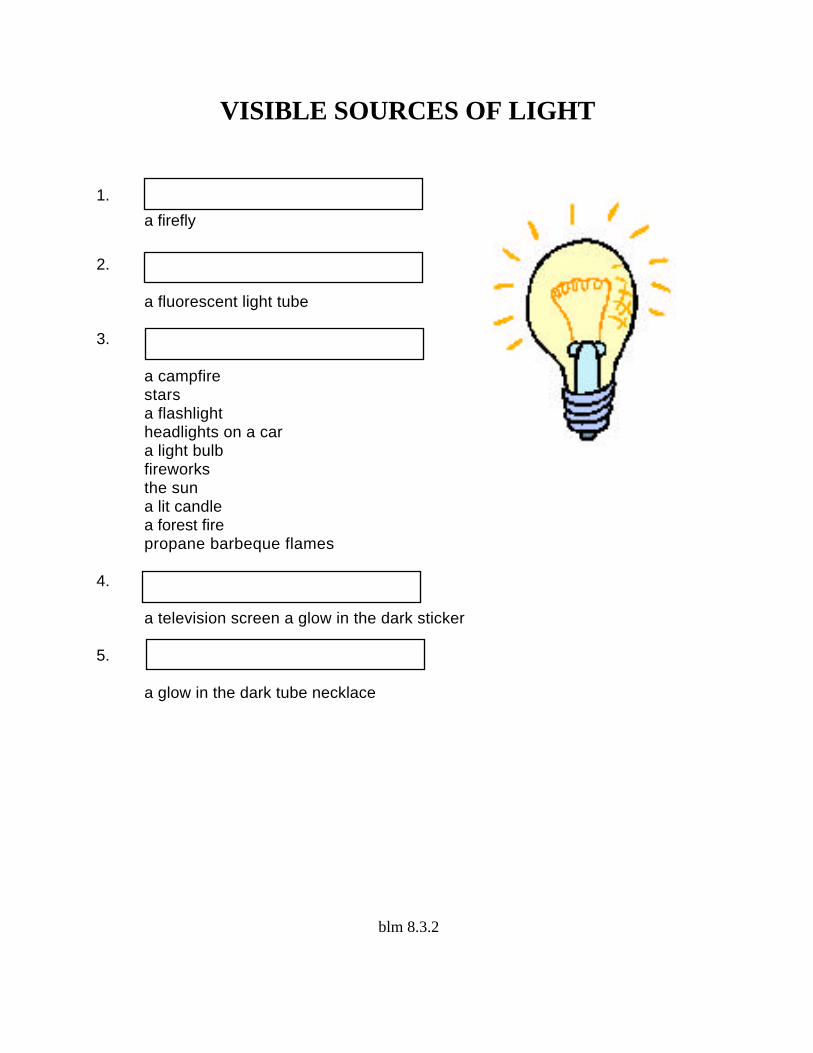
VISIBLE SOURCES OF LIGHT
1.
a firefly
2.
a fluorescent light tube
3.
a campfire stars a flashlight headlights on a car a light bulb fireworks the sun a lit candle a forest fire propane barbeque flames
4.
a television screen a glow in the dark sticker
5.
a glow in the dark tube necklace
blm 8.3.2

IncandescenceAny object that emits visible light because it is heated to a high temperature is incandescent. Examples of this are candles and any form of fire. Even objects that we don’t normally view as a light source are incandescent if they produce light. A stove element or the element inside of a toaster are good examples of this.
BioluminescenceFireflies sparking on a summer's evening. Jellyfish glowing in night waters. These are examples of bioluminescence - light emitted by living organisms. Unlike incandescent light, which is caused by heat, the light produced by luminous animals and plants results from a biochemical reaction to oxygen.
ChemiluninescenceEmission of light as a result of a chemical reaction at environmental temperatures.
FluorescenceEmission of light caused when ultraviolet light is absorbed by particles which emit light. The most common example of fluorescence is a fluorescent light tube. An electric current causes mercury vapor inside a light tube to produce ultraviolet radiation which is absorbed by a thin layer of phosphor. When phosphor absorbs ultraviolet radiation, it glows; that is it produces light.
PhosphorescenceSimilar to fluorescence but in this case, phosphorescent materials absorb ultraviolet radiation or visible light and are able to emit light (glow) for a longer period of time after the light source which it is absorbing energy from, is removed.
BLM 8.3.3

Shining Light at Various Objects
Object Result
BLM 8.4.1
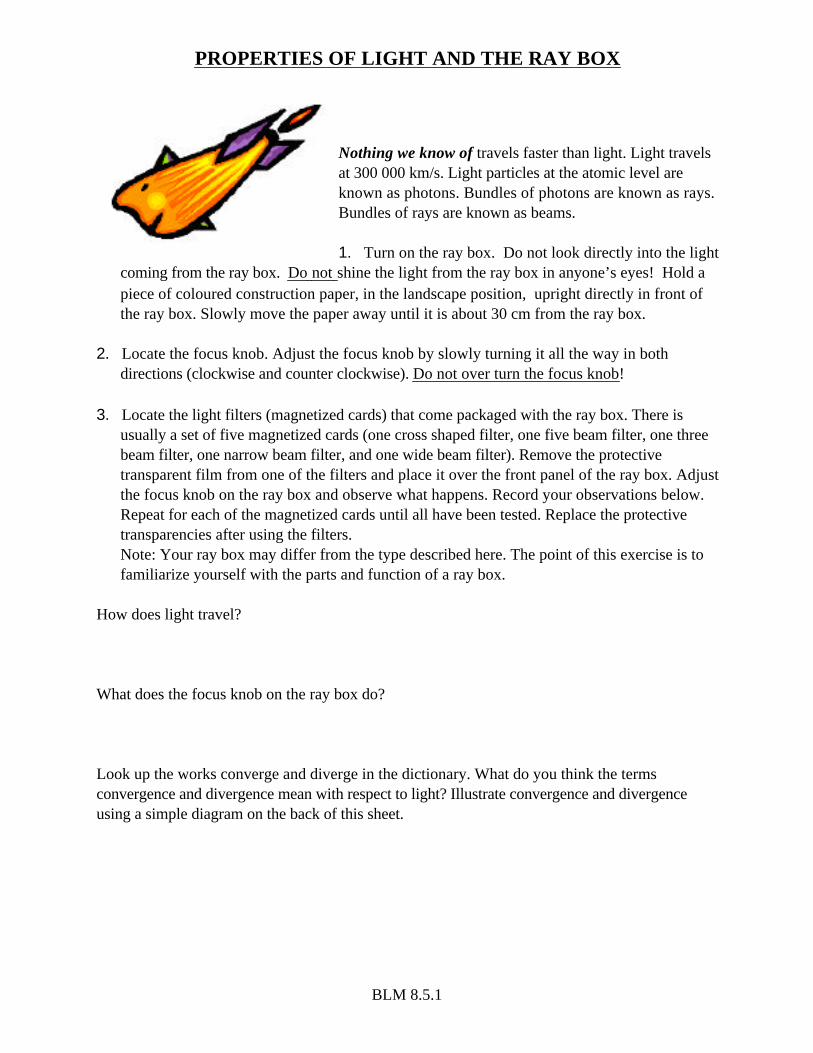
PROPERTIES OF LIGHT AND THE RAY BOX
Nothing we know of travels faster than light. Light travels at 300 000 km/s. Light particles at the atomic level are known as photons. Bundles of photons are known as rays. Bundles of rays are known as beams.
1. Turn on the ray box. Do not look directly into the light coming from the ray box. Do not shine the light from the ray box in anyone’s eyes! Hold a piece of coloured construction paper, in the landscape position, upright directly in front of the ray box. Slowly move the paper away until it is about 30 cm from the ray box.
2. Locate the focus knob. Adjust the focus knob by slowly turning it all the way in both
directions (clockwise and counter clockwise). Do not over turn the focus knob!
3. Locate the light filters (magnetized cards) that come packaged with the ray box. There is usually a set of five magnetized cards (one cross shaped filter, one five beam filter, one three beam filter, one narrow beam filter, and one wide beam filter). Remove the protective transparent film from one of the filters and place it over the front panel of the ray box. Adjust the focus knob on the ray box and observe what happens. Record your observations below. Repeat for each of the magnetized cards until all have been tested. Replace the protective transparencies after using the filters.Note: Your ray box may differ from the type described here. The point of this exercise is to familiarize yourself with the parts and function of a ray box.
How does light travel?
What does the focus knob on the ray box do?
Look up the works converge and diverge in the dictionary. What do you think the terms convergence and divergence mean with respect to light? Illustrate convergence and divergence using a simple diagram on the back of this sheet.
BLM 8.5.1

THE POOL TABLE
BLM 8.5.2

REFLECTION- Teacher Information
Look at the figure below. Notice the use of a single arrow to show the path of the light beam before and after the reflection. The point where normal intersects the reflective surface is called the point of incidence. The path of the light beam from the light source to the point of incidence is called the incident ray. The path of the reflected light beam from the point of incidence is called the reflected ray. The angle between the incident ray and normal is called the angle of incidence. The angle between the reflected ray and normal is called the angle of reflection.
BLM 8.5.3

THE LAW OF REFLECTION
Use the INSITE method to develop and test a hypothesis that compares the angle of incidence and the angle of reflection.
I: Identify the problemIs there a difference between the angle of incidence and the angle of reflection?
N: Narrow the problemWhat type of materials will be needed? What are the variables in the problem? What factors should be kept constant to ensure a fair test? What is the angle of incidence? What is the angle of reflection? How do we measure the angle of incidence? How do we measure the angle of reflection? How are the angle of incidence and the angle of reflection the same? How are the angle of incidence and the angle of reflection different?
S: State the hypothesisIn your opinion, what is the the answer (solution) to the problem. Remember this is a scientific guess.
I hypothesize that:
I: Investigate and gather informationOn BLM 8.5.3, read the information about the angle of incidence and the angle of reflection and examine figure 3.Materials: a ray box, a plane mirror, a pencil, a ruler, and a protractor.Variables: angle of light beam.Constants: position of mirror, intensity of light beam, normal, and point of incidence.Procedure (plan of investigation):. Set up the ray box to emit a single focussed beam of light (use the narrow light filter).. Using Figure 1 on BLM 8.5.5 align the ray box as instructed, so it emits a light beam
that hits the point of incidence. Using a ruler draw the incident ray and the reflected ray. Using a protractor, measure and record the angle of incidence and the angle of reflection.
. Using Figure 2 on BLM 8.5.5 align the ray box as instructed, so it emits a light beam that hits the point of incidence. Using a ruler draw the incident ray and the reflected ray. Using a protractor, measure and record the angle of incidence and the angle of reflection.
. Using Figure 3 on BLM 8.5.5 align the ray box as instructed, so it emits a light beam that hits the point of incidence. Using a ruler draw the incident ray and the reflected ray. Using a protractor, measure and record the angle of incidence and the angle of reflection.
BLM 8.5.4

. Using Figure 4 on BLM 8.5.5 draw, without the aid of the ray box, an incident ray and a reflected ray so the angle of incidence equals 62 degrees.
T: Test the hypothesisFollow the procedure above to test your hypothesis.
E: Examine the results and write a conclusionExamine the results of your investigation. Write a conclusion that outlines what you learned when you tested your hypothesis. In your conclusion write a statement about the law of reflection.
BLM 8.5.4

RAY DIAGRAMS
Figure 1
Figure 2Figure 3
BLM 8.5.5
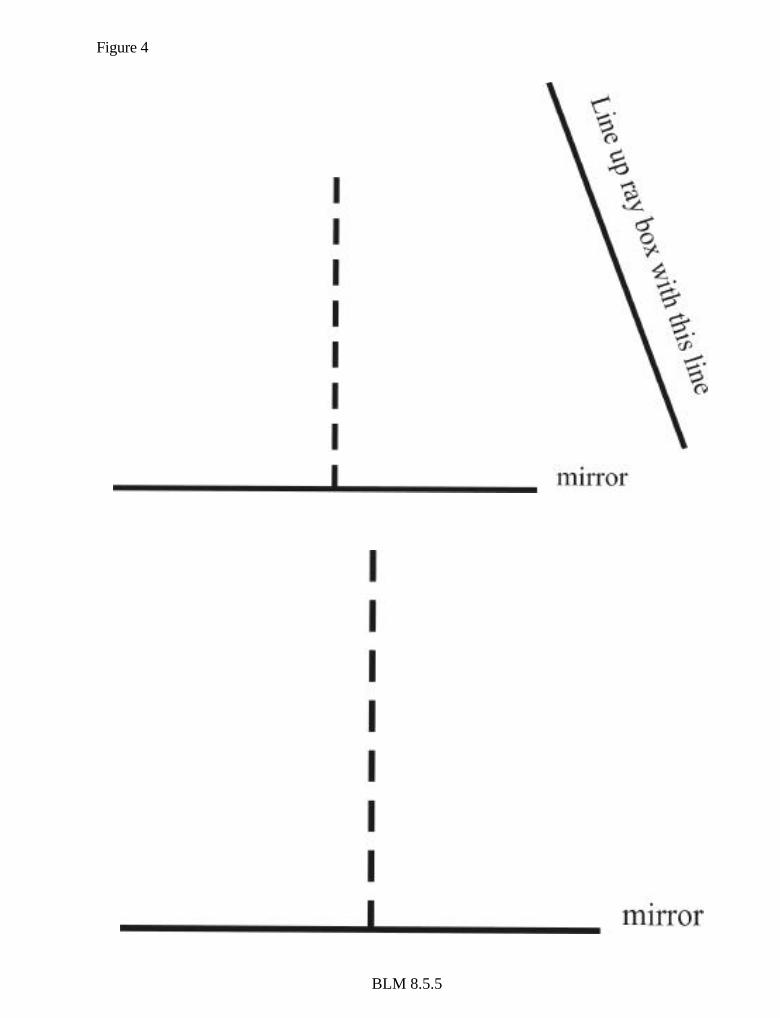
Figure 4
BLM 8.5.5

ANGLES OF REFLECTION
Use the I.N.S.I.T.E. method to examine and explain the differences in the ways that light reflects off a flat un-creased piece of aluminum foil and a piece of aluminum foil that has been crinkled.
Identify the problem
Narrow the problem
State the hypothesis
Investigate and gather informationStudy the appearance of frosted glass or stucco ceilings. Research questions: What is diffuse reflection? What is indirect lighting?
Materials:- a light source (ray box, flash light, etc.)- two sheets (pieces) of aluminum foil
Variables:
Constants:
Procedure:
BLM 8.5.6

. Crumple one sheet of the aluminum foil.
. Un-crumple the sheet of aluminum foil and stretch it so it is flat. Do not smooth out the crinkles.
. Keep the other sheet of aluminum foil smooth and flat. Do not crinkle or crease the second sheet in any way.
. Using the light shine a beam of light on the smooth sheet of aluminum foil. Move the light around so it reflects off the different areas. Make observations about the quality of the reflection and the angle of reflection of the light beam.
. Next, shine a beam of light on the crinkled sheet of aluminum foil. Move the light around so it reflects off different areas of the sheet. Make observations about the quality of the reflection and the angle of reflection of the light beam.
Test the hypothesisFollow the procedure above.
Examine the results and write a conclusionExamine the results of your investigation. Write a conclusion that outlines what you learned when you tested your hypothesis. In your conclusion make a generalization about the reflection of light off smooth, flat surfaces and rough, uneven surfaces.
BLM 8.5.6

PROPERTIES OF CURVED MIRRORS
OBJECT IMAGE IN CONCAVE MIRROR IMAGE IN CONVEX MIRROR
Rectangular Prism
Size as compared to real object (bigger, smaller or the same)
Orientation compared to real object (upright or inverted)
Size as compared to real object (bigger, smaller or the same)
Orientation compared to real object (upright or inverted)
Object close to mirror
Object far from mirror
Name two devices that use concave mirrors and two that use convex mirrors . Describe how the mirrors function to achieve the desired affect in each device.
Concave Mirrors Convex Mirrors
Use the word FUN below and reflect its image using:
-a plane mirror-a 45 degree angled plane mirror-a concave mirror close to image-a concave mirror far from image-a convex mirror close to image-a convex mirror far from image
BLM 8.5.7

Working with Lenses
Record what happens to images when viewed through each of the lenses shown below.
Simple Convex
Simple Concave
Double Convex
Double Concave
Did you try any lenses in combination? Identify the combination you used and describe your observations.
BLM 8.6.1

Refraction: The “Bending” of Light
LensDouble Convex Lens"Image Changed"
LensRectangular Prism"Image Stays the Same"
BLM 8.6.2

BLM 8.6.2

Refraction of Light Through a Lens
LENS
simple convex lens
simple convex lens
double convex lens
BLM 8.6.3
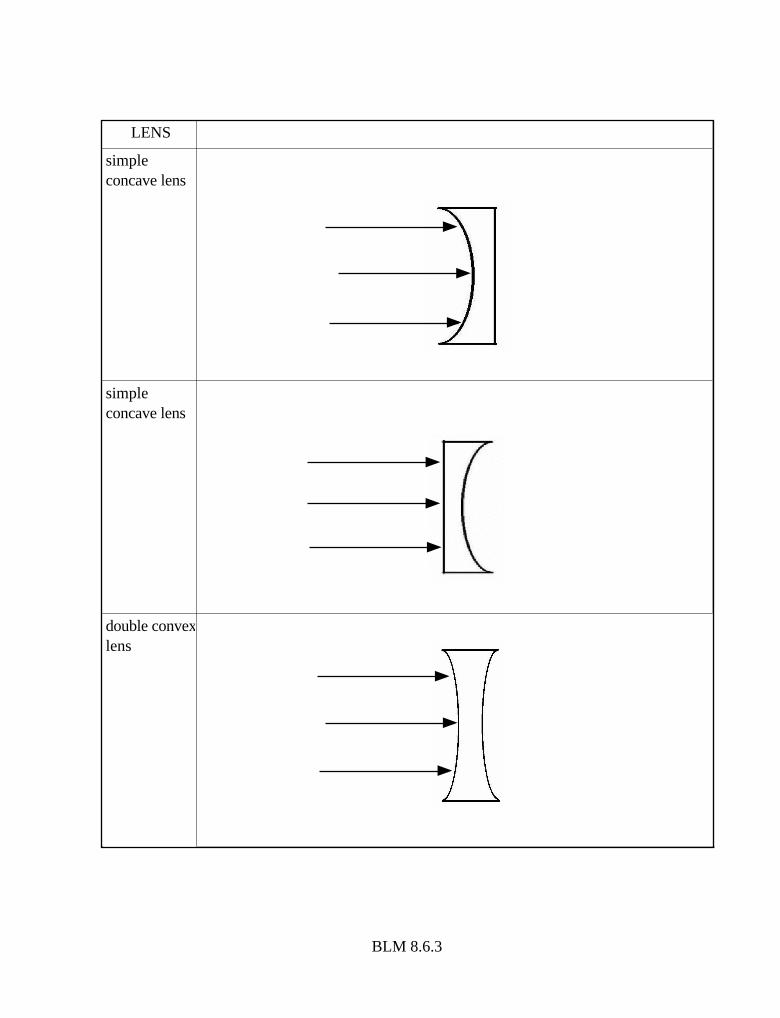
LENS
simple concave lens
simple concave lens
double convex lens
BLM 8.6.3

REFRACTION
Use the INSITE method as laid out below to develop and test a hypothesis that examines how the shape of transparent objects affects the way light travels.
I: Identify the problemHow does the shape of a transparent medium, such as a lens, affect the way light is refracted?
N: Narrow the problemWhat type of materials will be needed? What are the variables in the problem? What factors should be kept constant to ensure a fair test? What is the angle of incidence? What is the angle of emergence? When are the angle of incidence and the angle of emergence the same? How can we describe the way in which the rays of light emerge from the transparent media?
S: State the hypothesisMake a scientific guess as to what you believe is a solution to the problem above.
I hypothesize that:
I: Investigate and gather informationReview the findings from activities in BLM 8.6.1 and BLM 8.6.2.Materials: a ray box, a simple convex lens, a simple concave lens, a double convex lens, a double concave lens, a rectangular prismVariables: shape of the lensesConstants: position of lenses, position of the ray box, intensity of light beam, distance from the ray box to the lenses, Procedure (plan of investigation):. Set up the ray box to emit three focused beams of light (use the narrow light filter).. Align the ray box to be perpendicular to the axis of the rectangular prism. Emit three
light beams, the centre beam encountering the prism as close to the centre of the prism as possible so that all light beams pass straight through the prism without any refraction occurring. This setup position will now be the constant for all of the testing of the lenses in the experiment. The lenses will replace the rectangular prism, but will remain perpendicular to the ray box, and will have the centre beam encountering the centre of the lens.
. Look at the diagrams on BLM 8.6.3. Align the ray box so the three light beams hit each prism as illustrated. Observe what happens to the path of the light rays as they pass through and “emerge” from each prism. Using a ruler, draw the three emergent
BLM 8.6.4

rays on each diagram to illustrate your observations.
T: Test the hypothesis and record observationsFollow the procedure above to test your hypothesis. Make a chart that summarizes your observations.
E: Examine the results and write a conclusionExamine the results of your test. Write a conclusion that outlines what you learned in the investigation and testing of your hypothesis. In your conclusion write a statement which uses the terms converge (to come together) and diverge (to move apart).
BLM 8.6.4

How Will Light Refract?
LENS
simple convex lens
simple convex lens
double convex lens
BLM 8.6.5
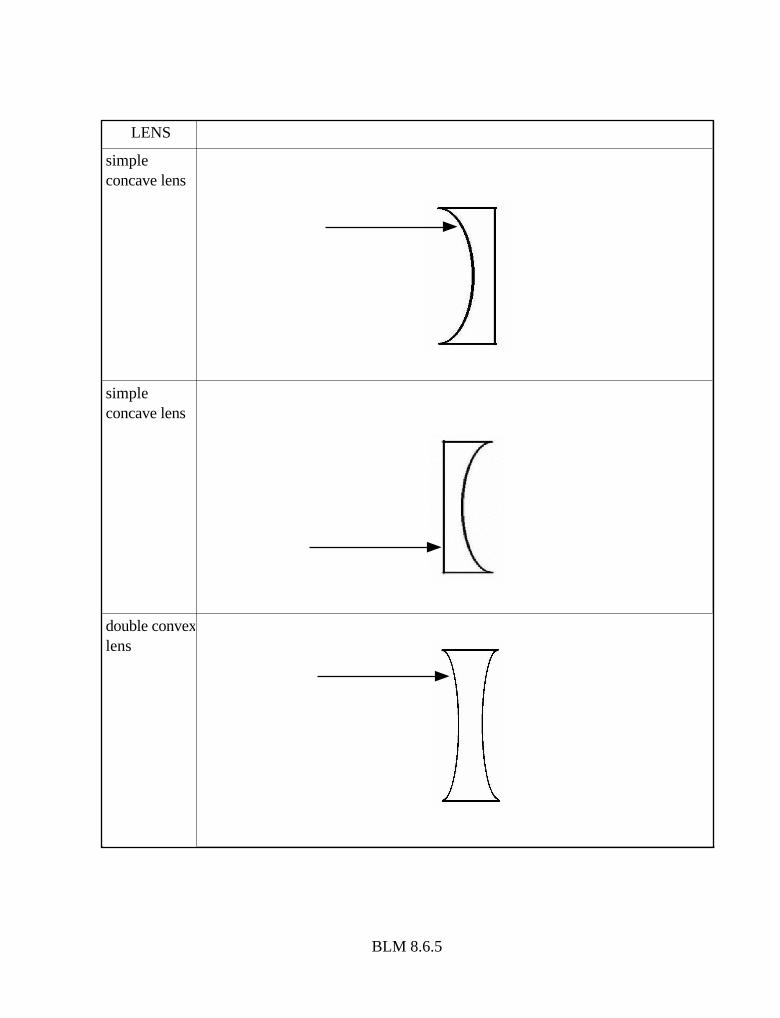
LENS
simple concave lens
simple concave lens
double convex lens
BLM 8.6.5

The Drop of Water Challenge!
Materials:- eye dropper- beaker with water- newspaper
Place a drop of water on a small letter on a piece of newspaper. What do you observe?
What property of light causes this to occur? _________________________________
In the space below, draw an labeled diagram which explains this phenomenon.
BLM 8.6.6

The Drop of Water Challenge! Teacher Notes
Materials:- eye dropper- beaker with water- newspaper
Place a drop of water on a small letter on a piece of newspaper. What do you observe?
The letter appears to be larger than the other letters surrounding it. It is “magnified”.
What property of light causes this to occur? Refraction
In the space below, draw a labeled diagram which explains this phenomenon.
BLM 8.6.7
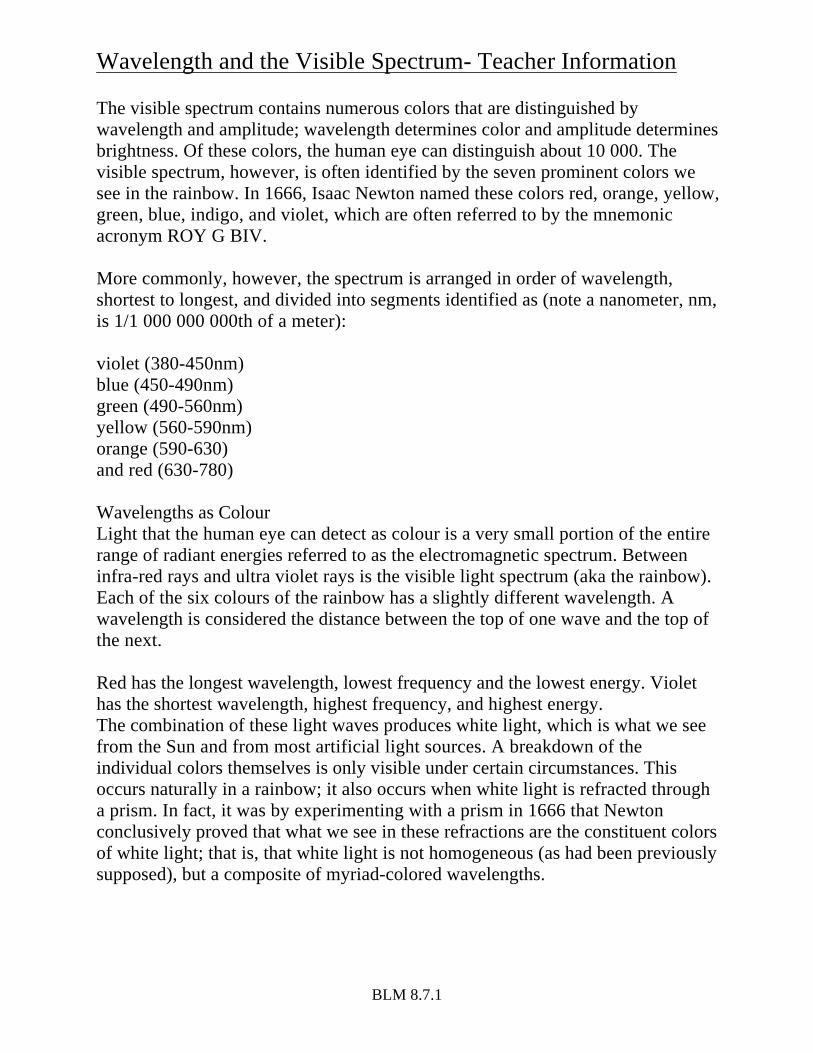
Wavelength and the Visible Spectrum- Teacher Information
The visible spectrum contains numerous colors that are distinguished by wavelength and amplitude; wavelength determines color and amplitude determines brightness. Of these colors, the human eye can distinguish about 10 000. The visible spectrum, however, is often identified by the seven prominent colors we see in the rainbow. In 1666, Isaac Newton named these colors red, orange, yellow, green, blue, indigo, and violet, which are often referred to by the mnemonic acronym ROY G BIV.
More commonly, however, the spectrum is arranged in order of wavelength, shortest to longest, and divided into segments identified as (note a nanometer, nm, is 1/1 000 000 000th of a meter):
violet (380-450nm)blue (450-490nm)green (490-560nm)yellow (560-590nm)orange (590-630)and red (630-780)
Wavelengths as ColourLight that the human eye can detect as colour is a very small portion of the entire range of radiant energies referred to as the electromagnetic spectrum. Between infra-red rays and ultra violet rays is the visible light spectrum (aka the rainbow). Each of the six colours of the rainbow has a slightly different wavelength. A wavelength is considered the distance between the top of one wave and the top of the next.
Red has the longest wavelength, lowest frequency and the lowest energy. Violet has the shortest wavelength, highest frequency, and highest energy. The combination of these light waves produces white light, which is what we see from the Sun and from most artificial light sources. A breakdown of the individual colors themselves is only visible under certain circumstances. This occurs naturally in a rainbow; it also occurs when white light is refracted through a prism. In fact, it was by experimenting with a prism in 1666 that Newton conclusively proved that what we see in these refractions are the constituent colors of white light; that is, that white light is not homogeneous (as had been previously supposed), but a composite of myriad-colored wavelengths.
BLM 8.7.1

Perceiving Light
BLM 8.7.2

Combining Light
BLM 8.7.3

Combining Light: Teacher Version
BLM 8.7.4

Additive Colour Theory Investigation
Name:_____________________________________________
Predictions and Observations
First Colour Second Colour Prediction (use pencil crayon) Result (use pencil crayon)
red green
blue green
red blue
yellow cyan
cyan green
magenta yellow
green cyan
blue yellow
Procedure:1. Working in groups set up your investigation area.2. Cover your light sources with colour filters.3. Experiment with your materials until you get the brightest possible light on the white screen. 4. Shine all three colours on your screen. Overlap all three beams.5. Try different colour combinations of lights.6. Record your observations on the chart above.
Conclusions (on a separate sheet of paper)1. Make a Venn diagram below showing what each combination of colours will produce.2. How does your diagram help to explain why sunlight appears white?
BLM 8.7.5

Additive Colour Theory Investigation
Name: TEACHER VERSION
Predictions and Observations
First Colour Second Colour Prediction (use pencil crayon) Result (use pencil crayon)
red green varies yellow
blue green varies cyan
red blue varies magenta
yellow cyan varies white
cyan green varies white
magenta yellow varies white
green cyan varies white
blue yellow varies white
Procedure1. Working in groups set up your investigation area.2. Cover your light sources with colour filters.3. Experiment with your materials until you get the brightest possible light on the white screen. 4. Shine all three colours on your screen. Overlap all three beams.5. Try different colour combinations of lights.6. Record your observations on the chart above.
Conclusions1. Make a Venn diagram below showing what each combination of colours will produce.2. How does your diagram help to explain why sunlight appears white?
Answers to the question may vary but should include some of the following information:
Sunlight is white because it is a combination of the three primary light colours, red, blue and green.
BLM 8.7.6

Optical Devices Research Assignment
We know that light travels in straight lines from a source. We have learned that it can be transmitted, reflected, refracted or absorbed when it encounters various media. We have also studied white light and spectral colours. Based upon the study of light, optical devices have been developed which make use of the properties of light. These devices are used to perform or enhance functions that the eye is not capable of performing.
Examples of Optical Devices:
Your assignment is to research one of the optical devices listed above (or choose one of your own in consultation with your teacher), and create a presentation which will include the following elements.
Required Elements:
1. A cross section diagram of the optical device with all parts labeled 2. A diagram which reveals how the optical device functions as a system with light. 3. A description of how the device functions as a system.
The presentation of your research to the class will include the following:
1. A 5 to 10 minute oral presentation of your material 2. Handout notes for all students of no more than 2 photocopied sheets (your teacher will photocopy a single double sided page for you) 3. A visual aid which could be: - a multimedia presentations file - prepared overhead transparencies - mounted diagrams and descriptions on Bristol board
BLM 8.8.1

STUDENT ACTIVITY SHEET FOR " OPTICS - SEEING IS BELIEVING"
People have been fascinated by the study of optics for many years. Magicians and illusionists have used that fascination and their understanding of light and the properties of light to create amazing illusions. Whether it is making whole buildings "disappear" or pulling a rabbit out of a hat, illusionists have relied on mirrors, light, colour and the human eye to entertain.
Your task is to design an illusion which uses one or more property of light. The illusion will be presented to your classmates who will try to explain how the illusion worked. You will also present the illusion as part of a traveling show to the students in other grades.
Each team will be assessed on:
1. The criteria in the Presentation Rubric2. The criteria in the Design Rubric3. The completion of the organizer
Use the following template to create the "Design Organizer" elements on separate sheets of paper.
Design Organizer
Student Name:Partner's Name:Date Started:Presentation Date:
Challenge: To design and perform an illusion incorporating one or more properties of light.
A. Possible Ideas (list at least 3)
Illusion:Property being Used:Pros / Cons:
B. Description of Illusion Chosen (one to two paragraphs)C. Materials Needed (a complete list of materials)D. Work Plan (extensive notes and labeled diagrams)

CRITERIA LEVEL 1 LEVEL 2 LEVEL 3 LEVEL 4
Identifying the Problems Related to the Task
Planning
Following a Plan
Communicating
-Identifies and describes the design challenge with limited clarity
- Explores a few possible solutions- Demonstrates limited understanding of the task
-Outlines limited steps to complete the plan
-Outlines limited steps to complete the plan
-Selects a few appropriate materials and equipment for the illusion-Tests the design and makes minimal modifications for improvement
-Records limited correct, complete data
- Uses limited appropriate science and technology vocabulary
-Identifies and describes the design challenge with partial explanations
- Explores some possible solutions- Demonstrates limited understanding of the task
-Outlines some steps to complete the plan
-Outlines some steps to complete the plan
-Selects some appropriate materials and equipment for the illusion-Tests the design and makes some modifications for improvement
-Records some correct, complete data
- Uses some appropriate science and technology vocabulary
-Identifies and describes the design challenge with considerable explanations
- Explores considerable possible solutions- Demonstrates general understanding of the task
-Outlines the steps to complete the plan in a detailed manner
-Outlines the steps to complete the plan in a detailed manner
-Selects most of the appropriate materials and equipment for the illusion-Tests the design and makes several modifications for improvement
-Records considerable correct, complete data
- Uses considerable appropriate science and technology vocabulary
-Identifies and describes the design challenge using complete and precise explanations- Thoroughly explores all or almost all possible solutions- Demonstrates a thorough understanding of the task
-Outlines the steps to complete the plan in a complex and thorough manner
-Outlines the steps to complete the plan in a complex and thorough manner-Selects all or almost all of the appropriate materials and equipment for the illusion-Tests the design and makes extensive modifications for improvement
-Records with great detail, all or almost all data in a clear and organized manner- Uses appropriate science and technology vocabulary extensively
Design Rubric for “Seeing is Believing”
BLM 8.9.2

PRESENTATION CHECKLIST FOR “SEEING IS BELIEVING”
Science and Technology
Criteria Limited Somewhat Usually Always
Student demonstrates and understands the property of light being demonstrated
Materials, etc. are used appropriately and with skill
Language Arts
Criteria Limited Somewhat Usually Always
Communicates to audience clearly and logically
Uses appropriate tone, volume and pace when presenting illusion
Performance has been planned and participants know their roles
BLM 8.9.3

I.N.S.I.T.E. Method
Throughout this unit students will be involved in inquiry based learning and investigations. The INSITE method, a problem solving model based on the principles of scientific inquiry, has been developed to help students conduct these investigations.
Identify the problemNarrow the problemState the hypothesisInvestigate and gather informationTest your hypothesis and record observationsExamine the results and write (communicate) conclusions
Identify the problemThe first step is for the students to identify the problem they will investigate or need to resolve.
Narrow the problemThe second step is to narrow the problem. At this stage the students will state the various questions (what, when, where, how, why, etc.) related to the problem.
State the hypothesisThe third step is to state the hypothesis. In this statement the students will make a scientific guess as to what they believe will be a solution to the problem.
Investigate and gather informationThe fourth step is for the students to conduct a scientific investigation related to the hypothesis. Students will need to conduct research and gather information related to the problem and the questions they generated in the second step. Once the students have enough background they will create a plan of investigation to test their hypothesis. The students will need to consider all the possible variables and constants in order to carry out a fair test. Plans should include a list of materials they will need.
Test the hypothesis and record observationsThe fifth step is for the students to follow their plan and carry out a fair test to confirm the validity of their hypothesis. Students will record their observations as they test their hypothesis. Students should be given opportunities to use a variety of recording devices such as charts, graphs, learning logs, or science journals.
Examine the results and write (communicate) conclusionsThe sixth step is for the students to examine the results of their test and then write a conclusion (communicate a response) that outlines what they learned in the investigation and testing of their hypothesis. It is important that students examine their results and whether or not their hypothesis was valid before writing their conclusion. If their hypothesis was not valid the students may need to either develop a new hypothesis or create a new plan to test their hypothesis in order to gain different results. Students should examine what worked and why, what needs further research, and what needs further investigation. If their hypothesis was valid the students should state the solution to the problem in their conclusion and outline why it was a solution.
BLM 8.uw.1

I.N.S.I.T.E. Method
I = Identify the problem
N = Narrow the problem
S = State the hypothesis
I = Investigate and gather information
T = Test the hypothesis and record observations
E = Examine the results and write (communicate) conclusions
BLM 8.uw.2
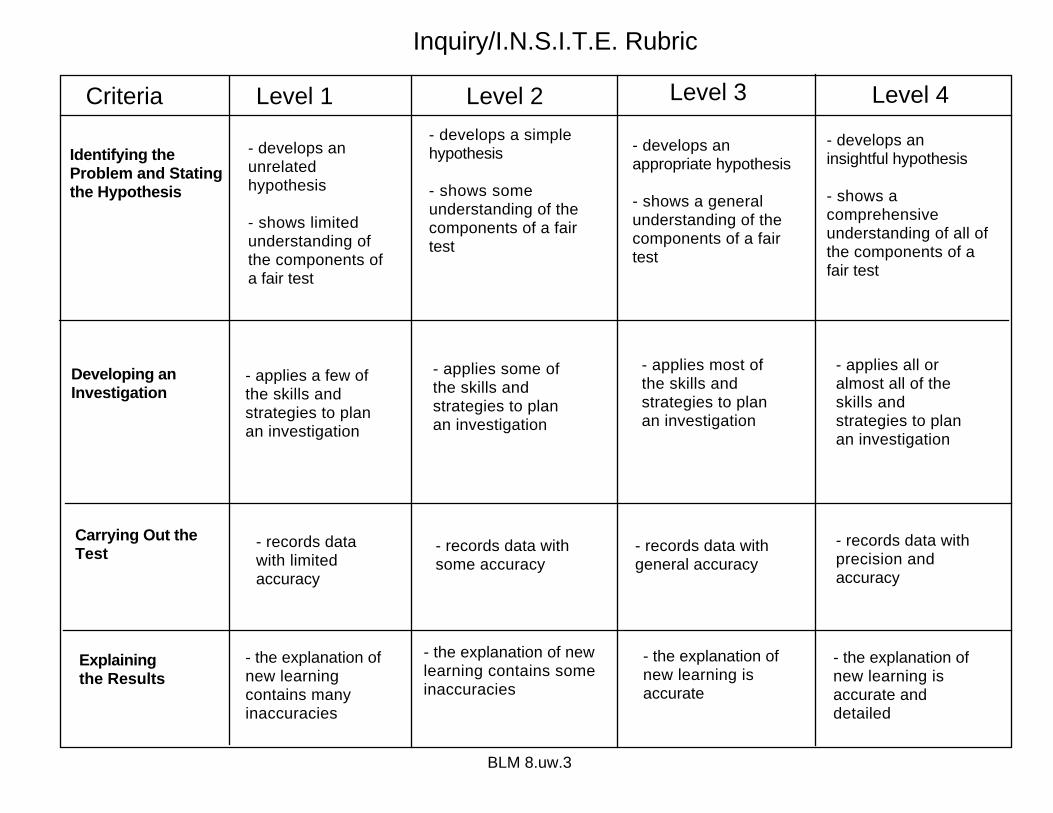
Inquiry/I.N.S.I.T.E. Rubric
Criteria Level 1 Level 2 Level 3 Level 4
Identifying the Problem and Stating the Hypothesis
Developing an Investigation
Carrying Out the Test
Explaining the Results
- develops an unrelated hypothesis
- shows limited understanding of the components of a fair test
- applies a few of the skills and strategies to plan an investigation
- records data with limited accuracy
- the explanation of new learning contains many inaccuracies
- develops a simple hypothesis
- shows some understanding of the components of a fair test
- records data with some accuracy
- the explanation of new learning contains some inaccuracies
- records data with general accuracy
- the explanation of new learning is accurate
- records data with precision and accuracy
- the explanation of new learning is accurate and detailed
- applies some of the skills and strategies to plan an investigation
- develops an appropriate hypothesis
- shows a general understanding of the components of a fair test
- applies most of the skills and strategies to plan an investigation
- develops an insightful hypothesis
- shows a comprehensive understanding of all of the components of a fair test
- applies all or almost all of the skills and strategies to plan an investigation
BLM 8.uw.3
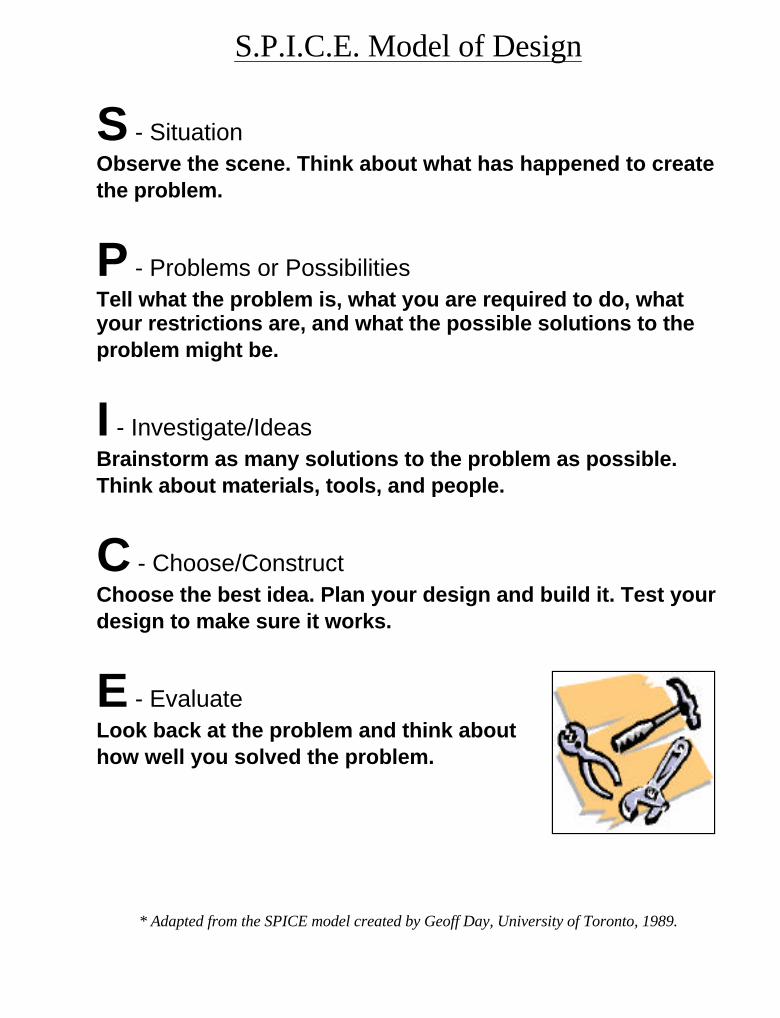
S.P.I.C.E. Model of Design
S - SituationObserve the scene. Think about what has happened to create the problem.
P - Problems or PossibilitiesTell what the problem is, what you are required to do, what your restrictions are, and what the possible solutions to the problem might be.
I - Investigate/IdeasBrainstorm as many solutions to the problem as possible. Think about materials, tools, and people.
C - Choose/ConstructChoose the best idea. Plan your design and build it. Test your design to make sure it works.
E - EvaluateLook back at the problem and think about how well you solved the problem.
* Adapted from the SPICE model created by Geoff Day, University of Toronto, 1989.

SCIENCE JOURNAL ASSESSMENT RUBRIC
CRITERIA LEVEL 1 LEVEL 2 LEVEL 3 LEVEL 4
Knowledge i. demonstrates limited understanding of the topic ii. draws a few conclusions about new learnings
i. demonstrates some understanding of the topic ii. draws some conclusions about new learnings
i. demonstrates a general understanding of the topic ii. generally draws relevant conclusions about new learnings
i. demonstrates a comprehensive understanding of the topic ii. draws meaningful and insightful conclusions about new learnings
Communication i. communicates information with limited clarity and accuracy ii. makes limited use of scientific and technological terminology
i. communicates information with some clarity and accuracy ii. makes some use of scientific and technological terminology
i. generally communicates information with clarity and accuracy ii. makes general use of scientific and technological terminology
i. communicates comprehensive information with clarity and accuracy ii. makes extensive use of scientific and technological terminology
Relating to the world outside the classroom
i. demonstrates limited understanding of how concepts relate to the world outside the classroom
i. demonstrates some understanding of how concepts relate to the world outside the classroom
i. demonstrates general understanding of how concepts relate to the world outside the classroom
i. demonstrates understanding of how concepts relate to the world outside the classroom and the implications of this relationship
BLM 8.uw.5

Expectation List
Selected
OpticsEnergy and Control An Integrated Unit for Grade 8
Page 1
Assessed
Science and Technology---Energy and Control• demonstrate an understanding of the properties of visible light and the properties of other types of electromagnetic radiation,
including infrared and ultraviolet rays, X-rays, microwaves, and radio waves;18s62
• investigate the properties of visible light, including the effects of reflection and refraction, and recognize how these propertiesare used in optical devices;
18s63
• describe ways in which different sources of visible light and the properties of light, both natural and artificial, are used byhumans for different purposes.
18s64
– identify the properties of visible light through experimentation; 48s65
– compare the properties of visible light with the properties of other types of electromagnetic radiation, including infrared andultraviolet rays, X-rays, microwaves, and radio waves;
18s66
– describe how incandescent, fluorescent, and phosphorescent sources produce light; 18s67
– identify colours as different wavelengths of light and explain why objects appear to have colour; 18s68
– describe qualitatively how visible light is refracted; 18s69
– investigate how objects or media refract, transmit, or absorb light (e.g., non-luminous objects are seen when reflected lightenters the eye; stars are seen when transmitted light enters the eye);
38s70
– identify ways in which the characteristics of mirrors and convex and concave lenses determine their use in opticalinstruments (e.g., in a camera, a telescope, binoculars, a microscope);
28s71
– investigate and describe the laws of reflection of visible light (e.g., using a plane mirror); 18s72
– explain colour vision using the additive theory; 18s73
– describe the effect of colour filters on white light using the subtractive theory. 18s74
– formulate questions about and identify needs and problems related to the properties and behaviour of light (e.g., interactionsbetween light and different materials), and explore possible answers and solutions (e.g., predict and demonstrate howvarious liquids will refract a light beam and describe the angle of refraction);
38s75
– plan investigations for some of these answers and solutions, identifying variables that need to be held constant to ensure a fairtest and identifying criteria for assessing solutions;
18s76
– use appropriate vocabulary, including correct science and technology terminology, to communicate ideas, procedures, andresults (e.g., use terms such as incidence, reflection, refraction, wavelength, frequency when describing the properties oflight);
78s77
– communicate the procedures and results of investigations for specific purposes and to specific audiences, using mediaworks, written notes and descriptions, charts, graphs, drawings, and oral presentations (e.g., prepare a brochure informingthe public of the risks of a specific type of electromagnetic radiation).
48s79
– describe how energy comes to earth as radiation in a range of wavelengths, some of which are visible; 18s80
– identify ways in which the properties of reflection are used in everyday situations (e.g., cosmetology, rear-view mirrors incars, security mirrors, night reflectors on jackets or bicycles);
18s81
– explain the function and purpose of combinations of multiple lenses or lenses and mirrors in optical systems (e.g., the sourceand one or more reflectors or lenses in cameras, periscopes, telescopes);
28s82
– compare the automatic functions of the human eye to functions in an automatic camera (e.g., focusing power, adaptation tobrightness);
18s83
– recognize that energy can be a significant cost in the manufacture and use of products or systems and explain how thatdetermines its production (e.g., analyse the costs and benefits of producing and using solar panels).
18s86
Written using the Ontario Curriculum Unit Planner 2.51 PLNR_01 March, 2001* Open Printed on Oct 26, 2001 at 10:49:09 AM Page F-1

OpticsEnergy and Control
Expectation Summary
An Integrated Unit for Grade 8
Selected Assessed
English Language8e1 8e2 8e3 8e4 8e5 8e6 8e7 8e8 8e9 8e108e11 8e12 8e13 8e14 8e15 8e16 8e17 8e18 8e19 8e208e21 8e22 8e23 8e24 8e25 8e26 8e27 8e28 8e29 8e308e31 8e32 8e33 8e34 8e35 8e36 8e37 8e38 8e39 8e408e41 8e42 8e43 8e44 8e45 8e46 8e47 8e48 8e49 8e508e51 8e52 8e53 8e54 8e55 8e56 8e57 8e58 8e59 8e608e61 8e62 8e63 8e64 8e65 8e66 8e67
French as a Second Language8f1 8f2 8f3 8f4 8f5 8f6 8f7 8f8 8f9 8f108f11 8f12 8f13 8f14 8f15 8f16 8f17
Mathematics8m1 8m2 8m3 8m4 8m5 8m6 8m7 8m8 8m9 8m108m11 8m12 8m13 8m14 8m15 8m16 8m17 8m18 8m19 8m208m21 8m22 8m23 8m24 8m25 8m26 8m27 8m28 8m29 8m308m31 8m32 8m33 8m34 8m35 8m36 8m37 8m38 8m39 8m408m41 8m42 8m43 8m44 8m45 8m46 8m47 8m48 8m49 8m508m51 8m52 8m53 8m54 8m55 8m56 8m57 8m58 8m59 8m608m61 8m62 8m63 8m64 8m65 8m66 8m67 8m68 8m69 8m708m71 8m72 8m73 8m74 8m75 8m76 8m77 8m78 8m79 8m808m81 8m82 8m83 8m84 8m85 8m86 8m87 8m88 8m89 8m908m91 8m92 8m93 8m94 8m95 8m96 8m97 8m98 8m99 8m1008m101 8m102 8m103 8m104 8m105 8m106 8m107 8m108 8m109 8m1108m111 8m112 8m113 8m114 8m115 8m116 8m117 8m118 8m119 8m1208m121 8m122
Science and Technology8s1 8s2 8s3 8s4 8s5 8s6 8s7 8s8 8s9 8s108s11 8s12 8s13 8s14 8s15 8s16 8s17 8s18 8s19 8s208s21 8s22 8s23 8s24 8s25 8s26 8s27 8s28 8s29 8s308s31 8s32 8s33 8s34 8s35 8s36 8s37 8s38 8s39 8s408s41 8s42 8s43 8s44 8s45 8s46 8s47 8s48 8s49 8s508s51 8s52 8s53 8s54 8s55 8s56 8s57 8s58 8s59 8s608s61 8s62 1 8s63 1 8s64 1 8s65 4 8s66 1 8s67 1 8s68 1 8s69 1 8s70 38s71 2 8s72 1 8s73 1 8s74 1 8s75 3 8s76 1 8s77 7 8s78 8s79 4 8s80 18s81 1 8s82 2 8s83 1 8s84 8s85 8s86 1 8s87 8s88 8s89 8s908s91 8s92 8s93 8s94 8s95 8s96 8s97 8s98 8s99 8s1008s101 8s102 8s103 8s104 8s105 8s106 8s107 8s108 8s109 8s1108s111 8s112 8s113 8s114 8s115 8s116 8s117 8s118 8s119 8s1208s121 8s122 8s123 8s124 8s125 8s126 8s127 8s128 8s129 8s1308s131 8s132 8s133 8s134 8s135 8s136 8s137 8s138 8s139 8s1408s141 8s142 8s143 8s144 8s145 8s146 8s147 8s148
History8h1 8h2 8h3 8h4 8h5 8h6 8h7 8h8 8h9 8h108h11 8h12 8h13 8h14 8h15 8h16 8h17 8h18 8h19 8h208h21 8h22 8h23 8h24 8h25 8h26 8h27 8h28 8h29 8h308h31 8h32 8h33 8h34 8h35 8h36 8h37 8h38 8h39 8h408h41 8h42 8h43 8h44 8h45 8h46 8h47 8h48 8h49 8h508h51 8h52 8h53 8h54 8h55 8h56 8h57
Geography8g1 8g2 8g3 8g4 8g5 8g6 8g7 8g8 8g9 8g108g11 8g12 8g13 8g14 8g15 8g16 8g17 8g18 8g19 8g208g21 8g22 8g23 8g24 8g25 8g26 8g27 8g28 8g29 8g308g31 8g32 8g33 8g34 8g35 8g36 8g37 8g38 8g39 8g408g41 8g42 8g43 8g44 8g45 8g46 8g47 8g48 8g49 8g508g51 8g52 8g53 8g54 8g55 8g56 8g57
Health & Physical Education8p1 8p2 8p3 8p4 8p5 8p6 8p7 8p8 8p9 8p108p11 8p12 8p13 8p14 8p15 8p16 8p17 8p18 8p19 8p208p21 8p22 8p23 8p24 8p25 8p26 8p27 8p28 8p29 8p308p31 8p32 8p33 8p34 8p35 8p36 8p37 8p38 8p39 8p408p41
The Arts8a1 8a2 8a3 8a4 8a5 8a6 8a7 8a8 8a9 8a108a11 8a12 8a13 8a14 8a15 8a16 8a17 8a18 8a19 8a208a21 8a22 8a23 8a24 8a25 8a26 8a27 8a28 8a29 8a308a31 8a32 8a33 8a34 8a35 8a36 8a37 8a38 8a39 8a408a41 8a42 8a43 8a44 8a45 8a46 8a47 8a48 8a49 8a508a51 8a52 8a53 8a54 8a55 8a56 8a57 8a58 8a59 8a608a61 8a62 8a63 8a64 8a65 8a66
Written using the Ontario Curriculum Unit Planner 2.51 PLNR_01 March, 2001* Open Printed on Oct 26, 2001 at 10:49:11 AM Page G-1

OpticsEnergy and Control An Integrated Unit for Grade 8
Page 1Unit Analysis
Assessment Recording Devices
6 Anecdotal Record3 Checklist1 Rating Scale5 Rubric
Assessment Strategies
1 Classroom Presentation5 Exhibition/demonstration6 Learning Log5 Observation4 Performance Task2 Questions And Answers (oral)1 Self Assessment
Groupings
5 Students Working As A Whole Class3 Students Working In Pairs7 Students Working In Small Groups3 Students Working Individually
Teaching / Learning Strategies
1 Advance Organizer2 Brainstorming1 Classifying2 Collaborative/cooperative Learning5 Demonstration7 Direct Teaching3 Experimenting1 Homework3 Inquiry1 Issue-based Analysis3 Learning Log/ Journal1 Model Making1 Oral Explanation1 Research
Analysis Of Unit Components
9 Subtasks 40 Expectations 77 Resources 89 Strategies & Groupings
-- Unique Expectations -- 22 Science And Tech Expectations
Resource Types
0 Rubrics 36 Blackline Masters 0 Licensed Software 0 Print Resources 1 Media Resources 0 Websites 14 Material Resources 26 Equipment / Manipulatives 0 Sample Graphics 0 Other Resources 0 Parent / Community 0 Companion Bookmarks
Written using the Ontario Curriculum Unit Planner 2.51 PLNR_01 March, 2001* Open Printed on Oct 26, 2001 at 10:49:15 AM Page H-1