Embed Size (px)
Citation preview
ADVANCED GUITAR EFFECTS PROCESSOR
OPERATION MANUAL
Contents
Major features 2 Hardware Software 3
Precautions 4
Controls and Display 5
Controls -
5 --
LCD w i n d i 9
Connection Examples 10
Effects and Parameters 1'1 Guitar amp effects 11
Mbddation effects 1 2 --
Delay effects 13 Special effects 14
User Programs and Preset Programs 15 .-
About the banks 15 User banks 15 Preset banks 15
Operation 16
Basic o ~ e r a t i o n 16 Editing 1 7
Other Functions 21 Tuning mode 21 Metronome mode 2 1
Remote control 2 1
Specifications 22
Congratulations and thank you for choosing the Zoom 9002PRO.For long-term reliability and optirnum performance, please read this manual carefully before use.
Major Features Hard ware
Analog and digital circuitry
Besides advanced digital signal processing, special analog circuitry is used for distortion and compression effects which are so important to electric guitar sound.
16-bit digital conversion
True 16-bit quantization assures professional results in the digital-to- analog and analog-to-digital converter circuits.
Zoom's own custom ZFx-1 DSP LSI
Zoom developed this original DSP LSI to deliver more digital signal proc- essing power in less space. The ZFx-1 chip dramatically expands your ca- pabilities for musical expression.
Mono input, stereo output
The 9002PRO accepts normal monaural input from your guitar. Chorus, delay, and reverb effects are output in stereo.
Large, easv viewing LCD display window
This customized LCD shows selected effects, parameters, and other infor- mation in a large (60 x 30rnin) window designed for high readability.
Headphone jacks and mix input
To monitor your playing in private, plug in stereo headphones. You can also play along with a tape or other source connected to the MIX IN jack.
User patch protection
User patch protection does not depend on a special baltery, so extra main- tenance is avoided.

Software
Effects
The effect chain has six stages: Compressor, Distortion, Equalizer, Modu- lation group, Delay, Reverb group. Special effects (SFX) can also be selected.
Easy operation
Sliding faders make adjusting parameter values quick and easy, with a familiar "analog" feel that is rare in digital equipment.
Preset banks and user banks
9002PRO has ten "user" memory banks and ten pre-programmed factory "preset" memory banks. Each bank holds four patches. "User" memory
banks are pre-loaded with the patches created by world top guitarists and created by ZOOM'S voicing expert with their advice and sound simulation. Your original patches and the edited patches can be stored in the 40 user patch memory locations.
Tuning and metronome functions
The 9002PRO will generate a reference pitch of 440Hz,441Mz,or 442Hz to which yo11 Ci l l l tune your "A" string. For rhythm training or tempo refer- ence, you can turn 011 the metronome function.
For live performance and home recording The compact 9002PRO is ideal for live performance. Optional remote control units for foot(9002F, FC02) or hand(9002R) control are available. A guitar amp simulator is attached. so that you can input a rich guitar sound directly to your recording equipment without needing an amp and microphone.

Precautions
Power supply
To avoid the possibility of damagrt, do not use any AC adaptor other than the supplied AC adaptor. Be sure to use only the supplied rechargeable battery or specified equiva- lent. To recharge, plug the supplied AC adaptor into the .4C adaptor jack. Or use the specified optional recharger. The use of other rechargers is dan- gerous because they may cause battery leakage or other damage. The supplied batlery is rated at 400 charge cycles before needing replacement. Five hours is the standard recharging time, giving about two a n d half hours hours of use, It is dangerous to recharge continuously for 48 or more hours. The LCD display will blink to indicate that you should recharge or replace the battery right away or use the AC adaptor to avoid the unit shutting off while playing.
Place ofuse
Like other digital devices, the 9002PRO may cause interference if used too close to radios, TVs, or some other electrical appliances. Avoid use in very hot, cold, humid, or dus ty environments; damage may result.
Cleaning
Use a soft, dry cloth to wipe off the 9002 when necessary. Never use paint thinner, alcohol, or other solvents which may damage the surface or warp the case.
Handling
Handle with care. Do not apply excessive force to the controls. Do not open the case or attempt repairs or modifications yourself; to do so will void the warranty.
Connection/disconnection procedure
Power should be turned off or volume turned down before making connec- tions to amps or other equipment. Sudden large signals may cause speaker damage.
Service
Consult with your local Zoom dealer if the 9002 does not operate properly.

Controls and Display
Controls
POWER switch
AC adaptor jack
REMOTE jack For connection of separately sold remote controller(9002R, 9002F. FC02)
INPUT jack (mono) For guitar cord.
GAIN switch Set to H for single coil pickup guitars. Set to L for guitars that have humbucking or active pickups.
MIX IN jack (stereo] Connect tape player or other music source to this jack. You can then play along on guitar. (Effects do not affect this signal.) N0TE:The connection cable without built-in resistor should be used for proper mixing level.
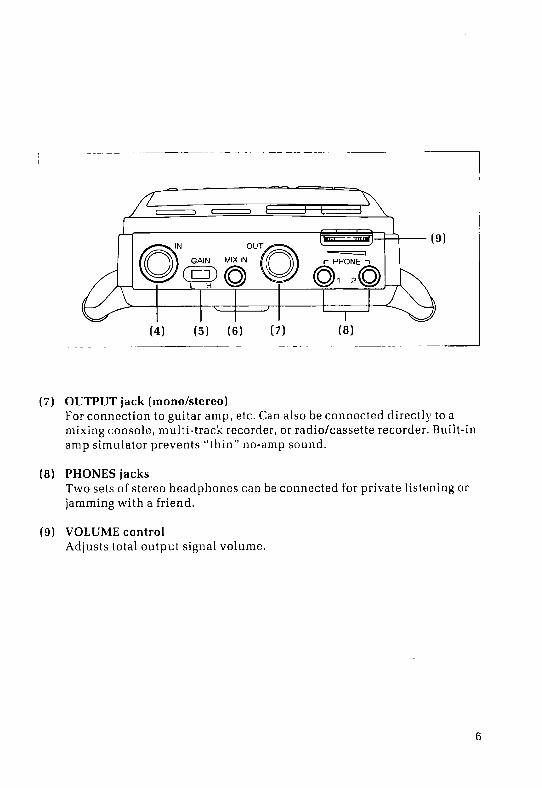
(7 ) OUTPUT jack (mono/stereo) For connection to guitar amp, etc. Can also be connected directly to a mixing console, multi-track recorder, or radio/cassette recorder. Built-in amp simulator prevents " thin" no-amp sound.
(8) PHONES jacks Two sets of stereo headphones can be connected for private listening or jamming with a friend.
(9) VOLUME control Adjusts total output signal volume.

DOWN BANK UP bL5

( l o ) LCD display Liquid crystal display shows bank, parameter, and othcr data.
(11) BANK keys For selection of preset and user banks.
(12) PATCH keys For selection of patches.
(13) PATCH LEDs Lit LED indicates selected patch. Flashing LED indicates patch selected for user bank storage.
(14) CURSOK keys For selecting individual effects, metronome tempo, and tuning reference frequency.
(15) BYPASS key For all effects off. In edit mode, each effect can be turned onloff individually. In tuning mode, tuning standard tone can be turned onloff.
(16) PARAMETER controls For adjustment of parameter valuse, effect output level, and noise redvction ettect Value is confirmed by LCD bars under sliders and by numeric readout.
(17) STORE key Allows you to store original or edited patches in the user bank area.
(18) CANCEL key Cancels STORE key operation. LYhen editing, this shifts yo11 to the next parameter name.
(19) METRO key Turns on metronome function. Use CURSOR keys to adjust tempo between 40 and 250bpm (bcats per minute). Volume is not adjustable.
(20) METRO LED The LED flashas with the tempo.
(21) TUNE key Generates refw-ence pitch for "A". CURSOR keys set frequency at 440Nz, 441Hz, or 4421-I~. All effects turn off and only the dircc:t sound comes through.
(22) REMOTE CONTROLLER For patch switc:hing within currently selected bank.

LCD Window
Bank number Shows selected bank:USER 0-9 and PRESET 0-9
Effect names These are the available individual effects. Only one of the modulation group and one of the reverb group effects can be used at a time.
COMP - DIST - E Q - PITC - DELI - DEL2
Modulation Group P H A FLA
REV' Reverb Group REV2
CHO SFX - Special effects can be combined with any other effects except for
modulation group effects.
Effect marks Dots indicate individual effects in use, A flashing dot indicates the effect being edited. --
-
Effect onloff I mark
DECAY TIME PEAK Shows effect DEPTH FREQ BALANCE
on/off status. I 17 17 1 PITCH 1 FINE 1 PATTERN
(,)-.a. I 1 ...I1 .a111 BANK Parameter USER names
1 1 PRESET -/-(l)
Indicates para- .
m e t e r s t h a t m a y 1 ( 3 ) - @ , @ l @ l * a / @ * , @ I @ @ I @
be adjusted in I (2)-COMP(DISTJ EQ ~PITC~PH FLA I CHO I DELI 1 ~ ~ ~ 2 1 REVIIREV~~ SFX I selected effect. I
( 8 ) - - -
Parameter value Readout shows precise parameter value. Changes as you adjust PARAMETER control.
Parameter bars Bars give general indication of parameter value. Changes as you adjust PARAMETER control.
Metronome mark Appears when metronome is on.
Tuning mark Appears when tuning reference pitch is on.

Connection Examples
The 9002PRO has stereo output so you can connect the left and right channels separately to two amplifiers. This increases the spaciousness of the stereo
1 N - OUT
u 9002PRO Guitar
Right channel Guitar amp
Left channel Guitar amp
* CVhite i:nd of supplied cable goes to left channel, red to right.
You can connect a CD player or tape player to the MIX input, and play along while listening on amp/headphones. The MIX input sound can not be effected by the effects.
,i i : rer -1
(1 K M I S Ih: PHONES
CD player m- J I N w Headphones rl
u Guitar
The 9002PRO has a built-in amp simulator so you can connect your recording equipment or mixing console. For stereo output, use a standard 6.3m.m or 1/4" stereo plug to plag converter cable.
C 0000
IN
OUT kw Multi-track
+ OR -1 Cassette
9002PRO
. directly to
two mono
recorder
recorder
Guitar

Effects and Parameters
Guitar a m p effects
Use DEPTH (range of 0-12) parameter to adjust sustain level. Sustains notes without adding distortion. A clean sound that keeps the signal level consistent. This provides studio quality analog compression effects.
Use DEPTH (0-12) parameter to adjust the amount of distortion. The PATTERN(1 or 2) switches guitar amp simulator on/off(l;off, 2;on). To use amp simulator without distortion, t u n on DIST and set DEPTH at 0.
First, select one of the two patterns, then use the DEPTH and FINE para- meters to adjust the effect. Use the PATTERN (1 or 2) parameter to select which pattern you want.
PATTERN 1: High Boost. Low Cut EQ DEPTH (0-10) controls low range boost or attenuation and FINE (0-10) controls high range boost or attenuation.Use with plenty of distortion to produce a heavy metal sound. Also adjustable for a restrained sound. This is a high-low shelving effect.
PA TTERN 2: Exciter DEPTH (0-1 0) and FINE (0-10). A bright tube amp tone using an exciter effect where DEPTH controls enhance level and FINE controls frequency.

Modulation effects
MODULATION GROUP (PITC, PI-lA , F'LA , CHO) One from this group can be used ut a time (but not 1,i'ith SFX) .
Use PITCH (-12-0-+12 range) to shift pitch in semitone steps up to one octave higher or lower. Use FINE (-10-0-+90) for fine atljustment above or below PITCH setting. Use BALANCE (0-10) to adjust between shifted and direct sound. This is used for harmonies, doubling, and thickening effects. First adjust PITCH. then FINE. Try creating unison, fifths, and non-cyclic chorus-like effects.
PHA:Phaser and Midrange Boost Use PATTERN (1 or 2) to sc3lect Phaser or Midrange Boost.
PATTERN 1 : Phaser Use DEPTH (0-10) to adjust the amount of rnodulation and resonance. Use FREQ (0-50) to adjust rnodulation speed. This creates rotating speaker sounds and other phase shifted effects.
P A T T E R N 2: h~lidrunge Boost Use DEPTH (0-10) to adjust lcvel of peak boost. Use FREQ (0-50) to adjust midrange frequency. Midrange boost gives different amplifier characteristics. It allows the guitarist to create a wide range of personal tonal styles.
FLA: Flanger Use DEPTH (0-10) to adjust amount of modulation. Use FREQ (0-50) to adjust modulation speed. Use PEAK (0-10) to adjust strength of the resonance peak. Flanging prociuces peaks that are harmonically related, unlike simple phasing. At high peak levels i t produces almost metallic ringing sounds.
Use DEPTH (0-10) to adjust the amount of modulation. Use FREQ (0-10) to adjust modulation speed. Use PATTERN (1 or 2) to select mono or slereo. Like flanging, chorus depends on the interaction between delayed and non-delayed signal components. Like phasing, it can help create a full- bodied sound.

Delay effects
DELI Delay 1
Use DECAY (0-10) to adjust the number of cchoes (0 is single). Use TIME (1-100) to adjust the delay time from 1/100 of a second to 1 second in ten millisecond increments. Use BALANCE (0-10) to adjust balance between direct (01 and delay (10). This is used for echo effects.
REVERB GROUP (DEL2, REV1, REG'2) Onefrom this group can be used a t a time.
DELZ Delay 2
Use DECAY (0-10) to adjust the number of repeats. (For mono output. the repeats will be half the tempo of the stereo repeats.) Use TIME (1-90) to adjust delay time from 1/100 of a second to 9/10 of a second in ten millisecond increments. Use BALANCE (0-10) to adjust the level of the delayed sound. Delay 2 is a stereo ping-pong delay where the sound echoes from the left to the right channel (if reproduced in stereo).
REV1 Reverb 1 (Large Hall]
Use TIME (0-10) to adjust the reverb time. Use BALANCE (0-10) to adjust the level of the reverb sound. Reverberation effects are essential for recording and for simulating larger performance environments. The longest reverb time is 4000ms.
REV2 Reverb 2 (Small Room)
Use TIME (0-50) to adjust the reverb time. Use BALANCE (0-10) to adjust the level of the reverb sound. Reverb 1 gives the reverb sound of a concert hall, and Reverb 2 gives the reverb of a small room. The conventional 9002 and 9002PRO have the Reverb 2 configuration. Previously, the harmonics of the guitar amplifier have been simulated, but the PRO has added an amplifier simulator to the DIST PATTERN, so that the amplifier simulator is not included in Reverb 2. When using the PRO, set DIST on, DEPTH to 0 and PATTERN to 2 if you want to get the equivalent 9002 setting of Reverb 2 with DIST off.

Special effects
SFX
lJse PATTERN (1 .2 .3 ) to select STEP, CRY, or METALLIC effects.
P A TTEIIN 1 : STEP Use DEPTH (0-10) to adjust a ~ n o ~ ~ n t of nlodulation. Use FREQ (0-50) to acliust ~nodulation spccd. This givt?s random, stepped sample&hold for sequencer and arpeggio type effects.
PA TTERiZ: 2: CR I' Use DEPTH (0-10) to adjust a r n o ~ ~ n t of modulation. Llse FREQ (1 or 2 ) to select 1: Voice type cffect: or 2: Fast attack and sweep down. This givw dynamic pick tvah and talking box typct cffects.
P A TTERN 3: AIETA LLIC Uso DEPTH (0- 10) to adjust amount of modulation. L-se FREQ (0-50) to adjust 1nodu1;ition speed. This gives ring mocli~lator type effccts.

User Programs and Preset Programs
About the banks
Each factory preset bank offers a choice of four "patches." Each patch is a chain of effects specially prepared to create a specific sound or effect for live performance or recording,
For example, one of the preset bank patches creates an instantly recogniz- able heavy metal sound. Another sounds just right for good old '50s rock and roll.
A patch may contain u p to six effects, in a "chain" like this:
COMP - DIST - EQ- PlTC (etc.) - DELI- REV 1 (etc.)
The user banks are set up in the same way. However, you can actually change what is stored in the user bank patches. [The factor?; preset bank patches always come up sounding the same. each time you select them,)
To recover factory preset data in user banks To input the factory preset data into the user banks again, turn the power off, then hold the STORE key down and turn the power on again. All 40 user patches will now contain the factory preset palches. When all 40 patches are initialized, any patches that you have stored will be lost. If any of that patch data is necessary, keep a memo of it.
User banks
User banks Ten "user" memory banks (0 through 9), each bank holds four patches, are preloaded with the patches created by world top guitarists and created by ZOOM'S voicing expert with their advice and sound simulation. Your original patches and the edited patches can be stored in the 40 user patch memory locations,
Preset banks
The ten(0 through 9)preset banks contain pre-programmed patches that are ready to use for a wide variety of musical applications. You can adjust the parameter values of individual effects within each patch as you like. Then you can store the results in patches in the user banks.

Operation
Basic operation
Turn on POWER switch.
The BANK part of the display will show l JSER 0 , and the PATCli LED 1 will light. The Parameter Value display area will show the output level This means that the currently selected patch is the first (of four) patches in user bank 0.
Call your desired bank and patch.
Use the B A N K keys (UP and DOWN) to select your desired bank. Use the PATCH keys ( 1 through 4) to choose a patch within the bank. As an example, let's select preset 1 , patch 2.
Selecting patch 2 in preset bank 2 .
+ Display illustrations shown here do not necessarily match those during actual use. They are provided for general reference only.

(I) Press either of the BANK kegs several times and notice how the BANK part of the display indicates each of the USER (0-9) and PRESET (0-9) banks. Try selting it to PRESET 1. The bank number will flash.
(2) Nexi, select your desired patch number by pressing one of the four PATCH keys (located below the BANK keys). Press the PATCH 2 key so that its LED lights. The bank number will stop flashing.
You have now selected preset bank 1 , patch 2.
Editing
Each patch is a chain of individual effects. You can select which individ- ual effects to use in a patch. And you can adjust the parameters of each effect. You can also adjust the signal output level and noise reduction level of the total patch. (such as "time" in a delay effect). Each effect has different adjustable parameters. Refer to the "Effects and Parameters" section of this manual. Edited patches can be stored in user banks for later use. To edit and store a patch, you follow these steps:
(1) Select bank and patch to start from (Preset 2, patch 3, for example)
(2) Select individual effect (FLA, for example)
(3)Adjust effect parameters (DEPTH and PEAK, for example)
(4)Adjust output level (To compensate for increased or decreased total volume resulting from change in effects used and/or their readjusted pa- rameter values) (5)Adjust noise reduction (G)Store(Store in user bank4, patch 1, for example) Effect editing procedure
First, press the left or right CURSOR key to move the flashing effect mark until it is above the individual effect that you want to edit ( in the list of effects at the bottom of the display). The adjustable parameter names for that effect will appear below the three sliding PARAMETER controls. (The number of adjustable parameters is usually two or three, depending on the effect.) [If parameter names do not appear, press the BYPASS key so that the lat effect on/off mark turns on.) One of the parameter names will be flashing. Adjust the PARAMETER control above the flashing name, As you slide the control u p or down, the parameter bars (below the parameter name) and the parameter value readout in the display will change to indicate the current value (within the possible range).

Let's try editing the DELI effect in our previously selected patch (preset 1, patch 1).
(1) IJse the CURSOR keys to move the flashing offect mark to DELI. Parameter namt:s DECAY, TIME: and BALANCE will appear on the display.
( 2 ) Of tho Ihrot! names, DECAY is flashing. I-Iowever, l(?l's adjust the TIME pararnetcr first. Gradually raise or lower the position o f the control over the TIME indication \ I ntil TlME starts flashing. (Or press the CANCEL key to move to the nes t adjusta1)le parameter.)
( 3 ) After TIME starts flashing, movemcni nf the conLr.01 will affect the value of the TIME parameter, as shown by thc parameter bars and the parameter value readout. Sl ide it i l l 1 the way dolvn to minirnize the delay time. Slide it all the waJr u p to si?t d d a y lime to the maximum length of one second.
After storing, the data has been rew~itten so the original data cannot be recalled. However, you can return all 40 user patches to the factory preset date. For details, see page 15 "To recover factory preset data in user banks" .

(4) Next, move the control above the BALANCE parameter name. Slide it all the way down to get the direct sound only. At the top position you get just the delay sound.
(5) Finally. adjust the control above the DECAY parameter name. This sets the amount of feedback (number of repeats or echoes). At the bottom position you hear a single repeat. At the top position you get the maximum number of repeats.
(6) Now, use the CURSOR keys to select other effects, and adjust them in the same way.
Undo
To return a patch to its original value, simply select a different patch and then return to the one that you wanted to reset to ils original value. In other words, if you switch to another patch without storing the previous one, any adjustments that you made on the previous one will be cancelled.
Output level adjustment
After adjusting the parameters of individual effects, you can adjust the
Adjusting the output level.

output level of the selected patch. This may be necessary to compensatc: for changes in total outpul level rtsulting from your parameter settings. This gives you control over changes in output level that may occur whcn vou switch patches tvhile performing.
(1) Use the CURSOR keys to move the effect mark all the way to the right of SFX or to the left of'COMP. The bars undcr the PEAKIBALANCEIPAT- TERN display section ~vi l l show output level, as will the readout. Or you can go directly to the output level adjustment mode by pressing the currently selected PATCH key again.
(2) Ad just the control above t hc PEAK/BALANCG/PATTERN display section. Output level is adjustable over n range of 10 to 99. as shown in the parameter \.slue readout. Noise reduction(NR) adjustment Finally, adjust the noise reduction. NR lowers the noise during standby. it can be adjusted and stored for each patch. (1)NR is adjustable over a range of 0 to 7, as shown in the parameter value readout, with the data slider on the left. Raise the sliderhalue until the noise lowers to acceptable level.
Patch storage
T o s aw >-our cditcd effect patch, follotv these steps.
(1) Press the STORE key once. The selected BANK number and patch LED will flash to indicate that you are in the storage node.
(2) Usc the RANK and PATCIH keys to select the user bank number and patch into which you wish to save the sound. (You cannot use a factor?; preset bank to store edited sounds.)
(31 At [his point you can still press the CANCEL key to cancel the storage mode and rcturn to the state that existed before you pressed the STORE key. If you do not wish to cancel, go on to step 4, below.
(4) Press the STORE key again and the BANK number and patch LED will stop flashing and remain lit. This confirms storage. Pre-loaded patch data recall To load the factory pre-load data into the user banks again, t ~ ~ r n the power off, then hold the STORE key down and turn the power on again, All 40 factory pre-load data will be loaded into the user patch memories. N0TE:With this operation, all patches you have stored will be lost. Necessary patch data should be kept with a memo in the blank patch chart.
Other Functions
Tuning mode
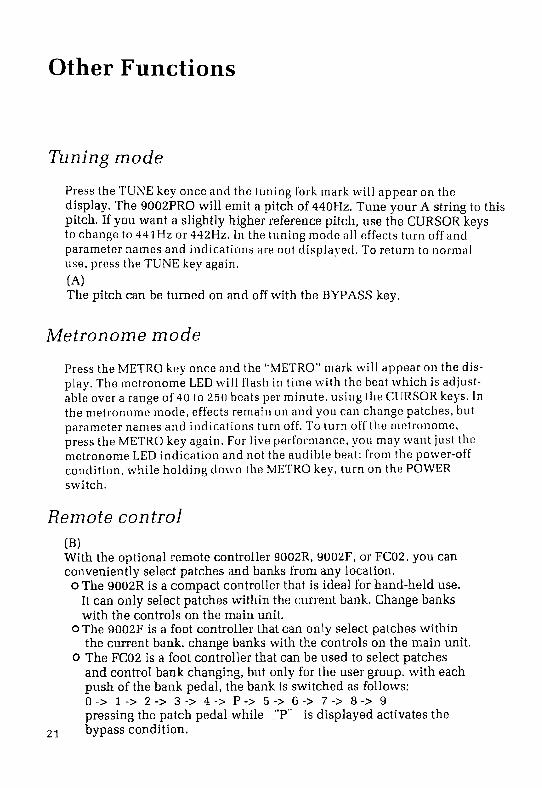
Press the TUNE key once ancl the tuning fork mark will appear on the display. The 9002PRO will emit a pitch of 440Hz. Tune your A string to this pitch. If you want a slightly higher reference pitch, use the CURSOR keys to change to 441 Hz or 442Hz. In the tuning mode all effects turn off and parameter names and indications are not displayed. To return to normal use. press the TUNE key again,
IN The pitch can be turned on and off with the BYPASS key,
Metronome mode
Press the METRO key once and the "METRO" mark will appear on the dis- play. The metronome LED will flash in time \vith the beat which is adjust- able over a range of 40 to 250 beats per minute, using the CURSOR keys. In the metronome mode, effects remain on and you can change patches, but parameter names ancl indications turn off. To turn off the metronome, press the METRO key again. For live performance, you may want just the metronome LED indication and not the audible beat: from the power-off condition, while holding down the METRO key, turn on the POWER switch.
Remote control IB) With the optional remote controller 9002R, 9002F, or FC02, you can conveniently select patches and banks from any location. o The 9002R is a compact controller that is ideal for hand-held use.
It can only select patches within the current bank, Change banks with the controls on the main unit.
0 The 9002F is a foot controller that can only select patches within the current bank. change banks with the controls on the main unit.
0 The FC02 is a foot controller that can be used to select patches and control bank changing, but only for the user group. with each push of the bank pedal, the bank is switched as follows: 0 -> 1 -> 2 -> 3 -> 4 -> P -> 5 -> 6 -> 7 -> 8 -> 9 pressing the patch pedal while "P" is displayed activates the bypass condition.

Specifications
Effect Programs:
Memory:
A/D DIA Converter:
Inputs:
Outputs:
Display:
Control:
Power:
Dimensions:
Weight:
Accessories:
Compressor, Distortion, EQ, Pitch Shifter, Phaser, Flanger, Chorus, Delay1 , Delay2, Reverb1 , Reverb2, SFX (6 effects can be used at once)
40 Preset PatchesAo User's Patches 16-bit linear
Guitar x 1 ['/,", -lo/-20clBn1, 470kQ) Mix x 1 (Mini, Stereo)
Line x 1 ('I," Stereo/Mono, -10dBm, i o k n ) Headphones x 2 (Mini, Stereo)
60 x 30mm Custom LCD
Remote
Rechargeable BatteryIAC: Adapter 24 hours initial charging time. two and half hou use at ful l charge.
AC adaptor, Rechargeable battery x 1,
All specifications and appearances subject to change without notice.

2-1 0-2, Miyanishi-cho, Fuchu-shi, Tokyo, I83 JAPAN Phone : 0423-69-71 1 1 Fax : 0423-69-71 15
Printed in Japan

![Operation Manual - Zoom...[AC adapter operation] • Be sure to use only an AC adapter which supplies 9 V DC, 300 mA and is equipped with a "center minus" plug (Zoom AD-0006). The](https://img.pdfslide.us/doc/110x75/61452cd834130627ed50d12e/operation-manual-zoom-ac-adapter-operation-a-be-sure-to-use-only-an-ac.jpg)