Embed Size (px)
Citation preview
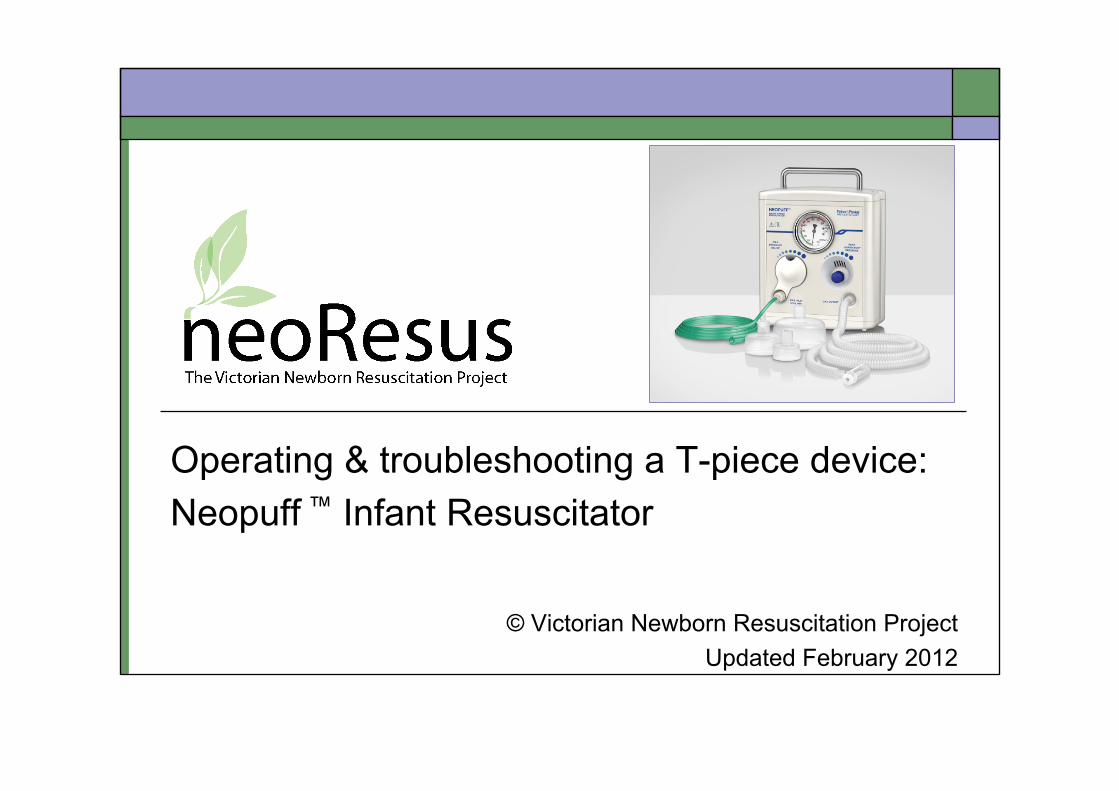
Operating & troubleshooting a T-piece device: Neopuff ™ Infant Resuscitator
© Victorian Newborn Resuscitation Project Updated February 2012
Aims & objectives This presentation has been designed to assist
you to: Assemble the Neopuff™ T-piece device
Set the recommended flow rate & pressures Operate the Neopuff™ T-piece device
Troubleshoot the Neopuff™ T-piece device
We suggest that you print a copy of this presentation and have the Neopuff ™ at hand to practice each action.
Updated February 2012 © Victorian Newborn Resuscitation Project
Manual ventilation devices The Australian Resuscitation Council (ARC) & the New Zealand Resuscitation Council (NZRC) guidelines state: “A T- piece device, a self inflating bag and a flow inflating bag are all acceptable devices to ventilate newborn infants either via a face mask or endotracheal tube”. (ARC & NZRC, 2010, Guideline 13.4)
Updated February 2012 © Victorian Newborn Resuscitation Project
T-piece device (e.g. Neopuff™ Infant Resuscitator)
Advantages of using a T-piece device The operator sets the peak inspiratory pressure (PIP) &
positive end expiratory pressure (PEEP). The T-piece device will not deliver PIP or PEEP/CPAP
above the set pressures if the flow remains constant. The PIP & PEEP are displayed on the manometer. The operator can control the length of the inspiratory
time by varying the duration of occlusion of the PEEP cap.
Updated February 2012
© Victorian Newborn Resuscitation Project
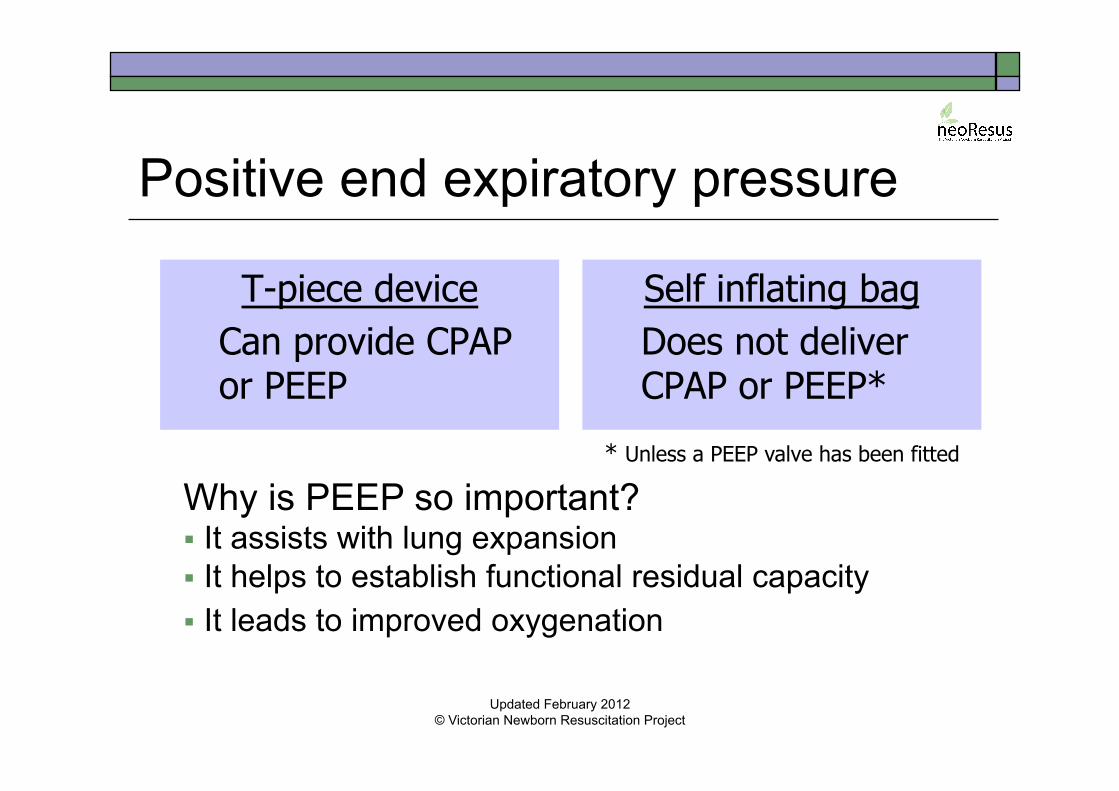
Positive end expiratory pressure
T-piece device Can provide CPAP or PEEP
Self inflating bag Does not deliver CPAP or PEEP*
Why is PEEP so important? It assists with lung expansion It helps to establish functional residual capacity It leads to improved oxygenation
* Unless a PEEP valve has been fitted
Updated February 2012 © Victorian Newborn Resuscitation Project

Setting up the Neopuff ™
To check & set the Neopuff ™ you will need: A Neopuff ™ Infant Resuscitator A compressed gas source A gas supply line (green oxygen tubing) with
the plastic connector (supplied) The patient supply line (tubing & T-piece) A test lung
Updated February 2012 © Victorian Newborn Resuscitation Project

The components of the Neopuff™
Gas supply line
Patient supply line with T-piece & mask
Test lung
Gas supply
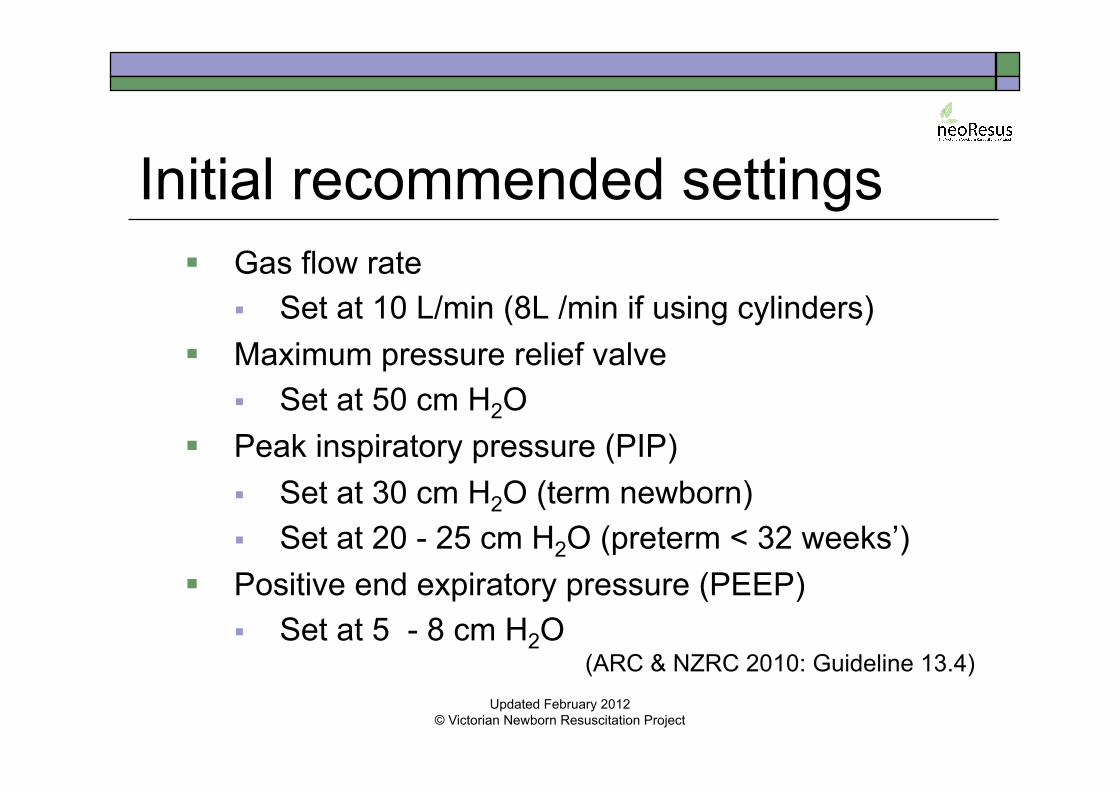
Initial recommended settings Gas flow rate
Set at 10 L/min (8L /min if using cylinders) Maximum pressure relief valve
Set at 50 cm H2O Peak inspiratory pressure (PIP)
Set at 30 cm H2O (term newborn) Set at 20 - 25 cm H2O (preterm < 32 weeks’)
Positive end expiratory pressure (PEEP) Set at 5 - 8 cm H2O
(ARC & NZRC 2010: Guideline 13.4)
Updated February 2012 © Victorian Newborn Resuscitation Project
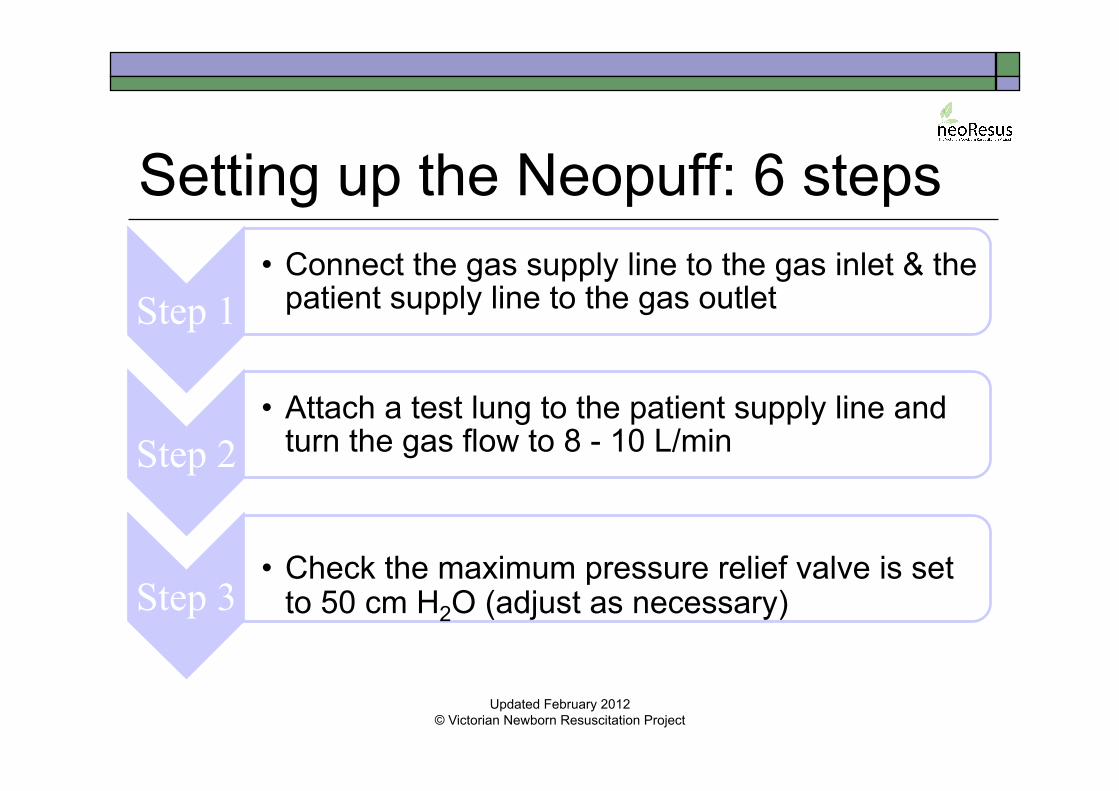
Setting up the Neopuff: 6 steps
Step 1 • Connect the gas supply line to the gas inlet & the
patient supply line to the gas outlet
Step 2 • Attach a test lung to the patient supply line and
turn the gas flow to 8 - 10 L/min
Step 3 • Check the maximum pressure relief valve is set
to 50 cm H2O (adjust as necessary)
Updated February 2012 © Victorian Newborn Resuscitation Project
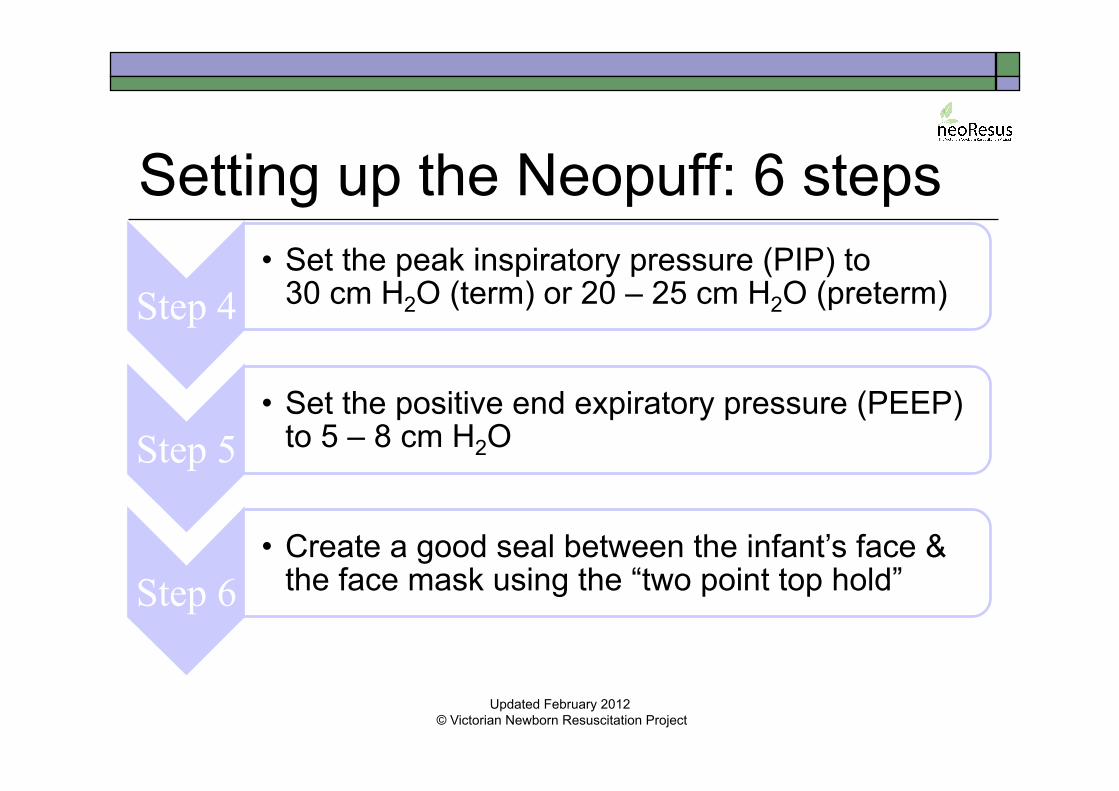
Setting up the Neopuff: 6 steps
Step 4 • Set the peak inspiratory pressure (PIP) to
30 cm H2O (term) or 20 – 25 cm H2O (preterm)
Step 5 • Set the positive end expiratory pressure (PEEP)
to 5 – 8 cm H2O
Step 6 • Create a good seal between the infant’s face &
the face mask using the “two point top hold”
Updated February 2012 © Victorian Newborn Resuscitation Project

1. Connect the gas & patient supply lines
1. Connect the gas supply line via the plastic connector to the ‘gas inlet’
2. Connect the patient supply line to the ‘gas outlet’
Updated February 2012 © Victorian Newborn Resuscitation Project
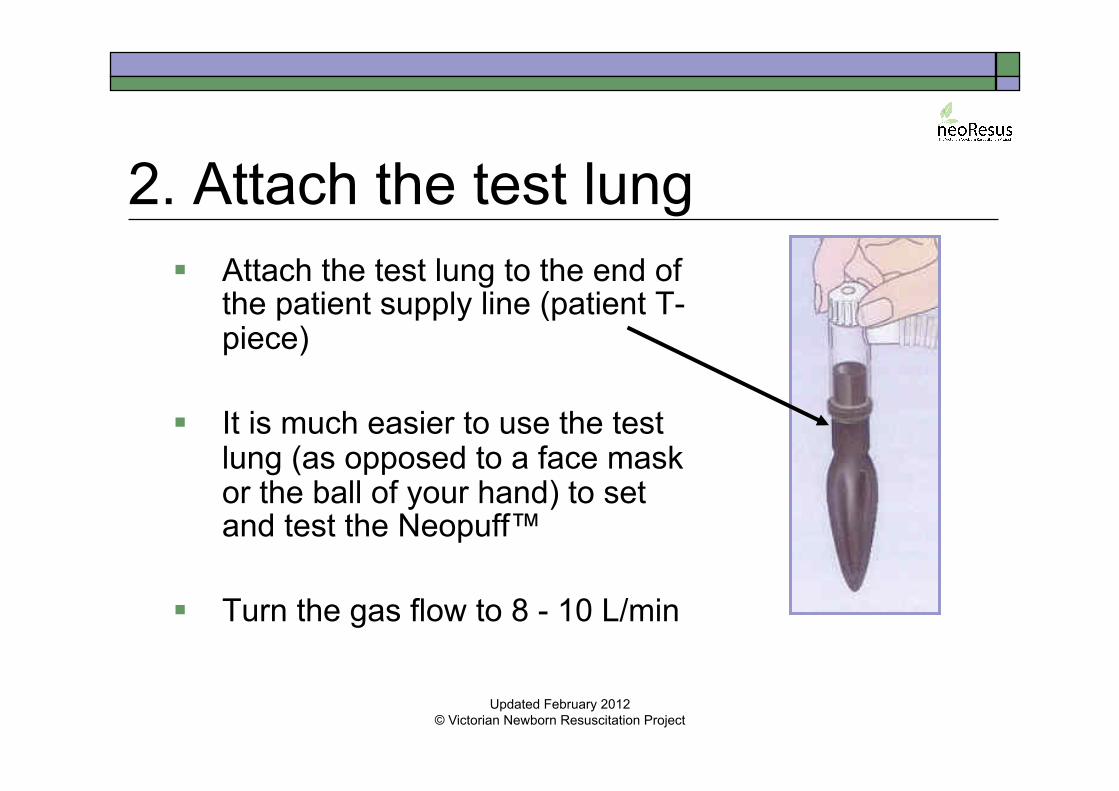
2. Attach the test lung Attach the test lung to the end of
the patient supply line (patient T-piece)
It is much easier to use the test lung (as opposed to a face mask or the ball of your hand) to set and test the Neopuff™
Turn the gas flow to 8 - 10 L/min
Updated February 2012 © Victorian Newborn Resuscitation Project
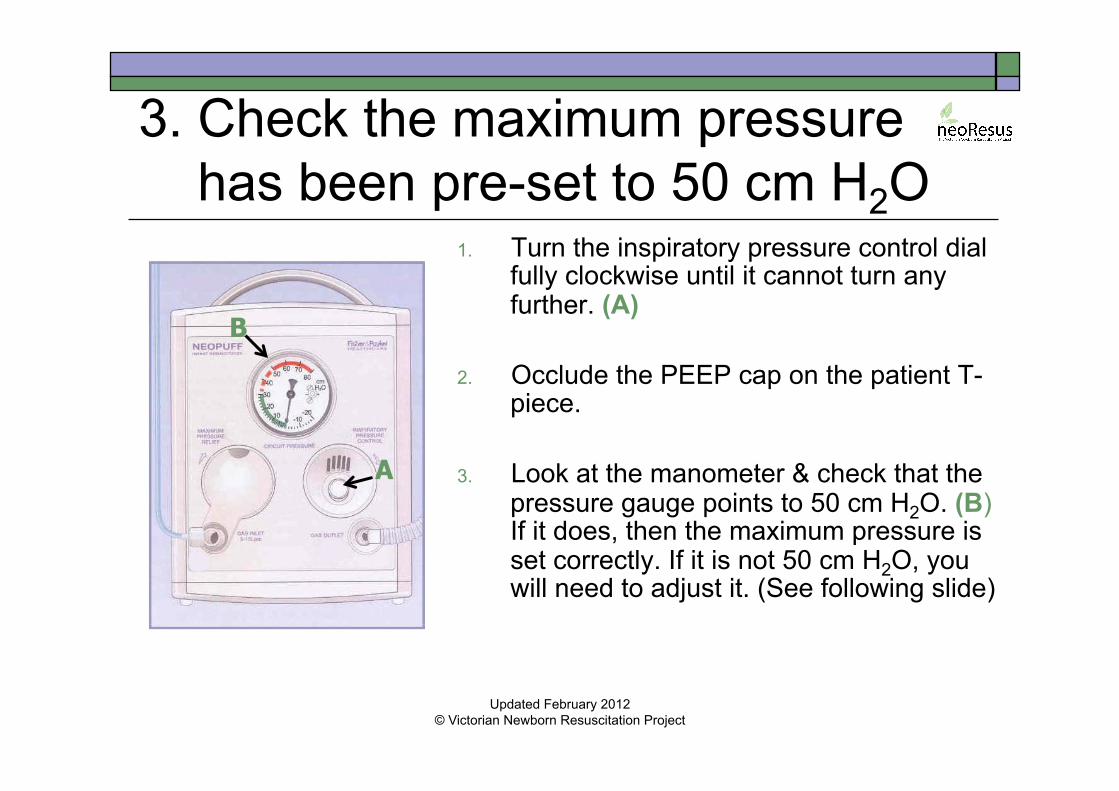
3. Check the maximum pressure has been pre-set to 50 cm H2O
1. Turn the inspiratory pressure control dial fully clockwise until it cannot turn any further. (A)
2. Occlude the PEEP cap on the patient T-
piece.
3. Look at the manometer & check that the pressure gauge points to 50 cm H2O. (B) If it does, then the maximum pressure is set correctly. If it is not 50 cm H2O, you will need to adjust it. (See following slide)
A
B
Updated February 2012 © Victorian Newborn Resuscitation Project
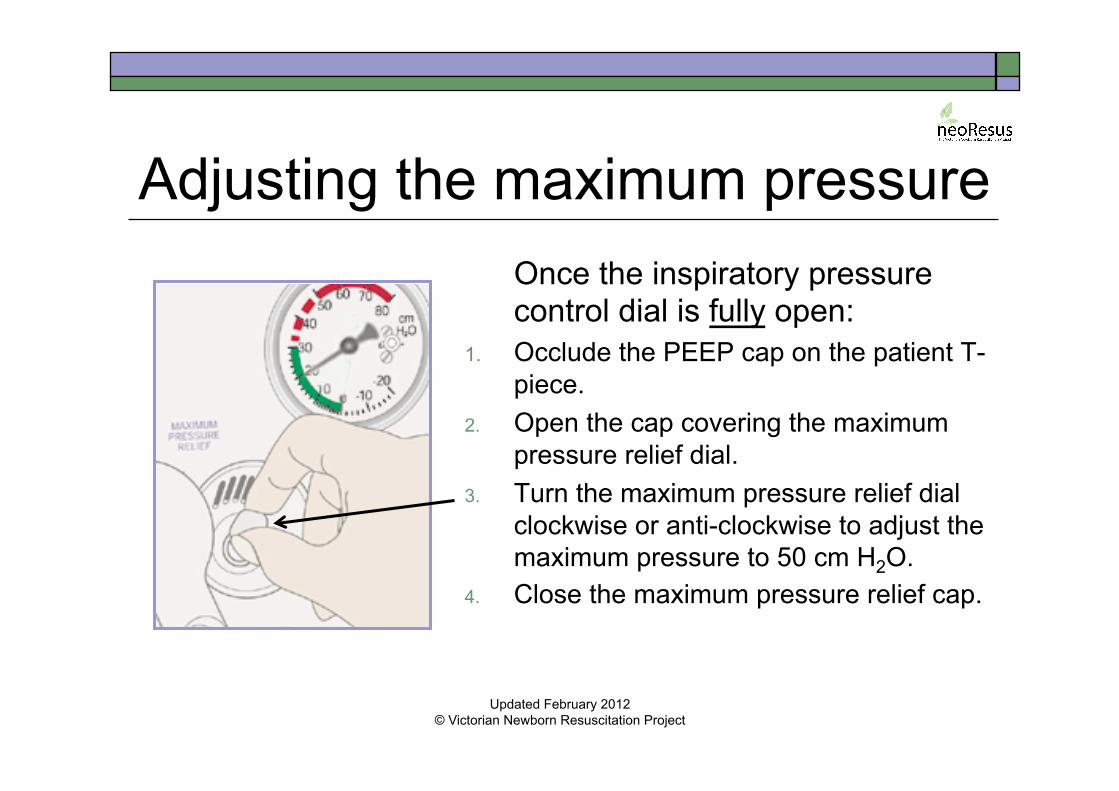
Adjusting the maximum pressure Once the inspiratory pressure control dial is fully open:
1. Occlude the PEEP cap on the patient T-piece.
2. Open the cap covering the maximum pressure relief dial.
3. Turn the maximum pressure relief dial clockwise or anti-clockwise to adjust the maximum pressure to 50 cm H2O.
4. Close the maximum pressure relief cap.
Updated February 2012 © Victorian Newborn Resuscitation Project
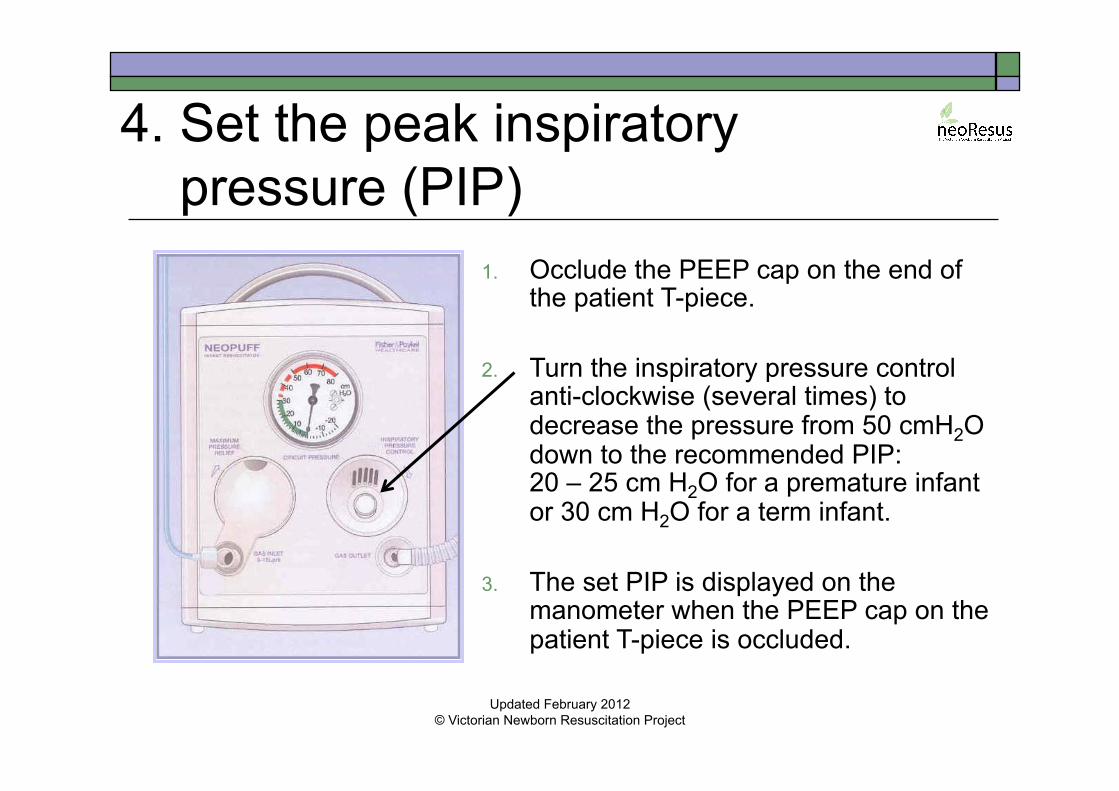
4. Set the peak inspiratory pressure (PIP)
1. Occlude the PEEP cap on the end of the patient T-piece.
2. Turn the inspiratory pressure control
anti-clockwise (several times) to decrease the pressure from 50 cmH2O down to the recommended PIP: 20 – 25 cm H2O for a premature infant or 30 cm H2O for a term infant.
3. The set PIP is displayed on the
manometer when the PEEP cap on the patient T-piece is occluded.
Updated February 2012 © Victorian Newborn Resuscitation Project
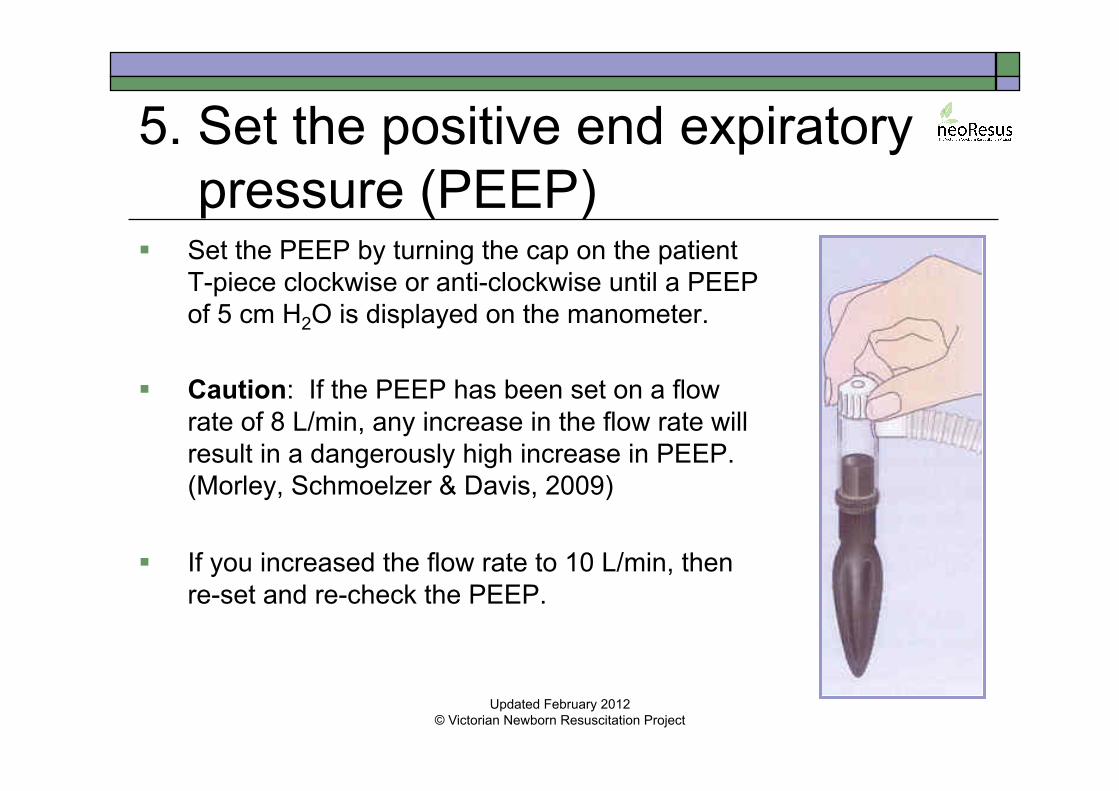
5. Set the positive end expiratory pressure (PEEP) Set the PEEP by turning the cap on the patient
T-piece clockwise or anti-clockwise until a PEEP of 5 cm H2O is displayed on the manometer.
Caution: If the PEEP has been set on a flow
rate of 8 L/min, any increase in the flow rate will result in a dangerously high increase in PEEP. (Morley, Schmoelzer & Davis, 2009)
If you increased the flow rate to 10 L/min, then
re-set and re-check the PEEP.
Updated February 2012
© Victorian Newborn Resuscitation Project
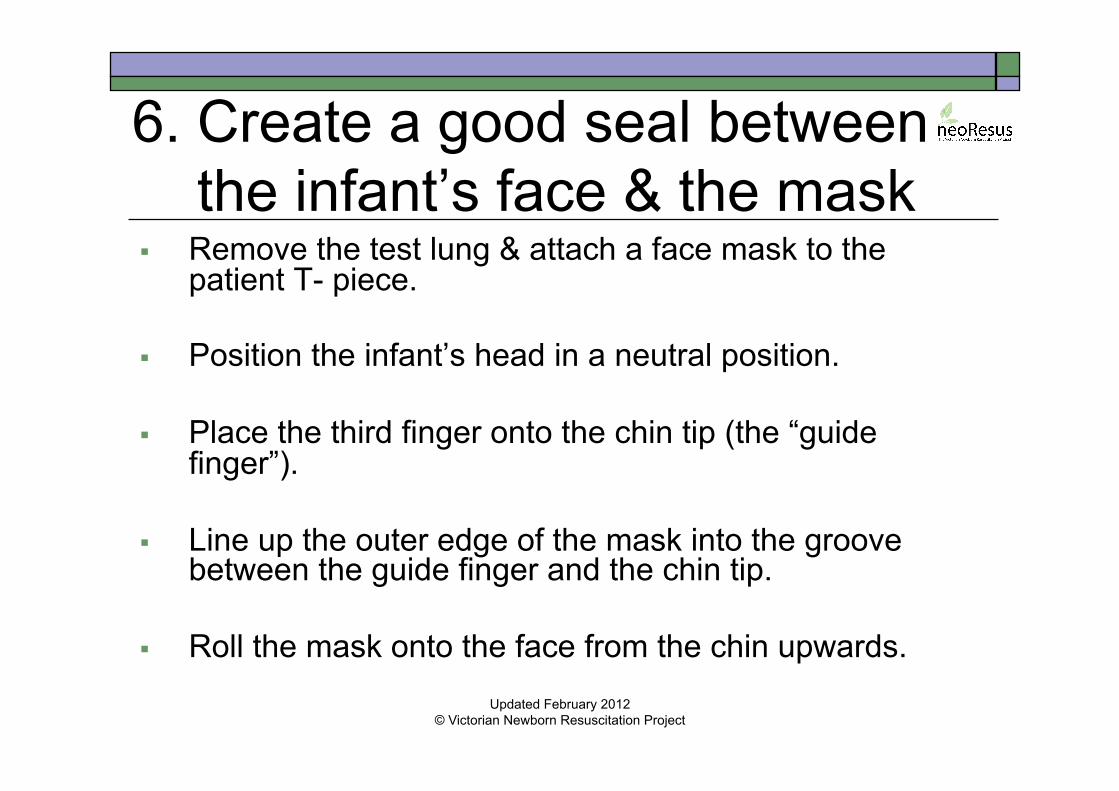
6. Create a good seal between the infant’s face & the mask Remove the test lung & attach a face mask to the
patient T- piece. Position the infant’s head in a neutral position.
Place the third finger onto the chin tip (the “guide finger”).
Line up the outer edge of the mask into the groove between the guide finger and the chin tip.
Roll the mask onto the face from the chin upwards.
Updated February 2012 © Victorian Newborn Resuscitation Project
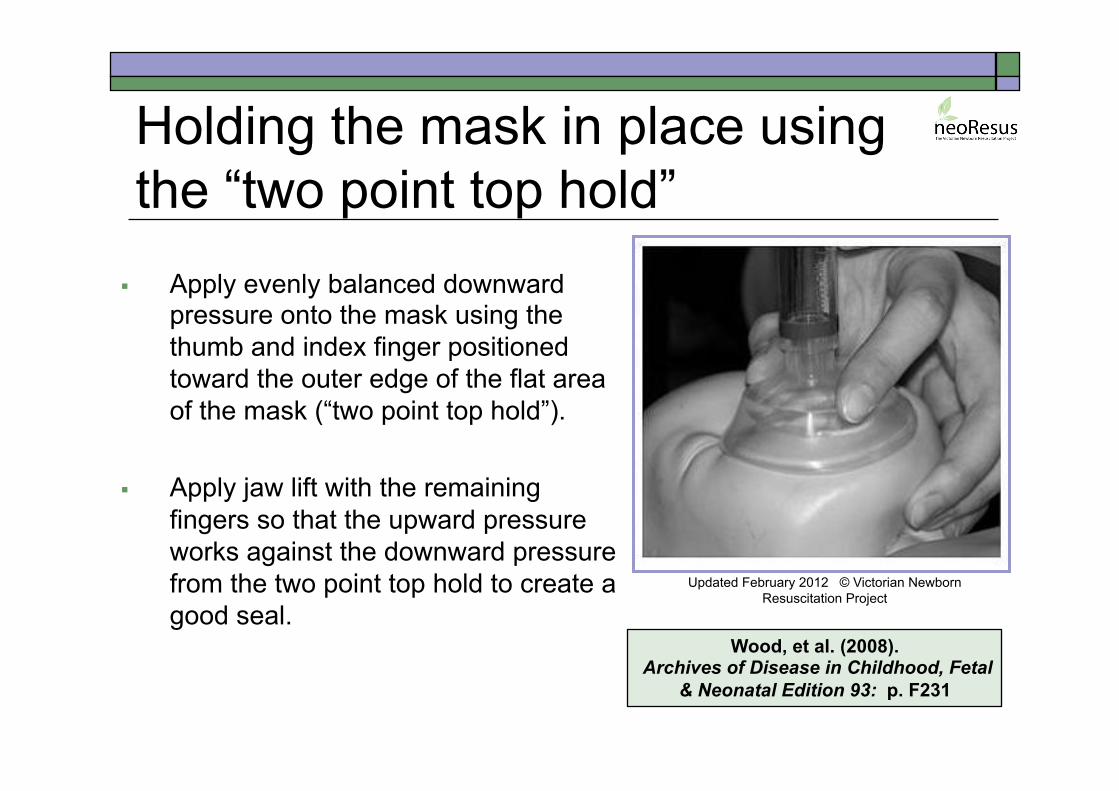
Holding the mask in place using the “two point top hold”
Apply evenly balanced downward pressure onto the mask using the thumb and index finger positioned toward the outer edge of the flat area of the mask (“two point top hold”).
Apply jaw lift with the remaining
fingers so that the upward pressure works against the downward pressure from the two point top hold to create a good seal.
Wood, et al. (2008). Archives of Disease in Childhood, Fetal
& Neonatal Edition 93: p. F231
Updated February 2012 © Victorian Newborn Resuscitation Project
Checking the face mask seal: “Listen & look” technique
Leaks averaging 40 – 70% are common due to poor mask placement technique. Therefore: Listen for a soft whistle of gas through the PEEP
cap. Look that a PEEP of 5 cm H2O is displayed on the
manometer. Be aware that a PIP of 30 cm H2O may be
reached on the manometer despite a face mask leak of up to 90%. (Wood, et al., 2008)
Updated February 2012 © Victorian Newborn Resuscitation Project

Delivering positive pressure inflations with the Neopuff™ Occlude the PEEP cap using your
thumb or finger for 0.5 seconds, then release for 0.5 seconds.
This will provide a ventilation rate of 60 inflations per minute.
Continue to check your mask seal by checking that the PEEP/CPAP returns to 5 cm H2O on the manometer after each manual inflation.
Updated February 2012 © Victorian Newborn Resuscitation Project

Air or oxygen for resuscitation? Term newborns: Use air (21%) initially. Preterm newborns < 32 weeks: Use air or blended air
and oxygen (21% to ∼ 30% oxygen to start). Use air if a blender is not available. Supplemental oxygen should be used judiciously,
ideally guided by pulse oximetry. “The first priority is to ensure adequate inflation of the lungs, followed by increasing the concentration of inspired oxygen only if needed.”(ARC & NZRC2, 2010, Guideline 13.4)
Updated February 2012 © Victorian Newborn Resuscitation Project
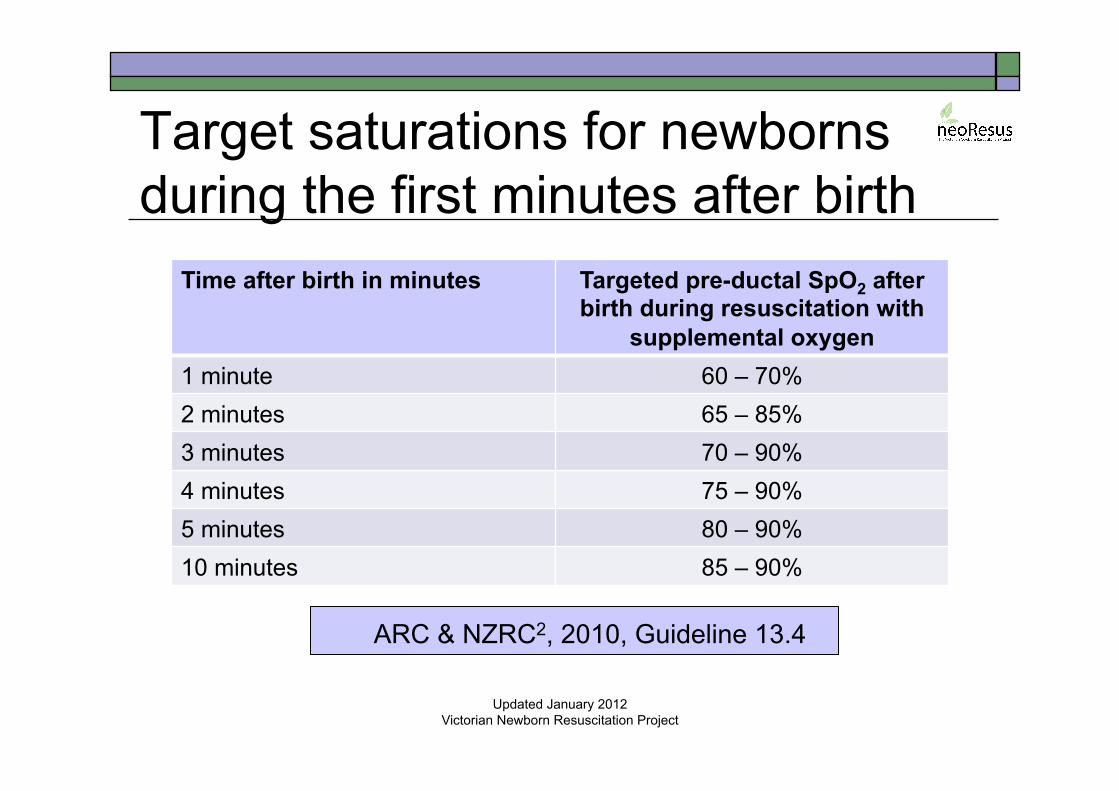
Target saturations for newborns during the first minutes after birth
Updated January 2012
Victorian Newborn Resuscitation Project
Time after birth in minutes Targeted pre-ductal SpO2 after birth during resuscitation with
supplemental oxygen 1 minute 60 – 70% 2 minutes 65 – 85% 3 minutes 70 – 90% 4 minutes 75 – 90% 5 minutes 80 – 90% 10 minutes 85 – 90%
ARC & NZRC2, 2010, Guideline 13.4

Initial inflations Higher inflation pressures (PIP > 30 cm H2O)
may be needed for the initial inflations. Subsequent inflations usually require less
pressure, although some babies may need higher inflation pressures (higher PIP).
Improvement in heart rate is the primary measure of adequate ventilation.
If the heart rate is not improving with good technique, then higher PIP may be required.
Updated February 2012
© Victorian Newborn Resuscitation Project
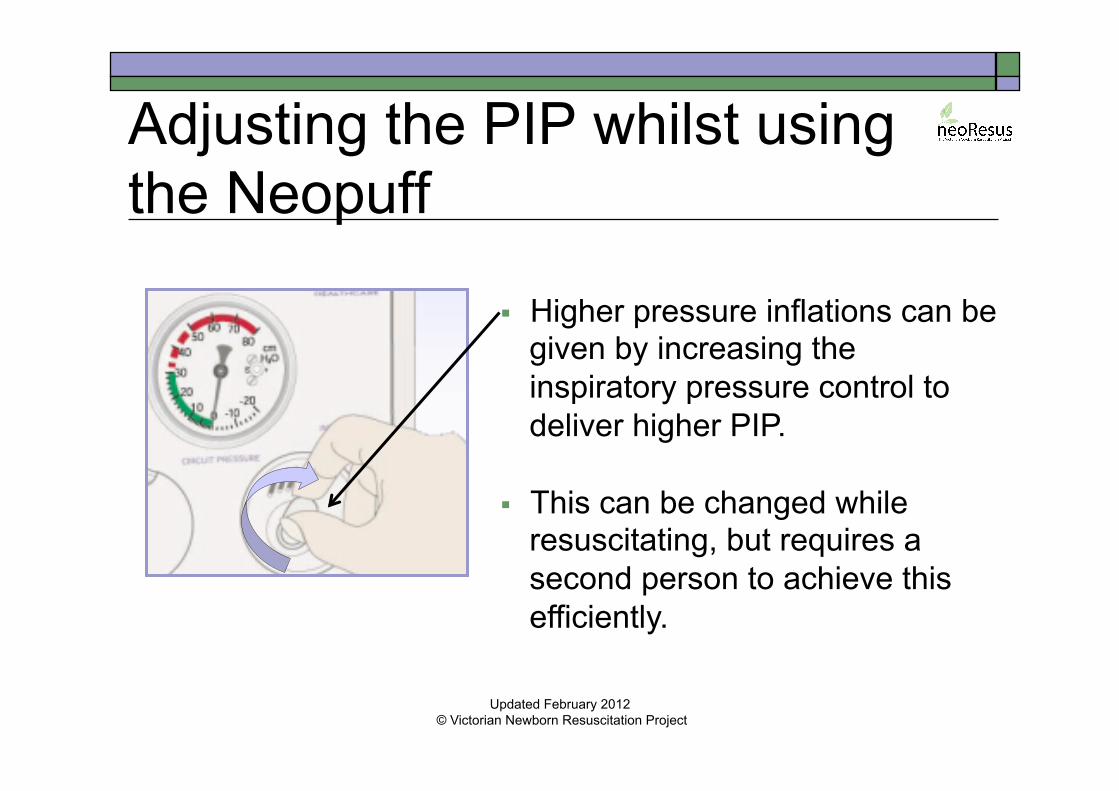
Adjusting the PIP whilst using the Neopuff
Higher pressure inflations can be given by increasing the inspiratory pressure control to deliver higher PIP.
This can be changed while
resuscitating, but requires a second person to achieve this efficiently.
Updated February 2012 © Victorian Newborn Resuscitation Project
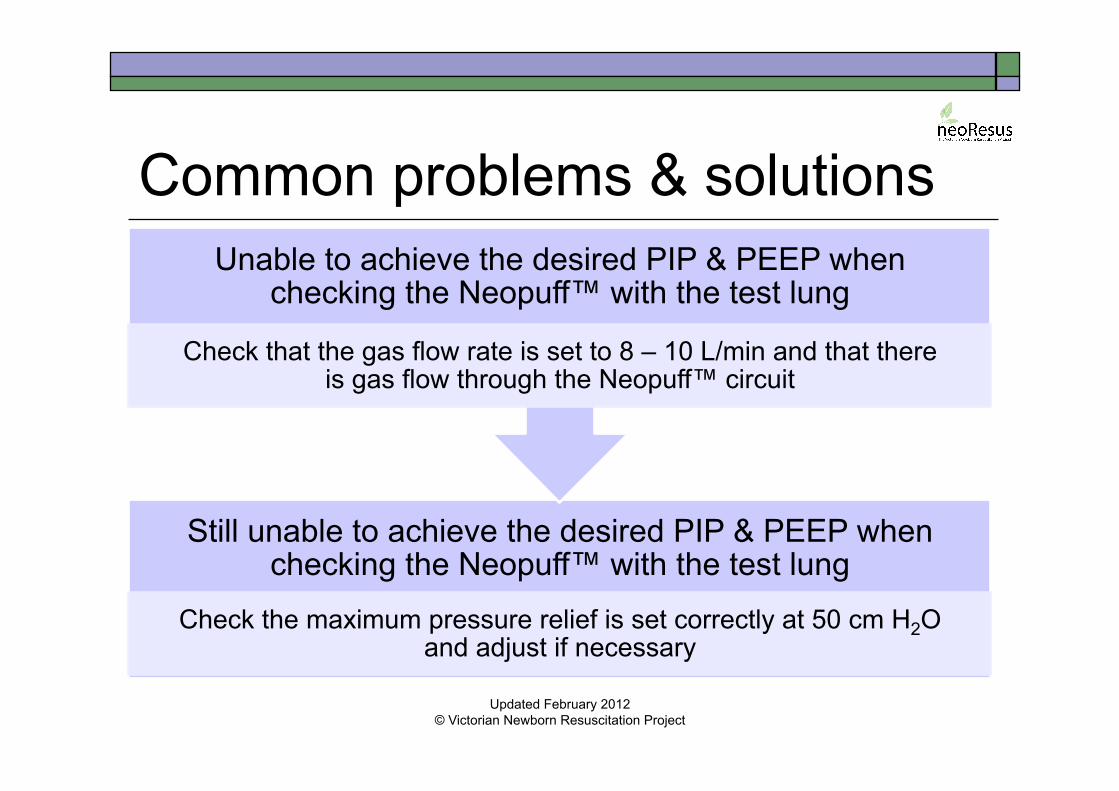
Common problems & solutions
Still unable to achieve the desired PIP & PEEP when checking the Neopuff™ with the test lung
Check the maximum pressure relief is set correctly at 50 cm H2O and adjust if necessary
Unable to achieve the desired PIP & PEEP when checking the Neopuff™ with the test lung
Check that the gas flow rate is set to 8 – 10 L/min and that there is gas flow through the Neopuff™ circuit
Updated February 2012 © Victorian Newborn Resuscitation Project
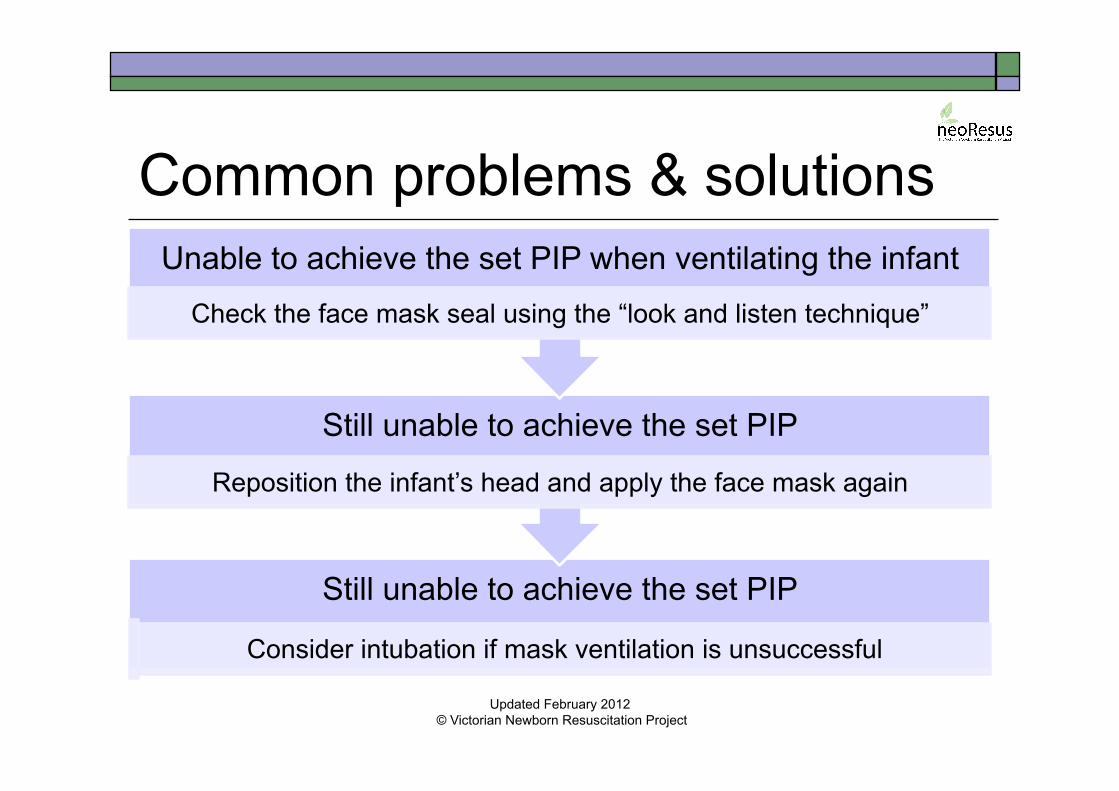
Common problems & solutions
Still unable to achieve the set PIP
Consider intubation if mask ventilation is unsuccessful
Still unable to achieve the set PIP
Reposition the infant’s head and apply the face mask again
Unable to achieve the set PIP when ventilating the infant
Check the face mask seal using the “look and listen technique”
Updated February 2012 © Victorian Newborn Resuscitation Project
Most importantly: look at the infant, not at the manometer! Effective ventilation is confirmed by three signs:
1. An increase in the heart rate above 100/minute. 2. A slight rise of the chest and upper abdomen with
each inflation. 3. An improvement in oxygenation.
Achieving the set PIP on the manometer is not a sign of effective ventilation.
Updated February 2012 © Victorian Newborn Resuscitation Project
Remember! If the heart rate remains < 100/min and/or the chest is
not moving despite ventilating with good technique:
TURN UP THE PEAK PRESSURE (PIP) 30 → 40 → 50 → 60 cm H2O
Continue to provide positive pressure ventilation until the heart rate is above 100/min and the infant has established effective spontaneous respirations.
Endotracheal intubation should be considered if ventilation via a face mask is unsuccessful.
Updated February 2012 © Victorian Newborn Resuscitation Project
References Australian Resuscitation Council & New Zealand Resuscitation Council.
(2010). Guideline 13.4: Airway management and mask ventilation of the newborn infant. Accessed February 2, 2012 from http://www.resus.org.au
Fisher & Paykel Healthcare. (2004). Neopuff™ Infant Resuscitator. Optimal resuscitation in neonatal care. Auckland, New Zealand.
Morley, C.J., Schmolzer, G.M., & Davis, P.G. (2009). Potential hazards of the Neopuff: using appropriate gas flow. Archives of Disease in Childhood- Fetal and Neonatal Edition, 94, F467-F468.
Wood, F.E., Morley, C.J., Dawson, J.A., Kamlin, C.O., Owen, L.S., Donath, S., & Davis, P.G. (2008). Improved techniques reduce face mask leak during simulated neonatal resuscitation. Study 2. Archives of Disease in Childhood: Fetal & Neonatal Edition, 93: F230 - F234.
Updated February 2012
© Victorian Newborn Resuscitation Project

Acknowledgements The animated graphics used in this presentation have
been reproduced with the kind permission of Dr Andy Gill; Consultant Neonatologist: King Edward Memorial Hospital: Western Australia.
The Neopuff colour diagrams have been reproduced with the kind permission of Fisher & Paykel Healthcare: Australia and New Zealand.
Updated February 2012 © Victorian Newborn Resuscitation Project
Disclaimer This teaching program has been developed by the Newborn Emergency Transport Service (NETS) Victoria as an educational program around neonatal care with the assistance of a grant from the Department of Health Victoria.
Whilst appreciable care has been taken in the preparation of this material NETS shall not be held responsible for any act or omission which may result in injury or death to any baby as a result of reliance on this material. Updated February 2012
© Victorian Newborn Resuscitation Project
Copyright This presentation was developed by Rosemarie Boland
on behalf of the Victorian Newborn Resuscitation Project (2012). The material is copyright NeoResus.
This presentation may be downloaded for personal use but remains the intellectual property of NeoResus and as such, may not be reproduced or used for another training program without the written permission of the Victorian Newborn Resuscitation Project Executive.
Please contact us at [email protected]
Updated February 2012 Victorian Newborn Resuscitation Project