Embed Size (px)
Citation preview

OPERATING MANUAL FOR
IftAZ/!1C
MICRO DISK SYSTEM
~ YAMAZAKI MACHINERY WORKS,LTD.

Page
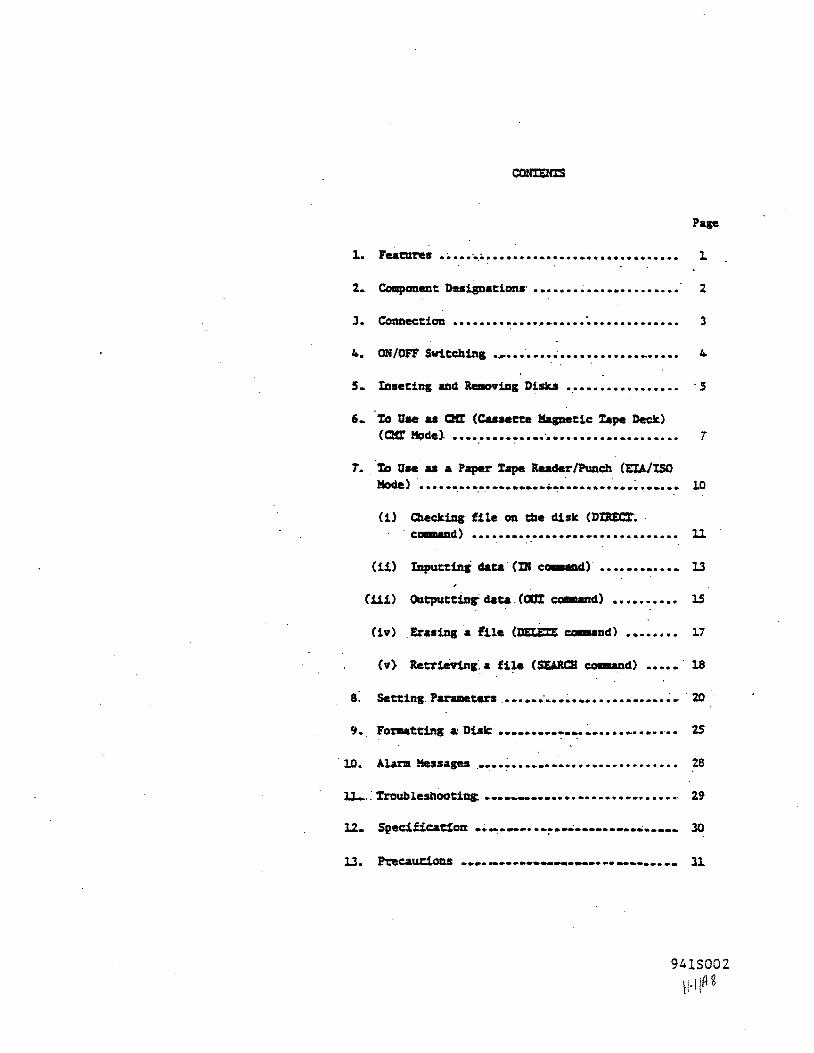
1. ,.acures ...................................... L
•••.•.....•••••.....•.
J. C'oDDection ........•.... ~ ................... . 3
"'. ORlOFF Switc:hiD, .,.",. ..................... ~ .... . s. tnsetine aad leIIov1ae D1sks .................. ·s
6.. %0 Use as aa: (Casaeem Hapet1c %ape Deck)
(aa: !tode). • ............... '. • • • • • • • • •• ... •• • •• • • 7
7.%0 Uae as • Paper '%.ape lleader/Puach (EtA/ISO Mode) ••••••••••••••••••••••••••••••••••••••• 10 . .. .
(1) Clec:k1ag file 011 tbe d1sk (DIREC:r". ca.maad) ••••••••••••••••••••••••••••••• 11
(11)
(111) Output:!nt data . (oo:r =--cl) 15
(1v) ErasiDea tUe CDEtErE =-aDd) l7
18
8: Settinc. Parameters ............ ~ ............... ~.. 10
'.. FO%BlatC1nC &' Dull: •••• _ •• ___ ................ '.. 2S
Alarm Hessages .--...... ~ .••..••.•..••.......• 28
ll... ~ %raublesboatins:, ........ _ ....................... e" 29
12. Spec1f1caC!aft _.~. __ ..... ~. __ ._._. ___ ._ •• __ • 30
13. P1:::-ec.a,u~ ....... --....... _ ... ___ ............. _ 31
9415002 ~.I/~ ~


-------rJ-1. Features
(1) Employs a 3.S·inch micro floppy disk, a new data storage medium replacing tape.
(2) Has a diskette capacity equivalent to 1.600 meters of paper tape or 3 rolls of magnetic tape at the maximum.
(3) Capable of high-speed reading and writing (A task can be performed in reduced operating times and rates shown in the table).
I LOAD/READ SAVE/PUNCH ~
CHI 70% 8S%
Paper tape reader 80% 20% Ipunch
(4) Incorporates easily legible English language liquidcrystal display.
(S) Has a built-in clock.
(6) Has a compact lightweight structure.
- 1 -

o~------2. Component Designations .
(3.S-incb micro floppy disk) Always use tbe double-side-double-density (200) type.
! I
c c
Front Rear
Use erase prevention tab as follows:
WRI:rE disabled WRnE enabled

--~----------~~~} (Body)
3. Connection
"-r uIol.-
Li ... ,. e..,.ul ., ..... , u.ca)
/ ...... ,"'c i I I
I , L
.,1. .~ "IS I 17
, 12 :I r"U\1< II oTz \l11'IIU PI"I< S\'~TDI -/
r _Cell 7
- 3 -
I
1 I Eject MP.C ..
j Oi ........ rc porr
D'''' ace ...... "la,. Upr
&. When used as a IT paper tape punch
1J When used as CM:r

-i!J-------, 4. ON/OFF Switching
(Switching ON)
(1) Check that the cable is connected properly.
(2) Put the POWER switch in the ON position.
(3) Note that
NDIE:
*** MAZAK MICRO DISK SYSTEM *** Ver. 1.0 84/12/25 14:25
appears on the LCD.
When switching the power on for the first time, always check the parameter set value. For the parameter setting procedure, see para. 8.
(Switching OFF)
(1) Remove the disk. (NDIE)
(2) Put the POWER switch in the OFF position.
NDIE: Switching off when a disk is still in the drive could damage the stored data on the disk. Always remove the disk before switching the system off.
Do not switch on and off repeatedly without allowing an interval of2 or more seconds between switch operations.
- 4 •

--------&]-S. Inserting and Removing Disks
(Inserting)
~ Open the cover.
[[i] Insert the disk with its front edge toward the operation side. Push the'disk in until it has clicked into place.
(Removing)
the disk can not be inserted upside down. [!] Close the cover.
,- 5 -

-{!If----------Iml. Open the cover. Check that the disk access pilot light
has gone out.
frn] Push the eject button until it clicks. and pull the disk straight out.
[l] Close the cover.
NOtE: If the disk is removed when the disk access pilot light is on, the stored data can be damaged.
HOI!: Immediately after the insertion of a disk, access to the disk will be performed for a few seconds to read the system information. Accordingly, removal of the disk immediately after its insertion may cause a trouble. Even if the system becomes malfunctioned due to such erroneous removal, however, it can be easily restored by putting the power switch in the OFF poSition once 'and then switching OR again. .
- 6 -
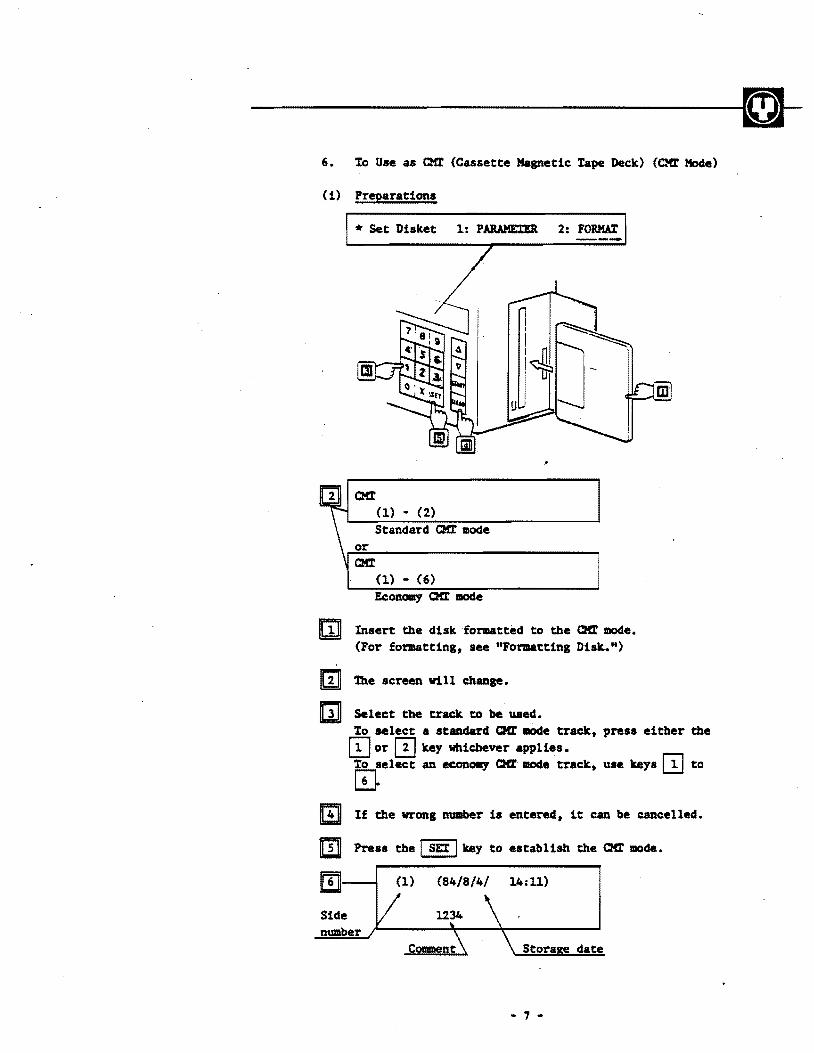
--------------~ 6. Io Use as CHI (Cassette Magnetic tape Deck) (CHr Hode)
(i) Preparations
'" Set Disket 1: PARAME'.l:ER 2: FORMAl'
CHI (1) • (2)
Standard CHI mode or CM:r
(1) - (6)
Economy CM:r mode
[j] Insert tbe disk formatted to tbe CM:r mode. (Por formatting, see "Formatting Disk. lt )
m lhe screen w11 1 change.
fUJI Select the track to be used. Io select a standard CMI .ade track, press either tbe ~ or 0 key whichever appUes. Io select an econOllY CMI mode track, use keys [!] to
CD m If tbe wrong nulDber is entered, it can be cancelled.
It!IJ Press the I SEt I key to estabUsh the CMI mode.
date
- 7 -
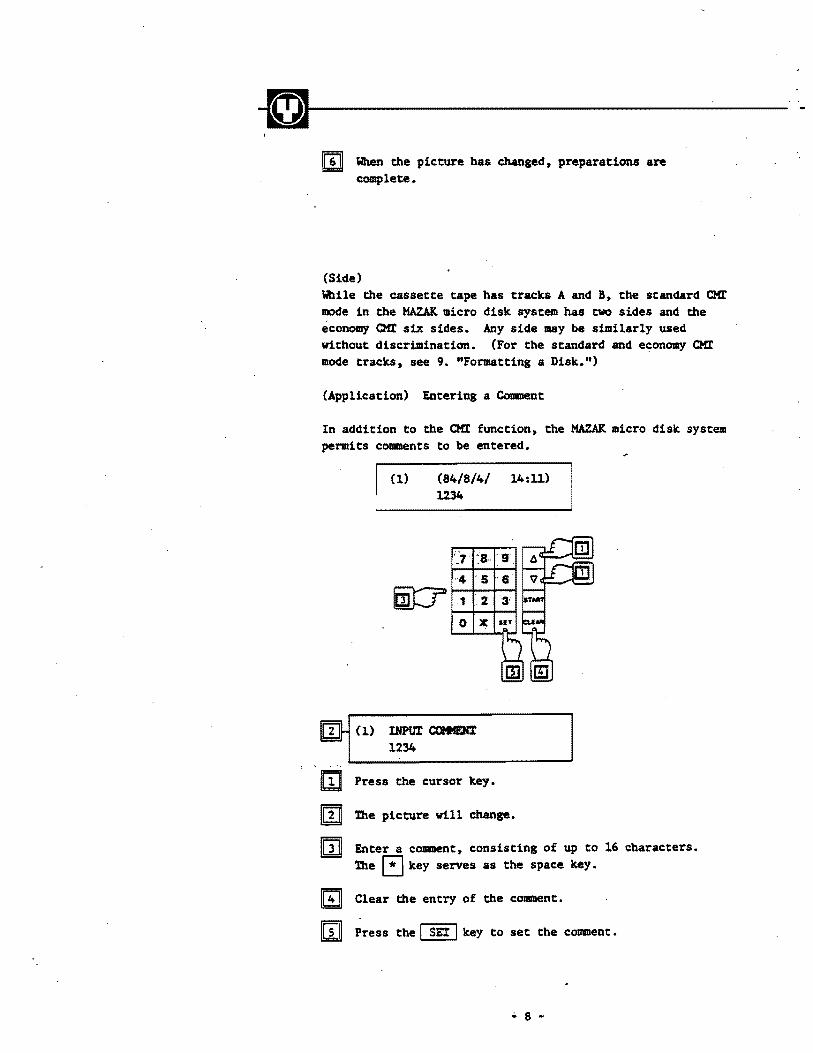
{~~--------------IGJl When the picture has changed, preparations are
complete.
(Side) While the cassette tape has tracks A and B, the standard CMr
mode in the MAZAK micro disk system has two sides and the economy aa six sides. Any side may be similarly used without discrimination. (For the standard and economy aa mode tracks, see 9. "Formatting a Disk.")
(Application) Entering a Comment
In addition to the aa function, the MAZAK micro disK system permits comments to be entered.
(1) (84/8/4/ 14:11) 1234
'~.7. ~8·· 9·
"4
(1) I.NPtlr COtI!IFJr.I: 1234
Press the cursor key.
'lhe picture will change.
Enter a comment, consisting of up to 16 characters. 'lhe ~ key serves as the space key.
Clear the entry of the comment.
Press the I SE! I key to set the comment •
.;. 8 -

-------[1-tmE:
NO'!E:
If READ or WIrE should be performed before pressing the I SE'I I key, the comment will not be updated.
No comment can be inputted after the following READ or WRITE is operated.
(ii) READ !WIrE
[!J Operate the NC unit.
[l] No micro disk operation is necessary.
(iii) eM! mode termination
m Press the CLEAR key, the image wi 11 change to the CH:r
preparation.
11]] Or,,' remove the disk.

-1]1----------7. Xo Use as a Paper Xape Reader/Punch
(EIA/ISO mode)
(*) Preparations
* Set Dislcet 1: PARAMErER 2: FORMA:r
EIA/ISO 1: DIKEC'!. 1: IN 3: 00'l It: DEI.E:rE 5: SEARCH
Insert the disk formatted to the EIA/ISO mode.
[]] 'The picture will' change.
[i] Select a command with the [!J to [!] keys.
m A wrong number can be erased.
[i] Press the I SEX I key to execute tbe command.
- 10 •
--------------~~} List of Command Functions
CoaDand Function
1 DIRECT. Displays the number of stored files, the residual memory capacity, the file des1&nation, the date of registration and the file size.
2 IN Accepts EIA/ISO data from an external source and write them in.
3 otr.t Sends the data stored in the disk to an external system.
4 DELErE Erases a file.
S SEARCH Retrieves a file.
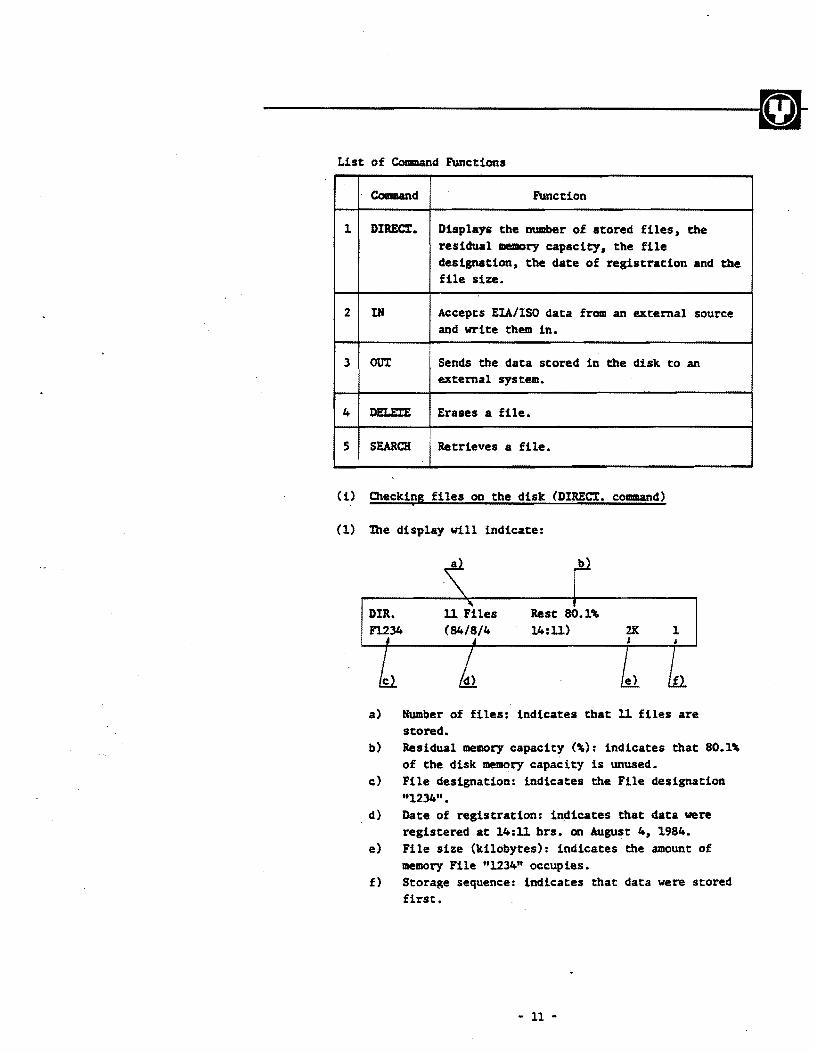
(i) Checking files on the disk (DIRECT. command)
(1) the display will indicate:
DIR.. Fl234
11 Files (84/8/4
Rest 80.1'-14:11) 2K 1
a) Number of fUes: indicates that 11 fUes are stored.
b) ReSidual memory capacity (,-): indicates that 80.1'of the disk memory capacity is unused.
c) File designation: indicates the File designation "1234".
d) Date of registration: indicates that data were registered at 14:11 brs. on August 4, 1984.
e) File size (kilobytes): indicates the amount of memory File "1234" occup ies •
f) Storage sequence: indicates that data were stored first.
- 11 -

~I-------
(2) Key inputs
(3) Ending the DIRECT. CODIDand:
Iml 'lhe image will move up one line.
'lhe image will move down one 11ne.
~: I
UJ Press the I CLEAR I key. l'he display will change to "Preparation" (P9).
m Press the eject button.
- 12 -

------------~~ (11) InputtinS data (Df cClJllllaDd)
(1) Input file name.
7 's: ... "~I
@::? 1,
O.
F
m Input the file name" to be registered. A file name IllUst have up to 4 digits.
A wron.g number can be erased. Press the I CLEAR I key before the number key. and the sc:reen wi 11 return to ''Preparation'' (P9).
![JJ Press the I SEt I key to set the file 'name.
NOlE: If a registered file name already exist, an error message will appear on the sc:reen.
(2) Start transmission
Df Push (SUIt)!!
[3 vuo
©
m Press the I S'rAR:r I key.
m Operate the He unit to output data.
I[]] PreSSing the ! CLEAR I key will interrupt the transmission.
HOlE: Always press the micro disk I Sl'AR'X I key before operating the Ne unit to output data.
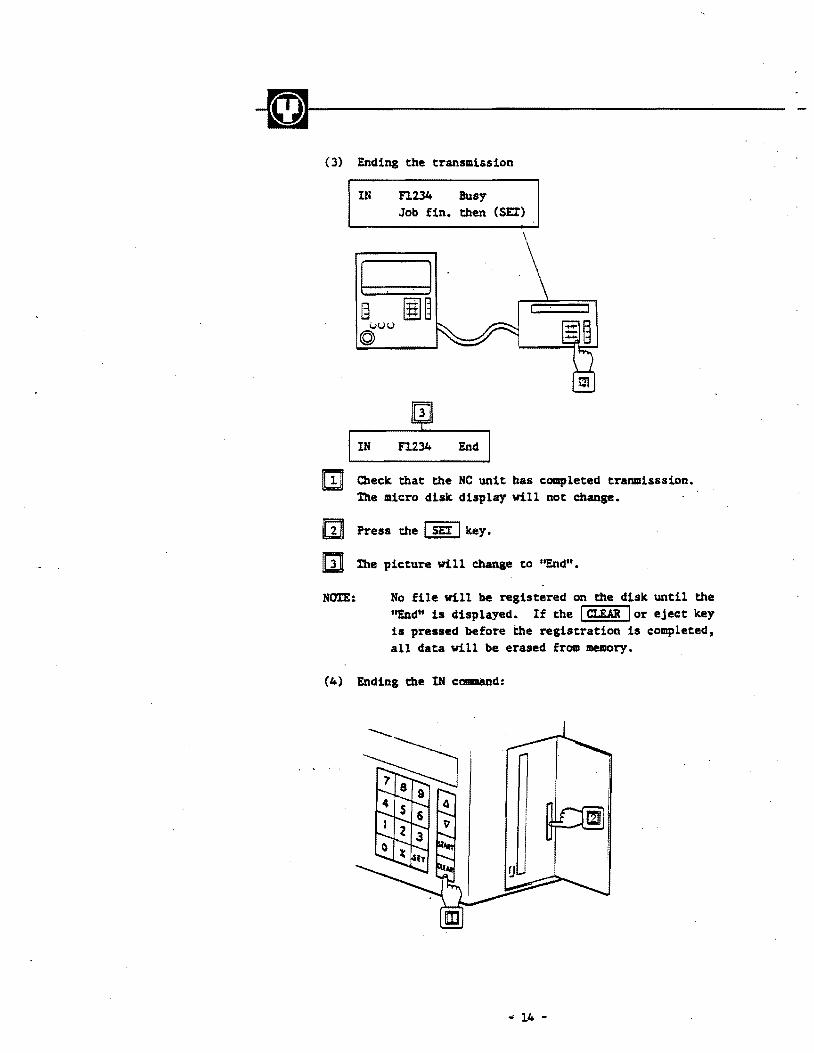
-al--------..;.-(3) Ending the transmission
IN 11234 Busy Job fin. then (SEl)
\
IN Fl234 End
[]] Check that the Ne unit has completed tranmisssion. !he micro disk display will not change.
Press the I SEr I key.
m !he picture will change to "End".
NotE: No file will be registered on the disk until the '~d" is displayed. If the I CLEAR lor eject key is pressed before the registration is completed, all data will be erased from memory.
(4) Ending the IN COllllilDd:
.. 14 -

-------rJ-m Press the I CLEAR I key to return to the initial cOlllllaDd
(FILE NAME INP1.I'r).
m Press the eject button.
Nam: Plural programs can be registered as a file but a desired program cannot be taken out fol'lll the file when necessary. In such a case, therefore, handle the file en bloc.
(iii) Outputting data (our command)
(1) Input file name.
lour r
Input the file name to be outputted. A file name must have up to 4 digits.
A wrong number can be cancelled. Before pressing the number key, press [ CLEAll I and the screen will return to ''Preparation'' (P9).
[i] Press the I SEt 1 key to set the file name.
Entering 4 file name which is not registered will result in an error message on the display.
- 15 -

-ll'---~---(2) Starting the transmission
our Fl234 EIA
Push (s:r.ARXH!
~I~CJ I..... __ =;"';;;..,J
\OJ Press the I STA.RT I key.
[i] Operate the NC unit to receive the data.
Non:: Always press the micro disk I Sl:ARl: I key beofre operating the NC unit t~ receive the data.
(3) Ending the transmission
OUI
OUI
Fl234 EIA
Fl234 EIA
Busy
End
[l] After the display changes, the transmission will end.
(4) Ending the OUI command See ''Ending the IN coamand!'
• - 16 -

---------!~
(iv) Erasing a file (DELEIE command)
(1) Input the file name.
DELE'!:E. F
7 8
4 5
@(? 1 :2
o
Input the file name to be erased.
A wrong number can be cancelled. Before pressing the number key t press ~ and the screen will return' to "Preparation" (pg).
1m! Press I SEl: I to execute the COIIIIIand.
(2) Erasing the file.
I DELEIE n234 Push (Sl'ART)!!
7 8 9
4 5 6
1 :2 3
0 X SET
I DELE'l:E n234 End
- 17 -

-1]1-------m Q\eck the file name and press I S'IAR:t I to erase the
file.
I~l If the file name is incorrect. the DELEIE command can be cancelled and the file will not be erased.
[]OJ the file has been erased.
(3) Ending the DELE7! command See ''Ending the IN cCllllDaftd".
(v) Retrieving a file (SEARCH command)
(1) Inputting the file name.
I SEARCH P
OJ Input the file name to be found. ' .... may be used as a ''wild card" character.
(Example) 123* corresponds to. all file names from 1230 to 1239.
A wrong number can be cancelled. Before pressing the ~ber 'key. press I CLEAR I screen w11l retum to "Preparation" (P9).
m Press I SE:r I to execute the coaIand.
- 18 -
the

--------------~~} (2) Retrieving the file.
789
458
, 2 3
o X lIT
FU3* Pusb (sr.o::r)!!
[jJ After checking the file name, press I Sl:AR't I .
m :ro interrupt the file retrieval, press I CL!A.R I •
NOTE: lbe' file name for retrieving a file differs from the workpiece Dumber. For example, if a coumand to puncb out plural programs in a row is g;ven on tbe side of the He or automatic programming system, they are regisered on the disk as a single file. In this case. the retrieval cannot be ... de using the workpiece number. Specify the figure registered as file name.
(3) a.eck the re lated files. See the ''DIREC'l'. command".
(4.), Eacling the SEARCH cOlDaftd. See ''Ending the IN cOIIDalldlt
•
• 19 -

{~~----------~-8. Setting Parameters
Data, time, serial transmission system or output code may be input.
(1) Entering the PAR.AHE:I:ER SEr mode.
'It Set Disket . 1: PAR.AHEn:R 2: FORHAX
, '
~! I
[!] If a disk is in the drive, press the eject button to remove it.
![]I Press W . [i] A wrong number can be cancelled.
[ij]' Press I SEl'l and the system will enter PAR.AHE:I:ER SE:r mode.
-.20 -

--------------~~r (2) Setting parameters.
Setting the date.
PAlWEI:ER DAlE (84/12/20) •••• (Year/HonthlDa
Hove the cursor and use number keys to change the data •. '
~ moves the cursor to the left. ~, moves the cursor to the right.
G Press I SE'l: I to input the parameter. Now set the next parameters. ;ben data are not changed, press I SET I
II!! Leave the PA.RAMErER SE'l: mode.
Setting the time.
(13:44)
Follow the Sallie procedure as for setting the date.
- 21 -

al-------Setting the CHr mode baud rate.
The asterisked value is a reference set value.
PARAHEIER CHr Baud-Rate - 4800
Select one of the following baud rates: 110, 300, 600, 1,200, 2,400, 4,800*, 9,600 and 19,200 bauds
m The baud rate will inereaae.
m lbe baud rate will decrease.
[i] Input a baud rate and input the other parameters.
GJI Leave the PARAME'.rER SEt mode.
Setting a ErA/ISO mode constant
Setting a baud rate:
1== ..... -.... - .... 101low the same procedure as in the arr mode.
- 22 -

--------------~~-Seetin, a stop bit:
PAR.AHEmR (S1'OP IU) PO - 0 (0 : 1 1: 1.S 2 2)
7 8
4 5
;;"::;2;
0: X
[[] Use number keys (0 to 2) to set a stop bit. Number represent stop bits as follows: [£U key ••••• Stop bit 1 [!J key ••••• Stop bit 1.S ~ key ••••• * Stop bit 2
[i] Set the stop bit and set other parameters.
(]1 Leave the PAR.AHEmR SE':r mode.
Setting a paritY bit:
I PARAMEIER (PARIn' 1Il:)
", Pl - 0 (0: NON 1: ODD 2: EVEN)
See "Setting .. stop bit" for bow to key 1n. Number keys represent:
[2J key [!] key [!J key
..... * No parity bit Odd parity
••••• Even parity
Selecting the EIA/ISO output code
I PAlWErER (otrrPtT.r CODE) P2 - 0 (0 :ZIA 1 : ISO)
See "Setting a stop bit" for how to key in. Number keys represent: [QJ key ••••• " * EIA [!] key ••••• ISO
• 23 •

-(~I--------
Setting DC code ENABLE/DISABLE
I PAR.AHE:I:ER (DC CODE) ~3 • 0 (0: ENABLE 1: DISABLE)
NO'l:E:
See "Setting a stop bit" for how to key in. Number keys represent.
W key W key
* Enable Disable'
Baud rate, stop bit and parity bit are the impor~ant transmission constan~s. !he settings in an external system must be adjusted to match those in this system.
- 24 -

--------------~~r 9. Formatting a Disk
Formatting an unformated disk:
'* Set Disket
J[}1 PORMA7 Push (SURl:)!! I [!] Insert an unfomatted disk.
W the screen will change.
[iJ] Press the I s:rARX I key.
'-bile formatting, a bleep is produced; In approximately 80 seconds, the formatting Will be completed.
[GJHPORMA7 1:<Xr(2) 2:CM:r(6) 3:EtA/ISO
Now. set either the arr or the EtA/ISO mode. Presa W to UIIe the disk in the standard Qfr mode. Pre.a II] to UIIe the disk in the economy CMr mode. Press [!l to use the disk in the EtA/ISO mode.
m A wrong number can be cancelled.
m Preas I SEr I to set the mode.
• 2S -

-£)1----------Refomattins a used disk:
* Set Disket l:PARAHEr.ER 2:FORHA.:I
~!...;FO;..;..RHAX.......:.:=-_...;In;;.;;;.:,s...;;e.;;.rt~D...;i;;.;S .... k.e=-t...;! ;;....!!
With no disk inserted;
Iml Press !!J. 1m] Press the I SET I key and the system will enter the
FORHAX mode.
[i] 'lbe screen will change.
IG] Insert the disk to be reformated. See "Formatting an unformated disk."
(!leference)
What formatting a disk does: An unformatted disk has no magnetic information on it. so it is not possible to write data on the disk. Formatting prepares the magnetic tracks on the disk so that data can be written magnetically. By thus initializing the disk to the particular disk operating system. data can be written onto it and saved. Disks must always be formatted before using.
In the HAZAK micro disk system, three types of disk configuration are used as follows:
- 26 -
.-

-------rJ-Standard CHr mode In this mode, the disk can be used like
a converntional cassette tape.
Economy CHr lIOde In this mode, the disk capacity is equivalent to three conventional cassette tapes. However, it is UDpossible to load a large program ifa bubb le memory is used.
ElA/ISO mode In this mode, the disk may be used instead of paper tape for the PIP/PTR.
- 27 -

-n~--------------10. AlarmHessages
Display Meaning Action
ALREADY A file already exists wh~ch Clange the file AVAILABLE has the same name as that designation.
being registered with thtt IN couaand.
SELECl'ED the file selected using the Clange the file FILE our or DELE7E command does designation. UN- not exist. AVAILABLE
DISK An error has taken place in Clange the disk.. ERROR reading from or writing to
a disk..
WRIll: the erasure prevention tab Clange the disk. or INHIBIT has been set in the WRIXE release the
INHIBIt position. erasure prevention tab.
MEttJRY An attempt has been made to Clange the disk.. OVER write data with insufficient
residual capacity.
IRANSFER. An error has taken place Replace the trans-ERROR while communicating with lIIission cable.
an extet'Dal. system.
- 28 •

--..........---------m-11. Troubleshooting
Symptom Point to be chcked/action
System cannot be o Check that the power connector is turned on. connecte properly.
Date and time are o Switch on, and leave the system for at not correct. least eight hours, then, set the
correct date and time.
Disk error takes o Check that a double-side-double-place. Data densiey disk is being used. cannot be read or o Check that the disk has been formated written. p.roperly.
o Check that the HAZAK micro disk system hooked up properly.
o Check the disk for possible scratches. Use a different one.
o Iurn off any nearby equipment that may produce eleatrical interfere~ce.
o Cleck that the signal connectors are connected properly.
o Check that transmission constants match. (parameter)
Data can neither o Check that the erasure prevention tab be written nor is still in place. erased.
Disk cannot be o Check that the disk is being inserted inserted. in the proper direction.
- 29 -

-(QJI-------__ 12. Specification
. Power 85 to 132 or l70 to 264 VAC. (See nameplate)
Power consumption lSW
Operating Ambient temperature: 10° to 50°C; environment Humidity: 20 to 80%;
Locate: clean and dustfree.
Outside dimensions 265 x l30 x 75 (except for handles)
Weisht 3.7 kg
Applicable disk 3.S-inch double-side-double-density micro floppy disk 640 kilobytes
Display: LCD 40 characters x 2 lines liquid crystal type
Interface RS-232C baud rate, llO, 300, 600, 1200, 2400, 4800, 9600, 19200
Applicable NC units and automatic programmers, external SY8 teDIS which have RS232C interfaces.
Software Specification
Memory capacity 319 kilobytes x 2 tracks in the standard CMr mode 106 kilobytes x 6 tracks in the economy CM'I mode 630 kilobytes (paper tape of approx. 1,600 meters long) in the ElA/lSO mode
CMr mode Operating an external system CoIIIaaands
ElA/lSO mode DIRECl', IN, OIJ'X, DELEn: and SEARCH coaaands
Parameter settings Date, time, serial transmission" system and output code
• - 30 -

--------------~~} 13. Precautions
(1) Installationn Precautions
l'he HAZ.AK micro disk system is a precision mach1De. Observe the following precautions:
1) Avoid storing or using the system in locations exposed to direct sunlight or near beat-producing devices such as electric or gas beaters, etc.
2) Avoid transporting, stroing and using the system at an extremely bigh or low t~racures or in locations where tempera cures cbange over a wide range.
3) Avoid storing and using the system in locations which are bighly bumid and/or where oils and/or ferrous dust are present.
4) l'his system uses precision mechanical parts. Do not apply any sbock to the system nor use it in a vibrating location.
5) l'he system may not operate properly near equi~t which generate stroDg _gnetic fields. Isolate the system froa such equi~t.
6) Install the system'only as illustrated below.
o
- 31 -

~~------------(2) Micro noppy Disk Handling Precautions
1) Hever apply solvents such as thinner, alcohol, freon, etc., to the disks.
2) Do not bring magnets near the disks. Exposure to a magnetic field can destroy recorded data.
3) Do not place anything on the disk, which could defot'lll or render it unserviceable.
4) Do not opeD the shutter; if magnetic side is stained, errors can result.
- 32 -

--------------~~r 5) Attach the label in the
proper place. Nben replacing it, do not place a new label on the old one.
6) Insert the disk in the drive carefully and gently. Putting it in and out roughly will damage the jacket, and the disk may not seat properly.
7) Do not use a micro floppy disk stained by liquids such as soft drinks, coffee, etc. or with eras ing rubber, _tal powder, etc.
8) Never take tbe floppy disk apare.
- 33 -

~~~-------------9) Avoid using and storing
disks in locations which are hot, htshly humid, exposed to tbe direct sunlight and/or dirty.
10) Recommended worlting environments are: temperature: 10° to sooe and hUlliidity: 20 tbru 8~ relative, but wet bulb temperature: 29°e and below Avoid rapid temperature changes. (Avoid temperature changes " over 200 e per hour.)
ll) Recommended storage environments are: temperature: 4 to S3°e and humidity: 8 to ~ relative
12) Recommended transport environments and methods are: temperature: -50 to S3°e and hUlliidity: 8 to ~ relative. Do not transport the micro floppy disk without putting it in its special container.
- 34E -
"-
.. ~YAMAZAKJ
YAMAZAKI MACHINERY WORKS. LTD. t. Norifune. Oguc:hi-dlo. Niwa-gun. Aichi.prri., Jaoan 480.01 Phone; Ogucni 1058791 Sot 131 Telex: J59777 Cible: "MAZAK" NAGOY A JAPAN FKSlmil.: 05879·5·2717
MAZAK CORPORATION 8025 Production Oriv., Florenca. Kentuckey 4 f042 Phone: 606-n7·S7oo T .... : 2'46'74 Facsimile: 606-n7·SIC3IS834
BUFFALO SERVICE OFFICE 7661 Seneca A--.e easE Aurara, NY 14052 Phone: 7'6-655-4388 Facsimile: 716-655-4915'
CHICAGO ReGIONAL OFFICE 600 N. Wtweling Road Mt. PrOlOlCt. Illinois 60056 Phone: 312·29a:9797 Facsimile: 312·298-4748
HARTFORD REGIONAL OFFICE 10 Bid_II Road South Windsor. ConnIC'ticut 06074 Phone: 203·528·9511 Facsimile: 203·528·2995
ATLANTA REGIONAL OFFICE 1964 Providence Court College Park. Geo'9ia 30337 Phone: 4CJ4.996-1030 Facsimi .. :4CJ4.99&;3533
LOS ANGEI.ES MAZAK TECHNICAL CENTER 1333 West 19Ot" Street G ... aend. ~Iifomia 90248 Phon.: 213·327·7172. Facsimile: 213·538-4087
HOUSTON REGIONAl. OFFICE 770 Belt Wav •. 8 HoUSton. T.xas 77060 Phone: 713-931·mO Facsimile: 713·931-6191
SEATTLE REGIONAL OFFICE 7857 South 180 BlCIg. No.1 Kent. Wastllngton 98031 . Phon.: 206·251-6015 Facslm,le: 206·251·5419
TULSA REGIONAL OFFICE 11424 EIre 58th Smtft Tulsa. Oklahoma 74145 Phone: 918-252·9533 FDmjle: 918·250-8298
YAMAZAKI MAQUINAS HERRAMIENTAS. s.A. DE C.V.
Boulltllan:.t Toluca 22·E PlantllBa" Naucalpan Oe Juarez EstJdo de Me.ico MEXICO Phone: 9Q5.358-s:MO FDmil,: 0015253585341
YAMAZAKI MACHINERY EUROPE N.V. R-= Park. Gr~ 7 3030 Iduwn BEI.GIUM Phone: 016-230902 T .... : 04662552 Facsimile: 016·224587
YAMAZAKI MACHINERY DEUTSCHLAND GmbH
Euiil'llJlfstraae 4. 7320 GOppingen Dauacl'lland Phone: 7161-68057/68058 TaIu: 41n7653 F-=simile: 7161.73613
YAMAZAKI MACHINERY DEUTSCHLAND GmbH NiedarllllUng DauUChIend Nordilldsa'dsle 46 . 6082 Morfeldan·Walidorf Dauucl'll.1nd Phone: 061(15.71025126 T ..... : 4185773 F-=simile; 6105-71%72
YAMAZAKI MACHINERY UK LTD. Budcholt Orive W .. ndon Industrial Estate Wamdon. WorcatM UNITED KING~OM Phone: 0905·57024 Telex: 338889 FlCSimile: 0905-57844
1985.5.200 I Pnnted In Japan

![Welcome [stllug.sluug.org]tutorial presentation floppy disk diskette Created Date: 1/18/2007 5:58:39 PM](https://img.pdfslide.us/doc/110x75/6071c77c8f6e552afb5c2d8f/welcome-tutorial-presentation-floppy-disk-diskette-created-date-1182007-55839.jpg)