Embed Size (px)
Citation preview

RQT8020-1LEC
Operating Instructions
DVD Recorder
DMR-ES10Model No.
EG GN GC GCS
For Asia
For Continental Europe
For Australia and N.Z.
Dear customerThank you for purchasing this product. For optimum performance and safety, please read these instructions carefully.
Before connecting, operating or adjusting this product, please read the instructions completely.Please keep this manual for future reference.
Region number supported by this unitRegion numbers are allocated to DVD players and DVD-Video according to where they are sold.
For Continental Europe and Middle East
•The region number of this unit is “2”.
•The unit will play DVD-Video marked with labels containing “2” or “ALL”.
Example:
For Asia
•The region number of this unit is “3”.
•The unit will play DVD-Video marked with labels containing “3” or “ALL”.
Example:
For Australia and N.Z.
•The region number of this unit is “4”.
•The unit will play DVD-Video marked with labels containing “4” or “ALL”.
Example:
2 ALL 35
2
3 ALL 36
2
4 ALL 46
2

RQT8020
2
Get
tin
g s
tart
edEN
GLIS
HCaution for AC Mains Lead
(For Saudi Arabia)For your safety, please read the following text carefully.This appliance is supplied with a moulded three pin mains plug for your safety and convenience.A 5-ampere fuse is fitted in this plug.Should the fuse need to be replaced please ensure that the replacement fuse has a rating of 5-ampere and that it is approved by ASTA or BSI to BS1362.
Check for the ASTA mark or the BSI mark on the body of the fuse.
If the plug contains a removable fuse cover you must ensure that it is refitted when the fuse is replaced.If you lose the fuse cover the plug must not be used until a replacement cover is obtained.A replacement fuse cover can be purchased from your local dealer.
If a new plug is to be fitted please observe the wiring code as stated below.If in any doubt please consult a qualified electrician.
IMPORTANTThe wires in this mains lead are coloured in accordance with the following code:Blue: Neutral, Brown: Live.As these colours may not correspond with the coloured markings identifying the terminals in your plug, proceed as follows:The wire which is coloured Blue must be connected to the terminal which is marked with the letter N or coloured Black or Blue.The wire which is coloured Brown must be connected to the terminal which is marked with the letter L or coloured Brown or Red.
WARNING: DO NOT CONNECT EITHER WIRE TO THE EARTH TERMINAL WHICH IS MARKED WITH THE
LETTER E, BY THE EARTH SYMBOL OR COLOURED GREEN OR GREEN/YELLOW.
THIS PLUG IS NOT WATERPROOF—KEEP DRY.
Before useRemove the connector cover.
How to replace the fuseThe location of the fuse differ according to the type of AC mains plug (figures A and B). Confirm the AC mains plug fitted and follow the instructions below.Illustrations may differ from actual AC mains plug.
1. Open the fuse cover with a screwdriver.
2. Replace the fuse and close or attach the fuse cover.
CAUTION! THIS PRODUCT UTILIZES A LASER. USE OF CONTROLS OR ADJUSTMENTS OR PERFORMANCE OF PROCEDURES OTHER THAN THOSE SPECIFIED HEREIN MAY RESULT IN HAZARDOUS RADIATION EXPOSURE. DO NOT OPEN COVERS AND DO NOT REPAIR YOURSELF. REFER SERVICING TO QUALIFIED PERSONNEL.
WARNING: TO REDUCE THE RISK OF FIRE, ELECTRIC SHOCK OR PRODUCT DAMAGE, DO NOT EXPOSE THIS APPARATUS TO RAIN, MOISTURE, DRIPPING OR SPLASHING AND THAT NO OBJECTS FILLED WITH LIQUIDS, SUCH AS VASES, SHALL BE PLACED ON THE APPARATUS.
CAUTION! • DO NOT INSTALL OR PLACE THIS UNIT IN A BOOKCASE,
BUILT-IN CABINET OR IN ANOTHER CONFINED SPACE. ENSURE THE UNIT IS WELL VENTILATED. TO PREVENT RISK OF ELECTRIC SHOCK OR FIRE HAZARD DUE TO OVERHEATING, ENSURE THAT CURTAINS AND ANY OTHER MATERIALS DO NOT OBSTRUCT THE VENTILATION VENTS.
• DO NOT OBSTRUCT THE UNIT’S VENTILATION OPENINGS WITH NEWSPAPERS, TABLECLOTHS, CURTAINS, AND SIMILAR ITEMS.
• DO NOT PLACE SOURCES OF NAKED FLAMES, SUCH AS LIGHTED CANDLES, ON THE UNIT.
• DISPOSE OF BATTERIES IN AN ENVIRONMENTALLY FRIENDLY MANNER.
THIS UNIT IS INTENDED FOR USE IN MODERATE CLIMATES.
THIS UNIT IS INTENDED FOR USE IN TROPICAL CLIMATES.
This product may receive radio interference caused by mobiletelephones during use. If such interference is apparent, pleaseincrease separation between the product and the mobiletelephone.
The socket outlet shall be installed near the equipment and easilyaccessible or the mains plug or an appliance coupler shall remainreadily operable.
For Continental Europe, Australia and N.Z.
For Asia and Middle East
(Inside of product)(Tuotteen sisällä)(Produktets innside)
RQLS0233
-
-
-
-
-
-
-
-
-
-
VISIBLE AND INVISIBLE LASER RADIATION WHEN OPEN.AVOID DIRECT EXPOSURE TO BEAM.
DANGER(FDA 21 CFR)
(IEC60825-1)VISIBLE AND INVISIBLE LASER RADIATION WHEN OPEN.AVOID EXPOSURE TO BEAM.
CAUTION
RAYONNEMENT LASER VISIBLE ET INVISIBLE EN CAS D’OUVERTURE.EXPOSITION DANGEREUSE AU FAISCEAU.
ATTENTION
SYNLIG OG USYNLIG LASERSTRÅLING VED ÅBNING.UNDGÅ UDSÆTTELSE FOR STRÅLING.
ADVARSEL
AVATTAESSA OLET ALTTIINA NÄKYVÄÄ JA NÄKYMÄTÖNLASERSÄTEILYLLE. ÄLÄ KATSO SÄTEESEEN.
VARO!
SYNLIG OCH OSYNLIG LASERSTRÅLNING NÄR DENNA DEL ÄR ÖPPNAD. BETRAKTA EJ STRÅLEN.
VARNING
SYNLIG OG USYNLIG LASERSTRÅLING NÅR DEKSEL ÅPNES.UNNGÅ EKSPONERING FOR STRÅLEN.
ADVARSEL
SICHTBARE UND UNSICHTBARE LASERSTRAHLUNG, WENN ABDECKUNGGEÖFFNET. NICHT DEM STRAHL AUSSETZEN.
VORSICHT
CAUTION!IF THE FITTED MOULDED PLUG IS UNSUITABLE FOR THE SOCKET OUTLET IN YOUR HOME THEN THE FUSE SHOULD BE REMOVED AND THE PLUG CUT OFF AND DISPOSED OF SAFELY.THERE IS A DANGER OF SEVERE ELECTRICAL SHOCK IF THE CUT OFF PLUG IS INSERTED INTO ANY 13-AMPERE SOCKET.
Figure A Figure B
Figure A Figure B
Fuse cover
Fuse(5 ampere)
Fuse(5 ampere)
RQT8020
3
Get
tin
g s
tart
edEN
GLIS
H
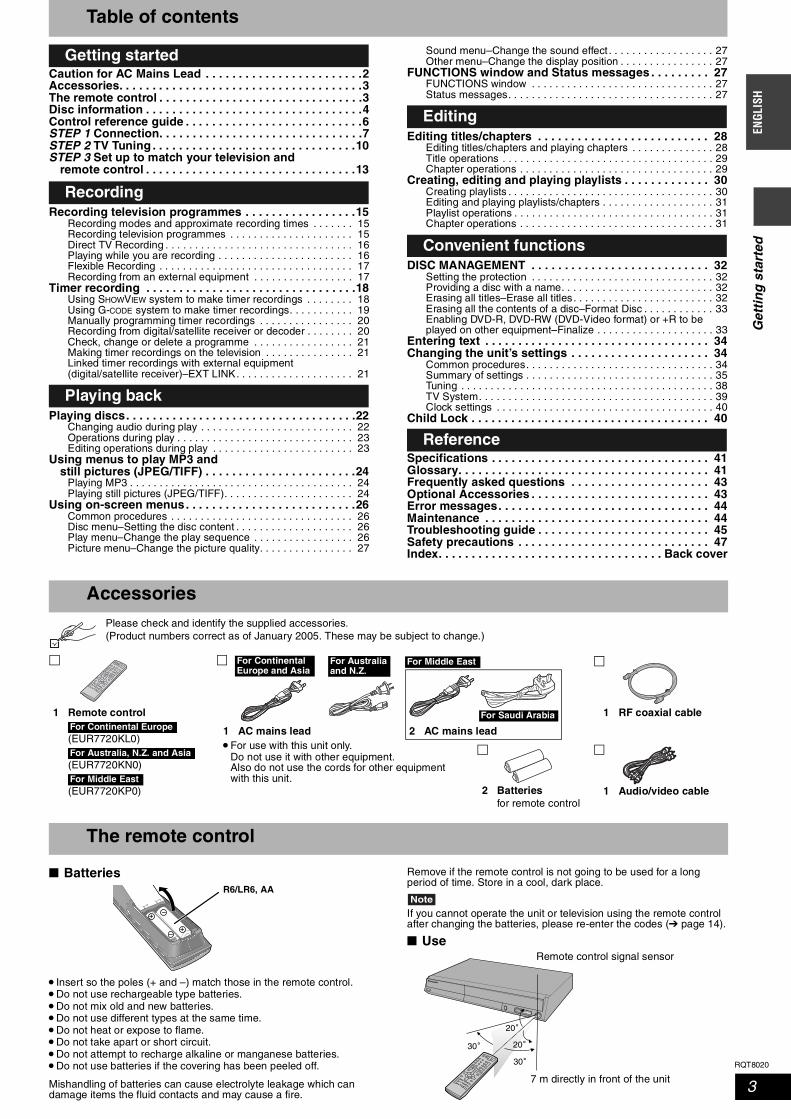
Table of contents
Caution for AC Mains Lead . . . . . . . . . . . . . . . . . . . . . . . .2Accessories. . . . . . . . . . . . . . . . . . . . . . . . . . . . . . . . . . . . .3The remote control . . . . . . . . . . . . . . . . . . . . . . . . . . . . . . .3Disc information . . . . . . . . . . . . . . . . . . . . . . . . . . . . . . . . .4Control reference guide . . . . . . . . . . . . . . . . . . . . . . . . . . .6STEP 1 Connection. . . . . . . . . . . . . . . . . . . . . . . . . . . . . . .7STEP 2 TV Tuning . . . . . . . . . . . . . . . . . . . . . . . . . . . . . . .10STEP 3 Set up to match your television and
remote control . . . . . . . . . . . . . . . . . . . . . . . . . . . . . . . .13
Recording television programmes . . . . . . . . . . . . . . . . .15Recording modes and approximate recording times . . . . . . . 15Recording television programmes . . . . . . . . . . . . . . . . . . . . . 15Direct TV Recording . . . . . . . . . . . . . . . . . . . . . . . . . . . . . . . . 16Playing while you are recording . . . . . . . . . . . . . . . . . . . . . . . 16Flexible Recording . . . . . . . . . . . . . . . . . . . . . . . . . . . . . . . . . 17Recording from an external equipment . . . . . . . . . . . . . . . . . 17
Timer recording . . . . . . . . . . . . . . . . . . . . . . . . . . . . . . . .18Using SHOWVIEW system to make timer recordings . . . . . . . . 18Using G-CODE system to make timer recordings. . . . . . . . . . . 19Manually programming timer recordings . . . . . . . . . . . . . . . . 20Recording from digital/satellite receiver or decoder . . . . . . . . 20Check, change or delete a programme . . . . . . . . . . . . . . . . . 21Making timer recordings on the television . . . . . . . . . . . . . . . 21Linked timer recordings with external equipment (digital/satellite receiver)–EXT LINK. . . . . . . . . . . . . . . . . . . . 21
Playing discs. . . . . . . . . . . . . . . . . . . . . . . . . . . . . . . . . . .22Changing audio during play . . . . . . . . . . . . . . . . . . . . . . . . . . 22Operations during play . . . . . . . . . . . . . . . . . . . . . . . . . . . . . . 23Editing operations during play . . . . . . . . . . . . . . . . . . . . . . . . 23
Using menus to play MP3 and still pictures (JPEG/TIFF) . . . . . . . . . . . . . . . . . . . . . . .24
Playing MP3 . . . . . . . . . . . . . . . . . . . . . . . . . . . . . . . . . . . . . . 24Playing still pictures (JPEG/TIFF). . . . . . . . . . . . . . . . . . . . . . 24
Using on-screen menus. . . . . . . . . . . . . . . . . . . . . . . . . .26Common procedures . . . . . . . . . . . . . . . . . . . . . . . . . . . . . . . 26Disc menu–Setting the disc content . . . . . . . . . . . . . . . . . . . . 26Play menu–Change the play sequence . . . . . . . . . . . . . . . . . 26Picture menu–Change the picture quality. . . . . . . . . . . . . . . . 27
Sound menu–Change the sound effect . . . . . . . . . . . . . . . . . . 27Other menu–Change the display position . . . . . . . . . . . . . . . . 27
FUNCTIONS window and Status messages . . . . . . . . . 27FUNCTIONS window . . . . . . . . . . . . . . . . . . . . . . . . . . . . . . . 27Status messages. . . . . . . . . . . . . . . . . . . . . . . . . . . . . . . . . . . 27
Editing titles/chapters . . . . . . . . . . . . . . . . . . . . . . . . . . 28Editing titles/chapters and playing chapters . . . . . . . . . . . . . . 28Title operations . . . . . . . . . . . . . . . . . . . . . . . . . . . . . . . . . . . . 29Chapter operations . . . . . . . . . . . . . . . . . . . . . . . . . . . . . . . . . 29
Creating, editing and playing playlists . . . . . . . . . . . . . 30Creating playlists . . . . . . . . . . . . . . . . . . . . . . . . . . . . . . . . . . . 30Editing and playing playlists/chapters . . . . . . . . . . . . . . . . . . . 31Playlist operations . . . . . . . . . . . . . . . . . . . . . . . . . . . . . . . . . . 31Chapter operations . . . . . . . . . . . . . . . . . . . . . . . . . . . . . . . . . 31
DISC MANAGEMENT . . . . . . . . . . . . . . . . . . . . . . . . . . . 32Setting the protection . . . . . . . . . . . . . . . . . . . . . . . . . . . . . . . 32Providing a disc with a name. . . . . . . . . . . . . . . . . . . . . . . . . . 32Erasing all titles–Erase all titles. . . . . . . . . . . . . . . . . . . . . . . . 32Erasing all the contents of a disc–Format Disc . . . . . . . . . . . . 33Enabling DVD-R, DVD-RW (DVD-Video format) or +R to be played on other equipment–Finalize . . . . . . . . . . . . . . . . . . . . 33
Entering text . . . . . . . . . . . . . . . . . . . . . . . . . . . . . . . . . . 34Changing the unit’s settings . . . . . . . . . . . . . . . . . . . . . 34
Common procedures. . . . . . . . . . . . . . . . . . . . . . . . . . . . . . . . 34Summary of settings . . . . . . . . . . . . . . . . . . . . . . . . . . . . . . . . 35Tuning . . . . . . . . . . . . . . . . . . . . . . . . . . . . . . . . . . . . . . . . . . . 38TV System. . . . . . . . . . . . . . . . . . . . . . . . . . . . . . . . . . . . . . . . 39Clock settings . . . . . . . . . . . . . . . . . . . . . . . . . . . . . . . . . . . . . 40
Child Lock . . . . . . . . . . . . . . . . . . . . . . . . . . . . . . . . . . . . 40
Specifications . . . . . . . . . . . . . . . . . . . . . . . . . . . . . . . . . 41Glossary. . . . . . . . . . . . . . . . . . . . . . . . . . . . . . . . . . . . . . 41Frequently asked questions . . . . . . . . . . . . . . . . . . . . . 43Optional Accessories . . . . . . . . . . . . . . . . . . . . . . . . . . . 43Error messages. . . . . . . . . . . . . . . . . . . . . . . . . . . . . . . . 44Maintenance . . . . . . . . . . . . . . . . . . . . . . . . . . . . . . . . . . 44Troubleshooting guide . . . . . . . . . . . . . . . . . . . . . . . . . . 45Safety precautions . . . . . . . . . . . . . . . . . . . . . . . . . . . . . 47Index. . . . . . . . . . . . . . . . . . . . . . . . . . . . . . . . . . Back cover
Please check and identify the supplied accessories.(Product numbers correct as of January 2005. These may be subject to change.)
Batteries
• Insert so the poles (+ and –) match those in the remote control.•Do not use rechargeable type batteries.•Do not mix old and new batteries.•Do not use different types at the same time.•Do not heat or expose to flame.•Do not take apart or short circuit.•Do not attempt to recharge alkaline or manganese batteries.•Do not use batteries if the covering has been peeled off.
Mishandling of batteries can cause electrolyte leakage which can damage items the fluid contacts and may cause a fire.
Remove if the remote control is not going to be used for a long period of time. Store in a cool, dark place.
Note
If you cannot operate the unit or television using the remote control after changing the batteries, please re-enter the codes ( page 14).
Use
Getting started
Recording
Playing back
Editing
Convenient functions
Reference
Accessories
The remote control
1 Remote control
(EUR7720KL0)
(EUR7720KN0)
(EUR7720KP0)
For Continental Europe
For Australia, N.Z. and Asia
For Middle East
1 RF coaxial cable
2 Batteriesfor remote control
1 Audio/video cable
•For use with this unit only. Do not use it with other equipment.Also do not use the cords for other equipment with this unit.
For Australia and N.Z.
For Middle EastFor Continental Europe and Asia
1 AC mains lead
For Saudi Arabia
2 AC mains lead
R6/LR6, AA
20
20
30
30
7 m directly in front of the unit
Remote control signal sensor

RQT8020
4
Get
tin
g s
tart
edEN
GLIS
HDisc information
Discs you can use for recording and play (12 cm/8 cm)
•We recommend using Panasonic discs. We recommend using DVD-RAM discs with cartridges to protect them from scratches and dirt.•You may not be able to record to DVD-R, DVD-RW and +R discs on this unit or play them due to the condition of the recording.•You cannot record programmes that allow “One time only recording” to CPRM compatible DVD-R and DVD-RW on this unit.•You can use high speed recording compatible discs on this unit.
1 You cannot record or play continuously on two sides.
Play-only discs (12 cm/8 cm)
3 Play may be impossible on some CD-R, CD-RW, DVD-RW or +RW discs due to the condition of the recording.4 You can play still pictures (JPEG/TIFF), CD-DA, Video CD and MP3 format data recorded on CD-R/RW.
•The producer of the disc can control how discs are played. So you may not always be able to control play as described in these operating instructions. Read the disc’s instructions carefully.
Disc type DVD-RAM• 4.7 GB/9.4 GB, 12 cm• 2.8 GB, 8 cm
DVD-R (DVD-Video format)• 4.7 GB, 12 cm• 1.4 GB, 8 cm
Logo
Indication in these instructions Before finalizing
After finalizing
Main use Re-writable discs One time recording discs (recordable until the disc is full)
Maximum recording time( page 15, Recording modes and approximate recording times)
8 hours(16 hours in EP ( 8Hours ) mode
on double-sided disc 1)8 hours
Play on other players Only on DVD-RAM compatible players. It is not necessary to finalize the disc. ( page 41)
Only after finalizing the disc.( page 33)
What you can do on this unit ( : Can do × : Cannot do)
Chasing playback ×Recording broadcasts that allow one copy
(CPRM ( page 41) compatible discs only.)
×
Recording both M 1 and M 2 of bilingual broadcast ×Only one is recorded
( page 36, Bilingual Audio Selection)
Recording 16:9 aspect picture ×(The picture is recorded in 4:3
aspect.)
Enter programme (title) name
Erase programme (title)
(Available space increases after erasing.)
(Available space does not increase after erasing.)
Creating playlists ×
RAM-R
DVD-V
Disc type DVD-Video DVD-Audio DVD-RW (DVD Video Recording format)
+RW
Logo––––
Indication in these instructions
Instructions High quality movie and music discs
High fidelity music discs•Played on this unit in
2 channels.•There is no digital output.
DVD-RW recorded on another DVD Recorder 3•You can play programmes that
allow “One time only recording” if they have been recorded to a CPRM compatible disc.
•By formatting ( page 33) the disc, you can record to it in DVD-Video format and play it on this unit.
+RW recorded on another DVD Recorder 3
• It may be necessary to finalize the disc on the equipment used for recording.
Regarding DVD-AudioSome multi-channel DVD-Audio will prevent down-mixing ( page 41) of all or part of their contents if this is the manufacturer’s intention. When playing such discs, or such parts of disc, unless the number of connected speakers is the same as the disc’s channel specification, audio will not be output properly (e.g. part of the audio is missing, multi-channel audio cannot be selected and audio is played in two channels.) Refer to the disc’s jacket for more information.
DVD-V DVD-A -RW(VR) DVD-V

RQT8020
5
Get
tin
g s
tart
edEN
GLIS
H
2
•2.6 and 5.2 GB DVD-RAM, 12 cm•3.95 and 4.7 GB DVD-R for Authoring•DVD-R recorded by DVD Video Recording format•DVD-R (DVD-Video format), DVD-RW (DVD-Video format), +R
recorded on another unit and not finalized ( page 41).• DVD-Video with a region
number other than “2” or “ALL” DVD-Video with a region number other than “3” or “ALL”
DVD-Video with a region number other than “4” or “ALL”
•Blu-ray•DVD-ROM, DVD-R DL, +R DL, +R (8 cm), CD-ROM, CDV, CD-G,
Photo CD, CVD, SVCD, SACD, MV-Disc, PD, Divx Video Disc, etc.
How to hold a discDo not touch the recorded surface. Concerning non-cartridge
discsBe careful about scratches and dirt. If there is dirt or
condensation on the discWipe with a damp cloth and then wipe dry. Handling precautions•Do not attach labels or stickers to
discs. (This may cause disc warping and un-balanced rotation, rendering it unusable.)
•Write on the label side of the disc only with a soft, oil-based felt pen. Do not use ballpoint pens or other hard writing implements.
•Do not use record cleaning sprays, benzine, thinner, static electricity prevention liquids or any other solvent.
•Do not use scratch-proof protectors or covers.•Do not drop, stack, or impact discs. Do not place objects on them.•Do not use the following discs:
– Discs with exposed adhesive from removed stickers or labels (rented discs etc).
– Discs that are badly warped or cracked.– Irregularly shaped discs, such as
heart shapes.•Do not place in the following areas:
– In direct sunlight.– In very dusty or humid areas.– Near a heater. – Locations susceptible to significant differences in temperature
(condensation can occur).– Where static electricity or electromagnetic waves occur.
•To protect discs from scratches and dirt, return them to their cases or cartridges when you are not using them.
When you use the discs recorded either PAL or NTSC, refer to this table.( : Possible to view, ×: Impossible to view)
1 If you select “NTSC” in “TV System” ( page 39), the picture may be clearer.
2 Select “NTSC” in “TV System” ( page 39).3 If your television is not equipped to handle PAL 525/60 signals
the picture will not be shown correctly.
DVD-RW (DVD-Video format)• 4.7 GB, 12 cm• 1.4 GB, 8 cm
+R• 4.7 GB, 12 cm
––––
Before finalizing Before finalizing
After finalizing After finalizing
Re-writable discs One time recording discs (recordable until the disc is full)
8 hours 8 hours
Only after finalizing the disc.( page 33)
Only after finalizing the disc.( page 33)
× ×
× ×
×Only one is recorded
( page 36, Bilingual Audio Selection)
×Only one is recorded
( page 36, Bilingual Audio Selection)
×(The picture is recorded in 4:3
aspect.)
×(The picture is recorded in 4:3
aspect.)
(The available space on DVD-RW (DVD-Video format) increases only when the last recorded title is erased.) 2
(Available space does not increase after erasing.)
× ×
Audio CD Video CD
––––
Music and audio recorded (including CD-R/RW 3 4)
CD-R and CD-RW 3 4 with music recorded in MP3
Still pictures (JPEG and TIFF) recorded on CD-R and CD-RW 3 4
Music and video recorded (including CD-R/RW 3 4)
The manufacturer accepts no responsibility and offers no compensation for loss of recorded or edited material due to a problem with the unit or recordable media, and accepts no responsibility and offers no compensation for any subsequent damage caused by such loss.Examples of causes of such losses are•A disc recorded and edited with this unit is played in a DVD
recorder or computer disc drive manufactured by another company.
•A disc used as described above and then played again in this unit.
•A disc recorded and edited with a DVD recorder or computer disc drive manufactured by another company is played in this unit.
-RW(V) +R
DVD-V DVD-V
The available space does not increase if these are erased.
Erase this to increase the available space.
Title 1 Title 2 The last recorded title
The available space
- - - -
CD VCD
DVD Video Recording formatThis is a recording method which allows you to freely record and edit television broadcasts and so on.•Digital broadcasts that allow “One time only recording” can be
recorded to a CPRM compatible disc. You can record to CPRM compatible DVD-RAM on this unit.
•Play is only possible on a compatible DVD player.Use a DVD-RAM to record by the DVD Video Recording format.
DVD-Video formatThis recording method is the same as commercially available DVD-Video.•Digital broadcasts that allow “One time only recording” cannot be
recorded.•These can be played on a DVD player. However programmes recorded
on this unit must be finalized to be played on other DVD players.Use a DVD-R or DVD-RW to record by the DVD-Video format.
Discs that cannot be played
Disc handling
Types of disc for the type of connected TV
TV type Disc Yes/No
Multi-system TVPAL
NTSC 1
NTSC TVPAL ×NTSC 2
PAL TVPAL
NTSC 3 (PAL60)
For Continental Europe and Middle East
For AsiaFor Australia and N.Z.

RQT8020
6
Get
tin
g s
tart
edEN
GLIS
HControl reference guide
e.g.,
e.g.,
e.g.,
Remote controlContinental Europe
SKIP SLOW/SEARCH
REC MODEREC
F Rec
TIME SLIP
FUNCTIONSDIRECT NAVIGATOR
TOP MENU
RETURN
VOLUMECH
STATUSDISPLAY
SUB MENU
DIRECT TV RECAV
CANCEL MANUAL SKIPINPUT SELECT
AUDIO ERASE
EXT LINK
CHAPTER
PROG/CHECK
TIMER
ShowView
CREATE
Turn the unit on ( page 10, 12)
Direct TV recording ( page 16)
Input select (AV1, AV2, AV3 or AV4)
For Continental Europe
For Australia, N.Z., Asia and Middle East
Select channels and title numbers etc./Enter numbers
Cancel
Basic operations for recording and play
Show Top menu/Direct Navigator( page 22, 24, 28)
Show sub menu ( page 25, 28, 31)Show on-screen menu ( page 26)
Change recording mode ( page 15)
Select Audio ( page 22)
Create chapter ( page 23)For Continental Europe
( page 14)Television operations
Channel select ( page 15)
Show SHOWVIEW screen ( page 18)
Show G-CODE screen ( page 19)
For Continental Europe
For Australia, N.Z. and Asia
Skip 30 seconds forward ( page 23)
Input select (AV1, AV2, AV3 or AV4)
Select channels
For Continental Europe
For Australia, N.Z., Asia and Middle East
Show FUNCTIONS window ( page 13, 27)
( page 10, 12, 23)Selection/Enter, Frame-by-frame
Return to previous screenShow status messages ( page 27)
Skip the specified time/Display the television image as a picture-in-picture ( page 16, 23)
Start Flexible Recording ( page 17)
Programme recording standby/release ( page 18, 19, 20)
Linked timer recordings with external equipment ( page 21)
Erase items ( page 23)
For Continental Europe
For Australia, N.Z., Asia and Middle East
Show timer recording programme screen( page 20)
( page 38)Manual tuning operation
Erase items ( page 23)
Create chapter ( page 23)
For Continental Europe
For Australia, N.Z., Asia and Middle East
INPUT SELECT
G-Code
ERASE
CREATE CHAPTER
Start recording ( page 15)
Main unitContinental Europe
RECOPEN/CLOSECHEXT LINK
Display ( below)Disc tray ( page 15, 22)
Open/close disc tray ( page 15, 22)Channel select ( page 15)
Start recording ( page 15)
Connection for camcorder etc. ( page 17)
/Remote control signal sensor
Standby/on switch (8) ( page 10)Press to switch the unit from on to standby mode or vice versa. In standby mode, the unit is still consuming a small amount of power.
Start play ( page 22)
Stop ( page 16, 23)
Rear panel terminals ( page 7, 8)
Linked timer recordings with external equipment ( page 21)
For Continental Europe
Opening the front panelPress down on the part with your finger.
The unit’s displayContinental Europe
EXT Link D.MIX XPRW–+ RAMSP
LPEP
PLAY VRRECREC PLAY PLAYREC
AVCD-DVD
D. MIX (multi-channel DVD-Audio only)When lit: down-mixing audio is played.When off: the disc prevents down-mixing so only
the two front channels can be played.
Recording modeMain display section
Disc typeRecording Playback
Recording/Playback
Timer recording indicator
Linked timer recordings with external equipment indicator
For Continental Europe

RQT8020
7
Get
tin
g s
tart
edEN
GLIS
H
STEP 1 Connection•The equipment connections described are examples.•Before connection, turn off all equipment and read the appropriate operating instructions.•Peripheral equipment and optional cables are sold separately unless otherwise indicated.
When there is no 21-pin Scart terminal on the television ( page 8)
RGBThis refers to the three primary colours of light, red (R), green (G), and blue (B) and also the method of producing video that uses them. By dividing the video signal into the three colours for transmission, noise is reduced for even higher quality images. Q Link functions Q Link offers a range of convenient functions (For further details page 42). Make sure to connect a fully wired 21-pin Scart cable to thetelevision if using the Q Link function.The following systems from other manufacturers have similar function to Q Link from Panasonic. For details, refer to your television’s operating instructions or consult your dealer.•Q Link (registered trademark of Panasonic)
•DATA LOGIC (registered trademark of Metz)
•Easy Link (registered trademark of Philips)
•Megalogic (registered trademark of Grundig)
•SMARTLINK (registered trademark of Sony)
Do not connect the unit through a video cassette recorderVideo signals fed through video cassette recorders will be affected by copyright protection systems and the picture will not be shown correctly on the television.
•When connecting to a television with a built in VCR, connect to the input terminals on the television side, not the VCR side.
When the unit is not to be used for a long timeTo save power, unplug it from the household mains socket. This unit consumes a small amount of power, even when it is turned off [approx. 3 W (Power Save mode)].
Connecting a television with 21-pin Scart terminal and VCR
VHF/UHFRF IN AV IN
VHF/UHFRF IN
AV OUT
3
12
4
1 4
Television’s rear panel
This unit’s rear panel
indicates included accessories.indicates accessories not included.
are required connections. Connect in the numbered order.
VCR’s rear panel
AV1 terminalIf your television is equipped with RGB input capability, by connecting with a fully wired 21-pin Scart cable you can see video using RGB output on this unit ( below).To output in RGB select “RGB (without component)” from “AV1 Output” in the SETUP menu ( page 36) after tuning is completed ( page 10–12).
Fully wired 21-pin Scart cable
RF coaxial cable
To the aerial
Aerial cable
Use a splitter if you also want to connect the aerial to your VCR.
Splitter
21-pin Scart cable
To household mains socket
(AC 220-240 V, 50 Hz)
(AC 220-240 V, 50 Hz/60 Hz)
For Continental Europe, Australia and N.Z.
For Asia and Middle East
e.g., Continental Europe
BE SURE TO READ THE CAUTION FOR THE AC MAINS LEAD ON PAGE 2 BEFORE CONNECTION.
AC mains leadConnect only after all other connections are complete.
•Use the AC mains lead that matches the socket for the area you live in.
For Middle East
For Saudi Arabia
For Continental Europe
Television
This unit
VCR
Television
VCR
This unit
Before moving the unit, ensure the disc tray is empty.Failure to do so will risk severely damaging the disc and the unit.
RQT8020
8
Get
tin
g s
tart
edEN
GLIS
H
STEP 1 Connection
Connecting to the television using the 21-pin Scart cables ( page 7)
( page 9, Note to owners of progressive compatible PAL system televisions)
Component video outputComponent signal outputs the colour difference signals (PB/PR) and luminance signal (Y) separately in order to achieve high fidelity in reproducing colours. If the television is compatible with progressive output, a high quality picture can be output because this unit’s component video output terminal outputs a progressive output signal ( page 42).
Connecting a television with AUDIO/VIDEO terminals and VCR
Connecting a television with S VIDEO or COMPONENT VIDEO terminals
VHF/UHFRF IN
VHF/UHFRF IN
R LAUDIO OUT VIDEO OUT
AUDIO INR L
VIDEO IN
1 2
3 4
Audio/Video cable
This unit’s rear panel
BE SURE TO READ THE CAUTION FOR THE AC MAINS LEAD ON PAGE 2 BEFORE CONNECTION.
indicates included accessories.indicates accessories not included.
are required connections. Connect in the numbered order.
To the aerial
Splitter
Aerial cable
Television’s rear panel
Red White Yellow
RF coaxial cable
AC mains leadConnect only after all other connections are complete.
•Use the AC mains lead that matches the socket for the area you live in.
For Middle East
Audio/Video cable
VCR’s rear panel
Red
White
Yellow
Red
White
Yellow
Red White Yellow
Use a splitter if you also want to connect the aerial to your VCR.
For Saudi Arabia
1 4
To household mains socket
(AC 220-240 V, 50 Hz)
(AC 220-240 V, 50 Hz/60 Hz)
For Continental Europe, Australia and N.Z.
For Asia and Middle East
e.g., Asia
AUDIO INR L
VIDEOIN
COMPONENTVIDEO IN
S VIDEOIN Television’s
rear panelRed White Yellow
Audio/Video cable
S Video cable
This unit’s rear panel
S VIDEO OUT terminalConnect to S VIDEO IN terminal on the television through a S Video cable. The S VIDEO OUT terminal achieves a more vivid picture than the VIDEO OUT terminal. (Actual results depend on the television.)
Red
White
Yellow
e.g., Continental Europe
AUDIO INR L
VIDEOIN
COMPONENTVIDEO IN
S VIDEOIN Television’s
rear panelRed White Yellow
Audio/Video cable
Video cable
This unit’s rear panel
COMPONENT VIDEO OUT terminalConnect to COMPONENT VIDEO IN terminals on the television through a component video cable. These terminals can be used for either interlace or progressive output ( page 42) and provide a purer picture than the S VIDEO OUT terminal. •Connect to terminals of the same colour.
Red
White
Yellow
e.g., Continental Europe

RQT8020
9
Get
tin
g s
tart
edEN
GLIS
H•Decoder here means the device used to decode scrambled broadcasts (Pay TV).
•Change the “AV2 Input” and “AV2 Connection” settings in the SETUP menu to match the connected equipment ( page 36).
To enjoy multi-channel surround sound on DVD-Video
Connect an amplifier with Dolby Digital, DTS and MPEG decoders using an optical digital audio cable and change the settings in “Digital Audio Output” ( page 36).•Digital output is not digital with DVD-Audio (figure 1), however you
can enjoy it in analogue (figure 2).(For digital playback, set “DVD-Audio Video mode Playback” ( page 35) to “On” when the DVD-Audio contains DVD-Video.)
•You cannot use DTS Digital Surround decoders not suited to DVD.
Connection to a stereo amplifier
For Continental Europe
Connecting a digital/satellite receiver or decoder
Connecting an amplifier or system component
AV OUT
This unit’s rear panel
21-pin Scart cable
Digital/satellite receiver or decoder’s rear panel
Viewing video from the decoder on the television while the unit is stopped, or while recordingIf you connected the television to the AV1 terminal and the decoder to the AV2 terminal on this unit, press [0]+[ENTER]. (“DVD” appears on the unit’s display.)Press again to cancel. (“TV” appears on the unit’s display.)• If the television is compatible with RGB input, the RGB
output signal from the decoder can also be output from the main unit the same way.
OPTICAL IN
Optical digital audio cableDo not bend this cable sharply.
Insert fully, with this side facing up.
This unit’s rear panel
Amplifier’s rear panel
(figure 1)
e.g., Continental Europe
AUDIO INR L
Amplifier’s rear panel
This unit’s rear panel
Audio cable
Red White
White
Red
(figure 2)
e.g., Continental Europe
Do not place the unit on amplifiers or equipment that may become hot.The heat can damage the unit.
Note to owners of progressive compatible PAL system televisions• If you have an LCD/plasma television or LCD projectorUsing progressive output, you can enjoy high-resolution video recorded on media such as DVD-Video. Connect this unit’s component video output terminals to your television and turn on the progressive output setting ( page 13).
• If you have a CRT (cathode ray tube) televisionUse component output with progressive “Off” (Factory setting, page 36), even if it is progressive compatible, because progressive output can cause some flickering. This is the same for multi system televisions using PAL mode.
COMPONENTVIDEO OUT
COMPONENTVIDEO INThis unit
Progressive output
COMPONENTVIDEO OUT
COMPONENTVIDEO INThis unit
Progressive output

RQT8020
10
Get
tin
g s
tart
edEN
GLIS
H
STEP 2 TV Tuning
When connecting to a television that has the Q Link function ( page 42) with a fully wired 21-pin Scart cable ( page 7).(The AV2 and AV4 Scart terminals on Panasonic televisions are compatible with the Q Link function.)
You can download the tuning positions from the television.This unit Auto Clock Setting function synchronizes the time when the TV channel that is broadcasting time and date information is tuned.
1 Turn on the television and select the appropriate AV input to suit the connections to this unit.
2 Press [^ DVD] to turn the unit on.Tuning Preset Downloading starts.
Tuning Preset Downloading is complete when you see the television picture.
• If the Country setting menu appears on the television, press [e, r, w, q] to select the country and press [ENTER].
If you select “Schweiz”, “Suisse” or “Svizzera” in the Country setting, or when the television tuning setting has been set to Switzerland, the “Power Save” setting menu appears. Select “On” or “Off” ( page 37).
To stop partwayPress [RETURN].
If the clock setting menu appearsSet the clock manually ( page 40).
To confirm that stations have been tuned correctly ( page 38)
To restart Preset Download ( page 39)
SKIP SLOW/SEARCH
REC MODEREC
F Rec
TIME SLIP
FUNCTIONSDIRECT NAVIGATOR
TOP MENU
RETURN
VOLUMECH
STATUSDISPLAY
SUB MENU
DIRECT TV RECAV
CANCEL INPUT SELECT
AUDIO ERASE
EXT LINK
CREATE CHAPTER
PROG/CHECK
TIMER
MANUAL SKIP
ShowView
8
^ DVD
RETURN
e, r, w, qENTER
2 CH 1
RECOPEN/CLOSECHEXT LINK
e.g., Continental Europe
e.g., Continental Europe
Numbered buttons
Tuning Preset Download(Setup with Q Link functions)
For Continental Europe
Download from TV
Pos 2
Download in progress, please wait.RETURN: to abort
RETURN
Country
RETURN: leave ENTER: access
Others
DeutschlandÖsterreichPortugalSuomiSverigeSchweizSuisseSvizzera
BelgiëBelgiqueBelgienDanmarkEspaña
FranceItaliaNederlandNorgeRETURN
SELECT
ENTER

RQT8020
11
Get
tin
g s
tart
edEN
GLIS
H
•When connecting to a television with the VIDEO OUT, S VIDEO OUT or COMPONENT VIDEO OUT terminal ( page 8).
•When connecting to a television that does not have the Q Link function ( page 42).
This unit’s Auto-Setup function automatically tunes all available TV stations and synchronizes the time when the TV channel that is broadcasting time and date information is tuned.
1 Turn on the television and select the appropriate AV input to suit the connections to this unit.
2 Press [^ DVD] to turn the unit on.The Country setting menu appears.
If you select “Schweiz”, “Suisse” or “Svizzera”, the “Power Save” setting menu appears. Select “On” or “Off” ( page 37).
3 Press [e, r, w, q] to select the country.
4 Press [ENTER].Auto-Setup starts. This takes about 8 minutes.
Auto-Setup is complete when you see the television picture.
To stop partwayPress [RETURN].
If the clock setting menu appearsSet the clock manually ( page 40).
To confirm that stations have been tuned correctly ( page 38)
To restart Auto-Setup ( page 39)You can also use the following method to restart Auto-Setup.When the unit is on and stoppedPress and hold [2 CH] and [CH 1] on the main unit until the Country setting screen appears.•All the settings except for the ratings level, ratings password and
time settings return to the factory preset. The timer recording programmes are also cancelled.
Auto-Setup(Setup without Q Link functions)
For Continental Europe
Country
RETURN: leave ENTER: access
Others
DeutschlandÖsterreichPortugalSuomiSverigeSchweizSuisseSvizzera
BelgiëBelgiqueBelgienDanmarkEspaña
FranceItaliaNederlandNorgeRETURN
SELECT
ENTER
Auto-Setup
Ch 1
Auto-Setup in progress, please wait.RETURN: to abort
RETURN

RQT8020
12
Get
tin
g s
tart
edEN
GLIS
HRefer to the control reference on page 10.
STEP 2 TV Tuning
When connecting to a television with the corresponding terminal ( page 8).This unit’s Auto-Setup function automatically tunes all available TV stations.
1 Turn on the television and select the appropriate AV input to suit the connections to this unit.
2 Press [^ DVD] to turn the unit on.The Country setting menu appears on the television.
3 Press [e, r] to select the country and press [ENTER].Auto-Setup starts. This takes about 5 minutes.
Auto-Setup is complete when you see the clock setting menu.
4 Press [w, q] to select the item you want to change.This is a 24-hour clock.The items change as follows:
Reset the clock regularly to maintain accuracy ( page 40).(Monthly accuracy +/– 15 seconds.)
5 Press [e, r] to change the setting.You can also use the numbered buttons for setting.
6 Press [ENTER] when you have finished the settings.The clock starts and the television displays the channel being received.
To stop partwayPress [RETURN].
To confirm that stations have been tuned correctly ( page 38)
To restart Auto-Setup ( page 39)You can also use the following method to restart Auto-Setup.When the unit is on and stoppedPress and hold [2 CH] and [CH 1] on the main unit until the Country setting screen appears.•All the settings except for the ratings level, ratings password and
time settings return to the factory preset. The timer recording programmes are also cancelled.
When connecting to a television with the corresponding terminal ( page 8).This unit’s Auto-Setup function automatically tunes all available TV stations.
1 Turn on the television and select the appropriate AV input to suit the connections to this unit.
2 Press [^ DVD] to turn the unit on.Auto-Setup starts. This takes about 5 minutes.
Auto-Setup is complete when you see the clock setting menu.
3 Press [w, q] to select the item you want to change.This is a 24-hour clock.The items change as follows:
Reset the clock regularly to maintain accuracy ( page 40).(Monthly accuracy +/– 15 seconds.)
4 Press [e, r] to change the setting.You can also use the numbered buttons for setting.
5 Press [ENTER] when you have finished the settings.The clock starts and the television displays the channel being received.
To stop partwayPress [RETURN].
To confirm that stations have been tuned correctly ( page 38)
To restart Auto-Setup ( page 39)You can also use the following method to restart Auto-Setup.When the unit is on and stoppedPress and hold [2 CH] and [CH 1] on the main unit until the Auto-Setup screen appears.•All the settings except for the ratings level, ratings password and
time settings return to the factory preset. The timer recording programmes are also cancelled.
Auto-SetupFor Australia and N.Z.
Country
Australia
Others
New Zealand
Auto-Setup
128
Auto-Setup in progress, please wait.RETURN: to abort
RETURN
Clock
Time Date
0 : 00 : 00
Please set clock manually.ENTER: store RETURN: leave
0 9No.
CHANGE SELECT
ENTER
1 1. . 2005
Hour Minute Second Day Month Year
Auto-SetupFor Asia and Middle East
Auto-Setup
128
Auto-Setup in progress, please wait.RETURN: to abort
RETURN
Clock
Time Date
0 : 00 : 00 1 1. . 2005
Please set clock manually.ENTER: store RETURN: leave
0 9No.
CHANGE SELECT
ENTER
Hour Minute Second Day Month Year
RQT8020
13
Get
tin
g s
tart
edEN
GLIS
H
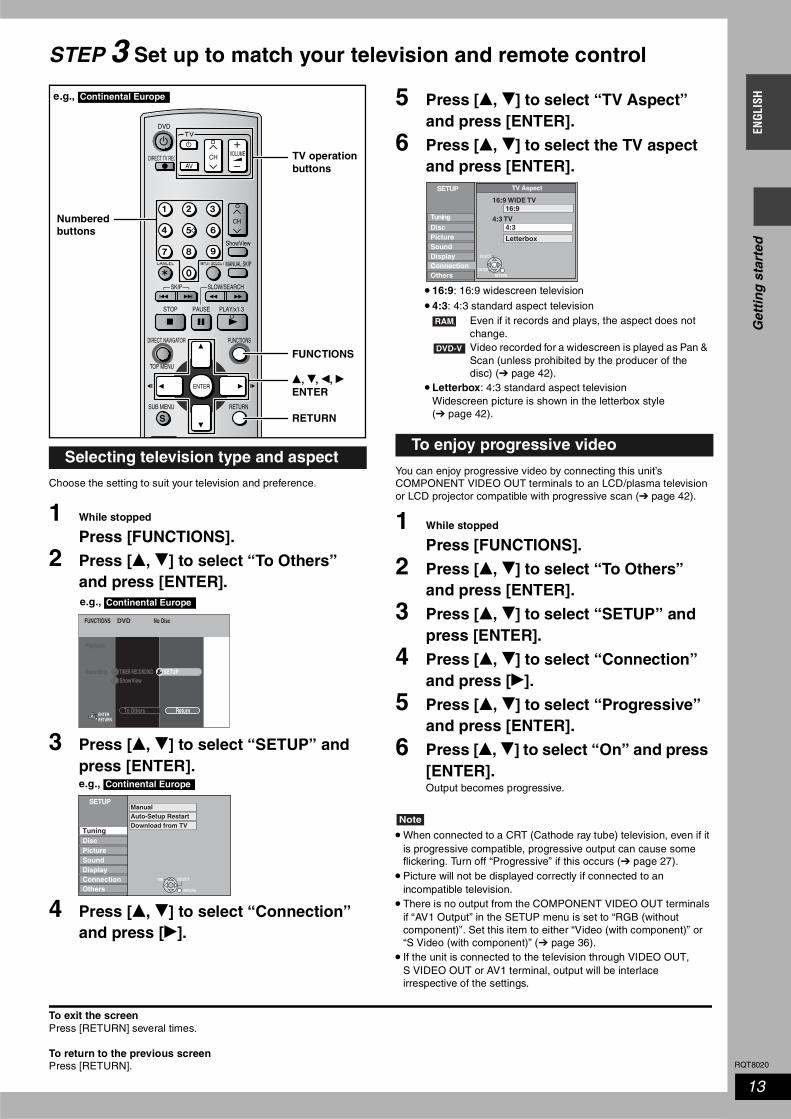
STEP 3 Set up to match your television and remote control
Choose the setting to suit your television and preference.
1 While stopped
Press [FUNCTIONS].
2 Press [e, r] to select “To Others” and press [ENTER].
3 Press [e, r] to select “SETUP” and press [ENTER].e.g.,
4 Press [e, r] to select “Connection” and press [q].
5 Press [e, r] to select “TV Aspect” and press [ENTER].
6 Press [e, r] to select the TV aspect and press [ENTER].
You can enjoy progressive video by connecting this unit’s COMPONENT VIDEO OUT terminals to an LCD/plasma television or LCD projector compatible with progressive scan ( page 42).
1 While stopped
Press [FUNCTIONS].
2 Press [e, r] to select “To Others” and press [ENTER].
3 Press [e, r] to select “SETUP” and press [ENTER].
4 Press [e, r] to select “Connection” and press [q].
5 Press [e, r] to select “Progressive” and press [ENTER].
6 Press [e, r] to select “On” and press [ENTER].Output becomes progressive.
Note
•When connected to a CRT (Cathode ray tube) television, even if it is progressive compatible, progressive output can cause some flickering. Turn off “Progressive” if this occurs ( page 27).
•Picture will not be displayed correctly if connected to an incompatible television.
•There is no output from the COMPONENT VIDEO OUT terminals if “AV1 Output” in the SETUP menu is set to “RGB (without component)”. Set this item to either “Video (with component)” or “S Video (with component)” ( page 36).
• If the unit is connected to the television through VIDEO OUT, S VIDEO OUT or AV1 terminal, output will be interlace irrespective of the settings.
To exit the screenPress [RETURN] several times.
To return to the previous screenPress [RETURN].
Selecting television type and aspect
SKIP SLOW/SEARCH
TIME SLIP
FUNCTIONSDIRECT NAVIGATOR
TOP MENU
RETURN
VOLUMECH
STATUSDISPLAY
SUB MENU
DIRECT TV RECAV
CANCEL MANUAL SKIPINPUT SELECT
PROG/CHECK
ShowView
Numbered buttons
RETURN
e, r, w, qENTER
TV operation buttons
FUNCTIONS
e.g., Continental Europe
FUNCTIONS No DiscDVD
Playback
ENTERRETURN
To Others Return
Recording TIMER RECORDINGShowView
SETUP
e.g., Continental Europe
Continental Europe
SETUP
DiscPictureSoundDisplayConnectionOthers
Tuning
ManualAuto-Setup RestartDownload from TV
TAB SELECT
RETURN
To enjoy progressive video
SETUP
DiscPictureSoundDisplay
Tuning
TV Aspect
16:9
4:3
Letterbox
Others
16:9 WIDE TV
4:3 TV
Connection
SELECT
ENTERRETURN
•16:9: 16:9 widescreen television
•4:3: 4:3 standard aspect televisionEven if it records and plays, the aspect does not change.Video recorded for a widescreen is played as Pan & Scan (unless prohibited by the producer of the disc) ( page 42).
•Letterbox: 4:3 standard aspect televisionWidescreen picture is shown in the letterbox style( page 42).
RAM
DVD-V

RQT8020
14
Get
tin
g s
tart
edEN
GLIS
HRefer to the control reference on page 13.
You can configure the remote control TV operation buttons to turn the television on/off, change the television input mode, select the television channel and change the television volume.
Point the remote control at the television
While pressing [^ TV], enter the code with the numbered buttons.
e.g., 01: [0] [1]Manufacturer and Code No.
Manufacturer and Code No.
Test by turning on the television and changing channels. Repeat the procedure until you find the code that allows correct operation.• If your television brand is not listed or if the code listed for your
television does not allow control of your television, this remote control is not compatible with your television.
If other Panasonic products are placed close together, change the remote control code on the main unit and the remote control (the two must match).Under normal circumstances use the factory set code “DVD 1”.
1 While stopped
Press [FUNCTIONS].
2 Press [e, r] to select “To Others” and press [ENTER].
3 Press [e, r] to select “SETUP” and press [ENTER].
4 Press [e, r] to select “Others” and press [q].
5 Press [e, r] to select “Remote Control” and press [ENTER].
6 Press [e, r] to select the code (“DVD 1”, “DVD 2” or “DVD 3”) and press [ENTER].
To change the code on the remote control
7 While pressing [ENTER], press and hold the numbered button ([1], [2] or [3]) for more than 2 seconds.
8 Press [ENTER]. When the following indicator appears on the
unit’s display
Note
Executing “Shipping Condition” in the SETUP menu returns the main unit code to “DVD 1”. Change the remote control code to 1 ( step 7).
Television operation
Brand Code Brand Code
Panasonic01, 02, 03, 04, 45
NOKIA 25, 26, 27
AIWA 35 NORDMENDE 10
AKAI 27, 30 ORION 37
BLAUPUNKT 09 PHILIPS 05, 06
BRANDT 10, 15 PHONOLA 31, 33
BUSH 05, 06 PIONEER 38
CURTIS 31 PYE 05, 06
DESMET 05, 31, 33 RADIOLA 05, 06
DUAL 05, 06 SABA 10
ELEMIS 31 SALORA 26
FERGUSON 10 SAMSUNG 31, 32, 43
GOLDSTAR/LG 31 SANSUI 05, 31, 33
GOODMANS 05, 06, 31 SANYO 21
GRUNDIG 09 SBR 06
HITACHI22, 23, 31, 40, 41, 42
SCHNEIDER05, 06, 29, 30, 31
INNO HIT 34 SELECO 06, 25
IRRADIO 30 SHARP 18
ITT 25 SIEMENS 09
JVC 17, 39 SINUDYNE 05, 06, 33
LOEWE 07 SONY 08
METZ 28, 31 TELEFUNKEN10, 11, 12, 13, 14
MITSUBISHI 06, 19, 20 THOMSON 10, 15, 44
MIVAR 24 TOSHIBA 16
NEC 36WHITE WESTINGHOUSE
05, 06
Brand Code Brand CodePanasonic/National
01, 02, 03, 04
PHILIPS 12
GOLDSTAR/LG 15, 16 SAMSUNG 12, 17, 18
HITACHI 08 SANYO 14, 19
JVC 07 SHARP 11
MITSUBISHI 09, 10 SONY 05
NEC 13 TOSHIBA 06
For Continental Europe
For Australia, N.Z., Asia and Middle East
When other Panasonic products respond to this remote control
SETUP Remote Control
Picture
Tuning
Disc
Press “ ” and “ENTER” togetherfor more than 2 seconds on the remote control.
Press and hold [ENTER] and the indicated number button at the same time for more than 2 seconds.

RQT8020
15
Rec
ord
ing
Rec
ord
ing
ENGL
ISH
Recording television programmes
.
Depending on the content being recorded, the recording times may become shorter than indicated.
(Unit: hour)
When “Recording time in EP Mode” is set to “EP ( 6Hours )” in the SETUP menu.The sound quality is better when using “EP ( 6Hours )” than when using “EP ( 8Hours )”.
Note
When recording to DVD-RAM using EP ( 8Hours ) mode, play may not be possible on DVD players that are compatible with DVD-RAM. In this case use EP ( 6Hours ) mode.
FR (Flexible Recording) ModeThe unit automatically selects a recording rate between XP and EP ( 8Hours ) that will enable the recordings to fit in the remaining disc space with the best possible recording quality.•You can set when programming timer recordings.•All the recording modes from “XP” to “EP” appear in the display.
• It is not possible to record continuously from one side of a double sided disc to the other. You will need to eject the disc and turn it over.
•When using 8 cm DVD-RAM or 8 cm DVD-R, remove the disc from the cartridge.
•You can record up to 99 titles on one disc ( 49 titles).• It is not possible to record digital broadcasts that allow “One time
only recording” onto DVD-R, DVD-RW, +R or 8 cm DVD-RAM discs. Use a CPRM compatible DVD-RAM.
Preparation•Turn on the television and select the appropriate video input to suit
the connections to this unit.•Turn the unit on.
1 Press [; OPEN/CLOSE] on the main unit to open the tray and insert a disc.•Press the button again to close the tray.
2 Press [1 2 CH] to select the channel.
3 Press [REC MODE] to select the recording mode (XP, SP, LP or EP).
4 Press [* REC] to start recording.
The elapsed time is shown on the display.Recording will take place on open space on disc. Data will not be overwritten. •You cannot change the channel or recording mode during
recording. You can change the channel or recording mode while paused; however, the recording will then be as a separate title.
• You can change the audio being received by pressing [AUDIO] during recording. (This does not affect the actual recording of the audio.)
Recording modes and approximate recording times
Mode
DVD-RAM DVD-RDVD-RW
+R(4.7 GB)
Single-sided (4.7 GB)
Double-sided (9.4 GB)
XP (High quality) 1 2 1
SP (Normal) 2 4 2
LP (Long play) 4 8 4
EP (Extra long play) 8 (6 ) 16 (12 ) 8 (6 )
FR (Automatic mode selection)
8 hours maximum
8 hours maximum for
one side
8 hours maximum
RECOPEN/CLOSECHEXT LINK
SKIP SLOW/SEARCH
REC MODEREC
F Rec
TIME SLIP
FUNCTIONSDIRECT NAVIGATOR
TOP MENU
RETURN
VOLUMECH
STATUSDISPLAY
SUB MENU
DIRECT TV RECAV
CANCEL MANUAL SKIPINPUT SELECT
AUDIO ERASE
EXT LINK
CREATE CHAPTER
PROG/CHECK
TIMER
ShowView
Numbered buttons
AV3 input terminals
F Rec
RETURN
e, r, w, qENTER
STATUSTIME SLIP
43
DIRECT NAVIGATOR
h q
2
* DIRECT TV REC
INPUT SELECT
For Continental Europe
For Australia, N.Z., Asia and Middle East
1
2 4g q
INPUT SELECT
-/--
For Continental Europe
For Australia, N.Z., Asia and Middle East
z TIMER
e.g., Continental Europe
e.g., Continental Europe
g
AUDIO
EP ( 6Hours )
EP ( 8Hours )
LP
SP
XP
Pic
ture
qua
lity
Recording time
Recording television programmes
XPSPLPEP
RAM -R -RW(V) +R
+R
When recording to DVD-R, DVD-RW (DVD-Video format) or +R•When recording bilingual TV broadcast onto DVD-R, DVD-RW or
+R, only one of either “M 1” or “M 2” audio can be recorded. Select at “Bilingual Audio Selection” ( page 36).
•The aspect ratio of the recorded images will be 4:3.• In order to play a DVD-R, DVD-RW (DVD-Video format) or +R
recorded using this unit on another playback source, the disc must first be finalized ( page 33).
Insert label-up.
Insert with the arrow facing in.
Insert fully so it clicks into place.
RAMSPDVD-
To select with the numbered buttons:e.g.,
5: [0] [5] 5: [5]15: [1] [5] 15: [-/--] [1] [5]
For Continental Europe For Australia, N.Z., Asia and Middle East
XPRAM
DVD-
Remaining time on the disc
XPRAM
DVD-
REC
RAM
RQT8020
16
Rec
ord
ing
ENGL
ISH
Recording television programmes
Refer to the control reference on page 15.
To stop recordingPress [g].From the start to the end of the recording is called one title.
It takes about 30 seconds for the unit to complete recording management information after recording finishes.
To pause recordingPress [h].Press again to restart recording.You can also press [* REC] to restart.(Recorded title is not split into separate titles.)
The Quick Start feature enables this unit to start recording to a DVD-RAM that is already inserted soon after turning it on.It is set to “On” at the time of purchase ( page 37).
Note
Startup takes more time when:– You play a disc or start recording to discs other than DVD-RAM.– The clock has not been set.
During recordingPress [* REC] on the main unit to select the recording time. Each time you press the button:
•This does not work during timer recordings ( page 18) or while using Flexible Recording ( page 17).
The unit automatically records the programme’s and station’s name if the station’s Title Page is correctly set ( page 38).
Note
The unit may take some time in retrieving titles (up to 30 minutes) and may fail in some cases.
When you insert a new DVD-RW or a DVD-RAM or DVD-RW (DVD-Video format) recorded on a computer or other equipment, a format confirmation screen is displayed. Format the disc to use it. However all the recorded contents are erased.
Press [w] to select “Yes” and press [ENTER].
To format a disc(Several steps are necessary to format a disc.)“Erasing all the contents of a disc–Format Disc” ( page 33)
When connected to a television that has the Q Link function using a fully wired 21-pin Scart cable ( page 7).This function allows you to immediately start recording the programme that you are viewing on the TV.
Insert a disc. ( page 15)
Press and hold [* DIRECT TV REC] for 1 second.Recording starts.
To stop recordingPress [g].
Press [q] (PLAY) during recording.
Press [DIRECT NAVIGATOR] during recording.
Press [e, r, w, q] to select a title and press [ENTER].
To exit the Direct Navigator screenPress [DIRECT NAVIGATOR].
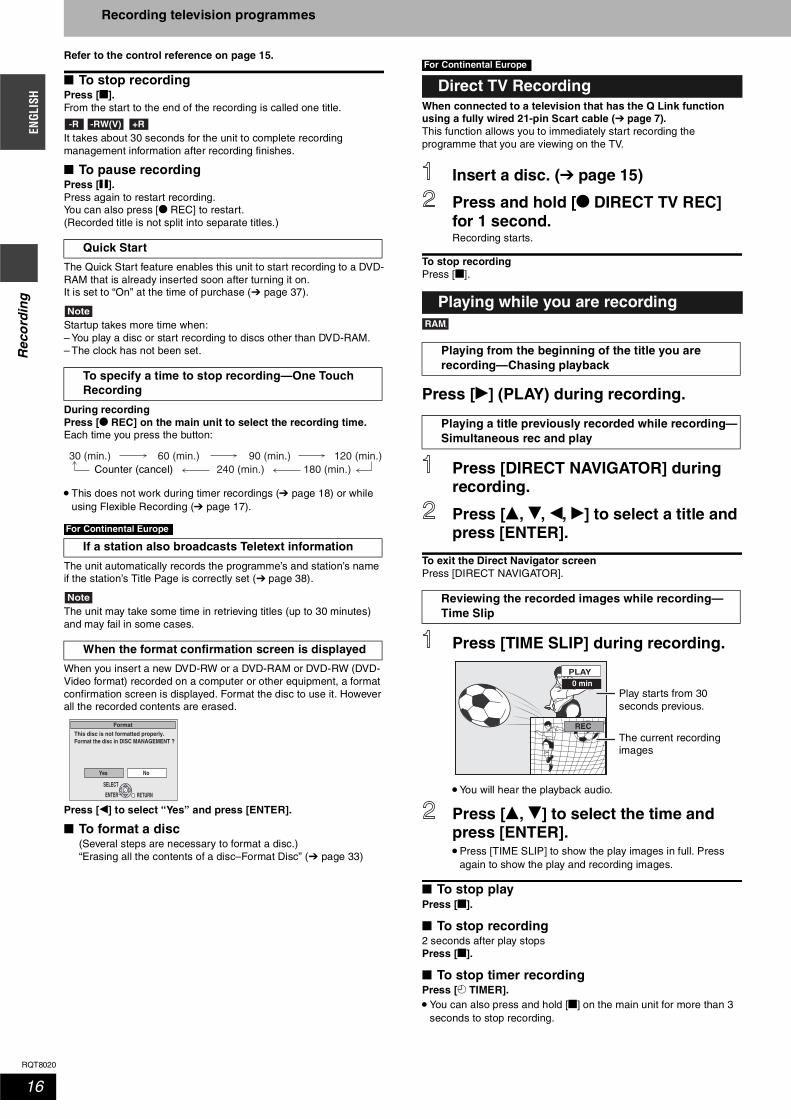
Press [TIME SLIP] during recording.
•You will hear the playback audio.
Press [e, r] to select the time and press [ENTER].•Press [TIME SLIP] to show the play images in full. Press
again to show the play and recording images.
To stop playPress [g].
To stop recording2 seconds after play stopsPress [g].
To stop timer recordingPress [z TIMER]. •You can also press and hold [g] on the main unit for more than 3
seconds to stop recording.
Quick Start
To specify a time to stop recording—One Touch Recording
If a station also broadcasts Teletext information
When the format confirmation screen is displayed
-R -RW(V) +R
30 (min.) 60 (min.) 90 (min.) 120 (min.)240 (min.) 180 (min.)Counter (cancel)
For Continental Europe
Format the disc in DISC MANAGEMENT ?This disc is not formatted properly.
ENTER
SELECT
RETURN
Format
NoYes
Direct TV Recording
Playing while you are recording
Playing from the beginning of the title you are recording—Chasing playback
Playing a title previously recorded while recording—Simultaneous rec and play
Reviewing the recorded images while recording— Time Slip
For Continental Europe
RAM
0 minPLAY
REC
Play starts from 30 seconds previous.
The current recording images

RQT8020
17
Rec
ord
ing
ENGL
ISHThe unit sets the best possible picture quality that fits the recording
within the remaining disc space.
Preparation•Select the channel to record or the external input.
While stoppedPress [F Rec].
Press [w, q] to select “Hour” and “Min.” and press [e, r] to set the recording time.•You can also set the recording time with the numbered
buttons.
When you want to start recordingPress [e, r, w, q] to select “Start” and press [ENTER].Recording starts.•All the recording modes from
XP to EP appear in the display.
To exit the screen without recording Press [RETURN].
To stop recording partwayPress [g].
To show the recording timePress [STATUS].
Note
When performing EXT LINK recording ( page 21), the flexible recording function does not work.
Preparation•Connect a video cassette recorder, etc. to this unit’s input
terminals.•When recording bilingual programmes
When both M 1 and M 2 is selected on the connected equipment, you can select the audio type in playback.
Select either M 1 or M 2 on the connected equipment. (The selected audio only is recorded.)
•When the output signal from the external equipment is NTSC, change the “TV System” to “NTSC” in the SETUP menu ( page 39).
•To reduce noise in input from external equipment (e.g., video casette recorder), set “AV-in NR” to “On” ( page 27).
•Check the time on the unit is correct.
e.g.,Connecting other video equipment to the AV3 input terminals
If the audio output of the other equipment is monaural, connect to L/MONO.
The S VIDEO terminal achieves a more vivid picture than the VIDEO terminal.
While stopped
Press [INPUT SELECT] to select the input channel for the equipment you have connected.
Press [REC MODE] to select the recording mode.
Start play on the other equipment.
Press [* REC].Recording starts.
To skip unwanted parts Press [h] to pause recording. (Press again to restart recording.)
To stop recordingPress [g].
To record programmes to fill up the remaining space on the disc Left, Flexible Recording
Flexible Recording
Using “Flexible Recording” is convenient in these kind of situations
•When the amount of free space on the disc makes selecting an appropriate recording mode difficult
•When you want to record a long programme with the best picture quality possible
e.g., Recording a 90 minutes programme to disc
: necessary space for recording
RAM -R -RW(V) +R
FLEXIBLE REC
Start Cancel
Recording in FR mode.
Set rec. time8 Hour 00 Min.Maximum rec. time1 Hour 30 Min.
Maximum recording timeThis is the maximum recording time in EP mode.
XPRAMSP
LPEP
DVD–
DVD-RAMREC 59
L R
ARD
Recording time
e.g., DVD-RAM
For Continental Europe
XP mode
If you select XP mode, the programme will not fit one disc.
SP mode
If you select SP mode, the programme will fit one disc.
FLEXIBLE REC
If you select “FLEXIBLE REC”, the programme will fit one disc perfectly.
4.7GBDVD-RAM
4.7GBDVD-RAM
If you try to record a 90 minutes programme in XP mode, only the first 60 minutes will fit on the disc and the 30 minutes balance will not get recorded.
another disc is necessaryFull
4.7GBDVD-RAM
However there will be 30 minutes remaining disc space.
Remains
4.7GBDVD-RAM
Fit
Recording from an external equipment
Almost all videos and DVD software on sale have been treated to prevent illegal copying. Any software that has been so treated cannot be recorded using this unit.
RAM -R -RW(V) +R
RAM
-R -RW(V) +R
RECOPEN/CLOSECHEXT LINK
Yellow White Red
S Video cable Audio/Video cable
Other video equipment
This unit e.g., Continental Europe

RQT8020
18
Rec
ord
ing
ENGL
ISH
Timer recording
You can enter up to 16 programmes up to a month in advance.
Preparation•Turn on the television and select the appropriate video input to suit
the connections to this unit.•Check the time on the unit is correct.
Entering SHOWVIEW numbers is an easy way of timer recording. You can find these numbers in TV listings in newspapers and magazines.
1 Press [ShowView].
2 Press the numbered buttons to enter the SHOWVIEW number.•To correct the number
Press [w] to move back to correct a digit.
3 Press [ENTER].
•Confirm the programme and make corrections if necessary using [e, r, w, q] ( page 20, Manually programming timer recordings, step 3).
•When “-- -----” appears in the “Name” column, you cannot set timer recording. Press [e, r] to select desired programme position. After you have entered the information of a TV station, it is kept in the unit’s memory.
•You can also press [REC MODE] to change the recording mode.
•VPS/PDC ( below)
ON←→OFF (---)
•Programme NamePress [w, q] to select “Programme Name” and press [ENTER] ( page 34).
4 Press [ENTER].The settings are stored.
Repeat steps 1–4 to programme other recordings.
5 Press [z TIMER]. The unit turns off and “z” lights on the unit’s display to indicate timer recording standby has been activated.
Even if the unit is in timer recording standby, play starts when you press [q] (PLAY) or [DIRECT NAVIGATOR]. Timer recording works even during play.
Using SHOWVIEW system to make timer recordings
SKIP SLOW/SEARCH
REC MODEREC
F Rec
TIME SLIP
FUNCTIONSDIRECT NAVIGATOR
TOP MENU
RETURN
STATUSDISPLAY
SUB MENU
CANCEL MANUAL SKIPINPUT SELECT
AUDIO ERASE
EXT LINK
CREATE CHAPTER
PROG/CHECK
TIMER
ShowView
Numbered buttons
z TIMER
e, r, w, qENTER
q
* REC
PROG/CHECK
DIRECT NAVIGATOR
g
EXT LINKLinked timer recording with external equipment (e.g., digital/satellite receiver)
For Continental Europe
e.g., Continental Europe
ShowView
G-Code
For Continental Europe
For Australia, N.Z. and Asia
CANCEL
RECOPEN/CLOSECHEXT LINK
g
REC MODE
INPUT SELECT
h
EXT LINKFor Continental Europe
e.g., Continental Europe
RAM -R -RW(V) +R
For Continental Europe
ShowView Remain
Enter ShowView Number by using 0-9 key.
1:58 SP12:53:00 15. 7. TUE
To release the unit from recording standbyPress [z TIMER]. The unit turns on and “z” goes out.•Be sure to press [z TIMER] before the programme start time to
put the unit on recording standby. Timer recording will work only if “z” is displayed.
To cancel recording when recording has already begun
Press [z TIMER]. •You can also press and hold [g] on the main unit for more than 3
seconds to stop recording.
Note
• “z” flashes for about 5 seconds when the unit cannot go to timer recording standby (e.g., a recordable disc is not in the disc tray).
• If the unit is not put in the timer recording standby mode at the latest 10 minutes before the programmed timer recording starting time, the “z” flashes on the unit display. In this case, press [z TIMER] to put the unit in the timer recording standby mode.
•When you programme successive timer recordings to start immediately one after the other, the unit cannot record the part at the beginning of the later programmes (a few seconds when recording with DVD-RAM and approximately 30 seconds when recording with DVD-R, DVD-RW (DVD-Video format) and +R).
VPS/PDC function ( page 42)As long as a VPS/PDC signal is being broadcast by the TV station, even if the broadcast programme time changes, the recording time automatically changes to match the new broadcast time.
To activate the VPS/PDC functionIn step 3 in the VPS/PDC column, press [e, r] to select “ON”.
20:0019:0015. 7. TUEModeStopStartName Date
SP
VPSPDC- - -1 ARD
Programme Name
TIMERRECORDING
Remain 1:58 SP12:54:00 15. 7. TUE
TIMERRECORDING
Remain
SP OK20:0019:00ARD 1 15. 7. TUE01Mode Disc
spaceStopStartNo. Name Date
New Timer Programme- - -
VPSPDC
1:58 SP12:55:00 15. 7. TUE
Check to make sure “OK” is displayed.
RAM

RQT8020
19
Rec
ord
ing
ENGL
ISH
You can enter up to 16 programmes up to a month in advance.
Preparation•Turn on the television and select the appropriate video input to suit
the connections to this unit.•Check the time on the unit is correct.
Entering G-CODE numbers is an easy way of timer recording. You can find these numbers in TV listings in newspapers and magazines.
1 Press [G-Code].
2 Press the numbered buttons to enter the G-CODE number.•To correct the number
Press [w] to move back to correct a digit.
3 Press [ENTER].
•Confirm the programme and make corrections if necessary using [e, r, w, q] ( page 20, Manually programming timer recordings, step 3).
•When “-- -----” appears in the “Name” column, you cannot set timer recording. Press [e, r] to select desired programme position. After you have entered the information of a TV station, it is kept in the unit’s memory.
•You can also press [REC MODE] to change the recording mode.
•Programme NamePress [w, q] to select “Programme Name” and press [ENTER] ( page 34).
4 Press [ENTER].The settings are stored.
Repeat steps 1–4 to programme other recordings.
5 Press [z TIMER]. The unit turns off and “z” lights on the unit’s display to indicate timer recording standby has been activated.
Even if the unit is in timer recording standby, play starts when you press [q] (PLAY) or [DIRECT NAVIGATOR]. Timer recording works even during play.
Using G-CODE system to make timer recordings
RAM -R -RW(V) +R
For Australia, N.Z. and Asia
G-Code Remain
Enter G-Code Number by using 0-9 key.
1:58 SP12:53:00 15. 7. TUE
20:0019:0015. 7. TUEModeStopStartName Date
SP1 ARD
Programme Name
TIMERRECORDING
Remain 1:58 SP12:54:00 15. 7. TUE
TIMERRECORDING
Remain
SP OK20:0019:00ARD 1 15. 7. TUE01Mode Disc
spaceStopStartNo. Name Date
New Timer Programme
1:58 SP12:55:00 15. 7. TUE
Check to make sure “OK” is displayed.
RAM
To release the unit from recording standbyPress [z TIMER]. The unit turns on and “z” goes out.•Be sure to press [z TIMER] before the programme start time to
put the unit on recording standby. Timer recording will work only if “z” is displayed.
To cancel recording when recording has already begun
Press [z TIMER]. •You can also press and hold [g] on the main unit for more than 3
seconds to stop recording.
Note
• “z” flashes for about 5 seconds when the unit cannot go to timer recording standby (e.g., a recordable disc is not in the disc tray).
• If the unit is not put in the timer recording standby mode at the latest 10 minutes before the programmed timer recording starting time, the “z” flashes on the unit display. In this case, press [z TIMER] to put the unit in the timer recording standby mode.
•When you programme successive timer recordings to start immediately one after the other, the unit cannot record the part at the beginning of the later programmes (a few seconds when recording with DVD-RAM and approximately 30 seconds when recording with DVD-R, DVD-RW (DVD-Video format) and +R).

RQT8020
20
Rec
ord
ing
ENGL
ISH
Timer recording
Refer to the control reference on page 18.You can enter up to 16 programmes up to a month in advance. (Each daily or weekly programme is counted as one programme.)Preparation•Turn on the television and select the appropriate video input to suit
the connections to this unit.•Check the time on the unit is correct.
1 Press [PROG/CHECK].
2 Press [e, r] to select “New Timer Programme” and press [ENTER].
3 Press [q] to move through the items and change the items with [e, r].
•Press and hold [e, r] to alter Start (Start time) and Stop (Finish time) in 30-minute increments.
•You can also set Name (Programme position/TV Station Name), Date, Start (Start time), and Stop (Finish time) with the numbered buttons.
•You can also press [REC MODE] to change the recording mode.•Date
•VPS/PDC ( page 18) ON←→OFF (---)
•Programme NamePress [w, q] to select “Programme Name” and press [ENTER] ( page 34).
4 Press [ENTER].
Repeat steps 2–4 to programme other recordings.
5 Press [z TIMER]. The unit turns off and “z” lights on the unit’s display to indicate timer recording standby has been activated.
Even if the unit is in timer recording standby, play starts when you press [q] (PLAY) or [DIRECT NAVIGATOR]. Timer recording works even during play.
Preparation•Connect a digital/satellite receiver or decoder to this unit’s input
terminals ( page 9).•When recording bilingual programmes
When both M 1 and M 2 is selected on the connected equipment, you can select the audio type in playback.
Select either M 1 and M 2 on the connected equipment. (The selected audio only is recorded.)
•When the output signal from the external equipment is NTSC, change the “TV System” to “NTSC” in the SETUP menu ( page 39).
1 While stopped
Press [INPUT SELECT] to select the input channel for the equipment you have connected.e.g., If you have connected to AV2 input terminals, select “A2”.
2 Press [REC MODE] to select the recording mode.
3 Select the channel on the other equipment.
4 Press [* REC].Recording starts.
To skip unwanted parts Press [h] to pause recording. (Press again to restart recording.)
To stop recordingPress [g].
Manually programming timer recordings
RAM -R -RW(V) +R
For Continental Europe
TIMERRECORDING
Remain
SP OK20:0019:00ARD 15. 7. TUE01Mode Disc
spaceStopStartNo. Name Date
New Timer Programme
1:58 SP12:56:00 15. 7. TUE
- - -
VPSPDC
For Australia, N.Z., Asia and Middle East
TIMERRECORDING
Remain
SP OK20:0019:00ARD 15. 7. TUE01Mode Disc
spaceStopStartNo. Name Date
New Timer Programme
1:58 SP12:56:00 15. 7. TUE
For Continental Europe
ModeStopStartName Date
Programme Name
TIMERRECORDING
Remain
SP - - -20:0019:0015. 7. TUE
1:58 SP12:57:00 15. 7. TUE
VPSPDC
1 ARD
For Australia, N.Z., Asia and Middle East
ModeStopStartName Date
Programme Name
TIMERRECORDING
Remain
SP20:0019:0015. 7. TUE
1:58 SP12:57:00 15. 7. TUE
1 ARD
Date: Current date up to one month later minus one day
Daily timer: SUN-SAT→MON-SAT→MON-FRI
Weekly timer: SUN→---→SAT
For Continental Europe
For Continental Europe
1:58 SPTIMERRECORDING
Remain12:58:00 15. 7. TUE
SP OK20:0019:00ARD 15. 7. TUE01Mode Disc
spaceStopStartNo. Name Date- - -
SP OK22:3022:00ARD 15. 7. TUE02 - - -New Timer ProgrammeNew Timer Programme
VPSPDC
Check to make sure “OK” is displayed.
For Australia, N.Z., Asia and Middle East
1:58 SPTIMERRECORDING
Remain12:58:00 15. 7. TUE
SP OK20:0019:00ARD 15. 7. TUE01Mode Disc
spaceStopStartNo. Name Date
SP OK22:3022:00ARD 15. 7. TUE02New Timer ProgrammeNew Timer Programme
Check to make sure “OK” is displayed.
To release the unit from recording standbyPress [z TIMER]. The unit turns on and “z” goes out.•Be sure to press [z TIMER] before the programme start time to
put the unit on recording standby. Timer recording will work only if “z” is displayed.
To cancel recording when recording has already begun
Press [z TIMER]. •You can also press and hold [g] on the main unit for more than 3
seconds to stop recording.
Note
• “z” flashes for about 5 seconds when the unit cannot go to timer recording standby (e.g., a recordable disc is not in the disc tray).
• If the unit is not put in the timer recording standby mode at the latest 10 minutes before the programmed timer recording starting time, the “z” flashes on the unit display. In this case, press [z TIMER] to put the unit in the timer recording standby mode.
•When you programme successive timer recordings to start immediately one after the other, the unit cannot record the part at the beginning of the later programmes (a few seconds when recording with DVD-RAM and approximately 30 seconds when recording with DVD-R, DVD-RW (DVD-Video format) and +R).
Recording from digital/satellite receiver or decoder
RAM
For Continental Europe
RAM
-R -RW(V) +R

RQT8020
21
Rec
ord
ing
ENGL
ISH
Even when the unit is turned off, you can display the timer recording list by pressing [PROG/CHECK].
Press [PROG/CHECK].
To change a programmePress [e, r] to select the programme and press [ENTER]. ( page 20, Manually programming timer recordings, step 3)
To delete a programmePress [e, r] to select the programme and press [ CANCEL].
To exit the timer recording listPress [PROG/CHECK].
To put the unit on timer recording standbyPress [z TIMER].The unit turns off and “z” lights on the unit’s display to indicate timer recording standby has been activated.
•Programmes that failed to record are deleted from the timer recording list at 4 a.m. two days later.
To make a timer recording with your television, connect to a television with a Q Link function ( page 42) that you can use for setting timer recordings using a fully wired 21-pin Scart cable ( page 7).
1 Make timer programming on the TV.2 Insert a disc.3 Turn off the unit.
The start and end of recording is controlled by TV.
To stop recordingPress [g].
Note
•When this unit is in timer recording standby or EXT LINK standby (“z” or “EXT Link” on the unit’s display), recording from TV does not start.
•Programmes are recorded as one title on this unit when the end time of the earlier timer recording and the start time of the later timer recording are close to each other.
To divide the titles, go to “Divide Title” ( page 29).
To record programmes from a digital/satellite receiver using timer programming
Preparation•Make sure you connect the AV2 input terminal of this unit to “VCR
Scart Terminal” of a digital/satellite receiver with a 21-pin scart cable ( page 9).
•Set the “AV2 Input” to match the connected equipment in the SETUP menu ( page 36).
•Set the “Ext Link” to match the connected equipment in the SETUP menu ( page 36). Ext Link 1: Start and stop timings of recording are controlled by
the control signal from a digital/satellite receiver.Ext Link 2: When an external equipment with a timer function
turns on, recording starts. When it turns off, recording stops.
1 Make timer programming on the external equipment.
2 Insert a disc.3 Press [EXT LINK].
The unit turns off and “EXT Link” lights on the unit’s display to indicate timer recording standby has been activated.
To cancel the external controlPress [EXT LINK] to stop recording or to cancel linked timer recording standby.• In order to prevent accidental operation, press [EXT LINK] to
cancel the setting after recording is finished.
For your reference•This function does not work with some equipment. Refer to the
equipment’s operating instructions.•The beginnings of recordings may not be recorded correctly in
some cases.•When “Ext Link” is set to “Ext Link 2”, this function does not work if
the input signal is NTSC system.•When “AV2 Connection” is set to “Decoder”, EXT LINK is not
available ( page 36).•Programmes are recorded as one title on this unit when the end
time of the earlier timer recording and the start time of the later timer recording are close to each other.
To divide the titles, go to “Divide Title” ( page 29).•While the unit is in EXT LINK standby mode or recording, video
picture is from the AV2 input terminal irrespective of “AV1 Output” setting.
Check, change or delete a programme
RAM -R -RW(V) +R
CancelENTERRETURN
TIMERRECORDING
Remain
SP OK20:0019:00ARD 15. 7. TUE01Mode Disc
spaceStopStartNo. Name Date
New Timer Programme
1:58 SP12:56:00 15. 7. TUE
- - -
VPSPDC
IconsThis programme is currently recording.The times overlap those in another programme. Recordingof the programme with the later start time starts when theearlier programme finishes recording.The disc was full so the programme failed to record. The material was copy-protected so it was not recorded.The programme did not complete recording because thedisc is dirty or some other reason.
W
F
X
Message displayed in the “Disc space” line
Displayed if the recording can fit in the remaining space.For recordings made daily or weekly, the display will show until when recordings can be made (up to a maximum of one month from the present time) based on the time remaining on the disc.It may not be possible to record because:• the disc is write-protected
• there is no more space left
• the number of possible titles has reached its maximum.
OK:
→ (Date):
! :
e.g., Continental Europe
Making timer recordings on the television(e.g., of digital broadcasts)
Linked timer recordings with external equipment (digital/satellite receiver)–EXT LINK
For Continental Europe
RAM -R -RW(V) +R
RAM
For Continental Europe
RAM -R -RW(V) +R
RAM

RQT8020
22
Pla
yin
g b
ack
ENGL
ISH
Playing discs
Preparation•Turn on the television and select the appropriate video input to suit
the connections to this unit.•Turn on this unit.• It is not possible to play continuously from one side of a double
sided disc to the other. You will need to eject the disc and turn it over.
•When using 8 cm DVD-RAM or 8 cm DVD-R, remove the disc from the cartridge.
•For a DVD-RAM with a cartridgeWith the write-protect tab in the protect position, play automatically starts when inserted in the unit.
•Depending on the disc, it may take time for the menu screen, pictures, sound etc. to start.
1 Press [; OPEN/CLOSE] on the main unit to open the tray and insert a disc.•Press the button again to close the tray.
2 Press [q] (PLAY).
Play starts from the most recently recorded title.
Play starts from the beginning of the disc.
Selecting recorded programmes (titles) to play
1 Press [DIRECT NAVIGATOR].
2 Press [e, r, w, q] to select the title and press [ENTER]. You can also select titles with the numbered buttons.e.g., 5: [0] [5] 15: [1] [5]
To show other pagesPress [e, r, w, q] to select “Previous” or “Next” and press [ENTER].•You can also press [u, i] to show other pages.
To exit the screenPress [DIRECT NAVIGATOR].
When a menu screen appears on the television
Press [e, r, w, q] to select the item and press [ENTER].Some items can also be selected using the numbered buttons.
Press the numbered buttons to select the item. e.g., 5: [0] [5] 15: [1] [5]
•To return to the menu screen
Press [AUDIO].
You can change the audio channel number each time you press the button. This allows you to change things like the soundtrack language.
e.g., English is the selected language ( page 26, Soundtrack).
RECOPEN/CLOSE
SKIP SLOW/SEARCH
REC MODEREC
F Rec
TIME SLIP
FUNCTIONSDIRECT NAVIGATOR
TOP MENU
RETURN
STATUSDISPLAY
SUB MENU
CANCEL MANUAL SKIPINPUT SELECT
AUDIO ERASE
EXT LINK
CREATE CHAPTER
PROG/CHECK
TIMER
ShowView
Numbered buttons
1
2g
e, r, w, qENTERw h, h q
TIME SLIP
DIRECT NAVIGATOR,TOP MENU
h
g
ERASE 1
RETURN
AUDIO
SUB MENU
u, i t, y
2
MANUAL SKIP
1 2 CH
CREATE CHAPTER 1
e.g., Continental Europe
1
2
For Continental Europe
For Australia, N.Z., Asia and Middle East
ERASE 2
CREATE CHAPTER 2
Insert label-up.
Insert with the arrow facing in.
Insert fully so it clicks into place.
PLAYRAM -R -RW(V) +R -RW(VR)
DVD-V DVD-A VCDCD
Direct Navigator screen icons
Currently recording.
Title protected.
Title that was not recorded due to recording protection (Digital broadcasts etc.)
Title cannot be played because data is damaged.
Title with “One time only recording” restriction
(NTSC) (PAL)
Title recorded using a different encoding system from that of the TV system currently selected on the unit.
Changing audio during play
RAM -R -RW(V) +R -RW(VR)
DVD-RAMDIRECT NAVIGATOR TITLE VIEW
Previous Page 02/02 Next
10 27.10. MON
07 08
8 27.10. MON
- - - - - -
- -
SUB MENUS SelectENTERRETURN
Previous Next
DVD-V DVD-A
VCD
DVD-V Press [TOP MENU] or [SUB MENU].
DVD-A Press [TOP MENU].
VCD Press [RETURN].
RAM -RW(VR) VCD
PLAY
L R
DVD-RAMLR L R
e.g., “L R” is selected
DVD-V DVD-A
Soundtrack 1 ENG Digital 3/2.1ch
DVD-V

RQT8020
23
Pla
yin
g b
ack
ENGL
ISH
Operations during play
Stop
Press [g].The stopped position is memorized.When stopped position is memorized (resume), the indicator appears in the unit’s display. (Excluding when playing from the Direct Navigator and when playing a playlist.) Resume play functionPress [q] (PLAY) to restart from this position.
Stopped position• If [g] is pressed several times, the indicator disappears and the position is cleared.•The position is cleared if the unit is turned off or the tray is opened.
Pause Press [h]. Press again or press [q] (PLAY) to restart play.
Search
Press [t] or [y].•The speed increases up to 5 steps. •Press [q] (PLAY) to restart play.•Audio is heard during first level search forward.
Audio is heard during all levels of search. (excluding moving picture parts) •Depending on the disc, searching may not be possible.
Skip While playing or paused, press [u] or [i].•Each press increases the number of skips.
Starting from a selected title
Press the numbered buttons.•This works only when stopped (screen saver is displayed on the television right) with some discs.e.g., 5: [0] [5] (MP3, JPEG and TIFF discs only) 5: [0] [0] [5]
15: [1] [5] 15: [0] [1] [5] Selecting groups
While stopped (screen saver is displayed on the television right) 5: [5]
Quick View The play speed can be increased without distorting the audio.
Press and hold [q] (PLAY/x1.3).Press again to return to normal speed.
Slow-motion
(Motion picture parts only)
While paused, press [t] or [y].•The speed increases up to 5 steps.•Press [q] (PLAY) to restart play.•Forward direction only. •The unit will pause if slow-motion play is continued for approximately 5 minutes.
Frame-by-frame
(Motion picture parts only)
While paused, press [w] (w h) or [q] (h q).•Each press shows the next frame.•Press and hold to change in succession forward or backward.•Press [q] (PLAY) to restart play.•Forward direction only.
Displaying the television image as a picture-in-picture
Skipping the specified time (Time Slip)
1 Press [TIME SLIP].2 Press [e, r] to select the time and press [ENTER]. Play skips the specified time. •Press [TIME SLIP] to show the play images in full.
Manual Skip
Play restarts from approximately 30 seconds later.
Press [MANUAL SKIP].
DVD-A CD
CD
DVD-A
RAM
-R -RW(V)RAM +R DVD-V
DVD-A
-RW(VR) VCDVCD
-R -RW(V)RAM +R DVD-V
DVD-A
-RW(VR) VCD VCD
Press [TIME SLIP]. The unit displays the television image as a picture-in-picture. •You will hear the playback audio.•Press [TIME SLIP] again to cancel. •Time Slip does not work when the unit’s “TV
System” settings are different from the title recorded on the disc.
•You can change the channel being received by pressing [1 2 CH].
•You cannot change the channel being received while recording.
Play images
Current receiving images
-R -RW(V)RAM +R -RW(VR)
-R -RW(V)RAM +R -RW(VR)
Editing operations during play
Erase
Erase titles during play.
1 Press [ERASE].2 Press [w, q] to select “Erase” and press [ENTER].•A title cannot be restored once it is erased. Make certain before proceeding. •You cannot erase when recording at the same time.•The available recording space on DVD-R or +R does not increase when you erase titles.•Available recording space on a DVD-RW (DVD-Video format) increases only when the last recorded
title is erased. It does not increase if other titles are erased.
Create chapter
( page 28, Title/Chapter)
Press [CREATE CHAPTER].Chapters are divided at the point pressed.•You cannot create chapters when the unit is in timer recording standby.
• You cannot create chapters when the unit is in EXT LINK standby.
-R -RW(V)RAM +R
RAM
For Continental Europe

RQT8020
24
Pla
yin
g b
ack
ENGL
ISH
Using menus to play MP3 and still pictures (JPEG/TIFF)
This unit plays MP3 files recorded on CD-R/RW designed for audio recording that are finalized ( page 41) on a computer.The screen shown right is displayed when you insert a disc containing MP3 files and still pictures (JPEG/TIFF).Press [ENTER], and follow the steps below.
1 Press [TOP MENU].
•Files are treated as tracks and folders are treated as groups.
2 Press [e, r] to select the track and press [ENTER]. Play starts on the selected track.• “ ” indicates the track currently playing. •You can also select the track with the numbered buttons.
e.g., 5: [0] [0] [5]15: [0] [1] [5]
Using the tree screen to find a groupWhile the file list is displayed 1 Press [q] while a track is highlighted to
display the tree screen.
2 Press [e, r] to select a group and press [ENTER]. The file list for the group appears.
To show other pagesPress [u, i].
To return to the previous screenPress [RETURN].
To exit the screenPress [TOP MENU].
You can play CD-R/CD-RW discs which contain still pictures (JPEG/TIFF) that have been recorded and finalized ( page 41) on a computer.The screen shown right is displayed when you insert a disc containing MP3 files and still pictures (JPEG/TIFF).Select JPEG menu before perform following the steps below.( page 25, To select JPEG Menu)
1 Press [TOP MENU].
SKIP SLOW/SEARCH
REC MODEREC
TIME SLIP
FUNCTIONSDIRECT NAVIGATOR
TOP MENU
RETURN
STATUSDISPLAY
SUB MENU
CANCEL MANUAL SKIPINPUT SELECT
EXT LINK
PROG/CHECK
EXT LINK TIMER
ShowView
Numbered buttons
RETURN
e, r, w, qENTER
TOP MENU
e.g., Continental Europe
FUNCTIONS
u, i
SUB MENU
STATUS
Regarding MP3 and still pictures (JPEG/TIFF)•Compatible formats: ISO9660 level 1 or 2 (except for extended
formats) and Joliet•Maximum number of files (tracks) and folders (groups)
recognizable: 999 files (tracks) and 99 folders (groups)•This unit is compatible with multi-session but reading or play of
the disc may take time if there are a lot of sessions.•Operation may take time to complete when there are many files
(tracks) and/or folders (groups) and some may not display nor be playable.
•The display order on this unit may differ from how the order is displayed on a computer.
•Depending on how you create the disc (writing software), files (tracks) and folders (groups) may not play in the order you numbered them.
•This unit is not compatible with packet-write format.•Depending on the recording, some items may not be playable.Regarding MP3•File format: MP3•Files must have the extension “.mp3” or “.MP3”.
Bit rates: 32 kbps to 320 kbps•Sampling frequency: 16 kHz/22.05 kHz/24 kHz/32 kHz/
44.1 kHz/48 kHz•This unit is not compatible with ID3 tags.Regarding still pictures (JPEG/TIFF)•File format: JPEG, TIFF (non-compressed RGB chunky format)
Files must have the extension “.jpg”, “.JPG”, “.tif” and “.TIF”.•Number of pixels: 34 x 34 to 6144 x 4096
(Sub sampling is 4:2:2 or 4:2:0)•Operation may take time to complete when playing TIFF format
still pictures.•MOTION JPEG is not supported.
•You can play MP3 and still pictures (JPEG/TIFF) on this unit by making folders as shown below. However depending on how you create the disc (writing software), play may not be in the order you numbered the folders.
•When the highest level folders are “DCIM” folders, they are displayed first on the tree.
002 Group
001
001 Group
001 track.mp3002 track.mp3003 track.mp3
001 track.mp3002 track.mp3003 track.mp3
003 Group 001 track.mp3002 track.mp3003 track.mp3004 track.mp3
003 Folder
001
002 Folder
P0000003.jpgP0000004.jpg
P0000001.jpg
treetree
P0000002.jpg
P0000005.jpg
P0000010.jpgP0000011.jpgP0000012.jpg
004 Folder P0000006.jpgP0000007.jpgP0000008.jpgP0000009.jpg
Order of play
Order of play
Structure of MP3 foldersPrefix with 3-digit numbers in the order you want to play them.
Structure of still pictures (JPEG/TIFF)Files inside a folder are displayed in the order they were updated or taken.
Playing MP3
Playing still pictures (JPEG/TIFF)
CD
Playback mode is set to MP3.Select “JPEG” from MENU in FUNCTIONSif you play pictures ( JPEG ).
ENTER RETURN
001 Both Ends Freezing002 Lady Starfish003 Life on Jupiter 004 Metal Glue 005 Paint It Yellow006 Pyjamamama007 Shrimps from Mars008 Starperson009 Velvet Cuppermine010 Ziggy Starfish
Page 001/002
1
1 : My favorite
23456 78910
Total Track TreeG 1T 1TOTAL 1/111
MENU GroupNo.
ENTERRETURN
SELECT
Prev.Next
No.--0 9
Selected group
G: Group no.T: Track no. in the groupTOTAL: Track no./Total track
no. in all groups
Tree
G 7/25 001 My favorite 001 Brazilian pops 002 Chinese pops 003 Czech pops 004 Hungarian pops 005 Liner notes 006 Japanese pops 007 Mexican pops 008 Philippine pops 009 Swedish pops 001 Momoko 002 Standard number 001 Piano solo 002 Vocal
MENU
14
40/111
MP3 music
ENTER
No.--0 9
TOTAL
RETURN
SELECT
G 8T
G: Selected group no. /Total group no.If the group has no track, “– –” is displayed as group number.
You cannot select groups that contain no compatible files.
CD
Playback mode is set to MP3.Select “JPEG” from MENU in FUNCTIONSif you play pictures ( JPEG ).
ENTER RETURN
ENTERRETURN
CD(JPEG)JPEG Menu PICTURE (JPEG) VIEW
image001
Pre
Folder
vious Page 01/01 Next
--- --- ---
001
008
003 004
009
002
005 006 007

RQT8020
25
Pla
yin
g b
ack
ENGL
ISH
2 Press [e, r, w, q] to select the still picture and press [ENTER]. •The selected still picture is displayed on the screen.
You can also select still pictures with the number buttons.e.g., 5: [0] [0] [5]
15: [0] [1] [5]
To select another folderWhile the JPEG Menu is displayed 1 Press [e, r, w, q] to select “Folder” and
press [ENTER].
2 Press [e, r] to select the folder and press [ENTER].
To display the previous or next still picture during playPress [w, q].
To show other pagesPress [u, i].
To return to the previous screenPress [RETURN].
To exit the screenPress [TOP MENU].
1 Press [ENTER].
2 Press [FUNCTIONS].
3 Press [e, r] to select “MENU” and press [ENTER].
4 Press [e, r] to select “JPEG” and press [ENTER].
After Step 1 ( page 24, Playing still pictures (JPEG/TIFF))
2 Press [e, r, w, q] to select “Folder” and press [SUB MENU].
3 Press [e, r] to select “Start Slide Show” and press [ENTER].
To change the slide intervalIn step 2 above, press [e, r] to select “Slide Interval” and press
[ENTER].
Press [w, q] to select the slide interval and press [ENTER].•You can select a slide interval between 0-30 seconds.
1 While playing
Press [SUB MENU].
2 Press [e, r] to select the item and press [ENTER].
To return the picture to its original sizePress [SUB MENU].
Press [e, r] to select “Zoom out” and press [ENTER].
To return the rotated picture to its original positionPress [SUB MENU].
Press [e, r] to select the opposite rotation button and press [ENTER].
Note
•The rotation and enlargement information will not be stored.
•When zooming in, the picture may be cut off.
Press [STATUS] twice.
To exit the picture properties screenPress [STATUS].
To select JPEG Menu
CD(JPEG)JPEG Menu Folder
F 1/21
image001image002image003image004image005image006image007image008image009image010DATA1DATA2
12 02 2004
ENTERRETURN
You cannot select folders that contain no compatible files.
F: Selected folder no./Total folder no.
FUNCTIONS VOL_200411291118MP3 Playback mode
DVD
Playback
Recording TIMER RECORDINGVCR Pl s
MENU
CD(MP3/JPEG)
Select file type.
MENU
ENTER RETURN
MP3
JPEG
To display still pictures one by one
To rotate and zoom in / zoom out
To view the picture properties
Slide Interval
Start Slide Show
1
Slide Interval
Display interval
Set display interval for Slide Show.
Press ENTER to set.
ENTER RETURN
SELECT
5sec.
2
Rotate LEFT
Zoom in
Rotate RIGHT
ENTERRETURN
The “Zoom in / Zoom out” function is only available for still pictures smaller than 640 x 480 pixels.
1
2
1
2
12:03:00 30.11.
26.11.2004Date 2/ 30No.
Shooting date

RQT8020
26
Pla
yin
g b
ack
ENGL
ISH
Using on-screen menus
1 Press [DISPLAY].
•Depending on the condition of the unit (playing, stopped, etc.) and disc contents, there are some items that you cannot select or change.
2 Press [e, r] to select the menu and press [q].
3 Press [e, r] to select the item and press [q].
4 Press [e, r] to select the setting.•Some items can be changed by pressing [ENTER].
To clear the on-screen menusPress [DISPLAY].
With some discs, you may only be able to make changes using the menus ( page 22) on the disc.
•The display changes according to the disc content. You cannot change when there is no recording.
Audio attributeLPCM/PPCM/%Digital/DTS/MPEG: Signal type
k (kHz): Sampling frequency
b (bit): Number of bits
ch (channel): Number of channels
Language
•Enter a code ( page 37) when you select “ : Others”.
This function works only when the elapsed play time is displayed.Select the item for repeat play. Depending on the disc, the items that can be selected will differ.
Common procedures
SKIP SLOW/SEARCH
REC MODEREC
F Rec
TIME SLIP
FUNCTIONSDIRECT NAVIGATOR
TOP MENU
RETURN
VOLUMECH
STATUSDISPLAY
SUB MENU
DIRECT TV RECAV
CANCEL MANUAL SKIPINPUT SELECT
AUDIO ERASE
EXT LINK
CREATE CHAPTER
PROG/CHECK
EXT LINK TIMER
ShowView
e, r, w, qENTER
DISPLAY
e.g., Continental Europe
STATUS
FUNCTIONS
Disc
PicturePlay
Soundtrack
Subtitle
1
Audio channel
Off
L R
Digital 2/0 ch
SoundOther
Menu Item Setting
Disc menu–Setting the disc content
Soundtrack
The disc’s audio attributes appear.
Select the audio and language ( below, Audio attribute, Language).
Subtitle
Turn the subtitle on/off and select the language ( below, Language).
(Only discs that contain subtitle on/off information)•Subtitle on/off information cannot be recorded using this unit.
Audio channel
page 22, Changing audio during play
Angle
Change the number to select an angle.
STILL-P (Still picture)
Selects the play method for still pictures. Slide Show: Plays according to the default order on the disc.Page: Select the still picture number and play. •RANDOM: Plays in random order.
•Return: Returns to the default still picture on the disc.
PBC (Playback control page 42)
Indicates whether menu play (playback control) is on or off. (unchangeable)
ENG: English SVE: Swedish CHI: Chinese
FRA: French NOR: Norwegian KOR: Korean
DEU: German DAN: Danish MAL: Malay
ITA: Italian POR: Portuguese VIE: Vietnamese
ESP: Spanish RUS: Russian THA: Thai
NLD: Dutch JPN: Japanese : Others
Play menu–Change the play sequence
Repeat play
•All (excluding MP3 discs)
•Chapter
•Group (MP3 discs only)
•PL (Playlist)
•Title
•Track Select “Off” to cancel.
-R -RW(V)RAM +R -RW(VR)
DVD-V DVD-A
DVD-V DVD-A
-R -RW(V)RAM +R -RW(VR)
RAM VCD-RW(VR)
DVD-V DVD-A
DVD-A
VCD
CD VCD
-R -RW(V)RAM +R DVD-V -RW(VR)
DVD-A CD
RAM
-R -RW(V)RAM +R DVD-V -RW(VR)
DVD-A VCDCD

RQT8020
27
Pla
yin
g b
ack
ENGL
ISH
Only when you have set “Progressive” to “On” in the SETUP menu ( page 36).
Position1 - 5: The higher the setting the lower the on-screen menu moves.
FUNCTIONS window and Status messages
By using the FUNCTIONS window you may access the main functions quickly and easily.
1 While stopped
Press [FUNCTIONS].Functions displayed depend on the type of disc.
2 Press [e, r] to select an item and press [ENTER].• If you select “To Others”, press [e, r] to select an item (e.g.,
“SETUP” or “DISC MANAGEMENT”) and press [ENTER]. • If you select “Return”, press [e, r] to select an item (e.g.,
“DIRECT NAVIGATOR” or “TIMER RECORDING”) and press [ENTER].
To exit the FUNCTIONS windowPress [FUNCTIONS].
Status messages appear on the television during operation to show the condition of the unit.
Press [STATUS].The display changes each time you press the button.
•TV audio typeStereo: STEREO/NICAM stereo broadcastM 1/M 2: Bilingual/NICAM dual-sound broadcastM 1: NICAM monaural broadcast
Not provided for Germany, Austria, Italy, Netherlands, Greece
Picture menu–Change the picture quality
Playback NR
Reduces noise and picture degradation.
Progressive ( page 42)
Select “On” to enable progressive output.Select “Off” if the picture is stretched horizontally.
Transfer (When “Progressive” is set to “On”)
Select the method of conversion for progressive output to suit the type of title being played ( page 41, Film and video).
When the output signal is PAL
•Auto: Detects 25 frame-per-second film content and appropriately converts it.
•Video: Select when using “Auto”, and the video content is distorted.
When the output signal is NTSC
•Auto 1 (normal):Detects 24 frame-per-second film content and appropriately converts it.
•Auto 2: Compatible with 30 frame-per-second film content in addition to 24 frame-per-second film content.
•Video: Select when using “Auto 1” and “Auto 2”, and the video content is distorted.
AV-in NR (Only when AV1, AV2, AV3 or AV4 is selected)
Reduces video tape noise while dubbing.•Automatic:
Noise reduction only works on picture input from a video tape.
•On: Noise reduction works for any input video.
•Off: Noise reduction is off. You can record the input signal as it is.
Sound menu–Change the sound effect
V.S.S. (Dolby Digital, 2-channel or over only)
Enjoy a surround-like effect if you are using two front speakers only.•Turn V.S.S. off if it causes distortion.
•V.S.S. does not work for bilingual recordings.
Dialog Enhancer (Dolby Digital, 3-channel or over only, including a center channel)
The volume of the center channel is raised to make dialog easier to hear.
Other menu–Change the display position
RAM -RW(V)-R DVD-ADVD-V+R -RW(VR)
RAM -RW(V) DVD-ADVD-V+R -RW(VR)
FUNCTIONS window
Status messages
FUNCTIONS DOCUMENTARYCartridge Protection OffDisc Protection Off
DVD DVD-RAM
Playback
Recording TIMER RECORDING
ENTERRETURN
ShowView
DIRECT NAVIGATOR
To Others
e.g., Continental Europe
FUNCTIONS DOCUMENTARYCartridge Protection OffDisc Protection Off
DVD DVD-RAM
Playback DIRECT NAVIGATOR
To Others Return
FLEXIBLE RECPLAYLISTS
Recording TIMER RECORDINGShowView
SETUPDISC MANAGEMENT
ENTERRETURN
“To Others” “Return”
1:45 SP12:34:50 24.12.
T12 0:01.23 SP gg
g
T12 0:12.34 SP
DVD-RAM
Remain
REC
StereoL R
PLAY
Type of disc
Recording or play status/input channel
Date and time
Available recording time and recording mode
Title number and elapsed time during recording/Recording mode
Title number and elapsed time during play/Recording mode
No display
TV audio type being received ( below)Selected audio type

RQT8020
28
Ed
itin
gEN
GLIS
HEditing titles/chapters
•The maximum number of items on a disc:
–Titles: 99 ( 49 titles)–Chapters: Approximately 1000 ( Approximately 254)
(Depends on the state of recording.)
Note
•Once erased or partially erased, title/chapters cannot be restored to their original state. Make certain before proceeding.
•You cannot edit during recording or chasing play.
Preparation•Turn on the television and select the appropriate video input to suit
the connections to this unit.•Turn the unit on.
• Insert the disc with the title to edit.
PreparationRelease protection ( page 32).
1 During play or while stopped
Press [DIRECT NAVIGATOR].2 Press [e, r, w, q] to select the title.
3 Press [SUB MENU], then [e, r] to select the operation and press [ENTER].• If you select “Edit”, press [e, r] to select the operation and
press [ENTER] ( page 29).
4 Press [e, r, w, q] to select the chapter.To start play Press [ENTER].To edit Step 5.
•To show other pages/Multiple editing ( above)
5 Press [SUB MENU], then [e, r] to select the operation and press [ENTER].
To exit the screen Press [DIRECT NAVIGATOR].
To return to the previous screenPress [RETURN].
SKIP SLOW/SEARCH
REC MODEREC
F Rec
TIME SLIP
FUNCTIONSDIRECT NAVIGATOR
TOP MENU
RETURN
VOLUMECH
STATUSDISPLAY
SUB MENU
DIRECT TV RECAV
CANCEL MANUAL SKIPINPUT SELECT
AUDIO ERASE
EXT LINK
CREATE CHAPTER
PROG/CHECK
EXT LINK TIMER
ShowView
RETURN
e, r, w, qENTER
DIRECT NAVIGATOR
SUB MENU
h
q
u, i
e.g., Continental Europe
RAM -R -RW(V) +R
Title/ChapterProgrammes are recorded as a single title consisting of one chapter.
Title
Chapter
Start End
You can divide a title into multiple chapters. ( page 23, 29, “Create Chapter”)
RAM
Title
Chapter Chapter ChapterChapter
You can change the order of chapters and create a playlist ( page 30). RAM
•Titles are divided into about 5-minute chapters after finalizing ( page 33). -R -RW(V) +R
+R
+R
Editing titles/chapters and playing chapters
To show other pagesPress [e, r, w, q] to select “Previous” or “Next” and press [ENTER].•You can also press [u, i] to show other pages. Multiple editingSelect with [e, r, w, q] and press [h]. (Repeat.)A check mark appears. Press [h] again to cancel.
RAM
DVD-RAMDIRECT NAVIGATOR TITLE VIEW
Previous Page 02/02 Next
10 27. 10. MON
07 08
8 27. 10. MON
- - - - - -
- -
SUB MENUS SelectENTERRETURN
Previous Next
Divide Title
Set up Protection
Cancel Protection
Partial Erase
Change Thumbnail
Enter Name
Properties
Edit
Chapter View
EraseRefer to “Title operations”.
If you select “Chapter View”
DVD-RAMDIRECT NAVIGATOR CHAPTER VIEW
Previous Page 01/01 Next
08 8 27. 10. MON
001 --- --- ---
--- --- ---
---
---
--- --- ---
SUB MENUS SelectENTERRETURN
0:00.00
Create Chapter
Combine Chapters
Title View
Erase Chapter
Refer to “Chapter operations”.
•You can go back to the Title View.

RQT8020
29
Ed
itin
gEN
GLIS
H
Multiple editing is possible.
Multiple editing is possible.
Title operations
Erase
Press [w, q] to select “Erase” and press [ENTER].•Once erased, the recorded contents are lost and cannot be restored.
Make certain before proceeding.•The available recording time on DVD-R or +R does not increase when you erase titles.•Available recording space on a DVD-RW (DVD-Video format) increases only when the last recorded title is
erased. It does not increase if other titles are erased.
PropertiesInformation (e.g., time and date) is shown.•Press [ENTER] to exit the screen.
Enter Name You can give names to recorded titles. page 34, Entering text
Set up Protection Cancel Protection
If set, this will protect the title from accidental erasure.
Press [w, q] to select “Yes” and press [ENTER].The lock symbol appears when the title is protected.
Partial Erase
( below, “For your
reference”)
You can remove unnecessary part of the recording.
Press [ENTER] at the start point and end point of the section you want to erase.Press [e, r] to select “Exit” and press [ENTER]. •Select “Next” and press [ENTER] to erase other sections.
Press [w, q] to select “Erase” and press [ENTER].
Change Thumbnail
( below, “For your reference”)
You can change the image to be shown as a thumbnail picture in the Title View.
Press [q] (PLAY) to start play. Press [ENTER] when the image you want to use as a thumbnail is shown.To change the thumbnailRestart play and press [e, r] to select “Change”, then press [ENTER] at the point you want to use as the thumbnail.
Press [e, r] to select “Exit” and press [ENTER].
Divide Title
( below, “For your reference”)
You can divide a title into two.
Press [ENTER] at the point you want to divide the title.Press [e, r] to select “Exit” and press [ENTER]. Press [w, q] to select “Divide” and press [ENTER].
To confirm the division pointPress [e, r] to select “Preview” and press [ENTER]. (The unit plays 10 seconds before and after the division point.)To change the division pointRestart play and press [e, r] to select “Divide”, then press [ENTER] at the point you want to change.
Note
•The divided titles retain the name and CPRM property ( page 41) of the original title.•Video and audio just before and after the dividing point may momentarily cut out.
-RRAM -RW(V) +R
-RRAM -RW(V) +R
-RW(VR)
Properties
No.
NameDate
01
420. 6.2004 WED
TimeRec time
12:190:30 (SP)
Dinosaur
ENTER RETURN
-RRAM -RW(V) +R
RAM
DVD-RAMDIRECT NAVIGATOR TITLE
10 10. 27. MON
07 08
8 10. 27. M
- - - -
RAM
DVD-RAMDIRECT NAVIGATOR Partial Erase
0:43.21
PLAY08
- -:- -.- - - -:- -.- -
Start End
Start
Next
Exit
End
ENTER
RETURN
1
2
3
-RRAM -RW(V) +R
DVD-RAMDIRECT NAVIGATOR Change Thumbnail
0:00.01
00:00.01
Change Start play and select the imageof a thumbnail.
08
ENTER
RETURN
Change
Exit
1
2
3
RAM
DVD-RAMDIRECT NAVIGATOR Divide Title
0:00.11
--:--.--
Divide
08 PLAY
Divide
Exit
Preview
ENTER
RETURN
1
2
3
Chapter operations
Erase Chapter Press [w, q] to select “Erase” and press [ENTER]. •Once erased, the recorded contents are lost and cannot be restored.
Make certain before proceeding.
Create Chapter
( below, “For your reference”)
Press [ENTER] at the point you want to divide.•Repeat this step to divide at other points.
Press [e, r] to select “Exit” and press [ENTER].
Combine Chapters Press [w, q] to select “Combine” and press [ENTER].•The selected chapter and next chapter are combined.
For your reference•Use search or Time Slip ( page 23) to find the desired point.
•To find the desired point correctly, use slow-motion or frame-by-frame ( page 23).
•Press [u, i] to skip to the end of a title.
RAM
RAM
DVD-RAMDIRECT NAVIGATOR Create Chapter
PLAY08
0:43.21
Create
Exit
1
2
RAM

RQT8020
30
Ed
itin
gEN
GLIS
HCreating, editing and playing playlists
•The maximum number of items on a disc:–Playlists: 99 –Chapters in playlists: Approximately 1000
(Depends on the state of recording.)• If you exceed the maximum numbers of items for a disc, all the
items entered will not be recorded.•You cannot create or edit a playlist while recording.
Preparation•Turn the unit on.
•Turn on the television and select the appropriate video input to suit the connections to this unit.
• Insert the disc with the title to edit.
•Release protection ( page 32).
1 While stopped
Press [FUNCTIONS].
2 Press [e, r] to select “To Others” and press [ENTER].
3 Press [e, r] to select “PLAYLISTS” and press [ENTER].
4 Press [e, r, w, q] to select “Create” and press [ENTER].
5 Press [w, q] to select the source title and press [r].•Press [ENTER] to select all the chapters in the title, then
skip to step 7.
6 Press [w, q] to select the chapter you want to add to a playlist and press [ENTER].Press [e] to cancel.
•You can also create a new chapter from the source title. Press [SUB MENU] to select “Create Chapter” and press [ENTER] ( page 29, Create Chapter).
7 Press [w, q] to select the position to insert the chapter and press [ENTER].
•Press [e] to select other source titles.
•Repeat steps 6–7 to add other chapters.
8 Press [RETURN].
To exit the screenPress [RETURN] several times.
To return to the previous screenPress [RETURN].
Creating playlists
SKIP SLOW/SEARCH
REC MODEREC
TIME SLIP
FUNCTIONSDIRECT NAVIGATOR
TOP MENU
RETURN
STATUSDISPLAY
SUB MENU
CANCEL MANUAL SKIPINPUT SELECT
EXT LINK
PROG/CHECK
EXT LINK TIMER
ShowView
RETURN
e, r, w, qENTER
SUB MENU
FUNCTIONS
e.g., Continental Europe
You can arrange the chapters ( page 28) to create a playlist.
•Editing playlists doesn’t modify the recorded data.
•Playlists are not recorded separately so this doesn’t use much capacity.
Title
Chapter
Chapter
Chapter
Chapter
Chapter
Title
Chapter Chapter
Playlist
RAM
FUNCTIONS DOCUMENTARYCartridge Protection OffDisc Protection Off
DVD DVD-RAM
Playback DIRECT NAVIGATOR
To Others Return
FLEXIBLE RECPLAYLISTS
Recording TIMER RECORDINGShowView
SETUPDISC MANAGEMENT
ENTERRETURN
e.g., Continental Europe
DVD-RAMPLAYLISTS PLAYLIST VIEW
Previous Page 01/01 Next
- - - - - -
- -- -- -
Create
ENTER
RETURN
DVD-RAMPLAYLISTS Create
08 8 27. 10. MON
01
001 ---
Source Title
Source Chapter
Chapters in PLAYLIST
Page 01/01
Page 001/001
Page 001/001
02
002 003
- - - -
DVD-RAMPLAYLISTS Create
08 8 27. 10. MON
01
001 ---
- - - -
------ --- ---
Source Title
Source Chapter
Chapters in PLAYLIST
Page 01/01
Page 001/001
Page 001/001
02
002 003
ENTER
RETURN
DVD-RAMPLAYLISTS Create
08 8 27. 10. MON
01
001 ---
------ --- ---
Source Title
Source Chapter
Chapters in PLAYLIST
Page 01/01
Page 001/001
Page 001/001
02
002 003
Press RETURN to exit.
- - - -

RQT8020
31
Ed
itin
gEN
GLIS
H
(play only)
1 While stopped Press [FUNCTIONS].
2 Press [e, r] to select “To Others” and press [ENTER].
3 Press [e, r] to select “PLAYLISTS” and press [ENTER].
4 Press [e, r, w, q] to select the playlist.To start play Press [ENTER].To edit Step 5.
•To show other pages/Multiple editing ( page 28)
5 Press [SUB MENU], then [e, r] to select the operation and press [ENTER].• If you select “Edit”, press [e, r] to select the operation and
press [ENTER].
6 Press [e, r, w, q] to select the chapter.To start play Press [ENTER]. To edit Step 7.
•To show other pages/Multiple editing ( page 28)
7 Press [SUB MENU], then [e, r] to select the operation and press [ENTER].
To exit the screenPress [RETURN] several times.
To return to the previous screenPress [RETURN].
Multiple editing is possible.
•Editing chapters in a playlist does not modify the source titles and source chapters.
Multiple editing is possible.
Editing and playing playlists/chaptersRAM -RW(VR)
DVD-RAMPLAYLISTS PLAYLIST VIEW
01
- - - -
- - - -
- -
Create27. 10. MON 0:30
Copy
Enter Name
Change Thumbnail
Create
Properties
Edit
Chapter View
Erase
Refer to “Playlist operations”.
If you select “Chapter View”
DVD-RAMPLAYLISTS CHAPTER VIEW
08 27. 10. MON 0:30
--- ---
--- --- ---
---
---
--- --- ---
001 002
0:00.00
Move Chapter
Create Chapter
Combine Chapters
Erase Chapter
PLAYLIST View
Add Chapter
Refer to “Chapter operations”.
•You can go back to the PLAYLIST View.
Playlist operations
Erase Press [w, q] to select “Erase” and press [ENTER].
Properties
Playlist information (e.g., time and date) is shown.•Press [ENTER]
to exit the screen.
Create page 30, Creating playlists, Step 5-8
Copy Press [w, q] to select “Copy” and press [ENTER].
Enter Name
page 34, Entering text
Change Thumbnail
page 29, Change Thumbnail
Chapter operations
Add Chapter
Move Chapter
Press [e, r, w, q] to select the position to insert the chapter and press [ENTER].
Create Chapter
page 29, Create Chapter
Combine Chapters
page 29, Combine Chapters
Erase Chapter
page 29, Erase Chapter
RAM
RAM -RW(VR)
Properties
No.Chapters
01012
DateTotal
20. 6.2004 WED0:30.05
Dinosaur
ENTER RETURN
RAM
RAM
RAM
RAM
RAM
page 30, Creating playlists, Step 5–7
DVD-RAMPLAYLISTS Move Chapter
Previous Page 01/01 Next
08 27. 10. MON 0:30
--- ---
--- --- ---
---
---
--- --- ---
001 002
ENTER
RETURN

RQT8020
32
Co
nve
nie
nt
fuct
ion
sEN
GLIS
HDISC MANAGEMENT
Preparation•Turn on the television and select the appropriate video input to suit
the connections to this unit.•Turn the unit on.• Insert the disc to be managed.
1 While stopped
Press [FUNCTIONS].
2 Press [e, r] to select “To Others” and press [ENTER].
3 Press [e, r] to select “DISC MANAGEMENT” and press [ENTER].
4 Press [e, r] to select “Disc Protection” and press [ENTER].
5 Press [w, q] to select “Yes” and press [ENTER].
The lock symbol appears closed when the disc is write-protected.
•For a DVD-RAM with a cartridge
With the write-protect tab in the protect position, play automatically starts when inserted in the unit.
To exit the screenPress [RETURN] several times.
To return to the previous screenPress [RETURN].
Preparation•Release protection ( left).
1 While stopped
Press [FUNCTIONS].
2 Press [e, r] to select “To Others” and press [ENTER].
3 Press [e, r] to select “DISC MANAGEMENT” and press [ENTER].
4 Press [e, r] to select “Disc Name” and press [ENTER]. page 34, Entering text•The disc name is displayed in the FUNCTIONS window.•With a finalized DVD-R, DVD-RW (DVD-Video format) and
+R, the name is displayed on the Top Menu.
To exit the screenPress [RETURN] several times.
To return to the previous screenPress [RETURN].
Preparation•Release protection ( left).
1 While stopped
Press [FUNCTIONS].
2 Press [e, r] to select “To Others” and press [ENTER].
3 Press [e, r] to select “DISC MANAGEMENT” and press [ENTER].
4 Press [e, r] to select “Erase all titles” and press [ENTER].
5 Press [w, q] to select “Yes” and press [ENTER].
6 Press [w, q] to select “Start” and press [ENTER].A message appears when finished.
7 Press [ENTER].Note
•Once erased, the recorded contents are lost and cannot be restored. Make certain before proceeding.
•Erasing all video titles will result in all playlists also being erased.
•Erase does not work if one or more titles are protected.
To exit the screenPress [RETURN] several times.
To return to the previous screenPress [RETURN].
Setting the protection
Setting the protection for the whole disc
SKIP SLOW/SEARCH
REC MODEREC
F R
TIME SLIP
FUNCTIONSDIRECT NAVIGATOR
TOP MENU
RETURN
STATUSDISPLAY
SUB MENU
CANCEL MANUAL SKIPINPUT SELECT
AUDIO ERASE
EXT LINK
CREATE CHAPTER
PROG/CHECK
EXT LINK TIMER
RETURN
e, r, w, qENTER
FUNCTIONS
e.g., Continental Europe
RAM
DISCMANAGEMENT
DVD-RAMTitle No. 11Used
Remain0 : 22
5:38 (EP)
Disc Name
Erase all titles
Disc Protection Off
PROTECT
Providing a disc with a name
Erasing all titles–Erase all titles
-RRAM -RW(V) +R
FUNCTIONS DOCUMENTARYCartridge Protection OffDisc Protection Off
DVD DVD-RAM
Playback DIRECT NAVIGATOR
My favorite 01/02
01Chapter 1
02Chapter 2
RAM

RQT8020
33
Co
nve
nie
nt
fuct
ion
sEN
GLIS
H
Note
Preparation
• Release protection ( page 32).
1 While stopped
Press [FUNCTIONS].
2 Press [e, r] to select “To Others” and press [ENTER].
3 Press [e, r] to select “DISC MANAGEMENT” and press [ENTER].
4 Press [e, r] to select “Format Disc” and press [ENTER].
5 Press [w, q] to select “Yes” and press [ENTER].
6 Press [w, q] to select “Start” and press [ENTER].A message appears when formatting is finished.
7 Press [ENTER].Note
•To stop formattingPress [RETURN].(You can cancel formatting if it takes more than 2 minutes. The disc must be reformatted if you do this.)
•Formatting cannot be performed on DVD-R, +R or CD-R/RW.
•You can format DVD-RW only as DVD-Video format on this unit.
•When a disc has been formatted using this unit, it may not be possible to use it on any other equipment.
To exit the screenPress [RETURN] several times.
To return to the previous screenPress [RETURN].
1 While stopped
Press [FUNCTIONS].2 Press [e, r] to select “To Others” and
press [ENTER].3 Press [e, r] to select “DISC
MANAGEMENT” and press [ENTER].4 Press [e, r] to select “Auto-Play
Select” and press [ENTER].Press [e, r] to select “Top Menu” or “Title 1” and press [ENTER].You can select whether to show the top menu after finalizing.Top Menu: The top menu appears first. Title 1: The disc content is played without displaying the
top menu.
5 Press [e, r] to select “Finalize” and press [ENTER].
Press [w, q] to select “Yes” and press [ENTER].Press [w, q] to select “Start” and press [ENTER].Finalizing starts.You cannot cancel finalizing.A message appears when finalizing is finished.
Press [ENTER].
Note
When finalizing a high-speed recording compatible disc, it may take longer than displayed on the confirmation screen (approximately four times).
•You cannot finalize DVD-R, DVD-RW (DVD-Video format) or +R recorded on other manufacturer’s equipment.
•DVD-R, DVD-RW (DVD-Video format) or +R finalized on this unit may not be playable on other players due to the condition of the recording.
•Visit Panasonic’s homepage for more information about DVDs.http://www.panasonic-europe.com
To exit the screenPress [RETURN] several times.
To return to the previous screenPress [RETURN].
Erasing all the contents of a disc–Format Disc
•Formatting erases all contents, and it cannot be restored. Check carefully before proceeding. The contents are erased when you format it even if you have set protection.
•Do not disconnect the AC mains lead while formatting. This can render the disc unusable. Formatting normally takes a few minutes, however it may take up to a maximum of 70 minutes.
RAM -RW(V) -RW(VR)
RAM
Enabling DVD-R, DVD-RW (DVD-Video format) or +R to be played on other equipment–Finalize
After finalizing
• The disc becomes play-only and you can no longer record or edit.
• You can record and edit the disc after formatting ( left) although it becomes play-only after finalizing.
•Titles are divided into about 5-minute chapters. This time varies greatly depending on the condition and mode of recording.
•There is a pause of several seconds between titles and chapters during play.
Do not disconnect the AC mains lead while finalizing. This will render the disc unusable.•Finalizing takes up to 15 minutes.
-R -RW(V) +R
1
2
3
-R +R
-RW(V)
For Continental Europe

RQT8020
34
Co
nve
nie
nt
fuct
ion
sEN
GLIS
HEntering text
You can give names to recorded titles, etc.The maximum number of characters:
If a name is long, parts of it may not be shown in some screens.
1 Show Enter Name screen.
2 Press [e, r, w, q] to select a character and press [ENTER].Repeat this step to enter other characters.•To erase a character
Press [e, r, w, q] to select the character in the name field and press [h].
•Using the numbered buttons to enter characterse.g., entering the letter “R”
Press [7] to move to the 7th row.Press [7] twice to highlight “R”.Press [ENTER].
•To enter a spacePress [ CANCEL] and press [ENTER].
•To add frequently used namesMaximum number of registered names: 20Maximum number of characters per name: 20
Press [i] while the name to be added is shown in the name field.Press [w] to select “Add” and press [ENTER].•To cancel adding word
Press [RETURN].•To recall an added name
Press [u].Press [e, r, w, q] to select the name to be recalled and press [ENTER].
•To erase an added namePress [u].Press [e, r, w, q] to select the name to be erased and press [SUB MENU].Press [ENTER].Press [w] to select “Erase” and press [ENTER].Press [RETURN].
3 Press [g] (Set).Returns to the previously displayed screen.
To end partwayPress [RETURN].Text is not saved.
1 While stopped
Press [FUNCTIONS].
2 Press [e, r] to select “To Others” and press [ENTER].
3 Press [e, r] to select “SETUP” and press [ENTER].
4 Press [e, r] to select the tab and press [q].
5 Press [e, r] to select the menu and press [ENTER].
6 Press [e, r] to select the option and press [ENTER].
To exit the screenPress [RETURN] several times.
To return to the previous screenPress [RETURN].
Characters Characters
Title 64 (44 ) Title 44
Playlist 64 Disc 40
Disc 64
timer recording
Title (timer recording) ( page 18, 19, 20, Step 3)
Title ( page 28, Step 3)
Playlist ( page 31, Step 5)
Disc ( page 32, “Providing a disc with a name”)
SKIP SLOW/SEARCH
REC MODEREC
F Rec
TIME SLIP
FUNCTIONSDIRECT NAVIGATOR
TOP MENU
RETURN
STATUSDISPLAY
SUB MENU
CANCEL MANUAL SKIPINPUT SELECT
AUDIO ERASE
EXT LINK
CREATE CHAPTER
PROG/CHECK
EXT LINK TIMER
ShowView
RETURN
e, r, w, qENTER
h
g
u, i
e.g., Continental Europe
FUNCTIONS
A
B
Numbered buttons
CANCEL
SUB MENU
C
RAM -R -RW(V) +R
RAM-R
-RW(V) +R
_Enter Name
1 2 3 4 5
A B C a
D E F d
G H I
N O
g
J K L j
M m
6 7 8 9 0
b c
e f / %
h i $# &
k l @n ] _o [
Space
P Q R S p
T U V t
W X Y Z w
q r s ( )
u v -
x y z
`
|
!?\
. , " ' : ;
1
2
3
4
5
6
7
8
9
0
ENTER
SELECT
RETURN
Set
Add to ListErase
Standard Characters Other Characters
List Names
A B
Name field: shows the text you have entered
Press [A] or [B] to select character type and press [ENTER].
Standard Characters ( left, Alphabet characters etc.)
Other Characters ( below, Umlaut characters, accented characters etc.)
For Continental Europe
A
B
¡ ¢ £ ¤ ¥
¯ ² ³ ´
µ · ¸¬ - ®
¹ º ¼ ½ ¾¿ ˚ À Â Ã Ä Å Æ ÈÇ
É Ê Ë Ì Í Î Ï Á Ñ Ò
Ó Ô Õ Ö × Ø Ù Ú Û Ü
¦ § ¨ © ª
˚ ±
Space
1
2
3
4
5
6
7
8
9
0
Ý Þ ß Ð à â ã ä å æç è é ê ë ì í î ï ð
ñ ò ó ô õ ö ÷ ø ù ú
û ü ý þ ÿ
Changing the unit’s settings
Common procedures
1
2
3
1
2
1
2
1
2
3
4
5
Remote Cotrol
Clock
Power Save
Quick
DVD 2
Tuning
SETUP
Disc
Tabs Menus Options

RQT8020
35
Co
nve
nie
nt
fuct
ion
sEN
GLIS
H
Changing the unit’s settings
The settings remain intact even if you switch the unit to standby.
Summary of settings
Tabs Menus Options (Underlined items are the factory presets.)
Tuning Manual ( page 38)
Auto-Setup Restart ( page 39)
Download from TV ( page 39)
Disc Settings for playback•Press [ENTER] to show the following settings.
RatingsSet a ratings level to limit DVD-Video play.
Follow the on-screen instructions. Enter a 4-digit password with the numbered buttons when the password screen is shown.•Do not forget your password.
•8 No Limit: All DVD-Video can be played.
•1 to 7: Prohibits play of DVD-Video with corresponding ratings recorded on them.
•0 Lock All: Prohibits play of all DVD-Video.•Unlock Recorder •Change Password•Change Level •Temporary Unlock
DVD-Audio Video mode PlaybackSelect “On” to play DVD-Video content on some DVD-Audio.
•On: The setting returns to “Off” when you change the disc or turn the unit off.
•Off
Soundtrack •Some discs start in a certain language despite any changes you make here.
•Enter a code ( page 37) when you selecting “Other ”.
•In case of English/French/German/Italian/Spanish/Dutch languages, when you make download from TV, and Country setting of Auto-Setup in plug-in, the language (“Soundtrack”/“Menus”) will be same and “Subtitle” will set to “Automatic”.
•English •French •German • Italian •Spanish
•Dutch
•Original: The original language of each disc will be selected.
•Other
Subtitle •Automatic: If the language selected for “Soundtrack” is not available, subtitles of that language will automatically appear if available on that disc.
•English •French •German • Italian •Spanish
•Dutch
•Other
Menus •English •French •German • Italian •Spanish
•Dutch •Other
Settings for recording•Press [ENTER] to show the following setting.
Recording time in EP modeSelect the maximum number of hours for recording in EP mode ( page 15, Recording modes and approximate recording times).
•EP ( 6Hours ):You can record for 6 hours on an unused 4.7 GB disc.
•EP ( 8Hours ):You can record for 8 hours on an unused 4.7 GB disc.
Picture Comb FilterSelect the picture sharpness when recording.The setting is fixed with “On” if you set “TV System” to “NTSC” ( page 39).
•On: Pictures become clear and vivid. Normally, use this setting.
•Off: Select it when recording noisy pictures.
Still ModeSelect the type of picture shown when you pause play ( page 41, Frames and fields).
•Automatic:
•Field: Select if jittering occurs when “Automatic” is selected.
•Frame: Select if small text or fine patterns cannot be seen clearly when “Automatic” is selected.
For Continental Europe
DVD-V
For Continental Europe
For Continental Europe
DVD-V
For Continental Europe
DVD-V
For Continental Europe

RQT8020
36
Co
nve
nie
nt
fuct
ion
sEN
GLIS
HChanging the unit’s settings
Tabs Menus Options (Underlined items are the factory presets.)
Sound Dynamic Range Compression (Dolby Digital only)Change the dynamic range for late night viewing.
•On
•Off
Bilingual Audio SelectionSelect whether to record the main or secondary audio type when recording to DVD-R, DVD-RW (DVD-Video format) or +R.You cannot select this when recording from an external source onto DVD-R, DVD-RW (DVD-Video format) or +R. Select the audio on the other equipment.
•M 1
•M 2
Digital Audio OutputChange the settings when you have connected equipment through this unit’s DIGITAL AUDIO OUT terminal ( page 9).Output is not digital with DVD-Audio.
•Press [ENTER] to show the following settings.
PCM Down ConversionSelect how to output audio with a sampling frequency of 96 kHz.•Signals are converted to 48 kHz despite the settings
across if the signals have a sampling frequency of 96 kHz with a disc that has copy protection.
•On: Converted to 48 kHz for output. Select if the equipment you connect cannot process signals with a sampling frequency of 96 kHz.
•Off: Signals are output as 96 kHz. (Choose when the connected equipment can process signals with a sampling frequency of 96 kHz.)
Dolby Digital Select how to output the signal.If “Bitstream” is selected, the connected equipment decodes the signal.If “PCM” is selected, this unit decodes the signal and output it as 2 channel.
Note
Not making the proper settings may result in noise or some trouble for digital recording. To avoid damaging your hearing and speakers, turn down the volume level.
•Bitstream: When connecting to equipment displaying the Dolby Digital logo.
•PCM: When connecting to equipment not displaying the Dolby Digital logo.
DTS •Bitstream: When connecting to equipment displaying the DTS logo.
•PCM: When connecting to equipment not displaying the DTS logo.
MPEG •Bitstream: When connected to equipment with a built-in MPEG decoder.
•PCM: When connected to equipment without a built-in MPEG decoder.
Display On-Screen MessagesChoose whether to show status messages automatically.
•Automatic
•Off
Grey BackgroundSelect “Off” if you do not want to have the unit show the grey background when tuner reception is weak.
•On
•Off
FL DisplayChanges the brightness of the unit’s display.This setting is fixed with “Automatic” if you set “Power Save” to “On”.
•Bright •Dim
•Automatic: The display turns dark during play, and reappears momentarily when you press a button. When the unit is turned off, all displays disappear. While using this mode, the standby power consumption can be reduced.
Connection TV Aspect ( page 13) •16:9 •4:3 •Letterbox
Progressive ( page 13)This setting is fixed with “Off” if you set “AV1 Output” to “RGB (without component)”.
•On •Off
TV System ( page 39) •PAL •NTSC
AV1 OutputSelects the output from the AV1 terminal.Select “RGB (without component)” for RGB output.Select “Video (with component)” or “S Video (with component)” for component output.
•Video (with component)
•S Video (with component)
•RGB (without component)
AV2 Settings Set to match the connected equipment.
•Press [ENTER] to show the following settings.
AV2 InputSet to “RGB/Video” when receiving or recording RGB output from external equipment.
•RGB/Video
•RGB
•Video
•S Video
AV2 ConnectionThis setting is fixed with “Ext” if you set “TV System” to “NTSC” ( page 39).
•Decoder: When a decoder is connected to decode scrambled signal (e.g., C+ decoder).
•Ext: When the VCR or a digital/satellite receiver is connected.
Ext LinkThis setting cannot be made when the “TV System” is set to “NTSC” ( page 39).
•Ext Link 1: When a digital receiver which transmits a special control signal recordings via the 21-pin Scart cable is connected.
•Ext Link 2: When an external equipment with a timer function is connected.
AV2 Input Set to “RGB/Video” when receiving or recording RGB output video from external equipment.
•RGB/Video
•RGB
•Video
•S Video
DVD-V
DVD-A
For Continental Europe
For Australia, N.Z., Asia and Middle East

RQT8020
37
Co
nve
nie
nt
fuct
ion
sEN
GLIS
H
Tabs Menus Options (Underlined items are the factory presets.)
Others Remote Control ( page 14) •DVD 1 •DVD 2 •DVD 3
Clock
Auto Clock Setting ( page 40)
Manual Clock Setting ( page 40)
Power Save•Refer to the following when “Power Save” is set to “On”.
– “FL Display” is automatically set to “Automatic” ( page 36).
– “Quick Start” function does not work (automatically set to “Off”).
– This function does not work in the timer recording standby mode.
– When the unit is off, Pay TV programmes cannot be watched on the TV because the signal from the connected decoder is not looped through. To watch them, turn on the unit.
•On: Power consumption is minimized when the unit is turned to standby ( page 41).
•Off
Quick StartA few seconds after turning on the unit, you can start recording to DVD-RAM.Power consumption is also higher when the unit is turned off if this is set to “On”.• If this is set to “On”, “Power Save” is automatically turned to
“Off”.
•On
•Off
Language Choose the language for these menus and the on-screenmessages.
•English •Deutsch •Français • Italiano •Español
•Nederlands
Country ( page 12) •Australia •New Zealand •Others
Shipping ConditionAll the settings except for the ratings level, ratings password and time settings return to the factory preset. The timer recording programmes are also cancelled.
•Yes
•No
Default SettingsAll the settings except for the programmed channels, time settings, country settings, language settings, disc language settings, ratings level, ratings password and remote control code return to the factory presets.
•Yes
•No
For Continental Europe
For Continental Europe
For Continental Europe
For Australia and N.Z.
Language code list Enter the code with the numbered buttons.
Abkhazian: 6566 Catalan: 6765 Gujarati: 7185 Lingala: 7678 Rhaeto-Romance: Tamil: 8465Afar: 6565 Chinese: 9072 Hausa: 7265 Lithuanian: 7684 8277 Tatar: 8484Afrikaans: 6570 Corsican: 6779 Hebrew: 7387 Macedonian: 7775 Romanian: 8279 Telugu: 8469Albanian: 8381 Croatian: 7282 Hindi: 7273 Malagasy: 7771 Russian: 8285 Thai: 8472Ameharic: 6577 Czech: 6783 Hungarian: 7285 Malay: 7783 Samoan: 8377 Tibetan: 6679Arabic: 6582 Danish: 6865 Icelandic: 7383 Malayalam: 7776 Sanskrit: 8365 Tigrinya: 8473Armenian: 7289 Dutch: 7876 Indonesian: 7378 Maltese: 7784 Scots Gaelic: 7168 Tonga: 8479Assamese: 6583 English: 6978 Interlingua: 7365 Maori: 7773 Serbian: 8382 Turkish: 8482Aymara: 6589 Esperanto: 6979 Irish: 7165 Marathi: 7782 Serbo-Croatian: 8372 Turkmen: 8475Azerbaijani: 6590 Estonian: 6984 Italian: 7384 Moldavian: 7779 Shona: 8378 Twi: 8487Bashkir: 6665 Faroese: 7079 Japanese: 7465 Mongolian: 7778 Sindhi: 8368 Ukrainian: 8575Basque: 6985 Fiji: 7074 Javanese: 7487 Nauru: 7865 Singhalese: 8373 Urdu: 8582Bengali; Bangla: Finnish: 7073 Kannada: 7578 Nepali: 7869 Slovak: 8375 Uzbek: 8590
6678 French: 7082 Kashmiri: 7583 Norwegian: 7879 Slovenian: 8376 Vietnamese: 8673Bhutani: 6890 Frisian: 7089 Kazakh: 7575 Oriya: 7982 Somali: 8379 Volapük: 8679Bihari: 6672 Galician: 7176 Kirghiz: 7589 Pashto, Pushto: 8083 Spanish: 6983 Welsh: 6789Breton: 6682 Georgian: 7565 Korean: 7579 Persian: 7065 Sudanese: 8385 Wolof: 8779Bulgarian: 6671 German: 6869 Kurdish: 7585 Polish: 8076 Swahili: 8387 Xhosa: 8872Burmese: 7789 Greek: 6976 Laotian: 7679 Portuguese: 8084 Swedish: 8386 Yiddish: 7473Byelorussian: 6669 Greenlandic: 7576 Latin: 7665 Punjabi: 8065 Tagalog: 8476 Yoruba: 8979Cambodian: 7577 Guarani: 7178 Latvian, Lettish: 7686 Quechua: 8185 Tajik: 8471 Zulu: 9085
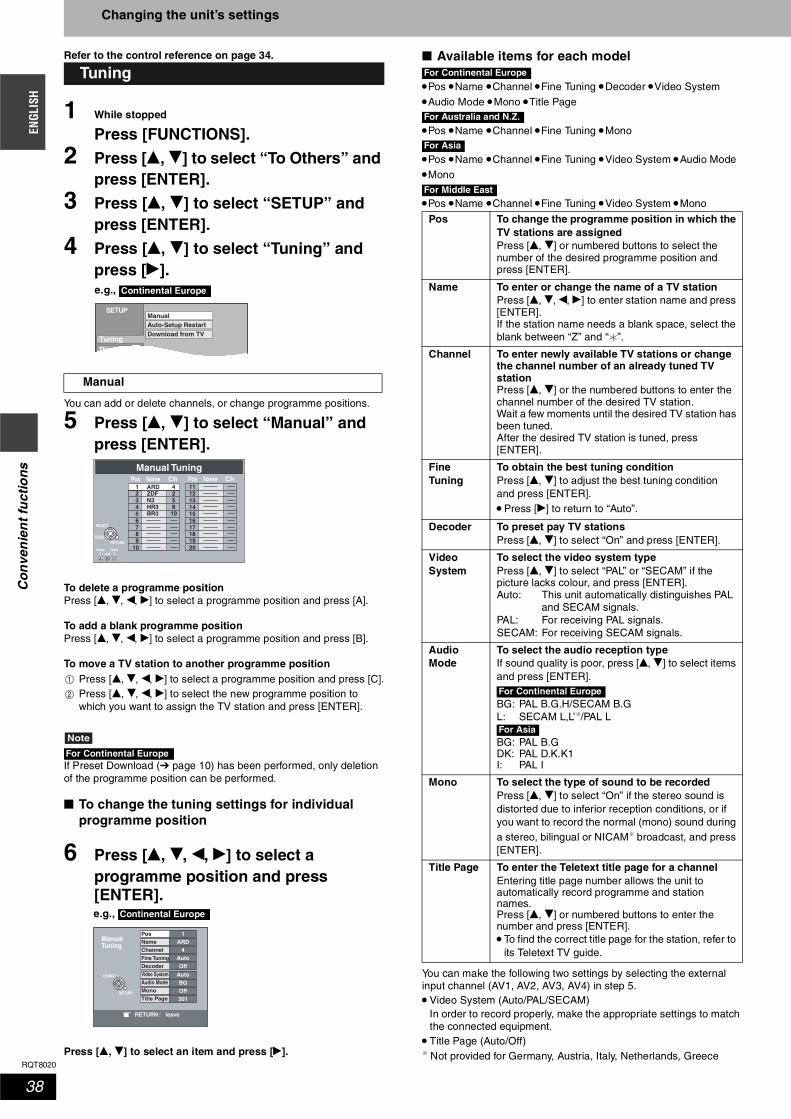
RQT8020
38
Co
nve
nie
nt
fuct
ion
sEN
GLIS
HChanging the unit’s settings
Refer to the control reference on page 34.
1 While stopped
Press [FUNCTIONS].
2 Press [e, r] to select “To Others” and press [ENTER].
3 Press [e, r] to select “SETUP” and press [ENTER].
4 Press [e, r] to select “Tuning” and press [q].
You can add or delete channels, or change programme positions.
5 Press [e, r] to select “Manual” and press [ENTER].
To delete a programme positionPress [e, r, w, q] to select a programme position and press [A].
To add a blank programme positionPress [e, r, w, q] to select a programme position and press [B].
To move a TV station to another programme positionPress [e, r, w, q] to select a programme position and press [C].Press [e, r, w, q] to select the new programme position to which you want to assign the TV station and press [ENTER].
Note
If Preset Download ( page 10) has been performed, only deletion of the programme position can be performed.
To change the tuning settings for individual programme position
6 Press [e, r, w, q] to select a programme position and press [ENTER].
Press [e, r] to select an item and press [q].
Available items for each model
•Pos •Name •Channel •Fine Tuning •Decoder •Video System
•Audio Mode •Mono •Title Page
•Pos •Name •Channel •Fine Tuning •Mono
•Pos •Name •Channel •Fine Tuning •Video System •Audio Mode
•Mono
•Pos •Name •Channel •Fine Tuning •Video System •Mono
You can make the following two settings by selecting the external input channel (AV1, AV2, AV3, AV4) in step 5.•Video System (Auto/PAL/SECAM)
In order to record properly, make the appropriate settings to match the connected equipment.
•Title Page (Auto/Off) Not provided for Germany, Austria, Italy, Netherlands, Greece
Tuning
Manual
SETUP
DiscTuning
ManualAuto-Setup RestartDownload from TV
e.g., Continental Europe
Manual TuningPos Name Ch Pos Name Ch
DeleteAdd
Move
1234
4258105
6789
10
11121314151617181920
ENTERRETURN
SELECT
ARDZDFN3HR3BR3
B CA
1
2
For Continental Europe
PosNameChannelFine TuningDecoderVideo System
1
Off
4Auto
RETURN : leave
Manual Tuning
ARD
AutoAudio Mode BGMono OffTitle Page 301
RETURN
CHANGE
e.g., Continental Europe
Pos To change the programme position in which the TV stations are assignedPress [e, r] or numbered buttons to select the number of the desired programme position and press [ENTER].
Name To enter or change the name of a TV stationPress [e, r, w, q] to enter station name and press [ENTER].If the station name needs a blank space, select the blank between “Z” and “ ”.
Channel To enter newly available TV stations or change the channel number of an already tuned TV station Press [e, r] or the numbered buttons to enter the channel number of the desired TV station. Wait a few moments until the desired TV station has been tuned. After the desired TV station is tuned, press [ENTER].
Fine Tuning
To obtain the best tuning conditionPress [e, r] to adjust the best tuning conditionand press [ENTER].•Press [q] to return to “Auto”.
Decoder To preset pay TV stationsPress [e, r] to select “On” and press [ENTER].
Video System
To select the video system typePress [e, r] to select “PAL” or “SECAM” if the picture lacks colour, and press [ENTER].Auto: This unit automatically distinguishes PAL
and SECAM signals.PAL: For receiving PAL signals.SECAM: For receiving SECAM signals.
Audio Mode
To select the audio reception typeIf sound quality is poor, press [e, r] to select items and press [ENTER].
BG: PAL B.G.H/SECAM B.GL: SECAM L,L’ /PAL L
BG: PAL B.GDK: PAL D.K.K1I: PAL I
Mono To select the type of sound to be recordedPress [e, r] to select “On” if the stereo sound is distorted due to inferior reception conditions, or if you want to record the normal (mono) sound during a stereo, bilingual or NICAM broadcast, and press [ENTER].
Title Page To enter the Teletext title page for a channelEntering title page number allows the unit to automatically record programme and station names.Press [e, r] or numbered buttons to enter the number and press [ENTER].•To find the correct title page for the station, refer to
its Teletext TV guide.
For Continental Europe
For Australia and N.Z.
For Asia
For Middle East
For Continental Europe
For Asia

RQT8020
39
Co
nve
nie
nt
fuct
ion
sEN
GLIS
H
You can restart auto channel setting if Preset Download or Auto-Setup ( page 10–12) fails for some reason.
Auto-Setup Restart
5 Press [e, r] to select “Auto-Setup Restart” and press [ENTER].The confirmation screen appears.
6 Press [w, q] to select “Yes” and press [ENTER].
7Press [e, r, w, q] to select a country and press [ENTER].
Download from TV
5 Press [e, r] to select “Download from TV” and press [ENTER].The confirmation screen appears.
6 Press [w, q] to select “Yes” and press [ENTER].Download starts.
To exit the screen Press [RETURN] several times.
To return to the previous screenPress [RETURN].
Tuner System/List of TV Reception ChannelsRF converter output: Not provided
Not provided for Germany, Austria, Italy, Netherlands, Greece
List of TV Reception Channels
Only for 8 MHz channel raster
Change this setting if you connect an NTSC television or to record NTSC video from another source.
1 While stopped
Press [FUNCTIONS].
2 Press [e, r] to select “To Others” and press [ENTER].
3 Press [e, r] to select “SETUP” and press [ENTER].
4 Press [e, r] to select “Connection” and press [q].
5 Press [e, r] to select “TV System” and press [ENTER].
6 Press [e, r] to select the TV system and press [ENTER].
•PAL (factory preset)– Select when connecting to a PAL or Multi-system
television. Programmes recorded using NTSC are played as PAL 60.
– Select to record television programmes and PAL input from other equipment.
•NTSC– Select when connecting to a NTSC television. Television
programmes cannot be recorded properly.– Select to record NTSC input from other equipment.
The confirmation screen appears.
7 Press [w, q] to select “Yes” and press [ENTER].
To exit the screen Press [RETURN] several times.
To return to the previous screenPress [RETURN].
To change the setting all at once (PAL←→NTSC)While stopped, press and hold [g] and [; OPEN/CLOSE] on the main unit at the same time for about 5 seconds.
Auto-Setup Restart, Download from TV
Tuner System
Channel Coverage VHF UHF CATV
PAL-BGH,SECAM-BG CCIR
E2-E12,A-H2 (Italy)
21-69S01-S05 (S1-S3)S1-S20 (M1-U10)
S21-S41
SECAM-L,L’ France 2-10 21-69
B-Q(100.5–299.5 MHz)
S21-S41(299.5–467.25 MHz)
Tuner System
Channel Coverage VHF UHF CATV
PAL-B Australia 0-12 28-69 45 MHz–470 MHz
PAL-BG New Zealand 1-11 21-69 44 MHz–470 MHz
Tuner System Channel Coverage VHF UHF CATV
PAL-BGH,SECAM-BG CCIR E2-E12 E21-E69
S01-S05M1-U10, U1-U10
S21-S41
PAL-I Hong Kong – 21-69 –
PAL-DK,SECAM-DKK1 OIRT R1-R12 21-69 44 MHz–470 MHz
PAL-D China 1-12 13-57 Z1-Z35
Tuner System Channel Coverage VHF UHF CATV
PAL-BGH,SECAM-BG CCIR E2-E12 E21-E69
S01-S05M1-U10, U1-U10
S21-S41
For Continental Europe, Australia and N.Z.
For Continental Europe
For Continental Europe
For Australia and N.Z.
For Asia
For Middle East
ChannelIndication
TV Channel
Germany/Italy France Other Countries
2-4
E2-E10
2-4
E2-E125-10
5-10, G-J (172.00–220.00 MHz) (INTER
BANDE)
11-12E11-E12
(Germany)H1-H2 (Italy)
–
13-20 A-H (Only Italy) – –
21-69 E21-E69 E21-E69 E21-E69
74-78 S01-S05 – S1-S5
80 S1 – M1
81-89 S2-S10B-F (100.00–172.00 MHz)
(INTER BANDE)M2-M10
90-99 S11-S0K-Q (220.00–300.00 MHz)
(INTER BANDE)U1-U10
121-141 S21-S41 (Hyperband)
S21-S41 (299.25–467.25 MHz) (INTER
BANDE)
S21-S41 (Hyperband)
TV System
For Continental Europe
SETUP
DiscPicture
Tuning
TV System
PAL
NTSC

RQT8020
40
Co
nve
nie
nt
fuct
ion
sEN
GLIS
HChanging the unit’s settings
Refer to the control reference on page 34.
• In the case of a power failure, the clock setting remains in memory for approximately 60 minutes.
1 While stopped
Press [FUNCTIONS].2 Press [e, r] to select “To Others” and press [ENTER].
3 Press [e, r] to select “SETUP” and press [ENTER].
4 Press [e, r] to select “Others” and press [q].
5 Press [e, r] to select “Clock” and press [ENTER].
If a TV station transmits a time setting signal, and when “Automatic” in the Clock setting menu is set to “On”, the automatic time correction function checks the time and if necessary it is adjusted several times every day.
6 Press [e, r] to select “On” of “Automatic” and press [ENTER].Auto clock setting starts.
The following screen appears when setting is complete.
To stop partwayPress [RETURN].• If the unit cannot set the clock automatically, set the clock
manually ( right, “Manual Clock Setting” Step 6).
6Press [e, r] to select “Off” of “Automatic” and press [ENTER].
7 Press [w, q] to select the item you want to change.The items change as follows:
8 Press [e, r] to change the setting.You can also use the numbered buttons for setting.
9 Press [ENTER] when you have finished the settings.The clock starts.
To exit the screen Press [RETURN] several times.
To return to the previous screenPress [RETURN].
The Child Lock deactivates all buttons on the unit and remote control. Use it to prevent other people from operating the unit.
Press and hold [ENTER] and [RETURN] simultaneously until “X HOLD” appears on the unit’s display.If you press a button while the Child Lock is on, “X HOLD” appears on the unit’s display and operation is impossible.
To cancel the Child LockPress and hold [ENTER] and [RETURN] simultaneously until “X HOLD” disappears.
Clock settings
•Usually, the unit’s Preset Download or Auto-Setup function ( page 10, 11) automatically adjusts the clock to correct time. Under some reception conditions, however, the unit cannot set the clock automatically.
• In this case, follow the operation steps below to manually set the clock.
For Continental Europe
Auto Clock Setting For Continental Europe
Clock
Automatic
Time Date
15 : 45 : 39
On
Automatic clock setting completed.ENTER: access RETURN: leave
1 8. . 2005
ENTERRETURN
CHANGE
Manual Clock Setting
Clock
Automatic Off
Time Date
15 : 45 : 39
Please set clock manually.ENTER: store RETURN: leave
0 9No.
1 8. . 2005
ENTERRETURN
CHANGE SELECT
e.g., Continental Europe
For Continental Europe
Hour Minute Second Day Month Year
Child Lock
REC MODEREC
TIME SLIP
FUNCTIONSDIRECT NAVIGATOR
TOP MENU
RETURN
STATUSDISPLAY
SUB MENU
EXT LINK
CREATE
PROG/CHECK
EXT LINK TIMER
RETURN
ENTER
e.g., Continental Europe

RQT8020
41
Ref
eren
ceEN
GLIS
H
Specifications
Recording System DVD Video Recording format (DVD-RAM),DVD-Video format (DVD-R),
DVD-Video format (DVD-RW)Recordable discsDVD-RAM : Ver. 2.0
Ver. 2.1/3×–SPEED DVD-RAM Revision 1.0Ver. 2.2/5×–SPEED DVD-RAM Revision 2.0
DVD-R : for General Ver. 2.0for General Ver. 2.0/4×–SPEED DVD-R Revision 1.0for General Ver. 2.x/8×–SPEED DVD-R Revision 3.0
DVD-RW : Ver. 1.1Ver. 1.1/2×–SPEED DVD-RW Revision 1.0Ver. 1.2/4×–SPEED DVD-RW Revision 2.0
+R : Ver. 1.0Ver. 1.1Ver. 1.2
Recording TimeMaximum 8 hours (with 4.7 GB disc)XP: Approx. 1 hour SP: Approx. 2 hoursLP: Approx. 4 hours EP: Approx. 6 hours/8 hours
Playable discsDVD-RAM, DVD-R, DVD-RW, +R,+RW, DVD-VIDEO, DVD-AUDIO, CD-AUDIO (CD-DA), Video CD,CD-R/RW (MP3, CD-DA, Video CD, JPEG formatted discs)
LASER SpecificationClass 1 LASER Product
Wave Length: 795 nm (CDs), 662 nm (DVDs)Laser Power:
No hazardous radiation is emitted with the safety protectionNORSK
Bølgelengde: 795 nm (CD), 662 nm (DVD)Laserstyrke: Ingen farlig stråling sendes ut
Audio Recording System: Dolby Digital 2chAudio In: AV1/AV2 (21 pin), AV3/AV4 (pin jack)Input Level: Standard: 0.5 Vrms, Full scale: 2.0 Vrms at 1 kHzInput Impedance: More than 10 kΩAudio Out: AV1/AV2 (21 pin), Audio Out (pin jack)Output Level: Standard: 0.5 Vrms, Full scale: 2.0 Vrms at 1 kHzOutput Impedance: Less than 1 kΩDigital Audio Out:Optical terminal (PCM, Dolby Digital, DTS, MPEG)Television System ( page 39)Video Video System:
SECAM (only input)/PAL colour signal, 625 lines, 50 fieldsNTSC colour signal, 525 lines, 60 fields
PAL colour signal, 625 lines, 50 fieldsNTSC colour signal, 525 lines, 60 fields
Recording System: MPEG2 (Hybrid VBR)
Video In (SECAM/PAL/NTSC):AV1/AV2 (21 pin), AV3/AV4 (pin jack) 1 Vp-p 75 Ω, termination
Video In (PAL/NTSC):AV1/AV2 (21 pin), AV3/AV4 (pin jack) 1 Vp-p 75 Ω, termination
S-Video In (SECAM/PAL/NTSC):AV2 (21 pin), AV3/AV4 (S terminal) 1 Vp-p 75 Ω, termination
S-Video In (PAL/NTSC):AV2 (21 pin), AV3/AV4 (S terminal) 1 Vp-p 75 Ω, termination
RGB In (PAL):AV2 (21 pin) 0.7 Vp-p (PAL) 75 Ω, termination
Video Out (PAL/NTSC):AV1/AV2 (21 pin), Video Out (pin jack) 1 Vp-p 75 Ω, termination
S-Video Out (PAL/NTSC):AV1 (21 pin), S-Video Out (S terminal) 1 Vp-p 75 Ω, termination
RGB Out (PAL/NTSC):AV1 (21 pin) 0.7 Vp-p (PAL) 75 Ω, termination
Component video output (NTSC 480p/480i, PAL 576p/576i)Y: 1.0 Vp-p 75 Ω, termination
PB: 0.7 Vp-p 75 Ω, terminationPR: 0.7 Vp-p 75 Ω, termination
OthersRegion Code:
# 2# 4# 3
Operating Temperature: 5–40 °COperating Humidity range: 10–80 % RH (no condensation)Power supply:
AC 220–240 V, 50 HzAC 220–240 V, 50/60 Hz
Power consumption: 23 WDimensions (W×D×H): Approx. 430 mm × 337 mm × 63 mmMass: Approx. 3.5 kg
Note
Specifications are subject to change without notice.Mass and dimensions are approximate.
BitstreamThis is the digital form of multi-channel audio data (e.g., 5.1 channel) before it is decoded into its various channels.
CPRM (Content Protection for Recordable Media) CPRM is technology used to protect broadcasts that are allowed to be recorded only once. Such broadcasts can be recorded only with CPRM compatible recorders and discs.
Dolby Digital This is a method of coding digital signals developed by Dolby Laboratories. Apart from stereo (2-channel) audio, these signals canalso be multi-channel audio. A large amount of audio information can be recorded on one disc using this method.
Down-mixingThis is the process of remixing the multi-channel audio found on some discs into two channels for stereo output. It is useful when you want to listen to the 5.1-channel audio recorded on DVDs through your television’s speakers. Some discs prohibit down-mixing and this unit can then only output the front two channels.
DTS (Digital Theater Systems)This surround system is used in many movie theaters. There is goodseparation between the channels, so realistic sound effects are possible.
Dynamic range Dynamic range is the difference between the lowest level of sound that can be heard above the noise of the equipment and the highest level of sound before distortion occurs. Dynamic range compression means reducing the gap between the loudest and softest sounds. This means you can listen at low volumes but still hear dialog clearly.
Film and video DVD-Video are recorded using either film or video. This unit can determine which type has been used, then uses the most suitable method of progressive output.For PALFilm is 25 frames per second.Video is 50 fields per second (two fields making up one frame).For NTSCFilm is 24 or 30 frames per second, with motion picture film generallybeing 24 frames per second.Video is 60 fields per second (two fields making up one frame).
FinalizeA process that makes play of a recorded CD-R, CD-RW, DVD-R etc. possible on equipment that can play such media. You can finalize DVD-R, DVD-RW (DVD-Video format) or +R on this unit. After finalizing, the disc becomes play-only and you can no longer record or edit. You can record after formatting although it becomes play-only after finalizing, when you use DVD-RW.
FormattingFormatting is the process of making media such as DVD-RAM recordable on recording equipment. You can format DVD-RAM or DVD-RW (only as DVD-Video format) on this unit.Formatting erases irrevocably all contents.
Frames and fields Frames refer to the single images that constitute the video you see on your television. Each frame consists of two fields.
•A frame still shows two fields, so there may be some blurring, but picture quality is generally better.
•A field still shows less picture information so it may be rougher, but there is no blurring.
JPEG (Joint Photographic Experts Group)This is a system used for compressing/decoding color still pictures. If you select JPEG as the storage system on digital cameras etc., the data will be compressed to 1/10–1/100 of its original size. The feature of JPEG is less deterioration in picture quality considering the degree of compression.
MP3 (MPEG Audio Layer 3)An audio compression method that compresses audio to approximately one tenth of its size without any considerable loss of audio quality. You can play MP3 you have recorded onto CD-R and CD-RW.
For Continental Europe, Asia and Middle East
Power consumption in standby mode:approx. 3 W (Power Save mode)
For Australia and N.Z.
For Continental Europe, Asia and Middle East
For Australia and N.Z.
For Continental Europe, Asia and Middle East
For Australia and N.Z.
For Continental Europe and Middle EastFor Australia and N.Z.For Asia
For Continental Europe, Australia and N.Z.For Asia and Middle East
Glossary
= +
Frame Field Field

RQT8020
42
Ref
eren
ceEN
GLIS
HGlossary
Pan & Scan/LetterboxIn general, DVD-Video are produced with the intention that they be viewed on a widescreen television (16:9 aspect ratio), so images often don’t fit regular (4:3 aspect ratio) televisions. Two styles of picture, “Pan & Scan” and “Letterbox”, deal with this problem.
Pan& Scan: The sides are cut off so the picture fills the screen.
Letterbox: Black bands appear at the top and bottom of the picture so the picture itself appears in an aspect ratio of 16:9.
Playback control (PBC) If a Video CD has playback control, you can select scenes and information with menus.(This unit is compatible with version 2.0 and 1.1.)
Progressive/InterlaceThe PAL video signal standard has 625 (or 576) interlaced (i) scan lines, whereas progressive scanning, called 625p (or 576p), uses twice the number of scan lines. For the NTSC standard, these are called 525i (or 480i) and 525p (or 480p) respectively.
Using progressive output, you can enjoy the high-resolution video recorded on media such as DVD-Video.Your television must be compatible to enjoy progressive video.Panasonic televisions with 625 (576)/50i · 50p, 525 (480)/60i · 60p input terminals are progressive compatible.
ProtectionYou can prevent accidental erasure by setting writing protection or erasure protection.
Sampling frequencySampling is the process of converting the heights of sound wave (analog signal) samples taken at set periods into digits (digital encoding). Sampling frequency is the number of samples taken per second, so larger numbers mean more faithful reproduction of the original sound.
ThumbnailThis refers to a miniature representation of a picture used to displaymultiple pictures in the form of a list.
TIFF (Tag Image File Format)This is a system used for compressing/decoding color still pictures.A common format for storing high quality images on digital cameras and other devices.
Q Link This function works only if the unit is connected via a fully wired 21-pin Scart cable to a TV featuring the Q Link or similar function.Q Link offers the following functions:•Download from the TV
When you connect the unit to a TV, the station list data is automatically copied from the TV to the unit, and the TV stations are assigned to the programme positions on the unit in the same order as on the TV.
•Direct TV RecordingBy simply pressing [* DIRECT TV REC], you can at once record the same programme that you are watching on the TV.
•TV/DVD Auto OnEven if the TV and the unit are off (standby mode), pressing [q] (PLAY), [DIRECT NAVIGATOR, TOP MENU], [ShowView] or [PROG/CHECK] automatically turns on both the TV and the unit.If the TV is off (standby mode) and the unit is on, when you press [FUNCTIONS] or [q] (PLAY), or insert the disc [except DVD-RAM, DVD-R, DVD-RW (DVD-Video format) and +R], the TV automatically is turned on.
•DVD Auto StandbyWhen you turn the TV off, the unit is turned off as well. However, this function works in the stop mode.
This function does not work during the following operations: Preset Download, Auto-Setup, Auto Clock Setting and Manual Tuning.
•On-Screen MessagesWhen you are watching a TV programme, the following messages appear on the TV screen to inform you of the unit’s condition:
Depending on the type of TV used, the above messages may not appear correctly.These operations are only available if the unit is connected to a TV featuring the Q Link function.
VPS (Video Programme System)/PDC (Programme Delivery Control) VPS or PDC is a very convenient system which records exactly from beginning to end of the TV programmes set in timer recording, even if theactual broadcasting time differs from the scheduled time due to delayed start or extension of the programme duration. Also, if a programme isinterrupted, for example, some special news is inserted, the recording will be paused automatically and resumed when the programme continues.Depending on the signals sent from the TV stations, the VPS/PDC system may not work properly even when “VPS/PDC” has been set to “ON”.Please check with the broadcasters in your area for details.• In the case of VPS/PDC recording, use the correct time (VPS/PDC time) for recording the TV programmes.
Set “VPS/PDC” to “OFF” when the recording time is not the correct time (VPS/PDC time). VPS/PDC recording is not performed when the time (VPS/PDC time) is incorrect, even if only by one minute. To find out the correct time (VPS/PDC time), consult Teletext, a newspaper or magazine, or other source.
• If the actual broadcasting times of timer recordings overlap (regardless of whether they are VPS/PDC controlled), the recording that starts firstalways has priority, and the recording of the later programme will start only after the first timer recording has finished.
•When the VPS/PDC signal drops out because the broadcast signal is weak, or when a TV station does not transmit a regular VPS/PDC signal,the timer recording will be performed in the normal mode (without VPS/PDC) even if it was programmed for VPS/PDC. In this case, even if the timer recording is performed, whatever has been programmed will not be cancelled at that particular time but at 4 a.m.two days later.
•The start times of scheduled programmes listed in the newspaper or magazine may be changed at a later date. Set “VPS/PDC” to “OFF” whenprogramming a programme whose start time has been subsequently changed. Particular care must be taken in this respect with SHOWVIEWprogramming since “VPS/PDC” is automatically set to “ON” in some countries ( below).
• If a programme listed in a newspaper or magazine has two SHOWVIEW numbers, use the SHOWVIEW number for VPS/PDC if you wish to proceedwith VPS/PDC recording using SHOWVIEW programming.
•The default settings for “VPS/PDC” differ depending on the country concerned. Refer to the following table.
• If the broadcasting station is not transmitting VPS/PDC signals, “---” appears in the menu for timer programming under “VPS/PDC”.•The beginnings of recordings may not be recorded correctly in some cases.
For Continental Europe
Message Message appears when:
This programme has already started
A timer recording has just started.
Set DVD to timer standby mode
The unit is not in the timer standby mode 10 minutes before the programmed recording start time (message appears every minute during these 10 minutes).
DVD is in timer recording mode
[* REC] on the main unit or [ShowView] was pressed while the unit is in the timer recording mode.
When SHOWVIEW programming
When the SHOWVIEW programming start time is changed
When programming manually
Belgium, Netherlands, Sweden, Denmark, Finland, Norway, France
ON OFF OFF
Germany, Switzerland, Austria ON ON ON
Italy, Spain, Portugal, Greece, Other Countries
OFF OFF OFF
For Continental Europe

RQT8020
43
Ref
eren
ceEN
GLIS
H
Frequently asked questions
Set up Page
Disc
Recording
What equipment is necessary to play multi channel surround sound?
•DVD-Video:You can play DVD-Video multi channel surround by digitally connecting an amplifier equipped with a Dolby Digital, DTS or MPEG decoder.
•DVD-Audio:Output is not digital with DVD-Audio.
9
—
Are the headphones and speakers directly connected to the unit?
•You cannot directly connect to the unit. Connect through the amplifier etc. 9
The television has a Scart terminal and component video input terminal. Which terminal should I connect with?
• If you have a regular television (CRT: cathode ray tube) we recommend using the Scart terminal. You can enjoy high-quality RGB video from this unit by connecting to an RGB compatible television.If you have an LCD/plasma television or LCD projector compatible with progressive scan, connect through the component video terminals for high-quality progressive video.If you have a CRT television that is compatible with progressive scan, we cannot recommend progressive output as some flickering can occur.
7, 8
Is my television progressive output compatible?
•All Panasonic televisions that have 625 (576)/50i · 50p, 525 (480)/60i · 60p input terminals are compatible. Consult the manufacturer if you have another brand of television.
—
Can I play DVD-Video, DVD-Audio and Video CDs bought in another country?
•You cannot play DVD-Video if their region number are not supported by this player.
Cover
Can a DVD-Video that does not have a region number be played?
•The DVD-Video region number indicates the disc conforms to a standard. You cannot play discs that do not have a region number.
—
Please tell me about DVD-R, DVD-RW, +R and +RW compatibility with this unit.
•This unit records and plays DVD-R, DVD-RW (DVD-Video format) and +R, and plays DVD-RW (DVD Video Recording format) and +RW.
•This unit also records and plays high speed recording compatible DVD-R, DVD-RW, +R discs.
4, 5
—
Please tell me about CD-R and CD-RW compatibility with this unit.
•This unit plays CD-R/CD-RW discs (audio recording discs) which have been recorded under one of the following standards: CD-DA, Video CD, MP3 and still pictures (JPEG/TIFF).Close the session or finalize the disc after recording. This unit can recognize up to 99 folders (groups) and 999 files (tracks) on a disc with MP3 or still pictures (JPEG/TIFF).
•You cannot write to a CD-R or CD-RW with this unit.
5, 24
—
Can I record from a commercially purchased video cassette or DVD?
•Most commercially sold video cassettes and DVD are copy protected; therefore, recording is usually not possible.
—
Can DVD-R, DVD-RW (DVD-Video Format) and +R recorded on this unit be played on other equipment?
•You can play on compatible equipment such as DVD players after finalizing the disc on this unit. However depending on the condition of the recording, the quality of the disc and capabilities of the DVD player, play may not be possible.
33
Can I record digital audio signals using this unit?
•You cannot record digital signals. The digital audio terminals on this unit are for output only.
—
Can a digital audio signal from this unit be recorded to other equipment?
•You can record if using the PCM signal. When recording DVD, change the “Digital Audio Output” settings to the following from the SETUP menu.– PCM Down Conversion: On– Dolby Digital/DTS/MPEG: PCMHowever, only– As long as digital recording from the disc is permitted.– As long as the recording equipment is compatible with a sampling frequency
of 48 kHz.•You cannot record MP3 signals.•Output is not digital with DVD-Audio.
36
——
Can I switch to bilingual broadcast during recording?
•With DVD-RAM, you can. Just press [AUDIO].•With DVD-R, DVD-RW (DVD-Video format) or +R, you cannot. Change before
recording with the “Bilingual Audio Selection” in the SETUP menu.
—36
Optional Accessories
Product numbers correct as of January 2005. These may be subject to change.
DVD-RAM 9.4 GB, double-sided, type 4 cartridge: LM-AD240ME (compatible with high speed recording 5X)LM-AD240LE (compatible with high speed recording 3X)
4.7 GB, single-sided, type 2 cartridge: LM-AB120ME (compatible with high speed recording 5X)LM-AB120LE (compatible with high speed recording 3X)
4.7 GB, single-sided, non-cartridge: LM-AF120ME (compatible with high speed recording 5X)LM-AF120LE (compatible with high speed recording 3X)
DVD-R 4.7 GB, single-sided, non-cartridge: LM-RF120ME (compatible with high speed recording 8X)LM-RF120LE (compatible with high speed recording 4X)

RQT8020
44
Ref
eren
ceEN
GLIS
HError messages
On the television Page
On the unit’s display
The precision parts in this unit are readily affected by the environment, especially temperature, humidity, and dust. Cigarette smoke also can cause malfunction or breakdown.
To clean this unit, wipe with a soft, dry cloth.•Never use alcohol, paint thinner or benzine to clean this unit.
•Before using chemically treated cloth, read the instructions that came with the cloth carefully.
Observe the following points to ensure continued listening and viewing pleasure.Dust and dirt may adhere to the unit’s lens over time, making it impossible to record or play discs.Use the lens cleaner about once every year, depending on frequency of use and the operating environment. Read the lens cleaner’s instructions carefully before use.
Cannot finish recording completely.
•The programme was copy-protected.
•The disc may be full.
•There are already 99 recorded titles ( 49 recorded titles).
———
Cannot playback.TV system is different from the setting.To playback, please change the TV System in SETUP.
•You tried to play a title recorded using a different encoding system from that of the TV system currently selected on the unit.Alter the “TV System” setting on this unit to suit.
39
Cannot record on the disc. •The disc may be dirty or scratched. 5
Unable to format.
Please check the disc.
Cannot record. Disc is full. •Create space by erasing any unnecessary titles. (Even if you erase recorded content from the DVD-R or the +R, there is no increase in disc space.)
•Use a new disc.
23, 29, 32
—
Cannot record. Maximum numbers of titles exceeded.
Error has occurred. Please press ENTER.
•Press [ENTER] to start recovery process. You cannot operate the unit while it is recovering (“SELF CHECK” appears on the unit’s display).
—
No disc •The disc may be upside down. —
Please change the disc. •There may be a problem with the disc. Press [; OPEN/CLOSE] to remove it and check it for scratches or dirt. (The unit turns off automatically after you open the tray.)
5
This is a non-recordable disc. •The unit cannot record on the disc you inserted. Insert a DVD-RAM or unfinalized DVD-R, DVD-RW (DVD-Video format) or +R.
•You inserted an unformatted DVD-RAM or DVD-RW. Format the disc with this unit.
4, 5
33This disc is not formatted properly.
5•The operation is prohibited by the unit or disc. —
REMOTE DVD (“ ” stands for a number.)
•The remote control and main unit are using different codes. Change the code on the remote control.
Press and hold [ENTER] and the indicated number button at the same time for more than 2 seconds.
14
HARD ERR • If there is no change after turning the unit on and off, consult the dealer where the unit was purchased.
—
NO READ •The disc is dirty or badly scratched. The unit cannot record, play, or edit.
•The message may appear when the lens cleaner has finished cleaning. Press [; OPEN/CLOSE] to eject the disc.
5—
PROG FULL •There are already 16 timer programmes. Delete unnecessary timer programmes. 21
SELF CHECK •There was a power failure or the AC plug was disconnected while the unit was on. The unit is carrying out its recovery process. Wait until the message disappears.
• If “Quick Start” is set to “On”, “PLEASE WAIT” is displayed while the unit is carrying out its recovery process. You cannot operate the unit while “PLEASE WAIT” is displayed.
—
—
UNSUPPORT •You have inserted a disc the unit cannot play or record on. 4, 5
UNFORMAT •You have inserted a DVD-RAM or DVD-RW that is unformatted or recorded on other equipment.
33
U59 •The unit is hot.The unit switches to standby for safety reasons. Wait for about 30 minutes until the message disappears.Select a position with good ventilation when installing the unit. Do not block the vent on the rear of the unit.
—
U99 •The unit fails to operate properly. Press [8] on the main unit to switch the unit to standby. Now press [8] on the main unit again to turn the unit on.
—
X HOLD •The Child Lock function is activated.Press and hold [ENTER] and [RETURN] simultaneously until “X HOLD” disappears.
40
Maintenance
+R
RAM -RW(V)
Lens cleaner: LF-K123LCA1 or RP-CL720 (On sale from May 2005)

RQT8020
45
Ref
eren
ceEN
GLIS
H
Troubleshooting guide
Before requesting service, make the following checks. If you are in doubt about some of the check points, or if the remedies indicated in the chart do not solve the problem, consult your dealer for instructions.
The following do not indicate a problem with this unit:
Power Page
Displays
TV screen and video
Sound
•
••
Regular disc rotating sounds. The sound of the disc rotating may become louder especially when finalizing a DVD-R, DVD-RW (DVD-Video format) or +R.Poor reception due to atmospheric conditions.Image disturbance during search.
•
•
•
Interruptions in reception due to periodic satellite broadcasting breaks.Operations do not work due to a poor-quality disc. (Try again using a Panasonic disc.)The unit freezes due to one of its safety devices being activated. (Press and hold [8] on the main unit for 10 seconds.)
No power.
Unit does not turn on pressing [^ DVD].
•••
Insert the AC mains lead securely into a known active AC mains socket.Timer recording is in recording standby. Press [z TIMER] to cancel the recording standby.
Linked timer recordings with external equipment is in recording standby. Press [EXT LINK] to cancel the recording standby.
7, 818–20
21
The unit switches to the standby mode.
• One of the unit’s safety devices is activated. Press [8] on the main unit to turn the unit on. —
The display is dim. • Change “FL Display” in the SETUP menu. 36
“0:00” is flashing on the unit’s display.
• Set the clock. 40
The clock is not correct. • Under adverse reception conditions, etc., the automatic time correction function may not work. In this case, “Automatic” is automatically turned to “Off”. If re-setting the Auto Clock Setting does not work, set the time manually.
40
The time recorded on the disc and the available time shown do not add up.The play time shown for MP3 does not agree with the actual time.
•••
•
•
Times shown may disagree with actual times.Even if you erase recorded content from the DVD-R or the +R, there is no increase in disc space.Available recording space on a DVD-RW (DVD-Video format) increases only when the last recorded title is erased. It does not increase if other titles are erased.More disc space than the actual recording time is used after recording or editing the DVD-R or the +R 200 times or more. While searching, the elapsed time may not display correctly.
———
—
—
Television reception worsens after connecting the unit.
• This can occur because the signals are being divided between the unit and other equipment. It can be solved by using a signal booster, available from audio-visual suppliers.
—
Status messages do not appear.
• Select “Automatic” in “On-Screen Messages” in the SETUP menu. 36
The grey background does not appear.
• Select “On” in “Grey Background” in the SETUP menu. 36
The 4:3 aspect ratio picture expands left and right.Screen size is wrong.
•
•
Use the television to change the aspect. If your television does not have that function, set “Progressive” in the Picture menu to “Off”.Check the settings for “TV Aspect” in the SETUP menu.
27
13
There is a lot of after-image when playing video.
• Set “Playback NR” in the Picture menu to “Off”. 27
When playing DVD-Video using progressive output, one part of the picture momentarily appears to be doubled up.
• Set “Progressive” in the Picture menu to “Off”. This problem is caused by the editing method or material used on DVD-Video, but should be corrected if you use interlace output.
27
There is no apparent change in picture quality when adjusted with the Picture menu in the on-screen menus.
• The effect is less perceivable with some types of video. —
The images from this unit do not appear on the television.
Picture is distorted.
•
••
Make sure that the television is connected to the AV1 terminal, VIDEO OUT terminal, S VIDEO OUT terminal or COMPONENT VIDEO OUT terminals on this unit. Make sure that the television’s input setting (e.g., AV1) is correct.The television isn’t compatible with progressive signals. Press and hold [g] and [q (PLAY/x1.3)] on the main unit at the same time for about 5 seconds. The setting will change to interlace.
7, 8
——
No sound.Low volume.Distorted sound.Cannot hear the desired audio type.
•
••
•
•
Check the connections and settings. Check the input mode on the amplifier if you have connected one.Press [AUDIO] to select the audio.Turn off V.S.S. in the following cases.–When using discs that do not have surround sound effects such as Karaoke discs.–When playing bilingual broadcast programmes. The disc may have a restriction on the method of audio output. If “D. MIX” does not appear in the display when playing multi-channel DVD-Audio, only audio for the two front channels will be output. Refer to the disc’s jacket.Output is not digital with DVD-Audio.
7–9, 36
2227
—
—
Cannot switch audio. •
•
•
•
You cannot change the audio type when a DVD-R, a DVD-RW (DVD-Video format) or a +R is in the disc tray.You cannot change the audio type when playing a DVD-R, a DVD-RW (DVD-Video format) or a +R. (You can select “M 1” or “M 2” in “Bilingual Audio Selection” in the SETUP menu before recording.)You have used digital connection. Set “Dolby Digital” to “PCM” or connect using audio cables (analog connection).There are discs which audio cannot be changed because of how the disc was created.
—
36
9, 36
—
For Continental Europe
For Continental Europe

RQT8020
46
Ref
eren
ceEN
GLIS
HTroubleshooting guide
Operation Page
Recording and timer recording
1 2
Play
Continued on the next page
Cannot operate the television.The remote control doesn’t work.
•
•
•••
•
Change manufacturer code. Some televisions cannot be operated even if you change the code.The remote control and main unit are using different codes. Change the code on the remote control.
Press and hold [ENTER] and the indicated number button at the same time for more than 2 seconds.
The batteries are depleted. Replace them with new ones.Coloured glass may obstruct the signal reception/transmission.Don’t place the signal sensor in direct sunlight or in areas that may be subject to sunlight exposure.The child lock function is activated.
14
14
3——
40
The unit is on but cannot be operated.
•••
Some operations may be prohibited by the disc.The unit is hot (“U59” appears on the display). Wait for “U59” to disappear. One of the unit’s safety devices may have been activated.Reset the unit as follows:Press [8] on the main unit to switch the unit to standby. If the unit doesn’t switch to standby, press and hold [8] on the main unit for about 10 seconds. The unit is forcibly switched to standby. Alternatively, disconnect the AC mains lead, wait one minute, then reconnect it.
———
Cannot eject disc. ••
•
•
Timer recording is in recording standby. Press [z TIMER] to cancel the recording standby. Linked timer recordings with external equipment is in recording
standby. Press [EXT LINK] to cancel the recording standby.The unit may have a problem. While the unit is off, press and hold [g] and [CH 1] on the main unit at the same time for about 5 seconds. Remove the disc and consult the dealer.If the Child Lock function is activated, above operation does not work. Cancel the Child Lock function.
18–2021
—
40
Cannot tune channels.
Cannot download channel presets.
••
Check the connections. You must connect to a television equipped with the Q Link function with
a fully wired 21-pin Scart cable to download channel presets.
7, 87
Startup is slow. •
•
•
Make sure that “Quick Start” is set to “On”.Even if “Quick Start” is set to “On”, startup is slow if the clock is not set, there was a power failure or the AC plug has just been connected.A few dozen seconds after turning on the unit, you can play a disc or start recording to discs other than DVD-RAM.Startup takes time for a few minutes after 5:15 am due to system maintenance of this unit.
37
—
—
For Continental Europe
For Continental Europe
For Continental Europe
Cannot record. •
••
•••
•
•
You haven’t inserted a disc or the disc you inserted cannot be recorded on. Insert a disc the unit can record onto. The disc is unformatted. Format the disc. The write-protect tab on the cartridge is set to PROTECT, or the disc is protected with DISC MANAGEMENT.Some programmes have limitations on the number of times they can be recorded. (CPRM)The disc is full or nearly full. Erase un-needed titles or use another disc.You cannot record on finalized DVD-R, DVD-RW (DVD-Video format), +R or DVD-RW (DVD Video Recording format) discs.Due to peculiarities of DVD-R, DVD-RW (DVD-Video format) or +R, you may be unable to record onto them if you either insert and remove the disc or switch the unit on and off while a disc is loaded, a total of fifty times.DVD-R, DVD-RW (DVD-Video format) and +R recorded on this unit may not be recordable on other Panasonic DVD recorders.
4, 5
3332
4123, 29, 32
—
—
—
Timer recording does not work properly.
SHOWVIEW programming does not work properly. 1
G-CODE programming does not work properly. 2
•
•
•
The timer programme is incorrect or different timer programme times overlap. Correct the programme.The unit is not on timer recording standby. (“z” on the unit’s display is not on.) Press [z TIMER].Set the clock.
21
18–20
40
Timer recording does not stop even when [g] is pressed.
••
While using timer recording, press [z TIMER]. (“z” disappears.) When using the linked timer recording with external equipment, press
“EXT LINK”. (“Ext Link” disappears.)
18–2021
The timer programme remains even after recording finishes.
• The timer programme remains if set to daily or weekly. 20
A part or whole of a recorded title has been lost.
• If there is a power failure or the plug is disconnected from the household AC mains socket while recording or editing, the title may be lost or the disc may become unusable. You will have to format the disc ( ) or use a new disc. We cannot offer any guarantee regarding lost programmes or discs.
—
RAM -RW(V)
For Continental Europe
RAM -RW(V)
For Continental Europe For Australia, N.Z. and Asia
Play fails to start even when [q] (PLAY) is pressed.Play starts but then stops immediately.
••
•
Insert the disc correctly with the label facing up.You tried to play a blank DVD-RAM, DVD-R, DVD-RW (DVD-Video format), +R or DVD-RW (DVD Video Recording format) unplayable on this unit.When recording to DVD-RAM using EP ( 8Hours ) mode, play may not be possible on DVD players that are compatible with DVD-RAM. In this case use EP ( 6Hours ) mode.
224, 5
35
DVD-Video is not played. • Some DVD-Video cannot be played when you change the ratings level. 35
Alternative soundtrack and subtitles cannot be selected.
••
The languages are not recorded on the disc.You may have to use the disc’s menus to select languages.
—22
No subtitles. ••
Subtitles are not recorded on the disc.Turn the subtitles on.
—26

RQT8020
47
Ref
eren
ceEN
GLIS
H
Play (Continued) Page
Edit
Other
Set the unit up on an even surface away from direct sunlight, high temperatures, high humidity, and excessive vibration. These conditions can damage the cabinet and other components, thereby shortening the unit’s service life.
Do not place heavy items on the unit.
Do not use high voltage power sources. This can overload the unit and cause a fire.
Do not use a DC power source. Check the source carefully when setting the unit up on a ship or other place where DC is used.
Ensure the AC mains lead is connected correctly and not damaged. Poor connection and lead damage can cause fire or electric shock. Do not pull, bend, or place heavy items on the lead.
Grasp the plug firmly when unplugging the lead. Pulling the AC mains lead can cause electric shock.
Do not handle the plug with wet hands. This can cause electric shock.
Do not let metal objects fall inside the unit. This can cause electric shock or malfunction.
Do not let liquids get into the unit. This can cause electric shock or malfunction. If this occurs, immediately disconnect the unit from the power supply and contact your dealer.
Do not spray insecticides onto or into the unit. They contain flammable gases which can ignite if sprayed into the unit.
Do not attempt to repair this unit by yourself. If sound is interrupted, indicators fail to light, smoke appears, or any other problem that is not covered in these instructions occurs, disconnect the AC mains lead and contact your dealer or an authorized service center. Electric shock or damage to the unit can occur if the unit is repaired, disassembled or reconstructed by unqualified persons.
Extend operating life by disconnecting the unit from the power source if it is not to be used for a long time.
Angle cannot be changed. • Angles can only be changed during scenes where different angles are recorded. —
You have forgotten your ratings password.
• While the disc tray is open, press and hold [* REC] and [q (PLAY/x1.3)] on the main unit at the same time for 5 or more seconds.
—
Quick View does not work. ••
This does not work when audio is other than Dolby Digital.This does not work when recording is in XP or FR mode.
——
The resume play function does not work.
••
This function only works when the indicator appears in the unit display.Memorized positions are canceled when the unit is turned off or when the tray is opened. The memorized position on the playlist is also canceled when the playlist and title are edited.
——
The Video CD picture does not display properly.
••
When connecting to Multi-system TV, select “NTSC” in “TV System” in the SETUP menu.When connecting to PAL TV, the lower part of the picture cannot be displayed correctly during search.
39—
Time Slip does not work. • Time Slip does not work when the unit’s “TV System” settings are different from the title recorded on the disc.
39
Cannot format. ••
The disc is dirty. Wipe with a damp cloth and then wipe dry.You tried formatting a disc that is not compatible with this unit.
54, 5
Cannot create chapters.
Cannot mark the start point or the end point during “Partial Erase” operation.
•
••
The unit writes the chapter information to the disc when you turn it off or remove the disc. The information is not written if there is an interruption to the power before this. These operations are not possible with still pictures. You cannot set points if they are too close to each other. You cannot set an end point before a start point.
—
——
Cannot erase chapters. • When the chapter is too short to erase, use “Combine Chapters” to make the chapter longer. 29
The available recording space doesn’t increase even after erasing recordings on the disc.
•
•
Available recording space on the DVD-R or the +R does not increase even after erasing previously recorded titles.Available recording space on a DVD-RW (DVD-Video format) increases only when the last recorded title is erased. It does not increase if other titles are erased.
—
—
Cannot create a playlist. • You cannot select all the chapters at once in a title if the title also includes still pictures. Select them individually.
—
Output is not digital. • Output is not digital with DVD-Audio. —
Safety precautions
Placement
Voltage
AC mains lead protection
Foreign matter
Service
MPEG Layer-3 audio decoding technology licensed from Fraunhofer IIS and Thomson multimedia.
This product incorporates copyright protection technology that is protected by method claims of certain U.S. patents and other intellectual property rights owned by Macrovision Corporation and other rights owners. Use of this copyright protection technology must be authorized by Macrovision Corporation, and is intended for home and other limited viewing uses only unless otherwise authorized by Macrovision Corporation. Reverse engineering or disassembly is prohibited.
Manufactured under license from Dolby Laboratories. “Dolby” and the double-D symbol are trademarks of Dolby Laboratories.
“DTS” and “DTS 2.0 + Digital Out” are trademarks of Digital Theater Systems, Inc.
SHOWVIEW is a trademark of Gemstar Development Corporation.The SHOWVIEW system is manufactured under licence from Gemstar Development Corporation.
G-CODE is a trademark of Gemstar Development Corporation.The G-CODE system is manufactured under licence from Gemstar Development Corporation.
G-CODE is a registered trademark of Gemstar Development Corporation. The G-CODE system is manufactured under license from Gemstar Development Corporation.

Matsushita Electric Industrial Co., Ltd.Web Site: http://www.panasonic.co.jp/global/
RQT8020-1LH0205HM1025
En
Index
Angle. . . . . . . . . . . . . . . . . . . . . . . . . . . . .26Aspect. . . . . . . . . . . . . . . . . . . . . . . . . . . .13Audio
Attribute . . . . . . . . . . . . . . . . . . . . . . .26Language . . . . . . . . . . . . . . . . . . . . . .26Playback. . . . . . . . . . . . . . . . . . . . . . .22Receiving . . . . . . . . . . . . . . . . . . . . . .27
AV-in NR . . . . . . . . . . . . . . . . . . . . . . . . . .27Change Thumbnail . . . . . . . . . . . . . . . . .29Channel
Audio . . . . . . . . . . . . . . . . . . . . . . . . .26Auto-Setup . . . . . . . . . . . . . . . . . .11, 12Preset Download . . . . . . . . . . . . . . . .10
Chapter . . . . . . . . . . . . . . . . . . . . . . . .23, 28Chasing playback . . . . . . . . . . . . . . . . . .16Child Lock. . . . . . . . . . . . . . . . . . . . . . . . .40Cleaning
Disc . . . . . . . . . . . . . . . . . . . . . . . . . . .5Lens . . . . . . . . . . . . . . . . . . . . . . . . . .44Main unit. . . . . . . . . . . . . . . . . . . . . . .44
Clock settings . . . . . . . . . . . . . . . . . . . . .40Connection
Aerial . . . . . . . . . . . . . . . . . . . . . . . .7, 8Amplifier, system component . . . . . . . .9AV3 input terminals . . . . . . . . . . . . . .17Decoder, digital receiver. . . . . . . . . . . .9Satellite receiver. . . . . . . . . . . . . . . . . .9Television . . . . . . . . . . . . . . . . . . . . .7, 8Video cassette recorder . . . . . . .7, 8, 17
Copy (playlist) . . . . . . . . . . . . . . . . . . . . .31Country setting . . . . . . . . . . . . . . . . .10, 12CPRM . . . . . . . . . . . . . . . . . . . . . . . . . . . .41Create Chapter . . . . . . . . . . . . . . . . . .23, 29Create playlists . . . . . . . . . . . . . . . . . . . .30Default Settings . . . . . . . . . . . . . . . . . . . .37Dialog Enhancer . . . . . . . . . . . . . . . . . . .27Direct Navigator . . . . . . . . . . . . . . . . . . . .22Direct TV Recording . . . . . . . . . . . . . . . .16DVD-RAM, DVD-R, DVD-RW, +R . . . . . .4, 5Enter name
Disc . . . . . . . . . . . . . . . . . . . . . . . . . .32Entering text . . . . . . . . . . . . . . . . . . . .34
Playlist . . . . . . . . . . . . . . . . . . . . . . . . 31Title . . . . . . . . . . . . . . . . . 18, 19, 20, 29
EraseChapter . . . . . . . . . . . . . . . . . . . . 29, 31Playlist . . . . . . . . . . . . . . . . . . . . . . . . 31Title . . . . . . . . . . . . . . . . . . . . . . . 23, 29
Ext Link . . . . . . . . . . . . . . . . . . . . . . . 21, 36Finalize. . . . . . . . . . . . . . . . . . . . . . . . 33, 41Flexible Recording . . . . . . . . . . . . . . . . . 17Format disc . . . . . . . . . . . . . . . . . . . . . . . 33FR (Flexible Recording) Mode . . . . . 15, 17FUNCTIONS window. . . . . . . . . . . . . . . . 27G-CODE . . . . . . . . . . . . . . . . . . . . . . . . . . . 19JPEG . . . . . . . . . . . . . . . . . . . . . . . . . 24, 41Language
Code list . . . . . . . . . . . . . . . . . . . . . . 37Soundtrack . . . . . . . . . . . . . . . . . 26, 35Subtitle . . . . . . . . . . . . . . . . . . . . 26, 35
Manual Skip. . . . . . . . . . . . . . . . . . . . . . . 23Menu
JPEG. . . . . . . . . . . . . . . . . . . . . . 24, 25MP3. . . . . . . . . . . . . . . . . . . . . . . . . . 24On-screen . . . . . . . . . . . . . . . . . . . . . 26SETUP . . . . . . . . . . . . . . . . . . . . . . . 34
ModeRecording . . . . . . . . . . . . . . . . . . . . . 15Still Mode . . . . . . . . . . . . . . . . . . . . . 35
MP3 . . . . . . . . . . . . . . . . . . . . . . . . . . 24, 41Noise reduction (NR)
AV-in NR . . . . . . . . . . . . . . . . . . . . . . 27Playback NR . . . . . . . . . . . . . . . . . . . 27
On-screenMenus . . . . . . . . . . . . . . . . . . . . . . . . 26Status messages. . . . . . . . . . . . . . . . 27
Partial Erase . . . . . . . . . . . . . . . . . . . . . . 29PCM Down Conversion . . . . . . . . . . . . . 36Picture settings. . . . . . . . . . . . . . . . . 27, 35Playback NR . . . . . . . . . . . . . . . . . . . . . . 27Playlist . . . . . . . . . . . . . . . . . . . . . . . . . . . 30Progressive . . . . . . . . . . . . . . 13, 27, 36, 42Properties
Playlist . . . . . . . . . . . . . . . . . . . . . . . . 31
Title . . . . . . . . . . . . . . . . . . . . . . . . . .29Protection
Cartridge . . . . . . . . . . . . . . . . . . . . . .32Disc . . . . . . . . . . . . . . . . . . . . . . . . . .32Title . . . . . . . . . . . . . . . . . . . . . . . . . .29
Q Link . . . . . . . . . . . . . . . . . . . . . . . . . .7, 42Quick Start . . . . . . . . . . . . . . . . . . . . .16, 37Quick View . . . . . . . . . . . . . . . . . . . . . . . .23Ratings level. . . . . . . . . . . . . . . . . . . . . . .35Recording. . . . . . . . . . . . . . . . . . . . . . . . .15
Direct TV Recording. . . . . . . . . . . . . .16External Link . . . . . . . . . . . . . . . . . . .21Flexible Recording . . . . . . . . . . . . . . .17Mode . . . . . . . . . . . . . . . . . . . . . . . . .15Timer . . . . . . . . . . . . . . . . . . . . . .18–21
Remote control code . . . . . . . . . . . . . . . .14Repeat play. . . . . . . . . . . . . . . . . . . . . . . .26Resume play function . . . . . . . . . . . . . . .23RGB
Input . . . . . . . . . . . . . . . . . . . . . . . . . .36Output . . . . . . . . . . . . . . . . . . . . . .7, 36
SETUP menu . . . . . . . . . . . . . . . . . . . . . .34Shipping Condition . . . . . . . . . . . . . . . . .37SHOWVIEW . . . . . . . . . . . . . . . . . . . . . . . . .18Simultaneous rec and play . . . . . . . . . . .16Soundtrack . . . . . . . . . . . . . . . . . . . . . . . .26Status messages . . . . . . . . . . . . . . . . . . .27Subtitle . . . . . . . . . . . . . . . . . . . . . . . . . . .26Teletext . . . . . . . . . . . . . . . . . . . . . . . . . . .16TIFF . . . . . . . . . . . . . . . . . . . . . . . . . . .24, 42Time Slip. . . . . . . . . . . . . . . . . . . . . . .16, 23Timer recording . . . . . . . . . . . . . . . . .18–21Transfer. . . . . . . . . . . . . . . . . . . . . . . . . . .27Tuning
Auto-Setup . . . . . . . . . . . . . . . . . .11, 12Manual . . . . . . . . . . . . . . . . . . . . . . . .38Preset Download . . . . . . . . . . . . . . . .10
TV System (PAL/NTSC) . . . . . . . . . . . . . .39TV type . . . . . . . . . . . . . . . . . . . . . . . . . . .13V.S.S. . . . . . . . . . . . . . . . . . . . . . . . . . . . . .27VPS/PDC. . . . . . . . . . . . . . . . . . . . . . .18, 42
SUOMI NORSK
VAROITUS! LAITTEEN KÄYTTÄMINEN MUULLA KUIN TÄSSÄ KÄYTTÖOHJEESSA MAINITULLA TAVALLA SAATTAA ALTISTAA KÄYTTÄJÄN TURVALLISUUSLUOKAN 1 YLITTÄVÄLLE NÄKYMÄTTÖMÄLLE LASERSÄTEILYLLE.
VAROITUS:TULIPALO-, SÄHKÖISKUVAARAN TAI TUOTETTA KOHTAAVAN MUUN VAHINGON VÄHENTÄMISEKSI EI LAITETTA SAA ALTISTAA SATEELLE, KOSTEUDELLE, VESIPISAROILLE TAI ROISKEELLE, EIKÄ NESTETTÄ SISÄLTÄVIÄ ESINEITÄ, KUTEN ESIMERKIKSI MALJAKOITA, SAA ASETTAA LAITTEEN PÄÄLLE.
VAROITUS!• ÄLÄ ASENNA TAI LAITA TÄTÄ LAITETTA
KABINETTITYYPPISEEN KIRJAKAAPPIIN TAI MUUHUN SULJETTUUN TILAAN, JOTTA TUULETUS ONNISTUISI. VARMISTA, ETTÄ VERHO TAI MIKÄÄN MUU MATERIAALI EI HUONONNA TUULETUSTA, JOTTA VÄLTETTÄISIIN YLIKUUMENEMISESTA JOHTUVA SÄHKÖISKU- TAI TULIPALOVAARA.
• ÄLÄ PEITÄ LAITTEEN TUULETUSAUKKOJA SANOMALEHDELLÄ, PÖYTÄLIINALLA, VERHOLLA TAI MUULLA VASTAAVALLA ESINEELLÄ.
• ÄLÄ ASETA PALAVAA KYNTTILÄÄ TAI MUUTA AVOTULEN LÄHDETTÄ LAITTEEN PÄÄLLE.
• HÄVITÄ PARISTOT LUONTOA VAHINGOITTAMATTOMALLA TAVALLA.
TÄMÄ LAITE ON TARKOITETTU KÄYTETTÄVÄKSI LEUDOSSAILMASTOSSA.
Laite tulee asettaa lähelle verkkopistorasiaa ja pistokkeen täytyyolla sellaisessa asennossa, että siihen on helppo tarttuaongelman sattuessa.
ADVARSEL! DETTE PRODUKTET ANVENDER EN LASER. BETJENING AV KONTROLLER, JUSTERINGER ELLER ANDRE INNGREP ENN DE SOM ER BESKREVET I DENNE BRUKSANVISNING, KAN FØRE TIL FARLIG BESTRÅLING. DEKSLER MÅ IKKE ÅPNES, OG FORSØK ALDRI ÅREPARERE APPARATET PÅ EGENHÅND. ALT SERVICE OG REPARASJONSARBEID MÅ UTFØRES AV KVALIFISERT PERSONELL.
ADVARSEL:FOR Å REDUSERE FAREN FOR BRANN, ELEKTRISK STØT ELLER SKADER PÅ PRODUKTET, MÅ DETTE APPARATET IKKE UTSETTES FOR REGN, FUKTIGHET, VANNDRÅPER ELLER VANNSPRUT. DET MÅ HELLER IKKE PLASSERES GJENSTANDER FYLT MED VANN, SLIK SOM BLOMSTERVASER, OPPÅ APPARATET.
ADVARSEL! • APPARATET MÅ IKKE PLASSERES I EN BOKHYLLE, ET
INNEBYGGET KABINETT ELLER ET ANNET LUKKET STED HVOR VENTILASJONSFORHOLDENE ER UTILSTREKKELIGE. SØRG FOR AT GARDINER ELLER LIGNENDE IKKE FORVERRER VENTILASJONSFORHOLDENE, SÅ RISIKO FOR ELEKTRISK SJOKK ELLER BRANN FORÅRSAKET AV OVERHETING UNNGÅS.
• APPARATETS VENTILASJONSÅPNINGER MÅ IKKE DEKKES TIL MED AVISER, BORDDUKER, GARDINER OG LIGNENDE.
• PLASSER IKKE ÅPEN ILD, SLIK SOM LEVENDE LYS, OPPÅ APPARATET.
• BRUKTE BATTERIER MÅ KASSERES UTEN FARE FOR MILJØET.
DETTE APPARATET ER BEREGNET TIL BRUK UNDERMODERATE KLIMAFORHOLD.
Utstyret bør plasseres i nærheten av AC-stikkontakten, ogstøpslet må være lett tilgjengelig hvis det skulle oppståproblemer.