Embed Size (px)
Citation preview

TIBCO OpenSpirit®
Extension for ArcGIS
User Guide
Software Release 2010.1.0
August 2012

ii
Important Information SOME TIBCO SOFTWARE EMBEDS OR BUNDLES OTHER TIBCO SOFTWARE. USE OF SUCH EMBEDDED OR BUNDLED TIBCO SOFTWARE IS SOLELY TO ENABLE THE FUNCTIONALITY (OR PROVIDE LIMITED ADD-ON FUNCTIONALITY) OF THE LICENSED TIBCO SOFTWARE. THE EMBEDDED OR BUNDLED SOFTWARE IS NOT LICENSED TO BE USED OR ACCESSED BY ANY OTHER TIBCO SOFTWARE OR FOR ANY OTHER PURPOSE.
USEOF TIBCO SOFTWARE AND THIS DOCUMENTIS SUBJECTTO THE TERMS AND CONDITIONSOFA LICENSE AGREEMENT FOUNDIN EITHERASEPARATELY EXECUTED SOFTWARE LICENSE AGREEMENT, OR, IF THERE IS NO SUCH SEPARATE AGREEMENT, THE CLICKWRAP END USER LICENSE AGREEMENT WHICH IS DISPLAYED DURING DOWNLOAD OR INSTALLATION OF THE SOFTWARE (AND WHICH IS DUPLICATED IN THE LICENSE FILE) OR IF THERE IS NO SUCH SOFTWARE LICENSE AGREEMENT OR CLICKWRAP END USER LICENSE AGREEMENT, THE LICENSE(S) LOCATED IN THE “LICENSE” FILE(S) OF THE SOFTWARE. USE OF THIS DOCUMENT IS SUBJECT TO THOSE TERMS AND CONDITIONS, AND YOUR USE HEREOF SHALL CONSTITUTE ACCEPTANCE OF AND AN AGREEMENT TO BE BOUND BY THE SAME.
This document contains confidential information that is subject to U.S. and international copyright laws and treaties. No part of this document may be reproduced in any form without the written authorization of TIBCO Software Inc.
TIBCO, The Power of Now, TIBCO OpenSpirit Extension for ArcGIS, TIBCO OpenSpirit Scan Utility are either registered trademarks or trademarks of TIBCO Software Inc. in the United States and/or other countries.
All other product and company names and marks mentioned in this document are the property of their respective owners and are mentioned for identification purposes only.
THIS SOFTWARE MAY BE AVAILABLE ON MULTIPLE OPERATING SYSTEMS. HOWEVER, NOT ALL OPERATING SYSTEM PLATFORMS FOR A SPECIFIC SOFTWARE VERSION ARE RELEASED AT THE SAME TIME. SEE THE README FILE FOR THE AVAILABILITYOF THIS SOFTWARE VERSIONONASPECIFIC OPERATING SYSTEM PLATFORM.
THIS DOCUMENT IS PROVIDED “AS IS” WITHOUT WARRANTY OF ANY KIND, EITHER EXPRESS OR IMPLIED, INCLUDING, BUT NOT LIMITED TO, THE IMPLIED WARRANTIES OF MERCHANTABILITY, FITNESS FORAPARTICULAR PURPOSE,OR NON-INFRINGEMENT.
THIS DOCUMENT COULD INCLUDE TECHNICAL INACCURACIES OR TYPOGRAPHICAL ERRORS. CHANGES ARE PERIODICALLY ADDED TO THE INFORMATION HEREIN; THESE CHANGES WILL BE INCORPORATED IN NEW EDITIONS OF THIS DOCUMENT. TIBCO SOFTWARE INC. MAY MAKE IMPROVEMENTS AND/OR CHANGES IN THE PRODUCT(S) AND/OR THE PROGRAM(S) DESCRIBED IN THIS DOCUMENT AT ANY TIME.
THE CONTENTS OF THIS DOCUMENT MAY BE MODIFIED AND/OR QUALIFIED, DIRECTLY OR INDIRECTLY, BY OTHER DOCUMENTATION WHICH ACCOMPANIES THIS SOFTWARE, INCLUDING BUT NOT LIMITED TO ANY RELEASE NOTES AND "READ ME" FILES.
Copyright©1999-2012 TIBCO Software Inc. ALL RIGHTS RESERVED.
TIBCO Software Inc. Confidential Information
Table of Contents | iii
OpenSpirit Extension for ArcGIS User Guide
Table of Contents
Installation ....................................................................................................................... 6
Prerequisites ................................................................................................................ 6
Installation Steps ......................................................................................................... 6
Scan Utility .................................................................................................................... 11
Using the Extension ...................................................................................................... 12
Common Tasks.......................................................................................................... 12
Connect to OpenSpirit ................................................................................................... 13
Add well, seismic, and interpretation data to the map ................................................... 14
Add horizon grids to the map ........................................................................................ 20
Synchronize map view extents with other applications.................................................. 21
Send data selection events ........................................................................................... 22
Send GIS feature events ............................................................................................... 23
Send grid events ........................................................................................................... 26
Receive GIS events....................................................................................................... 29
Receive grid events ....................................................................................................... 31
Send a map image to other applications ....................................................................... 34
Synchronize selections with other applications ............................................................. 35
Highlighting Session .................................................................................................. 35
Creating a Highlighting Session ................................................................................. 35
Ending a Highlighting Session ................................................................................... 37
Share cursor location with other applications ................................................................ 38
Enable listening ............................................................................................................. 40
See selected feature attributes and related data ........................................................... 41
Launch the data selector ............................................................................................... 44
Save in-memory features .............................................................................................. 45
Options dialog ............................................................................................................... 47
Display the log file ......................................................................................................... 51
Help ............................................................................................................................... 52
Support .......................................................................................................................... 53
Glossary ........................................................................................................................ 55

4 | TIBCO OpenSpirit ArcGIS Extension 2010
OpenSpirit Extension for ArcGIS User Guide
TIBCO OpenSpirit ArcGIS Extension 2010
With the OpenSpirit Extension, a user can extend ArcGIS functionality to allow a user to browse well, seismic, and interpretation data coming from a variety of G&G data stores and to bidirectionally share interaction events with other OpenSpirit enabled applications. Specifically this extension adds the ability to connect ArcMap to OpenSpirit in order to:
Read well, seismic, and interpretation data from OpenSpirit enabled data stores and display in ArcMap
Send and receive OpenSpirit data selection events (exchange references to data with other applications)
Send and receive OpenSpirit GIS events (exchange point, polyline and polygon features with other applications)
Send and receive OpenSpirit grid events (exchange surface grids with other applications)
Send and receive OpenSpirit cursor tracking events (exchange mouse cursor x,y,z positions with other applications)
Send and receive OpenSpirit map view events (synchronize map view extents with other applications)
Send OpenSpirit map image events (synchronize map view extents with other applications and display an image of the map)
Establish a selection highlighting synchronization session (send and receive instructions to select features)
To run the OpenSpirit ArcGIS Extension 2010 you will need ArcGIS Desktop 10 and OpenSpirit version 3.2.2 (or newer).
TIBCO OpenSpirit ArcGIS Extension 2010 | 5
OpenSpirit Extension for ArcGIS User Guide
6 | Installation
OpenSpirit Extension for ArcGIS User Guide
Installation
Prerequisites
In order to use the OpenSpirit ArcGIS Extension you must have the following applications installed on your Windows PC (running Windows XP 32/64, Vista 32/64 or Windows 7 32/64):
ArcGIS Desktop (ArcView or ArcEdit license) 10 OpenSpirit v 3.2.2 (or newer)
Installation Steps
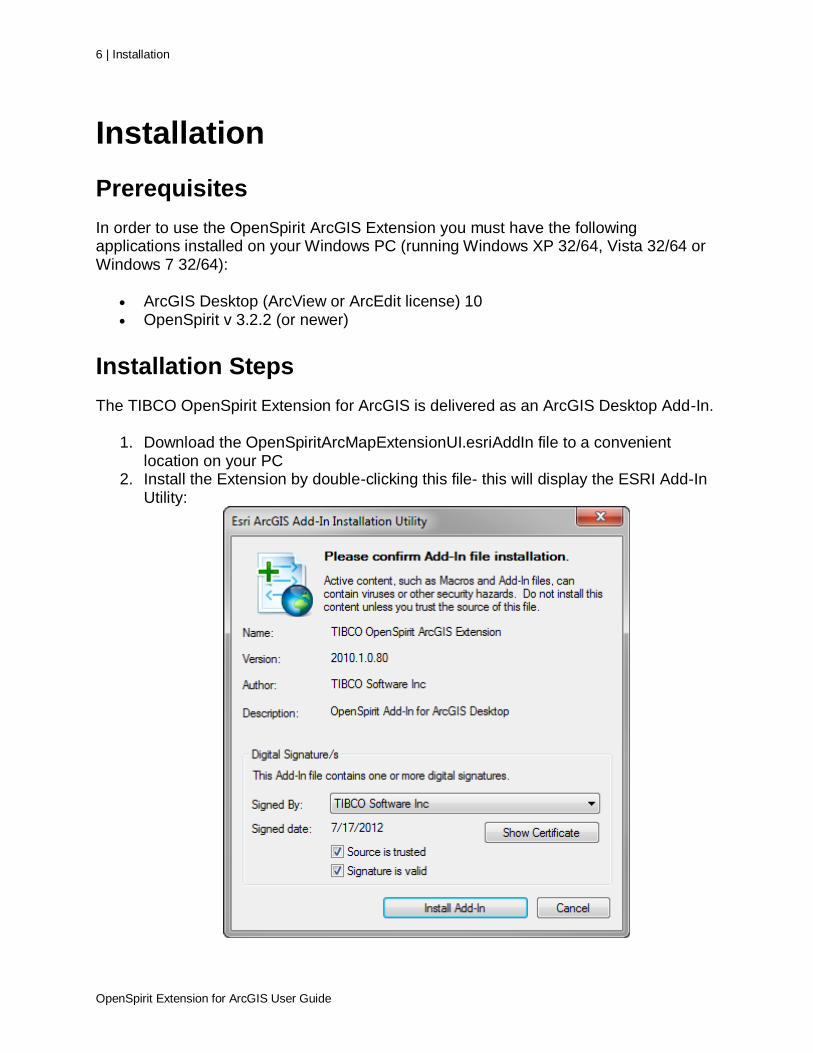
The TIBCO OpenSpirit Extension for ArcGIS is delivered as an ArcGIS Desktop Add-In.
1. Download the OpenSpiritArcMapExtensionUI.esriAddIn file to a convenient location on your PC
2. Install the Extension by double-clicking this file- this will display the ESRI Add-In Utility:
Installation | 7
OpenSpirit Extension for ArcGIS User Guide
Then click on "Install Add-In".
Your company may choose to install add-ins from a shared network drive, in which case you may just put the OpenSpirit Add-In in this directory and ArcGIS will discover it the next time it is run.
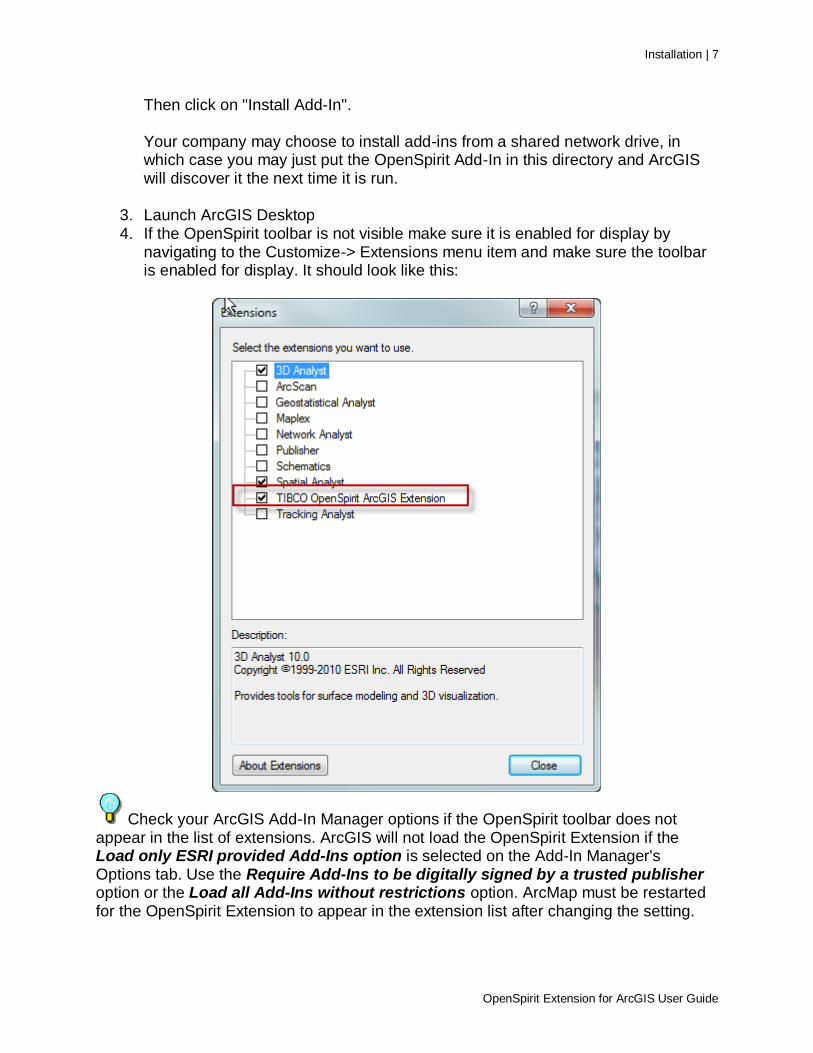
3. Launch ArcGIS Desktop 4. If the OpenSpirit toolbar is not visible make sure it is enabled for display by
navigating to the Customize-> Extensions menu item and make sure the toolbar is enabled for display. It should look like this:
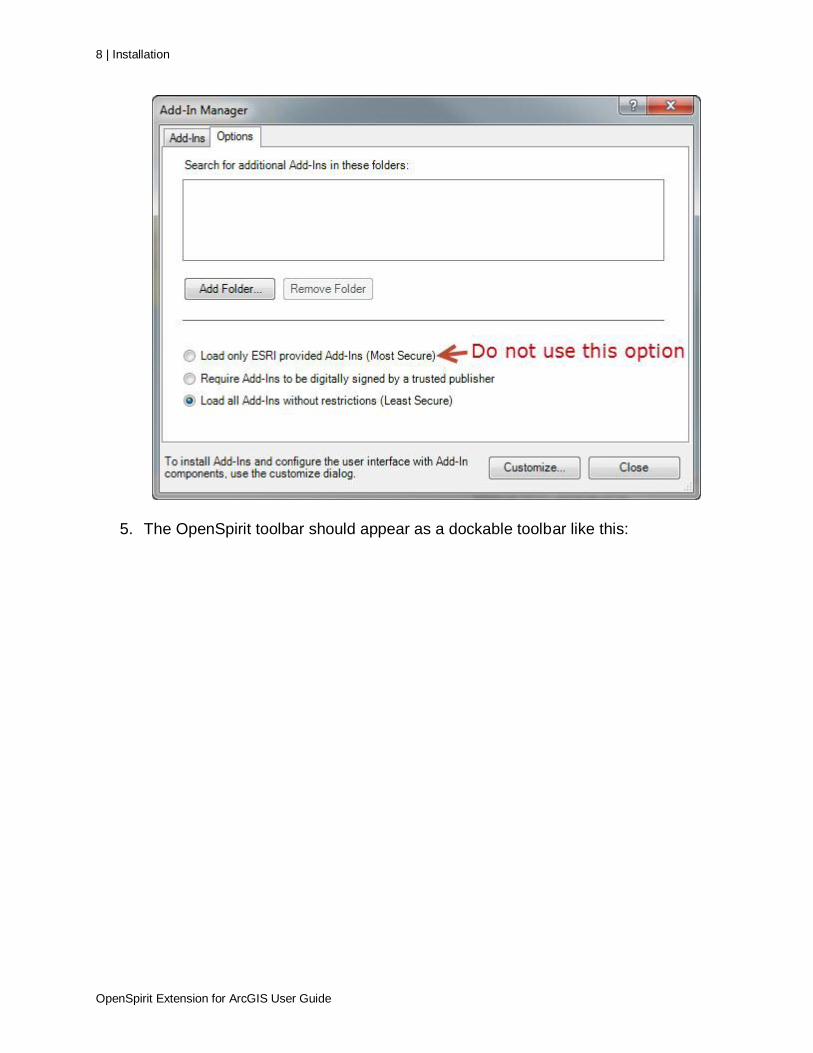
Check your ArcGIS Add-In Manager options if the OpenSpirit toolbar does not appear in the list of extensions. ArcGIS will not load the OpenSpirit Extension if the Load only ESRI provided Add-Ins option is selected on the Add-In Manager's Options tab. Use the Require Add-Ins to be digitally signed by a trusted publisher option or the Load all Add-Ins without restrictions option. ArcMap must be restarted for the OpenSpirit Extension to appear in the extension list after changing the setting.
8 | Installation
OpenSpirit Extension for ArcGIS User Guide
5. The OpenSpirit toolbar should appear as a dockable toolbar like this:
Installation | 9
OpenSpirit Extension for ArcGIS User Guide
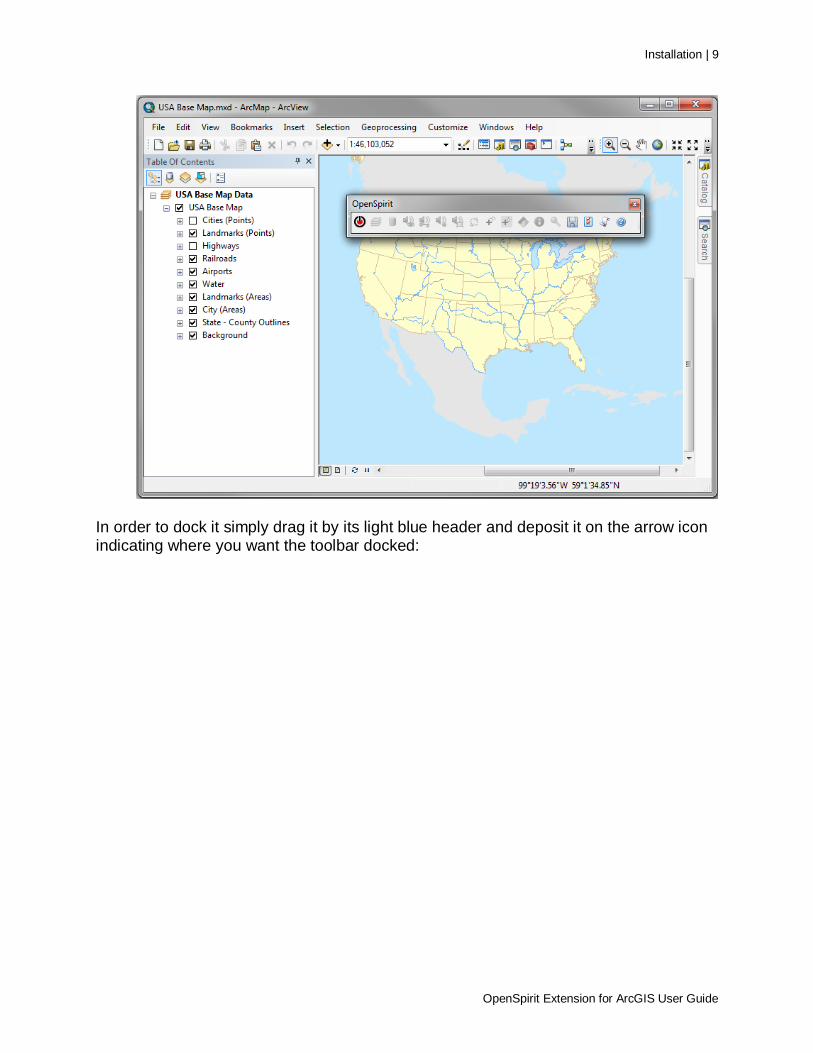
In order to dock it simply drag it by its light blue header and deposit it on the arrow icon indicating where you want the toolbar docked:
10 | Installation
OpenSpirit Extension for ArcGIS User Guide
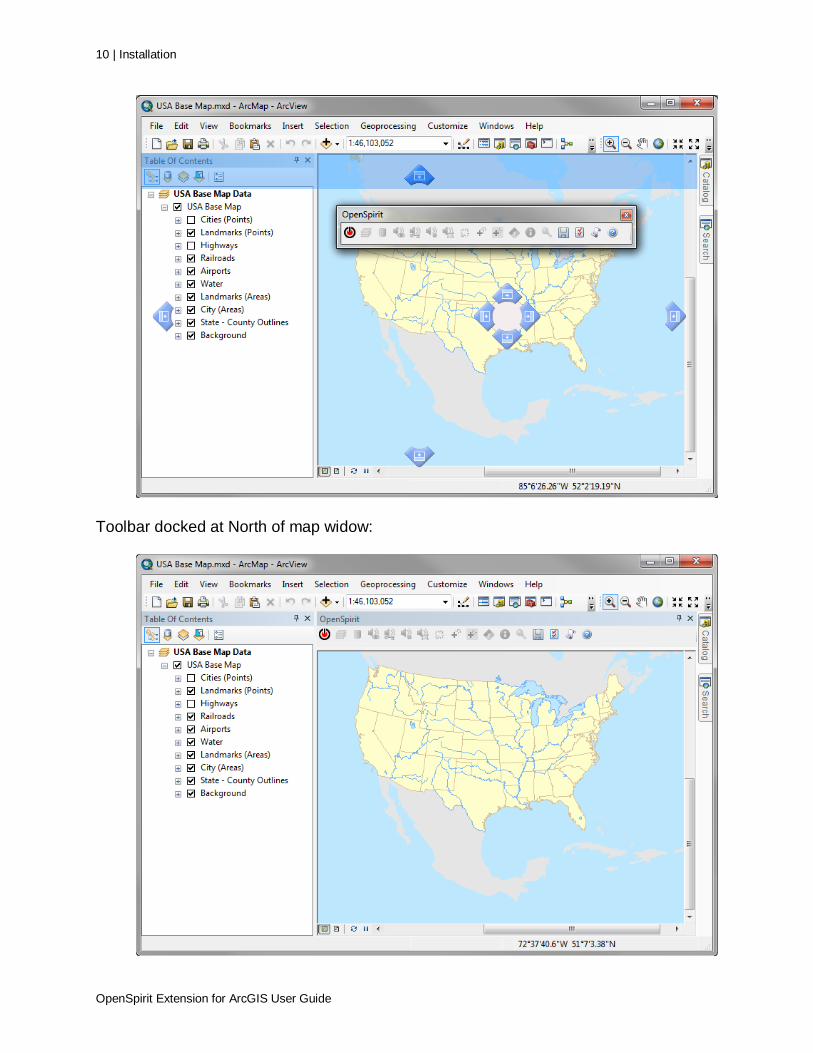
Toolbar docked at North of map widow:

Scan Utility | 11
OpenSpirit Extension for ArcGIS User Guide
Scan Utility
The TIBCO OpenSpirit Scan Utility is a separately licensed product that many users of the ArcGIS Extension use in conjunction with the TIBCO OpenSpirit Extension for ArcGIS. It is designed to be run as a scheduled task that can read all the projects in a company's office and maintain a set of feature classes representing the scanned well, seismic, and interpretation data. Feature classes may be created as shape files, file geodatabase, or in ArcSDE. The features created by the Scan Utility contain a field which has the OpenSpirit datakey so a link is maintained back to the original source project. The output of the scan utility may be added to ArcGIS desktop and the OpenSpirit ArcGIS Extension may then connect to the original projects to drill down to display additional information or send data selection events to other OpenSpirit enabled applications.
12 | Using the Extension
OpenSpirit Extension for ArcGIS User Guide
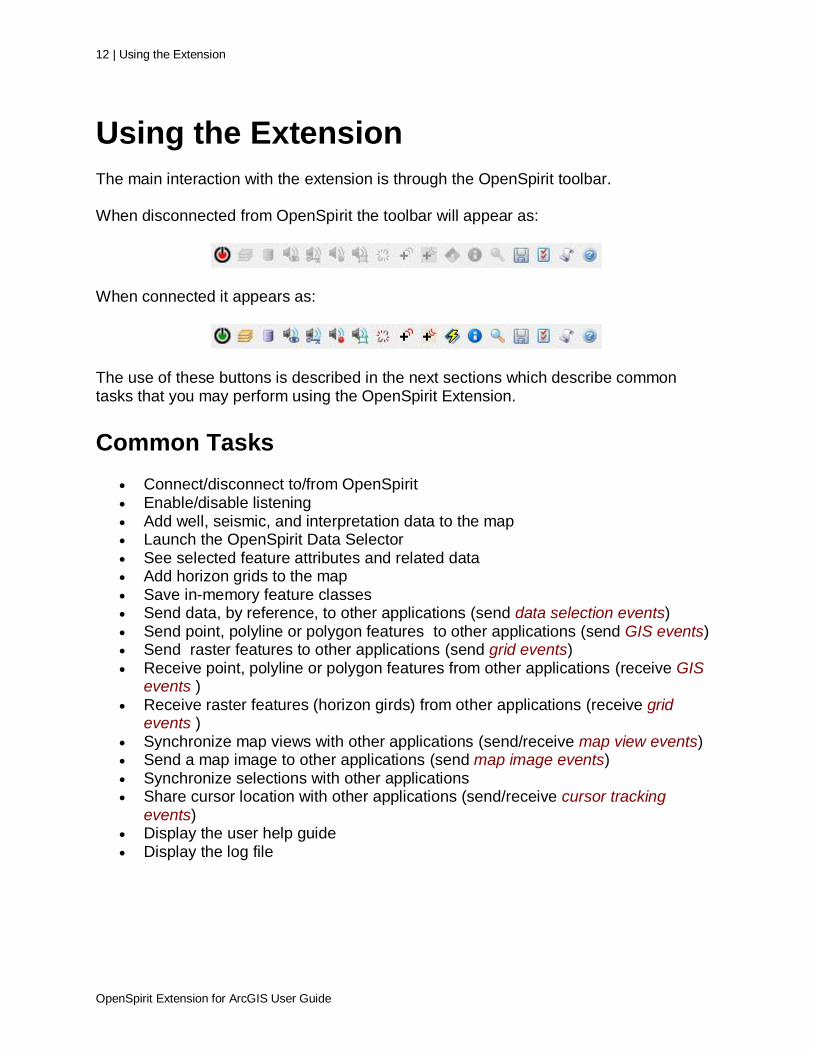
Using the Extension
The main interaction with the extension is through the OpenSpirit toolbar. When disconnected from OpenSpirit the toolbar will appear as:
When connected it appears as:
The use of these buttons is described in the next sections which describe common tasks that you may perform using the OpenSpirit Extension.
Common Tasks
Connect/disconnect to/from OpenSpirit Enable/disable listening Add well, seismic, and interpretation data to the map Launch the OpenSpirit Data Selector See selected feature attributes and related data Add horizon grids to the map Save in-memory feature classes Send data, by reference, to other applications (send data selection events) Send point, polyline or polygon features to other applications (send GIS events) Send raster features to other applications (send grid events) Receive point, polyline or polygon features from other applications (receive GIS
events ) Receive raster features (horizon girds) from other applications (receive grid
events ) Synchronize map views with other applications (send/receive map view events) Send a map image to other applications (send map image events) Synchronize selections with other applications Share cursor location with other applications (send/receive cursor tracking
events) Display the user help guide Display the log file
Connect to OpenSpirit | 13
OpenSpirit Extension for ArcGIS User Guide
Connect to OpenSpirit
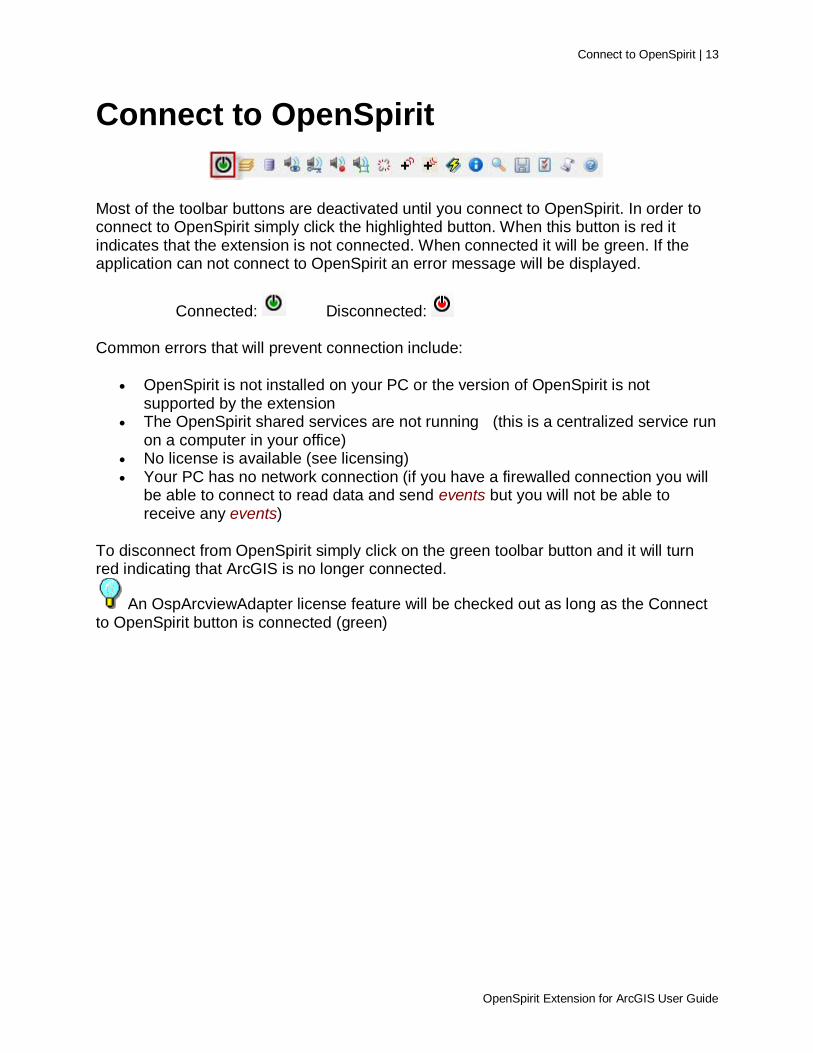
Most of the toolbar buttons are deactivated until you connect to OpenSpirit. In order to connect to OpenSpirit simply click the highlighted button. When this button is red it indicates that the extension is not connected. When connected it will be green. If the application can not connect to OpenSpirit an error message will be displayed.
Connected: Disconnected:
Common errors that will prevent connection include:
OpenSpirit is not installed on your PC or the version of OpenSpirit is not supported by the extension
The OpenSpirit shared services are not running (this is a centralized service run on a computer in your office)
No license is available (see licensing) Your PC has no network connection (if you have a firewalled connection you will
be able to connect to read data and send events but you will not be able to receive any events)
To disconnect from OpenSpirit simply click on the green toolbar button and it will turn red indicating that ArcGIS is no longer connected.
An OspArcviewAdapter license feature will be checked out as long as the Connect to OpenSpirit button is connected (green)

14 | Add well, seismic, and interpretation data to the map
OpenSpirit Extension for ArcGIS User Guide
Add well, seismic, and interpretation data to the map
There are several ways to display well, seismic, and interpretation data that reside in OpenSpirit enabled data stores.
1. Use the OpenSpirit Scan Utility to generate shape files or SDE layers and then add these to the ArcGIS map via the OpenSpirit Add Content button.
Any layers added in this manner will have OpenSpirit datakeys associated with every feature so you may then send OpenSpirit data selections events for features selected from the map. If you add scanned layers that represent wellbores, 2d lines, or 3d surveys you may then select these features and see children of the selected features - e.g. if you select wellbores from the map you may then list associated picks,logs, and checkshots (see the See selected feature attributes section). If you are selecting shape files output from the Scan Utility then you will navigate to the directory containing the shape files and select the "master" dbf file. This will then cause all the shape files generated by the scan utility to be added to the map representing the geometry of the scanned well, seismic, and interpretation data.

Add well, seismic, and interpretation data to the map | 15
OpenSpirit Extension for ArcGIS User Guide
If you are selecting SDE output from the Scan Utility then you need to select the appropriate database connection for your SDE instance and then select the scan set definition file. Scan sets created using the older version of the OpenSpirit Scan Utility (Scan Utility Classic), cataloged in a table named SCAN_SET_INFO. Beginning with version 2011 of the TIBCO OpenSpirit Scan Utility the scan set catalog table is named OSP_SCAN_SETS.
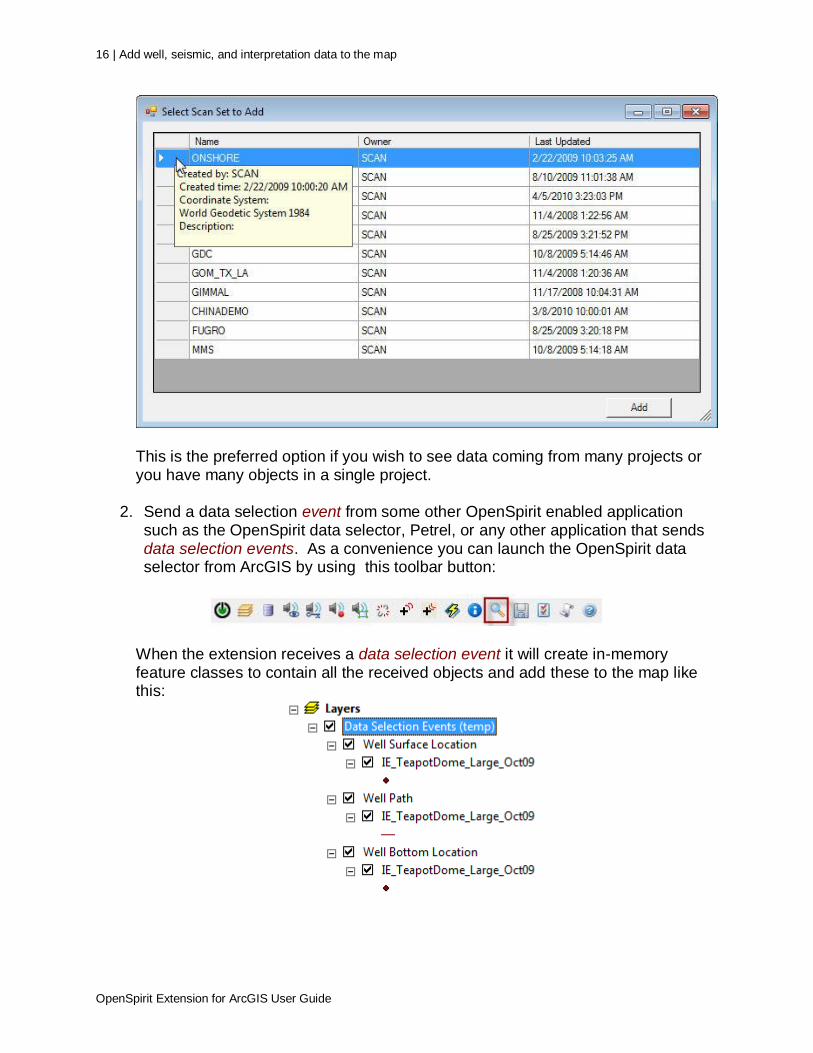
Then select the specific Scan Set (this contains the well, seismic, and interpretation feature classes made by the Scan Utility) you wish to add to the map:
16 | Add well, seismic, and interpretation data to the map
OpenSpirit Extension for ArcGIS User Guide
This is the preferred option if you wish to see data coming from many projects or you have many objects in a single project.
2. Send a data selection event from some other OpenSpirit enabled application such as the OpenSpirit data selector, Petrel, or any other application that sends data selection events. As a convenience you can launch the OpenSpirit data selector from ArcGIS by using this toolbar button:
When the extension receives a data selection event it will create in-memory feature classes to contain all the received objects and add these to the map like this:
Add well, seismic, and interpretation data to the map | 17
OpenSpirit Extension for ArcGIS User Guide
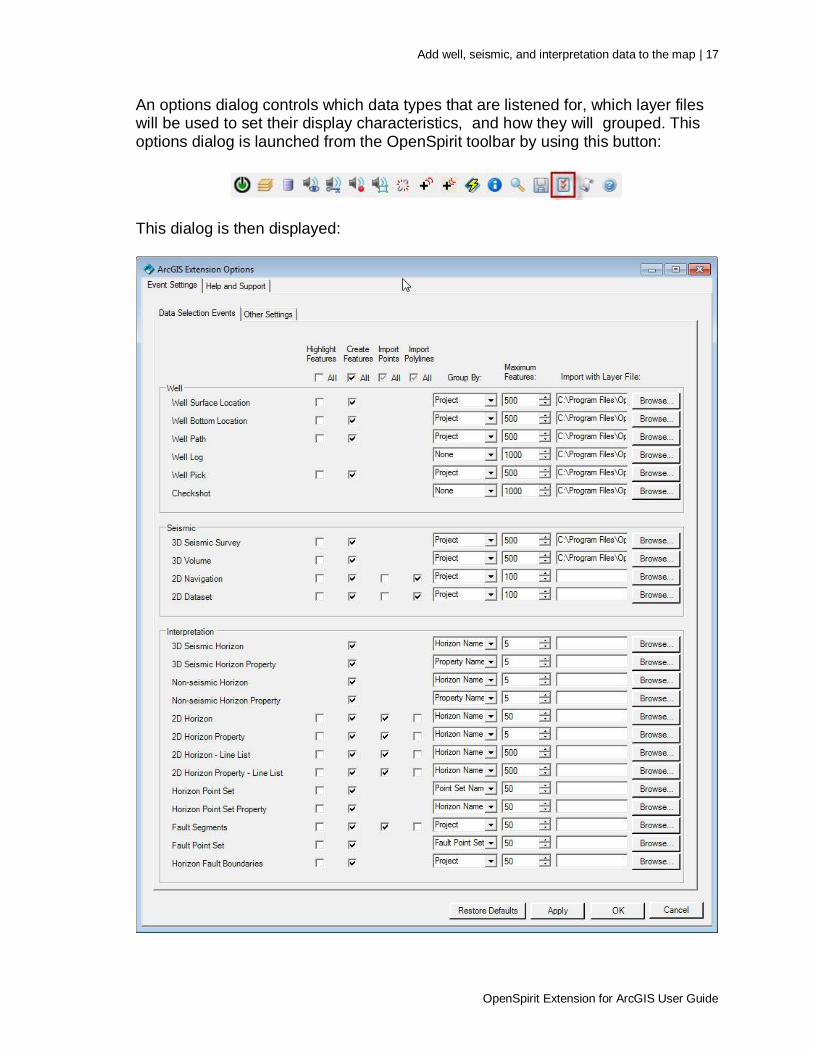
An options dialog controls which data types that are listened for, which layer files will be used to set their display characteristics, and how they will grouped. This options dialog is launched from the OpenSpirit toolbar by using this button:
This dialog is then displayed:
18 | Add well, seismic, and interpretation data to the map
OpenSpirit Extension for ArcGIS User Guide
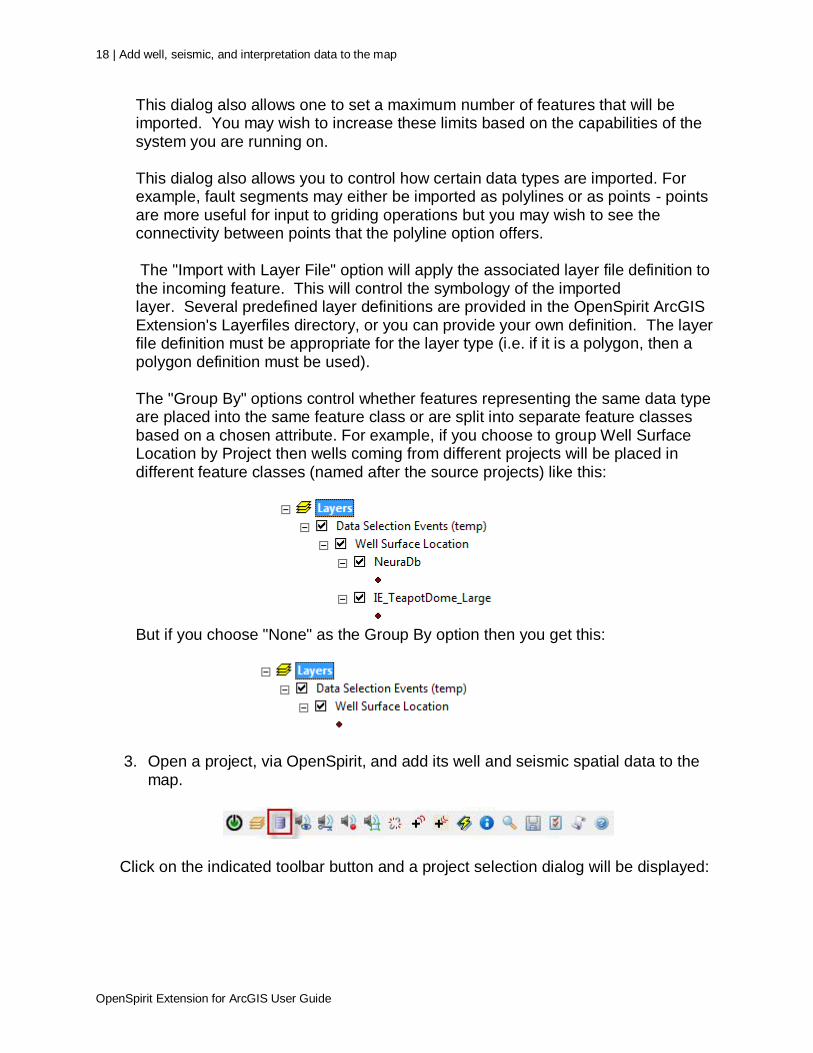
This dialog also allows one to set a maximum number of features that will be imported. You may wish to increase these limits based on the capabilities of the system you are running on. This dialog also allows you to control how certain data types are imported. For example, fault segments may either be imported as polylines or as points - points are more useful for input to griding operations but you may wish to see the connectivity between points that the polyline option offers. The "Import with Layer File" option will apply the associated layer file definition to the incoming feature. This will control the symbology of the imported layer. Several predefined layer definitions are provided in the OpenSpirit ArcGIS Extension's Layerfiles directory, or you can provide your own definition. The layer file definition must be appropriate for the layer type (i.e. if it is a polygon, then a polygon definition must be used). The "Group By" options control whether features representing the same data type are placed into the same feature class or are split into separate feature classes based on a chosen attribute. For example, if you choose to group Well Surface Location by Project then wells coming from different projects will be placed in different feature classes (named after the source projects) like this:
But if you choose "None" as the Group By option then you get this:
3. Open a project, via OpenSpirit, and add its well and seismic spatial data to the map.
Click on the indicated toolbar button and a project selection dialog will be displayed:
Add well, seismic, and interpretation data to the map | 19
OpenSpirit Extension for ArcGIS User Guide
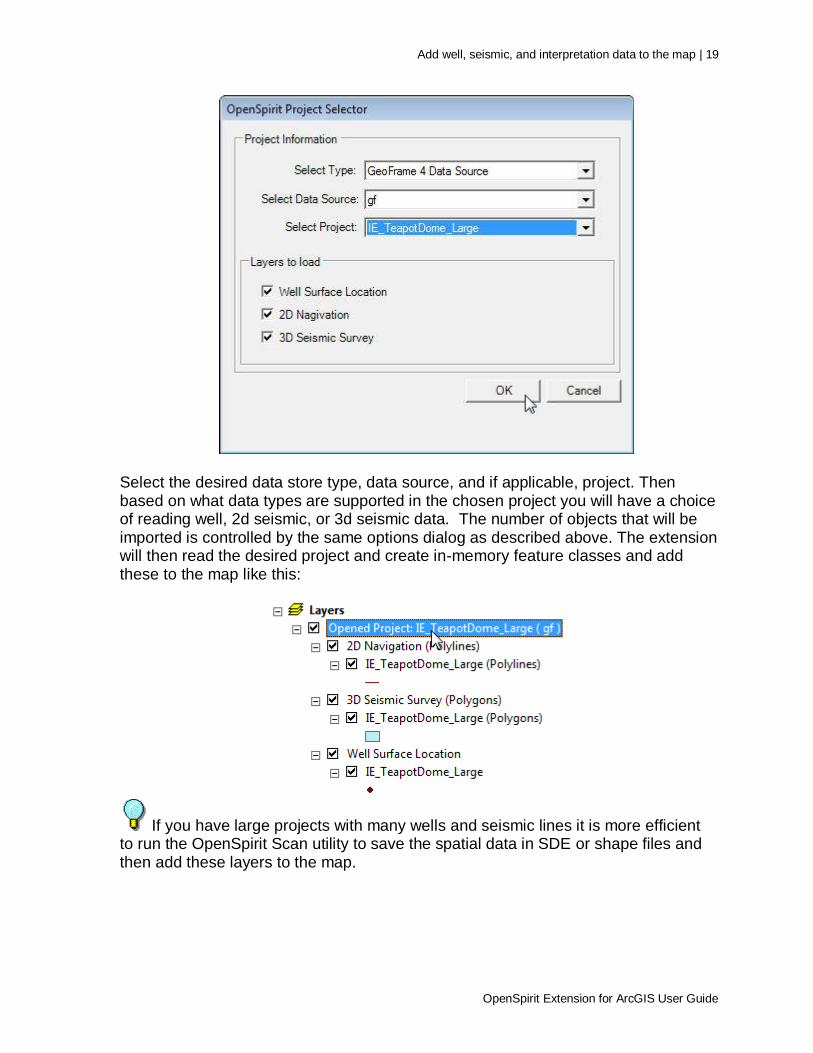
Select the desired data store type, data source, and if applicable, project. Then based on what data types are supported in the chosen project you will have a choice of reading well, 2d seismic, or 3d seismic data. The number of objects that will be imported is controlled by the same options dialog as described above. The extension will then read the desired project and create in-memory feature classes and add these to the map like this:
If you have large projects with many wells and seismic lines it is more efficient to run the OpenSpirit Scan utility to save the spatial data in SDE or shape files and then add these layers to the map.

20 | Add horizon grids to the map
OpenSpirit Extension for ArcGIS User Guide
Add horizon grids to the map
Horizon grids may be added to the map in three different ways:
1. An application may send OpenSpirit grid events to ArcGIS - See Receive grid events
2. An application (like the OpenSpirit data selector) may send a data selection event referencing a seismic 3d horizon or a non-seismic horizon grid to ArcGIS - See Add well, seismic, and interpretation data to the map. If a data selection event is sent from the Horizon tab (in the OpenSpirit Data Selector) by selecting a horizon grid then the primary time or depth attribute of that horizon will be imported. If you send a data selection event from the Horizon Property tab then the selected grid properties will be imported as raster features.
3. From within ArcGIS if a 3d seismic survey is selected you may use the OpenSpirit information button to see related data and add selected seismic horizons to the map - See selected feature attributes and related data
Unlike point, polyline, or polygon features, horizons grids are NOT temporary in memory features - they are stored in an Imagine .IMG raster format in a working directory that is specified in the options dialog.
Synchronize map view extents with other applications | 21
OpenSpirit Extension for ArcGIS User Guide
Synchronize map view extents with other applications
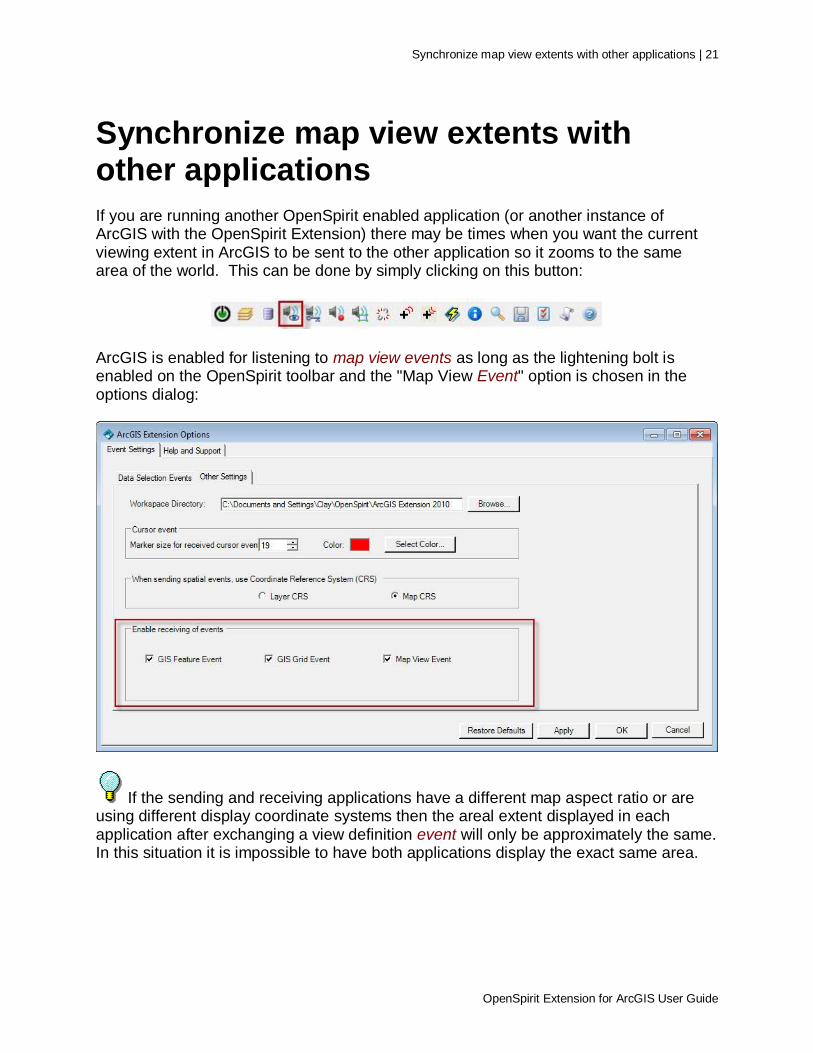
If you are running another OpenSpirit enabled application (or another instance of ArcGIS with the OpenSpirit Extension) there may be times when you want the current viewing extent in ArcGIS to be sent to the other application so it zooms to the same area of the world. This can be done by simply clicking on this button:
ArcGIS is enabled for listening to map view events as long as the lightening bolt is enabled on the OpenSpirit toolbar and the "Map View Event" option is chosen in the options dialog:
If the sending and receiving applications have a different map aspect ratio or are using different display coordinate systems then the areal extent displayed in each application after exchanging a view definition event will only be approximately the same. In this situation it is impossible to have both applications display the exact same area.
22 | Send data selection events
OpenSpirit Extension for ArcGIS User Guide
Send data selection events
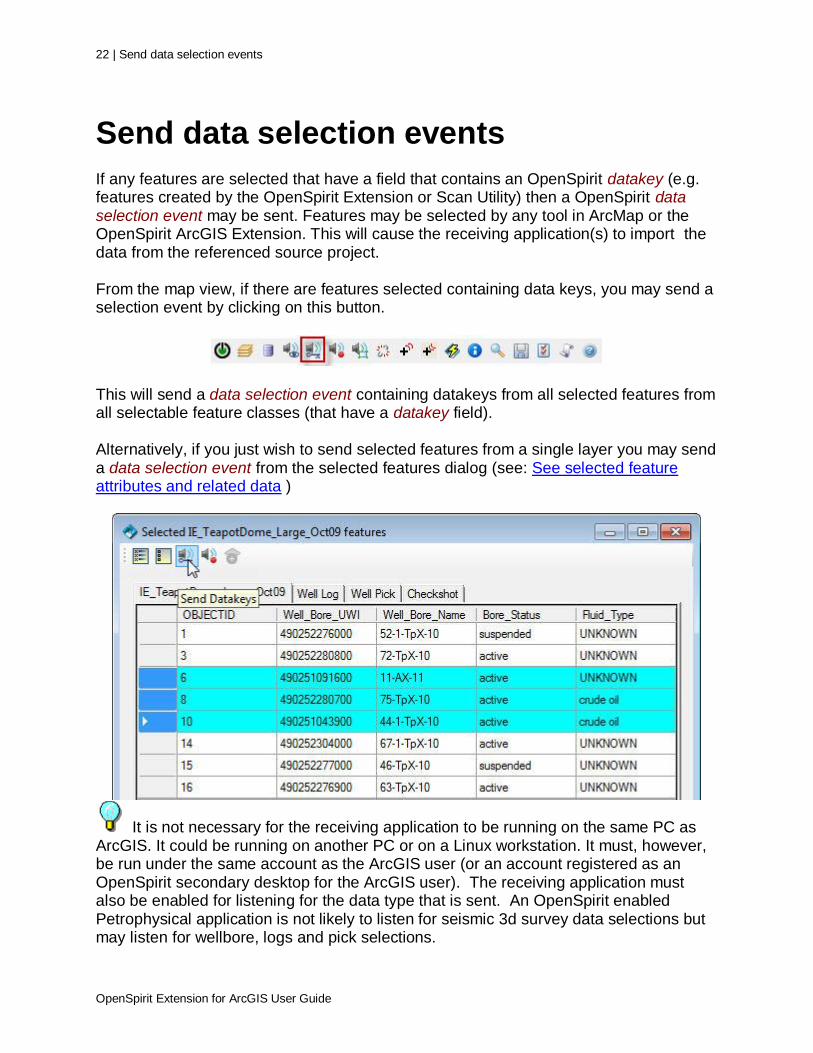
If any features are selected that have a field that contains an OpenSpirit datakey (e.g. features created by the OpenSpirit Extension or Scan Utility) then a OpenSpirit data selection event may be sent. Features may be selected by any tool in ArcMap or the OpenSpirit ArcGIS Extension. This will cause the receiving application(s) to import the data from the referenced source project. From the map view, if there are features selected containing data keys, you may send a selection event by clicking on this button.
This will send a data selection event containing datakeys from all selected features from all selectable feature classes (that have a datakey field). Alternatively, if you just wish to send selected features from a single layer you may send a data selection event from the selected features dialog (see: See selected feature attributes and related data )
It is not necessary for the receiving application to be running on the same PC as ArcGIS. It could be running on another PC or on a Linux workstation. It must, however, be run under the same account as the ArcGIS user (or an account registered as an OpenSpirit secondary desktop for the ArcGIS user). The receiving application must also be enabled for listening for the data type that is sent. An OpenSpirit enabled Petrophysical application is not likely to listen for seismic 3d survey data selections but may listen for wellbore, logs and pick selections.
Send GIS feature events | 23
OpenSpirit Extension for ArcGIS User Guide
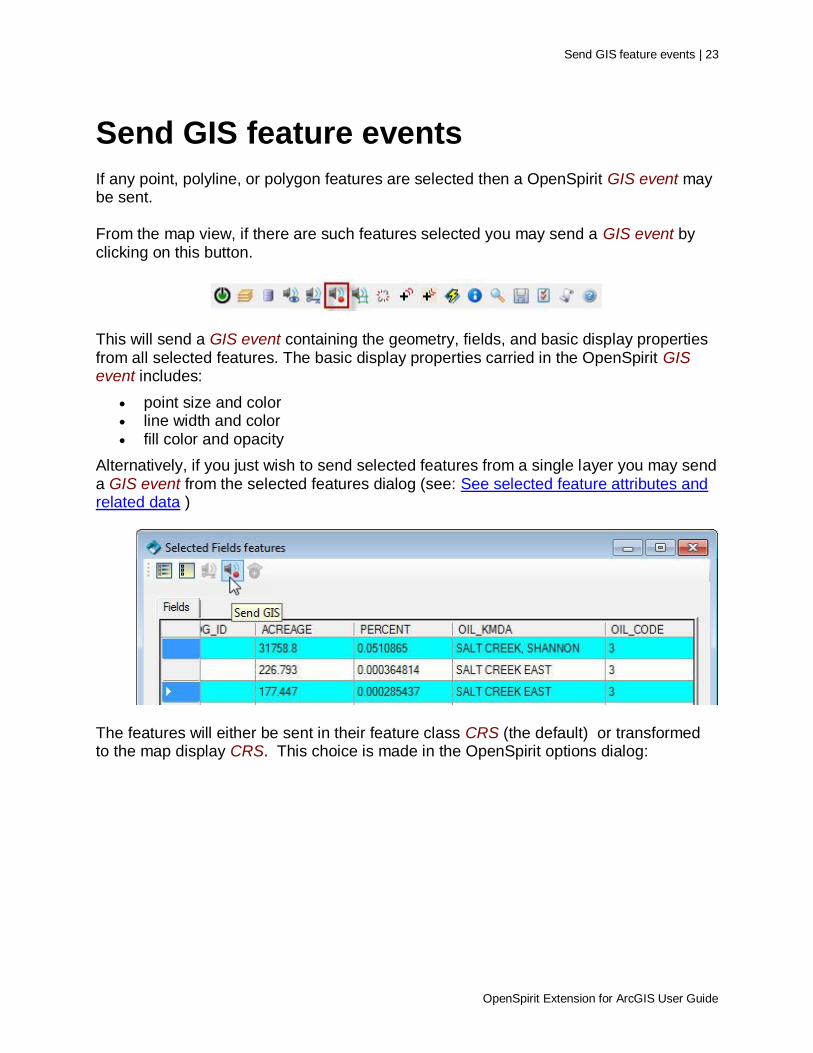
Send GIS feature events
If any point, polyline, or polygon features are selected then a OpenSpirit GIS event may be sent. From the map view, if there are such features selected you may send a GIS event by clicking on this button.
This will send a GIS event containing the geometry, fields, and basic display properties from all selected features. The basic display properties carried in the OpenSpirit GIS event includes:
point size and color line width and color fill color and opacity
Alternatively, if you just wish to send selected features from a single layer you may send a GIS event from the selected features dialog (see: See selected feature attributes and related data )
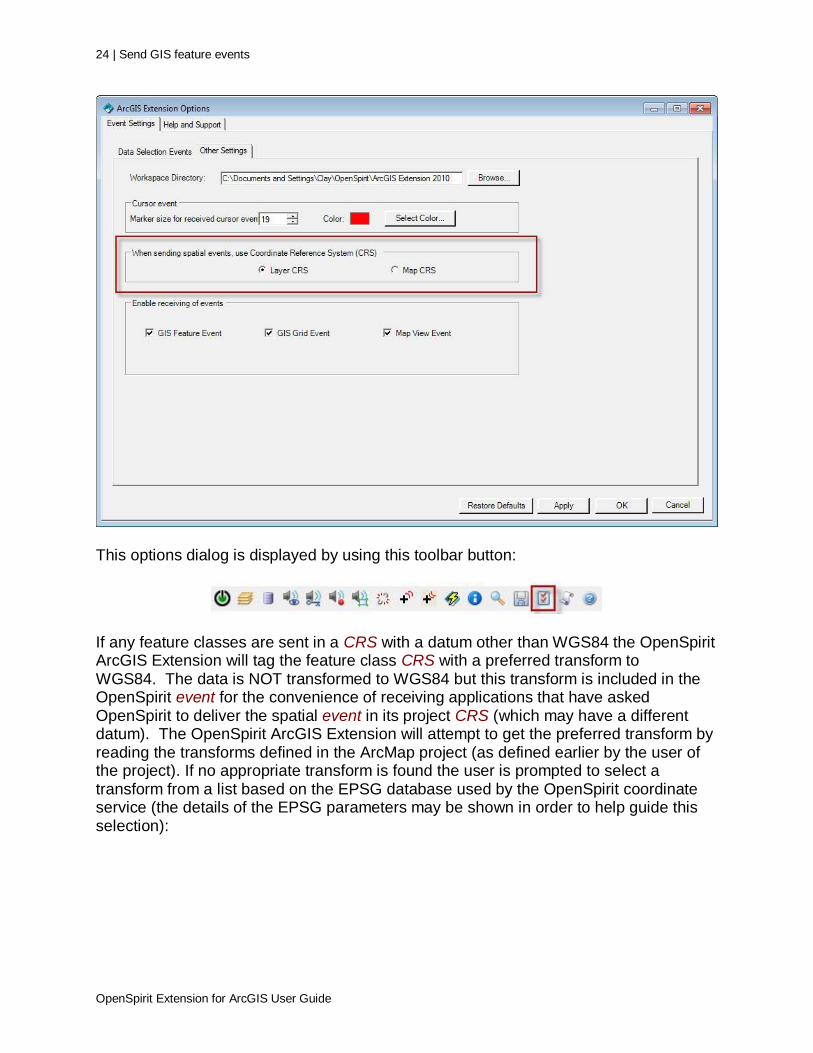
The features will either be sent in their feature class CRS (the default) or transformed to the map display CRS. This choice is made in the OpenSpirit options dialog:
24 | Send GIS feature events
OpenSpirit Extension for ArcGIS User Guide
This options dialog is displayed by using this toolbar button:
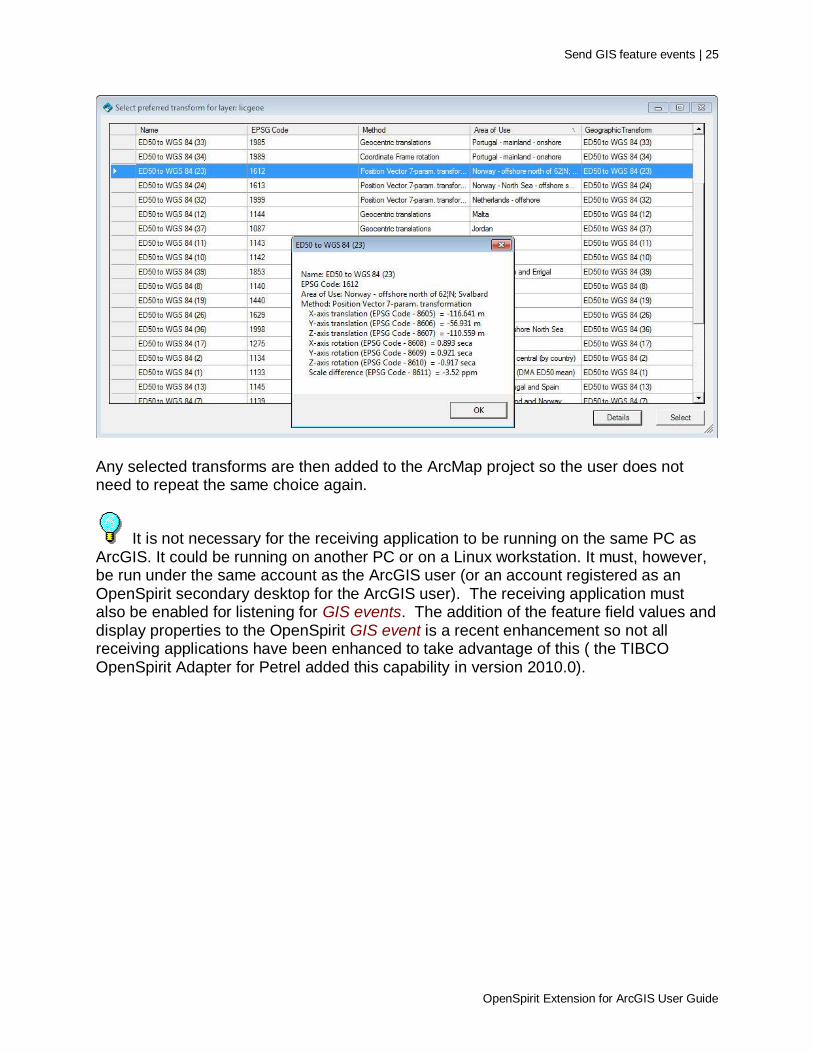
If any feature classes are sent in a CRS with a datum other than WGS84 the OpenSpirit ArcGIS Extension will tag the feature class CRS with a preferred transform to WGS84. The data is NOT transformed to WGS84 but this transform is included in the OpenSpirit event for the convenience of receiving applications that have asked OpenSpirit to deliver the spatial event in its project CRS (which may have a different datum). The OpenSpirit ArcGIS Extension will attempt to get the preferred transform by reading the transforms defined in the ArcMap project (as defined earlier by the user of the project). If no appropriate transform is found the user is prompted to select a transform from a list based on the EPSG database used by the OpenSpirit coordinate service (the details of the EPSG parameters may be shown in order to help guide this selection):
Send GIS feature events | 25
OpenSpirit Extension for ArcGIS User Guide
Any selected transforms are then added to the ArcMap project so the user does not need to repeat the same choice again.
It is not necessary for the receiving application to be running on the same PC as ArcGIS. It could be running on another PC or on a Linux workstation. It must, however, be run under the same account as the ArcGIS user (or an account registered as an OpenSpirit secondary desktop for the ArcGIS user). The receiving application must also be enabled for listening for GIS events. The addition of the feature field values and display properties to the OpenSpirit GIS event is a recent enhancement so not all receiving applications have been enhanced to take advantage of this ( the TIBCO OpenSpirit Adapter for Petrel added this capability in version 2010.0).
26 | Send grid events
OpenSpirit Extension for ArcGIS User Guide
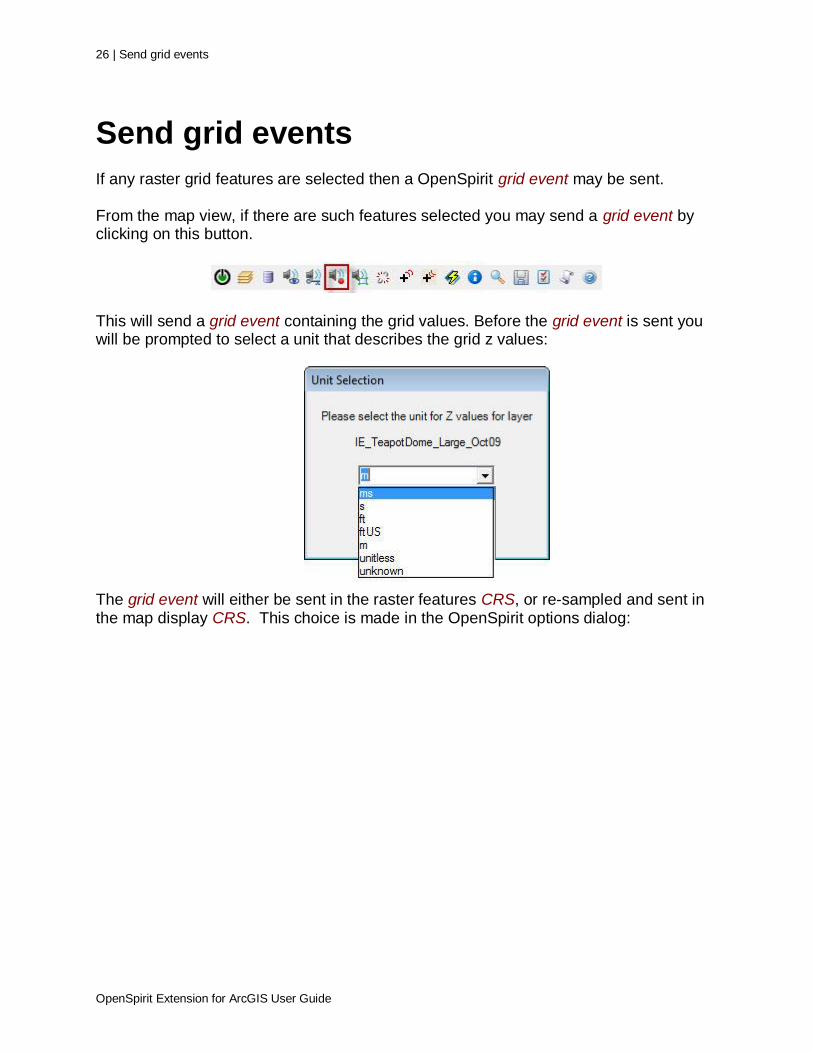
Send grid events
If any raster grid features are selected then a OpenSpirit grid event may be sent. From the map view, if there are such features selected you may send a grid event by clicking on this button.
This will send a grid event containing the grid values. Before the grid event is sent you will be prompted to select a unit that describes the grid z values:
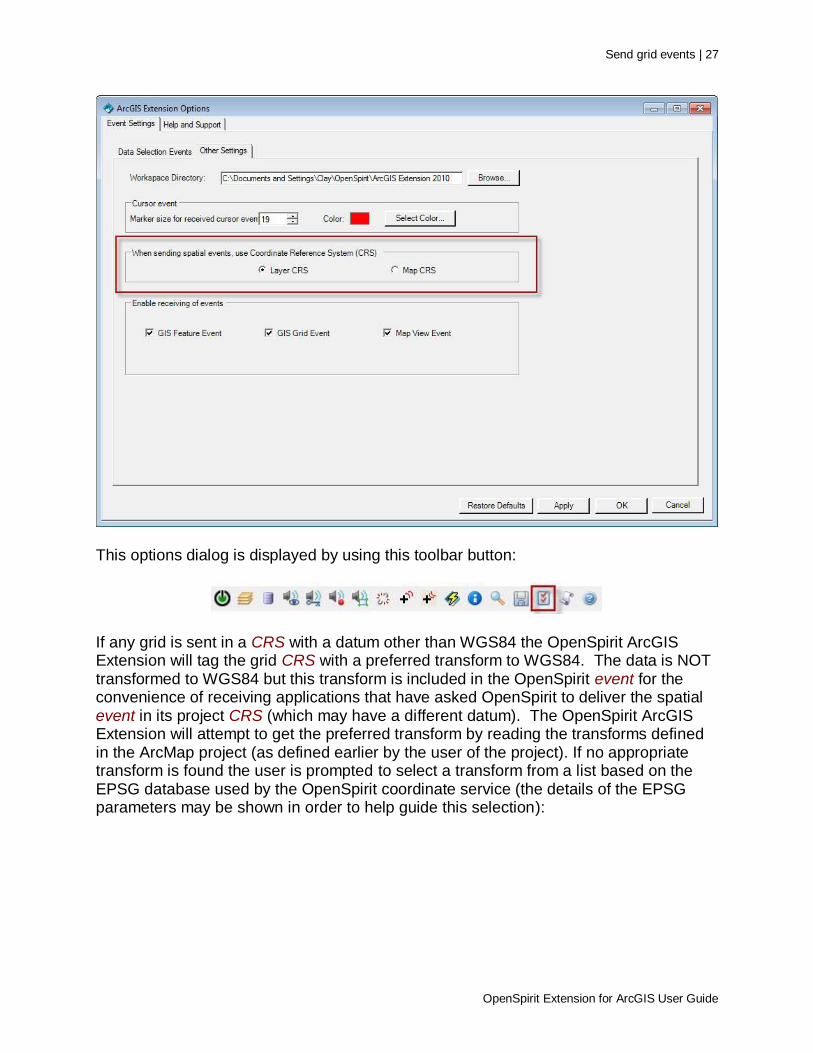
The grid event will either be sent in the raster features CRS, or re-sampled and sent in the map display CRS. This choice is made in the OpenSpirit options dialog:
Send grid events | 27
OpenSpirit Extension for ArcGIS User Guide
This options dialog is displayed by using this toolbar button:
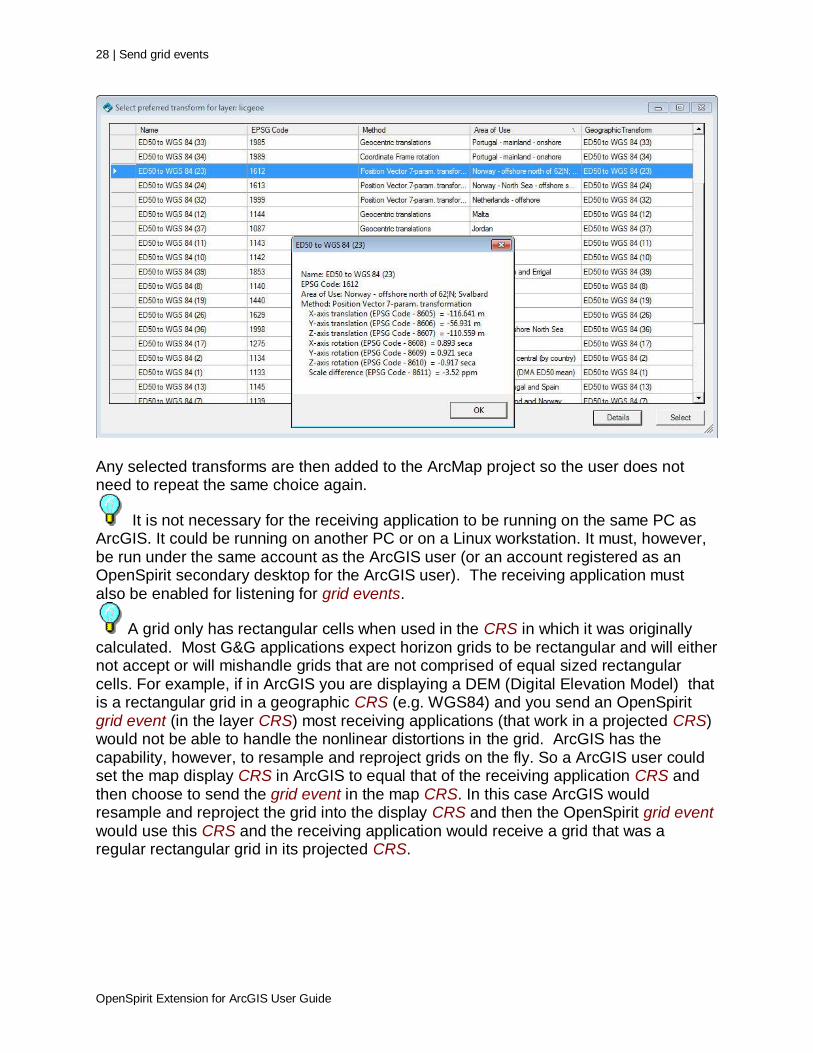
If any grid is sent in a CRS with a datum other than WGS84 the OpenSpirit ArcGIS Extension will tag the grid CRS with a preferred transform to WGS84. The data is NOT transformed to WGS84 but this transform is included in the OpenSpirit event for the convenience of receiving applications that have asked OpenSpirit to deliver the spatial event in its project CRS (which may have a different datum). The OpenSpirit ArcGIS Extension will attempt to get the preferred transform by reading the transforms defined in the ArcMap project (as defined earlier by the user of the project). If no appropriate transform is found the user is prompted to select a transform from a list based on the EPSG database used by the OpenSpirit coordinate service (the details of the EPSG parameters may be shown in order to help guide this selection):
28 | Send grid events
OpenSpirit Extension for ArcGIS User Guide
Any selected transforms are then added to the ArcMap project so the user does not need to repeat the same choice again.
It is not necessary for the receiving application to be running on the same PC as ArcGIS. It could be running on another PC or on a Linux workstation. It must, however, be run under the same account as the ArcGIS user (or an account registered as an OpenSpirit secondary desktop for the ArcGIS user). The receiving application must also be enabled for listening for grid events.
A grid only has rectangular cells when used in the CRS in which it was originally calculated. Most G&G applications expect horizon grids to be rectangular and will either not accept or will mishandle grids that are not comprised of equal sized rectangular cells. For example, if in ArcGIS you are displaying a DEM (Digital Elevation Model) that is a rectangular grid in a geographic CRS (e.g. WGS84) and you send an OpenSpirit grid event (in the layer CRS) most receiving applications (that work in a projected CRS) would not be able to handle the nonlinear distortions in the grid. ArcGIS has the capability, however, to resample and reproject grids on the fly. So a ArcGIS user could set the map display CRS in ArcGIS to equal that of the receiving application CRS and then choose to send the grid event in the map CRS. In this case ArcGIS would resample and reproject the grid into the display CRS and then the OpenSpirit grid event would use this CRS and the receiving application would receive a grid that was a regular rectangular grid in its projected CRS.
Receive GIS events | 29
OpenSpirit Extension for ArcGIS User Guide
Receive GIS events
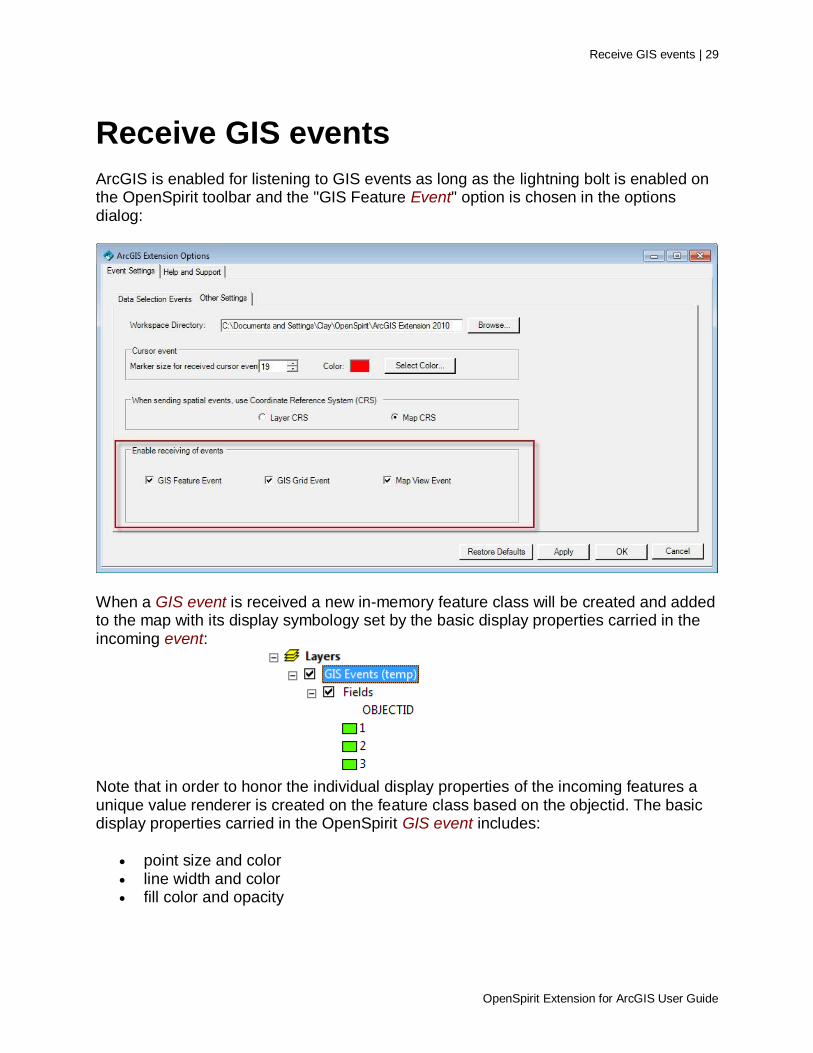
ArcGIS is enabled for listening to GIS events as long as the lightning bolt is enabled on the OpenSpirit toolbar and the "GIS Feature Event" option is chosen in the options dialog:
When a GIS event is received a new in-memory feature class will be created and added to the map with its display symbology set by the basic display properties carried in the incoming event:
Note that in order to honor the individual display properties of the incoming features a unique value renderer is created on the feature class based on the objectid. The basic display properties carried in the OpenSpirit GIS event includes:
point size and color line width and color fill color and opacity
30 | Receive GIS events
OpenSpirit Extension for ArcGIS User Guide
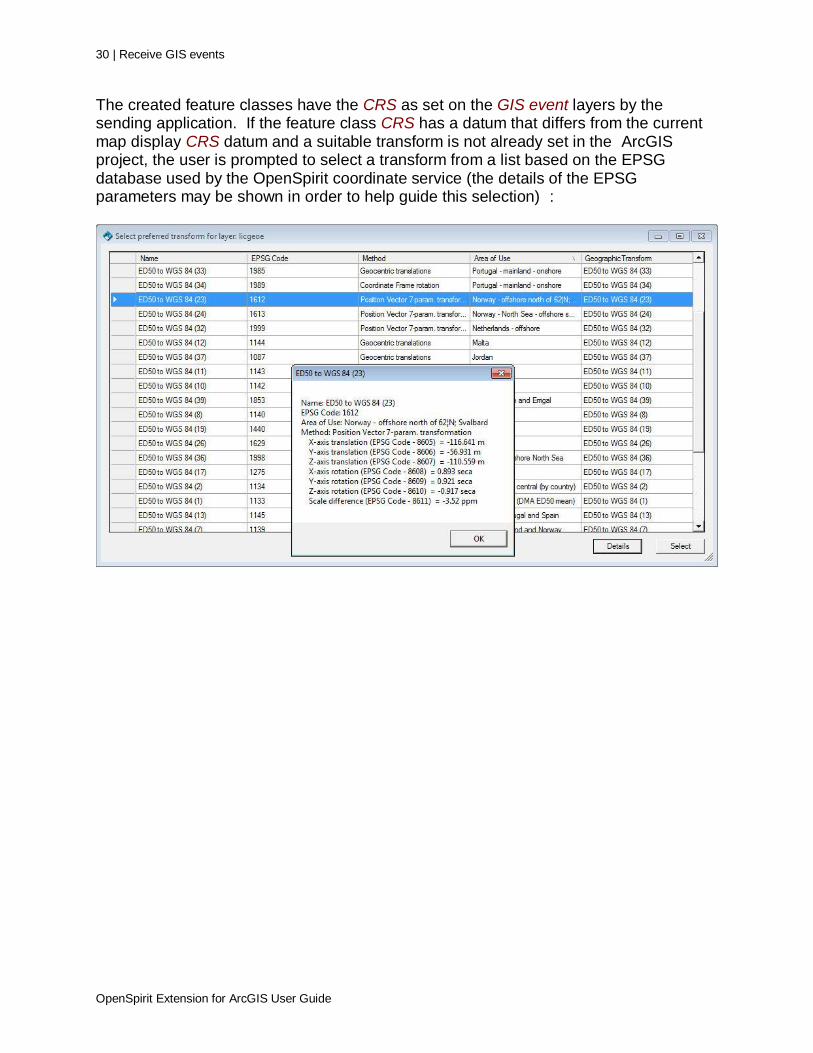
The created feature classes have the CRS as set on the GIS event layers by the sending application. If the feature class CRS has a datum that differs from the current map display CRS datum and a suitable transform is not already set in the ArcGIS project, the user is prompted to select a transform from a list based on the EPSG database used by the OpenSpirit coordinate service (the details of the EPSG parameters may be shown in order to help guide this selection) :
Receive grid events | 31
OpenSpirit Extension for ArcGIS User Guide
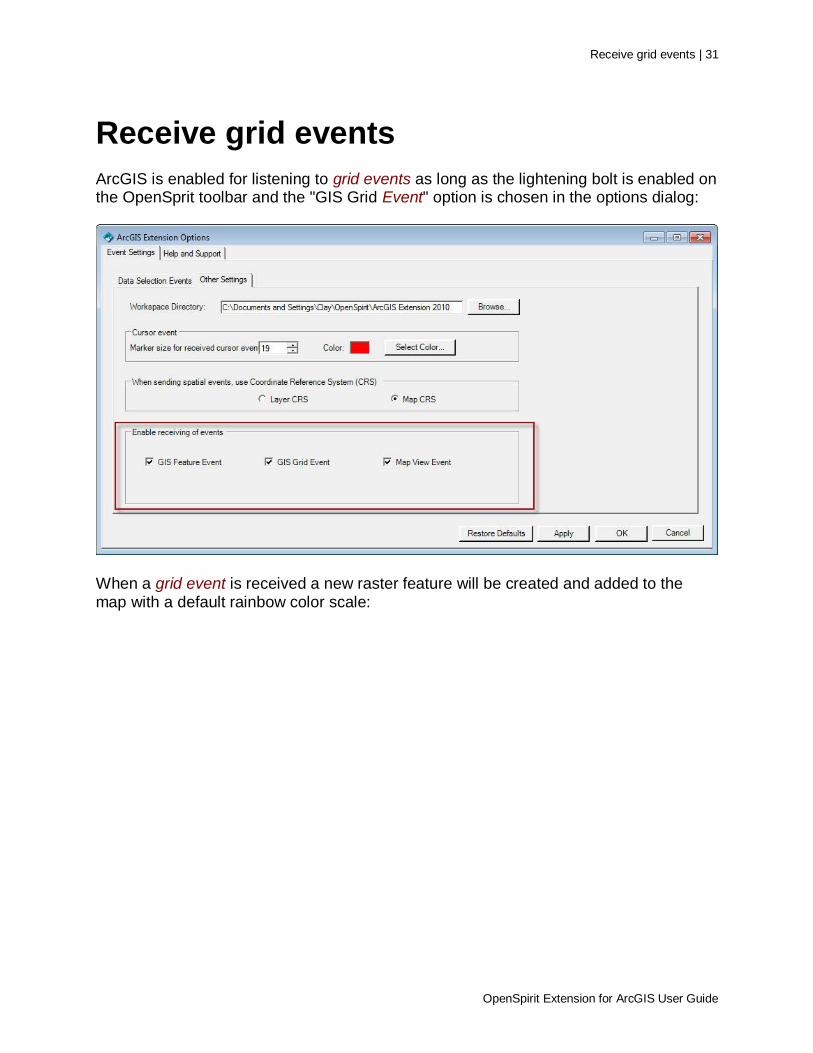
Receive grid events
ArcGIS is enabled for listening to grid events as long as the lightening bolt is enabled on the OpenSprit toolbar and the "GIS Grid Event" option is chosen in the options dialog:
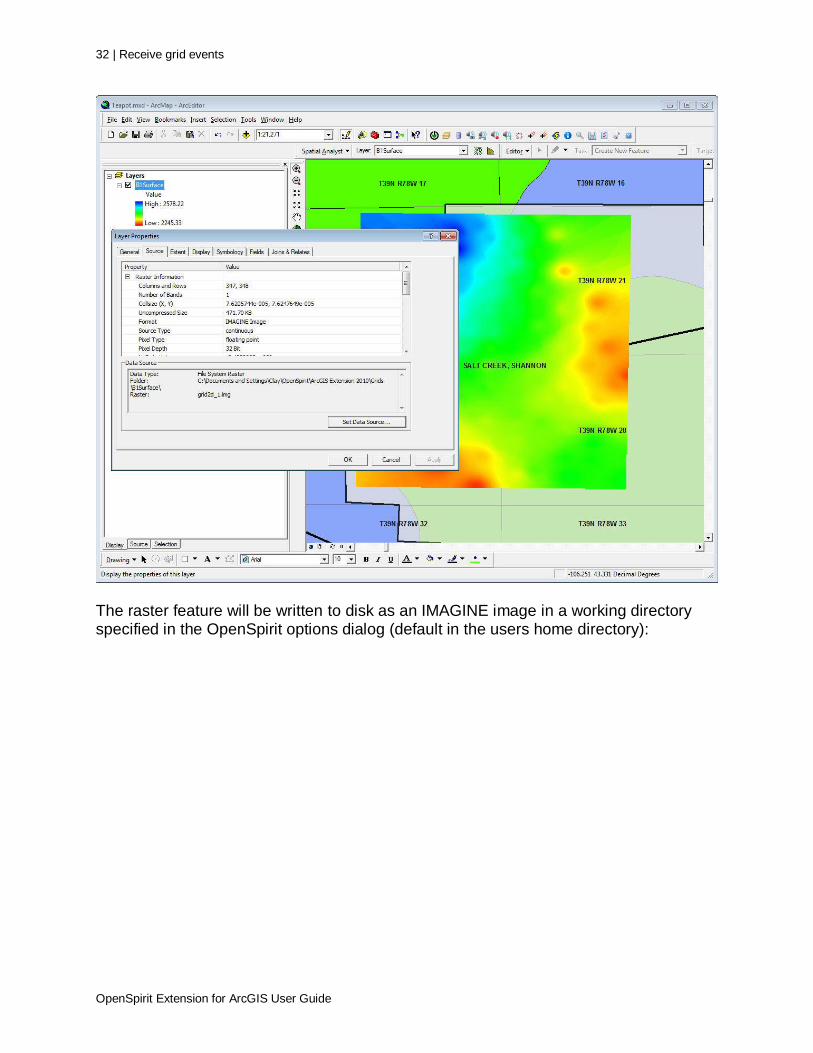
When a grid event is received a new raster feature will be created and added to the map with a default rainbow color scale:
32 | Receive grid events
OpenSpirit Extension for ArcGIS User Guide
The raster feature will be written to disk as an IMAGINE image in a working directory specified in the OpenSpirit options dialog (default in the users home directory):
Receive grid events | 33
OpenSpirit Extension for ArcGIS User Guide
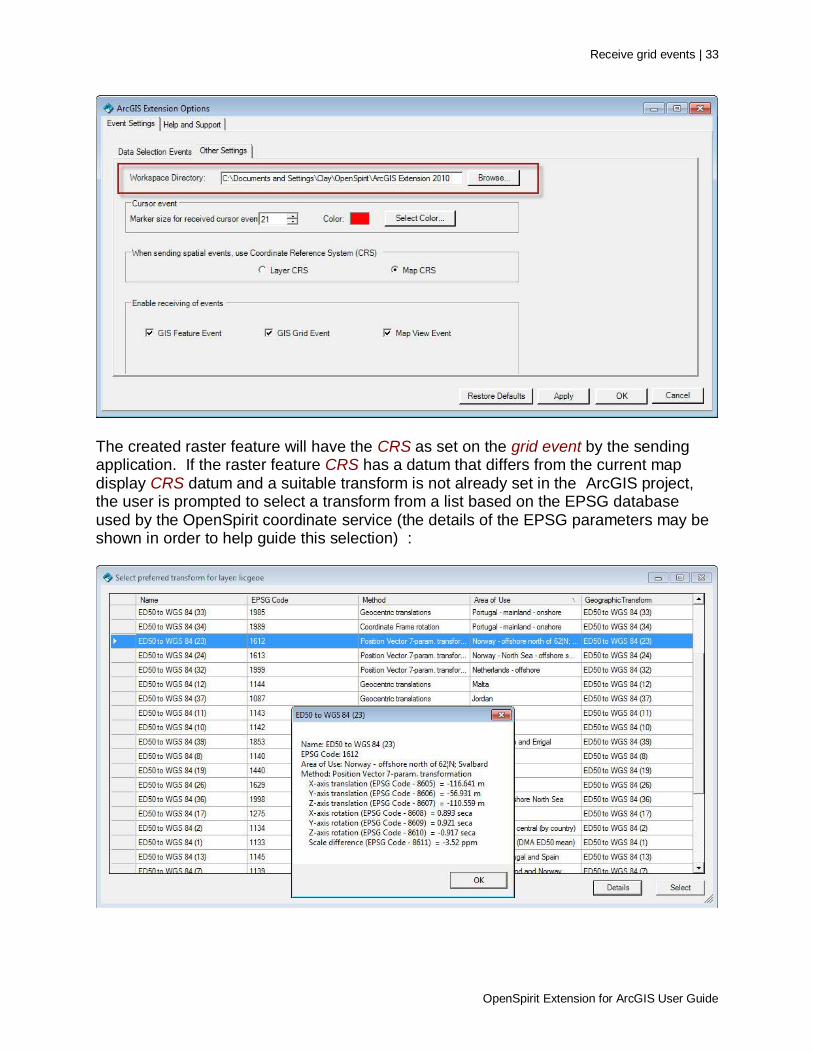
The created raster feature will have the CRS as set on the grid event by the sending application. If the raster feature CRS has a datum that differs from the current map display CRS datum and a suitable transform is not already set in the ArcGIS project, the user is prompted to select a transform from a list based on the EPSG database used by the OpenSpirit coordinate service (the details of the EPSG parameters may be shown in order to help guide this selection) :
34 | Send a map image to other applications
OpenSpirit Extension for ArcGIS User Guide
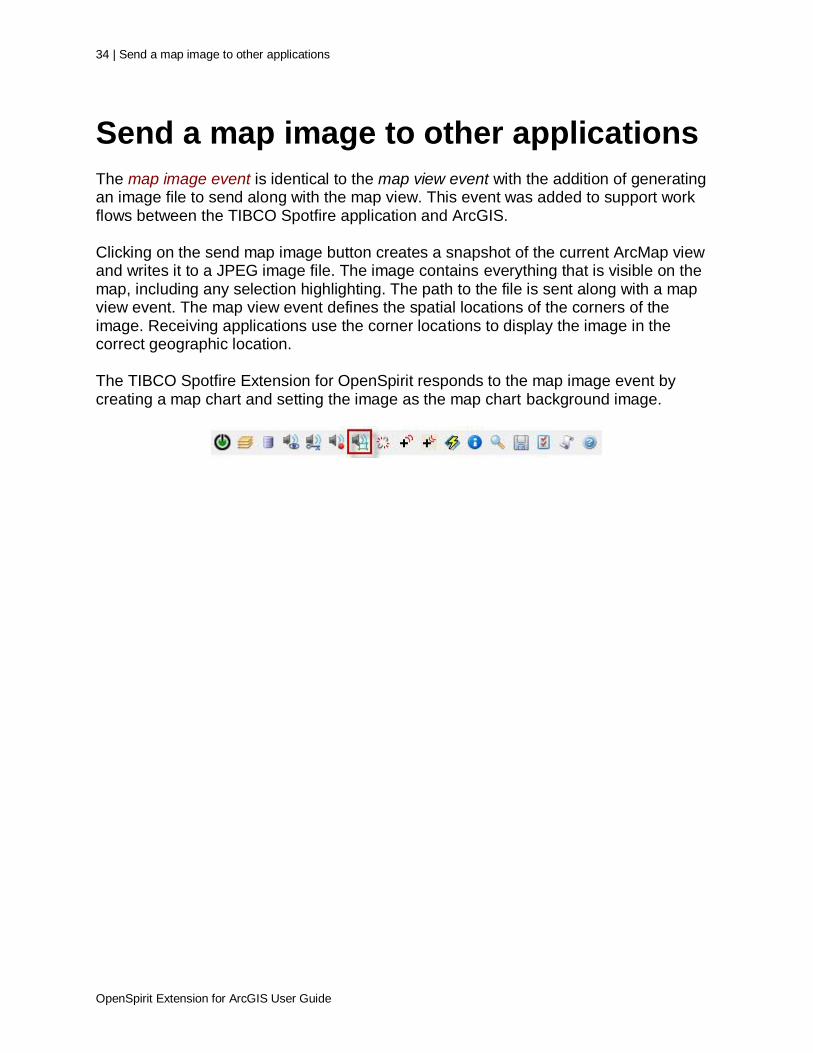
Send a map image to other applications
The map image event is identical to the map view event with the addition of generating an image file to send along with the map view. This event was added to support work flows between the TIBCO Spotfire application and ArcGIS. Clicking on the send map image button creates a snapshot of the current ArcMap view and writes it to a JPEG image file. The image contains everything that is visible on the map, including any selection highlighting. The path to the file is sent along with a map view event. The map view event defines the spatial locations of the corners of the image. Receiving applications use the corner locations to display the image in the correct geographic location. The TIBCO Spotfire Extension for OpenSpirit responds to the map image event by creating a map chart and setting the image as the map chart background image.
Synchronize selections with other applications | 35
OpenSpirit Extension for ArcGIS User Guide
Synchronize selections with other applications
Selection highlighting can be synchronized between ArcMap and another application that supports the OpenSpirit selection synchronization protocol. This feature was introduced to facilitate work flows between ArcMap and TIBCO's Spotfire application. Synchronization is accomplished by establishing a highlighting session between the two applications.
Highlighting Session
A highlighting session defines a link between a feature class in ArcMap and a data table in Spotfire. One or more feature class fields in ArcMap are associated with the same number of columns in a Spotfire data table. Once the highlighting session has been established selections in either application will cause the corresponding rows or features in the other application to be highlighted based on matching values in the associated columns and fields.
Creating a Highlighting Session
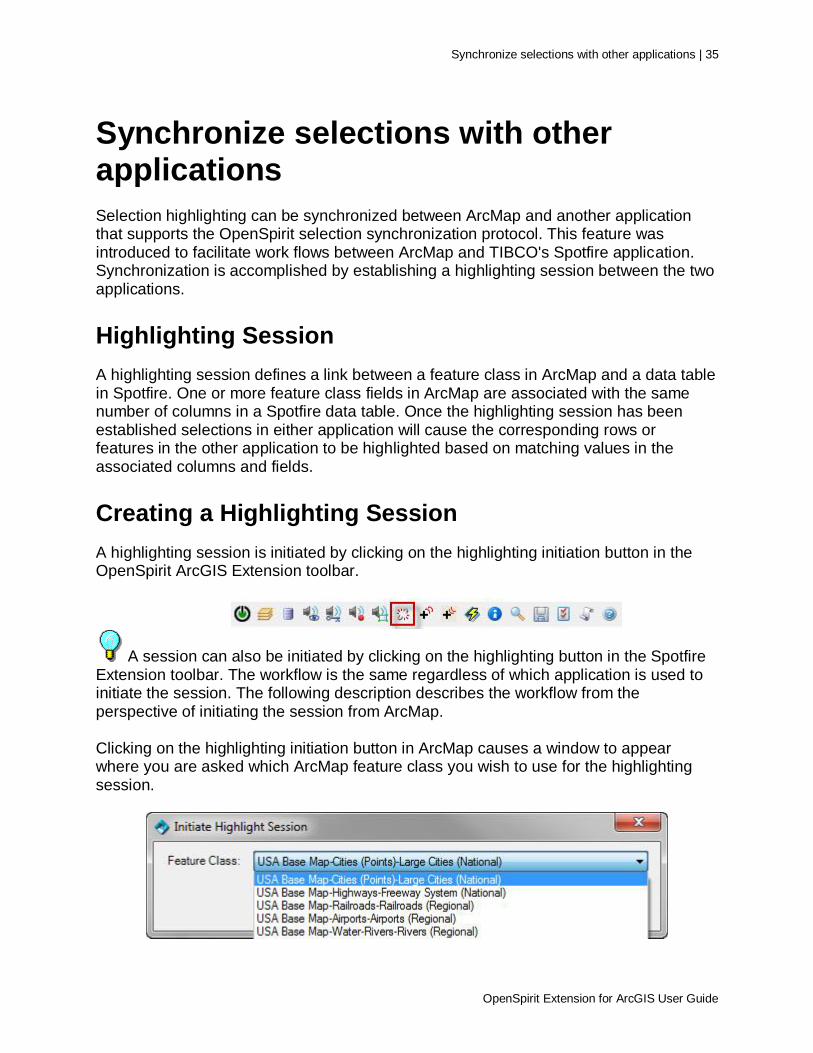
A highlighting session is initiated by clicking on the highlighting initiation button in the OpenSpirit ArcGIS Extension toolbar.
A session can also be initiated by clicking on the highlighting button in the Spotfire Extension toolbar. The workflow is the same regardless of which application is used to initiate the session. The following description describes the workflow from the perspective of initiating the session from ArcMap. Clicking on the highlighting initiation button in ArcMap causes a window to appear where you are asked which ArcMap feature class you wish to use for the highlighting session.
36 | Synchronize selections with other applications
OpenSpirit Extension for ArcGIS User Guide
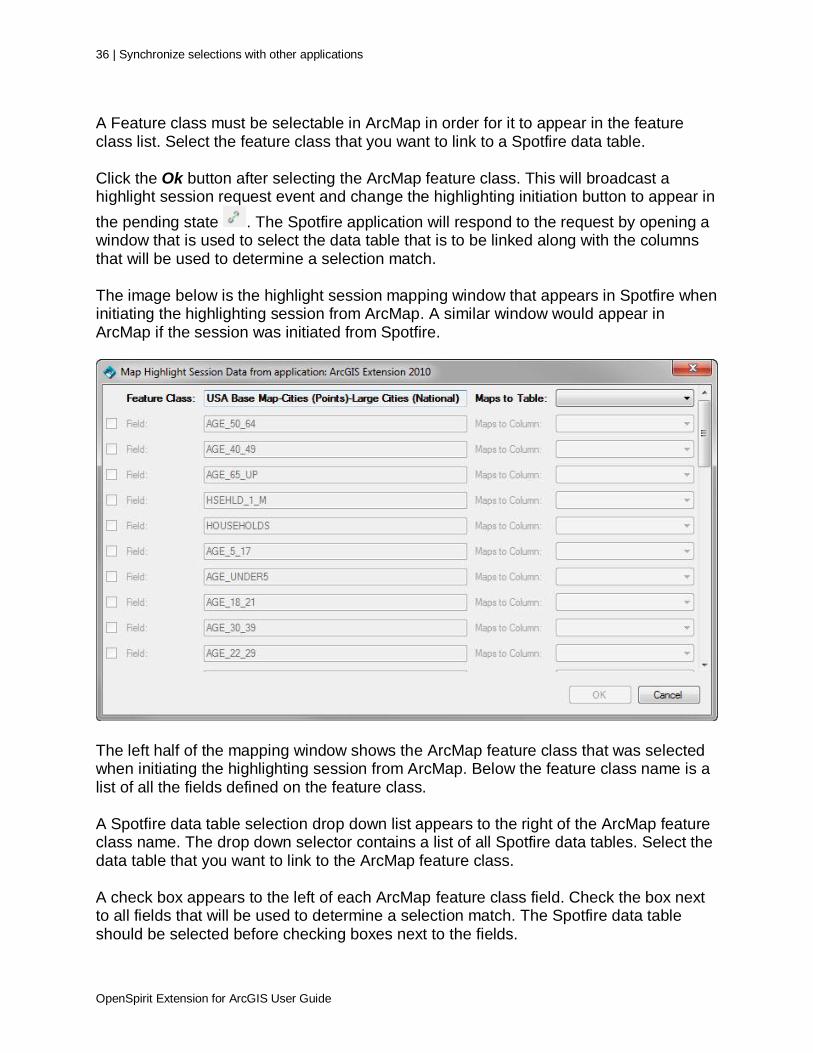
A Feature class must be selectable in ArcMap in order for it to appear in the feature class list. Select the feature class that you want to link to a Spotfire data table. Click the Ok button after selecting the ArcMap feature class. This will broadcast a highlight session request event and change the highlighting initiation button to appear in
the pending state . The Spotfire application will respond to the request by opening a window that is used to select the data table that is to be linked along with the columns that will be used to determine a selection match. The image below is the highlight session mapping window that appears in Spotfire when initiating the highlighting session from ArcMap. A similar window would appear in ArcMap if the session was initiated from Spotfire.
The left half of the mapping window shows the ArcMap feature class that was selected when initiating the highlighting session from ArcMap. Below the feature class name is a list of all the fields defined on the feature class. A Spotfire data table selection drop down list appears to the right of the ArcMap feature class name. The drop down selector contains a list of all Spotfire data tables. Select the data table that you want to link to the ArcMap feature class. A check box appears to the left of each ArcMap feature class field. Check the box next to all fields that will be used to determine a selection match. The Spotfire data table should be selected before checking boxes next to the fields.
Synchronize selections with other applications | 37
OpenSpirit Extension for ArcGIS User Guide
A Spotfire column selection drop down list will be enabled next to each field that is checked. Select the column that you want to match against the ArcMap feature class field. Click on the Ok button when you have selected all the field / column mappings. At least one field / column mapping must be selected to enable the Ok button.
Do not map more fields than are required to uniquely identify a match. The values of all mapped fields for all selected rows or features will be sent to the other application each time a selection changes. Selecting too many fields will significantly degrade the performance of the selection highlight synchronization. The highlight session mapping window will go away and the highlighting session will be
in effect. The highlighting session button will appear in the linked state . Selecting features in the linked ArcMap feature class will cause Spotfire to highlight matching rows in the linked data table. Rows are matched based on comparing values using the field / column associations made during the session initiation.
Ending a Highlighting Session
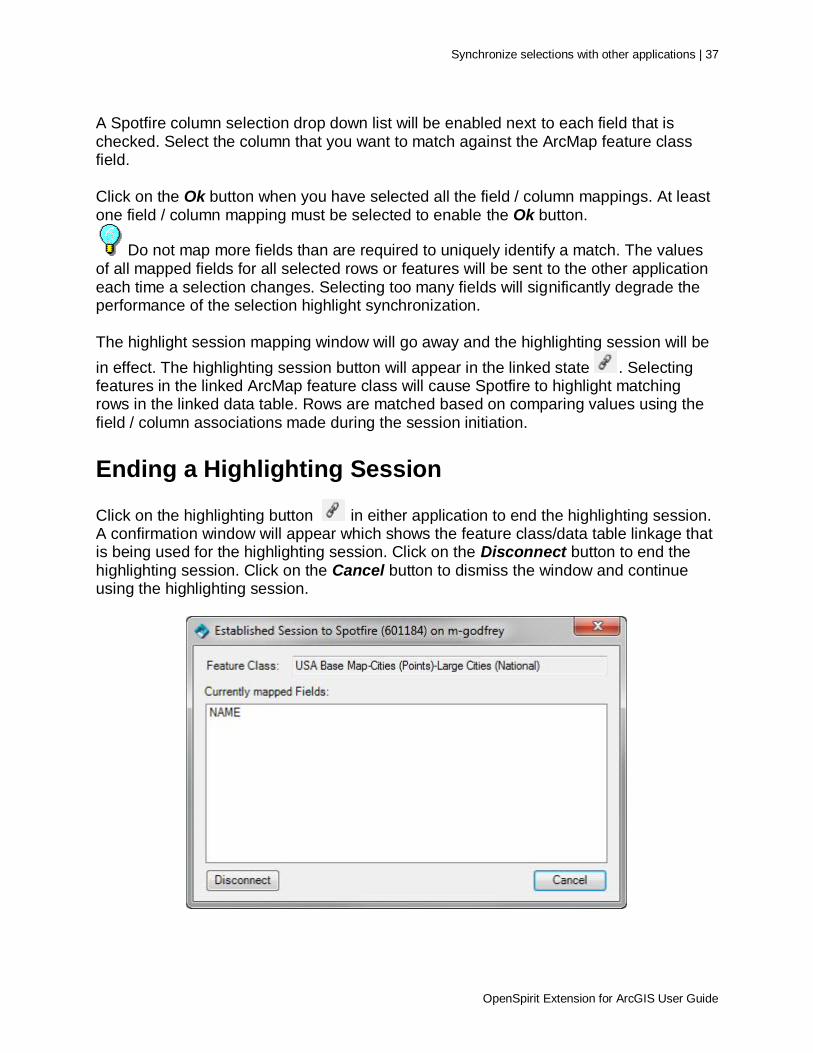
Click on the highlighting button in either application to end the highlighting session. A confirmation window will appear which shows the feature class/data table linkage that is being used for the highlighting session. Click on the Disconnect button to end the highlighting session. Click on the Cancel button to dismiss the window and continue using the highlighting session.
38 | Share cursor location with other applications
OpenSpirit Extension for ArcGIS User Guide
Share cursor location with other applications
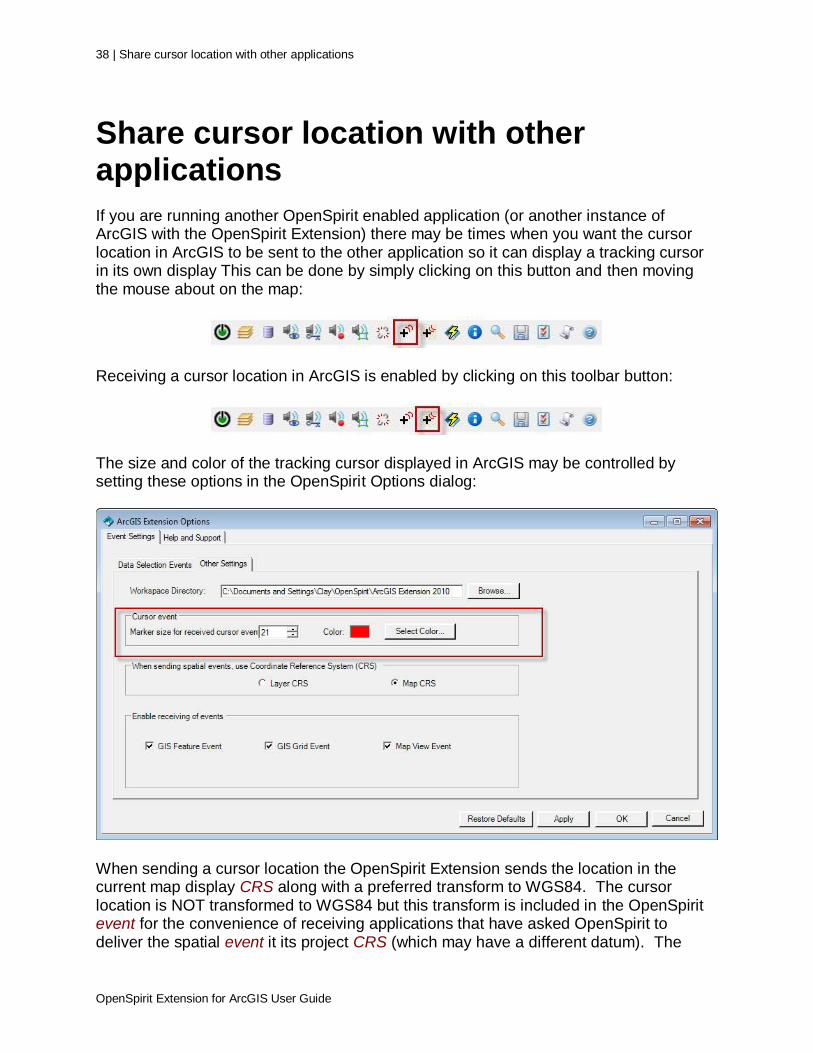
If you are running another OpenSpirit enabled application (or another instance of ArcGIS with the OpenSpirit Extension) there may be times when you want the cursor location in ArcGIS to be sent to the other application so it can display a tracking cursor in its own display This can be done by simply clicking on this button and then moving the mouse about on the map:
Receiving a cursor location in ArcGIS is enabled by clicking on this toolbar button:
The size and color of the tracking cursor displayed in ArcGIS may be controlled by setting these options in the OpenSpirit Options dialog:
When sending a cursor location the OpenSpirit Extension sends the location in the current map display CRS along with a preferred transform to WGS84. The cursor location is NOT transformed to WGS84 but this transform is included in the OpenSpirit event for the convenience of receiving applications that have asked OpenSpirit to deliver the spatial event it its project CRS (which may have a different datum). The

Share cursor location with other applications | 39
OpenSpirit Extension for ArcGIS User Guide
OpenSpirit ArcGIS Extension will attempt to get the preferred transform by reading the transforms defined in the ArcMap project (as defined earlier by the user of the project). If no appropriate transform is found the user is prompted to select a transform from a list based on the EPSG database used by the OpenSpirit coordinate service.
40 | Enable listening
OpenSpirit Extension for ArcGIS User Guide
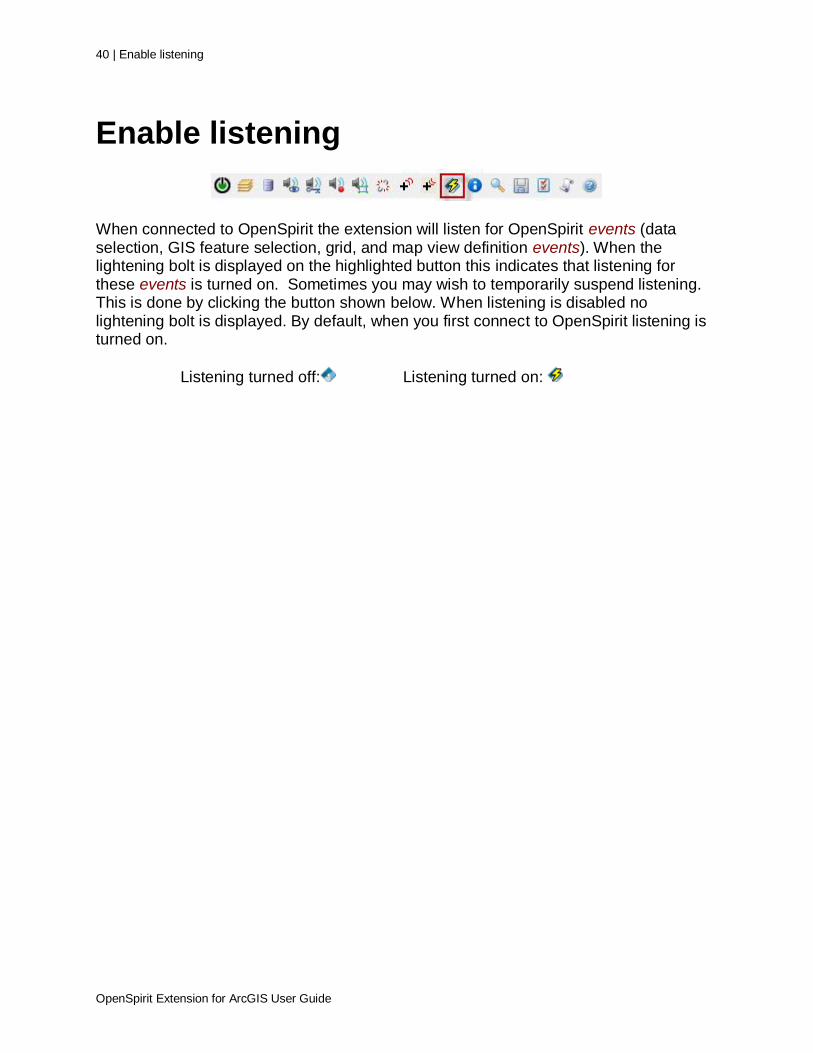
Enable listening
When connected to OpenSpirit the extension will listen for OpenSpirit events (data selection, GIS feature selection, grid, and map view definition events). When the lightening bolt is displayed on the highlighted button this indicates that listening for these events is turned on. Sometimes you may wish to temporarily suspend listening. This is done by clicking the button shown below. When listening is disabled no lightening bolt is displayed. By default, when you first connect to OpenSpirit listening is turned on.
Listening turned off: Listening turned on:
See selected feature attributes and related data | 41
OpenSpirit Extension for ArcGIS User Guide
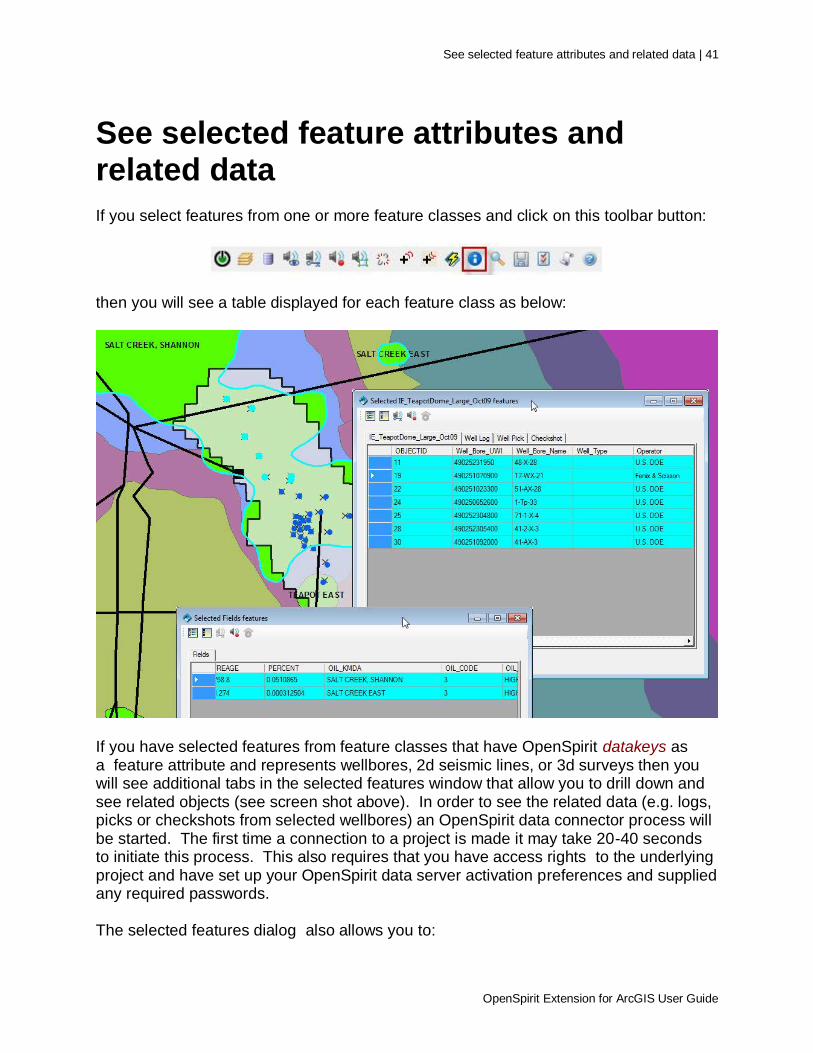
See selected feature attributes and related data
If you select features from one or more feature classes and click on this toolbar button:
then you will see a table displayed for each feature class as below:
If you have selected features from feature classes that have OpenSpirit datakeys as a feature attribute and represents wellbores, 2d seismic lines, or 3d surveys then you will see additional tabs in the selected features window that allow you to drill down and see related objects (see screen shot above). In order to see the related data (e.g. logs, picks or checkshots from selected wellbores) an OpenSpirit data connector process will be started. The first time a connection to a project is made it may take 20-40 seconds to initiate this process. This also requires that you have access rights to the underlying project and have set up your OpenSpirit data server activation preferences and supplied any required passwords. The selected features dialog also allows you to:
42 | See selected feature attributes and related data
OpenSpirit Extension for ArcGIS User Guide
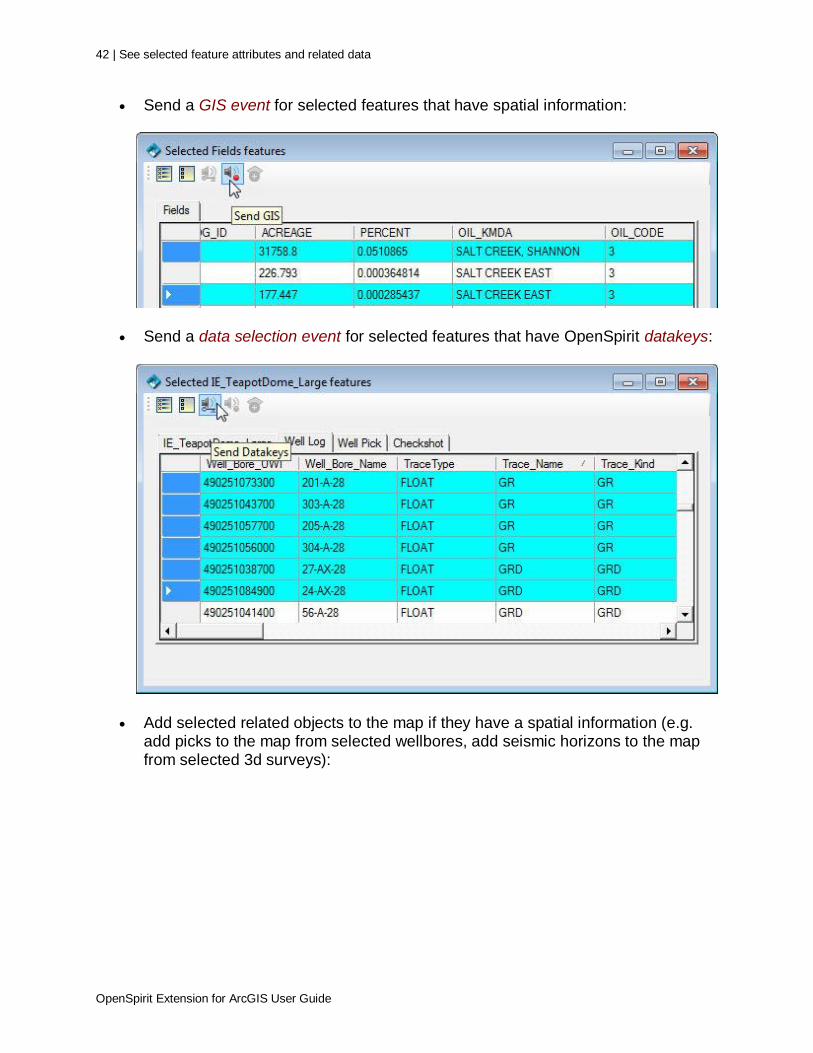
Send a GIS event for selected features that have spatial information:
Send a data selection event for selected features that have OpenSpirit datakeys:
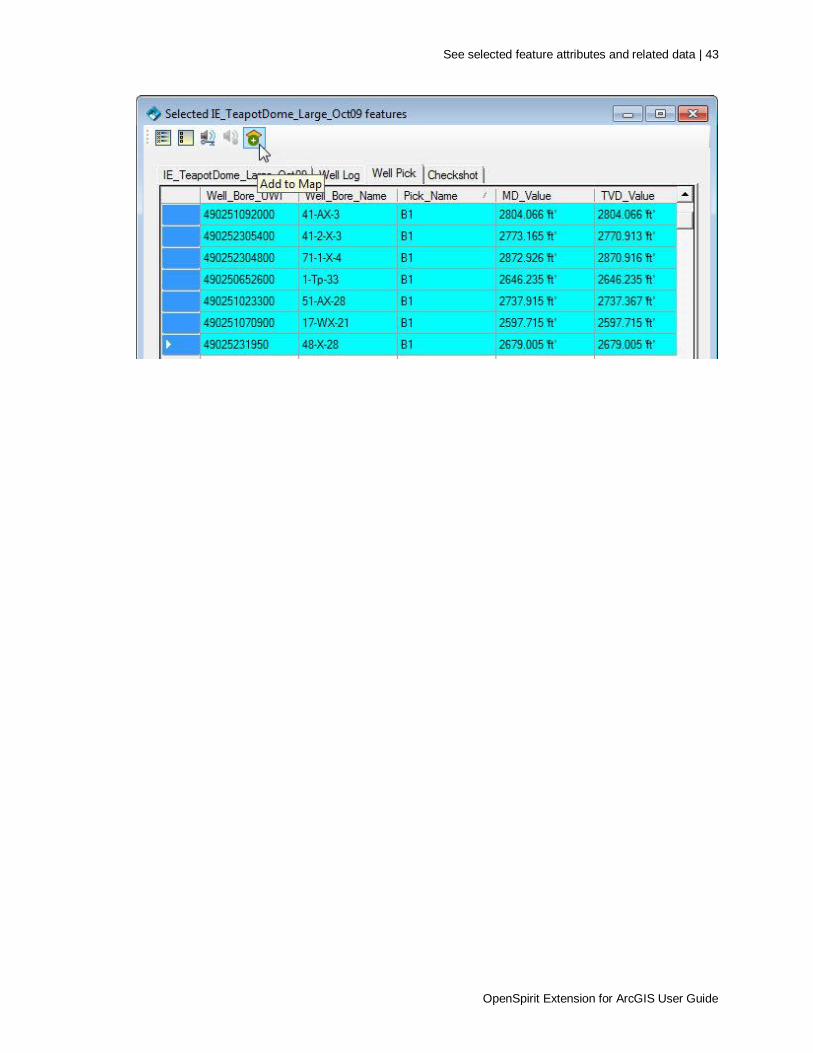
Add selected related objects to the map if they have a spatial information (e.g. add picks to the map from selected wellbores, add seismic horizons to the map from selected 3d surveys):
See selected feature attributes and related data | 43
OpenSpirit Extension for ArcGIS User Guide
44 | Launch the data selector
OpenSpirit Extension for ArcGIS User Guide
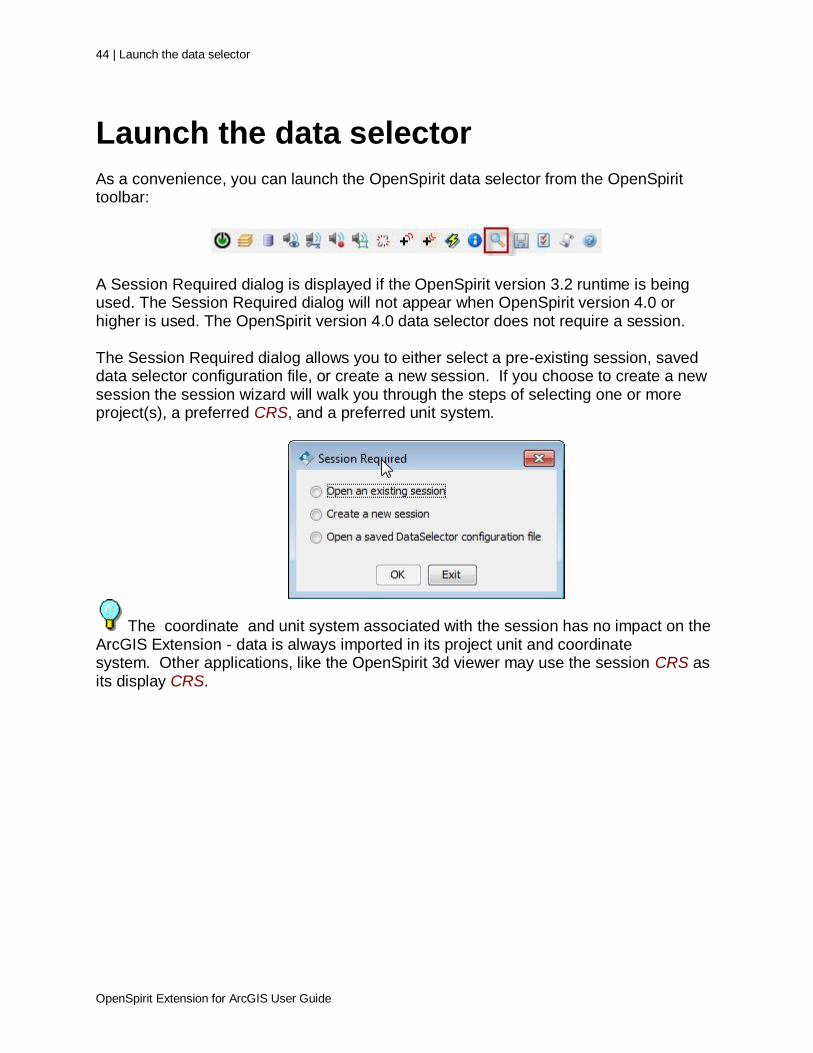
Launch the data selector
As a convenience, you can launch the OpenSpirit data selector from the OpenSpirit toolbar:
A Session Required dialog is displayed if the OpenSpirit version 3.2 runtime is being used. The Session Required dialog will not appear when OpenSpirit version 4.0 or higher is used. The OpenSpirit version 4.0 data selector does not require a session. The Session Required dialog allows you to either select a pre-existing session, saved data selector configuration file, or create a new session. If you choose to create a new session the session wizard will walk you through the steps of selecting one or more project(s), a preferred CRS, and a preferred unit system.
The coordinate and unit system associated with the session has no impact on the ArcGIS Extension - data is always imported in its project unit and coordinate system. Other applications, like the OpenSpirit 3d viewer may use the session CRS as its display CRS.
Save in-memory features | 45
OpenSpirit Extension for ArcGIS User Guide
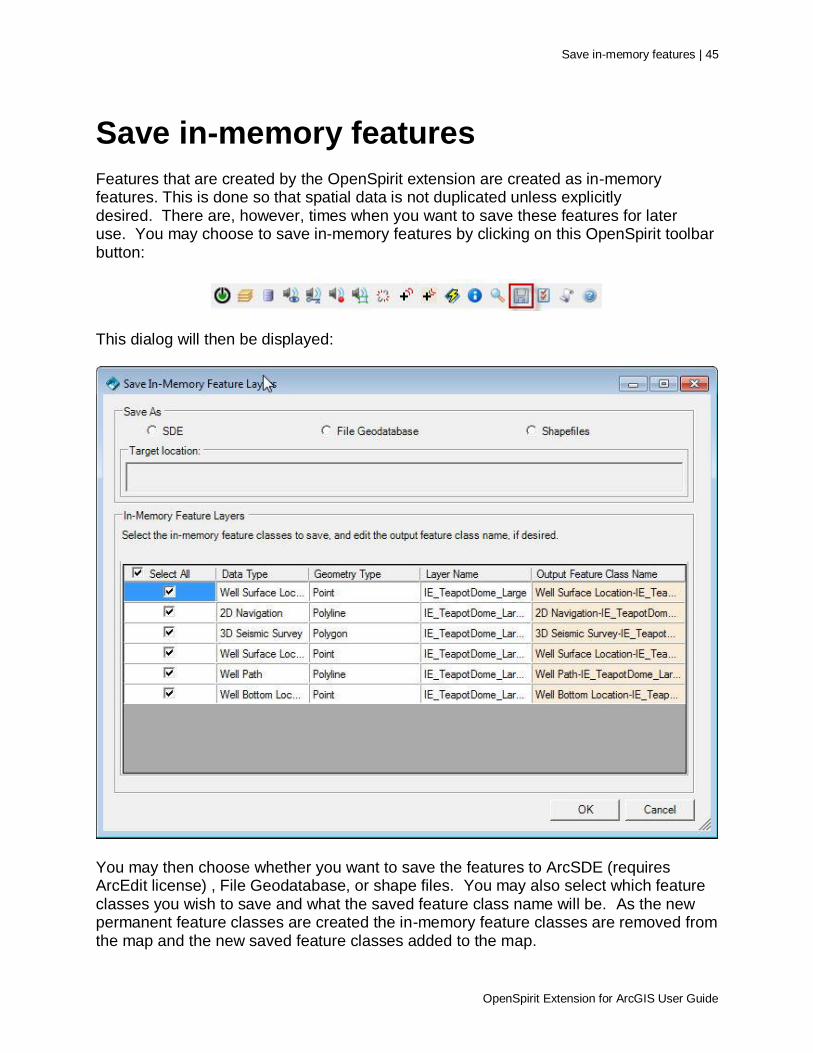
Save in-memory features
Features that are created by the OpenSpirit extension are created as in-memory features. This is done so that spatial data is not duplicated unless explicitly desired. There are, however, times when you want to save these features for later use. You may choose to save in-memory features by clicking on this OpenSpirit toolbar button:
This dialog will then be displayed:
You may then choose whether you want to save the features to ArcSDE (requires ArcEdit license) , File Geodatabase, or shape files. You may also select which feature classes you wish to save and what the saved feature class name will be. As the new permanent feature classes are created the in-memory feature classes are removed from the map and the new saved feature classes added to the map.

46 | Save in-memory features
OpenSpirit Extension for ArcGIS User Guide
If you try to exit ArcGIS and there are any unsaved in-memory feature classes you will be given a chance to save them before ArcGIS is closed.
Saving the ArcMap project will NOT save the in-memory features- you will need to do this explicitly as mentioned above.
Different storage options impose different constraints:
If features are being persisted to SDE, names should not conflict with Oracle reserved words and keywords.
If features are being persisted to SDE, names should not be more than 25 characters.
If features are being persisted to ShapeFiles, names should be less than 10 characters.
If features are being persisted to File Geodatabase, should not use any of the following for name: ADD, ALTER, AND, AS, ASC, BETWEEN, BY, COLUMN, CREATE, DATE, DELETE, DESC, DROP, EXISTS, FOR,FROM, IN, INSERT, INTO, IS, LIKE, NOT, NULL, OR, ORDER, SELECT, SET, TABLE, UPDATE, VALUES and WHERE.

Options dialog | 47
OpenSpirit Extension for ArcGIS User Guide
Options dialog
The Options dialog is displayed by selecting this toolbar button:
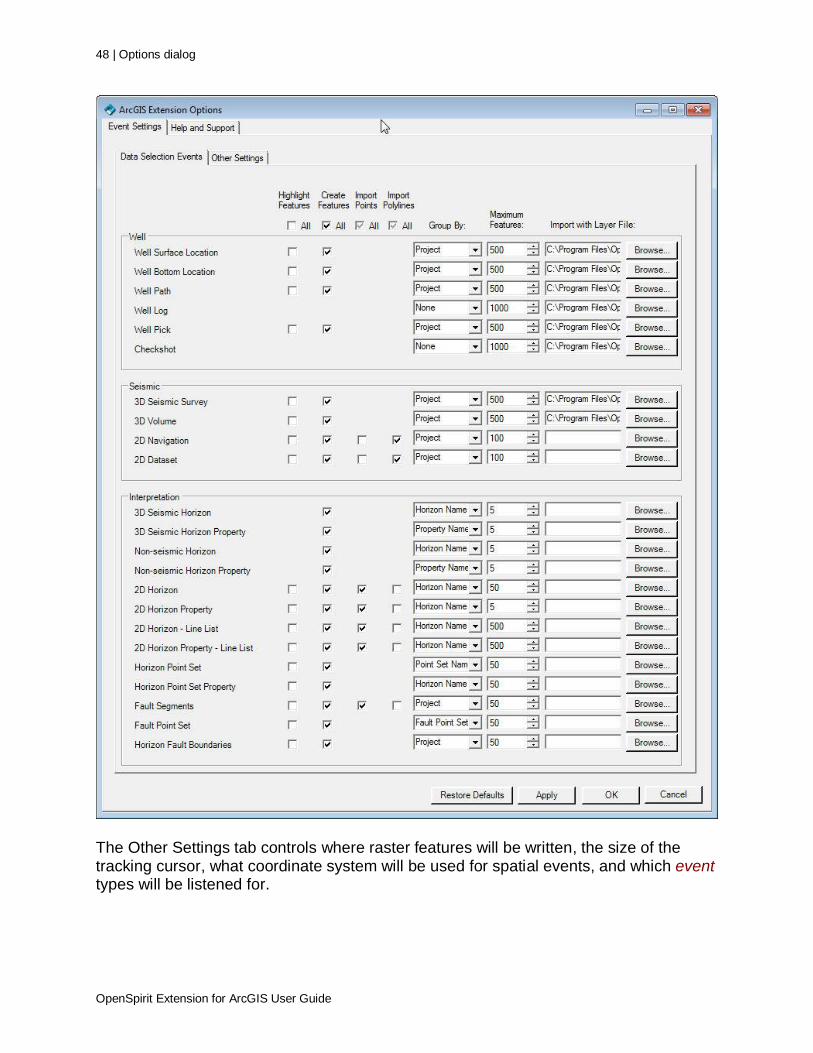
This dialog allows you to save preferences that effect how the OpenSpirit Extension will behave. The Data Selection tab controls how feature classes are created by the Extension (see Add well, seismic, and interpretation data to the map)
48 | Options dialog
OpenSpirit Extension for ArcGIS User Guide
The Other Settings tab controls where raster features will be written, the size of the tracking cursor, what coordinate system will be used for spatial events, and which event types will be listened for.

Options dialog | 49
OpenSpirit Extension for ArcGIS User Guide
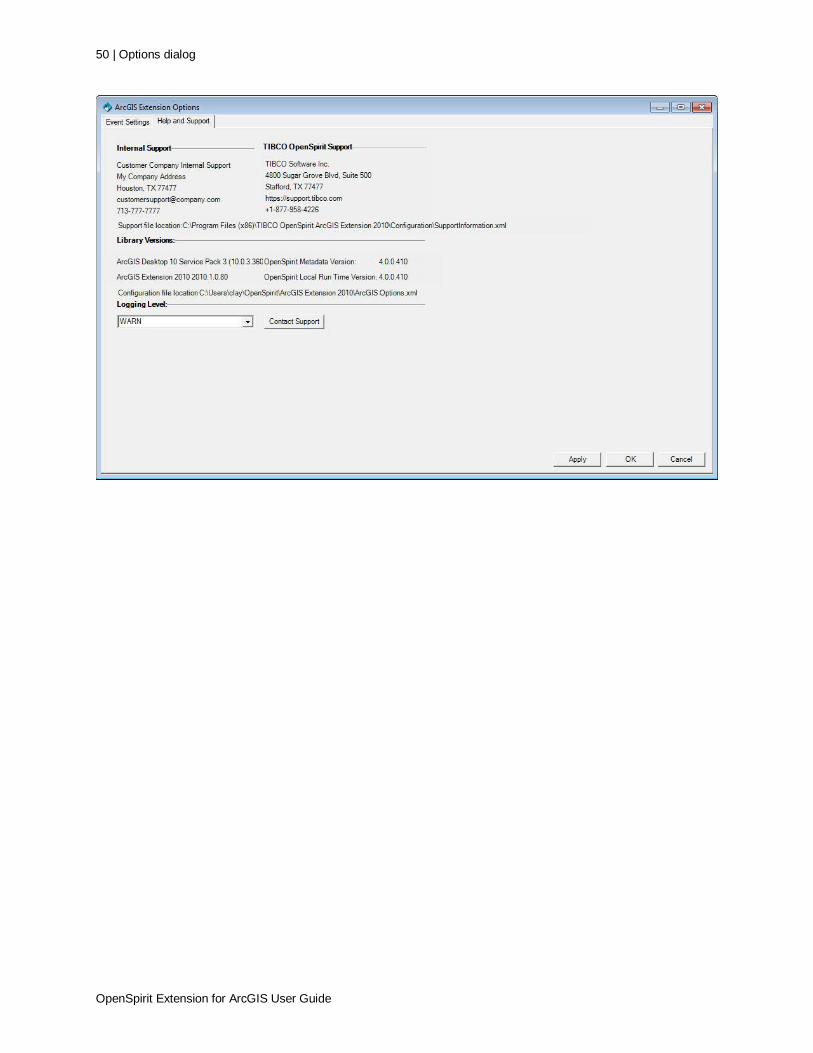
The Help and Support Tab provide contact information for the OpenSpirit support team, version information, control of the debug logging level, and provides an easy mechanism to allow email to be sent to the OpenSpirit support team.
50 | Options dialog
OpenSpirit Extension for ArcGIS User Guide
Display the log file | 51
OpenSpirit Extension for ArcGIS User Guide
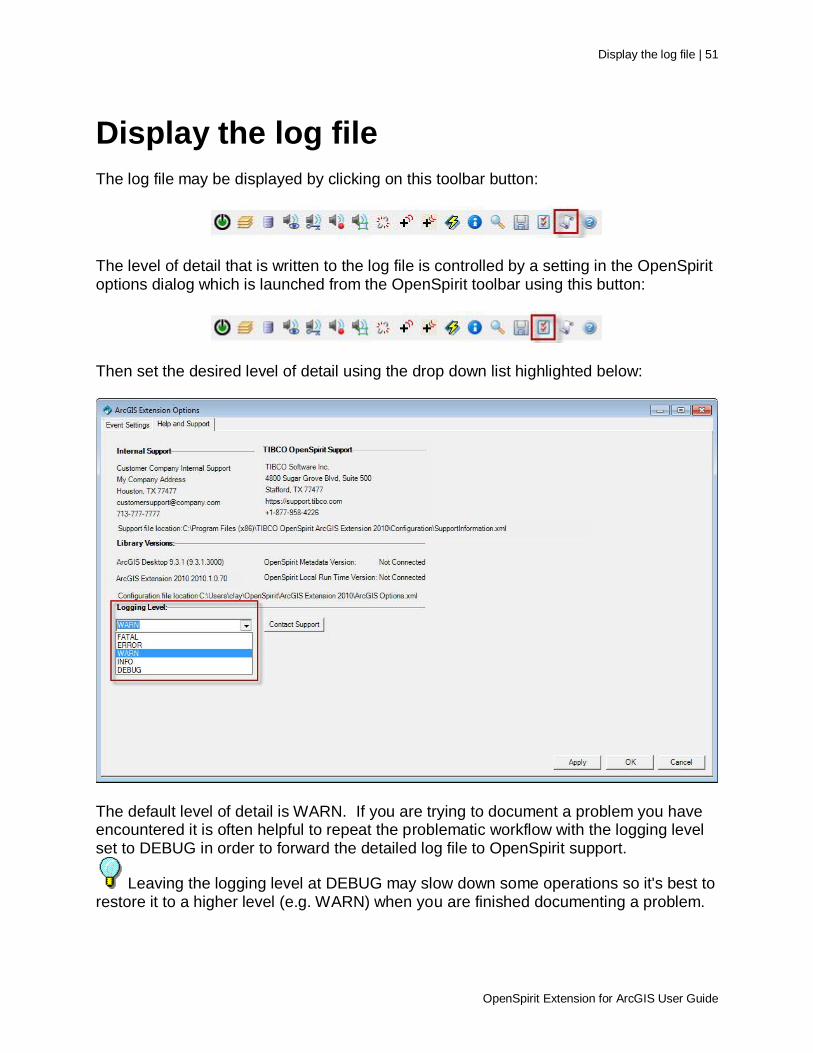
Display the log file
The log file may be displayed by clicking on this toolbar button:
The level of detail that is written to the log file is controlled by a setting in the OpenSpirit options dialog which is launched from the OpenSpirit toolbar using this button:
Then set the desired level of detail using the drop down list highlighted below:
The default level of detail is WARN. If you are trying to document a problem you have encountered it is often helpful to repeat the problematic workflow with the logging level set to DEBUG in order to forward the detailed log file to OpenSpirit support.
Leaving the logging level at DEBUG may slow down some operations so it's best to restore it to a higher level (e.g. WARN) when you are finished documenting a problem.

52 | Help
OpenSpirit Extension for ArcGIS User Guide
Help
This user help guide may be viewed by selecting this toolbar button:
Support | 53
OpenSpirit Extension for ArcGIS User Guide
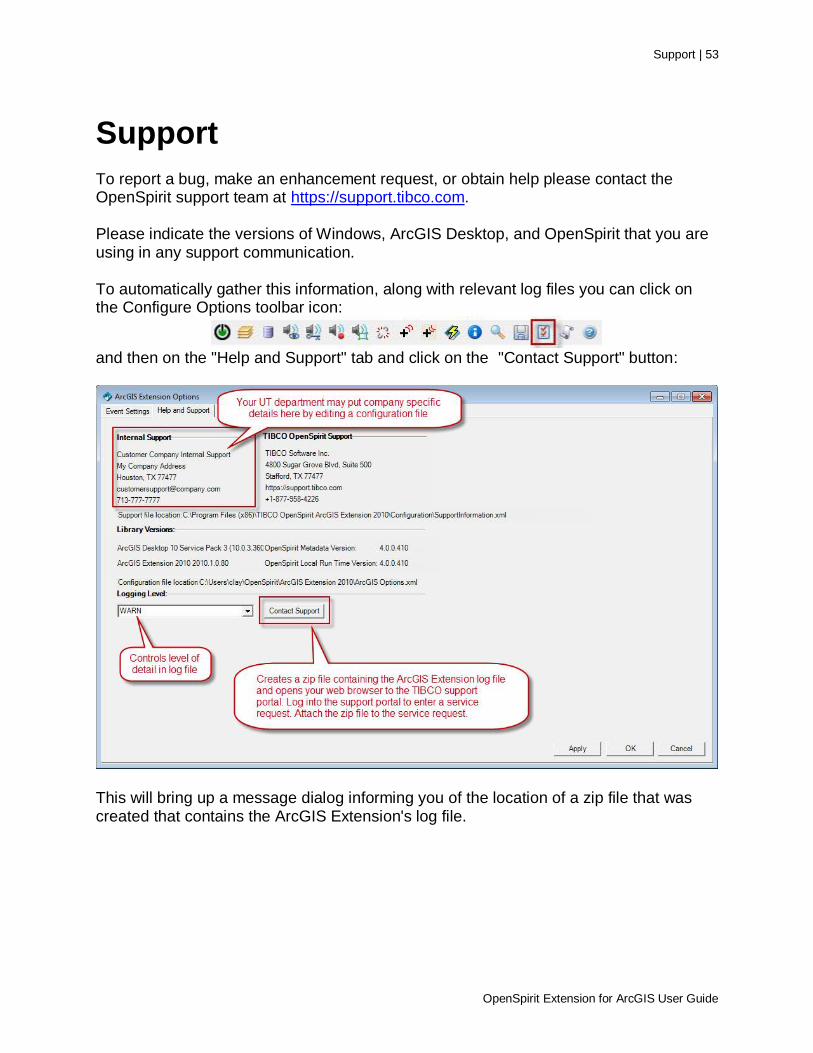
Support
To report a bug, make an enhancement request, or obtain help please contact the OpenSpirit support team at https://support.tibco.com. Please indicate the versions of Windows, ArcGIS Desktop, and OpenSpirit that you are using in any support communication. To automatically gather this information, along with relevant log files you can click on the Configure Options toolbar icon:
and then on the "Help and Support" tab and click on the "Contact Support" button:
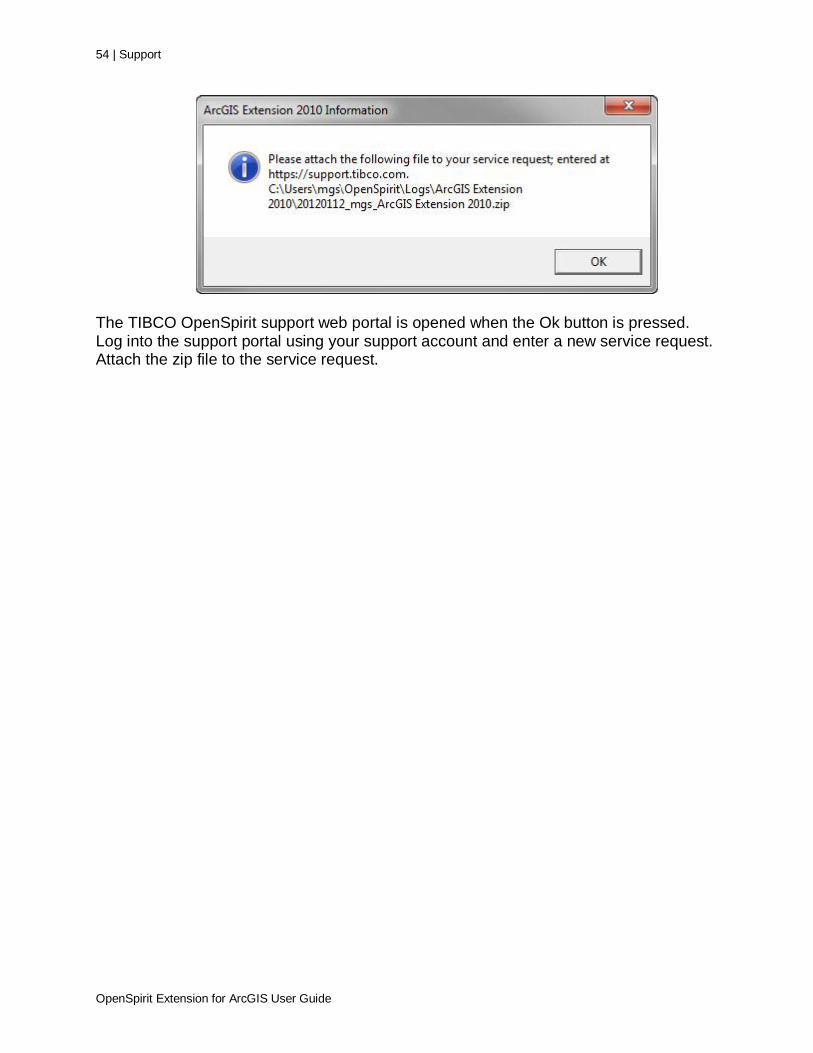
This will bring up a message dialog informing you of the location of a zip file that was created that contains the ArcGIS Extension's log file.
54 | Support
OpenSpirit Extension for ArcGIS User Guide
The TIBCO OpenSpirit support web portal is opened when the Ok button is pressed. Log into the support portal using your support account and enter a new service request. Attach the zip file to the service request.
Glossary | 55
OpenSpirit Extension for ArcGIS User Guide
Glossary
C
CRS: A Coordinate Reference System
cursor tracking events: An OpenSpirit event that contains the x,y position of the
mouse cursor in the map window. A receiving application will display a cursor icon that "tracks" this position.
D
data selection event: An OpenSpirit event that contains datakeys (references to data
residing in data stores connected to OpenSpirit). A receiving application will normally import and then display the data referenced by the received datakeys.
data selection events: OpenSpirit events that contain datakeys (references to data
residing in data stores connected to OpenSpirit). A receiving application will normally import and then display the data referenced by the received datakeys.
datakey: A reference to data that resides in a data store that has an OpenSpirit data connector.
datakeys: References to data that reside in a data store that has an OpenSpirit data connector.
E
event: A message sent between OpenSpirit enabled applications. Events may be
shared between applications running on different computers and operating systems.
events: A message sent between OpenSpirit enabled applications. Events may be shared between applications running on different computers.
G
GIS event: An OpenSpirit event that contains point, polyline, or polygon features. A
receiving application will display the received features.
GIS events: An OpenSpirit event that contains point, polyline, or polygon features. A
receiving application will display the received features.
grid event: An OpenSpirit event that contains a grid of values normally representing the
time or depth of a geologic surface. A receiving application will display the received surface.
56 | Glossary
OpenSpirit Extension for ArcGIS User Guide
grid events: An OpenSpirit event that contains a grid of values normally representing the time or depth of a geologic surface. A receiving application will display the received surface.
M
map image event: An OpenSpirit event that is a specialized version of the map view
event. This event generates a image file containing a snapshot of the current ArcMap window and sends the image file path along with the map view extents. A receiving application will zoom to this area in the same manner as when receiving a map view event. Some reveiving applications will also display the map image.
map image events: An OpenSpirit event that is a specialized version of the map view event. This event generates a image file containing a snapshot of the current ArcMap window and sends the image file path along with the map view extents. A receiving application will zoom to this area in the same manner as when receiving a map view event. Some reveiving applications will also display the map image.
map view events: An OpenSpirit event that defines the current map extent. An application that receives this event will zoom to this area.
S
selection highlighting synchronization session: A protocol used to link the selection
highlighting of two applications. Selections in one application cause items to be selected in the other application participating in the session. Selection linkage is based on a feature class field mapping created during the creation of the session.