Embed Size (px)
Citation preview
OPEN ESB 2.3 TUTORIAL
Working with FILEBC
Page | 1 Visit LogiCoy.com
‘
ABOUT LOGICOY
• LogiCoy incorporated in February 2009. • Headquarters in Los Angeles, California with 24/7 offices in US, U.K., and India, is a Global
Information Technology and Services company providing products and services in integration and middleware across various industries including financial, healthcare, telecommunications, manufacturing, and government.
• We are the original architects, developers and engineering managers and directors for Seebeyond eGate, ICAN, Sun Java CAPS, Mural MDM,Open/GlassFish ESB products from inception to end and know the code inside and out.
• We are the primary committers of the OpenESB codebase in the OpebESB Open source repository and actively working on the enhancents and new versions of OpenESB.
• We have augmented our product development with very seasoned SOA/EAI Technical Leads and Architects for integration solutions with field implementation experience using Sun Java CAPS, GlassFish ESB, eGate and other integration tools in healthcare integration projects. Contact us at: [email protected]
ABOUT THE AUTHOR
Page | 2 Visit LogiCoy.com
OpenESB Using JBI
Basic “File to File, Multi-record file” Projects Writen By Michael Czapski Updated by Mriganka Banerjee
Introduction This document is intended to help you get over the initial hurdles of exploring Java CAPS 6/JBI and OpenESB. It walks through the process of creation, deployment and execution of a simple File-to-File integration solution, and a simple File to BPEL Process to File solution, with detailed step-by-step illustrations. Both solutions use inbound files with multiple records. The focus is the practice of using JBI components not the theory of JBI.
This document addresses the integration solution developers, not developers of Service Engines or Binding Components.
The projects use JBI components only, that’s why they are just as good for OpenESB exploration as they are for Java CAPS 6/JBI exploration.
JBI (Java Business Integration) is not discussed to any great extent. JBI artifact names are used in discussion but not elaborated upon. Explanations are provided where necessary to foster understanding of the mechanics of developing integration solutions using JBI technologies in OpenESB and Java CAPS 6/JBI.
Java CAPS 6 and OpenESB are two of a number of toolkits that implement the JBI specification (JSR 208). When I use an expression like “In JBI …” I actually mean “In JBI as implemented in Java CAPS 6 and OpenESB …”. The same things may well be implemented differently in other JBI toolkits.
Java CAPS 6 “Revenue Release” is used and shown in illustrations. OpenESB can be used instead however the appearance of components shown in illustrations may vary somewhat.
WSDLs Java CAPS 6 and OpenESB use WSDL to define message structures and interactions between Binding Components (what in 5.x one would call OTDs and eWays or Adapters) and Service Units (what one would call Java Collaborations and eInsight Business Processes in 5.x). In 5.x WSDL was used for the same things but, unless one wanted to expose an eInsight Business Process as a web service, or consume a web service described by a WSDL, WSDL definitions were effectively invisible to the developer. This made the 5.x toolkit appear simpler to use, and conversely, made OpenESB and Java CAPS 6/JBI appear more complex and appear to require much deeper technical knowledge to work with as compared to Java CAPS 5.x.
Page | 3 Visit LogiCoy.com
In JBI WSDL is used to provide definitions of payload message structures that are exchanged between components and, in case of Binding Components, to provide the means to configure the Binding Component as required by the solution.
File In with multiple records to File Out In the spirit of “Let’s get to it”, here is a very simple Java CAPS 6/JBI (as well as OpenESB) project that picks up a text file containing multiple ‘records’ and writes the result to another text file. This solution is probably the simplest functioning JBI solution, with the fewest components, that one can possibly develop. This solution will use two File Binding Components (File BC) and no Service Engines at all. There will be no business logic. ‘Records’ will simply be read by one File BC and written by the other File BC. This will be a functional JBI solution, not necessarily a useful JBI solution.
Let’s create a Project Group, “02File2FileMultiRec”, to group our File-to-File projects. This is illustrated in Figure 3-1. You don’t need to create a project group. Java CAPS 6/JBI and OpenESB use NetBeans 6.1 IDE. Project organization in NetBeans 6.1 IDE is different from what you might be used to in eDesigner (5.x). There is no concept of hierarchical project structure with subprojects. Project structure is flat. Each project lives at the ‘root’ level. The closest one comes to project organization is Project Groups. See NetBeans 6.1 IDE help and documentation. Java CAPS 6 5.1-style projects are an exception. They are/can be structured hierarchically much as was the case in Java CAPS 5.x.
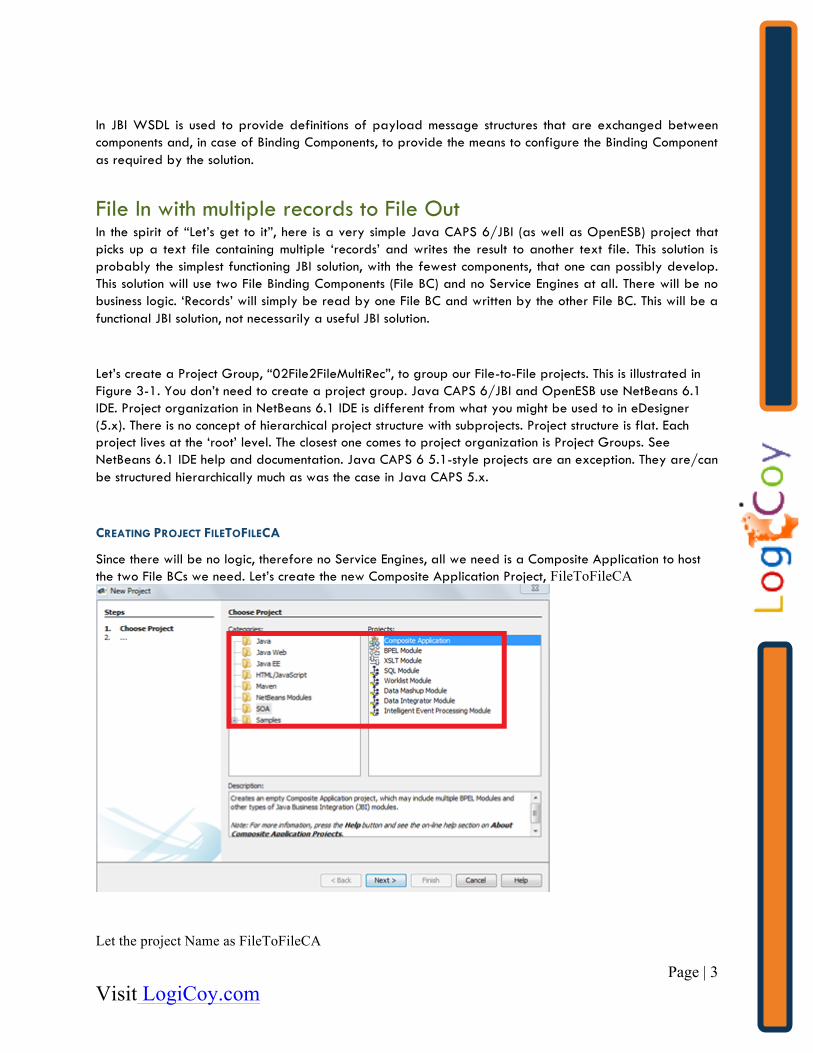
CREATING PROJECT FILETOFILECA
Since there will be no logic, therefore no Service Engines, all we need is a Composite Application to host the two File BCs we need. Let’s create the new Composite Application Project, FileToFileCA
Let the project Name as FileToFileCA
Page | 4 Visit LogiCoy.com
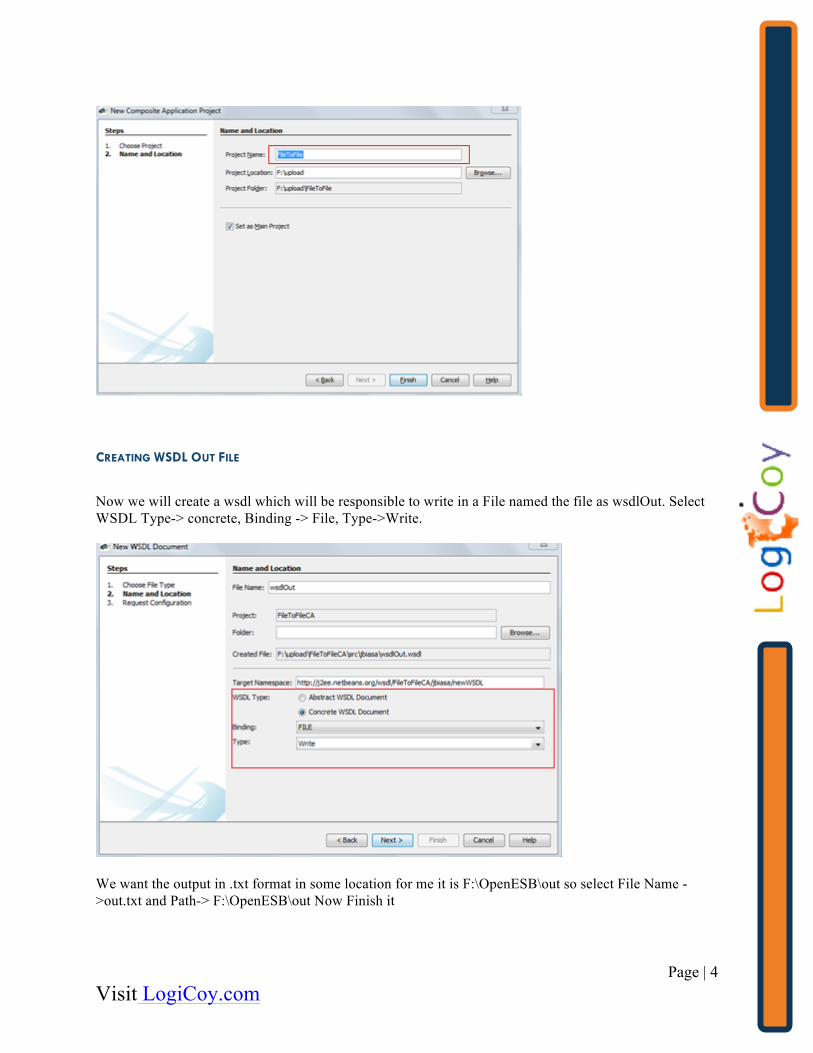
CREATING WSDL OUT FILE
Now we will create a wsdl which will be responsible to write in a File named the file as wsdlOut. Select WSDL Type-> concrete, Binding -> File, Type->Write.
We want the output in .txt format in some location for me it is F:\OpenESB\out so select File Name ->out.txt and Path-> F:\OpenESB\out Now Finish it

Page | 5 Visit LogiCoy.com
Now the wsdlOut.wsdl is created under Project Files
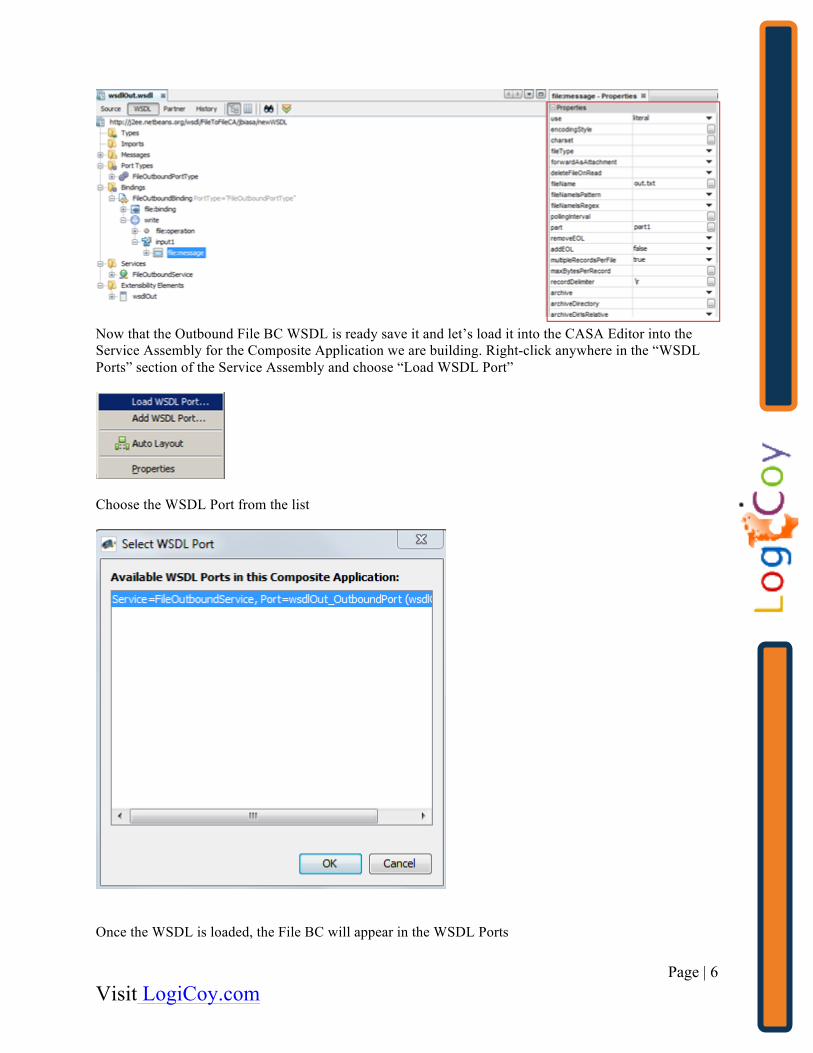
The name to give to the outbound file and file characteristics are configured through the Bindings->FileOutbindBinding->write->input1->file:message.We are intending to process an inbound file that will contain multiple records and to write all these records to the same output file. To enable that we must configure the multipleRecordsPerFile property to true and we must specify the record delimiter, in this case “\r”, also known by old hands as the carriage return. We could have specified any one or more delimiters. In addition, to preven the File BC from adding the platform’s newline character after every record, we set the property addEOL to false.
Page | 6 Visit LogiCoy.com
Now that the Outbound File BC WSDL is ready save it and let’s load it into the CASA Editor into the Service Assembly for the Composite Application we are building. Right-click anywhere in the “WSDL Ports” section of the Service Assembly and choose “Load WSDL Port”
Choose the WSDL Port from the list
Once the WSDL is loaded, the File BC will appear in the WSDL Ports
Page | 7 Visit LogiCoy.com
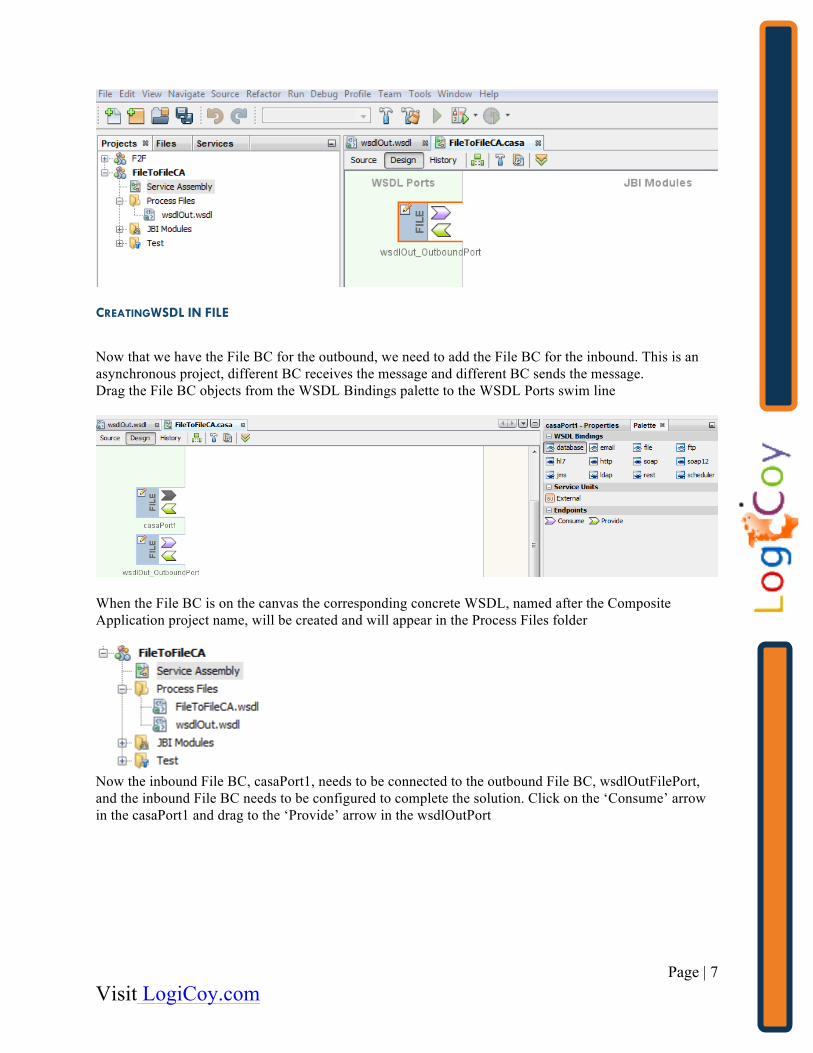
CREATINGWSDL IN FILE
Now that we have the File BC for the outbound, we need to add the File BC for the inbound. This is an asynchronous project, different BC receives the message and different BC sends the message. Drag the File BC objects from the WSDL Bindings palette to the WSDL Ports swim line
When the File BC is on the canvas the corresponding concrete WSDL, named after the Composite Application project name, will be created and will appear in the Process Files folder
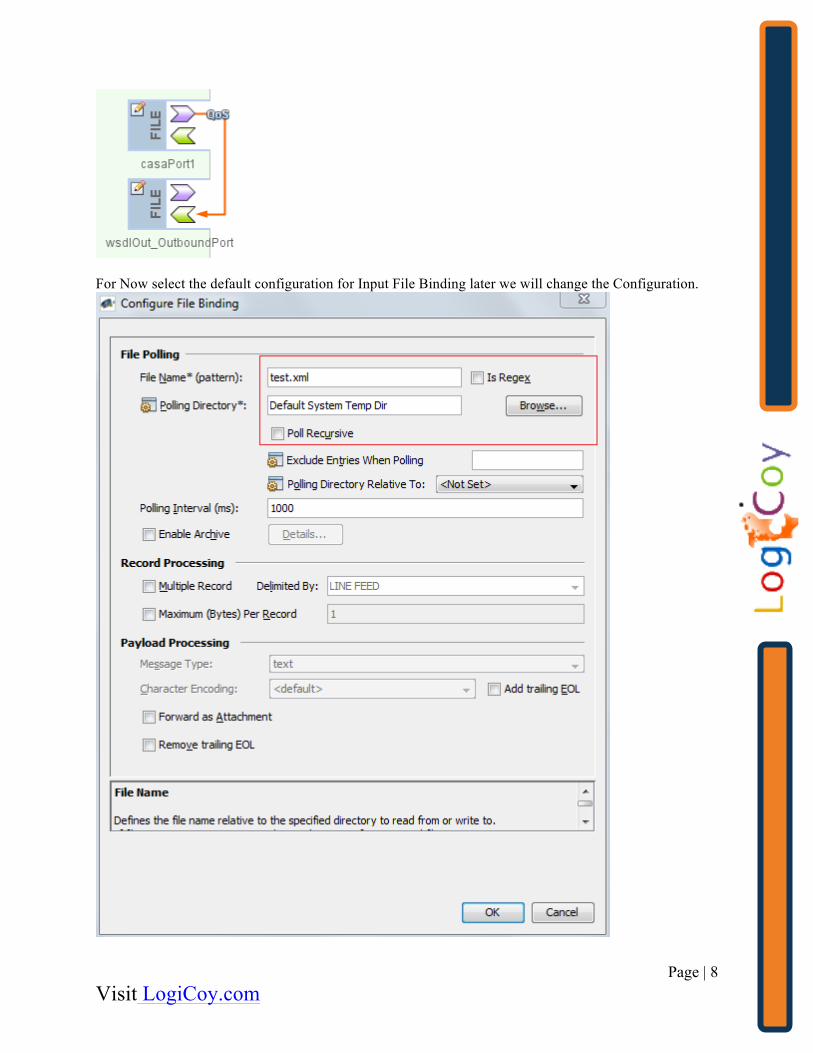
Now the inbound File BC, casaPort1, needs to be connected to the outbound File BC, wsdlOutFilePort, and the inbound File BC needs to be configured to complete the solution. Click on the ‘Consume’ arrow in the casaPort1 and drag to the ‘Provide’ arrow in the wsdlOutPort
Page | 8 Visit LogiCoy.com
For Now select the default configuration for Input File Binding later we will change the Configuration.
Page | 9 Visit LogiCoy.com
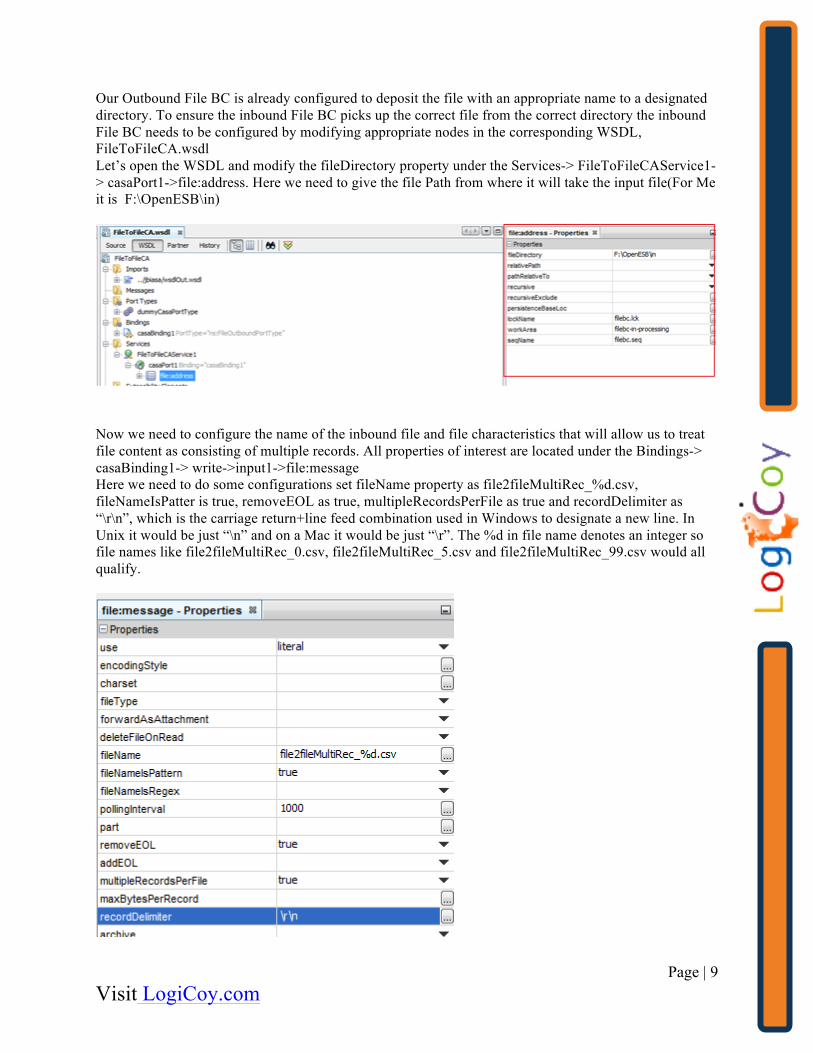
Our Outbound File BC is already configured to deposit the file with an appropriate name to a designated directory. To ensure the inbound File BC picks up the correct file from the correct directory the inbound File BC needs to be configured by modifying appropriate nodes in the corresponding WSDL, FileToFileCA.wsdl Let’s open the WSDL and modify the fileDirectory property under the Services-> FileToFileCAService1-> casaPort1->file:address. Here we need to give the file Path from where it will take the input file(For Me it is F:\OpenESB\in)
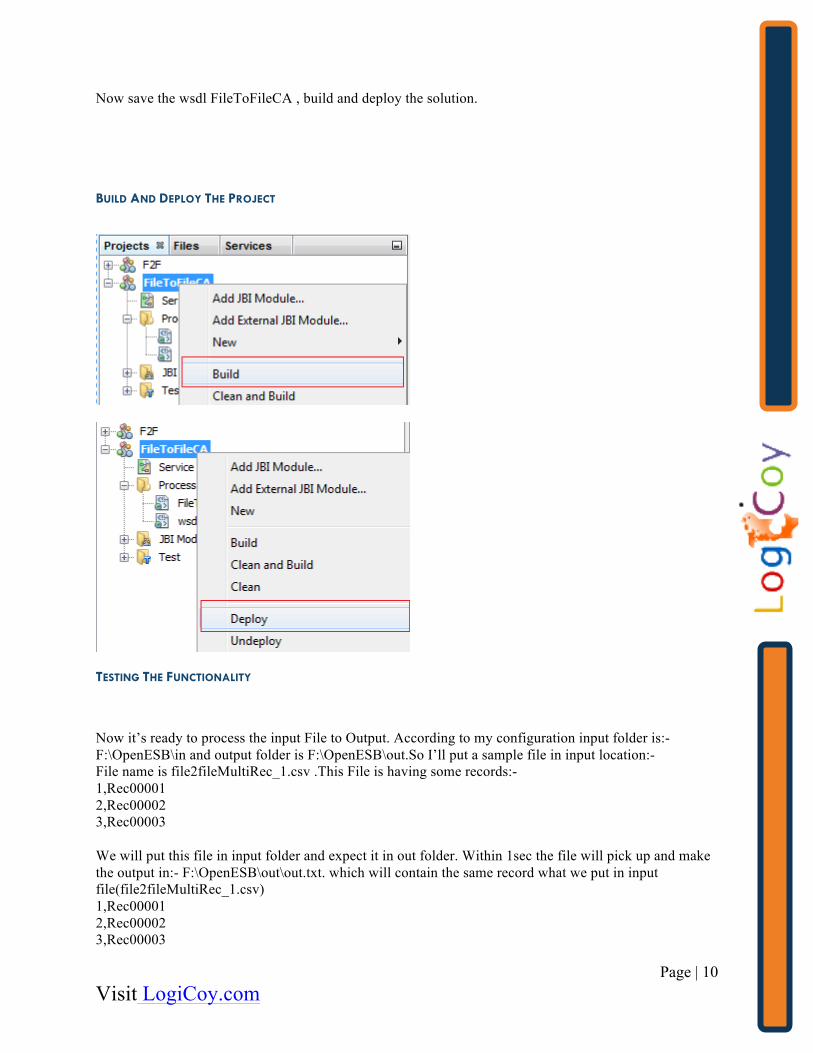
Now we need to configure the name of the inbound file and file characteristics that will allow us to treat file content as consisting of multiple records. All properties of interest are located under the Bindings-> casaBinding1-> write->input1->file:message Here we need to do some configurations set fileName property as file2fileMultiRec_%d.csv, fileNameIsPatter is true, removeEOL as true, multipleRecordsPerFile as true and recordDelimiter as “\r\n”, which is the carriage return+line feed combination used in Windows to designate a new line. In Unix it would be just “\n” and on a Mac it would be just “\r”. The %d in file name denotes an integer so file names like file2fileMultiRec_0.csv, file2fileMultiRec_5.csv and file2fileMultiRec_99.csv would all qualify.
Page | 10 Visit LogiCoy.com
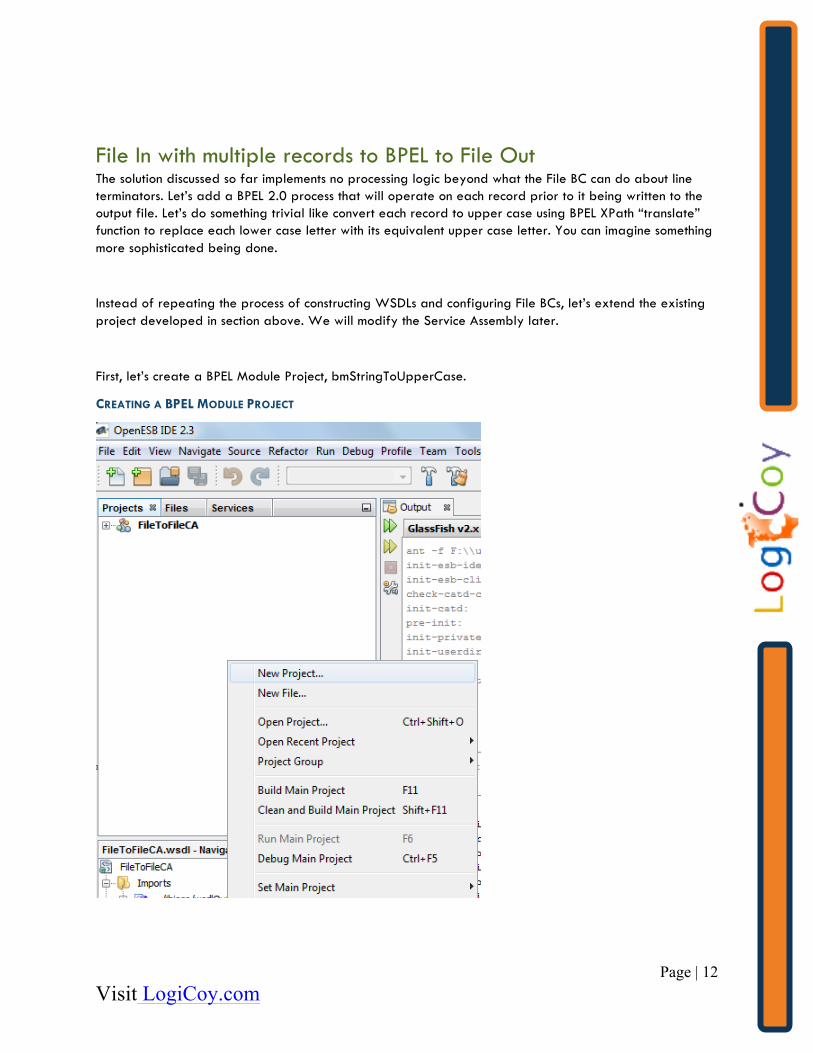
Now save the wsdl FileToFileCA , build and deploy the solution. BUILD AND DEPLOY THE PROJECT
TESTING THE FUNCTIONALITY
Now it’s ready to process the input File to Output. According to my configuration input folder is:- F:\OpenESB\in and output folder is F:\OpenESB\out.So I’ll put a sample file in input location:- File name is file2fileMultiRec_1.csv .This File is having some records:- 1,Rec00001 2,Rec00002 3,Rec00003 We will put this file in input folder and expect it in out folder. Within 1sec the file will pick up and make the output in:- F:\OpenESB\out\out.txt. which will contain the same record what we put in input file(file2fileMultiRec_1.csv) 1,Rec00001 2,Rec00002 3,Rec00003

Page | 11 Visit LogiCoy.com
Now we’ll put another file in the input folder and expect the record to be appended in output folder. Now we will put another file named file2fileMultiRec_2.csv which contains:- 4,Rec00004 5,Rec00005 Again within One second the file will pick up and append in F:\OpenESB\out\out.txt so the out file should contain 1,Rec00001 2,Rec00002 3,Rec00003 4,Rec00004 5,Rec00005
We have a functional solution that reads a file, a record at a time, and writes a file, a record at a time, by connecting two File BCs to each other with no intervening Service Engine of any sort. This is possibly the simplest Java CAPS 6/JBI and OpenESB JBI solution that can be constructed and with the fewest components.
Now, I never said that this solution is going to be useful; merely that it will be a functional JBI solution. Even with that, if you consider line ending conversion useful, the solution does something that may be of some value ☺
You can imagine, I am sure, using a File BC and a JMS BC, or any other pair of BCs that may suit your purpose. As a simple volume testing feeder, for example, you could construct a solution that reads a file, using a File BC, and pumps records directly to a JMS Queue using a JMS BC. That might be useful. More so then the File to File is likely to be.
Page | 12 Visit LogiCoy.com
File In with multiple records to BPEL to File Out The solution discussed so far implements no processing logic beyond what the File BC can do about line terminators. Let’s add a BPEL 2.0 process that will operate on each record prior to it being written to the output file. Let’s do something trivial like convert each record to upper case using BPEL XPath “translate” function to replace each lower case letter with its equivalent upper case letter. You can imagine something more sophisticated being done.
Instead of repeating the process of constructing WSDLs and configuring File BCs, let’s extend the existing project developed in section above. We will modify the Service Assembly later.
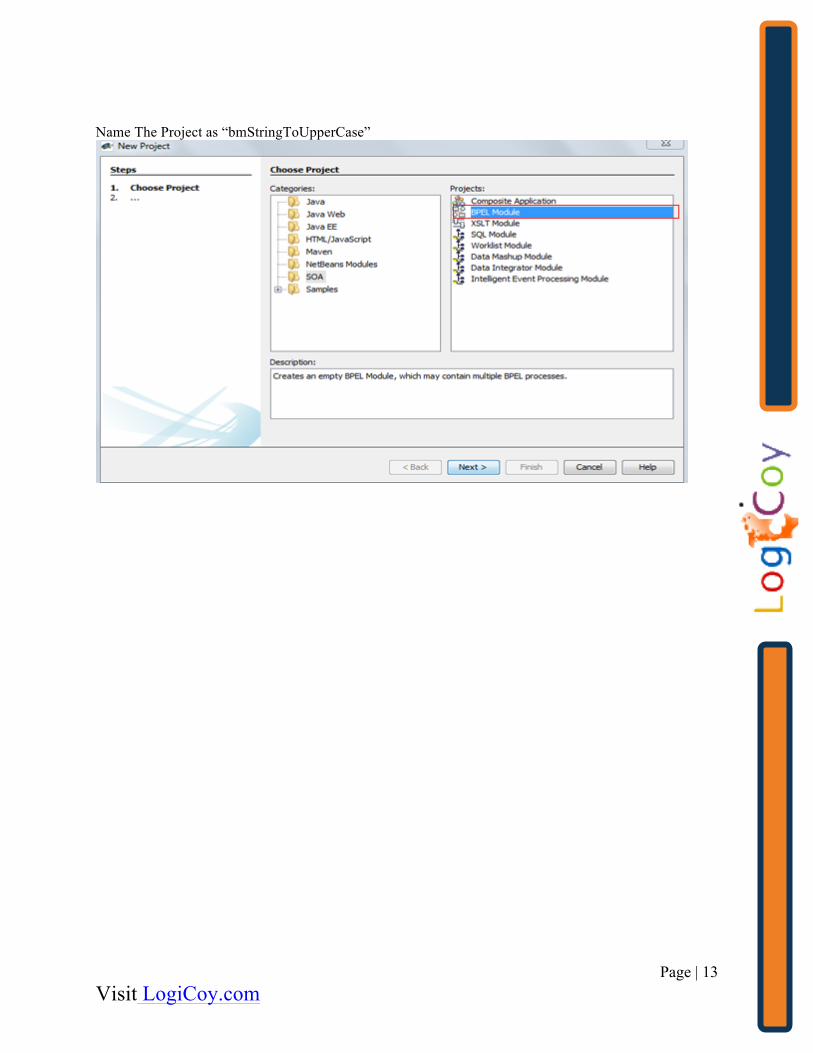
First, let’s create a BPEL Module Project, bmStringToUpperCase.
CREATING A BPEL MODULE PROJECT
Page | 13 Visit LogiCoy.com
Name The Project as “bmStringToUpperCase”
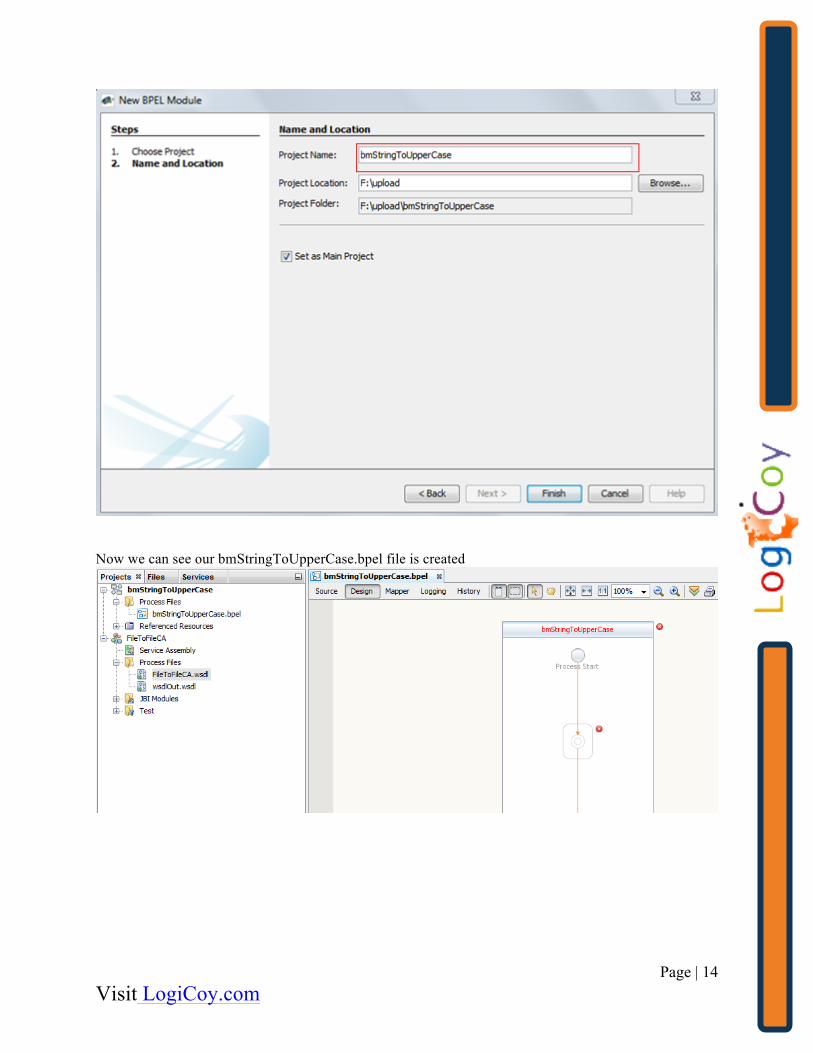
Page | 14 Visit LogiCoy.com
Now we can see our bmStringToUpperCase.bpel file is created
Page | 15 Visit LogiCoy.com
ADDING THE WSDL
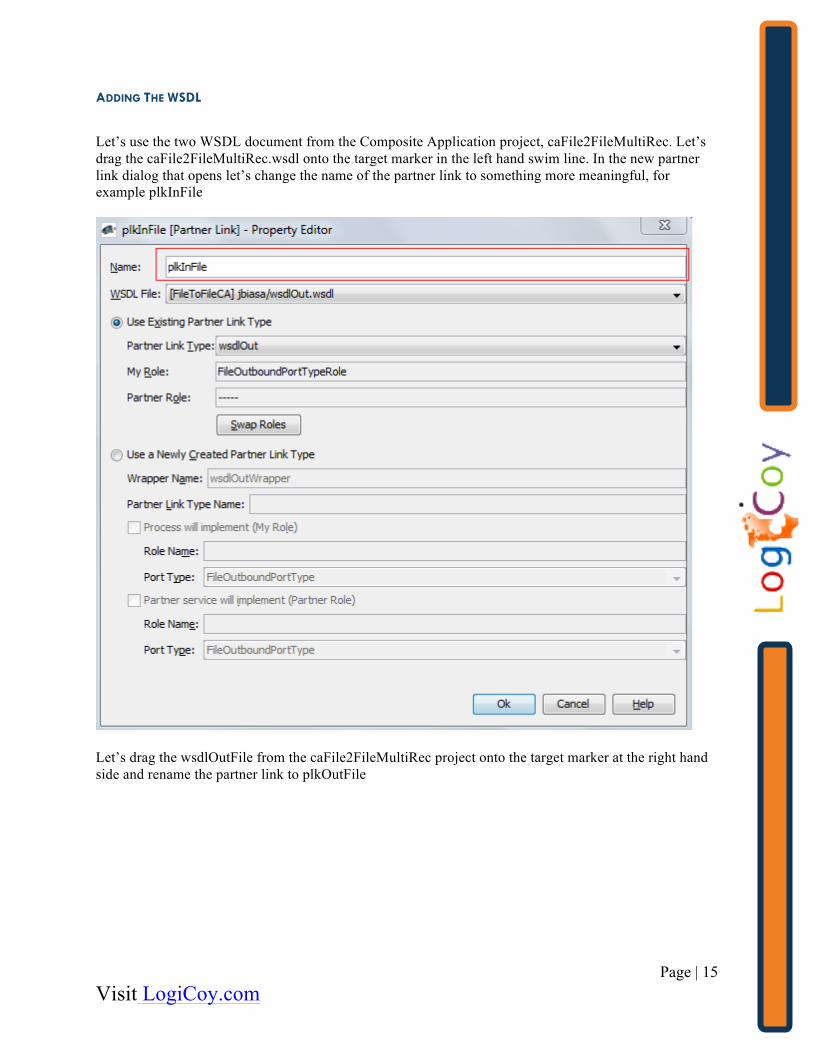
Let’s use the two WSDL document from the Composite Application project, caFile2FileMultiRec. Let’s drag the caFile2FileMultiRec.wsdl onto the target marker in the left hand swim line. In the new partner link dialog that opens let’s change the name of the partner link to something more meaningful, for example plkInFile
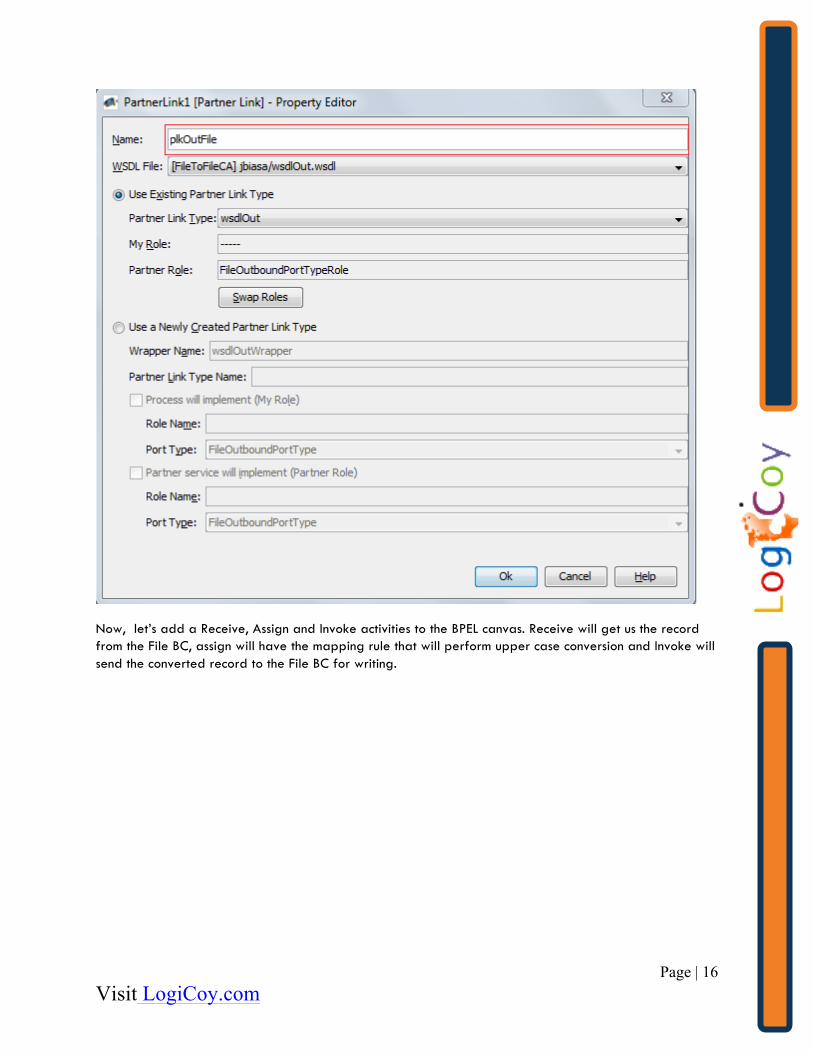
Let’s drag the wsdlOutFile from the caFile2FileMultiRec project onto the target marker at the right hand side and rename the partner link to plkOutFile
Page | 16 Visit LogiCoy.com
Now, let’s add a Receive, Assign and Invoke activities to the BPEL canvas. Receive will get us the record from the File BC, assign will have the mapping rule that will perform upper case conversion and Invoke will send the converted record to the File BC for writing.
Page | 17 Visit LogiCoy.com
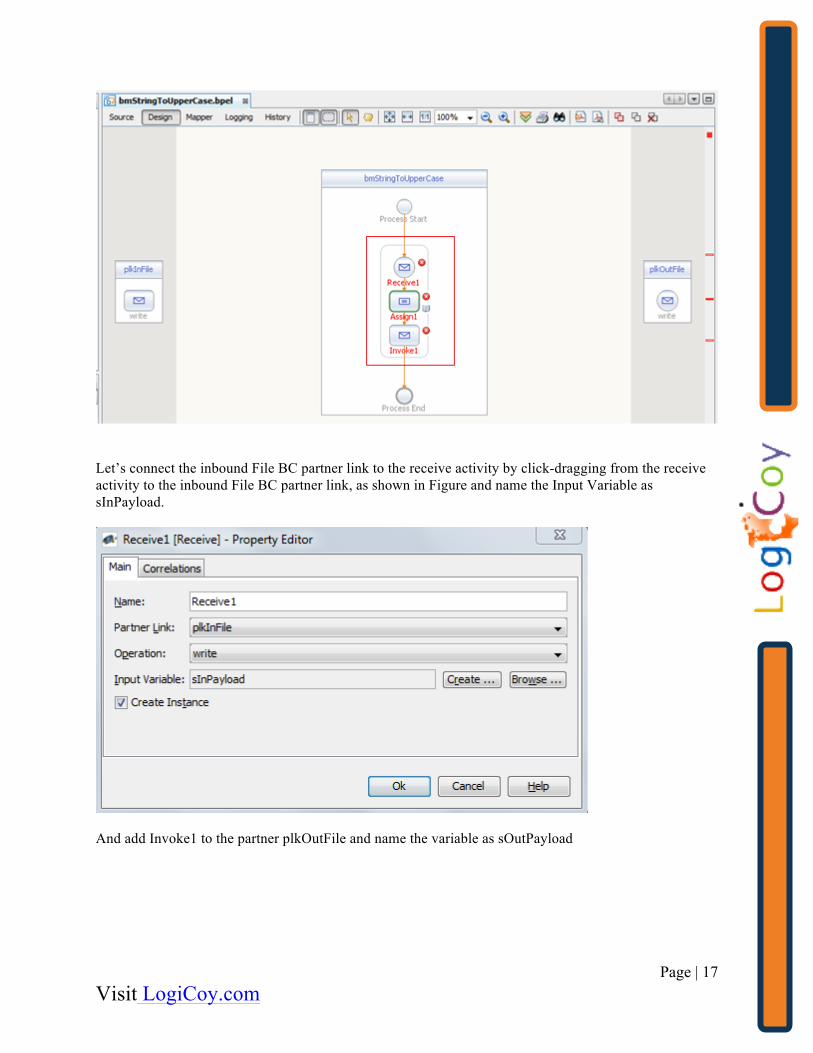
Let’s connect the inbound File BC partner link to the receive activity by click-dragging from the receive activity to the inbound File BC partner link, as shown in Figure and name the Input Variable as sInPayload.
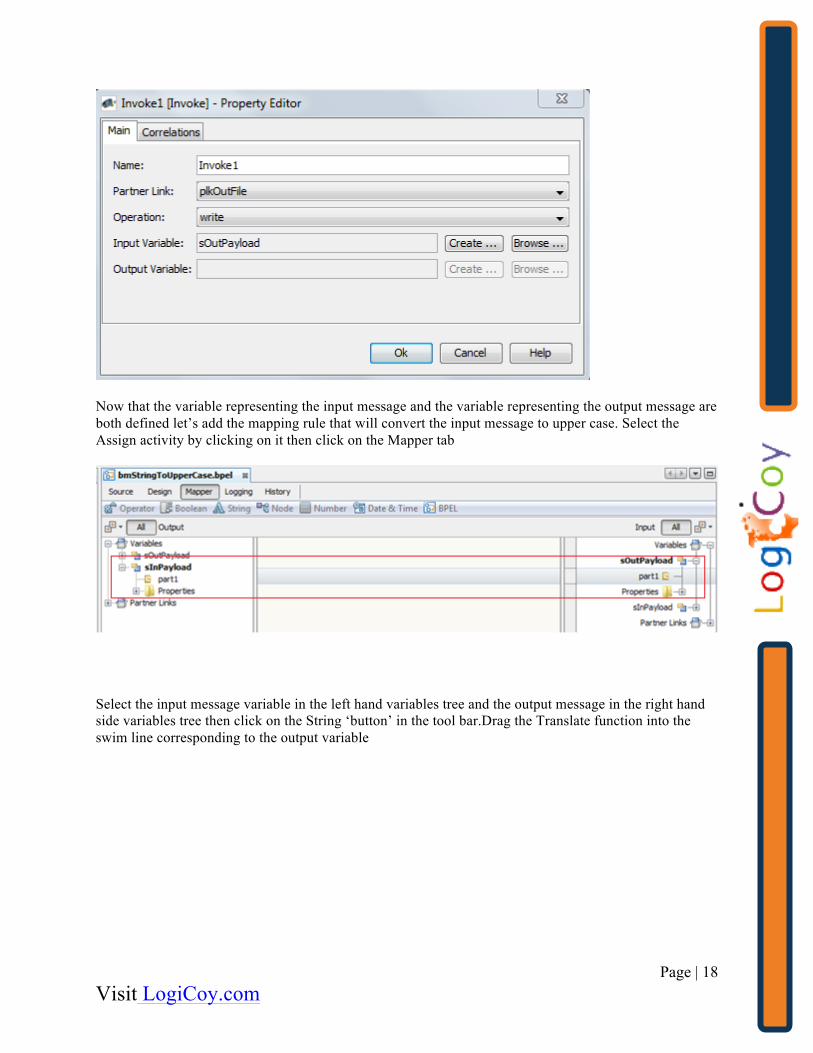
And add Invoke1 to the partner plkOutFile and name the variable as sOutPayload
Page | 18 Visit LogiCoy.com
Now that the variable representing the input message and the variable representing the output message are both defined let’s add the mapping rule that will convert the input message to upper case. Select the Assign activity by clicking on it then click on the Mapper tab
Select the input message variable in the left hand variables tree and the output message in the right hand side variables tree then click on the String ‘button’ in the tool bar.Drag the Translate function into the swim line corresponding to the output variable
Page | 19 Visit LogiCoy.com
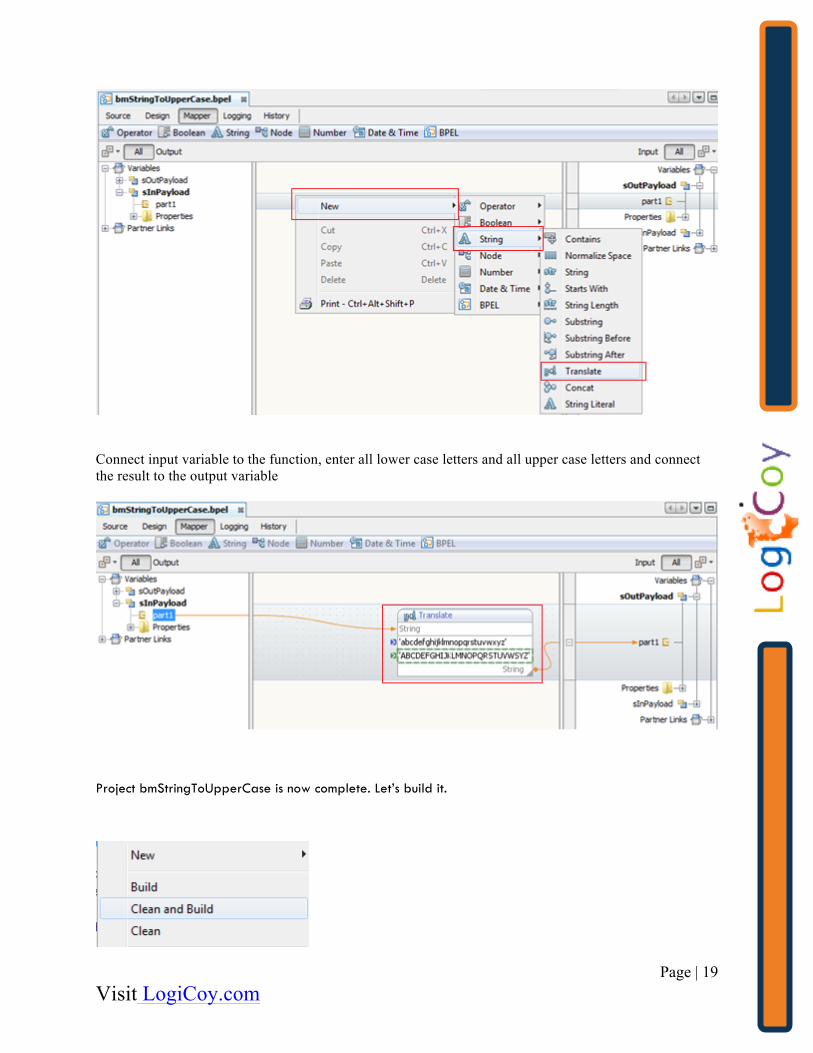
Connect input variable to the function, enter all lower case letters and all upper case letters and connect the result to the output variable
Project bmStringToUpperCase is now complete. Let’s build it.
Page | 20 Visit LogiCoy.com
BUILD COMPOSITE E APPLICATION
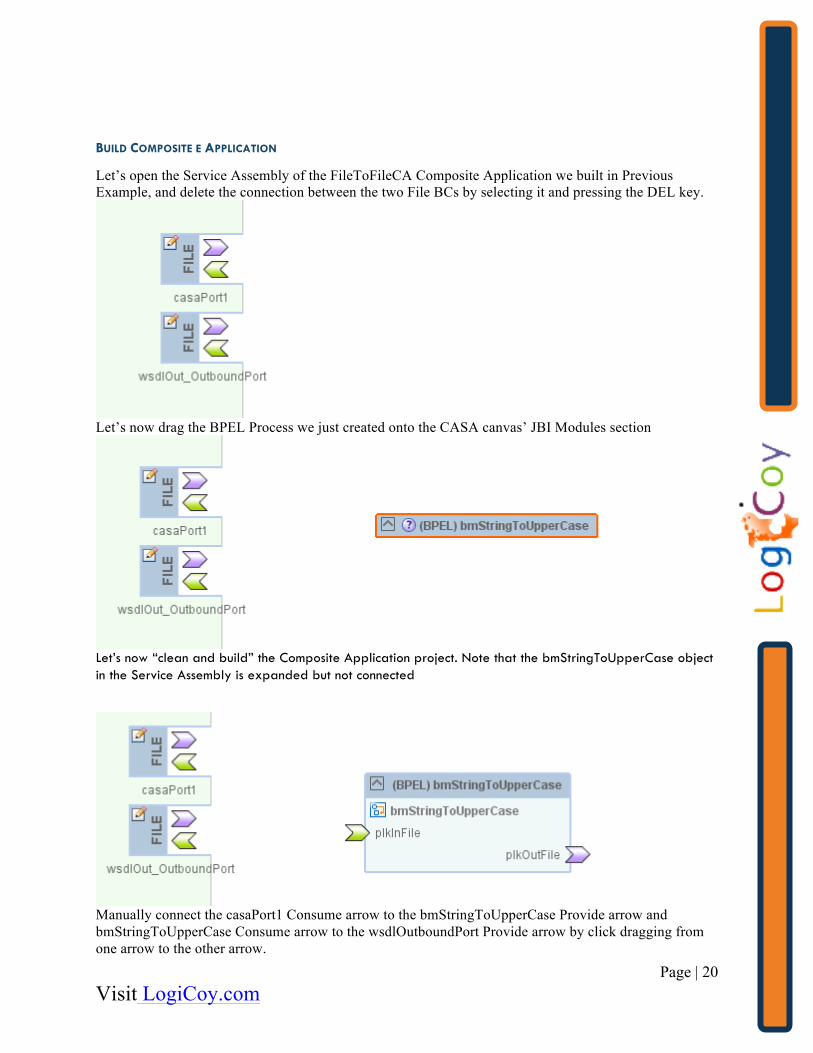
Let’s open the Service Assembly of the FileToFileCA Composite Application we built in Previous Example, and delete the connection between the two File BCs by selecting it and pressing the DEL key.
Let’s now drag the BPEL Process we just created onto the CASA canvas’ JBI Modules section
Let’s now “clean and build” the Composite Application project. Note that the bmStringToUpperCase object in the Service Assembly is expanded but not connected
Manually connect the casaPort1 Consume arrow to the bmStringToUpperCase Provide arrow and bmStringToUpperCase Consume arrow to the wsdlOutboundPort Provide arrow by click dragging from one arrow to the other arrow.
Page | 21 Visit LogiCoy.com
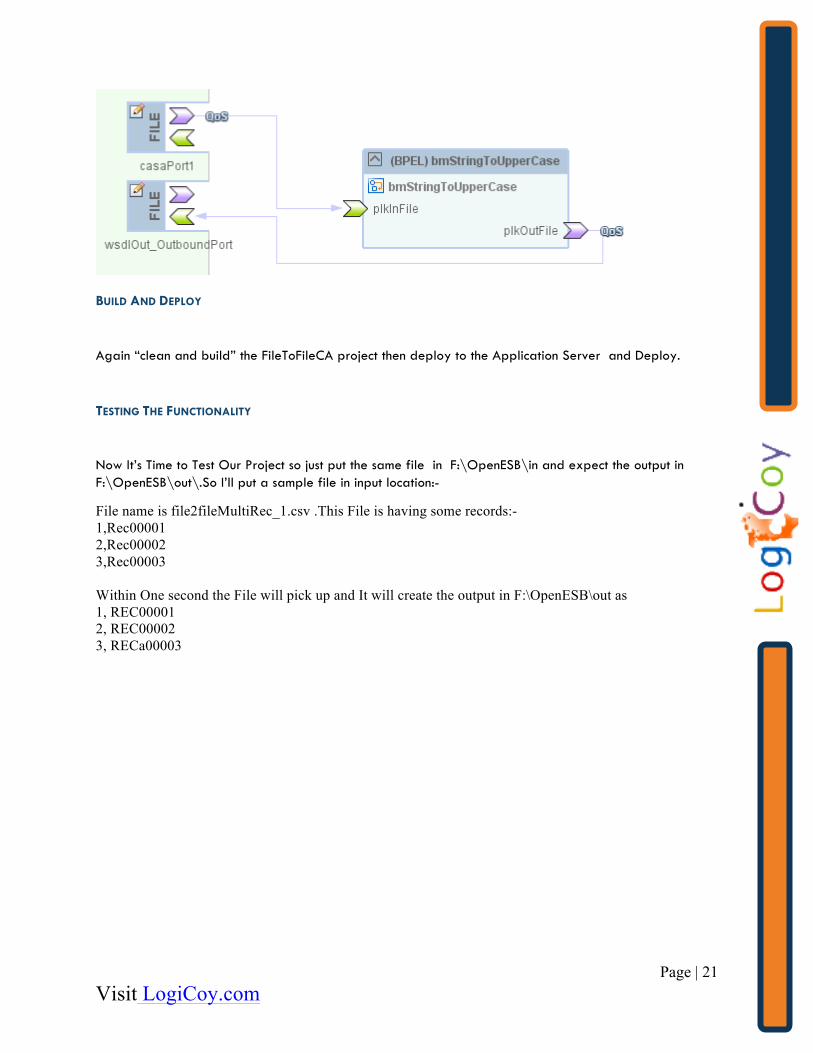
BUILD AND DEPLOY
Again “clean and build” the FileToFileCA project then deploy to the Application Server and Deploy.
TESTING THE FUNCTIONALITY
Now It’s Time to Test Our Project so just put the same file in F:\OpenESB\in and expect the output in F:\OpenESB\out\.So I’ll put a sample file in input location:-
File name is file2fileMultiRec_1.csv .This File is having some records:- 1,Rec00001 2,Rec00002 3,Rec00003 Within One second the File will pick up and It will create the output in F:\OpenESB\out as 1, REC00001 2, REC00002 3, RECa00003