Embed Size (px)
Citation preview

Office of History Document Management System
Using Code ZH Document Management System
The ZH Document Management System (ZH DMS) uses a set of integrated tools to satisfy the requirements for managing its archive of electronic documents. Adobe Acrobat Capture provides the necessary tools to convert paper documents into electronic documents. Manuals, letters, forms and other documents are converted to Portable Document Format (PDF). Acrobat Exchange allows the user to view and edit electronic PDF documents. Acrobat Reviewer allows the user to find and correct words that Acrobat Capture may have recognized incorrectly. The Web Page interface provides authorized users with the ability to retrieve, view and print documents. Microsoft Access provides the ability to create tables and generate reports. This reference guide addresses the functions for the following applications. Acrobat Capture Acrobat Exchange Acrobat Reviewer ZH Document Management System (ZH DMS) Web Page Document Retrieval Access

Acrobat Capture • Getting Started • Scanning and Processing a document in a single step • Scanning and Processing a document in two separate steps • Scanning and Processing a document with more than 100 pages
Acrobat Exchange • Getting Started • Open a PDF document • Using Thumbnails -Create a thumbnail -Browse a document using thumbnails -Move a page using thumbnails • Edit a document
-Insert a page -Extract a page -Replace a page -Delete a page -Delete a page using thumbnails Acrobat Reviewer
• Getting Started • Correcting an ACD document • Add a word to the dictionary
ZH Document Management System (ZH DMS) • Getting Started • Check-in a document • Find a DMS document • Find a document using the terms dialog • View a document in Draft or Layout • Check-out a document for editing • Check-out a copy of a document • Show Checked-out documents • Cancel Document Check Out
Web Page Document Retrieval • Logging on to ZH DMS Web Page • Find a document from the Web Page • Retrieve and view a document
Access • Getting Started • Update local data • View data • Run a report
Appendix

Acrobat Capture Acrobat Capture converts paper documents into electronic documents. Starting Acrobat Capture 1. Click ‘Start’ 2. Click ‘Programs’ 3. Click ‘Adobe Acrobat’ 4. Click ‘Acrobat Capture’
Acrobat Capture Window A. Scanner Area shows icons for scanners. B. Input folder area shows icons for Input folders.
Click a folder icon to select the folder. The selected folder is outlined, the files in the selected folder are shown in the contents area to the right.
C. Input folder contents area show icons for the files in the selected Input folder’s directory.
D. Output folder area shows icons for Output folders. Click the desired folder icon to select the folder destination of converted pages. Selected folder is outlined, icons for output files are shown in area to the right.
E. Output folder contents area shows icons for the output files in the Output folder.
F. Prompt text box displays a help message for the button or icon under the cursor.
G. Performance indicator shows the selected performance preference setting.
H. Scan displays the scan images to the input folder dialog box, used to name the file(s).
I. Process tells Acrobat capture to process the selected input folders.
J. Scan & Process display both dialog boxes to scan and process in one step.
H J I A
CB D E
F G

Acrobat Capture and ZH Document Management System
05/27/1998
4
Acrobat Capture Menu The Acrobat Capture menu contains the following options: File, Input, Process, Output, and Help. Below is a detailed view of each option.
Input and Output Folders When to choose an Input Folder An Input Folder must be selected before scanning a document that will be processed at a later time. The scanned document(s) will be stored in the selected input folder shown in the lower left portion of the screen. Selecting the Input Folder The selected input folder will be outlined in white, and the filenames and icons in the folder’s directory will appear in the input folder contents area on the right. Each input folder has its own input setup parameters.
Sample Input Folder
Input Folder Area Input Folder Contents Area
When to choose an Output Folder

Acrobat Capture and ZH Document Management System
05/27/1998
5
An Output Folder must be selected before any document can be converted to the Portable Document Format (PDF). The processed document will be stored in a designated output folder shown in the upper right portion of the screen. Selecting the Output Folder The selected folder will be outlined in white, and the filename and icons in the folder’s directory will appear in the output folder contents area on the right. Cleaning out temporary files Periodically, the Output Folder contents area will need the temporary files dumped. Click the file to be deleted, click the trash can icon. To delete a number of files, click on the first file to be deleted and hold the shift key down while clicking on the last file to be deleted. Then click the trash can.
Sample Output Folder
Output Folder Area Output Folder contents area
Selecting Output Folder Settings

Acrobat Capture and ZH Document Management System
05/27/1998
6
Each folder in Acrobat Capture has its own setup parameters and can output three styles of Portable Document Format (PDF) files: Acrobat PDF [Normal]: Document can be searched, scaled and indexed. This
format produces a ‘likeness’ of the scanned page, not an exact replica. Original page formatting is retained and graphics are preserved.
Acrobat PDF [Image]: Documents contain bitmap picture of the original
document and has no search capability. Acrobat PDF [Image + Hidden Text]: Document retains the original bitmap for
exact replication. Search capabilities are enabled. Acrobat Capture will also convert a file so that it can be edited using the Acrobat Capture Document [ACD] extension.
Changing Output Folder Settings 1. Click the desired folder in the ‘output
folder’ area. 2. Right-click on the output folder icon.
The Output Folder Setup screen appears.
3. Complete the ‘Location:’ field. 4. Click the file output format desired in
the ‘File Formats:’ field .

Acrobat Capture and ZH Document Management System
05/27/1998
7
5. Click OK. (Note: more than one format
may be selected.)

Acrobat Capture and ZH Document Management System
05/27/1998
8
Scanning and Processing a page in a single step [Ctrl +A] 1. Place the document in the scanner’s
automatic document feeder. (Select the Scanner with the paper size for the document to be scanned).
2. Click the output folder where the processed
document is to be saved. 3. Click the ‘Scan & Process’ button. The
Scan dialog box appears. 4. Enter the document name in the ‘Document
Name:’ field. (The appropriate extension is automatically added.).
5. Click Start. (The ‘Acrobat Capture Server
2.0’ screen appears during document processing.)
6. Click ‘Document Finished’ on the Scan
Document dialog box when scanning and processing is completed. (A new icon for the PDF document file appears in the output folder contents area.)

Acrobat Capture and ZH Document Management System
05/27/1998
9
Scanning and Processing a document in two separate steps Scanning the document [Ctrl + S] 1. Place the page(s) in the scanner’s
automatic document feeder. (Select the Scanner with paper size for the document to be scanned).
2. Click the ‘input folder’ icon from the Input
folder area where the document is to be saved.
3. Click the ‘Scan’ button. (The Scan dialog
box appears.) 4. Enter the document name in the
‘Document Name:’ field. (The extension is automatically added.)
5. Click Start. (‘Scanning image to disk’
screen appears.)

Acrobat Capture and ZH Document Management System
05/27/1998
10
6. Click ‘Document Finished’ on the Scan
Document dialog box when scanning is complete. (A new icon appears in the input folder. Each page scanned results in a file sequentially numbered.)
NOTE: The scanned document can be kept in the input folder and processed at a later time. Processing the document [Ctrl + P] This process can be done at any time once the document has been scanned and saved in an input folder. 1. Click the folder icon in the ‘input folder’
area containing the document files to be processed.
2. Click on the icon of the file (.tif) to be
processed. (For multiple page selection: click on the icon of the first file, hold the shift key, click on the icon of the last file to be processed. The files to be processed will be highlighted.)
3. Click the folder icon in the ‘output folder’
area where the document is to be saved after processing.
4. Click the ‘Process’ button. (The ‘Acrobat
Capture Server 2.0’ screen appears during document processing).

Acrobat Capture and ZH Document Management System
05/27/1998
11
Scanning and Processing a document with 100 or more pages 1. Place document pages in the scanner’s
automatic document feeder. (Document should not exceed 100 pages. Adobe Capture has difficulty creating .pdf files in excess of 100 pages.)
2. Click the input folder icon from the input
folder area where the document is to be saved.
3. Click the ‘Scan’ button. (The Scan dialog
screen appears.) 4. Type the document name in the ‘Document
Name:’ field. (The filename extension is automatically added.)
5. Click Start. (‘Scanning image to disk’ screen
appears.) 6. Click ‘Document Finished’ on the Scan
Document dialog box when scanning and processing is completed. (A new icon appears in the input folder. Each page scanned results in a file sequentially numbered.)
Repeat steps 1 through 7 for the next batch of pages (not to exceed 100).
View the PDF or ACD from Acrobat Capture

Acrobat Capture and ZH Document Management System
05/27/1998
12
1. While in Acrobat Capture, locate in the
‘Output’ folder the file to be viewed. 2. Double-click on the desired file. (Acrobat
Exchange or Reviewer launches.) 3. Click ‘View’ on the menu to alter viewing
options. (This option in Acrobat Exchange only.)
4. Exit Adobe Exchange by clicking ‘File’ on
the menu and click ‘Exit’ to return to the Adobe Capture screen.

Acrobat Capture and ZH Document Management System
05/27/1998
13
Acrobat Exchange Acrobat Exchange allows the user to view and edit electronic PDF documents. Starting Acrobat Exchange 1. Click ‘Start’ 2. Click ‘Programs’ 3. Click ‘Adobe Acrobat’ 4. Click ‘Acrobat Exchange’
Open an existing PDF document [Ctrl + O] 1. Click ‘File’ on the Acrobat Exchange
menu. 2. Click ‘Open’. (The ‘Open’ dialogue box
appears.) 3. Type the document file name in the ‘File
Name:’ field or double-click on the file. 4. Click Open. (Acrobat Exchange opens the
document)
Using Thumbnails A thumbnail is a miniature view of each page in the document and is displayed in an overview area. Create a thumbnail 1. Click ‘Document’ on the menu. 2. Click ‘Create all thumbnails’. Browse a document using

Acrobat Capture and ZH Document Management System
05/27/1998
14
thumbnails 1. Click ‘View’ on the menu. 2. Click ‘Thumbnails and Page’. 3. Click a thumbnail to choose a page it
represents. Note: If thumbnail appears as a gray box in the overview area, click Document> Create All Thumbnails to have the pages displayed. Move a page using thumbnails 1. Click on the desired thumbnail page
number box. 2. Left click and drag the thumbnail page
icon to the new location. (When the mouse is released the pages will be inserted and all subsequent pages will be renumbered.)
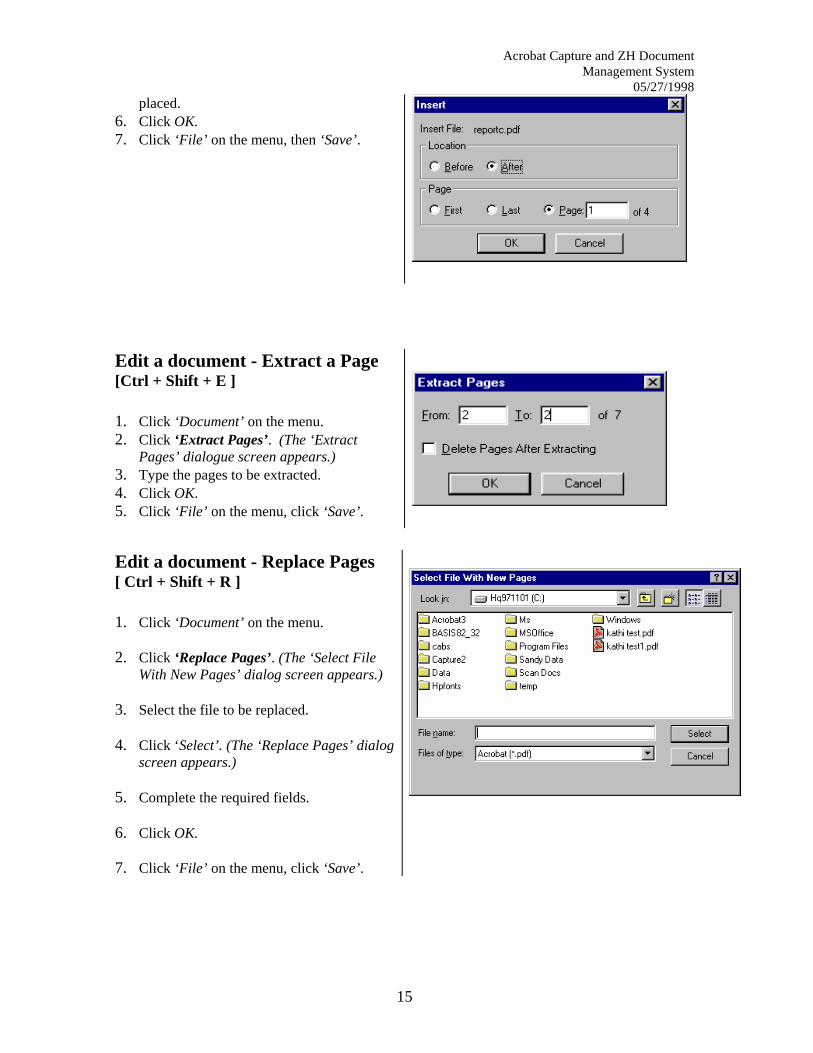
Edit a document - Insert a page [Ctrl + Shift + I ] 1. Click ‘Document’ on the menu. 2. Click ‘Insert Pages’. (The ‘Select File to
Insert’ dialog screen appears.) 3. Type the name of the document file in the
‘File Name:’ field. 4. Click ‘Select’. (The ‘Insert’ dialog screen
appears.) 5. Click the radio button to determine where
the location of the new pages should be
Acrobat Capture and ZH Document Management System
05/27/1998
15
placed. 6. Click OK. 7. Click ‘File’ on the menu, then ‘Save’.
Edit a document - Extract a Page [Ctrl + Shift + E ] 1. Click ‘Document’ on the menu. 2. Click ‘Extract Pages’. (The ‘Extract
Pages’ dialogue screen appears.) 3. Type the pages to be extracted. 4. Click OK. 5. Click ‘File’ on the menu, click ‘Save’.
Edit a document - Replace Pages [ Ctrl + Shift + R ] 1. Click ‘Document’ on the menu. 2. Click ‘Replace Pages’. (The ‘Select File
With New Pages’ dialog screen appears.) 3. Select the file to be replaced. 4. Click ‘Select’. (The ‘Replace Pages’ dialog
screen appears.) 5. Complete the required fields. 6. Click OK. 7. Click ‘File’ on the menu, click ‘Save’.

Acrobat Capture and ZH Document Management System
05/27/1998
16
Edit a document - Delete Pages [Ctrl + Shft + D ] 1. Click ‘Document’ on the menu. 2. Click ‘Delete Pages’. (The ‘Delete
Pages’ dialog box appears.) 3. Click ‘File’ on the menu, click ‘Save’. Delete pages using thumbnails 1. Click the page number box on the
thumbnail page to be deleted. 2. Click the ‘delete’ button. 3. Click ‘File’ on the menu, click ‘Save’.

Acrobat Capture and ZH Document Management System
05/27/1998
17
Acrobat Reviewer Acrobat Reviewer is used to find and correct words that Acrobat Capture may have recognized incorrectly. Starting Acrobat Reviewer 1. Click ‘Start’ 2. Click ‘Programs’ 3. Click ‘Adobe Acrobat’ 4. Click ‘Acrobat Capture Reviewer’
Correct a ACD document 1. Open desired document to be corrected. 2. Press ‘Tab’. (The insertion point moves to
the beginning of the first suspect word. The bitmap image of the line appears at the top of the window.)
3. Double-click to select the suspect, and type
the correction. (Press tab to move to the next suspect.)

Acrobat Capture and ZH Document Management System
05/27/1998
18
ZH Document Management System (ZH DMS) Starting ZH DMS 1. Select the ZH DMS Basis Desktop icon. 2. Type your user id in the ‘Database
username’ field and ‘Database password’. 3. Click the OK button. (ZH DMS displays the
Find screen.) Note: To retrieve a full list of every document, leave the fields blank and click the ‘Find’ button.
Check-in a document
1. Create document in the appropriate
application. Follow the steps to ‘Start ZH DMS’.
2. Click ‘Check-in’ on the Document
menu. 3. Complete the field group entries on the
‘Check-in’ dialog screen. 4. In the ‘filename’ field, type the file
path and extension or click the ‘ Browse’ button to locate the document if it is not known.
5. Click OK.

Acrobat Capture and ZH Document Management System
05/27/1998
19
Using Terms dialog with document check-in
1. Click ‘Check-in’ on the Document
menu. 2. Click in the desired field. (e.g. Series,
Subseries) 3. Click ‘Terms’ on the Find menu. 4. Click on the desired term in the Terms
box. 5. Click ‘Select’. (The term will appear in
the ‘Selected Terms’ box.) Note: Double-clicking on the desired term will also select the term and place it in the Selected Terms box. 6. Highlight the term(s) to be inserted into
the desired field in the ‘Selected Terms’ box.
7. Click ‘Apply’. (The selected term(s) will
be inserted in the field.) 8. Click ‘Close’ to close the term dialog
box. Note: (If every term in the ‘Selected Term’ box is desired, do not highlight any term.)

Acrobat Capture and ZH Document Management System
05/27/1998
20
Find a DMS document
1. Click ‘by form’ on the Find menu.
(The ‘Find’ screen appears.) 2. Determine the fields to use for the
search criteria. 3. Click into the desired field and type
in the search value. 4. Set the test operator by clicking on
the appropriate list indicator (u). 5. Click ‘Find’. Note: To retrieve a list of all documents, leave the fields blank and click the ‘Find’ button.)
6. Search results will be displayed on
the ‘Find Results’ screen. 7. Double-click on the desired document
to view.

Acrobat Capture and ZH Document Management System
05/27/1998
21
Find a document using the Terms dialog
1. Click ‘Terms’ on the Find menu. 2. Click the name of the search field
from the Source droplist box ( ). 3. Click on the term(s) to be matched
in the Terms box. 4. Click ‘Select’. (The term will appear
in the ‘Selected Terms’ box.) Note: Double-click the desired term will also select the term and place it in the Selected Terms box. 5. Click a ‘Connector’ operator. Note: ‘AND’ will select all marked terms in the selected field. ‘OR’ will select any marked terms in the selected field. 6. Highlight the term(s) to be matched
in the ‘Selected Terms’ box. (If every term in the ‘Selected Term’ box is desired, do not highlight any term.)
7. Click ‘Find’. (The ‘Find Results’
screen appears.)
View a document in Draft or Layout. 1. Open the document from the ‘Find
Results’ screen. 2. Click ‘View’ on the menu. 3. Click the appropriate view option ,

Acrobat Capture and ZH Document Management System
05/27/1998
22
Draft or Layout. (The active view is annotated with a check mark on the menu.)
Note: ‘Draft’ view allows hit-to-hit scrolling and viewing of external file icons. ‘Layout’ view allows for text stream viewing as the document was originally formatted. Limitations exist in layout view.
Check-out a document for editing
1. Find the desired document by
conducting a search. 2. Click ‘Check Out’ on the Document menu. (The ‘Check Out’ dialog screen
appears.) 3. In the ‘To file’ field, type the file
path and extension or click the ‘Browse’ button to locate the

Acrobat Capture and ZH Document Management System
05/27/1998
23
document. 4. The ‘Open document with’ field
should show (Associated_ Application) to launch the application such as Word, Excel, Powerpoint, or Acrobat Exchange.
5. Click OK. (‘Replace existing’ screen
appears. Select the appropriate choice.)
Check-out a copy of a document
1. Find the desired document by conducting a search.
2. Click ‘Check-out’ from the
Document menu. (The ‘Check Out’ dialog screen appears.)
3. Click the ‘copy’ radio button.
4. In the ‘To file’ field, type the file
path and extension or click the ‘Browse’ to locate the document.
5. The ‘Open document with’ field
should show (Associated Application) to launch the application.
6. Click OK. (‘Replace existing’
screen appears. Select the appropriate choice.)
Show Checked-out documents

Acrobat Capture and ZH Document Management System
05/27/1998
24
1. Click ‘Show Checked Out’ on the Document menu.
2. The ‘Checked Out’ dialog box appears listing your checked out documents.
Cancel Document Check Out 1. On the ‘Checked out’ dialog screen,
select the document to be canceled. 2. Select ‘Cancel Check-out’ from the
Document menu. (Note: To verify document cancel, click Show Checked-out on the Document menu.)

Acrobat Capture and ZH Document Management System
05/27/1998
25

Acrobat Capture and ZH Document Management System
05/27/1998
26
Web Page Document Retrieval Logging into ZH DMS 1. Open Netscape. 2. Type the URL address in the ‘Location’
field and press Enter. (The ‘Office of History’ screen appears.)
3. Click the ‘Report’ type desired. (The
‘Log into Basis’ screen appears.) 4. Type your username and password in
the ‘Basis Username’ and ‘Basis Password’ fields.
5. Click ‘OK’.(The ‘Find’ screen appears.)

Acrobat Capture and ZH Document Management System
05/27/1998
27
Find a DMS Document from the Web Page
1. Complete the ZH DMS Web log on
process. 2. On the ‘Find’ screen, determine the
fields to use for the search criteria. 3. Click into the desired field and type in
the search value. (Note: To retrieve a list of all documents, leave the fields blank and click the ‘OK’ button.)
4. Set the test operator by clicking on the
appropriate list indicator ( ). 5. Click the ‘OK’ button. 6. The ‘Find Documents’ Results screen
appears listing Documents.

Acrobat Capture and ZH Document Management System
05/27/1998
28
Retrieve and view a document
1. From the ‘Find Documents Results’
screen, click on the desired item. (The ‘Metadata’ screen appears.)
2. Click ‘Down Load’. (Acrobat Exchange
launches.)

Acrobat Capture and ZH Document Management System
05/27/1998
29
Microsoft Access Starting Microsoft Access 1. Click ‘Start’ 2. Click ‘Programs’ 3. Click ‘Microsoft Access’ (The Microsoft
Access screens appears.) 4. Click radio button ‘Open an Existing
Database’ 5. Click the database file to be opened. 6. Click ‘OK’ or double-click on the
database file name. (The selected database opens.)
Update local data 1. Click the ‘Queries’ tab. 2. Highlight ‘Update Local Data’. 3. Click ‘Open’ or double-click the
selection. (The Access screen will read “You are about to run a make-table query…)
4. Click ‘Yes’. (The Access screen will read
“The existing table ‘Local Data’ will be deleted…”)
5. Click ‘Yes’. (The Access screen will read
“There isn’t enough disk space…) 6. Click ‘Yes’. (When processing is
complete, the Access screen will read

Acrobat Capture and ZH Document Management System
05/27/1998
30
“You are about to paste…”) Note: It will take the system about 3 mins. to process the request. 7. Click ‘Yes’.

Acrobat Capture and ZH Document Management System
05/27/1998
31
To view data 1. Click the ‘Tables’ tab. 2. Double-click ‘Local Data’ or Click
‘Open’.
Run a Report 1. Click the ‘Reports’ tab. 2. Double-click on the existing report or
click ‘Preview’.

Acrobat Capture and ZH Document Management System
05/27/1998
32
ASSISTANCE
The Help Menu provides the user access to instruction on most HQ DMS functions. For DMS Technical Assistance, contact the NASA IR & MS Service Center:
358-HELP (4357)

Acrobat Capture and ZH Document Management System
05/27/1998
33
APPENDIX Acrobat Capture: Suspect Words Acrobat Capture identifies five types of suspect words. When viewing in Acrobat Reviewer the highlighted color indicates the words suspect type: Words with confidence levels below the specified threshold are recognition
suspects. Capture doubts that they have been recognized correctly. Recognition suspect words are highlighted in yellow.
Words not found in the dictionary are spelling suspects and highlighted in blue. Words with uncertain fonts are font suspects and highlighted in green. Words with a mix of alphabetic and numeric characters are alpha-numeric terms
and highlighted in magenta. Words containing all numerals are numeric terms and highlighted in orange.

Acrobat Capture and ZH Document Management System
05/27/1998
34
Basis Desktop Concepts: Defining the search criteria
Find Form Components field labels specifies the field you want the system to search test operators indicates the desired relationship between the search values
and the data in the field(s) being searched search values specifies the data you want the system to compare each
document’s field against connector operators combines two or more search conditions

Acrobat Capture and ZH Document Management System
05/27/1998
35
Test Operators Test Operators indicate the relationship between the search value and the data in the field being searched. Numeric fields Test Operators This test operator = > >= < <= not =
Searches for a value that matches the search value is greater than the search value is greater than or equal to the search value is less than the search value is less than or equal to the search value does not match the search value
Text Test Operators This test operator includes contains all contains any contains the phrase
Searches for any keywords in any order (when the search values are separated with commas or ampersands) all keywords in any order all keywords in any order all keywords and stopwords* in exact order and position
*Keywords are words that are not stopwords. Stopwords are small, common words that have little retrieval value, such as “the, a, of, and for”. Stopwords are used as search values in find operations that involve the exact matching of character strings.

Acrobat Capture and ZH Document Management System
05/27/1998
36
Date Fields Test Operators This test operator on after on or after before on or before not on
Searches for a date that matches the search value is greater than the search value is greater than or equal to the search value is less than the search value is less than or equal to the search value does not match your search value
Wildcards ? * #
represents one miscellaneous character represents 0-15000 miscellaneous characters represents 1 miscellaneous character string in a phrase
Character patterns (* or ?) can be used in a search only when the test operator is: equals = (for numeric) is not not = (for numeric) contains any Phrase patterns contain a #. Phrase patterns can only be used when the test operator is “contains in order”.

Acrobat Capture and ZH Document Management System
05/27/1998
37
PROTOTYPE TERMS SCREEN Using terms dialog with document check-in 1. Click ‘Check-in’ on the Document
menu. 2. Click in the desired field. (e.g. Series,
Subseries) 3. Click ‘Terms’ on the Find menu. 4. Click on the desired term in the Terms
box. 5. Click ‘Select’. (The term will appear in
the ‘Selected Terms’ box.) Note: Double-clicking on the desired term will also select the term and place it in the Selected Terms box. 6. Highlight the term(s) to be inserted into
the desired field in the ‘Selected Terms’ box.
7. Click ‘Apply’. (The selected term(s) will
be inserted in the field.) 8. Click ‘Close’ to close the term dialog
box. Note: (If every term in the ‘Selected Term’ box is desired, do not highlight any term.)

Acrobat Capture and ZH Document Management System
05/27/1998
38
Find a document using the terms dialog
1. Click ‘Terms’ on the Find menu. 2. Click the name of the search field
from the Source droplist box ( ). 3. Click on the term(s) to be matched
in the Terms box. 4. Click ‘Select’. (The ‘term’ will
appear in the ‘Selected Terms’ box.) Note: Double-click the desired term will also select the term and place it in the Selected Terms box. 5. Click a ‘Connector’ operator. Note: ‘AND’ will select all marked terms in the selected field. ‘OR’ will select any marked terms in the selected field. 6. Highlight the term(s) to be matched
in the ‘Selected Terms’ box. (If every term in the ‘Selected Term’ box is desired, do not highlight any term.)
7. Click ‘Find’. (The ‘Find Results’
screen appears.)