Embed Size (px)
Citation preview

8/9/2019 OceanStor S2600T&S5500T&S5600T&S5800T&S6800T Storage System V200R002 Online Capacity Expansion 01
http://slidepdf.com/reader/full/oceanstor-s2600ts5500ts5600ts5800ts6800t-storage-system-v200r002-online 1/226
OceanStor
S2600T&S5500T&S5600T&S5800T&S6800TStorage System
V200R002
Online Capacity Expansion
Issue 01Date 2014-12-29
HUAWEI TECHNOLOGIES CO., LTD.
8/9/2019 OceanStor S2600T&S5500T&S5600T&S5800T&S6800T Storage System V200R002 Online Capacity Expansion 01
http://slidepdf.com/reader/full/oceanstor-s2600ts5500ts5600ts5800ts6800t-storage-system-v200r002-online 2/226
Copyright © Huawei Technologies Co., Ltd. 2014. All rights reserved.
No part of this document may be reproduced or transmitted in any form or by any means without prior written
consent of Huawei Technologies Co., Ltd.
Trademarks and Permissions
and other Huawei trademarks are trademarks of Huawei Technologies Co., Ltd.
All other trademarks and trade names mentioned in this document are the property of their respective holders.
Notice
The purchased products, services and features are stipulated by the contract made between Huawei and the
customer. All or part of the products, services and features described in this document may not be within the
purchase scope or the usage scope. Unless otherwise specified in the contract, all statements, information,
and recommendations in this document are provided "AS IS" without warranties, guarantees or representations
of any kind, either express or implied.
The information in this document is subject to change without notice. Every effort has been made in the
preparation of this document to ensure accuracy of the contents, but all statements, information, and
recommendations in this document do not constitute a warranty of any kind, express or implied.
Huawei Technologies Co., Ltd.
Address: Huawei Industrial Base
Bantian, Longgang
Shenzhen 518129
People's Republic of China
Website: http://enterprise.huawei.com
Issue 01 (2014-12-29) Huawei Proprietary and Confidential
Copyright © Huawei Technologies Co., Ltd.
i
8/9/2019 OceanStor S2600T&S5500T&S5600T&S5800T&S6800T Storage System V200R002 Online Capacity Expansion 01
http://slidepdf.com/reader/full/oceanstor-s2600ts5500ts5600ts5800ts6800t-storage-system-v200r002-online 3/226
About This Document
Intended Audience
This document instructs operators to expand capacity for the OceanStor S2600T/S5500T/
S5600T/S5800T/S6800T storage system from the perspectives of capacity expansion process,
planning, and implementation.
This document is intended for:
l Technical support engineers
l Maintenance engineers
Conventions
As part of an effort to improve and enhance the product performance and capabilities, Huawei
periodically releases revisions of the hardware and software. Therefore, some functions
described in this document may not be supported by all versions of the software or hardware
currently in use. For the most up-to-date information about product features, refer to the product
release notes.
If a product does not function as described in this document, contact Huawei technical support.
Change History
Changes between document issues are cumulative. The latest document issue contains all the
changes made in earlier issues.
Issue 01 (2014-12-29)
This issue is the first official release.
OceanStor S2600T&S5500T&S5600T&S5800T&S6800T
Storage System
Online Capacity Expansion About This Document
Issue 01 (2014-12-29) Huawei Proprietary and Confidential
Copyright © Huawei Technologies Co., Ltd.
ii
8/9/2019 OceanStor S2600T&S5500T&S5600T&S5800T&S6800T Storage System V200R002 Online Capacity Expansion 01
http://slidepdf.com/reader/full/oceanstor-s2600ts5500ts5600ts5800ts6800t-storage-system-v200r002-online 4/226
Contents
About This Document.....................................................................................................................ii
1 Safety Operation Guide...............................................................................................................1
1.1 Alarm and Safety Symbols.............................................................................................................................................2
1.2 ESD.................................................................................................................................................................................2
1.3 Using Lasers Safely........................................................................................................................................................3
1.4 Using Fibers Safely........................................................................................................................................................3
1.5 Short Circuit...................................................................................................................................................................4
1.6 Operating the Equipment................................................................................................................................................4
2 Overview.........................................................................................................................................6
3 Capacity Expansion Process........................................................................................................8
4 Collecting Live Network Information.....................................................................................10
5 Making a Capacity Expansion Plan.........................................................................................13
5.1 Selecting a Capacity Expansion Method......................................................................................................................14
5.2 Planning for the Addition of Disks...............................................................................................................................18
5.3 Planning f or the Addition of Disk Enclosures..............................................................................................................20
5.3.1 Disk Enclosure Types and Quantity..........................................................................................................................20
5.3.2 SAS Ca ble Connection Modes and Rules........................................................................................................ .........24
5.3.3 SAS Cable Connection Diagram...............................................................................................................................32
5.4 Planning f or the Addition of Controller Enclosure (Inapplicable to the S2600T).......................................................37
5.4.1 Cable Connection Diagram for Connecting the Four Controllers of Two S5500T Storage Systems.......................37
5.4.2 Cable Connection Diagram for Connecting the Four Controllers of Two S5600T/S5800T/S6800T Storage Systems
............................................................................................................................................................................................39
5.4.3 SAS Ca ble Connection Diagram...............................................................................................................................40
5.5 Determining the Capacity Expansion Time..................................................................................................................40
6 Preparing for the Capacity Expansion.....................................................................................41
6.1 Preparing for the Capacity Expansion..........................................................................................................................42
6.2 Preparing Tools.............................................................................................................................................................44
6.3 Applying for a License File..........................................................................................................................................46
6.3.1 Preparations...............................................................................................................................................................46
6.3.2 Applying for a License..............................................................................................................................................47
OceanStor S2600T&S5500T&S5600T&S5800T&S6800T
Storage System
Online Capacity Expansion Contents
Issue 01 (2014-12-29) Huawei Proprietary and Confidential
Copyright © Huawei Technologies Co., Ltd.
iii
8/9/2019 OceanStor S2600T&S5500T&S5600T&S5800T&S6800T Storage System V200R002 Online Capacity Expansion 01
http://slidepdf.com/reader/full/oceanstor-s2600ts5500ts5600ts5800ts6800t-storage-system-v200r002-online 5/226
6.3.2.1 Applying for a License in Entitlement Activation Mode.......................................................................................47
6.3.2.2 Applying for a License in Password Activation Mode...........................................................................................50
6.4 Performing the Pre-expansion Check...........................................................................................................................52
6.4.1 Checking Storage System Status...............................................................................................................................52
6.4.2 Checking Storage System I/O Load..........................................................................................................................53
6.4.3 Checking the UltraPath Version................................................................................................................................54
6.4.4 Checking the ALUA Function...................................................................................................................................55
6.4.5 Checking the Connectivity Between the Application Server and the Storage System..............................................56
6.4.5.1 Check ing Storage System Alarms..........................................................................................................................56
6.4.5.2 Check ing the Disk Path Status in Windows...........................................................................................................57
6.4.5.3 Check ing the Disk Path Status in Linux.................................................................................................................58
6.4.5.4 Check ing the Disk Path Status in AIX...................................................................................................................59
6.4.5.5 Check ing the Disk Path Status in Solaris...............................................................................................................60
6.5 Backing U p Configuration Data of the Storage System...............................................................................................61
6.6 Importing a License File...............................................................................................................................................62
7 Adding Devices............................................................................................................................63
7.1 Adding Disks................................................................................................................................................................64
7.1.1 Adding Disks.............................................................................................................................................................64
7.1.2 Adding Disks (Applicable to High-Density Disk Enclosures)..................................................................................66
7.2 Adding Disk Enclosures...............................................................................................................................................69
7.2.1 (Optional) Removing a Filler Panel...........................................................................................................................69
7.2.2 Planning Installation Positions..................................................................................................................................707.2.3 Installing an Adjustable Guide Rail...........................................................................................................................79
7.2.4 Installing a Ball Bearing Guide Rail (Applicable to High-Density Disk Enclosures)..............................................83
7.2.5 Installing a Floating Nut............................................................................................................................................87
7.2.6 Installing a 2 U Disk Enclosure.................................................................................................................................88
7.2.7 Installing a 4 U Disk Enclosure.................................................................................................................................89
7.2.8 Installing a 4 U High-Density Disk Enclosure..........................................................................................................91
7.2.8.1 Installing a High-Density Disk Enclosure into a Cabinet.......................................................................................91
7.2.8.2 Installing a Cable Manager.....................................................................................................................................96
7.2.8.3 Inserting a Disk.......................................................................................................................................................98
7.2.9 Installing a Filler Panel............................................................................................................................................101
7.2.10 Connecting Cables.................................................................................................................................................102
7.3 Adding Controller Enclosure......................................................................................................................................103
7.3.1 (Optional) Removing a Filler Panel.........................................................................................................................104
7.3.2 Planning Installation Positions................................................................................................................................105
7.3.3 Installing an Adjustable Guide Rail.........................................................................................................................108
7.3.4 Installing a Ball Bearing Guide Rail (Applicable to High-Density Disk Enclosures)............................................112
7.3.5 Installing a Floating Nut..........................................................................................................................................116
7.3.6 Installing a Data Switch...........................................................................................................................................117
7.3.7 Installing Ethernet Switch (Applicable to the S5500T with Four Controllers).......................................................118
OceanStor S2600T&S5500T&S5600T&S5800T&S6800T
Storage System
Online Capacity Expansion Contents
Issue 01 (2014-12-29) Huawei Proprietary and Confidential
Copyright © Huawei Technologies Co., Ltd.
iv
8/9/2019 OceanStor S2600T&S5500T&S5600T&S5800T&S6800T Storage System V200R002 Online Capacity Expansion 01
http://slidepdf.com/reader/full/oceanstor-s2600ts5500ts5600ts5800ts6800t-storage-system-v200r002-online 6/226
7.3.8 Installing a 2 U Controller Enclosure (S5500T)......................................................................................................119
7.3.9 Installing a 4 U Controller Enclosure (S5600T/S5800T/S6800T)..........................................................................121
7.3.10 Installing a 2 U Disk Enclosure.............................................................................................................................122
7.3.11 Installing a 4 U Disk Enclosure.............................................................................................................................123
7.3.12 Installing a 4 U High-Density Disk Enclosure......................................................................................................125
7.3.12.1 Installing a High-Density Disk Enclosure into a Cabinet...................................................................................125
7.3.12.2 Installing a Cable Manager.................................................................................................................................130
7.3.12.3 Inser ting a Disk...................................................................................................................................................132
7.3.13 Installing a Cable Tray..........................................................................................................................................135
7.3.14 Installing a Filler Panel..........................................................................................................................................137
7.3.15 Connecting Cables.................................................................................................................................................138
7.3.16 Powering On Devices............................................................................................................................................140
7.3.17 Configuring VLANs on an Ethernet Switch (Applicable to the S5500T with Four Controllers).........................143
7.3.18 Adding a Controller Enclosure Using OceanStor Toolkit.....................................................................................143
8 Performing the Post-expansion Check..................................................................................152
9 Expanding Storage Space for Existing Services...................................................................153
9.1 Expanding LUNs........................................................................................................................................................154
9.2 Expanding Storage Space for an Application Server.................................................................................................155
9.2.1 Expanding a LUN on a Windows-Based Application Server.................................................................................155
9.2.2 Expanding a LUN on a SUSE-Based Application Server.......................................................................................159
9.2.3 Expanding a LUN on a Red Hat-Based Application Server....................................................................................160
9.2.4 Expanding a LUN on a Solaris-based Application Server......................................................................................162
9.2.5 Expanding a LUN on an AIX-based Application Server........................................................................................166
9.2.6 Expanding a LUN on an HP-UX-based Application Server...................................................................................170
9.2.7 Expanding a LUN on a VMware ESX-Based Application Server..........................................................................171
10 Allocating Storage Space to New Services.........................................................................177
10.1 Allocating Storage Space..........................................................................................................................................178
10.2 Making the Expanded Storage Space Available to an Application Server..............................................................179
10.2.1 Making Storage Space Available (on a Windows-based Application Server)......................................................179
10.2.2 Making Storage Space Available (on a SUSE-based Application Server)............................................................184
10.2.3 Making Storage Space Available (on a Red Hat-based Application Server)........................................................186
10.2.4 Making Storage Space Available (on a Solaris-based Application Server)..........................................................189
10.2.5 Making Storage Space Available (on an AIX-based Application Server)............................................................192
10.2.6 Making Storage Space Available (on a HP-UX-based Application Server).........................................................195
10.2.7 Making Storage Space Available (on a VMware ESX-based Application Server)...............................................198
A How to Obtain Help.................................................................................................................204
A.1 Preparations For Contacting Huawei.........................................................................................................................205
A.1.1 Collecting Troubleshooting Information................................................................................................................205
A.1.2 Making Debugging Preparations............................................................................................................................205
A.2 How to Use the Document.........................................................................................................................................205
OceanStor S2600T&S5500T&S5600T&S5800T&S6800T
Storage System
Online Capacity Expansion Contents
Issue 01 (2014-12-29) Huawei Proprietary and Confidential
Copyright © Huawei Technologies Co., Ltd.
v
8/9/2019 OceanStor S2600T&S5500T&S5600T&S5800T&S6800T Storage System V200R002 Online Capacity Expansion 01
http://slidepdf.com/reader/full/oceanstor-s2600ts5500ts5600ts5800ts6800t-storage-system-v200r002-online 7/226
A.3 How to Obtain Help from Website............................................................................................................................205
A.4 Ways to Contact Huawei...........................................................................................................................................206
B Glossary......................................................................................................................................207
C Acronyms and Abbreviations................................................................................................218
OceanStor S2600T&S5500T&S5600T&S5800T&S6800T
Storage System
Online Capacity Expansion Contents
Issue 01 (2014-12-29) Huawei Proprietary and Confidential
Copyright © Huawei Technologies Co., Ltd.
vi
8/9/2019 OceanStor S2600T&S5500T&S5600T&S5800T&S6800T Storage System V200R002 Online Capacity Expansion 01
http://slidepdf.com/reader/full/oceanstor-s2600ts5500ts5600ts5800ts6800t-storage-system-v200r002-online 8/226
1 Safety Operation Guide
About This Chapter
This chapter provides guidelines to safety operations during activities such as installation,
maintenance, and troubleshooting. The guidelines consist of the safety regulations for personnel
and equipment. These guidelines must be followed to avoid personal injury and equipment
damage.
1.1 Alarm and Safety Symbols
When you install or maintain equipment, observe the precautions provided by alarms and safety
symbols to prevent personal injury or equipment damage.
1.2 ESD
When installing or maintaining the equipment, follow the ESD safety precautions to prevent
personal injury or equipment damage.
1.3 Using Lasers Safely
When installing or maintaining the equipment, follow the laser safety precautions to ensure the
safety of personnel and equipment.
1.4 Using Fibers Safely
Use fibers in a safe and correct manner, to ensure the normal operation of the equipment and to
prevent personal injury and equipment damage.
1.5 Short CircuitWhen installing or maintaining equipment, use tools according to the regulations to avoid short
circuits.
1.6 Operating the Equipment
When operating the equipment, ensure safety precautions have been taken to prevent personal
injury and equipment damage.
OceanStor S2600T&S5500T&S5600T&S5800T&S6800T
Storage System
Online Capacity Expansion 1 Safety Operation Guide
Issue 01 (2014-12-29) Huawei Proprietary and Confidential
Copyright © Huawei Technologies Co., Ltd.
1
8/9/2019 OceanStor S2600T&S5500T&S5600T&S5800T&S6800T Storage System V200R002 Online Capacity Expansion 01
http://slidepdf.com/reader/full/oceanstor-s2600ts5500ts5600ts5800ts6800t-storage-system-v200r002-online 9/226
1.1 Alarm and Safety Symbols
When you install or maintain equipment, observe the precautions provided by alarms and safety
symbols to prevent personal injury or equipment damage.
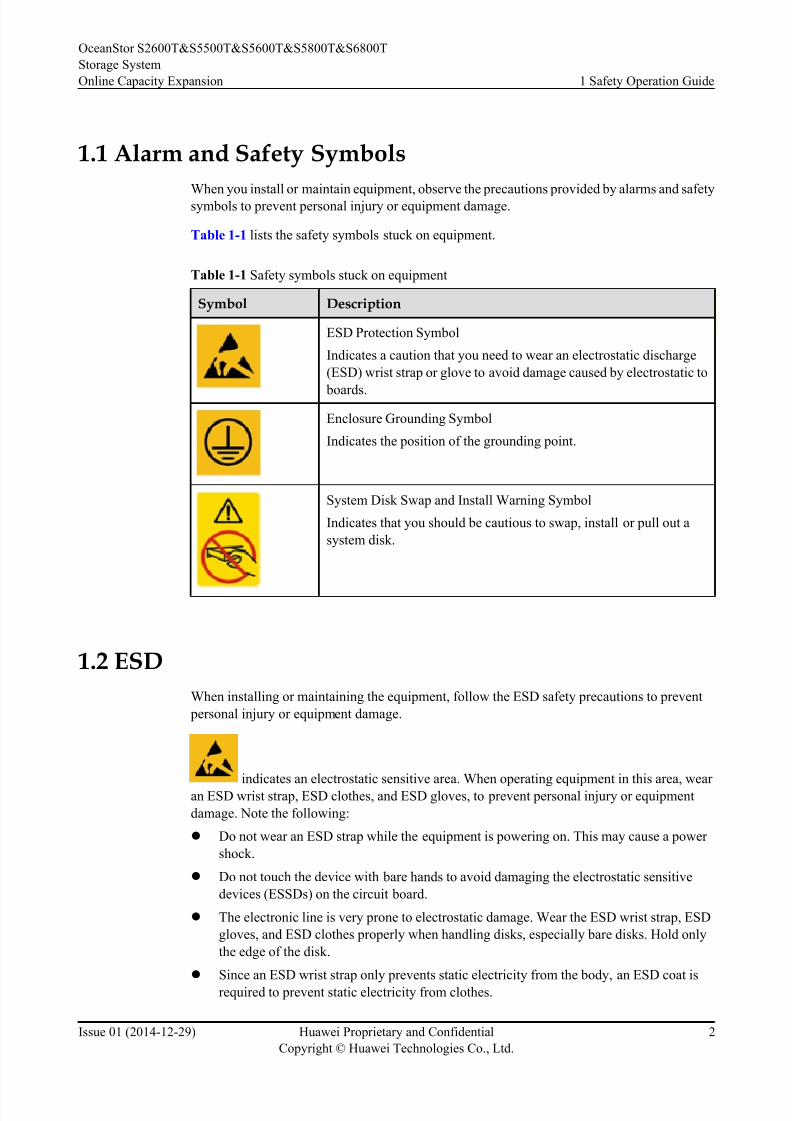
Table 1-1 lists the safety symbols stuck on equipment.
Table 1-1 Safety symbols stuck on equipment
Symbol Description
ESD Protection Symbol
Indicates a caution that you need to wear an electrostatic discharge
(ESD) wrist strap or glove to avoid damage caused by electrostatic to
boards.
Enclosure Grounding Symbol
Indicates the position of the grounding point.
System Disk Swap and Install Warning Symbol
Indicates that you should be cautious to swap, install or pull out a
system disk.
1.2 ESD
When installing or maintaining the equipment, follow the ESD safety precautions to prevent
personal injury or equipment damage.
indicates an electrostatic sensitive area. When operating equipment in this area, wear an ESD wrist strap, ESD clothes, and ESD gloves, to prevent personal injury or equipment
damage. Note the following:
l Do not wear an ESD strap while the equipment is powering on. This may cause a power
shock.
l Do not touch the device with bare hands to avoid damaging the electrostatic sensitive
devices (ESSDs) on the circuit board.
l The electronic line is very prone to electrostatic damage. Wear the ESD wrist strap, ESD
gloves, and ESD clothes properly when handling disks, especially bare disks. Hold only
the edge of the disk.
l Since an ESD wrist strap only prevents static electricity from the body, an ESD coat is
required to prevent static electricity from clothes.
OceanStor S2600T&S5500T&S5600T&S5800T&S6800T
Storage System
Online Capacity Expansion 1 Safety Operation Guide
Issue 01 (2014-12-29) Huawei Proprietary and Confidential
Copyright © Huawei Technologies Co., Ltd.
2
8/9/2019 OceanStor S2600T&S5500T&S5600T&S5800T&S6800T Storage System V200R002 Online Capacity Expansion 01
http://slidepdf.com/reader/full/oceanstor-s2600ts5500ts5600ts5800ts6800t-storage-system-v200r002-online 10/226
l Before installing or replacing devices, wear an ESD wrist strap, ESD gloves, and an ESD
coat to prevent static electricity from causing damage to you and equipment.
l Use special ESD bags to carry or transport the parts.
1.3 Using Lasers Safely
When installing or maintaining the equipment, follow the laser safety precautions to ensure the
safety of personnel and equipment.
Laser safety precautions include:
l Personal injury
l Equipment damage
Personal Injury
DANGER
The laser emitted by the optical transceiver is invisible infrared ray, which may cause permanent
damage to human eyes. Do not look into the optical transceiver during device maintenance.
Equipment Damage
To prevent equipment damage when you handle the equipment, be aware of the following
precautions:
l The optical transceivers on the equipment or the cables, which are not used, must be covered
with protective caps.
l When removing the cable that connects to the optical interface on the equipment, cover the
interface and the cable with dust-proof caps to prevent dust.
l When you perform the hardware loopback test by connecting the cable to the optical
transceiver, add an attenuator to avoid damage to the optical transceiver as a result of strong
optical power.
l When using the Optical Time Domain Reflectometer (OTDR), disconnect the cable
between the peer equipment and the local equipment to avoid damage to the optical
transceiver as a result of strong optical power.
l Do not remove or insert the optical transceiver connecting to cables at will.
1.4 Using Fibers Safely
Use fibers in a safe and correct manner, to ensure the normal operation of the equipment and to
prevent personal injury and equipment damage.
OceanStor S2600T&S5500T&S5600T&S5800T&S6800T
Storage System
Online Capacity Expansion 1 Safety Operation Guide
Issue 01 (2014-12-29) Huawei Proprietary and Confidential
Copyright © Huawei Technologies Co., Ltd.
3
8/9/2019 OceanStor S2600T&S5500T&S5600T&S5800T&S6800T Storage System V200R002 Online Capacity Expansion 01
http://slidepdf.com/reader/full/oceanstor-s2600ts5500ts5600ts5800ts6800t-storage-system-v200r002-online 11/226
DANGER
The laser beam on the optical interface board or from the fiber may cause injuries to eyes. Do
not stare into the optical interface or fiber connector during installation and maintenance of optical interface boards or fibers.
Cleaning the Fiber Connectors and Optical Interfaces
Use the special cleaning tools and materials to clean the fiber connectors and optical interfaces.
Common tools and materials:
l Special cleaning solvent (Isoamylol is preferred, propyl alcohol is the next, alcohol and
formalin are forbidden.)
l Non-woven lens tissue
l Special compressed gas
l Cotton stick (medical cotton or long fiber cotton)
l Special cleaning roll (used with above mentioned special cleaning solvent)
l Magnifier for optical connectors
Replacing Fibers
Use filter caps to cap the connectors of the fibers that are not used temporarily.
1.5 Short CircuitWhen installing or maintaining equipment, use tools according to the regulations to avoid short
circuits.
NOTICE
l Do not place tools on the air intake board of the enclosure. Otherwise, a short circuit may
be caused.
lDo not drop screws into the enclosure or the equipment. Otherwise, a short circuit may becaused.
1.6 Operating the Equipment
When operating the equipment, ensure safety precautions have been taken to prevent personal
injury and equipment damage.
OceanStor S2600T&S5500T&S5600T&S5800T&S6800T
Storage System
Online Capacity Expansion 1 Safety Operation Guide
Issue 01 (2014-12-29) Huawei Proprietary and Confidential
Copyright © Huawei Technologies Co., Ltd.
4
8/9/2019 OceanStor S2600T&S5500T&S5600T&S5800T&S6800T Storage System V200R002 Online Capacity Expansion 01
http://slidepdf.com/reader/full/oceanstor-s2600ts5500ts5600ts5800ts6800t-storage-system-v200r002-online 12/226
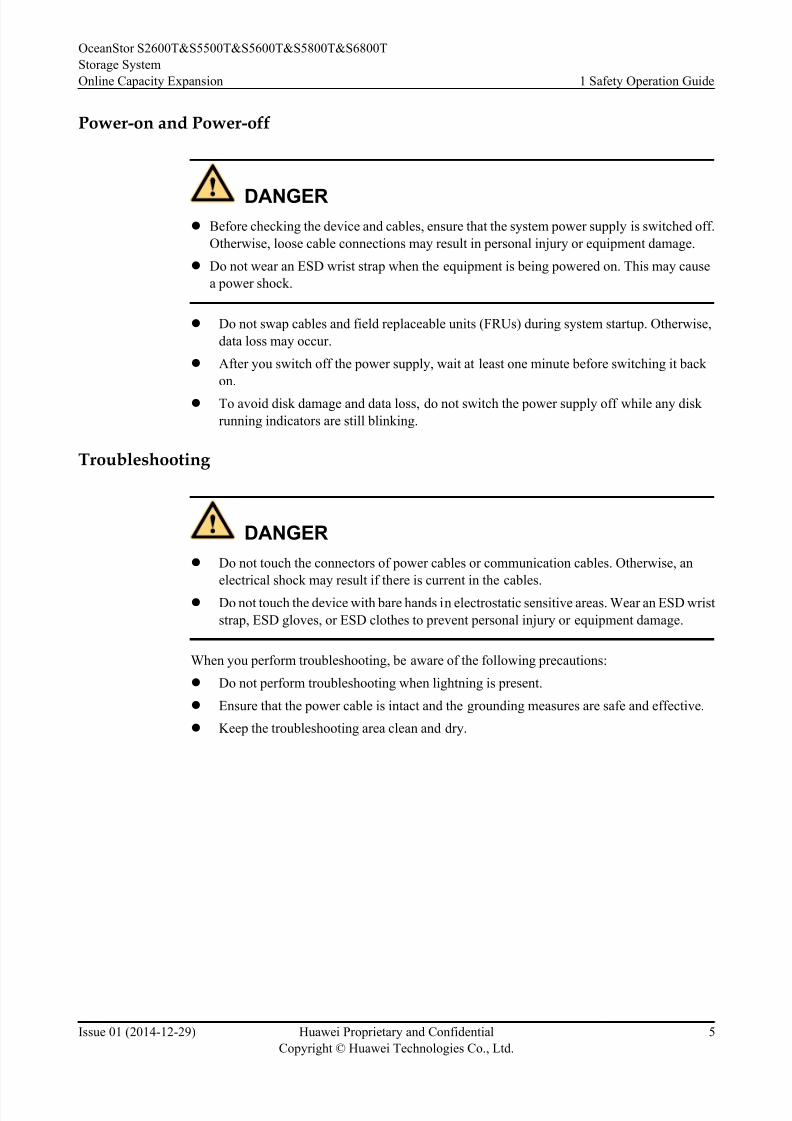
Power-on and Power-off
DANGER
l Before checking the device and cables, ensure that the system power supply is switched off.
Otherwise, loose cable connections may result in personal injury or equipment damage.
l Do not wear an ESD wrist strap when the equipment is being powered on. This may cause
a power shock.
l Do not swap cables and field replaceable units (FRUs) during system startup. Otherwise,
data loss may occur.
l After you switch off the power supply, wait at least one minute before switching it back
on.
l To avoid disk damage and data loss, do not switch the power supply off while any disk
running indicators are still blinking.
Troubleshooting
DANGER
l Do not touch the connectors of power cables or communication cables. Otherwise, an
electrical shock may result if there is current in the cables.
l Do not touch the device with bare hands in electrostatic sensitive areas. Wear an ESD wrist
strap, ESD gloves, or ESD clothes to prevent personal injury or equipment damage.
When you perform troubleshooting, be aware of the following precautions:
l Do not perform troubleshooting when lightning is present.
l Ensure that the power cable is intact and the grounding measures are safe and effective.
l Keep the troubleshooting area clean and dry.
OceanStor S2600T&S5500T&S5600T&S5800T&S6800T
Storage System
Online Capacity Expansion 1 Safety Operation Guide
Issue 01 (2014-12-29) Huawei Proprietary and Confidential
Copyright © Huawei Technologies Co., Ltd.
5
8/9/2019 OceanStor S2600T&S5500T&S5600T&S5800T&S6800T Storage System V200R002 Online Capacity Expansion 01
http://slidepdf.com/reader/full/oceanstor-s2600ts5500ts5600ts5800ts6800t-storage-system-v200r002-online 13/226
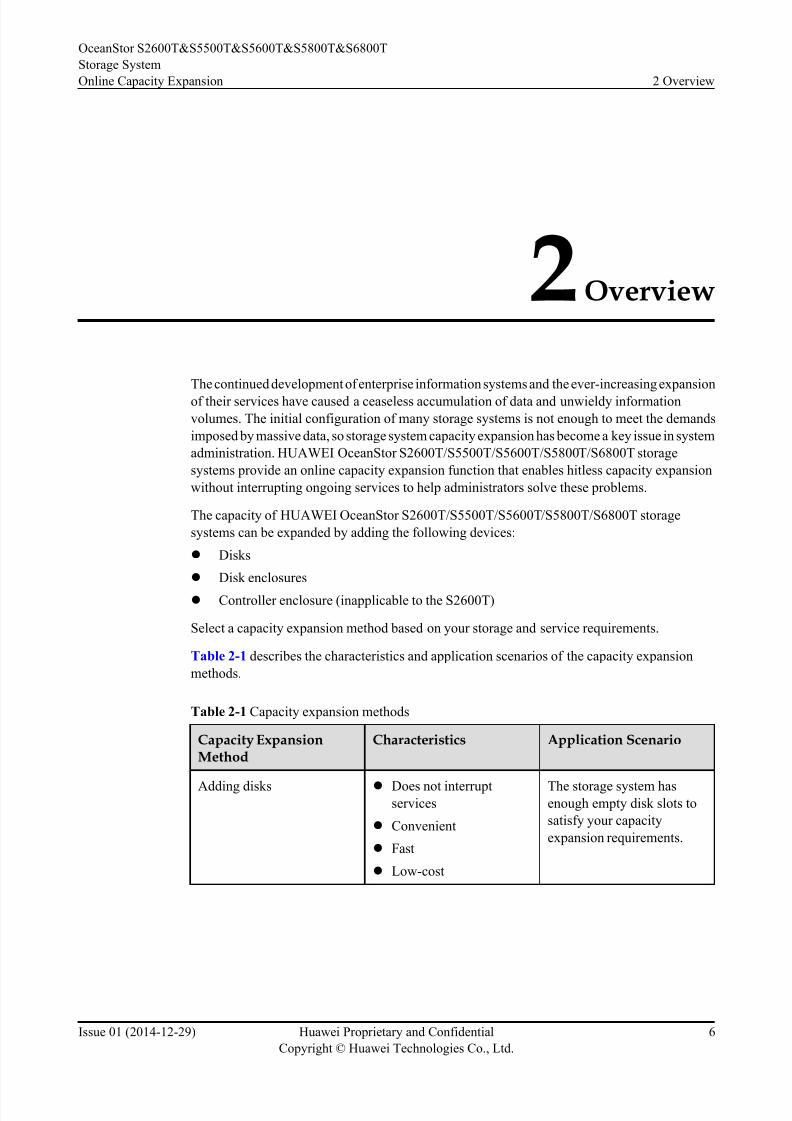
2 Overview
The continued development of enterprise information systems and the ever-increasing expansion
of their services have caused a ceaseless accumulation of data and unwieldy information
volumes. The initial configuration of many storage systems is not enough to meet the demands
imposed by massive data, so storage system capacity expansion has become a key issue in system
administration. HUAWEI OceanStor S2600T/S5500T/S5600T/S5800T/S6800T storage
systems provide an online capacity expansion function that enables hitless capacity expansion
without interrupting ongoing services to help administrators solve these problems.
The capacity of HUAWEI OceanStor S2600T/S5500T/S5600T/S5800T/S6800T storage
systems can be expanded by adding the following devices:
l Disks
l Disk enclosures
l Controller enclosure (inapplicable to the S2600T)
Select a capacity expansion method based on your storage and service requirements.
Table 2-1 describes the characteristics and application scenarios of the capacity expansion
methods.
Table 2-1 Capacity expansion methods
Capacity ExpansionMethod
Characteristics Application Scenario
Adding disks l Does not interruptservices
l Convenient
l Fast
l Low-cost
The storage system hasenough empty disk slots to
satisfy your capacity
expansion requirements.
OceanStor S2600T&S5500T&S5600T&S5800T&S6800T
Storage System
Online Capacity Expansion 2 Overview
Issue 01 (2014-12-29) Huawei Proprietary and Confidential
Copyright © Huawei Technologies Co., Ltd.
6
8/9/2019 OceanStor S2600T&S5500T&S5600T&S5800T&S6800T Storage System V200R002 Online Capacity Expansion 01
http://slidepdf.com/reader/full/oceanstor-s2600ts5500ts5600ts5800ts6800t-storage-system-v200r002-online 14/226
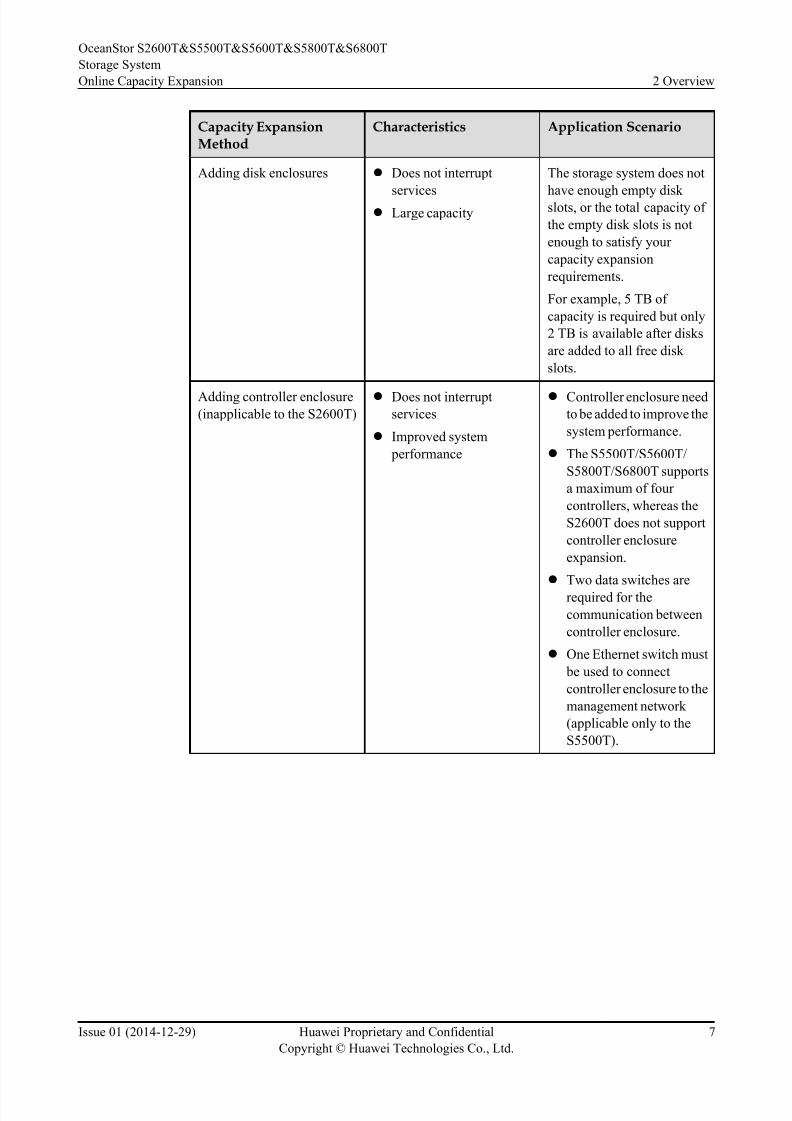
Capacity ExpansionMethod
Characteristics Application Scenario
Adding disk enclosures l Does not interrupt
servicesl Large capacity
The storage system does not
have enough empty disk slots, or the total capacity of
the empty disk slots is not
enough to satisfy your
capacity expansion
requirements.
For example, 5 TB of
capacity is required but only
2 TB is available after disks
are added to all free disk
slots.
Adding controller enclosure(inapplicable to the S2600T)
l Does not interruptservices
l Improved system
performance
l Controller enclosure needto be added to improve the
system performance.
l The S5500T/S5600T/
S5800T/S6800T supports
a maximum of four
controllers, whereas the
S2600T does not support
controller enclosure
expansion.
l Two data switches are
required for the
communication between
controller enclosure.
l One Ethernet switch must
be used to connect
controller enclosure to the
management network
(applicable only to the
S5500T).
OceanStor S2600T&S5500T&S5600T&S5800T&S6800T
Storage System
Online Capacity Expansion 2 Overview
Issue 01 (2014-12-29) Huawei Proprietary and Confidential
Copyright © Huawei Technologies Co., Ltd.
7
8/9/2019 OceanStor S2600T&S5500T&S5600T&S5800T&S6800T Storage System V200R002 Online Capacity Expansion 01
http://slidepdf.com/reader/full/oceanstor-s2600ts5500ts5600ts5800ts6800t-storage-system-v200r002-online 15/226
3 Capacity Expansion Process
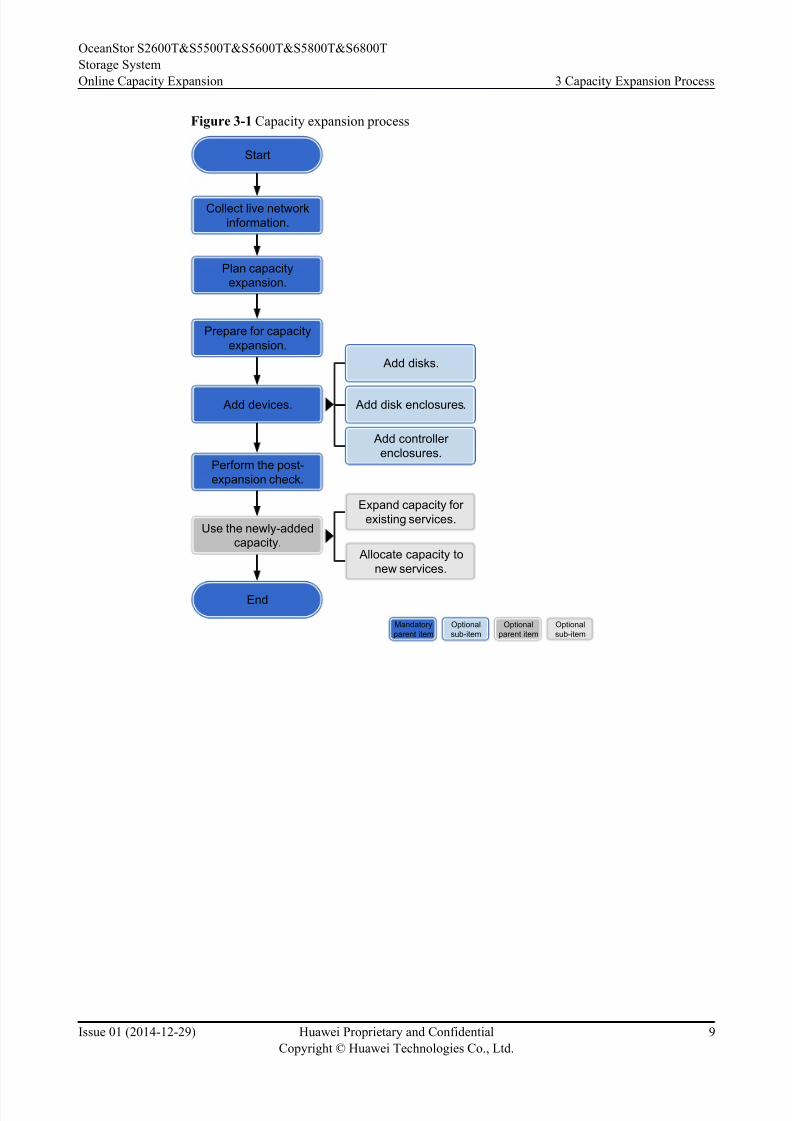
Storage system capacity expansion must follow the process outlined below in order to minimize
the risk of errors or faults. The capacity expansion process includes reviewing guidelines for
safe operation, collecting live network information, making a capacity expansion plan, preparing
tools, checking before capacity expansion, backing up storage system configurations, adding
expansion devices, checking after capacity expansion, and using the newly added capacity.
Figure 3-1 shows the capacity expansion process.
OceanStor S2600T&S5500T&S5600T&S5800T&S6800T
Storage System
Online Capacity Expansion 3 Capacity Expansion Process
Issue 01 (2014-12-29) Huawei Proprietary and Confidential
Copyright © Huawei Technologies Co., Ltd.
8
8/9/2019 OceanStor S2600T&S5500T&S5600T&S5800T&S6800T Storage System V200R002 Online Capacity Expansion 01
http://slidepdf.com/reader/full/oceanstor-s2600ts5500ts5600ts5800ts6800t-storage-system-v200r002-online 16/226
Figure 3-1 Capacity expansion process
Add devices.
Start
End
Perform the post-
expansion check.
Prepare for capacity
expansion.
Use the newly-addedcapacity.
Add disks.
Add disk enclosures.
Add controller
enclosures.
Expand capacity for
existing services.
Allocate capacity to
new services.
Mandatory
parent item
Optional
sub-item
Optional
parent item
Optional
sub-item
Plan capacityexpansion.
Collect live network
information.
OceanStor S2600T&S5500T&S5600T&S5800T&S6800T
Storage System
Online Capacity Expansion 3 Capacity Expansion Process
Issue 01 (2014-12-29) Huawei Proprietary and Confidential
Copyright © Huawei Technologies Co., Ltd.
9
8/9/2019 OceanStor S2600T&S5500T&S5600T&S5800T&S6800T Storage System V200R002 Online Capacity Expansion 01
http://slidepdf.com/reader/full/oceanstor-s2600ts5500ts5600ts5800ts6800t-storage-system-v200r002-online 17/226
8/9/2019 OceanStor S2600T&S5500T&S5600T&S5800T&S6800T Storage System V200R002 Online Capacity Expansion 01
http://slidepdf.com/reader/full/oceanstor-s2600ts5500ts5600ts5800ts6800t-storage-system-v200r002-online 18/226
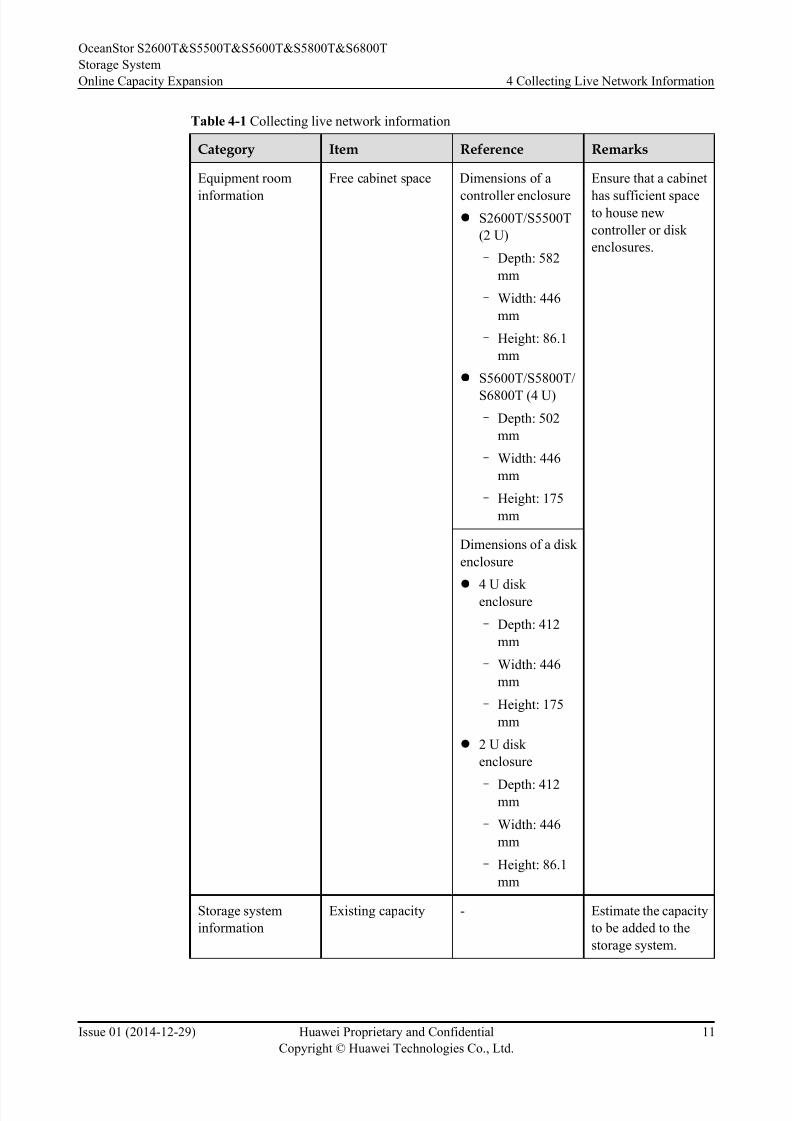
Table 4-1 Collecting live network information
Category Item Reference Remarks
Equipment room
information
Free cabinet space Dimensions of a
controller enclosure
l S2600T/S5500T
(2 U)
– Depth: 582
mm
– Width: 446
mm
– Height: 86.1
mm
l S5600T/S5800T/
S6800T (4 U)
– Depth: 502
mm
– Width: 446
mm
– Height: 175
mm
Ensure that a cabinet
has sufficient spaceto house new
controller or disk
enclosures.
Dimensions of a disk
enclosure
l4 U disk enclosure
– Depth: 412
mm
– Width: 446
mm
– Height: 175
mm
l 2 U disk
enclosure
–Depth: 412mm
– Width: 446
mm
– Height: 86.1
mm
Storage system
information
Existing capacity - Estimate the capacity
to be added to the
storage system.
OceanStor S2600T&S5500T&S5600T&S5800T&S6800T
Storage System
Online Capacity Expansion 4 Collecting Live Network Information
Issue 01 (2014-12-29) Huawei Proprietary and Confidential
Copyright © Huawei Technologies Co., Ltd.
11
8/9/2019 OceanStor S2600T&S5500T&S5600T&S5800T&S6800T Storage System V200R002 Online Capacity Expansion 01
http://slidepdf.com/reader/full/oceanstor-s2600ts5500ts5600ts5800ts6800t-storage-system-v200r002-online 19/226
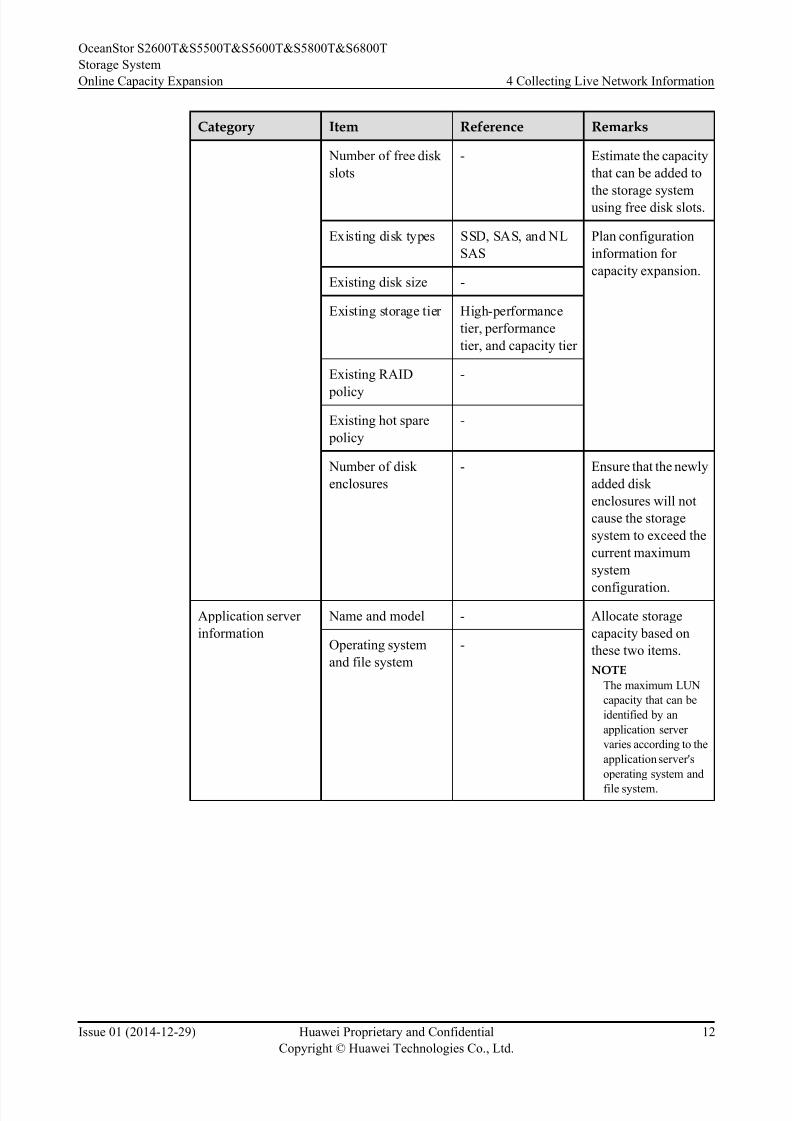
Category Item Reference Remarks
Number of free disk
slots
- Estimate the capacity
that can be added to
the storage systemusing free disk slots.
Existing disk types SSD, SAS, and NL
SAS
Plan configuration
information for
capacity expansion.Existing disk size -
Existing storage tier High-performance
tier, performance
tier, and capacity tier
Existing RAID
policy
-
Existing hot spare
policy
-
Number of disk
enclosures
- Ensure that the newly
added disk
enclosures will not
cause the storage
system to exceed the
current maximum
system
configuration.
Application server
information
Name and model - Allocate storage
capacity based on
these two items.
NOTE
The maximum LUN
capacity that can be
identified by an
application server
varies according to the
application server's
operating system and
file system.
Operating system
and file system
-
OceanStor S2600T&S5500T&S5600T&S5800T&S6800T
Storage System
Online Capacity Expansion 4 Collecting Live Network Information
Issue 01 (2014-12-29) Huawei Proprietary and Confidential
Copyright © Huawei Technologies Co., Ltd.
12
8/9/2019 OceanStor S2600T&S5500T&S5600T&S5800T&S6800T Storage System V200R002 Online Capacity Expansion 01
http://slidepdf.com/reader/full/oceanstor-s2600ts5500ts5600ts5800ts6800t-storage-system-v200r002-online 20/226
5 Making a Capacity Expansion Plan
About This Chapter
Capacity expansion plans vary by expansion method. Before expanding the storage system
capacity, mak e an appropriate plan based on the hardware compatibility of new and existing
devices, and the status of services being carried by the storage system.
5.1 Selecting a Capacity Expansion Method
Select a capacity expansion method based on your capacity and site requirements.
5.2 Planning for the Addition of Disks
If you want to expand the system capacity by adding disks, ensure that the disks that you wantto add is com patible with the existing storage system and determine the types and quantity of
the disks.
5.3 Planning for the Addition of Disk Enclosures
If you want to expand the system capacity by adding disk enclosures, plan the types and quantity
of disk enclosures that you want to add. After planning, draw two diagrams of the storage system,
one diagram r ecording the system's current cable connections, and the second showing the cable
connections after expansion is complete.
5.4 Planning for the Addition of Controller Enclosure (Inapplicable to the S2600T)
If you want to expand the system capacity by adding controller enclosure, draw a cable
connection diagram between the existing controllers, new controllers, and disk enclosures.
5.5 Determining the Capacity Expansion Time
Expanding system capacity at an appropriate time can reduce risks associated with the expansion
process.
OceanStor S2600T&S5500T&S5600T&S5800T&S6800T
Storage System
Online Capacity Expansion 5 Making a Capacity Expansion Plan
Issue 01 (2014-12-29) Huawei Proprietary and Confidential
Copyright © Huawei Technologies Co., Ltd.
13
8/9/2019 OceanStor S2600T&S5500T&S5600T&S5800T&S6800T Storage System V200R002 Online Capacity Expansion 01
http://slidepdf.com/reader/full/oceanstor-s2600ts5500ts5600ts5800ts6800t-storage-system-v200r002-online 21/226
5.1 Selecting a Capacity Expansion Method
Select a capacity expansion method based on your capacity and site requirements.
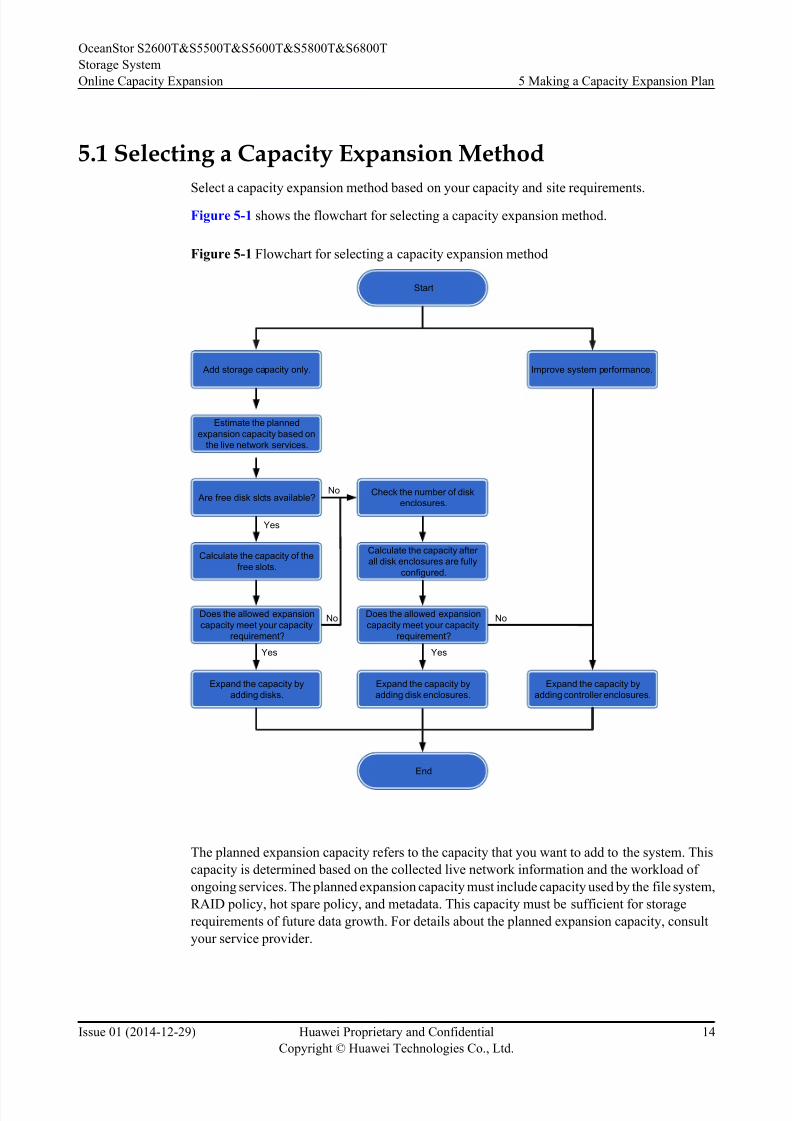
Figure 5-1 shows the flowchart for selecting a capacity expansion method.
Figure 5-1 Flowchart for selecting a capacity expansion method
Are free disk slots available?
Start
End
Calculate the capacity of the
free slots.
Estimate the planned
expansion capacity based on
the live network services.
Add storage capacity only. Improve system performance.
Does the allowed expansion
capacity meet your capacity
requirement?
Expand the capacity by
adding disks.
Check the number of disk
enclosures.
Calculate the capacity after
all disk enclosures are fully
configured.
Does the allowed expansion
capacity meet your capacity
requirement?
Expand the capacity by
adding disk enclosures.
Expand the capacity by
adding controller enclosures.
Yes
No
Yes
No
Yes
No
The planned expansion capacity refers to the capacity that you want to add to the system. This
capacity is determined based on the collected live network information and the workload of
ongoing services. The planned expansion capacity must include capacity used by the file system,
RAID policy, hot spare policy, and metadata. This capacity must be sufficient for storage
requirements of future data growth. For details about the planned expansion capacity, consult
your service provider.
OceanStor S2600T&S5500T&S5600T&S5800T&S6800T
Storage System
Online Capacity Expansion 5 Making a Capacity Expansion Plan
Issue 01 (2014-12-29) Huawei Proprietary and Confidential
Copyright © Huawei Technologies Co., Ltd.
14
8/9/2019 OceanStor S2600T&S5500T&S5600T&S5800T&S6800T Storage System V200R002 Online Capacity Expansion 01
http://slidepdf.com/reader/full/oceanstor-s2600ts5500ts5600ts5800ts6800t-storage-system-v200r002-online 22/226
NOTE
The planned expansion capacity recommended by your service provider is usually the one identified by an
application server. Therefore, this capacity must include capacity used by the file system, RAID policy,
hot spare policy, and metadata.
The allowed expansion capacity refers to the maximum available capacity of the existing free
disk slots.
Allowed expansion capacity = Capacity of a disk x Number of free disk slots
NOTE
l You can estimate the actual capacity of a disk based on the capacity of existing disks used in the
storage system.
l Use the actual capacity instead of the nominal capacity.
For example, if the storage system uses 600 GB SAS disks, the allowed expansion capacity is equal
to 559 GB (rather than 600 GB) multiplied by the number of free disk slots. Disk manufacturers and
operating systems use different conversion factors when calculating disk capacities. Therefore, the
nominal capacity of a disk is different from the actual capacity displayed in the operating system.
Disk manufacturers use 1000 as the conversion factor: 1 GB = 1000 MB, 1 MB = 1000 KB, 1 KB =
1000 bytes
Operating systems use 1024 as the conversion factor: 1 GB = 1024 MB, 1 MB = 1024 KB, 1 KB =
1024 bytes
The disk capacity displayed in the operating system is for reference only. The disk capacity reported
in the DeviceManager management software always prevails.
l For details about how to calculate the allowed expansion capacity, see Calculating the Allowed
Expansion Capacity.
Calculating the Allowed Expansion CapacityThe allowed expansion capacity is equal to the planned expansion capacity minus the capacity
used by the RAID policy, hot spare policy, and metadata.
NOTE
If you want to expand the system capacity by adding controller enclosure, consider the coffer disk capacity
when calculating the allowed expansion capacity.
l WriteHole capacity
WriteHole is used to resolve inconsistent data stripe verification caused by certain
operations before I/Os arrive at disks. Each disk reserves a 256 MB space as WriteHole
capacity.
l Metadata capacity
Each disk reserves 5.2% of its total capacity as metadata capacity.
l Capacity reserved when an uneven quantity of disks are selected
Each disk reserves 1% of its total capacity when an uneven quantity of disks are selected.
If 1% of the total space is smaller than 2 GB, 2 GB is reserved.
l Hot spare capacity
To prevent data loss caused by a member disk failure, the storage system employs hot spare
space to store data on the failed member disk.
The following are the supported hot spare policies:
– High
OceanStor S2600T&S5500T&S5600T&S5800T&S6800T
Storage System
Online Capacity Expansion 5 Making a Capacity Expansion Plan
Issue 01 (2014-12-29) Huawei Proprietary and Confidential
Copyright © Huawei Technologies Co., Ltd.
15

8/9/2019 OceanStor S2600T&S5500T&S5600T&S5800T&S6800T Storage System V200R002 Online Capacity Expansion 01
http://slidepdf.com/reader/full/oceanstor-s2600ts5500ts5600ts5800ts6800t-storage-system-v200r002-online 23/226
A storage tier uses the capacity of one disk among every 12 disks as the hot spare
capacity for them. The hot spare capacity non-linearly increases as the number of disks
increases. When the number of disks exceeds 168, a storage tier uses the capacity of
one disk among every 96 disks as the hot spare capacity for them.
–Low
A storage tier uses the capacity of one disk among every 24 disks as the hot spare
capacity for them. The hot spare capacity non-linearly increases as the number of disks
increases. When the number of disks exceeds 168, a storage tier uses the capacity of
one disk among every 192 disks as the hot spare capacity for them.
– None
No hot space capacity is reserved.
Table 5-1 shows the non-linear changes in hot spare capacity as the number of disks
increases.
Table 5-1 Changes in hot spare capacity
Number of Disks Threshold Number of HotSpare Disks for aHigh-Level HotSpare Policy
Number of HotSpare Disks for aLow-Level HotSpare Policy
1 to 12 12 1 1
13 to 24 24 2
25 to 48 48 3 2
49 to 72 72 4
73 to 120 120 5 3
121 to 168 168 6
169 to 264 264 7 4
265 to 360 360 8
NOTE
Table 5-1 lists common changes in hot spare capacity. The number of disks supported by a storage
system and their hot spare capacity may vary.
l Disk utilization of different RAID levels
Table 5-2 lists the disk utilization of different RAID levels.
OceanStor S2600T&S5500T&S5600T&S5800T&S6800T
Storage System
Online Capacity Expansion 5 Making a Capacity Expansion Plan
Issue 01 (2014-12-29) Huawei Proprietary and Confidential
Copyright © Huawei Technologies Co., Ltd.
16
8/9/2019 OceanStor S2600T&S5500T&S5600T&S5800T&S6800T Storage System V200R002 Online Capacity Expansion 01
http://slidepdf.com/reader/full/oceanstor-s2600ts5500ts5600ts5800ts6800t-storage-system-v200r002-online 24/226
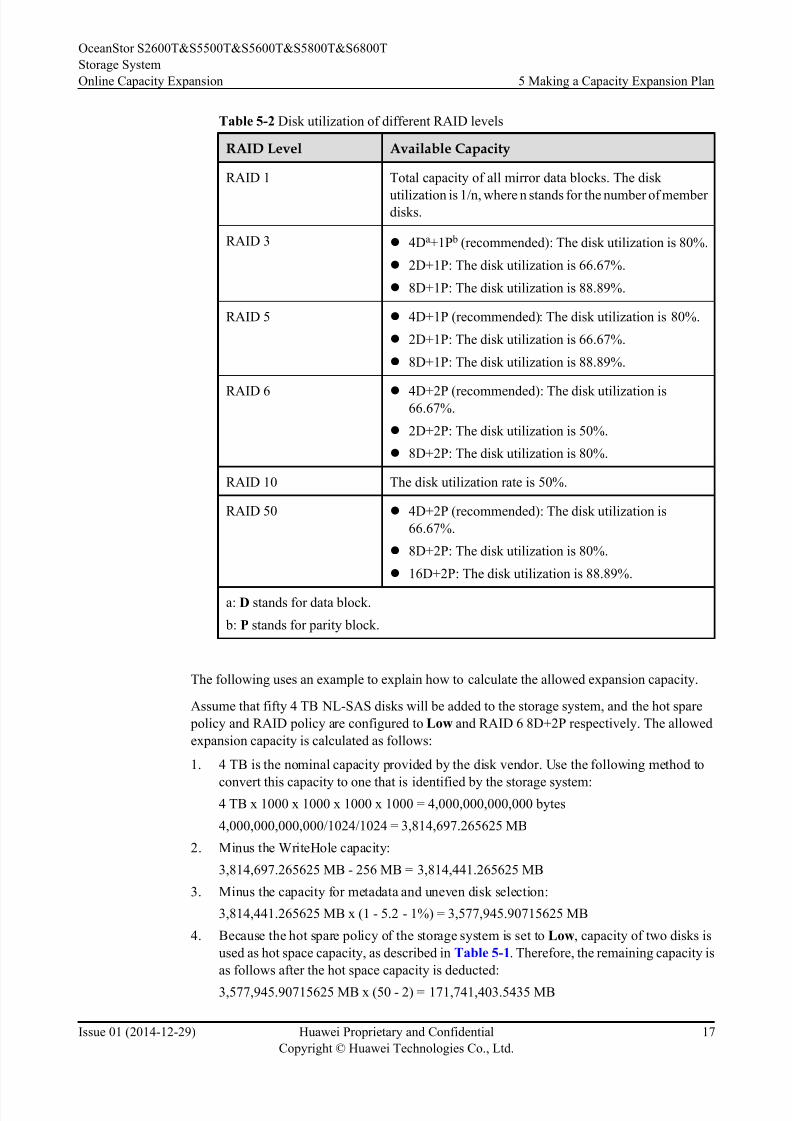
Table 5-2 Disk utilization of different RAID levels
RAID Level Available Capacity
RAID 1 Total capacity of all mirror data blocks. The disk
utilization is 1/n, where n stands for the number of member disks.
RAID 3 l 4Da+1P b (recommended): The disk utilization is 80%.
l 2D+1P: The disk utilization is 66.67%.
l 8D+1P: The disk utilization is 88.89%.
RAID 5 l 4D+1P (recommended): The disk utilization is 80%.
l 2D+1P: The disk utilization is 66.67%.
l 8D+1P: The disk utilization is 88.89%.
RAID 6 l 4D+2P (recommended): The disk utilization is66.67%.
l 2D+2P: The disk utilization is 50%.
l 8D+2P: The disk utilization is 80%.
RAID 10 The disk utilization rate is 50%.
RAID 50 l 4D+2P (recommended): The disk utilization is
66.67%.
l 8D+2P: The disk utilization is 80%.
l 16D+2P: The disk utilization is 88.89%.
a: D stands for data block.
b: P stands for parity block.
The following uses an example to explain how to calculate the allowed expansion capacity.
Assume that fifty 4 TB NL-SAS disks will be added to the storage system, and the hot spare
policy and RAID policy are configured to Low and RAID 6 8D+2P respectively. The allowed
expansion capacity is calculated as follows:
1. 4 TB is the nominal capacity provided by the disk vendor. Use the following method to
convert this capacity to one that is identified by the storage system:4 TB x 1000 x 1000 x 1000 x 1000 = 4,000,000,000,000 bytes
4,000,000,000,000/1024/1024 = 3,814,697.265625 MB
2. Minus the WriteHole capacity:
3,814,697.265625 MB - 256 MB = 3,814,441.265625 MB
3. Minus the capacity for metadata and uneven disk selection:
3,814,441.265625 MB x (1 - 5.2 - 1%) = 3,577,945.90715625 MB
4. Because the hot spare policy of the storage system is set to Low, capacity of two disks is
used as hot space capacity, as described in Table 5-1. Therefore, the remaining capacity is
as follows after the hot space capacity is deducted:
3,577,945.90715625 MB x (50 - 2) = 171,741,403.5435 MB
OceanStor S2600T&S5500T&S5600T&S5800T&S6800T
Storage System
Online Capacity Expansion 5 Making a Capacity Expansion Plan
Issue 01 (2014-12-29) Huawei Proprietary and Confidential
Copyright © Huawei Technologies Co., Ltd.
17
8/9/2019 OceanStor S2600T&S5500T&S5600T&S5800T&S6800T Storage System V200R002 Online Capacity Expansion 01
http://slidepdf.com/reader/full/oceanstor-s2600ts5500ts5600ts5800ts6800t-storage-system-v200r002-online 25/226
Equals to 171,741,403.5435 MB/1024/1024 = 163.785 TB
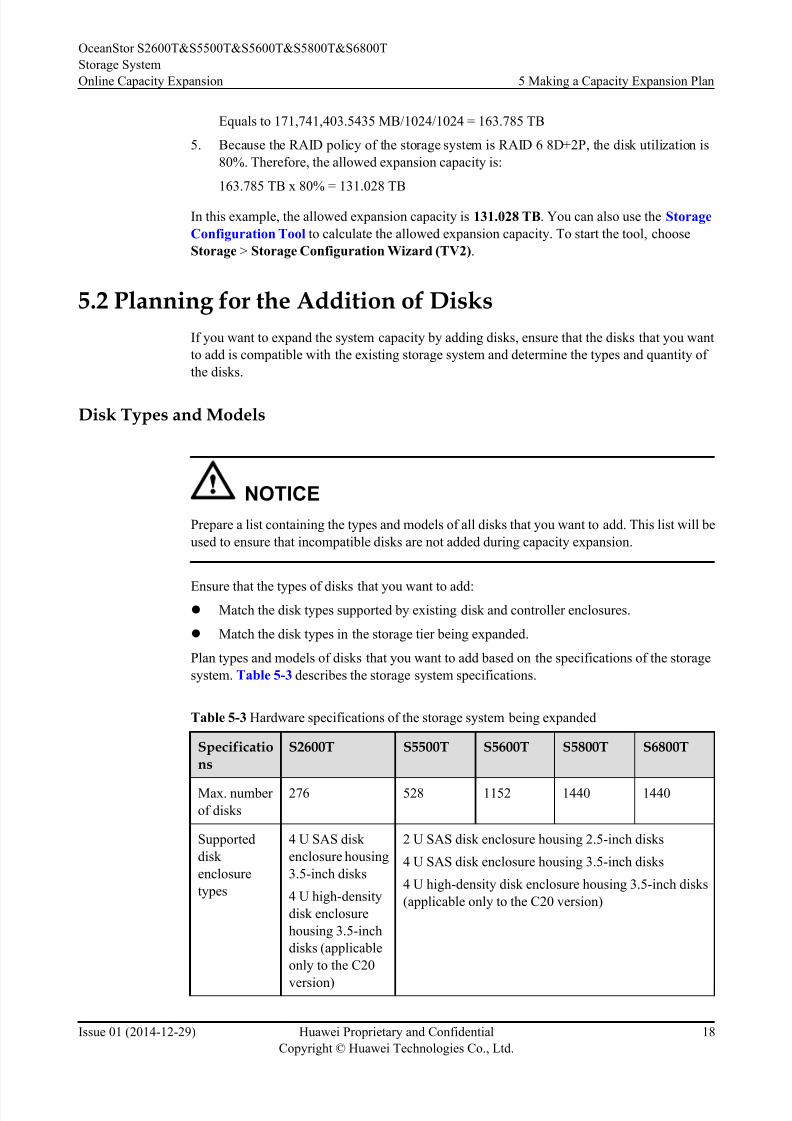
5. Because the RAID policy of the storage system is RAID 6 8D+2P, the disk utilization is
80%. Therefore, the allowed expansion capacity is:
163.785 TB x 80% = 131.028 TB
In this example, the allowed expansion capacity is 131.028 TB. You can also use the Storage
Configuration Tool to calculate the allowed expansion capacity. To start the tool, choose
Storage > Storage Configuration Wizard (TV2).
5.2 Planning for the Addition of Disks
If you want to expand the system capacity by adding disks, ensure that the disks that you want
to add is compatible with the existing storage system and determine the types and quantity of
the disks.
Disk Types and Models
NOTICE
Prepare a list containing the types and models of all disks that you want to add. This list will be
used to ensure that incompatible disks are not added during capacity expansion.
Ensure that the types of disks that you want to add:l Match the disk types supported by existing disk and controller enclosures.
l Match the disk types in the storage tier being expanded.
Plan types and models of disks that you want to add based on the specifications of the storage
system. Table 5-3 describes the storage system specifications.
Table 5-3 Hardware specifications of the storage system being expanded
Specifications
S2600T S5500T S5600T S5800T S6800T
Max. number
of disks
276 528 1152 1440 1440
Supported
disk
enclosure
types
4 U SAS disk
enclosure housing
3.5-inch disks
4 U high-density
disk enclosure
housing 3.5-inch
disks (applicable
only to the C20
version)
2 U SAS disk enclosure housing 2.5-inch disks
4 U SAS disk enclosure housing 3.5-inch disks
4 U high-density disk enclosure housing 3.5-inch disks
(applicable only to the C20 version)
OceanStor S2600T&S5500T&S5600T&S5800T&S6800T
Storage System
Online Capacity Expansion 5 Making a Capacity Expansion Plan
Issue 01 (2014-12-29) Huawei Proprietary and Confidential
Copyright © Huawei Technologies Co., Ltd.
18
8/9/2019 OceanStor S2600T&S5500T&S5600T&S5800T&S6800T Storage System V200R002 Online Capacity Expansion 01
http://slidepdf.com/reader/full/oceanstor-s2600ts5500ts5600ts5800ts6800t-storage-system-v200r002-online 26/226
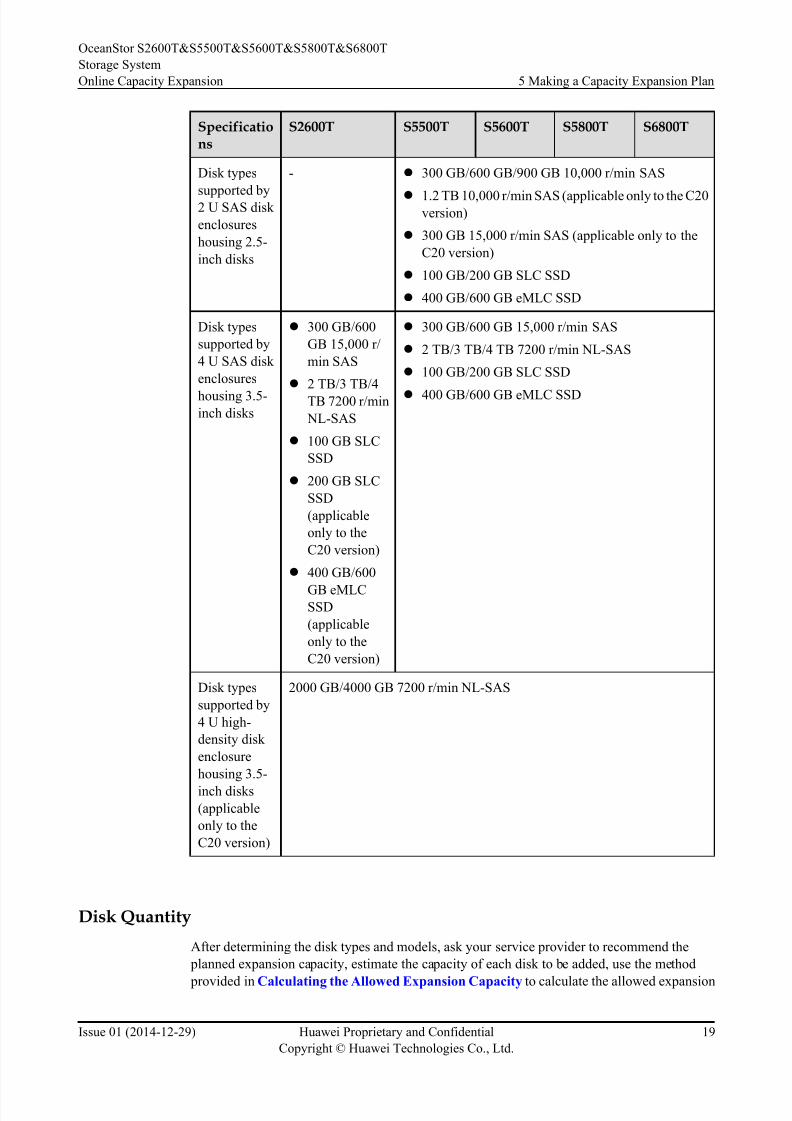
Specifications
S2600T S5500T S5600T S5800T S6800T
Disk types
supported by2 U SAS disk
enclosures
housing 2.5-
inch disks
- l 300 GB/600 GB/900 GB 10,000 r/min SAS
l 1.2 TB 10,000 r/min SAS (applicable only to the C20version)
l 300 GB 15,000 r/min SAS (applicable only to the
C20 version)
l 100 GB/200 GB SLC SSD
l 400 GB/600 GB eMLC SSD
Disk types
supported by
4 U SAS disk
enclosures
housing 3.5-inch disks
l 300 GB/600
GB 15,000 r/
min SAS
l 2 TB/3 TB/4
TB 7200 r/min
NL-SAS
l 100 GB SLC
SSD
l 200 GB SLC
SSD
(applicable
only to the
C20 version)
l 400 GB/600
GB eMLCSSD
(applicable
only to the
C20 version)
l 300 GB/600 GB 15,000 r/min SAS
l 2 TB/3 TB/4 TB 7200 r/min NL-SAS
l 100 GB/200 GB SLC SSD
l 400 GB/600 GB eMLC SSD
Disk types
supported by
4 U high-
density disk
enclosure
housing 3.5-
inch disks
(applicable
only to the
C20 version)
2000 GB/4000 GB 7200 r/min NL-SAS
Disk Quantity
After determining the disk types and models, ask your service provider to recommend the
planned expansion capacity, estimate the capacity of each disk to be added, use the method
provided in Calculating the Allowed Expansion Capacity to calculate the allowed expansion
OceanStor S2600T&S5500T&S5600T&S5800T&S6800T
Storage System
Online Capacity Expansion 5 Making a Capacity Expansion Plan
Issue 01 (2014-12-29) Huawei Proprietary and Confidential
Copyright © Huawei Technologies Co., Ltd.
19
8/9/2019 OceanStor S2600T&S5500T&S5600T&S5800T&S6800T Storage System V200R002 Online Capacity Expansion 01
http://slidepdf.com/reader/full/oceanstor-s2600ts5500ts5600ts5800ts6800t-storage-system-v200r002-online 27/226
capacity, and calculate the capacity used by the file system. Then compare your calculated
capacity with the capacity provided by the service provider.
Ensure that the planned expansion capacity provided by your service provider is equal to the
allowed expansion capacity minus the capacity used by the file system.
Then, divide the planned expansion capacity by the capacity of a disk to obtain the number of
disks to be added.
5.3 Planning for the Addition of Disk Enclosures
If you want to expand the system capacity by adding disk enclosures, plan the types and quantity
of disk enclosures that you want to add. After planning, draw two diagrams of the storage system,
one diagram recording the system's current cable connections, and the second showing the cable
connections after expansion is complete.
5.3.1 Disk Enclosure Types and Quantity
Plan the type and quantity of disk enclosures that you want to add based on the collected live
network information and the storage system's compatibility requirements.
Disk Enclosure Types
NOTICE
Prepare a list containing the types and models of all disk enclosures that you want to add. This
list will be used to ensure that incompatible disk enclosures are not added during capacity
expansion.
Observe the following rules when planning disk enclosures:
l The types of disk enclosures being added must match those supported by the existing
controller enclosure.
l The total number of disk enclosures in the storage system must not exceed the specified
upper limit.
l
The total number of disk enclosures in each disk enclosure group in the storage systemmust not exceed the specified upper limit.
l Regular and high-density disk enclosures cannot be connected to the same SAS interface
module. (This rule applies only to the C20 version.)
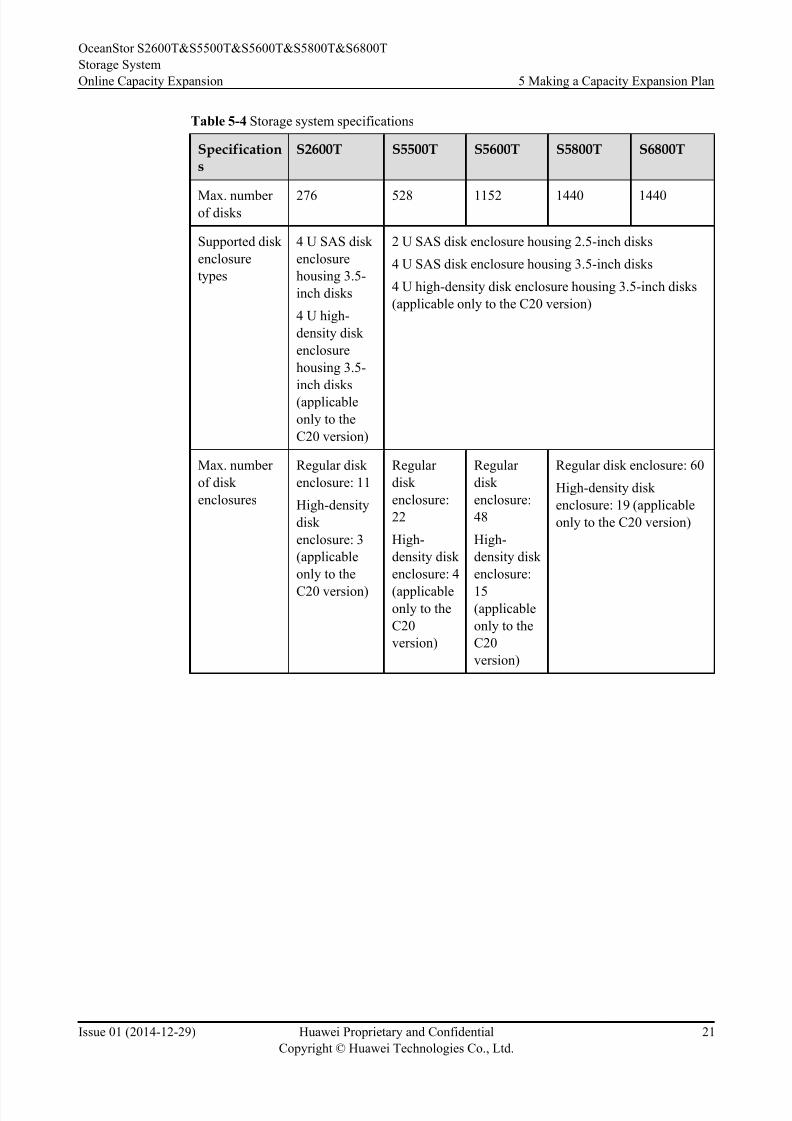
Refer to the storage system specifications described in Table 5-4.
OceanStor S2600T&S5500T&S5600T&S5800T&S6800T
Storage System
Online Capacity Expansion 5 Making a Capacity Expansion Plan
Issue 01 (2014-12-29) Huawei Proprietary and Confidential
Copyright © Huawei Technologies Co., Ltd.
20
8/9/2019 OceanStor S2600T&S5500T&S5600T&S5800T&S6800T Storage System V200R002 Online Capacity Expansion 01
http://slidepdf.com/reader/full/oceanstor-s2600ts5500ts5600ts5800ts6800t-storage-system-v200r002-online 28/226
Table 5-4 Storage system specifications
Specifications
S2600T S5500T S5600T S5800T S6800T
Max. number of disks
276 528 1152 1440 1440
Supported disk
enclosure
types
4 U SAS disk
enclosure
housing 3.5-
inch disks
4 U high-
density disk
enclosure
housing 3.5-
inch disks
(applicable
only to the
C20 version)
2 U SAS disk enclosure housing 2.5-inch disks
4 U SAS disk enclosure housing 3.5-inch disks
4 U high-density disk enclosure housing 3.5-inch disks
(applicable only to the C20 version)
Max. number
of disk
enclosures
Regular disk
enclosure: 11
High-density
disk
enclosure: 3
(applicable
only to the
C20 version)
Regular
disk
enclosure:
22
High-
density disk
enclosure: 4
(applicableonly to the
C20
version)
Regular
disk
enclosure:
48
High-
density disk
enclosure:
15(applicable
only to the
C20
version)
Regular disk enclosure: 60
High-density disk
enclosure: 19 (applicable
only to the C20 version)
OceanStor S2600T&S5500T&S5600T&S5800T&S6800T
Storage System
Online Capacity Expansion 5 Making a Capacity Expansion Plan
Issue 01 (2014-12-29) Huawei Proprietary and Confidential
Copyright © Huawei Technologies Co., Ltd.
21
8/9/2019 OceanStor S2600T&S5500T&S5600T&S5800T&S6800T Storage System V200R002 Online Capacity Expansion 01
http://slidepdf.com/reader/full/oceanstor-s2600ts5500ts5600ts5800ts6800t-storage-system-v200r002-online 29/226
Specifications
S2600T S5500T S5600T S5800T S6800T
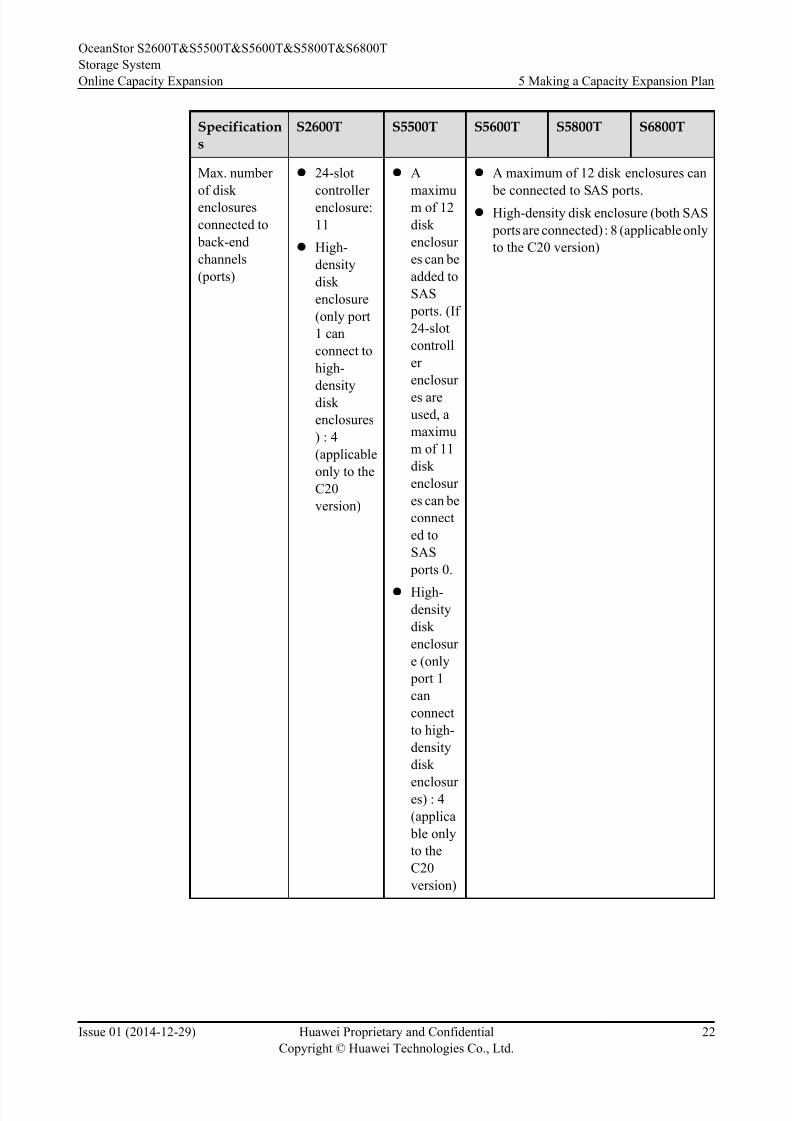
Max. number
of disk enclosures
connected to
back-end
channels
(ports)
l 24-slot
controller enclosure:
11
l High-
density
disk
enclosure
(only port
1 can
connect to
high-
density
disk
enclosures
) : 4
(applicable
only to the
C20
version)
l A
maximum of 12
disk
enclosur
es can be
added to
SAS
ports. (If
24-slot
controll
er
enclosur
es are
used, a
maximu
m of 11
disk
enclosur
es can be
connect
ed to
SAS
ports 0.
l High-density
disk
enclosur
e (only
port 1
can
connect
to high-
density
disk
enclosur es) : 4
(applica
ble only
to the
C20
version)
l A maximum of 12 disk enclosures can
be connected to SAS ports.l High-density disk enclosure (both SAS
ports are connected) : 8 (applicable only
to the C20 version)
OceanStor S2600T&S5500T&S5600T&S5800T&S6800T
Storage System
Online Capacity Expansion 5 Making a Capacity Expansion Plan
Issue 01 (2014-12-29) Huawei Proprietary and Confidential
Copyright © Huawei Technologies Co., Ltd.
22

8/9/2019 OceanStor S2600T&S5500T&S5600T&S5800T&S6800T Storage System V200R002 Online Capacity Expansion 01
http://slidepdf.com/reader/full/oceanstor-s2600ts5500ts5600ts5800ts6800t-storage-system-v200r002-online 30/226
Specifications
S2600T S5500T S5600T S5800T S6800T
Disk types
supported by 2U SAS disk
enclosures
housing 2.5-
inch disks
- l 300 GB/600 GB/900 GB 10,000 r/min SAS
l 1.2 TB 10,000 r/min SAS (applicable only to the C20version)
l 300 GB 15,000 r/min SAS (applicable only to the C20
version)
l 100 GB/200 GB SLC SSD
l 400 GB/600 GB eMLC SSD
Disk types
supported by 4
U SAS disk
enclosures
housing 3.5-inch disks
l 300 GB/
600 GB
15,000 r/
min SAS
l 2 TB/3 TB/
4 TB 7200
r/min NL-
SAS
l 100 GB
SLC SSD
l 200 GB
SLC SSD
(applicable
only to the
C20version)
l 400 GB/
600 GB
eMLC
SSD
(applicable
only to the
C20
version)
l 300 GB/600 GB 15,000 r/min SAS
l 2 TB/3 TB/4 TB 7200 r/min NL-SAS
l 100 GB/200 GB SLC SSD
l 400 GB/600 GB eMLC SSD
Disk types
supported by 4
U high-density
disk enclosure
housing 3.5-
inch disks
(applicable
only to the C20
version)
2000 GB/4000 GB 7200 r/min NL-SAS
OceanStor S2600T&S5500T&S5600T&S5800T&S6800T
Storage System
Online Capacity Expansion 5 Making a Capacity Expansion Plan
Issue 01 (2014-12-29) Huawei Proprietary and Confidential
Copyright © Huawei Technologies Co., Ltd.
23
8/9/2019 OceanStor S2600T&S5500T&S5600T&S5800T&S6800T Storage System V200R002 Online Capacity Expansion 01
http://slidepdf.com/reader/full/oceanstor-s2600ts5500ts5600ts5800ts6800t-storage-system-v200r002-online 31/226
Disk Enclosure Quantity
After determining the disk enclosure types and models, use the following formula to calculate
the number of disk enclosures that need to be added: Number of disk enclosures to be added =
Number of disks to be added/24.
NOTE
l For details about how to calculate the number of disks to be added, see Disk Quantity.
l 2 U or 4 U disk enclosures support a maximum of 24 disks.
l If the number of disk enclosures calculated using this formula is a decimal, round it up to a whole value.
l This calculation method is for reference only. The disk capacity displayed on the management software
prevails.
5.3.2 SAS Cable Connection Modes and Rules
Pay attention to the following SAS cable connection modes and rules before you plan SAS cable
connections and draw the disk enclosure connection diagrams.
Connection Modes
Disk enclosures must be connected in both forward and backward modes to achieve optimal
reliability.
Forward connection and backward connection are defined as follows:
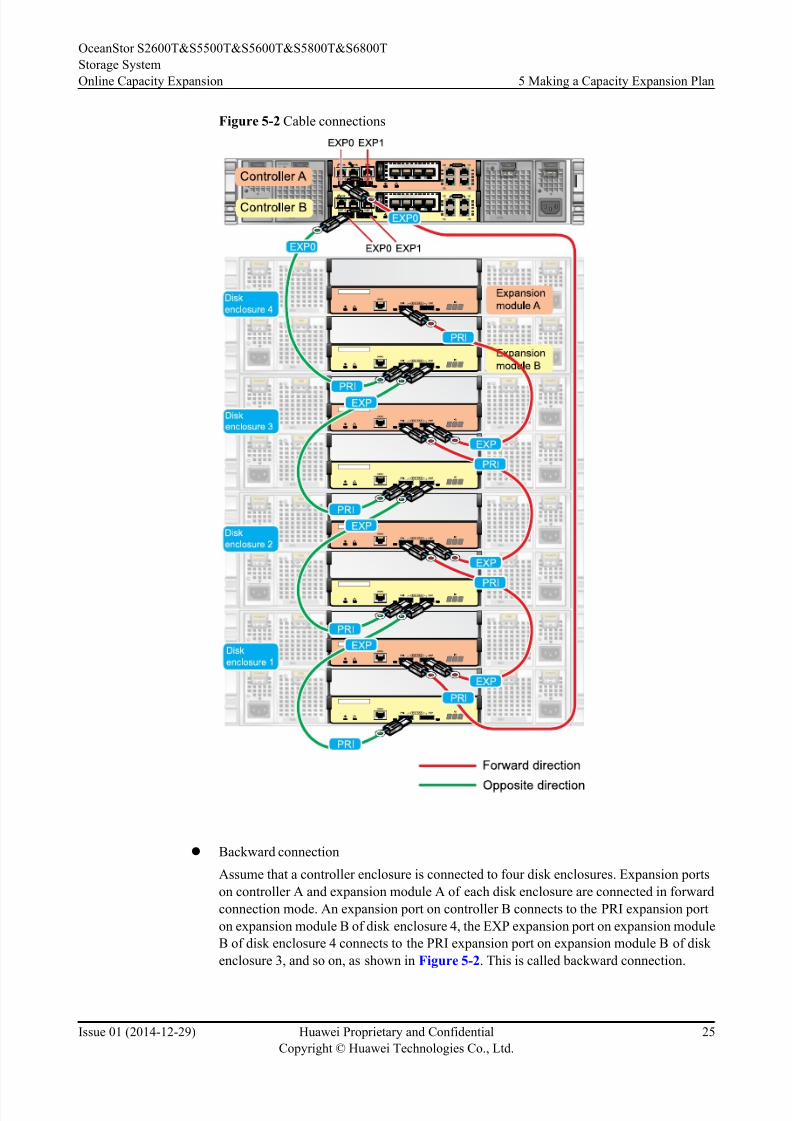
l Forward connection
Assume that a controller enclosure is connected to four disk enclosures. An expansion port
on controller A connects to the PRI expansion port on expansion module A of disk enclosure
1, the EXP expansion port on expansion module A of disk enclosure 1 connects to the PRIexpansion port on expansion module A of disk enclosure 2, and so on, as shown in Figure
5-2. This is called forward connection.
OceanStor S2600T&S5500T&S5600T&S5800T&S6800T
Storage System
Online Capacity Expansion 5 Making a Capacity Expansion Plan
Issue 01 (2014-12-29) Huawei Proprietary and Confidential
Copyright © Huawei Technologies Co., Ltd.
24
8/9/2019 OceanStor S2600T&S5500T&S5600T&S5800T&S6800T Storage System V200R002 Online Capacity Expansion 01
http://slidepdf.com/reader/full/oceanstor-s2600ts5500ts5600ts5800ts6800t-storage-system-v200r002-online 32/226
Figure 5-2 Cable connections
l Backward connection
Assume that a controller enclosure is connected to four disk enclosures. Expansion ports
on controller A and expansion module A of each disk enclosure are connected in forward
connection mode. An expansion port on controller B connects to the PRI expansion port
on expansion module B of disk enclosure 4, the EXP expansion port on expansion module
B of disk enclosure 4 connects to the PRI expansion port on expansion module B of disk
enclosure 3, and so on, as shown in Figure 5-2. This is called backward connection.
OceanStor S2600T&S5500T&S5600T&S5800T&S6800T
Storage System
Online Capacity Expansion 5 Making a Capacity Expansion Plan
Issue 01 (2014-12-29) Huawei Proprietary and Confidential
Copyright © Huawei Technologies Co., Ltd.
25
8/9/2019 OceanStor S2600T&S5500T&S5600T&S5800T&S6800T Storage System V200R002 Online Capacity Expansion 01
http://slidepdf.com/reader/full/oceanstor-s2600ts5500ts5600ts5800ts6800t-storage-system-v200r002-online 33/226
NOTE
For the S5600T, S5800T, and S6800T, P0 expansion ports on the port modules located in slots A0 and B0
of the controller enclosure must connect to the PRI expansion ports on the first disk enclosure because the
disk enclosure is used as a configuration disk enclosure that contains coffer disks. (S2600T/S5500T
controller enclosures contain coffer disks.) The configuration disk enclosure connects to both controllersA and B in forward connection mode. Other disk enclosures connect to controller A in forward connection
mode and to controller B in backward connection mode for optimal networking reliability.
Connection Rules
Observer the following disk enclosure connection rules:
l All EXP expansion ports on a storage system can only connect to PRI expansion ports.
l If a storage system is equipped with two or more disk enclosures, form multiple loops based
on the number of expansion ports on the controller enclosure, and ensure that the disk
enclosures are evenly distributed to each loop.
l The maximum number of disk enclosures that can be connected by expansion ports on a
controller enclosure and by the back-end ports cannot exceed the upper limit. For details
about the specifications, see 5.3.1 Disk Enclosure Types and Quantity.
l Connect the expansion module on controller A to expansion module A on each disk
enclosure and the expansion module on controller B to expansion module B on each disk
enclosure.
l Slots A0 and B0 of the S5600T/S5800T/S6800T controller enclosure must be equipped
with an expansion module, and port P0 must be directly connected to a PRI expansion port
on the configuration disk enclosure.
l Connect SAS disk enclosures using mini SAS cables, and ensure that the bending radius
of mini SAS cables is larger than 15 cm.
Connecting High-Density Disk Enclosures (Only Applicable to C20)
Observe the following connection rules:
l All EXP expansion ports on a storage system can only connect to PRI expansion ports.
l If a storage system is equipped with two or more disk enclosures, form multiple loops based
on the number of expansion ports on the controller enclosure, and ensure that the disk
enclosures are evenly distributed to each loop.
l An expansion loop composed of SAS expansion ports does not support mixing of ordinary
and high-density disk enclosures.
l Mini SAS HD cables and mini SAS HD-to-mini SAS cables are used to connect high-
density disk enclosures.
l Among the expansion ports on an S2600T/S5500T controller enclosure, only port EXP1
can be used to connect high-density disk enclosures.
High-density disk enclosure connections adopted by different product models are described as
follows:
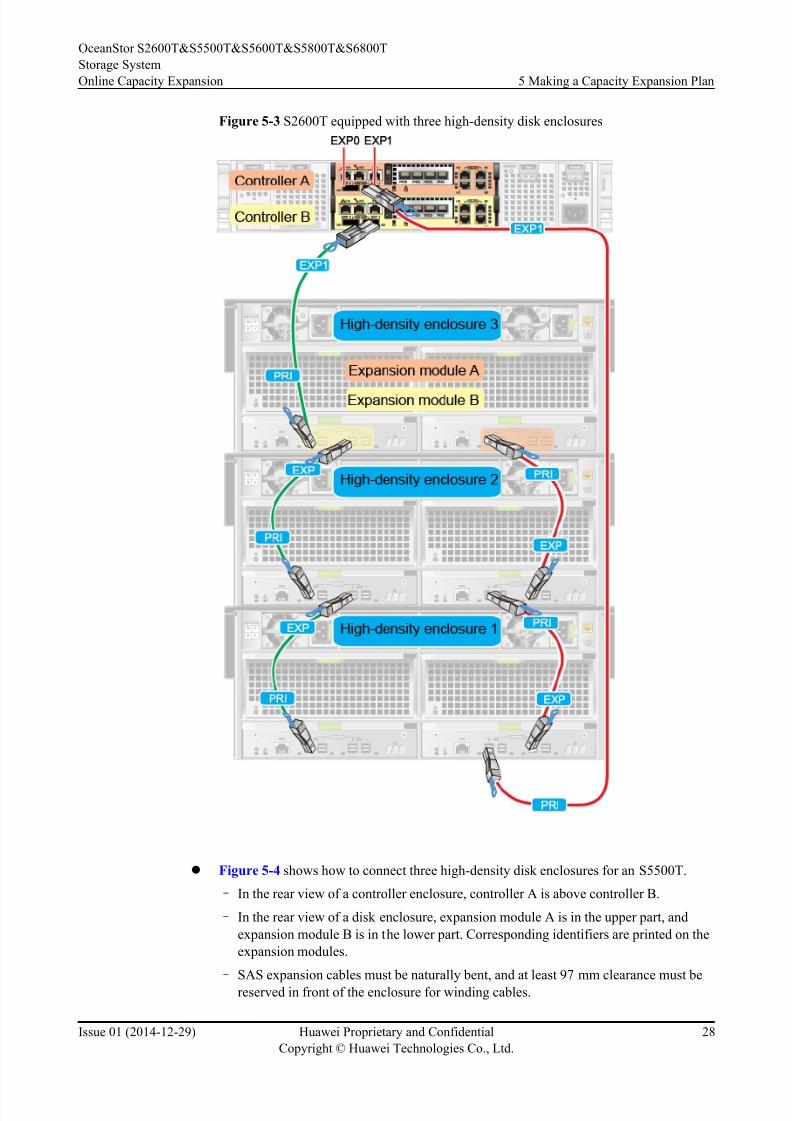
l Figure 5-3 shows how to connect three high-density disk enclosures for an S2600T.
– In the rear view of a controller enclosure, controller A is above controller B.
OceanStor S2600T&S5500T&S5600T&S5800T&S6800T
Storage System
Online Capacity Expansion 5 Making a Capacity Expansion Plan
Issue 01 (2014-12-29) Huawei Proprietary and Confidential
Copyright © Huawei Technologies Co., Ltd.
26

8/9/2019 OceanStor S2600T&S5500T&S5600T&S5800T&S6800T Storage System V200R002 Online Capacity Expansion 01
http://slidepdf.com/reader/full/oceanstor-s2600ts5500ts5600ts5800ts6800t-storage-system-v200r002-online 34/226
– In the rear view of a disk enclosure, expansion module A is in the upper part, and
expansion module B is in the lower part. Corresponding identifiers are printed on the
expansion modules.
– SAS expansion cables must be naturally bent, and at least 97 mm clearance must be
reserved in front of the enclosure for winding cables.
– In the rear view of a high-density disk enclosure, expansion module A is on the right,
and expansion module B is on the left. Corresponding identifiers are printed on the
expansion modules.
– Connect two high-density disk enclosures using mini SAS HD cables. Connect a
controller enclosure to a high-density disk enclosure using mini SAS HD-to-mini SAS
cables. The cables must be naturally bent, and at least 97 mm clearance must be reserved
in front of each enclosure for winding cables.
– A SAS port can be connected to a maximum of three high-density disk enclosures.
Ordinary and high-density disk enclosures cannot be simultaneously connected to a
SAS interface module.
OceanStor S2600T&S5500T&S5600T&S5800T&S6800T
Storage System
Online Capacity Expansion 5 Making a Capacity Expansion Plan
Issue 01 (2014-12-29) Huawei Proprietary and Confidential
Copyright © Huawei Technologies Co., Ltd.
27
8/9/2019 OceanStor S2600T&S5500T&S5600T&S5800T&S6800T Storage System V200R002 Online Capacity Expansion 01
http://slidepdf.com/reader/full/oceanstor-s2600ts5500ts5600ts5800ts6800t-storage-system-v200r002-online 35/226
Figure 5-3 S2600T equipped with three high-density disk enclosures
l Figure 5-4 shows how to connect three high-density disk enclosures for an S5500T.
– In the rear view of a controller enclosure, controller A is above controller B.
– In the rear view of a disk enclosure, expansion module A is in the upper part, and
expansion module B is in the lower part. Corresponding identifiers are printed on the
expansion modules.
– SAS expansion cables must be naturally bent, and at least 97 mm clearance must be
reserved in front of the enclosure for winding cables.
OceanStor S2600T&S5500T&S5600T&S5800T&S6800T
Storage System
Online Capacity Expansion 5 Making a Capacity Expansion Plan
Issue 01 (2014-12-29) Huawei Proprietary and Confidential
Copyright © Huawei Technologies Co., Ltd.
28

8/9/2019 OceanStor S2600T&S5500T&S5600T&S5800T&S6800T Storage System V200R002 Online Capacity Expansion 01
http://slidepdf.com/reader/full/oceanstor-s2600ts5500ts5600ts5800ts6800t-storage-system-v200r002-online 36/226
– In the rear view of a high-density disk enclosure, expansion module A is on the right,
and expansion module B is on the left. Corresponding identifiers are printed on the
expansion modules.
– Connect two high-density disk enclosures using mini SAS HD cables. Connect a
controller enclosure to a high-density disk enclosure using mini SAS HD-to-mini SAScables. The cables must be naturally bent, and at least 97 mm clearance must be reserved
in front of each enclosure for winding cables.
– A SAS port can be connected to a maximum of four high-density disk enclosures.
Ordinary and high-density disk enclosures cannot be simultaneously connected to a
SAS interface module.
OceanStor S2600T&S5500T&S5600T&S5800T&S6800T
Storage System
Online Capacity Expansion 5 Making a Capacity Expansion Plan
Issue 01 (2014-12-29) Huawei Proprietary and Confidential
Copyright © Huawei Technologies Co., Ltd.
29

8/9/2019 OceanStor S2600T&S5500T&S5600T&S5800T&S6800T Storage System V200R002 Online Capacity Expansion 01
http://slidepdf.com/reader/full/oceanstor-s2600ts5500ts5600ts5800ts6800t-storage-system-v200r002-online 37/226
Figure 5-4 S5500T equipped with three high-density disk enclosures
l Figure 5-5 shows how to connect three high-density disk enclosures for an S5600T/
S5800T/S6800T.
– In the rear view of the controller enclosure, slots B0/B1/B2/B3/B4/B5, MGMT B/
MGMT A, and A0/A1/A2/A3/A4/A5 have corresponding identifiers on the back of the
controller enclosure from left to right.
– In the rear view of the controller enclosure, ports are marked a number starting from 0
from the top down and have corresponding identifiers on the port module.
OceanStor S2600T&S5500T&S5600T&S5800T&S6800T
Storage System
Online Capacity Expansion 5 Making a Capacity Expansion Plan
Issue 01 (2014-12-29) Huawei Proprietary and Confidential
Copyright © Huawei Technologies Co., Ltd.
30
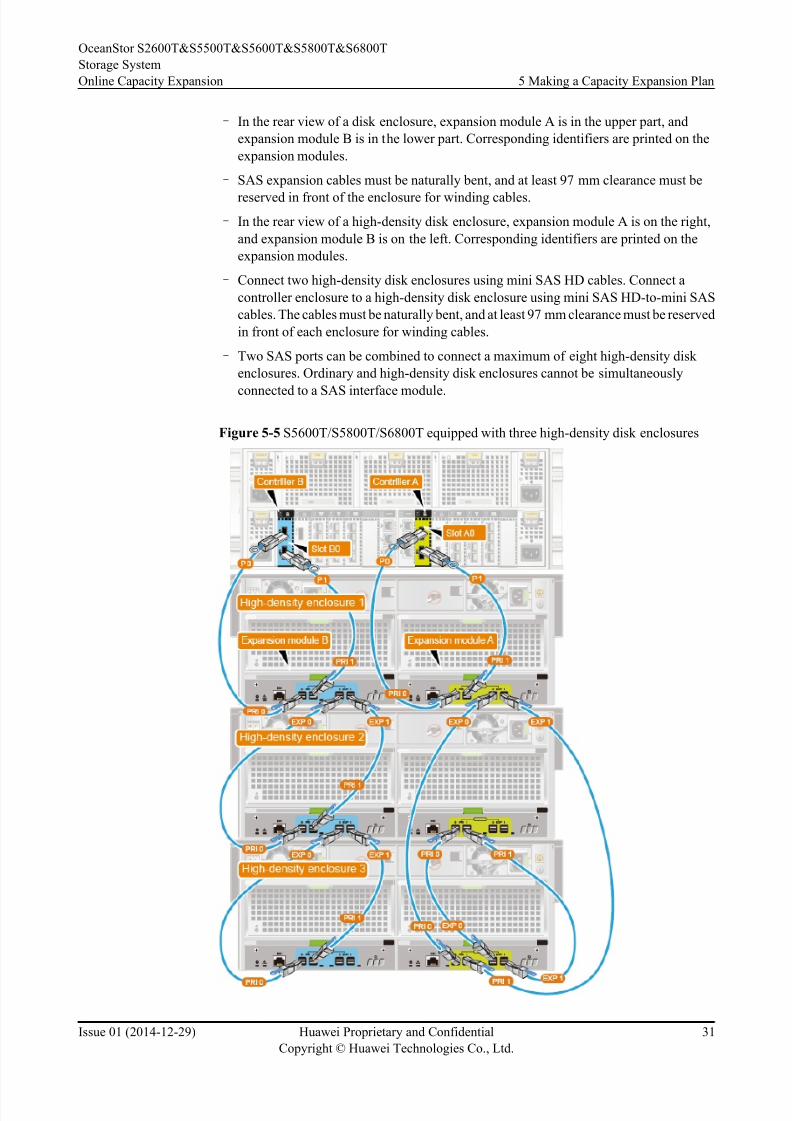
8/9/2019 OceanStor S2600T&S5500T&S5600T&S5800T&S6800T Storage System V200R002 Online Capacity Expansion 01
http://slidepdf.com/reader/full/oceanstor-s2600ts5500ts5600ts5800ts6800t-storage-system-v200r002-online 38/226
– In the rear view of a disk enclosure, expansion module A is in the upper part, and
expansion module B is in the lower part. Corresponding identifiers are printed on the
expansion modules.
– SAS expansion cables must be naturally bent, and at least 97 mm clearance must be
reserved in front of the enclosure for winding cables.
– In the rear view of a high-density disk enclosure, expansion module A is on the right,
and expansion module B is on the left. Corresponding identifiers are printed on the
expansion modules.
– Connect two high-density disk enclosures using mini SAS HD cables. Connect a
controller enclosure to a high-density disk enclosure using mini SAS HD-to-mini SAS
cables. The cables must be naturally bent, and at least 97 mm clearance must be reserved
in front of each enclosure for winding cables.
– Two SAS ports can be combined to connect a maximum of eight high-density disk
enclosures. Ordinary and high-density disk enclosures cannot be simultaneously
connected to a SAS interface module.
Figure 5-5 S5600T/S5800T/S6800T equipped with three high-density disk enclosures
OceanStor S2600T&S5500T&S5600T&S5800T&S6800T
Storage System
Online Capacity Expansion 5 Making a Capacity Expansion Plan
Issue 01 (2014-12-29) Huawei Proprietary and Confidential
Copyright © Huawei Technologies Co., Ltd.
31
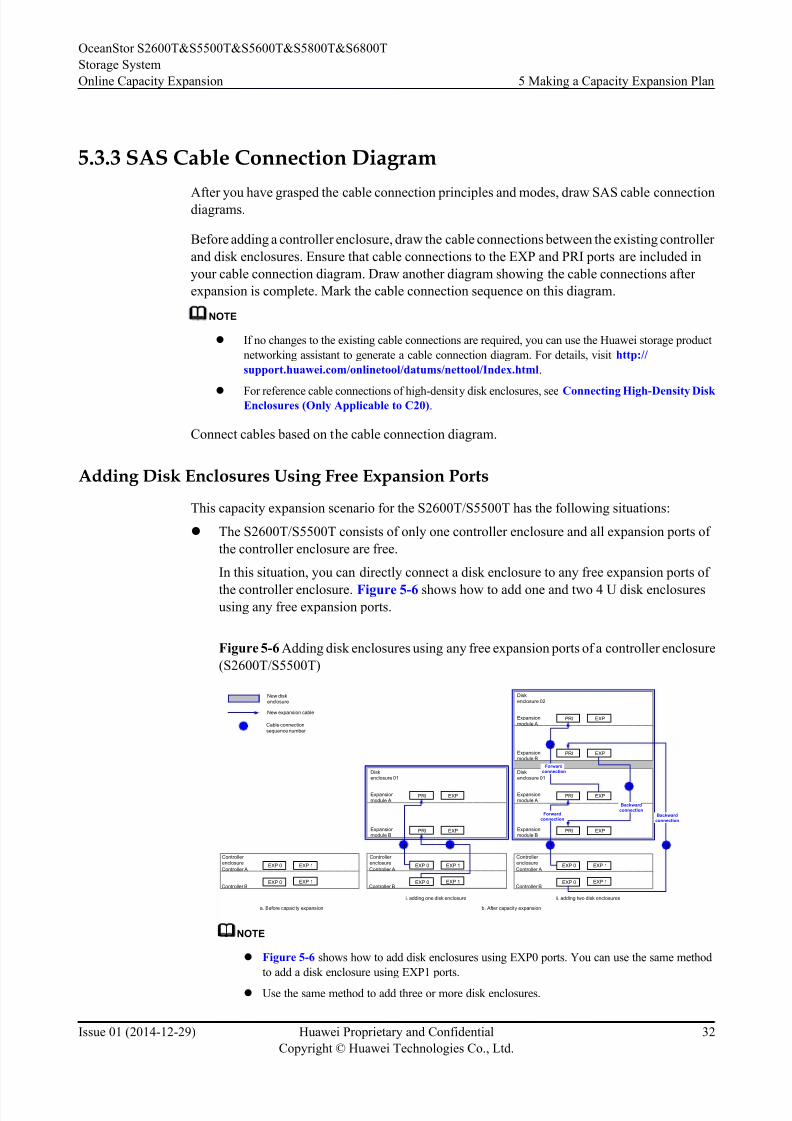
8/9/2019 OceanStor S2600T&S5500T&S5600T&S5800T&S6800T Storage System V200R002 Online Capacity Expansion 01
http://slidepdf.com/reader/full/oceanstor-s2600ts5500ts5600ts5800ts6800t-storage-system-v200r002-online 39/226
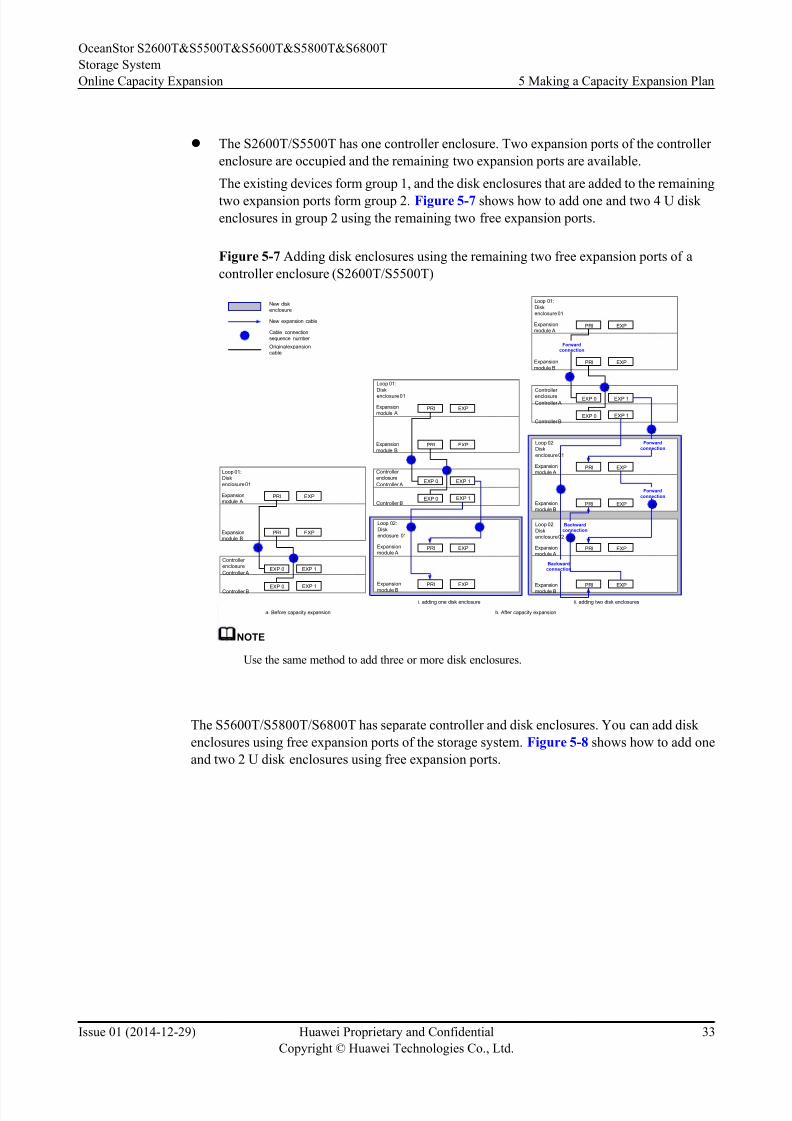
8/9/2019 OceanStor S2600T&S5500T&S5600T&S5800T&S6800T Storage System V200R002 Online Capacity Expansion 01
http://slidepdf.com/reader/full/oceanstor-s2600ts5500ts5600ts5800ts6800t-storage-system-v200r002-online 40/226
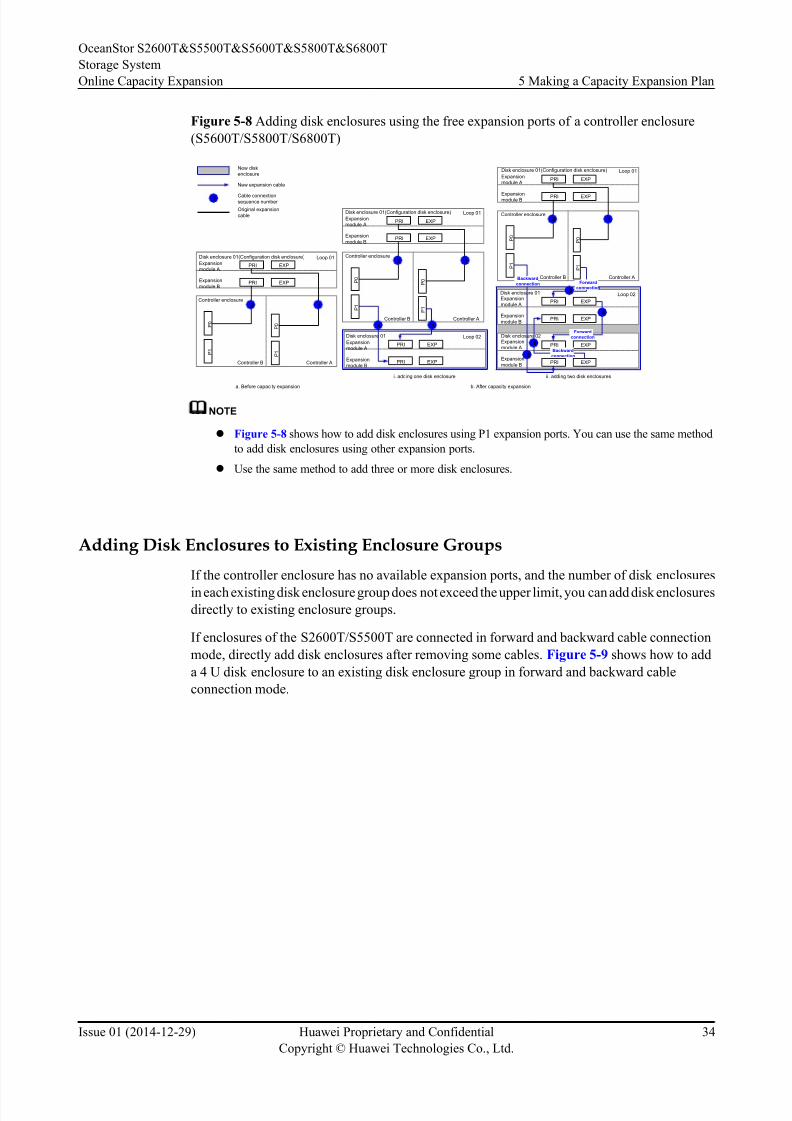
8/9/2019 OceanStor S2600T&S5500T&S5600T&S5800T&S6800T Storage System V200R002 Online Capacity Expansion 01
http://slidepdf.com/reader/full/oceanstor-s2600ts5500ts5600ts5800ts6800t-storage-system-v200r002-online 41/226
Figure 5-8 Adding disk enclosures using the free expansion ports of a controller enclosure
(S5600T/S5800T/S6800T)
P 0
P 1
P 0
P 1
PRI EXP
PRI EXP
PRI EXP
PRI EXP
2 1
34
Loop 02
P 0
P 1
P 0
P 1
PRI EXP
PRI EXP
2 1
P 0
P 1
P 0
P 1
PRI EXP
PRI EXP
2 1
PRI EXP
PRI EXP
PRI EXP
PRI EXP
Forward
connection
Forward
connection
Backward
connection
Backward
connection
3
4
5
6
New expansion cable
Cable connectionsequence number
Original expansion
cable
New disk
enclosure
1
Disk enclosure 01
Expansion
module A
Expansion
module B
Loop 01Disk enclosure 01(Configuration disk enclosure)
Expansion
module A
Expansion
module B
Controller AController B
Controller enclosure
Controller AController B
Controller enclosure
Loop 01Disk enclosure 01(Configuration disk enclosure)
Expansion
module A
Expansion
module B
Loop 01Disk enclosure 01(Configuration disk enclosure)
Expansion
module A
Expansionmodule B
Controller AController B
Controller enclosure
Loop 02Disk enclosure 01Expansion
module A
Expansion
module B
Disk enclosure 02Expansion
module A
Expansion
module B
i. adding one disk enclosure ii. adding two disk enclosures
a. Before capacity expansion b. After capacity expansion
NOTE
l Figure 5-8 shows how to add disk enclosures using P1 expansion ports. You can use the same method
to add disk enclosures using other expansion ports.
l Use the same method to add three or more disk enclosures.
Adding Disk Enclosures to Existing Enclosure Groups
If the controller enclosure has no available expansion ports, and the number of disk enclosures
in each existing disk enclosure group does not exceed the upper limit, you can add disk enclosuresdirectly to existing enclosure groups.
If enclosures of the S2600T/S5500T are connected in forward and backward cable connection
mode, directly add disk enclosures after removing some cables. Figure 5-9 shows how to add
a 4 U disk enclosure to an existing disk enclosure group in forward and backward cable
connection mode.
OceanStor S2600T&S5500T&S5600T&S5800T&S6800T
Storage System
Online Capacity Expansion 5 Making a Capacity Expansion Plan
Issue 01 (2014-12-29) Huawei Proprietary and Confidential
Copyright © Huawei Technologies Co., Ltd.
34
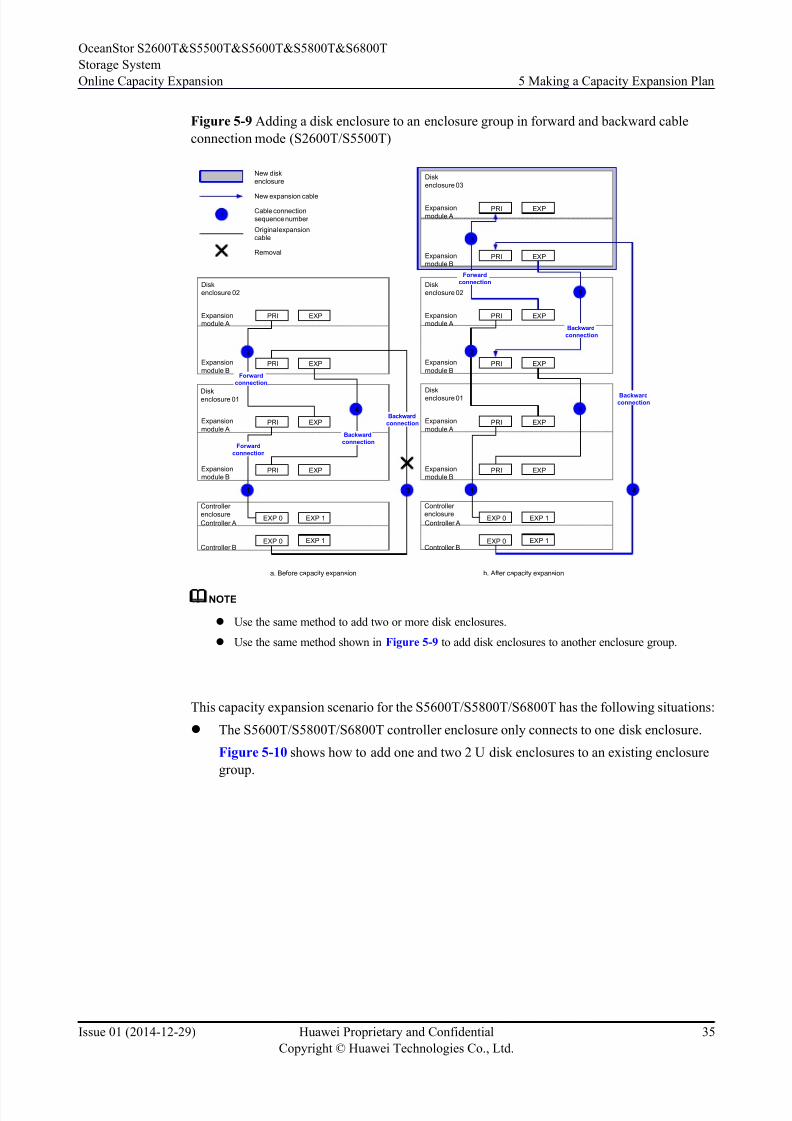
8/9/2019 OceanStor S2600T&S5500T&S5600T&S5800T&S6800T Storage System V200R002 Online Capacity Expansion 01
http://slidepdf.com/reader/full/oceanstor-s2600ts5500ts5600ts5800ts6800t-storage-system-v200r002-online 42/226
Figure 5-9 Adding a disk enclosure to an enclosure group in forward and backward cable
connection mode (S2600T/S5500T)
EXP 0 EXP 1
EXP 0 EXP 1
PRI EXP
PRI EXP
Diskenclosure 01
PRI EXP
PRI EXP
Diskenclosure 02
Expansionmodule A
Expansion
module B
Backward
connection
Backward
connectionForward
connection
Forward
connection
EXP 0 EXP 1
Controllerenclosure
EXP 0 EXP 1
PRI EXP
PRI EXP
Controller A
Controller B
Diskenclosure 01
PRI EXP
PRI EXP
Diskenclosure 02
PRI EXP
PRI EXP
Disk
enclosure 03
1
2
3
4
1
2
6
Forward
connection
Backward
connection
Backward
connection
4
3
5
a. Before capacity expansion b. After capacity expansion
Expansion
module A
Expansionmodule B
Expansion
module A
Expansionmodule B
Expansionmodule A
Expansion
module B
Expansion
module A
Expansionmodule B
New expansion cable
Cable connectionsequence number
Removal
Original expansioncable
New diskenclosure
1
Controller A
Controller B
Controller
enclosure
NOTE
l Use the same method to add two or more disk enclosures.
l Use the same method shown in Figure 5-9 to add disk enclosures to another enclosure group.
This capacity expansion scenario for the S5600T/S5800T/S6800T has the following situations:
l The S5600T/S5800T/S6800T controller enclosure only connects to one disk enclosure.
Figure 5-10 shows how to add one and two 2 U disk enclosures to an existing enclosure
group.
OceanStor S2600T&S5500T&S5600T&S5800T&S6800T
Storage System
Online Capacity Expansion 5 Making a Capacity Expansion Plan
Issue 01 (2014-12-29) Huawei Proprietary and Confidential
Copyright © Huawei Technologies Co., Ltd.
35
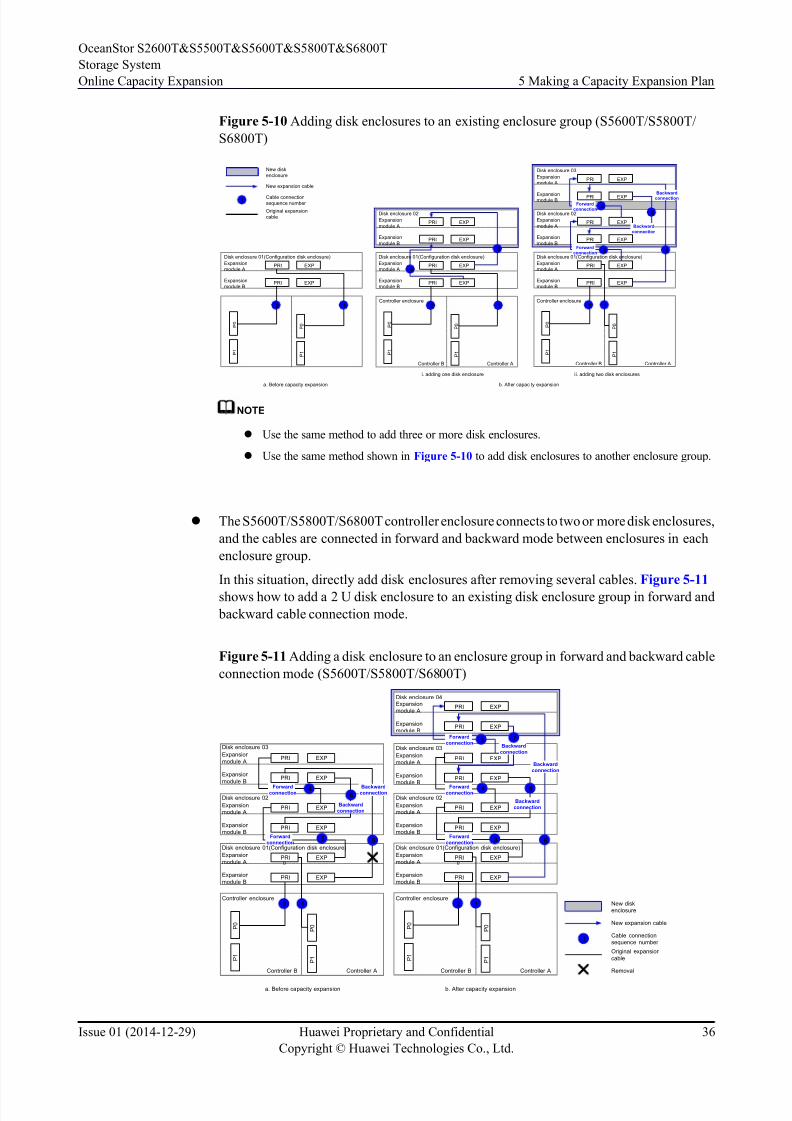
8/9/2019 OceanStor S2600T&S5500T&S5600T&S5800T&S6800T Storage System V200R002 Online Capacity Expansion 01
http://slidepdf.com/reader/full/oceanstor-s2600ts5500ts5600ts5800ts6800t-storage-system-v200r002-online 43/226
Figure 5-10 Adding disk enclosures to an existing enclosure group (S5600T/S5800T/
S6800T)
P 0
P 1
P 0
P 1
PRI EXP
PRI EXP
P 0
P 1
P 0
P 1
PRI EXP
PRI EXP
PRI EXP
PRI EXP
2 1 2 1
4
3
P 0
P 1
P 0
P 1
PRI EXP
PRI EXP
PRI EXP
PRI EXP
2
PRI EXP
PRI EXP
Forward
connection
Forward
connection
Backward
connection
Backward
connection
3
4
5
6
1
New expansion cable
Cable connectionsequence number
Original expansion
cable
New disk
enclosure
1
Disk enclosure 01(Configuration disk enclosure)
Expansion
module A
Expansion
module B
Controller AController B
Controller enclosure
i. adding one disk enclosure ii. adding two disk enclosures
a. Before capacity expansion b. After capacity expansion
Controller AController B
Controller enclosure
Disk enclosure 02
Expansion
module A
Expansion
module B
Disk enclosure 01(Configuration disk enclosure)
Expansion
module A
Expansion
module B
Disk enclosure 01(Configuration disk enclosure)
Expansion
module A
Expansion
module B
Disk enclosure 02
Expansion
module A
Expansion
module B
Disk enclosure 03
Expansion
module A
Expansionmodule B
NOTE
l Use the same method to add three or more disk enclosures.
l Use the same method shown in Figure 5-10 to add disk enclosures to another enclosure group.
l The S5600T/S5800T/S6800T controller enclosure connects to two or more disk enclosures,
and the cables are connected in forward and backward mode between enclosures in each
enclosure group.
In this situation, directly add disk enclosures after removing several cables. Figure 5-11
shows how to add a 2 U disk enclosure to an existing disk enclosure group in forward and
backward cable connection mode.
Figure 5-11 Adding a disk enclosure to an enclosure group in forward and backward cable
connection mode (S5600T/S5800T/S6800T)
PRI EXP
PRI EXP
PRI EXP
PRI EXP
P 0
P 1
P 0
P 1
PRI EXP
PRI EXP
PRI EXP
PRI EXP
2
Forward
connection
Backward
connection
3 5
1
P 0
P 1
P 0
P 1
PRI EXP
PRI EXP
PRI EXP
PRI EXP
2
PRI EXP
PRI EXP
Forward
connection
Forward
connection
Backward
connection
3
4 8
1
Backward
connection
6
Backward
connection
Forward
connection 4
6
Forward
connection 5
Backward
connection
7
New expansion cable
Cable connection
sequence number
Removal
Original expansion
cable
New disk
enclosure
1
a. Before capacity expansion b. After capacity expansion
Controller AController B
Controller enclosure
Disk enclosure 01(Configuration disk enclosure)
Expansion
module A
Expansion
module B
0
Disk enclosure 02
Expansion
module A
Expansion
module B
Disk enclosure 03
Expansion
module A
Expansion
module B
Disk enclosure 01(Configuration disk enclosure)
Expansion
module A
Expansion
module B
0
Disk enclosure 02
Expansion
module A
Expansion
module B
Disk enclosure 03
Expansion
module A
Expansion
module B
Disk enclosure 04Expansion
module A
Expansion
module B
Controller AController B
Controller enclosure
OceanStor S2600T&S5500T&S5600T&S5800T&S6800T
Storage System
Online Capacity Expansion 5 Making a Capacity Expansion Plan
Issue 01 (2014-12-29) Huawei Proprietary and Confidential
Copyright © Huawei Technologies Co., Ltd.
36

8/9/2019 OceanStor S2600T&S5500T&S5600T&S5800T&S6800T Storage System V200R002 Online Capacity Expansion 01
http://slidepdf.com/reader/full/oceanstor-s2600ts5500ts5600ts5800ts6800t-storage-system-v200r002-online 44/226
– Use the same method to add two or more disk enclosures.
– Use the same method shown in Figure 5-11 to add disk enclosures to another enclosure
group.
5.4 Planning for the Addition of Controller Enclosure(Inapplicable to the S2600T)
If you want to expand the system capacity by adding controller enclosure, draw a cable
connection diagram between the existing controllers, new controllers, and disk enclosures.
5.4.1 Cable Connection Diagram for Connecting the FourControllers of Two S5500T Storage Systems
The four controllers of two S5500T storage systems must be connected to each other through
data switches using PCIe ports. Also, the management network ports of the two S5500T storage
systems must be connected to the management network.
Before connecting cables, draw the cable connections between the four controllers and data
switches. Pay special attention to cables connected to ports and other components can be ignored.
NOTE
If no changes to the existing cable connections are required, you can use the Huawei storage product
networking assistant to generate a cable connection diagram. For details, visit http://support.huawei.com/
onlinetool/datums/nettool/Index.html.
Connect cables between the four controllers based on the cable connection diagram.
Connecting Controllers Through Data Switches Using PCIe Ports
The four controllers of the two S5500T storage systems can communicate with each other only
after being connected to data switches through PCIe ports. Figure 5-12 shows the cable
connections.
OceanStor S2600T&S5500T&S5600T&S5800T&S6800T
Storage System
Online Capacity Expansion 5 Making a Capacity Expansion Plan
Issue 01 (2014-12-29) Huawei Proprietary and Confidential
Copyright © Huawei Technologies Co., Ltd.
37
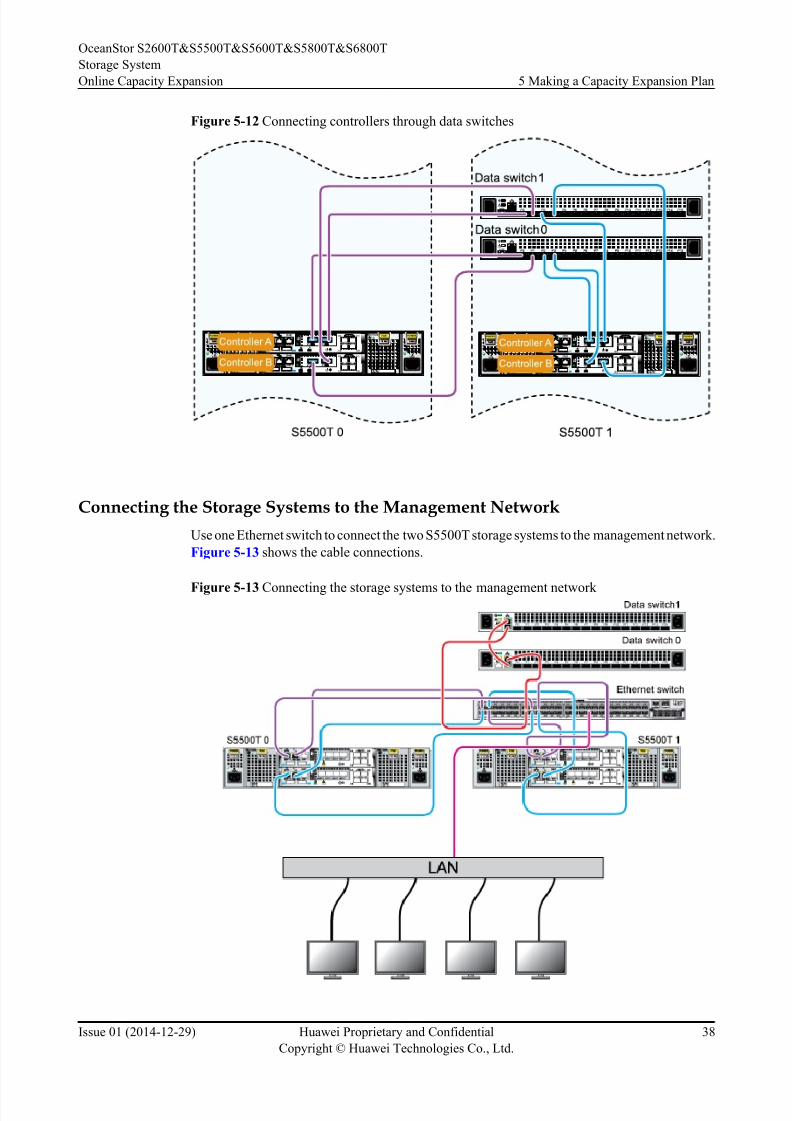
8/9/2019 OceanStor S2600T&S5500T&S5600T&S5800T&S6800T Storage System V200R002 Online Capacity Expansion 01
http://slidepdf.com/reader/full/oceanstor-s2600ts5500ts5600ts5800ts6800t-storage-system-v200r002-online 45/226
Figure 5-12 Connecting controllers through data switches
Connecting the Storage Systems to the Management Network
Use one Ethernet switch to connect the two S5500T storage systems to the management network.
Figure 5-13 shows the cable connections.
Figure 5-13 Connecting the storage systems to the management network
OceanStor S2600T&S5500T&S5600T&S5800T&S6800T
Storage System
Online Capacity Expansion 5 Making a Capacity Expansion Plan
Issue 01 (2014-12-29) Huawei Proprietary and Confidential
Copyright © Huawei Technologies Co., Ltd.
38
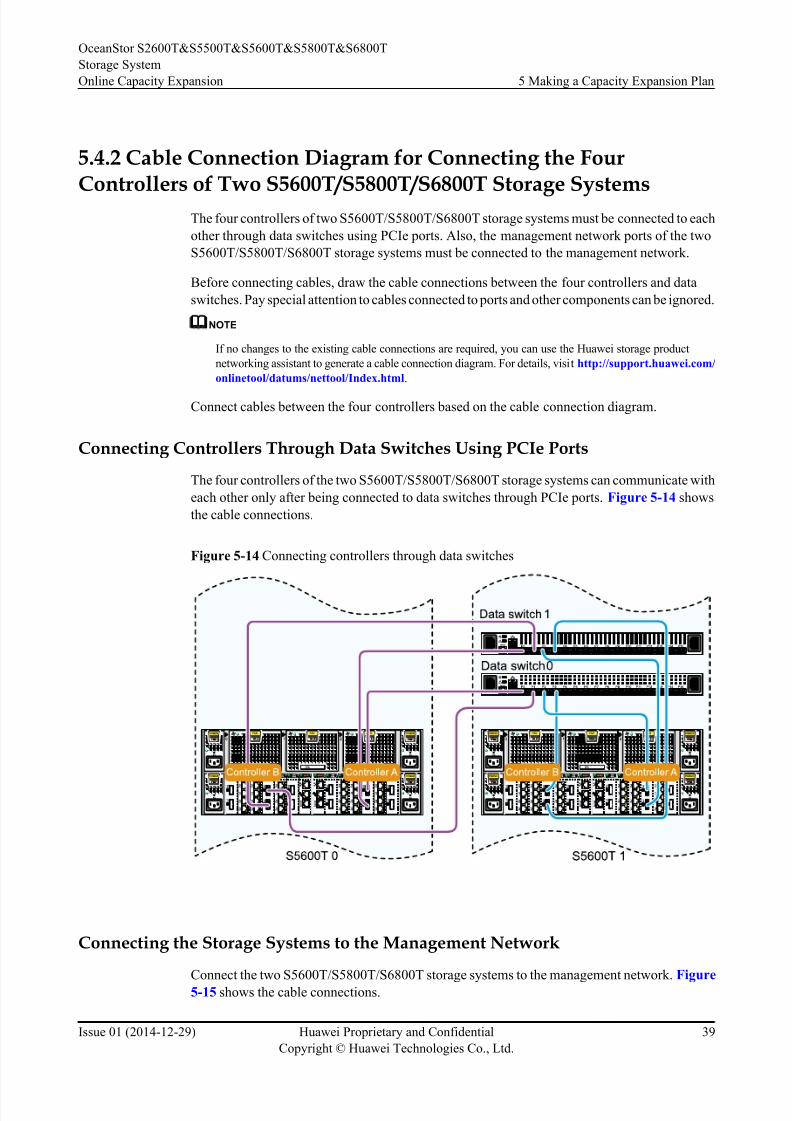
8/9/2019 OceanStor S2600T&S5500T&S5600T&S5800T&S6800T Storage System V200R002 Online Capacity Expansion 01
http://slidepdf.com/reader/full/oceanstor-s2600ts5500ts5600ts5800ts6800t-storage-system-v200r002-online 46/226
5.4.2 Cable Connection Diagram for Connecting the Four
Controllers of Two S5600T/S5800T/S6800T Storage SystemsThe four controllers of two S5600T/S5800T/S6800T storage systems must be connected to each
other through data switches using PCIe ports. Also, the management network ports of the two
S5600T/S5800T/S6800T storage systems must be connected to the management network.
Before connecting cables, draw the cable connections between the four controllers and data
switches. Pay special attention to cables connected to ports and other components can be ignored.
NOTE
If no changes to the existing cable connections are required, you can use the Huawei storage product
networking assistant to generate a cable connection diagram. For details, visit http://support.huawei.com/
onlinetool/datums/nettool/Index.html.
Connect cables between the four controllers based on the cable connection diagram.
Connecting Controllers Through Data Switches Using PCIe Ports
The four controllers of the two S5600T/S5800T/S6800T storage systems can communicate with
each other only after being connected to data switches through PCIe ports. Figure 5-14 shows
the cable connections.
Figure 5-14 Connecting controllers through data switches
Connecting the Storage Systems to the Management Network
Connect the two S5600T/S5800T/S6800T storage systems to the management network. Figure
5-15 shows the cable connections.
OceanStor S2600T&S5500T&S5600T&S5800T&S6800T
Storage System
Online Capacity Expansion 5 Making a Capacity Expansion Plan
Issue 01 (2014-12-29) Huawei Proprietary and Confidential
Copyright © Huawei Technologies Co., Ltd.
39
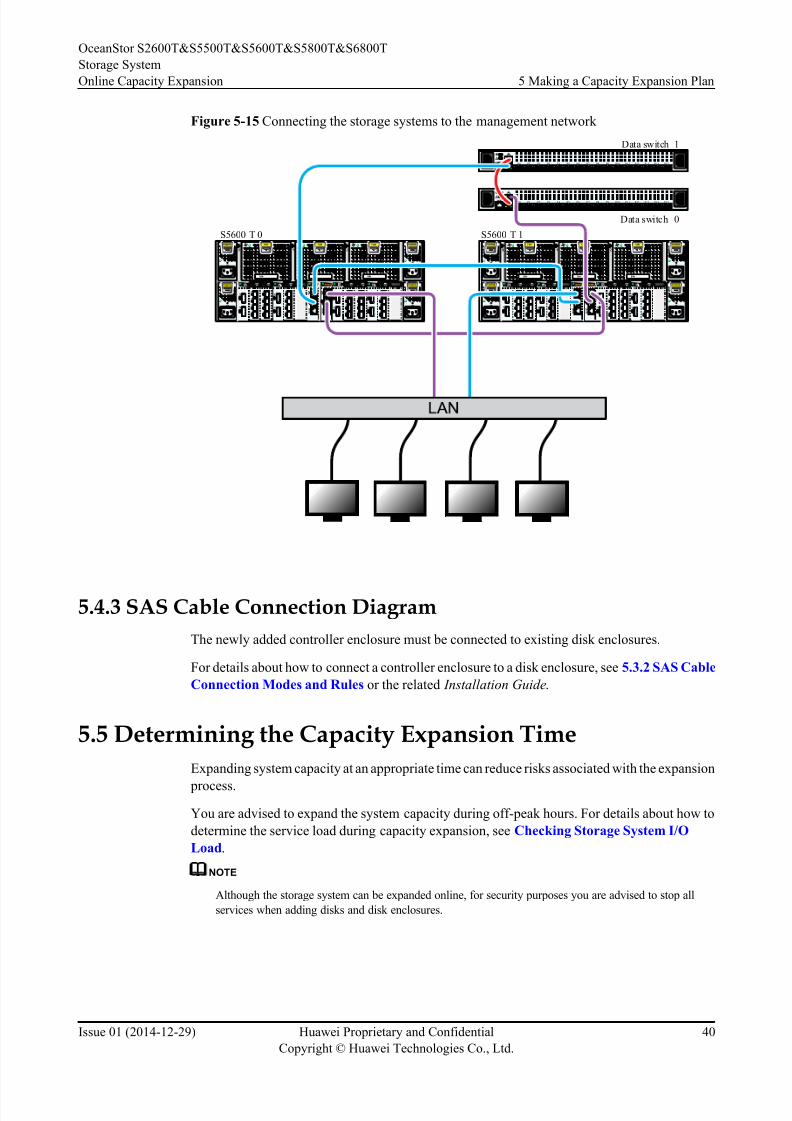
8/9/2019 OceanStor S2600T&S5500T&S5600T&S5800T&S6800T Storage System V200R002 Online Capacity Expansion 01
http://slidepdf.com/reader/full/oceanstor-s2600ts5500ts5600ts5800ts6800t-storage-system-v200r002-online 47/226
Figure 5-15 Connecting the storage systems to the management network
P0 P1 P2 P3 P4 P5 P6 P7 P8 P9 P10 P11 P12 P13 P14 P15
P0 P1 P2 P3 P4 P5 P6 P7 P8 P9 P10 P11 P12 P13 P14 P15
S5600 T 0 S5600 T 1
Data switch 1
Data switch 0
5.4.3 SAS Cable Connection Diagram
The newly added controller enclosure must be connected to existing disk enclosures.
For details about how to connect a controller enclosure to a disk enclosure, see 5.3.2 SAS Cable
Connection Modes and Rules or the related Installation Guide.
5.5 Determining the Capacity Expansion Time
Expanding system capacity at an appropriate time can reduce risks associated with the expansion
process.
You are advised to expand the system capacity during off-peak hours. For details about how to
determine the service load during capacity expansion, see Checking Storage System I/O
Load.
NOTE
Although the storage system can be expanded online, for security purposes you are advised to stop all
services when adding disks and disk enclosures.
OceanStor S2600T&S5500T&S5600T&S5800T&S6800T
Storage System
Online Capacity Expansion 5 Making a Capacity Expansion Plan
Issue 01 (2014-12-29) Huawei Proprietary and Confidential
Copyright © Huawei Technologies Co., Ltd.
40
8/9/2019 OceanStor S2600T&S5500T&S5600T&S5800T&S6800T Storage System V200R002 Online Capacity Expansion 01
http://slidepdf.com/reader/full/oceanstor-s2600ts5500ts5600ts5800ts6800t-storage-system-v200r002-online 48/226
6 Preparing for the Capacity Expansion
About This Chapter
Make preparations before capacity expansion.
6.1 Preparing for the Capacity Expansion
Preparation f or the capacity expansion includes preparing tools, applying for licenses,
performing the pre-expansion check, backing up storage system configuration data, and
importing licenses.
6.2 Preparing Tools
The tools for capacity expansion must be prepared in advance.
6.3 Applying for a License File
A license is the credential for using a value-added feature. You can apply for a license as required.
The process f or applying for a license is completed on the Electronic Software Delivery Platform
(ESDP). After obtaining a license, import it into a storage system.
6.4 Performing the Pre-expansion Check
Before capacity expansion, check the storage system health status, storage system I/O load,
multipathing software, ALUA function, and connectivity between the storage system and
application server. The capacity of a storage system can be correctly expanded only when the
storage system is working correctly. If you encounter any problem that cannot be resolved during
capacity expansion, contact Huawei technical support.
6.5 Backing Up Configuration Data of the Storage System
All configuration data on the storage system must be backed up before capacity expansion.
Backup data can be used to restore the storage system when capacity expansion fails.
6.6 Importing a License File
To add a data protection feature, you must import and activate a license file that grants permission
to use the added capacity or feature.
OceanStor S2600T&S5500T&S5600T&S5800T&S6800T
Storage System
Online Capacity Expansion 6 Preparing for the Capacity Expansion
Issue 01 (2014-12-29) Huawei Proprietary and Confidential
Copyright © Huawei Technologies Co., Ltd.
41

8/9/2019 OceanStor S2600T&S5500T&S5600T&S5800T&S6800T Storage System V200R002 Online Capacity Expansion 01
http://slidepdf.com/reader/full/oceanstor-s2600ts5500ts5600ts5800ts6800t-storage-system-v200r002-online 49/226
6.1 Preparing for the Capacity Expansion
Preparation for the capacity expansion includes preparing tools, applying for licenses,
performing the pre-expansion check, backing up storage system configuration data, and
importing licenses.
Figure 6-1 shows the flowchart for capacity expansion preparation.
Figure 6-1 Capacity expansion preparation flowchart
Prepare tools.
Apply for licenses.
Back up storage system
configuration data.
Import licenses.
Perform the pre-
expansion check.
Start
End
Table 6-1 describes the steps in the flowchart.
OceanStor S2600T&S5500T&S5600T&S5800T&S6800T
Storage System
Online Capacity Expansion 6 Preparing for the Capacity Expansion
Issue 01 (2014-12-29) Huawei Proprietary and Confidential
Copyright © Huawei Technologies Co., Ltd.
42
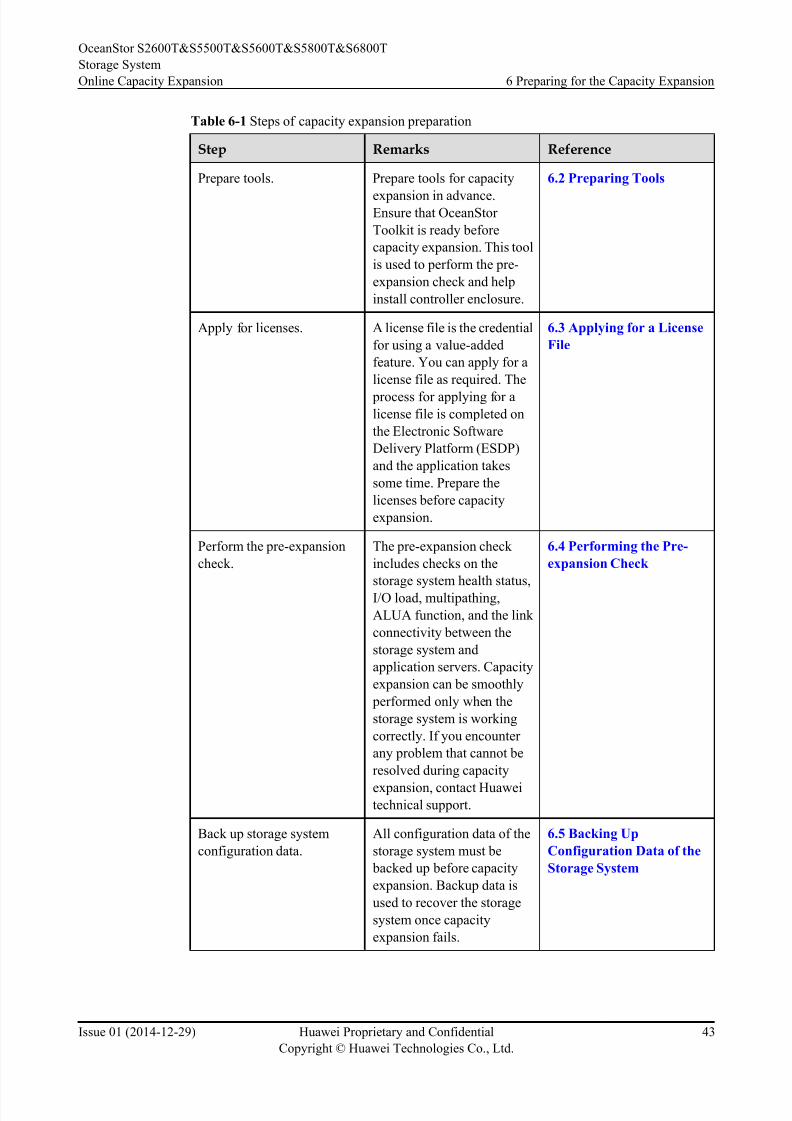
8/9/2019 OceanStor S2600T&S5500T&S5600T&S5800T&S6800T Storage System V200R002 Online Capacity Expansion 01
http://slidepdf.com/reader/full/oceanstor-s2600ts5500ts5600ts5800ts6800t-storage-system-v200r002-online 50/226
Table 6-1 Steps of capacity expansion preparation
Step Remarks Reference
Prepare tools. Prepare tools for capacity
expansion in advance.Ensure that OceanStor
Toolkit is ready before
capacity expansion. This tool
is used to perform the pre-
expansion check and help
install controller enclosure.
6.2 Preparing Tools
Apply for licenses. A license file is the credential
for using a value-added
feature. You can apply for a
license file as required. The
process for applying for alicense file is completed on
the Electronic Software
Delivery Platform (ESDP)
and the application takes
some time. Prepare the
licenses before capacity
expansion.
6.3 Applying for a License
File
Perform the pre-expansion
check.
The pre-expansion check
includes checks on the
storage system health status,
I/O load, multipathing,
ALUA function, and the link
connectivity between the
storage system and
application servers. Capacity
expansion can be smoothly
performed only when the
storage system is working
correctly. If you encounter
any problem that cannot be
resolved during capacity
expansion, contact Huaweitechnical support.
6.4 Performing the Pre-
expansion Check
Back up storage system
configuration data.
All configuration data of the
storage system must be
backed up before capacity
expansion. Backup data is
used to recover the storage
system once capacity
expansion fails.
6.5 Backing Up
Configuration Data of the
Storage System
OceanStor S2600T&S5500T&S5600T&S5800T&S6800T
Storage System
Online Capacity Expansion 6 Preparing for the Capacity Expansion
Issue 01 (2014-12-29) Huawei Proprietary and Confidential
Copyright © Huawei Technologies Co., Ltd.
43
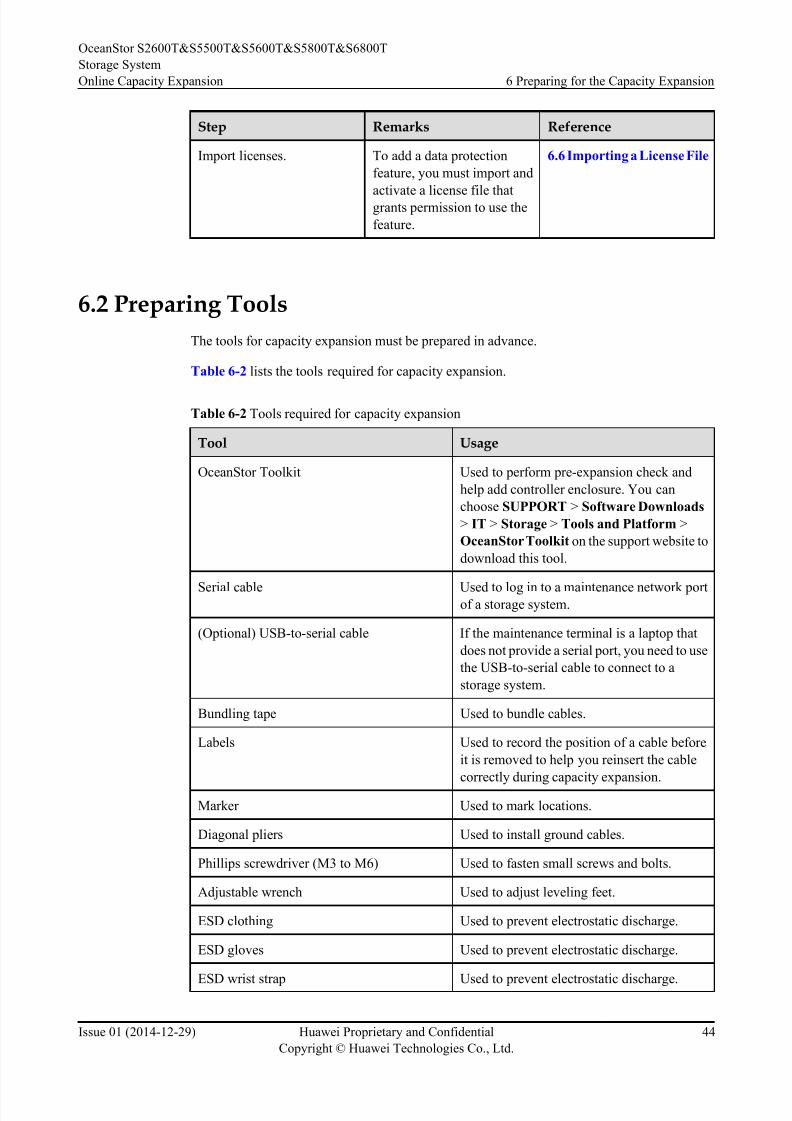
8/9/2019 OceanStor S2600T&S5500T&S5600T&S5800T&S6800T Storage System V200R002 Online Capacity Expansion 01
http://slidepdf.com/reader/full/oceanstor-s2600ts5500ts5600ts5800ts6800t-storage-system-v200r002-online 51/226
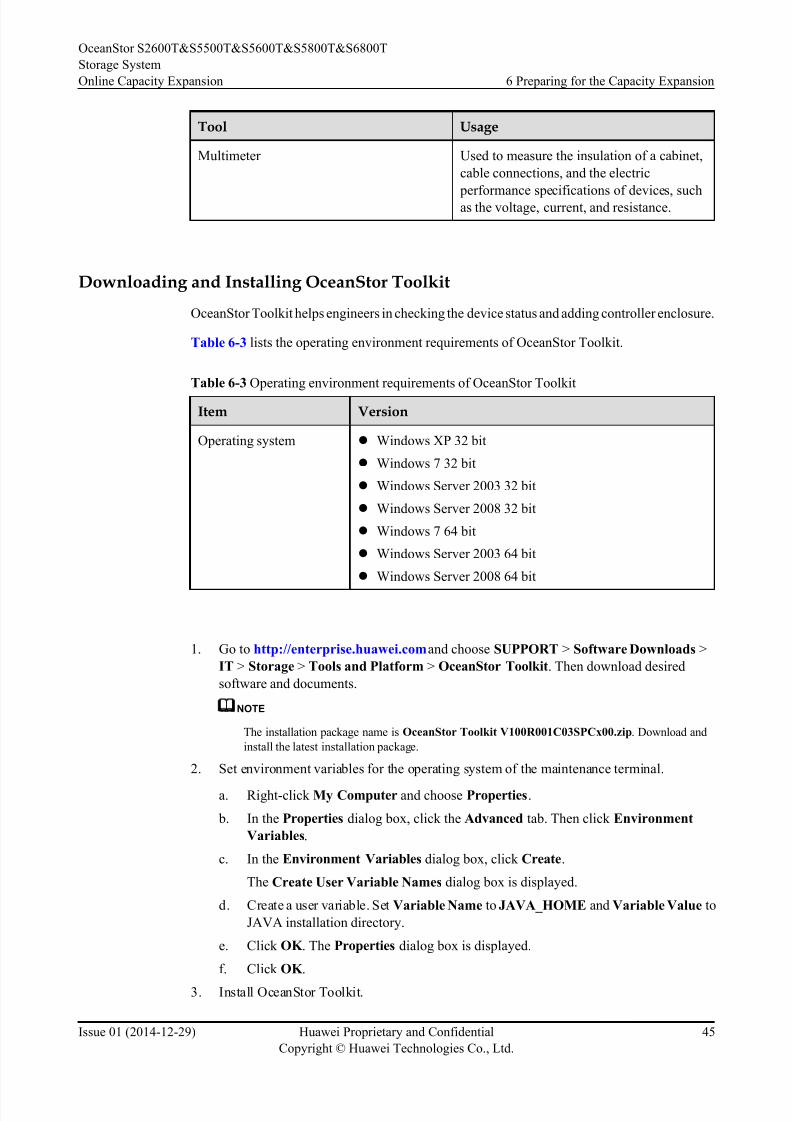
8/9/2019 OceanStor S2600T&S5500T&S5600T&S5800T&S6800T Storage System V200R002 Online Capacity Expansion 01
http://slidepdf.com/reader/full/oceanstor-s2600ts5500ts5600ts5800ts6800t-storage-system-v200r002-online 52/226
Tool Usage
Multimeter Used to measure the insulation of a cabinet,
cable connections, and the electric
performance specifications of devices, suchas the voltage, current, and resistance.
Downloading and Installing OceanStor Toolkit
OceanStor Toolkit helps engineers in checking the device status and adding controller enclosure.
Table 6-3 lists the operating environment requirements of OceanStor Toolkit.
Table 6-3 Operating environment requirements of OceanStor Toolkit
Item Version
Operating system l Windows XP 32 bit
l Windows 7 32 bit
l Windows Server 2003 32 bit
l Windows Server 2008 32 bit
l Windows 7 64 bit
l Windows Server 2003 64 bit
l Windows Server 2008 64 bit
1. Go to http://enterprise.huawei.com and choose SUPPORT > Software Downloads >
IT > Storage > Tools and Platform > OceanStor Toolkit. Then download desired
software and documents.
NOTE
The installation package name is OceanStor Toolkit V100R001C03SPCx00.zip. Download and
install the latest installation package.
2. Set environment variables for the operating system of the maintenance terminal.
a. Right-click My Computer and choose Properties.
b. In the Properties dialog box, click the Advanced tab. Then click Environment
Variables.
c. In the Environment Variables dialog box, click Create.
The Create User Variable Names dialog box is displayed.
d. Create a user variable. Set Variable Name to JAVA_HOME and Variable Value to
JAVA installation directory.
e. Click OK . The Properties dialog box is displayed.
f. Click OK .
3. Install OceanStor Toolkit.
OceanStor S2600T&S5500T&S5600T&S5800T&S6800T
Storage System
Online Capacity Expansion 6 Preparing for the Capacity Expansion
Issue 01 (2014-12-29) Huawei Proprietary and Confidential
Copyright © Huawei Technologies Co., Ltd.
45
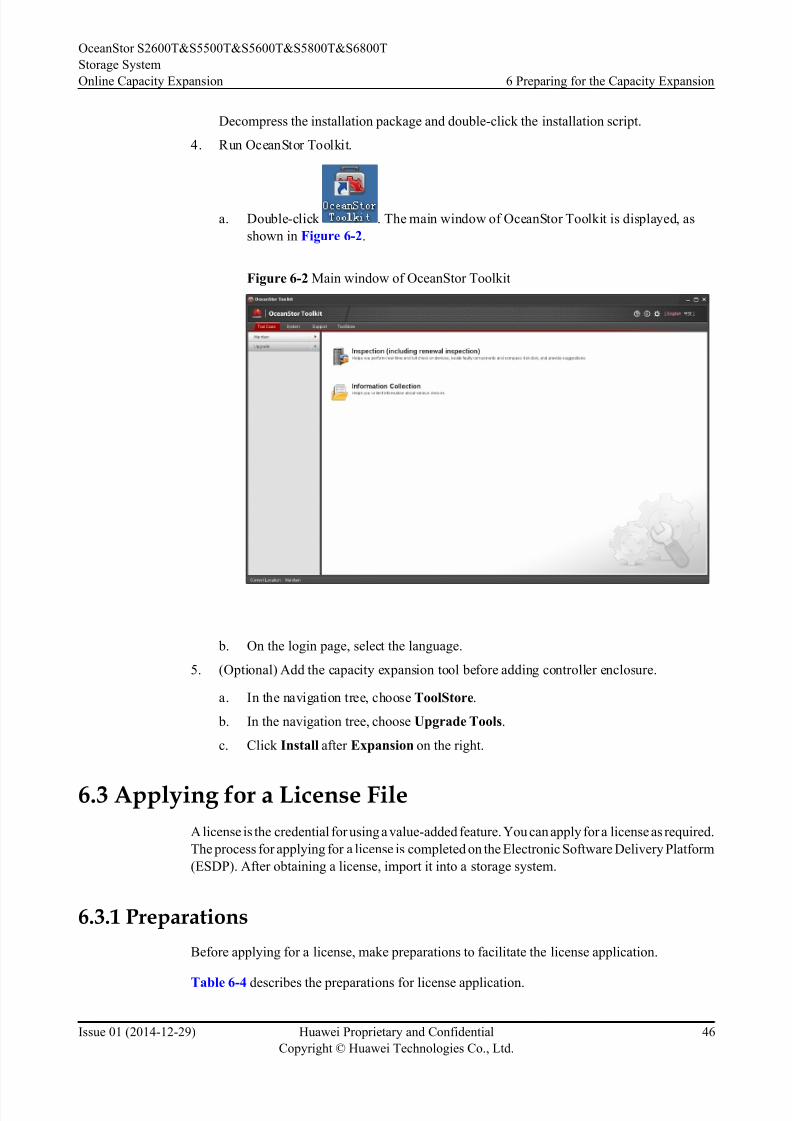
8/9/2019 OceanStor S2600T&S5500T&S5600T&S5800T&S6800T Storage System V200R002 Online Capacity Expansion 01
http://slidepdf.com/reader/full/oceanstor-s2600ts5500ts5600ts5800ts6800t-storage-system-v200r002-online 53/226
Decompress the installation package and double-click the installation script.
4. Run OceanStor Toolkit.
a. Double-click . The main window of OceanStor Toolkit is displayed, as
shown in Figure 6-2.
Figure 6-2 Main window of OceanStor Toolkit
b. On the login page, select the language.
5. (Optional) Add the capacity expansion tool before adding controller enclosure.
a. In the navigation tree, choose ToolStore.
b. In the navigation tree, choose Upgrade Tools.
c. Click Install after Expansion on the right.
6.3 Applying for a License File
A license is the credential for using a value-added feature. You can apply for a license as required.
The process for applying for a license is completed on the Electronic Software Delivery Platform
(ESDP). After obtaining a license, import it into a storage system.
6.3.1 Preparations
Before applying for a license, make preparations to facilitate the license application.
Table 6-4 describes the preparations for license application.
OceanStor S2600T&S5500T&S5600T&S5800T&S6800T
Storage System
Online Capacity Expansion 6 Preparing for the Capacity Expansion
Issue 01 (2014-12-29) Huawei Proprietary and Confidential
Copyright © Huawei Technologies Co., Ltd.
46
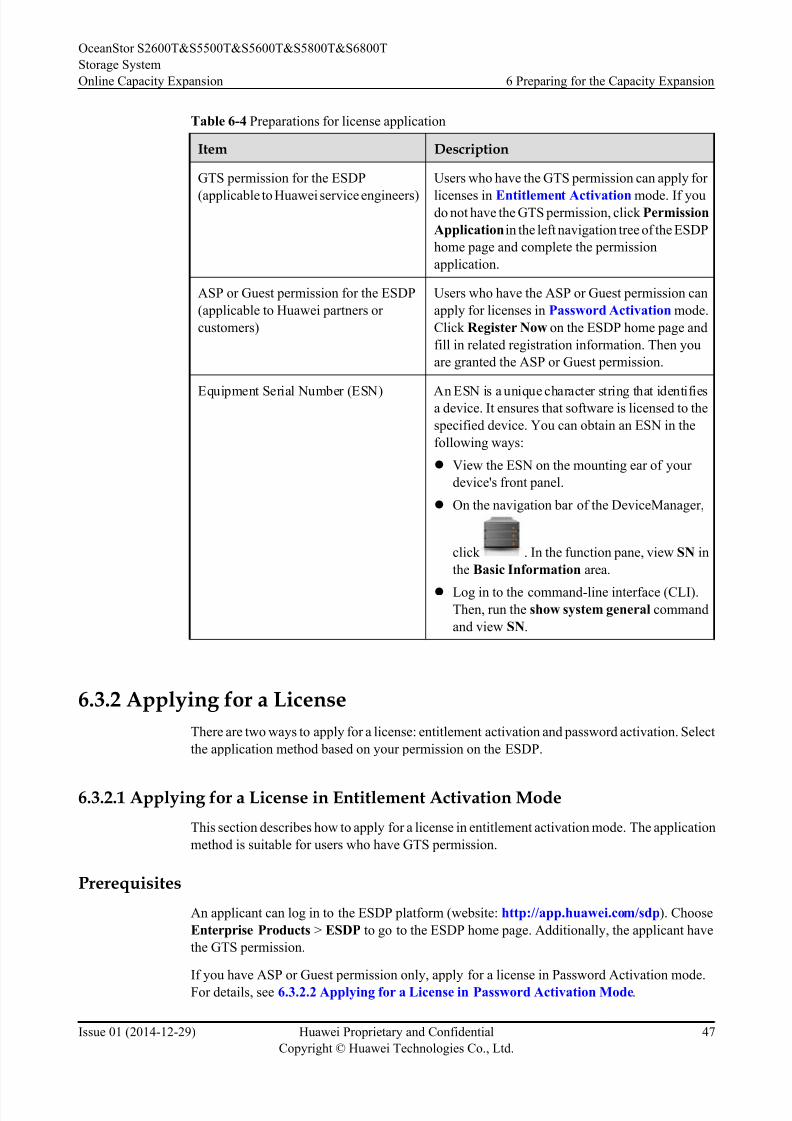
8/9/2019 OceanStor S2600T&S5500T&S5600T&S5800T&S6800T Storage System V200R002 Online Capacity Expansion 01
http://slidepdf.com/reader/full/oceanstor-s2600ts5500ts5600ts5800ts6800t-storage-system-v200r002-online 54/226
Table 6-4 Preparations for license application
Item Description
GTS permission for the ESDP
(applicable to Huawei service engineers)
Users who have the GTS permission can apply for
licenses in Entitlement Activation mode. If youdo not have the GTS permission, click Permission
Application in the left navigation tree of the ESDP
home page and complete the permission
application.
ASP or Guest permission for the ESDP
(applicable to Huawei partners or
customers)
Users who have the ASP or Guest permission can
apply for licenses in Password Activation mode.
Click Register Now on the ESDP home page and
fill in related registration information. Then you
are granted the ASP or Guest permission.
Equipment Serial Number (ESN) An ESN is a unique character string that identifiesa device. It ensures that software is licensed to the
specified device. You can obtain an ESN in the
following ways:
l View the ESN on the mounting ear of your
device's front panel.
l On the navigation bar of the DeviceManager,
click . In the function pane, view SN in
the Basic Information area.
l Log in to the command-line interface (CLI).Then, run the show system general command
and view SN.
6.3.2 Applying for a License
There are two ways to apply for a license: entitlement activation and password activation. Select
the application method based on your permission on the ESDP.
6.3.2.1 Applying for a License in Entitlement Activation Mode
This section describes how to apply for a license in entitlement activation mode. The application
method is suitable for users who have GTS permission.
Prerequisites
An applicant can log in to the ESDP platform (website: http://app.huawei.com/sdp). Choose
Enterprise Products > ESDP to go to the ESDP home page. Additionally, the applicant have
the GTS permission.
If you have ASP or Guest permission only, apply for a license in Password Activation mode.
For details, see 6.3.2.2 Applying for a License in Password Activation Mode.
OceanStor S2600T&S5500T&S5600T&S5800T&S6800T
Storage System
Online Capacity Expansion 6 Preparing for the Capacity Expansion
Issue 01 (2014-12-29) Huawei Proprietary and Confidential
Copyright © Huawei Technologies Co., Ltd.
47
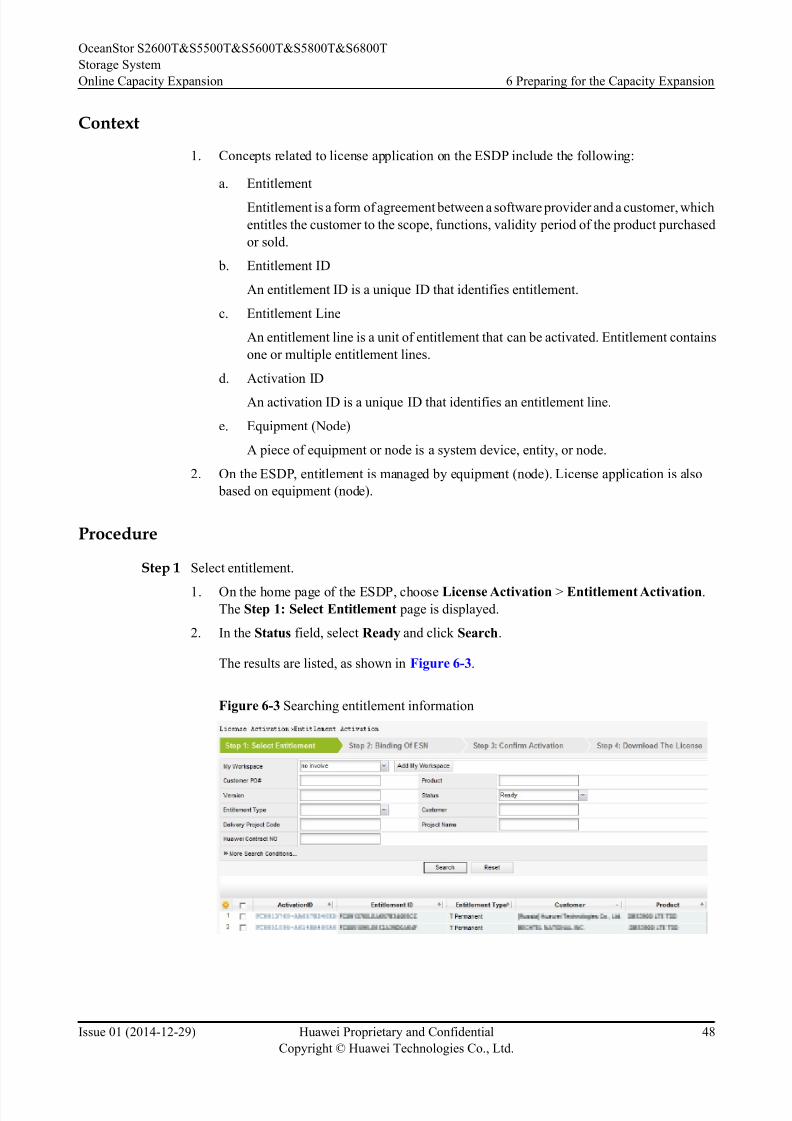
8/9/2019 OceanStor S2600T&S5500T&S5600T&S5800T&S6800T Storage System V200R002 Online Capacity Expansion 01
http://slidepdf.com/reader/full/oceanstor-s2600ts5500ts5600ts5800ts6800t-storage-system-v200r002-online 55/226
Context
1. Concepts related to license application on the ESDP include the following:
a. Entitlement
Entitlement is a form of agreement between a software provider and a customer, which
entitles the customer to the scope, functions, validity period of the product purchased
or sold.
b. Entitlement ID
An entitlement ID is a unique ID that identifies entitlement.
c. Entitlement Line
An entitlement line is a unit of entitlement that can be activated. Entitlement contains
one or multiple entitlement lines.
d. Activation ID
An activation ID is a unique ID that identifies an entitlement line.
e. Equipment (Node)
A piece of equipment or node is a system device, entity, or node.
2. On the ESDP, entitlement is managed by equipment (node). License application is also
based on equipment (node).
Procedure
Step 1 Select entitlement.
1. On the home page of the ESDP, choose License Activation > Entitlement Activation.The Step 1: Select Entitlement page is displayed.
2. In the Status field, select Ready and click Search.
The results are listed, as shown in Figure 6-3.
Figure 6-3 Searching entitlement information
OceanStor S2600T&S5500T&S5600T&S5800T&S6800T
Storage System
Online Capacity Expansion 6 Preparing for the Capacity Expansion
Issue 01 (2014-12-29) Huawei Proprietary and Confidential
Copyright © Huawei Technologies Co., Ltd.
48
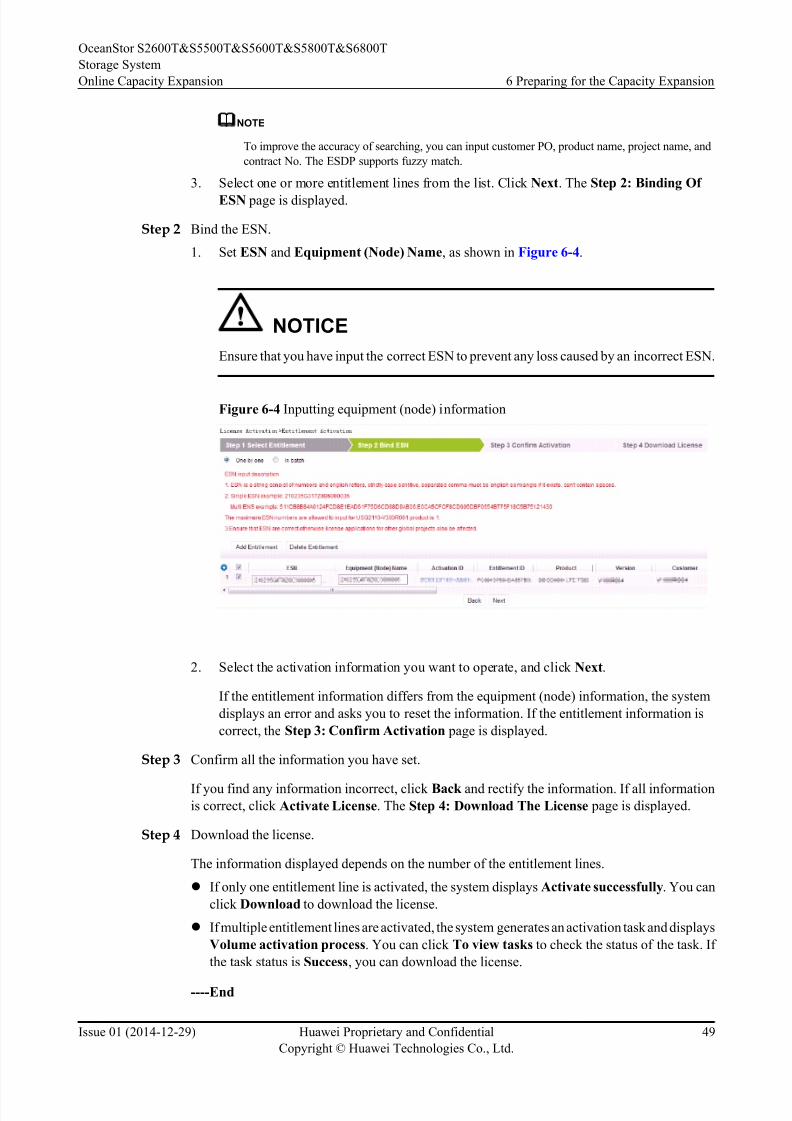
8/9/2019 OceanStor S2600T&S5500T&S5600T&S5800T&S6800T Storage System V200R002 Online Capacity Expansion 01
http://slidepdf.com/reader/full/oceanstor-s2600ts5500ts5600ts5800ts6800t-storage-system-v200r002-online 56/226
NOTE
To improve the accuracy of searching, you can input customer PO, product name, project name, and
contract No. The ESDP supports fuzzy match.
3. Select one or more entitlement lines from the list. Click Next. The Step 2: Binding Of
ESN page is displayed.
Step 2 Bind the ESN.
1. Set ESN and Equipment (Node) Name, as shown in Figure 6-4.
NOTICE
Ensure that you have input the correct ESN to prevent any loss caused by an incorrect ESN.
Figure 6-4 Inputting equipment (node) information
2. Select the activation information you want to operate, and click Next.
If the entitlement information differs from the equipment (node) information, the system
displays an error and asks you to reset the information. If the entitlement information is
correct, the Step 3: Confirm Activation page is displayed.
Step 3 Confirm all the information you have set.
If you find any information incorrect, click Back and rectify the information. If all informationis correct, click Activate License. The Step 4: Download The License page is displayed.
Step 4 Download the license.
The information displayed depends on the number of the entitlement lines.
l If only one entitlement line is activated, the system displays Activate successfully. You can
click Download to download the license.
l If multiple entitlement lines are activated, the system generates an activation task and displays
Volume activation process. You can click To view tasks to check the status of the task. If
the task status is Success, you can download the license.
----End
OceanStor S2600T&S5500T&S5600T&S5800T&S6800T
Storage System
Online Capacity Expansion 6 Preparing for the Capacity Expansion
Issue 01 (2014-12-29) Huawei Proprietary and Confidential
Copyright © Huawei Technologies Co., Ltd.
49

8/9/2019 OceanStor S2600T&S5500T&S5600T&S5800T&S6800T Storage System V200R002 Online Capacity Expansion 01
http://slidepdf.com/reader/full/oceanstor-s2600ts5500ts5600ts5800ts6800t-storage-system-v200r002-online 57/226
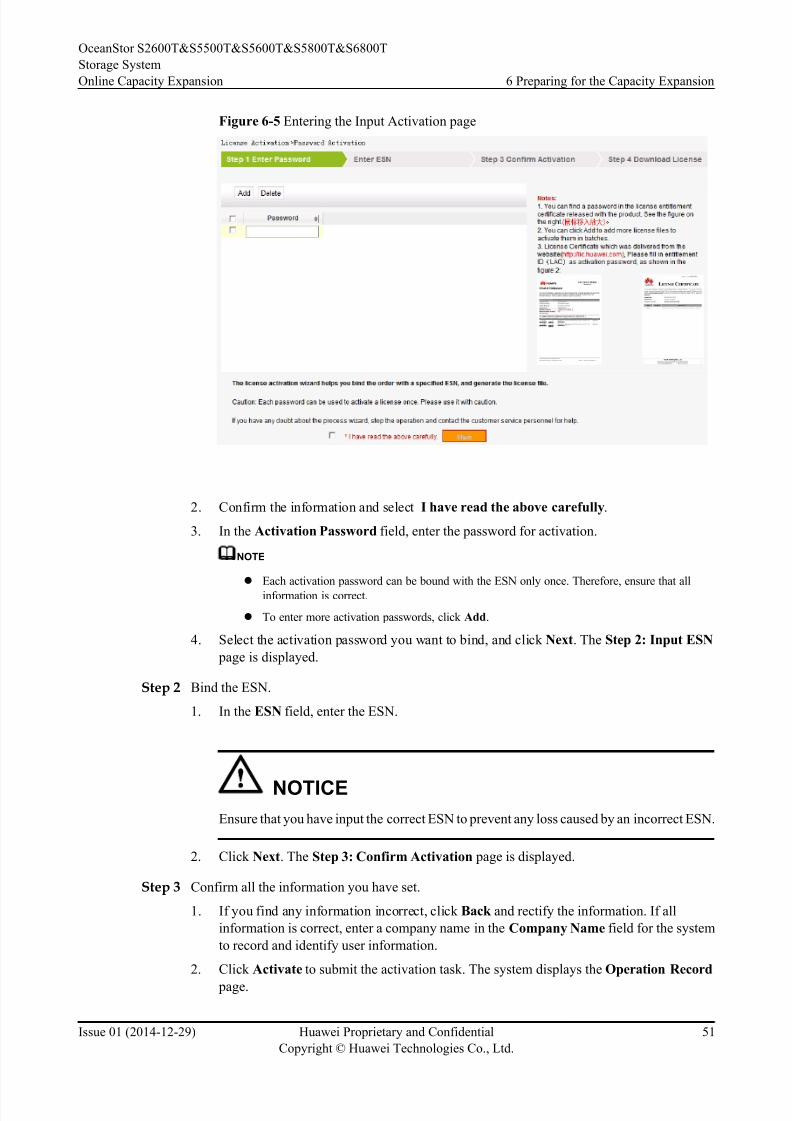
8/9/2019 OceanStor S2600T&S5500T&S5600T&S5800T&S6800T Storage System V200R002 Online Capacity Expansion 01
http://slidepdf.com/reader/full/oceanstor-s2600ts5500ts5600ts5800ts6800t-storage-system-v200r002-online 58/226
Figure 6-5 Entering the Input Activation page
2. Confirm the information and select I have read the above carefully.
3. In the Activation Password field, enter the password for activation.
NOTE
l Each activation password can be bound with the ESN only once. Therefore, ensure that all
information is correct.
l To enter more activation passwords, click Add.
4. Select the activation password you want to bind, and click Next. The Step 2: Input ESN
page is displayed.
Step 2 Bind the ESN.
1. In the ESN field, enter the ESN.
NOTICEEnsure that you have input the correct ESN to prevent any loss caused by an incorrect ESN.
2. Click Next. The Step 3: Confirm Activation page is displayed.
Step 3 Confirm all the information you have set.
1. If you find any information incorrect, click Back and rectify the information. If all
information is correct, enter a company name in the Company Name field for the system
to record and identify user information.
2. Click Activate to submit the activation task. The system displays the Operation Record
page.
OceanStor S2600T&S5500T&S5600T&S5800T&S6800T
Storage System
Online Capacity Expansion 6 Preparing for the Capacity Expansion
Issue 01 (2014-12-29) Huawei Proprietary and Confidential
Copyright © Huawei Technologies Co., Ltd.
51
8/9/2019 OceanStor S2600T&S5500T&S5600T&S5800T&S6800T Storage System V200R002 Online Capacity Expansion 01
http://slidepdf.com/reader/full/oceanstor-s2600ts5500ts5600ts5800ts6800t-storage-system-v200r002-online 59/226
8/9/2019 OceanStor S2600T&S5500T&S5600T&S5800T&S6800T Storage System V200R002 Online Capacity Expansion 01
http://slidepdf.com/reader/full/oceanstor-s2600ts5500ts5600ts5800ts6800t-storage-system-v200r002-online 60/226
NOTE
The default debugging password is debug@storage (applicable to the C00 version but not to the
C20 version).
5. Follow the wizard to specify inspection type, devices to be inspected, check items, and
check policies. Then start the inspection.
NOTE
Inspection type can be either Site deployment inspection or Real-time inspection. Select an
inspection type based on site requirements.
6. In Inspection Wizard, click Finish.
Step 2 View the inspection result.
l If Check result is Passed, the inspection is completed.
l If Check result is Not passed, the Information dialog box is displayed.
1. Read the content in the Information dialog box carefully and click OK .The Information Collection dialog box is displayed.
2. Click Collect to collect device information.
3. Save the collected information and inspection result. Then contact Huawei technical
support.
----End
6.4.2 Checking Storage System I/O Load
You are advised to expand the system capacity when the storage system load is light. You can
learn about the current storage system load by asking the application server engineers or bychecking the storage system I/O load.
Prerequisites
The performance monitoring function has been enabled.
Precautions
The performance monitoring function of the storage system consumes substantial CPU resources
and therefore affects storage system performance. Disable this function after gathering the
required information about storage system I/O load.
Procedure
Step 1 Log in to the OceanStor DeviceManager.
Step 2 On the right navigation bar, click .
The Monitor page is displayed.
Step 3 Click Performance monitoring.
The Performance monitoring page is displayed, as shown in Figure 6-6.
OceanStor S2600T&S5500T&S5600T&S5800T&S6800T
Storage System
Online Capacity Expansion 6 Preparing for the Capacity Expansion
Issue 01 (2014-12-29) Huawei Proprietary and Confidential
Copyright © Huawei Technologies Co., Ltd.
53
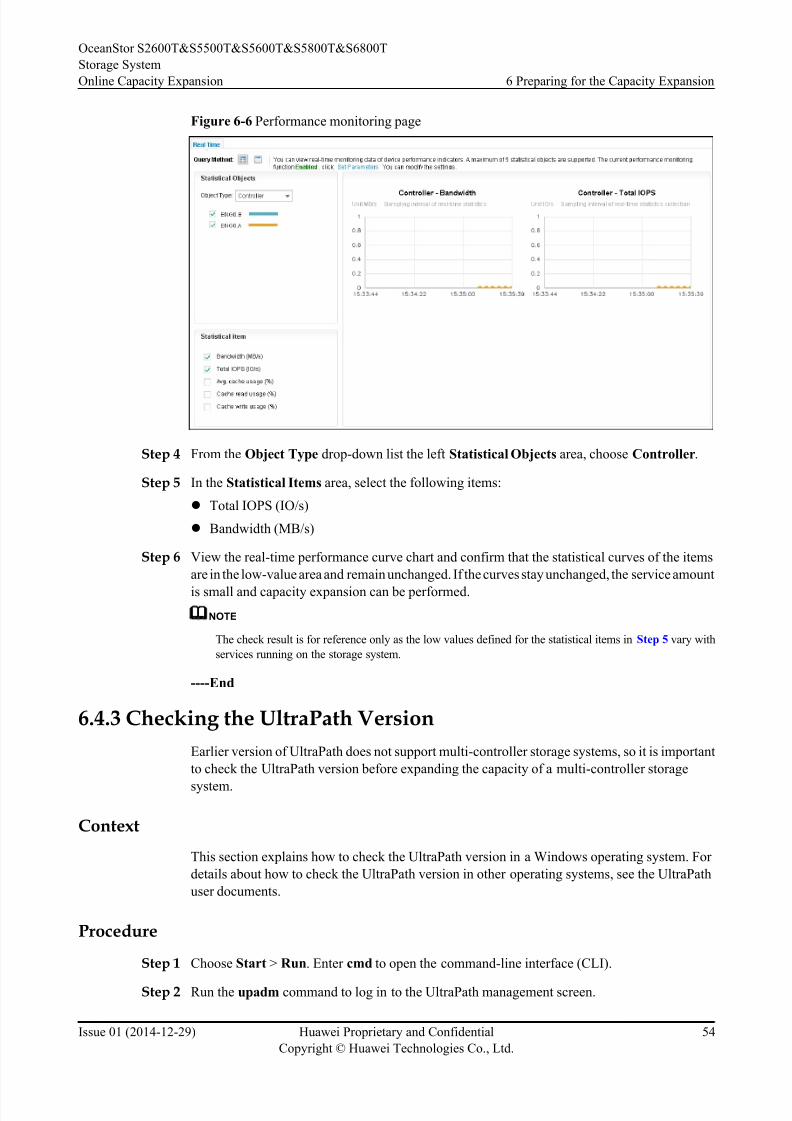
8/9/2019 OceanStor S2600T&S5500T&S5600T&S5800T&S6800T Storage System V200R002 Online Capacity Expansion 01
http://slidepdf.com/reader/full/oceanstor-s2600ts5500ts5600ts5800ts6800t-storage-system-v200r002-online 61/226
Figure 6-6 Performance monitoring page
Step 4 From the Object Type drop-down list the left Statistical Objects area, choose Controller.
Step 5 In the Statistical Items area, select the following items:
l Total IOPS (IO/s)
l Bandwidth (MB/s)
Step 6 View the real-time performance curve chart and confirm that the statistical curves of the items
are in the low-value area and remain unchanged. If the curves stay unchanged, the service amount
is small and capacity expansion can be performed.
NOTE
The check result is for reference only as the low values defined for the statistical items in Step 5 vary with
services running on the storage system.
----End
6.4.3 Checking the UltraPath Version
Earlier version of UltraPath does not support multi-controller storage systems, so it is important
to check the UltraPath version before expanding the capacity of a multi-controller storage
system.
Context
This section explains how to check the UltraPath version in a Windows operating system. For
details about how to check the UltraPath version in other operating systems, see the UltraPath
user documents.
Procedure
Step 1 Choose Start > Run. Enter cmd to open the command-line interface (CLI).
Step 2 Run the upadm command to log in to the UltraPath management screen.
OceanStor S2600T&S5500T&S5600T&S5800T&S6800T
Storage System
Online Capacity Expansion 6 Preparing for the Capacity Expansion
Issue 01 (2014-12-29) Huawei Proprietary and Confidential
Copyright © Huawei Technologies Co., Ltd.
54
8/9/2019 OceanStor S2600T&S5500T&S5600T&S5800T&S6800T Storage System V200R002 Online Capacity Expansion 01
http://slidepdf.com/reader/full/oceanstor-s2600ts5500ts5600ts5800ts6800t-storage-system-v200r002-online 62/226
8/9/2019 OceanStor S2600T&S5500T&S5600T&S5800T&S6800T Storage System V200R002 Online Capacity Expansion 01
http://slidepdf.com/reader/full/oceanstor-s2600ts5500ts5600ts5800ts6800t-storage-system-v200r002-online 63/226
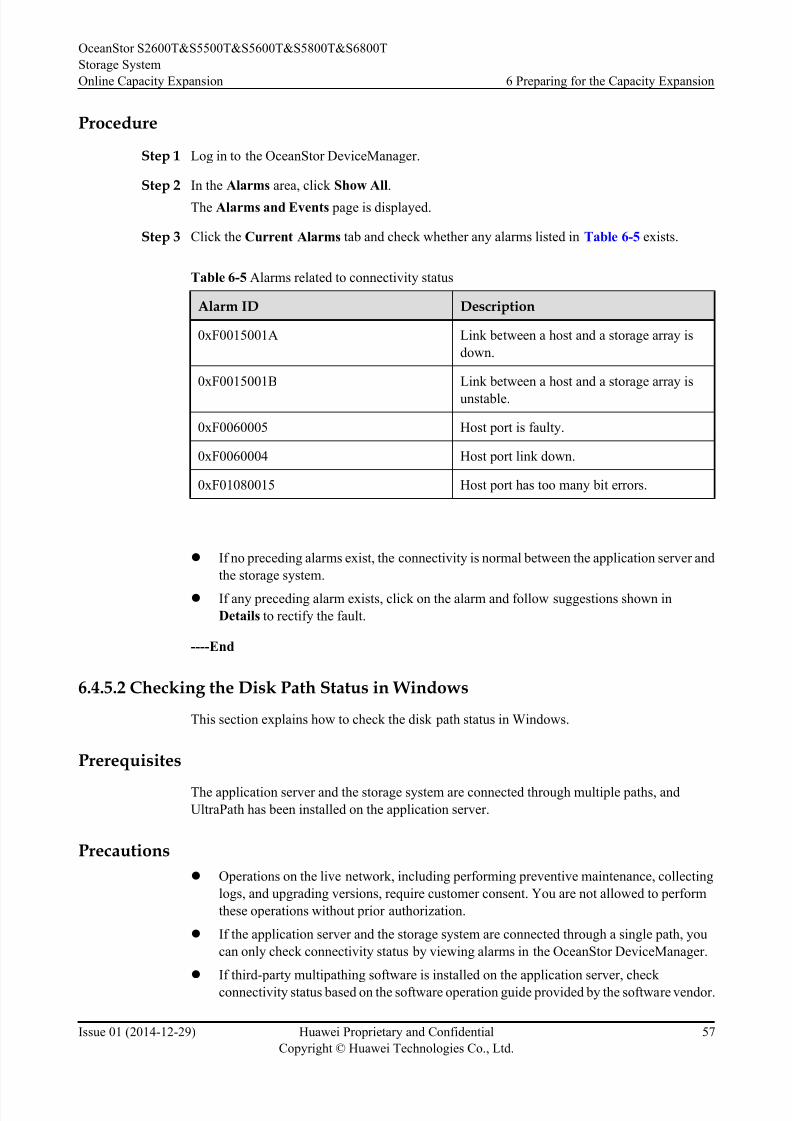
8/9/2019 OceanStor S2600T&S5500T&S5600T&S5800T&S6800T Storage System V200R002 Online Capacity Expansion 01
http://slidepdf.com/reader/full/oceanstor-s2600ts5500ts5600ts5800ts6800t-storage-system-v200r002-online 64/226
Procedure
Step 1 Log in to the OceanStor DeviceManager.
Step 2 In the Alarms area, click Show All.
The Alarms and Events page is displayed.
Step 3 Click the Current Alarms tab and check whether any alarms listed in Table 6-5 exists.
Table 6-5 Alarms related to connectivity status
Alarm ID Description
0xF0015001A Link between a host and a storage array is
down.
0xF0015001B Link between a host and a storage array is
unstable.
0xF0060005 Host port is faulty.
0xF0060004 Host port link down.
0xF01080015 Host port has too many bit errors.
l If no preceding alarms exist, the connectivity is normal between the application server and
the storage system.
l If any preceding alarm exists, click on the alarm and follow suggestions shown in
Details to rectify the fault.
----End
6.4.5.2 Checking the Disk Path Status in Windows
This section explains how to check the disk path status in Windows.
Prerequisites
The application server and the storage system are connected through multiple paths, and
UltraPath has been installed on the application server.
Precautions
l Operations on the live network, including performing preventive maintenance, collecting
logs, and upgrading versions, require customer consent. You are not allowed to perform
these operations without prior authorization.
l If the application server and the storage system are connected through a single path, you
can only check connectivity status by viewing alarms in the OceanStor DeviceManager.
l If third-party multipathing software is installed on the application server, check
connectivity status based on the software operation guide provided by the software vendor.
OceanStor S2600T&S5500T&S5600T&S5800T&S6800T
Storage System
Online Capacity Expansion 6 Preparing for the Capacity Expansion
Issue 01 (2014-12-29) Huawei Proprietary and Confidential
Copyright © Huawei Technologies Co., Ltd.
57
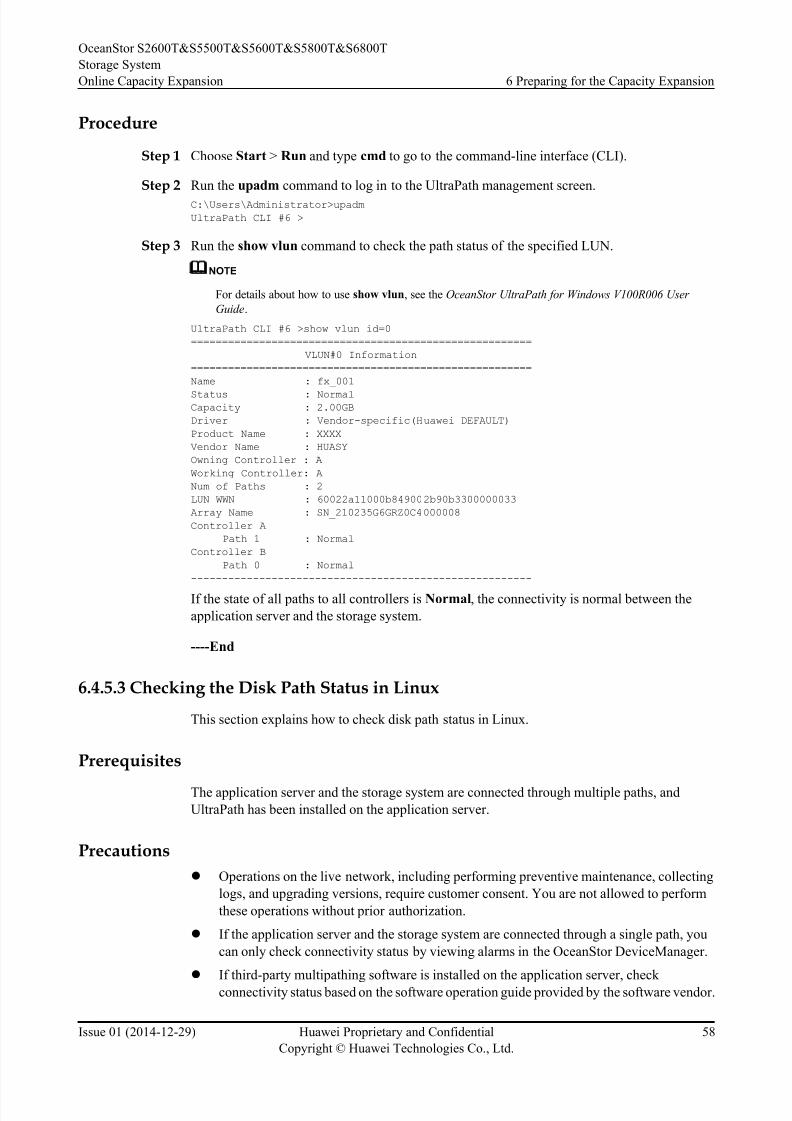
8/9/2019 OceanStor S2600T&S5500T&S5600T&S5800T&S6800T Storage System V200R002 Online Capacity Expansion 01
http://slidepdf.com/reader/full/oceanstor-s2600ts5500ts5600ts5800ts6800t-storage-system-v200r002-online 65/226
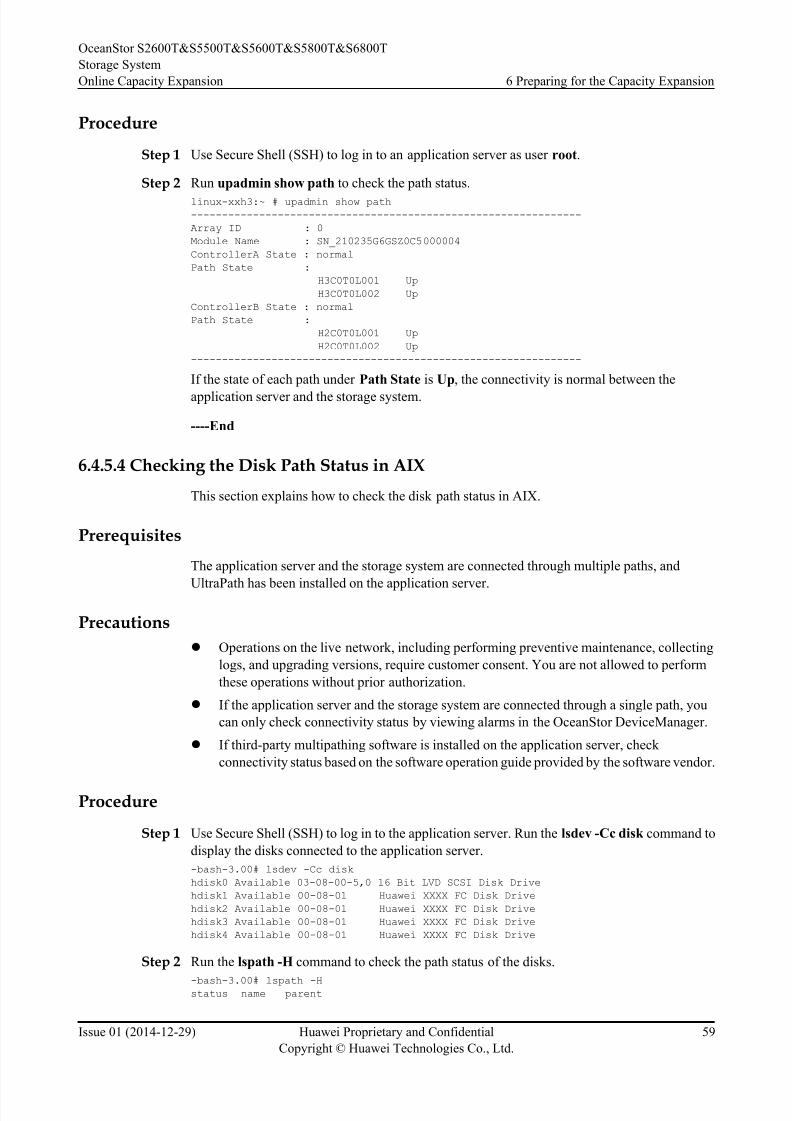
8/9/2019 OceanStor S2600T&S5500T&S5600T&S5800T&S6800T Storage System V200R002 Online Capacity Expansion 01
http://slidepdf.com/reader/full/oceanstor-s2600ts5500ts5600ts5800ts6800t-storage-system-v200r002-online 66/226
Procedure
Step 1 Use Secure Shell (SSH) to log in to an application server as user root.
Step 2 Run upadmin show path to check the path status.
linux-xxh3:~ # upadmin show path
---------------------------------------------------------------
Array ID : 0
Module Name : SN_210235G6GSZ0C5000004
ControllerA State : normal
Path State :
H3C0T0L001 Up
H3C0T0L002 Up
ControllerB State : normal
Path State :
H2C0T0L001 Up
H2C0T0L002 Up
---------------------------------------------------------------
If the state of each path under Path State is Up, the connectivity is normal between the
application server and the storage system.
----End
6.4.5.4 Checking the Disk Path Status in AIX
This section explains how to check the disk path status in AIX.
Prerequisites
The application server and the storage system are connected through multiple paths, and
UltraPath has been installed on the application server.
Precautions
l Operations on the live network, including performing preventive maintenance, collecting
logs, and upgrading versions, require customer consent. You are not allowed to perform
these operations without prior authorization.
l If the application server and the storage system are connected through a single path, you
can only check connectivity status by viewing alarms in the OceanStor DeviceManager.
l If third-party multipathing software is installed on the application server, check
connectivity status based on the software operation guide provided by the software vendor.
Procedure
Step 1 Use Secure Shell (SSH) to log in to the application server. Run the lsdev -Cc disk command to
display the disks connected to the application server.
-bash-3.00# lsdev -Cc disk
hdisk0 Available 03-08-00-5,0 16 Bit LVD SCSI Disk Drive
hdisk1 Available 00-08-01 Huawei XXXX FC Disk Drive
hdisk2 Available 00-08-01 Huawei XXXX FC Disk Drive
hdisk3 Available 00-08-01 Huawei XXXX FC Disk Drive
hdisk4 Available 00-08-01 Huawei XXXX FC Disk Drive
Step 2 Run the lspath -H command to check the path status of the disks.
-bash-3.00# lspath -Hstatus name parent
OceanStor S2600T&S5500T&S5600T&S5800T&S6800T
Storage System
Online Capacity Expansion 6 Preparing for the Capacity Expansion
Issue 01 (2014-12-29) Huawei Proprietary and Confidential
Copyright © Huawei Technologies Co., Ltd.
59
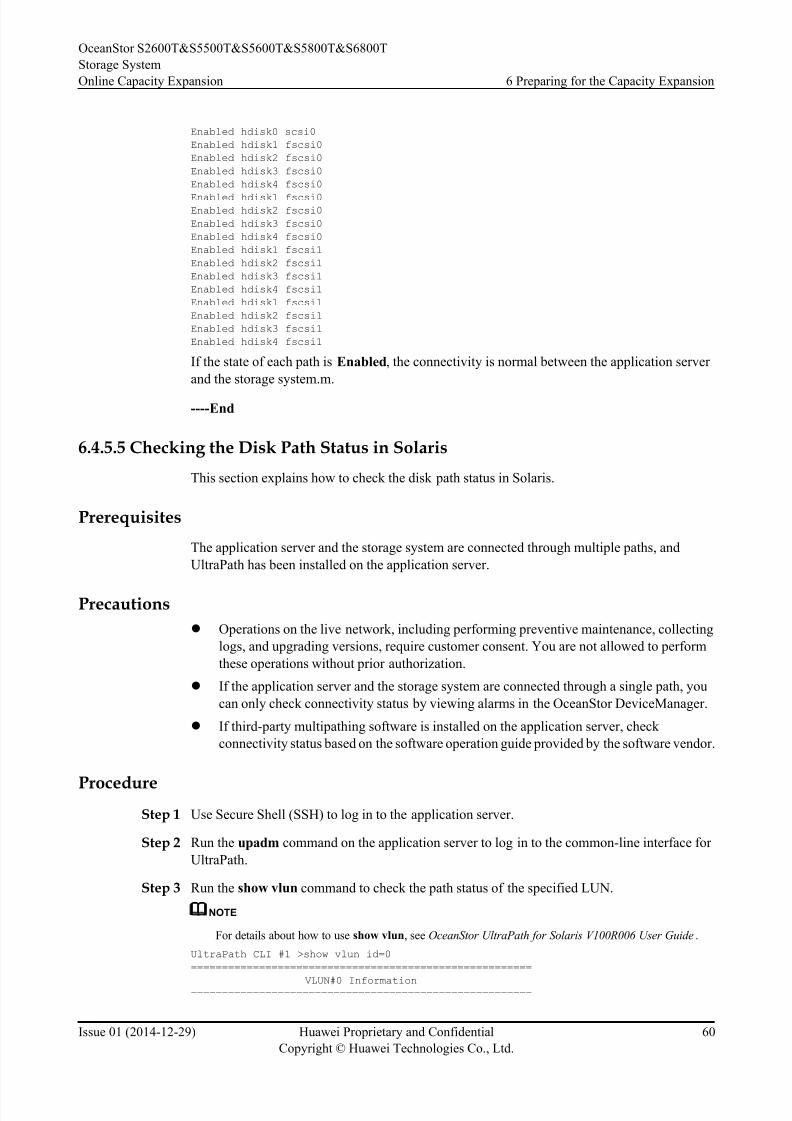
8/9/2019 OceanStor S2600T&S5500T&S5600T&S5800T&S6800T Storage System V200R002 Online Capacity Expansion 01
http://slidepdf.com/reader/full/oceanstor-s2600ts5500ts5600ts5800ts6800t-storage-system-v200r002-online 67/226
Enabled hdisk0 scsi0
Enabled hdisk1 fscsi0
Enabled hdisk2 fscsi0
Enabled hdisk3 fscsi0
Enabled hdisk4 fscsi0
Enabled hdisk1 fscsi0Enabled hdisk2 fscsi0
Enabled hdisk3 fscsi0
Enabled hdisk4 fscsi0
Enabled hdisk1 fscsi1
Enabled hdisk2 fscsi1
Enabled hdisk3 fscsi1
Enabled hdisk4 fscsi1
Enabled hdisk1 fscsi1
Enabled hdisk2 fscsi1
Enabled hdisk3 fscsi1
Enabled hdisk4 fscsi1
If the state of each path is Enabled, the connectivity is normal between the application server
and the storage system.m.
----End
6.4.5.5 Checking the Disk Path Status in Solaris
This section explains how to check the disk path status in Solaris.
Prerequisites
The application server and the storage system are connected through multiple paths, and
UltraPath has been installed on the application server.
Precautions
l Operations on the live network, including performing preventive maintenance, collecting
logs, and upgrading versions, require customer consent. You are not allowed to perform
these operations without prior authorization.
l If the application server and the storage system are connected through a single path, you
can only check connectivity status by viewing alarms in the OceanStor DeviceManager.
l If third-party multipathing software is installed on the application server, check
connectivity status based on the software operation guide provided by the software vendor.
ProcedureStep 1 Use Secure Shell (SSH) to log in to the application server.
Step 2 Run the upadm command on the application server to log in to the common-line interface for
UltraPath.
Step 3 Run the show vlun command to check the path status of the specified LUN.
NOTE
For details about how to use show vlun, see OceanStor UltraPath for Solaris V100R006 User Guide.
UltraPath CLI #1 >show vlun id=0
=======================================================
VLUN#0 Information=======================================================
OceanStor S2600T&S5500T&S5600T&S5800T&S6800T
Storage System
Online Capacity Expansion 6 Preparing for the Capacity Expansion
Issue 01 (2014-12-29) Huawei Proprietary and Confidential
Copyright © Huawei Technologies Co., Ltd.
60
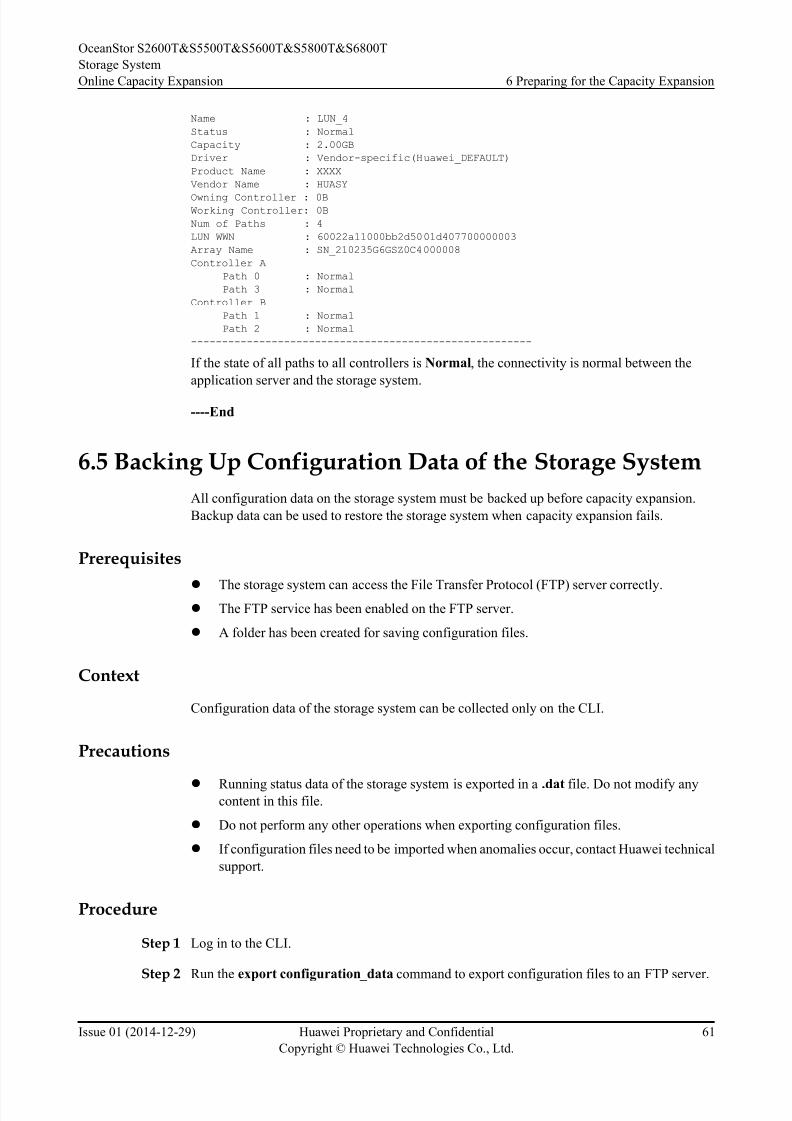
8/9/2019 OceanStor S2600T&S5500T&S5600T&S5800T&S6800T Storage System V200R002 Online Capacity Expansion 01
http://slidepdf.com/reader/full/oceanstor-s2600ts5500ts5600ts5800ts6800t-storage-system-v200r002-online 68/226
Name : LUN_4
Status : Normal
Capacity : 2.00GB
Driver : Vendor-specific(Huawei_DEFAULT)
Product Name : XXXX
Vendor Name : HUASY
Owning Controller : 0BWorking Controller: 0B
Num of Paths : 4
LUN WWN : 60022a11000bb2d5001d407700000003
Array Name : SN_210235G6GSZ0C4000008
Controller A
Path 0 : Normal
Path 3 : Normal
Controller B
Path 1 : Normal
Path 2 : Normal
-------------------------------------------------------
If the state of all paths to all controllers is Normal, the connectivity is normal between the
application server and the storage system.
----End
6.5 Backing Up Configuration Data of the Storage System
All configuration data on the storage system must be backed up before capacity expansion.
Backup data can be used to restore the storage system when capacity expansion fails.
Prerequisites
lThe storage system can access the File Transfer Protocol (FTP) server correctly.
l The FTP service has been enabled on the FTP server.
l A folder has been created for saving configuration files.
Context
Configuration data of the storage system can be collected only on the CLI.
Precautions
l Running status data of the storage system is exported in a .dat file. Do not modify anycontent in this file.
l Do not perform any other operations when exporting configuration files.
l If configuration files need to be imported when anomalies occur, contact Huawei technical
support.
Procedure
Step 1 Log in to the CLI.
Step 2 Run the export configuration_data command to export configuration files to an FTP server.
OceanStor S2600T&S5500T&S5600T&S5800T&S6800T
Storage System
Online Capacity Expansion 6 Preparing for the Capacity Expansion
Issue 01 (2014-12-29) Huawei Proprietary and Confidential
Copyright © Huawei Technologies Co., Ltd.
61
8/9/2019 OceanStor S2600T&S5500T&S5600T&S5800T&S6800T Storage System V200R002 Online Capacity Expansion 01
http://slidepdf.com/reader/full/oceanstor-s2600ts5500ts5600ts5800ts6800t-storage-system-v200r002-online 69/226
NOTE
For details about this command, see the Command Reference of the corresponding version of storage
system.
----End
6.6 Importing a License File
To add a data protection feature, you must import and activate a license file that grants permission
to use the added capacity or feature.
Prerequisites
You have obtained a valid license file from Huawei.
Context
Internet Explorer on Windows is used as an example here. If another browser is used, perform
related operations based on site requirement.
Procedure
Step 1 Log in to the OceanStor DeviceManager.
Step 2 Go to License Management page.
1. On the right navigation bar, click .
2. Under Viewing and Settings in the function pane on the left, choose More > Manage
License Files.
The License Management page is displayed.
Step 3 In the navigation tree on the left, choose Inactive License. In the function pane on the right,
view the inactive license files.
Step 4 Click Select to add the license file you have obtained from Huawei.
Step 5 Click Upload to upload the license file to the storage system.
Step 6 Click Activate to activate the license file you have uploaded.
After importing and activating the license file, you have access to the feature or storage capacity
that the license file includes.
----End
OceanStor S2600T&S5500T&S5600T&S5800T&S6800T
Storage System
Online Capacity Expansion 6 Preparing for the Capacity Expansion
Issue 01 (2014-12-29) Huawei Proprietary and Confidential
Copyright © Huawei Technologies Co., Ltd.
62
8/9/2019 OceanStor S2600T&S5500T&S5600T&S5800T&S6800T Storage System V200R002 Online Capacity Expansion 01
http://slidepdf.com/reader/full/oceanstor-s2600ts5500ts5600ts5800ts6800t-storage-system-v200r002-online 70/226
7 Adding Devices
About This Chapter
You can expand the storage system capacity by adding disks, disk enclosures, and controller
enclosure.
7.1 Adding Disks
The storage system has enough empty disk slots to satisfy your capacity expansion requirements.
7.2 Adding Disk Enclosures
You can add disk enclosures to vacant slots in bays to expand the storage system capacity.
7.3 Adding Controller Enclosure
You can add controller enclosure to improve the overall performance of the storage system.
OceanStor S2600T&S5500T&S5600T&S5800T&S6800T
Storage System
Online Capacity Expansion 7 Adding Devices
Issue 01 (2014-12-29) Huawei Proprietary and Confidential
Copyright © Huawei Technologies Co., Ltd.
63
8/9/2019 OceanStor S2600T&S5500T&S5600T&S5800T&S6800T Storage System V200R002 Online Capacity Expansion 01
http://slidepdf.com/reader/full/oceanstor-s2600ts5500ts5600ts5800ts6800t-storage-system-v200r002-online 71/226
7.1 Adding Disks
The storage system has enough empty disk slots to satisfy your capacity expansion requirements.
7.1.1 Adding Disks
This section explains how to expand the storage system capacity by adding disks, using 2.5-inch
disks as examples. The procedure for adding 3.5-inch disks is the same as that of adding 2.5-
inch disks.
Prerequisites
l Disks compatible with the storage system are prepared.
l Configuration data of the storage system has been backed up.
Precautions
l Slowly insert a disk into a disk enclosure in case of disk damage.
l Do not use excessive force when inserting or removing a disk, or else the disk appearance
or connectors may be damaged.
Procedure
Step 1 Insert a disk.
1. Put on ESD clothing and a pair of ESD gloves.
2. Take the disk out of an ESD bag.
3. Insert the disk into a vacant slot, as shown in step 1 in Figure 7-1.
NOTICE
l Before inserting a disk, move the disk handle to the fully open position. Otherwise, the
disk cannot be fully inserted into a slot.
l
Align a disk with a disk slot and then gently insert the disk. Do not use excessive forcewhen inserting a disk, or else disk connectors may be damaged.
l After inserting a disk, wait at least one minute before removing it.
OceanStor S2600T&S5500T&S5600T&S5800T&S6800T
Storage System
Online Capacity Expansion 7 Adding Devices
Issue 01 (2014-12-29) Huawei Proprietary and Confidential
Copyright © Huawei Technologies Co., Ltd.
64
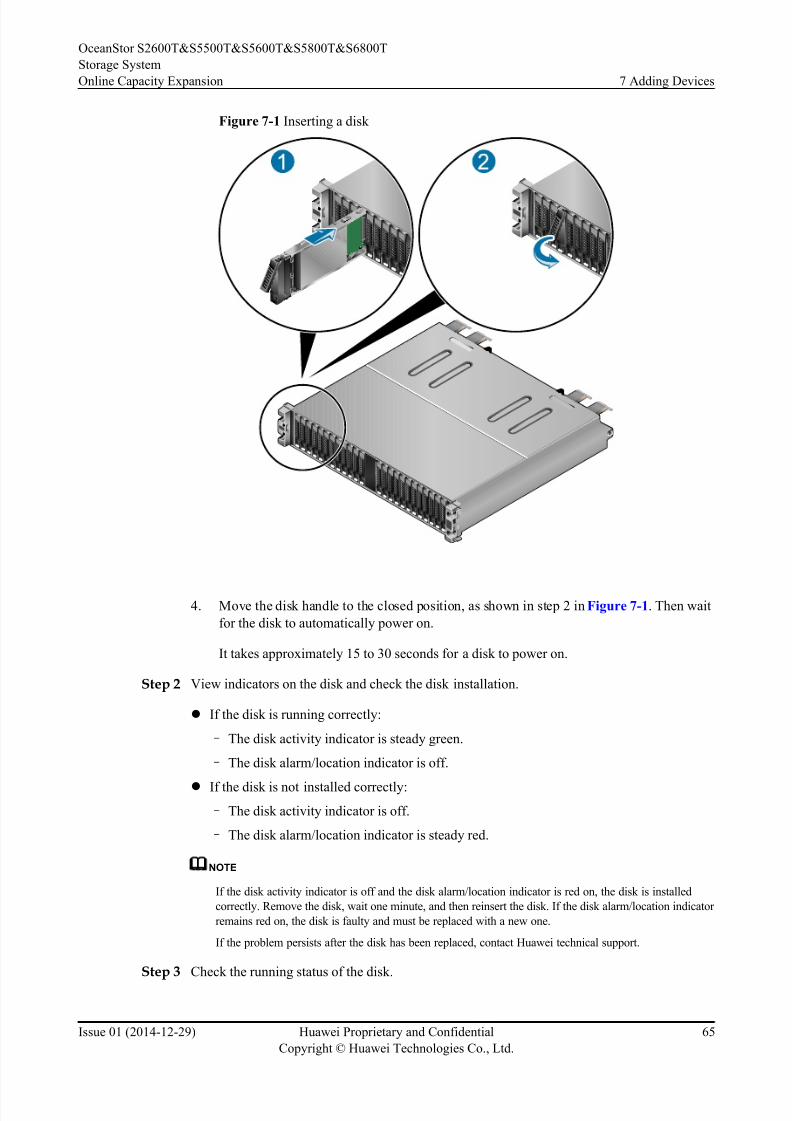
8/9/2019 OceanStor S2600T&S5500T&S5600T&S5800T&S6800T Storage System V200R002 Online Capacity Expansion 01
http://slidepdf.com/reader/full/oceanstor-s2600ts5500ts5600ts5800ts6800t-storage-system-v200r002-online 72/226
Figure 7-1 Inserting a disk
4. Move the disk handle to the closed position, as shown in step 2 in Figure 7-1. Then wait
for the disk to automatically power on.
It takes approximately 15 to 30 seconds for a disk to power on.
Step 2 View indicators on the disk and check the disk installation.
l If the disk is running correctly:
– The disk activity indicator is steady green.
– The disk alarm/location indicator is off.
l If the disk is not installed correctly:
– The disk activity indicator is off.
– The disk alarm/location indicator is steady red.
NOTE
If the disk activity indicator is off and the disk alarm/location indicator is red on, the disk is installed
correctly. Remove the disk, wait one minute, and then reinsert the disk. If the disk alarm/location indicator
remains red on, the disk is faulty and must be replaced with a new one.
If the problem persists after the disk has been replaced, contact Huawei technical support.
Step 3 Check the running status of the disk.
OceanStor S2600T&S5500T&S5600T&S5800T&S6800T
Storage System
Online Capacity Expansion 7 Adding Devices
Issue 01 (2014-12-29) Huawei Proprietary and Confidential
Copyright © Huawei Technologies Co., Ltd.
65
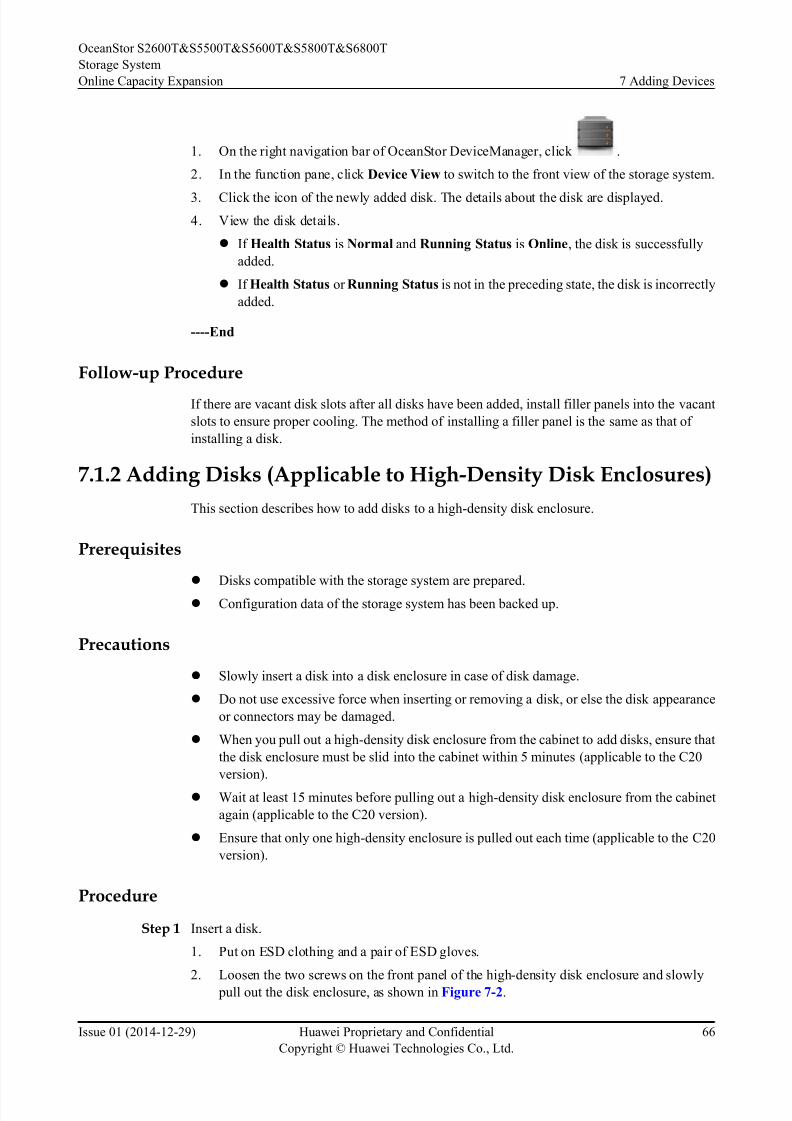
8/9/2019 OceanStor S2600T&S5500T&S5600T&S5800T&S6800T Storage System V200R002 Online Capacity Expansion 01
http://slidepdf.com/reader/full/oceanstor-s2600ts5500ts5600ts5800ts6800t-storage-system-v200r002-online 73/226
1. On the right navigation bar of OceanStor DeviceManager, click .
2. In the function pane, click Device View to switch to the front view of the storage system.
3. Click the icon of the newly added disk. The details about the disk are displayed.
4. View the disk details.
l If Health Status is Normal and Running Status is Online, the disk is successfully
added.
l If Health Status or Running Status is not in the preceding state, the disk is incorrectly
added.
----End
Follow-up Procedure
If there are vacant disk slots after all disks have been added, install filler panels into the vacant
slots to ensure proper cooling. The method of installing a filler panel is the same as that of
installing a disk.
7.1.2 Adding Disks (Applicable to High-Density Disk Enclosures)
This section describes how to add disks to a high-density disk enclosure.
Prerequisites
l Disks compatible with the storage system are prepared.
l Configuration data of the storage system has been backed up.
Precautions
l Slowly insert a disk into a disk enclosure in case of disk damage.
l Do not use excessive force when inserting or removing a disk, or else the disk appearance
or connectors may be damaged.
l When you pull out a high-density disk enclosure from the cabinet to add disks, ensure that
the disk enclosure must be slid into the cabinet within 5 minutes (applicable to the C20
version).
l Wait at least 15 minutes before pulling out a high-density disk enclosure from the cabinet
again (applicable to the C20 version).
l Ensure that only one high-density enclosure is pulled out each time (applicable to the C20
version).
Procedure
Step 1 Insert a disk.
1. Put on ESD clothing and a pair of ESD gloves.
2. Loosen the two screws on the front panel of the high-density disk enclosure and slowly
pull out the disk enclosure, as shown in Figure 7-2.
OceanStor S2600T&S5500T&S5600T&S5800T&S6800T
Storage System
Online Capacity Expansion 7 Adding Devices
Issue 01 (2014-12-29) Huawei Proprietary and Confidential
Copyright © Huawei Technologies Co., Ltd.
66
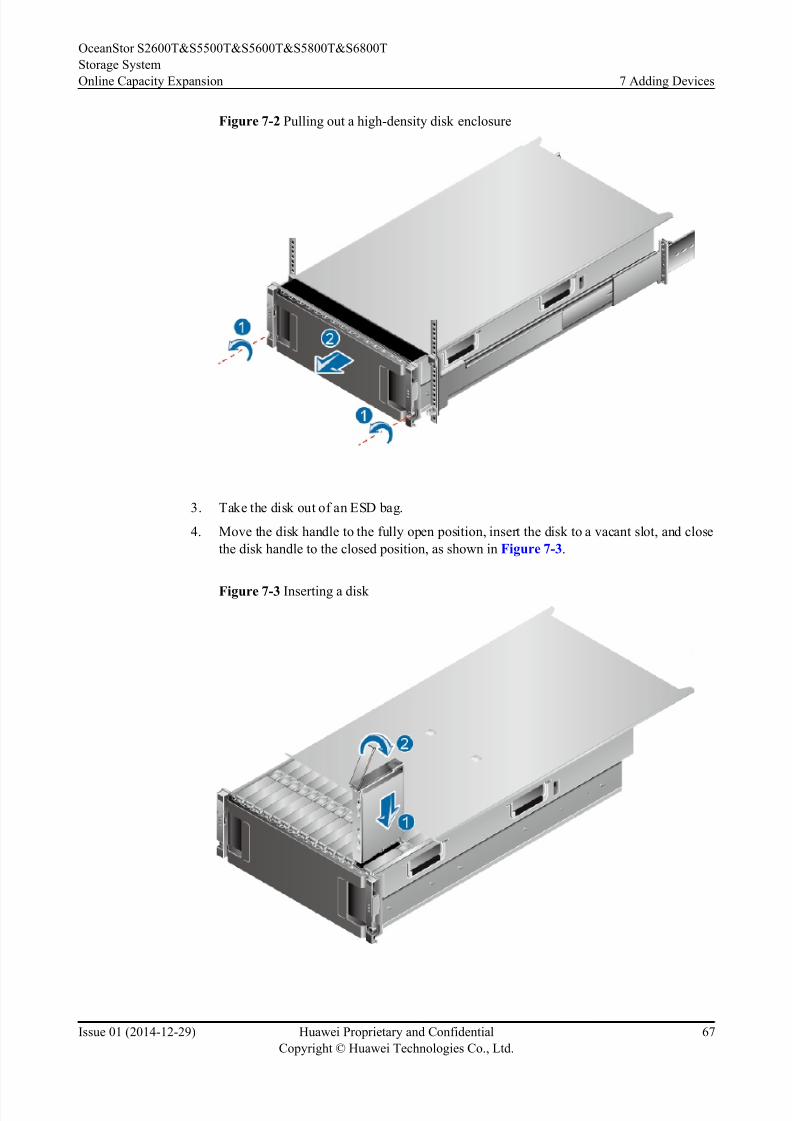
8/9/2019 OceanStor S2600T&S5500T&S5600T&S5800T&S6800T Storage System V200R002 Online Capacity Expansion 01
http://slidepdf.com/reader/full/oceanstor-s2600ts5500ts5600ts5800ts6800t-storage-system-v200r002-online 74/226
Figure 7-2 Pulling out a high-density disk enclosure
3. Take the disk out of an ESD bag.
4. Move the disk handle to the fully open position, insert the disk to a vacant slot, and close
the disk handle to the closed position, as shown in Figure 7-3.
Figure 7-3 Inserting a disk
OceanStor S2600T&S5500T&S5600T&S5800T&S6800T
Storage System
Online Capacity Expansion 7 Adding Devices
Issue 01 (2014-12-29) Huawei Proprietary and Confidential
Copyright © Huawei Technologies Co., Ltd.
67
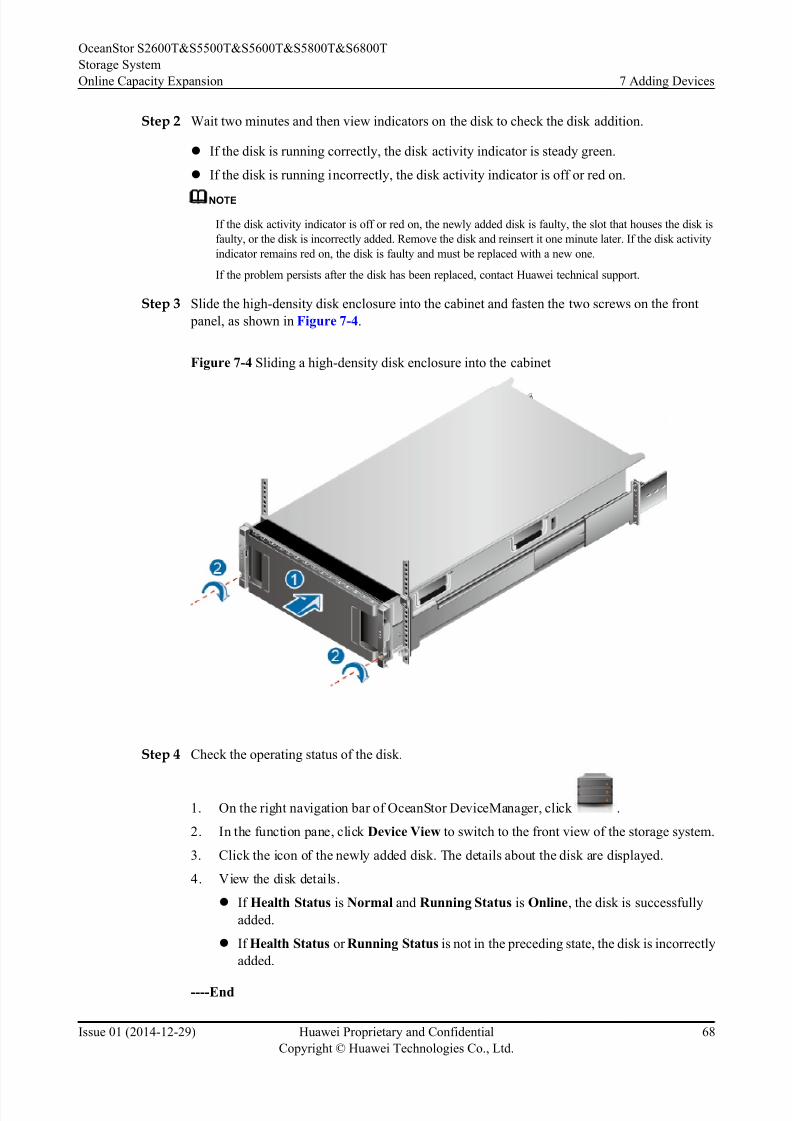
8/9/2019 OceanStor S2600T&S5500T&S5600T&S5800T&S6800T Storage System V200R002 Online Capacity Expansion 01
http://slidepdf.com/reader/full/oceanstor-s2600ts5500ts5600ts5800ts6800t-storage-system-v200r002-online 75/226
Step 2 Wait two minutes and then view indicators on the disk to check the disk addition.
l If the disk is running correctly, the disk activity indicator is steady green.
l If the disk is running incorrectly, the disk activity indicator is off or red on.
NOTE
If the disk activity indicator is off or red on, the newly added disk is faulty, the slot that houses the disk is
faulty, or the disk is incorrectly added. Remove the disk and reinsert it one minute later. If the disk activity
indicator remains red on, the disk is faulty and must be replaced with a new one.
If the problem persists after the disk has been replaced, contact Huawei technical support.
Step 3 Slide the high-density disk enclosure into the cabinet and fasten the two screws on the front
panel, as shown in Figure 7-4.
Figure 7-4 Sliding a high-density disk enclosure into the cabinet
Step 4 Check the operating status of the disk.
1. On the right navigation bar of OceanStor DeviceManager, click .
2. In the function pane, click Device View to switch to the front view of the storage system.
3. Click the icon of the newly added disk. The details about the disk are displayed.
4. View the disk details.
l If Health Status is Normal and Running Status is Online, the disk is successfully
added.
l If Health Status or Running Status is not in the preceding state, the disk is incorrectly
added.
----End
OceanStor S2600T&S5500T&S5600T&S5800T&S6800T
Storage System
Online Capacity Expansion 7 Adding Devices
Issue 01 (2014-12-29) Huawei Proprietary and Confidential
Copyright © Huawei Technologies Co., Ltd.
68
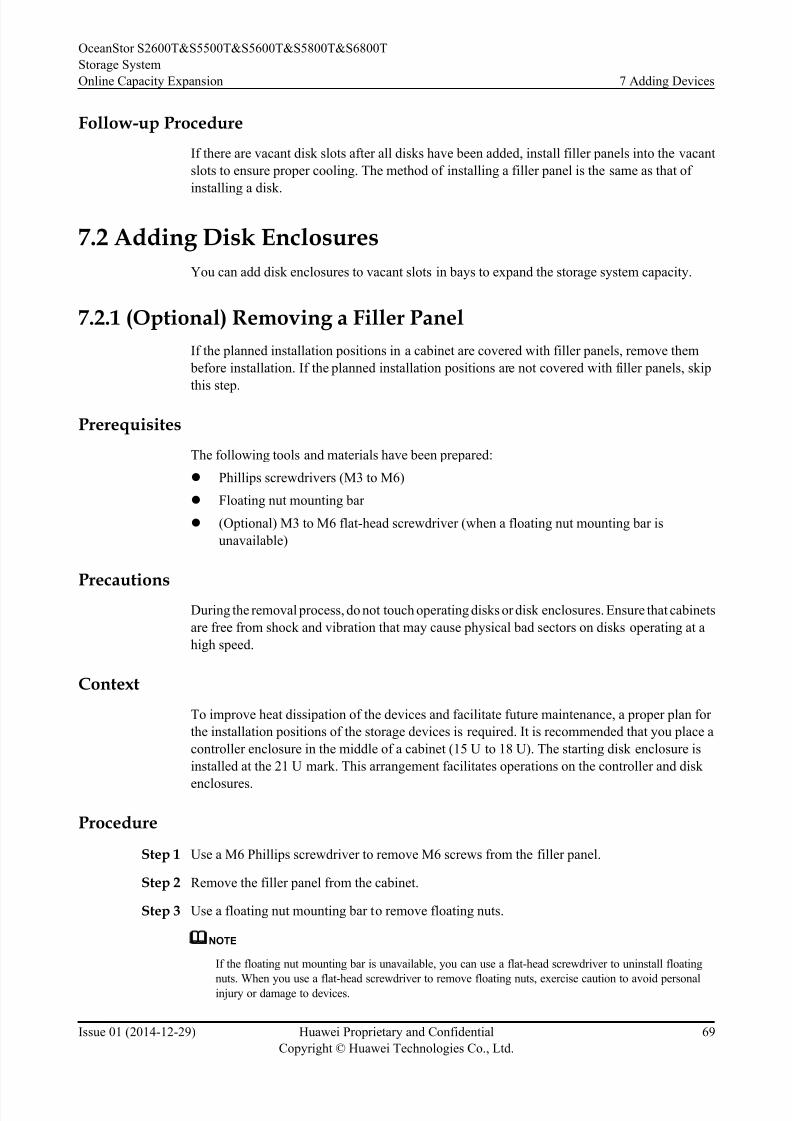
8/9/2019 OceanStor S2600T&S5500T&S5600T&S5800T&S6800T Storage System V200R002 Online Capacity Expansion 01
http://slidepdf.com/reader/full/oceanstor-s2600ts5500ts5600ts5800ts6800t-storage-system-v200r002-online 76/226
Follow-up Procedure
If there are vacant disk slots after all disks have been added, install filler panels into the vacant
slots to ensure proper cooling. The method of installing a filler panel is the same as that of
installing a disk.
7.2 Adding Disk Enclosures
You can add disk enclosures to vacant slots in bays to expand the storage system capacity.
7.2.1 (Optional) Removing a Filler Panel
If the planned installation positions in a cabinet are covered with filler panels, remove them
before installation. If the planned installation positions are not covered with filler panels, skip
this step.
Prerequisites
The following tools and materials have been prepared:
l Phillips screwdrivers (M3 to M6)
l Floating nut mounting bar
l (Optional) M3 to M6 flat-head screwdriver (when a floating nut mounting bar is
unavailable)
PrecautionsDuring the removal process, do not touch operating disks or disk enclosures. Ensure that cabinets
are free from shock and vibration that may cause physical bad sectors on disks operating at a
high speed.
Context
To improve heat dissipation of the devices and facilitate future maintenance, a proper plan for
the installation positions of the storage devices is required. It is recommended that you place a
controller enclosure in the middle of a cabinet (15 U to 18 U). The starting disk enclosure is
installed at the 21 U mark. This arrangement facilitates operations on the controller and disk
enclosures.
Procedure
Step 1 Use a M6 Phillips screwdriver to remove M6 screws from the filler panel.
Step 2 Remove the filler panel from the cabinet.
Step 3 Use a floating nut mounting bar to remove floating nuts.
NOTE
If the floating nut mounting bar is unavailable, you can use a flat-head screwdriver to uninstall floating
nuts. When you use a flat-head screwdriver to remove floating nuts, exercise caution to avoid personalinjury or damage to devices.
OceanStor S2600T&S5500T&S5600T&S5800T&S6800T
Storage System
Online Capacity Expansion 7 Adding Devices
Issue 01 (2014-12-29) Huawei Proprietary and Confidential
Copyright © Huawei Technologies Co., Ltd.
69
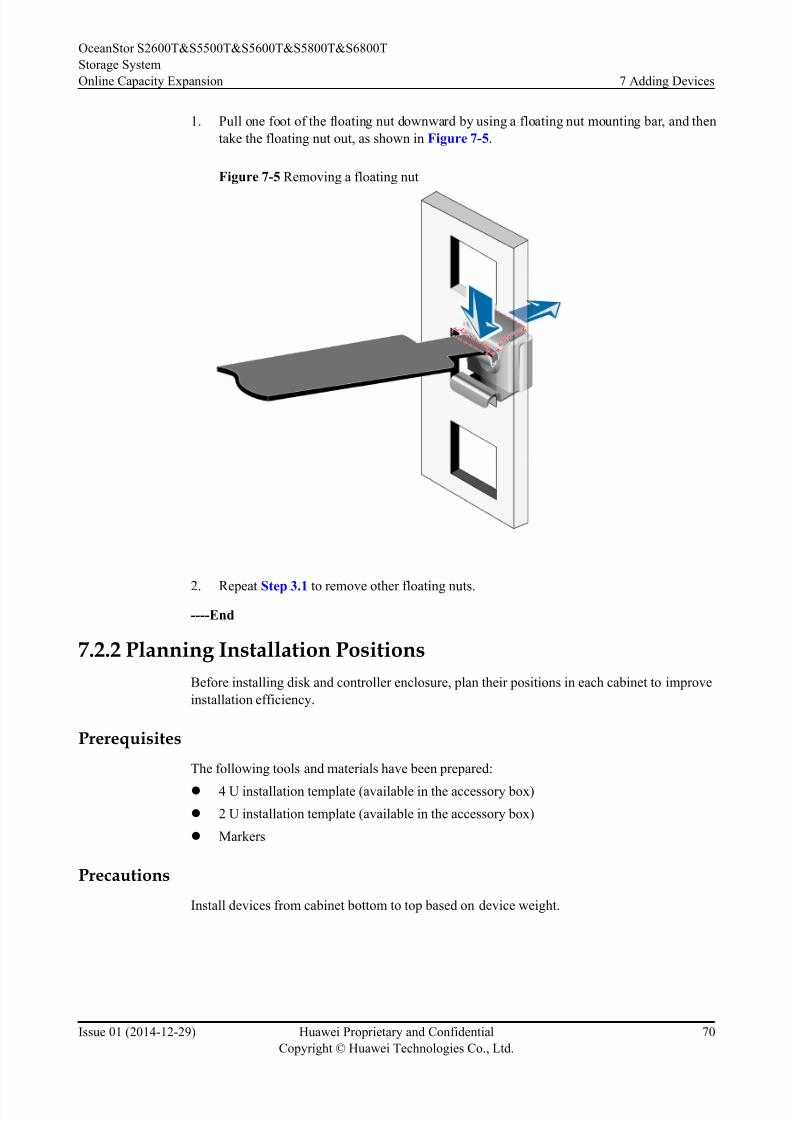
8/9/2019 OceanStor S2600T&S5500T&S5600T&S5800T&S6800T Storage System V200R002 Online Capacity Expansion 01
http://slidepdf.com/reader/full/oceanstor-s2600ts5500ts5600ts5800ts6800t-storage-system-v200r002-online 77/226
1. Pull one foot of the floating nut downward by using a floating nut mounting bar, and then
take the floating nut out, as shown in Figure 7-5.
Figure 7-5 Removing a floating nut
2. Repeat Step 3.1 to remove other floating nuts.
----End
7.2.2 Planning Installation Positions
Before installing disk and controller enclosure, plan their positions in each cabinet to improve
installation efficiency.
Prerequisites
The following tools and materials have been prepared:
l 4 U installation template (available in the accessory box)
l 2 U installation template (available in the accessory box)
l Markers
Precautions
Install devices from cabinet bottom to top based on device weight.
OceanStor S2600T&S5500T&S5600T&S5800T&S6800T
Storage System
Online Capacity Expansion 7 Adding Devices
Issue 01 (2014-12-29) Huawei Proprietary and Confidential
Copyright © Huawei Technologies Co., Ltd.
70
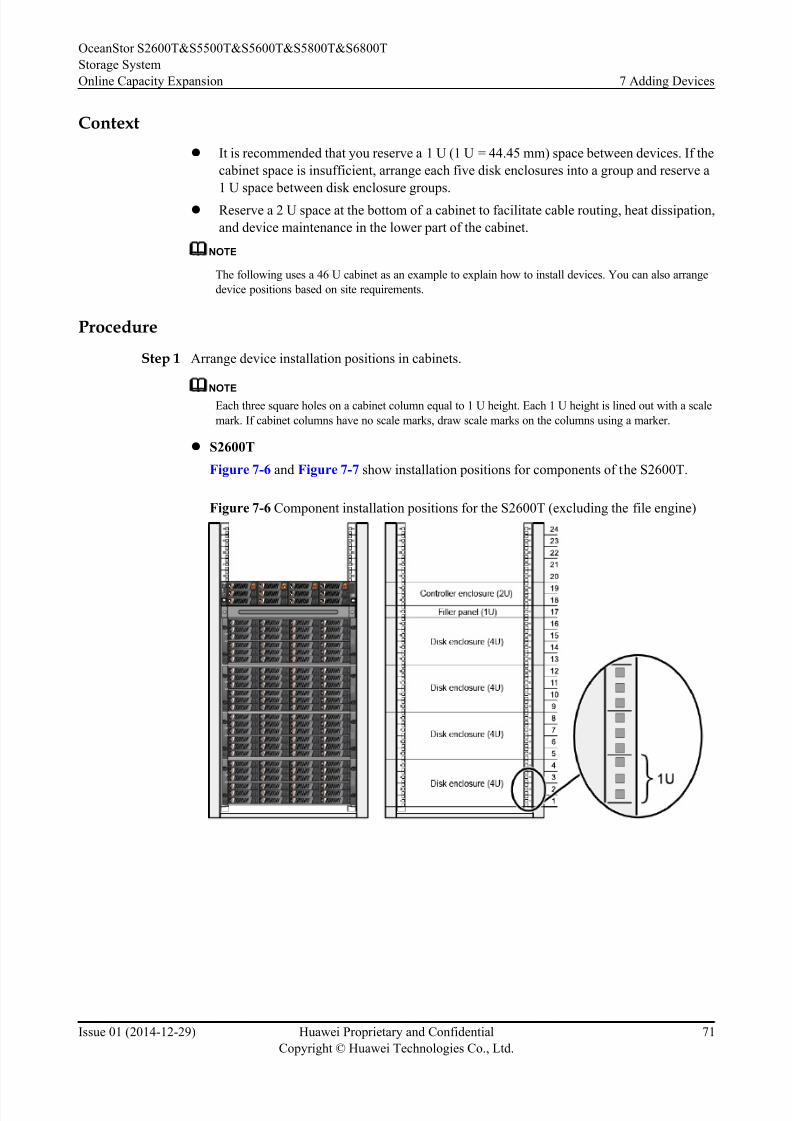
8/9/2019 OceanStor S2600T&S5500T&S5600T&S5800T&S6800T Storage System V200R002 Online Capacity Expansion 01
http://slidepdf.com/reader/full/oceanstor-s2600ts5500ts5600ts5800ts6800t-storage-system-v200r002-online 78/226
Context
l It is recommended that you reserve a 1 U (1 U = 44.45 mm) space between devices. If the
cabinet space is insufficient, arrange each five disk enclosures into a group and reserve a
1 U space between disk enclosure groups.
l Reserve a 2 U space at the bottom of a cabinet to facilitate cable routing, heat dissipation,
and device maintenance in the lower part of the cabinet.
NOTE
The following uses a 46 U cabinet as an example to explain how to install devices. You can also arrange
device positions based on site requirements.
Procedure
Step 1 Arrange device installation positions in cabinets.
NOTE
Each three square holes on a cabinet column equal to 1 U height. Each 1 U height is lined out with a scale
mark. If cabinet columns have no scale marks, draw scale marks on the columns using a marker.
l S2600T
Figure 7-6 and Figure 7-7 show installation positions for components of the S2600T.
Figure 7-6 Component installation positions for the S2600T (excluding the file engine)
OceanStor S2600T&S5500T&S5600T&S5800T&S6800T
Storage System
Online Capacity Expansion 7 Adding Devices
Issue 01 (2014-12-29) Huawei Proprietary and Confidential
Copyright © Huawei Technologies Co., Ltd.
71
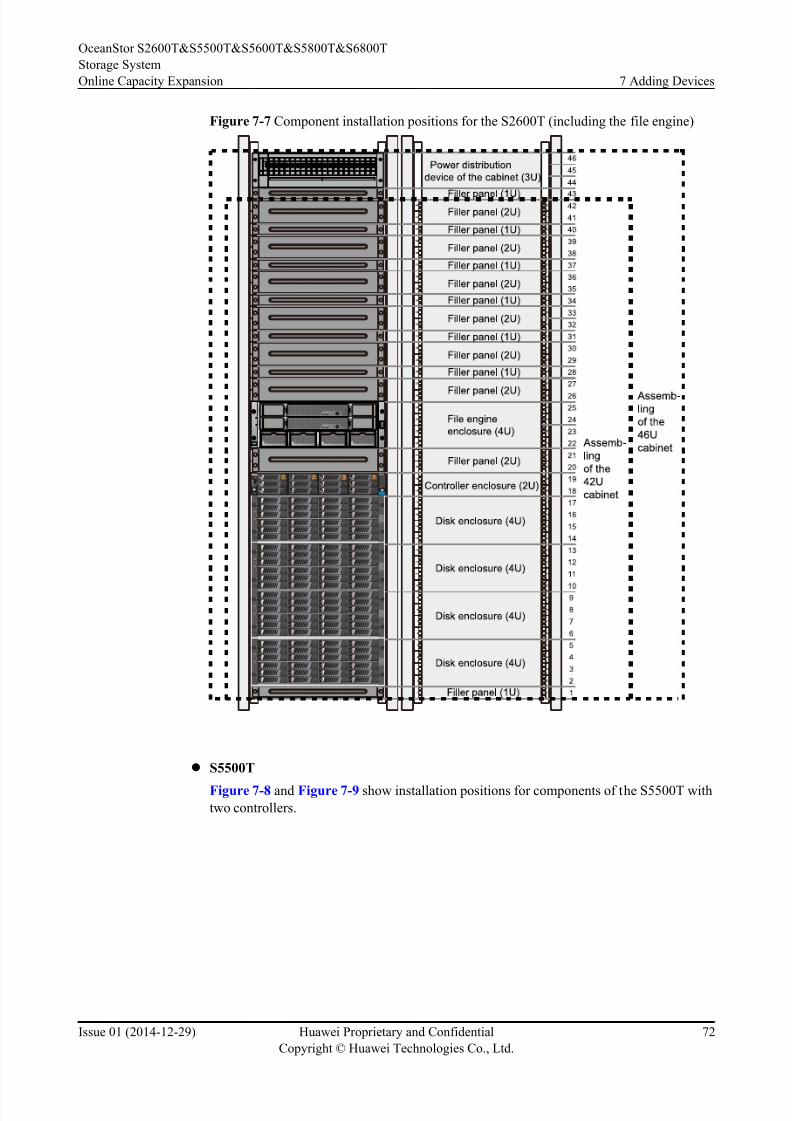
8/9/2019 OceanStor S2600T&S5500T&S5600T&S5800T&S6800T Storage System V200R002 Online Capacity Expansion 01
http://slidepdf.com/reader/full/oceanstor-s2600ts5500ts5600ts5800ts6800t-storage-system-v200r002-online 79/226
Figure 7-7 Component installation positions for the S2600T (including the file engine)
l S5500T
Figure 7-8 and Figure 7-9 show installation positions for components of the S5500T with
two controllers.
OceanStor S2600T&S5500T&S5600T&S5800T&S6800T
Storage System
Online Capacity Expansion 7 Adding Devices
Issue 01 (2014-12-29) Huawei Proprietary and Confidential
Copyright © Huawei Technologies Co., Ltd.
72
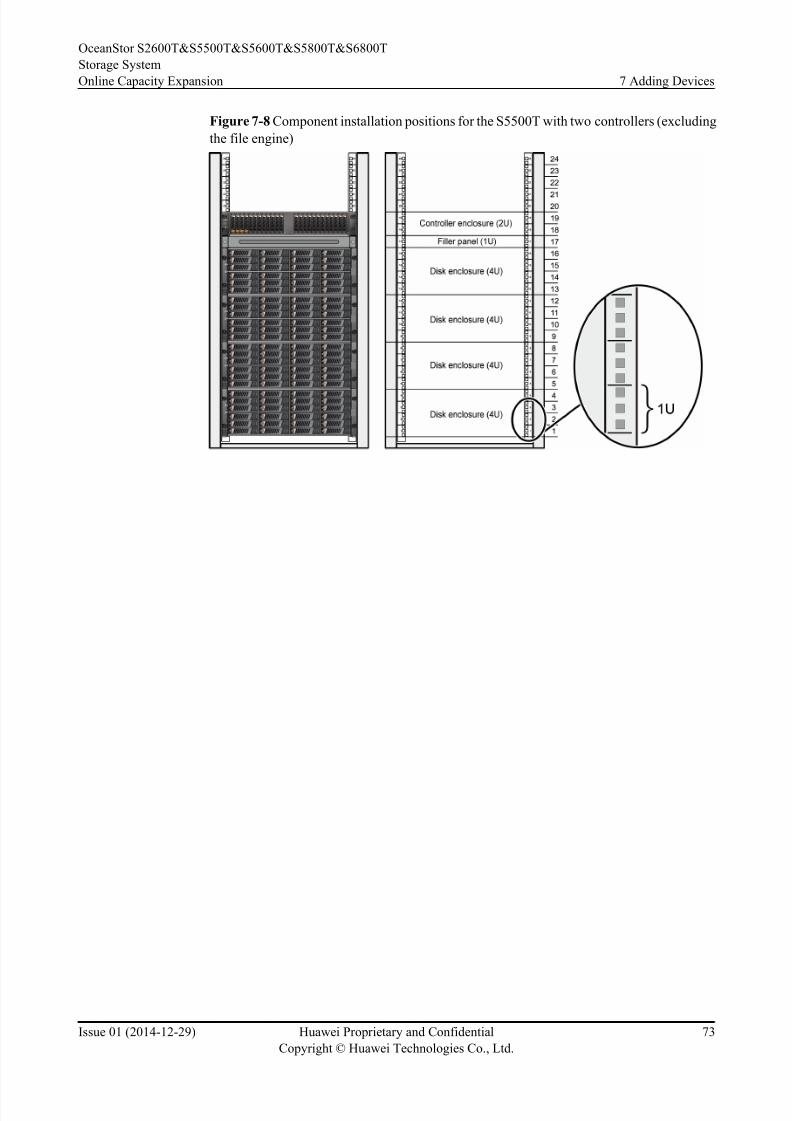
8/9/2019 OceanStor S2600T&S5500T&S5600T&S5800T&S6800T Storage System V200R002 Online Capacity Expansion 01
http://slidepdf.com/reader/full/oceanstor-s2600ts5500ts5600ts5800ts6800t-storage-system-v200r002-online 80/226
Figure 7-8 Component installation positions for the S5500T with two controllers (excluding
the file engine)
OceanStor S2600T&S5500T&S5600T&S5800T&S6800T
Storage System
Online Capacity Expansion 7 Adding Devices
Issue 01 (2014-12-29) Huawei Proprietary and Confidential
Copyright © Huawei Technologies Co., Ltd.
73
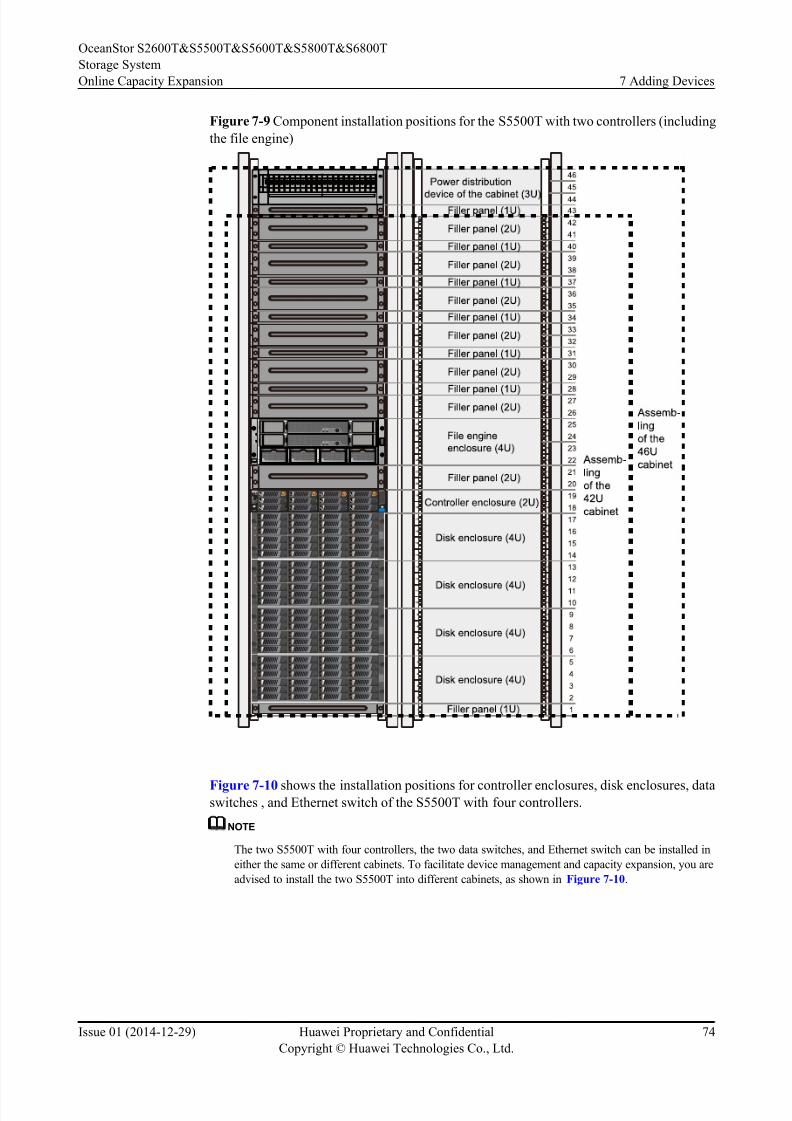
8/9/2019 OceanStor S2600T&S5500T&S5600T&S5800T&S6800T Storage System V200R002 Online Capacity Expansion 01
http://slidepdf.com/reader/full/oceanstor-s2600ts5500ts5600ts5800ts6800t-storage-system-v200r002-online 81/226
Figure 7-9 Component installation positions for the S5500T with two controllers (including
the file engine)
Figure 7-10 shows the installation positions for controller enclosures, disk enclosures, dataswitches , and Ethernet switch of the S5500T with four controllers.
NOTE
The two S5500T with four controllers, the two data switches, and Ethernet switch can be installed in
either the same or different cabinets. To facilitate device management and capacity expansion, you are
advised to install the two S5500T into different cabinets, as shown in Figure 7-10.
OceanStor S2600T&S5500T&S5600T&S5800T&S6800T
Storage System
Online Capacity Expansion 7 Adding Devices
Issue 01 (2014-12-29) Huawei Proprietary and Confidential
Copyright © Huawei Technologies Co., Ltd.
74
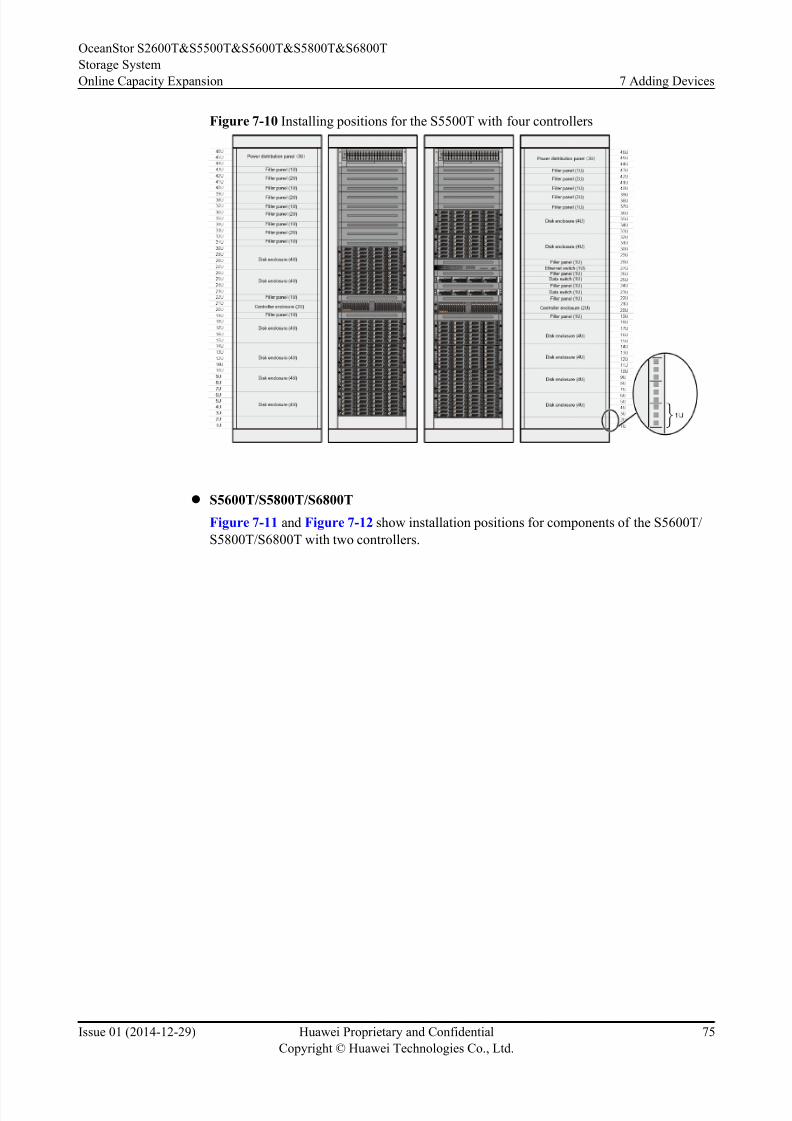
8/9/2019 OceanStor S2600T&S5500T&S5600T&S5800T&S6800T Storage System V200R002 Online Capacity Expansion 01
http://slidepdf.com/reader/full/oceanstor-s2600ts5500ts5600ts5800ts6800t-storage-system-v200r002-online 82/226
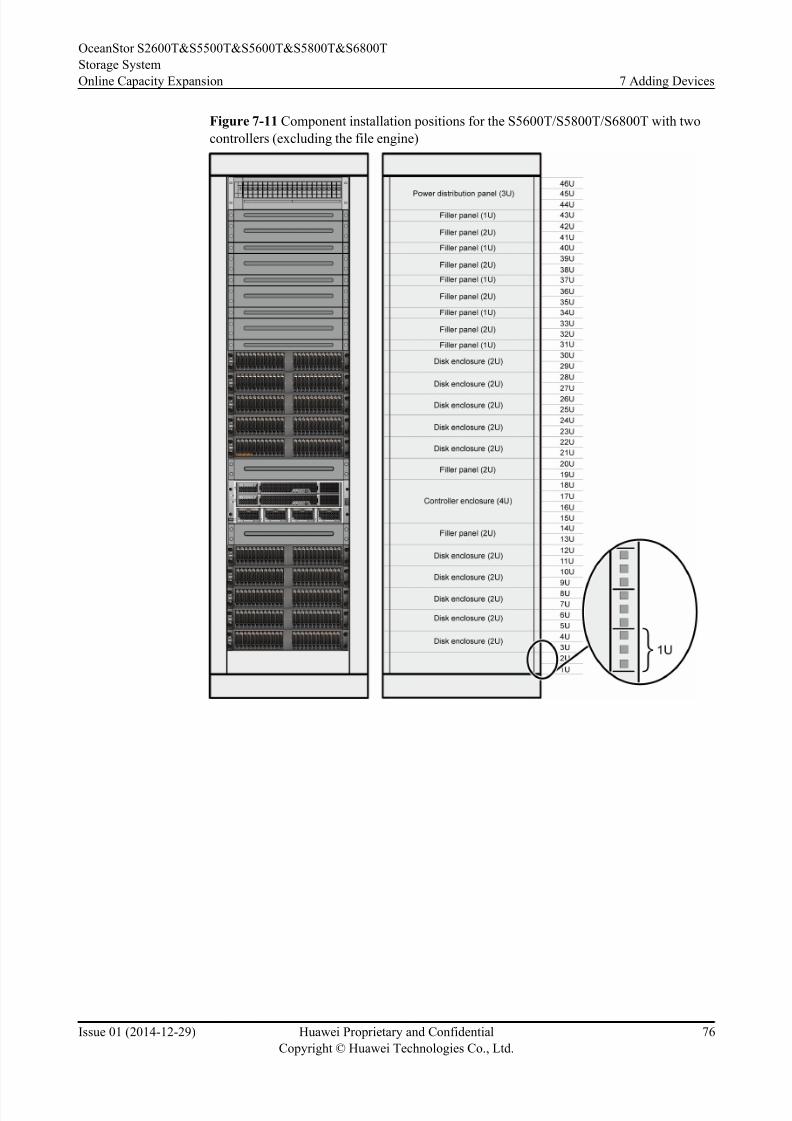
8/9/2019 OceanStor S2600T&S5500T&S5600T&S5800T&S6800T Storage System V200R002 Online Capacity Expansion 01
http://slidepdf.com/reader/full/oceanstor-s2600ts5500ts5600ts5800ts6800t-storage-system-v200r002-online 83/226
Figure 7-11 Component installation positions for the S5600T/S5800T/S6800T with two
controllers (excluding the file engine)
OceanStor S2600T&S5500T&S5600T&S5800T&S6800T
Storage System
Online Capacity Expansion 7 Adding Devices
Issue 01 (2014-12-29) Huawei Proprietary and Confidential
Copyright © Huawei Technologies Co., Ltd.
76
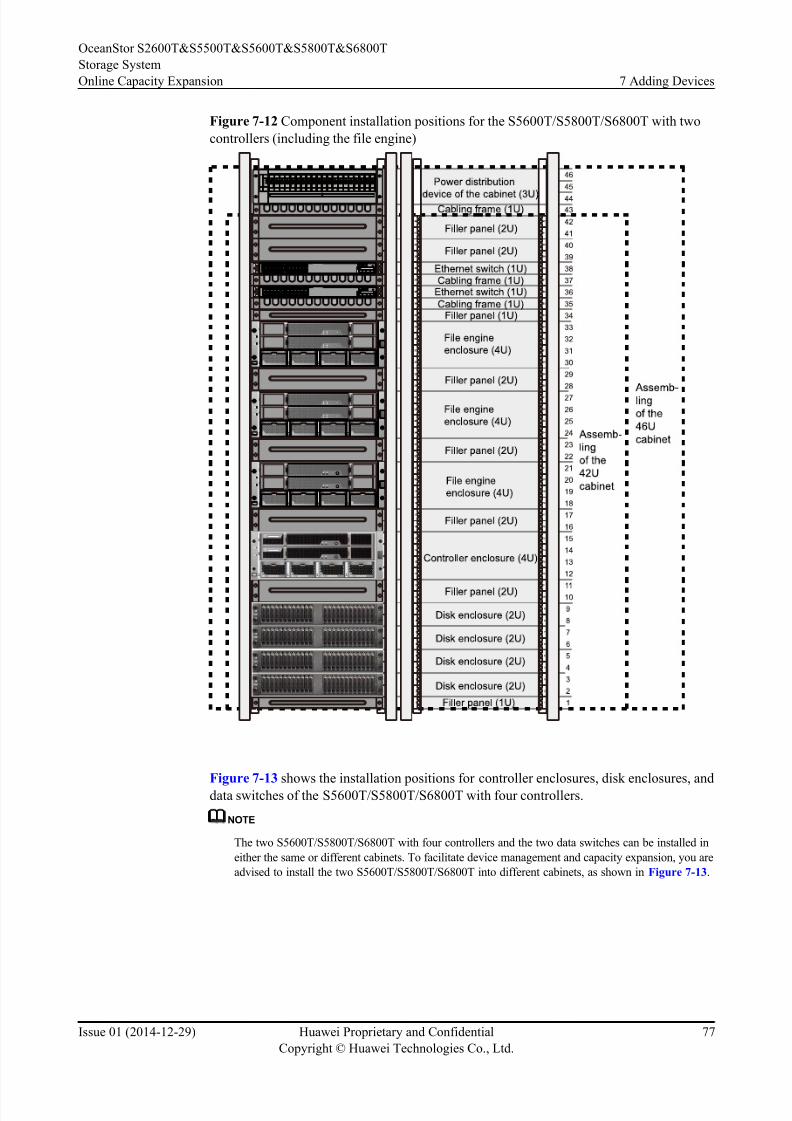
8/9/2019 OceanStor S2600T&S5500T&S5600T&S5800T&S6800T Storage System V200R002 Online Capacity Expansion 01
http://slidepdf.com/reader/full/oceanstor-s2600ts5500ts5600ts5800ts6800t-storage-system-v200r002-online 84/226
Figure 7-12 Component installation positions for the S5600T/S5800T/S6800T with two
controllers (including the file engine)
Figure 7-13 shows the installation positions for controller enclosures, disk enclosures, and
data switches of the S5600T/S5800T/S6800T with four controllers.
NOTE
The two S5600T/S5800T/S6800T with four controllers and the two data switches can be installed in
either the same or different cabinets. To facilitate device management and capacity expansion, you are
advised to install the two S5600T/S5800T/S6800T into different cabinets, as shown in Figure 7-13.
OceanStor S2600T&S5500T&S5600T&S5800T&S6800T
Storage System
Online Capacity Expansion 7 Adding Devices
Issue 01 (2014-12-29) Huawei Proprietary and Confidential
Copyright © Huawei Technologies Co., Ltd.
77
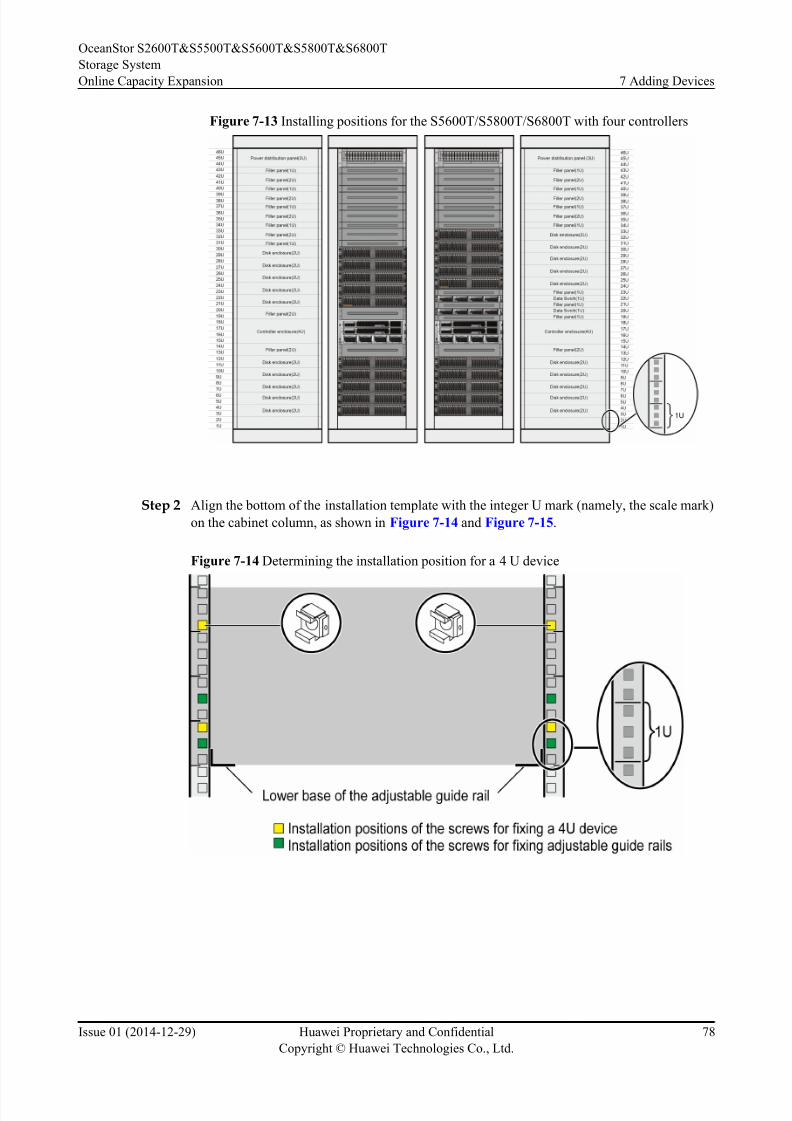
8/9/2019 OceanStor S2600T&S5500T&S5600T&S5800T&S6800T Storage System V200R002 Online Capacity Expansion 01
http://slidepdf.com/reader/full/oceanstor-s2600ts5500ts5600ts5800ts6800t-storage-system-v200r002-online 85/226
Figure 7-13 Installing positions for the S5600T/S5800T/S6800T with four controllers
Step 2 Align the bottom of the installation template with the integer U mark (namely, the scale mark)
on the cabinet column, as shown in Figure 7-14 and Figure 7-15.
Figure 7-14 Determining the installation position for a 4 U device
OceanStor S2600T&S5500T&S5600T&S5800T&S6800T
Storage System
Online Capacity Expansion 7 Adding Devices
Issue 01 (2014-12-29) Huawei Proprietary and Confidential
Copyright © Huawei Technologies Co., Ltd.
78
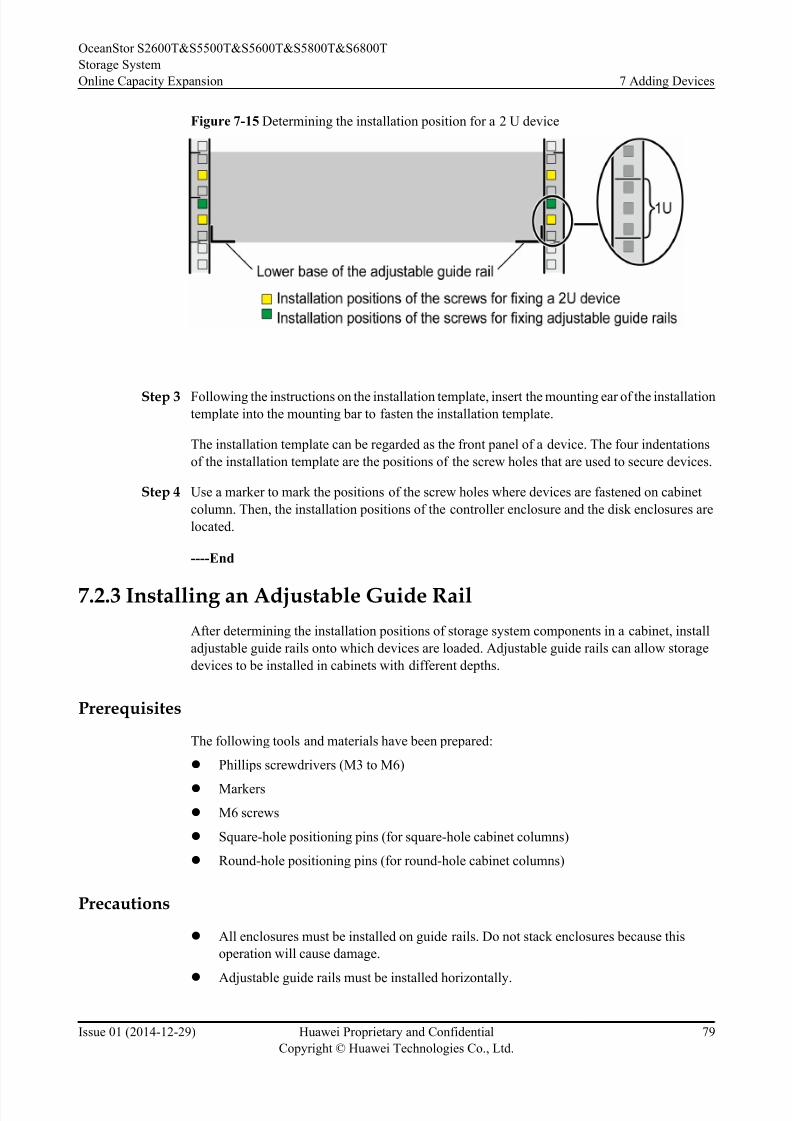
8/9/2019 OceanStor S2600T&S5500T&S5600T&S5800T&S6800T Storage System V200R002 Online Capacity Expansion 01
http://slidepdf.com/reader/full/oceanstor-s2600ts5500ts5600ts5800ts6800t-storage-system-v200r002-online 86/226
Figure 7-15 Determining the installation position for a 2 U device
Step 3 Following the instructions on the installation template, insert the mounting ear of the installationtemplate into the mounting bar to fasten the installation template.
The installation template can be regarded as the front panel of a device. The four indentations
of the installation template are the positions of the screw holes that are used to secure devices.
Step 4 Use a marker to mark the positions of the screw holes where devices are fastened on cabinet
column. Then, the installation positions of the controller enclosure and the disk enclosures are
located.
----End
7.2.3 Installing an Adjustable Guide Rail
After determining the installation positions of storage system components in a cabinet, install
adjustable guide rails onto which devices are loaded. Adjustable guide rails can allow storage
devices to be installed in cabinets with different depths.
Prerequisites
The following tools and materials have been prepared:
l Phillips screwdrivers (M3 to M6)
l Markers
l M6 screws
l Square-hole positioning pins (for square-hole cabinet columns)
l Round-hole positioning pins (for round-hole cabinet columns)
Precautions
l All enclosures must be installed on guide rails. Do not stack enclosures because this
operation will cause damage.
lAdjustable guide rails must be installed horizontally.
OceanStor S2600T&S5500T&S5600T&S5800T&S6800T
Storage System
Online Capacity Expansion 7 Adding Devices
Issue 01 (2014-12-29) Huawei Proprietary and Confidential
Copyright © Huawei Technologies Co., Ltd.
79

8/9/2019 OceanStor S2600T&S5500T&S5600T&S5800T&S6800T Storage System V200R002 Online Capacity Expansion 01
http://slidepdf.com/reader/full/oceanstor-s2600ts5500ts5600ts5800ts6800t-storage-system-v200r002-online 87/226
l During the installation, do not touch operating disks or disk enclosures. Ensure that cabinets
are free from shock and vibration that may cause physical bad sectors on disks operating
at a high speed.
Contextl To ensure that a guide rail can be installed horizontally, it is recommended that you mark
both front and rear columns where the guide rail is to be secured before installation.
l You are advised to install devices in the cabinet from bottom up.
l Each device is equipped with a pair of adjustable guide rails.
l The adjustable guide rails are 600 mm to 900 mm long. They are designed to fit into a
cabinet with the depth ranging from 800 mm to 1100 mm.
l The square-hole positioning pins have been assembled on the adjustable guide rails before
delivery. If the installation holes of the screws are round, change the square-hole positioning
pins to round-hole positioning pins before installing the adjustable guide rails.
NOTE
You can find round-hole positioning pins in the accessory bag delivered with the devices.
l The same adjustable guide rails are used for 2 U devices and 4 U devices. However, the
guide rails are fastened using different methods.
l This document uses an adjustable guide rail with square-hole positioning pins as an
example.
Procedure
Step 1 Align the adjustable guide rail with the front column and insert positioning pins into the square
holes on the column.
Step 2 Extend the adjustable guide rail until positioning pins are inserted into the rear column.
Step 3 Secure the adjustable guide rail of a 4 U or 2 U device with M6 screws.
l Secure the adjustable guide rail of a 4 U device with four M6 screws, as shown in Figure
7-16.
OceanStor S2600T&S5500T&S5600T&S5800T&S6800T
Storage System
Online Capacity Expansion 7 Adding Devices
Issue 01 (2014-12-29) Huawei Proprietary and Confidential
Copyright © Huawei Technologies Co., Ltd.
80

8/9/2019 OceanStor S2600T&S5500T&S5600T&S5800T&S6800T Storage System V200R002 Online Capacity Expansion 01
http://slidepdf.com/reader/full/oceanstor-s2600ts5500ts5600ts5800ts6800t-storage-system-v200r002-online 88/226

8/9/2019 OceanStor S2600T&S5500T&S5600T&S5800T&S6800T Storage System V200R002 Online Capacity Expansion 01
http://slidepdf.com/reader/full/oceanstor-s2600ts5500ts5600ts5800ts6800t-storage-system-v200r002-online 89/226
Figure 7-17 Securing the adjustable guide rail of a 2 U device
Step 4 Secure the adjustable guide rail of a 1 U device.
Figure 7-18 Securing the adjustable guide rail of a 1 U device
OceanStor S2600T&S5500T&S5600T&S5800T&S6800T
Storage System
Online Capacity Expansion 7 Adding Devices
Issue 01 (2014-12-29) Huawei Proprietary and Confidential
Copyright © Huawei Technologies Co., Ltd.
82
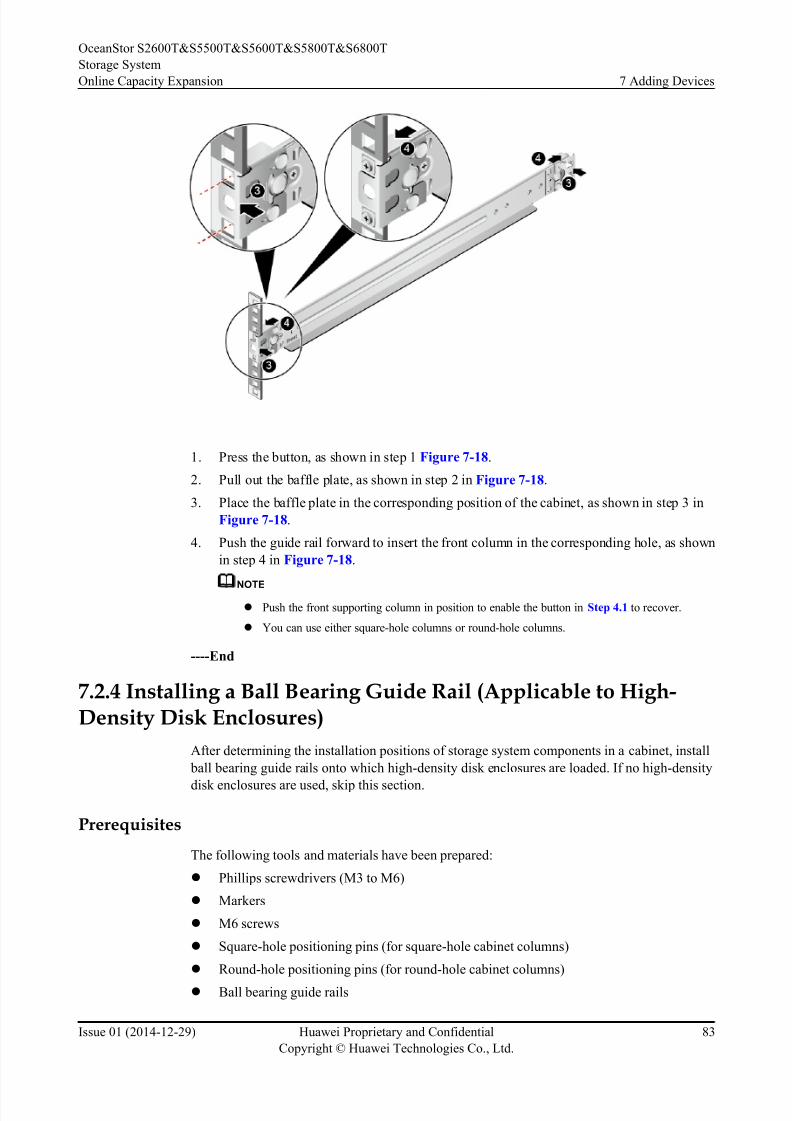
8/9/2019 OceanStor S2600T&S5500T&S5600T&S5800T&S6800T Storage System V200R002 Online Capacity Expansion 01
http://slidepdf.com/reader/full/oceanstor-s2600ts5500ts5600ts5800ts6800t-storage-system-v200r002-online 90/226
1. Press the button, as shown in step 1 Figure 7-18.
2. Pull out the baffle plate, as shown in step 2 in Figure 7-18.
3. Place the baffle plate in the corresponding position of the cabinet, as shown in step 3 in
Figure 7-18.
4. Push the guide rail forward to insert the front column in the corresponding hole, as shown
in step 4 in Figure 7-18.
NOTE
l Push the front supporting column in position to enable the button in Step 4.1 to recover.
l You can use either square-hole columns or round-hole columns.
----End
7.2.4 Installing a Ball Bearing Guide Rail (Applicable to High-Density Disk Enclosures)
After determining the installation positions of storage system components in a cabinet, install
ball bearing guide rails onto which high-density disk enclosures are loaded. If no high-density
disk enclosures are used, skip this section.
Prerequisites
The following tools and materials have been prepared:
l Phillips screwdrivers (M3 to M6)
l Markers
l M6 screws
l Square-hole positioning pins (for square-hole cabinet columns)
l Round-hole positioning pins (for round-hole cabinet columns)
l Ball bearing guide rails
OceanStor S2600T&S5500T&S5600T&S5800T&S6800T
Storage System
Online Capacity Expansion 7 Adding Devices
Issue 01 (2014-12-29) Huawei Proprietary and Confidential
Copyright © Huawei Technologies Co., Ltd.
83

8/9/2019 OceanStor S2600T&S5500T&S5600T&S5800T&S6800T Storage System V200R002 Online Capacity Expansion 01
http://slidepdf.com/reader/full/oceanstor-s2600ts5500ts5600ts5800ts6800t-storage-system-v200r002-online 91/226
Precautions
l High-density enclosures must be installed on ball bearing guide rails. Do not stack
enclosures because this operation will cause damage.
l
Ball bearing guide rails must be installed horizontally.l During the installation, do not touch operating disks or disk enclosures. Ensure that cabinets
are free from shock and vibration that may cause physical bad sectors on disks operating
at a high speed.
Context
l To ensure that a guide rail can be installed horizontally, it is recommended that you mark
both front and rear columns where the ball bearing guide rail is to be secured before
installation.
l You are advised to install devices in the cabinet from bottom up.
l Configure a pair of ball bearing guide rails for each high-density disk enclosure.
l Ball bearing guide rails can be flexibly extended from 600 mm to 750 mm.
Procedure
Step 1 Pull out the inner rail of the ball bearing guide rail, as shown in Figure 7-19.
1. Pull out the inner rail until you can see the stop tab.
2. Press the stop tab to remove the inner rail, as show in step 2 in Figure 7-19.
Put the removed inner rail into an ESD bag. The inner rail will be used to install a high-density
enclosure.
Figure 7-19 Pulling out an inner rail
OceanStor S2600T&S5500T&S5600T&S5800T&S6800T
Storage System
Online Capacity Expansion 7 Adding Devices
Issue 01 (2014-12-29) Huawei Proprietary and Confidential
Copyright © Huawei Technologies Co., Ltd.
84
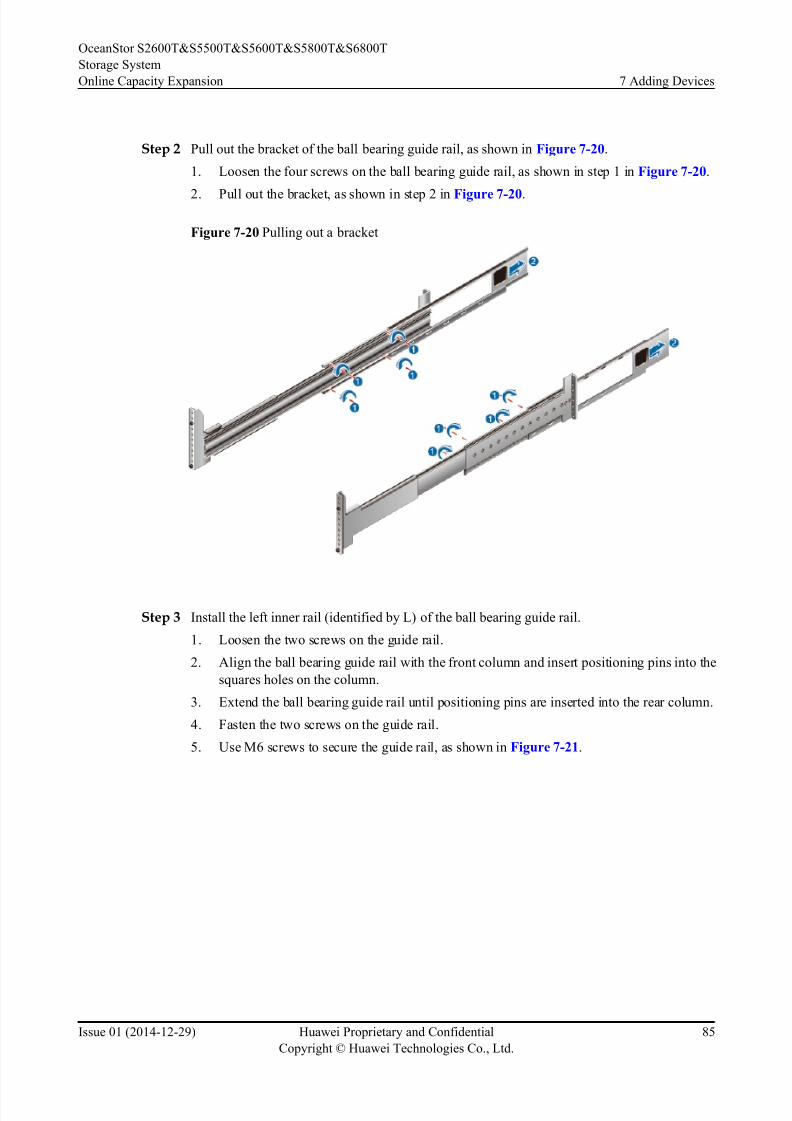
8/9/2019 OceanStor S2600T&S5500T&S5600T&S5800T&S6800T Storage System V200R002 Online Capacity Expansion 01
http://slidepdf.com/reader/full/oceanstor-s2600ts5500ts5600ts5800ts6800t-storage-system-v200r002-online 92/226

8/9/2019 OceanStor S2600T&S5500T&S5600T&S5800T&S6800T Storage System V200R002 Online Capacity Expansion 01
http://slidepdf.com/reader/full/oceanstor-s2600ts5500ts5600ts5800ts6800t-storage-system-v200r002-online 93/226
Figure 7-21 Installing a ball bearing guide rail
Step 4 Install the bracket of the ball bearing guide rail, as shown in Figure 7-22.
1. Install the bracket, as shown in step 1 in Figure 7-22.
2. Fasten the four screws on the ball bearing guide rail, as shown in step 2 in Figure 7-22.
Figure 7-22 Installing a bracket
OceanStor S2600T&S5500T&S5600T&S5800T&S6800T
Storage System
Online Capacity Expansion 7 Adding Devices
Issue 01 (2014-12-29) Huawei Proprietary and Confidential
Copyright © Huawei Technologies Co., Ltd.
86
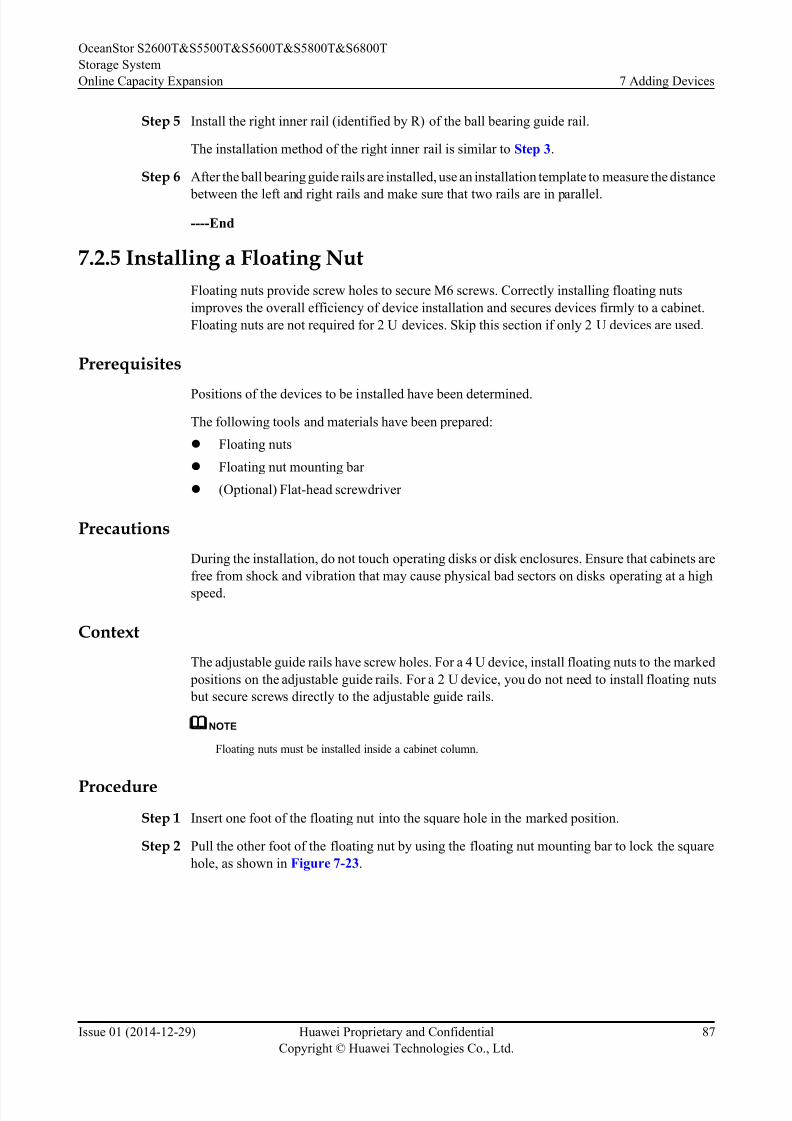
8/9/2019 OceanStor S2600T&S5500T&S5600T&S5800T&S6800T Storage System V200R002 Online Capacity Expansion 01
http://slidepdf.com/reader/full/oceanstor-s2600ts5500ts5600ts5800ts6800t-storage-system-v200r002-online 94/226
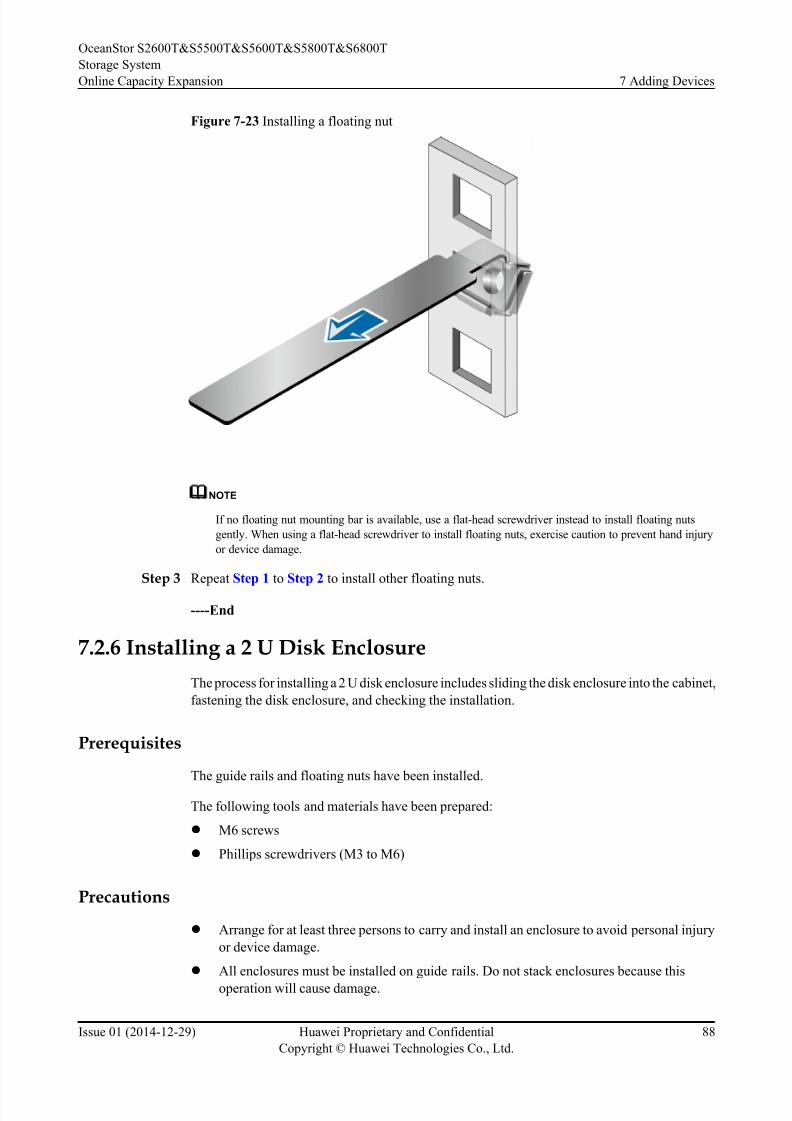
8/9/2019 OceanStor S2600T&S5500T&S5600T&S5800T&S6800T Storage System V200R002 Online Capacity Expansion 01
http://slidepdf.com/reader/full/oceanstor-s2600ts5500ts5600ts5800ts6800t-storage-system-v200r002-online 95/226
8/9/2019 OceanStor S2600T&S5500T&S5600T&S5800T&S6800T Storage System V200R002 Online Capacity Expansion 01
http://slidepdf.com/reader/full/oceanstor-s2600ts5500ts5600ts5800ts6800t-storage-system-v200r002-online 96/226
l During the installation, do not touch operating disks or disk enclosures. Ensure that cabinets
are free from shock and vibration that may cause physical bad sectors on disks operating
at a high speed.
Procedure
Step 1 Slide the disk enclosure into the cabinet and use M6 screws to secure it to the cabinet, as shown
in Figure 7-24.
Figure 7-24 Installing a disk enclosure into a cabinet
Step 2 Check that the disk enclosure is correctly installed and firmly screwed.
Step 3 Repeat the preceding steps to install other disk enclosures.
----End
7.2.7 Installing a 4 U Disk Enclosure
The process for installing a 4 U disk enclosure includes sliding the disk enclosure into the cabinet,
fastening the disk enclosure, and checking the installation.
Prerequisites
The guide rails and floating nuts have been installed.
The following tools and materials have been prepared:
OceanStor S2600T&S5500T&S5600T&S5800T&S6800T
Storage System
Online Capacity Expansion 7 Adding Devices
Issue 01 (2014-12-29) Huawei Proprietary and Confidential
Copyright © Huawei Technologies Co., Ltd.
89
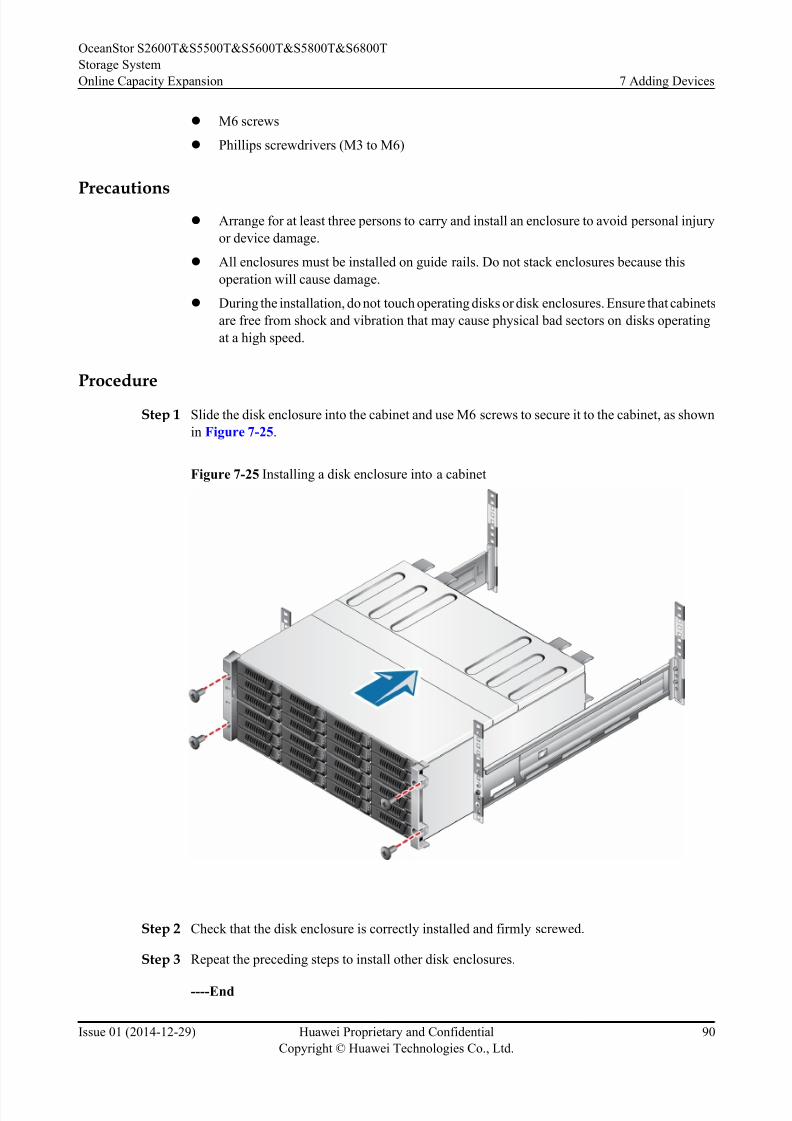
8/9/2019 OceanStor S2600T&S5500T&S5600T&S5800T&S6800T Storage System V200R002 Online Capacity Expansion 01
http://slidepdf.com/reader/full/oceanstor-s2600ts5500ts5600ts5800ts6800t-storage-system-v200r002-online 97/226
l M6 screws
l Phillips screwdrivers (M3 to M6)
Precautionsl Arrange for at least three persons to carry and install an enclosure to avoid personal injury
or device damage.
l All enclosures must be installed on guide rails. Do not stack enclosures because this
operation will cause damage.
l During the installation, do not touch operating disks or disk enclosures. Ensure that cabinets
are free from shock and vibration that may cause physical bad sectors on disks operating
at a high speed.
Procedure
Step 1 Slide the disk enclosure into the cabinet and use M6 screws to secure it to the cabinet, as shown
in Figure 7-25.
Figure 7-25 Installing a disk enclosure into a cabinet
Step 2 Check that the disk enclosure is correctly installed and firmly screwed.
Step 3 Repeat the preceding steps to install other disk enclosures.
----End
OceanStor S2600T&S5500T&S5600T&S5800T&S6800T
Storage System
Online Capacity Expansion 7 Adding Devices
Issue 01 (2014-12-29) Huawei Proprietary and Confidential
Copyright © Huawei Technologies Co., Ltd.
90
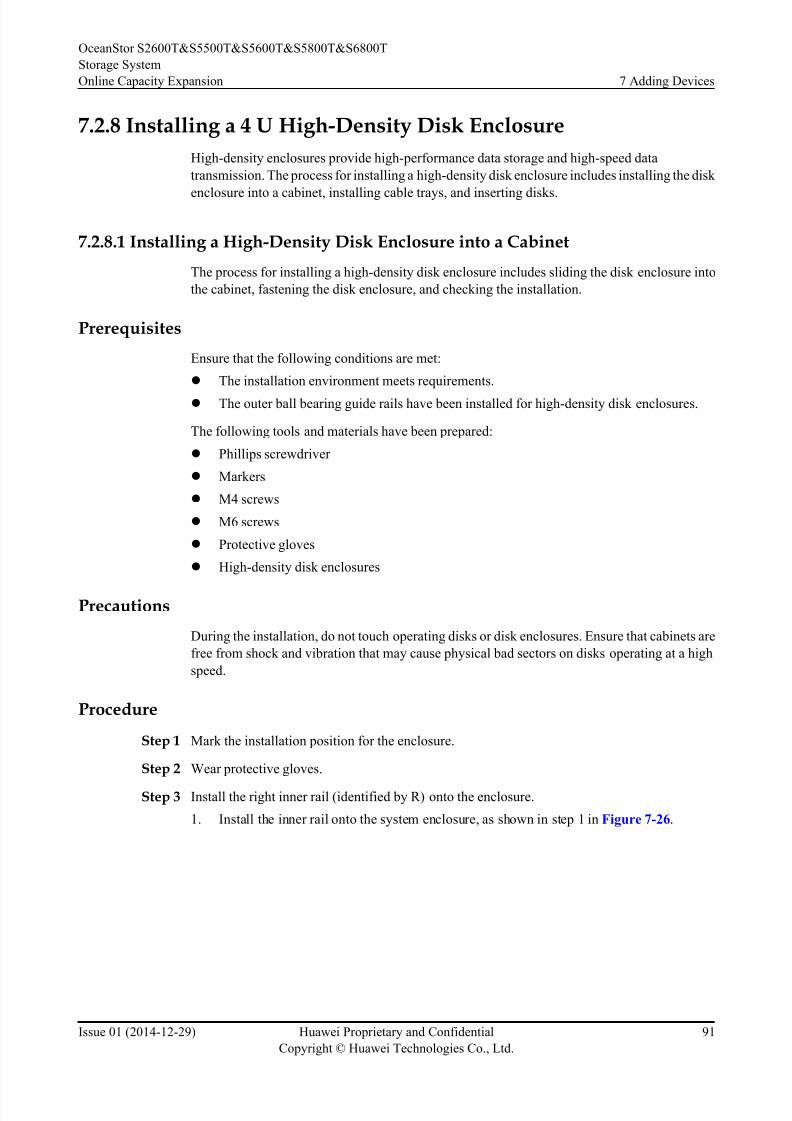
8/9/2019 OceanStor S2600T&S5500T&S5600T&S5800T&S6800T Storage System V200R002 Online Capacity Expansion 01
http://slidepdf.com/reader/full/oceanstor-s2600ts5500ts5600ts5800ts6800t-storage-system-v200r002-online 98/226
7.2.8 Installing a 4 U High-Density Disk Enclosure
High-density enclosures provide high-performance data storage and high-speed data
transmission. The process for installing a high-density disk enclosure includes installing the disk
enclosure into a cabinet, installing cable trays, and inserting disks.
7.2.8.1 Installing a High-Density Disk Enclosure into a Cabinet
The process for installing a high-density disk enclosure includes sliding the disk enclosure into
the cabinet, fastening the disk enclosure, and checking the installation.
Prerequisites
Ensure that the following conditions are met:
l The installation environment meets requirements.
l The outer ball bearing guide rails have been installed for high-density disk enclosures.
The following tools and materials have been prepared:
l Phillips screwdriver
l Markers
l M4 screws
l M6 screws
l Protective gloves
l High-density disk enclosures
Precautions
During the installation, do not touch operating disks or disk enclosures. Ensure that cabinets are
free from shock and vibration that may cause physical bad sectors on disks operating at a high
speed.
Procedure
Step 1 Mark the installation position for the enclosure.
Step 2 Wear protective gloves.
Step 3 Install the right inner rail (identified by R) onto the enclosure.
1. Install the inner rail onto the system enclosure, as shown in step 1 in Figure 7-26.
OceanStor S2600T&S5500T&S5600T&S5800T&S6800T
Storage System
Online Capacity Expansion 7 Adding Devices
Issue 01 (2014-12-29) Huawei Proprietary and Confidential
Copyright © Huawei Technologies Co., Ltd.
91
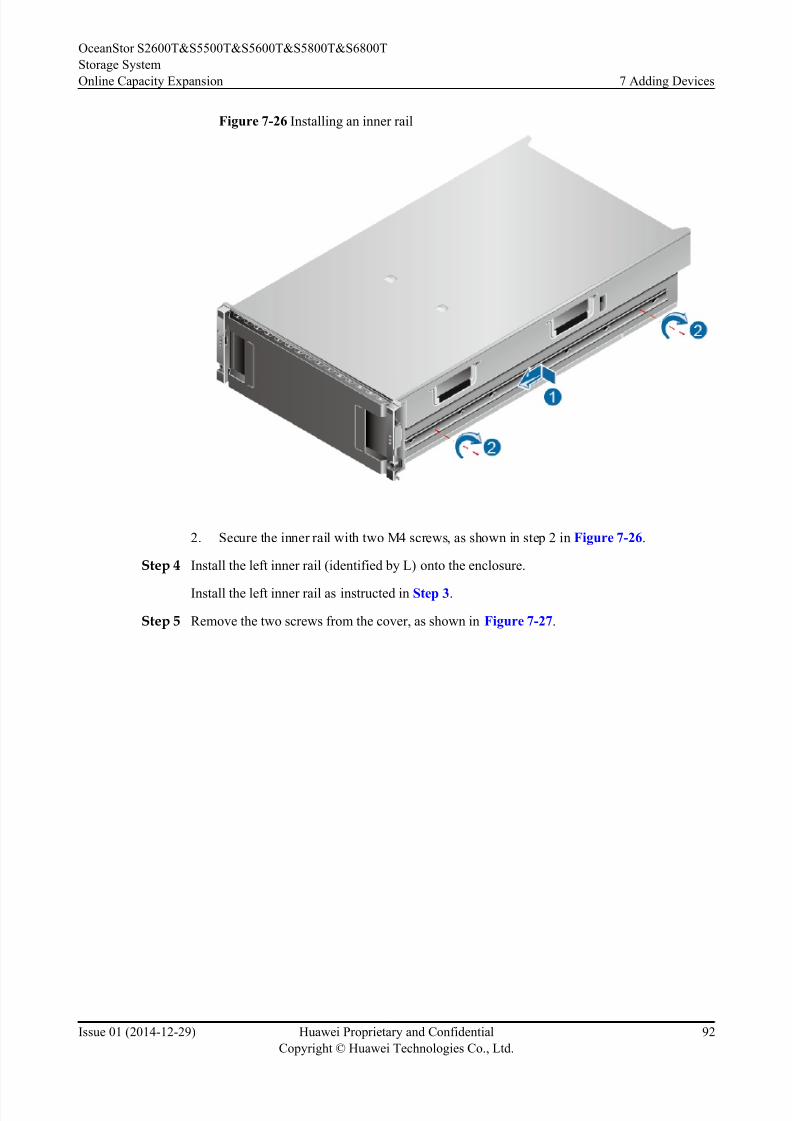
8/9/2019 OceanStor S2600T&S5500T&S5600T&S5800T&S6800T Storage System V200R002 Online Capacity Expansion 01
http://slidepdf.com/reader/full/oceanstor-s2600ts5500ts5600ts5800ts6800t-storage-system-v200r002-online 99/226
Figure 7-26 Installing an inner rail
2. Secure the inner rail with two M4 screws, as shown in step 2 in Figure 7-26.
Step 4 Install the left inner rail (identified by L) onto the enclosure.
Install the left inner rail as instructed in Step 3.
Step 5 Remove the two screws from the cover, as shown in Figure 7-27.
OceanStor S2600T&S5500T&S5600T&S5800T&S6800T
Storage System
Online Capacity Expansion 7 Adding Devices
Issue 01 (2014-12-29) Huawei Proprietary and Confidential
Copyright © Huawei Technologies Co., Ltd.
92
8/9/2019 OceanStor S2600T&S5500T&S5600T&S5800T&S6800T Storage System V200R002 Online Capacity Expansion 01
http://slidepdf.com/reader/full/oceanstor-s2600ts5500ts5600ts5800ts6800t-storage-system-v200r002-online 100/226
Figure 7-27 Removing screws
Step 6 Slide the enclosure in position along the ball guide rails, as shown in Figure 7-28.
NOTICE
l Do not pull out the middle rails when installing the enclosure because this may deform guide
rails.
l Before you install disks, install the enclosure into the cabinet.
OceanStor S2600T&S5500T&S5600T&S5800T&S6800T
Storage System
Online Capacity Expansion 7 Adding Devices
Issue 01 (2014-12-29) Huawei Proprietary and Confidential
Copyright © Huawei Technologies Co., Ltd.
93
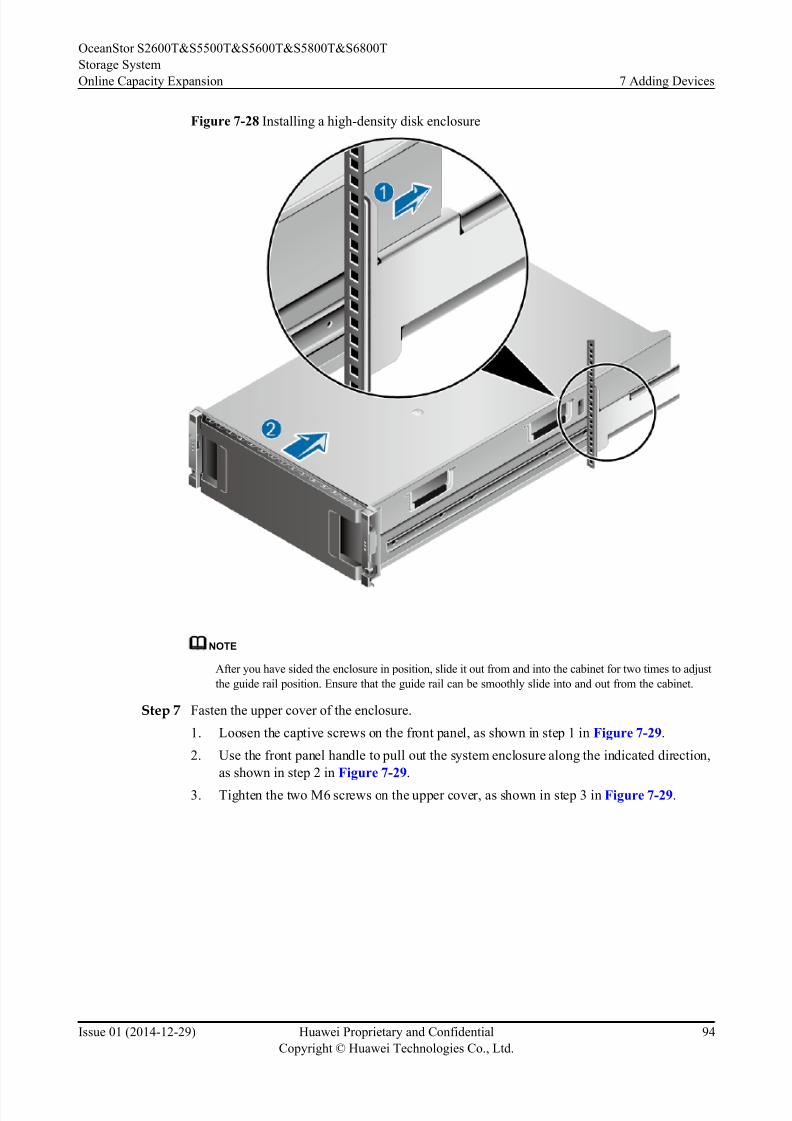
8/9/2019 OceanStor S2600T&S5500T&S5600T&S5800T&S6800T Storage System V200R002 Online Capacity Expansion 01
http://slidepdf.com/reader/full/oceanstor-s2600ts5500ts5600ts5800ts6800t-storage-system-v200r002-online 101/226
Figure 7-28 Installing a high-density disk enclosure
NOTE
After you have sided the enclosure in position, slide it out from and into the cabinet for two times to adjust
the guide rail position. Ensure that the guide rail can be smoothly slide into and out from the cabinet.
Step 7 Fasten the upper cover of the enclosure.
1. Loosen the captive screws on the front panel, as shown in step 1 in Figure 7-29.
2. Use the front panel handle to pull out the system enclosure along the indicated direction,
as shown in step 2 in Figure 7-29.
3. Tighten the two M6 screws on the upper cover, as shown in step 3 in Figure 7-29.
OceanStor S2600T&S5500T&S5600T&S5800T&S6800T
Storage System
Online Capacity Expansion 7 Adding Devices
Issue 01 (2014-12-29) Huawei Proprietary and Confidential
Copyright © Huawei Technologies Co., Ltd.
94

8/9/2019 OceanStor S2600T&S5500T&S5600T&S5800T&S6800T Storage System V200R002 Online Capacity Expansion 01
http://slidepdf.com/reader/full/oceanstor-s2600ts5500ts5600ts5800ts6800t-storage-system-v200r002-online 102/226
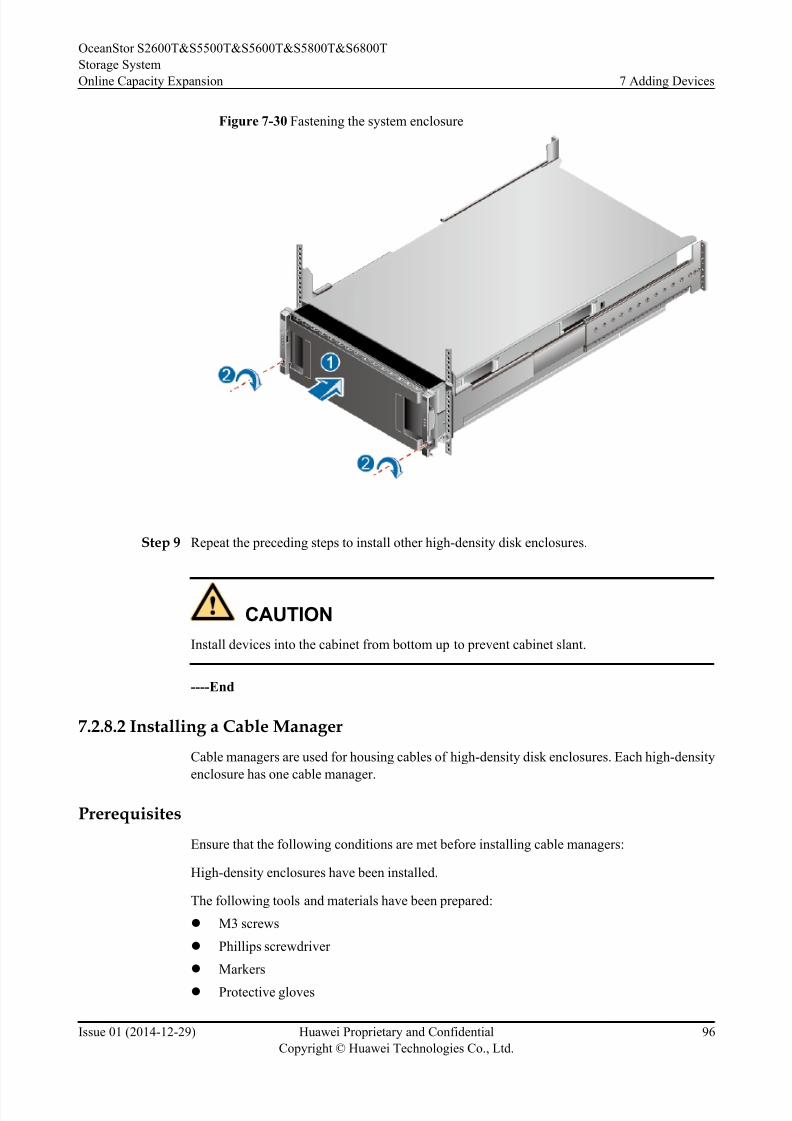
8/9/2019 OceanStor S2600T&S5500T&S5600T&S5800T&S6800T Storage System V200R002 Online Capacity Expansion 01
http://slidepdf.com/reader/full/oceanstor-s2600ts5500ts5600ts5800ts6800t-storage-system-v200r002-online 103/226
Figure 7-30 Fastening the system enclosure
Step 9 Repeat the preceding steps to install other high-density disk enclosures.
CAUTION
Install devices into the cabinet from bottom up to prevent cabinet slant.
----End
7.2.8.2 Installing a Cable Manager
Cable managers are used for housing cables of high-density disk enclosures. Each high-density
enclosure has one cable manager.
Prerequisites
Ensure that the following conditions are met before installing cable managers:
High-density enclosures have been installed.
The following tools and materials have been prepared:
l M3 screws
l Phillips screwdriver
l Markers
l Protective gloves
OceanStor S2600T&S5500T&S5600T&S5800T&S6800T
Storage System
Online Capacity Expansion 7 Adding Devices
Issue 01 (2014-12-29) Huawei Proprietary and Confidential
Copyright © Huawei Technologies Co., Ltd.
96

8/9/2019 OceanStor S2600T&S5500T&S5600T&S5800T&S6800T Storage System V200R002 Online Capacity Expansion 01
http://slidepdf.com/reader/full/oceanstor-s2600ts5500ts5600ts5800ts6800t-storage-system-v200r002-online 104/226
l Cable managers
Precautions
During the installation, do not touch operating disks or disk enclosures. Ensure that cabinets arefree from shock and vibration that may cause physical bad sectors on disks operating at a high
speed.
Procedure
Step 1 Determine the position for a cable manager. If the position is covered by a filler panel, mark the
position.
Step 2 Insert the cable manager into the ball bearing guide rails and the high-density disk enclosure, as
shown in Figure 7-31.
Figure 7-31 Installing a cable manager
Step 3 Use a Phillips screwdriver to fasten M6 screws to secure the cable manager, as shown in Figure
7-32.
OceanStor S2600T&S5500T&S5600T&S5800T&S6800T
Storage System
Online Capacity Expansion 7 Adding Devices
Issue 01 (2014-12-29) Huawei Proprietary and Confidential
Copyright © Huawei Technologies Co., Ltd.
97
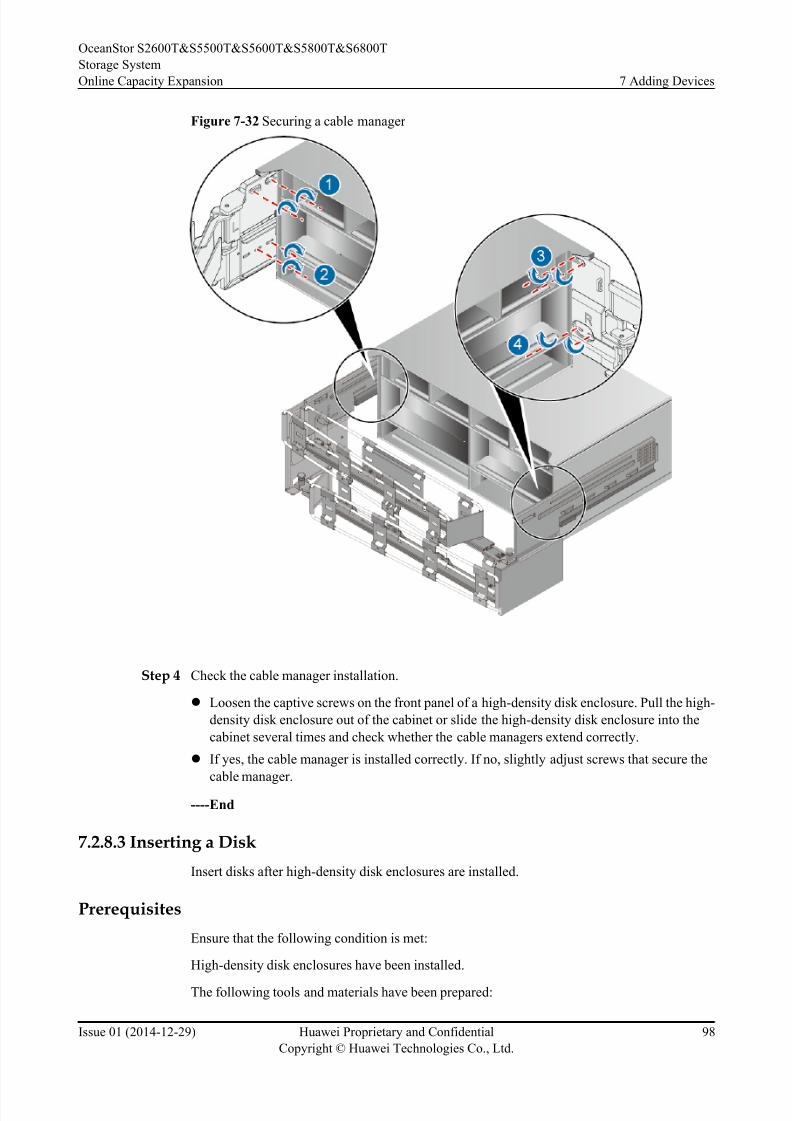
8/9/2019 OceanStor S2600T&S5500T&S5600T&S5800T&S6800T Storage System V200R002 Online Capacity Expansion 01
http://slidepdf.com/reader/full/oceanstor-s2600ts5500ts5600ts5800ts6800t-storage-system-v200r002-online 105/226
Figure 7-32 Securing a cable manager
Step 4 Check the cable manager installation.
l Loosen the captive screws on the front panel of a high-density disk enclosure. Pull the high-
density disk enclosure out of the cabinet or slide the high-density disk enclosure into the
cabinet several times and check whether the cable managers extend correctly.
l If yes, the cable manager is installed correctly. If no, slightly adjust screws that secure the
cable manager.
----End
7.2.8.3 Inserting a Disk
Insert disks after high-density disk enclosures are installed.
Prerequisites
Ensure that the following condition is met:
High-density disk enclosures have been installed.
The following tools and materials have been prepared:
OceanStor S2600T&S5500T&S5600T&S5800T&S6800T
Storage System
Online Capacity Expansion 7 Adding Devices
Issue 01 (2014-12-29) Huawei Proprietary and Confidential
Copyright © Huawei Technologies Co., Ltd.
98
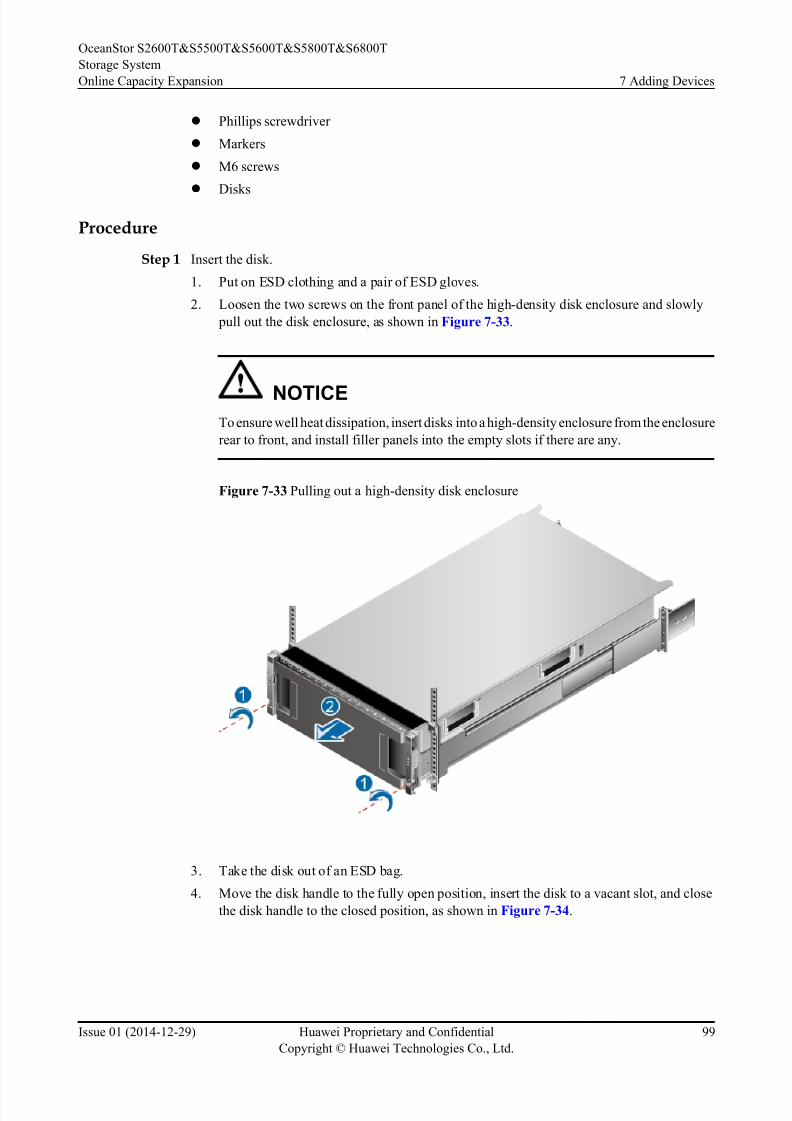
8/9/2019 OceanStor S2600T&S5500T&S5600T&S5800T&S6800T Storage System V200R002 Online Capacity Expansion 01
http://slidepdf.com/reader/full/oceanstor-s2600ts5500ts5600ts5800ts6800t-storage-system-v200r002-online 106/226
l Phillips screwdriver
l Markers
l M6 screws
l
Disks
Procedure
Step 1 Insert the disk.
1. Put on ESD clothing and a pair of ESD gloves.
2. Loosen the two screws on the front panel of the high-density disk enclosure and slowly
pull out the disk enclosure, as shown in Figure 7-33.
NOTICETo ensure well heat dissipation, insert disks into a high-density enclosure from the enclosure
rear to front, and install filler panels into the empty slots if there are any.
Figure 7-33 Pulling out a high-density disk enclosure
3. Take the disk out of an ESD bag.
4. Move the disk handle to the fully open position, inser t the disk to a vacant slot, and close
the disk handle to the closed position, as shown in Figure 7-34.
OceanStor S2600T&S5500T&S5600T&S5800T&S6800T
Storage System
Online Capacity Expansion 7 Adding Devices
Issue 01 (2014-12-29) Huawei Proprietary and Confidential
Copyright © Huawei Technologies Co., Ltd.
99
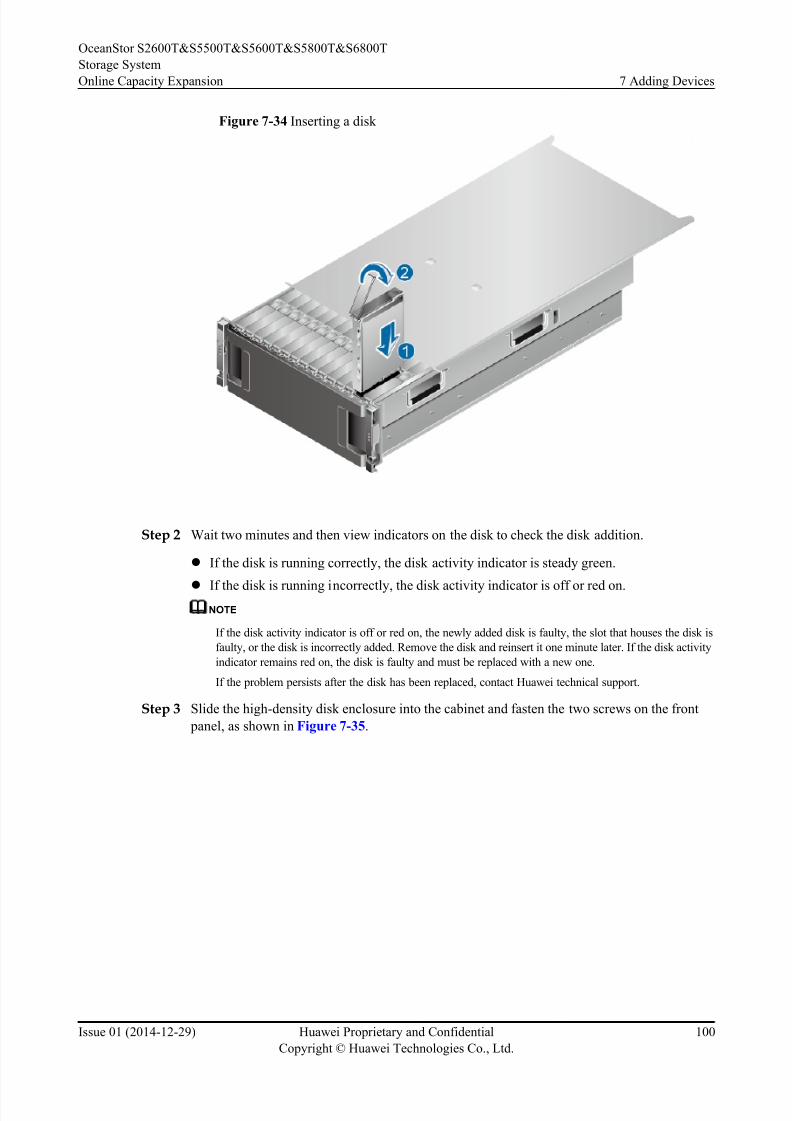
8/9/2019 OceanStor S2600T&S5500T&S5600T&S5800T&S6800T Storage System V200R002 Online Capacity Expansion 01
http://slidepdf.com/reader/full/oceanstor-s2600ts5500ts5600ts5800ts6800t-storage-system-v200r002-online 107/226
Figure 7-34 Inserting a disk
Step 2 Wait two minutes and then view indicators on the disk to check the disk addition.
l If the disk is running correctly, the disk activity indicator is steady green.
lIf the disk is running incorrectly, the disk activity indicator is off or red on.NOTE
If the disk activity indicator is off or red on, the newly added disk is faulty, the slot that houses the disk is
faulty, or the disk is incorrectly added. Remove the disk and reinsert it one minute later. If the disk activity
indicator remains red on, the disk is faulty and must be replaced with a new one.
If the problem persists after the disk has been replaced, contact Huawei technical support.
Step 3 Slide the high-density disk enclosure into the cabinet and fasten the two screws on the front
panel, as shown in Figure 7-35.
OceanStor S2600T&S5500T&S5600T&S5800T&S6800T
Storage System
Online Capacity Expansion 7 Adding Devices
Issue 01 (2014-12-29) Huawei Proprietary and Confidential
Copyright © Huawei Technologies Co., Ltd.
100
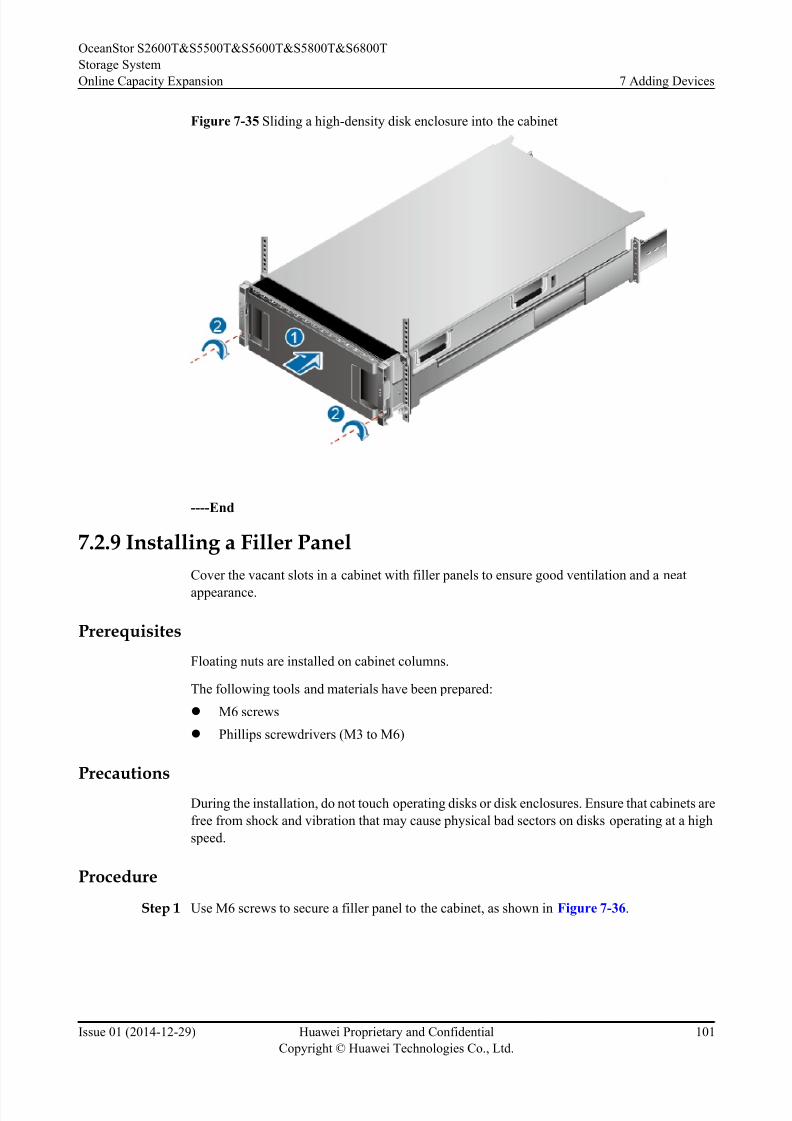
8/9/2019 OceanStor S2600T&S5500T&S5600T&S5800T&S6800T Storage System V200R002 Online Capacity Expansion 01
http://slidepdf.com/reader/full/oceanstor-s2600ts5500ts5600ts5800ts6800t-storage-system-v200r002-online 108/226
Figure 7-35 Sliding a high-density disk enclosure into the cabinet
----End
7.2.9 Installing a Filler Panel
Cover the vacant slots in a cabinet with filler panels to ensure good ventilation and a neat
appearance.
Prerequisites
Floating nuts are installed on cabinet columns.
The following tools and materials have been prepared:
l M6 screws
l Phillips screwdrivers (M3 to M6)
Precautions
During the installation, do not touch operating disks or disk enclosures. Ensure that cabinets are
free from shock and vibration that may cause physical bad sectors on disks operating at a high
speed.
Procedure
Step 1 Use M6 screws to secure a filler panel to the cabinet, as shown in Figure 7-36.
OceanStor S2600T&S5500T&S5600T&S5800T&S6800T
Storage System
Online Capacity Expansion 7 Adding Devices
Issue 01 (2014-12-29) Huawei Proprietary and Confidential
Copyright © Huawei Technologies Co., Ltd.
101
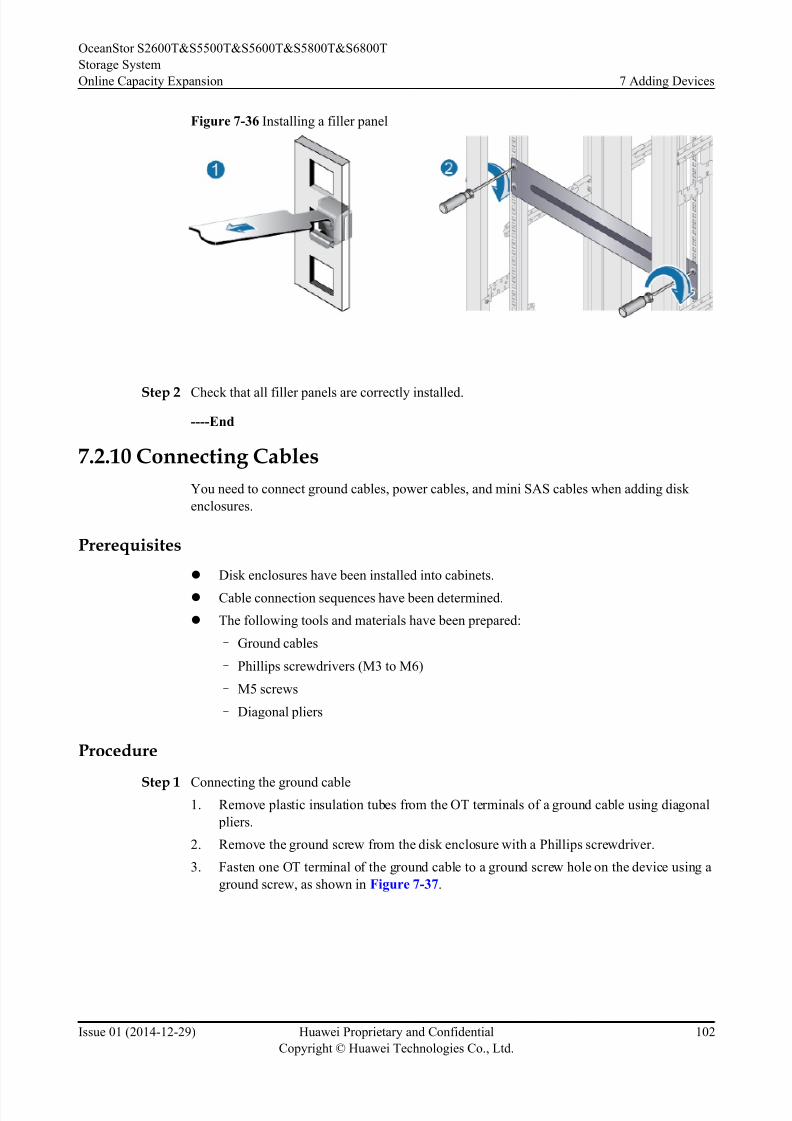
8/9/2019 OceanStor S2600T&S5500T&S5600T&S5800T&S6800T Storage System V200R002 Online Capacity Expansion 01
http://slidepdf.com/reader/full/oceanstor-s2600ts5500ts5600ts5800ts6800t-storage-system-v200r002-online 109/226
Figure 7-36 Installing a filler panel
Step 2 Check that all filler panels are correctly installed.
----End
7.2.10 Connecting Cables
You need to connect ground cables, power cables, and mini SAS cables when adding disk
enclosures.
Prerequisites
l Disk enclosures have been installed into cabinets.
l Cable connection sequences have been determined.
l The following tools and materials have been prepared:
– Ground cables
– Phillips screwdrivers (M3 to M6)
– M5 screws
– Diagonal pliers
Procedure
Step 1 Connecting the ground cable1. Remove plastic insulation tubes from the OT terminals of a ground cable using diagonal
pliers.
2. Remove the ground screw from the disk enclosure with a Phillips screwdriver.
3. Fasten one OT terminal of the ground cable to a ground screw hole on the device using a
ground screw, as shown in Figure 7-37.
OceanStor S2600T&S5500T&S5600T&S5800T&S6800T
Storage System
Online Capacity Expansion 7 Adding Devices
Issue 01 (2014-12-29) Huawei Proprietary and Confidential
Copyright © Huawei Technologies Co., Ltd.
102
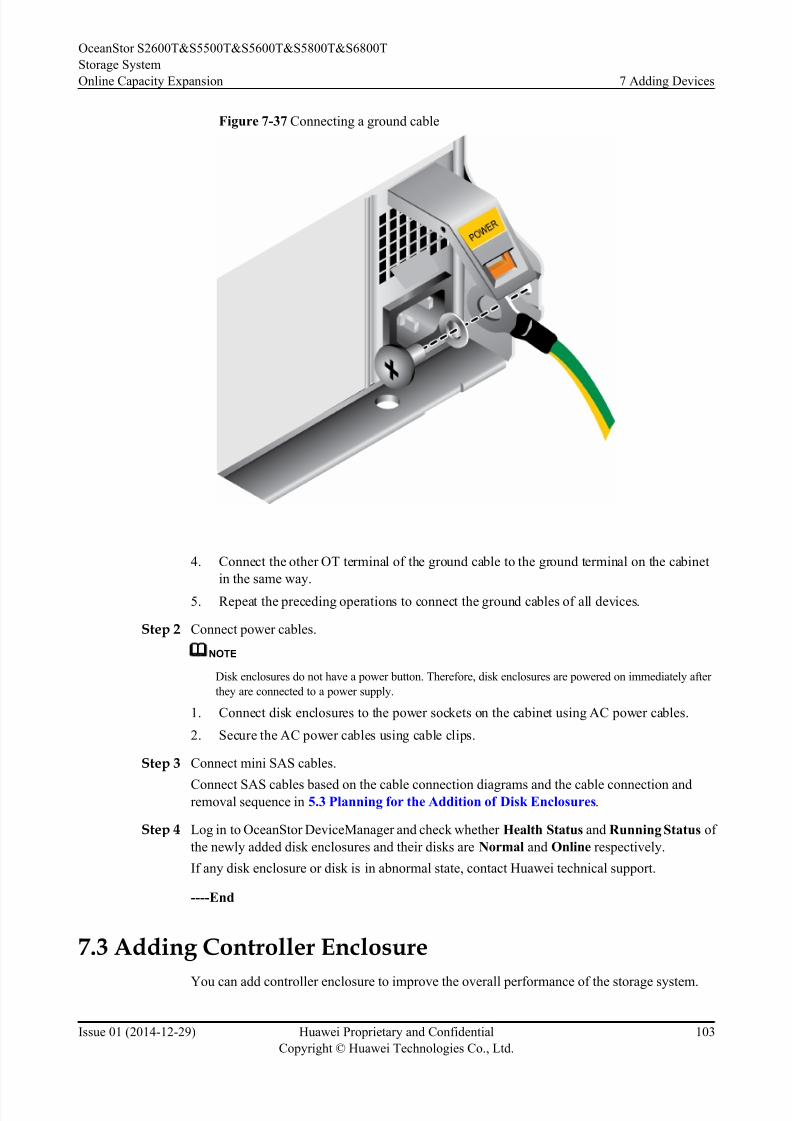
8/9/2019 OceanStor S2600T&S5500T&S5600T&S5800T&S6800T Storage System V200R002 Online Capacity Expansion 01
http://slidepdf.com/reader/full/oceanstor-s2600ts5500ts5600ts5800ts6800t-storage-system-v200r002-online 110/226
Figure 7-37 Connecting a ground cable
4. Connect the other OT terminal of the ground cable to the ground terminal on the cabinet
in the same way.
5. Repeat the preceding operations to connect the ground cables of all devices.
Step 2 Connect power cables.
NOTE
Disk enclosures do not have a power button. Therefore, disk enclosures are powered on immediately after
they are connected to a power supply.
1. Connect disk enclosures to the power sockets on the cabinet using AC power cables.
2. Secure the AC power cables using cable clips.
Step 3 Connect mini SAS cables.
Connect SAS cables based on the cable connection diagrams and the cable connection andremoval sequence in 5.3 Planning for the Addition of Disk Enclosures.
Step 4 Log in to OceanStor DeviceManager and check whether Health Status and Running Status of
the newly added disk enclosures and their disks are Normal and Online respectively.
If any disk enclosure or disk is in abnormal state, contact Huawei technical support.
----End
7.3 Adding Controller Enclosure
You can add controller enclosure to improve the overall performance of the storage system.
OceanStor S2600T&S5500T&S5600T&S5800T&S6800T
Storage System
Online Capacity Expansion 7 Adding Devices
Issue 01 (2014-12-29) Huawei Proprietary and Confidential
Copyright © Huawei Technologies Co., Ltd.
103
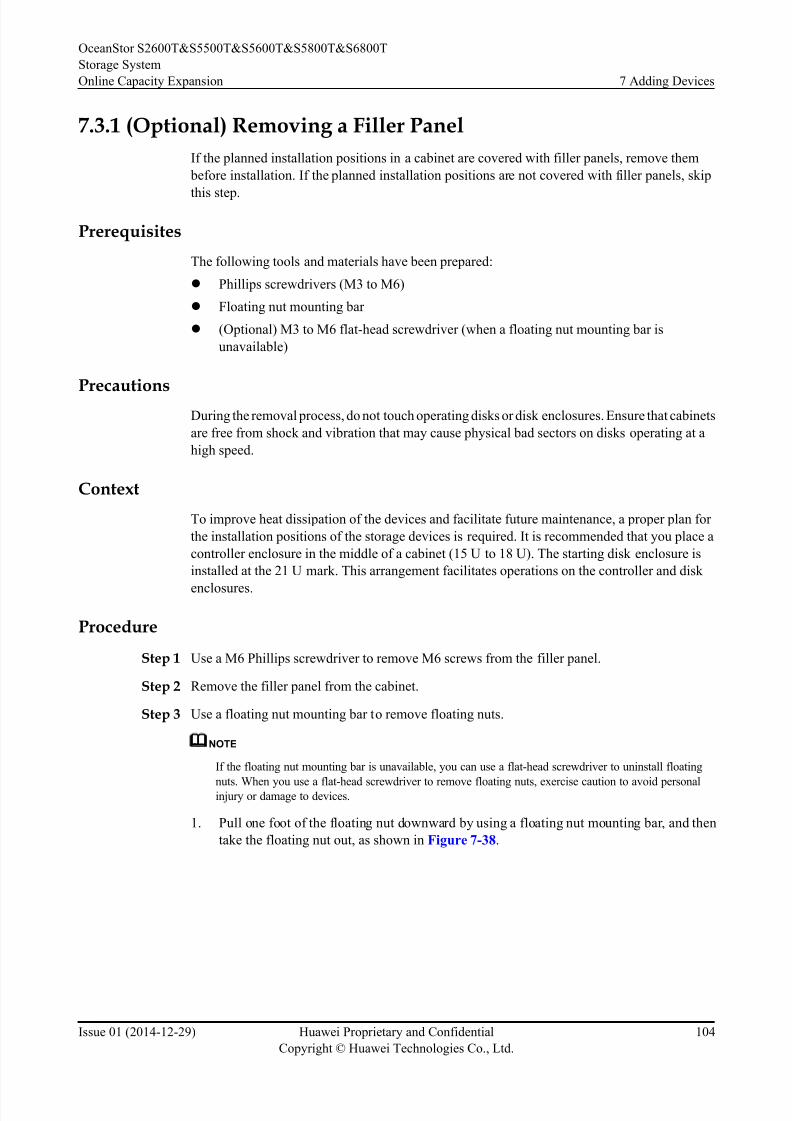
8/9/2019 OceanStor S2600T&S5500T&S5600T&S5800T&S6800T Storage System V200R002 Online Capacity Expansion 01
http://slidepdf.com/reader/full/oceanstor-s2600ts5500ts5600ts5800ts6800t-storage-system-v200r002-online 111/226
7.3.1 (Optional) Removing a Filler Panel
If the planned installation positions in a cabinet are covered with filler panels, remove them
before installation. If the planned installation positions are not covered with filler panels, skip
this step.
Prerequisites
The following tools and materials have been prepared:
l Phillips screwdrivers (M3 to M6)
l Floating nut mounting bar
l (Optional) M3 to M6 flat-head screwdriver (when a floating nut mounting bar is
unavailable)
PrecautionsDuring the removal process, do not touch operating disks or disk enclosures. Ensure that cabinets
are free from shock and vibration that may cause physical bad sectors on disks operating at a
high speed.
Context
To improve heat dissipation of the devices and facilitate future maintenance, a proper plan for
the installation positions of the storage devices is required. It is recommended that you place a
controller enclosure in the middle of a cabinet (15 U to 18 U). The starting disk enclosure is
installed at the 21 U mark. This arrangement facilitates operations on the controller and disk
enclosures.
Procedure
Step 1 Use a M6 Phillips screwdriver to remove M6 screws from the filler panel.
Step 2 Remove the filler panel from the cabinet.
Step 3 Use a floating nut mounting bar to remove floating nuts.
NOTE
If the floating nut mounting bar is unavailable, you can use a flat-head screwdriver to uninstall floating
nuts. When you use a flat-head screwdriver to remove floating nuts, exercise caution to avoid personalinjury or damage to devices.
1. Pull one foot of the floating nut downward by using a floating nut mounting bar, and then
take the floating nut out, as shown in Figure 7-38.
OceanStor S2600T&S5500T&S5600T&S5800T&S6800T
Storage System
Online Capacity Expansion 7 Adding Devices
Issue 01 (2014-12-29) Huawei Proprietary and Confidential
Copyright © Huawei Technologies Co., Ltd.
104
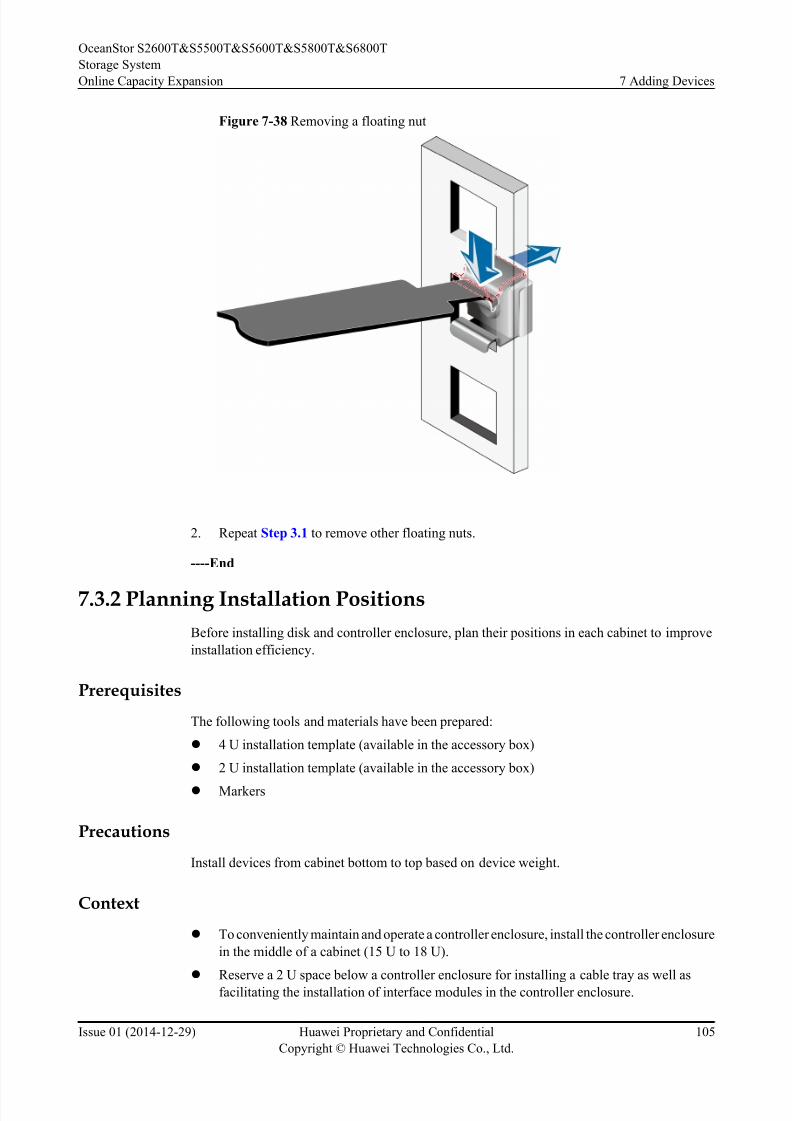
8/9/2019 OceanStor S2600T&S5500T&S5600T&S5800T&S6800T Storage System V200R002 Online Capacity Expansion 01
http://slidepdf.com/reader/full/oceanstor-s2600ts5500ts5600ts5800ts6800t-storage-system-v200r002-online 112/226
Figure 7-38 Removing a floating nut
2. Repeat Step 3.1 to remove other floating nuts.
----End
7.3.2 Planning Installation Positions
Before installing disk and controller enclosure, plan their positions in each cabinet to improve
installation efficiency.
Prerequisites
The following tools and materials have been prepared:
l 4 U installation template (available in the accessory box)
l 2 U installation template (available in the accessory box)
l Markers
Precautions
Install devices from cabinet bottom to top based on device weight.
Context
l To conveniently maintain and operate a controller enclosure, install the controller enclosure
in the middle of a cabinet (15 U to 18 U).
l Reserve a 2 U space below a controller enclosure for installing a cable tray as well as
facilitating the installation of interface modules in the controller enclosure.
OceanStor S2600T&S5500T&S5600T&S5800T&S6800T
Storage System
Online Capacity Expansion 7 Adding Devices
Issue 01 (2014-12-29) Huawei Proprietary and Confidential
Copyright © Huawei Technologies Co., Ltd.
105
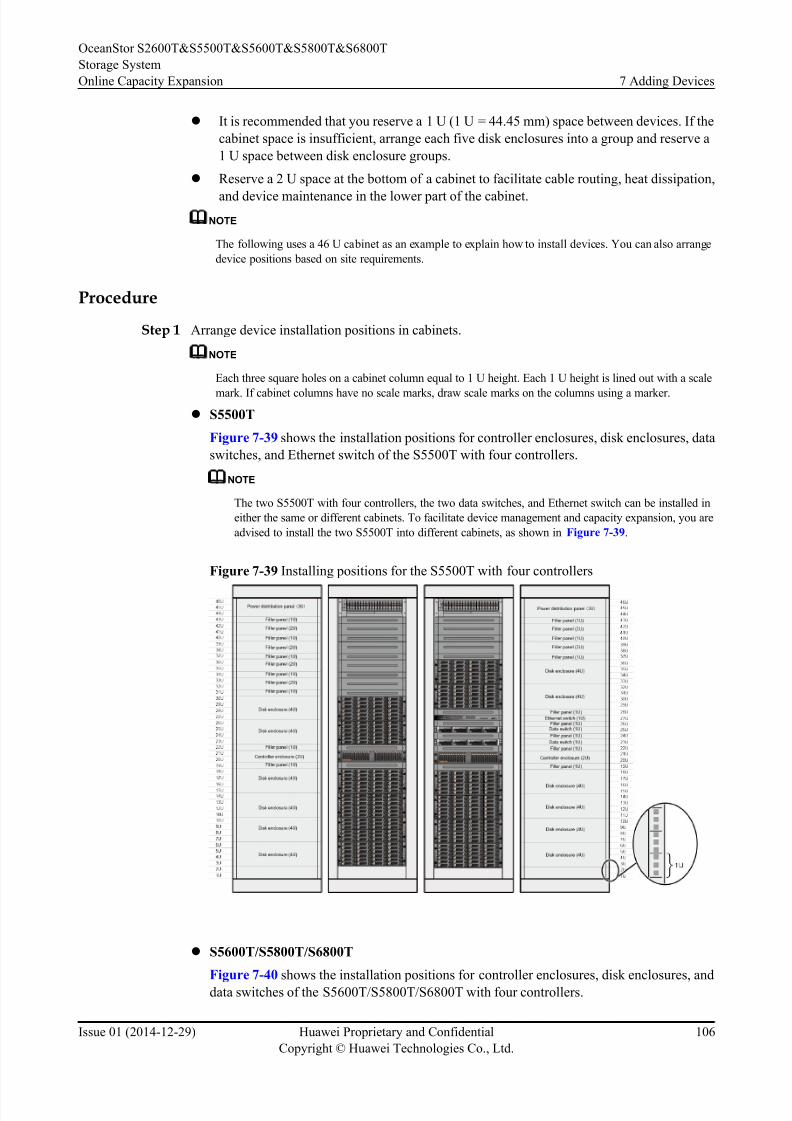
8/9/2019 OceanStor S2600T&S5500T&S5600T&S5800T&S6800T Storage System V200R002 Online Capacity Expansion 01
http://slidepdf.com/reader/full/oceanstor-s2600ts5500ts5600ts5800ts6800t-storage-system-v200r002-online 113/226
l It is recommended that you reserve a 1 U (1 U = 44.45 mm) space between devices. If the
cabinet space is insufficient, arrange each five disk enclosures into a group and reserve a
1 U space between disk enclosure groups.
l Reserve a 2 U space at the bottom of a cabinet to facilitate cable routing, heat dissipation,
and device maintenance in the lower part of the cabinet.
NOTE
The following uses a 46 U ca binet as an example to explain how to install devices. You can also arrange
device positions based on site requirements.
Procedure
Step 1 Arrange device installation positions in cabinets.
NOTE
Each three square holes on a cabinet column equal to 1 U height. Each 1 U height is lined out with a scale
mark. If cabinet columns have no scale marks, draw scale marks on the columns using a marker.
l S5500T
Figure 7-39 shows the installation positions for controller enclosures, disk enclosures, data
switches, and Ethernet switch of the S5500T with four controllers.
NOTE
The two S5500T with four controllers, the two data switches, and Ethernet switch can be installed in
either the same or different cabinets. To facilitate device management and capacity expansion, you are
advised to install the two S5500T into different cabinets, as shown in Figure 7-39.
Figure 7-39 Installing positions for the S5500T with four controllers
l S5600T/S5800T/S6800T
Figure 7-40 shows the installation positions for controller enclosures, disk enclosures, and
data switches of the S5600T/S5800T/S6800T with four controllers.
OceanStor S2600T&S5500T&S5600T&S5800T&S6800T
Storage System
Online Capacity Expansion 7 Adding Devices
Issue 01 (2014-12-29) Huawei Proprietary and Confidential
Copyright © Huawei Technologies Co., Ltd.
106
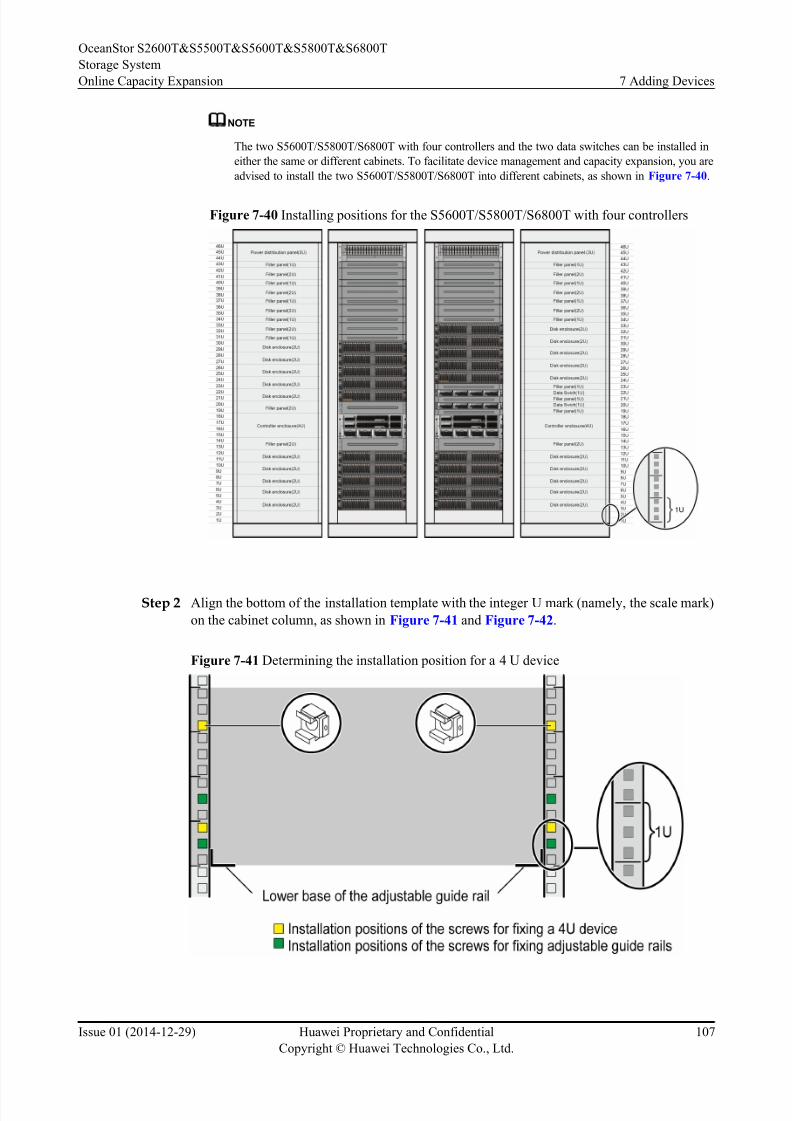
8/9/2019 OceanStor S2600T&S5500T&S5600T&S5800T&S6800T Storage System V200R002 Online Capacity Expansion 01
http://slidepdf.com/reader/full/oceanstor-s2600ts5500ts5600ts5800ts6800t-storage-system-v200r002-online 114/226
NOTE
The two S5600T/S5800T/S6800T with four controllers and the two data switches can be installed in
either the same or different cabinets. To facilitate device management and capacity expansion, you are
advised to install the two S5600T/S5800T/S6800T into different cabinets, as shown in Figure 7-40.
Figure 7-40 Installing positions for the S5600T/S5800T/S6800T with four controllers
Step 2 Align the bottom of the installation template with the integer U mark (namely, the scale mark)
on the cabinet column, as shown in Figure 7-41 and Figure 7-42.
Figure 7-41 Determining the installation position for a 4 U device
OceanStor S2600T&S5500T&S5600T&S5800T&S6800T
Storage System
Online Capacity Expansion 7 Adding Devices
Issue 01 (2014-12-29) Huawei Proprietary and Confidential
Copyright © Huawei Technologies Co., Ltd.
107

8/9/2019 OceanStor S2600T&S5500T&S5600T&S5800T&S6800T Storage System V200R002 Online Capacity Expansion 01
http://slidepdf.com/reader/full/oceanstor-s2600ts5500ts5600ts5800ts6800t-storage-system-v200r002-online 115/226
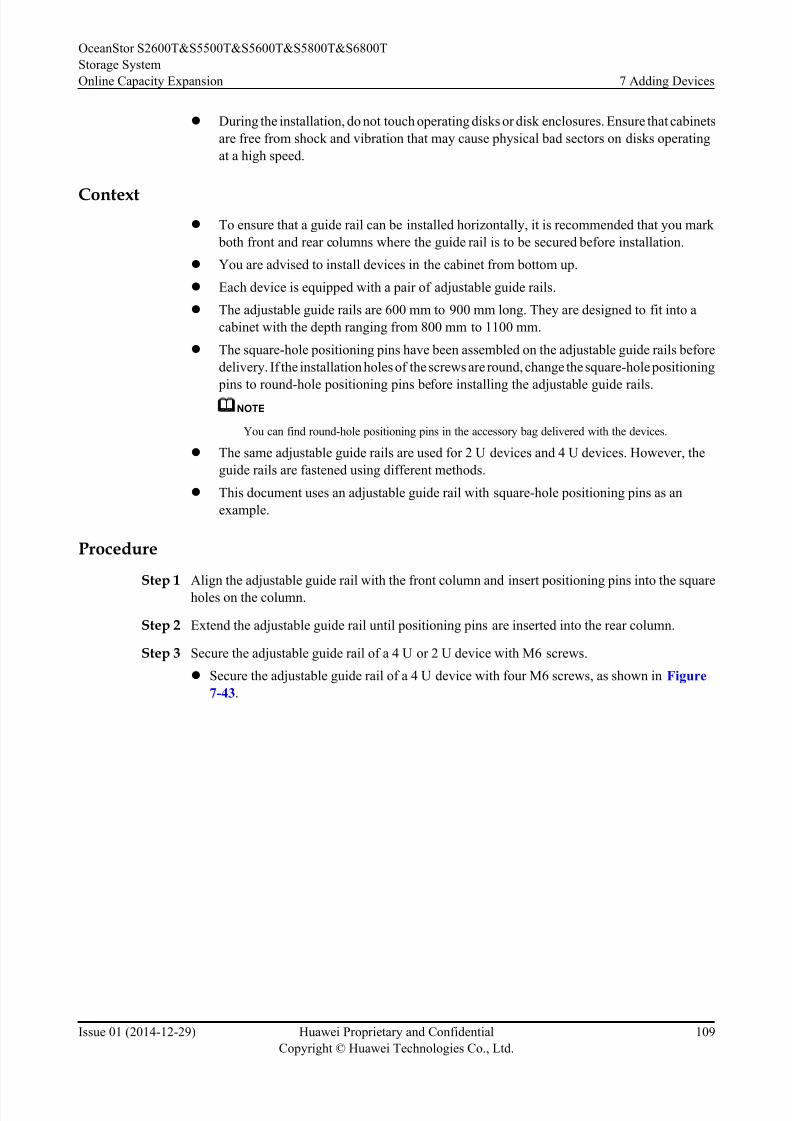
8/9/2019 OceanStor S2600T&S5500T&S5600T&S5800T&S6800T Storage System V200R002 Online Capacity Expansion 01
http://slidepdf.com/reader/full/oceanstor-s2600ts5500ts5600ts5800ts6800t-storage-system-v200r002-online 116/226
l During the installation, do not touch operating disks or disk enclosures. Ensure that cabinets
are free from shock and vibration that may cause physical bad sectors on disks operating
at a high speed.
Contextl To ensure that a guide rail can be installed horizontally, it is recommended that you mark
both front and rear columns where the guide rail is to be secured before installation.
l You are advised to install devices in the cabinet from bottom up.
l Each device is equipped with a pair of adjustable guide rails.
l The adjustable guide rails are 600 mm to 900 mm long. They are designed to fit into a
cabinet with the depth ranging from 800 mm to 1100 mm.
l The square-hole positioning pins have been assembled on the adjustable guide rails before
delivery. If the installation holes of the screws are round, change the square-hole positioning
pins to round-hole positioning pins before installing the adjustable guide rails.
NOTE
You can find round-hole positioning pins in the accessory bag delivered with the devices.
l The same adjustable guide rails are used for 2 U devices and 4 U devices. However, the
guide rails are fastened using different methods.
l This document uses an adjustable guide rail with square-hole positioning pins as an
example.
Procedure
Step 1 Align the adjustable guide rail with the front column and insert positioning pins into the square
holes on the column.
Step 2 Extend the adjustable guide rail until positioning pins are inserted into the rear column.
Step 3 Secure the adjustable guide rail of a 4 U or 2 U device with M6 screws.
l Secure the adjustable guide rail of a 4 U device with four M6 screws, as shown in Figure
7-43.
OceanStor S2600T&S5500T&S5600T&S5800T&S6800T
Storage System
Online Capacity Expansion 7 Adding Devices
Issue 01 (2014-12-29) Huawei Proprietary and Confidential
Copyright © Huawei Technologies Co., Ltd.
109
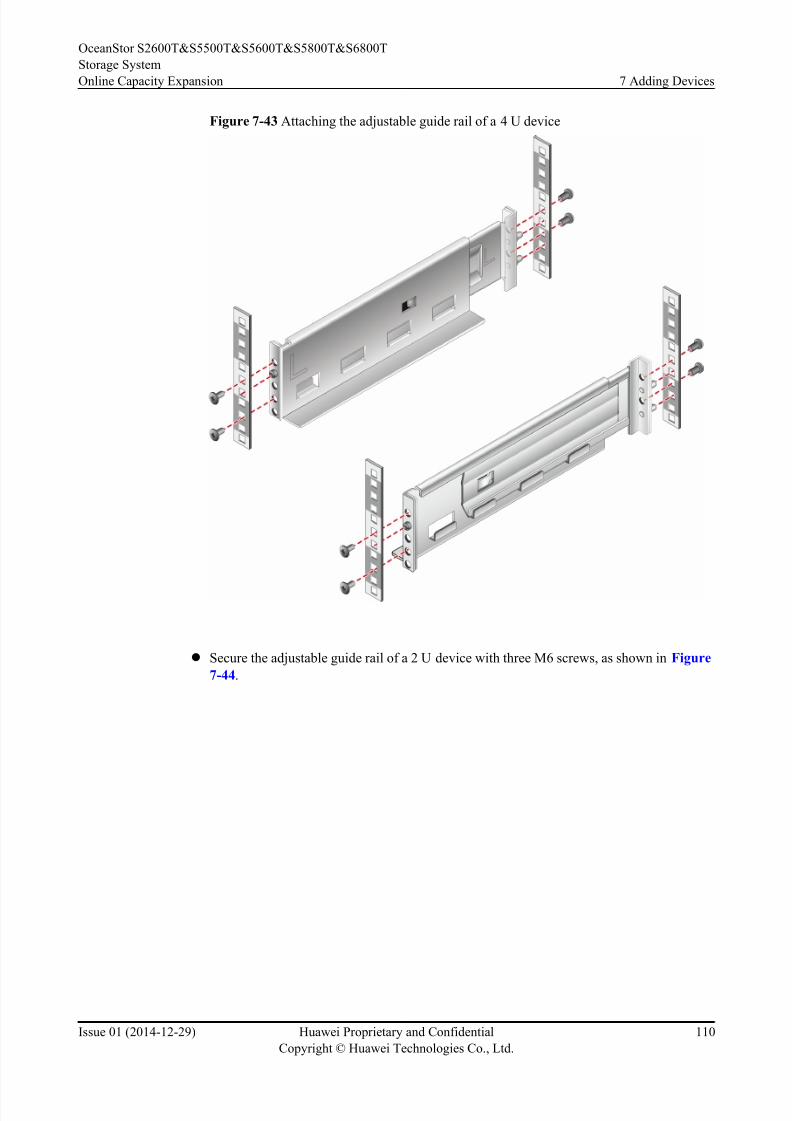
8/9/2019 OceanStor S2600T&S5500T&S5600T&S5800T&S6800T Storage System V200R002 Online Capacity Expansion 01
http://slidepdf.com/reader/full/oceanstor-s2600ts5500ts5600ts5800ts6800t-storage-system-v200r002-online 117/226
Figure 7-43 Attaching the adjustable guide rail of a 4 U device
l Secure the adjustable guide rail of a 2 U device with three M6 screws, as shown in Figure
7-44.
OceanStor S2600T&S5500T&S5600T&S5800T&S6800T
Storage System
Online Capacity Expansion 7 Adding Devices
Issue 01 (2014-12-29) Huawei Proprietary and Confidential
Copyright © Huawei Technologies Co., Ltd.
110
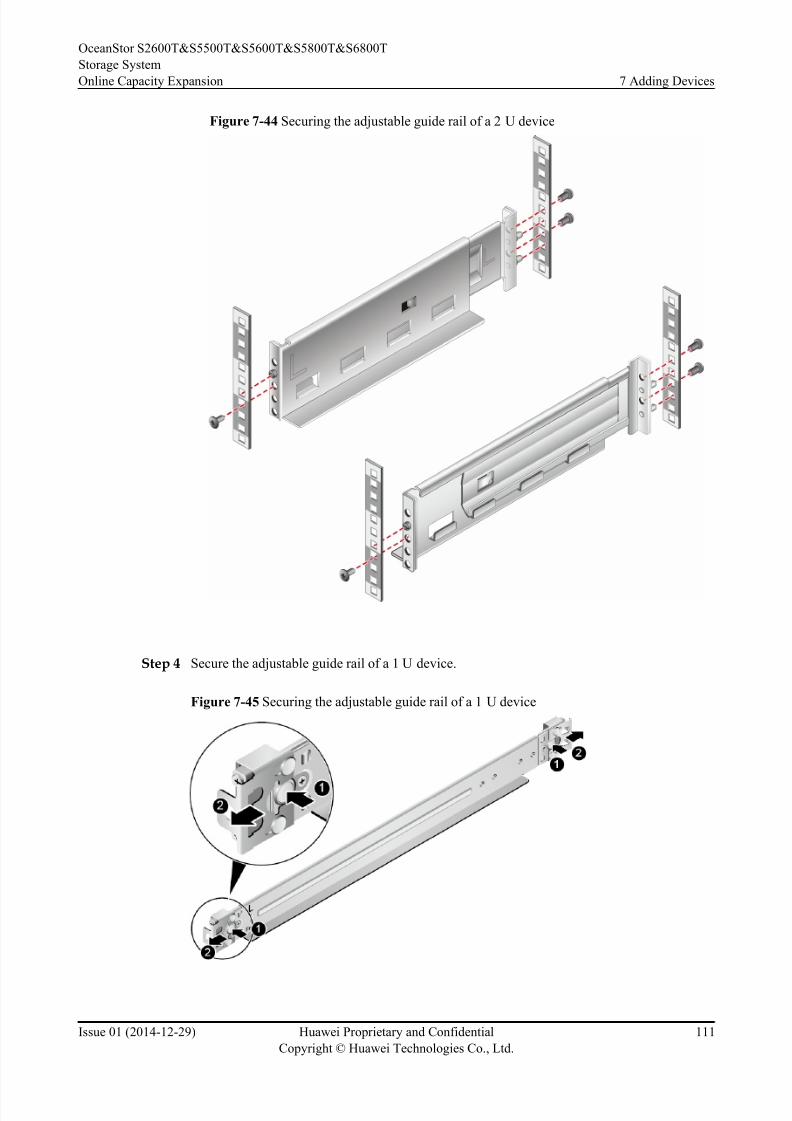
8/9/2019 OceanStor S2600T&S5500T&S5600T&S5800T&S6800T Storage System V200R002 Online Capacity Expansion 01
http://slidepdf.com/reader/full/oceanstor-s2600ts5500ts5600ts5800ts6800t-storage-system-v200r002-online 118/226
Figure 7-44 Securing the adjustable guide rail of a 2 U device
Step 4 Secure the adjustable guide rail of a 1 U device.
Figure 7-45 Securing the adjustable guide rail of a 1 U device
OceanStor S2600T&S5500T&S5600T&S5800T&S6800T
Storage System
Online Capacity Expansion 7 Adding Devices
Issue 01 (2014-12-29) Huawei Proprietary and Confidential
Copyright © Huawei Technologies Co., Ltd.
111

8/9/2019 OceanStor S2600T&S5500T&S5600T&S5800T&S6800T Storage System V200R002 Online Capacity Expansion 01
http://slidepdf.com/reader/full/oceanstor-s2600ts5500ts5600ts5800ts6800t-storage-system-v200r002-online 119/226
1. Press the button, as shown in step 1 Figure 7-45.
2. Pull out the baffle plate, as shown in step 2 in Figure 7-45.
3. Place the baffle plate in the corresponding position of the cabinet, as shown in step 3 in
Figure 7-45.
4. Push the guide rail forward to insert the front column in the corresponding hole, as shown
in step 4 in Figure 7-45.
NOTE
l Push the front supporting column in position to enable the button in Step 4.1 to recover.
l You can use either square-hole columns or round-hole columns.
----End
7.3.4 Installing a Ball Bearing Guide Rail (Applicable to High-Density Disk Enclosures)
After determining the installation positions of storage system components in a cabinet, install
ball bearing guide rails onto which high-density disk enclosures are loaded. If no high-density
disk enclosures are used, skip this section.
Prerequisites
The following tools and materials have been prepared:
l Phillips screwdrivers (M3 to M6)
l Markers
l M6 screws
l Square-hole positioning pins (for square-hole cabinet columns)
l Round-hole positioning pins (for round-hole cabinet columns)
l Ball bearing guide rails
OceanStor S2600T&S5500T&S5600T&S5800T&S6800T
Storage System
Online Capacity Expansion 7 Adding Devices
Issue 01 (2014-12-29) Huawei Proprietary and Confidential
Copyright © Huawei Technologies Co., Ltd.
112
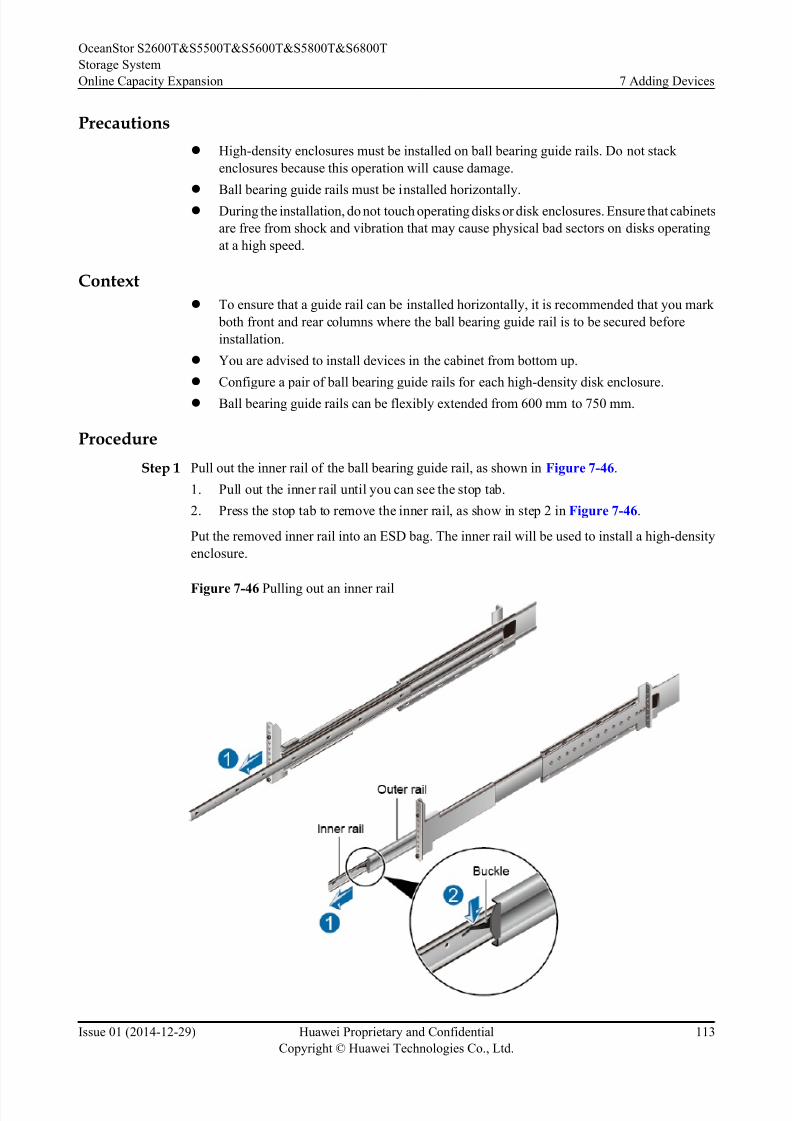
8/9/2019 OceanStor S2600T&S5500T&S5600T&S5800T&S6800T Storage System V200R002 Online Capacity Expansion 01
http://slidepdf.com/reader/full/oceanstor-s2600ts5500ts5600ts5800ts6800t-storage-system-v200r002-online 120/226
Precautions
l High-density enclosures must be installed on ball bearing guide rails. Do not stack
enclosures because this operation will cause damage.
l
Ball bearing guide rails must be installed horizontally.l During the installation, do not touch operating disks or disk enclosures. Ensure that cabinets
are free from shock and vibration that may cause physical bad sectors on disks operating
at a high speed.
Context
l To ensure that a guide rail can be installed horizontally, it is recommended that you mark
both front and rear columns where the ball bearing guide rail is to be secured before
installation.
l You are advised to install devices in the cabinet from bottom up.
l Configure a pair of ball bearing guide rails for each high-density disk enclosure.
l Ball bearing guide rails can be flexibly extended from 600 mm to 750 mm.
Procedure
Step 1 Pull out the inner rail of the ball bearing guide rail, as shown in Figure 7-46.
1. Pull out the inner rail until you can see the stop tab.
2. Press the stop tab to remove the inner rail, as show in step 2 in Figure 7-46.
Put the removed inner rail into an ESD bag. The inner rail will be used to install a high-density
enclosure.
Figure 7-46 Pulling out an inner rail
OceanStor S2600T&S5500T&S5600T&S5800T&S6800T
Storage System
Online Capacity Expansion 7 Adding Devices
Issue 01 (2014-12-29) Huawei Proprietary and Confidential
Copyright © Huawei Technologies Co., Ltd.
113
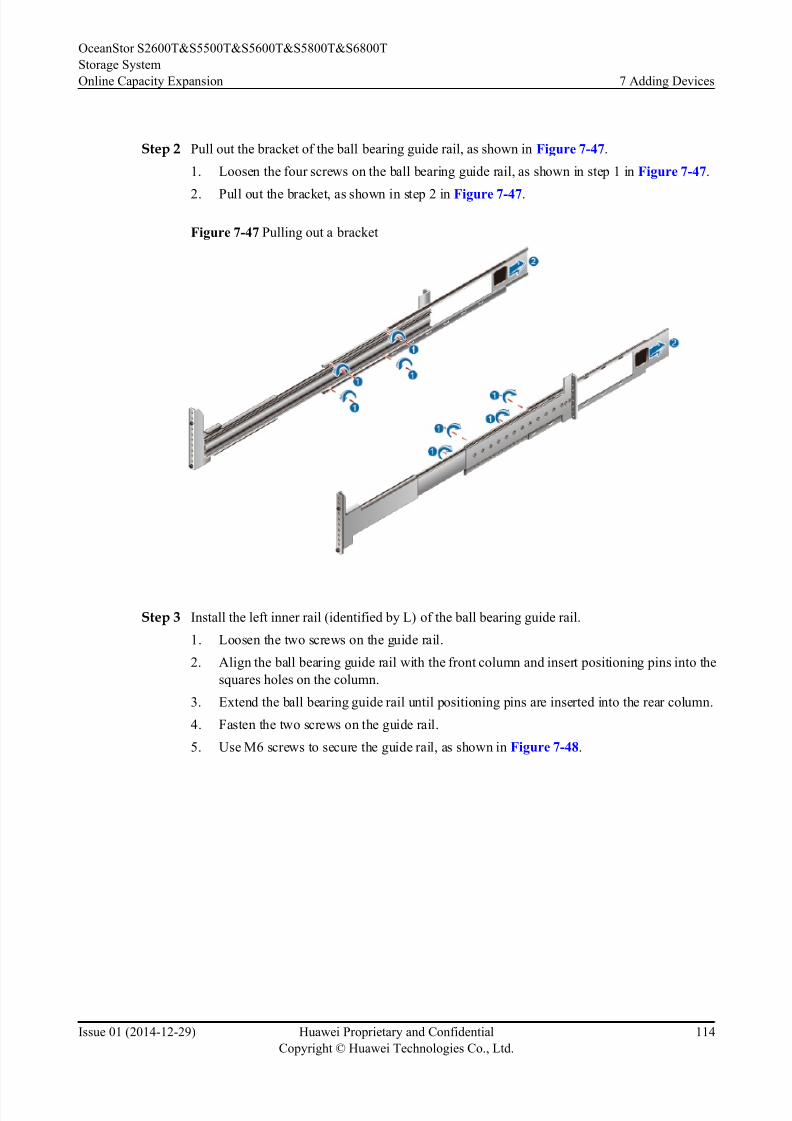
8/9/2019 OceanStor S2600T&S5500T&S5600T&S5800T&S6800T Storage System V200R002 Online Capacity Expansion 01
http://slidepdf.com/reader/full/oceanstor-s2600ts5500ts5600ts5800ts6800t-storage-system-v200r002-online 121/226
Step 2 Pull out the bracket of the ball bearing guide rail, as shown in Figure 7-47.
1. Loosen the four screws on the ball bearing guide rail, as shown in step 1 in Figure 7-47.
2. Pull out the bracket, as shown in step 2 in Figure 7-47.
Figure 7-47 Pulling out a bracket
Step 3 Install the left inner rail (identified by L) of the ball bearing guide rail.
1. Loosen the two screws on the guide rail.
2. Align the ball bearing guide rail with the front column and insert positioning pins into the
squares holes on the column.
3. Extend the ball bearing guide rail until positioning pins are inserted into the rear column.
4. Fasten the two screws on the guide rail.
5. Use M6 screws to secure the guide rail, as shown in Figure 7-48.
OceanStor S2600T&S5500T&S5600T&S5800T&S6800T
Storage System
Online Capacity Expansion 7 Adding Devices
Issue 01 (2014-12-29) Huawei Proprietary and Confidential
Copyright © Huawei Technologies Co., Ltd.
114
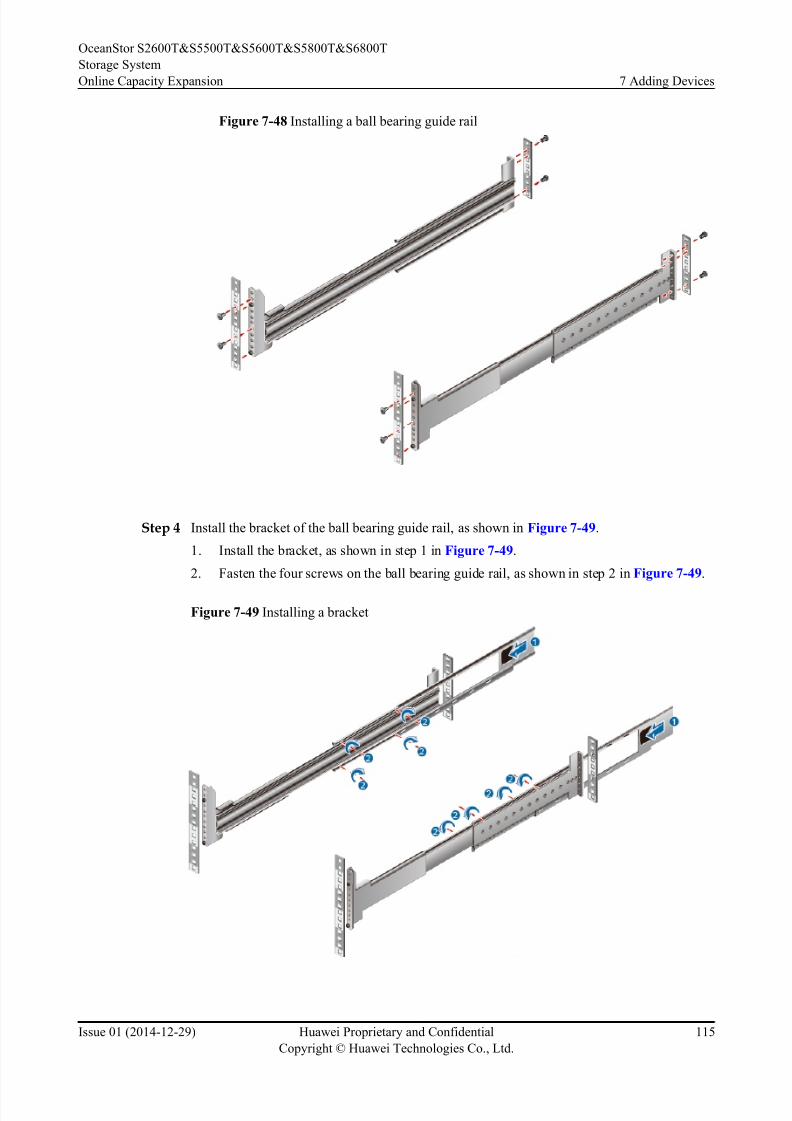
8/9/2019 OceanStor S2600T&S5500T&S5600T&S5800T&S6800T Storage System V200R002 Online Capacity Expansion 01
http://slidepdf.com/reader/full/oceanstor-s2600ts5500ts5600ts5800ts6800t-storage-system-v200r002-online 122/226

8/9/2019 OceanStor S2600T&S5500T&S5600T&S5800T&S6800T Storage System V200R002 Online Capacity Expansion 01
http://slidepdf.com/reader/full/oceanstor-s2600ts5500ts5600ts5800ts6800t-storage-system-v200r002-online 123/226
Step 5 Install the right inner rail (identified by R) of the ball bearing guide rail.
The installation method of the right inner rail is similar to Step 3.
Step 6 After the ball bearing guide rails are installed, use an installation template to measure the distance
between the left and right rails and make sure that two rails are in parallel.
----End
7.3.5 Installing a Floating Nut
Floating nuts provide screw holes to secure M6 screws. Correctly installing floating nuts
improves the overall efficiency of device installation and secures devices firmly to a cabinet.
Floating nuts are not required for 2 U devices. Skip this section if only 2 U devices are used.
Prerequisites
Positions of the devices to be installed have been determined.
The following tools and materials have been prepared:
l Floating nuts
l Floating nut mounting bar
l (Optional) Flat-head screwdriver
Precautions
During the installation, do not touch operating disks or disk enclosures. Ensure that cabinets are
free from shock and vibration that may cause physical bad sectors on disks operating at a high
speed.
Context
The adjustable guide rails have screw holes. For a 4 U device, install floating nuts to the marked
positions on the adjustable guide rails. For a 2 U device, you do not need to install floating nuts
but secure screws directly to the adjustable guide rails.
NOTE
Floating nuts must be installed inside a cabinet column.
Procedure
Step 1 Insert one foot of the floating nut into the square hole in the marked position.
Step 2 Pull the other foot of the floating nut by using the floating nut mounting bar to lock the square
hole, as shown in Figure 7-50.
OceanStor S2600T&S5500T&S5600T&S5800T&S6800T
Storage System
Online Capacity Expansion 7 Adding Devices
Issue 01 (2014-12-29) Huawei Proprietary and Confidential
Copyright © Huawei Technologies Co., Ltd.
116
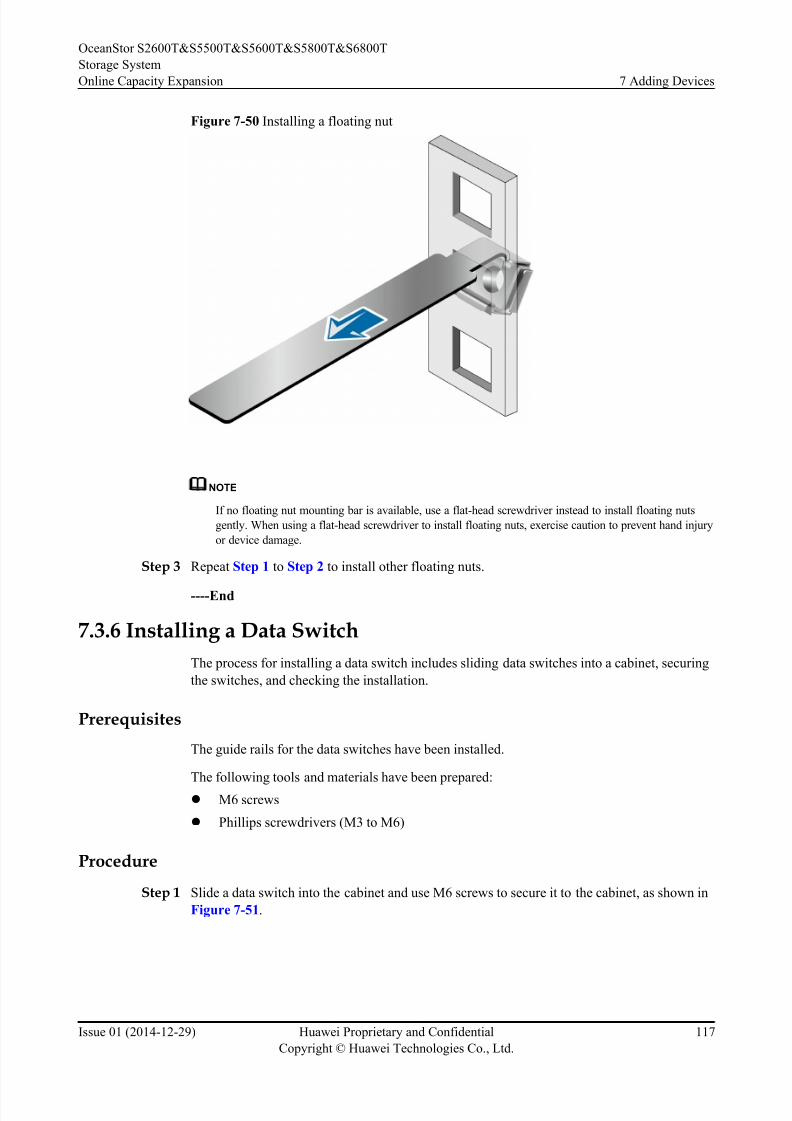
8/9/2019 OceanStor S2600T&S5500T&S5600T&S5800T&S6800T Storage System V200R002 Online Capacity Expansion 01
http://slidepdf.com/reader/full/oceanstor-s2600ts5500ts5600ts5800ts6800t-storage-system-v200r002-online 124/226
Figure 7-50 Installing a floating nut
NOTE
If no floating nut mounting bar is available, use a flat-head screwdriver instead to install floating nuts
gently. When using a flat-head screwdriver to install floating nuts, exercise caution to prevent hand injury
or device damage.
Step 3 Repeat Step 1 to Step 2 to install other floating nuts.
----End
7.3.6 Installing a Data Switch
The process for installing a data switch includes sliding data switches into a cabinet, securing
the switches, and checking the installation.
Prerequisites
The guide rails for the data switches have been installed.
The following tools and materials have been prepared:
l M6 screws
l Phillips screwdrivers (M3 to M6)
Procedure
Step 1 Slide a data switch into the cabinet and use M6 screws to secure it to the cabinet, as shown in
Figure 7-51.
OceanStor S2600T&S5500T&S5600T&S5800T&S6800T
Storage System
Online Capacity Expansion 7 Adding Devices
Issue 01 (2014-12-29) Huawei Proprietary and Confidential
Copyright © Huawei Technologies Co., Ltd.
117
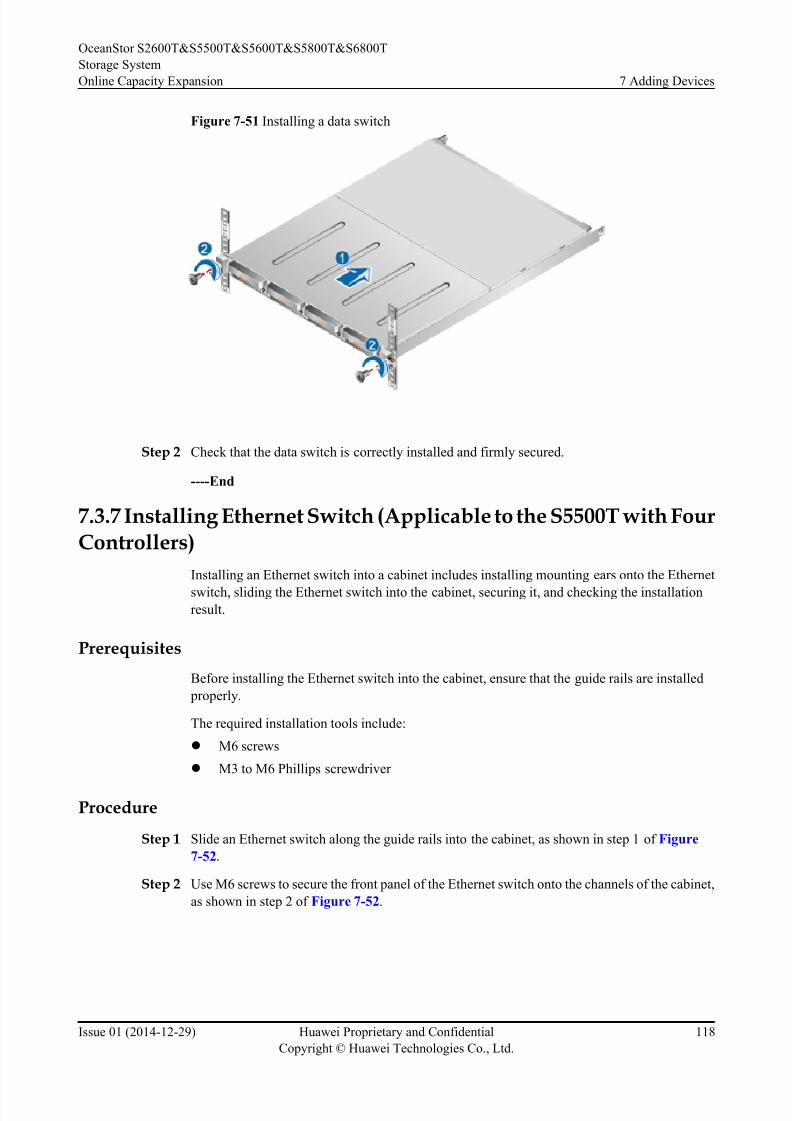
8/9/2019 OceanStor S2600T&S5500T&S5600T&S5800T&S6800T Storage System V200R002 Online Capacity Expansion 01
http://slidepdf.com/reader/full/oceanstor-s2600ts5500ts5600ts5800ts6800t-storage-system-v200r002-online 125/226
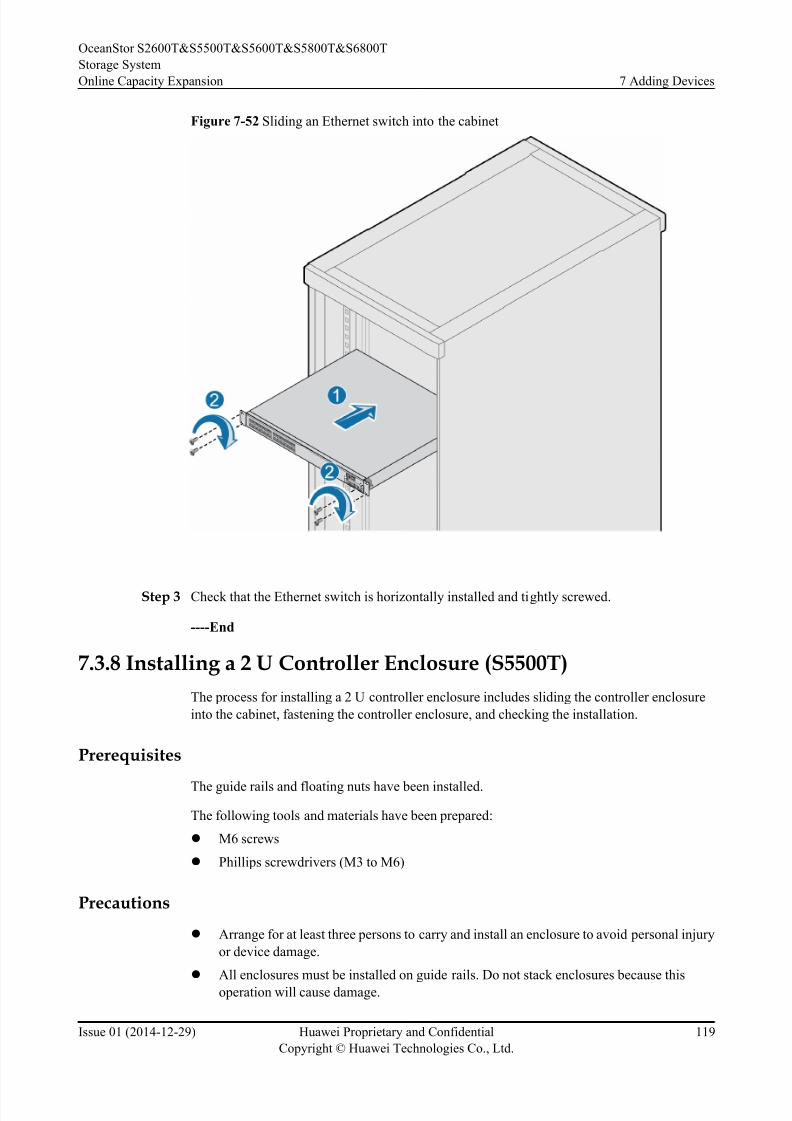
8/9/2019 OceanStor S2600T&S5500T&S5600T&S5800T&S6800T Storage System V200R002 Online Capacity Expansion 01
http://slidepdf.com/reader/full/oceanstor-s2600ts5500ts5600ts5800ts6800t-storage-system-v200r002-online 126/226
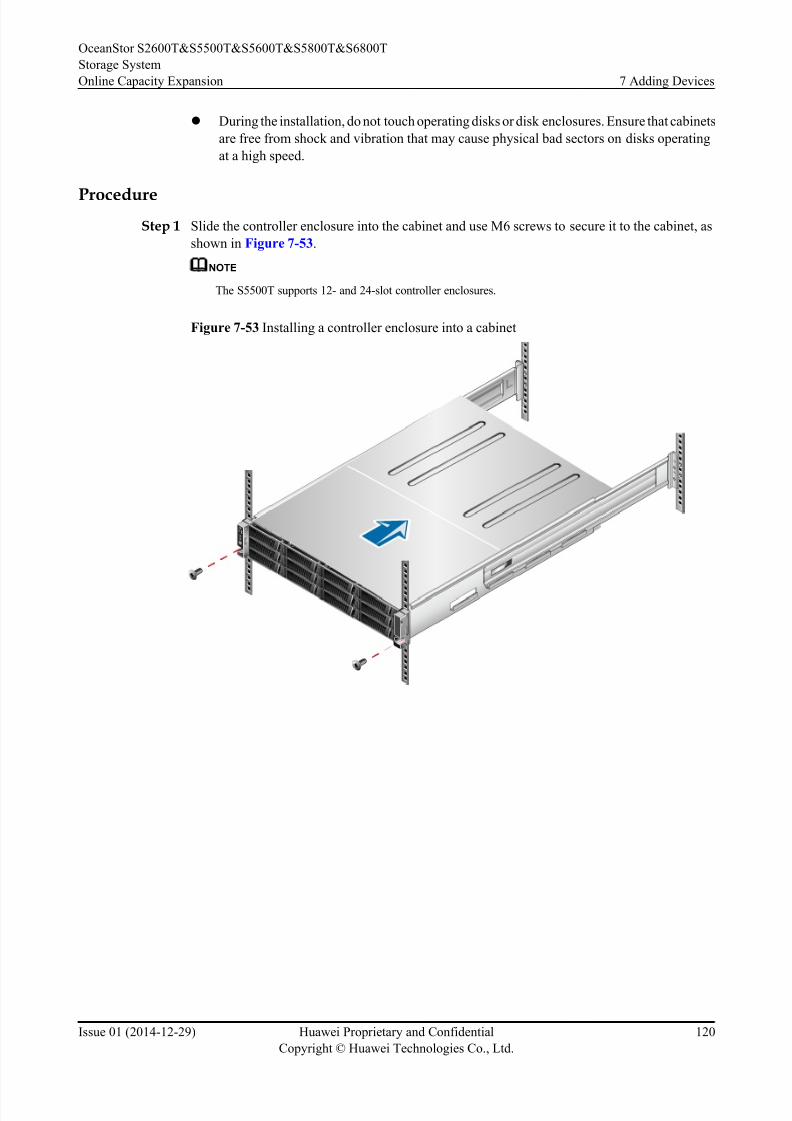
8/9/2019 OceanStor S2600T&S5500T&S5600T&S5800T&S6800T Storage System V200R002 Online Capacity Expansion 01
http://slidepdf.com/reader/full/oceanstor-s2600ts5500ts5600ts5800ts6800t-storage-system-v200r002-online 127/226
l During the installation, do not touch operating disks or disk enclosures. Ensure that cabinets
are free from shock and vibration that may cause physical bad sectors on disks operating
at a high speed.
Procedure
Step 1 Slide the controller enclosure into the cabinet and use M6 screws to secure it to the cabinet, as
shown in Figure 7-53.
NOTE
The S5500T supports 12- and 24-slot controller enclosures.
Figure 7-53 Installing a controller enclosure into a cabinet
OceanStor S2600T&S5500T&S5600T&S5800T&S6800T
Storage System
Online Capacity Expansion 7 Adding Devices
Issue 01 (2014-12-29) Huawei Proprietary and Confidential
Copyright © Huawei Technologies Co., Ltd.
120
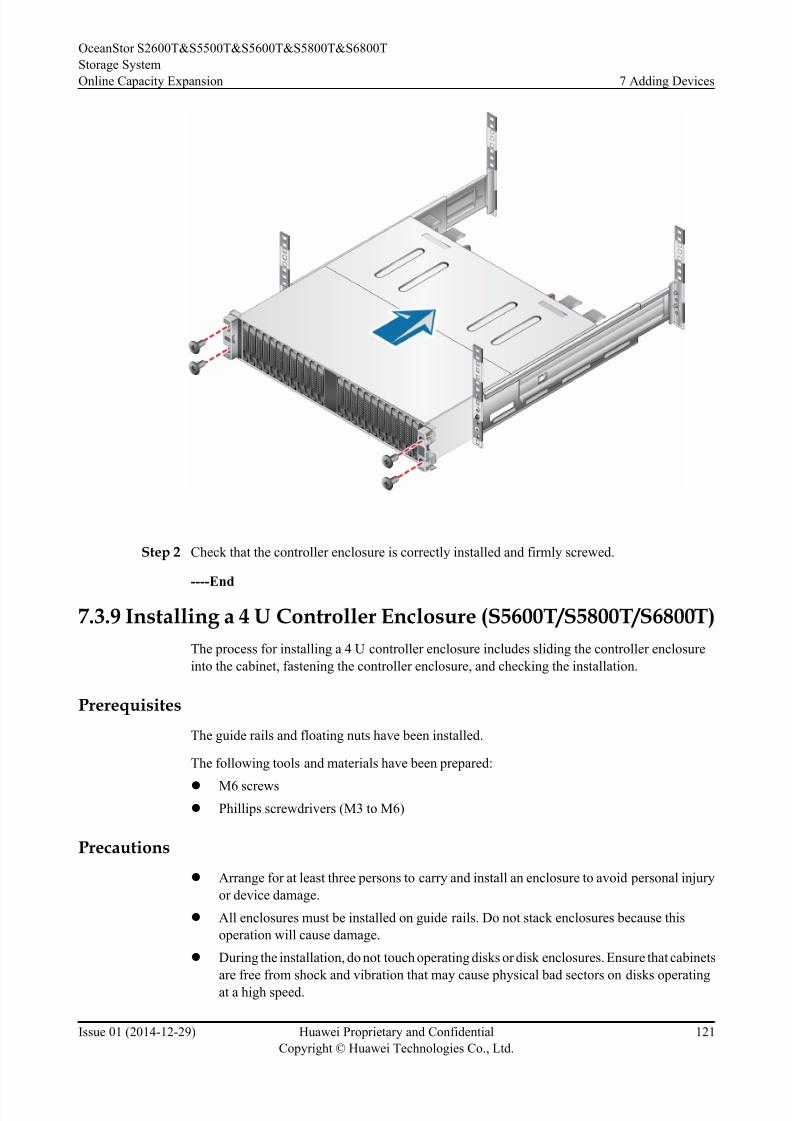
8/9/2019 OceanStor S2600T&S5500T&S5600T&S5800T&S6800T Storage System V200R002 Online Capacity Expansion 01
http://slidepdf.com/reader/full/oceanstor-s2600ts5500ts5600ts5800ts6800t-storage-system-v200r002-online 128/226
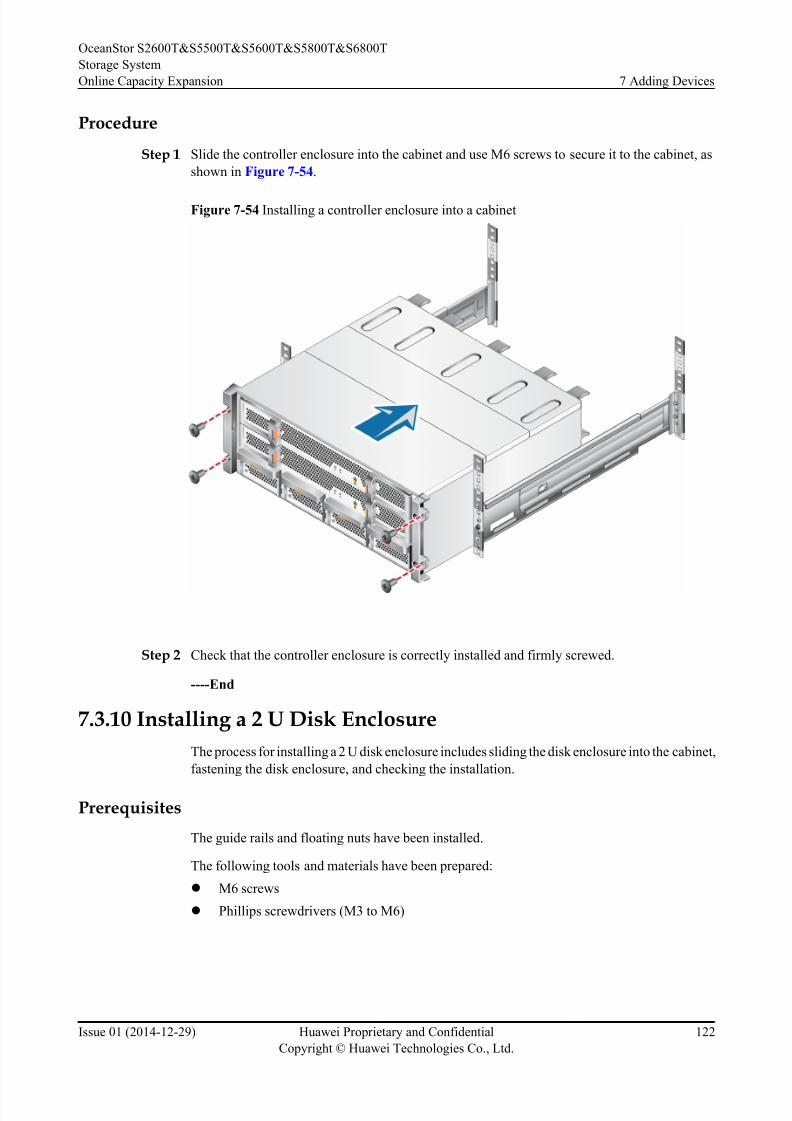
8/9/2019 OceanStor S2600T&S5500T&S5600T&S5800T&S6800T Storage System V200R002 Online Capacity Expansion 01
http://slidepdf.com/reader/full/oceanstor-s2600ts5500ts5600ts5800ts6800t-storage-system-v200r002-online 129/226
Procedure
Step 1 Slide the controller enclosure into the cabinet and use M6 screws to secure it to the cabinet, as
shown in Figure 7-54.
Figure 7-54 Installing a controller enclosure into a cabinet
Step 2 Check that the controller enclosure is correctly installed and firmly screwed.
----End
7.3.10 Installing a 2 U Disk Enclosure
The process for installing a 2 U disk enclosure includes sliding the disk enclosure into the cabinet,
fastening the disk enclosure, and checking the installation.
Prerequisites
The guide rails and floating nuts have been installed.
The following tools and materials have been prepared:
l M6 screws
l Phillips screwdrivers (M3 to M6)
OceanStor S2600T&S5500T&S5600T&S5800T&S6800T
Storage System
Online Capacity Expansion 7 Adding Devices
Issue 01 (2014-12-29) Huawei Proprietary and Confidential
Copyright © Huawei Technologies Co., Ltd.
122
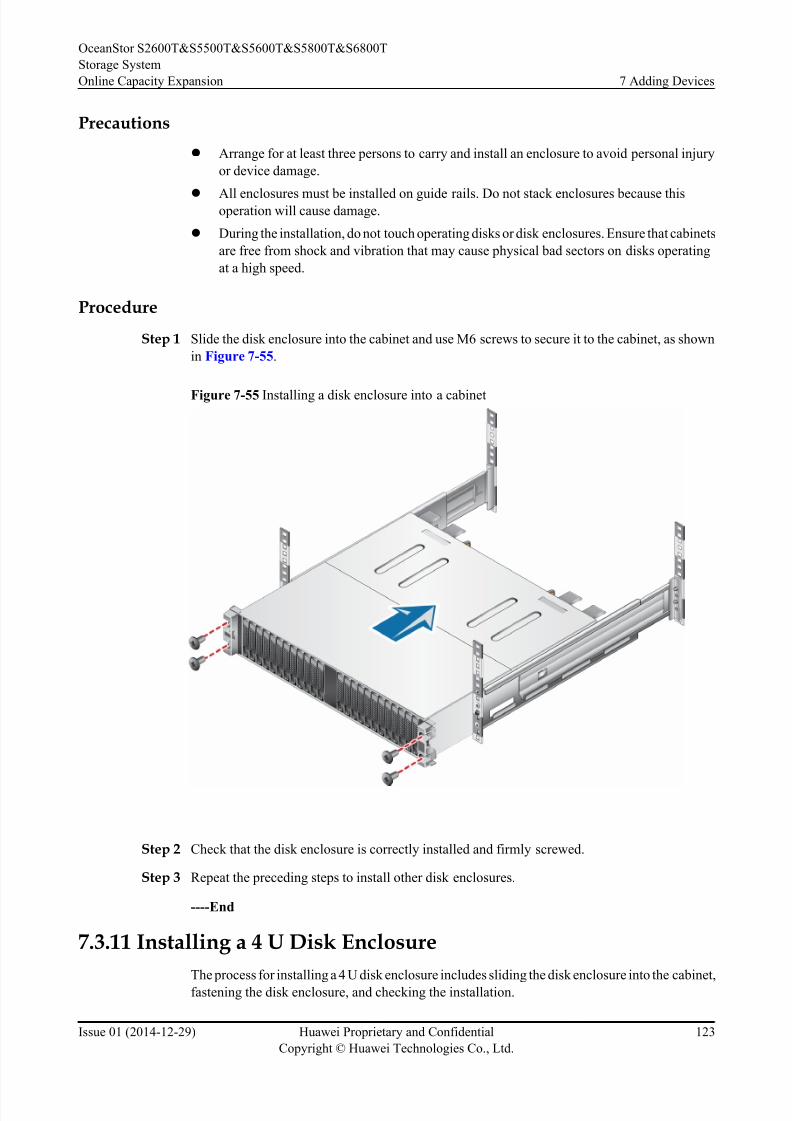
8/9/2019 OceanStor S2600T&S5500T&S5600T&S5800T&S6800T Storage System V200R002 Online Capacity Expansion 01
http://slidepdf.com/reader/full/oceanstor-s2600ts5500ts5600ts5800ts6800t-storage-system-v200r002-online 130/226
Precautions
l Arrange for at least three persons to carry and install an enclosure to avoid personal injury
or device damage.
l All enclosures must be installed on guide rails. Do not stack enclosures because thisoperation will cause damage.
l During the installation, do not touch operating disks or disk enclosures. Ensure that cabinets
are free from shock and vibration that may cause physical bad sectors on disks operating
at a high speed.
Procedure
Step 1 Slide the disk enclosure into the cabinet and use M6 screws to secure it to the cabinet, as shown
in Figure 7-55.
Figure 7-55 Installing a disk enclosure into a cabinet
Step 2 Check that the disk enclosure is correctly installed and firmly screwed.
Step 3 Repeat the preceding steps to install other disk enclosures.
----End
7.3.11 Installing a 4 U Disk Enclosure
The process for installing a 4 U disk enclosure includes sliding the disk enclosure into the cabinet,
fastening the disk enclosure, and checking the installation.
OceanStor S2600T&S5500T&S5600T&S5800T&S6800T
Storage System
Online Capacity Expansion 7 Adding Devices
Issue 01 (2014-12-29) Huawei Proprietary and Confidential
Copyright © Huawei Technologies Co., Ltd.
123
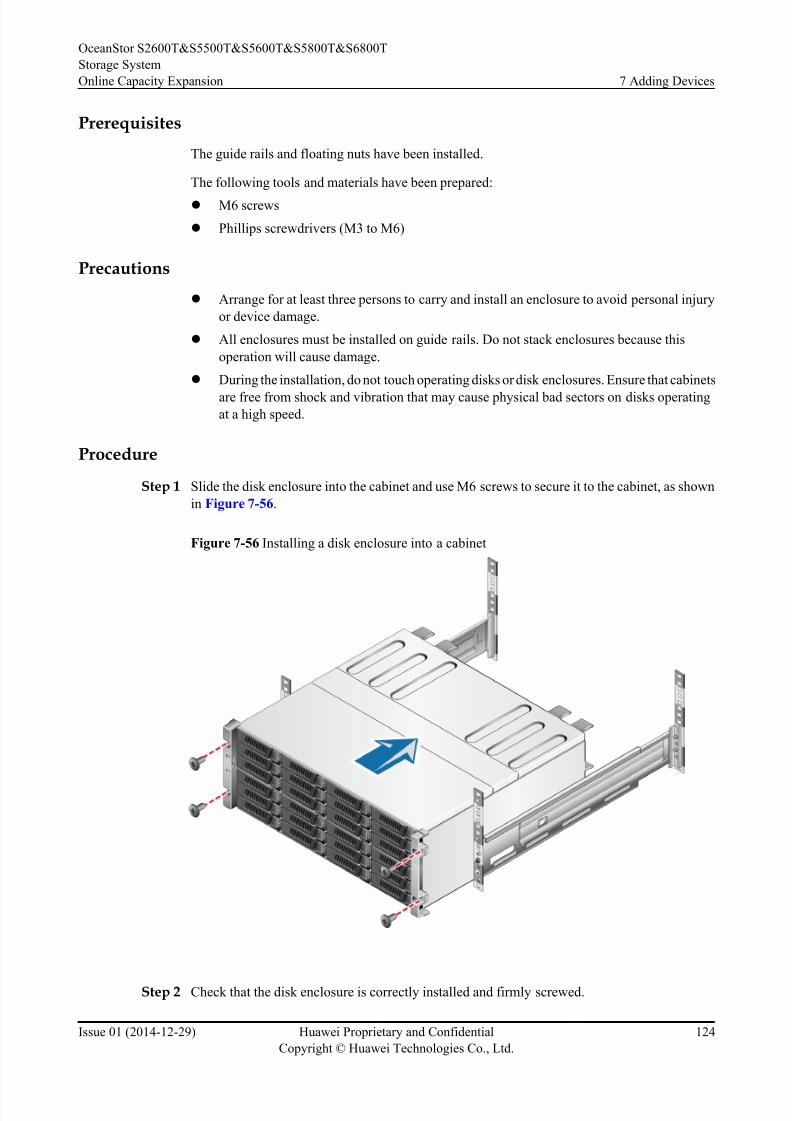
8/9/2019 OceanStor S2600T&S5500T&S5600T&S5800T&S6800T Storage System V200R002 Online Capacity Expansion 01
http://slidepdf.com/reader/full/oceanstor-s2600ts5500ts5600ts5800ts6800t-storage-system-v200r002-online 131/226
Prerequisites
The guide rails and floating nuts have been installed.
The following tools and materials have been prepared:
l M6 screws
l Phillips screwdrivers (M3 to M6)
Precautions
l Arrange for at least three persons to carry and install an enclosure to avoid personal injury
or device damage.
l All enclosures must be installed on guide rails. Do not stack enclosures because this
operation will cause damage.
l During the installation, do not touch operating disks or disk enclosures. Ensure that cabinets
are free from shock and vibration that may cause physical bad sectors on disks operating
at a high speed.
Procedure
Step 1 Slide the disk enclosure into the cabinet and use M6 screws to secure it to the cabinet, as shown
in Figure 7-56.
Figure 7-56 Installing a disk enclosure into a cabinet
Step 2 Check that the disk enclosure is correctly installed and firmly screwed.
OceanStor S2600T&S5500T&S5600T&S5800T&S6800T
Storage System
Online Capacity Expansion 7 Adding Devices
Issue 01 (2014-12-29) Huawei Proprietary and Confidential
Copyright © Huawei Technologies Co., Ltd.
124
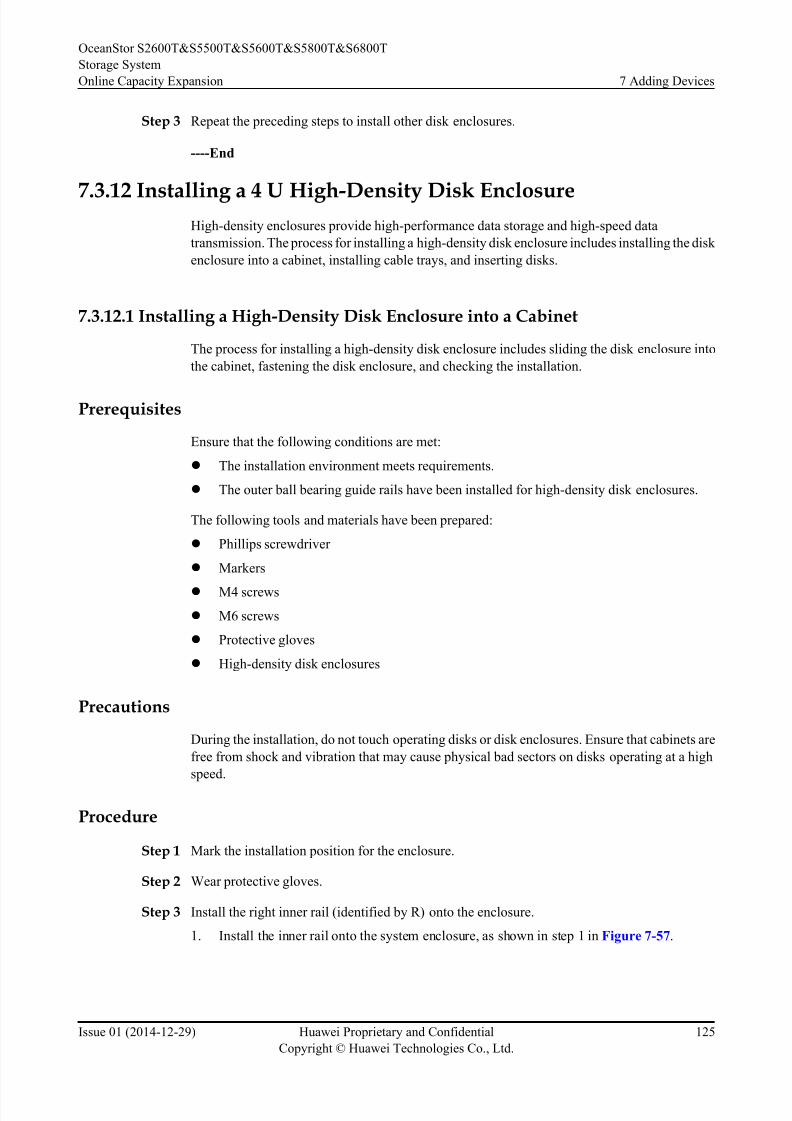
8/9/2019 OceanStor S2600T&S5500T&S5600T&S5800T&S6800T Storage System V200R002 Online Capacity Expansion 01
http://slidepdf.com/reader/full/oceanstor-s2600ts5500ts5600ts5800ts6800t-storage-system-v200r002-online 132/226
Step 3 Repeat the preceding steps to install other disk enclosures.
----End
7.3.12 Installing a 4 U High-Density Disk EnclosureHigh-density enclosures provide high-performance data storage and high-speed data
transmission. The process for installing a high-density disk enclosure includes installing the disk
enclosure into a cabinet, installing cable trays, and inserting disks.
7.3.12.1 Installing a High-Density Disk Enclosure into a Cabinet
The process for installing a high-density disk enclosure includes sliding the disk enclosure into
the cabinet, fastening the disk enclosure, and checking the installation.
Prerequisites
Ensure that the following conditions are met:
l The installation environment meets requirements.
l The outer ball bearing guide rails have been installed for high-density disk enclosures.
The following tools and materials have been prepared:
l Phillips screwdriver
l Markers
l M4 screws
l M6 screws
l Protective gloves
l High-density disk enclosures
Precautions
During the installation, do not touch operating disks or disk enclosures. Ensure that cabinets are
free from shock and vibration that may cause physical bad sectors on disks operating at a high
speed.
Procedure
Step 1 Mark the installation position for the enclosure.
Step 2 Wear protective gloves.
Step 3 Install the right inner rail (identified by R) onto the enclosure.
1. Install the inner rail onto the system enclosure, as shown in step 1 in Figure 7-57.
OceanStor S2600T&S5500T&S5600T&S5800T&S6800T
Storage System
Online Capacity Expansion 7 Adding Devices
Issue 01 (2014-12-29) Huawei Proprietary and Confidential
Copyright © Huawei Technologies Co., Ltd.
125

8/9/2019 OceanStor S2600T&S5500T&S5600T&S5800T&S6800T Storage System V200R002 Online Capacity Expansion 01
http://slidepdf.com/reader/full/oceanstor-s2600ts5500ts5600ts5800ts6800t-storage-system-v200r002-online 133/226
Figure 7-57 Installing an inner rail
2. Secure the inner rail with two M4 screws, as shown in step 2 in Figure 7-57.
Step 4 Install the left inner rail (identified by L) onto the enclosure.
Install the left inner rail as instructed in Step 3.
Step 5 Remove the two screws from the cover, as shown in Figure 7-58.
OceanStor S2600T&S5500T&S5600T&S5800T&S6800T
Storage System
Online Capacity Expansion 7 Adding Devices
Issue 01 (2014-12-29) Huawei Proprietary and Confidential
Copyright © Huawei Technologies Co., Ltd.
126

8/9/2019 OceanStor S2600T&S5500T&S5600T&S5800T&S6800T Storage System V200R002 Online Capacity Expansion 01
http://slidepdf.com/reader/full/oceanstor-s2600ts5500ts5600ts5800ts6800t-storage-system-v200r002-online 134/226
Figure 7-58 Removing screws
Step 6 Slide the enclosure in position along the ball guide rails, as shown in Figure 7-59.
NOTICE
l Do not pull out the middle rails when installing the enclosure because this may deform guide
rails.
l Before you install disks, install the enclosure into the cabinet.
OceanStor S2600T&S5500T&S5600T&S5800T&S6800T
Storage System
Online Capacity Expansion 7 Adding Devices
Issue 01 (2014-12-29) Huawei Proprietary and Confidential
Copyright © Huawei Technologies Co., Ltd.
127
8/9/2019 OceanStor S2600T&S5500T&S5600T&S5800T&S6800T Storage System V200R002 Online Capacity Expansion 01
http://slidepdf.com/reader/full/oceanstor-s2600ts5500ts5600ts5800ts6800t-storage-system-v200r002-online 135/226
Figure 7-59 Installing a high-density disk enclosure
NOTE
After you have sided the enclosure in position, slide it out from and into the cabinet for two times to adjust
the guide rail position. Ensure that the guide rail can be smoothly slide into and out from the cabinet.
Step 7 Fasten the upper cover of the enclosure.
1. Loosen the captive screws on the front panel, as shown in step 1 in Figure 7-60.
2. Use the front panel handle to pull out the system enclosure along the indicated direction,
as shown in step 2 in Figure 7-60.
3. Tighten the two M6 screws on the upper cover, as shown in step 3 in Figure 7-60.
OceanStor S2600T&S5500T&S5600T&S5800T&S6800T
Storage System
Online Capacity Expansion 7 Adding Devices
Issue 01 (2014-12-29) Huawei Proprietary and Confidential
Copyright © Huawei Technologies Co., Ltd.
128
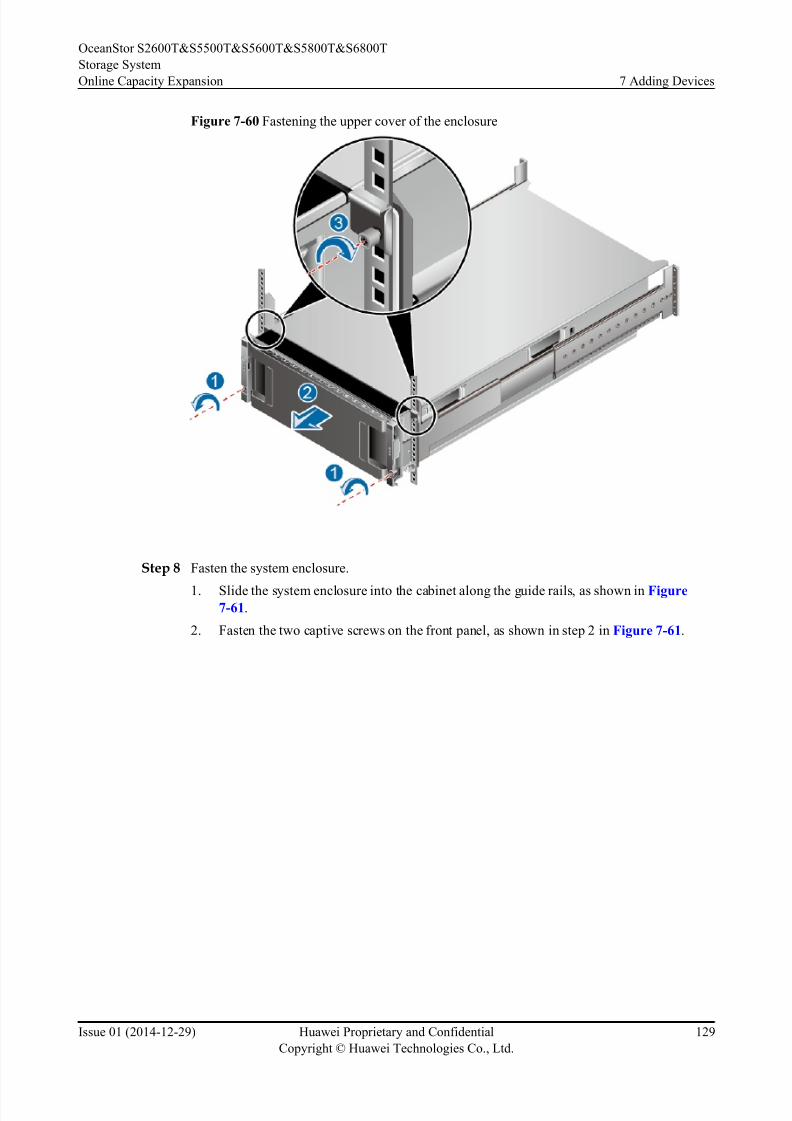
8/9/2019 OceanStor S2600T&S5500T&S5600T&S5800T&S6800T Storage System V200R002 Online Capacity Expansion 01
http://slidepdf.com/reader/full/oceanstor-s2600ts5500ts5600ts5800ts6800t-storage-system-v200r002-online 136/226
Figure 7-60 Fastening the upper cover of the enclosure
Step 8 Fasten the system enclosure.
1. Slide the system enclosure into the cabinet along the guide rails, as shown in Figure7-61.
2. Fasten the two captive screws on the front panel, as shown in step 2 in Figure 7-61.
OceanStor S2600T&S5500T&S5600T&S5800T&S6800T
Storage System
Online Capacity Expansion 7 Adding Devices
Issue 01 (2014-12-29) Huawei Proprietary and Confidential
Copyright © Huawei Technologies Co., Ltd.
129

8/9/2019 OceanStor S2600T&S5500T&S5600T&S5800T&S6800T Storage System V200R002 Online Capacity Expansion 01
http://slidepdf.com/reader/full/oceanstor-s2600ts5500ts5600ts5800ts6800t-storage-system-v200r002-online 137/226
Figure 7-61 Fastening the system enclosure
Step 9 Repeat the preceding steps to install other high-density disk enclosures.
CAUTION
Install devices into the cabinet from bottom up to prevent cabinet slant.
----End
7.3.12.2 Installing a Cable Manager
Cable managers are used for housing cables of high-density disk enclosures. Each high-density
enclosure has one cable manager.
Prerequisites
Ensure that the following conditions are met before installing cable managers:
High-density enclosures have been installed.
The following tools and materials have been prepared:
l M3 screws
l Phillips screwdriver
l Markers
l Protective gloves
OceanStor S2600T&S5500T&S5600T&S5800T&S6800T
Storage System
Online Capacity Expansion 7 Adding Devices
Issue 01 (2014-12-29) Huawei Proprietary and Confidential
Copyright © Huawei Technologies Co., Ltd.
130
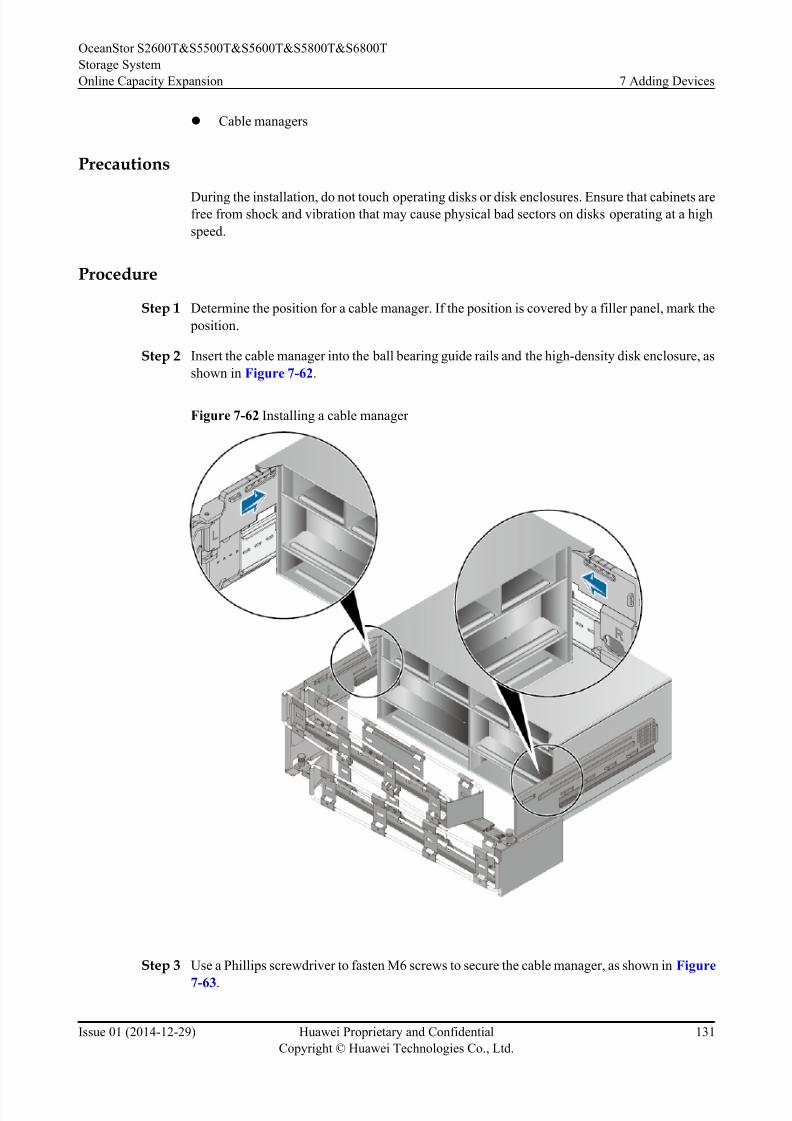
8/9/2019 OceanStor S2600T&S5500T&S5600T&S5800T&S6800T Storage System V200R002 Online Capacity Expansion 01
http://slidepdf.com/reader/full/oceanstor-s2600ts5500ts5600ts5800ts6800t-storage-system-v200r002-online 138/226
l Cable managers
Precautions
During the installation, do not touch operating disks or disk enclosures. Ensure that cabinets arefree from shock and vibration that may cause physical bad sectors on disks operating at a high
speed.
Procedure
Step 1 Determine the position for a cable manager. If the position is covered by a filler panel, mark the
position.
Step 2 Insert the cable manager into the ball bearing guide rails and the high-density disk enclosure, as
shown in Figure 7-62.
Figure 7-62 Installing a cable manager
Step 3 Use a Phillips screwdriver to fasten M6 screws to secure the cable manager, as shown in Figure
7-63.
OceanStor S2600T&S5500T&S5600T&S5800T&S6800T
Storage System
Online Capacity Expansion 7 Adding Devices
Issue 01 (2014-12-29) Huawei Proprietary and Confidential
Copyright © Huawei Technologies Co., Ltd.
131

8/9/2019 OceanStor S2600T&S5500T&S5600T&S5800T&S6800T Storage System V200R002 Online Capacity Expansion 01
http://slidepdf.com/reader/full/oceanstor-s2600ts5500ts5600ts5800ts6800t-storage-system-v200r002-online 139/226
Figure 7-63 Securing a cable manager
Step 4 Check the cable manager installation.
l Loosen the captive screws on the front panel of a high-density disk enclosure. Pull the high-
density disk enclosure out of the cabinet or slide the high-density disk enclosure into the
cabinet several times and check whether the cable managers extend correctly.
l If yes, the cable manager is installed correctly. If no, slightly adjust screws that secure the
cable manager.
----End
7.3.12.3 Inserting a Disk
Insert disks after high-density disk enclosures are installed.
Prerequisites
Ensure that the following condition is met:
High-density disk enclosures have been installed.
The following tools and materials have been prepared:
OceanStor S2600T&S5500T&S5600T&S5800T&S6800T
Storage System
Online Capacity Expansion 7 Adding Devices
Issue 01 (2014-12-29) Huawei Proprietary and Confidential
Copyright © Huawei Technologies Co., Ltd.
132

8/9/2019 OceanStor S2600T&S5500T&S5600T&S5800T&S6800T Storage System V200R002 Online Capacity Expansion 01
http://slidepdf.com/reader/full/oceanstor-s2600ts5500ts5600ts5800ts6800t-storage-system-v200r002-online 140/226
l Phillips screwdriver
l Markers
l M6 screws
l
Disks
Procedure
Step 1 Insert the disk.
1. Put on ESD clothing and a pair of ESD gloves.
2. Loosen the two screws on the front panel of the high-density disk enclosure and slowly
pull out the disk enclosure, as shown in Figure 7-64.
NOTICETo ensure well heat dissipation, insert disks into a high-density enclosure from the enclosure
rear to front, and install filler panels into the empty slots if there are any.
Figure 7-64 Pulling out a high-density disk enclosure
3. Take the disk out of an ESD bag.
4. Move the disk handle to the fully open position, inser t the disk to a vacant slot, and close
the disk handle to the closed position, as shown in Figure 7-65.
OceanStor S2600T&S5500T&S5600T&S5800T&S6800T
Storage System
Online Capacity Expansion 7 Adding Devices
Issue 01 (2014-12-29) Huawei Proprietary and Confidential
Copyright © Huawei Technologies Co., Ltd.
133

8/9/2019 OceanStor S2600T&S5500T&S5600T&S5800T&S6800T Storage System V200R002 Online Capacity Expansion 01
http://slidepdf.com/reader/full/oceanstor-s2600ts5500ts5600ts5800ts6800t-storage-system-v200r002-online 141/226
Figure 7-65 Inserting a disk
Step 2 Wait two minutes and then view indicators on the disk to check the disk addition.
l If the disk is running correctly, the disk activity indicator is steady green.
lIf the disk is running incorrectly, the disk activity indicator is off or red on.NOTE
If the disk activity indicator is off or red on, the newly added disk is faulty, the slot that houses the disk is
faulty, or the disk is incorrectly added. Remove the disk and reinsert it one minute later. If the disk activity
indicator remains red on, the disk is faulty and must be replaced with a new one.
If the problem persists after the disk has been replaced, contact Huawei technical support.
Step 3 Slide the high-density disk enclosure into the cabinet and fasten the two screws on the front
panel, as shown in Figure 7-66.
OceanStor S2600T&S5500T&S5600T&S5800T&S6800T
Storage System
Online Capacity Expansion 7 Adding Devices
Issue 01 (2014-12-29) Huawei Proprietary and Confidential
Copyright © Huawei Technologies Co., Ltd.
134
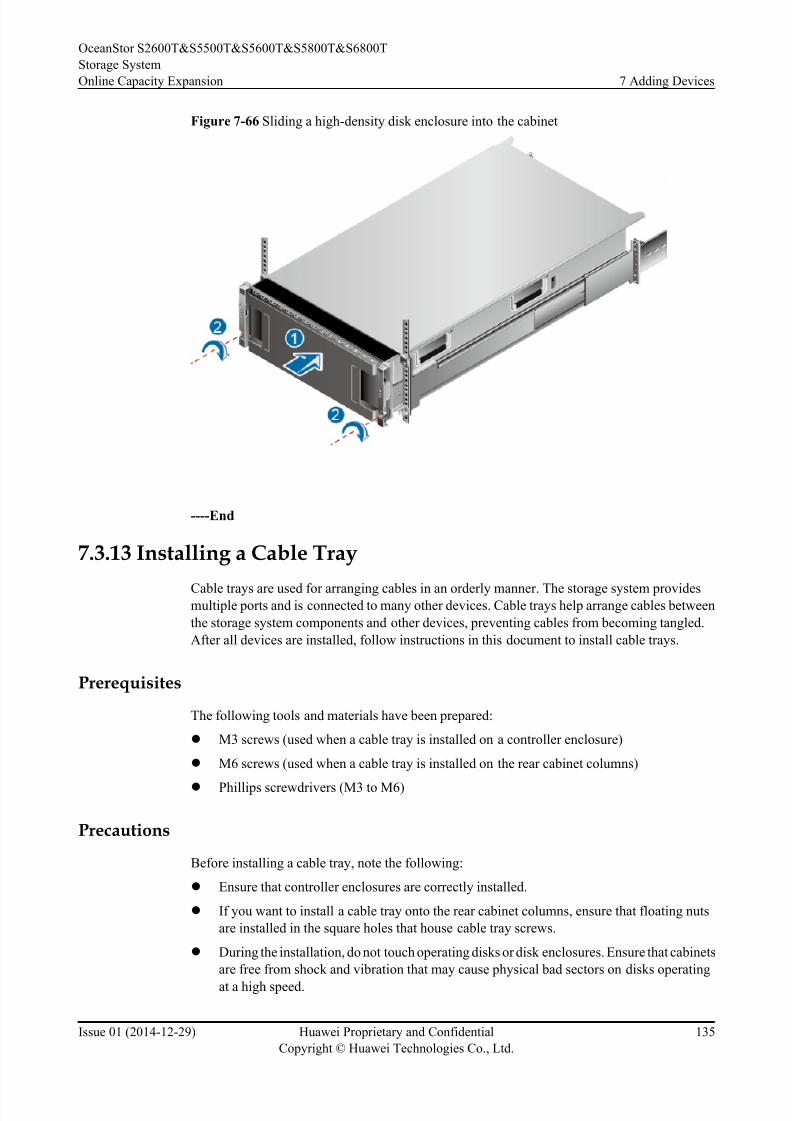
8/9/2019 OceanStor S2600T&S5500T&S5600T&S5800T&S6800T Storage System V200R002 Online Capacity Expansion 01
http://slidepdf.com/reader/full/oceanstor-s2600ts5500ts5600ts5800ts6800t-storage-system-v200r002-online 142/226
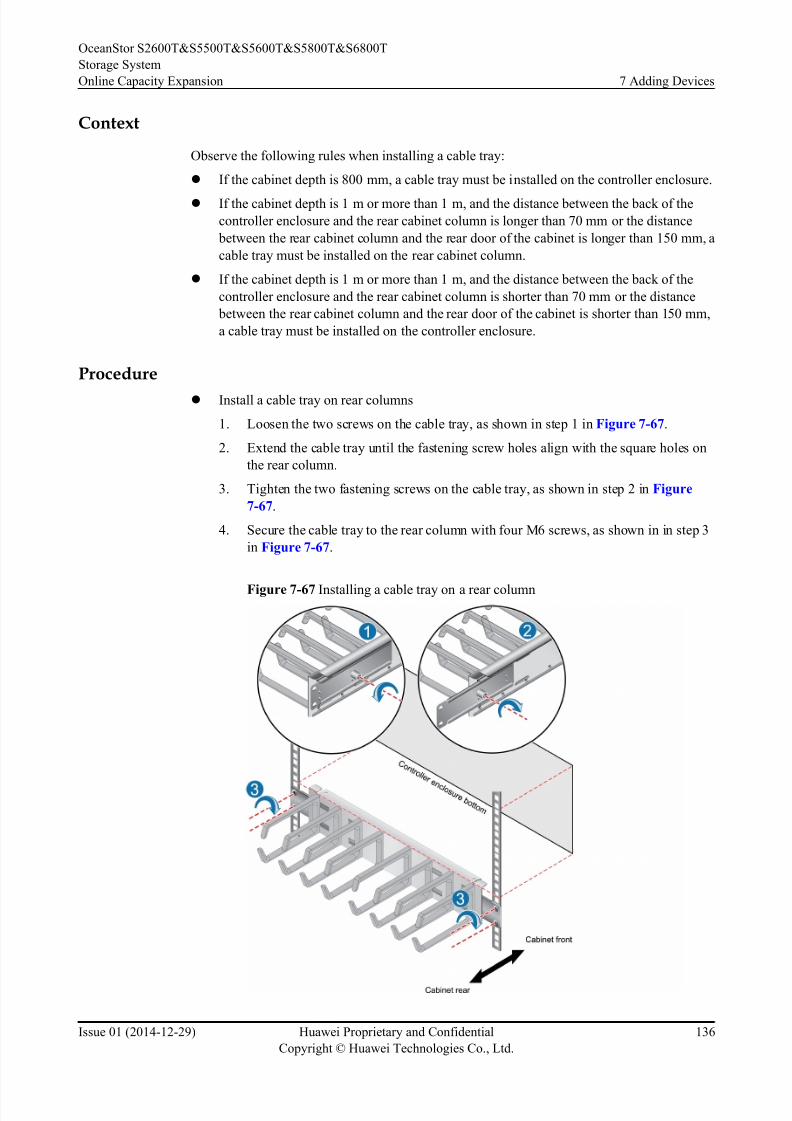
8/9/2019 OceanStor S2600T&S5500T&S5600T&S5800T&S6800T Storage System V200R002 Online Capacity Expansion 01
http://slidepdf.com/reader/full/oceanstor-s2600ts5500ts5600ts5800ts6800t-storage-system-v200r002-online 143/226
Context
Observe the following rules when installing a cable tray:
l If the cabinet depth is 800 mm, a cable tray must be installed on the controller enclosure.
l If the cabinet depth is 1 m or more than 1 m, and the distance between the back of the
controller enclosure and the rear cabinet column is longer than 70 mm or the distance
between the rear cabinet column and the rear door of the cabinet is longer than 150 mm, a
cable tray must be installed on the rear cabinet column.
l If the cabinet depth is 1 m or more than 1 m, and the distance between the back of the
controller enclosure and the rear cabinet column is shorter than 70 mm or the distance
between the rear cabinet column and the rear door of the cabinet is shorter than 150 mm,
a cable tray must be installed on the controller enclosure.
Procedure
l Install a cable tray on rear columns
1. Loosen the two screws on the cable tray, as shown in step 1 in Figure 7-67.
2. Extend the cable tray until the fastening screw holes align with the square holes on
the rear column.
3. Tighten the two fastening screws on the cable tray, as shown in step 2 in Figure
7-67.
4. Secure the cable tray to the rear column with four M6 screws, as shown in in step 3
in Figure 7-67.
Figure 7-67 Installing a cable tray on a rear column
OceanStor S2600T&S5500T&S5600T&S5800T&S6800T
Storage System
Online Capacity Expansion 7 Adding Devices
Issue 01 (2014-12-29) Huawei Proprietary and Confidential
Copyright © Huawei Technologies Co., Ltd.
136
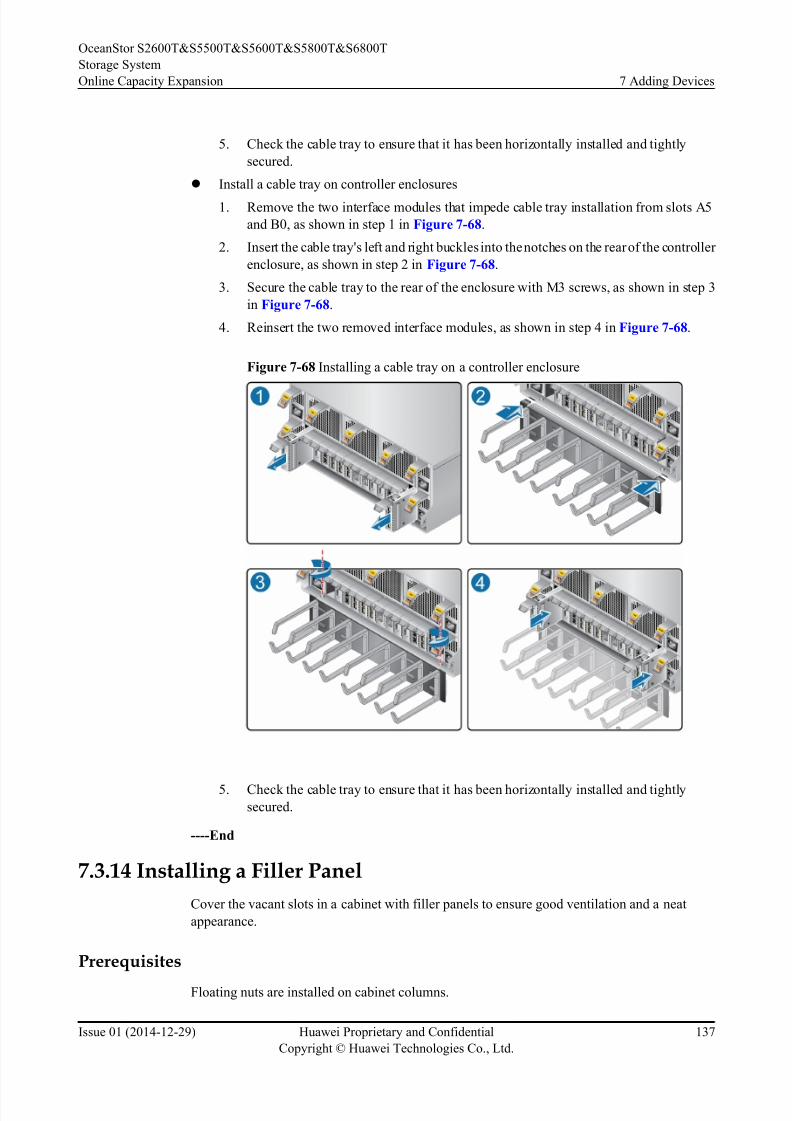
8/9/2019 OceanStor S2600T&S5500T&S5600T&S5800T&S6800T Storage System V200R002 Online Capacity Expansion 01
http://slidepdf.com/reader/full/oceanstor-s2600ts5500ts5600ts5800ts6800t-storage-system-v200r002-online 144/226
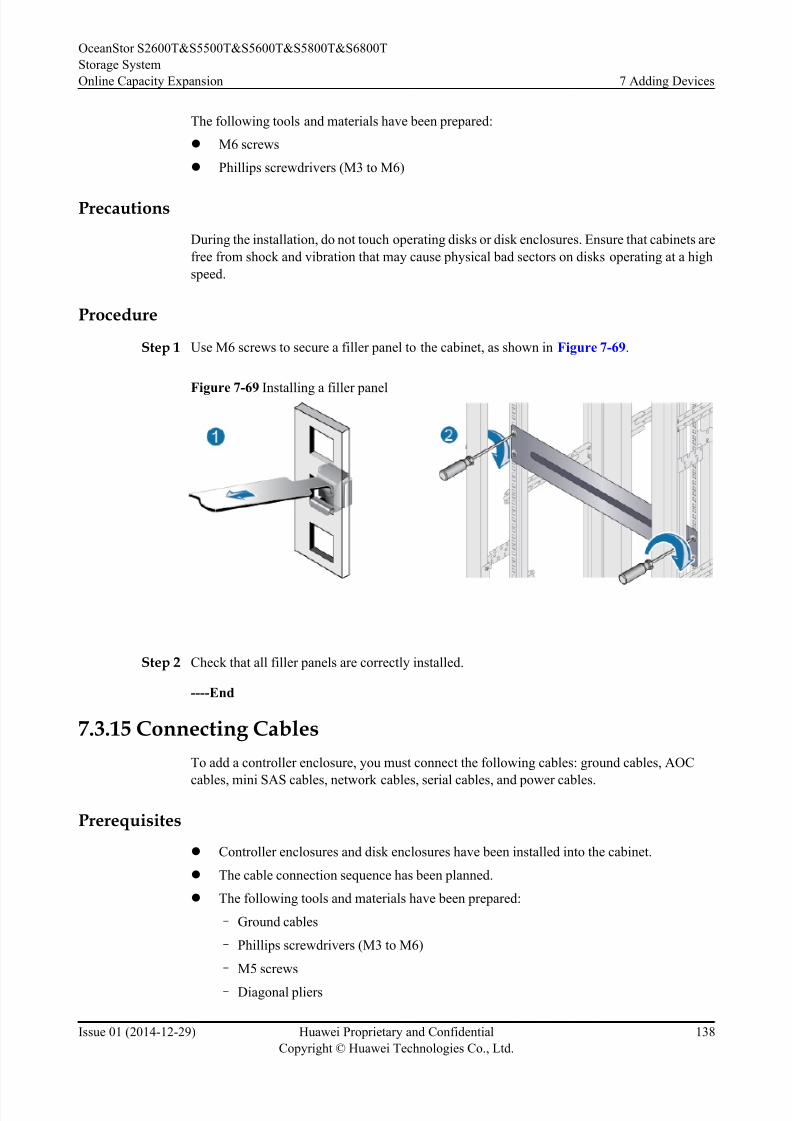
8/9/2019 OceanStor S2600T&S5500T&S5600T&S5800T&S6800T Storage System V200R002 Online Capacity Expansion 01
http://slidepdf.com/reader/full/oceanstor-s2600ts5500ts5600ts5800ts6800t-storage-system-v200r002-online 145/226
The following tools and materials have been prepared:
l M6 screws
l Phillips screwdrivers (M3 to M6)
Precautions
During the installation, do not touch operating disks or disk enclosures. Ensure that cabinets are
free from shock and vibration that may cause physical bad sectors on disks operating at a high
speed.
Procedure
Step 1 Use M6 screws to secure a filler panel to the cabinet, as shown in Figure 7-69.
Figure 7-69 Installing a filler panel
Step 2 Check that all filler panels are correctly installed.
----End
7.3.15 Connecting Cables
To add a controller enclosure, you must connect the following cables: ground cables, AOC
cables, mini SAS cables, network cables, serial cables, and power cables.
Prerequisites
l Controller enclosures and disk enclosures have been installed into the cabinet.
l The cable connection sequence has been planned.
l The following tools and materials have been prepared:
– Ground cables
– Phillips screwdrivers (M3 to M6)
– M5 screws
– Diagonal pliers
OceanStor S2600T&S5500T&S5600T&S5800T&S6800T
Storage System
Online Capacity Expansion 7 Adding Devices
Issue 01 (2014-12-29) Huawei Proprietary and Confidential
Copyright © Huawei Technologies Co., Ltd.
138
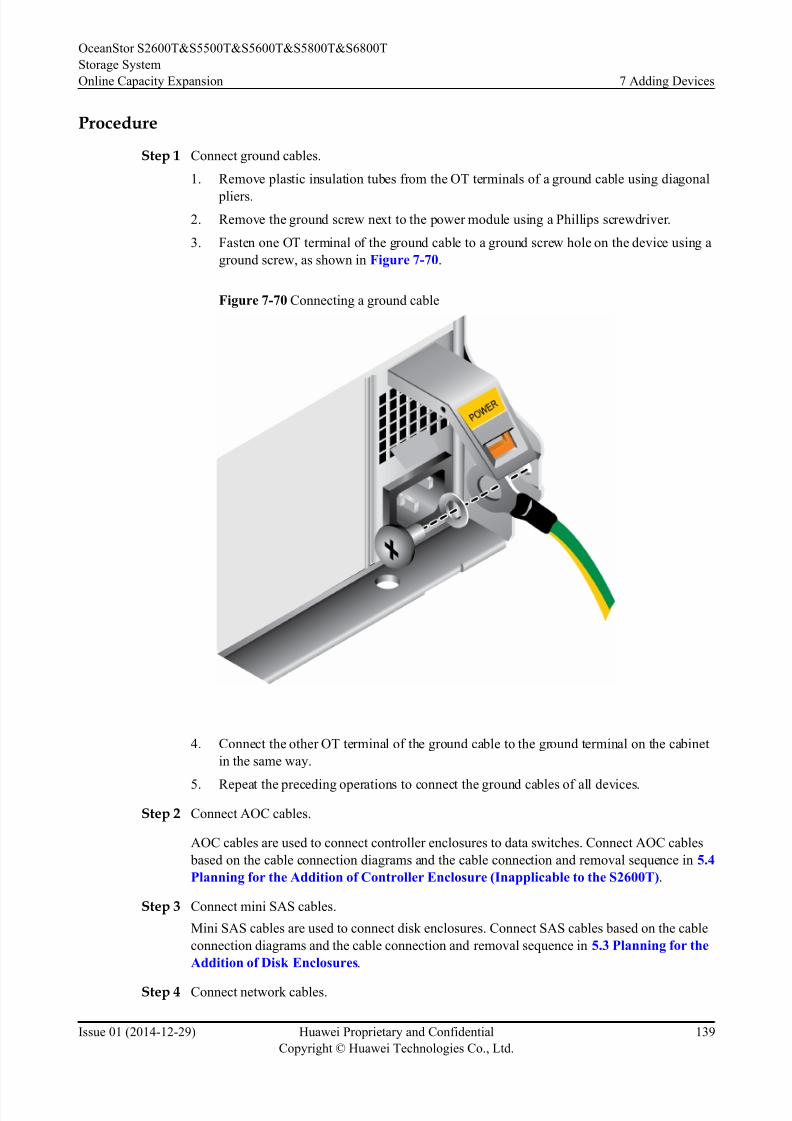
8/9/2019 OceanStor S2600T&S5500T&S5600T&S5800T&S6800T Storage System V200R002 Online Capacity Expansion 01
http://slidepdf.com/reader/full/oceanstor-s2600ts5500ts5600ts5800ts6800t-storage-system-v200r002-online 146/226
Procedure
Step 1 Connect ground cables.
1. Remove plastic insulation tubes from the OT terminals of a ground cable using diagonal
pliers.
2. Remove the ground screw next to the power module using a Phillips screwdriver.
3. Fasten one OT terminal of the ground cable to a ground screw hole on the device using a
ground screw, as shown in Figure 7-70.
Figure 7-70 Connecting a ground cable
4. Connect the other OT terminal of the ground cable to the ground terminal on the cabinet
in the same way.
5. Repeat the preceding operations to connect the ground cables of all devices.
Step 2 Connect AOC cables.
AOC cables are used to connect controller enclosures to data switches. Connect AOC cables
based on the cable connection diagrams and the cable connection and removal sequence in 5.4
Planning for the Addition of Controller Enclosure (Inapplicable to the S2600T).
Step 3 Connect mini SAS cables.
Mini SAS cables are used to connect disk enclosures. Connect SAS cables based on the cable
connection diagrams and the cable connection and removal sequence in 5.3 Planning for the
Addition of Disk Enclosures.
Step 4 Connect network cables.
OceanStor S2600T&S5500T&S5600T&S5800T&S6800T
Storage System
Online Capacity Expansion 7 Adding Devices
Issue 01 (2014-12-29) Huawei Proprietary and Confidential
Copyright © Huawei Technologies Co., Ltd.
139
8/9/2019 OceanStor S2600T&S5500T&S5600T&S5800T&S6800T Storage System V200R002 Online Capacity Expansion 01
http://slidepdf.com/reader/full/oceanstor-s2600ts5500ts5600ts5800ts6800t-storage-system-v200r002-online 147/226
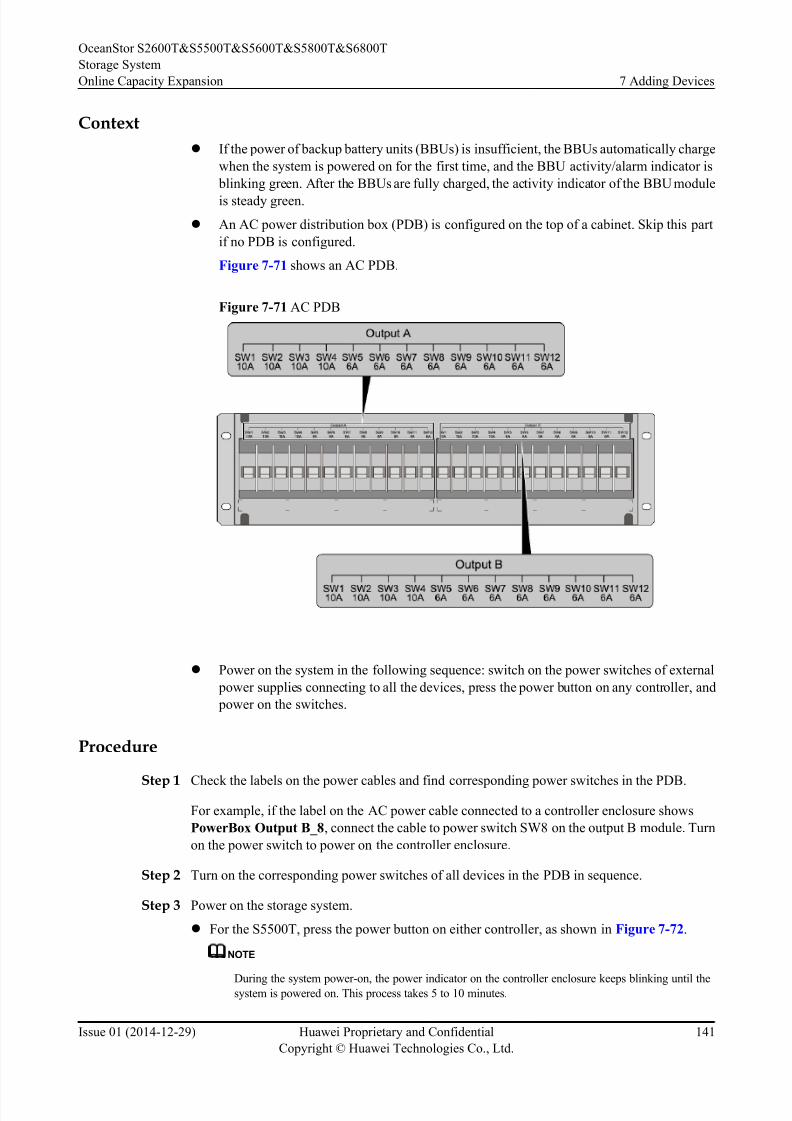
8/9/2019 OceanStor S2600T&S5500T&S5600T&S5800T&S6800T Storage System V200R002 Online Capacity Expansion 01
http://slidepdf.com/reader/full/oceanstor-s2600ts5500ts5600ts5800ts6800t-storage-system-v200r002-online 148/226
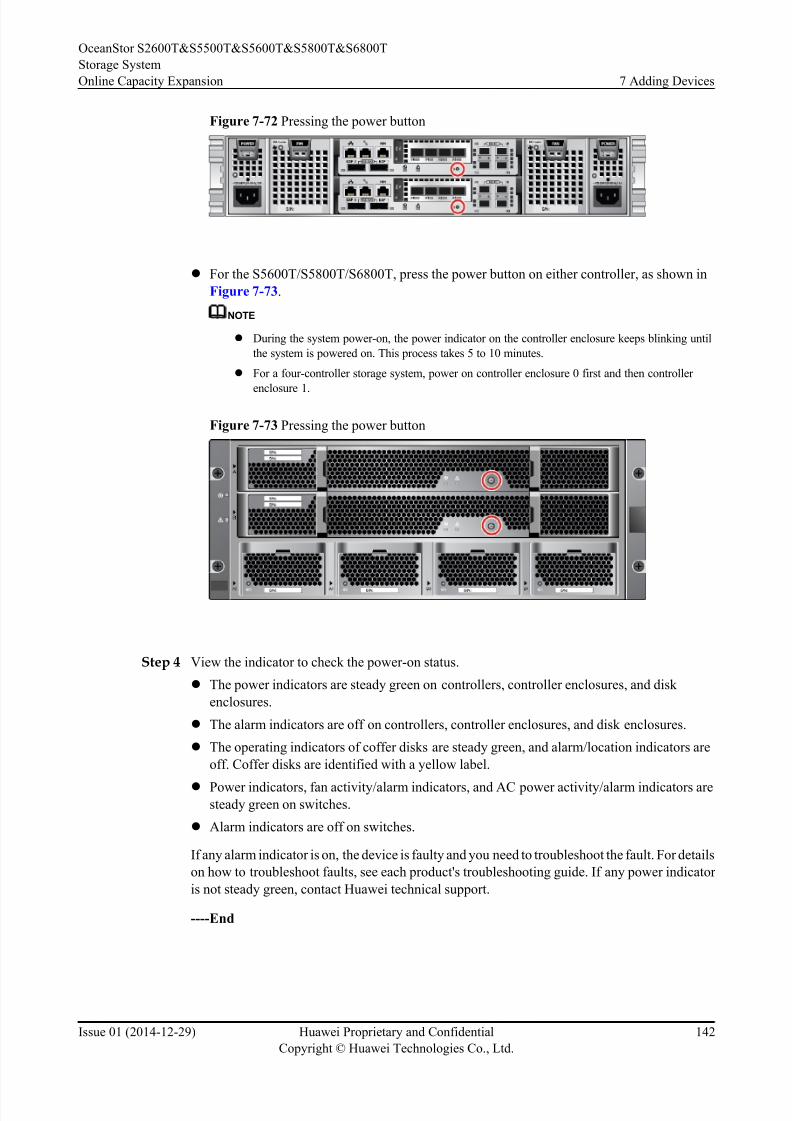
8/9/2019 OceanStor S2600T&S5500T&S5600T&S5800T&S6800T Storage System V200R002 Online Capacity Expansion 01
http://slidepdf.com/reader/full/oceanstor-s2600ts5500ts5600ts5800ts6800t-storage-system-v200r002-online 149/226
Figure 7-72 Pressing the power button
l For the S5600T/S5800T/S6800T, press the power button on either controller, as shown in
Figure 7-73.
NOTE
l During the system power-on, the power indicator on the controller enclosure keeps blinking until
the system is powered on. This process takes 5 to 10 minutes.
l For a four-controller storage system, power on controller enclosure 0 first and then controller
enclosure 1.
Figure 7-73 Pressing the power button
Step 4 View the indicator to check the power-on status.
l The power indicators are steady green on controllers, controller enclosures, and disk
enclosures.
l The alarm indicators are off on controllers, controller enclosures, and disk enclosures.
l The operating indicators of coffer disks are steady green, and alarm/location indicators are
off. Coffer disks are identified with a yellow label.
l Power indicators, fan activity/alarm indicators, and AC power activity/alarm indicators aresteady green on switches.
l Alarm indicators are off on switches.
If any alarm indicator is on, the device is faulty and you need to troubleshoot the fault. For details
on how to troubleshoot faults, see each product's troubleshooting guide. If any power indicator
is not steady green, contact Huawei technical support.
----End
OceanStor S2600T&S5500T&S5600T&S5800T&S6800T
Storage System
Online Capacity Expansion 7 Adding Devices
Issue 01 (2014-12-29) Huawei Proprietary and Confidential
Copyright © Huawei Technologies Co., Ltd.
142
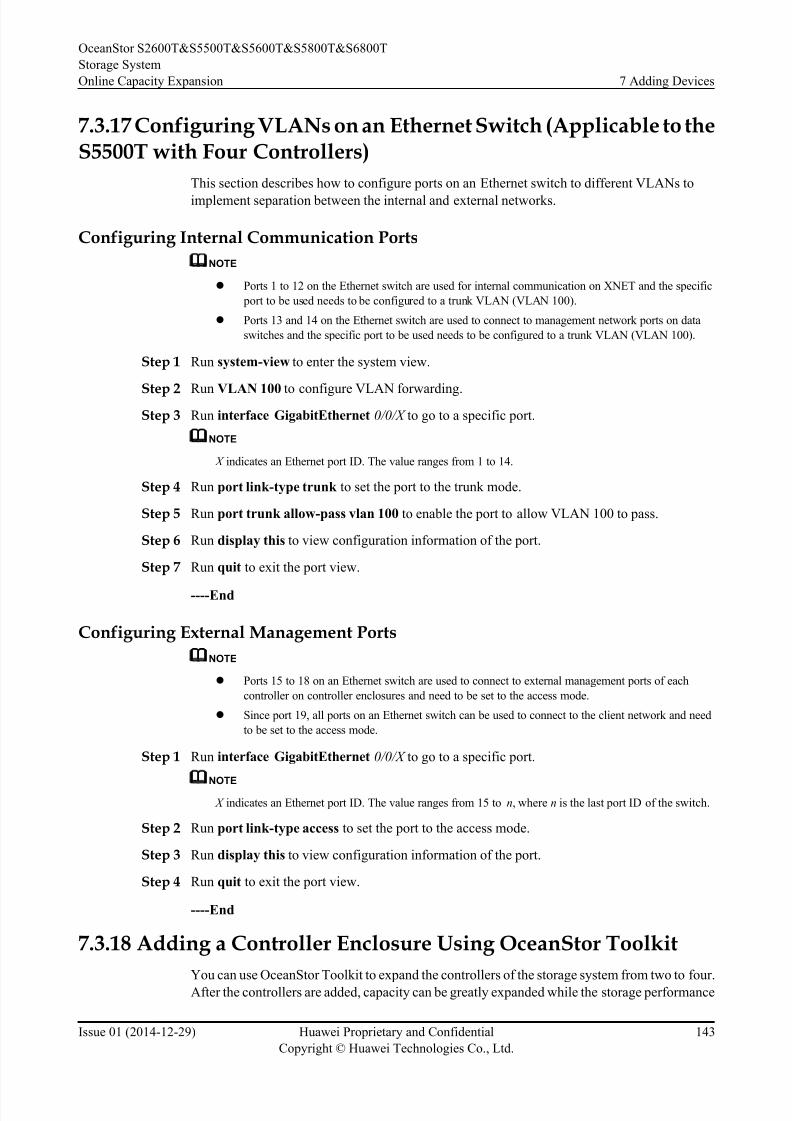
8/9/2019 OceanStor S2600T&S5500T&S5600T&S5800T&S6800T Storage System V200R002 Online Capacity Expansion 01
http://slidepdf.com/reader/full/oceanstor-s2600ts5500ts5600ts5800ts6800t-storage-system-v200r002-online 150/226
7.3.17 Configuring VLANs on an Ethernet Switch (Applicable to theS5500T with Four Controllers)
This section describes how to configure ports on an Ethernet switch to different VLANs to
implement separation between the internal and external networks.
Configuring Internal Communication Ports
NOTE
l Ports 1 to 12 on the Ethernet switch are used for internal communication on XNET and the specific
port to be used needs to be configured to a trunk VLAN (VLAN 100).
l Ports 13 and 14 on the Ethernet switch are used to connect to management network ports on data
switches and the specific port to be used needs to be configured to a trunk VLAN (VLAN 100).
Step 1 Run system-view to enter the system view.
Step 2 Run VLAN 100 to configure VLAN forwarding.
Step 3 Run interface GigabitEthernet 0/0/X to go to a specific port.
NOTE
X indicates an Ethernet port ID. The value ranges from 1 to 14.
Step 4 Run port link-type trunk to set the port to the trunk mode.
Step 5 Run port trunk allow-pass vlan 100 to enable the port to allow VLAN 100 to pass.
Step 6 Run display this to view configuration information of the port.
Step 7 Run quit to exit the port view.
----End
Configuring External Management Ports
NOTE
l Ports 15 to 18 on an Ethernet switch are used to connect to external management ports of each
controller on controller enclosures and need to be set to the access mode.
l Since port 19, all ports on an Ethernet switch can be used to connect to the client network and need
to be set to the access mode.
Step 1 Run interface GigabitEthernet 0/0/X to go to a specific port.
NOTE
X indicates an Ethernet port ID. The value ranges from 15 to n, where n is the last port ID of the switch.
Step 2 Run port link-type access to set the port to the access mode.
Step 3 Run display this to view configuration information of the port.
Step 4 Run quit to exit the port view.
----End
7.3.18 Adding a Controller Enclosure Using OceanStor Toolkit
You can use OceanStor Toolkit to expand the controllers of the storage system from two to four.
After the controllers are added, capacity can be greatly expanded while the storage performance
OceanStor S2600T&S5500T&S5600T&S5800T&S6800T
Storage System
Online Capacity Expansion 7 Adding Devices
Issue 01 (2014-12-29) Huawei Proprietary and Confidential
Copyright © Huawei Technologies Co., Ltd.
143
8/9/2019 OceanStor S2600T&S5500T&S5600T&S5800T&S6800T Storage System V200R002 Online Capacity Expansion 01
http://slidepdf.com/reader/full/oceanstor-s2600ts5500ts5600ts5800ts6800t-storage-system-v200r002-online 151/226
is improved accordingly. This capacity expansion method applies to the scenario that has
demanding capacity and performance requirements.
Prerequisites
l OceanStor Toolkit and the expansion tool are installed.
l The license file is obtained.
l Before using OceanStor Toolkit, ensure that the firewall is disabled to facilitate subsequent
storage system initialization.
l Before capacity expansion, ensure that the default password of the controller enclosure to
be added has been changed.
At the initial login to the storage device, change the default password as prompted.
Otherwise, the expansion tool cannot connect to the controller enclosure to be added.
l Before capacity expansion, ensure that the management port IP address of the controller
enclosure to be added is consecutive with the management IP address of the current storage
system.
Change method: Use a serial cable to connect to a controller enclosure to be added (the
baud rate is 115200, default user name admin, and password Admin@storage). Run
change controller ipv4_address or change controller ipv6_address to change the
management IP address.
l (Applicable to C20) Before capacity expansion, ensure that the default data switch IP
address is used.
l Before capacity expansion, ensure that the ibc_os_hs account password of the controller
enclosure and data switch is the default password Storage@21st.
–Controller enclosure: Log in as _super_admin (default password: Admin@revive) to
a serial port of a controller enclosure and run chgibcpasswd on each controller to change
the ibc_os_hs account password of the controller enclosure.
– Data switch: Log in to the command-line interface (CLI) of each data switch and run
os setibcpassword to change the ibc_os_hs account password of the data switch.
NOTE
For details about commands for controller enclosures and data switches, see the Restricted Command
Reference.
l (Applicable only to C20) If a user manually changed the private-public key pair of
ibc_os_hs, initialize the private-public key pair for all controllers before performing
capacity expansion. Initialization method: Log in as _super_admin (default password:
Admin@revive) to a serial port of a controller enclosure and run initibckey.
l (Applicable to C00) If you want to configure the data switch IP address, use a serial port
to connect to the data switch (the baud rate is 115200, default user name is admin, and
default password is Admin@dsw) and run the os setallip command.
Context
l One controller enclosure has two controllers.
l After a controller enclosure is added, the storage system has four controllers.
Interfaces in C20 are used as examples and are similar to the interfaces in C00.
OceanStor S2600T&S5500T&S5600T&S5800T&S6800T
Storage System
Online Capacity Expansion 7 Adding Devices
Issue 01 (2014-12-29) Huawei Proprietary and Confidential
Copyright © Huawei Technologies Co., Ltd.
144

8/9/2019 OceanStor S2600T&S5500T&S5600T&S5800T&S6800T Storage System V200R002 Online Capacity Expansion 01
http://slidepdf.com/reader/full/oceanstor-s2600ts5500ts5600ts5800ts6800t-storage-system-v200r002-online 152/226
Procedure
Step 1 Double-click . The OceanStor Toolkit main window is displayed.
Step 2 Go to the controller enclosure expansion page.
1. In the navigation tree, choose ToolCase > Upgrade.
2. In the function pane on the right, click Expansion.
The Select Device page is displayed, as shown in Figure 7-74.
Figure 7-74 Selecting devices
OceanStor S2600T&S5500T&S5600T&S5800T&S6800T
Storage System
Online Capacity Expansion 7 Adding Devices
Issue 01 (2014-12-29) Huawei Proprietary and Confidential
Copyright © Huawei Technologies Co., Ltd.
145
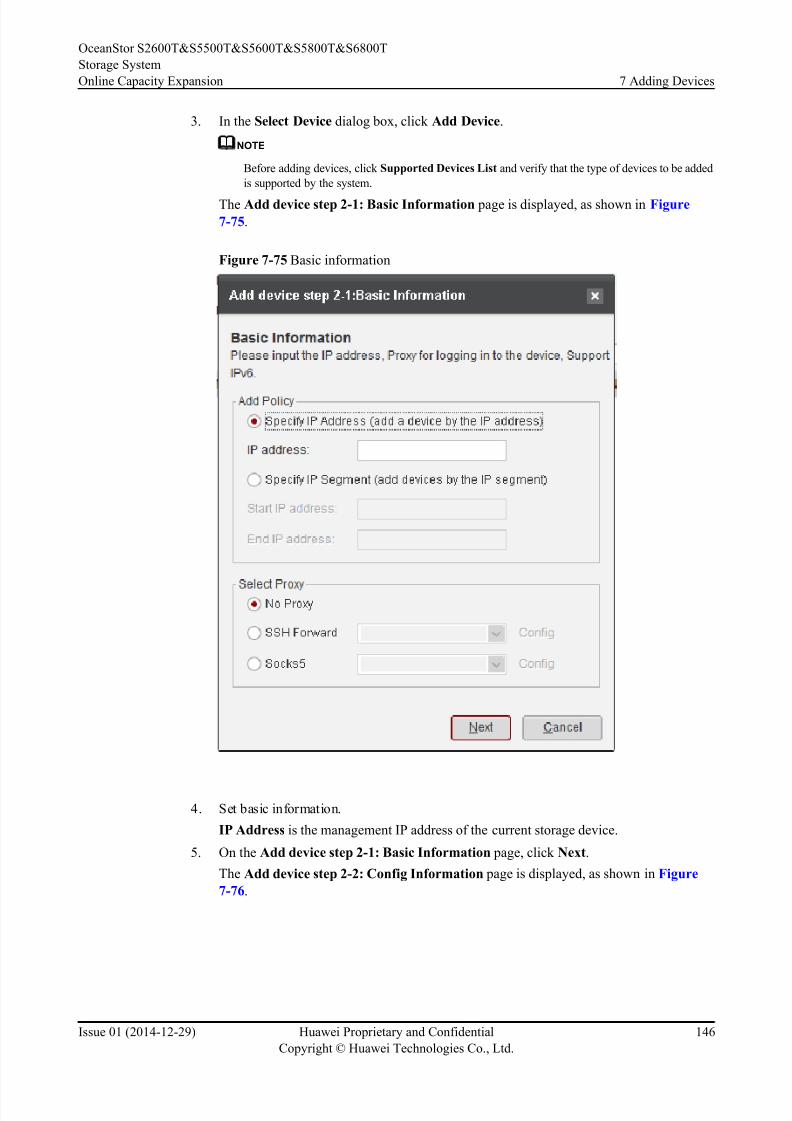
8/9/2019 OceanStor S2600T&S5500T&S5600T&S5800T&S6800T Storage System V200R002 Online Capacity Expansion 01
http://slidepdf.com/reader/full/oceanstor-s2600ts5500ts5600ts5800ts6800t-storage-system-v200r002-online 153/226
3. In the Select Device dialog box, click Add Device.
NOTE
Before adding devices, click Supported Devices List and verify that the type of devices to be added
is supported by the system.
The Add device step 2-1: Basic Information page is displayed, as shown in Figure
7-75.
Figure 7-75 Basic information
4. Set basic information.
IP Address is the management IP address of the current storage device.
5. On the Add device step 2-1: Basic Information page, click Next.
The Add device step 2-2: Config Information page is displayed, as shown in Figure
7-76.
OceanStor S2600T&S5500T&S5600T&S5800T&S6800T
Storage System
Online Capacity Expansion 7 Adding Devices
Issue 01 (2014-12-29) Huawei Proprietary and Confidential
Copyright © Huawei Technologies Co., Ltd.
146
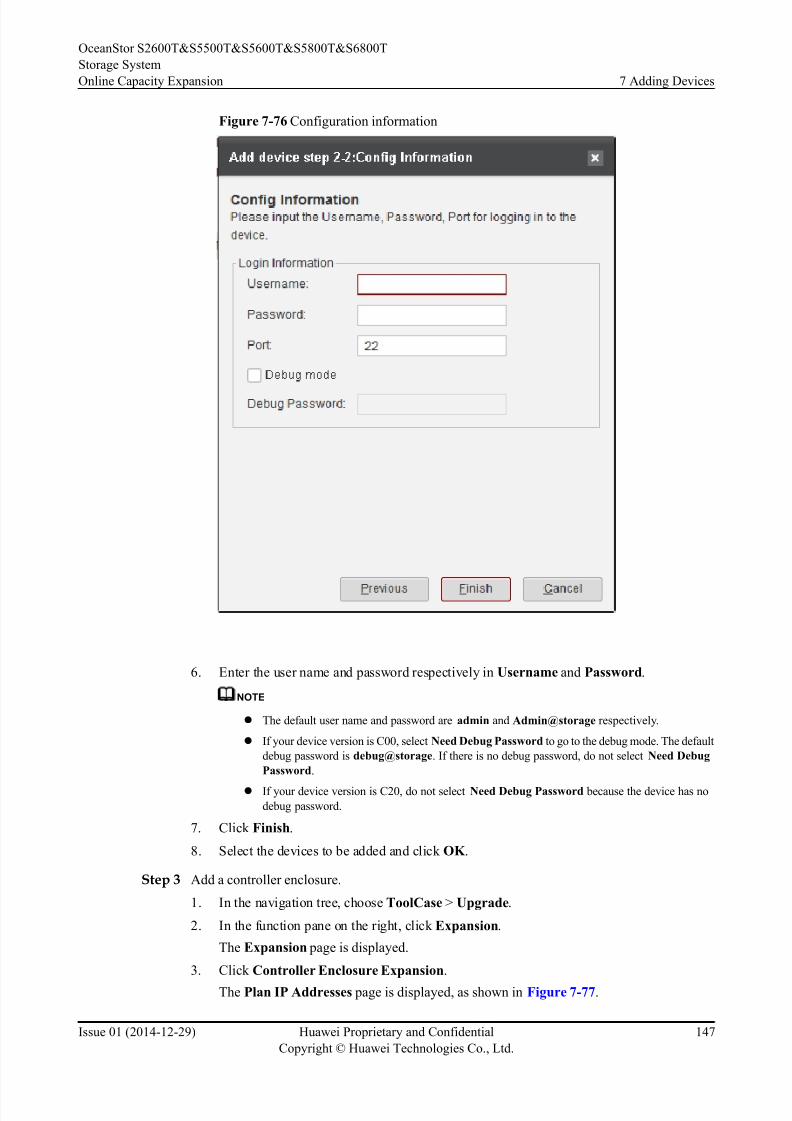
8/9/2019 OceanStor S2600T&S5500T&S5600T&S5800T&S6800T Storage System V200R002 Online Capacity Expansion 01
http://slidepdf.com/reader/full/oceanstor-s2600ts5500ts5600ts5800ts6800t-storage-system-v200r002-online 154/226
Figure 7-76 Configuration information
6. Enter the user name and password respectively in Username and Password.
NOTE
l The default user name and password are admin and Admin@storage respectively.
l If your device version is C00, select Need Debug Password to go to the debug mode. The default
debug password is debug@storage. If there is no debug password, do not select Need Debug
Password.
l If your device version is C20, do not select Need Debug Password because the device has no
debug password.
7. Click Finish.
8. Select the devices to be added and click OK .
Step 3 Add a controller enclosure.
1. In the navigation tree, choose ToolCase > Upgrade.
2. In the function pane on the right, click Expansion.
The Expansion page is displayed.
3. Click Controller Enclosure Expansion.
The Plan IP Addresses page is displayed, as shown in Figure 7-77.
OceanStor S2600T&S5500T&S5600T&S5800T&S6800T
Storage System
Online Capacity Expansion 7 Adding Devices
Issue 01 (2014-12-29) Huawei Proprietary and Confidential
Copyright © Huawei Technologies Co., Ltd.
147
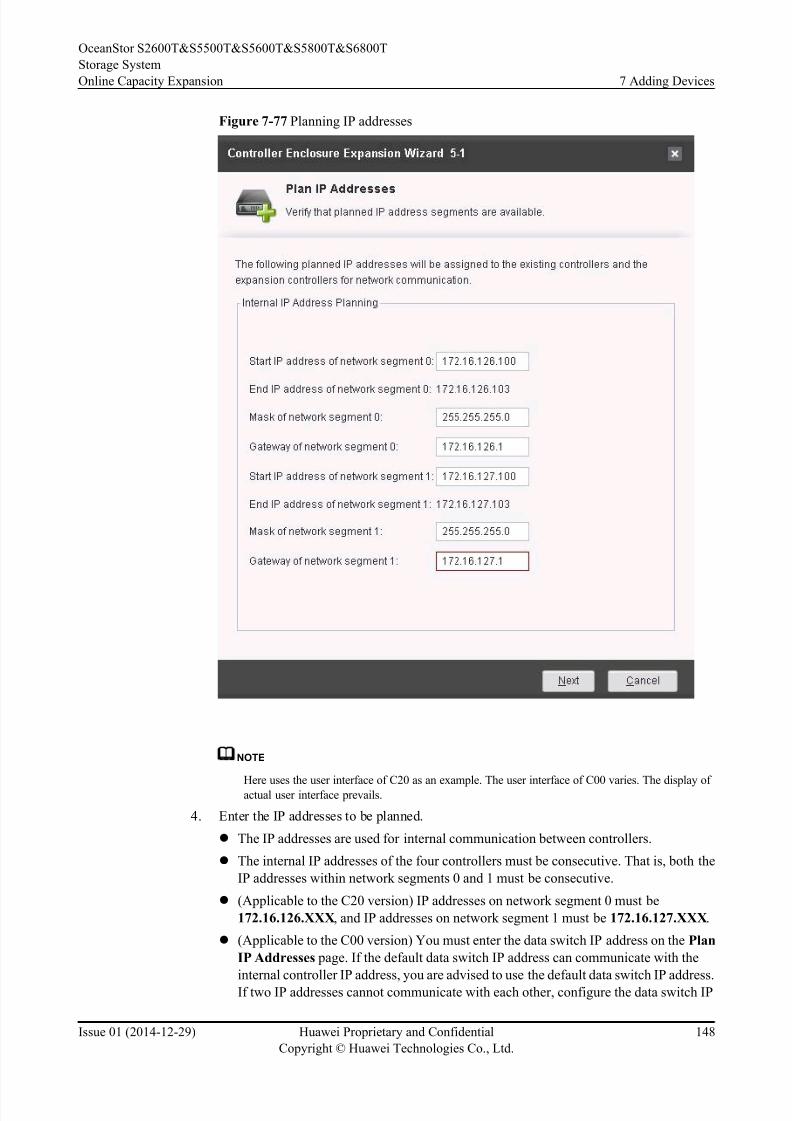
8/9/2019 OceanStor S2600T&S5500T&S5600T&S5800T&S6800T Storage System V200R002 Online Capacity Expansion 01
http://slidepdf.com/reader/full/oceanstor-s2600ts5500ts5600ts5800ts6800t-storage-system-v200r002-online 155/226
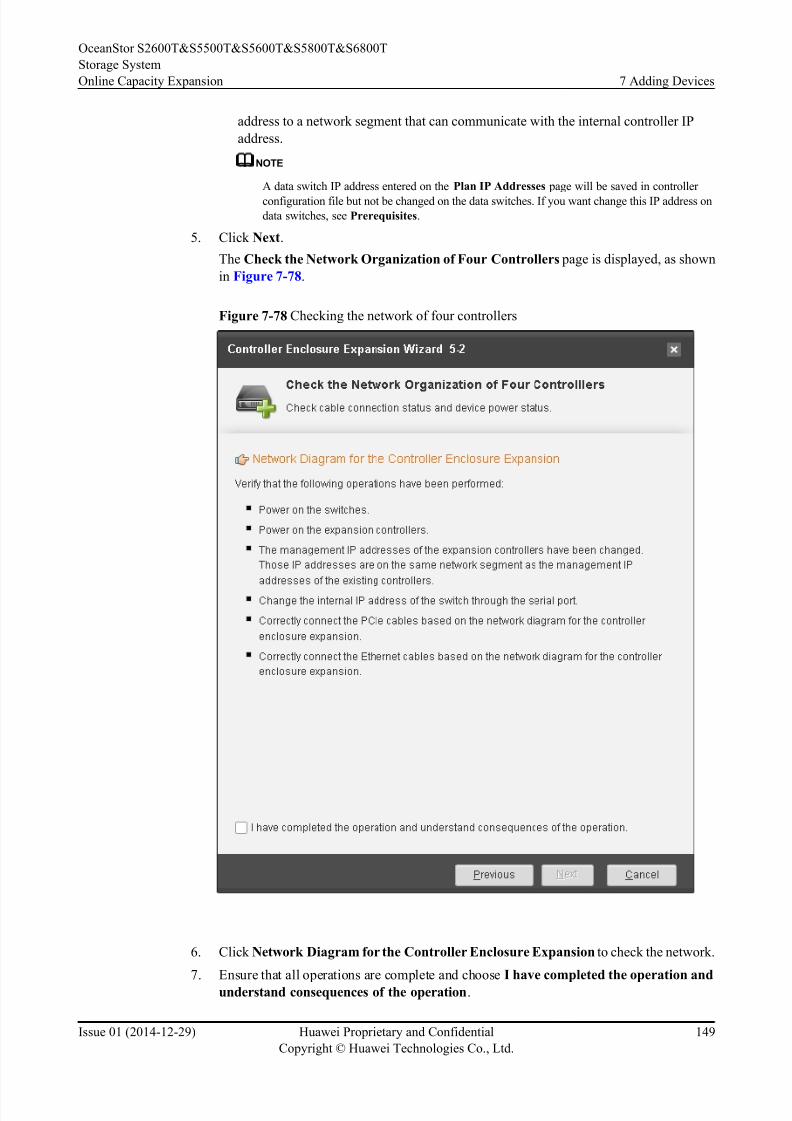
8/9/2019 OceanStor S2600T&S5500T&S5600T&S5800T&S6800T Storage System V200R002 Online Capacity Expansion 01
http://slidepdf.com/reader/full/oceanstor-s2600ts5500ts5600ts5800ts6800t-storage-system-v200r002-online 156/226
address to a network segment that can communicate with the internal controller IP
address.
NOTE
A data switch IP address entered on the Plan IP Addresses page will be saved in controller
configuration file but not be changed on the data switches. If you want change this IP address on
data switches, see Prerequisites.
5. Click Next.
The Check the Network Organization of Four Controllers page is displayed, as shown
in Figure 7-78.
Figure 7-78 Checking the network of four controllers
6. Click Network Diagram for the Controller Enclosure Expansion to check the network.
7. Ensure that all operations are complete and choose I have completed the operation and
understand consequences of the operation.
OceanStor S2600T&S5500T&S5600T&S5800T&S6800T
Storage System
Online Capacity Expansion 7 Adding Devices
Issue 01 (2014-12-29) Huawei Proprietary and Confidential
Copyright © Huawei Technologies Co., Ltd.
149
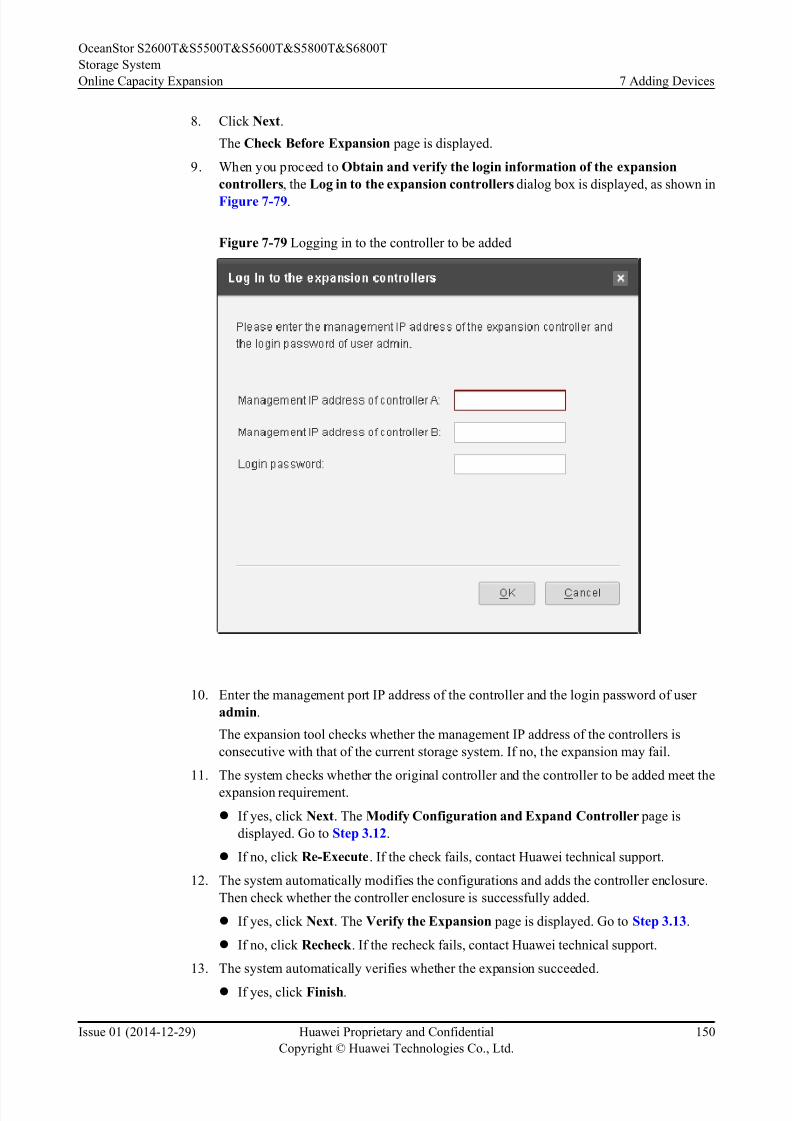
8/9/2019 OceanStor S2600T&S5500T&S5600T&S5800T&S6800T Storage System V200R002 Online Capacity Expansion 01
http://slidepdf.com/reader/full/oceanstor-s2600ts5500ts5600ts5800ts6800t-storage-system-v200r002-online 157/226
8. Click Next.
The Check Before Expansion page is displayed.
9. When you proceed to Obtain and verify the login information of the expansion
controllers, the Log in to the expansion controllers dialog box is displayed, as shown in
Figure 7-79.
Figure 7-79 Logging in to the controller to be added
10. Enter the management port IP address of the controller and the login password of user
admin.
The expansion tool checks whether the management IP address of the controllers is
consecutive with that of the current storage system. If no, the expansion may fail.
11. The system checks whether the original controller and the controller to be added meet the
expansion requirement.
l If yes, click Next. The Modify Configuration and Expand Controller page is
displayed. Go to Step 3.12.
l If no, click Re-Execute. If the check fails, contact Huawei technical support.
12. The system automatically modifies the configurations and adds the controller enclosure.
Then check whether the controller enclosure is successfully added.
l If yes, click Next. The Verify the Expansion page is displayed. Go to Step 3.13.
l If no, click Recheck . If the recheck fails, contact Huawei technical support.
13. The system automatically verifies whether the expansion succeeded.
l If yes, click Finish.
OceanStor S2600T&S5500T&S5600T&S5800T&S6800T
Storage System
Online Capacity Expansion 7 Adding Devices
Issue 01 (2014-12-29) Huawei Proprietary and Confidential
Copyright © Huawei Technologies Co., Ltd.
150

8/9/2019 OceanStor S2600T&S5500T&S5600T&S5800T&S6800T Storage System V200R002 Online Capacity Expansion 01
http://slidepdf.com/reader/full/oceanstor-s2600ts5500ts5600ts5800ts6800t-storage-system-v200r002-online 158/226
l If no, click Recheck . If the recheck fails, contact Huawei technical support.
----End
OceanStor S2600T&S5500T&S5600T&S5800T&S6800T
Storage System
Online Capacity Expansion 7 Adding Devices
Issue 01 (2014-12-29) Huawei Proprietary and Confidential
Copyright © Huawei Technologies Co., Ltd.
151
8/9/2019 OceanStor S2600T&S5500T&S5600T&S5800T&S6800T Storage System V200R002 Online Capacity Expansion 01
http://slidepdf.com/reader/full/oceanstor-s2600ts5500ts5600ts5800ts6800t-storage-system-v200r002-online 159/226
8 Performing the Post-expansion Check
After the capacity expansion of a storage system is expanded, check the status and services of
the storage system.
The post-expansion check is similar to the pre-expansion check. Assist customers in checking
storage system services to ensure that the services are running correctly.
OceanStor S2600T&S5500T&S5600T&S5800T&S6800T
Storage System
Online Capacity Expansion 8 Performing the Post-expansion Check
Issue 01 (2014-12-29) Huawei Proprietary and Confidential
Copyright © Huawei Technologies Co., Ltd.
152
8/9/2019 OceanStor S2600T&S5500T&S5600T&S5800T&S6800T Storage System V200R002 Online Capacity Expansion 01
http://slidepdf.com/reader/full/oceanstor-s2600ts5500ts5600ts5800ts6800t-storage-system-v200r002-online 160/226
9 Expanding Storage Space for Existing
Services
About This Chapter
You can expand the storage capacity to adapt to the increasing amount of data in the storage
system.
9.1 Expanding LUNs
This section describes how a user with super administrator permissions expands storage space
on the DeviceManager and enables an application server to use the expanded storage space.
9.2 Expanding Storage Space for an Application Server
A LUN must be expanded when its capacity is insufficient to meet service requirements. An
application server can use an expanded LUN only after required configurations are performed
on the application server.
OceanStor S2600T&S5500T&S5600T&S5800T&S6800T
Storage System
Online Capacity Expansion 9 Expanding Storage Space for Existing Services
Issue 01 (2014-12-29) Huawei Proprietary and Confidential
Copyright © Huawei Technologies Co., Ltd.
153
8/9/2019 OceanStor S2600T&S5500T&S5600T&S5800T&S6800T Storage System V200R002 Online Capacity Expansion 01
http://slidepdf.com/reader/full/oceanstor-s2600ts5500ts5600ts5800ts6800t-storage-system-v200r002-online 161/226
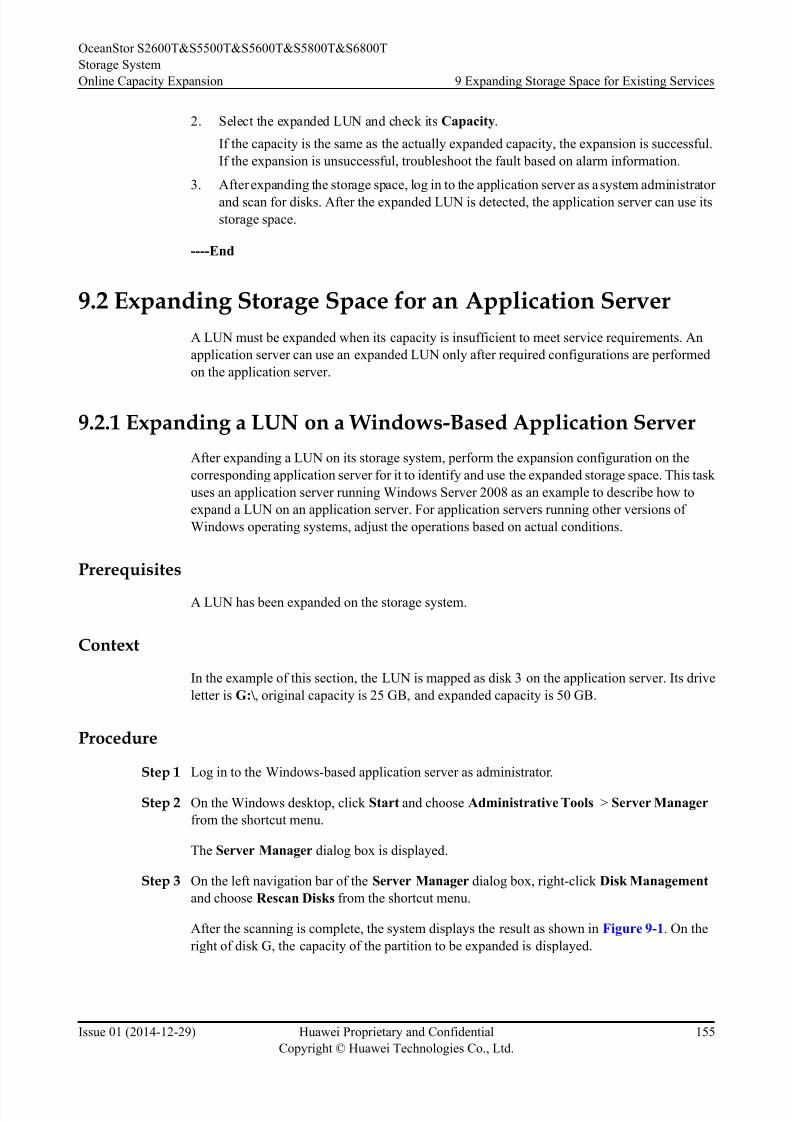
8/9/2019 OceanStor S2600T&S5500T&S5600T&S5800T&S6800T Storage System V200R002 Online Capacity Expansion 01
http://slidepdf.com/reader/full/oceanstor-s2600ts5500ts5600ts5800ts6800t-storage-system-v200r002-online 162/226
2. Select the expanded LUN and check its Capacity.
If the capacity is the same as the actually expanded capacity, the expansion is successful.
If the expansion is unsuccessful, troubleshoot the fault based on alarm information.
3. After expanding the storage space, log in to the application server as a system administrator
and scan for disks. After the expanded LUN is detected, the application server can use its
storage space.
----End
9.2 Expanding Storage Space for an Application Server
A LUN must be expanded when its capacity is insufficient to meet service requirements. An
application server can use an expanded LUN only after required configurations are performed
on the application server.
9.2.1 Expanding a LUN on a Windows-Based Application Server
After expanding a LUN on its storage system, perform the expansion configuration on the
corresponding application server for it to identify and use the expanded storage space. This task
uses an application server running Windows Server 2008 as an example to describe how to
expand a LUN on an application server. For application servers running other versions of
Windows operating systems, adjust the operations based on actual conditions.
Prerequisites
A LUN has been expanded on the storage system.
Context
In the example of this section, the LUN is mapped as disk 3 on the application server. Its drive
letter is G:\, original capacity is 25 GB, and expanded capacity is 50 GB.
Procedure
Step 1 Log in to the Windows-based application server as administrator.
Step 2 On the Windows desktop, click Start and choose Administrative Tools > Server Manager
from the shortcut menu.
The Server Manager dialog box is displayed.
Step 3 On the left navigation bar of the Server Manager dialog box, right-click Disk Management
and choose Rescan Disks from the shortcut menu.
After the scanning is complete, the system displays the result as shown in Figure 9-1. On the
right of disk G, the capacity of the partition to be expanded is displayed.
OceanStor S2600T&S5500T&S5600T&S5800T&S6800T
Storage System
Online Capacity Expansion 9 Expanding Storage Space for Existing Services
Issue 01 (2014-12-29) Huawei Proprietary and Confidential
Copyright © Huawei Technologies Co., Ltd.
155
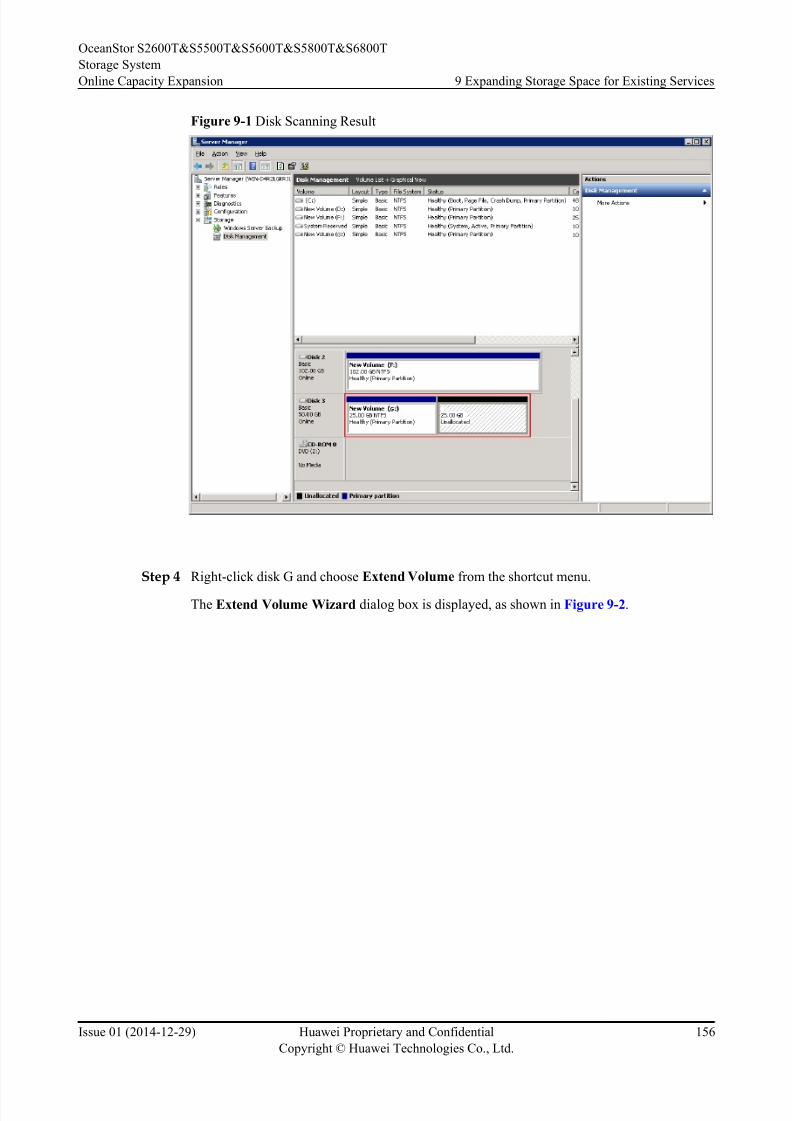
8/9/2019 OceanStor S2600T&S5500T&S5600T&S5800T&S6800T Storage System V200R002 Online Capacity Expansion 01
http://slidepdf.com/reader/full/oceanstor-s2600ts5500ts5600ts5800ts6800t-storage-system-v200r002-online 163/226
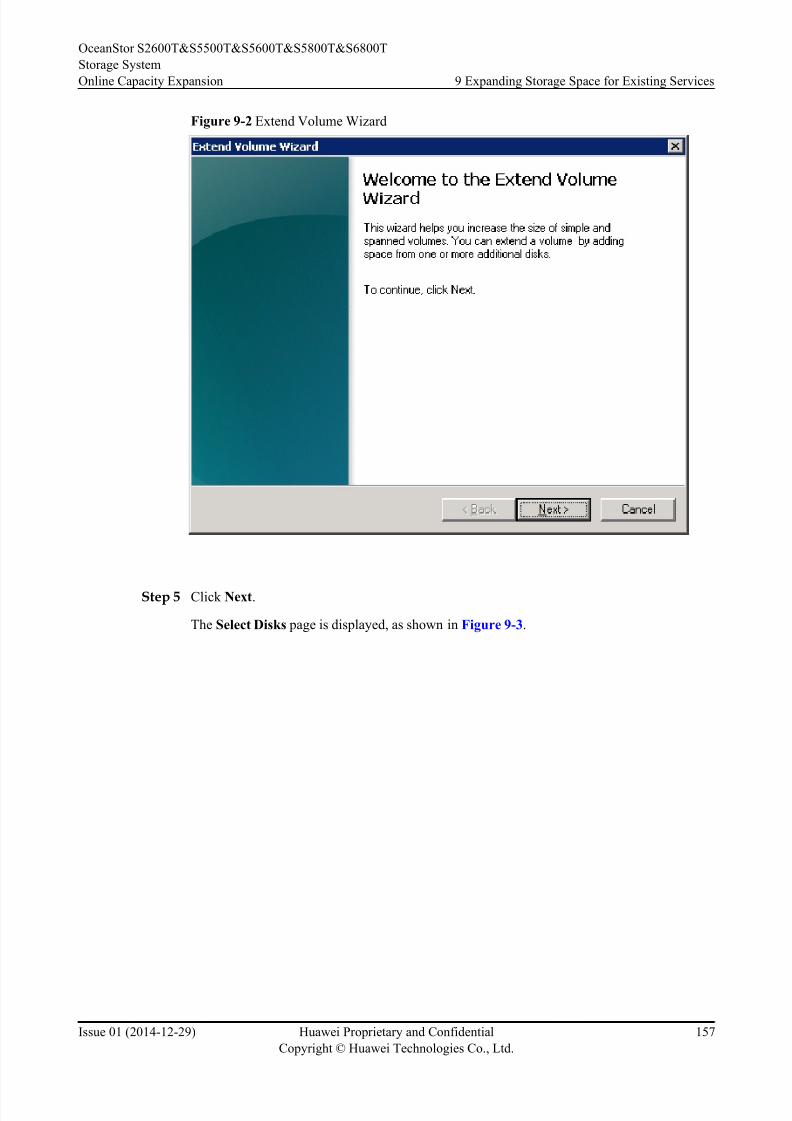
8/9/2019 OceanStor S2600T&S5500T&S5600T&S5800T&S6800T Storage System V200R002 Online Capacity Expansion 01
http://slidepdf.com/reader/full/oceanstor-s2600ts5500ts5600ts5800ts6800t-storage-system-v200r002-online 164/226
Figure 9-2 Extend Volume Wizard
Step 5 Click Next.
The Select Disks page is displayed, as shown in Figure 9-3.
OceanStor S2600T&S5500T&S5600T&S5800T&S6800T
Storage System
Online Capacity Expansion 9 Expanding Storage Space for Existing Services
Issue 01 (2014-12-29) Huawei Proprietary and Confidential
Copyright © Huawei Technologies Co., Ltd.
157
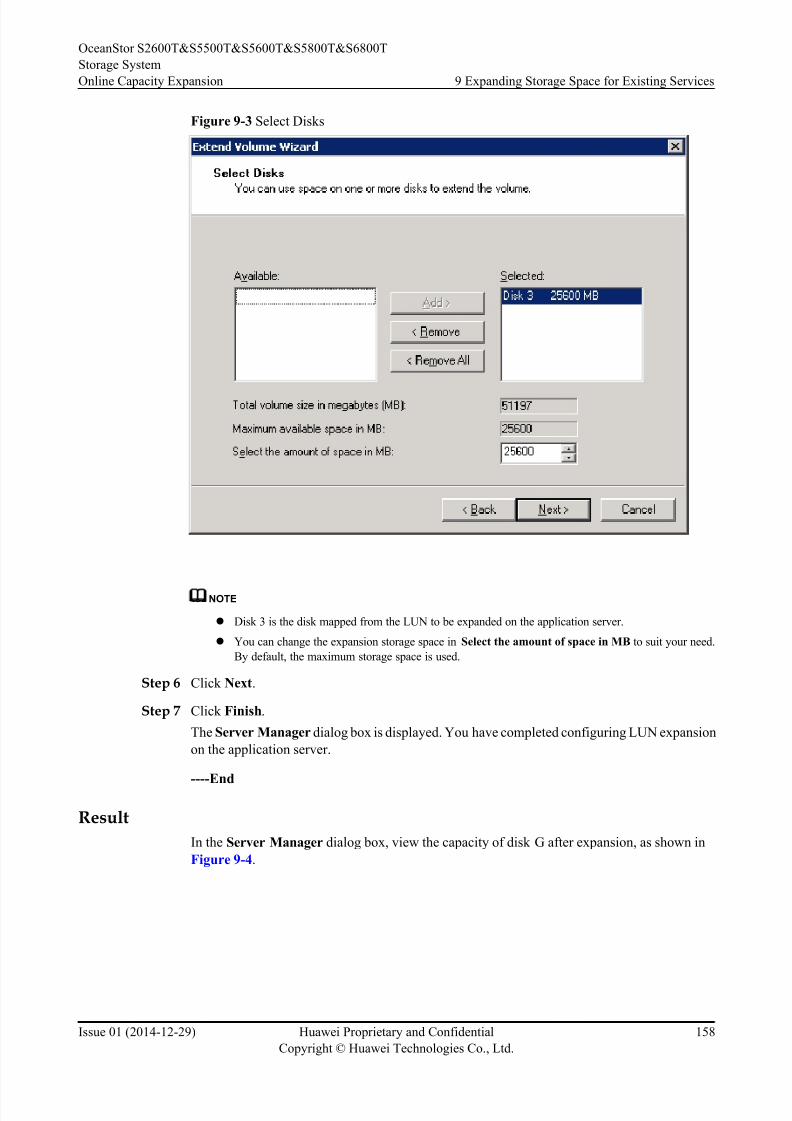
8/9/2019 OceanStor S2600T&S5500T&S5600T&S5800T&S6800T Storage System V200R002 Online Capacity Expansion 01
http://slidepdf.com/reader/full/oceanstor-s2600ts5500ts5600ts5800ts6800t-storage-system-v200r002-online 165/226
Figure 9-3 Select Disks
NOTE
l Disk 3 is the disk mapped from the LUN to be expanded on the application server.
l You can change the expansion storage space in Select the amount of space in MB to suit your need.
By default, the maximum storage space is used.
Step 6 Click Next.
Step 7 Click Finish.
The Server Manager dialog box is displayed. You have completed configuring LUN expansion
on the application server.
----End
Result
In the Server Manager dialog box, view the capacity of disk G after expansion, as shown in
Figure 9-4.
OceanStor S2600T&S5500T&S5600T&S5800T&S6800T
Storage System
Online Capacity Expansion 9 Expanding Storage Space for Existing Services
Issue 01 (2014-12-29) Huawei Proprietary and Confidential
Copyright © Huawei Technologies Co., Ltd.
158
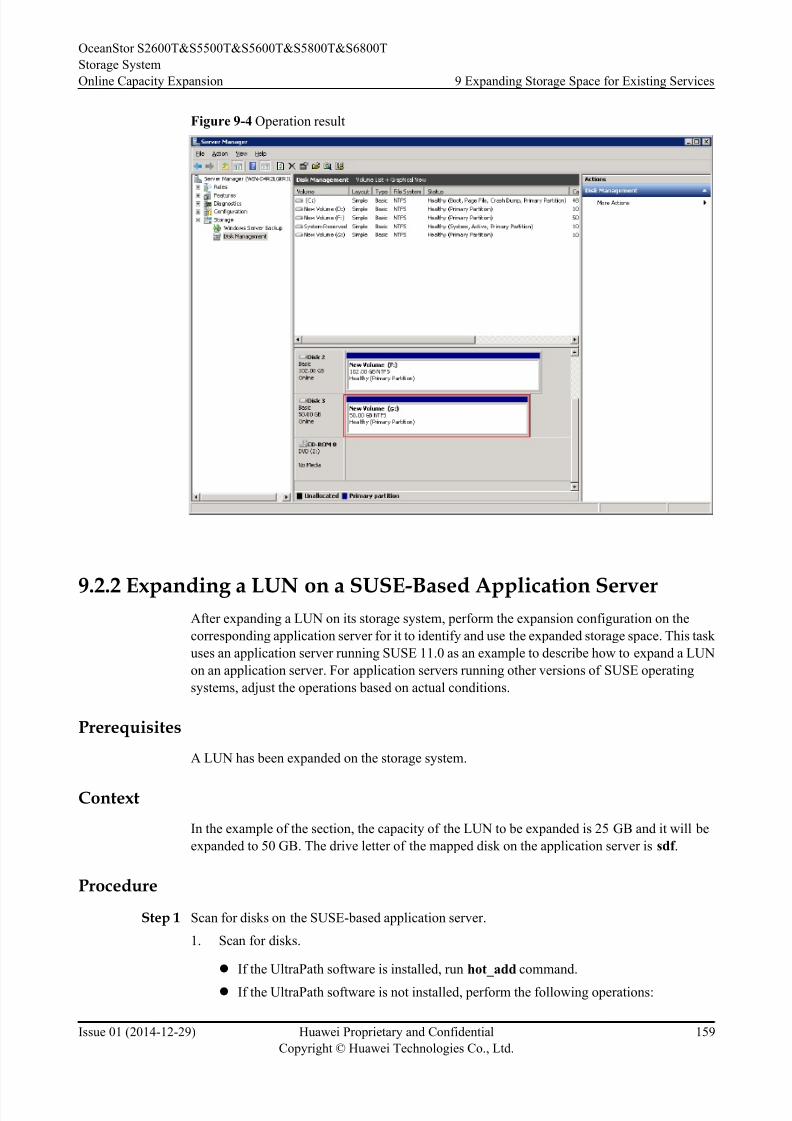
8/9/2019 OceanStor S2600T&S5500T&S5600T&S5800T&S6800T Storage System V200R002 Online Capacity Expansion 01
http://slidepdf.com/reader/full/oceanstor-s2600ts5500ts5600ts5800ts6800t-storage-system-v200r002-online 166/226
Figure 9-4 Operation result
9.2.2 Expanding a LUN on a SUSE-Based Application ServerAfter expanding a LUN on its storage system, perform the expansion configuration on the
corresponding application server for it to identify and use the expanded storage space. This task
uses an application server running SUSE 11.0 as an example to describe how to expand a LUN
on an application server. For application servers running other versions of SUSE operating
systems, adjust the operations based on actual conditions.
Prerequisites
A LUN has been expanded on the storage system.
Context
In the example of the section, the capacity of the LUN to be expanded is 25 GB and it will be
expanded to 50 GB. The drive letter of the mapped disk on the application server is sdf .
Procedure
Step 1 Scan for disks on the SUSE-based application server.
1. Scan for disks.
l If the UltraPath software is installed, run hot_add command.
l If the UltraPath software is not installed, perform the following operations:
OceanStor S2600T&S5500T&S5600T&S5800T&S6800T
Storage System
Online Capacity Expansion 9 Expanding Storage Space for Existing Services
Issue 01 (2014-12-29) Huawei Proprietary and Confidential
Copyright © Huawei Technologies Co., Ltd.
159
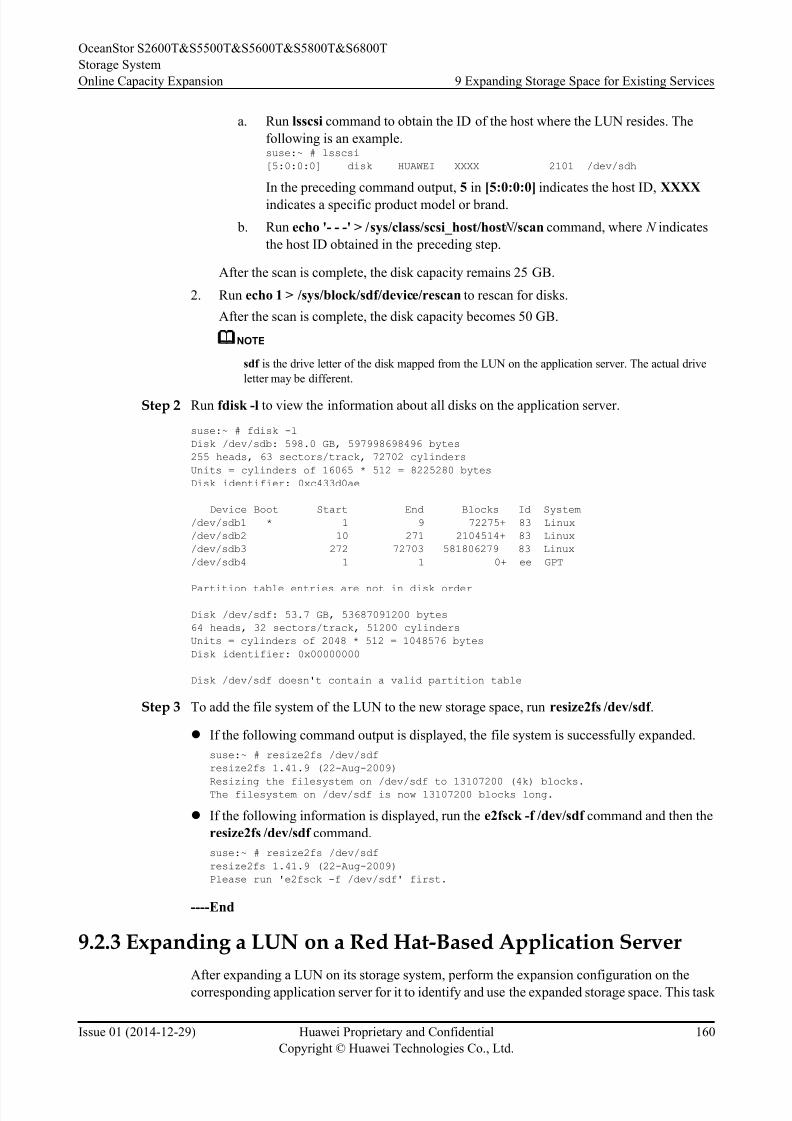
8/9/2019 OceanStor S2600T&S5500T&S5600T&S5800T&S6800T Storage System V200R002 Online Capacity Expansion 01
http://slidepdf.com/reader/full/oceanstor-s2600ts5500ts5600ts5800ts6800t-storage-system-v200r002-online 167/226
a. Run lsscsi command to obtain the ID of the host where the LUN resides. The
following is an example.suse:~ # lsscsi
[5:0:0:0] disk HUAWEI XXXX 2101 /dev/sdh
In the preceding command output, 5 in [5:0:0:0] indicates the host ID, XXXX
indicates a specific product model or brand.
b. Run echo '- - -' > /sys/class/scsi_host/host N /scan command, where N indicates
the host ID obtained in the preceding step.
After the scan is complete, the disk capacity remains 25 GB.
2. Run echo 1 > /sys/block/sdf/device/rescan to rescan for disks.
After the scan is complete, the disk capacity becomes 50 GB.
NOTE
sdf is the drive letter of the disk mapped from the LUN on the application server. The actual drive
letter may be different.
Step 2 Run fdisk -l to view the information about all disks on the application server.
suse:~ # fdisk -l
Disk /dev/sdb: 598.0 GB, 597998698496 bytes
255 heads, 63 sectors/track, 72702 cylinders
Units = cylinders of 16065 * 512 = 8225280 bytes
Disk identifier: 0xc433d0ae
Device Boot Start End Blocks Id System
/dev/sdb1 * 1 9 72275+ 83 Linux
/dev/sdb2 10 271 2104514+ 83 Linux
/dev/sdb3 272 72703 581806279 83 Linux
/dev/sdb4 1 1 0+ ee GPT
Partition table entries are not in disk order
Disk /dev/sdf: 53.7 GB, 53687091200 bytes
64 heads, 32 sectors/track, 51200 cylinders
Units = cylinders of 2048 * 512 = 1048576 bytes
Disk identifier: 0x00000000
Disk /dev/sdf doesn't contain a valid partition table
Step 3 To add the file system of the LUN to the new storage space, run resize2fs /dev/sdf .
l If the following command output is displayed, the file system is successfully expanded.
suse:~ # resize2fs /dev/sdf
resize2fs 1.41.9 (22-Aug-2009)
Resizing the filesystem on /dev/sdf to 13107200 (4k) blocks.The filesystem on /dev/sdf is now 13107200 blocks long.
l If the following information is displayed, run the e2fsck -f /dev/sdf command and then the
resize2fs /dev/sdf command.
suse:~ # resize2fs /dev/sdf
resize2fs 1.41.9 (22-Aug-2009)
Please run 'e2fsck -f /dev/sdf' first.
----End
9.2.3 Expanding a LUN on a Red Hat-Based Application Server
After expanding a LUN on its storage system, perform the expansion configuration on the
corresponding application server for it to identify and use the expanded storage space. This task
OceanStor S2600T&S5500T&S5600T&S5800T&S6800T
Storage System
Online Capacity Expansion 9 Expanding Storage Space for Existing Services
Issue 01 (2014-12-29) Huawei Proprietary and Confidential
Copyright © Huawei Technologies Co., Ltd.
160
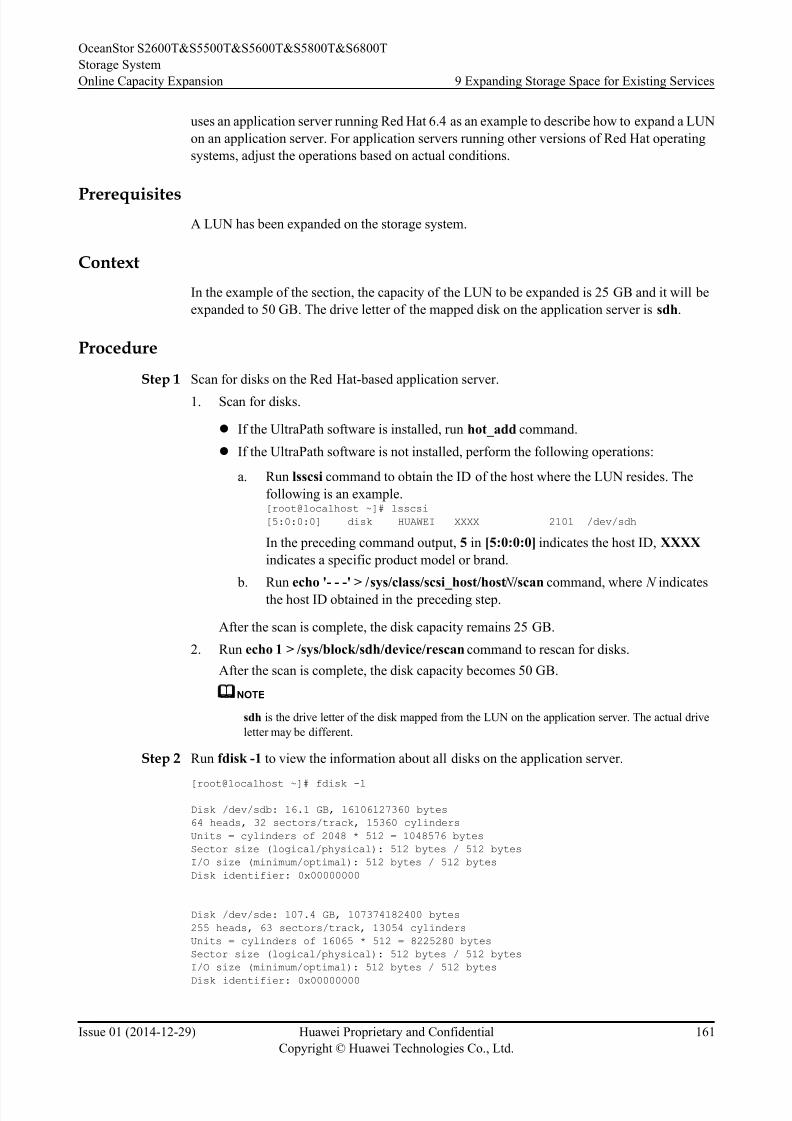
8/9/2019 OceanStor S2600T&S5500T&S5600T&S5800T&S6800T Storage System V200R002 Online Capacity Expansion 01
http://slidepdf.com/reader/full/oceanstor-s2600ts5500ts5600ts5800ts6800t-storage-system-v200r002-online 168/226
uses an application server running Red Hat 6.4 as an example to describe how to expand a LUN
on an application server. For application servers running other versions of Red Hat operating
systems, adjust the operations based on actual conditions.
PrerequisitesA LUN has been expanded on the storage system.
Context
In the example of the section, the capacity of the LUN to be expanded is 25 GB and it will be
expanded to 50 GB. The drive letter of the mapped disk on the application server is sdh.
Procedure
Step 1 Scan for disks on the Red Hat-based application server.
1. Scan for disks.
l If the UltraPath software is installed, run hot_add command.
l If the UltraPath software is not installed, perform the following operations:
a. Run lsscsi command to obtain the ID of the host where the LUN resides. The
following is an example.[root@localhost ~]# lsscsi
[5:0:0:0] disk HUAWEI XXXX 2101 /dev/sdh
In the preceding command output, 5 in [5:0:0:0] indicates the host ID, XXXX
indicates a specific product model or brand.
b. Run echo '- - -' > /sys/class/scsi_host/host N /scan command, where N indicatesthe host ID obtained in the preceding step.
After the scan is complete, the disk capacity remains 25 GB.
2. Run echo 1 > /sys/block/sdh/device/rescan command to rescan for disks.
After the scan is complete, the disk capacity becomes 50 GB.
NOTE
sdh is the drive letter of the disk mapped from the LUN on the application server. The actual drive
letter may be different.
Step 2 Run fdisk -1 to view the information about all disks on the application server.
[root@localhost ~]# fdisk -l
Disk /dev/sdb: 16.1 GB, 16106127360 bytes
64 heads, 32 sectors/track, 15360 cylinders
Units = cylinders of 2048 * 512 = 1048576 bytes
Sector size (logical/physical): 512 bytes / 512 bytes
I/O size (minimum/optimal): 512 bytes / 512 bytes
Disk identifier: 0x00000000
Disk /dev/sde: 107.4 GB, 107374182400 bytes
255 heads, 63 sectors/track, 13054 cylinders
Units = cylinders of 16065 * 512 = 8225280 bytes
Sector size (logical/physical): 512 bytes / 512 bytes
I/O size (minimum/optimal): 512 bytes / 512 bytes
Disk identifier: 0x00000000
OceanStor S2600T&S5500T&S5600T&S5800T&S6800T
Storage System
Online Capacity Expansion 9 Expanding Storage Space for Existing Services
Issue 01 (2014-12-29) Huawei Proprietary and Confidential
Copyright © Huawei Technologies Co., Ltd.
161
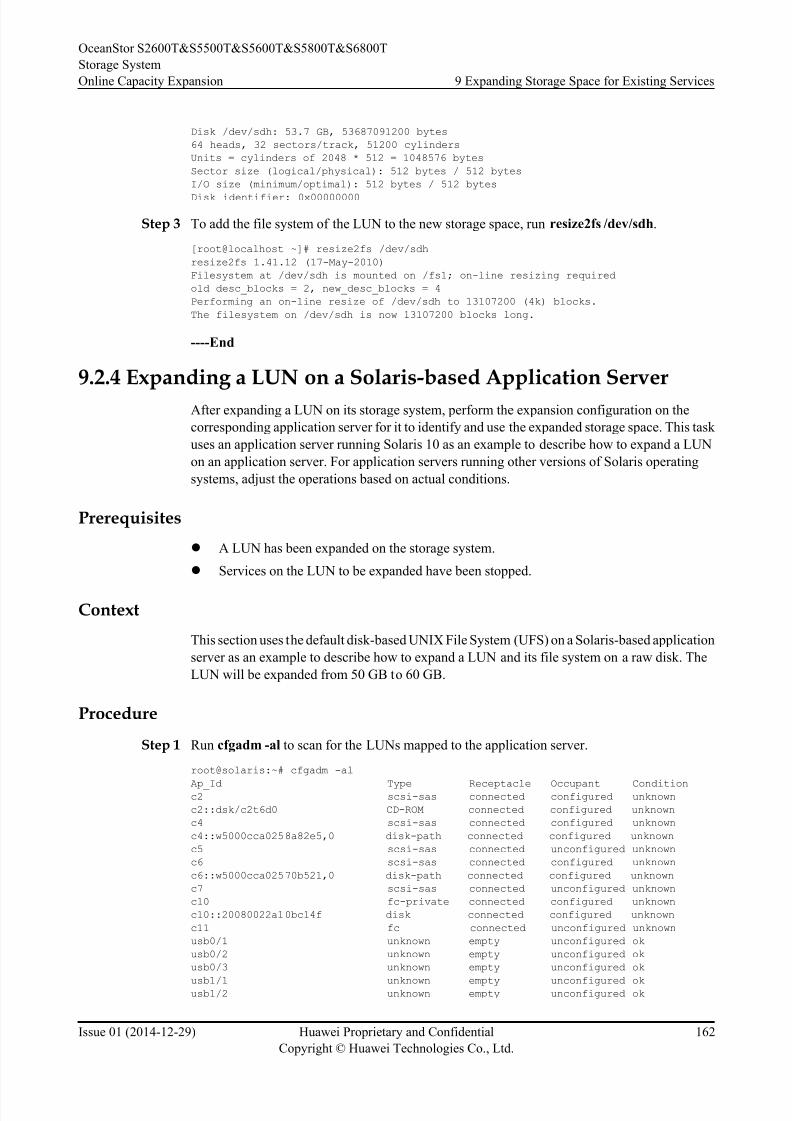
8/9/2019 OceanStor S2600T&S5500T&S5600T&S5800T&S6800T Storage System V200R002 Online Capacity Expansion 01
http://slidepdf.com/reader/full/oceanstor-s2600ts5500ts5600ts5800ts6800t-storage-system-v200r002-online 169/226
Disk /dev/sdh: 53.7 GB, 53687091200 bytes
64 heads, 32 sectors/track, 51200 cylinders
Units = cylinders of 2048 * 512 = 1048576 bytes
Sector size (logical/physical): 512 bytes / 512 bytes
I/O size (minimum/optimal): 512 bytes / 512 bytes
Disk identifier: 0x00000000
Step 3 To add the file system of the LUN to the new storage space, run resize2fs /dev/sdh.
[root@localhost ~]# resize2fs /dev/sdh
resize2fs 1.41.12 (17-May-2010)
Filesystem at /dev/sdh is mounted on /fs1; on-line resizing required
old desc_blocks = 2, new_desc_blocks = 4
Performing an on-line resize of /dev/sdh to 13107200 (4k) blocks.
The filesystem on /dev/sdh is now 13107200 blocks long.
----End
9.2.4 Expanding a LUN on a Solaris-based Application Server
After expanding a LUN on its storage system, perform the expansion configuration on the
corresponding application server for it to identify and use the expanded storage space. This task
uses an application server running Solaris 10 as an example to describe how to expand a LUN
on an application server. For application servers running other versions of Solaris operating
systems, adjust the operations based on actual conditions.
Prerequisites
l A LUN has been expanded on the storage system.
l Services on the LUN to be expanded have been stopped.
Context
This section uses the default disk-based UNIX File System (UFS) on a Solaris-based application
server as an example to describe how to expand a LUN and its file system on a raw disk. The
LUN will be expanded from 50 GB to 60 GB.
Procedure
Step 1 Run cfgadm -al to scan for the LUNs mapped to the application server.
root@solaris:~# cfgadm -al
Ap_Id Type Receptacle Occupant Conditionc2 scsi-sas connected configured unknown
c2::dsk/c2t6d0 CD-ROM connected configured unknown
c4 scsi-sas connected configured unknown
c4::w5000cca0258a82e5,0 disk-path connected configured unknown
c5 scsi-sas connected unconfigured unknown
c6 scsi-sas connected configured unknown
c6::w5000cca02570b521,0 disk-path connected configured unknown
c7 scsi-sas connected unconfigured unknown
c10 fc-private connected configured unknown
c10::20080022a10bc14f disk connected configured unknown
c11 fc connected unconfigured unknown
usb0/1 unknown empty unconfigured ok
usb0/2 unknown empty unconfigured ok
usb0/3 unknown empty unconfigured ok
usb1/1 unknown empty unconfigured okusb1/2 unknown empty unconfigured ok
OceanStor S2600T&S5500T&S5600T&S5800T&S6800T
Storage System
Online Capacity Expansion 9 Expanding Storage Space for Existing Services
Issue 01 (2014-12-29) Huawei Proprietary and Confidential
Copyright © Huawei Technologies Co., Ltd.
162
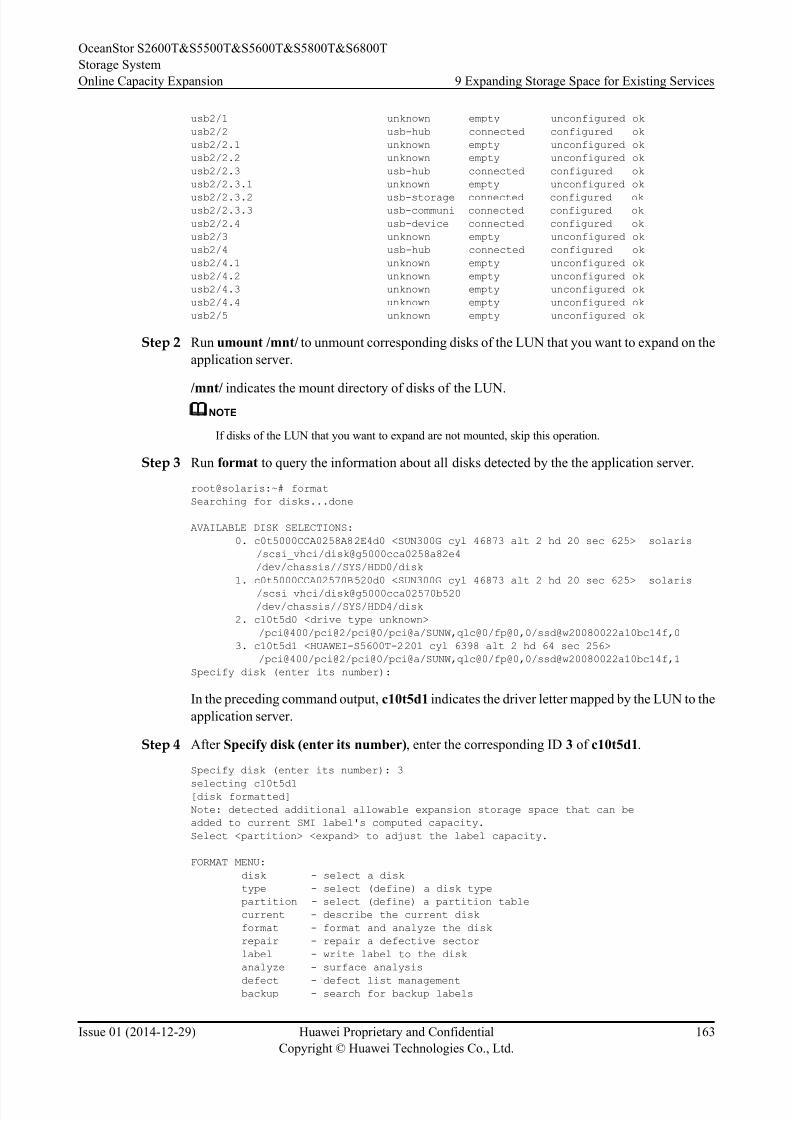
8/9/2019 OceanStor S2600T&S5500T&S5600T&S5800T&S6800T Storage System V200R002 Online Capacity Expansion 01
http://slidepdf.com/reader/full/oceanstor-s2600ts5500ts5600ts5800ts6800t-storage-system-v200r002-online 170/226
usb2/1 unknown empty unconfigured ok
usb2/2 usb-hub connected configured ok
usb2/2.1 unknown empty unconfigured ok
usb2/2.2 unknown empty unconfigured ok
usb2/2.3 usb-hub connected configured ok
usb2/2.3.1 unknown empty unconfigured ok
usb2/2.3.2 usb-storage connected configured okusb2/2.3.3 usb-communi connected configured ok
usb2/2.4 usb-device connected configured ok
usb2/3 unknown empty unconfigured ok
usb2/4 usb-hub connected configured ok
usb2/4.1 unknown empty unconfigured ok
usb2/4.2 unknown empty unconfigured ok
usb2/4.3 unknown empty unconfigured ok
usb2/4.4 unknown empty unconfigured ok
usb2/5 unknown empty unconfigured ok
Step 2 Run umount /mnt/ to unmount corresponding disks of the LUN that you want to expand on the
application server.
/mnt/ indicates the mount directory of disks of the LUN.NOTE
If disks of the LUN that you want to expand are not mounted, skip this operation.
Step 3 Run format to query the information about all disks detected by the the application server.
root@solaris:~# format
Searching for disks...done
AVAILABLE DISK SELECTIONS:
0. c0t5000CCA0258A82E4d0 <SUN300G cyl 46873 alt 2 hd 20 sec 625> solaris
/scsi_vhci/disk@g5000cca0258a82e4
/dev/chassis//SYS/HDD0/disk
1. c0t5000CCA02570B520d0 <SUN300G cyl 46873 alt 2 hd 20 sec 625> solaris
/scsi_vhci/disk@g5000cca02570b520
/dev/chassis//SYS/HDD4/disk
2. c10t5d0 <drive type unknown>
/pci@400/pci@2/pci@0/pci@a/SUNW,qlc@0/fp@0,0/ssd@w20080022a10bc14f,0
3. c10t5d1 <HUAWEI-S5600T-2201 cyl 6398 alt 2 hd 64 sec 256>
/pci@400/pci@2/pci@0/pci@a/SUNW,qlc@0/fp@0,0/ssd@w20080022a10bc14f,1
Specify disk (enter its number):
In the preceding command output, c10t5d1 indicates the driver letter mapped by the LUN to the
application server.
Step 4 After Specify disk (enter its number), enter the corresponding ID 3 of c10t5d1.
Specify disk (enter its number): 3
selecting c10t5d1[disk formatted]
Note: detected additional allowable expansion storage space that can be
added to current SMI label's computed capacity.
Select <partition> <expand> to adjust the label capacity.
FORMAT MENU:
disk - select a disk
type - select (define) a disk type
partition - select (define) a partition table
current - describe the current disk
format - format and analyze the disk
repair - repair a defective sector
label - write label to the disk
analyze - surface analysis
defect - defect list management backup - search for backup labels
OceanStor S2600T&S5500T&S5600T&S5800T&S6800T
Storage System
Online Capacity Expansion 9 Expanding Storage Space for Existing Services
Issue 01 (2014-12-29) Huawei Proprietary and Confidential
Copyright © Huawei Technologies Co., Ltd.
163
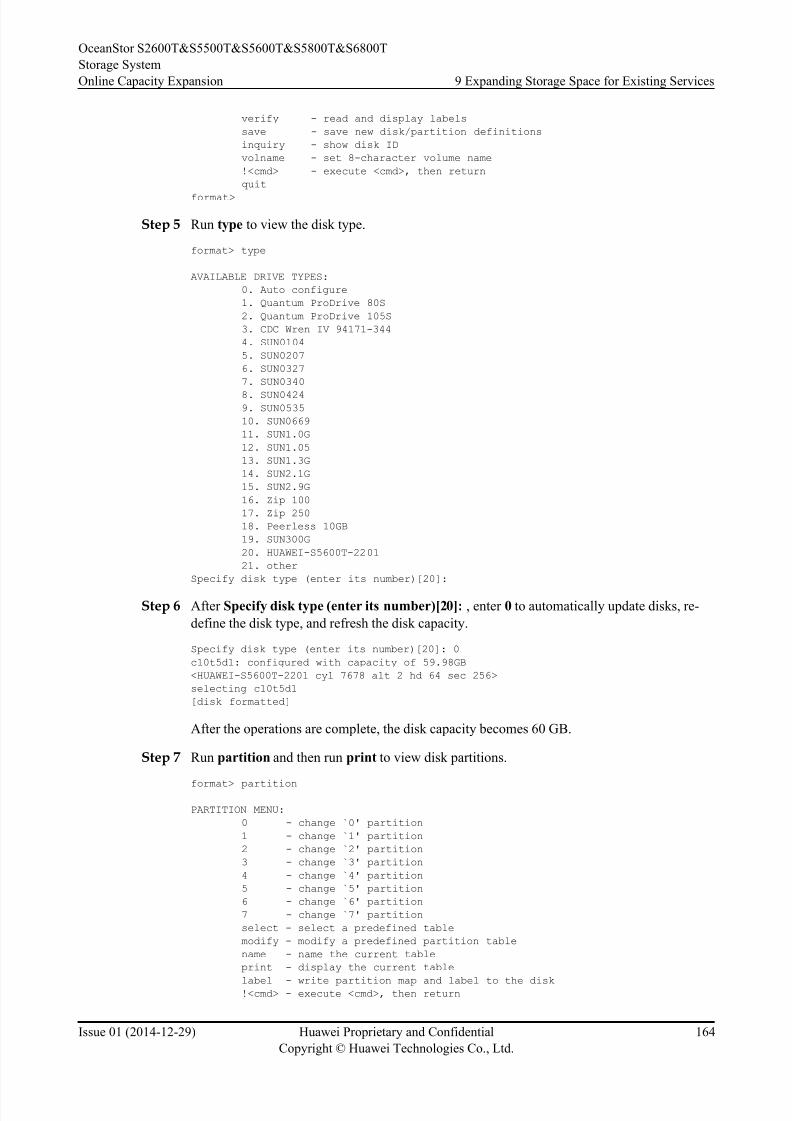
8/9/2019 OceanStor S2600T&S5500T&S5600T&S5800T&S6800T Storage System V200R002 Online Capacity Expansion 01
http://slidepdf.com/reader/full/oceanstor-s2600ts5500ts5600ts5800ts6800t-storage-system-v200r002-online 171/226
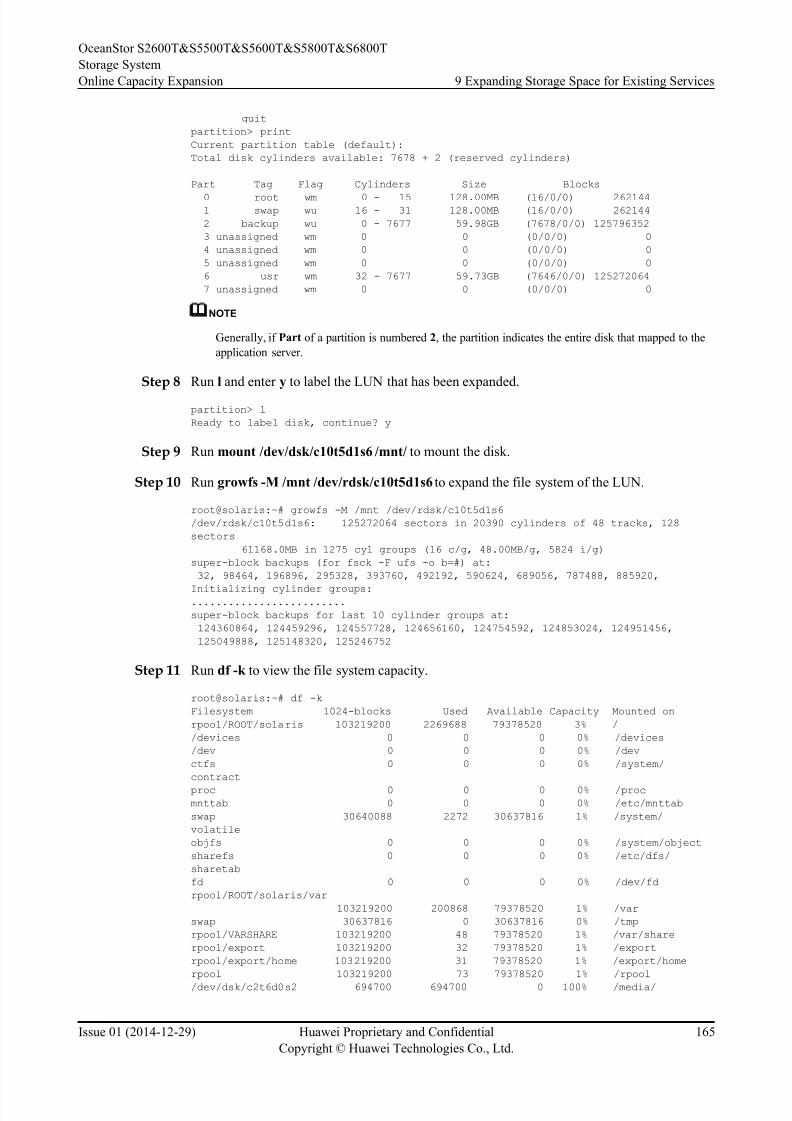
8/9/2019 OceanStor S2600T&S5500T&S5600T&S5800T&S6800T Storage System V200R002 Online Capacity Expansion 01
http://slidepdf.com/reader/full/oceanstor-s2600ts5500ts5600ts5800ts6800t-storage-system-v200r002-online 172/226
quit
partition> print
Current partition table (default):
Total disk cylinders available: 7678 + 2 (reserved cylinders)
Part Tag Flag Cylinders Size Blocks
0 root wm 0 - 15 128.00MB (16/0/0) 262144 1 swap wu 16 - 31 128.00MB (16/0/0) 262144
2 backup wu 0 - 7677 59.98GB (7678/0/0) 125796352
3 unassigned wm 0 0 (0/0/0) 0
4 unassigned wm 0 0 (0/0/0) 0
5 unassigned wm 0 0 (0/0/0) 0
6 usr wm 32 - 7677 59.73GB (7646/0/0) 125272064
7 unassigned wm 0 0 (0/0/0) 0
NOTE
Generally, if Part of a partition is numbered 2, the partition indicates the entire disk that mapped to the
application server.
Step 8 Run l and enter y to label the LUN that has been expanded.
partition> l
Ready to label disk, continue? y
Step 9 Run mount /dev/dsk/c10t5d1s6 /mnt/ to mount the disk.
Step 10 Run growfs -M /mnt /dev/rdsk/c10t5d1s6 to expand the file system of the LUN.
root@solaris:~# growfs -M /mnt /dev/rdsk/c10t5d1s6
/dev/rdsk/c10t5d1s6: 125272064 sectors in 20390 cylinders of 48 tracks, 128
sectors
61168.0MB in 1275 cyl groups (16 c/g, 48.00MB/g, 5824 i/g)
super-block backups (for fsck -F ufs -o b=#) at:
32, 98464, 196896, 295328, 393760, 492192, 590624, 689056, 787488, 885920,
Initializing cylinder groups:.........................
super-block backups for last 10 cylinder groups at:
124360864, 124459296, 124557728, 124656160, 124754592, 124853024, 124951456,
125049888, 125148320, 125246752
Step 11 Run df -k to view the file system capacity.
root@solaris:~# df -k
Filesystem 1024-blocks Used Available Capacity Mounted on
rpool/ROOT/solaris 103219200 2269688 79378520 3% /
/devices 0 0 0 0% /devices
/dev 0 0 0 0% /dev
ctfs 0 0 0 0% /system/
contract
proc 0 0 0 0% /proc
mnttab 0 0 0 0% /etc/mnttab
swap 30640088 2272 30637816 1% /system/
volatile
objfs 0 0 0 0% /system/object
sharefs 0 0 0 0% /etc/dfs/
sharetab
fd 0 0 0 0% /dev/fd
rpool/ROOT/solaris/var
103219200 200868 79378520 1% /var
swap 30637816 0 30637816 0% /tmp
rpool/VARSHARE 103219200 48 79378520 1% /var/share
rpool/export 103219200 32 79378520 1% /export
rpool/export/home 103219200 31 79378520 1% /export/home
rpool 103219200 73 79378520 1% /rpool
/dev/dsk/c2t6d0s2 694700 694700 0 100% /media/
OceanStor S2600T&S5500T&S5600T&S5800T&S6800T
Storage System
Online Capacity Expansion 9 Expanding Storage Space for Existing Services
Issue 01 (2014-12-29) Huawei Proprietary and Confidential
Copyright © Huawei Technologies Co., Ltd.
165
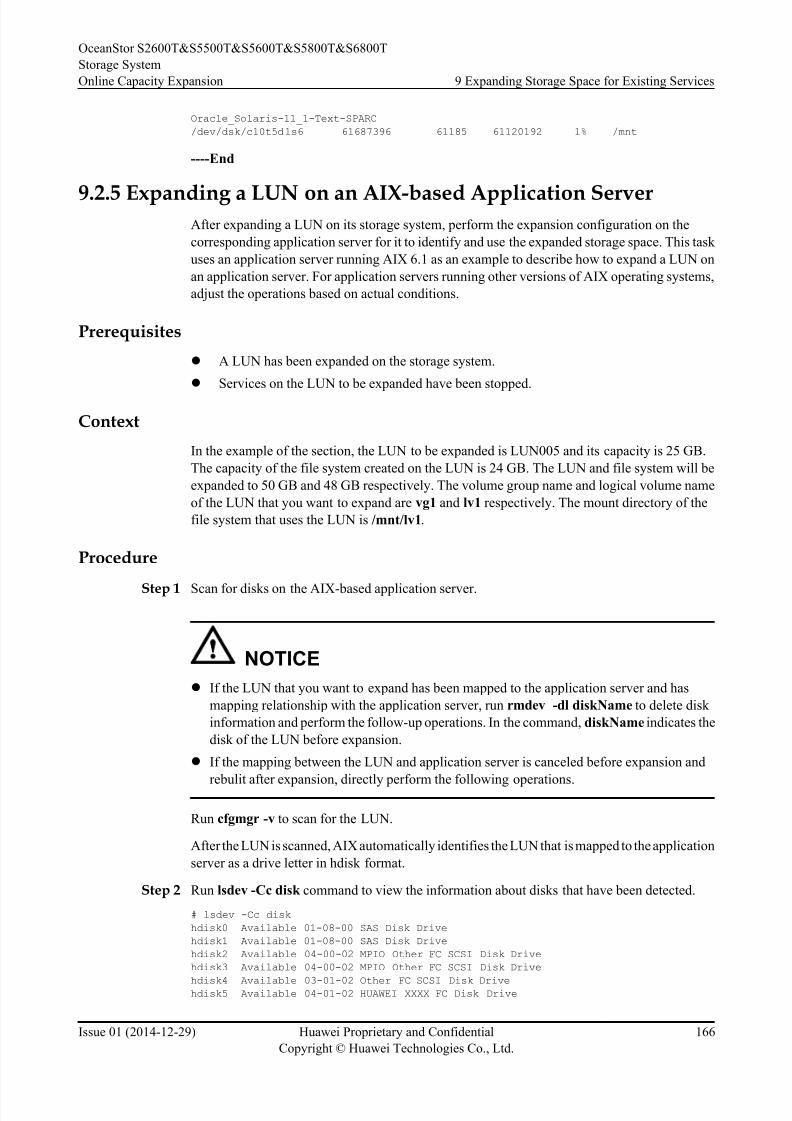
8/9/2019 OceanStor S2600T&S5500T&S5600T&S5800T&S6800T Storage System V200R002 Online Capacity Expansion 01
http://slidepdf.com/reader/full/oceanstor-s2600ts5500ts5600ts5800ts6800t-storage-system-v200r002-online 173/226
Oracle_Solaris-11_1-Text-SPARC
/dev/dsk/c10t5d1s6 61687396 61185 61120192 1% /mnt
----End
9.2.5 Expanding a LUN on an AIX-based Application ServerAfter expanding a LUN on its storage system, perform the expansion configuration on the
corresponding application server for it to identify and use the expanded storage space. This task
uses an application server running AIX 6.1 as an example to describe how to expand a LUN on
an application server. For application servers running other versions of AIX operating systems,
adjust the operations based on actual conditions.
Prerequisites
l A LUN has been expanded on the storage system.
l Services on the LUN to be expanded have been stopped.
Context
In the example of the section, the LUN to be expanded is LUN005 and its capacity is 25 GB.
The capacity of the file system created on the LUN is 24 GB. The LUN and file system will be
expanded to 50 GB and 48 GB respectively. The volume group name and logical volume name
of the LUN that you want to expand are vg1 and lv1 respectively. The mount directory of the
file system that uses the LUN is /mnt/lv1.
Procedure
Step 1 Scan for disks on the AIX-based application server.
NOTICE
l If the LUN that you want to expand has been mapped to the application server and has
mapping relationship with the application server, run rmdev -dl diskName to delete disk
information and perform the follow-up operations. In the command, diskName indicates the
disk of the LUN before expansion.
l If the mapping between the LUN and application server is canceled before expansion and
rebulit after expansion, directly perform the following operations.
Run cfgmgr -v to scan for the LUN.
After the LUN is scanned, AIX automatically identifies the LUN that is mapped to the application
server as a drive letter in hdisk format.
Step 2 Run lsdev -Cc disk command to view the information about disks that have been detected.
# lsdev -Cc disk
hdisk0 Available 01-08-00 SAS Disk Drive
hdisk1 Available 01-08-00 SAS Disk Drive
hdisk2 Available 04-00-02 MPIO Other FC SCSI Disk Drive
hdisk3 Available 04-00-02 MPIO Other FC SCSI Disk Drive
hdisk4 Available 03-01-02 Other FC SCSI Disk Drivehdisk5 Available 04-01-02 HUAWEI XXXX FC Disk Drive
OceanStor S2600T&S5500T&S5600T&S5800T&S6800T
Storage System
Online Capacity Expansion 9 Expanding Storage Space for Existing Services
Issue 01 (2014-12-29) Huawei Proprietary and Confidential
Copyright © Huawei Technologies Co., Ltd.
166
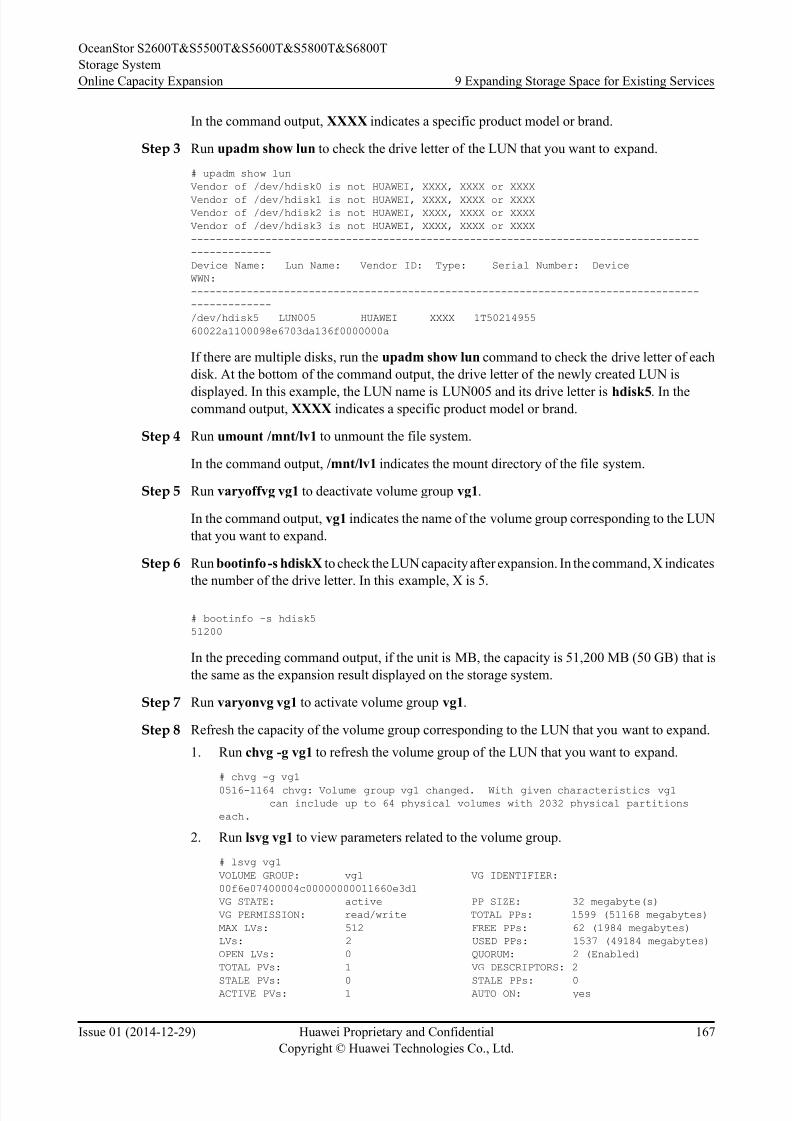
8/9/2019 OceanStor S2600T&S5500T&S5600T&S5800T&S6800T Storage System V200R002 Online Capacity Expansion 01
http://slidepdf.com/reader/full/oceanstor-s2600ts5500ts5600ts5800ts6800t-storage-system-v200r002-online 174/226
In the command output, XXXX indicates a specific product model or brand.
Step 3 Run upadm show lun to check the drive letter of the LUN that you want to expand.
# upadm show lun
Vendor of /dev/hdisk0 is not HUAWEI, XXXX, XXXX or XXXX
Vendor of /dev/hdisk1 is not HUAWEI, XXXX, XXXX or XXXXVendor of /dev/hdisk2 is not HUAWEI, XXXX, XXXX or XXXX
Vendor of /dev/hdisk3 is not HUAWEI, XXXX, XXXX or XXXX
----------------------------------------------------------------------------------
-------------
Device Name: Lun Name: Vendor ID: Type: Serial Number: Device
WWN:
----------------------------------------------------------------------------------
-------------
/dev/hdisk5 LUN005 HUAWEI XXXX 1T50214955
60022a1100098e6703da136f0000000a
If there are multiple disks, run the upadm show lun command to check the drive letter of each
disk. At the bottom of the command output, the drive letter of the newly created LUN is
displayed. In this example, the LUN name is LUN005 and its drive letter is hdisk5. In thecommand output, XXXX indicates a specific product model or brand.
Step 4 Run umount /mnt/lv1 to unmount the file system.
In the command output, /mnt/lv1 indicates the mount directory of the file system.
Step 5 Run varyoffvg vg1 to deactivate volume group vg1.
In the command output, vg1 indicates the name of the volume group corresponding to the LUN
that you want to expand.
Step 6 Run bootinfo -s hdiskX to check the LUN capacity after expansion. In the command, X indicates
the number of the drive letter. In this example, X is 5.
# bootinfo -s hdisk5
51200
In the preceding command output, if the unit is MB, the capacity is 51,200 MB (50 GB) that is
the same as the expansion result displayed on the storage system.
Step 7 Run varyonvg vg1 to activate volume group vg1.
Step 8 Refresh the capacity of the volume group corresponding to the LUN that you want to expand.
1. Run chvg -g vg1 to refresh the volume group of the LUN that you want to expand.
# chvg -g vg1
0516-1164 chvg: Volume group vg1 changed. With given characteristics vg1
can include up to 64 physical volumes with 2032 physical partitions
each.
2. Run lsvg vg1 to view parameters related to the volume group.
# lsvg vg1
VOLUME GROUP: vg1 VG IDENTIFIER:
00f6e07400004c00000000011660e3d1
VG STATE: active PP SIZE: 32 megabyte(s)
VG PERMISSION: read/write TOTAL PPs: 1599 (51168 megabytes)
MAX LVs: 512 FREE PPs: 62 (1984 megabytes)
LVs: 2 USED PPs: 1537 (49184 megabytes)
OPEN LVs: 0 QUORUM: 2 (Enabled)
TOTAL PVs: 1 VG DESCRIPTORS: 2
STALE PVs: 0 STALE PPs: 0ACTIVE PVs: 1 AUTO ON: yes
OceanStor S2600T&S5500T&S5600T&S5800T&S6800T
Storage System
Online Capacity Expansion 9 Expanding Storage Space for Existing Services
Issue 01 (2014-12-29) Huawei Proprietary and Confidential
Copyright © Huawei Technologies Co., Ltd.
167
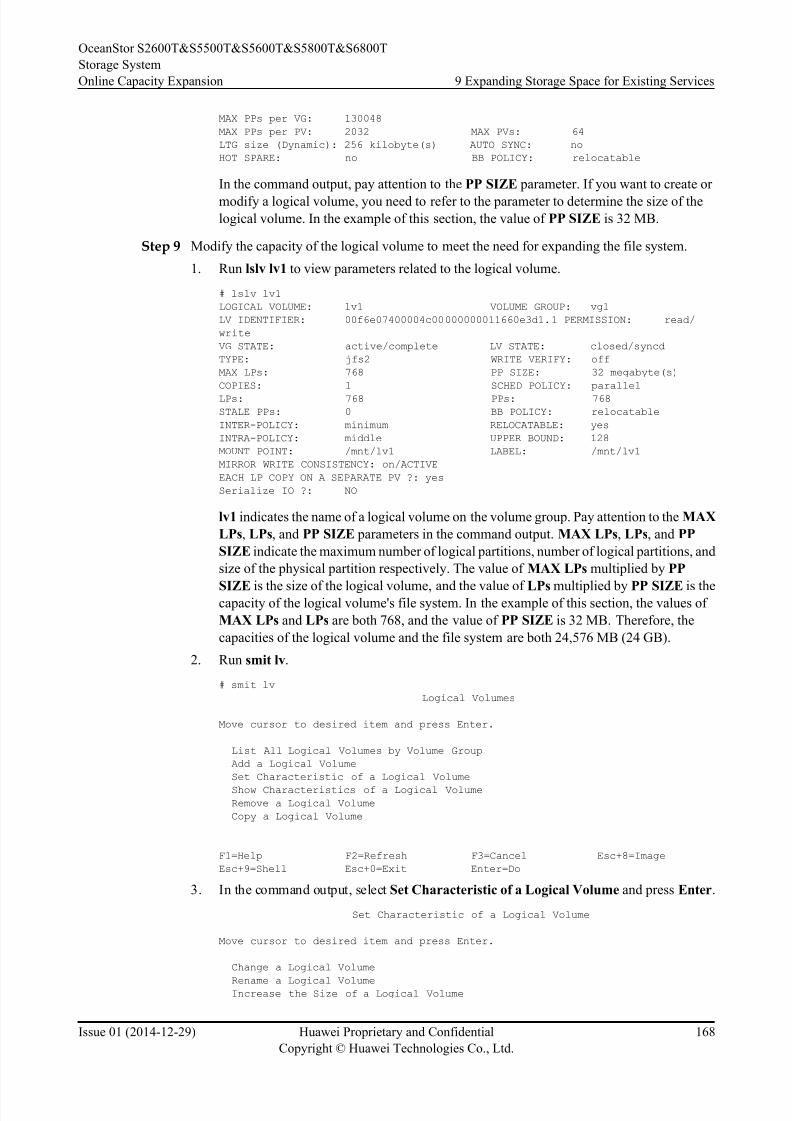
8/9/2019 OceanStor S2600T&S5500T&S5600T&S5800T&S6800T Storage System V200R002 Online Capacity Expansion 01
http://slidepdf.com/reader/full/oceanstor-s2600ts5500ts5600ts5800ts6800t-storage-system-v200r002-online 175/226
MAX PPs per VG: 130048
MAX PPs per PV: 2032 MAX PVs: 64
LTG size (Dynamic): 256 kilobyte(s) AUTO SYNC: no
HOT SPARE: no BB POLICY: relocatable
In the command output, pay attention to the PP SIZE parameter. If you want to create or
modify a logical volume, you need to refer to the parameter to determine the size of the
logical volume. In the example of this section, the value of PP SIZE is 32 MB.
Step 9 Modify the capacity of the logical volume to meet the need for expanding the file system.
1. Run lslv lv1 to view parameters related to the logical volume.
# lslv lv1
LOGICAL VOLUME: lv1 VOLUME GROUP: vg1
LV IDENTIFIER: 00f6e07400004c00000000011660e3d1.1 PERMISSION: read/
write
VG STATE: active/complete LV STATE: closed/syncd
TYPE: jfs2 WRITE VERIFY: off
MAX LPs: 768 PP SIZE: 32 megabyte(s)
COPIES: 1 SCHED POLICY: parallel
LPs: 768 PPs: 768
STALE PPs: 0 BB POLICY: relocatable
INTER-POLICY: minimum RELOCATABLE: yes
INTRA-POLICY: middle UPPER BOUND: 128
MOUNT POINT: /mnt/lv1 LABEL: /mnt/lv1
MIRROR WRITE CONSISTENCY: on/ACTIVE
EACH LP COPY ON A SEPARATE PV ?: yes
Serialize IO ?: NO
lv1 indicates the name of a logical volume on the volume group. Pay attention to the MAX
LPs, LPs, and PP SIZE parameters in the command output. MAX LPs, LPs, and PP
SIZE indicate the maximum number of logical partitions, number of logical partitions, and
size of the physical partition respectively. The value of MAX LPs multiplied by PP
SIZE is the size of the logical volume, and the value of LPs multiplied by PP SIZE is thecapacity of the logical volume's file system. In the example of this section, the values of
MAX LPs and LPs are both 768, and the value of PP SIZE is 32 MB. Therefore, the
capacities of the logical volume and the file system are both 24,576 MB (24 GB).
2. Run smit lv.
# smit lv
Logical Volumes
Move cursor to desired item and press Enter.
List All Logical Volumes by Volume Group
Add a Logical Volume
Set Characteristic of a Logical Volume
Show Characteristics of a Logical Volume
Remove a Logical Volume
Copy a Logical Volume
F1=Help F2=Refresh F3=Cancel Esc+8=Image
Esc+9=Shell Esc+0=Exit Enter=Do
3. In the command output, select Set Characteristic of a Logical Volume and press Enter.
Set Characteristic of a Logical Volume
Move cursor to desired item and press Enter.
Change a Logical Volume
Rename a Logical Volume Increase the Size of a Logical Volume
OceanStor S2600T&S5500T&S5600T&S5800T&S6800T
Storage System
Online Capacity Expansion 9 Expanding Storage Space for Existing Services
Issue 01 (2014-12-29) Huawei Proprietary and Confidential
Copyright © Huawei Technologies Co., Ltd.
168
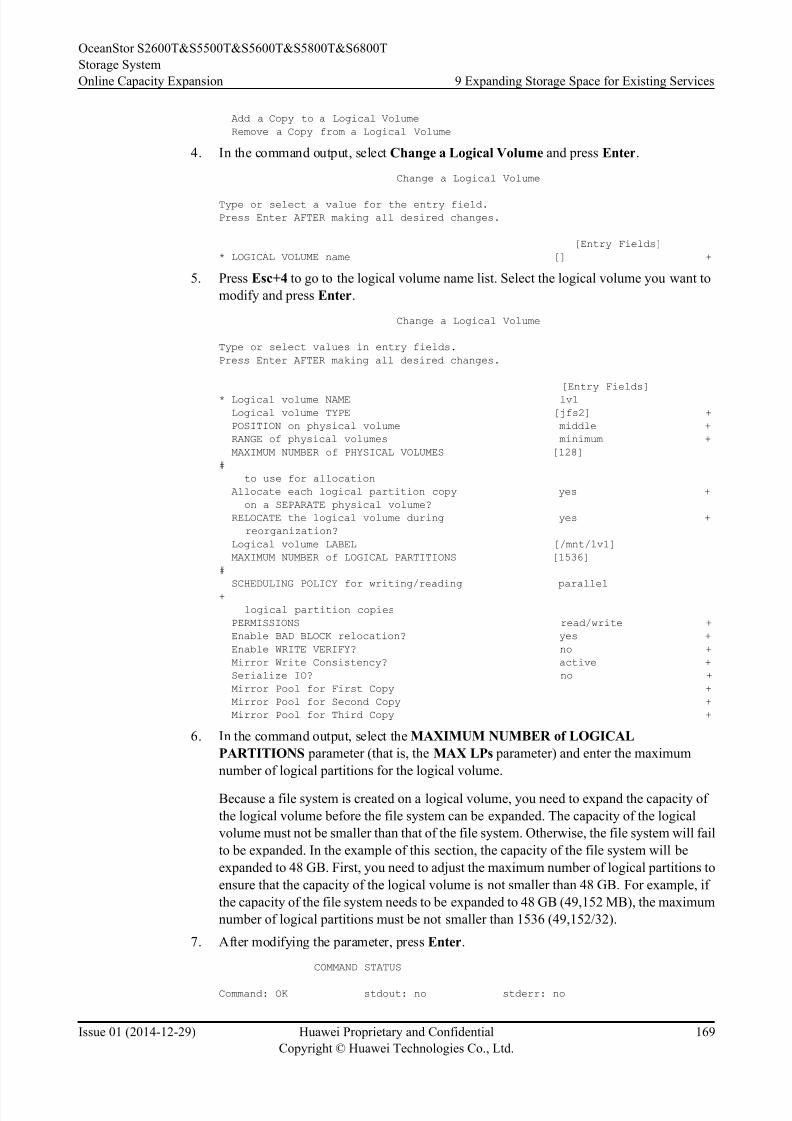
8/9/2019 OceanStor S2600T&S5500T&S5600T&S5800T&S6800T Storage System V200R002 Online Capacity Expansion 01
http://slidepdf.com/reader/full/oceanstor-s2600ts5500ts5600ts5800ts6800t-storage-system-v200r002-online 176/226
Add a Copy to a Logical Volume
Remove a Copy from a Logical Volume
4. In the command output, select Change a Logical Volume and press Enter.
Change a Logical Volume
Type or select a value for the entry field.
Press Enter AFTER making all desired changes.
[Entry Fields]
* LOGICAL VOLUME name [] +
5. Press Esc+4 to go to the logical volume name list. Select the logical volume you want to
modify and press Enter.
Change a Logical Volume
Type or select values in entry fields.
Press Enter AFTER making all desired changes.
[Entry Fields]
* Logical volume NAME lv1
Logical volume TYPE [jfs2] +
POSITION on physical volume middle +
RANGE of physical volumes minimum +
MAXIMUM NUMBER of PHYSICAL VOLUMES [128]
#
to use for allocation
Allocate each logical partition copy yes +
on a SEPARATE physical volume?
RELOCATE the logical volume during yes +
reorganization?
Logical volume LABEL [/mnt/lv1]
MAXIMUM NUMBER of LOGICAL PARTITIONS [1536]
#
SCHEDULING POLICY for writing/reading parallel+
logical partition copies
PERMISSIONS read/write +
Enable BAD BLOCK relocation? yes +
Enable WRITE VERIFY? no +
Mirror Write Consistency? active +
Serialize IO? no +
Mirror Pool for First Copy +
Mirror Pool for Second Copy +
Mirror Pool for Third Copy +
6. In the command output, select the MAXIMUM NUMBER of LOGICAL
PARTITIONS parameter (that is, the MAX LPs parameter) and enter the maximum
number of logical partitions for the logical volume.
Because a file system is created on a logical volume, you need to expand the capacity of
the logical volume before the file system can be expanded. The capacity of the logical
volume must not be smaller than that of the file system. Otherwise, the file system will fail
to be expanded. In the example of this section, the capacity of the file system will be
expanded to 48 GB. First, you need to adjust the maximum number of logical partitions to
ensure that the capacity of the logical volume is not smaller than 48 GB. For example, if
the capacity of the file system needs to be expanded to 48 GB (49,152 MB), the maximum
number of logical partitions must be not smaller than 1536 (49,152/32).
7. After modifying the parameter, press Enter.
COMMAND STATUS
Command: OK stdout: no stderr: no
OceanStor S2600T&S5500T&S5600T&S5800T&S6800T
Storage System
Online Capacity Expansion 9 Expanding Storage Space for Existing Services
Issue 01 (2014-12-29) Huawei Proprietary and Confidential
Copyright © Huawei Technologies Co., Ltd.
169
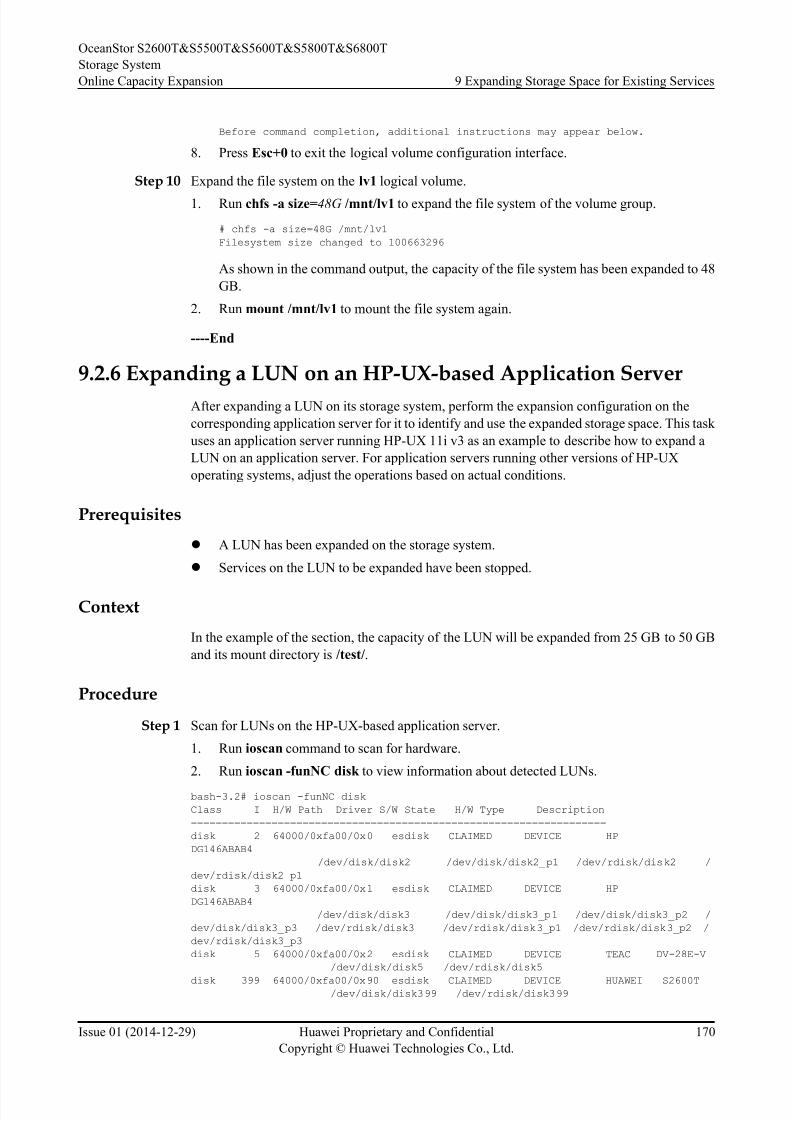
8/9/2019 OceanStor S2600T&S5500T&S5600T&S5800T&S6800T Storage System V200R002 Online Capacity Expansion 01
http://slidepdf.com/reader/full/oceanstor-s2600ts5500ts5600ts5800ts6800t-storage-system-v200r002-online 177/226
Before command completion, additional instructions may appear below.
8. Press Esc+0 to exit the logical volume configuration interface.
Step 10 Expand the file system on the lv1 logical volume.
1. Run chfs -a size=48G /mnt/lv1 to expand the file system of the volume group.
# chfs -a size=48G /mnt/lv1
Filesystem size changed to 100663296
As shown in the command output, the capacity of the file system has been expanded to 48
GB.
2. Run mount /mnt/lv1 to mount the file system again.
----End
9.2.6 Expanding a LUN on an HP-UX-based Application Server
After expanding a LUN on its storage system, perform the expansion configuration on the
corresponding application server for it to identify and use the expanded storage space. This task
uses an application server running HP-UX 11i v3 as an example to describe how to expand a
LUN on an application server. For application servers running other versions of HP-UX
operating systems, adjust the operations based on actual conditions.
Prerequisites
l A LUN has been expanded on the storage system.
l Services on the LUN to be expanded have been stopped.
Context
In the example of the section, the capacity of the LUN will be expanded from 25 GB to 50 GB
and its mount directory is /test/.
Procedure
Step 1 Scan for LUNs on the HP-UX-based application server.
1. Run ioscan command to scan for hardware.
2. Run ioscan -funNC disk to view information about detected LUNs.
bash-3.2# ioscan -funNC disk
Class I H/W Path Driver S/W State H/W Type Description
===================================================================
disk 2 64000/0xfa00/0x0 esdisk CLAIMED DEVICE HP
DG146ABAB4
/dev/disk/disk2 /dev/disk/disk2_p1 /dev/rdisk/disk2 /
dev/rdisk/disk2_p1
disk 3 64000/0xfa00/0x1 esdisk CLAIMED DEVICE HP
DG146ABAB4
/dev/disk/disk3 /dev/disk/disk3_p1 /dev/disk/disk3_p2 /
dev/disk/disk3_p3 /dev/rdisk/disk3 /dev/rdisk/disk3_p1 /dev/rdisk/disk3_p2 /
dev/rdisk/disk3_p3
disk 5 64000/0xfa00/0x2 esdisk CLAIMED DEVICE TEAC DV-28E-V
/dev/disk/disk5 /dev/rdisk/disk5
disk 399 64000/0xfa00/0x90 esdisk CLAIMED DEVICE HUAWEI S2600T /dev/disk/disk399 /dev/rdisk/disk399
OceanStor S2600T&S5500T&S5600T&S5800T&S6800T
Storage System
Online Capacity Expansion 9 Expanding Storage Space for Existing Services
Issue 01 (2014-12-29) Huawei Proprietary and Confidential
Copyright © Huawei Technologies Co., Ltd.
170
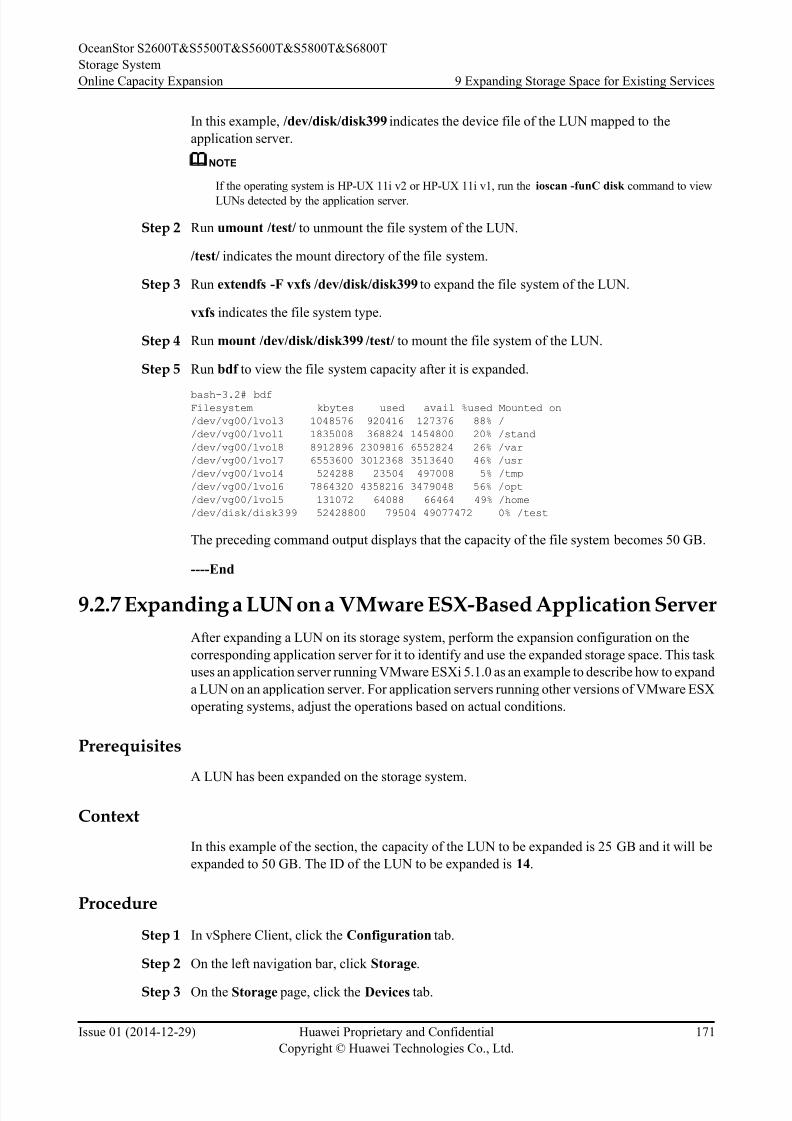
8/9/2019 OceanStor S2600T&S5500T&S5600T&S5800T&S6800T Storage System V200R002 Online Capacity Expansion 01
http://slidepdf.com/reader/full/oceanstor-s2600ts5500ts5600ts5800ts6800t-storage-system-v200r002-online 178/226
In this example, /dev/disk/disk399 indicates the device file of the LUN mapped to the
application server.
NOTE
If the operating system is HP-UX 11i v2 or HP-UX 11i v1, run the ioscan -funC disk command to view
LUNs detected by the application server.
Step 2 Run umount /test/ to unmount the file system of the LUN.
/test/ indicates the mount directory of the file system.
Step 3 Run extendfs -F vxfs /dev/disk/disk399 to expand the file system of the LUN.
vxfs indicates the file system type.
Step 4 Run mount /dev/disk/disk399 /test/ to mount the file system of the LUN.
Step 5 Run bdf to view the file system capacity after it is expanded.
bash-3.2# bdfFilesystem kbytes used avail %used Mounted on
/dev/vg00/lvol3 1048576 920416 127376 88% /
/dev/vg00/lvol1 1835008 368824 1454800 20% /stand
/dev/vg00/lvol8 8912896 2309816 6552824 26% /var
/dev/vg00/lvol7 6553600 3012368 3513640 46% /usr
/dev/vg00/lvol4 524288 23504 497008 5% /tmp
/dev/vg00/lvol6 7864320 4358216 3479048 56% /opt
/dev/vg00/lvol5 131072 64088 66464 49% /home
/dev/disk/disk399 52428800 79504 49077472 0% /test
The preceding command output displays that the capacity of the file system becomes 50 GB.
----End
9.2.7 Expanding a LUN on a VMware ESX-Based Application Server
After expanding a LUN on its storage system, perform the expansion configuration on the
corresponding application server for it to identify and use the expanded storage space. This task
uses an application server running VMware ESXi 5.1.0 as an example to describe how to expand
a LUN on an application server. For application servers running other versions of VMware ESX
operating systems, adjust the operations based on actual conditions.
Prerequisites
A LUN has been expanded on the storage system.
Context
In this example of the section, the capacity of the LUN to be expanded is 25 GB and it will be
expanded to 50 GB. The ID of the LUN to be expanded is 14.
Procedure
Step 1 In vSphere Client, click the Configuration tab.
Step 2 On the left navigation bar, click Storage.
Step 3 On the Storage page, click the Devices tab.
OceanStor S2600T&S5500T&S5600T&S5800T&S6800T
Storage System
Online Capacity Expansion 9 Expanding Storage Space for Existing Services
Issue 01 (2014-12-29) Huawei Proprietary and Confidential
Copyright © Huawei Technologies Co., Ltd.
171
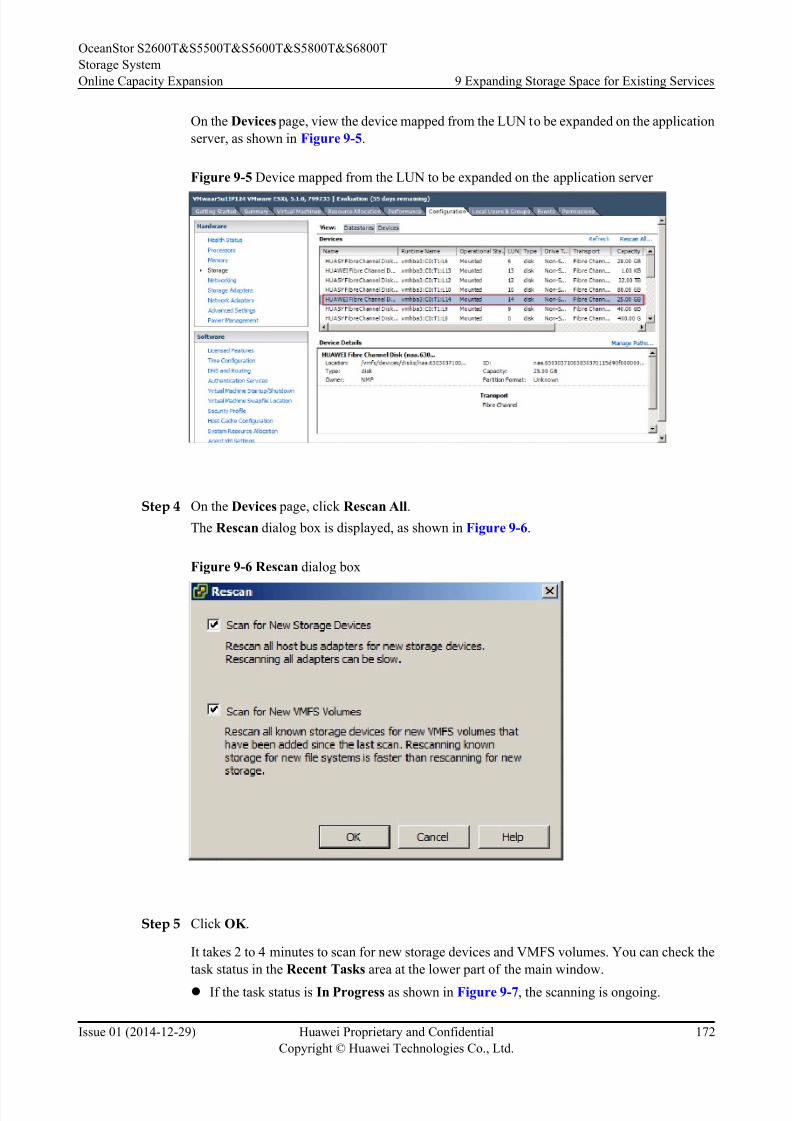
8/9/2019 OceanStor S2600T&S5500T&S5600T&S5800T&S6800T Storage System V200R002 Online Capacity Expansion 01
http://slidepdf.com/reader/full/oceanstor-s2600ts5500ts5600ts5800ts6800t-storage-system-v200r002-online 179/226
On the Devices page, view the device mapped from the LUN to be expanded on the application
server, as shown in Figure 9-5.
Figure 9-5 Device mapped from the LUN to be expanded on the application server
Step 4 On the Devices page, click Rescan All.
The Rescan dialog box is displayed, as shown in Figure 9-6.
Figure 9-6 Rescan dialog box
Step 5 Click OK .
It takes 2 to 4 minutes to scan for new storage devices and VMFS volumes. You can check the
task status in the Recent Tasks area at the lower part of the main window.
l If the task status is In Progress as shown in Figure 9-7, the scanning is ongoing.
OceanStor S2600T&S5500T&S5600T&S5800T&S6800T
Storage System
Online Capacity Expansion 9 Expanding Storage Space for Existing Services
Issue 01 (2014-12-29) Huawei Proprietary and Confidential
Copyright © Huawei Technologies Co., Ltd.
172
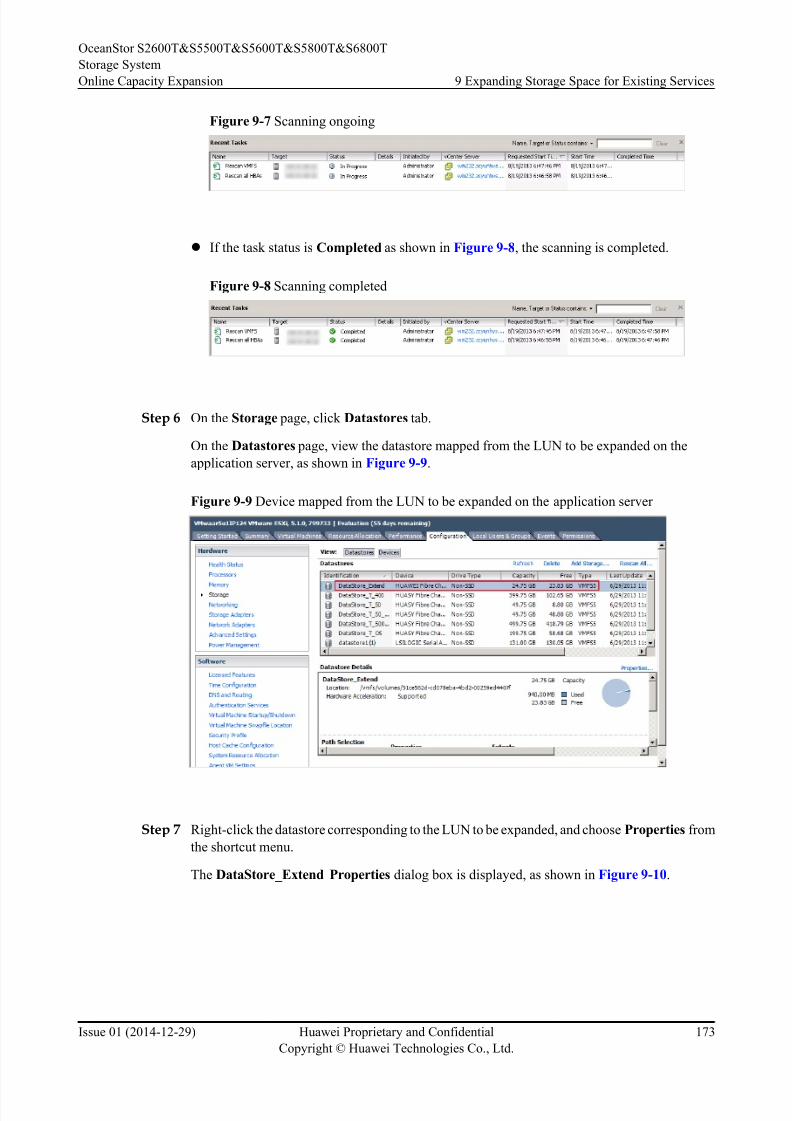
8/9/2019 OceanStor S2600T&S5500T&S5600T&S5800T&S6800T Storage System V200R002 Online Capacity Expansion 01
http://slidepdf.com/reader/full/oceanstor-s2600ts5500ts5600ts5800ts6800t-storage-system-v200r002-online 180/226
Figure 9-7 Scanning ongoing
l If the task status is Completed as shown in Figure 9-8, the scanning is completed.
Figure 9-8 Scanning completed
Step 6 On the Storage page, click Datastores tab.
On the Datastores page, view the datastore mapped from the LUN to be expanded on the
application server, as shown in Figure 9-9.
Figure 9-9 Device mapped from the LUN to be expanded on the application server
Step 7 Right-click the datastore corresponding to the LUN to be expanded, and choose Properties from
the shortcut menu.
The DataStore_Extend Properties dialog box is displayed, as shown in Figure 9-10.
OceanStor S2600T&S5500T&S5600T&S5800T&S6800T
Storage System
Online Capacity Expansion 9 Expanding Storage Space for Existing Services
Issue 01 (2014-12-29) Huawei Proprietary and Confidential
Copyright © Huawei Technologies Co., Ltd.
173
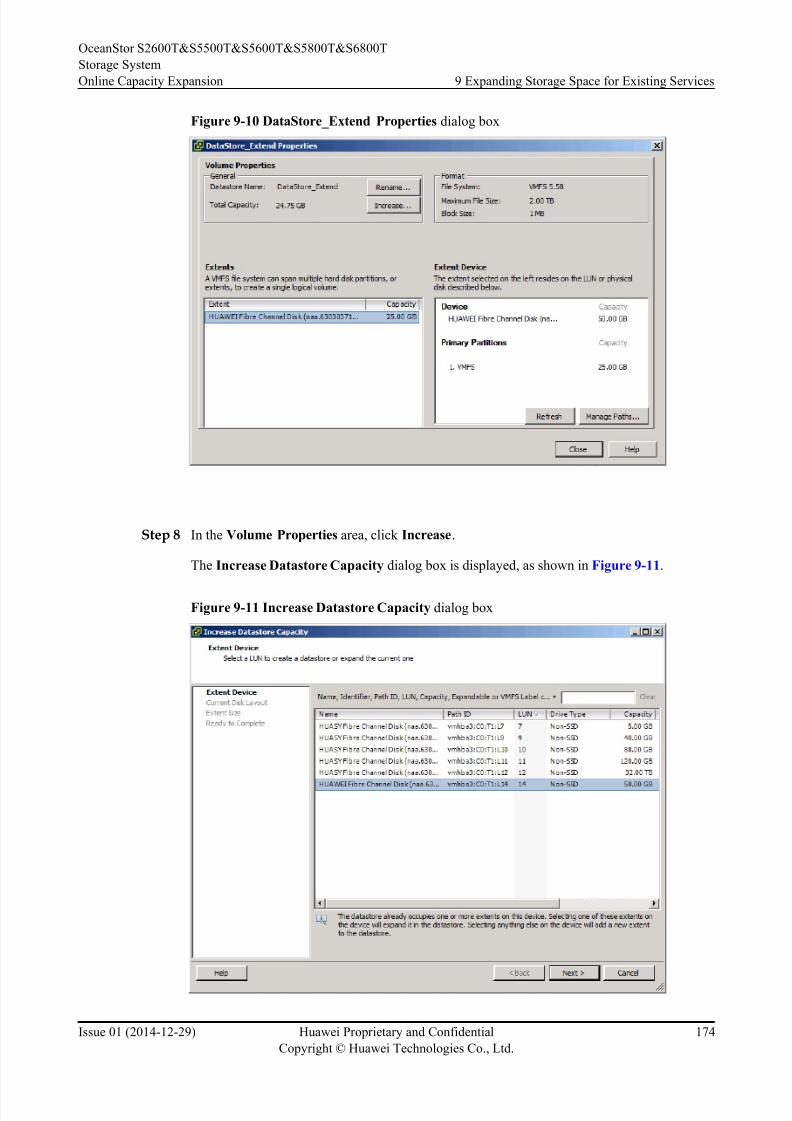
8/9/2019 OceanStor S2600T&S5500T&S5600T&S5800T&S6800T Storage System V200R002 Online Capacity Expansion 01
http://slidepdf.com/reader/full/oceanstor-s2600ts5500ts5600ts5800ts6800t-storage-system-v200r002-online 181/226
Figure 9-10 DataStore_Extend Properties dialog box
Step 8 In the Volume Properties area, click Increase.
The Increase Datastore Capacity dialog box is displayed, as shown in Figure 9-11.
Figure 9-11 Increase Datastore Capacity dialog box
OceanStor S2600T&S5500T&S5600T&S5800T&S6800T
Storage System
Online Capacity Expansion 9 Expanding Storage Space for Existing Services
Issue 01 (2014-12-29) Huawei Proprietary and Confidential
Copyright © Huawei Technologies Co., Ltd.
174
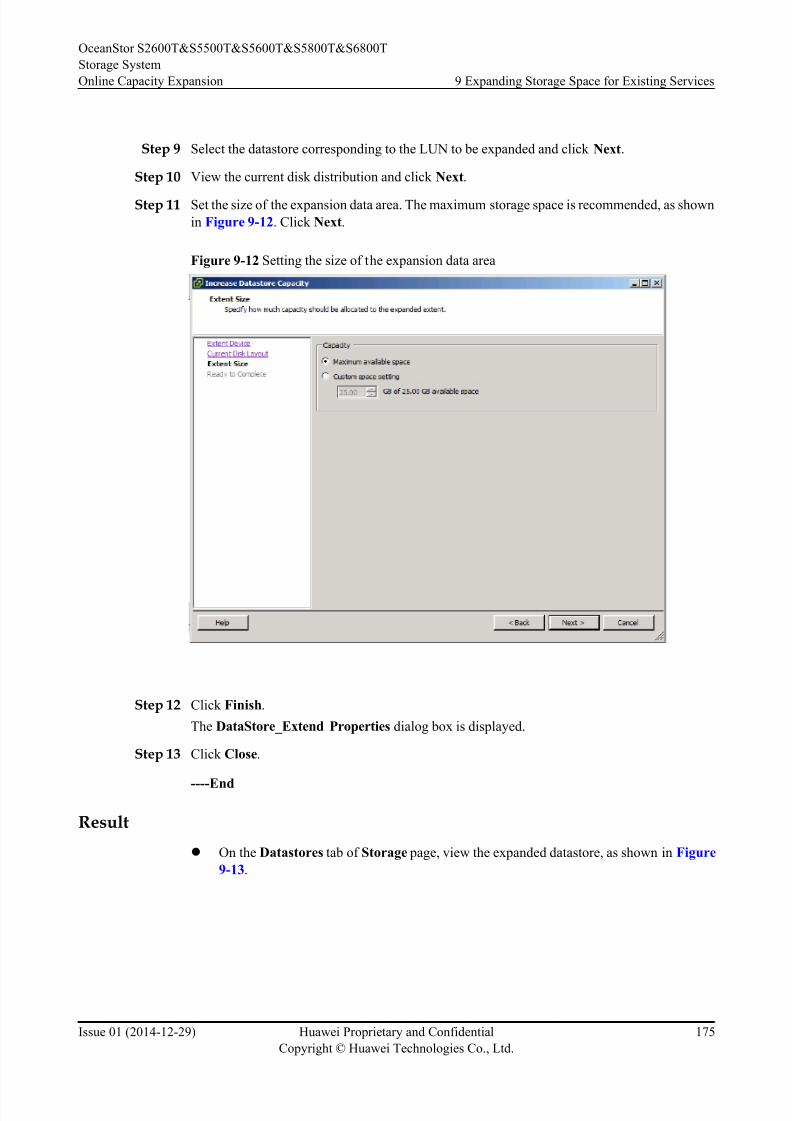
8/9/2019 OceanStor S2600T&S5500T&S5600T&S5800T&S6800T Storage System V200R002 Online Capacity Expansion 01
http://slidepdf.com/reader/full/oceanstor-s2600ts5500ts5600ts5800ts6800t-storage-system-v200r002-online 182/226
Step 9 Select the datastore corresponding to the LUN to be expanded and click Next.
Step 10 View the current disk distribution and click Next.
Step 11 Set the size of the expansion data area. The maximum storage space is recommended, as shown
in Figure 9-12. Click Next.
Figure 9-12 Setting the size of the expansion data area
Step 12 Click Finish.
The DataStore_Extend Properties dialog box is displayed.
Step 13 Click Close.
----End
Result
l On the Datastores tab of Storage page, view the expanded datastore, as shown in Figure
9-13.
OceanStor S2600T&S5500T&S5600T&S5800T&S6800T
Storage System
Online Capacity Expansion 9 Expanding Storage Space for Existing Services
Issue 01 (2014-12-29) Huawei Proprietary and Confidential
Copyright © Huawei Technologies Co., Ltd.
175
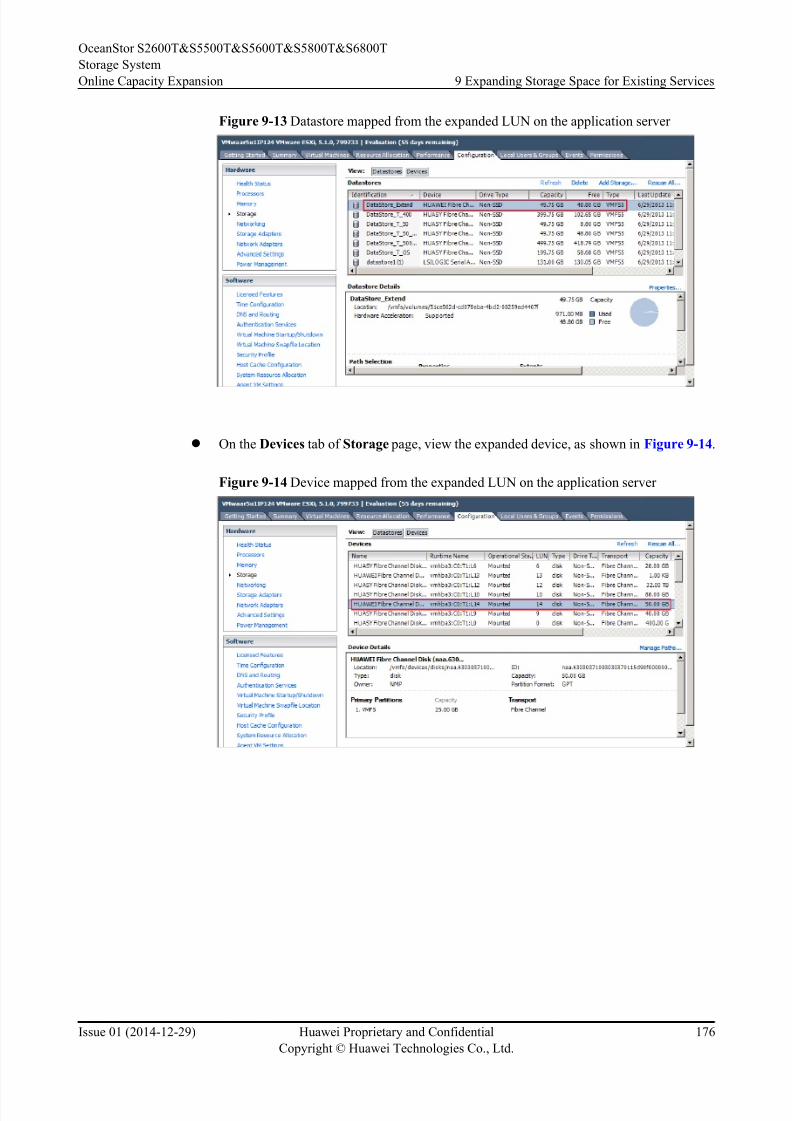
8/9/2019 OceanStor S2600T&S5500T&S5600T&S5800T&S6800T Storage System V200R002 Online Capacity Expansion 01
http://slidepdf.com/reader/full/oceanstor-s2600ts5500ts5600ts5800ts6800t-storage-system-v200r002-online 183/226
Figure 9-13 Datastore mapped from the expanded LUN on the application server
l On the Devices tab of Storage page, view the expanded device, as shown in Figure 9-14.
Figure 9-14 Device mapped from the expanded LUN on the application server
OceanStor S2600T&S5500T&S5600T&S5800T&S6800T
Storage System
Online Capacity Expansion 9 Expanding Storage Space for Existing Services
Issue 01 (2014-12-29) Huawei Proprietary and Confidential
Copyright © Huawei Technologies Co., Ltd.
176
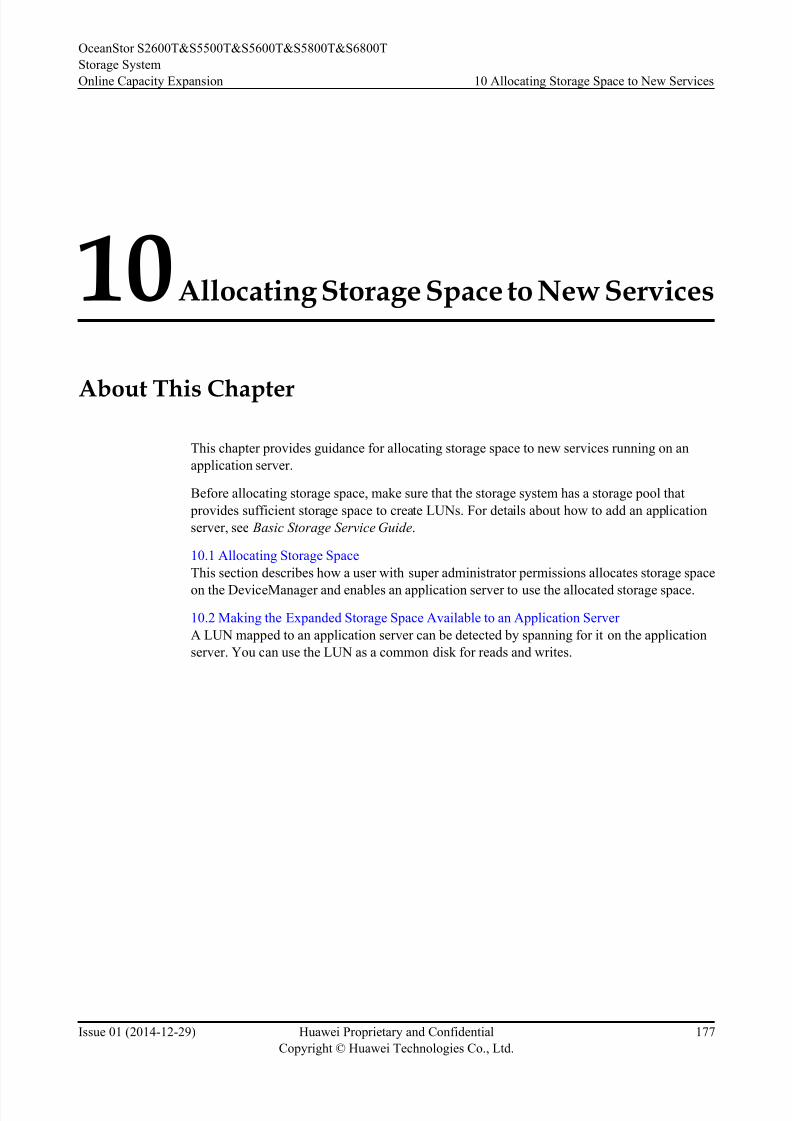
8/9/2019 OceanStor S2600T&S5500T&S5600T&S5800T&S6800T Storage System V200R002 Online Capacity Expansion 01
http://slidepdf.com/reader/full/oceanstor-s2600ts5500ts5600ts5800ts6800t-storage-system-v200r002-online 184/226
10 Allocating Storage Space to New Services
About This Chapter
This chapter provides guidance for allocating storage space to new services running on an
application server.
Before allocating storage space, make sure that the storage system has a storage pool that
provides sufficient storage space to create LUNs. For details about how to add an application
server, see Basic Storage Service Guide.
10.1 Allocating Storage Space
This section describes how a user with super administrator permissions allocates storage space
on the DeviceManager and enables an application server to use the allocated storage space.
10.2 Making the Expanded Storage Space Available to an Application Server
A LUN mapped to an application server can be detected by spanning for it on the application
server. You can use the LUN as a common disk for reads and writes.
OceanStor S2600T&S5500T&S5600T&S5800T&S6800T
Storage System
Online Capacity Expansion 10 Allocating Storage Space to New Services
Issue 01 (2014-12-29) Huawei Proprietary and Confidential
Copyright © Huawei Technologies Co., Ltd.
177
8/9/2019 OceanStor S2600T&S5500T&S5600T&S5800T&S6800T Storage System V200R002 Online Capacity Expansion 01
http://slidepdf.com/reader/full/oceanstor-s2600ts5500ts5600ts5800ts6800t-storage-system-v200r002-online 185/226
10.1 Allocating Storage Space
This section describes how a user with super administrator permissions allocates storage spaceon the DeviceManager and enables an application server to use the allocated storage space.
Prerequisites
l Communication is normal between a storage system and an application server to which
storage space is allocated.
l You have confirmed an application server to which a new LUN is mapped and the size of
the application server. Do not map a LUN that is larger than the maximum capacity
identified by the application server's operating system.
l The storage system has a storage pool that provides sufficient storage space to create LUNs.
For details about how to expand a storage pool, see Expanding LUNs.
Procedure
Step 1 In the navigation tree on the right, click .
The Provisioning page is displayed.
Step 2 Create a LUN and LUN group.
1. Under Resource Allocation, click Create LUN.
The Create LUN page is displayed.
2. Set LUN parameters as required by the new service. Table 10-1 describes the parameters.
Table 10-1 Parameters for creating a LUN
Parameter Description
Enabling
SmartThin
Enables SmartThin to create thin LUNs. A thin LUN is first allocated
an initial amount of storage space, and the allocated storage space
increases as data is written onto the thin LUN.
Capacity Indicates the actual storage space allocated to the LUN. The capacity
you set is the actual capacity that can be used by the LUN.
Quantity Indicates the quantity of LUNs to be created. The storage system
allows you to create multiple LUNs at a time. Each LUN is allocated
the same capacity and automatically named.
3. Click OK . The LUN creation is complete.
4. Under Resource Allocation, click Create LUN Group.
The Create LUN Group page is displayed.
5. Under LUN, select the LUN you have created and click the right arrow icon to add the
LUN to the LUN group.
OceanStor S2600T&S5500T&S5600T&S5800T&S6800T
Storage System
Online Capacity Expansion 10 Allocating Storage Space to New Services
Issue 01 (2014-12-29) Huawei Proprietary and Confidential
Copyright © Huawei Technologies Co., Ltd.
178
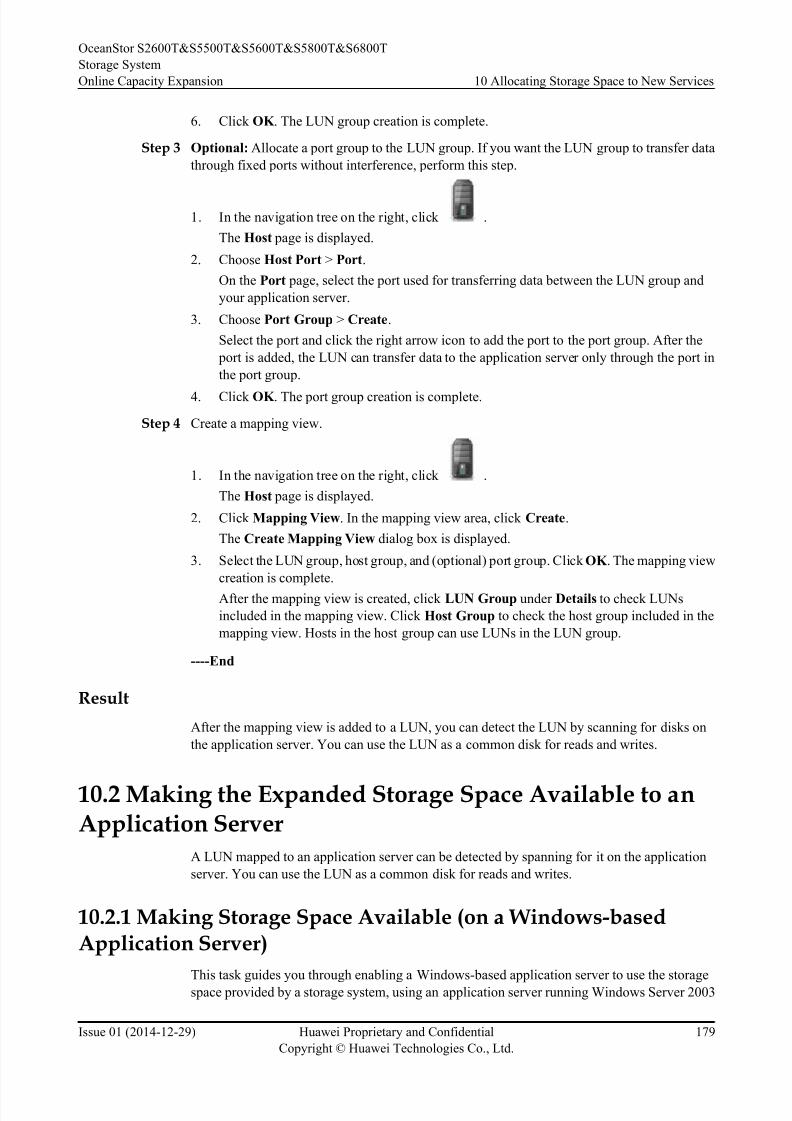
8/9/2019 OceanStor S2600T&S5500T&S5600T&S5800T&S6800T Storage System V200R002 Online Capacity Expansion 01
http://slidepdf.com/reader/full/oceanstor-s2600ts5500ts5600ts5800ts6800t-storage-system-v200r002-online 186/226
6. Click OK . The LUN group creation is complete.
Step 3 Optional: Allocate a port group to the LUN group. If you want the LUN group to transfer data
through fixed ports without interference, perform this step.
1. In the navigation tree on the right, click .
The Host page is displayed.
2. Choose Host Port > Port.
On the Port page, select the port used for transferring data between the LUN group and
your application server.
3. Choose Port Group > Create.
Select the port and click the right arrow icon to add the port to the port group. After the
port is added, the LUN can transfer data to the application server only through the port in
the port group.
4. Click OK . The port group creation is complete.
Step 4 Create a mapping view.
1. In the navigation tree on the right, click .
The Host page is displayed.
2. Click Mapping View. In the mapping view area, click Create.
The Create Mapping View dialog box is displayed.
3. Select the LUN group, host group, and (optional) port group. Click OK . The mapping view
creation is complete.
After the mapping view is created, click LUN Group under Details to check LUNs
included in the mapping view. Click Host Group to check the host group included in the
mapping view. Hosts in the host group can use LUNs in the LUN group.
----End
Result
After the mapping view is added to a LUN, you can detect the LUN by scanning for disks on
the application server. You can use the LUN as a common disk for reads and writes.
10.2 Making the Expanded Storage Space Available to anApplication Server
A LUN mapped to an application server can be detected by spanning for it on the application
server. You can use the LUN as a common disk for reads and writes.
10.2.1 Making Storage Space Available (on a Windows-basedApplication Server)
This task guides you through enabling a Windows-based application server to use the storage
space provided by a storage system, using an application server running Windows Server 2003
OceanStor S2600T&S5500T&S5600T&S5800T&S6800T
Storage System
Online Capacity Expansion 10 Allocating Storage Space to New Services
Issue 01 (2014-12-29) Huawei Proprietary and Confidential
Copyright © Huawei Technologies Co., Ltd.
179
8/9/2019 OceanStor S2600T&S5500T&S5600T&S5800T&S6800T Storage System V200R002 Online Capacity Expansion 01
http://slidepdf.com/reader/full/oceanstor-s2600ts5500ts5600ts5800ts6800t-storage-system-v200r002-online 187/226
as an example. For application servers running other versions of Windows operating systems,
adjust the operations based on actual conditions.
Context
The GUID Partition Table (GPT) disk is partitioned using the GPT scheme. The GPT scheme
provides more advantages than the traditional Master Boot Record (MBR) partitioning scheme.
GPT allows each disk to have 128 partitions and supports a maximum of 18 EB (1 EB = 1024
PB = 1,048,576 TB) disk capacity, whereas MBR allows each disk to have only four main
partitions and supports only a maximum of 2 TB disk capacity. Therefore, if a LUN mapped to
a host is larger than 2 TB, it is available only after being converted into a GPT disk.
Procedure
Step 1 Log in to the Windows-based application server as administrator.
Step 2 Go to the Computer Management dialog box.
Right-click the icon of My Computer on the desktop and choose Manage from the shortcut
menu.
Step 3 In the navigation tree, choose Disk Management and scan for new logical disks.
1. In the navigation tree on the left of the Computer Management dialog box, choose
Storage > Disk Management.
2. Right-click Disk Management and choose Rescan Disks from the shortcut menu.
NOTE
If you have deleted the LUN mapped to a Windows 2003-based application server, perform the
previous steps, confirm that the mapped LUN is deleted in the right area of the ComputerManagement dialog box, and then add a mapping.
l After the scan is complete, the new logical disk is displayed in the right area (using Disk
1 as an example), as shown in Figure 10-1 (The display varies according to the disk
size).
OceanStor S2600T&S5500T&S5600T&S5800T&S6800T
Storage System
Online Capacity Expansion 10 Allocating Storage Space to New Services
Issue 01 (2014-12-29) Huawei Proprietary and Confidential
Copyright © Huawei Technologies Co., Ltd.
180
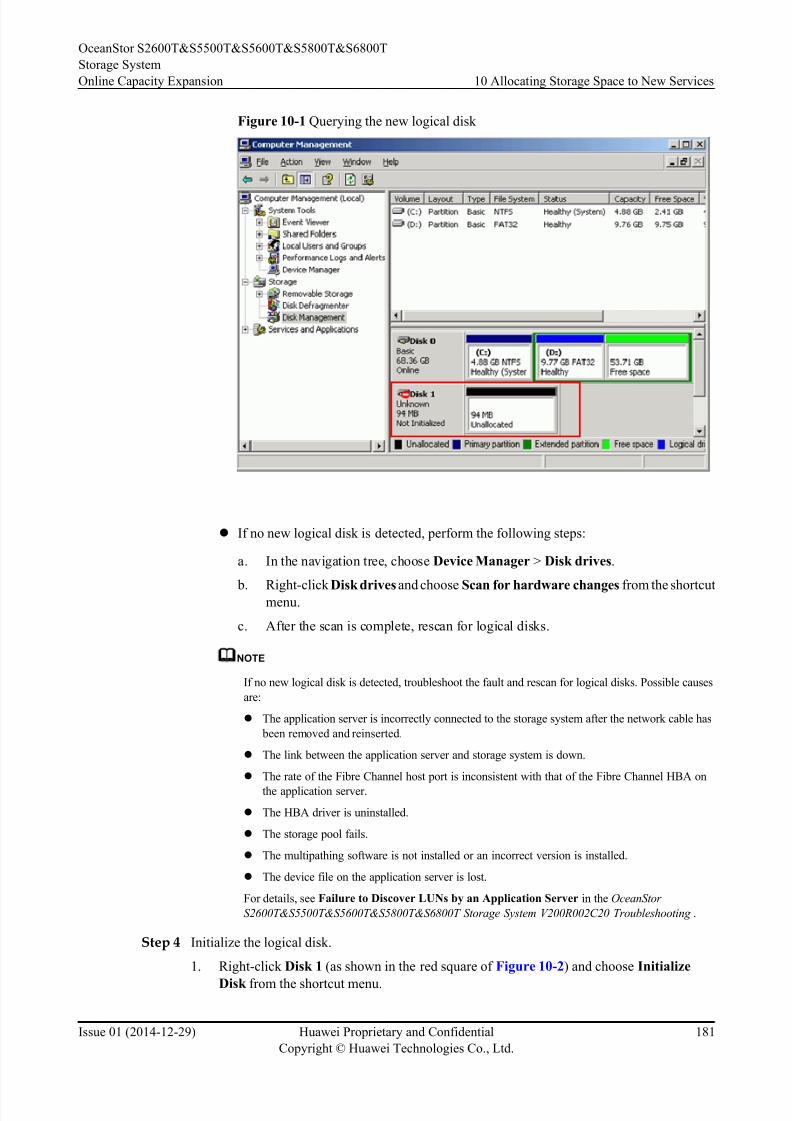
8/9/2019 OceanStor S2600T&S5500T&S5600T&S5800T&S6800T Storage System V200R002 Online Capacity Expansion 01
http://slidepdf.com/reader/full/oceanstor-s2600ts5500ts5600ts5800ts6800t-storage-system-v200r002-online 188/226
Figure 10-1 Querying the new logical disk
l If no new logical disk is detected, perform the following steps:
a. In the navigation tree, choose Device Manager > Disk drives.
b. Right-click Disk drives and choose Scan for hardware changes from the shortcutmenu.
c. After the scan is complete, rescan for logical disks.
NOTE
If no new logical disk is detected, troubleshoot the fault and rescan for logical disks. Possible causes
are:
l The application server is incorrectly connected to the storage system after the network cable has
been removed and reinserted.
l The link between the application server and storage system is down.
l The rate of the Fibre Channel host port is inconsistent with that of the Fibre Channel HBA on
the application server.
l The HBA driver is uninstalled.
l The storage pool fails.
l The multipathing software is not installed or an incorrect version is installed.
l The device file on the application server is lost.
For details, see Failure to Discover LUNs by an Application Server in the OceanStor
S2600T&S5500T&S5600T&S5800T&S6800T Storage System V200R002C20 Troubleshooting .
Step 4 Initialize the logical disk.
1. Right-click Disk 1 (as shown in the red square of Figure 10-2) and choose Initialize
Disk from the shortcut menu.
OceanStor S2600T&S5500T&S5600T&S5800T&S6800T
Storage System
Online Capacity Expansion 10 Allocating Storage Space to New Services
Issue 01 (2014-12-29) Huawei Proprietary and Confidential
Copyright © Huawei Technologies Co., Ltd.
181
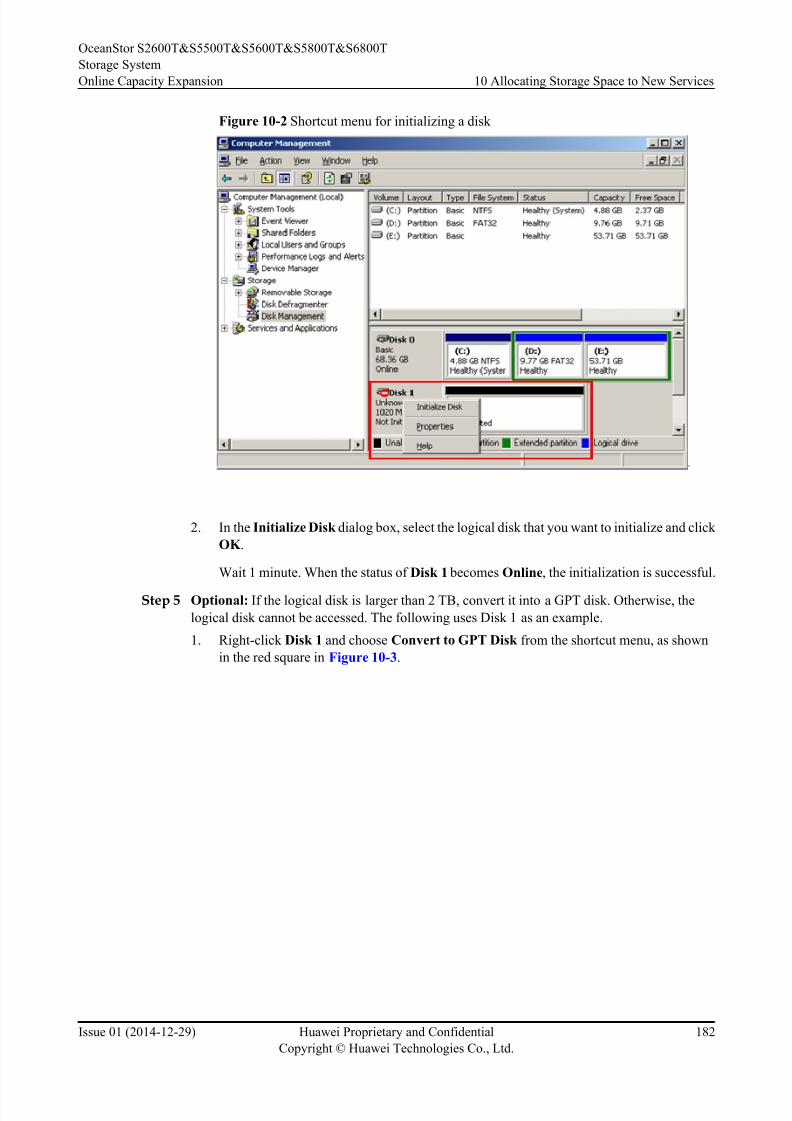
8/9/2019 OceanStor S2600T&S5500T&S5600T&S5800T&S6800T Storage System V200R002 Online Capacity Expansion 01
http://slidepdf.com/reader/full/oceanstor-s2600ts5500ts5600ts5800ts6800t-storage-system-v200r002-online 189/226
Figure 10-2 Shortcut menu for initializing a disk
2. In the Initialize Disk dialog box, select the logical disk that you want to initialize and click
OK .
Wait 1 minute. When the status of Disk 1 becomes Online, the initialization is successful.
Step 5 Optional: If the logical disk is larger than 2 TB, convert it into a GPT disk. Otherwise, the
logical disk cannot be accessed. The following uses Disk 1 as an example.
1. Right-click Disk 1 and choose Convert to GPT Disk from the shortcut menu, as shown
in the red square in Figure 10-3.
OceanStor S2600T&S5500T&S5600T&S5800T&S6800T
Storage System
Online Capacity Expansion 10 Allocating Storage Space to New Services
Issue 01 (2014-12-29) Huawei Proprietary and Confidential
Copyright © Huawei Technologies Co., Ltd.
182
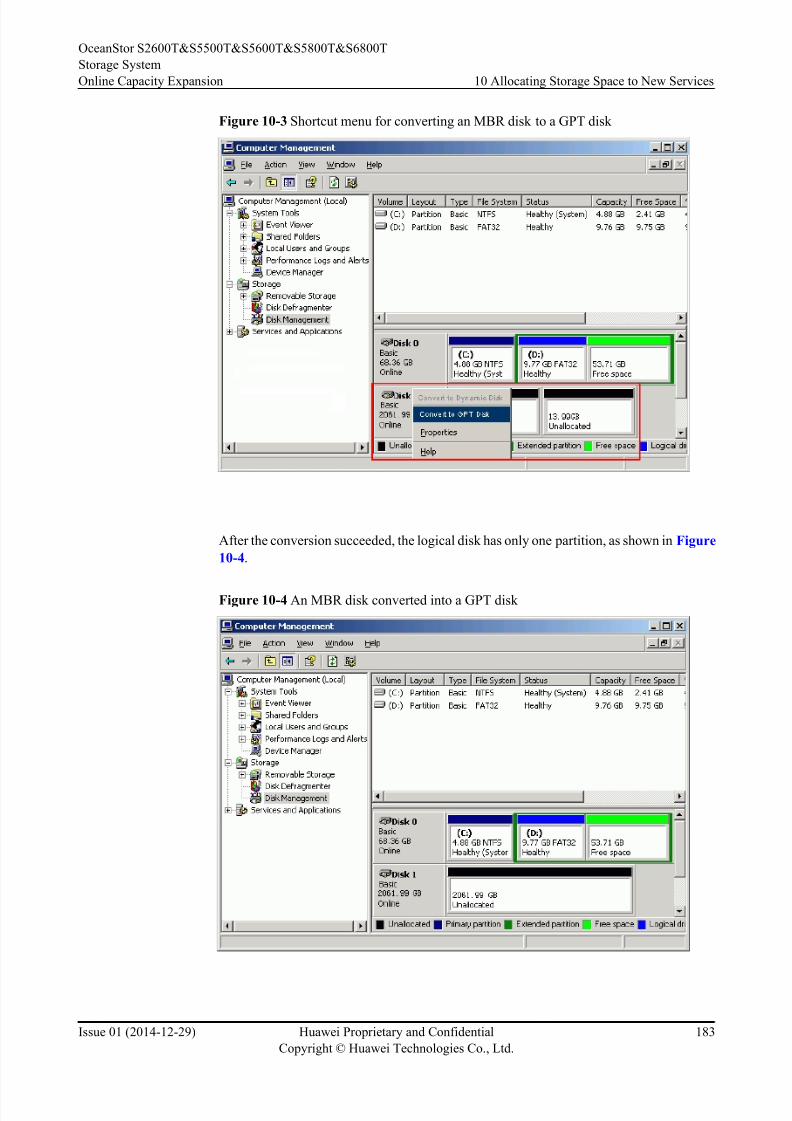
8/9/2019 OceanStor S2600T&S5500T&S5600T&S5800T&S6800T Storage System V200R002 Online Capacity Expansion 01
http://slidepdf.com/reader/full/oceanstor-s2600ts5500ts5600ts5800ts6800t-storage-system-v200r002-online 190/226
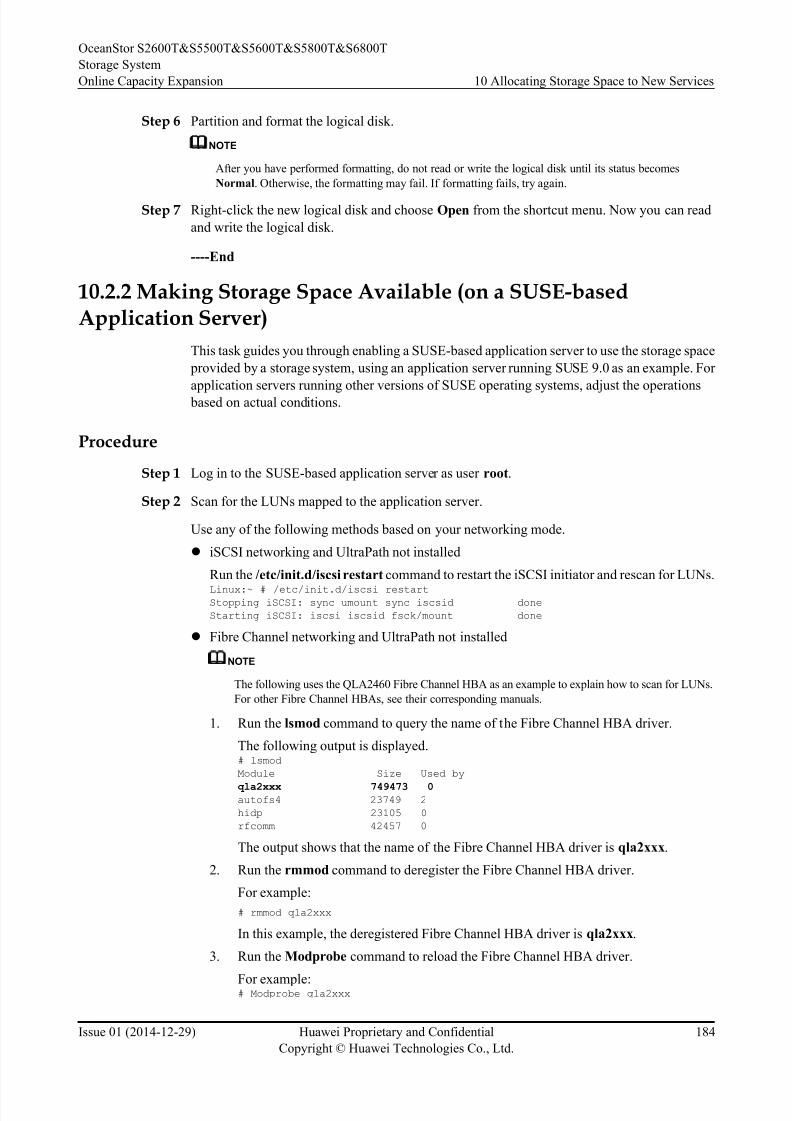
8/9/2019 OceanStor S2600T&S5500T&S5600T&S5800T&S6800T Storage System V200R002 Online Capacity Expansion 01
http://slidepdf.com/reader/full/oceanstor-s2600ts5500ts5600ts5800ts6800t-storage-system-v200r002-online 191/226
8/9/2019 OceanStor S2600T&S5500T&S5600T&S5800T&S6800T Storage System V200R002 Online Capacity Expansion 01
http://slidepdf.com/reader/full/oceanstor-s2600ts5500ts5600ts5800ts6800t-storage-system-v200r002-online 192/226
In this example, the reloaded Fibre Channel HBA driver is qla2xxx.
l iSCSI or Fibre Channel networking and UltraPath installed
Run the hot_add command to scan for LUNs.starting new devices re-scan...
scan mptsas HBA host /sys/class/scsi_host/host1... no new device found run /usr/sbin/upTools -s busscan...
found 2:0:0:0->/dev/sdb found 2:0:0:1->/dev/sdc /usr/sbin/hot_add is completed.
Step 3 Run the fdisk -l command to query the information about all disks on the application server.
The application server detects a LUN of 524 MB and named /dev/sdb, as shown below.Disk /dev/sda: 500.1 GB, 500107862016 bytes
255 heads, 63 sectors/track, 60801 cylinders
Units = cylinders of 16065 * 512 = 8225280 bytes
Device Boot Start End Blocks Id System
/dev/sda1 1 131 1052226 82 Linux swap
/dev/sda2 * 132 60797 487299645 83 Linux
Disk /dev/sdb: 524 MB, 524288000 bytes17 heads, 59 sectors/track, 1020 cylinders
Units = cylinders of 1003 * 512 = 513536 bytes
Disk /dev/sdb doesn't contain a valid partition table
NOTE
If no new logical disk is detected, troubleshoot the fault and rescan for logical disks. Possible causes are:
l The application server is incorrectly connected to the storage system after the network cable has been
removed and reinserted.
l The link between the application server and storage system is down.
l The rate of the Fibre Channel host port is inconsistent with that of the Fibre Channel HBA on the
application server.
l The HBA driver is uninstalled.
l The storage pool fails.
l The multipathing software is not installed or an incorrect version is installed.
l The device file on the application server is lost.
For details, see Failure to Discover LUNs by an Application Server in the OceanStor
S2600T&S5500T&S5600T&S5800T&S6800T Storage System V200R002C20 Troubleshooting .
Step 4 Run the fdisk command to partition the logical disk.
For example, to create a primary partition for the /dev/sdb logical disk, run the following
command.# fdisk /dev/sdb
Command (m for help): n
Command action e extended
p primary partition (1-4)
p
Partition number (1-4): 1
First cylinder (1-1011, default 1): 1
Last cylinder (1-1011, default 1011): 1011
Command (m for help): w
The partition table has been altered!
Calling ioctl () to re-read partition table.
Syncing disks.
Step 5 Create a file system on the logical disk.
For example, to create an ext3 file system, run the mkfs.ext3 /dev/sdb1 command. The following
output is displayed.
OceanStor S2600T&S5500T&S5600T&S5800T&S6800T
Storage System
Online Capacity Expansion 10 Allocating Storage Space to New Services
Issue 01 (2014-12-29) Huawei Proprietary and Confidential
Copyright © Huawei Technologies Co., Ltd.
185
8/9/2019 OceanStor S2600T&S5500T&S5600T&S5800T&S6800T Storage System V200R002 Online Capacity Expansion 01
http://slidepdf.com/reader/full/oceanstor-s2600ts5500ts5600ts5800ts6800t-storage-system-v200r002-online 193/226
mke2fs 1.38 (30-Jun-2005)
Filesystem label=
OS type: Linux
Block size=1024 (log=0)
Fragment size=1024 (log=0)
78312 inodes, 313100 blocks
15655 blocks (5.00%) reserved for the super userFirst data block=1
Maximum filesystem blocks=67633152
39 block groups
8192 blocks per group, 8192 fragments per group
2008 inodes per group
Superblock backups stored on blocks:
8193, 24577, 40961, 57345, 73729, 204801, 221185
Checking for bad blocks (read-only test): done 100
Writing inode tables: done
Creating journal (8192 blocks): done
Writing superblocks and filesystem accounting information: done
This filesystem will be automatically checked every 23 mounts or
180 days, whichever comes first. Use tune2fs -c or -i to override.
Step 6 Create a file directory.
Run the following command to create a file directory.# mkdir /directory
In this example, the directory directory is created.
Step 7 Mount the partitioned logical disk to the directory.
Run the following command to mount the logical disk.mount /dev/sdb1 /directory
In this example, the /dev/sdb1 logical disk is mounted to directory.
----End
Result
Run the mount command to check whether the logical disk is properly mounted. If the mounting
is successful, the application server can read and write the logical disk as a normal hard disk. If
the following output is displayed, the mounting succeeded.# mount
/dev/sda2 on / type ext3 (rw)
proc on /proc type proc (rw)
sysfs on /sys type sysfs (rw)
devpts on /dev/pts type devpts (rw,gid=5,mode=620)
/dev/sda5 on /home type ext3 (rw)
/dev/sda1 on /boot type ext3 (rw)
tmpfs on /dev/shm type tmpfs (rw)
none on /proc/sys/fs/binfmt_misc type binfmt_misc (rw)
sunrpc on /var/lib/nfs/rpc_pipefs type rpc_pipefs (rw)
none on /proc/fs/vmblock/mountPoint type vmblock (rw)
/dev/hdc on /media/RHEL_5.3 i386 DVD type iso9660 (ro,noexec,nosuid,nodev,uid=0)
/dev/sdb1 on /directory type ext3 (rw)
10.2.3 Making Storage Space Available (on a Red Hat-basedApplication Server)
This task guides you through enabling a Red Hat-based application server to use the storage
space provided by a storage system, using an application server running Red Hat Enterprise
OceanStor S2600T&S5500T&S5600T&S5800T&S6800T
Storage System
Online Capacity Expansion 10 Allocating Storage Space to New Services
Issue 01 (2014-12-29) Huawei Proprietary and Confidential
Copyright © Huawei Technologies Co., Ltd.
186
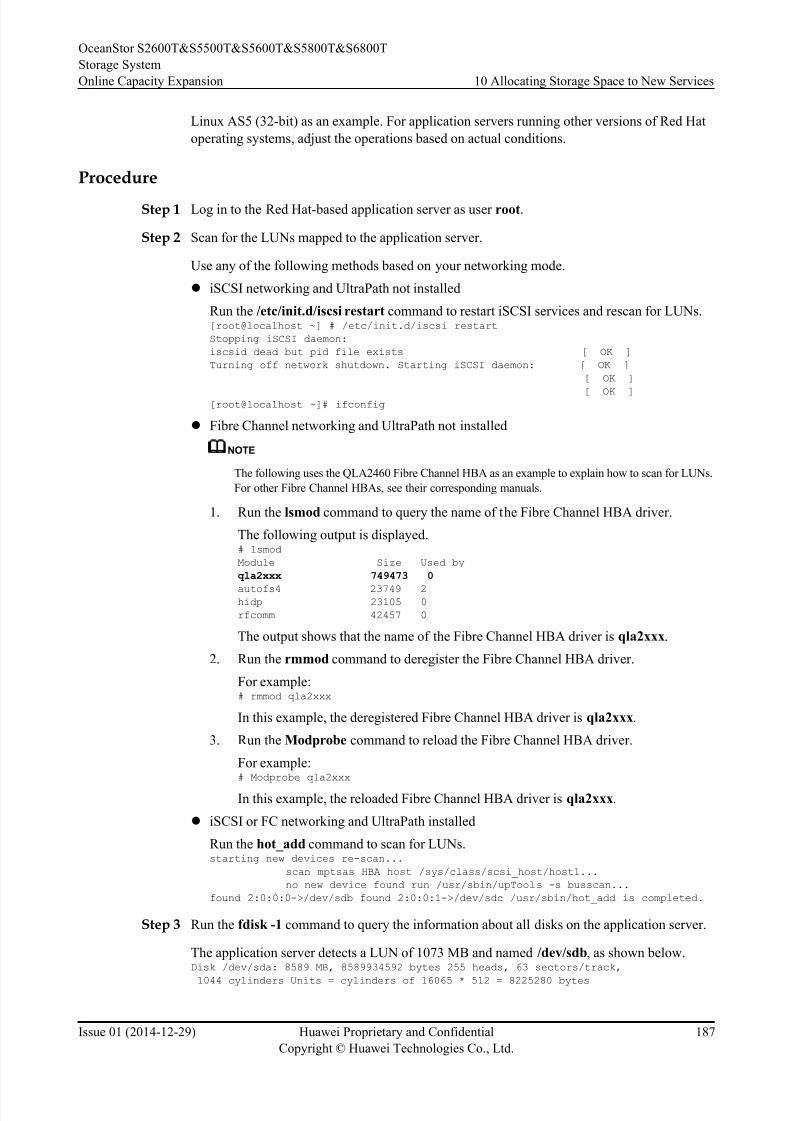
8/9/2019 OceanStor S2600T&S5500T&S5600T&S5800T&S6800T Storage System V200R002 Online Capacity Expansion 01
http://slidepdf.com/reader/full/oceanstor-s2600ts5500ts5600ts5800ts6800t-storage-system-v200r002-online 194/226
Linux AS5 (32-bit) as an example. For application servers running other versions of Red Hat
operating systems, adjust the operations based on actual conditions.
Procedure
Step 1 Log in to the Red Hat-based application server as user root.
Step 2 Scan for the LUNs mapped to the application server.
Use any of the following methods based on your networking mode.
l iSCSI networking and UltraPath not installed
Run the /etc/init.d/iscsi restart command to restart iSCSI services and rescan for LUNs.[root@localhost ~] # /etc/init.d/iscsi restart
Stopping iSCSI daemon:
iscsid dead but pid file exists [ OK ]
Turning off network shutdown. Starting iSCSI daemon: [ OK ]
[ OK ]
[ OK ][root@localhost ~]# ifconfig
l Fibre Channel networking and UltraPath not installed
NOTE
The following uses the QLA2460 Fibre Channel HBA as an example to explain how to scan for LUNs.
For other Fibre Channel HBAs, see their corresponding manuals.
1. Run the lsmod command to query the name of the Fibre Channel HBA driver.
The following output is displayed.# lsmod
Module Size Used by
qla2xxx 749473 0
autofs4 23749 2hidp 23105 0
rfcomm 42457 0
The output shows that the name of the Fibre Channel HBA driver is qla2xxx.
2. Run the rmmod command to deregister the Fibre Channel HBA driver.
For example:# rmmod qla2xxx
In this example, the deregistered Fibre Channel HBA driver is qla2xxx.
3. Run the Modprobe command to reload the Fibre Channel HBA driver.
For example:# Modprobe qla2xxx
In this example, the reloaded Fibre Channel HBA driver is qla2xxx.
l iSCSI or FC networking and UltraPath installed
Run the hot_add command to scan for LUNs.starting new devices re-scan...
scan mptsas HBA host /sys/class/scsi_host/host1...
no new device found run /usr/sbin/upTools -s busscan...
found 2:0:0:0->/dev/sdb found 2:0:0:1->/dev/sdc /usr/sbin/hot_add is completed.
Step 3 Run the fdisk -1 command to query the information about all disks on the application server.
The application server detects a LUN of 1073 MB and named /dev/sdb, as shown below.Disk /dev/sda: 8589 MB, 8589934592 bytes 255 heads, 63 sectors/track,
1044 cylinders Units = cylinders of 16065 * 512 = 8225280 bytes
OceanStor S2600T&S5500T&S5600T&S5800T&S6800T
Storage System
Online Capacity Expansion 10 Allocating Storage Space to New Services
Issue 01 (2014-12-29) Huawei Proprietary and Confidential
Copyright © Huawei Technologies Co., Ltd.
187
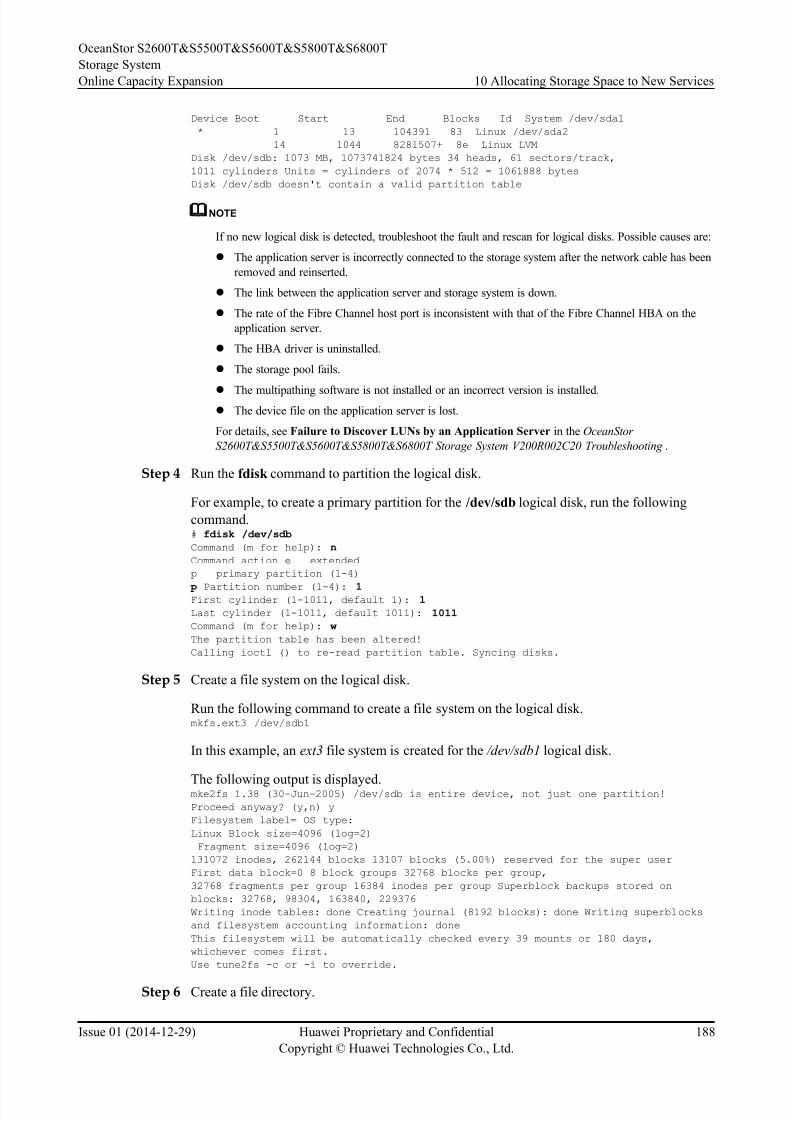
8/9/2019 OceanStor S2600T&S5500T&S5600T&S5800T&S6800T Storage System V200R002 Online Capacity Expansion 01
http://slidepdf.com/reader/full/oceanstor-s2600ts5500ts5600ts5800ts6800t-storage-system-v200r002-online 195/226
Device Boot Start End Blocks Id System /dev/sda1
* 1 13 104391 83 Linux /dev/sda2
14 1044 8281507+ 8e Linux LVM
Disk /dev/sdb: 1073 MB, 1073741824 bytes 34 heads, 61 sectors/track,
1011 cylinders Units = cylinders of 2074 * 512 = 1061888 bytes
Disk /dev/sdb doesn't contain a valid partition table
NOTE
If no new logical disk is detected, troubleshoot the fault and rescan for logical disks. Possible causes are:
l The application server is incorrectly connected to the storage system after the network cable has been
removed and reinserted.
l The link between the application server and storage system is down.
l The rate of the Fibre Channel host port is inconsistent with that of the Fibre Channel HBA on the
application server.
l The HBA driver is uninstalled.
l The storage pool fails.
l The multipathing software is not installed or an incorrect version is installed.l The device file on the application server is lost.
For details, see Failure to Discover LUNs by an Application Server in the OceanStor
S2600T&S5500T&S5600T&S5800T&S6800T Storage System V200R002C20 Troubleshooting .
Step 4 Run the fdisk command to partition the logical disk.
For example, to create a primary partition for the /dev/sdb logical disk, run the following
command.# fdisk /dev/sdb
Command (m for help): n
Command action e extended
p primary partition (1-4)
p Partition number (1-4): 1 First cylinder (1-1011, default 1): 1
Last cylinder (1-1011, default 1011): 1011
Command (m for help): w
The partition table has been altered!
Calling ioctl () to re-read partition table. Syncing disks.
Step 5 Create a file system on the logical disk.
Run the following command to create a file system on the logical disk.mkfs.ext3 /dev/sdb1
In this example, an ext3 file system is created for the /dev/sdb1 logical disk.
The following output is displayed.mke2fs 1.38 (30-Jun-2005) /dev/sdb is entire device, not just one partition!
Proceed anyway? (y,n) y
Filesystem label= OS type:
Linux Block size=4096 (log=2)
Fragment size=4096 (log=2)
131072 inodes, 262144 blocks 13107 blocks (5.00%) reserved for the super user
First data block=0 8 block groups 32768 blocks per group,
32768 fragments per group 16384 inodes per group Superblock backups stored on
blocks: 32768, 98304, 163840, 229376
Writing inode tables: done Creating journal (8192 blocks): done Writing superblocks
and filesystem accounting information: done
This filesystem will be automatically checked every 39 mounts or 180 days,
whichever comes first.
Use tune2fs -c or -i to override.
Step 6 Create a file directory.
OceanStor S2600T&S5500T&S5600T&S5800T&S6800T
Storage System
Online Capacity Expansion 10 Allocating Storage Space to New Services
Issue 01 (2014-12-29) Huawei Proprietary and Confidential
Copyright © Huawei Technologies Co., Ltd.
188
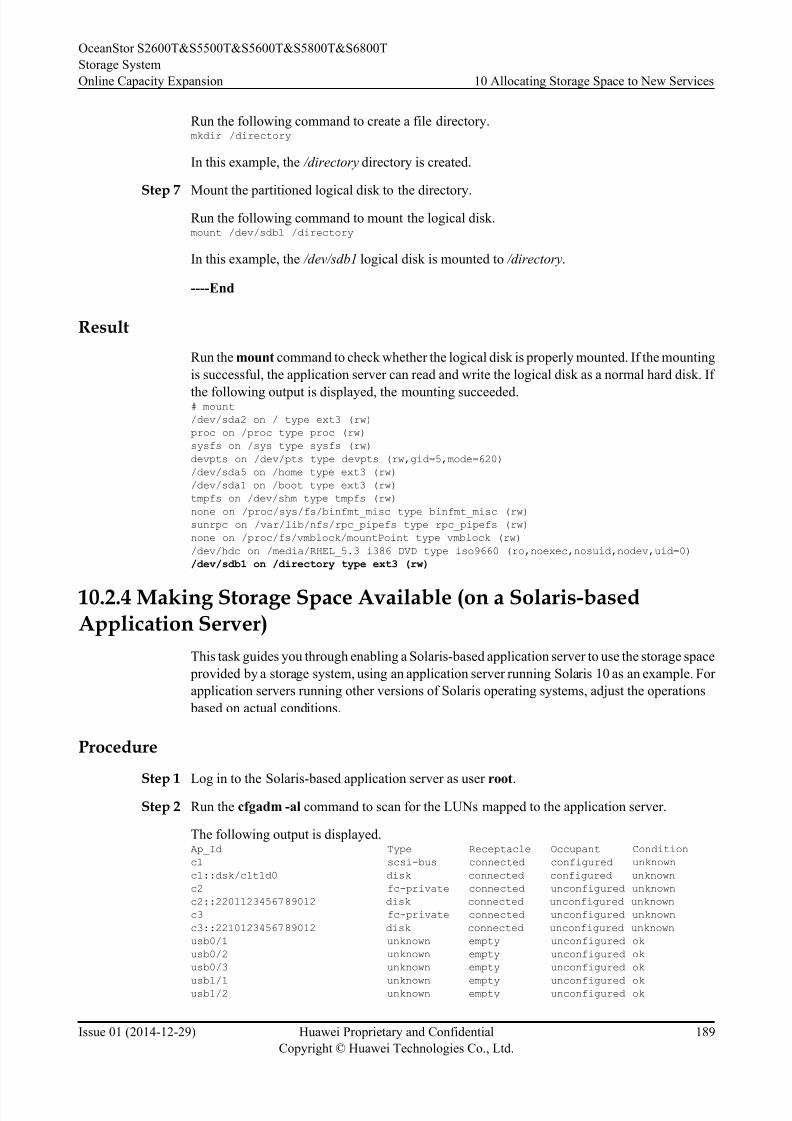
8/9/2019 OceanStor S2600T&S5500T&S5600T&S5800T&S6800T Storage System V200R002 Online Capacity Expansion 01
http://slidepdf.com/reader/full/oceanstor-s2600ts5500ts5600ts5800ts6800t-storage-system-v200r002-online 196/226
Run the following command to create a file directory.mkdir /directory
In this example, the /directory directory is created.
Step 7 Mount the partitioned logical disk to the directory.
Run the following command to mount the logical disk.mount /dev/sdb1 /directory
In this example, the /dev/sdb1 logical disk is mounted to /directory.
----End
Result
Run the mount command to check whether the logical disk is properly mounted. If the mounting
is successful, the application server can read and write the logical disk as a normal hard disk. If
the following output is displayed, the mounting succeeded.# mount
/dev/sda2 on / type ext3 (rw)
proc on /proc type proc (rw)
sysfs on /sys type sysfs (rw)
devpts on /dev/pts type devpts (rw,gid=5,mode=620)
/dev/sda5 on /home type ext3 (rw)
/dev/sda1 on /boot type ext3 (rw)
tmpfs on /dev/shm type tmpfs (rw)
none on /proc/sys/fs/binfmt_misc type binfmt_misc (rw)
sunrpc on /var/lib/nfs/rpc_pipefs type rpc_pipefs (rw)
none on /proc/fs/vmblock/mountPoint type vmblock (rw)
/dev/hdc on /media/RHEL_5.3 i386 DVD type iso9660 (ro,noexec,nosuid,nodev,uid=0)
/dev/sdb1 on /directory type ext3 (rw)
10.2.4 Making Storage Space Available (on a Solaris-basedApplication Server)
This task guides you through enabling a Solaris-based application server to use the storage space
provided by a storage system, using an application server running Solaris 10 as an example. For
application servers running other versions of Solaris operating systems, adjust the operations
based on actual conditions.
Procedure
Step 1 Log in to the Solaris-based application server as user root.Step 2 Run the cfgadm -al command to scan for the LUNs mapped to the application server.
The following output is displayed.Ap_Id Type Receptacle Occupant Condition
c1 scsi-bus connected configured unknown
c1::dsk/c1t1d0 disk connected configured unknown
c2 fc-private connected unconfigured unknown
c2::2201123456789012 disk connected unconfigured unknown
c3 fc-private connected unconfigured unknown
c3::2210123456789012 disk connected unconfigured unknown
usb0/1 unknown empty unconfigured ok
usb0/2 unknown empty unconfigured ok
usb0/3 unknown empty unconfigured ok
usb1/1 unknown empty unconfigured okusb1/2 unknown empty unconfigured ok
OceanStor S2600T&S5500T&S5600T&S5800T&S6800T
Storage System
Online Capacity Expansion 10 Allocating Storage Space to New Services
Issue 01 (2014-12-29) Huawei Proprietary and Confidential
Copyright © Huawei Technologies Co., Ltd.
189
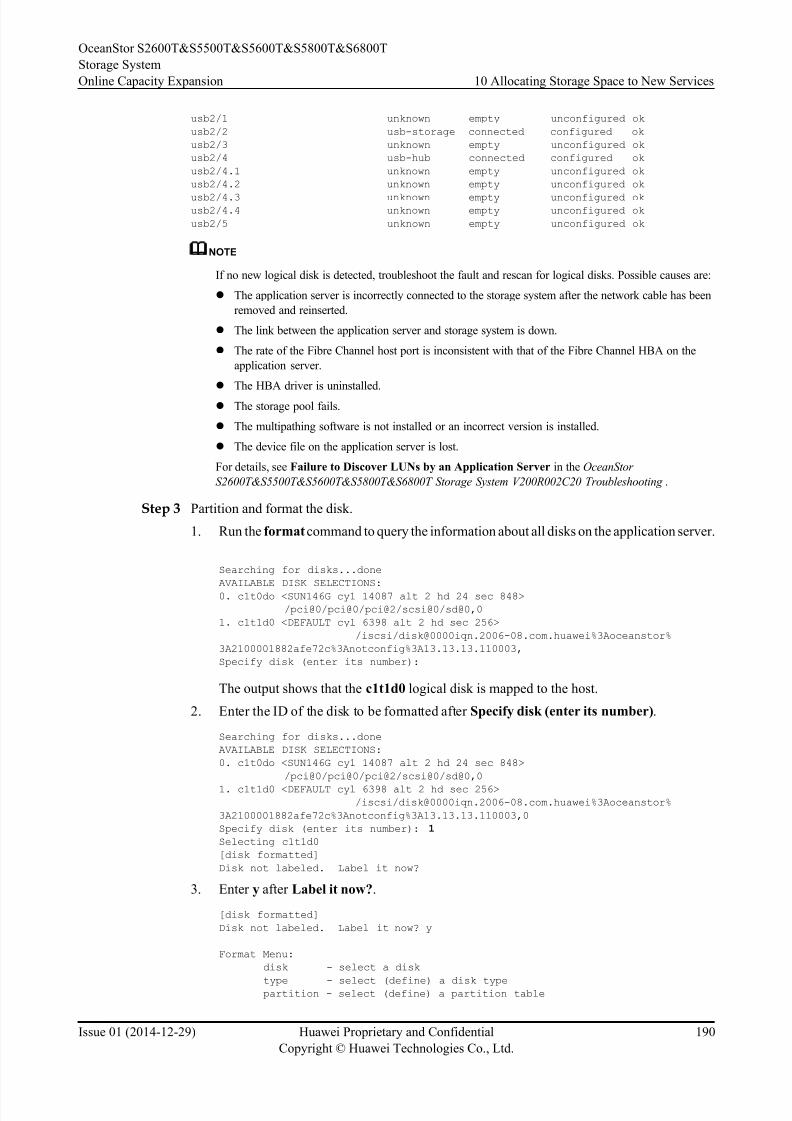
8/9/2019 OceanStor S2600T&S5500T&S5600T&S5800T&S6800T Storage System V200R002 Online Capacity Expansion 01
http://slidepdf.com/reader/full/oceanstor-s2600ts5500ts5600ts5800ts6800t-storage-system-v200r002-online 197/226
usb2/1 unknown empty unconfigured ok
usb2/2 usb-storage connected configured ok
usb2/3 unknown empty unconfigured ok
usb2/4 usb-hub connected configured ok
usb2/4.1 unknown empty unconfigured ok
usb2/4.2 unknown empty unconfigured ok
usb2/4.3 unknown empty unconfigured okusb2/4.4 unknown empty unconfigured ok
usb2/5 unknown empty unconfigured ok
NOTE
If no new logical disk is detected, troubleshoot the fault and rescan for logical disks. Possible causes are:
l The application server is incorrectly connected to the storage system after the network cable has been
removed and reinserted.
l The link between the application server and storage system is down.
l The rate of the Fibre Channel host port is inconsistent with that of the Fibre Channel HBA on the
application server.
l The HBA driver is uninstalled.
l The storage pool fails.
l The multipathing software is not installed or an incorrect version is installed.
l The device file on the application server is lost.
For details, see Failure to Discover LUNs by an Application Server in the OceanStor
S2600T&S5500T&S5600T&S5800T&S6800T Storage System V200R002C20 Troubleshooting .
Step 3 Partition and format the disk.
1. Run the format command to query the information about all disks on the application server.
Searching for disks...done
AVAILABLE DISK SELECTIONS:
0. c1t0do <SUN146G cy1 14087 alt 2 hd 24 sec 848>
/pci@0/pci@0/pci@2/scsi@0/sd@0,0
1. c1t1d0 <DEFAULT cyl 6398 alt 2 hd sec 256>
/iscsi/[email protected]%3Aoceanstor%
3A2100001882afe72c%3Anotconfig%3A13.13.13.110003,
Specify disk (enter its number):
The output shows that the c1t1d0 logical disk is mapped to the host.
2. Enter the ID of the disk to be formatted after Specify disk (enter its number).
Searching for disks...done
AVAILABLE DISK SELECTIONS:
0. c1t0do <SUN146G cy1 14087 alt 2 hd 24 sec 848>
/pci@0/pci@0/pci@2/scsi@0/sd@0,0
1. c1t1d0 <DEFAULT cyl 6398 alt 2 hd sec 256> /iscsi/[email protected]%3Aoceanstor%
3A2100001882afe72c%3Anotconfig%3A13.13.13.110003,0
Specify disk (enter its number): 1
Selecting c1t1d0
[disk formatted]
Disk not labeled. Label it now?
3. Enter y after Label it now?.
[disk formatted]
Disk not labeled. Label it now? y
Format Menu:
disk - select a disk
type - select (define) a disk type partition - select (define) a partition table
OceanStor S2600T&S5500T&S5600T&S5800T&S6800T
Storage System
Online Capacity Expansion 10 Allocating Storage Space to New Services
Issue 01 (2014-12-29) Huawei Proprietary and Confidential
Copyright © Huawei Technologies Co., Ltd.
190
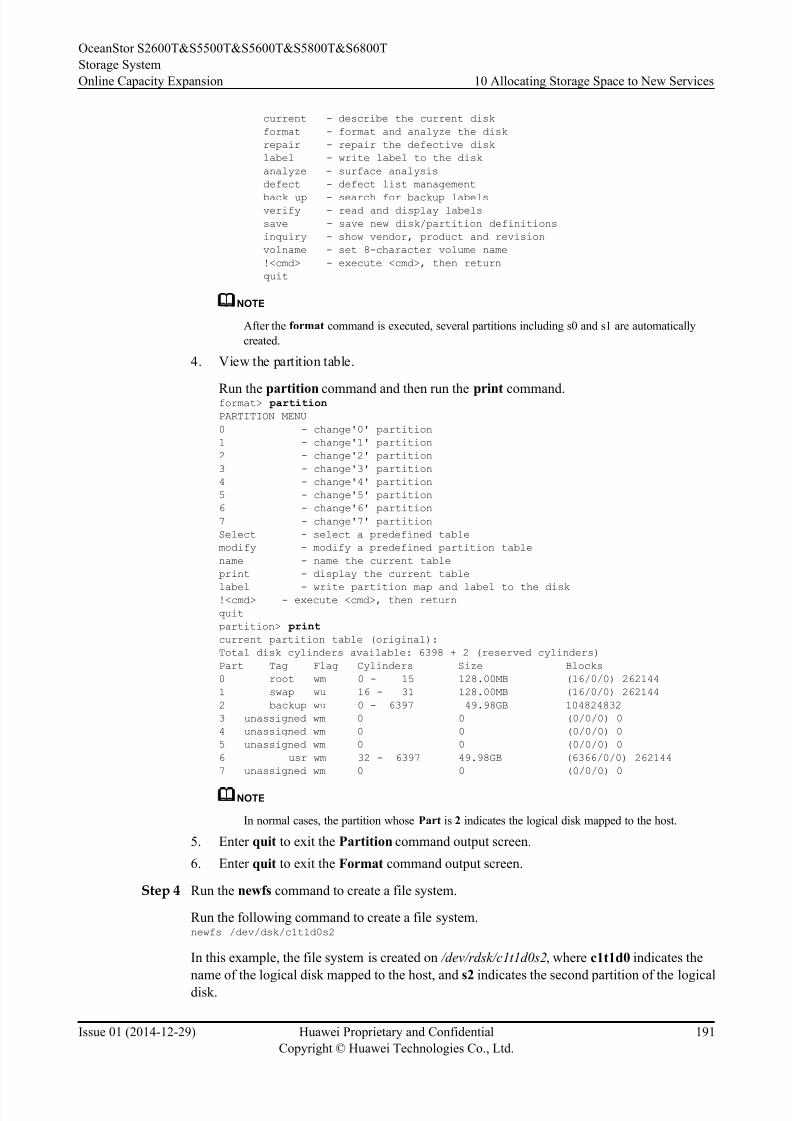
8/9/2019 OceanStor S2600T&S5500T&S5600T&S5800T&S6800T Storage System V200R002 Online Capacity Expansion 01
http://slidepdf.com/reader/full/oceanstor-s2600ts5500ts5600ts5800ts6800t-storage-system-v200r002-online 198/226
current - describe the current disk
format - format and analyze the disk
repair - repair the defective disk
label - write label to the disk
analyze - surface analysis
defect - defect list management
back up - search for backup labels verify - read and display labels
save - save new disk/partition definitions
inquiry - show vendor, product and revision
volname - set 8-character volume name
!<cmd> - execute <cmd>, then return
quit
NOTE
After the format command is executed, several partitions including s0 and s1 are automatically
created.
4. View the partition table.
Run the partition command and then run the print command.format> partition
PARTITION MENU
0 - change'0' partition
1 - change'1' partition
2 - change'2' partition
3 - change'3' partition
4 - change'4' partition
5 - change'5' partition
6 - change'6' partition
7 - change'7' partition
Select - select a predefined table
modify - modify a predefined partition table
name - name the current table
print - display the current table
label - write partition map and label to the disk!<cmd> - execute <cmd>, then return
quit
partition> print
current partition table (original):
Total disk cylinders available: 6398 + 2 (reserved cylinders)
Part Tag Flag Cylinders Size Blocks
0 root wm 0 - 15 128.00MB (16/0/0) 262144
1 swap wu 16 - 31 128.00MB (16/0/0) 262144
2 backup wu 0 - 6397 49.98GB 104824832
3 unassigned wm 0 0 (0/0/0) 0
4 unassigned wm 0 0 (0/0/0) 0
5 unassigned wm 0 0 (0/0/0) 0
6 usr wm 32 - 6397 49.98GB (6366/0/0) 262144
7 unassigned wm 0 0 (0/0/0) 0
NOTE
In normal cases, the partition whose Part is 2 indicates the logical disk mapped to the host.
5. Enter quit to exit the Partition command output screen.
6. Enter quit to exit the Format command output screen.
Step 4 Run the newfs command to create a file system.
Run the following command to create a file system.newfs /dev/dsk/c1t1d0s2
In this example, the file system is created on /dev/rdsk/c1t1d0s2, where c1t1d0 indicates the
name of the logical disk mapped to the host, and s2 indicates the second partition of the logical
disk.
OceanStor S2600T&S5500T&S5600T&S5800T&S6800T
Storage System
Online Capacity Expansion 10 Allocating Storage Space to New Services
Issue 01 (2014-12-29) Huawei Proprietary and Confidential
Copyright © Huawei Technologies Co., Ltd.
191
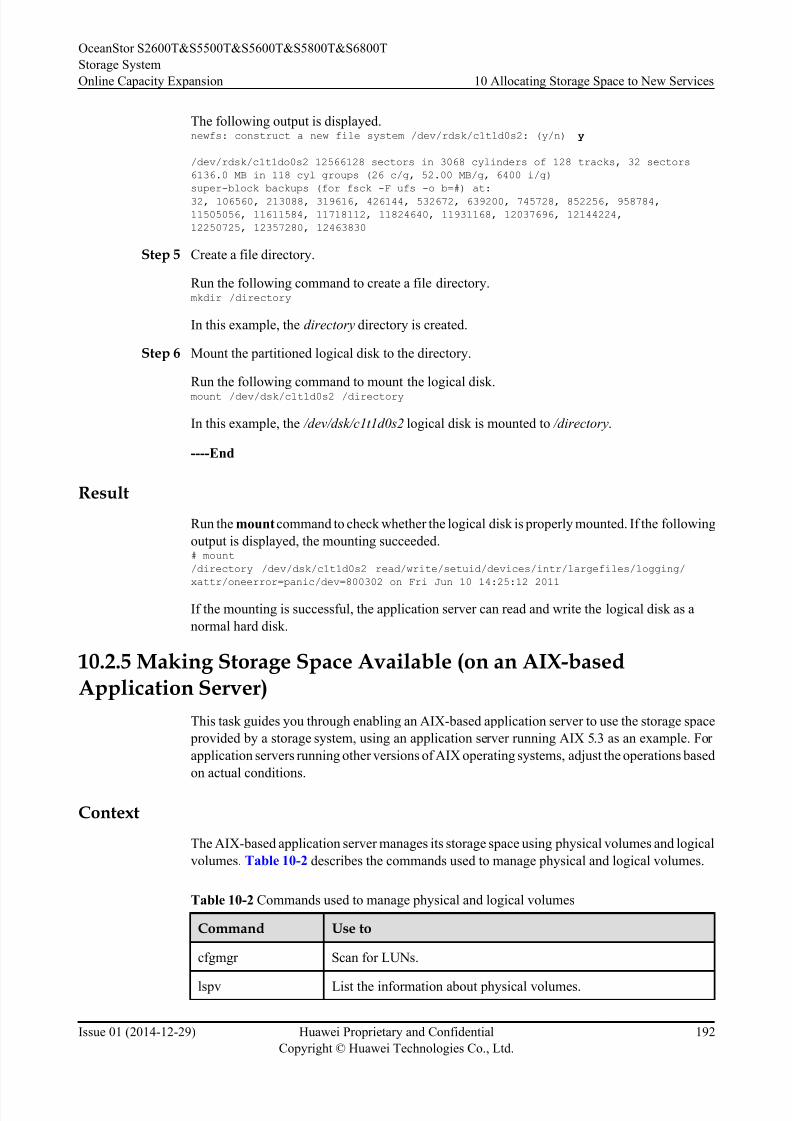
8/9/2019 OceanStor S2600T&S5500T&S5600T&S5800T&S6800T Storage System V200R002 Online Capacity Expansion 01
http://slidepdf.com/reader/full/oceanstor-s2600ts5500ts5600ts5800ts6800t-storage-system-v200r002-online 199/226
The following output is displayed.newfs: construct a new file system /dev/rdsk/c1t1d0s2: (y/n) y
/dev/rdsk/c1t1do0s2 12566128 sectors in 3068 cylinders of 128 tracks, 32 sectors
6136.0 MB in 118 cyl groups (26 c/g, 52.00 MB/g, 6400 i/g)
super-block backups (for fsck -F ufs -o b=#) at:
32, 106560, 213088, 319616, 426144, 532672, 639200, 745728, 852256, 958784,
11505056, 11611584, 11718112, 11824640, 11931168, 12037696, 12144224,
12250725, 12357280, 12463830
Step 5 Create a file directory.
Run the following command to create a file directory.mkdir /directory
In this example, the directory directory is created.
Step 6 Mount the partitioned logical disk to the directory.
Run the following command to mount the logical disk.mount /dev/dsk/c1t1d0s2 /directory
In this example, the /dev/dsk/c1t1d0s2 logical disk is mounted to /directory.
----End
Result
Run the mount command to check whether the logical disk is properly mounted. If the following
output is displayed, the mounting succeeded.# mount
/directory /dev/dsk/c1t1d0s2 read/write/setuid/devices/intr/largefiles/logging/
xattr/oneerror=panic/dev=800302 on Fri Jun 10 14:25:12 2011
If the mounting is successful, the application server can read and write the logical disk as a
normal hard disk.
10.2.5 Making Storage Space Available (on an AIX-basedApplication Server)
This task guides you through enabling an AIX-based application server to use the storage space
provided by a storage system, using an application server running AIX 5.3 as an example. For
application servers running other versions of AIX operating systems, adjust the operations based
on actual conditions.
Context
The AIX-based application server manages its storage space using physical volumes and logical
volumes. Table 10-2 describes the commands used to manage physical and logical volumes.
Table 10-2 Commands used to manage physical and logical volumes
Command Use to
cfgmgr Scan for LUNs.
lspv List the information about physical volumes.
OceanStor S2600T&S5500T&S5600T&S5800T&S6800T
Storage System
Online Capacity Expansion 10 Allocating Storage Space to New Services
Issue 01 (2014-12-29) Huawei Proprietary and Confidential
Copyright © Huawei Technologies Co., Ltd.
192
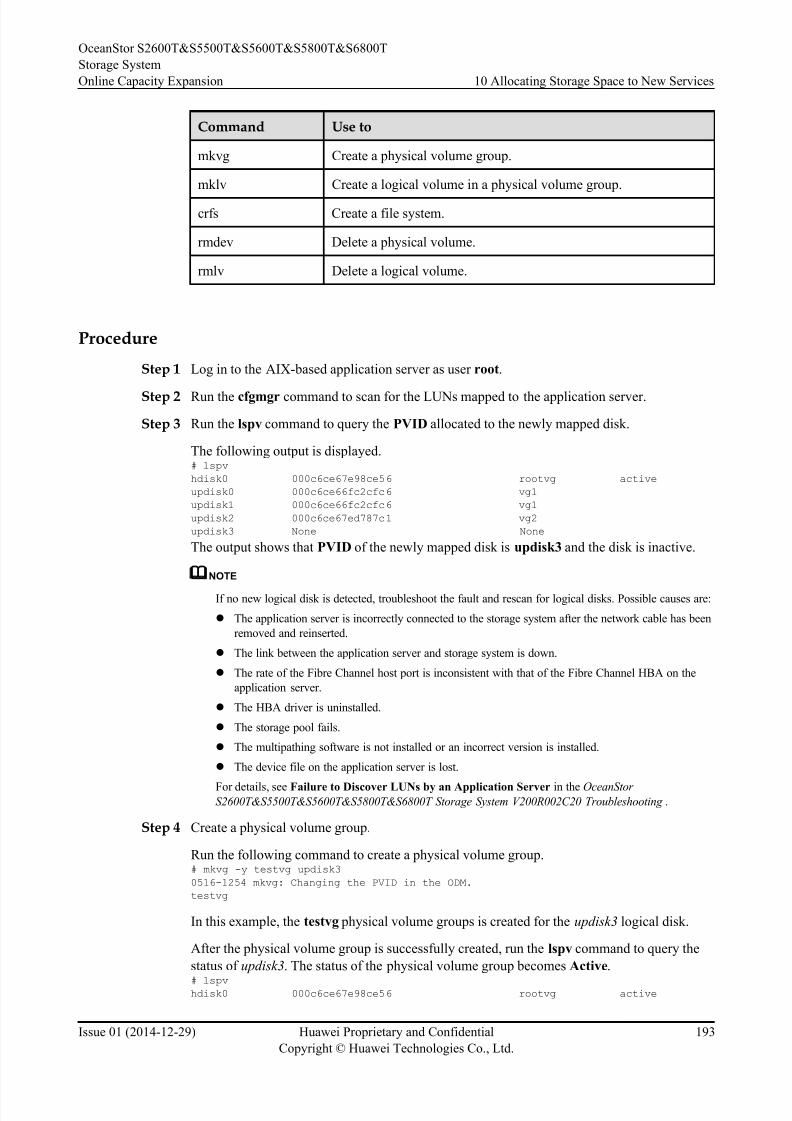
8/9/2019 OceanStor S2600T&S5500T&S5600T&S5800T&S6800T Storage System V200R002 Online Capacity Expansion 01
http://slidepdf.com/reader/full/oceanstor-s2600ts5500ts5600ts5800ts6800t-storage-system-v200r002-online 200/226
Command Use to
mkvg Create a physical volume group.
mklv Create a logical volume in a physical volume group.
crfs Create a file system.
rmdev Delete a physical volume.
rmlv Delete a logical volume.
Procedure
Step 1 Log in to the AIX-based application server as user root.
Step 2 Run the cfgmgr command to scan for the LUNs mapped to the application server.
Step 3 Run the lspv command to query the PVID allocated to the newly mapped disk.
The following output is displayed.# lspv
hdisk0 000c6ce67e98ce56 rootvg active
updisk0 000c6ce66fc2cfc6 vg1
updisk1 000c6ce66fc2cfc6 vg1
updisk2 000c6ce67ed787c1 vg2
updisk3 None None
The output shows that PVID of the newly mapped disk is updisk3 and the disk is inactive.
NOTE
If no new logical disk is detected, troubleshoot the fault and rescan for logical disks. Possible causes are:
l The application server is incorrectly connected to the storage system after the network cable has been
removed and reinserted.
l The link between the application server and storage system is down.
l The rate of the Fibre Channel host port is inconsistent with that of the Fibre Channel HBA on the
application server.
l The HBA driver is uninstalled.
l The storage pool fails.
l The multipathing software is not installed or an incorrect version is installed.
l The device file on the application server is lost.
For details, see Failure to Discover LUNs by an Application Server in the OceanStor S2600T&S5500T&S5600T&S5800T&S6800T Storage System V200R002C20 Troubleshooting .
Step 4 Create a physical volume group.
Run the following command to create a physical volume group.# mkvg -y testvg updisk3
0516-1254 mkvg: Changing the PVID in the ODM.
testvg
In this example, the testvg physical volume groups is created for the updisk3 logical disk.
After the physical volume group is successfully created, run the lspv command to query the
status of updisk3. The status of the physical volume group becomes Active.
# lspvhdisk0 000c6ce67e98ce56 rootvg active
OceanStor S2600T&S5500T&S5600T&S5800T&S6800T
Storage System
Online Capacity Expansion 10 Allocating Storage Space to New Services
Issue 01 (2014-12-29) Huawei Proprietary and Confidential
Copyright © Huawei Technologies Co., Ltd.
193
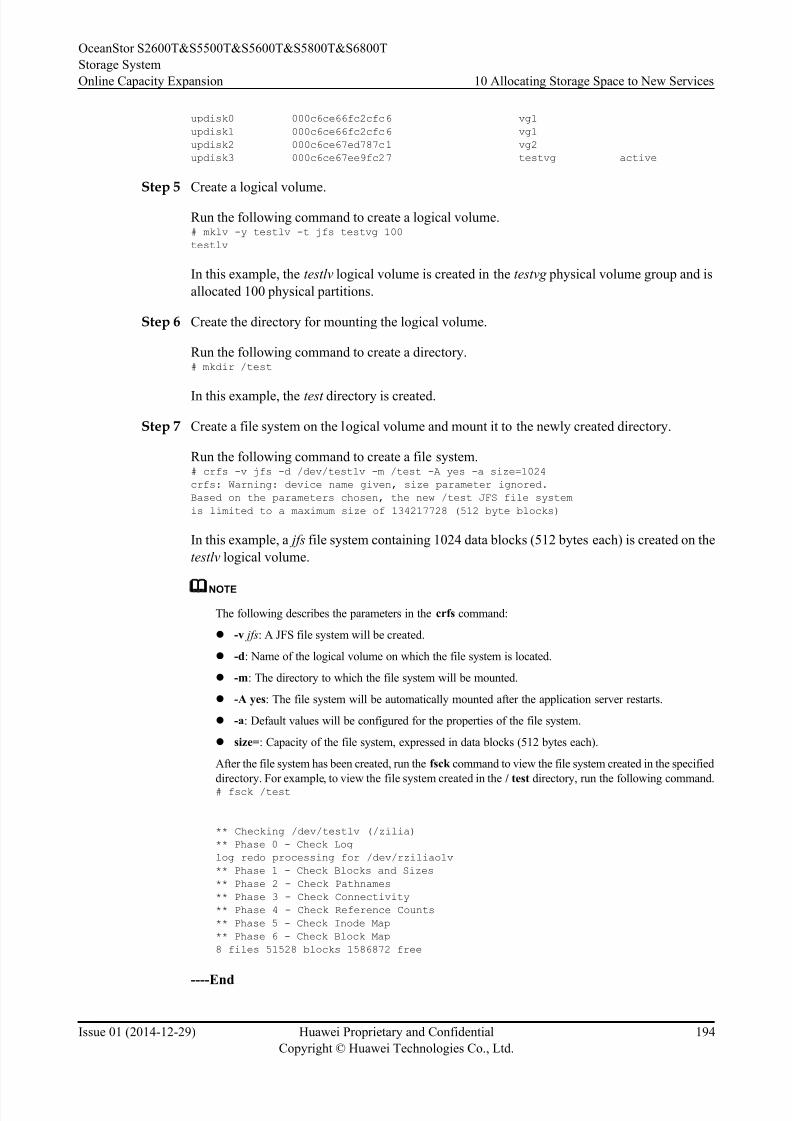
8/9/2019 OceanStor S2600T&S5500T&S5600T&S5800T&S6800T Storage System V200R002 Online Capacity Expansion 01
http://slidepdf.com/reader/full/oceanstor-s2600ts5500ts5600ts5800ts6800t-storage-system-v200r002-online 201/226
updisk0 000c6ce66fc2cfc6 vg1
updisk1 000c6ce66fc2cfc6 vg1
updisk2 000c6ce67ed787c1 vg2
updisk3 000c6ce67ee9fc27 testvg active
Step 5 Create a logical volume.
Run the following command to create a logical volume.# mklv -y testlv -t jfs testvg 100
testlv
In this example, the testlv logical volume is created in the testvg physical volume group and is
allocated 100 physical partitions.
Step 6 Create the directory for mounting the logical volume.
Run the following command to create a directory.# mkdir /test
In this example, the test directory is created.
Step 7 Create a file system on the logical volume and mount it to the newly created directory.
Run the following command to create a file system.# crfs -v jfs -d /dev/testlv -m /test -A yes -a size=1024
crfs: Warning: device name given, size parameter ignored.
Based on the parameters chosen, the new /test JFS file system
is limited to a maximum size of 134217728 (512 byte blocks)
In this example, a jfs file system containing 1024 data blocks (512 bytes each) is created on the
testlv logical volume.
NOTE
The following describes the parameters in the crfs command:
l -v jfs: A JFS file system will be created.
l -d: Name of the logical volume on which the file system is located.
l -m: The directory to which the file system will be mounted.
l -A yes: The file system will be automatically mounted after the application server restarts.
l -a: Default values will be configured for the properties of the file system.
l size=: Capacity of the file system, expressed in data blocks (512 bytes each).
After the file system has been created, run the fsck command to view the file system created in the specified
directory. For example, to view the file system created in the / test directory, run the following command.# fsck /test
** Checking /dev/testlv (/zilia)
** Phase 0 - Check Log
log redo processing for /dev/rziliaolv
** Phase 1 - Check Blocks and Sizes
** Phase 2 - Check Pathnames
** Phase 3 - Check Connectivity
** Phase 4 - Check Reference Counts
** Phase 5 - Check Inode Map
** Phase 6 - Check Block Map
8 files 51528 blocks 1586872 free
----End
OceanStor S2600T&S5500T&S5600T&S5800T&S6800T
Storage System
Online Capacity Expansion 10 Allocating Storage Space to New Services
Issue 01 (2014-12-29) Huawei Proprietary and Confidential
Copyright © Huawei Technologies Co., Ltd.
194
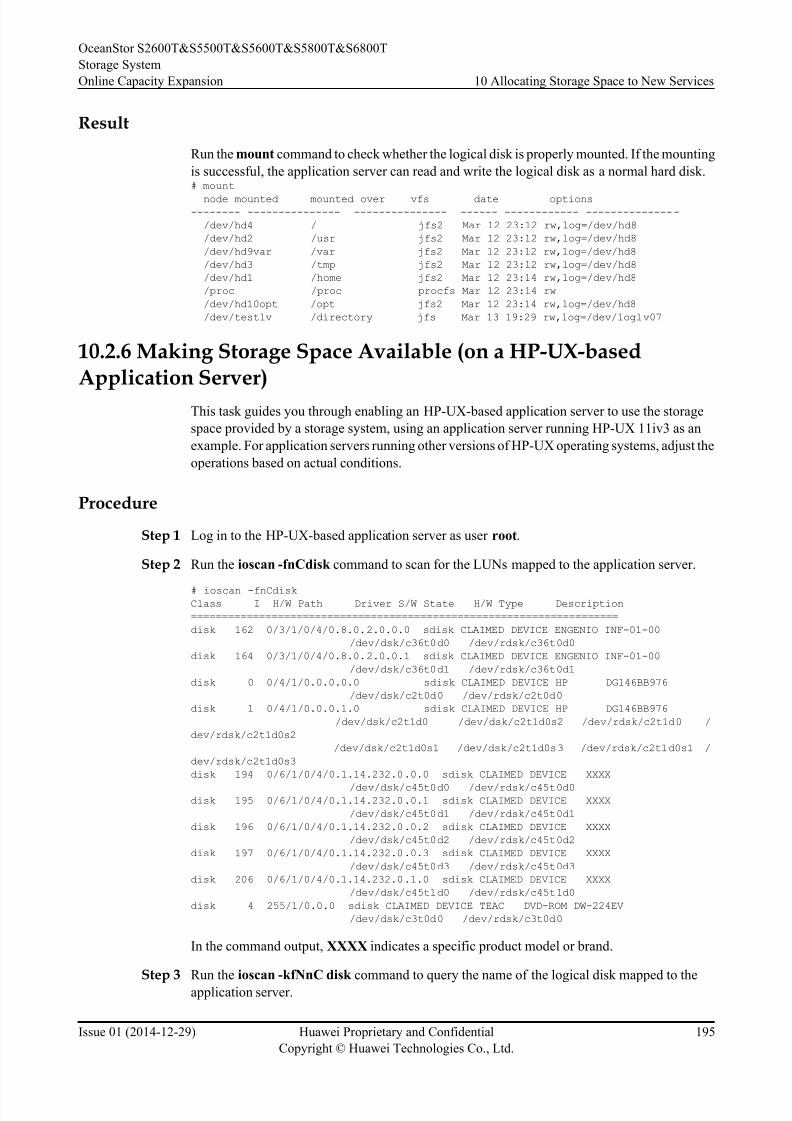
8/9/2019 OceanStor S2600T&S5500T&S5600T&S5800T&S6800T Storage System V200R002 Online Capacity Expansion 01
http://slidepdf.com/reader/full/oceanstor-s2600ts5500ts5600ts5800ts6800t-storage-system-v200r002-online 202/226
Result
Run the mount command to check whether the logical disk is properly mounted. If the mounting
is successful, the application server can read and write the logical disk as a normal hard disk.# mount
node mounted mounted over vfs date options-------- --------------- --------------- ------ ------------ ---------------
/dev/hd4 / jfs2 Mar 12 23:12 rw,log=/dev/hd8
/dev/hd2 /usr jfs2 Mar 12 23:12 rw,log=/dev/hd8
/dev/hd9var /var jfs2 Mar 12 23:12 rw,log=/dev/hd8
/dev/hd3 /tmp jfs2 Mar 12 23:12 rw,log=/dev/hd8
/dev/hd1 /home jfs2 Mar 12 23:14 rw,log=/dev/hd8
/proc /proc procfs Mar 12 23:14 rw
/dev/hd10opt /opt jfs2 Mar 12 23:14 rw,log=/dev/hd8
/dev/testlv /directory jfs Mar 13 19:29 rw,log=/dev/loglv07
10.2.6 Making Storage Space Available (on a HP-UX-basedApplication Server)
This task guides you through enabling an HP-UX-based application server to use the storage
space provided by a storage system, using an application server running HP-UX 11iv3 as an
example. For application servers running other versions of HP-UX operating systems, adjust the
operations based on actual conditions.
Procedure
Step 1 Log in to the HP-UX-based application server as user root.
Step 2 Run the ioscan -fnCdisk command to scan for the LUNs mapped to the application server.
# ioscan -fnCdiskClass I H/W Path Driver S/W State H/W Type Description
=====================================================================
disk 162 0/3/1/0/4/0.8.0.2.0.0.0 sdisk CLAIMED DEVICE ENGENIO INF-01-00
/dev/dsk/c36t0d0 /dev/rdsk/c36t0d0
disk 164 0/3/1/0/4/0.8.0.2.0.0.1 sdisk CLAIMED DEVICE ENGENIO INF-01-00
/dev/dsk/c36t0d1 /dev/rdsk/c36t0d1
disk 0 0/4/1/0.0.0.0.0 sdisk CLAIMED DEVICE HP DG146BB976
/dev/dsk/c2t0d0 /dev/rdsk/c2t0d0
disk 1 0/4/1/0.0.0.1.0 sdisk CLAIMED DEVICE HP DG146BB976
/dev/dsk/c2t1d0 /dev/dsk/c2t1d0s2 /dev/rdsk/c2t1d0 /
dev/rdsk/c2t1d0s2
/dev/dsk/c2t1d0s1 /dev/dsk/c2t1d0s3 /dev/rdsk/c2t1d0s1 /
dev/rdsk/c2t1d0s3
disk 194 0/6/1/0/4/0.1.14.232.0.0.0 sdisk CLAIMED DEVICE XXXX
/dev/dsk/c45t0d0 /dev/rdsk/c45t0d0disk 195 0/6/1/0/4/0.1.14.232.0.0.1 sdisk CLAIMED DEVICE XXXX
/dev/dsk/c45t0d1 /dev/rdsk/c45t0d1
disk 196 0/6/1/0/4/0.1.14.232.0.0.2 sdisk CLAIMED DEVICE XXXX
/dev/dsk/c45t0d2 /dev/rdsk/c45t0d2
disk 197 0/6/1/0/4/0.1.14.232.0.0.3 sdisk CLAIMED DEVICE XXXX
/dev/dsk/c45t0d3 /dev/rdsk/c45t0d3
disk 206 0/6/1/0/4/0.1.14.232.0.1.0 sdisk CLAIMED DEVICE XXXX
/dev/dsk/c45t1d0 /dev/rdsk/c45t1d0
disk 4 255/1/0.0.0 sdisk CLAIMED DEVICE TEAC DVD-ROM DW-224EV
/dev/dsk/c3t0d0 /dev/rdsk/c3t0d0
In the command output, XXXX indicates a specific product model or brand.
Step 3Run the ioscan -kfNnC disk command to query the name of the logical disk mapped to the
application server.
OceanStor S2600T&S5500T&S5600T&S5800T&S6800T
Storage System
Online Capacity Expansion 10 Allocating Storage Space to New Services
Issue 01 (2014-12-29) Huawei Proprietary and Confidential
Copyright © Huawei Technologies Co., Ltd.
195
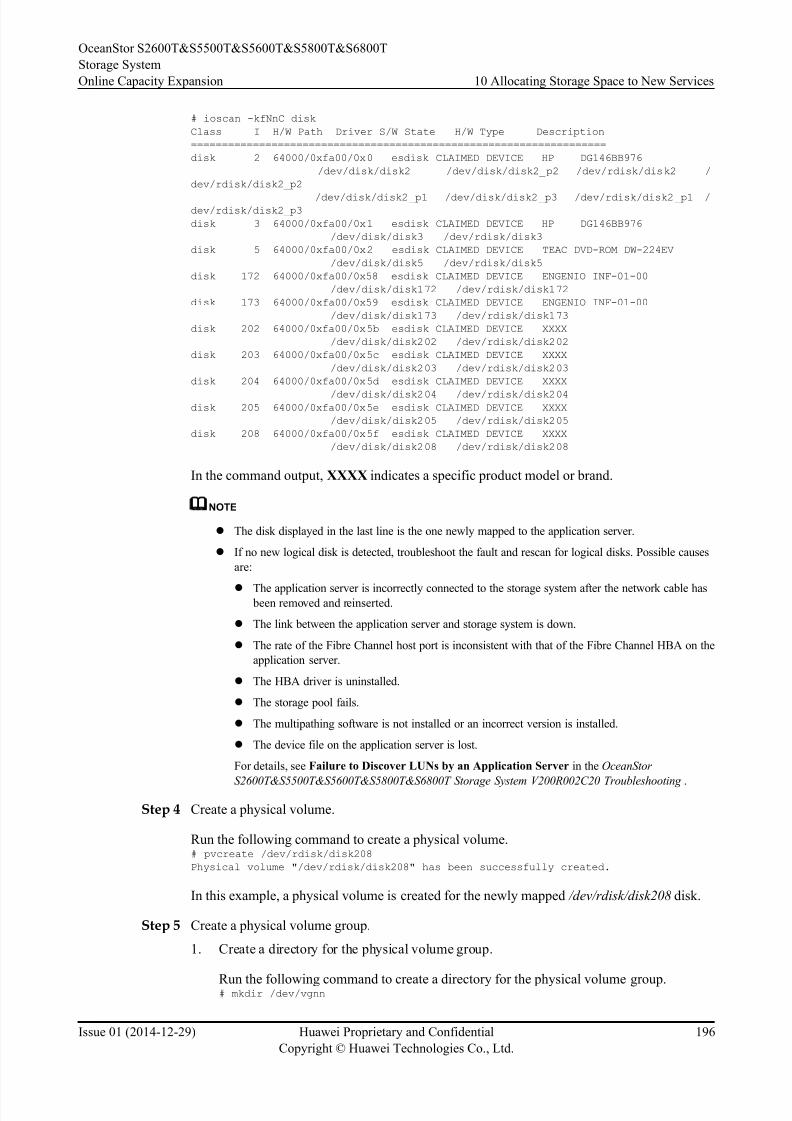
8/9/2019 OceanStor S2600T&S5500T&S5600T&S5800T&S6800T Storage System V200R002 Online Capacity Expansion 01
http://slidepdf.com/reader/full/oceanstor-s2600ts5500ts5600ts5800ts6800t-storage-system-v200r002-online 203/226
# ioscan -kfNnC disk
Class I H/W Path Driver S/W State H/W Type Description
===================================================================
disk 2 64000/0xfa00/0x0 esdisk CLAIMED DEVICE HP DG146BB976
/dev/disk/disk2 /dev/disk/disk2_p2 /dev/rdisk/disk2 /
dev/rdisk/disk2_p2
/dev/disk/disk2_p1 /dev/disk/disk2_p3 /dev/rdisk/disk2_p1 /dev/rdisk/disk2_p3
disk 3 64000/0xfa00/0x1 esdisk CLAIMED DEVICE HP DG146BB976
/dev/disk/disk3 /dev/rdisk/disk3
disk 5 64000/0xfa00/0x2 esdisk CLAIMED DEVICE TEAC DVD-ROM DW-224EV
/dev/disk/disk5 /dev/rdisk/disk5
disk 172 64000/0xfa00/0x58 esdisk CLAIMED DEVICE ENGENIO INF-01-00
/dev/disk/disk172 /dev/rdisk/disk172
disk 173 64000/0xfa00/0x59 esdisk CLAIMED DEVICE ENGENIO INF-01-00
/dev/disk/disk173 /dev/rdisk/disk173
disk 202 64000/0xfa00/0x5b esdisk CLAIMED DEVICE XXXX
/dev/disk/disk202 /dev/rdisk/disk202
disk 203 64000/0xfa00/0x5c esdisk CLAIMED DEVICE XXXX
/dev/disk/disk203 /dev/rdisk/disk203
disk 204 64000/0xfa00/0x5d esdisk CLAIMED DEVICE XXXX
/dev/disk/disk204 /dev/rdisk/disk204disk 205 64000/0xfa00/0x5e esdisk CLAIMED DEVICE XXXX
/dev/disk/disk205 /dev/rdisk/disk205
disk 208 64000/0xfa00/0x5f esdisk CLAIMED DEVICE XXXX
/dev/disk/disk208 /dev/rdisk/disk208
In the command output, XXXX indicates a specific product model or brand.
NOTE
l The disk displayed in the last line is the one newly mapped to the application server.
l If no new logical disk is detected, troubleshoot the fault and rescan for logical disks. Possible causes
are:
l The application server is incorrectly connected to the storage system after the network cable has been removed and reinserted.
l The link between the application server and storage system is down.
l The rate of the Fibre Channel host port is inconsistent with that of the Fibre Channel HBA on the
application server.
l The HBA driver is uninstalled.
l The storage pool fails.
l The multipathing software is not installed or an incorrect version is installed.
l The device file on the application server is lost.
For details, see Failure to Discover LUNs by an Application Server in the OceanStor
S2600T&S5500T&S5600T&S5800T&S6800T Storage System V200R002C20 Troubleshooting .
Step 4 Create a physical volume.
Run the following command to create a physical volume.# pvcreate /dev/rdisk/disk208
Physical volume "/dev/rdisk/disk208" has been successfully created.
In this example, a physical volume is created for the newly mapped /dev/rdisk/disk208 disk.
Step 5 Create a physical volume group.
1. Create a directory for the physical volume group.
Run the following command to create a directory for the physical volume group.# mkdir /dev/vgnn
OceanStor S2600T&S5500T&S5600T&S5800T&S6800T
Storage System
Online Capacity Expansion 10 Allocating Storage Space to New Services
Issue 01 (2014-12-29) Huawei Proprietary and Confidential
Copyright © Huawei Technologies Co., Ltd.
196
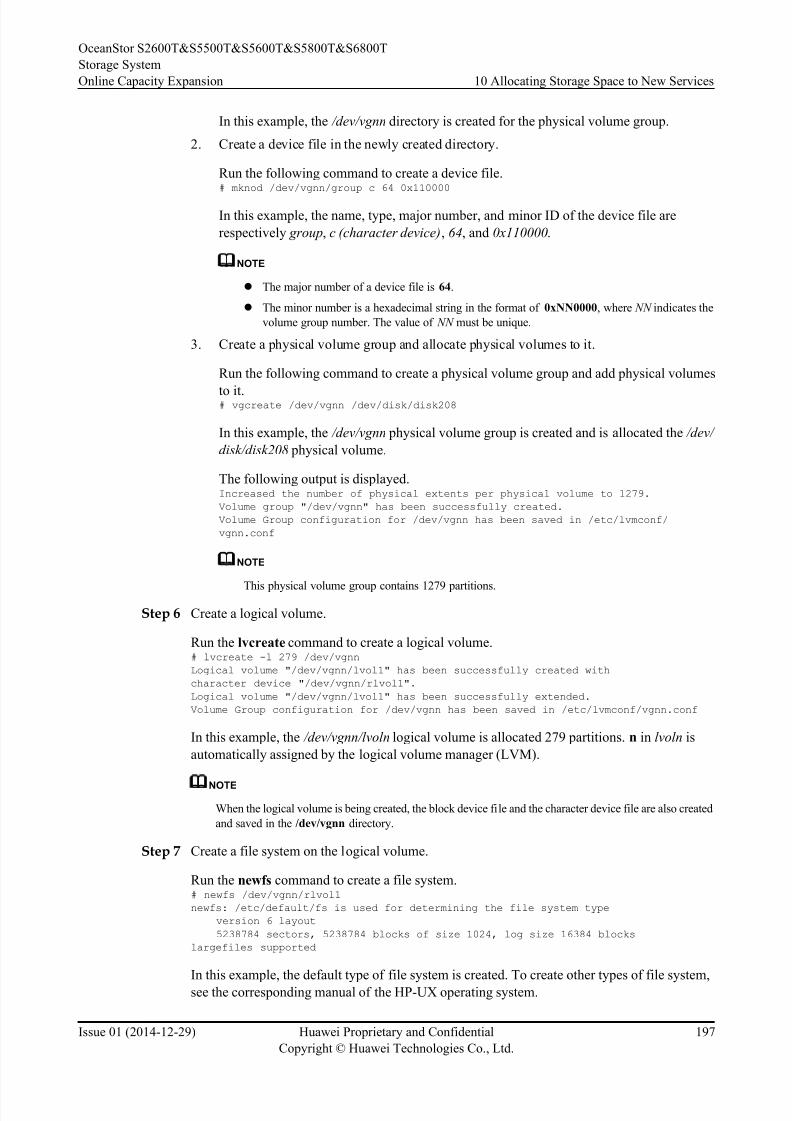
8/9/2019 OceanStor S2600T&S5500T&S5600T&S5800T&S6800T Storage System V200R002 Online Capacity Expansion 01
http://slidepdf.com/reader/full/oceanstor-s2600ts5500ts5600ts5800ts6800t-storage-system-v200r002-online 204/226
In this example, the /dev/vgnn directory is created for the physical volume group.
2. Create a device file in the newly created directory.
Run the following command to create a device file.# mknod /dev/vgnn/group c 64 0x110000
In this example, the name, type, major number, and minor ID of the device file are
respectively group, c (character device), 64, and 0x110000.
NOTE
l The major number of a device file is 64.
l The minor number is a hexadecimal string in the format of 0xNN0000, where NN indicates the
volume group number. The value of NN must be unique.
3. Create a physical volume group and allocate physical volumes to it.
Run the following command to create a physical volume group and add physical volumes
to it.# vgcreate /dev/vgnn /dev/disk/disk208
In this example, the /dev/vgnn physical volume group is created and is allocated the /dev/
disk/disk208 physical volume.
The following output is displayed.Increased the number of physical extents per physical volume to 1279.
Volume group "/dev/vgnn" has been successfully created.
Volume Group configuration for /dev/vgnn has been saved in /etc/lvmconf/
vgnn.conf
NOTE
This physical volume group contains 1279 partitions.
Step 6 Create a logical volume.
Run the lvcreate command to create a logical volume.# lvcreate -l 279 /dev/vgnn
Logical volume "/dev/vgnn/lvol1" has been successfully created with
character device "/dev/vgnn/rlvol1".
Logical volume "/dev/vgnn/lvol1" has been successfully extended.
Volume Group configuration for /dev/vgnn has been saved in /etc/lvmconf/vgnn.conf
In this example, the /dev/vgnn/lvoln logical volume is allocated 279 partitions. n in lvoln is
automatically assigned by the logical volume manager (LVM).
NOTE
When the logical volume is being created, the block device file and the character device file are also created
and saved in the /dev/vgnn directory.
Step 7 Create a file system on the logical volume.
Run the newfs command to create a file system.# newfs /dev/vgnn/rlvol1
newfs: /etc/default/fs is used for determining the file system type
version 6 layout
5238784 sectors, 5238784 blocks of size 1024, log size 16384 blocks
largefiles supported
In this example, the default type of file system is created. To create other types of file system,
see the corresponding manual of the HP-UX operating system.
OceanStor S2600T&S5500T&S5600T&S5800T&S6800T
Storage System
Online Capacity Expansion 10 Allocating Storage Space to New Services
Issue 01 (2014-12-29) Huawei Proprietary and Confidential
Copyright © Huawei Technologies Co., Ltd.
197
8/9/2019 OceanStor S2600T&S5500T&S5600T&S5800T&S6800T Storage System V200R002 Online Capacity Expansion 01
http://slidepdf.com/reader/full/oceanstor-s2600ts5500ts5600ts5800ts6800t-storage-system-v200r002-online 205/226
Step 8 Create a file directory.
Run the following command to create a file directory.# mkdir /directory
In this example, the /directory directory is created.
Step 9 Mount the logical volume to the file directory.
Run the following command to mount the logical volume to the file directory.# mount /dev/vgnn/lvol1 /directory
In this example, the /dev/vgnn/lvol1 logical volume is mounted to /directory.
----End
Result
Run the mount command to check whether the logical disk is properly mounted. If the mounting
is successful, the application server can read and write the logical disk as a normal hard disk.
10.2.7 Making Storage Space Available (on a VMware ESX-basedApplication Server)
This task uses a VMware ESXi.5.1.0 application server and data storage based on VMFS-5 file
system configuration as examples to introduce how to use the storage space by enabling a
VMware-based application server. For application servers running other versions of VMware
operating systems, adjust the operations based on actual conditions.
Context
You can employ the following two methods to use the storage space by enabling a VMware-
based application server:
l Device-based method
After a mapped device is detected on the application server, use the device to configure
disks for a VM.
l Data storage method
After a mapped device is detected on the application server, create a corresponding filesystem and use the storage space. Data storage is a common method to help you use the
storage space by enabling a VMware-based application server.
Procedure
Step 1 Go to the Add Storage dialog box.
1. On the vSphere Client, click the Configuration tab.
2. On the navigation bar, click Storage.
3. On the Storage page, select Devices tab and click Rescan All.
The Rescan dialog box is displayed, as shown in Figure 10-5.
OceanStor S2600T&S5500T&S5600T&S5800T&S6800T
Storage System
Online Capacity Expansion 10 Allocating Storage Space to New Services
Issue 01 (2014-12-29) Huawei Proprietary and Confidential
Copyright © Huawei Technologies Co., Ltd.
198
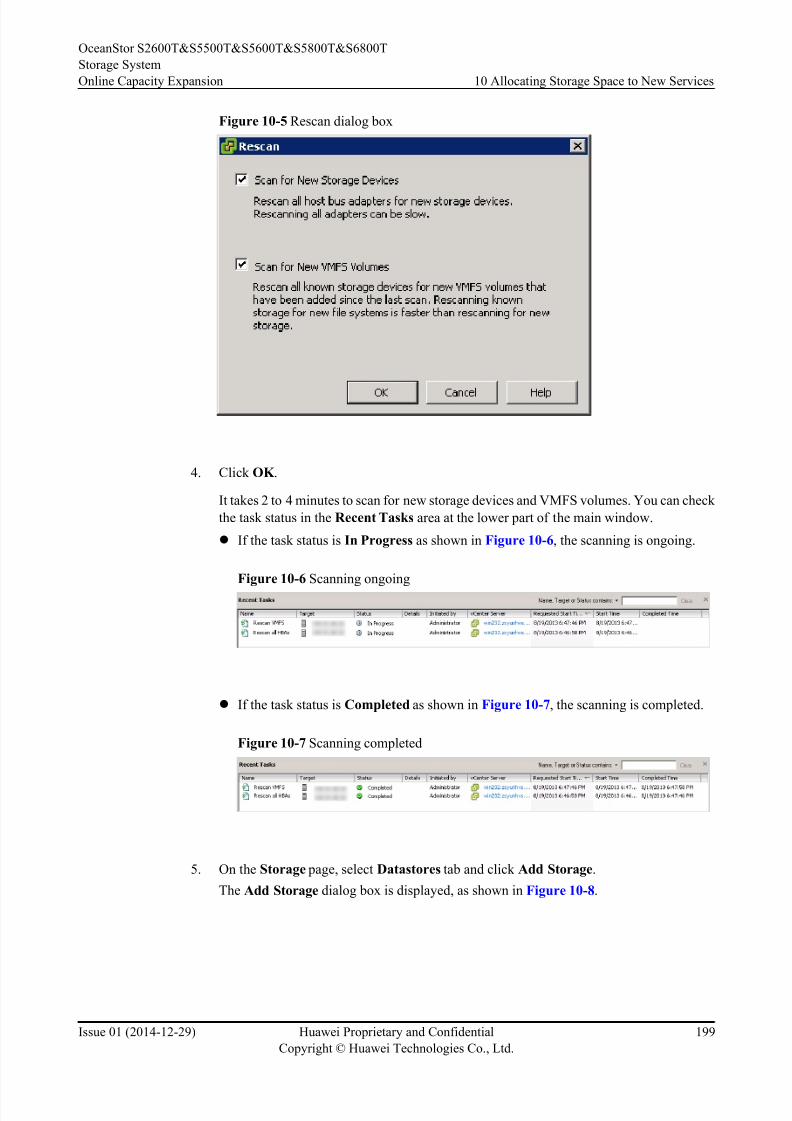
8/9/2019 OceanStor S2600T&S5500T&S5600T&S5800T&S6800T Storage System V200R002 Online Capacity Expansion 01
http://slidepdf.com/reader/full/oceanstor-s2600ts5500ts5600ts5800ts6800t-storage-system-v200r002-online 206/226
Figure 10-5 Rescan dialog box
4. Click OK .
It takes 2 to 4 minutes to scan for new storage devices and VMFS volumes. You can check
the task status in the Recent Tasks area at the lower part of the main window.
l If the task status is In Progress as shown in Figure 10-6, the scanning is ongoing.
Figure 10-6 Scanning ongoing
l If the task status is Completed as shown in Figure 10-7, the scanning is completed.
Figure 10-7 Scanning completed
5. On the Storage page, select Datastores tab and click Add Storage.
The Add Storage dialog box is displayed, as shown in Figure 10-8.
OceanStor S2600T&S5500T&S5600T&S5800T&S6800T
Storage System
Online Capacity Expansion 10 Allocating Storage Space to New Services
Issue 01 (2014-12-29) Huawei Proprietary and Confidential
Copyright © Huawei Technologies Co., Ltd.
199

8/9/2019 OceanStor S2600T&S5500T&S5600T&S5800T&S6800T Storage System V200R002 Online Capacity Expansion 01
http://slidepdf.com/reader/full/oceanstor-s2600ts5500ts5600ts5800ts6800t-storage-system-v200r002-online 207/226
Figure 10-8 Add Storage dialog box
Step 2 Configure datastore parameters.
1. Select Disk/LUN for Storage Type and click Next.2. Select the LUN mapped from the storage system and click Next, as shown in Figure
10-9.
OceanStor S2600T&S5500T&S5600T&S5800T&S6800T
Storage System
Online Capacity Expansion 10 Allocating Storage Space to New Services
Issue 01 (2014-12-29) Huawei Proprietary and Confidential
Copyright © Huawei Technologies Co., Ltd.
200
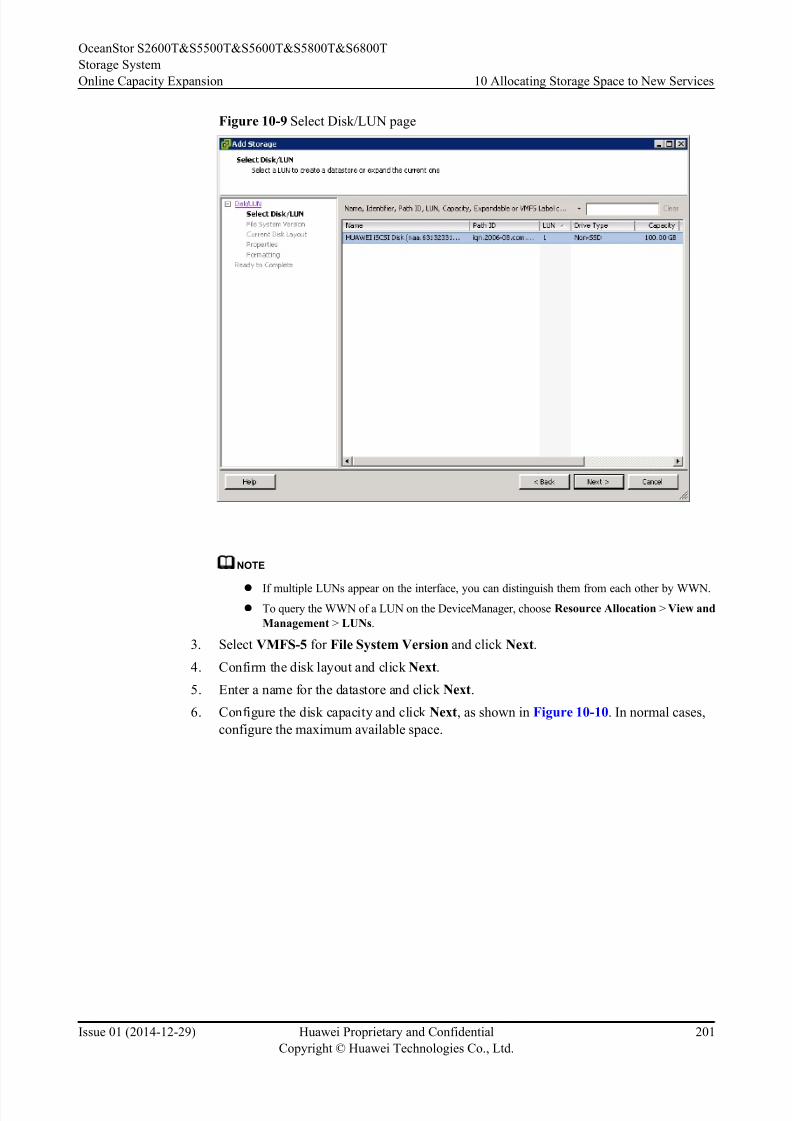
8/9/2019 OceanStor S2600T&S5500T&S5600T&S5800T&S6800T Storage System V200R002 Online Capacity Expansion 01
http://slidepdf.com/reader/full/oceanstor-s2600ts5500ts5600ts5800ts6800t-storage-system-v200r002-online 208/226
Figure 10-9 Select Disk/LUN page
NOTE
l If multiple LUNs appear on the interface, you can distinguish them from each other by WWN.
l To query the WWN of a LUN on the DeviceManager, choose Resource Allocation > View and
Management > LUNs.
3. Select VMFS-5 for File System Version and click Next.
4. Confirm the disk layout and click Next.
5. Enter a name for the datastore and click Next.
6. Configure the disk capacity and click Next, as shown in Figure 10-10. In normal cases,
configure the maximum available space.
OceanStor S2600T&S5500T&S5600T&S5800T&S6800T
Storage System
Online Capacity Expansion 10 Allocating Storage Space to New Services
Issue 01 (2014-12-29) Huawei Proprietary and Confidential
Copyright © Huawei Technologies Co., Ltd.
201
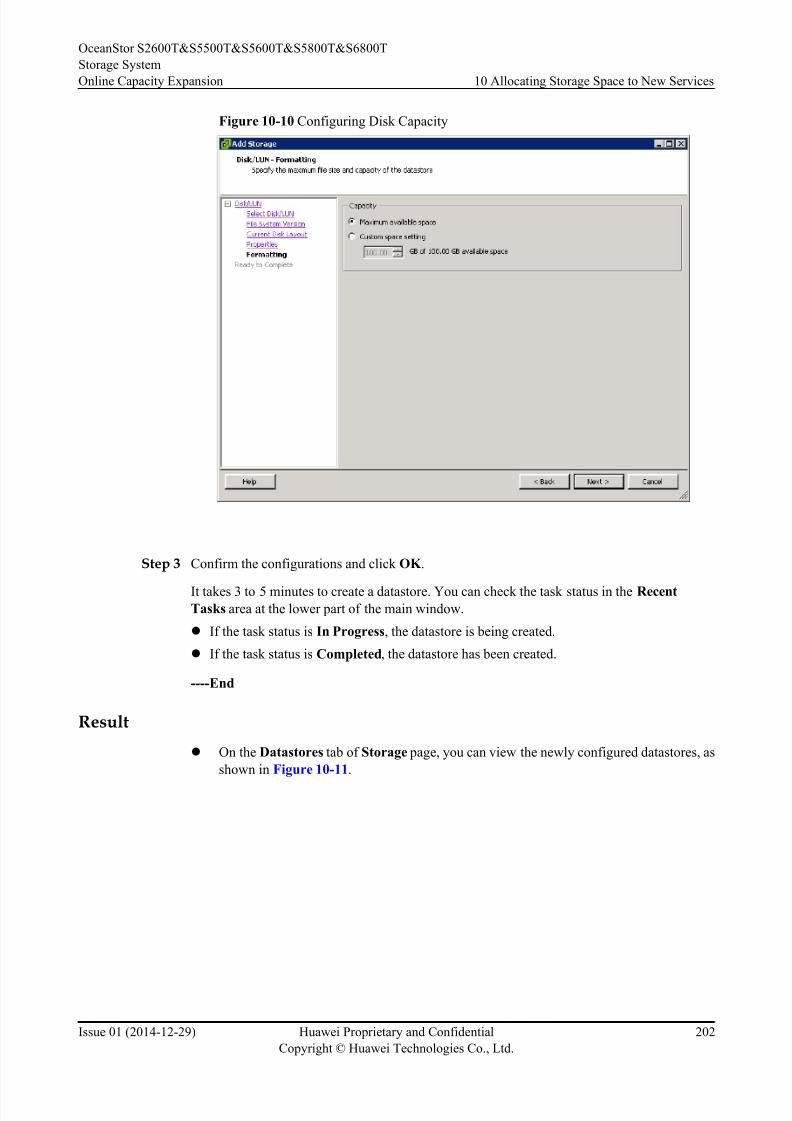
8/9/2019 OceanStor S2600T&S5500T&S5600T&S5800T&S6800T Storage System V200R002 Online Capacity Expansion 01
http://slidepdf.com/reader/full/oceanstor-s2600ts5500ts5600ts5800ts6800t-storage-system-v200r002-online 209/226
Figure 10-10 Configuring Disk Capacity
Step 3 Confirm the configurations and click OK .
It takes 3 to 5 minutes to create a datastore. You can check the task status in the RecentTasks area at the lower part of the main window.
l If the task status is In Progress, the datastore is being created.
l If the task status is Completed, the datastore has been created.
----End
Result
l On the Datastores tab of Storage page, you can view the newly configured datastores, as
shown in Figure 10-11.
OceanStor S2600T&S5500T&S5600T&S5800T&S6800T
Storage System
Online Capacity Expansion 10 Allocating Storage Space to New Services
Issue 01 (2014-12-29) Huawei Proprietary and Confidential
Copyright © Huawei Technologies Co., Ltd.
202
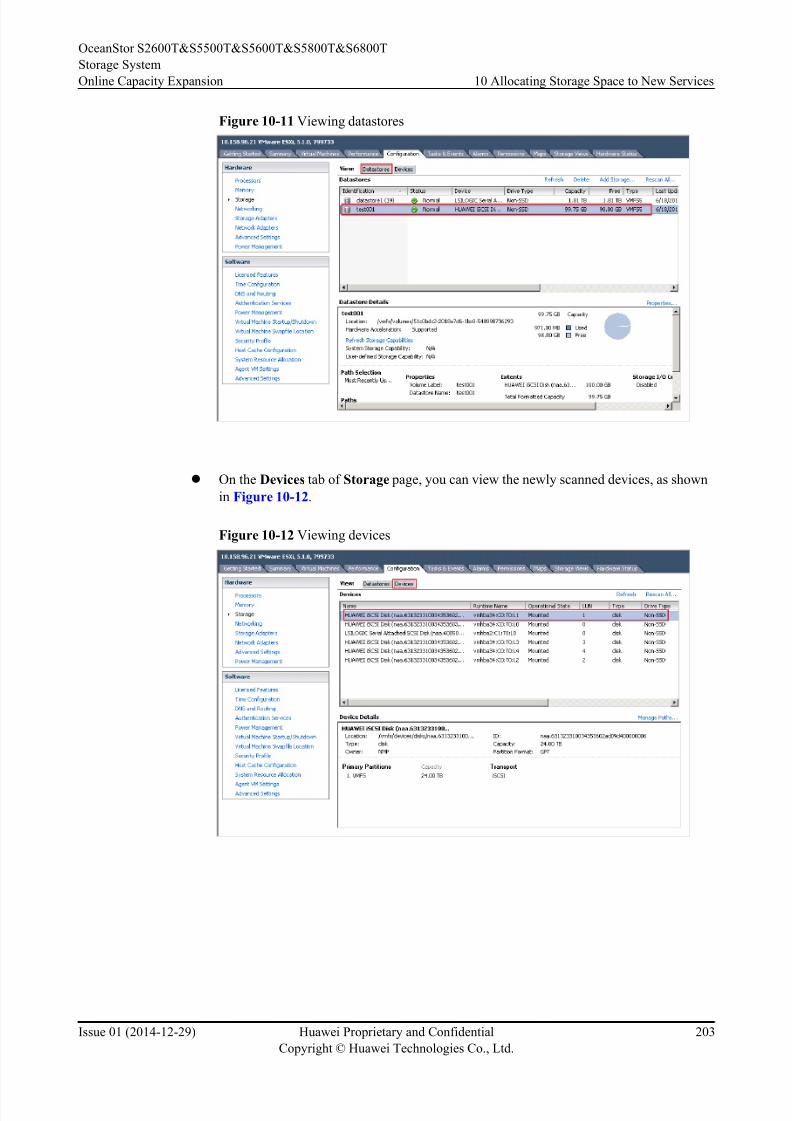
8/9/2019 OceanStor S2600T&S5500T&S5600T&S5800T&S6800T Storage System V200R002 Online Capacity Expansion 01
http://slidepdf.com/reader/full/oceanstor-s2600ts5500ts5600ts5800ts6800t-storage-system-v200r002-online 210/226
Figure 10-11 Viewing datastores
l On the Devices tab of Storage page, you can view the newly scanned devices, as shown
in Figure 10-12.
Figure 10-12 Viewing devices
OceanStor S2600T&S5500T&S5600T&S5800T&S6800T
Storage System
Online Capacity Expansion 10 Allocating Storage Space to New Services
Issue 01 (2014-12-29) Huawei Proprietary and Confidential
Copyright © Huawei Technologies Co., Ltd.
203
8/9/2019 OceanStor S2600T&S5500T&S5600T&S5800T&S6800T Storage System V200R002 Online Capacity Expansion 01
http://slidepdf.com/reader/full/oceanstor-s2600ts5500ts5600ts5800ts6800t-storage-system-v200r002-online 211/226
A How to Obtain Help
If a tough or critical problem persists in routine maintenance or troubleshooting, contact Huawei
for technical support.
A.1 Preparations For Contacting Huawei
To better solve the problem, you need to collect troubleshooting information and make
debugging preparations before contacting Huawei.
A.2 How to Use the Document
Huawei provides guide documents shipped with the device. The guide documents can be used
to handle the common problems occurring in daily maintenance or troubleshooting.
A.3 How to O btain Help from Website
Huawei provides users with timely and efficient technical support through the regional offices,
secondary technical support system, telephone technical support, remote technical support, and
onsite technical support.
A.4 Ways to Contact Huawei
Huawei Technologies Co., Ltd. provides customers with comprehensive technical support and
service. For any assistance, contact our local office or company headquarters.
OceanStor S2600T&S5500T&S5600T&S5800T&S6800T
Storage System
Online Capacity Expansion A How to Obtain Help
Issue 01 (2014-12-29) Huawei Proprietary and Confidential
Copyright © Huawei Technologies Co., Ltd.
204
8/9/2019 OceanStor S2600T&S5500T&S5600T&S5800T&S6800T Storage System V200R002 Online Capacity Expansion 01
http://slidepdf.com/reader/full/oceanstor-s2600ts5500ts5600ts5800ts6800t-storage-system-v200r002-online 212/226
A.1 Preparations For Contacting Huawei
To better solve the problem, you need to collect troubleshooting information and make
debugging preparations before contacting Huawei.
A.1.1 Collecting Troubleshooting Information
You need to collect troubleshooting information before troubleshoot.
You need to collect the following information:
l Name and address of the customer
l Contact person and telephone number
l Time when the fault occurred
l Description of the fault phenomena
l Device type and software version
l Measures taken after the fault occurs and the related results
l Troubleshooting level and required solution deadline
A.1.2 Making Debugging Preparations
When you contact Huawei for help, the technical support engineer of Huawei might assist you
to do certain operations to collect information about the fault or rectify the fault directly.
Before contacting Huawei for help, you need to prepare the boards, port modules, screwdrivers,
screws, cables for serial ports, network cables, and other required materials.
A.2 How to Use the Document
Huawei provides guide documents shipped with the device. The guide documents can be used
to handle the common problems occurring in daily maintenance or troubleshooting.
To better solve the problems, use the documents before you contact Huawei for technical support.
A.3 How to Obtain Help from WebsiteHuawei provides users with timely and efficient technical support through the regional offices,
secondary technical support system, telephone technical support, remote technical support, and
onsite technical support.
Contents of the Huawei technical support system are as follows:
l Huawei headquarters technical support department
l Regional office technical support center
l Customer service center
l Technical support website: http://support.huawei.com/enterprise/
You can query how to contact the regional offices at http://support.huawei.com/enterprise/.
OceanStor S2600T&S5500T&S5600T&S5800T&S6800T
Storage System
Online Capacity Expansion A How to Obtain Help
Issue 01 (2014-12-29) Huawei Proprietary and Confidential
Copyright © Huawei Technologies Co., Ltd.
205
8/9/2019 OceanStor S2600T&S5500T&S5600T&S5800T&S6800T Storage System V200R002 Online Capacity Expansion 01
http://slidepdf.com/reader/full/oceanstor-s2600ts5500ts5600ts5800ts6800t-storage-system-v200r002-online 213/226
A.4 Ways to Contact Huawei
Huawei Technologies Co., Ltd. provides customers with comprehensive technical support and
service. For any assistance, contact our local office or company headquarters.
Huawei Technologies Co., Ltd.
Address: Huawei Industrial Base Bantian, Longgang Shenzhen 518129 People's Republic of
China
Website: http://enterprise.huawei.com/
OceanStor S2600T&S5500T&S5600T&S5800T&S6800T
Storage System
Online Capacity Expansion A How to Obtain Help
Issue 01 (2014-12-29) Huawei Proprietary and Confidential
Copyright © Huawei Technologies Co., Ltd.
206
8/9/2019 OceanStor S2600T&S5500T&S5600T&S5800T&S6800T Storage System V200R002 Online Capacity Expansion 01
http://slidepdf.com/reader/full/oceanstor-s2600ts5500ts5600ts5800ts6800t-storage-system-v200r002-online 214/226
B Glossary
A
AC power module
The module that transfers the external AC power supply into the power
supply for internal use.
Application
server
A service processing node (a computer device) in the network.
Application programs of data services are run on the application server.
Asynchronous
remote
replication
A kind of remote replication. When the data on the primary site is
updated, the data does not need to be updated on the mirroring site
synchronously to finish the update. In this way, performance is not
reduced due to data mirroring.
B
Backup A periodic operation performed on the data stored in the database for
the purposes of database recovery in case that the database is faulty. The
backup also refers to data synchronization between active and standby
boards.
Bandwidth A range of transmission frequencies that a transmission line or channel
can carry in a network. In fact, it is the difference between the highest
and lowest frequencies the transmission line or channel. The greater the
bandwidth, the faster the data transfer rate.
Baud rate The number of times per second the signal can change on a transmission
line. Commonly, the transmission line uses only two signal states,
making the baud rate equal to the number of bits per second that can be
transferred. The underlying transmission technique may use some of the
bandwidth, so it may not be the case that user data transfers at the line's
specified bit rate.
Bit error A computer that is connected to the serial port or management network
port of the storage system for maintenance.
Bit error rate The percentage of bits that have errors relative to the total number of
bits received in a transmission.
OceanStor S2600T&S5500T&S5600T&S5800T&S6800T
Storage System
Online Capacity Expansion B Glossary
Issue 01 (2014-12-29) Huawei Proprietary and Confidential
Copyright © Huawei Technologies Co., Ltd.
207
8/9/2019 OceanStor S2600T&S5500T&S5600T&S5800T&S6800T Storage System V200R002 Online Capacity Expansion 01
http://slidepdf.com/reader/full/oceanstor-s2600ts5500ts5600ts5800ts6800t-storage-system-v200r002-online 215/226
Bonding Bonding can bind multiple independent physical network ports into a
logical port, which ensures the high availability of server network
connections and improving network performance.
Boundary scan A test methodology that uses shift registers in the output connections of
integrated circuits. One IC often is connected to the next. A data pattern
is passed through the chain and the observed returned data stream
affected by the circuit conditions gives an indication of any faults
present. The system is defined under IEEE standard 1149.1 and is also
often known as JTAG (Joint Test Action Group).
Browser/Server An architecture that defines the roles of browser and server, where the
browser is the service request party and the server is the service provider.
C
Cache hit ratio The ratio of directly accessed I/O from Cache to all the I/O operation
during the read operation.
Cache prefetch
strategy
According to the operation in which data has been read or is being read,
the required data is read from a disk into the cache in advance.
Captive Screw After the screw is loosened, screw caps and bolts are not disconnected
from the main body.
Cascading Connect the storage system to more disk enclosures through connection
cables, thus expanding the capacity of the storage system.
CHAP A method to periodically verify the identity of the peer using a 3-wayhandshake. During the establishment of a link, the authenticator sends
a "challenge" message to the peer. The peer responds with a value
calculated using a "one-way hash" function. The authenticator checks
the response against its own calculation of the expected hash value. If
the values match, the authentication is acknowledged. CHAP provides
protection against playback attack.
Clone A snapshot technology. The source data is completely copied to
generate a data duplicate; therefore the duplicate needs the storage space
as the same size as the source data. It is also called clone. In the VIS
system, it is also called third-mirror break-off snapshot.
Cluster A mechanism adopted to improve the system performance. Several
devices of the same type form a cluster. The exterior of a cluster is some
like a kind of equipment. In the interior of a cluster, the nodes share the
load.
Coffer A technology for ensuring data security and integrity in a storage
system. It is used to store the mission-critical data of the system.
Coffer disk Disks that build up the coffer.
Command device A special LUN through which the host can send inband commands to
storage devices.
OceanStor S2600T&S5500T&S5600T&S5800T&S6800T
Storage System
Online Capacity Expansion B Glossary
Issue 01 (2014-12-29) Huawei Proprietary and Confidential
Copyright © Huawei Technologies Co., Ltd.
208
8/9/2019 OceanStor S2600T&S5500T&S5600T&S5800T&S6800T Storage System V200R002 Online Capacity Expansion 01
http://slidepdf.com/reader/full/oceanstor-s2600ts5500ts5600ts5800ts6800t-storage-system-v200r002-online 216/226
8/9/2019 OceanStor S2600T&S5500T&S5600T&S5800T&S6800T Storage System V200R002 Online Capacity Expansion 01
http://slidepdf.com/reader/full/oceanstor-s2600ts5500ts5600ts5800ts6800t-storage-system-v200r002-online 217/226
Disk enclosure It consists of the following parts in redundancy: expansion module, hard
disk, power module, and fan module. System capacity can be expanded
by cascading multiple disk enclosures.
Disk utilization The percentage of used capacity in the total available capacity.
E
Engine Two controllers in one enclosure are called Engine.
Expansion Connecting a storage system to more disk enclosures through
connection cables, thus expanding the capacity of the storage system.
Expander module A component used for expanding.
F
Failover The automatic substitution of a functionally equivalent system
component for a failed one. The term failover is most often applied to
intelligent controllers connected to the same storage devices and host
computers. If one of the controllers fails, failover occurs, and the
survivor takes over its I/O load.
Field replaceable
unit
A unit that can function as a circuit board, part, or component of an
electronic device. It can be quickly and easily removed from a personal
computer or other electronic devices. If an FRU becomes faulty, users
can replace it with a new one instead of sending the entire product or
system for maintenance.
File Engine The component in a unified storage systems that provides file-level
service.
Firmware The programmable software part in a hardware component. A firmware
is a part of hardware, but is scalable as software.
Front-end host
port
The port that connects the controller enclosure to the service side and
transfers service data. There are three types of front-end host ports: SAS,
FC, and iSCSI.
G
Gateway The entrance node on another network.
Global system for
mobile
communications
The second-generation mobile networking standard defined by
European Telecommunications Standards Institute (ETSI). It is aimed
at designing a standard for global mobile phone networks. The standard
allows a subscriber to use a phone globally. GSM consists of three main
parts: mobile switching subsystem (MSS), base station subsystem
(BSS), and mobile station (MS).
OceanStor S2600T&S5500T&S5600T&S5800T&S6800T
Storage System
Online Capacity Expansion B Glossary
Issue 01 (2014-12-29) Huawei Proprietary and Confidential
Copyright © Huawei Technologies Co., Ltd.
210
8/9/2019 OceanStor S2600T&S5500T&S5600T&S5800T&S6800T Storage System V200R002 Online Capacity Expansion 01
http://slidepdf.com/reader/full/oceanstor-s2600ts5500ts5600ts5800ts6800t-storage-system-v200r002-online 218/226
H
Hard disk A non-volatile storage device that stores digitally encoded data on
rapidly rotating platters with magnetic surfaces. Hard disks generally
offer more storage and quicker access to data than floppy disks do.
Hard disk tray The tray that bears the hard disk.
Heartbeat Heartbeats are the packets, requiring no acknowledgement, transmitted
between two devices. The device can judge the validity status of the
peer device. Heartbeat supports node communication, fault diagnosis,
and event triggering.
Hit ratio The ratio of directly accessed I/Os from cache to all I/Os.
Hot swap In a running system, inserting or removing a blade does not affect
normal running of the system.
I
I/O Data movement process between memory and peripheral devices in the
computer system. I/O is a collective name, indicating the operations
reading data into the memory and writing data to other places from
computer memory.
Inband
management
Inband management means that the management control information of
the network and the carrier service information of the user network are
transferred through the same logical channel. Inband management
enables users to manage storage arrays through commands.Management commands are sent through service channels, that is, I/O
write and read channels. The advantages of inband management include
high speed, stable transfer, and no additional management network ports
required.
Initiator A system component that can initiate an I/O operation on an I/O bus or
on a network.
Intelligent
prefetch
A cache prefetch strategy. The system software calculates a proper size
of prefetched data. This strategy applies to a read application involving
a single bit stream or to the situations where you do not know whether
the data is read in a certain order. An example is reading or writing a
file.
Interface module interface module connects various types of front-end host port, such as
the front-end host ports of SAS, FC and iSCSI.
The interface module can be configured with one type of the following
host ports or expansion ports: 10Gb iSCSI, 8Gb FC, and iSCSI host
ports, or 4Gb FC and 6Gb SAS expansion ports.
L
OceanStor S2600T&S5500T&S5600T&S5800T&S6800T
Storage System
Online Capacity Expansion B Glossary
Issue 01 (2014-12-29) Huawei Proprietary and Confidential
Copyright © Huawei Technologies Co., Ltd.
211
8/9/2019 OceanStor S2600T&S5500T&S5600T&S5800T&S6800T Storage System V200R002 Online Capacity Expansion 01
http://slidepdf.com/reader/full/oceanstor-s2600ts5500ts5600ts5800ts6800t-storage-system-v200r002-online 219/226
Load balance A method of adjusting the system, application components and data to
averagely distribute the applied I/O or computing requests for physical
resources of the system.
Logical unit The entity is located inside the SCSI object, and can execute I/O
commands. After a SCSI I/O command is sent to an object, the logic
unit inside the object executes this command. Usually, each SCSI
physical disk has one logic unit. A tape drive and array controller may
have multiple logic units, which process different I/O commands. Each
logic unit inside an array controller corresponds to a virtual disk.
Logical unit
number
The SCSI identifier of the internal logical unit of a target.
LUN format The process of writing 0 bits in the data area on the logical drive and
generating related parity bits so that the logical drive can be in the ready
state.
LUN mapping The storage system maps LUNs to ASs so that the ASs can access the
storage reorganization.
LUN copy The function of copying the original LUN data to one or multiple target
LUNs.
M
Maintenance
terminal
The computer that is connected through a serial port or management
network port and maintains the storage system.
Management
network
An entity that provides a means to transmit and process the information
related to network management.
Management
network port
The network port on the controller enclosure that is connected to the
maintenance terminal. It is provided for the remote maintenance
terminal.
N
Node A managed device in the network. For a device with a single frame, one
node stands for one device. For a device with multiple frames, one nodestands for one frame of the device.
O
Out-of-band
management
A management mode used during out-of-band networking. In the out-
of-band management mode, the management and control information
of the network and the bearer service information of the user network
are transmitted through different logical channels.
Original LUN The LUN where the original data of the copied LUNs is located.
OceanStor S2600T&S5500T&S5600T&S5800T&S6800T
Storage System
Online Capacity Expansion B Glossary
Issue 01 (2014-12-29) Huawei Proprietary and Confidential
Copyright © Huawei Technologies Co., Ltd.
212
8/9/2019 OceanStor S2600T&S5500T&S5600T&S5800T&S6800T Storage System V200R002 Online Capacity Expansion 01
http://slidepdf.com/reader/full/oceanstor-s2600ts5500ts5600ts5800ts6800t-storage-system-v200r002-online 220/226
Owning
controller
For a LUN, the user configures the owing controller, that is, specified
the created LUN to a certain controller. When the owning controller of
the LUN is invalid, another controller manages the LUN automatically.
When the owning controller of the LUN is restored, the original
controller manages the LUN again.
P
Power failure
protection
When the external power failure occurs, the AC PEM depends on the
battery for power supply, which ensures the integrity of the dirty data
in cache.
Pre-copy When the system monitors that a member disk in a RAID group is to
fail, the system copies the data on the disk to a hot spare disk in advance.
This technology is called pre-copy.
Primary storage
controller
The controller that plays a leading role in controlling the management
is the primary storage controller. It can perform relevant management
operations on the controller enclosure.
Primary/
Secondary
switchover
A procedure during which the two controllers of the storage system
change their master/slave states.
Prior controller For the application server LUN, prior controller means that the working
controller is the owner controller of the corresponding array LUN.
R
RAID level The application of different redundant types to a logical drive. A RAID
level improves the fault tolerance or performance of the logical drive
but reduces the available capacity of the logical drive. You must specify
a RAID level for each logical drive.
Reconstruction A function of the storage system. It refers to the process of restoring the
data saved in the faulty member disk in a storage pool.
Redundancy The scheme to add more than one channels, elements or parts that have
the same functions with the counterparts in the system or device at a
critical place. When a fault occurs, the system or device can work well,and the reliability is then improved.
Remote
replication
A core technology for disaster recovery and a foundation that
implements remote data synchronization and disaster recovery. This
technology remotely maintains a set of data mirror through the remote
data connection function of the storage devices that are separated in
different places. Even when a disaster occurs, the data backup on the
remote storage device is not affected. Remote replication can be divided
into synchronous remote replication and asynchronous remote
replication by whether the host that requires mirrors needs the
confirmation information of the remote replication site.
OceanStor S2600T&S5500T&S5600T&S5800T&S6800T
Storage System
Online Capacity Expansion B Glossary
Issue 01 (2014-12-29) Huawei Proprietary and Confidential
Copyright © Huawei Technologies Co., Ltd.
213
8/9/2019 OceanStor S2600T&S5500T&S5600T&S5800T&S6800T Storage System V200R002 Online Capacity Expansion 01
http://slidepdf.com/reader/full/oceanstor-s2600ts5500ts5600ts5800ts6800t-storage-system-v200r002-online 221/226
Reverse
synchronizing
The process of restoring data from the redundancy machine (RM) when
the services of the production machine (PM) are recovering.
Route The path that network traffic takes from its source to its destination. In
a TCP/IP network, each IP packet is routed independently. Routes can
change dynamically.
S
Script A collection of data statements used to perform an operation.
Secondary
controller
(1) A controller that backs up service and management data of the
primary controller in a clustered system. When the primary controller
fails, the secondary controller is upgraded to the primary controller and
takes over the management and services of the controller enclosure. (2)
A controller that backs up the management data of the primary controller in a block-level array. When the primary controller fails, the secondary
controller is upgraded to the primary controller and takes over the
management of the system.
Serial port An input/output location (channel) that sends and receives data to and
from a computer's CPU or a communications device one bit at a time.
Serial ports are used for serial data communication and as interfaces
with some peripheral devices, such as mice and printers.
Service data Data which is saved in data disk. Service data is the data source for
computing check data in parity disk.
Service network port
The network port that is used to store services.
SFP optical
transceiver
A component that can make data conversion between optical signals
and electrical signals and that can receive and transfer data.
Simple network
management
protocol
A network management protocol of TCP/IP. It enables remote users to
view and modify the management information of a network element.
This protocol ensures the transmission of management information
between any two points. The polling mechanism is adopted to provide
basic function sets. According to SNMP, agents, which can be hardware
as well as software, can monitor the activities of various devices on the
network and report these activities to the network console workstation.Control information about each device is maintained by a management
information block.
Single point
failure
A type of failure. Data transmission over a network is stopped and
cannot be recovered automatically if a single point failure occurs. The
point can be an interface, a board, a device, or a link.
Small computer
system interface
A set of standards for physically connecting and transferring data
between computers and peripheral devices. SCSI is most commonly
used for hard disks and tape drives, but it can connect a wide range of
other devices, including scanners, and optical drive.
OceanStor S2600T&S5500T&S5600T&S5800T&S6800T
Storage System
Online Capacity Expansion B Glossary
Issue 01 (2014-12-29) Huawei Proprietary and Confidential
Copyright © Huawei Technologies Co., Ltd.
214
8/9/2019 OceanStor S2600T&S5500T&S5600T&S5800T&S6800T Storage System V200R002 Online Capacity Expansion 01
http://slidepdf.com/reader/full/oceanstor-s2600ts5500ts5600ts5800ts6800t-storage-system-v200r002-online 222/226
8/9/2019 OceanStor S2600T&S5500T&S5600T&S5800T&S6800T Storage System V200R002 Online Capacity Expansion 01
http://slidepdf.com/reader/full/oceanstor-s2600ts5500ts5600ts5800ts6800t-storage-system-v200r002-online 223/226
Topology The logical layout where computer systems and network components
are interconnected with one another. The topological structure gives the
interconnection relationship among the components from the viewpoint
of communication, but the topological structure does not specify the
exact locations of components and the interconnection mode.
Trap A type of SNMP message that indicates the occurrence of an event. This
type of message is transmitted to the received through UDP. The
transmission process is not completely reliable.
U
User datagram
protocol
A TCP/IP standard protocol that allows an application program on one
device to send a datagram to an application program on another. User
Datagram Protocol (UDP) uses IP to deliver datagram. UDP provides
application programs with the unreliable connectionless packet deliveryservice. There is a possibility that UDP messages will be lost,
duplicated, delayed, or delivered out of order. The destination device
does not confirm whether a data packet is received.
User interface The space in which users interact with a machine.
V
Variable prefetch A cache prefetch strategy. The size of the data to be prefetched is the
multiple for prefetching multiplied by the length of a read command.
This strategy applies to the applications that require reading data of
variable size in a certain order or to the situations where multiple
subscribers read data concurrently but no fixed prefetch size can be set,
because the amount of pre-read data cannot be judged. An example is
the streaming media demanded by multiple subscribers who use
different bit rates.
W
Working
controller
The controller used by the array LUN to read and write a disk.
Write back A caching technology in which the completion of a write request is
signaled as soon as the data is in cache, and actual writing to non-volatile
media occurs at a later time. Write back includes an inherent risk that
an application will take some action predicated on the write completion
signal, and a system failure before the data is written to non-volatile
media will cause media contents to be inconsistent with that subsequent
action. For this reason, good write back implementations include
mechanisms to preserve cache contents across system failures
(including power failures) and to flush the cache at system restart time.
OceanStor S2600T&S5500T&S5600T&S5800T&S6800T
Storage System
Online Capacity Expansion B Glossary
Issue 01 (2014-12-29) Huawei Proprietary and Confidential
Copyright © Huawei Technologies Co., Ltd.
216
8/9/2019 OceanStor S2600T&S5500T&S5600T&S5800T&S6800T Storage System V200R002 Online Capacity Expansion 01
http://slidepdf.com/reader/full/oceanstor-s2600ts5500ts5600ts5800ts6800t-storage-system-v200r002-online 224/226
Write through A caching technology in which the completion of a write request is not
signaled until data is safely stored on non-volatile media. Write
performance with the write through technology is approximately that of
a non-cached system, but if the data written is also held in cache,
subsequent read performance may be dramatically improved.
Z
Zone In the fiber channel, a collection of the N_Port or the NL_Port which
can communicate with each other in the optical network. Only the
N_Port or the NL_Port in the same partition can communicate with each
other through the optical network.
OceanStor S2600T&S5500T&S5600T&S5800T&S6800T
Storage System
Online Capacity Expansion B Glossary
Issue 01 (2014-12-29) Huawei Proprietary and Confidential
Copyright © Huawei Technologies Co., Ltd.
217
8/9/2019 OceanStor S2600T&S5500T&S5600T&S5800T&S6800T Storage System V200R002 Online Capacity Expansion 01
http://slidepdf.com/reader/full/oceanstor-s2600ts5500ts5600ts5800ts6800t-storage-system-v200r002-online 225/226
C Acronyms and Abbreviations
A
AOC Active Optical Cable
C
CLI Command Line Interface
E
ESDP Electronic Software Delivery Platform
ESN Equipment Serial Number
F
FC Fibre channel
I
iSCSI Internet Small Computer Systems Interface
L
LUN Logical Unit Number
P
PCIe Peripheral Component Interconnect Express
PDU Power Distribution Unit
OceanStor S2600T&S5500T&S5600T&S5800T&S6800T
Storage System
Online Capacity Expansion C Acronyms and Abbreviations
Issue 01 (2014-12-29) Huawei Proprietary and Confidential
Copyright © Huawei Technologies Co., Ltd.
218
8/9/2019 OceanStor S2600T&S5500T&S5600T&S5800T&S6800T Storage System V200R002 Online Capacity Expansion 01
http://slidepdf.com/reader/full/oceanstor-s2600ts5500ts5600ts5800ts6800t-storage-system-v200r002-online 226/226
R
RAID Redundant Array of Independent Disks
S
SAS Serial Attached SCSI
OceanStor S2600T&S5500T&S5600T&S5800T&S6800T
Storage System
Online Capacity Expansion C Acronyms and Abbreviations