Embed Size (px)
Citation preview
OBJECTFORMS PUBLISHER
TUTORIAL
RELEASE 2.1
OBJECTFORMS PUBLISHER
TUTORIAL
RELEASE 2.1JULY 1997

ObjectStore ObjectForms Publisher Tutorial
ObjectStore ObjectForms Publisher Release 2.1, July 1997
ObjectStore, Object Design, the Object Design logo, LEADERSHIP BY DESIGN, andObject Exchange are registered trademarks of Object Design, Inc. ObjectForms andObject Manager are trademarks of Object Design, Inc.
All other trademarks are the property of their respective owners.
Copyright © 1989 to 1997 Object Design, Inc. All rights reserved. Printed in the UnitedStates of America. Except as permitted under the Copyright Act of 1976, no part of thispublication may be reproduced or distributed in any form or by any means, or stored in adatabase or retrieval system, without the prior written permission of the publisher.
COMMERCIAL ITEM — The Programs are Commercial Computer Software, as definedin the Federal Acquisition Regulations and Department of Defense FAR Supplement, andare delivered to the United States Government with only those rights set forth in ObjectDesign’s software license agreement.
Data contained herein are proprietary to Object Design, Inc., or its licensors, and may notbe used, disclosed, reproduced, modified, performed or displayed without the priorwritten approval of Object Design, Inc.
This document contains proprietary Object Design information and is licensed for usepursuant to a Software License Services Agreement between Object Design, Inc., andCustomer.
The information in this document is subject to change without notice. Object Design,Inc., assumes no responsibility for any errors that may appear in this document.
Object Design, Inc.
Twenty Five Mall Road
Burlington, MA 01803-4194

RELEASE 2.1i
ContentsINTRODUCTION....................................................................................................... 3
Example Database .............................................................................................. 3HTML Examples ................................................................................................. 3Tutorial Examples............................................................................................... 5Note for UNIX Users........................................................................................... 6
BROWSING THE DATABASE ................................................................................. 7
DATA VIEW WINDOW ............................................................................................... 8VIEW INSTANCE WINDOW ....................................................................................... 11VIEWING MULTIMEDIA DATA.................................................................................. 12
YOUR FIRST PUBLICATION ................................................................................ 15
Running Publisher ............................................................................................ 15Setting the Default Web Server .......................................................................... 15Opening a Database.......................................................................................... 17
THE PUBLISHING PROCESS ...................................................................................... 18Selecting the Data to Publish............................................................................. 18Running the Publisher Wizard ........................................................................... 19
THE RUNTIME RESULT ............................................................................................ 21Running the HTTP MiniServer .......................................................................... 21The Publisher Runtime Service.......................................................................... 22Testing the Result.............................................................................................. 24
EDITING A PUBLICATION ................................................................................... 26
ITERATIVE REFINEMENTS ........................................................................................ 26A MORE COMPLETE EXAMPLE ................................................................................ 30
Specifying HTML Header and Footer................................................................ 30Editing the ObjectForms Template .................................................................... 32
NAVIGATION .......................................................................................................... 35
EXPANDING A RELATIONSHIP .................................................................................. 35EXPANDING MORE RELATIONSHIPS ......................................................................... 38NAVIGATING RELATIONSHIPS AND POINTERS ........................................................... 43
Publishing an HTML List .................................................................................. 48Recursive Navigation ........................................................................................ 50
PUBLISHING A QUERY RESULT......................................................................... 55
PUBLISHING MULTIMEDIA OBJECTS .............................................................. 63
PUBLISHING IMAGES ............................................................................................... 63Setting the Default Formatting Options ............................................................. 63
PUBLISHING VIDEOS ............................................................................................... 67
PUBLISHING A SINGLE INSTANCE.................................................................... 71
PUBLISHING AN INSTANCE....................................................................................... 71PUBLISHING AN IMAGE............................................................................................ 75
PUBLISHING A SPREADSHEET........................................................................... 79
PUBLISHING A COLLECTION OF OBJECTS.................................................................. 79NAVIGATING RELATIONSHIPS IN A SPREADSHEET..................................................... 87
INTEGRATING PUBLISHER WITH USER DEFINED CALL-BACKFUNCTIONS............................................................................................................. 90

ObjectStore Publisher Tutorialii
CREATING USER-DEFINED OBJECTFORMS CALL-BACK FUNCTIONS........................... 90
USING MULTIPLE INSTANCES OF THE PUBLISHER RUN-TIME SERVICE100
CREATING A NEW INSTANCE OF THE PUBLISHER RUNTIME...................................... 100CREATING A PUBLICATION THAT WORKS ON A DIFFERENT INSTANCE OF THEPUBLISHER RUNTIME............................................................................................. 101
RELEASE 2.1 3
Introduction
This tutorial guides you though the main features of ObjectStore ObjectForms Publisher.Each chapter provides step by step instructions that teach you how to perform a giventask. All the examples featured in the tutorial are included in the product package so thatyou can check your results against those in the tutorial.
Example Database
Publisher comes with two demo databases that contain the examples used in this tutorial.
They are stored in the <ObjectForms root>/DemoDBs directory and are calledExtraDemo.db and CarsDemo.db.
ExtraDemo.db is a simulated travel agency database. It contains multimedia data such asimages, video and sound stored using the Object Design Multimedia Object Managers.
CarsDemo.db is simulated used car shop database.
Empretr.db is a database used to show you how you can develop a complete, read-writeWeb application with ObjectForms and Publisher.
HTML Examples
Publisher also comes with two ready-to-run HTML examples that show you how you canuse Publisher and Publisher Runtime to create a complete Web application.
The first example is called Used Car Paradise and is stored under the <ObjectFormsroot>/WebRoot/Samples/Customers directory. It simulates the Web site of a used carstore where you can browse the company database to find a used car, check your orders,and search for customers by name.
Data View Window
ObjectStore Publisher Tutorial4
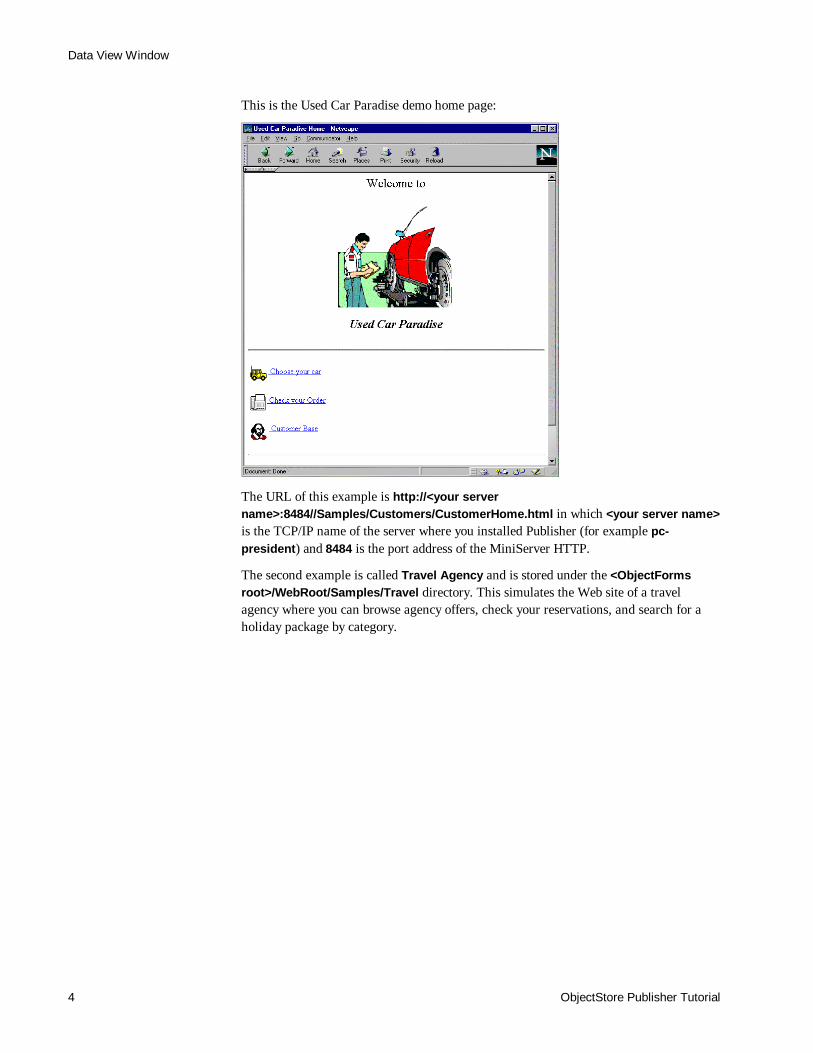
This is the Used Car Paradise demo home page:
The URL of this example is http://<your servername>:8484//Samples/Customers/CustomerHome.html in which <your server name>is the TCP/IP name of the server where you installed Publisher (for example pc-president) and 8484 is the port address of the MiniServer HTTP.
The second example is called Travel Agency and is stored under the <ObjectFormsroot>/WebRoot/Samples/Travel directory. This simulates the Web site of a travelagency where you can browse agency offers, check your reservations, and search for aholiday package by category.
Introduction
5
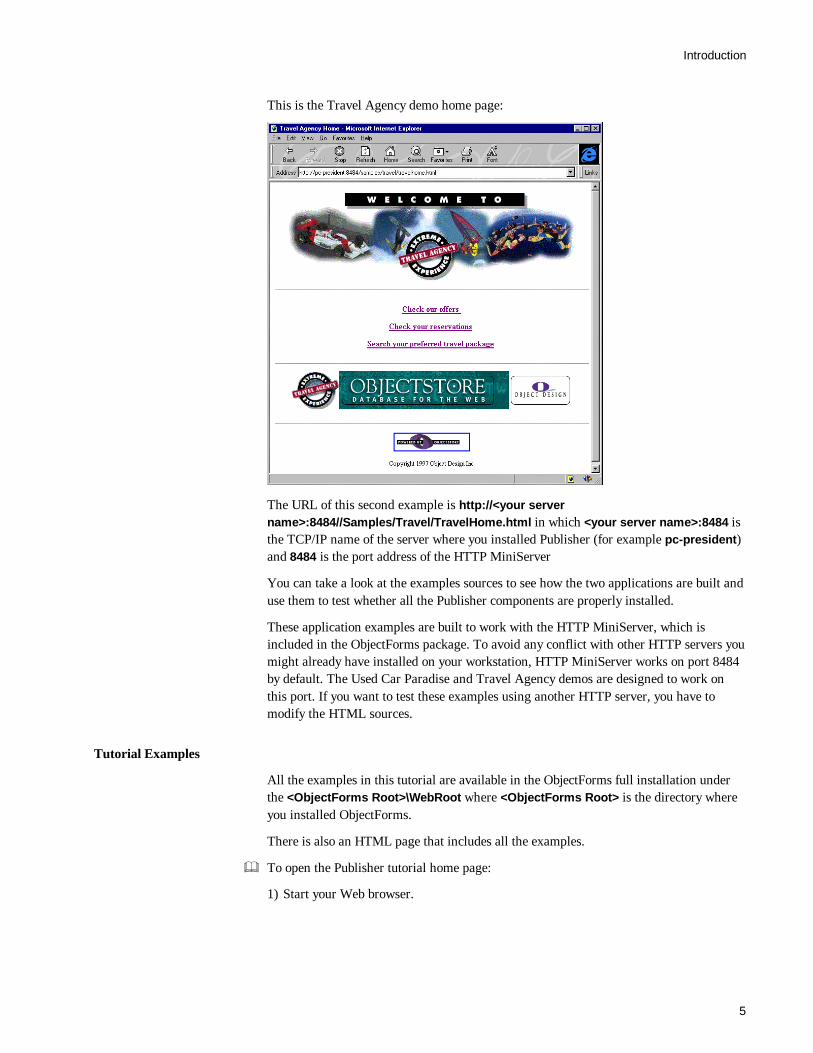
This is the Travel Agency demo home page:
The URL of this second example is http://<your servername>:8484//Samples/Travel/TravelHome.html in which <your server name>:8484 isthe TCP/IP name of the server where you installed Publisher (for example pc-president)and 8484 is the port address of the HTTP MiniServer
You can take a look at the examples sources to see how the two applications are built anduse them to test whether all the Publisher components are properly installed.
These application examples are built to work with the HTTP MiniServer, which isincluded in the ObjectForms package. To avoid any conflict with other HTTP servers youmight already have installed on your workstation, HTTP MiniServer works on port 8484by default. The Used Car Paradise and Travel Agency demos are designed to work onthis port. If you want to test these examples using another HTTP server, you have tomodify the HTML sources.
Tutorial Examples
All the examples in this tutorial are available in the ObjectForms full installation underthe <ObjectForms Root>\WebRoot where <ObjectForms Root> is the directory whereyou installed ObjectForms.
There is also an HTML page that includes all the examples.
& To open the Publisher tutorial home page:
1) Start your Web browser.
Data View Window
ObjectStore Publisher Tutorial6
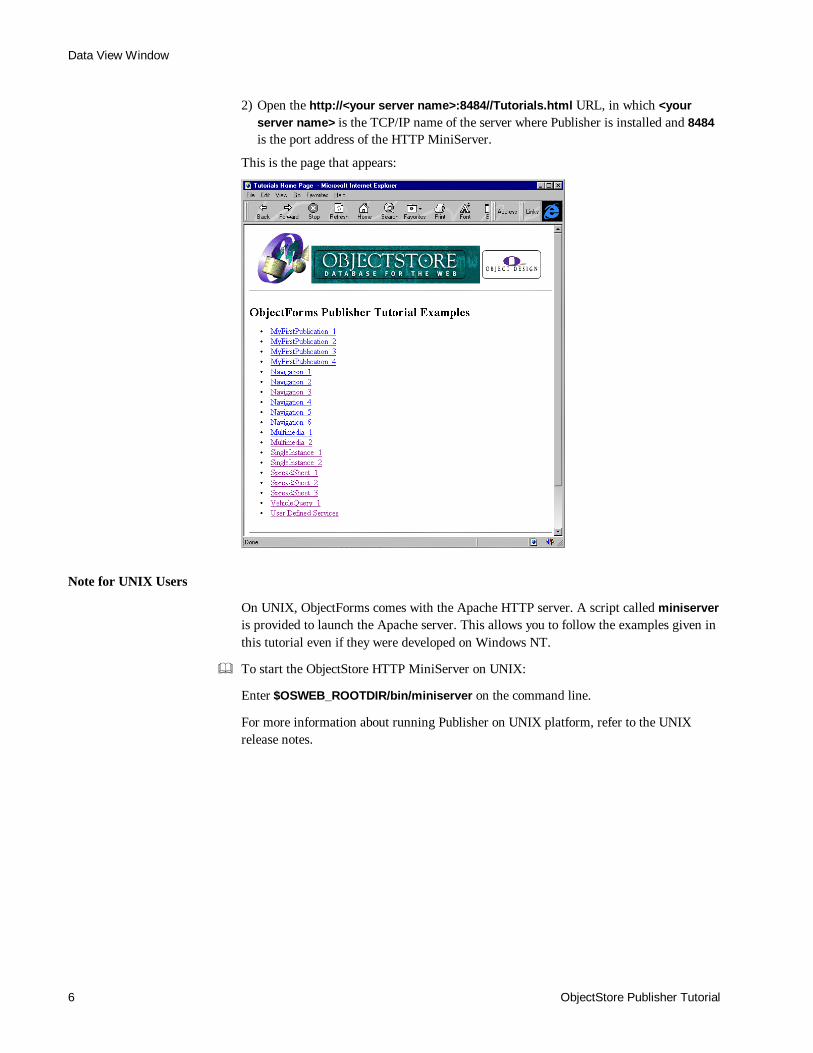
2) Open the http://<your server name>:8484//Tutorials.html URL, in which <yourserver name> is the TCP/IP name of the server where Publisher is installed and 8484is the port address of the HTTP MiniServer.
This is the page that appears:
Note for UNIX Users
On UNIX, ObjectForms comes with the Apache HTTP server. A script called miniserveris provided to launch the Apache server. This allows you to follow the examples given inthis tutorial even if they were developed on Windows NT.
& To start the ObjectStore HTTP MiniServer on UNIX:
Enter $OSWEB_ROOTDIR/bin/miniserver on the command line.
For more information about running Publisher on UNIX platform, refer to the UNIXrelease notes.
RELEASE 2.1 7
Browsing the Database
In this tutorial you learn how to browse an ObjectStore database using ObjectFormsPublisher.
Database: CarsDemo.db
To start this tutorial, first open the CarsDemo.db database.
& To open the CarsDemo.db database:
1) Run Publisher.
2) Select the File þ Open Database... command.
3) Select the CarsDemo.db file in the <ObjectForms root>\demodbs directory.
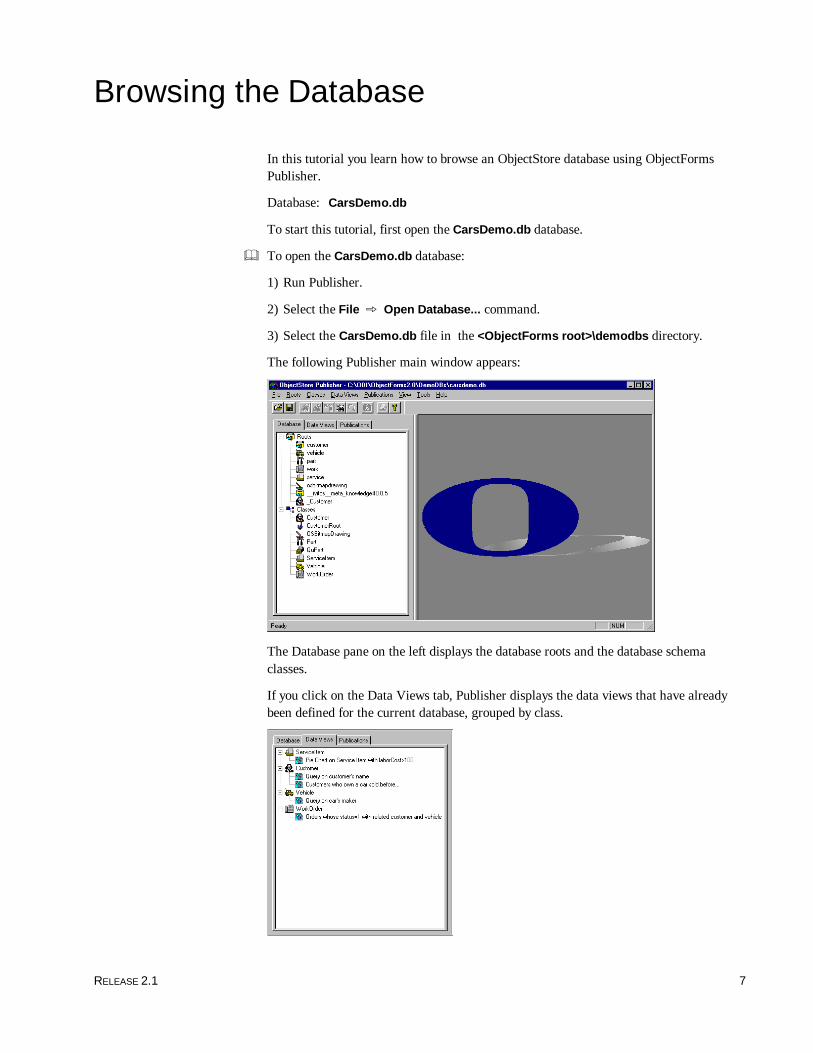
The following Publisher main window appears:
The Database pane on the left displays the database roots and the database schemaclasses.
If you click on the Data Views tab, Publisher displays the data views that have alreadybeen defined for the current database, grouped by class.
Data View Window
ObjectStore Publisher Tutorial8
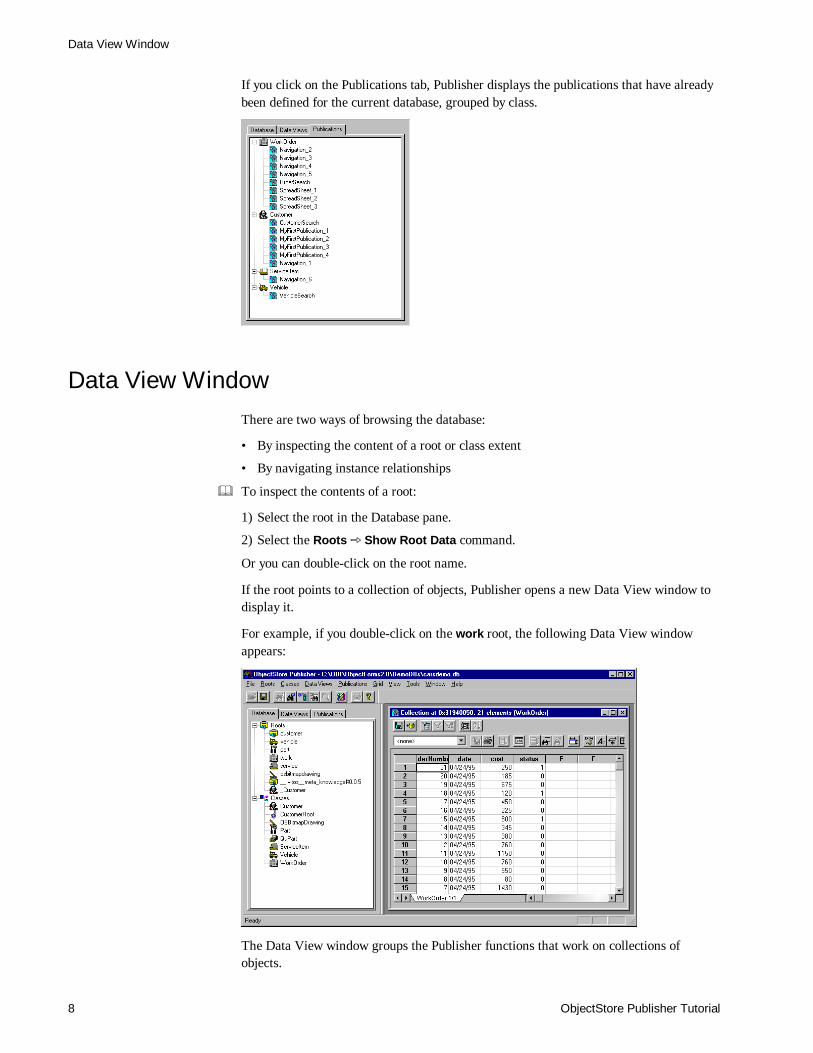
If you click on the Publications tab, Publisher displays the publications that have alreadybeen defined for the current database, grouped by class.
Data View WindowThere are two ways of browsing the database:
• By inspecting the content of a root or class extent
• By navigating instance relationships
& To inspect the contents of a root:
1) Select the root in the Database pane.
2) Select the Roots þ Show Root Data command.
Or you can double-click on the root name.
If the root points to a collection of objects, Publisher opens a new Data View window todisplay it.
For example, if you double-click on the work root, the following Data View windowappears:
The Data View window groups the Publisher functions that work on collections ofobjects.

Browsing the Database
9
The Data View window features a fully fledged spreadsheet where you can enterformulas, format the data, and create charts and drawings, as in any other spreadsheetavailable on the market.
& To define the data members whose values are to be displayed:
Select the Classes þ Set Instance Format command.
Publisher opens the Instance Format dialog where you can define how the instances of agiven class are represented.
For example, to see the Customer name and Vehicle make for each displayedWorkorder instance, select the settings as seen below:
When you click on the OK button, Publisher changes the representation of theWorkorder instances accordingly:
Filtering a CollectionYou can also filter and sort the displayed collection.
& To filter a collection in a Data View window:
Select the Data View þ Define Filter for Collection command.
Publisher opens the Data Member Constraints dialog, where you can define a filter.
Data View Window
ObjectStore Publisher Tutorial10
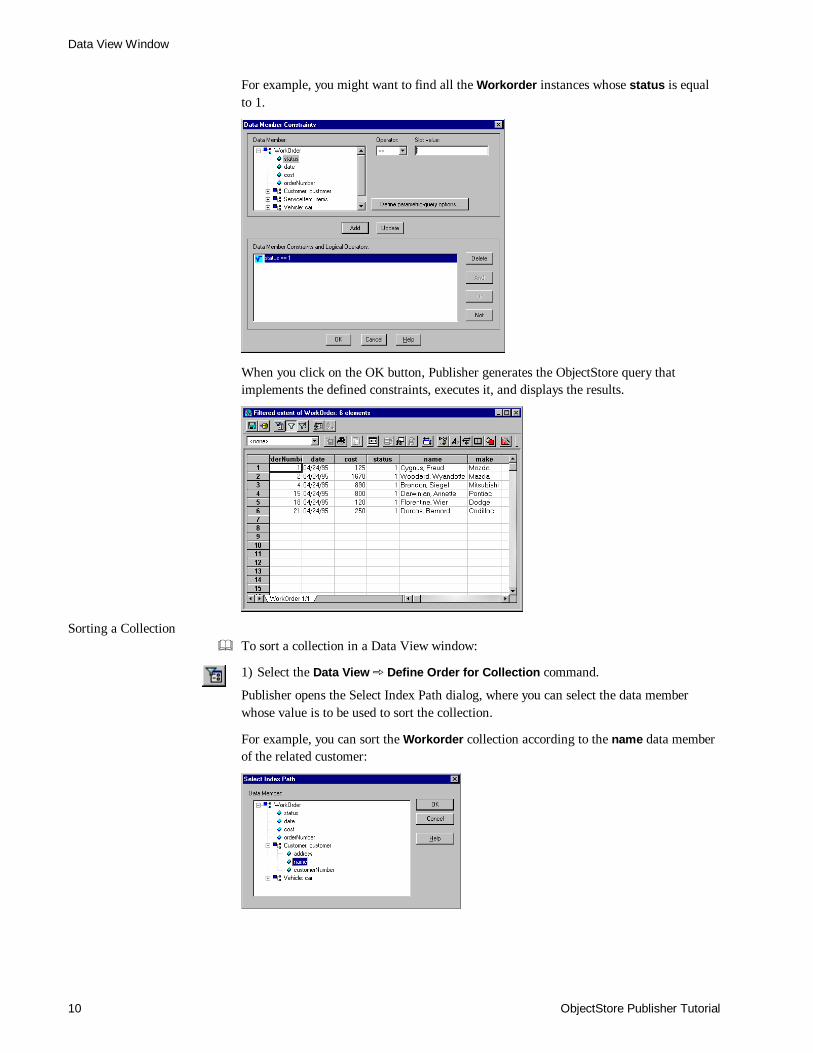
For example, you might want to find all the Workorder instances whose status is equalto 1.
When you click on the OK button, Publisher generates the ObjectStore query thatimplements the defined constraints, executes it, and displays the results.
Sorting a Collection& To sort a collection in a Data View window:
1) Select the Data View þ Define Order for Collection command.
Publisher opens the Select Index Path dialog, where you can select the data memberwhose value is to be used to sort the collection.
For example, you can sort the Workorder collection according to the name data memberof the related customer:
Browsing the Database
11
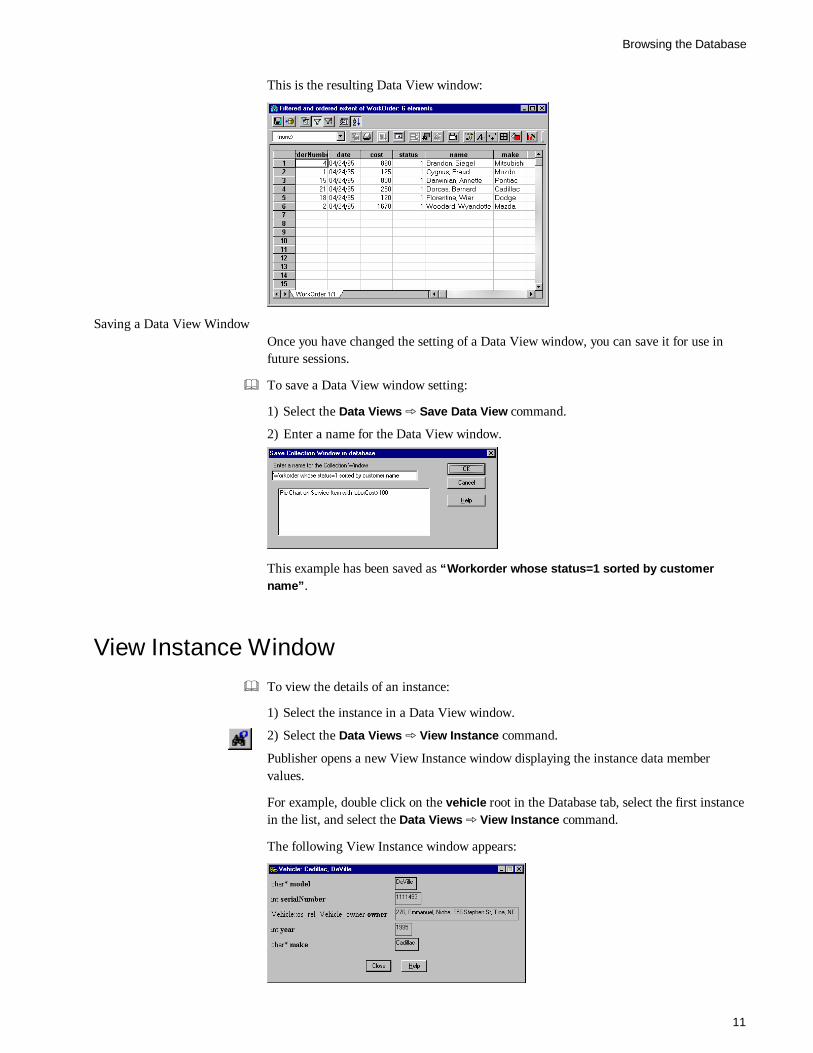
This is the resulting Data View window:
Saving a Data View WindowOnce you have changed the setting of a Data View window, you can save it for use infuture sessions.
& To save a Data View window setting:
1) Select the Data Views þ Save Data View command.
2) Enter a name for the Data View window.
This example has been saved as “Workorder whose status=1 sorted by customername”.
View Instance Window& To view the details of an instance:
1) Select the instance in a Data View window.
2) Select the Data Views þ View Instance command.
Publisher opens a new View Instance window displaying the instance data membervalues.
For example, double click on the vehicle root in the Database tab, select the first instancein the list, and select the Data Views þ View Instance command.
The following View Instance window appears:
Viewing Multimedia Data
ObjectStore Publisher Tutorial12
The data member values of the selected instance are shown.
The Vehicle class has a relationship with the Customer class. The value of thisrelationship is shown in the View Instance list.
& To navigate a relationship or pointer and inspect a related instance:
1) Select the relationship inside a View Instance window.
2) Select the Data Views þ View Instance command.
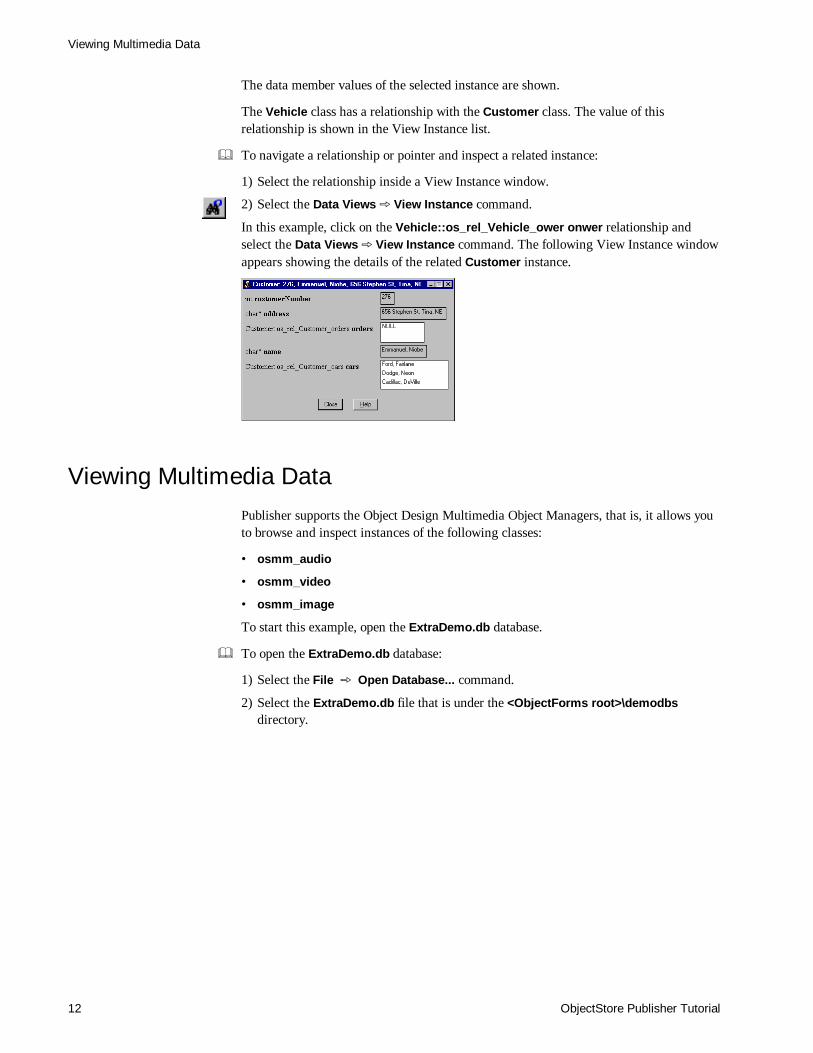
In this example, click on the Vehicle::os_rel_Vehicle_ower onwer relationship andselect the Data Views þ View Instance command. The following View Instance windowappears showing the details of the related Customer instance.
Viewing Multimedia DataPublisher supports the Object Design Multimedia Object Managers, that is, it allows youto browse and inspect instances of the following classes:
• osmm_audio
• osmm_video
• osmm_image
To start this example, open the ExtraDemo.db database.
& To open the ExtraDemo.db database:
1) Select the File þ Open Database... command.
2) Select the ExtraDemo.db file that is under the <ObjectForms root>\demodbsdirectory.
Browsing the Database
13
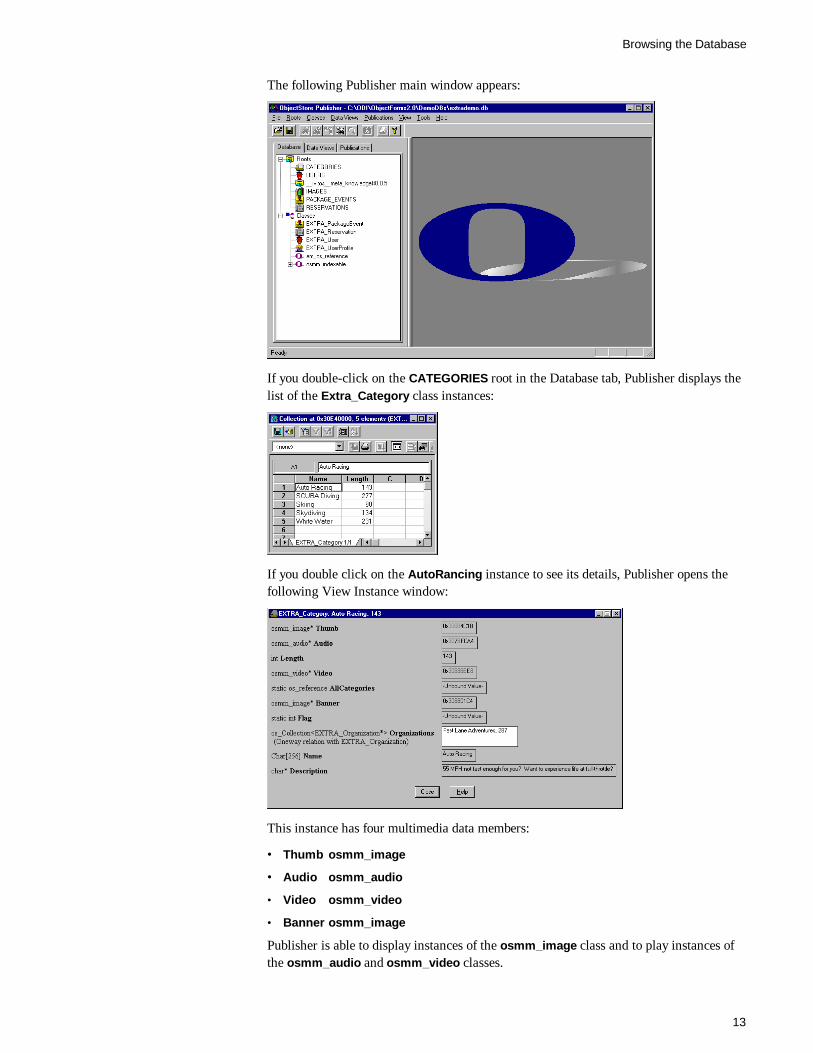
The following Publisher main window appears:
If you double-click on the CATEGORIES root in the Database tab, Publisher displays thelist of the Extra_Category class instances:
If you double click on the AutoRancing instance to see its details, Publisher opens thefollowing View Instance window:
This instance has four multimedia data members:
• Thumb osmm_image
• Audio osmm_audio
• Video osmm_video
• Banner osmm_image
Publisher is able to display instances of the osmm_image class and to play instances ofthe osmm_audio and osmm_video classes.
Viewing Multimedia Data
ObjectStore Publisher Tutorial14
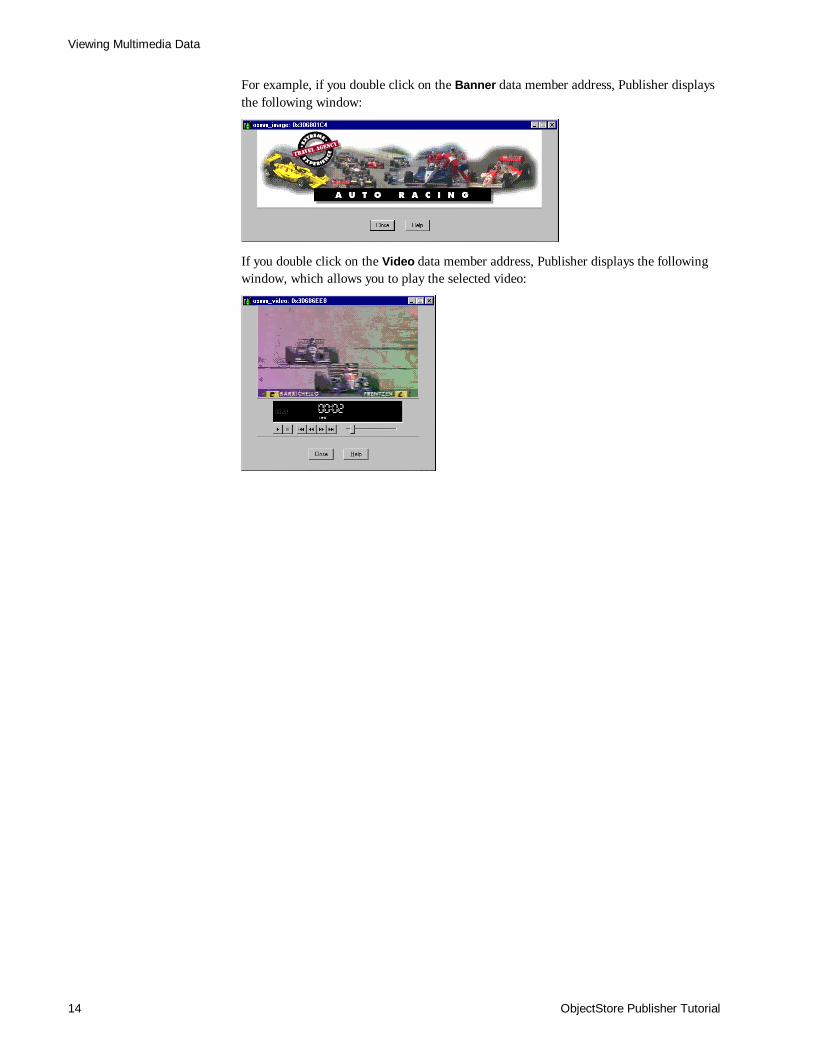
For example, if you double click on the Banner data member address, Publisher displaysthe following window:
If you double click on the Video data member address, Publisher displays the followingwindow, which allows you to play the selected video:
Your First Publication
15
Your First Publication
In this chapter you will create your first publication with Publisher. You will see thewhole publishing process and the resulting run-time execution of your publication.
The goal of this tutorial is to make you familiar with the Publisher user interface and thepublishing process, and to test if the configuration of the authoring and run-timeenvironments is fully set.
Database: CarsDemo.db
Running Publisher
First of all, run Publisher and open the CarsDemo.db demo database.
& To run Publisher:
1) Select the ObjectStore Publisher menu item from the Windows NT 4.0 Start menu.
Or
1) Double-click on the ObjectStore Publisher icon in the Program Manager (WindowsNT 3.51).
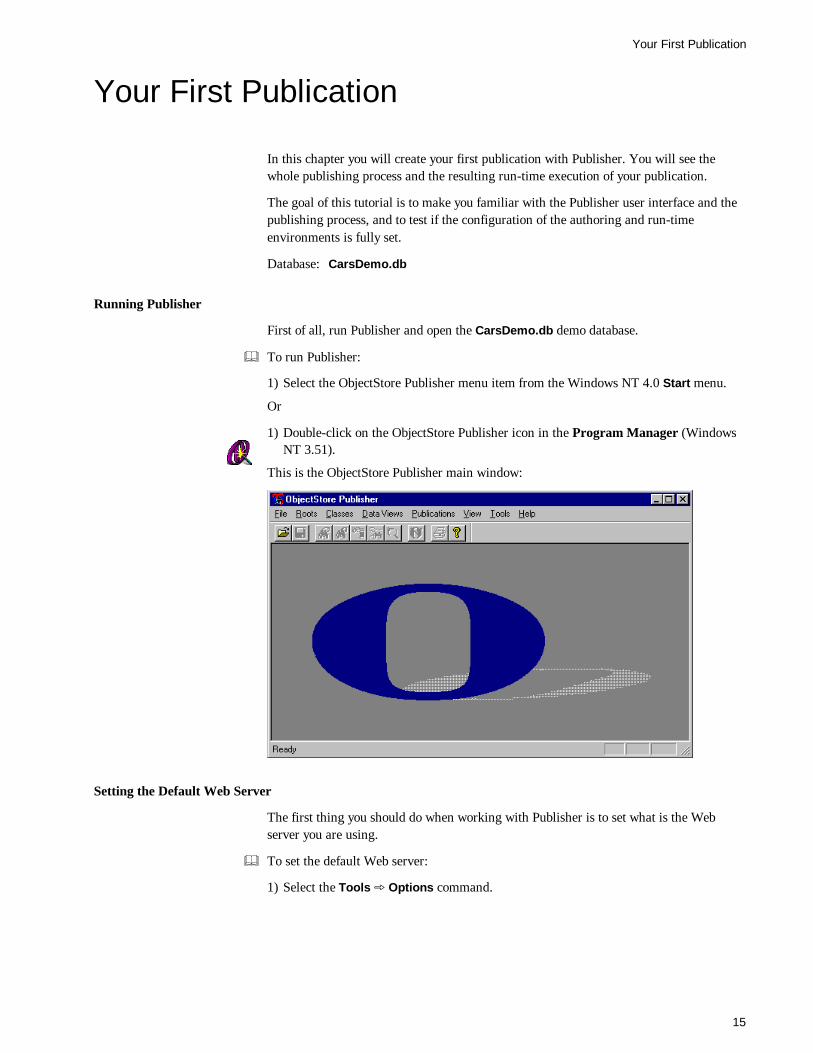
This is the ObjectStore Publisher main window:
Setting the Default Web Server
The first thing you should do when working with Publisher is to set what is the Webserver you are using.
& To set the default Web server:
1) Select the Tools þ Options command.
Viewing Multimedia Data
ObjectStore Publisher Tutorial16
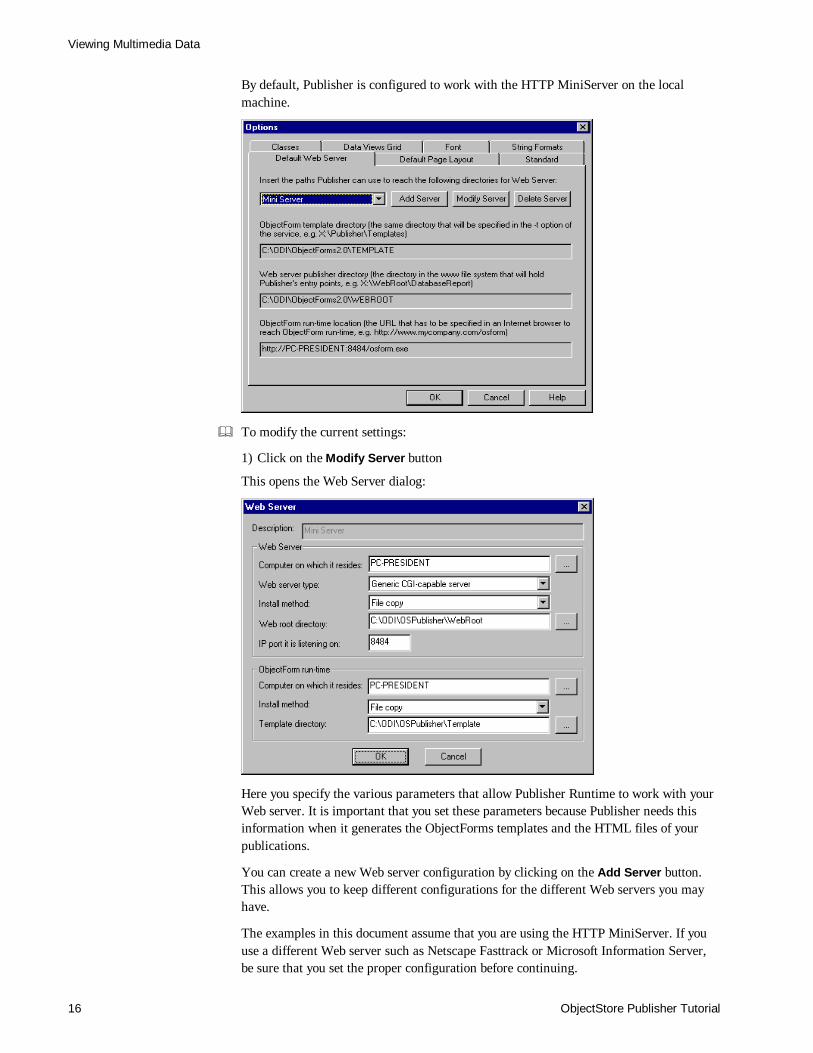
By default, Publisher is configured to work with the HTTP MiniServer on the localmachine.
& To modify the current settings:
1) Click on the Modify Server button
This opens the Web Server dialog:
Here you specify the various parameters that allow Publisher Runtime to work with yourWeb server. It is important that you set these parameters because Publisher needs thisinformation when it generates the ObjectForms templates and the HTML files of yourpublications.
You can create a new Web server configuration by clicking on the Add Server button.This allows you to keep different configurations for the different Web servers you mayhave.
The examples in this document assume that you are using the HTTP MiniServer. If youuse a different Web server such as Netscape Fasttrack or Microsoft Information Server,be sure that you set the proper configuration before continuing.
Your First Publication
17
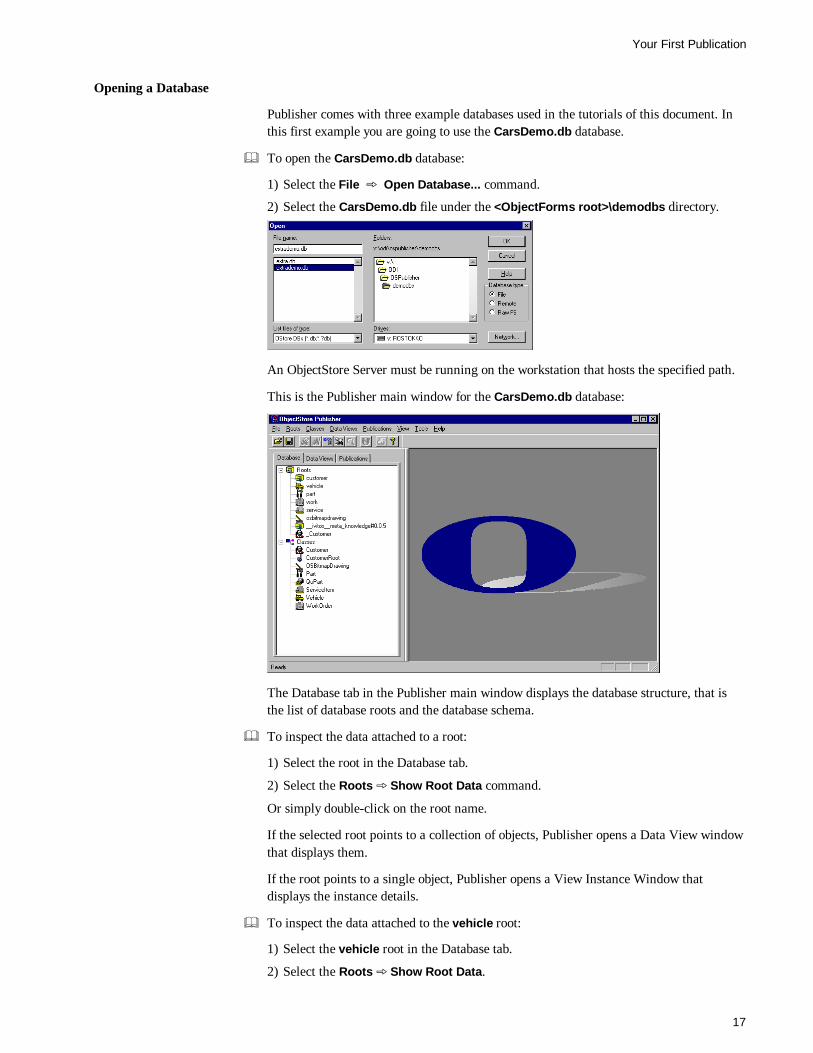
Opening a Database
Publisher comes with three example databases used in the tutorials of this document. Inthis first example you are going to use the CarsDemo.db database.
& To open the CarsDemo.db database:
1) Select the File þ Open Database... command.
2) Select the CarsDemo.db file under the <ObjectForms root>\demodbs directory.
An ObjectStore Server must be running on the workstation that hosts the specified path.
This is the Publisher main window for the CarsDemo.db database:
The Database tab in the Publisher main window displays the database structure, that isthe list of database roots and the database schema.
& To inspect the data attached to a root:
1) Select the root in the Database tab.
2) Select the Roots þ Show Root Data command.
Or simply double-click on the root name.
If the selected root points to a collection of objects, Publisher opens a Data View windowthat displays them.
If the root points to a single object, Publisher opens a View Instance Window thatdisplays the instance details.
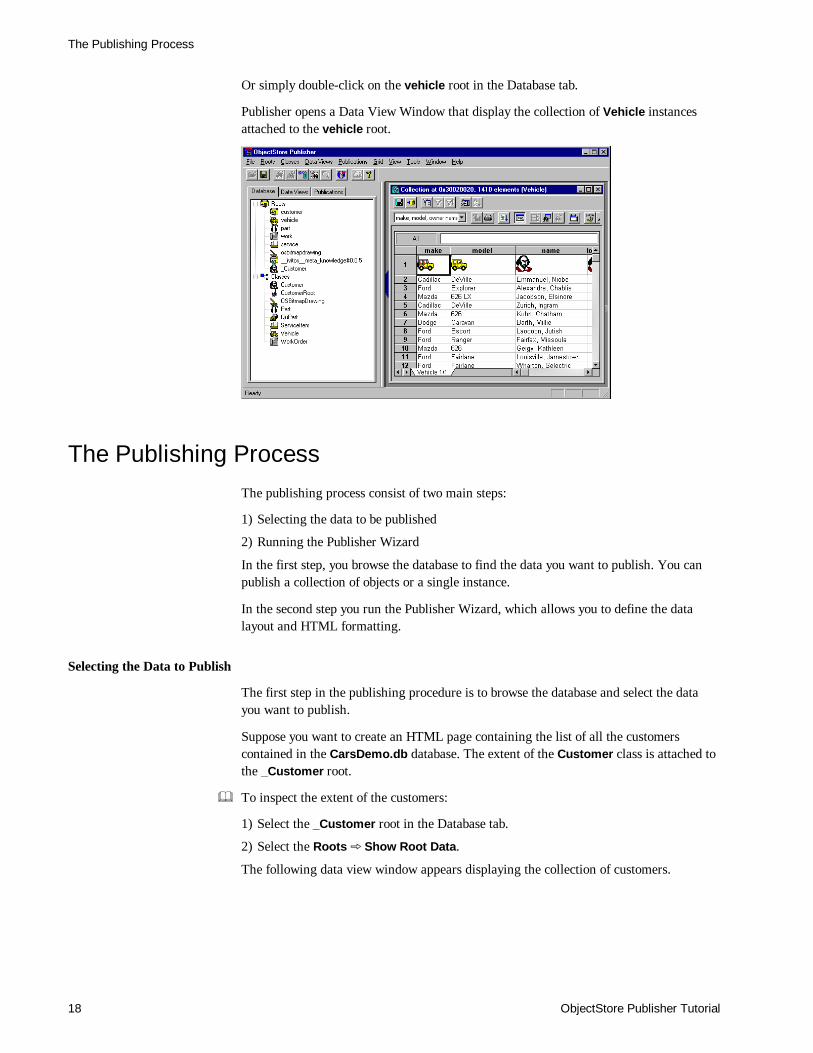
& To inspect the data attached to the vehicle root:
1) Select the vehicle root in the Database tab.
2) Select the Roots þ Show Root Data.
The Publishing Process
ObjectStore Publisher Tutorial18
Or simply double-click on the vehicle root in the Database tab.
Publisher opens a Data View Window that display the collection of Vehicle instancesattached to the vehicle root.
The Publishing ProcessThe publishing process consist of two main steps:
1) Selecting the data to be published
2) Running the Publisher Wizard
In the first step, you browse the database to find the data you want to publish. You canpublish a collection of objects or a single instance.
In the second step you run the Publisher Wizard, which allows you to define the datalayout and HTML formatting.
Selecting the Data to Publish
The first step in the publishing procedure is to browse the database and select the datayou want to publish.
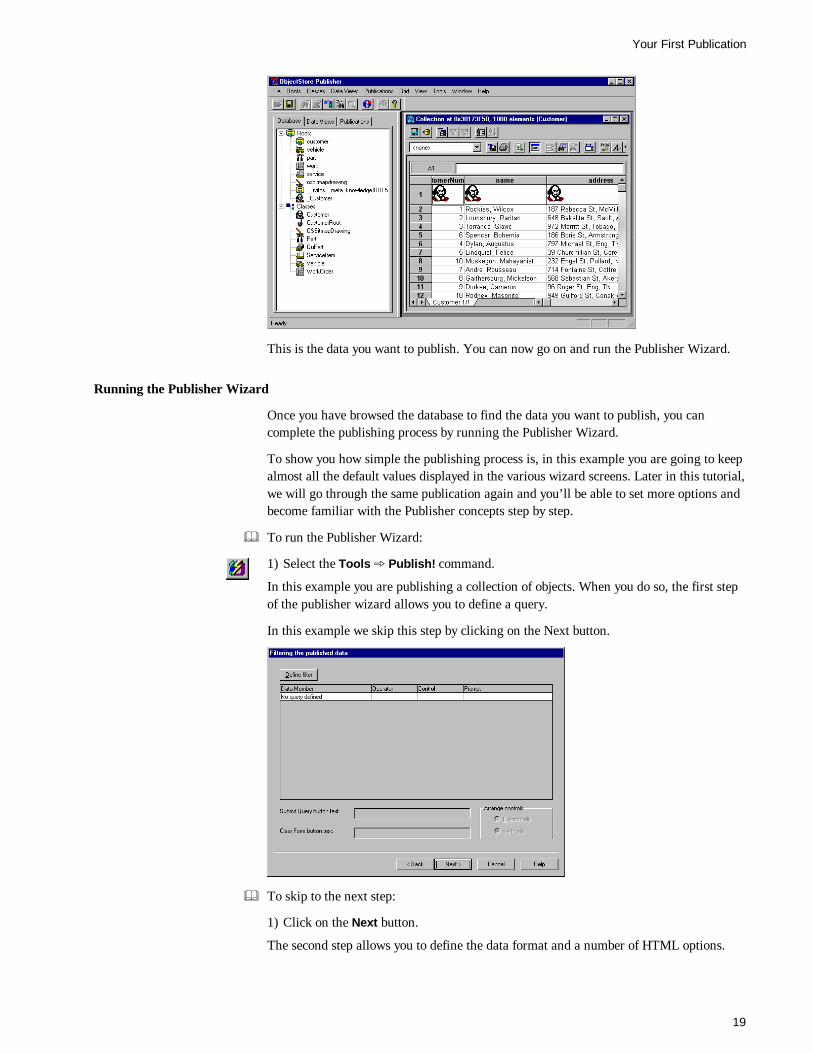
Suppose you want to create an HTML page containing the list of all the customerscontained in the CarsDemo.db database. The extent of the Customer class is attached tothe _Customer root.
& To inspect the extent of the customers:
1) Select the _Customer root in the Database tab.
2) Select the Roots þ Show Root Data.
The following data view window appears displaying the collection of customers.
Your First Publication
19
This is the data you want to publish. You can now go on and run the Publisher Wizard.
Running the Publisher Wizard
Once you have browsed the database to find the data you want to publish, you cancomplete the publishing process by running the Publisher Wizard.
To show you how simple the publishing process is, in this example you are going to keepalmost all the default values displayed in the various wizard screens. Later in this tutorial,we will go through the same publication again and you’ll be able to set more options andbecome familiar with the Publisher concepts step by step.
& To run the Publisher Wizard:
1) Select the Tools þ Publish! command.
In this example you are publishing a collection of objects. When you do so, the first stepof the publisher wizard allows you to define a query.
In this example we skip this step by clicking on the Next button.
& To skip to the next step:
1) Click on the Next button.
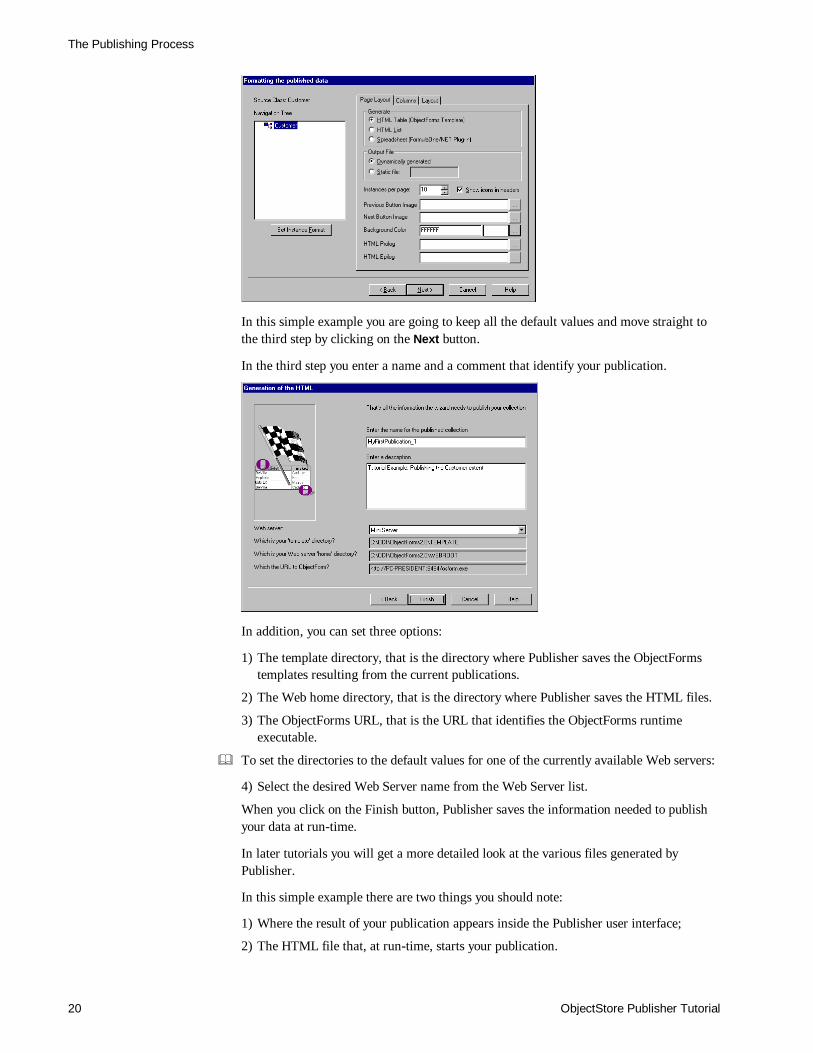
The second step allows you to define the data format and a number of HTML options.
The Publishing Process
ObjectStore Publisher Tutorial20
In this simple example you are going to keep all the default values and move straight tothe third step by clicking on the Next button.
In the third step you enter a name and a comment that identify your publication.
In addition, you can set three options:
1) The template directory, that is the directory where Publisher saves the ObjectFormstemplates resulting from the current publications.
2) The Web home directory, that is the directory where Publisher saves the HTML files.
3) The ObjectForms URL, that is the URL that identifies the ObjectForms runtimeexecutable.
& To set the directories to the default values for one of the currently available Web servers:
4) Select the desired Web Server name from the Web Server list.
When you click on the Finish button, Publisher saves the information needed to publishyour data at run-time.
In later tutorials you will get a more detailed look at the various files generated byPublisher.
In this simple example there are two things you should note:
1) Where the result of your publication appears inside the Publisher user interface;
2) The HTML file that, at run-time, starts your publication.
Your First Publication
21
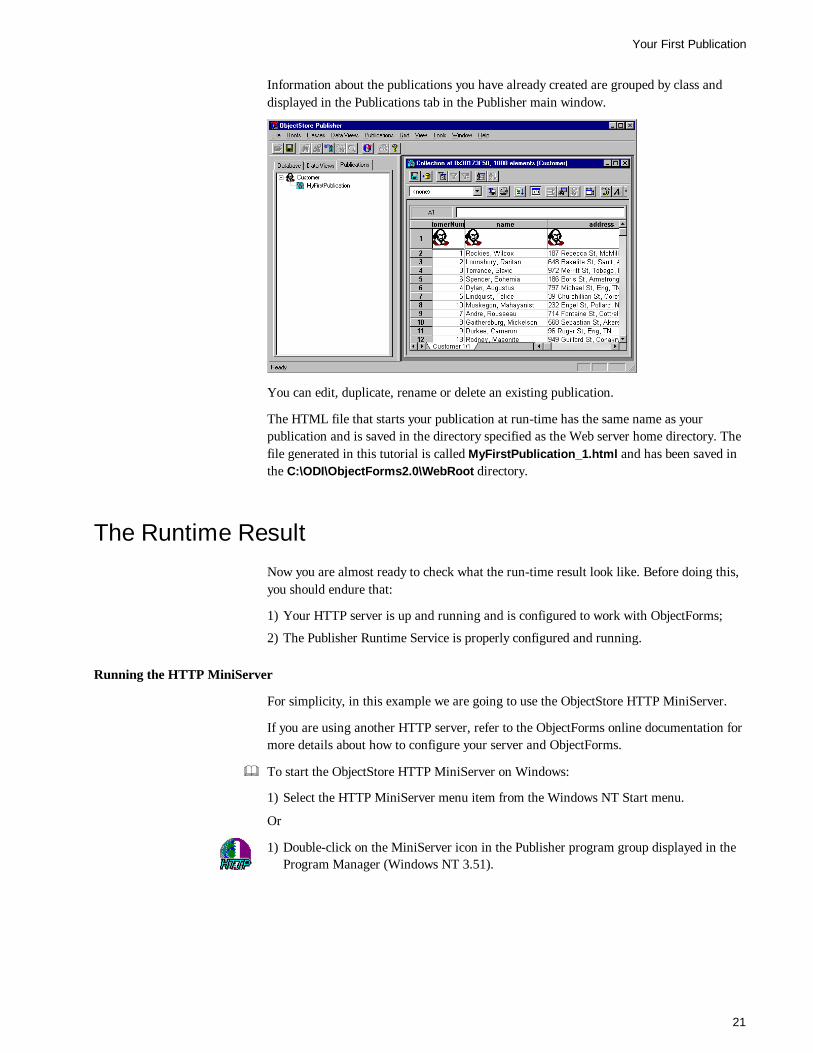
Information about the publications you have already created are grouped by class anddisplayed in the Publications tab in the Publisher main window.
You can edit, duplicate, rename or delete an existing publication.
The HTML file that starts your publication at run-time has the same name as yourpublication and is saved in the directory specified as the Web server home directory. Thefile generated in this tutorial is called MyFirstPublication_1.html and has been saved inthe C:\ODI\ObjectForms2.0\WebRoot directory.
The Runtime ResultNow you are almost ready to check what the run-time result look like. Before doing this,you should endure that:
1) Your HTTP server is up and running and is configured to work with ObjectForms;
2) The Publisher Runtime Service is properly configured and running.
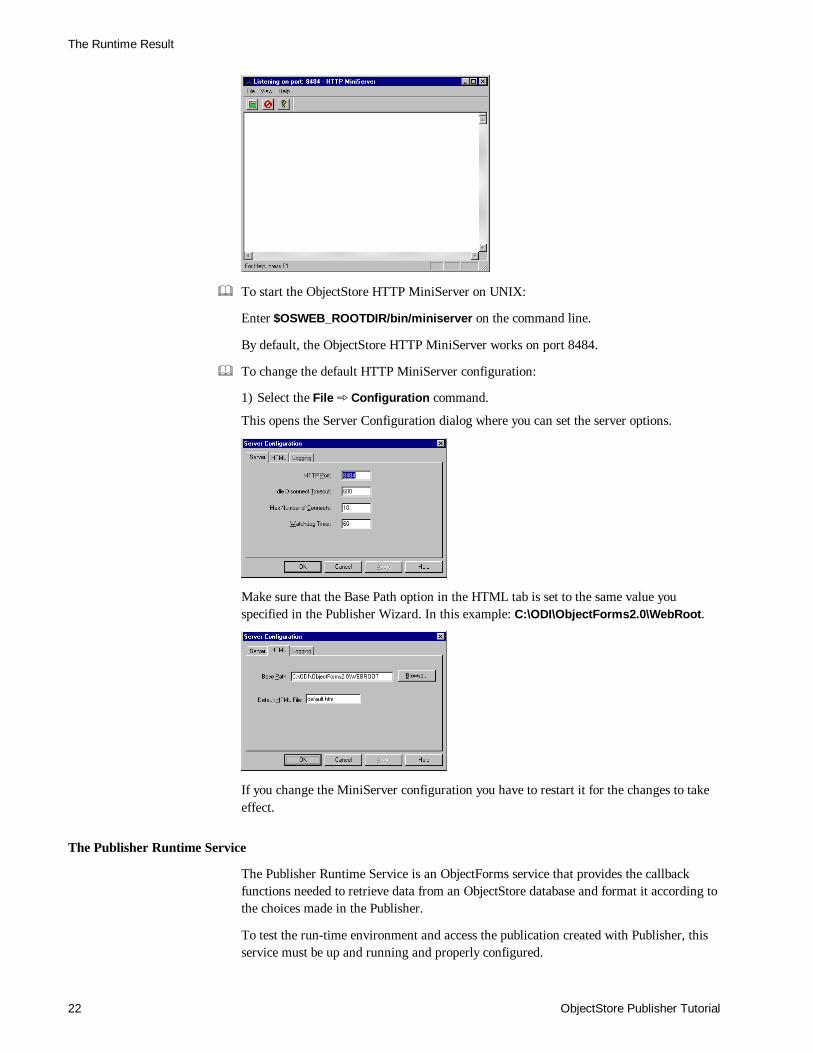
Running the HTTP MiniServer
For simplicity, in this example we are going to use the ObjectStore HTTP MiniServer.
If you are using another HTTP server, refer to the ObjectForms online documentation formore details about how to configure your server and ObjectForms.
& To start the ObjectStore HTTP MiniServer on Windows:
1) Select the HTTP MiniServer menu item from the Windows NT Start menu.
Or
1) Double-click on the MiniServer icon in the Publisher program group displayed in theProgram Manager (Windows NT 3.51).
The Runtime Result
ObjectStore Publisher Tutorial22
& To start the ObjectStore HTTP MiniServer on UNIX:
Enter $OSWEB_ROOTDIR/bin/miniserver on the command line.
By default, the ObjectStore HTTP MiniServer works on port 8484.
& To change the default HTTP MiniServer configuration:
1) Select the File þ Configuration command.
This opens the Server Configuration dialog where you can set the server options.
Make sure that the Base Path option in the HTML tab is set to the same value youspecified in the Publisher Wizard. In this example: C:\ODI\ObjectForms2.0\WebRoot.
If you change the MiniServer configuration you have to restart it for the changes to takeeffect.
The Publisher Runtime Service
The Publisher Runtime Service is an ObjectForms service that provides the callbackfunctions needed to retrieve data from an ObjectStore database and format it according tothe choices made in the Publisher.
To test the run-time environment and access the publication created with Publisher, thisservice must be up and running and properly configured.
Your First Publication
23
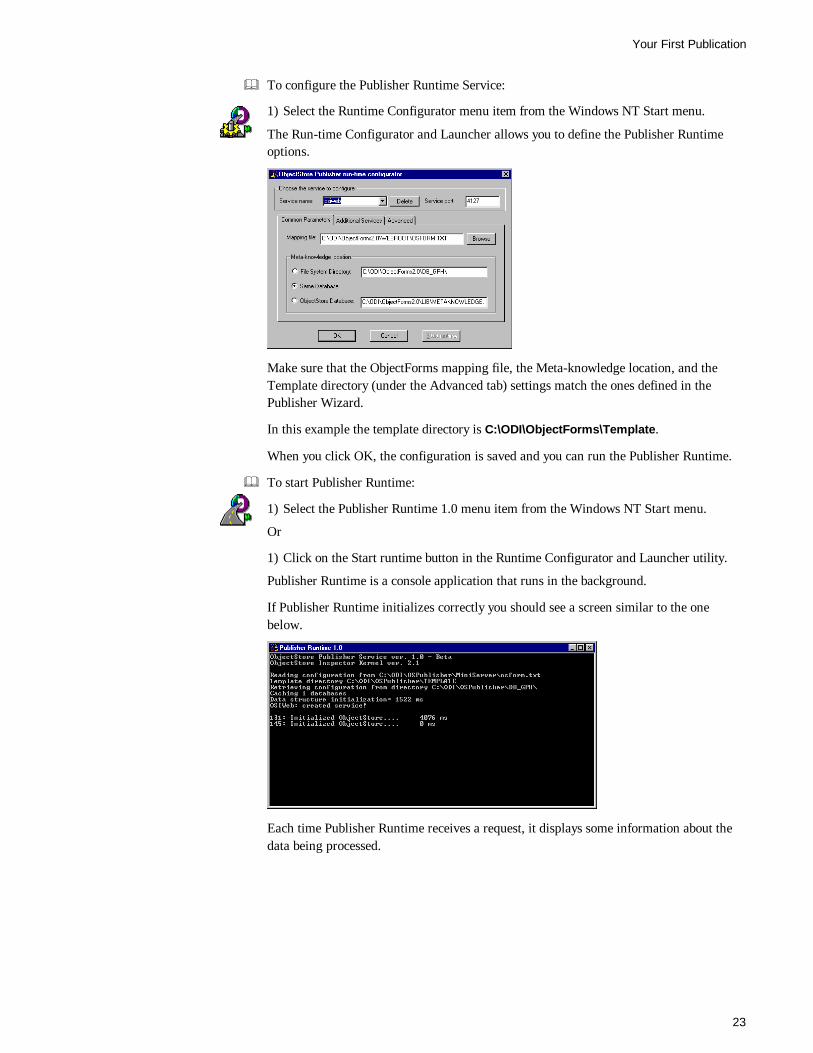
& To configure the Publisher Runtime Service:
1) Select the Runtime Configurator menu item from the Windows NT Start menu.
The Run-time Configurator and Launcher allows you to define the Publisher Runtimeoptions.
Make sure that the ObjectForms mapping file, the Meta-knowledge location, and theTemplate directory (under the Advanced tab) settings match the ones defined in thePublisher Wizard.
In this example the template directory is C:\ODI\ObjectForms\Template.
When you click OK, the configuration is saved and you can run the Publisher Runtime.
& To start Publisher Runtime:
1) Select the Publisher Runtime 1.0 menu item from the Windows NT Start menu.
Or
1) Click on the Start runtime button in the Runtime Configurator and Launcher utility.
Publisher Runtime is a console application that runs in the background.
If Publisher Runtime initializes correctly you should see a screen similar to the onebelow.
Each time Publisher Runtime receives a request, it displays some information about thedata being processed.
The Runtime Result
ObjectStore Publisher Tutorial24
Testing the Result
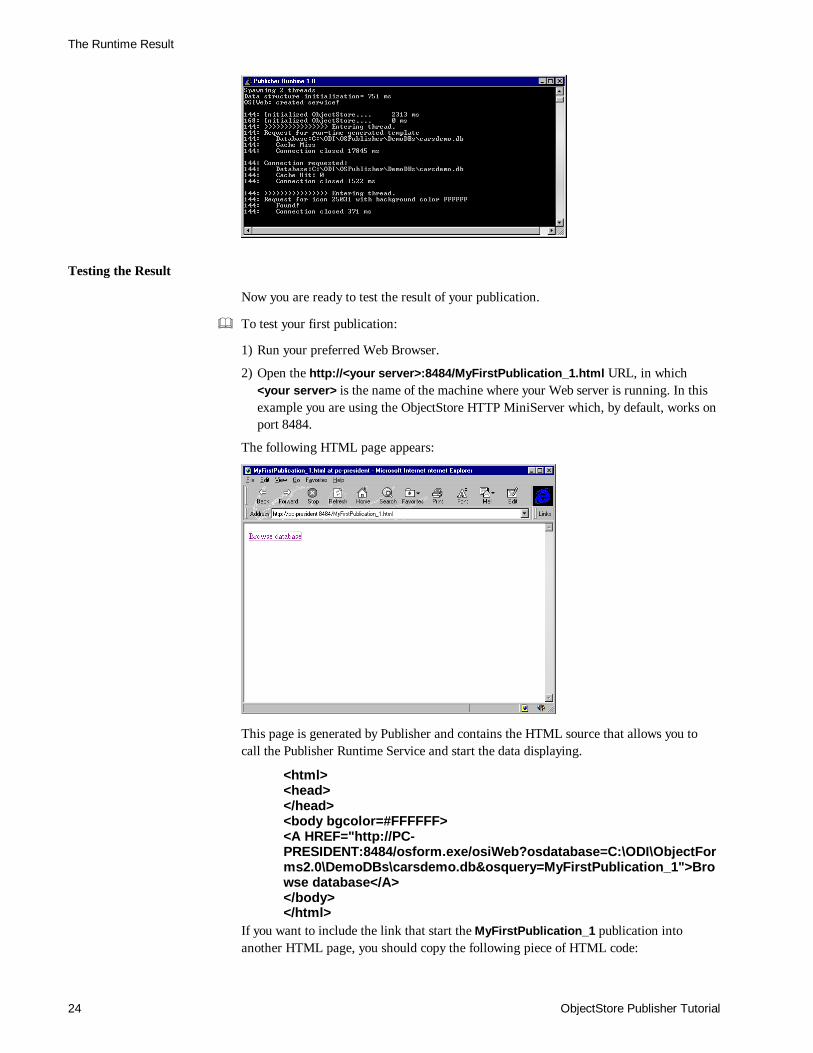
Now you are ready to test the result of your publication.
& To test your first publication:
1) Run your preferred Web Browser.
2) Open the http://<your server>:8484/MyFirstPublication_1.html URL, in which<your server> is the name of the machine where your Web server is running. In thisexample you are using the ObjectStore HTTP MiniServer which, by default, works onport 8484.
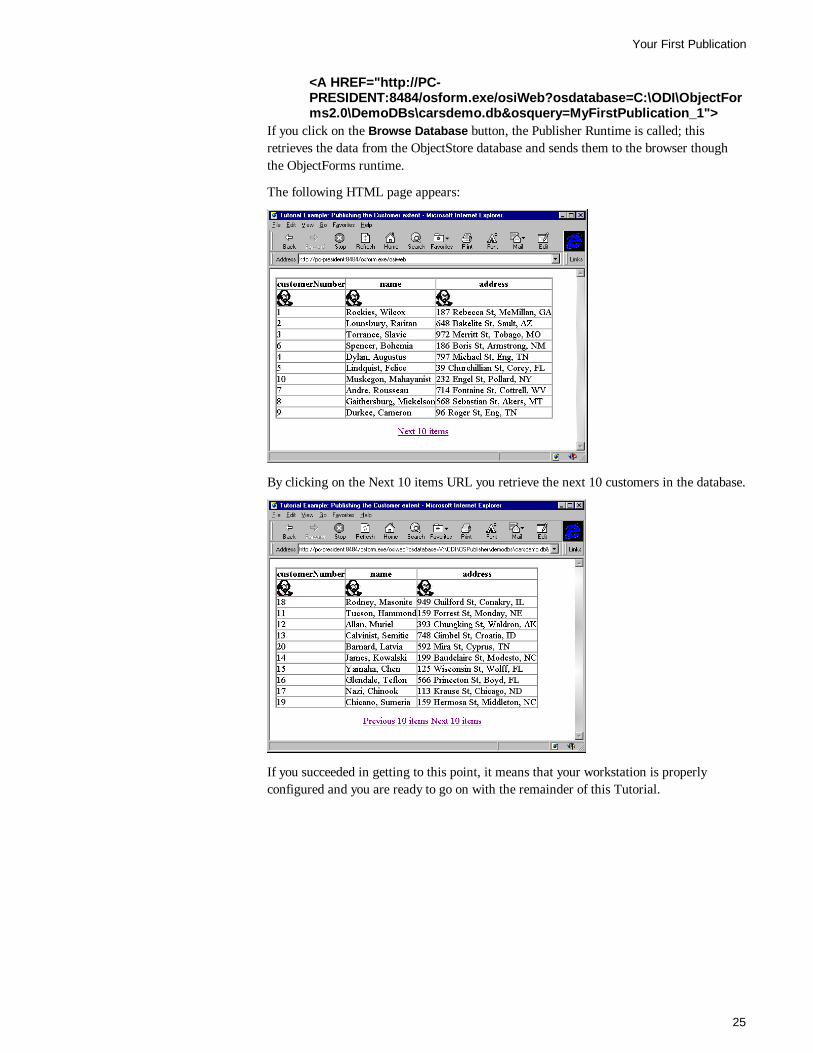
The following HTML page appears:
This page is generated by Publisher and contains the HTML source that allows you tocall the Publisher Runtime Service and start the data displaying.
<html><head></head><body bgcolor=#FFFFFF><A HREF="http://PC-PRESIDENT:8484/osform.exe/osiWeb?osdatabase=C:\ODI\ObjectForms2.0\DemoDBs\carsdemo.db&osquery=MyFirstPublication_1">Browse database</A></body></html>
If you want to include the link that start the MyFirstPublication_1 publication intoanother HTML page, you should copy the following piece of HTML code:
Your First Publication
25
<A HREF="http://PC-PRESIDENT:8484/osform.exe/osiWeb?osdatabase=C:\ODI\ObjectForms2.0\DemoDBs\carsdemo.db&osquery=MyFirstPublication_1">
If you click on the Browse Database button, the Publisher Runtime is called; thisretrieves the data from the ObjectStore database and sends them to the browser thoughthe ObjectForms runtime.
The following HTML page appears:
By clicking on the Next 10 items URL you retrieve the next 10 customers in the database.
If you succeeded in getting to this point, it means that your workstation is properlyconfigured and you are ready to go on with the remainder of this Tutorial.
Iterative Refinements
ObjectStore Publisher Tutorial26
Editing a Publication
In this tutorial you learn how to edit a previously saved publication. You will also seehow you can modify a publication and view the runtime result.
Database: CarsDemo.db
Iterative RefinementsIn the Your First Publication tutorial you created a simple publication calledMyFirstPublication_1. Suppose you now want to modify it by:
1) changing a number of instances per page;
2) customizing the Next page and Previous page buttons;
3) changing the sort order;
4) changing the table formatting.
In the Publisher main window, click on the Publication tab.
Under the Customer class is your previously defined publication calledMyFirstPublication_1.
& To edit MyFirstPublication_1:
1) Select MyFirstPublication_1 in the Publication tab.
2) Select the Publication þ Edit Publication command.
Or simply double click on MyFirstPublication_1 in the Publication tab.
This command starts the Publisher Wizard on the selected publication.
Skip the first step of the wizard (Query Definition) by clicking on the Next button.
& To change the number of instances per page:
1) Enter the desired number of instances in the Instance per page edit box
For example you could enter 20.
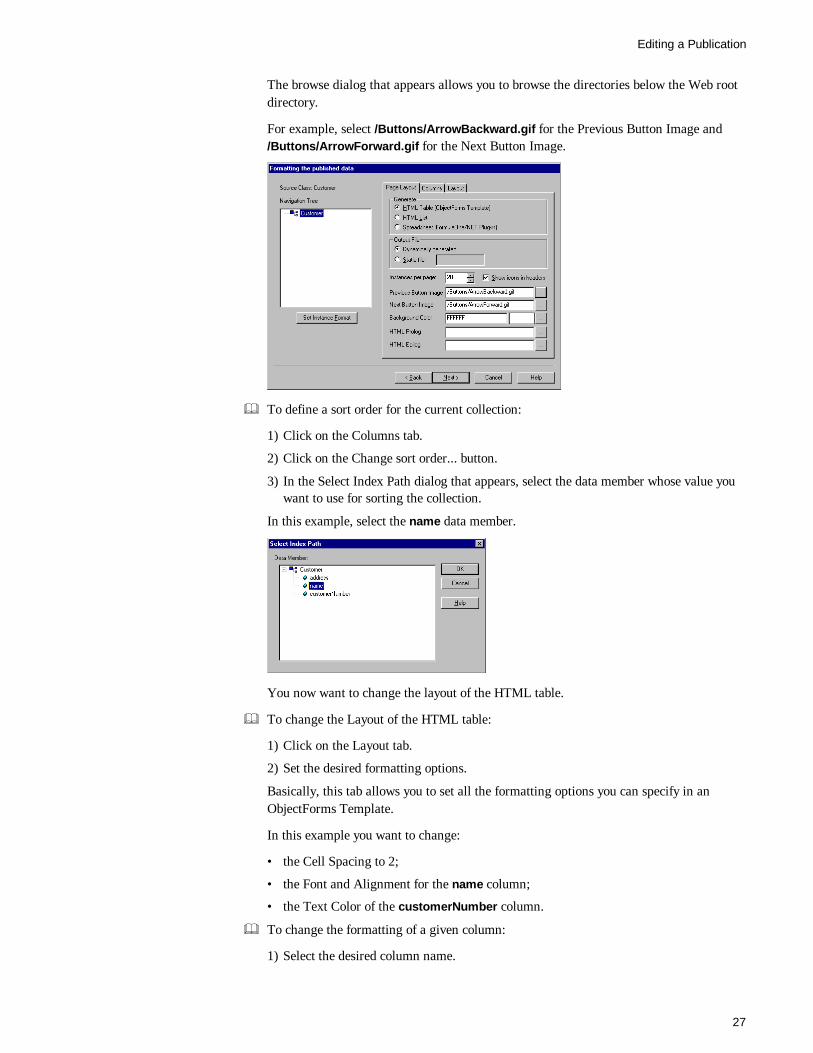
& To specify a bitmap for the Previous and Next buttons:
1) Click on the browse button.
2) Select a file in the file system.
Editing a Publication
27
The browse dialog that appears allows you to browse the directories below the Web rootdirectory.
For example, select /Buttons/ArrowBackward.gif for the Previous Button Image and/Buttons/ArrowForward.gif for the Next Button Image.
& To define a sort order for the current collection:
1) Click on the Columns tab.
2) Click on the Change sort order... button.
3) In the Select Index Path dialog that appears, select the data member whose value youwant to use for sorting the collection.
In this example, select the name data member.
You now want to change the layout of the HTML table.
& To change the Layout of the HTML table:
1) Click on the Layout tab.
2) Set the desired formatting options.
Basically, this tab allows you to set all the formatting options you can specify in anObjectForms Template.
In this example you want to change:
• the Cell Spacing to 2;
• the Font and Alignment for the name column;
• the Text Color of the customerNumber column.
& To change the formatting of a given column:
1) Select the desired column name.
Iterative Refinements
ObjectStore Publisher Tutorial28
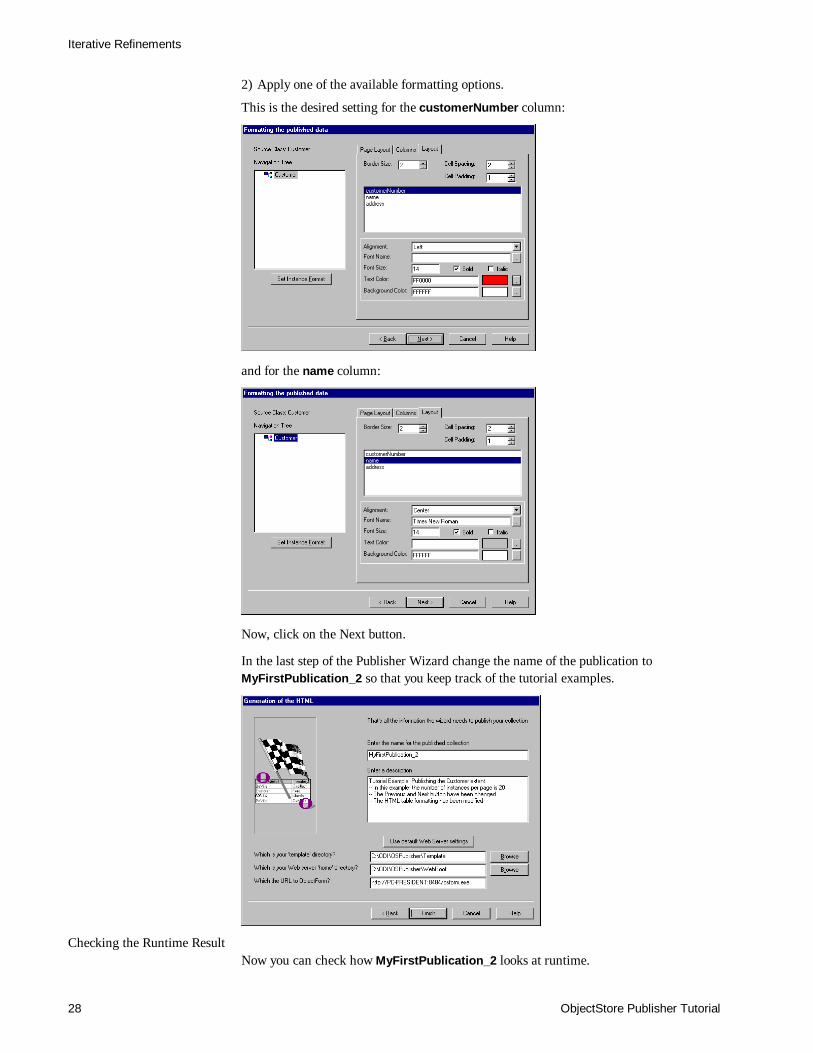
2) Apply one of the available formatting options.
This is the desired setting for the customerNumber column:
and for the name column:
Now, click on the Next button.
In the last step of the Publisher Wizard change the name of the publication toMyFirstPublication_2 so that you keep track of the tutorial examples.
Checking the Runtime ResultNow you can check how MyFirstPublication_2 looks at runtime.
Editing a Publication
29
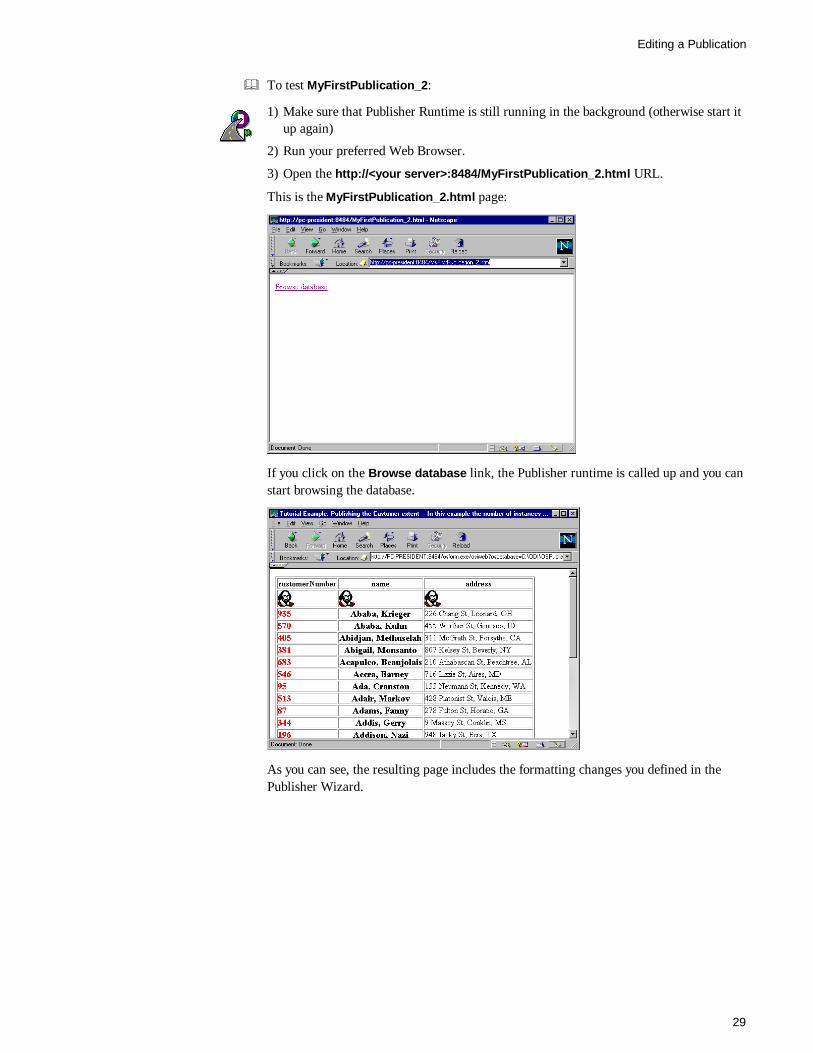
& To test MyFirstPublication_2:
1) Make sure that Publisher Runtime is still running in the background (otherwise start itup again)
2) Run your preferred Web Browser.
3) Open the http://<your server>:8484/MyFirstPublication_2.html URL.
This is the MyFirstPublication_2.html page:
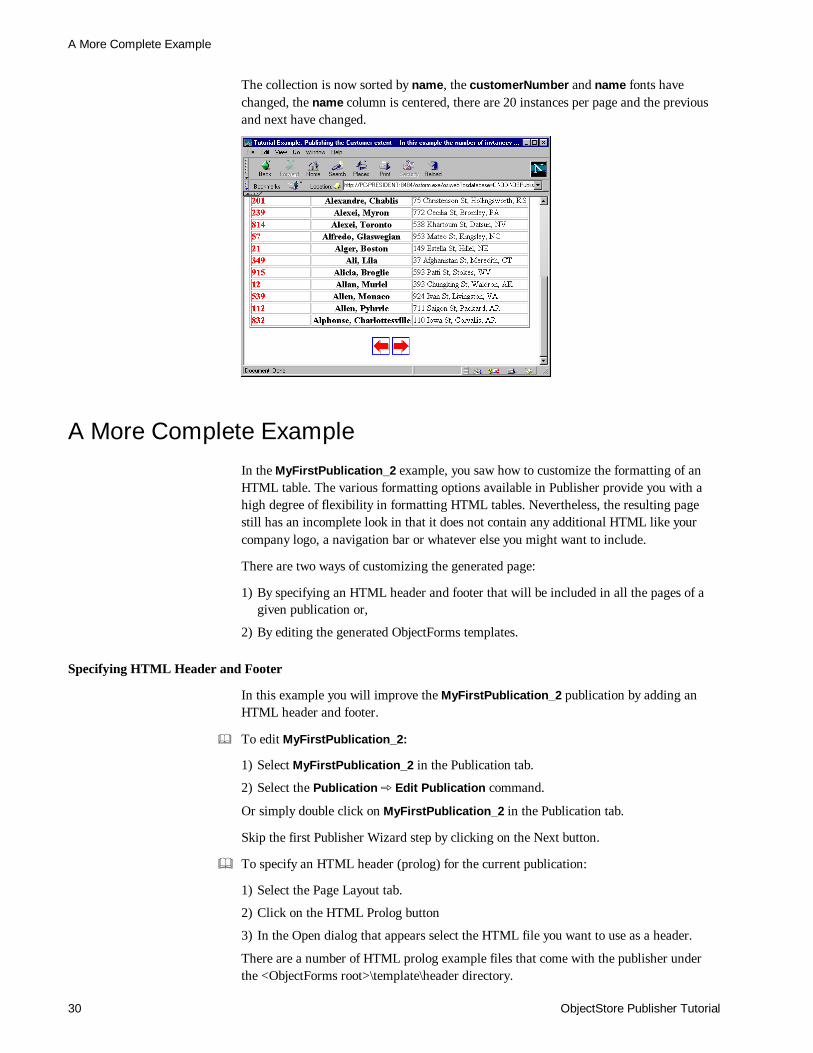
If you click on the Browse database link, the Publisher runtime is called up and you canstart browsing the database.
As you can see, the resulting page includes the formatting changes you defined in thePublisher Wizard.
A More Complete Example
ObjectStore Publisher Tutorial30
The collection is now sorted by name, the customerNumber and name fonts havechanged, the name column is centered, there are 20 instances per page and the previousand next have changed.
A More Complete ExampleIn the MyFirstPublication_2 example, you saw how to customize the formatting of anHTML table. The various formatting options available in Publisher provide you with ahigh degree of flexibility in formatting HTML tables. Nevertheless, the resulting pagestill has an incomplete look in that it does not contain any additional HTML like yourcompany logo, a navigation bar or whatever else you might want to include.
There are two ways of customizing the generated page:
1) By specifying an HTML header and footer that will be included in all the pages of agiven publication or,
2) By editing the generated ObjectForms templates.
Specifying HTML Header and Footer
In this example you will improve the MyFirstPublication_2 publication by adding anHTML header and footer.
& To edit MyFirstPublication_2:
1) Select MyFirstPublication_2 in the Publication tab.
2) Select the Publication þ Edit Publication command.
Or simply double click on MyFirstPublication_2 in the Publication tab.
Skip the first Publisher Wizard step by clicking on the Next button.
& To specify an HTML header (prolog) for the current publication:
1) Select the Page Layout tab.
2) Click on the HTML Prolog button
3) In the Open dialog that appears select the HTML file you want to use as a header.
There are a number of HTML prolog example files that come with the publisher underthe <ObjectForms root>\template\header directory.
Editing a Publication
31
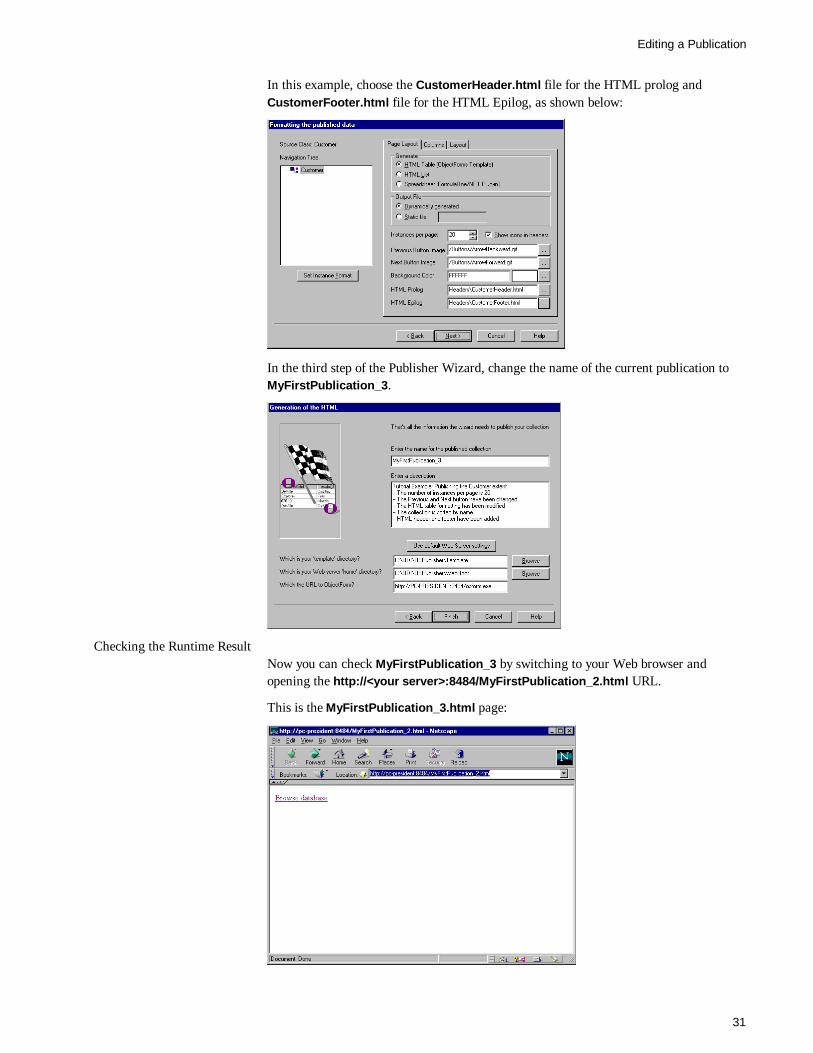
In this example, choose the CustomerHeader.html file for the HTML prolog andCustomerFooter.html file for the HTML Epilog, as shown below:
In the third step of the Publisher Wizard, change the name of the current publication toMyFirstPublication_3.
Checking the Runtime ResultNow you can check MyFirstPublication_3 by switching to your Web browser andopening the http://<your server>:8484/MyFirstPublication_2.html URL.
This is the MyFirstPublication_3.html page:
A More Complete Example
ObjectStore Publisher Tutorial32
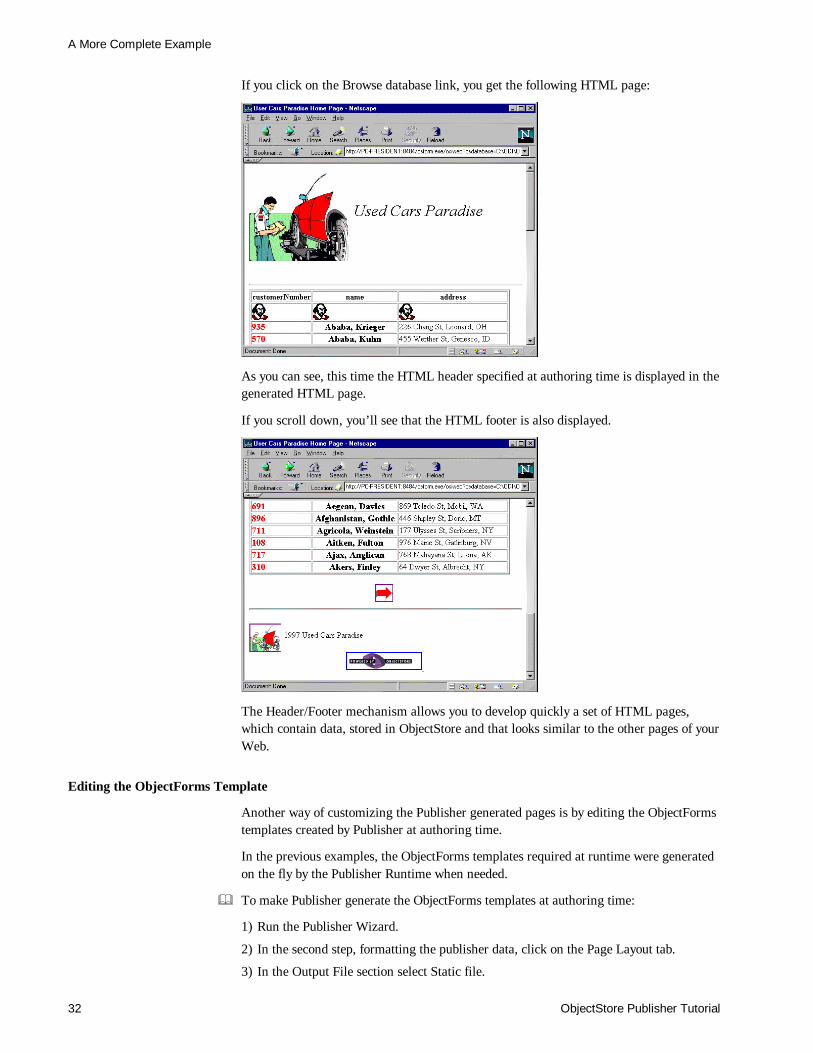
If you click on the Browse database link, you get the following HTML page:
As you can see, this time the HTML header specified at authoring time is displayed in thegenerated HTML page.
If you scroll down, you’ll see that the HTML footer is also displayed.
The Header/Footer mechanism allows you to develop quickly a set of HTML pages,which contain data, stored in ObjectStore and that looks similar to the other pages of yourWeb.
Editing the ObjectForms Template
Another way of customizing the Publisher generated pages is by editing the ObjectFormstemplates created by Publisher at authoring time.
In the previous examples, the ObjectForms templates required at runtime were generatedon the fly by the Publisher Runtime when needed.
& To make Publisher generate the ObjectForms templates at authoring time:
1) Run the Publisher Wizard.
2) In the second step, formatting the publisher data, click on the Page Layout tab.
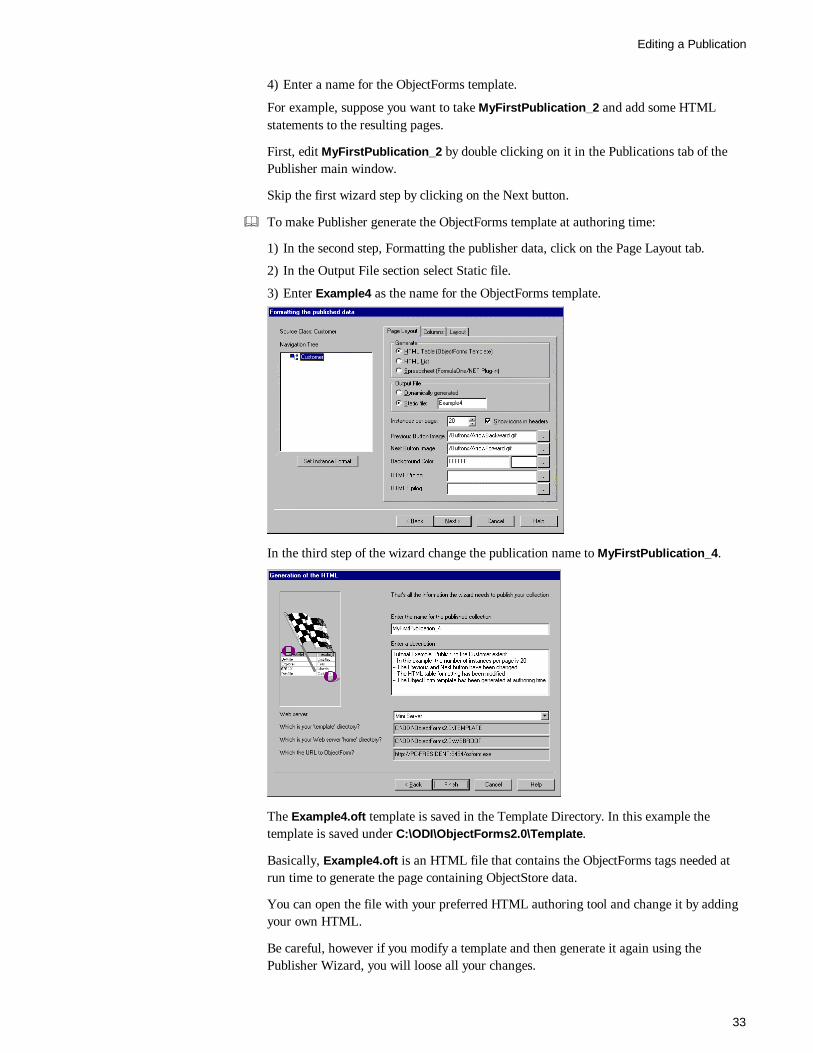
3) In the Output File section select Static file.
Editing a Publication
33
4) Enter a name for the ObjectForms template.
For example, suppose you want to take MyFirstPublication_2 and add some HTMLstatements to the resulting pages.
First, edit MyFirstPublication_2 by double clicking on it in the Publications tab of thePublisher main window.
Skip the first wizard step by clicking on the Next button.
& To make Publisher generate the ObjectForms template at authoring time:
1) In the second step, Formatting the publisher data, click on the Page Layout tab.
2) In the Output File section select Static file.
3) Enter Example4 as the name for the ObjectForms template.
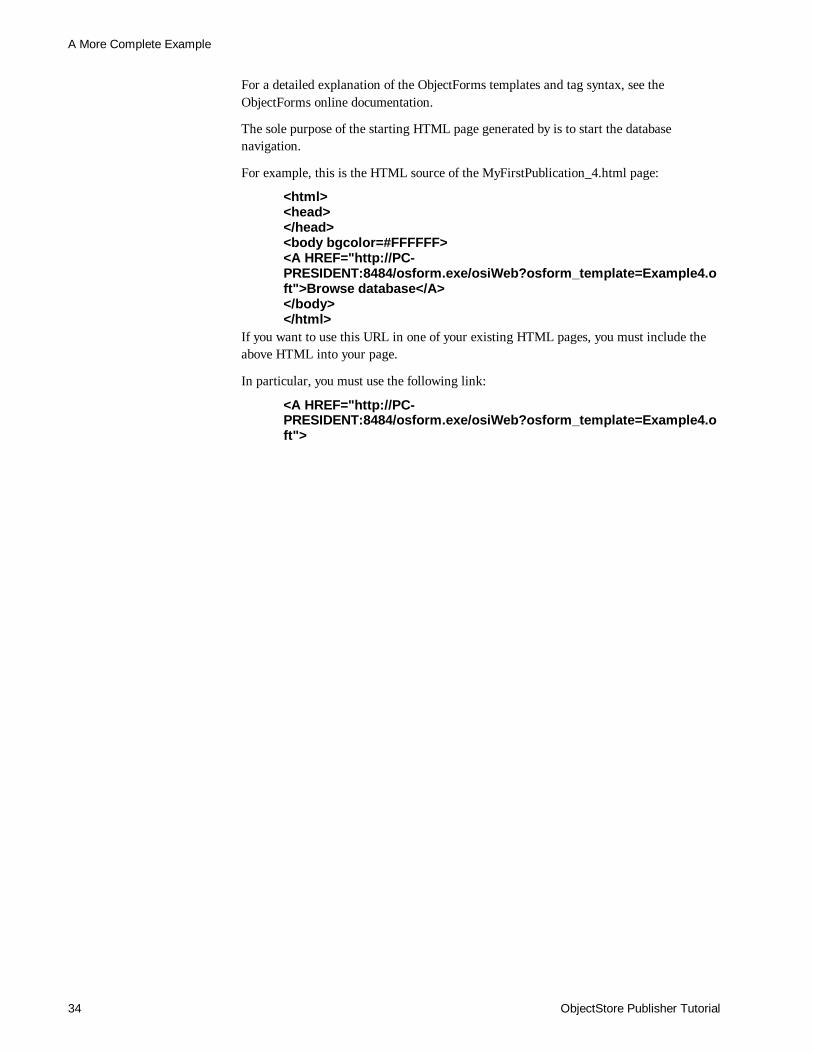
In the third step of the wizard change the publication name to MyFirstPublication_4.
The Example4.oft template is saved in the Template Directory. In this example thetemplate is saved under C:\ODI\ObjectForms2.0\Template.
Basically, Example4.oft is an HTML file that contains the ObjectForms tags needed atrun time to generate the page containing ObjectStore data.
You can open the file with your preferred HTML authoring tool and change it by addingyour own HTML.
Be careful, however if you modify a template and then generate it again using thePublisher Wizard, you will loose all your changes.
A More Complete Example
ObjectStore Publisher Tutorial34
For a detailed explanation of the ObjectForms templates and tag syntax, see theObjectForms online documentation.
The sole purpose of the starting HTML page generated by is to start the databasenavigation.
For example, this is the HTML source of the MyFirstPublication_4.html page:
<html><head></head><body bgcolor=#FFFFFF><A HREF="http://PC-PRESIDENT:8484/osform.exe/osiWeb?osform_template=Example4.oft">Browse database</A></body></html>
If you want to use this URL in one of your existing HTML pages, you must include theabove HTML into your page.
In particular, you must use the following link:
<A HREF="http://PC-PRESIDENT:8484/osform.exe/osiWeb?osform_template=Example4.oft">
Navigation
35
Navigation
In this chapter you will see how to create a publication that includes the navigation of oneor more relationships.
Database: CarsDemo.db
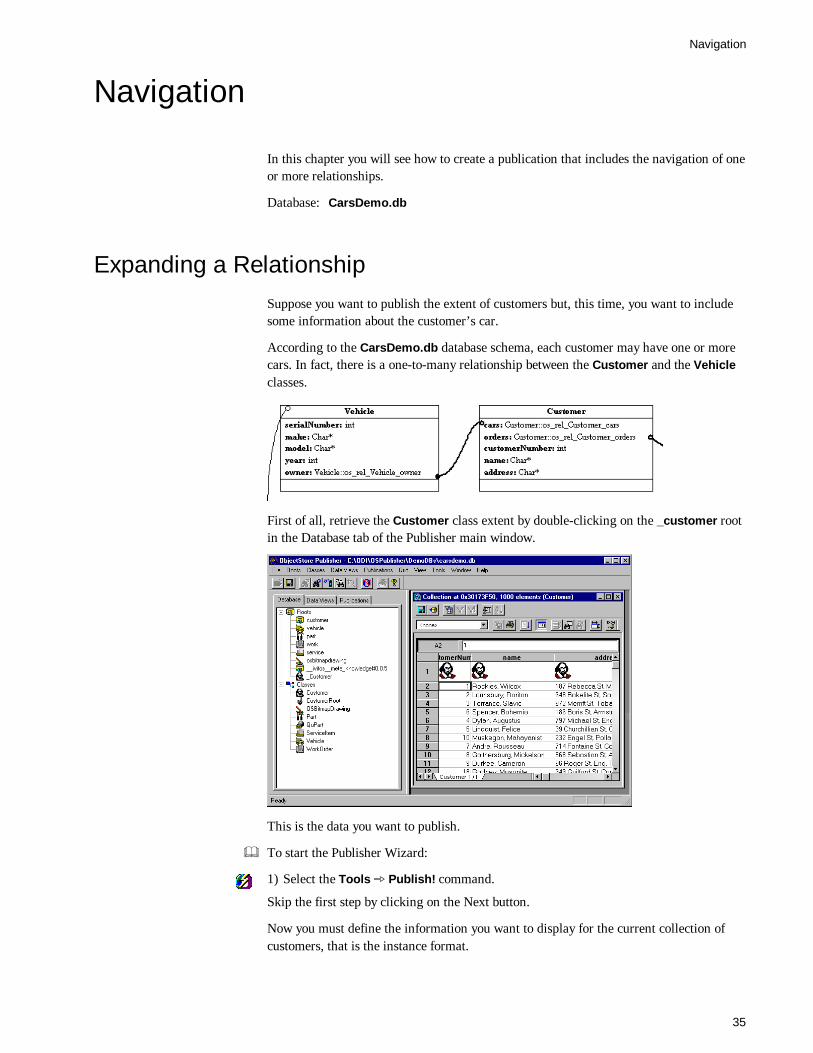
Expanding a RelationshipSuppose you want to publish the extent of customers but, this time, you want to includesome information about the customer’s car.
According to the CarsDemo.db database schema, each customer may have one or morecars. In fact, there is a one-to-many relationship between the Customer and the Vehicleclasses.
First of all, retrieve the Customer class extent by double-clicking on the _customer rootin the Database tab of the Publisher main window.
This is the data you want to publish.
& To start the Publisher Wizard:
1) Select the Tools þ Publish! command.
Skip the first step by clicking on the Next button.
Now you must define the information you want to display for the current collection ofcustomers, that is the instance format.
Expanding a Relationship
ObjectStore Publisher Tutorial36
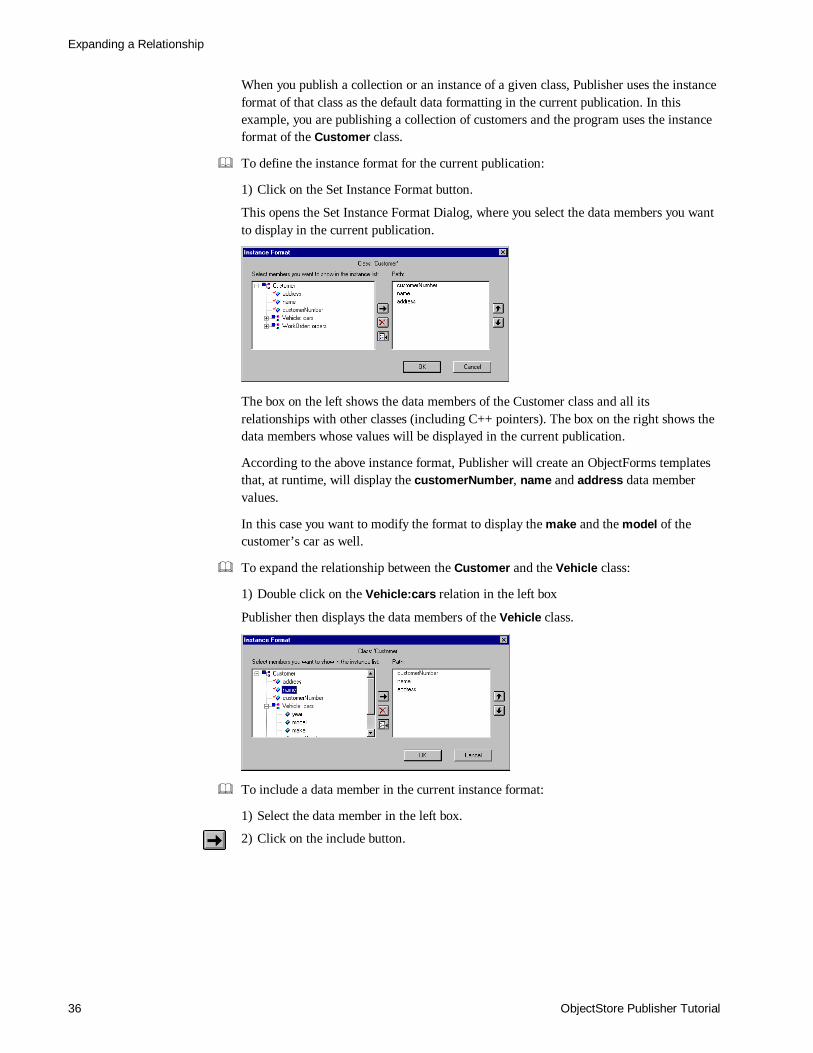
When you publish a collection or an instance of a given class, Publisher uses the instanceformat of that class as the default data formatting in the current publication. In thisexample, you are publishing a collection of customers and the program uses the instanceformat of the Customer class.
& To define the instance format for the current publication:
1) Click on the Set Instance Format button.
This opens the Set Instance Format Dialog, where you select the data members you wantto display in the current publication.
The box on the left shows the data members of the Customer class and all itsrelationships with other classes (including C++ pointers). The box on the right shows thedata members whose values will be displayed in the current publication.
According to the above instance format, Publisher will create an ObjectForms templatesthat, at runtime, will display the customerNumber, name and address data membervalues.
In this case you want to modify the format to display the make and the model of thecustomer’s car as well.
& To expand the relationship between the Customer and the Vehicle class:
1) Double click on the Vehicle:cars relation in the left box
Publisher then displays the data members of the Vehicle class.
& To include a data member in the current instance format:
1) Select the data member in the left box.
2) Click on the include button.

Navigation
37
Or simply double-click on the data member in the left box.
When you click on the OK button, the instance format you have defined becomes theinstance format for the current publication.
Now click on the Next button to go to the final step of the Publisher Wizard.
Enter a name for the publication and click on the Finish button to save the publication.
This example has been saved as Navigation_1.
Checking the Runtime Result& To check the run-time result of the Navigation_1 example:
1) Make sure that the HTTP MiniServer is running.
2) Make sure that Publisher Runtime is running.
3) Start your Web browser.
4) Open the http://<your server>:8484/Navigation_1.html URL.
Expanding More Relationships
ObjectStore Publisher Tutorial38
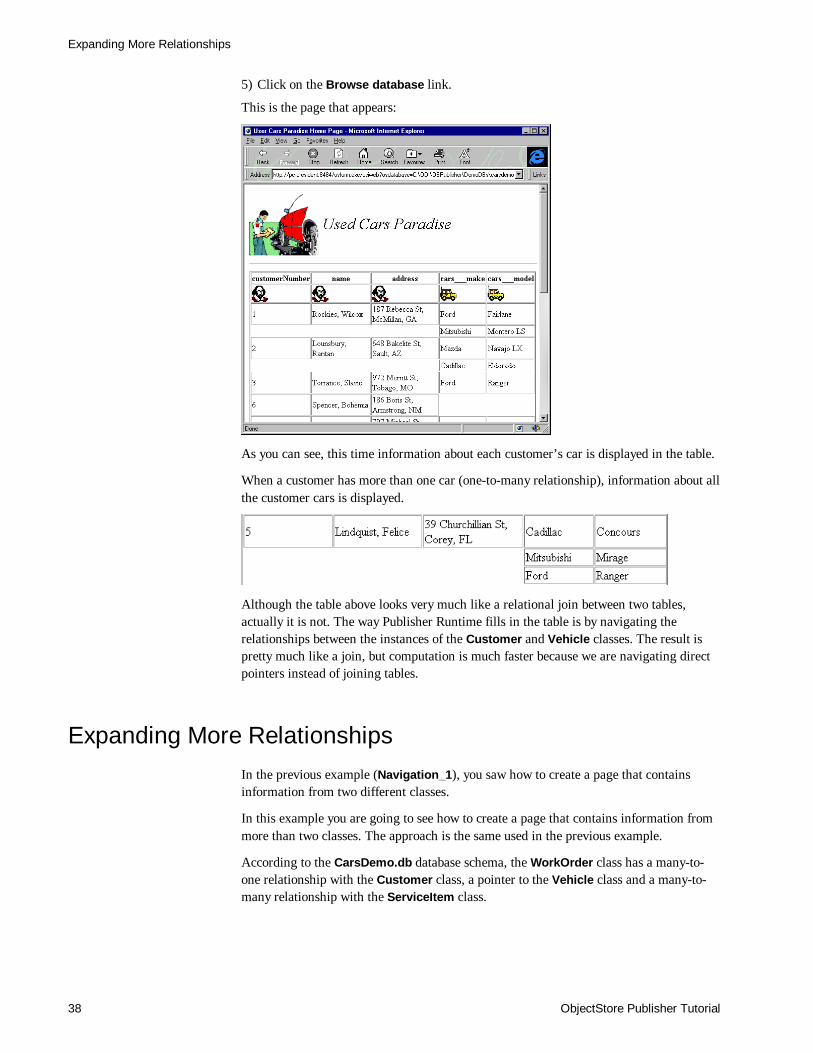
5) Click on the Browse database link.
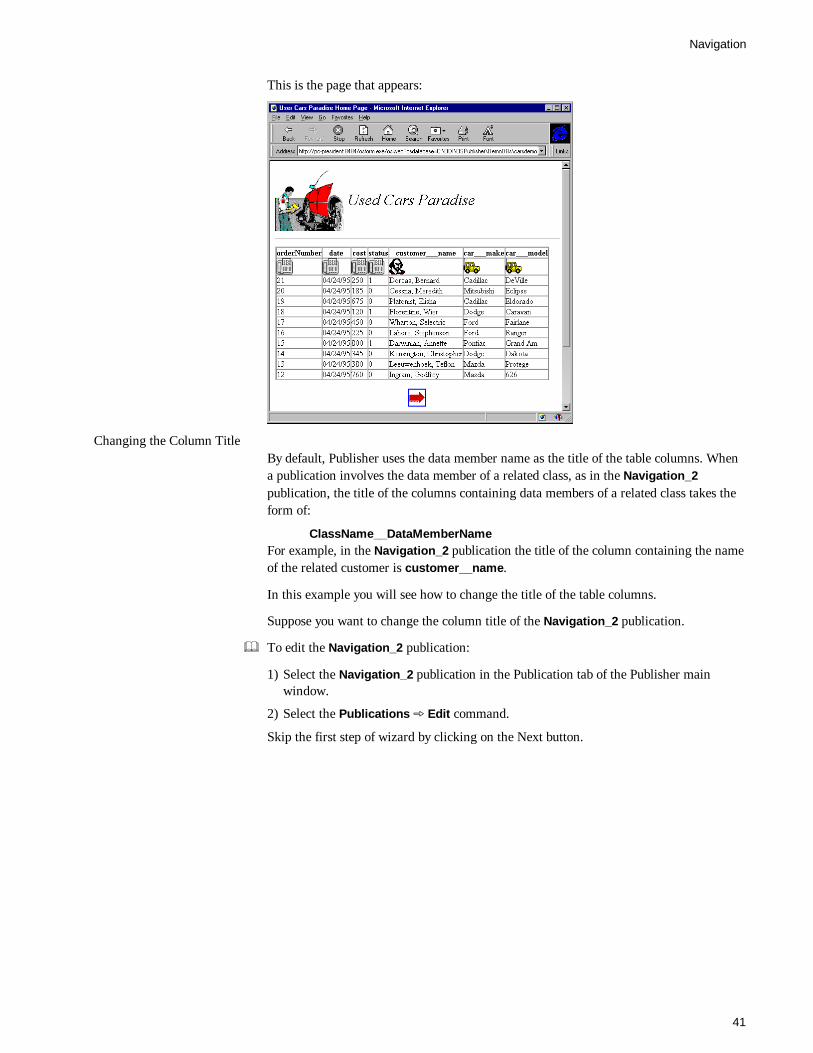
This is the page that appears:
As you can see, this time information about each customer’s car is displayed in the table.
When a customer has more than one car (one-to-many relationship), information about allthe customer cars is displayed.
Although the table above looks very much like a relational join between two tables,actually it is not. The way Publisher Runtime fills in the table is by navigating therelationships between the instances of the Customer and Vehicle classes. The result ispretty much like a join, but computation is much faster because we are navigating directpointers instead of joining tables.
Expanding More RelationshipsIn the previous example (Navigation_1), you saw how to create a page that containsinformation from two different classes.
In this example you are going to see how to create a page that contains information frommore than two classes. The approach is the same used in the previous example.
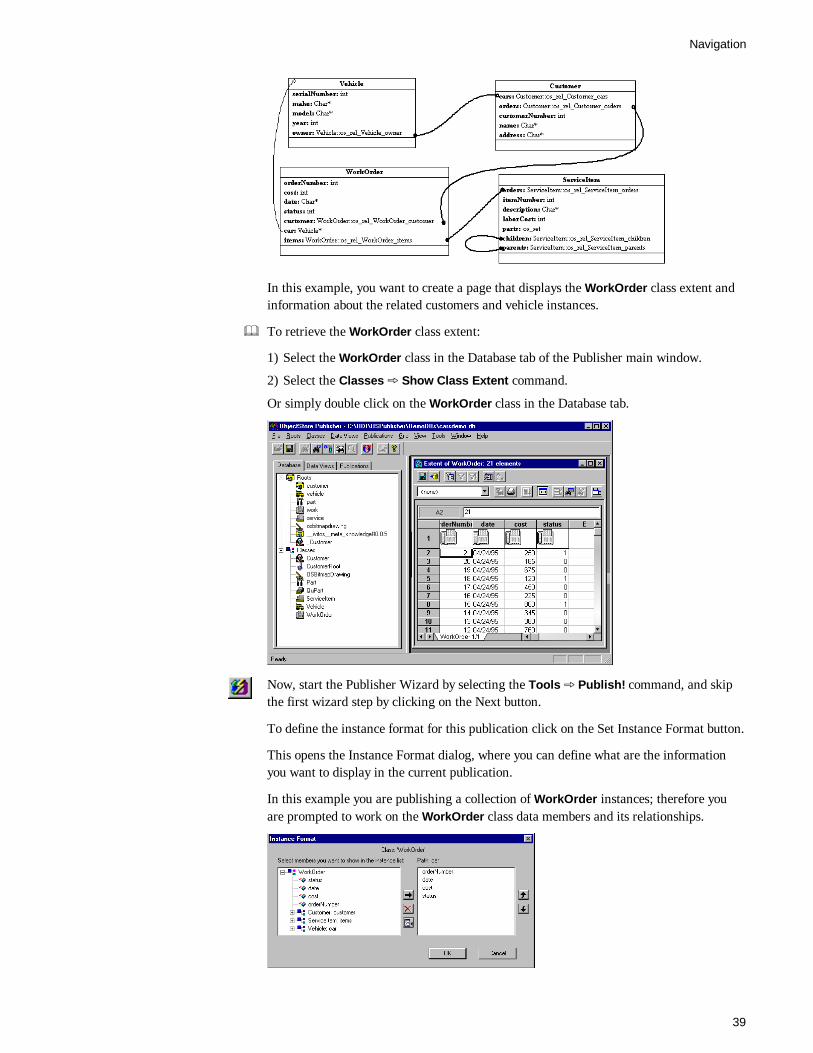
According to the CarsDemo.db database schema, the WorkOrder class has a many-to-one relationship with the Customer class, a pointer to the Vehicle class and a many-to-many relationship with the ServiceItem class.
Navigation
39
In this example, you want to create a page that displays the WorkOrder class extent andinformation about the related customers and vehicle instances.
& To retrieve the WorkOrder class extent:
1) Select the WorkOrder class in the Database tab of the Publisher main window.
2) Select the Classes þ Show Class Extent command.
Or simply double click on the WorkOrder class in the Database tab.
Now, start the Publisher Wizard by selecting the Tools þ Publish! command, and skipthe first wizard step by clicking on the Next button.
To define the instance format for this publication click on the Set Instance Format button.
This opens the Instance Format dialog, where you can define what are the informationyou want to display in the current publication.
In this example you are publishing a collection of WorkOrder instances; therefore youare prompted to work on the WorkOrder class data members and its relationships.
Expanding More Relationships
ObjectStore Publisher Tutorial40
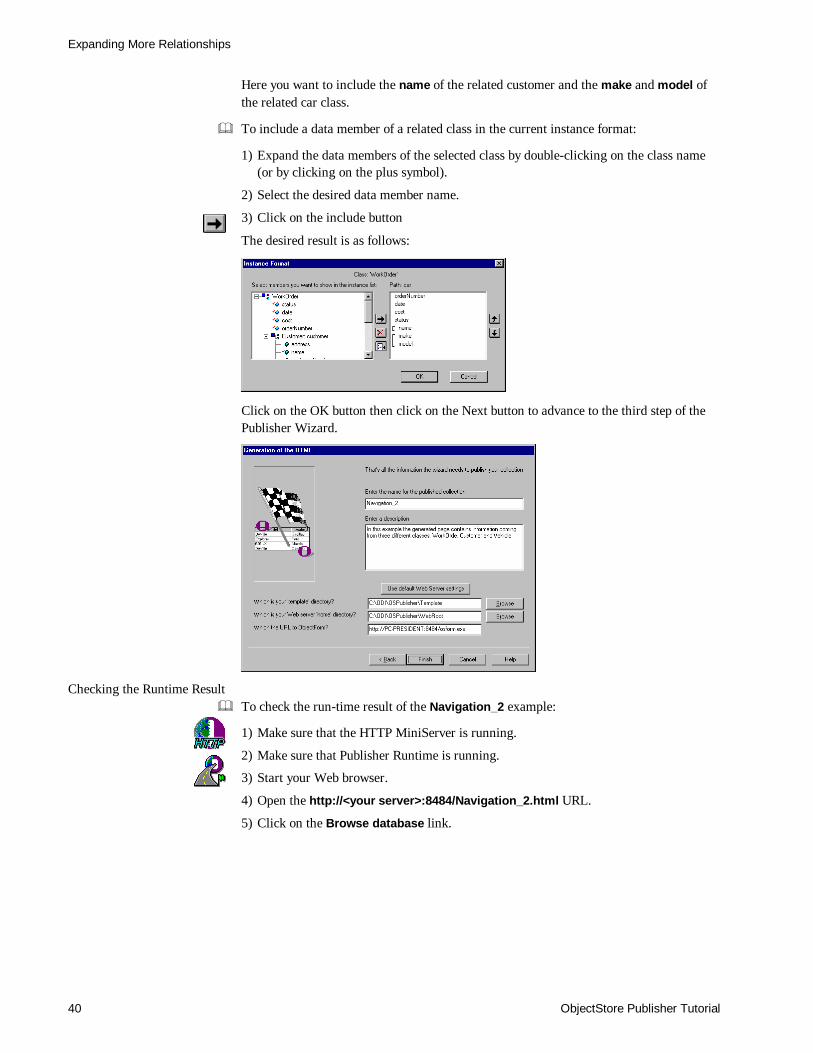
Here you want to include the name of the related customer and the make and model ofthe related car class.
& To include a data member of a related class in the current instance format:
1) Expand the data members of the selected class by double-clicking on the class name(or by clicking on the plus symbol).
2) Select the desired data member name.
3) Click on the include button
The desired result is as follows:
Click on the OK button then click on the Next button to advance to the third step of thePublisher Wizard.
Checking the Runtime Result& To check the run-time result of the Navigation_2 example:
1) Make sure that the HTTP MiniServer is running.
2) Make sure that Publisher Runtime is running.
3) Start your Web browser.
4) Open the http://<your server>:8484/Navigation_2.html URL.
5) Click on the Browse database link.
Navigation
41
This is the page that appears:
Changing the Column TitleBy default, Publisher uses the data member name as the title of the table columns. Whena publication involves the data member of a related class, as in the Navigation_2publication, the title of the columns containing data members of a related class takes theform of:
ClassName__DataMemberNameFor example, in the Navigation_2 publication the title of the column containing the nameof the related customer is customer__name.
In this example you will see how to change the title of the table columns.
Suppose you want to change the column title of the Navigation_2 publication.
& To edit the Navigation_2 publication:
1) Select the Navigation_2 publication in the Publication tab of the Publisher mainwindow.
2) Select the Publications þ Edit command.
Skip the first step of wizard by clicking on the Next button.
Expanding More Relationships
ObjectStore Publisher Tutorial42
In the second step of the wizard, click on the Columns tab.
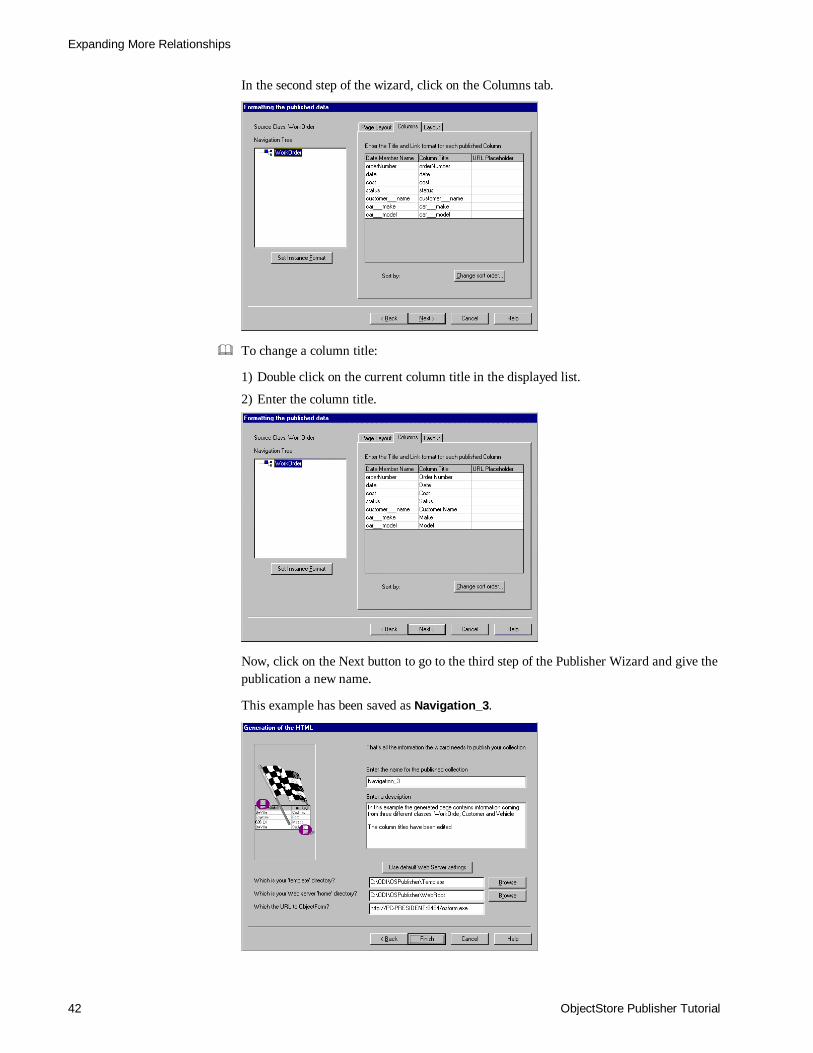
& To change a column title:
1) Double click on the current column title in the displayed list.
2) Enter the column title.
Now, click on the Next button to go to the third step of the Publisher Wizard and give thepublication a new name.
This example has been saved as Navigation_3.
Navigation
43
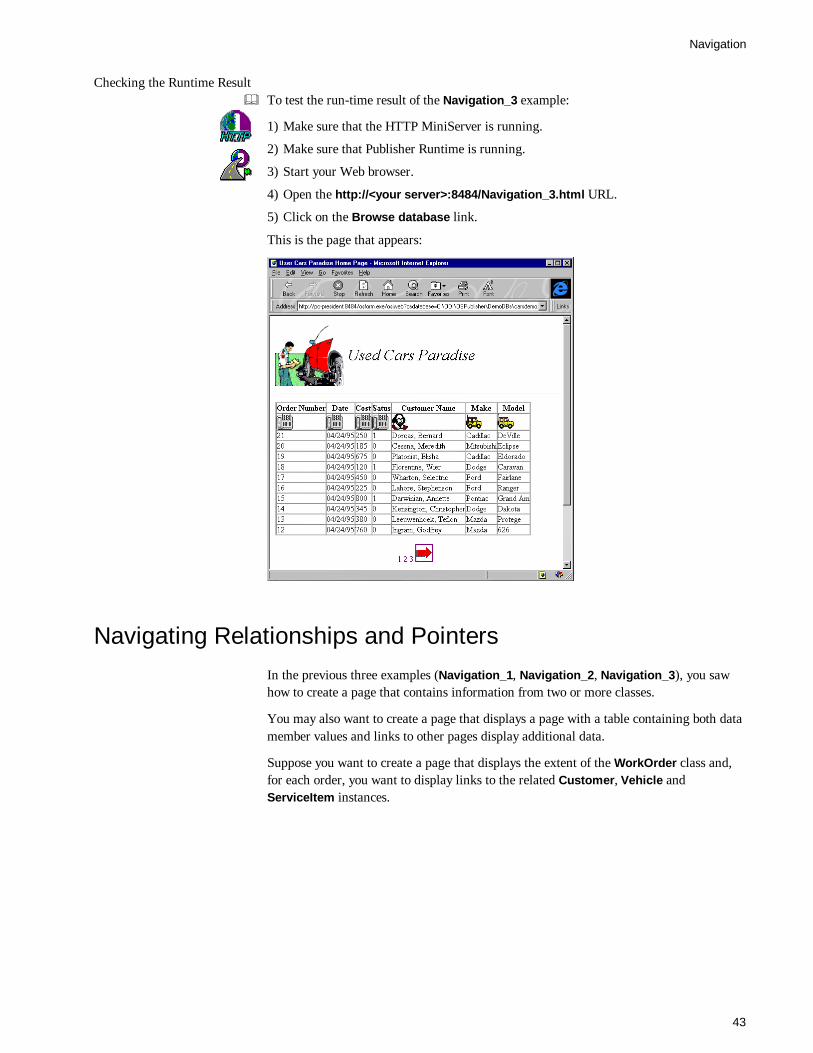
Checking the Runtime Result& To test the run-time result of the Navigation_3 example:
1) Make sure that the HTTP MiniServer is running.
2) Make sure that Publisher Runtime is running.
3) Start your Web browser.
4) Open the http://<your server>:8484/Navigation_3.html URL.
5) Click on the Browse database link.
This is the page that appears:
Navigating Relationships and PointersIn the previous three examples (Navigation_1, Navigation_2, Navigation_3), you sawhow to create a page that contains information from two or more classes.
You may also want to create a page that displays a page with a table containing both datamember values and links to other pages display additional data.
Suppose you want to create a page that displays the extent of the WorkOrder class and,for each order, you want to display links to the related Customer, Vehicle andServiceItem instances.
Navigating Relationships and Pointers
ObjectStore Publisher Tutorial44
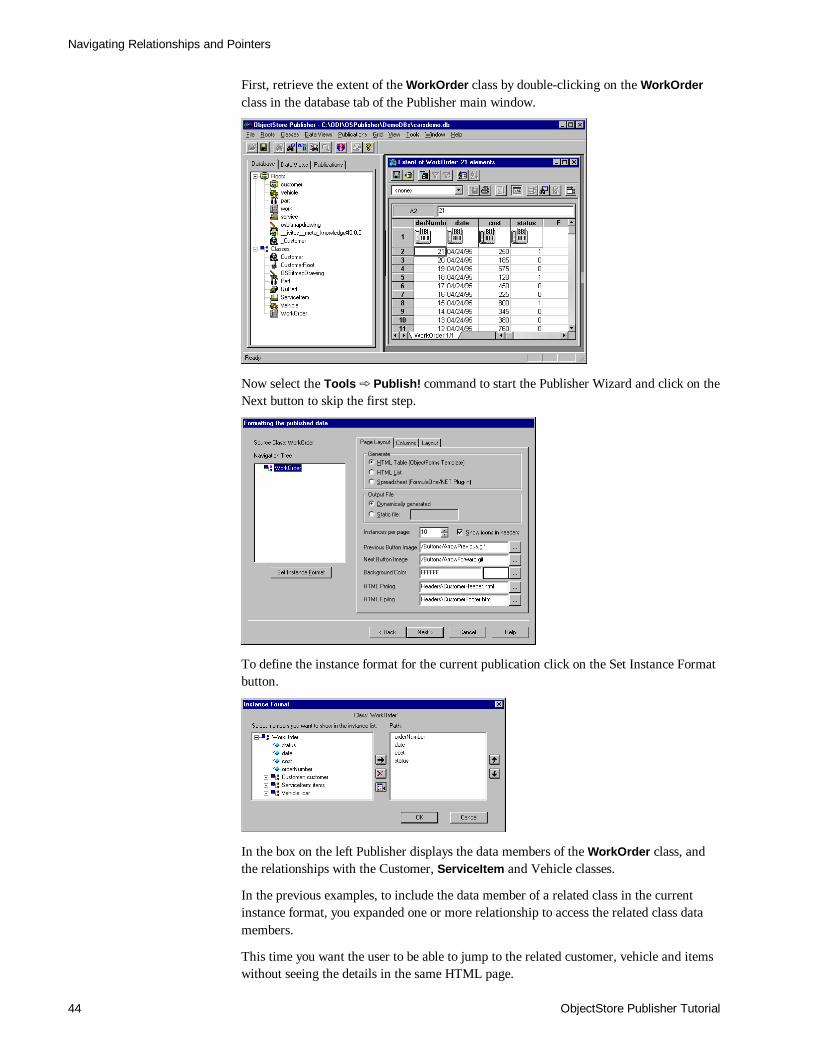
First, retrieve the extent of the WorkOrder class by double-clicking on the WorkOrderclass in the database tab of the Publisher main window.
Now select the Tools þ Publish! command to start the Publisher Wizard and click on theNext button to skip the first step.
To define the instance format for the current publication click on the Set Instance Formatbutton.
In the box on the left Publisher displays the data members of the WorkOrder class, andthe relationships with the Customer, ServiceItem and Vehicle classes.
In the previous examples, to include the data member of a related class in the currentinstance format, you expanded one or more relationship to access the related class datamembers.
This time you want the user to be able to jump to the related customer, vehicle and itemswithout seeing the details in the same HTML page.
Navigation
45
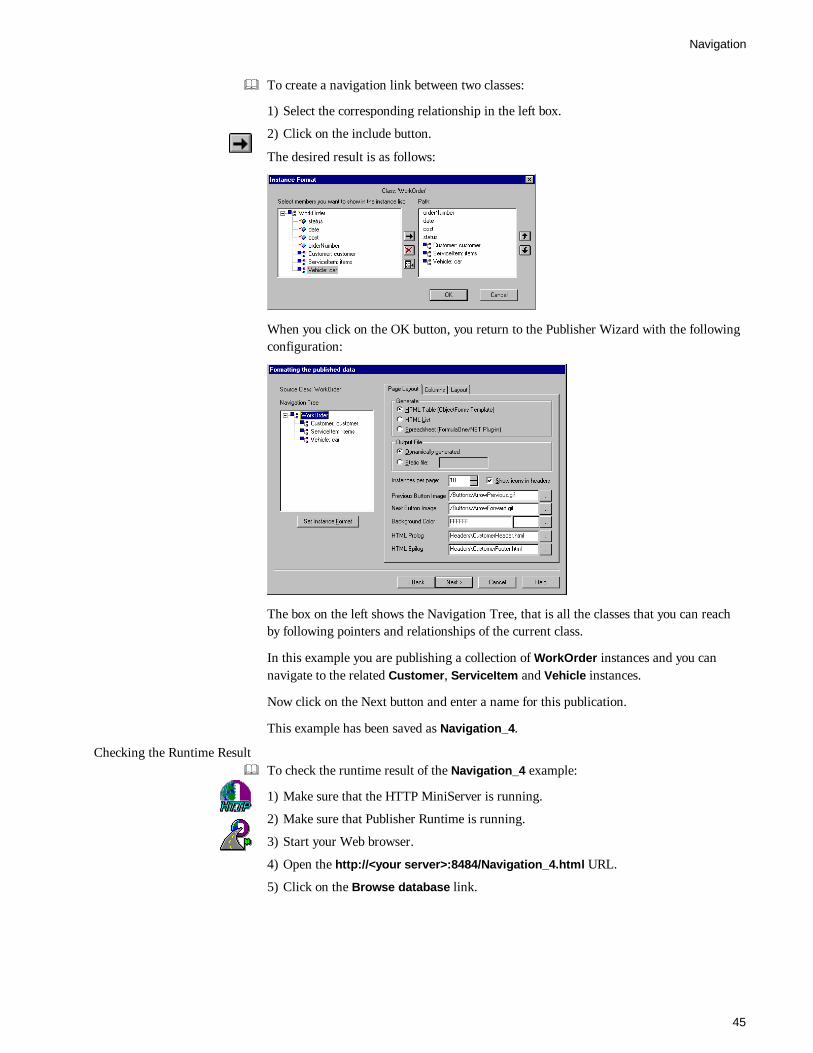
& To create a navigation link between two classes:
1) Select the corresponding relationship in the left box.
2) Click on the include button.
The desired result is as follows:
When you click on the OK button, you return to the Publisher Wizard with the followingconfiguration:
The box on the left shows the Navigation Tree, that is all the classes that you can reachby following pointers and relationships of the current class.
In this example you are publishing a collection of WorkOrder instances and you cannavigate to the related Customer, ServiceItem and Vehicle instances.
Now click on the Next button and enter a name for this publication.
This example has been saved as Navigation_4.
Checking the Runtime Result& To check the runtime result of the Navigation_4 example:
1) Make sure that the HTTP MiniServer is running.
2) Make sure that Publisher Runtime is running.
3) Start your Web browser.
4) Open the http://<your server>:8484/Navigation_4.html URL.
5) Click on the Browse database link.
Navigating Relationships and Pointers
ObjectStore Publisher Tutorial46
This is the page that appears:
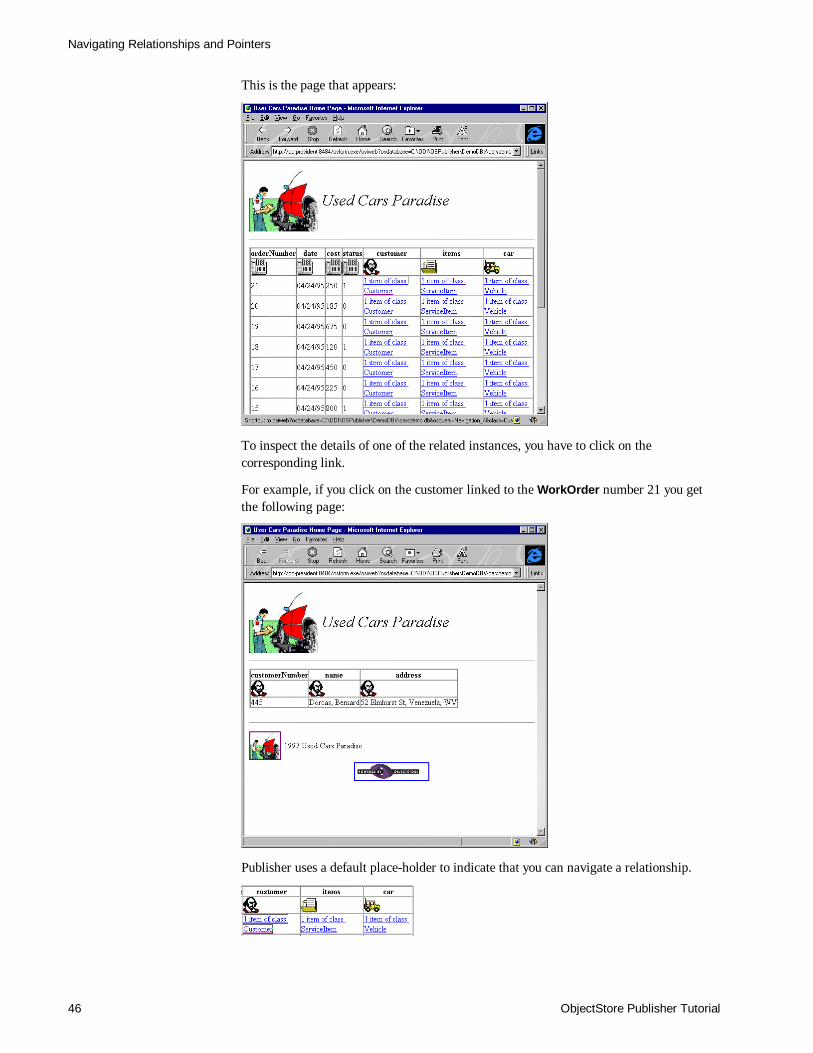
To inspect the details of one of the related instances, you have to click on thecorresponding link.
For example, if you click on the customer linked to the WorkOrder number 21 you getthe following page:
Publisher uses a default place-holder to indicate that you can navigate a relationship.
Navigation
47
These place-holders have the following form:
X item of class YYYIn which X is the number of related instances and YYY is the name of the related class.
For example:
1 item of the class Customer& To customize the place-holders that Publisher uses to identify a navigation link:
1) Edit the publication.
2) In the second step of the Publisher Wizard click on the Columns tab.
3) Double click on the place-holder you want to edit.
4) Enter a new place holder.
Typically, a place holder is a text. You can also insert a “%n” to make Publisher displaythe number of related instances.
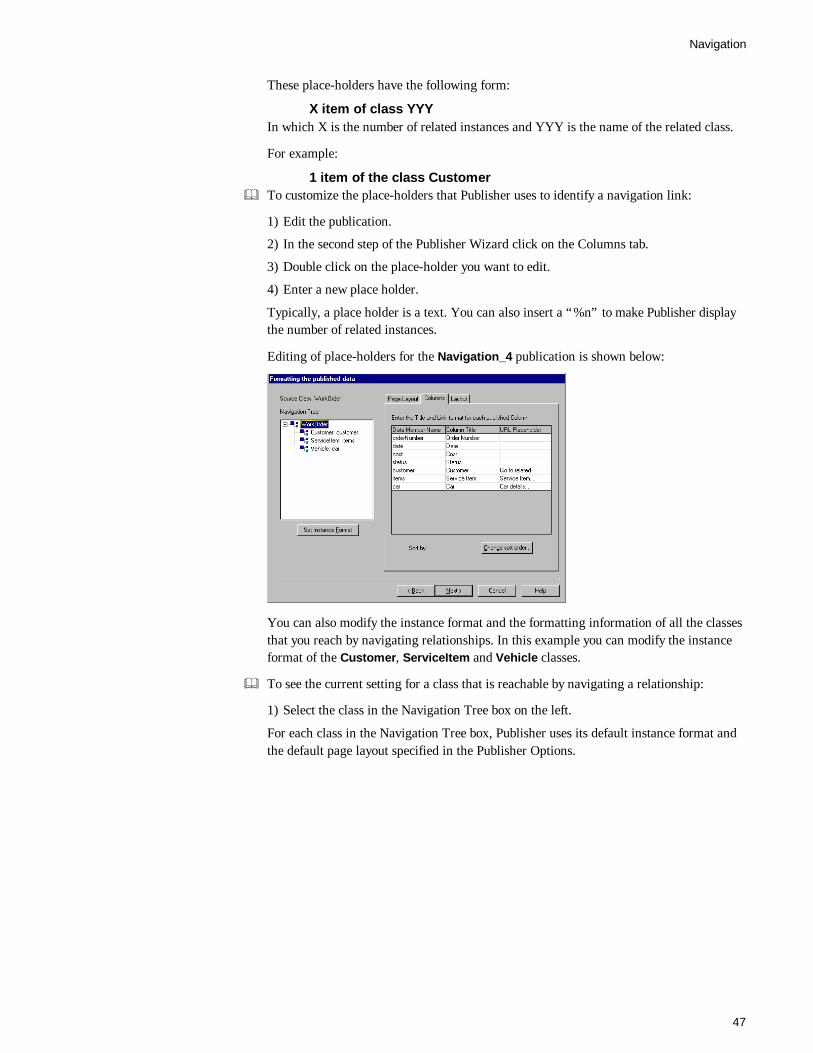
Editing of place-holders for the Navigation_4 publication is shown below:
You can also modify the instance format and the formatting information of all the classesthat you reach by navigating relationships. In this example you can modify the instanceformat of the Customer, ServiceItem and Vehicle classes.
& To see the current setting for a class that is reachable by navigating a relationship:
1) Select the class in the Navigation Tree box on the left.
For each class in the Navigation Tree box, Publisher uses its default instance format andthe default page layout specified in the Publisher Options.
Navigating Relationships and Pointers
ObjectStore Publisher Tutorial48
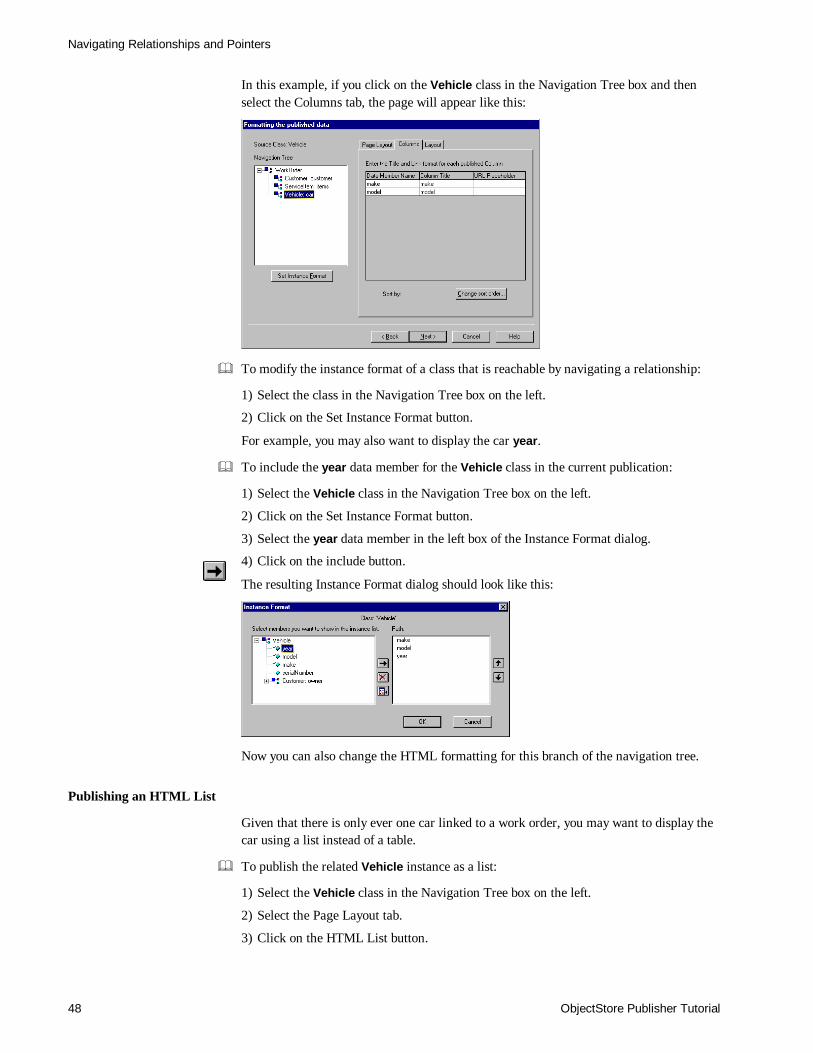
In this example, if you click on the Vehicle class in the Navigation Tree box and thenselect the Columns tab, the page will appear like this:
& To modify the instance format of a class that is reachable by navigating a relationship:
1) Select the class in the Navigation Tree box on the left.
2) Click on the Set Instance Format button.
For example, you may also want to display the car year.
& To include the year data member for the Vehicle class in the current publication:
1) Select the Vehicle class in the Navigation Tree box on the left.
2) Click on the Set Instance Format button.
3) Select the year data member in the left box of the Instance Format dialog.
4) Click on the include button.
The resulting Instance Format dialog should look like this:
Now you can also change the HTML formatting for this branch of the navigation tree.
Publishing an HTML List
Given that there is only ever one car linked to a work order, you may want to display thecar using a list instead of a table.
& To publish the related Vehicle instance as a list:
1) Select the Vehicle class in the Navigation Tree box on the left.
2) Select the Page Layout tab.
3) Click on the HTML List button.

Navigation
49
The wizard window should look like this:
This example has been saved as Navigation_5.
Checking the Runtime Result& To check the run-time result of the Navigation_5 example:
1) Make sure that the HTTP MiniServer is running.
2) Make sure that Publisher Runtime is running.
3) Start your Web browser.
4) Open the http://<your server>:8484/Navigation_5.html URL.
5) Click on the Browse database link.
This is the page that appears:
As you can see, the place-holders for the navigational links have changed.
Navigating Relationships and Pointers
ObjectStore Publisher Tutorial50
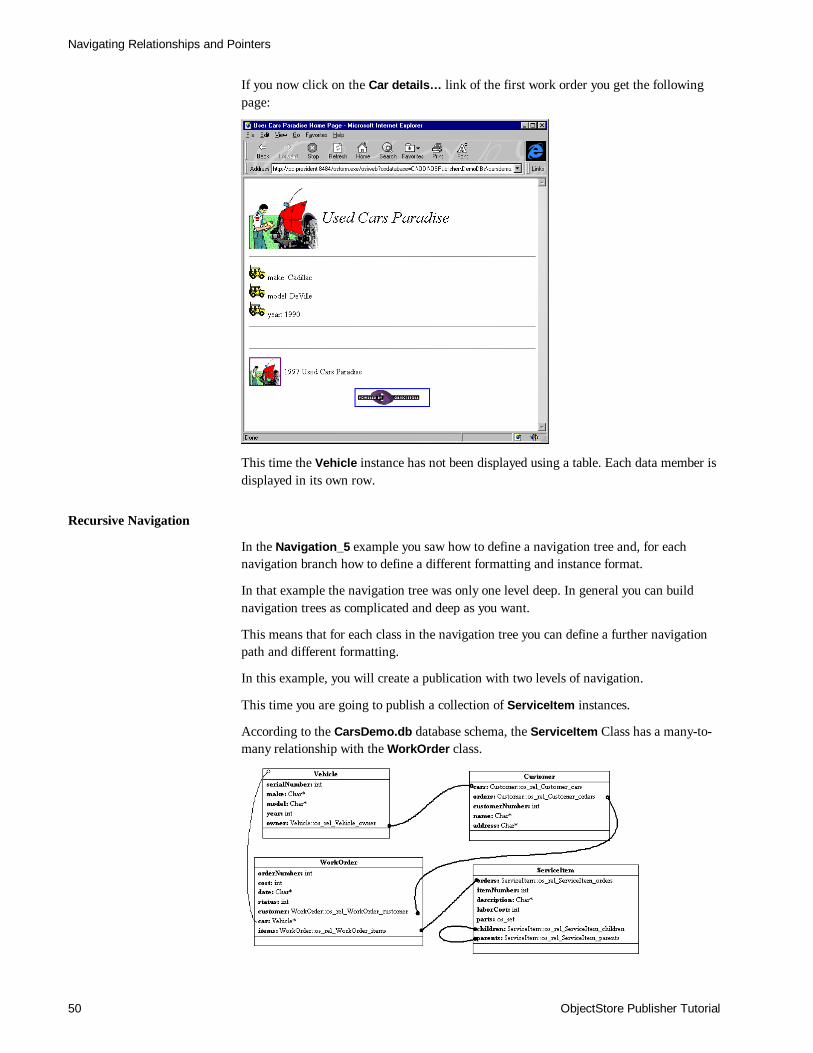
If you now click on the Car details… link of the first work order you get the followingpage:
This time the Vehicle instance has not been displayed using a table. Each data member isdisplayed in its own row.
Recursive Navigation
In the Navigation_5 example you saw how to define a navigation tree and, for eachnavigation branch how to define a different formatting and instance format.
In that example the navigation tree was only one level deep. In general you can buildnavigation trees as complicated and deep as you want.
This means that for each class in the navigation tree you can define a further navigationpath and different formatting.
In this example, you will create a publication with two levels of navigation.
This time you are going to publish a collection of ServiceItem instances.
According to the CarsDemo.db database schema, the ServiceItem Class has a many-to-many relationship with the WorkOrder class.
Navigation
51
In this example, you want to user to be able to navigate the link between ServiceItem andWorkOrder and then the links between WorkOrder and Customer.
First begin by finding the data you want to publish.
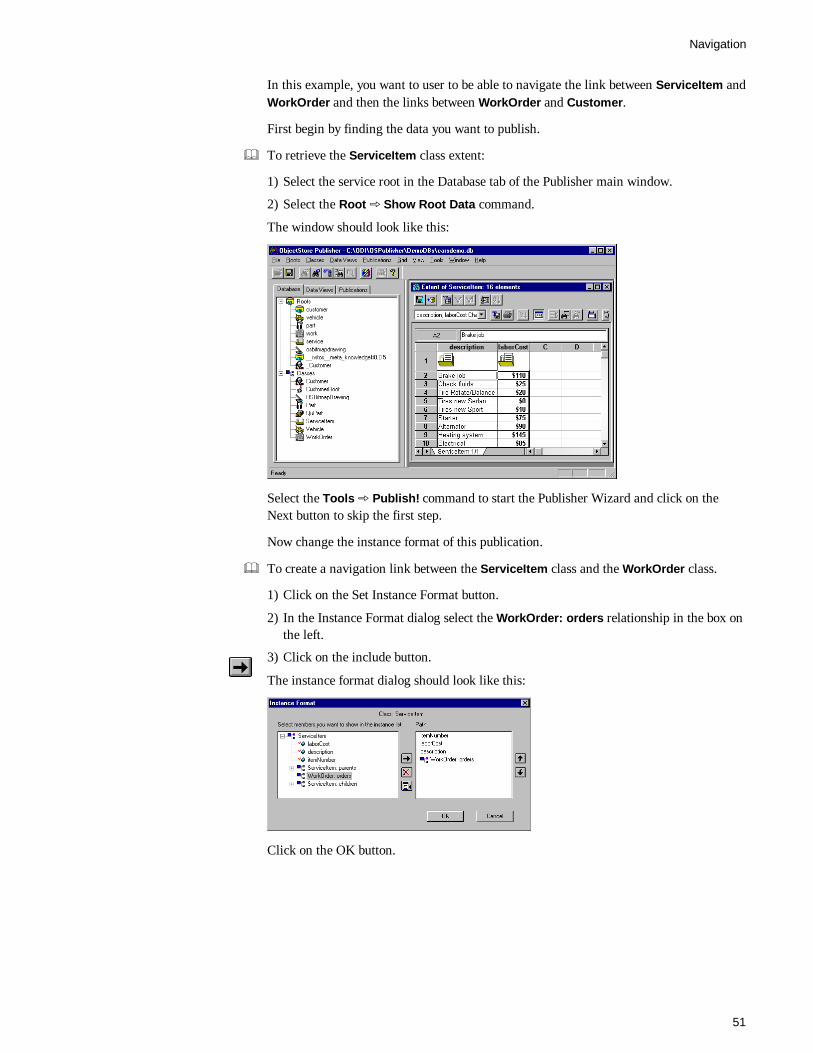
& To retrieve the ServiceItem class extent:
1) Select the service root in the Database tab of the Publisher main window.
2) Select the Root þ Show Root Data command.
The window should look like this:
Select the Tools þ Publish! command to start the Publisher Wizard and click on theNext button to skip the first step.
Now change the instance format of this publication.
& To create a navigation link between the ServiceItem class and the WorkOrder class.
1) Click on the Set Instance Format button.
2) In the Instance Format dialog select the WorkOrder: orders relationship in the box onthe left.
3) Click on the include button.
The instance format dialog should look like this:
Click on the OK button.
Navigating Relationships and Pointers
ObjectStore Publisher Tutorial52
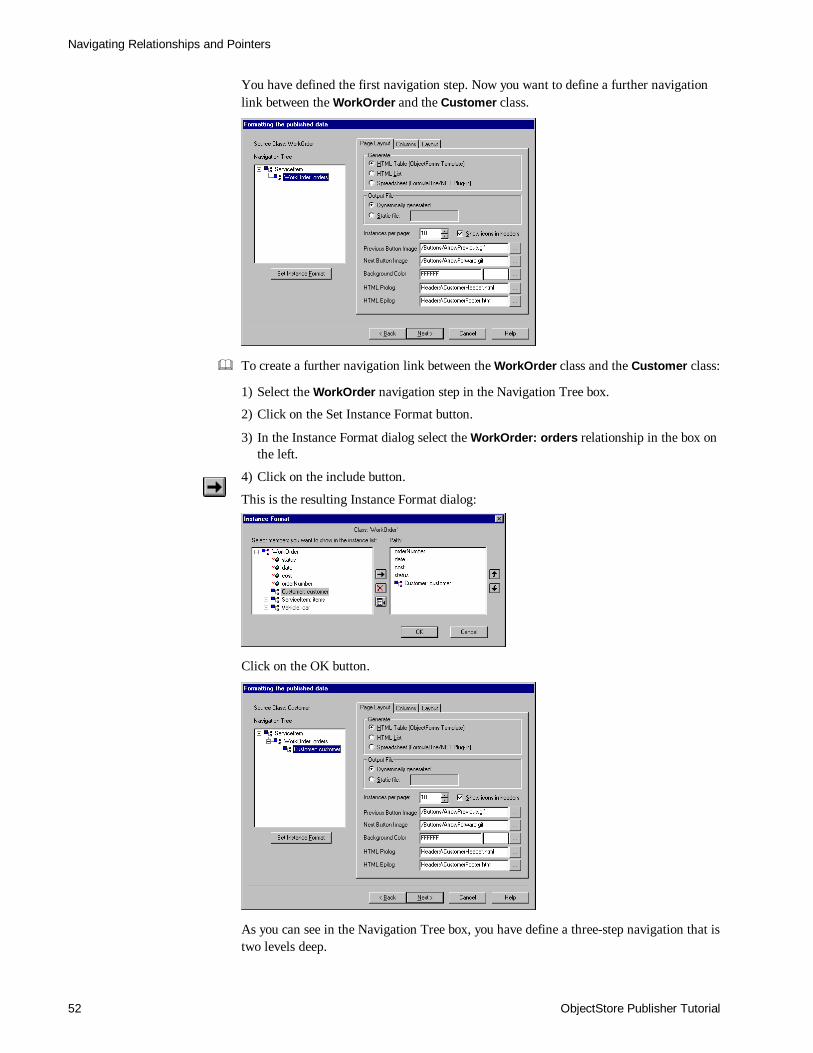
You have defined the first navigation step. Now you want to define a further navigationlink between the WorkOrder and the Customer class.
& To create a further navigation link between the WorkOrder class and the Customer class:
1) Select the WorkOrder navigation step in the Navigation Tree box.
2) Click on the Set Instance Format button.
3) In the Instance Format dialog select the WorkOrder: orders relationship in the box onthe left.
4) Click on the include button.
This is the resulting Instance Format dialog:
Click on the OK button.
As you can see in the Navigation Tree box, you have define a three-step navigation that istwo levels deep.
Navigation
53
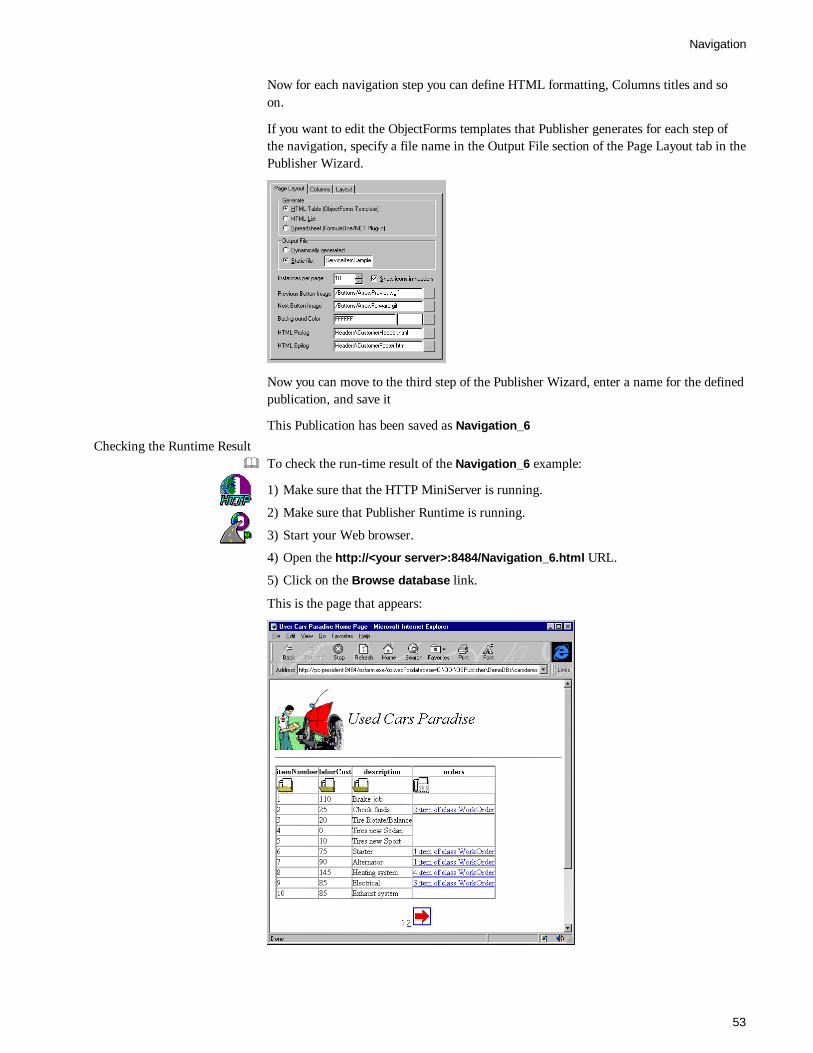
Now for each navigation step you can define HTML formatting, Columns titles and soon.
If you want to edit the ObjectForms templates that Publisher generates for each step ofthe navigation, specify a file name in the Output File section of the Page Layout tab in thePublisher Wizard.
Now you can move to the third step of the Publisher Wizard, enter a name for the definedpublication, and save it
This Publication has been saved as Navigation_6
Checking the Runtime Result& To check the run-time result of the Navigation_6 example:
1) Make sure that the HTTP MiniServer is running.
2) Make sure that Publisher Runtime is running.
3) Start your Web browser.
4) Open the http://<your server>:8484/Navigation_6.html URL.
5) Click on the Browse database link.
This is the page that appears:
Navigating Relationships and Pointers
ObjectStore Publisher Tutorial54
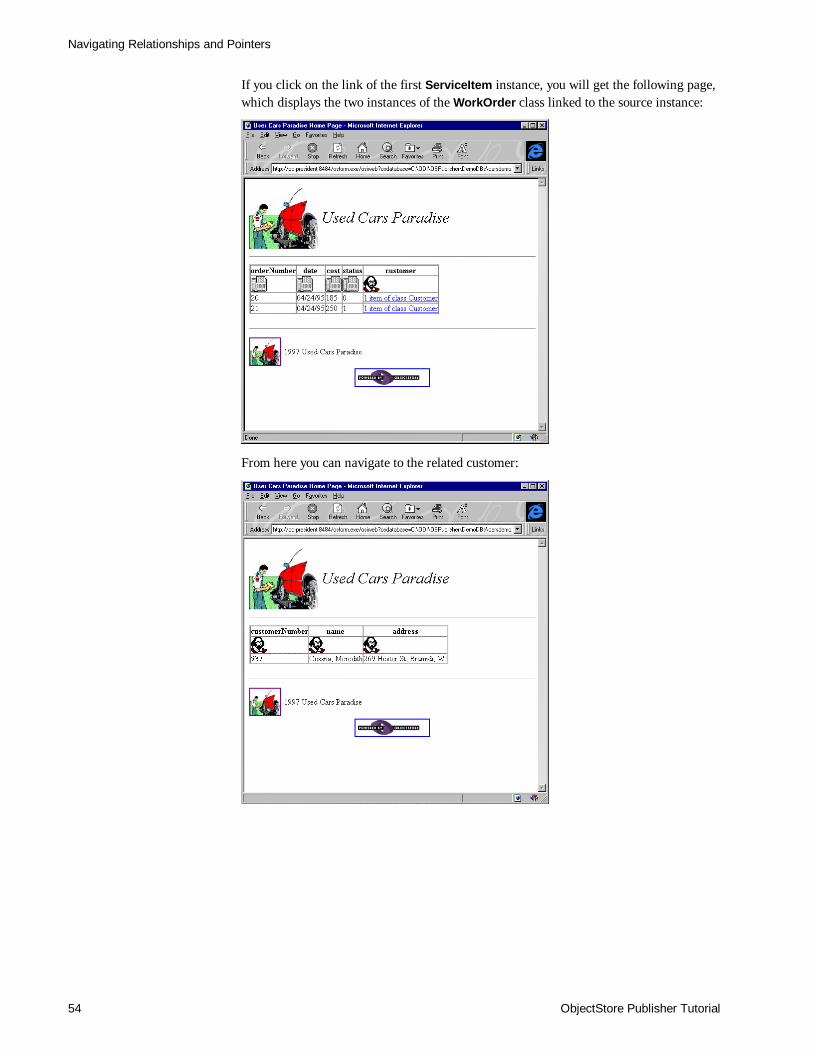
If you click on the link of the first ServiceItem instance, you will get the following page,which displays the two instances of the WorkOrder class linked to the source instance:
From here you can navigate to the related customer:
Publishing a Query Result
55
Publishing a Query Result
One of the advantages of using ObjectStore is its powerful query mechanism. Publisherexploits this ObjectStore feature by allowing you to publish the result of an ObjectStorequery.
You do not need to know the ObjectStore query syntax, Publisher provides you with avisual, point & click interface that hides all the low level details.
You define the query in terms of data member constraints and logical expression atauthoring time.
The query parameter values can be specified at authoring time or can be entered by thefinal user by filling in a Publisher generated HTML forms.
In this tutorial you learn how to create publications whose contents depends on the resultof an ObjectStore query.
Database: CarsDemo.db
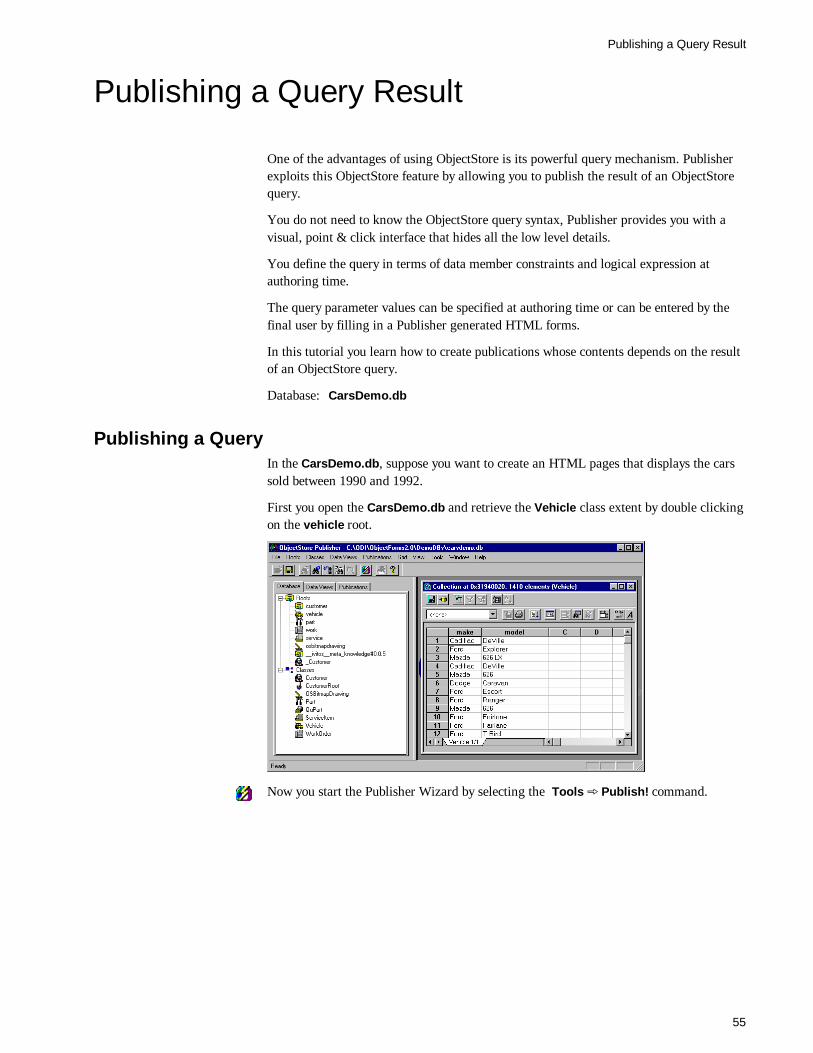
Publishing a QueryIn the CarsDemo.db, suppose you want to create an HTML pages that displays the carssold between 1990 and 1992.
First you open the CarsDemo.db and retrieve the Vehicle class extent by double clickingon the vehicle root.
Now you start the Publisher Wizard by selecting the Tools þ Publish! command.
Navigating Relationships and Pointers
ObjectStore Publisher Tutorial56
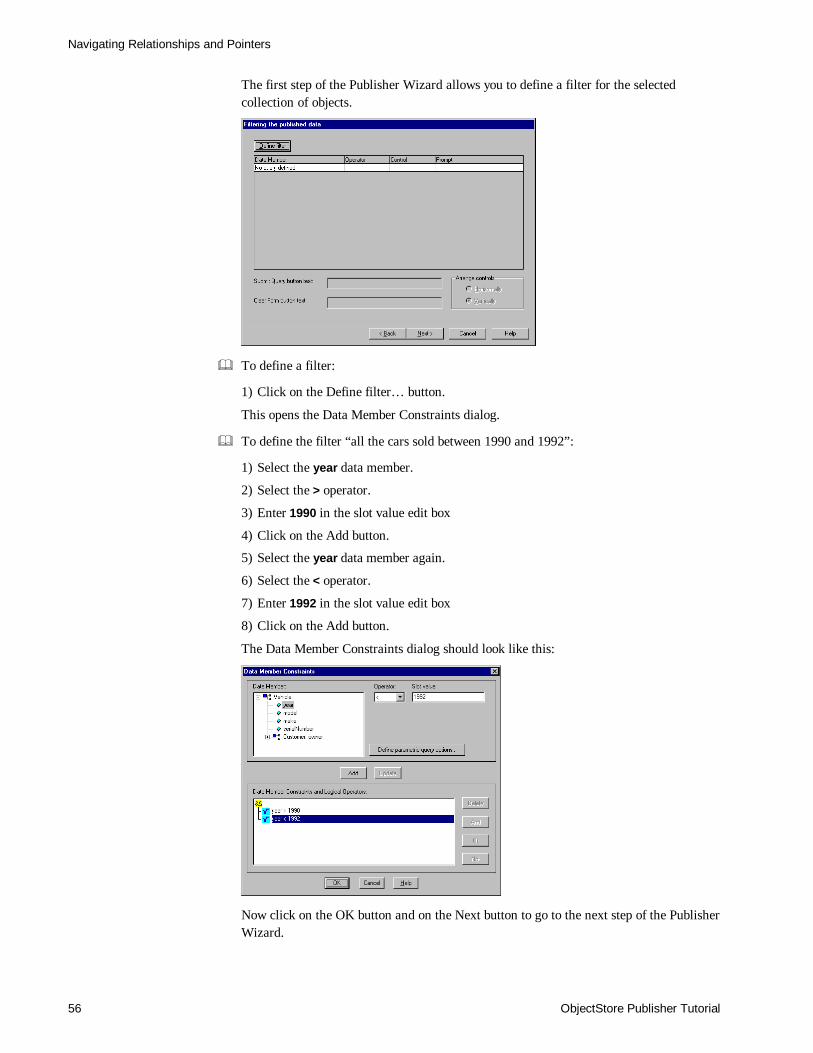
The first step of the Publisher Wizard allows you to define a filter for the selectedcollection of objects.
& To define a filter:
1) Click on the Define filter… button.
This opens the Data Member Constraints dialog.
& To define the filter “all the cars sold between 1990 and 1992”:
1) Select the year data member.
2) Select the > operator.
3) Enter 1990 in the slot value edit box
4) Click on the Add button.
5) Select the year data member again.
6) Select the < operator.
7) Enter 1992 in the slot value edit box
8) Click on the Add button.
The Data Member Constraints dialog should look like this:
Now click on the OK button and on the Next button to go to the next step of the PublisherWizard.
Publishing a Query Result
57
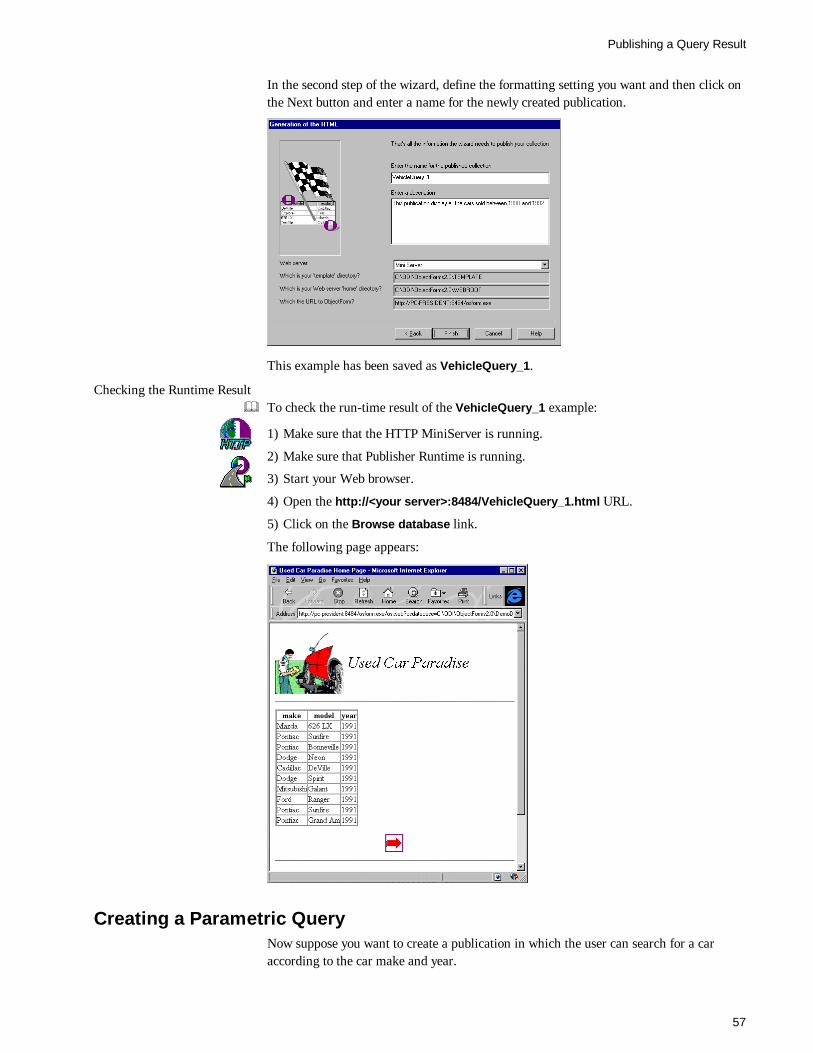
In the second step of the wizard, define the formatting setting you want and then click onthe Next button and enter a name for the newly created publication.
This example has been saved as VehicleQuery_1.
Checking the Runtime Result& To check the run-time result of the VehicleQuery_1 example:
1) Make sure that the HTTP MiniServer is running.
2) Make sure that Publisher Runtime is running.
3) Start your Web browser.
4) Open the http://<your server>:8484/VehicleQuery_1.html URL.
5) Click on the Browse database link.
The following page appears:
Creating a Parametric QueryNow suppose you want to create a publication in which the user can search for a caraccording to the car make and year.
Navigating Relationships and Pointers
ObjectStore Publisher Tutorial58
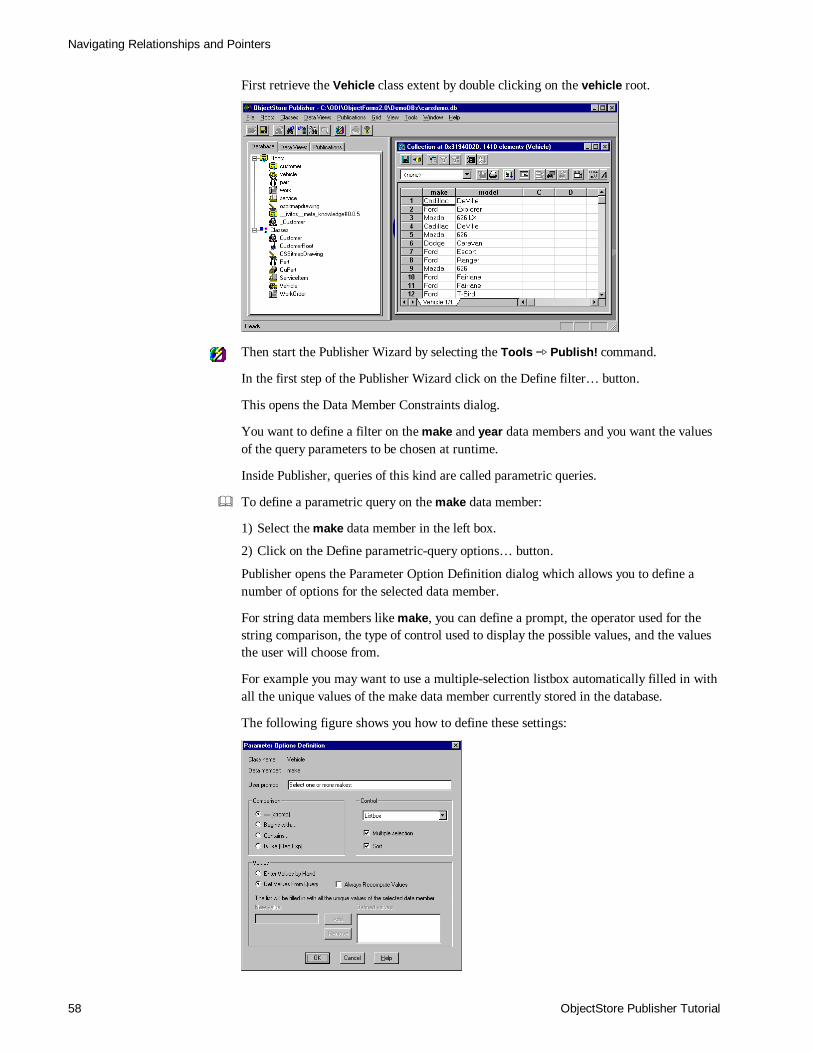
First retrieve the Vehicle class extent by double clicking on the vehicle root.
Then start the Publisher Wizard by selecting the Tools þ Publish! command.
In the first step of the Publisher Wizard click on the Define filter… button.
This opens the Data Member Constraints dialog.
You want to define a filter on the make and year data members and you want the valuesof the query parameters to be chosen at runtime.
Inside Publisher, queries of this kind are called parametric queries.
& To define a parametric query on the make data member:
1) Select the make data member in the left box.
2) Click on the Define parametric-query options… button.
Publisher opens the Parameter Option Definition dialog which allows you to define anumber of options for the selected data member.
For string data members like make, you can define a prompt, the operator used for thestring comparison, the type of control used to display the possible values, and the valuesthe user will choose from.
For example you may want to use a multiple-selection listbox automatically filled in withall the unique values of the make data member currently stored in the database.
The following figure shows you how to define these settings:
Publishing a Query Result
59
When you click on the OK button you return to the Data Member Constraints dialog:
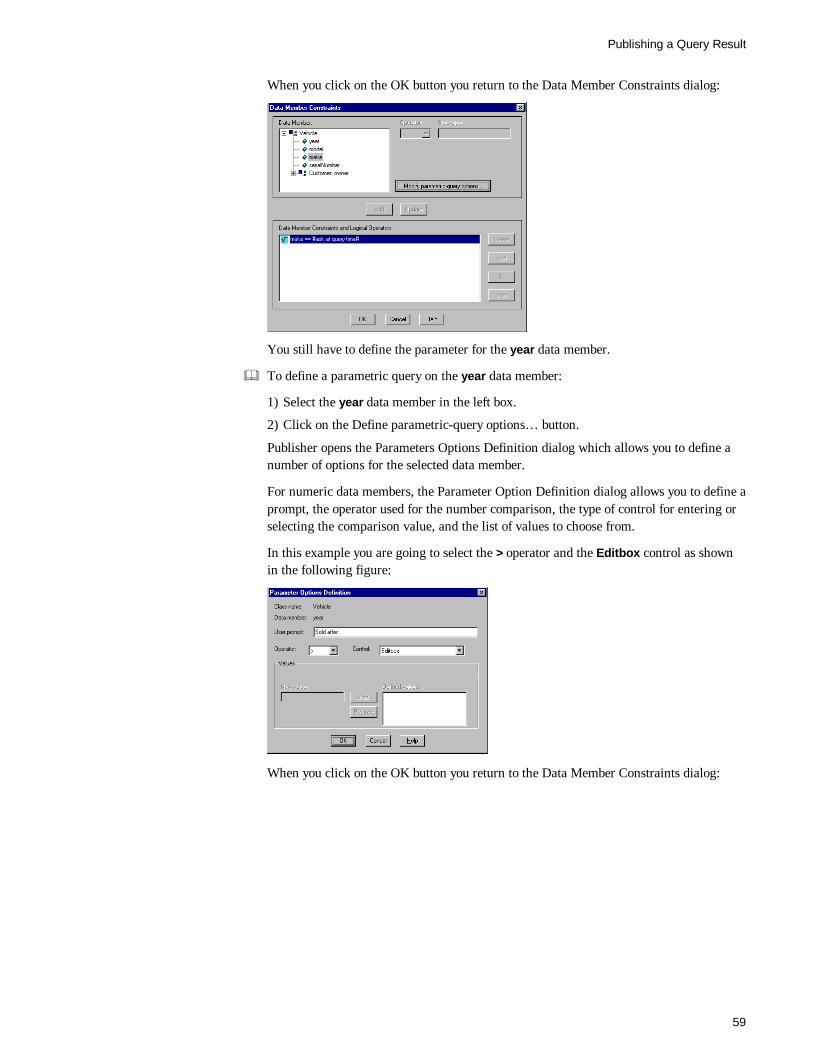
You still have to define the parameter for the year data member.
& To define a parametric query on the year data member:
1) Select the year data member in the left box.
2) Click on the Define parametric-query options… button.
Publisher opens the Parameters Options Definition dialog which allows you to define anumber of options for the selected data member.
For numeric data members, the Parameter Option Definition dialog allows you to define aprompt, the operator used for the number comparison, the type of control for entering orselecting the comparison value, and the list of values to choose from.
In this example you are going to select the > operator and the Editbox control as shownin the following figure:
When you click on the OK button you return to the Data Member Constraints dialog:
Navigating Relationships and Pointers
ObjectStore Publisher Tutorial60
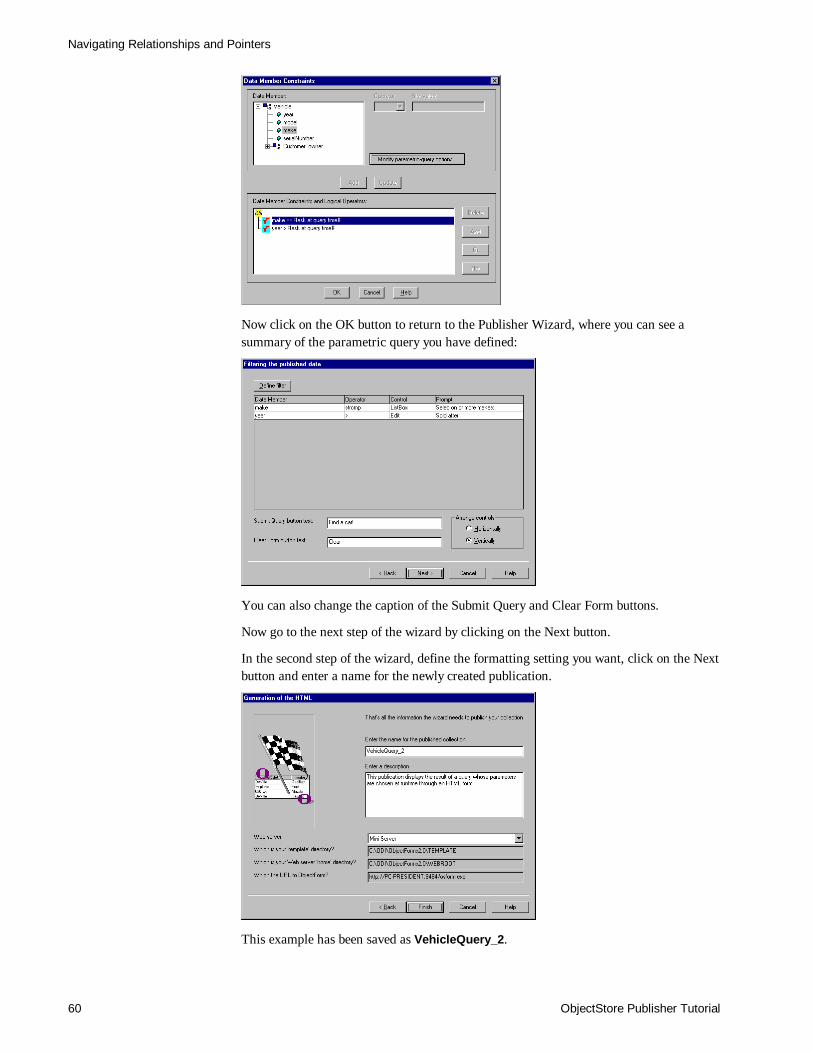
Now click on the OK button to return to the Publisher Wizard, where you can see asummary of the parametric query you have defined:
You can also change the caption of the Submit Query and Clear Form buttons.
Now go to the next step of the wizard by clicking on the Next button.
In the second step of the wizard, define the formatting setting you want, click on the Nextbutton and enter a name for the newly created publication.
This example has been saved as VehicleQuery_2.

Publishing a Query Result
61
Checking the Runtime Result& To check the run-time result of the VehicleQuery_2 example:
1) Make sure that the HTTP MiniServer is running.
2) Make sure that Publisher Runtime is running.
3) Start your Web browser.
4) Open the http://<your server>:8484/VehicleQuery_2.html URL.
The following HTML form appears:
Now select one or more makes, enter a year, and then click on the Find a car! button.Publisher Runtime processes your request, generates and executes the equivalentObjectStore query and displays the result.
For example, if you choose Cadillac and Pontiac sold after 1994, the following pageappears:
Navigating Relationships and Pointers
ObjectStore Publisher Tutorial62
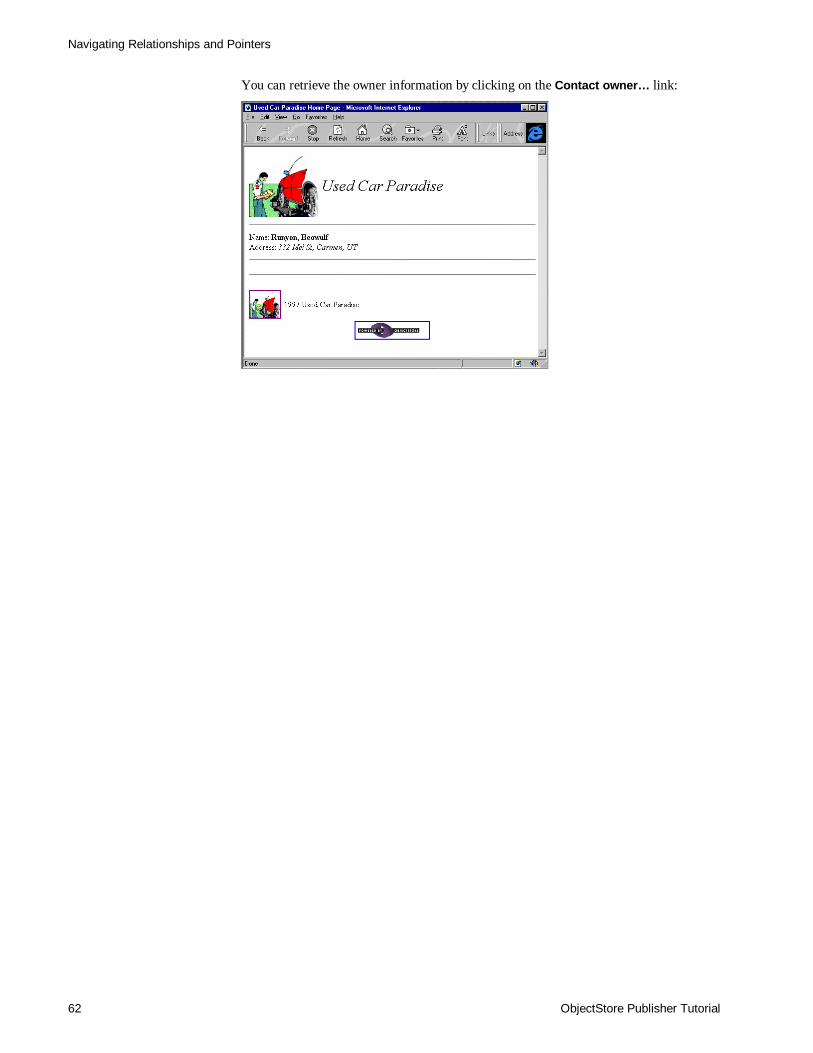
You can retrieve the owner information by clicking on the Contact owner… link:
Publishing Multimedia Objects
63
Publishing Multimedia Objects
In this tutorial you learn how to publish multimedia objects. Publisher currently supportsthe following multimedia object types:
• Images osmm_image
• Sounds osmm_audio
• Videos osmm_video
Database: ExtraDemo.db
Publishing ImagesTo start this tutorial, first open the ExtraDemo.db database.
& To open the ExtraDemo.db database:
1) Run Publisher.
2) Select the File þ Open Database... command.
3) Select the ExtraDemo.db file under the <ObjectForms root>\demodbs directory.
An ObjectStore Server must be running on the workstation that hosts the specified path.
This is the Publisher main window for the ExtraDemo.db database:
While in the previous example you used the default HTML headers and footers of theUsed Car Paradise demo, in this case we want to use different ones.
Setting the Default Formatting Options
& To define the Publisher HTML layout defaults:
1) Select the Tools þ Options… command
2) Click on the Default Page Layout tab.
Publishing Images
ObjectStore Publisher Tutorial64
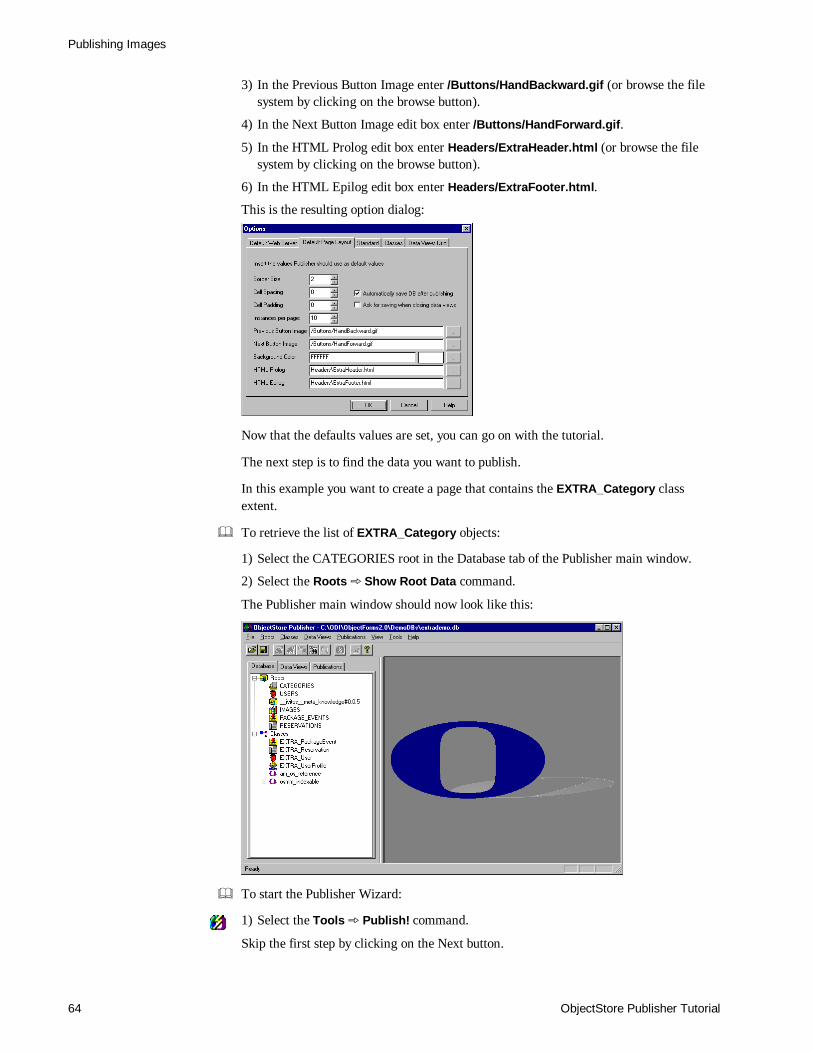
3) In the Previous Button Image enter /Buttons/HandBackward.gif (or browse the filesystem by clicking on the browse button).
4) In the Next Button Image edit box enter /Buttons/HandForward.gif.
5) In the HTML Prolog edit box enter Headers/ExtraHeader.html (or browse the filesystem by clicking on the browse button).
6) In the HTML Epilog edit box enter Headers/ExtraFooter.html.
This is the resulting option dialog:
Now that the defaults values are set, you can go on with the tutorial.
The next step is to find the data you want to publish.
In this example you want to create a page that contains the EXTRA_Category classextent.
& To retrieve the list of EXTRA_Category objects:
1) Select the CATEGORIES root in the Database tab of the Publisher main window.
2) Select the Roots þ Show Root Data command.
The Publisher main window should now look like this:
& To start the Publisher Wizard:
1) Select the Tools þ Publish! command.
Skip the first step by clicking on the Next button.

Publishing Multimedia Objects
65
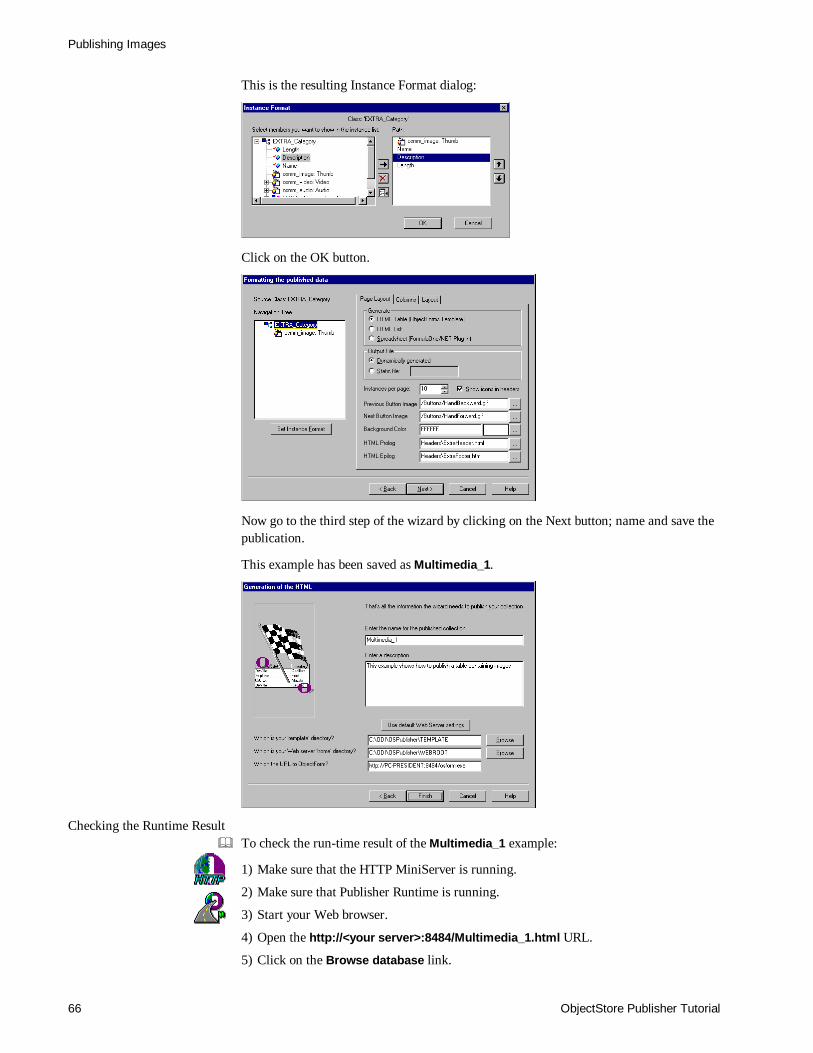
& To define the instance format for the current publication:
1) Click on the Set Instance Format button.
The following Instance Format dialog appears:
The box on the left displays the data members of the EXTRA_Category class. Themultimedia icon identifies the multimedia type handled by Publisher. You can includeany of these Multimedia data members in the current instance format.
For example you can include the Thumb data member, which is an image.
& To include a Multimedia data member in the current instance format:
1) Select the Thumb data member in the box on the left.
2) Click on the include button.
This is the resulting Instance Format dialog:
Suppose you want the Thumb image to appear at first in the resulting HTML page.
& To change the order of the data members included in the current instance format:
1) Select a data member in the Path list box.
2) Click on the up or down button.
In this example, move the Thumb to the top of the list:
To make this example more complete, let’s also include the Description data member inthe current instance format. To do this, select Description in the left box and click on theinclude button.
Publishing Images
ObjectStore Publisher Tutorial66
This is the resulting Instance Format dialog:
Click on the OK button.
Now go to the third step of the wizard by clicking on the Next button; name and save thepublication.
This example has been saved as Multimedia_1.
Checking the Runtime Result& To check the run-time result of the Multimedia_1 example:
1) Make sure that the HTTP MiniServer is running.
2) Make sure that Publisher Runtime is running.
3) Start your Web browser.
4) Open the http://<your server>:8484/Multimedia_1.html URL.
5) Click on the Browse database link.
Publishing Multimedia Objects
67
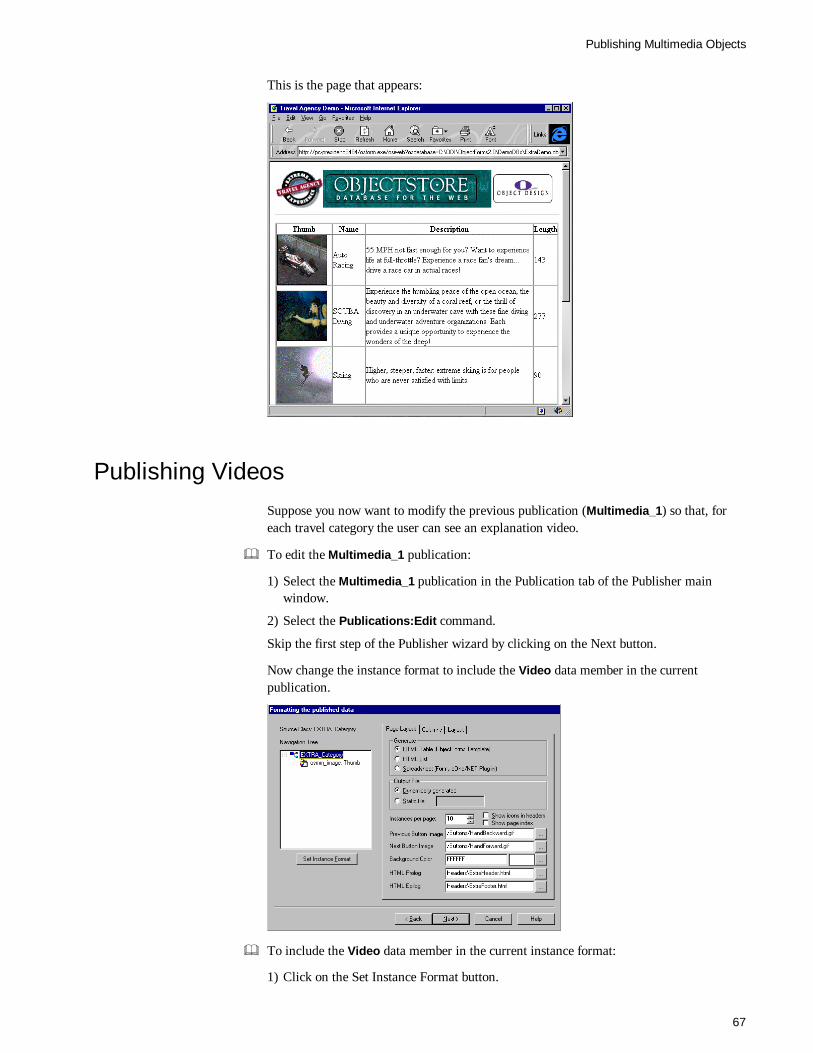
This is the page that appears:
Publishing VideosSuppose you now want to modify the previous publication (Multimedia_1) so that, foreach travel category the user can see an explanation video.
& To edit the Multimedia_1 publication:
1) Select the Multimedia_1 publication in the Publication tab of the Publisher mainwindow.
2) Select the Publications:Edit command.
Skip the first step of the Publisher wizard by clicking on the Next button.
Now change the instance format to include the Video data member in the currentpublication.
& To include the Video data member in the current instance format:
1) Click on the Set Instance Format button.
Publishing Videos
ObjectStore Publisher Tutorial68
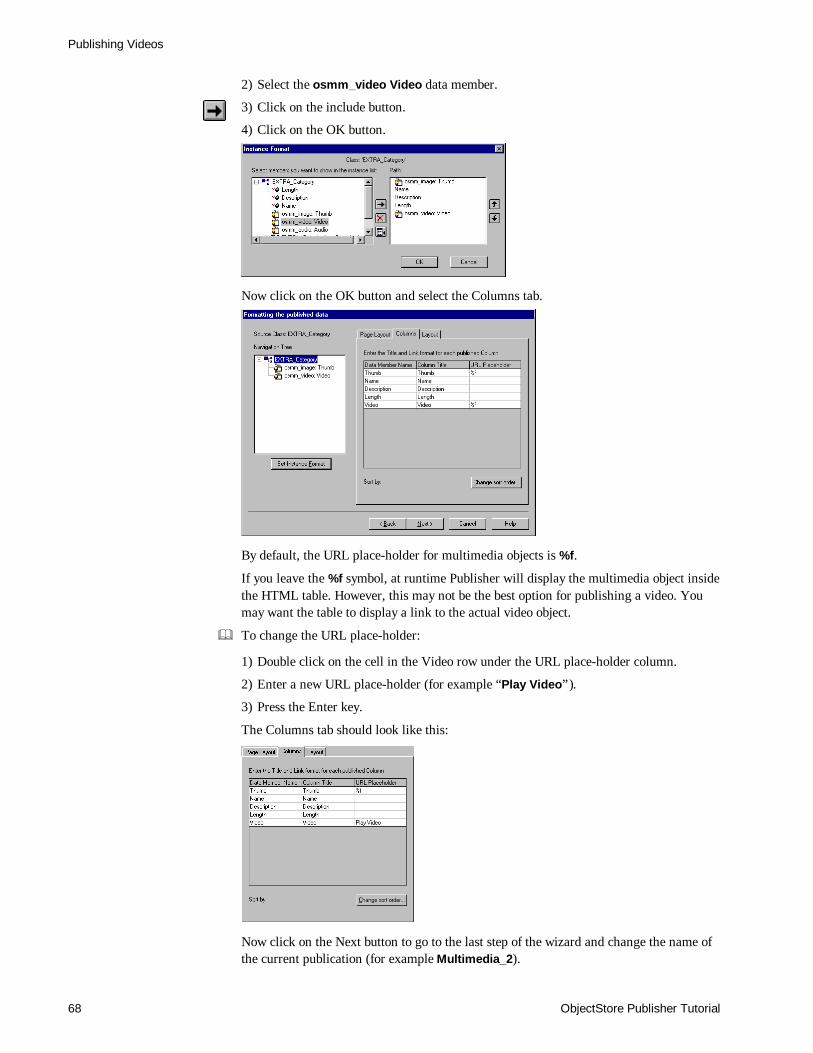
2) Select the osmm_video Video data member.
3) Click on the include button.
4) Click on the OK button.
Now click on the OK button and select the Columns tab.
By default, the URL place-holder for multimedia objects is %f.
If you leave the %f symbol, at runtime Publisher will display the multimedia object insidethe HTML table. However, this may not be the best option for publishing a video. Youmay want the table to display a link to the actual video object.
& To change the URL place-holder:
1) Double click on the cell in the Video row under the URL place-holder column.
2) Enter a new URL place-holder (for example “Play Video”).
3) Press the Enter key.
The Columns tab should look like this:
Now click on the Next button to go to the last step of the wizard and change the name ofthe current publication (for example Multimedia_2).

Publishing Multimedia Objects
69
Checking the Runtime Result& To check the run-time result of the Multimedia_2 example:
1) Make sure that the HTTP MiniServer is running.
2) Make sure that Publisher Runtime is running.
3) Start your Web browser.
4) Open the http://<your server>:8484/Multimedia_2.html URL.
5) Click on the Browse database link.
This is the page that appears:
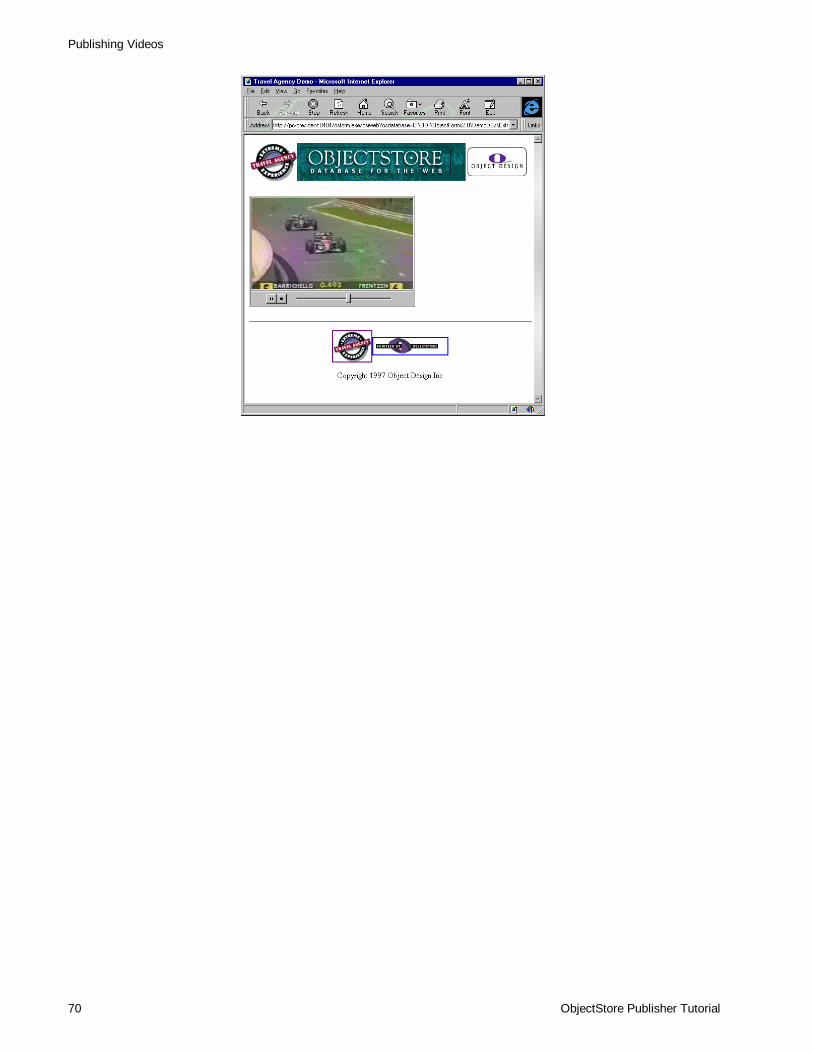
This time the Video column appears. If you click on one of the Play Video links, thevideo for the holiday category displayed in that row is played. Obviously your browsermust be able to play videos.
Publishing Videos
ObjectStore Publisher Tutorial70
Publishing a Single Instance
71
Publishing a Single Instance
In this tutorial you learn how to publish a single object. This feature is useful when youwant to publish an image or a text, or create a page containing different objects fromdifferent collections in the database.
Database: ExtraDemo.db
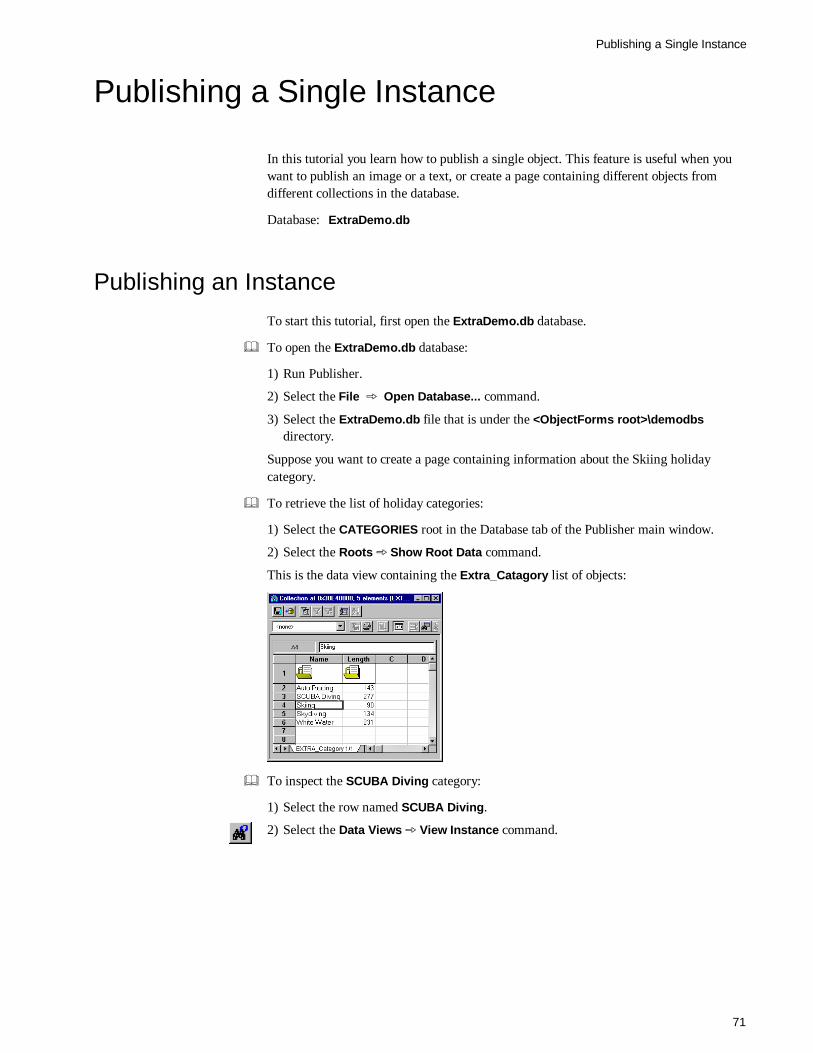
Publishing an InstanceTo start this tutorial, first open the ExtraDemo.db database.
& To open the ExtraDemo.db database:
1) Run Publisher.
2) Select the File þ Open Database... command.
3) Select the ExtraDemo.db file that is under the <ObjectForms root>\demodbsdirectory.
Suppose you want to create a page containing information about the Skiing holidaycategory.
& To retrieve the list of holiday categories:
1) Select the CATEGORIES root in the Database tab of the Publisher main window.
2) Select the Roots þ Show Root Data command.
This is the data view containing the Extra_Catagory list of objects:
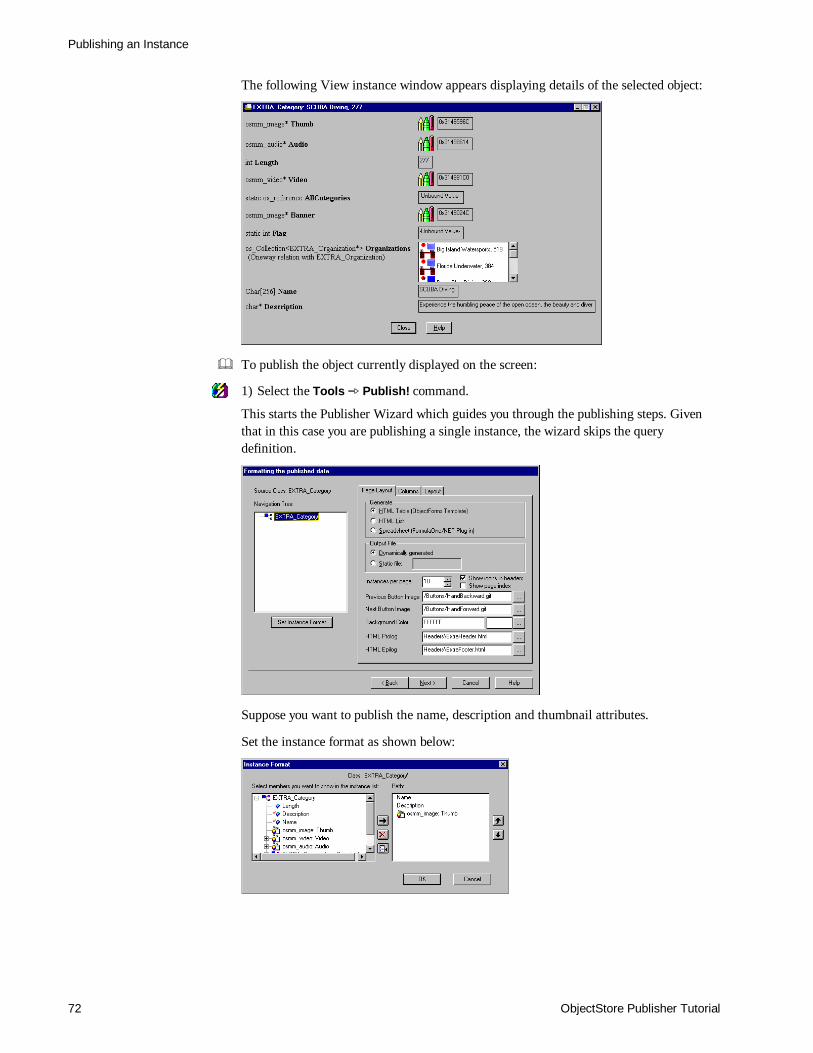
& To inspect the SCUBA Diving category:
1) Select the row named SCUBA Diving.
2) Select the Data Views þ View Instance command.
Publishing an Instance
ObjectStore Publisher Tutorial72
The following View instance window appears displaying details of the selected object:
& To publish the object currently displayed on the screen:
1) Select the Tools þ Publish! command.
This starts the Publisher Wizard which guides you through the publishing steps. Giventhat in this case you are publishing a single instance, the wizard skips the querydefinition.
Suppose you want to publish the name, description and thumbnail attributes.
Set the instance format as shown below:
Publishing a Single Instance
73
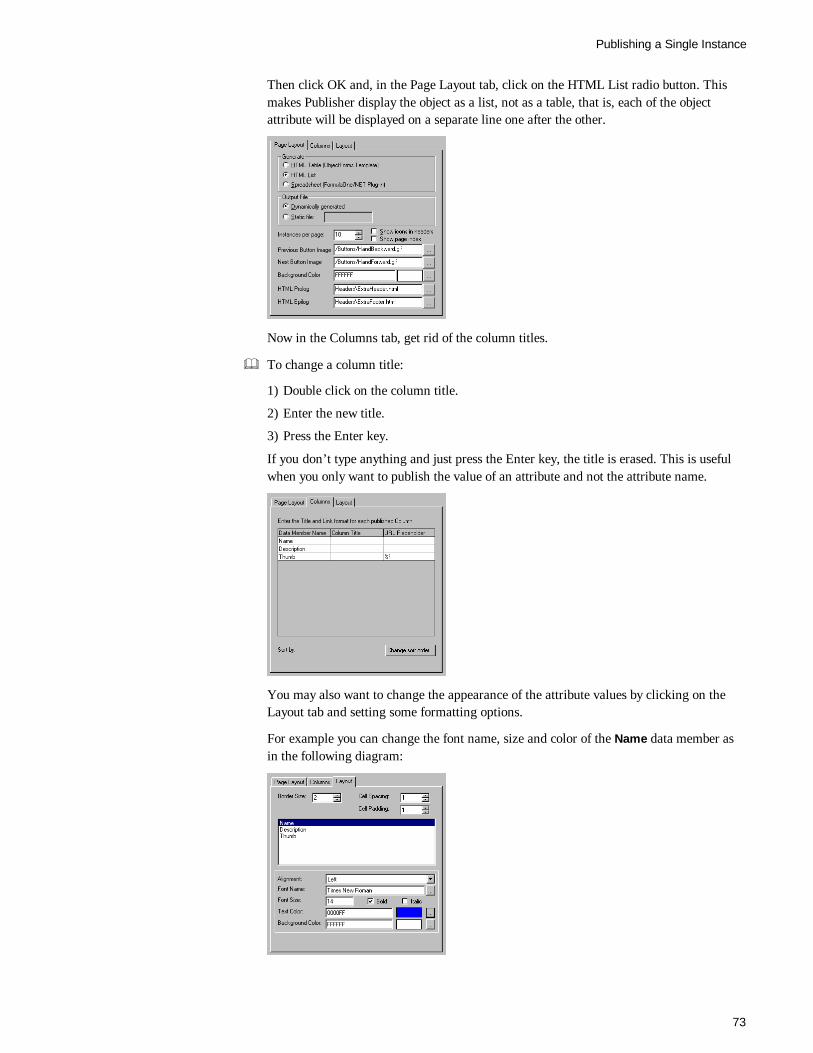
Then click OK and, in the Page Layout tab, click on the HTML List radio button. Thismakes Publisher display the object as a list, not as a table, that is, each of the objectattribute will be displayed on a separate line one after the other.
Now in the Columns tab, get rid of the column titles.
& To change a column title:
1) Double click on the column title.
2) Enter the new title.
3) Press the Enter key.
If you don’t type anything and just press the Enter key, the title is erased. This is usefulwhen you only want to publish the value of an attribute and not the attribute name.
You may also want to change the appearance of the attribute values by clicking on theLayout tab and setting some formatting options.
For example you can change the font name, size and color of the Name data member asin the following diagram:
Publishing an Instance
ObjectStore Publisher Tutorial74
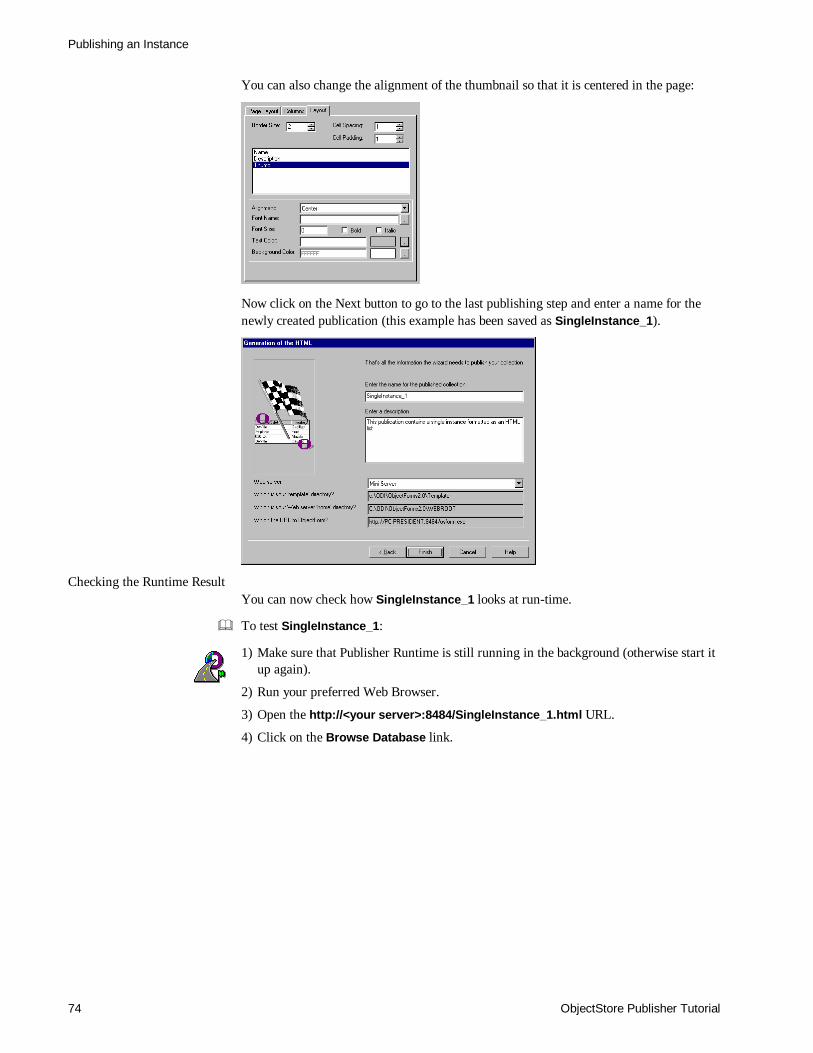
You can also change the alignment of the thumbnail so that it is centered in the page:
Now click on the Next button to go to the last publishing step and enter a name for thenewly created publication (this example has been saved as SingleInstance_1).
Checking the Runtime ResultYou can now check how SingleInstance_1 looks at run-time.
& To test SingleInstance_1:
1) Make sure that Publisher Runtime is still running in the background (otherwise start itup again).
2) Run your preferred Web Browser.
3) Open the http://<your server>:8484/SingleInstance_1.html URL.
4) Click on the Browse Database link.
Publishing a Single Instance
75
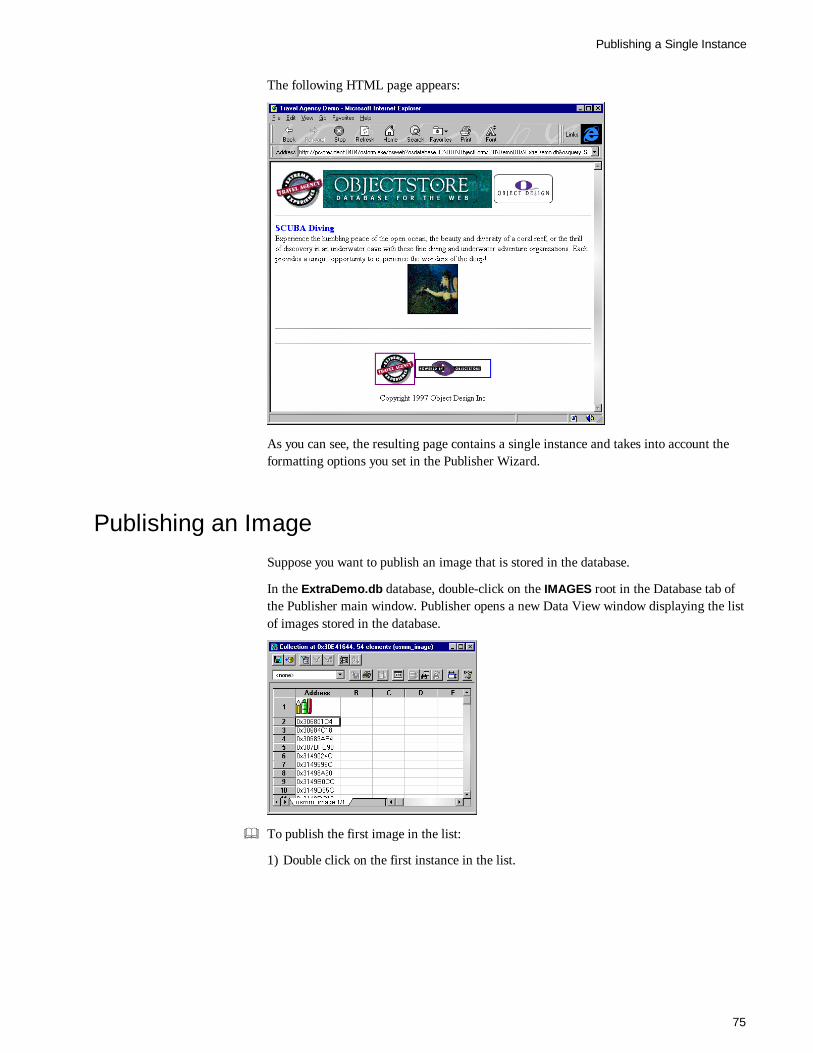
The following HTML page appears:
As you can see, the resulting page contains a single instance and takes into account theformatting options you set in the Publisher Wizard.
Publishing an ImageSuppose you want to publish an image that is stored in the database.
In the ExtraDemo.db database, double-click on the IMAGES root in the Database tab ofthe Publisher main window. Publisher opens a new Data View window displaying the listof images stored in the database.
& To publish the first image in the list:
1) Double click on the first instance in the list.
Publishing an Image
ObjectStore Publisher Tutorial76
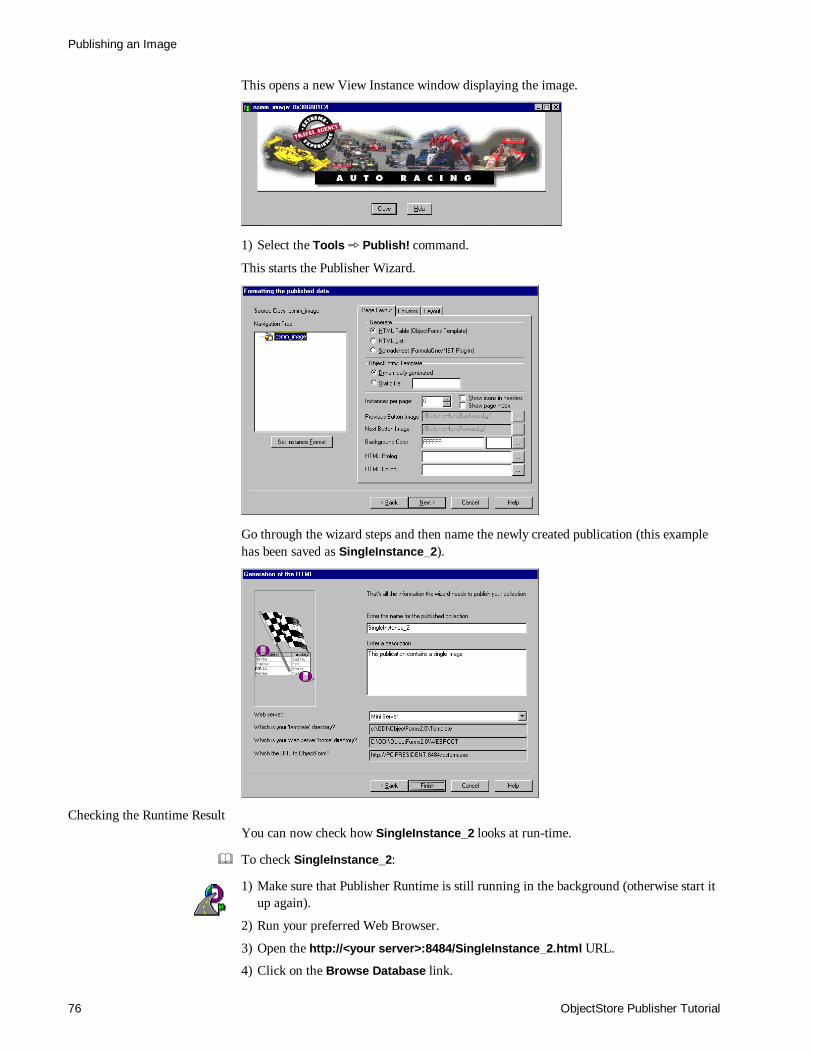
This opens a new View Instance window displaying the image.
1) Select the Tools þ Publish! command.
This starts the Publisher Wizard.
Go through the wizard steps and then name the newly created publication (this examplehas been saved as SingleInstance_2).
Checking the Runtime ResultYou can now check how SingleInstance_2 looks at run-time.
& To check SingleInstance_2:
1) Make sure that Publisher Runtime is still running in the background (otherwise start itup again).
2) Run your preferred Web Browser.
3) Open the http://<your server>:8484/SingleInstance_2.html URL.
4) Click on the Browse Database link.

Publishing a Single Instance
77
The following HTML page appears:
Suppose you want to use this image inside another ObjectForms template. First, getPublisher to create the ObjectForms template that displays the image.
& To make Publisher save the ObjectForms template for a publication:
1) Select the SingleInstance_2 publication in the Publications tab of the Publisher mainwindow.
2) Select the Publications þ Edit command.
3) Go to the ObjectForms Template section in the Page Layout tab of the PublisherWizard, click on the Static File button.
4) Enter a file name for the generated ObjectForms template (for exampleSingleInstance_2).
At the end of the Publishing process, Publisher create this file under the current templatedirectory (for example, c:\ODI\ObjectForms2.0\Template). The default extension forObjectForms templates is .OFT.
Publishing an Image
ObjectStore Publisher Tutorial78
This is the content of SingleInstance_2.oft:
<html><head></head><body bgcolor=#FFFFFF><%osdatabase="C:\ODI\ObjectForms2.0\DemoDBs\ExtraDemo.db"%><%osquery="SingleInstance_2"%><%osreference="{_ivitos_sameDB?|?14?452}"%><%card="-1"%><%class="osmm_image"%><%discr="1"%><%paramlist=""%><%QUERY NAME="query1" OSFUNCTION="osiquery"%><%if query1.Status EQ 0%><TABLE BORDER=2 CELLPADDING=0 CELLSPACING=0><%BEGINDETAIL NAME="query1"%>
<TR><TD><IMG ALIGN=TOP
SRC="<%SERVER_URL%><%SCRIPT_NAME%>/osiWeb?osdatabase=<%osdatabase%>&osreference=<%osreference%>&mmtype=4"></TD>
</TR><%ENDDETAIL%></TABLE><%else%><%query1.ErrorMsg%><p><%endif%></body></html>
This file uses the ObjectForms extended tag <% %> to insert the ObjectForms specificinstructions in an HTML file. You can either edit this file to add additional HTML codeor include it in another ObjectForms template.
For detailed information about the ObjectForms extended tag syntax see the ObjectFormsonline documentation.
Publishing a Spreadsheet
79
Publishing a Spreadsheet
In this tutorial you learn how to publish a collection of instances as a live spreadsheet.This will allow you to create an HTML page with a spreadsheet containing ObjectStoredata. In order to use this feature, you have to install the Formula Net plug-in from VisualComponent into your Web browser.
Database: CarsDemo.db
Publishing a Collection of ObjectsTo start this tutorial open the CarsDemo.db database.
& To open the CarsDemo.db database:
1) Run Publisher.
2) Select the File þ Open Database... command.
3) Select the CarsDemo.db file under the <ObjectForms root>\demodbs directory.
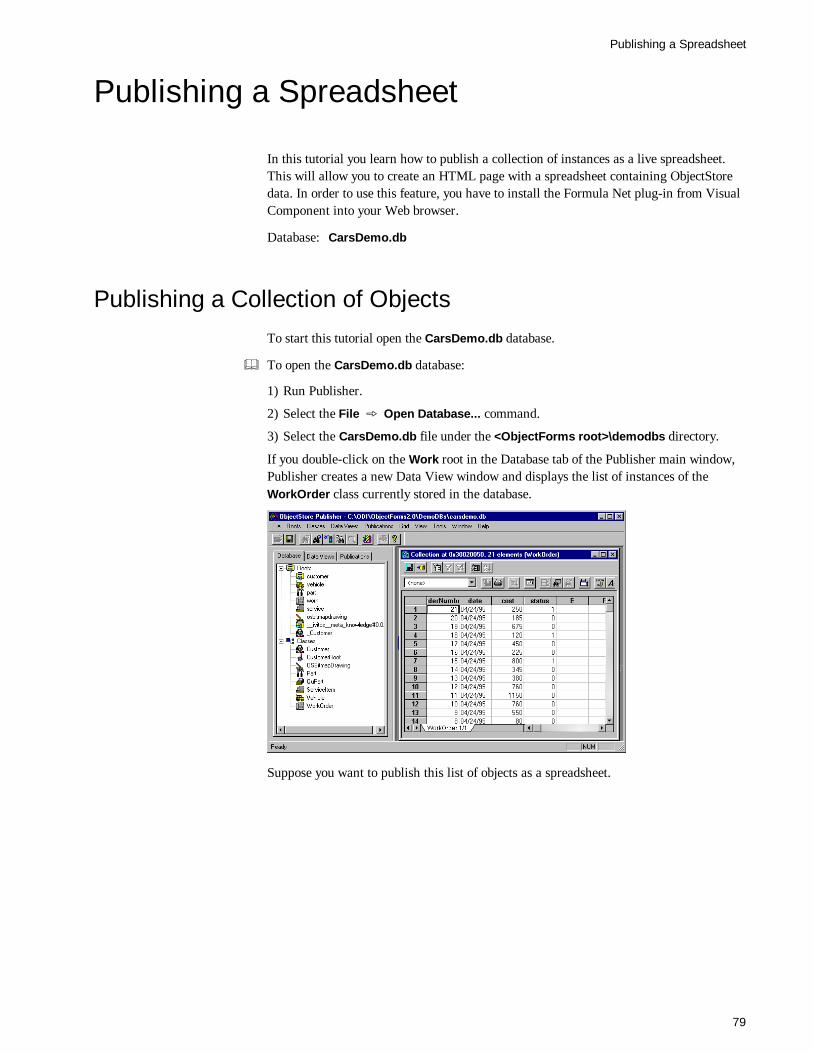
If you double-click on the Work root in the Database tab of the Publisher main window,Publisher creates a new Data View window and displays the list of instances of theWorkOrder class currently stored in the database.
Suppose you want to publish this list of objects as a spreadsheet.
Publishing a Collection of Objects
ObjectStore Publisher Tutorial80
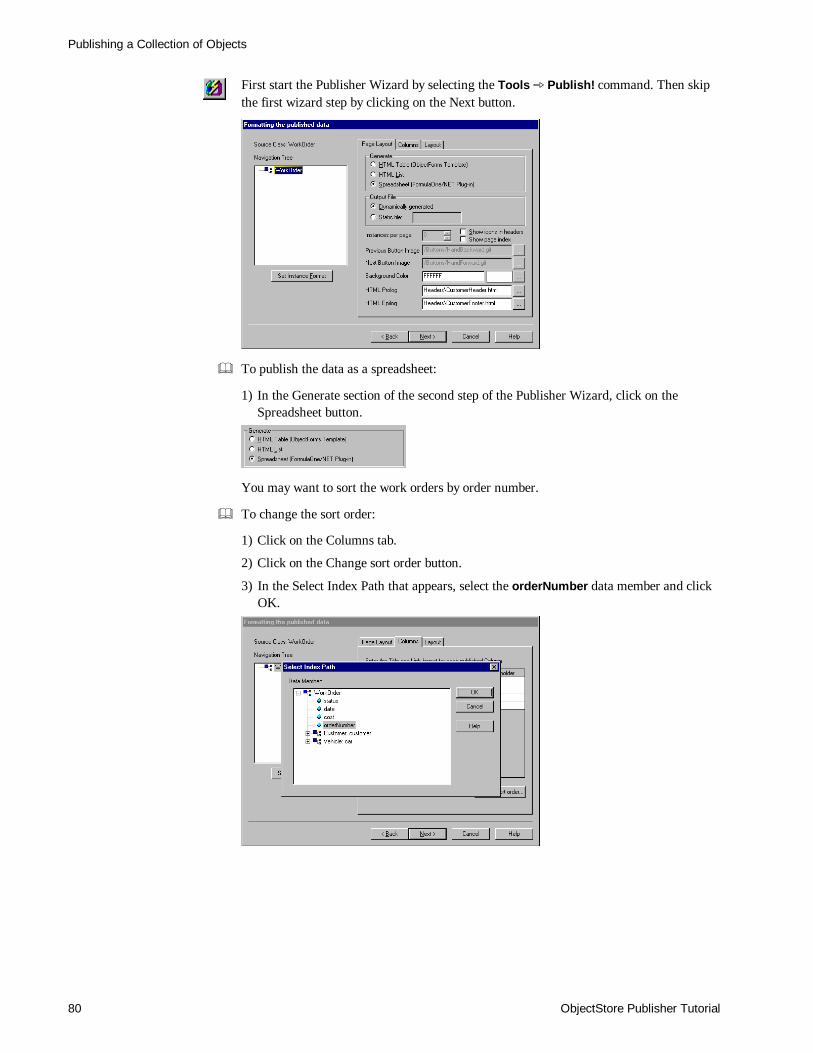
First start the Publisher Wizard by selecting the Tools þ Publish! command. Then skipthe first wizard step by clicking on the Next button.
& To publish the data as a spreadsheet:
1) In the Generate section of the second step of the Publisher Wizard, click on theSpreadsheet button.
You may want to sort the work orders by order number.
& To change the sort order:
1) Click on the Columns tab.
2) Click on the Change sort order button.
3) In the Select Index Path that appears, select the orderNumber data member and clickOK.
Publishing a Spreadsheet
81
Now click on the Next button and enter a name for the newly created publication (thisexample has been saved as SpreadSheet_1).
Checking the Runtime ResultBefore you can check how the SpreadSheet_1 publication looks at run-time, you have toinstall the Formula One Net plug-in from Visual Component into your Web browser.
& To install the Formula One Net plug in Netscape Navigator or Internet Explorer:
1) Connect to the Visual Component Web site (http://www.visualcomp.com).
2) Download the latest version of the Formula One Net plug-in
3) Close you Web browser.
4) Run the Formula One Net setup program.
Once you have successfully installed the Formula One Net plug-in, you can go on withthis tutorial.
& To check SpreadSheet_1:
1) Make sure that Publisher Runtime is still running in the background (otherwise start itup again).
2) Run your preferred Web Browser.
3) Open the http://<your server>:8484/ SpreadSheet_1.html URL.
4) Click on the Browse database link.
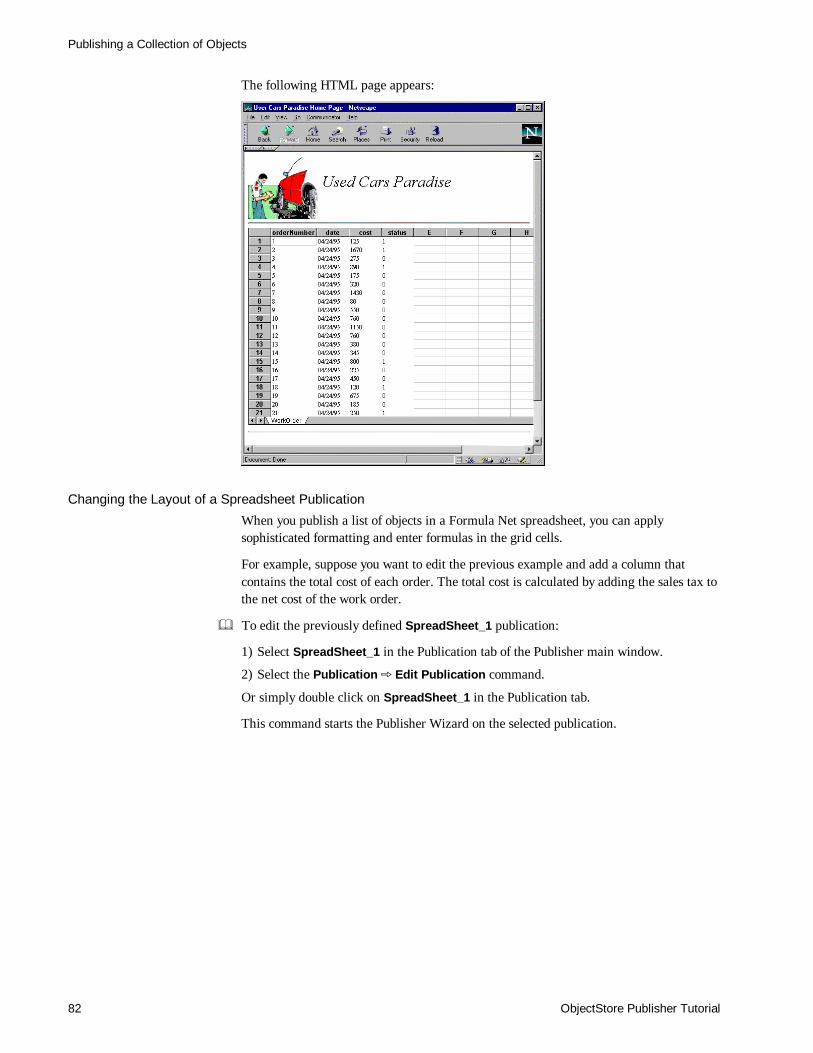
Publishing a Collection of Objects
ObjectStore Publisher Tutorial82
The following HTML page appears:
Changing the Layout of a Spreadsheet PublicationWhen you publish a list of objects in a Formula Net spreadsheet, you can applysophisticated formatting and enter formulas in the grid cells.
For example, suppose you want to edit the previous example and add a column thatcontains the total cost of each order. The total cost is calculated by adding the sales tax tothe net cost of the work order.
& To edit the previously defined SpreadSheet_1 publication:
1) Select SpreadSheet_1 in the Publication tab of the Publisher main window.
2) Select the Publication þ Edit Publication command.
Or simply double click on SpreadSheet_1 in the Publication tab.
This command starts the Publisher Wizard on the selected publication.
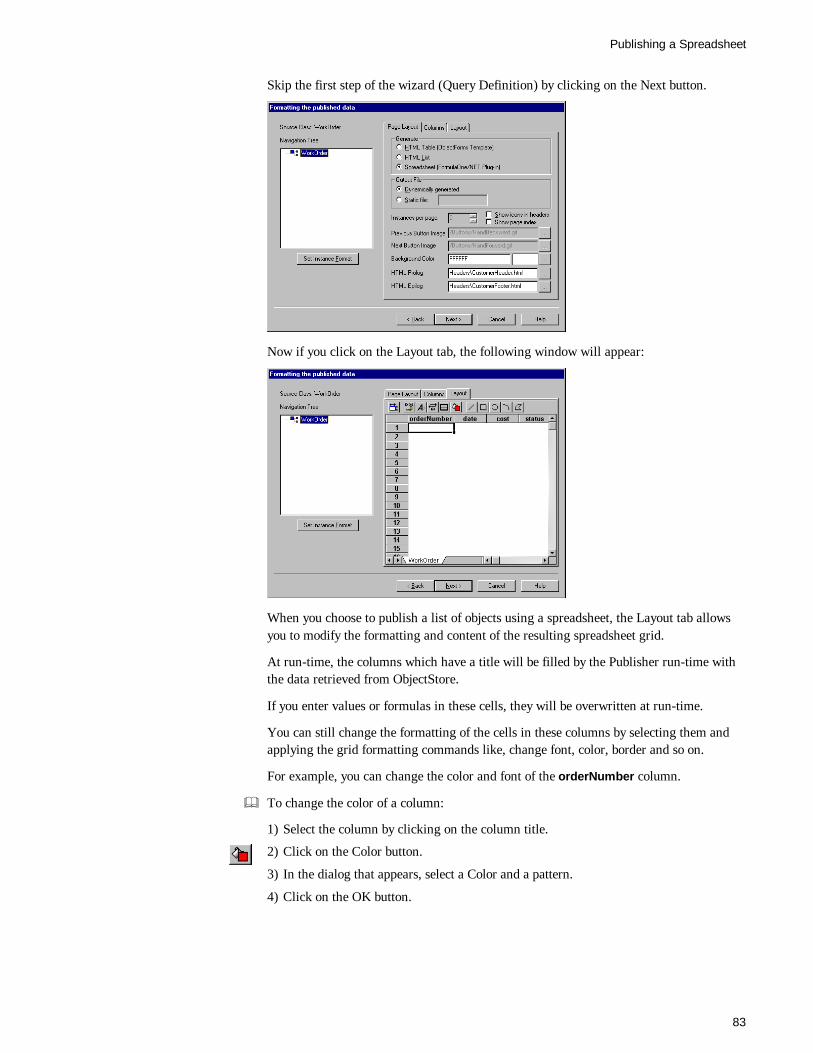
Publishing a Spreadsheet
83
Skip the first step of the wizard (Query Definition) by clicking on the Next button.
Now if you click on the Layout tab, the following window will appear:
When you choose to publish a list of objects using a spreadsheet, the Layout tab allowsyou to modify the formatting and content of the resulting spreadsheet grid.
At run-time, the columns which have a title will be filled by the Publisher run-time withthe data retrieved from ObjectStore.
If you enter values or formulas in these cells, they will be overwritten at run-time.
You can still change the formatting of the cells in these columns by selecting them andapplying the grid formatting commands like, change font, color, border and so on.
For example, you can change the color and font of the orderNumber column.
& To change the color of a column:
1) Select the column by clicking on the column title.
2) Click on the Color button.
3) In the dialog that appears, select a Color and a pattern.
4) Click on the OK button.
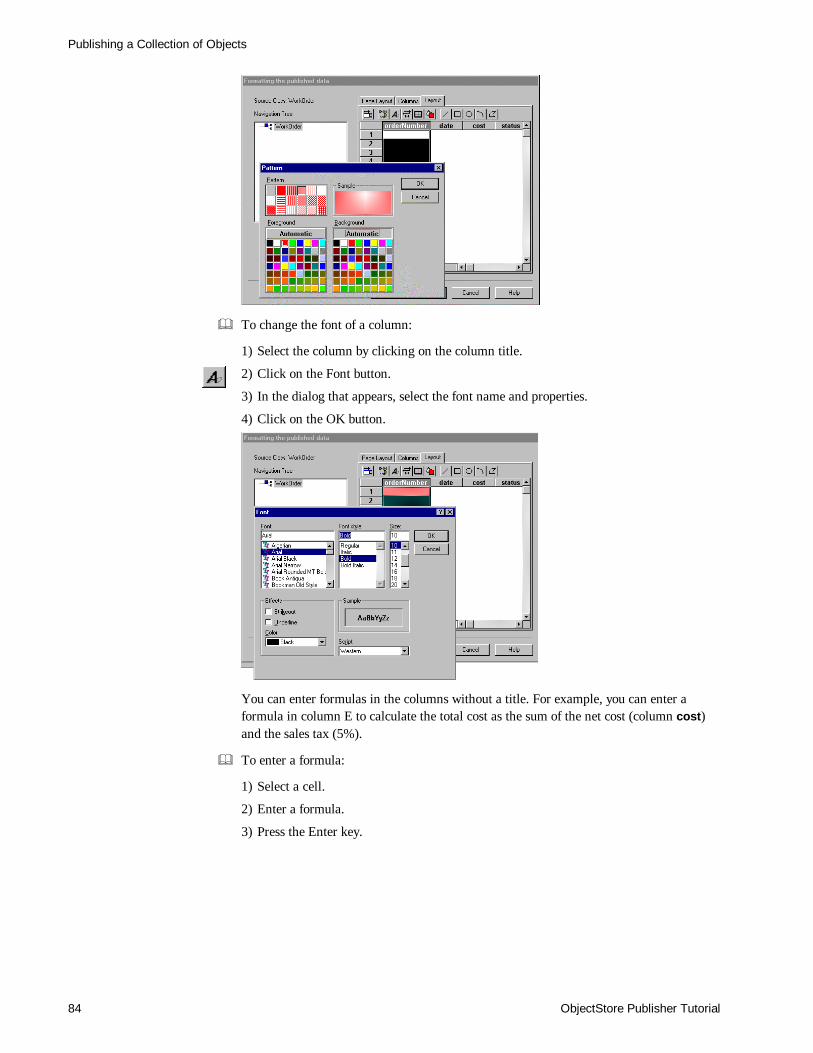
Publishing a Collection of Objects
ObjectStore Publisher Tutorial84
& To change the font of a column:
1) Select the column by clicking on the column title.
2) Click on the Font button.
3) In the dialog that appears, select the font name and properties.
4) Click on the OK button.
You can enter formulas in the columns without a title. For example, you can enter aformula in column E to calculate the total cost as the sum of the net cost (column cost)and the sales tax (5%).
& To enter a formula:
1) Select a cell.
2) Enter a formula.
3) Press the Enter key.

Publishing a Spreadsheet
85
The mechanism is similar to the one used in any common spreadsheets like MicrosoftExcel. Most of the functions available in Microsoft Excel can also be performed using thePublisher Spreadsheet.
& To copy the formula into another cells in the same column:
1) Select the cell containing the formula.
2) Click on the black square close to the bottom-right corner of the cell.
3) Drag it to the desired cell.
The result of the formula is 0 because at authoring time the spreadsheet does not containany data.
You can also enter a title for the new column.
& To change the title of a column:
1) Double click on the column header.
2) Enter the column title.
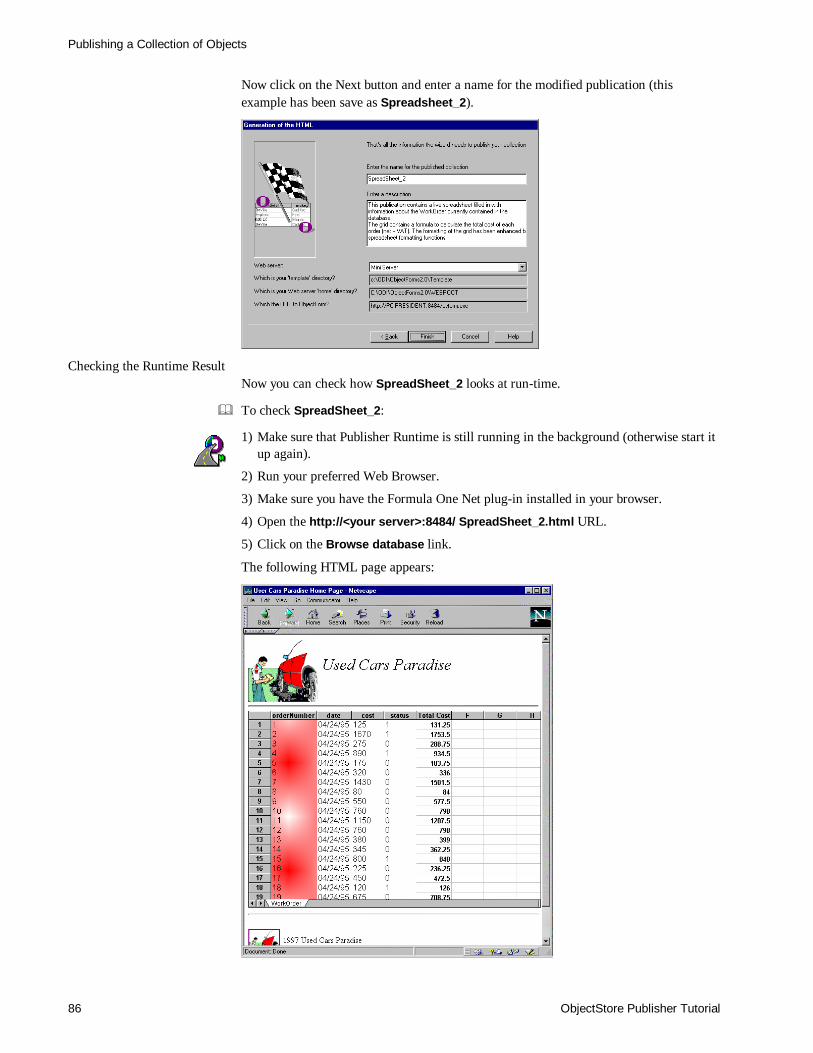
Publishing a Collection of Objects
ObjectStore Publisher Tutorial86
Now click on the Next button and enter a name for the modified publication (thisexample has been save as Spreadsheet_2).
Checking the Runtime ResultNow you can check how SpreadSheet_2 looks at run-time.
& To check SpreadSheet_2:
1) Make sure that Publisher Runtime is still running in the background (otherwise start itup again).
2) Run your preferred Web Browser.
3) Make sure you have the Formula One Net plug-in installed in your browser.
4) Open the http://<your server>:8484/ SpreadSheet_2.html URL.
5) Click on the Browse database link.
The following HTML page appears:
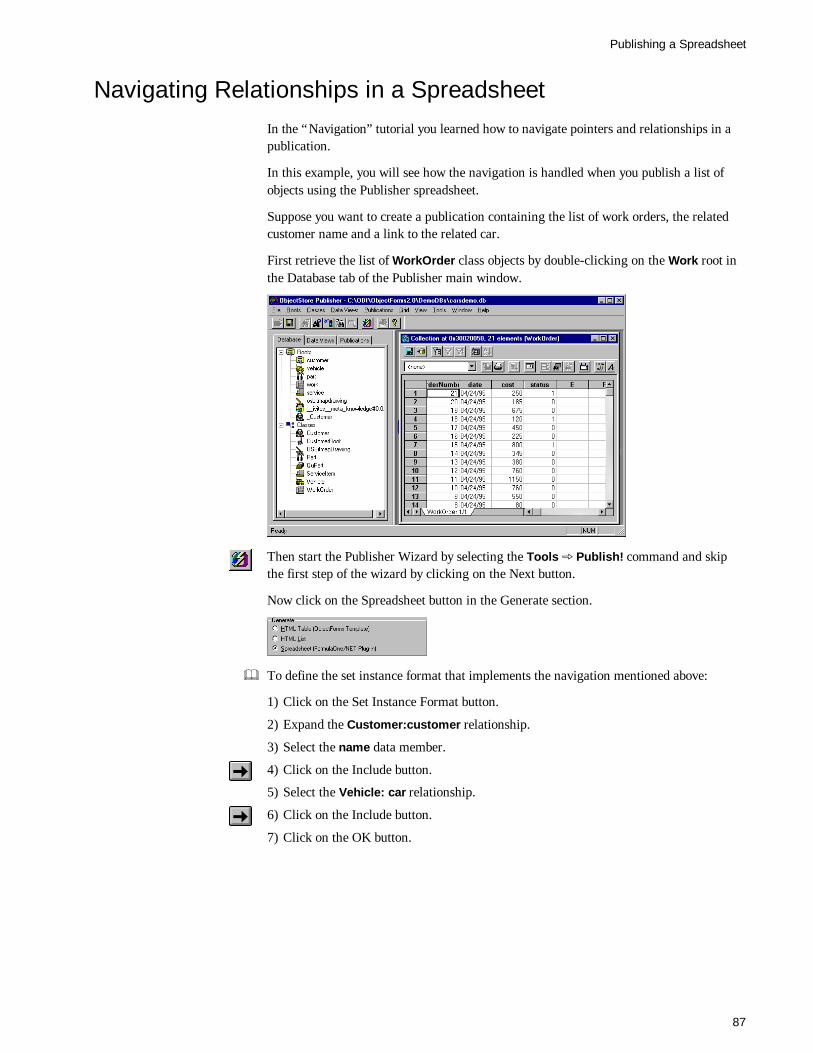
Publishing a Spreadsheet
87
Navigating Relationships in a SpreadsheetIn the “Navigation” tutorial you learned how to navigate pointers and relationships in apublication.
In this example, you will see how the navigation is handled when you publish a list ofobjects using the Publisher spreadsheet.
Suppose you want to create a publication containing the list of work orders, the relatedcustomer name and a link to the related car.
First retrieve the list of WorkOrder class objects by double-clicking on the Work root inthe Database tab of the Publisher main window.
Then start the Publisher Wizard by selecting the Tools þ Publish! command and skipthe first step of the wizard by clicking on the Next button.
Now click on the Spreadsheet button in the Generate section.
& To define the set instance format that implements the navigation mentioned above:
1) Click on the Set Instance Format button.
2) Expand the Customer:customer relationship.
3) Select the name data member.
4) Click on the Include button.
5) Select the Vehicle: car relationship.
6) Click on the Include button.
7) Click on the OK button.
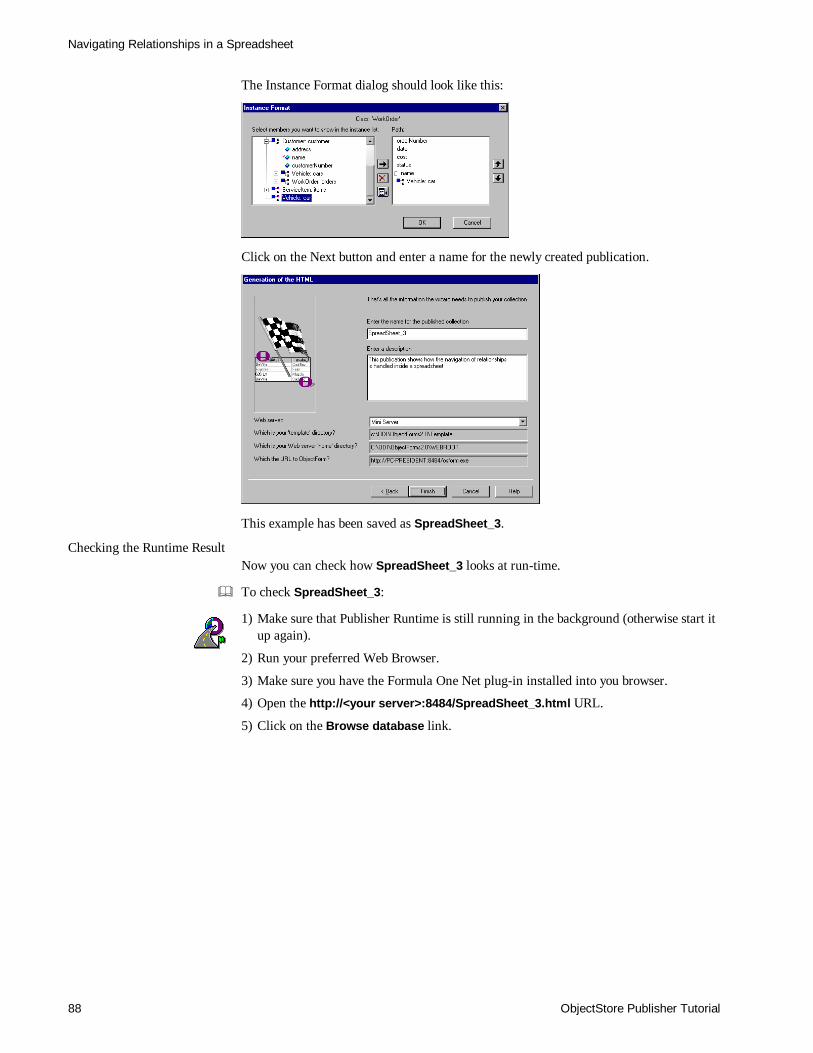
Navigating Relationships in a Spreadsheet
ObjectStore Publisher Tutorial88
The Instance Format dialog should look like this:
Click on the Next button and enter a name for the newly created publication.
This example has been saved as SpreadSheet_3.
Checking the Runtime ResultNow you can check how SpreadSheet_3 looks at run-time.
& To check SpreadSheet_3:
1) Make sure that Publisher Runtime is still running in the background (otherwise start itup again).
2) Run your preferred Web Browser.
3) Make sure you have the Formula One Net plug-in installed into you browser.
4) Open the http://<your server>:8484/SpreadSheet_3.html URL.
5) Click on the Browse database link.
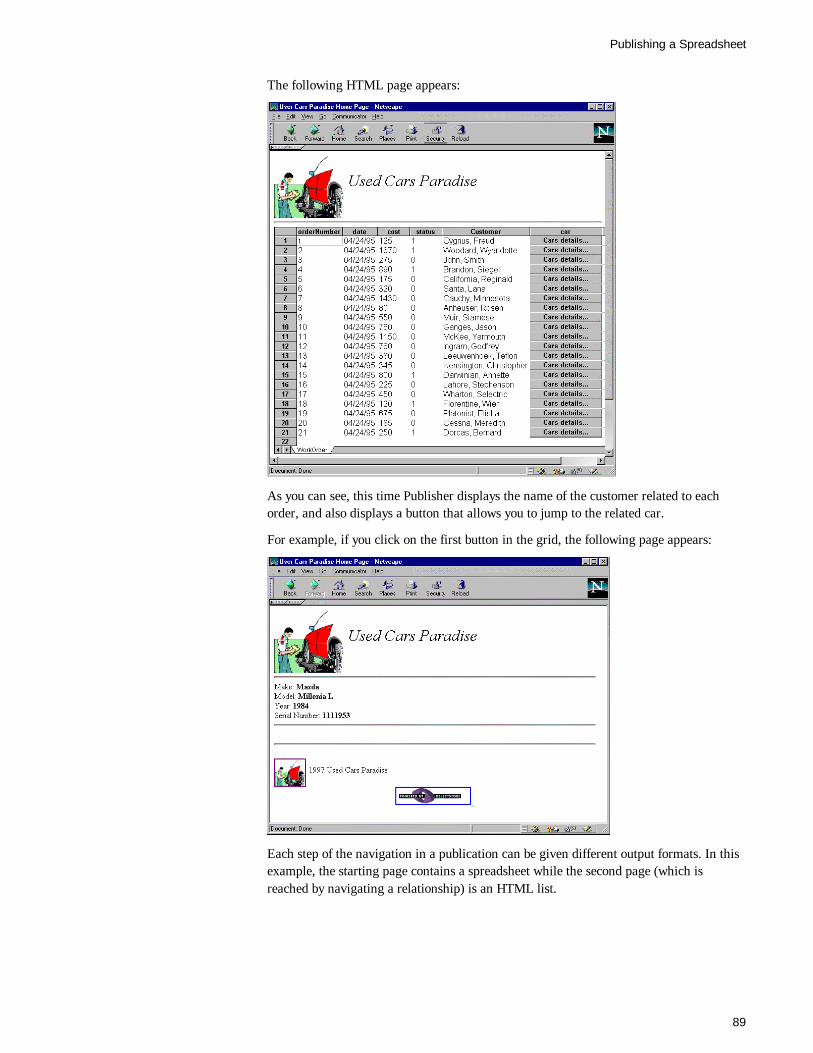
Publishing a Spreadsheet
89
The following HTML page appears:
As you can see, this time Publisher displays the name of the customer related to eachorder, and also displays a button that allows you to jump to the related car.
For example, if you click on the first button in the grid, the following page appears:
Each step of the navigation in a publication can be given different output formats. In thisexample, the starting page contains a spreadsheet while the second page (which isreached by navigating a relationship) is an HTML list.
Creating User-Defined ObjectForms Call-back Functions
ObjectStore Publisher Tutorial90
Integrating Publisher with User Defined Call-back Functions
Publisher Runtime provides a number of read-only services you can use to access anObjectStore database from the Web. If you need to update the database content bycreating new instances or modifying existing ones, you have to write your own piece ofcode.
In this tutorial you learn how to build a Web application by integrating the PublisherRuntime service with your own call-back functions.
Database: empretr.db
This tutorial applies to Windows NT only.
Creating User-Defined ObjectForms Call-back FunctionsTo start this tutorial open the empretr.db database.
& To open the empretr.db database:
1) Run Publisher.
2) Select the File þ Open Database... command.
3) Select the CarsDemo.db file that is under the <ObjectForms root>\demodbsdirectory.
The schema of the empretr.db database is very simple.
The part class has a pointer to the employee class.
Suppose you want to create a page with a table displaying the list of parts, together withthe name of the engineer responsible.
& To retrieve the list of the part class instances currently stored in the database:
1) Select the part_root root in the Database tab of the Publisher main window.
2) Select the Roots þ Show Root Data command.
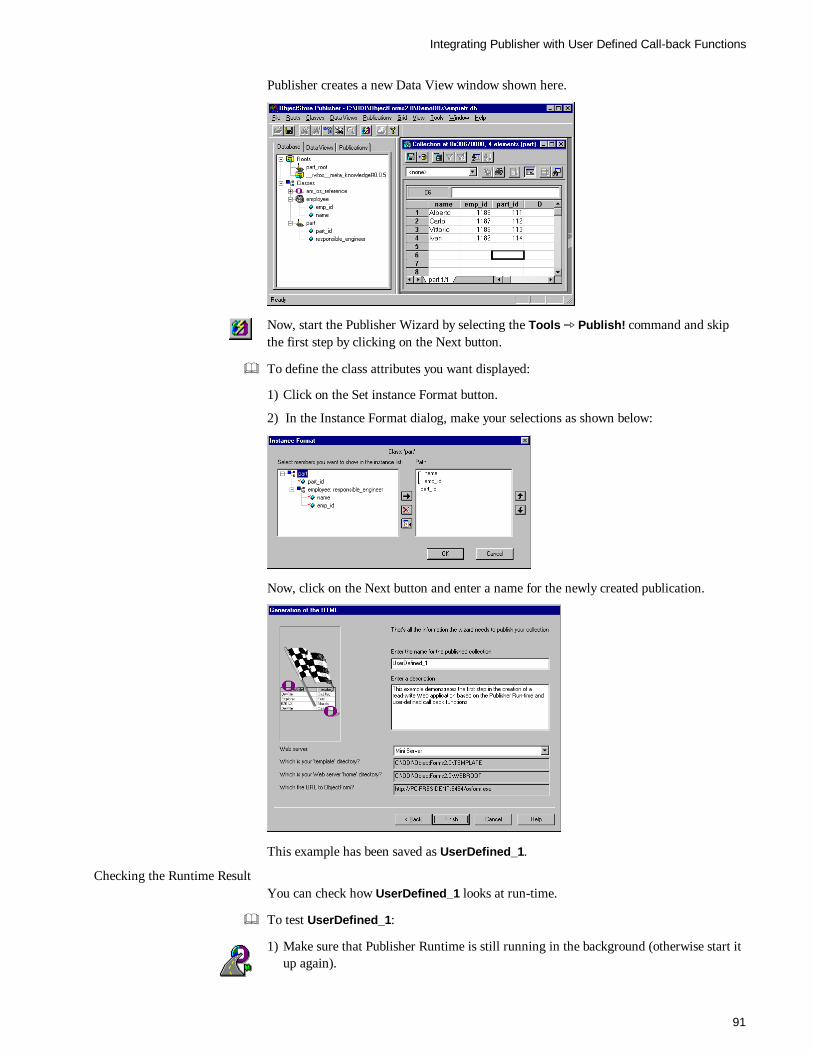
Integrating Publisher with User Defined Call-back Functions
91
Publisher creates a new Data View window shown here.
Now, start the Publisher Wizard by selecting the Tools þ Publish! command and skipthe first step by clicking on the Next button.
& To define the class attributes you want displayed:
1) Click on the Set instance Format button.
2) In the Instance Format dialog, make your selections as shown below:
Now, click on the Next button and enter a name for the newly created publication.
This example has been saved as UserDefined_1.
Checking the Runtime ResultYou can check how UserDefined_1 looks at run-time.
& To test UserDefined_1:
1) Make sure that Publisher Runtime is still running in the background (otherwise start itup again).
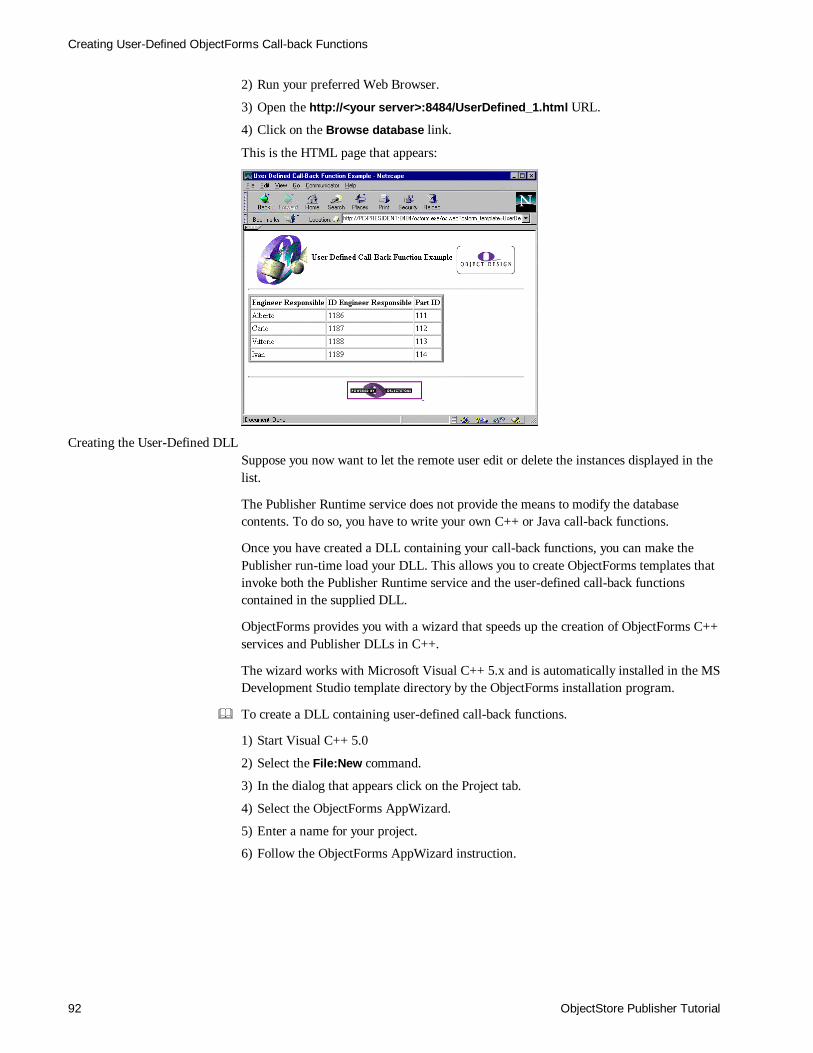
Creating User-Defined ObjectForms Call-back Functions
ObjectStore Publisher Tutorial92
2) Run your preferred Web Browser.
3) Open the http://<your server>:8484/UserDefined_1.html URL.
4) Click on the Browse database link.
This is the HTML page that appears:
Creating the User-Defined DLLSuppose you now want to let the remote user edit or delete the instances displayed in thelist.
The Publisher Runtime service does not provide the means to modify the databasecontents. To do so, you have to write your own C++ or Java call-back functions.
Once you have created a DLL containing your call-back functions, you can make thePublisher run-time load your DLL. This allows you to create ObjectForms templates thatinvoke both the Publisher Runtime service and the user-defined call-back functionscontained in the supplied DLL.
ObjectForms provides you with a wizard that speeds up the creation of ObjectForms C++services and Publisher DLLs in C++.
The wizard works with Microsoft Visual C++ 5.x and is automatically installed in the MSDevelopment Studio template directory by the ObjectForms installation program.
& To create a DLL containing user-defined call-back functions.
1) Start Visual C++ 5.0
2) Select the File:New command.
3) In the dialog that appears click on the Project tab.
4) Select the ObjectForms AppWizard.
5) Enter a name for your project.
6) Follow the ObjectForms AppWizard instruction.
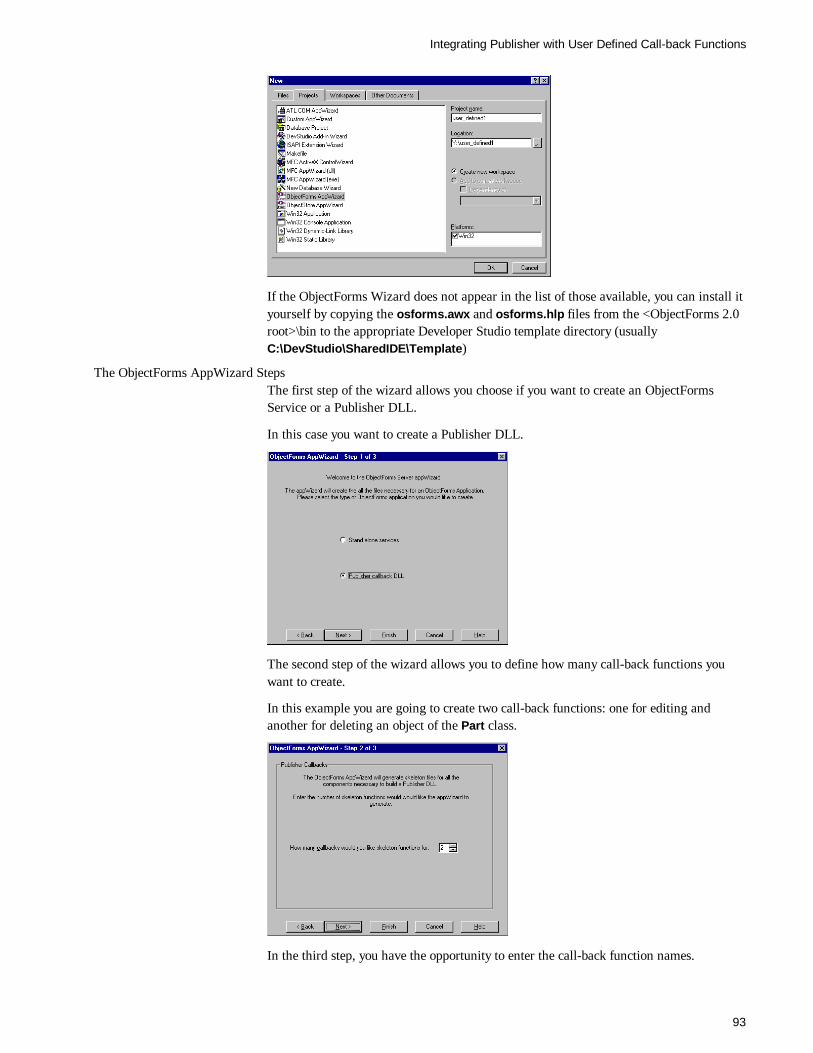
Integrating Publisher with User Defined Call-back Functions
93
If the ObjectForms Wizard does not appear in the list of those available, you can install ityourself by copying the osforms.awx and osforms.hlp files from the <ObjectForms 2.0root>\bin to the appropriate Developer Studio template directory (usuallyC:\DevStudio\SharedIDE\Template)
The ObjectForms AppWizard StepsThe first step of the wizard allows you choose if you want to create an ObjectFormsService or a Publisher DLL.
In this case you want to create a Publisher DLL.
The second step of the wizard allows you to define how many call-back functions youwant to create.
In this example you are going to create two call-back functions: one for editing andanother for deleting an object of the Part class.
In the third step, you have the opportunity to enter the call-back function names.

Creating User-Defined ObjectForms Call-back Functions
ObjectStore Publisher Tutorial94
& To change the name of a call-back function:
1) Select the function for the Callback name drop-down list.
2) Click on the Edit Callback button.
When you click on the Edit Callback button the following dialog appears:
This allows you to enter the name of the Callback Name, that is the name you will useinside the ObjectForms HTML templates, and Function Name, that is the name of theC++ function.
At the end of this process the wizard displays a summary of the information collected inthe previous steps.
When you click OK, the wizard generates all the files needed to create your DLL project.
Now you can go on writing the C++ code that implements your callback functions.
ObjectStore SchemaThe DLL you are defining will access persistent objects in an ObjectStore database,therefore you have to link the appropriate schema to the DLL.
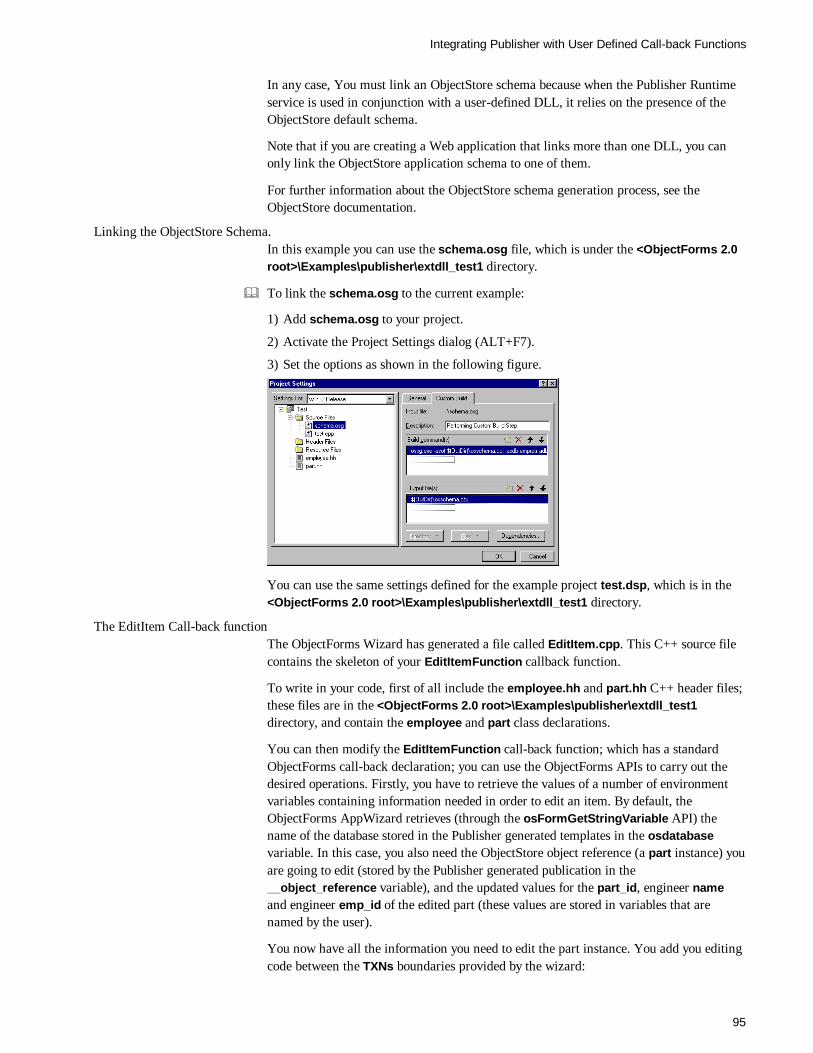
Integrating Publisher with User Defined Call-back Functions
95
In any case, You must link an ObjectStore schema because when the Publisher Runtimeservice is used in conjunction with a user-defined DLL, it relies on the presence of theObjectStore default schema.
Note that if you are creating a Web application that links more than one DLL, you canonly link the ObjectStore application schema to one of them.
For further information about the ObjectStore schema generation process, see theObjectStore documentation.
Linking the ObjectStore Schema.In this example you can use the schema.osg file, which is under the <ObjectForms 2.0root>\Examples\publisher\extdll_test1 directory.
& To link the schema.osg to the current example:
1) Add schema.osg to your project.
2) Activate the Project Settings dialog (ALT+F7).
3) Set the options as shown in the following figure.
You can use the same settings defined for the example project test.dsp, which is in the<ObjectForms 2.0 root>\Examples\publisher\extdll_test1 directory.
The EditItem Call-back functionThe ObjectForms Wizard has generated a file called EditItem.cpp. This C++ source filecontains the skeleton of your EditItemFunction callback function.
To write in your code, first of all include the employee.hh and part.hh C++ header files;these files are in the <ObjectForms 2.0 root>\Examples\publisher\extdll_test1directory, and contain the employee and part class declarations.
You can then modify the EditItemFunction call-back function; which has a standardObjectForms call-back declaration; you can use the ObjectForms APIs to carry out thedesired operations. Firstly, you have to retrieve the values of a number of environmentvariables containing information needed in order to edit an item. By default, theObjectForms AppWizard retrieves (through the osFormGetStringVariable API) thename of the database stored in the Publisher generated templates in the osdatabasevariable. In this case, you also need the ObjectStore object reference (a part instance) youare going to edit (stored by the Publisher generated publication in the__object_reference variable), and the updated values for the part_id, engineer nameand engineer emp_id of the edited part (these values are stored in variables that arenamed by the user).
You now have all the information you need to edit the part instance. You add you editingcode between the TXNs boundaries provided by the wizard:
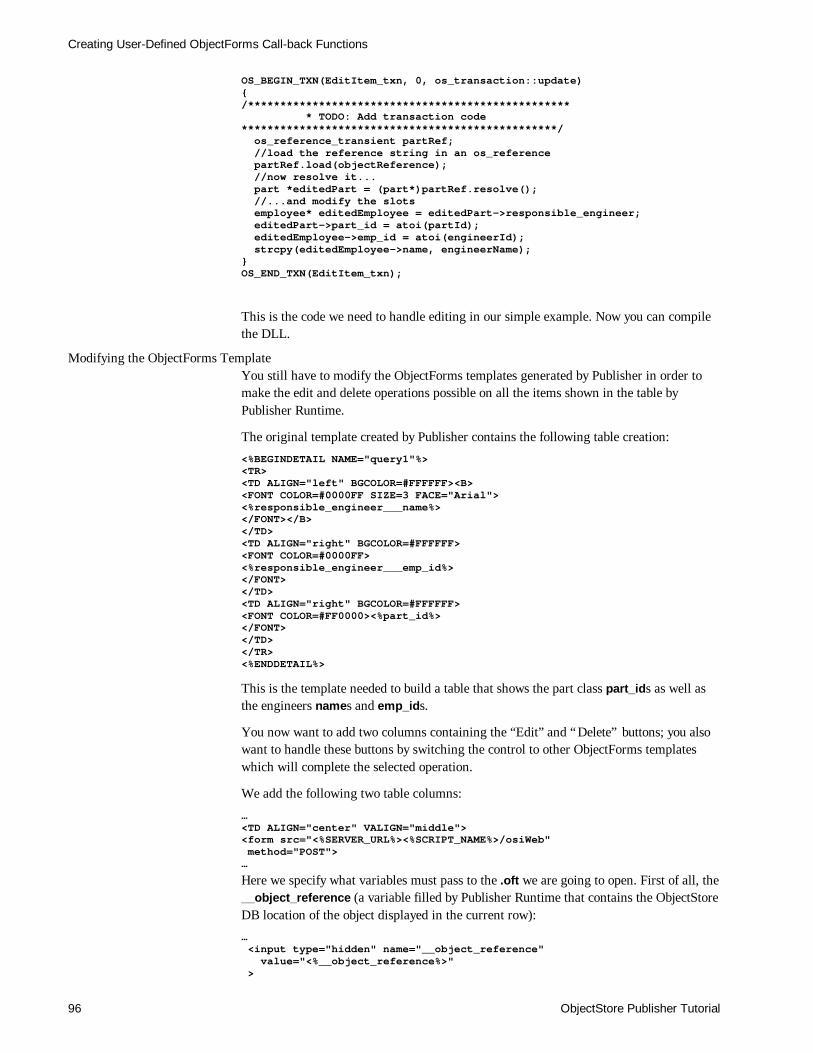
Creating User-Defined ObjectForms Call-back Functions
ObjectStore Publisher Tutorial96
OS_BEGIN_TXN(EditItem_txn, 0, os_transaction::update){/************************************************** * TODO: Add transaction code*************************************************/ os_reference_transient partRef; //load the reference string in an os_reference partRef.load(objectReference); //now resolve it... part *editedPart = (part*)partRef.resolve(); //...and modify the slots employee* editedEmployee = editedPart->responsible_engineer; editedPart->part_id = atoi(partId); editedEmployee->emp_id = atoi(engineerId); strcpy(editedEmployee->name, engineerName);}OS_END_TXN(EditItem_txn);
This is the code we need to handle editing in our simple example. Now you can compilethe DLL.
Modifying the ObjectForms TemplateYou still have to modify the ObjectForms templates generated by Publisher in order tomake the edit and delete operations possible on all the items shown in the table byPublisher Runtime.
The original template created by Publisher contains the following table creation:
<%BEGINDETAIL NAME="query1"%><TR><TD ALIGN="left" BGCOLOR=#FFFFFF><B><FONT COLOR=#0000FF SIZE=3 FACE="Arial"><%responsible_engineer___name%></FONT></B></TD><TD ALIGN="right" BGCOLOR=#FFFFFF><FONT COLOR=#0000FF><%responsible_engineer___emp_id%></FONT></TD><TD ALIGN="right" BGCOLOR=#FFFFFF><FONT COLOR=#FF0000><%part_id%></FONT></TD></TR><%ENDDETAIL%>
This is the template needed to build a table that shows the part class part_ids as well asthe engineers names and emp_ids.
You now want to add two columns containing the “Edit” and “Delete” buttons; you alsowant to handle these buttons by switching the control to other ObjectForms templateswhich will complete the selected operation.
We add the following two table columns:
…<TD ALIGN="center" VALIGN="middle"><form src="<%SERVER_URL%><%SCRIPT_NAME%>/osiWeb" method="POST">…
Here we specify what variables must pass to the .oft we are going to open. First of all, the__object_reference (a variable filled by Publisher Runtime that contains the ObjectStoreDB location of the object displayed in the current row):… <input type="hidden" name="__object_reference" value="<%__object_reference%>" >
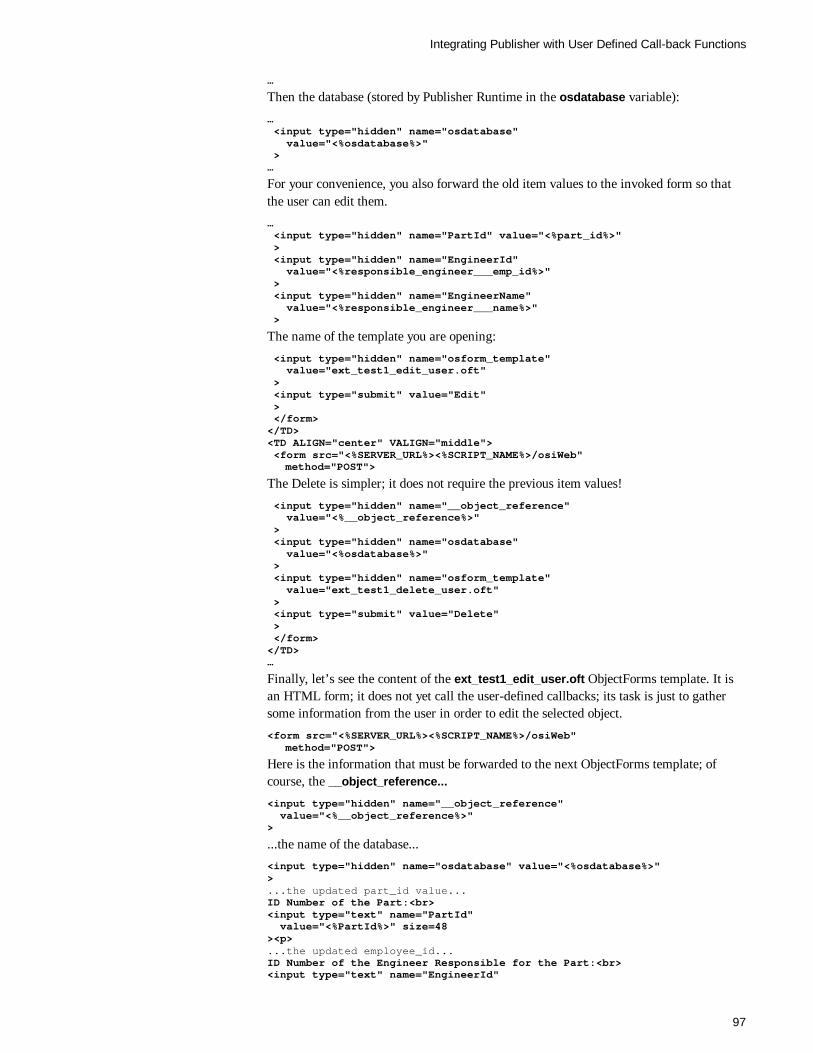
Integrating Publisher with User Defined Call-back Functions
97
…
Then the database (stored by Publisher Runtime in the osdatabase variable):
… <input type="hidden" name="osdatabase" value="<%osdatabase%>" >…
For your convenience, you also forward the old item values to the invoked form so thatthe user can edit them.… <input type="hidden" name="PartId" value="<%part_id%>" > <input type="hidden" name="EngineerId" value="<%responsible_engineer___emp_id%>" > <input type="hidden" name="EngineerName" value="<%responsible_engineer___name%>" >
The name of the template you are opening:
<input type="hidden" name="osform_template" value="ext_test1_edit_user.oft" > <input type="submit" value="Edit" > </form></TD><TD ALIGN="center" VALIGN="middle"> <form src="<%SERVER_URL%><%SCRIPT_NAME%>/osiWeb"
method="POST">
The Delete is simpler; it does not require the previous item values!
<input type="hidden" name="__object_reference" value="<%__object_reference%>" > <input type="hidden" name="osdatabase" value="<%osdatabase%>" > <input type="hidden" name="osform_template" value="ext_test1_delete_user.oft" > <input type="submit" value="Delete" > </form></TD>…
Finally, let’s see the content of the ext_test1_edit_user.oft ObjectForms template. It isan HTML form; it does not yet call the user-defined callbacks; its task is just to gathersome information from the user in order to edit the selected object.
<form src="<%SERVER_URL%><%SCRIPT_NAME%>/osiWeb"method="POST">
Here is the information that must be forwarded to the next ObjectForms template; ofcourse, the __object_reference...
<input type="hidden" name="__object_reference" value="<%__object_reference%>">
...the name of the database...<input type="hidden" name="osdatabase" value="<%osdatabase%>">...the updated part_id value...ID Number of the Part:<br><input type="text" name="PartId" value="<%PartId%>" size=48><p>...the updated employee_id...ID Number of the Engineer Responsible for the Part:<br><input type="text" name="EngineerId"
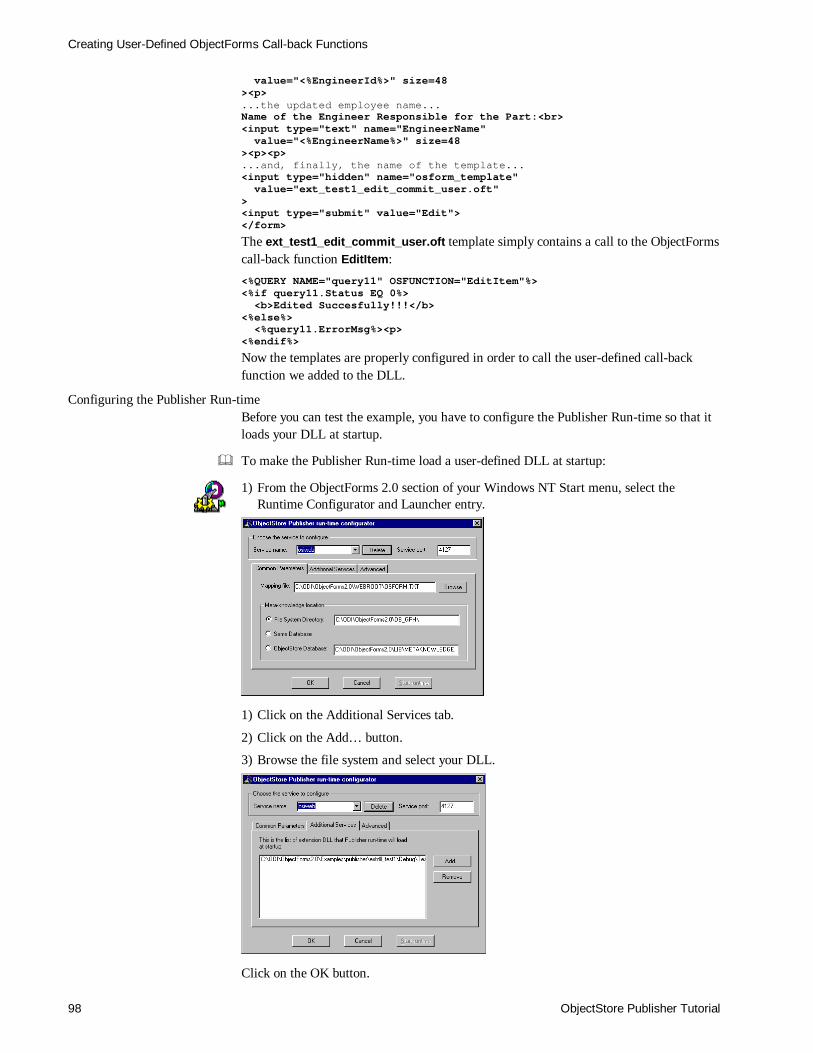
Creating User-Defined ObjectForms Call-back Functions
ObjectStore Publisher Tutorial98
value="<%EngineerId%>" size=48><p>...the updated employee name...Name of the Engineer Responsible for the Part:<br><input type="text" name="EngineerName" value="<%EngineerName%>" size=48><p><p>...and, finally, the name of the template...<input type="hidden" name="osform_template" value="ext_test1_edit_commit_user.oft"><input type="submit" value="Edit"></form>
The ext_test1_edit_commit_user.oft template simply contains a call to the ObjectFormscall-back function EditItem:<%QUERY NAME="query11" OSFUNCTION="EditItem"%><%if query11.Status EQ 0%> <b>Edited Succesfully!!!</b><%else%> <%query11.ErrorMsg%><p><%endif%>
Now the templates are properly configured in order to call the user-defined call-backfunction we added to the DLL.
Configuring the Publisher Run-timeBefore you can test the example, you have to configure the Publisher Run-time so that itloads your DLL at startup.
& To make the Publisher Run-time load a user-defined DLL at startup:
1) From the ObjectForms 2.0 section of your Windows NT Start menu, select theRuntime Configurator and Launcher entry.
1) Click on the Additional Services tab.
2) Click on the Add… button.
3) Browse the file system and select your DLL.
Click on the OK button.

Integrating Publisher with User Defined Call-back Functions
99
The next time you run the Publisher Run-time service, your DLL will be loaded and youcan call both Publisher-supplied and your own call-back functions from within the sameObjectForms template.
The Complete example is available under the directory <ObjectForms 2.0root>\Examples\publisher\extdll_text1, and all the modified ObjectForms templates arein the <ObjectForms 2.0 root>\template directory (they are called ext_test1*.oft; thestarting template is ext_test1.oft; to open it, open the ext_test1.html URL located in the<ObjectForms 2.0 root>\WebRoot directory.
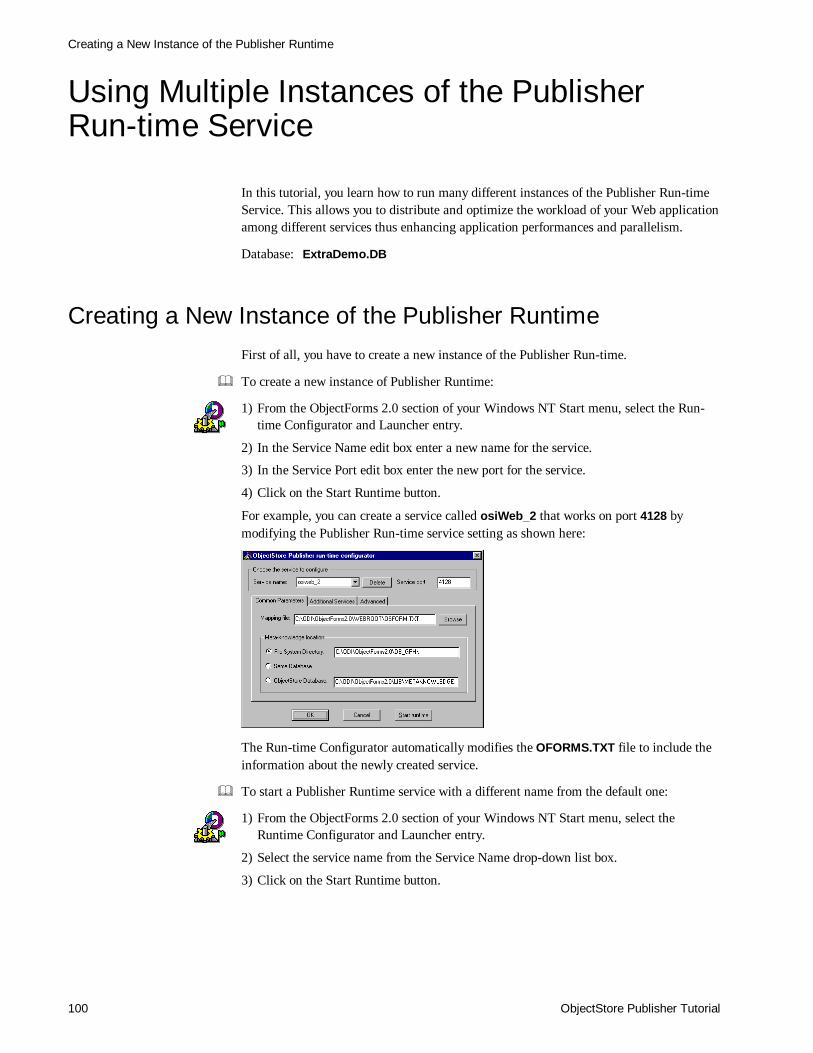
Creating a New Instance of the Publisher Runtime
ObjectStore Publisher Tutorial100
Using Multiple Instances of the PublisherRun-time Service
In this tutorial, you learn how to run many different instances of the Publisher Run-timeService. This allows you to distribute and optimize the workload of your Web applicationamong different services thus enhancing application performances and parallelism.
Database: ExtraDemo.DB
Creating a New Instance of the Publisher RuntimeFirst of all, you have to create a new instance of the Publisher Run-time.
& To create a new instance of Publisher Runtime:
1) From the ObjectForms 2.0 section of your Windows NT Start menu, select the Run-time Configurator and Launcher entry.
2) In the Service Name edit box enter a new name for the service.
3) In the Service Port edit box enter the new port for the service.
4) Click on the Start Runtime button.
For example, you can create a service called osiWeb_2 that works on port 4128 bymodifying the Publisher Run-time service setting as shown here:
The Run-time Configurator automatically modifies the OFORMS.TXT file to include theinformation about the newly created service.
& To start a Publisher Runtime service with a different name from the default one:
1) From the ObjectForms 2.0 section of your Windows NT Start menu, select theRuntime Configurator and Launcher entry.
2) Select the service name from the Service Name drop-down list box.
3) Click on the Start Runtime button.
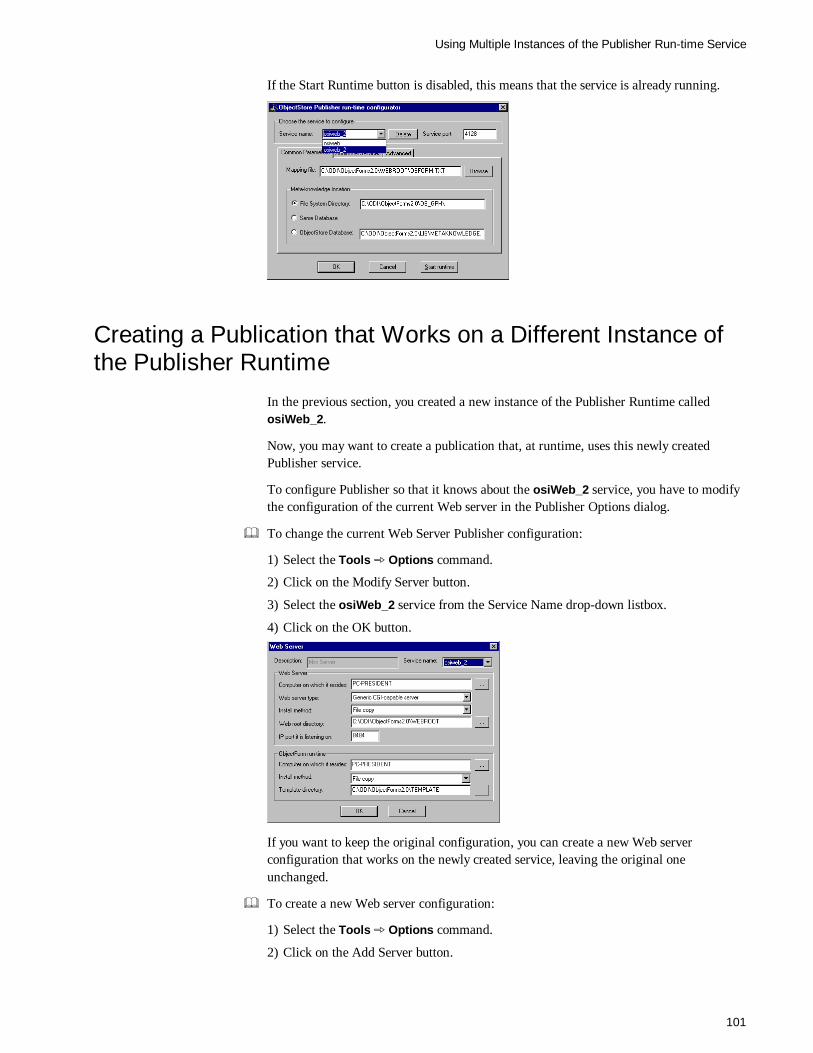
Using Multiple Instances of the Publisher Run-time Service
101
If the Start Runtime button is disabled, this means that the service is already running.
Creating a Publication that Works on a Different Instance ofthe Publisher Runtime
In the previous section, you created a new instance of the Publisher Runtime calledosiWeb_2.
Now, you may want to create a publication that, at runtime, uses this newly createdPublisher service.
To configure Publisher so that it knows about the osiWeb_2 service, you have to modifythe configuration of the current Web server in the Publisher Options dialog.
& To change the current Web Server Publisher configuration:
1) Select the Tools þ Options command.
2) Click on the Modify Server button.
3) Select the osiWeb_2 service from the Service Name drop-down listbox.
4) Click on the OK button.
If you want to keep the original configuration, you can create a new Web serverconfiguration that works on the newly created service, leaving the original oneunchanged.
& To create a new Web server configuration:
1) Select the Tools þ Options command.
2) Click on the Add Server button.
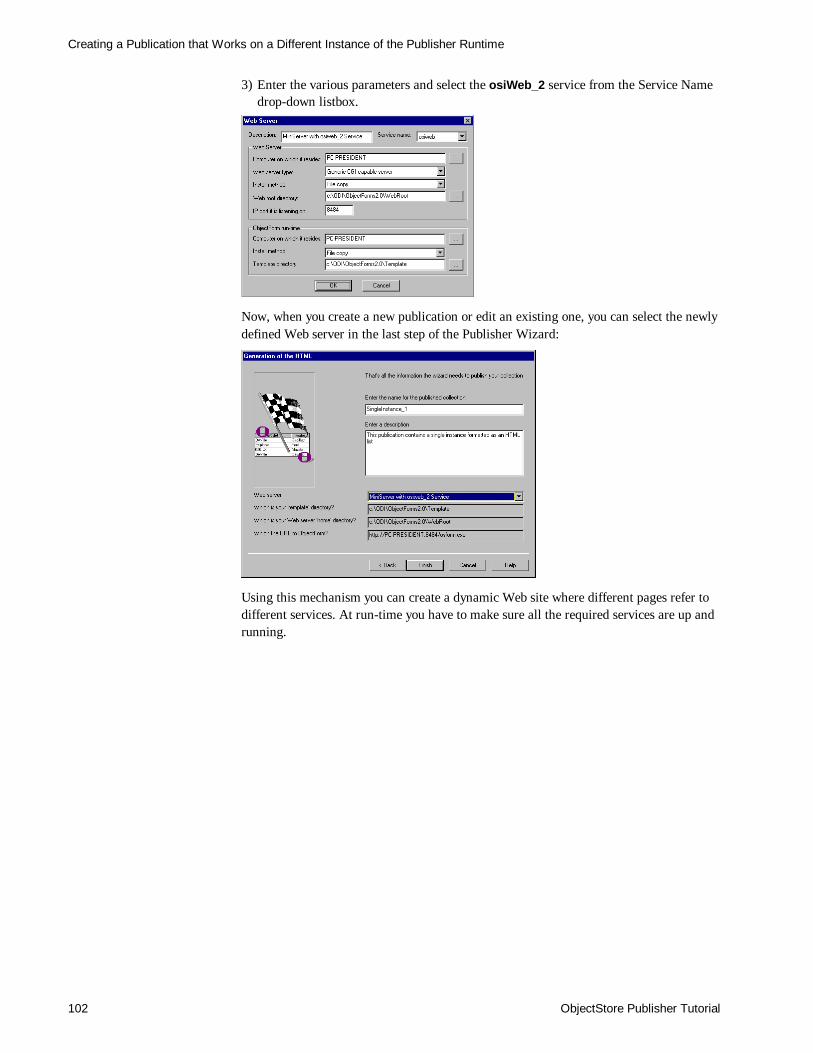
Creating a Publication that Works on a Different Instance of the Publisher Runtime
ObjectStore Publisher Tutorial102
3) Enter the various parameters and select the osiWeb_2 service from the Service Namedrop-down listbox.
Now, when you create a new publication or edit an existing one, you can select the newlydefined Web server in the last step of the Publisher Wizard:
Using this mechanism you can create a dynamic Web site where different pages refer todifferent services. At run-time you have to make sure all the required services are up andrunning.