Embed Size (px)
DESCRIPTION
o2c
Citation preview

Complete Order to cash cycle steps including1. Entering the Sales Order 2. Booking the Sales Order 3. Launch Pick Release 4. Ship Confirm 5. Create Invoice 6. Create the Receipts either manually or using Auto Lockbox ( In this article we will concentrate on Manual creation) 7. Transfer to General Ledger 8. Journal Import 9. Posting
Overview:
The below are the steps in short that we will go through in this article:
Enter the Sales Order Book the Sales Order Launch Pick Release Ship Confirm Create Invoice Create the Receipts either manually or using Auto Lockbox ( In this article we will concentrate on
Manual creation) Transfer to General Ledger Journal Import Posting
Let’s get into the details of each step mentioned above.
Enter the Sales Order:
Navigation: Order Management Super User Operations (USA)>Orders Returns >Sales Orders

Enter the Customer details (Ship to and Bill to address), Order type.
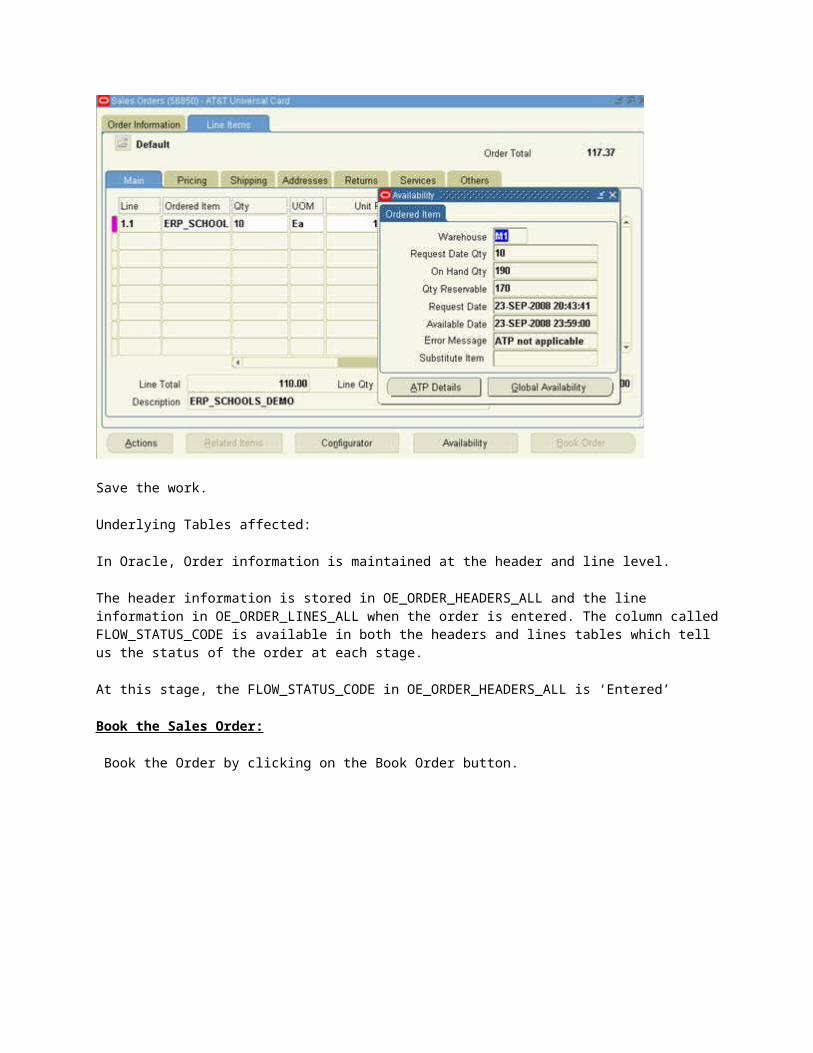
Click on Lines Tab. Enter the Item to be ordered and the quantity required.

Line is scheduled automatically when the Line Item is saved.
Scheduling / unscheduling can be done manually by selecting Schedule/Un schedule from the Actions Menu.
You can check if the item to be ordered is available in the Inventory by clicking on Availability Button.
Save the work.
Underlying Tables affected:
In Oracle, Order information is maintained at the header and line level.
The header information is stored in OE_ORDER_HEADERS_ALL and the line information in OE_ORDER_LINES_ALL when the order is entered. The column called FLOW_STATUS_CODE is available in both the headers and lines tables which tell us the status of the order at each stage.
At this stage, the FLOW_STATUS_CODE in OE_ORDER_HEADERS_ALL is ‘Entered’
Book the Sales Order:
Book the Order by clicking on the Book Order button.
Now that the Order is BOOKED, the status on the header is change accordingly.
Underlying tables affected:

At this stage:
The FLOW_STATUS_CODE in the table OE_ORDER_HEADERS_ALL would be ‘BOOKED’
The FLOW_STATUS_CODE in OE_ORDER_LINES_ALL will be ‘AWAITING_SHIPPING’.
Record(s) will be created in the table WSH_DELIVERY_DETAILS with RELEASED_STATUS=’R’ (Ready to Release)
Also Record(s) will be inserted into WSH_DELIVERY_ASSIGNMENTS.
At the same time DEMAND INTERFACE PROGRAM runs in the background and inserts into MTL_DEMAND
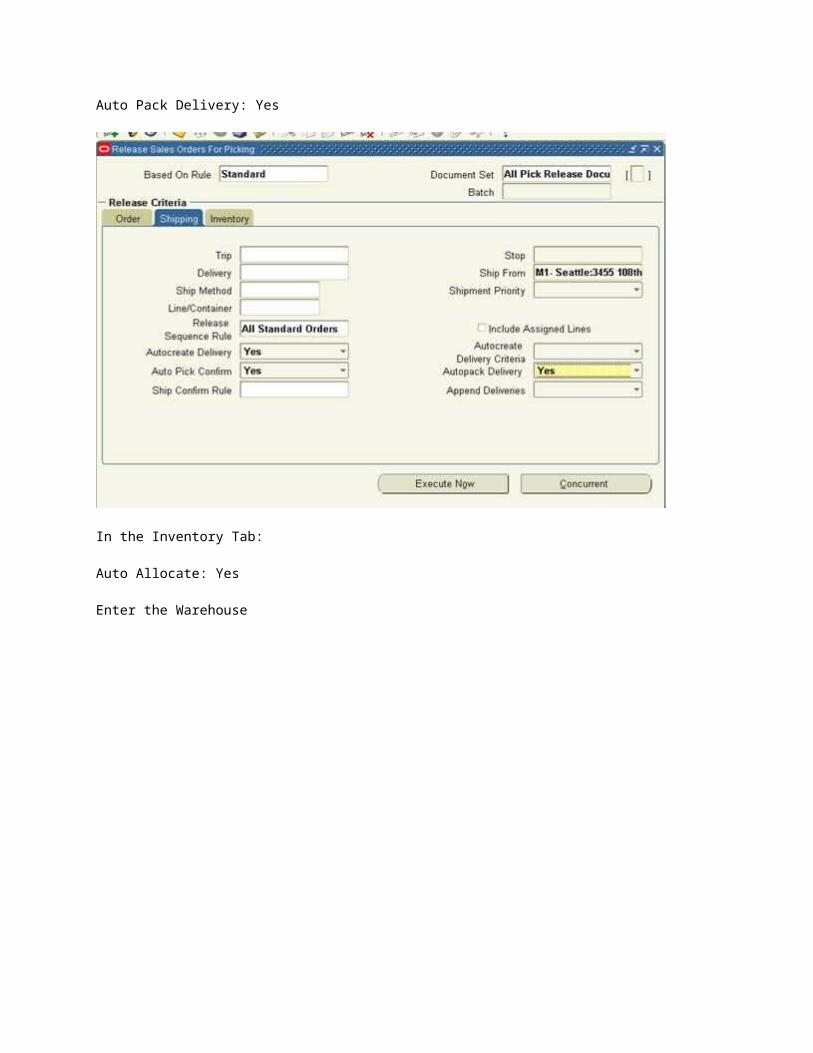
Launch Pick Release:
Navigation: Shipping > Release Sales Order > Release Sales Orders.
Key in Based on Rule and Order Number
In the Shipping Tab key in the below:
Auto Create Delivery: Yes
Auto Pick Confirm: Yes
Auto Pack Delivery: Yes

In the Inventory Tab:
Auto Allocate: Yes
Enter the Warehouse
Click on Execute Now Button.
On successful completion, the below message would pop up as shown below.

Pick Release process in turn will kick off several other requests like Pick Slip Report,
Shipping Exception Report and Auto Pack Report
Underlying Tables affected:
If Autocreate Delivery is set to ‘Yes’ then a new record is created in the table WSH_NEW_DELIVERIES.
DELIVERY_ID is populated in the table WSH_DELIVERY_ASSIGNMENTS.
The RELEASED_STATUS in WSH_DELIVERY_DETAILS would be now set to ‘Y’ (Pick Confirmed) if Auto Pick Confirm is set to Yes otherwise RELEASED_STATUS is ‘S’ (Release to Warehouse).
Pick Confirm the Order:
IF Auto Pick Confirm in the above step is set to NO, then the following should be done.
Navigation: Inventory Super User > Move Order> Transact Move Order
In the HEADER tab, enter the BATCH NUMBER (from the above step) of the order. Click FIND. Click on VIEW/UPDATE Allocation, then Click TRANSACT button. Then Transact button will be deactivated then just close it and go to next step.
Ship Confirm the Order:
Navigation: Order Management Super User>Shipping >Transactions.
Query with the Order Number.

Click On Delivery Tab
Click on Ship Confirm.
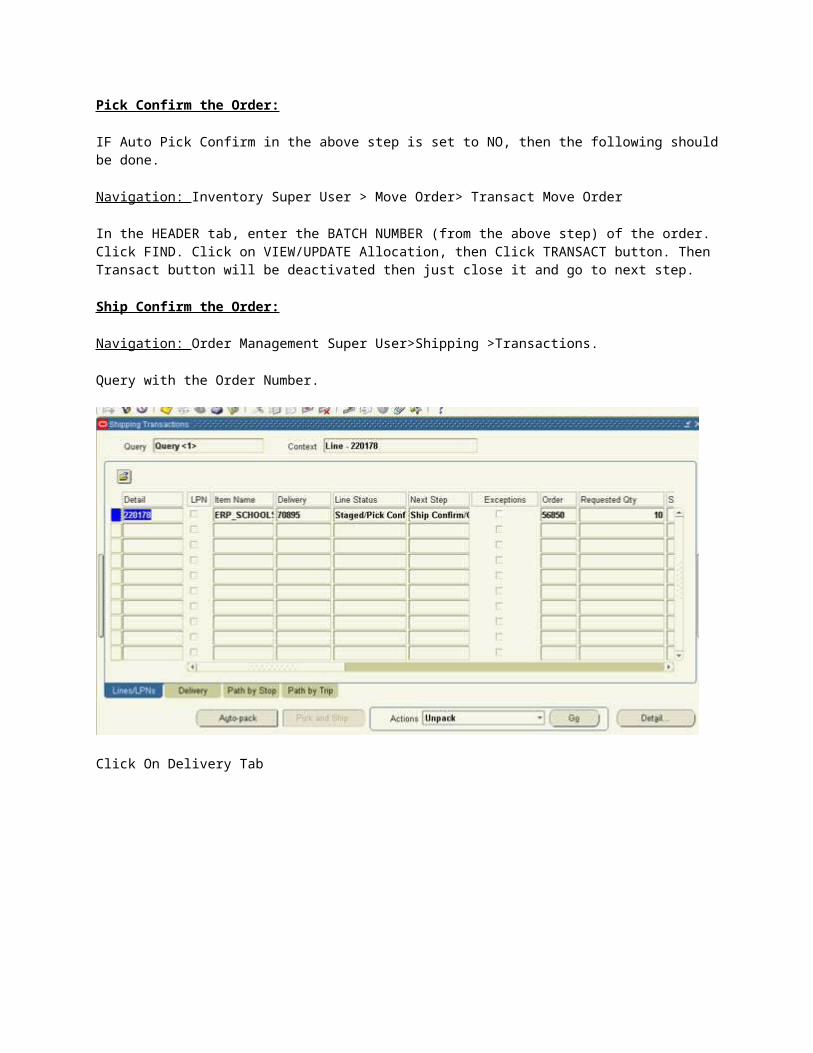
The Status in Shipping Transaction screen will now be closed.

This will kick off concurrent programs like. INTERFACE TRIP Stop, Commercial Invoice, Packing Slip Report, Bill of Lading
Underlying tables affected:
RELEASED_STATUS in WSH_DELIVERY_DETAILS would be ‘C’ (Ship Confirmed)
FLOW_STATUS_CODE in OE_ORDER_HEADERS_ALL would be "BOOKED"
FLOW_STATUS_CODE in OE_ORDER_LINES_ALL would be "SHIPPED"
Create Invoice:
Run workflow background Process.
Navigation: Order Management >view >Requests

Workflow Background Process inserts the records RA_INTERFACE_LINES_ALL with
INTERFACE_LINE_CONTEXT = ’ORDER ENTRY’
INTERFACE_LINE_ATTRIBUTE1 = Order_number
INTERFACE_LINE_ATTRIBUTE3 = Delivery_id
and spawns Auto invoice Master Program and Auto invoice import program which creates Invoice for that particular Order.

The Invoice created can be seen using the Receivables responsibility
Navigation: Receivables Super User> Transactions> Transactions
Query with the Order Number as Reference.

Underlying tables:
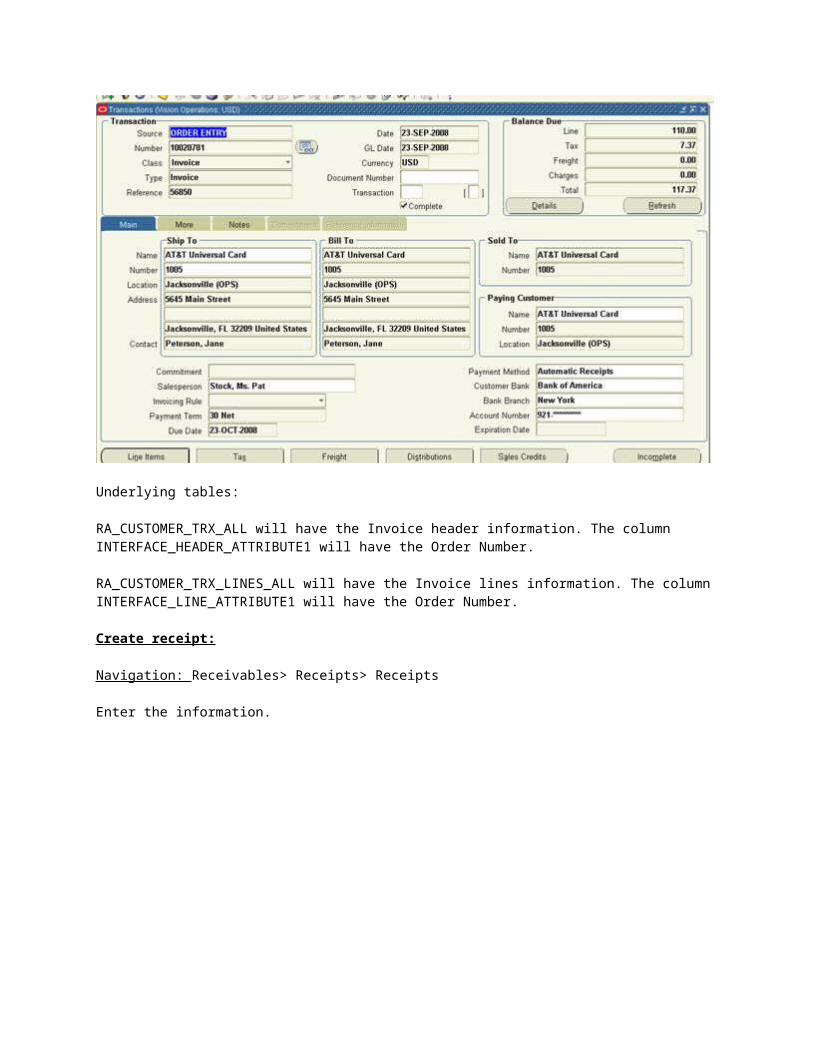
RA_CUSTOMER_TRX_ALL will have the Invoice header information. The column INTERFACE_HEADER_ATTRIBUTE1 will have the Order Number.
RA_CUSTOMER_TRX_LINES_ALL will have the Invoice lines information. The column INTERFACE_LINE_ATTRIBUTE1 will have the Order Number.
Create receipt:
Navigation: Receivables> Receipts> Receipts
Enter the information.
Click on Apply Button to apply it to the Invoice.

Underlying tables:
AR_CASH_RECEIPTS_ALL
Transfer to General Ledger:
To transfer the Receivables accounting information to general ledger, run General Ledger Transfer Program.
Navigation: Receivables> View Requests
Parameters:
Give in the Start date and Post through date to specify the date range of the transactions to be transferred.
Specify the GL Posted Date, defaults to SYSDATE. Post in summary: This controls how Receivables creates journal entries for your transactions in
the interface table. If you select ‘No’, then the General Ledger Interface program creates at least one journal entry in the interface table for each transaction in your posting submission. If you select ‘Yes’, then the program creates one journal entry for each general ledger account.
If the Parameter Run Journal Import is set to ‘Yes’, the journal import program is kicked off automatically which transfers journal entries from the interface table to General Ledger, otherwise follow the topic Journal Import to import the journals to General Ledger manually.

Underlying tables:
This transfers data about your adjustments, chargeback, credit memos, commitments, debit memos, invoices, and receipts to the GL_INTERFACE table.
Journal Import:
To transfer the data from General Ledger Interface table to General Ledger, run the Journal Import program from Oracle General Ledger.
Navigation: General Ledger > Journal> Import> Run
Parameters:
Select the appropriate Source. Enter one of the following Selection Criteria:
No Group ID: To import all data for that source that has no group ID. Use this option if you specified a NULL group ID for this source.
All Group IDs: To import all data for that source that has a group ID. Use this option to import multiple journal batches for the same source with varying group IDs.
Specific Group ID: To import data for a specific source/group ID combination. Choose a specific group ID from the List of Values for the Specific Value field.

If you do not specify a Group ID, General Ledger imports all data from the specified journal entry source, where the Group_ID is null.
Define the Journal Import Run Options (optional)
Choose Post Errors to Suspense if you have suspense posting enabled for your set of books to post the difference resulting from any unbalanced journals to your suspense account.
Choose Create Summary Journals to have journal import create the following:
• one journal line for all transactions that share the same account, period, and currency and that has a debit balance
• one journal line for all transactions that share the same account, period, and currency and that has a credit balance.
Enter a Date Range to have General Ledger import only journals with accounting dates in that range. If you do not specify a date range, General Ledger imports all journals data.
Choose whether to Import Descriptive Flexfields, and whether to import them with validation.
Click on Import button.
Underlying tables:
GL_JE_BATCHES, GL_JE_HEADERS, GL_JE_LINES
Posting:

We have to Post journal batches that we have imported previously to update the account balances in General Ledger.
Navigation: General Ledger> Journals > Enter
Query for the unposted journals for a specific period as shown below.
From the list of unposted journals displayed, select one journal at a time and click on Post button to post the journal.


If you know the batch name to be posted you can directly post using the Post window
Navigation: General Ledger> Journals> Post
Underlying tables:
GL_BALANCES.
OE tables contain Order details
Wsh tables contain delivery details
MTL tables contain Item details

Procure to Pay cycle covers the following steps1. Creating Requisition2. Creating Purchase Order3. Creating Receipt4. Creating Invoice in AP5. Paying the Invoice6. Transfer, Import and Post to GL
Overview:
In this article, we will see the steps involved in Procure to Pay Cycle. Here is the diagrammatic representation:
1) Create Requisition:
Requisition is nothing but a formal request to buy something (like Inventory material, office supplies etc) needed for the enterprise. Only an employee can create one. There are two types of requisitions:
Internal Requisition: Internal requisitions provide the mechanism for requesting and transferring material from one inventory to other inventory.
Purchase requisition: Unlike Internal requisitions, Purchase requisitions are used for requesting material from suppliers.
Navigation:
Purchasing Vision Operations (USA) > Requisitions > Requisitions
Choose the requisition type and enter the Item, quantity, Price details in the Lines tab.

In Source Details tab, specify the Buyer name.
Click the Distributions button. Enter the Charge Account.

Save the work. The status of the requisition will now be Incomplete. And now the Approve button is highlighted. The requisition needs to be approved first before proceeding further by the concerned authority. Submit this requisition for Approval by clicking on the Approve button. The status will now be updated to In Process .The workflow then will send an Approval notification to the concerned person (derived based on hierarchy used Position or Supervisor hierarchy) using which he can Approve or Reject the requisition.

At any time the status of requisition can be checked using the Requisition summary window.
Navigation:
Requisitions > Requisition Summary
Enter requisition number and click on the find button.
We can also check the Action History of requisition (it will show details about who has submitted, approved and cancelled the requisitions) as below:
Navigation:
Tools menu > Action History.
Underlying Tables:
PO_REQUISITION_HEADERS_ALL
PO_REQUISITION_LINES_ALL
PO_REQ_DISTRIBUTIONS_ALL
2) Create Purchase Order :
There are 4 types of Purchase Orders:
1. Standard PO: A Standard PO is created for onetime purchase of various items

2. Planned PO: A Planned PO is a longterm agreement committing to buy items or services from a single source. You must specify tentative delivery schedules and all details for goods or services that you want to buy, including charge account, quantities, and estimated cost.
3. Blanket agreement: A Blanket PO is created when you know the detail of the goods or services you plan to buy from a specific supplier in a period, but you do not know the detail of your delivery schedules.
4. Contract agreement: Contract purchase agreements are created with your suppliers to agree
on specific terms and conditions without indicating the goods and services that you will be purchasing
Navigation for creating a standard PO:
Purchase Orders > Purchase Orders
Choose type as Standard Purchase Order. Enter the Supplier, Buyer. In the Lines tab, specify the line number, line type, Item, quantity, price etc.
Click Terms to enter terms, conditions, and control information for purchase orders.
Click Currency button to enter and change currency information for purchase orders, RFQs, and quotations.
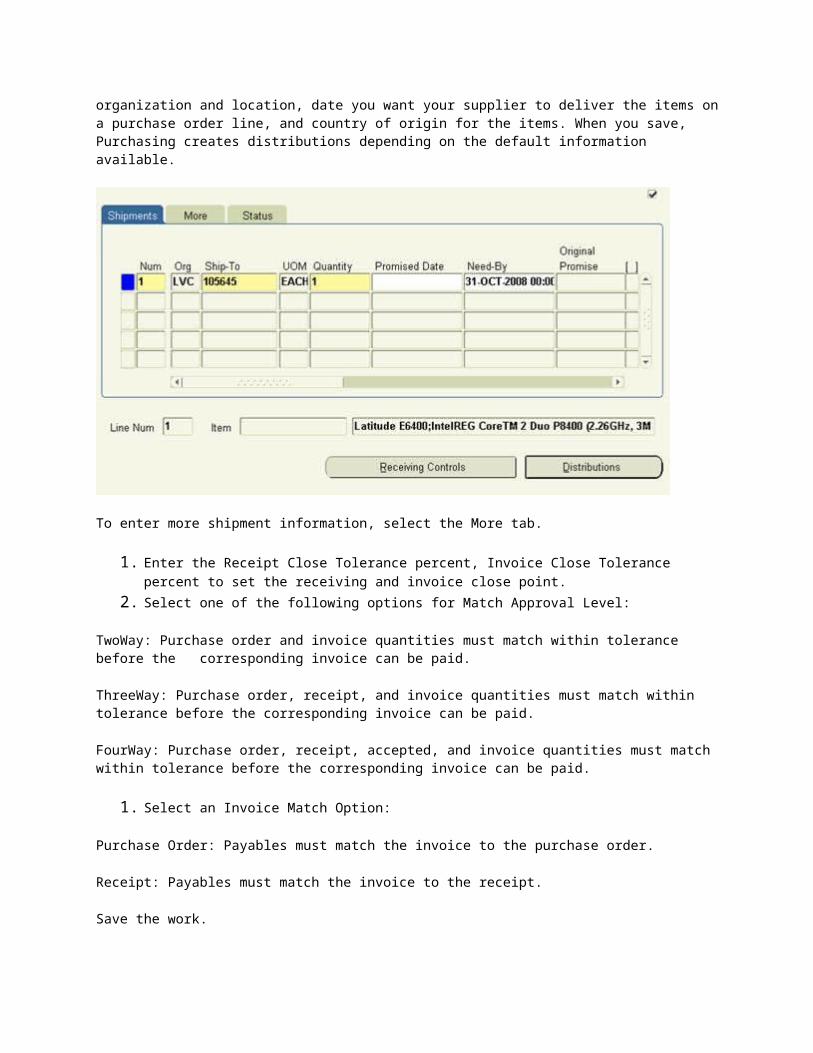
Click Shipments button to enter multiple shipments for standard and planned purchase order lines Purchase order shipment specifies the quantity, shipto organization and location, date you want your supplier to deliver the items on a purchase order line, and country of origin for the items. When you save, Purchasing creates distributions depending on the default information available.

To enter more shipment information, select the More tab.
1. Enter the Receipt Close Tolerance percent, Invoice Close Tolerance percent to set the receiving and invoice close point.
2. Select one of the following options for Match Approval Level:
TwoWay: Purchase order and invoice quantities must match within tolerance before the corresponding invoice can be paid.
ThreeWay: Purchase order, receipt, and invoice quantities must match within tolerance before the corresponding invoice can be paid.
FourWay: Purchase order, receipt, accepted, and invoice quantities must match within tolerance before the corresponding invoice can be paid.
1. Select an Invoice Match Option:
Purchase Order: Payables must match the invoice to the purchase order.
Receipt: Payables must match the invoice to the receipt.
Save the work.

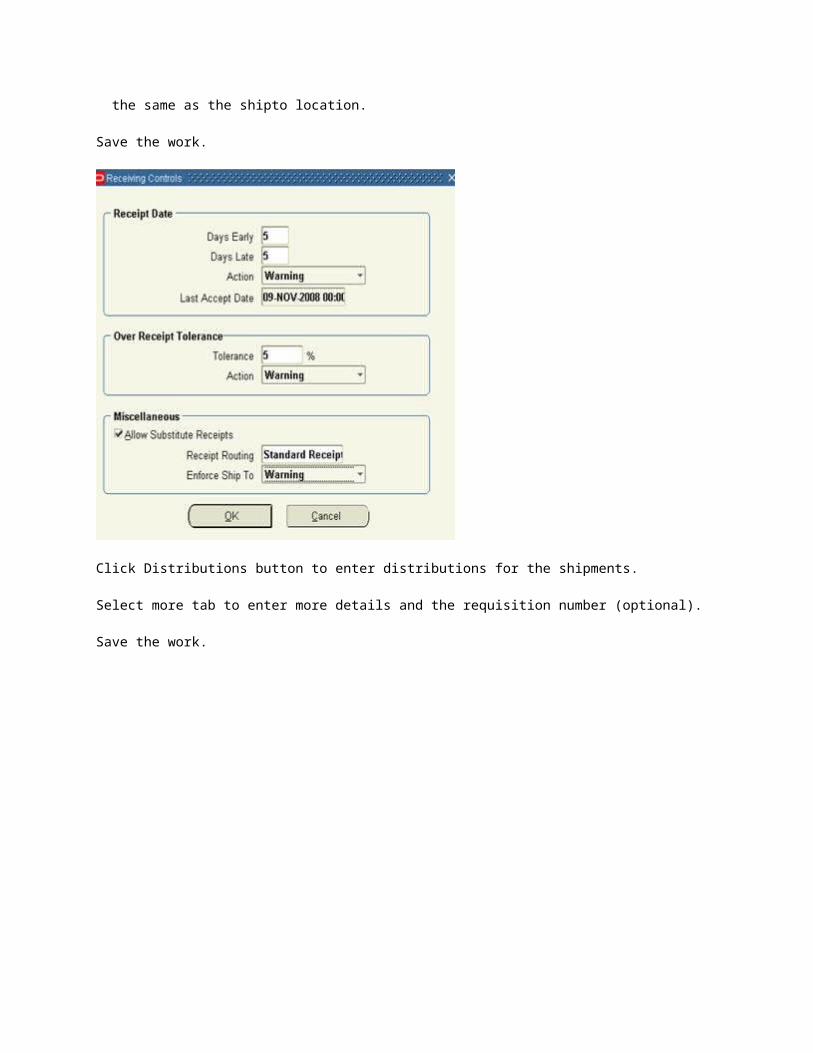
Click the Receiving Controls button to enter receiving control information for purchase orders.
- Enter the maximum acceptable number of Days Early and Days Late for receipts.
- Enter the Action for receipt date control.
- Enter the maximum acceptable overreceipt Tolerance percent (receipts that exceed the
quantity received tolerance).
- Enter the Action for Overreceipt Quantity.
- Select Allow Substitute Receipts to indicate that receivers can receive substitute items in place
of ordered items.
- Enter the default Receipt Routing that you assign goods: Direct Delivery, Inspection Required,
or Standard Receipt.
- Enter the Enforce Ship To location option to determine whether the receiving location must be
the same as the shipto location.
Save the work.

Click Distributions button to enter distributions for the shipments.
Select more tab to enter more details and the requisition number (optional).
Save the work.
Click on the Approve button to initiate the Approval process.
Underlying Tables:
PO_HEADERS_ALL

PO_LINES_ALL
PO_DISTRIBUTIONS_ALL (REQ_HEADER_REFERENCE_NUM in Distributions table is the Requisition number for this PO)
PO_LINE_LOCATIONS_ALL
3) Create Receipt:
Create a receipt to receive the items in the Purchase Order.
Navigation:
ReceivingReceipts
Enter the PO Number and select find button.
Go to Lines, check the lines you want to receive in the PO.
Click on Header button and Save which creates the receipt.

Receipt Tables are:
RCV_SHIPMENT_HEADERS
RCV_SHIPMENT_LINES (Lines Table has PO_HEADER_ID)
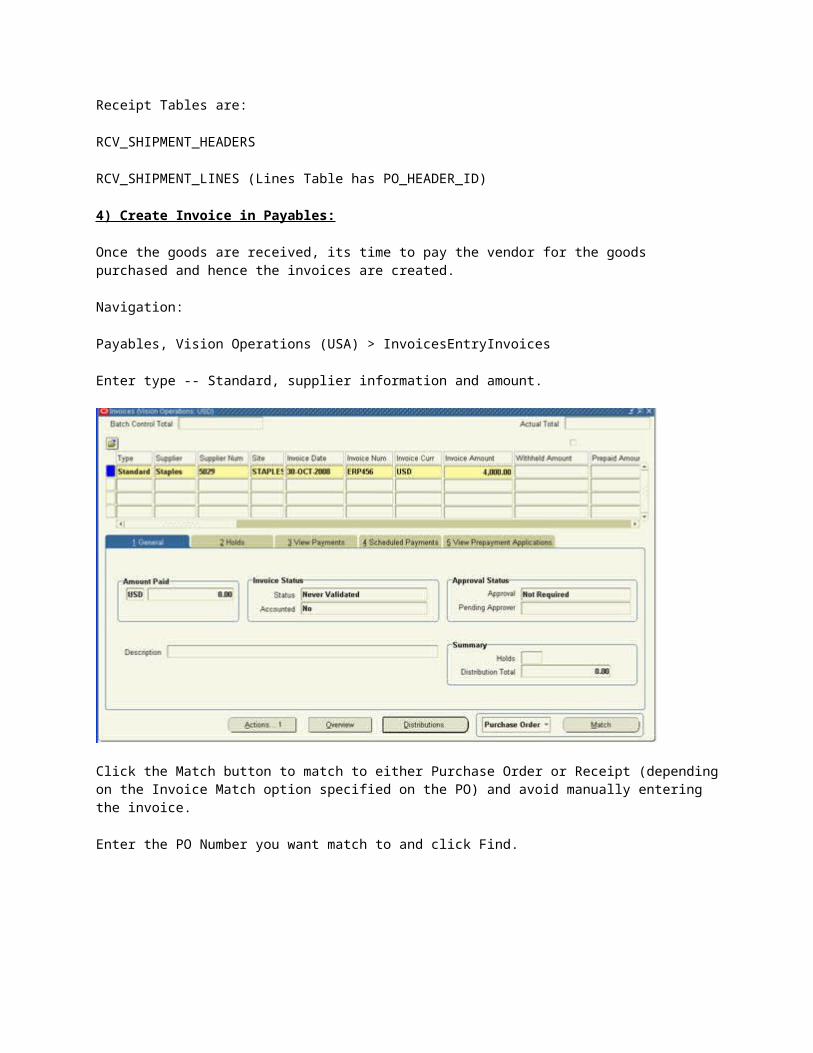
4) Create Invoice in Payables:
Once the goods are received, its time to pay the vendor for the goods purchased and hence the invoices are created.
Navigation:
Payables, Vision Operations (USA) > InvoicesEntryInvoices
Enter type -- Standard, supplier information and amount.
Click the Match button to match to either Purchase Order or Receipt (depending on the Invoice Match option specified on the PO) and avoid manually entering the invoice.
Enter the PO Number you want match to and click Find.

Select the lines required and click on Match button.
Click on Distribute button to navigate to the Match to Purchase Order Distributions window.

This creates the invoice and you can see the status of the invoice as Never Validated. it has to be Validated and Accounted before you can pay it.
Validating the Invoice:
Click on Actions Button and Select Validate. Click on OK button.
Now you can see the status of the invoice as Validated, if there are no issues during validation.
Create Accounting Entries:
Click on Actions Button and Select Create Accounting. Click on OK button.
Now we can see the Accounted status as Yes.
You can see the Accounting Entries here:
Tools View Accounting

Invoice Tables:
AP_INVOICES_ALL
AP_INVOICE_DISTRIBUTIONS_ALL
Accounting Entries Tables:
AP_ACCOUNTING_EVENTS_ALL
AP_AE_HEADERS_ALL
AP_AE_LINES_ALL
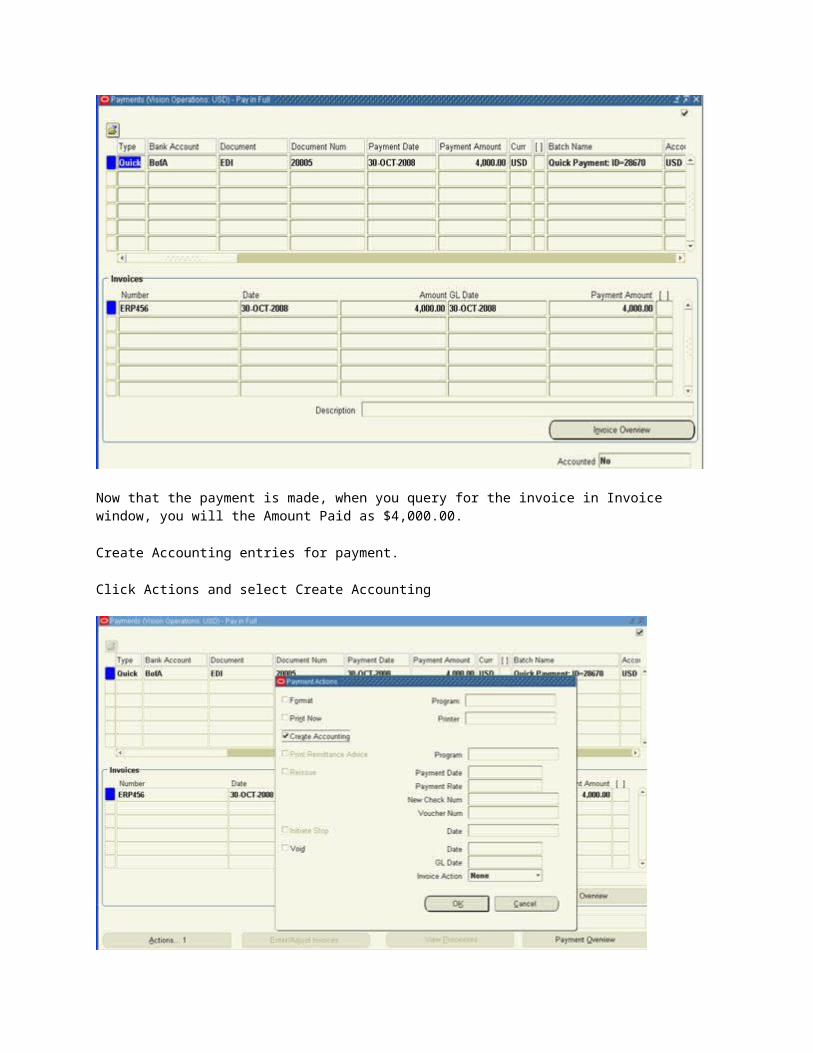
5) Making a Payment:
Go to the Invoice window and query the invoice you want to pay. You would see Amount paid as 0.00 before you make a payment.
Click Actions button. Select Pay in full and click OK.

Select the Bank Account and Document. Save the Work.

Now that the payment is made, when you query for the invoice in Invoice window, you will the Amount Paid as $4,000.00.
Create Accounting entries for payment.
Click Actions and select Create Accounting

Select the void checkbox to cancel the payment.
View Accounting Entries:
In the Payments window, query for the payment.
Tools menu View Accounting
Payment Tables:
AP_INVOICE_PAYMENTS_ALL
AP_PAYMENT_SCHEDULES_ALL
AP_CHECKS_ALL
AP_CHECK_FORMATS
AP_BANK_ACCOUNTS_ALL
AP_BANK_BRANCHES
AP_TERMS
You can also pay the invoices using Payment Batch screen. Refer to the article Make AP Payments through Payment Batches
6) Transfer to General Ledger :

Navigation:
Payables Responsibility > View Requests
Run the concurrent program Payables Transfer to General Ledger with the required parameters.
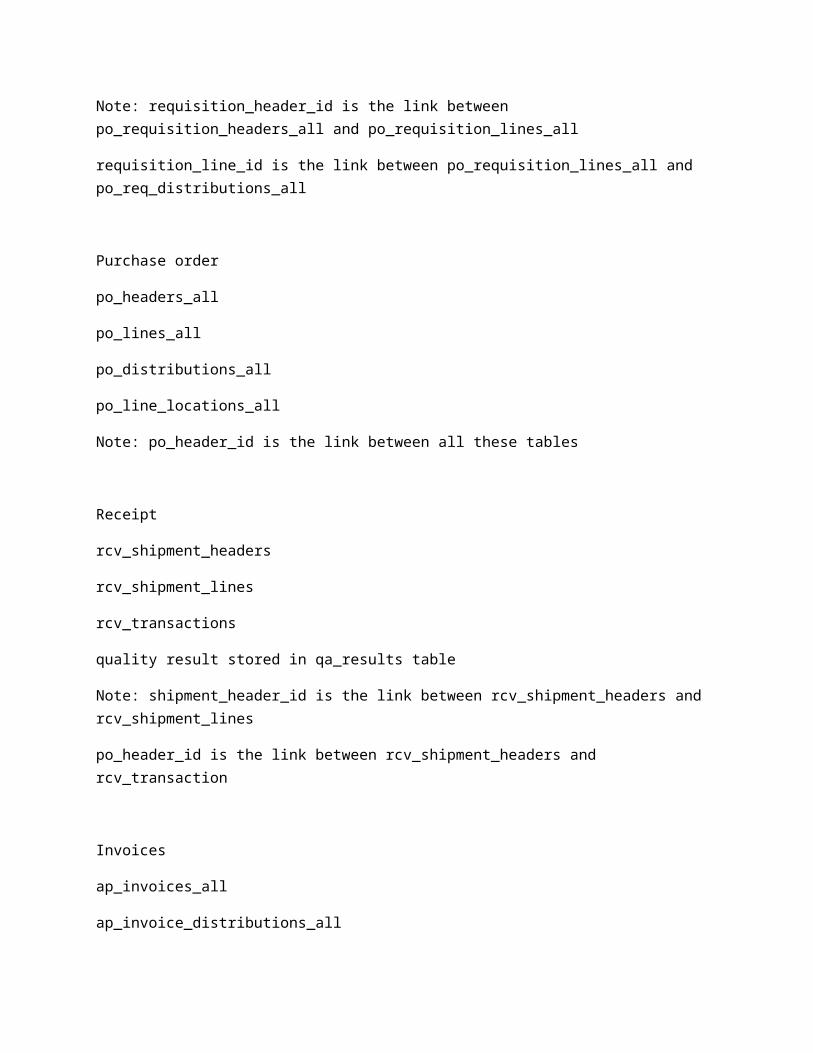
Procure To Pay base tables
Requisition
po_requisition_headers_all
po_requisition_lines_all ( segment1 ========== requisition number)
po_req_distributions_all
Note: requisition_header_id is the link between po_requisition_headers_all and po_requisition_lines_all
requisition_line_id is the link between po_requisition_lines_all and po_req_distributions_all
Purchase order
po_headers_all
po_lines_all
po_distributions_all
po_line_locations_all
Note: po_header_id is the link between all these tables
Receipt
rcv_shipment_headers
rcv_shipment_lines
rcv_transactions
quality result stored in qa_results table
Note: shipment_header_id is the link between rcv_shipment_headers and rcv_shipment_lines
po_header_id is the link between rcv_shipment_headers and rcv_transaction
Invoices
ap_invoices_all
ap_invoice_distributions_all
Note: invoice_id is the link between ap_invoices_all and ap_invoice_distributions_all
Payments
ap_checks_all
ap_invoice_payments_all
ap_payment_schedules_all

Payment Reconcillation
ap_banks
ap_bank_branches
GL Transfer
gl_periods
gl_period_status
gl_set_of_books
glfv_charts_of_accounts
AutoInvoice Program Overview in Oracle Applications – Receivables
AutoInvoice is a program that can be used to import and validate transaction data from other financial systems from which one can create invoices, debit memos, credit memos, and on-account credits. It rejects transactions with invalid information to insure the integrity of the data. This fits well with in Oracle ERP or to integrate with any third party application.
Top 10 reasons for using Auto Invoice
1. Powerful Interface Tool2. Supports Oracle & Non-Oracle Systems3. Import Large Amount of Data4. Calculate or Import Tax

5. Group Lines & Invoices
6. Online Error Correction
7 .Lines Validation
8. Derive GL Date
9 .Import Flex fields
10.Import or Derive Accounting Info
What is inside AutoInvoiceAutoInvoice is a program set consists of 3 main programs. Each program will have unique nature of work to do and they are called internally except Purge program whose execution is derived on the setup otherwise ready to execute stand alone.Master (RAXMTR)Import (RAXTRX)Purge (RAXDEL)
1. Auto Invoice Master program RAXMTRSelects and marks records in the interface tables to be processed based on the parameters the user entered and then calls the AutoInvoice Import program. Auto Invoice Master program has no report output.•Gathers statistics, it means it gathers the stats on interface tables and set the stats on certain indices on interface tables•Marks interface records for processing by marking request_id•Submits multiple workers for Parallel Processing by creating instances for request.
2. Auto Invoice Import Program Validates the selected record and creates transaction if it passes validation. Any record that fails validation is left in the interface table with an error code. Depending on the setup, related records may be rejected as well. This program has an output file called Auto Invoice Execution report, which you can view by clicking the View Report button in the Requests window.Working of Auto invoice , Validates data, Inserts records, Deletes interface data Only when system option purge set to ‘Y’
3. Auto Invoice Purge Program Deletes records from the interface tables. If you set the Purge Interface Table system option to No in Define System Option window, Auto Invoice does not delete processed records from the interface tables after each run,and we must submit Auto Invoice Purge Program periodically to clean up the interface tables. This program only deletes transaction lines that have been successfully imported.Deletes all rows where interface_status =‘P’• Ra_interface_lines• Ra_interface_distributions• Ra_interface_salescredits
Oracle Receivable’s Auto Invoice program will be used to import and validate Invoices. A custom feeder program is required to transfer data from the Advantage extract files and populate the Auto Invoice interface tables (RA_INTERFACE_LINES_ALL and RA_INTERFACE_DISTRIBUTIONS_ALL).If there is need to run populate sales credit into RA_INTERFACE_SALESCREDITS_ALL table. When run, AutoInvoice produces the AutoInvoice Execution Report and the AutoInvoice Validation Report. Any entries which failed validation can be reviewed in Oracle Receivables’ AutoInvoice Interface Exceptions window. Depending on the error, changes may need to be made in Receivables, the feeder program or the imported records in the interface tables.
How Autoinvoice Execution worksNormally, Auto Invoice can be divided into three major phases, Pre-grouping: here the validates all of the line level data takes place, Grouping: groups lines based on the grouping rules and validates header level data, Transfer :validates information that exists in Receivables tables
What happen when AutoInvoice run?Once the Auto invoice Program gets called, the following activity takes place is part of execution process. This can be analyzed by debug options.Line, accounting, and sales credit information for each line populates 3 interface tablesLines are ordered and groupedTax is calculatedGL date is determinedGL accounts are assigned using Auto AccountingTax, freight, commitments, and credit memos are linked to transaction linesAll transactions are batchedValidated lines are used to create the transaction
How Data is flowing?Select, insert and update and delete take place on certain tables once it is logged out.
Selects– RA_INTERFACE_LINES_ALL– RA_INTERFACE_DISTRIBUTIONS_ALL– RA_INTERFACE_SALESCREDITS_ALLUpdates/Insert– RA_INTERFACE_ERRORS_ALL– RA_CUSTOMER_TRX_ALL– RA_CUSTOMER_TRX_LINES_ALL– AR_PAYMENT_SCHEDULES_ALL– AR_RECEIVABLE_APPLICATIONS_ALL
Inserts– RA_INTERFACE_ERRORS_ALL
AutoInvoice Exception HandlingRecords that fail validation are called ‘Exceptions’. Exceptions stay in Interface Tables which is

RA_INTERFACE_ERRORS_ALL. Errors can be corrected in the Exception Handling window. Once corrections are made, Auto invoice must be resubmitted. Records that pass validation get transferred to Receivables tables
AutoInvoice Exception Handling Windows-Interface Exception window displays exception messages associated with all invalid records-Interface Lines window displays records that fail validation, provides an error message and can be used to correct the errors-The Line Errors windows displays errors associated with a specific line, and can only be opened from Interface Lines window-Interface Exceptions window displays Interface Id, Exception Type, Error Message and Invalid Value associated to the error-Data cannot be edited in this window, but error can be viewed and corrected by clicking the Details button-Error Message and Column name with invalid data are displayed in the Message column, and the invalid value that needs to be corrected is displayed in the Invalid Value column