Embed Size (px)
Citation preview

Notes For The Presenter
The HTML Crash Course provides a prepackaged solution for introducing a wide range of HTML tags
You may use the presentation as-is; you can also easily customize it
You may wish to remove this slide
Complete TechRepublic’s free feedback form (for a chance to win a free TechRepublic title)

HTML Crash Course
Understanding HTML Tags

What is HTML?
HTML stands for Hyper Text Markup Language
HTML defines the design and layout of a Web document by using a variety of tags and attributes
HTML is straight ASCI text and you can create HTML documents with Notepad

What are HTML Tags?
HTML tags are essentially commands that Web browsers use to determine how to display a document
HTML tags are enclosed in brackets
<HTML tag>
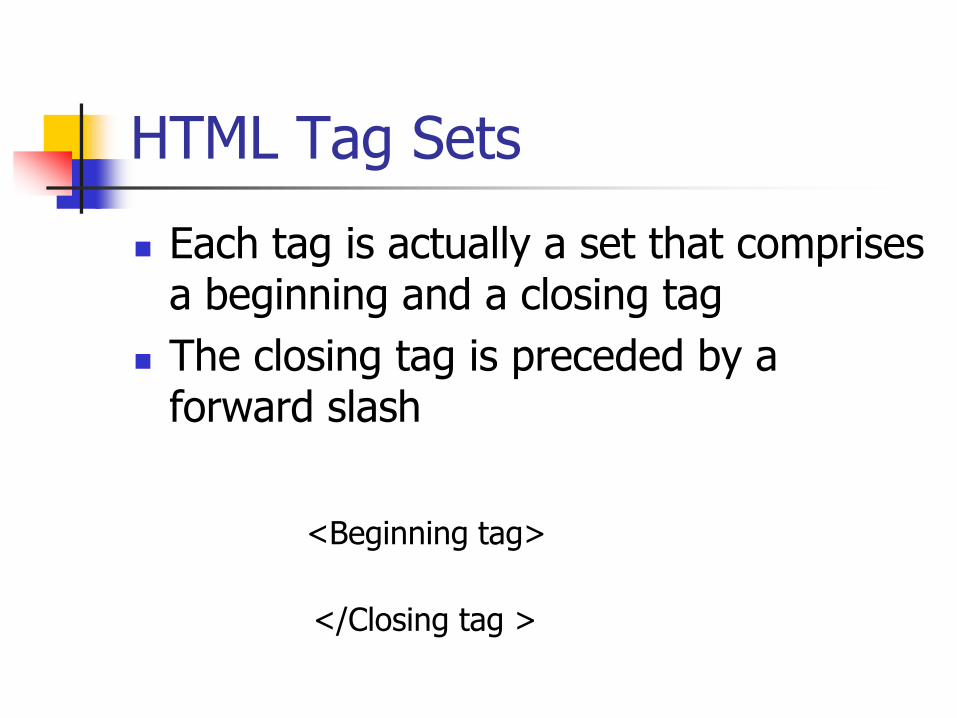
HTML Tag Sets
Each tag is actually a set that comprises a beginning and a closing tag
The closing tag is preceded by a forward slash
<Beginning tag>
</Closing tag >

Essential HTML tags
In order to create an HTML document, you only need to use these four tags: <html> </html>
<head> </head>
<title> </title>
<body> </body>

The <html> Tag
The <html> tag is the first thing that appears in an HTML document and the </html> tag is the last

The <head> Tag
The <head> tag demarcates the header section of an HTML document

The <title> Tag
The <title> tag displays the document title in the title bar of the browser

The <body> Tag
The <body> tag demarcates the main section of an HTML document

A Basic HTML Document

A Basic HTML Document

Creating Links
To link your HTML document to another document or Web site, you use the <a href=> and </a> tags
<a href="URL">label</a>

Link Example
To create a link to the TechRepublic site
To go to TechRepublic:
<a href="http://www.techrepublic.com">
Click Here</a>

Using Images
To add an image to an HTML document you use the <img> tag and the src= attribute
This tag doesn’t have a separate closing tag
<img src=“thepicture.jpg">

Adding a Border
You use the border= attribute to frame an image
<img src= “thepicture.jpg" border= "4">

Sizing an Image
You can use the width= and height= attributes to resize an image
<img src= “thepicture.jpg" border="4" width=“160"
height=“120">

Paragraph Tags
To separate text or images, you use the opening and closing paragraph tags <p></p>
<p>These lines will be</p>
<p>separated by a blank line</p>

Line Break Tag
To separate text or images, you also use the line break tag <br>
These three lines<br>
will appear one <br>
right after the other

Formatting Text
You use the <font> tag along with the face=, size=, and color= attributes to enhance text
<font face=“tahoma" size="4" color="#ff0000" >
Hello there! </font>

Header Tags
You use header tags <h#> </h#> for titles and section headings
<h1>Heading 1</h1>
<h2>Heading 2</h2>
<h3>Heading 3</h3>
<h4>Heading 4</h4>
<h5>Heading 5</h5>
<h6>Heading 6</h6>

Specifying Colors
Hexadecimal color codes consist of 6 characters from the hexadecimal number system preceded by the # symbol
Hexadecimal color codes are considered “Browser-Safe”

Color Charts
You can find “Browser-Safe” color charts on the Internet

Special Characters
To create special characters you use tags called character entity references or entities
© copyright
® trademark
¼ one quarter
½ one half
£ pound
non-breaking space

Special Characters
You can also use decimal character references in entities
© copyright
® trademark
¼ one quarter
½ one half
£ pound
  non-breaking space

Creating Tables
You create a basic table using the <table>, <tr>, <th> and <td> tags
<table>
<tr> <th> </th></tr>
<tr> <td> </td></tr>
</table>

Using Borders
You add the border= attribute to the <table> tag to frame your table
<table border="2“>

Adding White Space
You add the cellspacing= and cellpadding= attributes to the <table> tag to add white space to your table
<table cellspacing="2" cellpadding="4">

Example Table
<table border="2" cellspacing="2" cellpadding="4" >
<tr> <th>Year</th> <th>Sales</th> </tr>
<tr> <td>2004</td> <td>$100K</td> </tr>
<tr><td>2005</td><td>$200K</td> </tr>
</table>

Creating Forms
To create a form for soliciting user feedback, you’ll use the <form> tag along with its associated attributes
The <input> tag allows you to create text boxes, radio buttons, and check boxes

Specifying Scripts
Forms use the action= and method= attributes to direct the data they contain to a script that will process the data
<form method="post" action="http://dom.com/cgi/sendapp.cgi">

Creating a Text Box
To create a text box, you use the <input> tag along with the type=“text” attribute
Name:
<input type="text" name="Name" size="30">

Creating Radio Buttons
To create a radio buttons, you use the <input> tag along with the type=“radio” attribute
Gender:
<input type="radio" name=“gender" value="M">Male
<input type="radio" name="gender" value="F">Female

Creating Check Boxes
To create a check boxes, you use the <input> tag along with the type=“checkbox” attribute
Education Level:
<input type="checkbox" name="ELevel“ value="H">High School
<input type="checkbox" name=“ELevel" value="C">College

Action Buttons
To create action buttons, you use the <input> tag along with the type=“submit” and type=“reset” attributes
<input type="submit">
<input type="reset">

Example Form
<form method="post" action="http://dom.com/cgi/sendapp.cgi"> Name: <input type="text" name="FullName" size="30"><br> Gender: <input type="radio" name="gender" value="M">Male <input type="radio" name="gender" value="F">Female<br> Education Level: <input type="checkbox" name="ELevel" value="H">High School <input type="checkbox" name="ELevel" value="C">College <br><br> <input type="submit"> <input type="reset"> </form>

Example Form

Creating Framesets
To create a frameset you use the <frameset> tag along with the cols= and rows= attributes
You use the <frame> tag along with the src= attribute to specify which HTML document is to appear in each frame

Example Frameset
<html> <title>Frameset Page>/title> <frameset cols="50%,50%" rows="50%,50%"> <frame src=“red-page.htm"> <frame src=“grn-page.htm"> <frame src=“blu-page.htm"> <frame src=“yel-page.htm"> </frameset> </html>

Example Frameset

Cascading Style Sheets
Using Cascading Style Sheets makes it easier to alter text in an HTML document by specifying style rules
You can place the style rules in the header section of an HTML document

Style Definitions
The style definitions are defined within the <style> tag
<style type="text/css">
tag {name: value; name: value}
tag {name: value; name: value}
</style>

Common Tags
The most common tags defined in a Cascading Style Sheet
h#
body
p

Common Definitions
The most common definitions used in a Cascading Style Sheet
font-family:
font-size:
font-style:
color:

Example Cascading Style Sheet
<head>
<style type="text/css">
h1 {font-family: tahoma; font-size: 18pt; color: 0000ff}
p {font-family: georgia; font-size: 12pt; font-style: italic}
</style>
</head>

Example Cascading Style Sheet

Further Study
World Wide Web Consortium www.w3.org
Builder.com builder.com.com/1200-31-5084827.html
WebReference.com www.webreference.com
Web Design/HTML webdesign.about.com
HTML 4 for Dummies www.dummies.com


![Jselz DP Midterm Presentation [ with presenter notes]](https://img.pdfslide.us/doc/110x75/577ccfc01a28ab9e78907d15/jselz-dp-midterm-presentation-with-presenter-notes.jpg)