Embed Size (px)
Citation preview


Nosepiece
Objectives
Stage Clips
Light
Ocular lens(Eyepiece)
Arm
Stage
Coarse AdjustmentKnob
Fine AdjustmentKnob
Always carry a microscope with one hand holding the arm
and one hand under the base.
Base
Diaphragm

What’s My Power?To calculate the power of magnification, multiply the power of the ocular lens by the power of the objective.
Ocular lens (10X) Objectives (4X, 10X, 40X)

WHAT’S MY POWER?
• Low Power –Ocular lens = 10X–Objective = 4X
• TOTAL magnification for LOW power = ______________40 X

WHAT’S MY POWER?
• Medium Power –Ocular lens = 10X–Objective = 10X
•TOTAL magnification for MEDIUM power = ______________100 X

WHAT’S MY POWER?
• High Power –Ocular lens = 10X–Objective = 40X
•TOTAL magnification for HIGH power = ______________400 X

Comparing Powers of Magnification:
We can see better details with HIGHER the powers of magnification, but we can’t see as much of the image.

• Which of these images would be viewed at a higher power of magnification?

MICROSCOPE PICTURES

Compound Light Microscopes:
• You will be using compound light microscope in several labs.
• These microscopes have a maximum magnification of 400X–So you CANNOT see most of the
organelles like ribosomes, golgi bodies, lysomes, etc.
–More powerful microscopes are needed (2,000 X plus)
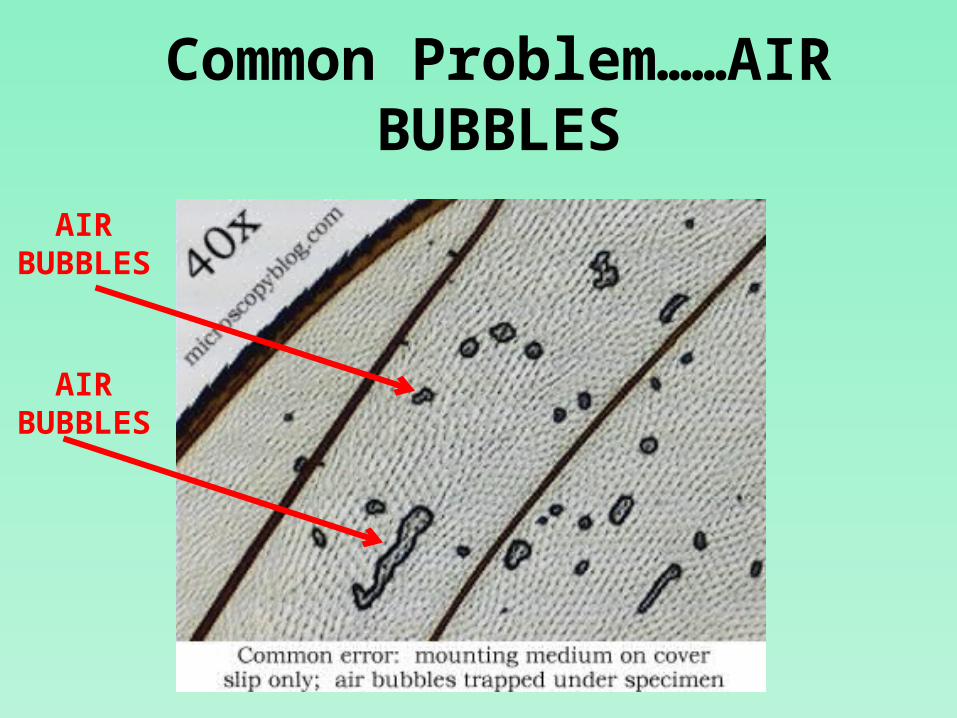
Common Problem……AIR BUBBLES
AIR BUBBLE
S
AIR BUBBLE
S

Stained Onion Cells• Can you identify the cell walls?• Can you identify any other organelles?

Stained Cheek Cells
Cell Membrane
Nucleus
Cytoplasm

Elodea - Typical plant cells as seen with the light microscope

Animal Cell

Nucleus

Rough ER

Golgi Body

Mitochondria

Chloroplasts

Ribosomes

Cytoskeleton

How To Make A Wet-mount Slide …1 – Get a clean slide and cover slip from your teacher.
2 – Place ONE drop of water/iodine in the middle of the slide. Don’t use too much or the water will run off the edge and make a mess!
3 – Place the edge of the cover slip on one side of the water/iodine drop.
You do not need to use the stage clips when viewing wet-mount slides!
5 – Place the slide on the stage and view it first with the LOW power objective. Once you see the image, you can rotate the nosepiece to view the slide with the different objectives.
4 - Slowly lower the cover slip on top of the drop.
Cover Slip
Lower slowly

Let’s give it a try ...1 – Turn on the microscope and then rotate the nosepiece to click the LOW power objective into place.
2 – Place a slide on the stage and secure it using the stage clips. Use the coarse adjustment knob (large knob) to get it the image into view and then use the fine adjustment knob (small knob) to make it clearer.
4 – When you are done, turn off the microscope and put up the slides you used.
3 – Once you have the image in view, rotate the nosepiece to view it under different powers. Draw what you see on your worksheet!
Be careful with the largest objective! Sometimes there is not enough room and you will not be able to use it!