Embed Size (px)
Citation preview

Industrial WatershedGroundwater Simulation Tank
Lab Manual
Your Names:
Boott Cotton Mills Museum115 John Street, Lowell, MAwww.uml.edu/tsongas978-970-5080
An education partnership between University of Massachusetts Lowell Graduate School of Education and Lowell National Historical Park.
2
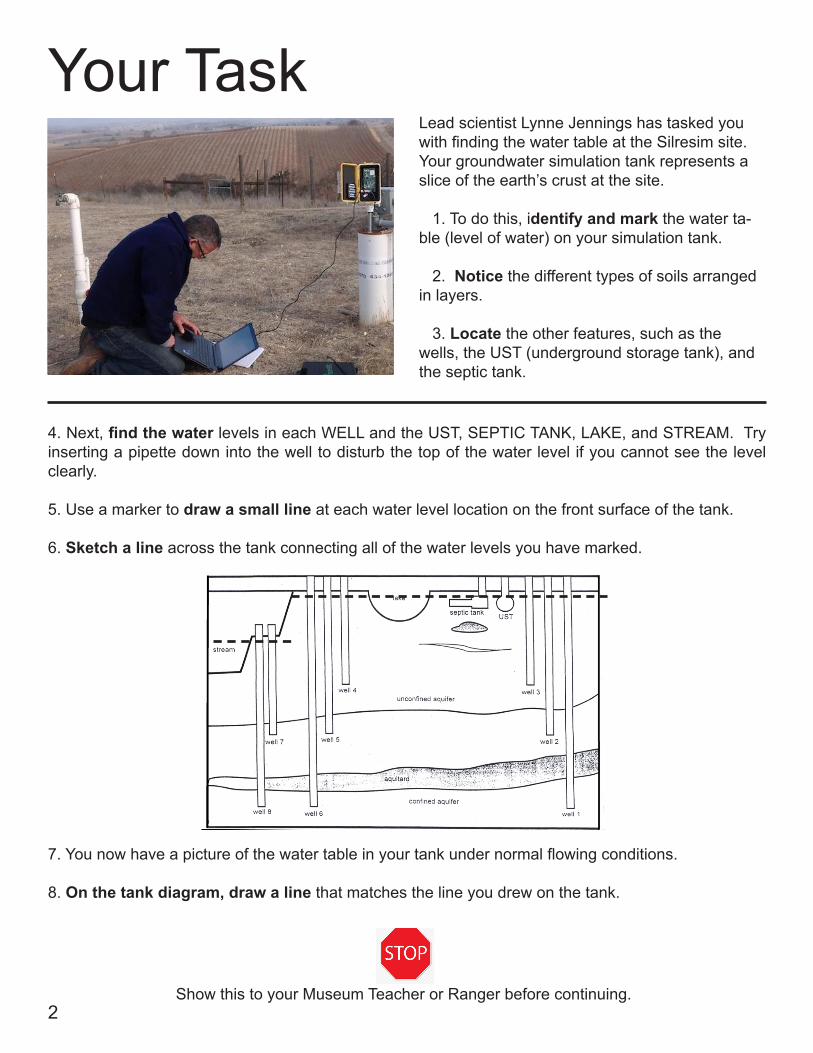
Lead scientist Lynne Jennings has tasked you with finding the water table at the Silresim site. Your groundwater simulation tank represents a slice of the earth’s crust at the site.
1. To do this, identify and mark the water ta-ble (level of water) on your simulation tank.
2. Notice the different types of soils arranged in layers.
3. Locate the other features, such as the wells, the UST (underground storage tank), and the septic tank.
Your Task
Show this to your Museum Teacher or Ranger before continuing.
4. Next, find the water levels in each WELL and the UST, SEPTIC TANK, LAKE, and STREAM. Try inserting a pipette down into the well to disturb the top of the water level if you cannot see the level clearly.
5. Use a marker to draw a small line at each water level location on the front surface of the tank.
6. Sketch a line across the tank connecting all of the water levels you have marked.
7. You now have a picture of the water table in your tank under normal flowing conditions.
8. On the tank diagram, draw a line that matches the line you drew on the tank.
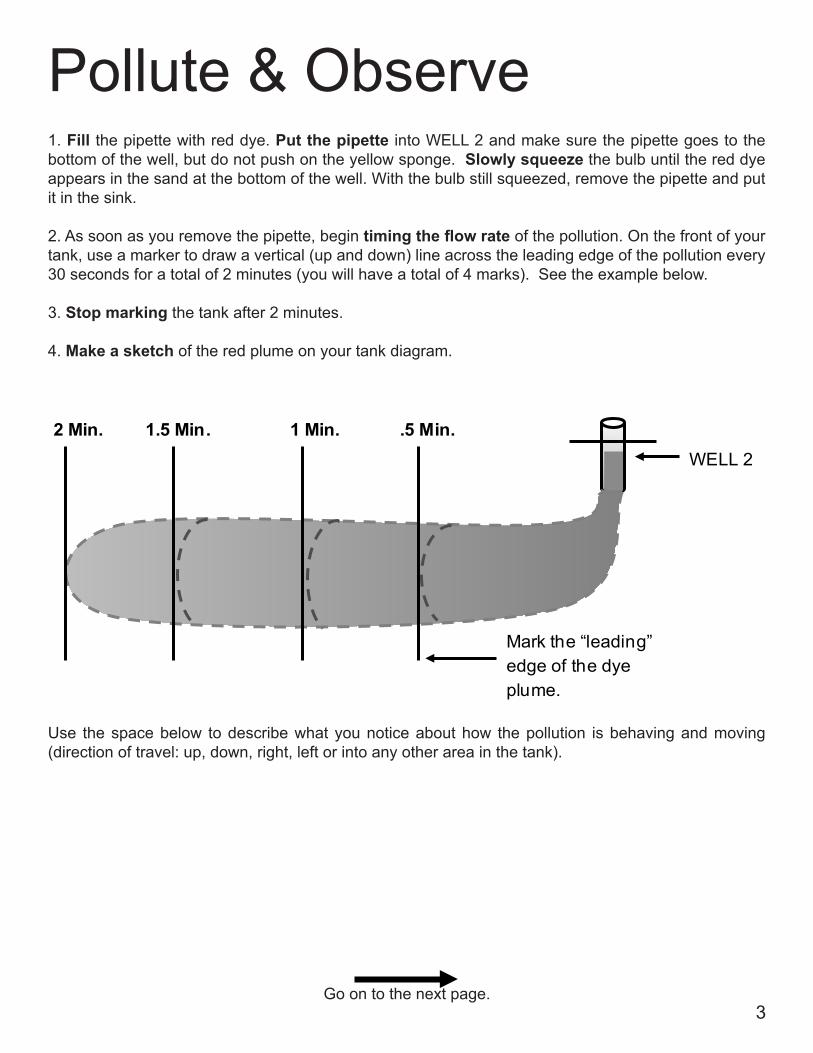
Pollute & Observe1. Fill the pipette with red dye. Put the pipette into WELL 2 and make sure the pipette goes to the bottom of the well, but do not push on the yellow sponge. Slowly squeeze the bulb until the red dye appears in the sand at the bottom of the well. With the bulb still squeezed, remove the pipette and put it in the sink.
2. As soon as you remove the pipette, begin timing the flow rate of the pollution. On the front of your tank, use a marker to draw a vertical (up and down) line across the leading edge of the pollution every 30 seconds for a total of 2 minutes (you will have a total of 4 marks). See the example below.
3. Stop marking the tank after 2 minutes.
4. Make a sketch of the red plume on your tank diagram.
Use the space below to describe what you notice about how the pollution is behaving and moving (direction of travel: up, down, right, left or into any other area in the tank).
3
2 Min. 1.5 Min. 1 Min. .5 Min.
Mark the “leading” edge of the dye plume.
WELL 2
Go on to the next page.
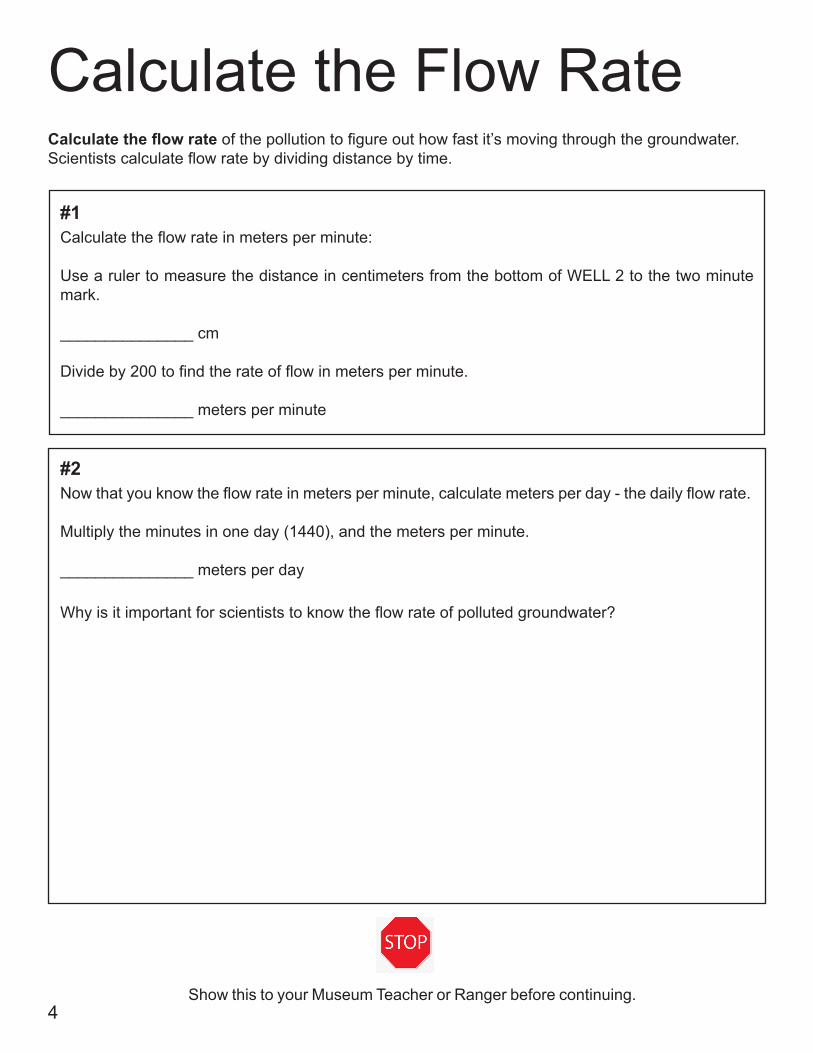
Calculate the flow rate of the pollution to figure out how fast it’s moving through the groundwater. Scientists calculate flow rate by dividing distance by time.
Calculate the flow rate in meters per minute:
Use a ruler to measure the distance in centimeters from the bottom of WELL 2 to the two minute mark.
_______________ cm
Divide by 200 to find the rate of flow in meters per minute.
_______________ meters per minute
Calculate the Flow Rate
Now that you know the flow rate in meters per minute, calculate meters per day - the daily flow rate.
Multiply the minutes in one day (1440), and the meters per minute.
_______________ meters per day
Why is it important for scientists to know the flow rate of polluted groundwater?
4
#2
#1
Show this to your Museum Teacher or Ranger before continuing.

Who is affected by the pollution from Well 2?Your next task is to find out who is affected by the groundwater pollution from the Silresim site. You will help Kelsey O’Neill, who leads the clean-up team.
Your team will pull water from WELL 5, at the home of a neighbor on Tanner Street, so that it can be tested later for pollutants.
5
1. Add another pipette of red dye to WELL 2.
2. Use the large syringe to pull water out of WELL 5 to simulate water being pumped out of the well and into the family’s house.
3. Insert the flexible plastic tube of the syringe into the top of WELL 5. Pull on the plunger. Do NOT pull the plunger all the way out of the syringe. When you’ve pulled the plunger as far as you safely can, empty the syringe into the back of the tank. Do not push the water back into the well.
4. You may need to pull water out of WELL 5 several times before you see pollution in WELL 5.
Plunger Slowly!
Go on to the next page.
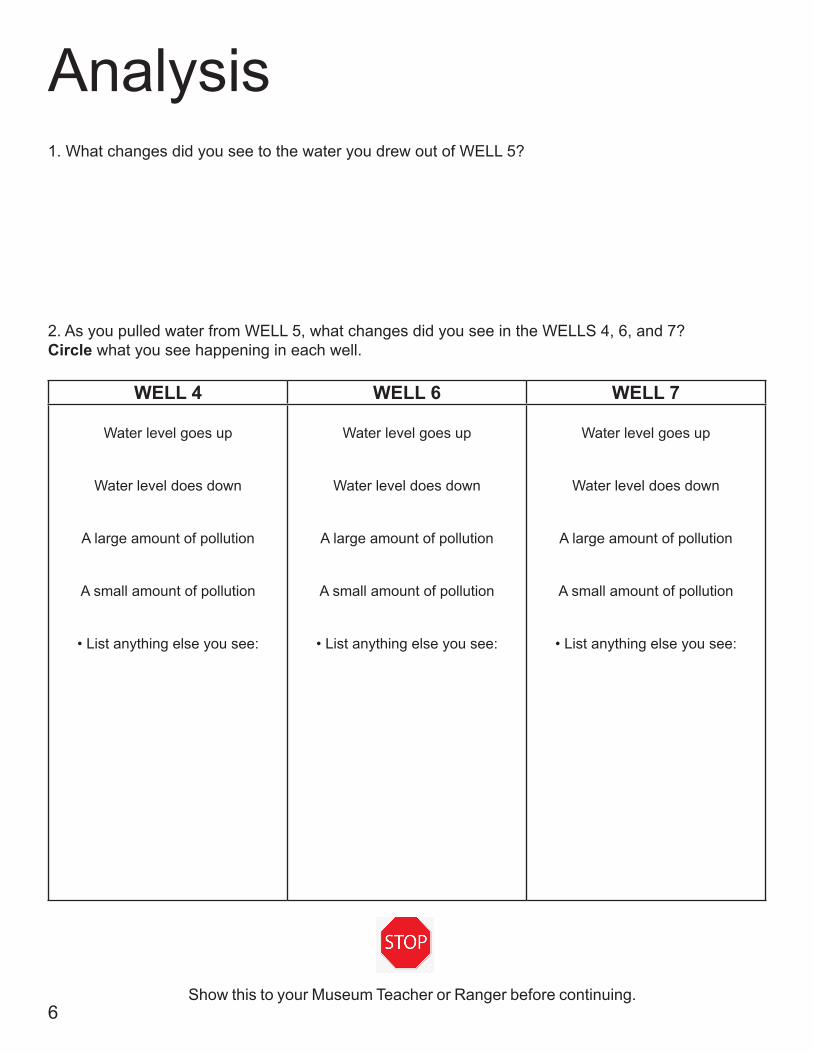
Analysis
6Show this to your Museum Teacher or Ranger before continuing.
1. What changes did you see to the water you drew out of WELL 5?
2. As you pulled water from WELL 5, what changes did you see in the WELLS 4, 6, and 7?Circle what you see happening in each well.
WELL 4 WELL 6 WELL 7
Water level goes up
Water level does down
A large amount of pollution
A small amount of pollution
• List anything else you see:
Water level goes up
Water level does down
A large amount of pollution
A small amount of pollution
• List anything else you see:
Water level goes up
Water level does down
A large amount of pollution
A small amount of pollution
• List anything else you see:
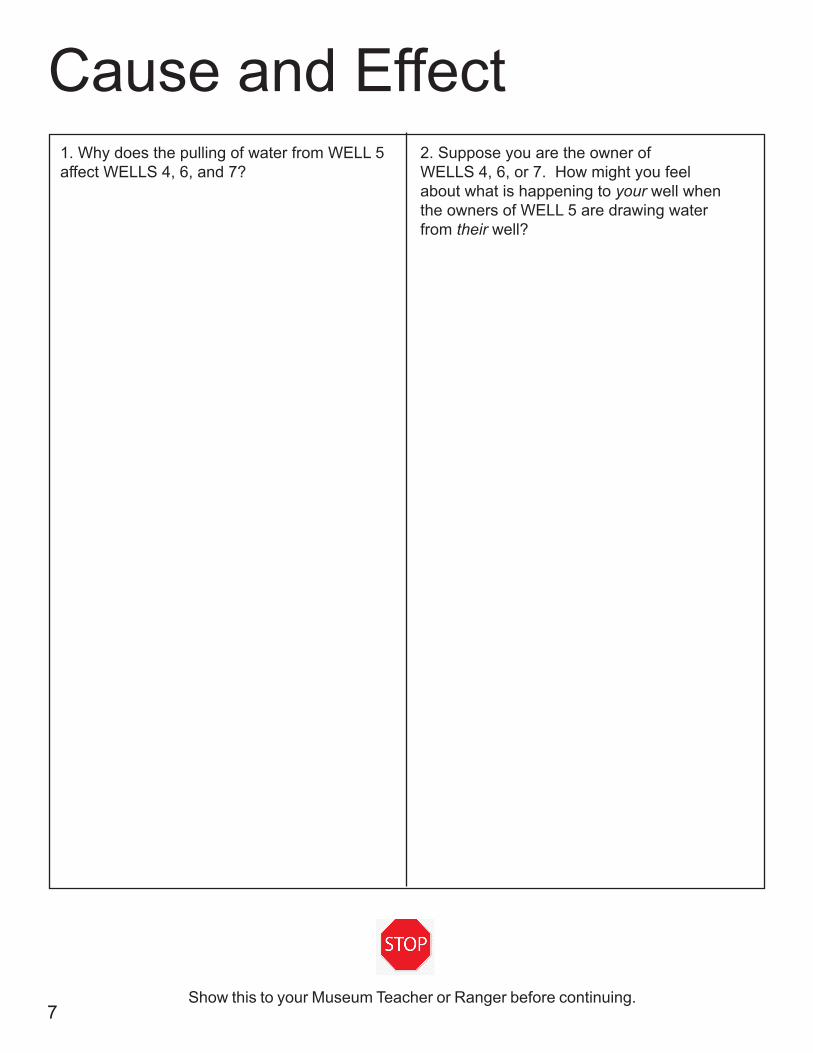
Cause and Effect
7Show this to your Museum Teacher or Ranger before continuing.
1. Why does the pulling of water from WELL 5 affect WELLS 4, 6, and 7?
2. Suppose you are the owner of WELLS 4, 6, or 7. How might you feel about what is happening to your well when the owners of WELL 5 are drawing water from their well?
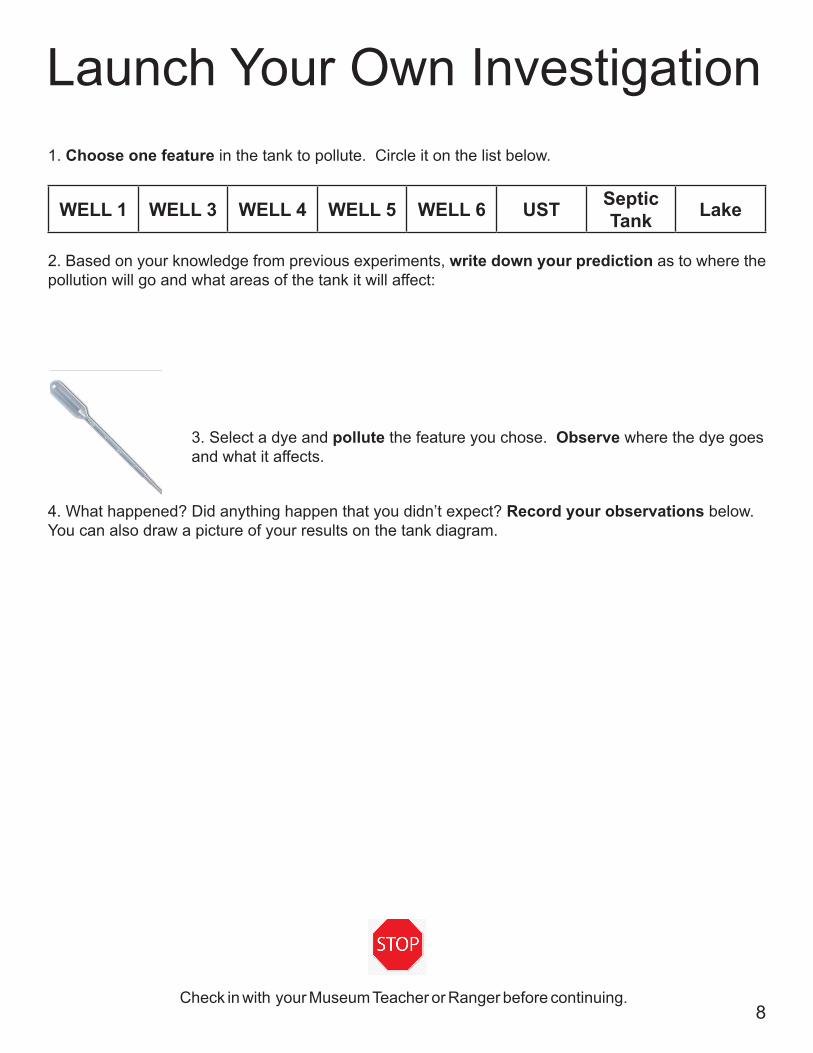
Launch Your Own Investigation1. Choose one feature in the tank to pollute. Circle it on the list below.
WELL 1 WELL 3 WELL 4 WELL 5 WELL 6 UST Septic Tank Lake
2. Based on your knowledge from previous experiments, write down your prediction as to where the pollution will go and what areas of the tank it will affect:
8
3. Select a dye and pollute the feature you chose. Observe where the dye goes and what it affects.
4. What happened? Did anything happen that you didn’t expect? Record your observations below. You can also draw a picture of your results on the tank diagram.
Check in with your Museum Teacher or Ranger before continuing.

9Check in with your Museum Teacher or Ranger before continuing.
Launch Your Own Investigation1. Choose one feature in the tank to pollute. Circle it on the list below.
WELL 1 WELL 3 WELL 4 WELL 5 WELL 6 UST Septic Tank Lake
2. Based on your knowledge from previous experiments, write down your prediction as to where the pollution will go and what areas of the tank it will affect:
3. Select a dye and pollute the feature you chose. Observe where the dye goes and what it affects.
4. What happened? Did anything happen that you didn’t expect? Record your observations below. You can also draw a picture of your results on the tank diagram.
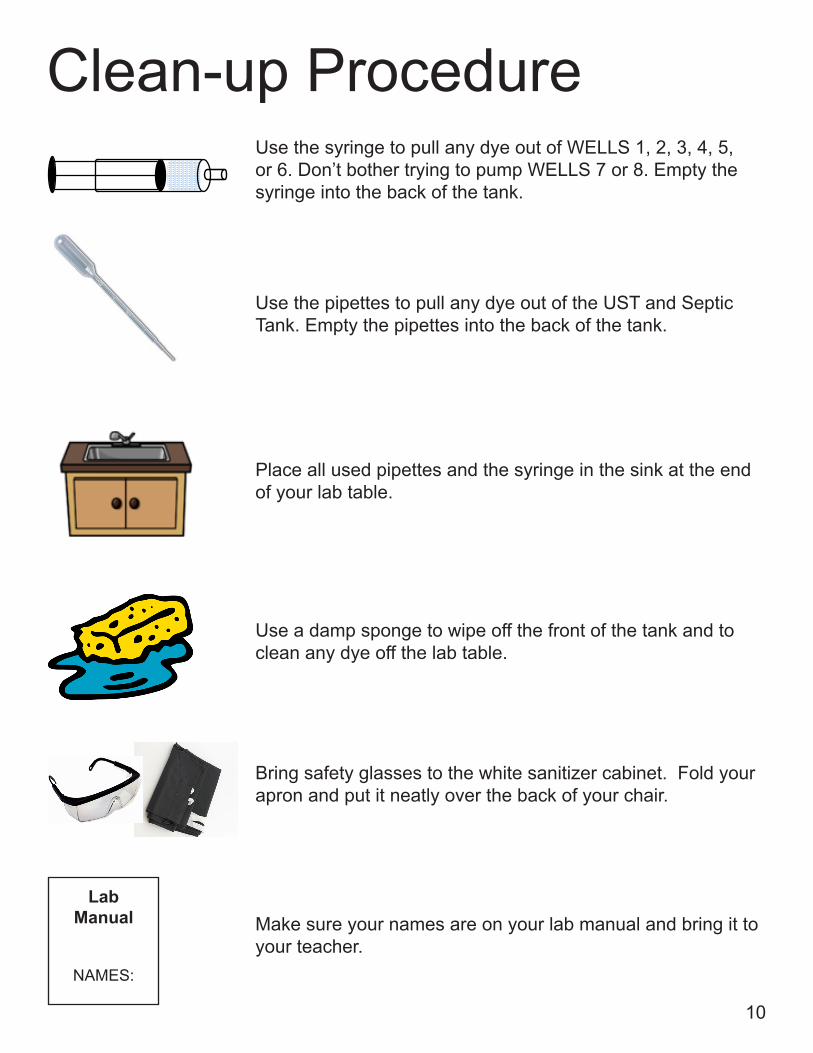
Clean-up ProcedureUse the syringe to pull any dye out of WELLS 1, 2, 3, 4, 5, or 6. Don’t bother trying to pump WELLS 7 or 8. Empty the syringe into the back of the tank.
Place all used pipettes and the syringe in the sink at the end of your lab table.
Use a damp sponge to wipe off the front of the tank and to clean any dye off the lab table.
Make sure your names are on your lab manual and bring it to your teacher.
Lab Manual
NAMES:
Bring safety glasses to the white sanitizer cabinet. Fold your apron and put it neatly over the back of your chair.
Use the pipettes to pull any dye out of the UST and Septic Tank. Empty the pipettes into the back of the tank.
10