Embed Size (px)
Citation preview
PA BPP
2-13-17 Page 1 of 65
Transactions
- ZPAA076
- SBWP
- PA40
NEW HIRE ACTION
Trigger:
There is a need to process a New Hire Action for one of the reasons listed in the Business Process
Procedure Overview section.
Business Process Procedure Overview:
A New Hire action needs to be initiated when a Supervisor/Manager notifies HR of the initial employment
of an individual to a position. This New Hire action form will be completed and submitted via workflow,
and will be assigned a PCR number (personnel change request number). This PCR will proceed through
the workflow approval levels as defined by the business process, and when complete, will come back to the
Initiator's inbox for processing. The Initiator will open the approved New Hire PCR request, process the
New Hire action, and when completed with all infotypes, click Complete on the PCR request.
As the initiator, you will use the Employee Request Form to create a New Hire Action workflow request
for an employee. You will review the workflow item and use the standard workflow functions as
appropriate to:
1. View the workflow log
2. View the workflow tracker
3. View the workflow header
4. View the priority classification
Once the PCR request has been approved, the initiator/requestor will process the New Hire action, which
begins from the approved PCR item in the SAP inbox.
The new hire action is executed after several steps have been completed and appropriate authorization
has been received. When a vacancy of an existing position has occurred or a new position has been
approved and established by the State and the vacancy has been posted in accordance with state policy,
interviews with all qualified candidates will be completed. The State then completes and approves a
recommendation package. The candidate receives and accepts an offer. The HR Administrator gathers the
necessary employee data (from employee application and other documents gathered such as Employee
Name, Work Schedule, Salary, Position Number, and Effective Date) and initiates the New Hire Action
Personnel Change Request (PCR) form within workflow using transaction ZPAA076.
The New Hire action is used to generate a Personnel No and HR Master Data for:
A new employee who has not worked for the State of North Carolina. In this situation the Reason for
Action is 01 – New Hire.
Perform the New Hire Action when an ‘Approved Recommendation Package’ is received from the
department to hire a person.
NOTE: There is an additional reason for New Hire, 02 National Guard. This reason will be addressed in a
separate Job Aid, since there are less infotypes available for this reason.

Title: New Hire Action Transactions: ZPAA076 / SBWP
2-13-17 Page 2 of 65
INITIATE
Notes must be attached to the PCR to aid in the approval decisions by those in the approval workflow
chain. These notes will not transfer to the Action, but may be copied and pasted into new notes
within the Action.
We recommend, on the Employee Action Request, entering the EE Position number first, and then
clicking Enter to request validation by SAP and the pre-population of many of the fields. If other
fields are entered prior to the position number, when SAP validates the position number, the fields
may not populate properly.
COMPLETE
We recommend processing the employee on the first day of employment.
Prior to starting the New Hire process from within workflow, display the position to ensure it is still
vacant. You can use transaction code PPOSE or PO13D to display the position. Not all will have
access to PO13D.
Personnel actions are date sensitive. Dates can be entered for an event in the future and will not
take effect until that date, but will show in the system as soon as they are entered (for future-
dated actions you will not be able to see the action unless you search within that date range – the
default date range for searches is the current date).
Access Transaction:
Via Menu Path: This is a custom transaction. It is not located in the SAP Menu path.
Via Transaction Code: ZPAA076
Title: New Hire Action Transactions: ZPAA076 / SBWP
2-13-17 Page 3 of 65
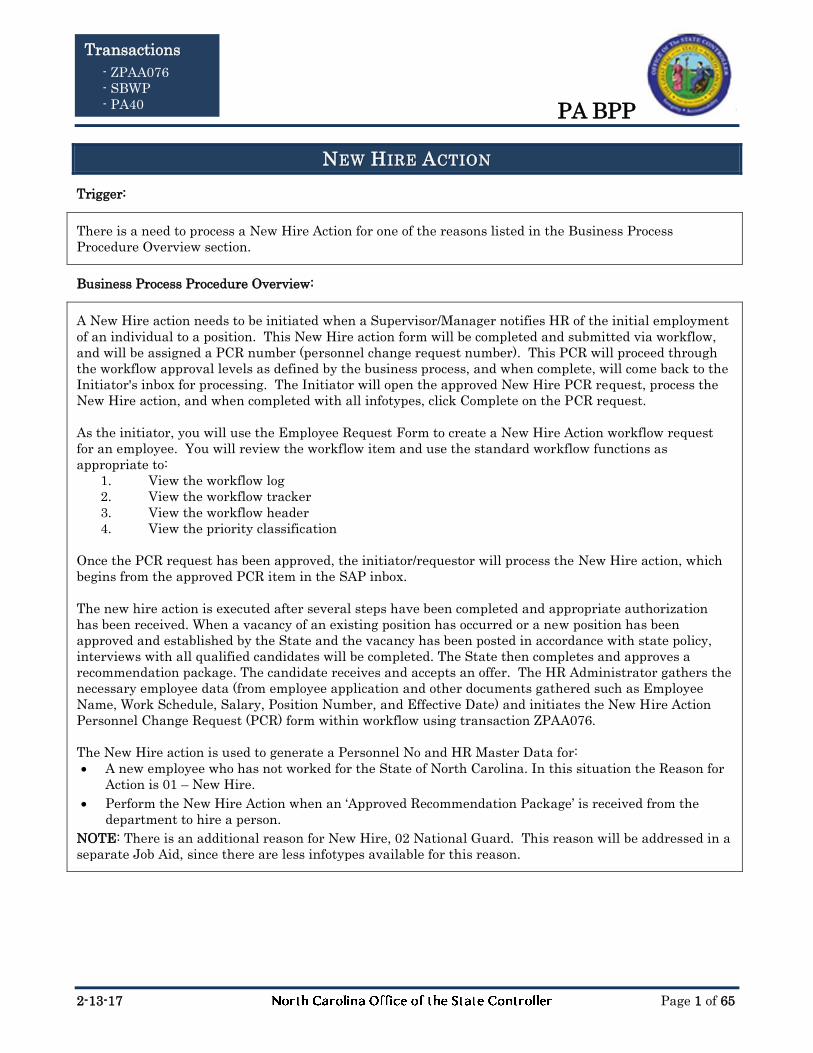
PROCEDURE
1. Update the following field:
Field Name Description Values
Command White alphanumeric box in upper left
corner used to input transaction
codes
Enter value in Command.
Example: ZPAA076
2. Click the Enter button.
Information
You may want to enter this transaction code in your Favorites folder.
Choose Favorites > Insert Favorites
Type in ZPAA076
Click Enter.
To see the transaction code displayed in front of the link in your
favorites:
Choose Edit > Settings
Place a check next to Display Technical Name
Click Enter
Title: New Hire Action Transactions: ZPAA076 / SBWP
2-13-17 Page 4 of 65
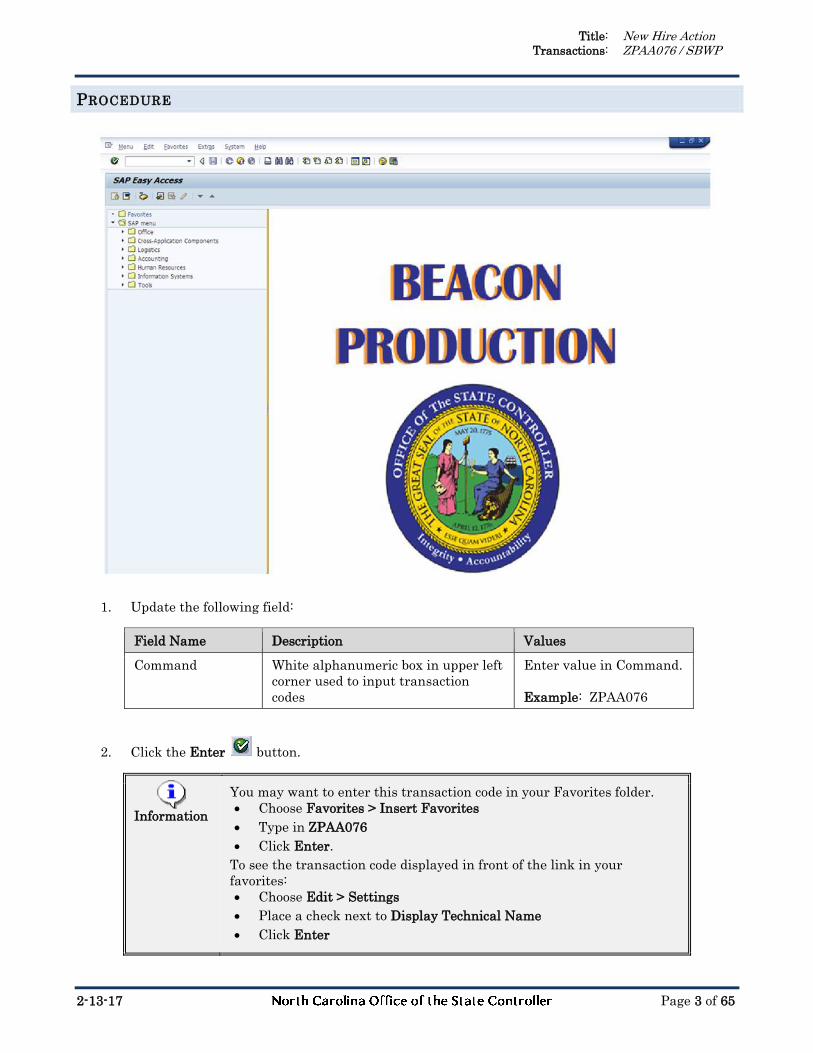
3. Update the following fields:
Field Name Description Values
Last 4 digits (SSN) The last 4 digits of the employees
social security number
Enter value in Last 4
digits (SSN).
Example: 5252
First The employee's first name Enter value in First.
Example: Matthew
Last The individual's legal last name Enter value in Last.
Example: McKinney
Effective on The date on which the action will be
effective
Enter value in Effective
on.
Example: 05/16/2011
Action Type An action is a grouping of activities to
perform a specific task. The action
will prompt you for the Infotypes
required to complete the task.
Enter value in Action
Type.
Example: Z0
Reason Reason for the action, such as New
Hire
Enter value in Reason.
Example: 01
Information
As of 3/18/08, the last 5 digits of the social security number are no longer
required. This has been changed to only require the last 4 digits of the
social security number. This piece of an employee's social security
number is only required for New Hire actions where the employee does
not already have a Personnel Number.
Title: New Hire Action Transactions: ZPAA076 / SBWP
2-13-17 Page 5 of 65
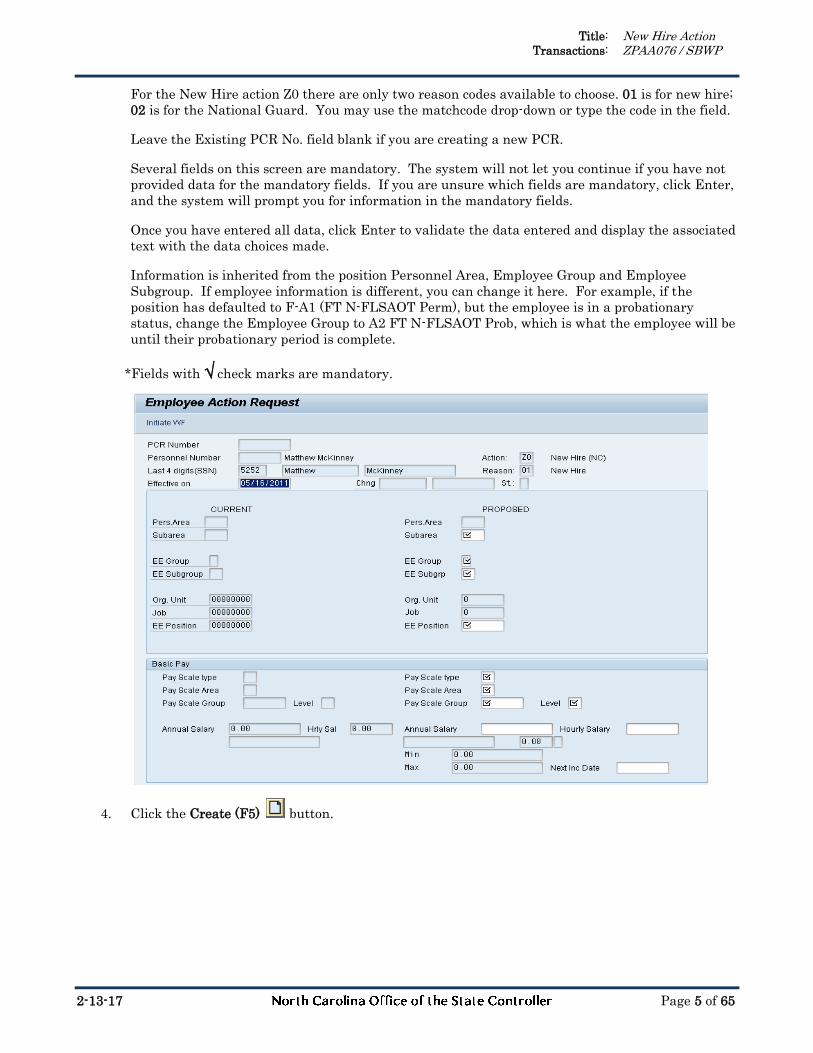
For the New Hire action Z0 there are only two reason codes available to choose. 01 is for new hire;
02 is for the National Guard. You may use the matchcode drop-down or type the code in the field.
Leave the Existing PCR No. field blank if you are creating a new PCR.
Several fields on this screen are mandatory. The system will not let you continue if you have not
provided data for the mandatory fields. If you are unsure which fields are mandatory, click Enter,
and the system will prompt you for information in the mandatory fields.
Once you have entered all data, click Enter to validate the data entered and display the associated
text with the data choices made.
Information is inherited from the position Personnel Area, Employee Group and Employee
Subgroup. If employee information is different, you can change it here. For example, if the
position has defaulted to F-A1 (FT N-FLSAOT Perm), but the employee is in a probationary
status, change the Employee Group to A2 FT N-FLSAOT Prob, which is what the employee will be
until their probationary period is complete.
*Fields with √ check marks are mandatory.
4. Click the Create (F5) button.
Title: New Hire Action Transactions: ZPAA076 / SBWP
2-13-17 Page 6 of 65
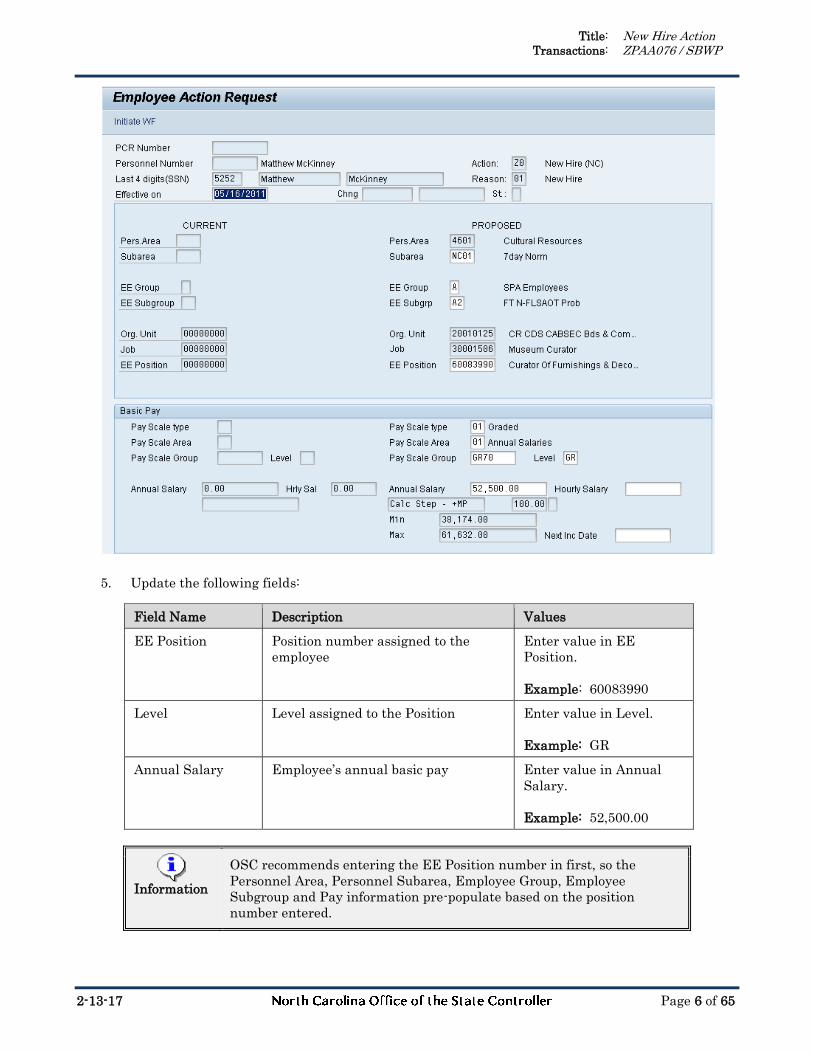
5. Update the following fields:
Field Name Description Values
EE Position Position number assigned to the
employee
Enter value in EE
Position.
Example: 60083990
Level Level assigned to the Position Enter value in Level.
Example: GR
Annual Salary Employee’s annual basic pay Enter value in Annual
Salary.
Example: 52,500.00
Information
OSC recommends entering the EE Position number in first, so the
Personnel Area, Personnel Subarea, Employee Group, Employee
Subgroup and Pay information pre-populate based on the position
number entered.

Title: New Hire Action Transactions: ZPAA076 / SBWP
2-13-17 Page 7 of 65
You may then change fields as necessary (for example, if the employee will be probationary, you
may want to change the Employee Subgroup). If you do not enter the position number first, the
pre-population of data based on the position number may not work properly.
Once you have entered the EE Position number, click Enter to request SAP pre-fill fields on the
screen.
The Job assignment to a graded position will default the compensation structure data (payscale
type, payscale area, and payscale group). If you are hiring into a banded position, the position
itself will have default values to propose in the compensation area.
6. Click the Enter button.
7. Update the following field (only if hiring a Temporary employee):
Field Name Description Values
Pay Scale Area A pay scale area is a special area in
which a collective agreement is valid.
Hourly salary is only used for
Temporary employees. You will need
to change the Pay Scale Area to
Hourly if using this field.
Enter value in Pay Scale
Area.
Example: 11
Hourly Salary The hourly rate Enter value in Hourly
Salary.
Example: 17.50
8. Click the Enter button.
TIP: Click Enter after entering the Salary or Hourly rate, and additional fields will be validated
and pre-populated.
9. Click the Save (Ctrl+S) button.
Title: New Hire Action Transactions: ZPAA076 / SBWP
2-13-17 Page 8 of 65
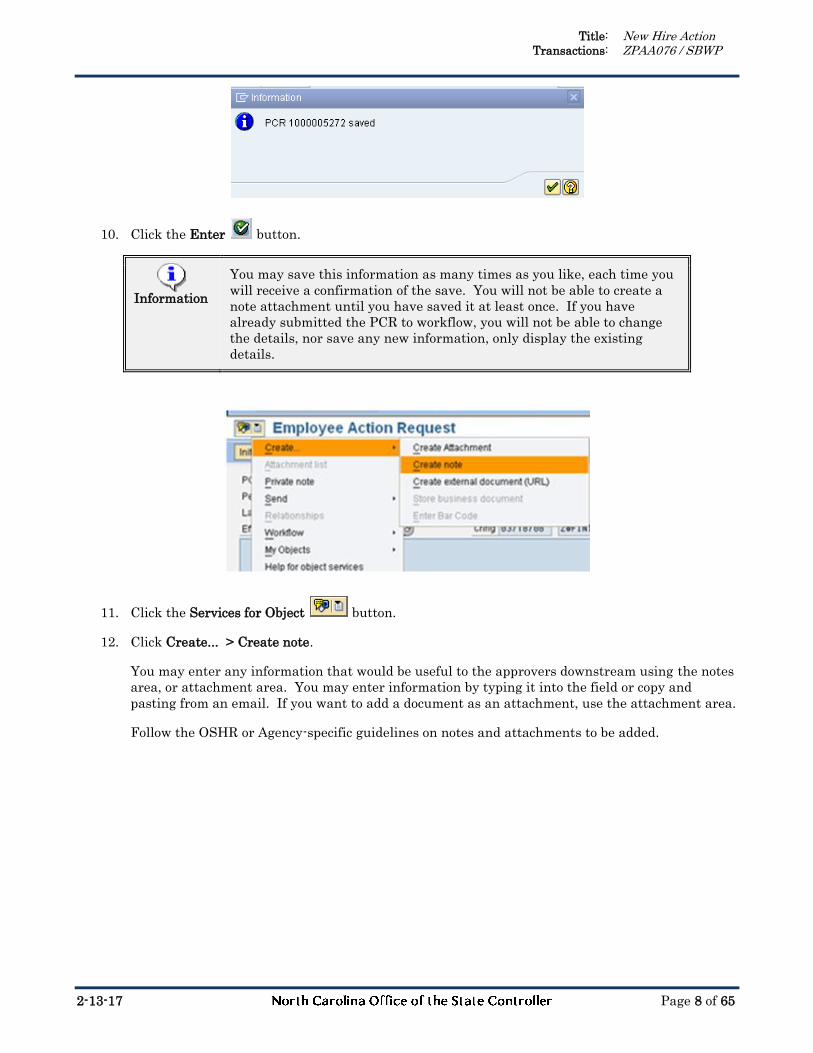
10. Click the Enter button.
Information
You may save this information as many times as you like, each time you
will receive a confirmation of the save. You will not be able to create a
note attachment until you have saved it at least once. If you have
already submitted the PCR to workflow, you will not be able to change
the details, nor save any new information, only display the existing
details.
11. Click the Services for Object button.
12. Click Create... > Create note.
You may enter any information that would be useful to the approvers downstream using the notes
area, or attachment area. You may enter information by typing it into the field or copy and
pasting from an email. If you want to add a document as an attachment, use the attachment area.
Follow the OSHR or Agency-specific guidelines on notes and attachments to be added.

Title: New Hire Action Transactions: ZPAA076 / SBWP
2-13-17 Page 9 of 65
13. Update the following fields:
Field Name Description Values
Title of note The short text to act as the title of
the attachment
Enter value in Title of
note.
Example: New Hire
Justification
Long text An open text field Enter value in long text.
Example: the
appropriate note
Information
The attached note may be entered here after saving the PCR prior to
initiating workflow, or after submitting workflow in the display mode of
the PCR. The note will remain with the PCR. The note will not transfer
to the Action process (such as a New Hire process), but will remain with
the PCR, and can be copied from the PCR and pasted into a note on the
Action when processed. This means that the information must be
entered in 2 places - on the PCR and on the Action.
14. Click the Enter button.
Title: New Hire Action Transactions: ZPAA076 / SBWP
2-13-17 Page 10 of 65
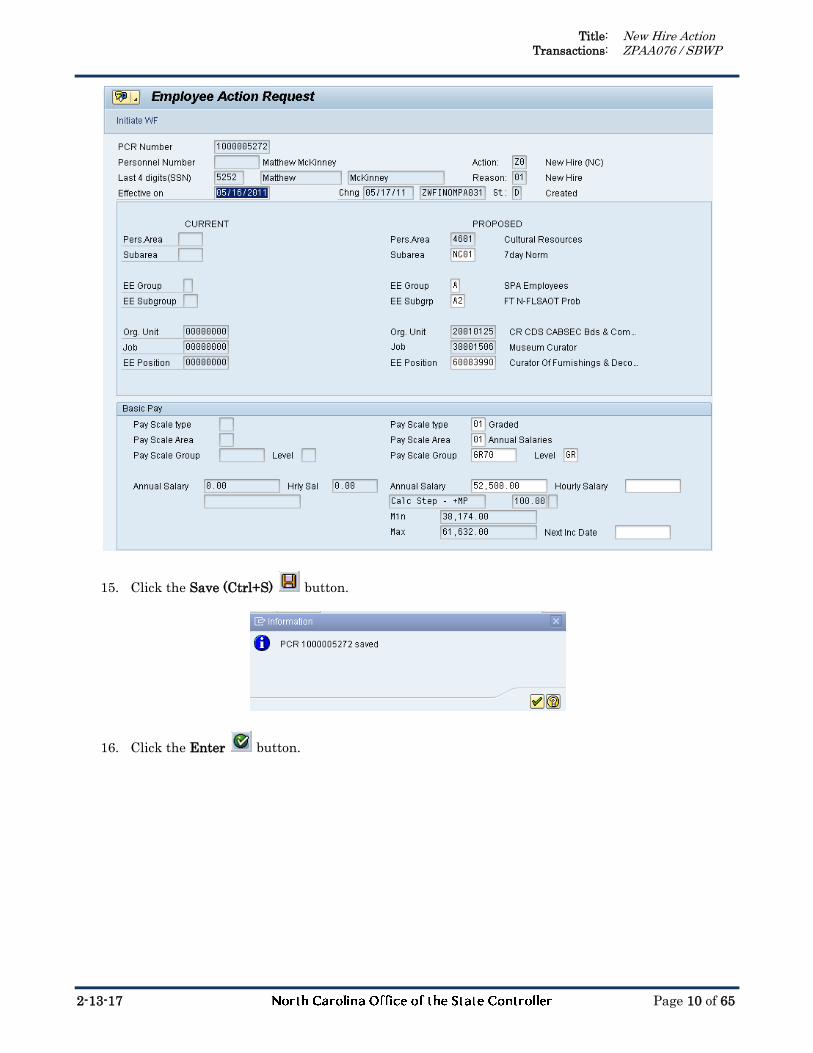
15. Click the Save (Ctrl+S) button.
16. Click the Enter button.
Title: New Hire Action Transactions: ZPAA076 / SBWP
2-13-17 Page 11 of 65
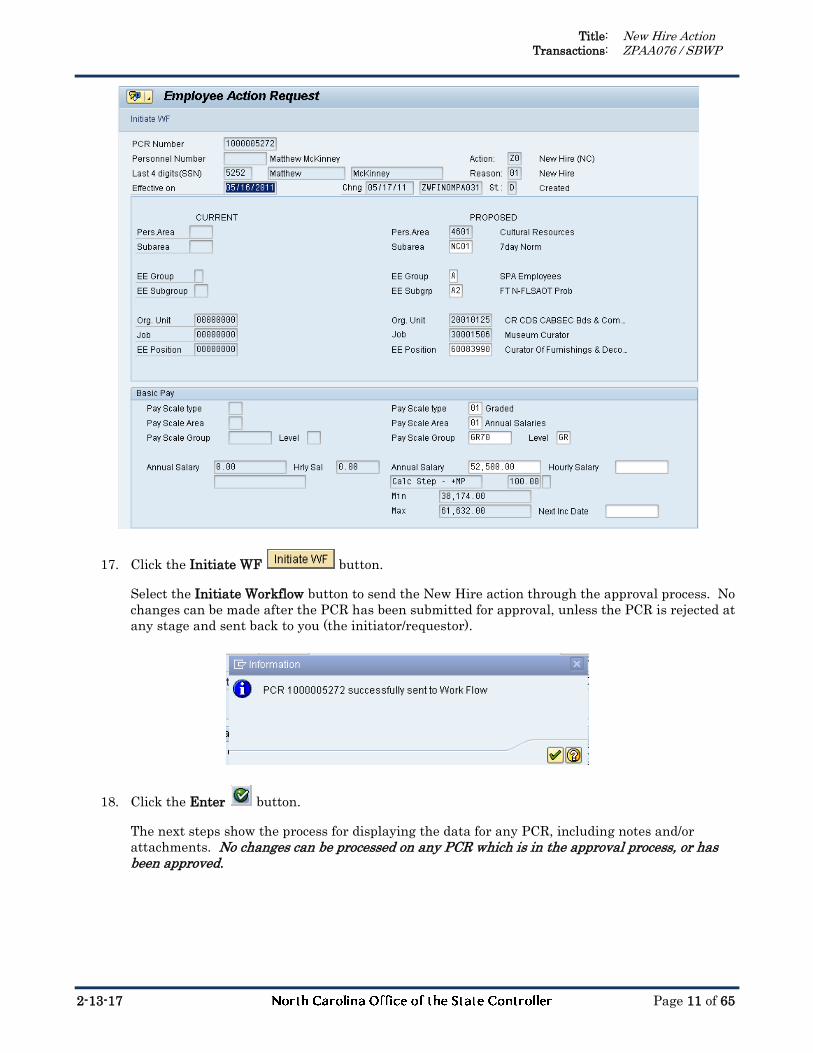
17. Click the Initiate WF button.
Select the Initiate Workflow button to send the New Hire action through the approval process. No
changes can be made after the PCR has been submitted for approval, unless the PCR is rejected at
any stage and sent back to you (the initiator/requestor).
18. Click the Enter button.
The next steps show the process for displaying the data for any PCR, including notes and/or
attachments. No changes can be processed on any PCR which is in the approval process, or has been approved.

Title: New Hire Action Transactions: ZPAA076 / SBWP
2-13-17 Page 12 of 65
19. Update the following field:
Field Name Description Values
Existing PCR No. Personnel Change Request number Enter value in Existing
PCR No.
Example: 1000005272
20. Click the Change (F6) button.
21. Click the Display (F7) button.
Title: New Hire Action Transactions: ZPAA076 / SBWP
2-13-17 Page 13 of 65
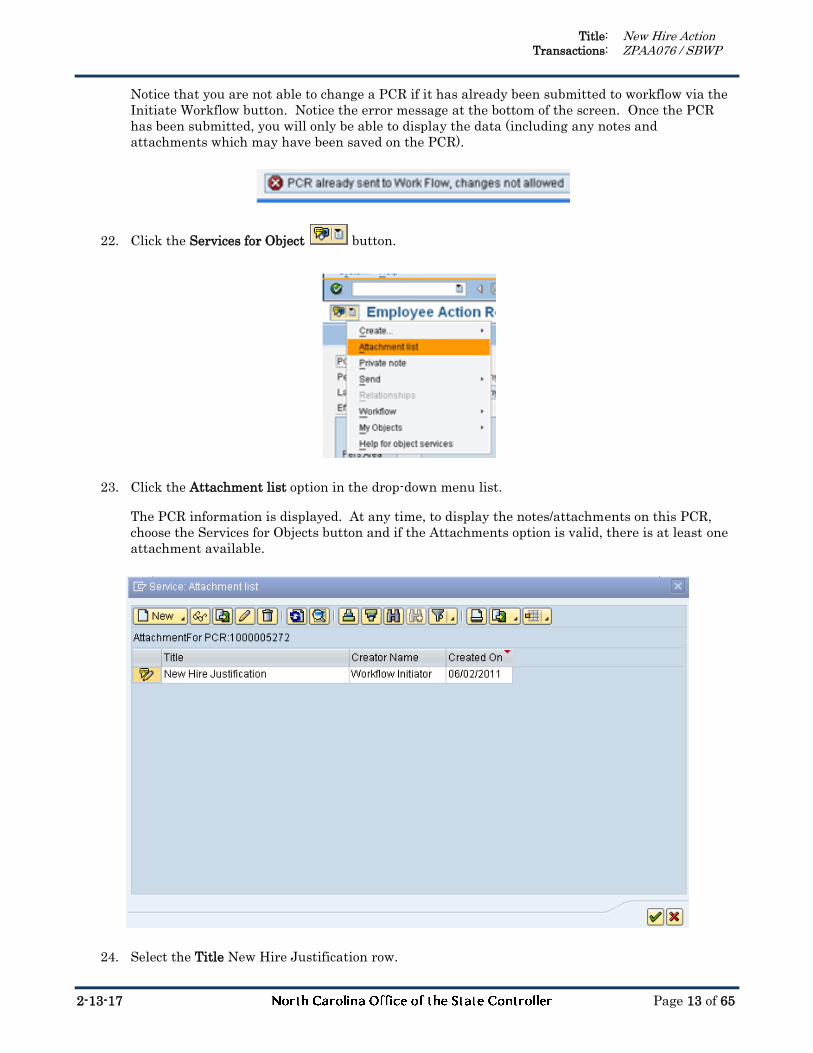
Notice that you are not able to change a PCR if it has already been submitted to workflow via the
Initiate Workflow button. Notice the error message at the bottom of the screen. Once the PCR
has been submitted, you will only be able to display the data (including any notes and
attachments which may have been saved on the PCR).
22. Click the Services for Object button.
23. Click the Attachment list option in the drop-down menu list.
The PCR information is displayed. At any time, to display the notes/attachments on this PCR,
choose the Services for Objects button and if the Attachments option is valid, there is at least one
attachment available.
24. Select the Title New Hire Justification row.
Title: New Hire Action Transactions: ZPAA076 / SBWP
2-13-17 Page 14 of 65
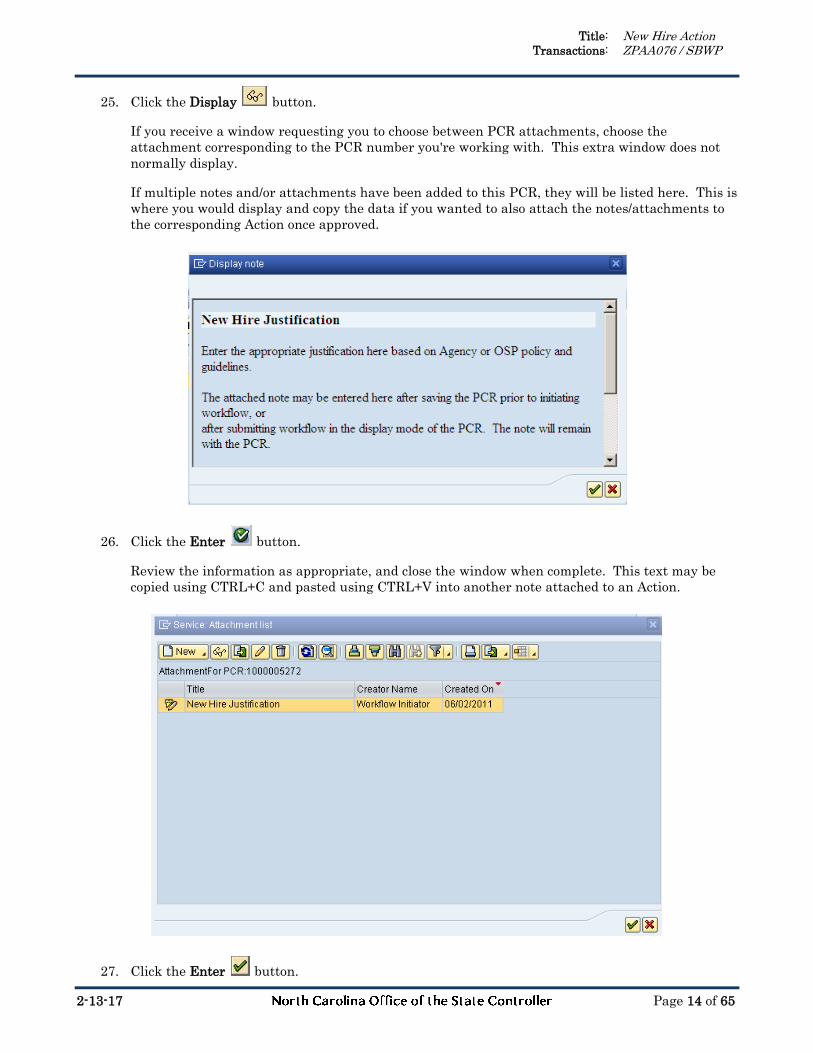
25. Click the Display button.
If you receive a window requesting you to choose between PCR attachments, choose the
attachment corresponding to the PCR number you're working with. This extra window does not
normally display.
If multiple notes and/or attachments have been added to this PCR, they will be listed here. This is
where you would display and copy the data if you wanted to also attach the notes/attachments to
the corresponding Action once approved.
26. Click the Enter button.
Review the information as appropriate, and close the window when complete. This text may be
copied using CTRL+C and pasted using CTRL+V into another note attached to an Action.
27. Click the Enter button.
Title: New Hire Action Transactions: ZPAA076 / SBWP
2-13-17 Page 15 of 65
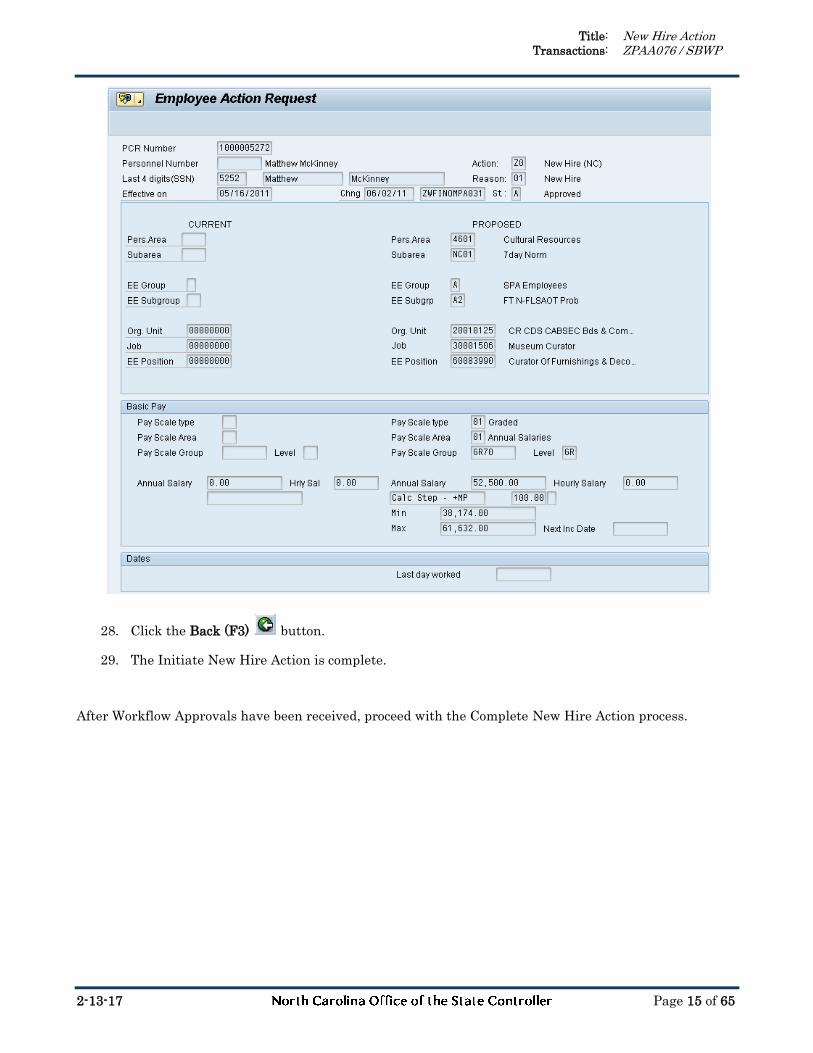
28. Click the Back (F3) button.
29. The Initiate New Hire Action is complete.
After Workflow Approvals have been received, proceed with the Complete New Hire Action process.

Title: New Hire Action Transactions: ZPAA076 / SBWP
2-13-17 Page 16 of 65
Instructions for Completing the Action
Access Transaction:
Via Menu Path: SAP menu >> Office >> SBWP - Workplace
Via Transaction Code: SBWP, PA40
30. Click the SAP Business Workplace (Ctrl+F12) button.
CRITICAL!
These instructions assume you have already initiated the New Hire
Personnel Change Request (PCR) in workflow, and you have an
approved PCR ready to be processed as a New Hire in the system.
31. Select Inbox >> Workflow.
You can process using step 32 or step 33.

Title: New Hire Action Transactions: ZPAA076 / SBWP
2-13-17 Page 17 of 65
32. Select the PCR row. Double-
click on row.
A list of your approved (or rejected) PCR's are listed on the right side of the screen. You may view
the PCR details and/or Workflow Tracker details prior to executing the PCR if desired. After the
PCR is executed, the New Hire action will be launched.
33. Click the Execute button.

Title: New Hire Action Transactions: ZPAA076 / SBWP
2-13-17 Page 18 of 65
34. Update the following fields:
Field Name Description Values
SSN Social security number Enter value in SSN.
Example: 888885252
Date of Birth The individual’s date of birth Enter value in Date of
Birth.
Example: 02/16/1989
35. Click the appropriate gender check box.
Information
The last 4 digits of the Social Security number must match the numbers
entered when initiating the PCR. If they do not match, the system will
notify you that you do not have a valid, approved PCR, and will not let
you process the New Hire action.
The Start Date is the effective date of the New Hire action.
Add the Middle Name - the information entered on this screen will populate infotype 0002
Personal Data.
CRITICAL!
You may NOT enter a dummy/temporary social security number.
Once infotype 0002 is saved you must contact BEST HR to be
maintained.
Title: New Hire Action Transactions: ZPAA076 / SBWP
2-13-17 Page 19 of 65
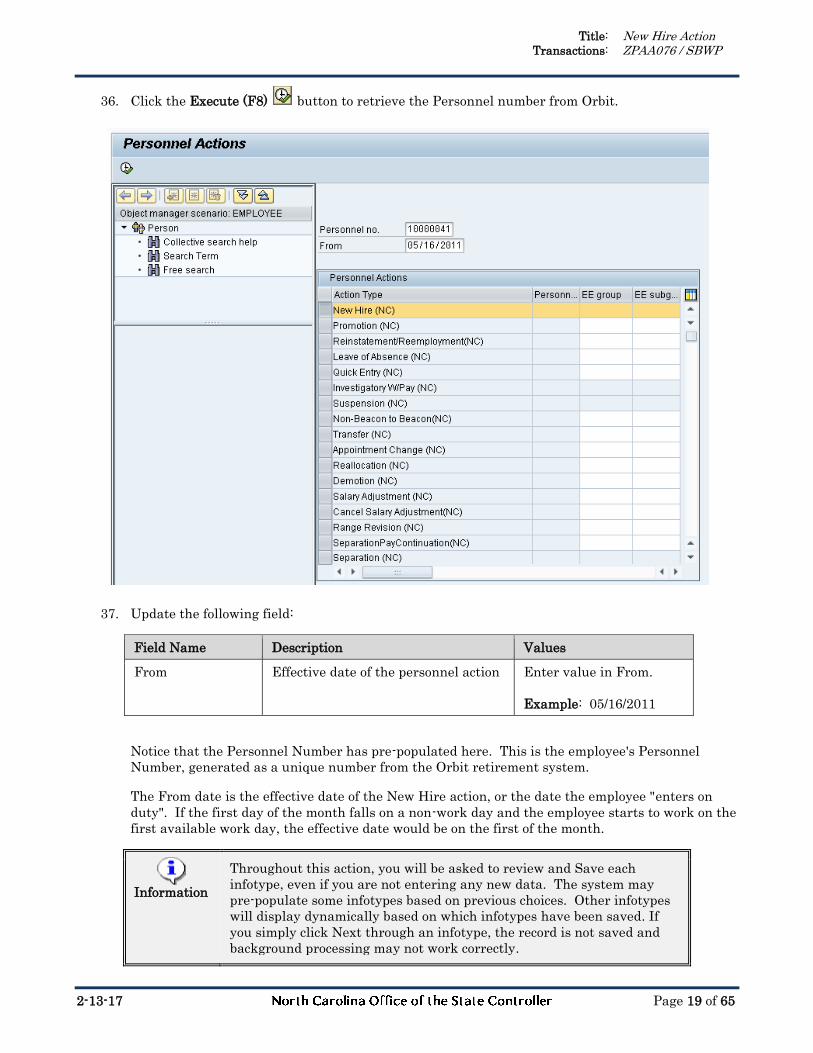
36. Click the Execute (F8) button to retrieve the Personnel number from Orbit.
37. Update the following field:
Field Name Description Values
From Effective date of the personnel action Enter value in From.
Example: 05/16/2011
Notice that the Personnel Number has pre-populated here. This is the employee's Personnel
Number, generated as a unique number from the Orbit retirement system.
The From date is the effective date of the New Hire action, or the date the employee "enters on
duty". If the first day of the month falls on a non-work day and the employee starts to work on the
first available work day, the effective date would be on the first of the month.
Information
Throughout this action, you will be asked to review and Save each
infotype, even if you are not entering any new data. The system may
pre-populate some infotypes based on previous choices. Other infotypes
will display dynamically based on which infotypes have been saved. If
you simply click Next through an infotype, the record is not saved and
background processing may not work correctly.
Title: New Hire Action Transactions: ZPAA076 / SBWP
2-13-17 Page 20 of 65
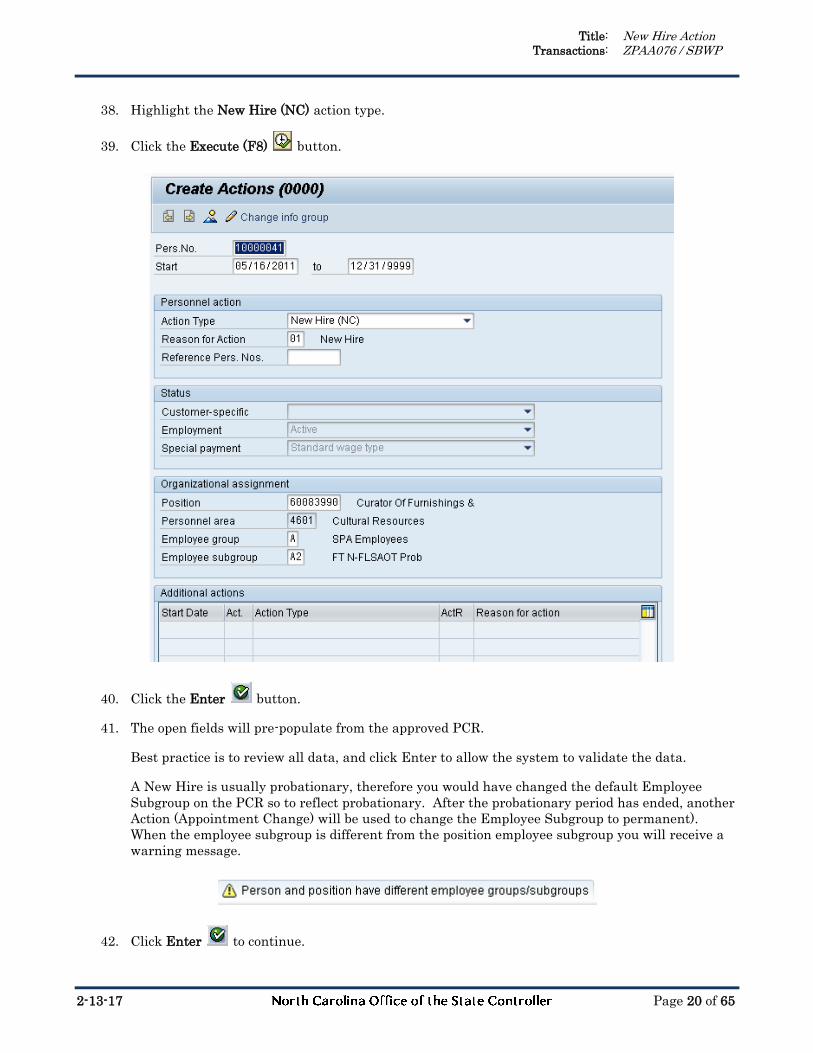
38. Highlight the New Hire (NC) action type.
39. Click the Execute (F8) button.
40. Click the Enter button.
41. The open fields will pre-populate from the approved PCR.
Best practice is to review all data, and click Enter to allow the system to validate the data.
A New Hire is usually probationary, therefore you would have changed the default Employee
Subgroup on the PCR so to reflect probationary. After the probationary period has ended, another
Action (Appointment Change) will be used to change the Employee Subgroup to permanent).
When the employee subgroup is different from the position employee subgroup you will receive a
warning message.
42. Click Enter to continue.
Title: New Hire Action Transactions: ZPAA076 / SBWP
2-13-17 Page 21 of 65
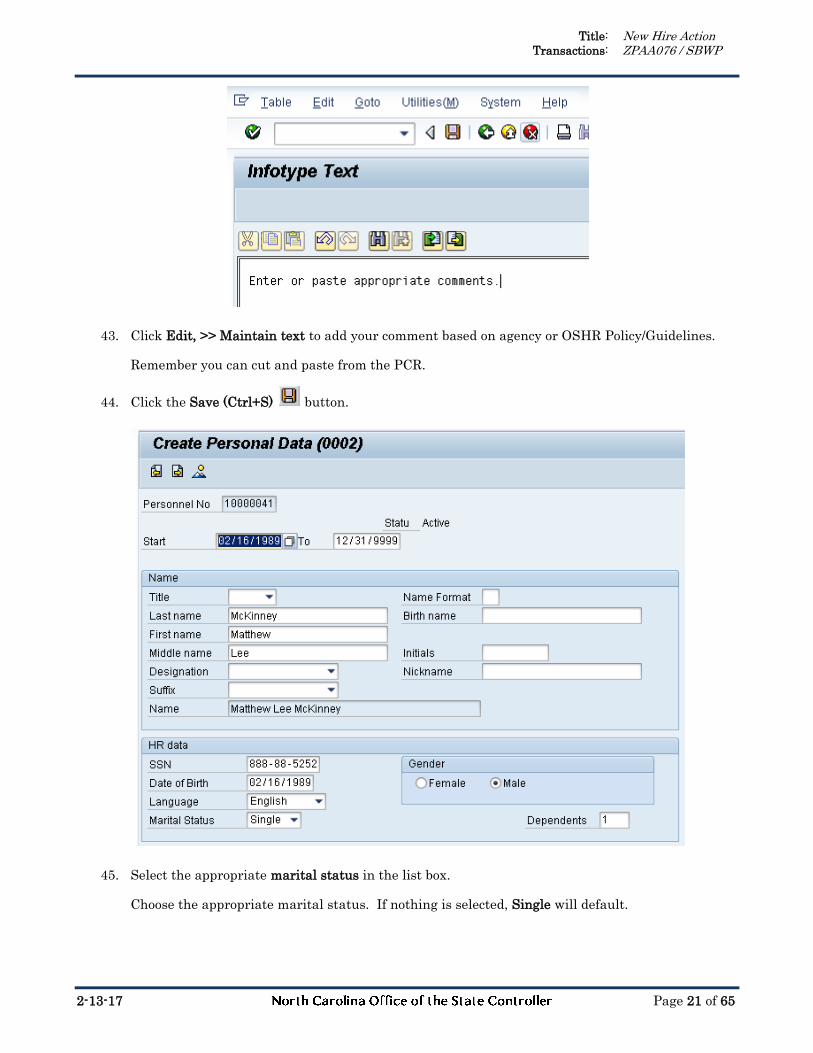
43. Click Edit, >> Maintain text to add your comment based on agency or OSHR Policy/Guidelines.
Remember you can cut and paste from the PCR.
44. Click the Save (Ctrl+S) button.
45. Select the appropriate marital status in the list box.
Choose the appropriate marital status. If nothing is selected, Single will default.
Title: New Hire Action Transactions: ZPAA076 / SBWP
2-13-17 Page 22 of 65
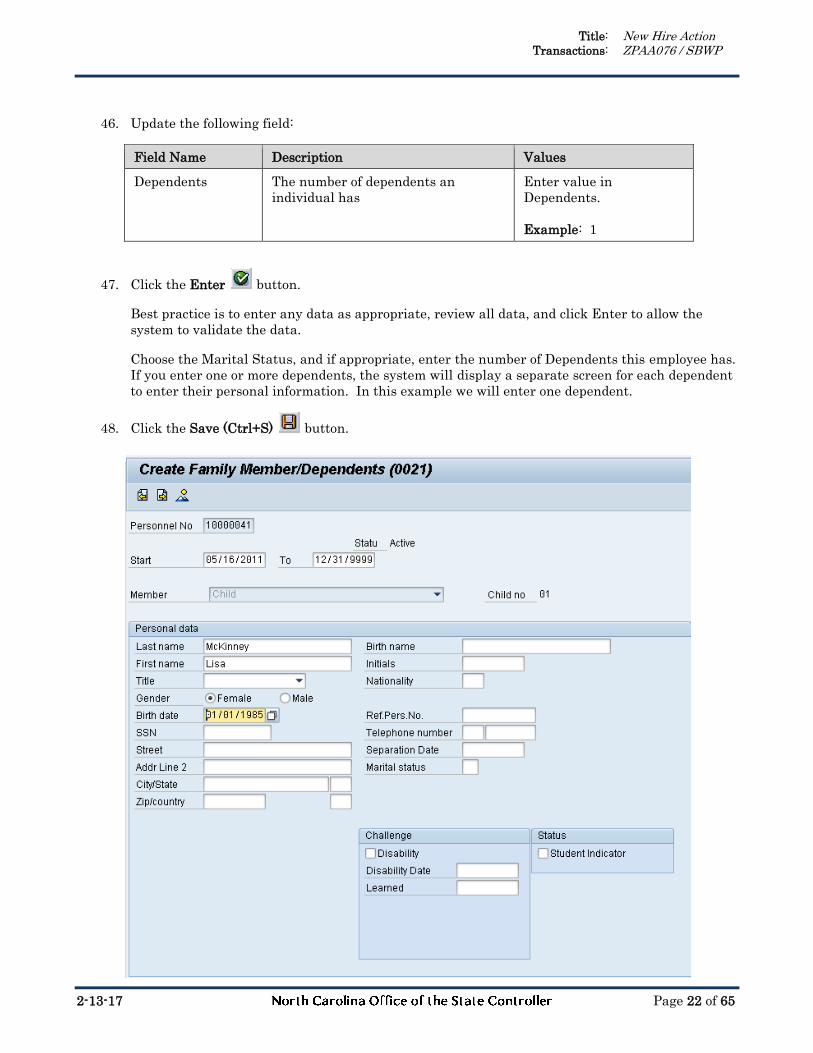
46. Update the following field:
Field Name Description Values
Dependents The number of dependents an
individual has
Enter value in
Dependents.
Example: 1
47. Click the Enter button.
Best practice is to enter any data as appropriate, review all data, and click Enter to allow the
system to validate the data.
Choose the Marital Status, and if appropriate, enter the number of Dependents this employee has.
If you enter one or more dependents, the system will display a separate screen for each dependent
to enter their personal information. In this example we will enter one dependent.
48. Click the Save (Ctrl+S) button.
Title: New Hire Action Transactions: ZPAA076 / SBWP
2-13-17 Page 23 of 65
49. Update the following field:
Field Name Description Values
First name The individual's legal first name Enter value in First
name.
Example: Lisa
50. Click the Female radio button.
Choose Female or Male.

Title: New Hire Action Transactions: ZPAA076 / SBWP
2-13-17 Page 24 of 65
51. Update the following field:
Field Name Description Values
Birth date The individual's date of birth Enter value in Birth date.
Example: 01/01/1985
52. Click the Enter button.
Best practice is to enter any data as appropriate, review all data, and click Enter to allow the
system to validate the data.
Enter all of the available data on the dependent(s), review, and click Save.
If you do not have this information, the employee can complete this data through Employee Self-
Service (ESS).
53. Click the Save (Ctrl+S) button.
Title: New Hire Action Transactions: ZPAA076 / SBWP
2-13-17 Page 25 of 65
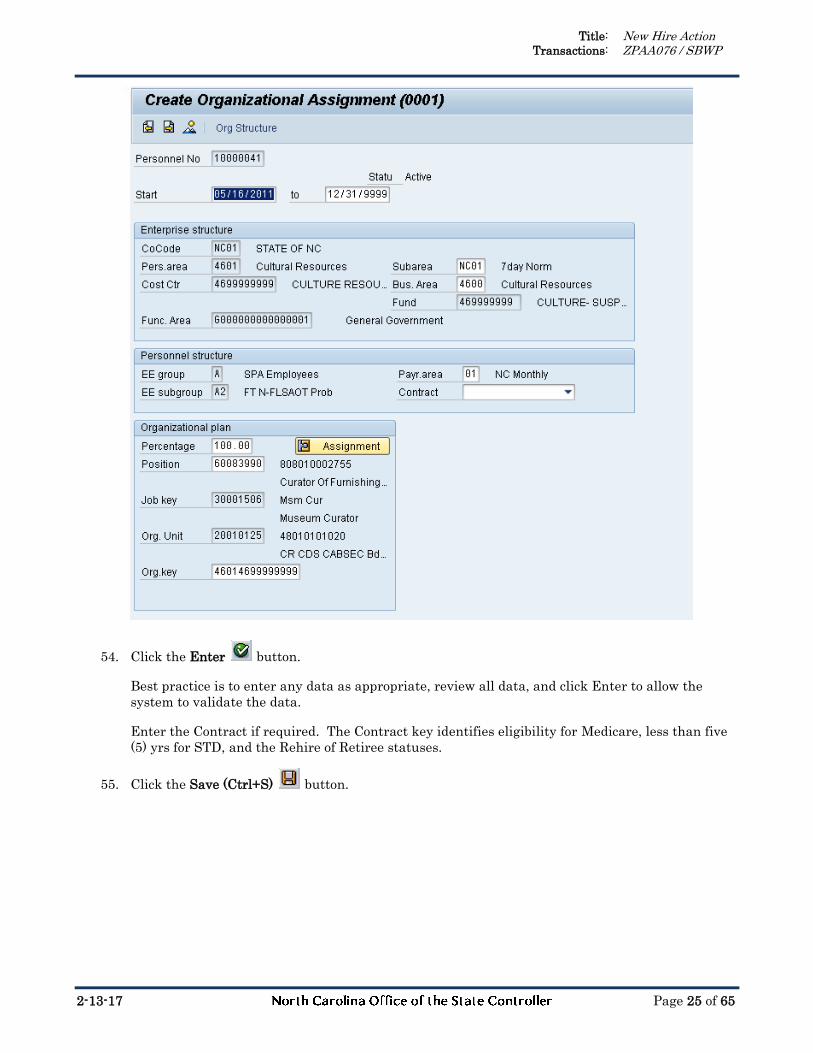
54. Click the Enter button.
Best practice is to enter any data as appropriate, review all data, and click Enter to allow the
system to validate the data.
Enter the Contract if required. The Contract key identifies eligibility for Medicare, less than five
(5) yrs for STD, and the Rehire of Retiree statuses.
55. Click the Save (Ctrl+S) button.
Title: New Hire Action Transactions: ZPAA076 / SBWP
2-13-17 Page 26 of 65
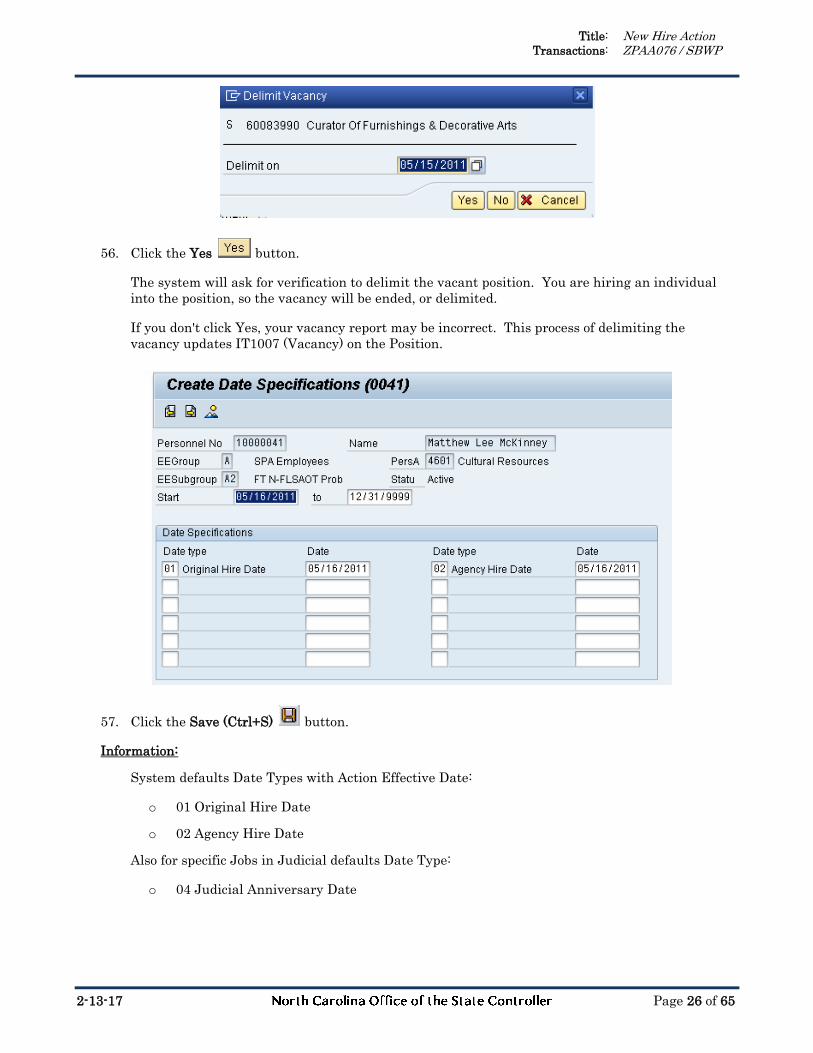
56. Click the Yes button.
The system will ask for verification to delimit the vacant position. You are hiring an individual
into the position, so the vacancy will be ended, or delimited.
If you don't click Yes, your vacancy report may be incorrect. This process of delimiting the
vacancy updates IT1007 (Vacancy) on the Position.
57. Click the Save (Ctrl+S) button.
Information:
System defaults Date Types with Action Effective Date:
o 01 Original Hire Date
o 02 Agency Hire Date
Also for specific Jobs in Judicial defaults Date Type:
o 04 Judicial Anniversary Date
Title: New Hire Action Transactions: ZPAA076 / SBWP
2-13-17 Page 27 of 65
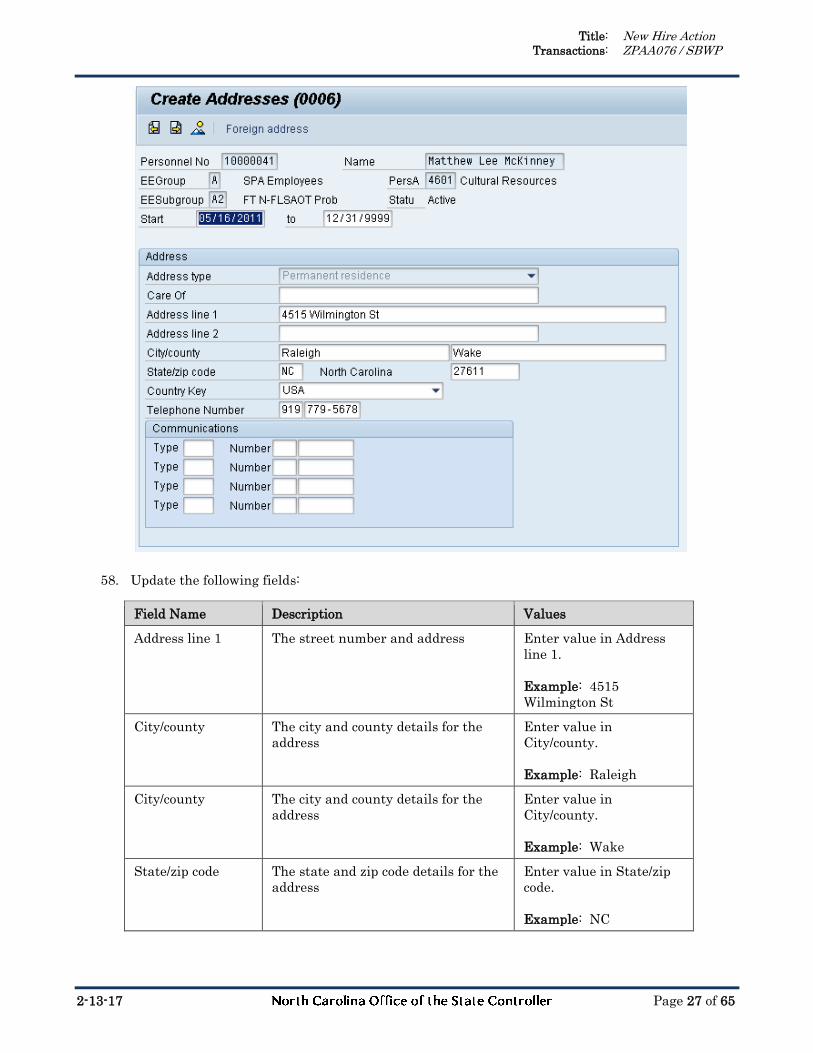
58. Update the following fields:
Field Name Description Values
Address line 1 The street number and address Enter value in Address
line 1.
Example: 4515
Wilmington St
City/county The city and county details for the
address
Enter value in
City/county.
Example: Raleigh
City/county The city and county details for the
address
Enter value in
City/county.
Example: Wake
State/zip code The state and zip code details for the
address
Enter value in State/zip
code.
Example: NC
Title: New Hire Action Transactions: ZPAA076 / SBWP
2-13-17 Page 28 of 65
State/zip code The state and zip code details for the
address
Enter value in State/zip
code.
Example: 27611
Telephone Number
Area Code
The individual's telephone number
area code
Enter value in Telephone
Number.
Example: 919
Telephone Number The individual's telephone number Enter value in Telephone
Number.
Example: 779-5678
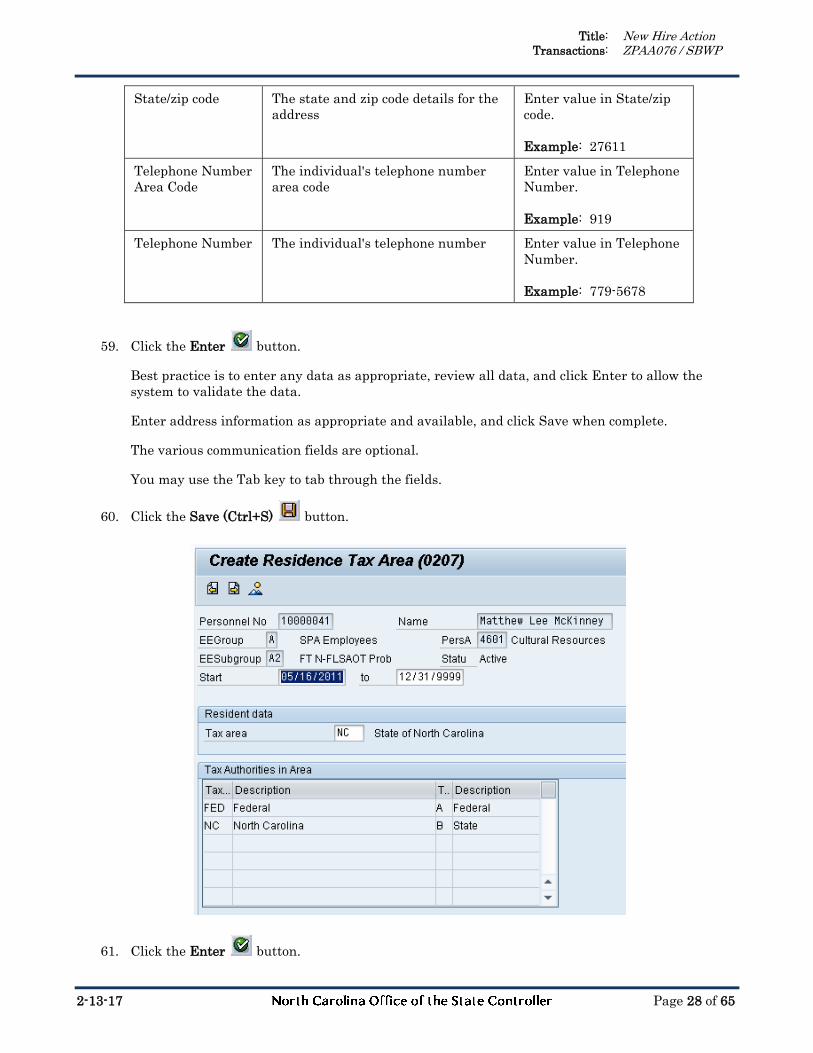
59. Click the Enter button.
Best practice is to enter any data as appropriate, review all data, and click Enter to allow the
system to validate the data.
Enter address information as appropriate and available, and click Save when complete.
The various communication fields are optional.
You may use the Tab key to tab through the fields.
60. Click the Save (Ctrl+S) button.
61. Click the Enter button.

Title: New Hire Action Transactions: ZPAA076 / SBWP
2-13-17 Page 29 of 65
Best practice is to enter any data as appropriate, review all data, and click Enter to allow the
system to validate the data.
If the employee resides in another state, that state should default from Infotype 0006 here.
NOTE: Always verify that the default information on the Create Residence Tax Area infotype is
correct before saving.
62. Click the Save (Ctrl+S) button.
63. Click the Enter button.
Best practice is to enter any data as appropriate, review all data, and click Enter to allow the
system to validate the data.
NOTE: Always verify that the default information on the Create Work Tax Area infotype is correct
before saving.
CRITICAL!
The Predominant Tax Area field is only used for employees who work
in and are taxed by multiple locations within Pennsylvania. This field
will default to No and should not be altered.
64. Click the Save (Ctrl+S) button.

Title: New Hire Action Transactions: ZPAA076 / SBWP
2-13-17 Page 30 of 65
65. Click the Enter button.
Best practice is to enter any data as appropriate, review all data, and click Enter to allow the
system to validate the data.
NOTE: Always verify that the default information on the Create Unemployment State infotype is
correct before saving.
66. Click the Save (Ctrl+S) button.
Title: New Hire Action Transactions: ZPAA076 / SBWP
2-13-17 Page 31 of 65
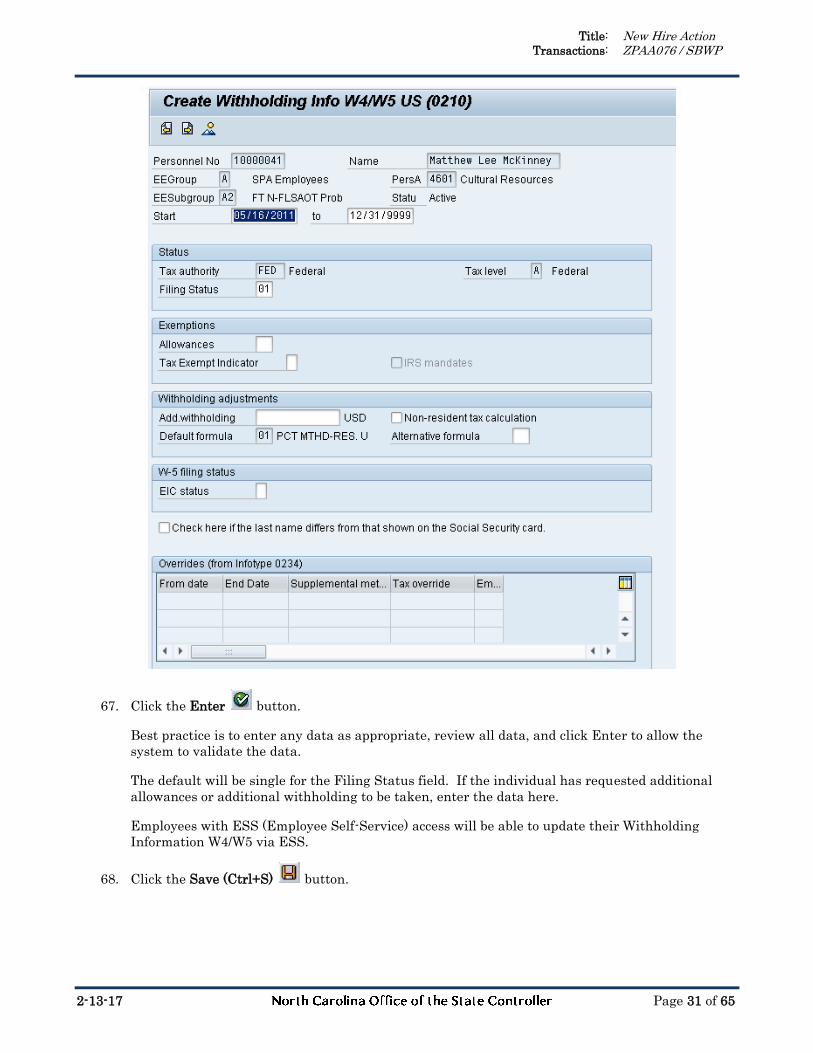
67. Click the Enter button.
Best practice is to enter any data as appropriate, review all data, and click Enter to allow the
system to validate the data.
The default will be single for the Filing Status field. If the individual has requested additional
allowances or additional withholding to be taken, enter the data here.
Employees with ESS (Employee Self-Service) access will be able to update their Withholding
Information W4/W5 via ESS.
68. Click the Save (Ctrl+S) button.
Title: New Hire Action Transactions: ZPAA076 / SBWP
2-13-17 Page 32 of 65
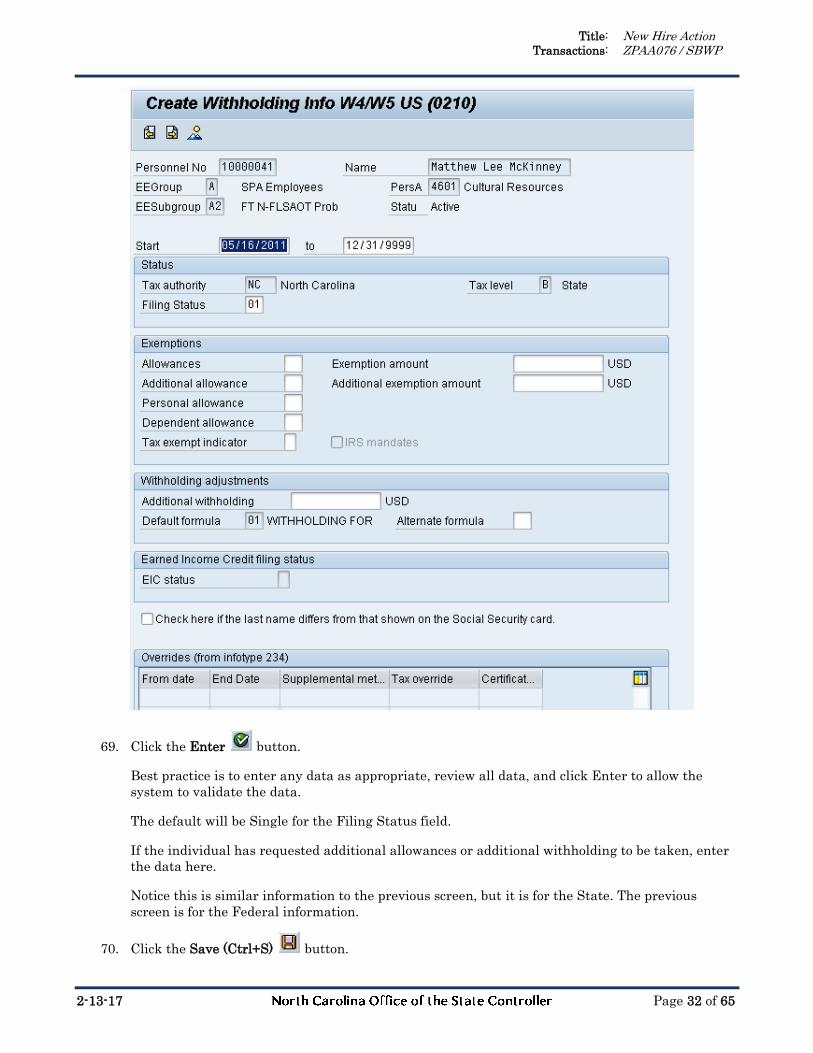
69. Click the Enter button.
Best practice is to enter any data as appropriate, review all data, and click Enter to allow the
system to validate the data.
The default will be Single for the Filing Status field.
If the individual has requested additional allowances or additional withholding to be taken, enter
the data here.
Notice this is similar information to the previous screen, but it is for the State. The previous
screen is for the Federal information.
70. Click the Save (Ctrl+S) button.
Title: New Hire Action Transactions: ZPAA076 / SBWP
2-13-17 Page 33 of 65
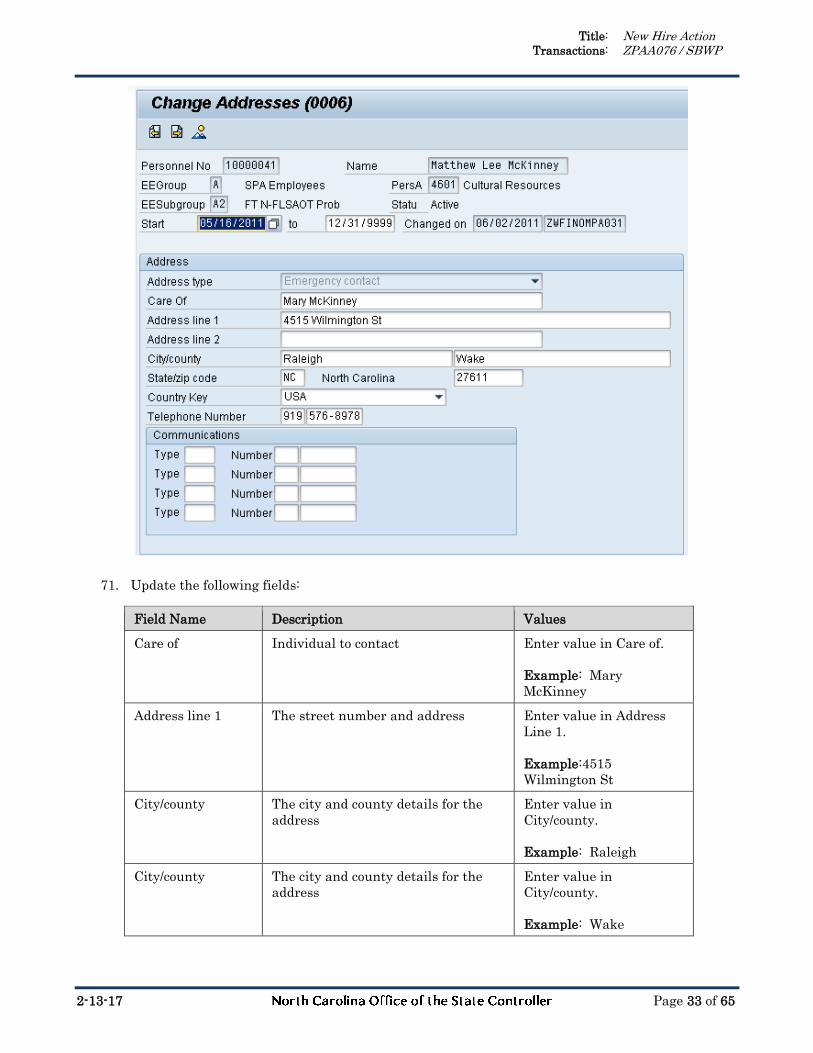
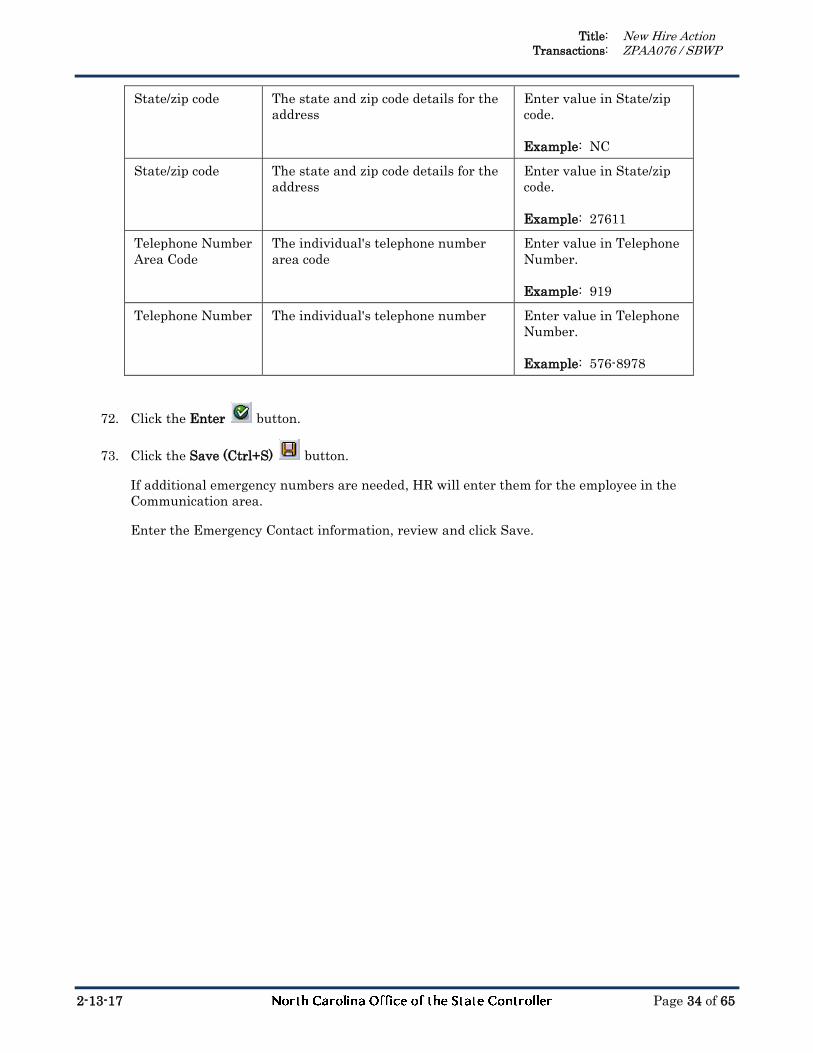
71. Update the following fields:
Field Name Description Values
Care of Individual to contact Enter value in Care of.
Example: Mary
McKinney
Address line 1 The street number and address Enter value in Address
Line 1.
Example:4515
Wilmington St
City/county The city and county details for the
address
Enter value in
City/county.
Example: Raleigh
City/county The city and county details for the
address
Enter value in
City/county.
Example: Wake
Title: New Hire Action Transactions: ZPAA076 / SBWP
2-13-17 Page 34 of 65
State/zip code The state and zip code details for the
address
Enter value in State/zip
code.
Example: NC
State/zip code The state and zip code details for the
address
Enter value in State/zip
code.
Example: 27611
Telephone Number
Area Code
The individual's telephone number
area code
Enter value in Telephone
Number.
Example: 919
Telephone Number The individual's telephone number Enter value in Telephone
Number.
Example: 576-8978
72. Click the Enter button.
73. Click the Save (Ctrl+S) button.
If additional emergency numbers are needed, HR will enter them for the employee in the
Communication area.
Enter the Emergency Contact information, review and click Save.
Title: New Hire Action Transactions: ZPAA076 / SBWP
2-13-17 Page 35 of 65
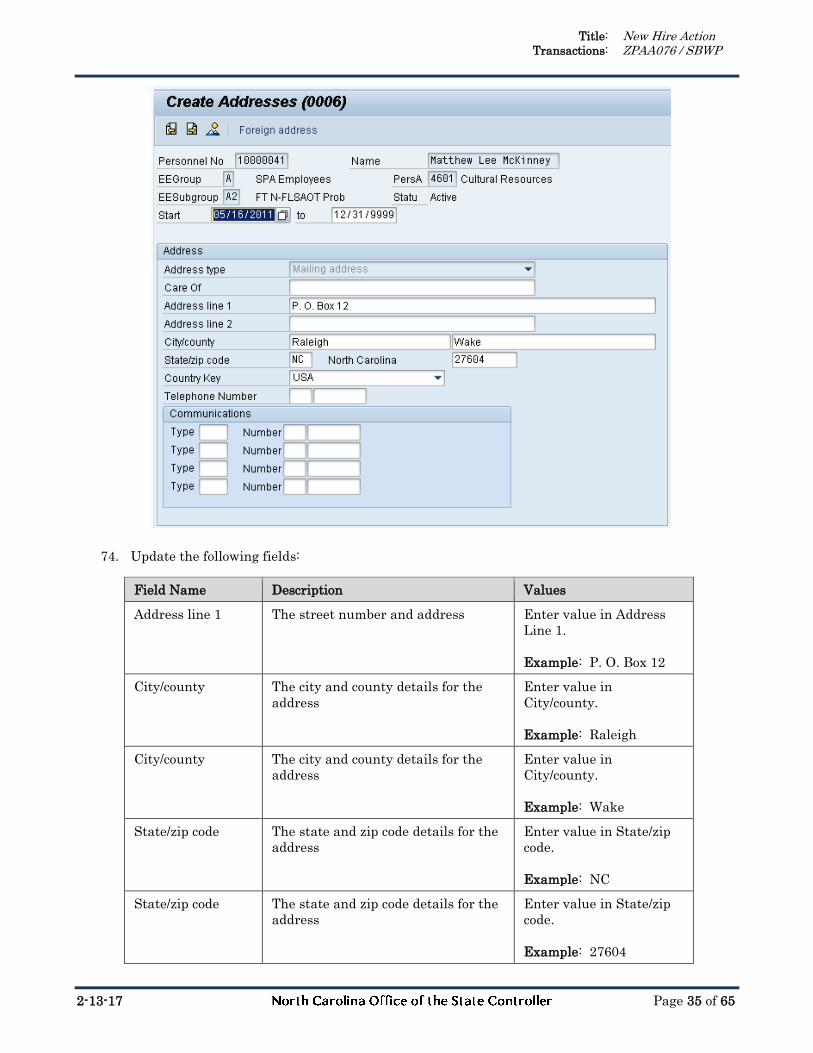
74. Update the following fields:
Field Name Description Values
Address line 1 The street number and address Enter value in Address
Line 1.
Example: P. O. Box 12
City/county The city and county details for the
address
Enter value in
City/county.
Example: Raleigh
City/county The city and county details for the
address
Enter value in
City/county.
Example: Wake
State/zip code The state and zip code details for the
address
Enter value in State/zip
code.
Example: NC
State/zip code The state and zip code details for the
address
Enter value in State/zip
code.
Example: 27604
Title: New Hire Action Transactions: ZPAA076 / SBWP
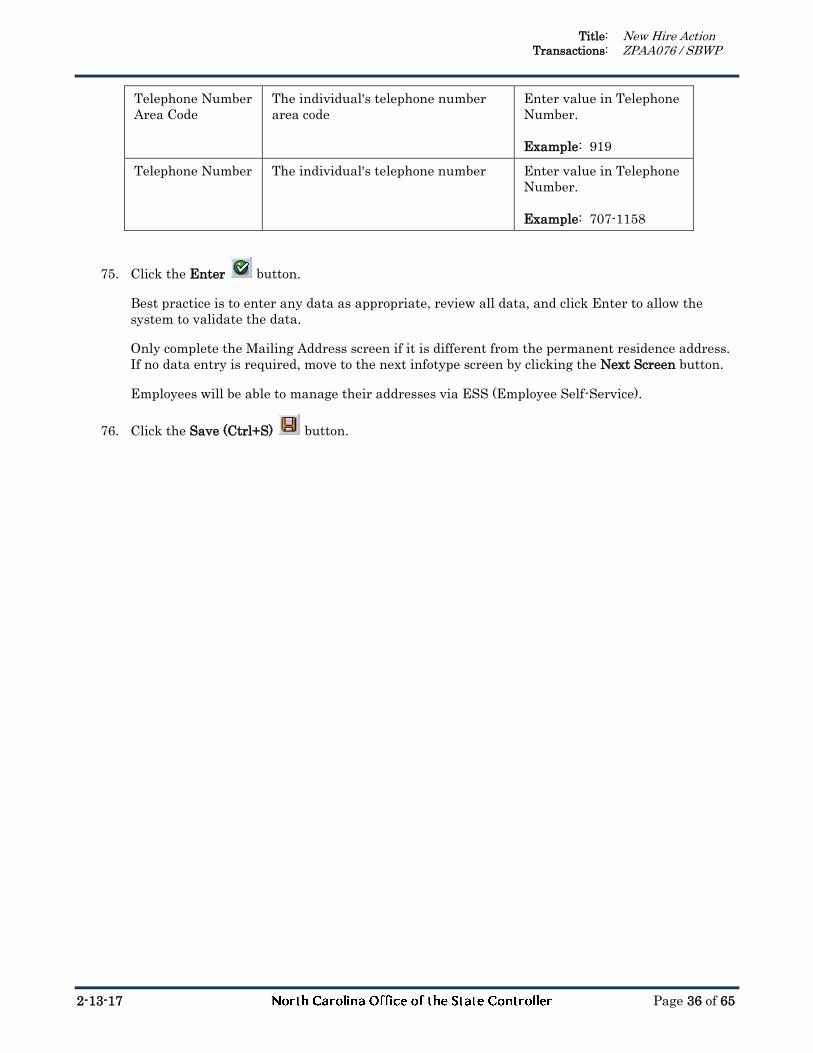
2-13-17 Page 36 of 65
Telephone Number
Area Code
The individual's telephone number
area code
Enter value in Telephone
Number.
Example: 919
Telephone Number The individual's telephone number Enter value in Telephone
Number.
Example: 707-1158
75. Click the Enter button.
Best practice is to enter any data as appropriate, review all data, and click Enter to allow the
system to validate the data.
Only complete the Mailing Address screen if it is different from the permanent residence address.
If no data entry is required, move to the next infotype screen by clicking the Next Screen button.
Employees will be able to manage their addresses via ESS (Employee Self-Service).
76. Click the Save (Ctrl+S) button.

Title: New Hire Action Transactions: ZPAA076 / SBWP
2-13-17 Page 37 of 65
77. Update the following fields:
Field Name Description Values
Task Type Select appropriate task type from list Select task type
Example: End of
probation
Date of Task Date on which the task occurs Enter value in Date of
Task.
Example: 02/01/2012
Comment Additional information about an item Enter value in Comment.
Example: End of
probation
78. Click the Enter button.
Enter a reminder through the Monitoring of Tasks screen as appropriate.
Insert any notes or comments pertaining to the task. Managers will be able to view reminders in
MSS (Manager Self-Service). The HR teams will manage the tasks via the Date Monitoring report
accessible through transaction code [S_PH0_48000450].
A common task type would be End of probation.
Title: New Hire Action Transactions: ZPAA076 / SBWP
2-13-17 Page 38 of 65
BEST PRACTICE: Best Practice is to enter the date to remind the supervisor to review the
appointment change (end of probation or other). If no data entry is required, move to the next
infotype screen by clicking the Next Screen button.
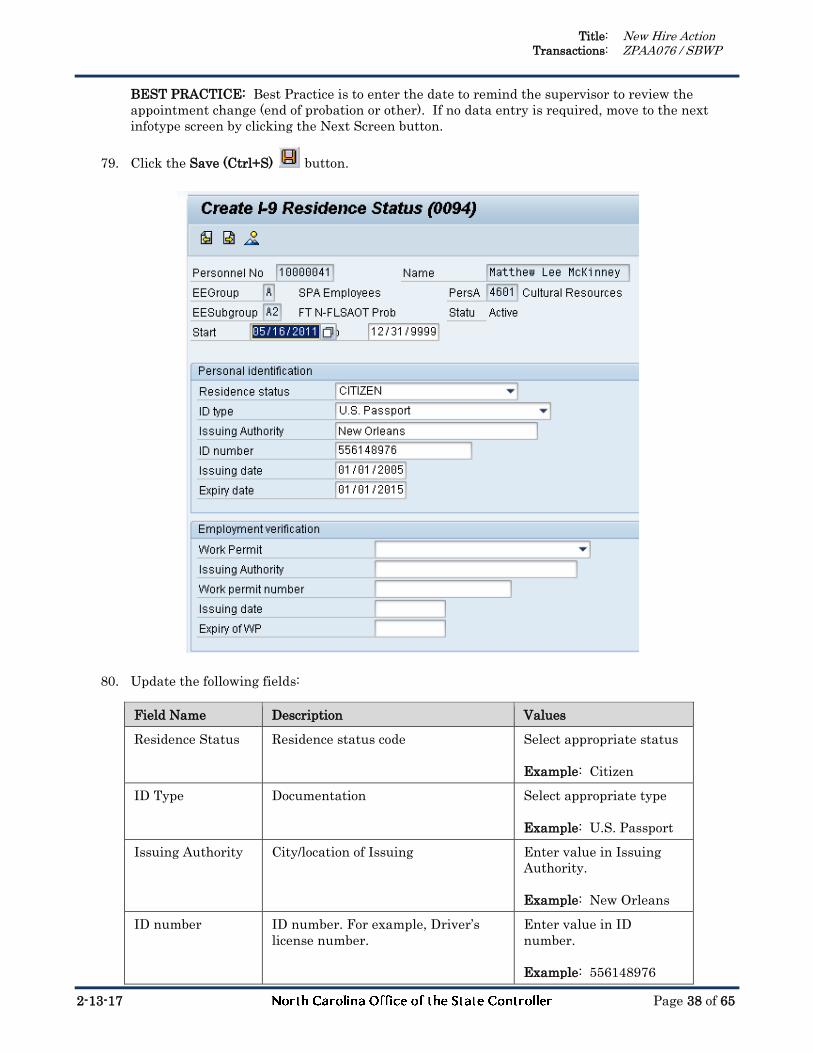
79. Click the Save (Ctrl+S) button.
80. Update the following fields:
Field Name Description Values
Residence Status Residence status code Select appropriate status
Example: Citizen
ID Type Documentation Select appropriate type
Example: U.S. Passport
Issuing Authority City/location of Issuing Enter value in Issuing
Authority.
Example: New Orleans
ID number ID number. For example, Driver’s
license number.
Enter value in ID
number.
Example: 556148976
Title: New Hire Action Transactions: ZPAA076 / SBWP
2-13-17 Page 39 of 65
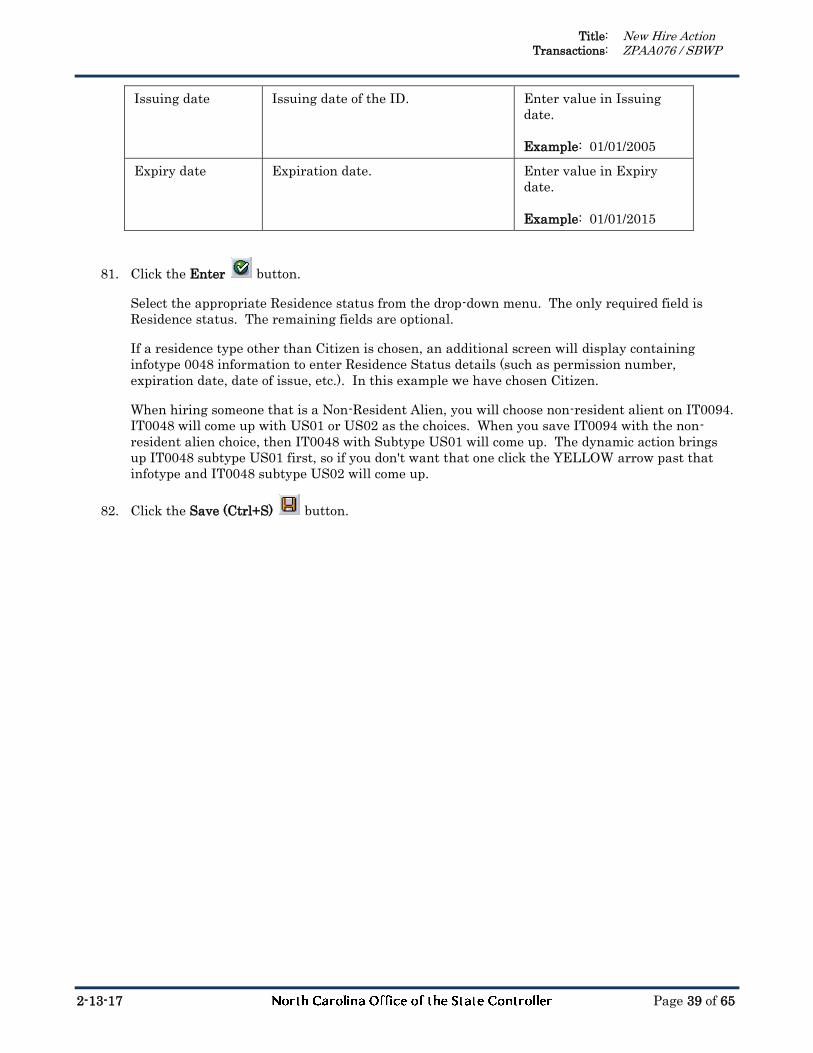
Issuing date Issuing date of the ID. Enter value in Issuing
date.
Example: 01/01/2005
Expiry date Expiration date. Enter value in Expiry
date.
Example: 01/01/2015
81. Click the Enter button.
Select the appropriate Residence status from the drop-down menu. The only required field is
Residence status. The remaining fields are optional.
If a residence type other than Citizen is chosen, an additional screen will display containing
infotype 0048 information to enter Residence Status details (such as permission number,
expiration date, date of issue, etc.). In this example we have chosen Citizen.
When hiring someone that is a Non-Resident Alien, you will choose non-resident alient on IT0094.
IT0048 will come up with US01 or US02 as the choices. When you save IT0094 with the non-
resident alien choice, then IT0048 with Subtype US01 will come up. The dynamic action brings
up IT0048 subtype US01 first, so if you don't want that one click the YELLOW arrow past that
infotype and IT0048 subtype US02 will come up.
82. Click the Save (Ctrl+S) button.
Title: New Hire Action Transactions: ZPAA076 / SBWP
2-13-17 Page 40 of 65
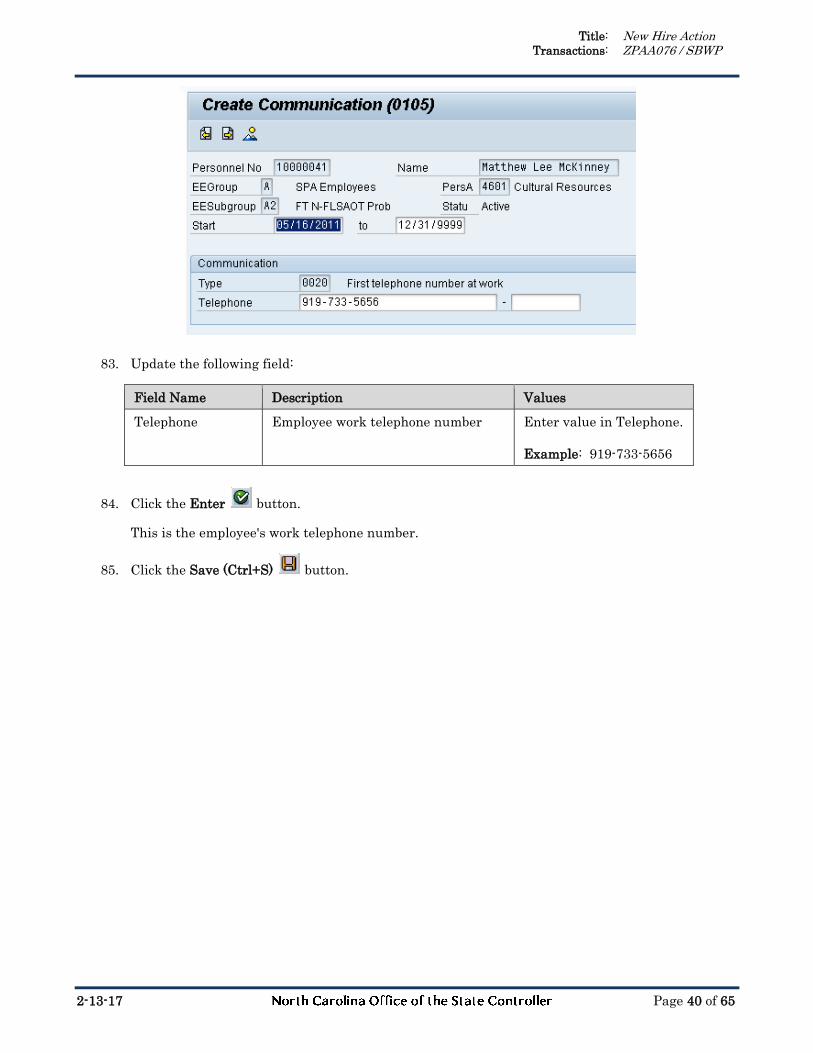
83. Update the following field:
Field Name Description Values
Telephone Employee work telephone number Enter value in Telephone.
Example: 919-733-5656
84. Click the Enter button.
This is the employee's work telephone number.
85. Click the Save (Ctrl+S) button.
Title: New Hire Action Transactions: ZPAA076 / SBWP
2-13-17 Page 41 of 65
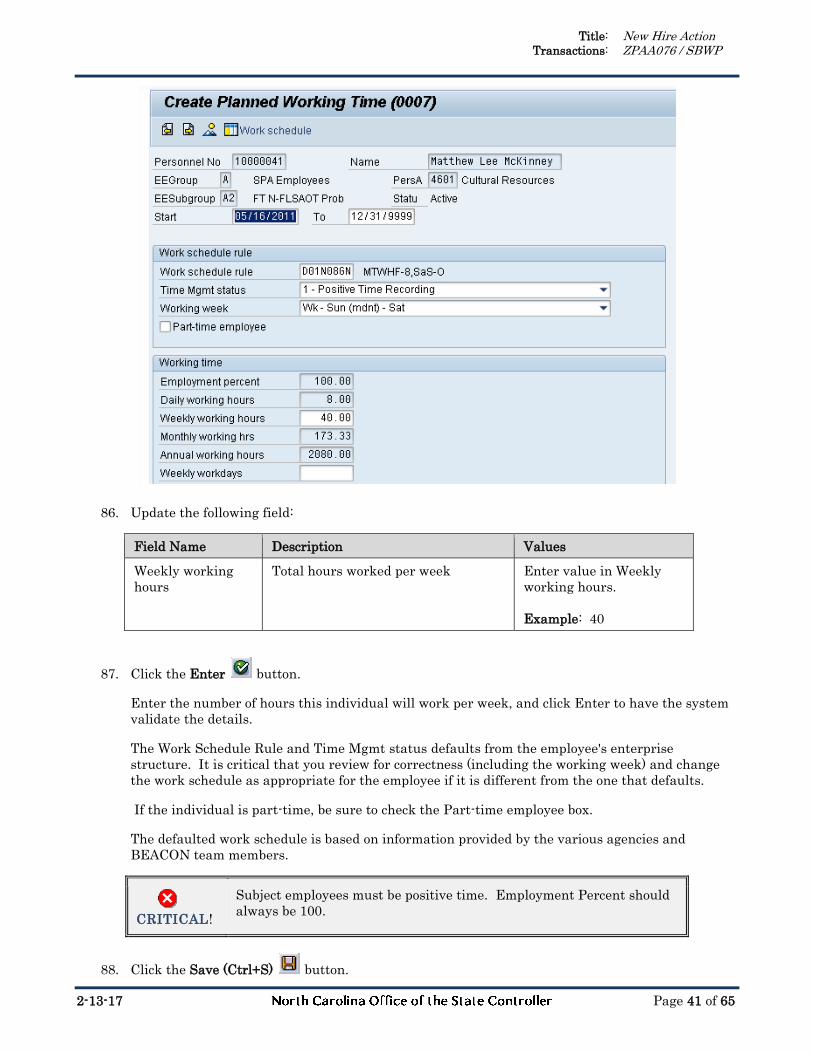
86. Update the following field:
Field Name Description Values
Weekly working
hours
Total hours worked per week Enter value in Weekly
working hours.
Example: 40
87. Click the Enter button.
Enter the number of hours this individual will work per week, and click Enter to have the system
validate the details.
The Work Schedule Rule and Time Mgmt status defaults from the employee's enterprise
structure. It is critical that you review for correctness (including the working week) and change
the work schedule as appropriate for the employee if it is different from the one that defaults.
If the individual is part-time, be sure to check the Part-time employee box.
The defaulted work schedule is based on information provided by the various agencies and
BEACON team members.
CRITICAL!
Subject employees must be positive time. Employment Percent should
always be 100.
88. Click the Save (Ctrl+S) button.
Title: New Hire Action Transactions: ZPAA076 / SBWP
2-13-17 Page 42 of 65
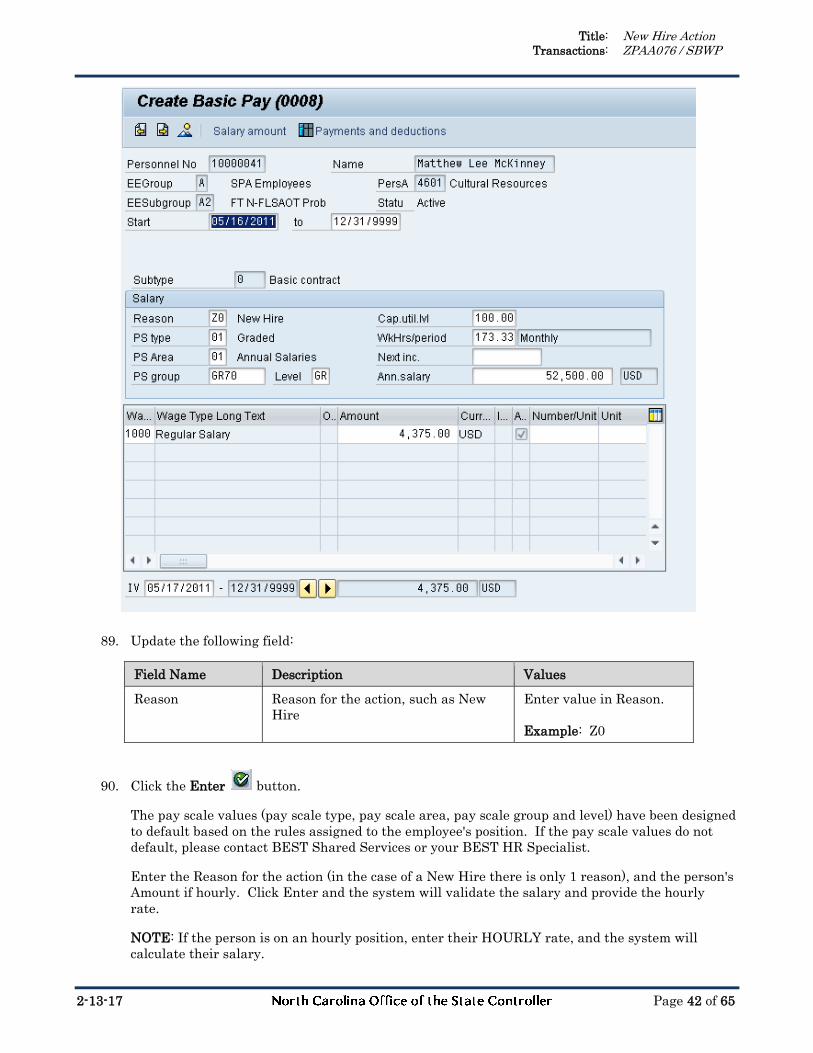
89. Update the following field:
Field Name Description Values
Reason Reason for the action, such as New
Hire
Enter value in Reason.
Example: Z0
90. Click the Enter button.
The pay scale values (pay scale type, pay scale area, pay scale group and level) have been designed
to default based on the rules assigned to the employee's position. If the pay scale values do not
default, please contact BEST Shared Services or your BEST HR Specialist.
Enter the Reason for the action (in the case of a New Hire there is only 1 reason), and the person's
Amount if hourly. Click Enter and the system will validate the salary and provide the hourly
rate.
NOTE: If the person is on an hourly position, enter their HOURLY rate, and the system will
calculate their salary.

Title: New Hire Action Transactions: ZPAA076 / SBWP
2-13-17 Page 43 of 65
Reason - enter or select from the drop-down menu
Next increase - this field is blank except for the Judicial Branch, which uses it to track the next
increase
Annual Salary - populates from the workflow, verify this field for accuracy
Amount - will be blank; if the employee is paid hourly instead of annually, enter the hourly
amount in the Amount field
Number/Unit - will be blank
Unit - will be blank
NOTE: Employees can be different from the position. For example, the position may be annual
salary and the employee may be hourly.
NOTE: DOT records will be recorded with 5 decimal places after the period, instead of only 2 for
payroll processing purposes (except for Temporaries). Also, DOT Salary/hourly amount may not
be correct depending on the yearly working hours.
91. Click the Save (Ctrl+S) button.
Title: New Hire Action Transactions: ZPAA076 / SBWP
2-13-17 Page 44 of 65
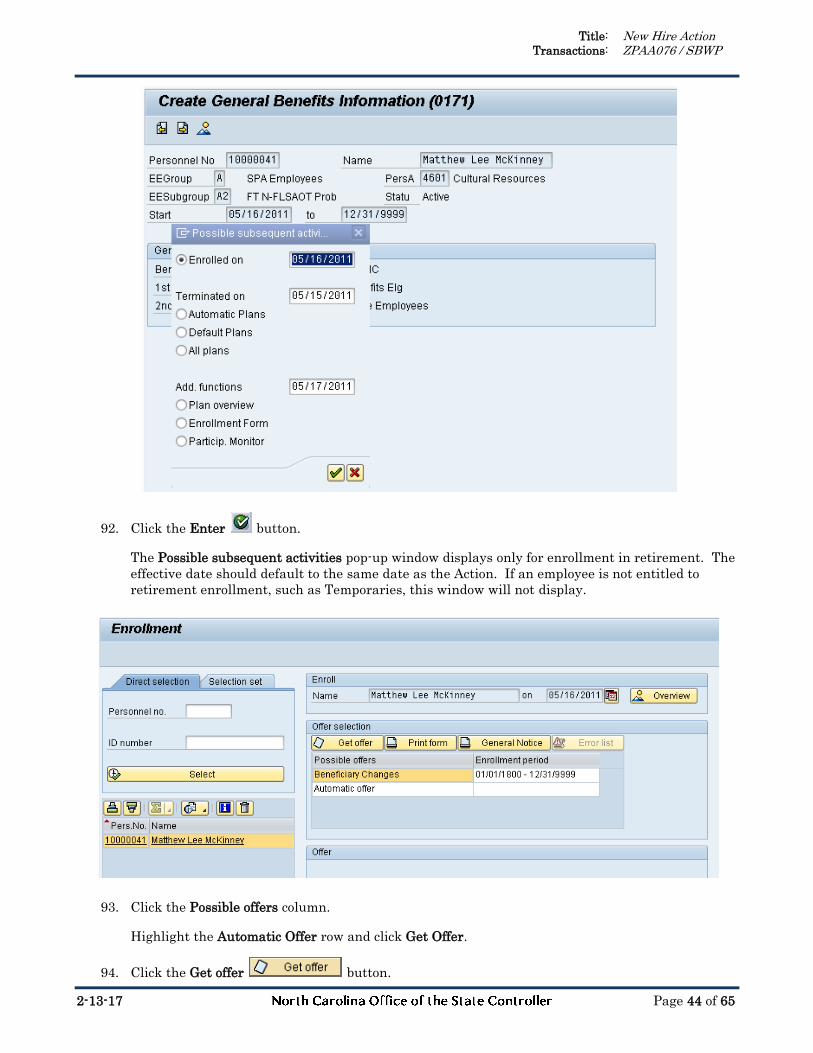
92. Click the Enter button.
The Possible subsequent activities pop-up window displays only for enrollment in retirement. The
effective date should default to the same date as the Action. If an employee is not entitled to
retirement enrollment, such as Temporaries, this window will not display.
93. Click the Possible offers column.
Highlight the Automatic Offer row and click Get Offer.
94. Click the Get offer button.

Title: New Hire Action Transactions: ZPAA076 / SBWP
2-13-17 Page 45 of 65
95. Click the Enroll button.
If the employee is Law Enforcement, they should also be eligible for the Supplemental LEORS
401(K) plan, this option will also be listed here. In that case, you would enroll the employee in
LESORS and the LEO’s 401K (Law Enforcement Officers Supplemental 401(K) plan.
96. Click the Enroll button.
Click Enroll to enroll the individual in the plan(s) listed.

Title: New Hire Action Transactions: ZPAA076 / SBWP
2-13-17 Page 46 of 65
97. Click the Continue button.
98. Click the Back (F3) button.
Title: New Hire Action Transactions: ZPAA076 / SBWP
2-13-17 Page 47 of 65
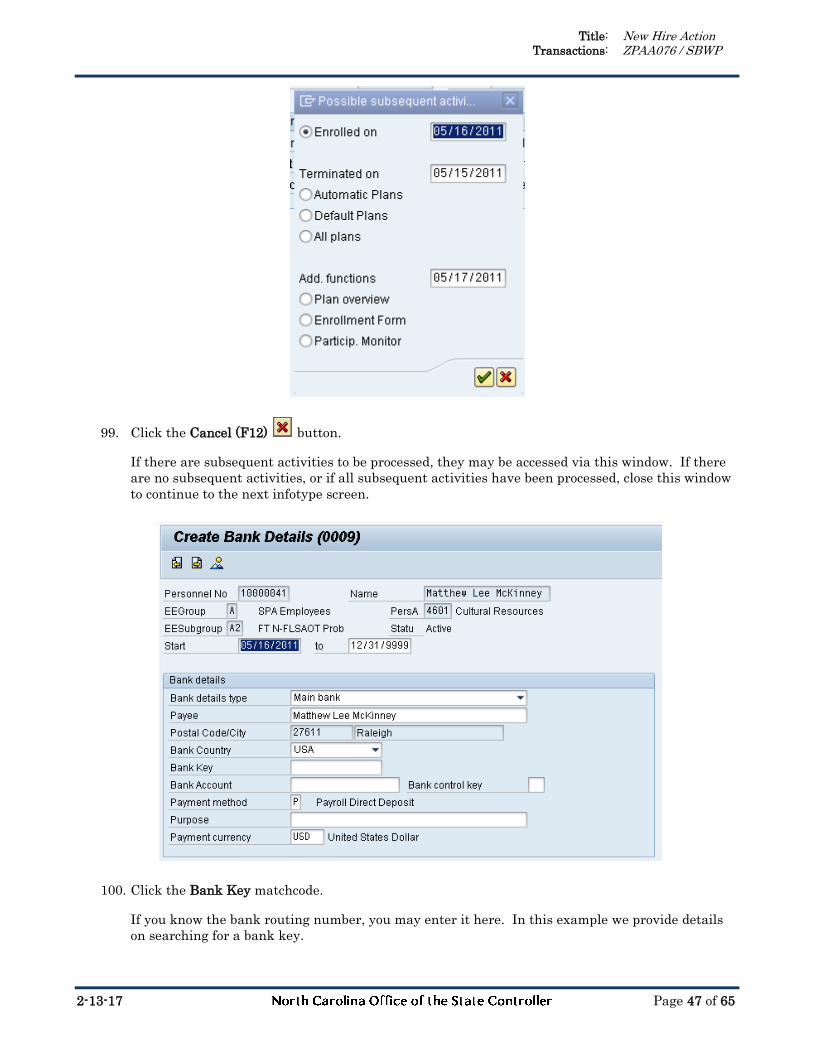
99. Click the Cancel (F12) button.
If there are subsequent activities to be processed, they may be accessed via this window. If there
are no subsequent activities, or if all subsequent activities have been processed, close this window
to continue to the next infotype screen.
100. Click the Bank Key matchcode.
If you know the bank routing number, you may enter it here. In this example we provide details
on searching for a bank key.

Title: New Hire Action Transactions: ZPAA076 / SBWP
2-13-17 Page 48 of 65
101. Update the following field:
Field Name Description Values
Bank name The name of the financial institution
where your account is located
Enter value in Bank
name.
Example: *fidelity*
Enter a part of the name of the bank and use the wildcard [*] to assist with the search.
102. Click the Enter button.
Title: New Hire Action Transactions: ZPAA076 / SBWP
2-13-17 Page 49 of 65
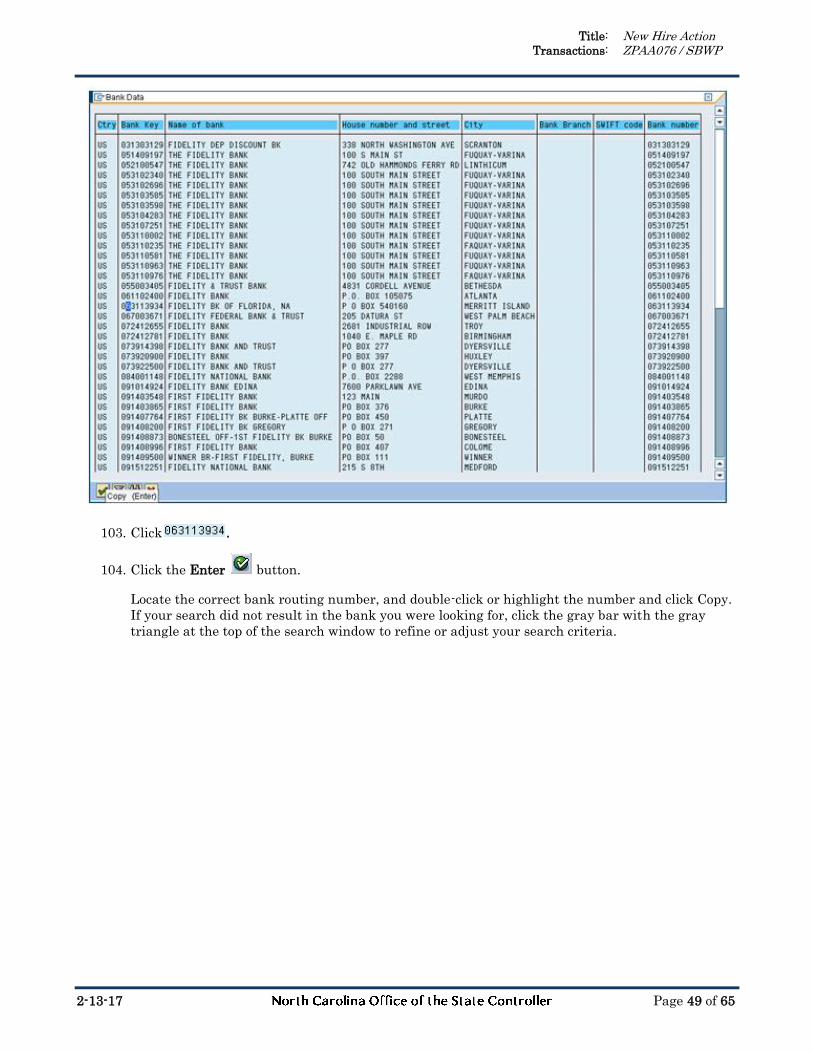
103. Click .
104. Click the Enter button.
Locate the correct bank routing number, and double-click or highlight the number and click Copy.
If your search did not result in the bank you were looking for, click the gray bar with the gray
triangle at the top of the search window to refine or adjust your search criteria.

Title: New Hire Action Transactions: ZPAA076 / SBWP
2-13-17 Page 50 of 65
105. Update the following fields:
Field Name Description Values
Bank Account The Bank account number from the
employee’s voided check
Enter value in Bank
Account.
Example: 5512468
Bank control key Key to control and identify bank
number
Enter value in Bank
control key.
Example: 01
106. Click the Enter button.
Entering the Bank control key field is critical. [01] is for checking, and [02] is for savings. If
Payroll Direct Deposit (ACH) is selected, this field must be populated with the bank key
information for the new employee.
The Payment method field will default to [P] for direct deposit, but you may change it to [C] for a
printed check, if the employee is not set up for direct deposit yet. The State recommends direct
deposit.
If Payroll Direct Deposit (ACH) is selected, the Bank Account Number field must be populated
with the bank account number of the new employee.
The Purpose field may be left blank. The employee will manage through ESS (Employee Self-
Service) or by sending a form to BEST Shared Services for changes.
Title: New Hire Action Transactions: ZPAA076 / SBWP
2-13-17 Page 51 of 65
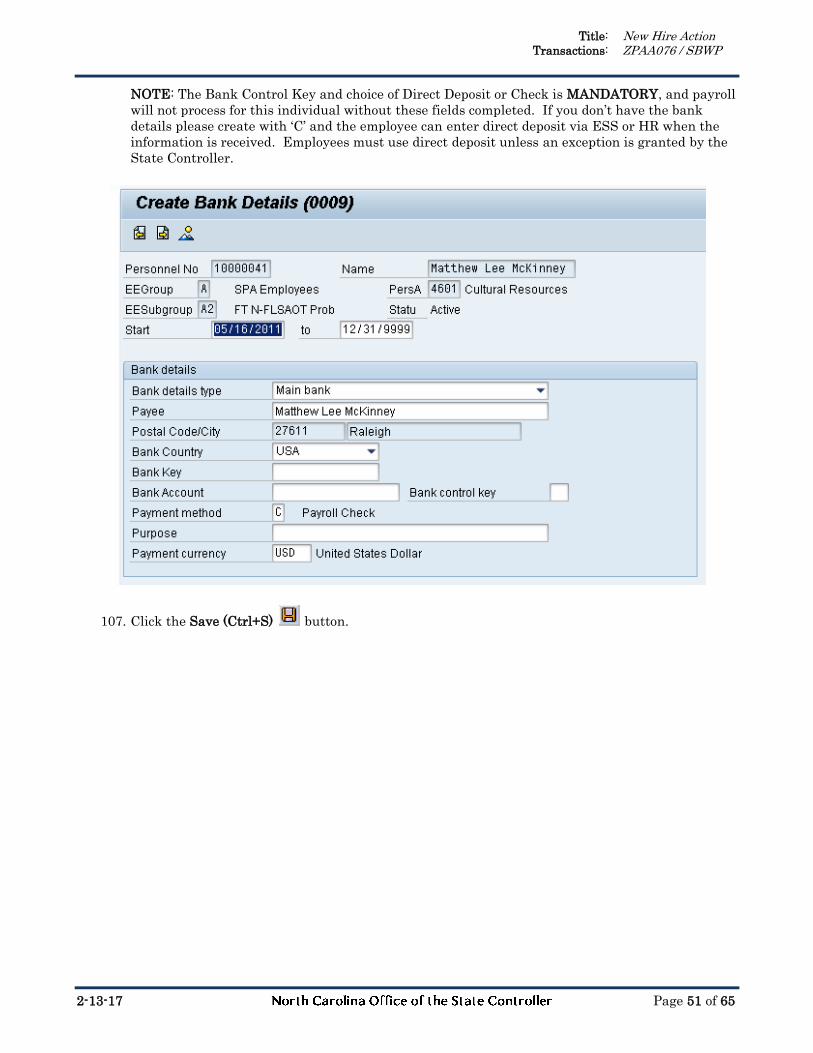
NOTE: The Bank Control Key and choice of Direct Deposit or Check is MANDATORY, and payroll
will not process for this individual without these fields completed. If you don’t have the bank
details please create with ‘C’ and the employee can enter direct deposit via ESS or HR when the
information is received. Employees must use direct deposit unless an exception is granted by the
State Controller.
107. Click the Save (Ctrl+S) button.
Title: New Hire Action Transactions: ZPAA076 / SBWP
2-13-17 Page 52 of 65
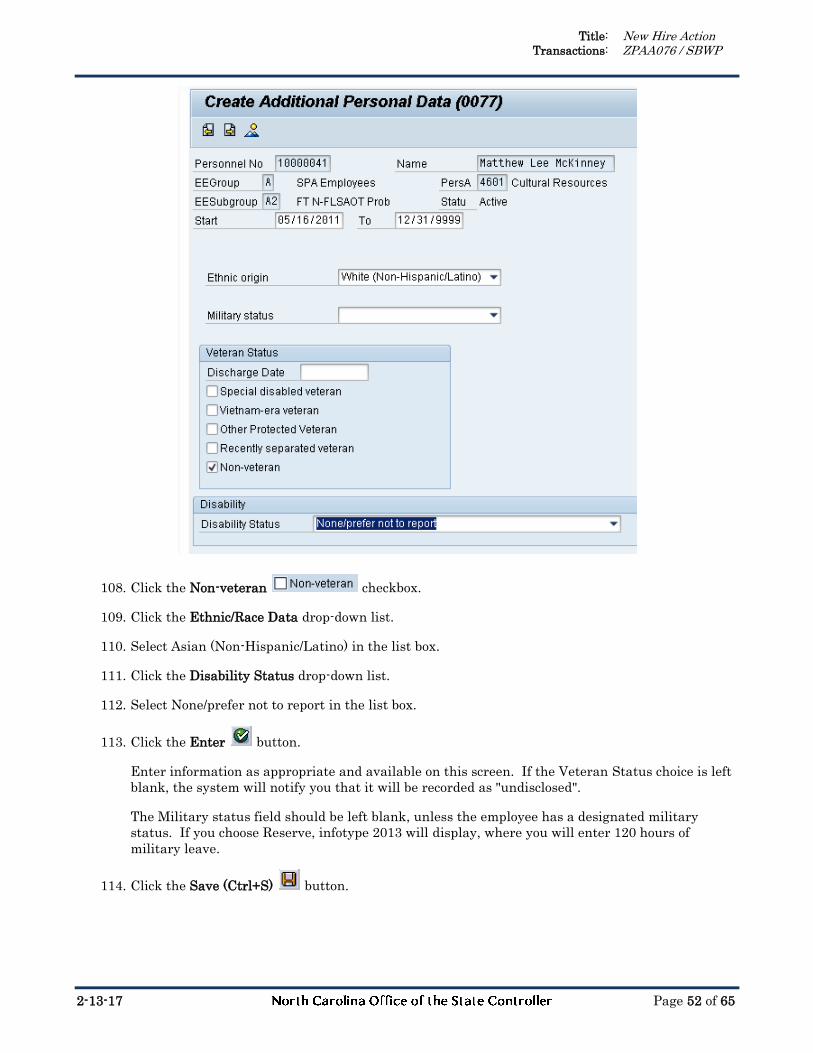
108. Click the Non-veteran checkbox.
109. Click the Ethnic/Race Data drop-down list.
110. Select Asian (Non-Hispanic/Latino) in the list box.
111. Click the Disability Status drop-down list.
112. Select None/prefer not to report in the list box.
113. Click the Enter button.
Enter information as appropriate and available on this screen. If the Veteran Status choice is left
blank, the system will notify you that it will be recorded as "undisclosed".
The Military status field should be left blank, unless the employee has a designated military
status. If you choose Reserve, infotype 2013 will display, where you will enter 120 hours of
military leave.
114. Click the Save (Ctrl+S) button.

Title: New Hire Action Transactions: ZPAA076 / SBWP
2-13-17 Page 53 of 65
115. Click .
116. Click the Enter button.
Select the education level stated on the employment application and the highest level used to
qualify for the position.
Title: New Hire Action Transactions: ZPAA076 / SBWP
2-13-17 Page 54 of 65
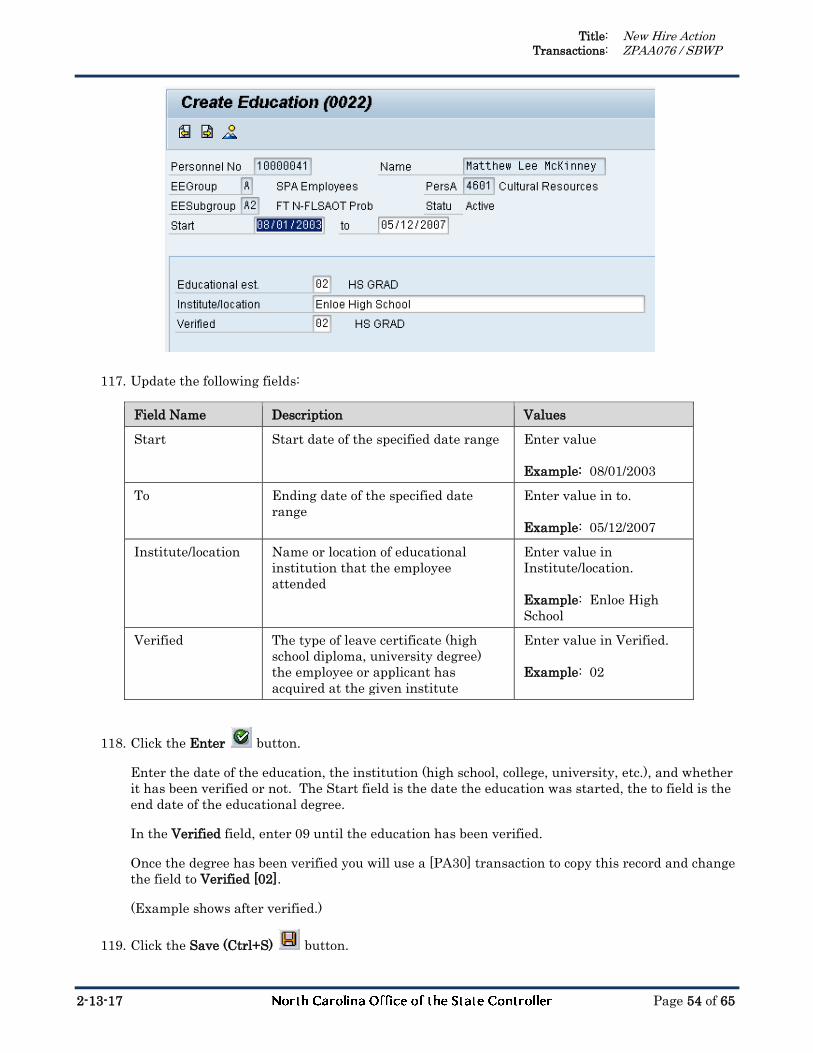
117. Update the following fields:
Field Name Description Values
Start Start date of the specified date range Enter value
Example: 08/01/2003
To Ending date of the specified date
range
Enter value in to.
Example: 05/12/2007
Institute/location Name or location of educational
institution that the employee
attended
Enter value in
Institute/location.
Example: Enloe High
School
Verified The type of leave certificate (high
school diploma, university degree)
the employee or applicant has
acquired at the given institute
Enter value in Verified.
Example: 02
118. Click the Enter button.
Enter the date of the education, the institution (high school, college, university, etc.), and whether
it has been verified or not. The Start field is the date the education was started, the to field is the
end date of the educational degree.
In the Verified field, enter 09 until the education has been verified.
Once the degree has been verified you will use a [PA30] transaction to copy this record and change
the field to Verified [02].
(Example shows after verified.)
119. Click the Save (Ctrl+S) button.
Title: New Hire Action Transactions: ZPAA076 / SBWP
2-13-17 Page 55 of 65
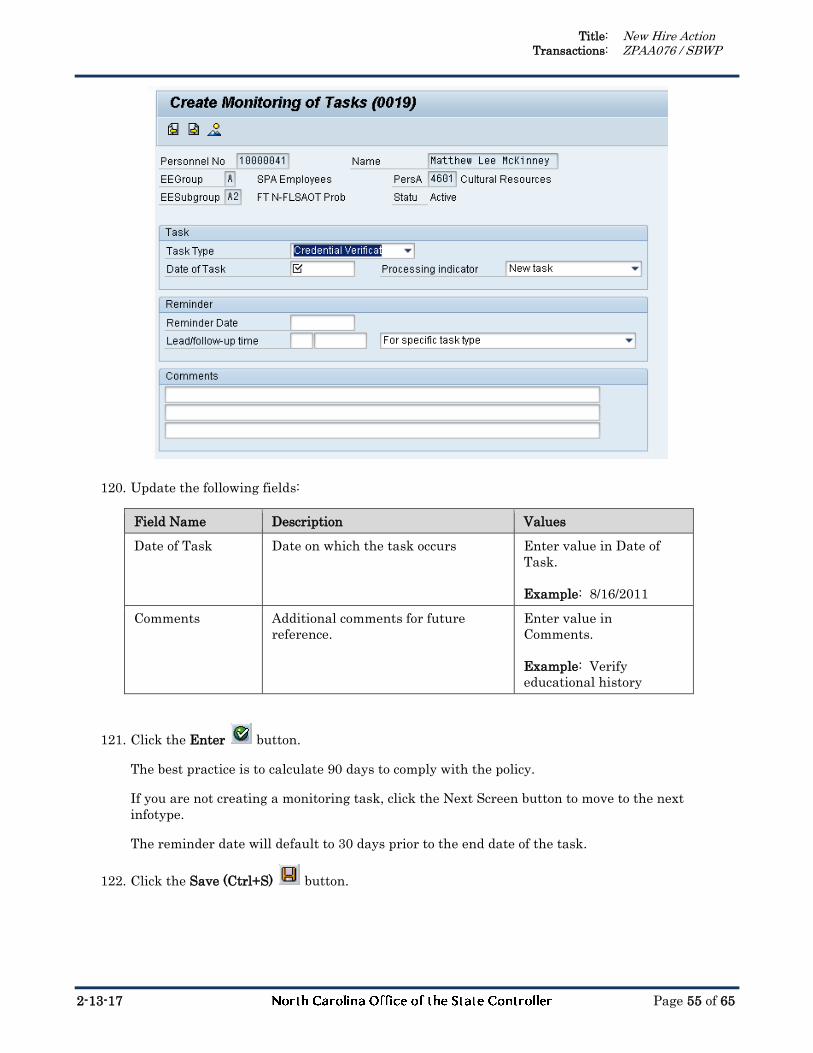
120. Update the following fields:
Field Name Description Values
Date of Task Date on which the task occurs Enter value in Date of
Task.
Example: 8/16/2011
Comments Additional comments for future
reference.
Enter value in
Comments.
Example: Verify
educational history
121. Click the Enter button.
The best practice is to calculate 90 days to comply with the policy.
If you are not creating a monitoring task, click the Next Screen button to move to the next
infotype.
The reminder date will default to 30 days prior to the end date of the task.
122. Click the Save (Ctrl+S) button.
Title: New Hire Action Transactions: ZPAA076 / SBWP
2-13-17 Page 56 of 65
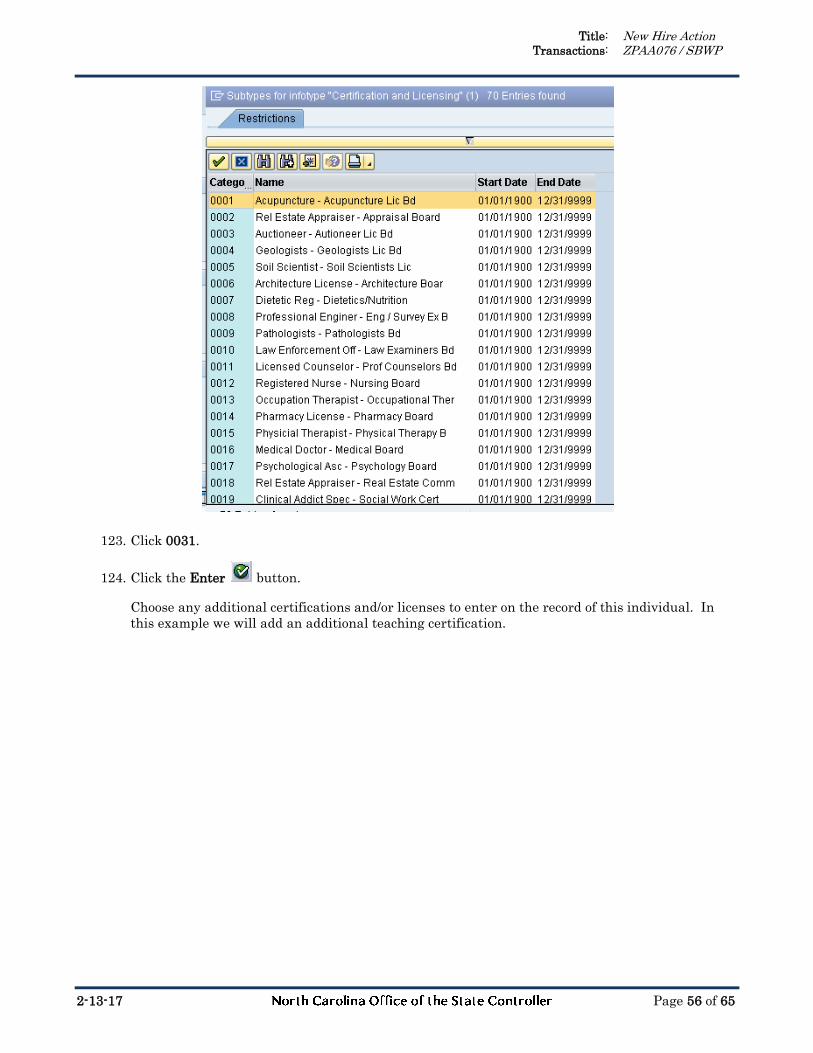
123. Click 0031.
124. Click the Enter button.
Choose any additional certifications and/or licenses to enter on the record of this individual. In
this example we will add an additional teaching certification.
Title: New Hire Action Transactions: ZPAA076 / SBWP
2-13-17 Page 57 of 65
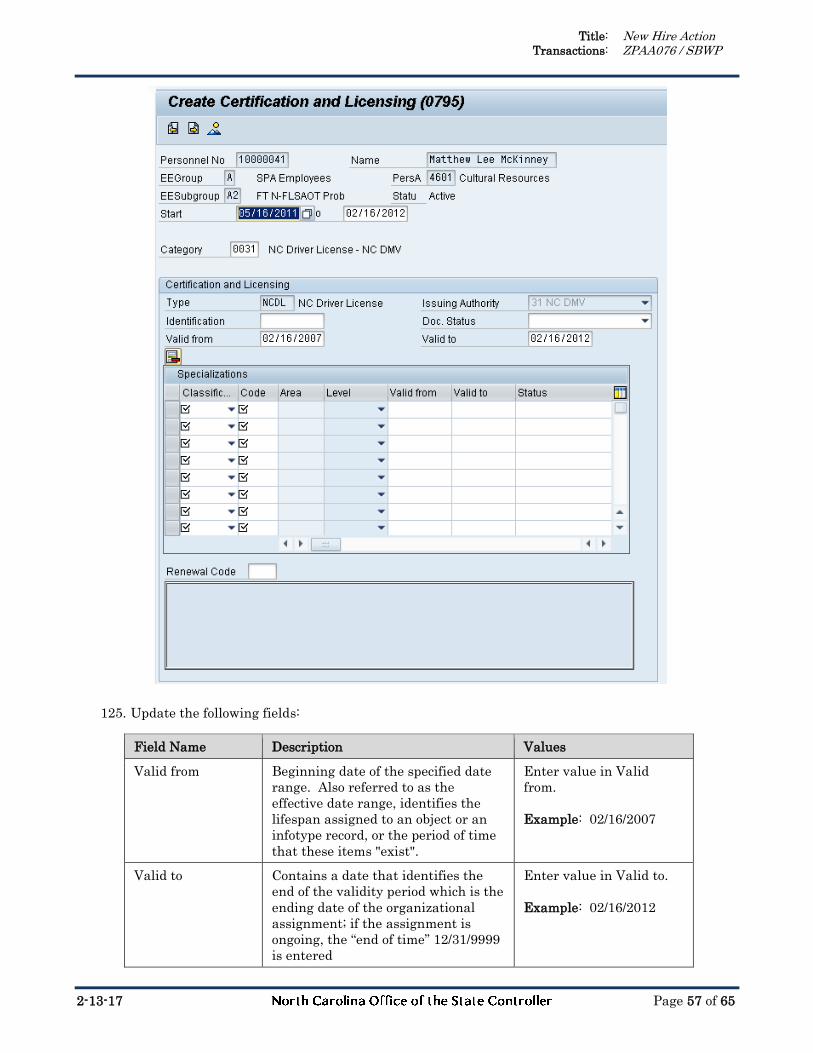
125. Update the following fields:
Field Name Description Values
Valid from Beginning date of the specified date
range. Also referred to as the
effective date range, identifies the
lifespan assigned to an object or an
infotype record, or the period of time
that these items "exist".
Enter value in Valid
from.
Example: 02/16/2007
Valid to Contains a date that identifies the
end of the validity period which is the
ending date of the organizational
assignment; if the assignment is
ongoing, the “end of time” 12/31/9999
is entered
Enter value in Valid to.
Example: 02/16/2012
Title: New Hire Action Transactions: ZPAA076 / SBWP
2-13-17 Page 58 of 65
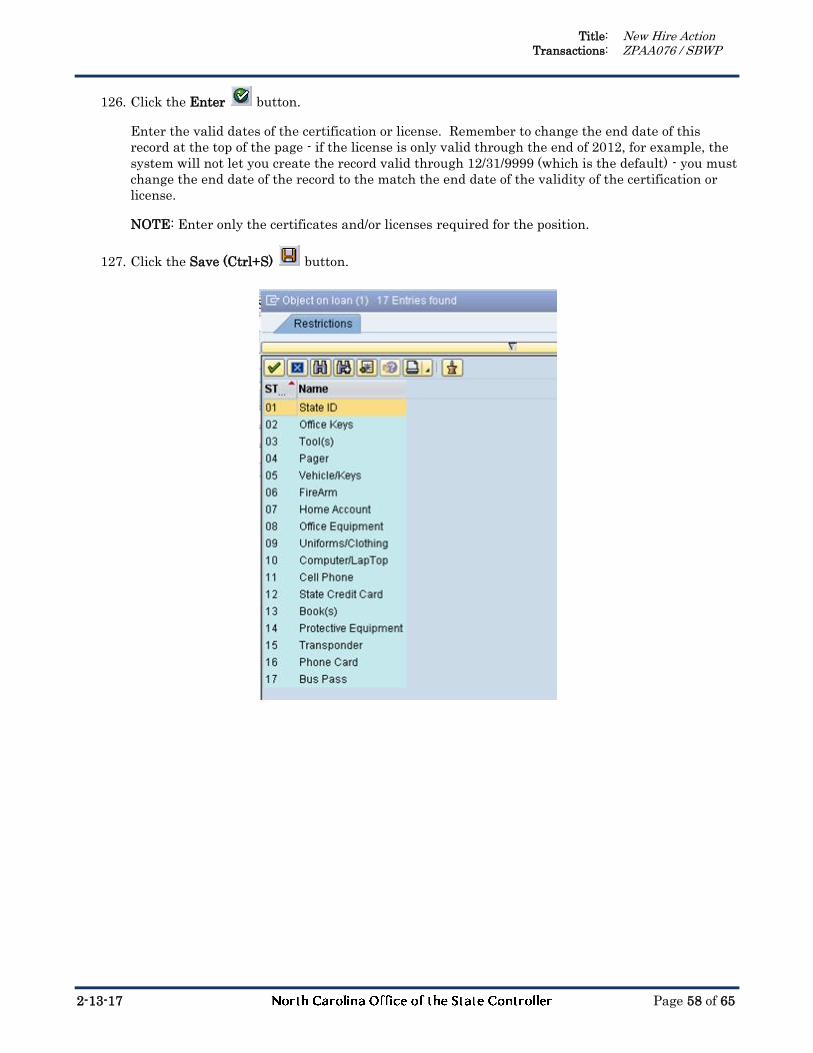
126. Click the Enter button.
Enter the valid dates of the certification or license. Remember to change the end date of this
record at the top of the page - if the license is only valid through the end of 2012, for example, the
system will not let you create the record valid through 12/31/9999 (which is the default) - you must
change the end date of the record to the match the end date of the validity of the certification or
license.
NOTE: Enter only the certificates and/or licenses required for the position.
127. Click the Save (Ctrl+S) button.
Title: New Hire Action Transactions: ZPAA076 / SBWP
2-13-17 Page 59 of 65
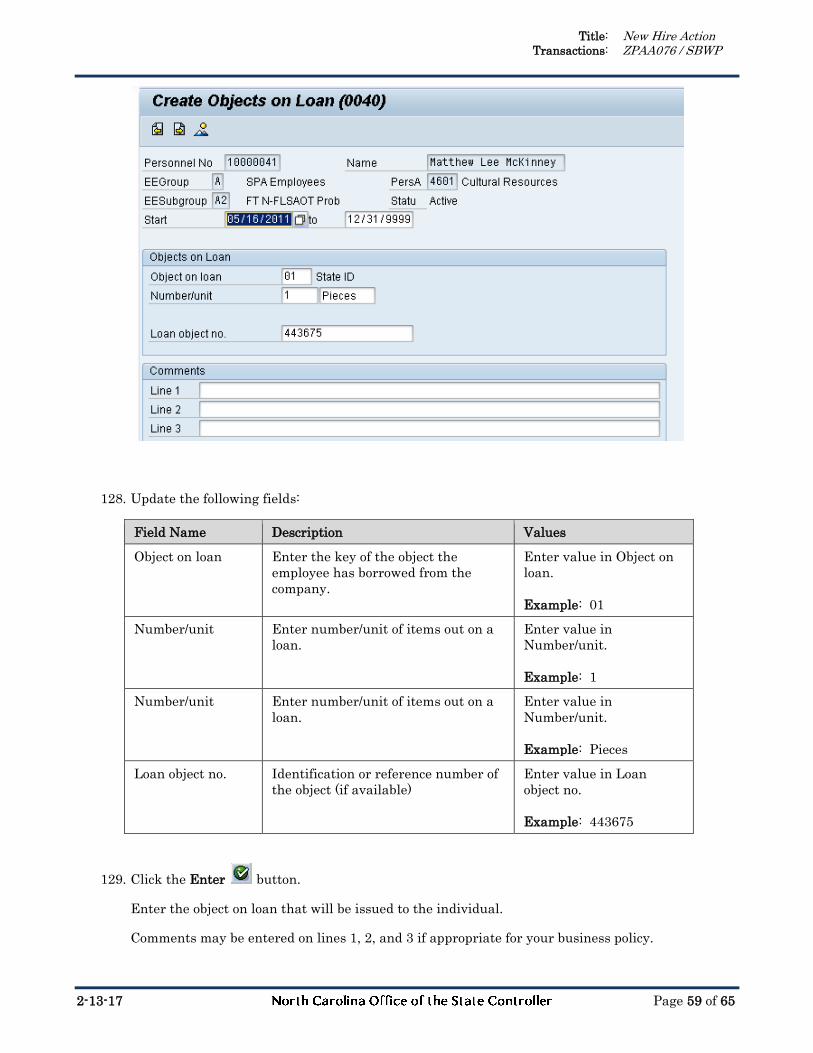
128. Update the following fields:
Field Name Description Values
Object on loan Enter the key of the object the
employee has borrowed from the
company.
Enter value in Object on
loan.
Example: 01
Number/unit Enter number/unit of items out on a
loan.
Enter value in
Number/unit.
Example: 1
Number/unit Enter number/unit of items out on a
loan.
Enter value in
Number/unit.
Example: Pieces
Loan object no. Identification or reference number of
the object (if available)
Enter value in Loan
object no.
Example: 443675
129. Click the Enter button.
Enter the object on loan that will be issued to the individual.
Comments may be entered on lines 1, 2, and 3 if appropriate for your business policy.
Title: New Hire Action Transactions: ZPAA076 / SBWP
2-13-17 Page 60 of 65
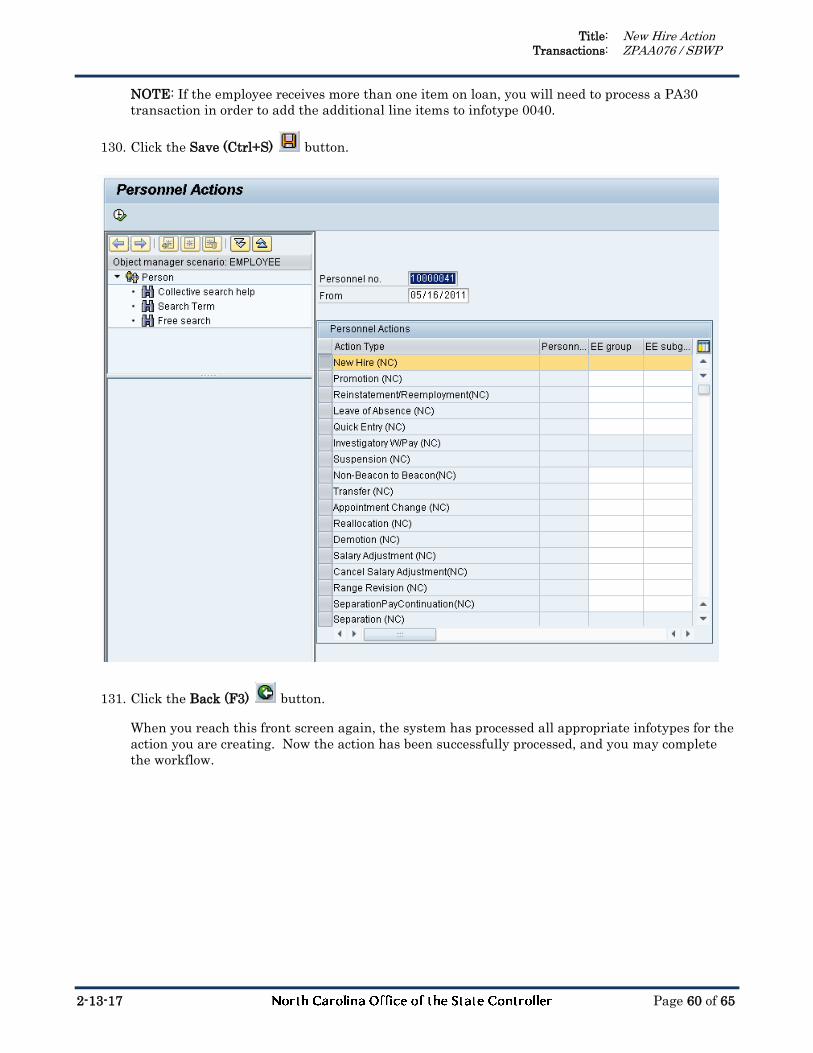
NOTE: If the employee receives more than one item on loan, you will need to process a PA30
transaction in order to add the additional line items to infotype 0040.
130. Click the Save (Ctrl+S) button.
131. Click the Back (F3) button.
When you reach this front screen again, the system has processed all appropriate infotypes for the
action you are creating. Now the action has been successfully processed, and you may complete
the workflow.

Title: New Hire Action Transactions: ZPAA076 / SBWP
2-13-17 Page 61 of 65
132. Click the Complete Work Item button.
Only once all of the infotype screens within the action have been processed and the system has
returned you to the main screen will this Complete button be visible. Now you may complete the
PCR in workflow.

Title: New Hire Action Transactions: ZPAA076 / SBWP
2-13-17 Page 62 of 65
133. Click the hyperlink.
To view the completed PCR in workflow anytime in the future, and verify that it has been marked
as completed, go to your Outbox.
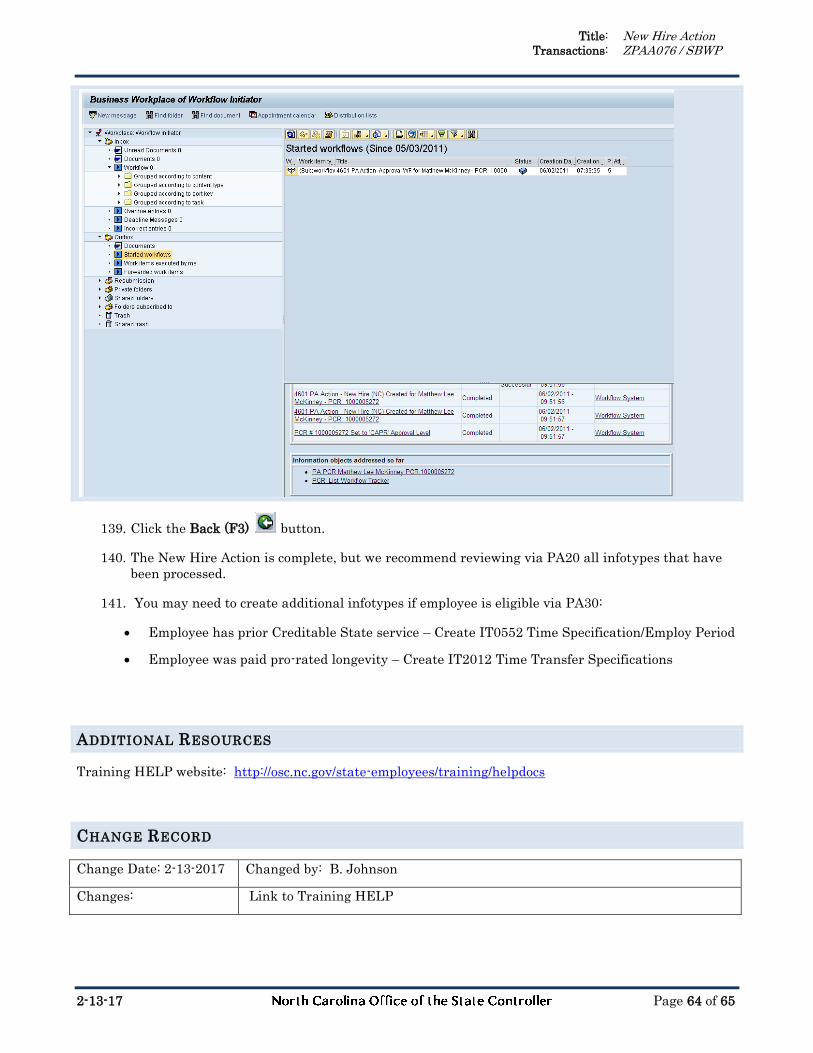
134. Select Outbox >> Started workflows.
Since you initiated this workflow item, the PCR will be in your Started workflows folder.

Title: New Hire Action Transactions: ZPAA076 / SBWP
2-13-17 Page 63 of 65
135. Select the PCR row.
136. Click the hyperlink.
137. Select the last row .
138. Click the Back (F3) button.
Notice the PCR now has the last step documented as Processed by you. The PCR is complete.
Title: New Hire Action Transactions: ZPAA076 / SBWP
2-13-17 Page 64 of 65
139. Click the Back (F3) button.
140. The New Hire Action is complete, but we recommend reviewing via PA20 all infotypes that have
been processed.
141. You may need to create additional infotypes if employee is eligible via PA30:
Employee has prior Creditable State service – Create IT0552 Time Specification/Employ Period
Employee was paid pro-rated longevity – Create IT2012 Time Transfer Specifications
ADDITIONAL RESOURCES
Training HELP website: http://osc.nc.gov/state-employees/training/helpdocs
CHANGE RECORD
Change Date: 2-13-2017 Changed by: B. Johnson
Changes: Link to Training HELP

Title: New Hire Action Transactions: ZPAA076 / SBWP
2-13-17 Page 65 of 65